cd3 town tutorial
DESCRIPTION
Tutorial de CD3TRANSCRIPT

CD3Towntutorial1.StartingupIn this tutorial I’ll try to show how I use City designer 3 and Photoshop CS5 to make my city maps. Hopefully you as a reader can learn a thing or two, but be warned this is how I work. That means that there might be more effective and quicker ways to reach the same reslut. If you miss some information or if I’m just impossible to understand please let me know in the comments and I try to clarify.
To complete this tutorial you need a copy of Photoshop CS4 or CS5. The reason earlier versions wont work is that you need a litle free addon from Adobe called pixelbender. And it only works on the newer versions. You also need a version of City Designer 3 from Profantasy, which also means that you need a copy of campaign Cartographer 3.
When I make maps I usually try to make a story around the map. This makes it easier, at least for me, to get some inspiration when you work. It also makes it easier to come up with ideas of what to put into your map. For this particular map I’ve decided to make a map of the small town Oddwood in the northern parts of the kingdom Armadien.
Oddwood is a small town situated on the road to the northern part of the kingdom. To the east you have some old ruins from the time before the old apocalypse. This means that a lot of adventurers and treasure seekers pass by here. To the north you have smaller villages and the wild barbarian woods, home to dangerous savages and mythical creatures.
First of all you need to start a new map in City Designer 3/Campaign Cartographer 3. Choose city and city style A. I’m using the default settings here except for the size that I’m slightly increasing. The size you’re using depends on how big you want to make your town.

I’m always starting with the water when I make a map, mainly because this will have a big influence how the town layout will turn out. In this case my little town is situated where two smaller rivers combine into one. After having done the rivers my map looks like below:
It’s not much but it is a start. When you’ve come this far you have to start to think about where your town exactly will be situated. Try to take the river, or other water constellation you have created, into account when you decide this. When you have a fairly good idea of how you want it to be start to draw some roads that will lead into the town. In my map I need a road that goes from south to north. I also need a bridge over the river and a road to the eastern ruins. Apart from this I’m putting in a fortress where the rivers meet. This feels like an strategically important place that the rest of the town will be build around. To make the fortress I used the buildings from style B, not A. I prefer the city style B buildings because they look more hand made then style A. You

decide what you like.
To make the bridge I created a new drawing tool by choosing one of the roads (the 5′ one). Save it as a bridge, changed the size to 7′ and changed it to use the fill style CD3_Darkwood_Roof

Bitmap. You can see the properties below:
2.Preparingthetools.
Before we start on the town itself we need to do some changes to the tools we are going
to use.
First open the house tool, it is the top one on the left side of the screen. From here you
can decide what style you want your house to have and also do some changes to it. First
of all press settings on the right side of the screen and a new window will appear. From
there you can change the settings of the selected style and create a new one.
In the settings part of the window you can choose different premade house styles, pick
one you like to start from. Press save and type the name of your new house style, I
called mine CD3 Clercon style. You can call it whatever you like.
Now it is time to change what the house looks like. What I did was to change the roof
color to a new bitmap. I picked CD3B_Rough_Red_Roof. I like to have my roofs red, if
you look at many old maps of cities you can see that a lot of the times the roofs are red.
You can pick the same or try some different bitmap. As you see from the picture below
there are a lot of different settings you can change, I’m satisfied with the change I have

done and press save in the Settings part of the window before I press OK.
Now when the house style is done it is time to do some changes to the street tool, it is
the one just below the house tool. Right click the tool button to open up the settings
window.
First of all press the Save button in the Street settings part of the window, type a new
name and press save. I called mine CD3B Clercon custom, the name can be anything
that you feel is apropriate.
The street options window looks like below and the thing I change is to only have the two
top versions of house types, I set both to 50%. You can do the same or try out some

different setting to see what you think looks good.
Now it is time to do some changes to the house, how they will appear on the map. Press
the button called House settings on the left side and a new window like the one below
will open.
From here you can decide the width, length and distance between the houses. You also
decide how far they will be from the road. It is quite hard to give any specific settings
here. It all depends on how big your map is. So trial and error is what you have to do .
Some general advice is that the distance between houses is good to set to 1 in both Min
and Max if you want a very dens town. Press OK when you’re done.
In my map I have also made a new drawing tool, the bridge. I added a bridge already in
the last post but I thought I might show you how I did it. Select drawing tools, in the new
window select advanced. This will open a long list with all the different drawing tools that
you have. Select a road, I selected Road, Dirt 5′. In the drawing tool select tool properties

and the window below will open.
Here I changed the fill style to CD3_Darkwood_Roof Bitmap. Change the width to 7.
Don’t forget to save your new tool with a new name, or you will overwrite the road tool.
3.StartingonthetownFinally it is time to start on the town itself. At the moment we have a road to the
north/south and a road to the east. We also have a small fortress where the two rivers
combine into one. When you make your town try to look at the terrain you have and
visualize how the town might have been built. In this case I started with two bridges that
lead to the fortress from both sides. The bridges also have to be connected to the
already existing roads. When this is done I have a natural area where my city will grow.
From the outer roads on both sides down to the river I continue to add in some roads to
get the right feeling of the town. Here you have to do some trial and error to see what
suits your town. Do you want a crowded and dens town or one with more of a village
feeling to it, or maybe something in between. Whenever you feel that you are done it is
time to add in the houses.
Adding houses is a two step kind of process. I always start with the street tool because it
speeds up the process, and I start with the bigger roads. First left click on the street tool,
click on the middle of the road where you want the houses to be, click a second time and
start placing your houses. In this stage you just want as many houses to be placed as

possible, you won’t be able to put houses wherever you want to. In some places the
streets are too close to each other, wait with these places, we will fix them in the next
step.
When you feel like you’re done you will have something like the picture below. As you
can see some areas needs some more houses and some places are too crowded,
especially the areas in the outskirts of the town.
The next step will be to delete some of the houses you just made. In some places they
might overlap each other or block a road. I also remove a lot of the houses on the roads
into town, this will give a more natural look to where the town actually starts. At this stage
I also add in more houses one by one. Select the House tool and start to put houses in
the town. I try to close off all green areas in the central town that are surrounded by
roads. In this way you will create good looking blocks of houses.
I also try to add in some details like squares or temples at this stage. Even though I use
City style A for the town I usually use the individual houses from City style B, those look
more hand painted, which I like. I’m adding a temple just east of the fortress and two

inns. Next to the temple I also put in some forest.
It is very easy to just continue in this way and adding more stuff. I usually try to think
logically about what would fit into my town. If I travelled here what would I expect to find?
Where do they grow crops? Do they fish? How do people get here, by foot or boat, or
maybe both?
I decided to put in some more forest, I mean this is actually a forest town. A small
settlement to the east where the fishermen lives, and where you can arrive by boat. I
also added a second temple (the temple of the dead with vast catacombs beneath it). On

the south side I added a castle ruin (said to be haunted by evil ghosts).
4.MakingfieldsOk now it is time to start on the hedges and fields. Before we start though we have to
create a new sheet called HEDGES. Click on the “Sheet and Effects” icon on the left side
of the CC3 program. In the window that opens (see image below) you click “Add” on the
left side to get a new sheet. Name the new sheet HEDGES and click on the “Move Up”
button to move it just below the ROADS sheet. You now have a sheet for your hedges

but you also need to add some effects to make them look good.
I usually add three effects to my HEDGES sheet, “Glow”, “Glow” and “Wall shadow,
directional”. I may vary the settings of the effects depending on the size of the map. For
this map the settings look as follow:

Select the “City Hedge tool” from the “Select drawing tool” menu. I find the smallest
hedge to be a bit too large so I made a new one that is only 2′ wide.To do this just
open ”Select drawing tool”, select Advance and chose ”City Hedge 3′”. Select properties
and change Width Fixed to 2, click OK and save as “City Hedge 2′”.

Now it is time to start drawing the hedges. I usually follow the roads and try to make an
area that is surrounded by hedges, like in the picture below.
I then start to divide the area into smaller pieces.In this way I create a nice pattern that
looks like fields, see below.

I continue this way until I have covered all the areas where I want to have my fields. The
end result will look like something in the picture below.
So far all the fields are green, but we also want to have some yellow ones (or some in
another colour if you prefer). To do this I select the “fields tool” from the “Select Drawing
Tools” menu. I then paint the whole map in the colour of the “Fields tool”. This will turn all
the green grass areas yellow.
Now open the “Sheet and effects” window and hide the FIELDS sheet. You hide a sheet
by clicking on the white square just next to the sheets name. This will bring up a small H
inside the square, which means that the sheet will be hidden. Click OK and the map will
look just as before you started to draw the yellow fields (because the FIELDS sheet is
now hidden).
The reason we’re doing this is that we are going to export one map with the FIELDS
sheet hidden and one when it is visible. We will then combine the two maps in
Photoshop, but that will be for a later post. First we have to do some last finishing
touches in CD3.

5. Some finishing touches in CD3
The map we have now includes all the things that you really need so it is time to try to
look at it again with new eyes to see if there are things you can improve. First of all I’d
like to add a new sheet called TOWER (see the last post on how to add sheets). Towers
are generally taller than the walls so they need longer shadows.
In the new sheet I add the following effects, “Glow”, “Glow” and “Wall shadow,
directional”. The exact settings in the effects are hard to give, it all depends on the size of
your map and what end result you expect. But for reference this is how I set them up:
The easiest thing to do is to try some different values and see how the result turns out.
But before you can do that you have to add your towers to the TOWER sheet.
On the left side of CD3 you have a tool called change properties. Click the button and
select all your towers in the map. When you mark a tower you will see a white square
around it (this means that it is selected). Right click with your mouse and select “Do it”
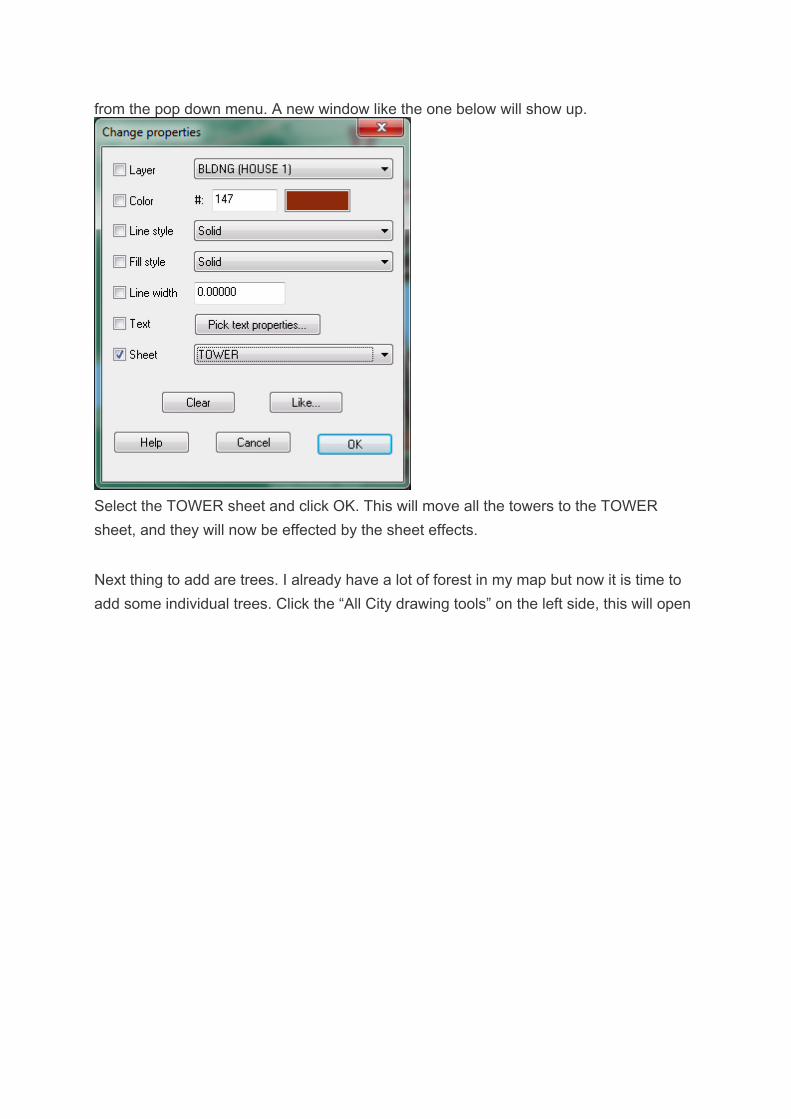
from the pop down menu. A new window like the one below will show up.
Select the TOWER sheet and click OK. This will move all the towers to the TOWER
sheet, and they will now be effected by the sheet effects.
Next thing to add are trees. I already have a lot of forest in my map but now it is time to
add some individual trees. Click the “All City drawing tools” on the left side, this will open

the window below.
Here I select the tool “City tree”. The good thing with this particular tool is that you can
decide what size your trees will be in. I add in some trees of different sizes that will make
the area look a bit more alive.
At last I’m adding some more houses to the area by the river (where you can suppose
that the fishermen lives). The place looked a bit too uninhabited before.
The map is now done in CD3 and it is time to continue the work in Photoshop. But first
you need to export two versions of the map. One with all the fields/grass in green and on
with all the fields/grass in yellow. When I export my maps from CD3 I’ve found out that
you get the best result by exporting them to a Pdf file.
To do this you use the print command in CD3, together with CutePdf or some other
program that lets you print to pdf.
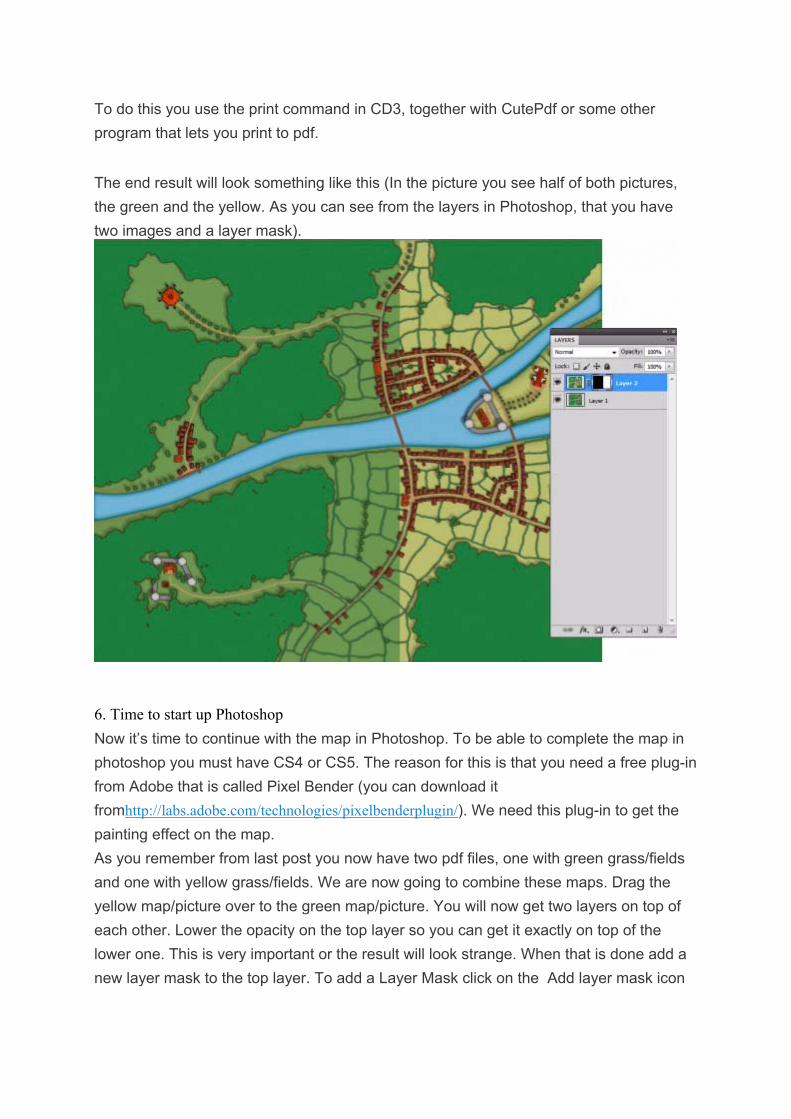
The end result will look something like this (In the picture you see half of both pictures,
the green and the yellow. As you can see from the layers in Photoshop, that you have
two images and a layer mask).
6. Time to start up Photoshop
Now it’s time to continue with the map in Photoshop. To be able to complete the map in
photoshop you must have CS4 or CS5. The reason for this is that you need a free plug-in
from Adobe that is called Pixel Bender (you can download it
fromhttp://labs.adobe.com/technologies/pixelbenderplugin/). We need this plug-in to get the
painting effect on the map.
As you remember from last post you now have two pdf files, one with green grass/fields
and one with yellow grass/fields. We are now going to combine these maps. Drag the
yellow map/picture over to the green map/picture. You will now get two layers on top of
each other. Lower the opacity on the top layer so you can get it exactly on top of the
lower one. This is very important or the result will look strange. When that is done add a
new layer mask to the top layer. To add a Layer Mask click on the Add layer mask icon

(down at the bottom of the layer window). This will add a mask filled with white (reveals
all). Mark the layer mask and press ctrl+I, this will invert the mask to black (hides all).
Now it is time to select the Brush tool (B). Select white as the colour you will use. Now
draw on the fields you want yellow. All the drawing has to be done in the layer mask!
Remember white will reveal and black will hide. In this way you can quite quickly get
some nice fields that will alternate in green and yellow.

The picture below shows how the end result looks on part of the map and the same
areas layermask.

When you’re done with all the fields you will have a map that looks like this:
The next step is to get the painting effect. First of all you can flatten the image. Copy the
layer two times, this will give you three layers with the background. Mark the middle
layer, this will be the Pixel Bender layer. Select Pixel Bender, you will find it under the
filter menu. In Pixel Bender click on the drop down menu and select the Oil paint filter.
This will in a blink turn your map into an oil painting (this is really cool I think).
On the right side you have some sliders that you can use to adjust the settings so that
you get the kind of effect that you want. It is generally better to do too much then too
little, we can adjust that a bit later as well. When you are satisfied with the result press

OK. In the picture below you can see my settings:
When you are back in Photoshop’s main windows you can always adjust the Oil paint
effect with the opacity setting of the layer. Try some different settings until you are
satisfied.
One of the drawbacks with the oil paint filter is that you loose some details, we’re going
to fix that now. Select the third layer and select Other/High Pass from the filter menu.
High pass will make your picture look grey and strange. Move the slider until your picture

looks like it’s glowing with neon lights, like in the picture below.
When you’re done click OK. Back in the main window you select the third layer again and
change the layer setting from Normal to Overlay. This will give you the details back in the
picture. Usually the effect gets a bit strong so it is always good to lower the opacity a bit
to get the best result.
7.FinishingitallupAt the moment the colours in the map are a bit too bright, so I need to do something
about that. In Photoshop I create a new adjustment layer called “Gradient Map”. You find
it at the bottom of the layers window. Click on the Black/white circle to open the menu

shown below.
The “Gradient Map” adjustment layer will add a new layer in which you can select
gradient effect, select the one that goes from black to white. This will turn your picture
into a black and white picture. But don’t worry all the colours are preserved in the layers

below.
Now it is time to lower the opacity of the Gradient map layer, when you do this you’ll see
that the colours start to slowly shine through the Black and white. In this way you can
control the strength of colour in your map. I usually set the opacity between 40-50%
depending on how it looks. You have to try some different setting until you are satisfied.
The next step is to darken the river. After having applied all the different effects on the
map the river (or sea if you’ve made a port) tend to be too bright. The easiest way to do
this is to create a new adjustment layer called curves. With curves you can darken or
bright up a picture very easily. When you do this concentrate only on how the river looks,
if the rest of the map start to look too dark just ignore it, we will fix that in the next step.
The easiest way to handle curves is to use the “Click and drag in image to modify the
curve” function. To do this you click on the icon with the pointing hand (marked with a red
circle in the picture below) in the Adjustments window. Now click with the left mouse
button on the picture and keep it pressed while you move the mouse. this will make the

picture brighter or darker. Stop when you have the result you want.
Now the whole picture is dark. Add an ordinary layer mask to the curves layer, press
ctrl+i to invert the mask to black. This will hide the effect you got from curves. Select the
brush tool and the colour white. Paint in the layer mask on the river/sea to make the
curves effect show up again, but this time only where you paint. If you think the river/sea
turned out too dark just lower the opacity of the Curves layer.

In the picture below you can see the difference in my map before and after I applied the
curves layer. The left side is with curves enabled.
The last thing is to add a border to the map. I like simple borders on my city maps that
wont take over the map. This will guarantee that it is the city that will be the focus of the
map. I usually just create a new layer that I name border. Select the whole image (ctrl+a)
and select edit/stroke from the menu bar. The number of pixels you choose here
depends on the size of your map. You probably have too try a couple of times until you
get the size you want. When you are done you have a nice and simple border around
your map.

if you have followed all of my steps you will now have the following layers in photoshop:

And the map will look something like this:
That’s about it. The only thing left is to label the map. Decide what places of interest
there are in the map and start label them.