ccs call flow designer - pragma...
TRANSCRIPT
User Manual
Please read this manual carefully before operating your set. Retain it for future reference.
CCS Call Flow Designer

iPECS CCS Call Flow Designer User Manual Issue 1.8
Copyright© 2013 Ericsson-LG Enternrpise Co. Ltd. All Rights Reserved This material is copyrighted by Ericsson-LG Enterprise Co. Ltd. Any unauthorized reproductions, use or disclosure of this material, or any part thereof, is strictly prohibited and is a violation of Copyright Laws. Ericsson-LG Enterprise reserves the right to make changes in specifications at any time without notice. The information furnished by Ericsson-LG Enterprise in this material is believed to be accurate and reliable, but is not warranted to be true in all cases. Ericsson-LG Enterprise and iPECS CCS are trademarks of Ericsson-LG Enterprise Co. Ltd.
Revision History
ISSUE DATE DESCRIPTION OF CHANGES
1.8 2014-02-28 Applied new BI

iPECS CCS Call Flow Designer User Manual Issue 1.8
ii
Table of Contents
1. IPECS CCS CALL FLOW DESIGNER INSTALL ............................... 4
1.1 PRE-INSTALLATION REQUIREMENTS ...................................................................... 4
1.2 INSTALLATION ...................................................................................................... 5
2. CONFIGURING CCS Q USING CALL FLOW DESIGNER .............. 13
2.1 MAIN INTERFACE ................................................................................................ 13 2.1.1 CCS Queue and Campaign Objects ................................................................. 14 2.1.2 Canvas ............................................................................................................. 15 2.1.3 Object Configurations ....................................................................................... 16
2.1.3.1 Callback Message Wizard ..............................................................................................17 2.1.4 Zoom and Refresh ........................................................................................... 19 2.1.5 Status............................................................................................................... 21
2.2 FILE MENU ........................................................................................................ 22 2.2.1 New ................................................................................................................. 22 2.2.2 Open From Workbook ...................................................................................... 24 2.2.3 Save to Workbook ............................................................................................ 25 2.2.4 Save to Server ................................................................................................. 27 2.2.5 Options ............................................................................................................ 28
2.2.5.1 Advanced .......................................................................................................................28 2.2.5.2 General ...........................................................................................................................29
2.3 OBJECT SETTINGS GLOSSARY ............................................................................ 30 2.3.1 Auto-Attendant ................................................................................................. 30
2.3.1.1 General ...........................................................................................................................30 2.3.1.2 Scheduling ......................................................................................................................31 2.3.1.3 Announcements .............................................................................................................31 2.3.1.4 Overflows .......................................................................................................................32
2.3.2 Queue .............................................................................................................. 33 2.3.2.1 General ...........................................................................................................................33 2.3.2.2 Agent Details ..................................................................................................................33 2.3.2.3 Skill Details .....................................................................................................................34 2.3.2.4 Scheduling ......................................................................................................................34 2.3.2.5 Announcements .............................................................................................................35 2.3.2.6 Completions ...................................................................................................................36 2.3.2.7 Overflows .......................................................................................................................36 2.3.2.8 Other Settings ................................................................................................................37
2.3.3 Callback Message ............................................................................................ 38 2.3.3.1 General ...........................................................................................................................38 2.3.3.2 Scheduling ......................................................................................................................38 2.3.3.3 Announcements .............................................................................................................38

iPECS CCS Call Flow Designer User Manual Issue 1.8
iii
2.3.3.4 Messages .......................................................................................................................39 2.3.4 CCS Call Team ................................................................................................ 40
2.3.4.1 General ...........................................................................................................................40 2.3.4.2 Agent Details ..................................................................................................................40 2.3.4.3 Skill Details .....................................................................................................................41 2.3.4.4 Scheduling ......................................................................................................................41 2.3.4.5 Announcements .............................................................................................................42 2.3.4.6 Overflows .......................................................................................................................42
2.3.5 Routing Options ............................................................................................... 43 2.3.5.1 General ...........................................................................................................................43 2.3.5.2 Scheduling ......................................................................................................................43 2.3.5.3 Routing ...........................................................................................................................44
2.3.6 Survey .............................................................................................................. 46 2.3.6.1 General ...........................................................................................................................46 2.3.6.2 Announcements .............................................................................................................46
2.3.7 Email ................................................................................................................ 48 2.3.7.1 General ...........................................................................................................................48 2.3.7.2 Agent Details ..................................................................................................................48 2.3.7.3 Skill Details .....................................................................................................................48 2.3.7.4 Scheduling ......................................................................................................................48 2.3.7.5 Email ..............................................................................................................................49
2.3.8 Voicemail ......................................................................................................... 50 2.3.8.1 General ...........................................................................................................................50 2.3.8.2 Scheduling ......................................................................................................................50 2.3.8.3 Announcements .............................................................................................................50 2.3.8.4 Messages .......................................................................................................................51
2.3.9 Callback Campaign .......................................................................................... 52 2.3.9.1 General ...........................................................................................................................52 2.3.9.2 Completions ...................................................................................................................53

iPECS CCS Call Flow Designer User Manual Issue 1.8
4
1. IPECS CCS CALL FLOW DESIGNER INSTALL
1.1 Pre-Installation Requirements
The machine running CCS Call Flow Designer must meet the following system requirements:
Call Flow Designer Recommended Hardware
Install Scope Call Flow Designer
Operating System
Windows 7 Professional or Windows 2008 Server
CPU
Core 2 Duo 1.6GHz
RAM
1 GB
Disk Space
10 GB
Additional Requirements:
Microsoft .NET Framework 4.0 Microsoft Excel 2007 or later
iPECS CCS Call Flow Designer User Manual Issue 1.8
5
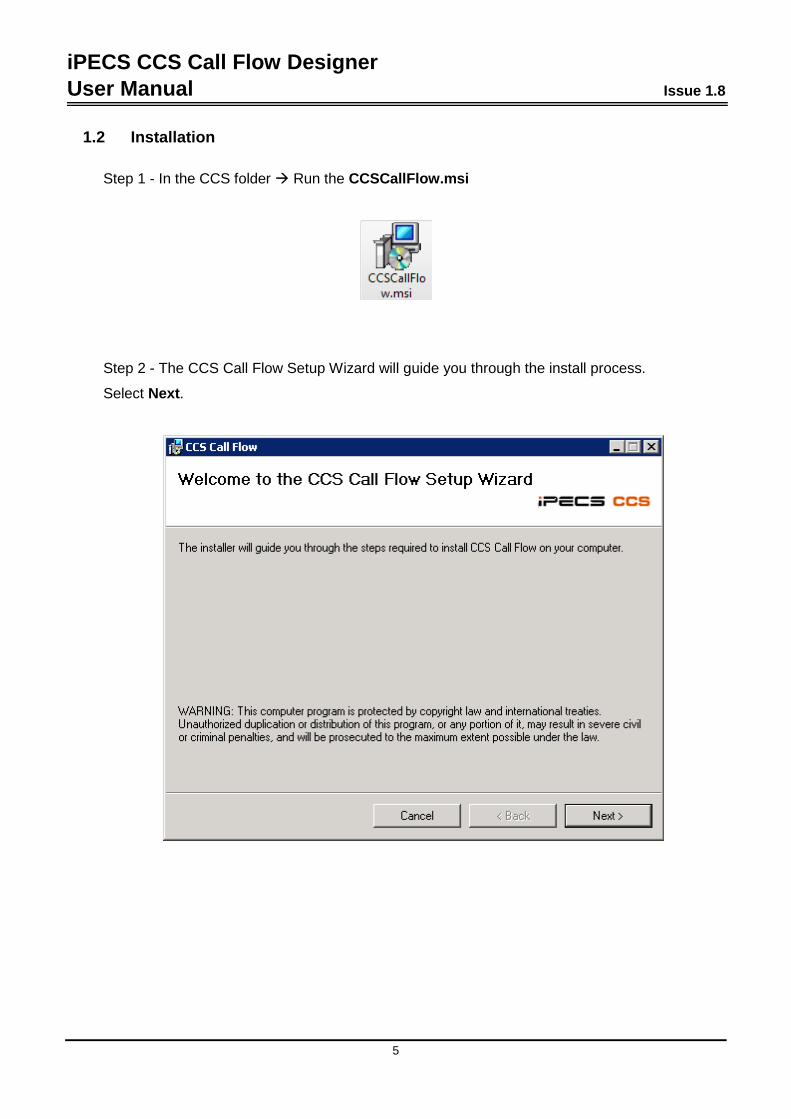
1.2 Installation
Step 1 - In the CCS folder Run the CCSCallFlow.msi
Step 2 - The CCS Call Flow Setup Wizard will guide you through the install process.
Select Next.

iPECS CCS Call Flow Designer User Manual Issue 1.8
6
Step 3 - Confirm the installation path for the CCS Call Flow Select Next.

iPECS CCS Call Flow Designer User Manual Issue 1.8
7
Step 4 - Confirm the installation Select Next.

iPECS CCS Call Flow Designer User Manual Issue 1.8
8
Step 5 - The CCS Call Flow Installer will start installing the program to completion.

iPECS CCS Call Flow Designer User Manual Issue 1.8
9
Step 6 - Select Close after the CCS Call Flow has been successfully installed.
Step 7 - Open the CCS Call Flow Designer from the desktop shortcut.
Step 8 - Select OK to set the Master Workbook.

iPECS CCS Call Flow Designer User Manual Issue 1.8
10
Step 9 - Select the Master Workbook Use the side button to browse for the workbook.
Step 10 - The workbook will be checked for validity. Press the Save button when finished.

iPECS CCS Call Flow Designer User Manual Issue 1.8
11
Step 11 - The CCS Call Flow Designer should now be open with a blank canvas as shown
below.
Step 12 - Select File Select Options In the Advanced section, configure the following
settings:
Gateway Server Name – The IP
address or machine name where
CCS Desk Gateway. The gateway
is typically running on the same
machine as the CCS Desk Server.
Gateway Server Port – The port
that CCS Desk Gateway listens on.
The default port is 8733.

iPECS CCS Call Flow Designer User Manual Issue 1.8
12
Step 13 - Select General to configure the template folders. The Master Workbook location can
also be changed in this section.
Master Workbook – The location of the master workbook.
Template Directory – The location of the Call Flow configuration templates.
Server Connection Details – Once connected to the CCS Desk Gateway, this section shows
the connection between the CCS Desk Gateway and the CCS Desk Server. This is read-only.
Step 14 - Click OK when finished and the Call Flow installation is completed.

iPECS CCS Call Flow Designer User Manual Issue 1.8
13
2. CONFIGURING CCS Q USING CALL FLOW DESIGNER
2.1 Main Interface Open the Call Flow Designer from the desktop shortcut, or from the start menu: Start Programs
CCS CCS Call Flow Designer.
The Call Flow Designer will be opened with a blank canvas.
There are several panels in the main interface:
a) The CCS Queue and Campaign objects panel
b) The Canvas
c) The Object Configurations panel
d) The Zoom and Refresh panel
e) The Status panel

iPECS CCS Call Flow Designer User Manual Issue 1.8
14
2.1.1 CCS Queue and Campaign Objects
There are several Queues and Campaigns objects available in Call Flow:
Auto-Attendant Play greeting files and provide information / options to callers.
Queue
Transfer queued voice calls / chat requests to agents, and to keep callers on hold while the agents are busy.
Callback Message
Take callers’ return phone number and voice message to be called back with the Callback in Queue.
CCS Call Team
Transfer campaign calls to available agents. Similar to Queue, however, there is no announcement (except to select the pre-emptive dialler server) or overflow option.
Routing Options
Very similar to Auto Attendant, but it also has access to configure a more complex announcement options with its Routing tab.
Transfer incoming emails to available agents. There is no announcement or overflow option.
Voicemail
Record callers’ voice messages and provide notification to agents if necessary.
Campaign Callback
Send customer’s requests, such as web callback, callback in queue, back to the agents.
Drag and drop them into the canvas to use the object in the flow.

iPECS CCS Call Flow Designer User Manual Issue 1.8
15
2.1.2 Canvas
The Canvas panel is where the flow is created. Drag and drop any Queues or Campaign
objects from the toolbar to start designing.
Objects can be moved around the canvas by drag and drop. The currently selected object will
have a red-coloured shadow. The line and arrow shows the connection between objects and the
direction. The above example shows that ‘Auto Attendant 0’ can overflow a call to ‘Queue 0’
To change the name of the object, click on the (...) button. Type the new name and click Enter when finished.
To delete the object from the canvas, right click on the object icon and select Delete. This
action is not reversible.
Copy and Paste feature will be available on future release of Call Flow Designer.

iPECS CCS Call Flow Designer User Manual Issue 1.8
16
2.1.3 Object Configurations
When an object is selected at the canvas, the Object Configurations panel will provide the
settings available for the object. Each object has a different set of configurations and must be
configured individually using the Call Flow or using the workbook spreadsheet.
Current Q shows the selected object and Current Type shows the object type.

iPECS CCS Call Flow Designer User Manual Issue 1.8
17
New object can be created and linked automatically to the selected object by pressing the +
button where applicable.
2.1.3.1 Callback Message Wizard
A wizard will automatically launch when using the + button to automatically create on a
Callback Message type.

iPECS CCS Call Flow Designer User Manual Issue 1.8
18
Create a Callback Message Group – automatically creates a linked Callback Message
queue, a Callback campaign, and a CCS Call Team queue. The complete set is required to
properly configure the Callback in Queue feature.
After selecting this option, the wizard will request the names for the new objects, the
maximum message length allowed for the callback message and the option to copy the
schedule configuration from the original Queue to the CCS Call Team.
Create Callback Message Only – only the Callback Message queue is created. The Callback
campaign and the CCS Call Team queue must be created manually.

iPECS CCS Call Flow Designer User Manual Issue 1.8
19
2.1.4 Zoom and Refresh
The Zoom tool will resize the canvas. Both the slider and the - / + buttons can be used to
configure the zoom value.

iPECS CCS Call Flow Designer User Manual Issue 1.8
20
We can restructure the canvas using the Refresh tool. Configure the number of columns in the # Columns box and click on the Refresh button beside it.

iPECS CCS Call Flow Designer User Manual Issue 1.8
21
2.1.5 Status
Located right beside the Zoom and Refresh panel, the Status panel provides the connection
status to the Desk Gateway Server, and the setup ‘lock’ condition.
There are three possible status messages:
1. There is No Connection to the Server Call Flow is unable to communicate with the CCS Desk Gateway.
2. The Connection to the Server is Currently Locked
Call Flow has detected that changes have been made outside the Call Flow tool and
therefore Call Flow will replace existing configuration when saving to Server.
3. Empty The Call Flow is connected to the CCS Desk Gateway and the configuration is not locked.

iPECS CCS Call Flow Designer User Manual Issue 1.8
22
2.2 File Menu
2.2.1 New
To clear the current canvas and create a new call flow, select this option and select Yes on the
screen below. This is action is not reversible i.e. the previous canvas is not recoverable.

iPECS CCS Call Flow Designer User Manual Issue 1.8
23
Choose from the available templates, or check the ‘Create Blank Template’ box to start with a
blank canvas. Press the Create button.
The template directory can be changed by using the ‘Reset Directory’ button.

iPECS CCS Call Flow Designer User Manual Issue 1.8
24
2.2.2 Open From Workbook
This menu option allows a workbook to be imported into CCS Call Flow. Choose the workbook
from the explorer window provided and click Open.
Similar to the ‘New’ option, this will clear the existing canvas and the action is not reversible.

iPECS CCS Call Flow Designer User Manual Issue 1.8
25
2.2.3 Save to Workbook
Export the current canvas into a workbook.
The different counters on the left show the number of items available in the configuration.
The steps are thoroughly described by the export wizard:
Step 1 – Confirm the master workbook. Press the (...) button to modify.
Step 2 – Browse the location of the new workbook and provide a filename. Press the (...) button to browse.
Step 3 – Enter the amount of agents to create. CCS Call Flow only supports up to 150 agents. If the canvas already has existing agents i.e.
imported from a workbook, then the new agents will be appended into the configuration. Enter
the value 0 when no further agent is required.

iPECS CCS Call Flow Designer User Manual Issue 1.8
26
Step 4 – Default Records Check the box to include default records into the exported workbook. As soon as you check the
box, the counters on the left will increment to illustrate the content of the workbook with the
default records.
Step 5 – Finish Click on the Export to finish.

iPECS CCS Call Flow Designer User Manual Issue 1.8
27
2.2.4 Save to Server
This will save the configuration loaded in Call Flow into the CCS Desk Server. This feature is
enabled only when the Call Flow is connected to the CCS Desk Gateway.
When the connection to the server is locked because other configurations have been made
outside Call Flow, then following alert message will appear to advise that all existing
configurations will be overwritten including the extra configurations. Select Yes to continue the
import.
When the connection to the server is not locked, the following message will appear to confirm
the import. Select Yes to continue the import.

iPECS CCS Call Flow Designer User Manual Issue 1.8
28
2.2.5 Options
2.2.5.1 Advanced
Gateway Server Name – The IP address or machine name where CCS Desk Gateway. The
gateway is typically running on the same machine as the CCS Desk Server.
Gateway Server Port – The port that CCS Desk Gateway listens on. The default port is 8733.

iPECS CCS Call Flow Designer User Manual Issue 1.8
29
2.2.5.2 General
Master Workbook – The location of the master workbook.
Template Directory – The location of the Call Flow configuration templates.
Server Connection Details – Once connected to the CCS Desk Gateway, this section shows
the connection between the CCS Desk Gateway and the CCS Desk Server. This is read-only.

iPECS CCS Call Flow Designer User Manual Issue 1.8
30
2.3 Object Settings Glossary This section explains the different configurations available in each queue and campaign objects.
2.3.1 Auto-Attendant
2.3.1.1 General
Supervisor – The agent responsible for the queue and the Status of the queue. The
supervisor is able to see the statistics for the Queue in the CCS Desk Queue Statistics Popup
Display even though the supervisor is not assigned as an agent to the Queue.
Incoming Priority – Sets the priority for the incoming calls for the queue. Please note that 0
is the lowest. To ensure that calls in lower priority queues are not ignored during times of high
volume in the higher priority queues, we can configure a rate of increase for a Queued calls
priority. Thus a low priority call increase until it has the highest call priority, and is answered.
Increasing By – The rate of the priority increase e.g. increase priority by 1 every 60 seconds.
Min Abandoned Time – The minimum time a call must wait in the queue before considered
abandoned. The maximum value is 199 seconds.
Cascade Queue Display – If the call is overflowed from another queue, use the previous
queue’s name and completion codes when the call is presented to the agent.
Cascade Queue Skills – If the call is overflowed from another queue, use the previous
queue’s skill based routing configuration to distribute the call to the available agent.
Cascade Queue Announcements – If the call is overflowed from another queue, use the
previous queue’s announcement messages and settings while the call is waiting in the queue.

iPECS CCS Call Flow Designer User Manual Issue 1.8
31
2.3.1.2 Scheduling
Zone – queue behaviour can be automatically adjusted according to Holidays for the Zone in
which a queue is based. Zones are primarily for centralized organizations that answer calls
from multiple locations, and have to apply the local working days according to the origin of the
call. In such case, public Holidays can occur in each of those locations that do not occur at the
same time in the other locations.
Ignore Calls Already in Queue – calls already waiting in the queue will not be overflowed
when the time has exceeded the active schedule of the queue.
Enable Time of Day Settings – enable or disable the queue schedule.
Times per Day – Select the queue opening and closing times of day for each day. The Copy
function is also available to easily copy a schedule from one day to other days.
2.3.1.3 Announcements
Enable Announcement – the checkbox must be ticked to enable announcement.
Inter-Announcement Delay – The time delay between announcements in seconds. The Hold
music for the queue will be played in between each announcement. Minimum value is 3.
Announcement Type – Determines what will be announced.
• Queue Position – Plays the first announcement using the queue’s greeting1, followed
by repeat and third announcements of the call’s position in the queue.
• Wait Time – The same as Queue Position but also announces the expected wait time
at the end of greeting1 first announcement.
• Simple Message – Plays the queue’s greeting1, greeting2, and greeting3 files for the
queue announcements.
Wait Time Value – When ‘Wait Time’ announcement type is selected, this option is enabled.
This is the monitoring range for the wait time statistic.
Announcement Server – The announcement server that will service calls into the queue.

iPECS CCS Call Flow Designer User Manual Issue 1.8
32
Queue Identifier (In-Band) – When using in-band signalling integration, this value serves as
the queue identifier matched against the in-band data received.
Announcement Routing 0-9 – During the announcement the caller can be prompted to press
a digit to indicate a selection of a service. The calls can then be routed to another Queue. Use
the Destination Type and Destination. Note there is only 1 announcement routing option
available for configuration. The same routing options will be configured for Initial
Announcement, Repeat Announcement and Third Announcement.
2.3.1.4 Overflows
Outside Hours – When the call arrives outside the schedule specified in the Schedule tab.
Holiday Mode – On a holiday, when the call arrives outside the schedule specified in the
Schedule tab.
Max Time In Q – Sets the time in seconds for how long the call remains in the queue, and
where to route once the time exceeds.
Max Calls In Q – The maximum number of calls allowed in the queue before subsequent calls
are overflowed.
Emergency Mode – When the system is put into emergency mode.

iPECS CCS Call Flow Designer User Manual Issue 1.8
33
2.3.2 Queue
2.3.2.1 General
Supervisor – The agent responsible for the queue and the Status of the queue. The
supervisor is able to see the statistics for the Queue in the CCS Desk Queue Statistics Popup
Display even though the supervisor is not assigned as an agent to the Queue.
Incoming Priority – Sets the priority for the incoming calls for the queue. Please note that 0
is the lowest. To ensure that calls in lower priority queues are not ignored during times of high
volume in the higher priority queues, we can configure a rate of increase for a Queued calls
priority. Thus a low priority call increase until it has the highest call priority, and is answered.
Increasing By – The rate of the priority increase e.g. increase priority by 1 every 60 seconds.
Min Abandoned Time – The minimum time a call must wait in the queue before considered
abandoned. The maximum value is 199 seconds.
Cascade Queue Display – If the call is overflowed from another queue, use the previous
queue’s name and completion codes when the call is presented to the agent.
Cascade Queue Skills – If the call is overflowed from another queue, use the previous
queue’s skill based routing configuration to distribute the call to the available agent.
Cascade Queue Announcements – If the call is overflowed from another queue, use the
previous queue’s announcement messages and settings while the call is waiting in the queue.
2.3.2.2 Agent Details
Queue Mode – The call distribution mode. There are 5 available options on how the calls will
be distributed.
• Round Robin – Calls are distributed in a circular fashion.
• Longest Available – The agent who has had the freest time will receive the next call.
• Last New Call – Sends the call to the agent who most recently finished a call.
• Shortest Available – The opposite of Longest Available.
• Least Talk Time – Distributes calls to agents who have had least proportion of time on
the phone.

iPECS CCS Call Flow Designer User Manual Issue 1.8
34
Wrap Up Time – The amount of time given to the agent after finishing a call from this queue.
Agent Absent Time – The time the system allows a call to ring at the agent’s phone before it
is routed to another agent, and the previous agent is automatically logged out for not
answering the queued call.
Agent Absent Break – The break status placed to the agent when absent to answer a call
into the queue.
Service Level – Is used to determine whether a call was answered within the required service
level. This is used when outputting adherence statistics to the optional Workforce data module.
Hide Caller ID – Prevents the display of the Caller ID on the Call Window in the CCS Desk
Client.
Auto-Record Mode – Forces call recording to start when the call is answered by the agent.
Auto-Answer Mode – Forces the call to be answered on the first ring.
2.3.2.3 Skill Details
Skills Based Routing – enable or disable this feature.
2.3.2.4 Scheduling
Zone – queue behaviour can be automatically adjusted according to Holidays for the Zone in
which a queue is based. Zones are primarily for centralized organizations that answer calls
from multiple locations, and have to apply the local working days according to the origin of the
call. In such case, public Holidays can occur in each of those locations that do not occur at the
same time in the other locations.
Ignore Calls Already In Queue – calls already waiting in the queue will not be overflowed
when the time has exceeded the active schedule of the queue.
Enable Time of Day Settings – enable or disable the queue schedule.

iPECS CCS Call Flow Designer User Manual Issue 1.8
35
Times per Day – Select the queue opening and closing times of day for each day. The Copy
function is also available to easily copy a schedule from one day to other days.
2.3.2.5 Announcements
Enable Announcement – the checkbox must be ticked to enable announcements.
Inter-Announcement Delay – The time delay between announcements in seconds. The Hold
music for the queue will be played in between each announcement. Minimum value is 3.
Announcement Type – Determines what will be announced.
• Queue Position – Plays the first announcement using the queue’s greeting1, followed
by repeat and third announcements of the call’s position in the queue.
• Wait Time – The same as Queue Position but also announces the expected wait time
at the end of greeting1 first announcement.
• Simple Message – Plays the queue’s greeting1, greeting2, and greeting3 files for the
queue announcements.
Wait Time Value – When ‘Wait Time’ announcement type is selected, this option is enabled.
This is the monitoring range for the wait time statistic.
Announcement Server – The announcement server that will service calls into the queue.
Queue Identifier (In-Band) – When using in-band signalling integration, this value serves as
the queue identifier matched against the in-band data received.
Third Announcement Interval – Used only if a third announcement needs to be played. This
is the frequency of how often the 3rd announcement (GREETING3) is played instead of
GREETING2.
If the value is set to 4, the order of the greetings would be 1,2,2,2,3,2,2,2,3
If the value is set to 0, third announcement is never played.
Initial Announcement Must Be Played – Ensures the First announcement is played to the
caller even if an agent is already available to take the call.

iPECS CCS Call Flow Designer User Manual Issue 1.8
36
Announcement Routing 0-9 – During the announcement the caller can be prompted to press
a digit to indicate a selection of a service. The calls can then be routed to another Queue. Use
the Destination Type and Destination. Note there are 3 separate of announcement routing
options that can be configured for steps of announcement i.e. Initial Announcement, Repeat
Announcement and Third Announcement.
2.3.2.6 Completions
Use Completion Codes – tick to enable this feature.
Default Code – this completion code will be entered automatically for every call on this queue.
Multiple Codes – Multiple codes to be entered for one call when this option is enabled.
Tree Format – If codes exist which have a ‘– ‘ in the name, they will be displayed in a tree
format.
2.3.2.7 Overflows
Outside Hours – When the call arrives outside the schedule specified in the Schedule tab.
Holiday Mode – On a holiday, when the call arrives outside the schedule specified in the
Schedule tab.
No Agents In – When no agents are logged into CCS Desk. Agents on break are also
considered logged out.
Max Time In Q – Sets the time in seconds for how long the call remains in the queue, and
where to route once the time exceeds.
Max Calls In Q – The maximum number of calls allowed in the queue before subsequent calls
are overflowed.
Agent Call Ratio – If the ratio of logged in agents to calls is too high, the calls will be
overflowed. With the value of 4, for every 1 agent logged in to the queue, the system will allow
4 calls to wait in the queue and the subsequent calls are overflowed.

iPECS CCS Call Flow Designer User Manual Issue 1.8
37
Emergency Mode – When the system is put into emergency mode.
2.3.2.8 Other Settings
GM Script – If CCS Desk is integrated with GoldMine, a GoldMine script can be used when a call is answered from the queue. To select a script click on the drop down menu and highlight the desired script. CCS Console Department – When CCS Console is used by the CCS Q agent, the screen
pop can be configured to show a specific department. The selection for department is taken
from the list of departments configured in the CCS Report directory.
Pop URL Mode – The configured URL will be displayed whenever a call from that queue is
ringing or answered by an agent.
This feature happens independently of any CRM integration that may be configured. There
are ‘variables’ that can be used e.g. http://intranet/find?ph={NUMBER}
{NUMBER} – The phone number of the incoming call
{QUEUEID} – The ID of the queue
{QUEUENAME} – The name of the queue
URL for end of CCS Chat – Similar to Pop URL but specifically for CCS Chat session routed
through the queue.

iPECS CCS Call Flow Designer User Manual Issue 1.8
38
2.3.3 Callback Message
2.3.3.1 General
Supervisor – The agent responsible for the queue and the Status of the queue. The
supervisor is able to see the statistics for the Queue in the CCS Desk Queue Statistics Popup
Display even though the supervisor is not assigned as an agent to the Queue.
Min Abandoned Time – The minimum time a call must wait in the queue before considered
abandoned. The maximum value is 199 seconds.
Ignore Abandoned In Reports – When enabled, a call in this queue will never be logged as
abandoned.
2.3.3.2 Scheduling
Zone – queue behaviour can be automatically adjusted according to Holidays for the Zone in
which a queue is based. Zones are primarily for centralized organizations that answer calls
from multiple locations, and have to apply the local working days according to the origin of the
call. In such case, public Holidays can occur in each of those locations that do not occur at the
same time in the other locations.
Ignore Calls Already In Queue – calls already waiting in the queue will not be overflowed
when the time has exceeded the active schedule of the queue.
Enable Time Of Day Settings – enable or disable the queue schedule.
Times per Day – Select the queue opening and closing times of day for each day. The Copy
function is also available to easily copy a schedule from one day to other days.
2.3.3.3 Announcements
Announcement Server – The announcement server that will service calls into the queue.
Queue Identifier (In-Band) – When using in-band signalling integration, this value serves as
the queue identifier matched against the in-band data received.
iPECS CCS Call Flow Designer User Manual Issue 1.8
39
2.3.3.4 Messages
Enable Voice Message Recording – when enabled, the queue will activate the message
recording feature.
Store Messages In Custom Location – By default, the recorded messages will be stored in
the folder belonging to the queue e.g. C:\CCS Ann\Q0001 for the first queue. If the Custom
Location is specified, the recorded messages will be stored there. Proper folder security
settings must be applied to ensure our system can write into it.
New Sub-Folder For Each Day’s Message – This option will create a sub folder for each
day’s messages e.g. C:\CCS Ann\Q0001\2013-01-11 for the 11th January 2013.
Play Tone At Start Of Recording – Enables a short tone to be played to advise the start of
the recording.
Use Message For Callback in Queue – When enabled, a message recording can be sent to
a campaign (Campaign type: Callback) for the next agent.
Maximum Message Length – This is the maximum length for a recorded message, in
minutes. Once this is reached the recording will stop and the call will be ended automatically.
Minimum Message Length – If the duration of a message recorded is less than this setting, it
will be discarded.
Send Recorded Message by Email – The recording will be sent as an email attachment to
the specified email recipient.
Email SMTP Sender – The SMTP profile to use when sending the email.
SMS Notification To An Agent – When this option is enabled and an agent is selected has a
mobile number configured in the agent’s profile, an SMS will be sent to that agent to inform
that a message has been recorded. This feature requires CCS SMS.
Second Copy Of Message In Different Folder – A copy of the recording can be made into
another specified folder. The ‘New sub-folder for each day’ option also affects this option.

iPECS CCS Call Flow Designer User Manual Issue 1.8
40
2.3.4 CCS Call Team
2.3.4.1 General
Supervisor – The agent responsible for the queue and the Status of the queue. The
supervisor is able to see the statistics for the Queue in the CCS Desk Queue Statistics Popup
Display even though the supervisor is not assigned as an agent to the Queue.
Incoming Priority – Sets the priority for the incoming calls for the queue. Please note that 0
is the lowest. To ensure that calls in lower priority queues are not ignored during times of high
volume in the higher priority queues, we can configure a rate of increase for a Queued calls
priority. Thus a low priority call increase until it has the highest call priority, and is answered.
Increasing By – The rate of the priority increase e.g. increase priority by 1 every 60 seconds.
Min Abandoned Time – The minimum time a call must wait in the queue before considered
abandoned. The maximum value is 199 seconds.
Ignore Abandoned In Reports – When enabled, a call in this queue will never be logged as
abandoned.
Cascade Queue Display – If the call is overflowed from another queue, use the previous
queue’s name and completion codes when the call is presented to the agent.
Cascade Queue Skills – If the call is overflowed from another queue, use the previous
queue’s skill based routing configuration to distribute the call to the available agent.
Cascade Queue Announcements – If the call is overflowed from another queue, use the
previous queue’s announcement messages and settings while the call is waiting in the queue.
2.3.4.2 Agent Details
Queue Mode – The call distribution mode. There are 5 available options on how the calls will
be distributed.
• Round Robin – Calls are distributed in a circular fashion.
• Longest Available – The agent who has had the freest time will receive the next call.
• Last New Call – Sends the call to the agent who most recently finished a call.
• Shortest Available – The opposite of Longest Available.

iPECS CCS Call Flow Designer User Manual Issue 1.8
41
• Least Talk Time – Distributes calls to agents who have had least proportion of time on
the phone.
Wrap Up Time – The amount of time given to the agent after finishing a call from this queue.
Service Level – Is used to determine whether a call was answered within the required service
level. This is used when outputting adherence statistics to the optional Workforce data module.
Hide Caller ID – Prevents the display of the Caller ID on the Call Window in the CCS Desk
Client.
Auto-Record Mode – Forces call recording to start when the call is answered by the agent.
Auto-Answer Mode – Forces the call to be answered on the first ring.
2.3.4.3 Skill Details
Skills Based Routing – enable or disable this feature.
2.3.4.4 Scheduling
Zone – queue behaviour can be automatically adjusted according to Holidays for the Zone in
which a queue is based. Zones are primarily for centralized organizations that answer calls
from multiple locations, and have to apply the local working days according to the origin of the
call. In such case, public Holidays can occur in each of those locations that do not occur at the
same time in the other locations.
Ignore Calls Already In Queue – calls already waiting in the queue will not be overflowed
when the time has exceeded the active schedule of the queue.
Enable Time Of Day Settings – enable or disable the queue schedule.
Times per Day – Select the queue opening and closing times of day for each day. The Copy
function is also available to easily copy a schedule from one day to other days.

iPECS CCS Call Flow Designer User Manual Issue 1.8
42
2.3.4.5 Announcements
Announcement Server – The announcement server that will service calls into the queue.
2.3.4.6 Overflows
Outside Hours – When the call arrives outside the schedule specified in the Schedule tab.
Holiday Mode – On a holiday, when the call arrives outside the schedule specified in the
Schedule tab.
No Agents In – When no agents are logged into CCS Desk. Agents on break are also
considered logged out.
Max Time in Q – Sets the time in seconds for how long the call remains in the queue, and
where to route once the time exceeds.
Max Calls in Q – The maximum number of calls allowed in the queue before subsequent calls
are overflowed.
Agent Call Ratio – If the ratio of logged in agents to calls is too high, the calls will be
overflowed. With the value of 4, for every 1 agent logged in to the queue, the system will allow
4 calls to wait in the queue and the subsequent calls are overflowed.
Emergency Mode – When the system is put into emergency mode.

iPECS CCS Call Flow Designer User Manual Issue 1.8
43
2.3.5 Routing Options
2.3.5.1 General
Supervisor – The agent responsible for the queue and the Status of the queue. The
supervisor is able to see the statistics for the Queue in the CCS Desk Queue Statistics Popup
Display even though the supervisor is not assigned as an agent to the Queue.
Incoming Priority – Sets the priority for the incoming calls for the queue. Please note that 0
is the lowest. To ensure that calls in lower priority queues are not ignored during times of high
volume in the higher priority queues, we can configure a rate of increase for a Queued calls
priority. Thus a low priority call increase until it has the highest call priority, and is answered.
Increasing By – The rate of the priority increase e.g. increase priority by 1 every 60 seconds.
Min Abandoned Time – The minimum time a call must wait in the queue before considered
abandoned. The maximum value is 199 seconds.
Ignore Abandoned In Reports – When enabled, a call in this queue will never be logged as
abandoned.
Cascade Queue Display – If the call is overflowed from another queue, use the previous
queue’s name and completion codes when the call is presented to the agent.
Cascade Queue Skills – If the call is overflowed from another queue, use the previous
queue’s skill based routing configuration to distribute the call to the available agent.
Cascade Queue Announcements – If the call is overflowed from another queue, use the
previous queue’s announcement messages and settings while the call is waiting in the queue.
2.3.5.2 Scheduling
Zone – queue behaviour can be automatically adjusted according to Holidays for the Zone in
which a queue is based. Zones are primarily for centralized organizations that answer calls
from multiple locations, and have to apply the local working days according to the origin of the
call. In such case, public Holidays can occur in each of those locations that do not occur at the
same time in the other locations.

iPECS CCS Call Flow Designer User Manual Issue 1.8
44
Ignore Calls Already In Queue – calls already waiting in the queue will not be overflowed
when the time has exceeded the active schedule of the queue.
Enable Time Of Day Settings – enable or disable the queue schedule.
Times per Day – Select the queue opening and closing times of day for each day. The Copy
function is also available to easily copy a schedule from one day to other days.
2.3.5.3 Routing
Enable Announcement – the checkbox must be ticked to enable announcements.
Inter-Announcement Delay – The time delay between announcements in seconds. The Hold
music for the queue will be played in between each announcement. Minimum value is 3.
Announcement Type – Determines what will be announced.
• Queue Position – Plays the first announcement using the queue’s greeting1, followed
by repeat and third announcements of the call’s position in the queue.
• Wait Time – The same as Queue Position but also announces the expected wait time
at the end of greeting1 first announcement.
• Simple Message – Plays the queue’s greeting1, greeting2, and greeting3 files for the
queue announcements.
Wait Time Value – When ‘Wait Time’ announcement type is selected, this option is enabled.
This is the monitoring range for the wait time statistic.
Announcement Server – The announcement server that will service calls into the queue.
Queue Identifier (In-Band) – When using in-band signalling integration, this value serves as
the queue identifier matched against the in-band data received.
Third Announcement Interval – Used only if a third announcement needs to be played. This
is the frequency of how often the 3rd announcement (GREETING3) is played instead of
GREETING2.
If the value is set to 4, the order of the greetings would be 1,2,2,2,3,2,2,2,3
If the value is set to 0, third announcement is never played.

iPECS CCS Call Flow Designer User Manual Issue 1.8
45
Initial Announcement Must Be Played – Ensures the Initial Announcement is played to the
caller even if an agent is already available to take the call.
Routing Options – A more complex routing options (compared to Auto-Attendant) can be
defined e.g. multiple digits, transfer to a registered device / number / CCS IVR service / etc.
The routing options configured are enabled for all announcement types.

iPECS CCS Call Flow Designer User Manual Issue 1.8
46
2.3.6 Survey
2.3.6.1 General
Supervisor – The agent responsible for the queue and the Status of the queue. The
supervisor is able to see the statistics for the Queue in the CCS Desk Queue Statistics Popup
Display even though the supervisor is not assigned as an agent to the Queue.
Incoming Priority – Sets the priority for the incoming calls for the queue. Please note that 0
is the lowest. To ensure that calls in lower priority queues are not ignored during times of high
volume in the higher priority queues, we can configure a rate of increase for a Queued calls
priority. Thus a low priority call increase until it has the highest call priority, and is answered.
Increasing By – The rate of the priority increase e.g. increase priority by 1 every 60 seconds.
Min Abandoned Time – The minimum time a call must wait in the queue before considered
abandoned. The maximum value is 199 seconds.
Ignore Abandoned In Reports – When enabled, a call in this queue will never be logged as
abandoned.
Cascade Queue Display – If the call is overflowed from another queue, use the previous
queue’s name and completion codes when the call is presented to the agent.
Cascade Queue Skills – If the call is overflowed from another queue, use the previous
queue’s skill based routing configuration to distribute the call to the available agent.
Cascade Queue Announcements – If the call is overflowed from another queue, use the
previous queue’s announcement messages and settings while the call is waiting in the queue.
2.3.6.2 Announcements
Announcement Type – Determines what will be announced.
• Queue Position – Plays the first announcement using the queue’s greeting1, followed
by repeat and third announcements of the call’s position in the queue.
• Wait Time – The same as Queue Position but also announces the expected wait time
at the end of greeting1 first announcement.

iPECS CCS Call Flow Designer User Manual Issue 1.8
47
• Simple Message – Plays the queue’s greeting1, greeting2, and greeting3 files for the
queue announcements.
Wait Time Value – When ‘Wait Time’ announcement type is selected, this option is enabled.
This is the monitoring range for the wait time statistic.
Announcement Server – The announcement server that will service calls into the queue.
Queue Identifier (In-Band) – When using in-band signalling integration, this value serves as
the queue identifier matched against the in-band data received.
Third Announcement Interval – Used only if a third announcement needs to be played. This
is the frequency of how often the 3rd announcement (GREETING3) is played instead of
GREETING2.
If the value is set to 4, the order of the greetings would be 1,2,2,2,3,2,2,2,3
If the value is set to 0, third announcement is never played.
Initial Announcement Must Be Played – Ensures the First announcement is played to the
caller even if an agent is already available to take the call.
Announcement Routing 0-9 – During the announcement the caller can be prompted to press
a digit to indicate a selection of a service. The calls can then be routed to another Queue. Use
the Destination Type and Destination. Note there is only 1 announcement routing option
available for configuration. The same routing options will be configured for Initial
Announcement, Repeat Announcement and Third Announcement

iPECS CCS Call Flow Designer User Manual Issue 1.8
48
2.3.7 Email
2.3.7.1 General
Supervisor – The agent responsible for the queue and the Status of the queue. The
supervisor is able to see the statistics for the Queue in the CCS Desk Queue Statistics Popup
Display even though the supervisor is not assigned as an agent to the Queue.
Incoming Priority – Sets the priority for the incoming calls for the queue. Please note that 0
is the lowest. To ensure that calls in lower priority queues are not ignored during times of high
volume in the higher priority queues, we can configure a rate of increase for a Queued calls
priority. Thus a low priority call increase until it has the highest call priority, and is answered.
Increasing By – The rate of the priority increase e.g. increase priority by 1 every 60 seconds.
Ignore Abandoned In Reports – When enabled, a call in this queue will never be logged as
abandoned.
2.3.7.2 Agent Details
Queue Mode – The call distribution mode. There are 5 available options on how the calls will
be distributed.
• Round Robin – Calls are distributed in a circular fashion.
• Longest Available – The agent who has had the freest time will receive the next call.
• Last New Call – Sends the call to the agent who most recently finished a call.
• Shortest Available – The opposite of Longest Available.
• Least Talk Time – Distributes calls to agents who have had least proportion of time on
the phone.
Wrap Up Time – The amount of time given to the agent after finishing a call from this queue. Service Level – Is used to determine whether a call was answered within the required service
level. This is used when outputting adherence statistics to the optional Workforce data module.
2.3.7.3 Skill Details
Skills Based Routing – enable or disable this feature.
2.3.7.4 Scheduling

iPECS CCS Call Flow Designer User Manual Issue 1.8
49
Zone – queue behaviour can be automatically adjusted according to Holidays for the Zone in
which a queue is based. Zones are primarily for centralized organizations that answer calls
from multiple locations, and have to apply the local working days according to the origin of the
call. In such case, public Holidays can occur in each of those locations that do not occur at the
same time in the other locations.
Ignore Calls Already In Queue – calls already waiting in the queue will not be overflowed
when the time has exceeded the active schedule of the queue.
Enable Time Of Day Settings – enable or disable the queue schedule.
Times per Day – Select the queue opening and closing times of day for each day. The Copy
function is also available to easily copy a schedule from one day to other days.
2.3.7.5 Email
SMTP Profile for Forwarding Email – The profile used for forwarding emails to the agents in
the queue.
Enter Completion Code for Each Email – When enabled, agent assigned with an email is
considered ‘busy’ as far as CCS Q is concerned. They will also have a window pop up on their
CCS Desk screen asking them to enter a completion code once that email is completed. If it is
disabled, the email will be sent to the first available agent but it will not make them busy.
Leave Agent Able To Take calls – While the agent is ‘busy’ on an email, when this option is
enabled, calls from this queue can still be routed into the agent.
Put Agent On Break When Handling Email - If the ‘Agent Busy’ option is not enabled, the
break selected in this drop down list will be applied to the agent when they receive an email.
Therefore they will become busy and will not be able to receive any more calls or emails until
they make themselves free.

iPECS CCS Call Flow Designer User Manual Issue 1.8
50
2.3.8 Voicemail
2.3.8.1 General
Supervisor – The agent responsible for the queue and the Status of the queue. The
supervisor is able to see the statistics for the Queue in the CCS Desk Queue Statistics Popup
Display even though the supervisor is not assigned as an agent to the Queue.
Min Abandoned Time – The minimum time a call must wait in the queue before considered
abandoned. The maximum value is 199 seconds.
Ignore Abandoned In Reports – When enabled, a call in this queue will never be logged as
abandoned.
2.3.8.2 Scheduling
Zone – queue behaviour can be automatically adjusted according to Holidays for the Zone in
which a queue is based. Zones are primarily for centralized organizations that answer calls
from multiple locations, and have to apply the local working days according to the origin of the
call. In such case, public Holidays can occur in each of those locations that do not occur at the
same time in the other locations.
Ignore Calls Already In Queue – calls already waiting in the queue will not be overflowed
when the time has exceeded the active schedule of the queue.
Enable Time of Day Settings – enable or disable the queue schedule.
Times per Day – Select the queue opening and closing times of day for each day. The Copy
function is also available to easily copy a schedule from one day to other days.
2.3.8.3 Announcements
Announcement Server – The announcement server that will service calls into the queue.
Queue Identifier (In-Band) – When using in-band signalling integration, this value serves as
the queue identifier matched against the in-band data received.

iPECS CCS Call Flow Designer User Manual Issue 1.8
51
2.3.8.4 Messages
Enable Voice Message Recording – when enabled, the queue will activate the message
recording feature.
Store Messages In Custom Location – By default, the recorded messages will be stored in
the folder belonging to the queue e.g. C:\CCS Ann\Q0001 for the first queue. If the Custom
Location is specified, the recorded messages will be stored there. Proper folder security
settings must be applied to ensure our system can write into it.
Play Tone At Start Of Recording – Enables a short tone to be played to advise the start of
the recording.
New Sub-Folder For Each Day’s Message – This option will create a sub folder for each
day’s messages e.g. C:\CCS Ann\Q0001\2013-01-11 for the 11th January 2013.
Maximum Message Length – This is the maximum length for a recorded message, in
minutes. Once this is reached the recording will stop and the call will be ended automatically.
Minimum Message Length – If the duration of a message recorded is less than this setting, it
will be discarded.
Send Recorded Message by Email – The recording will be sent as an email attachment to
the specified email recipient.
E-mail SMTP Sender – The SMTP profile to use when sending the email.
SMS Notification To An Agent – When this option is enabled and an agent is selected has a
mobile number configured in the agent’s profile, an SMS will be sent to that agent to inform
that a message has been recorded. This feature requires CCS SMS.
Second Copy Of Message In Different Folder – A copy of the recording can be made into
another specified folder. The ‘New sub-folder for each day’ option also affects this option.

iPECS CCS Call Flow Designer User Manual Issue 1.8
52
2.3.9 Callback Campaign
2.3.9.1 General
Queue – Where the campaign calls will be distributed into. (Queue type: CCS Call Team)
Mode – The campaign dialing mode.
• Preview – The campaign call is presented to the agent and they click the dial button
when ready.
• Progressive – The campaign call is presented to the agent and will start dialing
according to the ‘Seconds before dialing’ configuration.
Maximum Retries – Set the amount of times the call will be retried if engaged or unanswered
is detected. If this value is smaller than the completion code ‘Number of Retries’ configuration,
then the completion code setting is overridden.
Seconds Before Dialling – The time before the system starts dialing automatically. This
option is available only when Agent Mode is configured as Progressive.
Seconds Between Calls – The Available time required before an agent can be assigned with
a new campaign call. This is slightly different to the conventional wrap-up time, in that here
the agent is actually available so can still take calls from other sources.
Call Priority – Sets the priority of the campaign call over other calls the agent may receive. 1
is the lowest priority.

iPECS CCS Call Flow Designer User Manual Issue 1.8
53
2.3.9.2 Completions
Default Code – When enabled, this overcomes the situation where users are taking too long
to enter a code. A default code can be specified, which will automatically be selected if the
user has finished the call and has still not entered a code after x seconds of the call ending.
Disable ‘Complete Without Calling’ – Disable the option in CCS Desk.

Posted In Korea
The contents of this document are subject to revision without notice due to continued progress in methodology design and manufacturing. Ericsson-LG Enterprise shall have no liability for any error or damage of any kind resulting from the use of this document.
www.ericssonlg-enterprise.com © Ericsson-LG Enterprise Co., Ltd. 2012