openoffice.org calc…more basics - wisselwissel-gmbh.de/test/downloads/calc_lesson2_v2.pdf · this...
TRANSCRIPT

Introduction to OpenOffice.org Calc ©2004-2006 RL Barnes 1
OpenOffice.org Calc…More Basics
Unless otherwise expressly stated, all original material within this slideshow created by Richard L. Barnes
is licensed under a Creative Commons License.
www.nostabo.netSome material has been derived from the work of the OOoAuthors and remains under a
Creative Commons license.
This tutorial is based on OpenOffice.org Calc, version 2.0.2.

Introduction to OpenOffice.org Calc ©2004-2006 RL Barnes 2
The Basics of a Simple SpreadsheetThis lesson will cover:
• What is What?• Configuring Your View• How to…
• Open a Spreadsheet• Select a Sheet• Move Around the Spreadsheet• Store Data in a Cell• Use the Undo and Redo Commands• Create Simple Calculations• Use the Fill Feature• Find Other Spreadsheet Tools• Save and Close a Spreadsheet

Introduction to OpenOffice.org Calc ©2004-2006 RL Barnes 3
What is what?
OpenOffice.org Calc stores data in files which are called spreadsheets:• Calc spreadsheet files have the extension .ods.
• Spreadsheets are made up of Sheets.• Sheets contain Columns and Rows.
• The basic unit of a spreadsheet is a Cell.
• The maximum number of sheets a Calc spreadsheet can have is 256.• The maximum sheet size is 65,536 rows by 256 columns.• The maximum number of cells per sheet is 16,777,216.• Objects, such as charts, images or drawings exist on top of the cells,
not within them.
These concepts are basic to understanding and using Calc…
Introduction to OpenOffice.org Calc ©2004-2006 RL Barnes 4
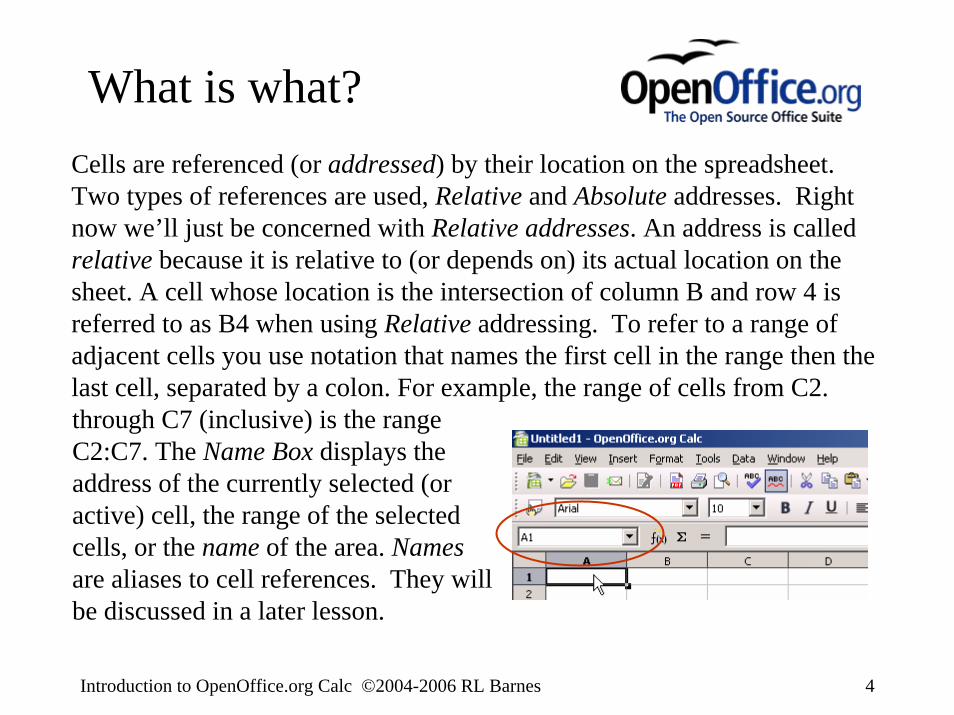
What is what?Cells are referenced (or addressed) by their location on the spreadsheet. Two types of references are used, Relative and Absolute addresses. Right now we’ll just be concerned with Relative addresses. An address is called relative because it is relative to (or depends on) its actual location on the sheet. A cell whose location is the intersection of column B and row 4 is referred to as B4 when using Relative addressing. To refer to a range of adjacent cells you use notation that names the first cell in the range then the last cell, separated by a colon. For example, the range of cells from C2.through C7 (inclusive) is the range C2:C7. The Name Box displays the address of the currently selected (or active) cell, the range of the selected cells, or the name of the area. Namesare aliases to cell references. They will be discussed in a later lesson.

Introduction to OpenOffice.org Calc ©2004-2006 RL Barnes 5
Before you get started…
Before you open your spreadsheet you may want to:
• Adjust some basic Calc window settings.
• Look over the Calc Options to see if there is any setting that could be changed to make your work more comfortable.
• Set the Tips and Extended Tips to provide you with the maximum feedback while fumbling about.

Introduction to OpenOffice.org Calc ©2004-2006 RL Barnes 6
The View menu offers settings to customize the look of the Calc window. From this menu you can show or hide toolbars, the Status bar and the column and row headers. You can also change the Calc window to display Full Screen or at a specific Zoom factor. The Zoom command enlarges or reduces the screen by the percent of the Zoom factor. You could, for example, select the Zoom command…

Introduction to OpenOffice.org Calc ©2004-2006 RL Barnes 7
…to change to a Zoom factor of 150%...if you select that option and click OK…

Introduction to OpenOffice.org Calc ©2004-2006 RL Barnes 8
…the display will change as shown here. This does not affect any of the other OpenOffice.org applications, it is set only for the current document. The current Zoom is shown in the Status bar by default.
Introduction to OpenOffice.org Calc ©2004-2006 RL Barnes 9
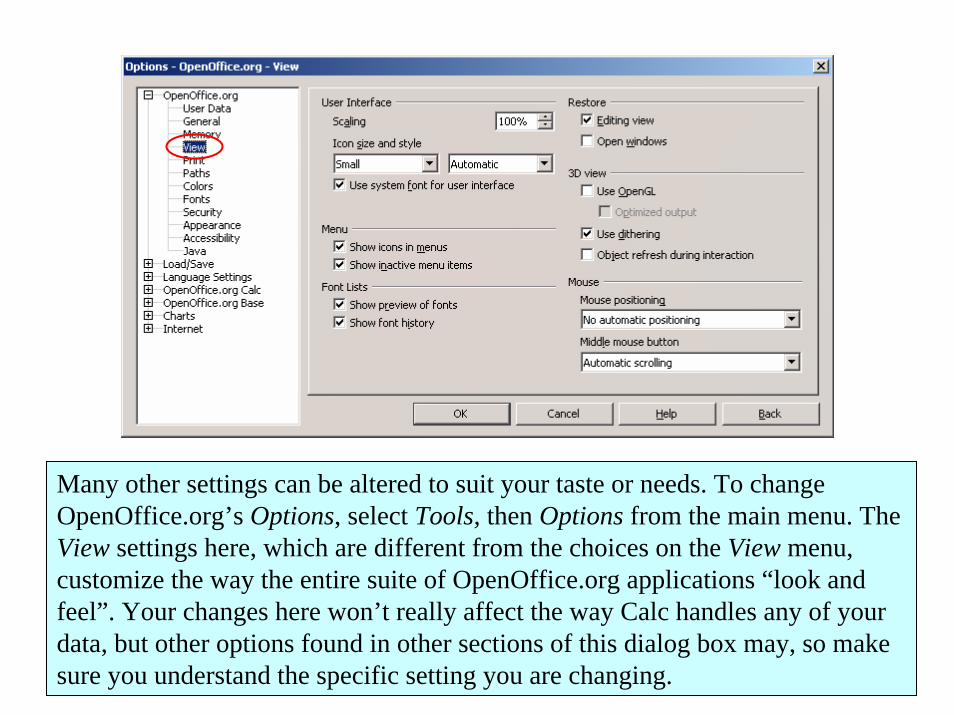
Many other settings can be altered to suit your taste or needs. To change OpenOffice.org’s Options, select Tools, then Options from the main menu. The View settings here, which are different from the choices on the View menu, customize the way the entire suite of OpenOffice.org applications “look and feel”. Your changes here won’t really affect the way Calc handles any of your data, but other options found in other sections of this dialog box may, so make sure you understand the specific setting you are changing.

Introduction to OpenOffice.org Calc ©2004-2006 RL Barnes 10
Other settings you may want to look over are found under the OpenOffice.org Calc > View section of the Options dialog…some of these are found on under the View menu, but some are only found here. Changes to these settings affect the spreadsheet from which you opened the Optionsdialog and every spreadsheet you open afterward. Other spreadsheets that are already open are not affected.
Introduction to OpenOffice.org Calc ©2004-2006 RL Barnes 11
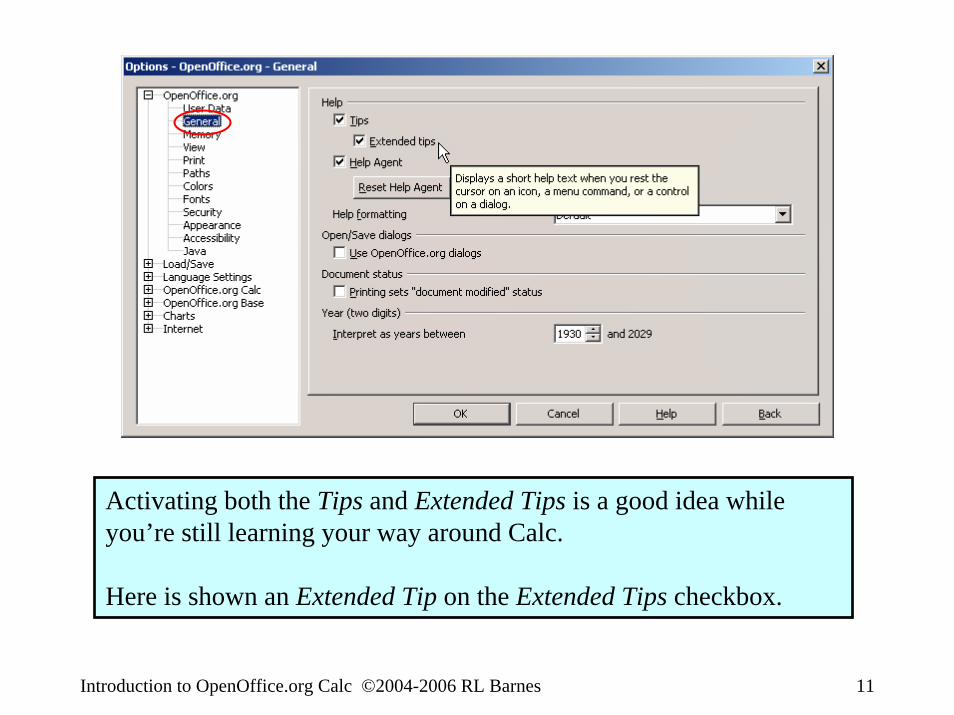
Activating both the Tips and Extended Tips is a good idea while you’re still learning your way around Calc.
Here is shown an Extended Tip on the Extended Tips checkbox.

Introduction to OpenOffice.org Calc ©2004-2006 RL Barnes 12
Opening a SpreadsheetAs is usual with most sophisticated programs, there are several ways to do things with Calc. To open an existing spreadsheet:
• Open the File menu…• Select the Open command…• Select the file from the Open dialog’s listing, or browse to
find the one you want to open.…or• Use the shortcut keys…Ctrl+O to display the Open dialog.…or• Select the file from the Recent Documents list.…or• Select a file from the Load URL list on the Standard toolbar.…or• Select the icon from the toolbar to display the Open dialog.
Introduction to OpenOffice.org Calc ©2004-2006 RL Barnes 13
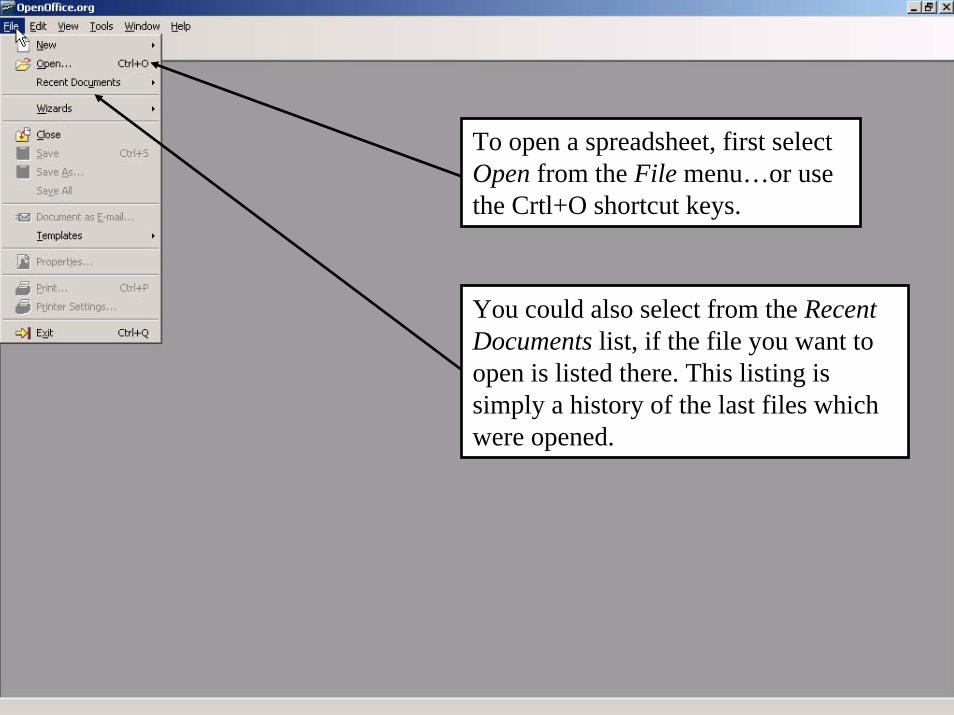
You could also select from the Recent Documents list, if the file you want to open is listed there. This listing is simply a history of the last files which were opened.
To open a spreadsheet, first select Open from the File menu…or use the Crtl+O shortcut keys.

Introduction to OpenOffice.org Calc ©2004-2006 RL Barnes 14
The Open dialog box will look and function like any Open dialog box on your specific operating system, unless the setting, “Use OpenOffice.org dialogs”, from the program Options has been set. This is the Open dialog from Windows 2000…

Introduction to OpenOffice.org Calc ©2004-2006 RL Barnes 15
If you have set the “Use OpenOffice.org dialogs” option the Opendialog box will look like this…although it is somewhat different, it contains all of the same elements as the previous one. So most users should be able to find their way around it with little trouble.

Introduction to OpenOffice.org Calc ©2004-2006 RL Barnes 16
Calc (version 2) spreadsheet files end with the ODS (OpenDocument Spreadsheet) extension. The files shown in the dialog above are located in a folder named sheets which includes Calc version 1 files (*.sxc) and Excel files (*.xls).
Introduction to OpenOffice.org Calc ©2004-2006 RL Barnes 17
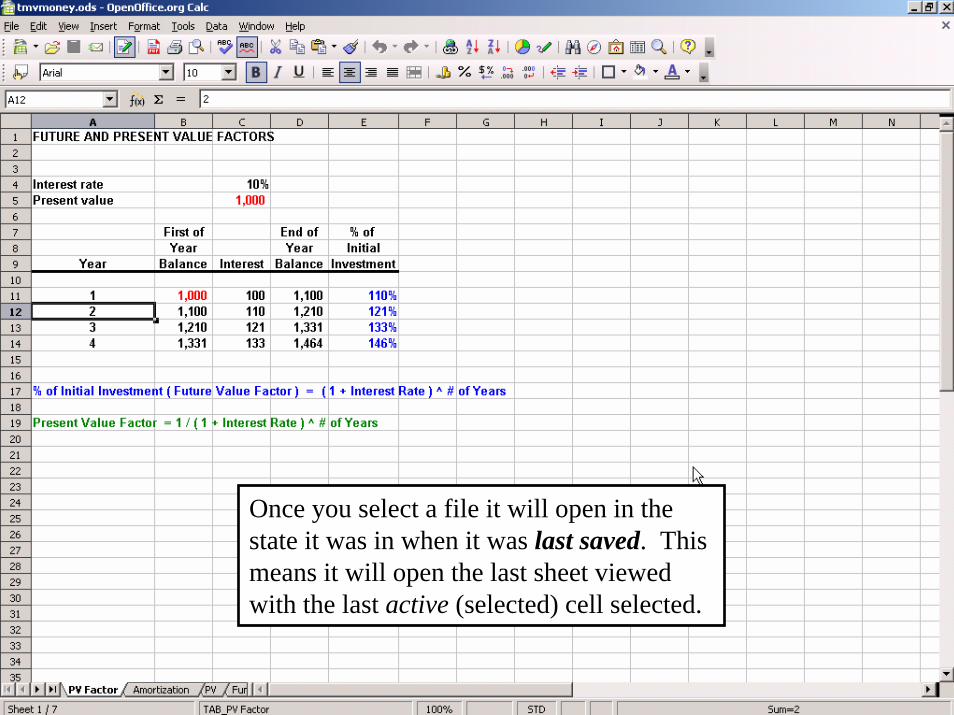
Once you select a file it will open in the state it was in when it was last saved. This means it will open the last sheet viewed with the last active (selected) cell selected.

Introduction to OpenOffice.org Calc ©2004-2006 RL Barnes 18
Calc can also open many other types of files and convert them to the Calc spreadsheet format. File types such as HTML, XML, RTF, plain text and CSVare all supported, and Calc will also open files created by other spreadsheet or database software, like Excel, Lotus 1-2-3, Quattro Pro, StarCalc and dBase.

Introduction to OpenOffice.org Calc ©2004-2006 RL Barnes 19
You could also select from the Load URL list which is located at the left of the Standard toolbar. Simply click the file you want to open, or highlight it and press the Enter key. The currently opened file is always found at the top of the list. You can also enter a new URL or file path to open a file not found in the listing.
This feature is not available on the toolbar by default and you most likely will have to add it…

Introduction to OpenOffice.org Calc ©2004-2006 RL Barnes 20
To add or remove buttons from your toolbars, click on the down arrow at the end of the toolbar you want to edit. This will display another menu…select the Visible Buttons menu item and you will see a list of all of the available buttons for that specific toolbar. To add a button put a checkmark next to the button’s entry in the list. The Load URL item is at the top of the list shown here.
To remove a button, uncheck the button’s entry.
Introduction to OpenOffice.org Calc ©2004-2006 RL Barnes 21
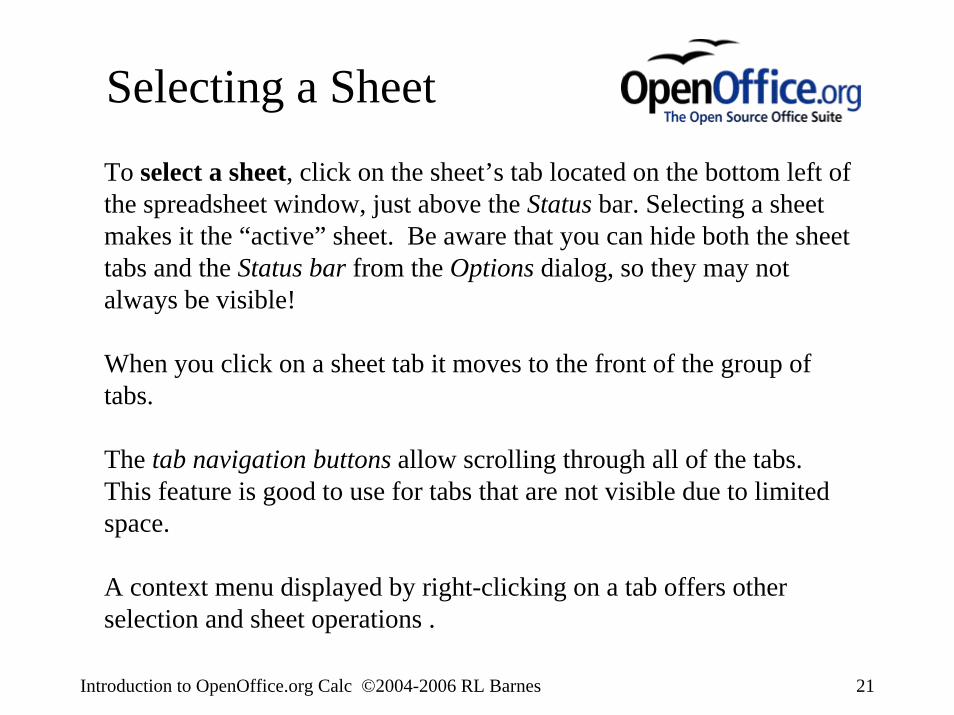
Selecting a SheetTo select a sheet, click on the sheet’s tab located on the bottom left of the spreadsheet window, just above the Status bar. Selecting a sheet makes it the “active” sheet. Be aware that you can hide both the sheet tabs and the Status bar from the Options dialog, so they may not always be visible!
When you click on a sheet tab it moves to the front of the group of tabs.
The tab navigation buttons allow scrolling through all of the tabs. This feature is good to use for tabs that are not visible due to limited space.
A context menu displayed by right-clicking on a tab offers other selection and sheet operations .

Introduction to OpenOffice.org Calc ©2004-2006 RL Barnes 22
You can move through the sheets in an open spreadsheet by using the sheet tabs, or the tab navigation buttons...notice that some of the tabs are hidden by the bottom scrollbar and are not completely shown. Currently “PV Factor” is the active sheet.
tab navigation buttons
sheet tabs

Introduction to OpenOffice.org Calc ©2004-2006 RL Barnes 23
Selecting the second tab brings that sheet forward and makes sheet 2, the “Amortization” sheet, active. This is an important concept since only active objects can receive input.
Introduction to OpenOffice.org Calc ©2004-2006 RL Barnes 24
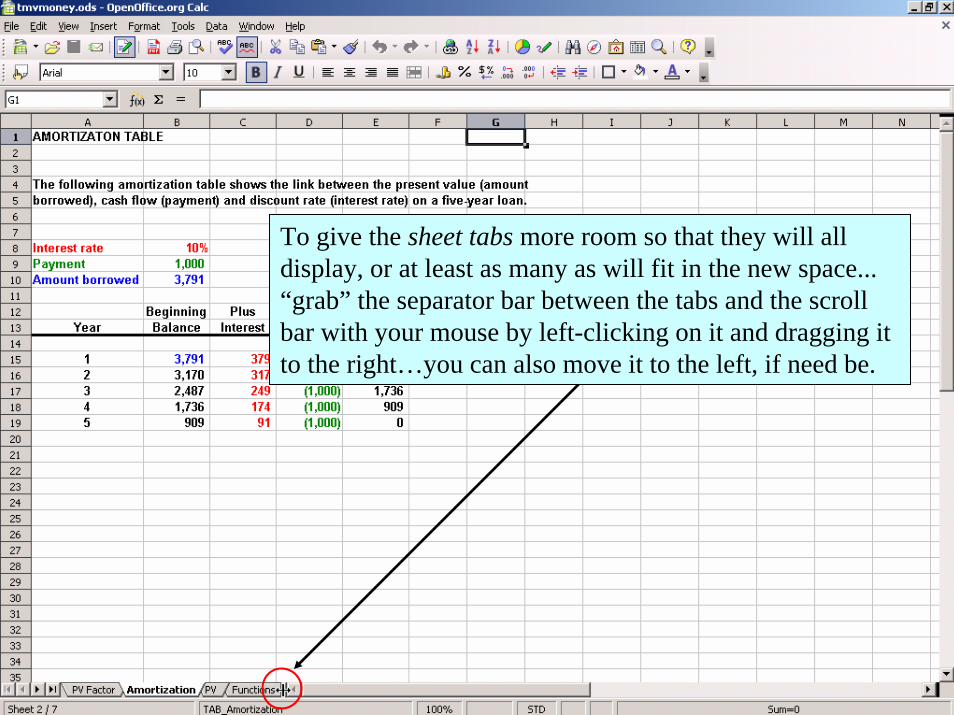
To give the sheet tabs more room so that they will all display, or at least as many as will fit in the new space... “grab” the separator bar between the tabs and the scroll bar with your mouse by left-clicking on it and dragging it to the right…you can also move it to the left, if need be.

Introduction to OpenOffice.org Calc ©2004-2006 RL Barnes 25
Right-clicking on any sheet’s tab will display a context menu showing all of the available operations for that sheet…If you want to Select All of the sheets you can choose that command from the menu, or you can press the Control key and click each sheet you wish to have “selected”. This will not make all of the selected sheets active, they will only be “selected”, which is useful for copying, deleting and formatting a group sheets.
Only one object can be active at a time!

Introduction to OpenOffice.org Calc ©2004-2006 RL Barnes 26
You can also select the entire sheet, but this does not make every cell active. To select the entire sheet, click on the space in the corner of the column and row headers as shown above in the red circle. In this example cell A11 is the active cell,which can only be realized by noting the highlight border around it. Selecting the entire sheet, or multiple regions is good for formatting and copying procedures.

Introduction to OpenOffice.org Calc ©2004-2006 RL Barnes 27
Moving Around a Sheet
Moving about the rows and columns in a Calc spreadsheet can be done with both a mouse and a keyboard. Standard shortcut keys, such as Ctrl+X for Cut or Ctrl+C for Copy work with Calc.
Navigation keys you can use are:• Arrows keys move up, down, left and right one cell• Tab move left one cell• Shift+Tab move right one cell• Page Up or Page Down move up or down one window of rows• Home move to the beginning of a row• End move to the end of a row (the last used
cell, not the actual “last cell” in the row).• Ctrl+Home move to cell A1• Ctrl+ End move to the last used cell in a sheet
Introduction to OpenOffice.org Calc ©2004-2006 RL Barnes 28
Putting Data in its Place
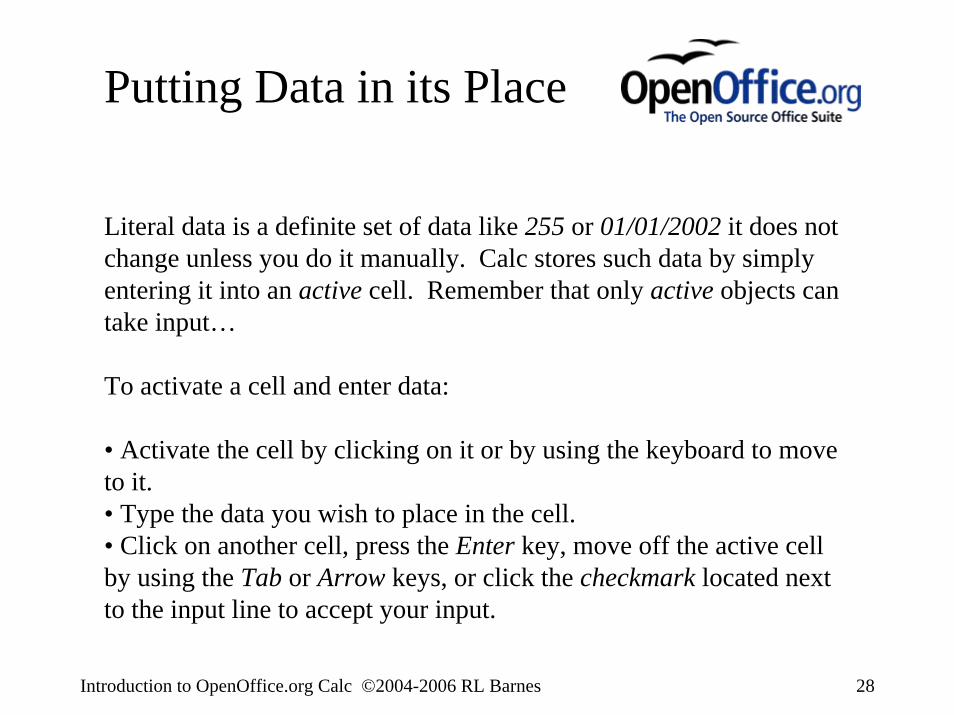
Literal data is a definite set of data like 255 or 01/01/2002 it does not change unless you do it manually. Calc stores such data by simply entering it into an active cell. Remember that only active objects can take input…
To activate a cell and enter data:
• Activate the cell by clicking on it or by using the keyboard to move to it.• Type the data you wish to place in the cell.• Click on another cell, press the Enter key, move off the active cell by using the Tab or Arrow keys, or click the checkmark located next to the input line to accept your input.
Introduction to OpenOffice.org Calc ©2004-2006 RL Barnes 29
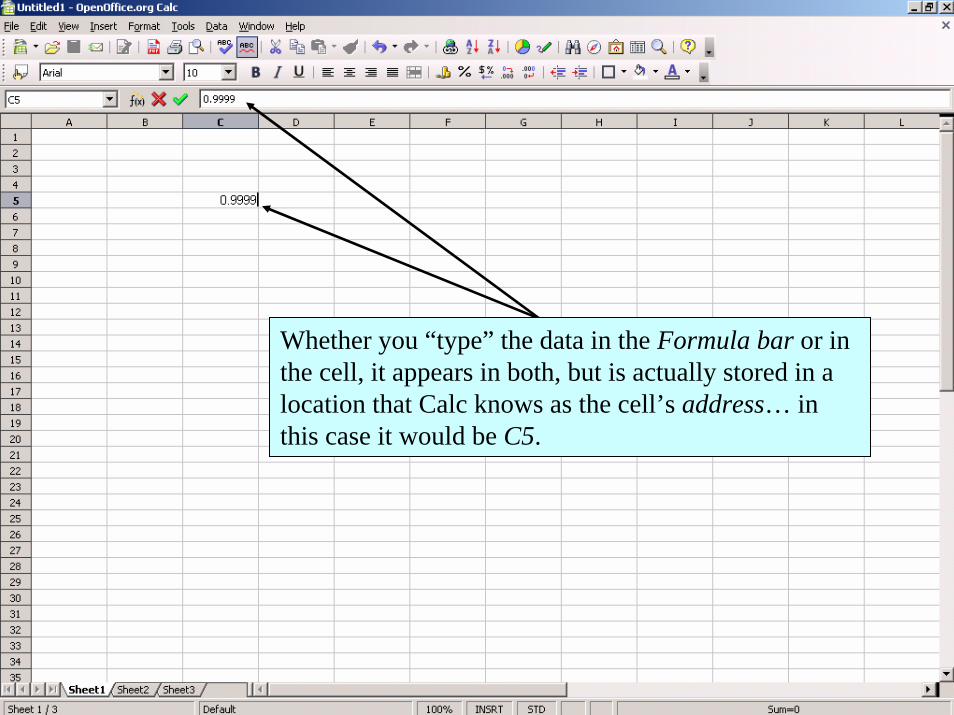
Whether you “type” the data in the Formula bar or in the cell, it appears in both, but is actually stored in a location that Calc knows as the cell’s address… in this case it would be C5.

Introduction to OpenOffice.org Calc ©2004-2006 RL Barnes 30
To enter or accept the input of a data value placed in a cell:• Press the Enter key • Move off the cell by using the Tab or Arrow keys, or clicking on
another cell.• or, by clicking the checkmark button located next to the Input line.
Although the last method is cumbersome as opposed to simply using the Enter, an arrow, or Tab key, it is a preferred method when working with formulas.
Introduction to OpenOffice.org Calc ©2004-2006 RL Barnes 31
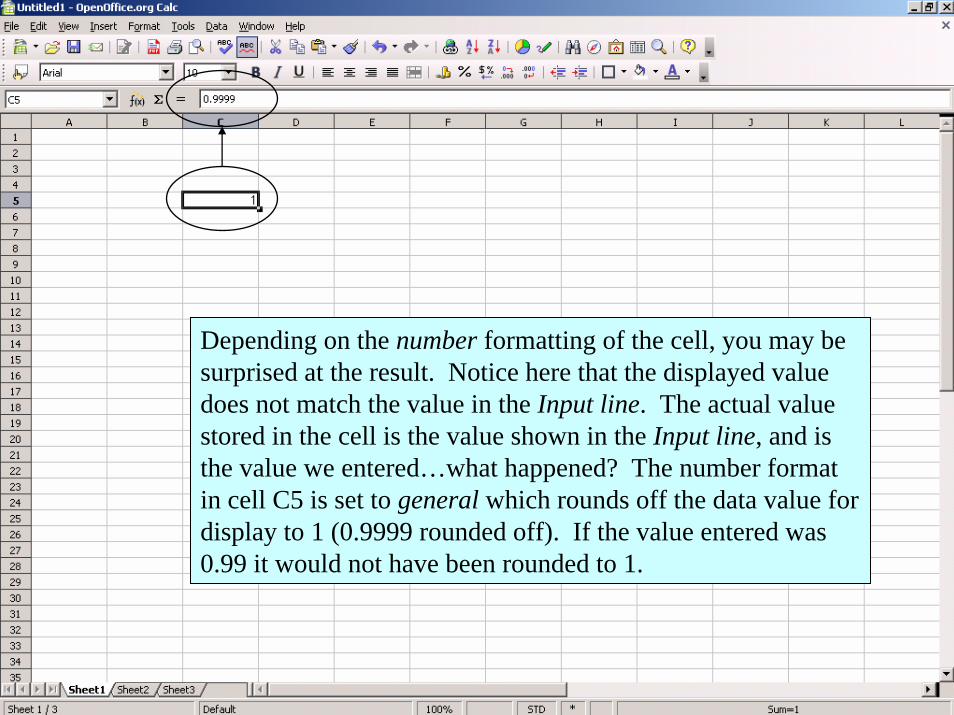
Depending on the number formatting of the cell, you may be surprised at the result. Notice here that the displayed value does not match the value in the Input line. The actual value stored in the cell is the value shown in the Input line, and is the value we entered…what happened? The number format in cell C5 is set to general which rounds off the data value for display to 1 (0.9999 rounded off). If the value entered was 0.99 it would not have been rounded to 1.

Introduction to OpenOffice.org Calc ©2004-2006 RL Barnes 32
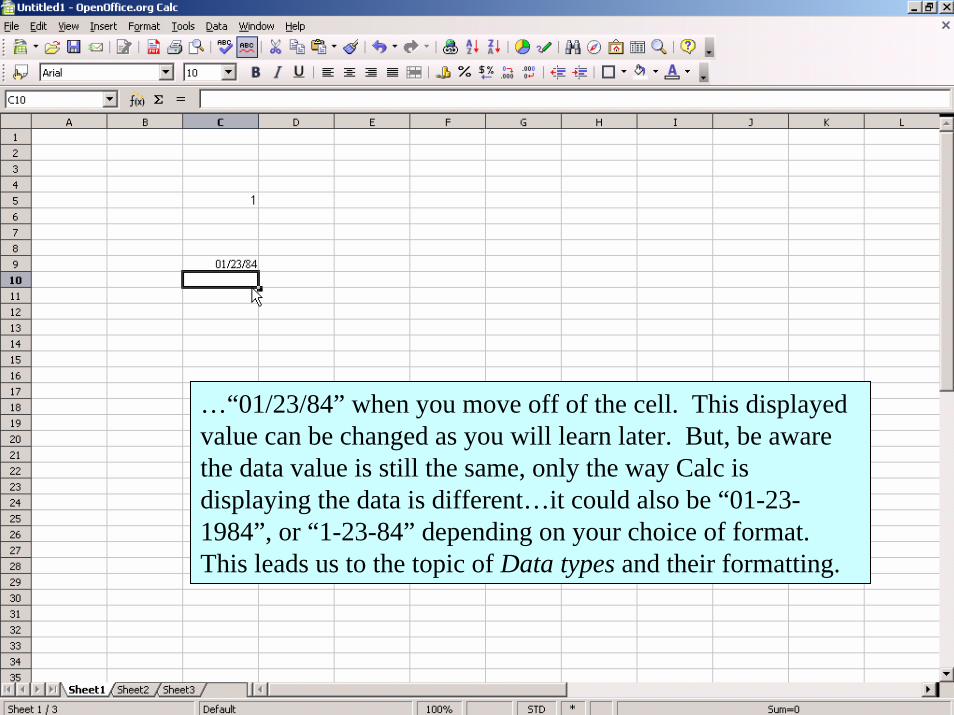
Number formats are important to understand because data will display differently depending on how the cell is formatted. Some data types are formatted a certain way by default…so entering the date, “January 23, 1984”, will change to…
Introduction to OpenOffice.org Calc ©2004-2006 RL Barnes 33
…“01/23/84” when you move off of the cell. This displayed value can be changed as you will learn later. But, be aware the data value is still the same, only the way Calc is displaying the data is different…it could also be “01-23-1984”, or “1-23-84” depending on your choice of format. This leads us to the topic of Data types and their formatting.
Introduction to OpenOffice.org Calc ©2004-2006 RL Barnes 34
Basic Data Types…All spreadsheets, including Calc, use 3 basic types of data:
• Numeric values – Number type data can include any number mixed with the following characters + - ( ) , / $ % . E e. If you try to enter a number that is to big for a cell, Calc will either convert the number to scientific notation, round it, or display a set of number signs (###) in the cell. In any of these cases the value in the cell does not change, only the display.• Text – Calc uses text mainly for labels. A cell formatted as holding textual data can have up to 65,535 characters (64 KB in size). Storing numbers as text prevents them from being used as numbers in calculations because they are considered alphanumeric text, not numbers.• Formulas – Formulas are instructions to Calc to perform some type of operation and return the result in the cell. Formulas are entered by first entering an equal sign ( = ) followed by the formula. Calc usually thinks that anything preceded by an equal sign is a formula.

Introduction to OpenOffice.org Calc ©2004-2006 RL Barnes 35
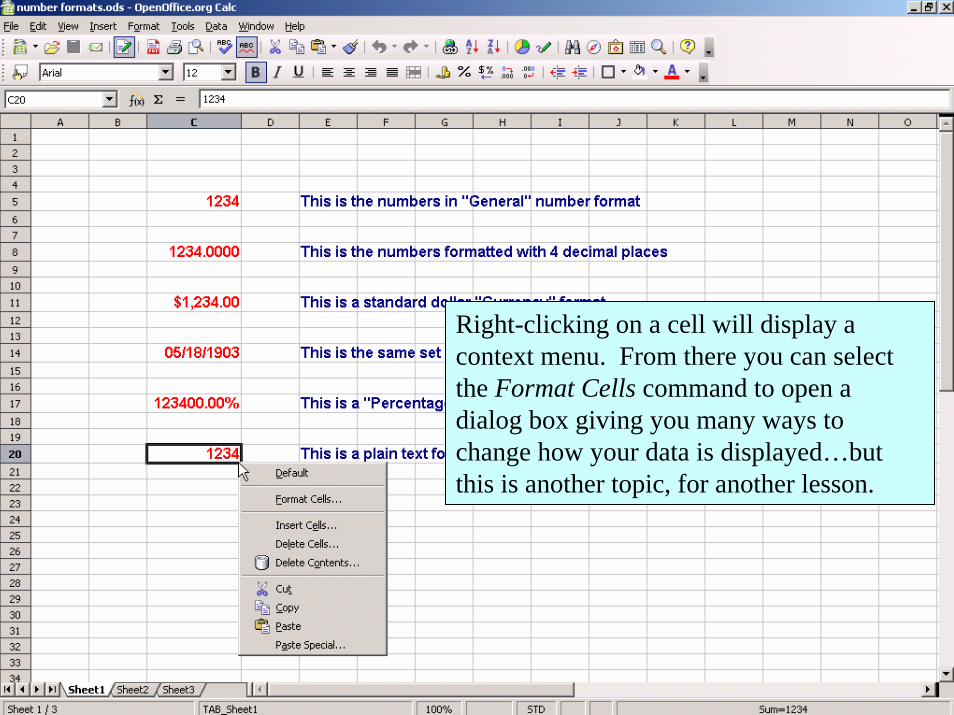
Everything stored in a cell is a number…here you see how changing the formatting of the cell changes the values which are displayed…each cell on the left contains the numbers 1234.
Introduction to OpenOffice.org Calc ©2004-2006 RL Barnes 36
Right-clicking on a cell will display a context menu. From there you can select the Format Cells command to open a dialog box giving you many ways to change how your data is displayed…but this is another topic, for another lesson.
Introduction to OpenOffice.org Calc ©2004-2006 RL Barnes 37
Undoing and Redoing…By default Calc stores the 100 most recent operations in memory so that it can retrieve old values and correct your mistakes. These actions are known as the Undo and Redo commands.
If you decide you really didn’t want to delete a value in a cell, or make a font formatting change to a label you can select the Undo command from either the toolbar or the Edit menu. If you then decide that you liked it the way it was before, select Redo.
Using these commands you can step your way back to a given state that your sheet was in, as long as you stay within the set number of “steps”. Anything past that is gone forever.
The number of saved steps can be changed from the Options dialog box.

Introduction to OpenOffice.org Calc ©2004-2006 RL Barnes 38
The Undo and Redo menu item commands as they may appear on the Edit menu…the shortcut keys are to the right of the menu
commands. The Redo command is not available at this time so it is “grayed-out”.
The Undo and Redo buttons as they appear on the Function toolbar…

Introduction to OpenOffice.org Calc ©2004-2006 RL Barnes 39
From the Standard toolbar, a “long-click” on the Undo command produces a window containing all of the saved Undo steps. From here
you can select to Undo any number of the steps by dragging over the list with your left mouse button pressed. Notice at the bottom of the Undo
window (above) it says that “1 undo action” is selected to process.

Introduction to OpenOffice.org Calc ©2004-2006 RL Barnes 40
Working with Formulas
Calculations placed in a cell are known as formulas in Calc.
• Formulas begin with an equal sign ( = ) so Calc knows that you aren’t entering literal data.• Simple formulas are constructed of numbers, cell references (or cell names) and operators, such as: < > + - / *
• A simple formula might look like: = (B3*H6)-D6• More complex formulas usually include functions, which are
predefined calculations that Calc provides.• A more complex formula might look like:
=IF(C10<0,ABS(C10),"N/A"))This formula tests to see if the value of C10 is less than 0, if it is, the formula returns the absolute value of C10, otherwise it will return the text “N/A”.

Introduction to OpenOffice.org Calc ©2004-2006 RL Barnes 41
Working with Formulas
Arithmetical Operators used in formulas:
• + addition A1 + B2 A1 plus B2• - subtraction A1 - B2 A1 minus B2• / division A1 / B2 A1 divided by B2• * multiplication A1 * B2 A1 times B2• % percent A1 * 10% A1 times 10 percent• ^ exponentiation A1 ^ 3 A1 to the 3rd power

Introduction to OpenOffice.org Calc ©2004-2006 RL Barnes 42
Comparative Operators used in formulas:
• = Equal to• > Greater than• < Less than• >= Greater than or Equal to• <= Less than or Equal to• <> NOT Equal to
Working with Formulas

Introduction to OpenOffice.org Calc ©2004-2006 RL Barnes 43
Calculations are evaluated (or processed) according to an “Order of Precedence” with regard to the operators. When Calc processes a formula it uses the following order:
• First expressions inside Parentheses ( )• Second Percent % • next Negation, negative numbers - 1• …then Exponentiation ^• …and Multiplication and Division * /• …and Addition and Subtraction + -• …finally Relational expressions =, <>, <, >, <=, >=
Working with Formulas

Introduction to OpenOffice.org Calc ©2004-2006 RL Barnes 44
Putting together a Formula:
• Activate the cell you want the calculation result to be displayed in…
• Type an equal sign.
• …then type the values, references, operators and functions into the cell.
• Press Enter and that should do it, the actual text you typed should be replaced with the result of the calculation.
Working with Formulas
Introduction to OpenOffice.org Calc ©2004-2006 RL Barnes 45
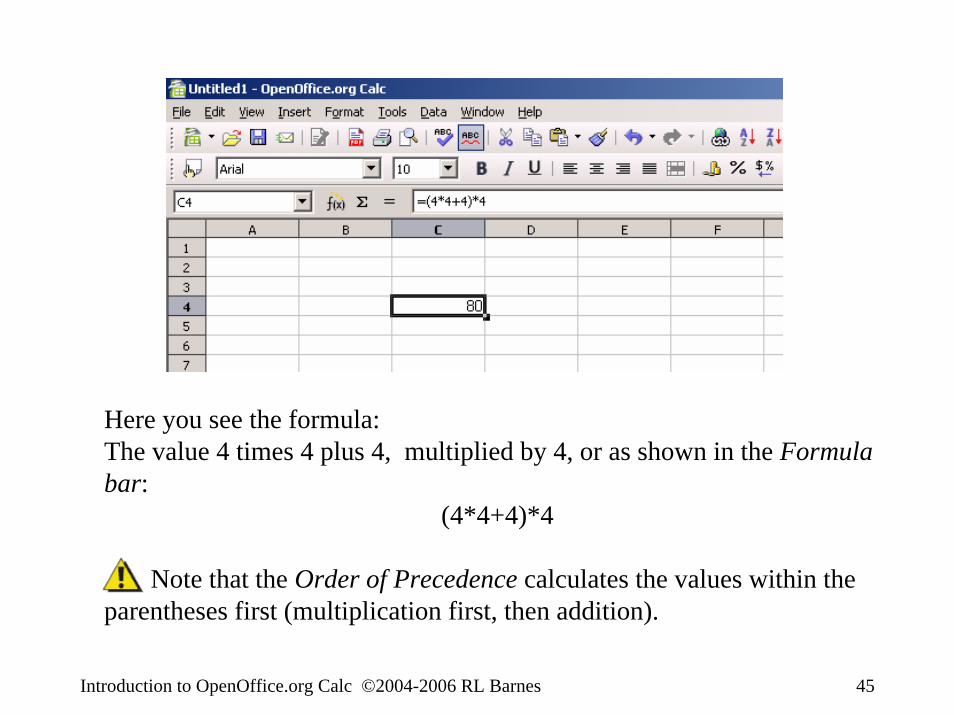
Here you see the formula:The value 4 times 4 plus 4, multiplied by 4, or as shown in the Formula bar:
(4*4+4)*4
Note that the Order of Precedence calculates the values within the parentheses first (multiplication first, then addition).

Introduction to OpenOffice.org Calc ©2004-2006 RL Barnes 46
This formula is a bit more complex since it uses two of Calc’s built-in functions :The value 2 raised to the power of 2 (or squared in this case), multiplied by pi, or as shown in the Input line:
= POWER(2;2) * PI()
The values between the function’s parentheses are called arguments.

Introduction to OpenOffice.org Calc ©2004-2006 RL Barnes 47
There are other ways to create simple calculations within a Calc spreadsheet. If you would like to add (sum) a row or column of numbers you can use the Sum command from the Formula toolbar. To use it, select the cell where you would like to display the sum and click the button.
The lower screenshot shows the result of a Sum operation. After the formula has been created the Sum button disappears and it replaced by the cancel and accept buttons.

Introduction to OpenOffice.org Calc ©2004-2006 RL Barnes 48
The Sum function also works with non-adjacent cells, but you have to select them yourself. To start the summing process select a cell and click the Sum button. The function will grab the nearest cell with a number format it can sum, and outline the cell(s) as shown to the right.
The lower screenshot shows the result of the above Sumoperation. Notice the actual formula used to produce the sum in cell D13…=SUM(D4:D12)…or sum the values in cells D4 through D12.

Introduction to OpenOffice.org Calc ©2004-2006 RL Barnes 49
When an error occurs during the processing of a formula the error code is displayed both in the cell itself and on the Status bar. Because the meaning may still be cryptic either way, further explanations are available in Calc’s help documentation.
This error occurred because a comma was used to separate the arguments in the Power function instead of a semi-colon. This is a common mistake for former Excel users!
Introduction to OpenOffice.org Calc ©2004-2006 RL Barnes 50
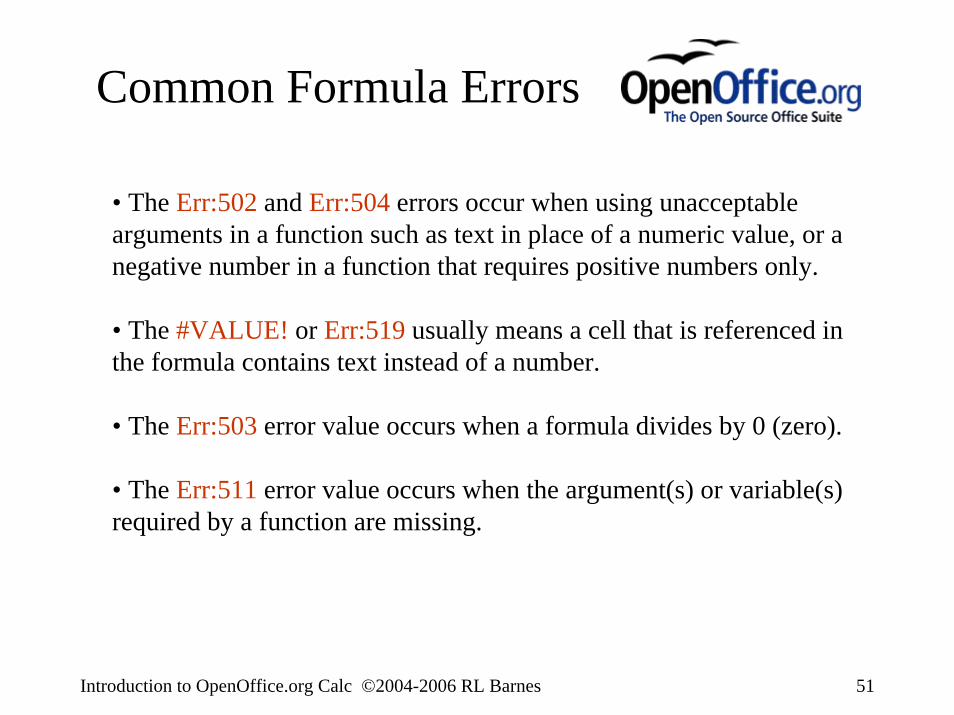
Common Formula Errors
• The #REF! or Err:524 error occurs when a cell reference is not valid. Deleting or changing cells referred to by formulas can cause the error.
• The #NAME? or Err:525 error occurs when Calc doesn't recognize a value in a formula, such as misspelling the name of a function, or entering text in a formula without enclosing the text in double quotation marks. Also, omitting a colon (:) in a range reference can be the cause. A comma mistake for users of other spreadsheet applications is separating values in a function with a comma instead of a semi-colon as required by Calc.
• A ### error code displays when the cell contains a number, date, or time that is wider than the cell’s current column width.
Introduction to OpenOffice.org Calc ©2004-2006 RL Barnes 51
Common Formula Errors
• The Err:502 and Err:504 errors occur when using unacceptable arguments in a function such as text in place of a numeric value, or a negative number in a function that requires positive numbers only.
• The #VALUE! or Err:519 usually means a cell that is referenced in the formula contains text instead of a number.
• The Err:503 error value occurs when a formula divides by 0 (zero).
• The Err:511 error value occurs when the argument(s) or variable(s) required by a function are missing.

Introduction to OpenOffice.org Calc ©2004-2006 RL Barnes 52
Using Fill…
Calc’s Fill feature is available for those times when you need to enter or copy data in some sort of predictable sequence. For instance, suppose you need to enter a column of numbers from 1 to 1000. You could type them all in one by one, or you could use the Fill function:
• Highlight a set of cells that are already in a sequence, or contains a value (or formula) you want to copy.
• Drag the the selection over the entire range you want to fill…or
• Use the Fill command from the Edit menu.
Introduction to OpenOffice.org Calc ©2004-2006 RL Barnes 53
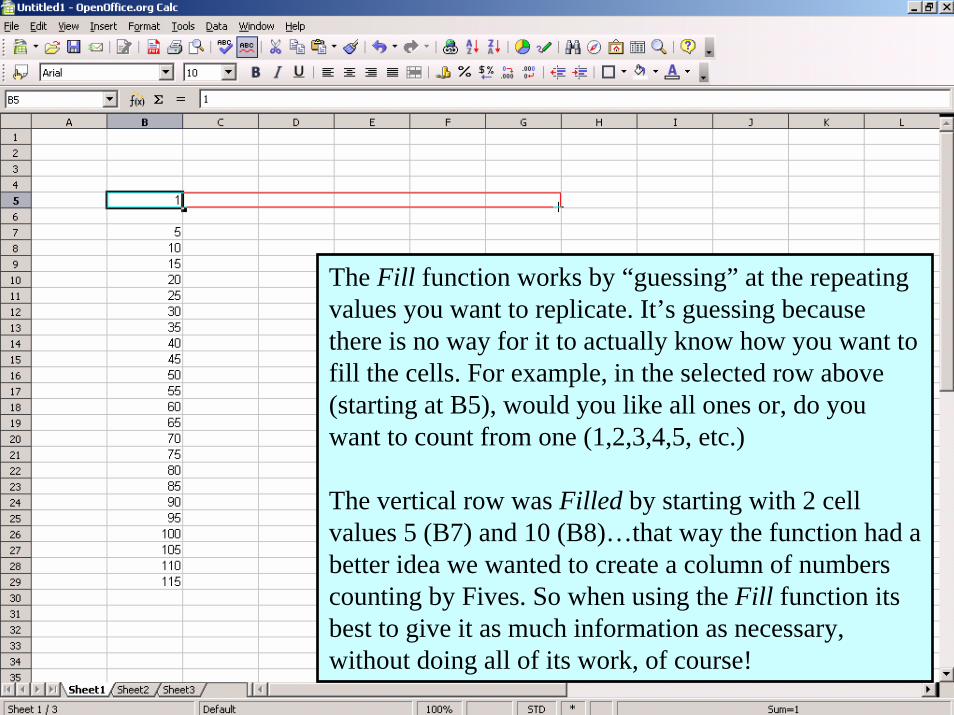
The Fill function works by “guessing” at the repeating values you want to replicate. It’s guessing because there is no way for it to actually know how you want to fill the cells. For example, in the selected row above (starting at B5), would you like all ones or, do you want to count from one (1,2,3,4,5, etc.)
The vertical row was Filled by starting with 2 cell values 5 (B7) and 10 (B8)…that way the function had a better idea we wanted to create a column of numbers counting by Fives. So when using the Fill function its best to give it as much information as necessary, without doing all of its work, of course!

Introduction to OpenOffice.org Calc ©2004-2006 RL Barnes 54
To perform an accurate Fill enter a series of numbers, but no more than necessary or you might as well enter them yourself! To the right you see
If you have the Tipsfeature activated, as you move the mouse pointer you will see each new cell value displayed as a tip. When you release the mouse button you will see the complete series, 1 through 7.
only the number 1 in cell B6. To create a series of cells with values ranging from 1 to 7, grab the small “handle” at the lower right of the selected cell (see the red circle). At that point your mouse pointer will turns into “crosshairs”. Then drag the cells in the direction you want to insert the numbers…we’ll go to the right to create the cells shown below.

Introduction to OpenOffice.org Calc ©2004-2006 RL Barnes 55
How did the Fill function know we wanted a series of numbers 1 through 7 on the last slide…it was a guess, remember? Look at the cells in row 9, they were Filled starting with the first three cells…it simply repeated the sequence because it is text and adding to that series is beyond the function’s capabilities. But dates it can do, and there are two rows demonstrating that by adding one more cell of data, the series changes dramatically. The first fill in row 12 used only the first cell to define the Fill, row 15 added one more date which provided a different series...the same date in a series of 7 years.

Introduction to OpenOffice.org Calc ©2004-2006 RL Barnes 56
You can control how the Fill function works by starting it from the Fill menu item on the Edit menu. You can launch a Fill in this manner by selecting cells and then selecting the type of Fill you want to perform. In this example the only alternatives are Down, Up and Series. If you select to Fill in a Series…

Introduction to OpenOffice.org Calc ©2004-2006 RL Barnes 57
…the Fill Series dialog will appear. From this dialog you can configure the Fill’s Direction, Series type, Starting and Ending values and the value of the Increment. Time units can also be set for date Fills, but you need to select the Date Series type to make the Time unit options available.

Introduction to OpenOffice.org Calc ©2004-2006 RL Barnes 58
You can add your own “logic” to the Fill function by defining lists in the Sort Lists dialog. Members of these lists are recognized by the Fill function and used to fill consecutive cells. To add or edit the Sort Lists used by Calc, open the Options dialog and select OpenOffice.org > Sort Lists. Also notice that you can Copy a list from a selected range (in this case F5:F11).
Introduction to OpenOffice.org Calc ©2004-2006 RL Barnes 59
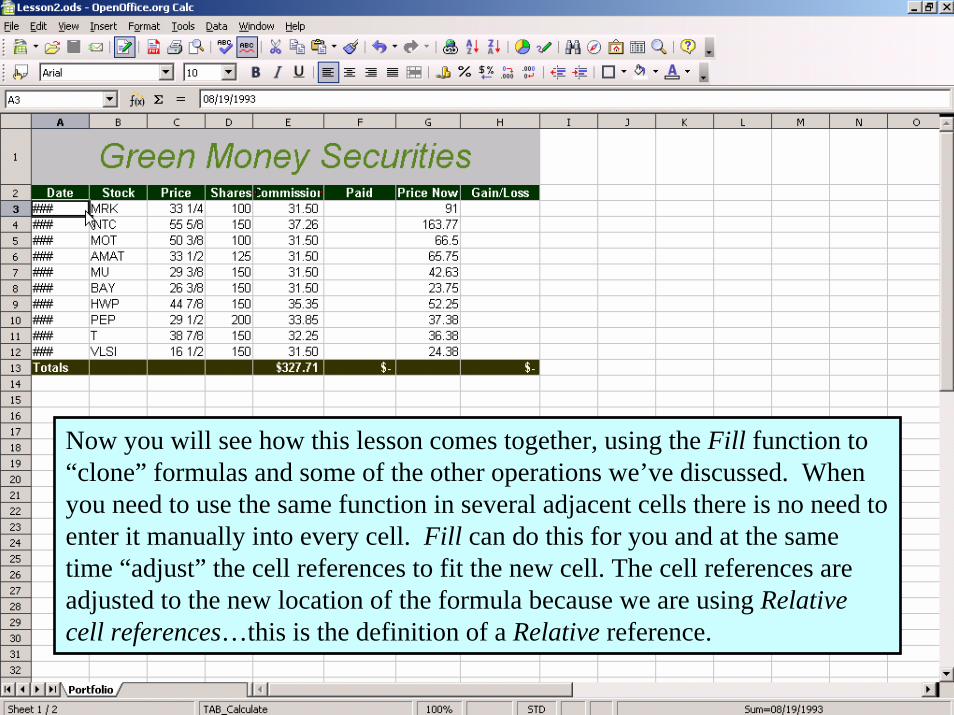
Now you will see how this lesson comes together, using the Fill function to “clone” formulas and some of the other operations we’ve discussed. When you need to use the same function in several adjacent cells there is no need to enter it manually into every cell. Fill can do this for you and at the same time “adjust” the cell references to fit the new cell. The cell references are adjusted to the new location of the formula because we are using Relativecell references…this is the definition of a Relative reference.
Introduction to OpenOffice.org Calc ©2004-2006 RL Barnes 60
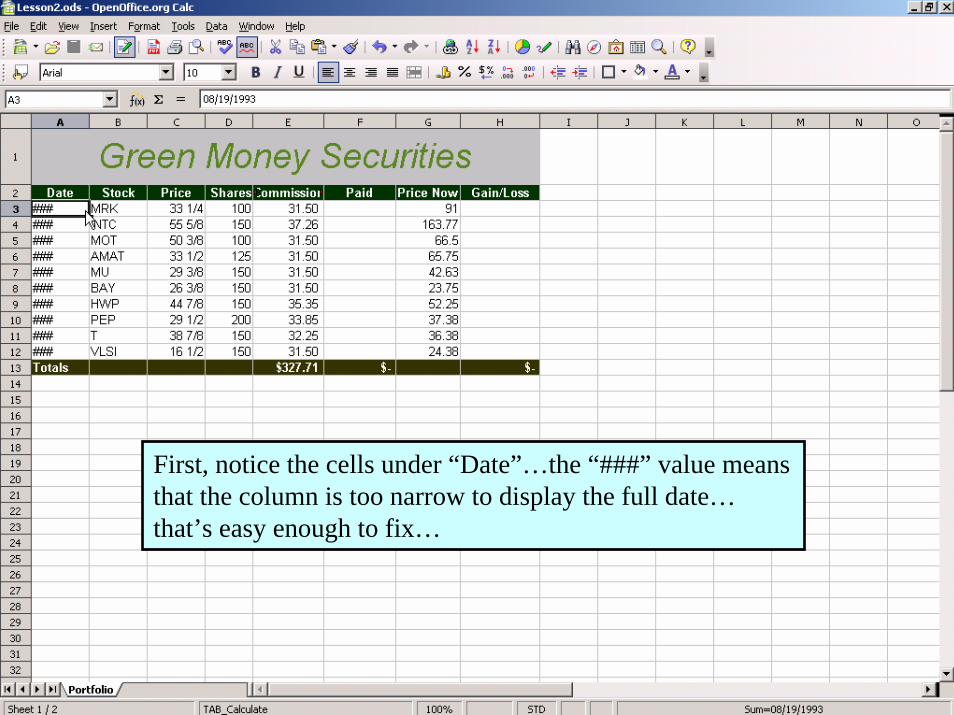
First, notice the cells under “Date”…the “###” value means that the column is too narrow to display the full date…that’s easy enough to fix…

Introduction to OpenOffice.org Calc ©2004-2006 RL Barnes 61
…to enlarge the column, grab the right border of the column at the column header and move it to the right…

Introduction to OpenOffice.org Calc ©2004-2006 RL Barnes 62
…with the date values now looking good, we enter a formula in cell F3 and copy it cells F4 through F12. The formula is the total amount paid for the stocks including the commission:
(C3*D3)+E3It will be similar for all of these cells, except for the source of data. For example, while the formula in cell F3 gets its share price from C3, a similar formula in cell F4 would use data from C4.

Introduction to OpenOffice.org Calc ©2004-2006 RL Barnes 63
To fill cells F4 through F12 with the formula, grab the handle at the lower right of the active cell border around cell F3 and drag it down and over F12…

Introduction to OpenOffice.org Calc ©2004-2006 RL Barnes 64
…this will copy the formula to all the cells within the Fill range and adjust the cell references in the formula to match the corresponding cell. Here cell F12 is set active and it’s formula is displayed in the Formula toolbar’s input line. Note that all of the references have been changed to retrieved their data from cells in row 12…this is how the Fill feature works with formulas.

Introduction to OpenOffice.org Calc ©2004-2006 RL Barnes 65
You can also see that the sum at the bottom of the “Paid” column is created using the formula:=F3+F4+F5+F6+F7+F8+F9+F10+F11+F12Although this is correct, it is more work than is necessary. A simpler formula that uses a cell reference to a range of cells would be:=F3:F12Clicking the Sum button on the Formula bar fixes this for us automatically.

Introduction to OpenOffice.org Calc ©2004-2006 RL Barnes 66
Now the remainder of the spreadsheet can be finished, by creating a formula in cell H3 to calculate the Gain or Loss, and using the Fillfunction to copy in to cells H4 through H12. Finally, cell H13, the Gain/Loss total can be summed.
There are other things to do to this sheet, such as adjusting some more column widths and, of course checking for spelling errors….but that, too, is another lesson.

Introduction to OpenOffice.org Calc ©2004-2006 RL Barnes 67
Calc provides several other tools that can aid your data entry and ensure an accurate and well developed spreadsheet. These include language tools like a spellchecker, thesaurus, and Autocorrect, sheet and document protection options, AutoInput and more.
While these functions are not going to be explained here, it is good to know that they exist. They will be described in detail in another lesson. Just remember that Calc provides many sophisticated capabilities for making your work easier and your spreadsheet more readable, precise and relevant.
Other tools…

Introduction to OpenOffice.org Calc ©2004-2006 RL Barnes 68
Many of Calc’s tools are located, logically, on the Tools menu. The language tools (Spellcheck, Thesaurus and Autocorrect) are near the top. Notice that the Thesaurus is grayed-out, this is because the active cell contains no text for it to consider. Remember that any menu item having an arrow pointing to the right offers more choices within a sub-menu. For example…

Introduction to OpenOffice.org Calc ©2004-2006 RL Barnes 69
…the Cell Contents menu item offers three options…here is where the AutoInput command is located. AutoInput is an entry completion function that will auto-complete your entries based on previous entries within the same column. Maybe it’s not the most intuitive menu location, mixed with the Recalculate command, but this is where you will find it.
As you would expect, all of these tools are explained within Calc’s Helpdocumentation.

Introduction to OpenOffice.org Calc ©2004-2006 RL Barnes 70
Saving and Closing a Spreadsheet
Saving changes to your spreadsheet should be done continually asyou work in Calc. Every 10 or 15 minutes stop and save your work as a safeguard.
A new spreadsheet that has never been saved, in reality, doesn’t exist, except in your computer’s memory. It must be saved, or for the first time, “Saved as…”
When you save a Calc spreadsheet the default file type is as a Calc spreadsheet (.ods), but you can also save it as a web page (.html or .htm), a text file (.txt), or even as an Excel file (.xls).

Introduction to OpenOffice.org Calc ©2004-2006 RL Barnes 71
Saving and Closing a SpreadsheetTo Save or Close a file, or to Exit Calc you can use the File menu, which offers the following commands:
• Create a new spreadsheet• Open a file• Recent Documents• Wizards, which aid you various tasks• Close a open spreadsheet• Save an existing file• Save a new file (Save As)• Save All open OpenOffice.org files• Export and Export to PDF • Print your work• …and Exit the program

Introduction to OpenOffice.org Calc ©2004-2006 RL Barnes 72
To Exit the program, which will also close the current spreadsheet…select Exit…remember to save your work if necessary.
To Close the current spreadsheet select Close from the File menu…or use the Close Document button if it is available.

Introduction to OpenOffice.org Calc ©2004-2006 RL Barnes 73
If you select Exit or Close with an unsaved spreadsheet you will be prompted to save it…
Select:• Save to save your changes…• Discard to Close or Exit and Not Save your changes, or…• Cancel to return to the spreadsheet and Not Exit or
Close the spreadsheet.

Introduction to OpenOffice.org Calc ©2004-2006 RL Barnes 74
Links for OOo Calc on the WebOfficial OpenOffice.org Calc information pagehttp://www.openoffice.org/product/calc.html
OpenOffice.org documentation linkshttp://documentation.openoffice.org
OpenOffice.org Forumshttp://www.oooforum.org
OOoAuthors FAQshttp://oooauthors.org/en/FAQs/Calc
Calc Frequently Asked Questions (FAQs)http://user-faq.openoffice.org/faq/ar01s06.html
OpenOffice.org Macros/Add-ins and Documentation http://www.ooomacros.org