c5 ac compressor replacement ac compressor replacement.pdf · c5 a/c compressor replacement *my...
TRANSCRIPT

C5 A/C Compressor Replacement
*my experience…as such, I can’t be held liable for anything.
For the past few months, my a/c compressor had been making some weird noises. I suspected the clutch:
http://youtube.com/watch?v=H1hKtbANgNQ
Last week, my a/c quit all together. The compressor would still turn, but it was producing no suction/compression, as
indicated by no pressure difference between the low and high sides. With the temperature in Phoenix rapidly
approaching triple digits (and after a week of showing up to work sweating like I just ran a marathon), I dropped by a
local shop. They diagnosed the issue as a compressor failure, and quoted me $1300 to replace it. I figured that I’d
rather do the job myself and save some beer money in the process. At first I was somewhat intimidated by the car’s air
conditioning system. I’ve done pretty much all the work on my car, and am comfortable with wrenching on pretty much
anything, but I’d never done much with a/c until now. Like everything else, though, with the proper tools and the
support of the great people on Corvette Forum (thanks Plasticfan, Bill Curlee, and Black Z06!), I felt confident I could get
the job done and save $800 in the process. Here’s how I did it.
Tools needed:
7, 10, 13, 15mm sockets
½” socket wrench
¼” socket wrench
½” and ¼” extensions
adjustable wrenches
13mm and 15mm combination wrenches
compressor
rubber-tipped blow gun
a/c flush gun (http://www.sjdiscounttools.com/msc91046-a.html)
electric vacuum pump (not an air venturi-style pump!)
r134a gaugeset
pliers, needlenose (for orifice tube removal) and channel lock (for hose clamps)
flathead screwdriver
vent thermometer
Parts:
a/c compressor (new Delco/Delphi unit)
accumulator (Napa p/n 408505)
orifice tube
“compressor guard” suction screen
a/c system flush (2 qts)
8 oz PAG 46 oil
4 oz PAG 46 oil, pressurized can
a/c gasket/o-ring kit
water pump gaskets
Nylog (to lubricate o-rings – I used dielectric grease, although there is controversy as to whether this is ok…Nylog is
made for this purpose)
small funnel
container to measure oil (I stole one from my girlfriend’s kitchen)
Helpful links:
http://www.acdelcotechconnect.com/pi/ac/lubrication.htm
http://forums.corvetteforum.com/showthread.php?t=1779848&highlight=ac+101
Procedure:
1) Evacuate the a/c system. I found a shop that stole my freon free of charge. ☺ When you get
home, drive the car up on ramps or jack it up. Remove the battery, battery surround, and battery
tray. I used a long extension and a 13mm socket to remove the battery hold-down, lifted out the
battery, and then removed the two plastic fasteners attaching the surround. Then I removed the
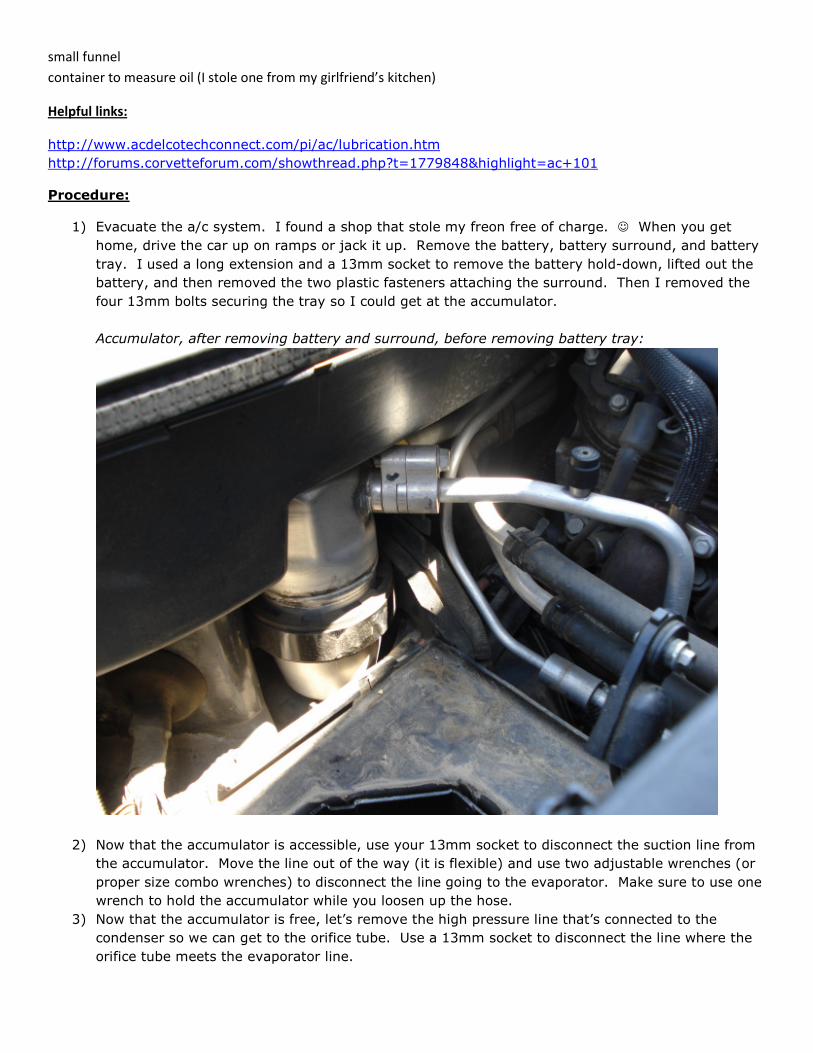
four 13mm bolts securing the tray so I could get at the accumulator.
Accumulator, after removing battery and surround, before removing battery tray:
2) Now that the accumulator is accessible, use your 13mm socket to disconnect the suction line from
the accumulator. Move the line out of the way (it is flexible) and use two adjustable wrenches (or
proper size combo wrenches) to disconnect the line going to the evaporator. Make sure to use one
wrench to hold the accumulator while you loosen up the hose.
3) Now that the accumulator is free, let’s remove the high pressure line that’s connected to the
condenser so we can get to the orifice tube. Use a 13mm socket to disconnect the line where the
orifice tube meets the evaporator line.

accumulator removed, high-pressure line disconnected at the orifice tube:
4) We now need to remove the high-pressure line from the condenser. Loosen up your air bridge
from the throttle body and MAF, disconnect the IAT sensor (if you have one mounted in the
bridge), and remove the bridge. Remove the four 10mm bolts securing the upper radiator support
and remove it. Now you can access the 13mm bolt that secures the line to the condenser. With
this line removed, you can easily remove and inspect the orifice tube.
top of condenser, where the high pressure line mounts:

high pressure line removed:

looking at the orifice tube in the line:

5) Using needlenose pliers, pull the orifice tube from the line.
orifice tube removed. Mine was completely clogged from debris crapped into the system by the
failed compressor:
6) Now that the accumulator, high pressure line, and orifice tube have been removed, let’s drain the
coolant so we can remove the water pump to get to that damn compressor. Draining the coolant is
easy: use a ¼” socket wrench and extension to open the drain petcock on the bottom passenger-
side rear of the radiator. I recently flushed the coolant, so I saved it.

draining the coolant - don’t mind the wrench that I dropped:
7) While the coolant is draining, use your 15mm wrench to release tension on the belts and remove
them. After the coolant has drained, remove the four hoses from the water pump. Next, remove
the water pump. There are three 10mm bolts on each side of the pump (6 total). Once that’s
outta the way, we can get to the compressor.

water pump removed – a bit of coolant will spill out even after draining:
8) Okay, we’re almost there. Disconnect the harness from the a/c clutch. There are four 15mm bolts
that fasten the compressor to its bracket (one is a stud, which needs to be removed with a 7mm
socket). From up top, remove the bolt and stud. You won’t be able to remove the bolts all of the
way – they will hit the framerail. To get to the bottom bolts we’ll need to remove the passenger
side wheel.
compressor – top two bolts:
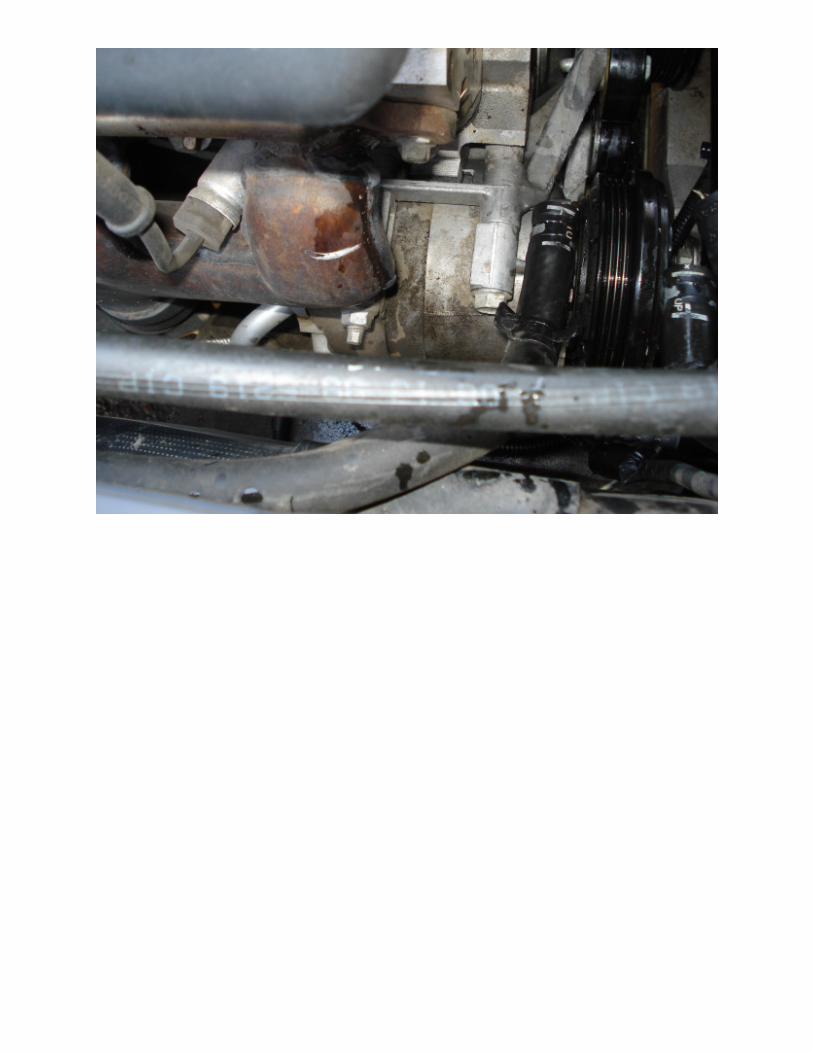

wheel removed, looking at the bottom two bolts:
9) With all four bolts removed, carefully manipulate your compressor toward the front of the car so
you can remove the hose/manifold from the rear of the compressor with your 13mm socket. Now
that the compressor is free, lift it over the steering rack and out toward the top.
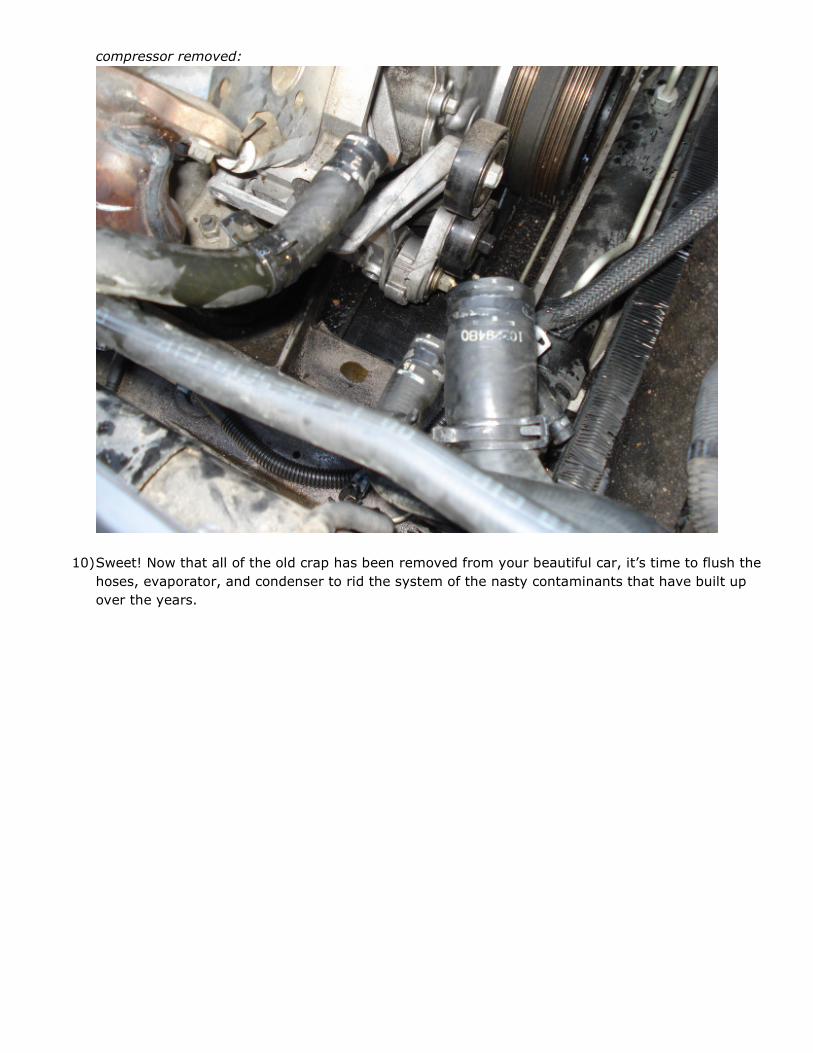
compressor removed:
10) Sweet! Now that all of the old crap has been removed from your beautiful car, it’s time to flush the
hoses, evaporator, and condenser to rid the system of the nasty contaminants that have built up
over the years.

flush gun and solvent:
11) Pour a pint of solvent into the flush gun and pressurize it to 90-150psi with your compressor. I
used a small 2hp 5cfm compressor – anything smaller probably wouldn’t have worked very well.
One pressurized, insert the flush gun’s rubber tip into the first component to be flushed and
squeeze the trigger. I kept the trigger depressed long after the solvent had exited the other side,
making sure to get all of the solvent out the other end. Repeat for each component (condenser,
evaporator, and hoses). Since my orifice tube was so disgusting, I flushed each component twice,
using a total of 2 quarts of solvent during the process. After flushing is complete, I hooked up a
rubber-tipped blow gun to the compressor (in-line with a filter/drier to keep the air as dry as
possible) and pumped compressed air through each component to thoroughly dry them. I blew air
through each component for approximately 10 minutes each.
12) Now our a/c system should be clean and ready for reassembly, so let’s get to it! Start by preparing
the compressor. Compressors can either come sans oil or precharged. My replacement was
empty, but either way we need to see how much oil was in the old compressor as a reference
point. Remove the 15mm bolt on the driver’s side of the old compressor and drain the oil into a
measuring container. If you measure less than 2.5oz, put 2.5oz of clean oil into the new
compressor. If there is more than 2.5oz, put the same amount into the new compressor. I
drained about 1.5oz of sludge out of the old one, so I put 2.5oz of PAG 46 into the new one.

this is what the old compressor’s oil looked like. Ridiculous, considering clean oil is clear!
13) After adding oil to the new compressor, I inserted a suction screen into the suction port. This
serves to capture any particles of debris not removed during flushing so that the new compressor
isn’t killed early in its life.
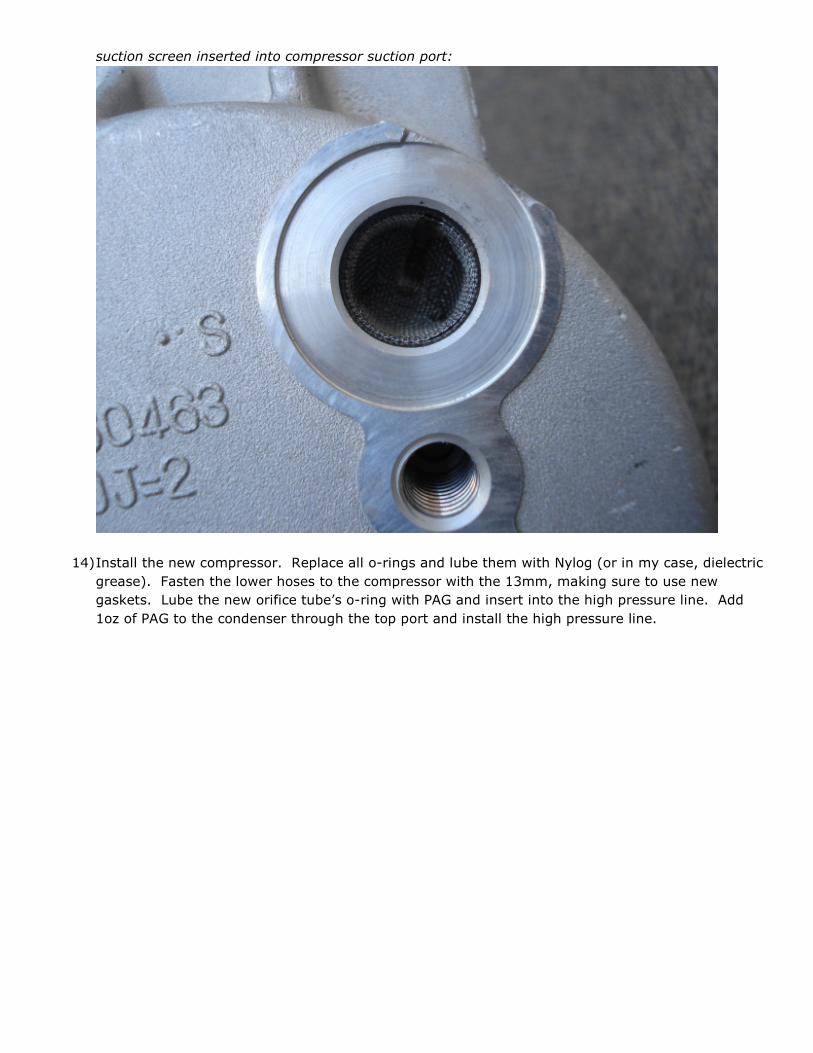
suction screen inserted into compressor suction port:
14) Install the new compressor. Replace all o-rings and lube them with Nylog (or in my case, dielectric
grease). Fasten the lower hoses to the compressor with the 13mm, making sure to use new
gaskets. Lube the new orifice tube’s o-ring with PAG and insert into the high pressure line. Add
1oz of PAG to the condenser through the top port and install the high pressure line.

lower hoses in place, new gaskets installed. Ready for compressor to be installed:
15) With the compressor installed, install the water pump using new gaskets. Turn the compressor by
hand 20 revolutions or so to work the oil through it, and then install both serpentine belts.
16) Drain the oil from the old accumulator into a measuring container. Add the same amount plus 2oz
to the new accumulator. Mine was empty, so I added 2oz. Install the new accumulator.

new accumulator installed:
17) The a/c system is now reassembled. Before we install the battery tray and battery, let’s hook up
the vacuum pump. Connect your gaugeset to the high and low sides, making sure both valves are
closed. Attach the vacuum pump to the gaugeset’s service port. Turn on the pump and then open
both the low and high side valves. Run for 20 min, close both valves, and turn off the pump. Wait
20 min and observe the vacuum reading on the low side gauge. If the system is leak-free, the
reading should have remained the same as when you turned off the pump. If the vacuum
lessened, you have a leak somewhere in the system. Check all connections. If not, turn on the
pump again and re-open both valves. I ran the pump for 6 hours to ensure that all
moisture/solvent was boiled from the system. The longer, the better (even overnight, if you have
the time!).
vacuum pump connected gaugeset service port:

low-side gauge reading vacuum of 29” after 20 min:

18) While the pump is running, install the battery tray, surround, and battery. After enough pump time
has elapsed, we’ll be ready to charge the system with r134a.
19) If you’ve been keeping track, my system only has a total of 5.5oz of PAG 46 in it at this point.
Total oil capacity is 9oz, so I’ll add another 4oz (for a total of 9.5oz, a little more than 9oz should
be OK) when charging. Close both valves on the gaugeset and turn off the vacuum pump.
Disconnect the pump from the service port. Next, I connected a 4oz pressurized can of PAG 46 oil
to the service port. I opened the high side valve first, and then cracked the low side valve. This
should effectively push oil into both lines (the oil will be distributed when the system is operating
anyway).
20) Now that the system’s at full oil capacity, the last thing to do is charge it with refrigerant. My 2000
Corvette wants 24oz of r134a as indicated by the label affixed atop the passenger-side fenderwell
(I believe other years may take 26oz, but am not sure), so I used 2 12oz cans. One can also
contained UV leak dye, so that if there are ever any leaks in the future they can easily be located.
the magic cans that cool you off:

after charging, in an ambient temperature of 85 degress, my a/c was blowing 42 degree air!
That does it for this write-up. I hope it was informative and showed you that this procedure is not rocket
science.
Feel free to email me at [email protected] or PM me through the Corvette Forum at
http://forums.corvetteforum.com/private.php?do=newpm&u=248598 with any questions or suggestions.
- Rocco
http://www.trans5.com/