business enterprises of texas ( bet ) equipment...
TRANSCRIPT

P a g e | 1
Business Enterprises of Texas
T W C / B E T November 2016
Equipment Manual:Cleaning

P a g e | 1
Equipment Manual: Cleaning

P a g e | 2
Table of Contents
Contents
Introduction.......................................................................................................1
Daily Cleaning.......................................................................................................1
Weekly Cleaning List.............................................................................................1
Monthly Cleaning List............................................................................................2
Yearly Cleaning/Safety List...................................................................................2Cleaning Checklist............................................................................................3
Daily Cleaning.............................................................................................3
Weekly........................................................................................................5
Monthly.......................................................................................................5Chemical Safety................................................................................................6
Training..................................................................................................................6Manually Cleaning And Sanitizing Equipment And Surfaces............................9
Cleaning tips........................................................................................................10
Other Solutions....................................................................................................10Refrigeration...................................................................................................11
Ice Dispenser (Line)............................................................................................11
Weekly......................................................................................................11
Semi-annually...........................................................................................11
Ice Maker (Bin)....................................................................................................11
Daily Cleaning...........................................................................................11
Monthly.....................................................................................................11
Semi Annually...........................................................................................12
Sandwich Bar......................................................................................................12
Daily Cleaning...........................................................................................12
Monthly Cleaning......................................................................................12
Condenser Coil.........................................................................................13

P a g e | 3Reach In Refrigerator..........................................................................................13
Daily Cleaning...........................................................................................13
Weekly Cleaning.......................................................................................13
Monthly Cleaning......................................................................................14
Freezers..............................................................................................................14
Daily Cleaning...........................................................................................14
Weekly Cleaning.......................................................................................14
Monthly.....................................................................................................15
Walk-in Refrigerator & Freezer............................................................................15
Daily Cleaning...........................................................................................16Cooking Equipment.........................................................................................16
Fryer - Floor Model..............................................................................................16
Daily Cleaning...........................................................................................16
Weekly......................................................................................................16
Monthly.....................................................................................................17
Fryer - Counter Model.........................................................................................19
Daily Cleaning...........................................................................................19
Weekly......................................................................................................20
Monthly.....................................................................................................20
Electric Range.....................................................................................................22
Daily Cleaning...........................................................................................22
Broiler22
Oven 23
Gas Ranges.........................................................................................................23
Daily Cleaning...........................................................................................23
Open Top Grates and Burners..................................................................24
Oven 24
Exterior.....................................................................................................24

P a g e | 4Combi Oven.........................................................................................................25
Daily Cleaning...........................................................................................25
Monthly.....................................................................................................25
Convection Oven.................................................................................................26
Daily Cleaning...........................................................................................26
Weekly......................................................................................................26
Monthly.....................................................................................................26
Alto Sham Smoker...............................................................................................27
Daily Cleaning...........................................................................................27
Monthly.....................................................................................................27
Microwave Oven..................................................................................................28
Daily Cleaning...........................................................................................28
CharGrill..............................................................................................................28
Daily Cleaning...........................................................................................28
Weekly......................................................................................................29
Monthly.....................................................................................................29
Griddle.................................................................................................................29
Daily Cleaning...........................................................................................29
Weekly......................................................................................................30
Monthly.....................................................................................................30
Gas Griddle.........................................................................................................31
Daily Cleaning...........................................................................................31
Rotisserie.............................................................................................................32
Daily Cleaning...........................................................................................32
Monthly.....................................................................................................32
Steamer Combo..................................................................................................33
Daily Cleaning...........................................................................................33

P a g e | 5Conveyor Oven....................................................................................................35
Two Sided Grill (Panini).......................................................................................35
Hot Dog Roller.....................................................................................................36Food Preparation............................................................................................37
Meat Slicer...........................................................................................................37
Daily Cleaning...........................................................................................38
Monthly.....................................................................................................38
Food Processor...................................................................................................38
Daily Cleaning...........................................................................................39
Monthly.....................................................................................................39
Manual Can Opener............................................................................................39
Daily Cleaning...........................................................................................39
Monthly.....................................................................................................40
Toaster................................................................................................................40
Daily Cleaning...........................................................................................40
Monthly.....................................................................................................40
Scales..................................................................................................................40
Daily Cleaning...........................................................................................41
Weekly......................................................................................................41Service Line....................................................................................................41
Soft Drink Dispenser............................................................................................41
Daily Cleaning...........................................................................................41
Weekly......................................................................................................42
Monthly.....................................................................................................42
Coffee Machine...................................................................................................43
Daily Cleaning...........................................................................................43
Weekly......................................................................................................43
Monthly.....................................................................................................43

P a g e | 6Iced Tea Maker....................................................................................................43
Daily Cleaning...........................................................................................43
Weekly......................................................................................................44
Monthly.....................................................................................................44
Steam Table........................................................................................................44
Daily Cleaning...........................................................................................45
Cold Well.............................................................................................................45
Daily Cleaning...........................................................................................45Other Equipment.............................................................................................45
Cash Register......................................................................................................45
Daily Cleaning...........................................................................................46
Weekly......................................................................................................46
Monthly.....................................................................................................46
Popcorn Popper...................................................................................................46
Daily Cleaning.........................................................................................46
Weekly.....................................................................................................46
Vent Hood............................................................................................................47
Daily Cleaning...........................................................................................47
Weekly......................................................................................................47
Semi Annually...........................................................................................47
Inspection of Hood and Ducts.............................................................................47
Cleaning of Hood and Ducts................................................................................48
Cleaning Vent Hood Filters..................................................................................50
Stainless Steel Cookware....................................................................................52
Aluminum Cookware...........................................................................................53
Plastic ware Holder/Cart......................................................................................55
Daily Cleaning...........................................................................................55
Monthly.....................................................................................................55

P a g e | 7Condiment Holders..............................................................................................55
Daily Cleaning...........................................................................................56
Weekly......................................................................................................56
Wooden Cutting Boards......................................................................................56
Daily Cleaning...........................................................................................56
Monthly.....................................................................................................56
Stainless Surfaces - Food Prep...........................................................................56
Daily Cleaning...........................................................................................56
Weekly......................................................................................................57
Stainless Steel Equipment...................................................................................57
Basics57
Daily Cleaning...........................................................................................58Master Cleaning Schedule #1.........................................................................53
Prep Daily Cleaning.............................................................................................53
Prep Weekly Cleaning.........................................................................................55
Grill/Fry Daily Cleaning-.......................................................................................57
Grill Weekly Cleaning..........................................................................................59
Cashier Daily Cleaning........................................................................................60
Cashier Weekly Cleaning....................................................................................63
Line Server Daily Cleaning..................................................................................64
Line Server Weekly Cleaning..............................................................................65
Utility Daily Cleaning............................................................................................66
Utility Weekly Cleaning........................................................................................67Master Cleaning Schedule #2.........................................................................68Appliance Log...................................................................................................3

P a g e | 1
IntroductionEquipment is the largest expense in the B E T program. It is expensive, and when it breaks down, your business may suffer losses in sales and profitability, face challenges in food safety and even employee moral can be affected.
There are three considerations when discussing equipment:
1) How To Use The Equipment;
2) Cleanliness;
3) Preventive Maintenance.
1) How To Use The Equipment: It is important that you are shown how to properly use the equipment in your training location, and your assigned facility. We will discuss some common pieces of equipment during training.
2) Cleanliness: Practicing good sanitation procedures is an on-going activity. Cleanliness is an attitude. Studies have shown that a customer will judge the overall quality of your operations by your cleanliness and sanitation practices. A tool that you and your employees can use to assure cleanliness is a Cleaning Checklist. A copy of a comprehensive list follows. You can revise this to use in your facility.
3) Preventive Maintenance: Keeping equipment in good repair is a must. 80% to 90% of B E T equipment repairs are due to lack of Preventive Maintenance programs in each facility. You will be given a Preventive Maintenance calendar to remind you when to complete tasks. This chapter includes the instructions for completing Preventive Maintenance tasks.
The importance of proper cleaning can be appreciated when one realizes that contaminated equipment (equipment and utensils which are not clean) is another major cause of foodborne disease outbreaks. Cleaning comprises many operations in the food establishment, and the process is usually specific to the type of cleaning necessary. No cleaning task in the food establishment is as important as the cleaning and sanitization of food contact surfaces of equipment and utensils.
Effective cleaning and sanitization of food contact surfaces of equipment serves three primary purposes:
- Reduces chances for contaminating safe food during processing, preparation, storage and service by physically removing soil, bacteria and other microorganisms; and
- Minimizes the chances of transmitting disease organisms to the consumer by achieving bacteriologically safe eating utensils.

P a g e | 2- Keeps equipment in good working order.
Daily Cleaning
Prep Utensils – wash; store clean and dry.
Appliances – wash and scrub parts in contact with food. Wipe down exterior.
Prep Tables – scrub surface. Wipe down frame. Sanitize.
Sinks – scour, and wash down, wipe surrounding walls and frames.
Floors – Sweep regularly to remove debris and mop with detergent and sanitizer solution.
Trash Cans –Wash and sanitize trash containers, inside and out.
Can openers - clean and sanitize.
Steam tables, hot holding, cold holding –clean, rinse and sanitize./
Weekly Cleaning List
(These duties can be rotated throughout the week).
Coffee, tea, fountain and other beverage equipment, cleaned and sanitized.
Ovens, ranges and steamers, detailed cleaned.
Storage units and shelves, cleaned and organized.
Floor drains cleaned and bleached.
Mop bucket detailed cleaned
Vend hood and filters, cleaned, degreased.
Scrub loading dock.
Knives, cleaned, sanitized and sharpened.
Walls and kick boards cleaned.
Monthly Cleaning List
Empty reach-in and walk-in coolers and wash and sanitize them.
Clean freezers, shelving interior surfaces
All refrigeration compressors dusted and cleaned.

P a g e | 3Move equipment and wash behind the hot line (oven, stove, fryers) to cut down on grease build up, which is a major fire hazard
Empty and sanitize the ice machine.
Calibrate ovens, fryers, coffee and tea machines as needed.
Wash all walls and ceilings, floor boards, door jambs.
Wipe down the dry storage area shelves.
Clean pilot lights on gas kitchen equipment.
Dust ceiling vents.
Pump grease trap as needed or every 6 months.
Yearly Cleaning/Safety List
Have fire suppression system inspected.
Check fire extinguishers
Clean vent hood system.
Change water filters

P a g e | 4
Cleaning Checklist
Daily Cleaning
Stainless Counters - Top, front, back, sides, shelves, cleaned and sanitized.
Sandwich Bar - Top front, sides, inside refrigerator, door gaskets, under cutting board & sanitized, food containers, racks, check temperature
Merchandisers - Glass spotless, door handles, inside walls/floor, racks, fan housing, front bottom panel, door gaskets, check temperature
Refrigerators/Freezers - Front, sides, door gaskets, check temperature, inside and outside, door handles
Steam Table Water emptied, wells wiped out, stainless steel surfaces cleaned
Food Warmers front, top, dials, shelves.
Soup Bar breath guard spotless, surface heating element, pans
Microwave Oven - Top, sides, inside, underneath, surfaces sanitized, filter cleaned.
Toaster - Top, sides, crumb tray, underneath, levers.
Drink Dispenser - Front, sides, drain tray & grate, dispensing lever, pour 1 gallon Sanitizer Solution down drain. Clean dispenser nozzles daily with a mild soapy solution and a tooth brush. Sanitize with a mild sanitizer, air dry and reinstall.
Coffee Machine/Tea - Emptied, sanitized, inside, spray-head and surrounding area, top, sides, warming element, underneath.
Coffee Pots - Clean inside with ice and tablespoon of salt.
Thermal Jugs - Clean with warm soap water then sanitize.
Metal Tea Urn - Scour with scratch pad or brush and hot soap water, then sanitize.
Warming Plate - Top, sides, underneath.
Popcorn Popper - Outside, no black carbon build up on kettle, old product discarded, glass spotless, handles, underneath machine.
Cookie/Donut Merchandiser - Outside, underneath, inside sanitized
Candy/Chips Racks - Wiped down, products neatly displayed
Grill - Cooking surface shining, splash-guards, grease/food trough emptied & cleaned, sides
Grill Scraper – Metal tool used to clean grill after us. Should be kept sharp to aid in removing food debris that may stick to the grill surface.

P a g e | 5Fryers - Filtered, no food debris, front, sides, inside cabinet, no grease spills, dials
Venthood - Wiped down.
Cutting Board(s) - Washed, sanitized
Cream Dispenser - Emptied, sanitized, cold packs put in freezer
Can Opener - Clean and sanitize blade
Convection Oven - Inside & racks, front top, sides, door handles
Ice Cream Merchandiser - Glass spotless, sides front, inside product organized, no empty boxes
Soft Serve Machine - Emptied, sanitized, drip pan emptied, "0" rings lubricated, outside wiped down
Meat Slicer - Cleaned & sanitized, underneath
Food Processor - Cups, blades, housing, cleaned and sanitized
Sinks - Wiped down, drain cups emptied
Mop Head - Sprayed out, hung up
Floors/Baseboards - Swept & mopped
Walls/Ceiling - Cleaned as needed
Tables/Chairs - Wiped down, tables sanitized
Utensils/Pots/Pans - Washed, sanitized
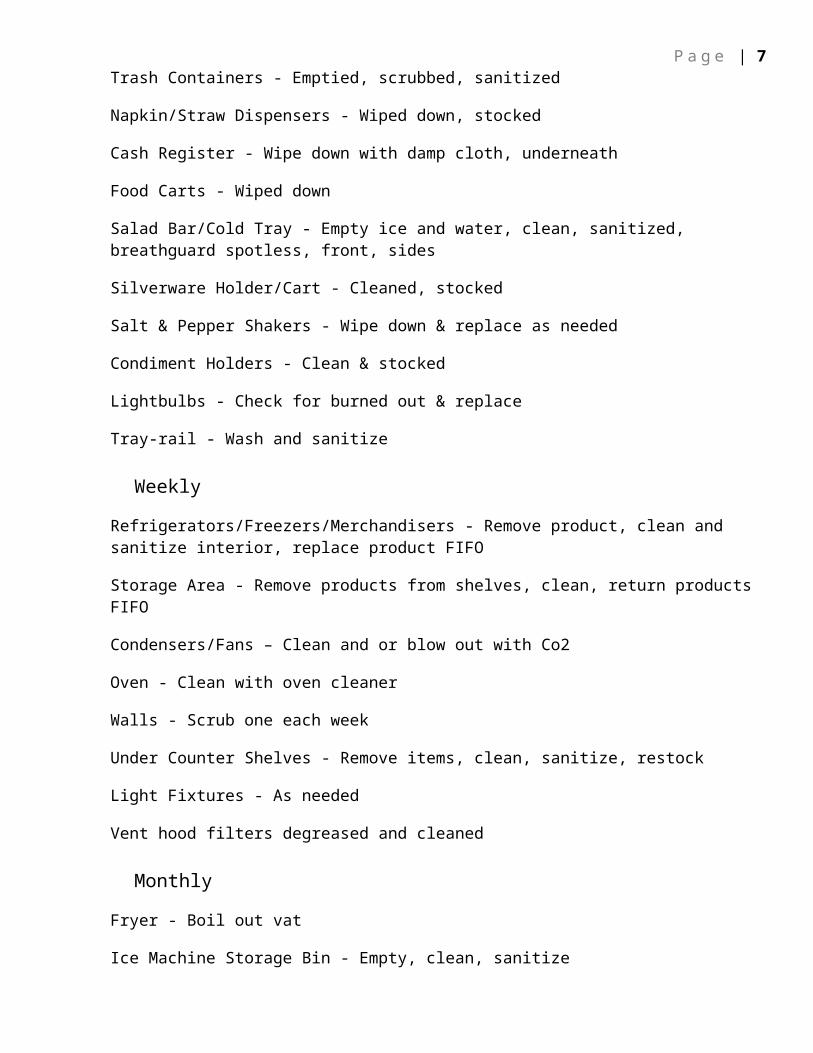
Trash Containers - Emptied, scrubbed, sanitized
Napkin/Straw Dispensers - Wiped down, stocked
Cash Register - Wipe down with damp cloth, underneath
Food Carts - Wiped down
Salad Bar/Cold Tray - Empty ice and water, clean, sanitized, breathguard spotless, front, sides
Silverware Holder/Cart - Cleaned, stocked
Salt & Pepper Shakers - Wipe down & replace as needed
Condiment Holders - Clean & stocked
Lightbulbs - Check for burned out & replace
Tray-rail - Wash and sanitize

P a g e | 6Weekly
Refrigerators/Freezers/Merchandisers - Remove product, clean and sanitize interior, replace product FIFO
Storage Area - Remove products from shelves, clean, return products FIFO
Condensers/Fans – Clean and or blow out with Co2
Oven - Clean with oven cleaner
Walls - Scrub one each week
Under Counter Shelves - Remove items, clean, sanitize, restock
Light Fixtures - As needed
Vent hood filters degreased and cleaned
Monthly
Fryer - Boil out vat
Ice Machine Storage Bin - Empty, clean, sanitize
Menu Board - Wipe down
HVAC Vents - As needed
Window Blinds, Curtains - As needed
Pictures, Decoration Items - Wipe down as needed

P a g e | 7
Chemical Safety
Identify all chemicals in the facility
Have an M S D S sheet on all chemicals
Instruct employees to not mix chemicals
Instruct employees to use according to container instructions
Instruct employees to use protective gear.
Instruct employees to follow facility safety guidelines
Store chemicals in a safe secure place away from food.
Training
Training needs to be well planned so that you and your employees get maximum benefit from it. It is crucial that on completion of the training your employees fully understand:
What the chemical hazards are.
What the potential risks to their health could be.
What controls are in place to protect health and safety.
How to use, handle, move and store the chemicals in a safe manner, including proper use of equipment (e.g. engineering controls, P P E).
How to safely clean up spills.
How to report a problem and who to report it to.
What to do in an emergency.
P a g e | 8
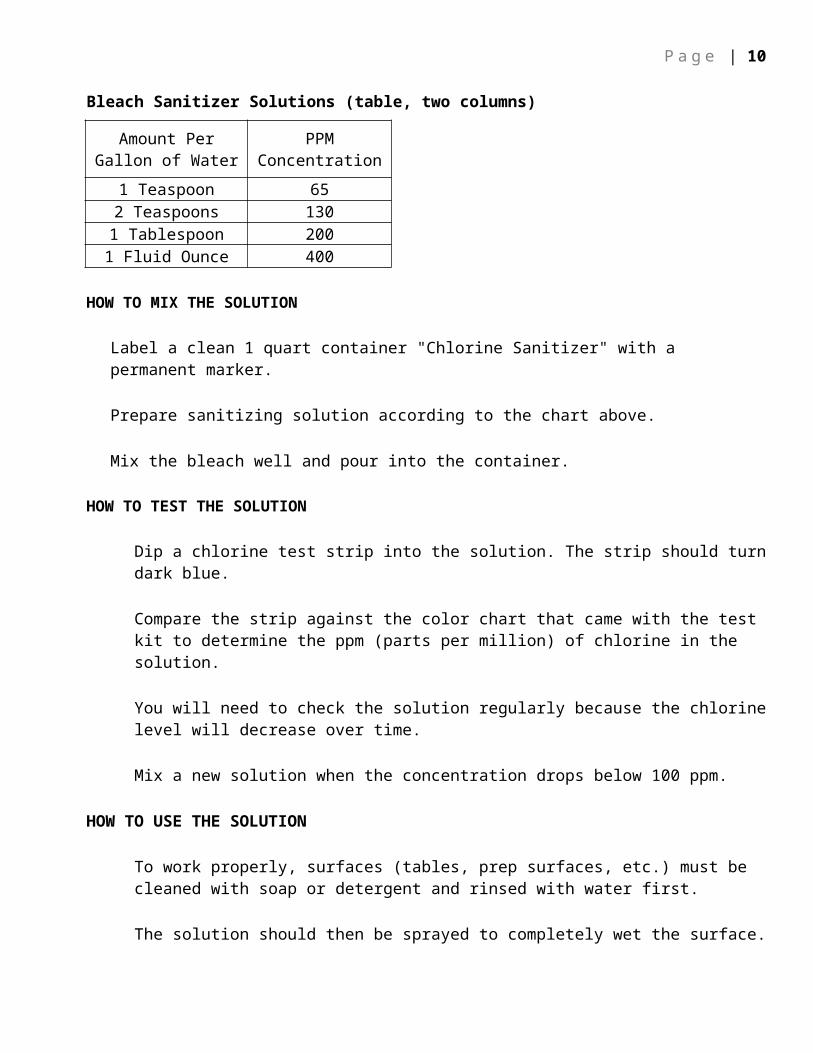
Bleach Sanitizer Solutions (table, two columns)
Amount Per Gallon of Water
PPM Concentration
1 Teaspoon 652 Teaspoons 1301 Tablespoon 2001 Fluid Ounce 400
HOW TO MIX THE SOLUTION
Label a clean 1 quart container "Chlorine Sanitizer" with a permanent marker.
Prepare sanitizing solution according to the chart above.
Mix the bleach well and pour into the container.
HOW TO TEST THE SOLUTION
Dip a chlorine test strip into the solution. The strip should turn dark blue.
Compare the strip against the color chart that came with the test kit to determine the ppm (parts per million) of chlorine in the solution.
You will need to check the solution regularly because the chlorine level will decrease over time.
Mix a new solution when the concentration drops below 100 ppm.
HOW TO USE THE SOLUTION
To work properly, surfaces (tables, prep surfaces, etc.) must be cleaned with soap or detergent and rinsed with water first.
The solution should then be sprayed to completely wet the surface.
The surface should be allowed to completely air dry before being used again; however, if the surfaces needs to be used immediately, allow the solution to remain at least 2 minutes before drying it with a single use paper towl.
Detergent
While it is important to use a detergent that will remove all dirt and food debris, you also need to consider the type of surface you are trying to clean. Caustic alkaline or acidic cleaners may be

P a g e | 9effective in removing food debris, but they can also be corrosive to softer metals such as aluminum, copper, or stainless steel. Stress cracking and clouding can also occur when hard plastics are exposed to corrosive cleaning agents for prolonged periods of time. Higher grades of stainless steel are likely to be more resistant to corrosion over time, which is why t is a preferred material for handling foods that are acidic, salty, or high in fat or water. If cleaning agents cause the surfaces that are being cleaned to deteriorate, it will be much more difficult to keep them clean. For this reason it is important to use cleaning agents that are effective and get the job done, but are not so aggressive that they pit, crack, rust, corrode or otherwise damage your food contact surfaces.
Concentration
There is an optimal concentration of detergent for each cleaning task. Again, check the “directions for use” on the container when deciding how much to use.
Degreaser/Oven Cleaner
Directions for Use: (follow manufacturer’s directions).
Preheat oven to 200°F, turn off.
Protect eyes.
Wear rubber gloves.
Squirt or spray onto oven surface. Let penetrate for 5 to 10 minutes.
Wipe with damp cloth or sponge.
Rinse with clean water.
After rinsing, heat oven for at least 10 minutes before using.
NOTE: DO NOT spray on light bulbs, heaters, electrical receptacles or connections. DO NOT use on aluminum, copper, galvanized, plastic, or painted surfaces, composition tile, or any surface damaged by strong alkali. If in doubt, test first on a small, inconspicuous area.

P a g e | 10
Manually Cleaning And Sanitizing Equipment And Surfaces
General Procedure
1. CLEANING SOLUTIONS: Dispense detergent or all purpose cleaning solution in a bucket or container.
2. RINSE WATER: Fill another clean bucket or container with fresh warm water.
3. SANITIZING SOLUTION: Dispense into a third bucket or container fresh sanitizing so-lution.
4. CLOTH: Use a separate clean cloth in each solution to clean, rinse and sanitize equipment and surfaces.
5. CLEANING & SANITIZING STEPS:
Unplug electrical equipment.
Disassemble removable parts.
Physically remove any dirt, food particles and debris from the equipment or surface areas. Use a clean cloth or brush soaked with the detergent or all purpose cleaning solution.
Follow by rinsing those same areas with fresh warm water.
Sanitize the equipment or surface areas using a clean cloth soaked in sanitizing solution.
Keep cloths stored in their appropriate buckets when not in use.
Allow equipment and surfaces to air dry.
Store equipment in a manner to prevent contamination.
Using wiping cloths
General Procedure
1. TABLE SPILLS: Use clean, dry cloths for wiping food spills on tables and use for no other purpose.
2. FOOD CONTACT SURFACES: Use clean, moist cloths dipped in sanitizing solution to wipe food spills on kitchenware and food contact surfaces of equipment. Use these wiping cloths for no other purpose. Store these wiping cloths in the sanitizing solution between uses.
P a g e | 113. NON-FOOD CONTACT SURFACES: Use clean, moist cloths used for cleaning non-food contact surfaces of equipment such as counters, dining table tops, and shelves. Cloths will be clean and dipped in sanitizing solution and used for no other purpose. These cloths will be stored in the sanitizing solution between uses.
Cleaning tips
1. Use equipment only that meets all sanitation standards for construction and is designed for ease in disassembling and thorough cleaning.
2. Change mop heads regularly.
3. Clean and sanitize all kitchenware and food contact surfaces used in preparation or serving of food and beverages after each meal.
4. Handle food contact surfaces of equipment and utensils in a way to prevent contamination.
5. Clean non-food contact surfaces of equipment twice weekly to keep them in ready-to-use condition.
6. Do not mix cleaning products. For example, mixing ammonia and chlorine causes a poisonous gas that when inhaled is injurious to the mucous membranes of the respiratory tract.
7. Clean cleaning equipment after each use.
8. Use specific areas for storage of cleaning equipment and cleaning supplies.
9. Store cleaning equipment and supplies separate from food items and paper supplies.
Other Solutions
Vinegar
The slightly acidic nature of white vinegar makes it effective at dissolving grease, soap scum and lime deposits from smooth surfaces in the kitchen. Because it’s so gentle, vinegar is also safe to use on most stainless steel. Mix 1/4 to 1/2 cup of vinegar with water in a bucket or spray bottle and use it to clean everything from windows and mirrors to toilets and floors. Use undiluted vinegar to tackle tougher cleaning jobs.

P a g e | 12
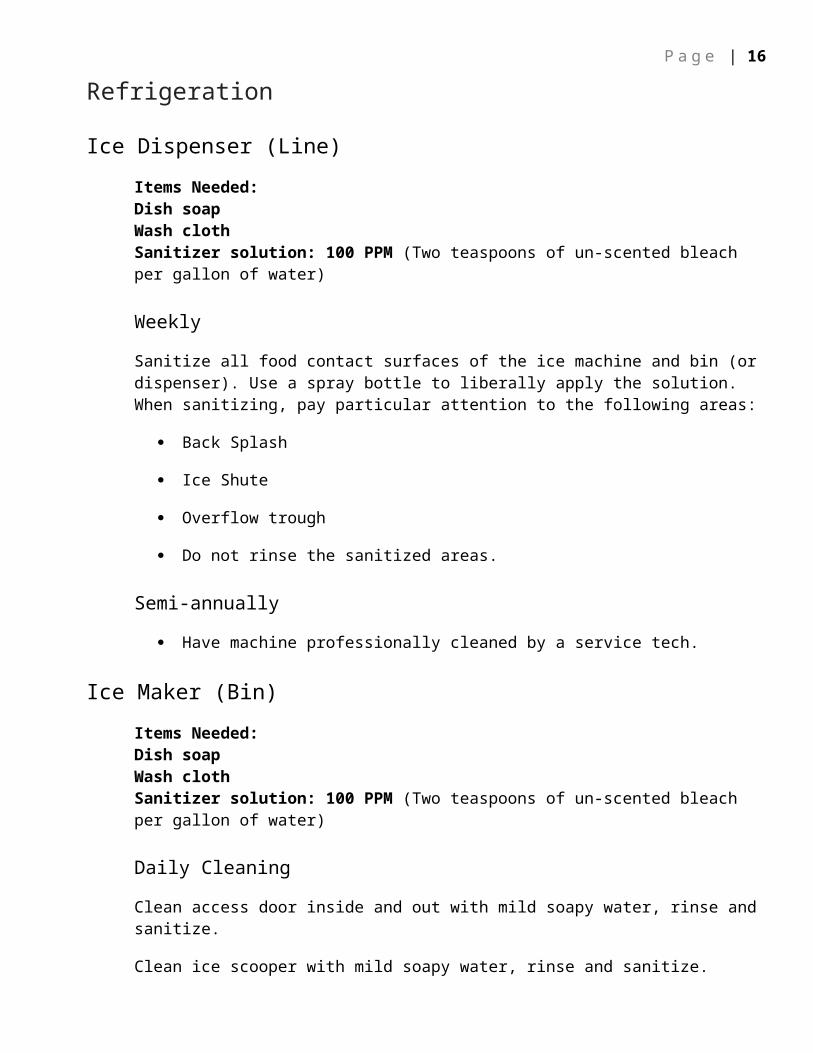
Refrigeration
Ice Dispenser (Line)
Items Needed:Dish soapWash clothSanitizer solution: 100 PPM (Two teaspoons of un-scented bleach per gallon of water)
Weekly
Sanitize all food contact surfaces of the ice machine and bin (or dispenser). Use a spray bottle to liberally apply the solution. When sanitizing, pay particular attention to the following areas:
Back Splash
Ice Shute
Overflow trough
Do not rinse the sanitized areas.
Semi-annually
Have machine professionally cleaned by a service tech.
Ice Maker (Bin)
Items Needed:Dish soapWash clothSanitizer solution: 100 PPM (Two teaspoons of un-scented bleach per gallon of water)
Daily Cleaning
Clean access door inside and out with mild soapy water, rinse and sanitize.
Clean ice scooper with mild soapy water, rinse and sanitize.
Clean ice transport device with mild soapy water, rinse and sanitize.
Monthly
Clean interior ice chute with mild soapy water, rinse and sanitize.

P a g e | 13Semi Annually
“Burnout” the ice bin, clean and sanitize. Clean the machine using a nickel-safe scale remover and an ice machine sanitizer.
Clean condenser fins and air filters (replace air filters if necessary).
Check the water filtration system, observing if the water pressure drops due to any restrictions. Replace filter if necessary.
Have a qualified technician clean the water system.
Sandwich Bar
Items Needed:Dish soapWash clothSanitizer solution: 100 PPM (Two teaspoons of un-scented bleach per gallon of water)
Daily Cleaning
Remove all food containers and store in a refrigerator. Clean stainless steel as per instructions above. Clean the inside walls and flooring with a mild soapy solution and rinse with clear water, sanitize with a spray solution of 100 PPM (2 teaspoons of un-scented bleach per gallon of water )and allow to air dry.
Plastic Cutting boards - To sanitize plastic cutting boards, wash or rinse with liquid dishwashing detergent and water. Then soak in a solution using 2 teaspoons of un-scented bleach per gallon of water. Let stand 2 minutes, then air dry.
Wooden Cutting Boards - To sanitize wooden cutting boards, wash, wipe, or rinse with dishwashing detergent and water, then apply solution. Let stand 2 minutes. Rinse with a solution of 2 teaspoons of un-scented per gallon of water. Do not rinse or soak overnight.
Reduce cutting board odors by rubbing with halved lemons and then rinsing with cold water
Clean interior surfaces with soapy water and sanitize with 100 PPM solution (2 tsp bleach per gallon)
Monthly Cleaning
Condensation Pan – empty and wash in soapy water.
Clean rubber gaskets with warm soapy water, rinse and sanitize with 100 PPM solution (2 tsp bleach per gallon)

P a g e | 14Condenser Coil
Condensers accumulate dirt and require cleaning every 30 days. Dirty condensers result in compressor failure, product loss, and lost sales. If you keep the Condenser clean you will minimize your service expense and lower your electrical costs. Proper cleaning involves removing dust from the Condenser. By using a soft brush, or vacuuming the Condenser with a shop vac, or using CO2, nitrogen, or pressurized air.
Cleaning
Step 1. Disconnect power to unit.
Step 2. Removing the four Phillips screws to allow removal of the front grill.
Step 3. Remove bolts anchoring compressor assembly to frame rails and carefully slide out. (tube connections are flexible)
Step 4. Clean off accumulated dirt from the condenser coil and the fan with a stiff bristle brush. (See image 1).
Step 5. Lift cardboard cover above fan at plastic plugs and carefully clean condenser coil and fan blades.
Step 6. After brushing condenser coil vacuum dirt from coil, and interior floor. (See image 2).
Step 7. Replace cardboard cover. Carefully slide compressor assembly back into position and replace bolts.
Step 8. Reinstall rear grill assembly onto unit. Tighten all screws.
Step 9. Connect unit to power and check to see if compressor is running.
Reach In RefrigeratorItems Needed:Dish soapWash clothSanitizer solution: 100 PPM (Two teaspoons of un-scented bleach per gallon of water)
Daily Cleaning
Clean exterior surfaces following stainless steel cleaning guidelines.
Weekly Cleaning
Clean rubber gaskets with warm soapy water, rinse.
Clean condenser coil and fan blades.

P a g e | 15Monthly Cleaning
DO NOT USE: abrasive cleaners, steel pads, wire brushes, scrapers or knives to clean your equipment.
It is always best to clean your refrigerator or freezer when the product load in your cabinet is as its lowest level. To clean the interior or exterior cabinet surfaces, follow these procedures:
1. Disconnect your cabinet from its power supply, remove all product from inside and temporarily move it to a walk-in or other refrigerated storage.
2. Open all doors and allow the cabinet to reach room temperature. Remove all accessories (shelves, racks, pilasters, clips, etc.) from inside and wash them with a baking soda and warm water solution, rinse thoroughly with clean water. Dry all accessories completely with a soft clean cloth.
3. Once the cabinet has reached room temperature, wash all inside and outside surfaces with a solution of warm water and baking soda. Pay particular attention to the face of the cabinet, as any residue or debris can impair the door seal. For slightly more difficult cleanups, ammonia or vinegar in warm water can be used. Rinse thoroughly with clear water and dry with a soft clean cloth. Carefully wash all of the vinyl door gaskets with clean water, dry them and check for any damage, which may affect the seal. Failure to dry all surfaces completely may cause water stains or streaking on the aluminum or stainless steel finish.
4. Return all accessories to their original locations, reconnect the power. It may take a full hour to restore temperature..
CHECK ALL OF YOUR EQUIPMENT PERIODICALLY. If you see any signs of rust, clean the area immediately, with a plastic scrubbing pad. If surface rust is removed promptly, permanent corrosion, pits and cracks may be avoided. Special stainless steel polishes, that can help restore the protective coating on your equipment, are available from a variety of retailers.
Freezers
Items Needed:Dish soapWash clothSanitizer solution: 100 PPM (Two teaspoons of un-scented bleach per gallon of water)
Daily Cleaning
Clean exterior surfaces following stainless steel cleaning guidelines.
Weekly Cleaning
Clean rubber gaskets with warm soapy water, rinse.
Clean condenser coil and fan blades.

P a g e | 16Monthly
DO NOT USE: abrasive cleaners, steel pads, wire brushes, scrapers or knives to clean your equipment.
It is always best to clean your refrigerator or freezer when the product load in your cabinet is as its lowest level. To clean the interior or exterior cabinet surfaces, follow these procedures:
1. Disconnect your cabinet from its power supply, remove all product from inside and temporarily move it to a walk-in or other refrigerated storage.
2. Open all doors and allow the cabinet to reach room temperature. Remove all accessories (shelves, racks, pilasters, clips, etc.) from inside and wash them with a baking soda and warm water solution, rinse thoroughly with clean water. Dry all accessories completely with a soft clean cloth.
3. Once the cabinet has reached room temperature, wash all inside and outside surfaces with a solution of warm water and baking soda. Pay particular attention to the face of the cabinet, as any residue or debris can impair the door seal. For slightly more difficult cleanups, ammonia or vinegar in warm water can be used. Rinse thoroughly with clear water and dry with a soft clean cloth. Carefully wash all of the vinyl door gaskets with clean water, dry them and check for any damage, which may affect the seal. Failure to dry all surfaces completely may cause water stains or streaking on the aluminum or stainless steel finish.
4. Return all accessories to their original locations, reconnect the power. It may take a full hour to restore temperature..
CHECK ALL OF YOUR EQUIPMENT PERIODICALLY. If you see any signs of rust, clean the area immediately, with a plastic scrubbing pad. If surface rust is removed promptly, permanent corrosion, pits and cracks may be avoided. Special stainless steel polishes, that can help restore the protective coating on your equipment, are available from a variety of retailers.
Walk-in Refrigerator & Freezer
Combination walk-in refrigerators and freezers require the same basic maintenance requirements as single-use units. Here are five basic cleaning and maintenance requirements foodservice operators will need to follow to keep their walk-in refrigerators and freezers running effectively.
As with single-use units, proper walk-in maintenance is crucial with combination units to maximize the equipment's service life and energy efficiency. Below are basic requirements for cleaning and maintenance, but foodservice operators should also follow the manufacturer's recommendations.
P a g e | 17Daily Cleaning
Regularly clean a walk-in's cooler and freezer sections should with soapy water and a sanitizing solution of 2 tablespoons bleach to 1 gallon of water (100 PPM). Do Not Rinse the cleaned, allow to air dry.
In the freezer section, use damp, not wet, mops to clean cooler floors. Excessive water not only will freeze on floors creating slippery conditions, but also can get in the floor seams and walls, causing damage. Instead, sweep freezers with a broom.
Monthly
Move all shelving away from the wall clean the walls and shelving with soapy water and sanitizer solution.
Cooking Equipment
Fryer - Floor Model
Items Needed:Dish soapDegreaserVinegarFilter powderFilterBoil Out cleanersWash cloth
Daily Cleaning
Skimming Vat-- Skim floating food particles as needed with Vat Skimmer.
Filter oil at least once a day while oil is still hot about 140°F to 175°F.**(see below)
Clean the inside of the boil pot and heating elements.
Remove excess oil from the exhaust tower, sides, control panel and door.
Clean fry baskets and dry.
Change the oil as needed (one inch visibility minimum).
Clean front and sides of the fryer with soapy solution and a damp cloth.
Keep oil covered.
Weekly
Complete boil out procedures
Check for loose fittings and correct

P a g e | 18Check for grease build up and remove
Move fryer away from wall, clean wall and floors
Monthly
Check for Calibration
Inspect power cord or gas line for damage
Inspect pilot light.
**Filtering The Fryer
The fryer should be filtered regularly to promote longer oil life. Depending on your business this should be done at least once a day at the end of the shift. Busier facilities may benefit from two filterings, post breakfast and post lunch. Allow at least 30 to 45 minutes to accomplish this task (includes cool down and start up times).
The following points should be observed when the fryer shortening is filtered:
Allow the fryer shortening to cool to about 150º to 200º F before filtering for best results.
This will reduce the possibility of spills and resulting burns.
Disposable filters (cone) have the advantage over washable filters. If all the soap is not removed and the washable filter dry prior to use, the fryer shortening may be damaged rather than helped by filtration.
Filtering aids, such as diamatacious earth such as used in swimming pool filters, are quite effective in removing fine particles from the oil when used as directed. Care must be exercised in selecting the right one. Some filtering aids will cause the fryer shortening to darken while others might cause a significant increase in the amount of soaps in the fryer shortenings.
Every precaution must be taken to insure that no unnecessary aeration of the fryer shortening occurs during filtering. Aeration, splashing, or blowing air through the fryer shortening with a pump will promote rapid oxidation, decreasing the life of the fryer shortening.
Rinse the residual crumbs from the fryer by back flushing with a portion of the filtered fryer shortening if the fryer is not scheduled to be washed.
When the fryer is refilled, check to insure the correct fryer shortening level is maintained for optimum results. It is very important that this is kept at the level specified by the manufacturer to insure proper operation of the unit.
Procedure

P a g e | 191. Use thermal oven mitts during this procedure to prevent burns from hot oil and
metal surfaces of the fryer.
2. Turn the thermostat to the off position. Turn the gas control to the pilot position or off depending on the manufacturer’s instructions.
WARNING Failure to insure that the Thermostat is in the "Off" position during procedure may result in equipment damage and/or personal injury.
3. Insure that filter paper is properly positioned in the filter holder or pan as needed depending on the type of filtering apparatus used.
4. Stir filter powder in the hot oil. The filter powder helps extend shortening life by removing impurities.
5. Allow the shortening to cool for 3 minutes after adding the filter powder.
6. Screw in the drain pipe to the drain valve receptacle.
7. Place a large stock pot under the drain pipe and position the filter cone under the drain pipe in the pot.
8. SLOWLY open the fry pot drain valve beneath the fry-kettle. Be very careful to avoid being splashed by hot oil. You may need to use a small diameter brush to ream out the drain line from inside the fry tank to open any clogs that might develop as you drain the oil into the filter pan.
9. Leave the drain valve open, dip filtered oil and wash down the sided of the fry pot, allowing the filtered shortening to return to the fry-kettle and drain out the bottom through the drain valve. Use a large brush to "Wash-Down" the fry tank with the hot shortening as it circulates through the fry tank. Continue this for at least 2 minutes.
10.Close the fryer drain valve.
11.Place the filtered shortening in the fry pot and cover if no longer needed to prevent oxidation.
12. Insure that the fryer contains the proper shortening level. Follow the oil rotation program guidelines.
13.Adjust the thermostat to your cooking temperature and heat the oil until it reaches the proper cooking temperature.
14.Remove used filter paper and discard, place any in used old oil in the recycle can.

P a g e | 2015.Clean spills with disposable towels, remove grease residue from the floor.
Boil Out Procedure:After the fryer has been in use for a period of time, a hard film of caramelized oil will forminside the fry pot. This film should be periodically removed by following the boil-out procedure.Clean fry pot(s) at least once a month.
1. Drain old oil and pour in the oil recycle can.
2. Before switching the fryer "ON", close the fry pot drain valve, then fill the empty fry pot with a mixture of cold water and detergent such as dish soap. Follow instructions on detergent bottle when mixing.
3. Press controller ON/OFF switch to "ON".
4. Simmer the solution for 45 minutes to 1 hour. Do not allow water level to drop below the bottom OIL LEVEL line in fry pot during boil-out operation.
CAUTIONDo not leave fryer unattended. The boil-out solution may foam and overflow. PressON/OFF switch to the "OFF" position to control boil over.
5. Turn the fryer ON/OFF switch(s) to the "OFF" position.
6. Add two gallons of water. Drain out the solution and clean the fry pot(s) thoroughly.
7. Refill the fry pot(s) with clean water. Rinse the fry pot(s) twice, drain and wipe down with a clean towel. Remove all traces of water prior to filling fry pot with oil.
Fryer - Counter Model
Items Needed:Dish soapDegreaserVinegarFilter powderFilterBoil Out cleanersWash cloth
Daily Cleaning
Filter oil at least once a day**(see below)
Clean the inside of the boil pot and heating elements
Remove excess oil from the exhaust tower, sides, control panel and door.
Fry Baskets cleaned and dried.

P a g e | 21Change the oil as needed (one inch visibility minimum)
Keep oil covered
Weekly
Complete boil out procedures
Check for loose fittings and correct
Check for grease build up and remove.
Move fryer , clean counter and side walls.
Monthly
Check for Calibration
Inspect power cord or gas line for damage.
Inspect pilot light. (gas).
**Filtering The Fryer
The fryer should be filtered regularly to promote longer oil life. Depending on your business this should be done at least once a day at the end of the shift. Busier facilities may benefit from two filterings, post breakfast and post lunch. Allow at least 30 to 45 minutes to accomplish this task (includes cool down and start up times).
The following points should be observed when the fryer shortening is filtered:
Allow the fryer shortening to cool to about 150º to 200º F before filtering for best results.
This will reduce the possibility of spills and resulting burns.
Disposable filters (cone) have the advantage over washable filters. If all the soap is not removed and the washable filter dry prior to use, the fryer shortening may be damaged rather than helped by filtration.
Filtering aids, such as diamatacious earth such as used in swimming pool filters, are quite effective in removing fine particles from the oil when used as directed. Care must be exercised in selecting the right one. Some filtering aids will cause the fryer shortening to darken while others might cause a significant increase in the amount of soaps in the fryer shortenings.
Every precaution must be taken to insure that no unnecessary aeration of the fryer shortening occurs during filtering. Aeration, splashing, or blowing air through the fryer shortening with a pump will promote rapid oxidation, decreasing the life of the fryer shortening.

P a g e | 22Rinse the residual crumbs from the fryer by back flushing with a portion of the filtered fryer shortening if the fryer is not scheduled to be washed.
When the fryer is refilled, check to insure the correct fryer shortening level is maintained for optimum results. It is very important that this is kept at the level specified by the manufacturer to insure proper operation of the unit.
Procedure
1. Use thermal oven mitts during this procedure to prevent burns from hot oil and metal surfaces of the fryer.
2. Turn the thermostat to the off position. Life the elements and secure in the up position.
WARNING Failure to insure that the Thermostat is in the "Off" position during procedure may result in equipment damage and/or personal injury.
3. Insure that filter paper is properly positioned in the filter holder or pan as needed depending on the type of filtering apparatus used.
4. Stir filter powder in the hot oil. The filter powder helps extend shortening life by removing impurities.
5. Allow the shortening to cool for 3 minutes after adding the filter powder.
6. Place a large stock pot on the floor in front of the fryer and place the filter cone in the stock pot across the top.
7. Carefully lift the fry pot from the fryer enclosure.
8. SLOWLY Pour the oil into the prepared filter cone.
9. Place the filtered shortening in the fry pot and cover if no longer needed to prevent oxidation.
10. Insure that the fryer contains the proper shortening level. Follow the oil rotation program guidelines.
11.Adjust the thermostat to your cooking temperature and heat the oil until it reaches the proper cooking temperature.
12.Remove used filter paper and discard, place any in used old oil in the recycle can.
13.Clean spills with disposable towels, remove grease residue from the floor.

P a g e | 23Boil Out Procedure:After the fryer has been in use for a period of time, a hard film of caramelized oil will forminside the fry pot. This film should be periodically removed by following the boil-out procedure.Clean fry pot(s) at least once a month.
1. Remove the fry pot and empty the old oil into the oil recycle container. Then fill the empty fry pot with a mixture of cold water and boil out chemical as per instructions on the container of the boil out chemical.
2. Press controller ON/OFF switch to "ON".
3. Simmer the solution for 45 minutes to 1 hour. Do not allow water level to drop below the bottom OIL LEVEL line in fry pot during boil-out operation.
CAUTIONDo not leave fryer unattended. The boil-out solution may foam and overflow. PressON/OFF switch to the "OFF" position to control boil over.4. Turn the fryer ON/OFF switch(s) to the "OFF" position.
5. Add two gallons of cold water. Drain out the solution and clean the fry pot(s) thoroughly.
6. Refill the fry pot(s) with clean water. Rinse the fry pot(s) twice, drain and wipe down with a clean towel. Remove all traces of water prior to filling fry pot with oil.
Electric Range
Items Needed:Dish soapDegreaserWash clothSanitizer solution: 100 PPM (Two teaspoons of un-scented bleach per gallon of water)
Daily Cleaning
WARNING: DISCONNECT ELECTRICAL POWER SUPPLY BEFORE CLEANING.
Do not use Dawn dish detergent to clean the exterior or interior components of the range.
Do not use scouring powder. It is extremely difficult to remove completely. It can build up accumulations that will damage the range.
Clean all parts of the range and the oven with a soft cloth and warm water and detergent. Rinse thoroughly and wipe dry with a soft clean cloth.
Broiler
Empty grease collector as often as necessary. It is recommended that the grease collector be emptied whenever it is 3/4 filled. Remove grease collector slowly and be careful of liquid wave action. After each day's use, empty and wash the grease collector and wash the grid and drip shield.

P a g e | 24Clean the inside bottom, back and sides of the broiler compartment as often as necessary, with special care to clean the inside surface of the baffle across the front top of the broiler.
Oven
Clean oven and oven door daily, especially if fruit pies or tomato sauces were baked, meats roasted, and if there have been spillovers.
If the oven liners and decks are heavily soiled, ammonia or oven cleaner may be used to remove spillage of burned on sugar and grease.
Clean the oven door gasket. DO NOT USE STRONG OVEN CLEANERS. Cleaners of this nature will destroy the gasket material.
After processing some foods at low temperatures, odors may linger in the oven. These odors may be cleared by setting the thermostat at 500°F and allowing the oven to operate unloaded for 30 to 45 minutes.
Gas Ranges
Items Needed:Dish soapDegreaserWash clothSanitizer solution: 100 PPM (Two teaspoons of un-scented bleach per gallon of water)
Daily Cleaning
Wipe top daily, while still warm, with a grease absorbing cloth to remove spillovers, grease, etc., before they burn in. Clean as you go Whenever a spill occurs, be sure to wipe it up immediately. This will prevent the food from becoming baked on to the range top. If a spill extinguishes the pilot light on a gas range, you will need to clean the burner heads and pilot orifice before relighting it.. A crust on top of the range looks unsightly and slows down speed of cooking because it reduces the flow of heat to the utensil. Scrape off if necessary.
If necessary, remove the burners and soak them in hot, soapy water. Clean under the grates or burners When your grates and burners are out for cleaning is a great time to clean under them. If your stove has drip trays, remove them and wipe them down. If they are wiped down daily, they will not be as difficult to clean. These can be soaked in warm soapy water if necessary.
Clean burner ports with a brush, stiff wire or ice pick.
Clean front and sides of the range with a damp cloth.
Remove any cooked food lodged under burners, lids, rings or plates.

P a g e | 25Open Top Grates and Burners
Boil weekly in a solution of washing soda and water. Clean drip pan under burners with warm soapy water. Rinse thoroughly and wipe dry with a soft clean cloth.
Oven
Clean oven and oven door daily, especially if fruit pies or tomato sauces were baked, meats roasted, and if there have been spillovers.
Do not use scouring powder. It is extremely difficult to remove completely, and can build up accumulations that will damage the oven.
Remove nickel plated racks and rack supports daily and clean in a sink.
After processing some foods at low temperatures, odors may linger in the oven. These odors may be cleared by setting the thermostat at 500°F and allowing the oven to operate unloaded for 30 to 45 minutes.
Exterior
Clean exterior finish daily with a mild grease dissolving solution.
Painted surfaces may be cleaned using a cloth and detergent solution. Rinse thoroughly and wipe dry with a soft clean cloth.

P a g e | 26
Combi Oven
Daily Cleaning
• Use sprayer bottle to spray Oven Cleaning Agent inside the oven cavity, behind the air baffle, and on the inner side of the door. (CAUTION: Do not spray Cleaning Agent into a hot oven! Discoloration of the interior surfaces will result. The oven temperature must be below 130ºF (55ºC) before spraying cleaner into the cabinet.)
• Turn the oven on and place the oven in STEAM mode for 15 minutes.
• If the unit is heavily soiled, repeat the above steps.
• Thoroughly rinse the inside of the oven cavity with the spray nozzle and spray hose assembly supplied with the unit.
• Make sure drain opening is clear.
• Leave the door open at night after cleaning.
• Do not clean the door gasket with a high-chlorine solution or bleach.
• Do not use steel wool or other metallic pads in the oven.
Monthly
• If lime or mineral deposit starts to build up in the interior, clean the unit by using descaler” or other non-caustic deliming solution. Follow manufacturer’s recommended procedures. Thoroughly rinse out unit with clean water.
• To remove normal dirt, grease, or product residue from stainless steel, use ordinary soap and water applied with a sponge or cloth. Dry thoroughly with a clean cloth. Never use vinegar or any corrosive cleaner.
• To remove grease and food splatter or condensed vapors that have baked on the equipment, apply cleanser to a damp cloth or sponge and rub cleanser on the metal in the direction of the polishing lines on the metal. Rubbing cleanser as gently as possible in the direction of the polished lines will not mar the finish of the stainless steel. NEVER RUB WITH A CIRCULAR MOTION. Soil and burnt deposits which do not respond to the above procedure can usually be removed by rubbing the surface with SCOTCHBRITE scouring pads. DO NOT USE ORDINARY STEEL WOOL, as any particles left on the surface will rust and further spoil the appearance of the finish. NEVER USE A WIRE RUSH, STEEL SCOURING PAD, SCRAPER, FILE OR OTHER STEEL TOOLS. Surfaces which are marred collect dirt more rapidly and become more difficult to clean. Marring also increases the possibility of corrosive attack. Refinishing may then be required.
Semi-annual

P a g e | 27At least twice a year, have a qualified service technician clean and adjust the unit for maximum performance.
Convection Oven
Items Needed:Dish soapWash clothSanitizer solution: 100 PPM (Two teaspoons of un-scented bleach per gallon of water)
Daily Cleaning
WARNING: TURN OVEN OFF AND DISCONNECT ELECTRICAL SUPPLY BEFORE CLEANING.
Clean the Nickel plated racks and rack supports may be removed and cleaning with soapy water.
Stainless steel oven front may be cleaned with a damp cloth. Stubborn soil may be removed with detergent.
Clean the Nickel plated racks and rack supports and clean with soapy water or degreaser if necessary
Clean porcelain oven interior daily with soap or detergent and water. Rinse thoroughly and wipe dry with a soft clean cloth.
Check the fan for potential obstructions that could reduce efficiency.
For burned-on foods and grease which resist simple soap and water cleaning, an abrasive cleanser (scouring powder) mixed into a paste may be used. Apply with stainless steel wool or sponge, always rubbing with the "grain."
This treatment is equally effective for "heat tint" (slightly darkened areas caused by oxidation). Again, remember to rub in the direction of the polish lines. Rinse with clear water and dry with a soft cloth.
CAUTION: Scouring power should not be used except with great care. Scouring powder is extremely difficult to remove completely. It can build up accumulations that will damage the oven. It will scratch and fog glass and can even damage and remove corrosion resistant finishes.
Clean outside of the oven daily by wiping with a clean damp cloth. Follow Stainless cleaning guidelines.
Weekly
Soak the Nickel plated racks and rack supports with degreaser overnight if necessary. Remove the degreaser with vinegar.

P a g e | 28Monthly
Remove the fan cover for cleaning. Clean with soapy water or degreaser if necessary.
Alto Sham Smoker
Items Needed:Dish soapDegreaserWash clothSanitizer solution: 100 PPM (Two teaspoons of un-scented bleach per gallon of water)
Daily Cleaning
1. Disconnect unit from power source and let cool.
2. Remove all detachable items such as wire shelves, side racks, and drip pans. Clean these items separately.
3. Wipe the interior metal surfaces of the oven with a paper towel to remove loose food debris.
4. Clean the interior metal surfaces of the cabinet with a damp clean cloth or sponge and any good commercial detergent.
5. Spray heavily soiled areas with a water soluble degreaser and let stand for 10 minutes, then remove soil with a plastic scouring pad.
6. Wipe control panel, door vents, door handles, and door gaskets thoroughly since these areas harbor food debris.
7. Rinse surfaces by wiping with sponge and clean, warm water.
8. Remove excess water with sponge and wipe dry with a clean cloth or air dry. Leave doors open until interior is completely dry. Replace side racks and shelves.
9. Wipe door gaskets and control panel dry with a clean, soft cloth.
10. Interior can be wiped with a sanitizing solution after cleaning and rinsing. This solution must be approved for use on stainless steel food contact surfaces.
11.To help maintain the protective film coating on polished stainless steel, clean the exterior of the cabinet with a cleaner recommended for stainless steel surfaces. Spray the cleaning agent on a clean cloth and wipe with the grain of the stainless steel.
12.Clean any glass with a window cleaner.13.Always follow appropriate state or local health (hygiene) regulations regarding all
applicable cleaning and sanitation requirements for equipment.
Monthly
Inspect and clean door vents.

P a g e | 29Check the oven once a month for physical damage and loose screws.
Inspect power line, plug and wall receptacle for damage
Detail clean control knobs, hinges, and spindles.
Detail clean smoker box and element.
Microwave Oven
Items Needed:Dish soapWash clothSanitizer solution: 100 PPM (Two teaspoons of un-scented bleach per gallon of water)
Daily Cleaning
Wipe up spills at once. Wash regularly with mild detergent and water and rinse and wipe dry with paper towel or clean cloth. Especially clean around edge of door and door opening, to prevent soil buildup which would prevent door closing tightly.
If spots seem dried on, boil water in a glass cup a few minutes; steam should loosen soil. Leave in oven 5 minutes. Then wipe dry.
If odors, either clean the interior with a solution of 1 tablespoon baking soda to 1 cup warm water, rinse and dry. Or mix 1 part lemon juice to 3 parts water in a large glass cup and boil 3-5 minutes. Let cool. Then remove water and wipe dry.
Never use abrasive pads or powders on oven. Follow manual directions for care.
Clean and sanitize the turntable, if so equipped.
Clean and sanitize the interior surfaces using a soapy solution and a sanitizer solution of 100 PPM (2 teaspoons per gallon of water)
CharGrill
Items Needed:Clean oilBrill brick/ Grill screenWire BrushDish soapWash cloth
Daily Cleaning
Always allow the grill to cool before trying to clean it.
Remove the drip pan by pulling straight toward you - SLOWLY.

P a g e | 30Beware to avoid spilling the pan. Clean with hot soapy water.
The grease tube may be cleaned with hot soapy water and a bottle brush.
Clean the drip pan and grease tube thoroughly after each use to avoid a fire hazard.
The grill grates are porcelain coated or chrome plated. They may be cleaned with hot soapy water.
In the event of extreme conditions commercially available oven cleaners may be used to clean these parts. Be sure to follow the manufacturer’s instructions for use.
Ensure the cleaning chemical does not come in contact with any painted surfaces on your appliance.
Clean area under the unit to remove excess grease and suet.
Weekly
Move equipment and clean underneath and surrounding walls.
Turn grill grates over and clean.
Detail control knobs
Monthly
Inspect gas lines for damage
Inspect pilot light to ensure it is lit and blue.
Griddle
Items Needed:Clean oilBrill brick/ Grill screenGrill BrushDish soapWash cloth
Daily Cleaning
1. Clean the griddle with a sharp griddle scraper. Take care not to vigorously strike the back or side splashes with the scraper.
2. Turn grill thermostat to "OFF". Keep exhaust fans "ON" when cleaning grill.
3. Clean the griddle while still slightly warm (150°F to 200°F) Thoroughly clean the griddle with a grill brick or grill pad using clean oil in a front to back motion, do not clean in a circular pattern. A detergent may be used on the plate surface to help clean it, but care must be taken to be sure the detergent is thoroughly removed.

P a g e | 31After removal of the detergent, the surface of the plate should then be covered with a thin film of oil to prevent rusting.
4. Thoroughly clean the griddle back splash, sides and front with a green scrub pad and soapy water.
5. Empty and clean the grease pan and trough.
6. Clean control panel and dials
7. Clean accessible areas on the outside of the grill
8. Wash the front, back, sides and splashguards with a warm, soapy cloth.
9. Thoroughly dry with a clean cloth, replace grease tray, then season the griddle.
Weekly
Clean the griddle surface thoroughly. If necessary, use a griddle brick, wire brush or steel wool on the surface. Rub with the grain of the metal while the griddle is still warm. Clean stainless steel surfaces with a damp cloth and polish with a soft, dry cloth. To remove discoloration, use a non-abrasive cleaner. After each "weekly" type of cleaning, the griddle must be re- seasoned. If the griddle usage is very high, consider going through the "weekly" cleaning procedures more often than once a week.
Clean outside area and underside to remove excess grease build up with strong soapy water and or degrease as needed.
Pull unit away from the wall and clean the floors and walls with strong soapy water and or degrease as needed.
Clean the table or counter top with an appropriate detergent to remove excess grease build up.
Monthly
Check Power cord, plug and receptacle
Check for excessive wear on griddle surfaces.
Check the pilot light to ensure proper flame height
Inspect the burners to ensure they have a “blue” flame, are not covered with grease and gas holes are not clogged.
Detail clean and check the control dials for accuracy and fit.
The flue has to be kept clean and free of any obstruction to ensure unrestricted flow of combustion products from the unit.

P a g e | 32
Gas GriddleItems Needed:Grill ScraperGrill screen and pad or grill brickOilSoapy WaterSoft Cloth
Empty the grease drawer at least daily. Clean the griddle regularly. To produce evenly cooked, perfectly browned griddle products, keep the griddle free of carbonized grease. Carbonized grease on the surface hinders the transfer of heat from the griddle surface to the food. This results in spotty browning and loss of cooking efficiency. Worst of all, carbonized grease tends to cling to the griddled foods, giving them a highly unsatisfactory and unappetizing appearance. To keep the griddle clean and operating at peak efficiency, follow these instructions:
Daily Cleaning
AFTER EACH USE: Clean the griddle with a flexible spatula or griddle scraper.
DURING THE DAY: Flush the hot griddle with water and scrape with griddle scraper to reduce the amount of carbonized grease build-up. Follow with a light coating of oil to prevent product sticking.
ONCE A DAY: Thoroughly clean backsplash, sides, and front. Take care the integral backsplash is not vigorously banged with the spatula.
Thoroughly clean and wipe out the grease trough on the griddle.
Remove the grease drawer, empty it, and wash it out in the same manner as any ordinary cooking utensil.
Clean the griddle surface thoroughly with oil and a grill pad or brick. Rub with the grain of the metal (front to back, never in a circular motion) while the griddle is still warm, not hot. Be sure the residue is thoroughly removed by flushing with clear water.
Clean stainless steel and chrome surfaces with a damp cloth and polish with a soft, dry cloth.
After each cleaning, the griddle must be re-seasoned.

P a g e | 33
Rotisserie
Items Needed:Dish soapWash clothSanitizer solution: 100 PPM (Two teaspoons of un-scented bleach per gallon of water)
Daily Cleaning
1. Press the electrical power switch to the "OFF" position. Allow rotisserie surfaces to cool.
2. Disconnect the rotisserie from the electrical power source.
3. Remove all detachable items such as spits, grease deflection trays, and grease collection unit. Drain grease from the drip pan and remove the drip pan from the oven when draining is complete.
4. Wash all detached items separately in a ware washing area or sink. Do not use abrasive or corrosive cleaners.
5. Wipe the interior metal surfaces of the oven with a paper towel to remove loose food debris.
6. Clean interior with a damp cloth or sponge and any good commercial detergent at the recommended strength.
7. Spray heavily soiled areas with a water soluble degreaser and let stand for 10 minutes. After 10 minutes, remove soil with a plastic scouring pad.
8. Rinse surfaces thoroughly by wiping with sponge and clean, warm water
9. Remove excess water with sponge and wipe dry with a clean cloth or air dry. Leave door open until interior is completely dry. Always replace all removable parts including drip pan and grease deflection trays before operating.
10. Interior can be wiped with a sanitizing solution after cleaning and rinsing. This solution should be 100 PPM (2 teaspoons bleach per gallon of water)
11.Wipe control panel and door handle(s) thoroughly since these areas harbor food debris and bacteria. Dry the control panel dry with a clean, soft cloth.
12.To help maintain the protective film coating on polished stainless steel, clean the exterior of the cabinet with a cleaner recommended for stainless steel surfaces. Spray the cleaning agent on a clean cloth and wipe with the grain of the stainless steel. For optional color coated exterior surfaces, wipe with a damp cloth or sponge and wipe dry with a clean cloth.
13.Clean glass doors with a standard, commercial glass cleaner.

P a g e | 34Monthly
Inspect power line, plug and wall receptacle for damage
Detail clean control knobs, hinges, and spindles.
Steamer Combo
Items Needed:Dish soapDe-lime solutionWash clothSanitizer solution: 100 PPM (Two teaspoons of un-scented bleach per gallon of water)
Daily Cleaning
1. Daily Cleaning Program - Daily cleaning, using 3 cups vinegar in the boiler, will reduce effort required in cleaning of the boiler and cavity.
2. Precautions
- warning: before cleaning the outside of the unit, switch off the electric power.
- warning: keep water and solutions out of controls and electrical components. Never hose or steam clean any part of the unit.
- warning: do not try to clean the cooking chamber while it is very hot from operation in the oven or combo mode. See the fast cool instructions in the operation section of this manual.
- warning: do not mix de-liming agent (acid) and degreaser (alkali) in the steam generator or on the cooking chamber walls.
- warning: take precautions to avoid contact with any cleaners, de-liming agent, or degreaser, as recommended by the supplier. Many cleaners are harmful to the skin, eyes, mucous membranes, and clothing. Carefully read the warnings and follow the directions on the label of the cleaner.
3. Procedure
Exterior
- Prepare a warm solution of the mild detergent as instructed by the supplier. Wet a cloth with this solution and wring it out. Use the moist cloth to clean the outside of the unit, including the controls, control panel, and other electrical parts that must not have liquid running freely on them.
- To remove materials stuck to the unit, use plastic wool, a fiber brush, or a plastic or rubber scraper with detergent solution. Do not use any metal material (like metal sponges) or metal implement (like a spoon, scraper, or wire brush) that might scratch the surface. Scratches make the surface hard to clean and provide places for bacteria to

P a g e | 35grow. Do not use steel wool, which may leave particles imbedded in the surface and cause eventual corrosion and pitting.
- Stainless steel surfaces on the outside of the unit may be polished with a recognized stainless steel cleaner.
Cooking Chamber
- Following the cleaner supplier's instructions, use the cooking chamber cleaner to clean all of the chamber completely. Clean every part that might be dirty, including both sides of the right side fan baffle and the cavity wall around the heating elements.
- Be sure to clean all food particles out of the drain screen.
- Run the unit in Steam Mode for 20 minutes to flush all oven cleaner out of the chamber. Drain the steam generator (by setting the unit to Oven Mode), before the unit is used for cooking. Wipe out the chamber before use.
- If the unit will not be used right away, leave the door open long enough to let the chamber dry completely.
De-Liming Steam Generator - Hardness of the water affects how well the de-limer works. If the water is very hard, stronger solutions of the de-limer may be needed, and de-liming may need to be done more often.
- Remove the generator cover, then set the unit into Steam Mode and let the generator fill with water.
- Following the directions of the supplier, pour de-limer into the generator, then replace the generator cover.
- Close the chamber door.
- Set the timer for 20 minutes and press the START pad.
- At the end of the 20 minutes steaming time, turn unit off.
- Let the generator drain, then check the generator for lime.
- If lime is left in the generator, repeat the procedure above.
- When the generator is clean, run the unit in Steam Mode for another 10 minutes to flush the cooking chamber.
- Drain the generator before the unit is used for cooking. Wipe out the cooking chamber before use.
- If you must stop in the middle of the generator cleaning procedure, drain and flush de-limer solution out of the generator and chamber right away. De-limer must not be left in contact with the unit any longer than is necessary to go through the cleaning procedure. Wipe out the cooking chamber before use.
Degreasing Steam Generator

P a g e | 36- If the generator is de-limed often, there should be little grease build-up, but degreasing may be needed after heavy use.
-- Remove the generator cover, then set the unit into Steam Mode and let the generator fill with water.
-- Following the directions of the degreaser supplier, pour degreaser into the generator, then replace the generator cover.
-- Close the chamber door.
-- Do not use the timer on the Convection Combo unit.
-- After the degreaser has been in the generator for 20 minutes, set the unit into Oven Mode.
-- Let the generator drain, then check the generator for grease.
-- If grease is left in the generator, repeat the procedure above.
-- When the generator is clean, run the unit in Steam Mode for 10 minutes to flush the cooking chamber. (The unit's timer must be used to get steam generation.)
-- Drain the generator before the unit is used for cooking. Wipe out the cooking chamber before use.
-- If you must stop in the middle of the degreasing procedure, drain and flush degreaser out of the generator and chamber right away. Degreaser must not be left in contact with the unit any longer than is necessary to go through the procedure. Wipe out the cooking chamber before use.
Weekly
Clean and check door gasket for damage.
Conveyor Oven
The recommended cleaning schedule shown below should be followed for proper performance and operation.
Daily:
Cleaning should include the wire conveyor belt and the crumb pans. The belt can easily be cleaned by using a wire brush, allowing any foreign material to drop into crumb pans. The crumb pans can then be emptied and cleaned accordingly.
Every two weeks:
Brush and clean the wire guard of the cooling fan(s) on the side(s) of the control panel.

P a g e | 37
Two Sided Grill (Panini)
Items Needed:Dish soapWash clothSanitizer solution: 100 PPM (Two teaspoons of un-scented bleach per gallon of water)
CLEANINGWhile holding top lid with one hand, apply only cleaners which are safe for aluminum and iron surfaces. Wipe with clean sponge or towel until unit is clean.
1. If particles adhere to the cooking surface during the day, scrape them off with a spatula or stiff brush.
NOTE: It is best not to let food cook on to the grill, as build-up of food on the grill will increase sticking and smoking. In addition, carbon may build up on the grill surface and reduce the cooking efficiency.
2. At the end of the day, wipe down all surfaces with a warm, damp cloth, use a mild detergent on all non-cooking areas and then dry entire unit. 3. Remove and empty to clean grease catcher cup as required using mild detergent and water.
CLEANING CARBON BUILDUP
1. When carbon build up occurs, use a carbon removal agent to clean cooking surface. When this process is completed, you must re-season the grill (See Seasoning Grill).
2. Acidic cleaners are NOT recommended as a cleaning agent.
CAUTION DO NOT IMMERSE OR LET THE UNIT STAND IN WATER. DO NOT HOSE DOWN THE UNIT OR THE TABLE/COUNTER IF THE UNIT IS ON THE TABLE/COUNTER.
KEEP AWAY FROM RUNNING WATER.
CAUTION DO NOT USE SHARP OBJECTS TO REMOVE CARBON BUILD-UP.
BEFORE CLEANING MAKE SURE POWER IS TURNED OFF, UNIT IS UNPLUGGED AND IS NOT TOO HOT.

P a g e | 38
Hot Dog Roller
Items Needed:IceDish soap2 Wash clothsSanitizer solution: 100 PPM (Two teaspoons of un-scented bleach per gallon of water)
DAILY CLEANING INSTRUCTIONS1. Heat the unit.
2. Using a moist cloth filled with crushed or flaked ice, wipe each tube. Wipe the tubes from each end to the center. This will keep as much of the loosened particles out of the bearings as possible. Extend the cloth as far as possible between the rollers.
3. With the heated rollers wiped with an ice filled cloth to loosen the particles, now, wipe clean with another cloth. Continue to wipe from the end of the rollers to the center. This will reduce the grease and partials getting into the bearings and drive mechanism. This will extend the life of the unit and extend the period between routine maintenance of the drive mechanism.
CAUTION: NEVER use abrasive powders or pads; these cleaners may damage the roller finish. Also, the particles may get into the drive mechanism shortening the unit life.
4. Remove the drip pan and wash it in hot, soapy water, then rinse.
5. If stains are still present, add a light detergent to the cloth and repeat.
Replace the pan and turn the unit off if the grill will not be immediately used.
Alternate Cleaning Method using optional 3M sponge and cleaning handle:
1. Turn heat down to lower setting (i.e. "hold" temperature) and allow grill to cool.
2. If the grill has considerable grease build-up, wipe the excess grease from the rollers with a lint free towel or paper towel before using the soap and sponge.
3. Place sponge onto cleaning handle.
4. Immerse sponge in warm, soapy water.
5. Scrub rollers starting from the outside of the roller working your way to the center. Rinse sponge and re-wet with the soapy solution as needed.
6. Ensure that entire roller surface is cleaned.
7. Dry with a lint free towel or paper towel.
NOTE: Cleanup will be faster if product is specifically made for cooking on rgrills. Several meat packers now offer this product.
For high-volume applications or for products that have a high sugar or fat content. the rollers may require more frequent cleaning. For longer life of your rollers, follow instructions for periodic cleaning throughout the day.
PERIODIC CLEANING THROUGHOUT THE DAY:
1. For high-volume applications or for product that has a high fat content clean the rollers ever 3-4 hours.

P a g e | 392. Clean by removing the product from the rollers and wiping with a damp cloth from outs
the rollers to the center. Replace the product and continue cooking. There should be no need to turn off the heat when wiping down the rollers But care should be taken no to bring hands into direct contact with the rollers as a burn could result.
NOTE: THIS APPLIANCE SHALL NOT BE CLEANED WITH A WATER JET.
Food Preparation
Meat Slicer
Items Needed:Dish soapWash clothSanitizer solution: 100 PPM (Two teaspoons of un-scented bleach per gallon of water)
Daily Cleaning
This machine must be thoroughly cleaned and sanitized after each day’s operation or after being idle for an extended period of time.
WARNING: THE SLICER KNIFE IS VERY SHARP. EXERCISE EXTREME CAUTION WHEN WORKING NEAR THE KNIFE.
WARNING: UNPLUG SLICER POWER CORD AND TURN THE INDEX KNOB FULLY CLOCKWISE BEFORE CLEANING THE SLICER.
Use a clean cloth soaked in mild detergent and warm water to wipe all surfaces of the machine. Rinse using a fresh cloth and clean water. Use only products formulated to be safe on stainless steel or aluminum.
Clean the Carriage Tray.
Wash and rinse both sides of the knife by wiping outward from the center. Use a mild detergent or sanitizer solution only. Never clean any part of the slicer with steel pads
Do not exceed chemical manufacturer's recommended concentrations for detergent or sanitizer. Do not exceed 200 parts per million concentration of available chlorine. Solution with concentrations greater than 200 ppm will accelerate corrosion of metals.
Monthly
WARNING: UNPLUG SLICER POWER CORD AND TURN THE INDEX KNOB FULLY CLOCKWISE BEFORE PERFORMING ANY MAINTENANCE PROCEDURE.
Lubrication
Carriage Slide Rod
Lubricate the Carriage Slide Rod with food grade oil. Either squirt 8 – 10 drops every 2 – 3 months (depending on usage) in the Wick Hole on the Carriage Transport Or, once

P a g e | 40monthly, apply 4 to 5 drops directly on the Carriage Slide Rod on each side of the Carriage Transport.
To apply oil, pull out the telescoping tube on the oil bottle, aim the tube, and squeeze gently on the sides of the bottle. After applying oil, move the Carriage Tray back and forth a few times so the oil spreads over the entire length of the slide rod. Also, apply 1 drop on both slots of the sharpener plunger and on the sharpener shaft.
Food Processor
Items Needed:Dish soapWash clothSanitizer solution: 100 PPM (Two teaspoons of un-scented bleach per gallon of water)
Daily Cleaning
Begin with the line cord unplugged and the "OFF' switch depressed.
Clean the food processor and accessories prior to initial use and after each use. Do not use harsh abrasive type cleaners on any part of the food processor.
Wash the motor shaft with a small brush.
Wash, rinse, sanitize and dry the bowl, continuous feed chute, covers, small food pusher, large food pusher, accessory discs, S-blades and ejector /slinger disc prior to initial use, and after use, unless they will be used again immediately. These items are all dishwasher-safe, and may be cleaned and rinsed in the dishwasher instead of manually in the sink.
For manual cleaning, it is recommended that you use washing solutions based on non-sudsing detergents, and chlorine-based sanitizing solutions that have a minimum chlorine concentration of 100 PPM.(2 teaspoons bleach per gallon of water).
Clean and sanitize the motor base prior to initial use and after each use. Unplug the unit, then wipe down the exterior surfaces of the motor base with cloths or sponges dampened with a soluble detergent. Next, wipe down with rinse water. Prevent liquid from running into the motor base by wringing out all excess moisture from cloths or sponges before using them.
NEVER IMMERSE THE MOTOR BASE IN WATER OR ANY OTHER LIQUID.
Allow the unit to air-dry before using again.
Never use harsh abrasive-type cleaners on any part of the food processor.
Monthly
Check power cord, plug and wall receptacle for damage.
Check motor casing, processor bowl, and pusher for damage.

P a g e | 41Check all blades for damage.
MixerWARNING: UNPLUG MACHINE POWER CORD BEFORE BEGINNING ANY CLEANING PROCEDURE.
The mixer should be thoroughly cleaned and sanitized daily. It should be washed with a clean damp cloth and warm soapy water. Bowls and agitators should be removed from the mixer and cleaned in a sink with warm soapy water, rinsed and sanitized.

P a g e | 42
Manual Can Opener
Items Needed:Dish soapWash clothSanitizer solution: 100 PPM (Two teaspoons of un-scented bleach per gallon of water)
Daily Cleaning
1. Remove all the food and can opening residues from the drive gear, the drive gear cavity, the knife and the area around the can stop using the stainless steel cleaning brush, Regular use of this tool will help prevent unwanted product buildup and harmful bacteria growth.
2. Wash the knife, gear and any splash area on the opener using soap and water.
3. Thoroughly dry the knife, gear and can opener using a dry cloth or paper towel.
4. Coat the knife and gear with food grade oil to prevent rusting.
Monthly
The drive gear should be inspected for wear monthly by first opening up a dent free #10 can with the opener. Inspect the can bead to see if the lines left by (tooth marks) the drive gear are narrow and evenly spaced, or if they are wide which indicates that the gear is slipping and may be removing metal from the can bead. If the gear is removing metal from the can bead, or milling, inspect the gear for wear.
If the teeth of the drive gear are dull, replace the drive gear. If the gear teeth appear to be sharp, inspect the arbor hole located below the gear by turning the opener upside down and determining if the hole is elongated or worn. If the hole is elongated, the opener is beyond repair and must be replaced.
ToasterItems Needed:Soapy WaterDegreaserSoft cloth
Daily Cleaning
Un-plug unit from wall receptacle and allow to cool.
Remove the crumb tray and discard crumbs. Wipe crumb tray clean and replace in toaster. Never operate the toaster without the crumb tray in place. To remove any pieces of bread remaining in the toaster, unplug toaster, turn the toaster upside down and gently shake. Never insert any metal or sharp instrument into the toaster slots. This could damage the toaster and present a potential safety hazard.
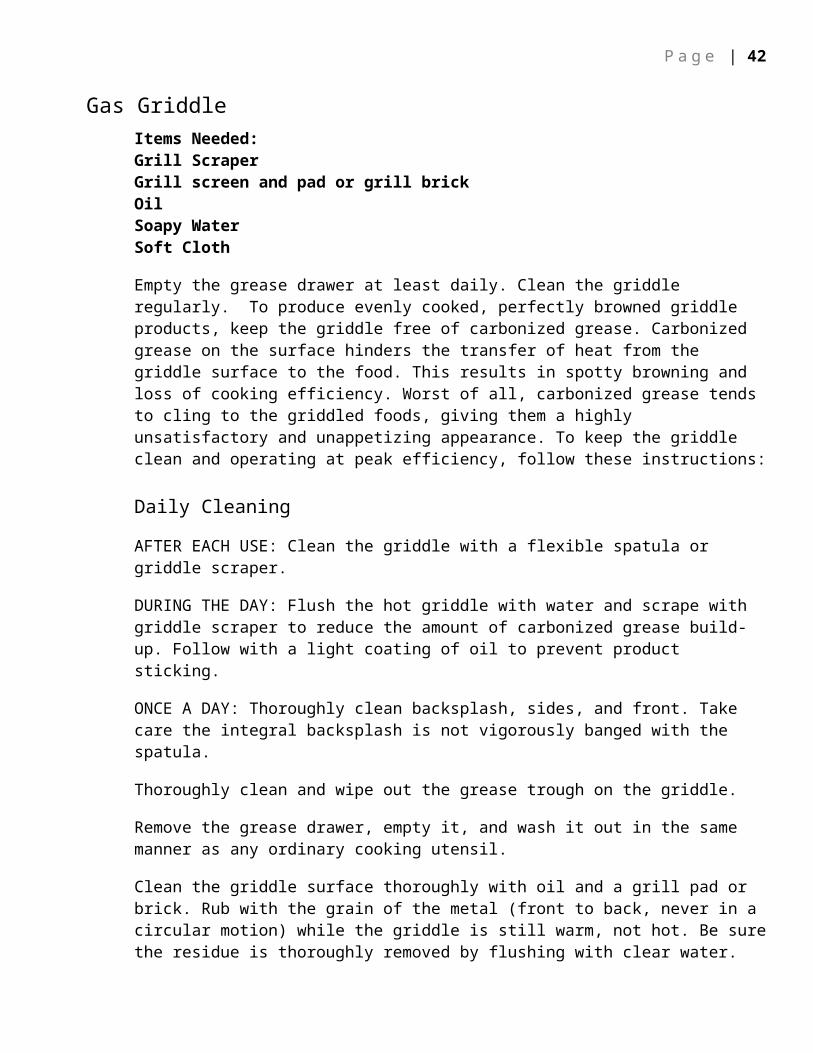
P a g e | 43Clean exterior with soapy water, rinse and allow to air dry.
Monthly
Degrease exterior if needed.
Scales
Items Needed:Dish soapWash clothSanitizer solution: 100 PPM (Two teaspoons of un-scented bleach per gallon of water)
Daily Cleaning
-- Never lift scale by grabbing platform, hold base.
-- Gently place items on platform.
-- Never immerse scale in water.
-- Wipe down base, platform and faceplate with soapy water, rinse and sanitize
Weekly
Detail clean base, platform and faceplate.
Service Line
Soft Drink Dispenser
Items Needed:Dish soapWash clothSanitizer solution: 100 PPM (Two teaspoons of un-scented bleach per gallon of water)
Daily Cleaning1. Take off the cup rest from the machine to wash in warm soapy water, then
reinstall.
2. Wash the exterior down, using warm soapy water, rinse it and dry thoroughly.
3. Remove nozzles and diffusers from the dispensing valves and clean them with a special nozzle brush and chlorine-based sanitizer solution; soak nozzles and diffusers in the sanitizer solution for about 3 minutes; replace after they dry
4. Clean underneath dispensing valves with the sanitizer solution and a dedicated brush; dry with a clean towel
5. Clean dispenser handles

P a g e | 446. Clean Back splash
7. Empty the ice bin if equipped and clean the sides of its interior
8. Clean the ice chute

P a g e | 45
Weekly 1. Wash hands
2. Disconnect the syrup line from bag-in-box (BIB) units; shake out any remaining liquid
3. Soak the connectors in the sanitizer solution for about a minute
4. Shake BIB connector to remove any excess sanitizer and reconnect each connector to the corresponding BIB.
5. Clean the spill tray and sanitize with bleach.
Monthly 1. Remove the splash plate and clean it in warm soapy water.
2. Clean the panel behind the splash plate with warm, soapy water. Replace the splash plate.
3. Flush the syrup lines:
a. Sanitize a bucket.
b. Fill the bucket with water and a sanitizing solution as recommended by your manufacturer.
c. Remove the syrup line from all bags in boxes.
d. Open the valve and soak it in your bucket.
e. Use a plastic bag or glove to cover the connectors.
f. Empty, rinse, and fill the bucket with hot water, not above 140 degrees.
g. Take plastic from the connector and place in the hot water.
h. Activate the valve at the soda machine.
i. Flush the line until the bucket is empty and repeat two or three times.
j. Take the connector from the bucket and attach it to the new bag in box.
k. Activate the valve at the soda machine until all the water flushes through.
4. Unplug the ice maker; scrub the inside of the ice bin and chute with a nylon brush and the sanitizer solution
5. Wash the condenser fins with a dedicated hard brush; clean the air filters, if they are used
6. Check the water filters to make sure they are current
7. Maintain the valve and syrup line product labels
8. Clean the coil with a soft brush.

P a g e | 46
Coffee Machine
Items Needed:Dish soapWash clothDe-lime solutionDe-lime springSanitizer solution: 100 PPM (Two teaspoons of un-scented bleach per gallon of water)
Daily Cleaning
1. The use of a damp cloth rinsed in any mild, non-abrasive, liquid detergent is recommended for cleaning all surfaces on coffee equipment.
2. Clean the underside area where the spray head is located with soapy water. Rinse well and allow to air dry.
3. Check and clean the spray head. The spray head holes must always remain open. Unscrew from the unit to clean and unclog the spray head holes.
Weekly
1. With the spray head removed, insert the deliming spring all the way into the spray head tube. When inserted properly, no more than two inches of spring should be visible. Saw back and forth six times.
2. Move equipment and clean underneath.
Monthly
Check and adjust brew timing and temperature if necessary.
Iced Tea Maker
Items Needed:Dish soapWash clothDe-lime solutionDe-lime springSanitizer solution: 100 PPM (Two teaspoons of un-scented bleach per gallon of water)
Daily Cleaning
1. Remove and thoroughly clean the entire brew funnel. The funnel tip and screen must be free of any tea particles or residue. Reassemble the funnel.
2. Clean hot water dispenser faucet daily.
P a g e | 473. Place the ON/OFF or SELECTOR switch in the "OFF” position. Remove and thoroughly rinse the spray head. The holes must be open and clear of any mineral deposits. Wipe the spray head panel clean with a damp cloth.
4. Insert the deliming spring into the spray head fitting until no more than two inches is visible and move it in and out 5 or 6 times. Insert the spring into the air vent hole in the spray head panel and move it in and out 5 or 6 times. Reattach the spray head.
5. Twist the faucet shank nut in a clockwise direction and remove the faucet from the brewer.
6. Soak inside of the tea dispenser in hot water and dish detergent for at least 5 (five) minutes. Scrub the tea dispenser with a brush to remove any residue build-up or stain. Rinse thoroughly. Sanitize the dispenser for one minute in chlorine solution (100 ppm, 2 teaspoons bleach per gallon of water) & allow to air dry.
7. Soak inside of the tea dispenser in hot water and dish detergent for at least 5 (five) minutes. Scrub the tea dispenser with a brush to remove any residue build-up or stain. Rinse thoroughly. Sanitize the parts for one minute in chlorine solution (100 ppm, 2 teaspoons bleach per gallon of water) & allow to air dry. Remove the dispensing faucet from dispenser. Use small brush to thoroughly clean inside & around faucet shank (the opening where the faucet was removed). Unscrew faucet cap from faucet body & disassemble all faucet parts. Transfer parts to a three compartment sink & wash, rinse, & sanitize. Use small brush to thoroughly scrub the faucet body. Allow the parts to air-dry overnight. Re-assemble faucet components and re-attach faucet to dispenser.
8. Sanitize all exposed surfaces of the reservoir with a chlorine solution (100 ppm, 2 teaspoons bleach per gallon of water). Insert the brew funnel and thoroughly rinse everything by running two complete brew cycles, empty the reservoir after each brew cycle.
9. Wash the entire outside surface of the brewer with a clean damp cloth.
Weekly
1. With the spray head removed, insert the deliming spring all the way into the spray head tube. When inserted properly, no more than two inches of spring should be visible. Saw back and forth six times.
2. Move equipment and clean underneath.
3. Check and adjust brew timing and temperature if necessary
Monthly
Check and adjust brew timing and temperature if necessary.
Steam Table
Items Needed:Dish soap

P a g e | 48Wash clothDe-lime solutionSanitizer solution: 100 PPM (Two teaspoons of un-scented bleach per gallon of water)
Daily Cleaning
To maintain appearance and increase the service life, the food warmer should be cleaned daily.
1. Before cleaning or moving, unplug the unit and let it cool completely.
2. Carefully drain or remove water from wells.
3. Wipe the entire interior of each water pan and well with clean, damp cloth.
4. To avoid damaging the finish, do not use abrasive materials, scratching cleaners or scouring pads to clean water deposits from the wells.
5. If soap or chemical cleaners are used, be sure they are completely rinsed away with clear water, immediately after cleansing. Chemical residue will corrode the surface of the unit.
Cold Well
Items Needed:Dish soapWash clothSanitizer solution: 100 PPM (Two teaspoons of un-scented bleach per gallon of water)
Daily Cleaning
1. Remove all food product containers from well. Remove any food product that has been spilled on the ice. Discard spilled food product.
2. Place a bucket under the drain and allow the water to flow into the container. Warm water may be poured over the ice to shorten melting time.
3. Wipe interior of well and all surface areas to remove remaining water and food spills.
4. If soap or chemical cleaners are used to clean the metal surfaces, be sure they are completely rinsed away with a clean damp cloth or sponge. Chemical residue may corrode the surface of the cold food table.
Other Equipment
Cash Register
Items Needed:Dish soapWash cloth

P a g e | 49Daily Cleaning
Clean with damp towel and mild soapy water to remove accumulated dust.
Weekly
Clean with damp towel and mild soapy water to remove accumulated dust and grease build up.
Monthly
Inspect power cord for damage
Popcorn Popper
Items Needed:Dish soapWash clothDegreaserVinegarSanitizer solution: 100 PPM (Two teaspoons of un-scented bleach per gallon of water)
Daily Cleaning
NEVER clean any electrical unit by immersing it in water.
1. Unplug unit before surface cleaning.
2. DO NOT immerse the popper pot in water!
3. Clean unit while unit is still warm. Use warm, soapy water. Mild cleaners and PLASTIC scouring pads may be used to remove baked- on food and water scale.
4. STAINLESS STEEL: To remove normal dirt or product residue from stainless steel, use ordinary soap and water (with or without detergent) applied with a sponge or cloth. Dry thoroughly with a clean cloth. Never use vinegar or corrosive cleaner. Do not use chorine based cleaners.
DO NOT USE ordinary steel wool as any particles left on the surface will rust.
NEVER USE a wire brush, steel or abrasive scouring pads (except stainless), scraper, file or other steel tools. Surfaces which are marred collect dirt more rapidly and become more difficult to clean. Marring also increases the possibility of corrosive attack.
NEVER USE any corrosive cleaner. Use only cleaners approved for stainless steel.
Weekly
Remove doors and clean completely and clean hinges

P a g e | 50Move away from wall and clean wall and floors.
Monthly
Inspect power cord for damage.
Vent Hood
Items Needed:Dish soapDegreaserVinegarWash cloth
Daily Cleaning
Stainless surface – clean surface with soapy water or degreaser if needed. Rinse and allow to air dry. If degreaser is used neutralize with vinegar.
Weekly
Remove grease filters and clean in soapy water (3 compartment sink) allow to air fry before replacing. If degreaser is used neutralize with vinegar.
Empty and clean grease drain and cups.
Semi Annually
Soak filters in a degreasing solution, rinse and neutralize with vinegar, allow to air dry.
Have system professionally cleaned.
Caution:
DO NOT use steel wool Pads, scrappers, or spatulas to clean hood!
DO NOT use the following substances on or around the hood!
1. Chlorine or chlorine based substances.
2. Acids (E.G. acetic, hydrochloric, sulfuric).
3. Chloride based substances (E.G. mercuric chloride, ferric chloride).
Vapors of the above substances can corrode stainless steel!

P a g e | 51
Inspection of Hood and Ducts
The schedule of inspections for grease and residue build-up depends on the type of cooking equipment and how much it is used. Whenever a build-up is found the system must be cleaned.
Every owner or operator should do a visual inspection, at least once a month, of those parts of the system readily accessible, including the removal of filters. A qualified company or individual must complete a thorough inspection of all components, ducting and fans, following the schedule laid out in NFPA 96
1. Monthly: For cooking appliances using solid fuel ( charcoal, wood, etc.)
2. Quarterly: High-volume operations, such as 24-hour kitchens, charbroiling or wok cooking.
3. Semiannually: Systems serving moderate-volume cooking operations, such as restaurants open during normal business hours.
4. Annually: Systems serving low-volume cooking operations, such as churches, day camps or seasonal business.
**The local authority having jurisdiction may require inspections be completed more often than indicated by this schedule.
*** Numbers 2 and 3 will apply to most B E T facilities.
Cleaning of Hood and Ducts
Cleaning of ventilation systems must be performed as required in Chapter 11 of NFPA 96. The use of a cleaning company or contractor is recommended. There are two primary methods of cleaning kitchen exhaust ductwork. The first is scraping and manual removal of build-up. The second is pressure washing or steam-cleaning. In either method the ventilation system must be cleaned to ensure all grease, oil and combustible residue is removed from the hood, filters, ducting and exhaust fans.
When grease and residue build-up is found the complete system must be cleaned by a properly trained, qualified, and certified company or person(s) acceptable to the authority having jurisdiction.
Before inspection and cleaning starts, electrical safety must be ensured. The safest approach is locking-out circuit breakers at the main panel.
The fire suppression system must remain in working order during the cleaning, except when the extinguishing system is being serviced at the same time.

P a g e | 52No flammable solvents or cleaning fluids may be used.
No cleaning chemicals of any kind may be used on any of the fusible links or other detection devices.
No coatings, powders or other substances may be applied to any part of the exhaust system after cleaning.
All access panels (doors) and cover plates must be properly re-installed after cleaning and before the system is put back into service.
Dampers, diffusers and other air handling devices must be properly re-installed after cleaning and before the system is put back into service.
Electrical switches and system components must be returned to their normal operating state.
When a vent cleaning service is used, a certificate showing date of inspection or cleaning must be kept on the premises by the owner/operator.
The cleaning contractor will post a label in the kitchen area showing the date of the cleaning, the name of the service company and a note detailing areas of the system that were not cleaned.
Where required, certificates of inspection and cleaning shall be submitted to the authority having jurisdiction.
General Inspection Requirements
The key to fire safety in commercial cooking operations is regular inspection, maintenance and cleaning the exhaust system, fire detection and suppression equipment and of the cooking appliances. Fire inspectors should check commercial cooking operations regularly, both to ensure safe operation of the systems and to familiarize themselves with the facility for fire preplanning purposes. Inspectors should complete the following:
Hoods, Filters, Ducts and Fans
Inspect the hood, duct and filters for grease build up. If accumulations are present, the hood, duct and filters must be cleaned.
Look for the label from the cleaning company identifying the last time the system was cleaned or ask the owner for the last cleaning company report. Cleaning should have taken place within the last 12 months, or less, depending on the type of cooking equipment used.
P a g e | 53Check all appliances to ensure that they are in the proper place, have not been moved since the last inspection and are fully covered by the hood.
Ensure proper placement of all appliances under the hood and the fire suppression system nozzles.
Inspect appliances for accumulations of grease. If accumulations are found, appliances must be cleaned.
Ensure that there have been no alterations, or changes to the hood, ducts or appliances. Only alterations permitted by NFPA 96 may be made to the exhaust system.
Ensure the hood and duct have not been damaged and that there are no breaches. Also ensure that any piping or other penetrations of the hood or duct openings, which are part of the system design, are in good condition and tightly fitted.
Check all lights located in the hood to ensure that they are properly protected. Lights should be rated for hazardous locations and enclosed to prevent grease from entering or contacting hot parts or wiring.
Check make-up air to determine if an adequate supply is available to allow the ventilation system to operate properly.
Cleaning Vent Hood Filters
For Low volume facilities with minimal cooking such as a snack bar that serves hamburgers and fries filters should be cleaned one monthly.
For medium to high volume facilities filters should be cleaned at least weekly.
Procedure In A Sink
For light grease build.
Cover your hands with thick rubber gloves before unlatching and sliding the grease filter out of the range hood. Most grease filters are held in place by latching clips that must be moved out of the way. Caution: the inside edges of the filters may be SHARP, avoid touching this area.
Rinse the filters in a sink which attaches to the grease trap, with hot water. Lower the grease filter into a sink full of hot diluted degreaser and allow it to soak for a couple hours or overnight. Dilute the multi-purpose degreaser according to the manufacturer's directions on the package.
After soaking the filters should be rinsed with hot water, allowed to dry and be returned to the filter holder.
For filters that are heavily laden with grease, cover your hands with thick rubber gloves before unlatching and sliding the grease filter out of the range hood. Most grease filters

P a g e | 54are held in place by latching clips that must be moved out of the way. Caution: the inside edges of the filters may be SHARP, avoid touching this area.
Spray filters with a heavy duty degrease such as “Greased Lightning® ” or equivalent Allow to soak for the appropriate amount of time according to manufactures’ instructions. Filters may also be placed in a plastic holding container with a degreaser solution designed to clean filters and allowed to soak until the grease is dissolved.
After soaking the filters should be rinsed with hot water, allowed to dry and be returned to the filter holder.
If a dishwashing machine is available the filter may be placed in the machine for regular

P a g e | 55
Daily Cleaning And Maintenance Of Stainless Steel Hoods
1. Carefully wipe away gritty substances clinging to stainless steel surfaces to avoid scratching.
2. Dilute 1/2 cup of laundry detergent (E.G. Tide, Surf) with 1 gallon warm water.
3. Soak a cloth in the water detergent solution. Wring out excess.
4. Rub the cloth in the direction of the grain.
5. Wipe stainless steel with cloth soaked in warm water to remove all traces of the cleansing agent.
6. Wipe stainless steel dry with a clean cloth.
7. Reapply a non-toxic stainless steel polish.
8. Empty and clean grease drain and cups.
9. Filters should be cleaned in a dishwasher or soak sink periodically.
CAUTION
DO NOT use steel wool Pads, scrappers, or spatulas to clean hood!
DO NOT use the following substances on or around the hood!
1. Chlorine or chlorine based substances.
2. Acids (E.G. acetic, hydrochloric, sulfuric).
3. Chloride based substances (E.G. mercuric chloride, ferric chloride).
Vapors of the above substances can corrode stainless steel!
Stainless Steel Cookware
The name "stainless steel" can be misleading. Contrary to popular belief, stainless steel can rust over time if not properly cared for. Rust will occur if the outer covering of the steel gets damaged. To avoid this proper cleaning and maintenance are required.
How to clean:
Use warm soapy water to clean pans.
Soapy water and a cloth or sponge is best to use to avoid scratching the surfaces of your pans.
For stubborn stains, use boiling water.

P a g e | 56For stains that are baked on or that won’t come loose with just soapy water, try pouring boiling water in the pot or pan to loosen the stain.
Dry pots and pans immediately.
This prevents water spots caused by hard water. If the spots continue, try filtering your water to remove some of the extra minerals.
Use vinegar solution to get rid of hard water spots.
Hard water can cause problems for steel over time. To remove these stains use a 1 part white vinegar to 3 parts water solution.
Things to avoid:
Minimize or eliminate the use of steel pads,
scrapers and other abrasive scrubbers. These nicks in the finish lead to rust over time.
Avoid bleach.
Bleach has a tendency to discolor steel.
When storing, if possible, avoid stacking.
Stacking the pots and pans can sometimes cause scratches. Hanging pots and pans is best, but if it isn’t practical, stacking will work.
Aluminum Cookware
Aluminum cookware is popular because it is light weight and is great at conducting heat. However aluminum is not as sturdy as stainless steel and like any piece of cookware, requires care. You can extend the life of your cookware by cleaning it properly.
How to clean:
Let it cool before washing.
Occasionally these pots and pans can warp if cleaned while still hot. Also cleaning a pan straight from the stove puts the person washing the dishes in danger of getting burned.
Use warm soapy water.
In most cases, all you need is a cloth and warm soapy water to clean your pots and pans.
Avoid cooking acidic foods.
If most of your pans are aluminum, you may not be able to avoid this. Acidic foods such as tomatoes can stain your pans. It can also cause them to become pitted over time.
Use vinegar or white tartar solution to brighten aluminum.
Mix either 4 tablespoons of white vinegar or white tartar in one quart of water.

P a g e | 57Things to avoid:
Never use metal utensils.
Only use plastic or wood utensils. Metal utensils can scratch the coating and reduce its ability to be nonstick.
Do not soak in soapy water.
The non-stick coating can absorb the soap and make food cooked in the pan taste soapy.
Never use abrasive scrub brushes.
Any type of abrasive scrub brush can damage the non-stick coating the same way a metal utensil would. If you have difficulty removing stains, use a little bit of baking soda to loosen the food.
Non-stick pans have different rules for cooking and cleaning. The coating is not as durable as the metal below it, and requires special attention. If you choose to use non-stick over natural finishes, take good care of the finish.
Cast Iron Cookware
Cast iron pans are inexpensive, incredibly durable, and ideal for use in a kitchen. Cast iron is an excellent heat conductor therefore the pans heat evenly throughout. It is safe to use on a stove, an open fire and in the oven. If maintained these pans can last a lifetime. The catch is that they must be taken care of or they will rust. Seasoning a cast iron pan is the most important thing and should be done before the pan is ever used. This process should be repeated after each use and cleaning.
Seasoning a pan:
1. Coat the pan in a very light coat of a neutral oil.
2. Vegetable oils work great for this.
3. Preheat your oven to 300 degrees.
4. Lay the pan upside down on the oven rack.
5. Put a piece of foil under the pan to catch the drippings. Placing the pan upside down allows excess oil to drip off the pan instead of staying behind. If the pan is placed face up, the oil can gum up on the surface.
6. Bake the pan for 45 minutes.
Some pans come with a factory season coating. Some people like to use this until it wears off, while others prefer to scrape it off and start from scratch.
By cooking food properly in the cast iron pan, you can reduce the amount of cleaning needed to maintain your cookware. Always preheat the pan. You want the pan to be warm but not so hot that it scorches food the instant you put it in. A good way to test is by

P a g e | 58sprinkling a little water on the pan. If the water bubbles and hops then your pan is perfect. If it evaporates, the pan is too hot.
How to clean:
Use soapy warm water to clean your pan.
Let the pan cool off before doing this. A lot of people believe that you should never wash a pan with soap. However, that is not acceptable in a commercial kitchen. Health codes insist upon washing with soap. It will not harm your pan, and it is ok to use if done properly.
Use a cloth or sponge to wash inside.
Never use abrasives. They create scratches and nicks that will cause your pan to rust.
Dry immediately after washing.
After washing the pan dry with a cloth to prevent rusting. You never want your pan to be damp or wet when storing.
Things to avoid:
Abrasives are bad for the pan.
They scratch the surface and cause the pan to rust.
Never ever soak your pan.
This can also cause rust.
Never store food in a cast iron pan.Anything cooked in the pan should be served, or put elsewhere for storing. Leaving acidic foods in the pan can breakdown the seasoning in the pan. Also, the food will absorb the metallic taste.
Plastic ware Holder/Cart
Items Needed:Dish soapWash clothSanitizer solution: 100 PPM (Two teaspoons of un-scented bleach per gallon of water)
Daily Cleaning
Clean with soapy water, rinse and sanitize.
Monthly
Remove plastic ware holders, wash rinse and sanitize.

P a g e | 59Detail clean the cart.

P a g e | 60
Condiment Holders
Items Needed:Dish soapWash clothSanitizer solution: 100 PPM (Two teaspoons of un-scented bleach per gallon of water)
Daily Cleaning
Whip out with a damp cloth.
Weekly
Clean with soapy water, rinse and sanitize.
Wooden Cutting Boards
Items Needed:Dish soapWash clothSanitizer solution: 100 PPM (Two teaspoons of un-scented bleach per gallon of water)
Daily Cleaning
To sanitize wooden cutting boards, wash, wipe, or rinse with dishwashing detergent and water, then apply solution. Let stand 2 minutes. Rinse with a solution of 2 teaspoons of un-scented per gallon of water. It is not recommended to rinse or soak wooden boards overnight.
Reduce cutting board odors by rubbing with halved lemons and then rinsing with cold water
Monthly
To maintain the wooden surface and keep the boards from drying out rub with a food grade oil like mineral oil.
Stainless Surfaces - Food Prep
Items Needed:Dish SoapRinse WaterSanitizer solution: 100 PPM (Two teaspoons of un-scented bleach per gallon of water)Soft Towel

P a g e | 61Daily Cleaning
Clean your stainless steel sinks and countertop frequently with warm soapy water, using a soft cloth. Thoroughly rinse with water, and wipe dry with a soft cloth to eliminate the possibility of water stains.
Household cleaning products that contain chlorides such as Chlorine bleach or acids can stain and corrode the surface of stainless steel if not thoroughly rinsed with clean water. Sanitize the surface with a mild bleach solution of 100 PPM, 1 tablespoon of un-scented bleach per gallon of water.
Be sure all soapy residue is removed and sanitizer solution is allowed to dry before placing foods on the counter top. This reduces the chance of chemical contamination which can lead to foodborne illness.
Never leave acidic foods like pickles, vinegar or citrus, lay in a sink or on a countertop for long periods of time as the acid will stain the surface.
Always use non-abrasive type pads, a sponge or soft cloth when cleaning stainless steel. Steel wool pads can leave steel particles on the surface and quickly form rust deposits and become a physical contaminant which can lead to foodborne illness.
When scouring a sink or countertop with an aggressive pad or mild cleaner, rub in the same direction as the grain to avoid cross scratching.
Weekly
Move all prep tables and other equipment that is on wheels and clean the walls and floors.
Stainless Steel Equipment(other than Food Prep surfaces)Items Needed:Dish soapWash cloth
Basics
CAUTION: Do not use any steel wool, abrasive or chlorine based products to clean stainless steel surfaces. The outside surface of the equipment is not a food contact surface and thus does not need to be sanitized. Please ensure that you use appropriate products when cleaning and polishing your unit. Cleaners containing chlorine must not be used as these will attack the stainless steel causing damage and in some cases corrosion. Avoid the use of TOXIC Stainless Steel Cleaners. These cleaners are expensive and dangerous and can easily contaminate food.
There are three basic things which can break down your stainless steel’s passivity layer and allow corrosion to occur.

P a g e | 621) Scratches from wire brushes, scrapers, and steel pads can be abrasive to stainless
steel’s surface.
2) Deposits left on your stainless steel can leave spots. These deposits can cause the passive layer to break down and rust your stainless steel. All deposits left from food prep or service should be removed as soon as possible.
3) Chlorides are present in table salt, food, and water. Household and industrial cleaners are the worst type of chlorides to use. Use plain soap and water or vinegar for cleaning.
To prevent rust on stainless steel:
1. Using the correct cleaning tools - Use non-abrasive tools when cleaning your stainless steel products like soft cloth or sponge.
2. Cleaning along the polish lines - Polishing lines or “grain” are visible on some stainless steels. Always scrub parallel to visible lines on some stainless steels. Use a plastic scouring pad or soft cloth when you cannot see the grain.
3. Use plain soapy water. Avoid cleaners containing quaternary salts as they can attack stainless steel, causing pitting and rusting.
4. Maintaining the cleanliness of your food equipment. Use cleaners at recommended strength. Avoid build-up of hard stains by cleaning frequently. When boiling water with your stainless steel equipment i.e. steam table, the single most likely cause of damage is chlorides in the water. Heating any cleaners containing chlorides will have the same damaging effects.
5. Rinse the surface with plain water. It is not necessary to sanitize surfaces not used as a food contact surface, like the door or sides of a refrigerator, if you do use a bleach solution ensure it is no more than 100 PPM, about one tablespoon of bleach to a gallon of water. Allow the surface to air dry. Oxygen helps maintain the passivity film on stainless steel.
6. Muriatic acid should never be used on or near stainless steel
Daily Cleaning
Clean stainless steel frequently with warm soapy water, using a sponge or soft cloth. Thoroughly rinse with clear water, and wipe dry with a soft cloth to eliminate the possibility of water stains.
Household cleaning products that contain chlorides such as Chlorine bleach or acids can stain and corrode the surface of stainless steel if not thoroughly rinsed with clean water. Sanitize the surface with a mild bleach solution of 100 PPM, 1 tablespoon of un-scented bleach per gallon of water.
Be sure all soapy residue is removed and sanitizer solution is allowed to dry before placing foods on the counter top. This reduces the chance of chemical contamination which can lead to foodborne illness.

P a g e | 63Quickly remove any cleaning solution that may splash on the surface when mopping the floor to prevent stains.
It is not necessary to sanitize stainless steel that is not a food contact surface.

P a g e | 64
Why use written cleaning and sanitation procedures, schedules and records?
Written cleaning and sanitation procedures, schedules and records are crucial to communicate and verify that proper methods are being used throughout the entire cycle of handling food and equipment.
Written procedures make it clear to each worker what his or her cleaning and sanitizing responsibilities are.
Written schedules make it clear when cleaning and sanitizing are to be done.
Sign off on schedules make it clear when the job has been completed.
Why post a daily, weekly and monthly cleaning schedule?
The best way to maintain a clean and sanitary foodservice department is to follow a cleaning schedule. Each area in a foodservice department has unique scheduling requirements for clean-ing and sanitizing. For example, food contact surfaces in preparation areas and dish rooms re-quire repeated cleaning and sanitizing throughout the day. On the other hand, nonfood contact surfaces such as the outside of the microwave typically only need to be cleaned twice a week. A posted cleaning schedule will help you stay on track to compliance with established standards and local, state and federal regulations.
Why sign or initial cleaning schedules?
Your signature helps forma a documentation trail. Your signature confirms the assigned job was completed. Cleaning and sanitizing tasks need to be done each and every time they are as-signed. Records of what tasks are completed and when they are completed are maintained in the department.
Records are used to substantiate that we operate under clean and sanitary conditions. These documents are subject to inspection by the administrator, local, state and federal authorities. Also, these documents may become important to show that proper procedures have been fol-lowed if a case of food borne illness occurs.

Master Cleaning Schedule #1
Prep Daily Cleaning
Frequencies listed are minimum standards. Any item needing cleaning is cleaned on a clean as you go basis. (table, 5 columns)
ITEM WHEN HOW SOLUTION TYPE(S)
POSITION
Initials when Complete
Hand wash sink , water control handles
Daily Wash, rinse and sanitize
General purpose cleaner, fresh water and sanitizer 100ppm Prep
Prep Tables Daily Wash, rinse and sanitize
General purpose cleaner, fresh water and sanitizer 100ppm Prep
Prep Room floors Daily Sweep and Mop. Quarry or tile cleaner – . 8 oz per 1 gallon Prep
Under refrigerators Daily Sweep, Mop. Quarry or tile cleaner – . 8 oz per 1 gallon Prep
Refrigerator Outside surface Daily Wash, rinse and
sanitizeGeneral purpose cleaner, fresh water and sanitizer 100ppm Prep
Can Opener Daily Wash, rinse and sanitize
General purpose cleaner, fresh water and sanitizer 100ppm Prep

Stove Burners and exterior Daily
Scrap off food debris, scrub with green scrubber, wipe with soft clean grill towel.
Degreaser followed by , vinegar solution,
Prep
Oven Interior and exterior Daily
Scrap off food debris, scrub with green scrubber, wipe with soft clean grill towel.
Degreaser followed by , vinegar solution,
Pep
Counters and non-food contact surfaces
Daily Wash, rinse and sanitize
General purpose cleaner, fresh water and sanitizer 100ppm Prep
Standard Oven exterior Daily
Scrap off food debris, scrub with green scrubber, wipe with soft clean grill towel.
Degreaser followed by , vinegar solution,
Prep

Prep Weekly Cleaning
Frequencies listed are minimum standards. Any item needing cleaning is cleaned on a clean as you go basis. Table 5 coulmns
Hand wash sink , Detail cleaning Friday Wash, scrub, rinse
and sanitizeGeneral purpose cleaner, fresh water and sanitizer 100ppm Prep
Prep Table Shelves Friday Wash, rinse and
sanitizeGeneral purpose cleaner, fresh water and sanitizer 100ppm Prep
Prep Room floors
Detail cleaningFriday Sweep and Scrub,
Mop, sanitize Quarry or tile cleaner – . 8 oz per 1 gallon Prep
Under refrigerators Friday
Move units from wall.
Sweep, scrub, Mop.
Quarry or tile cleaner – . 8 oz per 1 gallon Prep
Stove Burners and exterior Friday
Scrap off food debris, scrub with green scrubber, wipe with soft clean grill towel.
Degreaser followed by , vinegar solution, Prep
Refrigerator Outside surface Monday Polish Stainless steel cleaner Prep
Refrigerator inside surface Monday Wash, rinse and
sanitizeGeneral purpose cleaner, fresh water and sanitizer 100ppm Prep
Standard Oven Interior Monday
Scrap off food debris, scrub with green scrubber, wipe with soft clean grill towel.
Oven cleaner followed by , vinegar solution, Prep
Storage Shelves Wed Wash, rinse and General purpose cleaner, fresh water and sanitizer Prep

sanitize 100ppm
Convection Oven exterior Wed
Scrap off food debris, scrub with green scrubber, wipe with soft clean grill towel.
Degreaser followed by , vinegar solution, Prep
Convection Oven interior Wed
Scrap off food debris, scrub with green scrubber, wipe with soft clean grill towel.
Oven cleaner followed by , vinegar solution, Prep

Grill/Fry Daily Cleaning-
Frequencies listed are minimum standards. Any item needing cleaning is cleaned on a clean as you go basis. Table 5 columns
ITEM WHEN HOW SOLUTION TYPE(S) POSITION Initials when Complete
Fryer Exterior Daily
Remove build up with a Nylon pad, wipe with a soft clean towel.
Degreaser, fresh water with vinegar.
Grill/Fry
Griddle Cooking Surface Daily
Scrap off food debris, scrub with grill screen, wipe with soft clean grill towel season with clean oil.
fresh cooking oil grill screen Grill/Fry
Griddle Exterior Surfaces and shelving
Daily
Scrap off food debris, scrub with green scrubber, wipe with soft clean grill towel.
Degreaser followed by , vinegar solution,
Grill/Fry
Grill Daily Scrape off food debris
Season with fresh oil
Grill exterior surfaces and shelving
Daily
Scrap off food debris, scrub with green scrubber, wipe with soft clean grill towel.
Degreaser followed by , vinegar solution,
Grill/Fry
Sandwich Unit Exterior
Daily Scrap off food debris, scrub with green scrubber,
General purpose cleaner. Grill/Fry

wipe with soft clean grill towel.
Sandwich Unit Shelving and ticket holder
Daily
Scrap off food debris, scrub with green scrubber, wipe with soft clean grill towel.
General purpose cleaner. Grill/Fry
Toaster Daily
Scrap off food debris, scrub with green scrubber, wipe with soft clean grill towel.
General purpose cleaner. Grill/Fry
Kitchen Floor (grill, steam table area)
End of day Sweep, scrub and Mop with hot water
Quarry cleaner –
. 8 oz per 1 gallonGrill Fry
Cutting Board surfaces Daily Clean and sanitize General purpose cleaner,
sanitizer solution 100 PPM Grill Fry

Grill Weekly Cleaning
Frequencies listed are minimum standards. Any item needing cleaning is cleaned on a clean as you go basis. Table 5 columns
Fryer Interior Friday
Remove build up with a Nylon pad, Boil out pot wipe with a soft clean towel.
Boil out chemicals follow-up with vinegar solution ( one cup per gal)
Grill/Fry
Vend Hood and Back Splash Tuesday
Remove build up with a Nylon pad, Wipe with soft cloth
Degreaser followed by , vinegar solution,
Grill/Fry
Walls TuesdayRemove build up with a Nylon pad, Wipe with soft cloth
Degreaser followed by , vinegar solution,
Grill/Fry
Floors FridaySpray with very hot water. Scrub, dry mop
Tile/floor cleaner – . 8 oz per 1 gallon
Grill/Fry

Cashier Daily Cleaning
Frequencies listed are minimum standards. Any item needing cleaning is cleaned on a clean as you go basis. Table 5 columns
Coffee Machines DailyWash, rinse and sanitize urns. Wipe and buff exterior
Cleanser, fresh water and sanitizer 100ppm Cashier
Coffee Servers Daily Wash, rinse and sanitize.
Cleanser, fresh water and sanitizer 100ppm Cashier
Iced Tea dispenser
Daily Wash, rinse and sanitize in three compartment sink
Cleanser, fresh water and sanitizer 100ppm Cashier
Iced Tea Spigots Daily Remove Wash, rinse and sanitize
Cleanser, fresh water and sanitizer 100ppm Cashier
Cappuccino Machine ( Powder type)
Daily Wipe and buff exterior.
Hot water & sanitizer 100 ppm. Cashier
Merchandiser exterior
Throughout shift and end of day
Wipe clean with soft clean cloth.
Window cleaner.Cashier
Salad Bar Daily Wash, rinse and sanitize.
General purpose cleaner, fresh water and sanitizer 200ppm
Cashier
Counters and shelves Daily Wash, rinse and
sanitize.
General purpose cleaner, fresh water and sanitizer 100ppm
Cashier
Ice Machines Daily Wash, rinse and sanitize.
General purpose cleaner, fresh water and sanitizer
Cashier

100ppm
Cash Stand Daily Wash, rinse and sanitize.
General purpose cleaner, fresh water and sanitizer 100ppm
Cashier
Soda Fountain Daily Wipe clean and buff dry.
In-use wiping cloth. Cashier
Soda Fountain Nozzles Daily
Soak diffusers in sanitizer solution. Scrub interiors.
Cleanser, fresh water and sanitizer 100ppm Cashier
Popcorn machine interior and exterior
Daily Wash, rinse and sanitize
Cleanser, fresh water and sanitizer 100ppm Cashier

Cashier Weekly Cleaning
Frequencies listed are minimum standards. Any item needing cleaning is cleaned on a clean as you go basis. Table 5 columns
Cappuccino Machine ( Powder type)
Friday Clean dispenser and overflow trough.
Hot water & sanitizer 100 ppm. Cashier
Merchandiser Interior and trays Friday Wipe clean with soft
clean cloth.General purpose cleaner. Cashier
Merchandiser exterior Friday Wipe clean with soft
clean cloth.Window cleaner. Cashier
Salad Bar detail Friday. Wash, scrub rinse and sanitize.
General purpose cleaner, green scrub pad fresh water and sanitizer 100ppm
Cashier
All Equipment drains Friday Wash, scrub rinse
and sanitize.100% chlorine bleach ½ cup in each drain. Cashier

Line Server Daily Cleaning
Frequencies listed are minimum standards. Any item needing cleaning is cleaned on a clean as you go basis. Table 5 columns
Steam table wells Daily Empty, clean General purpose cleaner, green scrub pad fresh water Line Server
Steam table surfaces Daily Wash, scrub rinse
and sanitize.
General purpose cleaner, green scrub pad fresh water, sanitizer solution 100 PPM
Line Server
Steam table Sneeze guard Daily Wash, scrub rinse. General purpose cleaner, or
window cleaner soft cloth Line Server
Counters/ serving line Daily Wash, scrub rinse
and sanitize.General purpose cleaner, or window cleaner soft cloth Line Server
Cold Table interior and exterior
Daily Wash, scrub rinse.General purpose cleaner, or window cleaner soft cloth Line Server
Cold Table Sneeze guard Daily Wash, rinse. General purpose cleaner, or
window cleaner soft cloth Line Server
Food Warmer Interior and exterior
Daily Wash, scrub rinse and sanitize.
General purpose cleaner, or window cleaner soft cloth Line Server
Floor mats Daily Wash, scrub rinse and sanitize.
General purpose cleaner, or window cleaner soft cloth
Line Server

Line Server Weekly Cleaning
Frequencies listed are minimum standards. Any item needing cleaning is cleaned on a clean as you go basis. Table 5 columns
Convection Oven interior And racks
Friday Degrease, clean. Degreaser, vinegar water solution. Line Server
Cold table well and exterior Detail clean
Friday Clean, scrub and sanitize
General purpose cleaner, sanitizer solution 100 PPM Line Server
Walls (column) Monday Clean, scrub General purpose cleaner Line Server
Utensil Drawers Monday Clean and sanitize General purpose cleaner, sanitizer solution 100 PPM Line Server
Trash Can Monday Clean and sanitize Degreaser, sanitizer solution 100 PPM Line Server
Cold Table drain Friday Pour down drain 100% chlorine bleach ½ cup Line Server
Food Warmer Interior and trays Friday Wash, scrub rinse
and sanitize.degreaser, green scrub pad vinegar solution,
Line Server
Food Warmer Water well Friday Empty, clean
degreaser, green scrub pad vinegar solution and sanitizer 100ppm
Line Server

Utility Daily Cleaning
Frequencies listed are minimum standards. Any item needing cleaning is cleaned on a clean as you go basis. Table 5 columns
Three compartment sink Daily Clean, scrub and
sanitizeGeneral purpose cleaner, sanitizer solution 100 PPM Utility
Pot sink Daily Clean, scrub and sanitize
General purpose cleaner, sanitizer solution 100 PPM Utility
Washroom floors/ kickboards Daily
Mop, Scrub, dry mop with sanitizer solution 200 PPM
Tile Floor cleaner, fresh water, sanitizer solution 100 PPM
Utility
Customer service floors Daily
Mop. Scrub, dry mop with sanitizer solution 200 PPM
Tile Floor cleaner, fresh water, sanitizer solution 100 PPM
Utility
Storage shelves Daily Wash, scrub and rinse General purpose cleaner Utility
Dish tables Daily Wash, scrub and rinse General purpose cleaner Utility
Ice machines Daily Wash, scrub rinse and sanitize.
General purpose cleaner, sanitizer solution 100 PPM Utility
Trash can Daily Wash, scrub rinse and sanitize.
General purpose cleaner, sanitizer solution 100 PPM Utility

Utility Weekly Cleaning
Frequencies listed are minimum standards. Any item needing cleaning is cleaned on a clean as you go basis. Table 5 columns
All Floor drains Friday Clean, sanitizeClean outside surface, pour 1 cup pure bleach down drain.
Utility
All machine drains Friday Clean, sanitize
Clean outside surface, pour 1 cup pure bleach down drain.
Utility
Dish room walls Friday Clean, scrub sanitize Degreaser, sanitizer solution 200 PPM Utility
Mop Bucket Friday Clean, scrub Degreaser Utility
Mops Friday Clean and sanitize Fresh water, sanitizer solution 200 PPM Utility
Matts Friday Clean, scrub sanitize Degreaser, sanitizer solution 200 PPM Utility
Under sink areas and drains Monday Clean, scrub sanitize Degreaser, sanitizer solution
200 PPM Utility
Cutting Boards Monday Clean, whiten General purpose cleaner, sanitizer solution 300 PPM Utility

Master Cleaning Schedule #2, Table 6 columns
What Where When Cleaning Supplies How Who
Meat Slicer After each use -Hot soapy water
-Bleach mixture in spray bottle
-Clean towels
1. Unplug
2. Disassemble
3. Take slicing bed and guards to dishwashing area.
4. Move the blade almost to “0” so the blade will turn slightly.
5. Using hot soapy water and clean towel, scrub all surfaces.
6. Slide slicer to the side of counter and wash counter underneath slicer and backsplash.
7. Spray slicer with bleach mixture.
8. Air dry.
9. Re-assemble slicer by putting slicer bed and guards back on.
10.Mist slicer bed and guards with bleach mixture.
11.Air dry.
12.Wipe off electrical cord with hot soapy water.
13.Air dry cord and wrap around slicer.
What Where When Cleaning Supplies How WhoConvection Ovens Daily -Long handled brush
-Dust pan
Take tray off of top of oven and replace with clean tray

-Hot soapy water
-Clean towels
Wipe off top and outside of oven with hot soapy water
Brush crumbs out of inside of oven and dispose in garbage can
Weekly -Oven cleaner
-Rubber gloves
-Razor blades
-Hot water
-Clean towels
-Newspapers to protect floor
-Green Scrubbing pad
Turn off current in electric oven and pilot light in gas oven.
Oven should be warm, but not over 200 degrees.
Cover floor under and around oven with newspaper to protect floor
Remove racks and other equipment from oven.
Using a razor blade, scrape burnt on food from racks.
In dishroom, Spray racks with oven cleaner and allow 15-20 minutes for cleaner to work.
Scrub racks with green scrubbing pad.
Spray off oven cleaner and residue.
Wash racks in hot soapy water
Spray oven cleaner over inside surface of oven.
Leave door of oven open and let oven cleaner work for 15 to 20 minutes
Wipe clean with hot water.
After wiping, rinse off with towel soaked in hot water.
Return racks to oven
Wipe off outside of oven with hot soapy water.

Dispose of newspaper and clean up floor.

What Where When Cleaning Supplies How WhoWalk In Freezer Daily -Broom
-Dustpan
Sweep out freezer
Be sure to sweep under racks
Wipe off door, inside and out, handle and door gasket as needed
Monthly -Broom
-Dustpan
-Mop and bucket
-Windshield washing solution
Chip ice chunks off of floor (summer only)
Starting at the back of the freezer, pour windshield washing solution on floor doing a small part at a time as you work your way out of the door
Mop up solution with mop
Wipe off door, inside and out, handle and door gasket
Yearly (Summer) -Pressure washer
-Cleaning solution as recommended by pressure washer manufacturer
Remove product from shelves
Remove shelves from freezer
Take out back in the parking lot
Wash with pressure washer
Air dry
Clean floor as described above
Replace racks in freezer
Return product to appropriate shelves
Wipe doors inside and out, paying special attention to handle and gasket
What Where When Cleaning Supplies How WhoWalk In Cooler Daily -Broom
-Dustpan
-Mop and bucket
-Ecolab floor cleaner
-Glass cleaner
-Paper towel
Sweep floor to remove dirt
Make sure you get under racks
Using hot water with floor cleaner, dry mop floor
Allow to air dry
Wipe doors inside and out, paying special attention to handle and gasket
Glass reach in door – Wash windows with window cleaner
Wash handles and gaskets of glass reach in door with hot soapy water
Yearly (summer) -Pressure washer
-Cleaning solution
as recommended by pressure washer
manufacturer
Remove product from shelves
Remove shelves from cooler
Take out back in the parking lot
Wash with pressure washer
Air dry
Clean floor as described above in daily cleaning
Replace racks
Return product to appropriate shelves
Wipe doors inside and out, paying special attention to handle and gasket

What Where When Cleaning Supplies How Who
Hot Holding Units, Rotisserie & Smoker
After each use -Hot soapy water
-Bleach solution in spray bottle
-Clean towels
-Degreaser
-Silverware soak product
Remove drip tray and scrape off any debris
Soak drip tray with silverware soak product if necessary.
Rinse drip tray and wash
Remove side racks and shelving racks and or spikes wash in hot soapy water.
Scrub down inside with hot soapy water.
Rinse with clear, hot water.
Spray down with bleach solution to sanitize
Air dry
Wash off outside of unit with hot soapy water. Use degreaser if needed.
Replace drip tray, side racks and shelving
Microwaves At the end of every shift or as needed
-Hot soapy water
-Clean towels
-Bleach solution in spray bottle
Remove fan cover and wash.
Wash inside with hot soapy water
Spray with bleach solution
Air dry
Replace fan cover
Wash outside of microwave.
Clean off top
What Where When Cleaning Supplies How Who

Weekly Wash vent in hot soapy water
Remove fan cover and wash
Wash inside with hot soapy water
Spray with bleach solution
Air dry
Replace fan cover
Wash outside and top
Replace fan cover and vent.
Three Compartment
Sink
End of every shift
-Hot water
-Ajax cleanser
-Scouring pad
Drain sink compartments
Remove and dispose food scraps
Sprinkle each sink and each end drain board with Ajax cleanser.
Scrub sinks and drain boards.
Using a small amount of water, scrub sink with scouring pad
Rinse with hot water
Spray with bleach solution
Air dry

What Where When Cleaning Supplies How Who
Garbage Disposal End of every shift
-Hot soapy water
-Clean towel
Run garbage disposal to get rid of all garbage
Remove cover and wash in hot soapy water.
Rinse with hot water
Wash outside of disposal and pipes with clean towel and hot soapy water
Toaster Daily -Hot soapy water
-Clean towels
-Whisk broom and dust pan
Turn off and unplug
Remove slide plate and wipe down with hot soapy water
Brush crumbs out of toaster with whiskbroom. Catch crumbs in dust pan
Lift toaster and brush crumbs off of leg supports
Wash legs and supports with hot, soapy water
Replace slide plate
Leave unplugged

What Where When Cleaning Supplies How Who
Garbage Cans Daily -Garbage can liners
-Used towels
-Hot water
Remove garbage from each garbage can and dispose of it in the proper receptacle
Rinse out can if there is any leaks
Wipe up any spills on the outside of the can
Dispose of towels
Fill can with new garbage can liner
Monthly
(When temperature is above freezing)
-Garbage can liner
-Pressure washer
Remove garbage from can and dispose in the proper receptacle.
Take can out into parking lot
Wash with pressure washer following directions that come with pressure washer
Air dry
Fill with new trash liner
Grill After every shift -1/2 gallon warm water
-Grill screens
-Grill screen handle
-Dough cutter (aka bench knife, dough scraper)
-Oil from fryer
-Green scouring pad
-Paper towel
Pour water on grill while grill is still warm to loosen grease and dirt. Be very careful to prevent steam burns.
Place grill screen on grill, top with green scouring pad and grill screen handle.
Putting pressure on the grill screen, rub it up and down on the grill to clean off dirt. Do not rub left and right, as this will scratch the grill. Be sure to get to the edges.
Using the dough scraper, wrap in a paper towel and run along grill surface to remove excess grease and dirt. Change paper towel as

-Used cleaning cloth
-Hot soapy water
-Rubber gloves
often as necessary.
Put green scouring pad on the grill topped by the grill screen and screen handle.
Run the scouring pad up and down the grill (not left to right) to polish the grill.
Again using the dough scraper and paper towel, remove excess oil from grill.
Repeat the process for the back ledge of the grill.
Taking about a ¼ cup of oil from the fryer, spill on grill and wipe the entire grill surface with paper towel to season the grill for next use.
Empty grease trap into a 5-gallon bucket.
When bucket is ¾ full, take outside and dump into grease receptacle.
Clean off the front of grill with a used cloth and hot soapy water.
Brush all debris off shelf under grill.

What Where When Cleaning Supplies How Who
Grill Weekly -Razor blade
-Paper Towel
-Clean towels
-Hot soapy water
-Brush or scouring pad
Scrape all edges of grills with scraper to remove debris.
Scrape fronts of grills if necessary.
Wipe off these areas with paper towel.
Wash off all legs of grills
Scrub shelf under grill with hot soapy water and rinse.
Dish Area Weekly – Bar time (Friday or Saturday)
-Hot soapy water
-Clean towels
Wipe down all the legs of all the equipment and countertops in dish area.
Remove all cleaning supplies/products from shelf under clean dish side.
Wipe off shelf on clean dish side.
Wipe off bottles of product.
Return product to appropriate spot on shelf.
Heat Lamps Weekly – Bar time
-Clean towels
-Hot soapy water
Turn off heat lamps.
Wipe off with warm soapy water.

What Where When Cleaning Supplies How Who
Refrigeration Compressor
Monthly -Shop Vac Take grids off of compressor
Wash Grids.
Using shop vac, vacuum coils and all around unit to remove dust.
Replace grids.
Ice machine Daily -Clean towel
-Hot soapy water
Wipe off front of unit and opening door with hot soapy water.
Wipe off the inside of opening door with hot soapy water.
As needed Call service person to delime
Steam table Daily -Hot soapy water
-Clean towel
Unplug unit
Remove product and store in correct manner.
Empty water out of steam table well.
Wipe out steam table well with towel and hot soapy water.
Allow to air dry.
Clean off outside of steam table with hot soapy water.
Weekly – at the end of the night
Wednesday Night
Unplug unit
Clean following directions listed above.
Following directions on deliming product, delime unit.
Rinse. Air dry
What Where When Cleaning Supplies How Who

Employee Restroom and Breakroom
Daily -Mop and bucket
-Broom and dustpan
-Glass cleaner
-Paper Towel
-Bathroom supplies: paper towel, Toilet paper
-Ajax cleanser
Sweep floor
Mop floor
Remove everything from the breakroom table
Wash the breakroom table
Replace dirty ashtray with clean ashtray
Wash off breakroom chairs
Scrub sink with Ajax cleanser
Wash mirror with paper towel and glass cleaner
Check supplies (hand wiping paper towel, toilet paper) and refill if needed
Employee Restroom and Breakroom
Weekly -Toilet brush
-Toilet cleaner
Regular cleaning from above list
Clean toilet
Semi-Annual -Hot soapy water
-Clean towels
-Degreaser
-Brush
Wash wall with hot soapy water
Use degreaser on tough stains if needed

What Where When Cleaning Supplies How Who
Deep Fryer At end of every shift
-Slotted spoon or strainer
-Fryer oil
Strain out leftover food and debris that is floating in fat.
Add oil, if necessary, to bring it up to recommended oil level of fryer.
Weekly
Every Monday or Tuesday
-Fryer inset
-Extra large stockpot – approximate 10 gallons
-Fryer hook
-Fryer boil out cleaning agent
-Brush
-Drain nozzle that is attached to the inside left panel behind door
-Paper towel
-Degreaser
-Used towels
Turn off fryer
Attach drain nozzle by screwing it into a drain located in the middle of the front of machine
Place fryer inset underneath the drain nozzle to catch the grease
Turn drain valve to the right to open drain
As the fat is draining, use hook to push gunk through the nozzle
When completely drained, close valve
Dispose of fat in the proper waste receptacle
With valve closed, fill fryer with water to the oil level marking.
Turn fryer on.
Add fryer boil out to water.
Let boil-oil and water mixture heat.
Turn off machine.
With a brush, scrub sides, back, bottom and front of fryer cavity.
Drain water out of fryer.
Close drain valve.
Wipe out fryer cavity with paper towel.
Scrub outside of fryer (doors, back, etc.)

with degreaser.
Fill with new oil.
Deep Fryer Monthly -Razor blade Pull fryer out from wall.
Scrape sides to remove baked on crud.

What Where When Cleaning Supplies How Who
Char Broiler After every shift
-Steel brush with scraper end
-Used towels
Scrape food contact grids with steel brush. Use scraper end for especially baked on crud.
Be sure to scrape both the top and underside of each grid.
Wipe down grids with used towel to remove dirt.
Wipe off stainless steel sides and front.
Weekly -Tongs
-Razor blade
-Oven cleaner
-Used towels
-Glass Cleaner
Remove side plate facing aisle and wash with hot soapy water
Using tongs to prevent a serious burn, remove food contact grids.
With a razor blade, scrape off burnt on food.
Wash food contact grids with hot soapy water
Remove broiler shield (2 parts on 1 broiler). Wash with hot soapy water.
Remove broiler insert and scrape with razor blade.
Spray with oven cleaner. Let sit for 15-20 minutes.
Wipe worst food off with used towels.
Scrape again if needed.
Wash broiler insert in hot soapy water.
Remove broiler back plate and scrape with blade.
Spray back plate with oven cleaner and let sit for 15-20 minutes.

Wipe off with used towel.
Repeat process if needed.
Wash in hot soapy water.
Scrape stationary inside of char broiler with blade to remove baked on food particles.
Cover burner with foil, paper towel, etc to prevent it from getting wet when spraying oven cleaner on inside of broiler.
Wipe off inside and outside with used towels or paper towels to get off the majority of grease and food build up.
Spray the inside of char broiler with oven cleaner. Let stand 15 – 20 minutes.
In the meantime, use glass cleaner to clean stainless steel outside surfaces of unit. Wipe with a paper towel.
Clean legs on char broiler stand.
Wipe off inside of broiler.
Use pastry brush to brush debris from burner.
Pull drip tray. Scrape contents into garbage can.
Spray drip tray with oven cleaner. Let stand 15 – 20 minutes.
Wash drip pan in hot soapy water.
Reassemble unit: backplate, inset, burn shield, food contact grids, and drip tray.
Pull unit out from wall.
Clean wall before moving char broiler

back into place.
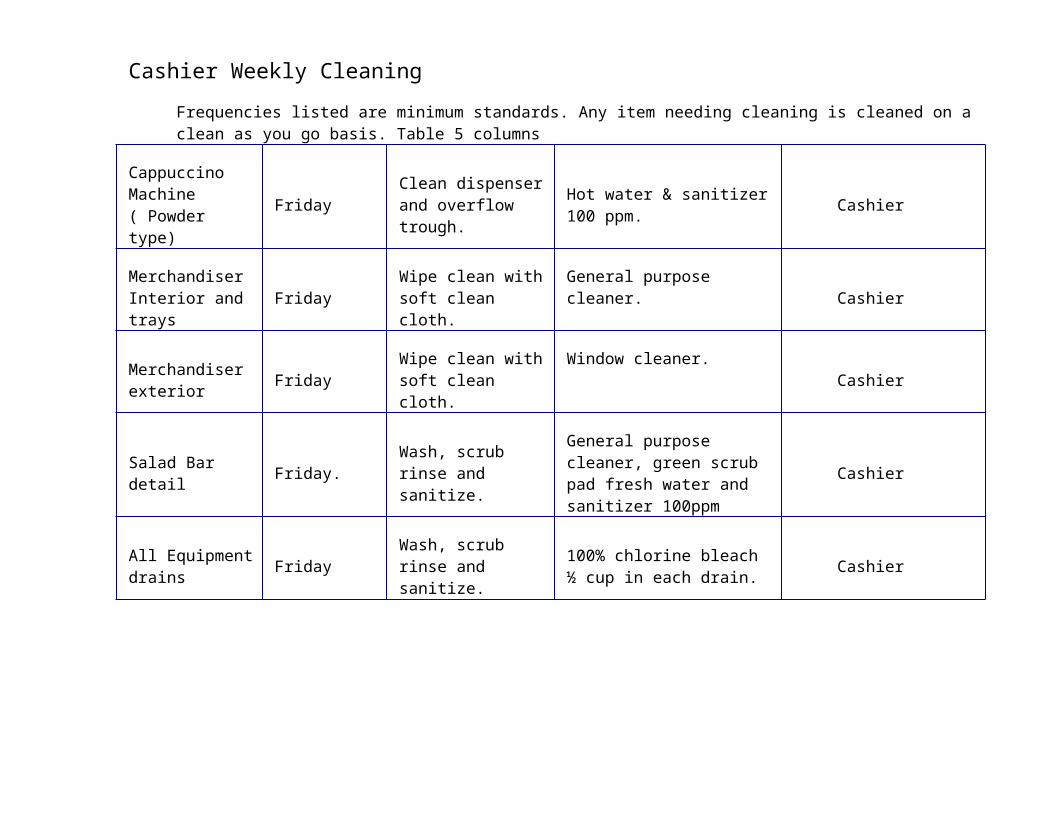
What Where When Cleaning Supplies How Who
Hoods As needed
At least once a week
-Disposable gloves
-Oven and grill cleaner
-Used towels
-Degreaser
Wearing disposable gloves, pull screens from hood by lifting up and out.
Take down filters to dishwashing area and spray with oven cleaner.
Let sit 15 – 20 minutes.
Wash filters in hot soapy water.
Repeat steps 2-4 as many times as necessary to get screens clean.
Using hot soapy water and degreaser if necessary, clean the inside of the hood to remove all grease.
Continue by cleaning outside and top of hood.
Polish with stainless steel cleaner.
Replace clean screens.

What Where When Cleaning Supplies How Who
Reach In Freezer Daily -Dry towel Before stocking, brush out crumbs with dry towel.
Wipe off doors, inside and out paying special attention to handles.
When restocking, be sure not to block fan.
Weekly
Monday a.m.
-Meat pan
-Sheet pan
-Hot soapy water
-Clean towel
Remove product by putting on sheet pan and taking to walk-in freezer.
Flip breaker to off position to defrost freezer.
Take out racks and wash in hot soapy water.
Leave door open.
Set a meat pan, full of hot water off of coffee urn, in the bottom of the freezer to speed defrosting.
Wipe out inside cavity.
Re-install shelving.
Turn breaker back on
Replace product when freezer reaches 0 degrees F.
Refrigeration Units Daily -Hot soapy water
-Clean towel
Wipe up all spills on bottom of unit with hot soapy water and clean towel.
Wash doors, handles and door gaskets.
Weekly -Hot soapy water
-Clean towels
Remove all product and store in walk-in cooler.
Remove racks and wash in hot soapy water.
Wash top, bottom and sides, inside

doors and gaskets with hot soapy water.
Replace clean racks.
Replace and restock product
Wipe off outside doors with hot soapy water.
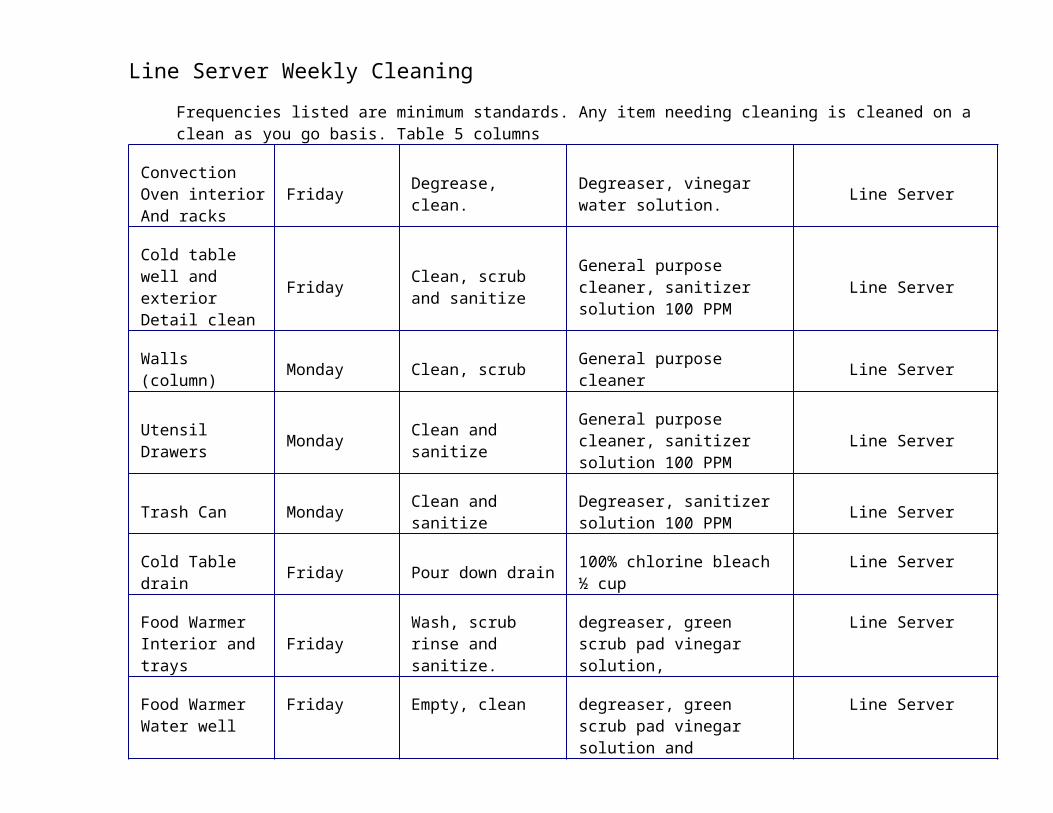
P a g e | 1
Closing Checklist. Table 2 columns
Daily Closing Checklist
All Foods covered/dated
Counters cleaned and sanitized
All Floors cleaned
Backdoor locked
Garbage dumped
Shelves N.C.O.
Fryers cleaned/OFF
Griddle cleaned/OFF
Grill cleaned/OFF
Steam table cleaned/OFF
Dishwasher area clean
All pots & pans stored
Refrigerators N.C.O./ 41 °F
Freezers N.C.O./ 0 °F
Popcorn, coffee maker OFF
Under refrigeration clean
Thaw Pulled
Weekly Cleaning Checklist
Degrease Oven
Filter/ boil out fryers
Hot water scrub kitchen floors
Clean walls
Clean Vent Hood

P a g e | 2
Clean refrigerators inside
Clean freezers inside
Chlorine Solutions. Table two columns
Amount of chlorine bleach per gallon of water for a given chlorine concentration
1 teaspoon - recommended for 3 compartment sink 65
2 teaspoons - recommended for food contact surfaces
130
1 tablespoon - maximum for food contact surfaces
200
1 fluid ounce - too strong400

P a g e | 3
Appliance Log. Table 5 columns
APPLIANCES BRANDMODEL & SERIAL NO.
PARTSAND SERVICE
PHONE
Ovens
Stoves
Deep Fat Fryers
Griddles/Grills
Hot Food Tables
Toasters
Microwave
Steamer
Merchandiser
Refrigerator
Freezer
Sandwich Bar
Ice Maker
Rotisserie
Smoker