burn cds / dvds - · pdf filerecording singles and 78s ... printing part or all of your...
TRANSCRIPT

133444555566667778
101010111111121212131313131414141415161617181919202020202121222223232425252526262727272828293031
Table of Content
Table of ContentVinylStudio Quick Start Guide
VinylStudio is not an Audio EditorVinylStudio Step-by-StepA couple of things worth knowing
Connecting up your Turntable or Tape DeckConnecting a Turntable to your PC
If you are using a Hi-FiIf you are using a Phono Pre-ampIf you are using a USB turntable or other USB device
Recording CassettesIf you are using a USB cassette deck or other USB device
Recording Reel-to-ReelHooking up your Computers SpeakersTesting your SetupUsing a Laptop
Recording AlbumsSetting the Record LevelWhy is The Recording Level Slider Disabled?Recording an LP SideWhile you are RecordingRecording Side 2Recording from TapeSetting the Needle Down LevelSpeed ConversionUsing Software Recording EqualisationUsing ASIORecording in DSD FormatNotes for Users of the PS Audio NuWave Phono Converter When Recording DSDNotesRecording Singles and 78s
Recording Other Material with no TrackbreaksWhat file format should I use?
Splitting TracksEntering, Editing or Importing a Track ListingSplitting Your Recordings into TracksGetting around in the Waveform DisplayUsing the ToolbarEditing album details and importing album artLookup Track Listings and Album Art
Lookup Album ArtScan for Trackbreaks
Scanning for Gaps Between Tracks AutomaticallyScanning for Gaps Between Tracks Manually
Zoom Track DialogAdjust Faders Dialog
Cleanup AudioFor New UsersWaveform DisplaySpectral ViewFrequency AnalysisUsing the ToolbarCleanup Audio - Scan for ClicksCleanup Audio - Filters
Hum FilterHiss FilterRumble FilterGraphic Equaliser and NormalisationPresetsFiltering Individual Tracks (or any other section of music)
Cleanup Audio - Equalisation Curves (FFT Filters)Applying a Single FilterApplying More than One Filter at a TimeFiltering Individual Tracks (or any other section of music)Applying Recording EqualisationImporting and Exporting Audacity Equalisation Curves
-- 1 --

31323232333434353636373939
3940414141414243434344454545464646474747474748484849494950
50505151525253545455555657575757
Cleanup Audio - Cut and SpliceTruncating Overly Long Recordings
Cleanup Audio - The Corrections ListCleanup Audio - Tips for Removing ClicksCleanup Audio - Percussion Protection
When to turn Percussion Protection UpWhen to turn Percussion Protection Off
Cleanup Audio - Brass ProtectionWhen to turn Brass Protection Off
Cleanup Audio - Patching Bad Scratches and DropoutsCleanup Audio - Repairing Clicks ManuallyImporting, Exporting and Converting Files - The File History List
Editing Files Outside VinylStudioBurn CDs / DVDs
Burning Multi-Session CDsWhy do my CDs not Play in my Player?Why is There no Track Listing Displayed in Windows Media Player?Export CD Track ListingCD / DVD Burning Options
Saving Tracks (and other Batch Operations)Saving TracksSaving Tracks in DSD FormatCopying Files to your MP3 Player or iPodPlaying Files in Windows Media PlayerBatch DeclickBatch NormalisationBatch File ConversionDeleting Multiple Albums or Album ComponentsChanging the Status of Multiple AlbumsMoving or Copying Albums Between CollectionsPrinting Part or All of your Collection
Importing and Exporting FilesImporting Existing Recordings
Importing Multiple FilesImporting Collections from DiscogsWhere are my Files Located?
Where are my Split-Up Tracks Stored?Controlling How Split-Up Tracks are Stored Using Custom StringsHow Singles Tracks are NamedWhere are my Recordings Located?What Files does VinylStudio Actually Create?Archiving your Recordings
MiscellaneousConfiguring VinylStudio Settings
AIFF File OptionsDFF File OptionsDSF File OptionsFLAC File OptionsMP3 File OptionsAdvanced MP3 File OptionsOGG Vorbis File OptionsAdvanced OGG File OptionsWAV File OptionsWMA File Options
Limitations in VinylStudio LitePurchasing and Registering VinylStudioUpgrading from VinylStudio 3Support and Feedback
-- 2 --

VinylStudio Quick Start GuideVinylStudio's view of the world looks like this:
As you can see, VinylStudio organises your recordings in a collection. You don't need to open, edit and save audio files in the way youmight be used to. The only time you might do this is when you import an existing recording into your collection. After that, you justselect the file you want to work on from a dropdown list and VinylStudio will take care of the rest. You can create as many collections asyou like, but you must create at least one. VinylStudio will prompt you to create a collection when it first starts up.
Within a collection, VinylStudio stores your recordings as a list of albums. These are recorded a side at a time and these recordings arethen split up into individual tracks which can then be played on your PC, downloaded to an MP3 player or iPod, or burned to CD. You canalso elect to remove clicks, hiss, hum and rumble before you save your tracks and there is also a graphic equaliser. VinylStudio can alsodigitise singles and the spoken word.
VinylStudio is not an Audio Editor
It is important to realise that VinylStudio is not an audio editor. That is to say, it does not directly edit your recordings or any audio filesyou might have imported. Instead, VinylStudio is 'non-destructive'. Any changes you make within the program are stored separately andthen 'overlayed' onto the original audio when you save your tracks or burn CDs. Consider VinylStudio as a decision-making tool, whereyou can change those decisions later if you choose. Your original recordings are never altered.
This, once you get to grips with it, is a big plus. You do not, for example, have to worry about keeping both original and cleanup-upcopies of your recordings. It also means that if you change your mind about something (perhaps you overdid it with the hiss filter) youcan go back into VinylStudio, make whatever changes you feel appropriate and then save your tracks again (or burn another CD).
-- 3 --

VinylStudio Step-by-Step
1. You first need to hook up your turntable or tape deck to your PC and check that it is working correctly. This is covered in more detailhere. Don't miss the section entitled 'Testing your Setup' near the end. The golden rule is that you need to see the recording levelindicators moving in time with the music (and not stuck on maximum, for example).
2. VinylStudio has five main working areas, which you select by clicking on the tabs at the top of the VinylStudio window:
3. To record an album, click on the Record tab (if necessary) which will take you to the Record window where you can enter the artistand title of the album you wish to record. Albums are recorded one complete side at a time and you should record both sides of thealbum before you proceed to the next step. Alternatively, if you have already recorded the album in another program, you can import anexisting recording. You can also record singles, or other material with no trackbreaks.
4. While your album is recording, you can lookup or type in the album's track listing. With luck, you will be able to find a track listing on-line.
5. Once you have a recording to work with, you need to split it into tracks, which you do in the Split Tracks window. Please note thatno additional files are created at this point (this happens later on). You are merely telling VinylStudio where the tracks begin and end. Werecommend you start with an album you know well, as this makes the task a good deal easier.
6. You can also, if you wish, removes clicks, scratches, hiss and hum from your recordings. This step is optional, but often worthwhile.VinylStudio does not make any changes to your original recordings when you do this, so feel free to experiment. And if you decide, whenlistening to a CD you have made, that these features might be worth a try after all, you can always give them a whirl and then burnanother CD. Declick your recording (if it needs it) before applying any of the other filters for best results.
7. When you are happy with the results of your work, you can burn CDs and/or save your tracks as individual, tagged files. These filescan be played on any computer (using Windows Media Player or iTunes, typically) or copied to your iPod or MP3 player. VinylStudio forMacintosh can also save tracks in AAC (MP4) format.
A couple of things worth knowing
Most actions in VinyStudio can be undone with the Undo / Redo buttons in the toolbar (Ctrl+Z / Ctrl+Y).
VinylStudio can record to, and work with, files in a variety of formats. Uncompressed formats (such as WAV) provide the bestperformance and musical fidelity while a compressed format (such as MP3) is much more economical on disk space. See here for moreinformation.
As of version 8, VinylStudio provides additional tools for keeping track of your collection as it grows. The are:album status - a value such as Recorded or Cleaned, which reminds you of the stage you have reached for each album you haverecordedsort or filter the album list - to help you locate an album in your collection quickly and easily
Connecting up your Turntable or Tape Deck
-- 4 --
Connecting a Turntable to your PCRecording CassettesRecording Reel-to-ReelHooking up your Computer's SpeakersTesting your SetupUsing a Laptop
Connecting a T urntable to your PC
To record vinyl albums (or 78s) you will need to hook up your record deck to your sound card or other input device. This can be achievedeither by running a cable from your Hi-Fi, or by using a Phono Pre-amp (which you will have to purchase separately). You can also use aUSB turntable or cassette deck if you have one.
In all cases, you can monitor what you are recording through your computer's speakers.
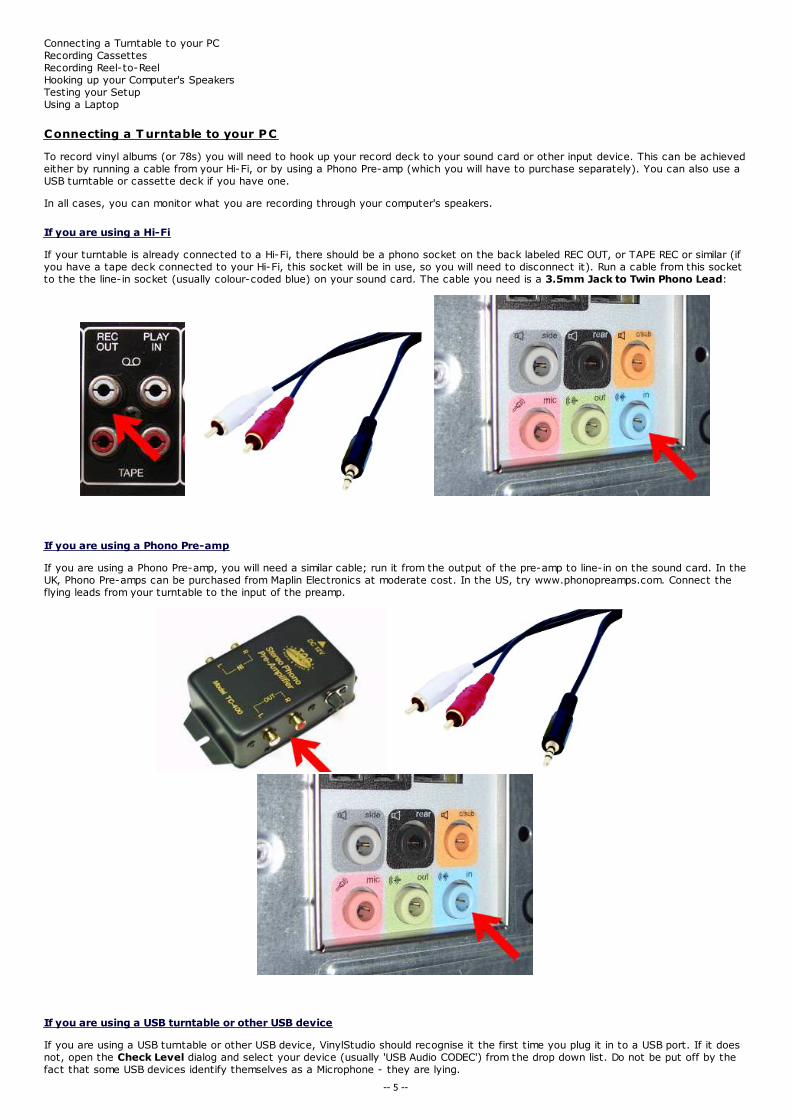
If you are using a Hi-Fi
If your turntable is already connected to a Hi-Fi, there should be a phono socket on the back labeled REC OUT, or TAPE REC or similar (ifyou have a tape deck connected to your Hi-Fi, this socket will be in use, so you will need to disconnect it). Run a cable from this socketto the the line-in socket (usually colour-coded blue) on your sound card. The cable you need is a 3.5mm Jack to Twin Phono Lead:
If you are using a Phono Pre-amp
If you are using a Phono Pre-amp, you will need a similar cable; run it from the output of the pre-amp to line-in on the sound card. In theUK, Phono Pre-amps can be purchased from Maplin Electronics at moderate cost. In the US, try www.phonopreamps.com. Connect theflying leads from your turntable to the input of the preamp.
If you are using a USB turntable or other USB device
If you are using a USB turntable or other USB device, VinylStudio should recognise it the first time you plug it in to a USB port. If it doesnot, open the Check Level dialog and select your device (usually 'USB Audio CODEC') from the drop down list. Do not be put off by thefact that some USB devices identify themselves as a Microphone - they are lying.
-- 5 --

Recording Cassettes
If you have a conventional cassette deck, you can run a cable like the one pictured above from the output sockets on your tape deck tothe line-in socket on your sound card (normally colour coded blue).
Another, very simple way to record cassettes is to use a personal cassette player (walkman) and run a cable from the headphone socketto the line-in socket on your sound card. This usually gives surprisingly good results. The cable you need has a 3.5mm / 1/8th inch malejack on each end and is not hard to obtain. Again, try Radio Shack in the US or Maplin Electronics in the UK. Plug one end of the cableinto the headphone jack on the tape player and the other into your PC.
If you are using a USB cassette deck or other USB device
If you are using a USB cassette deck or other USB device, VinylStudio should recognise it the first time you plug it in to a USB port. If itdoes not, open the Check Level dialog and select your device (usually 'USB Audio CODEC') from the drop down list. Do not be put off bythe fact that some USB devices identify themselves as a Microphone - they are lying.
Recording Reel-to-Reel
The easiest solution here is to run a cable like the one pictured above from the output sockets on your tape deck to the line-in socketon your sound card (normally colour coded blue). Again, you can monitor what you are recording through your computer's speakers.
Hooking up your Computers Speakers
Most PCs already have speakers attached so there should be no problem here, but some USB devices change the default playback device(to themselves) when they are plugged in for the first time which means that, in effect, your speakers stop working. If this happens toyou, you can change the playback device VinylStudio uses from the Change Playback Device dialog under the Options menu. You canalso reset the default playback device (as used by all other applications) by clicking on Change Default Playback Device in this dialog.
-- 6 --

T esting your Setup
To check that everything is correctly hooked up, start a record or tape playing, go to VinylStudio's Record Albums window and click onthe Check Level button. You should then see the recording level indicators moving in time with the music:
If you check the 'Monitor Recording' box (or sometimes even if you don't), you should hear what you are recording played back throughyour computer's speakers.
If no sound is getting through, a bit of experimentation might be needed:double-check your connectionstry selecting a different Input Source in the dropdown boxtry selecting a different Sound Card in the dropdown box (XP only)check that the recording level slider is not set at zero
Using a Laptop
Laptop computers are not always suitable for recording as many only have a microphone input, which is mono. The easiest way to tell ifthis is the case is to make a short recording and listen to it on headphones. If you need one, you can buy a USB sound card, such as theGriffin iMic, or even a phono-preamp equipped with a USB connection such as the NAD PP-3 or PP-4. If you are using a USB turntable,there is no problem recording on a laptop.
Please note that the iMic is not compatible with Windows Vista.
Recording Albums
The essential steps to record an album are as follows:ensure that your turntable (or tape deck) is hooked up correctly to your PCcheck that your setup is workingset the record levelenter the artist and album titlestart recording
Albums are recorded one complete side at a time and, usually, VinylStudio will stop recording when your record deck lifts the needle atthe end of an album side.
For more details, please refer to the following sections within this help page:-- 7 --

Setting the Record LevelRecording an LP SideWhile you are RecordingRecording Side 2Recording from TapeSetting the Needle Down LevelSpeed ConversionUsing Software Recording EqualisationUsing ASIORecording in DSD FormatNotes
Setting the Record Level
Start the record or tape playing and then click on the Check Level button. If all is well, you should see the recording level indicatorsmoving in time with the music (you may need to select the correct input device and (on XP) source line in the dropdown boxes first timethrough):
While the album is still playing, adjust the recording level using the slider. The recording level indicators should just enter the red zone onthe loudest sections of music. If the indicators flash completely red, you definitely need to reduce the recording level.
If you cannot get the recording indicators to move in time with the music, you will need to check that you turntable (or tape deck) ishooked up to your PC correctly. There are some details on how to do this here.
If you wish to record in DSD format, see also Recording in DSD Format
If you are using Windows Vista or later, the Check Level dialog looks a little different:
-- 8 --

in this case, select your input device from the Input Device dropdown and leave Use WASAPI enabled unless you have difficulties, inwhich case please try unchecking it. WASAPI is a Windows technology that offers a cleaner signal path when recording and is thisrecommended if you can use it.
If you have a USB device on Windows Vista or later, the Check Level dialog might look like this:
In this case, you should use the 'Set Digital Gain to 1` button to set the recording level. This gives the best dynamic range and minimisesthe risk of clipping. The important thing to note is that the recording level on your USB audio device is not adjustable. The slider justboosts or cuts the gain after the signal has been digitised, and either of these actions is undesirable. If you need to boost the playbacklevel after recording, you will find the tools to do it in the Graphic Equaliser window.
When 'Use WASAPI for Recording' is checked, some Windows systems can only record 16 bit audio. You can check if this applies to youby clicking on the 'Sample Rates' button. If this shows 'upto 16 bits per sample' and you want to record above that, then proceed asfollows:
1. Uncheck 'use WASAPI for Recording'.
2. Click on 'Recording Controls'.
3. In the window that opens, Click 'Properties'.
4. Click on the 'Advanced' tab.
5. Select the Default Format from the dropdown list which most closely matches what you want.
-- 9 --

6. Click OK.
Why is T he Recording Level Slider Disabled?
Some USB devices, notably the Ion USB Turntable and the NAD PP-3 phono pre-amp, have no software level adjustment. There is nothingVinylStudio can do about this as any clipping which occurs happens before the signal reaches the computer. Some Ion USB turntableshave a manual control on the back of the unit and some USB phono preams have a gain control. The NAD PP-3 is calibrated for mostpopular cartridges and implements something called 'soft clipping' which reduces the severity of the distortion that clipping introduces.
If this is a major bugbear for you, you might consider disconnecting the USB cable and running a cable from line out on the USB device(most USB devices have one) to line in on your computer's soundcard instead. VinylStudio's normal level control will then becomeavailable. The cable you need is a 3.5mm Jack to Twin Phono Lead as pictured here.
If you need to boost the playback level after recording, you will find the tools to do it in the Graphic Equaliser window.
Recording an LP Side
Once everything is connected and working:lift the needle (important!)close the 'Level Check' windowenter the artist and album title for the album you wish to record; you can also enter the release year and genre if you have themto hand, or you can do this (and other things) later via the Edit Album Details button in the Split Tracks windowif you are recording a single (or other material with no trackbreaks) check the This is a Single boxif you want VinylStudio to save tracks for this album in mono, check Mix down to mono. The actual recording will still be made instereo because the declicker works better.click on Create Album
VinylStudio will then add the album to your collection in preparation for recording:
Now:click on the Record buttonwait until VinylStudio asks you to lower the needle (the computer will beep)lower the needle
Recording should then start. If it does not, see setting the needle down level below.
If VinylStudio reports an error when you try to record, visit the Check Level dialog and check 'Limit playback to 16 bit'. Certain USBdevices, notably the Furutech ADL GT40 and the Creative Sound Blaster Surround 5.1 USB, cannot simultaneously play back and recordat higher sample rates and bit depths and therefore need this option set. On Windows Vista and later you should set the Default Formatto 2 channel, 16 bit, 44100 Hz (CD Quality) in Control Panel -> Sound -> Playback -> Properties -> Advanced if you have one of thesedevices and 'Use WASAPI' in the Change Playback Device dialog is not in effect for some reason (by default, it is).
While you are Recording
-- 10 --

To listen to what you are recording, check the Monitor Recording box. The sound might be slightly choppy on low-end machines or ifyou run other applications while recording, but your recording is not affected. Uncheck this box if you hear an echo (again, yourrecording is not affected). Use the Monitor Volume button to change the monitor playback level - again this does not affect therecording in any way - and use the Change Playback Device button to select a different playback device if no sound is coming fromyour speakers.
If your record deck lifts the needle or stops the turntable at the end of the record, recording will stop automatically. Alternatively, youcan select a maximum recording time from the dropdown list.
If the 'clipped' counter starts to mount up while your are recording, consider reducing the recording level and re-recording as loudpassages of your recording may sound distorted.
You can edit the track listing for the album you are recording it (or you can do this later - it's up to you). To do this, click on the EditTrack Listing button which will take you to the Split Tracks window. To return to the Record window at any time, click on the Recordtab at the top of the window.
You can also insert a trackbreak while recording by pressing B, or a marker by pressing M. These will become visible when recording iscomplete. You can do this from both the Record and Split Tracks windows. Note that the B key works best if you delete any existingtrackbreaks before you start recording.
Recording Side 2
To record side 2 (or 3 or 4) of an album, select the appropriate side from the drop-down box. Then click on Record. You can first selectthe album you wish to record from the drop-down list if needs be and you might like to use Check Level to set the recording level(although two sides of the same LP don't usually vary that much).
You can now also record an entire album as a single file. Some people prefer this as any audio cleanup work can be carried out on thealbum as a whole, rather than having to be done per-side. If this is what you want to do, check the Record all sides as one file box inthe record window. VinylStudio will then pause the recording at the end of each album side, rather than stopping. You can then turn therecord over and resume your recording from where you left off. You will wind up with a single file, still with a 'side1' suffix, containing theentire recording. This is the default setting for new users.
Recording from T ape
To record from tape, the procedure is the same as described above but if the music fades in gradually, VinylStudio might miss the start ofit when the Wait for Needle Down box is checked. If this happens to you, uncheck this box. VinylStudio will then start recording assoon as you click on the Record button, but it also prevents VinylStudio from stopping automatically at the end of the tape (so set amaximum recording time instead).
Setting the Needle Down Level
If you check the Wait for Needle Down box, VinylStudio will wait for you to lower the needle before it starts recording and, as long asyour record deck has an automatic tone arm, it will stop recording automatically at the end of the record.
The default Needle down level setting of 5% works in the majority of cases, but you might need to adjust it if:a. VinylStudio does nothing when the needle hits the record surface, or:b. VinylStudio reports that 'the needle appears to be already down' when you click on the Record button
For case (a), start the record playing and use the Check Level button to ensure that the recording level indicators are moving in timewith the music. If they are not, you need to sort the problem out before you can record anything.
For case (b), you can increase the Needle Down Level setting and try again, but the real problem might be that there is a high level ofbackground noise (typically mains hum) and you might look into this first. Also, it is essential that you do not lower the needle untilVinylStudio asks you to.
-- 11 --

If VinylStudio stops recording between tracks, rather than at the end of the record or tape, try increasing the Needle up timeoutsetting.
As mentioned above, when recording tapes you may get better results if you uncheck the Wait for Needle Down box and set amaximum recording time instead.
Speed Conversion
If you wish to record 78's on a turntable with no 78 RPM speed setting, check the Speed Conversion box and set the record andturntable speeds appropriately. We recommend recording 78's at 45 RPM (rather than 33), as this preserves more of the bass notes. Youcan also record 33's at 45 RPM to save time, but you will lose a little treble by doing so.
If you are using speed conversion when recording records, we recommend enabling recording equalisation in the Check Level dialog. Thisenables VinylStudio to compensate for the change in turntable speed (which affects the RIAA equalisation built into your phono preamp).See below for more details.
For tapes, type numbers in the boxes as shown in the following table:
Normal playing speed of tape Running speed of tape deck Set 'Tape' box to: Set 'Deck' box to:
1 7/8 ips 3 3/4 ips 10 20
1 7/8 ips 7 1/2 ips 10 40
1 7/8 ips 15 ips 10 80
3 3/4 ips 1 7/8 ips 20 10
3 3/4 ips 7 1/2 ips 10 20
3 3/4 ips 15 ips 10 40
7 1/2 ips 1 7/8 ips 40 10
7 1/2 ips 3 3/4 ips 20 10
7 1/2 ips 15 ips 10 20
15 ips 1 7/8 ips 80 10
15 ips 3 3/4 ips 40 10
15 ips 7 1/2 ips 20 10
For best results, set the deck speed as close as possible to the tape speed. Faster deck speeds will save you time but cost you treblewhich the graphic equaliser can only partially correct.
Using Software Recording Equalisation
As of V8.5, VinylStudio has a software recording equalisation feature, which can either be applied at record time or after recording iscomplete. When you apply recording equalisation at record time, VinylStudio maximises the dynamic range of your recording by runningyour recording device at the highest possible bit depth, regardless of the recording format you are using. You can therefore use softwareequalisation effectively even when recording at 16 bits per sample (which you might want to do to conserve disk space). It also has theadvantage that you see the equalised signal in the waveform display.
Recording equalisation is enabled in the Check Level dialog. When you change this setting, the recording level will also change, so makesure this is correct before you start recording. For discs cut from 1954 onwards, the RIAA preset should generally be used. For earlierdiscs, VinylStudio comes with a large number of preset curves but selecting the right one can be a challenge. Try consulting the sleevenotes or plug in a decent set of headphones and adjust the parameters by ear. Increasing the bass turnover frequency will boost bassnotes. Increasing the 10kHz rolloff value will cut treble. You can save your settings as a preset, and you can also enter time constantvalues if that is the information you have.
When using recording equalisation, use the 'flat' switch on your phono preamp if it has one. If it doesn't, check the 'Apply inverse RIAAfirst' box. You should use VinylStudio's recording equalisation if speed conversion is enabled, even if your preamp has no flat switch. Thechange in turntable speed will fool your preamp into applying the wrong curve and VinylStudio corrects this. For older 'acoustic'recordings which require no equalistion at all, just select 'Inverse RIAA' from the dropdown box if your phono preamp has no 'flat' switch.
The equalisation curves built into VinylStudio were taken from the Audacity wiki,http://wiki.audacityteam.org/wiki/78rpm_playback_curves and references therein, with much thanks. Other sources, from which you canenter the parameters yourself: Vinyl Engine Elliott Sound Projects
Using ASIO
If you wish to use an ASIO driver, open the Check Level dialog and select ASIO from the first dropdown list. You can then select your-- 12 --

ASIO driver (there is normally only one) and mappings for the left and right channels (again, the defaults will normally do).
If you experience 'dropouts', try increasing the buffer size in the ASIO control panel. You may also find level controls in here. Theappearance of the ASIO control panel varies from device to device.
You can also use ASIO as your playback device if desired. To do this, select 'Change Playback Device' from the Check Level dialog andselect ASIO in the first dropdown list. Please note that if you are using ASIO4ALL, you will probably need to set it as both the recordingand playback device.
Recording in DSD Format
If you have a ADC which supports DSD over PCM, VinylStudio can now record DSD files. To configure VinylStudio and your ADC to recordDSD, proceed as follows:
1. Select DSD on the front panel of your ADC.2. Open VinylStudio's Check Level dialog.3. Select your device in the Input Device or ASIO Device dropdown. On Windows, ASIO is often the best choice.4. Select your desired DSD sample rate in the 'DSD Input' dropdown (standard rate strongly recommended).5. You may also need to set the recording level slider to maximum. Do this before selecting ASIO.
Ensure also that 'Enable DoP Detection is enabled in the Recording Options dialog (it is, by default).
On Windows Vista and later, if you are unable to use WASAPI for recording for some reason you can get away without it, but you mustthen set Windows' shared recording format in the Sound section of the Control panel as follows:
DSD single rate: 176.4 kHz, 24 bits per sample, stereoDSD double rate: 352.8 kHz, 24 bits per sample, stereo
WASAPI is usually available (and functional) however.
Please note that DSD can only be recorded to lossless audio files (so not MP3, for example), and that you will need a fast computer(2GHz+, or 3 GHz+ to work with double-rate files) to work with them. Also, VinylStudio's editing features do not work with them,including:
RIAA equalisation when recordingdeclicking and patchingfilters (hiss, hum, rumble, graphic equaliser, normalisation and equalisation curves / FFT filter)fading tracks in and outcut-and-splicemix down to mono
In fact, that's not quite the full story. You can use these features (except for the first and last) if you save your tracks as PCM or whenburning audio or MP3 CDs. However, VinylStudio also supports saving DSD recordings as DSD, which is a bit-transparent operation andignores any edits you might have made. Sorry about that, but DSD is not an editable format, simple as that. Note that you do not needto use cut-and-splice to eliminate gaps between tracks. You can (and should) drag the trackbreak markers around to do that.
DFF, DSF, CAF, FLAC and Apple Lossless files have no practical limitations, and recording to DFF or DSF files is to be preferred as the filesare 2/3 the size of the corresponding WAV or AIFF files. Note that you can still save your tracks as DoP (DSD over PCM) in WAV, AIFF,FLAC, Apple Lossless or CAF files if that's what your player needs.
Notes for Users of the PS Audio NuWave Phono Converter When Recording DSD
There are currently some issues with this device which you need to be aware of to make successful DSD recordings. As a result, youmust:
1. Select the PS Audio 'native' (not ASIO) driver in the 'Input Device' dropdown.2. Set the recording level slider to maximum (important!).3. Under Windows, then choose ASIO in the Input Device dropdown of the Check Level dialog and select the PS Audio ASIO driver in
the 'ASIO Driver' dropdown if necessary.
There are severe issues with the PS Audio recording DSD on Windows XP which cause VinylStudio to misbehave or crash so please don'ttry it; this situation is unlikely to change.
Notes
If you wish to import an existing sound file (e.g. a recording made in another program), you will find details here.
If you are short of disk space, you might want to record to a compressed file format (such as MP3). More information can be found here.
VinylStudio automatically sets the album status to 'Recorded' when recording is complete (even if you have recorded only side 1).
Recording Singles and 78s
The easiest way to record singles or 78s is to add each side of each single or 78 to your collection as a separate album and check theThis is a single box in the Record window. VinylStudio will then:
automatically add a track with the same name as the album title (which is generally what you want)save this track (by default) in a folder called singles when you save your tracks (i.e. all such tracks go in the same folder)
Thus, for example, if you wanted to record Elvis Costello's Watching the Detectives, you would:1. Check the This is a single box in the Record window2. Add an 'album' to your collection with artist Elvis Costello and title Watching the Detectives; bear in mind that this album will
consist of just the one track3. Record the single (just the one side)4. Tidy up the start and end markers for the track in the Split Tracks window window (to trim off the needle drop, lead in, lead out
and needle lift)
This process is then repeated for the B side, and so on for your other singles until you have enough tracks recorded to burn a CD or saveyour tracks.
For EP's (remember those?), you can do the same thing and add the second track on each side manually in the Split Tracks window.-- 13 --

For EP's (remember those?), you can do the same thing and add the second track on each side manually in the Split Tracks window.
Recording Other Material with no Trackbreaks
If you had, say, a tape of an interview with The Dalai Lama, the procedure is much the same as recording one side of a single or 78.Thus you would:
1. Check the This is a single box in the Record window2. Add an album to your collection with artist Joe Bloggs (that's you) and title Interview with the Dalai Lama3. Record the tape4. Tidy up the recording in the Split Tracks window window if you so wish; truncating the recording to remove any silence at the end
will save you some disk space.5. Burn the 'album' to CD (or save as an MP3 file)
For more information on how singles tracks are named when they are saved, please refer to where are my files located?
What file format should I use?
The recording format VinylStudio uses is set in the Recording Options dialog under the Options menu. We generally recommendrecording to an uncompressed format (WAV on Windows, WAV, AIFF or CAF on the Mac) as this provides the best audio fidelity andmakes VinylStudio run faster. You can also record to a lossless compressed format (FLAC or Apple Lossless) and cut your disk spacerequirements by about 40% with no significant downside, especially on a fast machine.
If you are short of disk space however, you might like to record to a lossy compressed format, i.e. MP3, OGG or AAC. This uses much lessdisk space - about 75MB per album rather than 500 - but there is a slight loss of sound quality. All VinylStudio functions are available onall types of file, and there are also facilities to convert from one format to the other. To help you decide, you might like to make a coupleof test recordings and compare them on headphones.
If you plan to cleanup your recordings, the audio cleanup tools work slightly less well when recording to a lossy compressed format. Also,if you edit such a file outside VinylStudio, you will need to transcode it which will cost you some quality.
Please note that the format you save your tracks in need not be (and usually isn't) the same as the format used to make yourrecordings.
Splitting Tracks
In the Split Tracks window, you can:Enter track listingsSplit up your recordings into individual tracksUse the waveform display and toolbar to fine tune your resultsEdit the album title, artist, release year and genre etc., and import Album art
You can also edit an album title and/or artist, by selecting the album from the drop-down box, right-clicking on it and selecting EditAlbum Details.
Entering, Editing or Importing a T rack Listing
It is worth doing this first as it makes splitting the recording into tracks much easier subsequently. You can do this while recording is inprogress.
The first thing to try is VinylStudio's Lookup Track Listing feature. With luck, this will find a track listing which matches, or closelymatches, your album. Most of the online databases (but not Amazon) also include track times, in which case VinylStudio will createtrackbreaks for you in more or less the right places. If not, or if the retrieved listing is inaccurate, read on.
There are a number of tools in the Split Tracks window to edit an incorrect or incomplete listing, or to enter one from scratch:To enter new tracks, click on the last entry in the list. This opens a new window where you can enter the track title, the duration(if you have it) and the track artist (do this for compilation albums only). To enter further tracks, click Add Another.To edit the details for an existing track, double-click on it (or click on it and press F2). Again, this opens a new window and ifyou make a mistake in this window, close it and use Undo (Ctrl+Z).To move a track in the list, click on it and drag it to the desired position. To preserve your existing trackbreaks when moving ordeleting a track, hold down the Alt key while you are moving it.To delete a track, click on it and press Del.For more options, right-click on an item in the list.
-- 14 --

New tracks are always added at the end of the list; you can drag them to the correct position in the list subsequently, if necessary. Ifyou have the track times to hand (on the LP sleeve, say, or on the disc itself), it is worth typing them in, especially for classical music,as VinylStudio will then create trackbreaks for you in more or less the right places. You should avoid using the same name (e.g. Allegro)for different tracks in the same album as this can cause problems with Windows Media Player, iTunes and other music players.
To import a track listing from a file, select Import Track Listing from the Track menu. Each line of the file should contain a track namefollowed by an optional track time in brackets, e.g.:
Yellow Submarine (2:47)
For compilation albums, follow the track artist by a hyphen with a space on either side, e.g.:
Beatles - Yellow Submarine (2:47)
If a track name contains a hyphen, you can either omit the spaces round the hyphen or type it as two hyphens, e.g:
When I'm Sixty--Four
Splitting Your Recordings into T racks
If you have entered (or been able to lookup) reasonably accurate track times as described above, you are already most of the way thereas VinylStudio will have inserted trackbreak markers for you and you will just need to position them accurately in the gaps between thetracks as described below. If not, you can try your luck with VinylStudio's Scan for Trackbreaks feature. You will need to wait forrecording to complete first, of course, and results can vary depending on the nature of the music.
Whatever stage you are at in the track-splitting process, you can insert and / or adjust trackbreaks manually in the waveform displayusing the controls in the toolbar beneath it. Here is an example, with a few trackbreaks already defined:
To insert a trackbreak, drag the cursor (click on the ) to the gap between the tracks and click on the Insert Trackbreak button ; you can also add a trackbreak by double-clicking anywhere in the waveform display.
To adjust the position of a trackbreak, click on and drag the trackbreak marker in question. To position it precisely, zoom in using thezoom buttons in the toolbar (see below), the scroll wheel on your mouse or the + and - keys. Move the cursor to the area of interestfirst - VinylStudio centres this in the display when you zoom in.
To delete a trackbreak, click on the relevant marker and then click on the Delete Trackbreak button .
To eliminate the gap between tracks, position the trackbreak at the end of the first track (zooming in as necessary) then click on and-- 15 --

drag the green start marker while holding down the shift key. VinylStudio (usually) automatically eliminates the dead air at the end ofthe LP side (and marks it with a grey cross-hatch). If you wish to add a fixed period of silence between each tracks, see the Settingsdialog dialog.
To move trackbreaks as a group, hold down the Alt key while dragging. This is useful when you have retrieved a track listing from oneof the online databases and the tracks on side 2 are all a little out of kilter.
To move quickly from track to track while zoomed in, click on a track in the track listing.
To fade a track in or out, use the Adjust Faders dialog or hold down the Alt key and drag the little square boxes that then appear.
Getting around in the Waveform Display
It is well worth learning how the waveform display works (and the toolbar beneath it) to get the best out of VinylStudio.
To position the cursor (the vertical black line in the waveform display), click anywhere in the waveform display or click on the anddrag it to where you want it to be. VinylStudio uses the cursor to center the dislay when you zoom in, and moves the cursor along thedisplay when the track is playing. While playing in anchor mode, clicking in the waveform display positions the anchor point (displayed asa greyed-out cursor) rather than the cursor itself. To position the cursor, shift-click.
To zoom in an out, use the various zoom buttons in the toolbar listed above, the scroll wheel on your mouse or the + and - keys. Movethe cursor to the area of interest first - VinylStudio centres this in the display when you zoom in.
A number of functions are also available by right-clicking in the waveform display.
Using the T oolbar
The toolbar beneath the waveform display provides a number of tools to help you split your recordings into tracks quickly and efficiently.Shortcut keys are shown in backets:
(spacebar)
Starts playing from the current cursor position. Click in the waveform display first to position the cursor if necessary.
Stops playing. In anchor mode, the cursor will return to the anchor point (which is displayed as a greyed-out cursorwhile playing) unless you hold down the shift key. To switch between anchor mode and classic mode, use the 'cursoroptions' button .
(/) Pauses / resumes playback. This button is only displayed in anchor mode.
<Jump to the beginning of the selection (if there is one) or the recording. This is a shortcut key rather than a button.Press it twice if necessary. While playing in anchor mode, hold down the shift key to move the anchor point ratherthan the cursor.
> Jump to the end of the selection (if there is one) or the recording.
( Move backwards by one disc rotation period. Use this when manually repairing scratches that run across the disc. Youcan change the rotation period for the current album in the Edit Album Details dialog.
) Move forwards by one disc rotation period.
(S) Plays the current selection (shown highlighted in yellow in the waveform display). Shift-click to play in a continuousloop. To define a selection, click and drag in the waveform display. To clear the current selection, press Esc.
(1) Plays a brief snatch of music spanning 1 second either side of the current cursor position.
Displays a dropdown offering a choice of various cursor options, including whether the display pans to follow the cursorwhen it moves off the right-hand edge of the screen while playing. Use the dropdown to switch between anchor modeand classic mode.
Stop playing at the next end-of-track marker.
(+) Zoom in, centering the display at the current cursor position. Click in the waveform display first to position the cursorto the area of interest if necessary. You can also zoom in and out with the scroll wheel.
(-) Zoom out. You can also zoom in and out with the scroll wheel.
(Z) Zoom in (or out) so that the current selection exactly fills the window.
(A) Zoom all the way out (so that the entire recording is visible).
(M) Insert a marker at the current cursor position. This lets you mark a particular spot that you might to come back tolater. To delete a marker, click on it and press D.
(B ordouble click)
Insert a trackbreak at the current cursor position. You can do this while the recording is playing if you wish, which canbe handy for live albums. You can also insert a trackbreak by double-clicking anywhere in the waveform display.
(Del) Delete the trackbreak under the cursor. Click on the trackbreak you want to delete first.
Displays instructions on how to eliminate the gap between tracks.
(T) Zoom in (or out) such that the current track exactly fills the window. This also opens the track details dialog, whichallows you (amongst other things) to fade the track in or out.
(F)Adjust the faders for the trackbreak under the cursor. This lets you set up a 'cross-fade' between one track and thenext. Click on a trackbreak first. You can also adjust faders by holding down the Alt key and dragging the little squareboxes that then appear.
Scan for the end of the current track.
Opens the scan settings dialog. Scanning for trackbreaks is not an exact science, so some adjustment of thesesettings may be needed to get the best results.
-- 16 --

(C) Determines whether you hear corrected or uncorrected (i.e. the original, as recorded) audio when you click Play.Corrections, such as scanning for clicks and removing tape hiss, are applied in the Cleanup Audio window.
Turns off audio in the left or right-hand channel (so that you can listen to just one).
Opens the Windows mixer applet, which allows you to adjust the playback volume. You can also change the currentplayback device by clicking on thew down-arrow.
N Jump to the start of the next track.
P Jump to the start of the previous track.
` (back quote) Switch to the Cleanup Audio window (toggle).
TIP: it's worth learning the shortcut keys for the functions you use most; it can save a lot of time if you have a lot of albums to process.The shortcut key for a particular toolbar button is also displayed when you hover over it with the mouse.
Editing album details and importing album art
You can edit the various bits of information that VinylStudio stores for an current album by clicking on the Edit Album Details button(or by selecting Edit Album Details from the Album menu):
You can enter whatever information you have to hand in this dialog. Any information you enter will be stored (as tags) in the files yougenerate when you save your tracks. For more information on recording singles, click here.
Information on what the This is a single checkbox does, can be found here.
Mix down to mono specifies that the tracks for this album will be saved in mono rather than stereo. Some people prefer this for monomaterial and it can save some disk space, especially when saving in uncompressed formats.
Album art can be imported from files on your hard disk or looked up over the internet. You can also drag and drop images from most webbrowsers or from Explorer, or you can use Copy and Paste.
To import from an existing file, click Browse and navigate to the file on your hard disk. VinylStudio will embed the image in any files itgenerates for this album when saving tracks and it will scale it down if necessary to keep the resulting files down to a reasonable size.You can control VinylStudio's exact behaviour in this regard in the Settings dialog.
-- 17 --

Not all web browsers support drag and drop for images. We have tested the following:Firefox Supported.Google Chrome Supported.Internet Explorer Supported for certain images only (specifically, those that do not link to another page or image).Opera Not supported, but some images can be dragged to your desktop and then from there into VinylStudio.Safari Supported.
Where a browser does not support drag and drop, right-click on the image to save it as a file and then navigate to that file via the'Browse' button in VinylStudio's Edit Album dialog, or use Copy and Paste.
Lookup T rack Listings and Album Art
VinylStudio can look up track listings for many LPs over the Internet. To do this, click on the Split Tracks tab, select the album from thedropdown list if necessary and then click Lookup Track Listing. This will popup the following window:
-- 18 --

With luck, you will be able to retrieve a full track listing from one or other of the available databases by clicking Lookup. If so, select thebest match and then click Use Selected Listing.
If you can't find a match, try simplifying the artist or album title - just a few keywords will often do. Alternatively, you can try a differentdatabase. Music Brainz seems to have the best balance between coverage and 'noise', but the other databases are worth a try for moreobscure material. Only the Amazon, Discogs and Music Brainz databases contain pictures of album covers.
For Discogs, you can also enter the catalog number (without spaces or punctuation) in the Album Artist field, preceded by a #, e.g.#74321589412. Leave the album title blank. You can also broaden your search by starting the album artist with a + sign, e.g. +Billy Joel.This can be useful if a search returns no hits, and also lets you search by Discogs release ID.
Because some entries are for CDs rather than vinyl albums, track listings are sometimes in the wrong order or may contain extra tracks.You can edit an incorrect or incomplete listing as follows:
to edit a track name, click on it and press F2; you can also edit the track time in this wayto move a track in the list, click on it and drag it to the correct position in the listto delete a track, click on it and press Delto add tracks, type them in at the end of the list; you can then drag them to the correct position in the list if necessaryfor more options, right-click in the list
You can also edit the track listing subsequently in the Split Tracks window. Doing it there has the advantage that you can Undo (Ctrl+Z) and Redo (Ctrl+Y) any changes you make.
If the retrieved listing does not contain track times (or if they are inaccurate), it is worth typing them in if you have them to hand,especially for classical music. VinylStudio will then position trackbreak markers for you in roughly the right places. Please note that theAmazon databases do not contain track times and Discogs only has them for certain albums. Note also that for the Amazon and Discogsdatabases to work properly, your computer clock and time zone must be set correctly (else you will get HTTP error 403 - Forbidden orHTTP error 401 - Authorization required).
Lookup Album Art
VinylStudio can download album art from the Amazon and Discogs websites. This is then embedded in the files generated whenVinylStudio saves your tracks (but not for WAV files).
To retrieve album art from one of the online databases, lookup the album in the same way as described above. Then click Fetch AlbumArt to see the cover as a thumbnail, at which point the button changes to Import Album Art. Click this in turn to download the albumcover and store it as a file in your recordings folder. Note that you can download album art from one looked-up album and use the tracklisting from another, even if they come from a different databases. The Track Type database does not contain album art and coverage inMusic Brainz is currently rather patchy.
You can also import album art from a file on your hard disk. To do this, select Edit Album Details from the Album menu and click on the'Album Art' tab. You can also drag album art from most browsers to this tab, or use Copy and Paste.
Some other sites you might try for downloading album art are:www.albumart.orgimages.google.com
If you use these sites, you will have to save the image to your hard disk and then import it into VinylStudio in the Edit Album Detailsdialog (or drag the image across from your browser).
Scan for T rackbreaks-- 19 --
Once you have recorded an album (both sides!), you can scan it for trackbreaks. This can be useful when Lookup Track Listing has failedto find a match or when no track times are available. It is not, however, a precise science and results can vary. You can always, ofcourse, add trackbreaks manually, and it is well worth learning how to do so.
Scanning for Gaps Between Tracks Automatically
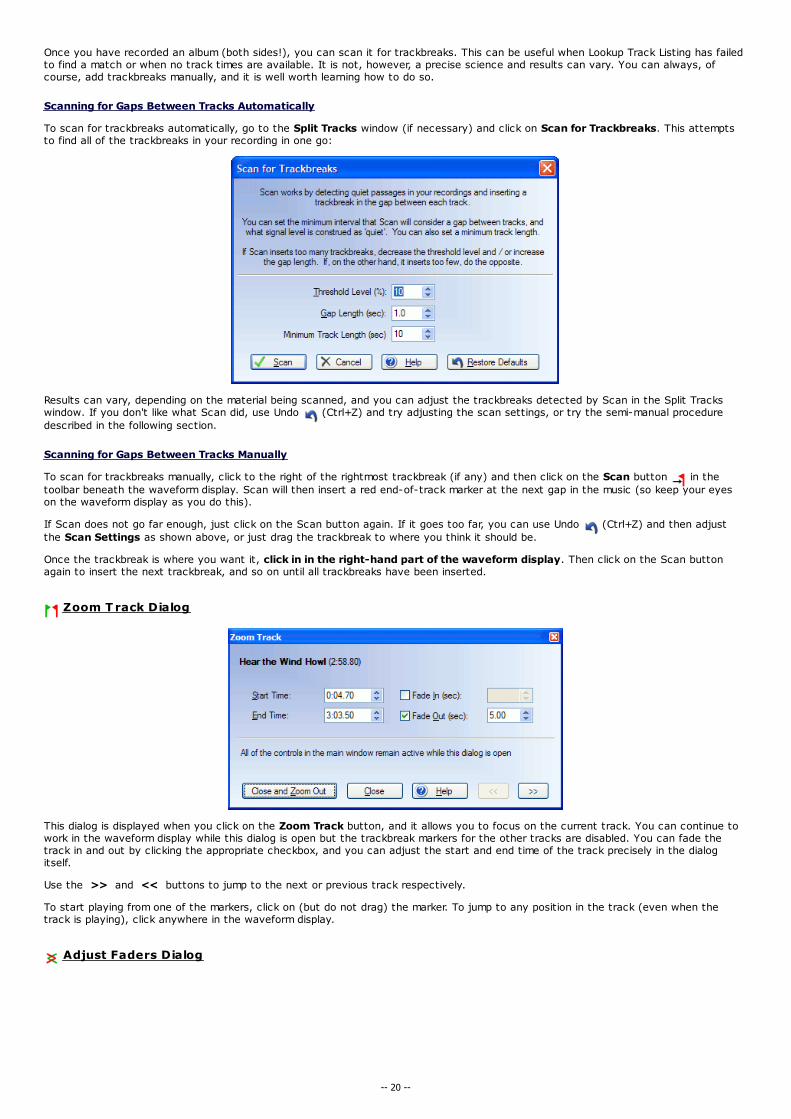
To scan for trackbreaks automatically, go to the Split Tracks window (if necessary) and click on Scan for Trackbreaks. This attemptsto find all of the trackbreaks in your recording in one go:
Results can vary, depending on the material being scanned, and you can adjust the trackbreaks detected by Scan in the Split Trackswindow. If you don't like what Scan did, use Undo (Ctrl+Z) and try adjusting the scan settings, or try the semi-manual proceduredescribed in the following section.
Scanning for Gaps Between Tracks Manually
To scan for trackbreaks manually, click to the right of the rightmost trackbreak (if any) and then click on the Scan button in thetoolbar beneath the waveform display. Scan will then insert a red end-of-track marker at the next gap in the music (so keep your eyeson the waveform display as you do this).
If Scan does not go far enough, just click on the Scan button again. If it goes too far, you can use Undo (Ctrl+Z) and then adjustthe Scan Settings as shown above, or just drag the trackbreak to where you think it should be.
Once the trackbreak is where you want it, click in in the right-hand part of the waveform display. Then click on the Scan buttonagain to insert the next trackbreak, and so on until all trackbreaks have been inserted.
Zoom T rack Dialog
This dialog is displayed when you click on the Zoom Track button, and it allows you to focus on the current track. You can continue towork in the waveform display while this dialog is open but the trackbreak markers for the other tracks are disabled. You can fade thetrack in and out by clicking the appropriate checkbox, and you can adjust the start and end time of the track precisely in the dialogitself.
Use the >> and << buttons to jump to the next or previous track respectively.
To start playing from one of the markers, click on (but do not drag) the marker. To jump to any position in the track (even when thetrack is playing), click anywhere in the waveform display.
Adjust Faders Dialog
-- 20 --

This dialog is displayed when you click on the Adjust Faders button (you will need to click on a trackbreak first) and allows you to focuson a single trackbreak to fade the tracks in and out (or, rather, out and in). You can continue to work in the waveform display while thisdialog is open, but all other trackbreak markers are disabled.
The currently selected track is shown highlighted in blue, and parts of the waveform which have been faded out (which will include allpreceding and subsequent tracks) are shown greyed-outand will not play until you select them (which you can do by clicking on themafter closing this dialog).
Once you have turned on fade-in or fade-out for a particular track, you can adjust the fade-in or fade-out points by dragging themarkers in the waveform display; the Adjust Faders dialog does not need to be open to do this. To start playing from a marker, click on(but do not drag) the marker. To jump to any position in the track (even when the track is playing), click anywhere in the waveformdisplay.
The >> and << buttons provide a convenient way to jump to the next or previous trackbreak respectively. This will only work if youhave first defined trackbreaks in the Split Tracksb> window.
If you hear faint clicks with the faders enabled, enable the rumble filter in the Filter Settings dialog.
Cleanup Audio
The Cleanup Audio window lets you remove clicks, scratches, tape hiss from your recordings and more. You don't need to save workingcopies of your files as you edit them - VinylStudio keeps track of your changes and applies them as and when needed (to any CD's youburn or tracks you save) whilst keeping your original recordings intact. This can save a lot of disk space, and, coupled with extensiveUndo and Redo facilities, makes VinylStudio a productive and forgiving working environment. VinylStudio's audio cleanup featuresare not just a toy; used correctly, they can achieve excellent results, even on badly damaged recordings.
In the Cleanup Audio window, you can:Remove clicks, pops and scratches from your recordings.Filter out hiss, hum and rumble.Equalise your recordings.Remove unwanted sections of audio ('cut and splice').Patch bad scratches and dropouts.Repair severe clicks and scratches manually.Hear the results as you work.Switch to Spectral View.Display a Frequency Analysis of your recording.
Follow any of the links above for more information.
The Cleanup Audio window also offers a number of 'housekeeping' tools, which let you:Convert your recordings between MP3 and WAV formats.Save working copies of your cleaned up files for editing outside VinylStudio.Import files recorded or edited outside VinylStudio.Delete unwanted files.
Again, follow any of these links for details.
Please note that if you have VinylStudio Lite, the audio cleanup features can only be used on a trial basis. Specifically, you cannot burncleaned up audio to CD or to saved tracks. To upgrade, select 'Upgrade to Full Version' from the Help menu.
For New Users
There are a lot of things you can do in the Cleanup Audio window and it's easy to get lost at first, so for new users, we recommend thatyou proceed as follows:
-- 21 --

first split your recording into tracks, if you have not done so already; this helps you find your way around your recording later onthen, if it is a vinyl (or shellac) recording, or a tape made from one, scan it for clicksif it is a tape recording, or a noisy 78, apply the hiss filter; if not, you probably don't need to botherfinally, use the graphic equaliser if you feel you need to adjust the tone, especially for recordings made from cassette taperepeat for side 2, if recorded separately
It is also worth spending a few minutes familiarising yourself with the operation of the waveform display and associated toolbar asdescribed in the sections below.
As you become more proficient, it is worth exploring the available filter settings in more depth as there is a lot you can do with them. Inparticular, the rumble filter should be applied to all vinyl recordings and the hum filter can make a big difference in certain cases.
Waveform Display
Unlike the Split Tracks window, which works on the album as a whole, the Cleanup Audio window works on one album side at a time. Thedisplay shows the audio signal both before and after any click repairs have been applied (one signal is superimposed on the other). Theoriginal signal is shown in green and repaired clicks are shown in grey:
Most of VinylStudio's functions work with the current selection. To define a selection (which is shown shown in yellow), click and drag inthe waveform display. You can subsequently adjust the either edge of the selection by clicking on it and dragging. To clear the selection,press Esc.
Positioning the cursor and zooming in and out work in the same way as in the Split Tracks window but it is worth repeating that, whenyou zoom in, VinylStudio uses the uses the current cursor position to centre the display (so you should position the cursor near the areaof interest before you zoom in). The waveform display is more fine-grained than the one in the Split Tracks window, and you can zoomright in to see the individual samples if you wish.
A number of functions are also available by right-clicking in the waveform display.
Spectral View
Spectral View shows the way that the frequencies are distributed in the audio stream. It can be useful for locating hard-to-find clickswhich tend to show up as spikes in the display when zoomed in enough. To best see such clicks, adjust the viewing window to spanabout 5 seconds of audio. Note that corrected clicks are hidden in the spectral view when corrected audio is being displayed (press C totoggle).
The colours in the display represent signal power at the frequncy given by the Y coordinate. The colours are:
Grey Minimum
Blue Low
Red Medium
White High
You can adjust spectral view options (FFT size and maximum frequency displayed) via the Options menu. To switch between SpectralView and the regular waveform display, press V or use the Cleanup Audio or right-click menu.
-- 22 --

You need a reasonably fast PC to use spectral view effectively. The display speeds up as you zoom in. Switch back to the normalwaveform display (V) when zooming out for better performance.
Frequency Analysis
VinylStudio can display a frequency analysis of part or all of your recording which can help you decide how to build an FFT filter to filterout unwanted noise:
Select 'Perform Frequency Analysis' from the Cleanup Audio window to display the Frequency Analysis window. selecting the section ofaudio you are interested in first. Read off unwanted peaks in the display by moving the cursor over them and use this information toconstruct an FFT filter in the Equalisation curves window.
Using the T oolbar
The buttons in the toolbar have the following functions (shortcut keys are shown in backets):
(spacebar)
Starts playing from the current cursor position. Click in the waveform display first to position the cursor if necessary.
Stops playing. In anchor mode, the cursor will return to the anchor point (which is displayed as a greyed-out cursorwhile playing) unless you hold down the shift key. To switch between anchor mode and classic mode, use the 'cursoroptions' button .
(/) Pauses / resumes playback. This button is only displayed in anchor mode.
<Jump to the beginning of the selection (if there is one) or the recording. This is a shortcut key rather than a button.Press it twice if necessary. While playing in anchor mode, hold down the shift key to move the anchor point ratherthan the cursor.
> Jump to the end of the selection (if there is one) or the recording.
( Move backwards by one disc rotation period. Use this when manually repairing scratches that run across the disc. Youcan change the rotation period for the current album in the Edit Album Details dialog.
) Move forwards by one disc rotation period.
[ Move the cursor to the previous click.
] Move the cursor to the next click.
(S) Plays the current selection (shown highlighted in yellow in the waveform display). Shift-click to play in a continuousloop. To define a selection, click and drag in the waveform display.
(1) Plays a brief snatch of music spanning 1 second either side of the current cursor position.
Displays a dropdown offering a choice of various cursor options, including whether the display pans to follow the cursorwhen it moves off the right-hand edge of the screen while playing. Use the dropdown to switch between anchor modeand classic mode.
Stop playing at the next end-of-track marker.
(+) Zoom in, centering the display at the current cursor position. Click in the waveform display first to position the cursorto the area of interest if necessary. You can also zoom in and out with the scroll wheel.
(-) Zoom out. You can also zoom in and out with the scroll wheel.
(Z) Zoom in (or out) so that the current selection exactly fills the window.
(A) Zoom all the way out (so that the entire recording is visible).
-- 23 --
(M)Insert a marker at the current cursor position. This lets you mark a particular spot that you might to come back tolater. To delete a marker, click on it and press D. Markers also appear in the corrections list, and you can select amarker by clicking on it in the list.
Show / hide trackbreaks (toggle).
Scan the recording (or current selection, if any) for clicks. To define a selection (highlighted in yellow), click and dragin the waveform display.
(R)Insert a click repair at the cursor position manually. Use this if VinylStudio has failed to find the click by scanning. Toadjust the width of a repair, zoom in on it and drag either edge. To select a click repair, click on it in the correctionslist list.
(P) Patch the current selection. Use this to repair damaged areas, such as scratches or dropouts, which are too wide forVinylStudio's click repair capabilities. To select a patch, click on it in the corrections list list.
(X) Cut out the current selection, and cross fade the edges of the cut with the surrounding audio. To select a cut, clickon it in the corrections list list.
(F) Opens the filter settings dialog, which allows you to filter out tape hiss, hum and rumble, and includes a graphicequaliser.
(E) Opens the Equalisation curves (FFT filters) dialog, which allows you to apply precise equalisation or filtering, includingRIAA and other recording equalisation curves.
(C) Determines whether you hear corrected or uncorrected (i.e. the original, as recorded) audio when you click Play.Corrections, such as scanning for clicks and removing tape hiss, are applied in the Cleanup Audio window.
Turns off audio in the left or right-hand channel (so that you can listen to just one).
Opens the Windows mixer applet, which allows you to adjust the playback volume.
` (back quote) Switch to the Split Tracks window (toggle).
V Switch to and from Spectral View (toggle).
Cleanup Audio - Scan for C licks
VinylStudio is capable of finding and fixing most of the clicks and scratches in your vinyl recordings automatically. That said, click repair isnot an exact science, and some form of manual intervention is sometimes needed to get the best results, especially if your recordingshave a lot of heavy clicks or, in particular, scratches. It is important to listen to the results, and using headphones helps a lot.
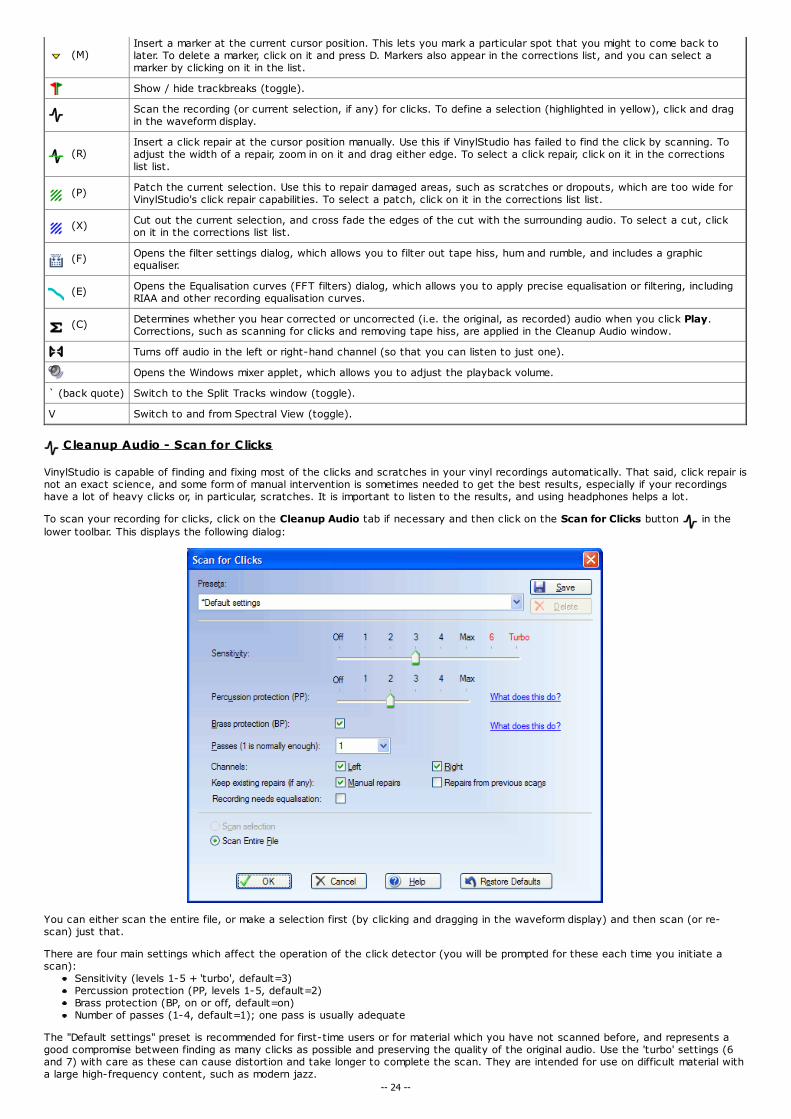
To scan your recording for clicks, click on the Cleanup Audio tab if necessary and then click on the Scan for Clicks button in thelower toolbar. This displays the following dialog:
You can either scan the entire file, or make a selection first (by clicking and dragging in the waveform display) and then scan (or re-scan) just that.
There are four main settings which affect the operation of the click detector (you will be prompted for these each time you initiate ascan):
Sensitivity (levels 1-5 + 'turbo', default=3)Percussion protection (PP, levels 1-5, default=2)Brass protection (BP, on or off, default=on)Number of passes (1-4, default=1); one pass is usually adequate
The "Default settings" preset is recommended for first-time users or for material which you have not scanned before, and represents agood compromise between finding as many clicks as possible and preserving the quality of the original audio. Use the 'turbo' settings (6and 7) with care as these can cause distortion and take longer to complete the scan. They are intended for use on difficult material witha large high-frequency content, such as modern jazz.
-- 24 --

For more information on how and when to adjust VinylStudio's click repair settings, refer to the Tips for Removing Clicks page.
Depending on its condition, scanning an LP side takes around 1 minute on a reasonably fast computer; less on modern hardware. Oncethe scan is complete, you can listen to the results and compare them with the original, uncorrected version by clicking on the buttonin the toolbar. All changes are non-destructive - they are stored in a separate file and your original recording is not changed - and youcan undo the scan (Ctrl+Z) if you don't like the results.
When scanning fails to find a click or impairs the quality of the music, you can rescan the offending area with different settings, or, ifnecessary, repair the click manually. For more information on how to get the best out of your vinyl, refer to the Tips for Removing Clickspage.
Note: if (and only if) you recorded with a 'flat' phono preamp, or if you applied only inverse RIAA equalisation at record time, you shouldcheck the 'Recording needs equalisation' box. This will greatly improve the accuracy of VinylStudio's click scanner. Do not check this boxif you are recording an old 'acoustic' disc (i.e. one which requires no equalisation in the first place). In that case, just apply inverse RIAAat record time if you cannot defeat the RIAA equalisation built into your phono preamp and scan for clicks using the default settings.
Cleanup Audio - Filters
VinylStudio has a complete set of filters to help you cleanup your recordings and to adjust the tonal balance. You can filter out hum, hiss(and other forms of noise) and rumble, and there is also a graphic equaliser with a normalisation facility. All filters are applied in real time- What you Hear is What you Get - and no changes are made to your original recordings. Instead, VinylStudio applies filtering 'on the fly'as and when needed (when burning a CD, for example). Filtering can be applied to an entire LP side, to individual tracks or even specificsections of music within a track.
To apply or adjust the filters for the currently selected album side, click on the Filters button in the lower toolbar. This displays theFilter Settings dialog shown below (note that all of the controls in the main window remain active while this dialog is open).
Please note that the effect of any filters being applied is not shown in the waveform display. If you want to see what your audio lookslike after filtering, you can save a copy of your recording from the File History List.
Hum Filter
Filtering is normally applied to an entire album side at a time, so we will cover that first. To adjust the Hum filter, click on the Hum Filtertab:
For the hum filter, the only thing you need to specify, other than whether to turn it on or not, is the mains frequency in your houeshold(or, to be precise, the mains frequency in the household where the recording was made); this is 50Hz in the UK, Europe, Australia andChina, and 60Hz in the Americas (in Japan it varies by region). Recordings made from vinyl often contain a certain amount of hum, so ifyours are affected in this way try turning this on while listening to a quiet passage on headphones. If hum filtering seems to inefeective,try changing the mains frequency.
Hiss Filter
The hiss filter is useful both for tapes and for other recordings with a high level of background noise such as 78's or badly worn vinylrecordings. We do not recommend applying it to vinyl recordings in good condition however as it is a subtractive process and canintroduce a certain amount of distortion. But feel free to experiment - you can always turn it off again.
For the hiss filter to function properly, VinylStudio needs you to define a Noise sample - a short section of the recording (1 second orso) containing background noise (NOT complete silence) and nothing else. You will be prompted to do this the first time you turn the hissfilter on, and you do so by selecting a suitable section (by clicking and dragging in the waveform display). If you get this wrong, theresults can either (a) sound very strange or (b) not be filtered at all so if you think this has happened to you, click on Redefine NoiseSample and try again.
-- 25 --

You can also load a noise sample from a previously saved file. This is useful if you have a recording where there is no place to define anoise sample in the normal way. Use this feature with care - inaccurate noise samples give poor results. You can also view a spectralanalysis of the currently defined noise sample via Show Noise Sample.
The two sliders determine how much filtering is applied; we suggest you experiment with these while listening to a quiet passage onheadphones. Don't be tempted to remove every last trace of hiss as this can make things sound rather artifical.
Hiss filtering works best after you have declicked your recording.
Rumble Filter
The rumble filter is a simple on / off affair. Turn it on to filter out potentially damaging low frequency noise often present on vinylrecordings (especially in the leadin) or introduced by turntable bearings. High levels of rumble can sometimes cause a faint click at thebeginning and end of tracks and can also cause the hiss filter to introduce faint clicking sounds into the music. Turning the rumble filteron will eliminate this. The rumble filter also performs DC-offset correction.
Graphic Equaliser and Normalisation
Use the graphic equaliser to, for example, boost the treble on recordings made from cassette tapes which can often sound rather dull.Changes are applied in real time so you can adjust the sound until you get the results you want. The preamp setting can be used toboost quiet signals, but be careful not to set this too high - if the VU meters turn completely red while playing a loud section you need toturn this down.
To normalise a recording, click Normalise. This displays a dialog to let you choose the desired volume level:
-3dB is the most common choice as it obviates any risk of clipping, although many commercial CDs are normalised to 0dB. Like all theaudio cleanup tools, VinylStudio's normalisation procedure is non-destructive - i.e. no changes are made to the recorded file. Instead,the results are applied when you burn CDs or save your tracks. You can also normalise albums in 'batch' mode in the Save Trackswindow.
If you wish to normalise all recorded sides for the album in a single operation, check Normalise all album sides before normalising.
-- 26 --

VinylStudio can then either normalise each side separately (the default), or adjust all sides by the same amount (which will be governedby the loudest album side).
By default, VinylStudio tries to ignore transients when normalising. This generally improves accuracy at the risk of some slight clipping. Ifyou prefer, you can turn this feature off.
Presets
You can save frequently used filter settings as a preset. To do this, adjust the filter settings as desired and then click Save. Presetsare named and a few predefined ones (marked with an asterisk) are provided for the more common situations you might encounter. The'78 recorded at 45RPM' preset attempts to correct inaccuracies in equalisation caused by recording at the wrong speed, but vintagerecords use varying equalisation schemes anyway so trust your ears and be prepared to experiment.
To apply the same settings as you used previously, select Last settings used.
Filtering Individual Tracks (or any other section of music)
VinylStudio can apply any set of filters to any section of music within an LP side. You might want to boost the bass on a particular track,for example. To do something like this, click on Advanced options and then on the Add Filter button to add a new set of filters. Thisdisplays the following dialog:
While this dialog is open, you can either define a selection by clicking and dragging in the waveform display or you can select a trackfrom the list and click Select Track. Either way, the new set of filters will be applied to the range you specify.
After you close the Add Filter dialog, the Filter Settings dialog should look something like this:
You will notice that a second entry has appeared in the list (#2) showing the section of music to which this set of filters is to be applied.Adding a new set of filters in this way allows any filter (hum, hiss, rumble and equaliser) to be adjusted in whatever way you choose forthe section of music specified.
You can add as many sets of filters as you like in this way and for each type of filter you can say whether you want to turn it on, turn itoff, or keep the existing settings (i.e. 'unchanged from the above'). This provides a lot of flexibility - more than you need probably - butit does let you say things like 'boost the treble on the entire recording except for tracks X, Y and Z'.
Note that filters don't 'add up' - that is to say, for example, adding a second hiss filter does not perform double the amount of filtering.Where the ranges of two or more filters overlap, the last one in the list takes precedence.
Cleanup Audio - Equalisation Curves (FFT Filters)
Starting with version 8.5, VinylStudio can apply FFT (Fourier transform)-based equalisation curves / filters to your recordings. All filtersare applied in real time - What you Hear is What you Get - and no changes are made to your original recordings. Instead, VinylStudioapplies filtering 'on the fly' as and when needed (when burning a CD, for example). Filtering can be applied to an entire LP side, toindividual tracks or even specific sections of music within a track. You can also apply more than one Equalisation Curve / Filter at a time.
An implementation detail that might be of interest is that FFT-based filtering and hiss filtering are carried out by the same piece of code,thus halving CPU-time requirements (and FFT-induced artefacts) when both features are enabled at the same time. It also doesn'tmatter how many curves you define. VinylStudio does them all together, just once.
-- 27 --

To apply or adjust equalisation curves / filters for the currently selected album side, click on the Equalisation curves button in thelower toolbar. This displays the dialog shown below (note that all of the controls in the main window remain active while this dialog isopen).
Please note that the effect of any filters being applied is not shown in the waveform display. If you want to see what your audio lookslike after filtering, you can save a copy of your recording from the File History List.
Applying a Single Filter
To apply just one filter, click on the 'On' button or select a preset: from the dropdown list:
To edit the curve, click and drag any 'node' (circle), click outside any node to insert a new one, or drag a node out of the window todelete it. If you make a mistake, use Undo (Ctrl+Z) or Redo Ctrl+Y). See also under the 'More' button for additional options.
You can save your work as a preset at any time by clicking 'Save Preset', but VinylStudio will apply your changes to the currentrecording (and remember what they are) whether you do that or not.
Applying More than One Filter at a Time
VinylStudio can apply several filters to the same recording, the result being the cumulative effect of all the filters specified. To do this,click on Advanced options and then on the Add Filter button to add a new filter. This displays the following dialog:
Unless you only want to apply filtering to (say) a particular track, click 'Apply to Entire Recording'. The result should look something likethis:
-- 28 --

You will notice that a second entry has appeared in the list (#2), representing the newly added filter. You can then edit the curve orselect a preset as above and the result will be added to the first filter you defined (unless you turn it off in which case it has no effectat all). There is no limit to the number of filters you can add in this way, although it is uncommon to define more than a couple.
Filtering Individual Tracks (or any other section of music)
VinylStudio can apply a filter to any section of music within an LP side. You might want to boost the bass on a particular track, forexample. To do something like this, click on Advanced options and then on the Add Filter button to add a new set of filters. Thisdisplays the same dialog as previously, but you use it differently:
While this dialog is open, you can either define a selection by clicking and dragging in the waveform display or you can select a trackfrom the list and click Select Track. Either way, the new filter will be applied to the range you specify.
After you close the Add Filter dialog, the screen should look something like this:
-- 29 --

This time, the newly added entry (#3) only applies to the section of music you selected and there are more radio buttons to choosefrom. These buttons allow precise control over how the filter is applied as follows:
Override: the newly added filter replaces any filters above it in the list for the section of music in question (i.e. preceding filtersare ignored).Off: all filtering is turned off for the section of music in question.No change: the newly added filter has no effect at all.Append: the newly added filter is added to any previous filters defined (i.e. their effect is cumulative).
You can add as many filters as you like in this way and for each one you can say whether you want to turn it on, turn everything off,keep the existing settings (i.e. 'unchanged from the above') or add to the existing filters. This provides a lot of flexibility - more than youneed probably - but it does let you say things like 'boost the treble on the entire recording except for tracks X, Y and Z'.
Applying Recording Equalisation
If your phono preamp has a 'flat' switch, if you are recording discs cut before 1954, or if you recorded with speed conversion enabled,you can apply recording equalisation to correct the tonal balance of your recording. If you simply want to apply RIAA equalisation, usethe RIAA preset. For anything more complex, select 'Apply Recording Equalisation' under the 'More' button, which will display the followingdialog:
For discs cut from 1954 onwards, the RIAA preset should generally be used. For earlier discs, VinylStudio comes with a large number ofpreset curves but selecting the right one can be a challenge. Try consulting the sleeve notes or plug in a decent set of headphones andadjust the parameters by ear. Increasing the bass turnover frequency will boost bass notes. Increasing the 10kHz rolloff value will cuttreble. You can save your settings as a preset, and you can also enter time constant values if that is the information you have. Eitherway VinylStudio will remember your settings and apply the correct curve to the recording.
When using recording equalisation, use the 'flat' switch on your phono preamp if it has one. If it doesn't, check the 'Apply inverse RIAAfirst' box. If you recorded with speed conversion enabled, it is important to tell VinylStudio so that it calculates the correct inversecurve. VinylStudio will generally remember this for you but older versions of VinylStudio didn't so you will need to set it here.
Once you quit this dialog, VinylStudio will add one (forward) or two (inverse and forward) equalisation filters to your recording, and it isthese filters that do the actual work:
-- 30 --

Please note that you can also apply recording equalisation at record time, which can improve the dynamic range of your recordings ifrecording at 16 bits per sample and also has the advantage that the waveform display shows the correctly equalised signal. This is ourrecommendation.
The equalisation curves built into VinylStudio were taken from the Audacity wiki,http://wiki.audacityteam.org/wiki/78rpm_playback_curves and references therein, with much thanks. Other sources, from which you canenter the parameters yourself: Vinyl Engine Elliott Sound Projects
Importing and Exporting Audacity Equalisation Curves
You can import and export curves from / to a file that Audacity 2.x can understand by selecting Import / Export Audacity Curves fromthe menu under the More button. This can also be used to move equalisation curves / filters between machines (including Macs andPCs).
Cleanup Audio - Cut and Splice
To cut out an unwanted section of audio, select it (by clicking and dragging) and then click on the Cut and Splice button in thetoolbar beneath the waveform display in the Cleanup Audio window. If you don't like what you hear, select Undo (Ctrl+Z), adjust theedges of the selection and try again.
VinylStudio cross-fades the sound on either side of the cut to make the cut less obvious. Select your desired splice length before youmake your cut. Use 'splice length short' if, as is common, you are cutting out very short sections such as bad scratches.
Cuts are shown in the waveform display as a vertical blue dotted line which, as you zoom in, becomes a cross-hatch showing the cross-faded area:
To delete a cut, right-click on it in the corrections list and then select Delete Cut. You can also delete a cut by selecting it in the listand pressing Del. If you zoom in sufficiently, you can also select a cut by clicking on it in the waveform display.
Please note that you don't need to use cut-and-splice to eliminate gaps between tracks. And nor should you - just shift-click on thegreen start-of-track marker in the Split Tracks window and drag it to the right. But if you do want to cut out a section of audio while youare in the Split Tracks window, proceed as follows:
1. Select the section of audio you want to cut out.2. Click on the Cleanup Audio tab.3. Click on the cut-and-splice button in the toolbar beneath the waveform display.
-- 31 --

4. Listen to your results.5. Return to the Split Tracks window.
The key to this is that VinylStudio preserves your selection and cursor position when switching between windows.
Truncating Overly Long Recordings
If your recording has a long period of silence at the end, as many do, you can save some disk space by truncating it. To do this,right-click on the waveform display at the appropriate point and then select Truncate Recording at Cursor. Please note that thisoperation cannot be undone.
Cleanup Audio - T he Corrections List
The Corrections List lists all the clicks, and potential clicks, found by scanning the album side. It also lists anycuts you may have made, any markers you have inserted, any click repairs inserted or adjusted manually andany patches you may have made.
Each entry in the list has a time stamp and then, for clicks or would-be clicks, the click width (in samples at44100 samples per second) and the channel (Left or Right). In addition:
Click repairs are coloured cyan.Potential clicks which have been identified as probable percussion bursts (and hence ignored) are markedPP, and coloured purple.Potential clicks which have been identified as probable horn blasts and the like are marked BP, andcoloured blue (not shown in this example).Clicks inserted or adjusted manually are marked Manual, and shown in light cyan.Patches are shown in green (not shown in this example)Click repairs wider than 50 samples can be a cause for concern and are coloured red.Cuts are also coloured blue.Markers inserted by the user are coloured dark yellow.Corrections falling within the current selection are shown with a pale yellow background.The current cursor position in the waveform display is shown by this symbol:
The checkboxes below the list control what is displayed. Note that, to select a click repair in the waveformdisplay, Show Clicks must be checked.
To select a correction from the list, click on it and then zoom in using the mouse wheel, the + and - keys or the zoom buttons in thetoolbar. You can also use the corrections list to delete a correction - right-click in the list for more information.
TIP: to select a range of corrections, click on the first in the list and then shift-click on the last.
Cleanup Audio - T ips for Removing Clicks
To get the best out of VinylStudio's click repair tools, especially on badly damaged recordings, you have to be prepared to put a bit oftime in. On the plus side, VinylStudio provides powerful tools which, when correctly applied, can give excellent results. Also, becauseyour original recordings are not changed by the repair process, you can always come back later, have another go at the affected area(s)and then burn a new CD.
Automated click repair is always a compromise between false negatives and false positives. False negatives are, of course,undetected clicks and scratches, while false positives cause unnecessary and potentially harmful changes to the original waveform.VinylStudio's default settings aim primarily to do no damage to the sound quality of your original recordings. While this catches themajority of clicks, it inevitably means that some slip through undetected; with a bit of manual intervention, these can be removed too.
VinylStudio provides a number of presets designed to work with differing types of source material but it is worth learning more about howto use the settings themselves if you want to get the best out of your vinyl (or shellac).
-- 32 --
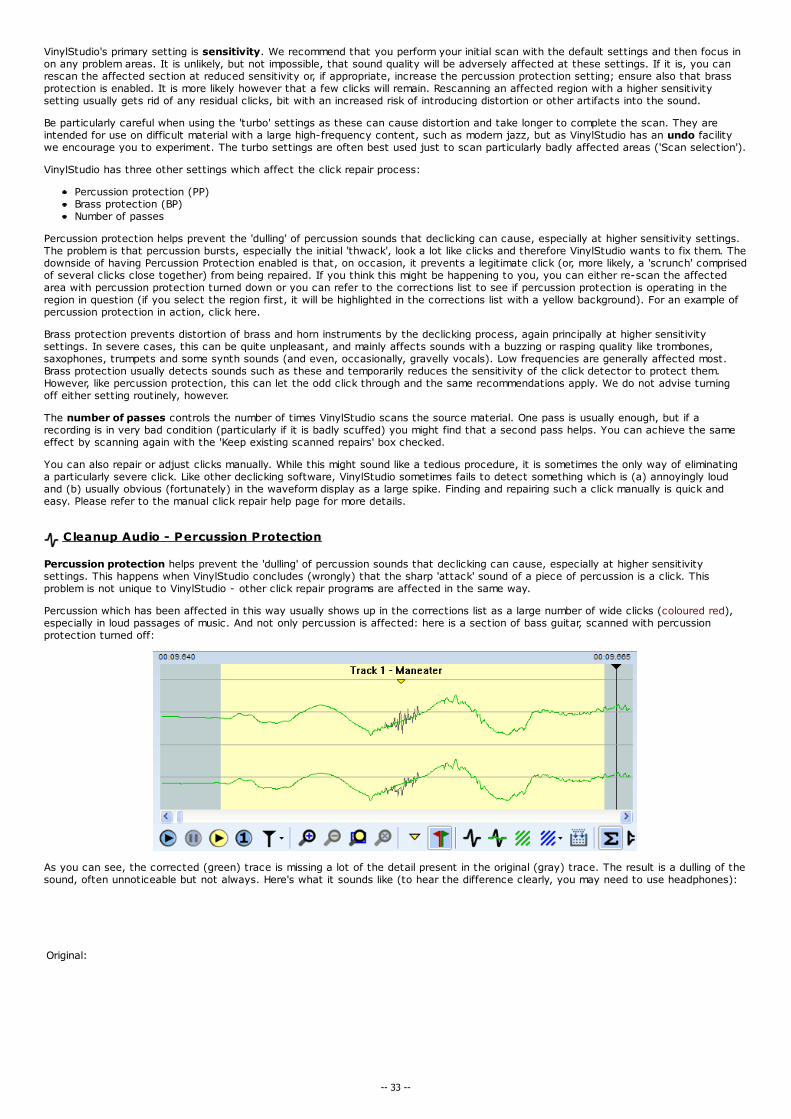
VinylStudio's primary setting is sensitivity. We recommend that you perform your initial scan with the default settings and then focus inon any problem areas. It is unlikely, but not impossible, that sound quality will be adversely affected at these settings. If it is, you canrescan the affected section at reduced sensitivity or, if appropriate, increase the percussion protection setting; ensure also that brassprotection is enabled. It is more likely however that a few clicks will remain. Rescanning an affected region with a higher sensitivitysetting usually gets rid of any residual clicks, bit with an increased risk of introducing distortion or other artifacts into the sound.
Be particularly careful when using the 'turbo' settings as these can cause distortion and take longer to complete the scan. They areintended for use on difficult material with a large high-frequency content, such as modern jazz, but as VinylStudio has an undo facilitywe encourage you to experiment. The turbo settings are often best used just to scan particularly badly affected areas ('Scan selection').
VinylStudio has three other settings which affect the click repair process:
Percussion protection (PP)Brass protection (BP)Number of passes
Percussion protection helps prevent the 'dulling' of percussion sounds that declicking can cause, especially at higher sensitivity settings.The problem is that percussion bursts, especially the initial 'thwack', look a lot like clicks and therefore VinylStudio wants to fix them. Thedownside of having Percussion Protection enabled is that, on occasion, it prevents a legitimate click (or, more likely, a 'scrunch' comprisedof several clicks close together) from being repaired. If you think this might be happening to you, you can either re-scan the affectedarea with percussion protection turned down or you can refer to the corrections list to see if percussion protection is operating in theregion in question (if you select the region first, it will be highlighted in the corrections list with a yellow background). For an example ofpercussion protection in action, click here.
Brass protection prevents distortion of brass and horn instruments by the declicking process, again principally at higher sensitivitysettings. In severe cases, this can be quite unpleasant, and mainly affects sounds with a buzzing or rasping quality like trombones,saxophones, trumpets and some synth sounds (and even, occasionally, gravelly vocals). Low frequencies are generally affected most.Brass protection usually detects sounds such as these and temporarily reduces the sensitivity of the click detector to protect them.However, like percussion protection, this can let the odd click through and the same recommendations apply. We do not advise turningoff either setting routinely, however.
The number of passes controls the number of times VinylStudio scans the source material. One pass is usually enough, but if arecording is in very bad condition (particularly if it is badly scuffed) you might find that a second pass helps. You can achieve the sameeffect by scanning again with the 'Keep existing scanned repairs' box checked.
You can also repair or adjust clicks manually. While this might sound like a tedious procedure, it is sometimes the only way of eliminatinga particularly severe click. Like other declicking software, VinylStudio sometimes fails to detect something which is (a) annoyingly loudand (b) usually obvious (fortunately) in the waveform display as a large spike. Finding and repairing such a click manually is quick andeasy. Please refer to the manual click repair help page for more details.
Cleanup Audio - Percussion Protection
Percussion protection helps prevent the 'dulling' of percussion sounds that declicking can cause, especially at higher sensitivitysettings. This happens when VinylStudio concludes (wrongly) that the sharp 'attack' sound of a piece of percussion is a click. Thisproblem is not unique to VinylStudio - other click repair programs are affected in the same way.
Percussion which has been affected in this way usually shows up in the corrections list as a large number of wide clicks (coloured red),especially in loud passages of music. And not only percussion is affected: here is a section of bass guitar, scanned with percussionprotection turned off:
As you can see, the corrected (green) trace is missing a lot of the detail present in the original (gray) trace. The result is a dulling of thesound, often unnoticeable but not always. Here's what it sounds like (to hear the difference clearly, you may need to use headphones):
Original:
-- 33 --

Dulled:
Although we have had to compress these sound samples to reduce the filesize, you can still hear that the 'attack' sound of the bassplayer's fingers plucking the strings has been lost, which is a shame. If you encounter this kind of problem, you can re-scan the affectedarea with a higher percussion protection setting, reduce the sensitivity or, if the music is click-free in that area, just use the RemoveCorrections option to remove all repairs made by VinylStudio. If you have the patience, you can even delete individual repairs.
In many cases however, percussion protection does its job. Here is a screenshot of the above example with percussion protectionenabled:
And as a result, the original sound is restored:
When to turn Percussion Protection Up
The default Percussion Protection setting is set fairly low to avoid clicks from slipping through. If your recording is in reasonablecondition, you can probably benefit by using a higher setting than the default. If you are prepared to put some time in, first try themaximum setting as this gives the best sound quality, but be prepared for the odd click to slip through. When this happens, rescan justthe affected area at a lower setting. And you can always use 'undo', of course. Preserving the quality of the music while putting up withthe occasional click is sometimes the best compromise.
The corrections list can help you identify sections of music where percussion protection is active (or not).
When to turn Percussion Protection Off
Percussion protection works less well on recordings with a lot of 'scrunches' (i.e. short bursts of clicks in rapid sequence) or scuffs asthese look a lot like percussion and can therefore escape detection, so if you are attempting to restore a scratchy old 78 you willprobably get better results with percussion protection turned down or turned off. Here is an example where percussion protection has gotit wrong (we deliberately used a higher than normal setting to provoke this):
Although the waveform looks like a piece of percussion, it is in fact a scuff on the record surface. In this case, the problem can beresolved by scanning with percussion protection turned to a lower setting:
-- 34 --

Cleanup Audio - Brass Protection
Brass protection prevents distortion of brass and horn instruments that can be introduced by the declicking process, principally athigher sensitivity settings. This problem (which is not unique to VinylStudio) can, in severe cases, be quite noticeable as the followingexample shows. Notice the grey areas in the waveform display, which indicate a large number of click repairs in the regions affected (it'snot normally this bad - we scanned this sample at maximum sensitivity with brass protection turned off to highlight the effect):
The result sounds like this (the difference is clearer on headphones):
Original:
Distorted:
If we zoom in, we can see what is going on (just to remind you, the green trace is the corrected waveform and the grey trace is theoriginal):
As you can see, the 'spikey' nature of the waveform has fooled the click detector which has therefore made undesirable changes to the
-- 35 --

music - it doesn't look like much, but then it doesn't take much to be audible. VinylStudio's unique brass protection feature is designed tocombat this problem by reducing the sensitivity of the click detector in passages of music such as this. Here is the same file scannedwith brass protection enabled:
And in closeup, you can see that the original waveform has been restored (or, rather, left unchanged):
And as a result, the distortion is eliminated:
Brass protection becomes somewhat less effective as the sensitivity is increased, so if a section of your music does sound distorted, or ifthere are a lot of solid grey areas on the waveform display, try scanning the affected section at reduced sensitivity (although, it shouldbe noted, some forms of distortion present in the original recording can actually be eliminated by scanning at higher sensitivity, so don'tbe afraid to experiment).
When to turn Brass Protection Off
Actually, almost never. It rarely causes problems and frequently protects your music from damage, especially at higher sensitivitysettings. The most likely problem you are liable to encounter is an unrepaired severe click in a passage of, say, saxophone music, and it isoften quicker and easier to repair such a click manually. However, if you have a recording in very bad condition which consists largely orentirely of 'mellow tones', you might get better results with brass protection turned off.
Cleanup Audio - Patching Bad Scratches and Dropouts
If your recordings contain scratches or dropouts which are too wide for VinylStudio's click repair capabilities, you can use the Patchcommand instead. This can patch upto 1/4 second (250ms) of audio by reconstructing the damaged section from the music on eitherside of it.
To patch a section of music in this way, first select it (by clicking and dragging in the waveform display) and then click on the Patchselection button in the toolbar beneath the waveform display in the Cleanup Audio window. This displays the Patch dialog:
-- 36 --

Click on Preview to hear how the patched section will sound, or on Play Original to hear the original, unpatched version. You can trythe various patch methods in turn to see what sounds best, although APA is usually a good bet. You can also adjust the selection bydragging either edge to select the damaged area precisely, then click OK to apply the patch permanently or Cancel to discard it.
Note that all of the controls in the toolbar are active while the Patch dialog is open, and that you can undo a patch after you close thisdialog if you decide you don't like it.
To delete a patch, right-click on it in the corrections list and then select Delete Patch. You can also delete a patch by selecting it inthe list and pressing Del
You cannot adjust the width of a patch directly, but if you first delete it you can then adjust the selection and repatch it. Alternatively,just place another patch over the top.
Cleanup Audio - Repairing C licks Manually
If VinylStudio fails to find a particularly irritating click, first try selecting the offending section of music (by clicking and dragging in thewaveform display) and then scan it with more aggressive settings. This usually does the trick, but if it doesn't, you can repair the clickmanually. Manual repairs can be fairly wide - up to 400 samples - but if you need a wider repair (for a bad scratch or scuff mark, say),try using patch instead.
The hardest part of the job is locating the click (although this gets easier with practise). Really bad clicks and scratches (which can behard for the software to detect, surprisingly) are usually visible in the waveform display as a large spike. To find them, define a selectionencompassing the offending section of music as closely as possible, then zoom in on it and play the selection , watching thecursor and listening carefully (wearing headphones helps a lot). Zoom in again, if need be, and repeat the procedure. When you arezoomed in close enough, most big clicks usually become clearly visible, like this:
Once the click is located repairing it is easy. Click on the click (so to speak), zoom in until the background of the display lights up(refining the cursor position as necessary along the way) and then click on the Insert Manual Repair button . You will then seesomething like this:
Notice how different (and massive) the click looks in closeup - its unusually broad shape is why it was not detected by scanning. Notealso you repair each channel separately. To finish up, drag the edges of the repair to completely cover the damaged area, making surethat the repair is wide enough:
-- 37 --

Et voila! The resulting repair is usually completely inaudible, but if not there may be another one close by so zoom out a little and have amore careful look. Ensure also that you have repaired both channels if, as is common, the click affects both.
You can adjust the width of an automatic repair in the same way. This can be useful if, as occasionally happens, VinylStudio has notremoved the click entirely. To select a repair, you can click (or double-click) on it in the corrections list or zoom in close and click on it inthe waveform display. In either case, make sure that the Show Clicks box is checked, and again you do this for each channelserparately.
Here is an example of a click that has been located automatically but only partially repaired:
Close, but no cigar. Although the situation is considerably improved, you can still hear it:
Original:
Automatic (partial) repair:
To remedy matters, drag the edges of the repair to completely remove the bump in the waveform. You don't need to be shy about this -make sure the repair is wide enough to completely remove the click:
-- 38 --

The final result is a perfect repair:
:
Importing, Exporting and Converting Files - T he File History List
The File History List in the Cleanup Audio window shows all working versions of the currently selected album side, in date order (mostrecent last). It is intended mainly for users who wish to import existing files or edit their recordings outside VinylStudio. Otherwise, it isnot normally necessary to save copies of your files as you work because VinylStudio applies all changes 'on the fly' as and when needed.But if you want to work on a file in another program, and you want that program to use any changes made inside VinylStudio, then youwill need to save or export a copy first.
To import an existing sound file, right-click in the File History List and select Import Sound File. You can elect to leave the file whereit is, or to copy or move it into VinylStudio's recordings folder. Note that this only works if you have created an album in the Recordwindow. See Importing Existing Recordings for some additional information.
To save a copy of a recorded album side, right-click in the File History List and select Save a Copy. You can either save a copy inVinylStudio's recording folder or to another folder of your choice. If you want to save a copy VinylStudio's recording folder you have tostick to VinylStudio's file naming conventions as described below.
You can also convert recordings from one file format to another, rename or delete saved copies, and, if desired, use the Set as Defaultmenu option to specify that CDs should be burned from something other than the most recently saved version (as indicated by a '>'symbol in the list). All of these options are available by right-clicking in the list.
Editing Files Outside VinylStudio
To export a file for editing in another program, we recommend saving a copy in WAV format, as this is the format that most such editorsare designed to use. Then, when you subsequently edit the file in (say) Audacity, you can simply overwrite it. You may need to shutdown VinylStudio (or select another album from the dropdown list) before you can save the file.
If you save a copy to another folder, you can use whatever filename you like. This is probably the easiest (or at least the most familiar)option for most users.
Alternatively, you can save working copies in VinylStudio's recordings folder. When you do this, VinylStudio requires you to use its ownnaming conventions; you will be prompted for a suffix which is appended to the name of the original file, so that the saved copy might becalled, for example:
Elton_John~Greatest_Hits~side1_copy.wav
Please note the squiggles and underscores used in the actual filename.
If you want to make a second copy of such a file outside VinylStudio (or, indeed, a copy of the original recording), you can do so bysaving the file with a new suffix, e.g.
Elton_John~Greatest_Hits~side1-edited-in-Audacity.wav
Then, provided that you stick to the naming convention that VinylStudio understands, VinylStudio will pick up the latest file when youselect Check for Changes from the Album menu.
For reference, the naming convention that VinylStudio uses for recorded album sides is:Artist~Album_title~side1<optional suffix>.wav (or .mp3)Artist~Album_title~side2<optional suffix>.wavetc.
If you use an external encoder to generate MP3 files, we recommend using Variable Bit Rate (VBR) encoding as this gives the bestquality for the minimum file size. Most MP3 encoders include such an option, and will do so by default if you specify different minimum andmaximum bitrates for the encoded files.
Burn CDs / DVDs
In the Burn CDs window, you can burn both Audio and MP3 or other data CDs from your recorded albums. To do this:1. Select Audio CD, Data CD or Data DVD as desired.
-- 39 --

2. Drag albums or individual tracks from the left-hand pane to the right-hand pane (the 'burn list').3. Click Burn.
VinylStudio can burn data CDs and DVDs containing a variety of file formats. To select the file format and compression / encodingoptions, click on the Options button.
Audio CDs will play on any CD player and can accomodate about an hour's worth of music. MP3 CDs can store roughly 7 hours of musicbut will work only on players specifically designed to play them. Data CDs burned using other file formats usually needs to be played onspecialist players; the amount of music you can fit on depends on the file format and compression options used.
To locate an album quickly, click anywhere in the left-hand pane and then type in the first few characters of the artist's name. Youcan also select more than one item at a time (albums and/ or tracks) by clicking while holding down the Ctrl key, and you can select arange of items by clicking on the first, then hold down the shift key and click on the last.
To delete tracks from the burn list, select one or more tracks and then right-click on any one of them. You can also move trackswithin the list (providing the selection is a single block) by clicking and dragging. Again, to select more than one track hold down the Ctrlkey, and to select a range of tracks, click on the first and then shift-click on the last.
VinylStudio displays the total size of the tracks in the burn list and the amount of free space on the CD or DVD in the drive (if any).If the total size of the tracks in the burn list exceeds the free space on the CD, the display will turn yellow; you will only be able to burnthe disc if you erase it or insert a new, blank disk. If the tracks exceed the capacity of the CD, the display turns red; you will not be ableto burn a disc until you remove some tracks from the burn list or insert higher capacity media. If no media is inserted, or if VinylStudiocannot determine its capacity, the available space is shown in black (best guess).
If you wish to change or eliminate the usual 2 second gap between tracks on Audio CDs, you can do so in the CD Burning Optionsdialog, but be aware that not all CD players can play such discs properly. You can also tell VinylStudio which size of media you are usingin this dialog.
If you wish to print a CD cover or label, you can export a track listing to a file in a format that most CD cover editors can read. Formore information, click here.
If you encounter problems burning CDs, ensure that there are no other CPU-intensive applications (such as games) running. You may alsofind it helpful to reduce the Write Speed in the CD Burning Options dialog. If this does not rectify matters, please contact AlpineSofttechnical support for advice.
VinylStudio will automatically update the album status for each album burned to CD (even if you just burn a single track).
Please note that if you are using VinylStudio Lite you may be unable to burn data CDs or DVDs. To upgrade, select Upgrade to FullVersion from the Help menu.
You can do other things, such as recording another album, while the CD is being written.
Burning Multi-Session CDs
VinylStudio now has improved support for burning multi-session data CDs. This allows you to add tracks to a CD you burned previously,provided that the CD is not already full. This only works for data CDs, not audio CDs. Once you have burned an audio CD, that's it.
-- 40 --
When you are adding tracks to a disc you have burned previously, VinylStudio might report that there is not enough space on the CD tofit on all the new tracks. You can avoid this problem by putting the CD in the drive before you start dragging tracks across to the burnlist. It takes a few seconds for VinylStudio to notice that you have inserted a disc but it will then display an updated 'percentage full'figure (possibly now greater than 100%) which allows for the space already used on the CD. Make sure that this figure is below 100% (bydeleting tracks from the burn list if necessary) before trying to burn the CD.
Please note that if you burn the same track to a CD twice it will appear on the CD twice (with different sequence numbers). Note alsothat multi-session discs burned on the Macintosh cannot be read by Windows, or by most domestic CD or DVD players.
Why do my CDs not Play in my Player?
One reason is that you might have burned an MP3 or other data CD. Most older CD players will only play audio CDs.
Another reason might be your choice of media. Try using 74 minute / 650MB blanks rather than the more common 80 minute / 700MBvariety. The smaller capacity discs are more compatible with older CD players because they have a wider 'groove'. You will probably haveto get them by mail order.
Please note also that rewriteable CDs (CD-RW's) will not play in some players.
Why is T here no T rack Listing Displayed in Windows Media Player?
VinylStudio can now write track listings to Audio CDs (so-called 'CD-Text') but in order to see them in Windows Media Player you need todownload a free plugin called WMPCDText from bmproductions.fixnum.org. If you are installing this on Vista, don't worry about the'unable to find Windows Media Player' message: just carry on and everything will work out fine. Please note that for reading CD-Text onWindows XP (but not on Vista), administrator rights are required.
Please note also that track names on audio CDs are truncated at 31 characters. This is a limitation of the burning engine we use(StarBurn) and cannot be changed, sorry.
Export CD T rack Listing
If you would like to print a CD cover or label for CDs burned in VinylStudio, you will need to purchase a third-party editing program suchas CD-Cover Editor or Easy Cover Design Pro or the CD Cover designer included in the Nero Burning Rom suite. All of these programs (andmost others of a similar nature) can import a track listing from a suitably formatted file, and VinylStudio can create such a file from thetracks present in the burn list (i.e. the tracks you have most recently burnt, are burning, or are about to burn to CD).
To do this, click on the Export Track Listing button in the burn CDs window and follow the on-screen instructions. If in doubt, export anM3U file as most programs can read these. Then import the file VinylStudio creates into your CD cover editing program as follows:
CD-cover Editor (which imports M3U files):right-click anywhere on your designselect 'Insert Object', and then 'Tracklist'click on the 'Import from Playlist' buttonselect the file you exported from VinylStudio
Easy Cover Design Pro (which also imports M3U files):click on 'Edit Tracks' in the toolbar on the left-hand side of the screenclick on the 'Import Playlist' buttonselect the file you exported from VinylStudio
Nero Cover Designer (which imports CDC files):click 'Data' in the menu bar and select 'Document Data' from the dropdown menuclick on 'Disk 1'click on the 'Import Data' buttonselect the file you exported from VinylStudioclick OK
The only mainstream CD cover editor we know of that cannot import a track listing in this way is AudioLabel. Future versions ofVinylStudio will include track information on audio CDs, which should resolve this problem. Track information is already included on MP3CDs and again, most CD cover editors (including AudioLabel) can read this information from the CD.
Please note that you cannot export track listings in VinylStudio Lite. To upgrade, select 'Upgrade to Full Version' from the Help menu.
CD / DVD Burning Options
To access the burn settings dialog, select CD / DVD Burning Options from the Options menu, or click on the Options button in the BurnCDs window:
-- 41 --

CD / DVD Drive selects your CD burner. There will normally be only one.
Burning Engine can be used to select IMAPI if StarBurn fails for any reason. Such a failure is rare, and StarBurn is more functional andreliable.
Media Size can be used to specify the size of media you are using (CD or DVD). Alternatively, insert blank media into your drive beforeyou start dragging tracks across to the burn list. VinylStudio will then calculate the available space automatically.
Write Speed allows you to reduce the write speed. This is normally unnecessary but with some burners, discs written at lower speedscan be played on a wider variety of players.
Write Mode allows you to force VinylStudio to use a particular write mode when burning audio CDs. VinylStudio normally selects the bestmethod for your particular drive automatically but it can be useful to be able to override this setting for certain drives. The Disk-at-oncemethods produce the most compatible discs, and you must select Disk-at-once Raw PW (or Automatic) to write track listings to CD.
Gap between tracks on audio CDs: this is normally 2 seconds but you might like to experimant with 'gapless' CD's if you are recordinglive albums. Please note however that not all players can play such CDs reliably.
File Format for Data Discs: select the file format (e.g. MP3) for files written to data discs. To change compression and encodingoptions, click on the File Options button.
Include album and track information on audio CDs ('CD Text'): writing this information to audio CDs is normally safe enough butmany CD players do not display it. For details on how to display these listings in Windows Media Player, click here.
Enable buffer underrun protection and Perform OPC check should normally be enabled. These option is provided in case using thesefeatures causes problems with your particular CD drive.
Finalize Data CDs should not normally be enabled, but a few players will only play finalized discs. You cannot add any more tracks to afinalized disc, even if it is not full.
Include in Filenames on Data Discs:Track number: ensures that the tracks on the CD or DVD remain in the order they appear in the burn list; if you uncheck this box,they will appear in alphabetical order.Artist: names tracks on the CD in the form Artist - Track TitleAlbum Title names tracks on the CD in the form [Artist -] Album Title - Track Title
Saving Tracks (and other Batch Operations)
Clicking on the Save Tracks tab will take you to the Save Tracks window. In this window, you can:
Save tracksSave tracks in DSD formatCopy these files to your MP3 Player or iPodImport these files into your Windows Media Player libraryDeclick some or all of your albums in 'batch' modeNormalise some or all of your albums in 'batch' modeConvert existing recordings to other file formatsDelete multiple albums or album components from your collectionChange the status of multiple albumsMove or copy albums between collectionsPrint part or all of your collection
-- 42 --

Saving T racks
VinylStudio can generate files in many formats, one per track, for any or all of the albums in your collection. These can then be played inWindows Media Player or iTunes, or copied out to your MP3 player or memory stick. Formats supported are MP3, WAV, AIFF, FLAC, OGGand, on Windows only, WMA. On the Macintosh, VinylStudio can also save tracks in AAC (MP4) and Apple Lossless (ALAC) format. Theseare the file formats favoured by iTunes (although iTunes can also play MP3 files perfectly well). Note that you can save your tracks inany format (or multiple formats), regardless of the format you recorded to.
Select the albums you want to save and then click on the Save Tracks button. The process may take a while, although VinylStudio willskip any tracks that have been saved before (unless they have changed). To force VinylStudio to save all tracks regardless, check the'Always save tracks, even if saved before' box. You can also save individual tracks by selecting Save Track As from the Track menu inthe Split Tracks window.
By default, saved tracks are saved in the following folder:
My Documents My Music <Name of your collection>
You can change this in the Settings dialog under the Options menu. You can also browse the folder from this dialog and you canchange settings used for file encoding (e.g. the level of compreesion to be used) when saving tracks.
VinylStudio will automatically update the album status for each album saved to help you keep track of your work.
Please note that if you are running VinylStudio Lite this feature may be unavailable. To upgrade, select 'Upgrade to Full Version' from theHelp menu.
Tip: to select several albums in a block, click on the first (make sure it is ticked) and then shift-click on the last.
Saving T racks in DSD Format
Starting in VinylStudio 8.6, you can save your tracks as DSD files provided you recorded to DSD format in the first place. To do save asDSD, tick the 'Save DSD recordings as DoP' checkbox in the confirmation dialog displayed when you save your tracks or choose a 'native'DSD format (.dff or .dsf). Files saved as DoP are stored in standard WAV, AIFF, FLAC, CAF or Apple Lossless files and can be played backdirectly by a compatible DAC.
Copying Files to your MP3 Player or iPod
To copy tracks to an iPod, iPad or iPhone, use iTunes. You will need to save your tracks first as described above.
To copy tracks to an MP3 player, first save them as MP3 files as described above. Then plug your MP3 player (or memory stick) into aUSB port and click on the Copy to Player button. VinylStudio then displays the following dialog:
-- 43 --

VinylStudio displays a list of drive letters which it thinks might be MP3 players or memory sticks. Select the one you want from the listand VinylStudio will then open two Explorer windows side-by-side, with your saved tracks on the left and your MP3 player on the right.You can then drag and drop files from one to the other in the usual way:
When dragging files across, be careful not to create too many folders on your MP3 player. Many players have a fairly low limit (10 or so)on the number of folders they can handle.
If you want to know how much space is left on your MP3 player, right-click in an empty part of the right-hand pane and selectProperties.
Playing Files in Windows Media Player
There are two approaches to this: you can either have VinylStudio generate playlists, one per album, or you can import the MP3 files youhave generated into Media Player's library directly.
To create playlists, select the Create Playlists for Windows Media Player option from the File menu. VinylStudio will then generate aplaylist for each album in your collection and store them in the following folder:
My Documents My Music <Name of your collection> Playlists
-- 44 --

(You can change this folder from the Settings dialog under the Options menu).
You can then open or import these playlists into Media Player in the usual way. They have the advantage of maintaining the identity ofthe albums in your collection.
To import your MP3 files directly into Media Player's library (which is the more common approach), click on Media Player's Librarytab, and then on Add to Library. Alternatively, you can tell Media Player to monitor your My Music folder. Then, all MP3 files thatVinylStudio (or any other program) generates in that folder - or any folder below it - will be added to the library automatically. This is thedefault for Media Player 12 and later. To see what folders Media Player 12 is monitoring, click on Organise, and then Manage Libraries -Music.
Batch Declick
To declick some or all of your albums in a single operation, select the ones of interest in the list and then select Scan Selected Albumsfor Clicks from the menu under the More button. You will be prompted for the scan settings to be used and then VinylStudio will performthe scan. For more information on what the various scan settings do, please refer to the Scan for Clicks help topic. Each album sidetakes about 1 minute on a modern computer.
Batch Normalisation
To normalise some or all of your albums in a single operation, select the ones of interest in the list and then select Normalise SelectedAlbums from the menu under the More button. You will be prompted for the volume level to be used and then VinylStudio will set towork with no further manual intervention required. Processing time varies depending on what filters you have selected for the albums inquestion. The Hiss filter is particularly CPU-intensive.
Batch File Conversion
VinylStudio can convert existing recordings from one file format to another. You might, for example, have recorded or imported yourrecordings in WAV format but now wish to convert them to FLAC format to save disk space. You can do such conversions in this window- just select the albums you want to convert in the list and then select Convert Recording Format of Selected Albums from the menuunder the More button.
-- 45 --

Deleting Multiple Albums or Album Components
To delete multiple albums at a time from your collection, select them in the list and then select Delete Selected Albums or AlbumComponents from the menu under the More button.
In addition to deleting the albums themselves, you can elect to just delete certain components, such as your 'raw' recordings, whileretaining the albums themselves in your collection as a reminder of what you have done. If you are exporting tracks to iTUnes, there issome mileage in deleting the tracks saved by VinylStudio, as these are duplicates of the copies stored in the iTunes library.
If you have plenty of disk space, consider keeping your albums around. That way, you can always save your tracks again if you needthem in another format, for example.
Changing the Status of Multiple Albums
You can use the album status to keep track of the stage you have reached working on a particular album or albums. To change thestatus of multiple albums at a time from your collection, select them in the list and then select Set Status of Selected Albums from themenu under the More button.
VinylStudio supports upto 5 'custom' status settings which you can use for whatever purpose you choose. You can give these names ofyour own by selecting 'Set Custom Album Status Names' from the Options menu.
Moving or Copying Albums Between Collections
This option can be used to merge two or more collections. To move albums from collection A to collection B, proceed as follows:1. Open collection A (Menu -> File -> Open Collection, or Menu -> File -> Recent Collections).2. Go to the 'Save Tracks' window.3. Select the desired albums in the list (or use 'Select All').4. Under the More button, select 'Move or Copy Selected Albums to Another Collection'.5. Navigate to collection B and select your desired options.6. Confirm that you want to proceed.
-- 46 --

VinylStudio will then take care of the rest.
Options available at step 5 are:Copy albums, rather than moving them.Link to existing recordings, rather then copying them (if the copy option is selected). This, in effect, shares the recordingsbetween the two collections.Delete saved tracks for albums moved or copied. You can then save them again (to a new location, potentially) from thedestination collection.
Generally, moving albums is what you want.
Printing Part or All of your Collection
To print part or all of your collection, select the desired albums in the list (or use 'Select All') and then select Print Selected Albumsfrom the menu under the More button. You can control exactly what is printed in the 'Printing Options' tab.
Importing and Exporting Files
Importing Existing Recordings
You can import recordings that you have made outside VinylStudio into your collection. To do so, click on the Record tab and then:enter the artist and album title for the album you wish to importif you are importing a single (or other material with no trackbreaks) check the This is a Single boxclick on Import Sound File(s)
If you have already added the album to your collection, click on Work with an existing album, then select the album from thedropdown list and click on Import Sound File. You can also import files via the File History List in the Cleanup Audio window, where youcan see which files have been imported or recorded previously for a particular album side.
The file you select will, at your option, either be left where it is or copied or moved into VinylStudio's recordings folder. VinylStudio canimport a variety of recording formats.
If you wish to re-import a file that you have edited outside VinyStudio, please refer to the File History List help topic. You can also usethe File History List to convert between recording formats.
Importing Multiple Files
As of VinylStudio V8.7, you can import several files at once for any particular album. This can be useful where the files are individualtracks, rather than whole album sides. VinylStudio can insert trackbreaks between the files for you and automatically name the tracksfrom the file names.
To import multile files, ctrl+click (or, on the Mac, command+click) or shift+click on the files when they are displayed in the list.VinylStudio will then take care of the rest. If the files are not in the right order, you can drag them around after you open them (butbefore you complete the import).
Importing Collections from Discogs
You can import collections from Discogs saved in XML format. This will create the albums in the file, with a complete track listing foreach, in VinylStudio. To do this, first export your collection from Discogs in XML format to a file somwehere on your hard disk. Then:
1. Select 'Import Discogs Collection' from VinylStudio's File menu.2. Navigate to the file you wish to import and click Open.3. Select the albums you wish to import.4. Click Import.
If the Discogs collection contains track durations, VinylStudio will insert trackbreaks in roughly the right place. It will also import albumnotes and cover art, if present.
-- 47 --
Where are my Files Located?
This help page covers the following topicsWhere are my Split-Up Tracks Stored?Controlling How Split-Up Tracks are Stored Using Custom StringsHow Singles Tracks are NamedWhere are my Recordings Located?What Files does VinylStudio Actually Create?Archiving your Recordings
Where are my Split-Up Tracks Stored?
When you save your tracks, they are normally stored in the following folder:
My Documents My Music <Name of your collection>
You can change this folder in VinylStudio's Settings dialog (which you will find under the Options menu) and you can browse the folderfrom within this dialog.
VinylStudio now offers more flexibility in how tracks are stored within this folder. By default, VinylStudio normally creates a separate sub-folder for each album, like this:
My Documents My Music <Name of your collection> Beatles - The White Album 01 - Back in the USSR.mp3 02 - Dear Prudence.mp3 ...
In more recent versions of VinylStudio however, albums are grouped in folders by album artist, like this:
My Documents My Music <Name of your collection> Beatles The White Album 01 - Back in the USSR.mp3 02 - Dear Prudence.mp3 ...
You can select (or change) this behaviour using the dropdown in VinylStudio's Settings dialog. There are separate settings for albumsand singles.
Controlling How Split-Up Tracks are Stored Using Custom Strings
Advanced users, or those who would just to understand a little more about what is going on, might like to peruse or enter custom stringsinto the Settings dialog to determine exactly where your split-up tracks are stored. These gives you a high degree of control over wherethe saved tracks end up. That said, the preset values in the dropdown lists normally suffice, and option 2 (group tracks by album artist)is recommended for both albums and singles.
To do this, you use keywords to tell VinylStudio how you want your tracks to be named and grouped into folders. When saving eachtrack, VinylStudio replaces these with the album title, track title or whatever, as appropriate. The following keywords are available:
[Album Artist] The album artist, e.g. Beatles. For compilations, we recommend you add the album to yourcollection under 'Various Artists' and enter the artist separately for each track. For singles, add thealbum to your collection under the name of the performing artist, or perhaps (for a sampler EP) again'Various Artists'.
[Album Title] The album title, e.g. The White album. For singles, this is not normally used when saving tracks butyou will need to enter something when you add the album to your collection, perhaps the name ofthe 'A' side, that you will recognise later.
[Track Number] This is the track number on the album, starting from 1. This is useful for preserving the order that thetracks appear in on the original album. We recommend omitting this keyword for singles.
[Track Title] The title of the track, e.g. Back in the USSR. All tracks must have a title and this keyword ismandatory.
[Track Artist] The track artist, if there is one. If not, this keyword is ignored. For this keyword to work properly,you should only enter track artist information for compilation albums / EPs.
[Performing Artist] This is the track artist, if it has one, or the album artist if not. Useful for singles or for grouping allyour tracks by performing artist (if you don't care which album they came from).
[Genre] The genre you have assigned to the album, if any.[Composer] The composer you have assigned to the album or track, if any.[Conductor] The conductor you have assigned to the album or track, if any.[Artist Alias] The artist alias you have assigned to the album or track, if any. You can use this to enter the album
or track artist in an alternative form, e.g. 'John, Elton', which you can then use in the filename ofyour saved tracks. For files that use ID3 tags (WAV, AIFF, DSF) this is placed in TSOP ('performersort order') tag. For other file formats, there is no tag for this.
[Comment] The comment you have assigned to the album or track, if any. Use this for anything you like.[Year] The release year of this album, if any.[File Type] The file type (e.g. MP3, OGG).
Inserting a backslash (\) specifies a folder rather than a file name. Thus for example:
[Album Artist] - [Track Title]
-- 48 --

might result in a file called, Beatles - Back in the USSR.mp3, whereas:
[Album Artist] \ [Track Title]might generate a folder called Beatles containing a file called Back in the USSR.mp3, like this:
My Documents My Music Beatles Back in the USSR.mp3
How Singles Tracks are Named
By default, all singles tracks (i.e. those for albums where you have told VinylStudio 'This is a single') are saved in a folder called Singles,like this:
My Documents My Music <Name of your collection> Singles Elton John - Goodbye Yellow Brick Road Elvis Costello - Watching the Detectives Joe Bloggs - Interview with the Dalai Lama Joe Bloggs - Interview with the Pope ...
In more recent versions of VinylStudio, singles and spoken word material are grouped in folders by album artist, like this:
My Documents My Music <Name of your collection> Elton John Elton John - Goodbye Yellow Brick Road ... Elvis Costello Watching the Detectives ... Joe Bloggs Interview with the Dalai Lama Interview with the Pope ... ...
Again, you can select (or change) this behaviour in VinylStudio's Settings dialog by clicking on the 'For singles' radio button. Note that,by default, the album title entered is not used when naming the files. It is however included in the files as an ID3 tag.
See also: Recording Singles and 78s.
Where are my Recordings Located?
It is useful to know where your 'raw' recordings are located if you want to back them up or if you would like to move them elsewhere(typically to an external hard drive). By default, VinylStudio stores your recordings in the following folder structure:
My Documents Recordings <Name of your collection>.mcf -- a file <Name of your collection> -- a folder Elton_John~Best_of~side1.wav Elton_John~Best_of~side2.wav ...
or, if you have upgraded from VinylStudio 3:
My Documents My Music Recordings <Name of your collection>.mcf -- a file <Name of your collection> -- a folder Elton_John~Best_of~side1.wav Elton_John~Best_of~side2.wav ...
Any album art you have downloaded in VinylStudio is also stored in your collection folder (in a sub-folder called artwork).
You can tell VinylStudio where to store your collection when you initially create it and you can open an Explorer window to display thecontents of your recordings folder from within the Settings dialog under the Options menu.
Your collection (.MCF) file stores information about your collection (such as album and track titles), rather than the recordingsthemselves. MCF files are precious and we recommend you back them up regularly. They are not very large.
If you want to move a collection from one place to another, it is important to maintain the relationship between the MCF file (e.g. MyCollection.mcf) and the folder containing your recordings (e.g. My Collection). The golden rule is that both of these must reside in thesame parent folder and must both have the same name.
What Files does VinylStudio Actually Create?
In addition to your split-up tracks (which are generated on demand), VinylStudio creates, for example, the following files when you
-- 49 --
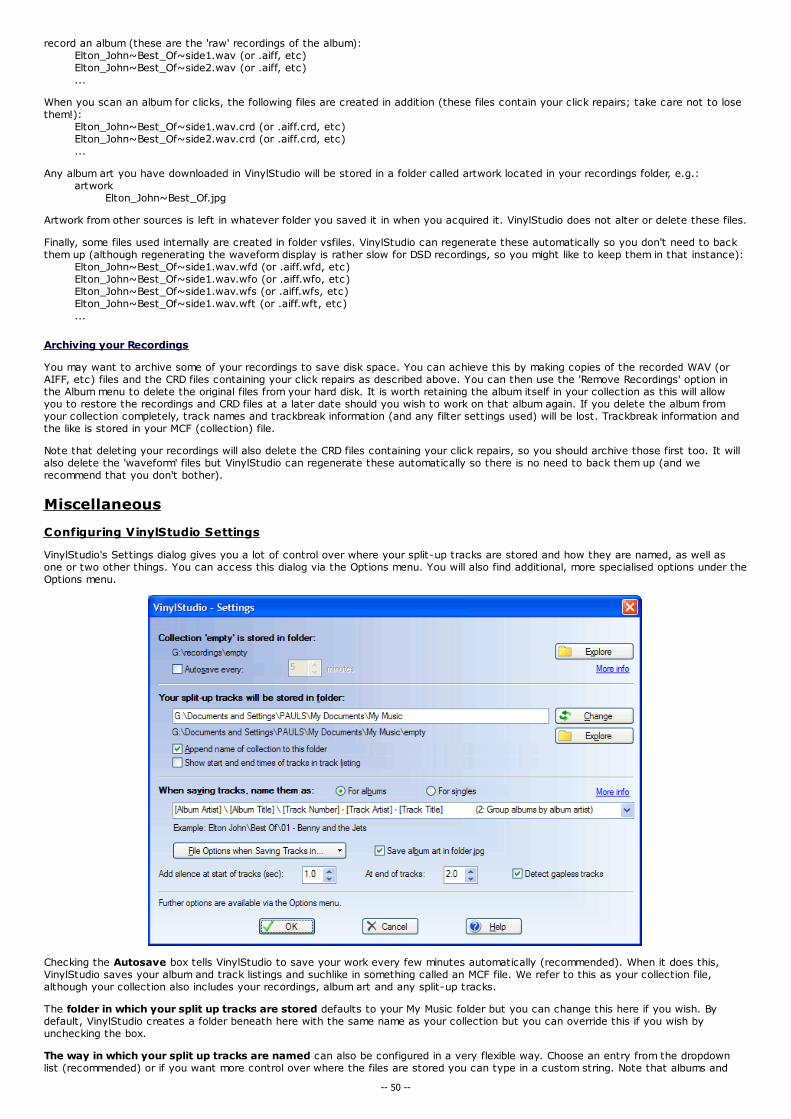
record an album (these are the 'raw' recordings of the album):Elton_John~Best_Of~side1.wav (or .aiff, etc)Elton_John~Best_Of~side2.wav (or .aiff, etc)...
When you scan an album for clicks, the following files are created in addition (these files contain your click repairs; take care not to losethem!):
Elton_John~Best_Of~side1.wav.crd (or .aiff.crd, etc)Elton_John~Best_Of~side2.wav.crd (or .aiff.crd, etc)...
Any album art you have downloaded in VinylStudio will be stored in a folder called artwork located in your recordings folder, e.g.:artwork
Elton_John~Best_Of.jpg
Artwork from other sources is left in whatever folder you saved it in when you acquired it. VinylStudio does not alter or delete these files.
Finally, some files used internally are created in folder vsfiles. VinylStudio can regenerate these automatically so you don't need to backthem up (although regenerating the waveform display is rather slow for DSD recordings, so you might like to keep them in that instance):
Elton_John~Best_Of~side1.wav.wfd (or .aiff.wfd, etc)Elton_John~Best_Of~side1.wav.wfo (or .aiff.wfo, etc)Elton_John~Best_Of~side1.wav.wfs (or .aiff.wfs, etc)Elton_John~Best_Of~side1.wav.wft (or .aiff.wft, etc)...
Archiving your Recordings
You may want to archive some of your recordings to save disk space. You can achieve this by making copies of the recorded WAV (orAIFF, etc) files and the CRD files containing your click repairs as described above. You can then use the 'Remove Recordings' option inthe Album menu to delete the original files from your hard disk. It is worth retaining the album itself in your collection as this will allowyou to restore the recordings and CRD files at a later date should you wish to work on that album again. If you delete the album fromyour collection completely, track names and trackbreak information (and any filter settings used) will be lost. Trackbreak information andthe like is stored in your MCF (collection) file.
Note that deleting your recordings will also delete the CRD files containing your click repairs, so you should archive those first too. It willalso delete the 'waveform' files but VinylStudio can regenerate these automatically so there is no need to back them up (and werecommend that you don't bother).
Miscellaneous
Configuring VinylStudio Settings
VinylStudio's Settings dialog gives you a lot of control over where your split-up tracks are stored and how they are named, as well asone or two other things. You can access this dialog via the Options menu. You will also find additional, more specialised options under theOptions menu.
Checking the Autosave box tells VinylStudio to save your work every few minutes automatically (recommended). When it does this,VinylStudio saves your album and track listings and suchlike in something called an MCF file. We refer to this as your collection file,although your collection also includes your recordings, album art and any split-up tracks.
The folder in which your split up tracks are stored defaults to your My Music folder but you can change this here if you wish. Bydefault, VinylStudio creates a folder beneath here with the same name as your collection but you can override this if you wish byunchecking the box.
The way in which your split up tracks are named can also be configured in a very flexible way. Choose an entry from the dropdownlist (recommended) or if you want more control over where the files are stored you can type in a custom string. Note that albums and
-- 50 --

singles each have their own separate setting; use the radio buttons to select the item of interest. Changing the setting for albums willmake a corresponding change to the setting for singles, as that is generally what is wanted. If not, change the setting for singlessubsequently.
File Options for the various file types that VinylStudio supports are listed below in alphabetical order. You can select the file type toconfigure from the dropdown list which is displayed when you click on the button.
Check Save album art in folder.jpg if you want VinylStudio to copy album art to file folder.jpg when saving tracks. Many media playersrecognise this file and will display it when the track is played and Explorer will show it as a folder icon. Note that this option only makessense if each album is saved to a separate folder.
Add Silence: use these fields to add silence at the start and / or end of saved tracks. If you set these fields, you should eliminate theexisting gaps between tracks in the Split Tracks window, possibly fading the tracks in and out if there is a lot of background noise.
Detect gapless tracks: if you check this box, VinylStudio will not insert silence across a trackbreak which has no gap between thetracks.
AIFF File Options
These are the options you can specify when recording to, converting to, or saving tracks in AIFF format. When saving tracks you canspecify a separate set of options for tracks saved in mono and stereo.
Sample Rate: as described for WAV files. To record DSD, select DSD standard rate (strongly recommended) or DSD double rate, althoughVinylStudio will normally set this automatically.
Bit depth: as described for WAV files.
Embed Album Art (when saving tracks): as described for MP3 files.
Write ID3 Tags as Unicode: Use Unicode when writing out the ID3 tags. This gives better results for languages other than English butmay be incompatible with some players.
DFF File Options
-- 51 --

These are the options you can specify when recording to, converting to, or saving tracks in DFF format.
DSD Rate: select standard rate or double rate as required, although standard rate is strongly recommended for file size and performancereasons. VinylStudio will usually set this automatically. When saving tracks, the only option is 'As recorded'.
DSF File Options
These are the options you can specify when recording to, converting to, or saving tracks in DSF format.
DSD Rate: select standard rate or double rate as required, although standard rate is strongly recommended for file size and performancereasons. VinylStudio will usually set this automatically. When saving tracks, the only option is 'As recorded'.
Embed Album Art (when saving tracks): as described for MP3 files.
Write ID3 Tags as Unicode: Use Unicode when writing out the ID3 tags. This gives better results for languages other than English butmay be incompatible with some players.
FLAC File Options-- 52 --
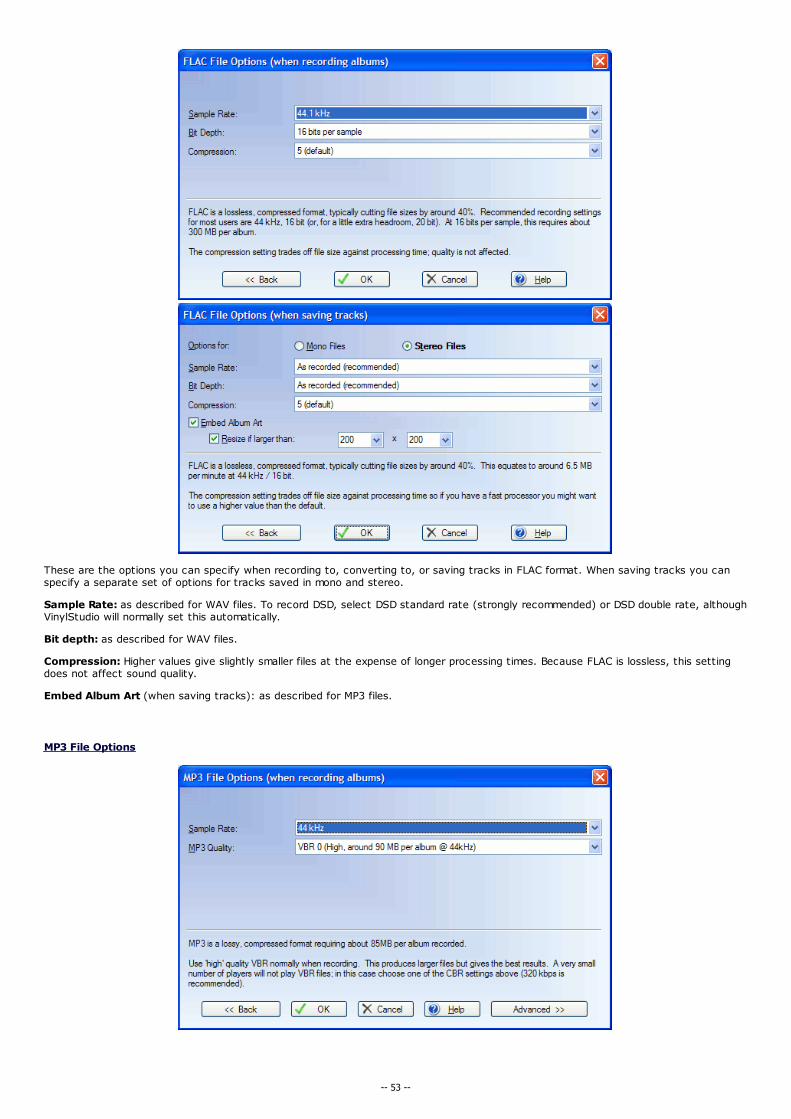
These are the options you can specify when recording to, converting to, or saving tracks in FLAC format. When saving tracks you canspecify a separate set of options for tracks saved in mono and stereo.
Sample Rate: as described for WAV files. To record DSD, select DSD standard rate (strongly recommended) or DSD double rate, althoughVinylStudio will normally set this automatically.
Bit depth: as described for WAV files.
Compression: Higher values give slightly smaller files at the expense of longer processing times. Because FLAC is lossless, this settingdoes not affect sound quality.
Embed Album Art (when saving tracks): as described for MP3 files.
MP3 File Options
-- 53 --

These are the options you can specify when recording to, converting to, or saving tracks in MP3 format. When saving tracks you canspecify a separate set of options for tracks saved in mono and stereo. The options for saving tracks are also used when burning MP3 CDs
Sample Rate: as described for WAV files.
MP3 Quality: This allows you to trade off file size against sound quality. Variable Bit Rate (VBR) format files offer significant advantagesover the Constant Bit Rate (CBR) format more commonly used, but a (very) few players have problems playing these. VBR High isrecommended when recording as you want, ideally, perfect fidelity and this setting comes close. VBR Low is generally a good compromisewhen saving tracks or burning CDs.
Embed Album Art (when saving tracks): If you have looked up or imported album art for the album you are working on, VinylStudio canembed this in the files it generates when saving tracks. Most players are fine with this but a few may object so you can disable it byunchecking the box. VinylStudio can also resize the image it stores in the file and it is generally wise to tell VinylStudio to limit theresolution to around 400 x 400 pixels. This does not change the original artwork file in any way.
Write ID3 Tags as Unicode: Use Unicode when writing out the ID3 tags. This gives better results for languages other than English butmay be incompatible with some players.
Advanced MP3 File Options
Minimum Bitrate: Set the minimum bitrate to use when encoding VBR or ABR files. This is not normally necessary but a (very) fewplayers have problems playing files containing low bitrate frames.
Maximum Bitrate: Set the maximum bitrate to use when encoding VBR or ABR files. This is not normally necessary or useful but canreduce file sizes with some types of music (e.g. heavy metal).
Bit reservoir: Enabling the bit reservoir improves recording quality somewhat, especially when generating CBR files. Recommended.
CRC: Include a checksum in every MP3 frame. This reduces encoding quality slightly and is not normally necessary (or useful).
Copyright: Set the 'copyright' flag in every MP3 frame. This has no other effect.
Original: Set the 'original' flag in every MP3 frame. This has no other effect.
Private: Set the 'private' flag in every MP3 frame. This has no other effect.
OGG Vorbis File Options
-- 54 --

These are the options you can specify when recording to, converting to, or saving tracks in OGG format. When saving tracks you canspecify a separate set of options for tracks saved in mono and stereo. The options for saving tracks are also used when burning MP3 CDs
Sample Rate: as described for WAV files.
MP3 Quality: This allows you to trade off file size against sound quality. Variable Bit Rate (VBR) format files offer significant advantagesover the Constant Bit Rate (CBR) format more commonly used, but a (very) few players have problems playing these. VBR High isrecommended when recording as you want, ideally, perfect fidelity and this setting comes close. VBR Low is generally a good compromisewhen saving tracks or burning CDs.
Embed Album Art (when saving tracks): as described for MP3 files.
Advanced OGG File Options
Minimum Bitrate: Set the minimum bitrate to use when encoding ABR files. This is not normally necessary or useful.
Maximum Bitrate: Set the maximum bitrate to use when encoding ABR files.
WAV File Options
-- 55 --

These are the options you can specify when recording to, converting to, or saving tracks in WAV format. When saving tracks you canspecify a separate set of options for tracks saved in mono and stereo. WAV files cannot carry tagging information or album art.
Sample Rate: When recording, 44kHz is recommended as this provides the best results when burning CDs and is generally more thanadequate for digitising records and tapes. When saving tracks, sample rate 'as recorded' is normally what you want but VinylStudio canconvert your saved tracks to a different sample rate if desired. Lower sample rates give smaller file sizes but you will lose some treble.Converting to higher sample rates generally serves no useful purpose.
To record DSD, select DSD standard rate (strongly recommended) or DSD 2x double rate, although VinylStudio will normally set thisautomatically.
If you have a ADC capable of supporting DSD over PCM and you wish to record in DSD format, select DSD in this dropdown.
Bit depth: The number of bits per sample in the output file. 16 bits per sample is normal. Higher bit depths generate larger files and takelonger to process but give a wider dynamic range if you have a 20 or 24 bit sound card or other audio device.
WMA File Options
-- 56 --

These are the options you can specify when saving tracks in WMA format. You can specify a separate set of options for tracks saved inmono and stereo. WMA cannot be used as a recording format.
Profile: A dropdown list of what the available codecs installed on your machine can do. Note that most hardware players do not supportWMA Professional or WMA Lossless.
VBR Quality: Move the slider to the right for better sound quality (and larger files) when using VBR encoding.
Embed Album Art : as described for MP3 files.
Limitations in VinylStudio Lite
VinylStudio Lite is intended to record, split tracks and burn audio CDs. The audio cleanup tools are functional but you will not be able toburn corrected (i.e. cleaned up) audio to CD.
The following other features are also unavailable:saving tracks as individual filesburning MP3 CDsburning DVDsexporting track listings (for creating CD covers)recording to FLAC, CAF or Apple Lossless format'batch' format conversions
To do these things you must upgrade to the full version, which you can do from VinylStudio's Help menu.
The version of VinylStudio Lite supplied with the NAD PP-3 can only record from the PP-3 via the USB port. If this causes you a problem,please get in touch. It can, however, export track listings for creating CD covers.
Purchasing and Registering VinylStudio
VinylStudio is shareware, and you can download a trial copy from www.alpinesoft.co.uk/VinylStudio. The trial copy will record a maximumof 5 albums. You can obtain a license key which unlocks the software for a modest fee by selecting Register from the Help menu withinVinylStudio.
Upgrading from VinylStudio 3
If you are upgrading from VinylStudio 3, we have changed the way you add albums to your collection. This is now done in the Recordwindow, rather than the Add Albums window, which has been abolished, and looking up track listings is now done via a button in the SplitTracks window.
Doing things this way allows you to lookup or enter track names while you are recording the album. It also makes it easier for new usersto get to grips with the program.
We have also changed the way VinylStudio behaves when you move or delete tracks in the track listing. In VinylStudio 3, the positions ofany existing trackbreaks are preserved when you do this. In VinylStudio 4, track durations are preserved instead (which means that someof the trackbreaks will move). To preserve your existing trackbreaks when moving or deleting a track, hold down the shift key.
Finally, VinylStudio now requires that the MCF file containing your collection live in the parent folder of the folder containing therecordings themselves. VinylStudio will offer to move your MCF file if necessary.
Further reading:Recording an LP SideEntering a Track ListingLooking up Track Listings
Support and Feedback
If you encounter a problem with VinylStudio, or if you have any comments or suggestions, you can get in touch with us by selectingSupport and Feedback from the Help menu within VinylStudio, or you can contact us through our website.
-- 57 --