build your own geiger-müller counter
TRANSCRIPT
Build your own Geiger-Müller counter
Introduction: Geiger Counters and Radiation Detection
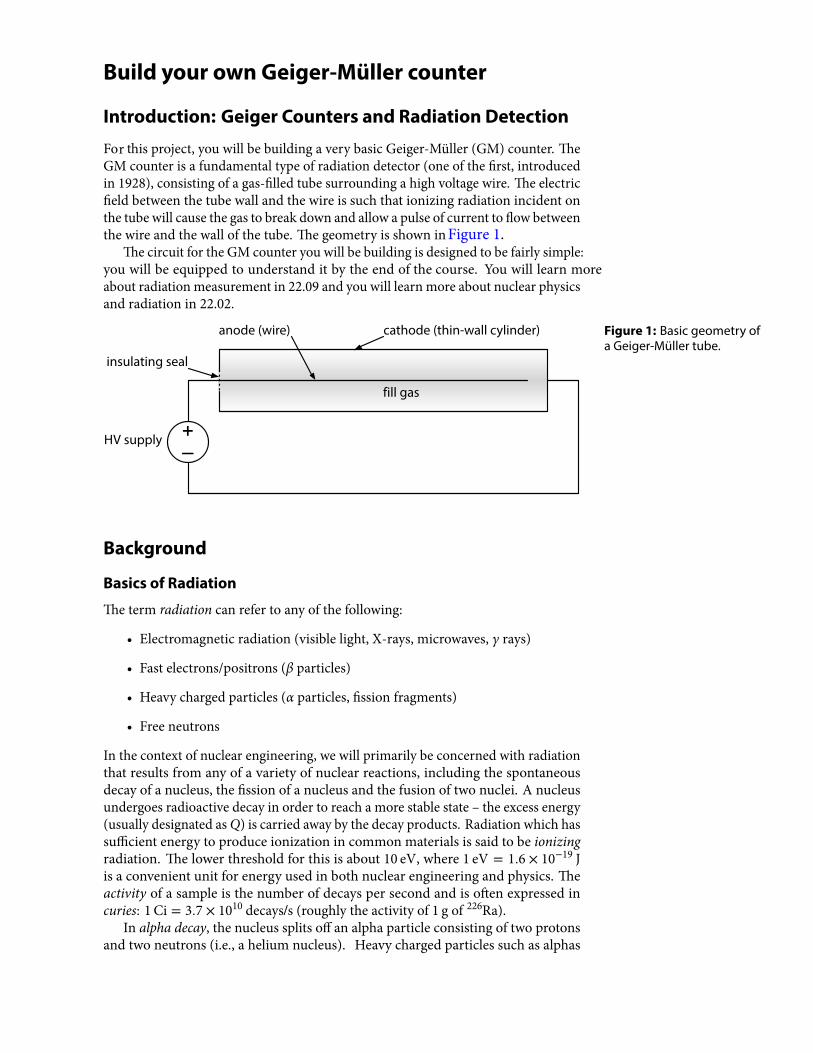
F is p ec y i e i din a e y asic ei e e c n e ec n e is a nda en a ype adia i n de ec ne e s in d ced
in 1928 c nsis in a as ed e s ndin a i a e i e e e ec ice d e een e e a and e i e is s c a i ni in adia i n inciden ne e i ca se e as ea d n and a a p se c en e eene i e and e a e e e e e y is s n in
e ci c i e c n e y i e i din is desi ned e ai y si p ey i e e ipped nde s and i y e end the course i ea n ea adia i n eas e en in 22 09 and y i ea n e a n c ea p ysicsand adia i n in 22 02
+–
insulating seal
anode (wire)
HV supply
cathode (thin-wall cylinder) Figure 1: Basic geometry ofa Geiger-Müller tube.
fill gas
Background
Basics of Radiation
e e t can e e any e in
ec a ne ic adia i n isi e i ays ic a es γ ays
Fas e ec ns p si ns β pa ic es
ea y c a ed pa ic es α pa ic es ssi n a en s
F ee ne ns
n e c n e n c ea en inee in e i p i a i y e c nce ned i adia i na es s any a a ie y n c ea eac i ns inc din e sp n ane s
decay a n c e s e ssi n a n c e s and e si n n c ei n c e snde es adi ac i e decay in de eac a e s a e s a e e e cess ene ys a y desi na ed as Q is ca ied a ay y e decay p d c s adia i n ic as
s cien ene y p d ce i ni a i n in c n a e ia s is said eadia i n e e es d is is a 10 eV e e 1 eV 1 6 10−19 J
is a c n enien ni ene y sed in n c ea en inee in and p ysics et t a sa p e is e n e decays pe sec nd and is en e p essed in
1 Ci 3 7 1010 decays s y e ac i i y 1 226 an e n c e s sp i s an a p a pa ic e c nsis in p ns
and ne ns i e a e i n c e s ea y c a ed pa ic es s c as a p as
Figure 1.
r t
r

241Am 237Np α
(a) α decay of 241Am, used in manysmoke detectors, Q = 5.6 MeV
n p −ν
(b) β− decay of freeneutron, Q = 0.78 MeV
60Co 60Ni −ν
1.17 MeV γ1.33 MeV γ
Figure 2: Illustrations of thevarious decay types.
(c) β− decay of 60Co (Q = 2.82 MeV) followed by twoγ decays of the excited 60Ni.
(a) “pancake” tube(photo credit: Wikimedia)
Figure 3: Examples of alpha-sensitive tubes: (a) is a “pan-cake” tube with a large-area mica window and an anodemade of concentric rings. (b) shows the mica window of an end-window tube. The tip of the anode wire can be seen in the middle of the window.
(b) end-window tube(photo credit: ORAU)
interact with matter primarily through the electric forces between their positive charge and the negative electrons in the absorbing matter. As a high-energy alpha passes through matter, it slows down through many such interactions with the light electrons. Because any given interaction is very small, the particle trajectory tends to be mostly straight. The range of alpha particles is fairly short – in air, a 2 MeV alpha has a mean range of only about 1 cm! Hence, detectors for alpha radiation must have a very thin wall – often mica with a thickness of around 0.001′′ is used, see Figure 3 for examples. The SBM-20 tubes we will be using have steel walls that are too thick to be used for alpha radiation.
There are two forms of beta decay. In β− decay, a neutron in the nucleus essentiallysplits into a proton, an electron and a neutrino, thereby increasing the atomic numberof the decaying nucleus. In β+ decay, a proton in the nucleus essentially splits into aneutron, a positron (anti-electron) and a neutrino, thereby decreasing the atomicnumber of the nucleus. Electrons also interact primarily with the electrons in theabsorbing material. Because the masses are equal in this case, any given interactioncan cause a large change in the trajectory – thus electron tracks meander more thanthose of alpha particles. Fast electrons also lose energy by emitting light in a processknown as bremsstrahlung. Electrons typically have much longer ranges than alphaparticles, and hence can be seen by the SBM-20 GM tubes we will be using.
Following a radioactive decay, a nucleus is often left in an excited state. Whenthis state decays, a very high energy photon is emitted in what is called gammadecay. Photons can lose their energy through several mechanisms: photoelectric
NSE: Build your own Geiger-Müller counter 2
© Wikipedia user N. Manytchkine. License CC BY-SA. This content is excluded from our Creative Commons license. For more information, see http://ocw.mit.edu/help/faq-fair-use/.
Courtesy of ORAU Foundation. Used with permission.

absorption by the electrons of the absorber, Compton scattering from the electronsof the absorber and (at high energies) pair production in the electric field of thenuclei in the absorber. Gamma rays also have long ranges and hence can be detectedby the SBM-20 GM tubes we will be using. You can tell the difference between betaand gamma radiation based on how easy it is to block with a high-Z absorber suchas lead – gamma will penetrate the barrier more readily than beta.
Principles of Soldering
Safety Note: Solder contains lead – be sure to wash your hands after handlingsolder, and do not solder near food or drink!
Safety Note: Molten solder can be flung towards you if a component slips. Al-ways wear eye protection when soldering!
Electronics are assembled using solder, alloys designed to have a low melting point,high electrical conductivity and good mechanical properties. The solder we will beusing is 60% tin and 40% lead. The following tips will help you to make a securejoint every time:
• Before you apply solder to a joint, make sure the joint is mechanically stable.For example, when soldering to a circuit board, bend the leads outwards oncethey are through the hole.
• Clean the iron’s tip on a moist sponge or brass sponge before and after makingeach joint.
• Put a small amount of solder on the tip of the iron right before touching it tothe part – this will help to conduct heat to the part.
• Make sure the tip of the iron contacts both parts to be connected – you needthem both hot to make a good joint!
• Feed the solder into the joint from opposite where the iron touches – if thesolder doesn’t melt, then you probably haven’t gotten the joint hot enough.
• Don’t overheat parts – a few seconds should do it. If you can’t get the solderto melt as described above within about ten seconds or less, take the iron away,clean the tip and put more solder at the tip of the iron to help conduct heatbetter.
• A good solder joint should be shiny and “wetted” to the surface, not dull and “balled up” on the surface – see Figure 4.
(a) good
beaded up ×Figure 4: Cross-sectionof good versus bad solderjoint.
solder is dull
(b) bad
NSE: Build your own Geiger-Müller counter 3

Resistors
Resistors are one of the fundamental building blocks of electronics. As implied by the name, they resist the flow of c urrent. Given a current I , a resistor of value R develops a potential difference V = IR across it (Ohm’s law). The value of a resistor is indicated by the color code shown in Figure 5.
4 7 ×100 ±5% = 4.7 kΩ ± 5%
1 0 0 ×10k±1% = 1.00 MΩ ± 1%
color band 1 band 2 (band 3) multiplier toleranceblack 0 0 0 1 Ω
brown 1 1 1 10 Ω ±1%red 2 2 2 100 Ω ±2%
orange 3 3 3 1 kΩyellow 4 4 4 10 kΩgreen 5 5 5 100 kΩ ±0.5%blue 6 6 6 1 MΩ ±0.25%
violet 7 7 7 10 MΩ ±0.1%grey 8 8 8 (100 MΩ) ±0.05%
white 9 9 9gold 0.1 Ω ±5%silver 0.01 Ω ±10%
Figure 5: Resistor color codechart. The value of the re-sistor is indicated by two orthree value bands, a multi-plier band and a toleranceband. Note that 1% and2% resistors are ambigu-ous as brown and red arevalid as both tolerance andvalue bands – always double-check the value of precisionresistors!
Capacitors
Capacitors are another fundamental building block of electronics. A capacitor stores charge: given a capacitor of capacitance C charged to a potential V , the charge stored is Q = CV . The value of the capacitors we will be using is indicated by a three-digit number code that works similarly to the resistor color code described above: the first two digits are the first two digits of the value and the third digit is the power of ten multiplier to get the capacitance in picofarads (1 pF = 10−12 F). For example, the code “224” means 22 × 104 pF = 220 nF.
Inductors
Inductors are the third fundamental building block of electronics. An inductor responds to changes in current: given an inductor of inductance L with time-varying current I flowing through it, the voltage is V = LdI/dt. The value of the inductor we will be using is indicated by a three-digit number code that works very much like the capacitor code described above: the first two digits are the first two digits of the value and the third digit is the power of ten multiplier to get the inductance in microhenries (1 µH = 10−6 H). For example, the code “102” means 10 × 102 µH = 1 mH.
NSE: Build your own Geiger-Müller counter 4

Assembling the Geiger-Müller Counter
The circuit diagram is shown in Figure 6. The parts needed are shown in Figure 7 and parts lists broken down by subassembly are given at each step. You will be assembling the circuit on a printed circuit board (PCB), the top of which is shown in Figure 8. In the subsequent steps, components involved in the active step will be shown in full color and components that have already been installed but are unimportant for the step at hand will be shown as black silhouettes.
Tip: Always disconnect the battery when done testing – you don’t want to wreckyour circuit by shorting it out!
Tip: When testing, always make sure the board is supported such that there isnothing shorting any connections out on it – this includes your hands as well asany debris on your workbench. The two safest approaches are to grip the edgesof the board with the work holder such that the board is held off the workbenchor to put standoffs in the mounting holes at the corners of the board.
Tip: With components that start out with short leads that you can’t bend to holdthe part in place, it sometimes helps to use a small piece of tape to hold the partin place while soldering.
Safety Note: When using wire cutters, wire fragments can be flung with enoughforce to injure your eyes. Keep your eye protection on while trimming leads.Another useful tip is to hold your hand over the area where you are cutting tocatch the leads as you trim them.
Troubleshooting Tips
If a circuit doesn’t work as expected, check the following:
1. Make sure the correct components have been placed in the correct spots.
2. Check the orientation of diodes, transistors and chips with respect to thesilkscreen outline.
3. Make sure that adjacent pads didn’t become shorted together (“bridged”)during soldering.
4. Make sure you are making the measurement properly: always hook the groundof your scope and the “COM” lead of your meter to the “GND” pin or one ofthe grounded mounting holes in the corners of the board.
NSE: Build your own Geiger-Müller counter 5

1_G
ND
18_
VCC
8
2_TR
IG2
3_O
UT
36_
THR
6
7_D
IS7
5_C
TRL
54_
RES
4
1 2 3 4 5 6
+-
123
3 21
5 67
10 98
12 1314
VCC 4
GND 11
VI3
2
VO1
1_O
UT
18_
GN
D8
2_VC
C2
3_C
OM
P3
6_D
TC6
7_R
T7
5_SC
P5
4_FB
4
Figure 6: Full schematic forthe GM counter.
NSE: Build your own Geiger-Müller counter 6

Figure 7: Parts of the GMcounter.
(a) top view with traces
Figure 8: The board has two layers – in (a) the top layer is shown as red and the bottom layer is shown as blue. Notice that most of the bottom layer is a solid area of copper – this is the ground plane, and is what is defined as zero volts for the circuit.
(b) top view with pads and silkscreen only
NSE: Build your own Geiger-Müller counter 7

Step 1: Build the power supply
Note: The 78L05 linear regulator must be installed in the correct orientation inthis step. Be sure you have it right before soldering it in!
Note: Don’t get the 78L05 linear regulator mixed up with the transistors, whichare in the same style of package!
The power supply provides the 5 V that the rest of the circuit runs on.
Parts UsedName Description/Value Diagram
9V battery snap –
– slider switchIC1 78L05C1, C2 10 µF filtering capacitor 106
106
106
t side faces to right
1. Hook up the leads from the battery snap as shownin Figure 9, taking care that the red wire goes on theside marked with a “+.” Be sure to follow Figure 9closely or the wires to the battery will soon break!
2. Solder the battery wires from the top of the board,trim any excess length.
3. Insert the parts as shown in the diagram. Make surethe flat side of the 78L05 linear regulator faces to-wards the two large capacitors.
4. Flip the board over, grip the edges with the workholder (if using one).
5. Solder all of the wires you just inserted and trim theexcess lead length protruding from the board.
(a) top of board
Figure 9: Thread the batteryleads in from the top of theboard and up again throughthe back, leaving a loop totake up strain.
(b) bottom of board
NSE: Build your own Geiger-Müller counter 8
fla

Step 2: Test the power supplyverify 5V here connect “COM” here 1. Support the board such that none of the connections
are shorted by hands, lead clippings, etc.
2. Check that the power switch is in the “off ” position(i.e., away from the text “ON” printed on the board).
3. Connect the battery and turn on the power switch.
4. Using the digital multimeter (DMM), check that thevoltage at the pad indicated with the red circle inthe figure is at about 5 V with respect to any of thegrounded mounting holes in the corners.
5. Turn the power switch off.
6. Disconnect the battery.
Step 3: Build the inverter
Note: There are two parts that must be installed in the correct orientation in thisstep. Be sure you have them right before soldering them in!
The inverter inverts the pulse from the GM tube.
t side faces towards bottom
470
Parts UsedName Description/Value Diagram
R14 5.1 kΩ 1/2 W resistorR15 10 kΩ resistorR16 1 kΩ resistorC5 47 pF capacitorQ3 2N3904 NPN transistorIO1 6-pin header
1. Insert the parts as shown. Make sure the FLAT sideof the transistor faces DOWN.
2. The short end of the 6-pin header goes into the board,with the plastic part on top, see Figure 10.
3. Flip the board over, solder all of the components inand trim the excess leads.
Figure 10: Correct header installation: long gold pins andplastic on TOP of board.
NSE: Build your own Geiger-Müller counter 9
fla

6-pin output header description
The 6-pin header you just installed provides easy access to the important signals inthe circuit, summarized in the table below:
IO header pin descriptionsLabel Description
HV 1000:1 voltage divider on HV power supplyGM GM tube I-to-V outputINV Inverter outputPS Pulse stretcher outputPWM Power converter switching waveformGND Ground
Note: Whenever you are using the oscilloscope, always connect the shield (blacklead when using a BNC-to-minigrabber cable) of each channel to the “GND” pin.Be careful to not short to adjacent pins!
Step 4: Test the inverter
use a wire to connect thenodes circled in red
hook A to “GM” hook B to “INV”ground both channels to “GND”
1. Connect channel A of the scope to “GM.”
2. Connect channel B of the scope to “INV.”
3. Don’t forget the ground connections to “GND” forboth channels!
4. Check that the power switch is off and that the boardis supported away from any materials that mightshort it out.
5. Connect the battery, turn the power switch on.
6. Use a wire to short the two pads circled in red to-gether, being careful to not touch adjacent pads.
7. On the scope, observe the signal from your wire onchannel A and the output from the inverter on chan-nel B, you should see signals like Figure 11.
8. Turn the power switch off and disconnect the battery.
NSE: Build your own Geiger-Müller counter 10

Figure 11: Waveforms forthe inverter test. The simu-lated GM pulse is channel A(green), the inverter outputis channel B (blue). The in-verter takes the 5 V pulsesignal and converts it to zero.With the wire removed, thetraces will be reversed – theinverter will output 5 V onchannel B while the pulse onchannel A is zero.
notches aligned with silkscreen outline, chips not installed yet
(a) while soldering:sockets only
(b) side of fully-inserted chip
notches aligned with silkscreen outline/notch on socket
Figure 12: Chip socketsallow chips to be removedwithout needing to removeany solder. When installinga chip, it is very importantto make sure the notch onthe top of the chip is in theright spot and that the chipis fully seated in the socket.
(Note that what is shown is aslightly different board thanwhat you are building.)
(c) for testing:chips inserted
NSE: Build your own Geiger-Müller counter 11

Step 5: Build the pulse stretcher
Note: There are two components that must be installed in the correct orientationin this step. Be sure you have them right before soldering them in!
The pulse stretcher turns the very short pulse from the GM tube into a 1.5 ms pulse.
Parts UsedName Description/Value Diagram
IC3LMC555 timer (and DIP-8socket)
LMC555
R17 6.2 kΩ resistorR19 75 Ω resistorC6 220 nF capacitorC7 10 nF capacitorLED1 small blue LED
224
103
longer lead on this sidenotch at top
1. We will be using chip sockets to make it easier toreplace chips if something goes wrong: see Figure 12.Do not insert the chips themselves until the last step.
2. Insert the small LED with the longer lead in the holenearest to where LED2 will go.
3. Insert the parts as shown in the diagram, bendingleads as necessary to hold them in place. Make sureto line up the notch at the top of the chip socket withthe notch indicated on the silkscreen outline.
4. Flip the board over, solder all of the components inand trim the excess leads.
5. Insert the 555 chip into its socket with the notch asshown on the silkscreen outline.
NSE: Build your own Geiger-Müller counter 12

Step 6: Test the pulse stretcher
use a wire to connect the nodes circled in red
hook A to “GM” hook B to “PS”ground both channels to “GND”
1 C nnec c anne e sc pe
2 C nnec c anne e sc pe
3 n e e nd c nnec i nsc anne s
4 C ec a e p e is and a e a d is a ayany a e ia s a i s i
C nnec e a e y n e p e s i c n
6 se a i e s e pads ci c ed in ede e ein ca e n c ad acen pads
7 n e sc pe se e e si na y i e nc anne and e p se s e c e n c anne
y c d ap e i e ie y en ep se s e c e s d p a 1 s ns a e p se appin is as is a d d
e ise e s e c e i e n as n ase i e is in c n ac
en e p se s e c e is n e es d i p
s d see si na s i e Fi e 13
8 n e p e s i c and disc nnec e a e y
Figure 13: Waveforms forthe pulse stretcher test.The simulated GM pulseis channel A (green), thepulse stretcher is channel B(blue). Channel B can be upto 5 V, in which case the twotraces would be right on topof each other.
NSE: Build your own Geiger-Müller counter 13

Note: The chip and LED must be installed in the correct orientation in this step.Be sure you have them right before soldering them in!
The filter collects the GM tube pulses to control the color of LED2: the higher thecount rate, the more red LED2 will get. The red pump drives this proportionalcurrent through the red LED.
106
notch to left
Parts UsedName Description/Value Diagram
MCP6004 quad op-ampIC4 (and DIP-14 socket)
MCP6004
LED2 large red-green LEDR20 100 kΩ resistorR21 36 kΩ resistorR22 2.4 kΩ resistorR23, R24,R25, R26 1 kΩ resistorC8 10 µF capacitor 106
1. Set the MCP6004 chip aside until the last step.
2. Insert the other parts into the board as shown.
3. Make sure the notch at the top of the chip socket isoriented as indicated on the silkscreen outline.
4. The FLAT side of the large LED should face towardsLED1. (The flat is only present on the thin band atthe base of the plastic housing.)
5. Flip the board over, solder all of the components inand trim the excess leads.
6. Insert the MCP6004 chip into its socket with itsnotch towards the edge of the board.
Step 8: Test the red LED pump
1. Check that the power switch is off and that the board is supported away fromany materials that might short it out.
2. Connect the battery, turn the power switch on.
3. Repeat the procedure from the previous tests: hold a wire at the right lead ofR16 and tap it on the lower, circular pad of the SBM-20.
4. You should see the red LED light up as you hold the wire in place, then gradu-ally fade away when you remove the wire.
5. Turn the power switch off and disconnect the battery.
NSE: Build your own Geiger-Müller counter 14
�at side to bottom
Step 7: Build the filter and red LED pump

Parts UsedName Description/Value Diagram
R27, R28, R29,R30, R31, R32,R33, R34 1 kΩ resistor
1. Insert the parts into the board as shown.
2. Flip the board over, solder all of the components inand trim the excess leads.
Step 10: Test the green pump
1. Check that the power switch is off and that the board is supported away fromany materials that might short it out.
2. Connect the battery, turn the power switch on.
3. Repeat the procedure from the previous tests: hold a wire at the right lead ofR16 and tap it on the lower, circular pad of the SBM-20.
4. The LED should go from green to red as you hold the wire in place, then fadeback to green when you remove the wire.
5. Turn the power switch off and disconnect the battery.
NSE: Build your own Geiger-Müller counter 15
Step 9: Build the green LED difference amplifier and pump
The green difference amplifier and pump drive current through the green LEDinversely proportional to the count rate.
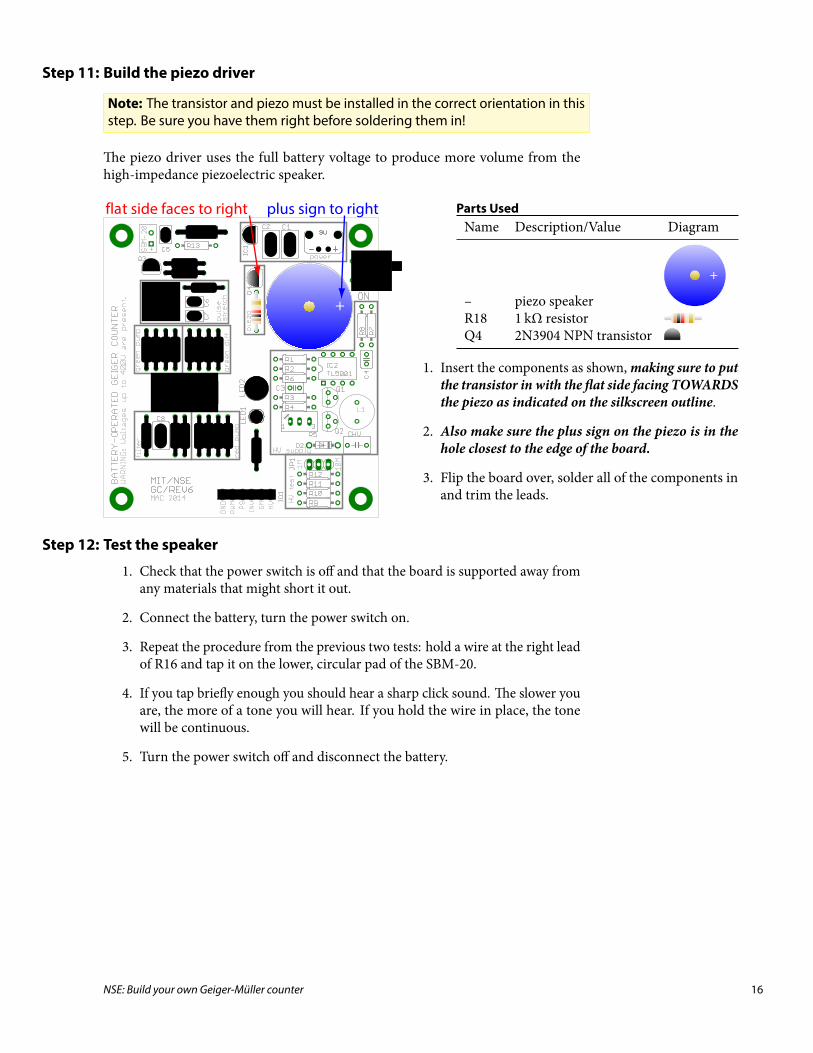
Step 11: Build the piezo driver
Note: The transistor and piezo must be installed in the correct orientation in thisstep. Be sure you have them right before soldering them in!
The piezo driver uses the full battery voltage to produce more volume from thehigh-impedance piezoelectric speaker.
+
t side faces to right plus sign to right Parts UsedName Description/Value Diagram
– piezo speaker
+
R18 1 kΩ resistorQ4 2N3904 NPN transistor
1. Insert the components as shown, making sure to putthe transistor in with the flat side facing TOWARDSthe piezo as indicated on the silkscreen outline.
2. Also make sure the plus sign on the piezo is in thehole closest to the edge of the board.
3. Flip the board over, solder all of the components inand trim the leads.
Step 12: Test the speaker
1. Check that the power switch is off and that the board is supported away fromany materials that might short it out.
2. Connect the battery, turn the power switch on.
3. Repeat the procedure from the previous two tests: hold a wire at the right leadof R16 and tap it on the lower, circular pad of the SBM-20.
4. If you tap briefly enough you should hear a sharp click sound. The slower youare, the more of a tone you will hear. If you hold the wire in place, the tonewill be continuous.
5. Turn the power switch off and disconnect the battery.
NSE: Build your own Geiger-Müller counter 16
fla

Step 13: Build the HV divider/bleeder
Note: The 3-pin header must be installed in the correct orientation in this step.Be sure you have it right before soldering it in!
The resistors installed in this step serve both to help drain the high voltage powersupply’s capacitor after the device is turned off and to form a 1000:1 voltage dividerthat helps you to safely measure the output of the power supply with conventionaltest equipment. Because of the high impedances involved, it is necessary to usedifferent resistors for different input impedances of test equipment. The two possiblestates of jumper JP1 select the type of equipment used: 10 MΩ for a DMM, 1 MΩfor a standard oscilloscope.
Parts UsedName Description/Value Diagram
R9, R10 1 GΩ resistorR11 1 MΩ resistorR12 1.1 MΩ resistor
JP1 3-pin header
2-pin jumper
1. Set the 2-pin jumper aside until the last step.
2. The short end of the 3-pin header goes into the board,with the plastic part on top, just like the 6-pin header.
3. Insert the other parts as shown.
4. Flip the board over and grip it with the work holder,solder all of the components in and trim the excessleads.
5. Install the 2-pin jumper in the “10M” position.
NSE: Build your own Geiger-Müller counter 17

Step 14: Build the boost converter
Safety Note: From this step on, there will be parts of the board at 400 V whenturned on. The available current is small, but is still enough to give you a nastyshock (and probably destroy all of your chips in the process). Be very careful tonot touch the board whenever the battery is connected!
Note: There are five components that must be installed in the correct orientation in this step. Be sure you have them right before soldering them in!
The boost converter steps the 9 V battery voltage up to the 400 V needed for the GMtube. The TL5001 is a general-purpose power converter controller that providesactive control of the output voltage.
153BA 472
102
105
brass dot to left
flat sides to leftnotch to left
silver band to right
Parts UsedName Description/Value Diagram
TL5001 chip (and DIP-8IC2 socket)
D2 BA159 diodeR1, R2 10 kΩ resistorR3 10 MΩ resistorR4 22 kΩ resistor
R5 20 kΩ potentiometerR6 4.7 kΩ resistorR7 4.7 MΩ resistorR8 6.8 MΩ resistorC3 15 nF capacitorC4 1 µF capacitorCHV 4.7 nF HV capacitorQ1, Q2 FQN1N50C MOSFET
L1 1 mH inductor102
1. Set the TL5001 chip aside until the last step.
2. Insert the other parts into the board as shown.
3. Make sure the silver band on the diode is towards the HV capacitor as indi-cated on the silkscreen outline/in the diagram.
4. Make sure the notch at the top of the chip socket is oriented as indicated onthe silkscreen outline.
5. Make sure the brass screw on top of the potentiometer ends up away fromthe transistors as shown on the silkscreen outline/in the diagram.
6. Make sure the flat sides of the transistors face AWAY from the inductor.
7. Flip the board over, solder all of the components in and trim the excess leads.
8. Insert the TL5001 chip into its socket with the notch to the left.
NSE: Build your own Geiger-Müller counter 18

Step 15: Note locations of high voltage
Step 16: Tune the boost converter
measure HV supply on “HV”be sure to connect meter “COM” to “GND”
1 C ec a e p e s i c is and a e a dis s pp ed a ay any a e ia s a is i
2 C nnec y e V pin C nnec es C ead e pin
3 a e s e a e pe is se a 10
4 Make sure no one is touching the board and thatthere are no debris that could create a short in con-tact with the board.
C nnec e a e y n e p e s i c n
6 sin e p as ic ad s in n e ass p eni e e n c c ise n i e e e eads ess
an 300 V Be careful to not touch the high volt-age portions of the board while doing this!
make sure jumper is at “10M”7 en n e n c n e c c ise n i e e
e eads 400 V e di ide is 1000 1 s is cesp nds 400 V p e V s pp y
8 n e p e s i c and disc nnec e a e y
NSE: Build your own Geiger-Müller counter 19

Step 17: Install the GM tube resistor and clips
Parts Used
Figure 14: Wire ready to be soldered to clip.
Name Description/Value Diagram
– fuse clips for GM tube (×2)R13 5.1 MΩ
1. Solder wires to the fuse clips:
(a) Cut sections of red and black wire each about6” (15 cm) long and strip about 1/8” (3 mm) ofinsulation from each end of these wires.
(b) Use pliers to form one end of each wire into a“J” shape.
(c) Hook the “J” into the hole in the tab on the clip,then crush the hook so it will stay still when soldering. Refer to Figure 14.
(d) Solder the wires to the solder tab.
2. At this point, you may wish to use the GM tube andcase as a guide to trim your wires to a more appropri-ate length – but don’t cut too much off!
3. Insert the loose end of the red wire into the holemarked with a “+,” insert the black wire into theother hole in the block labelled “SBM-20.”
4. Insert the 5.1 MΩ resistor as shown.
5. Flip the board over, solder all of the components inand trim the excess leads.
Step 18: Install into the case
1. Make sure the battery is disconnected, the power switch is off and that youhave removed all debris from the board.
2. Use #2-56 × 3/16” screws with nuts inside the case to secure the battery clip,then put a piece of electrical tape over the nuts to protect the battery.
3. Use #4-40 × 3/16” self-threading screws to attach the board to the standoffswith the board oriented so the battery snap is close to the clip you just installed.
4. Use #4-40 × 1/4” screws to attach the two hexagonal standoffs inside the case.
5. Screw the fuse clips to the standoffs using plastic #4-40 × 3/16” screws. Youmight need to bend the clip out a bit using pliers, just don’t bend it too far!
6. Bend the tabs on the fuse clips so they are nearly vertical.
7. Insert the GM tube into the clips with the end marked with “+” at the clip withthe red wire. Be gentle when pushing down on the tube – it is very fragile!Push down on the plastic right next to the clips to avoid crushing the tube.
NSE: Build your own Geiger-Müller counter 20
battery clip:#2-56 �at head screws into hex nuts
circuit board:#4-40 self-tapping pan head screws
GM tube:#4-40 �at head to attach hex stando�s to case, plastic #4-40 pan head to attach clips to stando�s

Step 19: Test the GM tube
hoo to hoo to gro nd both channels to
1. Mak ur th ow r switch s off that no brih s f ll n on the bo r .
2. Hook h l A of our co to th “GM” in.
3. Hook h l B of our co to th “PS” in.
4. o t th b tter , tur th ower sw t h on.
5. At ty l b kgrou l v l , you houl he r lickth fir t co or less.
6. Obs rv the g l on the o om r toFigur 15.
7. Tur th ow r switch off. You r ow r y forfi l mbly.
Figure 15: a eforms forthe com lete co nter
hannel green is theact al lse from thet be channel bl e isthe lse stretcher o canad st the ime i nobto get a closer loo at the
lse from the t be
NSE: Build your own Geiger-Müller counter

Step 20: Final assembly
1. Make sure the power switch is off.
2. Insert the battery into the clip and connect it.
3. Make sure the battery is not touching the clip holding the GM tube!
4. If the posts in the top run into the tabs on the clips holding the GM tube,remove the GM tube to avoid damaging it, then bend the tabs to be closer tovertical. Once the top fits, carefully put the tube back in, following the sameprecautions as before.
5. Put the top on with the rectangular notch over the power switch and secure itwith the four self-threading screws.
Figure 16: Completed GMcounter.
This project was designed by Mark Chilenski (graduate student, Course 22). Numerous productiveconversations were had with Prof. Anne White, Prof. Mike Short, Matthew D’Asaro (graduate student,Course 6) and John Walk (graduate student, Course 22) in the design of this project.
NSE: Build your own Geiger-Müller counter 22

MIT OpenCourseWarehttp://ocw.mit.edu
22.S902 Do-It-Yourself (DIY) Geiger CountersJanuary IAP 2015
For information about citing these materials or our Terms of Use, visit: http://ocw.mit.edu/terms.