build a sigma tile - ptc
TRANSCRIPT
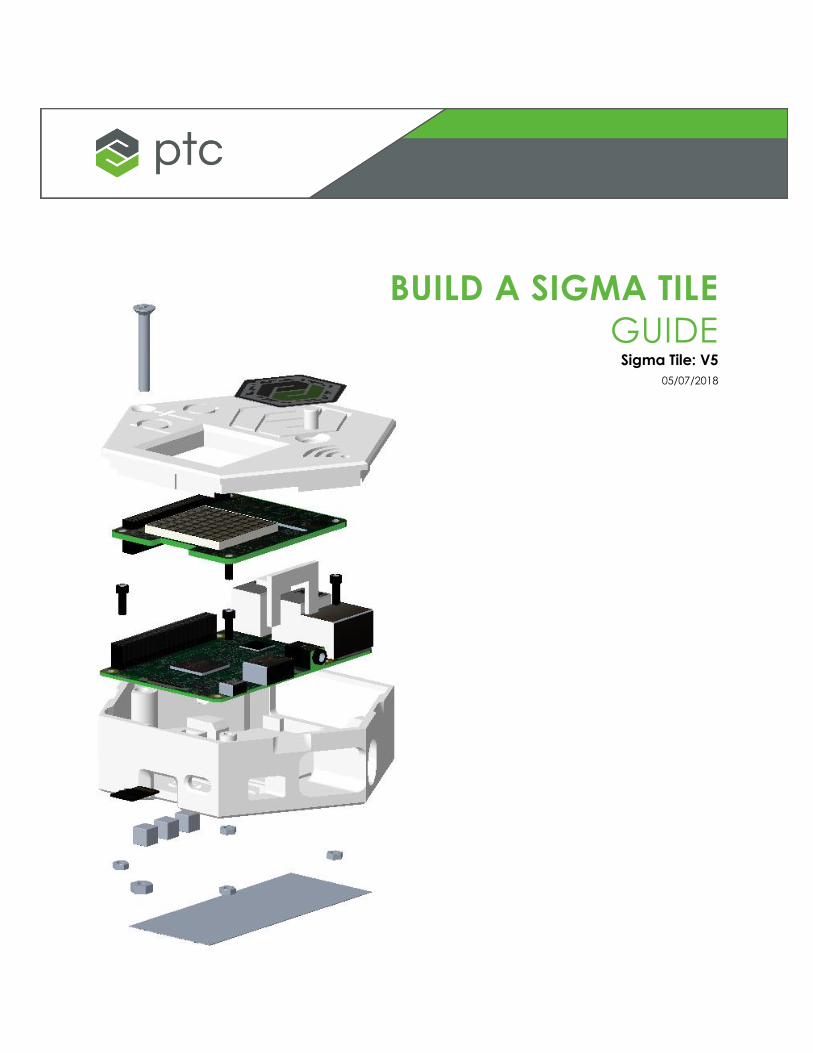
BUILD A SIGMA TILE
GUIDE Sigma Tile: V5
05/07/2018
pg. 2
CONTENTS
Introduction ................................................................................................................................... 3
Requirements ................................................................................................................................ 3
Step 1 – Procuring Components & Materials ............................................................................ 4
Step 2 – 3D Printing Components ............................................................................................... 5
Step 3 – Printing Stickers ............................................................................................................... 6
Step 4 – Assembling Components ............................................................................................. 7
Step 5 – Understanding the Sigma Tile Python Script .............................................................. 8
Step 6 - Creating Micro-SD Card with Sigma Tile software ..................................................... 8
Step 7 – Testing The Sigma Tile .................................................................................................... 9
Appendix A: Understanding the Sigma Tile ............................................................................ 12
Appendix B: Technical Support ................................................................................................ 14
Appendix C: Augmented Reality Assembly Template ......................................................... 15
Appendix D: Creating your own Sigma Tile Disk Image........................................................ 16
Appendix E: Updating the Sigma Tile code from GitHub .................................................... 25

pg. 3
INTRODUCTION
In this guide you will learn how to build a Sigma Tile using simple, easy to procure,
proven components such as a Raspberry Pi and a Sense Hat and by following simple
instructions leveraging augmented reality for the mechanical assembly steps.
The PTC Sigma Tile runs on a Raspberry Pi with a Sense Hat using several Python
programs. You will also learn how to install these programs on the Raspberry Pi of your
Sigma Tile.
If you are new to the Sigma Tile and want to better understand what it is and intended
application, go to Appendix A.
REQUIREMENTS
In order to build your Sigma Tile, you will need a computer with the following programs
and peripherals:
Software Requirements
PuTTY terminal emulator to remotely communicate with Raspberry-Pi.
7-Zip for extracting archive files.
WinSCP or other similar programs to transfer files between your computer and
Raspberry Pi.
Win32 Disk Imager for writing to a bootable USB drive or micro SD on a windows
host.

pg. 4
Helpful Peripherals
USB mouse and keyboard
Monitor with HDMI input
Micro USB power supply (5V, 2.4A)
STEP 1 – PROCURING COMPONENTS & MATERIALS
1. Review the key components of the Sigma Tile:
In order to build the Sigma Tile, you will need the following minimum required
electronic components:
Raspberry Pi 3 Model B
Raspberry Pi Sense Hat
16GB MicroSD card
MicroUSB cable
Note: The Raspberry Pi Sense HAT is an add-on board for Raspberry Pi. It has an 8X8 RGB
LED matrix, a five-button joystick and includes the following sensors:
Gyroscope
Accelerometer
Magnetometer
Temperature Sensor
Barometric Pressure Sensor
Humidity Sensor

pg. 5
It also comes with Python library.
To create a complete experience with the Sigma Tile, you will need additional
components. You will also need some basic tools.
The electronics components, fasteners and tools can be easily ordered online
from various electronics and hardware suppliers. The enclosure can be 3d-
printed using the STL file provided.
Below is the complete Bill of Materials for the Sigma Tile with estimated cost:
Tools
1. You will need a M2 Hex key and a Philips screwdriver
STEP 2 – 3D PRINTING COMPONENTS

pg. 6
Using the provided STL files or the Creo models, 3d-print the following parts:
SigmaTile_Body_v5.stl
SigmaTile_Cover.stl
SigmaTile_Spacer.stl
SigmaTile_Joystick.stl
STEP 3 – PRINTING STICKERS
Using the PDF files provided, print, on adhesive paper, and cut the following:
Sigma Tile ThingMark Print 1365-50.pdf

pg. 7
Sigma Tile Legend Sticker Print.pdf
STEP 4 – ASSEMBLING COMPONENTS
Using your smart phone or tablet, download the ThingWorx View app, scan the
ThingMark located in Appendix D of this guide and follow the “Assembly” instructions to
assemble your Sigma Tile.
NOTE: for best results, you may want to print Appendix D and place it on a desk to
visualize the Augmented Reality assembly work instructions.
CAUTION: Raspberry Pi – Sense HAT is Electrostatic Sensitive Devices (ESD). Proper care
must be observed protecting it from any damage. Best practices include using wrist
straps and/or electrostatic grounding mat, keeping the electronic parts in protective
bags, etc.

pg. 8
STEP 5 – UNDERSTANDING THE SIGMA TILE PYTHON SCRIPT
The heart of the Sigma Tile is the SigmaTile_SenseHat_V5.py Python script which can be
found in the ThingWorx Developer Portal. This script reads the Sense Hat sensors and
uses the MODBUS protocol to communicate between Raspberry Pi and Kepware.
Modbus is a serial communication protocol developed in 1979 for use in Programmable
Logic Controllers (PLCs). You can find the details about this protocol at modbus.org.
Raspberry Pi will act as the server and Kepware will be a client. The python scripts will
simply initialize the Modbus server and update the values from the Sense HAT when it
receives the request from the client. We use pymodbus libraries, the details of which
can be found at https://github.com/bashwork/pymodbus. Other libraries and protocols
are available which are not in the scope of this documentation.
Other aspects of the code include the reading of the Sense HAT’s joystick position to
trigger various events: change of the LED Display mode and change of the Error Code
values as illustrated in the picture below:
For more details on the functional aspect of the Sigma Tile python script, please refer to
the Learn KepServerEX Using a Sigma Tile guide and the Learn ThingWorx
Manufacturing Apps Using a Sigma Tile guide.
STEP 6 - CREATING MICRO-SD CARD WITH SIGMA TILE SOFTWARE

pg. 9
The easiest and fastest way to get your Sigma Tile running is for you to use our premade
disk image of the Raspberry Pi software with the proper scripts and configuration. If you
want to create your own image, see Appendix D.
USING A PREMADE DISK IMAGE
1. Download the Sigma Tile SD card disk image for your Raspberry Pi. (Please note
that this image is around 15GB)
2. Insert your microSD card, and format it using SDFormatter.
a. Format Type: Full (erase)
b. Format Size Adjustment: On
3. Write the Sigma Tile disk image to the SD card using Win32DiskImager.
4. Insert the microSD card into the Raspberry Pi
STEP 7 – TESTING THE SIGMA TILE

pg. 10
1. Power your Sigma Tile with the Micro-USB cable. Within about 15 seconds a Wi-Fi
symbol will be displayed on the LED display, indicating that the Sigma Tile is
searching for a network.
2. If you see the WIFI symbols: Congratulations! You have completed this guide
and built your own Sigma Tile. The next step will be to connect your Sigma Tile to
a network and to further connect it with Kepware KepServerEX. You will learn
how to do that in the Learn KepServerEX Using a Sigma Tile guide.
3. If you did not see the WIFI symbols, continue to the troubleshooting section.
TROUBLESHOOTING:
1. If the LED Display shows a rainbow and stays on that image, try the following:
o Open the Sigma Tile Cover and try adjusting the SenseHat as the
connection between the Raspberry Pi and the SenseHat may be
improper with some possible Pins misalignments or false contacts
o Ensure that the Sense Hat is level with the Raspberry Pi and the
SenseHat is fully placed on the lip of the Spacer.

pg. 11
2. If after waiting for over 1 minute, the LED Display still shows a blank screen
after briefly showing a rainbow at started, the Python script may not have
started properly. Using the USB keyboard, mouse and monitor, connect to
your Sigma Tile and confirm that the Raspberry Pi Operating System has
started properly. If not, you have a defective disk image. Try re-imaging your
Micro-SD card with the latest image provided on the ThingWorx Developer
Portal. If the PI OS is running, in the command window, try running the Sigma
Python script by typing the following command:
sudo python SigmaTile_SenseHat_V5.py
If the WIFI symbol now displays, it is an indication that the Python script did not
start automatically. If so, follow these instructions:
1. Change to the directory that hosts all of the code to: cd mfg-tile/
a. Pull down the latest code from the repository: git pull
b. Ensure that the launcher is executable: chmod +x launcher.sh
c. Add the cron job to start the script on boot: crontab mycron.tab
2. Reboot the Raspberry Pi: sudo reboot now

pg. 12
APPENDIX A: UNDERSTANDING THE SIGMA TILE
WHAT IS A SIGMA TILE?
The PTC Sigma Tile is a very low cost, ultra-portable IoT device that you
can build yourself. It is equipped with sensors and controls and can act
as a Smart Connected Product or as the Industrial Controller (PLC) of a
production asset or line. It is intended to be used for IoT demonstration
and IoT applications development and testing purposes.
For a quick demo overview
of the Sigma Tile in action,
check out this video:
https://vimeo.com/246388214
(2-minute video)
GET STARTED
Step 1 – Learn Industrial Connectivity with KEPServerEX and a Sigma Tile
LearnKepServerEXUsingSigmaTileGuide.pdf
Install and configure the free trial edition of Kepware KEPServerEX to connect to the Sigma
Tile and, in less than 10 minutes, stream real time readings from the Sigma Tile sensors:
temperature, pressure, humidity… and control the Sigma Tile from KEPServerEX.
Step 2 – Learn ThingWorx Manufacturing Apps
LearnThingWorxMFGAppsUsingSigmaTileGuide.pdf
Download the ThingWorx Manufacturing Apps Free Trial and, in less than 60 minutes,
experience the power of the Industrial IoT with your Sigma Tile acting as the PLC of a
production asset or line.
SIGMA TILE FUNCTIONAL REFERENCE GUIDE

pg. 13
RESOURCES
Sigma Tile related Guides – on ThingWorx Developer Portal (under Additional
Resources):
https://developer.thingworx.com/apps/manufacturing
Kepware KepServerEX - Trial Edition:
https://my.kepware.com/mykepware/Landing.aspx
ThingWorx Manufacturing Apps Free Trial:
https://developer.thingworx.com/apps/manufacturing

pg. 14
APPENDIX B: TECHNICAL SUPPORT
If you have any questions related to the Sigma Tile or this guide, (installation, configuration,
capabilities), we invite to check our ThingWorx User Community page at the link below:
https://community.ptc.com/t5/PTC-Sigma-Tile/gp-p/sigma-tile.
You will be able to search and view posts from other users, from PTC Subject Matter Experts. You
will be able to ask questions, share your lessons learned and provide feedback. You will need to
create an account to be able to view or post to the community.
If you have any questions related to the ThingWorx Manufacturing Apps, check the following
Community page:
https://community.ptc.com/t5/Manufacturing-Apps/bd-p/manufacturingapps
If you have any questions related to the KepServerEX, check the Kepware Technical Support
page:
https://www.kepware.com/en-us/support/technical-support/

pg. 15
APPENDIX C: AUGMENTED REALITY ASSEMBLY TEMPLATE
Note that the nuts and magnets are under the body of the Sigma Tile when
viewing with ThingWorx View

pg. 16
APPENDIX D: CREATING YOUR OWN SIGMA TILE DISK IMAGE
In this Appendix you will learn how to create your own Sigma Tile disk image by installing all the
necessary libraries and scripts on top of the standard Raspberry Pi Raspbian operating system.
For more information about the Raspberry Pi OS, check https://www.raspberrypi.org/
The procedure is intended for experienced Raspberry Pi users. If you are new to the Raspberry
Pi we recommend you use our pre-configure Sigma Tile SD Card disk image described in Step 6
above.
PREREQUISITES First you will need a Micro SD card with the following:
NOOBS pre-installed Micro SD card (16GB minimum). Optionally, Raspbian can be
installed on your own Micro SD card.
INSTRUCTIONS
1. The first step is setting up the Raspberry Pi. In this step you need to make sure Raspbian is
installed properly, network is configured either through network cable or Wi-Fi. The
detailed instructions to setup Raspberry Pi is available at
https://www.raspberrypi.org/documentation/setup/. Make sure to enable the SSH and
I2C. The details for the same are provided in the Frequently Asked Questions section of
this document. See Troubleshooting steps at the end of this Appendix for details.
2. The next step is to assemble Sense HAT onto Raspberry Pi. The Raspberry Pi should be
powered off using the command sudo halt. Do use the Electrostatic Sensitive Devices
precautions to avoid any damage to the hardware. The step by step installation
instructions are provided at https://www.raspberrypi.org/learning/astro-pi-
guide/assemble.md.
3. Use the IP address to SSH into the Pi.

pg. 17
or
Use the mouse and keyboard to access the command line of the Pi.
user: pi
password: raspberry
4. Open the terminal window using Putty or directly from Raspberry Pi. The first step is
updating and upgrading the system. Run the following commands from the terminal
windows:
sudo apt-get update
sudo apt-get upgrade
Installing Python libraries
sudo apt-get install python-dev
sudo apt-get install python-pip
With the latest version of pip, installing cryptography will render an error. Use the
following four commands to resolve the error:
cd
mkdir test
cd test
wget https://bootstrap.pypa.io/get-pip.py
sudo python get-pip.py
the get-pip.py will install compatible pip verasudosudsion.

pg. 18
sudo pip install pymodbus
sudo pip install pycrypto
sudo apt-get install libffi-dev
sudo apt-get install libssl-dev
sudo pip install cryptography
Then install Sense HAT Software packages.
sudo apt-get install sense-hat
sudo reboot
After the reboot command, allow a few minutes for the system to reboot. We are
ready to run our script and test now!
5. You will now install the necessary Sigma Tile scripts on your Rasbperry Pi:
Option 1: using Git-Hub
Open terminal window in Raspberry Pi. Execute the following commands.
Make sure Git is installed by executing the command below.
sudo apt-get install git-core
Copy the source code for this exercise from the git. Make sure to run from the
home directory.
cd
git clone https://github.com/PTCInc/mfg-tile
You will find several files downloaded to mfg-tile directory
cd mfg-tile/
ls –lrt
You can execute the script using the command below:
sudo python SigmaTile_SenseHat_V5.py
Option 2: copying Sigma Tile scripts manually
On the ThingWorx Developer Portal, and using your computer, locate the
Sigma Tile Raspberry Pi Scripts.

pg. 19
Using WinSCP, open a session on your Raspberry Pi and follow these two
steps:
Create a folder under root called mfg-tile
Copy the preceding files into the mfg-tile directory.
From the command window on the Raspberry Pi, execute the script using
the command below.
sudo python SigmaTile_SenseHat_V5.py
Ensure that the launcher is executable:
chmod +x launcher.sh
Add the cron job to start the script on boot:
crontab mycron.tab
Reboot the Raspberry Pi:
sudo reboot now
6. Within about 15 seconds a Wi-Fi symbol or a white disk will be displayed on the
LED display, indicating that the Sigma Tile script is now running. You are now ready to
start and follow the Learn KEPServerEX using a Sigma Tile guide.
7. Optional: To ensure you have the latest code, you can update the Raspberry Pi from the
GitHub repository with these additional steps.
Use the IP address to SSH into the Pi.

pg. 20
or
Use the mouse and keyboard to access the command line of the Pi.
user: pi
password: raspberry
In the Command terminal, change to the directory that hosts all of the code:
cd mfg-tile/
Pull down the latest code from the repository:
git pull
Ensure that the launcher is executable:
chmod +x launcher.sh
Add the cron job to start the script on boot:
crontab mycron.tab
Reboot the Raspberry Pi:
sudo reboot now
Troubleshooting and FAQ:
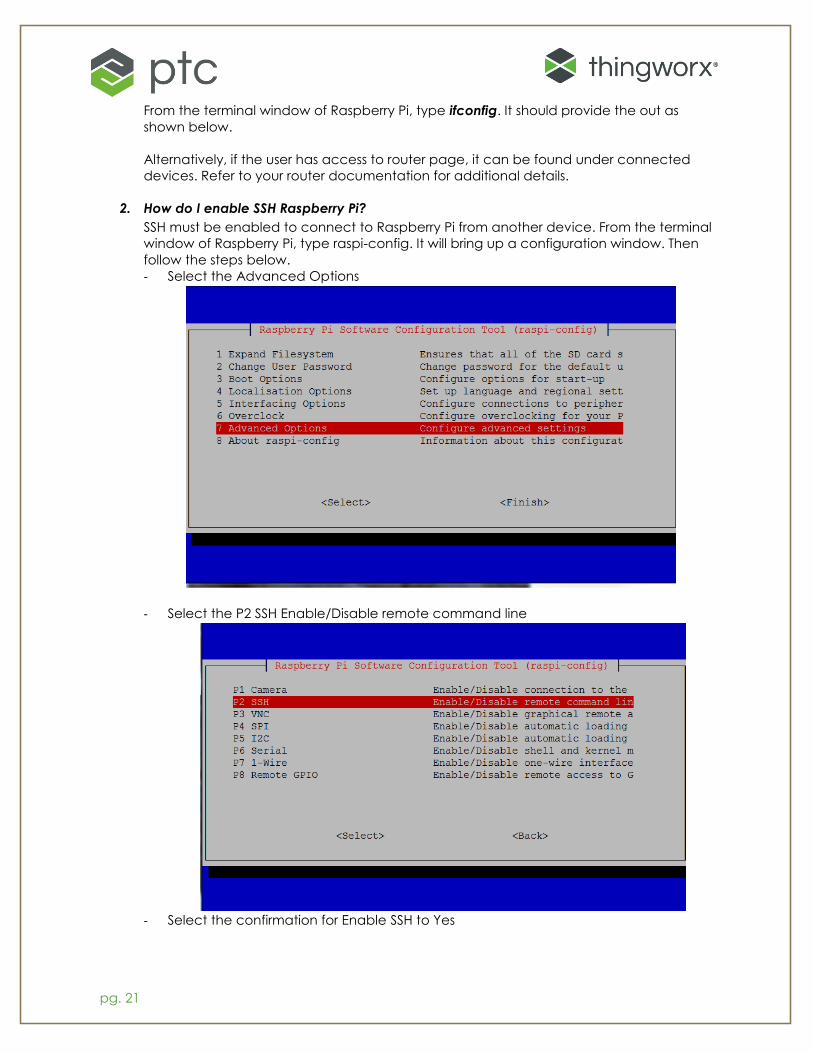
1. How do I find out the IP address of my Raspberry Pi?
pg. 21
From the terminal window of Raspberry Pi, type ifconfig. It should provide the out as
shown below.
Alternatively, if the user has access to router page, it can be found under connected
devices. Refer to your router documentation for additional details.
2. How do I enable SSH Raspberry Pi?
SSH must be enabled to connect to Raspberry Pi from another device. From the terminal
window of Raspberry Pi, type raspi-config. It will bring up a configuration window. Then
follow the steps below.
- Select the Advanced Options
- Select the P2 SSH Enable/Disable remote command line
- Select the confirmation for Enable SSH to Yes

pg. 22
- Exit out of configuration window.
- Restart the Raspberry Pi using “sudo shutdown now –r” command
- After the restart, the user should able to perform a remote login from another system.
3. How do I enable I2C interface in my Raspberry Pi?
I2C must be enabled to connect the Raspberry Pi to Sense HAT. From the terminal
window of Raspberry Pi, type raspi-config. It will bring up a configuration window. Then
follow the steps below.
- Select Interfacing Options
- Enable I2C by selecting options shown below

pg. 23
- Select Yes
- The confirmation page stating I2C interface is enabled will be shown. Select OK.
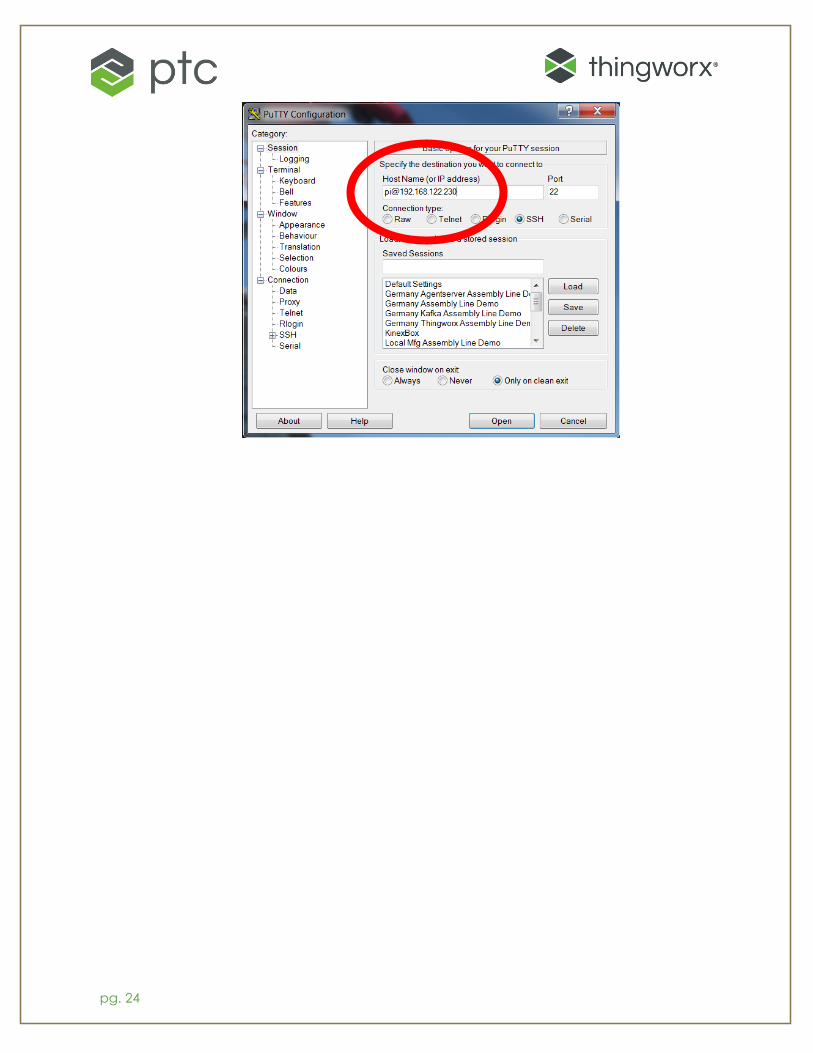
4. How do I connect to Raspberry Pi from my computer or laptop?
Putty is a handy tool for this. Following the link in the Bill of Materials section, download
the software. You will need the IP address of the Raspberry Pi and SSH must be enabled
on the Raspberry Pi. The following screen shot shows the rest.
pg. 24

pg. 25
APPENDIX E: UPDATING THE SIGMA TILE CODE FROM GITHUB
To ensure you have the latest code, you can update the Raspberry Pi from the GitHub repository
with these additional steps.
Use the IP address to SSH into the Pi.
or
Use the mouse and keyboard to access the command line of the Pi.
user: pi
password: raspberry
In the Command terminal, change to the directory that hosts all of the code:
cd mfg-tile/
Pull down the latest code from the repository:
git pull
Ensure that the launcher is executable:
chmod +x launcher.sh
Add the cron job to start the script on boot:
crontab mycron.tab
Reboot the Raspberry Pi:
sudo reboot now