brevard county public schools
TRANSCRIPT

Brevard County Public Schools
Online GradeBook
l
http://et.intranet.brevard.k12.fl.us/Training_Ca
Teacher Manua
2/18/05lendar/Application/handouts.htm
Table of Contents
Setting Up Your Grade Book Installing GradeBook Client p. 1 GradeBook Setup—No Weighting p. 2 GradeBook Setup—Weighting Categories p. 3 GradeBook Setup—Weighting Assignments p. 4 Entering Assignment Information Entering Assignment Information p. 5 Changing Assignment Information p. 6 Assignment Page Full p. 6
Copying Assignment Information From One Class to Another p. 7 Grades/Grading Entering Assignment Grades p. 8 Entering A Default Assignment Grade p. 9
FA’s and Overwriting Grades p. 10 Fixed Grading Symbols p. 11 Extra Credit p. 12
Dropping Low Scores p. 13 Recalculating Term Grades p. 14
New Students/Withdrawn Students Viewing Active/Withdrawn Students p. 15 End of Grading Period
End of Cycle Procedures p. 16 Enter Exam Grades (Secondary) p. 17 End of Cycle Conduct p. 18 End of Cycle Comments (Elementary) p. 19 End of Cycle Comments (Secondary) p. 20 Content Specific Skills –O, S, N, U (Elementary) p. 21 Skills of Cooperation & Independence (Elementary) p. 22
Objectives and Standards Objectives and Standards p. 23 Notes Assignment/Student Notes p. 24 Creating A Column of Teacher Defined Information p. 25
Printing Printing Your Assignments p. 26 Printing Your Objectives/Standards p. 27 Printing Your Comments p. 28 Printing Your End-Of-Cycle Grades p. 29 Printing Assignment by Date p. 30 Printing Grade Sheets for a Range of Dates p. 31 Printing One Student’s Class Grades p. 32 Printing Daily Grades for every Student in Class-1 student per page p. 33 Printing From Your Print Queue p. 34
Deleting Files in Queue p. 35 References Icons & Key Descriptions p. 36 Grade Reporting Cycle and Slot (Elementary) p. 37 Grade Reporting Cycle and Slot (Secondary) p. 38 Grade Reporting Cycle and Slot (Block) p. 39 Sample picture from page 7 p. 40 Sample picture from page 33 p. 41
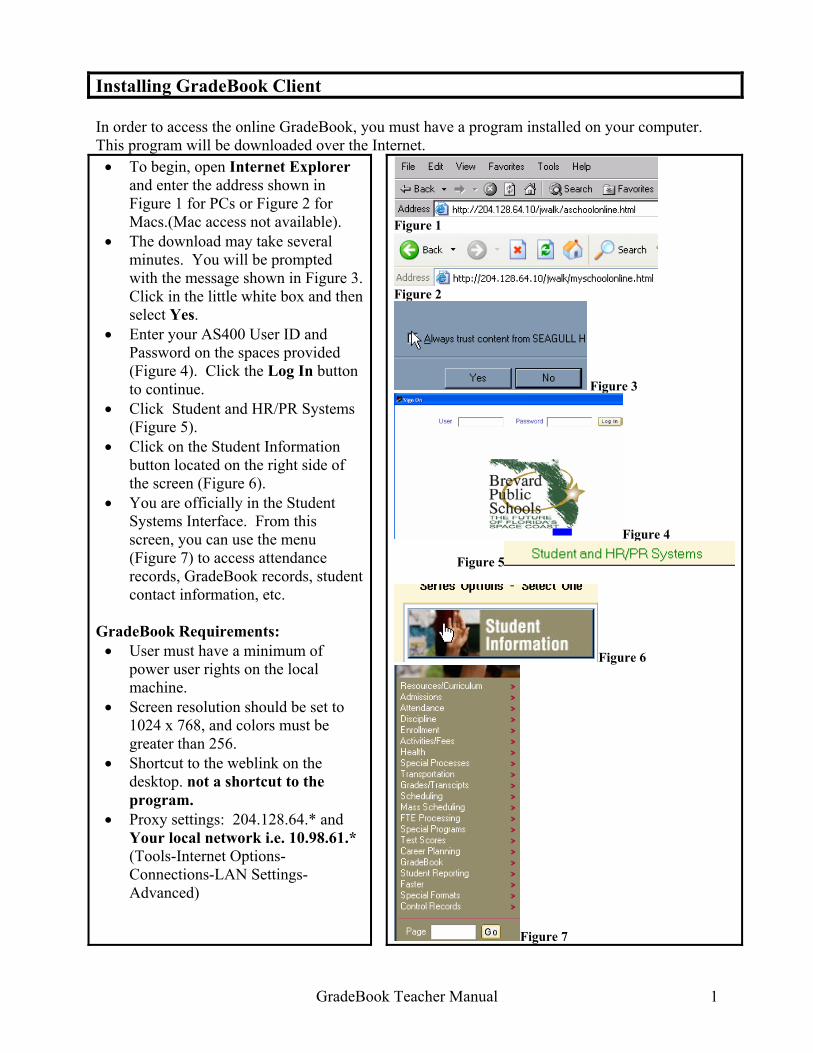
Installing GradeBook Client In order to access the online GradeBook, you must have a program installed on your computer. This program will be downloaded over the Internet. • To begin, open Internet Explorer
and enter the address shown in Figure 1 for PCs or Figure 2 for Macs.(Mac access not available).
• The download may take several minutes. You will be prompted with the message shown in Figure 3. Click in the little white box and then select Yes.
• Enter your AS400 User ID and Password on the spaces provided (Figure 4). Click the Log In button to continue.
• Click Student and HR/PR Systems (Figure 5).
• Click on the Student Information button located on the right side of the screen (Figure 6).
• You are officially in the Student Systems Interface. From this screen, you can use the menu (Figure 7) to access attendance records, GradeBook records, student contact information, etc.
GradeBook Requirements: • User must have a minimum of
power user rights on the local machine.
• Screen resolution should be set to 1024 x 768, and colors must be greater than 256.
• Shortcut to the weblink on the desktop. not a shortcut to the program.
• Proxy settings: 204.128.64.* and Your local network i.e. 10.98.61.* (Tools-Internet Options-Connections-LAN Settings-Advanced)
Figure 1
Figure 2
Figure 3
Figure 4
Figure 5
Figure 6
Figure 7
GradeBook Teacher Manual 1
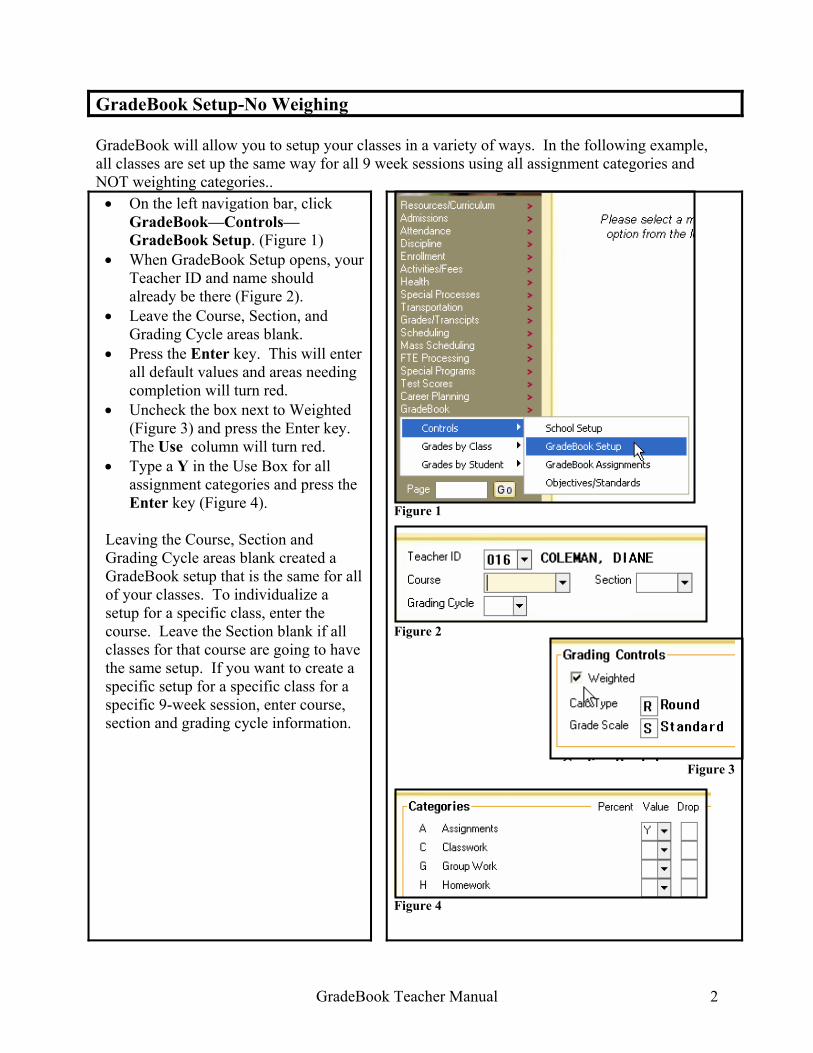
GradeBook Setup-No Weighing GradeBook will allow you to setup your classes in a variety of ways. In the following example, all classes are set up the same way for all 9 week sessions using all assignment categories and NOT weighting categories.. • On the left navigation bar, click
GradeBook—Controls—GradeBook Setup. (Figure 1)
• When GradeBook Setup opens, your Teacher ID and name should already be there (Figure 2).
• Leave the Course, Section, and Grading Cycle areas blank.
• Press the Enter key. This will enter all default values and areas needing completion will turn red.
• Uncheck the box next to Weighted (Figure 3) and press the Enter key. The Use column will turn red.
• Type a Y in the Use Box for all assignment categories and press the Enter key (Figure 4).
Leaving the Course, Section and Grading Cycle areas blank created a GradeBook setup that is the same for all of your classes. To individualize a setup for a specific class, enter the course. Leave the Section blank if all classes for that course are going to have the same setup. If you want to create a specific setup for a specific class for a specific 9-week session, enter course, section and grading cycle information.
Figure 1
Figure 2
Figure 3
Figure 4
GradeBook Teacher Manual 2
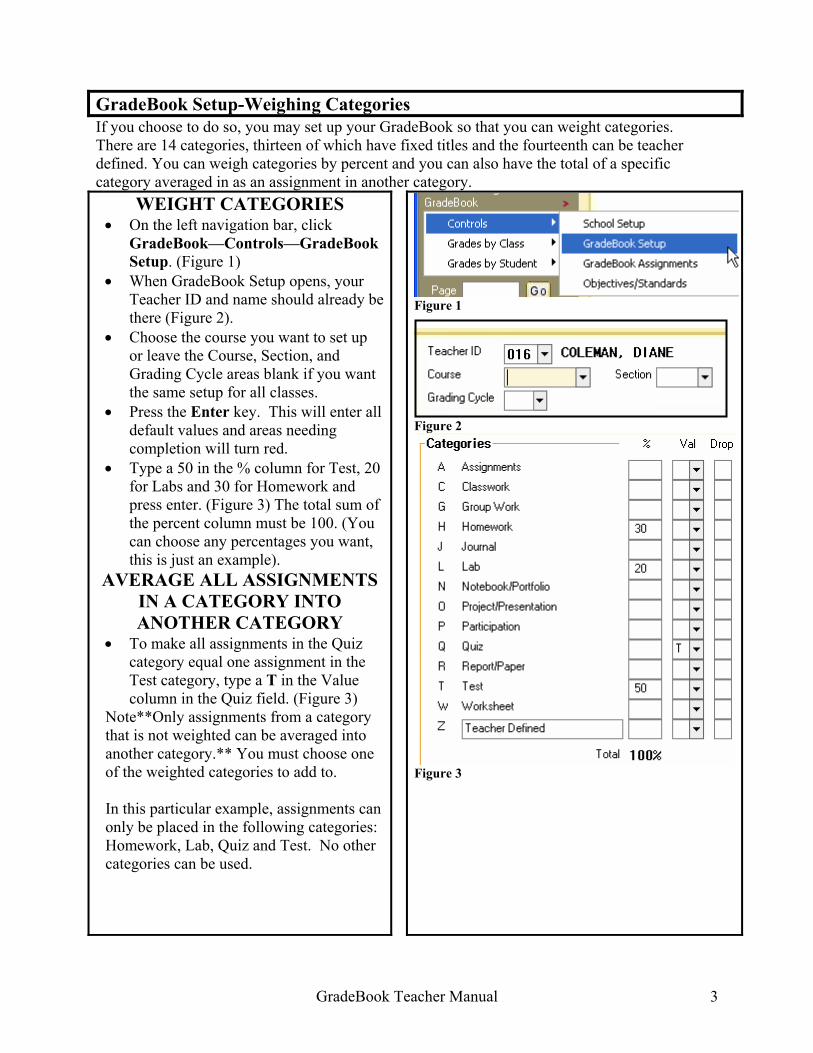
GradeBook Setup-Weighing Categories If you choose to do so, you may set up your GradeBook so that you can weight categories. There are 14 categories, thirteen of which have fixed titles and the fourteenth can be teacher defined. You can weigh categories by percent and you can also have the total of a specific category averaged in as an assignment in another category.
WEIGHT CATEGORIES • On the left navigation bar, click
GradeBook—Controls—GradeBook Setup. (Figure 1)
• When GradeBook Setup opens, your Teacher ID and name should already be there (Figure 2).
• Choose the course you want to set up or leave the Course, Section, and Grading Cycle areas blank if you want the same setup for all classes.
• Press the Enter key. This will enter all default values and areas needing completion will turn red.
• Type a 50 in the % column for Test, 20 for Labs and 30 for Homework and press enter. (Figure 3) The total sum of the percent column must be 100. (You can choose any percentages you want, this is just an example).
AVERAGE ALL ASSIGNMENTS IN A CATEGORY INTO ANOTHER CATEGORY
• To make all assignments in the Quiz category equal one assignment in the Test category, type a T in the Value column in the Quiz field. (Figure 3)
Note**Only assignments from a category that is not weighted can be averaged into another category.** You must choose one of the weighted categories to add to. In this particular example, assignments can only be placed in the following categories: Homework, Lab, Quiz and Test. No other categories can be used.
Figure 1
Figure 2
Figure 3
GradeBook Teacher Manual 3
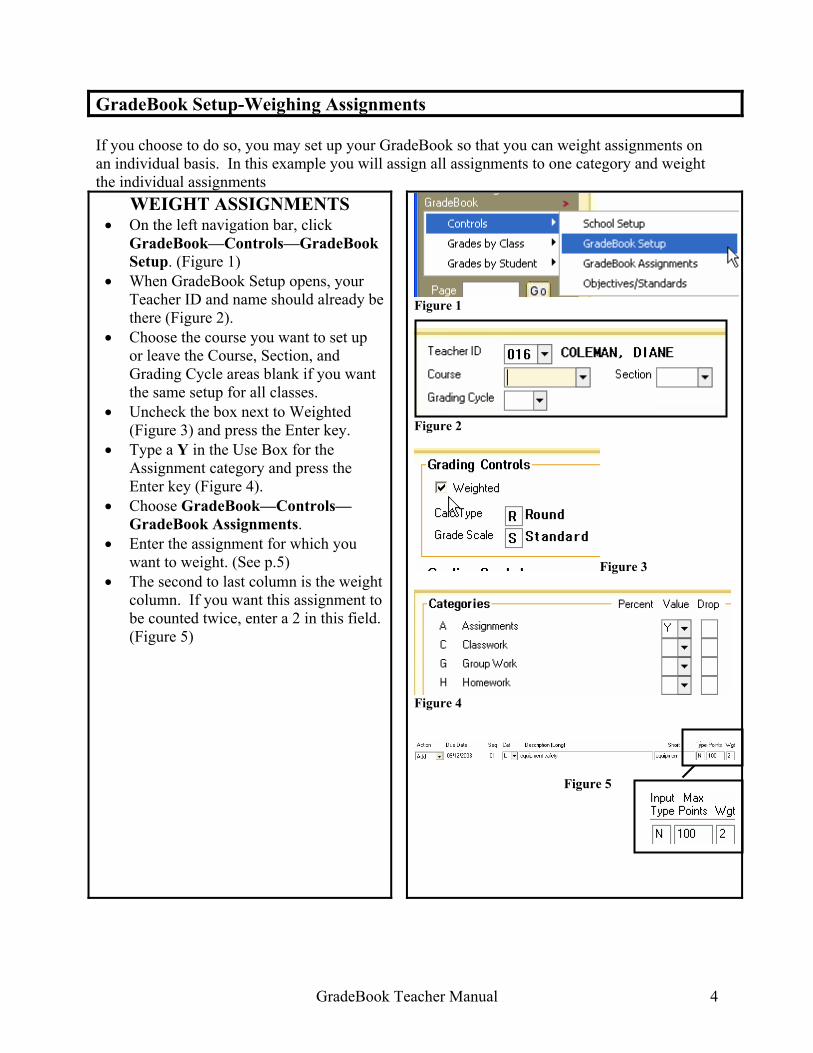
GradeBook Setup-Weighing Assignments If you choose to do so, you may set up your GradeBook so that you can weight assignments on an individual basis. In this example you will assign all assignments to one category and weight the individual assignments
WEIGHT ASSIGNMENTS • On the left navigation bar, click
GradeBook—Controls—GradeBook Setup. (Figure 1)
• When GradeBook Setup opens, your Teacher ID and name should already be there (Figure 2).
• Choose the course you want to set up or leave the Course, Section, and Grading Cycle areas blank if you want the same setup for all classes.
• Uncheck the box next to Weighted (Figure 3) and press the Enter key.
• Type a Y in the Use Box for the Assignment category and press the Enter key (Figure 4).
• Choose GradeBook—Controls—GradeBook Assignments.
• Enter the assignment for which you want to weight. (See p.5)
• The second to last column is the weight column. If you want this assignment to be counted twice, enter a 2 in this field. (Figure 5)
Figure 1
Figure 2
Figure 3
Figure 4
Figure 5
GradeBook Teacher Manual 4
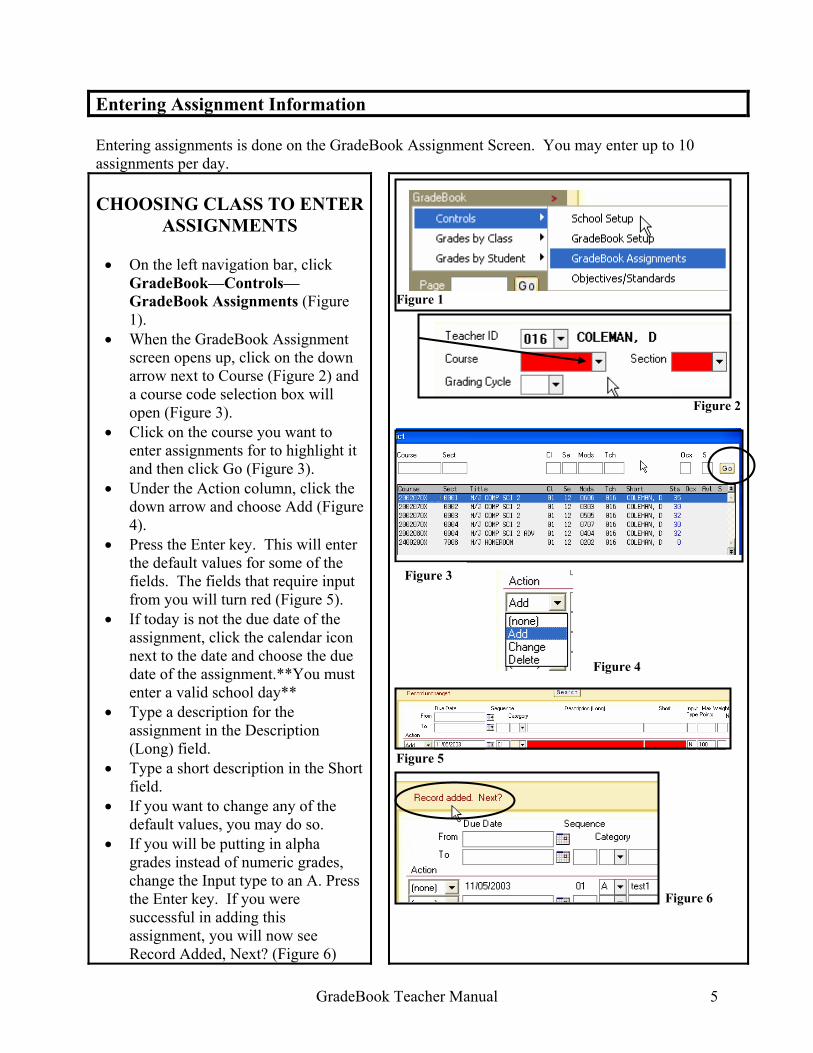
Entering Assignment Information Entering assignments is done on the GradeBook Assignment Screen. You may enter up to 10 assignments per day. CHOOSING CLASS TO ENTER
ASSIGNMENTS • On the left navigation bar, click
GradeBook—Controls—GradeBook Assignments (Figure 1).
• When the GradeBook Assignment screen opens up, click on the down arrow next to Course (Figure 2) and a course code selection box will open (Figure 3).
• Click on the course you want to enter assignments for to highlight it and then click Go (Figure 3).
• Under the Action column, click the down arrow and choose Add (Figure 4).
• Press the Enter key. This will enter the default values for some of the fields. The fields that require input from you will turn red (Figure 5).
• If today is not the due date of the assignment, click the calendar icon next to the date and choose the due date of the assignment.**You must enter a valid school day**
• Type a description for the assignment in the Description (Long) field.
• Type a short description in the Short field.
• If you want to change any of the default values, you may do so.
• If you will be putting in alpha grades instead of numeric grades, change the Input type to an A. Press the Enter key. If you were successful in adding this assignment, you will now see Record Added, Next? (Figure 6)
Figure 1
Figure 2
Figure 4
Figure 5
Figure 6
Figure 3
GradeBook Teacher Manual 5
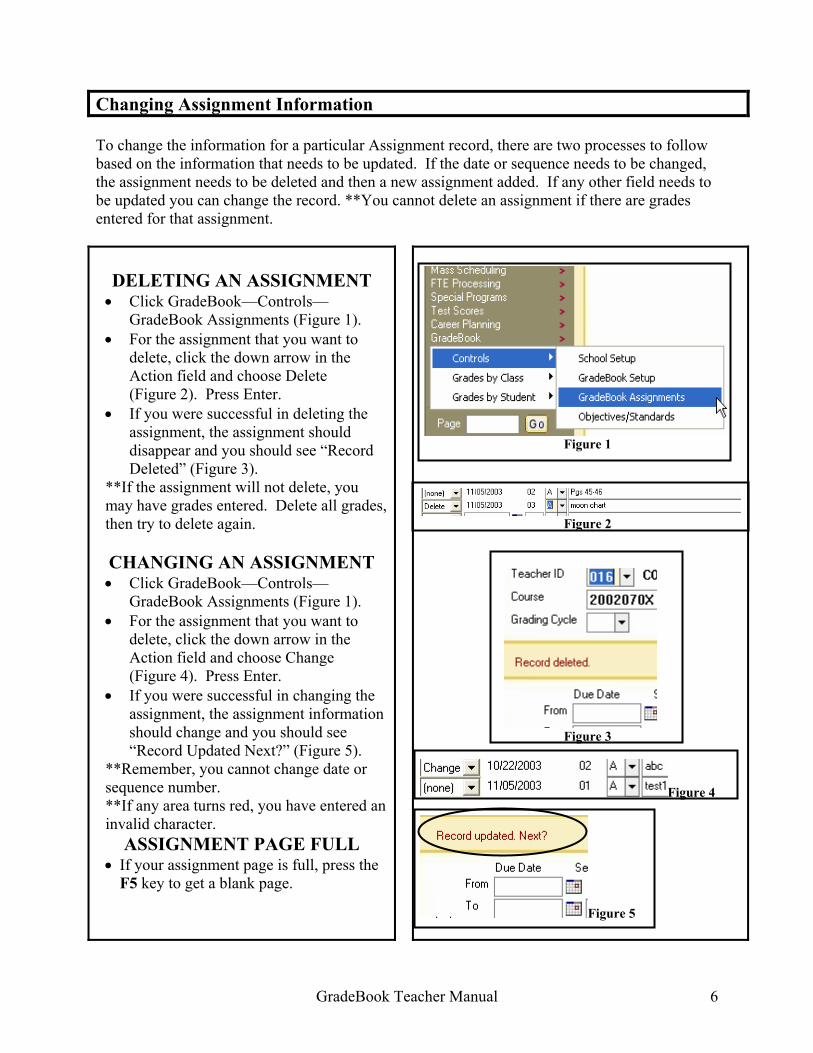
Changing Assignment Information To change the information for a particular Assignment record, there are two processes to follow based on the information that needs to be updated. If the date or sequence needs to be changed, the assignment needs to be deleted and then a new assignment added. If any other field needs to be updated you can change the record. **You cannot delete an assignment if there are grades entered for that assignment.
DELETING AN ASSIGNMENT • Click GradeBook—Controls—
GradeBook Assignments (Figure 1). • For the assignment that you want to
delete, click the down arrow in the Action field and choose Delete (Figure 2). Press Enter.
• If you were successful in deleting the assignment, the assignment should disappear and you should see “Record Deleted” (Figure 3).
**If the assignment will not delete, you may have grades entered. Delete all grades, then try to delete again. CHANGING AN ASSIGNMENT • Click GradeBook—Controls—
GradeBook Assignments (Figure 1). • For the assignment that you want to
delete, click the down arrow in the Action field and choose Change (Figure 4). Press Enter.
• If you were successful in changing the assignment, the assignment information should change and you should see “Record Updated Next?” (Figure 5).
**Remember, you cannot change date or sequence number. **If any area turns red, you have entered an invalid character.
ASSIGNMENT PAGE FULL • If your assignment page is full, press the
F5 key to get a blank page.
Figure 1
Figure 2
Figure 3
Figure 4
Figure 5
GradeBook Teacher Manual 6
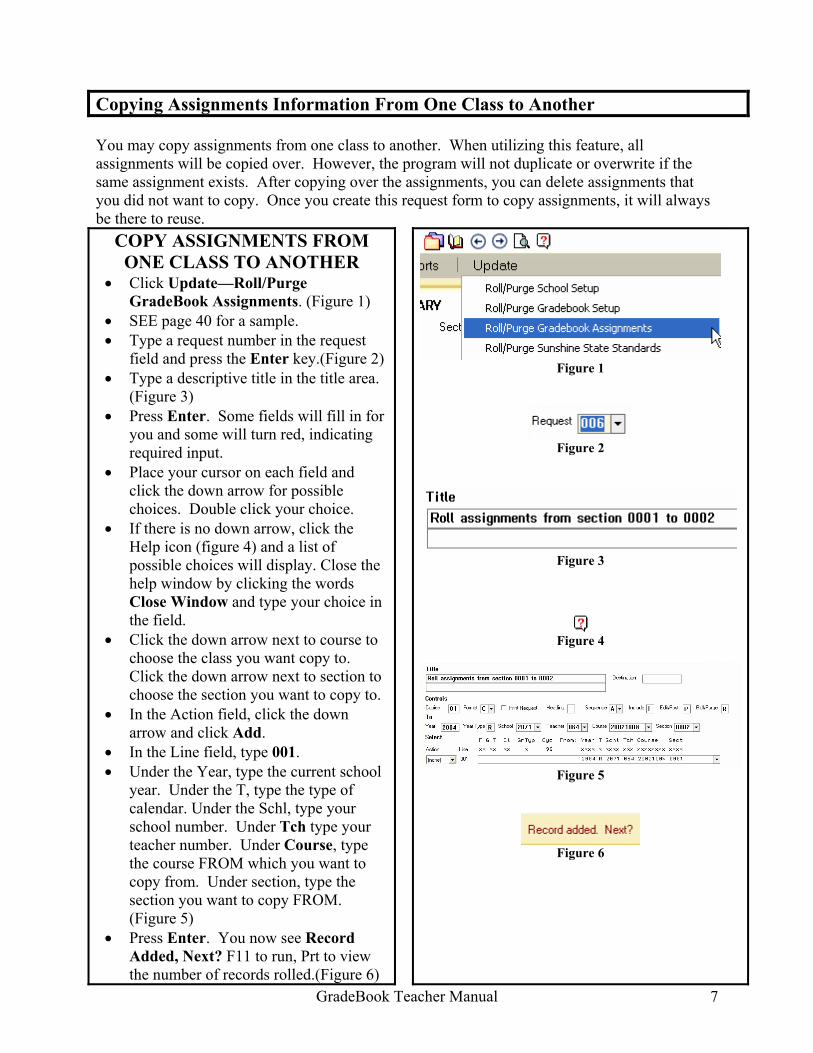
Copying Assignments Information From One Class to Another You may copy assignments from one class to another. When utilizing this feature, all assignments will be copied over. However, the program will not duplicate or overwrite if the same assignment exists. After copying over the assignments, you can delete assignments that you did not want to copy. Once you create this request form to copy assignments, it will always be there to reuse.
GradeBook Teacher Manual 7
COPY ASSIGNMENTS FROM ONE CLASS TO ANOTHER
• Click Update—Roll/Purge GradeBook Assignments. (Figure 1)
• SEE page 40 for a sample. • Type a request number in the request
field and press the Enter key.(Figure 2) • Type a descriptive title in the title area.
(Figure 3) • Press Enter. Some fields will fill in for
you and some will turn red, indicating required input.
• Place your cursor on each field and click the down arrow for possible choices. Double click your choice.
• If there is no down arrow, click the Help icon (figure 4) and a list of possible choices will display. Close the help window by clicking the words Close Window and type your choice in the field.
• Click the down arrow next to course to choose the class you want copy to. Click the down arrow next to section to choose the section you want to copy to.
• In the Action field, click the down arrow and click Add.
• In the Line field, type 001. • Under the Year, type the current school
year. Under the T, type the type of calendar. Under the Schl, type your school number. Under Tch type your teacher number. Under Course, type the course FROM which you want to copy from. Under section, type the section you want to copy FROM. (Figure 5)
• Press Enter. You now see Record Added, Next? F11 to run, Prt to view the number of records rolled.(Figure 6)
Figure 1
Figure 2
Figure 3
Figure 4
Figure 5
Figure 6
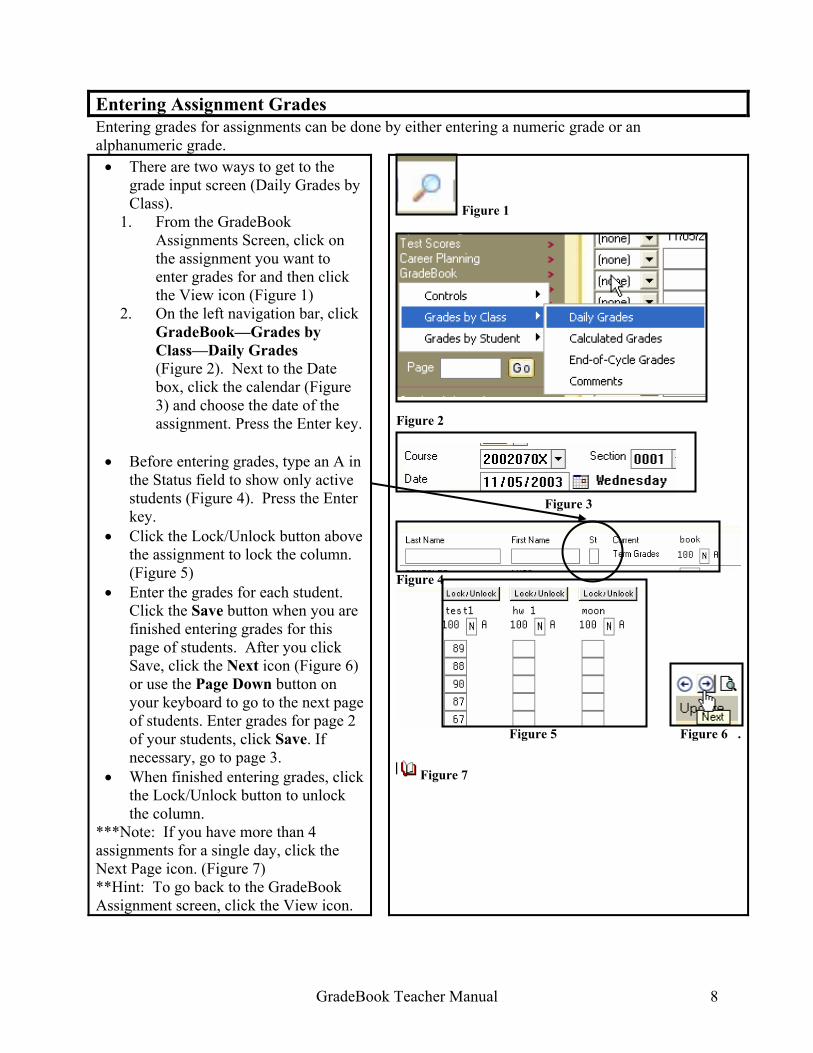
Entering Assignment Grades Entering grades for assignments can be done by either entering a numeric grade or an alphanumeric grade. • There are two ways to get to the
grade input screen (Daily Grades by Class).
1. From the GradeBook Assignments Screen, click on the assignment you want to enter grades for and then click the View icon (Figure 1)
2. On the left navigation bar, click GradeBook—Grades by Class—Daily Grades (Figure 2). Next to the Date box, click the calendar (Figure 3) and choose the date of the assignment. Press the Enter key.
• Before entering grades, type an A in
the Status field to show only active students (Figure 4). Press the Enter key.
• Click the Lock/Unlock button above the assignment to lock the column. (Figure 5)
• Enter the grades for each student. Click the Save button when you are finished entering grades for this page of students. After you click Save, click the Next icon (Figure 6) or use the Page Down button on your keyboard to go to the next page of students. Enter grades for page 2 of your students, click Save. If necessary, go to page 3.
• When finished entering grades, click the Lock/Unlock button to unlock the column.
***Note: If you have more than 4 assignments for a single day, click the Next Page icon. (Figure 7) **Hint: To go back to the GradeBook Assignment screen, click the View icon.
Figure 1
Figure 2
Figure 3
Figure 4
Figure 5 Figure 6 .
Figure 7
GradeBook Teacher Manual 8
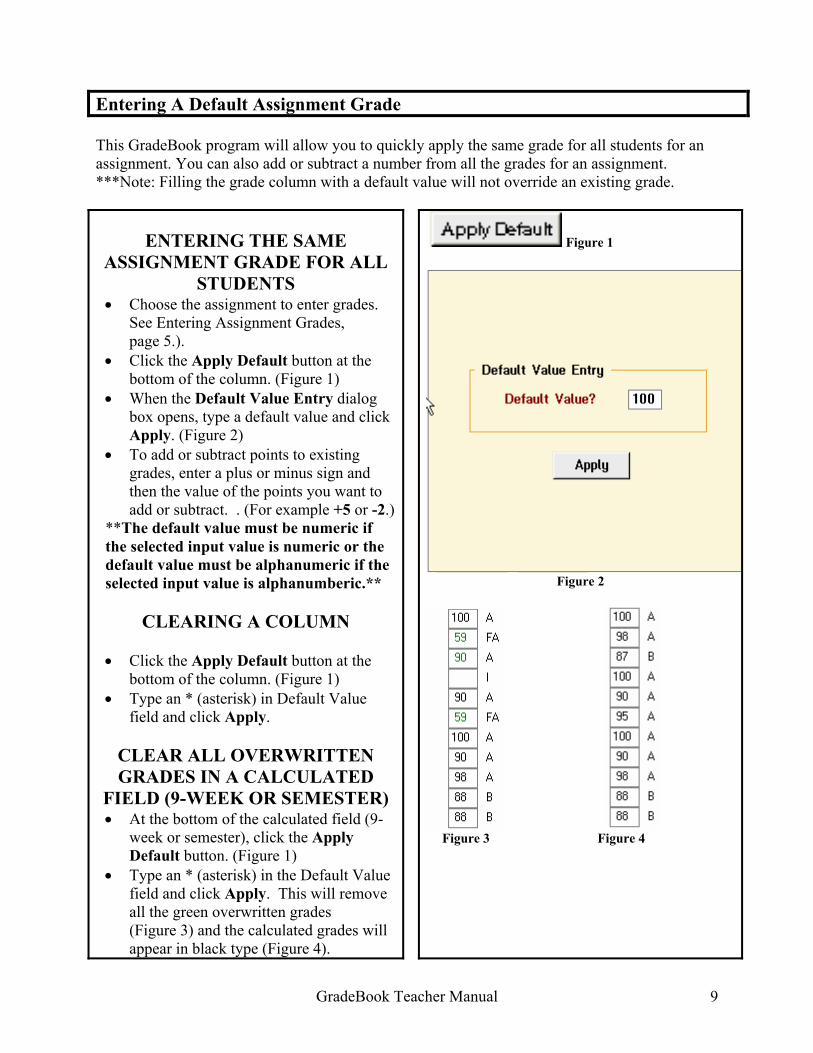
Entering A Default Assignment Grade This GradeBook program will allow you to quickly apply the same grade for all students for an assignment. You can also add or subtract a number from all the grades for an assignment. ***Note: Filling the grade column with a default value will not override an existing grade.
ENTERING THE SAME
ASSIGNMENT GRADE FOR ALL STUDENTS
• Choose the assignment to enter grades. See Entering Assignment Grades, page 5.).
• Click the Apply Default button at the bottom of the column. (Figure 1)
• When the Default Value Entry dialog box opens, type a default value and click Apply. (Figure 2)
• To add or subtract points to existing grades, enter a plus or minus sign and then the value of the points you want to add or subtract. . (For example +5 or -2.)
**The default value must be numeric if the selected input value is numeric or the default value must be alphanumeric if the selected input value is alphanumberic.**
CLEARING A COLUMN • Click the Apply Default button at the
bottom of the column. (Figure 1) • Type an * (asterisk) in Default Value
field and click Apply.
CLEAR ALL OVERWRITTEN GRADES IN A CALCULATED
FIELD (9-WEEK OR SEMESTER) • At the bottom of the calculated field (9-
week or semester), click the Apply Default button. (Figure 1)
• Type an * (asterisk) in the Default Value field and click Apply. This will remove all the green overwritten grades (Figure 3) and the calculated grades will appear in black type (Figure 4).
Figure 1
Figure 2
Figure 3 Figure 4
GradeBook Teacher Manual 9
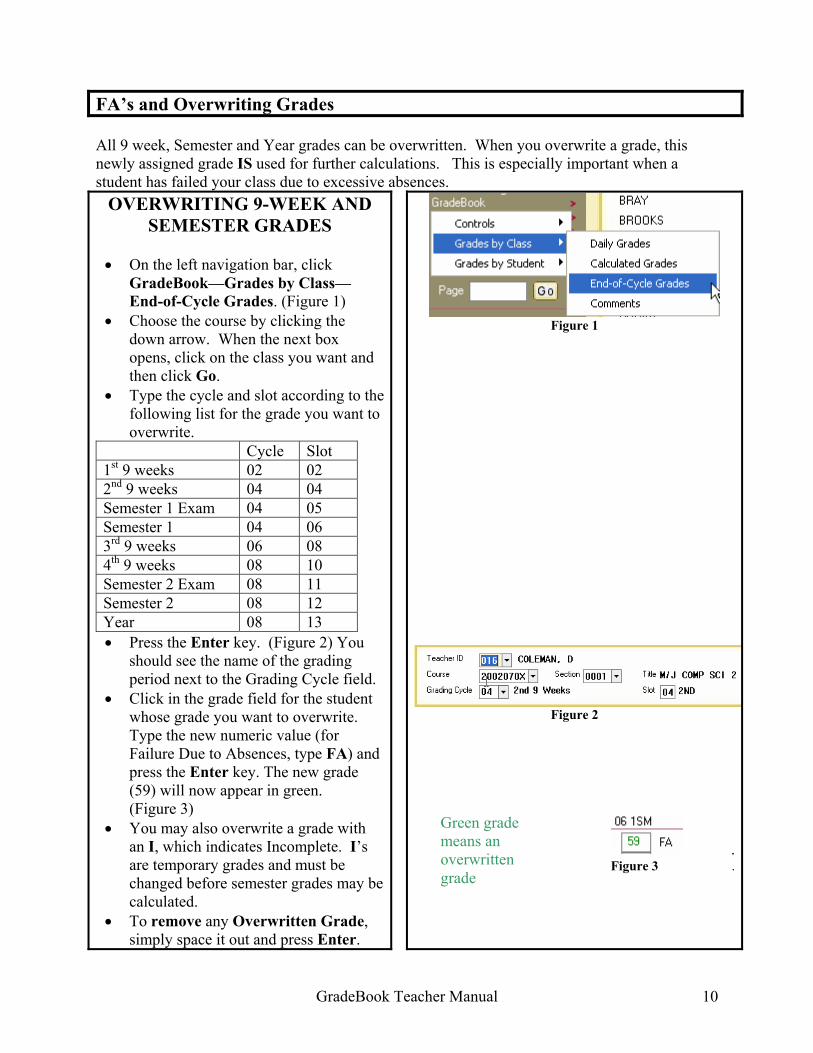
FA’s and Overwriting Grades All 9 week, Semester and Year grades can be overwritten. When you overwrite a grade, this newly assigned grade IS used for further calculations. This is especially important when a student has failed your class due to excessive absences.
OVERWRITING 9-WEEK AND SEMESTER GRADES
• On the left navigation bar, click
GradeBook—Grades by Class—End-of-Cycle Grades. (Figure 1)
• Choose the course by clicking the down arrow. When the next box opens, click on the class you want and then click Go.
• Type the cycle and slot according to the following list for the grade you want to overwrite.
Cycle Slot 1st 9 weeks 02 02 2nd 9 weeks 04 04 Semester 1 Exam 04 05 Semester 1 04 06 3rd 9 weeks 06 08 4th 9 weeks 08 10 Semester 2 Exam 08 11 Semester 2 08 12 Year 08 13 • Press the Enter key. (Figure 2) You
should see the name of the grading period next to the Grading Cycle field.
• Click in the grade field for the student whose grade you want to overwrite. Type the new numeric value (for Failure Due to Absences, type FA) and press the Enter key. The new grade (59) will now appear in green. (Figure 3)
• You may also overwrite a grade with an I, which indicates Incomplete. I’s are temporary grades and must be changed before semester grades may be calculated.
• To remove any Overwritten Grade, simply space it out and press Enter.
Figure 1
Figure 2
. Figure 3 .
Green grade means an overwritten grade
GradeBook Teacher Manual 10
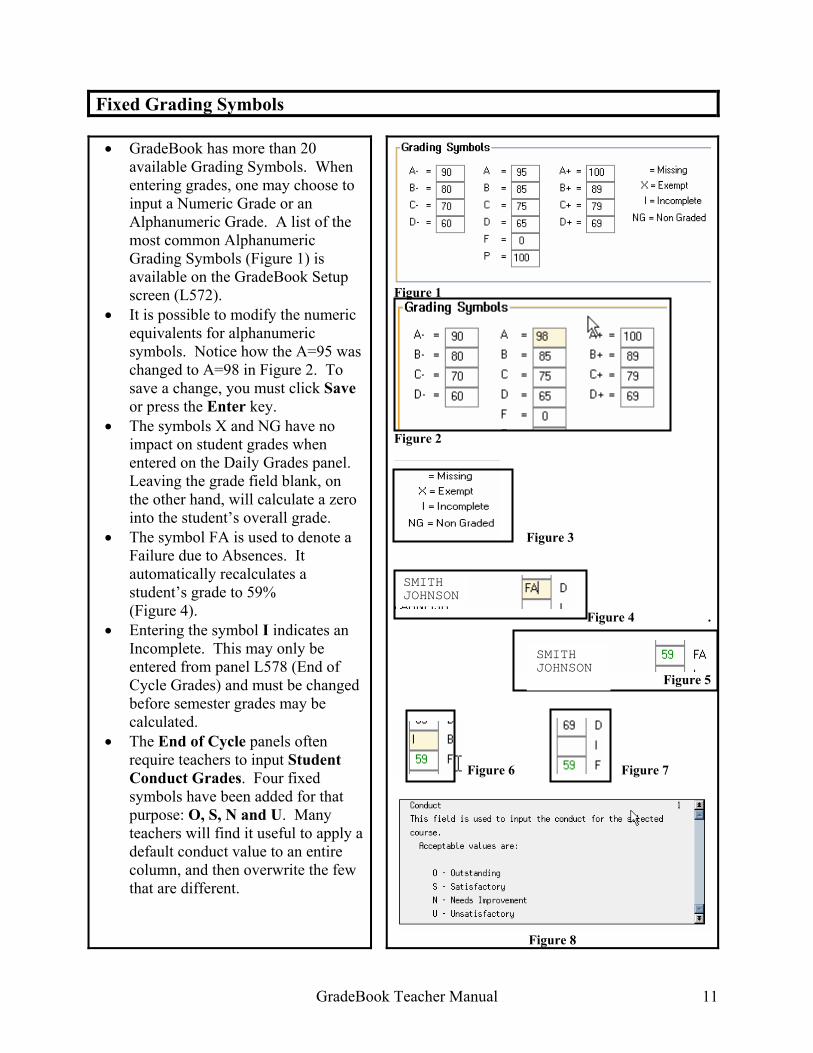
Fixed Grading Symbols • GradeBook has more than 20
available Grading Symbols. When entering grades, one may choose to input a Numeric Grade or an Alphanumeric Grade. A list of the most common Alphanumeric Grading Symbols (Figure 1) is available on the GradeBook Setup screen (L572).
• It is possible to modify the numeric equivalents for alphanumeric symbols. Notice how the A=95 was changed to A=98 in Figure 2. To save a change, you must click Save or press the Enter key.
• The symbols X and NG have no impact on student grades when entered on the Daily Grades panel. Leaving the grade field blank, on the other hand, will calculate a zero into the student’s overall grade.
• The symbol FA is used to denote a Failure due to Absences. It automatically recalculates a student’s grade to 59% (Figure 4).
• Entering the symbol I indicates an Incomplete. This may only be entered from panel L578 (End of Cycle Grades) and must be changed before semester grades may be calculated.
• The End of Cycle panels often require teachers to input Student Conduct Grades. Four fixed symbols have been added for that purpose: O, S, N and U. Many teachers will find it useful to apply a default conduct value to an entire column, and then overwrite the few that are different.
Figure 1
Figure 2
Figure 3
Figure 4 .
Figure 6
SMITHJOHNSON
GradeBook Teacher Manual
SMITH JOHNSON
Figure 5
Figure 7
Figure 8
11
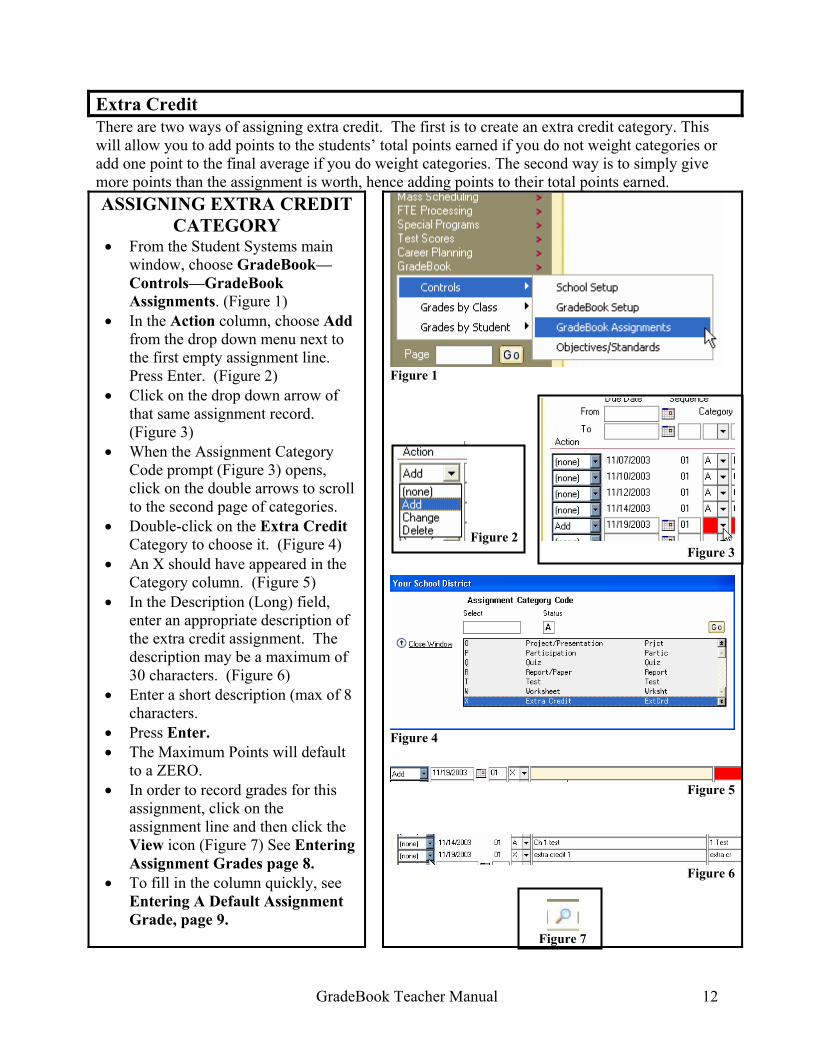
Extra Credit There are two ways of assigning extra credit. The first is to create an extra credit category. This will allow you to add points to the students’ total points earned if you do not weight categories or add one point to the final average if you do weight categories. The second way is to simply give more points than the assignment is worth, hence adding points to their total points earned. ASSIGNING EXTRA CREDIT
CATEGORY • From the Student Systems main
window, choose GradeBook—Controls—GradeBook Assignments. (Figure 1)
• In the Action column, choose Add from the drop down menu next to the first empty assignment line. Press Enter. (Figure 2)
• Click on the drop down arrow of that same assignment record. (Figure 3)
• When the Assignment Category Code prompt (Figure 3) opens, click on the double arrows to scroll to the second page of categories.
• Double-click on the Extra Credit Category to choose it. (Figure 4)
• An X should have appeared in the Category column. (Figure 5)
• In the Description (Long) field, enter an appropriate description of the extra credit assignment. The description may be a maximum of 30 characters. (Figure 6)
• Enter a short description (max of 8 characters.
• Press Enter. • The Maximum Points will default
to a ZERO. • In order to record grades for this
assignment, click on the assignment line and then click the View icon (Figure 7) See Entering Assignment Grades page 8.
• To fill in the column quickly, see Entering A Default Assignment Grade, page 9.
Figure 1
Figure 2 Figure 3
Figure 4
Figure 5
Figure 6
Figure 7
GradeBook Teacher Manual 12

Dropping Low Scores GradeBook allows you to drop low scores in a variety of combinations. You may drop the lowest score overall. You may drop up to 9 low grades for each category that you have grades assigned to.
DROP THE LOWEST OVERALL GRADE
• Click GradeBook—Controls—GradeBook Setup. (Figure 1)
• To drop the lowest overall grade, enter the appropriate Cycle number in the Drop Low Scores Cycle box. (Figure 2)
• By clicking on the F1 key while inside one of the Cycle boxes, a list of the available cycle numbers will be displayed. (Figure 3)
• Do nothing more. The lowest score, regardless of category type, will be dropped and not calculated into term grades.
DROP THE LOWEST GRADE
WITHIN A CATEGORY • To drop one or more of the lowest
grades within a category, you must first enter the appropriate Cycle number in the GradeBook Setup. (Figure 2)
• Type a number between 1 and 9 (the number of low assignments you wish to drop) in the Drop column for the category in which you would like to drop grades for. (Figure 4)
Figure 1
Figure 2
Figure 3
Figure 4
GradeBook Teacher Manual 13

Recalculating Term Grades It is always a good idea to recalculate grades periodically. Especially before printing weekly term grades. • Choose GradeBook—Grades by
Class—Daily Grades. (Figure 1) • Choose the class you want to
recalculate grades for. • Click the Recalculate button.
(Figure 2) • You should now see, Grades
Calculated. (Figure 3) Note: Only assignments with a date of today or past dates will be used in the calculation. If you enter grades for an assignment and leave some students’ grades blank for this assignment, pressing Save or the Enter key will only recalculate student term grades that have just entered grades for. You must do a mass recalculate in order to recalculate all student grades
Figure 1
Figure 2
Figure 3
GradeBook Teacher Manual 14

Viewing Active/Withdrawn Students GradeBook allows you to view only actively enrolled students only, or all students, including those that have been withdrawn from your class
VIEW ALL STUDENTS
(INCLUDING WITHDRAWN)
• Even if a student has withdrawn
from your class, he or she may still be visible in your GradeBook. Notice the “W” in the Status (St) field? (Figure 1)
• GradeBook defaults to view all students including those students that have been withdrawn from your class.
VIEW ONLY ACTIVE
STUDENTS • To hide the records of withdrawn
students, enter an A (for active) in the Status column as shown in Figure 2. After clicking the Save button or pressing the Enter key, withdrawn students will no longer be visible in your GradeBook.
Figure 1
Figure 2
The “W” stands for withdrawn. It appears in the Status (ST) Column.
GradeBook Teacher Manua
By placing an A in the Status column, I can remove all Withdrawn students from
i
SMITH JON TAYLOR MARK WILLIAMS MARY WILLIAMS TOM ZEPKA LINDSEY
HAYES SAMSMITH JON TAYLOR MARK WILLIAMS MARY WILLIAMS TOM ZEPKA LINDSEYZEPOLI SCOTT
l 15

End-of-Cycle Procedures Report cards will be printed at the Educational Services Facility in Viera. It is imperative that your GradeBook be ready for report card printing by the deadline. (See the Grade Reporting Calendar in the Resource section. You should prepare your GradeBook for printing by following these procedures
ELEMENTARY • Recalculate Term Grades. (See
page 14.) • Click GradeBook—Grades by
Class—End-of-Cycle Grades. • Choose the class you want to view
term averages for. • Type in the cycle and slot number
(see p. 37) that corresponds to the term grade you want to view.
• If necessary, overwrite term grades here. (See p. 10)
• Enter End-of-Cycle Conduct. (See p. 18)
• Enter Report Card Comments. (See p. 19)
• Enter Content Specific Skills. (See p. 21)
SECONDARY • Recalculate Term Grades (See page
14.) • Click GradeBook—Grades by
Class—End-of-Cycle Grades. • Choose the class you want to view
term averages for. • Type in the cycle and slot number
(see p. 38-39) that corresponds to the term grade you want to view.
• If necessary, overwrite term grades here. (See p. 10)
• Enter Exam Grades. (Must be numeric) (2nd & 4th 9-Weeks only).(See p.17)
• Enter End-of-Cycle Conduct. (See p. 18)
• Enter Report Card Comments. (See p. 20)
ELEMENTARY
1. Recalculate 2. View term grades 3. Overwrite grade if necessary 4. Enter Conduct 5. Enter Comments 6. Enter Content Specific Skills
SECONDARY
1. Recalculate 2. View term grades 3. Overwrite grade if necessary 4. Enter Exam Grade (2nd & 4th 9-Weeks) 5. Enter Conduct 6. Enter Comments
GradeBook Teacher Manual 16

Entering Exam Grades (Secondary) At the end of 2nd 9 weeks and 4th 9 weeks you must enter an exam grade for students. If nothing is entered in this field, the program will calculate a zero so it is important to enter an actual numeric grade or X for Exempt or NG for no grade. Both X and NG will not affect the outcome of the students’ semester average. You MUST have assignments added and grades entered for the current grading cycle and/or semester. • Choose GradeBook—Grades by
Class—End-of-Cycle Grades (Figure 1)
• Choose the class you want. (Figure 2)
• Type in the cycle and slot number for the grading cycle using the chart on p 38-39. (Figure 3)
• Enter exam grades for all students. You must enter a numeric value. If students were exempt, type an X. If you do not give a semester exam, type NG. (Figure 4)(These are the only exceptions to the numeric value). You may use the default button at the bottom of the column to fill the column with the same value.
• You MUST enter conduct grades before the system will accept your exam grades. You can fill the conduct column using the default box at the top. You must also enter Semester Conduct at 2nd and 4th 9 weeks grading periods or every 9 wks if block scheduled.. See p.18 for more instructions. (Figure 4)
• DO NOT PROCEED IF THERE IS ANY RED ON THE SCREEN. You must enter information in the red area and get a positive statement to move on.
Figure 1
Figure 2
Figure 3
Figure 4
GradeBook Teacher Manual 17
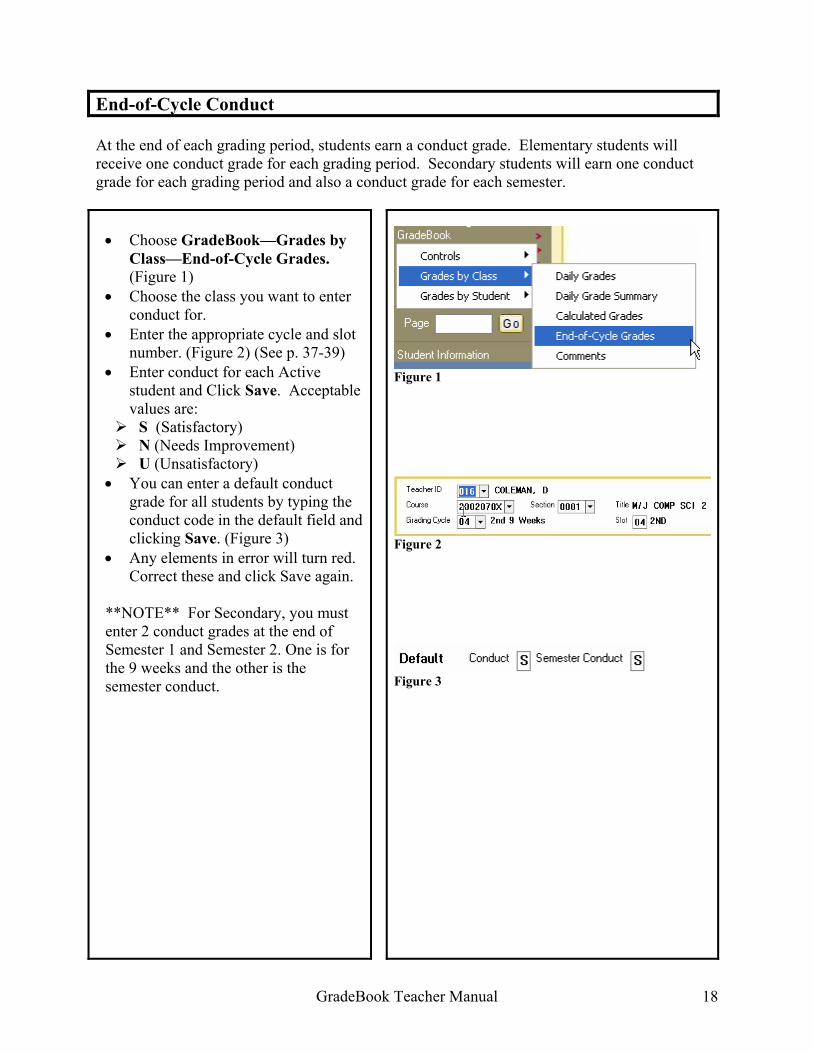
End-of-Cycle Conduct At the end of each grading period, students earn a conduct grade. Elementary students will receive one conduct grade for each grading period. Secondary students will earn one conduct grade for each grading period and also a conduct grade for each semester.
• Choose GradeBook—Grades by
Class—End-of-Cycle Grades. (Figure 1)
• Choose the class you want to enter conduct for.
• Enter the appropriate cycle and slot number. (Figure 2) (See p. 37-39)
• Enter conduct for each Active student and Click Save. Acceptable values are: S (Satisfactory) N (Needs Improvement) U (Unsatisfactory)
• You can enter a default conduct grade for all students by typing the conduct code in the default field and clicking Save. (Figure 3)
• Any elements in error will turn red. Correct these and click Save again.
**NOTE** For Secondary, you must enter 2 conduct grades at the end of Semester 1 and Semester 2. One is for the 9 weeks and the other is the semester conduct.
Figure 1
Figure 2
Figure 3
GradeBook Teacher Manual 18
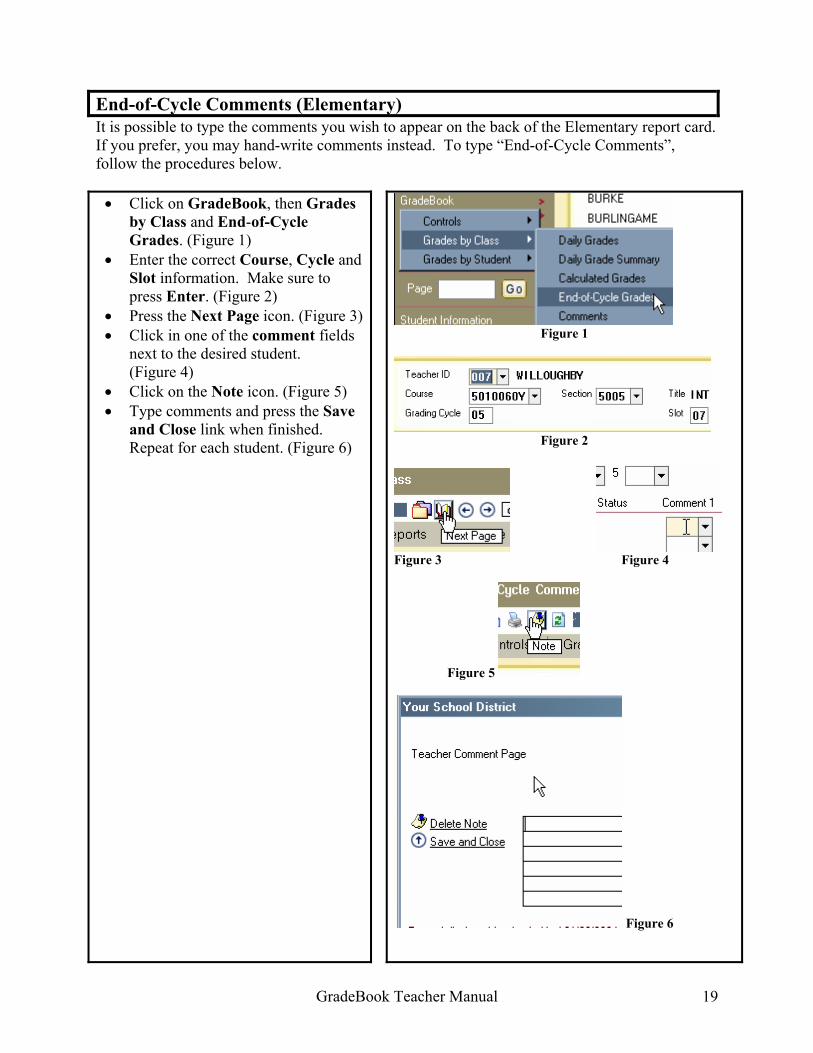
End-of-Cycle Comments (Elementary) It is possible to type the comments you wish to appear on the back of the Elementary report card. If you prefer, you may hand-write comments instead. To type “End-of-Cycle Comments”, follow the procedures below. • Click on GradeBook, then Grades
by Class and End-of-Cycle Grades. (Figure 1)
• Enter the correct Course, Cycle and Slot information. Make sure to press Enter. (Figure 2)
• Press the Next Page icon. (Figure 3)• Click in one of the comment fields
next to the desired student. (Figure 4)
• Click on the Note icon. (Figure 5) • Type comments and press the Save
and Close link when finished. Repeat for each student. (Figure 6)
Figure 1
Figure 2
Figure 3 Figure 4
Figure 5
Figure 6
GradeBook Teacher Manual 19
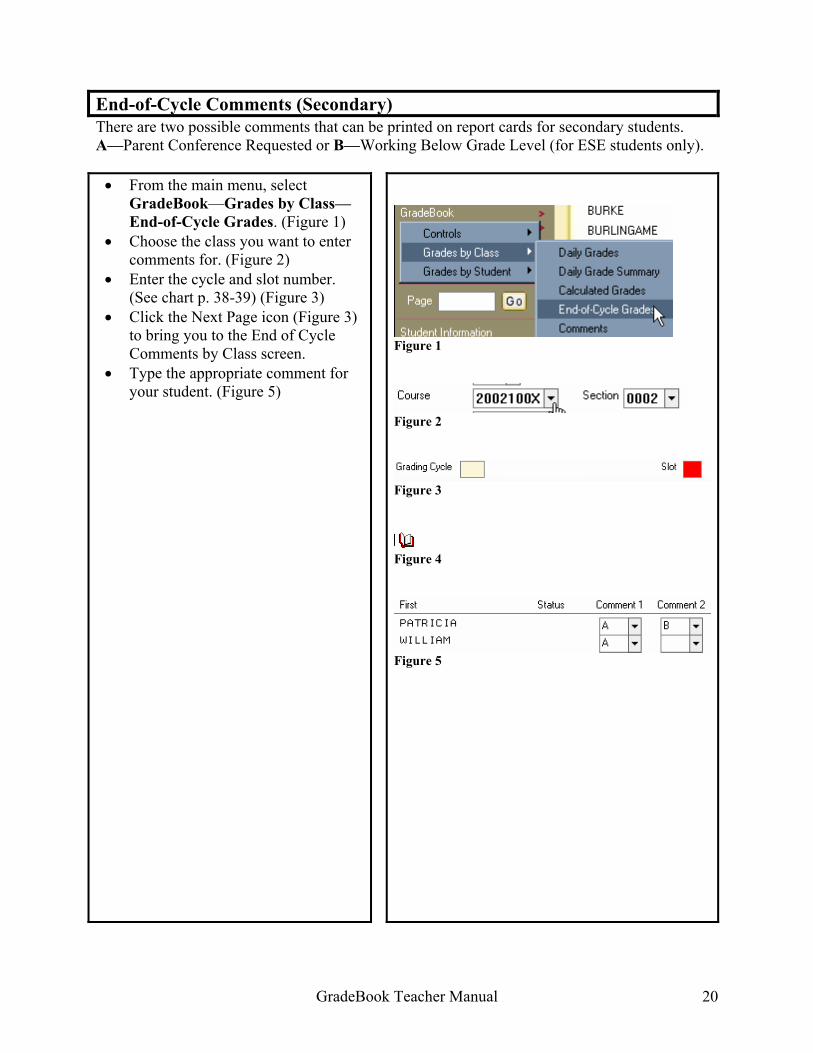
End-of-Cycle Comments (Secondary) There are two possible comments that can be printed on report cards for secondary students. A—Parent Conference Requested or B—Working Below Grade Level (for ESE students only). • From the main menu, select
GradeBook—Grades by Class—End-of-Cycle Grades. (Figure 1)
• Choose the class you want to enter comments for. (Figure 2)
• Enter the cycle and slot number. (See chart p. 38-39) (Figure 3)
• Click the Next Page icon (Figure 3) to bring you to the End of Cycle Comments by Class screen.
• Type the appropriate comment for your student. (Figure 5)
Figure 1
Figure 2
Figure 3
Figure 4
Figure 5
GradeBook Teacher Manual 20
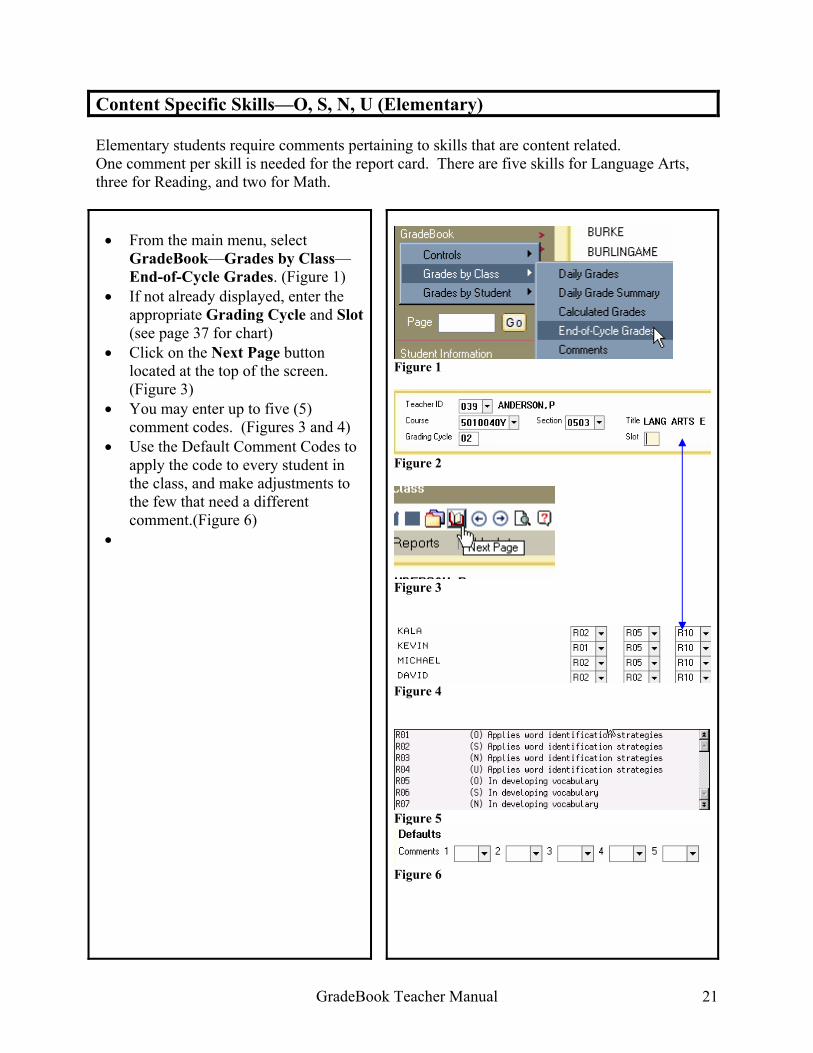
Content Specific Skills—O, S, N, U (Elementary) Elementary students require comments pertaining to skills that are content related. One comment per skill is needed for the report card. There are five skills for Language Arts, three for Reading, and two for Math.
• From the main menu, select
GradeBook—Grades by Class—End-of-Cycle Grades. (Figure 1)
• If not already displayed, enter the appropriate Grading Cycle and Slot (see page 37 for chart)
• Click on the Next Page button located at the top of the screen. (Figure 3)
• You may enter up to five (5) comment codes. (Figures 3 and 4)
• Use the Default Comment Codes to apply the code to every student in the class, and make adjustments to the few that need a different comment.(Figure 6)
•
Figure 1
Figure 2
Figure 3
Figure 4
Figure 5
Figure 6
GradeBook Teacher Manual 21

Skills of Cooperation and Independence—O, S, N, U (Elementary) Elementary students require comments pertaining to their skills of cooperation and independence.
• From the main menu, select
GradeBook—Grades by Class—Report Card Comments. (Figure 1)
• If not already displayed, enter the appropriate Grading Cycle and Slot (see page 37 for chart)
• The Skill field requires one of the following:
SC-Skills of Cooperation SI-Skills of Independence (Figure 2)
• Press Enter. You should see your roster below.(Figure 3)
• Press the comment column drop down and choose from the list available. (Figure 4)
• You may enter up to five (5) comment codes.
• Use the Default Comment Codes to apply the code to every student in the class, then make adjustments to the few that need a different comment.(Figure 5)
Figure 1
Figure 2
Figure 3
Figure 4
Figure 5
GradeBook Teacher Manual 22

GradeBook will allow you to align objectives and standards with your assignments. Before you can choose objectives, you must set up your GradeBook and assignments. You must also know the date of the assignment and the sequence number of the assignment.
Objectives and Standards
• To assign objectives/standards to an assignment choose GradeBook – Controls – Objectives/Standards. (Figure 1)
• Choose the class you want to assign objectives to assignments. (Figure 2).
• Next, type the date of the assignment or click the calendar icon to choose the date. (Figure 3) Press Enter.
• Type in the two digit sequence number for the assignment. Press Enter. (Figure 4) Note**Sequence numbers distinguish each assignment from the others for that particular day since you are permitted up to 10 assignments per day.
• Click the down arrow in the Action window and choose Add. (Figure 5)
• Under the Obj/Std ID field, type a 3 digit number. Start with 001, 002, etc. Choose a new number with each new standard you add to a specific assignment.
• Click the down arrow in the Objective field. (Figure 7)
• All objectives will appear in the window. To narrow the search to objectives specific to your area, type the first letter or two for the course you teach in the Select box. For example, if the objective is for Language Arts, type LA in the Select box at the top and press Go. Click the objective you want to add and click Go. (Figure 8)
• Click Save. • You should now see, Record Added,
next? (Figure 9) • Repeat previous step to add additional
objectives. Click Save. • If you need to Change or Delete
objectives, select the action from the Action window.
Figure 1
Figure 2
Figure 3
Figure 4 Figure 5
Figure 7
Figure 8
Figure 9
GradeBook Teacher Manual 23

You may attach notes containing additional information about records in your GradeBook. Notes can be created about assignments and students. You also have the option to print, edit, and delete notes.
Assignment/Student Notes
ADDING NOTES ABOUT AN ASSIGNMENT
• Click GradeBook—Controls—GradeBook Assignments. (Figure 1)
• Choose the class you want. • To create a note about an assignment, select
the assignment by clicking on it, then click the notes icon from the toolbar. (Figure 2)
• Next, type your message in the window. (Figure 3)
• Check the Make notes printable box if you want your note to be printable on reports. (Figure 3)
• After typing information, choose Save and Close. (Figure 3)
• An icon will appear to the right of your assignment that indicates you have written a note about that assignment. (Figure 4)
• To edit or delete notes, click the note icon in the Note column and make changes to the note or click the delete option on the left to delete the note. (Figure 3)
ADDING NOTES ABOUT A STUDENT
• Click GradeBook—Grades by Class—Comments. (Figure 5)
• Choose the class you want. • To create a note about a student, select the
student by clicking on their name, then click the notes icon from the toolbar. (Figure 2)
• Check the Make notes printable box if you want your note to be printable on reports. (Figure 3)
• Type your note and then click Save and Close. (Figure 3) An icon will appear in the Note column for students with notes (Figure 6)
Figure 1
Figure 2
Figure 3
Figure 4
Figure 5
Figure 6
GradeBook Teacher Manual 24
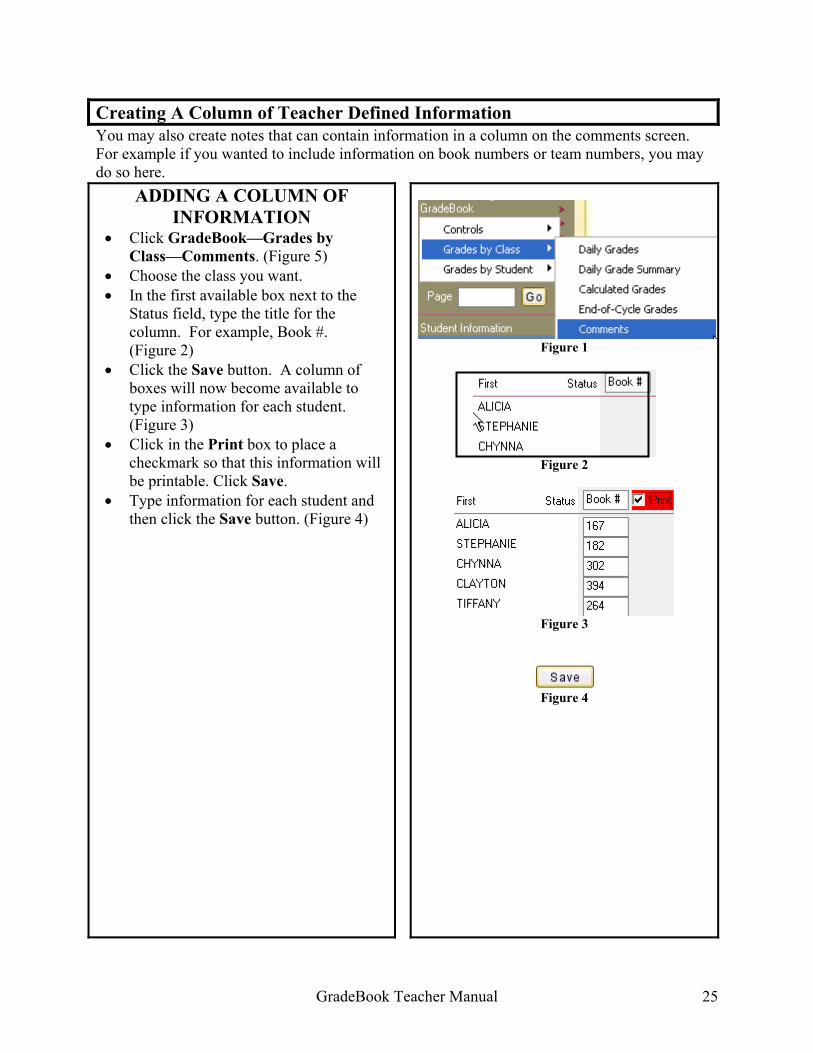
You may also create notes that can contain information in a column on the comments screen. For example if you wanted to include information on book numbers or team numbers, you may do so here.
Creating A Column of Teacher Defined Information
ADDING A COLUMN OF INFORMATION
• Click GradeBook—Grades by Class—Comments. (Figure 5)
• Choose the class you want. • In the first available box next to the
Status field, type the title for the column. For example, Book #. (Figure 2)
• Click the Save button. A column of boxes will now become available to type information for each student. (Figure 3)
• Click in the Print box to place a checkmark so that this information will be printable. Click Save.
• Type information for each student and then click the Save button. (Figure 4)
Figure 1
Figure 2
Figure 3
Figure 4
GradeBook Teacher Manual 25
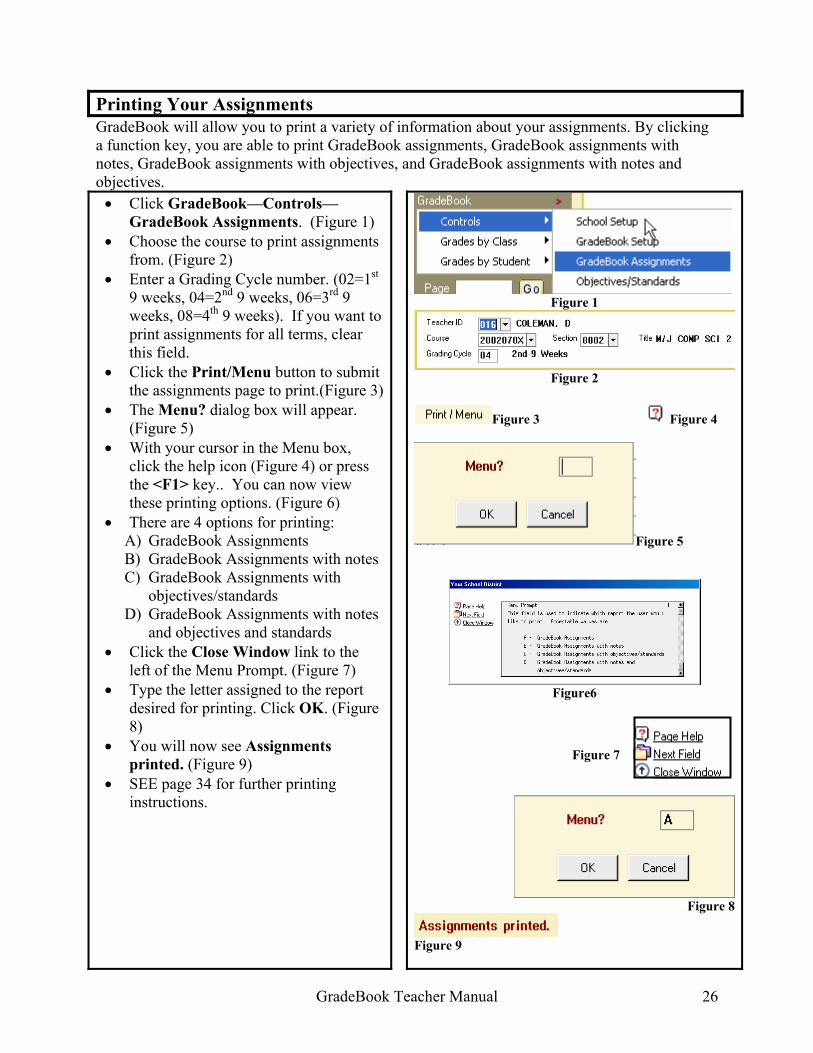
Printing Your Assignments GradeBook will allow you to print a variety of information about your assignments. By clicking a function key, you are able to print GradeBook assignments, GradeBook assignments with notes, GradeBook assignments with objectives, and GradeBook assignments with notes and objectives. • Click GradeBook—Controls—
GradeBook Assignments. (Figure 1) • Choose the course to print assignments
from. (Figure 2) • Enter a Grading Cycle number. (02=1st
9 weeks, 04=2nd 9 weeks, 06=3rd 9 weeks, 08=4th 9 weeks). If you want to print assignments for all terms, clear this field.
• Click the Print/Menu button to submit the assignments page to print.(Figure 3)
• The Menu? dialog box will appear. (Figure 5)
• With your cursor in the Menu box, click the help icon (Figure 4) or press the <F1> key.. You can now view these printing options. (Figure 6)
• There are 4 options for printing: A) GradeBook Assignments B) GradeBook Assignments with notes C) GradeBook Assignments with
objectives/standards D) GradeBook Assignments with notes
and objectives and standards • Click the Close Window link to the
left of the Menu Prompt. (Figure 7) • Type the letter assigned to the report
desired for printing. Click OK. (Figure 8)
• You will now see Assignments printed. (Figure 9)
• SEE page 34 for further printing instructions.
Figure 1
Figure 2
Figure 3 Figure 4
Figure 5
Figure6
Figure 8
Figure 9
Figure 7
GradeBook Teacher Manual 26
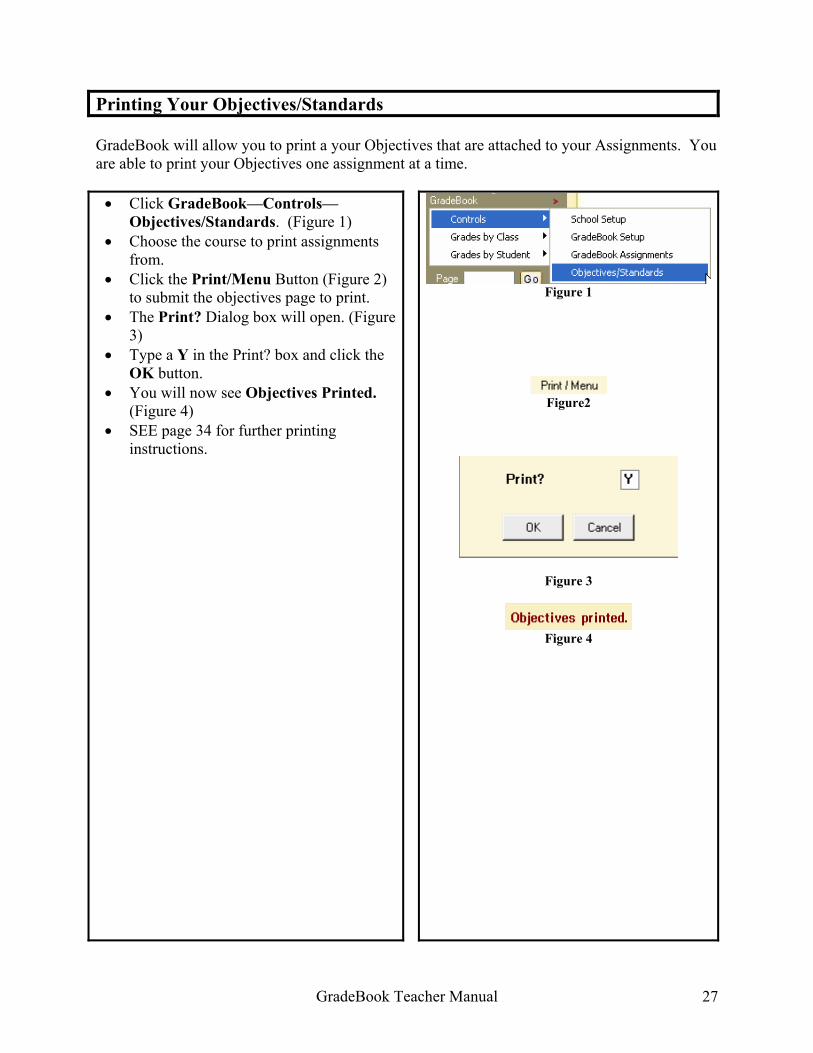
Printing Your Objectives/Standards GradeBook will allow you to print a your Objectives that are attached to your Assignments. You are able to print your Objectives one assignment at a time. • Click GradeBook—Controls—
Objectives/Standards. (Figure 1) • Choose the course to print assignments
from. • Click the Print/Menu Button (Figure 2)
to submit the objectives page to print. • The Print? Dialog box will open. (Figure
3) • Type a Y in the Print? box and click the
OK button. • You will now see Objectives Printed.
(Figure 4) • SEE page 34 for further printing
instructions.
Figure 1
Figure2
Figure 3
Figure 4
GradeBook Teacher Manual 27
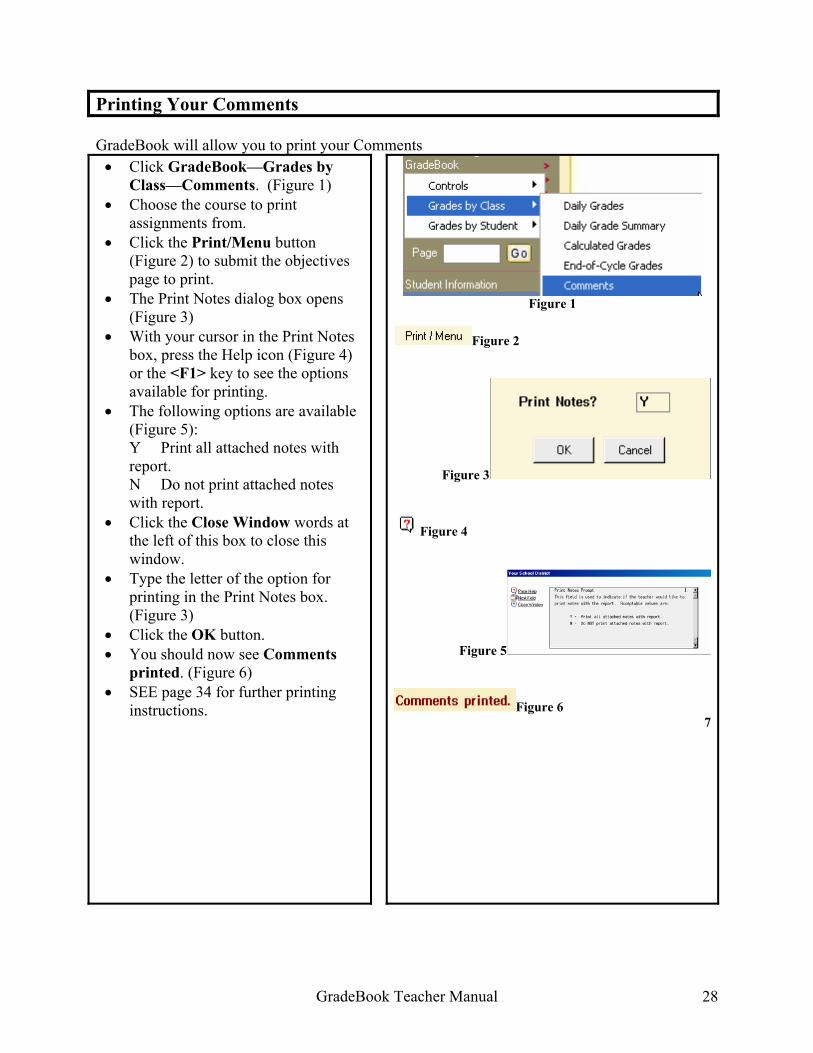
Printing Your Comments GradeBook will allow you to print your Comments • Click GradeBook—Grades by
Class—Comments. (Figure 1) • Choose the course to print
assignments from. • Click the Print/Menu button
(Figure 2) to submit the objectives page to print.
• The Print Notes dialog box opens (Figure 3)
• With your cursor in the Print Notes box, press the Help icon (Figure 4) or the <F1> key to see the options available for printing.
• The following options are available (Figure 5): Y Print all attached notes with report. N Do not print attached notes with report.
• Click the Close Window words at the left of this box to close this window.
• Type the letter of the option for printing in the Print Notes box. (Figure 3)
• Click the OK button. • You should now see Comments
printed. (Figure 6) • SEE page 34 for further printing
instructions.
Figure 1
Figure 2
Figure 3
Figure 4
Figure 5
Figure 6 7
GradeBook Teacher Manual 28
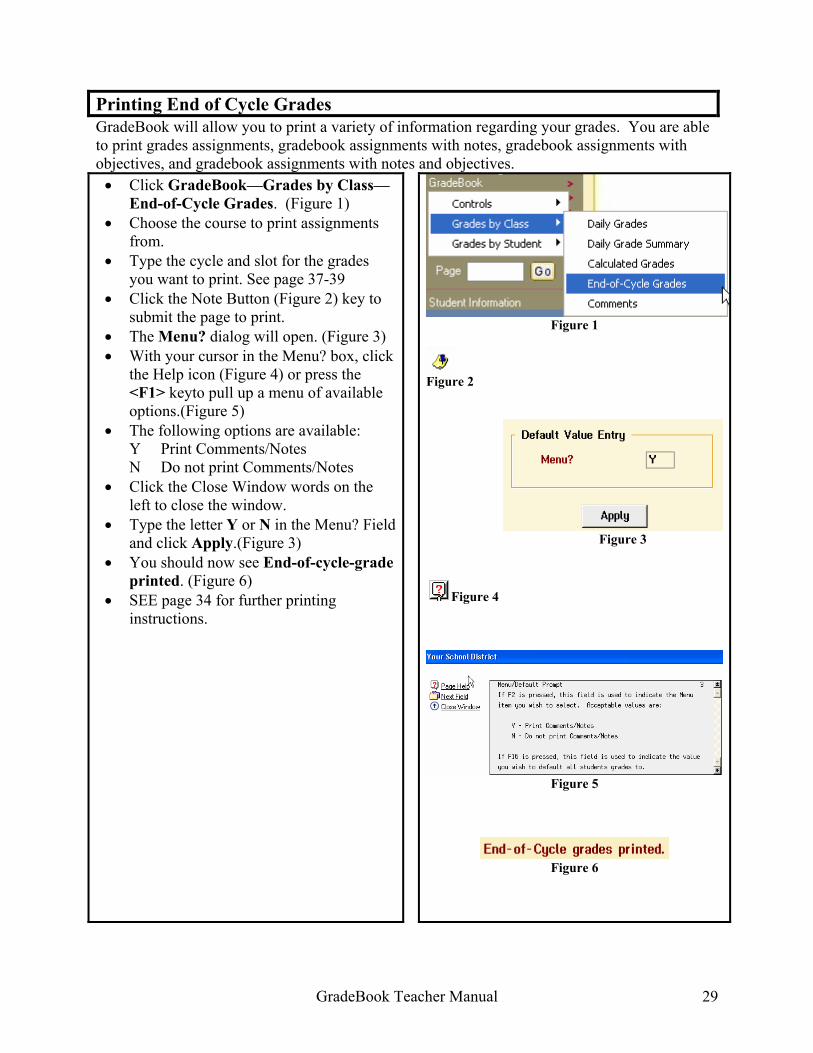
Printing End of Cycle Grades GradeBook will allow you to print a variety of information regarding your grades. You are able to print grades assignments, gradebook assignments with notes, gradebook assignments with objectives, and gradebook assignments with notes and objectives. • Click GradeBook—Grades by Class—
End-of-Cycle Grades. (Figure 1) • Choose the course to print assignments
from. • Type the cycle and slot for the grades
you want to print. See page 37-39 • Click the Note Button (Figure 2) key to
submit the page to print. • The Menu? dialog will open. (Figure 3) • With your cursor in the Menu? box, click
the Help icon (Figure 4) or press the <F1> keyto pull up a menu of available options.(Figure 5)
• The following options are available: Y Print Comments/Notes N Do not print Comments/Notes
• Click the Close Window words on the left to close the window.
• Type the letter Y or N in the Menu? Field and click Apply.(Figure 3)
• You should now see End-of-cycle-grade printed. (Figure 6)
• SEE page 34 for further printing instructions.
Figure 1
Figure 2
Figure 3
Figure 4
Figure 5
Figure 6
GradeBook Teacher Manual 29
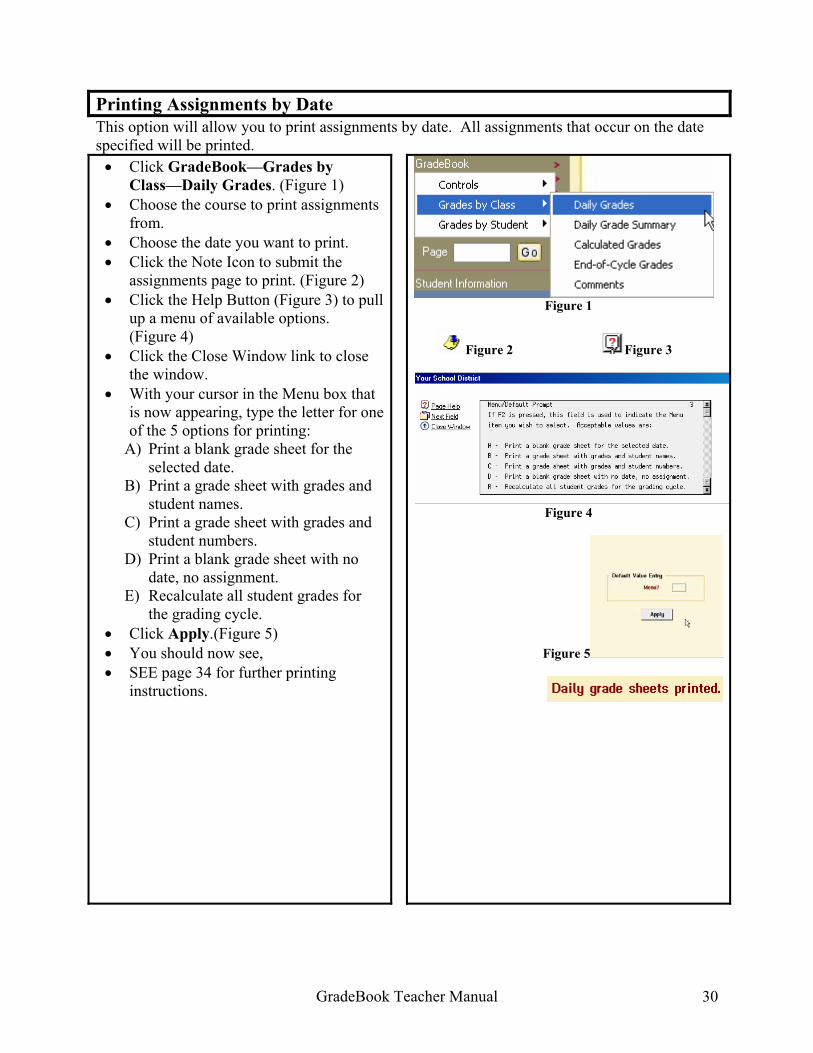
Printing Assignments by Date This option will allow you to print assignments by date. All assignments that occur on the date specified will be printed. • Click GradeBook—Grades by
Class—Daily Grades. (Figure 1) • Choose the course to print assignments
from. • Choose the date you want to print. • Click the Note Icon to submit the
assignments page to print. (Figure 2) • Click the Help Button (Figure 3) to pull
up a menu of available options. (Figure 4)
• Click the Close Window link to close the window.
• With your cursor in the Menu box that is now appearing, type the letter for one of the 5 options for printing:
A) Print a blank grade sheet for the selected date.
B) Print a grade sheet with grades and student names.
C) Print a grade sheet with grades and student numbers.
D) Print a blank grade sheet with no date, no assignment.
E) Recalculate all student grades for the grading cycle.
• Click Apply.(Figure 5) • You should now see, • SEE page 34 for further printing
instructions.
Figure 1
Figure 2 Figure 3
Figure 4
Figure 5
GradeBook Teacher Manual 30
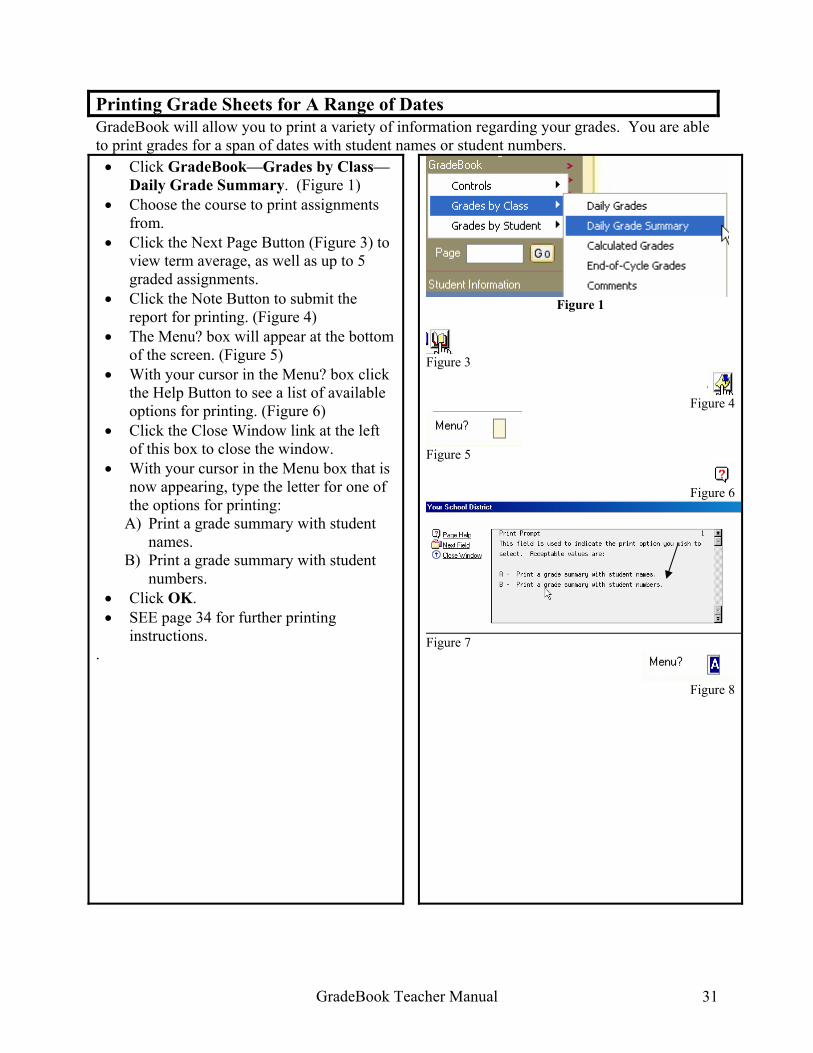
Printing Grade Sheets for A Range of Dates GradeBook will allow you to print a variety of information regarding your grades. You are able to print grades for a span of dates with student names or student numbers. • Click GradeBook—Grades by Class—
Daily Grade Summary. (Figure 1) • Choose the course to print assignments
from. • Click the Next Page Button (Figure 3) to
view term average, as well as up to 5 graded assignments.
• Click the Note Button to submit the report for printing. (Figure 4)
• The Menu? box will appear at the bottom of the screen. (Figure 5)
• With your cursor in the Menu? box click the Help Button to see a list of available options for printing. (Figure 6)
• Click the Close Window link at the left of this box to close the window.
• With your cursor in the Menu box that is now appearing, type the letter for one of the options for printing:
A) Print a grade summary with student names.
B) Print a grade summary with student numbers.
• Click OK. • SEE page 34 for further printing
instructions. .
Figure 1
Figure 3
Figure 4
Figure 5
Figure 6
Figure 7
Figure 8
GradeBook Teacher Manual 31

Printing One Student’s Class Grades GradeBook will allow you print one student’s class grades. This information is helpful to present to parents in a parent conference. • On the left navigation bar, click
GradeBook—Grades by Student—Class Grades.(Figure 1)
• Select the course and section in which the student attends. Type in the Grading Cycle. Next, click the drop down arrow by StudentID and select your student. (Figure 2)
• You may have to use the Page Down button to find the right student. Use the filter line to speed up the process. (Figure 3)
• You should see a list of assignments and grades that correspond to those assignments. (Figure 4)
• Press the Print/Menu key. (Figure 5) • The Print? Box pops up. (Figure 6) • Type Y in the Print? box and click
OK. (Figure 6) • SEE page 34 for further printing
instructions.
Figure 1
Figure 2
Figure 3
Figure 4
Figure 5
Figure 6
GradeBook Teacher Manual 32
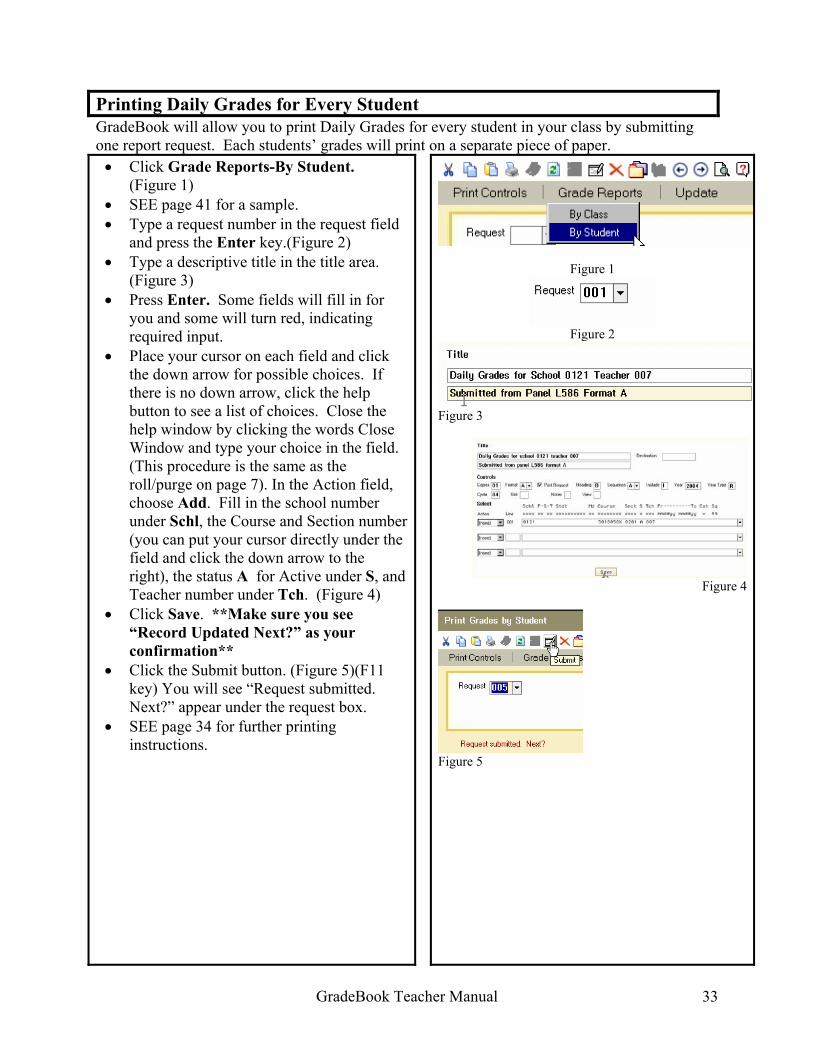
Printing Daily Grades for Every Student GradeBook will allow you to print Daily Grades for every student in your class by submitting one report request. Each students’ grades will print on a separate piece of paper. • Click Grade Reports-By Student.
(Figure 1) • SEE page 41 for a sample. • Type a request number in the request field
and press the Enter key.(Figure 2) • Type a descriptive title in the title area.
(Figure 3) • Press Enter. Some fields will fill in for
you and some will turn red, indicating required input.
• Place your cursor on each field and click the down arrow for possible choices. If there is no down arrow, click the help button to see a list of choices. Close the help window by clicking the words Close Window and type your choice in the field. (This procedure is the same as the roll/purge on page 7). In the Action field, choose Add. Fill in the school number under Schl, the Course and Section number (you can put your cursor directly under the field and click the down arrow to the right), the status A for Active under S, and Teacher number under Tch. (Figure 4)
• Click Save. **Make sure you see “Record Updated Next?” as your confirmation**
• Click the Submit button. (Figure 5)(F11 key) You will see “Request submitted. Next?” appear under the request box.
• SEE page 34 for further printing instructions.
Figure 1
Figure 2
Figure 3
Figure 4
Figure 5
GradeBook Teacher Manual 33
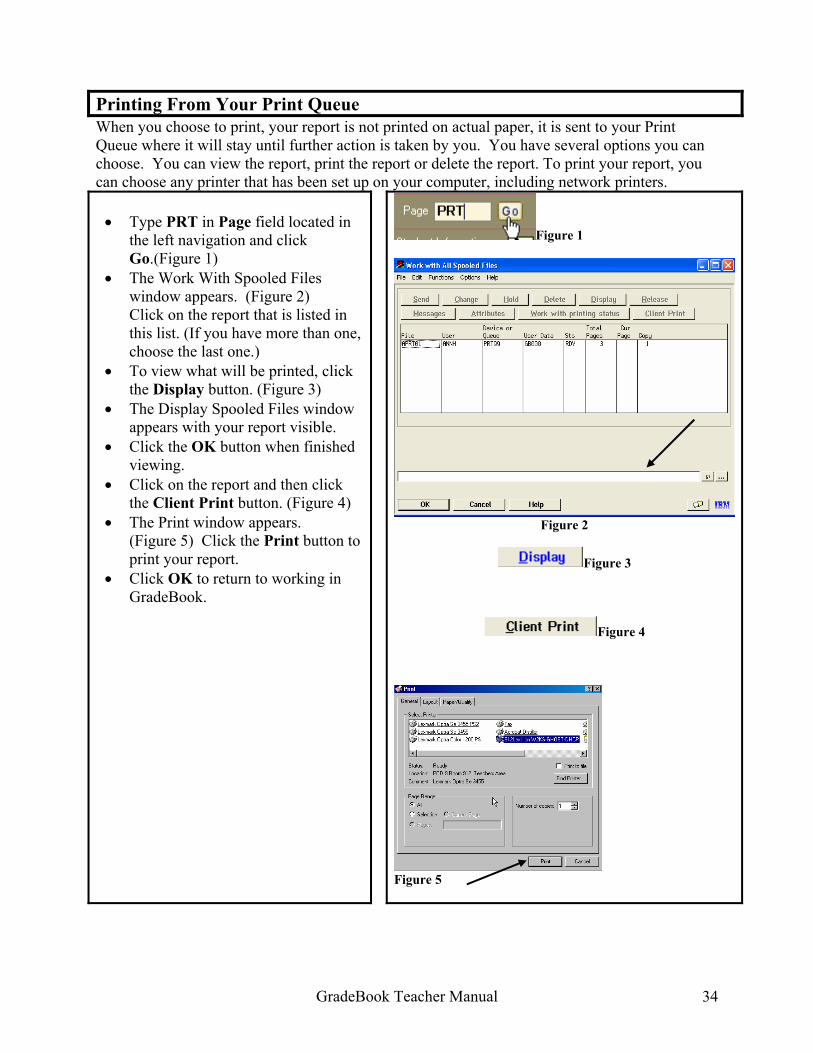
Printing From Your Print Queue When you choose to print, your report is not printed on actual paper, it is sent to your Print Queue where it will stay until further action is taken by you. You have several options you can choose. You can view the report, print the report or delete the report. To print your report, you can choose any printer that has been set up on your computer, including network printers.
• Type PRT in Page field located in
the left navigation and click Go.(Figure 1)
• The Work With Spooled Files window appears. (Figure 2) Click on the report that is listed in this list. (If you have more than one, choose the last one.)
• To view what will be printed, click the Display button. (Figure 3)
• The Display Spooled Files window appears with your report visible.
• Click the OK button when finished viewing.
• Click on the report and then click the Client Print button. (Figure 4)
• The Print window appears. (Figure 5) Click the Print button to print your report.
• Click OK to return to working in GradeBook.
Figure 1
Figure 2
Figure 3
Figure 4
Figure 5
GradeBook Teacher Manual 34
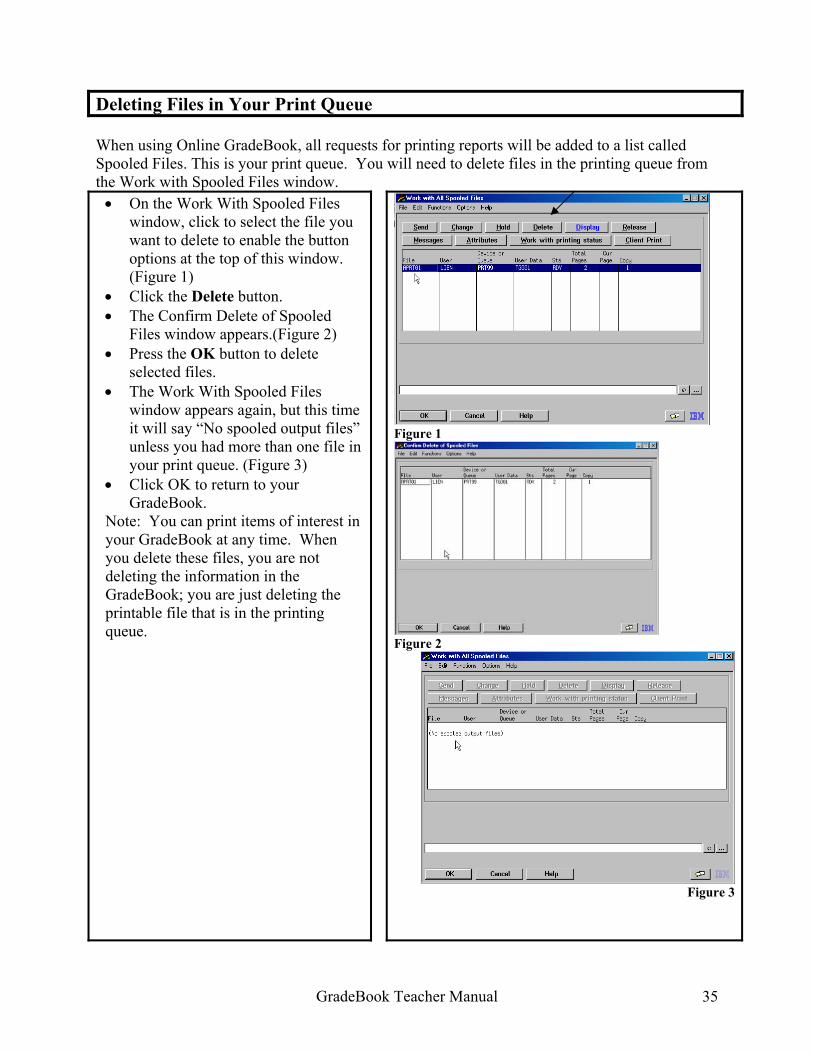
Deleting Files in Your Print Queue When using Online GradeBook, all requests for printing reports will be added to a list called Spooled Files. This is your print queue. You will need to delete files in the printing queue from the Work with Spooled Files window. • On the Work With Spooled Files
window, click to select the file you want to delete to enable the button options at the top of this window. (Figure 1)
• Click the Delete button. • The Confirm Delete of Spooled
Files window appears.(Figure 2) • Press the OK button to delete
selected files. • The Work With Spooled Files
window appears again, but this time it will say “No spooled output files” unless you had more than one file in your print queue. (Figure 3)
• Click OK to return to your GradeBook.
Note: You can print items of interest in your GradeBook at any time. When you delete these files, you are not deleting the information in the GradeBook; you are just deleting the printable file that is in the printing queue.
Figure 1
Figure 2
Figure 3
GradeBook Teacher Manual 35
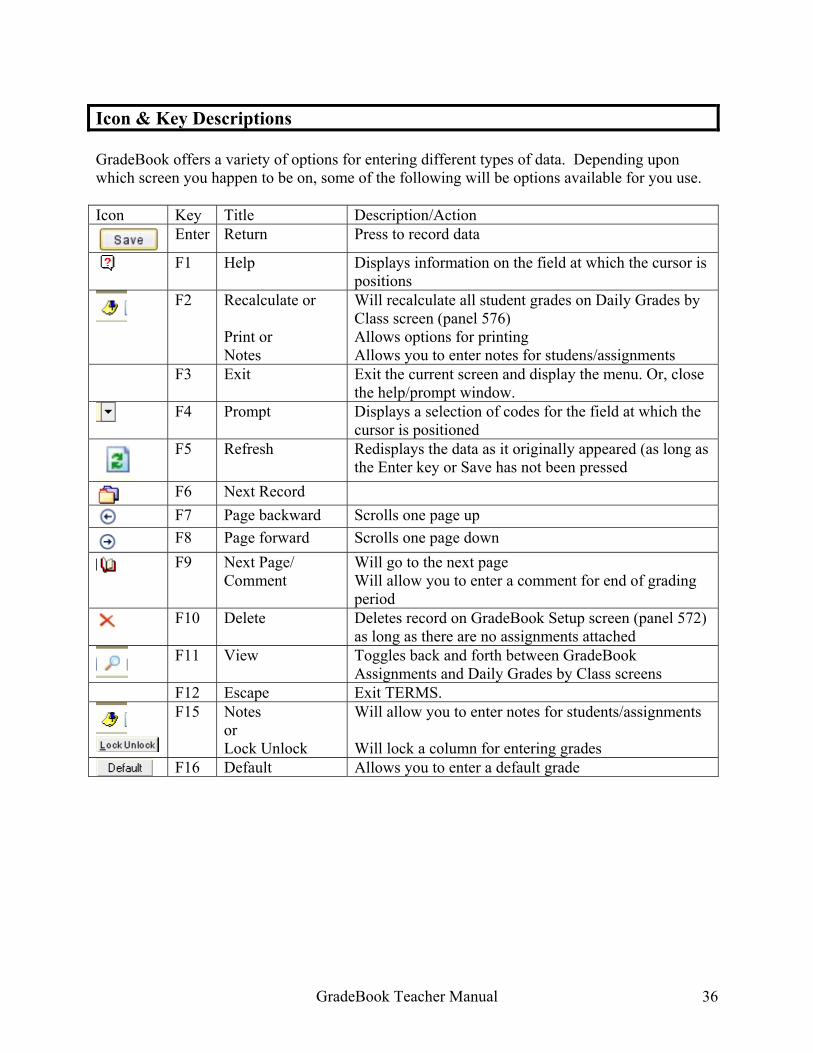
Icon & Key Descriptions
GradeBook offers a variety of options for entering different types of data. Depending upon which screen you happen to be on, some of the following will be options available for you use. Icon Key Title Description/Action
Enter Return Press to record data
F1 Help Displays information on the field at which the cursor is positions
F2 Recalculate or
Print or Notes
Will recalculate all student grades on Daily Grades by Class screen (panel 576) Allows options for printing Allows you to enter notes for studens/assignments
F3 Exit Exit the current screen and display the menu. Or, close the help/prompt window.
F4 Prompt Displays a selection of codes for the field at which the cursor is positioned
F5 Refresh Redisplays the data as it originally appeared (as long as the Enter key or Save has not been pressed
F6 Next Record
F7 Page backward Scrolls one page up
F8 Page forward Scrolls one page down
F9 Next Page/ Comment
Will go to the next page Will allow you to enter a comment for end of grading period
F10 Delete Deletes record on GradeBook Setup screen (panel 572) as long as there are no assignments attached
F11 View Toggles back and forth between GradeBook
Assignments and Daily Grades by Class screens F12 Escape Exit TERMS.
F15 Notes or Lock Unlock
Will allow you to enter notes for students/assignments Will lock a column for entering grades
F16 Default Allows you to enter a default grade
GradeBook Teacher Manual 36
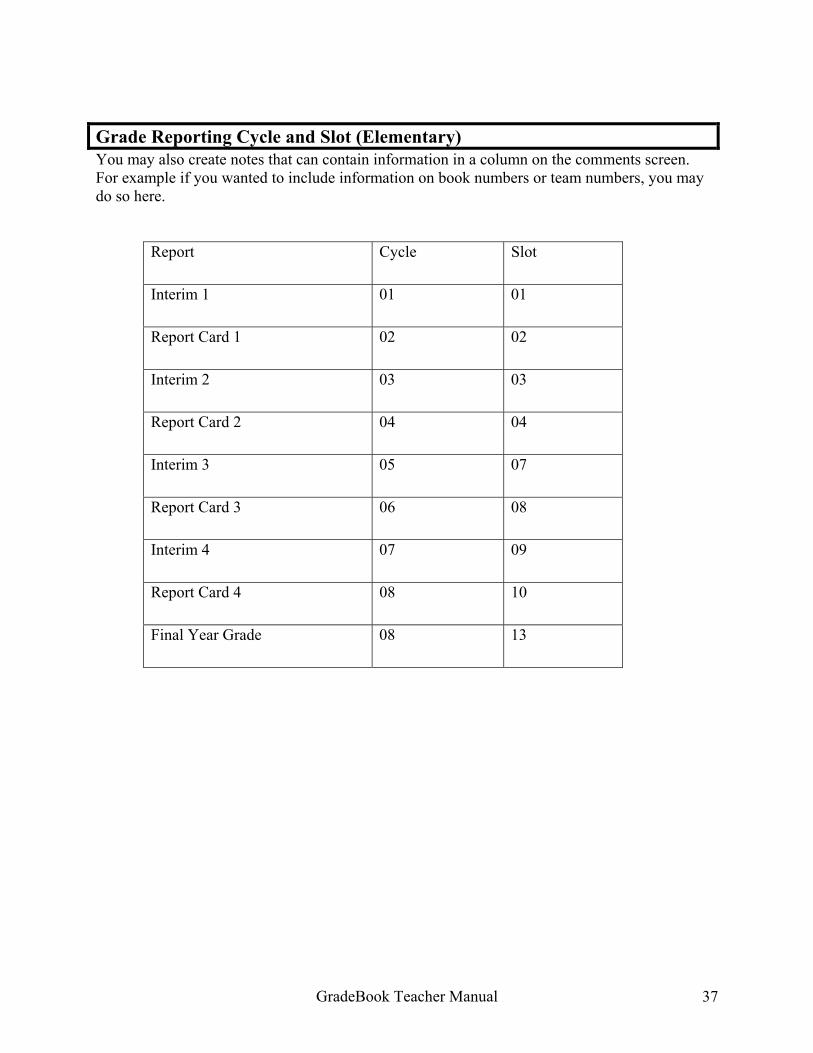
You may also create notes that can contain information in a column on the comments screen. For example if you wanted to include information on book numbers or team numbers, you may do so here.
Grade Reporting Cycle and Slot (Elementary)
Report Cycle Slot
Interim 1 01 01
Report Card 1 02 02
Interim 2 03 03
Report Card 2
04 04
Interim 3 05 07
Report Card 3 06 08
Interim 4 07 09
Report Card 4 08 10
Final Year Grade 08 13
GradeBook Teacher Manual 37
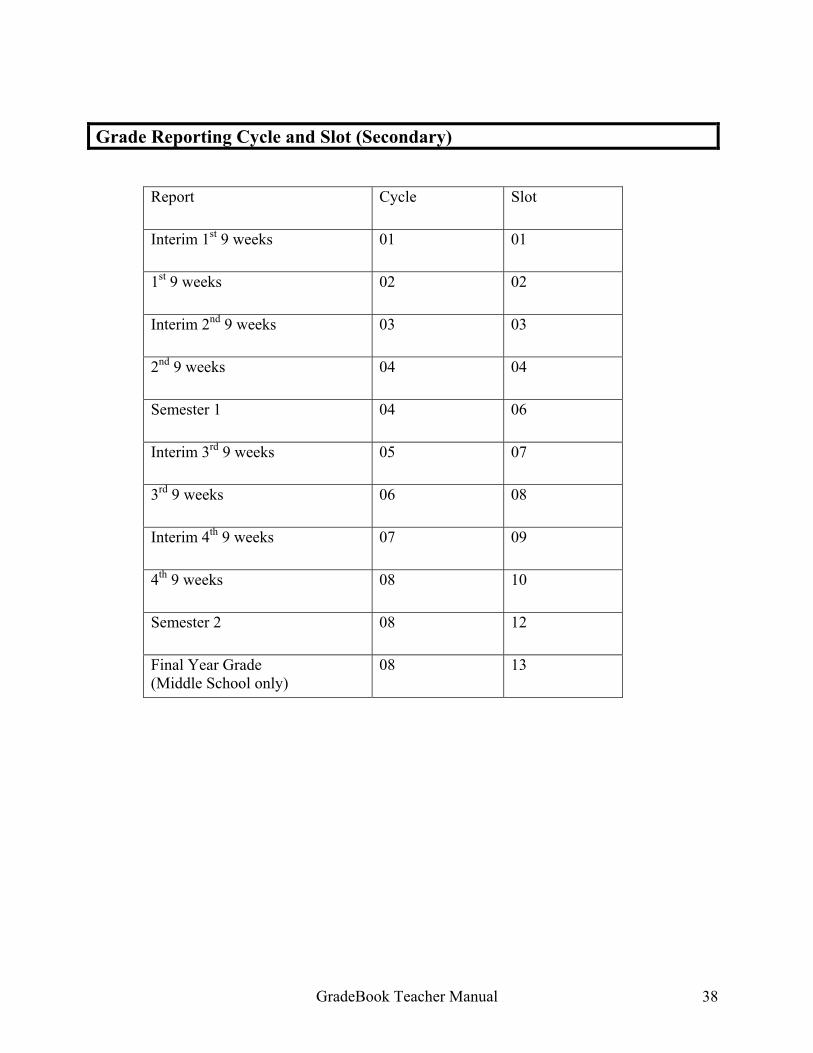
Grade Reporting Cycle and Slot (Secondary)
Report Cycle Slot
Interim 1st 9 weeks 01 01
1st 9 weeks 02 02
Interim 2nd 9 weeks 03 03
2nd 9 weeks 04 04
Semester 1 04 06
Interim 3rd 9 weeks 05 07
3rd 9 weeks 06 08
Interim 4th 9 weeks 07 09
4th 9 weeks 08 10
Semester 2 08 12
Final Year Grade (Middle School only)
08 13
GradeBook Teacher Manual 38
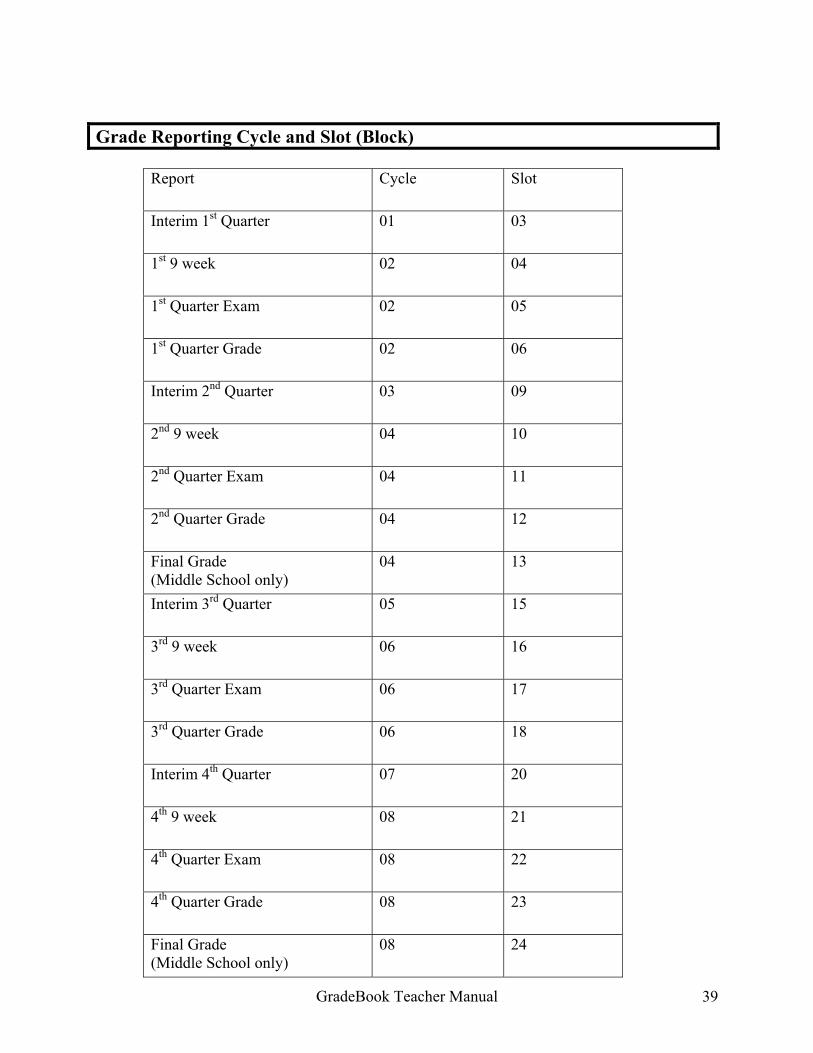
Grade Reporting Cycle and Slot (Block)
Report Cycle Slot
Interim 1st Quarter 01 03
1st 9 week 02 04
1st Quarter Exam 02 05
1st Quarter Grade 02 06
Interim 2nd Quarter 03 09
2nd 9 week 04 10
2nd Quarter Exam 04 11
2nd Quarter Grade 04 12
Final Grade (Middle School only)
04 13
Interim 3rd Quarter 05 15
3rd 9 week 06 16
3rd Quarter Exam 06 17
3rd Quarter Grade 06 18
Interim 4th Quarter 07 20
4th 9 week 08 21
4th Quarter Exam 08 22
4th Quarter Grade 08 23
Final Grade (Middle School only)
08 24
GradeBook Teacher Manual 39
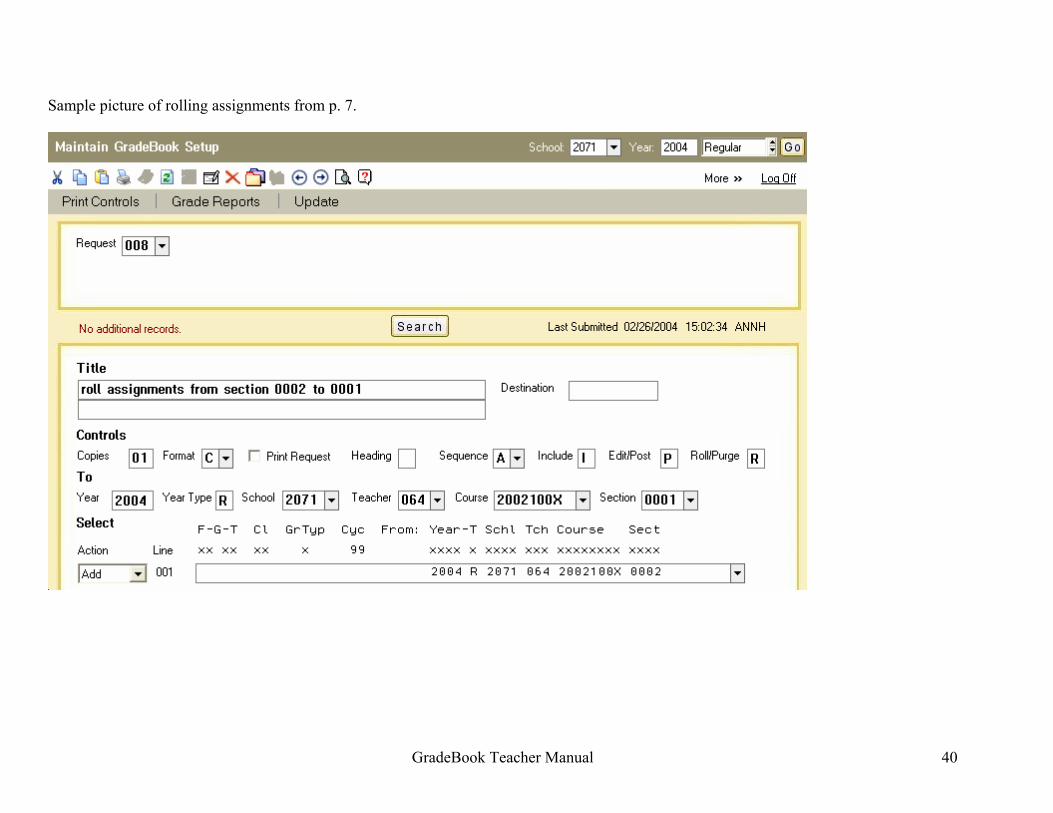
Sample picture of rolling assignments from p. 7.
GradeBook Teacher Manual 40

GradeBook Teacher Manual 41
Sample picture of Printing Daily Grades for Every Student from p.33.