boost your dressage scores - horses and people | the … strategies and boost your dressage scores?...
TRANSCRIPT
www.horsesandpeople.com.au • HORSES and PEOPLE • Page 33
Boost YourDressage Scores
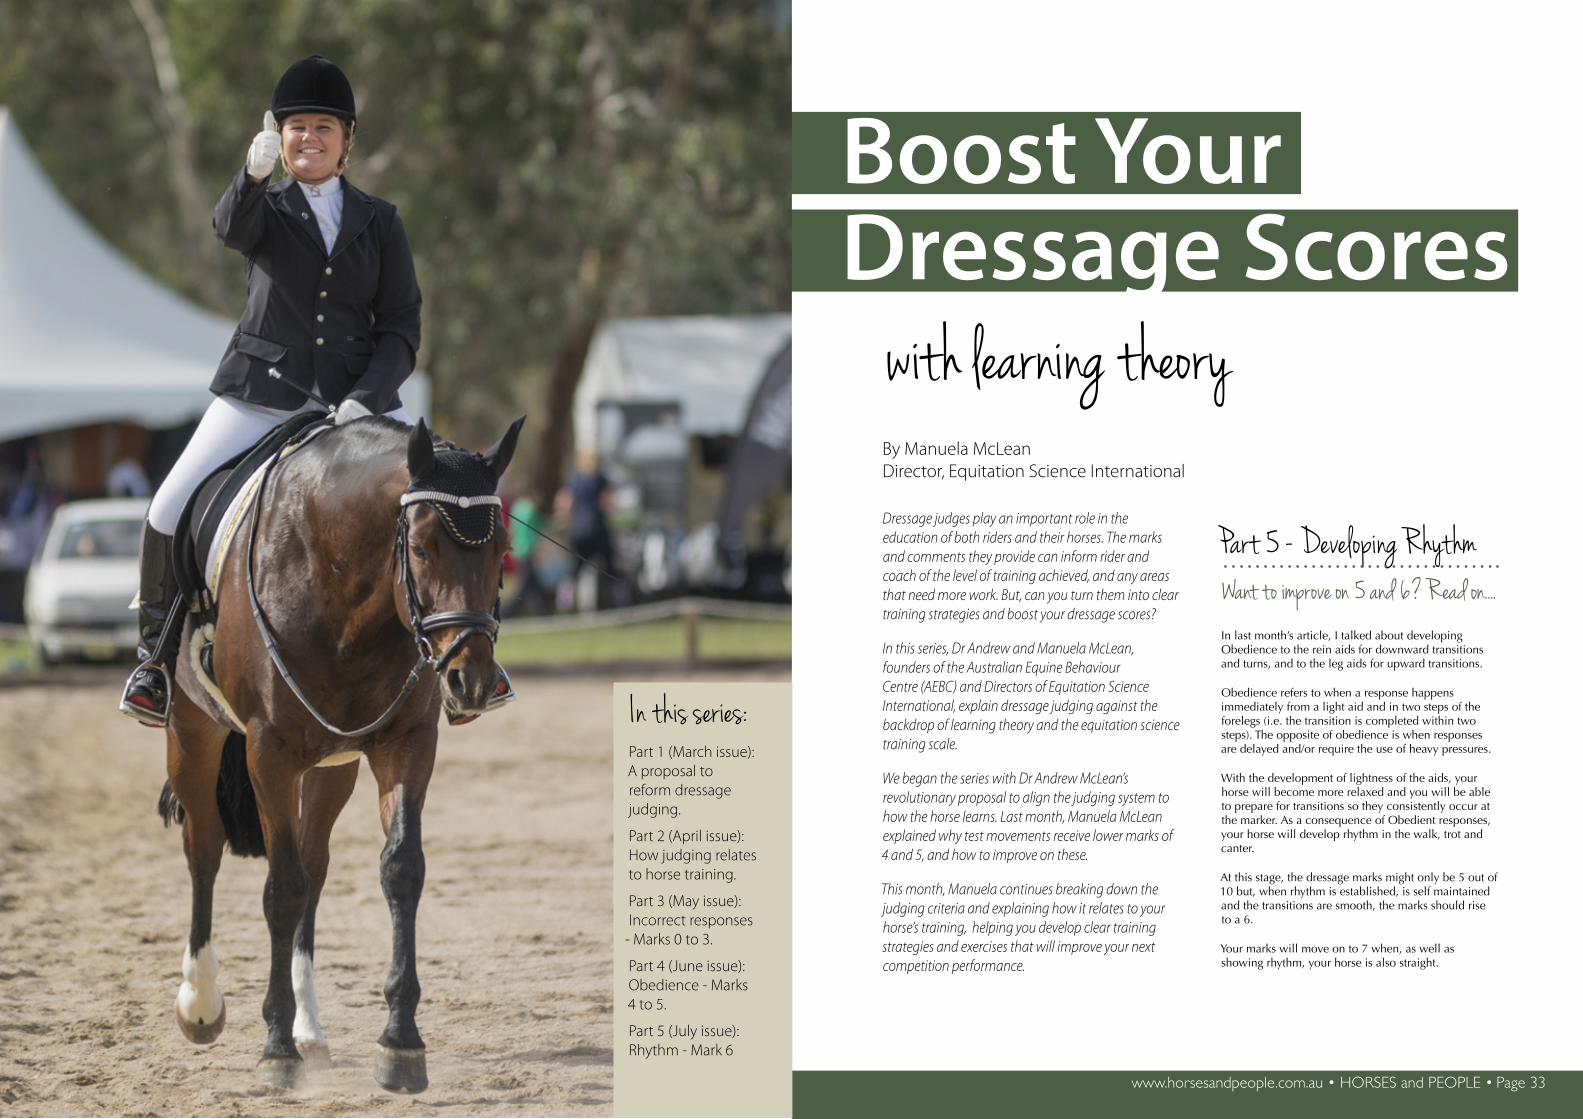
Dressage judges play an important role in the education of both riders and their horses. The marks and comments they provide can inform rider and coach of the level of training achieved, and any areas that need more work. But, can you turn them into clear training strategies and boost your dressage scores?
In this series, Dr Andrew and Manuela McLean, founders of the Australian Equine Behaviour Centre (AEBC) and Directors of Equitation Science International, explain dressage judging against the backdrop of learning theory and the equitation science training scale.
We began the series with Dr Andrew McLean’s revolutionary proposal to align the judging system to how the horse learns. Last month, Manuela McLean explained why test movements receive lower marks of 4 and 5, and how to improve on these.
This month, Manuela continues breaking down the judging criteria and explaining how it relates to your horse’s training, helping you develop clear training strategies and exercises that will improve your next competition performance.
with learning theoryBy Manuela McLeanDirector, Equitation Science International
In this series:Part 1 (March issue): A proposal to reform dressage judging.
Part 2 (April issue): How judging relates to horse training.
Part 3 (May issue): Incorrect responses
- Marks 0 to 3.
Part 4 (June issue):Obedience - Marks 4 to 5.
Part 5 (July issue):Rhythm - Mark 6
Part 5 - Developing RhythmWant to improve on 5 and 6? Read on....In last month’s article, I talked about developing Obedience to the rein aids for downward transitions and turns, and to the leg aids for upward transitions.
Obedience refers to when a response happens immediately from a light aid and in two steps of the forelegs (i.e. the transition is completed within two steps). The opposite of obedience is when responses are delayed and/or require the use of heavy pressures.
With the development of lightness of the aids, your horse will become more relaxed and you will be able to prepare for transitions so they consistently occur at the marker. As a consequence of Obedient responses, your horse will develop rhythm in the walk, trot and canter.
At this stage, the dressage marks might only be 5 out of 10 but, when rhythm is established, is self maintained and the transitions are smooth, the marks should rise to a 6.
Your marks will move on to 7 when, as well as showing rhythm, your horse is also straight.

www.horsesandpeople.com.au • HORSES and PEOPLE • Page 35Page 34 • HORSES and PEOPLE • Phone: 07 5467 9796 • [email protected]
“From obedience to r hythmAchieving marks of 6 and higherRegularity
Obedience allows the development of regularity of the rhythm - where the horse has a clear 4-beat walk, 2-beat trot and 3-beat canter, and when each gait shows the correct sequence of footfalls. (See opposite page.)
Judge’s remark: “Irregular”
Comments about ‘irregularity’ refer to problems in rhythm. Irregularity is mostly seen in the trot when the horse appears to be hopping or when the trot diagonals are not even and the horse steps short on one diagonal pair. A lateral walk and a 4-beat canter are also incorrect in the rhythm, but are not irregular. Irregularities often occur if length of stride is too short or long and when the tempo too fast or slow in a transition and the following gait.
Improving regularity
Exercises involving frequent transitions between the gaits and improving the Obedience step of the shaping scale (See last month’s article) will develop your horse’s regularity, and reduce evasions and resistances to the rein and leg aids.
When rhythm is established, self maintained and the transitions are smooth, your marks should rise to a 6. When you develop straightness you will achieve 7s.
Judge’s remark: “Leaning (on the bit)”
A horse that ‘leans on the bit’ is often running, so downward transitions will help to develop self-carriage to the rein aids. We will talk more about these later in this article. Horses can also lean on the bit by extending their necks forward, when they go on the forehand. This can be associated with stalling in the temp or shortening the stride while leaning. If the rider has not asked the horse to slow, then he should either quicken the stride or lengthen it just as the horse begins to lean.
Judge’s remark: “Needs to be more forward”
One of the most common comments judges make relating to rhythm is that the horse needs to be ‘more forward’, but what does this comment really mean?
There are two ways to achieve ‘more forward’ depending on the horse’s natural way of going. These are TEMPO and STRIDE LENGTH.
Tempo is the speed of the legs, whereas stride length refers to the amount of over-track.
To develop rhythm, riders should first aim to work on achieving the correct tempo as part of the shaping of the horse’s responses, and, once that is established, work on improving the stride length.
When a horse loses tempo or stride length randomly (without the rider asking for the change), they will develop problems, particularly tension, which can contribute to the development of conflict behaviours.
The horse’s gaits are described as 2-beat (trot), 3-beat (canter) and 4-beat (walk and gallop), which corresponds with the number of footfalls or beats that can be heard within each stride. Most riding horses have four natural gaits:
• Walk (a four-beat gait);
• Trot (a two-beat gait);
• Canter (a three-beat gait);
• Gallop (a four-beat gait). Walk
The walk is a four-beat gait. When the horse is standing relatively squarely, the first leg to leave the ground is a foreleg. Beginning with the left foreleg, the sequence of steps is left foreleg, right hindleg, right foreleg, left hindleg. In the walk, each limb typically strikes the ground at a rate ranging from 50 to 60 beats per minute. In synchrony with the walk, the horse’s neck extends and contracts. For this reason, the rider’s hands follow this movement and should also move forward and back, otherwise the walk becomes stilted.
Trot
The trot is a symmetrical, diagonal two-beat gait in which the limbs form diagonal pairs. There is a period of suspension between each diagonal pair of limbs. The legs strike the ground at around 75 beats per minute. The sequence of footfalls is right hindleg and left foreleg, left hindleg and right foreleg. In the trot, the neck does not extend or contract during locomotion as it does in the walk and canter. Therefore, the rider’s hands should not move during the trot when no aids are given.
Canter
The canter is a three-beat gait with a period of suspension after the third beat. The footfalls of the canter with the right foreleg leading are left hindleg, right hindleg and left foreleg, right foreleg. In canter speeds required for dressage, the limbs or the pair of limbs strike the ground at rates ranging from 90 to 100 beats per minute. The canter is an asymmetrical gait because the three beats comprise a leading hindleg, then a diagonal pair (foreleg and hindleg), followed by the leading foreleg and terminated by a moment of suspension.
In the changes of various gaits into the canter, the initial limb to begin the canter differs. For example, when the horse makes the transition from trot to canter, the first limb to begin the canter is the leading foreleg. However, when the horse makes the change from one leading leg to the other in the canter (a flying change), the first limb to begin the new canter is the outside hind. This has implications for the signals used in training and re-training. For example, to execute a flying change, any signal should target the new outside hindleg immediately following the suspension phase.
Gallop
The gallop is a four-beat gait similar to the canter except that the speed is greater and the diagonal pair of legs is separated.
The horse’s gaitsKnowing about the biomechanics of movement helps us in our timing for upwards and downwards transitions, particularly for making them lighter and so using less pressure.
• A downward transition should begin when the outside foreleg protracts (moves forward) and begins its swing (flight) phase; a transition is therefore complete when that foreleg touches the ground in the next step.
• For correct biomechanics, an upward transition should be timed with the action of the hindlegs; at the beginning of the swing phase of the inside hindleg. (I.e. when the hindleg is leaving the ground and moving forward. This enables it to reach under further.)
Training Tip:To obtain rhythm, frst develop your horse’s tempo, then work on improving stride length.
Longitudinal flexion develops when the horse’s back muscles - particularly the longissimus dorsi - lengthens and the neck extends forward from the base of the wither.
The nuchal ligament from the wither to the poll stretches allowing the neck to arch and the poll to flex. The supraspinous ligament from the wither to the tail also lengthens and allows his back to lift, it feels soft to sit on.
To achieve this without force from the bit and driving from the legs at the same time, a rider should aim that the horse stretches his neck and lifts his back when riding an
An excerpt from: Academic Horse Training, Equitation Science in Practice by Andrew and Manuela McLean
About Longitudinal Flexionupward transition, lengthening or quickening, targeting this lengthening as part of the response. The rein connection at this time is soft but the rider does not allow lengthening outwards or upwards without pulling back but by keeping a steady feel of the horses mouth.
If the horse gets strong, ride the appropriate downward transition, shortening or slowing before trying again. A horse that is forced to come round from the reins only will always end up stiff in the back, especially if the rider pulls back, as this shortens the nuchal ligament and contracts the part of the longissimus dorsi that extends into the neck and attaches to the cervical verterbrae.
andJUDGING vs.TRAINING SERIES
Judge’s remark: “Behind the leg”
A horse that is ‘behind the leg’ is one that does not maintain a rhythm without the rider applying the leg aid constantly. An upward transition every time the rider feels the need to use their leg will help re-train the go response and develop self-carriage (when the horse maintains his own rhythm).
Photo by Emma Wilkins

www.horsesandpeople.com.au • HORSES and PEOPLE • Page 37Page 36 • HORSES and PEOPLE • Phone: 07 5467 9796 • [email protected]
TempoThe tempo refers to the speed of his legs, i.e, is your horse moving his legs too slowly or too quickly? Each gait should have a definite tempo. Judges are after a walk that is ‘active’, a trot that has ‘suspension’ and a canter that has ‘jump’. In some cases, the tempo may not be quick enough to show these qualities. His legs are moving slowly and the judge will remark that he ‘needs to be more forward’ or ‘more active’.
On the other hand, a horse that has a ‘lateral walk’ (where the beat is 1-2…3-4 instead of 1-2-3-4), one that is ‘running’ in the trot or is ‘flat’ and fast in the trot is a horse that is too quick in the tempo. His legs are moving so quickly that they do not have the time to push upwards in the stance phase (when his feet are on the ground) to develop elevation or an uphill look. The judge will often remark that the horse is ‘downhill’ and ‘on the forehand’.
When you ride, you should feel the movement of your horse’s back in each gait and go with the movement. The horse’s back in walk should feel flat and have a backward and forward motion of about 1 cm, in trot it should feel like a hopping action, and in canter a circular backwards and forwards motion. Signs that there are changes in tempo can be felt when you end up at the back of the saddle because his back is not lifting or tipping forward because he is on the forehand.
With horses that are long and slow in rhythm, you will need to quicken their tempo, while those that are short and quick in their rhythm should work on lengthening the stride. Looking at the tempo and over-track of the stride will give you an indication as to which one to choose.
Looking at the horse’s transitions can help: if he slows after the upward transition, but is long in the stride, then choose to quicken, but if his stride is short or is not long enough after the transition then choose lengthening. In the first stride (or two steps) of the transition, a horse should step into his hoof prints (track-up). This is achieved through improving the obedience of the upward and downward transition aids.
The aids to quicken the tempo:To quicken a horse’s tempo, a rider should begin from a neutral position in the correct rhythm. Firstly, engage the core, then the seat needs to quicken its action by a quick clench of the gluteal muscles (bottom), whilst giving a light squeeze of the lower calves. The aid should be on for two steps of the forelegs and this develops to a squeeze for one step as the horse progresses in his training.
If this doesn’t work to produce a quicker step, then the horse can be motivated with a quick nudge-nudge of the heels, or trained to quicken from two light taps of the whip. (See last month’s article where we explained how to train the whip taps as a single aid using operant conditioning or pressure-release training.)
Riders who have a stable leg position and are not squeezing constantly to keep the horse going can use spurs but, even then, they should take great care and be sure they are absolutely aware and in control of how they use the spurs because constant, random or confusing pressures from the spurs will lead to habituation and conflict behaviours. As riders, we should be aiming to achieve responses to the basic movements without the use of spurs. If used for the higher level movements, they should be used with the lightest touch for refinement of responses.
The aids to slow the tempo:To slow a horse’s tempo, a rider needs to begin from a neutral position in the correct rhythm. Firstly, engage the core, close the thighs and knees (this can help to stabilise your body to slow the seat action), and close the fingers around the reins for two steps. The rider can also engage the lateral and back muscles in the process. The position of the rider and the aid should be maintained (blocking) and increased until the horse slows the tempo, aiming to achieve the response within two seconds and, eventually with practice, in two steps. Remember to reward instantly with a softening of the rein pressure as soon as the horse responds. This does not mean releasing the rein or leg contact entirely, but relaxing it back to a neutral, soft, ‘contact’ position.
Once the horse can slow and quicken obediently, we must check for self-carriage by making a loop in the reins or releasing leg contact for two to four steps to see if the horse maintains the tempo by himself. Re-taking the contact is also important to ensure that the horse does not change its tempo during this time. A light contact of the rein and legs should always mean nothing to the horse unless the rider changes his posture and applies an aid, so ensure your horse maintains rhythm during the giving and re-taking of the contact. It is important not to lose your posture and seat action when testing for self-carriage
Training tipYou can train tempo changes from a nice rhythm beginning with quickening eight steps and slowing for two to four steps, and repeating until it is obedient and smooth.
If his tempo is too slow:
If you have a horse that tends to be slow in the tempo and does not use his hindquarters, try doing an upward transition (squeeze for two steps) and then at step three or four of the new gait apply the quickening aid. If the horse is still not reacting, instead of quickening, after the initial two to four steps, try moving up into the next gait.
As these transitions improve, you should begin to feel that he lowers his hindquarters and, if you feel that you almost get left behind, then you will know are on the right track! Your horse will be ‘forward’ in the upward transition and this will help bring his hindlegs underneath him. Comments about hindquarters trailing often refer to activity or tempo..
This can also help with maintaining activity in the collected or shorter canter by applying the quickening aid just after the shortening aid. Comments such as ‘needs to be more active’ relate to the hindlegs not being quick enough in a gait or transition and appear to be trailing.
If his tempo is too quick:
If you have a horse that tends to be too quick in his tempo, then try slowing before a downward transition. Your transitions will become less ‘abrupt’ and your horse will flow from one gait to another smoothly; your transitions will be well prepared.
Use a MetronomeOne of the best ways to learn if your tempo is correct is to use a metronome.
Metronome apps can be downloaded onto your smartphone (I recommend Tap Metronome). They are also available as a single device you can slip in your pocket while you ride.
Simply set the metronome pace and ride to the beat.
These are the beats that you should strive for in a Preliminary or Novice test:
• The medium walk tempo is 55 beats per minute.
• The working trot tempo is 75 beats per minute. (The tempo of the collected trot is slightly slower at 69 beats and the stride is shorter and more elevated, so practice slowing the tempo to achieve the beginnings of collection.)
• The working canter is 95 beats per minute.
Helpful hint:
When using the metronome, it should beep each time the same foreleg touches the ground. If the horse is too quick or too slow, you will not be able to keep the tempo or rhythm and the beep sound will beep as the other foreleg is touching the ground.
andJUDGING vs.TRAINING SERIES
www.horsesandpeople.com.au • HORSES and PEOPLE • Page 39Page 38 • HORSES and PEOPLE • Phone: 07 5467 9796 • [email protected]
Stride lengthOnce the correct tempo has been achieved, then lengthening the stride will be easier as it takes a degree of activity to achieve longer steps in all the gaits.
Movements such as long rein walk and ‘show a few lengthened strides’ (two to three strides) can be asked for gradually. When the test includes a medium trot, it requires the horse to lengthen into the correct over-track immediately (at the marker) and an obedient lengthening will always score higher than a gradual lengthening will.
Lengthening of the stride produces a lengthening of the back muscles, particularly the longissimus dorsi; this muscle also extends into the neck and is the foundation of longitudinal flexion. One of the characteristics of a horse that has longitudinal flexion is a soft and swinging back, his tail becomes raised and swings in an ‘S’ shape.
A horse cannot lengthen and over-track if he is too short in the frame. It is moving his nose further forward that allows the hindlegs to step under and over-track.
Horses come into the correct frame naturally (i.e. without rider intervention to artificially create the frame) as a result of lengthening and shortening of the muscles associated with changes in stride length.
Horses that are too short in the stride feel choppy or flat in their movement. The judge will comment that he may not be forward enough, show ‘insufficient ground covering’, appear
‘tense’, ‘lose rhythm’ (e.g. steps short with one hindleg), may
The forelegs of the horse tend to predominate over the action of the hindlegs. This is a result of the action of two neural oscillators called the ‘central pattern generators’.
Neural oscillators are clumps of nerves that activate in a rhythmic or repetitive manner.
These neural oscillators maintain the purity of the gaits and cause the hindlegs to follow similar patterns of movement as the forelegs.
Did you know?
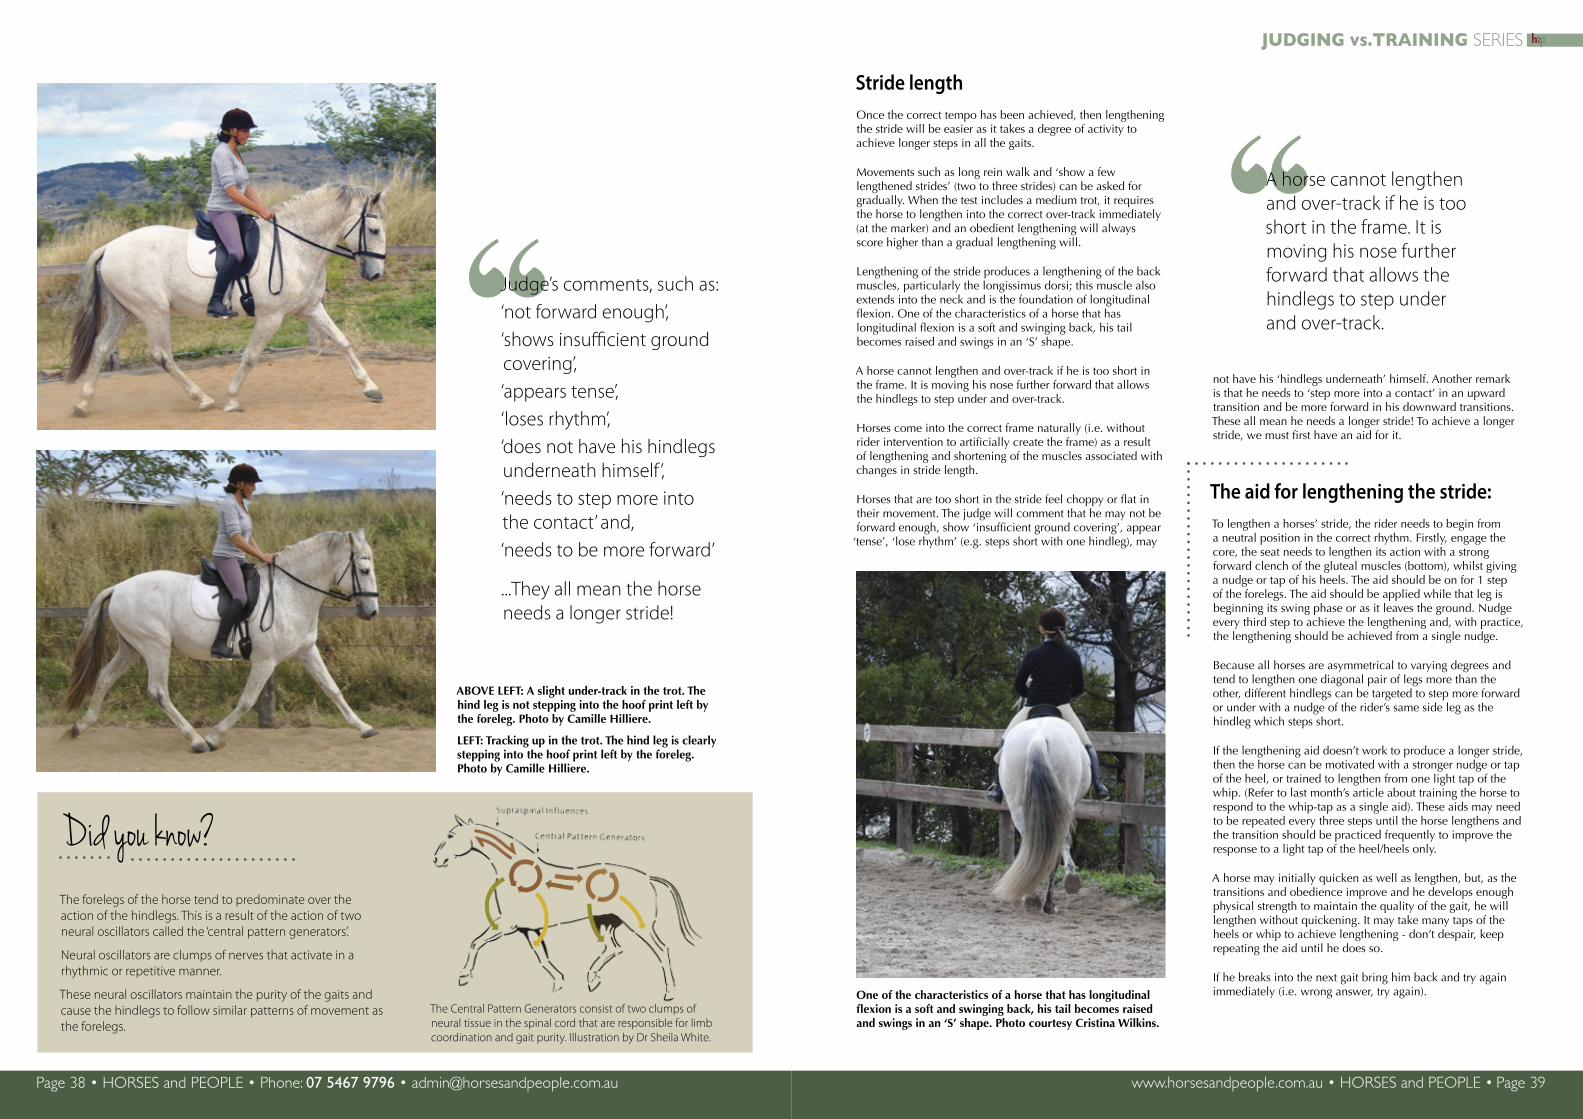
“Judge’s comments, such as:‘not forward enough’, ‘shows insufficient ground covering’, ‘appears tense’, ‘loses rhythm’, ‘does not have his hindlegs underneath himself’, ‘needs to step more into the contact’ and, ‘needs to be more forward’
...They all mean the horse needs a longer stride!
The Central Pattern Generators consist of two clumps of neural tissue in the spinal cord that are responsible for limb coordination and gait purity. Illustration by Dr Sheila White.
not have his ‘hindlegs underneath’ himself. Another remark is that he needs to ‘step more into a contact’ in an upward transition and be more forward in his downward transitions. These all mean he needs a longer stride! To achieve a longer stride, we must first have an aid for it.
The aid for lengthening the stride:To lengthen a horses’ stride, the rider needs to begin from a neutral position in the correct rhythm. Firstly, engage the core, the seat needs to lengthen its action with a strong forward clench of the gluteal muscles (bottom), whilst giving a nudge or tap of his heels. The aid should be on for 1 step of the forelegs. The aid should be applied while that leg is beginning its swing phase or as it leaves the ground. Nudge every third step to achieve the lengthening and, with practice, the lengthening should be achieved from a single nudge.
Because all horses are asymmetrical to varying degrees and tend to lengthen one diagonal pair of legs more than the other, different hindlegs can be targeted to step more forward or under with a nudge of the rider’s same side leg as the hindleg which steps short.
If the lengthening aid doesn’t work to produce a longer stride, then the horse can be motivated with a stronger nudge or tap of the heel, or trained to lengthen from one light tap of the whip. (Refer to last month’s article about training the horse to respond to the whip-tap as a single aid). These aids may need to be repeated every three steps until the horse lengthens and the transition should be practiced frequently to improve the response to a light tap of the heel/heels only.
A horse may initially quicken as well as lengthen, but, as the transitions and obedience improve and he develops enough physical strength to maintain the quality of the gait, he will lengthen without quickening. It may take many taps of the heels or whip to achieve lengthening - don’t despair, keep repeating the aid until he does so.
If he breaks into the next gait bring him back and try again immediately (i.e. wrong answer, try again).
“A horse cannot lengthen and over-track if he is too short in the frame. It is moving his nose further forward that allows the hindlegs to step under and over-track.
One of the characteristics of a horse that has longitudinal flexion is a soft and swinging back, his tail becomes raised and swings in an ‘S’ shape. Photo courtesy Cristina Wilkins.
ABOVE LEFT: A slight under-track in the trot. The hind leg is not stepping into the hoof print left by the foreleg. Photo by Camille Hilliere.
LEFT: Tracking up in the trot. The hind leg is clearly stepping into the hoof print left by the foreleg. Photo by Camille Hilliere.
andJUDGING vs.TRAINING SERIES

www.horsesandpeople.com.au • HORSES and PEOPLE • Page 41Page 40 • HORSES and PEOPLE • Phone: 07 5467 9796 • [email protected]
The aid for shortening the stride: To shorten a horse’s stride, a rider needs to begin from a neutral position in the correct rhythm.
Firstly, engage the core, stepping the weight into the heels, while keeping the top of the hips forward. This shortens the seat action, whilst closing the fingers around the reins for one step. The rider can also engage his lateral and back muscles in the process.
The position of the rider should be maintained and the aid should be repeated every three steps, increasing in pressure gradually until the horse shortens his stride.
Perfect practice makes perfect, so remember to make frequent transitions between longer and shorter strides to achieve them from a single light aid.
A shortening of the stride always follows a lengthening of stride in dressage tests and it is important to ask for just the right amount so as to not shorten too much. Remember the correct tempo.
The collected paces all involve some shortening. In the walk, the horse steps into his hoof prints, in the trot it can under-track a little and in the canter there should be a smaller over-track of approximately 30cm. The tempo of the stride should remain almost the same in the collected gaits, which makes the hindlegs appear to stay quick (engaged). You may have to quicken the step after the shortening aid. Remember to never use two aids at a time, but one can follow another in the next two steps.
Training tipPractice frequent transitions of lengthening for eight steps and shortening for four steps.
When these transitions are obedient, test for self-carriage (making a loop in the reins or softening the legs) to see if the horse maintains the correct stride length.
When self-carriage improves, you can cover more distance and lengthen the stride across the diagonal, but it is best to first train lengthening on the long side.
To improve an upward transition, a lengthening aid is best applied as part of the upward transition; squeeze for two steps for up a gait, then at steps three to four nudge the heels for a longer stride. The nudge may need to be repeated if the horse does not lengthen and, gradually over many repetitions, the horse will begin to ‘chain’ together this sequence and do it all by himself.
His hindlegs will ‘step under’ as a result and he will be more ‘uphill’, the hollowness that occurs a few steps into the transitions will disappear as he lengthens his stride. These are the qualities that judges are looking for and will reward with higher marks.
RESPONSE
BACK
STOP (DOWN GAIT)
SLOW (TEMPO)
SHORTEN (STRIDE)
GO (UP GAIT)
QUICKEN (TEMPO)
LENGTHEN (STRIDE)
DIRECT TURN
INDIRECT TURN
YIELD HINQUARTERS
SIGNAL (AID)
Closed fingers on reins (for 2 steps)
Closed fingers on reins (for 2 steps)
Closed fingers on reins (for 2 steps)
Closed fingers on reins (for 1 step)
Squeeze upper calves (for 2 steps)
Squeeze lower calves (for 2 Steps)
Tap of heels (for 1 step)
Open rein
Closed rein
Squeeze 1 leg back (2 steps)
POSTURAL CUE
Lower leg position back from neutral
Seat ceases following movement
Thighs close, seat movement slows
Seat movement shortens
Seat movements changes
Seat movement quickens
Seat movement lengthens or is higher
Shoulders and hips turn in same direction
Shoulders and hips turn in same direction
Hips change direction
The 10 basic signals
“When these transitions are obedient, test for self-carriage (making a small loop in the reins and softening the legs) to see if the horse maintains the correct stride length.
andJUDGING vs.TRAINING SERIES
Photo by Kerri Afford Photography

www.horsesandpeople.com.au • HORSES and PEOPLE • Page 43Page 42 • HORSES and PEOPLE • Phone: 07 5467 9796 • [email protected]
Judge’s remark: ‘Running into canter’
Lengthening the stride before an upward transition to canter helps to eliminate the ‘running into canter’ because this is the horse telling the rider that he needs more power to comfortably ‘pop’ into canter. This is a bit like driving a manual car, it needs more revs and speed to change gears smoothly. This fix is only temporary, i.e. once the canter aid is obedient and in a rhythm, the horse will be able to move up into canter from a slower pace. Lengthening the walk eliminates a hop into the trot too.
Please Do it! Thank you!Posture cue
Light aidIncrease pressure
Alternative pressure(e.g. whip-taps)
Release pressureScratch
Remember to use learning theory appropriately
Horse is under stimulus control of handler/rider (anywhere, anytime)
Horse maintains connection & outline. Development of impulsion, engagement, throughness, collection.
Horse maintains directional line & straightness
Horse maintains rhythm & tempo
Horse offers an immediate response to a light aid
Horse offers an attempt at the correct response
Harmony
Basic Attempt
Obedience
Rhythm
Straightness
Contact
The Equitation Science Shaping Scale
Timing of the aids and rewards:
Applying an aid:Responses need to be correctly trained and reinforced regularly so they become habits, and for the horse to learn to respond to posture and light aids. In training, the ridden or led horse is rewarded for a response primarily by a release of pressure.
The pressure of, let’s say the rein aid, is used to motivate him to trial a response, when he stops, that rein pressure is released to a very light contact (like holding hands) and he, therefore, learns that rein pressure means stop.
Pressure-release training is also called Negative Reinforcement, the ‘negative’ term is meant in the mathematical sense: taking away a pressure. In the beginning, it might look a little rusty, but with good timing and shaping, it can be refined to postural cues and light aids.
As well as releasing the pressure, using a scratch at the base of the wither paired with a “good boy/girl” when the horse has performed the correct response enhances his learning.
Of course, it is only necessary to apply the ‘do it’ part if the horse either doesn’t respond to the aid or if he is a bit delayed to respond.
If you are using alternative motivating pressures, such as, a whip and/or spurs, they also need to be trained in the same way (operant conditioning or pressure/release) and, preferably, as separate aids.
Helpful hint
A horse that has increased his stride length should show an over-track of 10-15cm in the walk and trot, and over one meter in the canter.
You can actually measure length of stride by looking at the over-track or under-track of a hindleg. Do this by looking at the spot where the foreleg landed (the hoof print left by the foreleg) and then look where the same side hindleg lands.
The horse’s conformation will affect his ability to over-track, e.g. a horse that is long in the back and short in the leg will not always achieve a good over-track. If a horse covers ‘more ground’ per stride, then he has also lengthened.
Judges remark: “Needs to be more forward in the downward transition”
This is a very common remark from judges and can seem a bit confusing. It means the horse either slowed his tempo or shortened his stride after the transition. So, to obtain this quality, quicken the tempo or lengthen the stride just after the downward transition.
Remember to soften the rein aid (reward the transition) before quickening or lengthening the steps - the leg aids should only be applied once the horse has completed the first two steps of the transition, not at the same time as the rein aids. Keep your communication clear and simple enough for the horse to understand!
Judge’s remark: ‘Needs more impulsion’
The comment ‘needs more impulsion’ refers to problems in both the tempo and stride length together. Nevertheless, from a training perspective, horses need to be trained first to have tempo and then stride length. Each of these need to be trained separately until they are self-maintained by the horse before making further progress. As soon as the transitions are obedient, remember to test for self-carriage with the reins and legs - this will tell you if your horse is improving and ready to progress to the next step.
andJUDGING vs.TRAINING SERIES
If the horse doesn’t respond to the light aid, then it is important to repeat the process until there are three improved or correct responses. Each of the basic responses shown above needs to be ‘shaped’ or improved following the Shaping Scale, from a
‘Basic Attempt’ to ‘harmony’.
As training develops and the horse is clear in all signals, is steady in the rhythm, straight and accepting a light contact of seat, leg and rein, there will be an improved suppleness, throughness and engagement, and a lowering of the hindquarters as collection increases.

www.horsesandpeople.com.au • HORSES and PEOPLE • Page 45Page 44 • HORSES and PEOPLE • Phone: 07 5467 9796 • [email protected]
ABOUT THE AUTHOR: Manuela McLean, NCAS Level 2 (Dressage Specialist), BSc (Biology), Dip Ed. Manuela co-developed the AEBC training system and co-authored ‘Academic Horse Training’ with her husband, Dr Andrew Mclean. One of her most recent achievements is coaching and training Joann Formosa and her stallion, Worldwide PB, to gold medal success at the London 2012 Paralympics. In just six months, Manuela trained Worldwide PB to be a
competitive Paralympic mount, to be responsive to verbal and postural cues, and to the lightest of aids. A national coach of dressage, Manuela’s focus is on teaching riders how to train and maintain the basics in their horses; creating a true foundation for higher level dressage. Manuela has ridden and competed at FEI level in Dressage and advanced Three Day Eventing. In great demand as a clinician, she travels to teach riders of all ages throughout Australia and to New Zealand, Canada, Denmark, Finland and the United Kingdom.
andJUDGING vs.TRAINING SERIES
Using the turn aids
A horse can be straightened with the rein aids while slowing or shortening, but try to make the pressure even on both reins while doing this. If he bends his neck, use an indirect turn (rein into the neck) to straighten it. Look at the cheek pieces of the bridle (you should be able to see them both). A direct turn aid (rein away) may be needed to put the horse on your line while straightening.
Transitions performed on a line, for example the ¾ line of a dressage arena, the gaits, as well as the lengthening and shortening or quickening and slowing aids will develop the straightness needed to achieve scores of 7 or more.
Straightness and rhythm help to develop thoroughness, and it is important to be able to ride circles and straight lines in the same stride length and tempo for lateral flexion and bend to develop. Once your horse turns obediently, target that he maintains the tempo and stride length by applying the appropriate aid after the two steps of turn, whether it be a direct or indirect turn.
Training tip
Round and forward circles are often marked harshly because of losses of rhythm. The first thing for any rider riding a dressage test is to learn the touch points of the circles, riding to a touch point improves accuracy and line. Put your horse’s ears on the line and ride from one touch point to another. Look ahead, keeping the turn position and, at about 3-5 meters before the touch point, then look at the following one. Steer the horse’s shoulders with your reins first and then use leg aids to correct losses of tempo or stride.
Use an outside indirect turn aid if your horse falls out and an inside indirect turn aid if he falls in. Watch those cheek pieces, they rarely lie! Practice making your circle bigger or smaller using indirect turn aids, as well as with direct turn aids. Riding a hexagonal shape is useful for this; use an indirect turn aid at each turn and ride straight in between re-establishing the tempo or stride length.
Helpful hint
When riding a circle, it is important to know its size and diameter to work out where those touch points are. The letters of the arena are there as a guide, they are situated around the outside, but also on the centre line. If you have trouble, place cones at these touch points and ride from one cone to another.
To ride a 20m circle at B on the left rein:
• Start at B (touch point 1), aim to cross the centre line 2m towards X from I (touch point 2), then
• Aim for E (touch point 3),
• Then aim to cross the centre line 2m from L towards X (touch point 4) and then,
• Nack to B.
To make the circle round, aim to stay on each touch point for three steps.
In the beginning, just steer first (ride your line) and then work on speed. You will notice that most horses will stall as they leave the wall or edge of the arena, and also as they return to the wall. This can happen four times on the circle at B, so you can see how important it is to correct these variations in rhythm! They may shorten the stride or slow the tempo, so aim to keep your seat action the same. If he shortens, your seat action will also shorten and, if he slows the tempo, you will feel like pushing more.
Notice these feelings and respond by quickening or slowing appropriately. You will soon find that your circles will become round and the ‘egg shape’ will disappear.
Once rhythm is self-maintained in turns, flexion and bend can now be targeted, as well as lateral movements. By adding these components, your training will improve and you will be ready to start working on the next step of the shaping scale: Straightness. Your marks will improve again.
A
C
H M
S R
E B
P
F
V
K
I
X
L
D
G
Riding 20m circles
Online Course! VideosAnimationsImagesDiagramsKnowledge checks
Essential for riders, trainers and coaches at all levels.
Visit www.aebc.talentlms.com/catalog/ or call AEBC (03) 5787 1374
$79.95 (incl GST)
Online Short Course
By world renowned trainer & coachDr Andrew McLean
How horses learn Discover a new world of training
Improve the connection between you and your horse in one simple course!
and
More about this next time...
Touch point Touch point
Touch point
Touch point
Touch point Touch point
Touch point Touch point
Touch point
Touch point