bmc2 pci-vic best practice protocols · bmc2 pci-vic best practice protocols updated and revised...
TRANSCRIPT

BMC2 PCI-VIC Best Practice Protocols
Updated and Revised from 2010
January 2014

January 2014 1
JJaannuuaarryy 22001144
BMC2 PCI/PVI Best Practice Protocols Table of Contents
1. Pre Hospital Instructions
2. Pre Procedure Orders
3. Pre Procedure and In Lab/OR Policy: Contrast Induced Nephropathy
4. Hydration Protocol
5. In Lab/OR Protocol: Contrast Use
6. In Lab/OR Protocol: Arterial Access for Professionals with Advanced Training
7. Post-Procedure Protocol: Sheath Removal Protocol (includes three addendums) a) Staff Training and Competency – Sheath Removal b) Arterial Access Checklist c) Sheath Removal Checklist
8. Post Procedure: Groin Bleed Protocol 9. Post Procedure: Transfusion Protocol
10. Post Procedure: Transfusion Guideline
11. Post Procedure: Example of Informed Consent for Transfusion
12. Post Procedure Orders
13. Discharge Instructions (includes one addendum)
a) Rehabilitation – Preventive Cardiovascular Referral
14. Exercise Protocol
15. Pre-Operative Cardiac Clearance
16. Prevention of Surgical Site Infection

January 2014 1
JJaannuuaarryy 22001144
BMC2 PCI-VIC wishes to acknowledge the many protocols and order sets generously shared with the BMC2 Collaborative by the sites referenced below. These protocols and order sets were used in the creation of the BMC2 Best Practice Protocols.
Bay Regional Medical Center Bronson Medical Center Henry Ford Hospital Ingham Regional Medical Center McLaren Regional Medical Center Oakwood Hospital and Medical Center Providence Hospital and Medical Center Sinai Grace Hospital St. John Hospital and Medical Center University of Michigan Medical Center VA Hospital, Ann Arbor William Beaumont Hospital, Royal Oak William Beaumont Hospital, Troy

January 2014 1
JJaannuuaarryy 22001144
1. PRE HOSPITAL INSTRUCTIONS
Instructions for Heart and Vascular Patients: 1. You have been scheduled for your procedure on __________________________________. 2. MEDICATIONS:
- You should take your morning medications with small sips of water when you wake up on the morning of your procedure. Take all other medications on schedule with small sips of water unless otherwise directed.
- YOU MUST TAKE ASPIRIN 81 mg, 4 tabs or one adult ASPIRIN 325 mg the day before and the day of your procedure unless otherwise instructed.
- Do not take your “water pills” (example-Lasix HCTZ) the morning of your procedure. - DIABETIC patients should not take their insulin on the day of their procedure. If you take Lantus insulin take only half of your usual dose of insulin the night before your procedure. If you are on oral medications for diabetes, do not take your dose on the morning of the procedure. Patients taking Metformin (Glucophage) should not take it for 48 hours prior to the procedure.
- Patients taking Coumadin or other blood thinners should check with their physician regarding discontinuing these medications prior to their procedure. If you have been instructed to take Lovenox, do not take it the morning of the procedure.
- Do not take any medications for erectile dysfunction within 48 hours of your procedure.
3. ANEMIA: In preparing for procedure it is important to be screened for anemia. If you have too few red blood cells, you are anemic. Too few red blood cells decrease your blood’s ability to carry oxygen to the body’s tissues. Testing for anemia is done by having a complete blood count (CBC) or hemoglobin and hematocrit (Hgb and Hct). Your hemoglobin lets you know if your body is making enough red blood cells. It is important to know if you have anemia before your procedure because of the risk of blood loss during and/or after your procedure. Anemia, if not properly treated, can also affect the functioning of your heart, lungs, kidneys, and brain. Anemia is present in 35-56% of patients going for a procedure or surgery (depending on their overall health).
What should my hemoglobin be? Female: 12-16 g/dL Male: 13.5-18 g/dL If low, discuss with your primary care physician.
4. KIDNEY FUNCTION: Your kidney function will also be assessed by blood work. The dye used during a heart
catheterization is taken out of the body by the kidneys and can overtax them. It is important to monitor your kidney function after your procedure if your creatinine levels were elevated (≥ 1.5), before the procedure or you have known impaired kidney function.

January 2014 2
JJaannuuaarryy 22001144
5. EATING INSTRUCTIONS: Do not eat or drink anything after midnight before your
procedure. If your procedure is scheduled after 12:00 noon, you may eat a breakfast of 2 pieces of dry toast and coffee / clear liquid up to 6 hours prior to your scheduled time.
6. Bring only the following items with you: The clothes you are wearing (no jewelry).
Identification and insurance cards (no credit cards or money). Medications and/or med list and any cards from previous stents if you have them.
7. You may shower. DO NOT use powders, oils or lotions. You may wear deodorant. 8. A family member or companion must be at the hospital during the procedure and available
to drive you home when you are discharged. 9. DO NOT smoke or consume alcohol 24 hours before your procedure. 10. Please understand that although a tentative schedule is set, emergencies can cause delays.
These delays are unavoidable. They only occur because a life saving treatment is being offered to someone else.
11. Depending on the results of your procedure, you may spend the night in the hospital. 12. If you have any questions, please call __________________________________________ Special Instructions : ___________________________________________________________ _____________________________________________________________________________
References: Adapted from the policies and procedures developed by:
William Beaumont Hospital, Royal Oak
McLaren Regional Medical Center
Henry Ford Hospital

Janaury 2014 1
JJaannuuaarryy 22001144
2. PRE-PROCEDURE ORDERS
Admit to: Pre-Procedure Holding Area.
Current vital signs include today’s weight in kilograms.
IV access 18 g or larger.
Diet: NPO
Confirm or obtain the following lab work within 2 weeks of procedure: CBC, BMP with GFR,
PT/INR. PT/INR same day if patient on Coumadin. Notify physician of all abnormal labs.
If GFR < 30, repeat BMP with GFR day of the procedure.
BHCG on female </= 50 yo.
EKG
Allens test for radial cases.
Prep both groins. Palpate and mark pedal pulses bilaterally.
Pre-Op medications to be given in Pre-procedure area.
ASA 325 mg
Clopidogrel 75 mg daily
Clopidogrel 600 mg PO x 1
Clopidogrel 150 mg PO x1
Clopidogrel 300 mg PO x 1
DC Heparin
Confirm last dose of Enoxaparin was > 12 hours prior to procedure.
Contrast dye allergy pre-medication
Prednisone – 50 mg PO, 13, 7, and 1 hour prior to the procedure. Diphenhydramine – 50 mg PO 1 hour prior to the procedure.
Alternate IV protocol if a patient cannot take oral medications: Hydrocortisone – 200 mg IV, 13, 7, and 1 hour prior to the procedure.
Diphenhydramine – 50 mg IM or IV, 1 hour prior to the procedure.
If Diabetic:
Confirm ½ dose long acting insulin given the night before.
Metformin held pre-procedure and hold for 48 hours post procedure.
Current glucose level

Janaury 2014 2
JJaannuuaarryy 22001144
Confirm on Statin, Beta blocker and ACE-I/ARB. If not currently prescribed, flag for post procedure initiation.
Obtain consent for procedure.
ID those at increased risk for CIN (GFR < 60).
0.9NS (for patients with normal LV function): 1cc/kg for 2 hours prior to the procedure and 3 hours after the procedure
or
Sodium Bicarbonate Infusion (154 mEq/L): 3.5-mL/kg initial bolus for 1 hour immediately before contrast injection, followed by an infusion of 1.18 mL/kg per hour thereafter for 6 hours.
Note: Sodium Bicarbonate infusion: patients >110 kg get the calculated dose for 110kg (to avoid fluid overload).
CAUTION: Patients who are at risk for fluid overload should be given less IV hydration and observed carefully for development of heart failure. Determine contrast threshold at 3 x Creatinine Clearance according to the following formula:
Creatinine clearance = (140 – Age in years) x weight (Kg) / (Pre procedure creatinine x 72) Creatinine clearance x 3 = Contrast Threshold Contrast Threshold _______
Nephrology Consult (consider if GFR < 30).
Additional orders:
References: Adapted from the policies and procedures developed by:
Henry Ford Hospital St. John Hospital and Medical Center
Ingham Regional Medical Center William Beaumont Hospital, Royal Oak
McLaren Regional Medical Center
Oakwood Hospital and Medical Center
Providence Hospital and Medical Center

January 2014 1
JJaannuuaarryy 22001144
3. PRE-PROCEDURE AND IN-LAB/OR POLICY:
CONTRAST INDUCED NEPHROPATHY
Prevention of acute deterioration of renal function following invasive cardiovascular diagnostic and therapeutic procedures in patients with severe renal dysfunction. Acute deterioration of renal function is a well-recognized complication of diagnostic and therapeutic cardiac catheterization, and is associated with significant morbidity and an increased risk of in-hospital and long term mortality. What is Contrast Induced Nephropathy? Acute deterioration in renal function after administration of radiographic contrast is termed Contrast Induced Nephropathy (CIN). One or more of the following definitions have been used in the published literature to define CIN:
1) An increase in serum creatinine of 0.5 mg/dl over baseline (used in BMC2 reporting). 2) An increase in serum creatinine 25% above baseline. 3) Nephropathy requiring new dialysis, defined as acute deterioration of renal function
requiring a new need for temporary or permanent dialysis support. Risk Factors for CIN: Several studies have identified the following risk factors for the development of nephropathy. CIN Risk Calculator: https://bmc2-vic.org/calculators/cin Baseline renal insufficiency: This is the most important risk factor for development of CIN. Patients with severe impairment of renal function at baseline (GFR < 30 ml/minute) are at the highest risk of CIN. Other risk factors include: Peripheral vascular disease , diabetes mellitus, prior history of hypertension, cardiogenic shock, congestive heart failure, dehydration, hyponatremia, diuretic usage, hypoalbuminemia, blood transfusion requirement, prior history of bypass surgery, intraortic balloon pump use, multiple myeloma with renal dysfunction. In addition to these patient’s risk factors, the total amount of contrast media administered during the procedure has been consistently found to be the most important predictor for the development of contrast nephropathy.

January 2014 2
JJaannuuaarryy 22001144
Prevention of CIN: 1. Preventing CIN:
Identify patients at increased risk of developing CIN (GFR<60). Those at highest risk for developing CIN include patients with a GFR < 30 or a predicted risk of more than 2% - https://bmc2-vic.org/calculators/cin. Anytime a decision is made to administer radiographic contrast to these patients, the risk / benefit ratio of proceeding with the procedure or using an alternative test should be carefully considered. Patients should be fully informed of the risk of CIN since the prospect of renal failure and possible need for renal replacement therapy may strongly influence their wishes to proceed with the procedure.
2. Hydration:
To reduce the incidence of CIN and should be used in all patients considered to be at high risk:
0.9% normal saline is superior to 0.45% half-isotonic saline. Hydration protocols that appear to have the best supporting data include:
⇒ Saline - 0.9% NS 1 cc/kg starting 3 hours before the procedure and continued for 4 hours after the procedure OR
⇒ Sodium Bicarbonate Infusion (154 mEq/L): 3.5-mL/kg initial bolus for 1 hour immediately before contrast injection, followed by an infusion of 1.18 mL/kg per hour thereafter for 6 hours.
3. Minimization of Contrast Volume: Minimize total amount of contrast media by avoiding unnecessary angiographic
projections or unnecessary tests (i.e. Left Ventriculography when EF is already available from non-invasive tests) and by using biplane angiography if available.
Use of biplane angiography permits an almost 40% reduction in contrast volume used
and physicians who do not have access to biplane angiography should consider referring their highest risk patients (estimated creatinine clearance < 30 cc) to centers with biplane capabilities especially if excess contrast volume use is anticipated.
Several studies have shown the importance of a contrast dose threshold with the risk of
CIN rising with increasing contrast dose.
Contrast dose should not exceed the contrast threshold at 3 x Creatinine Clearance. Creatinine clearance = (140 – Age in years) x weight (Kg) / (Pre procedure creatinine x 72) Creatinine clearance x 3 = Contrast Threshold Contrast Threshold _______
4. Iso-Osmolar Contrast: Use of iso-osmolar contrast appears to be associated with the lowest risk of CIN in most but not all studies and should be preferentially used in patients deemed to be at high risk. The relative renal safety of low osmolar contrast media may vary and the available data suggest that iopamidol (Isovue), iopromide (Ultravist), or ioversol (Optiray) may have similar risk of CIN as Iodixanol (Visipaque).

January 2014 3
JJaannuuaarryy 22001144
5. Peri-Procedural Hemo-Filtration:
Use of peri-procedural hemo-filtration has demonstrated remarkable efficacy in one trial and may be considered in patients at extremely high risk. The data evaluating this strategy come from one trial and require validation in further studies.
6. Post Procedure Follow-up: Ideally, all patients should have their serum creatinine checked after the procedure. Patients with rising creatinine values should have a repeat serum creatinine 24-72 hours after the procedure.
Conclusion:
The development of CIN is associated with a high risk of morbidity and mortality. Patients with severe impairment in renal function at baseline (estimated creatinine
clearance < 30 ml/min) are at high risk of developing CIN and all preventive strategies should be employed in this population to reduce the risk of CIN.
Modification of procedure strategies to minimize the total amount of contrast and pre-
procedure hydration with 0.9% normal saline or with bicarbonate infusion are currently the most important interventions that have been shown to reduce the incidence of contrast induced nephropathy.
References: Adapted from the policies and procedures developed by:
Blue Cross Blue Shield Cardiovascular Consortium (BMC2) Pocket Guide
Henry Ford Hospital
Oakwood Hospital and Medical Center
University of Michigan Medical Center
William Beaumont Hospital, Royal Oak

January 2014 4
JJaannuuaarryy 22001144
Practical Algorithm of Renal Complications in the Cath Lab: Practical algorithm for prevention of renal complications in the cardiac catheterization lab. Risk score calculator is online ( https://bmc2.org/calculators/cin ).15 LVEDP = left ventricular end-diastolic pressure, CV = contrast volume, GFR = glomerular filtration rate.

January 2014 1
January 2014
4. HYDRATION PROTOCOL *IV Hydration (in pre-procedure area):
0.9NS (for patients with normal LV function): 1cc/kg for 3 hours prior to the procedure and 4 hours after the procedure
OR
Sodium Bicarbonate Infusion (154 mEq/L): 3.5-mL/kg initial bolus for 1 hour immediately before contrast injection, followed by an infusion of 1.18 mL/kg per hour thereafter for 6 hours.
* Sodium Bicarbonate infusion: patients >110 kg get the calculated dose for 110kg (to avoid fluid overload). *In the OR: hold ACE-I and diuretics day of procedure
For those with Cardiomyopathy (LV EF <30%) without overt symptoms of Heart failure:
*0.9 % NS bolus 100-200 cc over one hour, followed by an infusion of 75cc/hr for six hours post procedure (can be adjusted based on hemodynamic measurements obtained during cath).
*In the OR: hold ACE-I and diuretics day of procedure,
For High Risk Patients (those w/history of renal transplant OR Cr >2.0/GFR <20 mL/min) *0.9% NS OR Sodium Bicarbonate Infusion (154 mEq/L): 3.5-mL/kg initial bolus for 1 hour immediately before contrast injection, followed by an infusion of 1.18 mL/kg per hour thereafter for 6 hours.
OR
*Admit for IV hydration to begin 12 hours prior to procedure: 0.9% NS 1ml/kg/hour starting 12 hours prior and to continue for 12 hours after the procedure. *In the OR hold ACE-I and diuretics day of procedure,
*Consider obtaining Renal Consult day prior to admission to follow patient pre/post procedure.

January 2014 1
JJaannuuaarryy 22001144
5. IN-LAB/OR PROTOCOL: CONTRAST USE Purpose: To establish a common practice for the monitoring of contrast use. Policy:
I. General Information:
A. This procedure will be performed by the monitoring staff in coordination with the circulating staff.
B. Contrast selection, as performed by pre-procedure staff, will be confirmed with Attending
Interventionalist prior to opening contrast. Final selection is directed by Attending Interventionalist.
C. Contrast threshold, as calculated by pre-procedure staff, will be reported to the Attending Interventionalist prior to the case starting.
Creatinine clearance = (140 – Age in years) x weight (Kg) / (Pre procedure creatinine x 72) Creatinine clearance x 3 = Contrast Threshold Contrast Threshold _______
D. Physician will be notified when 75% contrast threshold reached.
[Contrast Threshold x .75]
E. Physician will be notified when contrast threshold dose has been reached.
• Some cases will require much larger volumes of contrast secondary to complications, or anatomical reasons. In such cases, the need to complete the procedure and ensure a satisfactory angiographic result is necessary for reducing the risk of acute closure, myocardial infarction and death. These concerns almost always outweigh the need to preserve renal function. The operator’s decision in such case must be respected.
References: Adapted from the policies and procedures developed by:
Blue Cross Blue Shield Cardiovascular Consortium (BMC2) - Nephropathy Requiring Dialysis Pocket Card
St. John Hospital and Medical Center, Detroit

January 2014 1
JJaannuuaarryy 22001144
6. IN-LAB/OR PROTOCOL: ARTERIAL ACCESS FOR
PROFESSIONALS WITH ADVANCED TRAINING Access site
1. Brachial a) Cut down
1. Performed by Attending Interventionalist or Vascular Surgeon. b) Percutaneous
1. Performed by Attending Interventionalist or Fellow.
2. Radial a) Percutaneous
1. Performed by Attending Interventionalist or Fellow. 2. Set up / Access
a) Confirm normal Allen’s Test of < 10 seconds. b) Confirm no contraindications.
1. Known PAD in upper extremity. 2. Need for 8 fr sheath. 3. Raynaud’s 4. Buerger’s disease 5. Need for radial artery for dialysis or bypass.
c) Patient on monitor per standard protocol. d) Place arm on arm board with wrist hyper-extended. Gently restrain arm in
position. e) Remove excess hair. f) Sterile prep and drape. g) Palpate radial pulse. h) Administer local anesthetic over radial pulse 1 cm proximal to radial styloid
process. i) Obtain access with modified Seldingers technique. j) Once sheath placed, administer:
1. Intra arterial nitroglycerin. 2. Intra arterial Verapamil. 3. Intra arterial heparin (mixing with blood to avoid excess discomfort).
3. Sheath removal and radial band application. a) Flush sheath. b) Place radial band compression device. c) Administer intra arterial nitroglycerin. d) Remove sheath and apply compression device. e) Leave arm in wrist immobilizer.
4. Removal Radial of compression band. a) 2-3 hours after placement, gradually release pressure every 15minutes until
removed.

January 2014 2
JJaannuuaarryy 22001144
b) If bleeding occurs, tighten wrist band and contact Attending Interventionalist or Fellow.
c) 1 hour after removal of radial band, remove wrist immobilizer. d) Instruct patient to only use light activity with affected limb for 24 hours.
3. Femoral
a) Performed by <> HOSPITAL SPECIFIC 1. Set up
a) Place patient on table in standard position. b) Ensure adequate hair removal and adjust as needed. c) Sterile prep from umbilicus to knee. d) Drape patient.
2. Access to be obtained by <> HOSPITAL SPECIFIC a) Palpate land marks.
1. Inguinal ligaments extend from anterior superior iliac spine to pubic tubercle.
2. Palpate the femoral pulse. 3. Place hemostats over desired access point and use fluoroscopy to confirm
location. Goal is to access the common femoral artery 1 cm lateral to the most medial cortex of the femoral head. Post procedure compression against the femoral head will aid in hemostasis. Puncture above this site will increase the risk of retroperitoneal bleeding. Access lower than this increases risk of AV fistulas and pseudo-aneurysms. Access below the bifurcation of the common femoral artery into the superficial femoral artery and the femoral profunda is also a contraindication for closure devices.
b) Administer local anesthesia. Using a 23½ gauge needle administer 10 ml of 2% Lidocaine subcutaneously between 1 – 3 cm below the inguinal ligament, at the site where the femoral artery can be palpated. Once a wheel has been made, the Lidocaine is administered into the deep tissue along the trajectory for arterial and venous entry. Aspirate before administering Lidocaine in the deep tissue.
c) Make a small skin nick (with a #11 scalpel) above area of the femoral artery and vein (optional). This decreases resistance encountered with the advancement of the needle.
d) If a venous line is needed, obtain access prior or after obtaining arterial access. To obtain venous access, use an 18 gauge Cook needle. Apply a syringe to the end of the needle, and with the bevel up, one finger beneath and one finger medial to the femoral artery, gentle suction should be applied to the syringe. Femoral venous access is secured prior to arterial access to allow for administration of fluids, drugs, or access to advance a Swan-Ganz catheter.
e) When venous access is achieved, advance .035 or .038 guide wire into the needle, if resistance is met, do not force the wire in, but withdraw wire and reposition the needle. If unable to easily advance wire, withdraw needle. Once the wire can be successfully advanced, remove the needle. Then advance the sheath over the wire to maintain access. Flush the sheath with heparinized solution.
f) To obtain arterial access, advance an 18 gauge Cook needle with the bevel up and the needle positioned at a 45º angle. Palpate the artery using three middle

January 2014 3
JJaannuuaarryy 22001144
fingers of the left hand 1 – 3 cm below the inguinal ligament. Do not puncture greater than 3 cm below the inguinal ligament to prevent entering the profunda (to ease in obtaining hemostasis) or the superficial femoral branches (to prevent limb ischemia in the event an IABP will need to be inserted).
1. Advance the needle, supporting it with the index finger and middle finger straddling the needle. Slowly advance the needle until a brisk pulsating blood flow is achieved. Avoid advancing the needle through the artery to prevent bleeding through the back wall of the vessel.
2. Once the needle has entered the artery and a brisk flow is noted, stabilize the needle.
a) Then slowly advance a .035 or .038 J-Guide wire through the needle. There should not be any resistance noted.
b) If there is, stop and remove the wire. Slowly advance the Cook needle to 1- 2 mm, and attempt to re-advance the guide wire as long as adequate flow is noted. Reattempt to advance the guide wire. The needle may be only partially in the artery and a dissection may occur if the wire is forced forward. Avoid advancing the needle through the artery. If flow is not brisk with needle repositioning, or the wire can not be advanced, then slowly pull back.
c) If unable to achieve blood return, remove the needle and the groin should be compressed for 5 minutes. The Attending Physician should be consulted at this time before an additional attempt is made to achieve access.
3. Once the wire has been advanced, and location of the wire has been verified under fluoroscopy, then the needle is removed. (If the patient complains of any pain when the wire is advanced, withdraw the wire, remove the needle, and hold pressure for 5 minutes. Then consult the Attending Physician before re-attempting access.) Using the left hand to stabilize the artery and wire, the sheath is placed over the wire. Using a rotational motion the sheath is advanced into the artery. Warn the patient that they will feel pressure at this point as the sheath is being manipulated. If the operator is experiencing difficulty advancing the sheath, use the dilator only or a smaller sheath. If still experiencing difficulty, consult physician. The wire should move freely up the aorta, which is located to the left side of the patient. The wire may cause a dissection. Contrast maybe needed to verify placement.
4. Once the sheath has been placed, flush the sheath with Heparinized solution. To maintain patency of the sheath, and remove debris.
5. The Attending Interventionalist should be achieving access in the following situations:
a) Patient who has had Aorta-Bifemoral Bypass. b) Severe Peripheral Vascular Disease. c) Multiple procedures at the same site with large amount of
scar tissue. d) Hemodynamically unstable, (i.e. cardiogenic shock). e) Critical Aortic Stenosis secondary to risk of potential vagal
response. f) Morbid Obesity.

January 2014 4
JJaannuuaarryy 22001144
Sheath removal and hemostasis
1. Manual pressure in recovery area. 2. Closure devices place per protocol by <> HOSPITAL SPECIFIC 3. Prior to placement of a closure device, angiography should be performed of the
access site to ensure access in proper location, no PAD and adequate vessel size. References: Adapted from the policies and procedures developed by:
Bay Regional Medical Center
Oakwood Hospital and Medical Center
Grossmans, “Cardiac Catheterization Angiography and Intervention, 6th Edition

January 2014 1
JJaannuuaarryy 22001144
7. POST-PROCEDURE PROTOCOL: SHEATH REMOVAL
PROTOCOL A dedicated sheath pulling team that has met competency requirements may be the best organizational structure to minimize vascular complications.
1. Confirm with recovery RN that: a. Patient is ready for sheath pull. b. Atropine available for vaso vagal response. c. Pertinent history: special considerations (i.e. previous groin complications).
Catheter/Sheath Type Special Instructions Femoral gortex graft access site. Manual hold only, no clamp. New iliac stent (same side approach) or less than 6 months old.
Manual hold only, no clamp.
New iliac stent (opposite side approach) None Old iliac stent (more than 6 months old) Manual hold only, no clamp. Antegrade approach Manual hold only, no clamp. Cardiac biopsy sheath Must be removed in lab. Brachial sheath Monitor with pulse oximeter. Radial sheath Use of Hemo-band. Hemo-band may be
adjusted and/or removed on unit (see Hemo-band policy).
Markedly obese None. Manual hold preferred. Aortic insufficiency Will require longer hold time. C-clamp
recommended. SBP > 180 mm Hg Must be treated prior to removal.
2. Assess the patient for sheath pull.
a. BP greater than 160 systolic and greater than 100 diastolic. b. BP less than 90 systolic and heart rate less than 45 bpm (contact attending or
fellow if BP is high or low). c. ACT less than 180 seconds when measured on the Hemochron Junior Signature. d. Active chest pain. e. Visualize and assess the sheath insertion site (look for any existing bruising,
hematoma or anything unusual). 3. Gather appropriate supplies.
a. Blue pad b. 11 blade if needed for suture removal. c. 4 x 4’s d. PPE (personal protective equipment) e. 5 cc syringe f. adhesive band aid

January 2014 2
JJaannuuaarryy 22001144
4. Educate patient on sheath pull procedure (using procedure below as a guide).
5. Procedure
a. Place the call light within reach. b. Assess baseline vital signs. c. PPE in place prior to start of the procedure. d. Remove sheath site dressing. e. Remove the stitches using the blade. f. Pull off 5cc of waste blood to check for clots. (If clot present, aspirate into the 5
cc syringe and discard syringe in red container.) g. Palpate pulse at the site. h. Apply firm pressure to the site using three fingers positioned sequentially up
(toward the head) the artery beginning at the skin puncture. (The staff member pulling the sheath will stand on the same side as the patient’s puncture site. If the patient’s puncture site is on the right side, the staff member holds pressure with their left hand, if the patient’s puncture site is on the left side; the staff member holds pressure with their right hand.)
i. Pull sheath. j. Continuous firm pressure should be held at the site to obliterate the distal pulse
for 3-5 minutes. After the initial 3-5 minutes pressure must be reduced enough for the nurse to obtain a distal pulse.
• Hold pressure for at least 15-20 minutes for a diagnostic procedure. • Hold pressure for at least 30 minutes for an interventional procedure. • Hold pressure for at least 45 minutes for the removal of a balloon pump.
k. Continually assess the site for bleeding, hematoma and bruising. Have the nurse notify the attending immediately if any of these (or other) complications occur.
l. If a venous sheath and arterial sheath are both present, the venous sheath should be pulled during the last 5 minutes of the arterial hold (using the time guidelines listed in item j.) Assess the site, remove stitches, pull sheath and hold pressure directly on the puncture site (one finger on the site, one finger above and one finger below the puncture site) for a minimum of 5 minutes.
m. If bleeding occurs at the puncture site after initial hemostasis, re-apply pressure immediately and have the nurse contact the attending physician.
n. Instruct the patient to: 1. “If you feel anything wet, warm or sticky near the bandage, call for help immediately.” 2. “If you have to sneeze, cough or laugh, hold pressure on the bandage.” 3. “Keep your head on the pillow and keep your leg straight.”
o. Give report to the nurse so that the nurse can document the procedure on the flow sheet.

January 2014 3
JJaannuuaarryy 22001144
Note: The removal of these sheaths is very important and if done improperly can cause the patient great harm and the need for corrective surgery. It can often take longer to control hemostasis than it took to perform the cardiac catheterization. Patience is a must; possible complications include the following:
1. Hematoma: A large, firm collection of blood under the SQ tissue. Possibly caused by inadequate pressure to the puncture site.
2. Arterial Thrombus 3. Venous Thrombus 4. Distal Embolization 5. Pseudoaneurysm: An injury to the vessel wall in which blood is retained in the
surrounding tissue. 6. Vasovagal response: Upon removal of lines, pallor, bradycardia, hypotension or
emesis may occur. Treatment may include: increasing IV fluids, elevating the foot of the bed 10 to 12 inches, and possibly administration of atropine and or an anti-emetic.
7. Infection 8. AV Fistula
If any of the above occurs, notify the physician immediately.
References: Adapted from the policies and procedures developed by:
Bay Regional Medical Center
Blue Cross Blue Shield of Michigan Cardiovascular Consortium
Providence Hospital and Medical Center
University of Michigan Medical Center
St. John Hospital and Medical Center
William Beaumont Hospital, Troy

January 2014 4
JJaannuuaarryy 22001144
STAFF TRAINING AND COMPETENCY – SHEATH REMOVAL
Preceptor:__________________________ Staff:___________________________
Date training initiated:________________ Completed:_______________________
Date Completed/preceptor initials
1. Read sheath removal protocol. _______________________
2. Review protocol with preceptor. _______________________
3. Observe sheath removal and holding pressure on at least two occasions. _______________________
4. Remove sheath and hold pressure under supervision of the preceptor or designee on twenty occasions. 1.______________________
2.______________________
3.______________________
Performance of sheath removal and holding pressure will be observed by the staff member’s
preceptor or designee periodically to ensure competence of proper technique.
_______________________________ has successfully completed the sheath removal training
and has demonstrated competence in the removal of sheaths with the achievement of hemostasis.
_______________________________M.D. ___________________________Preceptor

January 2014 5
JJaannuuaarryy 22001144
ARTERIAL ACCESS CHECKLIST
OBJECTIVE: The clinician will independently achieve arterial access for patients under direct supervision of the physician. Case Number Physician Signature Verifying Completion
1.
2.
3.
4.
5.
6.
7.
8.
9.
10.
11.
12.
13.
14.
15.

January 2014 6
JJaannuuaarryy 22001144
SHEATH REMOVAL CHECKLIST
Gather all necessary equipment (gloves, gauze protective gear, etc). ______
Demonstrate proper positioning of patient – supine with the artery exposed. ______ Place patient on a cardiac monitor. ______
Able to state appropriate coagulation studies along with proper reporting of abnormal value (ACT < 180 seconds). ______ Assess pedal pulses, color, pain, temperature, and sensation of affected extremity throughout time of hold. ______
Obtain baseline blood pressure, HR, and rhythm. ______
Remove sutures securing sheath to extremity. ______
Demonstrate proper position of manual hold 1” to 1 ½” proximal to insertion site, wearing sterile gloves and using sterile gauze. ______ Demonstrate appropriate length of manual hold. ______ Able to verbalize actions to be taken in the event of a vagal response from patient (notify MD, Atropine, fluids). ______ Apply dressing ______ Demonstrate proper documentation: Date and time of sheath removal. Patient’s response to procedure. Coagulation study prior to hold. Interventions to any complications if applicable. Status of affected extremity and site pre and post sheath removal. Complete description of hematoma if present. ______ Name_________________________________ Preceptor________________________
Date__________________________________

January 2014 1
January 2014
8. POST PROCEDURE: (5 MINUTE) GROIN BLEED
STOP THE BLEEDING! -HOLD manual pressure -STOP/REVERSE anti-coagulants -CALL physician -CONSIDER lab/OR for covered stent
ASSESS FOR INSTABILITY! -HR>100, SBP<100 -Oliguria, confusion, cool extremities -Retroperitoneal bleed or ongoing anterior bleed*
VOLUME RESUSCITATE! -2 large bore IV’s or central “Cordis” line -STAT PRBC’s (Type and Crossed or O neg) -FFP if gave > 2U PRBC’s -Avoid hypothermia
DIAGNOSTIC TESTING! -CBC with differential, PTT, PT -ECG -Repeat cath or non-contrast CTAP -Ultrasound
-MONITOR FOR REBLEED
-CONSIDER ICU
1
2
3
4
STABLE
UNSTABLE
5
*70% of retroperitoneal bleeds will NOT have a palpable/visible hematoma!
January 2014 2
January 2014
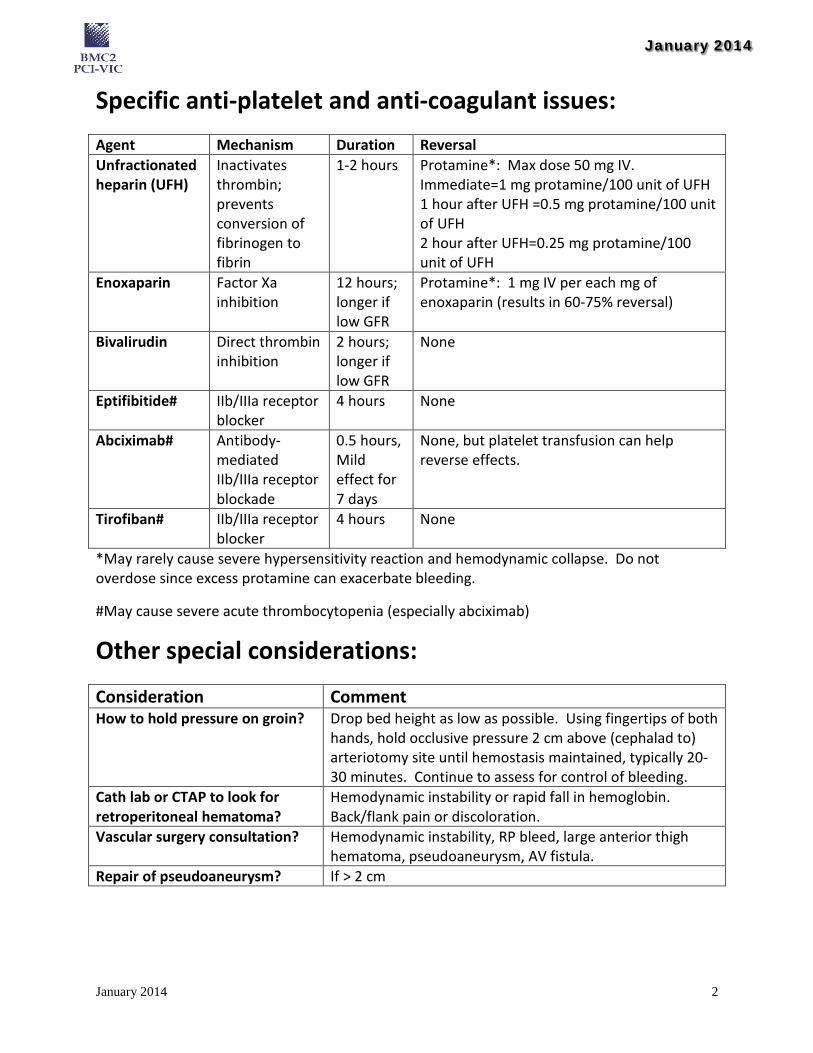
Specific anti-platelet and anti-coagulant issues: Agent Mechanism Duration Reversal Unfractionated heparin (UFH)
Inactivates thrombin; prevents conversion of fibrinogen to fibrin
1-2 hours Protamine*: Max dose 50 mg IV. Immediate=1 mg protamine/100 unit of UFH 1 hour after UFH =0.5 mg protamine/100 unit of UFH 2 hour after UFH=0.25 mg protamine/100 unit of UFH
Enoxaparin Factor Xa inhibition
12 hours; longer if low GFR
Protamine*: 1 mg IV per each mg of enoxaparin (results in 60-75% reversal)
Bivalirudin Direct thrombin inhibition
2 hours; longer if low GFR
None
Eptifibitide# IIb/IIIa receptor blocker
4 hours None
Abciximab# Antibody-mediated IIb/IIIa receptor blockade
0.5 hours, Mild effect for 7 days
None, but platelet transfusion can help reverse effects.
Tirofiban# IIb/IIIa receptor blocker
4 hours None
*May rarely cause severe hypersensitivity reaction and hemodynamic collapse. Do not overdose since excess protamine can exacerbate bleeding.
#May cause severe acute thrombocytopenia (especially abciximab)
Other special considerations:
Consideration Comment How to hold pressure on groin? Drop bed height as low as possible. Using fingertips of both
hands, hold occlusive pressure 2 cm above (cephalad to) arteriotomy site until hemostasis maintained, typically 20-30 minutes. Continue to assess for control of bleeding.
Cath lab or CTAP to look for retroperitoneal hematoma?
Hemodynamic instability or rapid fall in hemoglobin. Back/flank pain or discoloration.
Vascular surgery consultation? Hemodynamic instability, RP bleed, large anterior thigh hematoma, pseudoaneurysm, AV fistula.
Repair of pseudoaneurysm? If > 2 cm

January 2014 1
JJaannuuaarryy 22001144
9. POST PROCEDURE: TRANSFUSION PROTOCOL
Date: Time:
Patient weight ______________kg Name_____________________________ Date of birth_______________
ONLY MINIMAL EFFECTIVE DOSE OF EACH BLOOD COMPONENT SHOULD BE USED: (Check boxes to order or fill in blanks as necessary)
1. Choose one of the following:
□ Crossmatch # ______units and transfuse today. □ Routine □ASAP □STAT Consider alternative therapy when anemia is non symptomatic and patient is not having significant active blood loss:
• Iron Therapy •Erythropoietin • Restrictive transfusion (1 unit) □ Crossmatch # _______ units on call for surgery. Date/Time Surgery:______________________ □ Type and Screen □ Pre-admission Surgery Date:_________________________________________
2. Medications: □ Diphenhydramine ______mg □ IV Push □ PO times one dose pre-transfusion. □ Acetaminophen _______mg PO times one per dose pre-transfusion. □ Furosemide _____mg □ IV Push □ PO □ give one dose between units □ 1 dose after each unit □ __________________________________________________________________ 3. Laboratory: □ Hemoglobin/Hematocrit _______ □ Protime with INR □ APTT__________(Post-transfusion) □ CBC without diff w platelets _______ □ CBC w diff w platelets □___________________________________________________________________

January 2014 2
JJaannuuaarryy 22001144
4. Indications for transfusion: (complete when ordering product to be administered) □ Red Blood Cells Number of units:__________ Current Hgb:_____ □ Irradiated □ Split in half □ Hgb S neg □ ___________ Indication: □ Hemoglobin < 8 g/dl or Hematocrit < 24%, not symptomatic. (Consider alternative therapy.) □ Hemoglobin < 8 g/dl or Hematocrit < 24%, and symptomatic. □ Acute blood loss (Unresponsive to fluid resuscitation or ongoing loss related to surgery or other.) □ Other diagnosis/indication: □ Describe:_______________________________________________ □ Sickle cell anemia or congenital blood disorder. □ Treatment for cancer. □ Platelets Number of units: ________ Current platelet count_________ □ Irradiated □ _____________ Indication: □ Platelet count less than 10,000 or less than 20,000 with signs of bleeding. □ Platelet count less than 50,000 with planned minor procedure. □ Platelet count less than 100,000 with planned major surgery. □ Uncontrolled or active bleeding due to platelet dysfunction. □ Describe:____________________________________________________ □ Fresh Frozen Plasma Number of units:_______ Current PT/PTT/INR_________ Indication: □ PT greater than 15 seconds or PTT greater than 45 seconds or INR greater than 1.5. □ Active or massive bleeding. □ On anticoagulation therapy with imminent surgery. □ DIC □ Describe:________________________________________ □ Cryoprecipitate: Number of units:___________ Current Fibrinogen_______ Indication: □ Fibrinogen under 100 mg with active bleeding. □ DIC or massive bleeding. □ VonWillebrand’s Disease or Hemophilia A or Factor VIII or XIII Deficiency when alternative therapy is insufficient. □ Describe:___________________________________________________________________
Indications for transfusions will be tracked and may be subject to peer review
Physician/Provider Signature: _________________________________________________________ Time faxed to Pharmacy: _____________________________________________________________
References: Adapted from the policies and procedures developed by: Bronson Medical Center

January 2014 1
JJaannuuaarryy 22001144
10. POST PROCEDURE: TRANSFUSION GUIDELINE
(Excluding Patients with Acute Ongoing Blood Loss)
References: Adapted from the policies and procedures developed by:
Blue Cross Blue Shield Cardiovascular Consortium

January 2014 1
JJaannuuaarryy 22001144
11. POST PROCEDURE: EXAMPLE OF INFORMED
CONSENT FOR TRANSFUSION Category One: □ I DO NOT WANT ANY TRANSFUSION of any of the following blood products to be
used in my medical treatment: • Whole blood • Red Blood cells • White blood cells • Platelets • Plasma (includes FFP)
Even if my doctor tells me the products will: • Keep me alive
• Avoid permanent damage to tissue, organs or body functions □ I ACCEPT ALL BLOOD PRODUCTS
□ Category Two: I want to reduce my exposure to blood transfusions. I want my doctor to use methods to keep and make the most of my own blood supply if needed. I understand this may reduce the need for blood therapy. I understand I may need blood therapy at some future time in my medical care.
No matter which category you choose, check the following choices regarding blood fractions, procedures, and treatments: □ I accept minor blood fractions:
□ Albumin/Plasmanate □ Erythropoietin □ Immunoglobulin □ Floseal □ Cryoprecipitate □ Tisseal □ Clotting factors (fibrinogen, factor VII, VIII, IX, XII) □ Other______________________________________
□ I refuse all minor blood fractions.
□ I accept the following procedures or treatment: □ I am willing to receive bone, tissue, and muscle transplant. □ Dialysis □ Blood salvage during or after surgery. □ Heart lung machine autologous blood. □ Acute normovolemic hemodilution. □ Other_______________________________________
□ I refuse all procedures or treatments.

January 2014 2
JJaannuuaarryy 22001144
The risks and benefits of blood transfusion and refusal of blood have been explained to me. I have been given the chance to ask questions. I understand the answers I have been given. Date__________________________________ Time________________________________________
If patient is unable to sign or is a minor, complete the following: Patient is a minor ______ years of age or is unable to sign because:
______________________________________________________________________ ______________________________________________________________________ ______________________________________________________________________ _______________________________ ___________________________
Signature of: □ Patient Witness □ Closest Relative (relationship) □ Guardian Interpreter’s Statement: I have given translation of the consent form and the doctor’s explanation to the patient and their parent, closest relative or legal guardian. ________________________________________ Signature of Interpreter
References: Adapted from the policies and procedures developed by:
Bronson Medical Center

January 2014 1
JJaannuuaarryy 22001144
12. POST-PROCEDURE ORDERS Admit Patient
Primary Diagnosis/Procedure ______________________________________ Secondary Diagnosis _____________________________________________ Procedure – Closure Device placed in Left femoral puncture site. Procedure – Closure Device placed in Right femoral puncture site. Procedure – Peripheral Intervention Procedure – Coronary Intervention Procedure
Vitals
Vital Signs Progression – Temperature, Pulse, Respirations, Blood Pressure Check: groin for blood or hematoma and foot pulse while sheaths in place an after hemostasis every 15 minutes for 4 times, then every 30 minutes for 2 times, then every 1 hour for 4 times, then every 4 hours.
Vital Signs Progression – Temperature, Pulse, Respirations, Blood Pressure Check: pedal pulses every 5 minutes for during sheath removal.
Notify Clinician
Temp > 38.5 C Heart Rate > 100 Heart Rate < 40 Pulse Ox < 90% SBP > 160 SPB < 90 Vascular Complications, (expanding hematoma or bleeding). Chest Pain, and activate the conditional STAT EKG order. Bleeding, of puncture site after deployment of the device and light or manual pressure
does not control the bleeding. Platelet count < 100,000 or if count is 20% less than starting value. Stop abciximab if
count < 50,000. Hypoxia < 85% and resp rate > 18. Puncture Site Lump > small pea size.
Activity Flat Bedrest – For: 2 hours Type-in Nursing – Massage pad PRN while on bedrest. Bedrest _________ hours Elevate Head of Bed – 30 degrees, while on bedrest and while sheath’s in place. Activity – Stand, 3 hours after venous sheath removal hemostasis. Activity – Stand, 6 hours after arterial sheath removal hemostasis.
Ambulate – May begin____________________

January 2014 2
JJaannuuaarryy 22001144
Nursing Assess – Puncture site by gently palpating with fingertips, use minimal pressure per
Sheath Management Guidelines. Sheath Removal (See Sheath Removal Protocol) Closure Device
1.) Flat Bed Rest for 2 hours. 2.) After 2 hours, elevate HOB 75 degrees. 3.) Ambulate @ __________ am / pm. 4.) DO NOT apply pressure dressings, sandbag, clamp or firm manual pressure to
puncture site. 5.) Apply light digital or manual pressure to the puncture site for bleeding. 6.) Notify Clinician for bleeding at puncture site after deployment of the device
and light or manual pressure does not control the bleeding. 7.) Assess puncture site by gently palpating with fingertips, use minimal pressure
every 14 minutes. 8.) Notify Clinician if puncture site lump > small pea size. 9.) Please give patient completed closure device information card before
discharge. Nursing Monitoring/assessment Total Fluid Intake Intake and Output Check – Groin pre and post ambulation Diet
NPO Diet – Full Liquid. Full Liquid Tray x 1. Active Order – Advance Diet as Tolerated. Diet – Mechanical Soft. Conditional Order – Advance Diet as Tolerated.
Diet – Low Cholesterol. Low Cholesterol, No Added Salt (4 Gm). Conditional Order – Advance Diet as Tolerated.
Diet – Diabetic 1601-2200 Calories. Conditional Order – Advance Diet as Tolerated. Diet – Diabetic 2201-2500 Calories. Conditional Order – Advance Diet as Tolerated. Diet – Conditional Order – Advance Diet as Tolerated.
IV Fluids 0.9% NaCI – 1,000 mL IV @ ________ml/hour (1cc/kg/hr), stop after 4 hours
D5% - 1,000 mL, sodium bicarbonate additive 154 mEq IV, stop after 6 hours. Infuse at 1.18 mL/kg/hr for 6 hours post-procedure.
Infusions
Nitroglycerin Infusion UH – IV microgram/minute microgram/minute; Titrate to Systolic Blood Pressure ______ to _______. Re-evaluate in a.m.
Units Microgram/minute Instructions Titrate to Systolic Blood Pressure _____ to ____. Re-evaluate in a.m.

January 2014 3
JJaannuuaarryy 22001144
GPIIb/IIIa Drugs (CHOOSE ONE):
Eptifibatide Abciximab
Aspirin/Antiplatelet Agent Clopidogrel (Plavix) 75 mg orally daily or, Prasugrel (Effient) 10 mg orally daily Enteric coated Aspirin 325 mg orally daily. Give 1st dose NOW if not given in ED. Aspirin contraindicated, REASON: ___________________________________________________________________
Beta Blocker Beta Blocker ____________ Dose____________ Schedule__________ Beta Blocker contraindicated, REASON: ___________________________________________________________________
ACE Inhibitor
ACE Inhibitor____________ Dose____________ Schedule__________ ACE contraindicated, REASON: ____________________________________________________________________ Other ____________________________________________________________________
Cholesterol Lowering Drug
Statin____________ Dose____________ Schedule__________ Other ____________________________________________________________________
Lipid lowering therapy contraindicated REASON: ____________________________________________________________________
Smoking Cessation Nicotine Patch 14 mg _____ or 22 mg _____ Apply to skin once daily (remove old
patch & rotate sides). Other ____________________________________________________________________
Other Medications
Diuretic name ________ dose_________ mg □ orally or □ IV every _________ Docusate sodium (colace) 100 mg orally twice daily. Prochlorperazine (Compazine) 5-10 mg IV push over 5 minutes every 6 hours as
needed for nausea/vomiting. Maalox 30 ml orally every 4 hours as needed for indigestion. Alprazolam (Xanax) 0.25 mg orally every 6 hours as needed for anxiety. May repeat
1 time at bedtime for sleep for total of 0.5 mg. Acetaminophen (Tylenol) 325 mg, 1-2 tablets orally every 4 hours as needed for
discomfort. (Total acetaminophen dose not to exceed 4 grams / 24 hours).

January 2014 4
JJaannuuaarryy 22001144
Nitroglycerin 0.4 mg sublingual as needed for chest pain. May repeat every 5 minutes times 3 doses.
Simethicone (Mylicon) 80 mg orally every 4 hours as needed for gas. Atropine 0.5 to 1 mg IV for symptomatic bradycardia (level of conscious changes /
hypotensive / chest pain) maximum dose 0.04 mg/kg. Tylenol #3 (Acetaminophen 300 mg / codeine 30 mg) 1-2 tablets orally every 4 hours
as needed (not to exceed 4 gm / 24 hours). For codeine allergies, give Darvocet N-100 (Propoxyphene Napsylate 100 mg /
Acetaminophen 650 mg 1-2 tablets orally every 4 hours as needed – not to exceed 4 gm / 24 hours).
Ondansetron (Zofran) 2 to 4 mg IV every 4 hours as needed for nausea. Other medications
_______________________________________________________________________ _______________________________________________________________________ _______________________________________________________________________ _______________________________________________________________________
Post Procedure Labs Post-Procedure (6-8 hours)
Platelet Count (If on abciximab, 2-4 hours after procedure) Stop abciximab if PLT is < 50,000.
Troponin Level – Enter collection time 6-8 hours post-procedure. Creatine Phosphokinase/CK_MB – Enter collection time 6-8 hours post-procedure. POC Activated Clotting Time – per protocol.
AM Labs CBCP Basic Metabolic Panel
• A creatinine level should be drawn for all patients at high risk for CIN (Pre procedure Cr >1.5), consider a creatinine level at 72 hours
Troponin Level Creatine Phosphokinase/CK-MB
AM ECG
Radiology Portable Chest Chest Xray – PA & Lateral Respiratory
Oxygen Nasal Cannula UH – Cannula, T, Priority: Routine, Cannula flow titrate to keep patient within SpO2 target range, SpO2 target = 90-94%.
References: Adapted from the policies and procedures developed by:
University of Michigan Medical Center
St. John Hospital and Medical Center

January 2014 1
JJaannuuaarryy 22001144
13. DISCHARGE INSTRUCTIONS Instructions for Heart and Vascular Patients: You had the following procedure: ______________________________________ Appointments and Plan for Continued Care: Physician/Clinic ________________________________ Date _________________
Physician/Clinic ________________________________ Date _________________
Physician/Clinic ________________________________ Date _________________
Laboratory /Other Tests ______________________________________________ Patients with GFR < 30 pre procedure or those with rising creatinine: BMP with GFR 24-72 hours post procedure. Date ____________________ Cardiac/Peripheral Rehabilitation: ______________________________ The following instructions are general guidelines. Everyone is individual and specific instructions should be obtained from your doctor.
1. A small bruise is common at the puncture site and will go away. Bruising may extend to the knee with increased activity. A small bump at the puncture site may or may not be present. However, if you did not have a bump when you were discharged, and one develops, notify your doctor. If you did have a bump when you were discharged, and it becomes larger, notify your doctor. The puncture site may be some what stiff and sore, this will disappear.
2. If the puncture site becomes painful, swollen, red, warm to touch or if discharge is present, call your doctor. If your leg or arm, below the puncture site, becomes numb, pale or cool to touch, notify your doctor.
3. If you notice bleeding at the puncture site, apply direct pressure with your fingertips for 10 minutes. If bleeding continues, notify our doctor or go to the nearest emergency room.
4. You should be driven home by another person. Driving yourself may cause bleeding. You may not drive for 3 days after discharge.
5. You may resume normal activities after your third day at home, unless your doctor advises you otherwise.
6. You are encouraged to drink plenty of water (8-10 glasses) for the first day unless your doctor advised otherwise. This is to clear any remaining dye from your system.
7. If cardiac warning signs or symptoms occur, call your doctor or go to the nearest emergency room. If you normally take Nitroglycerin tablets under your tongue for chest pain, follow your doctor’s instructions for taking Nitroglycerin. Go to the nearest emergency room if the pain does not go away.

January 2014 2
JJaannuuaarryy 22001144
Signs and Symptoms - Seek medical attention or come to the emergency department if you develop: • discomfort or pain in your chest, neck, arm or jaw fatigue or weakness • palpations, rapid or irregular heartbeat excessive sweating • increase in shortness of breath with exertion or lying down increase in bleeding or bruising • a cough that does not go away or gets worse when you lie down lightheadedness or dizziness • weight gain of 3 or more lbs. in 24-48 hours or 5 lbs. in 1 week nausea or loss of appetite • increased swelling in legs or abdomen
8. If an irregular or fast-pounding heartbeat develops, call your doctor.
9. If a flushed feeling occurs for more than 24 hours, or a fever over 101 degrees Fahrenheit develops, call your doctor.
10. Avoid strenuous activities such as housework, bending, exercise and sexual activity for the first 3 days.
11. You may shower at home the day of your catheterization using care not to slip or fall. The insertion site (groin or arm) may be somewhat, sore and bruised for a few days. If this does not improve in a few days, call your physician.
12. For Wrist Procedure: Avoid aggressive movement of the wrist for 3 days. Walk around at will. You may sit in a regular chair or recliner.
13. For Brachial Procedure: No lifting or pushing for 3 days. Keep arm elevated for 12 hours. Walk around at will. You may sit in a regular chair or recliner. Rest frequently.
14. No soaking in bath, hot tub, or swimming pool for 3 days.
Smoking: Do not smoke. Smoking increases the chance of suffering a future heart attack, worsens symptoms and can cause other illnesses that may shorten your life. If you smoke, you should talk to your doctor about ways to quit. Call 1-800-XXX-XXXX regarding Smoking Cessation Programs.
Weight Monitoring: Weight gain of 3 or more pounds in 24-48 hours or 5 pounds in 1 week can be an early sign that your body is retaining fluid and your heart failure may be getting worse. Weigh yourself daily, before breakfast, but after going to the bathroom, and keep a record of your daily weights.

January 2014 3
JJaannuuaarryy 22001144
DISCHARGE MEDICATIONS Medication Dose Frequency Route Contraindication
Aspirin: daily or ________ By mouth Yes
Beta-Blocker: daily or ________ By mouth Yes
ACE-I or ARB: daily or ________ By mouth Yes
Cholesterol Lowering Agent: daily or ________ By mouth Yes
Diuretic: daily or ________ By mouth
Digoxin: daily or ________ By mouth
Aldactone: daily or ________ By mouth
Nitrate: daily or ________ By mouth
Sub Lingual Nitroglycerine: As needed daily or ________ By mouth
Calcium Channel Blocker: daily or ________
Clopidogrel: daily or ________ Yes
Prasugrel: daily or ________ Yes
Coumadin: daily or ________
daily or ________
daily or ________
daily or ________
daily or ________
daily or ________
INFORMATION ABOUT CARDIAC MEDICATIONS
ACE Inhibitors (ACE – I)
Angiotensin Receptor Blockers (ARBs)
Beta-Blockers
Dilates blood vessels, improves blood flow, lowers your blood pressure and reduces the work of your heart.
Dilates blood vessels, improves blood flow, lowers your blood pressure and reduces the work of your heart.
Slows heart rate and lowers blood pressure to decrease the workload of the heart.
Anti-platelet Drugs Statins Diuretics Reduces the risk of blood clots after PCI, stenting and CABG (coronary artery bypass surgery). For patients who have had a heart attack, daily aspirin reduces the risk of a second heart attack by one-third.
A group of cholesterol lowering drugs that reduces the risk of heart attack, stroke and death.
Reduces the amount of salt and water in the body by increasing urine production.
References: Adapted from the policies and procedures developed by:
Providence Hospital and Medical Center
Oakwood Hospital and Medical Center
St. John Hospital & Medical Center, Detroit
McLaren Regional Medical Center
Sinai Grace Hospital

January 2014 4
JJaannuuaarryy 22001144
REHABILITATION
Preventive Cardiovascular Referral
Rehabilitation Address: _________________________________________________ Phone and Fax number: _________________________________________________ Please provide the following information, sign, and fax to the above number. Name: ________________________________ _________________________________ (Last) (First) Address: _______________________ City: ___________________State/Zip: ____________ DOB: ________________ SS#:____________________________ Gender: Male Female Home Phone: _________________________ Work Phone:_____________________________
PREVENTIVE SERVICES Please check off (X) the Service(s) that you are requesting.
Diet/Nutrition Counseling Cardiac Rehab (Phase 2) continuous telemetry
monitoring Exercise Evaluation & Instruction Cardiac Rehab (Phase 2-B) 6-9 Sessions self- pay program PAD Exercise Training CR-Fit (Phase 3 Maintenance Program) Heart Failure Exercise Diabetes Exercise DIAGNOSIS/ICD-9: MI 410.9 Coronary Bypass Surgery V45.81 Stable Angina 413.9 PTCA/Stents V45.82 Heart Transplant V43.2 Heart Valve Repair/Replacement V43.3 Other ______________________________________________________________________ Is Stress Test Required? Yes No Limitations / Restrictions or Comments: _____________________________________________ ______________________________________________________________________________ Physician Name: ___________________________________ Date: ______________________ Physician Signature: ________________________________ Phone#: ____________________ Resident Name: ____________________________________ Fax#: ______________________ Resident Signature: ___________________________________ Date: ____________________

January 2014 1
January 2014
14. EXERCISE PROTOCOL
Exercise programs are an important part of treatment for patients with claudication.
ACC/AHA 2005 guidelines for the management of patients with peripheral arterial disease Class I Individuals with intermittent claudication who are offered the option of endovascular or surgical therapies should be provided information regarding supervised claudication exercise therapy and pharmacotherapy.
1. A program of supervised exercise training is recommended as an initial treatment modality for patients with intermittent claudication. (Level of Evidence: A)
2. Supervised exercise training should be performed for a minimum of 30 to 45 minutes, in sessions performed at least 3 times per week, for a minimum of 12 weeks. (Level of Evidence: A)
Class IIb The usefulness of unsupervised exercise programs is not well established as an effective initial treatment modality for patients with intermittent claudication. (Level of Evidence: B)
References:
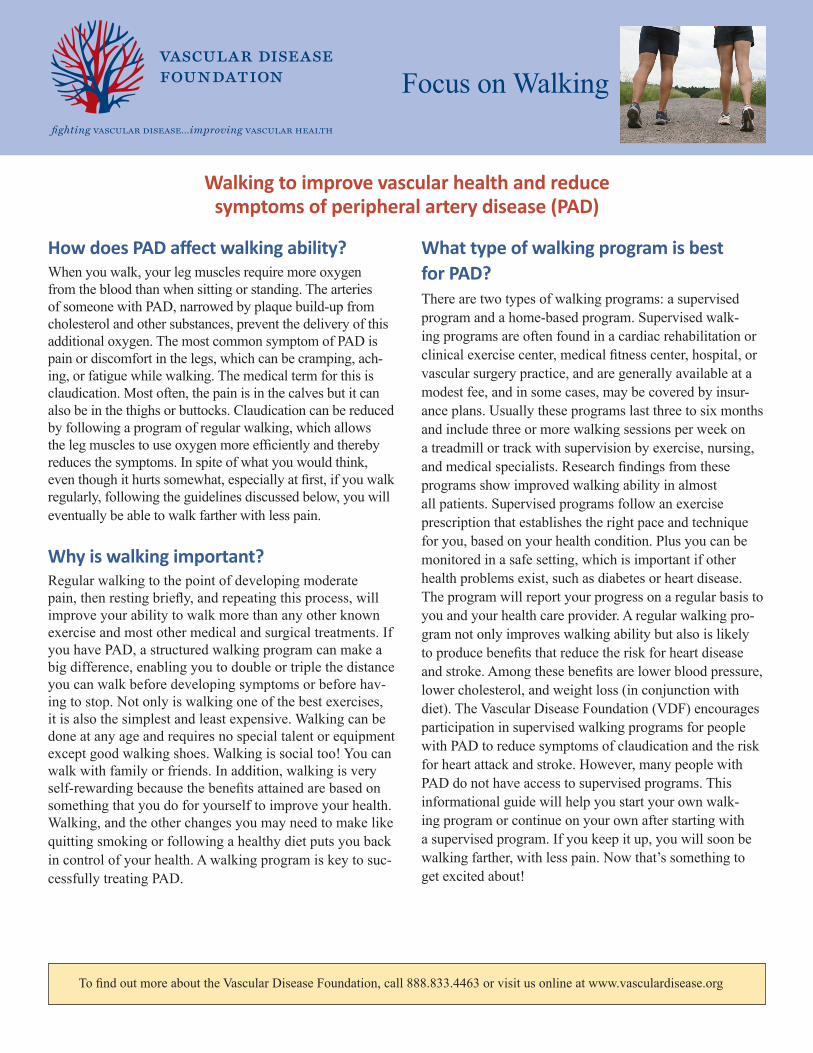
Vascular disease Foundation: http://vasculardisease.org/flyers/focus-on-walking-flyer.pdf
How does PAD affect walking ability?When you walk, your leg muscles require more oxygenfrom the blood than when sitting or standing. The arteries of someone with PAD, narrowed by plaque build-up from cholesterol and other substances, prevent the delivery of this additional oxygen. The most common symptom of PAD is pain or discomfort in the legs, which can be cramping, ach-ing, or fatigue while walking. The medical term for this is claudication. Most often, the pain is in the calves but it can also be in the thighs or buttocks. Claudication can be reduced by following a program of regular walking, which allows the leg muscles to use oxygen more efficiently and thereby reduces the symptoms. In spite of what you would think, even though it hurts somewhat, especially at first, if you walk regularly, following the guidelines discussed below, you will eventually be able to walk farther with less pain. Why is walking important?Regular walking to the point of developing moderatepain, then resting briefly, and repeating this process, will improve your ability to walk more than any other known exercise and most other medical and surgical treatments. If you have PAD, a structured walking program can make a big difference, enabling you to double or triple the distance you can walk before developing symptoms or before hav-ing to stop. Not only is walking one of the best exercises, it is also the simplest and least expensive. Walking can be done at any age and requires no special talent or equipment except good walking shoes. Walking is social too! You can walk with family or friends. In addition, walking is very self-rewarding because the benefits attained are based on something that you do for yourself to improve your health. Walking, and the other changes you may need to make like quitting smoking or following a healthy diet puts you back in control of your health. A walking program is key to suc-cessfully treating PAD.
What type of walking program is bestfor PAD?There are two types of walking programs: a supervised program and a home-based program. Supervised walk-ing programs are often found in a cardiac rehabilitation or clinical exercise center, medical fitness center, hospital, or vascular surgery practice, and are generally available at a modest fee, and in some cases, may be covered by insur-ance plans. Usually these programs last three to six months and include three or more walking sessions per week on a treadmill or track with supervision by exercise, nursing, and medical specialists. Research findings from theseprograms show improved walking ability in almostall patients. Supervised programs follow an exercise prescription that establishes the right pace and technique for you, based on your health condition. Plus you can be monitored in a safe setting, which is important if other health problems exist, such as diabetes or heart disease. The program will report your progress on a regular basis to you and your health care provider. A regular walking pro-gram not only improves walking ability but also is likely to produce benefits that reduce the risk for heart disease and stroke. Among these benefits are lower blood pressure, lower cholesterol, and weight loss (in conjunction with diet). The Vascular Disease Foundation (VDF) encourages participation in supervised walking programs for people with PAD to reduce symptoms of claudication and the risk for heart attack and stroke. However, many people with PAD do not have access to supervised programs. This informational guide will help you start your own walk-ing program or continue on your own after starting with a supervised program. If you keep it up, you will soon be walking farther, with less pain. Now that’s something to get excited about!
To find out more about the Vascular Disease Foundation, call 888.833.4463 or visit us online at www.vasculardisease.org
Focus on Walking
Walking to improve vascular health and reducesymptoms of peripheral artery disease (PAD)

Getting startedBefore starting your own walking program, discussyour plans with your health care provider to make surethere are no medical conditions or physical limitationsthat would prevent you from safely walking. Consider-ations include heart or other medical conditions, orlimitations due to medications, arthritis, balance, posture,and loss of sensation in your feet. In some cases, you may be asked to take an exercise test on a tread-mill to evalu-ate your initial walking ability and to ensure that your heart does not have major blockages. Your health care pro-vider may have specific instruc-tions on how hard to exercise, as well as how long and how many times per week. Alterna-tively, if you cannot attend a supervised pro-gram on a regular basis, consider a few visits for instruc-tion before you start your home program.
Proper equipmentA good pair of shoes is one key to success. It is veryimportant to wear shoes that fit comfortably – neithertoo tight or too loose. Do not wear shoes that are tooworn. Always wear socks or stockings to prevent blisters,especially if you have diabetes. You should inspect your feet daily, and especially after walking to be sure that a blister or sore has not developed.
Set a scheduleIt is important to walk on a regular basis to see results.Establish a time when you can devote an hour three ormore times per week. Walking can be done at any timeof the day that is convenient for you. Treat your walking as an appointment with yourself. If a “walk appointment” cannot be kept, reschedule it as soon as possible. Walking is as important as taking your medicine - that is why we call the individualized program that is provided for you an “exercise prescription.”
Select a placeOne advantage of a home walking program is that you can choose where and when you walk. You may want to walk on a treadmill at home or at a community facility. You may want to walk inside at a mall or outside on a track, around the block, or in a park. You may choose to vary your place on a daily or weekly basis. If the weather turns bad choose places that are safe for you to walk.
Set a goalA regular walking program increases the speed, dis-tance, and time you can walk before experiencing pain. The benefits from exercise occur gradually, will become noticeable over two to three months, and will continue to increase. For some individuals, it might take up to six months to see improvements. Remember that you must keep walking on a regular basis to maintain these im-provements. Hopefully, you will find walking so helpful that it becomes a permanent part of your life. Set reason-able goals by knowing your limits before starting the program. How many blocks or minutes can you now walkbefore you have pain? How many times do you have to stop and rest before you get to the mailbox or the store? Write down your limits on a progress form, like the one on the last page of this pamphlet. Then set goals to in-crease your time and distance by 10 percent or 20 percent per month. If you have completed a formal exerciseprogram, discuss your goals with the program staff.
To find out more about the Vascular Disease Foundation, call 888.833.4463 or visit us online at www.vasculardisease.org

STEP 1 - Warm-upAs with any exercise, it is a good idea to warm-up before you start. Begin with very slow and easy walking, or easy stretching of the muscles of the thighs and the calves.
STEP 2 - WalkBegin walking and increase the pace until you reach amoderate level of pain. Use the walking pain scale as aguide to determine moderate pain—it should be equal to a three or four on the scale, which may feel like a “Charlie horse,” cramp or tightness. Unlike most advice to stop when you feel pain in other parts of the body, walking until you experience moderate pain in the legs stimulates improvement in people with leg symptoms due to PAD. Try to walk at a pace that causes some pain in three to five minutes. If you can walk longer than that without reaching pain in your legs during your exercise workout, you are prob-ably not working hard enough. If you cannot walk faster, try walking up a hill or increase the incline on a treadmill. If these are not pos-sible, try to walk a little longer.
STEP 3 - Stop and restStop walking after you reach a pain level of three or four and cannot walk farther. (See Walking Pain Scale.) Rest until the pain is gone. It may take several minutes. Please note that chest pain and/or shortness of breath with exercise or walking should be discussed with a health care provider.
STEP 4 - Repeat the walk/stop stepsAfter the pain is gone, repeat the walk/stop sequenceseveral times. The goal is to walk for a total of 50 minutesduring each session, not counting the rest breaks. At first,you might be able to achieve only 10 to 20 minutes. Try to build up to 50 minutes over several weeks. Soon you will find that you can walk faster or up a steeper incline at the same level of pain. This is a good sign of improvement. If you find that you can walk for eight toten minutes without reaching a pain level of three orfour, it is time to increase your speed or distance. If you are walking outdoors,wear the right clothing for thetemperature and protect yourself from the sun with a hat, long sleeves, and sunscreen. Also, drink plenty of water, especially if it is hot. STEP 5 - FinishingFinish by doing some gentle leg stretches of the thighand calf muscles. Stretching after exercise helps to reduce soreness of the muscles. Record your session in a log.
Your Walking Program - Step by Step1
24
3
5
Walking with a treadmillIf using a treadmill, walk at a speed and grade that will produce your usual leg symptoms within three to five minutes.If you have not used a treadmill before, ask someone who knows how it works to be at your side until you get used toit. If you do not know what your starting level is, set the treadmill at a flat grade (no incline) and begin with a slow speed (1.0 – 1.5 mph). If you are still comfortable after five minutes, increase the speed slightly. If you cannot walk faster, try increasing the grade on the treadmill. It will take some trial and error to find the right treadmill settings that produce pain of moderate severity (See Walking Pain Scale). Write down these treadmill settings and use them for your next walking session. When the walking becomes easy and the pain is less than moderate, increase the speed or grade on the treadmill. Use the directions in Step 4 above to build up your exercise session time and intensity.
Tracking your progressIt helps to record your progress every week or two. Use the same walking route each time you do a “progress check” so you can compare results. Time or mark the distance at which your pain causes you to stop and rest. Carry the “Walking Progress Log” or a small piece of paper and a pencil and write it down while you rest. Walk again to where you must stop and rest. Again, write down the time or location. Continue this throughout the exercise session. Be sure to update the “Walking Prog-ress Log” at the end of the walking session.
Walking Pain ScaleUse this five-point scale to help
you figure our your level of pain.
1 = no pain2 = onset of pain3 = mild pain4 = moderate pain5 = severe pain
To find out more about the Vascular Disease Foundation, call 888.833.4463 or visit us online at www.vasculardisease.org

Practical Tips1. Ask a friend or family member to walk with you. It will pass the time more quickly and motivate you to continue. It will also be good for their health!
2. Don’t be discouraged, even if you cannot walk far at first. Reaching your goals takes time. Try different routes to make your walks more inter- esting. Take a music/media player so you can enjoy music or books while you walk if you are walking alone.
3. If you miss a walking appointment, don’t despair. Simply get back to your usual schedule as soon as possible.
4. Use the “Walking Progress Log," or make one of your own. Logs may also be found on the VDF website.
5. Carry a cane with a seat so you can always have a place to sit and rest.
6. Consider running shoes for walking! Running shoes typically are light-weight, with flexible materials and extra padding.
7. Carry a stopwatch to track your minutes walked.
8. Remember, you deserve to enjoy the best health possible. Take the time to walk for your health.
© 2012 VASCULAR DISEASE FOUNDATION 8206 Leesburg Pike, Suite 301 • Vienna, VA 22182 30vdf2012
The Vascular Disease FounDaTion
Established in 1998, the Vascular Disease Foundation (VDF) devel-ops educational information and initiatives for patients, their families and friends, and health care providers regarding often ignored, but serious vascular diseases. In fact, VDF is the only multidisciplinary national public 501(c)(3) non-profit organization focused on providing public education and improving awareness about vascular diseases.For more information, visit vasculardisease.org.
Help the Vascular Disease Foundation continue to make this critical educational information available. Your contribution will make saving lives a greater reality. Make a donation today at: contact.vasculardisease.org/donate
To find out more about the Vascular Disease Foundation, call 888.833.4463 or visit us online at www.vasculardisease.org

January 2014 1
January 2014
15. PRE-OPERATIVE CARDIAC CLEARANCE Adapted from the European Society of Cardiology; Guidelines for pre-operative cardiac risk assessment and perioperative cardiac management in non-cardiac surgery.
A. Cardiac testing for the presence and extent of coronary artery disease is only recommended in patients with three or more clinical risk factors scheduled for high risk surgery.
B. Secondary prevention of complications of atherosclerotic disease, such as lifestyle changes and medical therapy, should be initiated prior to surgery. These interventions improve both perioperative and late outcomes.
C. Patients on chronic beta-blocker therapy should continue medication during surgery.
D. In beta-blocker naïve patients in whom beta-blockers are recommended, a low-dose started one week prior to surgery is recommended. The dose should be titrated to achieve heart rate between 60 and 70 beats per minute.
E. Statins with a long half-life or extended-release formulations are recommended to bridge the period right after surgery when oral intake is not feasible.
F. Discontinuation of aspirin therapy should be considered only in those in whom it is foreseen that hemostasis is difficult to control during surgery.
See the full document for complete recommendations.
References:
European Society of Cardiology: http://www.escardio.org/GUIDELINES-SURVEYS/ESC-GUIDELINES/Pages/perioperative-cardiac-care.aspx

January 2014 2
January 2014

January 2014 1
January 2014
16. SURGICAL SITE INFECTION • Administer antimicrobial agents for prophylaxis with a particular procedure or disease
according to evidence-based standards and guidelines for best practices.
• Administer intravenous antimicrobial prophylaxis within one hour before incision to maximize tissue concentration (two hours are allowed for the administration of vancomycin).
• Administer a prophylactic antimicrobial agent with an adequate dose based on BMI.
• Redose prophylactic antimicrobial agents in procedures > 4 hours and every 4 hours as necessary.
o Guideline recommended antibiotic for all vascular surgery procedures is cefazolin with a redosing schedule of every 4 hours.
o Alternative recommended antibiotics to cefazolin, for contraindicated patients, is clindamycin, with a redosing schedule of every 6 hours, and vancomycin.
• Discontinue the prophylactic antimicrobial agent within 24 hours after surgery (within 48
hours is allowable for cardiothoracic procedures).
• Preoperatively, use solutions that contain Chlorhexidine plus Alcohol as skin antiseptic preparations and allow appropriate drying time per product guidelines.
References:
Safe Practices for Better Healthcare–2010 Update, A CONSENSUS REPORT; Gregg S. Meyer, MD, MSc, Charles R. Denham, MD, James Battles, PhD, Pascale Carayon, PhD, Michael R. Cohen, MS, ScD, RPh, Jennifer Daley, MD, David R. Hunt, MD, FACS, Mary MacDonald, Maura McAuliffe, PhD, CRNA, Julianne Morath, MS, RN, Peter Pronovost, MD, PhD, Patrick Romano, MD, MPH.
Factors Associated with Surgical Site Infection After Lower Extremity Bypass in the SVS Vascular Quality Initiative (VQI)-a National Perspective. Jeffrey Kalish, Alik Farber, Karen Homa, Magidiel Trinidad-Hernandez, Adam Beck, Mark Wyers, Mark Davies, Jason Chiriano, Margaret Tracci, Larry Kraiss, Jack Cronenwett.
Clinical practice guidelines for antimicrobial prophylaxis in surgery; Dale W. Bratzler, E. Patchen Delllinger, Keith M. Olsen, Trish M. Perl, Paul G. Auwaerter, Maureen K. Bolon, Douglas N. Fish, Lena M. Naplitano, Robert G. Sawyer, Douglas Slain, James P. Steinberg, and Robert A. Weinstein.