block 3 - council of europe muscles of the digestive tube (oesophagus, pylorus, colon), the urinary...
TRANSCRIPT

MEDICAL ASPECTS OF DISASTERS AND
EMERGENCY FIRST-AID PROVISION
EPIDEMIOLOGY AND SANITARY ACTION
Bl-3/A
Bl-3/B
BLOCK 3
ACCO
RDRI
SQUES
MAJEURS • MAJOR HAZARDS AGREEMENT
Conseil de l'Europe • Council of Europe

MODULE Bl-3/A
SCHOOL OF CIVIL PROTECTION
HANDBOOK
ACCO
RDRI
SQUES
MAJEURS • MAJOR HAZARDS AGREEMENT
Conseil de l'Europe • Council of Europe
MEDICAL ASPECTS OF
DISASTERS AND
EMERGENCY FIRST-AID
PROVISION
Authors
Mustapha DENIAL• Directeur Executif de l'Observatoire National des Droits de l'Enfant, sous la presidence
de Son Altesse Royale La Princesse Lalla Meryem.
• Coordinateur de la commission maghrebine de vaccination (Algerie, Libye, Maroc,Mauritanie et Tunisie) en charge de la reorganisation des services de vaccination et dela campagne d'eradication de la poliomyelite et du tetanos
• Membre du Conseil Consultatif des Droits de l'Homme
• Docteur en medecine, Universite de Montpellier I, 1986
Paola BIANCOLecturer, University Nurse School, Turin, Italy
In charge of the Infection Control Programme care, "San Giovanni Bosco" Hospital, Turin,Italy
CEMEC (European Centre for Disaster Medicine, Republic of San Marino) consultant forimplementation of emergency programmes in refugee camps
Expert and consultant in different humanitarian missions: 2001 - Implementation ofEmergency Project in Cibitoke hospital, Burundi; 2000 - EUR-OPA MHA Risk AssessmentMission in Kosovo; 1999 - Italian Health System (Valona refugee camp) Albania;1995/1996 - International Red Cross (Goma refugee camp) Zaire; 1994/1995 -UNICEF/CUAMM (Nyamata Project for Orphan Care) Rwanda; 1993/1994 - Croix Rougede Belgique, and Medicins sans Frontieres, (Ngenda, Mass refugee camp) Rwanda;1988/1990 - Different Italian NGOs Italian cooperation project: primary health care -Camerun; 1983 - Zaire.
Mohamed NESH-NASHPresident of Tanjah Tebbiah Polyclinic, Tanger, Morocco
Founder and the Board Member of the Moroccan Human Right Organisation (OMDH)
Member of the Mohamed V Foundation in charge of migrants
Former Vice-President of the health Commission of the International Federation of the RedCross and Red Crescent (Geneva, Switzerland)
Former Vice President of the Medical Organisation in Tanger, Morocco
• Coordinator of Moroccan Medico-Social Mission in Mitrovica (Kosovo), 1999-2001
• Director of Relief and Assistance Operation for Migrants Spain & Morocco), 1978 - 1992
• Director of Moroccan Red Crescent Clinics (1980-1992)
• Adviser of the Arab Secretariat of the Red Crescent and Red Cross (Jeddah)
• Member of the Moroccan National Observatory of the right of children
• Mission in El Salvador, Sudan, Palestine, Spain, Morocco
• Medical Doctor & surgery, Madrid, Spain, 1962
Toute reproduction partielle ou totale à usage collectif de la présentepublication est strictement interdite sans l’autorisation expresse des auteurs.Reproduction interdite par quelque procédé que ce soit(impression, photographie, photocopie, scanner, etc.)Crédit photographique : tous droits réservés

1. The human body . . . . . . . . . . . . . . . . . . . . . . 11.1 The skeleton . . . . . . . . . . . . . . . . . . . . . . . . . . . . . . . . . . . . . . 11.2 Muscles . . . . . . . . . . . . . . . . . . . . . . . . . . . . . . . . . . . . . . . . . 11.3 The respiratory system . . . . . . . . . . . . . . . . . . . . . . . . . . . . . . 31.4 Circulatory systems . . . . . . . . . . . . . . . . . . . . . . . . . . . . . . . . . 41.5 Physiology . . . . . . . . . . . . . . . . . . . . . . . . . . . . . . . . . . . . . . . . 51.6 Effects of emergencies and disasters on health . . . . . . . . . . . . 5
2. The general principles of first AID . . . . . . . . . 92.1 Examining a casualty . . . . . . . . . . . . . . . . . . . . . . . . . . . . . . . . 92.2 Handling techniques . . . . . . . . . . . . . . . . . . . . . . . . . . . . . . . . 122.3 Organisation of medical care . . . . . . . . . . . . . . . . . . . . . . . . . . 18
3. Treatment of casualties . . . . . . . . . . . . . . . . . 213.1 Haemorrhages . . . . . . . . . . . . . . . . . . . . . . . . . . . . . . . . . . . . . 213.2 Fractures . . . . . . . . . . . . . . . . . . . . . . . . . . . . . . . . . . . . . . . . 373.3 Wounds . . . . . . . . . . . . . . . . . . . . . . . . . . . . . . . . . . . . . . . . . . 443.4 Breathing difficulties . . . . . . . . . . . . . . . . . . . . . . . . . . . . . . . . 473.5 Burns . . . . . . . . . . . . . . . . . . . . . . . . . . . . . . . . . . . . . . . . . . . 64
4. Bandages . . . . . . . . . . . . . . . . . . . . . . . . . . . 674.1 Triangular bandages . . . . . . . . . . . . . . . . . . . . . . . . . . . . . . . . 674.2 Tailed bandages . . . . . . . . . . . . . . . . . . . . . . . . . . . . . . . . . . . 704.3 Roller bandages . . . . . . . . . . . . . . . . . . . . . . . . . . . . . . . . . . . 73
Annex 1: Classification card . . . . . . . . . . . . . . . . . . 78
Annex 2: Management of health relief supplies . . . 78
Annex 3: Medical care survey form . . . . . . . . . . . . 81
Table of contents page
MEDICAL ASPECTS OFDISASTERS AND EMERGENCYFIRST-AID PROVISION

BL -
3/A
BL -
3/AMEDICAL ASPECTS OF DISASTERS
AND EMERGENCYFIRST-AID PROVISION
1
1. The human body 1.1 The skeleton
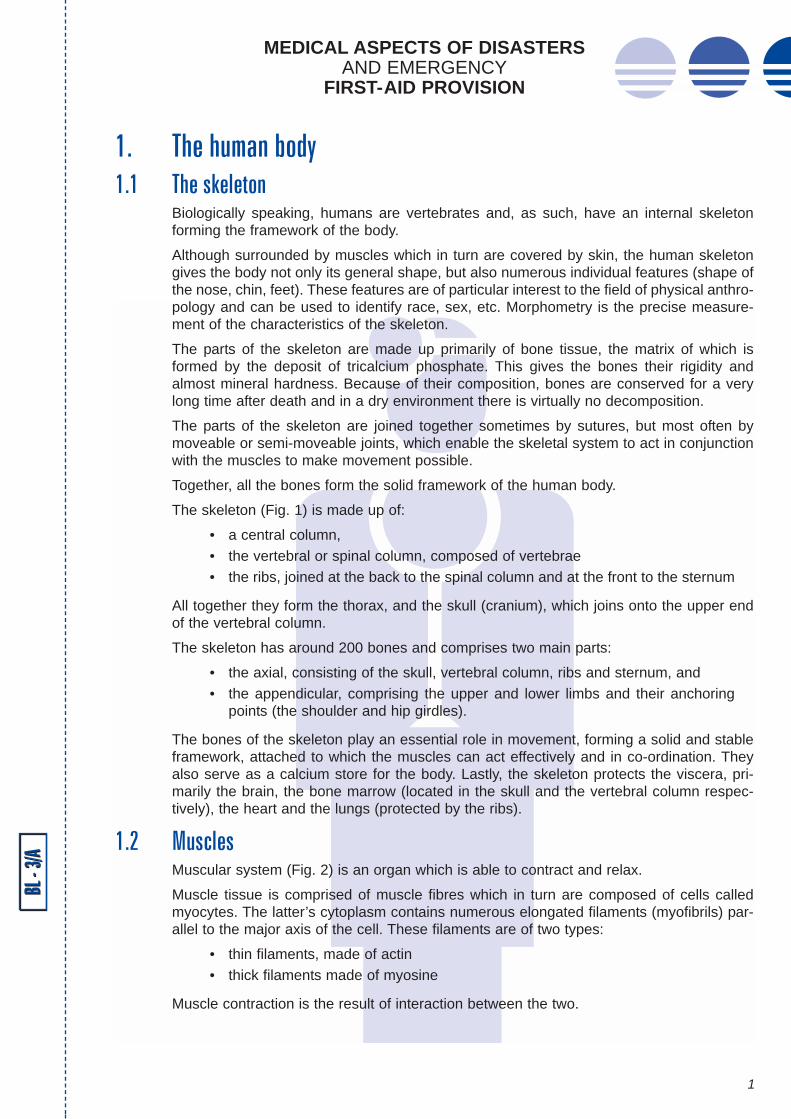
Biologically speaking, humans are vertebrates and, as such, have an internal skeletonforming the framework of the body.
Although surrounded by muscles which in turn are covered by skin, the human skeletongives the body not only its general shape, but also numerous individual features (shape ofthe nose, chin, feet). These features are of particular interest to the field of physical anthro-pology and can be used to identify race, sex, etc. Morphometry is the precise measure-ment of the characteristics of the skeleton.
The parts of the skeleton are made up primarily of bone tissue, the matrix of which isformed by the deposit of tricalcium phosphate. This gives the bones their rigidity andalmost mineral hardness. Because of their composition, bones are conserved for a verylong time after death and in a dry environment there is virtually no decomposition.
The parts of the skeleton are joined together sometimes by sutures, but most often bymoveable or semi-moveable joints, which enable the skeletal system to act in conjunctionwith the muscles to make movement possible.
Together, all the bones form the solid framework of the human body.
The skeleton (Fig. 1) is made up of:
• a central column,• the vertebral or spinal column, composed of vertebrae• the ribs, joined at the back to the spinal column and at the front to the sternum
All together they form the thorax, and the skull (cranium), which joins onto the upper endof the vertebral column.
The skeleton has around 200 bones and comprises two main parts:
• the axial, consisting of the skull, vertebral column, ribs and sternum, and• the appendicular, comprising the upper and lower limbs and their anchoring
points (the shoulder and hip girdles).
The bones of the skeleton play an essential role in movement, forming a solid and stableframework, attached to which the muscles can act effectively and in co-ordination. Theyalso serve as a calcium store for the body. Lastly, the skeleton protects the viscera, pri-marily the brain, the bone marrow (located in the skull and the vertebral column respec-tively), the heart and the lungs (protected by the ribs).
1.2 MusclesMuscular system (Fig. 2) is an organ which is able to contract and relax.
Muscle tissue is comprised of muscle fibres which in turn are composed of cells calledmyocytes. The latter’s cytoplasm contains numerous elongated filaments (myofibrils) par-allel to the major axis of the cell. These filaments are of two types:
• thin filaments, made of actin• thick filaments made of myosine
Muscle contraction is the result of interaction between the two.

BL -
3/A
MEDICAL ASPECTS OF DISASTERS AND EMERGENCY
FIRST-AID PROVISION
2
BL -
3/A
Fig. 2 The muscular systemFig. 1 The skeleton system
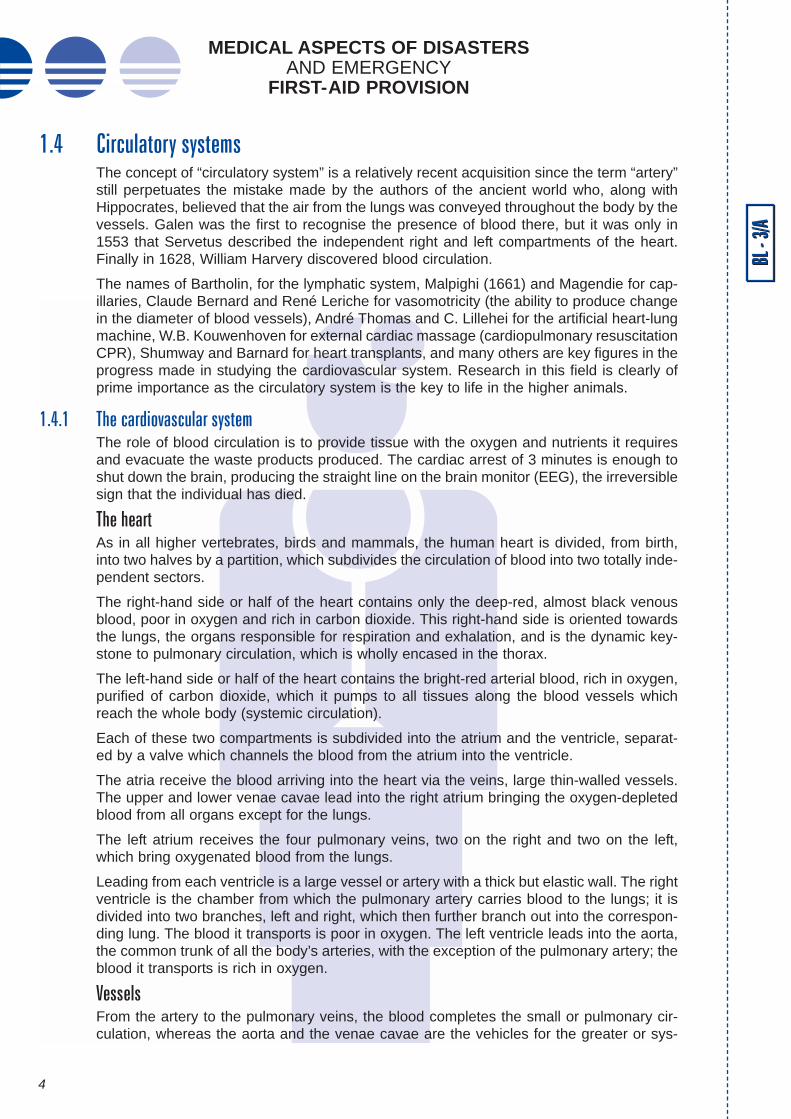
Fig. 4 The cardiovascular system
Fig. 3 The respiratory system

BL -
3/A
BL -
3/AMEDICAL ASPECTS OF DISASTERS
AND EMERGENCYFIRST-AID PROVISION
3
1.2.1 Cardiac muscleThe cardiac muscle is also called the myocardium. It is similar in structure to striated mus-cles, but its contractions are rhythmical and involuntary. These contractions pump theblood through the cardiovascular system.
1.2.2 Smooth musclesSmooth muscles are present in the walls of many organs (the uterus, intestines, thebronchial tubes, gall bladder, blood vessels, etc). Although similar to those of striated mus-cles, their contractions are involuntary, being triggered by the self-stimulating nervous sys-tem which is not under direct conscious control.
1.2.3 DisordersCertain smooth muscles can have spasms (sudden involuntary contractions). These arethe muscles of the digestive tube (oesophagus, pylorus, colon), the urinary tracts, theupper respiratory tracts (glottis, larynx), and especially the sphincters: anal sphincter, thebiliary tract sphincter (spasms in which lead to biliary colic) and the vesical sphincter(spasms in which result in urine retention).
1.2.4 Striated musclesAlso striped or skeletal muscles, striated muscles join the bones together and make motionpossible. They contract voluntarily, under the control of the brain. Each muscle fibre isconnected to a nerve ending which receives signals from the brain. This signal stimulatesthe muscle by releasing acetylcholine, a chemical neurotransmitter (substance secreted bycertain neurons to transmit the nerve impulse to other cells), which via a chain of chemicalreactions, acts upon the end-plate (the area of the muscle cell with which the nerve fibrewhich commands it comes into contact) and produces motion. These muscles are main-tained in a constant state of moderate contraction: muscular tone. Hypotonia (pathologicalreduction of muscular tone) can result following a fall in level of potassium in the blood.Hypertonia (pathological increase in the muscular tonus) can be a result of a fall in the levelof calcium in the blood; when it is very severe, it is referred to as spasticity.
Skeletal muscles are classified in accordance with how they work. A muscle is termed ago-nist if it is a prime mover, antagonist if it opposes agonist movement. An extensor muscle“opens” a joint, a flexor muscle “closes” it; adductor muscles move a limb or appendagetowards the mid-line of the body, abductors move it away from the mid-line. Muscles whichenable a part of the body (e.g. hand, foot) to move are called intrinsic muscles when situ-ated in that part of the body and extrinsic muscles when they are located in another partof the body (forearm, leg).
1.3 The respiratory systemThe respiratory system (Fig. 3) is a system of organs involved in the initial stages of res-piration, i.e. breathing (movement of air in the lungs) and haematosis (turning carbon diox-ide-laden venous blood into oxygen-bearing arterial blood) whereby cells are provided withthe energy they require.
The respiratory system comprises the respiratory tracts (i.e. the upper air passages - thenasal cavity, the mouth, pharynx and larynx), the windpipe (trachea), the bronchial tubesand the lungs, enveloped in pleura. The thorax, with its rib cage and muscles, also playsa part in the functioning of the respiratory system.
BL -
3/A
MEDICAL ASPECTS OF DISASTERS AND EMERGENCY
FIRST-AID PROVISION
4
1.4 Circulatory systemsThe concept of “circulatory system” is a relatively recent acquisition since the term “artery”still perpetuates the mistake made by the authors of the ancient world who, along withHippocrates, believed that the air from the lungs was conveyed throughout the body by thevessels. Galen was the first to recognise the presence of blood there, but it was only in1553 that Servetus described the independent right and left compartments of the heart.Finally in 1628, William Harvery discovered blood circulation.
The names of Bartholin, for the lymphatic system, Malpighi (1661) and Magendie for cap-illaries, Claude Bernard and René Leriche for vasomotricity (the ability to produce changein the diameter of blood vessels), André Thomas and C. Lillehei for the artificial heart-lungmachine, W.B. Kouwenhoven for external cardiac massage (cardiopulmonary resuscitationCPR), Shumway and Barnard for heart transplants, and many others are key figures in theprogress made in studying the cardiovascular system. Research in this field is clearly ofprime importance as the circulatory system is the key to life in the higher animals.
1.4.1 The cardiovascular systemThe role of blood circulation is to provide tissue with the oxygen and nutrients it requiresand evacuate the waste products produced. The cardiac arrest of 3 minutes is enough toshut down the brain, producing the straight line on the brain monitor (EEG), the irreversiblesign that the individual has died.
The heartAs in all higher vertebrates, birds and mammals, the human heart is divided, from birth,into two halves by a partition, which subdivides the circulation of blood into two totally inde-pendent sectors.
The right-hand side or half of the heart contains only the deep-red, almost black venousblood, poor in oxygen and rich in carbon dioxide. This right-hand side is oriented towardsthe lungs, the organs responsible for respiration and exhalation, and is the dynamic key-stone to pulmonary circulation, which is wholly encased in the thorax.
The left-hand side or half of the heart contains the bright-red arterial blood, rich in oxygen,purified of carbon dioxide, which it pumps to all tissues along the blood vessels whichreach the whole body (systemic circulation).
Each of these two compartments is subdivided into the atrium and the ventricle, separat-ed by a valve which channels the blood from the atrium into the ventricle.
The atria receive the blood arriving into the heart via the veins, large thin-walled vessels.The upper and lower venae cavae lead into the right atrium bringing the oxygen-depletedblood from all organs except for the lungs.
The left atrium receives the four pulmonary veins, two on the right and two on the left,which bring oxygenated blood from the lungs.
Leading from each ventricle is a large vessel or artery with a thick but elastic wall. The rightventricle is the chamber from which the pulmonary artery carries blood to the lungs; it isdivided into two branches, left and right, which then further branch out into the correspon-ding lung. The blood it transports is poor in oxygen. The left ventricle leads into the aorta,the common trunk of all the body’s arteries, with the exception of the pulmonary artery; theblood it transports is rich in oxygen.
VesselsFrom the artery to the pulmonary veins, the blood completes the small or pulmonary cir-culation, whereas the aorta and the venae cavae are the vehicles for the greater or sys-
BL -
3/A

BL -
3/A
BL -
3/AMEDICAL ASPECTS OF DISASTERS
AND EMERGENCYFIRST-AID PROVISION
5
temic circulation. Blood is passed between the arteries and the corresponding veins at tis-sue level via a vast network of small canals, the capillaries, with the result that the bloodis completely contained: the circulatory system is “closed’.
In describing the vasculation of an organ, we shall look at the muscular wall of the heart,or the myocardium. Two coronary arteries, the left and the right, which originate in the aortaand are about 5mm in diameter, enter the heart. Each of these arteries has its own dedi-cated territory and if there is any obstruction in either one, the circulation cannot general-ly be re-established by anastomoses (bypass surgery).
A sudden blockage in one branch of the left coronary artery, for example, stops the flow ofblood to a whole section of the left ventricle wall and this section, having lost all blood sup-ply, dies. This is what happens in a heart attack (myocardial infarction).
Each coronary artery is subdivided into ever finer branches; the wall of the artery gradual-ly becomes thinner. The final branches of the arteries become the capillaries, charac-terised by a stratified layer of flattened cells, the endothelium. The extreme thinness of thecapillary walls (1 micrometer thick) is conducive to the diffusion of gases and the transferof dissolved substances between the blood and the vascularised area.
Capillaries are approximately 7-8 micrometers in diameter, i.e. roughly the same as thediameter of a red blood corpuscle. The transition from capillaries to venules takes placealmost imperceptibly. These venules continue from the network of capillaries and gradual-ly form larger branches. Lastly, circulation back to the myocardium passes through a sin-gle venous trunk, the coronary sinus, which leads into the right atrium.
1.4.2 The lymphatic system The lymphatic system plays a very important role, draining the interstitial, extra-cellularspaces which contain lymphatic fluid. This fluid penetrates a system of small, irregular,multi-valved vessels, the lymphatic canals. They are interspersed by nodes, the lymphaticnodes. The lymphatic collectors come together in larger ducts. The most important, the tho-racic duct, originates in the abdomen, crosses the thorax and empties into the left sub-clavical vein at the base of the neck. The lymphatic system drains digested fat from thesmall intestine. Lymphatic fluid is whitish, rich in white blood corpuscles, has no red bloodcorpuscles and is drained by the system of veins.
1.5 PhysiologyPhysiology is the study of the functions and normal functioning of living organisms. It isconcerned with the physical and chemical processes at work in cells, tissues, organs andthe various systems of healthy living beings.
1.6 Effects of emergencies and disasters on health
1.6.1 Types of emergencies and disastersA long technical study should be made of each of the bellow listed emergencies and/or dis-asters, with operational plans being elaborated for intervention by specialised teams andequipment.
Detail approaches to be adopted, the precautions to be undertaken during rescue opera-tions, and a number of prevention guidelines will be detailed and presented in other mod-ules.
In the following observed are only a few of the basic principles pertinent to different natu-ral and man-made emergencies and/or disasters.

BL -
3/A
MEDICAL ASPECTS OF DISASTERS AND EMERGENCY
FIRST-AID PROVISION
6
EarthquakesThe buildings’ destruction in earthquakes may cause many deaths (over 10% of the pop-ulation) and injure large numbers of people. The toll depends mostly on three factors:
• the buildings’ typology• the time of day at which the earthquake occurs, and• the population density.
Little information is available about the kinds of injuries (or injury epidemiology) resultingfrom earthquakes, but regardless of the number of casualties, the broad pattern of injury islikely to be a mass of injured with minor cuts and bruises, a smaller group suffering fromsimple fractures, and a minority with serious multiple fractures or internal injuries requiringsurgery and other intensive treatment. Patients may appear in two waves, the first con-sisting of casualties from the immediate area around the medical facility, and the secondof referrals as humanitarian operations in more distant areas become organised.
Destructive windsUnless they are complicated by secondary emergencies and/or disasters such as thefloods or sea surges often associated with them, destructive winds cause relatively fewdeaths and injuries.
Effective warning before such windstorms will limit morbidity and mortality, and mostinjuries will be relatively minor.
Flash floods and tidal wavesFlash floods and tidal waves may cause many deaths but leave relatively few severelyinjured in their wake. Deaths result mainly from drowning and are most common amongthe weakest members of the population.
FloodsSlow-onset flooding causes limited immediate morbidity and mortality. A slight increase indeaths from venomous snake bites has been reported, but not fully substantiated.Traumatic injuries caused by flooding are few and require only limited medical attention.
FiresEvery year about 100 severe burn disasters occur, each with more than 20 deaths at thescene. These are classified as severe fires and explosions due to airplane accidents, mineexplosions, industrial and factory explosions, traffic accidents (bus, tanker truck, train),hotel and discotheque fires, fires collateral to natural disasters (earthquakes, volcano erup-tions), etc.
The heat aggression can be associated with a toxic threat such as inhalation of combus-tion products or caustic gases, with a mechanical aggression such explosion and collapseand with radiation and contamination threat.
Road accidentsIn many serious accidents, the effectiveness of relief depends upon the behaviour of thefirst witnesses in the minutes immediately following the disaster.
The fate of the casualties and the action taken by relief personnel will depend to a largeextent on:
• the speed with which the warning has been given• whether the warning is addressed to the appropriate headquarters• the accuracy of the information provided
BL -
3/A

BL -
3/A
BL -
3/AMEDICAL ASPECTS OF DISASTERS
AND EMERGENCYFIRST-AID PROVISION
7
• victim-preservation measures taken• the initial steps taken
Unless the accident is of catastrophic proportions, it is possible to be either witness or victim.
1.6.2 Principal effects on human healthIn the past, sudden-impact disasters were believed to cause not only widespread death,but also massive social disruption and outbreaks of epidemic disease and famine, leavingsurvivors entirely dependent on outside relief. Systematic observation of the effects of nat-ural disasters health has led to different conclusions, both about their effects on humanhealth and about the most effective ways of providing humanitarian assistance. Though alldisasters are unique in the way they affect areas with different levels of vulnerability andwith distinct social, health and economic conditions, there are still similarities between dif-ferent emergencies and disasters. If recognised, these common factors can be used tooptimise the management of health humanitarian assistance and use of resources. The fol-lowing key issues should be noted:
• There is a relationship between the type of disaster and its effects on health.This is particularly true of the immediate impact in causing injuries. For exam-ple, earthquakes cause many injuries requiring medical care, while floods andtidal waves cause relatively few.
• Some effects are a potential, rather than an inevitable threat to health. Forexample, population movement and other environmental changes may lead toincreased risk of disease transmission, although epidemics do not generallyresult from natural disasters.
• The actual and potential health risks after a disaster do not all occur at thesame time. Instead, they tend to arise at different times and to vary in impor-tance within a disaster-affected area. Thus casualties occur mainly at the timeand place of impact and require immediate medical care, while the risks ofincreased disease transmission take longer to develop and are greatest wherethere is overcrowding and standards of sanitation have declined.
• Disaster-created needs for food, shelter and primary health care are usuallynot total. Even displaced people often salvage some of the basic necessities oflife. Furthermore, people generally recover quickly from their immediate shockand spontaneously engage in search and rescue, transport of the injured andother private relief activities.
• Effective management of health humanitarian aid depends on anticipating andidentifying problems as they arise, and delivering specific materials at the precisetimes and points where they are needed. The logistical ability to transport maxi-mum numbers of supplies and personnel to disaster areas is less essential.
1.6.3 Common health problemsSocial reactionsAfter a major natural emergency or disaster, human behaviour only rarely reaches gener-alised panic or stunned waiting. Spontaneous yet highly organised individual actionincreases as survivors rapidly recover from their initial shock and set about purposefully toachieve clear personal ends. Earthquake survivors often begin search and rescue activi-ties minutes after an impact and within hours may have organised themselves into groupsto transport the injured to medical posts.
Additional resources should, therefore, be directed towards meeting the needs that sur-vivors themselves cannot meet on their own.

BL -
3/A
MEDICAL ASPECTS OF DISASTERS AND EMERGENCY
FIRST-AID PROVISION
8
DiseasesThe most frequently observed increases in disease incidence are caused by faecal con-tamination of water and food; hence such diseases are mainly enteric.
The risk of epidemics is proportional to population density and displacement. These fac-tors increase the pressure on water and food supplies and the risk of contamination (as inrefugee camps), the disruption of pre-existing sanitation services such as piped water andsewage, and the failure to maintain or restore normal public health programmes in theimmediate post-disaster period.
Population displacementsWhen large, spontaneous or organised population movements occur, an urgent need toprovide humanitarian assistance is created. People may move to urban areas where pub-lic services cannot cope, and the result may be an increase in morbidity and mortality.
Climatic exposureThe health hazards of exposure to the elements are not great, even after major emergen-cies or disasters in temperate climates. As long as the population is dry, reasonably wellclothed, and able to find windbreaks, death from exposure does not appear to be a majorrisk. The need to provide emergency shelter therefore varies greatly with local conditions.It may be necessary to provide shelter for reasons other than protection against the ele-ments.
Food and nutritionFood shortages in the immediate aftermath may arise in two ways. Food stock destructionwithin the disaster area may reduce the absolute amount of food available, or disruption ofdistribution systems may curtail access to food.
Mental healthAnxiety, neuroses and depression are not major, acute public health problems immediate-ly following disasters, and family and neighbours in rural or traditional societies can dealwith them temporarily. Wherever possible, efforts should be made to preserve the familyand community social structures. The indiscriminate use of sedatives and tranquillisersduring the emergency relief phase is strongly discouraged.
BL -
3/A

BL -
3/A
BL -
3/AMEDICAL ASPECTS OF DISASTERS
AND EMERGENCYFIRST-AID PROVISION
9
2. The general principles of first AID2.1 Examining a casualty
The first-aider to approach a casualty has an enormous responsibility. Not only in view ofthe steps that must be immediately taken, but also those that must be avoided. He or shemust also prevent any harmful intervention by bystanders who may or may not have anymedical knowledge.
In the time of just a few seconds, the first-aider should be able to assess the vital functionsof the casualty by looking, listening and asking questions. He or she will be looking forwhether:
• the casualty is conscious or not• the casualty suffers from any breathing difficulties• the casualty’s’ circulation is functioning normally
2.1.1 The initial assessmentExcept in dangerous situations (fire, risk of further accidents), a few words, a careful andquick examination and listening should provide answers to four fundamental questionsconcerning the state of the casualty:
• is he or she conscious ? • does he or she have breathing difficulties ? • is there any loss of blood ? • is he or she in a state of severe shock ?
ConsciousnessWhen approaching a casualty, the first-aider should speak to him or her. An examinationcarried out in total silence yields few results.
It is only by asking questions (e.g. “What happened?”, “Where does it hurt?”, “Are youalone?”, “Where are you going?”) that the injured person will be able to respond, either ver-bally or visually; an eyelid opening or a hand moving are signs of consciousness whichshould be looked for.
If there is no response, the first-aider may legitimately assume that the casualty is uncon-scious. However, it is possible that he or she can still hear everything. Accordingly, careshould be taken to avoid pointless comments which could be misunderstood, or indeedunderstood only too well, by an apparently unconscious casualty.
Examination of the two pupils, by raising the eyelids, takes only a few tenths of a second.The pupils should be round, symmetrical and regular. Normally, they are more dilated indarkness and should contract when a light is shone on them or when the eyelids areopened. This response is called the “pupil reflex”.
The pupils may be:
• contracted, which is usual• dilated, without any response to light. This generally indicates a lack of oxygen
to the brain caused by either an airway obstruction (asphyxia) or a circulatoryproblem (state of shock, cardiac arrest)
• irregular or asymmetrical (one contracted, the other dilated), generally indica-tive of damage to the nervous system

BL -
3/A
MEDICAL ASPECTS OF DISASTERS AND EMERGENCY
FIRST-AID PROVISION
10
These aspects are all part and parcel of the initial assessment and should be noted down.If there is a blood clot on the eye or eyes, or if there is severe damage to the eyes, it is notpossible to examine the pupils. In such cases, the first-aider should not attempt to openthe eyelids, should assume a fractured skull, and keep a very careful watch
Unconsciousness may be assumed from the casualty’s physical state (motionless, headbent, eyes closed, etc); however, despite the urgent action this requires, the first-aidershould still carry out a rapid examination:
• is the casualty breathing normally ?• is there a loss of blood ? • is he or she in a visible state of shock ?
The same examination should also be carried out on a casualty who is conscious. A num-ber of clear and concise questions should also be asked. The casualty may lose con-sciousness at any moment and the information required will be all the more difficult, if notimpossible, to obtain at a later stage.
BreathingLook and listen for signs of breathing. That may be:
• hard or impossible to see or hear• gasping• noisy• wheezing• rapid and superficial
BL -
3/A
Questions to be asked as soon as possible• Where does it hurt?• Do you have any problems breathing? Take a deep breath, breathe out
hard!• Are you taking any medication for your heart? For your nerves? For dia-
betes?• Are you under any medication?
• Are you taking anticoagulants?• Are you taking corticosteroids?
• Are you carrying any medical card showing:• You are suffering from haemophilia?• You are suffering from diabetes?• You are being treated with anticoagulants?
• Do you have any allergies to particular medicines?• Do you have any other allergies?
The answers to these questions could save the casualty’s life if he or shesubsequently loses consciousness. They should be noted on an evacuationsheet following this initial examination.

BL -
3/A
BL -
3/AMEDICAL ASPECTS OF DISASTERS
AND EMERGENCYFIRST-AID PROVISION
11
Chest and abdomen movements may be:
• non-existent, this is respiratory arrest• irregular or erratic, preceding respiratory arrest• too fast or too slow, a sign of breathing deficiency
The consequences of breathing difficulties are:
• the neck muscles tighten or a hollow forms just above or just below the ster-num, indicating major effort required to breathe
• fluttering of the nose, indicating advanced breathing difficulties• a bluish hue to the lips, ears or nails (cyanosis) indicating a lack of oxygen in
the body• sweating is often a sign of a build-up of carbon dioxide in the body, a conse-
quence of breathing difficulties
It is essential to listen to the casualty speak (if he or she is conscious) or breathe (if uncon-scious). A casualty who complains of choking should be believed (and the causes of thishave to be identified).
With unconscious casualties, make sure you listen out for gurglings caused by a build-upof mucus, blood or vomit which can obstruct the upper air passages. One out of 7 casual-ties die from this.
A gasping sound is often caused by the tongue falling backwards when the head is bent.
BleedingIt is usually quite clear when there is considerable external bleeding. The position of thecasualty and the path followed by the blood flowing beneath the clothes can mislead, andfirst-aider should be alert to this. Bleeding from the thigh, whether arterial or venous, isoften seen only once it reaches the foot, having travelled down the leg underneath thetrousers. The same can be true of bleeding from the arm or the armpit, which runs downunder the sleeve and drips off the hand onto the car seat (in a road accident for example).However, as a general rule, bloodstained clothing should immediately be visible.
State of shockCommonly the only indication of internal bleeding is a state of shock. It is therefore essen-tial that the initial examination should check for this, since in such cases the measures tobe taken are somewhat different. Indications of a state of shock in a conscious casualtyare anxiety, shivering trembling and thirst.
With unconscious casualties, first-aiders have to assess the situation themselves.Indications are paleness of the lips, ears and the face. Cold sweats, rapid and superficialbreathing and, especially, a very weak but racing pulse (over 110/min) taken at the neck orthe groin, are signs that the casualty should not be left in a sitting position.
Lastly, with an unconscious casualty, if there is no pulse, or if it cannot be detected, andthe person concerned is no longer breathing or is gasping, there has been cardiac arrestand the appropriate steps must be taken immediately.
2.1.2 First stepsIf the victim is conscious, has no breathing difficulties, is not bleeding and is not in a stateof severe shock, the examination should be continued and the casualty monitored pend-ing, during and after evacuation.
If the victim is unconscious, is not bleeding, is not in a state of severe shock, is not breath-ing or not breathing properly, the first-aider should:

BL -
3/A
MEDICAL ASPECTS OF DISASTERS AND EMERGENCY
FIRST-AID PROVISION
12
• make sure the upper air passages are unobstructed• if the victim is in a vehicle (road accident), as carefully as possible tilt the head
well back so that the head, neck and trunk are all aligned. As soon as is prac-ticable, unfasten clothes, remove any dentures, insert a Guedel-type airway (ortilt the head to the side in the recovery position) and, where appropriate,arrange for oxygen to be administered (provided there is no risk of fire)
• No matters what the location (except where the air is toxic) carry out artificialresuscitation (such as mouth-to-nose) before and during removal. This taskshould be taken over by a qualified first-aider as soon as possible, using man-ual insufflators.
If the victim is in a severe state of shock indicating major internal bleeding, it is essentialfor him or her to be placed in a lying position (with the head, neck and body aligned) beforebeing extricated, to allow circulation to the brain. If there is no serious injury, raise his orher legs slightly.
If the victim appears to be dead, a qualified first-aider should apply external cardiac mas-sage and resuscitation, once any obstruction to the air passages have been removed andonce steps have been taken to ensure no further accidents could occur.
2.2 Handling techniques
2.2.1 General principlesThe first aid personnel must be given training in the correct use of handling techniques. Ifthis is not done, injuries – pain, lumbago, sciatica, back strain, torn muscles, sprains, etc– will be inevitable.
This general advice should be followed in all cases of handling, e.g. in lifting and carryingcasualties on stretchers (this, however, involves team work).
The position to be adoptedThe centres of gravity of both the bearer and the load should be as close together as pos-sible. The lever arm, i.e. the distance between the load and the fulcrum, should be as shortas practicable. A crane, for example, can bear 1 tonne when the trolley is 3 metres fromthe tower, and 500 kg when it is 6 metres away.
Reducing the length of the lever arm also reduces the pressure on the vertebrae. However,this can only be done by adopting a particular position, with the feet as close to the loadas possible. To do that, the knees and hips should be bent.
Balance is essential to avoid any involuntary movement. A person’s balance is linked to theposition of and distance between the feet, which should never be parallel; one should bein front of the other. In this way, the surface area between the external sides of the feet islarger and the centre of gravity is generally perpendicular to this. If the centre of gravitymoves outside this base surface area, a fall is inevitable.
The individual’s centre of gravity is located more or less at the pubis.
The carrier should therefore be close to the object, with one foot in front of the other, eitherside of the item to be carried, and should bend his or her hips and knees.
Lastly, the back should be kept straight, with the chin tucked in, shoulders back and elbowsas close as possible to the body. It is the power of the leg muscles which is used to per-form the lift. To use this power to its best advantage, the back should be straight, the kneesbent and the pelvis tilted forward. Do not bend too much, however, as it would then be dif-ficult to straighten up. When bending and straightening up, move slowly and smoothly.
BL -
3/A

BL -
3/A
BL -
3/AMEDICAL ASPECTS OF DISASTERS
AND EMERGENCYFIRST-AID PROVISION
13
Fig. 5 Examination of conscious victims

BL -
3/A
MEDICAL ASPECTS OF DISASTERS AND EMERGENCY
FIRST-AID PROVISION
14
BL -
3/A
Fig. 6 Examination of unconscious victims
Fig. 7 Handling techniques (A-turinig a victim/patient ; B-Lifting a victim/patient)
A B
CCOOLLLLEECCTTIIOONN AANNDD TTRRAANNSSPPOORRTTAATTIIOONN MAKING THE SPOON
CCOOLLLLEECCTTIIOONN AANNDD TTRRAANNSSPPOORRTTAATTIIOONN MAKING THE BRIDGE

BL -
3/A
BL -
3/AMEDICAL ASPECTS OF DISASTERS
AND EMERGENCYFIRST-AID PROVISION
15
Mistakes to be avoidedPay attention to the following:
• make sure your feet are not too close together or too far apart; this will upsetyour balance and could cause spinal injury or hernias
• be as close as possible to the load to be lifted• do not arch your back or curve the spinal column as this could damage the
inter-vertebral disks; damage can also be caused by twisting the spine, to beavoided at all times
• do not forget to bend your legs; keeping them straight will make you arch your back• do not bend your legs too much otherwise you will have difficulty straightening up
2.2.2 Application of handling principles to casualties / patientsThere are many patients or others who are unable to move by themselves. Family mem-bers are often required to pull them back up to the top of the bed, sit them down on a bed,lift them, help them walk, turn them over, wash them etc. A person is very heavy and muchmore difficult to manoeuvre than crates or buckets. This is why it is first of all essential tounderstand the general principles before they can be applied to specific cases.
Examples/Exercises on movementsThese are a few exercises for providing a better understanding of movements.These techniques can help avoid injuries. This is possibly one of the most impor-tant things to retain.
Carrying an object with handles
Position the load between your feet, with one handle facing forwards, your armsoutstretched and legs bent. Lift the object by straightening your legs, using yourthigh to support the load.
Carrying a box without handles
The box should be placed at an angle and gripped by opposite corners and thenlifted by straightening your legs. If you wish to place it on a table, or if it is restingon your thigh, take it in your forearms, keeping your legs bent. Then place it againstyour chest and, by straightening your legs, lift it to onto the table.
Carrying a stretcher
You should bend down, keep your back straight and have your feet slightly apart.To lift, straighten your legs, keeping your arms straight all the time.
Lifting a bucket
Place your feet either side of the bucket, bend your legs and keep your shouldersstraight. Bend slightly forward. Lift the bucket by straightening your legs.
Lifting a wheelbarrow
The technique is very similar to carrying a stretcher. Your feet should be slightlyapart, body bent forward, arms as far back as possible. Lift the wheelbarrow bystraightening your legs.

BL -
3/A
MEDICAL ASPECTS OF DISASTERS AND EMERGENCY
FIRST-AID PROVISION
16
First of all, the room should be tidied. If the floor is littered with various objects, or if the fur-niture is positioned too closely together, it is not at all easy to move about. Your feet couldslip or your knees knock into something. In short, it is very likely that you could fall.
Access to the bed should be as convenient as possible. If access from three sides (the bedhead and the two sides) is impossible, access from a single direction should be unob-structed, with plenty of room.
BL -
3/A
Related movements Once you are in a position where your back is straight, feet apart and knees bent,there are a number of other movements to help reduce fatigue.
Your arms should remain straight when lifting. In fact, the arms and hands merelyserve as a “claw” but the arm muscles are not actually used for lifting, even thoughthese muscles react quickly and precisely and provide considerable power whenlifting. You should take hold of the load with the palms of your hand and not the endof your fingers, so that it does not slip and oblige you to make extra effort to keephold.
Pressure on the spinal column should be distributed by trying to create “shockabsorbers”, formed by air in the organs.
When exerting effort, hold your breath after breathing in (when the diaphragm israised), not after breathing out.
A crane with its weights and counterweights gives a good illustration of how toavoid becoming unbalanced. This will help you limit excessive contraction of theparavertebral muscles. The counterweight could be, for example, a straightenedleg.
The object may be moved more easily as a result of the speed it acquires as thesemovements flow on from each other (but this speed should not be reduced mid-way through the process). To this end, do not keep your feet in one place, but movethem appropriately. Moving in this way also helps avoid sprains to the spinal col-umn.
The direction of movement can also be utilised. Lastly, movement increases kinet-ic energy, i.e. to a certain extent, your own body weight can also on occasion beturned to advantage.
Principles to be borne in mindAlways stand close to the load, feet apart, the two centres of gravity as closeas possible, back straight and legs bent
Use your leg muscles to lift the load and be careful not to twist the spine
To reduce the effort required, use the weight of the body and the speedacquired in the movement, for example when breaking the fall of an object
Never arch your back to lift anything, never carry anything in a crouchedposition or twist your body

BL -
3/A
BL -
3/AMEDICAL ASPECTS OF DISASTERS
AND EMERGENCYFIRST-AID PROVISION
17
It is often more difficult to arrange for the right number of carriers, and frequently just one per-son has to do the lifting. Clearly, it is much better if there are two people to perform this task.
It is essential to ensure that patients are aware of what is going to happen. They must be toldwhat movements will be made so that they do not do anything out of fear which could leadto a fall. Lastly, while beds which are too high are difficult to access, beds at floor level canoften be raised, making it much easier to provide care to a patient or elderly person.
Examples/ExercisesTurning a patient over in bed
To turn a patient over in bed, you should, if possible, stand on the side of the bedopposite to the one towards which he or she will be pivoted. With your knees bent,feet apart, place one of your arms under the patient’s shoulder and the other handaround the crotch area. By straightening your legs, you should be able to turn thepatient without much effort. Occasionally, patients lying on their stomach have tobe turned onto their back. To do this, place one hand around the patient’s thighs orpelvis and the other under the thorax. Pull the hand around the thorax upwards.This makes it easy to turn the patient round.
Seating a patient on the bed side
It is relatively easy to seat a patient on the side of the bed.
The principle involved is to pivot the patient once he or she is in a semi-seatedposition. Place your arm around patients back of the neck and the other around theopposite thigh. The patient can then be turned round without having to be lifted.
Complete the manoeuvre by bending your knees.
Getting a patient seated on the edge of the bed into a standing position
To get a patient seated on the edge of the bed into a standing position, it is usefulto put a draw sheet or a belt around his or her waist. Keeping your back straight,your knees bent and one foot in front of the other, take hold of the belt or sheet andsteady the patient’s legs. By leaning backwards you will create a counterweightand be able to lift the patient.
Pulling a patient back up to the top of the bed
It is often quite difficult to pull a patient back up to the top of the bed. It is mucheasier if there are two of you. Stand either side of the patient, place your forearmand hand under him or her, bend one leg and keep the other straight in the wait-ing position. Then bend your straight leg. Here, you are shifting the weight of thebody from one leg to the other.
It is much harder to do this task on your own, especially if you cannot stand at thehead of the bed. Where this is possible, stand behind the patient, take hold of hisor her wrists and place your arms underneath his or her armpits.
These movements should not be undertaken without careful prepara-tion. They do illustrate, however, that applying good handling princi-ples can ease everyone’s task and prevent injury.
BL -
3/A
MEDICAL ASPECTS OF DISASTERS AND EMERGENCY
FIRST-AID PROVISION
18
2.3 Organisation of medical care First aid is generally given at the disaster site itself in order to provide casualties with theurgent care they need. When disasters occur in urban areas, first aid is generally admin-istered by ambulance staff, fire fighters, the police, the Red Cross, or other health careorganisations. If the disaster occurs in a rural area, away from a town or city, dispensaryand health centre staff are responsible for emergency assistance.
Whatever the type of disaster, a number of basic principles have to be observed to avoidinefficiency and chaos.
The following must be carried out:
• a command post must be set up to co-ordinate relief, monitor the use ofresources and prevent conflicts of responsibility
• an assessment must be made of the scale of the disaster, the number of casu-alties, where they are located and their immediate needs
• an appropriate location has to be found for the initial triage of casualties, beforethey are evacuated to medical centres
• casualties should be given first aid (including maintenance of vital functions,stopping bleeding, clearing air passages and, where required, transfusions andIV drips)
• contact should be made with regional hospitals and their outposts so that theycan implement their emergency plans to take in the casualties
2.3.1 Mobile hospitalsThe use of mobile hospitals as observation, treatment or first-aid centres is justifiable whenexisting hospitals have been damaged or cannot function.
Before they are set up, it is essential to ensure that there is adequate staff, in terms of qual-ifications (medical, auxiliary, administrative and technical) and numbers, and that there arethe appropriate medical and surgical facilities, supplies of medicines and emergencyequipment. It is also necessary to ensure that there are adequate supplies of drinkingwater, food and other daily necessities for both casualties and staff, so that these hospitalsdo not have to depend on the already stretched resources of the community. The localauthorities should be given responsibility for co-ordinating the tasks assigned to the mobilehospitals. These local authorities should be able to incorporate the activities of the mobileunits into the general framework laid down by the national plan.
2.3.2 First-aid mobile hospitalsA first-aid mobile hospital is a day centre providing first-aid care (treating bruises, cuts,sprains etc) and ambulatory treatment for the non-serious casualties and inhabitants of thedisaster area.
2.3.3 Observation mobile hospitalsThese are units with limited medical and paramedical staff resources, possibly reinforcedby volunteers. They will take in patients who have already been treated and who requiresimply medical surveillance or nursing care.
2.3.4 Search and rescue unitsIf they are to be effective, rescue units should have teams who have been trained in firstaid. They should, in addition, be able to travel immediately to the scene of the disaster.
BL -
3/A

BL -
3/A
BL -
3/AMEDICAL ASPECTS OF DISASTERS
AND EMERGENCYFIRST-AID PROVISION
19
2.3.5 Triage, identification and classification of casualtiesWhen there are a large number of casualties and medical resources are limited, the injuredhave to be classified on the basis of the likelihood of their survival. This procedure is calledtriage.
Triage is a continual process. Initial priorities are determined at the disaster site (first-leveltriage). A second order of priority (second-level triage) is decided upon outside the disas-ter area or upon admission to hospital. A third order of priority (third-level triage) is carriedout in the hospital and it is at this point that decisions are taken on transfer to the health-care services.
Fig. 8 Model triage tag
/sorce: PAHO, Scientific publication N° 443, 1983/

BL -
3/A
MEDICAL ASPECTS OF DISASTERS AND EMERGENCY
FIRST-AID PROVISION
20
2.3.6 Triage at the disaster siteIdeally, a doctor should be dispatched to the disaster area to examine all casualties what-ever the severity of their injuries. This doctor should take care of the triage operations.
All deaths should be certified so that medical staff do not waste any time having to carryout examinations to confirm death.
2.3.7 Identification and classificationWherever possible, casualties should be identified during the triage process. This involvesputting a colour-coded tag on the casualty (Table 1) that indicates the injury severity andthe evacuation priority.
Table 1 Tagging of casualties
2.3.8 Evacuation prioritiesEvacuation priorities (Table 2) are made in accordance with the injury status of the casualty.
Table 2 Evacuation priority according to injury status of the casualty
BL -
3/A
Evacuation order
red tagsyellow tagsgreen tags
red tagsyellow tagsgreen tags
to be evacuated after othercasualties
Injury status of the casualty
Casualties who are neither trapped nor buried
Casualties who have been trapped or buried
The dead• casualties with black tags, neither trapped nor
buried• casualties with black tags who are trapped
Colour of the tag
Red
Yellow
Green
Black
Evacuation priority
Highest
Second
Third
Casualty description
Used only for casualties requiring immediate care.
Casualties falling into this category must receive care butthey are not in a life-threatening situation.
Used for casualties who have minor injuries or who arelikely to die very shortly.
Placed on the dead, only. Casualties are considered to bedead if they are no longer breathing, if there has been nopulse for 20 minutes, or if their situation is such that it isimpossible to apply the necessary techniques to maintaintheir vital functions.

BL -
3/A
BL -
3/AMEDICAL ASPECTS OF DISASTERS
AND EMERGENCYFIRST-AID PROVISION
21
3. Treatment of casualties3.1 Haemorrhages
Haemorrhage means bleeding, a discharge of blood from the vessels when an artery, veinor capillary vessel is ruptured. The bleeding may be internal (inside the body tissues) orexternal, where there is an open wound.
3.1.1 Types of haemorrhageHaemorrhages are traditionally broken down into three types:
• external haemorrhage, generally linked to an accident and the casualty losesblood from an open wound
• internal haemorrhage, where the blood escapes from the normal circulatorychannels, but remains inside the body and cannot be seen from the outside;the fact that an accident has taken place and the appearance of certain symp-toms should alert the rescuer to the possibility of serious haemorrhage; ecchy-mosis or bruising are visible signs of less serious haemorrhage
• internal haemorrhage with bleeding from body openings, where the blood flowsfrom the body without there being any open wounds; the bleeding occurs insidebody cavities connected to the outside: the casualty may bleed from the heador face orifices (ears, nose, mouth) or from the genito-urinary tract and anus
External haemorrhagesThree categories of external haemorrhage:
• arterial• venous• capillary
are usually distinguished, depending on the type of blood vessel involved (artery, vein, cap-illary).
Arterial haemorrhagesAs artery walls are thick, the cut remains wide open and bright red blood gushes out inrhythmic spurts, corresponding to each beat of the heart (left ventricle).
Venous haemorrhagesAs veins have thinner, softer walls, the severed edges tend to collapse and close, reduc-ing the bleeding. The wound bleeds in a steady stream of dark red blood, much darker thanarterial blood, as it is poor in oxygen and much richer in carbon dioxide. Rupture of a vari-cose vein is one example of venous haemorrhage.
Capillary haemorrhageCapillary haemorrhage affects the minute blood vessels we call “capillaries” because theyare as fine as hair. Here blood oozes in droplets. Most external haemorrhages are capil-lary haemorrhages, i.e. most of the haemorrhages that occur as a result of everyday acci-dents, in the family environment, during leisure activities and at work.
For a very long time these different types of haemorrhage were dealt with in different ways.
Nowadays it is the amount of bleeding, rather than this textbook pattern, that determinesthe course of action.

BL -
3/A
MEDICAL ASPECTS OF DISASTERS AND EMERGENCY
FIRST-AID PROVISION
22
Accidents are usually complex events that rarely affect only one vein, one artery or onegroup of capillaries. It is often difficult, if not impossible (even for a doctor) to determine theexact type of haemorrhage at the scene of the accident.
Bleeding wounds (which are often covered by clothing) are more often than not a sign ofruptured veins or arteries. Some deep wounds (bullet or knife wounds or injuries causedby pitchforks, agricultural equipment and so on) often bleed in a steady flow, which can bemisleading, for even if a major artery has been severed deep inside the body, the mass ofmuscle has a regulating effect on the external bleeding.
Internal haemorrhagesThese are haemorrhages with no open wound. Although blood escapes from the bloodvessels, it cannot be seen from the outside. It remains inside the body.
The term “internal haemorrhage” covers a variety of accidents, from the most harmless(bruising) to the most serious (rupture of the liver or spleen, ectopic pregnancy).
The course of action varies according to the gravity of the injury.
Internal haemorrhages may be caused by:
• a simple knock, blow or everyday accident• contusion injury following an accident to the chest, abdomen (rupture of the
liver or spleen), back, skull, etc.• rupture or tear of one or more blood vessels by broken bone fragments• injury by firearm or foreign body; here there is an open wound but often only a
small one, obstructed by a foreign body; the bleeding remains inside the body• ectopic pregnancy; rupture of the fallopian tube produces internal bleeding that
requires urgent surgery
Serious internal haemorrhagesThere is always a possibility of serious internal haemorrhage in the event of an accident.
Warning signs exist on three levels:
• the accident itself, where the victim received a violent blow to the abdomen,back, skull, etc.
• the general appearance of the casualty, where the previously discussed signsof a state of shock are apparent
• the victim looks pale and drawn, is weak and faint, is cold and shivering (coldhands or feet); the pulse is barely perceptible, weak, tenuous, irregular. If stillconscious, the casualty complains of breathing difficulties (suffocation), intensethirst, buzzing in the ears, blurred vision and, above all fear, the feeling that heor she is dying
Some internal haemorrhages, large or small, very local or more widespread, are signs ofdiseases of the blood and must be treated accordingly.
Ecchymosis, or bruisingBruising is an accumulation of varying amounts of blood under the skin following the rup-ture of capillary vessels; it may also occur under a mucus membrane (conjunctivitis) oraround an open wound.
The first sign of ecchymosis or bruising is a reddish or blackish discolouration of the skinthat changes colour as the days go by, turning blue, greenish then yellowish before even-tually disappearing. When bruising following a violent blow or sprain is accompanied by a
BL -
3/A

BL -
3/A
BL -
3/AMEDICAL ASPECTS OF DISASTERS
AND EMERGENCYFIRST-AID PROVISION
23
very sharp pain and functional disability, it is a sign of a more serious injury - a fractured orbroken bone. If bruising appears spontaneously, without any physical trauma, it is a signof a blood disorder that falls outside the scope of first aid.
HaematomaThe difference between an ecchymosis and a haematoma is that with haematoma there ismore blood and it forms a clot or cyst in the body tissue (subcutaneous haematoma, forexample) or inside an organ.
Amongst the more serious haematoma are those formed inside the skull following a blowor an accident. For example, extradural (epidural) haematoma is a haematoma wherehaemorrhage occurs between the outer membrane covering the brain (the dura mater) andthe skull. Haematomas may also be subdural (when they form between the dura mater andthe brain) or intracerebral (inside the brain itself).
Ectopic (or extrauterine) pregnancyIn normal pregnancy the ovum, fertilised by a sperm in the outer third of the fallopian tube,implants itself in the uterus. Sometimes, for some obscure reason, the fertilised eggimplants itself in the fallopian tube. The tube is not elastic enough for it to develop to matu-rity, so two types of accident are to be feared:
• tubal abortion, where the ovum is ejected into the peritoneal cavity• tubal rupture, where the fallopian tube breaks, causing heavy bleeding in the
peritoneal cavity
Tubal rupture is a terrible and brutal accident. The victim feels a sudden stabbing pain inthe lower abdomen. She is pale and faint, with signs of internal haemorrhage.
This is a case of bleeding in a body cavity being evacuated through a natural orifice.
OtorrhagiaThis means bleeding from the ear. The origin may be accidental (fall on the head, roadaccident), or a burst eardrum sustained in a diving accident. Bleeding from the ear mayalso occur in connection with certain ear disorders, such as otitis.
Blood or a clearer fluid may be secreted from the ear. As burst eardrums are dealt with inthe section on diving and leisure accidents, suffice it to say here that bleeding from the earmay be a sign of a fractured skull, and in particular fracture of the petrosal bone, when theorigin of the haemorrhage is a trauma.
EpistaxisThis is the scientific name for nosebleed. The cause is often simple and local, in whichcase only a simple treatment is required.
Sometimes it is a sign of a blood disease or of high blood pressure.
In the event of an accident, however, sometimes but not necessarily in conjunction withotorrhagia, it can point to fracture of the skull.
HaematemesisBlood leaks or is vomited from the mouth. The victim vomits varying quantities of very darkblood, which should be conserved for subsequent analysis in order to evaluate the amountof blood lost and the real extent of the haematemesis.
There are various possible causes: ruptured varices, veins or oesophageal lining, gastricor duodenal ulcer, haemorrhagic gastritis, etc.

BL -
3/A
MEDICAL ASPECTS OF DISASTERS AND EMERGENCY
FIRST-AID PROVISION
24
HaemoptysisHaemoptysis is the spitting of blood, generally accompanied by coughing. It may be of car-diovascular or broncho-pulmonary origin. More often than not the origin of these broncho-pulmonary accidents is disease: bronchiectasis (brochial dilatation), pneumonia, lungabscess, tuberculosis, etc. Cardiovascular origins include the mitral stenosis that charac-terises many heart diseases.
HaematuriaHaematuria is the presence of blood in the urine. The colour of the urine depends on howmuch blood it contains.
Following a blow or shock it can be a sign of a fractured pelvis, but in general it is merelya symptom of a disease of the urinary tract.
Some of the most frequent causes of renal haematuria are acute inflammation of the kid-neys, kidney stones, kidney cancer, renal tuberculosis.
MenorrhagiaMenorrhagia is abnormal vaginal bleeding during menstruation. Any change in the amountof bleeding or the duration of the period should be reported to a doctor. If the bleeding isprofuse and gives cause for concern, the patient must be taken to hospital, as a bloodtransfusion may be necessary. Menorrhagia may be caused by cysts, tumours, fibromas,genital infections, etc.
MetrorrhagiaThis is also vaginal blood loss, but outside the normal menstruation period. It may be a signof a tumour, an ectopic pregnancy, inflammatory lesions of the genital apparatus (ovaries,fallopian tubes, uterus).
Like all menstrual anomalies, metrorrhagia can be a sign of a disease that should be treat-ed without delay. A doctor or gynaecologist should therefore be consulted at the earliestopportunity.
3.1.2 What to do in the event of external haemorrhageThe most important sign for the rescuer is the amount of blood being lost. The section ofan artery in the thigh or the arm requires immediate action, a reflex which is nothing newbut, on the contrary, a spontaneous, subconsciously remembered reaction. Someone whoinstinctively presses a cloth to a bleeding forehead, a child who presses a handkerchiefagainst a grazed knee or winds it round a bleeding finger, is doing the right thing.
Immediate actionsIn just about every case the first things to do are:
• press your hand directly on the wound• if necessary, lay the casualty down in a horizontal position to prevent the onset
of shock
Pressing down on the woundFirst aid is often administered by a bystander who has no special equipment. This first stepmust be taken very quickly, possibly with the aid of any available piece of cloth (handker-chief, towel, folded scarf, etc.) held down firmly on the wound. Done properly, this is suffi-cient to stop the bleeding. It is important to stop the bleeding as soon as possible, as bloodloss can be dangerous for the casualty. The most urgent thing for the first-aid provider isthe haemorrhage, not the wound, which will be attended to later in hospital. It is vital not towaste time looking for a sterile bandage or a clean cloth to place between the hand and
BL -
3/A

BL -
3/A
BL -
3/AMEDICAL ASPECTS OF DISASTERS
AND EMERGENCYFIRST-AID PROVISION
25
the bleeding wound. If there is nothing at all to hand, which is often the case, and howev-er unpleasant it may be, the rescuer must press his or her hand directly on the wound tostop the bleeding.
Laying the casualty downThe casualty may already be lying down. In the event of wounds to the upper limbs, tho-rax or head, however, the casualty may still be in a standing or sitting position; in this caseit is important to make him or her lie down.
This serves two purposes:
• it makes it easier to apply compression to a wound to the lower limbs, thoraxor head
• it helps prevent the shock that often accompanies cases of severe haemor-rhage
The casualty must be made to lie down with great care. The easiest way is to ask the casu-alty to kneel and then, still supported by the rescuer (who constantly maintains manualcompression of the wound), to sit on one side and finally to lie down.
Too much haste may cause the casualty to fall over, making the rescuer release the pres-sure on the wound; this must be avoided.
So, when faced with a haemorrhage, press down on the wound with the hand (protectedby a cloth when one is available) and only release the pressure when you have made animprovised bandage to stop the bleeding (using a scarf, for example).
What to do nextAfter a short time (a few minutes) the rescuer should check on the casualty’s condition bycarefully releasing the pressure of the hand on the wound. The rescuer will observe one oftwo situations:
• the bleeding will have stopped or decreased considerably• the bleeding will resume as badly as before
Make a bandageHaving to press on the wound immobilises the rescuer, so he/she must try to make a tightbandage with whatever material is available, in order to be free to do other things.
Sterile compressesWhen first-aid equipment is available, sterile compresses should be placed on the woundand held in place with strips of gauze, canvas or elastic bandage.
Sticking plasterThese are easy to use and should always be kept in the home, in the car and at the work-place. Separately wrapped and sterile, they protect the wound and effectively stop ordinarycuts from bleeding.
Emergency haemostatic pad dressingThis material is more sophisticated and very effective.
Supplied in a plastic sachet that protects it from the light, the ready-to-use dressing is inthree parts: a compress, a foam pad and an elastic bandage. The sterile compress,wrapped separately, is placed over the wound. The latex foam pad is airtight and acts asa sponge. When placed over the wound and compressed, it absorbs some of the blood,depending on how serious the haemorrhage is and how tightly it is compressed (with about

BL -
3/A
MEDICAL ASPECTS OF DISASTERS AND EMERGENCY
FIRST-AID PROVISION
26
40% pressure it absorbs 50 ml of blood). This absorption of blood is quite normal. If bloodcontinues to seep through the bandage, however, it should be tied tighter. As it fills withblood, the foam expands and a balance is achieved between the pressure inside the veinor artery and the pressure of the pad. It is held in place with a sliding strap under which thebandage passes and under which one can slip one’s hand.
The elastic bandage is between 0.9 and 1.3 metres long, with a grip on one end and a fas-tening device using hooks which attach to the final layers of the bandage. It is highly elas-tic, so rescuer must be careful not to pull it too tight as each extra turn adds to the pres-sure already exerted by the previous layers.
The emergency haemostatic pad should be applied as follows:
• place the sterile compress on the wound• slip the hand between the pad and the reverse side of the bandage, under-
neath the sliding strap• apply the pad and start winding the bandage (the side facing inwards is the
side with the green dotted line). Although this type of bandage can stop all sortsof haemorrhages, both those which decrease considerably after local manualcompression and those which resume bleeding as badly as before, care mustbe taken to avoid certain mistakes.
• The rescuer should not release pressure on the wound in order to go and fetchthe haemostatic pad from the first-aid cabinet or kit.
• The rescuer should not release pressure on the wound while preparing the pad(opening the wrapper and taking out the compress).
• The transition from manual pressure to application of the haemostatic padshould take no more than a split second. If necessary the cloth already cover-ing the wound may be left in place instead of the sterile compress. As soon asthe pad is held in place by the first loop of bandage, the rest of the bandageshould be applied in the recommended manner, winding inwards from theextremity towards the root of the member.
The emergency haemostatic pad stops blood circulation locally, in the injured vessels, butwithout the disadvantages of the tourniquet. Its wide distribution and use should be encour-aged.
BL -
3/A
Improvising a bandage with whatever is availableWhen there is no domestic, car or factory first-aid kit to hand, which is usually thecase, the cloth used initially should be left in place and held there by a bandage,which replaces the pressure previously exerted by the rescuer. The bandage maybe made with a scarf, a tie or a twisted strip of cloth.
The bandage should be moderately tight, but not as tight as a tourniquet, which isalways dangerous, often serves no useful purpose and sometimes makes thingsworse. If the bleeding continues, the bandage is not tight enough. It should betightened by tying another strip of whatever cloth is available around it.

BL -
3/A
BL -
3/AMEDICAL ASPECTS OF DISASTERS
AND EMERGENCYFIRST-AID PROVISION
27
In all cases the following precautions should be taken:
• the bandage should not turn red or leak blood - if it does it has not been appliedtightly enough
• blood should continue to circulate lower down the limb from the bandage; theextremity of the limb should not turn cold or blue; the pulse must remain per-ceptible; the compress bandage is not a tourniquet
The haemostatic pad can be used more than once. Just roll up the bandage with the hooksfacing outwards and apply a new sterile compress. If the latex foam pad is bloodstained, itshould be washed like a woollen garment and left to dry away from the light.
Horizontally lying casualtyWith the casualty lying horizontally, raise the injured limb above the level of the heart todecrease the pressure in the veins and arteries.
Applying non-local pressureWhile the above measures will stop most haemorrhages, there are some rare cases wherea more delicate approach is needed:
• when the material available for making a compress bandage is insufficient andthe bleeding continues
• when the rescuer cannot press directly on the wound because a foreign bodyis in the way (for example, a knife or broken glass)
In such cases the rescuer must stop the circulation between the heart and the wound, asclose to the wound as possible.
This is done by exerting pressure on the main arterial trunk, pressing the artery against abone with the thumb or fist. The pressure should be maintained at all times, even duringpick-up and transportation to hospital, until trained emergency staff takes over.
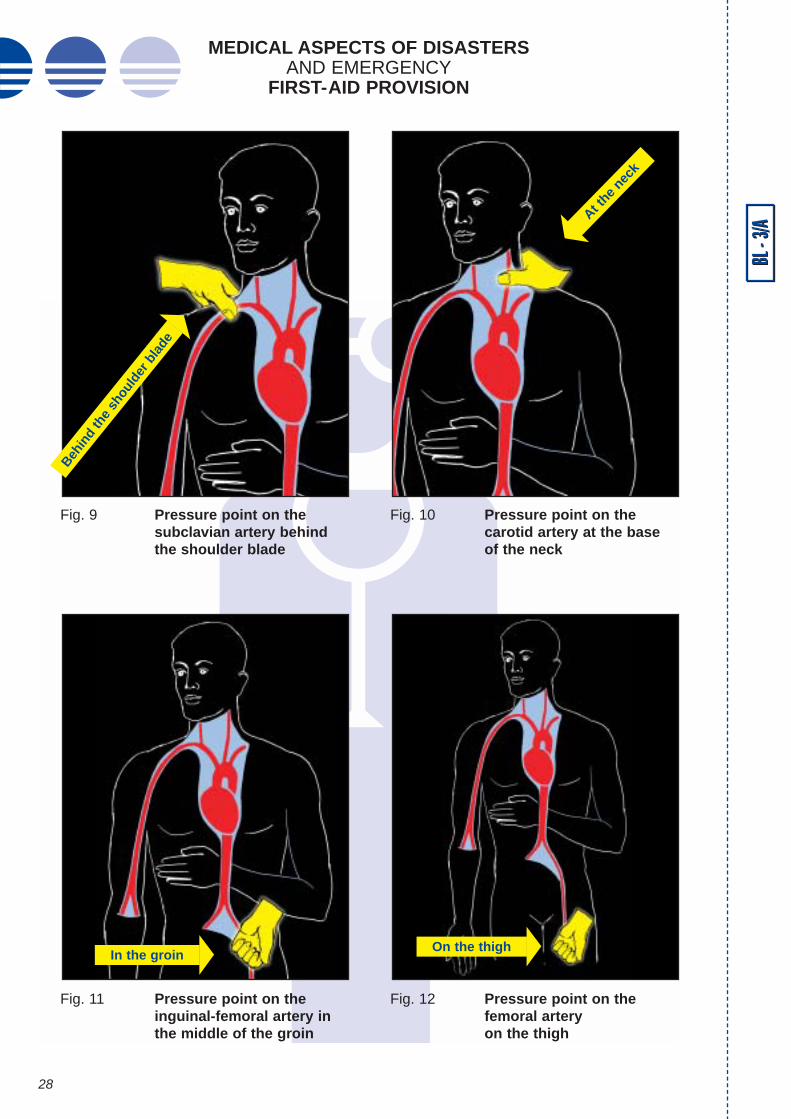
In order to apply pressure on the artery correctly, the rescuer or first-aid provider must befamiliar with the paths followed by the main arteries and the points on the body where theyare most accessible. 6 precise pressure points should be remembered:
• 3 points on each upper limb (behind the clavicle or collar bone, under thearmpit and on the inside of the arm between elbow and armpit
• 2 points on the lower limbs (in the middle of the groin and on the inside of thethigh, between the knee and the groin)
• 1 point on each carotid (on either side of the Adam’s apple)
In all cases the pressure should be exerted as close as possible to the wound.
In practice 2 key points can be used to stop almost all haemorrhages thus:
• the sub-clavian pressure point (under the collar bone, by pressing the arteryagainst the first rib) for all haemorrhages of the upper body
• the pressure point in the hollow of the groin, i.e. where the leg meets the trunk,for all haemorrhages of the lower limbs
Statistically the carotid pressure points are seldom used. Bleeding from severed carotidsis so profuse that pressure on the artery is only effective if exerted within seconds of thewound being inflicted. In first aid and occupational safety training only the 2 pressure pointslocated at the roots of the limbs are taught.
BL -
3/A
MEDICAL ASPECTS OF DISASTERS AND EMERGENCY
FIRST-AID PROVISION
28
BL -
3/A
Fig. 9 Pressure point on thesubclavian artery behindthe shoulder blade
Fig. 10 Pressure point on thecarotid artery at the baseof the neck
Fig. 11 Pressure point on theinguinal-femoral artery inthe middle of the groin
Fig. 12 Pressure point on thefemoral artery on the thigh
Behin
d th
e sh
ould
er b
lade
On the thighIn the groin
At the
neck

BL -
3/A
BL -
3/AMEDICAL ASPECTS OF DISASTERS
AND EMERGENCYFIRST-AID PROVISION
29
The upper limbs
The sub-clavian arteryFrom the aortic arch, a major artery reaches out of the thorax between the collar bone andthe first rib to irrigate the upper limbs.
This is the artery to compress (Fig. 9) in the event of serious haemorrhage of the shoulderor the armpit, or when a whole limb is torn off, in a road accident, for example (arm out ofwindow when overtaking or passing too close to a vehicle coming the other way).
The sub-clavian artery is accessible behind the collar bone, at the base of the neck(Fig. 9). Press the thumb downwards into the hollow.
If the haemorrhage is on the left side, use the right thumb; if it is on the right side use theleft thumb. The other fingers use the upper back muscles for leverage.
When this is done properly the bleeding should stop.
The axillary arteryThis leaves the trunk and is accessible in the hollow of the armpit.
Pressure is exerted here when the haemorrhage is located in the upper arm. The rescuermust use both hands, wrapping them round the shoulder muscles and pressing into thearmpit with both thumbs placed side by side, flattening the artery against the bone.
The position of the thumbs is important. They must be side by side, not tip to tip or one ontop of the other.
As previously, the pressure must be maintained until the casualty can be got to a hospital.
In practice, although it is mentioned in the main first-aid manuals, this pressure point is sel-dom used because it “neutralises” the rescuer.
The humeral arteryThe humeral artery irrigates the upper limbs and is accessible inside the biceps on theupper arm. It forks in the forearm below the elbow.
This pressure point is used for all major haemorrhages of the upper limbs when no mate-rial is available or when pressure cannot be exerted locally. It is in fact a “pressure line”along the artery. If the wound is on the right side, the right thumb is used, and if it is on theleft side, the left thumb. The rescuer grasps the arm from behind, slips the thumb round thebiceps and presses it against the humerus (the arm bone).
The other fingers grip the outer arm for pressure.
Another technique is to apply the pressure with the fingers, seizing the arm from the frontand applying counter pressure with the thumb on the outside of the arm. It is more tiring tokeep up the pressure in this position, so the other, more accurate method, using the thumb,is recommended.
There are countless possible pressure points, even on the forearm. All that is needed is anaccessible artery and a bone against which to press it. But the branching of the humeralartery into the radial and ulnar arteries can lead to mistakes that waste precious time to thedetriment of the casualty. For practical purposes, therefore, there is generally consideredto be no emergency pressure point below the elbow.
The lower limbs
The groinThe aorta branches into the two iliac arteries, which then become the femoral arteries atthe level of the groin.

BL -
3/A
MEDICAL ASPECTS OF DISASTERS AND EMERGENCY
FIRST-AID PROVISION
30
The femoral artery in the groin is the pressure point in the event of haemorrhage in theupper third of the thigh.
The artery is accessible (Fig. 11) in the middle of the groin (the mid-inguinal point). It isessential for this operation that the casualty should be lying down. The rescuer, beside thecasualty, watching his or her face, presses down with closed fist and outstretched arm ver-tically on the middle of the groin. Difficult as this may be, this pressure must be appliedfirmly even while the casualty is picked up and transported to hospital.
Effective pressure can only be applied with the fist, especially when the subject is over-weight, in which case it is virtually impossible to depress the artery using one or boththumbs.
The femoral arteryThis artery spirals down the inside of the thigh from the middle of the groin to the poplitealfossa at the back of the knee.
It is used as a pressure point (Fig. 12) for all haemorrhages of the lower limbs that cannotbe stopped using a bandage compress.
Like the humeral artery, it is accessible on the inside of the limb. The rescuer, positionedbeside the casualty where he or she can watch the casualty’s face, presses vertically downon the artery with the fist, the arm outstretched, always between the wound and the heart.To make it easier, the casualty’s leg is slightly bent and placed sideways against theground. Once again, a constant pressure must be kept up until the casualty is hospitalised.
The carotidSevered carotid arteries are a rare occurrence, generally caused by a road accident or anaccident at work. They are usually accompanied by other damage, such as a severed tra-chea, and sometimes lead to instant death.
The rescuer may be tempted to use this pressure point in the event of profuse bleedingfrom facial wounds, nosebleeds or the vomiting or spitting of blood. This is not only inef-fective but it can be dangerous for the casualty as it deprives the brain of necessary blood.
Bleeding from open wounds to the head or face should be stopped by manual pressure fol-lowed by a compress bandage.
Bleeding from the orifices is a sign of internal haemorrhage. So the only time the carotidshould be used as a pressure point to stop bleeding is when a single carotid is severed (bya knife or broken glass, for example). As usual, the pressure should be exerted betweenthe wound and the heart. The carotid arteries run along both sides of the Adam’s apple. Itis important not to obstruct breathing. Pressure should be applied using the right thumb(Fig. 10) if the left carotid is severed and with the left thumb if the right carotid is severed.The other fingers press against the back of the neck. The carotid should be pressed back-wards against the vertebrae. Again, the pressure must be maintained throughout pick-upand transportation to hospital.
The tourniquetThis was long considered as the easiest, most effective means of stopping an externalhaemorrhage, so it is found in most manuals and school textbooks. Before consideringhow to use it properly, therefore, let us consider its disadvantages, for the tourniquet canbe a dangerous weapon.
It stops all irrigation of the limb downstream of the application point, crushing and injuringbody tissue and complicating any surgery the injury may require. It should be used only inexceptional circumstances and in certain specific cases when:
BL -
3/A

BL -
3/A
BL -
3/AMEDICAL ASPECTS OF DISASTERS
AND EMERGENCYFIRST-AID PROVISION
31
• the rescuer is alone and has to leave the scene to fetch help• the rescuer is alone and there are other casualties in need of urgent attention
and first aid• the rescuer cannot continue to apply manual pressure (for example while the
casualty is disengaged from a vehicle following a road accident)• a whole limb has been severed (hand or arm sawn off by a circular saw or
chopped off by a guillotine or other cutting machine, leg severed by fallingsheet metal or the wheel of a railway truck or carriage)
Even then, the rescuer should check that the following four conditions are fulfilled:
• is the tourniquet really necessary ?• has a major artery in the arm or leg been severed ?• is it not possible to use a compress bandage ?• is there enough room for the tourniquet between the heart and the wound, i.e.
between the wound and the root of the limb (armpit or groin) ?
In such cases, when all these conditions are fulfilled, a tourniquet can be improvised.
The word tourniquet means different things to different people:
• for a nurse it is a venous tourniquet made with a rubber strap and used to facil-itate the taking of blood samples or the administration of intravenous injections;it is therefore a means of stopping venous (or return) circulation and is of noconcern to the rescuer at an accident scene
• the tourniquet has traumatised generations of accident casualties, not onlybecause of the equipment needed (a strap or cuff, a stick, sometimes a sec-ond strap) but because it is often a source of skin and tissue lesions
• finally, there is the improvised tourniquet, the weapon of last resort for the mod-ern-day first-aid provider
Applying an improvised tourniquetThis is never the first course of action. It should only be done when other methods fail orcannot be used in the circumstances.
The first-aid provider should already be exerting pressure (haemostasis) on or near thewound, and should continue to do so while applying the tourniquet.
Taking the available material in the free hand, proceed as follows:
• fold the material double to make a loop• wrap it round the limb, with the loop towards you• slip the hand through the loop, grab the two loose ends and pull them through
the loop• tighten the tourniquet by pulling the two ends apart - this can be done by hold-
ing one end between the teeth• now stop applying pressure with the other hand and use both hands to tie a
tight flat knot on the side of the limb opposite the loop• check that the tourniquet is sufficiently tight, i.e. that the bleeding has stopped

BL -
3/A
MEDICAL ASPECTS OF DISASTERS AND EMERGENCY
FIRST-AID PROVISION
32
What to do nextAfter applying the tourniquet, the rescuer must:
• prevent the casualty from going into shock• carefully note the time at which the tourniquet was applied• alert the emergency services• keep a constant watch on the casualty while awaiting the ambulance and dur-
ing transport
Preventing shockBlood loss (sometimes substantial) and pain can trigger severe shock.
To prevent this the first-aid provider should lay the casualty down in a horizontal position,cover him or her for warmth, and comfort him/her.
The dressed wound and tourniquet should be kept visible.
Write a note for the emergency servicesThe first-aid provider should note the time at which the tourniquet was applied, either onhis/her own watch or on that of the casualty, or preferably both; then, as soon as the essen-tial steps have been taken (dressing the wound, warming and comforting the casualty), thefirst-aid provider should prepare a note for the doctor or surgeon who will be receiving thecasualty in hospital. The doctor needs to know how long the circulation has been stoppedin the injured limb.
Also, in major disasters, the arrival of large numbers of casualties can cause delays in thehandling of emergency cases. So the note should provide the following information if pos-sible:
• the casualty’s name• the word “tourniquet” in a highly visible position• the time at which the tourniquet was applied (24-hour system, i.e. 17.15, not
5.15)
BL -
3/A
Material usedA tourniquet can be improvised using various materials: a tie, a canvas belt, a scarffolded diagonally, a strip of cloth, a stocking, etc. can all give excellent results.
Narrower materials, like string, wire, shoe laces cut into the skinand should be avoided at all costs.Elastic tourniquets (made of flat rubber bands) are not improvised and are used inother circumstances.
Special casesThe improvised tourniquet is usually applied to the thigh, and the available materi-al may be too short to make a tourniquet as described above. In this case, justpass one end of the material through the loop, pull it tight and tie it to the other end.

BL -
3/A
BL -
3/AMEDICAL ASPECTS OF DISASTERS
AND EMERGENCYFIRST-AID PROVISION
33
If there is no paper, pen or pencil to hand, the most important piece of information (the word“tourniquet” or a large “T” and the time of application) can be written on the casualty’s fore-head with lipstick or whatever else is available.
Alerting the emergency servicesThe evacuation of a casualty wearing a tourniquet is an emergency. The requisite prepa-rations must be made with minimum delay. The emergency services should therefore bealerted swiftly, clearly and accurately, so that the ambulance can arrive at the scene in theshortest possible time and surgery can be performed without unnecessary delay.
Constant supervision• The first-aid provider must check the casualty’s general condition, especially
the following:• breathing (apply mouth-to-mouth artificial respiration if breathing stops)• state of consciousness (place the casualty on his or her side in the recovery
position if unconscious)• circulation (check pulse regularly)• this observation must be kept up during transport, either by the ambulance
crew or by the first-aid provider where a less appropriate vehicle has to beused. In any event the casualty must be transported lying down, preferably ona stretcher
3.1.3 What to do in the event of internal haemorrhageSerious internal haemorrhagesAs no local action is possible, the first-aid provider’s role is limited to preventing the situa-tion from deteriorating:
• a conscious casualty should be laid down flat, with the legs slightly elevated• an unconscious casualty should be laid on his/her side in the recovery position
In both cases, try to keep the casualty warm.
If the casualty is conscious and asks for something to drink, do not give any liquid at all,and certainly not anything like alcohol, tea or coffee, which stimulate the heartbeat, there-by increasing the haemorrhage.
Important warningOnce a tourniquet has been applied it must never be removed or loos-ened except by a doctor!
Doctors alone are aware of the risks involved in removing tourniquets and able totake preventive action or corrective measures if anything goes wrong. In additionto blood loss, removing a tourniquet can result in sudden respiratory and circula-tory arrest. The first-aid provider cannot take that risk, no matter how long it takesto evacuate the casualty. The careful loosening of the tourniquet every 20 minutesstill recommended in some manuals is an obsolete and dangerous practice thatmust be proscribed.

BL -
3/A
MEDICAL ASPECTS OF DISASTERS AND EMERGENCY
FIRST-AID PROVISION
34
EcchymosisOrdinary ecchymosis or bruising is treated by applying a compress bandage soaked inalcohol. If in doubt, or in the event of extensive bruising, leave it to a doctor to decide whattreatment to administer.
Bruising in the presence of an open wound can foster the development of microbes andinfection, hence the importance of immediate first aid, to disinfect the wound and place thecasualty in a clean environment.
HaematomasIn simple cases, following a not-too-severe blow, haematomas can be held in check withwarm, salty compresses. Certain anticoagulant ointments also help: arnica is one exam-ple, often used on bumps.
However, bumps on the head and serious haematomas can be external signs of more seri-ous damage and a doctor should be consulted.
Ectopic (or extrauterine) pregnancyWhere profuse intraperitoneal bleeding occurs, only an emergency surgical operation cansave the casualty. There is nothing the rescuer can do except call an ambulance as quick-ly as possible. Failing this, he/she should transport the casualty to the nearest hospital bycar, in the same position as for ordinary internal haemorrhage (recovery position).
This type of accident can occur during the first 6 weeks of pregnancy and is sometimespreceded by loss of very dark blood, severe abdominal pain and fainting.
Internal haemorrhages that bleed through body orificesOtorrhagiaThe casualty should be placed in the recovery position (on his/her side) and picked up andtransported in that position, under observation. Which side up is of no consequence andwill neither help nor harm the casualty.
Epistaxis• The simple nosebleed is a frequent accident in childhood (falls, rough games).
Numerous traditional remedies exist, but the procedure to follow is straightfor-ward:
• keep the subject’s head up and slightly tilted forward; sitting subjects may sup-port their head on their hand, with their elbow on the table
• press against the bleeding nostril with a finger• prevent the subject from coughing or blowing his/her nose for a few minutes
after the bleeding stops
Tilting the head backwards does stop the bleeding, it is true, but blood runs down the throatand some people react badly to this.
BL -
3/A
Important warningThe drug antipyrine is frequently confused with aspirin. Aspirin is not haemo-static. On the contrary, it increases bleeding and should therefore not be used.Women who lose a lot of blood during menstruation are advised to avoid this sim-ple “miracle” drug.

BL -
3/A
BL -
3/AMEDICAL ASPECTS OF DISASTERS
AND EMERGENCYFIRST-AID PROVISION
35
If the bleeding persists, the nostril can easily be plugged:
• roll a small piece of gauze into a cylindrical plug• imbibe it with oxygenated water or a special haemostatic substance• insert it into the nostril, leaving one end protruding
If plugging the nostril fails to stop the bleeding, the subject should be seen by a doctor, whomay cauterise the nostril.
Recurrent nosebleeds should be reported to a doctor as they may be a sign of a more seri-ous problem. When a nosebleed occurs following a blow to the skull or a fall, the accident(violent blow to the nose, road accident, fall, etc.) should alert the rescuer to possible com-plications; even if there is no simultaneous bleeding from the ear, a nosebleed is a possi-ble external sign of a fractured skull.
In all cases caution is required and the casualty should be evacuated in the recovery posi-tion to a hospital and placed under observation.
HaematemesisIf the bleeding is not too serious, call a doctor and make the subject stay in bed in a semi-reclining position or lying on the side so that the airways are unobstructed. The subjectmust not eat or drink anything. To avoid masking the symptoms and making the bleedingworse, refrain from giving the subject ice to suck or a hot water bottle to hug.
In the event of profuse bleeding, immediate hospitalisation is necessary, to replace the lostblood by transfusion and/or perform surgery.
HaemoptysisThe bright red frothy blood ejected should be kept for analysis. The subject should remainin bed, in a semi-reclining position, the airways unobstructed. The subject should not talkor cough or drink anything.
Haemoptysis can be caused by thoracic trauma.
Whatever the cause, a doctor should be called, and in particularly alarming cases the sub-ject should be taken to hospital with the utmost urgency.
Special casesNon-bleeding open woundsWhen a member is severed, crushed or seriously damaged, it is possible that a majorblood vessel has been severed but is temporarily crushed or obstructed by a foreign body,such as a piece of bone or muscle.
There is no haemorrhage as such, although the wound is bloody.
When the subject is moved, however, during pick-up or transportation to hospital, a sud-den life-threatening haemorrhage may be triggered, so extreme vigilance is called for.Delayed external haemorrhage can cause death within seconds. Preventive action mustbe taken. There are two possibilities.
If the whole member has been severed, a tourniquet may be applied. It should be placedjust above the wound, tightened, even if there is no haemorrhage, and a note left in evi-dence as explained earlier, stating the time of application.
If the wound is deep and likely to have severed a major blood vessel, haemorrhage mayoccur at any time. The first-aid provider or ambulance crew must remain vigilant and keepa compress bandage or, better still, an emergency haemostatic pad at the ready. Theapplication of a tourniquet (loosely at first) should be envisaged only in the event of exten-sive damage, a fracture or when it is impossible to apply a haemostatic pad properly.

BL -
3/A
MEDICAL ASPECTS OF DISASTERS AND EMERGENCY
FIRST-AID PROVISION
36
Compound (open) fracture of the femur or thigh boneFracture of the femur is one of the most serious fractures of all as the femur is one of thelargest bones in the human body. It is always accompanied by profuse bleeding, bruisingand swelling, so it is only natural to mention it in this section on haemorrhages. It is a“shock-inducing” fracture, so it is important to prevent the casualty from going into shock.It should be remembered that the broken bones might still move even after the accident.Even after immobilisation of the limb, contraction of the large muscular masses of the thighcan move the splintered bone, causing it to perforate the femoral artery and trigger profusearterial haemorrhage.
If the fracture is closed, there is likely to be internal haemorrhage, with a large bruise andsigns of shock. If the fracture is open, blood will spurt from the wound. The presence of asplint or other apparatus may make it difficult or impossible to press on or near the woundto stop the bleeding.
A tourniquet may be set in position between the wound and the heart (and left loose if thereis no heavy bleeding) before the fracture is splinted.
The wound must then be kept under careful observation during transport. If the wound sud-denly starts to bleed profusely, the bleeding can be stopped by pulling the two ends of thetourniquet to tighten it.
Crushed limbsWhere a limb has been crushed or compressed for a long time under a heavy load (beam,tree trunk, car chassis, etc.) it should not be freed without due reflection and precaution.
Could the load be acting as a tourniquet? If so, lifting it off suddenly could trigger a haem-orrhage or worse, so this must be avoided.
One means of doing so in such exceptional circumstances is to apply a tight tourniquet fur-ther up the limb before removing the load.
A note should be made of the existence of the tourniquet, as usual, but in this case the timeof application noted should be the (approximate) time of the accident, when the circulationwas first cut off.
BL -
3/A
ConclusionIn spite of the wide variety of haemorrhages, the rescuer’s response is generallyvery much the same:
• avoid aggravating the situation• evacuate the casualty while keeping him/her under constant observation
As a rule one simple step is enough to stop an external haemorrhage: press direct-ly on the wound with the hand, then, after a few minutes, replace this measure witha bandage tightened until the bleeding stops. If pressure cannot be applied direct-ly to the wound, compress a pressure point on an artery between the wound andthe heart.
Only in exceptional circumstances and as a last resort should a tourniquet be used,but tourniquets can be dangerous and should be avoided if possible.

BL -
3/A
BL -
3/AMEDICAL ASPECTS OF DISASTERS
AND EMERGENCYFIRST-AID PROVISION
37
3.2 Fractures The skeleton, joints and muscles together form what we call the musculoskeletal system.
The skeleton, composed of 208 bones, forms the supporting framework for the body.Bones are living tissue which grows and needs irrigation. They provide anchorage for themuscles, which impart motion, and they protect the vital organs (the rib cage protects theheart and lungs, the skull protects the brain, and so on).
Composed of proteins and minerals, including calcium and phosphorus, the bones can begrouped into three main categories:
• long bones, like those of the limbs and the ribs• flat bones, like the skull and the shoulder blades• short bones, like the vertebrae, the tarsi and the carpi
Add the fact that red blood corpuscles are generated by the red marrow of the long bonesand we have summarised the main functions performed by the skeleton in the human body.
The names of all the bones in the body are of little interest to providers of first aid, but twoparts of the skeleton deserve special attention:
• the spine• the skull
The spine, made up of 32 or 33 vertebrae, depending on whether one counts 3 or 4 coc-cygeal vertebrae, is the “backbone” of the human body. The column of vertebrae forms aprotective canal for the spinal cord. The intervertebral discs, whose purpose is to cushionshocks, connect the adjacent vertebrae, with the exception of the first cervical vertebrae.
Each disc is composed of a fibrocartilagenous ring (annulus fibrosus) around a softernucleus called the nucleus pulposus. The discs are the first to suffer when the spine isplaced under excess pressure or undergoes undue torsion. The disc is crushed, or slipsout of place and can even crack in older subjects.
The head is made up of 14 facial bones and 8 skull bones. It rests on and is attached tothe spinal column. The skull, or cranium, forms the protective envelope of the noble con-trol organs (brain, cerebellum, medulla oblongata).
A fracture occurs when a bone is partially or completely broken. There are a number ofpossible causes:
• direct blows: a blow or shock to the bone (occupational accident), an objectfalling on the unprotected head, a leg hit by a car bumper in a road accident, ablow from the boom when sailing, etc.
• indirect blows: these fractures are the effect of countercoup or muscular contrac-tion (fracture of the spine following a fall on the heels, fracture of the arm or fore-arm caused by a fall from a bicycle, even when only the hand strikes the ground)
• spontaneous fracture: through decalcification, for example.
3.2.1 Types of fractureThe signs of a fracture differ depending on its location. Traditionally a distinction is madebetween three types of fracture:
• simple non-displaced fractures• simple displaced fractures• open or compound fractures

BL -
3/A
MEDICAL ASPECTS OF DISASTERS AND EMERGENCY
FIRST-AID PROVISION
38
The last type is compound because as well as the fracture there is an open wound, andtherefore a risk of infection in addition to the general dangers of fractures. The open woundmay be caused by the causal agent (and is therefore an inward-facing wound) or it may becaused by the broken bone, in which case it is outward-facing.
If the casualty is moved there is added risk of tearing muscles or perforating or severingblood vessels and nerves.
The bones most frequently fractured are the long bones, sometimes with no displacement.Only an X-ray can confirm the diagnosis. In other cases the broken bone may have beendisplaced in various ways and to varying degrees, and the rescuer should be able torecognise signs of overlapping, bent or twisted fractures.
To simplify matters, fractures of the long bones are often compared with a branch break-ing.
The short bones (vertebrae, carpi, tarsi, metatarsi, metacarpi) are often crushed and“cracked like nuts”.
Flat bones, on the other hand, are often broken without being deformed (the skull, forexample). They crack like a car windscreen, but their shape remains the same after theimpact.
There are five main pointers to a possible fracture:
• highly localised pain that intensifies at the slightest movement• inability to use the injured limb which is not due to paralysis or a nerve prob-
lem• deformity caused by bone displacement (limb at abnormal angle at the fracture
point; limb shortened where two bone parts have overlapped or compacted;“ski-type” rotation of the leg, where the foot is not at the proper angle with theknee; transversal displacement)
• sooner or later other signs appear - swelling, oedema, ecchymosis,haematoma, signs of bleeding from ruptured blood vessels
• sometimes the casualty will have heard the bone crack; under no circum-stances should the rescuer expect to hear any cracking or attempt to move thebones to listen for a cracking sound
It is rare to come across all these signs at once, but one is enough. The rescuer shouldalways bear in mind that when an accident occurs there is the possibility of a fracture.
3.2.2 How fractures heal A pocket of blood forms round the fracture point and phosphocalcic changes occur as cal-cium is supplied. Bone tissue is generated. A callus forms and hardens until the bonemends.
Sometimes the callus is too large, causing discomfort, unsightly deformity or functionalproblems.
If the new bone tissue does not harden enough, the bone will set abnormally. This prob-lem seems to arise several months after the fracture, when the person starts to move orput pressure on the injured limb again prematurely.
3.2.3 What to do in the event of fracture A number of principles guide the rescuer, who should, when examining the casualty, seekto establish the exact circumstances of the accident and ascertain exactly what happened,in order to be able to:
BL -
3/A

BL -
3/A
BL -
3/AMEDICAL ASPECTS OF DISASTERS
AND EMERGENCYFIRST-AID PROVISION
39
• preserve the vital functions, which are an absolute priority, without aggravatingobvious or suspected fractures
• identify related lesions, particularly in road accidents• avoid making matters worse by any inappropriate manipulation• avoid all movement before the fracture has been properly immobilised• alleviate pain, thereby reducing the risk of shock• in the event of a compound fracture, cover the wound carefully• immobilise the fractured limb or, where spinal injury is suspected, the
head/neck/trunk system• arrange for proper transport under observation
Fractured limbs To avoid pain and displacement, block the joints above and below the fracture.
Always use a fast and simple splint requiring minimum material. It is not difficult to immo-bilise a fractured limb.
Fractures of the forearmIf the fracture is a simple, single fracture, the injured person will often naturally do the rightthing by holding the fractured forearm with the other forearm. The wrist and elbow jointsshould be immobilised with whatever material is available; this can usually be done, atleast temporarily, using the casualty’s own clothes. If the casualty is wearing a pullover ora cardigan, the bottom of the garment should be rolled upwards until the fractured limb canrest in it. This is then held in place by a sling, one end of which is passed under the itemof clothing in which the arm is resting, then back up the front and round the neck to be tiedto the other end.
Temporary immobilisation also be achieved by turning up the flap of a jacket and pinningit with the arm cradled inside, or supporting it in a sling tied round the neck.
Where a triangle of cloth is available it can be used to make an even better sling that blocksthe elbow. The triangle has a long base ending in two corners, and a summit or apex. Onecorner of the triangle is passed under the injured forearm and up over the chest to theshoulder on the same side, with the apex towards the elbow; the other corner is folded upover the injured arm and the two ends are tied together round the neck. The forearmshould preferably be maintained in a horizontal position or tilted slightly towards the oppo-site shoulder. The fingers should be left protruding from the edge of the sling and the wristshould be well supported.
To block the elbow properly, take the overlapping apex of the sling and secure it with a pinor twist and tuck the end in between the sling and the elbow.
Sometimes the broken bone is displaced and the temporary immobilisation describedabove is insufficient, as the thorax, against which the fractured forearm rests, is not flat. Insuch cases the fractured arm and the nearest joints may be immobilised using a magazinecurled into a U-shaped tube or a malleable metal splint that will accommodate any defor-mity of the fractured arm. The magazine technique requires a magazine, three thongs andsome padding. Proceed as follows:
• slip the three thongs crosswise under the magazine at equal distances• place the forearm along the middle of the magazine or ask the casualty to do so• form a cradle for the forearm by loosely tying the two ends of the middle thong
together• place the padding between the magazine and the fractured limb, filling in the

BL -
3/A
MEDICAL ASPECTS OF DISASTERS AND EMERGENCY
FIRST-AID PROVISION
40
area around the deformed fracture point and making a sort of cushion softenough to accommodate any subsequent swelling
Having padded the arm to immobilise the fracture, the rescuer should then:
• tie up the two end thongs: the one by the thumb should be folded double andone end passed above the thumb, leaving the thumb free, while the other ispassed across the palm of the hand (taking care not to make a noose aroundthe thumb that could cause a constriction)
• tighten the middle thong• check that the magazine causes no discomfort to the elbow
Prior to all this, the rescuer should take off any watch or bracelet the casualty is wearingon the forearm that could cause a constriction in the event of tightening or swelling. Theprocedure is now half complete as only the wrist has been immobilised. The elbow cannow be immobilised very easily by placing the splinted forearm in a triangular sling asdescribed above.
Fractures of the upper armThe principle is the same as before - immobilise the joints on either side of the fracture, i.e.the elbow and shoulder. Once again, the casualty’s clothing may provide the necessarymaterial.
Two triangular slings are used. First, an ordinary sling is applied (as for fractures of theforearm) to block the elbow. Next, to immobilise the shoulder and the fractured bones, asecond sling is applied as follows:
• with the apex of the triangle facing downwards towards the elbow• place the middle of the sling against the top of the shoulder • tie the ends together under the opposite armpit, if possible without covering the
hand
As with a normal sling, the apex of the triangle (at the elbow) should once again be twist-ed and tucked in. Both the elbow and the shoulder are now immobilised.
Fractures of the lower limbsBroken legs require more equipment. Chance first-aid providers will use whatever meansare available:
• use the uninjured limb as a splint• improvise a lateral splint out of wood (a stick or slat of wood)• make a U-splint using a blanket and two pieces of wood
Professional emergency services will use:
• a malleable metal side splint (wire mesh splint, Kramer splint)• a ready-made metal tube splint or a malleable metal wire or aluminium splint
(SAM splint)• a Thomas splint• a reduced air pressure or vacuum splint
For the casual first-aid provider the rule is once again to immobilise the broken limb in theposition it is in, no matter how badly misshapen it may be.
Qualified first-aiders will generally carefully exert gentle traction on the limb, along its axis,with one hand under the heel and the other over the instep.
BL -
3/A

BL -
3/A
BL -
3/AMEDICAL ASPECTS OF DISASTERS
AND EMERGENCYFIRST-AID PROVISION
41
Using the uninjured leg as a splintPadding is placed between the legs and the feet are maintained perpendicular to the legswith the aid of a figure-of-8-shaped bandage. The fractured limb is then bound to the unin-jured limb by wrapping several wide bandages around both legs, taking care that no band-age covers the site of the fracture.
Side splintsImprovised splints can be made using any strong, narrow stick, strip of wood, broom han-dle etc., and cut to suit the size of the injured person and the location of the fracture.
Fracture of the thighOne splint is placed along the outside of the body, from the bottom of the foot to under thearmpit. The other is placed along the inside leg, from foot to groin. Both are padded, espe-cially around the groin and armpit. They will be held in place with straps or thongs (in prin-ciple three straps per limb segment and three round the trunk). It is easier to position thestraps first and to lay the splints on top of them. The “end” straps (ankle, top of thigh andtop of trunk) should be wound once round the splints to hold them in place while paddingis positioned. The three straps are then tied to position the splints, and padding is addedto the gaps and the hollows left by the deformed limb. The remaining straps are then tiedtight and the foot is blocked perpendicular to the leg using a figure-of-8 bandage.
Wherever the fracture is located, the shoe should first be unlaced but not removed. Theknee should be immobilised with a wide bandage. The splint is then finished.
Fracture of the lower legThe outside splint stops at mid-thigh. Only the knee and ankle joints need to be immo-bilised. There is no need for straps around the chest, waist and hip. The knee must beimmobilised by a wide strap, however, and the foot held perpendicular to the leg. Gapsbetween the splint and the leg should be padded, and padding should be positionedaround the knee and ankle and wherever contact with the wood could cause discomfort orinjury.
Place an improvised “stretcher” or U-splint under the fractured leg: take a blanket and rolleach edge of it round a stick. Carefully raise the leg just high enough to slide the splint intoposition. This is the most delicate part of the operation. It should be done either whilepulling gently on the foot and raising the leg or by making a “cushion of hands” under thefractured limb if there are enough helpers. The improvised splint is then held tight by strapsor a spiral bandage. The foot is maintained perpendicular to the leg.
Specialized equipmentMalleable metal splintsThese are side splints made of wire mesh and known as Kramer splints, which can be cutto size and adjusted to the deformation. They fit snugly round the angle of the broken limband protect it during pick-up and transportation. Like wooden side splints, they are held inplace with 3 straps per limb segment, with extra immobilisation around the joints.
Malleable metal U-splintsThese are like mesh casts padded and wrapped in cotton, on which the fractured leg isplaced rather like on an improvised splint. Here too the splint is held in place with straps ora spiral bandage around leg and splint.
Pneumatic or inflatable splintsAlthough these are supposedly for use in the event of fracture of the upper or the lowerlimbs, they should really be used only for fractures of the ankle or lower leg. In thigh frac-

BL -
3/A
MEDICAL ASPECTS OF DISASTERS AND EMERGENCY
FIRST-AID PROVISION
42
tures they do not immobilise the hip, and this is unacceptable. There are several modelsof pneumatic splints (the most frequently used are made of long tubular compartments andcan be folded into a tube shape). Buttons are easier to close than zip fasteners. Like“stretcher-type” U-splints, the uninflated splint is placed under the injured limb, whichshould be raised very carefully, exerting a slight traction on the foot. It is then fastened andinflated by mouth. It should not be blown up too hard as the resulting pressure could hin-der the circulation. This is less of a problem when the splint is made up of parallel tubularcompartments with spaces between them.
Inflatable splints can be left on the casualty while X-rays are taken.
The Thomas splintThis is a complex piece of equipment comprising the following:
• an elongated U-shaped metal frame with a dent in the curved part for fasten-ing a thong to immobilise the instep
• a bandage forming several figures-of-8, forming a trough or bed• two articulated hoops at the upper end of the inside branch, which wrap around
the thigh and clip into the upper end of the outside branch• two rings on the side, for use in raising the limb off the ground
It takes two people to apply this splint - one to raise the limb off the ground while pullinggently on the foot along the line of the leg, while the other first ties a canvas ring looselyround the ankle, with strong bonds on each side, then places thick padding where theinside leg joins the trunk and finally applies the splint without the traction on the leg beingreleased.
The limb is immobilised using a bandage or straps. If possible, the foot is held perpendi-cular to the leg with a bandage tied to the side rings.
The traction exerted by the first rescuer is maintained by the canvas ring round the ankle,which is attached to the dent in the frame at the level of the instep.
Another version – the ATLAIR IT 10 – exists, with a frame that is permeable to X-rays, andlong inflatable cushions replacing the bandages and straps to hold the limb still.
Vacuum splints and mattressesVacuum mattresses are useful for immobilising the spine. The casualty is placed on themattress and the air is emptied from the envelope, which contains small polystyrene ballsthat espouse the shape of the body and immobilise it. The mattress becomes a rigid, easy-to-transport stretcher.
Chest injuriesAlmost 25% of the injuries sustained in road accidents are chest injuries sustained by driv-ers thrown against the steering wheel.
There are several types of chest injury:
• visible injuries with an open wound• injuries where the casualty has difficulty breathing because several ribs are
broken• a simple fracture of the rib is usually no problem and the injury heals well• in the case of a blowing wound it is essential to close the wound immediately.
This is done by pressing a piece of cloth onto the wound with the hand. Thisemergency step can subsequently be replaced by a triangular bandage orstrips of overlapping adhesive cloth, to facilitate evacuation.
BL -
3/A

BL -
3/A
BL -
3/AMEDICAL ASPECTS OF DISASTERS
AND EMERGENCYFIRST-AID PROVISION
43
When there is no open wound the casualty’s pain should alert the rescuer. The pain issharper when the casualty coughs or breathes deeply. The casualty barely dares tobreathe, which can result in real suffocation, with the casualty turning blue, sweating, etc.If the wound is slight, the casualty is placed in a semi-sitting position, but this position mustnot be used if there is any suspicion of spinal injury, which there usually is in road acci-dents. In general, therefore, the casualty is transported in the recovery position (on the sidewhich gives least discomfort), making sure that the airways are completely unobstructed.No body bandage should be used.
The casualty must be evacuated as a matter of urgency, without any shaking, bumping orsudden acceleration or deceleration that might aggravate his or her condition. The follow-ing should be kept under close observation:
• breathing (frequency should remain almost normal, between 12 and 20 breathsper minute)
• colouring of lips and nails• pulse (the normal rate is between 60 and 80 beats per minute)• state of consciousness
If necessary, artificial respiration should be administered. Care should be taken with oxy-gen - sweating is a sign of carbon dioxide poisoning. An adverse effect is possible.
In conclusion, road accident casualties should always be examined for chest injuries,which may be easy to detect, for example when the casualty has difficulty breathing prop-erly or coughing up the mucus obstructing the lungs (which can accelerate suffocation). Ifno injury is obvious at first glance, pain may be revealed by asking the casualty to coughor take a deep breath.
Fractures of the jawThese may occur as a result of a blow to the chin or the whole face. Simple fractures ofthe lower jaw should be held in place by a sling, the main purpose of which is to maintainthe lower jaw against the upper jaw (the (remaining) lower teeth against the upper teeth).If the whole face is injured, this takes priority and the airways must be cleared of anyobstructions (clotted blood, foreign bodies such as teeth, dentures, glass, etc.). The casu-alty should be placed in the recovery position, the mouth open and the tongue protruding.
Injuries to the jointsThese are strain injuries. The ligaments may simply be stretched, as in the case of a sim-ple sprain, or torn, resulting in a more serious injury. When the two parts of the joint areactually pulled apart or out of joint, we call it dislocation or luxation.
SprainsThe ligaments are pulled or torn. Sprains generally affect the ankle or knee but can alsoaffect the wrist and elbow. They may be caused by a fall, by tripping or by a sporting acci-dent. The subject immediately feels a searing pain and cannot move for a few minutes,then the pain subsides and movement becomes possible. Swelling occurs. Any sprainedor twisted joint should be X-rayed to make sure there is no more serious injury (dislocationor even a fracture). Local application of a soothing ointment twice a day for several daysusually helps. It is advisable to bandage the ankle with a medium-tight bandage over a stripof cotton soaked in alcohol.
Remember that one of the purposes of the bandage is to hold the foot perpendicular to the leg.
Where ligaments have been torn the joint must be immobilised in a plaster cast. This is fol-lowed by massage treatment when the cast is removed.

BL -
3/A
MEDICAL ASPECTS OF DISASTERS AND EMERGENCY
FIRST-AID PROVISION
44
DislocationsDislocation occurs when the two bones of the joint are separated. The person is unable touse the injured limb or even to move it, as the joint is blocked in an abnormal position. first-aid providers must leave the joint as they find it and not try to put it back in place. In theevent of a dislocated shoulder (the most frequent case), place a cushion, made of cloth-ing, for example, between the arm and the thorax to hold the arm away from the body. Foldthe arm on the injured side across the chest and support it with the aid of a sling.
The sling should be placed with the apex of the triangle on the elbow side, with one endround the front of the arm and over the neck on the uninjured side and the other end pass-ing behind the back, the two ends being tied together on the healthy shoulder. The fingersshould protrude from the edge of the sling so that the circulation can be observed. Theelbow is blocked in place by securing the apex of the sling with a (safety) pin or by twist-ing it and tucking it in beside the elbow. The patient should then be taken to hospital for anX-ray before the joint is put back in place.
3.3 Wounds
3.3.1 Types of wound Minor wounds These are superficial grazes, scratches and clean-edged cuts or incisions, which general-ly heal normally. In such cases bleeding is minimal, there is little or no risk of infection, andthe casualty is, in principle, properly vaccinated against tetanus (i.e. had a booster injec-tion less than five years ago).
Severe wounds It is solely for a doctor to decide what treatment should be given.
Severe wounds may:
• be large (possibly requiring stitches or a skin graft)• go deep• be very dirty/highly contaminated• have a large foreign object lodged in them or one that is difficult to spot and
remove• be contused, in which case the crushed tissue is conducive to infection• be complicated by a fracture, a haemorrhage, etc.
Specific wounds Certain wounds can be life-threatening; these include wounds to the thorax, abdomen,face and eyes
Wounds to the thoraxDepending on their seriousness, these wounds can affect a casualty’s breathing to agreater or lesser extent. A perforating wound, or a wound combined with a fractured rib,may lead to asphyxia, especially if the casualty is lying down with the head in a low posi-tion.
Wounds to the abdomenApart from obviously superficial grazing, any wound to the abdomen, even a small punc-ture wound, entails a risk of damage to an intra-abdominal organ.
The hollow organs (stomach, intestines), covered by the peritoneum (the membrane which
BL -
3/A

BL -
3/A
BL -
3/AMEDICAL ASPECTS OF DISASTERS
AND EMERGENCYFIRST-AID PROVISION
45
also forms the lining of the abdominal cavity), may be perforated, resulting in a peritonitis-related shock.
The solid organs (liver, spleen, etc.) may rupture, causing an internal haemorrhage.Rupturing may be either immediate or delayed, as is frequently the case with road acci-dent casualties. Following an impact, the external membrane remains intact but there isbleeding inside the organ. As the blood builds up, the fairly inflexible outer membrane rup-tures under the pressure and the casualty suffers a violent internal haemorrhage, with allthe symptoms of shock.
Wounds to the face and eyes Facial wounds usually bleed heavily. Wounds to the eyes often cause shock, because theyare very painful.
3.3.2 How to deal with a wound Minor wounds Debriding (cleaning) the woundA wound is often contaminated through contact with the ground and may contain dirt, dustor various kinds of debris, and sometimes oil or grease. It must therefore be cleaned rap-idly, but without using substances which may cause tissue necrosis. Use of ether is not rec-ommended for reasons already explained; alcohol is an irritant and causes stinging; hydro-gen peroxide and soap give good results.
Handling a compressWithout the right equipment, i.e. tweezers, a compress should be removed from its pack-aging by holding one corner. If it is in an individual wrapper, tear one edge of the wrapperand remove the compress, holding it by one corner. A compress removed from a metal boxshould be handled in the same way.
Actual cleaning of the woundThe compress is used to clean the wound, moving outwards from the centre of the woundonto the surrounding healthy skin. Never go over the same area twice to avoid transferringdebris back onto the part of the wound which has already been cleaned.
Protecting the wound Wherever possible, a minor wound should not be dressed but be left uncovered. If thewound is oozing fluid or there is a risk of dirt getting into it, it must be covered. The dress-ing will consist of one or two compresses of sterile gauze, which form a dust barrier butallow the wound to breathe. The dressing should be kept in place with strips of, preferablynon-allergic, adhesive plaster, attaching the edges of the compress to the surroundingskin.
Severe wounds Three rules must be followed:
• protect the wound• prevent deterioration of the situation• evacuate the casualty under supervision
The golden rule: Do not touch the wound!

BL -
3/A
MEDICAL ASPECTS OF DISASTERS AND EMERGENCY
FIRST-AID PROVISION
46
Protecting the woundA rescuer does not have appropriate means of cleaning and disinfecting a wound proper-ly. Antiseptics and other products should not be used. The wound should be left as it is untilthe casualty is taken in charge by the emergency services.
Preventing deterioration of the situation • Deterioration of the situation may concern:• the wound itself, which may become infected• the casualty, who may show symptoms of shock
Depending on its size, the wound should be covered with a sterile dressing (compresses)or a clean piece of cloth (a handkerchief, napkin, towel, etc.).
Some particularly severe, large, deep wounds have a traumatising effect. The casualtyshould therefore always be kept lying down and warm and should be comforted.
EvacuationThe casualty should be evacuated to a hospital, which is better equipped to treat seriousinjuries than a mere local medical practice. A severely wounded person must be trans-ported lying down.
It is advisable to prepare an information sheet, giving the casualty’s name, the time and cir-cumstances of the injury and any other potentially useful information.
Specific wounds With a wound to the thorax (chest or upper back), the presence of air “bubbles” must imme-diately be checked, i.e. whether air is leaking out from the lungs via the wound (“blowingwound”). Where this is the case, the wound must be “sealed” as quickly as possible withan airtight dressing.
Several techniques are possible, depending on the equipment available:
• in a real emergency, the rescuer should press either a hand or a clean, thickpad of cloth directly onto the wound
• a pad of cloth may be kept in place with an improvised triangular bandage, tiedaround the thorax, with the upper corner of the bandage passing over the per-son’s shoulder and secured with a strip of cloth
• if a little equipment is available, the wound should be covered with several lay-ers of gauze compresses and kept airtight with a patchwork of pieces of adhe-sive plaster, arranged so that each piece of plaster overlaps the edge of thecompresses and half covers the previous piece of plaster
Positioning the casualty while waiting for evacuation and during transportWounds to the thorax necessitate emergency evacuation. If the person is conscious, he orshe should be kept in a half-sitting position, sometimes leaning over slightly onto theinjured side. The casualty will in fact automatically adopt the position which causes leastdiscomfort.
An unconscious person should be transported lying on one side, with the head propped upand tilted back to facilitate breathing. The casualty must be kept under close surveillancethroughout transport, and, if available, oxygen should be administered to a person experi-encing breathing difficulties.
BL -
3/A

BL -
3/A
BL -
3/AMEDICAL ASPECTS OF DISASTERS
AND EMERGENCYFIRST-AID PROVISION
47
3.4 Breathing difficulties
3.4.1 General observationsOxygen is absolutely vital to human life. A cell receiving insufficient oxygen and too muchcarbon dioxide will first cease functioning and then die.
Death of an organ deprived of oxygen occurs after a variable period of time, depending onthe type of organ concerned. The most vulnerable organ is the nervous system. The braincannot go short of oxygen for more than three minutes, beyond which time the conse-quences may be irreversible and any effort to resuscitate the casualty may be irrevocablydoomed. This shows how important it is for a rescuer to take rapid action when faced witha person experiencing breathing difficulties.
RespirationRespiration consists of all the phenomena linked to the absorption, circulation and cellularuse of oxygen present in the air (which is made up of 20.93% oxygen, 79.03% nitrogen,very small quantities of rare gases and traces of carbon monoxide).
VentilationThis is the movement of air in and out of the lungs, measured in litres per minute. In themechanics of breathing, ventilation ensures the intake of oxygen into the lungs and therelease of carbon dioxide into the atmosphere.
If oxygen is to reach the cells, the two fundamental body systems must be functioningproperly:
• the respiratory system, which brings in air• the circulatory system, which carries blood around the body
Role of the respiratory systemThe respiratory system is the mechanism which brings large quantities of blood into con-tact with air. It is an air-pump which carries air through the airways to the pulmonary alve-oli. The respiratory system has two separate parts:
• a system of airways in which virtually no exchange of gases takes place• the alveoli where oxygen is exchanged for carbon dioxide at high speed
Role of the circulatory systemThe circulatory system takes up oxygen from the alveoli, releasing carbon dioxide inexchange, and transports all essential substances to and from the cells by means of aremarkable chemical, haemoglobin, which can carry large quantities of oxygen and carbondioxide. This circulatory system acts as a pump which evacuates blood from the heartalong the arteries to fine tubes (capillaries) surrounding the alveoli. The capillary networkhas a surface area of about 70 m2, which explains the speed of gaseous exchanges at thislevel. The blood is evacuated by a pump (the right ventricle) along a transport system (thepulmonary arteries) to an exchange system (the capillaries); it then flows through a gath-ering system (the pulmonary veins) to a second pump (the left ventricle), which delivers itto all the cells in the body.
Blood serves as a vehicle for oxygen. Oxygen is transported in two ways:
• dissolved in the plasma• combined with the haemoglobin contained in the red blood cells

BL -
3/A
MEDICAL ASPECTS OF DISASTERS AND EMERGENCY
FIRST-AID PROVISION
48
3.4.2 AsphyxiaThe term asphyxia was originally applied to a person with no detectable pulse, but it grad-ually came to mean lack of ventilation. Then, anyone whose condition necessitated artifi-cial resuscitation of the respiratory function was considered to be suffering from asphyxia,i.e. anyone experiencing respiratory difficulties even if ventilation had not ceased entirely.Lack of oxygen or excess carbon dioxide in the cells, tissues and organs, whatever thecause, is what really defines respiratory failure. A deficiency of oxygen is known as “hypox-ia”, and its complete lack “anoxia” (which is exceptional).
An increase in carbon dioxide is known as “hypercapnia”. Hypercapnia and hypoxia areoften combined in persons experiencing breathing difficulties and result in cell death.
Signs of respiratory difficultiesAsphyxia always involves:
• the symptoms of the causal illness or accident• the symptoms of hypoxia and hypercapnia themselves, whether separate or
combined• the symptoms due to the various (arterial and bulbar) nerve receptors’ reaction
to the hypoxia or hypercapnia
In a medical environment, measurement of the partial pressures in oxygen and carbondioxide, and of the pH of the blood, makes it possible to determine the seriousness of apatient’s condition.
Most of the symptoms observed are respiratory, circulatory or cerebral. A number of stagescan be distinguished, depending on whether hypoxia or hypercapnia predominates.
HypercapniaHypercapnia develops more slowly than hypoxia, and the four stages traditionallydescribed (Table 3) may last several hours or days.
Hypoxia Irrespective of its cause, hypoxia is a deficiency of oxygen reaching the lungs. It involvesfour stages (Table 4), each lasting a few minutes.
BL -
3/A
Stage
One
Two
Three
Four
Description
Difficulty in breathing
SweatingPartial airway obstructionRapid pulseHigh blood pressureSlight cyanosis
Deep coma with total loss of reflexes
Cardiac arrestCessation of breathing
Table 3 Three stages of hypercapnia

BL -
3/A
BL -
3/AMEDICAL ASPECTS OF DISASTERS
AND EMERGENCYFIRST-AID PROVISION
49
The signs of asphyxia The symptoms are usually a combination of the symptoms of hypercapnia and hypoxia,varying according to the cause. It is important to be aware that a person suffering fromasphyxia does not always cease breathing. As we have just seen, during the first twostages of hypoxia and the first three stages of hypercapnia ventilation continues, althoughthe speed, strength and regularity of breathing may vary. It is therefore no longer possibleto consider that a casualty is suffering from asphyxia only once the chest and abdomenhave stopped moving and breathing has ceased, at which point effective artificial ventila-tion, commenced within the next few seconds, is clearly the sole means of resuscitatingthe casualty. To recognise a case of asphyxia before this stage is reached, it is necessaryto know how to look and listen for the symptoms.
Cyanosis of the fingernails, lips and ear lobes is a sign of hypoxia or of the second andthird stages of hypercapnia. A pulse which is fast and too marked may indicate the begin-ning of hypercapnia.
It is above all the rhythm and quality of breathing that symptomatize the onset of asphyx-ia and make it necessary to start resuscitation:
• breathing which is too fast - beyond forty breaths per minute - but weak,scarcely causing any movement of the ribs
• breathing which is too slow - five or six breaths per minute - shortly before res-piratory arrest
• troubled, noisy (gurgling) breathing, showing an obstruction of the airways dueto an accumulation of secretions in the throat, trachea and bronchi; this is asign of excess carbon dioxide (hypercapnia) at all stages
Resuscitation is possible only through artificial ventilation and opening of the airways.
Table 4 Four stages of hypoxia
Stage
One
Two
Three
Four
Description
The person takes stronger, quicker and quicker breaths, straining the rib cage toabsorb as much air as possible - this is known as polypnoea.The pulse, whethertaken at the wrist or the carotid, is fast, often more than 100 beats per minute; itmay reach and exceed 150 per minute; at this initial stage, blood pressure is nothigh.
The person falls unconscious, often suddenly, but with no loss of reflexes. Thisstate is brief, and there is little time to act. Breathing is always strong and fast.The heartbeat speeds up considerably; cyanosis is particularly evident at thisstage; the pupils are often already dilated. Attempts at resuscitation are alwayssuccessful.
Only a few minutes later the person falls into coma, with a total loss of reflexesand, above all, cessation of breathing (apnoea). Blood pressure falls,convulsions are frequent, and the pupils are usually dilated.
Circulation stops due to cardiac arrest. The person is no longer breathing, andhis or her pupils show excessive dilation (mydriasis).At this stage artificialventilation alone does not always suffice to resuscitate the casualty, andcardiopulmonary resuscitation, combining artificial ventilation and heartmassage, may be the only means of restarting breathing and heart movement.

BL -
3/A
MEDICAL ASPECTS OF DISASTERS AND EMERGENCY
FIRST-AID PROVISION
50
When a person is inhaling harshly, or gasping for air, it should not be assumed that ventila-tion is continuing. On the contrary, artificial ventilation should be commenced immediately.
When a person is pale, unconscious, has dilated pupils, is no longer breathing or is gasp-ing for air, and has no discernible pulse, artificial ventilation sometimes suffices to restartall the vital functions. However, in most cases it must be combined with heart massage.
The causes of asphyxiaThe causes of asphyxia include:
• A change in the mix of gases breathed in • A fall in partial pressure in oxygen, alone • Decreased oxygen combined with a non-toxic gas• Stale air• A lack of breathable oxygen in the atmosphere
The presence of toxic gases in the air breathed in, preventing haematosis
Partial or complete obstruction of the airways:
• the mouth and nose• the front and back of the throat• obstruction with the tongue - when a person is unconscious and lying on his or
her back the tongue falls down the back of the throat.• obstruction with blood - blood in the nose or mouth of a person lying on his or
her back will flow down into the throat, where it coagulates• swelling of the mucous membranes of the throat• presence of mucus• spasms of the glottis - these occur in the event of sudden stimulation of the
entrance to the trachea. They may be triggered by cold water swallowed by adiver or a person who is drowning or by a violent blow to the throat.
• strangulation• hanging• obstruction of the trachea and bronchi: Small foreign bodies (peas, parts of toys,
peanuts) which are swallowed, particularly by children, may get past the epiglot-tis and enter the trachea. They never cause a complete obstruction to begin with,and artificial ventilation (mouth-to-mouth) remains perfectly effective until special-ist medical help is available. However, no time must be lost in getting to a hospi-tal, as the mucous membrane of the trachea swells up in reaction to the irritation,and the resulting oedema may completely obstruct the windpipe in a matter ofhours. It is necessary to be aware that, although the breathing difficulties maycease, this does not always mean that the foreign body is no longer causing anobstruction. It may in fact obstruct only one of the bronchi, in which case the childwill be breathing normally. However, specialist medical help must be obtained asa matter of urgency, in order to remove the foreign body using bronchoscopy.
• Drowning - in the last stages of drowning, flooding of the bronchopulmonary systemwith water prevents oxygen from reaching the alveoli and passing into the blood.
3.4.2 Carbon monoxide poisoning Carbon monoxide poisoning is a frequent phenomenon, especially in towns and cities.Poisoning may be due to a suicide attempt or may be caused accidentally by a fuel-burn-ing appliance.
BL -
3/A
BL -
3/A
BL -
3/AMEDICAL ASPECTS OF DISASTERS
AND EMERGENCYFIRST-AID PROVISION
51
Symptoms of carbon monoxide poisoningAcute poisoningThe initial symptoms of acute poisoning are not well known, as casualties are often intox-icated while asleep. However, it would seem that the first signs are headache, abdominal
pain, dizziness, loss of hearing, confusion, somnolence and, above all, a general impres-sion of unease, followed by gradual paralysis, beginning with the extremities. Casualtiesusually attempt to stand up in order to open a window and take a few steps before col-lapsing. Loss of consciousness is sometimes preceded by a period of mental confusionand agitation, which may give the impression that the person is drunk.
Subsequent effectsThe subsequent effects of carbon monoxide poisoning are variable. If left untreated, acutepoisoning is always fatal. Despite treatment, various complications may be observed:
• pulmonary (lung infections)• cardiac (irregular heartbeat, pseudo-infarction)• vascular (state of shock)• renal (renal insufficiency, uraemia)
The long-term effects are mainly neurological and mental. Even after recovery, casualtiesmay be subject to stuporous states or pseudo-dementia, convulsions, pseudo-Parkinsonism, fits of dizziness or paralysis.
What is carbon monoxide?Carbon monoxide is a colourless, odourless, tasteless gas. It is lighter than andeasily mixes with air. On burning, carbon monoxide emits intense heat and is trans-formed into carbon dioxide. In certain conditions (presence of oxygen), its com-bustion causes a violent explosion. It is sufficiently toxic to harm the organism.Carbon monoxide is considered dangerous from a concentration of 1/10,000 (i.e.one litre of carbon monoxide for ten cubic metres of air). Once the concentrationreaches 1/500 (one litre of carbon monoxide for 500 litres of air), there is a dangernot only of chronic poisoning, but also of acute poisoning with coma.Concentrations of 1/200 or more (one litre for 200 litres of air) result in rapid death.
All town and city dwellers have small quantities of carbon monoxide in their blood.In a non-smoker arterial blood contains 2.2% carbon monoxide, and in a smoker3%. In a country dweller the quantity is tiny.
How does carbon monoxide affect the organism?It does not have a direct toxic effect. The damage which it causes is due to its affin-ity with all molecular structures that usually fix oxygen.
The effects vary depending on the quantity of carbon monoxide absorbed and howquickly it builds up in the organism. Symptoms depend on carbon monoxide con-centration in the air inhaled, duration of exposure and the casualty’s prior state ofhealth. Poisoning may be acute, non-acute or chronic.

BL -
3/A
MEDICAL ASPECTS OF DISASTERS AND EMERGENCY
FIRST-AID PROVISION
52
How to deal with carbon monoxide poisoning A rescuer must take extreme care when attempting to save a casualty. There are two main risks:
• the gas is highly toxic, and the rescuer may be poisoned in turn• the slightest spark or flame may trigger an explosion
Before doing anything, it is essential to seek help.
The treatment to be given is the same as for any person suffering from asphyxia.
First, ensure that the airways are unobstructed by loosening clothing and clearing the per-son’s mouth and throat with two fingers wrapped in a piece of cloth.
Examine the casualtyDifferent solutions can be envisaged depending on the casualty’s state (Table 5).
BL -
3/A
State
One
Two
Three
Description
The casualty is unconscious but still breathing and has a detectable pulse.Lay the casualty on his/her side, and monitor pulse and breathing!
The casualty is no longer breathing or breathing too slowly and irregularly; a pulsecan be felt.Immediately start artificial ventilation!
The casualty is no longer breathing, and a pulse cannot be felt.Immediately start artificial ventilation! After breathing into the person’smouth or nose three times, take the pulse again. If there is no pulse, beginheart massage combined with artificial ventilation.
Table 5 Three states of carbon monoxide casualty
ConclusionCarbon monoxide poisoning is a frequent occurrence, which anyone who under-stands the causes can avoid by taking simple preventive measures.
Rescuers must be aware of the risk and approach any casualty with care, as theirown life is in danger. Carbon monoxide poisoning must be suspected where any-one is found asphyxiated in a kitchen or bathroom. It must be borne in mind thatthis form of poisoning is all the more insidious since carbon monoxide is odourless.Casualties show an abnormal rosy colouring. Before taking any further steps, res-cuers must contact the fire department because of the risk to themselves andsometimes to all other people present in the building. An asphyxiated casualtymust be dealt with as follows:
• ensure that the airways are kept unobstructed by tilting back the person’s head and,if he/she is breathing, placing him/her on his/her side
• if breathing has stopped begin artificial ventilation (mouth-to-mouth) immediately
• never cause a spark and open all windows to air the premises and reduce the riskof explosion
• before going to the casualty’s assistance rescuers must protect themselves and others

BL -
3/A
BL -
3/AMEDICAL ASPECTS OF DISASTERS
AND EMERGENCYFIRST-AID PROVISION
53
3.4.3 Carbon dioxide poisoning Carbon dioxide poisoning (hypercapnia) may be caused either by breathing air with anexcess concentration in carbon dioxide (external cause) or by problems in eliminating car-bon dioxide produced by the organism (internal cause), which arise in all cases of respira-tory failure.
Symptoms of hypercapniaInitial symptoms of hypercapnia are a fast pulse, slight reddening of the complexion andsweating with no physical effort. Blood pressure also rises at this stage.
Obstruction of the airways is frequent and often discernible through gurgling or snortingnoises when breathing. At the same time, ventilation speeds up, and the person may expe-rience all the usual forms of breathing difficulties.
Casualties are often agitated, lack coordination, and their speech becomes incoherent oraggressive.
Subsequently, at the second stage, breathing is fast and weak (oligopnoea). Casualties areoften agitated but may already show signs of unusual torpor or somnolence. Heavy sweat-ing can be observed at the level of the forehead, armpits and chest, and the casualtyshows obvious signs of obstruction of the airways. Slight cyanosis of the base of the fin-gernails, the ear lobes or the lips may be noted. At stage three, the casualty falls into adeep coma. Breathing is weak and sometimes irregular, with interruptions. The pulse is fastand sometimes irregular. There are clear signs of cyanosis, particularly of the fingernails.The airways are severely obstructed, and breathing is noisy.
How to deal with carbon dioxide poisoning Where the person is breathing, the vicious circle of reciprocal cause and effect must bebroken. To do this:
What is carbon dioxide ?Carbon dioxide (CO2) is an odourless, colourless gas, with a faint acid taste (sodawater). It is heavier than air and initially builds up at ground level. It will put out aflame and prevents combustion.
The usual sources of carbon dioxide are combustion (fires, ovens), fermentation(wine and cider fermentation tanks) and human and animal respiration (on breath-ing out, carbon dioxide is emitted along with water vapour and nitrogen).
How does carbon dioxide affect the organism ?Experiments have been conducted in which a person was administered a mix ofgases containing a known percentage of carbon dioxide. When the carbon dioxideconcentration in alveolar air is increased by 0.2%, ventilation per minute doubles.A 4% concentration in alveolar air produces a state of polypnoea (deep, rapidbreathing) in a person at rest. 10% is the tolerance limit in a conscious person.Beyond 10%, a decrease in breathing capacity (oligopnoea) is noted, followed byrespiratory arrest (apnoea).

BL -
3/A
MEDICAL ASPECTS OF DISASTERS AND EMERGENCY
FIRST-AID PROVISION
54
• the casualty should be brought out of the state of torpor by being shaken orpinched, and must be made to breathe heavily and cough
• secretions should be removed with a mucosity aspirator, if available• the airways should be opened up by loosening any clothing or other object that
may hamper breathing• the casualty should be made to lie down with the upper half of the body
propped up and the head tilted back; an unconscious casualty should be posi-tioned on his/her side (in the recovery position)
• take care to prevent a too sudden intake of oxygen, which may, paradoxically,cause respiratory arrest
Where the person is no longer breathing, after rapidly loosening clothing and clearing themouth and throat with two fingers wrapped in a piece of cloth, mouth-to-nose resuscitationshould be commenced immediately.
3.4.4 Electrocution Electrocution causes over 200 deaths per year in France, for example. A casualty who hasbeen resuscitated, or who showed no signs of asphyxia, may develop after-effects, suchas renal failure, which may prove fatal in the long run. Casualties may also suffer cosmet-ic damage through burning. This type of accident is, above all, due to carelessness on thepart of the casualty or his or her entourage. Electrical accidents are a consequence of thenature of electricity itself – electricity is not visible on the surface of a conductor, and thiscan be conducive to negligence (imprudence, poor maintenance of electrical wiring andappliances) – but can be avoided through a minimum of care and attention.
The main risks and lesions caused Electric shockElectric shock can be observed in cases where there is neither cardiac arrest nor asphyx-ia. It is generally due to a strong flow of current of several amperes.
Casualties are projected over a distance of several metres as soon as they come into con-tact with the conductor. For a number of seconds or minutes they remain immobile, hag-gard and dazed, with bulging, wild eyes. The complexion is pale and blue-grey in colour.Breathing is rapid, sometimes panting or weak. The pulse rate exceeds 120 beats perminute and may reach 180 to 200 per minute in cases, in which case the casualty’s life isthreatened. The person feels numb.
BL -
3/A
ConclusionCarbon dioxide poisoning is mostly caused by inhaling stale air, by a build-up ofthe gas in a confined area or by an inability to eliminate the carbon dioxide pro-duced by the body.
Hypercapnia should be suspected when the person is sweating, experiences diffi-culty breathing, shows signs of cyanosis or is in a coma. It may lead to respirato-ry and cardiac arrest.
It is important to clear the airways, to stimulate the person so that he/she beginsto breathe normally and, in the event of coma, to position the person on his/herside in the recovery position.
Respiratory arrest necessitates immediate artificial ventilation.

BL -
3/A
BL -
3/AMEDICAL ASPECTS OF DISASTERS
AND EMERGENCYFIRST-AID PROVISION
55
After a number of minutes or hours numbness gives way to muscle ache, breathing returnsto normal, and the person feels calmer and recovers some colour. The pulse often takestime to stop racing (several hours). Serious injuries may have been caused when the per-son was propelled through the air (broken limbs, severe wounding, cranial traumatism).Others may be the result of the electrical current itself (torn muscles, serious burns).
After an accident of this type the casualty must therefore undergo a full examination. Thestate of shock must be monitored and treated as such.
Asphyxia Depending on the strength of the current, this may take the form of respiratory arrest alone,due to muscle contraction (detectable carotid pulse), or circulatory arrest, due to ventricu-lar fibrillation (no carotid pulse).
Respiratory arrest: This occurs with a current of between 20 and 80 mA. It is a result ofconstant contraction of the diaphragm and intercostal muscles for as long as the currentpasses. Chest movement is paralysed, and the person can neither exhale nor inhale.
Circulatory arrest: This occurs with a current of between 80 mA and several amperes (afigure of 100 mA is usually given). The current produce genuine short-circuits inside thebody, resulting in contraction of the ventricles and of all the fibres of the myocardium.
The heart no longer functions as a pump; under the hand it feels like a mass of earthworms(ventricular fibrillation). Blood is no longer evacuated into the circulatory system; the heartno longer fills and empties; circulation ceases.
BurnsThese may be caused by an electrical arc (spark) between two live conductors, by parti-cles of molten metal (jewellery), or by the current itself passing through the body. Burnsvary in seriousness, but are always more severe than is apparent to the naked eye, as amere visual examination reveals only the entry and exit points of the current, not the extentof internal lesions.
Visible burns exist only where the current entered and left the body. They are distinctive inappearance. Their shape varies: round, linear, or map-like. They may be very small, some-times even a mere pinpoint, or large. However, they are always deep, reaching the under-lying muscles and bones. The area may be completely charred. These burns have smoothedges, which are greyish or purplish in colour; their surface is hard, tough and flexible.They do not bleed when probed with an instrument, even at some depth. All circulation hasceased in the burnt area, which is truly necrotised, consisting of dead, eroded tissue.Healing is extremely slow because of the vascular changes, and surgery is often neces-sary.
How to deal with electrocution The approach varies depending on whether the casualty is still in contact with the con-ductor and whether the accident occurs indoors or outdoors.
The casualty is not in contact with the conductorThe person has been projected some distance away from the conductor and usually showsthe effects of electric shock. A brief examination should be made to verify breathing andpulse. The casualty must be treated for shock and left lying down, if unconscious on his orher side (in the recovery position), after the airways have been cleared. Prevent the per-son from standing up, talk to and reassure him/her. Keep him/her warm, by covering, andarrange for transfer to a hospital for surveillance, administration of an alkaline drip and anynecessary treatment.

BL -
3/A
MEDICAL ASPECTS OF DISASTERS AND EMERGENCY
FIRST-AID PROVISION
56
Serious burns are particularly subject to infection. They must be isolated from the sur-rounding air with a temporary, sterile dressing. Lastly, the rescuer must bear in mind that ifone accident has occurred, there may be a risk of others. The electricity supply must beturned off until the cause of the accident has been established and any necessary repairshave been made.
The casualty is still in contact with the conductor The current may be conducted by a pool of water, in which case the electricity supply mustbe turned off (at the master switch) before touching the casualty. If need be, the defectiveappliance (an electric razor, for example) may simply be unplugged. Remove any wiretouching the person, because the power can always be switched on again accidentally bysomeone else. If it is difficult to switch off the electricity supply, or that would take too long,the wire or other electrical source can be pulled away from the casualty. To do this, rescuersshould protect themselves by standing on insulating material (a wooden chair, stool orstepladder, possibly placed on glass) and using a dry piece of wood, e.g. a broom-handle,or a dry bottle to touch the electrical source. These measures, which should be applied onlywhen dealing with a household electricity supply, are merely fall-back solutions and do notremove all risk. After removing the casualty from the electrical source, the rescuer mustensure that his or her airways are kept clear by loosening clothing at the neck and waist,clearing the mouth and throat, removing any dentures and tilting the head back. If the per-son has stopped breathing but has a detectable carotid pulse, mouth-to-mouth or mouth-to-nose resuscitation must be administered immediately, until the person begins to breatheagain on their own and regains consciousness. If these measures are taken without delay,they are usually successful. The casualty should then be evacuated to a hospital.
If the person is in a death-like state, i.e. has no carotid pulse, has stopped breathing, isunconscious, shows a blue-grey colouring and has both pupils dilated, after clearing theairways and tilting the head back, the rescuer should breathe into the mouth or nose threetimes, then check the carotid pulse. If a pulse can now be felt, the rescuer should contin-ue artificial ventilation. If there is still no pulse, heart massage must be commenced, begin-ning with 5 or 10 chest compressions, given by pressing on the lower sternum with botharms straight, so that it is compressed by about 4 cm. The rescuer should then alternatefive chest compressions with one breath (insufflation) until a pulse is detected, from whichpoint artificial ventilation alone is necessary.
Always ensure that help is being sought and that the emergency services have been calledso they can take charge of the casualty and transfer him or her to hospital.
Electrocution outdoorsIn this case the type of current is unknown, and rescuers can take action only if they havethemselves ensured that the power supply is off or if they have special insulating equip-ment (an electrical emergencies kit), including rubber boots and gloves, wire cutters, a polewith an insulated handle and a special stool. Each of these pieces of equipment must havebeen tested to guarantee that it protects the user up to a given voltage noted on the equip-ment itself.
A high-voltage power line brought down by a storm and lying on the ground is a case apart.Despite the considerable safety systems incorporated in power grids, such a line poses avery high risk, and may be dangerous even at some distance because of residual currenttravelling through the ground. The only solution is to call the electricity company and sealoff the area, preventing people from approaching the power line, even if someone near ithas been electrocuted and needs help. No attempt should be made to cut off the power bybreaking the circuit, as the device used to do so may not be sufficiently insulated.
BL -
3/A

BL -
3/A
BL -
3/AMEDICAL ASPECTS OF DISASTERS
AND EMERGENCYFIRST-AID PROVISION
57
3.4.5 How to deal with breathing difficulties It always falls to a chance rescuer to administer first aid, but specialist medical assistance,according to the nature of the problem, must be obtained very rapidly. This shows howimportant it is to call the emergency services.
Success or failure often depends on speed of action. A rescuer must not need to thinkabout what to do or dig in his or her memory. There are only a few seconds in which to takeaction, and time lost may prove fatal.
First stepsEliminate the cause of asphyxia Without risking his or her own life, a rescuer must first move the casualty away from oreliminate the cause of asphyxia. The earlier this measure is taken, the more effective it willbe. It may entail:
• a simple action, such as turning off the electricity supply at the master switchthen removing any wire still in contact with the casualty
• complex action, involving more or less sophisticated techniques, the basicprinciples of which should be familiar to everyone, if only to avoid unnecessaryexposure to danger
ConclusionElectrocution can always be avoided, and such accidents should therefore neveroccur. They cause many different kinds of lesion.
Immediate injuries consist of burns and a state of shock. The greatest risk is of res-piratory or circulatory failure, necessitating artificial resuscitation, possibly includ-ing external heart massage.
Long-term damage mainly results from the internal effects of electrocution, aboveall on the kidneys.
When coming to the assistance of a person who has been electrocuted, the rescuermust think fast and exercise the greatest possible caution. In all cases, rescuersmust always call for help first, then ensure that they themselves will not be exposedto danger, by turning off (or having someone else turn off) the power supply, beforeremoving the casualty from the power source and administering first aid.
Each step taken by a rescuer, whether amateur or
professional, must obey one obvious, basic rule:
"every second counts"!

BL -
3/A
MEDICAL ASPECTS OF DISASTERS AND EMERGENCY
FIRST-AID PROVISION
58
Although there is a need for speed, the measures taken by any rescuer must be wellthought-out. Ensuring one’s own safety is a basic rule, with direct consequences for thecasualty’s chances of survival and for subsequent rescue action.
Alert the public emergency servicesMedical reanimation techniques are often very complex and cannot be taught to amateurrescuers. However, the latter should be familiar with effective methods of providing basiclife support while waiting for specialist assistance.
Examination and initial actionThe rescuer must quickly examine the casualty to assess his or her condition, whichdecides the first steps to be taken. There are four possibilities (Table 6), according to acasualty’s state of consciousness and whether he or she is still breathing and has a pulse.
In any case, the first steps taken by an amateur rescuer are aimed at providing effectivebasic life support but will be limited in scope, and the chances of success therefore dependentirely on the rapid arrival of medical assistance. This shows the vital importance of seek-ing help promptly and providing precise information to the emergency services.
Preventing asphyxiaThe recovery positionAt present, an incalculable number of unconscious casualties die of asphyxia each day.The way accident casualties or persons who fall into a coma die often has nothing to dowith the cause. Death is simply due to gradual asphyxia, caused by the tongue obstruct-ing the back of the throat, or sudden asphyxia, caused by inhalation of gastric secretions.
The recovery position keeps the upper airways of an unconscious person clear, by facili-tating the evacuation of mucus, vomit or blood and preventing the tongue from blocking thethroat. This position must be used whenever breathing may be hampered by obstructionof the upper airways, particularly in the event of aggravating circumstances, such asunconsciousness, loss of normal coughing or swallowing reflexes, vomiting, blood runningthrough the nose or mouth or facial injury.
Placing the person in this position is simple, but must be done with care in the case of acci-dent casualties. If the rescuer is alone, he or she should kneel beside the casualty at chestlevel. With one hand, grasp the lower part of the person’s farther thigh (just above theknee) and, with the other hand, the lower half of the farther upper arm (near the elbow).
The person is rolled towards the rescuer in a single movement. The upper leg is bent atthe knee, to serve as a prop. The head is tilted back and the mouth opened and turnedtowards the ground or bed-surface.
Where two rescuers are present (which is desirable after any accident which may havecaused a spinal fracture), the second places his or her hands on the casualty’s cheeks,keeps the head extended and follows the rotating movement. In this way it is possible toavoid any bending or rotation of the neck and to keep the spinal column aligned. To main-tain head, neck and thorax alignment, it is preferable to have first placed an improvisedcushion (a folded pullover or jacket), of a thickness equivalent to half the width of theshoulder, against the person’s check. The casualty should then be wedged in positionusing blankets or items of clothing placed between the knees and behind his or her back.
Clearing the airwaysThis entails ensuring unhampered respiratory movement and a good airway from themouth to the lungs. A partial obstruction worsens respiratory problems, hastens asphyxiaand makes any resuscitation attempt ineffective.
After loosening tight clothing (collar, tie, belt), a number of actions should be taken.
BL -
3/A

BL -
3/A
BL -
3/AMEDICAL ASPECTS OF DISASTERS
AND EMERGENCYFIRST-AID PROVISION
59
Casualty's state
First possibilityThe casualty is unconsciousand is still breathing, but withdifficulty. A pulse can be felt.
Second possibilityThe casualty is conscious butbreathing is laboured, toofast, too slow or hampered.
Third possibilityThe casualty is unconscious;breathing has stopped or isineffective (too slow, too fast,weak); a pulse can be detect-ed at the throat or groin.
Fourth possibilityThe casualty is unconscious;breathing has stopped, nopulse can be detected at thethroat or groin; pupils areoften dilated. This is some-times referred to as a death-like state. It corresponds tocirculatory arrest, or deficien-cy, combined with respiratoryarrest.
First steps to be taken
open the airways by loosening any clothing which may hamper breathing(collar, tie, belt), removing dentures, tilting the head back and clearing themouth and throat with two fingers, using a hooking motion. Removesecretions with a mucosity aspirator, if available
insert a Guedel-type artificial airway, if available
prevent the asphyxia from worsening (for instance, due to obstruction ofthe airways with vomit) by lying the casualty on his/her side in the recov-ery position
administer oxygen, carefully to begin with (a rush of oxygen may causerespiratory arrest in a person suffering from hypercapnia)
do not leave the person alone but stay near and monitor skin colour (dis-appearance of cyanosis, integuments turning pink again), breathing(rhythm, strength, respiratory failure), circulation (the rescuer should keepone hand on the carotid pulse), recovery of consciousness (keep talkingto the casualty)
reassure and calm the casualty, who experiences a suffocating feeling
leave the casualty in the position where breathing is easiest, often half sit-ting-up
loosen any clothing which may hamper breathing (collar, tie, belt)
encourage the casualty to cough and to breathe slowly
remove dentures
place the head in the correct position, slightly tilted back
administer oxygen with care
loosen the clothing
clear the mouth and throat
remove dentures and immediately begin a method of oral (mouth-to-mouth, mouth-to-nose) or manual (Silvester or Nielsen) resuscitation
The speed with which the method can be implemented is a key successfactor. Only mouth-to-mouth and mouth-to-nose resuscitation in fact makeit possible to commence artificial ventilation immediately.
clear the airways
begin mouth-to-mouth or mouth-to-nose resuscitation immediately
If, after three insufflations, there is still no detectable pulse, begin artificialcirculation by means of external cardiac massage, alternating with artifi-cial ventilation
Table 6 Possibilities according to a casualty's state of consciousness, breathing and a pulse conditions

BL -
3/A
MEDICAL ASPECTS OF DISASTERS AND EMERGENCY
FIRST-AID PROVISION
60
Tilt the head backWhatever the casualty’s position, this action tips the tongue forward, away from the backof the throat, and thus opens the upper airways. It can be done as follows: the rescuer’shands are placed on the person’s cheeks, with the fingers hooked round the lower jaw,which is gently tilted up.
Artificial ventilation There are two main types of artificial ventilation. A number of methods not requiring appa-ratus can be used for first-aid purposes; their means of action, and therefore effectiveness,differ according to the technique used. The two main categories to be distinguished are:
• expired air resuscitation methods, which entail breathing air into the asphyxiat-ed person’s airways; these are the oral methods (mouth-to-mouth; mouth-to-nose)
• closed-chest manual methods, which entail causing movements of the rib cageso that the air contained in the lungs is expelled, and then allowing the lungsto refill with air passively, by widening the rib cage to facilitate inhaling
There are many closed-chest manual methods, the most well known being the Schafer,Nielsen and Silvester methods. Only the last two are described here. Other known meth-ods (Hederer, Chauveau, Binet) are more complex to implement or require a significantamount of equipment (the Eve method).
Relay methods, using apparatus, make it possible to maintain artificial ventilation for alengthy period. No matter how simple the apparatus used, these methods are alwaysintended as a follow-up measure to oral or manual resuscitation begun immediately on thespot. Typical apparatus consists of a manual ventilator, of bellows or bag-valve type, con-nected to a face-mask. This type of equipment is fast and easy to use and effective, but isalways a follow-up solution to mouth-to-mouth.
In a medical environment mechanical artificial ventilators, of varying degrees of complexi-ty, are used as a follow-up measure to emergency resuscitation.
Oral methodsTheir unquestionable effectiveness is due to the fact that the air supplied by the rescuerhas high oxygen content.
The air reaching the alveoli of the asphyxiated person is in fact that contained in the res-cuer’s mouth, throat, bronchi and trachea. The alveolar air exhaled by the rescuer, whichhas a high carbon dioxide content, in fact serves to push properly oxygenated air towardsthe casualty’s alveoli.
The oral methods, which can be implemented rapidly in any location, constitute the basicartificial ventilation technique. The only circumstances in which they cannot be used arewhere there is extensive facial injury and the mouth and nose are no longer recognisable,or where the casualty has undergone a tracheotomy or has a tracheal wound. Amateur res-cuers should be aware of the slight, but real, risk that exists when oral ventilation is givento a casualty intoxicated with certain poisonous substances that are eliminated via thelungs (trichlorethylene, carbon tetrachloride, methyl bromide). In such cases, the rescuermust be careful to remove his lips completely from the casualty’s face when the latterexhales so as not to breathe in the toxic air released.
Mouth-to-mouthMore often than not, the casualty will be lying on the ground, but this method can be car-ried out anywhere: in a bed, a boat, a car, on rocks or even in water.
With a casualty lying on his or her back, the rescuer takes up position alongside him or her
BL -
3/A

BL -
3/A
BL -
3/AMEDICAL ASPECTS OF DISASTERS
AND EMERGENCYFIRST-AID PROVISION
61
and, after opening the airways (loosening clothing, clearing the mouth), tilts the head back,placing one hand or forearm under the back of the casualty’s neck and the other on thecasualty’s forehead. Other techniques are possible, such as lifting the casualty’s chin orplacing a support under the casualty’s shoulders.
The nose, though which a significant amount of the air insufflated would otherwise escape,is closed by pinching it with the index finger and thumb of the hand resting on the casual-ty’s forehead. It is also possible for the rescuer to use his or her own cheek, which fills withair on insufflation, to close the casualty’s nose. After taking a slightly deeper breath thannormal, the rescuer places his or her lips around the casualty’s mouth, ensuring a goodseal. Then, without completely emptying his or her lungs, the rescuer blows into the casu-alty’s mouth quite fast. The rescuer than removes his or her mouth and watches for thecasualty’s chest to fall, while taking another breathes. The sign that this method is effec-tive is chest movement in the casualty as air enters and leaves the lungs.
The volume of air insufflated should be neither too much not too little. Optimal frequencyin an adult is 15 to 20 breaths per minute. The rescuer should not breathe too fast, so asto avoid hyperventilating, which would make him or her dizzy and thus less efficient.
Mouth-to-noseThis method can be easier in certain situations. The positions of the casualty and the res-cuer are the same as for mouth-to-mouth resuscitation. The rescuer tilts the casualty’shead back, by lifting the chin with the palm of his or her hand, and closes the casualty’smouth to prevent the insufflated air from escaping. The other hand presses down gently onthe casualty’s forehead. The rescuer seals his or her mouth around the casualty’s noseand blows into it quite fast, before removing his or her mouth and watching for the casual-ty’s chest to fall. The insufflation rate should be about 15 to 20 breaths per minute.
Mouth-to-mouth-and-noseThis technique is applied to infants or small children. The rescuer places his or her lipsaround the casualty’s mouth and nose. The rescuer should give weaker breaths than foran adult and more frequently, about 25 to 30 per minute. The volume of air needed is thatsufficient to raise the casualty’s chest. This shows how important it is for the rescuer tomonitor the child’s chest movement. Giving too much air inflates the child’s stomach, whichmay with time hamper ventilation. Moreover, the rescuer should press gently on the child’sstomach one or two times per minute, to evacuate any air that has entered the stomachdespite the rescuer’s precautions.
Manual methodsThere are many manual methods, which are always a fall-back solution and must only beused when the oral methods (mouth-to-mouth, mouth-to-nose) prove impossible. The pre-cautions are the same as for any artificial ventilation method.
Immediate action is essential. Time lost placing the casualty in the right position may haveserious consequences.
As with any other artificial ventilation method, the airways must be opened by looseningthe casualty’s collar and belt, then opening and clearing the mouth and throat.
To ensure maximum effectiveness, it is essential that the casualty should be lying on a firmsurface, so as to permit proper compression of the rib cage. These methods are based onthe principle of chest compression using the rescuer’s own weight, but, as the chest is quiteresistant to pressure, the surface on which the casualty is placed to be pressed down at thesame time should be firm and not sink or compress when the rescuer applies pressure.
All of these methods begin with a movement to expel air from the casualty’s lungs (expiration).

BL -
3/A
MEDICAL ASPECTS OF DISASTERS AND EMERGENCY
FIRST-AID PROVISION
62
Heart massage When the casualty is no longer breathing but a pulse can be felt, administering artificialventilation, so that the blood in circulation is oxygenated, is enough. It is a quite differentmatter when the heart is no longer beating or is beating ineffectively.
During evaluation of an asphyxiated casualty, the sign of cardiac failure is absence of a(properly checked) pulse in the throat or groin.
The casualty is usually pale and has ceased breathing. There is no detectable pulse. Thepupils are usually dilated (mydriasis). The casualty is in a death-like state. It is first neces-sary to administer effective artificial ventilation, as a result of which the pulse will oftenbecome detectable. If, after three properly administeredrescue breaths (mouth-to-mouth or mouth-to-nose), thepulse is still absent, artificial circulation by external heartmassage must be commenced, combined with artificialventilation. If either artificial circulation or artificial ventila-tion is not properly provided, it will be impossible to resus-citate the casualty.
However, attention must be drawn to the fact that, althoughthere is absolutely no risk with artificial ventilation, externalheart massage does entail a risk of fracturing the ribs or thesternum, with damage to the underlying viscera (liver,spleen, stomach, heart). This means that someone whodoes not have adequate training must be absolutely certainthat the casualty is in a death-like state, before commenc-ing such a dangerous procedure. The pulse must bechecked several times, after administering several rescuebreaths, before beginning heart massage. Nothing couldbe worse than administering chest compressions to a per-son who has merely fainted. Before taking this action, arescuer must be convinced that, if nothing is done, the casualty will die. It is only in thesecircumstances that an amateur rescuer should, as a last resort, take this initiative whichmay have very serious consequences.
The principle of external heart massage is based on the fact that the heart is a hollow mus-cle, which can be compared to the pear-shaped bulb of a spray. It is located in the middleof the thorax between two bone surfaces, the sternum in front and the spine behind, withthe lungs on either side. Blood arrives at the heart via the pulmonary and major circulato-ry veins, and is evacuated via the pulmonary arteries to the lungs, where it is oxygenated,and then passes via the aorta to the organs and tissue. When the heart has stopped it isflaccid like the bulb of a spray. By pressing on the sternum it is possible to squeeze theheart against the spine, causing the blood contained in it to flow out into the arteries.
When pressure on the sternum is released, the heart fills spontaneously, like the bulb of aspray resuming its initial shape after being compressed. The normal rate of massage to beadministered by the rescuer is compression and release five times in about three seconds,or ten times in six seconds, alternating with one inflation of the lungs (insufflation) in thefirst case and two in the second.
In the course of about one minute of this compressions-breathing cycle, 60 chest com-pressions and twelve breaths (insufflations) should be administered.
Before commencing cardio-pulmonary resuscitation ensure:
BL -
3/A
Fig. 13Cardio-pulmonary massage (reanimation)

BL -
3/A
BL -
3/AMEDICAL ASPECTS OF DISASTERS
AND EMERGENCYFIRST-AID PROVISION
63
• that the casualty shows all the signs of a death-like state (unconsciousness,blue or grey colouring, respiratory failure, absence of a carotid or femoralpulse, mydriasis of the pupils, which no longer react to light)
• that the person is lying on his or her back on a firm surface (e.g. the ground)
The rescuer should begin by administering three effective rescue breaths and then checkthe pulse again.
It is then necessary to alternate five external cardiac compressions with one insufflationadministered by the mouth-to-mouth or mouth-to-nose method, or ten cardiac compres-sions with two insufflations.
To do this, the rescuer should kneel down beside the casualty’s shoulder with his or herknees touching the casualty’s arm. After the first three breaths, if there is still no pulse, therescuer locates the lower third of the sternum, which is the flat bone in the middle of thechest. The rescuer then places the heel of his or her hand (fingers lifted off the casualty’schest) on this part of the sternum, with the axis of the hand perpendicular to the axis of the
ConclusionRespiratory failure is frequent and causes many deaths if the right action is nottaken immediately.
From a moral standpoint, no one should let another person die simply becausethey do not know the basic steps to be taken, as described in many manuals andtaught by national and international relief organisations, such as the Red Cross. Itis important to know how to avoid respiratory failure in a person who is uncon-scious or experiencing breathing difficulties by opening the upper airways. Thisentails rapidly:
• loosening clothing• laying a person who is vomiting, bleeding from the mouth or unconscious on
his/her side• prudently tilting back the person's head• clearing the mouth and throat
These are essential steps, which often suffice to avoid asphyxia.
It is important to know how to recognise respiratory failure. An asphyxiating personoften ceases ventilating (lack of movement of the chest and abdomen), but some-one who is breathing too fast or too slowly, struggling to breathe or gasping for airmust also be given effective artificial ventilation without delay.
It is important to react fast and give mouth-to-mouth or mouth-to-nose resuscita-tion, no matter where the person is located (bed, roadside, rocks, boat, water, car,etc).
It is important for a rescuer to be familiar with artificial ventilation methods, whichhe or she can put into practice without having to think first.
It is important to be aware that if circulatory arrest (no carotid pulse) continues afterthe commencement of effective artificial ventilation, a rescuer may need to associ-ate artificial ventilation with external heart massage. This technique can be dan-gerous and allows of no error. It can have tragic consequences and should be usedonly in cases where a death-like state persists. In such cases an inability to carryout the proper measures will result in death.

BL -
3/A
MEDICAL ASPECTS OF DISASTERS AND EMERGENCY
FIRST-AID PROVISION
64
sternum. This hand is for positioning purposes and most remain in place for five compres-sions. The other hand is placed on top of the first; it is this hand which is mainly used toexert pressure. With elbows locked and arms straight, the rescuer uses the weight of his orher body to press down, with a smooth, sharp movement, on the sternum. Pressure is thensuddenly released, again with a smooth, sharp movement. For the massage to be effective,the chest must be compressed by 3 to 5 centimetres. This involves little risk, provided thatthe hands are positioned correctly. If they are placed too high or to the side, there is a riskof fracturing the ribs. If they are placed too low, the massage will be ineffective.
The rhythm is slightly less than one compression every half-second (five movements inthree seconds or ten in six).
Although dangerous if performed improperly, this technique can save lives, even when car-ried out by an amateur. However, it is vital to seek help promptly, giving information that isas precise as possible, and to obey all the rules necessary to ensure effective artificial ven-tilation (removal of the cause of the breathing problem, if accidental, opening of the air-ways, head tilted back, etc.).
The effectiveness of artificial ventilation can be verified by watching for the casualty’s chestto rise on inflation of the lungs.
The effectiveness of heart massage can be seen from the return of normal colour to theface, a reduction in dilation of the pupils, and the resumption of a pulse in the groin (to bechecked by another rescuer).
Resuscitation should continue until spontaneous circulation resumes (in this case thepulse, which should be checked between chest compressions, restarts), the casualtybegins to breathe again spontaneously and regains consciousness.
3.5 Burns A burn is damage to the skin or mucous mem-branes caused by heat, fire, electricity or causticchemicals.
3.5.1 Classification of burns Burns are classified according to their:
• extent• depth• location• cause
Extent. The extent of a burn determines whetherit is life threatening. It can be calculated usingWallace’s “rule of nines”, which divides the bodyinto percentages. The head, each lower leg,each thigh, each arm, the chest, the back, thestomach and the buttocks all count for 9%, and1% is added for the genitals.
Depth. The depth of a burn determines the dura-tion of the healing process. A first-degree burnmerely reddens the skin; a second-degree burninvolves blistering; a third-degree burn affectssub-cutaneous tissue, muscles or even bones.
BL -
3/A
Fig. 14 Calculation ofburns extent
9% of which 1% for the face
18%
18%
1%
18%
9% of which 1% for the hand

BL -
3/A
BL -
3/AMEDICAL ASPECTS OF DISASTERS
AND EMERGENCYFIRST-AID PROVISION
65
Location. Burns to the genitals, trunk, bodily orifices, joints and extremities are the mostserious. Burns to the face entail a risk of damage to the mucous membranes and airways.
Cause. Fire causes burns which do not continue to develop. Steam penetrates clothingand the respiratory system. Electricity causes serious internal injuries. Chemicals causeburns which grow worse if the area is not immediately rinsed with water.
3.5.2 The main types of burns and related risks Depending on the cause, location, extent, depth or possible complications, a burn may be(Table 7):
• minor, not requiring medical attention• severe, necessitating medical assistance• very severe, necessitating emergency admission to hospital without waiting for
a medical opinion
Chemical burns are always serious. They take place in ten to fifteen seconds, followingwhich pain is felt. They must always be rinsed with large quantities of water.
In the case of a burn by electrocution the visible damage is no guide to the extent of inter-nal injuries (haemolysis, renal insufficiency, etc.).
Burn
Minor
Severe
Very severe
Description
First or second degree burns, which aresmall in size (no more than a fewsquare centimetres) and are not locatedon a joint, bodily orifice or the face.
First, second or third degree burns ofthe following three types:
extensive, but covering less than 20% of thebody in an adult, less than 10% in a child andless than 8% in an infant
suffered by a person with diabetes or a heartcondition or who is elderly
affecting a joint or bodily orifice
First, second or third degree burns ofthe following four types:
covering more than 20% of the body in an adult,10% in a child and 8% in an infant
suffered by a person with diabetes or a heartcondition or who is elderly
affecting bodily apertures or joints
caused by chemicals or electrocution
Table 7 The main types of burns and related risks
Risks
heatstroke, in the event ofredness of the skin
infection, in the event of blistering
shock, in all cases
heatstroke, in the event ofextensive redness of the skin
infection, in the event of blistering or necrosis
Shock
Infection
Asphyxia

BL -
3/A
MEDICAL ASPECTS OF DISASTERS AND EMERGENCY
FIRST-AID PROVISION
66
3.5.3 How to deal with a burns General precautionsShould the casualty’s clothing be removed? The answer is yes, if the burn is caused bysteam or a caustic liquid or if clothing is still burning; no, if clothing is no longer burning andthe burn was caused by a flame. Should water be poured over the casualty? Yes, if cloth-ing is still burning or if the burn is due to a caustic chemical (acid or alkaline); no, if the burnis due to a flame and clothing is no longer burning. Should the casualty be given some-thing to drink? Yes, if the burn is severe; no, if the casualty is unconscious or there is burn-ing of the mouth or throat.
Minor burnsThe following steps should be taken:
• someone who is suffering from sunburn should be kept in the shade• blisters should never be broken; apply an antiseptic and carefully cover the
area with a sterile dressing• chemical burns should be rinsed with large quantities of water
Severe burnsThe following steps should be taken:
• treat casualties for shock, by making them lie down, reassuring them and cov-ering them if they feel cold
• give bicarbonated water to drink• cover the burn with a sterile dressing or clean cloth• seek medical assistance
Very severe burnsTreat the casualty for shock, by:
• lying him/her down, on his/her side if unconscious• giving reassurance• covering him/her• giving bicarbonated water to drink if he or she is conscious and feels thirsty• wrap the casualty in a clean sheet• lift both of the casualty’s legs
The casualty must then be evacuated to the nearest hospital, where a drip can be admin-istered.
BL -
3/A

BL -
3/A
BL -
3/AMEDICAL ASPECTS OF DISASTERS
AND EMERGENCYFIRST-AID PROVISION
67
4. BandagesFor treating minor wounds or burns and certain joint injuries, bandages are a necessaryaddition to the usual equipment, as a means either for keeping a sterile dressing in placewhen adhesive plaster or tape is unavailable or for immobilising a joint.
Moreover, a wound which is fairly extensive, even if only superficial (scratches or grazingafter falling off a bicycle, for instance), or which is located on a joint, particularly the innerside, may often be untreatable with the limited equipment available in a home, car orcamper’s first-aid kit. A sore eye that needs covering, a boil in the armpit, a sprained ankle,a minor wound to the palm of the hand … all may find you unequipped and obliged to seekhelp from the nearest chemist, nurse or even doctor. Yet it is easy to save time and avoidexpense and trouble by using bandaging techniques.
Depending on the bandage’s shape, it is referred to as a triangular, tailed or roller band-age. These different types of bandage are most often used on the same parts of the body(joints, limbs, etc.) as an improvised means of keeping a sterile dressing, or failing that aclean piece of cloth, in place on an injury (wound or burn), when an adhesive plaster ortape is not available.
4.1 Triangular bandages4.1.1 General observations
An improvised triangular bandage consists of a large piece of cloth (handkerchief, napkin,towel or any square piece of fabric) folded into a triangle. Examples are:
• household linen, preferably freshly laundered • pieces of fabric found in a traveller’s luggage• bandages produced by relief organisations from pieces of woven or unwoven
fabric, which are increasingly to be found in members’ first-aid kits; these tri-angles of fabric are folded so as to take up as little space as possible, sterilisedand individually wrapped. Frequently their size is determined by the initial pieceof fabric, but the ideal bandage is an isosceles triangle, in which the two equalsides are between 90 cm and 1 m long. To facilitate manipulation, the long sideis referred to as the base, the vertex as the tip or point, and the two baseangles as the corners.
Triangular bandages have many advantages:
• they can be used on any part of the body• they can be applied very rapidly • they are an easy means of keeping in place a dressing, or clean piece of cloth,
positioned directly on a wound, without causing pain either when the bandageis tied or when it is removed
• they stay in place well, without hampering movement; a properly positionedbandage does not slip or move out of place
• they are extremely easy to improvise
A few simple rules should be followed by rescuers to ensure correct use of triangular band-ages:
• when bandaging limbs (the most common use) the tip is always placed towardsthe shoulder or hip
• the knot is, in principle, positioned on the opposite side to the injury; the twocorners are tied together and the tip is then folded down. A reef knot is thenused to hold the bandage in place

BL -
3/A
MEDICAL ASPECTS OF DISASTERS AND EMERGENCY
FIRST-AID PROVISION
68
4.1.2 Placing triangular bandages Head Depending on the location of the wound - the back of the neck or, conversely, the foreheador scalp - the bandage must be turned round.
For example, when bandaging a boil on the back of the neck proceed as follows:
• a sterile dressing or clean piece of cloth is placed on the boil itself• the base of the triangle is positioned on the back of the neck, holding the dress-
ing in place • the tip is placed on the forehead• the two corners are wrapped around the head, preferably without covering the
ears too much, and are then knotted in the middle of the forehead, securing thetip, which is itself then folded back and held in place with a reef knot
With a wound to the hairline or scalp, use of a traditional adhesive plaster makes it nec-essary to shave the area surrounding the wound. Children will accept this without prob-lems, but adults are sometimes more reticent, in which case use of a bandage is a goodsolution.
Since the knot cannot be tied on the wound, the bandage must be turned round, as follows:
• the base of the triangle is positioned on the forehead, and it is the tip which isplaced at the back of the neck
• the two corners are wrapped around the head, without covering the ears (whichsupport the bandage) and tied in a simple knot; the bandage is then securedwith a reef knot
The appearance of these two types of bandage, which can be compared to the scarf awoman ties around her head to protect her hair when doing the housework, can beimproved by folding the base of the triangle up over a few centimetres and concealing theknot with the resulting roll of cloth.
ThoraxThe technique is the same whether the chest or the upper back is being bandaged.
The base of the triangle is tied around the thorax parallel to the waist. The tip is passedover one shoulder. A strip of material, such as a cloth belt, is then knotted to the tip and tothe two corners (already tied together) or to the casualty’s belt. A sterile dressing or cleanpiece of cloth must naturally be positioned between the casualty’s chest (or back) and themiddle of the bandage before it is tightened.
A triangular bandage can be used in this way to keep in place a thick pad of material seal-ing a wound to the thorax through which air is leaking (a “blowing” wound).
AbdomenThe principle is the same, but instead of passing over a shoulder, the tip is secured afterpassing it between the legs.
Elbow or kneeWounds are most often located on the outer surface of the joint (the kneecap or the tip ofthe elbow), in which movement must be maintained. The bandage should be applied withthe elbow or knee half bent. The triangle is positioned on the outer surface of the joint withthe tip lying on the upper arm or the thigh pointing towards the shoulder or the hip. The cor-ners are crossed over at the back of the knee or in the hollow of the elbow, then knottedabove the joint so as to secure the tip, which is folded back.
BL -
3/A

BL -
3/A
BL -
3/AMEDICAL ASPECTS OF DISASTERS
AND EMERGENCYFIRST-AID PROVISION
69
Shoulder or hipAs for the thorax or abdomen, the tip is kept in place with a strip of bandage or cloth.
ShoulderThe tip is rolled around a strip of bandage or cloth, which is then positioned so that it pass-es over the shoulder, with the base of the triangle facing out. The strip securing the tip ofthe triangle is then passed under the opposite armpit and tied there, or preferably slightlyin front on the chest, so as not to hamper arm movement (if it was tied in the back it wouldcause discomfort when the casualty was seated).
HipThe principle is the same as for the shoulder. Depending on the location of the wound, itis possible to cover either the hip itself or the front or back of the pelvis.
The tip of the triangle is rolled around the strip of bandage or cloth or around the casual-ty’s belt, and the corners are tied horizontally around the thigh, with the knot on the outsideof the leg.
Parts of limbsThe rule that the tip should always point towards the shoulder or hip is followed, but thebandage is turned in such a way that one of the equal sides lies along the axis of the limb.
The bandage should stop at the joints (on either side of the wound), which should not becovered.
Lower legThe tip is positioned under the knee, and one of the equal sides is placed along the axisof the leg; this leaves the other side positioned horizontally parallel to the ground. This sec-ond side is wound around the leg to secure the tip of the bandage. The first side, positionedabove the ankle, is wound in the opposite direction, moving up the leg.
Depending on the circumstances:
• either the two corners are knotted together half way up the leg, using a reefknot on the opposite side to the wound
• each corner is slipped separately under one side of the bandage, alreadywound around the leg
The second technique, which makes it possible to use a smaller size of bandage, is lesssatisfactory, as the bandage may become loose more easily and slip out of place when theperson moves.
Forearm, upper arm and thigh The principle is the same. One of the equal sides is left parallel to the axis of the limb, andthe tip is placed under the upper joint. The bandage maintains the dressing or piece ofmaterial in place, and the two corners are wound around the limb, in opposite directions,before being knotted on the opposite side to the wound.
FootThe foot may either be placed flat on the triangular bandage (resting on a chair, for exam-ple) or the bandage may be placed on top of the foot. In the latter case, the tip pointstowards the ankle, and the base is wrapped around the foot, covering the heel. The twocorners are crossed over at the front of the ankle, holding the tip in place, then knotted asdescribed above.

BL -
3/A
MEDICAL ASPECTS OF DISASTERS AND EMERGENCY
FIRST-AID PROVISION
70
The foot may also be placed on top of the bandage. Position the foot in the middle of thetriangle with the toes towards the tip. The tip is then immediately folded back, to pointtowards the ankle.
The base is wrapped around the heel, and the two corners are crossed over on top of thefoot, securing the base in place, then wrapped around the ankle and knotted at the front.
HandA wound may be located in the palm or on the back of the hand. In some cases, woundsor burns may also be positioned between the fingers. As a precautionary measure, the fin-gers should be separated from each other with sterile dressings, or an accordion-foldedpiece of fabric. The hand is positioned in the middle of the triangle, with the tip towards thewrist. The base is folded over the fingers, then the corners are crossed over and wrappedaround the wrist; they are secured first with a simple knot, then with a reef knot, holdingthe tip in place after it has been folded back.
Face Less frequently, a triangular bandage can be used to cover a casualty’s face, in the eventof severe burns or damage to the bones of the face. In this case, holes should be made inthe bandage to allow the casualty to breathe, and possibly also to see, or to permit sub-sequent medical examination. The resulting mask is a good example of the primary use ofbandages, as a protection against dirt and infection.
4.2 Tailed bandages
4.2.1 General observationsThese are also an improvised means of holding in place a sterile dressing or clean pieceof cloth on a wound, when an adhesive plaster or strip is unavailable.
Their name comes from their shape.
As with triangular bandages, pre-cut tailed bandages are produced for inclusion in first-aidkits, sometimes made out of elasticised material and individually wrapped. Where moresuitable equipment (a haemostatic pad or individual dressing) is not available, they can bevery useful for stopping haemorrhages, which require compression bandaging.
A tailed bandage is made out of a piece of cloth (towel, serviette, old shirt, piece of sheet,etc), from which a strip should be torn. This strip of cloth will be about 1 m long and of vari-able width, depending on the intended use, although three widths are generally encoun-tered in practice:
• 8 to 12 cm for the nose, chin, eye or ear• 15 to18 cm for the forehead, back of the neck or armpit• 20 to 30 cm for the thorax or abdomen
The principle is that the central portion of the strip of fabric is left intact, to be used to main-tain a protective dressing or clean piece of cloth in place on a wound or burn. Then, theends of the strip of cloth are torn to form two or three straps, known as the “tails”, whichcan be tied together on either side of the area covered by the bandage.
4.2.2 Placing tailed bandages KneeDepending on the position of the central piece of material (on the kneecap, or converselyat the back of the knee), the bandage is tied somewhat differently.
BL -
3/A

BL -
3/A
BL -
3/AMEDICAL ASPECTS OF DISASTERS
AND EMERGENCYFIRST-AID PROVISION
71
KneecapThis is a bump-shaped part of the body. As with a triangular bandage, the tailed bandageis always tied with the joint in a bent position. The centre keeps the dressing in place. Theupper tails, at thigh level, are crossed around the back of the knee then tied around thelower leg (with the knot to the front or the outside). The lower tails are also crossed aroundthe back of the knee and tied around the thigh.
Back of the kneeThe centre is positioned in the hollow of the half-bent joint. The upper tails are tied aroundthe thigh, and the lower tails around the lower leg.
Elbow The technique is the same as for the knee. The bandage should be applied with the fore-arm bent horizontal, and movement of the joint must not be hampered when the bandageis in place.
HeadBack of the neckThis type of bandage is often used to hold a dressing in place or cover a boil. The back ofthe neck is a flat part of the body. The centre secures the dressing. The upper tails arepassed around the head over the ears (which serve as a support), then tied across theforehead. The lower tails are tied around the neck, but not too tightly.
ForeheadThe forehead is regarded as a bump-shaped part of the body. The two sets of tails shouldtherefore be crossed over each other.
This is one of the most difficult bandages to tie because of the hair. It is advisable to usea fairly wide bandage (about 15 cm). The bandage is placed on the forehead. The uppertails (those nearest the ears) are tied under the chin. The lower tails, positioned above theeyes, are passed over the upper ones, thus securing the bandage at the temples. They arethen knotted at the back of the head.
NoseA thin strip of material should be prepared, so that the bandage covers neither the eyesnor the mouth. The centre of the bandage keeps the dressing in place on the nose. Theupper tails are passed around the head, under the ears, then tied at the back of the neck.The lower tails, sometimes folded slightly to form a pocket of material, are folded back andpass over the ears, before also being tied behind the head.
ChinThis bandage is frequently used for either chin wounds or fractures of the lower jaw.
Although an improperly tied bandage entails little risk when it is a matter of keeping adressing in place on the chin, the same does not apply in the event of a fractured jaw.
In the latter case, the sequence of actions in applying the bandage is important and mustbe studied with care. If capable, the casualty should himself hold the broken jaw in place.The first step is therefore to press the lower jaw against the upper jaw, which serves as asplint. The bandage’s role is that of a support wrapped around the head (under the chinand over the scalp), as follows:
• holding the bandage with the tips of the fingers, place the centre under thecasualty’s chin
• the two upper tails are passed over the temples and tied on top of the head

BL -
3/A
MEDICAL ASPECTS OF DISASTERS AND EMERGENCY
FIRST-AID PROVISION
72
• the two lower tails are folded back, crossed over at the back of the neck andthen tied on the casualty’s forehead, after passing over the ear
By folding back the lower tails, a small pocket of fabric is formed with the centre, intendedto hold the dressing in place on the chin.
The bandage is sometimes not long enough for the lower tails to be tied directly on theforehead. In that case a strip of material should be attached to one of the tails, so that it islong enough for the bandage to be secured. The tails put in place first are supported by thetop of the head, in as vertical a position as possible, but tend to slip because of the hair.The extra turn around the head is therefore intended to secure them at the temples.
Care should be taken, as in the event of a bilateral fracture of the lower jaw, it is danger-ous to tie the lower tails too tightly at the back of the neck.
EyeThe difficulty here lies in the need to cover only one eye, without hampering vision from theother eye. The eye to be protected is covered with a dressing. The centre of the bandageis placed above the ear and tied behind the head. The lower tail is passed under the earon the side of the injured eye, twisted on itself (diagonally) to keep the uninjured eye free,then, after being pressed against the head, tied with the other tail behind the head.
EarIt is first necessary to form a small pocket of material, to be positioned over the ear and thedressing. This is the most difficult part of this bandaging technique. The simplest methodis to place the bandage flat in front of you, pick up the furthest tail on either side and turnit towards you, perpendicular to the nearer tail.
Then, pass the end of the tail under and through the “buttonhole” created on either side ofthe centre. For the pocket to be properly formed, the knot must in fact be tied in the samedirection, on either side of the centre. The pocket of fabric, containing the dressing, isplaced against the ear and the upper tails are tied above the opposite ear. The lower tailsare then tied around the neck, not too tightly.
ThoraxA tailed bandage can be applied to the thorax to keep in place a dressing used to seal a“blowing” wound. It may have two or three tails.
With two tails, the centre keeps in place the dressing or piece of cloth, and the tails are tiedon the opposite side of the thorax to the wound.
With three tails, it is the central tail that keeps the dressing in place. It is therefore tied first,especially with a “blowing” wound. The upper tails are passed over a shoulder, to preventthe bandage from slipping down, and then tied around the thorax.
Armpit This is one of the most frequently used forms of tailed bandage, since keeping a dressingin place with adhesive plaster or tape is very difficult on this part of the body, which is par-ticularly mobile, with a fair amount of hair and, often, a tendency to perspire.
Boils in the armpit are frequent, and this type of bandage is virtually the only means ofkeeping a moist dressing in place.
The sterile dressing or pad of material is positioned directly on the centre of the bandage,then the whole thing is placed in the armpit, and the middle tails are crossed over on topof the shoulder on the injured side, then tied under the opposite armpit.
The other tails are tied two around the arm, but not too tightly, and two around the thorax.
BL -
3/A

BL -
3/A
BL -
3/AMEDICAL ASPECTS OF DISASTERS
AND EMERGENCYFIRST-AID PROVISION
73
To keep a dressing moist, it is advisable to position a waterproof barrier (plastic, for exam-ple) between the centre of the tailed bandage and the gauze or cotton of the dressing. Thisis a more sophisticated technique, and the equipment used is less improvised.
4.3 Roller bandages
4.3.1 General observationsLike triangular or tailed bandages, roller bandages can be used to hold in place a steriledressing or clean piece of cloth on a wound or burn, but these bandages are also used toimmobilise joints, especially a sprained ankle.
Equipment usedThere are several types of roller bandage:
• single-use gauze roller bandages, which are thrown away each time the dress-ing is changed
• cloth roller bandages, which can be washed and ironed like ordinary linen.Despite their ease of use, they are not very common, except among profes-sional relief workers. Such bandages can be improvised by cutting up sheetsor other large pieces of cloth, but this remains exceptional
• elasticised crepe bandages, which are multi-use if properly looked after
WashingThe technique varies according to the material used:
• cloth roller bandages can be boiled, to ensure that they are properly sterilised;they are then ironed like ordinary linen but with a very hot iron.
• elasticised bandages should be treated like wool; boiling and a hot iron aretherefore to be avoided. After being washed in a suitable detergent and care-fully rinsed, they should be dried flat between two towels.
After washing, the bandage should be rolled up again. Fold one end over on itself four orfive times to start off the roll of bandage, which is referred to as the head. Then hold theroll between your hands from underneath, with the end secured between the thumb andthe forefinger on either side. The forefingers support the bandage, and the roll is movedwith the thumbs towards the person rolling the bandage.
Rules of useApart from the three usual types of roller bandage (cloth, gauze, elasticised), there are cer-tain bandages, usually available in widths of 5, 7 and 10 cm, with an average length ofbetween 5 and 8 metres, which is often not enough to allow proper tying with traditionalbandaging techniques.
A roller bandage has two parts: the ends and the roll itself, known as the head.
The roll should preferably be oriented uppermost, that is to say pointing towards the res-cuer. The bandage is held between the thumb and the forefinger.
A bandage is always begun with two turns, the first slightly slanting so as to leave a cor-ner, which is then tucked in and held in place with the second turn. The tucked-in end pre-vents the bandage from rolling on itself and slipping.
When bandaging a limb, start from the lowest point and move up towards the elbow orshoulder, for an arm, or the knee or hip, for a leg.

BL -
3/A
MEDICAL ASPECTS OF DISASTERS AND EMERGENCY
FIRST-AID PROVISION
74
All bandages are finished by making two turns. Depending on the equipment available, abandage can be secured in three ways:
• with a safety-pin, inserted from top to bottom, securing the end to the previous turn • by tucking the end in under the previous turn• by tearing the last strip of bandage in half lengthways; the two cut ends can be
tied in a simple knot to prevent the fabric from fraying or tearing further. Thetwo resulting ends are then tied together to secure the bandage, as with atailed bandage.
After applying a bandage, the rescuer should always check that the bandage is not tootight, hampering or blocking circulation. With a bandaged limb, it is recommended to checkthe casualty’s pulse at the wrist or the ankle. A bandage which is too lose will tend to slipand will not serve its purpose.
Techniques There are three bandaging techniques:
• spiral bandages, which are the easiest to apply. These are used for parts oflimbs or when a joint (elbow or knee) has to be immobilised completely in theextended position. Begin bandaging below the wound or joint and move up thelimb in a spiral. Each new turn of the bandage covers part (1/2 to 2/3) of theprevious turn
• the herringbone bandage is more effective, particularly for the lower leg orthigh, but more difficult to apply. After two turns the bandage is folded over onitself at each turn, to form a V-shape. This is done either by pressing the thumbon the point where the bandage is folded over, while changing the direction ofthe roll, or by guiding the movement of the bandage with a finger
• a crossed or figure-of-eight bandage is used for joints (elbow or knee); theturns form the shape of a figure 8 or a letter X
4.3.2 Placing roller bandages Elbow An elbow bandage must allow movement and leave the joint as flexible as possible.
As with a triangular or a tailed bandage, the arm is bent. The first two turns (securing theend) start at the elbow itself, then alternate turns are made around the forearm and theupper arm, each time overlapping the edge of the previous turn by 1 or 2 cm. The band-age is crossed over in the hollow of the elbow and forms a figure eight.
Lastly, the bandage is finished off with two turns around the upper arm, moving towardsthe shoulder.
KneeThe technique is the same. A figure-of-eight bandage is applied, crossing over at the backof the knee, and finished off with two turns around the thigh.
If the first two turns are numbered 1 and 2, it can be said that the uneven-numbered turnsare always made around the lower leg or forearm, and the even-numbered turns alwaysaround the thigh or upper arm.
This figure-of-eight bandage stays in place well and allows freedom of movement, evenwhen taking part in certain sports, for example.
A roller bandage 5 to 8 cm wide is best suited for use on the elbow or knee.
BL -
3/A

BL -
3/A
BL -
3/AMEDICAL ASPECTS OF DISASTERS
AND EMERGENCYFIRST-AID PROVISION
75
FingerA narrow (3 to 5 cm) bandage should preferably be used. It should be applied as follows:
• begin with two turns around the wrist, to provide a stable base for the bandage• pass the bandage diagonally across the back of the hand and right up to the
end of the finger to be covered (a sterile dressing should already have beenpositioned on the wound to protect it)
Fig. 15 Placing roller bandages

BL -
3/A
MEDICAL ASPECTS OF DISASTERS AND EMERGENCY
FIRST-AID PROVISION
76
• pass the bandage under the finger and hold it in place with the middle finger ofthe other hand
• take the bandage to the base of the finger, pass it back on top and hold it inplace with your forefinger; the bandage is then held in place with one or twoturns at the tip of the finger
• return to the wrist and continue applying the bandage in a figure-of-eightshape, moving from the tip of the finger to the wrist, successively overlappingthe edges of the previous turns by about 1/3 of the bandage’s width
• finish off the bandage with two turns around the wrist
Before starting to apply the bandage, the rescuer should ensure that the finger is slightlybent and not pulled too far back, which would rapidly cause discomfort or even pain.
HandThe wound is covered and protected with a sterile dressing or clean piece of cloth. If nec-essary the fingers are separated, for example with an accordion-folded dressing.
The bandage is begun in the same way, starting at the wrist, and wrapping it several timesaround the fingers, so they are fully covered. The thumb is usually left free, but can alsobe protected with the bandage.
It is rarely possible to complete a proper hand bandage with a bandage of the usual length.It is therefore necessary to use a second bandage of the same kind and width (preferably5 to 8 cm).
EyeThe eye sometimes has to be held firmly closed, in which case a tailed bandage will not do.
A tailed bandage is, on the other hand, preferable where the aim is merely to prevent blink-ing and limit movement or to avoid anything pressing on the eye when a foreign object islodged in it, piercing the pupil.
An eye bandage is applied using a 5 cm wide roller bandage. Two turns are wrappedaround the forehead, above the ears, then the bandage is folded over towards the back ofthe neck and passed vertically across the middle of the head. The bandage covers theinjured eye then passes down to the corner of the lower jaw. It is wound around the headdiagonally, each turn partly overlapping the previous one (on the side opposite the injuredeye). The bandage is finished by winding twice around the forehead.
TempleTo hold a compression pad in place and stop a haemorrhage at the temple, a 5 cm widebandage should be used. This technique can also be applied to fractures of the lower jaw.The bandage is begun with two turns around the forehead, above the ears. Start applyingthe bandage from left to right, beginning on the temple opposite the dressing. Hold thebandage in place with a finger, positioned on a slant, and fold it over on one of the tem-ples, then pass it under the chin and over the top of the head twice. Depending on the typeof injury, the fold is positioned on the wound itself or on the opposite temple. As is the casewith the hand, a second bandage is often required. Continue with two further turns aroundthe head and under the chin and finish with two turns around the forehead.
ThoraxThe thorax is rarely bandaged with a traditional roller bandage in an emergency.
Use of such a bandage is dangerous if the casualty has a broken rib or internal contusions.More often than not, a bandage is improvised out of large pieces of cloth, held in place withsafety-pins and supported with straps over the shoulders, to avoid slippage.
BL -
3/A
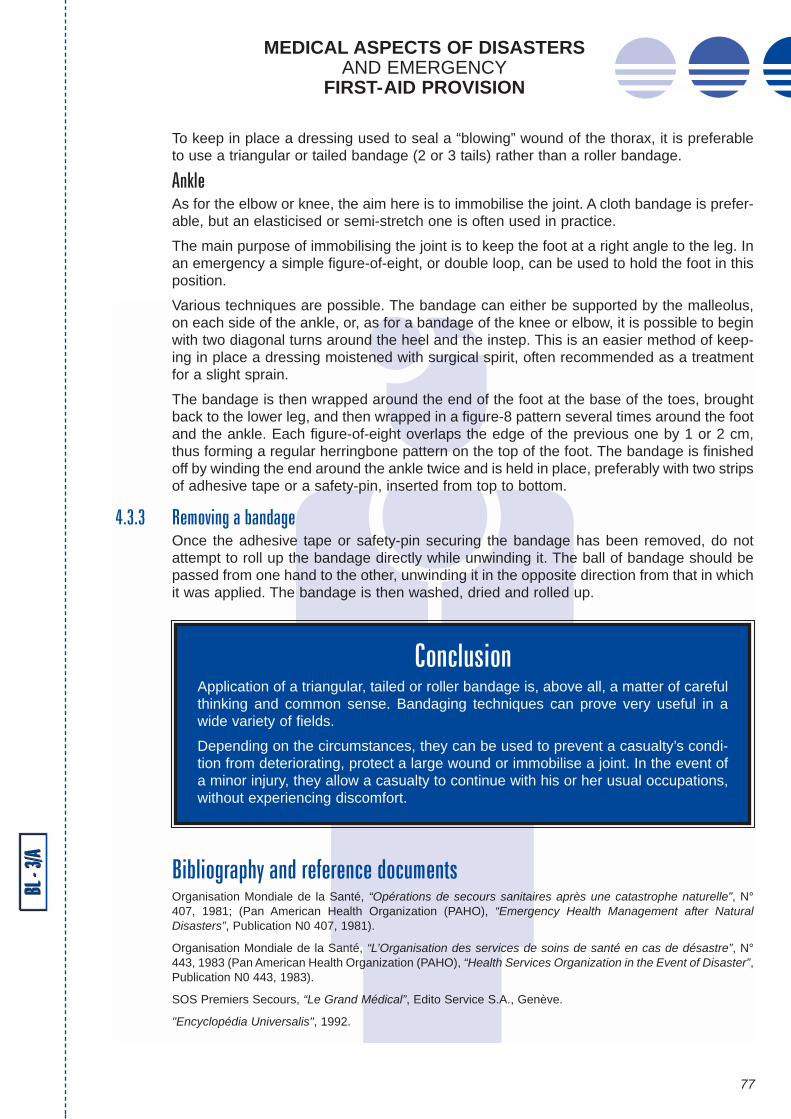
BL -
3/A
BL -
3/AMEDICAL ASPECTS OF DISASTERS
AND EMERGENCYFIRST-AID PROVISION
77
To keep in place a dressing used to seal a “blowing” wound of the thorax, it is preferableto use a triangular or tailed bandage (2 or 3 tails) rather than a roller bandage.
Ankle As for the elbow or knee, the aim here is to immobilise the joint. A cloth bandage is prefer-able, but an elasticised or semi-stretch one is often used in practice.
The main purpose of immobilising the joint is to keep the foot at a right angle to the leg. Inan emergency a simple figure-of-eight, or double loop, can be used to hold the foot in thisposition.
Various techniques are possible. The bandage can either be supported by the malleolus,on each side of the ankle, or, as for a bandage of the knee or elbow, it is possible to beginwith two diagonal turns around the heel and the instep. This is an easier method of keep-ing in place a dressing moistened with surgical spirit, often recommended as a treatmentfor a slight sprain.
The bandage is then wrapped around the end of the foot at the base of the toes, broughtback to the lower leg, and then wrapped in a figure-8 pattern several times around the footand the ankle. Each figure-of-eight overlaps the edge of the previous one by 1 or 2 cm,thus forming a regular herringbone pattern on the top of the foot. The bandage is finishedoff by winding the end around the ankle twice and is held in place, preferably with two stripsof adhesive tape or a safety-pin, inserted from top to bottom.
4.3.3 Removing a bandage Once the adhesive tape or safety-pin securing the bandage has been removed, do notattempt to roll up the bandage directly while unwinding it. The ball of bandage should bepassed from one hand to the other, unwinding it in the opposite direction from that in whichit was applied. The bandage is then washed, dried and rolled up.
Bibliography and reference documentsOrganisation Mondiale de la Santé, “Opérations de secours sanitaires après une catastrophe naturelle”, N°407, 1981; (Pan American Health Organization (PAHO), “Emergency Health Management after NaturalDisasters”, Publication N0 407, 1981).
Organisation Mondiale de la Santé, “L’Organisation des services de soins de santé en cas de désastre”, N°443, 1983 (Pan American Health Organization (PAHO), “Health Services Organization in the Event of Disaster”,Publication N0 443, 1983).
SOS Premiers Secours, “Le Grand Médical”, Edito Service S.A., Genève.
"Encyclopédia Universalis", 1992.
ConclusionApplication of a triangular, tailed or roller bandage is, above all, a matter of carefulthinking and common sense. Bandaging techniques can prove very useful in awide variety of fields.
Depending on the circumstances, they can be used to prevent a casualty’s condi-tion from deteriorating, protect a large wound or immobilise a joint. In the event ofa minor injury, they allow a casualty to continue with his or her usual occupations,without experiencing discomfort.
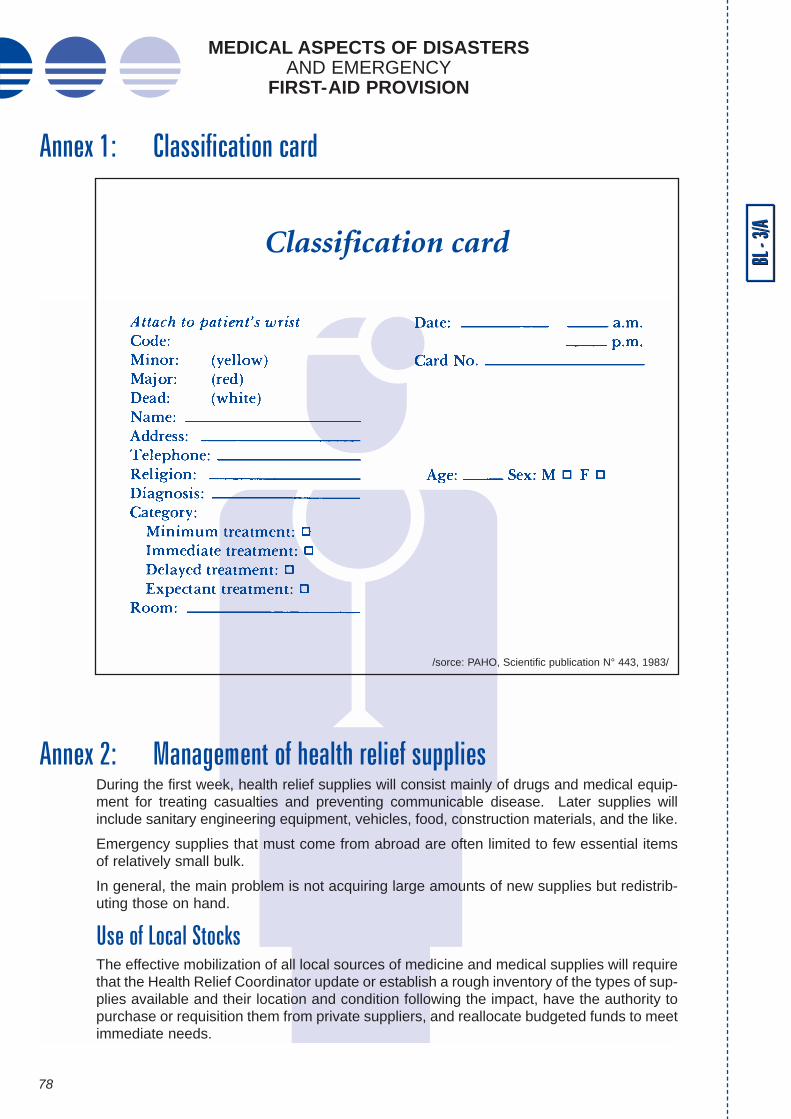
BL -
3/A
MEDICAL ASPECTS OF DISASTERS AND EMERGENCY
FIRST-AID PROVISION
78
Annex 1: Classification card
Annex 2: Management of health relief suppliesDuring the first week, health relief supplies will consist mainly of drugs and medical equip-ment for treating casualties and preventing communicable disease. Later supplies willinclude sanitary engineering equipment, vehicles, food, construction materials, and the like.
Emergency supplies that must come from abroad are often limited to few essential itemsof relatively small bulk.
In general, the main problem is not acquiring large amounts of new supplies but redistrib-uting those on hand.
Use of Local StocksThe effective mobilization of all local sources of medicine and medical supplies will requirethat the Health Relief Coordinator update or establish a rough inventory of the types of sup-plies available and their location and condition following the impact, have the authority topurchase or requisition them from private suppliers, and reallocate budgeted funds to meetimmediate needs.
BL -
3/A
Classification card
/sorce: PAHO, Scientific publication N° 443, 1983/

BL -
3/A
BL -
3/AMEDICAL ASPECTS OF DISASTERS
AND EMERGENCYFIRST-AID PROVISION
79
National List of Essential DrugsEvery disaster-prone country should prepare in advance its own list of basic medical sup-plies to be made available immediately through local stockpiling, increases in inventory inpharmaceutical stores or government hospitals, or donation following a major catastrophe.
Submitting Requests for International AssistanceTo maximize the benefit of scarce international assistance to the country, the followingguidelines should be followed:
D A single government official should be made responsible for channelling emer-gency international requests, for otherwise duplication, confusion, and shortcom-ings will result.
D Potential donors should be asked to provide large amounts of a few items sincethis simplifies and expedites procurement and shipping.
D The request should clearly indicate the order of priority, amounts, and formulation(e.g. tablets or syrup). Vague requests for “antidiarrheal drugs,” “antibiotics,” or“vaccines” must be avoided. The amounts requested should be compatible withthe size of the affected population and the anticipated occurrence of trauma anddisease.
D Requests should be limited to drugs of proven therapeutic value and reasonablecost.
D Perishable products and vaccines should not be requested unless refrigerationfacilities are available and special handling arrangements can be made at the air-port.
D Supplies will be duplicated if the same list is sent to several donors.
Procedures for Labelling and Marking ConsignmentsLong experience in different international relief operations has shown that all agenciesneed to use a uniform system for marking or labelling relief consignments. Recipient gov-ernments and donors should adopt the procedures the League of Red Cross Societies hasdeveloped in coordination with United Nations agencies.
D Colour code. The colours used for the relief supplies most often required after dis-asters are:• red for foodstuffs• blue for clothing and household equipment• green for medical supplies and equipment.
D Labelling. The label should provide essential information on:• expiration date of the product• temperature controls• English should be used on all labels (stencilled markings)
D Size and weight. Containers should be of a size and weight that one man can han-dle (ideally, 25 kg; up to a maximum of 50 kg) since mechanical loading andunloading devices are rarely available at the receiving end.
D Contents. Relief supplies should always be packed by type in separate containers.D Advance notice to the consignee and Health Relief Coordinator. To cover in one
document all the details necessary for safe transport and ease of handling at the

BL -
3/A
MEDICAL ASPECTS OF DISASTERS AND EMERGENCY
FIRST-AID PROVISION
80
receiving end, the following information is essential:• name of sender• name of consignee• method of transport, including (where applicable) the name of the vessel or
flight number and its date and port or airport of departure• a detailed list of contents, including weight, dimensions, and number and type
of packages• value in the currency of the sending country• type of insurance, name of company, etc.• the carrier’s agent, including the name of the person to be contacted in the
receiving country• estimated time of arrival (ETA)• instructions or special requirements for handling and storing the supplies; in
most instances a pro forma invoice is required by the authorities in the send-ing or receiving country or both
D Acknowledgement by the receiving country. It is important that an acknowledge-ment be sent to donors as quickly as possible after consignments are received.
Inventory and Distribution of Incoming SuppliesUnsolicited drug supplies are often a major problem in large relief operations. The receiv-ing government should adopt a firm policy about accepting unsolicited, unannounced sup-plies. This policy statement should in general suggest that international assistance not besent except in response to a specific request from or after negotiation with the national gov-ernment. National representatives abroad and local diplomatic missions and aid agenciesshould be informed of the policy.
When possible, professional inspection of medical supplies collected from the private sec-tor abroad should be arranged before shipment.
Despite any such policy, the arrival of unsolicited supplies should be anticipated and pro-cedures devised to handle them.
Expired Drugs, Perishable ProductsSome drugs close to or past their stated expiration dates are often donated or offered.Expiration dates are very conservatively set for some drugs, and with suitable storage thedrugs remain safe and potent for much longer. When consignments are large and the drugis of particular value, reference laboratory testing and recertification should be arranged.Assistance may be requested from the United Nations or bilateral sources.
BL -
3/A

BL -
3/A
BL -
3/AMEDICAL ASPECTS OF DISASTERS
AND EMERGENCYFIRST-AID PROVISION
81
Annex 3: Medical care survey form
/sorce: PAHO, Scientific publication N° 443, 1983/
Medical care survey form

BL -
3/A
MEDICAL ASPECTS OF DISASTERS AND EMERGENCY
FIRST-AID PROVISION
82
BL -
3/A
/sorce: PAHO, Scientific publication N° 443, 1983/

BL -
3/A
BL -
3/AMEDICAL ASPECTS OF DISASTERS
AND EMERGENCYFIRST-AID PROVISION
83
/sorce: PAHO, Scientific publication N° 443, 1983/

BL -
3/A
MEDICAL ASPECTS OF DISASTERS AND EMERGENCY
FIRST-AID PROVISION
84
BL -
3/A
/sorce: PAHO, Scientific publication N° 443, 1983/

BL -
3/A
BL -
3/AMEDICAL ASPECTS OF DISASTERS
AND EMERGENCYFIRST-AID PROVISION
85
/sorce: PAHO, Scientific publication N° 443, 1983/

BL -
3/A
MEDICAL ASPECTS OF DISASTERS AND EMERGENCY
FIRST-AID PROVISION
86
BL -
3/A
/sorce: PAHO, Scientific publication N° 443, 1983/
BL -
3/A
BL -
3/AMEDICAL ASPECTS OF DISASTERS
AND EMERGENCYFIRST-AID PROVISION
87
/sorce: PAHO, Scientific publication N° 443, 1983/

BL -
3/A
MEDICAL ASPECTS OF DISASTERS AND EMERGENCY
FIRST-AID PROVISION
88
BL -
3/A
/sorce: PAHO, Scientific publication N° 443, 1983/

BL -
3/A
BL -
3/AMEDICAL ASPECTS OF DISASTERS
AND EMERGENCYFIRST-AID PROVISION
89
/sorce: PAHO, Scientific publication N° 443, 1983/

BL -
3/A
MEDICAL ASPECTS OF DISASTERS AND EMERGENCY
FIRST-AID PROVISION
90
BL -
3/A
/sorce: PAHO, Scientific publication N° 443, 1983/

BL -
3/A
BL -
3/AMEDICAL ASPECTS OF DISASTERS
AND EMERGENCYFIRST-AID PROVISION
91
/sorce: PAHO, Scientific publication N° 443, 1983/

It is strictly forbidden to reproduce any part of this publication forcollective use without prior formal permission from the authors.
Reproduction forbidden in any form or by any means (printing, photography, photocopy, scanner, etc.).
Photographic credit: all rights reserved.
J&D graphics
Design: