blackbaud direct marketing introduction guide
TRANSCRIPT

Blackbaud Direct Marketing Introduction Guide

03/21/2013 Blackbaud Direct Marketing 3.0 Blackbaud Direct Marketing Introduction US
©2013 Blackbaud, Inc. This publication, or any part thereof, may not be reproduced or transmitted in any form or by anymeans, electronic, or mechanical, including photocopying, recording, storage in an information retrieval system, orotherwise, without the prior written permission of Blackbaud, Inc.
The information in this manual has been carefully checked and is believed to be accurate. Blackbaud, Inc., assumes noresponsibility for any inaccuracies, errors, or omissions in this manual. In no event will Blackbaud, Inc., be liable for direct,indirect, special, incidental, or consequential damages resulting from any defect or omission in this manual, even if advisedof the possibility of damages.
In the interest of continuing product development, Blackbaud, Inc., reserves the right to make improvements in this manualand the products it describes at any time, without notice or obligation.
All Blackbaud product names appearing herein are trademarks or registered trademarks of Blackbaud, Inc.
All other products and company names mentioned herein are trademarks of their respective holder.
IntroBBDM-2013
ContentsBLACKBAUD DIRECTMARKETING WORKFLOW 1Marketing Plan Workflow 2List Workflow 2Segment Workflow 3Source Code Workflow 3Marketing Effort Workflow 4
GENERAL FEATURES 5Application-Level Search 6
Configure Search 6Edit Search Lists 6
Feature Search 7Context-Based Feature Search 7
RSS Feed Search 8Quick Find Search 8Search Help Documents 9
General Navigation 9Menu, Navigation, Explorer, and Status Bars 9
Home Page 10Customize the Default Home Page 10
Calendars 11Workspace for Your System Role 11Change Password 13Refresh a Page 13Filters 13Really Simple Syndication (RSS) 14Mark Data as Inactive 16Zoom Buttons 16Navigation Tree 17Export Grid 19KPI Dashboard 20Documentation 21
Attachments 21Add Attachments 22
Add an Attachment Screen 22Edit Attachments 22Delete Attachments 22
Media Links 22Add Media Links 23

Add a Media Link Screen 23Edit Media Links 23Delete Media Links 23
Notes 23Add Notes 23
Add a Note Screen 24Edit Notes 24Delete Notes 24
Notifications 24Add Notifications to Specific Records 25Edit Notifications for Specific Records 26Delete Notifications from Specific Records 26
Open Attachment Files 26Report Toolbar 26HTML Editor 27
HTML Editor Functions 27Buttons on the Toolbar 27Menus on the Toolbar 31
Merge Fields 32Style Sheet Options 33HTML Editor Table and Line Properties 34
Insert/Edit Table Screen 35Table Row Properties Screen 36Table Cell Properties Screen 38
COMMUNICATIONS CONFIGURATION 1Ask Ladders 1
Add Ask Ladders 1Edit an Ask Ladder 3Delete an Ask Ladder 4Copy an Ask Ladder 4Mark an Ask Ladder Inactive or Active 4Add Ask Ladder Overrides for an Unactivated Marketing Effort 5Edit an Ask Ladder Override 5Delete an Ask Ladder Override 5Smart Fields for Ask Ladders 6
Finder Number Settings 6Calculate Check Digits 7
Blackbaud Internet Solutions Integration 8
INDEX 11

Blackbaud DirectMarketingWorkflowMarketing Plan Workflow 2
List Workflow 2
Segment Workflow 3
Source Code Workflow 3
Marketing Effort Workflow 4
The following provides a workflow of each main functional area in Blackbaud Direct Marketing, and how thesepieces work together in the overall workflow of the program.Using the features in the program, you can plan and execute all facets of your direct and public marketing efforts.• Administrators can establish the record source(s) that the program will work with, the users and their roles inthe program, and more.
• Use the Vendors, Creatives, and Packages features to establish records for the businesses you purchase itemsfrom, the items you use in your direct and public marketing efforts (anything from graphics to small gifts suchas pens you may include), and the actual pieces that make up your marketing efforts.
• Add acquisition lists to the program. These hold general information about the list and group related listsegments that make up the list. Use list segments to import the data in the list into the program for use in yourmarketing efforts.
• Use finder files to keep rented and exchanged names and addresses separate from your house file. The recordsincluded in these files cannot be stored permanently in the database until those recipients give a gift.
• Use the Segmentation feature area to create the segments that will enable you to target specific directmarketing efforts and pieces ofmail to different groups of donors.
• Use the Public Media feature area to create public media segments such as media outlets, time slots, andmarketing locations to target your public marketing efforts.
• The Planner feature enables a Marketing Executive or Director to plan out the fiscal year (or other fixed timeperiod) for your organization. This person in your organization knows the strategy and budget and capturesthis information in the Planner.
• Create source code parts and layouts that you can apply to your marketing efforts to establish the specificcombination of list, package, segment, etc. that results in a particular gift.
• Use theMarketing Efforts feature to create the direct or public marketing effort itself, including thesegmentation or public media. You can then create an export for themarketing effort to send to a mailinghouse or call center, for example, or import into another program.
chapter 1
• Perform analysis by running performance reports on all facets of your marketing efforts.
Marketing Plan WorkflowTo create a marketing plan, first you need a plan template. A template enables you to build a hierarchy of itemssuch as campaigns or programs (you determine the name of these items) and color code them for easyrecognition of your plans. The bottom two levels of a template are always “Planned appeals” and “Plannedmarketing efforts.” Then you can create a plan based on the template and add the items specified in thetemplate hierarchy.You also include “assumptions” for projected budget and revenue for the items, as well as segment summariesand specifications to describe who should be included in the various segments of a planned marketing effort.Once all stakeholders have signed off on a plan, you can approve it. When you approve a plan, a marketing effortis created for each Planned marketing effort in the plan. The Segments grid in each marketing effort isautomatically populated with all the Segment Summaries from the plan. These summaries enable you to groupsegments together so their values “roll up” into each other.
List WorkflowBefore you bring a list into the program, you should configure the criteria you want to use to determine whethera record on the list is already present in your source system. This is set in Configuration, Record Sources, in thesource you intend to use as a target for a list. Based on this criteria, a query is automatically generated thatincludes all members of the list who are duplicates in your database.Then add the list which acts as a list header that holds general information about the list. It serves as a way togroup related list segments that make up the list. For example, a list can group all imported and vendor managedsegments used for the samemarketing effort. You can have a list called Reader’s Digest and its list segments areReaders Digest 0-12month subscribers and Readers Digest 13-24month subscribers.Use list segments to import and manage list records. You can specify information about the list and the rules forusing it. When you add an imported list, you must first determine how the fields in the import file will map toyour record source. If you are importing your first list, you must create a file layout to determine how the fields inthe list will map to those in your record source.When creating a file layout, the program will automatically map as many fields as possible and you can manuallymap any the program is unable to match. Once you save a file layout, you can use it when you import other listsinto the same record source. For example, different lists from the same vendor may use the same layout.Bring the records into the program based on your file layout mappings. Once the list is brought in, it can beadded to the Consolidated Query Viewwhich enables you to create queries that pull in all records meeting thecriteria, whether the records came from your source or a list. You can now use the list segments for marketingefforts.Finally, you can reuse lists or purge or delete them. For example, if you use the same list for subsequentmarketing efforts, you can add new list segments for each newmarketing effort or create one list segment forwhich you change the import file each year. When the imported records for a list segment are no longer valid oryour organization no longer has permission to use those records, you can purge the list segment’s importhistory from the system. To completely remove any trace of the imported records (including all information andIDs), you can delete the list segment’s import history.
2 CHAPTER 1

Segment WorkflowThemain reason to use segmentation is that different groups of donors will have different responses tomarketing efforts. Targeting specific groups enables you to increase the effectiveness of your efforts. After youcreate themarketing effort, you then add direct marketing segments to target specific sets of users with certainpackages or public media segments to target a demographic of people such as those who travel by a specificlocation, visitors of a specific website or business, or the audience of a specific television or radio program. Youcan specify different packages (marketing pieces such as mail or email) and apply them to particular segments.You can create individual segments or createmultiple segments at the same time. After you create segments,you can apply them to your marketing efforts. There are several types of segments, each serving a differentpurpose. When you createmultiple segments, the segment builder enables you to create numerous segmentsfrom a limited number of selections. You can also group segments so that you can apply all segments in a groupto a marketing effort at the same time instead of applying them individually.Selections form the backbone of your direct marketing segments. When creating constituent, revenue, ormembership segments, you specify one or more selections to be used to filter your source records anddetermine which ones belong in the segment. You can create the selections you will need before you beginadding segments, or create the selections while you are adding segments.Constituent segments are based on one or more selections of constituents. You can add list segments for usewith imported and vendor managed lists. These segments help you track the costs and record counts forimported and vendor managed lists used on marketing efforts. Revenue segments group donors foracknowledgement efforts, while membership segments group constituents for membership efforts.Use public media segments to target prospects you do not knowwith customized content based on theircharacteristics. For example, you can base public media marketing efforts on media outlets and time slots, suchas for broadcast or online efforts, or marketing locations, such as for billboards, promotional literature, or otherout-of-home efforts. Through these segments, you can communicate your message to a specific demographic,such as prospects who live in a specific area, visit a specific website, or prefer a specific television or radioprogram.
Source CodeWorkflowYou first create a source code parts and layouts that contains the items and formatting instructions for a validcode. You can then apply that layout to themarketing efforts and other items such as lists, segments, andpackages that you want to contain a code. When you export themarketing effort to a fulfillment house, youspecify the codes that should be included on the various response devices included in themarketing effort.When gifts come in from themarketing effort, the appropriate code is entered on each gift record so you canestablish the specific combination of list, package, segment, etc. that resulted in the gift for analysis purposes.For example, a typical source code could bemade up of three pieces or codes; one that defines themarketingeffort, one that defines the segment within themarketing effort, and one that defines the list used by themarketing effort. You could build a layout to format this source code as follows:07A051 - could be theMarketing Effort code with two digits representing the year, “A” for Acquisition, two digitsfor themonth, and a single digit for a month sequence (in case you have two marketing efforts in May).134 - could represent the segment, in this case a three digit Recency, Frequency, and Monetary (RFM) score.L001 - could represent the List ID.The combined Source Code in this case would be 07A051 134 L001.
BLACKBAUD D IRECT MARKETING WORKFLOW 3

Marketing Effort WorkflowSetting up direct and public marketing efforts requires several steps. In Configuration, an administrator mustdetermine the record sources to include in a marketing effort. When setting up a record source, theGift RecordSource is required to activate a marketing effort. When an administrator selects a gift record source and mapsthe appropriate fields, an activated marketing effort can determine all the gifts associated with a marketing effortand calculate performancemeasures based on the gift amounts and other criteria.Also, Export definitions enable you to specify several different templates that you can use when exporting anactivemarketing effort.After an administrator has prepared your data record source, in theMarketing Efforts feature area, you cancreate a marketing effort based on an approved marketing plan, which enables information from the plan todefault into themarketing effort, or you can create a “one-off” marketing effort. When you create themarketingeffort, you can specify records that should be included or excluded from it, or you can do this later.After you create themarketing effort, you then add direct marketing segments to target specific sets of userswith certain packages or public media segments to target a demographic of people such as those who travel by aspecific location, visitors of a specific website or business, or the audience of a specific television or radioprogram.For themarketing effort and its various components, you can specify source codes. These source codes will beincluded on the response devices used in themarketing effort, and entered on gift records that come in from themarketing effort. By recording the code on a gift record, you establish the specific combination of list, package,segment, etc. that resulted in the gift for analysis purposes.You can then test various aspects of a marketing effort, such as different combinations of packages andsegments, on a subset of recipients before you send out the actual marketing effort.When you finish creating and testing a direct marketing effort, you can activate it. By activating themarketingeffort, you are specifying the appeal to be associated with gifts that come in as a result of themarketing effort.Public media marketing efforts are activated automatically when you create the effort. During the creationprocess, you also select the appeal to associate with the effort.Finally, you can create an export file of themarketing effort for use by a processing house or to import intoanother program.
4 CHAPTER 1
General FeaturesApplication-Level Search 6
General Navigation 9
Home Page 10
Calendars 11
Workspace for Your System Role 11
Change Password 13
Refresh a Page 13
Filters 13
Really Simple Syndication (RSS) 14
Mark Data as Inactive 16
Zoom Buttons 16
Navigation Tree 17
Export Grid 19
KPI Dashboard 20
Documentation 21
Report Toolbar 26
HTML Editor 27
The program provides many features to help you navigate through, access, and share your information. Thisguide explains various navigation tools in the program and how to use features such as the home page andfavorites.
chapter 2

Application-Level SearchThe application-level search function helps you find a specific feature in the program when you do not know itslocation. The Find field available at the top of any application page accesses a pervasive search engine. Based onthe search option you select, the engine searches the program and returns links to all pages, tasks, RSS feeds,and help documentation that satisfy the search criteria. The search engine also overlooks minor spelling errorsand respects system security.You can base your search on features, RSS feeds, or a quick find option.
Configure SearchAlthough the pervasive search function includes some items by default — ad-hoc and smart queries, constituent,mailing, revenue, to name a few— you can edit the search list and expand this number.
Edit Search ListsWhen a feature search returns a feature that requires context, the search pagemust be able to resolve thecontext. Context on a feature is always tied to a specific record type, as are search lists; however, each recordtype can havemultiple search lists associated with it. For these records types, you must manually map to thesearch list to use. For example, the batch record type includes three search lists: batch template search, batchsearch, and batch type search. With theDefault search list configuration option in Administration, you canselect the list to use in your searches.
} Select search lists for record types
1. From Administration, click Default search lists under Configuration. The Default Search Lists pageappears. This page displays a list of record types mapped to related search lists.
2. Click Edit. The Define the default search list for system record types screen appears.
6 CHAPTER 2

3. Under Default search list, select the list to use for the corresponding record type.
4. Click Save. You return to the Default Search Lists page. Your chances appear in the grid.
Feature SearchA feature search is a quick navigational tool that searches all areas of the program—pages, tasks, RSS feeds —for information that satisfies your search criteria. It is themost general of the search options and likely generatesthemost results.For example, if you enter “add constituent” in the Find field, the Search Results page displays links to areas in theprogram that match the words “add” and “constituent.” On the Search Results page, if you click a task link suchas Add an individual, the task is invoked, and the Add an individual screen appears for you to enter a newconstituent. If you click a page link such as Constituent Giving Information, a search screen appears, and youcan search for the constituent whose information you want to view.To execute a feature-level search, click Features beside the Search button and select the feature to search. Enteryour search criteria in the Find field and click Search. The results appear on the Search Results page.
Context-Based Feature SearchIn the Find field, you can include context information and refine your feature search. For example, to locateRobert Hernandez’s constituent record, rather than search for just “constituent record,” you can include theconstituent name: “constituent info?rob hernandez.” In the search results, you can click links to variousconstituent areas in the program with information about Robert Hernandez. When you click a link, constituentinformation appears or a search screen appears with a list ofmatching records.In the Find field, you can also call up and display ad-hoc and smart query results. For example, if you have an“Ohio Constituents” ad-hoc query, you can enter “query?Ohio Constituents” in the Find field. When you clickAd-hoc Query Results in the search results, the Ad-hoc Query page appears for the “Ohio Constituents” query.From this page, you can browse records, edit the query definition, create an export, create tasks, and assignpermissions.
Note: For information about Query, see the Query chapter in theQuery and Export Guide.
GENERAL FEATURES 7

RSS Feed SearchRSS feeds in the program are included by default in feature-level searches. However, you can search for RSS feedsonly. This limits the number of results and provides a way to view RSS feeds available.To restrict your search to RSS feeds, click Features beside the Search button and select RSS feeds. Enter yoursearch criteria in the Find field and click Search. Only RSS feeds that match your search criteria appear on theSearch Results page.
Click an RSS feed to access the feed page in the program. From this page, you can review feed data and subscribeto the feed.
Quick Find SearchWith the quick find functionality, you can search for and open specific records in the application.
8 CHAPTER 2

For example, if you click Features beside the Search button and select Constituents, Constituent, you can enter“Joseph Bernstein” in the Find field to search for Joseph’s constituent record. If a single record matches yourcriteria, the record opens. If multiple records match your search criteria, a search screen appears with a list ofmatching records. You can refine your search criteria and execute a new constituent search.
Search Help DocumentsThe feature-level search functionality includes help topics in the search process. The top five help topics relatedto the search criteria appear on the Search Results page. Under Help Contents, links to related help topicsappear. To access the help file, click a link.
General NavigationThe program includes a variety of navigation features that give you increased control over the software.
Menu, Navigation, Explorer, and Status BarsPages in the program include the following features:• Navigation bar: The navigation bar allows you to navigate through the program, return to your home page,and move forward and backward through pages in your history. Your role in the program determines theappearance of the navigation bar, and it only displays features that you have permission to access.
• Explorer bar: From the explorer bar, you can quickly access recently performed searches, recently viewedrecords and pages, and shortcuts. Depending on the current page, you can also access related tasks andactivities.
GENERAL FEATURES 9
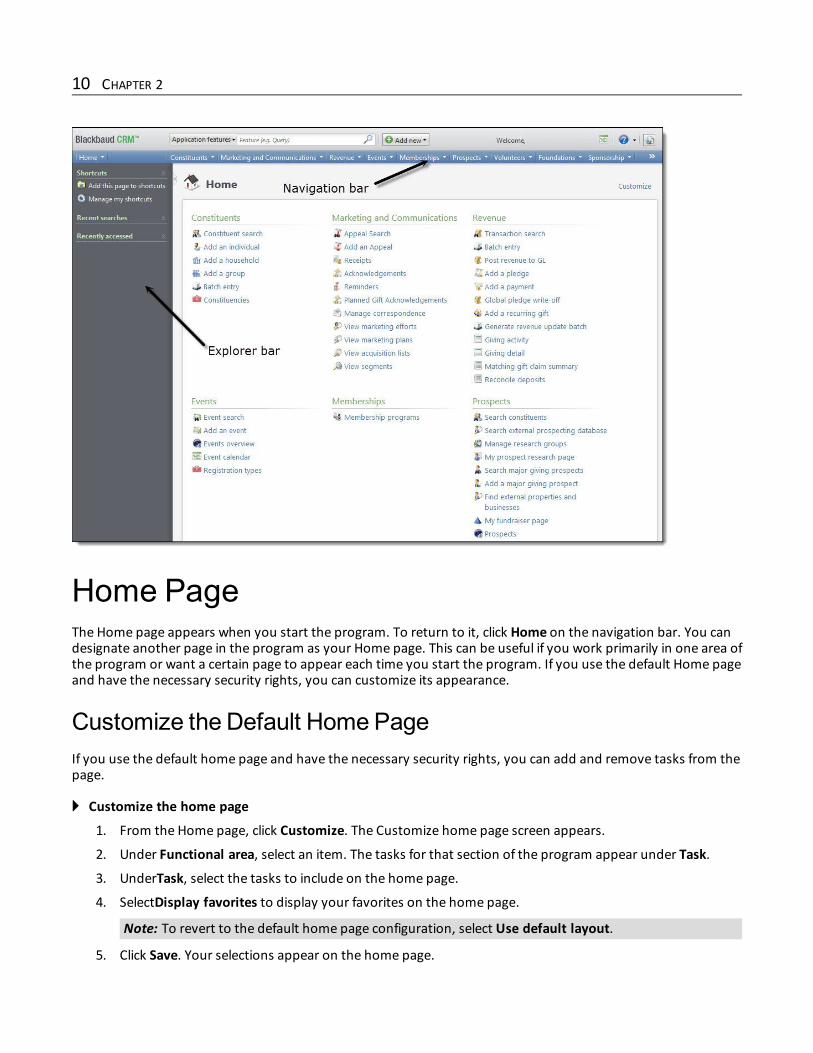
Home PageThe Home page appears when you start the program. To return to it, click Home on the navigation bar. You candesignate another page in the program as your Home page. This can be useful if you work primarily in one area ofthe program or want a certain page to appear each time you start the program. If you use the default Home pageand have the necessary security rights, you can customize its appearance.
Customize the Default Home PageIf you use the default home page and have the necessary security rights, you can add and remove tasks from thepage.
} Customize the home page
1. From the Home page, click Customize. The Customize home page screen appears.
2. Under Functional area, select an item. The tasks for that section of the program appear under Task.
3. UnderTask, select the tasks to include on the home page.
4. SelectDisplay favorites to display your favorites on the home page.
Note: To revert to the default home page configuration, select Use default layout.
5. Click Save. Your selections appear on the home page.
10 CHAPTER 2

CalendarsVarious calendars are used throughout the program to provide a view of scheduled items related to yourorganization or community. These can include upcoming events, mailings, holidays, or other items related to thespecific calendar you are viewing. In addition to an effective view of scheduled items, many calendars providetools to add and edit items directly from the calendar, which can save you time.Although the calendars displayed throughout the program may have different purposes, they each have severalcommon components to help you more effectively view and interact with information. For example, filtersprovide a way to narrow or expand the items displayed on the calendar and color-coding helps you identifyitems.To help customize calendars for how you work, you can change the colors used to identify specific items on thecalendar. To change the colors defined for each item that appears on the calendar, click Customize style. In thegrid, within the Style column, click the down arrow and select a color to assign to each. Click OK to save.
Workspace for Your System RoleDepending on your role, you can access a workspace from your home page to view and manage tasks associatedwith your role and key performance indicators (KPIs) to track the effectiveness of your efforts. You can alsoaccess the organization calendar to view activities scheduled at your organization. By default, you can access theworkspace from your home page. On the default home page, clickWorkspace. TheWorkspace page appears anddisplays information pertinent to your role.If your organization enables email alerts, you can configure and manage your email preferences from theWorkspace page. For example, you can enter the email address to receive alerts or select whether to receivespecific alerts. Under Tasks, click Email preferences. Your application user record appears. For information abouthow to configure email preferences, see the Administration Guide.Depending on your role and the activities you perform, the workspacemay contain multiple tabs to help younavigate through the information.
Note: For information about how to add and manage items or set filters on the Organization Calendar, see theAdministration Guide.
Organization Calendar
On the Organization Calendar tab, you can view scheduled items related to your organization or community,such as to help schedule and coordinate activities and processes. From the calendar, you can add and managecalendar items such as holidays, community events, or scheduled breaks in your organization’s operation. Youcan also select the type of activities to view during a specific period of time.
Note: Depending on your role, you can manage your batches from theWorkspace page. To access the BatchEntry page, such as to manage additional batches, click Batches under Administration. For information aboutbatch entry, see theData Management Guide.
My Tasks
On theMy Tasks tab, you can view and manage tasks related to your system role. For example, if you work withmailings or interact with constituents, your mailings and constituent interactions appear underMy tasks. If youwork with batch entry, batches assigned to you such as for data entry or approval appear. You can select
GENERAL FEATURES 11

whether to display only a specific type of task and whether to display completed tasks. To filter the grid, selectthe criteria of the tasks to view and click Apply. To remove the filter, click Reset. To update the information in thegrid, click Refresh List. From the grid, you can add and manage your tasks as necessary. To view additionalinformation about an item related to a task, such as a batch or an interaction, select it in the grid and click Go to.The record of the item appears.
Donors
If your role works with revenue transactions, the Donors tab appears. Under Donors, you can view theconstituents associated with recent pledges and payments toward donations or recurring gifts. You can selectthe recent time period of the transactions to view, such as Today or This month. You can also select to view onlytransactions above a specific revenue amount within the selected time period. To filter the grid, select the criteriaof the transactions to view and click Apply. To remove the filter, click Reset. To update the information in thegrid, click Refresh List. To view additional information about a donor, select the donor in the grid and click Go toconstituent. The record of the constituent appears.
Note: Depending on your role, you can view your KPIs from theWorkspace page. To access the KPI Instancespage, such as to add or manage KPIs, click KPIs under Administration. For information about KPIs, see theData Management Guide.
Note: Depending on your role, you can view your KPIs from theWorkspace page. To access the KPI Instancespage, such as to add or manage KPIs, click KPIs under Administration. For information about Batch entry, seethe Data section of the help file.
KPIs
On the KPIs tab, you can view key performance indicators (KPIs) to track the effectiveness of activities pertinentto your role. KPIs track your strategic performance to help determine a course of action. When you monitor yourbusiness activity with KPIs, you can place a value on otherwise difficult to measure activities such as leadershipdevelopment. To view the value of a KPI, select it under KPIs and click Show Details. TheDetails window displaysthe value of the selected KPI. To update the value of a KPI, such as to include recent activity, select it in the gridand click Update KPI value. To view additional information about a KPI, select it in the grid and click Go to KPI.The record of the KPI appears.
Note: Depending on your role, you can view your smart queries from theWorkspace page. To access the Querypage, such as to add or manage smart queries, click Smart queries under Administration. For informationabout query, see theData Management Guide.
Smart Queries
On the Smart Queries tab, you can view smart queries to access records based on criteria pertinent to your role.Smart queries are designed to allow you to easily create a query that is not ad-hoc but groups records based onspecific criteria such as SYBUNT (constituents who gave Some Year But Unfortunately Not This year). You can usesmart queries for the same purposes as ad-hoc queries, such as to casually browse records or generate aselection for use in other processes. To view the results of a smart query, select it under Smart queries and clickView results. The record of the smart query appears.
12 CHAPTER 2

Change PasswordAll users should change their passwords the first time they log into the application and on a regular basisaccording to your organization’s security policy. Passwords expire every 90 days and users are prompted 15 daysin advance to change it.
Note: If your organization does not host the program through Blackbaud and does not use organizationalunits, please contact your system administrator for information about how to change your password.
All passwords are case sensitive and must meet the following complexity standards:• A password cannot be the same or overly similar to a previously used password.• Passwords must be at least eight characters in length.• Passwords must contain at least three of the following four character types: uppercase letters (ABC), lowercaseletters (abc), numbers (123), or symbol characters (!@#).
} Change your password
1. On themenu bar, clickWelcome and select Change password. The Change password screen appears.
2. In theOld password field, enter your current password.
3. In theNew password and Confirm password fields, enter a new password that meets the followingcomplexity requirements:
• A password cannot be the same or overly similar to a previously used password.
• Passwords must be at least eight characters in length.
• Passwords must contain at least three of the following four character types: uppercase letters (ABC),lowercase letters (abc), numbers (123), or symbol characters (!@#).
4. Click Save.
Refresh a PageWhen you work in the program, you might encounter a situation where a record is changed by another userwhile you view it. If this happens, the information on the pagemight be inaccurate. You can refresh the page todisplay themost current information in the database.To refresh a page, click Refresh under Tasks.
FiltersThe Filter button allows you to customize entries in data lists. You can use the Filter button to select recordtypes to display in a list or to select a date range. The filter options that appear depend on the type of data in thelist.For some data lists, the filter options always appear above the lists. For other data lists, you must click Filter toopen the filter options.
GENERAL FEATURES 13

The filter options that appear depend on the data list.
When you apply filters to a list of items, the program remembers your filter settings and uses them as defaultsthe next time you view the list. For example, if you typically are only interested in themost recent transactionson a constituent’s revenue history, you can apply a date range filter of “Last 30 days.” When you go to anyconstituent record and view the revenue history, it uses the default filter and displays only transactions that tookplace in the last 30 days. If you apply a date range filter of “Last quarter,” the next time you view the revenuehistory, it displays transactions from the last quarter.Filter settings are stored for each user, so a user’s defaults do not impact anyone else. Filter settings are alsostored across sessions, so you can log out and log back in and still see your defaults.
Note: There are also filters on some dashboards and reports; however, these settings are not stored and mustbe reapplied each time you access the dashboard or report.
You can also sort the information that appears in a datalist by clicking on a column heading. For example, youcan click on a Date column heading and items will be listed in chronological order. Sort options are not storedand must be reapplied each time you access the datalist.
Really Simple Syndication (RSS)You can use the program to publish lists of data, such as registrations for an event, as Really Simple Syndication(RSS) feeds. RSS is a simple XML-based system that lets users subscribe to content such as news or websiteupdates and then aggregate it into a single location using RSS-aware software. With this feature you can targetimportant information to members of your organization. Users who subscribe to the RSS feed can view theinformation as it is updated in the program. For example, an RSS feed can supply the person responsible for aspecial event with up-to-date registration information.
14 CHAPTER 2

} Use the RSS feature
1. Locate a data list that has been RSS-enabled in the program. The View RSS feed icon denotes a data listthat can be subscribed to as a feed.
2. Click View RSS feed. A link to the feed opens in your default web browser.
Note: The link to the RSS feed is in the form of a text-based URL. For example, https://<SERVERNAME>/<SERVER PATH>/<RSS FEED LINK>.
3. If the web browser supports RSS, it can give you the option to subscribe to the feed.
4. You can use the browser’s built-in functionality to subscribe to the feed, or you can copy and paste thelink to the RSS feed into a preferred software or service. Themethod used to view the feed determineshow it looks.
5. The link to the RSS feed can also be shared with other users. You can send the URL, and they can view thefeed with an RSS-enabled software or service. As the information is updated in the program, theinformation in the related RSS feed is visible to all subscribers.
GENERAL FEATURES 15

Mark Data as InactiveWhen you delete information from the database, you cannot recover that data. As an alternative, you can markdata such as constituent records or membership program levels as inactive. This allows you to retain theinformation in the database but exclude it by default from lists, search results, queries, and reports.To mark data as inactive, you select it in the grid and either clickMark inactive in the action bar or under Tasks inthe explorer bar. You can use filter options in the program to include inactive data in lists, search results, queries,and reports.
To restore inactive data, you select it in the grid and either clickMark active in the action bar or under Tasks inthe explorer bar.
Zoom ButtonsWhen the program displays data in summary views, sometimes the data does not fit in the space provided andmust be truncated. When this happens, a zoom button appears beside the data, and users can click the buttonto view the complete data.
When users click the zoom button, a screen appears with the complete data.
16 CHAPTER 2

Elsewhere in the program, a similar zoom button appears in some fields in the program where users can add andedit data.
When users click this zoom button, an expanded field appears, and they can edit or view data that does not fit inthe space provided by the field.
Navigation TreeThe navigation tree is an efficient way to viewmultiple, nested pages of information. The navigation tree displaysinformation as an expandable, hierarchical set of links to other pages. This lets you to see the big picture ratherthan a single path.For example, you can open a fundraising purpose and get a broad view of all the activities involved by displayinglinks to all of the associated appeals.If a navigation tree is available, it is collapsed on the top-right side of the page. To expand the navigation tree,move your cursor over the button. You can resize the panel or pin it to keep it visible when you move the cursoraway. You can also toggle the visibility of the navigation tree by selecting View, Navigation tree in themenu.
GENERAL FEATURES 17

} Access the navigation tree
1. Navigate to a page with a navigation tree. The navigation tree is collapsed on the top-right side of thepage.
2. Move the cursor over the button. The navigation tree appears.
18 CHAPTER 2

• To hide the navigation tree, move the cursor away.
• To keep the navigation tree visible, click the button or click Auto Hide on the navigation tree.
• To close the navigation tree, click Auto Hide again and move the cursor away.
• To close the navigation tree completely, click Close on the navigation tree. The navigation tree andbutton no longer appear on the page.
• To restore the navigation tree and button, select View, Navigation Tree in themenu.
3. When the navigation tree is open, you can view information about connected pages.
• To expand and collapse the nested groups, click the plus and minus icons beside the page.
• To access a page, place your cursor over the page name and click the link.
Export GridWhen you right-click a data list, you can select Export grid to export the contents of the data list to a .csv file. The.csv file includes the data from each column in the data list.
Note: If you useMulticurrency, amounts associated with exported data display in the user’s base currency.
GENERAL FEATURES 19

KPI DashboardAll users have a personal dashboard, displaying key performance indicator (KPI) data. The dashboard includesdata from every KPI instance that the user has permissions to.
20 CHAPTER 2

The KPI dashboard stores all KPI values and statistics in an easy to view format. In addition, you can customizethe dashboard view to make it easier to access the information you need. You can also export the information toMicrosoft Excel or generate a PDF.For more information about the KPI dashboard, see the Reports and Analysis Guide.
DocumentationOn the Documentation tab, you can add notes to track helpful or interesting information about your records.You can save links to websites or related materials stored outside of the program. You can also attach itemsdirectly to records. When you attach a file, the program stores a copy in the database.
AttachmentsYou can attach items to records. When you attach a file, the program stores a copy in the database.
GENERAL FEATURES 21

Add AttachmentsYou can use attachments to track additional details about records. When you attach a file, the program stores acopy in the database.
} Add an attachment
1. On the Documentation tab of a record, click Add, Attachment. The Add an attachment screen appears.
2. Select an attachment type. Enter the date, title, and author. To search for the attachment, click Choosefile.
3. Click Save. You return to the Documentation tab.
Add an Attachment Screen
Screen Item Description
Type Select the type of attachment. The system administrator configures attachment types. Ifyou have security rights, click Type to add an attachment type.
Date Enter the date of the attachment.Title Enter the title, or purpose, of the attachment.Author To search for the author, click the binoculars. A search screen appears.
File To locate the attachment, click Choose file. To view an attachment, click Open file. Toremove an attachment, click Clear file.
Edit AttachmentsOn the Documentation tab, you can edit an attachment. You can remove a file and choose a different file. Youcan also view an attachment.
} Edit an attachment
1. On the Documentation tab of a record, select an attachment and click Edit. The Edit attachment screenappears.
2. Make changes as necessary to the attachment type, date, title, or author. To view an attachment, clickOpen file To remove an attachment, click Clear file To select a different file, click Choose file.
3. Click Save. You return to the Documentation tab.
Delete AttachmentsAfter you add an attachment to the Documentation tab, you can delete it as necessary.
} Delete an attachment
1. On the Documentation tab of a record, select an attachment and click Delete. A confirmation messageappears.
2. Click Yes. You return to the Documentation tab, and the attachment no longer appears.
Media LinksOn the Documentation tab, you can save links to websites or related materials stored outside of the program.
22 CHAPTER 2

Add Media LinksWhen you add a media link, you enter the website address.
} Add a media link
1. On the Documentation tab of a record, click Add,Media link. The Add a media link screen appears.
2. Select a media link type. Enter the date, title, and author. Enter the URL for a website.
3. Click Save. You return to the Documentation tab.
Add a Media Link Screen
Screen Item Description
Type Select the type ofmedia link. The system administrator configures media link types. Ifyou have security rights, click Type to add a media link type.
Date Enter the date of themedia link.Title Enter the title, or purpose, of the link.Author To search for an author, click the binoculars. A search screen appears.Media URL Enter the URL for a website.
Edit Media LinksYou can edit the URL for a website.
} Edit a media link
1. On the Documentation tab of a record, select a media link and click Edit. The Edit media link screenappears.
2. Make changes as necessary to themedia link type, date, title, or author. You can edit the URL for awebsite.
3. Click Save. You return to the Documentation tab.
Delete Media LinksAfter you add media links to the Documentation tab, you can delete them as necessary.
} Delete a media link
1. On the Documentation tab of a record, select a media link and click Delete. A confirmation messageappears.
2. Click Yes. You return to the Documentation tab, and themedia link no longer appears.
NotesOn the Documentation tab, you can add notes to track helpful or interesting information about your records.
Add NotesOn the Documentation tab, you can track notes about your records.
GENERAL FEATURES 23

} Add a note
1. On the Documentation tab of a record, click Add, Note. The Add a note screen appears.
2. Select a note type. Enter the date, title, author, and the content of the note.
3. Click Save. You return to the Documentation tab.
Add a Note Screen
Screen Item Description
Type Select the type of note. The system administrator configures note types. If you havesecurity rights, click Type to add a note type.
Date Enter the date of the note.Title Enter the title, or purpose, of the note.Author To search for an author, click themagnifying glass. A search screen appears.Notes Enter the content of the note.
Edit NotesOn the Documentation tab, you can edit notes as necessary.
} Edit a note
1. On the Documentation tab of a record, select a note and click Edit. The Edit note screen appears.
2. Make changes as necessary to the note type, date, title, author, or note content.
3. Click Save. You return to the Documentation tab.
Delete NotesAfter you add notes to the Documentation tab, you can delete notes when necessary.
} Delete a note
1. On the Documentation tab of a record, select a note and click Delete. A confirmation message appears.
2. Click Yes. You return to the Documentation tab, and the note no longer appears.
NotificationsNotifications allow you to share important information about a record or a group of records with users. You candetermine whether all users should receive a notification or only a targeted group of users. For example, youmay want all users to receive a notification when they open the record of a board member.Notifications are not available for every record type. They are available only for:• Bank Account Adjustment records• Bank Account Deposit records• Bank Account Deposit Correction records• Constituent records• Event records
24 CHAPTER 2
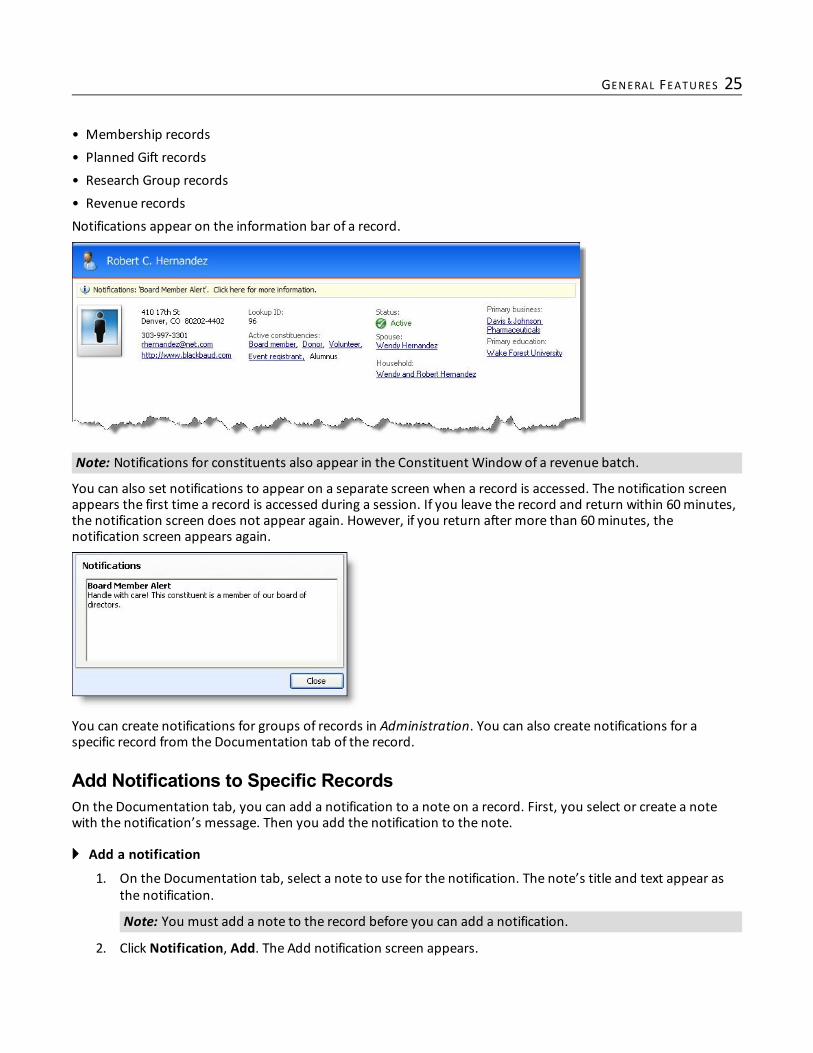
• Membership records• Planned Gift records• Research Group records• Revenue recordsNotifications appear on the information bar of a record.
Note: Notifications for constituents also appear in the Constituent Window of a revenue batch.
You can also set notifications to appear on a separate screen when a record is accessed. The notification screenappears the first time a record is accessed during a session. If you leave the record and return within 60minutes,the notification screen does not appear again. However, if you return after more than 60minutes, thenotification screen appears again.
You can create notifications for groups of records in Administration. You can also create notifications for aspecific record from the Documentation tab of the record.
Add Notifications to Specific RecordsOn the Documentation tab, you can add a notification to a note on a record. First, you select or create a notewith the notification’s message. Then you add the notification to the note.
} Add a notification
1. On the Documentation tab, select a note to use for the notification. The note’s title and text appear asthe notification.
Note: You must add a note to the record before you can add a notification.
2. Click Notification, Add. The Add notification screen appears.
GENERAL FEATURES 25

3. Select how long to display the notification, whether to display it on a separate screen, and the users whoview the notification.
4. Click Save. You return to the Documentation tab.
Edit Notifications for Specific RecordsAfter you add a notification to a record, you can edit its properties on the Documentation tab. You can changehow long to display the notification and who views it. To edit the notification’s content, you edit the noteassociated with the notification.
} Edit a notification
1. On the Documentation tab, select the note with the notification and click Notification, Edit. The Editnotification screen appears.
2. Make changes as necessary to the notification, such as how long to display it and who views it.
Note: To edit the notification title or content, edit the note itself.
3. Click Save. You return to the Documentation tab.
Delete Notifications from Specific RecordsOn the Documentation tab, you can delete a notification when you no longer need it. To remove a notificationfrom a record, select the note with the notification to remove and click Notification, Delete.
Open Attachment FilesAfter you add an attachment on the Documentation tab, you can open the attachment. Select the attachmentand click Open file.
Report ToolbarSeveral features in the program offer reports to view data. When you generate a report, you can use the reporttoolbar to modify how you view the report. The toolbar buttons are common to all reports.
26 CHAPTER 2

HTML EditorThe program provides a powerful HTML editor to allow you to format and lay out content. With the HTML editor,you can update content easily and safely while you maintain control over the design and content.You can use the HTML editor in different views, depending on your HTML experience and where you access theHTML editor in the program.• Normal –When you open the HTML editor to create or edit content, this is the “normal” view. This view issimilar to a standard word processing application. By default in normal view, when you press ENTER, you createa <p> tag in the HTML content to indicate a new paragraph. When you press SHIFT + ENTER, you create a <br>tag to indicate a single carriage return in the content.
• HTML – To view or edit the HTML source code, click HTML Code on the View tab in the toolbar. The HTMLSource Editor screen appears. To return to the normal view, close the window. You cannot use the HTML viewto embed your own form via HTML in the HTML editor. We recommend you put the form on a page that is notstored in the program but can be referenced in an iFrame. For more information about how to includecustomized forms in the program, contact Blackbaud’s Professional Services at [email protected].
• Preview – To view the content as it will appear on the web page and to test hyperlinks, click Preview on theView tab in the toolbar. The Preview screen appears. To return to the normal view, close the window.
HTMLEditor FunctionsThese tables explain the buttons and menus on the toolbar of the HTML editor. Some features havemorebuttons available than others.
Note: On your website, users can use an HTML editor with a limited set of these buttons on some parts. Withthe HTML editor, users can also insert images, tables, or links.
Buttons on the ToolbarButton Function Description
Full screen To work in full screen mode, click Full screen. To turn off full screen mode and view thescreen at its normal size, click Full screen again.
Preview To view the content as it will appear on the web page, click Preview. The Preview screenappears. To return to the normal view, close the window.
Print To print the current content, click Print. The Print screen appears. Select the printer andyour print preferences, and click Print.
Edit HTMLsource
To view or edit the HTML source code, click Edit HTML source. The HTML Source Editorscreen appears. To return to the normal view, close the window.
Clean upHTML
To remove unnecessary tags from the HTML, click Clean up HTML. The Clean Up HTMLscreen appears. With the buttons on this screen, you can remove all HTML tags,remove all MicrosoftWord-specific markup, clean up stylesheets, clean up <Font> tags,and clean up <Span> tags.
Spell check
To check the spelling, click Spell check. When you turn the spell checker on, it checksthe spelling of all existing content in the HTML editor and will check new content as youcreate it. When the spell checker finds an error, a red squiggly line appears below theword. Right-click the underlined word to select the correct spelling. You can also spellcheck in different languages. Use the drop-down to the select the language.
GENERAL FEATURES 27

Button Function Description
Find andreplace
To find and replace text, click Find and replace. The Find/Replace screen appears. In theFind what field, enter the text to search for. In the Replace with field, enterreplacement text. To search for the text, click Find next. To replace the text, clickReplace. To replace all instances, click Replace all.
Cut To remove text from the content area and copy it to the clipboard, click Cut. The text isremoved, and you can paste it elsewhere in the content area.
CopyTo copy text to the clipboard, click Copy. You can paste the text elsewhere in thecontent area.Note: For Firefox, security settings disable the Copy button. To copy text to theclipboard in Firefox, highlight it and press CTRL-C.
Paste
To paste text from the clipboard, click Paste. The text appears in the content area. Itretains the formatting from when you cut or copied it.Note: For Firefox, the Paste button in HTMLmode removes HTML tags. To paste textwith HTML tags in Firefox, press CTRL-V. For Firefox on Macs, you cannot paste text withHTML tags in HTMLmode because Ctrl-V also removes the HTML tags.
Paste plaintext
To paste text from the clipboard without any formatting, click Paste plain text. The textappears in the content area and does not retain its formatting.
Paste fromWord
To paste text from the clipboard that you copied from MicrosoftWord, click Paste fromWord. The text appears in the content area without the proprietary HTML ofWord. Thetext format may differ from the format inWord.
Insert pagebreak
To insert a printed page break, click Insert page break. The HTML editor adds a divisionwith an attribute of PAGE-BREAK-BEFORE: always at the selected location.
Inserthorizontalrule
To insert a horizontal line, click Insert horizontal rule in the toolbar. On the screen thatappears, enter the width and height for the line and select whether to include ashadow.
Insert customcharacters
To insert a special character, click Insert custom characters. The Custom charactersscreen appears. In the grid, select a character. The custom character appears at theselected location.
Insert anchor
To link to a specific location on a page, place your cursor at the link’s endpoint (forexample, a heading) and click Insert anchor. The Insert/edit anchor screen appears soyou can enter a name for the anchor’s location. The HTML editor adds <aname="anchor name"></a> before the defined location. In the normal view, the HTMLeditor displays an anchor symbol at the defined location.To link to the anchored location, in the HTML source view, append “#anchorname” tothe end of the link.
Insert image To insert an image, click Insert image. On the Select Image from Image library screen,you can select the image.
Insert linkTo link text to a web address or web page, click Insert link. If the text is in a format thatthe program recognizes as a web address or page, such as www.abc123.org, the linkformats automatically. Otherwise, the page link screen appears.
Remove link To remove a hyperlink from text, click Remove link. The text no longer acts as ahyperlink.
Undo To undo the last action in the content area, click Undo. The action is reversed. You canundo multiple actions.
Redo To redo an undone action in the content area, click Redo. The action is reinstated. Youcan redo multiple actions.
Help To access a description of the HTML editor features, click Help. The help file appears.
Insert tableTo insert a table, click Insert table. The Insert/edit table screen appears. For moreinformation about option on this screen, see HTML Editor Table and Line Properties onpage 34. After you create a table, you can select it and click Insert table to edit its
28 CHAPTER 2

Button Function Descriptionproperties.
Delete table To delete a table, select it and click Delete table.
Rowproperties
To edit the properties of a row, select it and click Row properties. The row propertiesscreen appears. For more information about row properties, see HTML Editor Tableand Line Properties on page 34.
Cellproperties
To edit the properties of a cell, select it and click Cell properties. The cell propertiesscreen appears. For more information about cell properties, see HTML Editor Table andLine Properties on page 34.
Insert rowabove To insert a row above a row in a table, click Insert row above. A new row appears.
Insert rowbelow To insert a row below a row in a table, click Insert row below. A new row appears.
Delete row To remove a row from a table, click Delete row. The row is deleted.
Insertcolumn tothe left
To insert a column to the left of a column in a table, click Insert column to the left. Anew column appears.
Insertcolumn tothe right
To insert a column to the right of a column in a table, click Insert column to the right. Anew column appears.
Deletecolumn To remove a column from a table, click Delete column. The column is deleted.
Split mergedtable cells
To split a cell that spans multiple rows into two cells, click Split merged table cells. Theselected cell no longer spans the row on the bottom.
Merge tablecells
To merge a cell with the cell to its right, clickMerge table cells. Any content in the cellon the right is removed, and the selected cell now spans both columns.
Show tableborders To hide or reveal the borders of your tables, click Show table borders.
Insert newlayer
To insert a layer, click Insert new layer. The HTML editor adds a layer using the <div>tag. To reposition the layer, select the layer and use the crossed arrows to drag thelayer to the new location. To resize the layer, drag the resize handles found at thelayer’s corners or sides.
Move layerforward
To move a layer forward, select the layer and clickMove layer forward. The HTMLeditor increases the z-index number for the layer.
Move layerbackward
To move a layer backward, select the layer and clickMove layer backward. The HTMLeditor decreases the z-index number for the layer.
Absolutepositioning
To apply absolute positioning to a selected layer, click Absolute positioning. The HTMLeditor adds the position: absolute tag to the layer and its location on the page in pixels.To remove absolute positioning from the selected layer, click Absolute positioningagain.
Direction leftto right
To apply left to right directionality to all items in the division, click Direction left toright. For a left to right table, column zero is on the left side and row zero is at the top.
Directionright to left
To apply right to left directionality to all items in the division, click Direction right toleft. For a right to left table, column zero is on the right side and row zero is at the top.
Block quote To insert a long quotation, click Block quote. The HTML editor adds a <blockquote> tagaround the selected text.
Abbreviation To add a tooltip that defines an abbreviation, select the word and click Abbreviation.The Abbreviation Element screen appears so you can enter the abbreviation’s definition
GENERAL FEATURES 29

Button Function Descriptionin the Title field and define formatting for the tooltip. The HTML editor adds an <abbr>tag around the selected word. When viewed in a browser, the abbreviation isunderlined and a tooltip appears when you place your cursor over the underlined word.Screen readers read the abbreviation as a word, rather than spell out the letters.
Acronym
To add a tooltip that defines an acronym, select the word and click Acronym. TheAcronym Element screen appears so you can enter the acronym’s definition in the Titlefield and define formatting for the tooltip. The HTML editor adds an <acronym> tagaround the selected word. When viewed in a browser, the acronym is underlined and atooltip appears when you place your cursor over the underlined word. Screen readersread the acronym as a word, rather than spell out the letters.
Citation
To add an in-line citation or reference to another source, select the word or phrase andclick Citation. The Citation Element screen appears so you can enter text in the Titlefield for the citation’s tooltip (such as the author, book title, and page number(s) or alink to a website) and define formatting for the tooltip. The HTML editor adds a <cite>tag around the selected word or phrase. When viewed in a browser, the citation isusually italicized and the tooltip appears when you place your cursor over the italicizedword or phrase.
Bold To make text bold, click Bold. The HTML editor adds a <strong> tag around the text.
Italic To italicize text, click Italic. The HTML editor adds an <em> tag around the text.
Underline To underline text, click Underline. The HTML editor adds a <u> tag around the text.
Strikethroughtext
To strike a line through text, click Strikethrough text. The HTML editor adds a <strike>tag around the text.
Superscript To strike a line through text, click Strikethrough text. The HTML editor adds a <strike>tag around the text.
Subscript To strike a line through text, click Strikethrough text. The HTML editor adds a <strike>tag around the text.
Align left To align text to the left, click Align left. The HTML editor adds an attribute of align=leftto the division.
Align center To align text to the center, click Align center. The HTML editor adds an attribute ofalign=center to the division.
Align right To align text to the right, click Align right. The HTML editor adds an attribute ofalign=right to the division.
Align full To fully justify text, click Align full. The HTML editor adds an attribute of align=justify tothe division.
Removeformat
To remove formatting from text, click Remove format. The HTML editor removes anyspecial format attributes, and the text appears as plain text.
Text color To change the color of text, click Text color and select a color from the palette. TheHTML editor adds a <span> tag with the color around the text.
Highlight To highlight text, click Highlight and select a color for the highlight from the palette. TheHTML editor adds a <span> tag with the background color around the text.
Insertnumberedlist
To insert a numbered list, click Insert numbered list. The HTML editor adds an <ol> tagat the selected location. The items are numbered sequentially, starting with “1.” To enda list, click Insert numbered list again.
Insertunorderedlist
To insert a bulleted list, click Insert unordered list. The HTML editor adds an <ul> tag atthe selected location. The items in the list have bullets. To end a list, click Insertunordered list again.
30 CHAPTER 2

Button Function Description
Indent textTo increase an indent, click Indent text. The HTML editor adds a <blockquote> tagaround the paragraph. If you increase the indent for a list item, the number or bulletchanges to indicate a secondary relationship to the list.
Outdent textTo decrease an indent, click Outdent text. The HTML editor removes the <blockquote>tag around the paragraph. If you decrease the indent of a list item, the text becomesplain text. If you decrease the indent of a secondary list item, the number or bulletbecomes part of the parent list.
Stylesheetoptions
To render content on a page, the program uses the stylesheet associated with thepage’s layout. To view your content with stylesheets applied and edit the content for aspecific stylesheet, click Stylesheet options. On the Stylesheet Options screen, you canselect the stylesheet to view and override the background and foreground colors of theHTML editor to improve readability. For more information about how to view contentwith stylesheets applied, see Style Sheet Options on page 33.
Insertconditionalcontent
To add conditional content to an email message to customize themessage for differenttypes of recipients, click Insert conditional content. On the Conditional Content screen,you can create the first conditional content block. You can then define the content andselect the group of recipients who view it.This button appears only on the add/edit screens for templates, messages, andnewsletters.If you send an email message from Blackbaud Direct Marketing, this option does notappear.
Viewconditionalcontent
To verify that conditional content appears as expected for each group of recipients, clickView conditional content. The ViewMessage screen appears.This button appears only on the add/edit screens for templates, messages, andnewsletters.If you send an email message from Blackbaud Direct Marketing, this option does notappear.
Insert mergefields
To add merge fields with personalized information to the HTML content, click Insertmerge fields. For more information, see Merge Fields on page 32.
Insertcontentplaceholder
On the add or edit layout screen, you can click Insert content placeholder to add panesfor parts to the layout. A yellow icon appears as a placeholder for a pane. When youcreate templates and web pages, a pane contains multiple parts. You select the parts toappear in the pane.
Menus on the ToolbarMenu Menu name Description
Font menu This menu lists common fonts that appear correctly on most webbrowsers. To change the font applied to text, select a font.
GENERAL FEATURES 31

Menu Menu name Description
Sizemenu To change the size of text, select a size from this menu.
Paragraph menu To apply a paragraph tag to text, select a format from this menu.For example, select “Normal” for body text.
Merge FieldsTo create personalized content, usemerge fields to display offline information. For example, in an email, you caninsert the First namemerge field so it displays “Hello, <First name>” to the recipient.• To add merge fields, clickMerge fields on the Insert tab in the HTML editor toolbar. Themerge fields listappears in a separate window that you can move around.
• To view the available fields, click the plus sign next to a group of fields to expand the list.• You can double-click or drag and drop merge fields from the window to the content area.• You can add multiple fields at a time. To do this, place your cursor to the left or right of the group name orfields (not over the group or fields) and click and drag your mouse to select them. After the fields are selected,you can drag them as a group to the content area.
32 CHAPTER 2

Style Sheet OptionsOn your website, the program uses the style sheet associated with a web page’s layout to render the contentyou enter in the HTML editor. Because the part on which you enter the HTML content may be shared acrossmultiple web pages with different style sheets, you may need to edit the content as necessary to improve itsreadability with a specific style sheet. When you use the HTML editor in the normal view, you can view thecontent as it appears with different style sheets applied.
} View HTML content with a specific style sheet applied
1. On the View tab in the HTML editor toolbar for formatted text and images parts, click Style sheetoptions. The Style sheet Options screen appears.
2. In the Edit using style sheet field, select the style sheet to apply to the content in the HTML editor.
GENERAL FEATURES 33

3. Depending on the style sheet, the background and foreground colors of the HTML editor may affect thereadability of your text. Change the background and foreground colors of the HTML editor as necessaryto edit the content.
a. Select Override style sheet colors.
b. Select the color to adjust. For the background color, click Select next to Editor background color.For the foreground color, click Select next to Editor default font color.
The Select a color screen appears. Using the tabs, you can pick a color three different ways or enterits hexadecimal value in the Color field.
c. Click Apply. You return to the Style sheet Options screen.
4. Click OK. You return to the HTML editor. The content appears with the selected style sheet and colorsapplied.
HTMLEditor Table and Line PropertiesIn the normal view, you can use the HTML editor to design tables, table rows, table cells, and horizontal lines thatdivide the web page. You can also adjust the properties for these items to determine characteristics such as size,styles, and color.• To create a table, click Table on the Insert tab in the HTML editor toolbar. The Insert/Edit Table Screenappears. On the General and Advanced tabs, you can design the table and adjust its properties. Werecommend only users familiar with HTML and CSS style elements adjust the properties on the Advanced tab.For more information, see Insert/Edit Table Screen on page 35 Insert/Edit Table Screen on page 35.
• To edit the properties of a row in a table, select the row and click Row properties on the Table tab in thetoolbar. The Table Row Properties screen appears. On the General and Advanced tabs, you can design the rowand adjust its properties. We recommend only users familiar with HTML and CSS style elements adjust theproperties on these tabs. For more information, see Table Row Properties Screen on page 36.
• To edit the properties of a cell in a table, select the cell and click Cell properties on the Table tab in the toolbar.The Table Cell Properties screen appears. On the General and Advanced tabs, you can design the cell andadjust its properties. We recommend only users familiar with HTML and CSS style elements adjust theproperties on these tabs. For more information, see Table Cell Properties Screen on page 38.
• To insert a horizontal line, click Horizontal ruler on the Insert tab in the toolbar. On the screen that appears,enter the width and height for the line and select whether to include a shadow.
34 CHAPTER 2

Insert/Edit Table ScreenTo create a table, click Table on the Insert tab in the HTML editor toolbar. The Insert/Edit Table Screen appears.On the General and Advanced tabs, you can design the table and adjust its properties. We recommend onlyusers familiar with HTML and CSS style elements adjust the properties on the Advanced tab. After you create atable, you can select the table and click Table to edit its properties.General Tab
Screen Item DescriptionCols Enter the number of columns.
Cellpadding Enter the amount of space to appear between the ruled line and the content of a cell inthe table.
Alignment Select the horizontal alignment of the table. You can select Left, Center, Right, or Not Set.Width Enter the pixel dimensions to use for the cells.Class Select the CSS class to apply.
Table caption Select this checkbox to display a caption at the top of the table. To remove the tablecaption, clear the checkbox or delete its code in HTMLmode.
Rows Enter the number of rows.Cellspacing Enter the amount of space to appear between cells of the table.
Border Enter the width, in pixels, of a border around the table. To display the table with noborder, enter “0.”
Height Enter the pixel dimensions to use for the cell.
Advanced Tab
GENERAL FEATURES 35
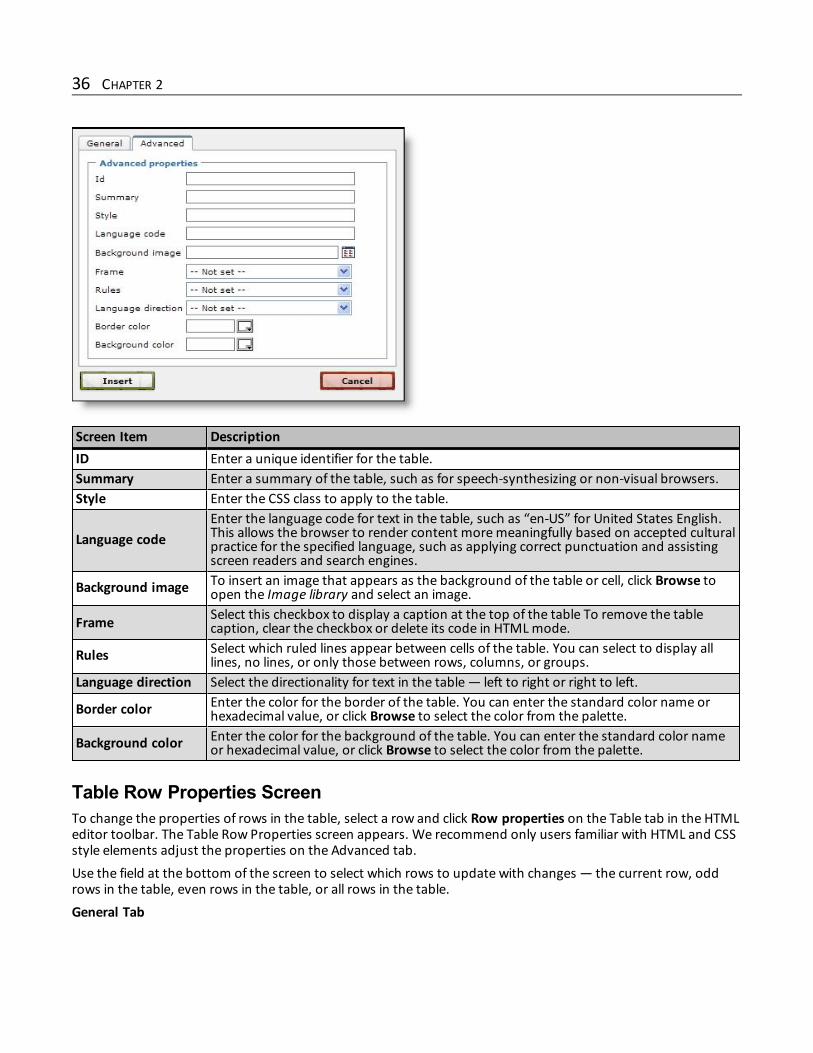
Screen Item DescriptionID Enter a unique identifier for the table.Summary Enter a summary of the table, such as for speech-synthesizing or non-visual browsers.Style Enter the CSS class to apply to the table.
Language codeEnter the language code for text in the table, such as “en-US” for United States English.This allows the browser to render content moremeaningfully based on accepted culturalpractice for the specified language, such as applying correct punctuation and assistingscreen readers and search engines.
Background image To insert an image that appears as the background of the table or cell, click Browse toopen the Image library and select an image.
Frame Select this checkbox to display a caption at the top of the table To remove the tablecaption, clear the checkbox or delete its code in HTMLmode.
Rules Select which ruled lines appear between cells of the table. You can select to display alllines, no lines, or only those between rows, columns, or groups.
Language direction Select the directionality for text in the table — left to right or right to left.
Border color Enter the color for the border of the table. You can enter the standard color name orhexadecimal value, or click Browse to select the color from the palette.
Background color Enter the color for the background of the table. You can enter the standard color nameor hexadecimal value, or click Browse to select the color from the palette.
Table Row Properties ScreenTo change the properties of rows in the table, select a row and click Row properties on the Table tab in the HTMLeditor toolbar. The Table Row Properties screen appears. We recommend only users familiar with HTML and CSSstyle elements adjust the properties on the Advanced tab.Use the field at the bottom of the screen to select which rows to update with changes — the current row, oddrows in the table, even rows in the table, or all rows in the table.General Tab
36 CHAPTER 2

Screen Item DescriptionRow type Select Header, Body, or Footer for the row type.
Alignment Select the horizontal alignment of the row. You can select Left, Center, Right, or NotSet.
Vertical alignment Select the vertical alignment of the row. You can select Top, Center, Bottom, or NotSet.
Class Select the CSS class to apply to the row.Height Enter the pixel dimensions to use for the row height.
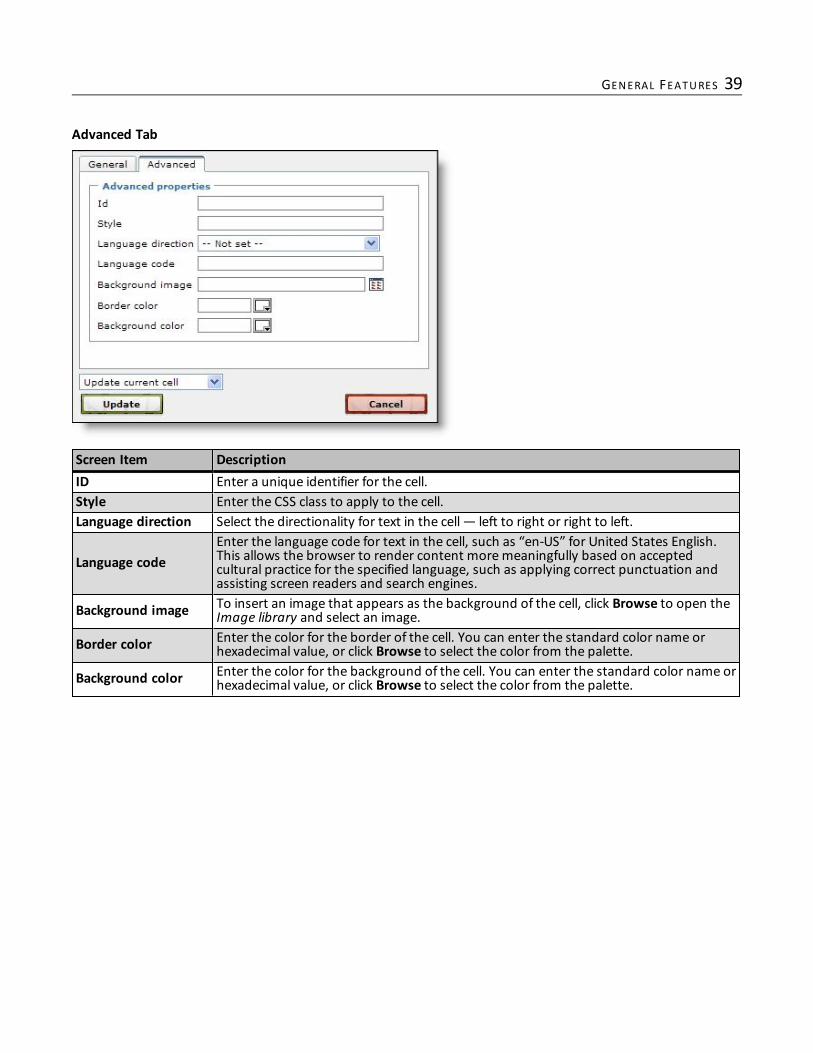
Advanced Tab
Screen Item DescriptionID Enter a unique identifier for the row.
GENERAL FEATURES 37

Screen Item DescriptionStyle Enter the CSS class to apply to the row.Language direction Select the directionality for text in the row — left to right or right to left.
Language codeEnter the language code for text in the row, such as “en-US” for United States English.This allows the browser to render content moremeaningfully based on acceptedcultural practice for the specified language, such as applying correct punctuation andassisting screen readers and search engines.
Background image To insert an image that appears as the background of the row, click Browse to openthe Image library and select an image.
Background color Enter the color for the background of the row. You can enter the standard color nameor hexadecimal value, or click Browse to select the color from the palette.
Table Cell Properties ScreenTo change the properties of cells in the table, select a cell and click Cell properties on the Table tab in the HTMLeditor toolbar. The Table cell properties screen appears. We recommend only users familiar with HTML and CSSstyle elements adjust the properties on the Advanced tab.Use the field at the bottom of the screen to select which cells to update with changes — the current cell, all cells inthe row, all cells in the column, or all cells in the table.General Tab
Screen Item Description
Alignment Select the horizontal alignment of the cells You can select Left, Center, Right, or NotSet.
Vertical alignment Select the vertical alignment of the cells You can select Top, Center, or Bottom.Width Enter the pixel dimensions to use for the cell width.Class Select the CSS class to apply to the cell.Cell type Select whether the cell is a header for a column or includes data.
Scope Select whether the cell type applies to the column, row, group of columns, or groupof rows.
Height Enter the pixel dimensions to use for the cell height.
38 CHAPTER 2
Advanced Tab
Screen Item DescriptionID Enter a unique identifier for the cell.Style Enter the CSS class to apply to the cell.Language direction Select the directionality for text in the cell — left to right or right to left.
Language codeEnter the language code for text in the cell, such as “en-US” for United States English.This allows the browser to render content moremeaningfully based on acceptedcultural practice for the specified language, such as applying correct punctuation andassisting screen readers and search engines.
Background image To insert an image that appears as the background of the cell, click Browse to open theImage library and select an image.
Border color Enter the color for the border of the cell. You can enter the standard color name orhexadecimal value, or click Browse to select the color from the palette.
Background color Enter the color for the background of the cell. You can enter the standard color name orhexadecimal value, or click Browse to select the color from the palette.
GENERAL FEATURES 39

40 CHAPTER 2

CommunicationsConfigurationAsk Ladders 1
Finder Number Settings 6
Blackbaud Internet Solutions Integration 8
Before you can manage communication information, we recommend you set up configuration options. FromMarketing and Communications, you can access these options under Configuration.You use configuration options to set upMarketing and Communications for your users. Use these options tomanage the various elements necessary to communicate with your constituents to support your fundraisingefforts.
Ask LaddersAn ask ladder is a set of fixed or calculated ask amounts based on a constituent’s giving history and included on aresponse device. You assign ask ladders to segments in a marketing effort to ensure each recipient receives theappropriate ask amount on their marketing effort. On the Ask Ladders page, you can manage the ask laddersyour organization uses. To access this page fromMarketing and Communications, click Ask ladders underConfiguration.Under Ask Ladders, you can view the name, entry amount, and record source of each ask ladder. You can alsoviewwhether an ask ladder is active or in use. To include only ask ladders with a specific status in the grid, clickFilter, select whether to view inactive or active ask ladders, and click Apply. To update the information in thegrid, click Refresh List.From the grid, you can also manage the ask ladders your organization uses.
Add Ask LaddersWhen you create an ask ladder, you define the calculations for ask amounts based on an “entry amount” valuefrom the constituent’s giving history, such as themost recent or largest gift amount. The parameters you definefor an ask ladder determine the lower and upper limits of an entry amount range and the ask amountcalculations that apply to constituents who fall within that range. To calculate ask amounts, the program adds aspecified amount to the entry amount or multiplies the entry amount by a specified value. For fixed ask ladders,you define ask amounts used for all constituents. This table demonstrates each type of ask ladder (Add, Multiply,and Fixed) and how ask amounts are calculated for each type.
chapter 1
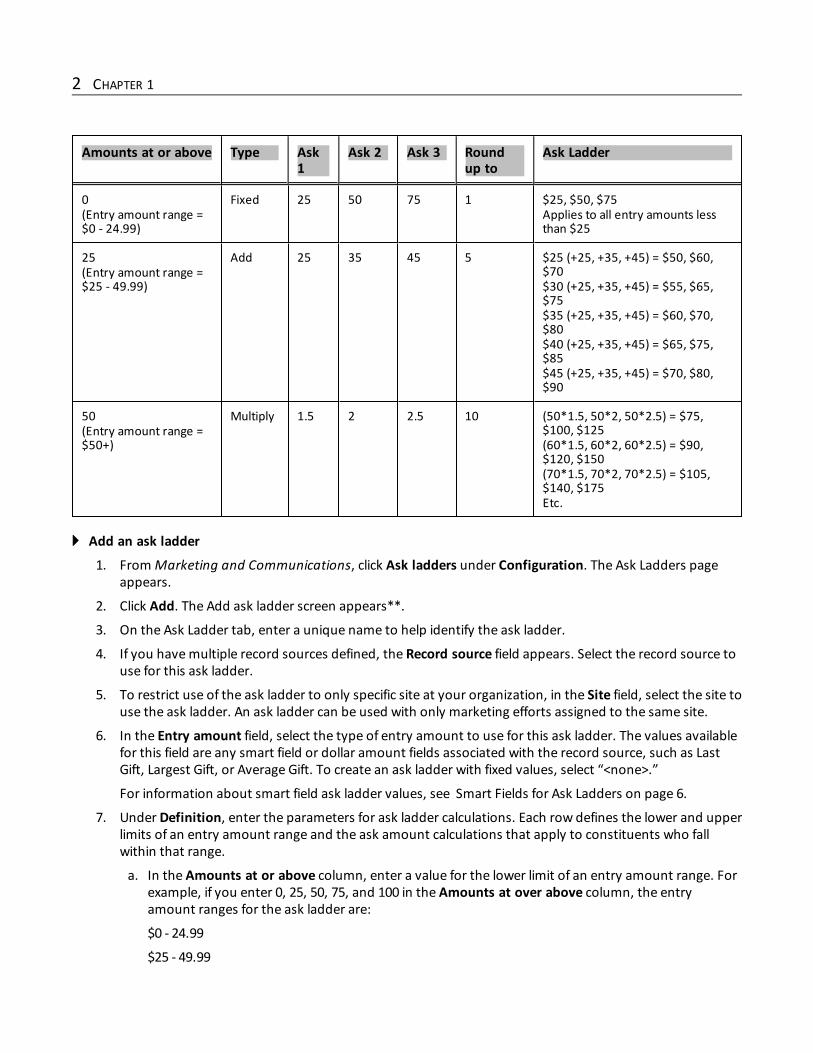
Amounts at or above Type Ask1
Ask 2 Ask 3 Roundup to
Ask Ladder
0(Entry amount range =$0 - 24.99)
Fixed 25 50 75 1 $25, $50, $75Applies to all entry amounts lessthan $25
25(Entry amount range =$25 - 49.99)
Add 25 35 45 5 $25 (+25, +35, +45) = $50, $60,$70$30 (+25, +35, +45) = $55, $65,$75$35 (+25, +35, +45) = $60, $70,$80$40 (+25, +35, +45) = $65, $75,$85$45 (+25, +35, +45) = $70, $80,$90
50(Entry amount range =$50+)
Multiply 1.5 2 2.5 10 (50*1.5, 50*2, 50*2.5) = $75,$100, $125(60*1.5, 60*2, 60*2.5) = $90,$120, $150(70*1.5, 70*2, 70*2.5) = $105,$140, $175Etc.
} Add an ask ladder
1. FromMarketing and Communications, click Ask ladders under Configuration. The Ask Ladders pageappears.
2. Click Add. The Add ask ladder screen appears**.
3. On the Ask Ladder tab, enter a unique name to help identify the ask ladder.
4. If you havemultiple record sources defined, the Record source field appears. Select the record source touse for this ask ladder.
5. To restrict use of the ask ladder to only specific site at your organization, in the Site field, select the site touse the ask ladder. An ask ladder can be used with only marketing efforts assigned to the same site.
6. In the Entry amount field, select the type of entry amount to use for this ask ladder. The values availablefor this field are any smart field or dollar amount fields associated with the record source, such as LastGift, Largest Gift, or Average Gift. To create an ask ladder with fixed values, select “<none>.”
For information about smart field ask ladder values, see Smart Fields for Ask Ladders on page 6.
7. Under Definition, enter the parameters for ask ladder calculations. Each row defines the lower and upperlimits of an entry amount range and the ask amount calculations that apply to constituents who fallwithin that range.
a. In the Amounts at or above column, enter a value for the lower limit of an entry amount range. Forexample, if you enter 0, 25, 50, 75, and 100 in the Amounts at over above column, the entryamount ranges for the ask ladder are:
$0 - 24.99
$25 - 49.99
2 CHAPTER 1
$50 - 74.99
$75 - 99.99
$100+
Note: To ensure that each constituent receives an ask ladder, we recommend that you use $0 as the first valuein the Amounts at or above column. If you do not have a constituent’s giving history, such as if the constituentcomes from an acquisition list or has a constituency of Relation only, his entry amount is considered $0.
b. In the Type column, select themethod to calculate ask amounts.
“Add” — Select this option to add the values entered in the Ask columns to entry amounts.
“Multiply” — Select this option to multiply the entry amount by the amounts entered in the Askcolumns.
“Fixed” — Select this option to use the values entered in the Ask columns for all constituents in thisentry amount range. Fixed ask ladders are useful for constituents who do not have an entry amountdefined.
c. In the Ask columns, enter values according to the calculation method selected in the Type field.
If you select Add, enter the values to add to the entry amount, such as 50, 75, and 100. For aconstituent with an entry amount of $30, the ask ladder included on themarketing effort would be$80, $105, $130 (if rounded to 1 or 5).
If you select Multiply, enter the values to multiply by the entry amount, such as 1.5, 2, and 2.5. For aconstituent with an entry amount of $30, the ask ladder included on themarketing effort would be$45, $60, $75 (if rounded to 1 or 5).
If you selected Fixed, enter the fixed values to use for the entry amount range, such as 50, 75, 100.For all constituents in the entry amount range, the ask ladder included on themarketing effortwould be $50, $75, and $100.
d. In the Prompt field, enter the text to appear on themarketing effort for write-in ask amounts, suchas “Other Amount.”
e. In the Round up to field, enter a whole number to round up calculated ask amounts. For example, ifyou enter 10, the program rounds all calculated ask amounts up to the tens place value.
Note: If you select <none> in the Entry amount field, you can define only one row in the grid because that askladder is used for all constituents included in themarketing effort.
8. To test the parameters of calculated ask amounts, select the Preview tab.
a. In the Entry amount range field, select an entry amount range based on the values entered in theAmounts at or above column. The grid displays the calculated ask amounts for all entry amountsincluded in the range.
b. In the Interval field, select the place value to round to. This changes the ask amounts in the gridbased on rounding.
9. To adjust the ask amounts as necessary, select the Ask Ladder tab.
10. Click Save. You return to the Ask Ladders page.
Edit an Ask LadderYou can edit ask ladders that are not in use on an activated marketing effort.
COMMUNICATIONS CONFIGURATION 3

} Edit an ask ladder
1. FromMarketing and Communications, click Ask ladders under Configuration. The Ask Ladders pageappears.
2. Select an ask ladder and click Edit. The Edit ask ladder screen appears.
3. Make changes as necessary. The items on this screen are the same as on the Add ask ladder screen. For adetailed explanation of the options, see Add Ask Ladders on page 1.
4. Click Save. You return to the Ask Ladders page.
Delete an Ask LadderYou can delete ask ladders that are not in use on an activated marketing effort.
} Delete an ask ladder
1. FromMarketing and Communications, click Ask ladders under Configuration. The Ask Ladders pageappears.
2. Under Ask Ladders, select an ask ladder and click Delete. A confirmation message appears.
3. Click Yes. You return to the Ask Ladders page.
Copy an Ask LadderTo create a new ask ladder with similar settings as an existing ask ladder, you can copy the existing ask ladderrather than create the new ask ladder.
} Copy an ask ladder
1. FromMarketing and Communications, click Ask ladders under Configuration. The Ask Ladders pageappears.
2. Under Ask Ladders, select an ask ladder and click Copy. A confirmation message appears.
3. Click Yes. You return to the Ask Ladders page. Under Ask Ladders, the new ask ladder appears with thename “Copy of <ask ladder>.”
4. Edit the new ask ladder as necessary. For information about how to edit an ask ladder, see Edit an AskLadder on page 3.
Mark an Ask Ladder Inactive or ActiveRather than delete an ask ladder that you no longer use, you can mark it inactive. Inactive ask ladders remain inthe database but are not available when users select ask ladders for a segment.After you mark an ask ladder inactive, you can mark it active to resume its use.
} Mark an ask ladder inactive
1. FromMarketing and Communications, click Ask ladders under Configuration. The Ask Ladders pageappears.
2. Under Ask Ladders, select an ask ladder and clickMark inactive. A confirmation message appears.
4 CHAPTER 1

3. Click Yes. You return to the Ask Ladders page.
} Mark an ask ladder active
1. FromMarketing and Communications, click Ask ladders under Configuration. The Ask Ladders pageappears.
2. Under Ask Ladders, select an inactive ask ladder and clickMark active. A confirmation message appears.
3. Click Yes. You return to the Ask Ladders page.
Add Ask Ladder Overrides for an UnactivatedMarketing EffortYou can create ask ladder overrides to apply different ask ladders to selections rather than the one specified fortheir segment.
} Add an ask ladder override
1. From the record of an unactivated marketing effort, click Edit ask ladder overrides under Tasks. The Editask ladder overrides screen appears.
2. Click Add an ask ladder override. The Add ask ladder override screen appears.
3. In the Selection field, select the selection the override applies to.
4. In the Ask ladder field, select the ask ladder to apply to the selection.
5. Click Save. You return to the Edit ask ladder overrides screen. In the grid, the new override appears.
6. Click Save. You return to themarketing effort record.
Edit an Ask Ladder OverrideYou can edit ask ladders overrides that are not in use on an activated marketing effort.
} Edit an ask ladder override
1. From the record of an unactivated marketing effort, click Edit ask ladder overrides under Tasks. The Editask ladder overrides screen appears.
2. In the grid, select an ask ladder override and click Edit an ask ladder override. The Edit ask ladderoverride screen appears.
3. Edit the selection or ask ladder as necessary.
4. Click Save. You return to the Edit ask ladder overrides screen.
5. Click Save. You return to themarketing effort record.
Delete an Ask Ladder OverrideYou can delete ask ladder overrides that are not in use on an activated marketing effort.
} Delete an ask letter override
1. From the record of an unactivated marketing effort, click Edit ask ladder overrides under Tasks. The Editask ladder overrides screen appears.
COMMUNICATIONS CONFIGURATION 5

2. In the grid, select an ask ladder override and click Remove an ask ladder override. A confirmationmessage appears.
3. Click Yes. You return to themarketing effort record.
Smart Fields for Ask LaddersThe smart field for the ask ladder value calculates values for ask ladder entry amounts based on criteria you set.The calculation considers only revenue that falls within the date and amount parameters you set on theParameters tab of the Add ask ladder smart field screen.The table below explains each field on the Parameters tab:
Screen Item Description
Value to return Select “Largest gift amount,” “Smallest gift amount,” “Last gift amount” (themostrecent gift), or “Average gift amount.”
Default value Enter the entry amount to use when a value can not be calculated.
Revenue date optionsSelect “All revenue,” “This calendar year,” “Past {n} months.” or “Specific range.” Ifyou select “Past {n} months,” enter the number ofmonths. If you select “Specificrange,” enter a starting and ending date.
Revenue amountoptions
Select “All revenue” or “Specific range.” If you select “Specific range,” enter a dollaramount range in the fields.
Selected revenue Select a revenue selection from Query. Use this field for more specific filtering; forexample, finding revenue based on gift type.
Finder Number SettingsA finder number is a sequential number assigned to each name on a recipient list. and printed on each replyform. To speed the data entry of responses to an appeal, finder numbers eliminate the need to enter a name andaddress. Finder numbers generally consist of 15 or fewer characters, less than a name and address and thereforeless time-consuming to enter.Finder numbers are used to match a gift to a particular marketing effort, to enable tracking and reporting onmarketing effort performance. Activating a marketing effort generates the finder numbers. In a marketing effortexport, you can include Finder number as one of your export fields.You can specify the next finder number to use when you activate a marketing effort and the number ofcharacters available in your numbers.
} Set finder numbers
1. FromMarketing and Communications, click Finder number settings under Configuration. The Findernumber settings screen appears.
6 CHAPTER 1
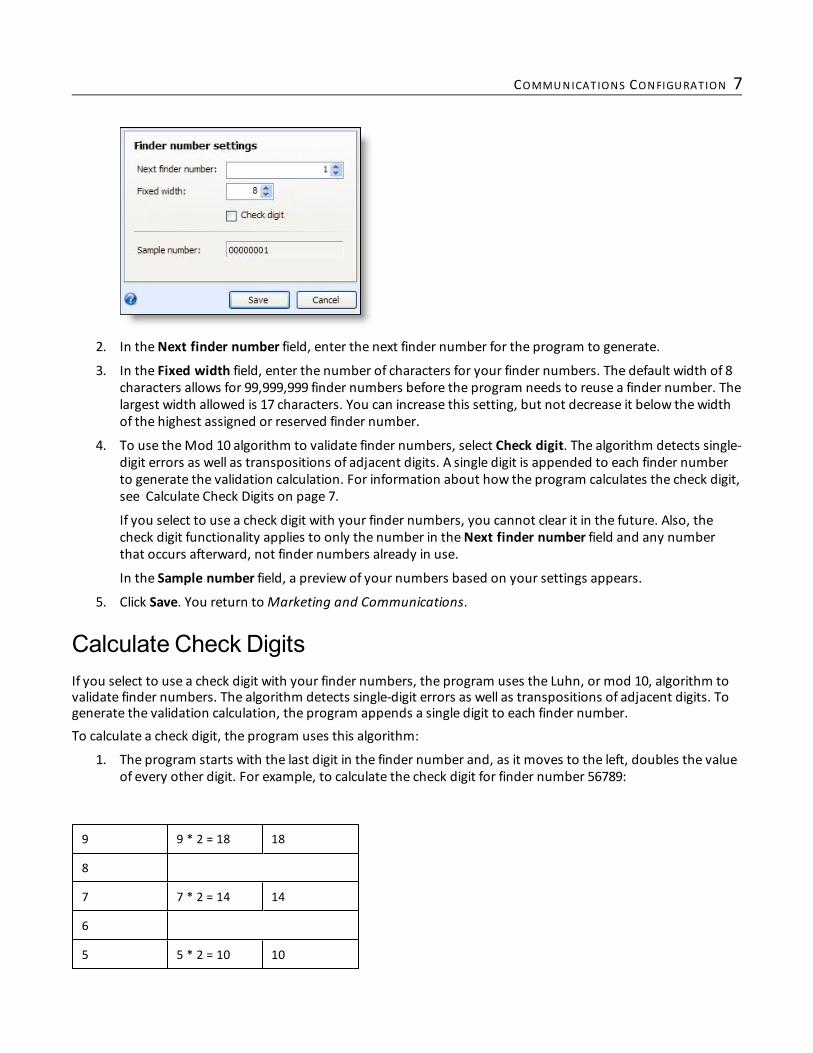
2. In theNext finder number field, enter the next finder number for the program to generate.
3. In the Fixed width field, enter the number of characters for your finder numbers. The default width of 8characters allows for 99,999,999 finder numbers before the program needs to reuse a finder number. Thelargest width allowed is 17 characters. You can increase this setting, but not decrease it below the widthof the highest assigned or reserved finder number.
4. To use theMod 10 algorithm to validate finder numbers, select Check digit. The algorithm detects single-digit errors as well as transpositions of adjacent digits. A single digit is appended to each finder numberto generate the validation calculation. For information about how the program calculates the check digit,see Calculate Check Digits on page 7.
If you select to use a check digit with your finder numbers, you cannot clear it in the future. Also, thecheck digit functionality applies to only the number in theNext finder number field and any numberthat occurs afterward, not finder numbers already in use.
In the Sample number field, a preview of your numbers based on your settings appears.
5. Click Save. You return toMarketing and Communications.
Calculate Check DigitsIf you select to use a check digit with your finder numbers, the program uses the Luhn, or mod 10, algorithm tovalidate finder numbers. The algorithm detects single-digit errors as well as transpositions of adjacent digits. Togenerate the validation calculation, the program appends a single digit to each finder number.To calculate a check digit, the program uses this algorithm:
1. The program starts with the last digit in the finder number and, as it moves to the left, doubles the valueof every other digit. For example, to calculate the check digit for finder number 56789:
9 9 * 2 = 18 18
8
7 7 * 2 = 14 14
6
5 5 * 2 = 10 10
COMMUNICATIONS CONFIGURATION 7

2. The program adds the individual digits of the doubled numbers to the undoubled numbers from theoriginal finder number.
9 9 * 2 = 18 18 1 + 8 = 9 9
8 8
7 7 * 2 = 14 14 1 + 4 = 5 5
6 6
5 5 * 2 = 10 10 1 + 0 = 1 1
9 + 8 + 5 + 6 + 1 = 29
Note: Themodulo operation finds the remainder when you divide a number. X modulo Z (abbreviated as Xmod Z) is the remainder when you divide X by Z. For example, “7mod 3” equals 1, while “9mod 3” equals 0.
3. The program calculates the sum of the digits mod 10. For this example, 29mod 10 = 9. (29 divided by 10 =2with a remainder of 9.)
4. For the check digit calculation, the program subtracts the remainder from 10. So, 10 - 9 = 1. The checkdigit equals 1.
If the check digit equals 0, the finder number is valid. In this example, because the check digit equals 1, the 56789finder number is invalid.
Blackbaud Internet Solutions IntegrationWhen Blackbaud Direct Marketing integrates with Blackbaud Internet Solutions, you can send email messagestargeted to segments in a marketing effort. Emails aremerged with data from Blackbaud Direct Marketing topersonalize the content of each message. After the emails are sent, you can track their effectiveness usingreports and KPIs.Before you send emails from Blackbaud Direct Marketing, the system administrator must configure theintegration with Blackbaud Internet Solutions so the two programs can share information.After the integration package is loaded, theWebsite integration link appears under Configuration on theMarketing and Communications page. Click this link to access theWebsite Integration page.For more information about how to configure integration with Blackbaud Internet Solutions, see the BlackbaudDirect Marketing Blackbaud Internet Solutions Integration Guide.
8 CHAPTER 1

COMMUNICATIONS CONFIGURATION 9

10 CHAPTER 1

Index
Aask ladder
make inactive 4ask ladder overrides
add 5delete 5edit 5
ask laddersadd 1copy 4delete 4edit 3
attachmentsabout 21add 22add screen 22delete 22edit 22open 26
Ccalendars 11change password 13customize
home page appearance 10interface 9
Eexplorer bar 9
Ffilter 13finder number settings 6
GGeneral Features 5
Hhome page 10
Kkey performance indicators 20KPI 20KPI dashboard 20
Mmailings
add ask ladder overrides 5add ask ladders 1copy ask ladders 4delete ask ladder overrides 5delete ask ladders 4edit ask ladder overrides 5edit ask ladders 3
mark record active 16mark record inactive 16media link
add 23add screen 23delete 23edit 22-23open 26
menu bar 9
Nnavigation 9navigation bar 9

navigation tree 17note
about 23add 23add screen 24edit 24
notesdelete 24
notificationsabout 24add 25delete 26edit 26
Ppassword
change 13
RReally Simple Syndication 14refresh page 13report toolbar 26RSS
See Really Simple Syndication 14
Sstatus bar 9
Zzoom buttons 16
12 INDEX