better farming series 32. biogas 2: building a better · better farming series 32. biogas 2:...
TRANSCRIPT

Better Farming Series 32. Biogas 2: building a betterbiogas unit
(introductory text)
Preface
Introduction
How to build a better small biogas unit
You will need
Cleaning the oil drum
Where to put your biogas unit
Preparing the oil drum
Testing for leaks
Preparing the gas holder
Attaching the gas holder
Putting in the waste
The waste materials
The starter
Putting waste in this biogas unit
After the waste is in
Time
Temperature
(introductory text)
Cold weather protection
Scum
When the gas is made
Taking care of your biogas unit
Making more biogas
What more can you do?
(introductory text)
Another kind of biogas unit
Better Farming Series 32. Biogas 2: building a better biogas unit
FOOD AND AGRICULTURE ORGANIZATION OF THE UNITED NATIONS
Rome 1986
P-69
ISBN 92-5-102392-1
© FAO 1986
1 af 26 11-01-02 18:19
Humanity Development Library: Document text http://127.0.0.1:1027/cgi-bin/gw?e=t1c...dl-1-O.15.B.113.1-11-100-20-00&q=&g=11

Preface
The first twenty- six volumes in FAO's Better Farming Series were based on the Coursd'apprentissage agricole prepared in Côte d'Ivoire by the Institut africain de developpementéconomique et social for use by extension workers. Later volumes, beginning with No. 27, have beenprepared by FAO for use in agricultural development at the farm and family level. The approach hasdeliberately been a general one, the intention being to constitute basic prototype outlines to bemodified or expanded in each area according to local conditions of agriculture.
Many of the booklets deal with specific crops and techniques, while others are intended to give thefarmer more general information which can help him to understand why he does what he does, so thathe will be able to do it better. This booklet was added to the series owing to the favourable commentsreceived on Booklet No. 31, Biogas: what it is; how it is made; how to use it. Both booklets havebeen based on published works by researchers and experimenters in small scale biogas production inAfrica, Asia, Europe and North America.
Adaptations of the series, or of individual volumes in it, have been published in Arabic, Bengali,Creole, Hindi, Igala, Indonesian, Kiswahili, Malagasy, SiSwati, Thai and Turkish.
Requests for permission to issue this manual in other languages and to adapt it according to localclimatic and ecological conditions are welcomed. They should be addressed to the Director,Publications Division, Food and Agriculture Organization of the United Nations, Via delle Terme diCaracalla, 00100 Rome, Italy.
Introduction
1. You have already built one or more biogas units like the one described in the Better FarmingSeries Booklet No. 31; Biogas: what it how it is made; how to use it.
Biogas unit
2. When you first began you found that you had to learn a lot of new things in order to make your unitwork.
3. However, little by little you have learned more and more through your own experience.
4. When your first gas was made you used it for cooking. You found that cooking with gas wascleaner, easier and faster than cooking with kerosene, charcoal or fuelwood.
2 af 26 11-01-02 18:19
Humanity Development Library: Document text http://127.0.0.1:1027/cgi-bin/gw?e=t1c...dl-1-O.15.B.113.1-11-100-20-00&q=&g=11

Cooking
5. Now that you know more about biogas and how it is made, let us look at another way to makebiogas even better.
6. In this booklet you will learn how to build and use a better small biogas unit like the one shownbelow.
biogas unit
7. It too has an oil drum for a waste holder and, like your first small unit, all the waste is put in at onetime when you begin.
8. However, the new unit is closed. A closed unit is cleaner. You cannot smell the waste after youhave put it in as you could with your old unit.
9. In addition, with your old unit some of the gas was lost from around the open sides of the oil- drumwaste holder.
3 af 26 11-01-02 18:19
Humanity Development Library: Document text http://127.0.0.1:1027/cgi-bin/gw?e=t1c...dl-1-O.15.B.113.1-11-100-20-00&q=&g=11
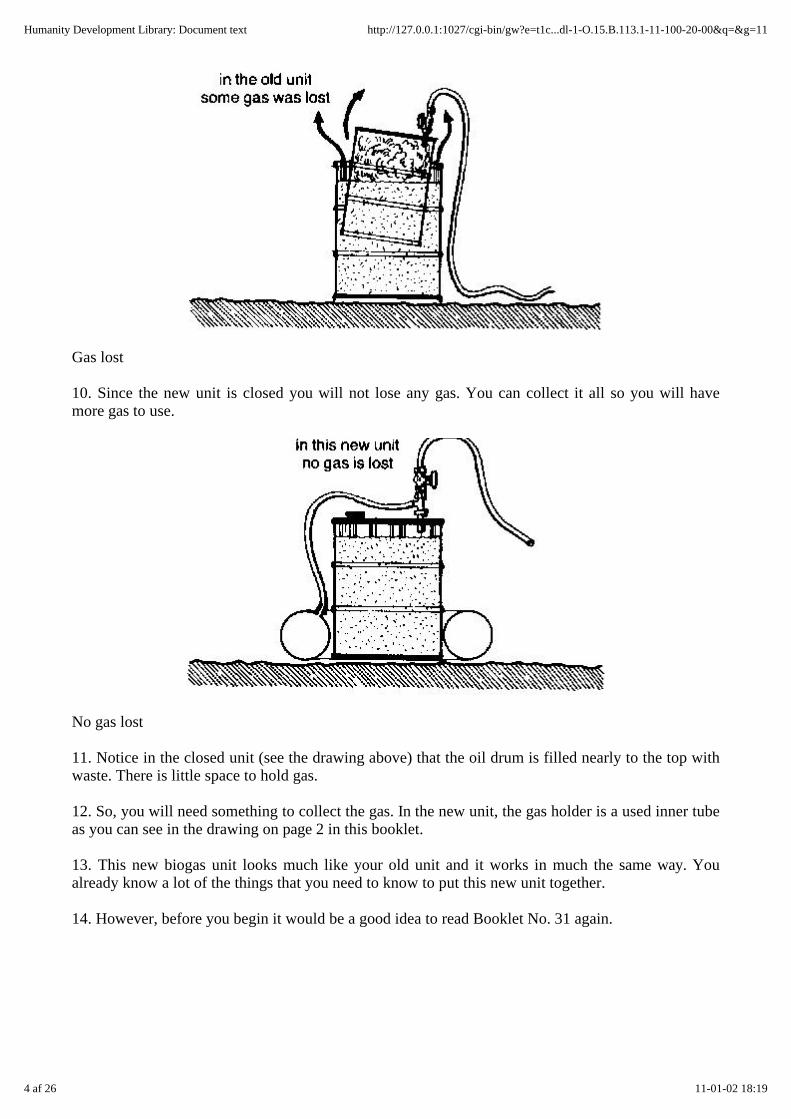
Gas lost
10. Since the new unit is closed you will not lose any gas. You can collect it all so you will havemore gas to use.
No gas lost
11. Notice in the closed unit (see the drawing above) that the oil drum is filled nearly to the top withwaste. There is little space to hold gas.
12. So, you will need something to collect the gas. In the new unit, the gas holder is a used inner tubeas you can see in the drawing on page 2 in this booklet.
13. This new biogas unit looks much like your old unit and it works in much the same way. Youalready know a lot of the things that you need to know to put this new unit together.
14. However, before you begin it would be a good idea to read Booklet No. 31 again.
4 af 26 11-01-02 18:19
Humanity Development Library: Document text http://127.0.0.1:1027/cgi-bin/gw?e=t1c...dl-1-O.15.B.113.1-11-100-20-00&q=&g=11

Biogas unit
How to build a better small biogas unit
You will need
• an oil drum of about 200 litres, to hold the waste
Oil drum
• a piece of pipe about 15 centimetres long and about 2 centimetres in diameter to fit the oil drum, forthe gas outlet
Gas outlet
• a pipe T- piece, to connect the gas outlet to the inner tube
5 af 26 11-01-02 18:19
Humanity Development Library: Document text http://127.0.0.1:1027/cgi-bin/gw?e=t1c...dl-1-O.15.B.113.1-11-100-20-00&q=&g=11

T- piece
• a piece of pipe about 10 centimetres long to fit the T- Piece
Pipe
• a valve to fit the 1 10- centimetre pipe
Valve
Note
The drawing on page 14 in this booklet shows you how these pipe fittings are attached to the oildrum.
• at least 12 metres of rubber or plastic tube, about 2 centimetres in diameter, for the gas lines
Tube
• one or more inner tubes, to collect the gas
6 af 26 11-01-02 18:19
Humanity Development Library: Document text http://127.0.0.1:1027/cgi-bin/gw?e=t1c...dl-1-O.15.B.113.1-11-100-20-00&q=&g=11

Inner tubes
• if you are using more than one inner tube, you will also need one or more small T- pieces to connectthe inner tubes.
T- pieces
15. The oil drum should have one hole for putting in the waste and another hole for the gas outlet.Many drums have threaded holes with threaded plugs to close them.
16. Try to find an oil drum with threaded holes in the top. That way it will be easier to build this unitand to make it airtight.
Drum
Cleaning the oil drum
17. Begin by cleaning the drum inside and outside to remove all oil and grease.
18. Take the metal plugs out of the holes and put them carefully aside, so that you can find themlater.
19. First clean the inside of the drum. Pour in a bucket or two of warm, soapy water or other cleaner.Then close all of the holes.
7 af 26 11-01-02 18:19
Humanity Development Library: Document text http://127.0.0.1:1027/cgi-bin/gw?e=t1c...dl-1-O.15.B.113.1-11-100-20-00&q=&g=11

Soaper water or cleaner
20. Put the drum on its side. Roll it back and forth so that the soapy water or cleaner can wash thewhole inside. Then open the holes and empty out the water.
empty out dirty water
21. Continue to wash the inside of the oil drum with soapy water or cleaner until it is completelyclean.
22. You can tell the oil drum is clean when the water you empty out is clean.
23. When you are sure that the inside is clean, pour in three buckets of fresh water and roll the drumback and forth once more. This is to rinse out any soap or cleaner that is still inside. Then empty itout again.
8 af 26 11-01-02 18:19
Humanity Development Library: Document text http://127.0.0.1:1027/cgi-bin/gw?e=t1c...dl-1-O.15.B.113.1-11-100-20-00&q=&g=11

24. Now clean the outside of the drum with a brush and soapy water or cleaner. Rinse it with freshwater.
25. Open the holes in the top and put the drum on stones with the top down. Let it drain and dry.
Clean the outside
26. When the drum is dry inside and out you are ready to begin.
Where to put your biogas unit
27. Before you build your new biogas unit you should decide where to put it. Items 26 to 34 inBooklet No. 31 will tell you where.
28. However, do not put this unit underground. If the unit is underground you will not be able toshake it to break up the scum (see Items 109 to 1 13 in this booklet).
Preparing the oil drum
29. If your oil drum has a hole in its side, close it tightly. You can use a threaded metal plug or weld apiece of metal over the hole.
9 af 26 11-01-02 18:19
Humanity Development Library: Document text http://127.0.0.1:1027/cgi-bin/gw?e=t1c...dl-1-O.15.B.113.1-11-100-20-00&q=&g=11
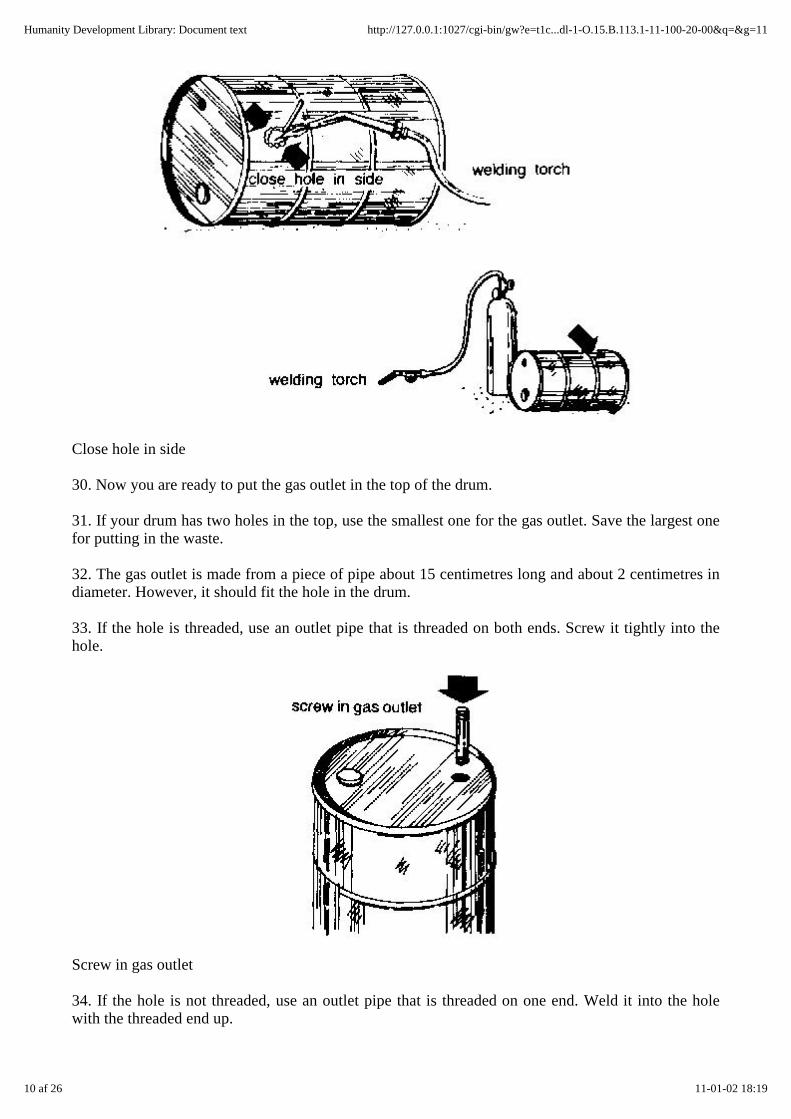
Close hole in side
30. Now you are ready to put the gas outlet in the top of the drum.
31. If your drum has two holes in the top, use the smallest one for the gas outlet. Save the largest onefor putting in the waste.
32. The gas outlet is made from a piece of pipe about 15 centimetres long and about 2 centimetres indiameter. However, it should fit the hole in the drum.
33. If the hole is threaded, use an outlet pipe that is threaded on both ends. Screw it tightly into thehole.
Screw in gas outlet
34. If the hole is not threaded, use an outlet pipe that is threaded on one end. Weld it into the holewith the threaded end up.
10 af 26 11-01-02 18:19
Humanity Development Library: Document text http://127.0.0.1:1027/cgi-bin/gw?e=t1c...dl-1-O.15.B.113.1-11-100-20-00&q=&g=11

Welding torch
35. If there is only one threaded hole in the top of the oil drum, use it to put in the waste.
36. Then you will have to cut a hole about 2 centimetres in diameter for the gas outlet. Weld in a pipethat is threaded on one end, as shown in the drawing at the top of this page.
Hole for gas outlet
37. Now you are ready to attach the pipe T- piece, the 10- centimetre piece of pipe and the valve.
38. The valve you use must be airtight so that it will not leak gas. You must be sure to screw all ofthese pieces tightly to the gas outlet.
11 af 26 11-01-02 18:19
Humanity Development Library: Document text http://127.0.0.1:1027/cgi-bin/gw?e=t1c...dl-1-O.15.B.113.1-11-100-20-00&q=&g=11

Screw the pieces
Note
If you do not have a valve, you can tie or clamp the gas line to stop the flow of gas (see Item 48 inBooklet No. 31).
Testing for leaks
39. Now you are ready to test the drum for leaks. To make biogas, the drum must be airtight.
40. To test for leaks, open the valve, take out the metal plug in the waste hole and fill the drum withwater.
12 af 26 11-01-02 18:19
Humanity Development Library: Document text http://127.0.0.1:1027/cgi-bin/gw?e=t1c...dl-1-O.15.B.113.1-11-100-20-00&q=&g=11

Test for leaks
41. Be sure to fill it to the top. Then close the valve and put the metal plug back in the waste hole.
42. Use a piece of cloth to dry any water that you have spilled on the outside of the drum.
43. If you see water leaking from anywhere on the drum, mark the place of each leak.
Mark leaks
44. Then turn the drum over on its side. When the drum is full of water it is very heavy, so asksomeone to help you.
13 af 26 11-01-02 18:19
Humanity Development Library: Document text http://127.0.0.1:1027/cgi-bin/gw?e=t1c...dl-1-O.15.B.113.1-11-100-20-00&q=&g=11
Mark leaks
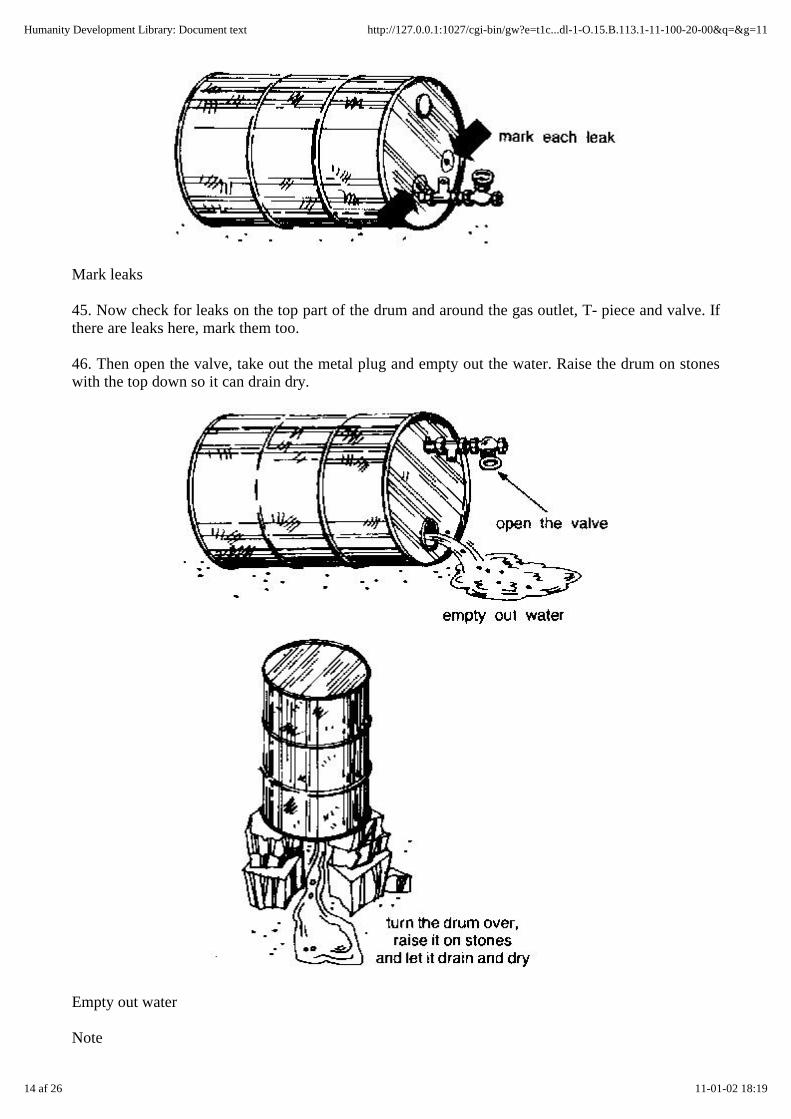
45. Now check for leaks on the top part of the drum and around the gas outlet, T- piece and valve. Ifthere are leaks here, mark them too.
46. Then open the valve, take out the metal plug and empty out the water. Raise the drum on stoneswith the top down so it can drain dry.
Empty out water
Note
14 af 26 11-01-02 18:19
Humanity Development Library: Document text http://127.0.0.1:1027/cgi-bin/gw?e=t1c...dl-1-O.15.B.113.1-11-100-20-00&q=&g=11

When you put the drum on stones, be very careful not to damage the gas outlet, the pipe T- piece orthe valve.
47. Seal the leaks by coating them with tar, mastic or paint. If there are any leaks around the gasoutlet, tighten the outlet, T- piece and valve again. Coat the joints with tar, mastic or paint.
Tar or paint
48. When the sealing is dry, fill the drum with water again. Check that all the leaks are sealed. If thedrum still leaks, empty out the water and let it dry.
15 af 26 11-01-02 18:19
Humanity Development Library: Document text http://127.0.0.1:1027/cgi-bin/gw?e=t1c...dl-1-O.15.B.113.1-11-100-20-00&q=&g=11

fill drum again
49. Put some tar or paint inside the drum. Then turn the drum around and around to coat the inside ofit.
50. Fill the drum with water again. If it still leaks, start all over again. It is very important to seal allleaks carefully.
51. When the drum is well sealed and no longer leaks, let it dry completely. Now you can begin toprepare the gas holder.
Preparing the gas holder
52. As you have been told this unit has an inner tube which holds the gas.
53. If you can get a large truck or tractor inner tube, you will need only one.
Tube
54. You can also use tubes from automobiles. However, these are smaller so you will need two oreven three.
55. Try to get a large tube because it is easier to attach one large tube than two or three small ones.
56. First check each tube that you are going to use for leaks. Each tube must be airtight. To check a
16 af 26 11-01-02 18:19
Humanity Development Library: Document text http://127.0.0.1:1027/cgi-bin/gw?e=t1c...dl-1-O.15.B.113.1-11-100-20-00&q=&g=11
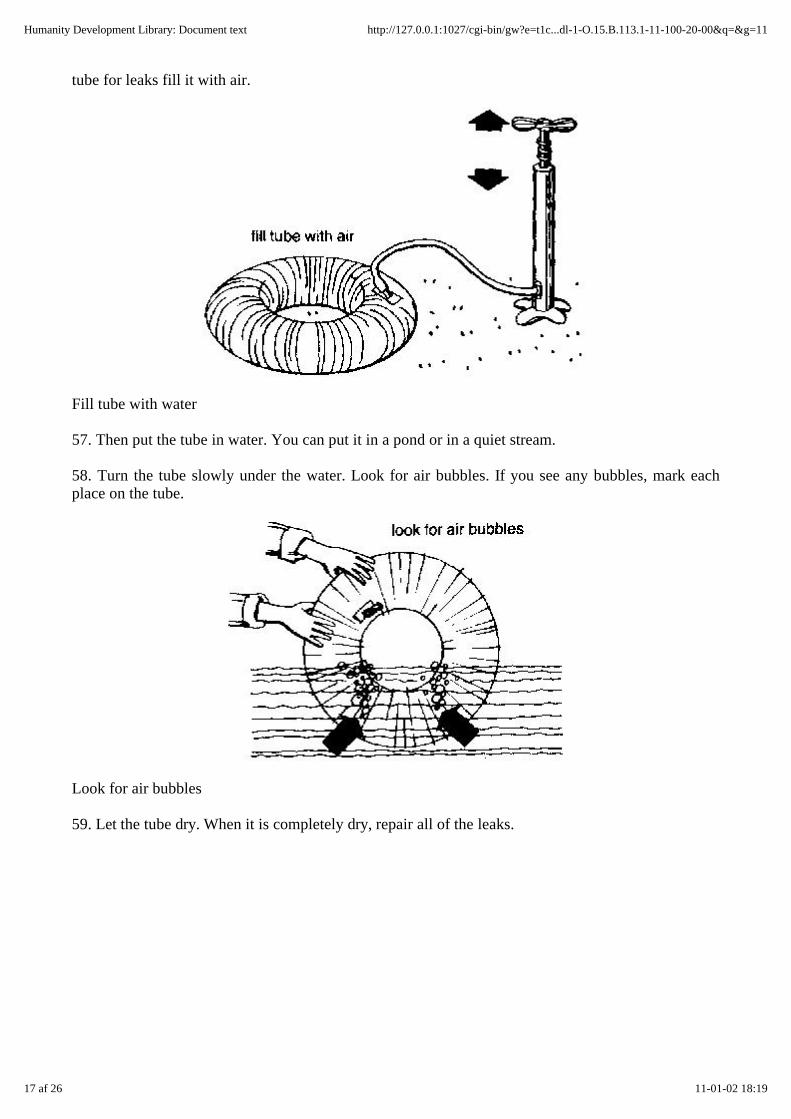
tube for leaks fill it with air.
Fill tube with water
57. Then put the tube in water. You can put it in a pond or in a quiet stream.
58. Turn the tube slowly under the water. Look for air bubbles. If you see any bubbles, mark eachplace on the tube.
Look for air bubbles
59. Let the tube dry. When it is completely dry, repair all of the leaks.
17 af 26 11-01-02 18:19
Humanity Development Library: Document text http://127.0.0.1:1027/cgi-bin/gw?e=t1c...dl-1-O.15.B.113.1-11-100-20-00&q=&g=11

Repair all leaks
60. Fill the tube with air and put it in the water again to make sure that you have repaired all of theleaks well.
Check again for leaks
61. If there are still leaks, start all over again. It is very important to seal all leaks carefully.
62. When all the leaks are sealed let all of the air out. To do this, unscrew the cap of the air inlet andremove the valve.
Let the air out
63. Roll the tube very tightly. If you have a smooth, round pole, you can roll the tube around this.
64. When the tube is tightly rolled and there is no air in it, screw the cap on the air inlet. This is tokeep more air from getting inside.
Screw the cap on the air inlet
Note
When you screw the cap on the air inlet, do not put the valve back, and keep the inner tube rolled upuntil you attach the short gas line (see Item 70 in this booklet).
65. Now you are ready to attach the gas holder.
18 af 26 11-01-02 18:19
Humanity Development Library: Document text http://127.0.0.1:1027/cgi-bin/gw?e=t1c...dl-1-O.15.B.113.1-11-100-20-00&q=&g=11

Attaching the gas holder
66. Cut a short piece from one end of the 12- metre gas line. This is to attach the inner tube to thepipe T- piece on the oil drum.
67. This piece should be long enough to connect the T- piece and the inner tube without being tight.If it is too tight, it may pull off.
68. Fold the short gas line at a place near the centre. Tie the fold tightly with cord. The drawingbelow will show you how.
fold in centre
69. The fold will keep more air from getting into the inner tube when you attach it to the short pieceof gas line.
70. Take the air inlet cap off the still- rolled inner tube and attach the short gas line. Be sure to attachit tightly. You may have to tie it with cord and seal it with tar or mastic. Now you can unroll the innertube (see the drawings on the next page).
Unroll the inner tube
71. It is very important to keep the gas holder from moving or the short gas line may pull off.
72. If you are using a large inner tube, fit it over the oil drum and place it on the ground. The drumwill keep the tube from moving.
Fold in centre
73. If you are using an inner tube that is too small to fit over the oil drum, you will have to keep it inplace using wooden stakes.
Use wooden stakes
74. Connect the top of the short gas line to the pipe T- piece on the oil drum.
Connect short gas line
19 af 26 11-01-02 18:19
Humanity Development Library: Document text http://127.0.0.1:1027/cgi-bin/gw?e=t1c...dl-1-O.15.B.113.1-11-100-20-00&q=&g=11
75. However, do not untie the fold in the centre of the short gas line (see Item 101 in this booklet) orattach the long gas line to the valve (see Items 89 to 122 in this booklet) until you are told to do so.
76. The drawings below show you how to connect both large and small inner tubes to this kind ofbiogas unit.
Biogas unit
77. Now you are ready to put waste into the oil drum.
Putting in the waste
The waste materials
78. You have already been told that this biogas unit is very much like the one that you learned how tobuild in Booklet No. 31.
79. Since your new biogas unit is much the same as your old one, you can use the same kind ofwastes in the same way. Items 58 to 66 in Booklet No. 31 tell you how to prepare them.
Use wastes
80. With the new unit, as with your old unit, you put in all of the waste at one time when you begin.Then, when all of the gas is made, you take out all of the waste, use it for fertilizer, and begin all overagain.
81. However, be especially careful to mix the waste and water well. Once this kind of unit is closedyou should not open it until all of the gas is made.
82. You cannot stir it or add more water if the waste becomes too thick as you could with your oldunit (see Items 94 to 96 in Booklet No. 31).
83. So, the waste and water mixture for the new biogas unit should be thin enough to pour easily.
84. It should be about as thin as the paint or the whitewash that you use to paint your house.
The starter
85. If your old unit is working, take 4 litres of waste from it to use as a starter when you begin.
86. However, if you do not have any waste to use as a starter you will have to make some. Items 67 to70 in Booklet No. 31 will tell you how to do it.
Putting waste in this biogas unit
87. When you are ready to add the waste, unscrew the plug in the waste hole and put it carefullyaside. Put a large funnel in the hole.
20 af 26 11-01-02 18:19
Humanity Development Library: Document text http://127.0.0.1:1027/cgi-bin/gw?e=t1c...dl-1-O.15.B.113.1-11-100-20-00&q=&g=11
Put a large funnel in the hole
88. Open the valve so that when you add the waste the air that is inside the drum will be forced outthrough the gas outlet.
89. You have not yet been told to attach the gas line and you should not have done so (see Item 75 inthis booklet).
90. Put three buckets of waste and three buckets of water in a large container and mix it well (seeItem 84 in this booklet ).
Mix waste and water
91. When the waste and water are well mixed, dip out a bucketful and pour it through the funnel intothe oil drum.
Pour waste through the funnel
92. If it does not flow through the funnel, add a little more water to the waste mixture in the largecontainer.
Add water
93. Then try to pour another bucketful through the funnel. If the mixture is thin enough to go throughthe funnel, pour the rest into the drum.
94. Again put three buckets of waste and three buckets of water in the large container and mix it asbefore.
95. Pour this mixture into the drum. Then take out the funnel. Put a pole long enough to reach thebottom of the drum into the waste hole and stir all the mixture well.
96. Continue in this way until the waste in the drum is about 10 centimetres from the top. Now put inabout 4 litres of starter and stir it well.
Pour in starter
21 af 26 11-01-02 18:19
Humanity Development Library: Document text http://127.0.0.1:1027/cgi-bin/gw?e=t1c...dl-1-O.15.B.113.1-11-100-20-00&q=&g=11

97. The starter, which has already begun to work, will help you to make gas sooner.
After the waste is in
98. Close the waste hole tightly and turn off the valve. After about two weeks, open the valve and letout all the gas that has collected in the top of the drum.
99. While you are letting the gas out, be very careful not to have fire near the biogas unit.
100. Listen as the gas escapes. When you hear the sound of the gas stop, turn off the valve quickly.This is to keep air from getting into the drum.
Keep air from getting into the drum
101. Now you can untie the fold in the centre of the short gas line that runs to the inner tube gasholder. When you see the tube begin to swell, you will know that gas is being collected.
102. If you find that gas is leaking from the top of the drum after the unit has begun to work, seal theleaks with tar, mastic or paint as you were told to do in Item 47 in this booklet.
103. If gas is leaking around the gas outlet, T- piece, valve or inner tube, tighten them.
Note
A good way to check for leaks after the biogas unit has begun to work is to put soapy water on thedrum and on the joints of the parts and lines. If you see bubbles anywhere you will know that there isa leak. Seal all leaks as you have been told to do.
Bubbles
Time
104. It may take up to three weeks or even a month for the waste in your new biogas unit to beginmaking gas. After that, the unit will continue to make gas for about eight weeks.
105. During these eight weeks half of the gas will be made in the first two or three weeks and the restin the last five or six weeks.
106. If you find that too little gas is being made in the last weeks empty the unit and start again.
Temperature
107. You have been told in Booklet No. 31 that biogas is best produced at a temperature between 32and 37°C. When the temperature is below 15°C, almost no gas is made.
22 af 26 11-01-02 18:19
Humanity Development Library: Document text http://127.0.0.1:1027/cgi-bin/gw?e=t1c...dl-1-O.15.B.113.1-11-100-20-00&q=&g=11

Temperatures to produce biogas
Cold weather protection
108. If the temperature where you live often falls below 15°C, you can keep the waste mixture warmby covering this biogas unit with plant materials such as leaves, grass, straw or maize stalks.
Protect the drum oil
109. However, as you were told in Item 28 in this booklet, you must not put this unit underground asyou could with your old unit or you will not be able to shake it to break up the scum
Scum
110. Sometimes a hard layer of scum may form on top of the waste mixture in your biogas unit. Ifthis happens, less gas will be made and gas will not collect in the inner tube.
Hard layer of scrum
111. If the waste is well mixed before it is put into unit, there will be less chance for scum to formand your biogas unit will make gas well.
112. Scum is more likely to form if you use plant materials than if you use only animal waste.
113. To keep scum from forming, shake your biogas unit from time to time. The drawing belowshows you how.
Shake the oil drum
When the gas is made
114. Do not burn the first gas that is made in your biogas unit. It may have air in it and could explode.
115. A few days after the inner tube has begun to swell with gas, open the valve and let out all of thegas that has been collected.
116. While you are letting the gas out be very careful not to have fire near the biogas unit.
117. After the valve is open you will have to force the gas out of the inner tube or tubes.
118. You can force gas out of a tube by rolling it as you were told to do in Item 63 in this booklet, orby putting a weight on it such as pieces of wood or stones.
23 af 26 11-01-02 18:19
Humanity Development Library: Document text http://127.0.0.1:1027/cgi-bin/gw?e=t1c...dl-1-O.15.B.113.1-11-100-20-00&q=&g=11

119. The drawings on the next page show you how to force air out of a biogas unit with one or moreinner tubes.
120. When all of the gas is out, close the valve and your biogas unit will begin to collect gas again.
121. If you have done this carefully, the next gas that is made will have no air in it and will be safe toburn. Do not open the unit again until all the gas has been made.
Collect gas
122. Now you can attach the gas line to the top of the valve. However, do not open the valve until theinner tube is half full. Later, you can help to push the gas out of the inner tube by putting a few stonesor bricks on it.
Attach the gas line
123. Items 108 to 114 in Booklet No. 31 tell you how to use biogas for cooking and how to clean theburner.
124. After all the gas has been made, take the unit apart and empty out the fertilizer. Items 115 to 118in Booklet No. 31 tell you how to use the fertilizer.
125. However, be sure to keep about 4 litres of the fertilizer to be used as a starter for next time.
Keep fertilizer as a starter
126. Clean the unit carefully and check for leaks.
Check for leaks
127. Now fill the unit with new waste material and add the starter. Close the unit tightly and it willbegin to make gas again.
Fill oil drum with waste
128. Remember, every time you start again, do not burn the first gas that is made.
Taking care of your biogas unit
24 af 26 11-01-02 18:19
Humanity Development Library: Document text http://127.0.0.1:1027/cgi-bin/gw?e=t1c...dl-1-O.15.B.113.1-11-100-20-00&q=&g=11

129. Always be careful when you are near a biogas unit because gas may be leaking.
130. If gas is leaking and you breathe in too much of it, It can make you very sick.
131. Never build a fire, smoke, or even light a match near the unit, because if gas is leaking it mayexplode.
Never build fire near the unit
132. Check your biogas unit and gas lines often to be sure that there are no leaks. The note on page34 in this booklet tells you how to check for leaks in a working biogas unit.
133. If the oil drum begins to rust, coal it with the kind of paint that is used to paint metal.
Paint the oil drum
134. About once each year, when you are taking the unit apart, wash it inside and outside with warmsoapy water as you were told to do in Items 19 to 26 in this booklet.
Clean the drum
135. Then paint it inside and outside as you were told to do in Items 47 and 49 in this booklet.
Making more biogas
136. As with your old biogas unit, the easiest way to make more gas is to build one or more smallunits and get gas from them all.
137. If you can get more oil drums, pipe, T- pieces, valves, inner tubes and gas lines, and if you haveenough time, you can build and run more units.
138. The drawings below show you how to connect several unitsto the same gas line with T- Pieces.
T- piece
139. As you have already been told in Booklet No. 31, when you have several biogas units, fill themwith waste at different times. That way, when all the gas in one unit has been used, you will get gasfrom another unit that is still working.
What more can you do?
25 af 26 11-01-02 18:19
Humanity Development Library: Document text http://127.0.0.1:1027/cgi-bin/gw?e=t1c...dl-1-O.15.B.113.1-11-100-20-00&q=&g=11

140. The biogas unit that you learned to build in Booklet No. 31 and the biogas unit that you learnedto build in this booklet are both small units that use one drum for the waste holder.
141. With both of these small units you put in all of the waste when you first began. Then, when allof the gas was made, you cleaned out the unit, used the waste as fertilizer and started all over again.
Use waste
142. By building and using either or both of these units you learned a lot from your experience.
143. Now, let us look at still another biogas unit that you can build using what you have learned tohelp you.
Another kind of biogas unit
144. This unit is bigger and better than your first two units. It is also more difficult to build and touse.
145. This kind of biogas unit can also be built using oil drums with the same kind of pipe fittings thatyou used before.
146. However, it can be built much bigger than your old units. You can use several oil drums insteadof only one. So, you can make more gas than you did before.
Another kind of biogas unit
147. This kind of unit is also filled with waste when you first begin.
148. Then, after the unit begins to make gas, you continue to put in waste from time to time. You maydo this every few days or you may do it every week.
149. However, when you put new waste into this kind of unit, an equal amount of waste is pushed outof the unit.
Put in waste material
150. With fresh waste material always moving through the unit, it will make biogas for a much longertime.
151. You will learn more about this bigger and better unit in a later booklet in this series.
View this page in text format
26 af 26 11-01-02 18:19
Humanity Development Library: Document text http://127.0.0.1:1027/cgi-bin/gw?e=t1c...dl-1-O.15.B.113.1-11-100-20-00&q=&g=11