basics of word processing - national institute of open ...download.nos.org/srsec336new/lesson...
TRANSCRIPT
36 :: Data Entry Operations
Basics of Word Processing
3.1 INTRODUCTION
Word processing is an application program that allows you to
create letters, reports, newsletters, tables, form letters, brochures,
and Web pages. Using this application program you can add
pictures, tables, and charts to your documents. You can also
check spelling and grammar.
In this lesson, we will learn Word 2007 and use its features, tools
and techniques. All Professional Documents will be discussed
using this package only.
3.2 OBJECTIVES
After going through this lesson you would be able to:
l define features of Word 2007
l explain basic menu details of Word 2007
l create, save and print new Word document
l protect a word document quickly and efficiently
l manage word files and their printing
3

Basics of Word Processing :: 37
3.3 MAIN FEATURES OF WORD PROCESSING
The main features are:
l You can create professional documents fast, using built-
in and custom templates.
l You can easily manage large documents using various
features like the ability to create table of contents, index,
and cross-references.
l You can work on multiple documents simultaneously
l With the help of mail merge, you can quickly create merge
documents like mass mailings or mailing labels.
l AutoCorrect and AutoFormat features catch typographical
errors automatically and allow you to use predefined
shortcuts and typing patterns to quickly format your
documents.
l The print zoom facility scales a document on different paper
sizes, and allows you to print out multiple pages on a single
sheet of paper.
l The nested tables feature supports putting one table inside
another table.
l You can export and save your word documents in PDF and
XPS file format.
3.4 FEATURES OF WORD 2007
MS Word 2007 has useful features and tools introduced to
produce professionally created documents. Some of these
features are discussed below.
You can easily create, format, edit professional-looking user
document using comprehensive set of easy to use tools provided
by MS Word. It uses the MS Office Fluent user Interface concept.
This interface uses a new component called Ribbon to group the
tools by task, within task by sub tasks and related commands
that are used more frequently. The new user result oriented
interface presents the tools to you in a more organised and
efficient manner, which are easy to locate.

38 :: Data Entry Operations
Fig. 3.1
1. Tabs are more task oriented such as Home, Insert, Page
Layout
2. Within each tab, the related sub-tasks are grouped together
3. Related command button 1 are also grouped together to
execute a command or to display a command menu
The MS Word 2007 provides a lot of pre-formatted template to
produce documents, reports etc. While using the pre-formatted
template, you can select already available cover page, header
and footer to give the documents a professional look without
spending much time in formatting a new one.
MS Word 2007 also provides features for creating chart and
diagram which include three-dimensional shapes, transparency,
drop shadows, and other effects. This helps create highly
professional documents with flexibility in representing data more
efficiently and professionally.
Using MS Word 2007 digital signature feature, you can ensure
the authenticity, integrity, and origin of the document. The same
can be done either by adding an invisible digital signature to a
document, or inserting a Microsoft Office Signature Line, which
capture a visible representation of a signature along with a digital
signature.
Similarly, before sharing a document which is in its final form with
others, you can use MS Word 2007 “Mark As Final” features to
protect the document from any changes. “Mark as Final”
command makes the document “read-only” making the typing,
editing and proofing command disabled. But just to remember,

Basics of Word Processing :: 39
“Mark As Final” is a security feature as anyone can edit a
document that is marked as final by turning off Mark as Final.
MS Word 2007 also provides the feature and tools to export your
document to either PDF (Portable Document Format) or XPS
(XML Paper Specification) format.
3.5 STARTING MS WORD PROGRAM
You can start your Word program different ways. One way is
using Start button:
1. Click on the Start button.
2. In the menu that appears select All Programs→→→→→Microsoft
Office→→→→→Microsoft Office Word 2007. In few seconds you
will see Word screen on the monitor.
Fig. 3.2

40 :: Data Entry Operations
You can also start your MS Word program by double clicking on
Microsoft Word icon, which lies on the Microsoft Office Shortcut
Bar (MOSB).
3.6 WORD SCREEN LAYOUT
The Word screen (Window) contains a number of objects such as
Tabs, Menus, Sub menus, short-cut commands etc. We will
describe the Word’s default screen layout (Fig. 3.1) here.
Fig. 3.3 Screen Layout
3.6.1 Menus
If you are familiar with previous versions of Word, when you begin
to explore Word 2007, you will notice a significant change in the
menu structure, look and feel. The features in Word 2007 display
as various tabs such as Home, Insert, Page Layout, References
etc. To view all sub tasks/options (expanded form) in each
menu, you must click the required option. For example, the
images in Figure 3.4 show the Border menu in collapsed form
(Figure 3.4a) and in expanded form (Figure 3.4b).

Basics of Word Processing :: 41
Fig. 3.4a Collapsed menu Fig. 3.4b Expanded menu
Shortcut Menus
These features allow you to access variousWord commands faster than using theoptions on the menu bar. When the menu isexpanded, the shortcut menu is displayedwith short-cut command option for each ofthe short-cut menu item. The options on thismenu will vary depending on the sub-taskthat was clicked or selected. For example, theshortcut menu on the side is produced byselecting or expanding the Border option ofthe paragraph sub-task of the Home Tab fromthe Tab bar.
The shortcut menus are helpful because they display only thoseoptions that can be applied to the item that was selected and,therefore, prevent searching through the many menu options.
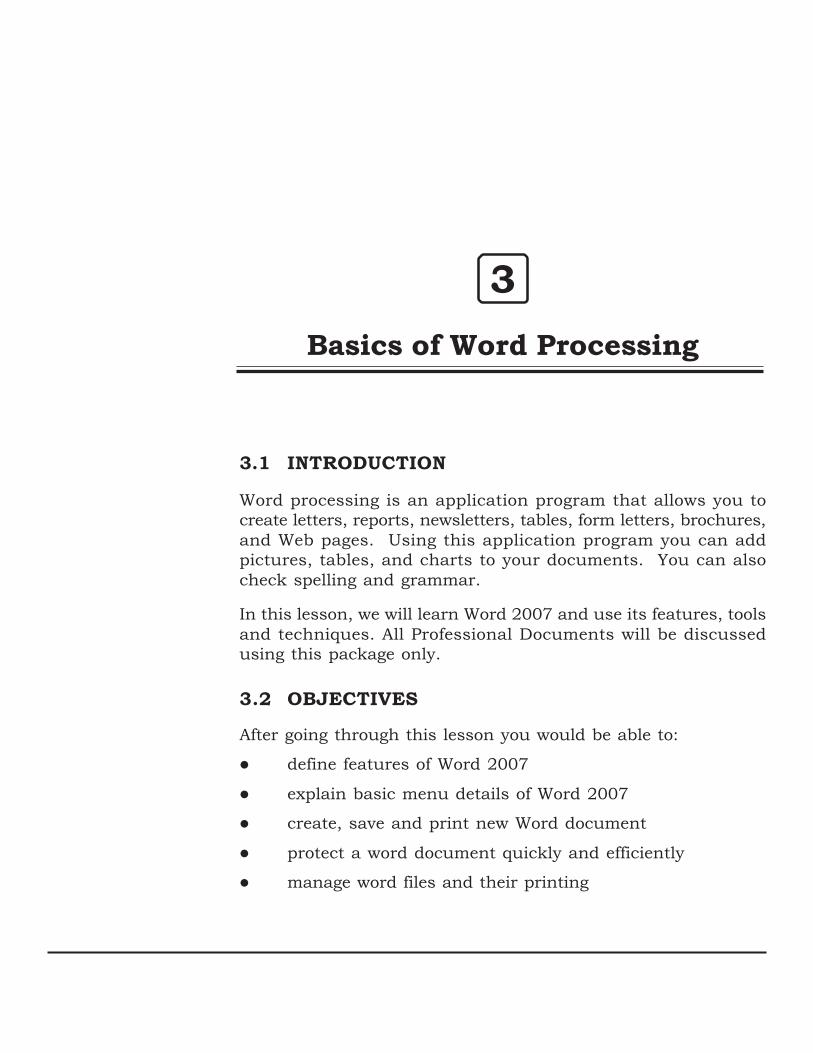
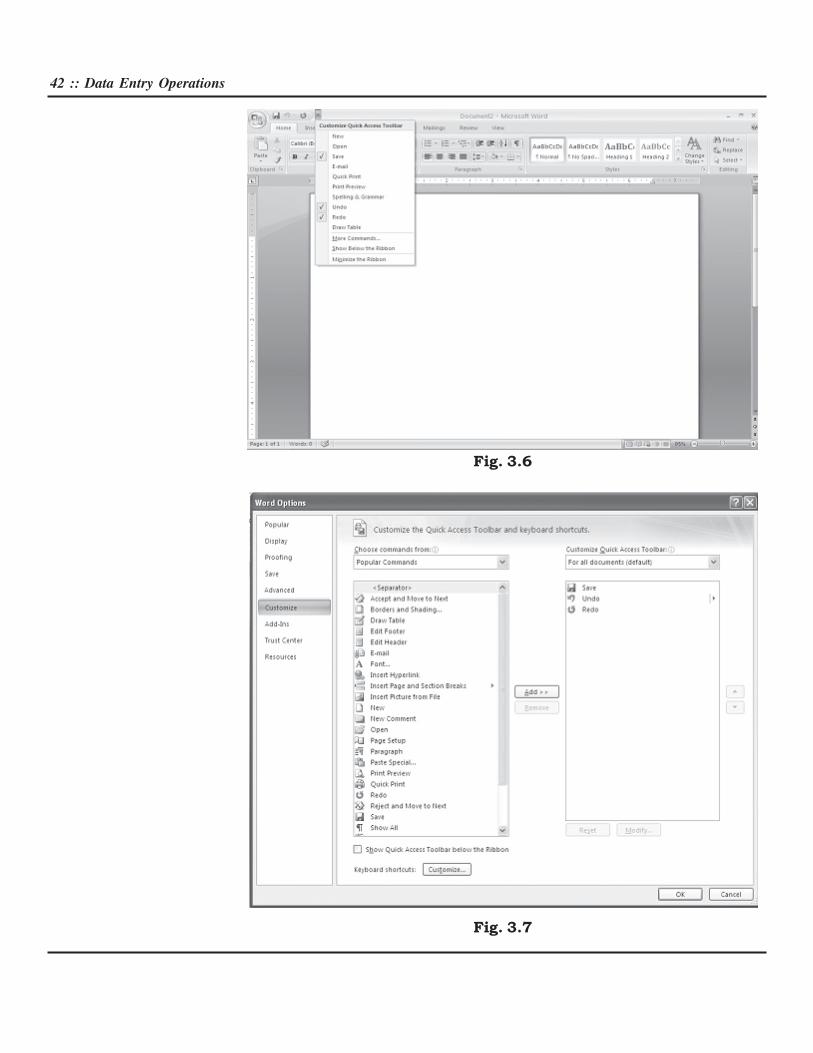
3.6.2 Toolbars
MS Word 2007 provides a customized quick access toolbar to
organize the tools available for easy and fast access of the
commands. Many toolbars displaying shortcut buttons are also
available to make editing and formatting quicker and easier. The
toolbars that are already displayed on the screen are checked.
To add/modify simply click on the “More Commands” option
which will display the following menu for customized selection of
tools as per your requirement.
Fig. 3.5
42 :: Data Entry Operations
Fig. 3.6
Fig. 3.7
Basics of Word Processing :: 43
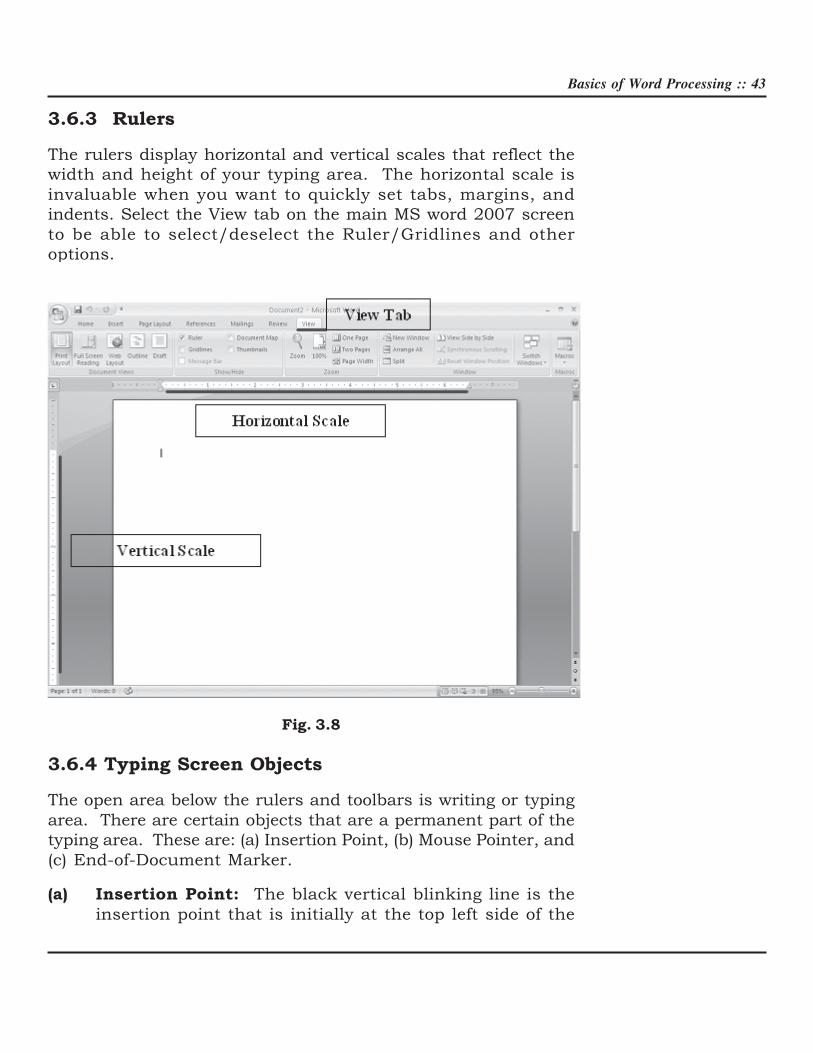
3.6.3 Rulers
The rulers display horizontal and vertical scales that reflect the
width and height of your typing area. The horizontal scale is
invaluable when you want to quickly set tabs, margins, and
indents. Select the View tab on the main MS word 2007 screen
to be able to select/deselect the Ruler/Gridlines and other
options.
Fig. 3.8
3.6.4 Typing Screen Objects
The open area below the rulers and toolbars is writing or typing
area. There are certain objects that are a permanent part of the
typing area. These are: (a) Insertion Point, (b) Mouse Pointer, and
(c) End-of-Document Marker.
(a) Insertion Point: The black vertical blinking line is the
insertion point that is initially at the top left side of the

44 :: Data Entry Operations
typing area. It indicates the place where your typing is
inserted into the document. As you type, the blinking line
continuously moves along towards right inserting in that line
whatever is typed. When the up, down, left, or right arrows
of the keyboard is used, the insertion point moves
accordingly. When you move and place the cursor any
where in the text and click, the insertion point shifts to that
place from its current location indicating that it is ready to
accept your typing.
(b) Mouse Pointer: When you move the mouse around in the
typing area, the mouse pointer is in the shape of a thin I-
beam. As you move the mouse near the menu bar and
toolbars, the mouse pointer becomes a pointing arrow. If
you move the mouse pointer to some existing piece of text
and click the mouse, you will see the insertion point in that
spot of the text.
(c) End-of-Document Marker: The horizontal line (like a short
underline) at the end of the document (seen only when
Word is in Normal view) is called end-of-document marker.
This marker lets you know where the end of document
occurs.
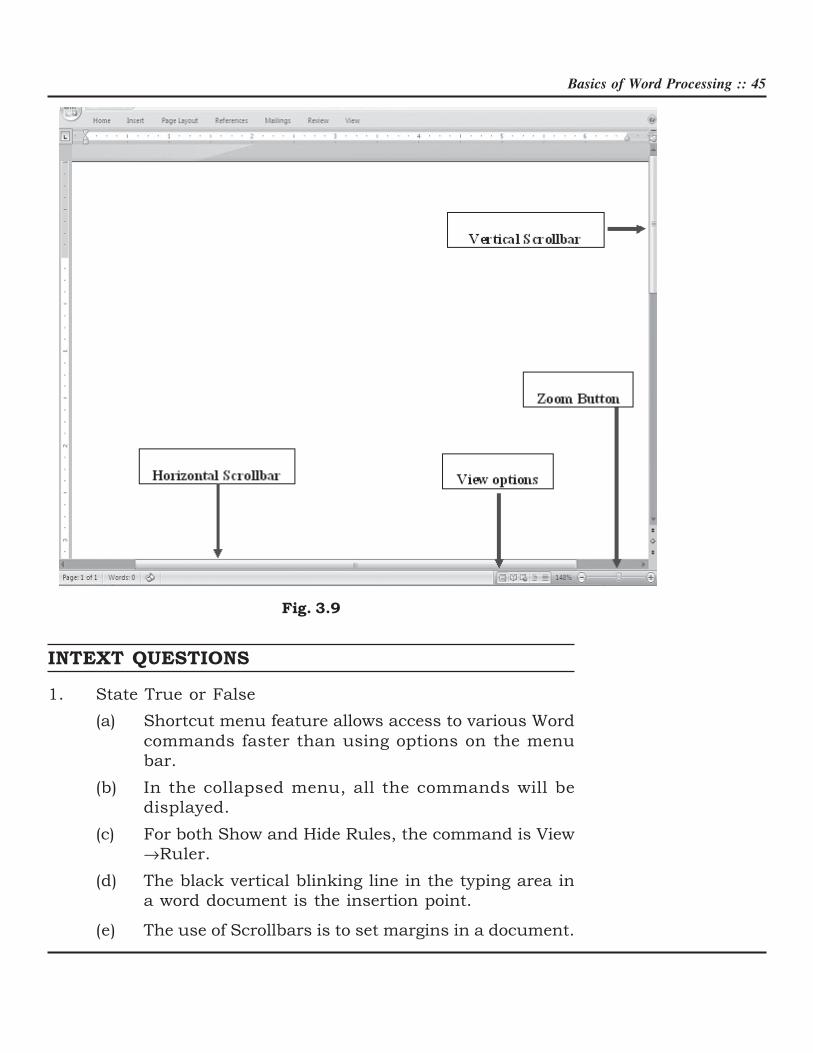
3.6.5 Vertical and Horizontal Scrollbars
The typing area is bordered on the right side by the vertical scroll
bar with a scroll button and arrows. The single down arrow scrolls
through the document line by line. The double down arrow allows
you to move to the top of the next page. The double up arrow
allows you to move to the top of the previous page. The double
down arrow allows you to move to the top of the next page. You
can also drag the vertical scroll button up and down the scroll
bar to move up and down through the document.
The first bar along the bottom of the typing area is the horizontal
scroll bar. To see the text that is off the right side of the screen, use
the left arrow button. To see the text that is off the left side of the
screen, use the right arrow button. You can also drag the horizontal
scroll button to move left or right of the document.
In Word 2007, the options such as view documents and zoom is also
available on the bottom bar for easy access.
Basics of Word Processing :: 45
Fig. 3.9
INTEXT QUESTIONS
1. State True or False
(a) Shortcut menu feature allows access to various Word
commands faster than using options on the menu
bar.
(b) In the collapsed menu, all the commands will be
displayed.
(c) For both Show and Hide Rules, the command is View
→Ruler.
(d) The black vertical blinking line in the typing area in
a word document is the insertion point.
(e) The use of Scrollbars is to set margins in a document.
46 :: Data Entry Operations
2. To view shortcut menu, we need to:
(a) Click the mouse
(b) Right click the mouse
(c) First click and then right click the mouse
3. Horizontal scale is useful to quickly set:
(a) Margins
(b) Tabs
(c) Indents
(d) All of the above
4. What is the command to start the Word Program using Start
button?
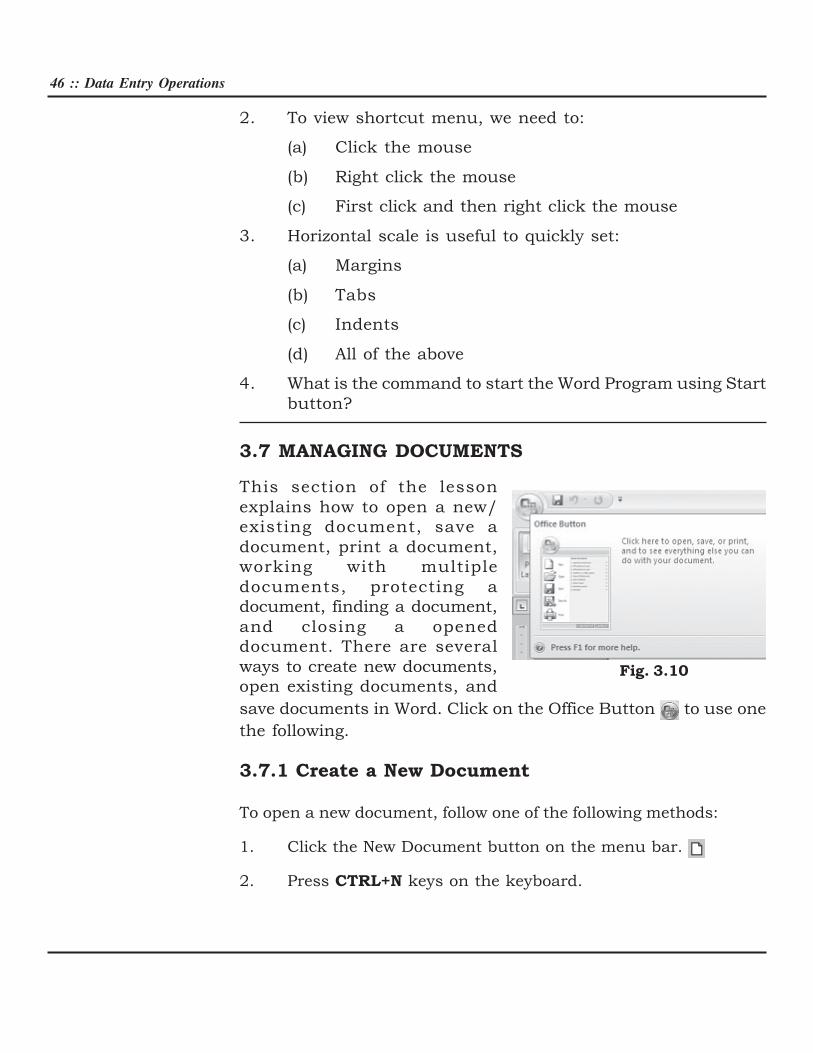
3.7 MANAGING DOCUMENTS
This section of the lesson
explains how to open a new/
existing document, save a
document, print a document,
working with multiple
documents, protecting a
document, finding a document,
and closing a opened
document. There are several
ways to create new documents,
open existing documents, and
save documents in Word. Click on the Office Button to use one
the following.
3.7.1 Create a New Document
To open a new document, follow one of the following methods:
1. Click the New Document button on the menu bar.
2. Press CTRL+N keys on the keyboard.
Fig. 3.10

Basics of Word Processing :: 47
3.7.2 Open an Existing Document
Click on the office 2007 button at the top left
corner of your screen to open an existing
document, follow one of the following methods:
1. Click the Open File button on the menu
bar.
2. Press CTRL+O keys on the keyboard.
3. Each of the above method will show the
Open dialog box. Choose the file and click
the Open button.
3.7.3 Save a New/Existing Document
To save a new/existing document that is
opened, follow one of the following methods:
1. Click the Save button on the menu bar.
2. Press CTRL+S keys on the keyboard.
If the document is already named and saved
earlier, it will simply save the document. On the
other hand, if the file is a new document then it
will prompt you by opening Save As dialog box.
Select the folder where you want to place your
document in Save In: box, type the name of the
document in File Name: box, and then click OK.
You can also save a new document by choosing
CTRL→→→→→A on the keyboard and then selecting the
above actions in Save As dialog box.
3.7.4 Working on Multiple Documents
Several documents can be opened simultaneously if you are
typing or editing multiple documents simultaneously. All open
documents can be arranged under the View Tab.
Fig. 3.12
Fig. 3.11
Office 2007
Button
48 :: Data Entry Operations
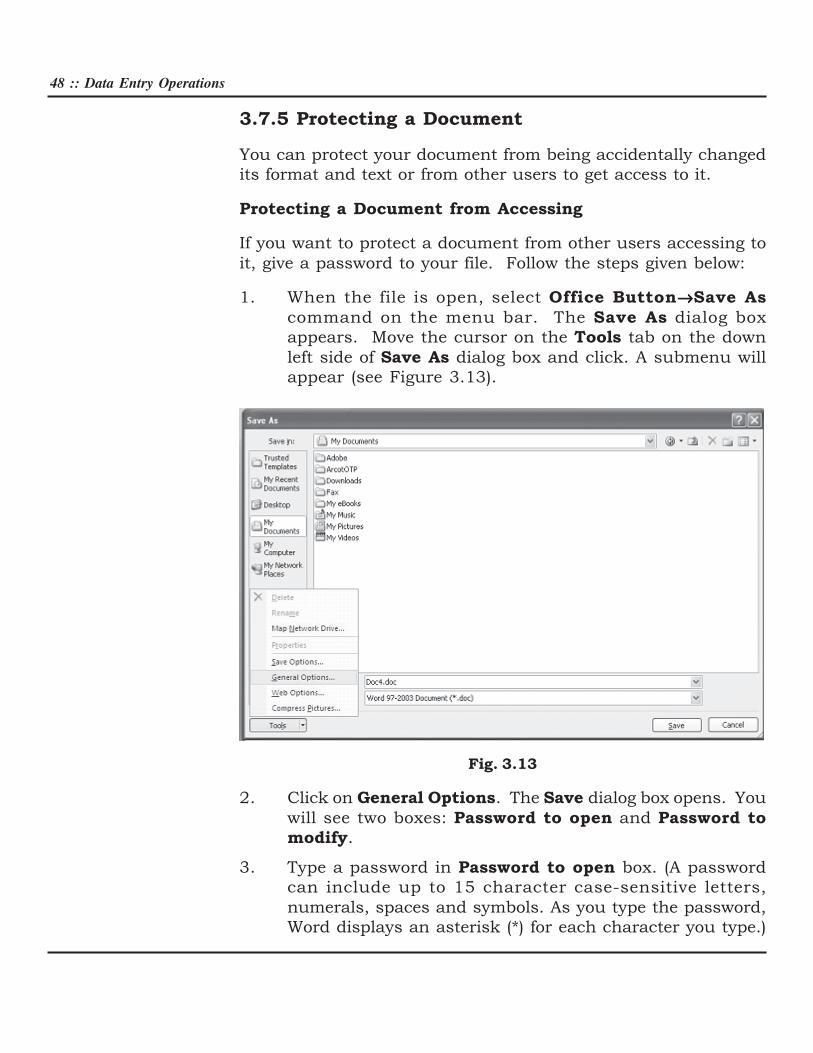
3.7.5 Protecting a Document
You can protect your document from being accidentally changed
its format and text or from other users to get access to it.
Protecting a Document from Accessing
If you want to protect a document from other users accessing to
it, give a password to your file. Follow the steps given below:
1. When the file is open, select Office Button→→→→→Save As
command on the menu bar. The Save As dialog box
appears. Move the cursor on the Tools tab on the down
left side of Save As dialog box and click. A submenu will
appear (see Figure 3.13).
Fig. 3.13
2. Click on General Options. The Save dialog box opens. You
will see two boxes: Password to open and Password to
modify.
3. Type a password in Password to open box. (A password
can include up to 15 character case-sensitive letters,
numerals, spaces and symbols. As you type the password,
Word displays an asterisk (*) for each character you type.)
Basics of Word Processing :: 49
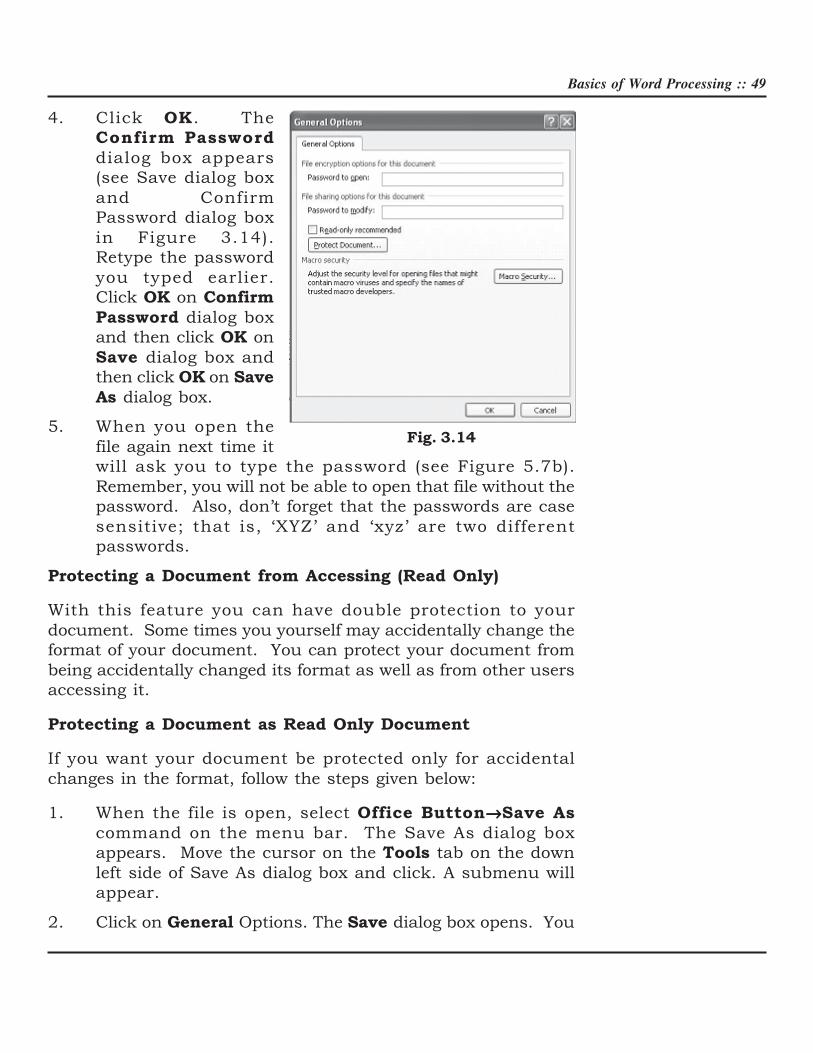
4. Click OK. The
Confirm Password
dialog box appears
(see Save dialog box
and Confirm
Password dialog box
in Figure 3.14).
Retype the password
you typed earlier.
Click OK on Confirm
Password dialog box
and then click OK on
Save dialog box and
then click OK on Save
As dialog box.
5. When you open the
file again next time it
will ask you to type the password (see Figure 5.7b).
Remember, you will not be able to open that file without the
password. Also, don’t forget that the passwords are case
sensitive; that is, ‘XYZ’ and ‘xyz’ are two different
passwords.
Protecting a Document from Accessing (Read Only)
With this feature you can have double protection to your
document. Some times you yourself may accidentally change the
format of your document. You can protect your document from
being accidentally changed its format as well as from other users
accessing it.
Protecting a Document as Read Only Document
If you want your document be protected only for accidental
changes in the format, follow the steps given below:
1. When the file is open, select Office Button→→→→→Save As
command on the menu bar. The Save As dialog box
appears. Move the cursor on the Tools tab on the down
left side of Save As dialog box and click. A submenu will
appear.
2. Click on General Options. The Save dialog box opens. You
Fig. 3.14

50 :: Data Entry Operations
will see Read only
recommended check
box at the left side
bottom of the Save
dialog box.
3. Check-mark (√) the
Read only
recommended check
box. Click OK on Save
dialog box and then click
OK on Save as dialog
box.
Next time when you open the
document after giving
password it will prompt you
with a message ‘Open as
read-only?. If you
accidentally make changes
and then try to save the
document, the file will not be
saved. Instead, you will be prompted by a message ‘This file is
read-only’.
If you want to make changes to a document remove the check
mark by clicking on Read-only recommended box, which lies
below Password to open box under Save dialog box.
Modifying a Password Given to Protect a Document
If you suspect that some one knows your password and you want
to change it, modify it by typing present password in Password
to open: box and new password in Password to modify: box in
the Save dialog box.
Protect a Document for Track changes, Comments, and Forms
Some times you may feel that your document should be reviewed
by others to improve the document’s contents. The reviewers of
your document can suggest some changes or comments without
modifying the original document. After the review, if you wish that
the changes were necessary you can incorporate them.
Fig. 3.15

Basics of Word Processing :: 51
Fig. 3.16
Track changes: Selecting this option from the Review Tab and
Tracking sub-task, let other users to change the document but
highlights all changes so that you can track changes. While a
document is protected for track changes, you cannot turn off
change tracking nor can you accept or reject track changes.
3.7.6 Find Documents
When you forgot the name of a file, but you remember a few letters
in a word that may be in the file name, use Open dialog box. Word
will search through the list of files in the selected folder or device
for your particular file. For example, if your file name is ‘Annual
paper’ you can type the letters annual. Word will locate this file.
Follow these steps to find files:
1. Select Office Button Open command on the menu bar. The
Open dialog box will be displayed.
2. In Look in: box, select the folder or click where you suspect
your file will be located. Type few letters you remember that
match with file name in File Name: box (Remember you
can type upper case or lower case letters, since search is
not case sensitive). If the typed letters are beginning letters
of your file name, the file name will appear in the File Name:
box. Click Open to open the document.
3. If you don’t see your file name appearing in the File Name:
box as you type, move the cursor on the Tools tab on the top
right side of Open dialog box. If the typed letters in the File
Name: box matches with some part of your file name, all the
file names matching with your typed letters along with other
files will appear in Name box in the Open dialog box. If you
trace your file in the box, double-click on the file name or select

52 :: Data Entry Operations
the file name and then click Open in Find dialog box to open
the document.
Fig. 3.17
3.7.7 Close a Document
Close the current document by selecting Office Button→→→→→Close
command on the menu bar or click the Close icon if it is visible
on the Standard toolbar.
3.8 PRINTING DOCUMENTS
While printing a document you have the following options in Print
dialog box: (see Figure 3.18).
1. Name of the printer (if you have more than one printers).
2. Choose paper size, orientations, resolution etc. by pressing
Properties button.
3. Print the entire document or only current page or specific
pages
4. Print a draft copy, which omits graphics to allow faster
printing.

Basics of Word Processing :: 53
5. Number of copies to be printed, etc.
Fig. 3.18
3.8.1 Printing a Document
To print a document or selected pages follow the steps given
below:
1. Open the document to be printed.
2. Choose Office Button→→→→→Print command on the menu bar.
The Print dialog box will open. Select the Options like print
range, Number of copes, Printer name etc. See that printer
is switched on and the paper is available in the printer tray.
3. Click OK.
3.8.2 Printing a Document on a Different Paper Size
You might have created a document using some selected paper
size. You may want to print that document in a different paper
size or multiple pages in a single sheet of paper without
disturbing the general format. You can do it using Zoom feature

54 :: Data Entry Operations
in Print dialog box. Follow the steps given below to resize your
document to fit into a new paper size.
If you want to print a document in a different paper size, follow
the steps given below:
1. Open the document to be printed.
2. Choose Office Button→→→→→Print command on the menu bar.
The Print dialog box will open. Select the Options like print
range, Number of copes, Printer name etc. See that printer
is switched on and the paper is available in the printer tray.
3. Select the appropriate paper size in Scale to paper size:
under Zoom in Print dialog box.
4. Click OK.
3.8.3 Printing a Document’s Multiple Pages in a Single
Sheet of Paper
If you want to print multiple pages of a document in a single sheet
of paper, follow the steps given below:
1. Open the document to be printed.
2. Choose Office Button→→→→→Print command on the menu bar.
The Print dialog box will open. Select the Options like print
range, Number of copies, Printer name etc. See that printer
is switched on and the paper is available in the printer tray.
3. Select the appropriate paper size in Pages per sheet: under
Zoom in Print dialog box.
4. Click OK.
3.9 EXIT WORD PROGRAM
When finished your work in Word and closing all the files, you can
quit the Word program by selecting Office Button→→→→→Exit
command on the menu bar.
3.10 KEYBOARD SHORTCUTS
Keyboard shortcuts can save time and the effort of switching from
the keyboard to the mouse to execute simple commands. Print
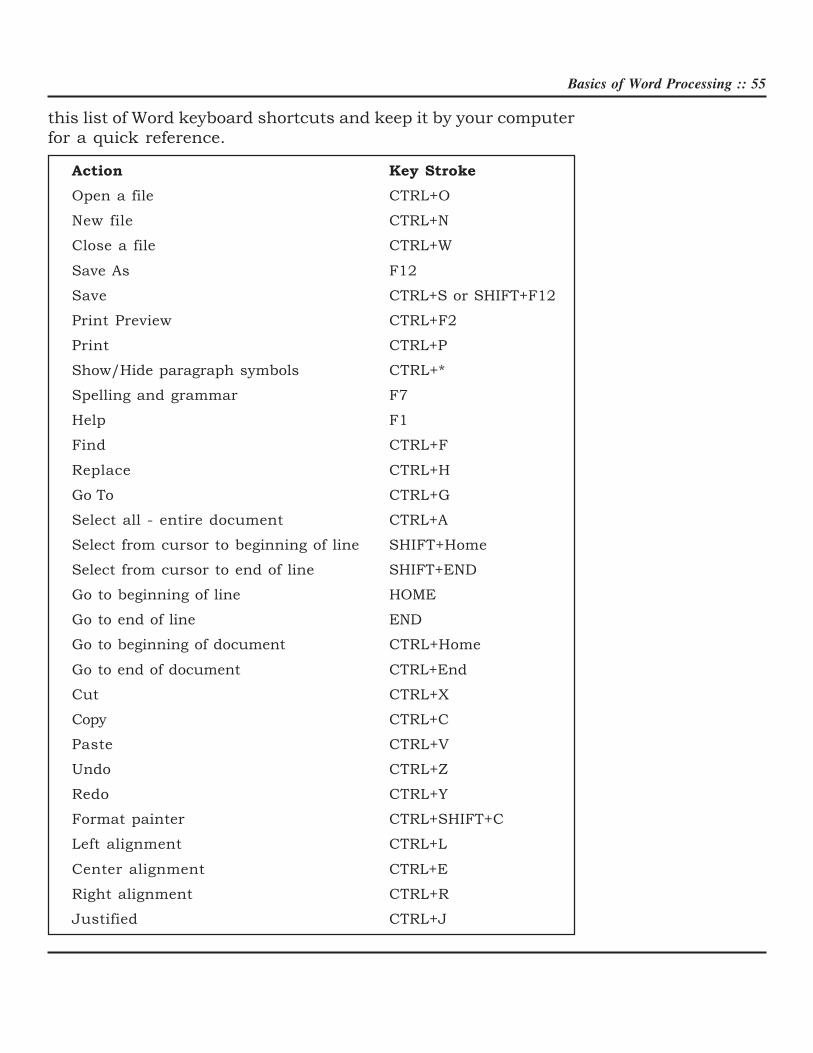
Basics of Word Processing :: 55
this list of Word keyboard shortcuts and keep it by your computer
for a quick reference.
Action Key Stroke
Open a file CTRL+O
New file CTRL+N
Close a file CTRL+W
Save As F12
Save CTRL+S or SHIFT+F12
Print Preview CTRL+F2
Print CTRL+P
Show/Hide paragraph symbols CTRL+*
Spelling and grammar F7
Help F1
Find CTRL+F
Replace CTRL+H
Go To CTRL+G
Select all - entire document CTRL+A
Select from cursor to beginning of line SHIFT+Home
Select from cursor to end of line SHIFT+END
Go to beginning of line HOME
Go to end of line END
Go to beginning of document CTRL+Home
Go to end of document CTRL+End
Cut CTRL+X
Copy CTRL+C
Paste CTRL+V
Undo CTRL+Z
Redo CTRL+Y
Format painter CTRL+SHIFT+C
Left alignment CTRL+L
Center alignment CTRL+E
Right alignment CTRL+R
Justified CTRL+J

56 :: Data Entry Operations
Delete previous word CTRL+Backspace
Apply bulleted list CTRL+SHIFT+L
Indent CTRL+M
Page break CTRL+Enter
Font face CTRL+SHIFT+F
Font size CTRL+SHIFT+P
Bold CTRL+B
Italics CTRL+I
Underline CTRL+U
Double underline CTRL+SHIFT+D
Word underline CTRL+SHIFT+W
All caps CTRL+SHIFT+A
Change case SHIFT+F3
Subscript CTRL+=
Superscript CTRL+SHIFT+=
Make web hyperlink CTRL+K
Go to next cell Tab
Go to previous cell SHIFT+Tab
Go to beginning of column ALT+PageUp
Highlight to beginning of column ALT+SHIFT+PageUp
Go to end of column ALT+PageDown
Highlight to end of column ALT+SHIFT+PageDown
Go to beginning of row ALT+Home
Highlight to beginning of row ALT+SHIFT+Home
Go to end of row ALT+End
Highlight to end of row ALT+SHIFT+End
Column break CTRL+SHIFT+Enter
Copyright © ALT+CTRL+C
Date field ALT+SHIFT+D
Go to footnotes ALT+CTRL+F
Show/Hide ¶ CTRL+SHIFT+8
Thesaurus SHIFT+F7
Note: A plus sign indicates that the keys need to be pressed at the
same time.
Basics of Word Processing :: 57
INTEXT QUESTIONS
5. What are the shortcuts key using keyboard for opening a
new document?
6. What is the command on the menu bar to save?
(a) a new file, (b) existing file
7. What are the steps to print a document on a different paper
size in Print dialog box.
8. State True or False.
(a) Window menu allows you to work with two documents
simultaneously.
(b) It is not necessary to give a password to protect a file
from reviewers.
(c) Selecting Tracked changes command in Protect
Document dialog box do not let others to change the
document.
3.11 WHAT YOU HAVE LEARNT
In this lesson you learnt about various features of MS-word like
create, print, format. You are now in a position to move text from
one place to another and apply different font and character styles.
You can also protect your document using different commands.
3.12 TERMINAL QUESTIONS
1. Write any two uses of rulers in Word Program.
2. What is a mouse pointer?
3. What is an end-of-document marker?
4. Explain the steps in renaming a document.
5. What are the steps in protecting a document from
accessing?

58 :: Data Entry Operations
6. How do you modify a password given to protect a
document?
7. What are the steps in printing a document’s multiple pages
in a single sheet of paper?
8. Write any three options available in the Print dialog box.
3.13 FEEDBACK TO INTEXT QUESTIONS
1. (a) True
(b) False
(c) True
(d) True
(e) False
2. (b) (right click the mouse)
3. (d) (all of the above)
4. Programs→Microsoft Word
5. CTRL+N keys
6. (a) File→Save As,
(b) File→Save
7. Select the appropriate paper size in Scale to paper size:
under Zoom and then click OK.
8. (a) True
(b) False
(c) False