basic winlink 2000 training guide
TRANSCRIPT
BASIC WINLINK 2000 TRAINING GUIDE
Lewis Thompson W5IFQ, AAR6UK
June 26, 2009
CONTENTS
Introduction .................................................................................................................................... 3 About Winlink 2000........................................................................................................................ 3 Required Equipment....................................................................................................................... 3 Setting Up Airmail Step by Step .....................................................................................................5 Connecting to RMS Relay on HF...................................................................................................14 Connecting Using Telnet (the Internet).......................................................................................... 16 Connecting to RMS Packet Nodes on VHF................................................................................... 18 Sending Messages ......................................................................................................................... 19 Subject Line Preamble …………………………………………………………………………19 Address Book …………………………………………………………………………………… 20 User Defined Options ................................................................................................................... 24 HF Propagation Features............................................................................................................... 26 Appendix 1.................................................................................................................................... 27 Appendix 2.................................................................................................................................... 27 Appendix 3.................................................................................................................................... 28 Appendix 4.................................................................................................................................... 29
2
Introduction Winlink 2000 is a versatile digital network messaging technology that allows radio operators to send e-mail messages over HF, VHF or UHF frequencies to other radio operators, and virtually every e-mail address available. Winlink 2000 is the name of the network system, but the software that you will use to connect into the system is Airmail. Airmail acts like an e-mail client such as MS Outlook™ , Outlook Express™. About Winlink 2000 The Winlink 2000 system uses a variety of components to do its job. The major term you will hear is the RMS Relay (Radio Message Server). The RMS Relay is a computer with special software connected to a HF transceiver. The RMS Relay is the station that you will connect to for sending and receiving e-mail via HF. These RMS Relay stations are located throughout the world. Another term you will hear is RMS Packet. A RMS Packet node is a “VHF/UHF Packet gateway to a CMS. Some RMS Packet stations are co-located with a RMS Relay (for example, CTECC W5TQ PMBO). In this special case, the VHF RMS Packet station relays through the RMS Relay station to a CMS and can “hub” if the internet connection is lost. Using the Internet, RMS Relay and RMS Packet stations connect to any one of a number of CMS’s (Common Message Servers). These redundant, mirror image CMS’s are the connection between public e-mail addresses and Winlink e-mail addresses. Without the CMS system, you could not send messages between the internet and Winlink. Failure of the CMS system is very unlikely because of the redundancy of the CMS’s. Finally, you can also connect to a CMS directly via the internet using Telnet. Airmail has a telnet feature that allows you to connect without a radio. This is an excellent way to learn to operate Airmail before complicating the procedure with a radio. You should only have to determine two things. What HF RMS Relay and VHF RMS Packet stations are available for you to use. Required Equipment What do you need to get on Winlink 2000? You will need a computer with Airmail installed, and a HF or VHF radio, and a supported TNC (modem). In more detail, the computer must have a Windows 98 or greater operating system (or Linux running Wine). The computer does not have to be a high performance machine, just something that can run a simple terminal program. It must have the proper ports to
3
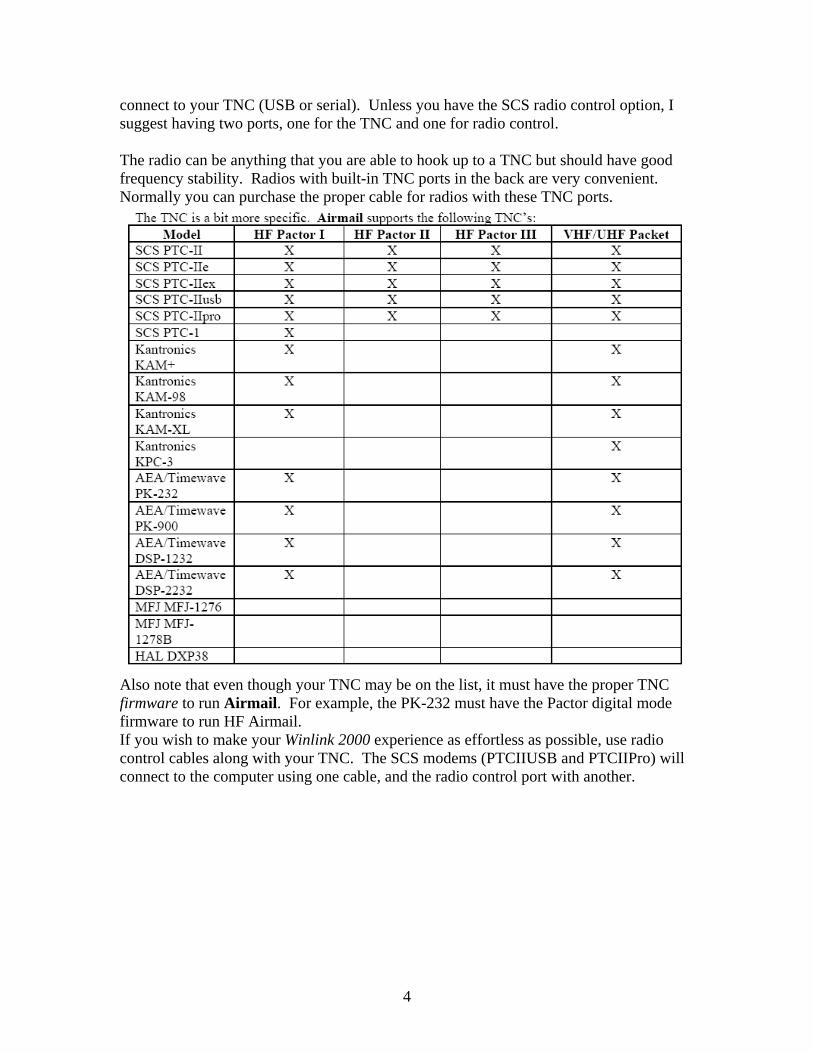
connect to your TNC (USB or serial). Unless you have the SCS radio control option, I suggest having two ports, one for the TNC and one for radio control. The radio can be anything that you are able to hook up to a TNC but should have good frequency stability. Radios with built-in TNC ports in the back are very convenient. Normally you can purchase the proper cable for radios with these TNC ports.
Also note that even though your TNC may be on the list, it must have the proper TNC firmware to run Airmail. For example, the PK-232 must have the Pactor digital mode firmware to run HF Airmail. If you wish to make your Winlink 2000 experience as effortless as possible, use radio control cables along with your TNC. The SCS modems (PTCIIUSB and PTCIIPro) will connect to the computer using one cable, and the radio control port with another.
4

4. It will ask you where you would like to install Airmail. If you plan on using Airmail on both Ham and MARS frequencies, you will need to install two separate Airmails into two separate directories in your program files. Label this first one C:\Program files\HAMAirmail . Then click "Next”. Otherwise, simply click “Next” taking the default directory as shown below:
5

5. It will ask if you want to make shortcuts. It is recommended that you uncheck the Make an entry in the Start Menu. and press Next.
6
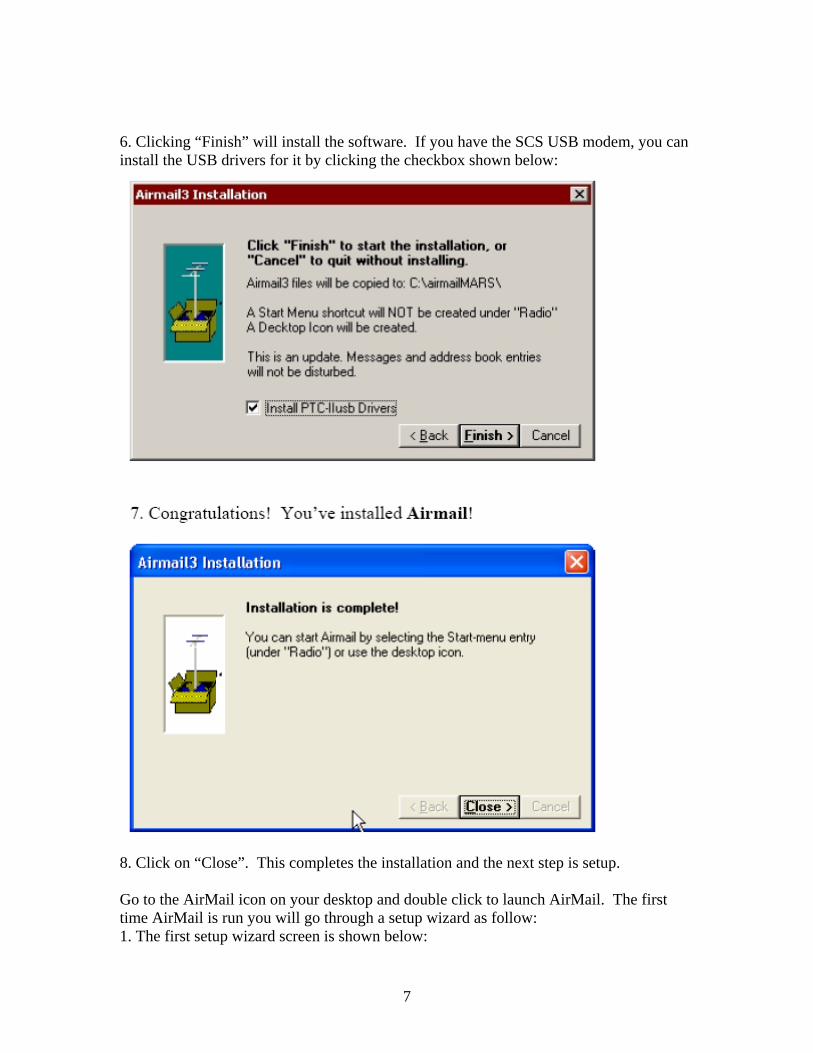
6. Clicking “Finish” will install the software. If you have the SCS USB modem, you can install the USB drivers for it by clicking the checkbox shown below:
8. Click on “Close”. This completes the installation and the next step is setup. Go to the AirMail icon on your desktop and double click to launch AirMail. The first time AirMail is run you will go through a setup wizard as follow: 1. The first setup wizard screen is shown below:
7
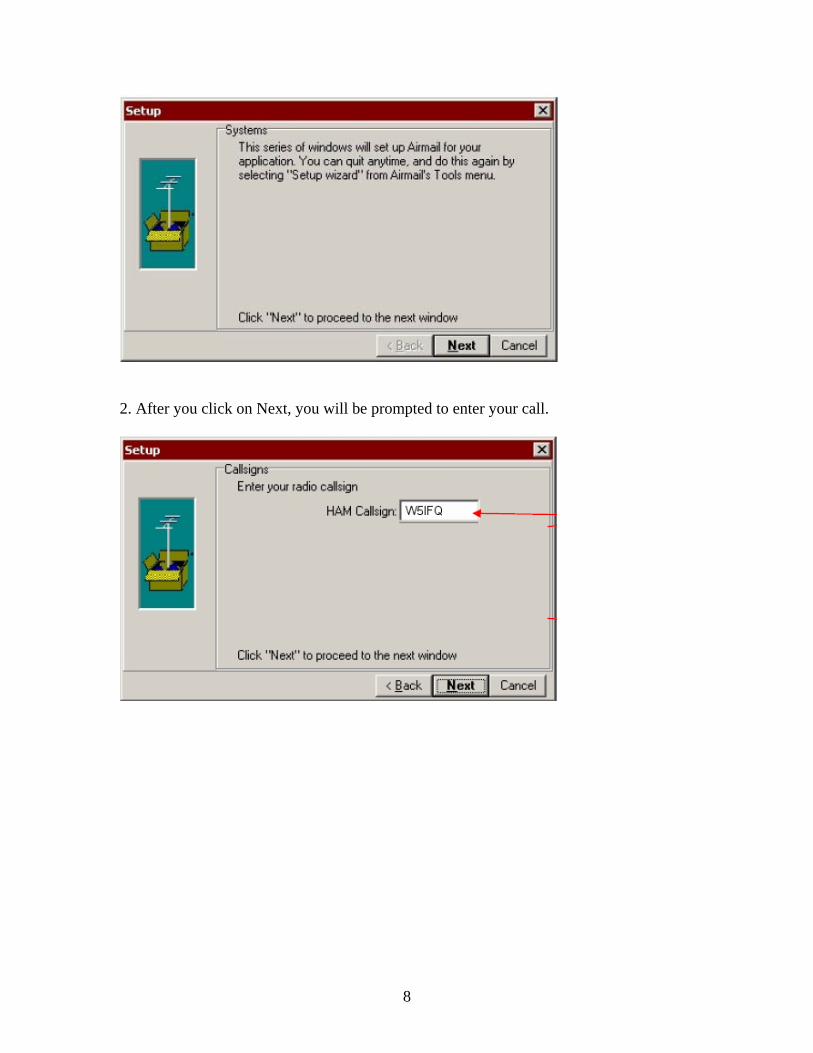
2. After you click on Next, you will be prompted to enter your call.
8
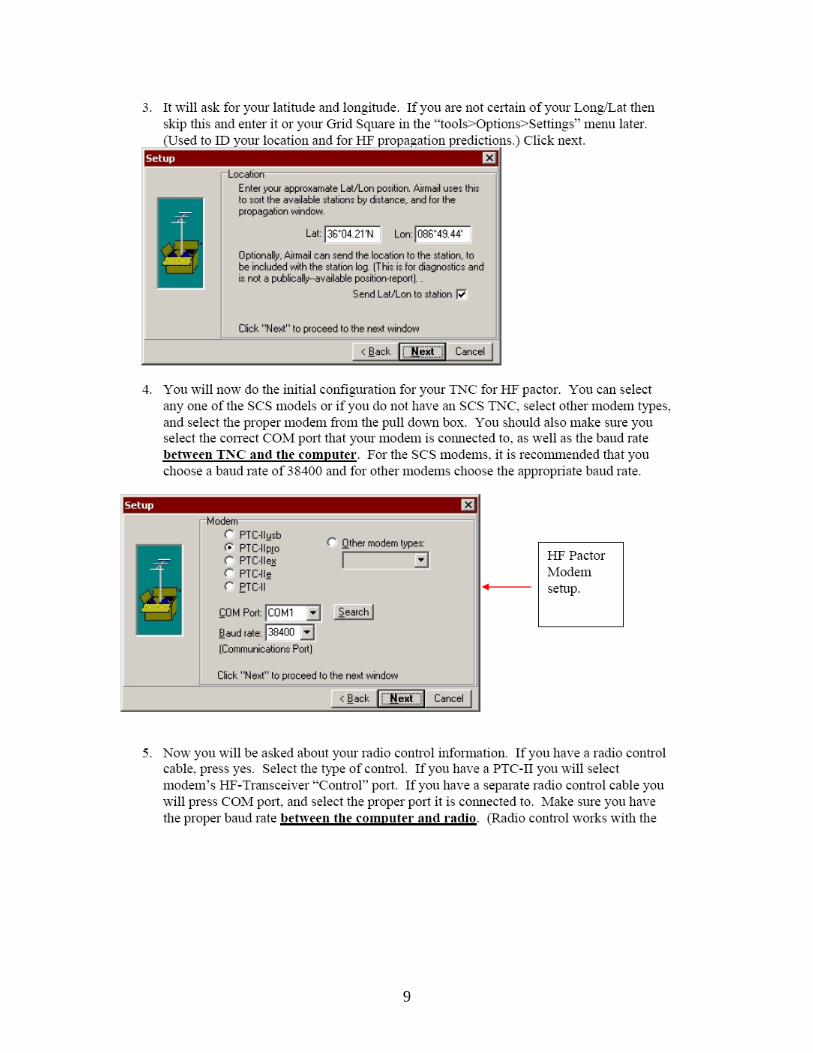
9
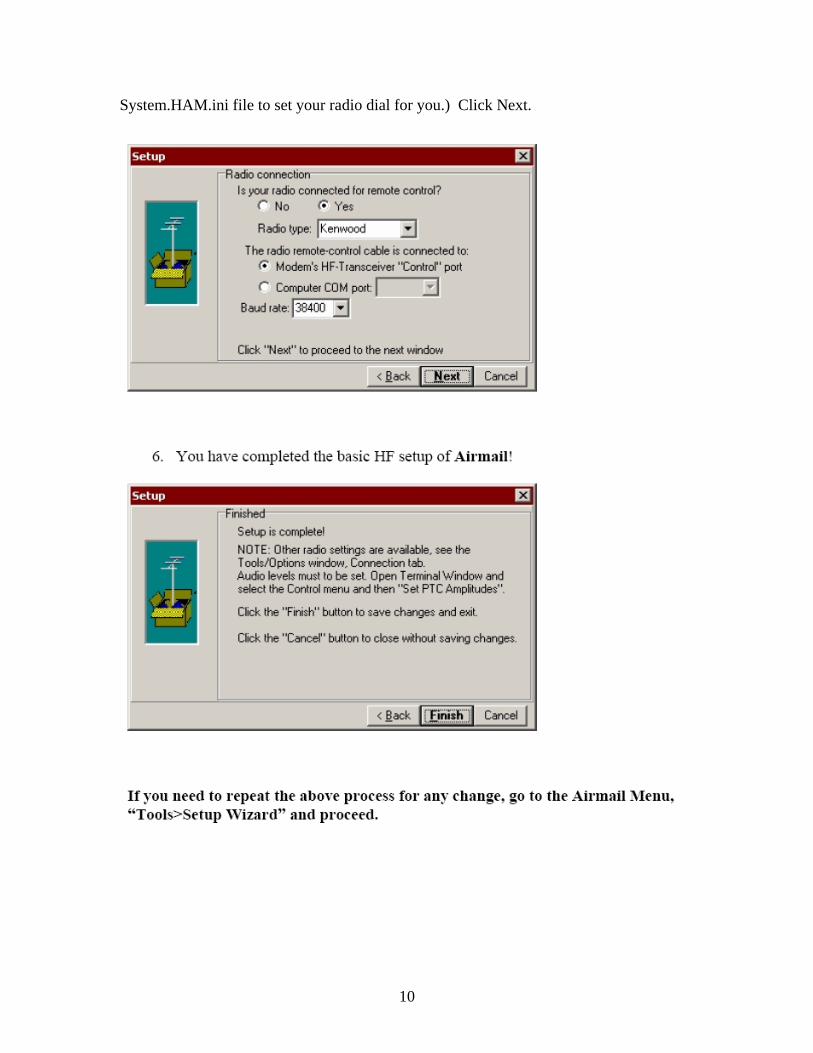
System.HAM.ini file to set your radio dial for you.) Click Next.
10
11
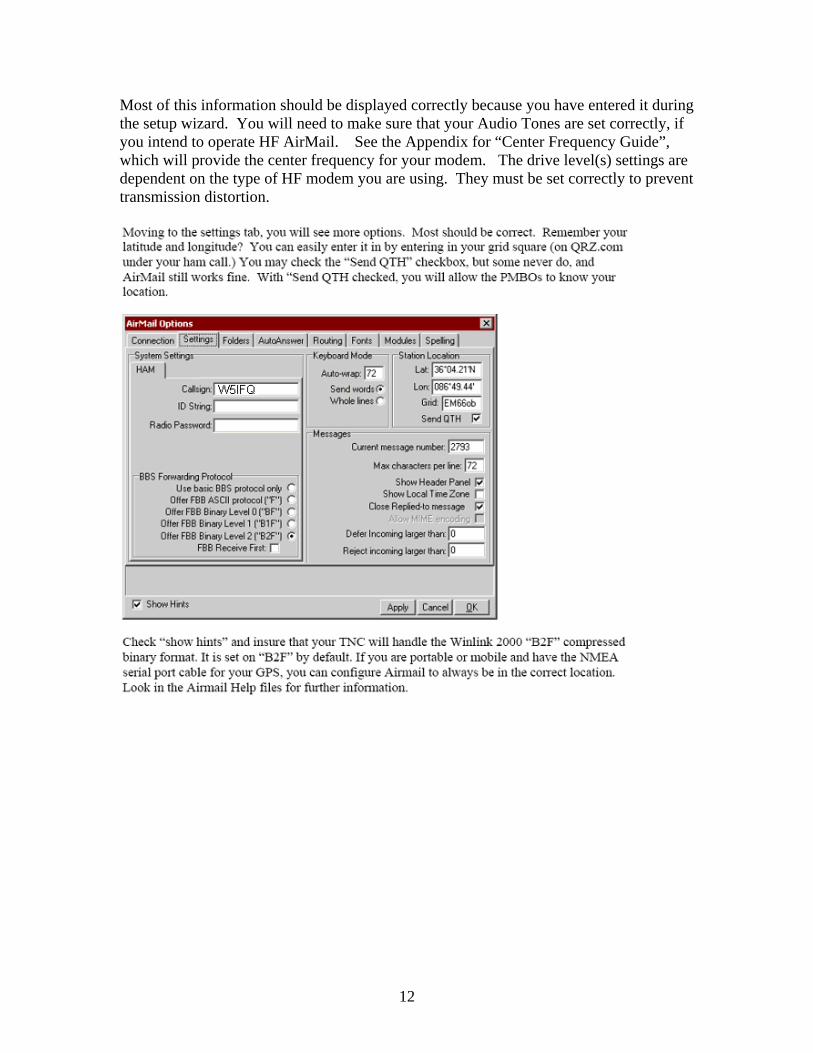
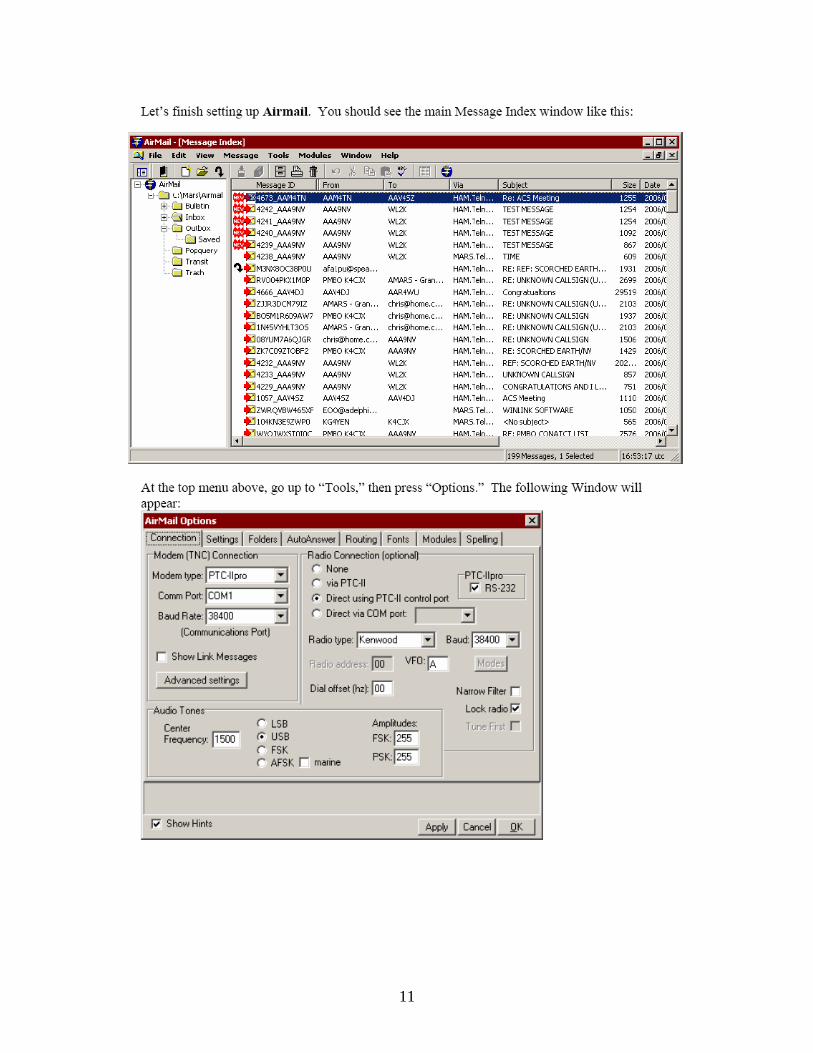
Most of this information should be displayed correctly because you have entered it during the setup wizard. You will need to make sure that your Audio Tones are set correctly, if you intend to operate HF AirMail. See the Appendix for “Center Frequency Guide”, which will provide the center frequency for your modem. The drive level(s) settings are dependent on the type of HF modem you are using. They must be set correctly to prevent transmission distortion.
12
13
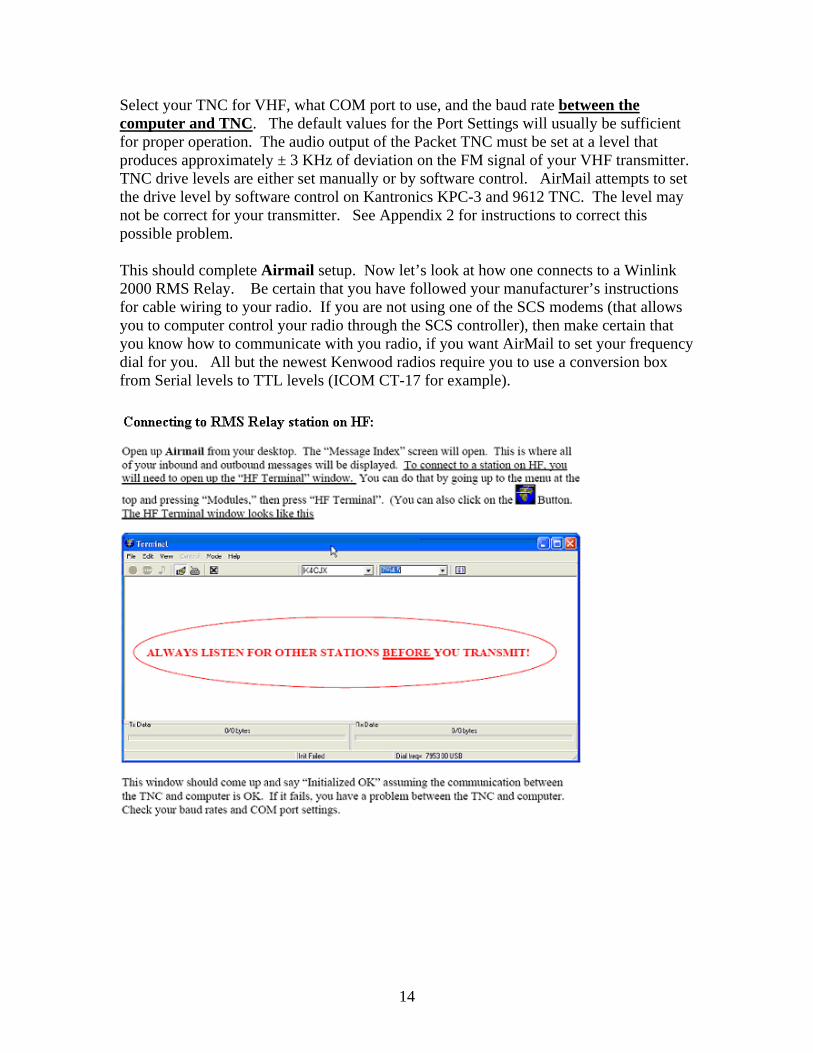
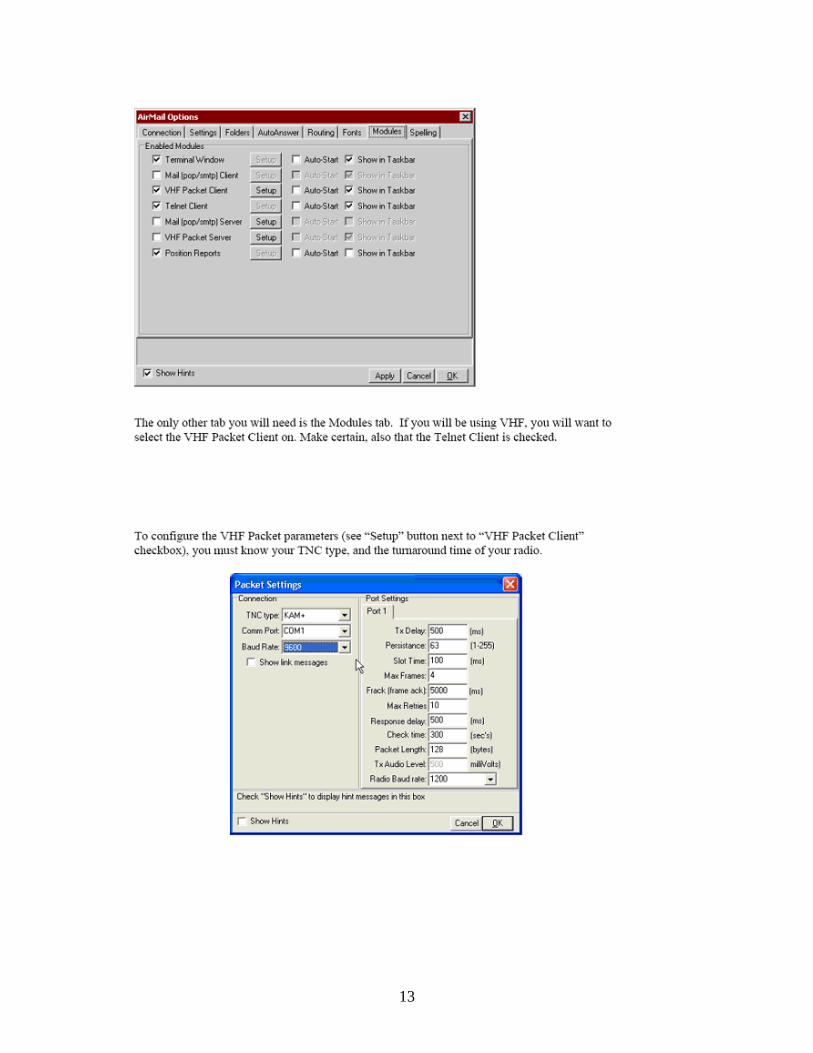
Select your TNC for VHF, what COM port to use, and the baud rate between the computer and TNC. The default values for the Port Settings will usually be sufficient for proper operation. The audio output of the Packet TNC must be set at a level that produces approximately ± 3 KHz of deviation on the FM signal of your VHF transmitter. TNC drive levels are either set manually or by software control. AirMail attempts to set the drive level by software control on Kantronics KPC-3 and 9612 TNC. The level may not be correct for your transmitter. See Appendix 2 for instructions to correct this possible problem. This should complete Airmail setup. Now let’s look at how one connects to a Winlink 2000 RMS Relay. Be certain that you have followed your manufacturer’s instructions for cable wiring to your radio. If you are not using one of the SCS modems (that allows you to computer control your radio through the SCS controller), then make certain that you know how to communicate with you radio, if you want AirMail to set your frequency dial for you. All but the newest Kenwood radios require you to use a conversion box from Serial levels to TTL levels (ICOM CT-17 for example).
14
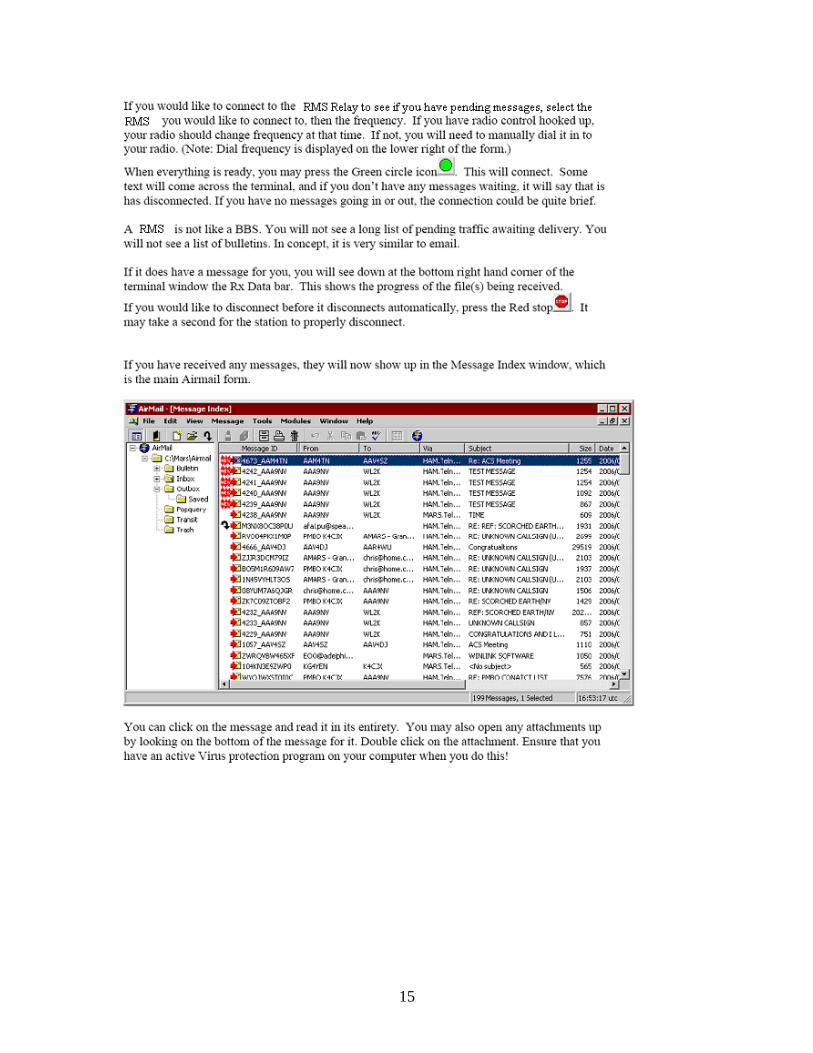
15
16

To make changes in an existing configuration, click on “Settings”. To add a new CMS, click on “New” and then fill in the settings as shown below and in Appendix 3.
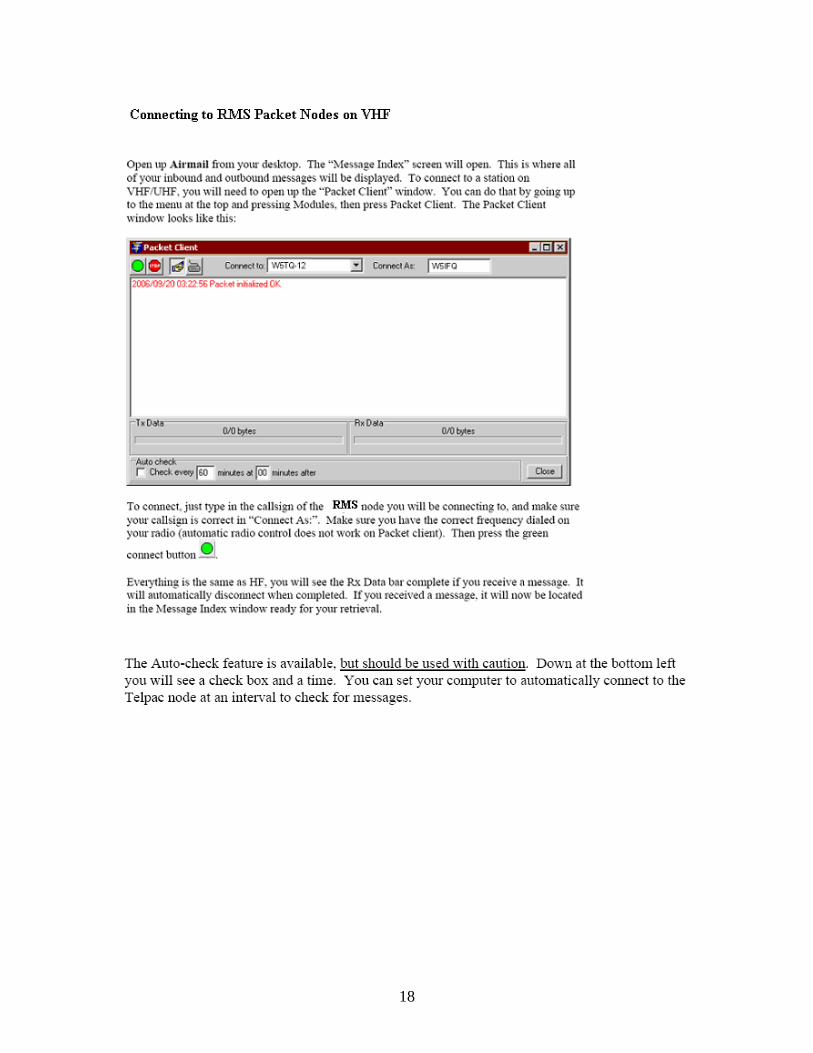
In order to use this module, port 8772 TCP must be opened. Protocol will always be B2. Several other PMBO addresses can be found in Appendix 3. NOTE: the auto-check feature shown in the two graphics above is not recommended for normal operation.
SANDIEGO.WINLINK.ORG (Complete address not visible)
17
18
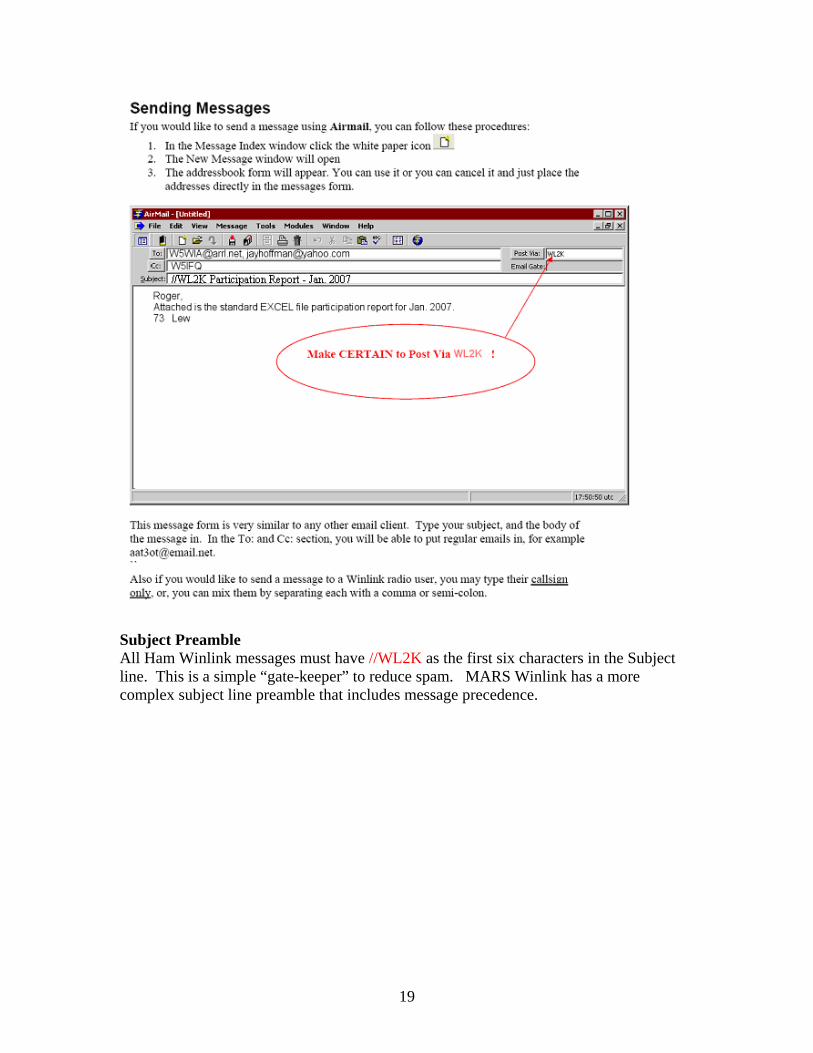
Subject Preamble All Ham Winlink messages must have //WL2K as the first six characters in the Subject line. This is a simple “gate-keeper” to reduce spam. MARS Winlink has a more complex subject line preamble that includes message precedence.
19
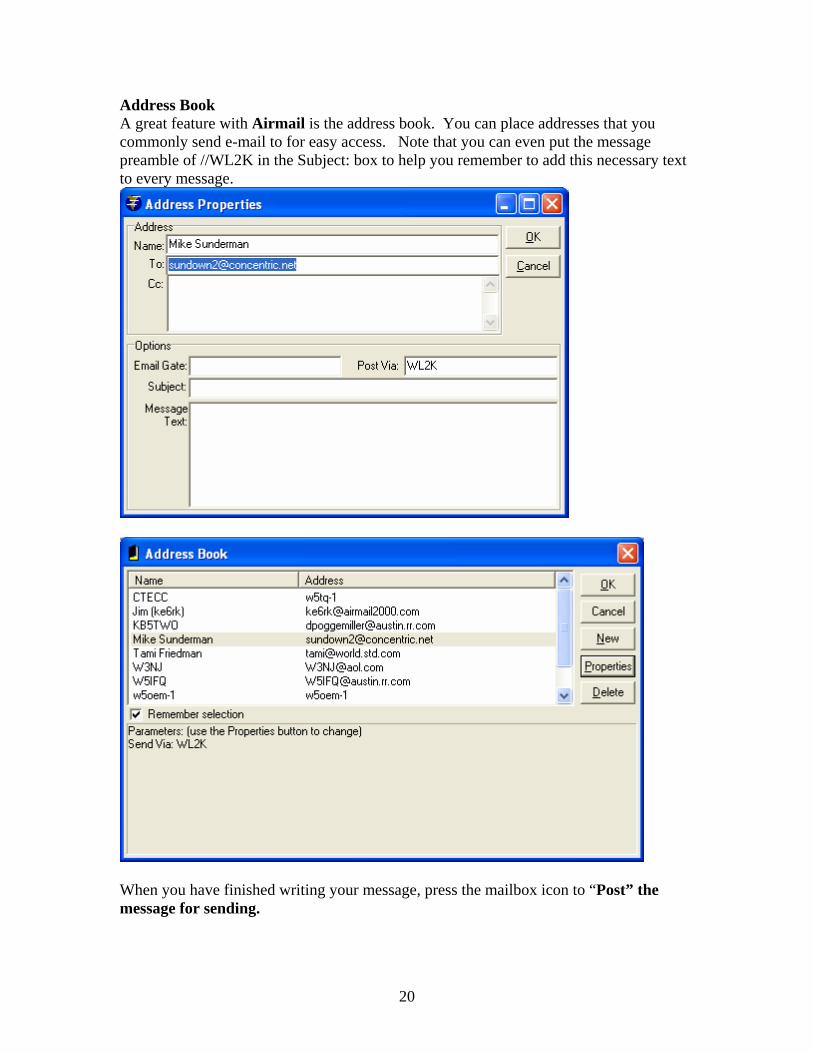
Address Book A great feature with Airmail is the address book. You can place addresses that you commonly send e-mail to for easy access. Note that you can even put the message preamble of //WL2K in the Subject: box to help you remember to add this necessary text to every message.
When you have finished writing your message, press the mailbox icon to “Post” the message for sending.
20
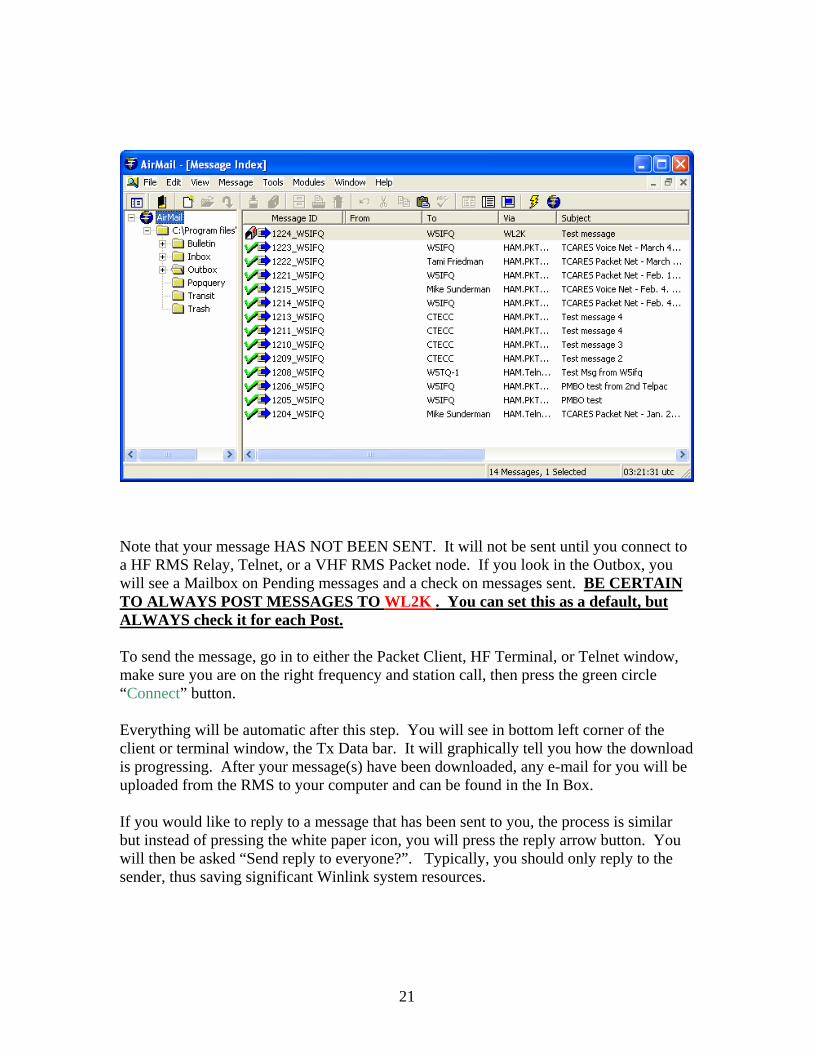
Note that your message HAS NOT BEEN SENT. It will not be sent until you connect to a HF RMS Relay, Telnet, or a VHF RMS Packet node. If you look in the Outbox, you will see a Mailbox on Pending messages and a check on messages sent. BE CERTAIN TO ALWAYS POST MESSAGES TO WL2K . You can set this as a default, but ALWAYS check it for each Post. To send the message, go in to either the Packet Client, HF Terminal, or Telnet window, make sure you are on the right frequency and station call, then press the green circle “Connect” button. Everything will be automatic after this step. You will see in bottom left corner of the client or terminal window, the Tx Data bar. It will graphically tell you how the download is progressing. After your message(s) have been downloaded, any e-mail for you will be uploaded from the RMS to your computer and can be found in the In Box. If you would like to reply to a message that has been sent to you, the process is similar but instead of pressing the white paper icon, you will press the reply arrow button. You will then be asked “Send reply to everyone?”. Typically, you should only reply to the sender, thus saving significant Winlink system resources.
21
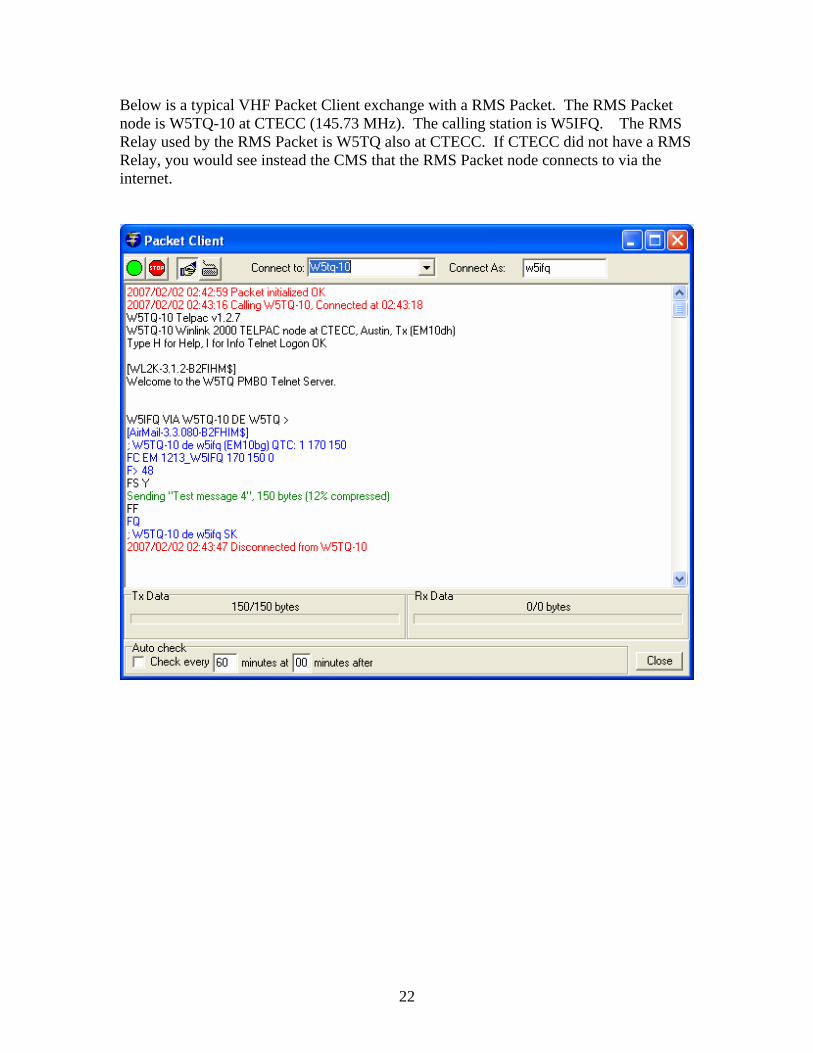
Below is a typical VHF Packet Client exchange with a RMS Packet. The RMS Packet node is W5TQ-10 at CTECC (145.73 MHz). The calling station is W5IFQ. The RMS Relay used by the RMS Packet is W5TQ also at CTECC. If CTECC did not have a RMS Relay, you would see instead the CMS that the RMS Packet node connects to via the internet.
22
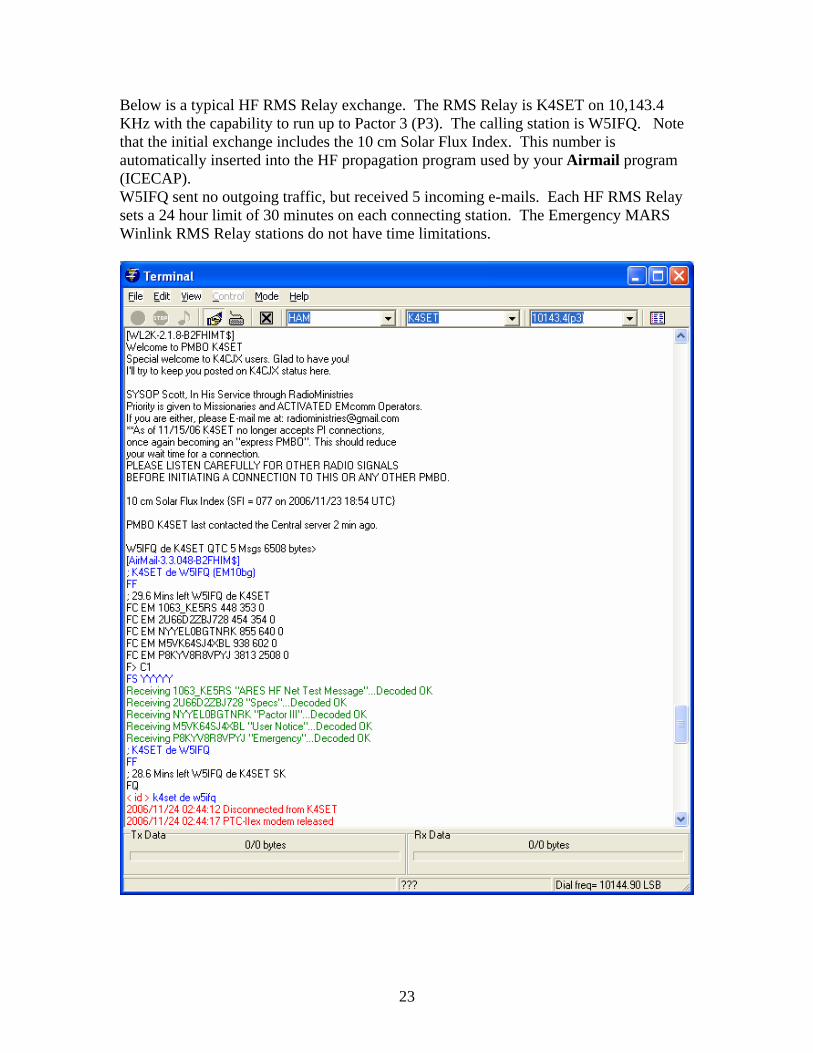
Below is a typical HF RMS Relay exchange. The RMS Relay is K4SET on 10,143.4 KHz with the capability to run up to Pactor 3 (P3). The calling station is W5IFQ. Note that the initial exchange includes the 10 cm Solar Flux Index. This number is automatically inserted into the HF propagation program used by your Airmail program (ICECAP). W5IFQ sent no outgoing traffic, but received 5 incoming e-mails. Each HF RMS Relay sets a 24 hour limit of 30 minutes on each connecting station. The Emergency MARS Winlink RMS Relay stations do not have time limitations.
23
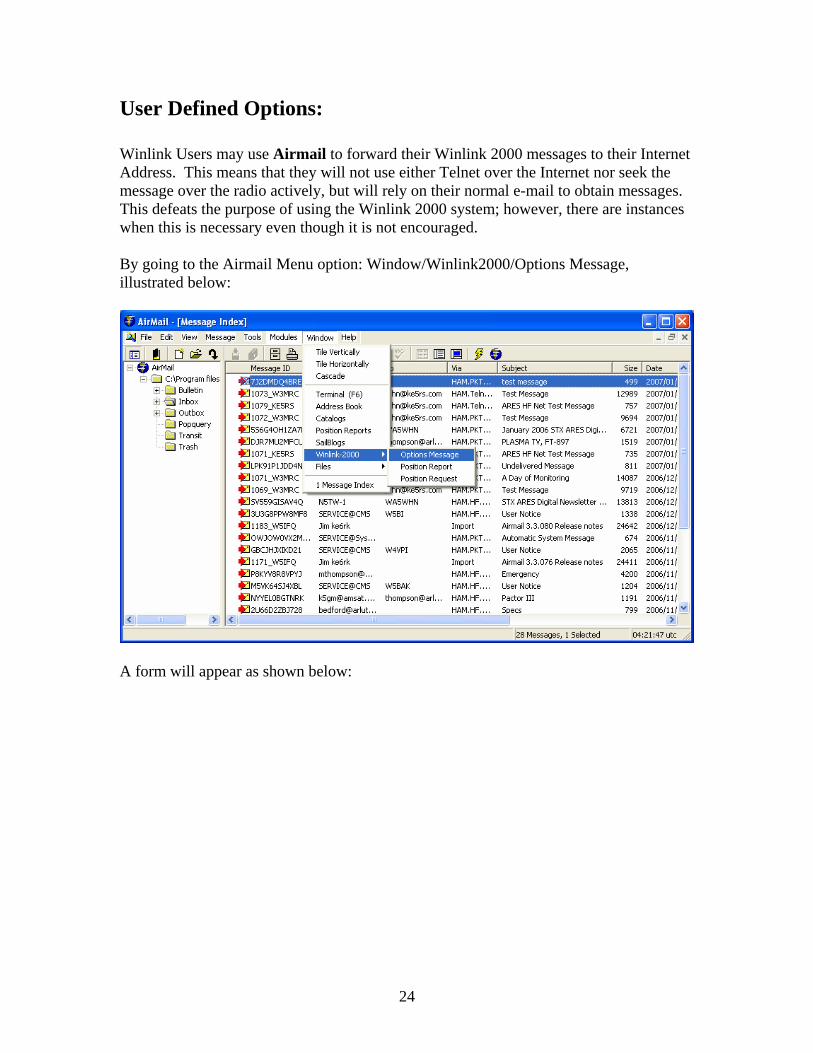
User Defined Options: Winlink Users may use Airmail to forward their Winlink 2000 messages to their Internet Address. This means that they will not use either Telnet over the Internet nor seek the message over the radio actively, but will rely on their normal e-mail to obtain messages. This defeats the purpose of using the Winlink 2000 system; however, there are instances when this is necessary even though it is not encouraged. By going to the Airmail Menu option: Window/Winlink2000/Options Message, illustrated below:
A form will appear as shown below:
24
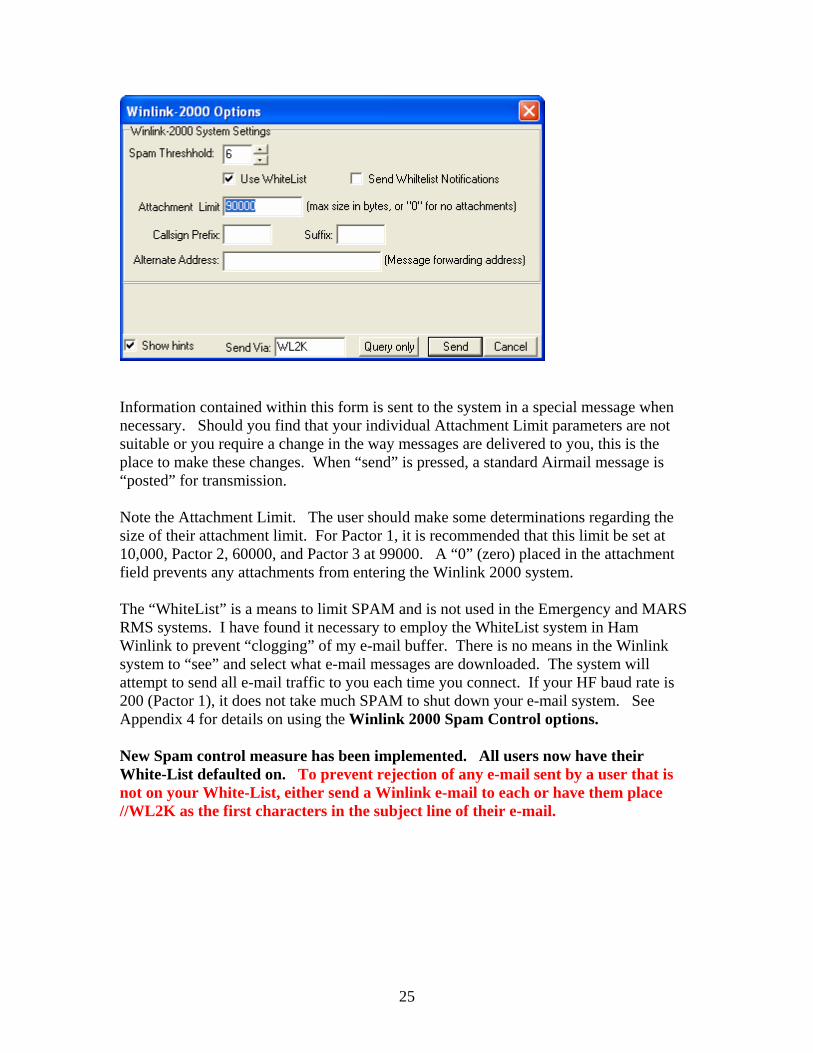
Information contained within this form is sent to the system in a special message when necessary. Should you find that your individual Attachment Limit parameters are not suitable or you require a change in the way messages are delivered to you, this is the place to make these changes. When “send” is pressed, a standard Airmail message is “posted” for transmission. Note the Attachment Limit. The user should make some determinations regarding the size of their attachment limit. For Pactor 1, it is recommended that this limit be set at 10,000, Pactor 2, 60000, and Pactor 3 at 99000. A “0” (zero) placed in the attachment field prevents any attachments from entering the Winlink 2000 system. The “WhiteList” is a means to limit SPAM and is not used in the Emergency and MARS RMS systems. I have found it necessary to employ the WhiteList system in Ham Winlink to prevent “clogging” of my e-mail buffer. There is no means in the Winlink system to “see” and select what e-mail messages are downloaded. The system will attempt to send all e-mail traffic to you each time you connect. If your HF baud rate is 200 (Pactor 1), it does not take much SPAM to shut down your e-mail system. See Appendix 4 for details on using the Winlink 2000 Spam Control options. New Spam control measure has been implemented. All users now have their White-List defaulted on. To prevent rejection of any e-mail sent by a user that is not on your White-List, either send a Winlink e-mail to each or have them place //WL2K as the first characters in the subject line of their e-mail.
25

26
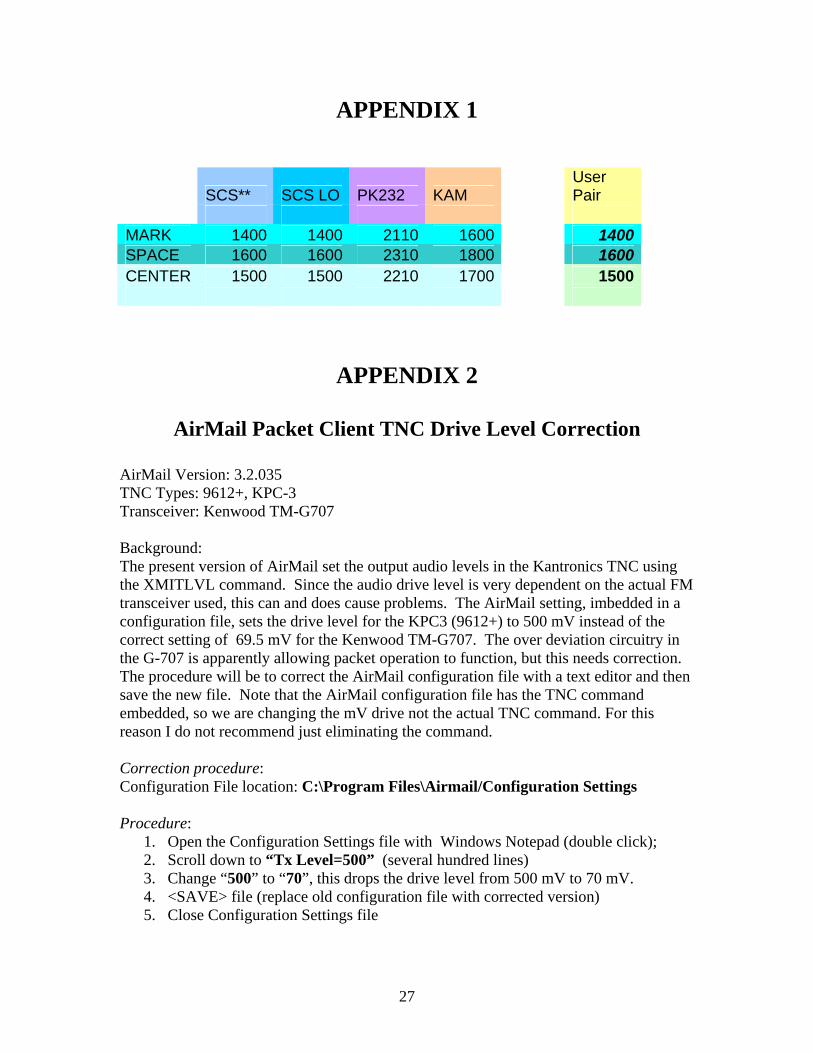
APPENDIX 1
SCS** SCS LO PK232 KAM User Pair
MARK 1400 1400 2110 1600 1400 SPACE 1600 1600 2310 1800 1600 CENTER 1500 1500 2210 1700 1500
APPENDIX 2
AirMail Packet Client TNC Drive Level Correction
AirMail Version: 3.2.035 TNC Types: 9612+, KPC-3 Transceiver: Kenwood TM-G707 Background: The present version of AirMail set the output audio levels in the Kantronics TNC using the XMITLVL command. Since the audio drive level is very dependent on the actual FM transceiver used, this can and does cause problems. The AirMail setting, imbedded in a configuration file, sets the drive level for the KPC3 (9612+) to 500 mV instead of the correct setting of 69.5 mV for the Kenwood TM-G707. The over deviation circuitry in the G-707 is apparently allowing packet operation to function, but this needs correction. The procedure will be to correct the AirMail configuration file with a text editor and then save the new file. Note that the AirMail configuration file has the TNC command embedded, so we are changing the mV drive not the actual TNC command. For this reason I do not recommend just eliminating the command. Correction procedure: Configuration File location: C:\Program Files\Airmail/Configuration Settings Procedure:
1. Open the Configuration Settings file with Windows Notepad (double click); 2. Scroll down to “Tx Level=500” (several hundred lines) 3. Change “500” to “70”, this drops the drive level from 500 mV to 70 mV. 4. <SAVE> file (replace old configuration file with corrected version) 5. Close Configuration Settings file
27
Testing: 1. Open AirMail and go to the Packet Client 2. Once Packet Client has successfully initializes, close the packet client window 3. Go to Options, <DUMB TERMINAL> 4. Set baud rate to 9600, click in the window after the last text (numbers) and then
hit <return>. You should now see the “cmd:” 5. Type XMITLVL <return> 6. The correct answer should be XMITLVL=139/255 7. The first of the two numbers is the drive level for port 1 with a sensitivity of 0.5
mV per count or 69.5 mV 8. If you get this answer, all is well and simply close AirMail, if not, go back and
check the Configuration Setting file again as described above.
APPENDIX 3
Winlink 2000 Telnet CMS Server Information
Remote Callsign = WL2K Host = Server.winlink.org Port = 8772 Timeout = 120 Local Callsign = (Your Ham callsign) Password = CMSTELNET Remote Callsign = WL2KH Host = Halifax.winlink.org Port = 8772 Timeout = 120 Local Callsign = (Your Ham callsign) Password = CMSTELNET Remote Callsign = WL2KS Host = Sandiego.winlink.org Port = 8772 Timeout = 120 Local Callsign = (Your Ham callsign) Password = CMSTELNET Remote Callsign = WL2KP Host = Perth.winlink.org Port = 8772 Timeout = 120 Local Callsign = (Your Ham callsign)
28

Password = CMSTELNET Remote Callsign = WL2KW Host = Washington.winlink.org Port = 8772 Timeout = 120 Local Callsign = (Your Ham callsign) Password = CMSTELNET
29
Appendix 4
WhiteList SPAM Control
SPAM User Control Options: Found in WL2K_HELP category, Check SPAM.CONTROL. As of July 30, 2005, the individual Winlink 2000 user now has control over the amount of unwanted message rejection they wish to deploy for their own account. There are two options available to the user: 1) The user may now manually compose and send an "OPTIONS Message" to SYSTEM with a subject of OPTIONS, designating which SPAM control options are requested, and 2) the user may turn their individual Acceptance list (Whitelist) on or off. THE DEFAULT OPTION IS WHITELIST ON AND A SPAM LEVEL OF 4. The SPAM control message should contain the information below, one line per individual instruction: SPAM THRESHOLD: (Integer between 2 and 10. a good value is 4 or 5, and 200 turns the SPAM filter OFF. Turning the SPAM filter OFF is not recommended even if the Whitelist is used. Keep it at a level of 5. WHITELIST: To Activate the Whitelist, use: TRUE, YES or ON. To deactivate the Whitelist, use: FALSE, NO or OFF. Examples are given below. These are NOT case sensitive Here is an example of using the Whitelist and NO additional SPAM control: TO: SYSTEM Subject: OPTIONS -------------------------- Whitelist: ON Spam Threshold: 200
30
**************************** Here is an example of no Whitelist and SPAM Control: TO: SYSTEM Subject: OPTIONS -------------------------- Whitelist: OFF Spam Threshold: 5 ***************************** USING THE WHITELIST: NOTE: The Whitelist will contain all e-mail addresses sent FROM your Winlink e-mail address even if you do not actually activate the list, and retain these Internet e-mail addresses for a period of 400 days from your last e-mail to that address. You may also send a system message to activate, delete, or reject an e-mail address. This is described below. Sending the following e-mail to: SYSTEM with subject: WHITELIST will assist you in controlling your own personal Whitelist. In the message body, the following options are available: LIST - would return a list of all whitelist entries for the user. ACCEPT: [email protected] - would allow messages from [email protected] to be accepted. You may send multiple lines, each containing one e-mail address. Reject: [email protected] - would reject any messages from [email protected]. You may send multiple lines, each containing one e-mail address. Delete: [email protected] - would remove [email protected] from the user's Whitelist. You may send multiple lines, each containing one e-mail address. Entries without the @ would be treated as "domain names" only. For example if "Accept: sailmail.com" were entered
31
32
then any message from that "domain name" (sailmail.com) would be accepted. The user's Whitelist is updated continuously, even if the user has the whitelist feature turned off, and will still build history, which will be functional if it is turned ON. An example of such a message to control the Whitelist: TO: SYSTEM Subject: WHITELIST ------------------- Accept: [email protected] ******************************* Another example: TO: SYSTEM Subject: WHITELIST ------------------- Accept: [email protected] Accept: [email protected] Accept: [email protected] Delete: [email protected] Delete: [email protected] Reject: [email protected] Reject: nogood.com Accept: sailmail.com Accept: ARRL.org ******************************* IMPORTANT: When you REJECT an address, you will NOT be notified that it came to you. When you DELETE an existing address, or if a new address attempt to send you an e-mail, you will receive a notice that the deleted or unapproved address is attempting to send you mail. This only happens on the first attempt. You can then either do nothing, send an accept message, or send an e-mail to the addressee requesting he send the email again. For help with any of the above information, contact Steve, [email protected].