basic mechanical principles - village volunteers · pdf filebasic mechanical principles: the...
TRANSCRIPT

Basic mechanical principles:
THE SIX SIMPLE MACHINES
Author: Gunnar Nelson
For those of you who are interested in mechanical devices, I'd like to introduce to you the six
simple machines: The lever, wheel & axle, pulley, inclined plane, wedge and screw. It is
helpful to understand how all of these things work as it will help you to understand how
complicated machines work using the same principles.
IMPORTANT TERMS
Before we start talking about simple machines there are two important terms you will need
to know:
FORCE: Force can be a push or a pull. For example, if you pull on the handle of a wagon or
cart you are exerting a pulling force. Also, if you push a door open, you are exerting a pushing
force on the door.
WORK: Work is force over a distance. For example, lifting a bucket of water requires you to
exert a pulling force on the handle to lift it off the ground. How far you lift the bucket off the
ground is the distance. So, exerting a pulling force to move the bucket a certain distance off the
ground is work.

THE LEVER
The first machine I will explain is the lever. The lever is actually made up of two pieces: a lever
(which could be a long, flat, wooden plank) and a fulcrum (which could be a round log or rock).
.
(As you can see in the drawing, the lever sits on top of the fulcrum.)
When the lever is on top of the fulcrum it is able to pivot from side to side. (See drawing below)

So far you're probably thinking "So what. So a lever can pivot around a fulcrum, what's so useful
about that?" But a lever can be a very useful tool because it allows us to lift heavy objects with
ease. To show you how this is possible, let's do a little experiment. First I'll give you some
instructions on how to build a lever. Then I'll show you how to do the experiment.
THE EXPERIMENT
LIST OF THINGS YOU WILL NEED:
1 Wooden plank about 2.5 to 3 meters long, at least 2.5 centimeters thick and about 20
centimeters wide.
1 Round log (the more round the better) about 20-25 centimeters in diameter and at least
as wide as the wooden plank preferably wider.
A group of friends who are all different sizes

Now that you have your materials you will need to put them together:
Step 1 First, find a flat, level, hard surface to place your log on.
NOTE: make sure the log is securely in place and that it will not roll easily out of
position. You may want to cut a flat spot into the bottom of the log or use a few
heavy rocks around the base of the log to keep it from rolling
Step 2 Next, place your wooden plank on top of the log making sure they are Perpendicular.
NOTE: Perpendicular is when two lines intersect at a 90 degree angle. Perpendicular
lines look like a plus sign +.
.
Step 3 Also, make sure the wooden plank is centered, lengthwise on the fulcrum.

Now that your lever is assembled we can begin the experiment:
1.) From your group of friends, pick two who are very different in weight.
(One much heavier than the other)
2.) Next, have them sit one at one end of the lever and one at the other end as shown
in the picture below.
NOTE: (Notice that the lever is touching the ground on the side where the heavier friend is
sitting and the lighter friend is off the ground.)
Now I'm going to show you how the lighter friend can lift the heavier friend off the ground!
1.) First, you will need your friends to get off the lever
2.) Then, roll the fulcrum closer to the side where the heavier friend will be sitting.
3.) Now, have your friends get back on the lever. (Remember to have the heavier
friend sit on the side of the lever that the fulcrum is closest to)

NOTE: (You may have to experiment by moving the fulcrum around to find the correct position
where the lighter friend will be able to lift the heavier friend.)
How is that possible? How could 31 kg lift 46 kg?
It's called: MECHANICAL ADVANTAGE!
And it's what makes levers a very useful tool!
NOTE: (I'm going to end my explanation here because the theory of mechanical advantage gets
complicated. However, if you are interested in learning more Wikipedia.com has a great
explanation of Mechanical Advantage, The Law of the Lever and some mathematical equations
related to mechanical advantage. Just copy and paste this link into the address bar on you internet
browser: http://en.wikipedia.org/wiki/Mechanical_advantage)

Let's sum up the important points about levers:
More Mechanical Advantage: If you are pushing down on one end of a lever, the
closer the fulcrum is to what you are trying to lift, the less force you need to exert to lift
it.
Less Mechanical Advantage: If you are pushing down on one end of a lever, the closer
the fulcrum is to you and the further it is away from what you are trying to lift, the more
force you have to exert to lift it.
There are some trade-offs to increasing mechanical
advantage.
As you increase mechanical advantage you decrease the distance you are able to
move the weight or the friend you are trying to lift

Here are some examples of levers that are used everyday:

Wheel and axle
"The simple machine called a wheel and axle refers to the assembly formed by two disks, or
cylinders, of different diameters mounted so they rotate together around the same axis."
(Definition taken from: http://en.wikipedia.org/wiki/Wheel_and_axle)
There are several ways a wheel and axle can be used including:
As a winch: The wheel has a groove running around its' circumference. A rope or cable is wound
around the wheel in the groove. A crank arm and handle are attached to one end of the axle. As the wheel
is rotated in one direction by applying force to the crank handle, the rope wraps around the wheel. Then,
as the wheel is rotated in the opposite direction, the rope unwraps from the wheel. If a load is attached to
the rope (let's say a bucket of water); if the wheel is rotated so that the rope wraps around it, the rope will
lift the bucket. Then, if the wheel is turned in the opposite direction so that the rope unwraps, the bucket
will be lowered.
On a wagon: The axle is attached to the bottom of the wagon and the wheel rotates on the axle.
NOTE: The following internet link will take you to a video that explains wheels and axles in
detail: http://www.youtube.com/watch?v=P7xu9O0miEc

Here are some examples of wheels and axles that you could
see everyday:

PULLEY
The pulley is very similar to the wheel and axle. It is made of a wheel (usually with a groove
around its outer edge), the wheel typically rides on an axle and the wheel and axle is mounted in
some sort of fixture. (See illustration below)
Pulleys are usually used with ropes, belts or cables running in their grooves. Used this way, the
pulley allows the rope, belt or cable to change direction while transmitting force.
Pulleys can also be used for mechanical advantage. To learn more about this just copy and paste
the following link into the internet address bar: http://www.youtube.com/watch?v=9T7tGosXM58

Places you might find pulleys in action:

INCLINED PLANE
The inclined plane is different from the first three machines we have discussed as it does not
move. An inclined plane is a flat surface that can be used to allow heavy loads to be moved over
vertical obstacles. Another name for an inclined plane is ramp.
As you can see in the picture below, the man pulling the wagon cannot go any further
because of the vertical obstacle.
However, if he uses an inclined plane (ramp) it will allow him to travel over the vertical
obstacle.

Like the lever, there are trade offs when using an inclined plane:
* Using an inclined plane makes it possible to travel over vertical obstacles by creating a
gentle slope to slowly lift the load, reducing the amount of force required to move it.
* The trade off is that the inclined plane increases the distance the load has to travel. In the
picture below: Distance A (length of inclined plane) is longer than distance B (the height
of the vertical obstacle).
IMPORTANT POINTS ABOUT INCLINED PLANES:
* The heavier the load you are trying to move, the longer the ramp you will need to move it
over a vertical obstacle. (As the ramp gets longer, the slope becomes less steep)
* Also, the taller the vertical obstacle, the longer the ramp you will need.
* If your load is light and you are more interested in going the shortest distance possible, a
shorter, steeper ramp can be used. This will increase the amount of force required to
move the load but you will not have to travel as long a distance.
* You don't just use inclined planes to go up hill; they can also be used to move heavy
objects over sharp drop-offs. Without an inclined plane, the heavy load you are moving
could fall and get damaged.

Here are some examples of inclined planes that are used
everyday:
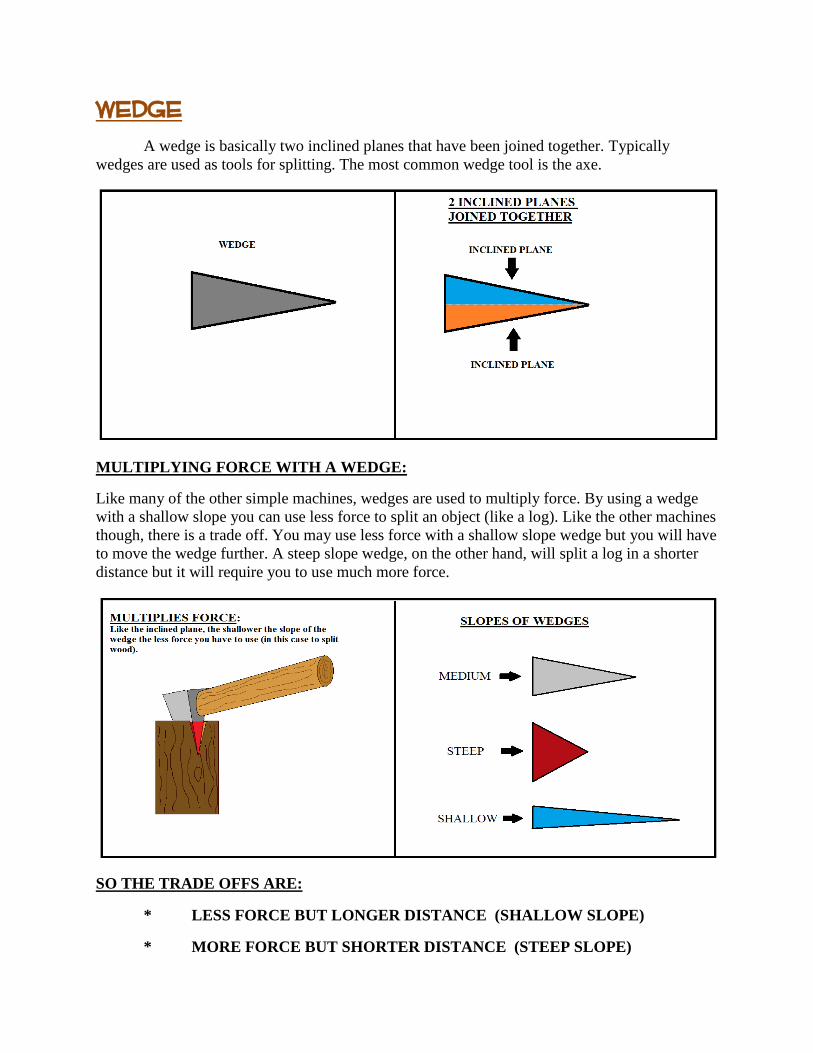
WEDGE
A wedge is basically two inclined planes that have been joined together. Typically
wedges are used as tools for splitting. The most common wedge tool is the axe.
MULTIPLYING FORCE WITH A WEDGE:
Like many of the other simple machines, wedges are used to multiply force. By using a wedge
with a shallow slope you can use less force to split an object (like a log). Like the other machines
though, there is a trade off. You may use less force with a shallow slope wedge but you will have
to move the wedge further. A steep slope wedge, on the other hand, will split a log in a shorter
distance but it will require you to use much more force.
SO THE TRADE OFFS ARE:
* LESS FORCE BUT LONGER DISTANCE (SHALLOW SLOPE)
* MORE FORCE BUT SHORTER DISTANCE (STEEP SLOPE)

Examples of some common wedge tools:
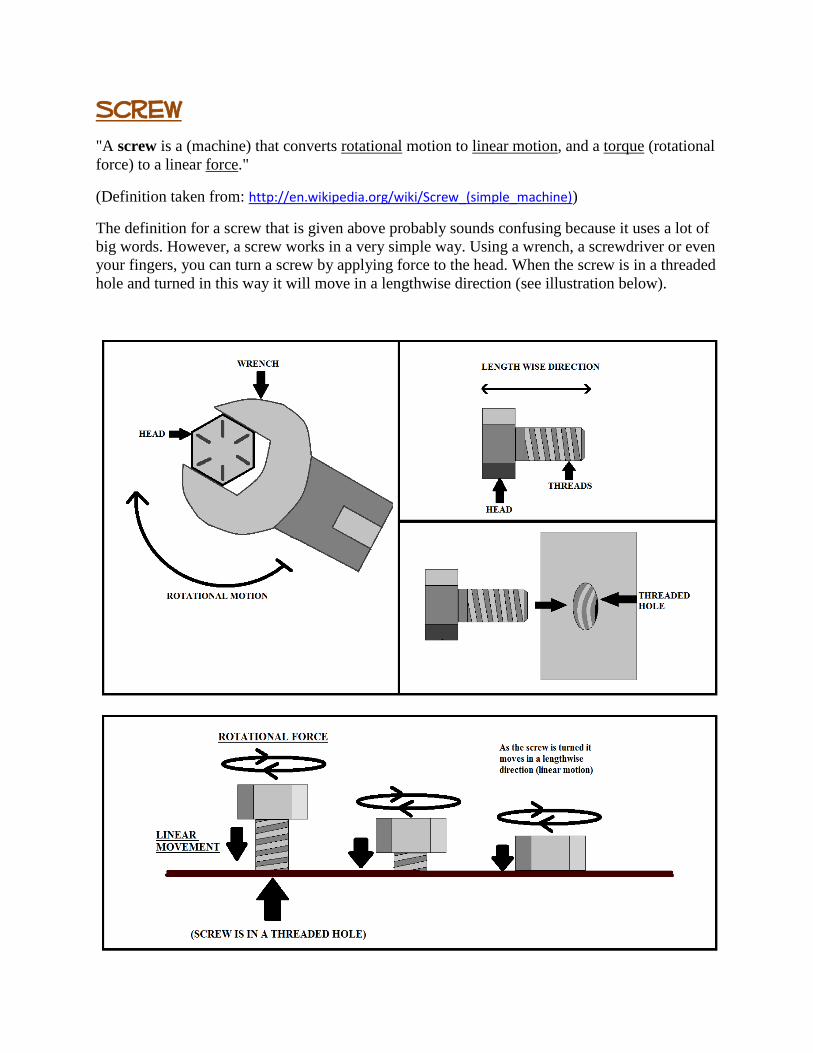
Screw
"A screw is a (machine) that converts rotational motion to linear motion, and a torque (rotational
force) to a linear force."
(Definition taken from: http://en.wikipedia.org/wiki/Screw_(simple_machine))
The definition for a screw that is given above probably sounds confusing because it uses a lot of
big words. However, a screw works in a very simple way. Using a wrench, a screwdriver or even
your fingers, you can turn a screw by applying force to the head. When the screw is in a threaded
hole and turned in this way it will move in a lengthwise direction (see illustration below).

Examples of how screws can be used: