backing up and restoring progeny databases · page 7 of 19 backing up a network (server-enabled)...
TRANSCRIPT

Rev. 1.1
Version 8
Backing Up and Restoring Progeny Databases

Page 2 of 19
Table of Contents
Introduction .......................................................................................................... 3
Backing up a standalone (local) database ............................................................ 3
Manual Backups ................................................................................................. 3
Manual Backup Frequency ................................................................................ 5
Restoring a Manual Backup ............................................................................... 6
Automatic Backups ............................................................................................ 6
Backing Up a Network (Server-Enabled) Database ............................................. 7
Network Backups from the Progeny Client ...................................................... 7
Network Backups from the Progeny Server Configuration Utility ................. 10
Restoring a Progeny Database from a Network Backup ................................ 17
If You Need Assistance Or Have Questions: ....................................................... 19

Page 3 of 19
Introduction Backing up your Progeny databases is perhaps one of the most critically important things
you need to do. Depending on how you use Progeny (server-enabled vs. standalone) there
are several methods for accomplishing this. The following documentation will guide you
through the process of setting up a bullet-proof backup system to ensure the safety of your
data and show you how to restore your databases from these backups should disaster
occur.
Backing up a standalone (local) database Because you do not have the Progeny Server Configuration Utility, your database is at even
more risk of data loss than other installations. Standalone installations have two main
methods for backing up databases: manual backups (creating ZIP files) and automatic
backups (using the DBBACKUP.exe program). We will cover both here.
Manual Backups
To create manual backups, the first thing you need to do is locate your database file. This is
accomplished by looking at where your Progeny Client points to the Local Database
connection you use to access your database. Use the image below to see where your
database is stored:

Page 4 of 19
Open your Windows Explorer (My Computer for XP users) and navigate to this folder. You
should see two files within this folder that contain your database information – both will
have the same name, and one will be the database file (.db) while the other will be your
transaction log (.log). BOTH of these files need to be backed up. The image below
demonstrates this:
To make our backup, we will select both the .db and .log files, then right click and choose
Send To Compressed (Zipped) Folder as seen in the image below:
Page 5 of 19
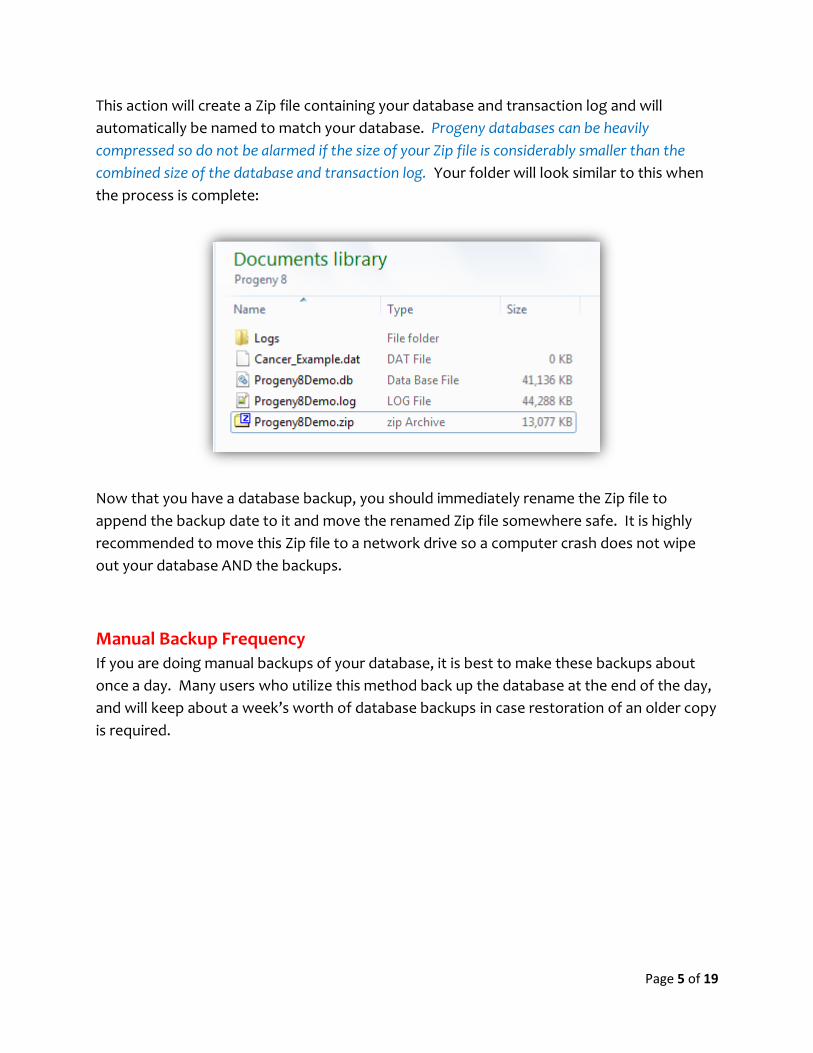
This action will create a Zip file containing your database and transaction log and will
automatically be named to match your database. Progeny databases can be heavily
compressed so do not be alarmed if the size of your Zip file is considerably smaller than the
combined size of the database and transaction log. Your folder will look similar to this when
the process is complete:
Now that you have a database backup, you should immediately rename the Zip file to
append the backup date to it and move the renamed Zip file somewhere safe. It is highly
recommended to move this Zip file to a network drive so a computer crash does not wipe
out your database AND the backups.
Manual Backup Frequency
If you are doing manual backups of your database, it is best to make these backups about
once a day. Many users who utilize this method back up the database at the end of the day,
and will keep about a week’s worth of database backups in case restoration of an older copy
is required.

Page 6 of 19
Restoring a Manual Backup
Should a database corruption or computer crash occur, you can easily restore your database
from a previous version by retrieving the appropriate Zip file from your network or other
backup location and moving it to your local computer. If the current database is corrupted
or otherwise unusable, either delete it or put it in a folder for later analysis. Right click your
Zip file, then choose Extract All to restore the database and log files to their former places.
NOTE: Often times the Extract All process will want to create a new folder for the extracted
files using the Zip file name as the name of the new folder. In the current example Extract All
would want to extract the files to the following folder:
C:\Users\stracey\Documents\Progeny 8\Progeny8Demo
If you remove the last part of this file path ( \Progeny8Demo) the database and log file will be
placed in the original folder they came from.
With the files restored to their original folder, you can now launch the Progeny Client and
access the restored database using your User Name and Password from before.
Automatic Backups
Progeny has a backup utility called DBBACKUP.exe which is a command-line tool used to
automate the process of backing up your database and transaction log. Combined with
Windows Scheduled Tasks, this can allow you to work without worry of data loss.
This process requires that you have specific permissions on your computer and experience in
both working with the Windows Command Line and creating batch files.
If you would like to set this process up on your system, please contact a Progeny Support
Technician to discuss your system configuration and permissions to determine if the
DBBACKUP.exe system can be used with your Progeny installation. The Progeny Support
Technician will then assist you in configuring and deploying this backup method. You can
reach Progeny Support:
By Email – [email protected]
By Phone – 1-800-PROGENY (800-776-4369)

Page 7 of 19
Backing Up a Network (Server-Enabled) Database The Progeny Server Configuration Utility allows you to set “events” which will automatically
create a copy of the database and transaction log at the time the event runs. You can have
as many events as you like, but each event MUST have its own folder assigned – instead of
creating dozens of copies of the database and transaction log files, the events will overwrite
the previous copy each time they run to minimize disk space.
You can create these events either through the Progeny Client application or directly
through the Progeny Server Configuration Utility. We will cover both of these methods –
however, as the method for restoring a database from these backups is identical the
restoration instructions will come at the end of this section.
NOTE: The Network Backup methods should only be performed by someone with access to
both the server desktop and the ‘progeny’ superuser ID.
Network Backups from the Progeny Client
The first step in setting up a backup system for your network databases is to create the
appropriate folder structure. You will need to create a backup folder for each database, and
inside each folder you will need a sub-folder for each backup event. On Progeny’s internal
servers, we have a folder in the root C:\ folder called ProgenyDatabases where we keep all
active and backup databases. Within this ProgenyDatabases folder, we have two sub-
folders: ActiveDatabases and DatabaseBackups. All operational databases are kept within
the ActiveDatabases folder and the DatabaseBackups folder contains a sub-folder for each
database in the ActiveDatabases folder. Finally, within each database sub-folder of
DatabaseBackups is a folder for each of the three backup events we configure. This
structure is depicted below:

Page 8 of 19
NOTE: As you are creating your folder structure, take note of the folder paths for each backup
event folder for each database. You will need this when configuring your backup events.
It is recommended when creating your backup folders that you create at least two events for
each database: one daily backup and one sequential backup that runs every couple hours.
When naming your backup folders, you should choose a name that starts with a letter and does
not contain any spaces.
Once your folder structure is in place, launch the Progeny client either from your desktop or
from the server (whichever is installed) and log into the network database using the
‘progeny’ superuser ID. Right click the folder tree root (look for the little monitor icon) and
select Automated Backups…
The Automated Backups menu manages all backup events for the network database. To
create a new event, click “New” and you will be prompted to create a name for your new
backup event. This name should correspond to one of the backup event folders you created
for this database on the server.

Page 9 of 19
Once you have a name in place, you will choose the backup type and enter the folder path
for the backup. You have two options here: “Backup Database + Log File” and “Backup Log
File Only.” Choose “Backup Database + Log File.”
The exact folder path, relative to the server, will be inserted in the “To Path:” field. If this
was a daily backup on one of Progeny’s internal servers, we would configure this to be:
C:\ProgenyDatabases\DatabaseBackups\Progeny8Demo\Daily
Next you will choose the backup frequency. There are several options here, so we’ll cover
them individually.
Every Day: Database event will run seven (7) days a week.
Only On: Database event will only run on the days specified (checked)
Once At: Backup event will run once per day, at the chosen time
Every: Backup event will run repeatedly during each day, according to the number of
minutes/hours specified
Finally, if you choose to have the database run more than once per day (using the Every:
option), you can set limiting hours on the backup event using the “Backup Time (Optional)”
section. The backup event will begin running at the first specified hour, and will stop
running at the second specified hour.

Page 10 of 19
When you have completed your configuration of the backup event, click the OK button to
commit the event. You should immediately re-open the Automated Backups menu to verify
that the backup event was successfully created. If the event shows in the Event Name field
(like below) then you know the backup event was successfully created.
Network Backups from the Progeny Server Configuration Utility
Power users can create database backup events directly from within the Progeny Server
Configuration Utility by logging directly into the database backend. Open the Progeny
Server Configuration Utility and choose Connections Connect With SQL Anywhere 11…
from the top menu.

Page 11 of 19
Once in the Connect menu, you can enter the connection information using the information
tabs if you like, but the simplest method for making a database connection is to use the
Connect Assistant (light blue area on the right side of the Connect menu). Follow the
prompts that the Connect Assistant provides, and when asked for a User ID and Password
you will need to use the ‘progeny’ superuser ID and password.
When you are successfully connected to the database backend, you will be shown a screen
that contains all the administrative-level functions and options within the database. Using
the Folders pane on the left-hand side scroll to the bottom of the list and select
Maintenance Plans from the list to view any active Maintenance Plans (Backup Events). If
you have previously configured a backup event from within the Progeny Client, you will see
it listed on the right-hand side; otherwise the area on the right will be empty.

Page 12 of 19
On the right-hand side, right click the empty space and choose New Maintenance Plan…
Enter a name for your Maintenance Plan (Backup Event). Unless your database file is very
large (>2GB), there is no need to choose either of the two options shown below the
Maintenance Plan name prompt.

Page 13 of 19
On the next screen, you will choose the start date and initial running time for the
Maintenance Plan (Backup Event).
If this Maintenance Plan will be running only once per day, the time you set here is
the time when the daily backup will run.
If this Maintenance plan will run on a repeating (sequential) basis, choose the option
at the bottom to specify how often the backup will occur. The Maintenance Plan will
first run at the time specified then continue according to the scheduled timeframe
you set.
Next you will choose which days of the week the Maintenance plan will run. Here you can
select specific days of the week, have it run seven (7) days a week (by choosing all days
Sunday-Saturday) or select specific days of the month for it to run.

Page 14 of 19
On the following page you have the choice to include a database validation when running
the Maintenance Plan. This is entirely optional, but Progeny does not recommend that you
bother with this page. Running validations with your Maintenance Plan will not gain you
much in terms of database safety and will make the Backup Events take significantly more
time to complete.
Page 15 of 19
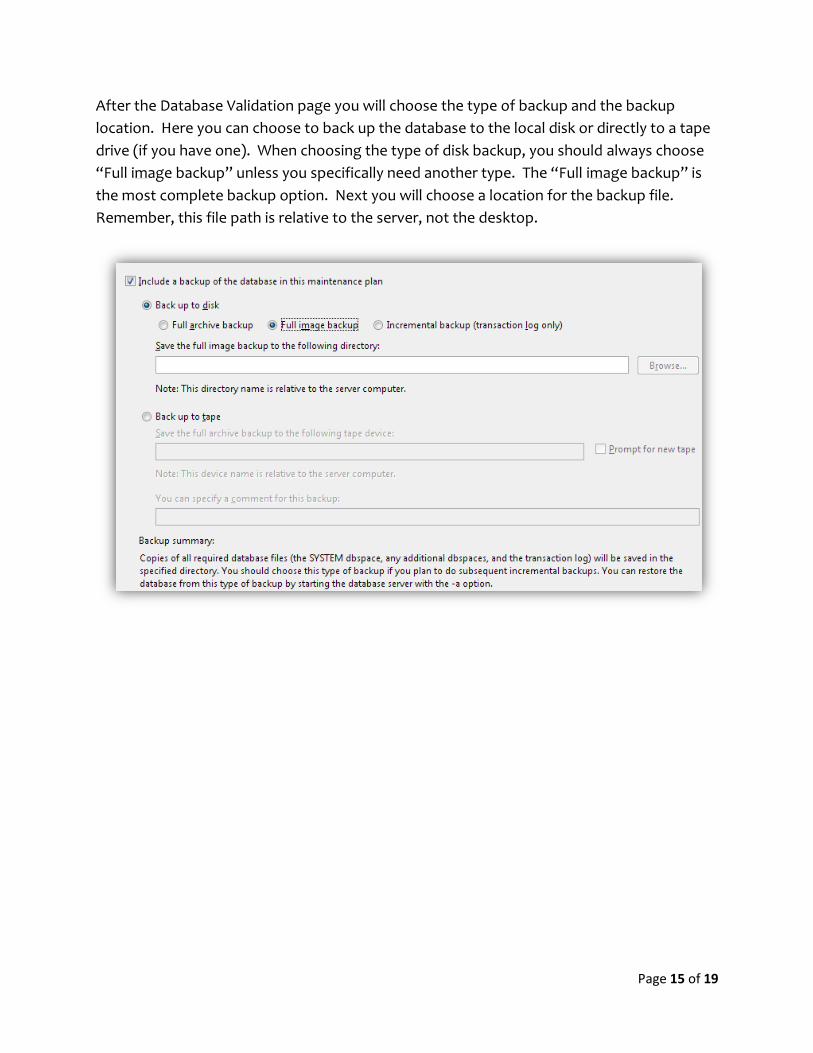
After the Database Validation page you will choose the type of backup and the backup
location. Here you can choose to back up the database to the local disk or directly to a tape
drive (if you have one). When choosing the type of disk backup, you should always choose
“Full image backup” unless you specifically need another type. The “Full image backup” is
the most complete backup option. Next you will choose a location for the backup file.
Remember, this file path is relative to the server, not the desktop.

Page 16 of 19
On the last page, you will have the option to have Maintenance Plan reports created/sent
automatically for each event. This is entirely optional, and can be a royal pain depending on
your network & security configurations so use this only if necessary.
This is the final page of the Maintenance Plan configuration, so click “Finish” when
complete. When the Create Maintenance Plan Wizard closes, you will see your new backup
event listed on the right-hand side of the window.

Page 17 of 19
Restoring a Progeny Database from a Network Backup
Should your server crash or the database become corrupted or otherwise unusable, the first
step is to stop the database service. Open the Progeny Server Configuration Utility, click
SQL Anywhere 11 Services Tab, then right click the database service in question and
choose Stop.
Once stopped, you will see the icon next to the database service showing a red square.
NOTE: Don’t close this window yet – you will be coming back to this in a few steps to restart the
database service!
Navigate to the backup event folder you want to restore to and select both the database
and log files. Right click the selected files then choose Send To Compressed (Zipped)
Folder.
Once the Zip file has been created, copy it.

Page 18 of 19
Go to the folder containing your active databases and either delete the database & log files
or move them to another folder for later analysis. Paste the Zip file into this folder, then
right click the Zip file and choose Extract All…
NOTE: Often times the Extract All process will want to create a new folder for the extracted
files using the Zip file name as the name of the new folder. In the current example Extract All
would want to extract the files to the following folder:
C:\Users\stracey\Documents\Progeny 8\Progeny8Demo
If you remove the last part of this file path ( \Progeny8Demo) the database and log file will be
placed in the original folder they came from.
Now you cannot immediately restart the network database service – these backup files need
to be activated first.
If you have the Progeny Client installed on the server, launch the application and
locally log into the database. To do this, make sure the Local Database radio button is
chosen, then click Browse and navigate to the database file. Log in using the
‘progeny’ superuser ID and password. Once you get to the Main screen, you can
close the application as the database is now active.
If you do not have the Progeny Client installed on the server, you will need to copy
the Zip file down to a desktop that has the Client application installed. Extract the
database and log files, then use the instructions in the bullet point above to activate
the database. Once active, put the newly-activated database and log files into a NEW
Zip file, then copy this new Zip file back up to the server and Extract the activated
files into the folder where you keep your active databases.
Page 19 of 19
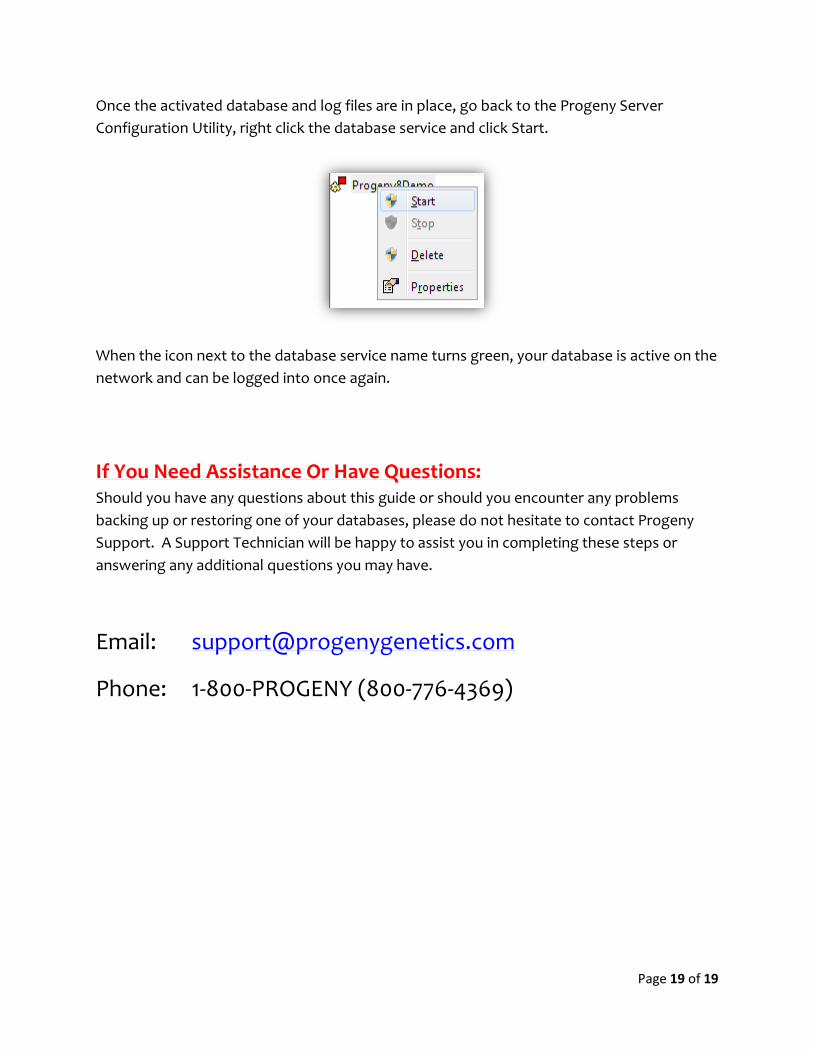
Once the activated database and log files are in place, go back to the Progeny Server
Configuration Utility, right click the database service and click Start.
When the icon next to the database service name turns green, your database is active on the
network and can be logged into once again.
If You Need Assistance Or Have Questions: Should you have any questions about this guide or should you encounter any problems
backing up or restoring one of your databases, please do not hesitate to contact Progeny
Support. A Support Technician will be happy to assist you in completing these steps or
answering any additional questions you may have.
Email: [email protected]
Phone: 1-800-PROGENY (800-776-4369)