ace management server administrator’s manual · you can find the most up-to-date technical...
TRANSCRIPT
ACE Management ServerAdministrator’s Manual
VMware ACE 2.5

VMware, Inc.3401 Hillview Ave.Palo Alto, CA 94304www.vmware.com
2 VMware, Inc.
ACE Management Server Administrator’s Manual
You can find the most up-to-date technical documentation on the VMware Web site at:
http://www.vmware.com/support/
The VMware Web site also provides the latest product updates.
If you have comments about this documentation, submit your feedback to:
© 2007, 2008 VMware, Inc. All rights reserved. Protected by one or more U.S. Patent Nos. 6,397,242, 6,496,847, 6,704,925, 6,711,672, 6,725,289, 6,735,601, 6,785,886, 6,789,156, 6,795,966, 6,880,022, 6,944,699, 6,961,806, 6,961,941, 7,069,413, 7,082,598, 7,089,377, 7,111,086, 7,111,145, 7,117,481, 7,149,843, 7,155,558, 7,222,221, 7,260,815, 7,260,820, 7,269,683, 7,275,136, 7,277,998, 7,277,999, 7,278,030, 7,281,102, 7,290,253, 7,356,679, 7,409,487, 7,412,492, 7,412,702, and 7,424,710; patents pending.
VMware, the VMware “boxes” logo and design, Virtual SMP, and VMotion are registered trademarks or trademarks of VMware, Inc. in the United States and/or other jurisdictions. All other marks and names mentioned herein may be trademarks of their respective companies.
ACE Management Server Administrator’s ManualItem: EN-000042-00
VMware, Inc. 3
Contents
About This Book 7
1 Introduction 9Features of ACE Management Server 9System Requirements 11
Required Hardware 11Supported Operating Systems 11Supported External Databases 12Supported Proxies 12Required Web Browsers 12Licensing 12
2 Planning an ACE Management Server Deployment 13Deployment Components 13
Host System Options 15Windows Hosts 15Linux Hosts 15Server Appliance Option 15
Database Options 16Active Directory Authentication Options 17
Performing Capacity Planning 17Database Throughput and Scalability 18LDAP Throughput 18Network Bandwidth and Policy Update Frequency 19ACE Policy Configuration 20Load Balancers 20
Security Features and Considerations 20Using SSL Certificates and Protocol 21
Accessing ACE Management Server from Outside the Corporate Firewall 22Deployment Planning Worksheet 24
ACE Management Server Administrator’s Manual
4 VMware, Inc.
3 Installing and Configuring ACE Management Server 25Preparing for Installation 25
Configure TLS in Your Browser 26Installing and Upgrading ACE Management Server 26
Install an ACE Management Server on a Windows Host 27Install ACE Management Server on a Linux System 28Install an ACE Management Server Appliance 29
Verify That the Apache Service Is Started or Restarted 31Start and Configure ACE Management Server 33Log In to ACE Management Server 34
4 Configuration Options for ACE Management Server 37Prerequisites for Configuring the Server 37
Create Users and Groups for Integration with Active Directory 38Set Up an External Database 39
Creating a System DSN Entry for an External Database 40Increase the Number of Database Connections Allowed 42Enable Database Connection Pooling on Linux 43Set Up a Connection Between the Server Appliance and an External
Database 43Prepare Custom Security Certificates 44
View the Properties of the Self‐Signed Certificate File 45Starting ACE Management Server Configuration 45Viewing and Changing Licensing Information 46Using an External Database 46Creating Access Control 47Uploading Custom SSL Certificates 48Logging Events 49Applying Configuration Settings 50
5 Load‐Balancing Multiple ACE Management Server Instances 51Typical Setup Using Load‐Balanced ACE Management Server Instances 52Install the Required Services for Load Balancing 53Use the Same SSL Certificate on All Servers 53Create New SSL Certificates and Keys for Each Server 55Installing and Configuring the Load Balancer 57Verify That ACE Instances Are Using the Load Balancer 57

VMware, Inc. 5
Contents
6 Managing ACE Instances 59Viewing ACE Instances That the Server Manages 60
Use the VMware ACE Help Desk Application 60Use the Instance View in Workstation 61
Search for an Instance 62Sort by Column Heading and Change Column Width 63Show, Hide, and Move Columns in the Instance View 64Create or Delete Custom Columns in the Instance View 64View Instance Details 65Reactivate, Deactivate, or Delete an ACE Instance 65Change a Copy Protection ID 66Reset the Authentication Password 66Add Information for Custom Columns 67
7 Troubleshooting and Maintenance 69Troubleshooting Configuration Problems 69
Connection Problems Between a Linux ACE Instance and ACE Management Server 69
Change the Port Assignment for ACE Management Server 70Delete the Server Configuration File and Set a New Administrator
Password 71Restore a Backup Copy of an SSL Certificate 72
Configuring Multiple ACE Management Server Instances to Use SSL 73Database Backup 74
Appendix: Database Schema and Audit Event Log Data 75Using Database Reporting Tools 75Database Schema 76Querying the Audit Event Log Data 81
Glossary 85
Index 89

ACE Management Server Administrator’s Manual
6 VMware, Inc.

VMware, Inc. 7
This manual, the VMware ACE Management Server Administrator’s Manual, provides information about installing and using the VMware® ACE Management Server, which enables you to manage ACE instances in real time. Using ACE Management Server is optional, but doing so provides the following benefits:
Manage activation of ACE packages.
Manage authentication of those activated packages.
Dynamically deliver policy updates to managed ACE instances.
Dynamically deliver instance customization data for managed ACE instances with Windows guest operating systems.
Intended AudienceThis book is intended for anyone who needs to install, upgrade, or use ACE Management Server to manage ACE instances. ACE Management Server is intended for ACE administrators who must maintain and update ACE policies used on virtual machines deployed throughout an enterprise.
Document FeedbackVMware welcomes your suggestions for improving our documentation. If you have comments, send your feedback to:
About This Book
ACE Management Server Administrator’s Manual
8 VMware, Inc.
Technical Support and Education ResourcesThe following sections describe the technical support resources available to you. To access the current versions of this book and other books, go to:
http://www.vmware.com/support/pubs
Online and Telephone SupportUse online support to submit technical support requests, view your product and contract information, and register your products. Go to:
http://www.vmware.com/support
Customers with appropriate support contracts should use telephone support for the fastest response on priority 1 issues. Go to:
http://www.vmware.com/support/phone_support.html
Support OfferingsFind out how VMware support offerings can help meet your business needs. Go to:
http://www.vmware.com/support/services
VMware Professional ServicesVMware Education Services courses offer extensive hands‐on labs, case study examples, and course materials designed to be used as on‐the‐job reference tools. Courses are available onsite, in the classroom, and live online. For onsite pilot programs and implementation best practices, VMware Consulting Services provides offerings to help you assess, plan, build, and manage your virtual environment. To access information about education classes, certification programs, and consulting services, go to:
http://www.vmware.com/services

VMware, Inc. 9
1
The VMware ACE Management Server enables you to manage VMware ACE instances, to dynamically publish policy changes for those instances, and to test and deploy packages more easily.
This chapter includes the following topics:
“Features of ACE Management Server” on page 9
“System Requirements” on page 11
Features of ACE Management ServerACE Management Server offers scalability and reliability:
You can increase capacity by adding network resources such as load balancers and extra server hardware.
For testing environments, the default embedded backing store provides a simple and efficient database solution. To scale ACE Management Server for production deployments, you can configure and use an external relational database management system (RDBMS).
In Windows, multithreaded processes handle server requests. In Linux, multiple processes handle server requests. If one process fails, another takes over.
ACE Management Server offers Active Directory integration:
You can use Active Directory to authenticate users of ACE instances.
You do not need a schema change for your existing Active Directory.
LDAP is used to access Active Directory.
Introduction 1

ACE Management Server Administrator’s Manual
10 VMware, Inc.
Information about Windows domain user account states is provided in clear and useful messages. Reasons for login failures are presented as “locked out” or “password expired.”
ACE Management Server acts as an Active Directory password change proxy.
You can use the instance customization feature in ACE with your own established naming conventions to associate users with machines.
Security features include the following:
Encrypted communications between server and clients travel over HTTPS traffic.
Passwords are stored securely in hashed form in the backing store.
Flexible database options allow use of an embedded database or external RDBMS to store ACE instance data and policies.
ACE Management Server is easy to install and configure. Client traffic can be proxied by easily available products. The server uses easily available software components:
Apache Web server 2.0
The default SQLite database store
The server setup uses industry‐standard protocols:
HTTPS and LDAP
XML‐RPC for message encapsulation
ACE Management Server offers extensibility and availability:
You can create and use more than one ACE Management Server. When you use more than one server, you can set the servers up so that they share the same database for load balancing or increased fault tolerance.
A Windows ACE Management Server can be on the same system as Workstation.
You can designate a single ACE Management Server name, such as https://ace.policyserver.company.com, and use DNS lookup to translate the host name to an address. The address is cached if a DNS server is not available. Additionally, you can use different ACE Management Server instances if users travel between offices in different geographic locations.
NOTE Your server name must be either the machine name in English or the IP address. International characters are not supported.

VMware, Inc. 11
Chapter 1 Introduction
System RequirementsThe following sections describe the ACE Management Server system requirements.
Required HardwareA minimum of an 800MHz‐compatible x86 and x86‐64 architecture processor
Compatible processors include:
Celeron, Pentium II, Pentium III, Pentium 4, Pentium M (including computers with Centrino mobile technology), Xeon (including Prestonia), AMD, Athlon, Athlon MP, Athlon XP, Duron, Opteron, AMD64 Opteron, and Athlon 64
Experimental support for Intel IA‐32e CPU
40MB of free space is required for basic installation. VMware recommends at least 10GB of free disk space.
An 8‐bit display adapter is required.
For local area networking, any Ethernet controller that the operating system supports is sufficient.
Supported Operating SystemsFollowing are the supported operating systems for ACE Management Server:
Windows Server 2003 Web Edition SP1 and SP2, Windows Server 2003 Standard Edition SP1 and SP2, Windows Server 2003 Enterprise Edition SP1 and SP2 (includes 64‐bit and R2 editions)
Windows XP Professional (includes 64‐bit editions)
Windows 2000 Server Service Pack 4 and Windows 2000 Advanced Server Service Pack 4
Red Hat Enterprise Linux Advanced Server 4.0 with Update 4.
SUSE Linux Enterprise Server 9 Service Pack 3
ACE Management Server Administrator’s Manual
12 VMware, Inc.
Supported External DatabasesAn SQLite database engine is embedded in the ACE Management Server. Although this database is adequate for testing purposes, use one of the following external databases in production environments:
Windows‐based servers – Microsoft SQL Server 2000 or higher; Oracle Database 10g
If you use a Microsoft SQL Server database, the database must be hosted on a system that uses the same locale as the system that hosts ACE Management Server. For example, if ACE Management Server is installed on a Japanese system, the database server must also be installed on a Japanese system and must use Japanese collation.
Linux‐based servers – PostgreSQL 7.4 or higher; Red Hat Enterprise Linux Advanced Server 4.5 or higher.
Supported ProxiesYou can deploy ACE Management Server with the following HTTPS proxy solutions:
Apache Proxy – Using mod_proxy
Zeus Technology Load Balancer – A commercially available load balancer and traffic management solution
Required Web BrowsersThe browser‐based ACE Management Server Setup application and the VMware ACE Help Desk application require one of the following Web browsers:
Mozilla Firefox 1.52 or higher
Internet Explorer 6.0 or higher
LicensingYou must configure the server and enter the serial number in the server setup Web application. If you do not, you cannot connect to the server in Workstation.
Your serial number is on the registration card in your package. If you purchased VMware ACE online, the serial number is sent by email. Workstation and ACE instances cannot connect to an ACE Management Server with an expired or nonexistent license.

VMware, Inc. 13
2
This chapter provides guidelines for deploying VMware ACE Management Server instances, including capacity planning and best practices. This chapter includes the following topics:
“Deployment Components” on page 13
“Performing Capacity Planning” on page 17
“Security Features and Considerations” on page 20
“Accessing ACE Management Server from Outside the Corporate Firewall” on page 22
“Deployment Planning Worksheet” on page 24
Deployment ComponentsA typical ACE Management Server deployment has the following components:
One or more ACE Management Server instances – Configuring multiple servers to use the same database increases the number of ACE clients you can manage and guarantees high availability.
Database server – For production deployments, VMware recommends Oracle Database 10g or MS‐SQL for ACE Management Server installed on a Windows host, and Postgres for ACE Management Server installed on a Linux host.
(Optional) Active Directory domain controller – To enable the ACE Management Server Active Directory integration, you must configure ACE Management Server to communicate with your domain controller.
Planning an ACE Management Server Deployment 2

ACE Management Server Administrator’s Manual
14 VMware, Inc.
(Optional) HTTP load balancer – Use a load balancer to help scale the capacity of your ACE Management Server deployment.
(Optional) HTTP proxy – If clients will access ACE Management Server from outside the corporate firewall, VMware recommends using an HTTPS proxy in the DMZ. You can use ACE Management Server with Apache Proxy and Zeus Technology Load Balancer.
For an example of an ACE Management Server deployment, see Figure 2‐1.
Figure 2-1. Comprehensive ACE Management Server Deployment
ACE Management Server offers convenience and flexibility in its setup options.
You can install the server on Windows or Linux hosts. For testing purposes, you can download and run the server as a virtual appliance. ACE Management Server includes its own security certificates and embedded database, but you can use an external database and use certificates from a certificate authority if you prefer. You can also configure ACE Management Server to use Active Directory for authentication.
ACE Management Server(one or more)
Active Directorydomain controller
(optional)
databaseserver
proxy for ACE Management Server service through corporate firewall
(optional)
WSAE client(within
corporatenetwork)
loadbalancer(optional)
ACE Player client(outside corporate network)
ACE Player client(within
corporatenetwork)
LDAPKerberos
ODBC
HTTPS
HTTPS
HTTPS
HTTPSHTTPS
VMware, Inc. 15
Chapter 2 Planning an ACE Management Server Deployment
Host System OptionsYou can install ACE Management Server on a Windows host, a Linux host, or as a virtual appliance. If you set up multiple ACE Management Server instances, they must all be the same type.
Windows Hosts
If you plan to integrate with Active Directory, VMware recommends that you install ACE Management Server on a Windows host.
The Windows ACE Management Server uses the WinLDAP library bundled with your Windows operating system to integrate with Active Directory. Internal testing results indicate that the Windows implementation provides better performance than Linux.
Linux Hosts
You can install ACE Management Server on a Linux host and use Active Directory for authentication, even though performance is slower than on Windows hosts. If you plan to use a Linux host in production environments, use the Linux installer rather than the ACE Management Server appliance. If you do not have the supported Linux operating systems installed on a physical server, you can create a virtual machine, install a supported Linux operating system, and install ACE Management Server in the virtual machine.
Server Appliance Option
The ACE Management Server appliance is a self‐contained, preinstalled, and preconfigured ACE Management Server packaged with a small Linux operating system in a virtual machine. The appliance is convenient and quick to set up in a testing environment but is not recommended for production environments.
By default, the appliance attempts to configure its network by using DHCP. If you do not want to use DHCP, you can use the browser‐based ACE Management Server Setup application to configure the network settings. You can use the same interface to update the appliance when updates become available.
You must have access to a Web browser (Mozilla 1.52 or higher or Internet Explorer 6.0 or higher) to change network settings or obtain updates for the appliance.

ACE Management Server Administrator’s Manual
16 VMware, Inc.
Database OptionsACE Management Server offers the following database options:
Embedded SQLite database – The default mode of ACE Management Server works with an embedded SQLite 3 database engine. The SQLite database engine is initialized during server installation and requires no special configuration. The embedded database supports up to several gigabytes of data.
The SQLite database is file based and is not designed to be effectively shared across multiple processes. If you use third‐party tools to access the database for a read operation, therefore, you cannot depend on transactional isolation of the pending write operations of the ACE Management Server.
The embedded database is adequate for testing purposes, but VMware recommends that you use an external database in production environments.
Supported external database – In production environments, use a supported external database as a backing store for ACE Management Server, through ODBC connectivity. Supported external database engines are the following:
On Windows, Microsoft SQL Server (SQL Server 2000 or SQL Server 2005) and Oracle Database 10g
On Linux, PostgreSQL 7.4 or higher
Using an external database with ACE Management Server offers the following benefits:
Online backup so that you do not have to shut down ACE Management Server to back up the database.
Enhanced security model. You can fine‐tune permissions to access sensitive data. The SQLite database engine provides file‐system based security.
Performance fine‐tuning.
Ability to use external database management and reporting tools.
Ability to use load balancers with multiple ACE Management Server instances. You must use an external RDBMS as the backing store, because the SQLite database is not designed to be effectively shared across multiple processes.
NOTE If ACE Management Server is deployed in the DMZ, use an external database located inside your corporate network behind a firewall.

VMware, Inc. 17
Chapter 2 Planning an ACE Management Server Deployment
Active Directory Authentication OptionsActive Directory integration provides the following benefits:
Permits joining an operating system that is running an ACE instance to the domain remotely.
Provides search functions so you can quickly find a particular individual or group.
Enables you to use Active Directory Users and Groups to configure role‐based access to the features of ACE Management Server.
Performing Capacity PlanningACE Management Server enables you to manage ACE instances and policies in real time. The number of clients that a single ACE Management Server can serve depends on several key factors:
Database throughput and scalability
LDAP throughput (if you are using Active Directory)
Network bandwidth available for incoming client requests
ACE policy configuration
Load balancers for very large deployments (more than 5,000 clients)
Table 2‐1 lists recommendations for the number of clients supported based on the hardware you are using. The figures for recommended clients reserve some server processing power so that interactive clients receive responses in a timely fashion and the server satisfies increases in demand.
Table 2-1. Number of Clients Supported
Hardware Recommended Clients
2‐GHz AMD 2‐way server (Opteron 280, 4GB RAM) 6,000
2‐GHz Intel 2‐way desktop machine (4GB RAM) 4,000

ACE Management Server Administrator’s Manual
18 VMware, Inc.
Database Throughput and ScalabilityFor production deployments, VMware recommends that you use Oracle, MS‐SQL, or Postgres as your database platform.
More than 95 percent of the storage space that an ACE Management Server requires is used to log event information, which is an audit trail of all transactions performed through ACE Management Server. Table 2‐2 lists recommended database sizes based on the number of clients being served.
The figures in the table are based on a 90‐day database archival period. Back up the database records every 90 days and keep event logs for 90 days. You can configure ACE Management Server to purge event logs every 90 days.
The authentication event generates most of the data because an event is generated every time someone attempts to authenticate to ACE Management Server. You can configure ACE Management Server to log less event information. See “Logging Events” on page 49.
LDAP ThroughputACE Management Server can communicate with your Active Directory domain controller to authenticate user credentials. Your domain controller infrastructure handles the LDAP traffic required to support the number of clients that you anticipate.
Integrating with Active Directory through LDAP is implemented differently in the Windows ACE Management Server than in the Linux‐based ACE Management Server. The Windows ACE Management Server uses the WinLDAP library bundled with your Windows operating system. The Linux ACE Management Server uses a third‐party Kerberos Library and OpenSSL. VMware internal testing results indicate that the Windows implementation provides better performance than Linux.
Table 2-2. Database Storage Recommendations
Number of Clients Recommended Database Size
100 50Mb
1,000 500Mb
10,000 5,000Mb

VMware, Inc. 19
Chapter 2 Planning an ACE Management Server Deployment
Network Bandwidth and Policy Update FrequencyThe amount of network bandwidth that ACE Management Server and ACE instances require depends on the frequency of policy updates that you configure. Table 2‐3 shows the amount of bandwidth needed when you use a policy update frequency value of 10 minutes.
VMware recommends that for large deployments (more than 5,000 clients), you increase the time between policy updates by clients because this reduces the amount of required bandwidth.
Table 2‐4 shows the bandwidth needed when the policy update frequency value is set to 30 minutes.
The amount of network bandwidth required can also be higher if your policy set is very complex.
VMware recommends that you have a separate network link between ACE Management Server and your database server, so that traffic coming and going from ACE Management Server to its clients does not interfere with the traffic to and from your database server.
Table 2-3. Network Bandwidth Required with a Policy Update Frequency of 10 Minutes
Number of Clients Bandwidth Required
100 0.125Mb/sec.
1,000 1.25Mb/sec.
10,000 12.5Mb/sec.
Table 2-4. Network Bandwidth Required with a Policy Update Frequency of 30 Minutes
Number of Clients Bandwidth Required
100 0.04Mb/sec.
1,000 0.4Mb/sec.
10,000 4Mb/sec.
ACE Management Server Administrator’s Manual
20 VMware, Inc.
ACE Policy ConfigurationThe configuration of ACE policies can affect performance. You can increase the amount of data that is transferred between ACE Management Server and ACE Player by using one of the following methods:
Host policies – Enabling host policies (such as host network quarantine) requires that a host‐side daemon retrieves the host policies from the ACE Management Server.
Complex network quarantine policies – If the set of rules that makes up your network quarantine is very large, the transfer of these rules from the ACE Management Server to the clients can affect the scalability.
The numbers shown in Table 2‐3 and Table 2‐4 are estimates of required bandwidth given average‐size rule sets for network quarantine. You can view the size of your policy set by examining the ACE file directory and counting the size of the .vmpl file. An average policy set is 15KB or less.
Load BalancersThe ACE Management Server client‐server protocol is built on top of the HTTPS protocol. You can use HTTP load‐balancing software and hardware solutions to scale an ACE Management Server deployment beyond the capacity of a single server (or for high‐availability deployments).
ACE Management Server scales in a linear fashion when an enterprise‐grade HTTPS load balancer is used. See Chapter 5, “Load‐Balancing Multiple ACE Management Server Instances,” on page 51.
Security Features and ConsiderationsBy default, ACE Management Server uses the Secure Sockets Layer (SSL) protocol to provide encrypted and secure communications.
Following is an overview of security features and recommendations on how to configure the ACE Management Server to avoid security problems:
Traffic to and from clients is protected by HTTPS – By default, ACE Management Server creates a self‐signed certificate when you install it to use for HTTPS traffic. These certificates are secure, but you can also configure ACE Management Server to use your own certificate and key pairs.
Traffic from ACE Management Server to Active Directory is encrypted – If the server is integrated with an Active Directory service, it communicates with the service through an SSL‐protected link. LDAP traffic is encrypted at the application layer. Credentials are protected by using the Kerberos protocol to authenticate credentials.

VMware, Inc. 21
Chapter 2 Planning an ACE Management Server Deployment
Sensitive configuration options are encrypted – Passwords stored in the configuration file are encrypted.
Database security – The database store contains sensitive data such as cryptographic keys. Configure your database security so that it is protected from intrusion and protected in case of data loss. For more information about features that are available to protect your data, see your database documentation.)
SSL encrypts data through the use of a public‐key and private‐key pair. The public key is known to everyone and the private key is known only to the message recipient. URLs that require an SSL connection start with https.
During ACE Management Server installation, the following two files are created:
server.key – An RSA 1024‐bit key, this is the private key.
server.crt – A self‐signed certificate. Its signature is verified by the public key, which is embedded in the certificate. This public certificate is valid for 10 years from the date and time at which the server is installed. The certificate file is encoded in PEM format.
By default, these files are stored in the SSL directory in the VMware ACE Management Server program directory.
VMware Player, which runs the ACE instances, does not trust any certificates stored on the host machine on which it is running. Instead, it relies on a complete certification chain that is included in the ACE package. Using self‐signed certificates is adequate for most security needs.
You can, however, use a certificate issued by a certificate authority. If you have multiple ACE Management Server instances, you can use one certificate for all or you can use a different certificate on each one.
Using SSL Certificates and ProtocolWhen an ACE‐enabled virtual machine connects to an ACE Management Server, it downloads the public certificate for that server and any chain of certificates required to verify the server’s public certificate. A server certificate might have a chain of several certificates that must be verified step by step until the verification process reaches the root, or trusted, certificate in the certificate store. The first time a connection is made to a server by any ACE‐enabled virtual machine on a Workstation administrator machine, the certificate and its verification are downloaded to the Workstation host system.

ACE Management Server Administrator’s Manual
22 VMware, Inc.
The store or collection of certificates that is downloaded when an ACE‐enabled virtual machine connects to a server is included in each ACE package that you create with that virtual machine. It is saved in the ACE Resources directory. When you deploy and run an ACE instance of this ACE‐enabled virtual machine, the VMware Player application uses the certificates included in the package to verify connections made to the ACE Management Server. It verifies that the certificates that are in the ACE package match those that the server provides. If they do not match exactly, VMware Player displays an error message and does not run the instance.
VMware Player checks the integrity of the certificate store included in the package every time it communicates with the server. VMware Player does not trust any certificates stored on the host machine on which it is running. Instead, it relies on a complete certification chain that is included in the ACE package. The use of self‐signed certificates is adequate for most security needs.
If, however, your enterprise requires the use of a certificate signed by a certificate authority (internal or commercial), you can set up that type of key‐certificate pair for the ACE packages to use. A certificate authority, or CA, is an entity that issues and signs public‐key certificates, typically for a fee.
Accessing ACE Management Server from Outside the Corporate Firewall
All client requests to ACE Management Server are HTTPS traffic on port 443. This means that any solution using a proxy to secure HTTPS traffic into your corporate servers can be used to proxy ACE Management Server traffic.
Because of the number of data connections that the ACE Management Server must make on the back end (LDAP, DNS, ODBC, Kerberos), VMware recommends using an HTTPS proxy in the DMZ. This proxy can relay ACE Management Server traffic to the actual ACE Management Server inside the corporate network.
Figure 2-2. Recommended Deployment for External Access
HTTPSproxy server
external client ODBC
NETBIOS (port 137)
DNS
KRB5 (port 88)
LDAP (port 389)
HTTPS traffic(443)
HTTPS traffic(443)
externalfirewall
AMS server
internalfirewall

VMware, Inc. 23
Chapter 2 Planning an ACE Management Server Deployment
ACE Management Server can be deployed with the following HTTPS proxy solutions:
Apache Proxy – Using mod_proxy
Zeus Technology Load Balancer – A commercially available load balancer and traffic management solution
Avoid the following problems when you use a proxy for traffic into an ACE Management Server:
SSL Termination – If your HTTPS proxy terminates the SSL connection, you must use the same SSL key and certificate on the HTTPS proxy server and ACE Management Server. Or, use the ACE Management Server certificate chain to embed the HTTPS proxy certificate verification chain in the ACE package.
An example of a proxy server that terminates SSL connections is Apache Proxy. The Zeus load‐balancing products support SSL passthrough, which means that the SSL connection is terminated at ACE Management Server.
Multiple ACE Management Server SSL certificates – If you are deploying multiple ACE Management Server instances behind a load‐balancing solution, all ACE Management Server instances must use the same SSL key and certificate pair. You can also use the ACE Management Server certificate chain feature to embed every SSL certificate verification chain into the ACE package.
DNS resolution – When you create an ACE‐enabled virtual machine, you must specify a host name for ACE Management Server. This host name must resolve to the appropriate IP address for both internal and external clients. Internally, it can resolve to ACE Management Server itself. Externally, it can resolve to the HTTPS proxy server.
Because the traffic coming into ACE Management Server is plain HTTPS traffic and the server is stateless, you can deploy many other configurations to provide external access to an ACE Management Server. When you design your deployment, think of ACE Management Server as a Web server with secure traffic.

ACE Management Server Administrator’s Manual
24 VMware, Inc.
Deployment Planning WorksheetUse the deployment planning worksheet to record your choice of server system, database, security certificates, and optional components for a production environment.
Table 2-5. Worksheet for ACE Management Server in a Production Environment
Component Considerations Decision
Active Directory integration
Performance is better when the ACE Management Server is installed on a Windows host.See also “Create Users and Groups for Integration with Active Directory” on page 38.
Use Active Directory? ________If yes, name of user account for ACE Management Server to query the Active Directory database: __________________Fully qualified domain name of the LDAP server: _______________________
ACE Management Server
If you use multiple servers, all must be installed on the same platform.For capacity planning, see “Number of Clients Supported” on page 17.
Use Windows or Linux hosts?_____________How many servers? ____________
Database server
The database server must be compatible with the ACE Management Server host. See “Supported External Databases” on page 12.
MSQL, Oracle, or PostgresSQL database?____________________________
Load balancer Use a load balancer for large deployments or for high availability. It must support HTTPS and requires an external database. See “Load Balancers” on page 20.
Use a load balancer? ________
Proxy If ACE clients will contact ACE Management Server from outside the firewall, use a proxy. See “Accessing ACE Management Server from Outside the Corporate Firewall” on page 22.
Use a proxy? __________
Apache Proxy or Zeus Technology Load Balancer? ________________________
SSL certificates
If you use multiple servers and plan to use a different SSL certificate for each one, you must create or send for the certificates.ACE Management Server supports only public‐key certificates that are signed using the SHA1 algorithm. See “Using SSL Certificates and Protocol” on page 21.
Which type of certificate: self‐signed third‐party, or internal CA (certificate authority)? ___________________
Number of certificates? __________
Ports For Active Directory, use port 389.For the ACE Management Server appliance, use port 8080. See “Change the Port Assignment for ACE Management Server” on page 70 and “Accessing ACE Management Server from Outside the Corporate Firewall” on page 22.
Port 8000 for configuring the ACE Management Server.
Port 443 for client requests.
Which additional ports? ______________
VMware, Inc. 25
3
This chapter includes the following topics:
“Preparing for Installation” on page 25
“Installing and Upgrading ACE Management Server” on page 26
“Verify That the Apache Service Is Started or Restarted” on page 31
“Start and Configure ACE Management Server” on page 33
“Log In to ACE Management Server” on page 34
Preparing for InstallationBefore you install ACE Management Server, you must plan your deployment. Complete the following tasks:
1 To determine which type of ACE Management Server installer to use, how many servers to install, and which deployment components to include, see Chapter 2, “Planning an ACE Management Server Deployment,” on page 13.
2 To configure your Web browser to use Transport Layer Security (TLS), see “Configure TLS in Your Browser” on page 26.
3 To synchronize the clock on the host system with the client system, use Network Time Protocol (NTP).
4 To choose an HTTPS port for the host on which you plan to run ACE Management Server, see Table 3‐1.
Installing and Configuring ACE Management Server 3
ACE Management Server Administrator’s Manual
26 VMware, Inc.
Configure TLS in Your BrowserTransport Layer Security (TLS) must be configured on your Web browser to operate ACE Management Server.
To configure TLS in your browser
Depending on the type of browser, do one of the following:
For an Internet Explorer browser:
a Choose Tools > Internet Options > Advanced and scroll down to Security.
b Select the Use TLS 1.0 check box and click OK.
For a Mozilla browser:
a Choose Tools > Options > Advanced.
b Select the Use TLS 1.0 check box and click OK.
Installing and Upgrading ACE Management ServerYou can install one or more ACE Management Server instances to service the ACE instances in your enterprise. If you set up multiple ACE Management Server instances, they all must be installed on either Windows hosts or Linux hosts, or all must be installed as appliances.
To upgrade from ACE Management Server 2.0 to 2.5, use the same procedure as for installing the server for the first time. When the installer detects an earlier version, it uninstalls the old version before installing the new one. Configuration settings are preserved.
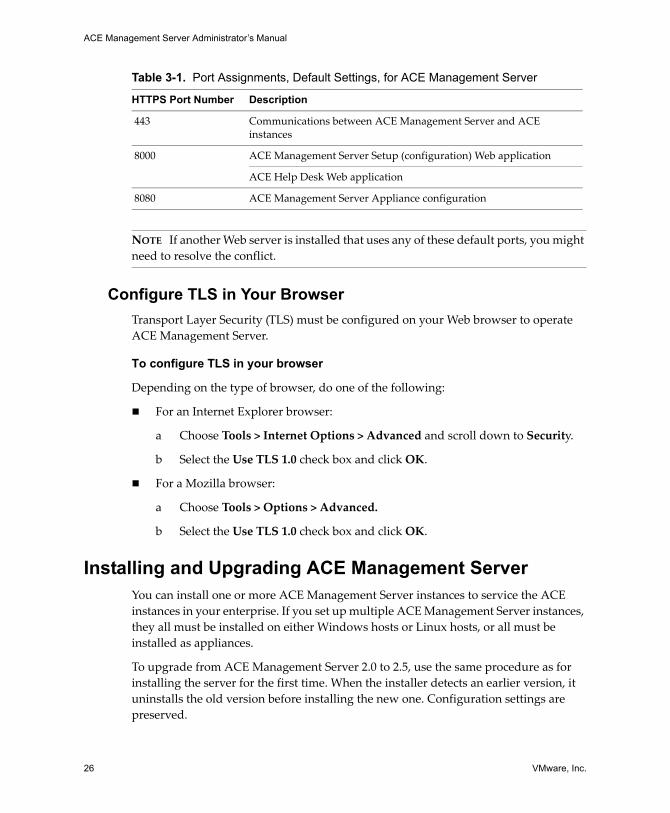
Table 3-1. Port Assignments, Default Settings, for ACE Management Server
HTTPS Port Number Description
443 Communications between ACE Management Server and ACE instances
8000 ACE Management Server Setup (configuration) Web application
ACE Help Desk Web application
8080 ACE Management Server Appliance configuration
NOTE If another Web server is installed that uses any of these default ports, you might need to resolve the conflict.

VMware, Inc. 27
Chapter 3 Installing and Configuring ACE Management Server
For production deployments, VMware recommends that ACE Management Server be installed on either a dedicated server or a virtual platform with sufficient available resources to ensure performance and stability. System requirements depend almost exclusively on the number of ACE instances being supported and the frequency with which they are configured to communicate with the server. For more information about VMware performance testing, see “Performing Capacity Planning” on page 17.
However, ACE Management Server was tested and can be installed on desktop or workstation platforms to support a small number of clients or nonproduction evaluations.
Install an ACE Management Server on a Windows HostInstalling ACE Management Server on a Windows host involves downloading and running an installation wizard. You can install ACE Management Server on the following Windows systems:
Windows Server 2003
Windows XP Professional (includes 64‐bit editions)
Windows 2000 Server
Before you begin, make sure the clock is synchronized and the required ports are available, as described in “Preparing for Installation” on page 25.
Use this installation procedure to install or update ACE Management Server software.
To install an ACE Management Server on a Windows host
1 Download the VMware-ACE-Management-Server.exe file from the VMware Web site and save the file on the system that is to host the server.
The file is available as a separate downloadable file in the same download location as the Workstation application.
2 Double‐click the VMware-ACE-Management-Server.exe file to start the installation wizard.
3 Follow the prompts in the installation wizard.
4 If you are using a computer that has a firewall enabled and you see a message at the end of the installation asking whether you want to unblock the Apache service, choose Unblock.
ACE Management Server does not work properly if you do not unblock the Apache service.
After ACE Management Server is installed, you can configure it. See “Start and Configure ACE Management Server” on page 33.
ACE Management Server Administrator’s Manual
28 VMware, Inc.
Install ACE Management Server on a Linux SystemYou can install ACE Management Server on the following Linux systems:
Red Hat Enterprise Linux 4
SUSE Linux Enterprise Server 9 SP3
Before you begin, make sure the system meets these requirements:
A working installation of Apache 2.0 is installed on the system. (The RPM for a Web server is included with the Red Hat Enterprise Linux 4 or SUSE Linux Enterprise Server 9 installation.)
Apache Web service is operating normally and is receiving requests for SSL HTTP.
The mod_ldap and mod_ssl modules are available on your system.
The following packages are installed on your Red Hat Enterprise Linux 4 or SUSE Linux Enterprise Server 9 system: curl, openldap, openssl, apache, and gdbm.
For SUSE Linux Enterprise Server 9, the cyrus-sasl-gssapi package is installed. This package is not installed by default.
When you use the external database option, the following packages are required as well:
Red Hat Enterprise Linux 4: unixODBC
SUSE Linux Enterprise Server 9: unixODBC and, if you plan to use the X11 graphical configuration tool, unixODBC-gui-qt
The clock is synchronized and the required ports are available, as described in “Preparing for Installation” on page 25.
Use this installation procedure to install or update ACE Management Server software.
To install ACE Management Server on a Linux system
1 Download the .rpm file from the VMware Web site and save the file on the system that is to host the server.
The file is available as a separate downloadable file in the same download location as the Workstation application.
2 Run the Red Hat or SUSE Linux RPM installer for ACE Management Server:
vmware-ace-management-server-<build_number>.i386-rhel4.rpm
vmware-ace-management-server-<build_number>.i386-sles9.rpm

VMware, Inc. 29
Chapter 3 Installing and Configuring ACE Management Server
For example:
rpm -Uhv vmware-ace-management-server-87693.i386-rhel4.rpm
3 For a SUSE Linux Enterprise Server 9 server, ensure that the LDAP module (mod_ldap) is configured for loading:
a Open the following file with a text editor:
/etc/sysconfig/apache2
b Add the ldap config option to the APACHE_MODULES variable.
c Save and close the file.
After ACE Management Server is installed, you can configure it. See “Start and Configure ACE Management Server” on page 33.
Install an ACE Management Server ApplianceThe ACE Management Server appliance is a self‐contained, preinstalled, and preconfigured ACE Management Server packaged with a small operating system in a virtual machine. Although the appliance is adequate for test environments, VMware recommends that you do not use it in production environments.
Before you begin, make sure the clock is synchronized and the required ports are available, as described in “Preparing for Installation” on page 25.
To install an ACE Management Server appliance
1 Download the .zip file for the appliance from the VMware Web site and save the file on the system that is to host the server.
2 Extract the files to the directory where the server is to be located.
3 Start Workstation, choose File > Open to open, and select the ams_appliance.vmx file.
4 Click the Power On button to start the virtual appliance.
5 At the password prompt, enter a password and confirm it.
This password is used for both root and network accounts. Make a note of this password so that you can use it for later appliance management operations from the console and the Web.
The appliance configures its network by using DHCP.
ACE Management Server Administrator’s Manual
30 VMware, Inc.
The console view displays the following information:
Current network settings
URLs for remotely administering the appliance and configuring the ACE Management Server itself
If you press Return at the login prompt, the information appears again.
6 At the time zone prompt, accept the current setting or make a change as needed.
7 (Optional) To configure the server to use a static IP address or to specify a proxy server, use the Appliance Management and Configuration application, as follows:
a Leave the ACE Management Server appliance running.
b Browse to https://<hostIPaddress>:8080.
c In the connection dialog box, type root in the user name field and your network or root password in the password field.
d Click the Network link on the first page of the browser‐based ACE Management Server Setup application.
e To view instructions about configuring network settings, click the Help link in the upper‐right corner of the Web page.
f After you change network settings, click Apply.
8 (Optional) To reconfigure any update options, for example, to disable automatic downloads of updates, use the Appliance Management and Configuration application, as follows:
a Leave the ACE Management Server appliance running.
b Browse to https://<hostIPaddress>:8080.
c In the connection dialog box, type root in the user name field and your network or root password in the password field.
d Click the Update link on the first page of the Appliance Configuration and Management Web application and complete the Appliance Update page.
e To view instructions about configuring update options, click the Help link in the upper‐right corner of the Web page.
VMware, Inc. 31
Chapter 3 Installing and Configuring ACE Management Server
9 When you finish configuring any network or update settings, navigate to the ACE Management Server Setup Web application to configure the server.
To access that application, choose one of these methods:
From the Appliance Management and Configuration Web application page, click the ACE Login link in the upper‐right corner of the page.
From a command prompt window, close the window, open a browser, and enter the URL for the ACE Management Server Setup Web application:
https://<hostIPaddress>:8000/
10 Click Configuration to open the Web application.
Verify That the Apache Service Is Started or RestartedIf you installed ACE Management Server on a Linux host, verify that the Apache service is started before you attempt to log in.
For troubleshooting purposes, you might occasionally need to manually restart the Apache service that ACE Management Server uses.
To verify that the Apache service is started or restarted
Do one of the following:
On Windows hosts:
a Click the Apache icon in the taskbar.
b Select Apache2 in the menu that appears.
c Choose the appropriate command:
To start the service if it is stopped, click Start.
If the service is already started, this command is unavailable.
To restart, click Stop and then click Start.
Ensure that you click Stop and Start rather than Restart.
ACE Management Server Administrator’s Manual
32 VMware, Inc.
On SUSE Linux Enterprise Server 9 hosts or in the virtual machine that contains the ACE Management Server appliance:
a Open a terminal window on the host or in the virtual machine.
b As root, enter the following command:
/etc/init.d/apache2 status
If the status is started, you can log in to ACE Management Server. See “Start and Configure ACE Management Server” on page 33.
c Enter the appropriate command:
To start the service if it is stopped, enter the following command:
/etc/init.d/apache2 start
To restart the service, enter the following commands:
/etc/init.d/apache2 stop/etc/init.d/apache2 start
On Red Hat Enterprise Linux 4:
a Open a terminal window on the host or in the virtual machine.
b As root, enter the following command:
/etc/init.d/httpd status
If the status is started, you can log in to ACE Management Server. See “Start and Configure ACE Management Server” on page 33.
c Enter the appropriate command:
To start the service if it is stopped, enter the following command:
/etc/init.d/httpd start
To restart the service, enter the following commands:
/etc/init.d/httpd stop/etc/init.d/httpd start
VMware, Inc. 33
Chapter 3 Installing and Configuring ACE Management Server
Start and Configure ACE Management ServerBefore you begin, make sure that the following prerequisites are satisfied, as applicable:
If you installed ACE Management Server on a Linux host or are using the ACE Management Server appliance, verify that the Apache server is running. See “Verify That the Apache Service Is Started or Restarted” on page 31.
If this is the first time you are logging in, make sure you have the serial number for the product. The serial number is on the registration card in your package. If you purchased VMware ACE online, the serial number is sent by email.
If you plan to use an external database, Active Directory integration, or custom SSL certificates, you must perform some setup tasks before you can configure ACE Management Server. See the following topics, as applicable:
“Create Users and Groups for Integration with Active Directory” on page 38
“Set Up an External Database” on page 39
“Prepare Custom Security Certificates” on page 44
To start and configure ACE Management Server
1 Open a Web browser and go to https://<hostname>:8000.
The <hostname> value can be the fully qualified name of the computer on which ACE Management Server is installed or it can be an IP address.
If you installed ACE Management Server on a Windows host and you are using that host to configure it, you can alternatively choose Start > VMware > VMware ACE Management Server.
2 Accept the license agreement and click Start.
The configuration tabs appear as they do in subsequent log‐ins, but for the first log‐in, wizard buttons such as Next and Back also appear.
3 Complete the information on each tab and click Next.
The only fields that require changes and do not have default settings are the Serial Number field on the Licensing tab and the Administrator password on the Access Control tab.
For information about specific fields and tabs, click Help on the tab.
ACE Management Server Administrator’s Manual
34 VMware, Inc.
Log In to ACE Management ServerThe first time you log in to ACE Management Server, you must set a password. The next time you log in, you must provide that password or provide Active Directory credentials if you configured the server to use Active Directory for authentication.
Communications between Workstation and ACE Management Server take place over a secure SSL connection.
If the server is integrated with Active Directory service, enter your administrative credentials in one of the formats shown in Table 3‐2.
Table 3-2. Login Options When Using Active Directory Service
Option Description Example
long name + password + domain name
The long name is the <First_name> <Last_name> format.
John Doe
long name + password The long name is the <First_name> <Last_name> format.Leave the Domain field blank.
John Doe
short name + password + domain
The short name is the sAMAccountName.
ace (the short form of the long name ACE User)
short name + password The short name is the sAMAccountName.Leave the Domain field blank.
ace (the short form of the long name ACE User)
email address + password You can only use this option for a domain that is accessed through a direct connection. Leave the Domain field blank.
NETBIOS DOMAIN NAME\username + password
The NetBIOS name is a short name for domains that is registered in the NetBIOS Name Service (WINS). Leave the Domain field blank.
username + password + NETBIOS DOMAIN NAME
The NetBIOS name is a short name for domains that is registered in the NetBIOS Name Service (WINS).

VMware, Inc. 35
Chapter 3 Installing and Configuring ACE Management Server
To log in to ACE Management Server
1 Open a Web browser and go to https://<hostname>:8000.
The <hostname> value can be the fully qualified name of the computer on which ACE Management Server is installed or it can be an IP address.
If you installed ACE Management Server on a Windows host and you are using that host to configure it, you can alternatively choose Start > VMware > VMware ACE Management Server.
2 Do one of the following:
To configure ACE Management Server, click Configuration.
To view and take actions on ACE instances managed by this server, click Help Desk.
3 Enter login credentials.
If you use Active Directory for authentication, see Table 3‐2. In multidomain environments, you might be required to enter a domain (for example, eng.com).

ACE Management Server Administrator’s Manual
36 VMware, Inc.
VMware, Inc. 37
4
After you install ACE Management Server, you must use the browser‐based ACE Management Server Setup application to configure the server.
This chapter includes the following topics:
“Prerequisites for Configuring the Server” on page 37
“Starting ACE Management Server Configuration” on page 45
“Viewing and Changing Licensing Information” on page 46
“Using an External Database” on page 46
“Creating Access Control” on page 47
“Uploading Custom SSL Certificates” on page 48
“Logging Events” on page 49
“Applying Configuration Settings” on page 50
Prerequisites for Configuring the ServerIf you plan to use Active Directory integration (using LDAP), an external database, or custom SSL certificates, you must perform some setup tasks before you configure the ACE Management Server.
Configuration Options for ACE Management Server 4

ACE Management Server Administrator’s Manual
38 VMware, Inc.
Create Users and Groups for Integration with Active DirectoryTo use Active Directory for authenticating users, add users to an Active Directory group and create a user so that ACE Management Server can query LDAP.
When you configure ACE Management Server to use LDAP, follow these guidelines to avoid negatively affecting performance:
The default domain is the domain for which the LDAP host is a domain controller.
The query user is a user in the default domain.
The admin user group is a group that exists in the default domain.
Integrating with Active Directory through LDAP is implemented differently in the Windows‐based ACE Management Server than in the Linux‐based ACE Management Server. The operating systems differ in the libraries they use to connect to Active Directory and the external databases they support. The Windows ACE Management Server uses the WinLDAP library bundled with the Windows operating system. The Linux ACE Management Server uses a third‐party Kerberos Library and OpenSSL. VMware internal testing results indicate that the Windows implementation is provides better performance than Linux.
To create users and groups for integration with Active Directory
1 Create a user that ACE Management Server can use to connect to the LDAP server and use for querying.
Make a note of the sAMAccountName value for that user (for example, aceuser.)
2 Create an ACE Administrators group in the domain.
3 Add ACE administrator users to the ACE Administrators group.
4 (Optional) Create a Help Desk group and assign users to it for the Help Desk role.
You can log in to the Help Desk Web application with your administrative LDAP credentials or password. Creating a Help Desk role allows you to permit certain users to perform Help Desk tasks from within the Help Desk application but does not give them access to other administrative tools.

VMware, Inc. 39
Chapter 4 Configuration Options for ACE Management Server
Set Up an External DatabaseBefore you begin, make sure that you have one of the following supported database servers:
Windows‐based servers – Microsoft SQL Server 2000 or higher; Oracle Database 10g
If you use a Microsoft SQL Server database, the database must be hosted on a system that uses the same locale as the system that hosts ACE Management Server. For example, if ACE Management Server is installed on a Japanese system, the database server must also be installed on a Japanese system and must use Japanese collation.
Linux‐based servers – PostgreSQL 7.4 or higher; Red Hat Enterprise Linux Advanced Server 4.5 or higher.
Before you install the database on a Linux host, make sure the unixODBC RPM package is installed on the Linux system. VMware recommends that you update the package to the latest version released for your specific Linux distribution. The unixODBC package provides an ODBC API to programs running on Linux systems that is similar to the Windows ODBC API.
The package contains the libodbc shared library, providing the ODBC Driver Manager API to other programs, a set of configuration utilities, and ODBC drivers for popular databases. On both Red Hat Enterprise Linux and SUSE Linux Enterprise Server 9, the ODBC driver for PostgreSQL is included in the unixODBC binary distribution package.
Also, make sure the unixODBC-gui-qt package is installed (this utility is included in the Red Hat Enterprise Linux unixODBC package). This package is required to use the ODBCConfig X11 graphical configuration tool for setting up a data source name (DSN).
To set up an external database
1 Install a database server on a host.
The external database does not have to be installed on the same server as ACE Management Server, but it must be installed on the same platform. For example, if ACE Management Server is installed on a Windows host, the database server must also be installed on a Windows host.
ACE Management Server creates the database schema automatically if proper access rights are granted.

ACE Management Server Administrator’s Manual
40 VMware, Inc.
2 Configure the database.
Ensure that you have a dedicated database and a user account that has full access to this database, including rights to create tables. Do not give this database user permissions that it does not need. For example, you might not want to give this account read or write permission to other databases that your RDBMS manages.
All tables that are created in the database have a name starting with a PolicyDb_ prefix and indexes with PdbIns_ or PdbLf_ prefixes. You might provide ACE Management Server with a DSN to a database that it shares with some other application, if the database count is at a premium.
3 (Optional) If ACE Management Server is going to connect to the database over the network (TCP socket connection), ensure that the following are in place:
TCP connectivity is enabled in the database configuration options.
The TCP connection is not blocked by firewall settings on the database server or the ACE Management Server host.
If you are using a PostgreSQL database, configure per‐user permission to connect to the database over the network. Configure that permission in the pg_hba.conf file, which is located in the root folder of your database.
4 (Optional) On the ACE Management Server machine, to verify the server’s connectivity to the database with the configured user credentials, run a command‐line or graphical SQL tool.
Examples of such tools are sqlcmd.exe for SQL Server, sqlplus.exe for Oracle, and psql for PostgresSQL. For database configuration and verification instructions, see the respective database documentation.
5 On the ACE Management Server machine, create a System DSN entry.
Creating a System DSN Entry for an External Database
The only required information in DSN configuration is the DSN name, server IP address or host name, and the database name. You do not need to provide a user name and password in the DSN configuration. You provide a user name and password later, when you use the ACE Management Server Setup application.
Ensure that you create a system DSN and not a user DSN. If you create a user DSN, it is visible only to your user account. ACE Management Server runs under the local system account, so the server cannot detect or use a user DSN.

VMware, Inc. 41
Chapter 4 Configuration Options for ACE Management Server
Create a System DSN Entry for a Windows Database
Regardless of whether the host is 32‐bit or 64‐bit, you create a DSN entry for a 32‐bit system.
Before you begin, to determine the correct ODBC driver, see your operating system and database documentation.
To create a System DSN entry for a Windows database
1 Do one of the following:
On 32‐bit hosts, use the ODBC Data Sources plug‐in by choosing Control Panel > Administrative Tools > Data Sources (ODBC).
On 64‐bit hosts, navigate to %WINDIR%\syswow64\odbcad32.exe and use that program to create a System DSN entry for a 32‐bit subsystem.
ACE Management Server does not support ODBC using an SQL Native Client driver on Windows 64‐bit systems.
2 Create an entry that includes the DSN name, server IP address or host name, and the database name.
3 (Optional) If the DSN Setup wizard provides an option to test the connection, verify that the connection works with the database user credentials.
4 Make a note of the database DSN, user name, and password.
You can now use the browser‐based ACE Management Server Setup application to connect to this database.
Create a System DSN Entry for a Linux Database
On Linux systems, you use a text editor or the ODBCConfig graphical (X11) utility to create a system DSN entry. The ODBCConfig utility mimics the Windows ODBC Data Sources Control Panel plug‐in.
Before you begin, determine the correct ODBC driver:
On Red Hat Enterprise Server, the driver is located at /usr/lib/libodbcpsql.so.
On SUSE Linux Enterprise Server 9, the driver is located at /user/lib/unixODBC/libodbcpsql.so.2. The DSN configuration for the unixODBC package is stored in the /etc directory (/etc/unixODBC for SUSE Linux Enterprise Server).
If you are using the ACE Management Server appliance, see “Set Up a Connection Between the Server Appliance and an External Database” on page 43.

ACE Management Server Administrator’s Manual
42 VMware, Inc.
You use the odbc.ini file for creating DSNs and the odbcinst.ini file for driver and general ODBC system configuration.
To create a System DSN entry for a Linux database
1 As root, use the ODBCConfig utility to create a System DSN entry.
You also must configure the server address and the database name in the DSN settings.
For information about using unixODBC, see the unixODBC Project Web page.
The ODBCConfig utility makes changes to the odbc.ini and odbcinst.ini files.
2 Make a note of the database DSN, user name, and password.
You can now use the browser‐based ACE Management Server Setup application to connect to this database.
Increase the Number of Database Connections Allowed
For optimal server performance, ACE Management Server starts multiple parallel threads (on Windows) or processes (on Linux) listening for the incoming connections from the clients. Every client connection typically runs a database transaction, so it needs to open a database connection.
ACE Management Server usually requires as many database connections as it does parallel threads or processes for client connections. If the server runs out of database connections, the clients might start receiving connection errors.
Following is a list of the locations for the Apache configuration file and the typical default number of connections:
The default installation of the PostgreSQL database on Red Hat Enterprise Linux allows 100 remote connections, which is less than the number of parallel threads that the Apache server starts by default on the same platform. Change this number if you expect a high volume of client requests to your server (more than 100 active clients).
Platform Location Client Connections
Windows C:\Program Files\VMware\VMware ACE Management Server\Apache2\ conf\httpd.conf
250 (WinNT MPM section)
Red Hat Enterprise Linux
/etc/httpd/conf/httpd.conf 256 (prefork MPM section)
SUSE Linux /etc/apache2/server-tuning.conf 150 (prefork MPM section)
ACE Management Server appliance
/etc/httpd/apache2.conf 20 (prefork MPM section)

VMware, Inc. 43
Chapter 4 Configuration Options for ACE Management Server
To increase the number of database connections allowed
1 Inspect the Apache configuration file on the ACE Management Server host to determine the number of parallel threads or processes that might start at the same time.
2 Configure the database to allow as many connections as the Apache server.
See your database documentation.
Enable Database Connection Pooling on Linux
Enabling database connection pooling for databases on Linux hosts can give a substantial performance gain under high loads. ACE Management Server can reuse database connections rather than opening new connections for every request.
Enable database connection pooling in the ODBC Driver Manager (it is disabled by default) to optimize performance for servers on Linux platforms.
On Windows platforms, ODBC connection pooling is enabled by default.
To enable database connection pooling on Linux
1 Start the ODBCConfig utility as a root user.
2 Click the Advanced tab.
3 Select the Connection Pooling check box.
Set Up a Connection Between the Server Appliance and an External Database
The ACE Management Server appliance does not contain a PostgreSQL database server. You can, however, use an external database server with the appliance.
To set up a connection between the server appliance and an external database
1 Log in to the server appliance console as root, using the password you created during your first run of the server appliance.
2 Open the /etc/odbc.ini file in a text editor.
For example:
vaos# vi /etc/odbc.ini
This file contains the postgres_dsn setting for the OBSC DSN.
3 Uncomment all lines in the postgres_dsn file except the first two.
To uncomment lines, delete the pound sign (#) at the beginning of each line.
ACE Management Server Administrator’s Manual
44 VMware, Inc.
4 Replace placeholders <...> with the PostgreSQL database server DNS name or IP address and the database name of this server.
5 Use the default port number or set a different port number.
6 Save the file.
After you complete this task, postgres_dsn appears in the drop‐down menu on the Database tab in the ACE Management Server Setup application.
Prepare Custom Security CertificatesTo use custom SSL certificates, either your own self‐signed certificates or those of a third‐party or internal CA (certificate authority), you must provide the certificate, key, and (in the case of CAs) certificate chain files. These files must be PEM encoded.
After you create or obtain these files, upload them to ACE Management Server by using the Custom SSL Certificates tab in the ACE Management Server Setup application.
For more information about how VMware ACE uses SSL certificates, see “Using SSL Certificates and Protocol” on page 21.
To prepare custom security certificates
1 Create or provide the needed files:
For your own self‐signed certificate, use the openssl utility to create a new self‐signed certificate.
For a third‐party CA or internal CA, obtain an SSL certificate signed by that CA, and a certificate‐verification chain file.
The chain file is a concatenation of every certificate required to verify the new SSL certificate you created or obtained. Steps for obtaining the certificate chain vary, depending on which host operating system you are using and on the source from which the CA certificate is obtained.
A private‐key file. SSL encrypts data through the use of a public‐key and private‐key pair. The public key is known to everyone and the private key is known only to the message recipient.
The certificate signatures must use the SHA1 algorithm digest. The files must be PEM‐encoded.

VMware, Inc. 45
Chapter 4 Configuration Options for ACE Management Server
2 Rename the files, as follows:
Rename the private key file to server.key.
Rename the certificate file to server.crt.
Rename the certificate chain file to chain.crt.
You can now use the ACE Management Server Setup application to upload the certificate files.
View the Properties of the Self-Signed Certificate File
This file is stored in the SSL directory in the VMware ACE Management Server program directory.
To view the properties of the self-signed certificate file
Do one of the following:
On a Windows host, navigate to the location of the server.crt file and double‐click the file name.
On a Linux host, use the following command:
openssl x509 -in /var/lib/vmware/acesc/ssl/server.crt -text
To replace an expired certificate, see “Prepare Custom Security Certificates” on page 44. Do not modify certificates to make them permanent.
Starting ACE Management Server ConfigurationIf you plan to use Active Directory integration (using LDAP), an external database, or custom SSL certificates, you must perform some setup tasks before configuring the ACE Management Server. See “Prerequisites for Configuring the Server” on page 37.
The text that appears on the Start tab changes, depending on whether you have done an initial configuration:
If this page says This server has not been configured yet, you must click Start to complete the configuration setup wizard.
If this page says This server is configured, the Next and Previous wizard buttons do not appear. You can navigate to other tabs by clicking a tab.
ACE Management Server Administrator’s Manual
46 VMware, Inc.
Viewing and Changing Licensing InformationAfter you enter an ACE Management Server serial number, use the Licensing tab to determine the expiration date, if any.
The serial number is on the registration card in your package. If you purchased VMware ACE online, the serial number is sent by email.
If the system on which you installed ACE Management Server currently has more than one valid server license, just one license appears on the page.
You can use the Licensing tab to add or change a serial number, user name, or company name.
If you make changes to the information on this tab, you must click Apply or Cancel before you can navigate to another tab.
Using an External DatabaseThe embedded database is an SQLite database. VMware recommends that you use an external database in production environments.
The embedded database is initialized during server installation and requires no special configuration. This database is adequate for testing purposes but is not designed to be effectively shared across multiple processes.
Before you can configure the ACE Management Server to use an external database, you must create a system DSN and credentials for accessing that data source. See “Set Up an External Database” on page 39.
Use the following information to help you complete the fields on the Database tab:
Data Source Name (DSN) – Data source name you used when you created a system DSN entry on the ACE Management Server machine.
User Name and Password – Credentials for a user account that has full access to the database, including rights to create tables.
After you enter the database connection credentials, the setup application checks for an existing database.
CAUTION After you enter credentials, if the message Compatible schema exists. Do you want to reinitialize the schema and overwrite the existing data? appears, select Use existing schema and data unless you want to erase all data in your existing database. To reinitialize the database at some later time, you can reopen this configuration application and return to this page.
VMware, Inc. 47
Chapter 4 Configuration Options for ACE Management Server
If the existing schema is not compatible, no schema is available or the schema cannot be upgraded. If you overwrite the existing schema and data, a new schema is created. If you do not overwrite the existing schema and data, the configuration application quits.
If you are upgrading the server from the previous release, the database schema is upgraded automatically and you do not lose your previous data. The upgrade is performed on the first start of the upgraded server, even if you do not rerun the setup application.
If you make changes to the information on the Database tab, you must click Apply or Cancel before you can navigate to another tab.
Creating Access ControlOn the Access Control tab, you can create a local Administrator role and Help Desk role or use Active Directory for authenticating users with these roles.
Before you can configure the ACE Management Server to use a domain account for authentication, you must create users and groups so that ACE Management Server can connect to the LDAP server. See “Create Users and Groups for Integration with Active Directory” on page 38.
Use the following information to help you complete the fields for authentication:
Local account – If you specify a password for the Administrator role and forget or lose it, you must delete the server configuration file. Deleting this file sets the server back to its initial state. You must reconfigure the server and set the administrator password again.
See “Delete the Server Configuration File and Set a New Administrator Password” on page 71.
Domain account (LDAP) – To use Active Directory for authentication, specify the host and credentials that the ACE Management Server uses to connect to and query the domain controller:
Host Name – Enter a fully qualified domain name (for example, ldap.vmware.com) instead of an IP address or host name with no parent domain name (for example, ldap).
Query User sAMAcountName and Query User Password – Use the password and short name for the user account you created for this purpose in Active Directory.
ACE Management Server Administrator’s Manual
48 VMware, Inc.
Query User Domain – The domain must be the domain for which the LDAP host is a domain controller.
Admin Group DN and Help Desk Group DN – (Optional) Enter the distinguished name for these groups, which you created for this purpose in Active Directory (for example, cn=Users,dc=simplecorp,dc=com).
If this option is not enabled, anyone who logs in to the Help Desk application must be a member of the ACE Administrators group.
Help Desk Role or Group DN – Creating a Help Desk role allows you to permit certain users to perform Help Desk tasks from the Help Desk application. Users in this role cannot access other administrative tools. You can still log in to the Help Desk Web application with your administrative LDAP credentials or local Administrator password.
If you make changes to the information on the Access Control tab, you must click Apply or Cancel before you can navigate to another tab.
Uploading Custom SSL CertificatesTo have ACE Management Server use custom SSL certificates, either your own self‐signed certificates or those of a third‐party or internal CA (certificate authority), use the Custom SSL Certificates tab to upload the PEM‐encoded files.
Before you can upload custom SSL certificates, you must create and rename the certificate files. See “Prepare Custom Security Certificates” on page 44.
By default, during ACE Management Server installation, the following two files are created:
server.key – This RSA 1024‐bit key is the private key.
server.crt – This self‐signed certificate is valid for 10 years from the date and time at which the server is installed. Its signature is verified by the public key, which is embedded in the certificate. The certificate file is encoded in PEM format.
When you run an ACE instance, the VMware Player application uses the complete certification chain that is included in its package, not on the host, to verify connections made to ACE Management Server. Therefore, the use of self‐signed certificates is adequate for most security needs. For more information about how VMware ACE uses security certificates, see “Using SSL Certificates and Protocol” on page 21.
When you click Upload certificates, a summary page displays the files and locations you specify on this tab. Note the location of any backup files. You might need to use the backup if you find that the new file is invalid when you click Apply. See “Restore a Backup Copy of an SSL Certificate” on page 72.

VMware, Inc. 49
Chapter 4 Configuration Options for ACE Management Server
After you upload custom SSL certificates, you must update any existing ACE‐enabled virtual machines to use a new certificate and key file. To do so, use Workstation to create an update package. When you deploy the new package, ACE instances receive the new certificate file and certificate chain.
Logging EventsThe server collects log entries for events that change the database. On the Logging tab, you can set the logging levels and set an option for purging log entries.
ACE Management Server uses the following logging categories:
ACE Administration – Logs events for instance creation, update, and destruction.
Package Administration – Logs events for package creation, update, instance customization, and package removal.
Policy Administration – Logs events for policy‐set update and publish, user access control changes, and instance passwords set by an ACE administrator.
Instance Administration – Logs ACE instance life‐cycle events, such as creation, copying, revocation, reenablement, and deletion. Also logs instance password change by a user or an administrator, changes in expiration for each instance, changes of instance guest or host operating system information, and setting instance custom fields. The debug level can be used to log the most ubiquitous traffic such as policy update requests from active instances. Failed instance verifications are logged only at the debug level.
Authentication – Logs events for every authentication request, such as administration or help desk authentication attempts (at the normal level), instance authentication (at the informational level), and remote LDAP password change. Set logging for this category to the lowest level that is practical for you. This category can generate a large volume of entries.
For each category, you can choose one of the following logging levels:
None – No log entry is made for this event.
Critical – An example of a critical log event is one that removes all packages, instances, and policies associated with an ACE‐enabled virtual machine.
Normal – This level of detail is sufficient to answer most queries.
Informative – Entries for nondestructive events that have limited effect.
Debug – Entries for every client access of the server. It provides more records of certain event types, creating a large number logging entries compared to other log levels. It logs all informational transactions, such as instance status and so on.

ACE Management Server Administrator’s Manual
50 VMware, Inc.
Use the Event Log Purging control to configure the amount of logging information retained. The purge maintenance process runs approximately every six hours.
If you make changes to the information on the Logging tab, you must click Apply or Cancel before you can navigate to another tab.
Applying Configuration SettingsThe Restart page appears when you click Apply on one of the tabs. You must restart the server for the configuration settings to take effect.
If you click Later, you can always restart the server by clicking Apply on any of the tabs, even if you do not make changes on the tab.
VMware, Inc. 51
5
If you have thousands of clients, you can configure multiple VMware ACE Management Server instances to work together. You can set up two or more servers and use them with a load balancer.
This chapter includes the following topics:
“Typical Setup Using Load‐Balanced ACE Management Server Instances” on page 52
“Install the Required Services for Load Balancing” on page 53
“Use the Same SSL Certificate on All Servers” on page 53
“Create New SSL Certificates and Keys for Each Server” on page 55
“Installing and Configuring the Load Balancer” on page 57
“Verify That ACE Instances Are Using the Load Balancer” on page 57
Load-Balancing Multiple ACE Management Server Instances 5
ACE Management Server Administrator’s Manual
52 VMware, Inc.
Typical Setup Using Load-Balanced ACE Management Server Instances
A single ACE Management Server can handle a preset number of clients, but you can add more servers to your ACE Management Server infrastructure by using load balancing. When you add more servers to the load‐balancing group, the number of clients that you can serve scales linearly. For example, if you can serve 2,000 clients with one server, using two load‐balanced servers allows you to serve 4,000 clients.
Figure 5‐1 shows a simple deployment topology for using load balancing.
Figure 5-1. Two ACE Management Server Instances Working Together
To use a setup similar to the one depicted, you must have the following:
Two or more machines (or virtual machines) to host the ACE Management Server processes
An external database to host the ACE Management Server data
A load balancing solution to manage traffic
ACEManagement
Server 1
ACEManagement
Server 2
Active Directorydomain controller
databaseserver
loadbalancer(optional)
AMS Client
AMS Client
AMS Client
LDAPKerberos
LDAPKerberos
ODBC
ODBC
HTTPS
HTTPS
HTTPS
HTTPS
HTTPS

VMware, Inc. 53
Chapter 5 Load-Balancing Multiple ACE Management Server Instances
Install the Required Services for Load BalancingServices include multiple ACE Management Server instances, an external database, and Workstation.
To install the required services for load balancing
1 Install the ACE Management Server package on two or more machines (or virtual machines).
See “Installing and Upgrading ACE Management Server” on page 26.
2 Configure each ACE Management Server separately to access the same external database.
See “Start and Configure ACE Management Server” on page 33.
Both ACE Management Server installations must be able to identify the same data store so either installation can field queries for clients and scale the number of clients that can be served.
3 To verify that both ACE Management Server instances are working properly, start Workstation and connect to each ACE Management Server directly:
a In Workstation, choose File > Connect to ACE Management Server.
b Enter the IP or host name of the machine where ACE Management Server is installed, change the number in the Port field if necessary, and click OK.
The setup is successful if you can view the same data in the Instance View window for each ACE Management Server instance. If you create a test ACE and preview it, you see the preview instance on both servers.
Use the Same SSL Certificate on All ServersFor a load‐balancing solution, you can copy the SSL certificate and key from one ACE Management Server to another.
CAUTION This procedure directs you to upload both the certificate file (the .crt file) and the matching key file (the .key file). If you do not upload both, the Apache httpd service on the second ACM Management Server might freeze. In this case, you must uninstall and reinstall ACE Management Server.

ACE Management Server Administrator’s Manual
54 VMware, Inc.
To use the same SSL certificate on all servers
1 Log in to the ACE Management Server Setup application for the first ACE Management Server.
2 Click the Custom SSL Certificates tab to determine the location of the SSL certificate and key directory files.
On Windows, the files are located at C:\Program Files\VMware\VMware ACE Management Server\ssl.
On Linux, the files are located at \var\lib\vmware\acesc\ssl.
The certificate file is server.crt. The key file is server.key.
3 Copy the files to the second ACE Management Server.
If you are using the ACE Management Server virtual appliance, use the scp (secure copy) command to copy the certificate and key files:
a Open a command prompt.
b Enter the following command:
scp user@<host>:<file> user@<host>:<file>
You can also enable shared folders if you are using Workstation to run the virtual appliance, and copy the files from the virtual machine through the shared folders feature. For more information about shared folders, see the VMware Workstation User’s Manual.
4 Log in to the ACE Management Server Setup application for the second ACE Management Server.
5 Use the Custom SSL Certificates tab to upload the files:
a Specify the key file in the Server Private Key field.
b Specify the certificate file in the Server Public Certificate field.
c Click Upload certificates.
d Click Apply and click Restart.

VMware, Inc. 55
Chapter 5 Load-Balancing Multiple ACE Management Server Instances
Create New SSL Certificates and Keys for Each ServerIf you do not want to use the same SSL certificate and key for each ACE Management Server, you must create new SSL certificates and keys for each server.
If you plan to obtain SSL certificates from a certificate authority, you must create certificate chains. Figure 5‐2 provides an overview of determining which certificates are included in a chain.
Figure 5-2. Creating the Certificate Chain File
To create new SSL certificates and keys for each server
1 Create as many SSL certificate and key pairs as you need (one for each server in your server farm).
The procedure varies, depending on the tools you use. To determine how to create these certificates and keys, see the documentation for your platform. Each certificate must have a unique common name and a unique serial number.
[Root SSL Certificate in PEM format][Intermediary SSL Certificate in PEM format]
[AMS #1 SSL Certificate in PEM format][AMS #1 SSL Certificate in PEM format]
convert to PEMthen append to file
convert to PEMthen append to file
convert to PEMthen append to file
convert to PEMthen append to file
certificateverification
chain
Server SSLCertificates
Certificate Chain FileRoot SSL Certificate
Intermediary SSL Certificate
ACE Management Server #1SSL Certificate
ACE Management Server #2SSL Certificate

ACE Management Server Administrator’s Manual
56 VMware, Inc.
2 If your certificates require a certificate chain to be verified, create a certificate chain file for each certificate.
The certificate chain file is a text file that contains every certificate (in PEM format) needed to verify the leaf certificate (including the root certificate of the chain).
a Download the verification chain from your certificate authority.
b Each certificate must be in PEM format before you create the certificate chain file.
To convert to PEM format, use the open SSL tools available online.
c Create the certificate chain file by concatenating each PEM‐encoded certificate into one file.
If both of your certificates are self‐signed, your certificate chain file must be a file that contains both certificates concatenated.
If you received your certificates from the same certificate authority, the chain file must contain only the verification chain for these certificates, and the chains must be the same.
If the certificates come from different certificate authorities, the chain file must contain both certificate verification chains.
For example, if you are using two ACE Management Server instances you have two certificate chain files.
3 Join all of the certificate chain files into one file.
If you can, eliminate the duplicate entries.
4 Convert the server’s SSL certificates to PEM format.
5 Add the server’s SSL certificates in PEM format to the certificate chain file.
6 On the Custom SSL Certificates tab, upload the SSL certificate file, the SSL key file, and the certificate chain file:
a Specify the key file in the Server Private Key field.
b Specify the certificate file in the Server Public Certificate field.
c Click Upload certificates.
d Click Apply and click Restart.
Complete this step for every ACE Management Server in your farm to upload files to each ACE Management Server.

VMware, Inc. 57
Chapter 5 Load-Balancing Multiple ACE Management Server Instances
Installing and Configuring the Load BalancerACE Management Server uses HTTPS to communicate with its clients. You can use any load balancing solution that supports HTTPS with ACE Management Server.
Install the load balancer and configure port 443 (HTTP over SSL) for load balancing. Do not configure port 8080 or 8000 for load balancing. These two ports are used for configuration. Port 8080 is the virtual appliance configuration port and 8000 is the ACE Management Server configuration port.
Verify That ACE Instances Are Using the Load BalancerAfter you configure multiple ACE Management Server instances to work with a load balancer and install the necessary SSL certificates, perform verification. Verify that ACE instances can connect to ACE Management Server instances by using the address of the load‐balancer.
Before you begin, restart Workstation so that Workstation can download the SSL certificate when a connection to the ACE Management Server is established.
To verify that ACE instances are using the load balancer
1 Create an ACE‐enabled virtual machine.
2 Open the policy editor.
3 Select Policy Update Frequency.
4 Select Disable Offline Usage.
5 Click OK.
6 Remove the first ACE Management Server from the load balancing configuration so that all traffic goes to the second ACE Management Server.
7 Preview the ACE instance.
This preview creates an instance on the ACE Management Server.
8 Close the ACE Player.
9 Remove the second ACE Management Server from the load‐balancing configuration and add the first ACE Management Server back to the configuration.
All traffic goes to the first ACE Management Server.
10 Preview the same ACE instance again, and when prompted whether to reinstantiate or reuse the instance, select Use Existing Instance.
If the instance starts successfully, both servers are using the same SSL certificate.

ACE Management Server Administrator’s Manual
58 VMware, Inc.
VMware, Inc. 59
6
After ACE Management Server is installed and configured, you can do the following:
View ACE instances that are managed by a particular ACE Management Server.
Revoke and re‐enable an instance.
Fix various problems with the ACE instances as reported by instance users.
This chapter includes the following topics:
“Viewing ACE Instances That the Server Manages” on page 60
“Search for an Instance” on page 62
“Sort by Column Heading and Change Column Width” on page 63
“Show, Hide, and Move Columns in the Instance View” on page 64
“Create or Delete Custom Columns in the Instance View” on page 64
“View Instance Details” on page 65
“Reactivate, Deactivate, or Delete an ACE Instance” on page 65
“Change a Copy Protection ID” on page 66
“Reset the Authentication Password” on page 66
“Add Information for Custom Columns” on page 67
Managing ACE Instances 6
ACE Management Server Administrator’s Manual
60 VMware, Inc.
Viewing ACE Instances That the Server ManagesTo view and manage a server’s ACE instances, you can use either the Instances page of the VMware ACE Help Desk or the server’s instance view in Workstation.
Both user interfaces enable you to fix a limited set of ACE instance problems, such as reactivating an instance, changing the instance’s expiration date, and resetting the user password if the user has lost or forgotten it.
Because the VMware ACE Help Desk is a browser‐based application, you can use it on computers that do not have Workstation installed. The Help Desk also allows you to create a restricted help desk role. Users with this role can fix a limited set of problems reported by end users, but they cannot change configuration settings for the ACE Management Server.
The instance view in Workstation enables you to perform all the tasks available in the VMware ACE Help Desk and a few more tasks. For example, in the instance view, you can create custom columns and save the searches you create.
Use the VMware ACE Help Desk ApplicationACE administrators and help desk assistants can access ACE instances through the VMware ACE Help Desk Web application. You can use the Help Desk to reactivate an instance, change the instance’s expiration date, and reset a user password if it is lost or forgotten.
To use the VMware ACE Help Desk application
1 Open a Web browser and go to https://<hostname>:8000.
The <hostname> value can be the fully qualified name of the computer on which ACE Management Server is installed or it can be an IP address.
If you installed ACE Management Server on a Windows host and you are using that host to configure it, you can alternatively choose Start > VMware > VMware ACE Management Server.
2 Click the Help Desk link.
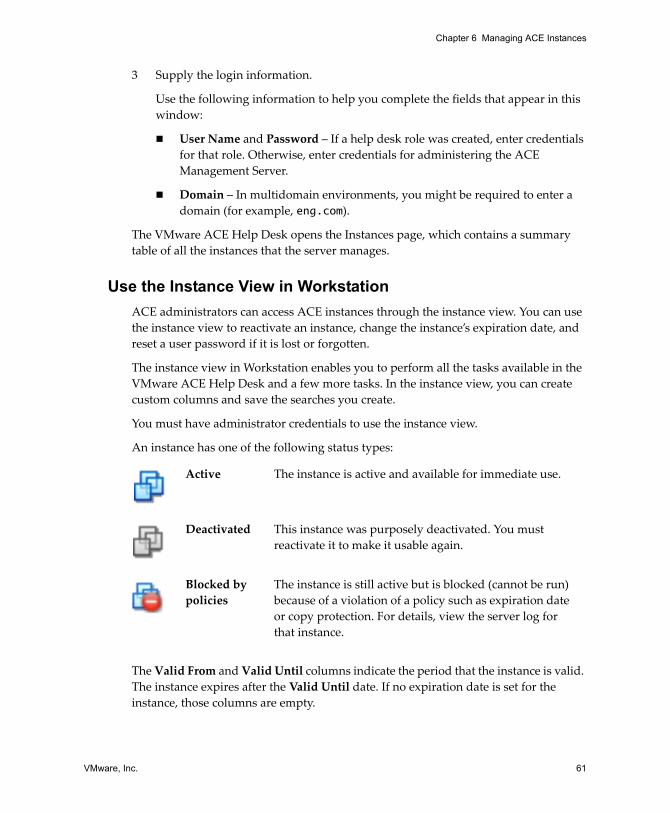
VMware, Inc. 61
Chapter 6 Managing ACE Instances
3 Supply the login information.
Use the following information to help you complete the fields that appear in this window:
User Name and Password – If a help desk role was created, enter credentials for that role. Otherwise, enter credentials for administering the ACE Management Server.
Domain – In multidomain environments, you might be required to enter a domain (for example, eng.com).
The VMware ACE Help Desk opens the Instances page, which contains a summary table of all the instances that the server manages.
Use the Instance View in WorkstationACE administrators can access ACE instances through the instance view. You can use the instance view to reactivate an instance, change the instance’s expiration date, and reset a user password if it is lost or forgotten.
The instance view in Workstation enables you to perform all the tasks available in the VMware ACE Help Desk and a few more tasks. In the instance view, you can create custom columns and save the searches you create.
You must have administrator credentials to use the instance view.
An instance has one of the following status types:
The Valid From and Valid Until columns indicate the period that the instance is valid. The instance expires after the Valid Until date. If no expiration date is set for the instance, those columns are empty.
Active The instance is active and available for immediate use.
Deactivated This instance was purposely deactivated. You must reactivate it to make it usable again.
Blocked by policies
The instance is still active but is blocked (cannot be run) because of a violation of a policy such as expiration date or copy protection. For details, view the server log for that instance.
ACE Management Server Administrator’s Manual
62 VMware, Inc.
To use the instance view in Workstation
1 From the Workstation menu bar, choose File > Connect to ACE Management Server.
2 Specify the fully qualified host name or the IP address and click OK.
In most cases, the default port number does not need to be changed.
3 Complete the login window.
Use the following information to help you complete the fields that appear in this window:
User Name and Password – Enter credentials for administering the ACE Management Server.
Domain – In multidomain environments, you might be required to enter a domain (for example, eng.com).
Search for an InstanceYou can use the search function to query the ACE Management Server database for one or more particular ACE instances. Search criteria are joined with AND, not OR, operations.
Before you begin, do one of the following:
Log in to the VMware ACE Help Desk for an ACE Management Server.
Connect to an ACE Management Server from the Workstation window.
To search for an ACE instance
1 Click Search and specify the criteria to be included when the database is queried.
Use the following information to help you specify search criteria:
Activated By – Activation method, such as password, Active Directory user, or activation key. If no such activation method exists, N/A appears in the column.
ACE VM Name – Name of the ACE‐enabled virtual machine from which the ACE instance was created.
Guest Name – (For Windows guests only) Computer name resolved on the user’s machine during instance customization, if you use that feature. The NetBIOS name is reported here, and it is a maximum of 15 characters long. Even if the actual computer name contains more characters, the name always appears as the NetBIOS name.
VMware, Inc. 63
Chapter 6 Managing ACE Instances
Custom columns – Custom columns that you created appear directly below the Guest MAC Address criterion.
Exact match only – Values are case‐sensitive.
Save as – (Available in the Workstation instance view only) Saved searches are specific to each server. You can edit or delete your saved searches by selecting the name of a saved search in the Saved Searches drop‐down menu and clicking Options.
2 Click Search.
In the search results, the total number of instances appears just below the table.
3 To navigate through a large number of results, do one of the following:
In the VMware ACE Help Desk, click the previous and next arrows at the right of the status bar at the bottom of the Instances table.
In the instance view in Workstation, scroll down.
4 To return to the full list, do one of the following:
In the VMware ACE Help Desk, click the Back to all instances link, located below the Search button.
In the instance view in Workstation, click Clear Search.
Sort by Column Heading and Change Column WidthYou can reorder the instances in the table alphabetically or numerically, depending on the selected column’s contents, in ascending or descending order.
To sort by column heading and change column width
1 Click the column heading of the column to sort.
Click again to re‐sort in the opposite (ascending or descending) order.
2 To change column widths, click a column divider and drag it to a new width.
ACE Management Server Administrator’s Manual
64 VMware, Inc.
Show, Hide, and Move Columns in the Instance ViewAlthough you can sort and resize columns in either the VMware ACE Help Desk or the Workstation instance view, you can show, hide, and move columns only in the Workstation instance view.
Column changes for one server do not affect other servers.
To show, hide, and move columns in the instance view
1 In Workstation, connect to the ACE Management Server and log in.
See “Use the Instance View in Workstation” on page 61.
2 To show or hide a column, right‐click the column heading row and select or deselect the column to show or hide.
If you show a column that was previously hidden, the column is added to the right side of the table.
3 To move a column, click the column header, drag the column to a new location, and release the mouse button.
Create or Delete Custom Columns in the Instance ViewCustom columns enable you to add categories of information about the instances that an ACE Management Server manages. For example, you can add a Help Ticket column to record the ID associated with end users’ support requests.
You can create custom columns only in the Workstation instance view. In the instance view table, you can add, delete, and rename up to nine custom columns.
To create or delete custom columns in instance view
1 In Workstation, connect to the ACE Management Server and log in.
See “Use the Instance View in Workstation” on page 61.
2 Right‐click the column heading row and choose Add Custom Column.
3 Type a name for the new column in the Name text box and click OK.
4 To change the name of or delete a custom column, right‐click the custom column header and choose a command from the context menu.
After you create a custom column, use the Instance Details page for each ACE instance to add information to display. See “Add Information for Custom Columns” on page 67.

VMware, Inc. 65
Chapter 6 Managing ACE Instances
View Instance DetailsThe Instance Details page displays all of the same information shown on the summary page, and it includes information about the ACE instance’s policy settings.
You can reactivate, deactivate, or change the expiration date from the Instance Details page, as you can from the summary page. The following tasks are available only from the Instance Details page:
Changing the copy protection ID
Resetting the authentication password
Adding information for custom columns
To view instance details
1 Select the instance by clicking its instance row.
2 Click the View detail icon at the top of the table or double‐click the instance row.
3 If you use the VMware ACE Help Desk, to view details about network access, click the links under Zone, Host Access, or Guest Access.
You can view the Zones or Rules Detail page for this zone or this type of network access.
The Everywhere and Everywhere else zone settings are not linked to a Zones Detail page because they are self‐explanatory.
Reactivate, Deactivate, or Delete an ACE InstanceYou can immediately deny or allow access to an instance by deactivating or reactivating it. After you deactivate an instance, you can delete it from the list of instances that the server manages.
Before you begin, do one of the following:
Log in to the VMware ACE Help Desk for an ACE Management Server.
Connect to an ACE Management Server from the Workstation window.
To reactivate, deactivate, or delete an ACE instance
1 Select the instance by clicking its instance row.
2 Click the Deactivate or Reactivate icon in the upper‐left corner of the Instances page.
3 If you clicked Reactivate, when prompted, reset the expiration dates.

ACE Management Server Administrator’s Manual
66 VMware, Inc.
4 (Optional) If you clicked Deactivate, click Delete to delete the instance row.
5 Click OK.
Change a Copy Protection IDIf an end user attempts to copy or move a copy‐protected ACE instance, the user receives an error message that contains a new copy protection ID. After the end user sends that ID to you, the administrator, you can use it to replace the original ID.
Before you begin, do one of the following:
Log in to the VMware ACE Help Desk for an ACE Management Server.
Connect to an ACE Management Server from the Workstation window.
The Copy Protection ID field is always active, so you can change the ID at any time.
To change a copy protection ID
1 Select the instance by clicking its instance row.
2 Click the View detail icon at the top of the table or double‐click the instance row.
3 Do one of the following:
In the VMware ACE Help Desk, replace the alphanumeric string in the Copy Protection ID field with a new ID and click the Save icon at the top of the page.
In Workstation, click the Policies tab, replace the copy protection ID with a new ID, and click OK.
Reset the Authentication PasswordYou can reset passwords for instances with user‐specified passwords. The new password must have at least one character.
To reset the authentication password
1 Select the instance by clicking its instance row.
2 Click the View detail icon at the top of the table or double‐click the instance row.
CAUTION If you change a copy protection ID for an active instance, the original instance no longer runs.
VMware, Inc. 67
Chapter 6 Managing ACE Instances
3 Click Reset Password and specify a new password.
In the Workstation instance view, this button appears on the Policies tab.
4 Send the new password to the user in an e‐mail message.
Add Information for Custom ColumnsAlthough you must use the instance view in Workstation to create custom columns, you can add information to custom column fields in either the instance view or the VMware ACE Help Desk.
Before you begin, if necessary, use the instance view in Workstation to create custom columns. See “Create or Delete Custom Columns in the Instance View” on page 64.
To add information for custom columns
1 Select the instance by clicking its instance row.
2 Click the View detail icon at the top of the table or double‐click the instance row.
3 Do one of the following:
In the VMware ACE Help Desk, enter custom values in one or more custom fields and click the Save icon at the top of the page.
In Workstation, click the Custom tab, enter custom values in one or more custom fields, and click OK.

ACE Management Server Administrator’s Manual
68 VMware, Inc.

VMware, Inc. 69
7
This chapter includes the following topics:
“Troubleshooting Configuration Problems” on page 69
“Configuring Multiple ACE Management Server Instances to Use SSL” on page 73
“Database Backup” on page 74
Troubleshooting Configuration ProblemsCommon configuration problems include resolving connection problems and port conflicts and resetting ACE administrator passwords.
Connection Problems Between a Linux ACE Instance and ACE Management Server
If an ACE instance on a Linux host cannot contact the server, determine whether a firewall or proxy setting is blocking or rerouting HTTPS traffic on port 443.
By default, HTTPS traffic from the VMware Player to ACE Management Server is routed on port 443. Disable the firewall or turn off the proxy setting to allow VMware Player‐to‐server traffic on that port.
Troubleshooting and Maintenance 7
ACE Management Server Administrator’s Manual
70 VMware, Inc.
Change the Port Assignment for ACE Management ServerACE Management Server is a module running on the Apache 2.0 platform. To change the port that the server listens on, you must manually edit the Apache configuration file.
To change the port assignment for ACE Management Server
1 Using a text editor, open the ACE Management Server component HTTP configuration file.
Depending on the server’s operating system, the file is placed in one of the following locations:
Windows – C:\Program Files\VMware\VMware ACE Management Server\Apache2\conf\httpd.conf
Red Hat Enterprise Linux 4 – /etc/httpd/conf.d/acesc.conf
SUSE Linux Enterprise Server 9 SP3 – /etc/apache2/conf.d/acesc.conf
This path is different if VMware ACE Management Server is installed in a different location. Use the path you established for your server.
2 Locate the line entry in the file that reads Listen 443 and change the port number.
You cannot use port 8000, which the server uses for configuration, or port 8080, which the ACE Management Server appliance uses.
3 Locate the section header for the Virtual Server configuration for port 443.
This line looks similar to the following:
<VirtualHost -default_:443>
4 Change the port number in the section header to the desired port number.
For example, to change to port 8443, change 443 to 8443.
5 Save the file.
6 Stop and start the Apache service.
For instructions, see “Verify That the Apache Service Is Started or Restarted” on page 31.
When you create an ACE‐enabled virtual machine, you can specify which port is to be used to communicate with ACE Management Server.

VMware, Inc. 71
Chapter 7 Troubleshooting and Maintenance
Delete the Server Configuration File and Set a New Administrator Password
If you lose or forget the administrator password, you must delete the configuration file and reconfigure the server. As part of that configuration, you set a new password.
To delete the server configuration file and set a new administrator password
1 Navigate to the location of the ACE Management Server configuration file:
Depending on the server’s operating system, the file is placed in one of the following locations:
Windows – C:\Program Files\VMware\VMware ACE Management Server\conf\acesc.conf
Linux – /var/lib/vmware/acesc/conf/acesc.conf
2 Save a copy of the file to a new location so that you can refer to it when you reconfigure the server.
3 Delete the original configuration file.
4 Start the ACE Management Server Setup application and configure the server again, specifying a password on the Access Control tab.
See “Start and Configure ACE Management Server” on page 33.
5 Continue with the ACE Management Server Setup application in one of the following ways:
If this is the initial configuration of the server, click Next.
If you are reconfiguring the server, click Apply and click Restart or Later.
If you click Later, you must restart the server for the configuration changes to take effect. You can restart the server by clicking Apply on any of the tabs, even if you do not make changes on the tab.
ACE Management Server Administrator’s Manual
72 VMware, Inc.
Restore a Backup Copy of an SSL CertificateIf you upload an invalid certificate file, the ACE Management Server Setup application fails when you click Apply and then Restart and you cannot restart the Apache service. To fix this problem, restore the backup certificate file for the corresponding certificate.
To restore a backup copy of an SSL certificate
1 Navigate to the ACE Management Server directory where the backup is stored.
The filenames use the following format:
<certificate_filename>.<date>-<time>
The <certificate_filename> value is one of the following:
server.crt – The server public certificate
server.key – The server private key
chain.crt – The certificate chain
The <date> portion of the filename is in the format YYYYMMDD (year, month, day).
The <time> portion of the filename is in the format HHMMSS (hours, minutes, seconds).
For example, a filename might be server.crt.20070216-095344.
2 Save the file in the correct location as ssl/<filename>.crt and restart the Apache server manually.
See “Verify That the Apache Service Is Started or Restarted” on page 31.
3 Start the ACE Management Server Setup application and use the Custom SSL Certificates tab to upload the backup copy.
“Start and Configure ACE Management Server” on page 33.

VMware, Inc. 73
Chapter 7 Troubleshooting and Maintenance
Configuring Multiple ACE Management Server Instances to Use SSL
You might configure multiple ACE Management Server instances to use SSL in the following scenarios:
Multiple servers behind one or more proxy servers:
Each server can have its own SSL key and certificate (ACE Management Server and proxy server).
The cert_chain file must contain the certificate file and verification chain for the SSL certificates that the proxy servers are using. Place this cert_chain file in each ACE Management Server.
When self‐signed certificates are being used, the actual certificate is the verification chain. The chain file contains each self‐signed certificate being that the proxies are using.
You can also use the same key and certificate for every server and proxy. In this case, you do not need to create a cert_chain file.
Each certificate must have a unique common name.
Multiple servers using DNS round robin:
Each server can have its own SSL key and certificate (ACE Management Server and proxy server).
The cert_chain file must contain the certificate and verification chain for every certificate that the servers use. Place this certificate chain file in each ACE Management Server.
When self‐signed certificates are being used, the actual certificate is the verification chain. The chain file contains each self‐signed certificate that each of the servers is using.
You can use the same key and certificate for every server. In this case, you do not need to create a cert_chain file.
See also “Load‐Balancing Multiple ACE Management Server Instances” on page 51.

ACE Management Server Administrator’s Manual
74 VMware, Inc.
Database BackupIf you are using an external database, use a backup and recovery strategy that is appropriate for your database system. Back up your ACE Management Server database on a regular basis to ensure that the database can be recovered promptly if needed.
If you are using the embedded database, you can use standard file‐backup tools, such as ntbackup or dd. The data is stored in one of the following locations:
Windows – C:\Program Files\VMware\VMware ACE Management Server\db\acesc.bin.
Linux – /var/lib/vmware/acesc/db/acesc.bin
If you are using the embedded database in a production environment, stop the server, copy the file to a different location for the backup, and restart the server. SQLite is file based, so the database file might be modified by the ACE Management Server process at the same time that it is being copied for backup. An inconsistent database snapshot might be produced. This problem is unlikely to occur because the file is usually not large and is copied quickly.
Other alternatives for backing up an open database, as recommended by members of an SQLite community, are the following:
Use the sqlite3 command‐line tool to log in to the SQLite database. Use the .dump command, store the result in a separate file, and back up that result file. An SQL script recreates the database.
Use the Shadow Volume Copy mechanism on Windows systems or LVM volume snapshots on Linux (and the crash‐restore feature of SQLite) to back up the complete database directory, including journal files if they are present. On a Windows XP SP1 or later operating system, use ntbackup on the database directory.
Use the sqlite3 command‐line tool to log in to the SQLite database. Use the BEGIN EXCLUSIVE command, copy the database file, and then use the COMMIT command.
For information to help you use your company’s own management or reporting tools or automated scripts with the data in the VRM database, see “Appendix: Database Schema and Audit Event Log Data” on page 75.

VMware, Inc. 75
This appendix explains the format of the data stored in the database and the best ways to access this data. This appendix includes the following topics:
“Using Database Reporting Tools” on page 75
“Database Schema” on page 76
“Querying the Audit Event Log Data” on page 81
Using Database Reporting ToolsYou can use a third‐party database management or reporting tool with the VMware ACE Management Server database. You can create custom reports of the system state by using a reporting tool. You can also use a reporting tool to inspect the audit trail of the administrator or user actions stored in the Event table. For example, you might find active instances with outdated ACE policy sets, or excessive failed authentication attempts.
The RDBMS access control mechanism protects the data stored in the database. Do not allow the database user account that your reporting tool uses to have a higher than necessary level of access to the data. Otherwise you might compromise the security of your VMware ACE system.
For example, reporting tools typically do not need write access to the database. Instead, you can create a separate read‐only account for the reporting tool. You might also want to disallow read access to database fields that contain sensitive information, such as user passwords, instance customization data (which might have the domain administrator login), or instance disk encryption keys. The embedded SQLite database does not support authentication, so access can be protected only by file‐based security that provides read‐only permissions or permissions to perform any operation.
Appendix: Database Schema and Audit Event Log Data
ACE Management Server Administrator’s Manual
76 VMware, Inc.
Database SchemaTables in the ACE Management Server database represent the major configuration objects of ACE Management Server, including Ace, Package, Instance, Access Policy, Runtime Policy, and User Data, which contains image customization settings and other data for each user. Administrator and user actions are audit logged in the Event table in the database, while possible event types are listed in the EventType table.
Note the following about the database schema:
A few tables with internal system information and indexes are not listed.
Boolean values are stored as strings with TRUE or FALSE values.
Timestamps are stored as decimal 64‐bit number strings showing the number of microseconds from 12:00 a.m 01/01/1970.
Other dates and times are stored as decimal strings showing the number of seconds from 12:00 a.m 01/01/1970.
ACE, Package, Instance, Access, and UserData records are never deleted from the database. They are marked as deleted with the deleted field set to TRUE, so that the previous information can be inspected for audit purposes.
The guest and host operating system portions of the ACE policy set are stored in the PolicyDb_RuntimePolicy table in respective fields as strings, if their size is less than 2000 bytes. If the policy component exceeds 2000 bytes, the string is split in 2000‐byte chunks and stored in the PolicyDb_LongField table. In this case, the value for the respective ExtKey field in the RuntimePolicy table contains the foreign key pointing to the corresponding series of strings in the LongField table (see the notes in the table definition).
The following is the database schema script.
/* Name – value pairs of service information, e.g. DB schema version number */CREATE TABLE PolicyDb_MetaInfo (
name VARCHAR(128), /* Name of the name-value pair */value VARCHAR(1024), /* Value of the name-value pair */PRIMARY KEY(name));
/* This table holds data for guest and host policy sets, split in 2K chunks *//* Select all fields for the key in the order of index and append strings together *//* to reconstruct the policy set */CREATE TABLE PolicyDb_LongField (
longFieldKey VARCHAR(128), /* Unique ID of the long field series */longFieldIndex INTEGER, /* Index in the series */longFieldValue VARCHAR(2000), /* Up to 2000 chars of field value chunk */sessionExpires VARCHAR(21), /* Optional field for storing session blob */PRIMARY KEY (longFieldKey, longFieldIndex));

VMware, Inc. 77
Appendix: Database Schema and Audit Event Log Data
/* ACE Master data */CREATE TABLE PolicyDb_Ace (
aceUID VARCHAR(128), /* Unique ID (primary key) */aceName VARCHAR(128), /* Name of this ace */activePolicySetVersion INTEGER NOT NULL, /* Soft foreign key to active RT policy*/aceTsCreated VARCHAR(21) DEFAULT 0 NOT NULL, /* Creation timestamp */aceTsLastModified VARCHAR(21) DEFAULT 0 NOT NULL, /* Last modified timestamp */deleted VARCHAR(7) DEFAULT 'FALSE', /* Is this entry deleted (tombstone) */PRIMARY KEY(aceUID));
/* Package data */CREATE TABLE PolicyDb_Package (
packageUID VARCHAR(128), /* Unique ID (primary key) */aceUID VARCHAR(128) NOT NULL, /* The ACE it belongs to. */pkgName VARCHAR(128), /* UI visible name. */pkgUseValidDates VARCHAR(7)
DEFAULT 'FALSE' NOT NULL, /* Use validity dates or always valid */pkgValidDateStart VARCHAR(21) NOT NULL, /* The package is valid from this date.*/pkgValidDateEnd VARCHAR(21) NOT NULL, /* The package is valid till this date.*/pkgDisabled VARCHAR(7) DEFAULT 'FALSE' NOT NULL, /* Is the package disabled */pkgProtectionKey VARCHAR(1024), /* The key used for package distribution */pkgPreview VARCHAR(7) DEFAULT 'FALSE' NOT NULL, /* Is preview package */pkgTsCreated VARCHAR(21) DEFAULT 0 NOT NULL, /* Creation timestamp */pkgTsLastModified VARCHAR(21) DEFAULT 0 NOT NULL, /* Last modified timestamp */deleted VARCHAR(7) DEFAULT 'FALSE', /* Is this entry deleted (tombstone) */PRIMARY KEY(packageUID),FOREIGN KEY(aceUID) REFERENCES PolicyDb_Ace(aceUID));
/* Access Control object data (single item of the list, associated with ACE Master)*/CREATE TABLE PolicyDb_Access (
accessPK VARCHAR(128), /* Unique ID (primary key) */aceUID VARCHAR(128), /* Ace for which this access policy is (FK)*/identityData VARCHAR(128), /* Internal representation, SID in AD */
/* case, token value goes here. */accVersion INTEGER NOT NULL, /* Access object version number */identityType INTEGER NOT NULL, /* AD User, Group, or Token Value */identityName VARCHAR(128), /* UI visible user/group name in AD case */accUseInstanceLimit VARCHAR(7)
DEFAULT 'FALSE' NOT NULL, /* Limit number of instances for this ID? */accInstanceLimit INTEGER NOT NULL, /* Max no. of ACE instances allowed */accTsCreated VARCHAR(21) DEFAULT 0 NOT NULL, /* Creation timestamp */accTsLastModified VARCHAR(21) DEFAULT 0 NOT NULL, /* Last modified timestamp */deleted VARCHAR(7) DEFAULT 'FALSE', /* Is this entry deleted (tombstone) */PRIMARY KEY(accessPK),FOREIGN KEY(aceUID) REFERENCES PolicyDb_Ace(aceUID));
/* ACE Instance object data */CREATE TABLE PolicyDb_Instance (
instanceUID VARCHAR(128), /* VM instance ID (primary key) */

ACE Management Server Administrator’s Manual
78 VMware, Inc.
packageUID VARCHAR(128) NOT NULL, /* The package it belongs to. */aceUID VARCHAR(128) DEFAULT '' NOT NULL, /* The ACE Master it belongs to */creatorIdName VARCHAR(128) NOT NULL, /* Display name of the activator user */creatorIdData VARCHAR(256), /* Fully qualified name of the activator */creatorAuthType INTEGER NOT NULL, /* The type of access check at activation */activationDate VARCHAR(21) NOT NULL, /* The date and time for the activation. */lastPolicyCheck VARCHAR(21) NOT NULL, /* Last time when the player called server */revocationDate VARCHAR(21) NOT NULL, /* When the instance was revoked */replacementDate VARCHAR(21) NOT NULL, /* When replaced because of Copy Protect. */
/* policy */inheritsExpiration
VARCHAR(7) DEFAULT 'FALSE' NOT NULL, /* Use expiration info from Policy Set */insUseValidDates
VARCHAR(7) DEFAULT 'FALSE' NOT NULL, /* Use validity dates or always valid */insValidDateStart VARCHAR(21) NOT NULL, /* The instance is valid from this date*/insValidDateEnd VARCHAR(21) NOT NULL, /* The instance is valid till this date*/insPassword VARCHAR(128), /* The login password for non-AD */
/* authentication for this instance */hostName VARCHAR(128), /* The name of the host PC the VM runs on */hostIp VARCHAR(128), /* The IP addr of the host the VM runs on */insProtectionKey VARCHAR(1024), /* Instance VM disk encryption key */copyProtectionId VARCHAR(1024), /* Stores location of the copy */insPreview VARCHAR(7) DEFAULT 'FALSE' NOT NULL, /* Is preview instance */guestIpAddress VARCHAR(128) DEFAULT '', /* Reported VM IP address */guestMacAddress VARCHAR(128) DEFAULT '', /* Assigned VM MAC address */guestMachineName VARCHAR(128) DEFAULT '', /* The guest (VM) OS host name */guestConfigStatus INTEGER DEFAULT 0, /* The completion status of guest */
/* auto-configuration */guestConfigMsg VARCHAR(512), /* Message for the guest auto-config */insTsCreated VARCHAR(21) DEFAULT 0 NOT NULL, /* Creation timestamp */insTsLastModified VARCHAR(21) DEFAULT 0 NOT NULL, /* Last modified timestamp */deleted VARCHAR(7) DEFAULT 'FALSE', /* Is this entry deleted (tombstone) */insCustom1 VARCHAR(255), /* User-defined field */insCustom2 VARCHAR(255), /* User-defined field */insCustom3 VARCHAR(255), /* User-defined field */insCustom4 VARCHAR(255), /* User-defined field */insCustom5 VARCHAR(255), /* User-defined field */insCustom6 VARCHAR(255), /* User-defined field */insCustom7 VARCHAR(255), /* User-defined field */insCustom8 VARCHAR(255), /* User-defined field */insCustom9 VARCHAR(255), /* User-defined field */PRIMARY KEY(instanceUID),FOREIGN KEY(packageUID) REFERENCES PolicyDb_Package(packageUID),FOREIGN KEY(aceUID) REFERENCES PolicyDb_Ace(aceUID));
/* MAC Address Pool (reserved for future use) */CREATE TABLE PolicyDb_MacPool (
macPoolUID VARCHAR(128), /* primary key */aceUID VARCHAR(128) NOT NULL, /* ACE for which this MacPool is used */macPoolName VARCHAR(128), /* User visible name */

VMware, Inc. 79
Appendix: Database Schema and Audit Event Log Data
description VARCHAR(128), /* name and description of the MAC pool*/rangeStart VARCHAR(21) NOT NULL, /* Start address of the MAC pool */rangeEnd VARCHAR(21) NOT NULL, /* End address of the MAC pool */lastAssigned VARCHAR(21) NOT NULL, /* Last assigned address */mplTsCreated VARCHAR(21) DEFAULT 0 NOT NULL, /* Creation timestamp */mplTsLastModified VARCHAR(21) DEFAULT 0 NOT NULL, /* Last modified timestamp */deleted VARCHAR(7) DEFAULT 'FALSE', /* Is this entry deleted (tombstone) */PRIMARY KEY(macPoolUID),FOREIGN KEY(aceUID) REFERENCES PolicyDb_Ace(aceUID));
/* Instance customization data */CREATE TABLE PolicyDb_UserData (
userDataPK VARCHAR(516), /* Primary key */aceUID VARCHAR(128), /* ACE for which this UserData is defined */packageUID VARCHAR(128), /* Package for which this UserData is used */activator VARCHAR(128), /* The user */udataName VARCHAR(128), /* User data entry name */udataType INTEGER NOT NULL, /* Attribute of the date */udataValue VARCHAR(2048), /* User data entry value */udtTsCreated VARCHAR(21) DEFAULT 0 NOT NULL, /* Creation timestamp */udtTsLastModified VARCHAR(21) DEFAULT 0 NOT NULL, /* Last modified timestamp */deleted VARCHAR(7) DEFAULT 'FALSE', /* Is this entry deleted (tombstone) */FOREIGN KEY(aceUID) REFERENCES PolicyDb_Ace(aceUID),FOREIGN KEY(packageUID) REFERENCES PolicyDb_Package(packageUID),PRIMARY KEY(userDataPK));
/* ACE Master policy set */CREATE TABLE PolicyDb_RuntimePolicy (
aceUID VARCHAR(128), /* The ACE it belongs to. */policyVersion INTEGER, /* Version of the RT Policy for this ACE */clientPolicyData VARCHAR(2000), /* Runtime policy for the guest OS */clientPolicyDataExtKey VARCHAR(128), /* If too long store in LongField table */hostPolicyData VARCHAR(2000), /* Runtime policy for the host OS (NQ) */hostPolicyDataExtKey VARCHAR(128), /* If too long store in LongField table */expirationType INTEGER NOT NULL, /* Expiration Type (enum) */expValue_1 VARCHAR(21) NOT NULL, /* Expiration value (depends on type) */expValue_2 VARCHAR(21) NOT NULL, /* Expiration value (depends on type) */cacheLifetime VARCHAR(21) NOT NULL, /* How long could work without server */rtpInstType INTEGER NOT NULL, /* Instantiation authentication check type */rtpAuthType INTEGER NOT NULL, /* Runtime authentication check type */rtpUseInstanceLimit VARCHAR(7)
DEFAULT 'FALSE' NOT NULL, /* Limit number of instances for this ACE? */rtpInstanceLimit INTEGER NOT NULL, /* Max no. of ACE instances allowed */rtpUsePerUserInstanceLimit VARCHAR(7)
DEFAULT 'FALSE' NOT NULL, /* Limit number of instances per user? */rtpPerUserInstanceLimit INTEGER NOT NULL, /* Max no. of ACE instances per user */copyPolicy INTEGER DEFAULT 0 NOT NULL, /* Behavior if VM instance is copied */published VARCHAR(7) DEFAULT 'FALSE' NOT NULL,/* Policy published (update locked)*/rtpTsCreated VARCHAR(21) DEFAULT 0 NOT NULL, /* Creation timestamp */rtpTsLastModified VARCHAR(21) DEFAULT 0 NOT NULL, /* Last modified timestamp */

ACE Management Server Administrator’s Manual
80 VMware, Inc.
deleted VARCHAR(7) DEFAULT 'FALSE', /* Is this entry deleted (tombstone) */PRIMARY KEY (aceUID, policyVersion),FOREIGN KEY(aceUID) REFERENCES PolicyDb_Ace(aceUID));
/* ACE Management Server info - reserved for future use */CREATE TABLE PolicyDb_AcescServer (
serverHostname VARCHAR(128), /* Host name of the server computer */serverPort INTEGER, /* TCP port number server is listening on */secure VARCHAR(7) DEFAULT 'FALSE' NOT NULL, /* Whether HTTPS is enabled */sslCertificateExtKey VARCHAR(128), /* SSL Certificate data, key to stored */
/* in LongField table */sslCertificateChainExtKey VARCHAR(128), /* SSL Certificate Chain data, key to */
/* stored in LongField table */PRIMARY KEY (serverHostname, serverPort));
/* Audit Event Log Event Types lookup table */CREATE TABLE PolicyDb_EventType (
eventType INTEGER, /* Event Type code (PK) */eventMessage VARCHAR(1024), /* Printable message for this event type */eventCategory INTEGER, /* Event Category code */eventCategoryName VARCHAR(128), /* Event Category printable name */eventLogLevel INTEGER, /* Event Log Level */PRIMARY KEY (eventType));
/* Audit Event Log data */CREATE TABLE PolicyDb_Event (
eventUID INTEGER, /* Primary key of the table (sequential) */eventTs VARCHAR(21), /* Timestamp of the event creation in uSec */loginName VARCHAR(128), /* Login user name of the actor */aceUID VARCHAR(128), /* UID of the ACE affected by event */packageUID VARCHAR(128), /* UID of the package affected by event */instanceUID VARCHAR(128), /* UID of the instance affected by event */policyVersion INTEGER, /* Version of ACE policy affected by event */eventCategory INTEGER, /* Event Category as defined in EventType */eventType INTEGER, /* Event Type as defined in EventType */sessionID VARCHAR(128), /* Ace Server Session ID */clientIP VARCHAR(128), /* IP Address of the client machine (resvd) */serverIP VARCHAR(128), /* IP Address of the Ace Server (reserved) */turnaroundTime VARCHAR(21), /* Server-side execution time in ms */handlerName VARCHAR(128), /* Name of the ClientLib handler (debug) */returnCodeText VARCHAR(128), /* Text error code returned to the client */messageParams VARCHAR(1024), /* Tab separated list of event data */prevEventUID INTEGER UNIQUE, /* UID of the previous recorded event */eventSignature VARCHAR(128), /* Event signature, signed with server key */FOREIGN KEY(eventType) REFERENCES PolicyDb_EventType(eventType),FOREIGN KEY(prevEventUID) REFERENCES PolicyDb_Event(eventUID),PRIMARY KEY (eventUID));

VMware, Inc. 81
Appendix: Database Schema and Audit Event Log Data
Querying the Audit Event Log DataYou can use the ACE Server Component to create an audit trail for all transactions that the server performs. You can use this system to track usage, security breaches, policy errors, performance, and so on.
The ACE Server Component Event Logging infrastructure is flexible enough to provide detailed logging when necessary, without overwhelming the system by slowing performance.
The event logging mechanism captures enough information to answer the following questions:
Who activated an instance?
When was an instance activated?
Who revoked an instance?
Who turned off copy protection policy?
What changes to policy were made on a particular date?
Who is failing to authenticate?
The mechanism does not necessarily answer these questions directly, but provides enough data so that an administrator can view event logs and find answers. The data being logged meets the following requirements:
Provides details of each transaction served.
Centralizes the gathering of event log data when multiple servers are used.
Provides a means for administrators to select which type of transactions are logged.
Can be configured to provide more or fewer logs when necessary.
Some of this audit trail is already visible through other features of the product. For example, the instance viewer displays the date of the last policy get operation, or the expiration date, and so on. The event logging mechanism can answer more difficult questions, such as which administrator made which policy changes and which administrator deleted an ACE instance.

ACE Management Server Administrator’s Manual
82 VMware, Inc.
Table A‐1 describes the data that is stored in a log entry.
ACE, package, and instance UIDs and policy version provide coordinates of the log event in the space of ACE Server objects. They help link the event with the state of the system. By using database query tools, you can find all ACE administration events that affected a particular ACE instance from its creation until its deletion.
Not all coordinates are present for all events. For example, if a package expiration date update is logged, the instance UID field is not set, because all instances within the package are affected.
Table A-1. Log Entry Data
Data Description
Audit log event ID (PK) An incrementing integer
Log timestamp In microseconds from 12:00 a.m. 01/01/1970, stored as a decimal string
Login user name
Affected ACE UID (FK)
Affected package UID (FK)
Affected instance UID (FK)
Affected Policy Set Version
Event category Auth, AceAdmin, PkgAdmin, PolicyAdmin, InstAdmin
Event type code (FK) References PolicyDb_EventType table
Session ID Debug
Incoming IP address Reserved for future use
Server IP Address Reserved for future use
Operation turnaround time Time spent in server in ms
Operation handler name (debug)
Return code text Success, failure, specific error
Message parameters Tab‐separated list
Previous event UUID to prevent unauthorized record deletion or insertion
Log integrity
Event record hash with a server key to reveal modification of the record
Log integrity

VMware, Inc. 83
Appendix: Database Schema and Audit Event Log Data
If immutable data is stored permanently elsewhere in the database, it is not duplicated in the log entry. For example, when a new policy is published, the complete policy text is not included in the log entry. Instead, its version number is referenced, so that the complete data of the event can be reconstructed from PolicyDb_ RuntimePolicy and PolicyDb_Access tables if necessary.
The event type code is associated with a lookup table PolicyDb_EventType, which contains a text message template for each type of event, category, and log level of the event. The message can contain %s parameter placeholders, in which case the Message Parameters field in the log entry contains a tab‐delimited list of values for these parameters. For example, an instance administration event with type = 4110 has the following message:
4110 -> "Instance Set Guest Info requested, IP address = %s, MAC address %s, configuration message \"%s\", machine name \"%s\", configuration status %s"
In this example, the Message Parameters field shows:
10.17.0.3 00:0C:29:1A:2B:3C OK ACETest 0
The resulting parameters replace the %s placeholders in the message template.
ACE Management Server event logging contains an experimental tamper evidence feature. Every record in the event log (except the first one) must have a unique reference to the previous event, further enforced by the database foreign key and unique constraint. Each successive record has a unique ID incremented by 1, so missing records are immediately evident. If a user with direct access to the database changes, adds, or removes some records, the user must change either the previous event pointer or other data in the remaining event records. Data within every record is hashed together with a server key and is stored in the eventSignature field.
For more information about event categories, configuring levels of event logging for each category, and purging old events to keep the table size in check, see “Logging Events” on page 49.
NOTE ACE Management Server does not log sensitive data like passwords or encryption keys.

ACE Management Server Administrator’s Manual
84 VMware, Inc.

VMware, Inc. 85
ACE instanceA virtual machine that ACE administrators create, associate with virtual rights management (VRM) policies, and then package for deployment to users.
ACE Management ServerA server that the ACE administrator can install and use for activating and tracking ACE instances and for hosting dynamic policies for ACE instances.
ACE‐enabled virtual machineA virtual machine template that the ACE administrator creates. The virtual machine can be configured with various policies, devices and deployment settings. It can then be used as the basis for creating packages to be sent to ACE users. In earlier versions of VMware ACE, this template was called an ACE Master.
activationA step in an ACE instance setup that includes package protection and setting up the ACE instance’s runtime authentication policy. The successful completion of activation makes the packaged virtual machine, with its policies and other settings, an ACE instance. The activation setting in the access control policy determines who can access an installed ACE package and turn it into an ACE instance. See also authentication.
authenticationA step in an ACE instance setup that includes instance protection. The successful completion of the authentication step allows the user to run the instance. See also activation.
Glossary
ACE Management Server Administrator’s Manual
86 VMware, Inc.
deployment settingsA set of rules and settings associated with a package, such as instance customization settings. These settings cannot be changed after packaging. The only way to change deployment settings is to create a new package.
guest operating system An operating system that runs inside an ACE instance. See also host operating system.
host computer The physical computer on which the VMware Player software is installed. It hosts the ACE instances.
host operating system An operating system that runs on the host machine. See also guest operating system.
hot fix An installable file that resets a user’s password, renews an expired virtual machine or enables a copy‐protected virtual machine to run from a new location.
instance customizationThe act of customizing an ACE instance, thus making it unique from all other instances. The instance customization process automates the actions of the Microsoft Sysprep utility. It also provides the ACE administrator with features needed to set up an automated remote domain join process of the ACE instance to a company VPN network.
managed ACE instanceAn ACE instance that an ACE Management Server manages. See also ACE Management Server.
package An installable bundle for distribution to users. A full package includes an ACE‐enabled virtual machine configuration file, virtual disk files, policies, a package installer, and resource files. It also includes the VMware Player application used to run ACE instances.
policy A formal set of guidelines that control the capabilities of an ACE instance. Policies are set in the policy editor in Workstation. See also publish.
VMware, Inc. 87
Glossary
previewAn operating and viewing mode that an administrator can use to preview the ACE instance as it will run on the user’s machine. The administrator can use this feature to see the effects of policy and configuration settings without having to perform the packaging and deployment steps.
publishThe process of making policies available on ACE Management Server so that ACE instances can receive them according to the policy update schedule. See also policy.
standalone ACE instanceAn ACE instance that is not managed by ACE Management Server. Any changes to its policies or other settings are made by the administrator’s distribution of updates to the user.
virtual machine A virtualized x86 PC environment in which a guest operating system and associated application software can run. An ACE‐enabled virtual machine that has policies and other settings associated with it is known as an ACE instance. See also ACE instance.
VMware Player A simple application that allows a user to run an ACE instance.
Workstation The program that an administrator uses to create, deploy, and update ACE packages and manage ACE instances. Formerly named “VMware ACE Manager” or “VMware Workstation ACE Edition.”
VMware Tools A suite of utilities and drivers that enhances the performance and functionality of the guest operating system. Key features of VMware Tools include some or all of the following, depending on your guest operating system: an SVGA driver, a mouse driver, the VMware Tools control page, and support for such features as shared folders, shrinking virtual disks, time synchronization with the host, VMware Tools scripts, and connecting and disconnecting devices while the ACE instance is running.

ACE Management Server Administrator’s Manual
88 VMware, Inc.

VMware, Inc. 89VMware, Inc. 89
Index
AACE instance
log events for 49on Linux host, fixing server
connection problem 69security certificates in 21
ACE Management ServerActive Directory integration 17changing port assignment 70configuring 37creating Active Directory user and
group for 37, 38database backup 74database schema 76default port assignments 26embedded database 16external database option 16features 9fixing connection problem with ACE
instance on Linux host 69hardware requirements 11installing 26installing on Linux system 28installing on Windows system 27installment options 27licensing 46logging on 34querying the audit event log data 76serial number 46stopping and starting manually 31using 59
Active Directorycreating group for use with ACE
Management Server 38creating user for use with ACE
Management Server 38integration with ACE Management
Server 17logon options, ACE Management
Server 34audit event log data, querying 81
Ccertificates, setting up 44change the copy protection ID 66clock synchronization (note) 25column headings, sorting by 63configuration Restart page 50configuring
ACE Management Server instances 37
copy protection, changing the ID for 66custom fields in instance view 64
Ddatabase
backup 74external 16for ACE 16
database for ACE Management Server 16
deactivate an ACE instance 65details for an instance, viewing 65
ACE Management Server Administrator’s Manual
90 VMware, Inc.
Eevent logging 49expiration dates, changing 65
HHelp Desk
advanced instance queries 62Instances page 60using 60
Help Desk Instance Details page 65
Iinstalling ACE Management Server 26Instance Details page 65instance queries 62instance view
custom fields 64customizing columns in 64details 65
Instances page 60
LLDAP
See Active Directorylicensing, ACE Management Server 46logging events 49logging on to the ACE Management
Server 34
Ppasswords, resetting
admin password for ACE Management Server 71
for ACE instances 66port assignments, default 26port for ACE Management Server 70
Rreactivate an ACE instance 65reset the password for an instance 66Restart page 50restarting the ACE Management
Server 50
Ssearching for instances in Help Desk 62security, SSL 20, 21sort instances 63SQLite database for ACE Management
server 16SSL certification, using 20, 21SSL protocol, using 20, 21stopping and starting the Apache service
manually 31
Ttroubleshooting with the Help Desk
application 60
Uusing the ACE Management Server 59
Vview details for an instance 65VMware Player
fixing ACE Server connection problem on Linux host 69