avid video peripherals -...
TRANSCRIPT
Avid® Video PeripheralsAVoption|V10 and Avid Mojo
Version 7.1
Copyright
This guide is copyrighted ©2006 by Digidesign, a division of Avid Technology, Inc. (hereafter “Digidesign”), with all rights reserved. Under copyright laws, this guide may not be duplicated in whole or in part without the written consent of Digidesign.
Avid, Avid DNA, AVid EDL Manager, Avid Mojo, Avid Unity, AVoption|V10, Digidesign, DigiDrive, Pro Tools, and Pro Tools|HD are trademarks or registered trademarks of Digidesign and/or Avid Technology, Inc. All other trademarks are the property of their respective owners.
Product features, specifications, system requirements, and availability are subject to change without notice.
PN 9106-18865-00 REV A 03/06
WARNING: This product contains chemicals, including lead, known to the State of California to cause cancer and birth defects or other reproductive harm. Wash hands after handling.
Warnings and Cautions• Never install equipment if it appears damaged. • Disconnect the power cord before servicing unit. • Only perform the services explicitly described in this
document. For services or procedures not outlined in this document, speak with authorized Avid service personnel.
• Follow all warnings and cautions in the procedures. • Operate the device within its marked electrical ratings and
product usage instructions.Note: Certification information for Avid Mojo is contained in the Avid Mojo documentation.
FCC NoticeThis device complies with Part 15 of the FCC Rules. Operation is subject to the following two conditions:• This device may not cause harmful interference.• This device must accept any interference received,
including interference that may cause undesired operation.
This equipment has been tested and found to comply with the limits for a Class A digital device, pursuant to Part 15 of the FCC Rules. These limits are designed to provide reasonable protection against harmful interference when the equipment is
CLASS 1 LED PRODUCT
operated in a commercial environment. This equipment generates, uses, and can radiate radio frequency energy and, if not installed in accordance with the instruction manual, may cause harmful interference to radio communications. Operation of this equipment in a residential area is likely to cause harmful interference in which case the user will be required to correct the interference at his own expense.
Canadian ICES-003This Class A digital apparatus meets all requirements of the Canadian Interference Causing Equipment Regulations.Cet appareil numérique de la classe A respecte toutes les exigences du Règlement sur le matériel brouilleur du Canada.
European Union Notice
Australia and New Zealand EMC Regulations
John Kells, Australian Operations ManagerAvid Technology (Australia)Unit B5 Skyline PlaceFrench Forest NSW 2086AustraliaPhone: 61-2-8977-4800
Taiwan EMC RegulationsTaiwan EMC Regulations BSMI Class A EMC Warning
N1709

Declaration of Conformity
(According to ISO/IEC Guide 22 and EN 45014)
Application of Council Directives:
73/23/EEC, 89/336/EEC.
Standards to which Conformity is Declared:
EN60950:1999 Third EditionCISPR 22:1997 / EN55022:1994 + A1:1995 + A2:1997 Class A EN55024:1998/EN61000 — 3-2, 4-2, 4-3, 4-4, 4-5, 4-6, 4-8, 4-11
Manufacturer’s Name:
Avid Technology, Inc. 1925 Andover StreetTewksbury, MA 01876, USA
European Contact: Nearest Avid Sales and Service Office or Avid Technology International B.V. Sandyford Business Center Unit 3,Dublin 18, Ireland
Type of Equipment: Information Technology Equipment
Product Name: Products for the Windows NT, Windows 2000, or Windows XP Operating System: Avid Adrenaline DNA, Avid DS Nitris DNA, Avid Equinox Break-Out-Box, Avid|DS, Avid Xpress, Avid Xpress DV, Film Composer, Media Composer, MediaDock 2+, MediaDock LVD, MediaDrive, MediaRAID, MEDIArray, MEDIArray Drive, MEDIArray II, MEDIArray II Drive, Meridien I/O box, NewsCutter, NewsCutter DV, NewsCutter XP, Pro Tools AVoption|V10, SymphonyProducts for the Mac OS X Operating System: Avid Adrenaline DNA, Avid Xpress, Avid Xpress DV, Film Composer, Media Composer, MediaDock 2+, MediaDock LVD, MediaDrive, MediaRAID, MEDIArray, MEDIArray Drive, MEDIArray II, MEDIArray II Drive, Meridien I/O box, Pro Tools AVoption|V10, SymphonyProducts for the UNIX Operating System: AirPlay, VideoSPACEProducts for MediaNetwork and Workgroups: Avid ProEncode, Avid Unity MediaManager, Avid Unity MediaNetwork, Avid Unity TransferManager, LANserver, LANserver EX, MEDIArray, MEDIArray Drive, MEDIArray II, MEDIArray II Drive, Nearchive, PortServer, Xdeck
Base Model Numbers:
None
Product Options: All

(1) Products for the Windows NT, Windows 2000, or Windows XP Operating System: Products were tested in a typical Avid Adrenaline DNA, Avid DS Nitris DNA, Avid Equinox Break-Out-Box, Avid|DS, Avid Xpress, Avid Xpress DV, Film Composer, Media Composer, MediaDock 2+, MediaDock LVD, MediaDrive, MediaRAID, MEDIArray, MEDIArray Drive, MEDIArray II, MEDIArray II Drive, Meridien I/O box, NewsCutter, NewsCutter DV, NewsCutter XP, Pro Tools AVoption|V10, or Symphony configuration.
(2) Products for the Mac OS X Operating System: Products were tested in a typical Avid Adrenaline DNA, Avid Xpress, Avid Xpress DV, Film Composer, Media Composer, MediaDock 2+, MediaDock LVD, MediaDrive, MediaRAID, MEDIArray, MEDIArray Drive, MEDIArray II, MEDIArray II Drive, Meridien I/O box, Pro Tools AVoption|V10, or Symphony configuration.
(3) Products for the UNIX Operating System: Products were tested in an AirPlay or VideoSPACE configuration.
(4) Products for MediaNetwork and Workgroups: Products were tested in a typical Avid ProEncode, Avid Unity MediaManager, Avid Unity MediaNetwork, Avid Unity TransferManager, LANserver, LANserver EX, MEDIArray, MEDIArray Drive, MEDIArray II, MEDIArray II Drive, Nearchive, PortServer, or Xdeck configuration.
I, the undersigned, hereby declare that the equipment specified above conforms to the above Directives and Standards.
George R. Smith, Director of Hardware Engineering
This symbol on the product or its packaging indicates that this product must not be disposed of with other waste. Instead, it is your responsibility to dispose of your waste equipment by handing it over to a designated collection point for the recycling of waste electrical and electronic equipment. The separate collection and recycling of your waste equipment at the time of disposal will help conserve natural resources and ensure that it is recycled in a manner that protects human health and the environment. For more information about where you can drop off your waste equipment for recycling, please contact your local city recycling office or the dealer from whom you purchased the product.
contents
Chapter 1. Introduction to Pro Tools with Avid Video . . . . . . . . . . . . . . . . . . . . . . . . . . . . 1
DigiTranslator 2.0 Integrated Option . . . . . . . . . . . . . . . . . . . . . . . . . . . . . . . . . . . . . . . . . . . 2
MachineControl. . . . . . . . . . . . . . . . . . . . . . . . . . . . . . . . . . . . . . . . . . . . . . . . . . . . . . . . . . 2
Avid Unity Support. . . . . . . . . . . . . . . . . . . . . . . . . . . . . . . . . . . . . . . . . . . . . . . . . . . . . . . . 2
System Requirements . . . . . . . . . . . . . . . . . . . . . . . . . . . . . . . . . . . . . . . . . . . . . . . . . . . . . 2
Digidesign Registration . . . . . . . . . . . . . . . . . . . . . . . . . . . . . . . . . . . . . . . . . . . . . . . . . . . . 3
About the Pro Tools Guides . . . . . . . . . . . . . . . . . . . . . . . . . . . . . . . . . . . . . . . . . . . . . . . . . 3
Conventions Used in This Guide . . . . . . . . . . . . . . . . . . . . . . . . . . . . . . . . . . . . . . . . . . . . . . 3
About www.digidesign.com . . . . . . . . . . . . . . . . . . . . . . . . . . . . . . . . . . . . . . . . . . . . . . . . . 4
Chapter 2. Avid DNA Video Peripherals Hardware Overview . . . . . . . . . . . . . . . . . . . . . . 5
Supported Video Resolutions . . . . . . . . . . . . . . . . . . . . . . . . . . . . . . . . . . . . . . . . . . . . . . . . 5
AVoption|V10 Interface . . . . . . . . . . . . . . . . . . . . . . . . . . . . . . . . . . . . . . . . . . . . . . . . . . . . 7
Avid Mojo Interface and Video Connections . . . . . . . . . . . . . . . . . . . . . . . . . . . . . . . . . . . . . 10
Synchronization Hardware . . . . . . . . . . . . . . . . . . . . . . . . . . . . . . . . . . . . . . . . . . . . . . . . . 10
Chapter 3. Installing Avid DNA Video Peripherals . . . . . . . . . . . . . . . . . . . . . . . . . . . . . . 11
Uninstalling AVoptionDNA, Pro Tools, Media Station|V10 and/or Avid Xpress Pro . . . . . . . . . . 11
Disabling nVidia Display Driver Service . . . . . . . . . . . . . . . . . . . . . . . . . . . . . . . . . . . . . . . . 13
Installing Pro Tools Hardware . . . . . . . . . . . . . . . . . . . . . . . . . . . . . . . . . . . . . . . . . . . . . . . 13
Installing Media Station|PT and Pro Tools Software . . . . . . . . . . . . . . . . . . . . . . . . . . . . . . . 13
Connecting Avid DNA Video Peripheral Hardware . . . . . . . . . . . . . . . . . . . . . . . . . . . . . . . . . 14
Starting Up Your System . . . . . . . . . . . . . . . . . . . . . . . . . . . . . . . . . . . . . . . . . . . . . . . . . . 16
Authorizing DigiTranslator 2.0 . . . . . . . . . . . . . . . . . . . . . . . . . . . . . . . . . . . . . . . . . . . . . . 16
Updating Firmware on Application Launch . . . . . . . . . . . . . . . . . . . . . . . . . . . . . . . . . . . . . . 18
Using NTSC and PAL . . . . . . . . . . . . . . . . . . . . . . . . . . . . . . . . . . . . . . . . . . . . . . . . . . . . . 18
Setting Up Local Storage . . . . . . . . . . . . . . . . . . . . . . . . . . . . . . . . . . . . . . . . . . . . . . . . . . 18
Checking and Updating ATTO Firmware . . . . . . . . . . . . . . . . . . . . . . . . . . . . . . . . . . . . . . . . 20
Test Sessions . . . . . . . . . . . . . . . . . . . . . . . . . . . . . . . . . . . . . . . . . . . . . . . . . . . . . . . . . . 20
Contents v

vi
Chapter 4. Pro Tools Video Track . . . . . . . . . . . . . . . . . . . . . . . . . . . . . . . . . . . . . . . . . . . . 21
Avid Video Track in Pro Tools. . . . . . . . . . . . . . . . . . . . . . . . . . . . . . . . . . . . . . . . . . . . . . . 21
Video Track Options . . . . . . . . . . . . . . . . . . . . . . . . . . . . . . . . . . . . . . . . . . . . . . . . . . . . . 22
Exporting Files from Avid Programs . . . . . . . . . . . . . . . . . . . . . . . . . . . . . . . . . . . . . . . . . . 24
Digitizing Video to the Pro Tools Timeline . . . . . . . . . . . . . . . . . . . . . . . . . . . . . . . . . . . . . . 25
Editing Video Clips . . . . . . . . . . . . . . . . . . . . . . . . . . . . . . . . . . . . . . . . . . . . . . . . . . . . . . 29
Viewing Video Clips in the Scrub Video Window . . . . . . . . . . . . . . . . . . . . . . . . . . . . . . . . . . 32
Taking the Video Track Offline . . . . . . . . . . . . . . . . . . . . . . . . . . . . . . . . . . . . . . . . . . . . . . 33
Appendix A. 24fps Workflows . . . . . . . . . . . . . . . . . . . . . . . . . . . . . . . . . . . . . . . . . . . . . . . 35
Appendix B. PCI Slot Configurations for Avid DNA Video Peripherals . . . . . . . . . . . . 37
Windows PCI Slot Configurations . . . . . . . . . . . . . . . . . . . . . . . . . . . . . . . . . . . . . . . . . . . . 37
Macintosh PCI Slot Configurations . . . . . . . . . . . . . . . . . . . . . . . . . . . . . . . . . . . . . . . . . . . 41
Appendix C. Video Buffer Underrun Errors. . . . . . . . . . . . . . . . . . . . . . . . . . . . . . . . . . . . . 43
Index . . . . . . . . . . . . . . . . . . . . . . . . . . . . . . . . . . . . . . . . . . . . . . . . . . . . . . . . . . . . . . . . . . . . . 45
Avid Video Peripherals Guide

chapter 1
Introduction to Pro Tools with Avid Video
This guide describes how to use AVoption|V10™ and Avid Mojo® peripherals (referred to here as Avid DNA video peripherals) with Pro Tools|HD® systems.
Pro Tools® and Avid DNA™ video peripherals combine the powerful audio post-production features of Pro Tools with integrated support for import and playback of Avid video media.
Capabilities of Pro Tools with Avid DNA Peripherals
Pro Tools with Avid DNA peripherals lets you:
• Import and play back Avid video on the Pro Tools Video track with near sample-ac-curate precision against audio tracks.
• Digitize video to the Pro Tools Timeline.
• Spot individual video clips to new loca-tions in the Video track.
• View video edits and clip names in the Video track.
• View the Video track as a series of picture frames.
• Play video on an external monitor.
• Import mixed video resolutions to the Video track.
• Import and play back true 24P and 25P (Progressive Scan) picture media created in Avid video workstations.
Avid Media Station|PT Capabilities
Media Station|PT software (purchased sepa-rately) was developed by Avid specifically for the needs of the Pro Tools post-production edi-tor. Combined with AVoption|V10 or Avid Mojo, Media Station|PT lets you:
• Capture NTSC or PAL video directly from tape.
• Open and re-digitize an existing sequence from an Avid editing system (such as Media Composer Adrenaline).
• Digitize audio and video from an EDL by creating an Avid sequence with Avid EDL Manager™.
• Import QuickTime and other non-OMFI media files
• Render effects.
• Create a video mixdown.
• Transcode Media Composer sequences for export to Pro Tools with Avid Mojo.
• Export an AAF or OMF sequence for import into Pro Tools.
• Import an AAF sequence created in Pro Tools.
• Lay back audio and video to tape.
• Export audio and video sequences as QuickTime or other format digital files.
Chapter 1: Introduction to Pro Tools with Avid Video 1

2
DigiTranslator 2.0 Integrated OptionUse DigiTranslator to convert AAF and OMFI se-quences into Pro Tools session files. You can also use it to export audio material from Pro Tools sessions to AAF sequences or OMFI sequences and files for import into other systems.
MachineControlYou can use Digidesign’s MachineControl soft-ware to remotely control your external audio and video decks from Pro Tools. Machine-Control is a Pro Tools software option that can be purchased separately.
Avid Unity Support(Windows XP Only)
Pro Tools with AVoption|V10 or Avid Mojo sup-ports Avid Unity™ MediaNetwork, which pro-vides integrated high-speed network storage sys-tems for Avid and Pro Tools workstations.
For detailed information on configuring your Pro Tools system with AVoption|V10 or Avid Mojo as an Avid Unity MediaNetwork cli-ent, see the Pro Tools Client Avid Unity™ Media-Network Guide. Also, refer to the Digidesign Web site (www.digidesign.com), as well as the Avid Unity MediaNetwork documentation.
DigiTranslator 2.0 is included with AVop-tion|V10 and may be purchased separately for Avid Mojo users. For more information, refer to the DigiTranslator 2.0 Integrated Option Guide.
For more information, see the Machine-Control Guide.
Avid Video Peripherals Guide
Record and Play Back with Unity
Both audio and video media can be recorded to and played back from Avid Unity Workspaces. You can digitize video directly to Avid Unity MediaNetwork by designating a Unity Work-space as the video record volume.
System Requirements• A Digidesign-qualified Pro Tools|HD sys-
tem with a 192 I/O or 192 Digital I/O.
• SYNC I/O
• Separate drives for audio and video media
For complete system requirements, visit the Digidesign Web site (www.digidesign.com).
Compatibility Information
Digidesign can only assure compatibility and provide support for hardware and software it has tested and approved.
For a list of Digidesign-qualified computers, op-erating systems, hard drives, and third-party de-vices, refer to the Digidesign Web site (www.digidesign.com).
Avid DNA video peripherals are qualified with specific versions of ATTO and nVidia software. To ensure the best performance from your Pro Tools system, check the Digidesign Web site (www.digidesign.com).
For detailed information on storage require-ments, visit the Digidesign Web site (www.digidesign.com).
Digidesign RegistrationReview the enclosed Digidesign Registration In-formation Card and follow the instructions on it to quickly register your purchase online. Regis-tering your purchase is the only way you can be eligible to receive complimentary technical sup-port and future upgrade offers. It is one of the most important steps you can take as a new user.
About the Pro Tools GuidesIn addition to the printed guides that came with your system, PDF versions of the Pro Tools guides are installed automatically with Pro Tools in the following directory: Program Files\Digidesign\Pro Tools\Documentation. To view or print the PDF guides, install Acrobat Reader (included on the Pro Tools Installer disc).
Conventions Used in This GuideAll Digidesign guides use the following conven-tions to indicate menu choices and key com-mands::
The following symbols are used to highlight im-portant information:
Convention Action
File > Save Choose Save from the File menu
Control+N Hold down the Control key and press the N key
Control-click Hold down the Control key and click the mouse button
Right-click (Windows) Click with the right mouse button
User Tips are helpful hints for getting the most from your Pro Tools system.
Important Notices include information that could affect your Pro Tools session data or the performance of your Pro Tools system.
Shortcuts show you useful keyboard or mouse shortcuts.
Cross References point to related sections in this guide or other Pro Tools Guides.
Chapter 1: Introduction to Pro Tools with Avid Video 3
4
About www.digidesign.comThe Digidesign Web site (www.digidesign.com) is your best online source for information to help you get the most out of your Pro Tools sys-tem. The following are just a few of the services and features available.
Registration Register your purchase on-line. See the enclosed registration form for instructions.
Support Contact Digidesign Technical Support or Customer Service; download software up-dates and the latest online manuals; browse the Compatibility documents for system require-ments; search the online Answerbase or join the worldwide Pro Tools community on the Digi-design User Conference.
Training and Education Study on your own using courses available online or find out how you can learn in a classroom setting at a certified Pro Tools training center.
Products and Developers Learn about Digidesign products; download demo software or learn about our Development Partners and their plug-ins, applications, and hardware.
News and Events Get the latest news from Digi-design or sign up for a Pro Tools demo.
To learn more about these and other resources available from Digidesign, visit the Digidesign Web site (www.digidesign.com).
Avid Video Peripherals Guide

chapter 2
Avid DNA Video Peripherals Hardware Overview
Supported Video Resolutions
Supported Video Resolutions for AVoption|V10
Pro Tools AVoption|V10 supports the following video resolutions for import and playback:
• All standard-definition Avid OMF and MXF video files
• Avid IMX MPEG50 files (MPEG30, MPEG40, and OP1a files not supported)
• DV 50, DV 25 and DVC Pro 25 resolutions compressed with the Avid codec, including:
• DV25 411: DV25 interlaced scan at 4:1:1 sampling (for NTSC 30i and PAL 25i projects)
• DV25 420: DV25 interlaced scan at 4:2:0 sampling (for PAL 25i projects)
• DV25p 411: DV25 progressive scan at 4:1:1 sampling (for NTSC 23.976p and NTSC 24p projects)
The oldest class of ABVB files (ABVB “MFM” files) are not supported in Pro Tools. These files were created with ver-sions of Media Composer lower than 7.0, and do not have the .omf extension.
Ch
• DV25p 420: DV25 progressive scan at 4:2:0 sampling (for PAL 25p and PAL 24p projects)
Supported Video Resolutions for Avid Mojo
Pro Tools with Avid Mojo supports import and playback of any combination of the following video resolutions created with the Avid DV, JFIF or MXF video codecs:
• 1:1 (Uncompressed JFIF/MXF)
• DV50
• DV25 4:1:1
• DV25 4:2:0
• DV25P 4:1:1
• DV25P 4:2:0
• 15:1s 4:2:2
• 14:1P 4:2:2
• 28:1P 4:2:2
• 35:1P 4:2:2
apter 2: Avid DNA Video Peripherals Hardware Overview 5

6
Support for Mixed Video Resolutions
Avid DNA video peripherals support Avid video clips of mixed resolutions in the Video track. For example, the Video track can contain Avid DV25 and 15:1s clips. However, all clips must be Avid clips of the same frame rate. Mixed clips with different frame rates are not supported. Mixing Avid and QuickTime video clips is not supported.
Avid Video Peripherals Guide
Caveats
The following caveats apply to supported resolu-tions:
• Quicktime video is not supported for play-back with Avid DNA video peripherals. In order to use Avid DNA video peripherals for Quicktime playback, you must first import the video into an Avid editing application such as Media Station|PT and export it as an AAF or OMF. (See the Media Station|PT Guide for more information.)
• Import and playback of MPEG-IMX 30 and MPEG-IMX 40 files are not supported by Pro Tools. Check the Digidesign Web site (www.digidesign.com) for updates on sup-port for these formats.
• Pro Tools with Avid DNA peripherals out-puts video to NTSC and PAL monitors only. 24 fps and 23.97 fps video is converted to NTSC (29.97 fps) or PAL (25 fps) output in Pro Tools.
• Pro Tools video digitizing and playback is intended for monitoring purposes only, and is not suitable for professional layback or broadcast, regardless of the resolution or frame rate of the video clip. Video output from Media Station|PT software is profes-sional quality.
AVoption|V10 InterfaceThe following sections describe the functions of the AVoption|V10 breakout box.
AVoption|V10 Front Panel
The front panel of the AVoption|V10 (see Figure 1) has eleven indicators and a power switch. When the AVoption|V10 is powered on, the indicators turn on and off as it goes through a power-on self-test (POST).
The front panel of the AVoption|V10 breakout box provides the following LED indicators:
HD (Yellow) Is currently non-functional.
SD (Green) Lights when Standard Definition (SD) codec selected in Media Station|PT.
DV (Yellow) Lights when DV input is selected.
Ch
NTSC (Yellow) Lights when an NTSC project is selected.
PAL (Green) Lights when a PAL project is se-lected.
Ref (Green) Lights when the AVoption|V10 is locked to the incoming Reference signal.
Pull Down (Green) Lights when Pull Down is se-lected in Media Station|PT software. For indica-tion of any pull-downs applied by Pro Tools, see the indicator light on the SYNC I/O.
LTC (Green) Lights when LTC IN is being input to AVoption|V10.
44.1 (Yellow) Lights when 44.1 kHz audio is se-lected in Media Station|PT.
48 (Green) Lights when 48 kHz audio is selected in Media Station|PT.
96 (Green) Is currently non-functional.
Figure 1. AVoption|V10 breakout box front panel
Power switch
apter 2: Avid DNA Video Peripherals Hardware Overview 7
8
AVoption|V10 Back Panel
Avid Video Peripherals Guide
Figure 2. AVoption|V10 back panel
1 2 3 4 5 6
181715131210 1987 9
11 14 16 20 21
22 23
Table 1. Video I/O Identifiers
Number Label Function, Type of Connector, and Usage
1 Video Reference (REF) Black burst or house synchronization input, BNC connector. Synchronizes the system with the global clock source pro-vided by the house sync or black burst generator.
2 COMPONENT Y IN Video Y component input, BNC connector. Connects to ana-log video output of decks.
3 COMPONENT R-Y IN Video R-Y component input, BNC connector. Connects to analog video output of decks.
4 COMPONENT B-Y IN Video B-Y component input, BNC connector. Connects to analog video output of decks.
5 COMPOSITE IN Composite video input, BNC connector. Connects to analog video output of decks.
6 S-VIDEO IN Super-video input, 4-pin connector. Connects to analog video output of decks.
7 S-VIDEO OUT Super-video output, 4-pin connector. Connects to analog video input of decks.
8 COMPONENT Y OUT Video Y component (Betacam) output, BNC connector. Con-nects to analog video input of decks.
9 COMPONENT R-Y OUT Video R-Y component (Betacam) output, BNC connector. Connects to analog video input of decks.
10 COMPONENT B-Y OUT Video B-Y component (Betacam) output, BNC connector. Connects to analog video input of decks.
11 COMPOSITE OUT 1 Composite video output, BNC connector. Connects to analog video input of decks or monitor.
12 COMPOSITE OUT 2 Composite video output, BNC connector. Connects to analog video input of decks or monitor.
13 SDI IN Serial digital input, BNC connector. Connects to a serial dig-ital output from a digital video source.
14 SDI OUT 1 Serial digital output number 1, BNC connector. Connects to VTR input, a video monitor, or other serial digital device.
15 SDI OUT 2 Serial digital output number 2, BNC connector. Connects to VTR input, a video monitor, or other serial digital device.
16 SDTI IN Not currently used.
17 SDTI OUT Not currently used.
18 1394 Host Connects to any available 1394 (FireWire) port on the CPU.
19 1394 DV Connects to the DV source deck.
20 LTC IN Receives LTC time code.
21 LTC OUT Sends LTC time code out (not used).
22 OPTICAL IN Not currently used.
23 OPTICAL OUT Not currently used.
Table 1. Video I/O Identifiers
Number Label Function, Type of Connector, and Usage
Chapter 2: Avid DNA Video Peripherals Hardware Overview 9
10
Video Connections
The following video input and output connec-tions are available with the AVoption|V10:
• Inputs for composite, component (Y, R-Y, B-Y), S-Video, DV (1394), and SDI
• Outputs for composite, component (Y, R-Y, B-Y), S-Video, DV (1394), and SDI
• Video Ref input to allow the video to be locked to an external source such as house sync or a black burst generator
All analog video outputs are active during cap-ture and playback. A video monitor can be con-nected to any of the following video outputs on the AVoption|V10:
• Component
• Composite
• SDI
• S-Video
• DV
Avid Video Peripherals Guide
Avid Mojo Interface and Video ConnectionsFor information on Avid Mojo video connec-tions, see the Using Your Avid Mojo DNA Guide in-cluded in your Avid Mojo package (or available electronically on the installer disc).
Synchronization Hardware
Synchronization Peripheral
Avid DNA video peripherals require the Digi-design SYNC I/O for use with Pro Tools|HD sys-tems.
Synchronization Source
For accurate synchronization during capture and playback, a common video reference is re-quired:
• Black burst
• House Reference Synchronization source
• Local video source (such as the TBC video output of the machine)
chapter 3
Installing Avid DNA Video Peripherals
To install hardware and software for a Pro Tools system with an Avid DNA video peripheral, fol-low these steps:
1 Uninstall any previous versions of AVoptionDNA, Pro Tools, or other Avid applica-tions: See “Uninstalling AVoptionDNA, Pro Tools, Media Station|V10 and/or Avid Xpress Pro” on page 11.
2 Turn off and disconnect any Avid DNA video peripherals from your computer. (You do not need to remove your Pro Tools hardware.)
3 Install Pro Tools hardware (if not installed al-ready): See “Installing Pro Tools Hardware” on page 13.
4 Install Media Station|PT software, if desired. See “Installing Media Station|PT and Pro Tools Software” on page 13.
5 Connect and power on the Avid DNA video peripheral: See “Connecting Avid DNA Video Peripheral Hardware” on page 14.
6 Install Pro Tools software: See “Installing Me-dia Station|PT and Pro Tools Software” on page 13.
7 Set up local storage (if necessary): See “Setting Up Local Storage” on page 18.
Uninstalling AVoptionDNA, Pro Tools, Media Station|V10 and/or Avid Xpress ProIf you are upgrading your Pro Tools system with an Avid DNA video peripheral, you must first uninstall Pro Tools and specific Avid applica-tions, based on your operating system.
Uninstalling on Windows XP
It is advised that you uninstall software from Windows XP in the following order:
1 Uninstall the AVoptionDNA software.
2 Uninstall your previous version of Pro Tools.
3 Uninstall Media Station|V10 software.
To uninstall AVoptionDNA software:
1 Choose Start > Control Panel.
2 Launch Add or Remove Programs.
3 From the Currently Installed Programs list, choose AVoptionDNA.
4 Click the Change/Remove button.
5 Follow the on-screen instructions to remove AVoptionDNA software.
6 Restart your computer.
Chapter 3: Installing Avid DNA Video Peripherals 11
12
To uninstall Pro Tools on Windows XP:
1 Choose Start > Control Panel.
2 Launch Add or Remove Programs.
3 From the Currently Installed Programs list, se-lect Digidesign Pro Tools TDM.
4 Click the Change/Remove button.
5 Follow the on-screen instructions to remove Pro Tools.
6 Restart your computer.
To uninstall Media Station|V10:
1 Insert the Avid Media Station|V10 Installer disc in your computer’s CD/DVD drive.
2 Locate and launch the Media Station|V10 Setup.exe file.
3 Choose Change/Remove, and follow the in-structions to remove the software.
4 Restart your computer.
Uninstalling on Mac OS X
It is advised that you uninstall software from Mac OS X in the following order:
1 Uninstall Avid Xpress Pro.
2 Uninstall your previous version of Pro Tools.
To uninstall Avid Xpress Pro:
1 Insert the Avid Xpress Pro Installer disc into your computer’s CD/DVD drive.
2 Locate and launch the Avid Xpress Pro In-staller.
3 Click Uninstall.
4 Follow the instructions to remove Avid Xpress Pro from your computer.
5 Restart your computer.
Avid Video Peripherals Guide
To uninstall Pro Tools on Mac OS X:
1 Make sure you are logged in as an Administra-tor for the account where Pro Tools is installed. For details on Administrator privileges in Mac OS X, refer to your Apple OS X documenta-tion.
2 Insert the Pro Tools Installer disc into your CD/DVD drive. Double-click the Pro Tools in-staller icon.
– or –
Click on the downloaded installer file.
3 Enter your Administrator password and click OK to authenticate the installation.
4 In the Installer window, choose Uninstall from the pop-up menu, and click Uninstall.
5 Follow the on-screen instructions to remove Pro Tools.
6 When finished, click Quit to close the Installer window.
7 Restart your computer.
Disabling nVidia Display Driver ServiceTo use Avid video peripherals with Pro Tools|HD systems, the nVidia Display Driver Service should be disabled.
To disable nVidia Display Driver Service:
1 Select Start > My Computer > Manage.
2 Double-click Services & Applications
3 Double-click Services.
4 Right-click the nVidia service.
5 Choose Properties.
6 Set Startup Type to Disabled.
7 Click Apply.
8 Click OK.
Installing Pro Tools HardwareIf you do not already have a currently supported Pro Tools system installed, you must install your Pro Tools hardware. For detailed Pro Tools hard-ware installation information, see your Getting Started Guide.
If you already have Pro Tools hardware in-stalled, proceed by installing the Avid DNA video peripheral hardware (see “Connecting Avid DNA Video Peripheral Hardware” on page 14).
Follow the correct PCI slot placement of your Pro Tools cards according to the information in Appendix B, “PCI Slot Configurations for Avid DNA Video Peripherals.”
Installing Media Station|PT and Pro Tools SoftwareTo use Media Station|PT and Pro Tools on the same computer, you must:
• Log in using an account with Administra-tive privileges whenever you install or use either application.
• Log in as the same user for both applica-tions.
Installing Media Station|PT Software
For detailed information about installing or up-grading Media Station|PT software, refer to the Media Station|PT Guide.
Installing Pro Tools Software
For detailed information about installing or up-grading Pro Tools software, refer to the Upgrading to Pro Tools 7.1 Guide.
For information on supported computers and PCI slot configuration, visit the Digi-design Web site (www.digidesign.com).
After installing Media Station|PT, connect your Avid DNA video peripheral hardware before installing Pro Tools. See “Connect-ing Avid DNA Video Peripheral Hardware” on page 14.
Chapter 3: Installing Avid DNA Video Peripherals 13
14
Connecting Avid DNA Video Peripheral Hardware
To connect Avid DNA video peripheral hardware:
1 Connect the power cable for the Avid DNA video peripheral.
2 Connect one end of the FireWire cable to the Host port on the Avid DNA video peripheral, and connect the other end to any internal FireWire port on your computer.
Connecting a DV Device
To connect a DV device to the Avid DNA video peripheral:
■ Connect one end of the FireWire (1394) cable to the DV port on the Avid DNA video periph-eral, and connect the other end to any available FireWire port on the DV Device.
All FireWire ports on Digidesign-qualified computers are connected to the same bus, and the Avid DNA video peripheral must be the only device attached to this bus. There-fore, you must install a PCI FireWire card if you need to connect other FireWire devices. See Appendix B, “PCI Slot Configurations for Avid DNA Video Peripherals” for more information on where to connect a PCI FireWire card.
It is critical to follow the card installation directions in Appendix B, “PCI Slot Config-urations for Avid DNA Video Peripherals.”
All Firewire decks and cameras that are connected to Avid DNA video peripheral must be powered on after powering on the Avid DNA video peripheral.
Avid Video Peripherals Guide
Connecting Serial Digital Video Input and Output(AVoption|V10 only)
To connect the output of a serial digital video source to the AVoption|V10:
■ Using a BNC cable, connect the serial digital output from a digital video source to SDI IN on the AVoption|V10 breakout box.
To connect the serial digital video output from the AVoption|V10 to a digital video deck:
■ Using a BNC cable, connect SDI OUT 1 or 2 on the AVoption|V10 breakout box to the serial dig-ital input of the video deck.
Connecting a SYNC I/O
The SYNC I/O is required for Pro Tools|HD sys-tems with an Avid DNA video peripheral. For more information on configuring and using the SYNC I/O, see the SYNC I/O Guide.
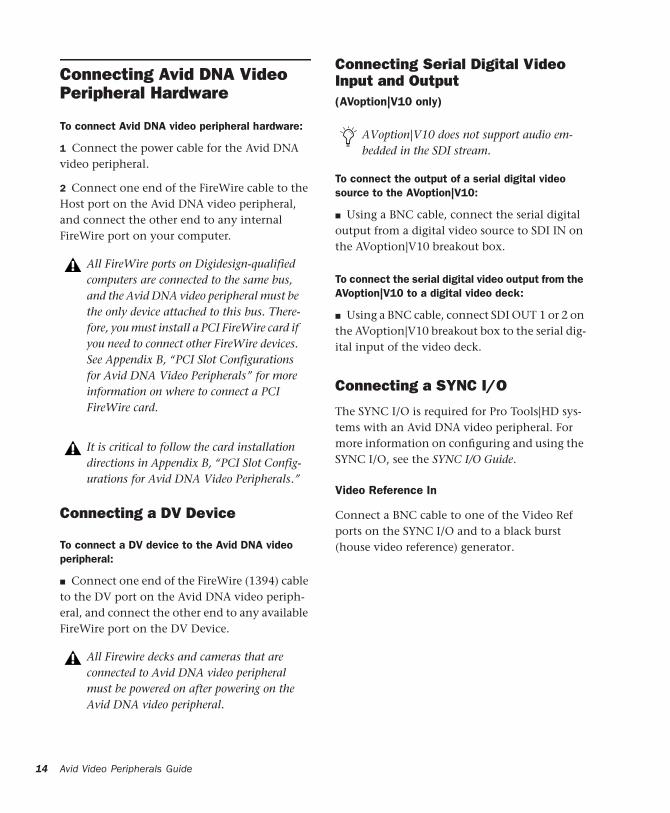
Video Reference In
Connect a BNC cable to one of the Video Ref ports on the SYNC I/O and to a black burst (house video reference) generator.
AVoption|V10 does not support audio em-bedded in the SDI stream.
The unused Video Ref port must be terminated (using the 75-ohm terminator included with the SYNC I/O) or connected to another terminated video device (such as the AVoption|V10).
Loop Sync In/Out
Loop Sync is the clock signal used to synchro-nize Pro Tools|HD-series audio interfaces. Con-nect Loop Sync In on the SYNC I/O to Loop Sync Out on the primary Pro Tools|HD audio in-terface. Connect Loop Sync Out on the SYNC I/O to Loop Sync In on the primary Pro Tools|HD audio interface. If you have multi-ple Pro Tools audio interfaces, connect Loop In on the SYNC I/O to Loop Out on the last Pro Tools interface.
SYNC I/O video connections
SYNC I/O connection to a Pro Tools|HD audio interface
MTC OUTHOST SERIALVIDEO REF VIDEO
IN
OUT
INTERNALLY TERMINATED
House VideoReference
AC 100-240V, 50-60HZ, .5A 30W
9-PIN OUT 2
9-PIN OUT 1
x)
IN
OUT
LOOP SYNC
to Loop Sync In(audio interface)
from Loop Sync Out(audio interface)
Using Centralized Video Switching and Routing
Many professional facilities have centralized video switching and routing systems. These sys-tems can be used to route Avid DNA video pe-ripheral inputs and outputs to flexible input sources and output destinations.
Connecting House Video Reference or Black Burst
In most Avid DNA video peripheral setups, the following black burst or house video reference (house sync) connections are required:
• To the Video Ref connector on the SYNC I/O
• To a video input on your VTR (a video ref-erence input if available)
• To the Video Ref connector on the Avid DNA video peripheral (this connection can also originate from the unused Video Ref port on the SYNC I/O)
Read the documentation for your black burst generator for more information.
Connecting a VTR
A VTR can be used to provide video input to and record video output from the Avid DNA video peripheral. In most situations, there are three connections you need to make:
1 Connect a black burst or house sync output to a video input on your VTR (preferably a refer-ence video input).
2 Connect the Avid DNA video peripheral Com-posite IN, Component IN, S-Video IN, or SDI IN connectors to the corresponding output or out-puts on your VTR.
Chapter 3: Installing Avid DNA Video Peripherals 15
16
3 Connect the Avid DNA video peripheral Com-posite OUT, Component OUT, S-Video OUT, or SDI OUT connectors to the corresponding in-puts on your VTR.
– or –
Connect the Avid DNA video peripheral Com-posite OUT or Component OUT connectors to the corresponding input on an NTSC or PAL video monitor, then connect the outputs from this monitor to the corresponding inputs on your VTR.
Connecting an External Video Monitor
Connect an external NTSC or PAL video moni-tor to any of the Composite, Component, or S-Video outputs (see “Video Connections” on page 10).
Starting Up Your SystemTo ensure that the components of your Pro Tools system communicate properly with each other, you need to start up your system in the correct order.
Start up your Pro Tools system in the following order:
1 Turn on the expansion chassis, if any.
2 Turn on any external hard drives.
3 Turn on the SYNC I/O.
4 Turn on the Pro Tools|HD audio interfaces.
5 Turn on the Avid DNA video peripheral.
6 Turn on the DV camcorder or digital video deck, if any.
7 Start up your computer.
Avid Video Peripherals Guide
Authorizing DigiTranslator 2.0DigiTranslator 2.0 is authorized using the iLok USB Smart Key (iLok) from PACE Anti-Piracy.
The iLok is similar to a dongle, but unlike a don-gle, it is designed to securely authorize multiple software applications from a variety of software developers.
This key can hold over 100 licenses for all of your iLok-enabled software. Once an iLok is au-thorized for a given piece of software, you can use the iLok to authorize that software on any computer.
DigiTranslator comes with either an Activation Code (on the included Activation Card) or an iLok License Card:
• To authorize DigiTranslator using an Activa-tion Code, see “Authorizing DigiTranslator Using an Activation Code” on page 17.
• To authorize DigiTranslator using an iLok Li-cense Card, see “Authorizing DigiTranslator Using a License Card” on page 17.
The iLok USB Smart Key is not supplied with Avid DNA video peripherals. One iLok is included with your Pro Tools|HD Core system.

Authorizing DigiTranslator Using an Activation Code
To authorize DigiTranslator using an Activation Code:
1 If you do not have an existing iLok.com ac-count, visit www.iLok.com and sign up for an iLok.com account.
2 Transfer the license for DigiTranslator 2.0 to your iLok.com account by doing the following:
• Visit http://secure.digidesign.com/activation.
• Input your Activation Code (listed on your Activation Card) and your iLok.com User ID. Your iLok.com User ID is the name you create for your iLok.com account.
3 Transfer the licenses from your iLok.com ac-count to your iLok USB Smart Key by doing the following:
• Insert the iLok into an available USB port on your computer.
• Go to www.iLok.com and log in.
• Follow the on-screen instructions for trans-ferring your licences to your iLok.
4 Launch Pro Tools.
5 If you have any installed unauthorized plug-ins or software options, you will be prompted to authorize them. Follow the on-screen instruc-tions to complete the authorization process.
For information about iLok technology and licenses, see the electronic PDF of the iLok Usage Guide.
Authorizing DigiTranslator Using a License Card
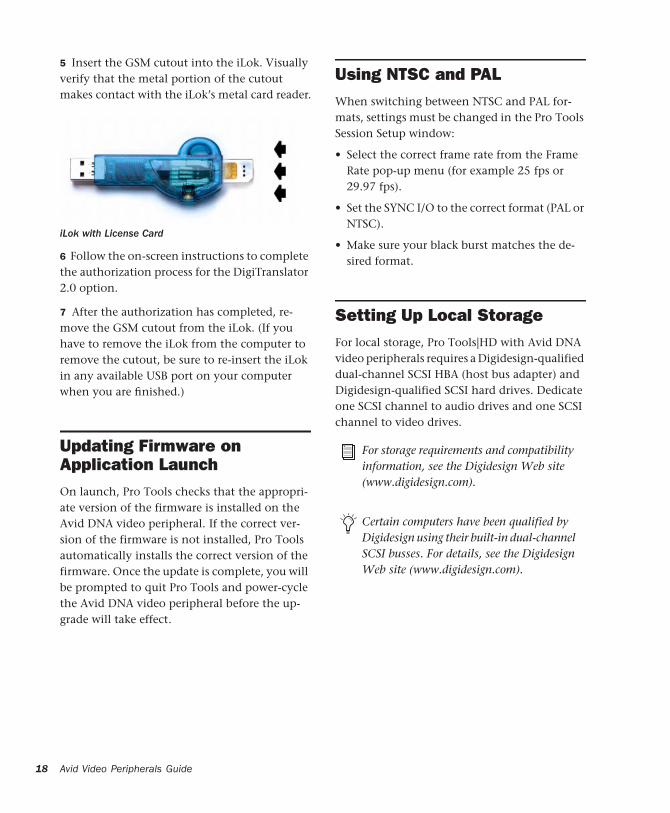
License Cards are specific to each plug-in or soft-ware option. You will receive the appropriate Li-cense Cards for the plug-ins or software options that you purchase. License Cards have a small punch-out plastic chip called a GSM cutout.
The authorization steps in this section must be repeated for purchased plug-in or software op-tion.
To authorize DigiTranslator using a License Card:
1 Insert the iLok into an available USB port on your computer.
2 Launch Pro Tools. You will be prompted to au-thorize any installed unauthorized plug-ins or software options.
3 Follow the on-screen instructions until you are prompted to insert the License Card into the iLok.
4 Separate the GSM cutout from the larger pro-tective card by pulling it up and out with your thumb. Do not force the cutout down with your finger.
For additional information about iLok tech-nology and authorizations, see the elec-tronic PDF of the iLok Usage Guide.
If you are already using a demo version of the plug-in or software option, launch Pro Tools before you insert the iLok, then insert the iLok into any available USB port when prompted by Pro Tools.
Chapter 3: Installing Avid DNA Video Peripherals 17
18
5 Insert the GSM cutout into the iLok. Visually verify that the metal portion of the cutout makes contact with the iLok’s metal card reader.
6 Follow the on-screen instructions to complete the authorization process for the DigiTranslator 2.0 option.
7 After the authorization has completed, re-move the GSM cutout from the iLok. (If you have to remove the iLok from the computer to remove the cutout, be sure to re-insert the iLok in any available USB port on your computer when you are finished.)
Updating Firmware on Application LaunchOn launch, Pro Tools checks that the appropri-ate version of the firmware is installed on the Avid DNA video peripheral. If the correct ver-sion of the firmware is not installed, Pro Tools automatically installs the correct version of the firmware. Once the update is complete, you will be prompted to quit Pro Tools and power-cycle the Avid DNA video peripheral before the up-grade will take effect.
iLok with License Card
Avid Video Peripherals Guide
Using NTSC and PALWhen switching between NTSC and PAL for-mats, settings must be changed in the Pro Tools Session Setup window:
• Select the correct frame rate from the Frame Rate pop-up menu (for example 25 fps or 29.97 fps).
• Set the SYNC I/O to the correct format (PAL or NTSC).
• Make sure your black burst matches the de-sired format.
Setting Up Local StorageFor local storage, Pro Tools|HD with Avid DNA video peripherals requires a Digidesign-qualified dual-channel SCSI HBA (host bus adapter) and Digidesign-qualified SCSI hard drives. Dedicate one SCSI channel to audio drives and one SCSI channel to video drives.
For storage requirements and compatibility information, see the Digidesign Web site (www.digidesign.com).
Certain computers have been qualified by Digidesign using their built-in dual-channel SCSI busses. For details, see the Digidesign Web site (www.digidesign.com).
Installing the SCSI Host Bus Adapter (HBA)
To install a SCSI HBA:
1 Turn off your computer and any peripherals. Leave your computer’s power cable plugged in so the computer is grounded.
2 Disconnect all cables attached to the com-puter (such as hard drives, displays, USB and FireWire devices) except for the power cable.
3 Open the computer case.
4 Disconnect the power cable from the com-puter.
5 Remove the SCSI accelerator card from the anti-static bag, being careful to handle it only by the edges.
6 Line up the SCSI accelerator card with the in-stallation slot, and slide the card into place gen-tly so the PCI connector is aligned with the PCI slot.
7 Press down firmly on the card with even pres-sure. The connector should click into place in the PCI slot.
8 Fasten the card in place using the included screw to attach the card bracket to the computer mounting bracket.
9 Close the computer case, and re-connect all cables that were previously attached to the com-puter.
Before handling any card, discharge static electricity from your clothes or body by touching a grounded metal surface, such as the power supply case inside your computer.
Drive Configuration Requirements
Audio Pro Tools can store audio data to multiple hard drives. You should allocate audio tracks to different hard drives manually. “Round robin” disk allocation is not recommended in a system that includes video drives. For more informa-tion, see the Pro Tools Reference Guide.
Video Video files may be played from a single hard drive, though you must use a “striped set” of two or more SCSI drives if you are playing 1:1 video, or if the size of a single video file exceeds the free space on a single drive. It is not possible to create a striped set of FireWire drives.
Striped Drive Requirements
(Video Storage Only)
Striped drives are configured so that multiple hard drives behave as if they are one hard drive. This makes higher data throughput possible. Re-quirements will vary depending on the drives. For example, a 5th-Generation DigiDrive™ (re-leased November 2001) requires 2-way striped drive sets when capturing or playing uncom-pressed (1:1) video. For earlier generations of drives, 4- way striped drives or greater (4 or more drives acting as one) are required when captur-ing or playing uncompressed (1:1) video; and 2-way striped drives (2 drives acting as one) are re-quired when capturing or playing 2:1 and 3:1 compressed video.
For storage requirements and compatibility information, see the Digidesign Web site (www.digidesign.com).
Striped drives are supported for video only, and not supported for audio record and playback
Chapter 3: Installing Avid DNA Video Peripherals 19
20
Formatting and Striping Media Drives on Windows XP Systems
To create, format, and stripe drives for video media on Windows XP systems:
1 Start your system, and log in to an account with administrative privileges.
2 Right-click the My Computer icon, and select Manage. The Computer Management window opens.
3 Click the Disk Management folder.
4 Format hard drives intended for audio record and playback as NTFS.
5 To stripe drives for video record and playback, make the first drive a Dynamic drive by right-clicking the disk ID section of the disk in the Computer Management window and selecting Upgrade to, or Create Dynamic disk, depending upon the status of your disk.
When you select a disk in the Computer Man-agement window, the white section of the disk changes to stripes, showing that the section has been selected.
6 Repeat the preceding step for each drive you want to stripe.
7 Right-click one of the Dynamic drives and se-lect Action > Create Volume.
8 Follow the instructions in the Create Volume Wizard to finish striping the drives using NTFS format.
Disk drives must be configured as Dynamic if you are striping drives.
For more information on the Computer Management window, click the Help icon in the toolbar of the Computer Management window.
Avid Video Peripherals Guide
Formatting and Striping Drives on Mac OS X Systems
On Mac OS X, use the Apple Disk Utility to for-mat your drives Mac OS Extended.
To create a striped set of SCSI drives for Mac OS X, you should use ATTO ExpressStripe 3.0 or later (supplied with Media Station|PT or available separately from ATTO Technologies).
Checking and Updating ATTO FirmwareThe cards listed below must be set correctly for maximum performance:
• Digidesign SCSI128 card
• ATTO EPCI-UL3D SCSI Host Bus Adapter card
If you are using one of these cards, it is recom-mended that you verify that you have the proper ATTO firmware and drivers (and update them if necessary). Refer to the electronic PDF version of the ATTO Utilities Read Me (located in the ATTO Utilities folder in the Additional Files folder on each Pro Tools Installer disc) for detailed information.
Test SessionsWhen installation is completed, you can check your system by opening and playing one of the test sessions installed in the Pro Tools Utilities Folder (Pro Tools\Pro Tools Utilities\AVoptionDNA Tests\):
• AVoptionDNA Test NTSC.pts
• AVoptionDNA Test PAL.pts
If your system is working correctly, you will see a brief video and hear 2 tracks of audio on play-back.

chapter 4
Pro Tools Video Track
Pro Tools with Avid DNA video peripherals lets you use the Video track to digitize and play video on the Timeline, or import and play video files created in a compatible Avid video applica-tion (such as Media Station|PT).
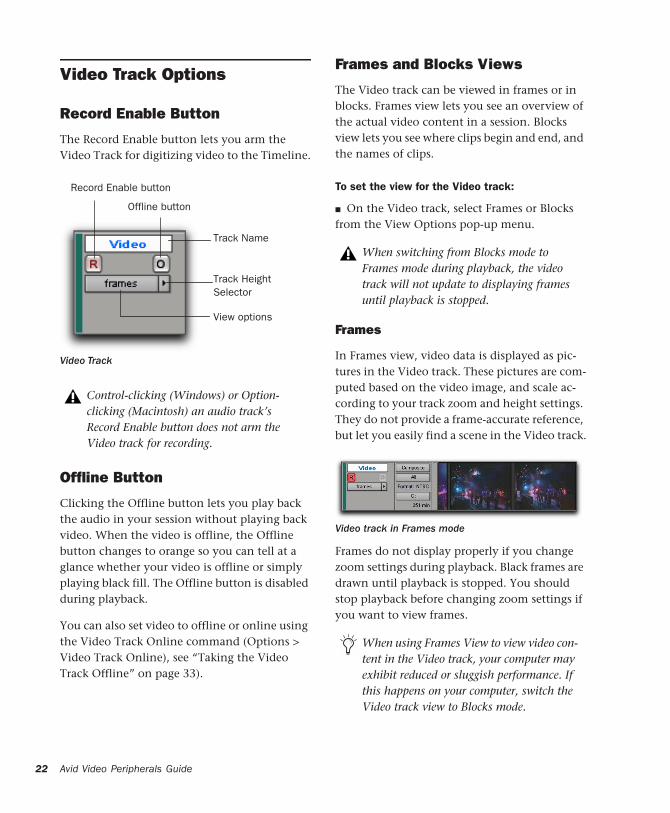
Avid Video Track in Pro ToolsThe Video track holds the video clips you add or digitize into Pro Tools. A Pro Tools session can only contain one Video track.
To create a new Video track:
■ Choose Track > Avid Video > New Track.
The new, empty Video track appears in the Edit window. The Video track does not appear in the Mix window.
Media Station|PT software and Pro Tools cannot run simultaneously. Quit Pro Tools before launching Media Station|PT, and quit Media Station|PT before launching Pro Tools.
Video Track
To name the Video track:
1 Double-click the Track Name button to open the Name and Comments dialog.
2 Type a name (and any optional comments), then click OK.
To delete the Video track:
1 Select the track by clicking the Track Name button in the Edit window.
2 Choose Track > Delete.
To clear all video from the Video track:
■ Choose Track > Avid Video > Clear Track.
You cannot change names of clips after they have been added to the Video track. When added, clips retain the name they were given by the original Avid application.
Chapter 4: Pro Tools Video Track 21
22
Video Track Options
Record Enable Button
The Record Enable button lets you arm the Video Track for digitizing video to the Timeline.
Offline Button
Clicking the Offline button lets you play back the audio in your session without playing back video. When the video is offline, the Offline button changes to orange so you can tell at a glance whether your video is offline or simply playing black fill. The Offline button is disabled during playback.
You can also set video to offline or online using the Video Track Online command (Options > Video Track Online), see “Taking the Video Track Offline” on page 33).
Video Track
Control-clicking (Windows) or Option-clicking (Macintosh) an audio track’s Record Enable button does not arm the Video track for recording.
Record Enable button
Offline button
View options
Track Name
Track HeightSelector
Avid Video Peripherals Guide
Frames and Blocks Views
The Video track can be viewed in frames or in blocks. Frames view lets you see an overview of the actual video content in a session. Blocks view lets you see where clips begin and end, and the names of clips.
To set the view for the Video track:
■ On the Video track, select Frames or Blocks from the View Options pop-up menu.
Frames
In Frames view, video data is displayed as pic-tures in the Video track. These pictures are com-puted based on the video image, and scale ac-cording to your track zoom and height settings. They do not provide a frame-accurate reference, but let you easily find a scene in the Video track.
Frames do not display properly if you change zoom settings during playback. Black frames are drawn until playback is stopped. You should stop playback before changing zoom settings if you want to view frames.
When switching from Blocks mode to Frames mode during playback, the video track will not update to displaying frames until playback is stopped.
Video track in Frames mode
When using Frames View to view video con-tent in the Video track, your computer may exhibit reduced or sluggish performance. If this happens on your computer, switch the Video track view to Blocks mode.
Blocks
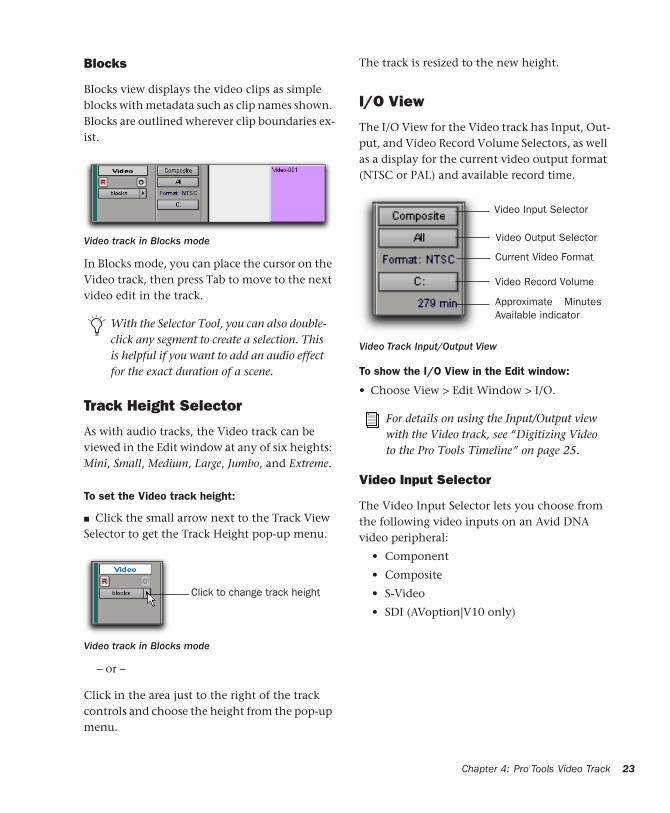
Blocks view displays the video clips as simple blocks with metadata such as clip names shown. Blocks are outlined wherever clip boundaries ex-ist.
In Blocks mode, you can place the cursor on the Video track, then press Tab to move to the next video edit in the track.
Track Height Selector
As with audio tracks, the Video track can be viewed in the Edit window at any of six heights: Mini, Small, Medium, Large, Jumbo, and Extreme.
To set the Video track height:
■ Click the small arrow next to the Track View Selector to get the Track Height pop-up menu.
– or –
Click in the area just to the right of the track controls and choose the height from the pop-up menu.
Video track in Blocks mode
With the Selector Tool, you can also double-click any segment to create a selection. This is helpful if you want to add an audio effect for the exact duration of a scene.
Video track in Blocks mode
Click to change track height
The track is resized to the new height.
I/O View
The I/O View for the Video track has Input, Out-put, and Video Record Volume Selectors, as well as a display for the current video output format (NTSC or PAL) and available record time.
To show the I/O View in the Edit window:
• Choose View > Edit Window > I/O.
Video Input Selector
The Video Input Selector lets you choose from the following video inputs on an Avid DNA video peripheral:
• Component
• Composite
• S-Video
• SDI (AVoption|V10 only)
Video Track Input/Output View
For details on using the Input/Output view with the Video track, see “Digitizing Video to the Pro Tools Timeline” on page 25.
Video Input Selector
Video Output Selector
Current Video Format
Video Record Volume
Approximate MinutesAvailable indicator
Chap
ter 4: Pro Tools Video Track 23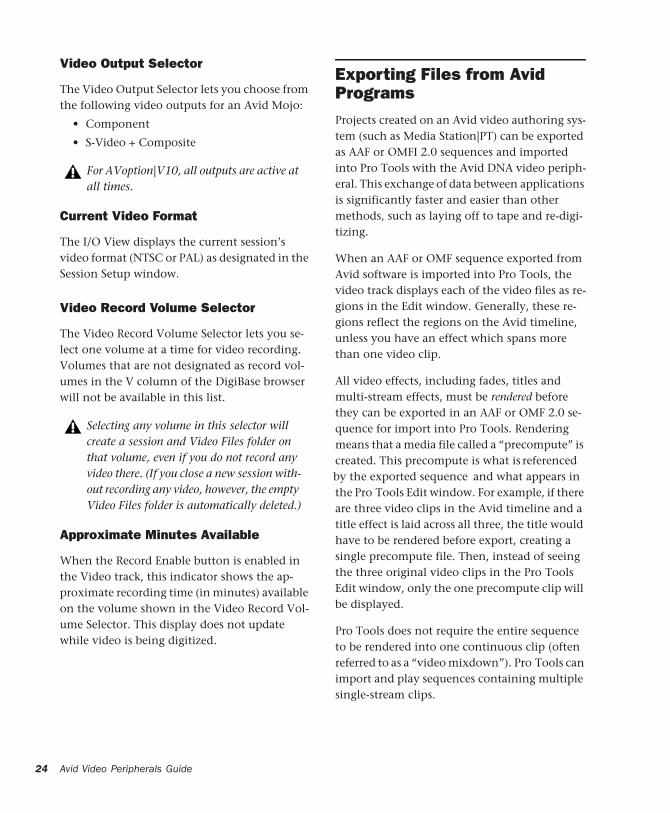
24
Video Output Selector
The Video Output Selector lets you choose from the following video outputs for an Avid Mojo:
• Component
• S-Video + Composite
Current Video Format
The I/O View displays the current session’s video format (NTSC or PAL) as designated in the Session Setup window.
Video Record Volume Selector
The Video Record Volume Selector lets you se-lect one volume at a time for video recording. Volumes that are not designated as record vol-umes in the V column of the DigiBase browser will not be available in this list.
Approximate Minutes Available
When the Record Enable button is enabled in the Video track, this indicator shows the ap-proximate recording time (in minutes) available on the volume shown in the Video Record Vol-ume Selector. This display does not update while video is being digitized.
For AVoption|V10, all outputs are active at all times.
Selecting any volume in this selector will create a session and Video Files folder on that volume, even if you do not record any video there. (If you close a new session with-out recording any video, however, the empty Video Files folder is automatically deleted.)
Avid Video Peripherals Guide
Exporting Files from Avid ProgramsProjects created on an Avid video authoring sys-tem (such as Media Station|PT) can be exported as AAF or OMFI 2.0 sequences and imported into Pro Tools with the Avid DNA video periph-eral. This exchange of data between applications is significantly faster and easier than other methods, such as laying off to tape and re-digi-tizing.
When an AAF or OMF sequence exported from Avid software is imported into Pro Tools, the video track displays each of the video files as re-gions in the Edit window. Generally, these re-gions reflect the regions on the Avid timeline, unless you have an effect which spans more than one video clip.
All video effects, including fades, titles and multi-stream effects, must be rendered before they can be exported in an AAF or OMF 2.0 se-quence for import into Pro Tools. Rendering means that a media file called a “precompute” is created. This precompute is what is referenced by the exported sequence and what appears in the Pro Tools Edit window. For example, if there are three video clips in the Avid timeline and a title effect is laid across all three, the title would have to be rendered before export, creating a single precompute file. Then, instead of seeing the three original video clips in the Pro Tools Edit window, only the one precompute clip will be displayed.
Pro Tools does not require the entire sequence to be rendered into one continuous clip (often referred to as a “video mixdown”). Pro Tools can import and play sequences containing multiple single-stream clips.

Avid Multi-Cam Resolution Files
(Windows XP Only)
Pro Tools with AVoption|V10 supports all stan-dard-definition Avid Multi-Cam Resolution files for import and playback. Pro Tools will play the clip of an Avid Multi-Cam Resolution file that was being used as the active camera angle when the file was exported to AAF or OMF.
Digitizing Video to the Pro Tools TimelinePro Tools with an Avid DNA video peripheral lets you digitize video directly to the Video track for use in the Pro Tools editing environment.
Video is digitized in the Avid DV25 file format, and may be used in the Video track along with OMF and MXF video clips of other resolutions that are from other sources. Though the video files which are captured in Pro Tools are techni-cally MXF files, they are intended only for use in Pro Tools. They have not been tested for import into other applications, and may not be of stan-dard broadcast quality.
QuickTime video clips cannot be mixed with OMF or MXF video clips in the Video track.
Up to six hours of video can be digitized in a single record pass.
Each record pass can only record to a single volume (or a set of striped drives). One video file cannot be recorded across multiple vol-umes.
Hardware Requirements and Options
SYNC I/O Requirement
For digitizing video, Pro Tools requires a SYNC I/O locked to video reference.
For information about setting up SYNC I/O hardware and locking the SYNC I/O to video ref-erence, see the SYNC I/O User’s Guide.
To configure SYNC I/O for digitizing video in Pro Tools:
1 Ensure that the SYNC I/O is locked to the ap-propriate video reference for your system setup. For more information, see the SYNC I/O Guide or the MachineControl Guide.
2 In the Session Setup window (Setup > Session), select SYNC I/O from the Clock Source pop-up menu.
3 Choose a Time Code Rate for the type of video you want to record.
Session Setup window Clock Source selection
Ensure that the Time Code Rate is compat-ible with the type of video format you plan to use. For example, NTSC is not compati-ble with a Time Code Rate of 25 frames per second.
Chapter 4: Pro Tools Video Track 25
26
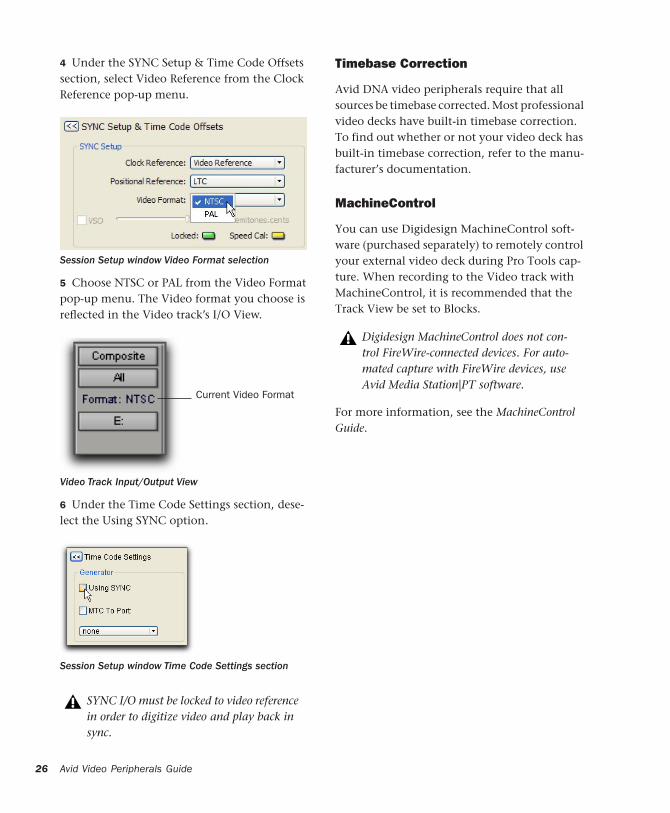
4 Under the SYNC Setup & Time Code Offsets section, select Video Reference from the Clock Reference pop-up menu.
5 Choose NTSC or PAL from the Video Format pop-up menu. The Video format you choose is reflected in the Video track’s I/O View.
6 Under the Time Code Settings section, dese-lect the Using SYNC option.
Session Setup window Video Format selection
Video Track Input/Output View
Session Setup window Time Code Settings section
SYNC I/O must be locked to video reference in order to digitize video and play back in sync.
Current Video Format
Avid Video Peripherals Guide
Timebase Correction
Avid DNA video peripherals require that all sources be timebase corrected. Most professional video decks have built-in timebase correction. To find out whether or not your video deck has built-in timebase correction, refer to the manu-facturer’s documentation.
MachineControl
You can use Digidesign MachineControl soft-ware (purchased separately) to remotely control your external video deck during Pro Tools cap-ture. When recording to the Video track with MachineControl, it is recommended that the Track View be set to Blocks.
For more information, see the MachineControl Guide.
Digidesign MachineControl does not con-trol FireWire-connected devices. For auto-mated capture with FireWire devices, use Avid Media Station|PT software.
Digitizing Video in Pro Tools
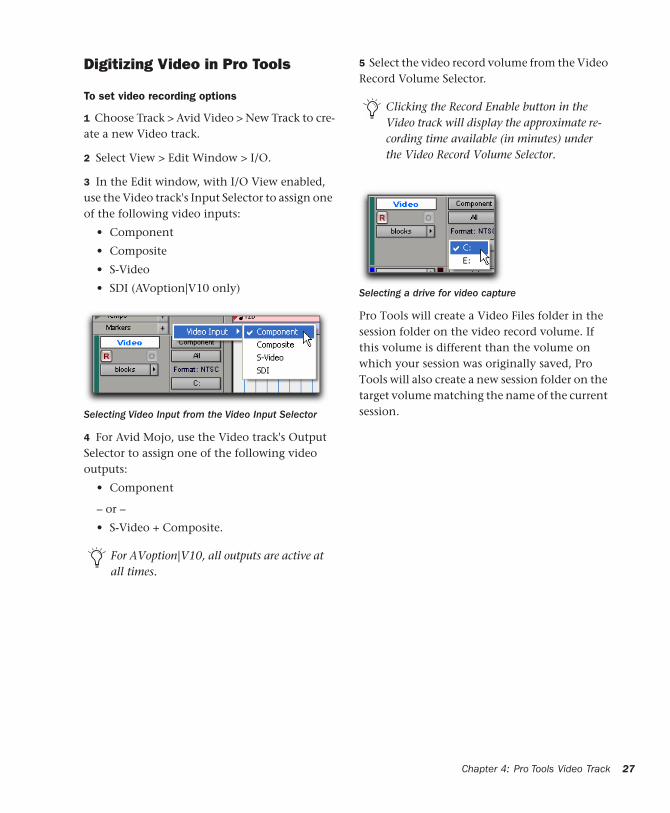
To set video recording options
1 Choose Track > Avid Video > New Track to cre-ate a new Video track.
2 Select View > Edit Window > I/O.
3 In the Edit window, with I/O View enabled, use the Video track's Input Selector to assign one of the following video inputs:
• Component
• Composite
• S-Video
• SDI (AVoption|V10 only)
4 For Avid Mojo, use the Video track's Output Selector to assign one of the following video outputs:
• Component
– or –
• S-Video + Composite.
Selecting Video Input from the Video Input Selector
For AVoption|V10, all outputs are active at all times.
5 Select the video record volume from the Video Record Volume Selector.
Pro Tools will create a Video Files folder in the session folder on the video record volume. If this volume is different than the volume on which your session was originally saved, Pro Tools will also create a new session folder on the target volume matching the name of the current session.
Clicking the Record Enable button in the Video track will display the approximate re-cording time available (in minutes) under the Video Record Volume Selector.
Selecting a drive for video capture
Chapter 4: Pro Tools Video Track 27
28
To digitize video to the Video track:
1 In the Edit window, do one of the following:
• Place the Playback cursor where you want to start recording.
– or –
• Make a selection on a Timebase Ruler or on a track to select a range of time for the re-cording. (To make a selection on a track, Operations > Link Edit and Timeline Selec-tion must be enabled.)
2 Record enable the Video track by clicking the Record Enable button. The approximate record-ing time available on the selected video record volume will be displayed (in minutes) below the Video Record Volume Selector. This display does not update while video is being digitized.
If you want to digitize video without speci-fying a selection in the Timeline, the video record volume must have at least 200 MB of available space. You can also limit the amount of recording time by changing the Open Ended Record Allocation settings (lo-cated in Setups > Preferences > Operations).
Because it is not possible to record a partial frame of video, selections in the Video track are rounded to the frame boundaries. This means that the start of the selection is moved earlier to the nearest frame boundary and the end of the selection is moved later to the next frame boundary.
Avid Video Peripherals Guide
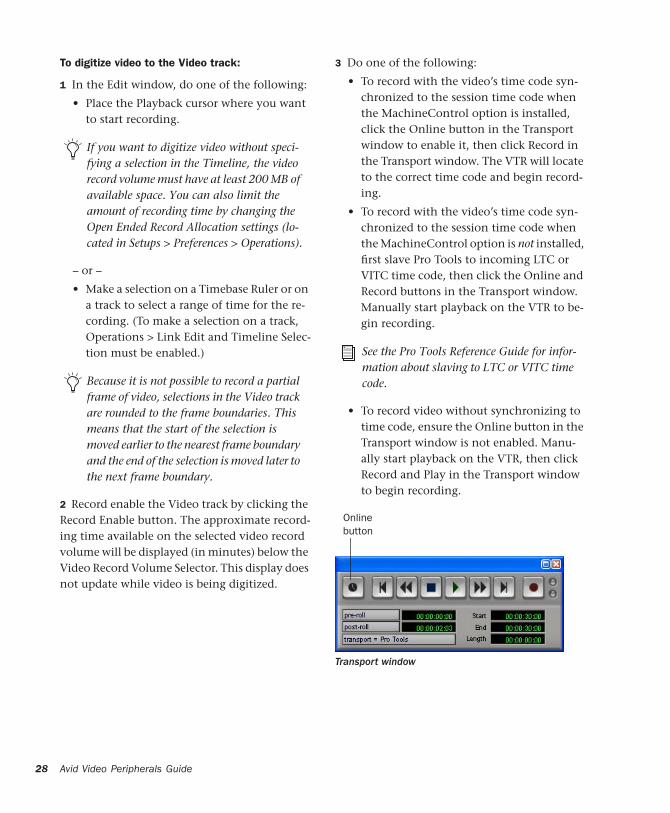
3 Do one of the following:
• To record with the video’s time code syn-chronized to the session time code when the MachineControl option is installed, click the Online button in the Transport window to enable it, then click Record in the Transport window. The VTR will locate to the correct time code and begin record-ing.
• To record with the video’s time code syn-chronized to the session time code when the MachineControl option is not installed, first slave Pro Tools to incoming LTC or VITC time code, then click the Online and Record buttons in the Transport window. Manually start playback on the VTR to be-gin recording.
• To record video without synchronizing to time code, ensure the Online button in the Transport window is not enabled. Manu-ally start playback on the VTR, then click Record and Play in the Transport window to begin recording.
See the Pro Tools Reference Guide for infor-mation about slaving to LTC or VITC time code.
Transport window
Onlinebutton
4 When you have finished recording, click Stop in the Transport window.
To abort a record pass:
• Press Control+period (Windows) or Com-mand+period (Macintosh) to abort a record pass in progress and restore the Video track to its original state. The video that you digitized before aborting will be deleted from disk.
To undo a record pass:
• Choose Track > Avid Video > Undo Capture to undo a record pass after it has completed. The digitized video will be removed from the Video track, and any video clips that were overwritten in the Video track will be re-stored.
When you undo a record pass, the digitized video will be removed from the Video track, but will not be removed from disk.
Dropouts During Video Digitize
When recording video, a dropout may occur in the video signal. Dropouts can be caused by bad cable connections, dropouts in the source tape, or other problems. When Pro Tools detects a dropout in video signal while recording, a warn-ing dialog appears. The recording will continue as specified and may still be usable.
If you record over existing clips in the Video track, the actual video files remain intact. All video recording in Pro Tools is non-de-structive.
Because the Location Indicators freeze when the warning dialog appears, it is recommended that you make a note of the location shown in the indicators before dismissing the dialog, then do the following:
• Check the recorded video near that loca-tion to see if the error caused an unaccept-able dropout.
• Check the video recorded after the initial dropout, as the warning is only posted for the first occurrence and there may be other errors later in the recording.
Editing Video ClipsYou can edit video clips in the Video track in the following ways:
• Add video clips.
• Move the Video track or video clips within the Video track.
• Copy video clips.
• Clear selected video frames.
• Lock or unlock the video track.
• Undo or redo video editing operations.
Adding Video Clips
Using the Add Video command, you can add several Avid video clips to a single Video track in Pro Tools.
If there are already clips on the Video track and you add over them, the overwritten material will be removed from the Video track. You can undo and restore the original clips. For more in-formation, refer to “Undoing or Redoing Video Editing Operations” on page 32.
Chapter 4: Pro Tools Video Track 29

30
Individual OMFI and MXF video and audio files can be added to your Pro Tools session just like other files. To open, import, or export an OMF or AAF sequence, you must have the Digi-Translator 2.0 option installed. DigiTranslator 2.0 is included with AVoption|V10 and is avail-able separately for Avid Mojo users.
To add OMFI or MXF video to the Avid Video track:
1 If the Pro Tools session does not already have an Avid Video Track, add one by choosing Track > Avid Video > New Track.
2 Choose Track > Avid Video > Add Video, select the desired Avid video file, and click OK.
3 In the Spot dialog that appears, specify the SMPTE frame number for the start of the video clip.
4 Click OK when you are done.
For more information, see the DigiTransla-tor 2.0 Integrated Option Guide.
Using the Import Video command to add video clips will remove any pre-existing video clips from the Video track.
Avid Video Peripherals Guide
Moving the Video Track or Video Clips
In Pro Tools with Avid DNA video peripherals, you can spot the entire Video track, or just a se-lected video clip, to a new SMPTE frame loca-tion. When you move the Video track, the whole track or sequence is moved to the new frame location you specify. When you move a single video clip, it is moved to the new speci-fied location within the Video track.
To spot the entire Video track to a new frame location:
1 Select View > Rulers > Time Code.
– or –
Select Time Code from the Main Location Indi-cator pop-up menu.
2 Enable Spot mode by clicking the Spot button.
3 Shift-click any clip in the Video track with the Grabber tool.
You can also drag a video clip to a new lo-cation within the Video track just as you would drag regions in audio tracks.
If there are already clips on the Video track, and you edit over them, the overwritten ma-terial will be removed from the Video track. You can undo Move Clip and restore the orig-inal clips. For more information, see “Undo-ing or Redoing Video Editing Operations” on page 32.

4 In the Spot dialog that appears, specify a new SMPTE frame number for the start of the Video track. In this dialog, you can press Plus (+) or Mi-nus (–) on the numeric keypad, enter a number, and press the Enter key to add or subtract that number of frames from the currently selected time field.
5 Click OK when you are done.
To spot a single video clip to a new frame location:
1 Select View > Rulers > Time Code.
– or –
Select Time Code from the Main Location Indi-cator pop-up menu.
2 Enable Spot mode by clicking the Spot button.
3 Select the clip you want to move on the Video track with the Grabber tool.
4 In the Spot dialog, specify a new SMPTE frame number for the start of the clip. In this dialog, you can press Plus (+) or Minus (–) on the nu-meric keypad, enter a number, and press the En-ter key to add or subtract that number of frames from the currently selected time field.
5 Click OK when you are done.
Spot dialog
Copying Video Clips
You can copy video clips to a new SMPTE frame location within the Video track.
To copy a video clip to a new frame location:
1 Select View > Rulers > Time Code.
– or –
Select Time Code from the Main Location Indi-cator pop-up menu.
2 Enable Spot mode by clicking the Spot button.
3 Alt-click (Windows) or Option-click (Macin-tosh) the clip on the Video track with the Grab-ber tool.
4 In the Spot dialog, specify a new SMPTE frame number for the start of the clip. In this dialog, you can press Plus (+) or Minus (–) on the nu-meric keypad, enter a number, and press the En-ter key to add or subtract that number of frames from the currently selected time field.
5 Click OK when you are done.
Clearing Selected Video Frames
You can clear material from the Video track.
To clear a selection:
1 Using the Selector, click and drag in the Video track to select the material you want to clear. You can also double-click to select an entire ex-isting video clip.
2 Choose Track > Avid Video > Clear Selection.
Chapter 4: Pro Tools Video Track 31

32
Locking the Video Track
If you want to permanently associate your video clips with a certain location on your Video track, you can lock it in place so that it cannot be moved accidentally.
To lock or unlock the Video track:
1 Using the Grabber, select the Video track.
2 Choose Region > Lock/Unlock.
When the Video track is locked, a small lock icon appears in the track, indicating that the Video track has been locked and cannot be moved. If you attempt to move a locked region, you will receive an error message.
Once a Video track is locked, you cannot Add video clips to it without first unlocking it.
Undoing or Redoing Video Editing Operations
The Video menu lets you undo or redo the most recent video editing operation.
If there are already video clips on the Video track, and you edit over them, the overwritten material is removed from the Video track. You can undo the video editing command and re-store the original clips.
You can also lock the Video track by triple-clicking in the Video track (to select all clips), and then pressing Control-L (Win-dows) or Command-L (Macintosh).
The Undo History window does not keep track of video editing operations, except for dragging a video clip to a different location and unlocking or locking a video clip. (See the Pro Tools Reference Guide for more in-formation on the Undo History window.)
Avid Video Peripherals Guide
To undo the most recent video editing command:
■ Choose Track > Avid Video > Undo [Opera-tion].
– or –
To redo the command, choose Track > Avid Video > Redo [Operation].
If you added or moved a clip over a pre-existing clip and consequently truncated it, Undo will also restore the trimmed clip to its original length.
Viewing Video Clips in the Scrub Video WindowPro Tools with the Avid DNA video peripheral provides a resizable Scrub window. When the Scrub window is enabled, video output alter-nates automatically between the Scrub window and the video reference monitor, depending on whether or not you are scrubbing.
The Scrub window only opens when Pro Tools is in Scrub mode. When not in Scrub mode, the Scrub window disappears and video is routed to the video reference monitor.
Due to the latency inherent in video data transfer across FireWire, it is not possible to accurately scrub the Video track with an ex-ternal reference monitor. When playing back, Pro Tools automatically compensates for this latency because play speed is pre-dictable and consistent. However, the play speed when scrubbing is neither predictable nor consistent. The result is that as you scrub, the video display is not in sync with the cursor. When you stop on a particular frame, the display jumps to the cursor loca-tion.

To use the Scrub window:
■ Choose Track > Avid Video > Use Scrub Win-dow.
To place and resize the Scrub window:
1 Stop playback.
2 Choose Track > Avid Video > Set Scrub Win-dow Size & Location. The Scrub window opens.
3 Place and resize the Scrub window as desired.
4 Close the Scrub window.
Window placement and size are saved for the next time the window is opened. The window closes automatically if you start playback.
The Scrub window is only available when there is Avid video in the Video track. There is no Scrub window for QuickTime video.
When scrubbing, video viewed on an exter-nal monitor may not be correctly synchro-nized. To maintain synchronization while scrubbing, use the Scrub window to view video.
Taking the Video Track OfflineThe Offline button duplicates the function of the Video Track Online command in the Op-tions menu. Clicking the Offline button lets you play back the audio in your session without playing back the video. When the video is of-fline, the Offline button changes to orange so you can tell at a glance whether your video is of-fline, or simply playing black fill. Both the Of-fline button and the Video Track Online menu command are disabled while your session is playing.
To take the video offline:
■ Deselect Options > Video Track Online.
– or –
• Click the Offline button.
To put the video back online:
■ Select Options > Video Track Online.
– or –
• Click the Offline button.
Video Track
Offline button
Chapter 4: Pro Tools Video Track 33

34
Avid Video Peripherals Guide
appendix a
24fps Workflows
Audio Layback to Video
Although you cannot output 24P video to a video recorder with Pro Tools, you can “Punch Down” by adding audio that has been posted to a 24P video clip in Pro Tools to videotape that was created on another video system.
Pro Tools with the Avid DNA video periph-eral does not support 24 or 23.976 fps video output. Though 24 and 23.976 fps video clips are supported, the actual output of Pro Tools is limited to NTSC (29.97 fps) and PAL (25 fps) standards. On playback, the 24 fps clips are converted in software to these standards. The conversion can pro-duce visible artifacts. Therefore, Pro Tools video playback is intended for monitoring purposes only, and is not suitable for profes-sional layback or broadcast, regardless of the resolution or frame rate of the video clip. Output from Media Station|PT is profes-sional quality.
Playing in Sync with 24 fps Video Tapes
To play back synchronized to a video transport playing at 24 fps:
1 In Pro Tools, open the Session Setup window (Setup > Session).
2 Set the Frame Rate to 24 fps.
3 Slave Pro Tools to the video transport.
– or –
If the MachineControl option is installed, select the appropriate profile to control the video transport.
Playing in Sync with 29.97 fps (NTSC) Video Tapes
To play in sync with a 29.97 fps video created from a 24 fps source:
1 Slave Pro Tools to the VTR.
2 Choose Setup > Session.
3 From the Frame Rate pop-up menu, select 29.97 FPS.
For more information on slaving Pro Tools to the VTR, see the Synchronization chap-ters of the Pro Tools Reference Guide.
Appendix A: 24fps Workflows 35
36
4 If the audio in Pro Tools is running at film speed (24 fps), choose 0.1% Down from the Au-dio Rate Pull Up/Down pop-up menu.
24P Clips and Pull Down When the SYNC I/O is set to pull down, the playback of the 24P clip is pulled down along with the audio. This way, when laying back audio to an NTSC video tape running at 29.97 fps, the Pro Tools video display and the output of the video deck will remain in sync.
Playing in Sync with 25 fps (PAL) Video Tapes
To lay back a 24P session directly to a 25 fps (PAL) tape:
1 Choose Setup > Session.
2 From the Frame Rate pop-up menu, select 25 FPS.
3 From the Audio Rate Pull Up/Down pop-up menu, select 4.0% Up.
Audio pull-down is required when you are posting to a 29.97 fps video clip made from a 24 fps source. This is because the 24 fps source is also “pulled down” by the telecine process which produces the 29.97 fps tape.
Avid Video Peripherals Guide
appendix b
PCI Slot Configurations for Avid DNA Video Peripherals
This appendix documents supported PCI slot configurations for Pro Tools|HD systems with Avid DNA video peripherals, with and without an expansion chassis.
Windows PCI Slot Configurations
HP xw9300 with Magma 64-bit 7-Slot Expansion Chassis or Digidesign Expansion|HD Chassis
Slot orders are labeled from top (closest to the power supply) to bottom.
Slot Card
CPU Slot 1 (32-bit) Do not use
CPU Slot 2 (AGP) Monitor card
CPU Slot 3 (32-bit) Do not use
CPU Slot 4 (PCIe) Do not use
CPU Slot 5 (100MHz 64-bit) optional PCI FireWire card or unused
CPU Slot 6 (100MHz 64-bit) ATTO 3300FC HBA or optional PCI FireWire card
CPU Slot 7 (133MHz 64-bit) Expansion Chassis HBA
Chassis Slot 1 (closest to power supply)
HD Core card
Chassis Slots 2–7 HD Accel or HD Process cards (6 maximum)
Appendix B: PCI Slot Configurations for Avid DNA Video Peripherals 37
38
HP xw8000
HP xw8000 with Magma 64-bit 7-Slot Expansion Chassis or Digidesign Expansion|HD Chassis
Slot Card
CPU Slot 1 (AGP) Monitor card
CPU Slot 2 Do not use
CPU Slot 3 Do not use
CPU Slot 4 (133MHz 64-bit) HD Core card
CPU Slot 5 (100MHz 64-bit) HD Accel or HD Process card (if any)
CPU Slot 6 (100MHz 64-bit) HD Accel or HD Process card (if any), ATTO 3300FC HBA, or optional PCI FireWire card
Slot orders in the chassis run from left (closest to the power supply) to right.
Slot Card
CPU Slot 1 (AGP) Monitor card
CPU Slot 2 Do not use
CPU Slot 3 Do not use
CPU Slot 4 (133MHz 64-bit) Expansion Chassis HBA
CPU Slot 5 (100MHz 64-bit) Do not use
CPU Slot 6 (100MHz 64-bit) ATTO 3300FC HBA (if any), optional PCI FireWire card, or unused
Chassis Slot 1 (closest to power supply) HD Core card
Chassis Slots 2–7 HD Accel or HD Process cards (6 maximum)
Avid Video Peripherals Guide
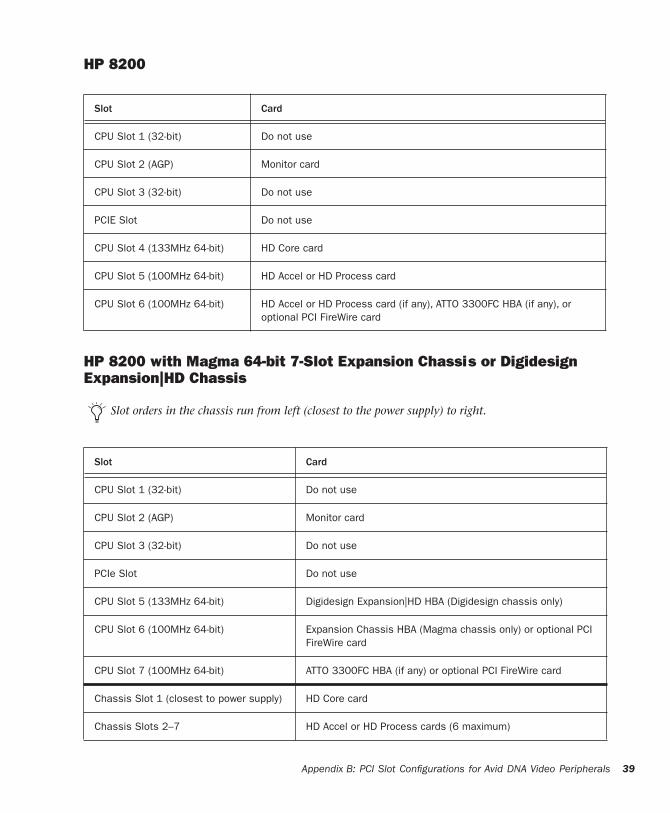
HP 8200
HP 8200 with Magma 64-bit 7-Slot Expansion Chassis or Digidesign Expansion|HD Chassis
Slot Card
CPU Slot 1 (32-bit) Do not use
CPU Slot 2 (AGP) Monitor card
CPU Slot 3 (32-bit) Do not use
PCIE Slot Do not use
CPU Slot 4 (133MHz 64-bit) HD Core card
CPU Slot 5 (100MHz 64-bit) HD Accel or HD Process card
CPU Slot 6 (100MHz 64-bit) HD Accel or HD Process card (if any), ATTO 3300FC HBA (if any), or optional PCI FireWire card
Slot orders in the chassis run from left (closest to the power supply) to right.
Slot Card
CPU Slot 1 (32-bit) Do not use
CPU Slot 2 (AGP) Monitor card
CPU Slot 3 (32-bit) Do not use
PCIe Slot Do not use
CPU Slot 5 (133MHz 64-bit) Digidesign Expansion|HD HBA (Digidesign chassis only)
CPU Slot 6 (100MHz 64-bit) Expansion Chassis HBA (Magma chassis only) or optional PCI FireWire card
CPU Slot 7 (100MHz 64-bit) ATTO 3300FC HBA (if any) or optional PCI FireWire card
Chassis Slot 1 (closest to power supply) HD Core card
Chassis Slots 2–7 HD Accel or HD Process cards (6 maximum)
Appendix B: PCI Slot Configurations for Avid DNA Video Peripherals 39
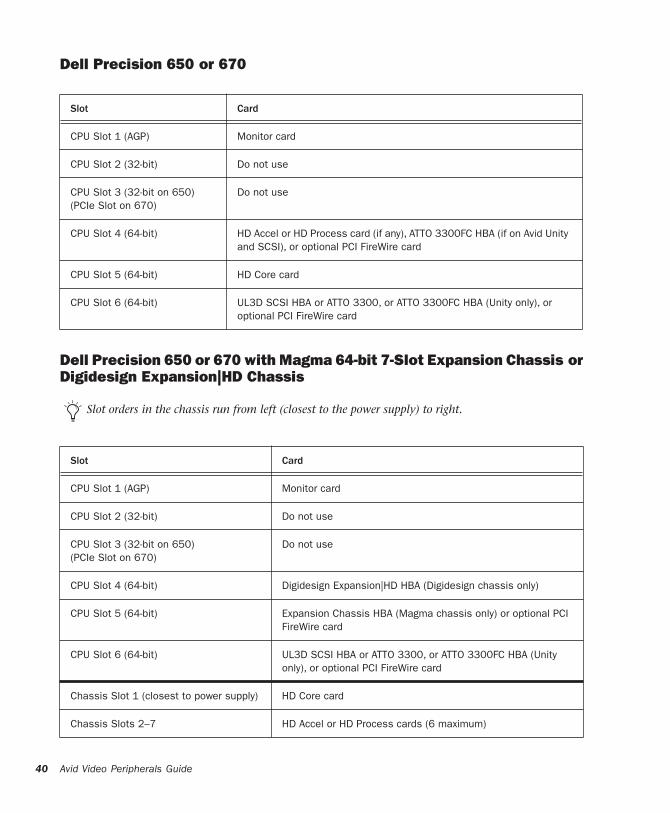
40
Dell Precision 650 or 670
Dell Precision 650 or 670 with Magma 64-bit 7-Slot Expansion Chassis or Digidesign Expansion|HD Chassis
Slot Card
CPU Slot 1 (AGP) Monitor card
CPU Slot 2 (32-bit) Do not use
CPU Slot 3 (32-bit on 650)(PCIe Slot on 670)
Do not use
CPU Slot 4 (64-bit) HD Accel or HD Process card (if any), ATTO 3300FC HBA (if on Avid Unity and SCSI), or optional PCI FireWire card
CPU Slot 5 (64-bit) HD Core card
CPU Slot 6 (64-bit) UL3D SCSI HBA or ATTO 3300, or ATTO 3300FC HBA (Unity only), or optional PCI FireWire card
Slot orders in the chassis run from left (closest to the power supply) to right.
Slot Card
CPU Slot 1 (AGP) Monitor card
CPU Slot 2 (32-bit) Do not use
CPU Slot 3 (32-bit on 650)(PCIe Slot on 670)
Do not use
CPU Slot 4 (64-bit) Digidesign Expansion|HD HBA (Digidesign chassis only)
CPU Slot 5 (64-bit) Expansion Chassis HBA (Magma chassis only) or optional PCI FireWire card
CPU Slot 6 (64-bit) UL3D SCSI HBA or ATTO 3300, or ATTO 3300FC HBA (Unity only), or optional PCI FireWire card
Chassis Slot 1 (closest to power supply) HD Core card
Chassis Slots 2–7 HD Accel or HD Process cards (6 maximum)
Avid Video Peripherals Guide

Macintosh PCI Slot Configurations
Apple G5
Apple G5 with 64-bit 7-Slot Expansion Chassis or Digidesign Expansion|HD Chassis
Slot Card
CPU Slot 1 (AGP) Monitor card
CPU Slot 2 HD Core card
CPU Slot 3 HD Accel or HD Process card (if any)
CPU Slot 4 (133MHz 64-bit) SCSI HBA or optional PCI or PCIe FireWire card
Slot orders in the chassis run from left (closest to the power supply) to right.
Slot Card
CPU Slot 1 (AGP) Monitor card
CPU Slot 2 Expansion Chassis HBA
CPU Slot 3 Optional PCI or PCIe FireWire card
CPU Slot 4 (133MHz 64-bit) SCSI HBA
Chassis Slot 1 (closest to power supply) HD Core card
Chassis Slots 2–7 HD Accel or HD Process cards (6 maximum)
Appendix B: PCI Slot Configurations for Avid DNA Video Peripherals 41
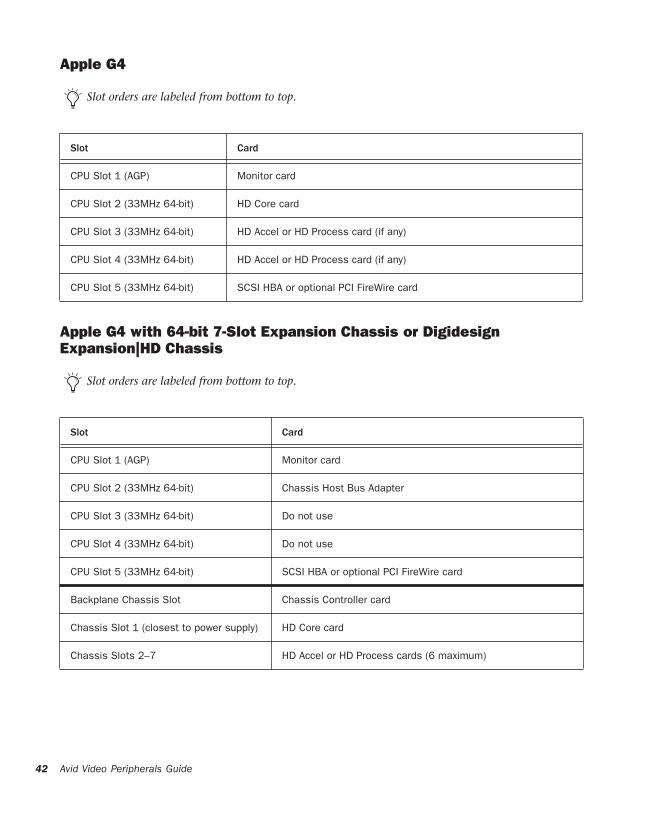
42
Apple G4
Apple G4 with 64-bit 7-Slot Expansion Chassis or Digidesign Expansion|HD Chassis
Slot orders are labeled from bottom to top.
Slot Card
CPU Slot 1 (AGP) Monitor card
CPU Slot 2 (33MHz 64-bit) HD Core card
CPU Slot 3 (33MHz 64-bit) HD Accel or HD Process card (if any)
CPU Slot 4 (33MHz 64-bit) HD Accel or HD Process card (if any)
CPU Slot 5 (33MHz 64-bit) SCSI HBA or optional PCI FireWire card
Slot orders are labeled from bottom to top.
Slot Card
CPU Slot 1 (AGP) Monitor card
CPU Slot 2 (33MHz 64-bit) Chassis Host Bus Adapter
CPU Slot 3 (33MHz 64-bit) Do not use
CPU Slot 4 (33MHz 64-bit) Do not use
CPU Slot 5 (33MHz 64-bit) SCSI HBA or optional PCI FireWire card
Backplane Chassis Slot Chassis Controller card
Chassis Slot 1 (closest to power supply) HD Core card
Chassis Slots 2–7 HD Accel or HD Process cards (6 maximum)
Avid Video Peripherals Guide

appendix c
Video Buffer Underrun Errors
This appendix describes the three different types of video buffer underrun errors in Pro Tools with Avid DNA video peripherals.
The Video Engine (“DIO Video Engine”) can en-counter three different types of buffer underrun errors.
“Video playback stopped due to a disk fifo buffer underrun.”
Indicates a disk buffer underrun in which data could not be read from the hard drive fast enough to play video.
“Video playback stopped due to a software decompression buffer underrun.”
Indicates a software decompression buffer un-derrun in which there weren’t enough CPU cy-cles to decompress video fast enough to main-tain play back.
“Video playback stopped due to a hardware or driver buffer underrun.”
Indicates a low level software buffer underrun in which the hardware or low level software could not keep up with the system load and needed to duplicate frames at the video output.
Visit http://answerbase.digidesign.com to search for possible solutions for any of these errors.
Appendix C: Video Buffer Underrun Errors 43

44
Avid Video Peripherals Guide
AActivation Code 17Add Video 29analog video outputs 10Australia EMC regulations iiauthorization
DigiTranslator 2.0 16authorizing plug-ins 17Avid Mojo
interface 10video connections 10video resolutions 5
Avid Multi-Cam Resolution files 25Avid Unity 2AVoption|V10 16
back panel 8capabilities 1capabilities with Pro Tools 1connecting a DV device 14connecting a SYNC I/O 14connecting a VTR 15connecting black burst 15connecting digital video 14connecting house video reference 15Declaration of Conformity iiifront panel 7installing a new system 13PAL monitor 16PCI slot configurations 37rear panel 8reference video 16striped drive requirements 19system requirements 2video connections 10video resolutions 5
Bblack burst 10, 15
connecting to AVoption|V10 15Blocks view 23buffer underrun errors 43
Ccentralized video
switching and routing for AVoption|V10 15compatibility 2connecting
AVoption|V10a VTR 15house sync 15
DDigiTranslator 2.0
authorizing 16disk allocation 19
Eexporting
overview 24
FFrames View 22Frames view for Video track 22
Gguide conventions 3
index
Index 45

46
Hhard drives
formatting audio drives 19selecting for video capture 27striped drives 19
house reference synchronization 10house sync
connecting to AVoption|V10 15house video reference 15
IiLok USB Smart Key 16Importing files
preparing 24installation
AVoption|V10 hardware 14Pro Tools 13
installingAVoption|V10
new system 13SCSI HBA 19
LLicense Card 17local storage 18Loop Sync 15
MMachineControl option 2Media Station
uninstalling 12Media Station|PT
capabilities 1installing 13
monitorsconnecting NTSC 16connecting PAL 16
NNew Zealand EMC regulations iiNTSC 16, 18
switching between NTSC and PAL 18NTSC monitor 16
Avid Video Peripherals Guide
OOffline Video 33
PPACE Anti-Piracy 16PAL 16, 18
switching between NTSC and PAL 18PCI slot configurations 37plug-ins
authorizing 17Preparing to Import Files 24Pro Tools
capabilities with Avid peripherals 1Pro Tools software installation
Macintosh configuration 13Pro Tools
Add Video 29clearing a video selection 31clearing the Video track 21connecting a SYNC I/O 14copying video to a new frame location 31creating a Video track 21deleting the Video track 21installing 13locking the Video track 32Loop Sync 15Movie track
Frames View 22moving the Video track 30naming the Video track 21Scrub window 32spotting the entire Video track to a new frame
location 30spotting video to a new frame location 31video scrubbing 32Video track 21
Blocks view 23clearing a selection 31clearing track 21creating 21deleting 21locking 32moving 30naming 21setting the view 22spotting to a new frame location 30spotting video to a new frame location 31
Rrecording video 28
selecting target volumes 27setting options 27
registration 3Round Robin 19
SSCSI HBA
installing for AVoption|V10 19selecting target volumes for video capture 27setting video recording options 27storage requirements 18, 19striped drives 19switching and routing
centralized video for AVoption|V10 15SYNC I/O 10, 14
Loop Sync 15required for AVoption|V10 10Video Reference In 14
synchronization 10connecting black burst or house video
reference 15
TTaiwan EMC regulations ii
UUndo/Redo for Video Editing Commands 32
Vvideo
centralized video switching and routing 15switching between NTSC and PAL 18
video clipsclearing selection 31copying 31
video connections 14Video Offline, working with 33Video Reference In 14video resolutions
mixed resolutions 6supported with Pro Tools 5
Video track 21Frames view 22viewing as blocks 23
viewing blocks in the Video track 23VTR 15
connecting to AVoption|V10 15
WWeb site 4
Index 47

48
Avid Video Peripherals Guide

DIGIDESIGN2001 Junipero Serra Boulevard
Daly City, CA 94014-3886 USA
Tel: 650.731.6300
Fax: 650.731.6399
TECHNICAL SUPPORT (USA)Tel: 650.731.6100
Fax: 650.731.6384
PRODUCT INFORMATION (USA)Tel: 650.731.6102
Fax: 800.333.2137
INTERNATIONAL OFFICESVisit our Digidesign Web sitefor contact information
www.digidesign.com