automatic voice/pager dialer system
TRANSCRIPT
E-AVDS-CELC-V3
Automatic Voice Dialer System
Installation and Operation Manual
MAN402 Rev Date 11/3/21
ENVIROMUX® Series

TRADEMARK
ENVIROMUX is a registered trademark of Network Technologies Inc in the U.S. and other countries.
COPYRIGHT
Copyright © 2021 by Network Technologies Inc. All rights reserved. No part of this publication may be reproduced, stored in a retrieval system, or transmitted, in any form or by any means, electronic, mechanical, photocopying, recording, or otherwise, without the prior written consent of Network Technologies Inc, 1275 Danner Drive, Aurora, Ohio 44202.
CHANGES
The material in this guide is for information only and is subject to change without notice. Network Technologies Inc reserves the right to make changes in the product design without reservation and without notification to its users.

TABLE OF CONTENTS
Introduction...................................................................................................................................................................... 1 Materials .......................................................................................................................................................................... 1 Mounting and Wiring ....................................................................................................................................................... 2 Installation ....................................................................................................................................................................... 3 Programming................................................................................................................................................................... 7 Technical Specifications................................................................................................................................................ 12 Warranty Information..................................................................................................................................................... 12

NTI Automatic Voice Dialer
1
INTRODUCTION
The E-AVDS-CELC-V3 is an automatic voice dialer system that when used in conjunction with the ENVIROMUX Enterprise Environment Monitoring System can call up to 6 pre-programmed numbers and provide a recorded message communicating the status of a sensor. When the SYSTEM recognizes an alarm it triggers the auto dialer. The telephone auto dialer uses a telephone line to dial the pre-programmed telephone number. It then replays a previously recorded message, thereby alerting the recipient of the call to the alarm and potential intrusion. Once the user is connected through the phone line, they can operate the auto-dialer remotely.
Features:
Calls up to 6 telephones or cell phones when a sensor goes out of range of a configurable threshold. o Initial "location" part of voice message can be up to 12 seconds. o Up to three different endings for custom recorded voice messages of up to 6 seconds each.
Four input channels. o E-16D supports four input channels via the Output Relay connections. o E-5D supports two input channels o E-2D supports one input channel
For full channel support with E-5D and E-2D, use in conjunction with a E-DI16DOR16 to work with the dialer. (Note: When using the E-DI16DOR16, each input must be set to N.O.)
Powered by the E-2D/5D/16D. o Current consumption: 200mA @ 12VDC.
The dialer message playback tone is adjustable The last event that has occurred is viewable on the LCD display The auto dialer can be operated remotely after answering the phone call or by calling it directly Dimensions WxDxH: 3.94x5.51x1.38 in (100x140x35 mm) Regulatory approvals: CE, RoHS
MATERIALS
Materials supplied with this kit: NTI E-AVDS-CELC-V3 URL Slip with path to this manual
NTI Automatic Voice Dialer
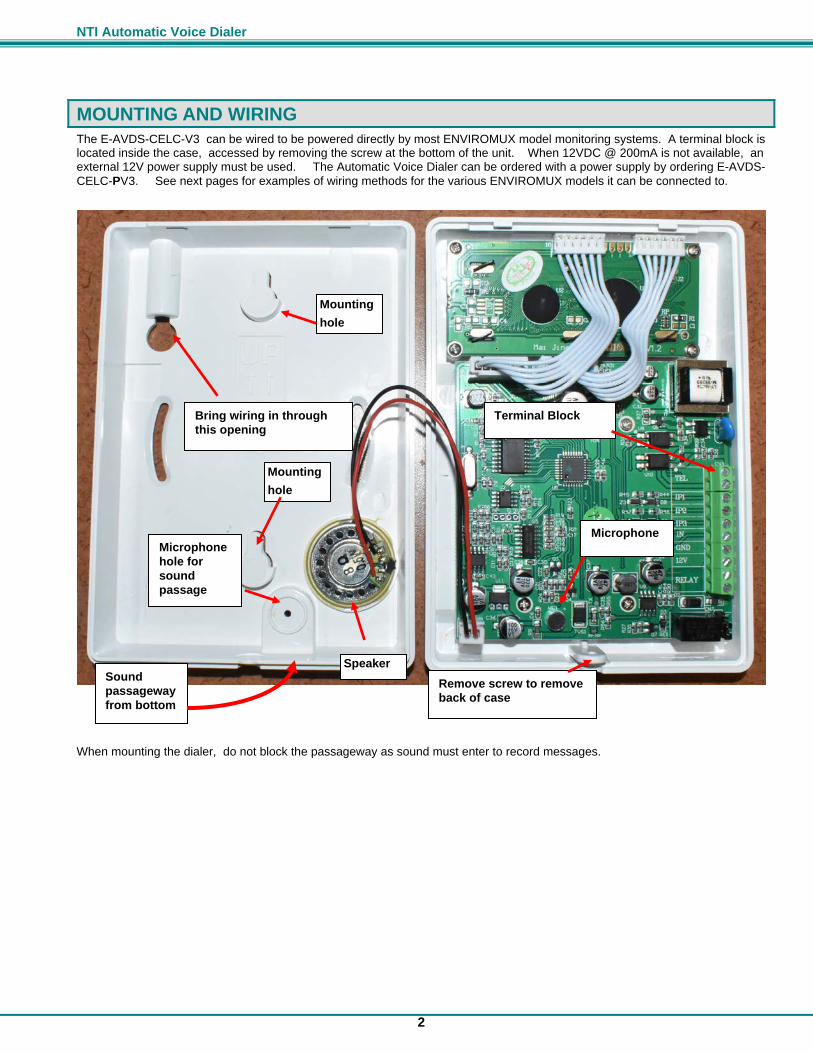
MOUNTING AND WIRING The E-AVDS-CELC-V3 can be wired to be powered directly by most ENVIROMUX model monitoring systems. A terminal block is located inside the case, accessed by removing the screw at the bottom of the unit. When 12VDC @ 200mA is not available, an external 12V power supply must be used. The Automatic Voice Dialer can be ordered with a power supply by ordering E-AVDS-CELC-PV3. See next pages for examples of wiring methods for the various ENVIROMUX models it can be connected to.
When mounting the dialer, do not block the passageway as sound must enter to record messages.
2
Remove screw to remove back of case
Terminal Block Bring wiring in through this opening
MicrophoneMicrophone hole for sound passage
Mounting
hole
Mounting
hole
Sound passageway from bottom
Speaker

NTI Automatic Voice Dialer
INSTALLATION
The dialer must be connected to a +12 V power supply which is fused at 2 Amps or less. Standard copper wiring should be used. Connect the alarm cable wiring starting with +12V and 0V connections from the ENVIROMUX and wire them into the +12V and 0V terminals of the Dialer. If the ENVIROMUX is not being used as the power supply for the Dialer then a common 0V connection between the control panel and dialer must be made. Now wire as many trigger channels from the ENVIROMUX to the auto dialer as required. Wiring examples are provided.
3

NTI Automatic Voice Dialer
4

NTI Automatic Voice Dialer
5

NTI Automatic Voice Dialer
6

NTI Automatic Voice Dialer
7
PROGRAMMING
The dialer is on standby when only the green power "ON" LED is illuminated. To make changes to the configuration, you must first enter the four-digit engineer code. The factory set engineer code is 8888 Press ENTER → 8888 → ENTER to get into the menu. Note: Setting success will issue "DI" sound. If there is no operation within 20 seconds, the system will automatically exit and sound "DI~DI~DI~DI" 1. Programming Telephone Number Up to six telephone numbers can be programmed into the dialer. Alarm Number a) Press ENTER Key to start or press 01→ ENTER to program the first phone number b) Press UP and Down Key to select numbers (1-6) you want programmed with ENTER c) Key in the telephone number and finish by pressing ENTER. Up to 14 digits are allowed. The number is automatically saved once you hear the sound "DI" 1.1 Delete Telephone number a) Press ENTER b) Press UP and Down Key to select the telephone number to be deleted (1-6) and press ENTER c) Press ENTER again Setting success will cause the dialer to issue the sound "DI". 2. Recording Message / PLAY You can program up to four messages. Message 0 is used as a location message (common to messages 1, 2 and 3) and lasts up to 12 seconds Message 1,2 and 3 are used as alarm messages, each lasting up to 6 seconds. Message numbers correspond to the Input numbers. A trigger of Input 1 will call the phone number associated with Input 1 and play Messages 0 and 1. A trigger of Input 2 will call the phone number associated with Input 2 and play Messages 0 and 2, etc. To record or re-record a message: a) Select the menu with the UP and Down Key or press 02→ ENTER to start the program. b) Press ENTER to start recording. c) Press the number of the message (0-3, where 0 corresponds to the location message). d) Key in 0= Record, 1=Playback e) Now speak clearly into the microphone. The countdown (12 seconds for message 0, 6 seconds for message 1-3) is displayed on the screen. Example: A location message (message "0") can be "This is the alarm system at Mr. David's house, Shennan Road, Futian. There is... " The second part of the message, the alarm message, can be (for example): Message 1 " Fire alarm " Message 2 " Personal Attack " Message 3 " Intruder alarm "

NTI Automatic Voice Dialer
8
The dialer automatically stops recording at the end of a message delay. If the announcement to be recorded in message 0 is much shorter than 12 seconds you can stop the recording at any time by pressing ENTER. After the message is recorded there is a short interval, after which the dialer plays back your recorded message. 2.1 Playback of Message To play any of the messages previously recorded: b) Press ENTER c) Press the number of the message (0-3, where 0 corresponds to the location message). d) Key in 1=Playback
3. Dialing mode The dialer can be programmed to call a specific number when each alarm occurs, or it can be programmed to call all programmed numbers. Once: non- sequential dialing, which calls a particular number, depending upon the type of alarm (number of the input). I.e. Trigger Input 1 to call phone number 1. Trigger Input 2 to call phone number 2. Trigger Input 3 to call phone number 3. In this mode, phone numbers 4 though 6 are not used. Sequential: calls up to six numbers in succession. Regardless of which input is triggered, all 6 programmed phone numbers will be called. Only the Location message and message associated with the input trigged will play for all 6 recipients called. Set the Dial- up mode a) Select the menu with the UP and DOWN keys or press 03→ ENTER to start the program. b) Key in 0= Once, 1= Sequential c) Press ENTER to finish. Setting success will issue "DI" 4. Trigger Types
The three inputs (IP1- IP3) , and the Relay Control input (IN) , can be individually programmed as: L-N.O L-N.C H-N.O H-N.C
L-N.O = Input will trigger the dialer when the input is connected to ground, and stop dialing when the input is disconnected from ground. L-N.C = Input will trigger the dialer when the input is disconnected from ground, and stop dialing when the input is connected to ground. H-N.O = Input will trigger the dialer when the input is connected to 12V, and stop dialing when the input is disconnected from 12V. H-N.C = Input will trigger the dialer when the input is disconnected from 12V, and stop dialing when the input is connected to 12V.

NTI Automatic Voice Dialer
9
o change the trigger levels and Down keys or press 04→ ENTER to start the program
Down keys, and press
O
) Key in 0=H-NO; 1=H-NC; 2=L-NO; 3=L-NC
ally Open)
d) Pre me above steps to change other input settings.
ote: The Inhibit input (IN) is for changing the state of the relay. It has nothing to do with dialing phone
. Trigger Modes
three programmable inputs, and the user can change the trigger mode of the input. a circular
trigger signal stops, the
and Down keys or press 05→ ENTER to start the program
d then press ESC to return to the menu to continue
6. Display the Latest Event
ill log the trigger input (IP1 to IP3) in its event memory.
o view the last event: and Down key or press 06 → Enter to start the program
ote: If the last alarm number with "OK" is displayed on the screen, it means the user has pressed the “0" key when
Ta)Select the menu with the UP b)Select the three inputs ( IP1- IP3) , or input (IN) that you need to program again by UP andENTER key you will see:
IP 1 Trigger Level L - N.
IP1 Trigger Level IP1 (0-3)
2=L-NO
c The factory default settings are:
IP1: 0=L-N.O (- ve trigger, NormIP2: 2=L-N.O (- ve trigger, Normally Open) IP3: 2=H-N.O (+ ve trigger, Normally Open) IN: 3=L-N.C (- ve trigger, Normally Closed) ss ENTER to complete the settings, and use sa
e) Press ESC to return to the menu to continue.
Nnumbers.
5
The auto dialer has 0=Edge Trigger-When the trigger signal is detected the dialer will start dialing. The dialer will make call to all numbers three times even if the trigger signal is stopped 1=Level Trigger-When the trigger signal is detected the dialer will start dialing. If the dialer will stop dialing. (Level Trigger is the default setting) To change the trigger mode a) Select the menu with the UPb) Key in 0= Edge Trigger, 1= Level Trigger c) Press ENTER to complete the settings, an
When the dialer is triggered it w Ta) Select menu with UPb) The last alarm event will be displayed c) Press ESC to return to the main menu Nthey answered the phone and confirmed the alarm notification.
L- N.O

NTI Automatic Voice Dialer
10
. Changing the Engineer Code
he engineer code is 8888 by default . You can change this as follows: start the program
en press ESC menu to continue. After code is
. Perform a Test Call
bers have been set up correctly the dialer can perform a test call. To make a test call:
to the menu to continue
. Setting the Dialer Tone
ds a fast "DI" ler sounds four DI~DI~DI~DI.
ses Medium (1).
) Select the menu with the UP and Down keys or press 09→ ENTER to start the program
0. Setting Ring Time for Remote Phone Control
efore answering a call from a user, the user will be able to rol).
) Select the menu with the UP and Down keys or press
1. Setting Relay Working Time
by the Relay Control Input (IN). The relay activation time can be programmed
UP Down 11 ENTER
2. Setti rded Message
corded message ten seconds after the phone is connected with the
UP Down 12 ENTER
set d then press ontinue.
7
Ta) Select the menu with the UP and Down keys or press 07→ ENTER tob) Press ENTER again to key in new password
to return to the c) Press ENTER to complete the settings, and thchanged, the dialer automatically resets to the top of the Engineering menu 8
o test that telephone numTa) Select the menu with the UP and Down keys or press 08→ ENTER to start the program b) Press UP and Down key (1 to 6 ) to select the number to be tested. c) Press ENTER to complete the settings, and then press ESC to return 9
o confirm an action the dialer sounTTo alert you to an error or exit the program the diaYou can alter the volume of the messages when they are played back. By default the dialer u ab) Key in 0 = Silent; 1 = Medium; 2 = Loud
d then press ESC to return to the menu to continue c) Press ENTER to complete the settings, an 1
fter setting the number of times the Dialer will ring bAactivate or deactivate the onboard relay remotely (see 13. Answering Alarm Phone Call to Start Remote Cont
10→ ENTER to start the program ab) Key in 0-9 times, (default is 3, to disable the feature enter 0)
menu to continue c) Press ENTER to complete the settings, and then press ESC to return to the 1
he dialer has one relay controlledTfrom 1 to 255 seconds. The factory setting for relay activation time is 10 seconds. The static relay state (N.O. or N.C.) is determined by a jumper in the lower right corner of the circuit board. (See page 6)
) Select the menu with the and keys or press → to start the program ab) Key in the number (1-255)
he settings, and then press ESC to return to the menu to continue c) Press ENTER to complete t
ng Play Times of Reco1
hen the dialer is triggered it will playback the reWperson called. The user can set the number of times the recorded message will play, once or twice (default setting is once). a) Select the menu with the and keys or press → to start the program. b) Key in 1= once; 2= twice
the ting, an ESC to return to the menu to cc) Press ENTER to complete

NTI Automatic Voice Dialer
11
3. Answering Alarm Phone Call to Start Remote Control
hen an alarm occurs, the auto dialer will call the stored phone numbers. When answering the call, the user will first
emote Controlling Includes: ce more.
ON the microphone at the dialer so the caller can hear what is going on in
ou can also call the dialer to control the relay output (whether the dialer has called you or you have called
ress 8 - the relay will activate, and the relay will automatically deactivate after the preset time (see "11. Setting
ress 9 - to deactivate the relay.
ote: If you call the dialer directly, you will only be able to change the state of the relay. You cannot control
hen you call the Dialer: ny slow beeps as you have programmed in Step 10 on page 10.
do nothing, after 30 seconds the dialer will hang up.
4. Stop dialing through keypad
ser can stop the dialer from dialing by using the keypad. l stop dialing in few seconds.
5. Reset
isconnect the power at the dialer. Press the Enter button and re-apply power to the dialer. It will
1 Whear the recorded voice message followed by two beeps. The user can choose to remotely control the dialer as indicated below, or if there are no entries within 30 seconds the dialer will hang up. RPress 3 - to play the message onPress 4 - to start monitoring. This will turn the environment around the dialer. The call will be one-way, the caller will not be able to talk to anyone at the dialer's location. Monitoring will last 10 seconds unless you press 4 again. Press 0 - to cause the dialer to stop dialing, and it will not dial any other numbers. Ythe dialer): PRelay Working Time"). P Nthe alarm in any way. W
1. You will hear as ma2. When the dialer answers you will hear two fast beeps. 3. Enter the password- 8888 using your phone's keypad. 4. If correct, you will hear two fast beeps. 5. Press 8, or 9 (described above). If you
1 UPress Esc→ 8888→ Enter at the keypad. The dialer wil 1 Dissue a long beep which means the dialer has been reset to factory settings.

NTI Automatic Voice Dialer
12
TECHNICAL SPECIFICATIONS Max. # of stored phone 6 numbers
Max. # of digits per phone 14 number
Recording (message) 12 Seconds for location message
t) messages duration 6 seconds for each of 3 alarm (inpu
Input Voltage 10 to 15 VDC
Standby Current 40mA
Max. Operating Current 200mA
Onboard Relay Max. 1A @125VAC or 2A @24VDC
Dialing Method Tone
Power Supply Powered by ENVIROMUX
Size WxDxH 3.94 x 5.51 x 1.38 In. (100.00 x 140.00 x 35.00 mm)
Approvals CE, RoHS
WARRANTY INFORMATION
The warranty period on this product (parts and labor) is two (2) years from the date of purchase. Please contact Network m for
MAN402 Rev. 11/3/21
Technologies Inc at (800) 742-8324 (800-RGB-TECH) or (330) 562-7070 or visit our website at http://www.networktechinc.coinformation regarding repairs and/or returns. A return authorization number is required for all repairs/returns.