at&t voip nortel bcm200/400 (release 4.0.2.03a) h.323 ... · 5.3 real-time bcm fault/alarms...
TRANSCRIPT
AT&T IP Flexible Reach Service Nortel BCM200/400 (Release 4.0.2.03a) H.323 Configuration Guide
© 2008 AT&T Knowledge Ventures. All rights reserved. AT&T and the AT&T logo are trademarks of AT&T Knowledge Ventures. Subsidiaries and affiliates of AT&T Inc. provide products and services under the AT&T brand. Issue 1.9 Page 1 of 36
AT&T VOIP Nortel BCM200/400 (Release 4.0.2.03a) H.323
Configuration Guide For Use with AT&T
IP Flexible Reach Service
NN10000-102 Issue 2.0
02/04/2008

AT&T IP Flexible Reach Service Nortel BCM200/400 (Release 4.0.2.03a) H.323 Configuration Guide
© 2008 AT&T Knowledge Ventures. All rights reserved. AT&T and the AT&T logo are trademarks of AT&T Knowledge Ventures. Subsidiaries and affiliates of AT&T Inc. provide products and services under the AT&T brand. Issue 1.9 Page 2 of 36
TABLE OF CONTENTS
1 Introduction................................................................................................................. 4 1.1 Pre-IP PBX Configuration Activity .................................................................... 4 1.2 Customer Questions ............................................................................................ 4 1.3 Trouble Reporting............................................................................................... 5 1.4 Document Feedback............................................................................................ 5 1.5 Document Change History.................................................................................. 5
2 Special Notes .............................................................................................................. 7 3 Overview..................................................................................................................... 8 4 Configuration Guide ................................................................................................. 10
4.1 Nortel BCM Version and Feature Requirements.............................................. 10 4.2 VOIP Gateway Trunks...................................................................................... 12 4.3 H.323 Gateway Parameters............................................................................... 19 4.4 Media Parameters.............................................................................................. 20 4.5 Port Ranges ....................................................................................................... 22 4.6 Configuring Outgoing Calls from BCM to AT&T IP Flex Reach ................... 23 4.7 Configuring Incoming Calls from AT&T IP Flex Reach to BCM ................... 24 4.8 Configuring IP Phone LCD Screen to Display DID Number........................... 25
5 Troubleshooting ........................................................................................................ 26 5.1 System Monitoring with BCM Monitor ........................................................... 26 5.2 Real-time BCM System Status LED Displays.................................................. 29 5.3 Real-time BCM Fault/Alarms Management..................................................... 30 5.4 BCM Service Management System.................................................................. 31 5.5 BCM Log Management .................................................................................... 33
APPENDIX A: Configuring Destination Code with Wildcard ........................................ 36

AT&T IP Flexible Reach Service Nortel BCM200/400 (Release 4.0.2.03a) H.323 Configuration Guide
© 2008 AT&T Knowledge Ventures. All rights reserved. AT&T and the AT&T logo are trademarks of AT&T Knowledge Ventures. Subsidiaries and affiliates of AT&T Inc. provide products and services under the AT&T brand. Issue 1.9 Page 3 of 36
TABLE OF FIGURES
Figure 1: AT&T IP Flexible Reach Network ..................................................................... 8 Figure 2: BCM200/400 software version ......................................................................... 10 Figure 3: Software Management Menu ............................................................................ 11 Figure 4: Patch List........................................................................................................... 11 Figure 5: Available VOIP Gateway Trunks...................................................................... 13 Figure 6: Assigning DN numbers to Line Pool ................................................................ 14 Figure 7: Configuring Global DN length.......................................................................... 15 Figure 8: Configuring Public Received Number Length and Dialing Plan...................... 15 Figure 9: Configuring Private Received Number Length................................................. 16 Figure 10: Defining Route for VOIP Trunks.................................................................... 17 Figure 11: Assign Destination Code to Route Numbers................................................... 18 Figure 12: H.323 Gateway Parameters ............................................................................. 19 Figure 13: Media Parameters ............................................................................................ 21 Figure 14: ATA device settings for fax port..................................................................... 21 Figure 15: Media Gateway Port Range............................................................................. 22 Figure 16: Configuring DID for Outgoing Calls .............................................................. 23 Figure 17: Configuring DID for Incoming Calls With 4-digit Dial Plan ......................... 24 Figure 18: Displaying DID Number on IP Set LCD......................................................... 25 Figure 19: System Monitoring Example........................................................................... 26 Figure 20: IP Device Listing............................................................................................. 27 Figure 21: RTP Session Information ................................................................................ 27 Figure 22: Line Monitor Information ............................................................................... 28 Figure 23: System Resources............................................................................................ 28 Figure 24: Front Panel LED Display ................................................................................ 29 Figure 25: Real-time BCM200/400 Alarm Display.......................................................... 30 Figure 26: BCM Service Manager Screen ........................................................................ 31 Figure 27: Log Management Screen................................................................................. 34 Figure 28: Configuring Destination Code with Wildcard................................................. 36

AT&T IP Flexible Reach Service Nortel BCM200/400 (Release 4.0.2.03a) H.323 Configuration Guide
© 2008 AT&T Knowledge Ventures. All rights reserved. AT&T and the AT&T logo are trademarks of AT&T Knowledge Ventures. Subsidiaries and affiliates of AT&T Inc. provide products and services under the AT&T brand. Issue 1.9 Page 4 of 36
1 Introduction This document provides a configuration guide to assist Nortel Networks BCM administrators in connecting to AT&T IP Flexible Reach service. This document does not describe procedures to configure the BCM for advanced functionality. For more information and procedures, please refer to the Nortel technical documentation found on the Nortel website. 1.1 Pre-IP PBX Configuration Activity This guide assumes that the administrator is knowledgeable in IP PBX programming and operations. An important tool that the administrators should have at their disposal prior to testing their IP PBX with IP Flexible Reach is the Wireshark network protocol analyzer. This software can be used to run traces on problem calls so the information can be shared with equipment and network engineers. This free software can be obtained at http://www.wireshark.org/. The customer may also use TCPDUMP which can be found on most UNIX and Linux systems. The customer should have Wireshark or TCPDUMP loaded on a server that is connected to a LAN switch or hub that can monitor both the signaling and media packets on any calls between the customer PBX and the IP Flexible Reach managed router. 1.2 Customer Questions Section 4 of this guide provides screen shots and instructions for the configuration of your IP PBX. Should you have questions regarding these instructions, please contact Brian Stegemoller at +1 (972) 685-6629; ((972) 745-5139 after 2/22/2010). When calling this number please have the following information available:
Company name Company location Administrator name and phone number IP PBX name and software version
AT&T IP Flexible Reach Service Nortel BCM200/400 (Release 4.0.2.03a) H.323 Configuration Guide
© 2008 AT&T Knowledge Ventures. All rights reserved. AT&T and the AT&T logo are trademarks of AT&T Knowledge Ventures. Subsidiaries and affiliates of AT&T Inc. provide products and services under the AT&T brand. Issue 1.9 Page 5 of 36
Customer Configuration Guide – Issue number and date 1.3 Trouble Reporting Nortel and AT&T will make every effort to quickly resolve reported troubles. The time required for trouble shooting can be reduced if the customer has the necessary detailed information available when reporting a problem. Prior to reporting a problem please provide a Wireshark or TCPDUMP trace of the failed call. 1.4 Document Feedback IP PBX administrators who would like to provide feedback on the contents of this document should send it to Brian Stegemoller ([email protected]) with a copy to Al Chee ([email protected]) and Steven Chen ([email protected]). 1.5 Document Change History Issue 1.0 01-03-2007; first general release Issue 1.1 02-05-2007;
1) Modified section 4.2 for clarity of IP trunks and line pool configuration. 2) Added CCG disclaimer statement at end of document. 3) Modified cover page.
Issue 1.2 March 2, 2007; Modified section 4.2 with additional clarification of BCM IP trunk operation.
Issue 1.3 March 15, 2007; Modified section 2, special note regarding specific unsupported BCM to BCM unattended call transfers.
Issue 1.4 May 16, 2007 – Added footnote Issue 1.5 June 27, 2007;
1) Modified section 4.2 to reflect 4-digit dialing plan configuration. 2) Modified section 4.7 to reflect 4-digit public received number configuration. 3) Added Appendix A for procedure on configuring destination code with “wild card”; this is deployed when the IP Flexible Reach private dial plan (site code) is the same digit used for the BCM’s destination code.

AT&T IP Flexible Reach Service Nortel BCM200/400 (Release 4.0.2.03a) H.323 Configuration Guide
© 2008 AT&T Knowledge Ventures. All rights reserved. AT&T and the AT&T logo are trademarks of AT&T Knowledge Ventures. Subsidiaries and affiliates of AT&T Inc. provide products and services under the AT&T brand. Issue 1.9 Page 6 of 36
Issue 1.6 July 6, 2007 – Moved Appendix A to end of document. Issue 1.7 October 30, 2007 / December 10, 2007;
1) Updated Media Parameters screenshot and T.38 Fax Support in Section 4.4 w/ ATA device settings screen 2) Removed Unattended Call Transfer, Fax Limitations, and CPE Failover in Section 2 3) Added statement in Section 3 regarding T.38 fax support 4) Changed naming convention; “BCM 200/400” to “BCM200/400” 5) Updated patch list in Figure 4 6) Updated CPE failover (text & screens) in 4.3 7) Added Sections 1.1 – 1.4 8) Added G.729B support in 4.4
Issue 1.8 March 27, 2008; 1) Added BCM200/400 T.38 fax speed limitation under Section 2.
Issue 1.9 August 18, 2008 1) Added Nortel Document Number
Issue 2.0 February 2, 2010 Updated Contact Information to Reflect AVAYA Merger

AT&T IP Flexible Reach Service Nortel BCM200/400 (Release 4.0.2.03a) H.323 Configuration Guide
© 2008 AT&T Knowledge Ventures. All rights reserved. AT&T and the AT&T logo are trademarks of AT&T Knowledge Ventures. Subsidiaries and affiliates of AT&T Inc. provide products and services under the AT&T brand. Issue 1.9 Page 7 of 36
2 Special Notes Emergency 911/E911 Services Limitations While AT&T IP Flexible Reach services support E911/911 calling capabilities in certain circumstances, there are significant limitations on how these capabilities are delivered. Please review the AT&T IP Flexible Reach Service Guide in detail to understand these limitations and restrictions. Fax Limitations T.38 fax is now supported with the IP Flexible Reach service; however, the BCM200/400 fax speed is limited to 9600 bps.

AT&T IP Flexible Reach Service Nortel BCM200/400 (Release 4.0.2.03a) H.323 Configuration Guide
© 2008 AT&T Knowledge Ventures. All rights reserved. AT&T and the AT&T logo are trademarks of AT&T Knowledge Ventures. Subsidiaries and affiliates of AT&T Inc. provide products and services under the AT&T brand. Issue 1.9 Page 8 of 36
3 Overview This section provides a service overview of the Nortel Business Communication Manager 200/400 (BCM200/400) IP PBX integration with AT&T IP Flexible Reach service. For an overview of Nortel BCM50 for IP Flexible Reach; please reference a separate document named “Nortel BCM50 Configuration Guide.”
Figure 1: AT&T IP Flexible Reach Network
The Nortel BCM customer premises site shall consist of the following components.
• Nortel IP 2004 or IP 2002 phones – These phones use the Nortel proprietary UNIStim signaling protocol to communicate to the Nortel BCM200/400 IP PBX for call feature and routing support. These phones can be connected to a Nortel Ethernet switch (ES 470, ERS 5520, etc.) that supplies in-line power (IEEE 802.3af) to the phones.
Nortel BCM200/400
Private Side
Legacy Circuit PBX
AT&T Managed With
Voice GW
Call Control Element
Public Side
Switch AT&T Managed
Router With NAT
IP BorderElement
Network GatewayBorder
Element
PST
ApplicationServer
AT&T IP Flexible Reach Service Nortel BCM200/400 (Release 4.0.2.03a) H.323 Configuration Guide
© 2008 AT&T Knowledge Ventures. All rights reserved. AT&T and the AT&T logo are trademarks of AT&T Knowledge Ventures. Subsidiaries and affiliates of AT&T Inc. provide products and services under the AT&T brand. Issue 1.9 Page 9 of 36
• Nortel BCM200/400 IP PBX – This unit consists of the following.
o Media Service Card (MCS) Processor o Two ports Ethernet / IP card o Integrated CallPilot voice mail system o Analog station ports for connection to fax machines. o Digital station ports for Norstar digital phones o T1 voice card for connection to the local PSTN. o GATM-8 analog trunk to PSTN for inbound/outbound fax
The following routing scenarios are supported by the Nortel BCM IP PBX and DO NOT use the AT&T Call Control.
• Local Nortel BCM phone to local Nortel BCM phone • Local fax machine to other fax machine on PSTN via GATM-8 analog trunk
module The following routing scenarios are supported by the BCM IP PBX and DO use the AT&T Call Control. For voice calls, the G.729 codec shall be used.
• Nortel BCM phones to PSTN (domestic US and international). • Nortel BCM phones to legacy PBX site with Cisco gateway. • Legacy PBX site with Cisco gateway to Nortel BCM phones. • Nortel BCM phones at one Nortel BCM IP PBX site to Nortel BCM phones
at another Nortel BCM IP PBX site. If the customer has subscribed to Calling Plans B and C (Local), then the following routing scenarios are supported by the BCM IP PBX and DO use the AT&T Call Control. For voice calls, the G.729 or G.711 codec may be used. BCM selects G.729 as the highest priority codec.
• Inbound PSTN to BCM phone • Outbound local PSTN calls from the BCM phones. • Outbound local N11 (i.e. 411, 911) calls from the BCM phones.
Fax was tested and is supported on the BCM200/400 using the T.38 fax protocol through the AT&T IP Flexible Reach network to/from the following:
• PSTN • Legacy PBX site with Cisco gateway • Another Nortel BCM IP PBX site

AT&T IP Flexible Reach Service Nortel BCM200/400 (Release 4.0.2.03a) H.323 Configuration Guide
© 2008 AT&T Knowledge Ventures. All rights reserved. AT&T and the AT&T logo are trademarks of AT&T Knowledge Ventures. Subsidiaries and affiliates of AT&T Inc. provide products and services under the AT&T brand. Issue 1.9 Page 10 of 36
4 Configuration Guide This configuration guide specifies the Nortel BCM200/400 screens that must be configured and updated to support the AT&T IP Flexible Reach service. 4.1 Nortel BCM Version and Feature Requirements The Nortel Networks BCM must be running release 4.0.2.03a. You can check the version of BCM by viewing the following screen.
Figure 2: BCM200/400 software version
Ensure that the System Identification page specifies Version 4.0.2.03a. This is the supported release that is required for AT&T IP Flexible Reach service.
AT&T IP Flexible Reach Service Nortel BCM200/400 (Release 4.0.2.03a) H.323 Configuration Guide
© 2008 AT&T Knowledge Ventures. All rights reserved. AT&T and the AT&T logo are trademarks of AT&T Knowledge Ventures. Subsidiaries and affiliates of AT&T Inc. provide products and services under the AT&T brand. Issue 1.9 Page 11 of 36
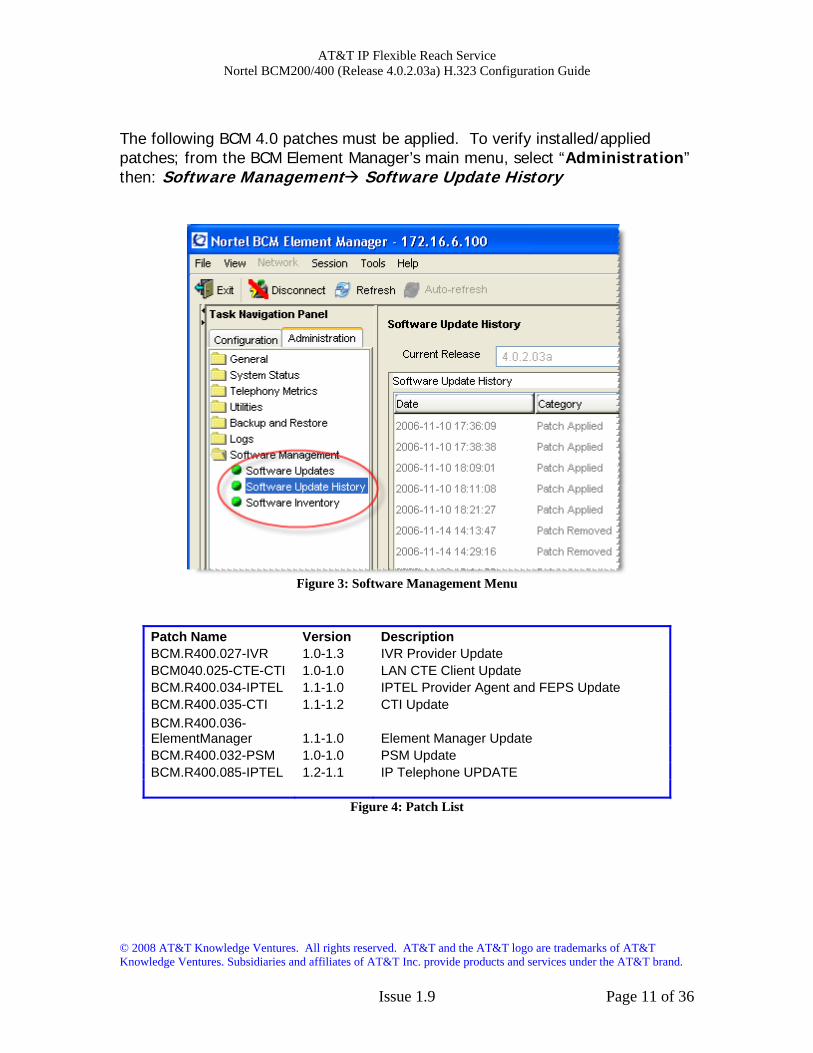
The following BCM 4.0 patches must be applied. To verify installed/applied patches; from the BCM Element Manager’s main menu, select “Administration” then: Software Management Software Update History
Figure 3: Software Management Menu
Patch Name Version Description BCM.R400.027-IVR 1.0-1.3 IVR Provider Update BCM040.025-CTE-CTI 1.0-1.0 LAN CTE Client Update BCM.R400.034-IPTEL 1.1-1.0 IPTEL Provider Agent and FEPS Update BCM.R400.035-CTI 1.1-1.2 CTI Update BCM.R400.036-ElementManager 1.1-1.0 Element Manager Update BCM.R400.032-PSM 1.0-1.0 PSM Update BCM.R400.085-IPTEL 1.2-1.1 IP Telephone UPDATE
Figure 4: Patch List
AT&T IP Flexible Reach Service Nortel BCM200/400 (Release 4.0.2.03a) H.323 Configuration Guide
© 2008 AT&T Knowledge Ventures. All rights reserved. AT&T and the AT&T logo are trademarks of AT&T Knowledge Ventures. Subsidiaries and affiliates of AT&T Inc. provide products and services under the AT&T brand. Issue 1.9 Page 12 of 36
4.2 VOIP Gateway Trunks Voice over IP (VoIP) lines, are signaling channels that simulate how CO lines work. However, VoIP lines transmit data to the IP network over a LAN or IP network rather than over physical lines. Once the VoIP trunks are set up, you can assign them to line pools, and program their behavior in the same way you would PRI lines. VoIP trunks use line numbers 001 to 060. To view these line records select Configuration --> Telephony --> Lines --> Active VoIP Lines. To access VoIP lines, you need to enter software keycodes. Each keycode supports a specific number of trunks. The H.323 trunks start numbering up from 001. No entries appear in the Enabled VoIP lines field until you complete the IP Trunks Settings field, which displays when you select IP Trunks under Configuration --> Resources --> Telephony Resources --> IP trunks. VoIP trunks should be configured to use a single line pool per VoIP trunk type. Do not mix other trunk types on the same line pool. The VoIP line pools are assigned to routes, which in turn, are configured with destination codes that route calls to the AT&T IP Flex Reach network. You can also create a fallback for the trunk. This is a situation where the system reroutes the call to a PSTN line pool if the primary route is not available or the call quality is not suitable. If you do not configure your network for fallback and the call quality is below threshold, the IP call fails.

AT&T IP Flexible Reach Service Nortel BCM200/400 (Release 4.0.2.03a) H.323 Configuration Guide
© 2008 AT&T Knowledge Ventures. All rights reserved. AT&T and the AT&T logo are trademarks of AT&T Knowledge Ventures. Subsidiaries and affiliates of AT&T Inc. provide products and services under the AT&T brand. Issue 1.9 Page 13 of 36
Check under Configurations Lines Active VOIP Lines to see if Trunks have been allocated. You should have a number of VOIP gateway trunks displayed. The total number of lines indicated corresponds to the number of IP trunks licensed by Nortel for your BCM. In this case we show eight active trunks.
Figure 5: Available VOIP Gateway Trunks
AT&T IP Flexible Reach Service Nortel BCM200/400 (Release 4.0.2.03a) H.323 Configuration Guide
© 2008 AT&T Knowledge Ventures. All rights reserved. AT&T and the AT&T logo are trademarks of AT&T Knowledge Ventures. Subsidiaries and affiliates of AT&T Inc. provide products and services under the AT&T brand. Issue 1.9 Page 14 of 36
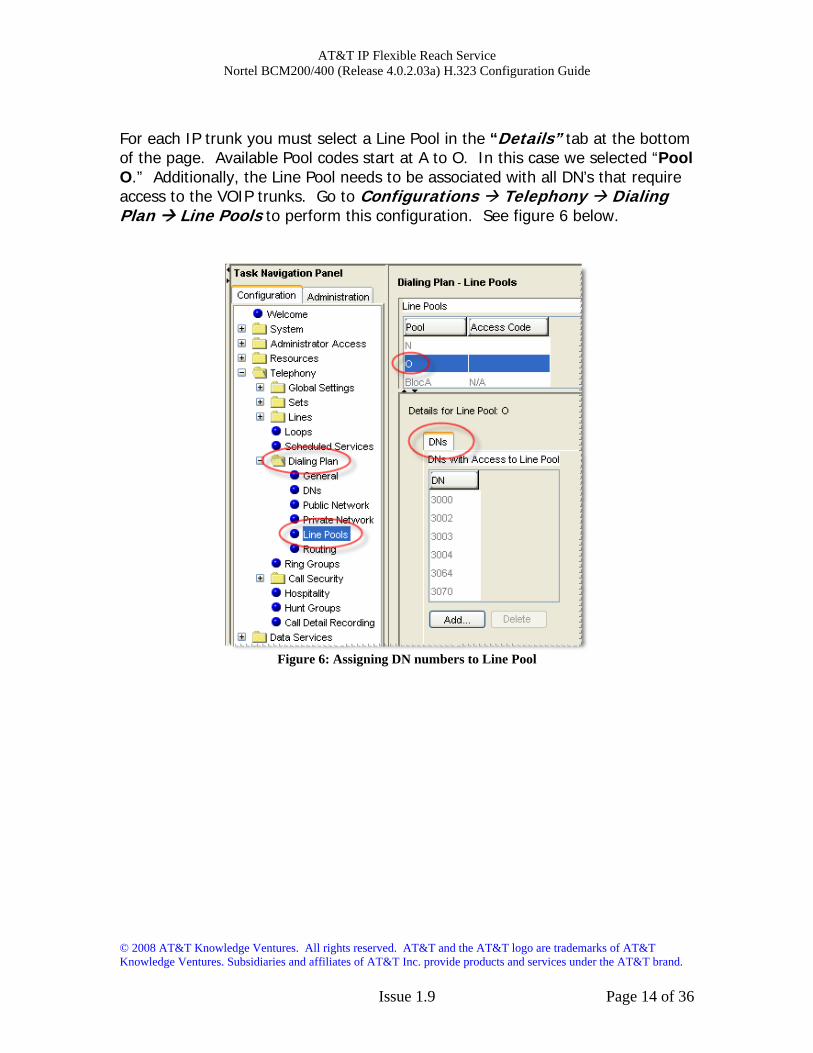
For each IP trunk you must select a Line Pool in the “Details” tab at the bottom of the page. Available Pool codes start at A to O. In this case we selected “Pool O.” Additionally, the Line Pool needs to be associated with all DN’s that require access to the VOIP trunks. Go to Configurations Telephony Dialing Plan Line Pools to perform this configuration. See figure 6 below.
Figure 6: Assigning DN numbers to Line Pool

AT&T IP Flexible Reach Service Nortel BCM200/400 (Release 4.0.2.03a) H.323 Configuration Guide
© 2008 AT&T Knowledge Ventures. All rights reserved. AT&T and the AT&T logo are trademarks of AT&T Knowledge Ventures. Subsidiaries and affiliates of AT&T Inc. provide products and services under the AT&T brand. Issue 1.9 Page 15 of 36
Under Configuration Telephony Dialing Plan General, we define the DN length to 4 digits.
Figure 7: Configuring Global DN length
Under Configuration Telephony Dialing Plan Public Network, we define the Public Received number length to “4” digits and Public network dialing plan to “National.”
Figure 8: Configuring Public Received Number Length and Dialing Plan
Under Configuration Telephony Dialing Plan Private Network, we define the Private Received number length to “4” digits.

AT&T IP Flexible Reach Service Nortel BCM200/400 (Release 4.0.2.03a) H.323 Configuration Guide
© 2008 AT&T Knowledge Ventures. All rights reserved. AT&T and the AT&T logo are trademarks of AT&T Knowledge Ventures. Subsidiaries and affiliates of AT&T Inc. provide products and services under the AT&T brand. Issue 1.9 Page 16 of 36
Figure 9: Configuring Private Received Number Length
AT&T IP Flexible Reach Service Nortel BCM200/400 (Release 4.0.2.03a) H.323 Configuration Guide
© 2008 AT&T Knowledge Ventures. All rights reserved. AT&T and the AT&T logo are trademarks of AT&T Knowledge Ventures. Subsidiaries and affiliates of AT&T Inc. provide products and services under the AT&T brand. Issue 1.9 Page 17 of 36
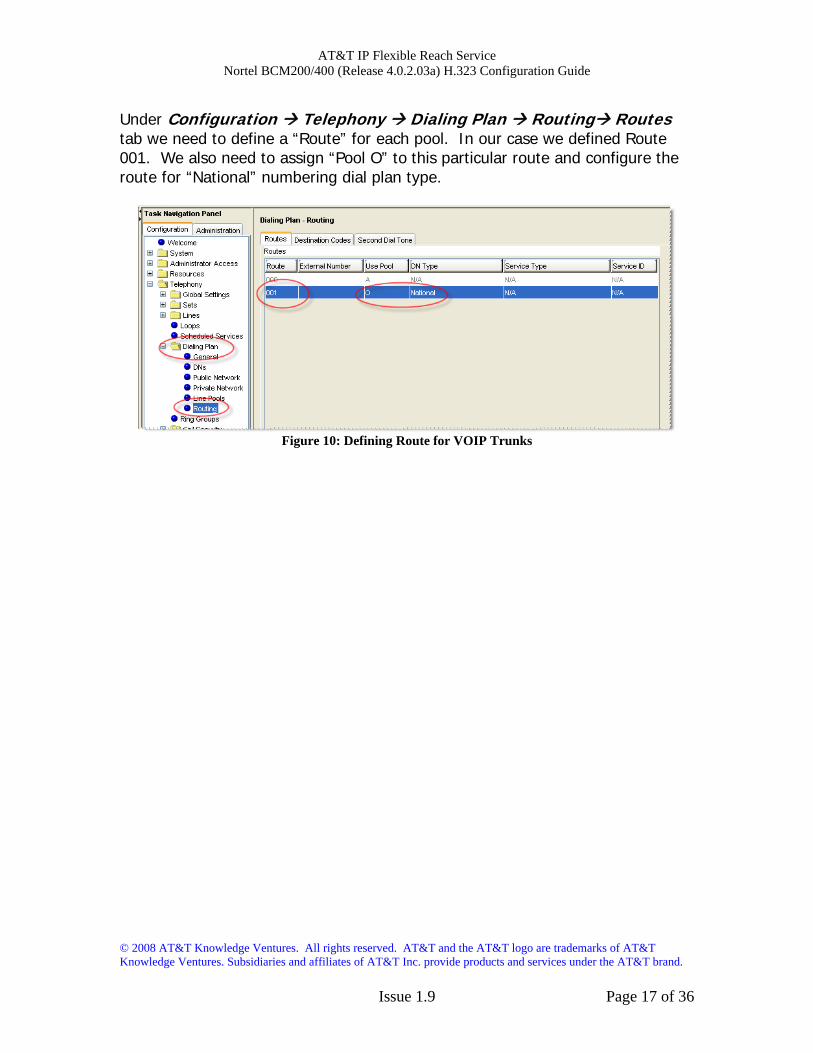
Under Configuration Telephony Dialing Plan Routing Routes tab we need to define a “Route” for each pool. In our case we defined Route 001. We also need to assign “Pool O” to this particular route and configure the route for “National” numbering dial plan type.
Figure 10: Defining Route for VOIP Trunks

AT&T IP Flexible Reach Service Nortel BCM200/400 (Release 4.0.2.03a) H.323 Configuration Guide
© 2008 AT&T Knowledge Ventures. All rights reserved. AT&T and the AT&T logo are trademarks of AT&T Knowledge Ventures. Subsidiaries and affiliates of AT&T Inc. provide products and services under the AT&T brand. Issue 1.9 Page 18 of 36
Under Configuration Telephony Dialing Plan Routing Under the “Destination Codes” tab we need to associate the Route to the desired access code. Configure this to access code “9” or to whatever code you want to access for outside (IP off-net) call that will be presented to the AT&T service for routing. In this case, when “9” is dialed we wish to push the dialed string to the IP trunk for routing. Note: When completing the Technical Questionnaire Section 6.0 Dial Plan Information and the private dial plan is selected (YES), then please refer to Appendix ‘A’: Configuring Destination Code with Wildcard.
Figure 11: Assign Destination Code to Route Numbers

AT&T IP Flexible Reach Service Nortel BCM200/400 (Release 4.0.2.03a) H.323 Configuration Guide
© 2008 AT&T Knowledge Ventures. All rights reserved. AT&T and the AT&T logo are trademarks of AT&T Knowledge Ventures. Subsidiaries and affiliates of AT&T Inc. provide products and services under the AT&T brand. Issue 1.9 Page 19 of 36
4.3 H.323 Gateway Parameters Configuration Telephony Resources IP Trunks
• On this screen we need to populate the Call Signaling as “GatekeeperRoutedNoRAS”
• Alias Name: The AT&T IP Flexible Reach service does not require a H.323 ID name. However, the BCM was tested with a H.323 ID name and Nortel recommends that the customer provides a meaningful name in this field.
• H.245 tunneling must be enabled. • For the Call Signaling Port use 1720 as a value. • Make sure the Primary Gatekeeper IP is populated with the correct
AT&T IPBE IP address. Sample IP addresses are shown next. o Primary and Backup Gatekeepers – (please contact your
Customer Care Representative for the AT&T IP border element IP addresses)
Figure 12: H.323 Gateway Parameters

AT&T IP Flexible Reach Service Nortel BCM200/400 (Release 4.0.2.03a) H.323 Configuration Guide
© 2008 AT&T Knowledge Ventures. All rights reserved. AT&T and the AT&T logo are trademarks of AT&T Knowledge Ventures. Subsidiaries and affiliates of AT&T Inc. provide products and services under the AT&T brand. Issue 1.9 Page 20 of 36
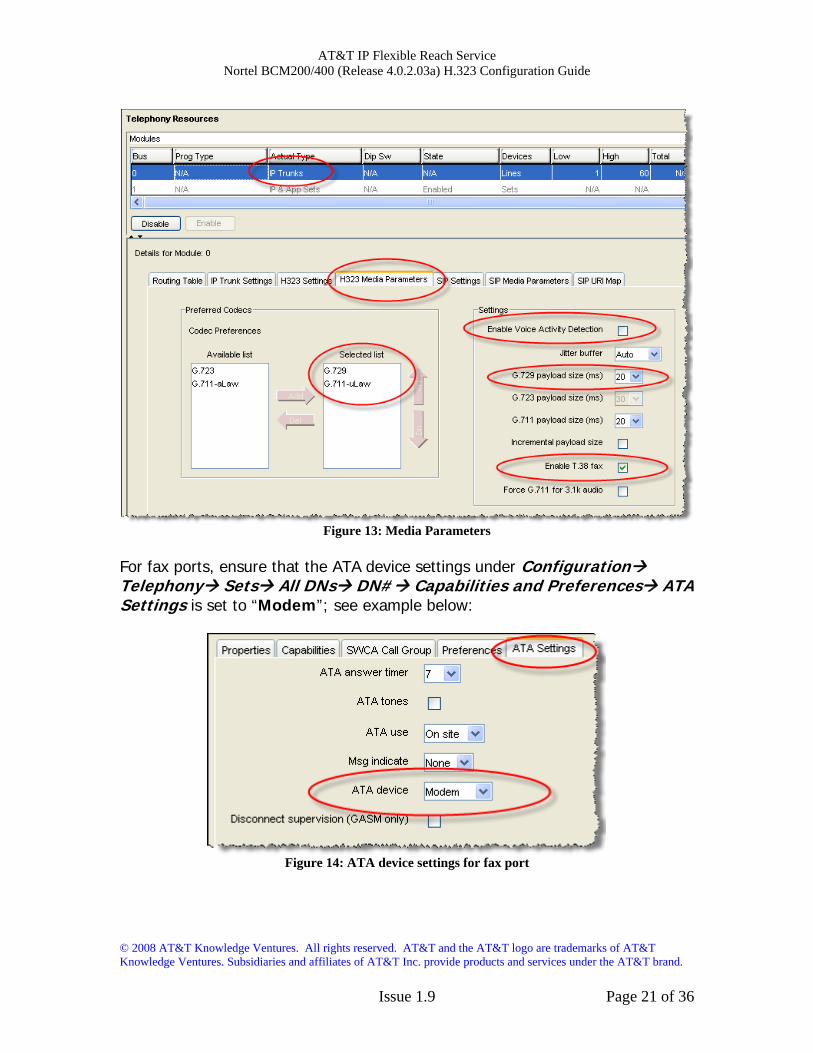
The BCM supports failover to a second IP border element. The system will need patch BCM.R400.085-IPTEL for this functionality to be supported. The BCM will send [SYN] requests to the primary border element as keep-alive. If there is no response from the primary, the BCM will send [SYN] requests to the secondary. If the secondary responds with [SYN, ACK], the BCM will direct calls to the secondary border element. In the meanwhile, the BCM will periodically send [SYN] requests to the primary. Additionally, the AT&T IP Flexible Reach service will send incoming calls to the BCM from multiple IP border elements. The BCM will accept calls from any border element without additional configuration. 4.4 Media Parameters Configuration Resources Telephony Resources IP Trunks H323 Media Parameters Within the Media Parameters tab; ensure that all values are exactly as the sample screen shot shown below:
• 1st Preferred Codec: G.729* • Jitter Buffer – Voice: Auto • T.38 Fax Support: Enabled • G.729 Payload Size: 20
* For default configurations, G.729A codec will be used for voice calls. However, in the case that G.729B needs to be configured instead of G.729A, ensure that “Enable Voice Activity Detection” is checked.
AT&T IP Flexible Reach Service Nortel BCM200/400 (Release 4.0.2.03a) H.323 Configuration Guide
© 2008 AT&T Knowledge Ventures. All rights reserved. AT&T and the AT&T logo are trademarks of AT&T Knowledge Ventures. Subsidiaries and affiliates of AT&T Inc. provide products and services under the AT&T brand. Issue 1.9 Page 21 of 36
Figure 13: Media Parameters
For fax ports, ensure that the ATA device settings under Configuration Telephony Sets All DNs DN# Capabilities and Preferences ATA Settings is set to “Modem”; see example below:
Figure 14: ATA device settings for fax port
AT&T IP Flexible Reach Service Nortel BCM200/400 (Release 4.0.2.03a) H.323 Configuration Guide
© 2008 AT&T Knowledge Ventures. All rights reserved. AT&T and the AT&T logo are trademarks of AT&T Knowledge Ventures. Subsidiaries and affiliates of AT&T Inc. provide products and services under the AT&T brand. Issue 1.9 Page 22 of 36
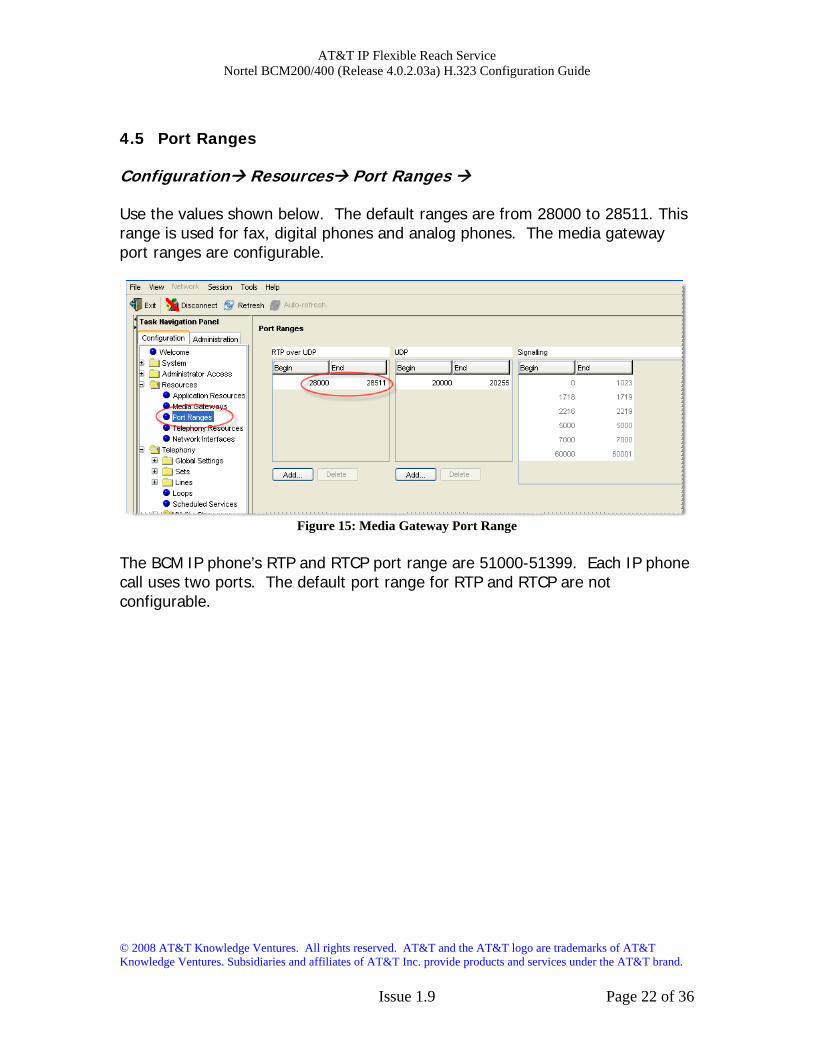
4.5 Port Ranges Configuration Resources Port Ranges Use the values shown below. The default ranges are from 28000 to 28511. This range is used for fax, digital phones and analog phones. The media gateway port ranges are configurable.
Figure 15: Media Gateway Port Range
The BCM IP phone’s RTP and RTCP port range are 51000-51399. Each IP phone call uses two ports. The default port range for RTP and RTCP are not configurable.

AT&T IP Flexible Reach Service Nortel BCM200/400 (Release 4.0.2.03a) H.323 Configuration Guide
© 2008 AT&T Knowledge Ventures. All rights reserved. AT&T and the AT&T logo are trademarks of AT&T Knowledge Ventures. Subsidiaries and affiliates of AT&T Inc. provide products and services under the AT&T brand. Issue 1.9 Page 23 of 36
4.6 Configuring Outgoing Calls from BCM to AT&T IP Flex Reach
Configuration Telephony Sets All DNs First locate the desired private DN number that you want to assign the public DID number under the “Line Access” tab. In this case we have selected “DN 3000”. At this point, select the “Properties” tab under the “Details” window. We will now associate the private DN number with the DID number. In the example below; 3000 is entered in the “Private OLI” field and 7323683476 is entered in the “Public OLI” field. This example enables “calling number translation” (outgoing) for this particular DN number.
Figure 16: Configuring DID for Outgoing Calls

AT&T IP Flexible Reach Service Nortel BCM200/400 (Release 4.0.2.03a) H.323 Configuration Guide
© 2008 AT&T Knowledge Ventures. All rights reserved. AT&T and the AT&T logo are trademarks of AT&T Knowledge Ventures. Subsidiaries and affiliates of AT&T Inc. provide products and services under the AT&T brand. Issue 1.9 Page 24 of 36
4.7 Configuring Incoming Calls from AT&T IP Flex Reach to BCM Configuration Telephony Sets All DNs We will now configure the “called number translation” (incoming) for the DN number. First locate the desired private DN number that you want to assign the public DID number under the “Line Access” tab. In this case we have selected “DN 3000”. At this point, select the “Line Assignment” tab under the “Details” window. Enter 3000 in the “Private Received” number field; then enter the last 4 digits of the DID (Public number) in the “Public Received” number field. Incoming DID calls will be routed to telephones, based on the trailing portion of the digits received by the network. For example, Incoming calls from the AT&T IP Flexible Reach network will deliver a ten digit DID number, e.g. 7323683476. The BCM will route the call using the last four digits, e.g. 3476. Additionally, this configuration will allow incoming 4-digit dialing plan calls from the IP Flexible Reach network, e.g. 3476.
Figure 17: Configuring DID for Incoming Calls With 4-digit Dial Plan

AT&T IP Flexible Reach Service Nortel BCM200/400 (Release 4.0.2.03a) H.323 Configuration Guide
© 2008 AT&T Knowledge Ventures. All rights reserved. AT&T and the AT&T logo are trademarks of AT&T Knowledge Ventures. Subsidiaries and affiliates of AT&T Inc. provide products and services under the AT&T brand. Issue 1.9 Page 25 of 36
4.8 Configuring IP Phone LCD Screen to Display DID Number Configuration Telephony Lines Target Lines Line 241 To display the DID number on the IP phone LCD screen; select Line 241 than go to the “Parameters” tab. In our example below, enter 3683476 in the “Name” field and then select “public” as the line type from the drop down menu.
Figure 18: Displaying DID Number on IP Set LCD
AT&T IP Flexible Reach Service Nortel BCM200/400 (Release 4.0.2.03a) H.323 Configuration Guide
© 2008 AT&T Knowledge Ventures. All rights reserved. AT&T and the AT&T logo are trademarks of AT&T Knowledge Ventures. Subsidiaries and affiliates of AT&T Inc. provide products and services under the AT&T brand. Issue 1.9 Page 26 of 36
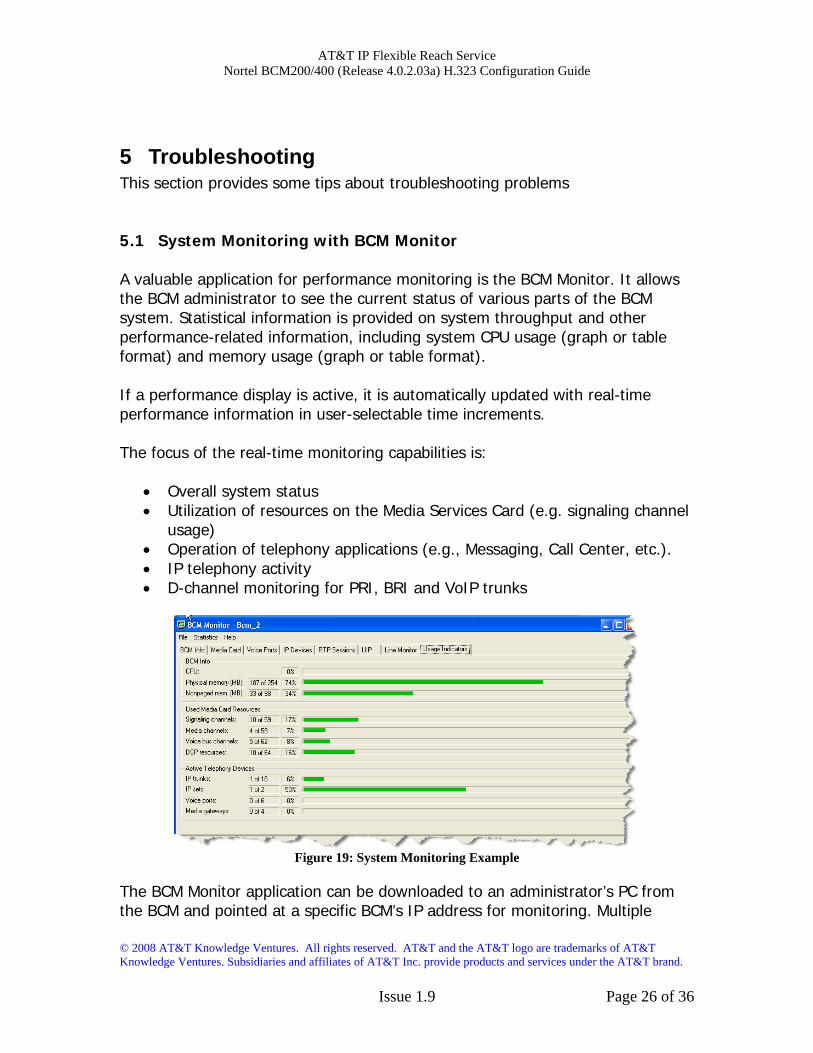
5 Troubleshooting This section provides some tips about troubleshooting problems 5.1 System Monitoring with BCM Monitor A valuable application for performance monitoring is the BCM Monitor. It allows the BCM administrator to see the current status of various parts of the BCM system. Statistical information is provided on system throughput and other performance-related information, including system CPU usage (graph or table format) and memory usage (graph or table format). If a performance display is active, it is automatically updated with real-time performance information in user-selectable time increments. The focus of the real-time monitoring capabilities is:
• Overall system status • Utilization of resources on the Media Services Card (e.g. signaling channel
usage) • Operation of telephony applications (e.g., Messaging, Call Center, etc.). • IP telephony activity • D-channel monitoring for PRI, BRI and VoIP trunks
Figure 19: System Monitoring Example
The BCM Monitor application can be downloaded to an administrator’s PC from the BCM and pointed at a specific BCM’s IP address for monitoring. Multiple
AT&T IP Flexible Reach Service Nortel BCM200/400 (Release 4.0.2.03a) H.323 Configuration Guide
© 2008 AT&T Knowledge Ventures. All rights reserved. AT&T and the AT&T logo are trademarks of AT&T Knowledge Ventures. Subsidiaries and affiliates of AT&T Inc. provide products and services under the AT&T brand. Issue 1.9 Page 27 of 36
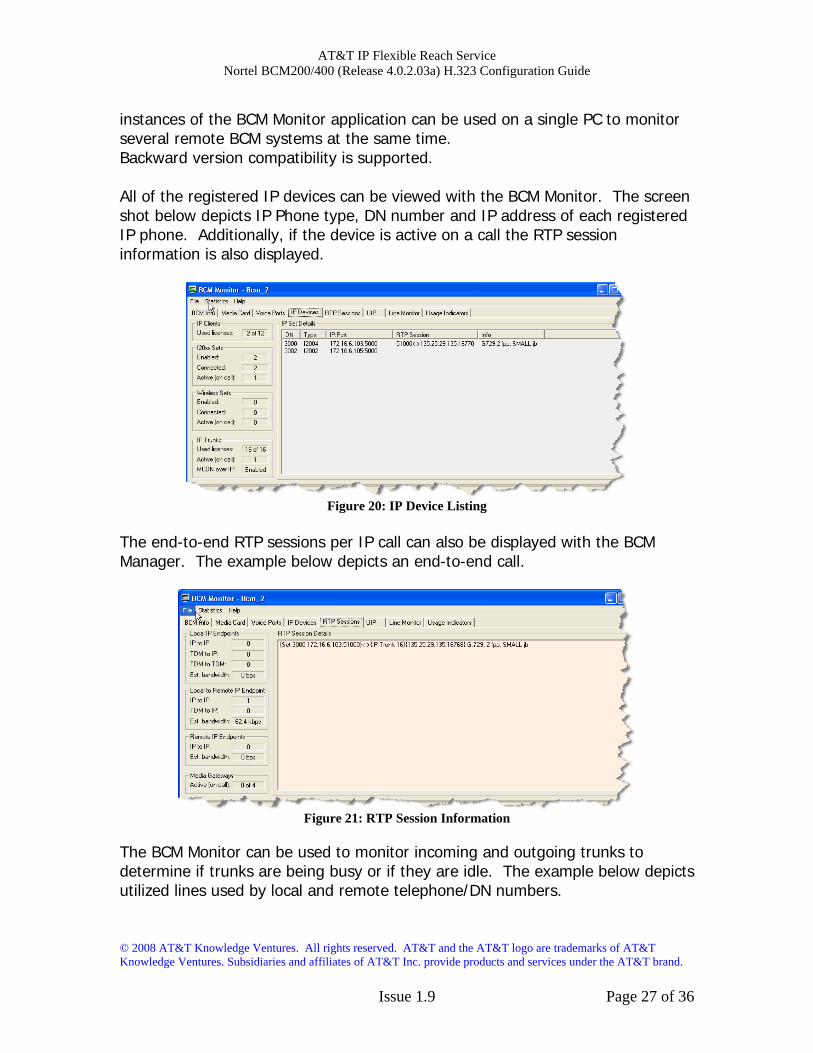
instances of the BCM Monitor application can be used on a single PC to monitor several remote BCM systems at the same time. Backward version compatibility is supported. All of the registered IP devices can be viewed with the BCM Monitor. The screen shot below depicts IP Phone type, DN number and IP address of each registered IP phone. Additionally, if the device is active on a call the RTP session information is also displayed.
Figure 20: IP Device Listing
The end-to-end RTP sessions per IP call can also be displayed with the BCM Manager. The example below depicts an end-to-end call.
Figure 21: RTP Session Information
The BCM Monitor can be used to monitor incoming and outgoing trunks to determine if trunks are being busy or if they are idle. The example below depicts utilized lines used by local and remote telephone/DN numbers.

AT&T IP Flexible Reach Service Nortel BCM200/400 (Release 4.0.2.03a) H.323 Configuration Guide
© 2008 AT&T Knowledge Ventures. All rights reserved. AT&T and the AT&T logo are trademarks of AT&T Knowledge Ventures. Subsidiaries and affiliates of AT&T Inc. provide products and services under the AT&T brand. Issue 1.9 Page 28 of 36
Figure 22: Line Monitor Information
The BCM Monitor can also be used to monitor all types of system usages. The following are some parameters that can be monitored:
• CPU utilization • Physical memory • Media card DSP utilization • IP sets and IP Trunks • Voice ports and media gateway usage
Figure 23: System Resources

AT&T IP Flexible Reach Service Nortel BCM200/400 (Release 4.0.2.03a) H.323 Configuration Guide
© 2008 AT&T Knowledge Ventures. All rights reserved. AT&T and the AT&T logo are trademarks of AT&T Knowledge Ventures. Subsidiaries and affiliates of AT&T Inc. provide products and services under the AT&T brand. Issue 1.9 Page 29 of 36
5.2 Real-time BCM System Status LED Displays Administration System LED Status The BCM200/400 front panel LED displays can be viewed remotely to determine certain critical components. The following are some LED indications that can be viewed remotely with the NCM Unified Manager:
• Power • Hard drive (HDD) • Multi-service Card (MSC) • Modem • Ethernet ports (NIC) • System temperature • Fan indications
Figure 24: Front Panel LED Display
Using the Element Manager “System Status” tab, you can monitor overall system performance and other performance-related information. You monitor system status using the following tools:
• LED Status • QoS Monitor • UPS Status • NTP Metrics • Interface Metrics • Disk Mirroring • QoS Metrics

AT&T IP Flexible Reach Service Nortel BCM200/400 (Release 4.0.2.03a) H.323 Configuration Guide
© 2008 AT&T Knowledge Ventures. All rights reserved. AT&T and the AT&T logo are trademarks of AT&T Knowledge Ventures. Subsidiaries and affiliates of AT&T Inc. provide products and services under the AT&T brand. Issue 1.9 Page 30 of 36
5.3 Real-time BCM Fault/Alarms Management You can view and manage real-time alarms generated by the BCM system. Alarms arise from components that are running on the system; these alarms indicate faults or informational conditions that may require resolution from the system administrator. Examples of alarm conditions include:
• T1 circuit on the system is down • Service running on the BCM has been stopped by an administrator
Alarm information can be delivered to you by any of the following means:
• The Alarms Panel in the BCM Element Manager • The Alarm Banner in the BCM Element Manager • Core telephony alarms show on the alarm set • Simple Network Management Protocol (SNMP) traps for remote
management of faults • LEDs on the BCM main unit
Below is an example of the BCM Alarms Panel in the BCM Element Manager:
Figure 25: Real-time BCM200/400 Alarm Display
You can manage alarms and alarm information by:
• Configuring alarm settings, for example filtering alarms so that only the desired subset of alarms are displayed in the BCM Element Manager Alarms Panel or sent as SNMP traps
• Administering alarms, for example acknowledging selected alarms and clearing the alarm log
AT&T IP Flexible Reach Service Nortel BCM200/400 (Release 4.0.2.03a) H.323 Configuration Guide
© 2008 AT&T Knowledge Ventures. All rights reserved. AT&T and the AT&T logo are trademarks of AT&T Knowledge Ventures. Subsidiaries and affiliates of AT&T Inc. provide products and services under the AT&T brand. Issue 1.9 Page 31 of 36
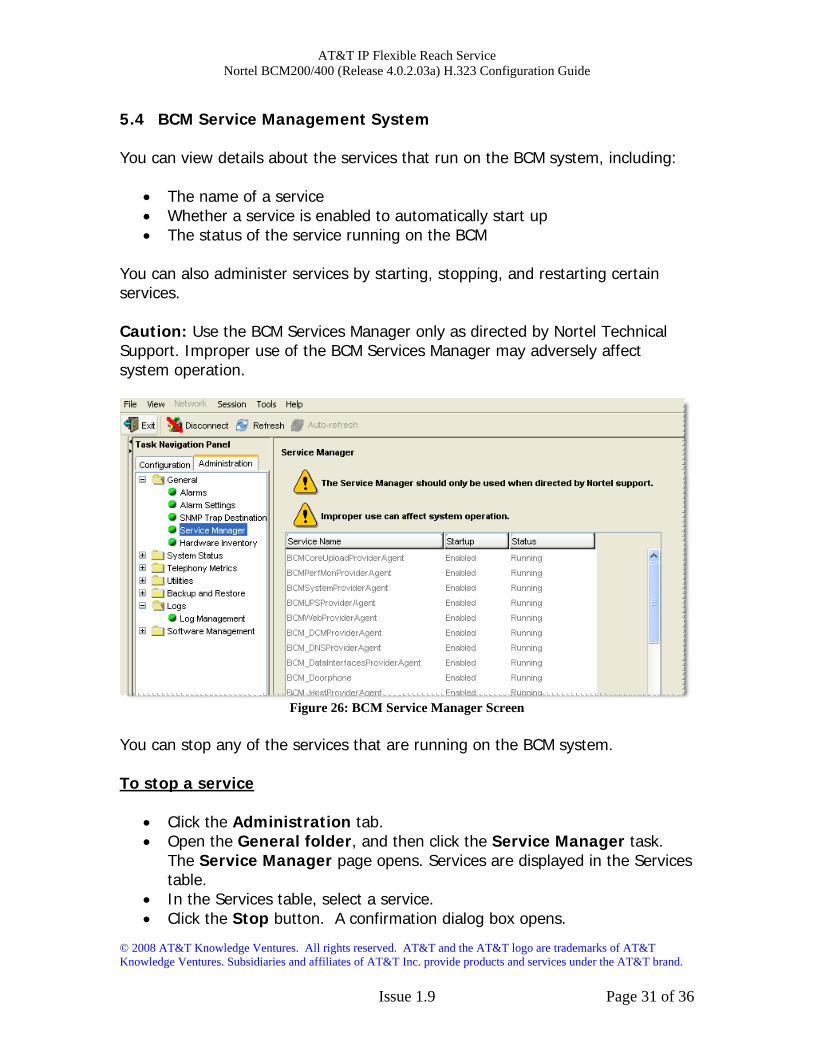
5.4 BCM Service Management System You can view details about the services that run on the BCM system, including:
• The name of a service • Whether a service is enabled to automatically start up • The status of the service running on the BCM
You can also administer services by starting, stopping, and restarting certain services. Caution: Use the BCM Services Manager only as directed by Nortel Technical Support. Improper use of the BCM Services Manager may adversely affect system operation.
Figure 26: BCM Service Manager Screen
You can stop any of the services that are running on the BCM system. To stop a service
• Click the Administration tab. • Open the General folder, and then click the Service Manager task.
The Service Manager page opens. Services are displayed in the Services table.
• In the Services table, select a service. • Click the Stop button. A confirmation dialog box opens.

AT&T IP Flexible Reach Service Nortel BCM200/400 (Release 4.0.2.03a) H.323 Configuration Guide
© 2008 AT&T Knowledge Ventures. All rights reserved. AT&T and the AT&T logo are trademarks of AT&T Knowledge Ventures. Subsidiaries and affiliates of AT&T Inc. provide products and services under the AT&T brand. Issue 1.9 Page 32 of 36
• Click Yes. In the Services table, Stopped is displayed in the Status column for the stopped service.
To restart a service
• Click the Administration tab. • Open the General folder, and then click the Service Manager task. The
Service Manager page opens. Services are displayed in the Services table.
• In the Services table, select a stopped service. • Click the Restart button. A confirmation dialog box opens. • Click Yes. In the Services table, Running is displayed in the Status
column for the restarted service.
AT&T IP Flexible Reach Service Nortel BCM200/400 (Release 4.0.2.03a) H.323 Configuration Guide
© 2008 AT&T Knowledge Ventures. All rights reserved. AT&T and the AT&T logo are trademarks of AT&T Knowledge Ventures. Subsidiaries and affiliates of AT&T Inc. provide products and services under the AT&T brand. Issue 1.9 Page 33 of 36
5.5 BCM Log Management Another extremely useful tool is the “Log Management.” This allows you to quickly and easily collect all relevant logs files and other information to help the various support teams debug any problems you may have with your BCM200/400. The entire log files required to diagnose a problem is consolidated into a single file. A log file is a collection of individual log events generated by the BCM. An administrator can use log files to monitor and analyze system behavior, user sessions, and events. You manage log files by transferring selected BCM log archives from the BCM to a specified location, such as your personal computer. You can then view individual log events using the BCM Element Manager Log Browser or your usual text editor. Note: Depending on the privileges assigned to you, you may or may not see all the log files or processes described in this section. In addition to the log files generated by the BCM, the Element Manager itself generates a log file. This log is found under the Help selection of the BCM Element Manager Toolbar. This log contains diagnostic information. The BCM manages log archives and maintains generations of information depending upon size or other criteria. Generations of log files have a numbered extension such as 3.gz. A generation of the “alarms.systemlog” file is created each time the BCM is rebooted or when the log file reaches the 1 MB limit. Transferring and Extracting Log Files You use the BCM Element Manager to transfer log files from the BCM to an external location. You must transfer the log files to an external device before you can view them. If you are using the BCM Element Manager Log Browser to view the logs, you will also have to extract the log files from the log archive that is transferred from the BCM. The log archive contains a collection of log files. When you transfer the log archives to another device, you can specify:
• The location to which you want to transfer log files, such as your personal computer or a network folder

AT&T IP Flexible Reach Service Nortel BCM200/400 (Release 4.0.2.03a) H.323 Configuration Guide
© 2008 AT&T Knowledge Ventures. All rights reserved. AT&T and the AT&T logo are trademarks of AT&T Knowledge Ventures. Subsidiaries and affiliates of AT&T Inc. provide products and services under the AT&T brand. Issue 1.9 Page 34 of 36
• The category of logs you want to transfer, such as Sensitive Information logs
• A schedule for a log file transfer You can also transfer log files using the BCM Web page if you cannot access the BCM Element Manager. After you transfer the log archives, several options are available to you for extracting the log file information and for viewing the log files. If you are using the BCM Element Manager (recommended), the Log Browser prompts you to extract the actual log files from the .tar file. If you prefer, you can use the WinZip application to expand the .tar file into its included log files. As an alternative to using the BCM Element Manager Log Browser, you can use an application such as WordPad to view the log files. Using the BCM Element Manager Log Browser to view extracted log files gives you the ability to view information in a way that suits you; for example, you can filter and sort information according to priority, time, message, and so on.
Figure 27: Log Management Screen
When you first suspect a problem with your BCM, it is important that you go into the “Log Management” screen and download the log file to your PC. Even if you end up resolving the issue, it is good to know that this information has been captured.

AT&T IP Flexible Reach Service Nortel BCM200/400 (Release 4.0.2.03a) H.323 Configuration Guide
© 2008 AT&T Knowledge Ventures. All rights reserved. AT&T and the AT&T logo are trademarks of AT&T Knowledge Ventures. Subsidiaries and affiliates of AT&T Inc. provide products and services under the AT&T brand. Issue 1.9 Page 35 of 36
This Customer Configuration Guide ("CCG") is offered as a convenience to AT&T's customers. The specifications and information regarding the product in this CCG are subject to change without notice. All statements, information, and recommendations in this CCG are believed to be accurate but are presented without warranty of any kind, express or implied, and are provided “AS IS”. Users must take full responsibility for the application of the specifications and information in this CCG. In no event shall AT&T or its suppliers be liable for any indirect, special, consequential, or incidental damages, including, without limitation, lost profits or loss or damage arising out of the use or inability to use this CCG, even if AT&T or its suppliers have been advised of the possibility of such damage.

AT&T IP Flexible Reach Service Nortel BCM200/400 (Release 4.0.2.03a) H.323 Configuration Guide
© 2008 AT&T Knowledge Ventures. All rights reserved. AT&T and the AT&T logo are trademarks of AT&T Knowledge Ventures. Subsidiaries and affiliates of AT&T Inc. provide products and services under the AT&T brand. Issue 1.9 Page 36 of 36
APPENDIX A: Configuring Destination Code with Wildcard In an inbound call scenario, when the leading digit sent to the BCM is the same as the digit used in the destination code. Without configuring for a wildcard; the BCM will interpret the call as a tandem call, and will fail to terminate the call on the BCM. To remedy this, it is recommended to configure destination code with wildcard. If the IP Flexible Reach sends a site prefix that is the same as the digit being used for the destination code; please use the following configuration example. In this example, the number sent to the BCM is the following: “961170”. To configure the BCM for this call, use the following wildcard configuration. Under Configuration Telephony Dialing Plan Routing, under the Destination Codes tab, add the destination code “9A” to use Normal Route “001.” Configure the absorbed length to 1 so that the BCM will absorb the ‘9’ only in an outbound call scenario. Uncheck the digit following the ‘9’ in the incoming digit stream to the BCM (in this example, the ‘6’ in “961170”).
Figure 28: Configuring Destination Code with Wildcard