atlas of colonoscopy - readingsample€¦ · atlas of colonoscopy ... objects) as well as to...
TRANSCRIPT

Atlas of Colonoscopy
Techniques - Diagnosis - Interventional Procedures
Bearbeitet vonMaximilian Bittinger, Helmut Messmann
1. Auflage 2005. Buch. 248 S. HardcoverISBN 978 3 13 140571 5
Format (B x L): 23 x 31 cm
Weitere Fachgebiete > Medizin > Klinische und Innere Medizin > Gastroenterologie,Proktologie
Zu Inhaltsverzeichnis
schnell und portofrei erhältlich bei
Die Online-Fachbuchhandlung beck-shop.de ist spezialisiert auf Fachbücher, insbesondere Recht, Steuern und Wirtschaft.Im Sortiment finden Sie alle Medien (Bücher, Zeitschriften, CDs, eBooks, etc.) aller Verlage. Ergänzt wird das Programmdurch Services wie Neuerscheinungsdienst oder Zusammenstellungen von Büchern zu Sonderpreisen. Der Shop führt mehr
als 8 Millionen Produkte.

II
�25
Messmann, Atlas of Colonoscopy (ISBN 3131405716) © 2005 Georg Thieme Verlag
a b
5
5 Inserting the Endoscope and Advancing Itin the ColonA. Probst
Inspection and Palpation
Inspection. The examination begins with an inspection of theperianal region. The patient should be in the left lateral posi-tion with his knees bent and pulled up. A simple inspectioncan detect skin changes, scars, anal skin tags, hemorrhoids,anal fissures, anal venous thromboses, fistula, injuries, or pro-lapse (anal or rectal prolapse). Any findings must be notedlater in the examination report. Figures 5.1, 5.2 show examplesof pathologies detected during inspection. The diagnostic re-port should include exact localization: for example, distancefrom the anus or a description of location as if the patientwere in the dorsal recumbent position (at the 12-o’clock posi-tion ventral to the anus).
Palpation. Following inspection, a digital examination of theanal canal and distal rectum must be completed before the ac-tual endoscopic examination begins. Attention should be paid topalpable endoluminal abnormalities (polyps, tumors, foreignobjects) as well as to extraluminal appearances. Male patientscan also undergo a prostate check. An assessment of sphinctertonus as well as any noticeable discomfort during the examina-tion (inflammation, fissures) should be included in the palpa-tion findings. Patients who have been prepared for routine en-doscopy will have an empty rectal ampulla. Emergency patientsare another matter, however. Especially in the event of acutegastrointestinal bleeding, in addition to endoluminal inspection,characterization of stool contents can provide important addi-tional information (melena, fresh blood, coagulum, stool), help-ing to infer the source and intensity of bleeding and making therest of the diagnostic procedure easier. Figure 5.3 provides someexamples of endoscopic pathological findings that can be de-tected during digital palpation.
Table 5.1 provides a summary of possible findings from in-spection and palpation prior to endoscopy.
Passing the Anal Sphincter
After completing inspection and palpation and, if necessary, ad-ministering an analgesic, the actual endoscopic examination canbegin. A local anaesthetic lubricating jelly, such as a lubricantcontaining Lidocain, should be applied liberally. The endoscopetip is then inserted in the rectum and guided digitally withoutvisualization. The examiner should explain to the patient thesteps being taken and inform the patient that he may experiencethe urge to evacuate his bowels. The endoscope tip is inserted inthe direction indicated by preceding palpation; as a rough guide,the direction of the anal canal runs in a line between the anusand the navel. After “blindly” inserting the endoscope 4–5 cm,
Table 5.1 Inspection and palpation prior to endoscopy
Inspection Palpation
� Skin changes (eczema,ulcers, condyloma)?
� Signs of swelling (periprocticabscess)?
� Injuries?� Scars (surgical operations)?� Anal skin tags?� Hemorrhoids?� Anal venous thrombosis?� Anal fissure?� Fistula openings?� Anal prolapse/rectal pro-
lapse?
� Intestinal contents (stool,blood, coagulum)?
� Sphincter tonus?� Pain (inflammation, anal
fissures)?� Endoluminal obstruction
(polyps, tumors, hemor-rhoids)?
� Impressions from anextraluminal aspect?
� Prostate?� Stenosis (passage of
finger or endoscope)?� Anastomosis?
Figure 5.1 Examining the perianal regionin the left lateral position: patient withCrohn disease; reddened fistula opening atabout the 6-o’clock position.
Fig. 5.2 Inspecting the perianal region.a Total rectal prolapse.b Pronounced circular anal skin tags.

II
No
rmal
Exam
inat
ion
Pro
ced
ure
26�
Messmann, Atlas of Colonoscopy (ISBN 3131405716) © 2005 Georg Thieme Verlag
a
c
b
d
air is insufflated and the endoscope tip is pulled back until thelumen of the distal rectum can be seen (Fig. 5.4). The rectallumen is then centered in the middle of the monitor screen(Fig. 5.5) and the endoscope is advanced under visualization ofthe lumen to the rectosigmoid junction.
At this point in the examination there has not yet been suffi-cient inspection of the distal rectum or anal canal, which will bemore closely examined on withdrawal of the endoscope later(possibly also using retroflexion of the endoscope in the rectum;see below).
Endoscope Insertion in Postoperative Patients(Colostomy/Ileostomy)
Examination options. If the patient has a colostomy/ileostomyas a result of an operation with lost intestinal continuity, endos-copy of the colon via the anus and ileum is often impossible andmust be performed through the stoma (Fig. 5.6). Before the ex-amination, the examiner should know the extent of the opera-tion(s), the type of stoma, and its location. In the case of an endileostomy, only the anastomosed small intestine can be ex-amined endoscopically; the remaining colon, if there is any, isnot reachable via the stoma. If the patient has a colostomy, the
Fig. 5.3 Endoluminally palpable obstruc-tions.a Soft, stalklike obstructions with smooth
surface in the anal canal (hypertrophiedanal papilla on the dentate line, endo-scope inverted in rectum).
b Sessile, submucosal obstruction with in-dentation in the center, 6 cm above theanus (histology: lymphoma).
c Large, endoluminal obstruction 5 cmabove the anus (luminal obstruction dueto polyp; histological adenoma withsevere intraepithelial neoplasia).
d Hardened semicircular obstruction indistal rectum (broadbased growing carci-noma with spontaneous bleeding).
Fig. 5.4 After “blindly” advancing the en-doscope in the rectum, the instrument iswithdrawn. Direct view of the rectal wall.After withdrawal and air insufflation thelumen can be seen (lower right).
Fig. 5.5 Centering the rectal lumenbefore continuing colonoscopy.
Fig. 5.6 Colostomy (appositional streaks ofblood due to acute lower gastrointestinalbleeding).
Inserting the Endoscope and Advancing It in the Colon

II
�27
Messmann, Atlas of Colonoscopy (ISBN 3131405716) © 2005 Georg Thieme Verlag
b
c
a
5
ba
proximal colon and terminal ileum can normally be examinedwithout a problem. If the patient has a double-barreledileostomy or a colostomy, the intestinal segments proximal anddistal to the stoma can be examined (Fig. 5.7).
Inspection and palpation. Before the actual endoscopy, athorough inspection of the area surrounding the stoma and digi-tal palpation of the anastomosed intestinal segment should beperformed. Special attention should be paid during inspectionto signs of prolapse and mucosal abnormalities involving thevisible intestinal mucosa as well as irregularities on the sur-rounding skin. Along with detecting endoluminal irregularities,the purpose of palpation is to ascertain the width of the lumenand the direction of the anastomosed intestinal segment. Know-ing the width of the stoma and insertion direction is essentialfor inserting the endoscope and choice of instrument used is de-termined in part by the palpated diameter of the lumen.
Inserting and advancing the endoscope. Insertion of the instru-ment is eased by the examiner’s finger and the use of air insuf-flation; it is inserted until the intestinal lumen comes into view.The lumen is then centered on the monitor screen before furtheradvancing the endoscope. The rest of the examination ulti-mately depends on remaining intestine. Colonoscopy throughthe stoma can be made more difficult by loss of original in-testine, increased postoperative mobility of the remaining in-testine, or angulation as a result of postoperative adhesions.
Advancing the Endoscope in theSigmoid Colon (Sigmoidoscopy)
Normal procedure. After reaching the rectosigmoid junctionabout ca. 16 cm proximal to the anocutaneous line, the endos-copy of the sigmoid colon begins. The sigmoid colon is situatedintraperitoneally and is highly variable in length. The junctionbetween rectum and sigmoid colon often appears as an acutebend in the lumen. The sigmoid colon can also be recognized byits prominent, circular folds. Passing the sigmoid colon with thepatient lying in the left lateral position is unproblematic insimple cases where the sigmoid colon shortens itself, enablingeasier passage through curves. Passing the sigmoid-descendingjunction is often more difficult in this position, especially formore slender patients, as the sigmoid colon is forced into the leftabdomen, narrowing the angle of the junction with the de-scending colon. Changing position to the supine position—or,especially for slender patients, to the right lateral position—al-lows the sigmoid colon to fall more into the middle and right
lower abdomen, thereby straightening the angle and makingpassage of the endoscope tip into the descending colon signifi-cantly easier.
Constant visualization of the lumen is desirable for passingthe sigmoid colon. The instrument should be kept as straight aspossible, without significant bowing or looping. However, in-dividual differences in length and course of the sigmoid coloncan make viewing the lumen more difficult and in somepatients, looping cannot be avoided.
“Blind” advancement of the endoscope and changing patientposition. If the view of the colonic lumen is obstructed or pre-vented by sharp angling, the examiner can attempt to ascertainluminal direction and briefly point the instrument tip withoutvisualization in the presumed direction of the lumen, usinggentle pressure to advance the endoscope in this direction. Thepresumed direction of the lumen is often indicated by shadow-ing (Fig. 5.8). Such maneuvers, which are performed only in ex-ceptional cases, require experience, a light touch, and extremeconcentration. The procedure must be stopped if macroscopicchanges to the nearby mucosal surface (blanching, bloodless-
Fig. 5.7 Schematic illustration of various stomas. a: end colostomy,b: double-barreled colostomy, c: end ileostomy.
Fig. 5.8 a, b Acute angling of the lumen(example shown: sigmoid-descending junc-tion). The direction of the lumen cannot beseen either at about the 7-o’clock position(a) or at the 12-o’clock position (b), but itcan be presumed, in part due to shadowing(arrows). In exceptional situations, the en-doscope tip can be very carefully advancedin the presumed direction without visualiza-tion.
Advancing the Endoscope in the Sigmoid Colon (Sigmoidoscopy)
II
No
rmal
Exam
inat
ion
Pro
ced
ure
28�
Messmann, Atlas of Colonoscopy (ISBN 3131405716) © 2005 Georg Thieme Verlag
a
b
ness of mucosal vessels) are observed, or if there is increasedresistance to advancement of the instrument and discomfort tothe patient as these are signs of increased danger of perfora-tion. Sharp kinks of the lumen can often be minimized or eveneliminated by changing the position of the patient; the in-traperitoneal location of the mobile sigmoid colon makes thiseasier. In addition to the supine position, the right lateral posi-tion can also be helpful in some situations. Changing thepatient’s position does not increase risk and thus must alwaysbe attempted first before resorting to “blind” advancement ofthe instrument.
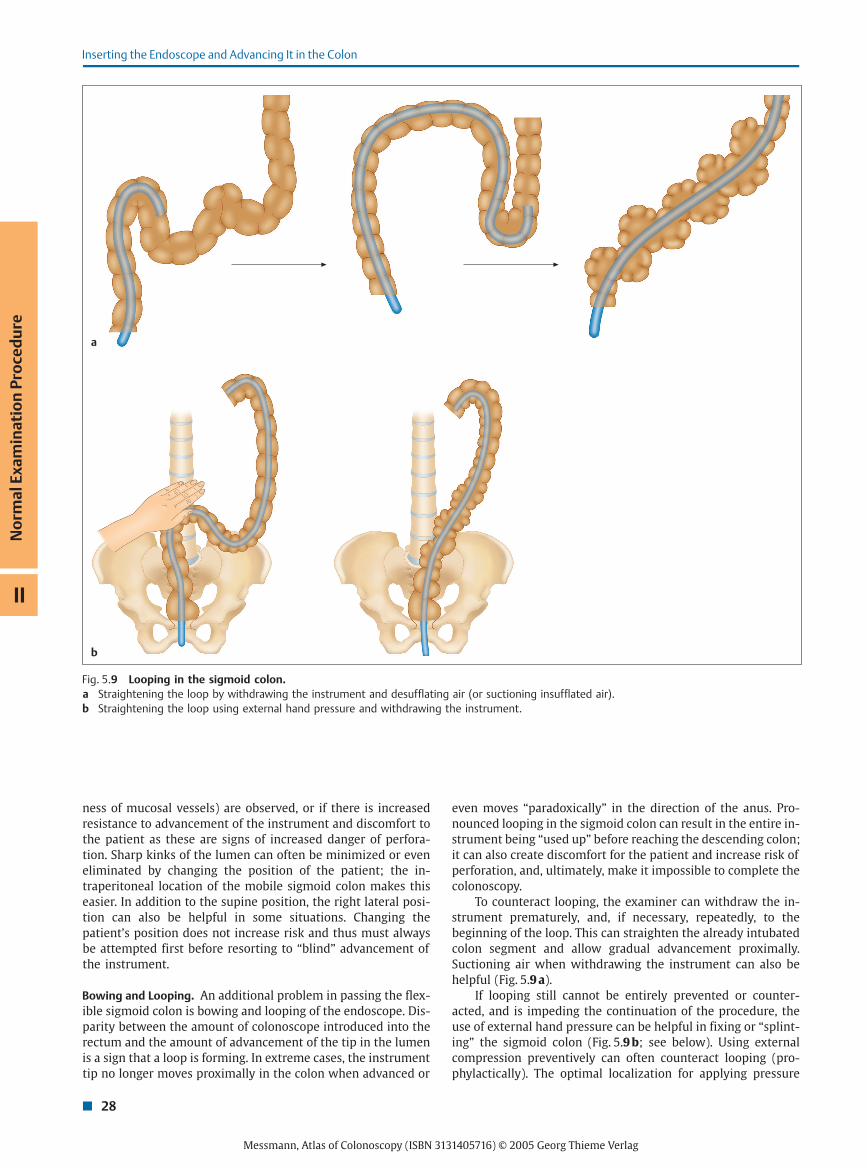
Bowing and Looping. An additional problem in passing the flex-ible sigmoid colon is bowing and looping of the endoscope. Dis-parity between the amount of colonoscope introduced into therectum and the amount of advancement of the tip in the lumenis a sign that a loop is forming. In extreme cases, the instrumenttip no longer moves proximally in the colon when advanced or
even moves “paradoxically” in the direction of the anus. Pro-nounced looping in the sigmoid colon can result in the entire in-strument being “used up” before reaching the descending colon;it can also create discomfort for the patient and increase risk ofperforation, and, ultimately, make it impossible to complete thecolonoscopy.
To counteract looping, the examiner can withdraw the in-strument prematurely, and, if necessary, repeatedly, to thebeginning of the loop. This can straighten the already intubatedcolon segment and allow gradual advancement proximally.Suctioning air when withdrawing the instrument can also behelpful (Fig. 5.9 a).
If looping still cannot be entirely prevented or counter-acted, and is impeding the continuation of the procedure, theuse of external hand pressure can be helpful in fixing or “splint-ing” the sigmoid colon (Fig. 5.9 b; see below). Using externalcompression preventively can often counteract looping (pro-phylactically). The optimal localization for applying pressure
Fig. 5.9 Looping in the sigmoid colon.a Straightening the loop by withdrawing the instrument and desufflating air (or suctioning insufflated air).b Straightening the loop using external hand pressure and withdrawing the instrument.
Inserting the Endoscope and Advancing It in the Colon

II
�29
Messmann, Atlas of Colonoscopy (ISBN 3131405716) © 2005 Georg Thieme Verlag
a b c d
5
can be found by palpation. In rare cases of pronounced or atypi-cal looping, brief use of radiography may be necessary fororientation.
A further option for straightening the lumen and making iteasier to pass the proximal sigmoid colon and the sigmoid-de-scending junction is the so-called alpha-loop maneuver. Rotat-ing the endoscope 180° counterclockwise in the sigmoid coloncreates a loop (similar in shape to the Greek letter alpha;Fig. 5.10 a) which makes further advancement easier. The loopcan be straightened after reaching the descending colon or thesplenic flexure (by rotating the colonoscope clockwise). Theprocedure is detailed schematically in Fig. 5.10 b–d.
Advancing Further to the Hepatic Flexure
Sigmoid-descending junction. After passing the sigmoid colon,the junction with the descending colon is reached. Sharp an-gling of the lumen, due to the “secondary retroperitoneal” posi-tion of the descending colon, can make it difficult to pass the sig-moid-descending junction. Unlike the flexible sigmoid colon,which is located intraperitoneally, the descending colon is fixedon the posterior abdominal wall. Looping or excess air insuffla-tion in the sigmoid colon during preceding advancement of theendoscope can increase angling. Thus, after passing the sig-moid-descending junction, it is recommended that the sigmoidloops should be straightened by carefully withdrawing the in-strument and suctioning excess air. This reduces the pull on themesentery, which can cause discomfort to the patient, and alsomakes further advancement of the instrument easier.
In the case of a long and highly flexible sigmoid colon, ap-plying external hand pressure or using the alpha maneuver canmake entering the descending colon easier (Fig. 5.10). The actualbeginning of the descending colon (corresponding to its distalendpoint) is usually evident when a longer intestinal sectionwith a somewhat oval-shaped lumen and a relatively straightpath becomes visible (Fig. 5.11). A visible fold in the lumen onthe other side of this segment often indicates the splenic flexure.
Another—albeit less reliable—sign that the splenic flexure hasbeen reached is the “bluish” coloration of the spleen visiblethrough the colon wall (Fig. 5.12). After successfully passing thesigmoid-descending junction, advancing the endoscope in thedescending colon is generally unproblematic. Nonetheless,splinting the sigmoid colon can still be helpful.
Splenic flexure. At the proximal end of the descending colon thesplenic flexure is reached, marking the transition to the trans-verse colon. The transverse colon is located intrapertioneally,running across the upper abdomen to the hepatic flexure. Thesplenic flexure is highly variable with regard to position anddegree of angling. A high flexure, which is located beneath thediaphragm, results in a larger angle (� 90°) between the de-scending colon and the transverse colon compared with a morecaudal location (� 90°). In extreme cases, the flexure can bemade of an ascending and a descending limb (Payr disease),
Fig. 5.10 Alpha loop technique.a Alpha loop.b–d Straightening the loop by pulling the endoscope back and rotating the shaft clockwise.
Fig. 5.11 View into the descending colon. Relatively straightpath, oval lumen, and evenly spaced haustrations.
Advancing Further to the Hepatic Flexure

II
No
rmal
Exam
inat
ion
Pro
ced
ure
30�
Messmann, Atlas of Colonoscopy (ISBN 3131405716) © 2005 Georg Thieme Verlag
a b
a b
creating an angle of 180° (Fig. 5.13). Passage can be especiallydifficult if the splenic flexure is displaced vertically. In suchcases, “pushing up” the endoscope in the more distal colon(especially the sigmoid colon) followed by withdrawing the in-strument can advance the endoscope in the left side of thetransverse colon. This is basically the same procedure as thealpha maneuver described above, though instead of forming acomplete loop in the sigmoid colon, merely the beginning of abend or an incomplete loop (combined with external pressure ifnecessary) is sufficient (cf. Fig. 5.9 b, Fig. 5.10).
Transverse colon. Recognizing that the transverse colon hasbeen reached is usually simple, given its typical triangular-shaped lumen and strong, evenly spaced haustrations (Fig. 5.14).Compared with the relatively uniform, straight path of the de-scending colon, the position of the transverse colon is more vari-able due to its intraperitoneal position and fixation on a meso-
colon, which may vary in length. The fixation on both retroperi-toneal fixated colon flexures causes it to bend convexly and ven-trally. The middle of the transverse colon, however, droopscaudally. The path between splenic and hepatic flexures canvary greatly; at the one extreme, the transverse colon can benearly horizontal, while at the other it can “droop” all the waydown to the minor pelvis (Fig. 5.15). This results in any numberof related difficulties in passage and therefore also advancingthe endoscope in the hepatic flexure.
External pressure can lift a drooping midtransverse coloncranially and enable the advancement of the endoscope to con-tinue (see below). It is also possible to push the endoscope “up”after reaching the most caudal point in the drooping transversecolon. If the instrument is then carefully withdrawn, a cranialdisplacement of the midtransverse colon and correspondingstraightening of the transverse colon can ease passage and re-trieve “used-up” endoscope length. Passage of the transverse
Fig. 5.12 Splenic flexure with luminal impression, shimmering ofspleen.
Fig. 5.13 Variations of the splenic flexure with different anglesbetween the descending colon and transverse colon.a A “high” flexure, ca. 180°.b “Drooping flexure.”
Fig. 5.14 a, b View into the transverse colon after passing the splenic flexure: typical triangular configuration and pro-nounced, evenly spaced haustration.
Inserting the Endoscope and Advancing It in the Colon

II
�31
Messmann, Atlas of Colonoscopy (ISBN 3131405716) © 2005 Georg Thieme Verlag
5
a b
a b
colon and reaching the hepatic flexure is sometimes onlypossible using a combination of advancing/withdrawing and ex-ternal hand pressure. Optimal cooperation between examinerand assistant is essential. Pronounced angling of the lumentoward the ascending colon is a sign that the endoscope isreaching the hepatic flexure (Fig. 5.16).
Hepatic flexure. The fixation of the hepatic flexure and the as-cending colon to the posterior abdominal wall combined withthe mobility of the intraperitoneally located transverse coloncan result in sharp angling at the hepatic flexure. The situation issimilar to the transition described above from the intraperi-toneally situated sigmoid colon to the retroperitoneally fixateddescending colon; the difficulties passing the hepatic flexure areanalogous. If at this point the patient is still in the left lateralposition, it is strongly recommended that he should changeposition if problems passing the hepatic flexure are en-countered; the patient should be supine or even in the rightlateral position. In some cases, simply changing the position ofthe patient results in visualization of the previously displacedlumen of the ascending colon and can enable the examiner toovercome the flexure without a problem. If passage continues tobe difficult, it is often necessary to push the endoscope up untilthe instrument tip is placed where the ascending colon begins.This part of colonoscopy often causes discomfort to the patient.As soon as the instrument tip is positioned in the ascendingcolon, it should be straightened by pulling back. This assistsfurther advancement considerably and often the endoscope tipmoves further toward the cecum as a result.
Applying external pressure can also be a significant helpwith the hepatic flexure. Splinting the sigmoid colon, a droopingtransverse colon, or both can help straighten the endoscope,preventing repeated looping which “uses up” endoscope lengthwhile helping to reach the ascending colon successfully. If thisdoes not work, additional external hand pressure on the rightflank with the flat of the hand placed dorsally or slanted later-ally to apply pressure directly to the flexure can be very helpful(see below).
Proximal Colon
After passing the hepatic flexure, the view opens up to the pro-ximal segments of the large intestine. In addition to the capa-cious ascending colon, the cecal pole and ileocecal valve areoften visible at the end of the field of vision (Fig. 5.17). Oftenafter passing the hepatic flexure, there can be a certain unneces-sary advancement of the endoscope in the more distal colonsegments. Thus, after positioning the endoscope tip securely inthe ascending colon, it is recommended that the endoscope becarefully withdrawn and straightened. This alone can oftenfurther advance the instrument, in some cases even reaching thebase of the cecum. If this does not succeed, active advancementof the endoscope is necessary. For passing the ascending colon,
Fig. 5.15 Schematic illustration of various paths of the transversecolon.a “Drooping” transverse colon.b Nearly horizontal transverse colon.
Fig. 5.16 Hepatic flexure from an endoscopic aspect.a Ascending colon toward the 5-o’clock position. b Ascending colon toward the 7-o’clock position.
Proximal Colon

II
No
rmal
Exam
inat
ion
Pro
ced
ure
32�
Messmann, Atlas of Colonoscopy (ISBN 3131405716) © 2005 Georg Thieme Verlag
advancing and withdrawing to straighten it, applying externalhand pressure to prevent inefficient loss of instrument length inthe flexible, more distal colon segments, or a combination ofboth procedures can be helpful. In some cases, the base of thececum can ultimately be reached only by additionally reposi-tioning the patient; especially for advancement in the righthemicolon, positioning the patient on his right side can makeadvancement easier.
Base of the cecum. Identifying the base of the cecum is usuallyunproblematic, given its characteristic morphology and the pro-ximity of the ileocecal valve. The base of the cecum is character-ized by a folded pattern produced by the three convergingtaenia; the appendix valve or invaginated appendiceal orifice islocated at its center (Fig. 5.18). The ileocecal valve is located afew centimeters distally, and usually appears as a yellowish,thickened fold, separating the cecum from the ascending colon(Fig. 5.19). Position and flexibility of the cecum vary dependingon its fixation to the dorsal abdominal wall. A broadly fixatedcecum on the posterior wall of the abdominal cavity (as a con-tinuation of the fixation of the ascending colon) results in amostly immobile cecum. The range of normal anatomy encom-passes all possible variations, including the complete lack ofsuch a fixation, resulting in extreme cases in a highly mobilececum and a possible inversion of the cecal pole or only the ap-pendix. This explains why the base of the cecum can in somecases be completely visualized from the proximal ascendingcolon, but not in the case of an inverted or tilted cecum, whichrequires precise advancement in the cecum (Fig. 5.19). It is agood idea to document the images of the cecum (with orwithout the ileocecal valve) as a record of completion of colo-noscopy. Along with the typical endoluminal morphology,reaching the cecum can often also be confirmed by visible trans-illumination of the endoscope tip in the lower right abdomen(Fig. 5.20).
Fig. 5.17 View into the ascending colon after passing the he-patic flexure. The ileocecal valve, seen as a yellowish, thickenedfold, is on the lower edge of the lumen (arrow) in the distance.
Fig. 5.18 View of the base of the cecum. Convergence of thethree tenia originating at about the 3-o’clock, 11-o’clock, and6-o’clock positions; appendix orifice in the center of the image.
Fig. 5.19 View of the ileocecal valve (thickened, yellowish semi-circular fold on the left) and tilted cecum, obscured view into thececum from this aspect.
Fig. 5.20 Transil-lumination of theendoscope tipthrough the abdomi-nal wall of the lowerright abdomen uponreaching the cecum.
Inserting the Endoscope and Advancing It in the Colon