asims user manual
TRANSCRIPT

Issue 6 1 AL15
MAA_OpAssure_KE_MAN_001 Version_6.15 Jul_2021
OFFICIAL
USER MANUAL
ISSUE 6
AL 15
DATED Jul 21

Issue 6 2 AL15
MAA_OpAssure_KE_MAN_001 Version_6.15 Jul_2021
OFFICIAL

Issue 6 3 AL15
MAA_OpAssure_KE_MAN_001 Version_6.15 Jul_2021
OFFICIAL
Preliminaries

Issue 6 4 AL15
...............................................................................................................................................................
..........................................................................
MAA_OpAssure_KE_MAN_001
................................
Version_6.15
.........................................
Jul_2021
................................
OFFICIAL
................................
P 1. Contents
............................................................................................
PRELIMINARIES
......................................................................................................................................................................................
........
3
................................
P 1. Contents
............................................................................................................................................
..........................................................................................
4
...................
P 2. List / Record of Amendments
....................................................................................................................................................................................................
8
................................
P 3. List of Effective Pages
.........................................................................................................................
........................................................................
10
................................
P 3.1. Introduction
..............................................................................................................................................................................................
................
10
................................
P 4. List of Abbreviations
..........................................................................................................................................................................
...
11
................................
P 5. Definition of Terms
............................................................................................................................................................
.....................................................................................................................
13
................................
P 6. ASIMS Quick Look
.....................................................................................................................
........................................................................................................
16
........
P 6.1. Introduction
...................................................................................................................................................
........................................................................................
16
................
P 6.2. System Security Classification - OFFICIAL
.............................................................................................................................................................
...................................................................................................................................
16
................................
P 6.3. ASIMS Contacts
..........................................................................................
.......................................................................................
17
................................
P 6.4. Report Process Flow
.....................................................................................................................................................
.................................
18
................................
P 6.5. Training
.................................................................................................................................
.......................................................................
18
.......................
P 6.6. Test Server
........................................................................................................................................................................
...............................................19
................................P 7. How to use the ASIMS Manual........................................................................................................
..............................................................................
21
................................
P 7.1. Introduction
.........................................................................................................................................................................................
.......................................................
21
........
P 7.2. FAQ Section Signpost
..................................................................................................................................................................................................
21
..
PART A ASIMS BACKGROUND AND OVERVIEW
................................................................................................................................................................................................
....................................................................................................................................................................................................
...................
23
................................
A 1. ASIMS Background
....................................................................................................................................................
................................................................................................
24
................................
A1.1. What is ASIMS? 24 A1.2. ASIMS History Timeline 24 A1.3. Why Report? 24 A 1.4. What should be reported? 24 A 1.5. Occurrence Reporting and Investigation. 25
A 2. ASIMS Overview 26 A 2.1. Accessing ASIMS 26 A 2.2. ASIMS Homepage 27 A 2.3. ASIMS User Home Screen 28 A 2.4. Types of ASIMS User 29
PART B REPORTING AN OCCURRENCE 32 B 1. Reporting an Occurrence Overview 33
B 1.2. Introduction 33 B 2. Raising a DASOR - Online 36
B 2.1. Online Reporting 36 B 2.2. Reporter Form Sections 38 B 2.3. Review and Submit 43
B 3. Additional Reports 46 B 3.1. Bird Strike 46 B 3.2. Airprox 46 B 3.3. Air Traffic Management 49 B 3.4. MALDROP 51 B 3.5. Parachuting 53 B 3.6. Laser/HP Illumination 55 B 3.7. Human Fatigue 56 B 3.8. Lightning Strike 58 B 3.9. SESOR (DE&S use only) 59
PART C PROGRESSING A DASOR 60 C 1. Progressing a DASOR Overview 61
C 1.1. Introduction 61 C 2. Occurrence Manager Role 63
C 2.1. Introduction 63 C 2.2. General Responsibilities 64 C 2.3. Occurrence Manager Workflow 65 C 2.4. Occurrence Manager Checks 65 C 2.5. Occurrence Manager Tab Completion 67 C 2.6. Occurrence Manager Tab Sections 68 C 2.7. Report Acceptance 70
Issue 6 5 AL15
......................................................................................................................................................................................................
...............................................
MAA_OpAssure_KE_MAN_001
................................
Version_6.15
..........................................
Jul_2021
................................
OFFICIAL
.......................
C 2.8. Actions following Auto-Acceptance
......................................................................................................................................................................
..........................................................................
74
................................
C 2.9. Send for Action
.................................................
....................................................................................................................................................................
75
......
C 2.10. Monitoring Actions
.............................................................................................................................................................................................
...........................................................
76
................................
C 2.11. Hashtags
....................................................................................................................................................................................................
.....
77
................................
C 2.12. Progressing to Investigation
.......................................................................................................
.............................................................................
78
......
C 2.13. Linking Reports
.....................................................................................................................................................................................
80
................................
C 2.14. Transferring to INForm
..............................................................................................................
...........................................................................................
82
................................
C 3. Maintenance Role
......................................................................................................................................................................
..................................
84
................................
C 3.1. Introduction
..............................................................................................................................................................................................
.............................................
84
................................
C 3.2. Technical Tab Completion
......................................................................................................................................
..................................................
85
................................
C 3.3. Technical Tab Sections
........................................................................................................................................................................................
85
......................
C 3.4. Review and Complete
..............................................................................................................................................................
........................................................................
90
................................
C 4. ATM Supervisor Role
................................................................................................................................................................................................................
92
................
C 4.1. Introduction
.............................................................................................................................................................
........................................................................
92
................................
C 4.2. ATM Supervisor Tab Completion
..........................................................................................................................................................................................
92 ...........C 4.3. ATM Supervisor Tab Sections ................................................................
..............................................................................................................
93
................................
C 4.4. Review and Complete
..............................................................................................................................
........................................................................................
93
.....................
C 5. Commentator Role
.................................................................................................................................................
........................................................................
95
................................
C 5.1. Introduction
....................................................................................................................................................................................
.............................................................
95
................................
C 5.2. Adding Comments
................................................................................................................................................................................
96
........................
C 5.3. Acknowledging Comments
.....................................................................................................................................................................
97
................................
C 5.4. Comment Status
................................
97 C 6. Questions 99
C 6.1. Introduction 99 C 6.2. Asking a question 99 C 6.3. Answering a question 100 C 6.4. Acknowledge Answer 101
PART D MANAGING ASIMS 102 D 1. Managing ASIMS Overview 103
D 1.1. Introduction 103 D 2. My Details 104
D 2.1. Introduction 104 D 2.2. Amend/Update/View 104
D 3. Following Reports/Recommendations 106 D 3.1. Introduction 106 D 3.2. Follow a Report 106 D 3.3. Un-follow a Report 106 D 3.4. Follow a Recommendation 106 D 3.5. Unfollow a Recommendation 106
D 4. Home Screen Reports Summary 107 D 4.1. Introduction 107 D 4.2. Reports Summary Sections 107 D 4.3. Reports Summary Functionality................................ 109 D 4.4. Default View 109
D 5. ASIMS Notifications 111 D 5.1. Introduction 111 D 5.2 Notification Details 111
D 6. Local Administrators 122 D 6.1. Introduction 122 D 6.2. Amending Role Groups 122 D 6.3. Assigning Investigator(s) 125
PART E INVESTIGATION, FINDINGS AND RECOMMENDATIONS 127 E 1. Investigation 128
E 1.1. Introduction 128 E 1.2. Managing Comments 129 E 1.3. Investigation Tab Completion 130 E 1.4. Investigation Tab Sections 132 E 1.5. Review and Complete 133
E 2. Findings 134

Issue 6 6 AL15
...........................................................................................................................................................................................................
............................
MAA_OpAssure_KE_MAN_001
................................
Version_6.15
.....................................
Jul_2021
................................
OFFICIAL
................................
E 2.1. Introduction
..............................................................................................................................
.................................................................................................
134
.....
E 2.2. Taxonomy
.................................................................................................................................................................................
...........................................................................
134
................................
E 2.3. Findings Tab Completion
...................................................................................................................................................................................
136
................................
E 2.4. Findings Tab Sections
...........................................................................................................................................................
............................................................
138
................................
E 2.5. Review and Complete
...........................................................................................................................
.....................................................................
144
......................
E 3. Raising Recommendations
......................................................................................................................................................................
................
145
................................
E 3.1. Introduction
.........................................................
...........................................................................................................................................
145
................................
E 3.2. Recommendation Generation
..............................................................................................
....................................................................................................................................
146
................................
E 3.3. Send to ADH/AM
.....................................................................................................................................................................
.............
147
................................
E 3.4. Linking to an existing recommendation
.................................................................................................................................
.....................
148
................................
E 4. Send for Review
.............................................................................................................................................................................................
......................................
149
................................
E 4.1. Introduction
......................................................................................................................................
...............................................................................................
149
................................
E 4.2. Send to Occurrence Manager Review
...........................................................................................................................
......................................................
149
................................
E 4.3. Send to DDH/AM Review
............................................................................................................................................................................................
149
................................
E 4.4. Send to ORG
............................................................................................................................................................................................
...............................................150
................................E 5. Occurrence Manager Review...................................................................................................
................................................................................
152
.............................
E 5.1. Introduction
..........................................................................................................................................................................................................
152
................................
E 5.2. Review and Complete
........................................................................................................................................................
..........................................................................
152
......
E 6. ORG
...................................................................................................................................................................................
......................................................
154
................................
E 6.1. Introduction
......................................................................................................................................................................
........................................
154
................................
E 6.2. ORG Tab Completion
......................................................................................................................................
154 E 6.3. ORG Tab Sections 155 E 6.4. Review and Complete 157
PART F ADH DASOR REVIEW AND CLOSURE 158 F 1. DDH / AM Review 159
F 1.1. Introduction 159 F 1.2. Members of DDH/AM Review Group 160 F 1.3. DDH/AM Review 160 F 1.4. Return to Investigation 161 F 1.5. Report Closure 161 F 1.6. Elevate to ODH/AM Review 162 F 1.7. Complete pending comments 163
F 2. ODH / AM Review Group 164 F 2.1. Introduction 164 F 2.2. Members of ODH/AM Review Group 165 F 2.3. ODH/AM Review 165 F 2.4. Report Closure 166 F 2.6. Complete pending comments 167
PART G SIGNIFICANT EQUIPMENT SAFETY OCCURRENCE REPORT (SESOR) 169 G 1. ASIMS SESOR Functionality 170
G 1.1. Introduction 170 G 1.2. SESOR Process Flow 170 G 1.3. Procedure for Raising a SESOR 170 G 1.4. SESOR Occurrence Manager Role 178 G 1.5. Procedure for Responding to a SESOR 182 G 1.6. DAT Review Role 183 G 1.7. SESOR Searching 185
PART H RECOMMENDATIONS 186 H 1. Recommendation Progression 187
H 1.1. Introduction 187 H 1.2. ADH/AM 188 H 1.3. Recommendation Owner 193 H 1.4. Implementor 195 H 1.5. Owner Review 198 H 1.6. ADH/AM Review 199
PART I DATA EXPLOITATION 200 I 1. ASIMS Data Exploitation 201
I 1.1. Introduction 201 I 2. DASOR Searching 202

Issue 6 7 AL15
...............................................................................................................................................................................................
......................................
MAA_OpAssure_KE_MAN_001
................................
Version_6.15
..................................................
Jul_2021
................................
OFFICIAL
................................
I 2.1.
................................
Standard Search
............................................................................................................................................................
202
................................
I 2.2.
......
Searchable Fields
.....................................................................................................................................................
202
................................
I 2.3.
................................
Search Results
.....................................................................................................................
204
................................
I 2.4.
................................
Trend Chart Option
....................................................................................................................
205
................................
I 2.5.
............................
Download Options
................................................................................................................................................................
205
............................
I 2.6.
................................
My Saved Download Options
..............................................................................................................................
......................
205
................................
I 2.7.
................................
My Saved Search
.......................................................................................................
.......
209
................................
I 2.8.
................................
Advanced Search
...........................................................................................................................................
209
................................
I 2.9.
................................
Search Expression - Advanced
..............................................................................................................................
....................................................................................................................
210
................................I 2.10.
................................Search Results - Advanced .............................................................................
...................................................................................................................................
213
................................
I 2.11.
............................
Save Filter - Advanced
..........................................................................................................................................
...........................................................................................
216
..........................
I 2.12.
................................................................
Exporting Data
............................................................................................................................................................
216
................................
I 3.
..............................
ASIMS Data Download
................................................................
219I 3.1. Introduction 219I 3.2. ASIMS Data 219I 3.3. Pivot Table 219I 3.4. Pivot Chart 221
I 4. Recommendation Searching 223I 4.1. Standard Search 223I 4.2. Searchable Fields 223I 4.3. Search Results 224I 4.4. Advanced Search 225I 4.5. Search Expression - Advanced 226I 4.6. Search Results - Advanced 228I 4.7. Save Filter - Advanced 229I 4.7. Exporting Data 230
I 5. Trending 233I 5.1. Introduction 233I 5.2. Filters for Trend Chart 234I 5.3. Trend Chart 234
I 6. Dashboard 238I 6.1. Introduction 238I 6.2. Adding a chart 239I 6.3. Removing a chart 241

Issue 6 8 AL15
MAA_OpAssure_KE_MAN_001 Version_6.15 Jul_2021
OFFICIAL
P 2. List / Record of Amendments
IssueAL No
Issue Date
Amended by Details of Amendment
1 0 Oct 09 Initial Issue
2 0 Sep 10Reflect the formation of the MAA Typographical issues amended
3 0 Oct 10Supervisor section added Update to reflect software changes
4
0 Jan 11 Typographical error changes
1 Sep 11 Introduction of ASIMS v2.0
2 Oct 11 Typographical error changes
5
0 Feb 14 MAA-AP-KE-DBA Introduction of ASIMS v2.3 (new look and feel)
1 Jul 14 MAA-AP-KE-DBA Introduction of ASIMS v2.3 Admin functions
2 Jan 15 MAA-AP-KE-DBA Introduction of ASIMS v2.4
3 Apr 15 DSA-MAA-AP-KE-RA2Organisational changes with the formation of the DSA SESOR section content redacted
4 Jul 15 DSA-MAA-AP-KE-RA2
SESOR section added Search SESOR section redacted Linking of reports guidance added to the Occurrence Manager section.
6
0 Feb 16 DSA-MAA-AP-KE-RA2Complete re-write and re-format for the release of ASIMS v3.0
1 Mar 17 DSA-MAA-AP-KE-DBA Introduction of ASIMS v3.1
2 Apr 18 DSA-MAA-AP-KE-DBA Introduction of ASIMS v3.2
3 Sep 18 DSA-MAA-AP-KE-DBA Introduction of ASIMS v3.3.1
4 Feb 19DSA-MAA-OpAssure-KE-ASIMSDBA
Introduction of ASIMS v3.3.2
5 Mar 19DSA-MAA-OpAssure-KE-ASIMSDBA
Introduction of ASIMS v3.3.3
6 Aug 19DSA-MAA-OpAssure-KE-ASIMSDBA
Include ASIMS Notification Details Adjusted formatting to meet new JSP 101 requirements Incorporate text removed from RA 1410
7 Nov 19DSA-MAA-OpAssure-KE-ASIMSDBA
Information Role Group definitions added Part G updated
8 Apr 20DSA-MAA-OpAssure-KE-ASIMSDBA
Updated email notifications format

Issue 6 9 AL15
MAA_OpAssure_KE_MAN_001 Version_6.15 Jul_2021
OFFICIAL
9 Jun 20DSA-MAA-OpAssure-KE-ASIMSAsstDBA
Revision of information on Recommendation Implementors and Same Incident linking definition
10 Dec 20DSA-MAA-OpAssure-KE-ASIMSAsstDBA
Revision of parachuting form Revision on injury reporting
11 Jan 21DSA-MAA-OpAssure-KE-ASIMSAsstDBA
Revison of submitting a SESOR report.
12 Jan 21DSA-MAA-OpAssure-KE-ASIMSAsstDBA
Revison of DDH Closure statement image. Revised for gender neutrality. These amendments have not been highlighted in the document. Amended AL and Issue number to display them correctly. Amended reference for serious fault reporting.
13 Apr 21DSA-MAA-OpAssure-KE-ASIMSDBA
Updated terminology within the ORG section.
14 Jul 21DSA-MAA-OpAssure-KE-ASIMSAsstDBA
Amended wording for gender neutrality.
15 Jul 21DSA-MAA-OpAssure-KE-ASIMSAsstDBA
Add narrative description of DASOR lifecycle.

Issue 6 10 AL15
MAA_OpAssure_KE_MAN_001 Version_6.15 Jul_2021
OFFICIAL
P 3. List of Effective Pages
P 3.1. Introduction
P 3.1.1. The list of effective pages indicates when functional changes to ASIMS processes have been made. Minor grammar/spelling changes are not indicated as a change.
Page No AL Page No
AL Page No
AL Page No
AL Page No
AL Page No
AL
Front Part B Cont. Part C Cont. Part D Cont. Part F Cont. Part I
0 0 38 4 80 1 122 4 158 2 197 0
39 10 81 9 159 4 198 0
Prelims 40 10 82 2 Part E 160 0 199 0
1 0 41 4 83 0 123 2 161 4 200 0
2 0 42 5 84 4 124 4 162 12 201 0
3 0 43 6 85 12 125 4 163 0 202 0
4 0 44 6 86 0 126 4 164 4 203 0
5 0 45 4 87 0 127 0 165 4 204 0
6 0 46 6 88 0 128 6 205 0
7 0 47 4 89 4 129 6 Part G 206 0
8 4 48 6 90 0 130 6 166 0 207 0
9 0 49 10 91 1 131 14 167 0 208 0
10 4 50 6 92 5 132 14 168 0 209 0
11 4 51 4 93 5 133 1 169 0 210 0
12 3 52 0 94 0 134 4 170 0 211 0
13 1 53 6 95 6 135 0 171 0 212 0
14 7 54 6 96 6 136 14 172 0 213 0
15 6 55 10 97 6 137 1 173 0 214 0
16 4 56 6 138 0 174 11 215 0
17 0 Part D 139 1 175 11 216 0
18 0 Part C 98 6 138 0 176 0 217 0
19 0 57 2 99 6 139 1 177 0 218 0
58 5 100 6 140 4 178 0 219 0
Part A 59 5 101 6 141 4 179 0 220 0
20 1 60 5 102 6 142 1 180 0 221 0
21 6 61 0 103 6 143 4 181 5 222 0
22 6 62 2 104 6 144 2 182 0 223 0
23 1 63 5 105 6 145 1 224 9
24 0 64 0 106 6 146 1 Part H 225 0
25 0 65 2 107 6 147 9 183 0 226 0
26 0 66 0 108 8 148 0 184 0 227 0
27 4 67 2 109 8 149 0 185 0 228 0
28 0 68 2 110 8 150 4 186 0 229 0
69 0 111 8 151 0 187 0 230 0
Part B 70 2 112 7 152 0 188 0 231 0
29 1 71 5 113 4 153 2 189 0 232 0
30 0 72 5 114 3 154 4 190 0 233 0
31 0 73 4 115 4 191 5 234 0
32 6 74 4 116 3 Part F 192 9 235 0
33 15 75 4 117 3 155 4 193 1 236 0
34 15 76 4 118 5 156 13 194 9 237 0
35 4 77 2 119 4 157 13 195 0 238 0
36 4 78 4 120 4 158 2 196 0 239 0
37 0 79 4 121 4 159 4
Issue 6 11 AL15
.
.
.
.
…..
..
...
.....
MAA_OpAssure_KE_MAN_001 Version_6.15 Jul_2021
OFFICIAL
P 4. List of Abbreviations
ABM….. Air Battlespace Manager ADH……… Aviation Duty Holder AIB………. Accident Investigation Branch ALARP…. As Low As Reasonably Practicable ALI………. Air Land Integration AM……….. Accountable Manager AoR……… Area of Responsibility ASIMS…. Air Safety Information Management System ATC……… Air Traffic Control ATM……… Air Traffic Manager CAA……… Civil Aviation Authority CANP…… Civil Aviation Notification Procedure DAC……… Defence Aviation Community DASOR…. Defence Aviation Safety Occurrence Report DAEMS Defence Aviation Error Management System DDH……... Delivery Duty Holder DE&S……. Defence Equipment & Support DG……….. Director General DSA……… Defence Safety Authority DZ……….. Drop Zone EMS……... Error Management System FL………... Flight Level Hdg……… Heading HISL…….. High Intensity Strobe Light HP………. High Power GCS……… Ground Control Station LI…………. Local Investigation MAA……... Military Aviation Authority MAR……... Military Aircraft Register MOD…….. Modification MOR…….. Mandatory Occurrence Report (Civ) NMC…….. Negative Mode Charlie NSN……… NATO Stock Number ODH……... Operational Duty Holder ORG……. Occurrence Review Group ORN……... Originator Reference Number OSI………. Occurrence Safety Investigation PDF……… Portable Document Format POC……… Point Of Contact PT……….. Project Team PWI……… Preliminary Warning Instruction QOR……... Quality Occurrence Report RA………. Regulatory Article RA (ATM).. Resolution Advisory Rec………. Recommendation RT……….. Radio Transmission RTI………. Routine Technical Instruction

Issue 6 12 AL15
.
..
.
MAA_OpAssure_KE_MAN_001 Version_6.15 Jul_2021
OFFICIAL
RtL………. Risk to Life SESOR….. Significant Equipment Safety Occurrence Report SI………… Service Inquiry SI(T)…….. Service Instruction (Technical) SME……... Subject Matter Expert SMS……. Safety Management System SON……... Significant Occurrence Notification SQEP……. Suitably Qualified and Experienced Person SSR……… Secondary Surveillance Radar STI………. Special Technical Instruction SyOps…... Security Operating Procedures TA………... Traffic Avoidance TAA………. Type Airworthiness Authority TBD……… To Be Determined TCAS……. Traffic Collision Avoidance System UTI………. Urgent Technical Instruction

Issue 6 13 AL15
MAA_OpAssure_KE_MAN_001 Version_6.15 Jul_2021
OFFICIAL
P 5. Definition of Terms
Term Definition
ADH/AM Review
(Recommendation status)
The recommendation owner has completed their review of the implementation and the recommendation is sent to the ADH/AM to review the recommendation prior to closure.
Awaiting Comments
(Comment status)
The report has been sent for comment to an individual or role group/s and at least one request for comment is currently outstanding (final comment not added). (Note: This status is replaced with New Comments when there are comments on a report that the user has not yet acknowledged).
Closed
(Recommendation Status)
The recommendation has been closed and all work completed. (Note: Recommendations at this status are not shown on the Managed Recommendations section – they need to be searched for using the Search Recommendations function).
Closed and filed
(DASOR status)
The report has been closed. (Note: reports at this status are not shown on the Managed Reports section – they need to be searched for using the Search Reports function).
Comments Received
(Comment status)
The report has been sent for comment to an individual or role group/s and all requests have been actioned (final comments added). (Note: This status is replaced with New Comments when there are comments on a report that the user has not yet acknowledged).
Complete Pending Comments
(DASOR status)
The report has been placed in a pending state by an ADH/AM awaiting additional comments prior to closure.
DDH/AM Review
(DASOR status)
The report has been sent to the DDH/AM role group for review.
Defence AIB Review
(Recommendation status)
The recommendation has been passed to the Defence AIB for comment following review by the ADH/AM. (Note: This step only happens when the DASOR the recommendation was raised against initiated a DG DSA convened investigation).
DG Review
(Recommendation status)
The recommendation has been passed to the DG DSA for comment and closure following the Defence AIB Review. (Note: This step only happens when the DASOR the

Issue 6 14 AL15
MAA_OpAssure_KE_MAN_001 Version_6.15 Jul_2021
OFFICIAL
Term Definition
recommendation was raised against initiated a DG DSA convened investigation).
Draft
(Recommendation Status)
The recommendation has been raised but has not been sent to an ADH / AM for implementation. (Note: Recommendations at this status are not shown on the Managed Recommendations section – they need to be searched for using the Search Recommendations function).
Imp(s) Assigned
(Recommendation status)
The recommendation has been assigned a Recommendation Implementor(s) to implementation the recommendation.
Master Report A report that has been linked to subordinate report(s), upon closure of the Master Report the Investigation, Findings and Recommendations will be copied to all linked subordinate report(s) before being closed.
New Comments
(Comment status)
The report has comments that the user has not yet acknowledged. (Note: This status is individual to each user, this is because it is dependent on the user having acknowledged the comments on a report)
Not Requested
(Comment status)
Default comment status – indicates that no requests for comment have been sent. (Note: This status is replaced with New Comments when there are comments on a report that the user has not yet acknowledged).
Occurrence Manager Review
(DASOR status)
For investigation type of LI only. Upon completion of the investigation the report is returned to the occurrence manager to review the findings and recommendations prior to onward transmission to DDH/AM Review.
ODH/AM Review
(DASOR status)
The report has been sent to the ODH/AM role group for review.
Open report
(DASOR status)
These reports have been accepted by the Occurrence Manager and have also been distributed – this should have been done within 2 working days. These reports are now viewable by all ASIMS users and can now be sent for Comments (to specific role group(s) or individuals) or for Investigation.
ORG Review
(DASOR status)
The report has been sent to the ORG role group for review (OSI only), the ORG tab is only visible to members of the ORG review.

Issue 6 15 AL15
MAA_OpAssure_KE_MAN_001 Version_6.15 Jul_2021
OFFICIAL
Term Definition
Owner Assigned
(Recommendation status)
The recommendation has been accepted and a Recommendation Owner assigned.
Owner Review
(Recommendation status)
The implementor(s) have completed the implementation of the recommendation and the owner must review the work completed before onward transmission.
Pre-submitted report
(DASOR status)
A report which has been drafted but not yet submitted, or those for which there has been a submit attempt and ASIMS does not know the correct staffing chain for the report. These reports will appear in search results, but the report details are only viewable by the ASIMS Admin Team.
Raised
(Recommendation status)
The recommendation has been raised in ASIMS and is awaiting ADH/AM review.
Rejected
(Recommendation status)
The recommendation has been rejected by the ADH/AM. (Note: Recommendations at this status are not shown on the Managed Recommendations section – they need to be searched for using the Search Recommendations function).
Rewrite (Recommendation status)
The recommendation has been returned to the originator for rewrite.
Submitted Report – awaiting acceptance
(DASOR status)
These reports are awaiting the Occurrence Manager to review and accept them. These reports will appear in search results, but the report details are only viewable by those in the report Maintenance, ATM Supervisor or Occurrence Manager role groups.
Subordinate Report A report that has been linked to a Master Report, while an investigation is ongoing, upon closure of the Master Report the Investigation, Findings and Recommendations will be copied to the Subordinate Report before being closed.
Under Investigation
(DASOR status)
The report has been allocated to an investigator(s) to undertake an investigation. The Investigation section (investigation, findings & recommendation tabs) can only be seen/edited by the Investigator(s) and the report Occurrence Manager role group members.

Issue 6 16 AL15
MAA_OpAssure_KE_MAN_001 Version_6.15 Jul_2021
OFFICIAL
P 6. ASIMS Quick Look
P 6.1. Introduction
P 6.1.1. The Air Safety Information Management System (ASIMS) is a web-based application to support the reporting, management and analysis of Air Safety occurrences, investigations and recommendations.
P 6.1.2. ASIMS is only accessible online through MODNet/DII. If an individual does not have access to ASIMS they will need to download the appropriate PDF DASOR form from the MAA website (https://www.gov.uk).
P 6.1.3. Occurrence reporting and investigation requirements are mandated in MAA RA 1410. The DAC report Air Safety occurrences using ASIMS which is supported by the MAA Knowledge Exploitation team and ASIMS Helpdesk.
Note: An ASIMS account is not required to report an occurrence.
P 6.2. System Security Classification - OFFICIAL
P 6.2.1. DASOR information transmitted via ASIMS must be classified no higher than Official.
P 6.2.2. Official-Sensitive, and higher, information cannot be transmitted via ASIMS even though it is hosted on the Defence Intranet computer network. This is because ASIMS can automatically send data to external email addresses (such as to Defence contractors) and therefore sensitive information should not be entered.
P 6.2.3. This does not prevent event reporting on ASIMS. In general, the Air Safety relevant information (i.e. that information which could be used to identify remedial actions to prevent recurrence) will need no security restrictions. Any additional information of an Official-Sensitive or above classification can be signposted and appropriate contact details provided without disclosure of the content.
P 6.2.4. This guidance also applies to attachments. Please review all attachments to ensure no information at Official-Sensitive or above is contained within them. This includes imagery that may disclose location via geo-tags or recognisable geographical features.
P 6.2.5. If information above Official status is considered of material importance to the event, it may be transmitted using a medium appropriate to the security classification given to the report (iaw JSP 440); front line command and Air Safety staff with appropriate security vetting will then decide what elements of the report can be entered onto ASIMS. The general principle is to keep the classification as low as possible.
Note: The inclusion of aircraft information or personal information does not itself classify a DASOR as Official. The former is information which is available under the Freedom of Information Act and the latter is protected by Data Protection Laws.

Issue 6 17 AL15
MAA_OpAssure_KE_MAN_001 Version_6.15 Jul_2021
OFFICIAL
P 6.3. ASIMS Contacts
P 6.3.1. ASIMS Access:
ASIMS military website (DII): https://www.asims.r.mil.uk
ASIMS PDF forms: https://www.gov.uk/government/publications/defence-air-safety-
occurrence-report-dasor-forms
P 6.3.2. ASIMS Helpdesk Contact Details:
Email: [email protected]
Telephone: Military Network: 9679 84188 / 89568 Civilian Network: 030 679 84188 / 89568
P 6.3.3. Useful links
ASIMS Updates: https://modgovuk.sharepoint.com/sites/defnet/dsa/Pages/ASIMS-Updates.aspx
ASIMS Training: https://www.asims.r.mil.uk/training/home.html
RA 1410 – Occurrence Reporting: https://www.gov.uk/government/publications/regulatory-article-ra-1410-
occurrence-reporting

Issue 6 18 AL15
MAA_OpAssure_KE_MAN_001 Version_6.15 Jul_2021
OFFICIAL
P 6.4. Report Process Flow
P 6.4.1. The diagram below shows the process flow of a DASOR from submission to the closure.
Fig 1
P 6.4.2. ASIMS is made up of Role Groups which control user permissions, the notifications users receive and the actions users need to perform. When a report is submitted, it is sent to different role groups to complete specific sections of the report depending on the type of report raised.
P 6.4.3. ASIMS role groups must be populated, regularly monitored and updated by SQEP with requests for change submitted to the ASIMS Helpdesk or single Service Points of Contact. Sqn/units should inform the ASIMS Helpdesk/single Service Points of Contacts of role group/role assignment requests for changes to cover deployments/detachments and/or embarkations; to ensure the correct routing of DASORs.
P 6.4.4. ASIMS contains Information Distribution Lists (Info Dist Lists) for each platform (inc Parachuting and MALDROP). These lists enable all interested users to be notified when a DASOR is raised for a particular platform.
P 6.5. Training
P 6.5.1. The ASIMS training suite is accessible from the ASIMS Home Page.

Issue 6 19 AL15
MAA_OpAssure_KE_MAN_001 Version_6.15 Jul_2021
OFFICIAL
P 6.5.2. ASIMS Users should undertake the appropriate training for their role/requirements prior to using the system as defined in the Training Matrix within the training package.
P 6.6. Test Server
P 6.6.1. An ASIMS Test Server has been set up to provide the user community a safe environment to train on and test functionality of ASIMS without having to input into the live system.
P 6.6.2. The test server is an exact replica of the current live ASIMS version, and all content within this manual applies, with the following exceptions:
a. The Sign on page contains a red banner across the top to indicate that this is not the live system.
b. The DASOR data will only be as current as the date of the last test server refresh.
c. The header at the top of the page will have a red background.
d. The Message of the Day will be different to the live system indicating the version of ASIMS and the date the live data was copied.
e. Notifications do not work but the DASOR workflow will still mimic the live system, i.e. a member of a maintenance role group will still have access at the same point of the DASOR workflow as the live system but will not receive a notification to inform them of such access.
Fig 2

Issue 6 20 AL15
MAA_OpAssure_KE_MAN_001 Version_6.15 Jul_2021
OFFICIAL
Warning: Do not submit live Air Safety occurrences onto the test server.
P 6.6.4. The test server can be found through the following link:
https://www.maatestserver.r.mil.uk/VistairCas/login

Issue 6 21 AL15
MAA_OpAssure_KE_MAN_001 Version_6.15 Jul_2021
OFFICIAL
P 7. How to use the ASIMS Manual
P 7.1. Introduction
P 7.1.1. The ASIMS manual has been divided into multiple sections which are each intended to be informative about a particular aspect of ASIMS; for example, reporting an occurrence, recording the results of an investigation, or extracting data from ASIMS.
P 7.1.2. For the majority of ASIMS users, this format will be ideal for the particular task they wish to undertake at a particular time. Users who are more involved with the day-to-day managing and exploitation of ASIMS and the data it holds will need to read multiple sections of the manual to understand the full range of the system’s capabilities.
P 7.1.3. Each section of the Manual starts with a short description of that section. This is then followed by a full in-depth explanation of the relevant aspect of ASIMS.
P 7.2. FAQ Section Signpost
What do you want to do with ASIMS? The relevant part(s) of this Manual to read…
Understand the basics of ASIMS Part A – ASIMS Overview, Background and Basics
Submit a DASOR (e.g. an air safety occurrence report, or a “hazard observation”)
Part B – Reporting an Occurrence
Submit a specialist occurrence report such as bird strike, airprox, fatigue, air traffic management report, maldrop, or parachuting report.
Part B – Reporting an Occurrence
Request an ASIMS account Part A 2.1 – Accessing ASIMS
I’ve forgotten my ASIMS password Part A 2.1 – Accessing ASIMS
I want to get some data out of ASIMS Part I – ASIMS Data Exploitation
Carry out the role of Occurrence Manager Part C – Progressing a DASOR
Add specialist technical (maintenance) input to a DASOR
Part C 3 – Maintenance Role
Add specialist air traffic (ATC supervisor) input to a DASOR
Part C 4 – ATM Supervisor Role
Add a comment to a DASOR Part C 5 – Commentator Role

Issue 6 22 AL15
MAA_OpAssure_KE_MAN_001 Version_6.15 Jul_2021
OFFICIAL
What do you want to do with ASIMS? The relevant part(s) of this Manual to read…
Assess a DASOR allocated to me as, or on behalf of, the DDH
Part F – ADH/AM DASOR Review and Closure
Assess a DASOR allocated to me as, or on behalf of, the ODH
Part F – ADH/AM DASOR Review and Closure
I have logged into ASIMS – what does it all mean?
Part A 2 – ASIMS Overview
I’m an Occurrence Manager – how do I check the Role Groups on my unit?
Part D 6 – Local Administrators
Record the results of an investigation Part E 1 – Investigation
Raise a recommendation to prevent an incident recurring
Part E 3 – Recommendations
I’m in a Project Team and want to raise a SESOR, or add some comments to one which already exists
Part G – ASIMS SESOR Functionality

Issue 6 23 AL15
MAA_OpAssure_KE_MAN_001 Version_6.15 Jul_2021
OFFICIAL
Part A ASIMS Background and Overview

Issue 6 24 AL15
MAA_OpAssure_KE_MAN_001 Version_6.15 Jul_2021
OFFICIAL
A 1. ASIMS Background
A1.1. What is ASIMS?
A 1.1.1. The ASIMS is a web-based application to support the reporting, management and analysis of air safety occurrences, investigations and recommendations. It forms an intrinsic part of DAEMS. DAEMS provides the governance structure, knowledge (through training), roles and regulation; ASIMS provides the software tool needed to manage Air Safety occurrences.
A 1.1.2. Where personnel do not have access to the MOD Intranet, DASOR information (or updates) must be submitted to the appropriate Home Unit or Command Flight Safety Organization by hard or soft copy pdf, telecon relay or Unit Level Form (pdf copies of the DASOR and all other specialist reports are available through the MAA websites). It is recommended that blank ASIMS forms (either electronic/hardcopy) are part of a detachment/deployment pack and made available when operating offline. Alternatively, an In-Form could be raised which, if Air Safety related, will be transferred on to ASIMS by the unit’s Occurrence Manager or Error Management Coordinator.
A1.2. ASIMS History Timeline
A 1.2.1. Air Safety occurrences were originally reported via a signal-based system known as Pandora.1 The RAF Institute of Flight Safety began developing a web-based replacement known as the Flight Safety Information Management System, which subsequently developed into ASIMS.
A 1.2.2. ASIMS was introduced on 1 Apr 09 by the Directorate of Aviation Regulation & Safety, which was subsumed into the MAA.
A1.3. Why Report?
A 1.3.1. Reporting occurrences and hazard observations enables action to be taken to prevent recurrence, or more importantly, to anticipate and prevent other, potentially more serious outcomes, both locally and across Defence; thereby reducing RtL.
A 1.3.2. Reporting and resolving observed or perceived hazards will make working in Defence Aviation safer, preserve capability, and can also improve work life quality.
A 1.4. What should be reported?
A 1.4.1. The occurrence reporting and investigation requirements are mandated in MAA RA 1410 with DASOR timelines contained at Annex A. Any event with an Air Safety implication should be reported.
A 1.4.1. All losses attributable to enemy action must be reported appropriately, cognisant of classification and sensitivity, via a DASOR.
1 Legacy Pandora Incident Report data is available on ASIMS as scanned documents.

Issue 6 25 AL15
MAA_OpAssure_KE_MAN_001 Version_6.15 Jul_2021
OFFICIAL
A 1.4.2. ADHs and AMs must ensure that Serious Faults are reported2 3 4. The senior engineer of the Unit involved must ensure that the Serious Fault fields are completed in the technical section of the DASOR, see para C 3.3. Those who report Serious Faults using systems other than ASIMS must ensure that ASIMS is also populated and maintained.
A 1.5. Occurrence Reporting and Investigation.
A 1.5.1. A DASOR is to clearly capture and record the Air Safety issue through to resolution. Brevity is encouraged.
A 1.5.1. Due to their use as a single reference source, DASORs must be completed as fully and as accurately as possible. As new information is obtained, Occurrence Managers, or those requested to provide additional evidence, must update DASORs accordingly and notes made to that effect in the Comments section.
2 Refer to RA 4814 – Occurrence Reporting (MRP 145.A.60). 3 Refer to RA 5404 – Fault Reporting and Investigation for Contractors. 4 Refer to RA 5805 – Responsibilities of the Holder of a Military Type Certificate and MAA Design Organization Approvals (MRP 21 Subpart A).

Issue 6 26 AL15
MAA_OpAssure_KE_MAN_001 Version_6.15 Jul_2021
OFFICIAL
A 2. ASIMS Overview
A 2.1. Accessing ASIMS
A 2.1.1. ASIMS is accessed through DII/MODNet.
A 2.1.2. Any individual can apply for an ASIMS account, this is done by completing the “New User Account Request” online form available from the Online Resources section on the ASIMS logon page, see fig 3. The account will be created in 1-5 working days and the individual will receive an email notification when the account has been created.
Note: All initial accounts are created as a browser account, this enables the user to view and download DASORS but restricts personal information from being displayed.
A 2.1.3. If the user requires additional permissions within ASIMS they should contact someone in the station Flight/Air Safety Office or an allocated Safety Manager, if you are a member of a DE&S Project Team, who will arrange for the permissions to be added.
Note: The ASIMS Helpdesk do not have the local knowledge to assign the correct role groups to your account and is why it is requested by the local POC. Some local POC’s have admin permissions to carry out role group amendments so the changes can often be made instantly.
A 2.1.4. If you are having difficulty logging in to ASIMS, passwords can be reset from the logon page by selecting the Reset Password button.
A 2.1.5. Additional fields will be displayed in which you can enter your ASIMS username and select Request Password.
Warning: Both usernames and passwords are case sensitive; the username should normally be your DII/MODNet username/PUID (i.e. the username you use for accessing your DII workstation).
A 2.1.6. Your new password will be emailed to the email address recorded on your ASIMS profile with further instructions on how to complete the process. Should your recorded e-mail address be incorrect, please contact the ASIMS helpdesk.
Note: If an ASIMS account is not accessed for 180 days it will be disabled, a warning notification is sent out 30 days prior to it being disabled. In order to prevent the account being disabled the user needs to log into their account.
Note: Once an ASIMS account has been disabled for 720 days it will be deleted, a warning notification is sent out 30 days prior to it being deleted. In order to prevent the account being deleted the user needs to contact the ASIMS helpdesk and request the account is reactivated then log into the account within 30 days of the warning notification.

Issue 6 27 AL15
MAA_OpAssure_KE_MAN_001 Version_6.15 Jul_2021
OFFICIAL
A 2.2. ASIMS Homepage
A 2.2.1. The ASIMS logon screen contains 5 sections:
a. Message of the Day (MotD): This displays useful information from the ASIMS Helpdesk, configurable by the ASIMS Helpdesk at the MAA. Users may suggest/request items to be added to the MotD through the ASIMS Helpdesk.
b. Raise an Air Safety Occurrence Report: Enables the user to raise a report without the need to log into ASIMS.
c. ASIMS Log In: This section enables users to log in into ASIMS and reset their password.
d. Online Resources: Provides useful links to related documentation.
e. Noticeboard: RSS feeds from the MAA website.
Fig 3

Issue 6 28 AL15
MAA_OpAssure_KE_MAN_001 Version_6.15 Jul_2021
OFFICIAL
A 2.3. ASIMS User Home Screen
A 2.3.1. Once you have logged into ASIMS you will be presented with the User Home Screen.
Fig 4
A 2.3.2. This screen is the main page for accessing the functionality of ASIMS and is made up of the following sections, from top to bottom:
a. ASIMS logo and Helpdesk contact details.
b. Menu Bar. The menu bar is always available irrespective of which view is accessed and displays the following:
(1) User name: As specified in the user My Details.
(2) Date and Time: The time displayed is from the last refresh of the page.
(3) My Details: A user can amend their email address, job title, phone number, subscribe/unsubscribe to platform information distribution lists, change their password and select to supress ASIMS email notifications until a specified date (see Part D for more details).
(4) Log Out: Log out of ASIMS and return to the ASIMS Home Page.

Issue 6 29 AL15
MAA_OpAssure_KE_MAN_001 Version_6.15 Jul_2021
OFFICIAL
(5) Main Menu: Contains links to:
• Home – the User Home Screen.
• Create New DASOR – initiate the creation of a new DASOR.
• Common Audit Tool – Not Used.
• Air Safety Dashboard – MAA Air Safety Dashboard (permissions apply).
(6) Admin (permissions apply).
(7) Analysis: Contains links to:
• DASOR Search.
• DASOR Search (Adv).
• Rec Search.
• Rec Search (Adv).
• Trending.
• Dashboard.
(8) Resources: Contains links to:
• Blog.
• Feedback.
• Findings Taxonomy.
• MAA Regulations.
• Statistics.
• Technical Taxonomy.
• Training.
• User Manual.
c. Message of the Day. See Para A 2.2.1a.
d. Raise a Report. A button to initiate the creation of a new DASOR.
e. Reports Summary. This provides a summary of number of reports, serious faults, SESORs, recommendations and questions that the individual user is required to action, is managing and is following.
Note: Selecting a report total from the summary table will display those specific reports in a list at the bottom of the screen. For easy visibility of a specific report summary section a default view can be saved which will be saved to the user profile (See Part D 4.4 for more detail).
A 2.4. Types of ASIMS User
A 2.4.1. ASIMS is made up of Role Groups which control user permissions, the notifications users receive and the actions users need to perform. When a report is submitted, it is sent to different role groups to complete specific sections of the report depending on the type of report raised.

Issue 6 30 AL15
MAA_OpAssure_KE_MAN_001 Version_6.15 Jul_2021
OFFICIAL
Note: Role group membership is managed by the local Flight Safety Officers and equivalent. The local Flight Safety Officers are the only people authorised to move people into and out of role groups.
A 2.4.2. Types of user:
a. Reporter. The individual who raises the report. This user does not need to belong to a Role Group nor require an account to carry out this function.
b. Basic User. Provides basic level access to read and search.
c. Occurrence Manager. Air Safety responsible person responsible for accepting the report and managing the report through its life cycle.
d. Maintenance. Aircraft Maintainers, ground radio, survival equipment, responsible for completing the Technical section.
e. ATC Supervisor. ATC/ABM/Range Supervisor, responsible for completing the supervisor’s section of ATM reports.
f. Commentator. Any personnel who may wish to comment on specific types of reports.
g. Investigator. A trained investigator individually assigned to the investigation.
h. Investigator (SI). Defence AIB or associated personnel assigned to the investigation.
i. Site Admin. Authorised personnel who can update role groups and assign investigators within their area or responsibility.
j. Legacy Reporting. Users who can input historical/legacy reports.
k. New DASOR Notification. Air Safety Executive who will receive notification of every DASOR raised.
l. DDH/AM Review Group. Personnel specifically selected by the DDH/AM to exercise their authority in relation to occurrence reporting. It should be noted that although their authority for acting on safety information may be delegated to named individuals, the decisions made on their behalf remain the responsibility of the DDH/AM.
m. ODH/AM Review Group. Personnel specifically selected by the ODH/AM to exercise their authority in relation to occurrence reporting.
Issue 6 31 AL15
MAA_OpAssure_KE_MAN_001 Version_6.15 Jul_2021
OFFICIAL
A 2.4.3. Each Station and Unit requires several specific Role Groups to enable the management of reports assigned to them:
a. Station:
• Occurrence Manager
b. Unit:
• Maintenance
• ATC Supervisor
• DDH/AM Review Group
A 2.4.4. ASIMS contains Information Distribution Lists (Info Dist Lists) for each platform (inc Parachuting and Mal Drop). These lists enable all interested users to be notified when a DASOR is raised for a particular platform. The notification is for information purposes only.
Note: Users can manage their subscriptions to ‘Info Dist List’ from their “My Details” section (see para 2.2) once logged into ASIMS.

Issue 6 32 AL15
MAA_OpAssure_KE_MAN_001 Version_6.15 Jul_2021
OFFICIAL
Part B Reporting an Occurrence

Issue 6 33 AL15
MAA_OpAssure_KE_MAN_001 Version_6.15 Jul_2021
OFFICIAL
B 1. Reporting an Occurrence Overview
B 1.2. Introduction
Fig 5
B 1.1.1. ►Fig 5 details the DASOR lifecycle from submissions (far left) through to closure (bottom right).
a. Report – A report is submitted onto the system.
b. ATM Supervisor Section – On submission all reports with an ATM additional report add are sent to a supervisor role group to complete the ATM supervisor section.
c. Occurrence Manager – On submission all reports are sent to an occurrence manager for review and acceptance.
d. Technical Section – On submission all reports (except those with an ATM or AIRPROX additional report) including those with no additional reports are sent to a maintenance role group to complete the technical section.
e. Investigation – Once a report has been accepted the occurrence manager will send the report for investigation. Whilst under investigation comments can be added to the report and questions asked of users and role groups.

Issue 6 34 AL15
MAA_OpAssure_KE_MAN_001 Version_6.15 Jul_2021
OFFICIAL
f. Occurrence Review Group – Completed Ocurrence Safety Investigations (OSI) are sent to the Occurrence Review Group (ORG).
g. Occurrence Manager Review – Completed Local Investigations (LI) are sent for occurrence manager review.
h. DDH/AM Review – Completed Service Inquirys (SI), ORG’s and occurrence manager reviews are sent for DDH/AM review and closure.
i. ODH/AM Review – Reports not closed by DDH/AM Review are sent for ODH/AM Review and closure. ◄
B 1.1.2. Air Safety occurrences shall be reported in accordance with RA 1410 annex A.
B 1.1.3. The act of reporting includes submission of a report by the reporter and acceptance of the report by an Occurrence Manager (see Part C 2).
B 1.1.4. There are 3 methods of reporting using ASIMS:
a. Log in to ASIMS and create a DASOR from the ASIMS User Home Screen. DII access and a user log on is required.
b. Create a DASOR from the ASIMS Home Page. DII access required, a user log on is not required.
c. Use the DASOR PDF forms. Use if access to DII is not available. A user log on is not required.
Note: If method c is used the PDF forms should be sent to the Flight/Air Safety Office of the station the report is to be raised on to be submitted onto ASIMS.
B 1.1.5. The ASIMS home page is found at https://www.asims.r.mil.uk.
B 1.1.6. The ASIMS PDF forms are found at https://www.gov.uk/government/publications/defence-air-safety-occurrence-report-dasor-forms.
B 1.1.7. Initiate the creation of a DASOR using one of the 3 methods.
B 1.1.8. Complete as many of the fields on the form as possible; fields marked red are mandatory which include:
a. Occurrence Type. Occurrence Type; Event Type; and Service
b. Details of Individual Reporting Occurrence. Rank/Title; Full Name; Job Title; Contact Details; and Was this DASOR generated from an In-form/EMS report.
Note: The reporter details will be automatically populated if logged in but are editable. If the reporter wishes to report anonymously the details should be removed.

Issue 6 35 AL15
MAA_OpAssure_KE_MAN_001 Version_6.15 Jul_2021
OFFICIAL
c. Occurrence Details. Date of Occurrence; Time of Occurrence; Place of Occurrence; Country; Ship/Station/Organisation; and Unit/Squadron/Flight/Site.
Note: Ensure the correct Ship/Station and Squadron/Unit are selected to ensure the DASOR work flow is correct; unless instructed otherwise select your home Ship/Station and Unit/Squadron irrespective of where the occurrence took place.
d. Aircraft Involved. Embarked on ship (when service = RN); Aircraft Registration; and Aircraft Type/Mark.
e. Description of Event. Brief Title; Narrative Description of Event; and Perceived Severity.
B 1.1.9. The reporter should consider the use of the additional reports to provide further information. Select any additional reports that are deemed relevant and complete as many of the fields on the form as possible.
Note: Selecting an additional report will add additional fields for completion in the reporter’s view. For reporters using PDF forms the additional forms are separate to the reporter PDF form.
B 1.1.10. In addition to those identified at Para B 1.1.8 if any additional forms are selected the following mandatory fields are required:
a. If MALDROP form selected: Condition of DZ Surface.
b. If Laser/HP Illumination form selected: Number of Laser(s)/High Powered Light; Light Source Type; Was Laser/Light Eye Protection (LEP) available/used during incident; Fixed/Rotary; Distraction; Glare; Afterimages; and Injury.
c. If Human Fatigue form selected: Start of duty time; Workload in the hour prior to the occurrence; Awake duration; and level of alertness.
d. If SESOR (DE&S use only) selected: Aircraft Repair Category; and Engine Repair Category.
B 1.1.11. Once the fields are complete:
a. Logged in. Select Review Report >> check the details before confirming submission.
b. Not Logged in. Select Submit Report.
c. PDF forms. Send to unit POC, typically the unit Flight/Air Safety Cell or EMS coordinator.
Note: An error message will be displayed if any mandatory fields have not been completed (ASIMS submissions only).
Note: The DASOR reference number should be recorded so that feedback from your local Occurrence Manager can be requested.

Issue 6 36 AL15
MAA_OpAssure_KE_MAN_001 Version_6.15 Jul_2021
OFFICIAL
B 2. Raising a DASOR - Online
B 2.1. Online Reporting
B 2.1.1. Reports can be raised anonymously, without need for an ASIMS account, by selecting the Create New DASOR button from the ASIMS Home Page. Once the report is opened users will need to select the Anonymous Report box to submit an anonymous report. Users can still enter reporter details on anonymous reports and a valid email address must be supplied if the user requires feedback
Fig 6
B 2.1.2. ASIMS account holders may log into ASIMS and select the Create New DASOR button from the Raise a report section of the User Home Screen or the Create New DASOR link from the Menu Bar.

Issue 6 37 AL15
MAA_OpAssure_KE_MAN_001 Version_6.15 Jul_2021
OFFICIAL
Fig 7
B 2.1.3. When you log into ASIMS and raise a report you will receive automatic feedback as the report is progressed through ASIMS. If you raise an anonymous report you will only receive feedback if a valid email address is supplied.
B 2.1.4. Feedback notifications will be received informing you that the status of your report has changed, this feedback is sent when the report is Accepted onto the system and when the report has been Closed. The notification will include a link to the report if the reporter logged into ASIMS when raising the report or a PDF copy of the report if it was raised anonymously.
Note: If an email address is entered when raising a report anonymously the email address supplied will be displayed within the contact details field in the Details of Individual Reporting Occurrence section of the report. This field is visible to all users of ASIMS except those with browser accounts.
B 2.1.5. Selection of Create New DASOR will open the blank DASOR reporter form for completion.
B 2.1.6. As many fields as possible should be completed to provide maximum detail of the event; all fields marked red are mandatory.
B 2.1.7. All free text (narrative fields) should be completed in sentence case i.e. only use capitals at the start of sentences, nouns (names of people, places, the titles of organizations etc. and abbreviations.
Note: Pressing the help icon to the right of the field name, will display help text about the field.

Issue 6 38 AL15
MAA_OpAssure_KE_MAN_001 Version_6.15 Jul_2021
OFFICIAL
B 2.2. Reporter Form Sections
B 2.2.1. Occurrence Type.
a. Occurrence Type: Select the occurrence type for the report dependent on the environment of the event.
• Air (including Parachuting and Maldrop)
• ATC/ABM/ALI
• Maintenance (including Ground Handling and Airworthiness)
• Synthetic (including Simulator and Test DASORs)
• Other (including Support, Logistics, Admin, SESOR)
b. Event Type.
• Accident
• Incident
• Hazard Observation
• Hostile Action/Loss
c. Service: Select the service of the DDH who is likely to be most interested in the occurrence. I.e. the service of the personnel or aircraft exposed to risk. If in doubt, select the Service of those that may reasonably be expected to do something about the risk or as a last resort your own Service.
• RN
• Army
• RAF
• Industry
• Defence
B 2.2.2. Additional Reports. Select any additional reports as appropriate, each tick box will add additional fields for completion. There are 8 additional reports available which are explained in more detail at Part B 3:
• Airprox
• Air Traffic Management
• Bird Strike
• Human Fatigue
• Laser/HP Illumination
• Lightning Strike
• MALDROP
• Parachuting
• SESOR (DE&S use only)
B 2.2.3. Details of Individual Reporting Occurrence. Enter your details, all red boxes are mandatory and must be completed. If the Anonymous Report tick box is selected these fields are not mandatory.
Note: The anonymous report tick box is only available when raising a DASOR when not logged into ASIMS.

Issue 6 39 AL15
MAA_OpAssure_KE_MAN_001 Version_6.15 Jul_2021
OFFICIAL
B 2.2.4. Was this DASOR generated from an In-form/EMS report. Indicate if this issue initially raised using an In-form or EMS report and has been subsequently transferred to ASIMS. Yes/No. If yes then the originating in-form/ems reports serial number is required.
B 2.2.5. Rank or Title & Initials/Name. Enter details of Aircraft Commander and Authorising Officer if known or relevant.
B 2.2.6. Injuries. Enter any injuries and/or deaths of personnel – Inclusion of these details should be considered as potentially sensitive, particularly at the initial stage, and can be communicated separately to the Occurrence Manager/investigator(s).
Note: Injuries are defined in the Reporting of Injuries, Diseases and Dangerous Occurrence Regulations (RIDDOR) 2013 Regulation 4: http://www.hse.gov.uk/riddor/ and http://www.legislation.gov.uk/uksi/2013/1471/contents/made
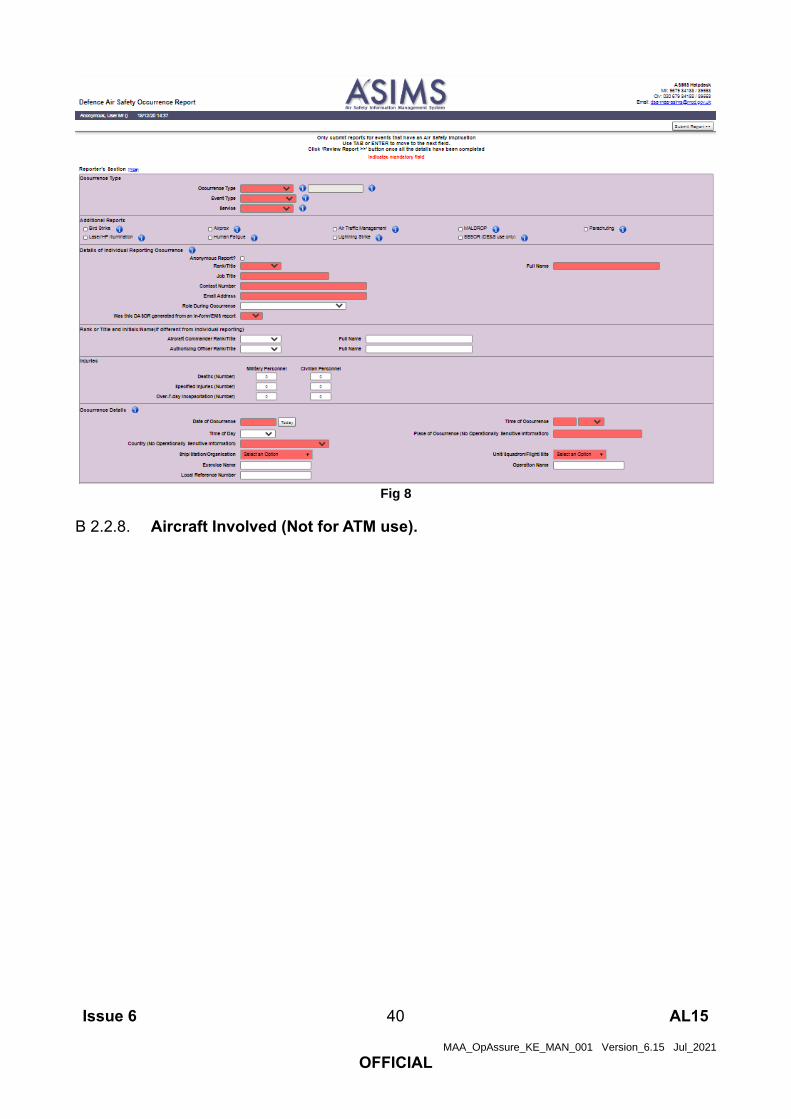
B 2.2.7. Occurrence Details
a. Date of Occurrence: Enter the date of occurrence manually or use the calendar. Select the Today button to enter the current date.
b. Time of Occurrence: Enter the time of the occurrence manually or using the drop down (note the drop-down values can be amended once selected), not the time you submitted the report, select Local or Zulu as appropriate.
c. Time of Day: Enter the light level at the time of the occurrence.
d. Place of Occurrence: Enter the location of the occurrence, station/unit or building.
e. Country: Select the country in which the occurrence occurred.
f. Ship/Station/Organization: Select your ship/station/organization from the drop-down list. Note: If the report is being raised by DE&S (acting within their duty holder facing capacity) then an appropriate FLC ship/station/organization, related to the duty holder being notified of the occurrence, should be selected.
g. Unit/Squadron/Flight: Select your Unit/Squadron/Flight from the drop-down list. Note: If the report is being raised by DE&S (acting within their duty holder facing capacity) then an appropriate FLC unit/squadron/flight, related to the duty holder being notified of the occurrence, should be selected.
h. Exercise Name: Enter the exercise name if applicable.
i. Operation Name: Enter the Operation name if applicable.
j. Local reference number: Enter your local ref or job card number if applicable.
Issue 6 40 AL15
MAA_OpAssure_KE_MAN_001 Version_6.15 Jul_2021
OFFICIAL
Fig 8
B 2.2.8. Aircraft Involved (Not for ATM use).

Issue 6 41 AL15
MAA_OpAssure_KE_MAN_001 Version_6.15 Jul_2021
OFFICIAL
a. Embarked in ship: Confirm if the air platform is operating from (stationed) on-board a ship at the time of the occurrence.
b. Aircraft Registration: Enter the aircraft registration number (or part of the registration), aircraft type or mark and select the aircraft from the list. Enter N/A if the registration is not known.

Issue 6 42 AL15
MAA_OpAssure_KE_MAN_001 Version_6.15 Jul_2021
OFFICIAL
Note: UK Military Registrations in the following 5-character format (No spaces): LetterLetterNumberNumberNumber; UK Civil Registrations in the following 6-character format (No Spaces): G-LetterLetterLetterLetter.
c. GCS/RPAS Serial Number: If the aircraft registration relates to an RPAS where only one registration is recorded in the MAR then an additional box is displayed. This field is used to record the Ground Control Station and the RPAS Serial No of the specific aircraft being reported.
d. Aircraft Type/Mark: Select the relevant Aircraft Type/Mark. If the Aircraft registration selected is on the MAR then this field will auto-populate.
Note: For MALDROP reports select MALDROP, for Parachuting reports select Parachuting, if no aircraft was involved select No Aircraft.
e. Other (Please State): Free text field to detail aircraft if it does not appear in the Aircraft Type/Mark list.
Note: If the Air Traffic Management (ATM) additional report has been selected these fields will be greyed out and should not be completed, there is field for this information within the ATM section.
B 2.2.9. Meteorological & Environmental Conditions. Complete as much information as possible; the more information contained within the report the better discriminatory factors can be identified.
B 2.2.10. Flight Details. This part of the DASOR form will only become active if you have selected the Occurrence Type as Air. If these are available to you, complete as many of the boxes as possible.
B 2.2.11. Briefed Task. Enter the details of the task you were undertaking.
B 2.2.12. Description of Event.
a. Brief Title: Enter a brief title of the event; try to describe the Air Safety issue, using unambiguous language appropriate to the risk (neutral - not alarmist). Please use ‘Sentence case’ and expand any abbreviations.
Warning: This field is not to be used to describe the task being undertaken at the time of the occurrence.

Issue 6 43 AL15
MAA_OpAssure_KE_MAN_001 Version_6.15 Jul_2021
OFFICIAL
b. Narrative Description of Event: Describe clearly and as objectively as you can:
• All the facts pertinent to the Air Safety occurrence,
• Your view on how the occurrence developed,
• How the occurrence could have been worse,
• Any mitigations that worked,
• Those mitigations that failed,
• Any proposed solutions.
Warning: You should NOT attribute blame, include personal information (Names, addresses etc.), be inflammatory or opinionated; or include information that is above OFFICIAL.
B 2.2.13. Perceived Severity of Occurrence.
a. A - High. There are few or no remaining barriers that could credibly have prevented a loss of life or significant injury, leaving outcome to chance.
b. B - Medium. The remaining barriers are weak or can be missed, leaving a clear path to loss of life or significant injury.
c. C - Low. The remaining barriers appear adequate in the protection they offer against loss of life or significant injury.
d. D - Negligible. There is no readily conceivable means through which this occurrence could have led to a loss of life or significant injury.
B 2.2.14. Your assessment should attempt to reflect the risk you faced, or another individual in your position may face. Do not make provision for luck or comparison with other risks.
Note: Should the reported occurrence involve loss of life or RIDDOR reportable injury, A - High is to be selected.
B 2.3. Review and Submit
B 2.3.1. If the report is being submitted anonymously there is no ability to review the report prior to submission. Ensure all fields have been completed and spell checked then select the Submit Report button and move to B 2.3.8.
B 2.3.2. Once satisfied all relevant fields are complete and spell checked select the Review Report >> button located in the top right-hand corner of the screen. You will then have a chance to review the report prior to.
B 2.3.3. At this point the report is at Pre-Submit status, you should review the report to ensure all the data entered is correct and you are satisfied with the content, at this point the report can still be deleted if required.

Issue 6 44 AL15
MAA_OpAssure_KE_MAN_001 Version_6.15 Jul_2021
OFFICIAL
Note: If you wish to track the progress of the report then select the Follow Report button or make a note of the Report Reference to search for the report later. Followed reports are included in your Followed report total on the User Home Screen.
B 2.3.4. If you have any relevant attachments (photos, film footage, documents etc.) they can be added to the report at this stage. There is a file size limit of 10MB so if you have a large film, please split it down into multiple short clips and/or compress the file. Navigate to the Attachments tab, select the Browse button to locate the file then select Attach File. To remove an attachment, please contact the ASIMS Helpdesk.
Note: If the report is being raised by DE&S (acting within their duty holder facing capacity) and they have technical information that should be added to the report then a PDF version of the technical section of the report, see Para B 1.1.6, should be completed and added as an attachment. The occurrence manager should be made aware of this attachment and requested to update the technical tab of the report with its contents.
B 2.3.5. Once satisfied the report contains all available information select Sign and Submit Report.
B 2.3.6. A message will appear to confirm submission of the report.
Press OK to submit the report.
Fig 9
Note: If you wish to receive automatic feedback about the progress of your report then an email address must be provided when submitting a report. If an email address is supplied the reporter will then receive an email notification when the report is accepted by the occurrence manager and when the report is closed. For reports submitted anonymously a pdf copy of the report will be included in the notification, for users who logged into ASIMS and submitted the report a link to the report will be included in the notification.
Note: If the report has been submitted anonymously a message will be displayed stating the report has been submitted successfully and display the report reference. Make a note of the Report Reference to search for the report later so its progress can be tracked, an ASIMS account will be required.

Issue 6 45 AL15
MAA_OpAssure_KE_MAN_001 Version_6.15 Jul_2021
OFFICIAL
Fig 10
B 2.3.7. The report has now been submitted into ASIMS and is pending acceptance by the Occurrence Manager; it will not be visible to the wider ASIMS community until accepted.

Issue 6 46 AL15
MAA_OpAssure_KE_MAN_001 Version_6.15 Jul_2021
OFFICIAL
B 3. Additional Reports
B 3.1. Bird Strike
B 3.1.1. All wildlife strikes (including bird strikes) must be recorded using this form whether the Pilot was aware of the strike at the time and irrespective of whether any airframe damage was sustained. Bird remains must be identified locally or with use of a specialist bird remains identification organization.
B 3.1.2. Complete as many fields as possible to provide maximum detail of the event.
Fig 11
B 3.1.3. Form Sections:
a. Flight or Sortie Details. Lat; Long; HISLs; Airborne Radar; Ambient Light; Weather.
b. Bird Strike Details. Crew Injury; Aircraft Damage Category; Impact Point; Damage Point; Impact Point 2; Damage Point 2; Size of Bird; Bird Remains Collected; Remains Identified By; Bird Species; Bird Numbers.
B 3.2. Airprox
B 3.2.1. An Airprox form is to be raised by the Aircraft Commander whenever an Airprox is deemed to have occurred.
B 3.2.2. Pilot Initial Radio Telephony (RT) Report.
a. An initial RT report, prefixed ‘Airprox’, must be transmitted to the controlling Air Traffic Service Unit (ATSU) or;
b. If not in receipt of such a service, to the nearest appropriate ATSU or;
c. If it is not possible to make an initial report by RT, it must be made expeditiously to an appropriate ATSU as soon as possible after landing.
d. On landing a DASOR, containing full details of the incident, must be submitted.
B 3.2.3. Notification via Other Party. An Aircraft Commander who is advised that they have been involved in an Airprox, irrespective of whether they were aware of the occurrence or considered that it constituted an Airprox, must submit a DASOR.

Issue 6 47 AL15
MAA_OpAssure_KE_MAN_001 Version_6.15 Jul_2021
OFFICIAL
B 3.2.4. Other Nations’ Aircraft. For an Airprox involving other nations’ military Air Systems which are under the control of or hosted by a UK Service unit or Contractor Flying Organization a DASOR must be submitted by the controllers or hosts respectively.
B 3.2.5. ATSU Report and Actions. ATSU Airprox reporting and responses to reported Airprox must be completed using a DASOR. Appropriate preservation of Air Traffic Control (ATC) data must be undertaken iaw the Air Navigation Order (ANO) and CAP 670.
B 3.2.6. Swanwick (Mil) Radar Analysis Cell (RAC) Actions. For Airprox in UK Airspace only, Swanwick (Mil) RAC will attempt to identify the reported Air System either military or civil. The UK Airprox Board (UKAB) will guide Swanwick (Mil) RAC on the nature and extent of action required and advise when tracing action may be terminated.
B 3.2.7. Complete as many fields as possible to provide maximum detail of the event.
B 3.2.8. Form Sections:
a. Reporting aircraft description:
(1) Colour scheme and external lighting. Free text box to identify the colour scheme and external lighting (strobes, HISLs, nav lights etc).
(2) Radio call sign; In communication with; Type of ATC service; RT frequency; SSR transponder.
(3) Classification of flight. Including whether in a formation.
(4) Flight Rules at time of Airprox. Including whether a CANP was filed and low flying booking number.
(5) Position of Airprox; Aircraft Heading.
(6) Altimeter setting; Aircraft attitude.
(7) Flight weather conditions at time of Airprox.
b. Description of other aircraft seen. Type, high/low wing, number of engines; Radio callsign, registration; Markings, colour, lighting; Aircraft attitude – other details.
c. Description of Airprox:
(1) First sighting distance/radar/TCAS/TAS contact; Minimum horizontal and vertical separation at time of Airprox; Form of avoiding action taken, if none, state reason; Assessment of risk of collision; Other relevant factors; Airborne Collision Avoidance System.
(2) How did you report the Airprox, or hear about the Airprox report.
d. Diagrams of the Airprox.

Issue 6 48 AL15
MAA_OpAssure_KE_MAN_001 Version_6.15 Jul_2021
OFFICIAL

Issue 6 49 AL15
MAA_OpAssure_KE_MAN_001 Version_6.15 Jul_2021
OFFICIAL
Fig 12
B 3.3. Air Traffic Management
B 3.3.1. All occurrences relating to ATM, Air Operations, and Air Land Integration must use this form to report ATM occurrences. This form must also be used on all occasions when a Runway or Aerodrome Movement Area (AMA) Incursion has occurred.
B 3.3.2. Complete as many fields as possible to provide maximum detail of the event.
Note: The Air Traffic Management additional report can only be selected for reports with Occurrence Type of ATC/ABM/ALI or Synthetic.
Note: If the Air Traffic Management additional report is selected the user cannot add Maldrop or Parachuting additional reports to the same DASOR.

Issue 6 50 AL15
MAA_OpAssure_KE_MAN_001 Version_6.15 Jul_2021
OFFICIAL
Fig 13
B 3.3.3. Form Sections:
a. Category of Occurrence. Is this a mandatory report and/or an Airprox?
b. Occurrence Details.
1) Location of Event; Airspace Classification; Runway in use (Terminal only).
2) Callsign; Type; SSR; Height/Altitude/FL/NMC; Pressure Setting; Type of Service; Hdg or Track; Climbing/Descending/Level; Under Control of (Unit).
3) RT Frequency; Radar Equipment in Use; Equipment Serviceability; Number of Aircraft Involved; Number of Aircraft on Frequency.
4) Were the aircraft co-ordinated; Was traffic information given by you; Was avoiding action given by you; Was prescribed separation lost; Did either pilot receive a TCAS RA.
5) Minimum vertical separation and minimum horizontal separation.
c. Personnel Factors. Shift start time; time since last break; days since last day off; workload; task difficulty for controller at time of occurrence.
d. Runway Incursion. Details; aircraft or vehicle type; specific vehicle details. Only available if Available tick box selected.

Issue 6 51 AL15
MAA_OpAssure_KE_MAN_001 Version_6.15 Jul_2021
OFFICIAL
e. ATM Equipment Failures. ATS Facility; duration of outage; equipment location; equipment type; equipment status; facility configuration; previous defects/occurrences; operational impact.
B 3.4. MALDROP
B 3.4.1. This form must be raised as follows:
a. The Aircraft Commander is responsible for raising a MALDROP (including Hazard /Observation) if this occurs while the materiel load is still within the aircraft or on the point of dispatch.
b. Where the controller of the Drop Zone (DZ) in which materiel and/or personnel is being delivered is the Drop Zone Safety Officer (DZSO) or the Aerial Delivery Non-Commissioned Officer (ADNCO), that individual is responsible for raising a MALDROP and preserving any evidence.
c. In all other cases, when service persons control DZs for the purpose of receiving re-supply of materiel, the senior person present is responsible for raising notification of a MALDROP through their respective chain of command.
B 3.4.2. Complete as many fields as possible to provide maximum detail of the event.
Note: If the Maldrop additional report is selected the user cannot add Air Traffic Management or Parachuting additional reports to the same DASOR. Also, when the Maldrop additional report is select the following fields are automatically set on the DASOR; Aircraft Registration = N/A, Aircraft Type/Mark - Maldrop
B 3.4.3. The following mandatory fields are marked in red and must be completed:
a. Condition of DZ Surface. Tick all that apply.

Issue 6 52 AL15
MAA_OpAssure_KE_MAN_001 Version_6.15 Jul_2021
OFFICIAL

Issue 6 53 AL15
MAA_OpAssure_KE_MAN_001 Version_6.15 Jul_2021
OFFICIAL
Fig 14
B 3.4.4. Form Sections:
a. Drop Zone. Type of Occurrence; DZ designation; DZ elevation; direction of run in; surface windspeed; wind direction.
b. Condition of DZ Surface. Soft; hard; wet; stones; grass-covered; sand; smooth; uneven.
c. Comments on Despatch, Landing and MALDROP (other than from reporter). Commentator details; Brief description.
d. Stores/Parachute Details. Description of stores; main parachute used; extractor parachute used; platform or container used.
e. Additional Information.
B 3.5. Parachuting
B 3.5.1. The responsibility for reporting parachute occurrences normally rests with the DZSO controlling the DZ on which the occurrence occurs. However, on those occasions when a Parachute Malfunction Party (PMP) has been activated in support of a major airborne exercise, then Officer Commanding (OC) PMP will assume reporting responsibility.
B 3.5.2. Complete as many fields as possible to provide maximum detail of the event.
Note: If the Parachuting additional report is selected the user cannot add Air Traffic Management or Maldrop additional reports to the same DASOR. Also, when the Parachuting additional report is select the following fields are automatically set on the DASOR; Aircraft Registration = N/A, Aircraft Type/Mark - Para

Issue 6 54 AL15
MAA_OpAssure_KE_MAN_001 Version_6.15 Jul_2021
OFFICIAL
Fig 15
B 3.5.3. Form Sections:
a. Drop Zone Details. Provide details of the DZ.
b. Additional Aircraft Details. Provide additional details of the aircraft role fit, attitude, sortie timings and despatcher complement and qualifications.
c. Parachutist Details. Select the Add Parachutist button to display additional fields for completion relating specifically to an individual parachutist during the event. Complete as required the available sections:
• Previous experience
• Details of Injury
• History of training and descents
• Details of subject descent to deployment
• Equipment load configuration
• Stick details
• Deployment of Parachute

Issue 6 55 AL15
MAA_OpAssure_KE_MAN_001 Version_6.15 Jul_2021
OFFICIAL
Fig 16
Note: Multiple parachutists can be added to the form by selecting the Add Parachutist button again.
d. Equipment. Provide details of the parachute equipment used.
B 3.6. Laser/HP Illumination
B 3.6.1. For all aviation occurrences involving a Laser or High-Power illumination of an Air System.
B 3.6.2. Complete as many fields as possible to provide maximum detail of the event.
B 3.6.3. The following mandatory fields are marked in red and must be completed:

Issue 6 56 AL15
MAA_OpAssure_KE_MAN_001 Version_6.15 Jul_2021
OFFICIAL
a. Number of Laser(s)/High Powered Light. 1 to 10.
b. Light Source Type. What colour was the light?
c. Was Laser/Light Eye Protection available/used during incident. Yes or No.
d. Approx Duration of Laser(s) on (seconds).
e. Fixed/Rotary.
f. Distraction. Yes or No.
g. Glare. Yes or No.
h. Afterimages. Yes or No.
i. Injury. Yes or No.
Fig 17
B 3.6.4. In addition to the mandatory fields identified in Para 3.6.2 there is a field to identify the approximate duration of the laser in seconds and a free text field to describe any medical consultation undertaken/intended as required.
B 3.7. Human Fatigue
B 3.7.1. When Human Fatigue has caused or contributed to an aviation occurrence.
B 3.7.2. Complete as many fields as possible to provide maximum detail of the event.
B 3.7.3. The following mandatory fields are marked in red and must be completed:
a. Time Zone. Indicate the time zone the times are recorded in.
b. Start of duty time. Provide a date and time the duty started.
c. Workload in the hour prior to the occurrence? What level of workload was undertaken in the hour before the event: High; Medium; Low.
d. Awake. Part of the sleep diary, duration awake prior to the event.

Issue 6 57 AL15
MAA_OpAssure_KE_MAN_001 Version_6.15 Jul_2021
OFFICIAL
e. Level of alertness. How alert did you feel immediately before the event? Select the most appropriate option.
B 3.7.4. Form Sections:
a. Human Fatigue. Provide details of the duty, workload and sleep cycle. More than one sleep cycle can be added by selecting the Add sleep cycle button. A sleep cycle can be removed by selecting the Remove sleep cycle button.
b. Level of alertness. Identify how alert you were immediately before the event and specify whether at any point you fell asleep or were told you appeared fatigue.
c. Your Health. Provide an indication of your health at the time of the event.
d. Other factors. Provide details of other potential factors.
e. Reporting Form – to generate individual or investigator’s Fatigue form. Did another person appear to suffer from fatigue?

Issue 6 58 AL15
MAA_OpAssure_KE_MAN_001 Version_6.15 Jul_2021
OFFICIAL
Fig 18
B 3.8. Lightning Strike
B 3.8.1. When a lightning strike has caused or contributed to an aviation occurrence.
B 3.8.2. Complete as many fields as possible to provide maximum detail of the event.

Issue 6 59 AL15
MAA_OpAssure_KE_MAN_001 Version_6.15 Jul_2021
OFFICIAL
Fig 19
B 3.8.3. Provide details about the conditions at the time of the event including the terrain below, the aircraft altitude and configuration and meteorological conditions.
B 3.8.4. Provide details about the lightning strike including the loudness of the bang, the brilliance and position of the flask, whether there was any effect on the aircraft and/or crew.
B 3.8.5. Provide a description/position of the strike on the aircraft once on the ground. This is an initial description only; full details of any damage are to be provided by maintenance staff in the technical section of the report.
B 3.9. SESOR (DE&S use only)
B 3.9.1. A SESOR is used to communicate awareness of a potential Air Safety hazard between DE&S Delivery Teams. This form is only to be used by DE&S personnel. This supports the DE&S Safety and Environmental Protection Leaflet. Further information can be found in the COM(Air) Policy Instruction 04 (COMPI 04) and para G3.
B 3.9.2. Additional form used by DE&S personnel only. A Significant Equipment Safety Occurrence Report (SESOR) is a report that communicates awareness of a potential equipment air safety hazard between DE&S Delivery Teams.
B 3.9.3. This additional form is covered in detail in Part G of this Manual.

Issue 6 60 AL15
MAA_OpAssure_KE_MAN_001 Version_6.15 Jul_2021
OFFICIAL
Part C Progressing a DASOR

Issue 6 61 AL15
MAA_OpAssure_KE_MAN_001 Version_6.15 Jul_2021
OFFICIAL
C 1. Progressing a DASOR Overview
C 1.1. Introduction
Fig 20
C 1.1.1. The appropriate personnel within the ADH/AM chain need to read and assess every DASOR to ensure that it is understood, investigated appropriately, the relevant Air Safety lessons are identified, and recommendations are made and implemented to prevent recurrence of a similar (or worse) event taking place.
C 1.1.2. To achieve this the report needs to be made visible to the wider community and further information, in addition to the reporter’s narrative, included from related SMEs so that an investigation can be carried out.
C 1.1.3. This section explains the staffing process for a DASOR through to investigation. In general terms, this is as follows:
a. An assigned Occurrence Manager will take ownership of the DASOR and accept the report into the system.
b. The DASOR is distributed to interested parties in order to provide early notice of the event. This could include but is not limited to: aircrew; maintainers; commanders; equipment delivery teams; aviation medical staff; the CAA; industry partners.
c. Specialist input will be requested from Maintainers, ATM Supervisors and Commentators as necessary.

Issue 6 62 AL15
MAA_OpAssure_KE_MAN_001 Version_6.15 Jul_2021
OFFICIAL
d. An investigator will be assigned to carry out an investigation into the event.

Issue 6 63 AL15
MAA_OpAssure_KE_MAN_001 Version_6.15 Jul_2021
OFFICIAL
C 2. Occurrence Manager Role
C 2.1. Introduction
Fig 21
C 2.1.1. The Occurrence Manager is responsible for managing the report from submission, through investigation and on to the ADH/AM Review process.
C 2.1.2. The Occurrence Manager accepts and distributes the DASOR making it visible to all ASIMS users, in line with the timelines defined in RA1410.
Warning: If an Occurrence Manager does not accept and distribute a DASOR within the timelines defined in RA1410 the report will be automatically accepted by ASIMS and distributed to the internal info distribution list only for the platform associated with the report. In this instance the report has not been appropriately checked prior to distribution and may not reach all intended targets (see Part C 2.8 for required Occurrence Manager recovery actions).
C 2.1.3. Once the Technical or ATM Supervisor sections of the report, as required, have been completed the occurrence manager identifies the level of investigation, selects the investigators and sends the report for investigation.
C 2.1.4. Every DASOR submitted will be assigned to an Occurrence Manager role group following submission by the Reporter. As a member of an Occurrence Manager role group a notification will be received.
C 2.1.5. The notification will contain a link to the DASOR and a copy of the brief title. Selecting the link will open that specific report in the default web browser.

Issue 6 64 AL15
MAA_OpAssure_KE_MAN_001 Version_6.15 Jul_2021
OFFICIAL
C 2.1.6. The report will be added to the associated Occurrence Manager role group members Requiring Action and Managed list in the Reports Summary section of the User Home Screen.
C 2.1.7. All the reports that you are acting as an Occurrence Manager for can be viewed by selecting the number of reports in the Managed column of the DASORs row in the Reports Summary section on the User Home Screen. This will display the related DASORs in a results table. Selecting a row of the table will open the respective DASOR in a new window.
C 2.2. General Responsibilities
C 2.2.1. The Occurrence Managers’ general responsibilities include but are not limited to:
a. Active promotion of Air Safety reporting.
b. Staffing the DASOR, ensuring the Reporter, Technical and ATM Supervisor sections are fully completed, and all personal and operationally sensitive information is removed.
c. Where associated DASORs, SONs, etc exist, they must be linked to the originating DASOR.
d. Accept and distribute the report in accordance with RA 1410 Annex A.
e. Select the type of Investigation required and manage the onward flow of the report to the identified Investigator(s).
f. For LI level investigations review the investigation findings and recommendations before onward transmission to DDH/AM Review.

Issue 6 65 AL15
MAA_OpAssure_KE_MAN_001 Version_6.15 Jul_2021
OFFICIAL
C 2.3. Occurrence Manager Workflow
Fig 22
C 2.3.1. The Occurrence Manager workflow and considerations are shown above.
Warning: The initial steps through to the acceptance of the report need to be completed in line with the guidance material in RA1410.
C 2.3.2. Given the limited time available to the Maintenance or ATM Supervisor role groups the report may contain only scant information at the point of acceptance.
C 2.3.3. The Occurrence Manager will then manage the onward flow of the report to the identified Investigator.
C 2.4. Occurrence Manager Checks
C 2.4.1. Once a notification has been received for a new report raised it needs to be reviewed by an Occurrence Manager before it can be accepted and distributed.
C 2.4.2. DASORs are broken down into sections and each section is displayed in its own tab. If you need to edit the data within a tab, navigate to the tab and then select the Edit button. If an edited tab is unsaved when navigating to a different tab an alert will warn that data may be lost; press Cancel to go back to select the Save button.

Issue 6 66 AL15
MAA_OpAssure_KE_MAN_001 Version_6.15 Jul_2021
OFFICIAL
C 2.4.3. Check each tab for accuracy and ensure that all drop down boxes and tick boxes have been set correctly, if any have been missed or are incorrect then they should be amended or set accordingly. The more data that is captured on each report the better analysis that can be performed and the more proactive we can be in safety management. Note Para C 2.3.3.
Warning: All free text sections of the DASOR must clearly describe the subject matter and must be completed in ‘Sentence case’. They should not attribute blame, contain personal information, be inflammatory, or be opinionated; and must not contain material above Official (check attachments images closely).
C 2.4.4. As an Occurrence Manager, you have the authority to amend the report for spelling mistakes and minor grammatical changes, but not to alter its meaning without the consent of the report originator.
Warning: Undue amendment or pre-processing of reports is detrimental to Just Culture and Reporting Culture.
C 2.4.5. The following sections should be checked:
a. The Summary and Report Details tab must be filled out as fully as possible ensuring all details pertinent to the occurrence are captured:
• Occurrence Type, Event Type and Service have been completed in accordance with MAA 02 (Glossary of Terms).
• The Brief Title must clearly describe the Air Safety issue, using unambiguous language appropriate to the risk (neutral - not alarmist). The title should be written in ‘Sentence case’ and expand any abbreviations.
• The ‘Narrative Description of Event’ must clearly describe what aspect of Air Safety has been or could have been compromised; it must not: attribute blame, contain personal information, be inflammatory or opinionated; and must not contain material above Official.
Note: The originator may be contacted for further information. Changes to the narrative should only be made with the reporter’s permission.
b. The Technical or ATM Supervisor tab may not contain any details at this point but can be updated throughout the investigation process prior to DDH/AM review. If the technical section is irrelevant to the occurrence, e.g. for a laser illumination event, the phrase: ‘No work required’ is to be entered in the Investigation and Rectification Work Carried Out and Why text box.
c. The Attachments tab should not contain any attachments above Official.

Issue 6 67 AL15
MAA_OpAssure_KE_MAN_001 Version_6.15 Jul_2021
OFFICIAL
C 2.5. Occurrence Manager Tab Completion
Fig 23
C 2.5.1. Once the report has been reviewed the Occurrence Manager tab has to be completed to identify who will be managing the report, indicate the action being performed and identify the ODH/equivalent AM.
C 2.5.2. Select the Occurrence Manager tab in the respective report to access the Occurrence Manager form fields.
C 2.5.3. To complete the Occurrence Manager tab, select the Edit button to enable write access to the tab fields.

Issue 6 68 AL15
MAA_OpAssure_KE_MAN_001 Version_6.15 Jul_2021
OFFICIAL
Fig 24
C 2.5.4. Complete as many fields as possible to provide maximum detail that is known at the time of acceptance. The following mandatory fields are marked in red and must be completed:
a. Further Action. Further Action; Investigation Type.
b. Investigation Type. Can be left at TBD for the purposes of accepting the report.
c. Operating Duty Holders or Aircraft Operating Authorities. ODH/AM.
C 2.5.4. The following fields are required fields and are identified with a red asterisk, these must be completed prior to sending the report for investigation:
a. FOD Related, Age of Report.
C 2.6. Occurrence Manager Tab Sections
C 2.6.1. Occurrence Manager Details.
a. Prime DASOR for Occurrence. By default, all reports are prime reports. If the report is the only report for this occurrence, then it should remain ticked. If this occurrence has already been reported by another party, then the Occurrence Manager should liaise with the Occurrence Manager(s) of the other reports and a decision made as to which report will be processed as the prime. All other reports should have the selection unticked and be linked to the prime report (see Part C 2.13).

Issue 6 69 AL15
MAA_OpAssure_KE_MAN_001 Version_6.15 Jul_2021
OFFICIAL
b. Occurrence Manager details. Rank/Title; Full Name; Job Title; Contact Details.
Note: These fields will be automatically populated with the details of the first person who edits the tab. These details can be changed if they do not reflect the person who will be managing the report.
c. Occurrence Manager Notes. A free text box to be used as required for report related notes by the Occurrence Manager.
C 2.6.2. Further Action.
a. Further Action. Select whether the report is Ongoing or whether Nil Further Action is required.
Note: Select Ongoing unless this is a non-prime report and is going to be closed.
b. Investigation Type. Select the investigation type as required:
• TBD
• LI
• OSI
• SI
Note: Select TBD if the level of investigation is not known at the acceptance stage in order to accept and distribute the report. This can be changed later when it has been decided what type of investigation is required.
c. DG DSA Convened. A check box used to identify an OSI or SI has been convened by the Director General of the DSA; select as required.
d. Transferred to INForm. Used to indicate if the issue identified is not air safety related and is going to be managed by the INForm process. The report still needs to be accepted before the report can be progressed. Note, if the tick box is selected then an INForm serial number must be supplied.
e. Investigators. Used to identify individuals to be assigned as investigators for the report.
C 2.6.3. Operating Duty Holders or Aircraft Operating Authorities.
a. ODH/AM. Select the appropriate ODH/AM for this occurrence
b. Other ODH/AM operating this aircraft. Select any other ODH/AM who may also be operating this aircraft.

Issue 6 70 AL15
MAA_OpAssure_KE_MAN_001 Version_6.15 Jul_2021
OFFICIAL
C 2.6.4. Additional Information.
a. FOD Related. Indicate if the DASOR is related to a FOD occurrence.
b. Age of Report. Select the appropriate age of the report:
• 1st – First Age Reports focus on issues with things.
• 2nd – Second Age Reports focus on issues with them.
• 3rd – Third Age Reports focus on issues with me & us.
C 2.6.5. Reports. Record any other actions performed or identify reports raised outside of ASIMS. This does not need to be completed to accept and distribute the report; the details can be added later. Additional, non-technical, reports can be added by selecting the ‘+’ button:
• F765X
• H&S
• STANEVAL Review
• Task Audit
• Contract Amendment
• Request for Change
• Inform
• MEMS
• Other
Note: If an additional report is added incorrectly it can be removed by selecting the ‘–’ button.
C 2.6.6. Assessed Severity. By default, this field is populated with the reporter’s perceived severity. Occurrence Managers can change this value to the assessed severity. If changed a justification needs to be added.
C 2.6.7. Once satisfied the relevant fields are complete select the Save button located in the top right-hand corner of the tab.
C 2.7. Report Acceptance
C 2.7.1. Once the contents of the report have been checked and the Occurrence Manager tab completed the report needs to be accepted and distributed to the relevant information addressees. This process will formally accept the report into ASIMS and make it viewable to all users, sending an email notification to all interested parties.
C 2.7.2. Open the Distribution tab of the DASOR and select the show link next to the Info Addressees heading. This will display the Info distribution options, expanded automatically for the aircraft type identified within the report. If the ATM additional report has been selected, then the list will be opened at the No Aircraft entry.
C 2.7.3. The 01. Internal – Info Dist and 02. External- Info Dist entries, if available, are pre-selected and should always be selected for the aircraft type identified within the report. Optionally select any other entries pertinent to the type of report raised.

Issue 6 71 AL15
MAA_OpAssure_KE_MAN_001 Version_6.15 Jul_2021
OFFICIAL
Role Group Example of when to use and who is notified
01. Internal – Info Dist Aircraft Type
Selected for all reports. Notifies interested users (with an ASIMS account) that a report has been raised for a specific aircraft type.
02. External- Info Dist Aircraft Type Selected for all reports. Notifies interested users (without an ASIMS account) that a report has been raised for a specific aircraft type and users receive a PDF copy of the report.
03. and here if Ground Occurrence When a report has been raised for a ground occurrence. Notifies interested users (with an ASIMS account).
04. and here if Wildlife Strike When a report has been raised that involves wildlife interaction, including domestic animals other than birds e.g. horses, rodents, swarms of insects. Automatically selected if the Bird Strike additional report is selected. Notifies interested users (with an ASIMS account).
05. and here if Airprox When a report has been raised that involves an Airprox. Automatically selected if the Airprox additional report is selected. Notifies interested users (with an ASIMS account) and the UK Airprox board for UK based occurrences.
06. and here if ATM Occurrence When a report has been raised that involves Air Traffic Management, Air Operations or Air Land Integration. Automatically selected if the Air Traffic Management additional report is selected. Notifies interested users (with an ASIMS account) and Aquilla.
07. and here if CAA MOR/SARG When a report is raised on a civilian registered, military owned or flown aircraft. Notifies the CAA by sending a PDF copy of the report.
08. and here if Uncharted Obstruction When a report is raised that contains the details of an obstruction that is not currently displayed on military published flying charts. Notifies the Defence Geographical department.

Issue 6 72 AL15
MAA_OpAssure_KE_MAN_001 Version_6.15 Jul_2021
OFFICIAL
09. and here if SESOR Only to be used when the DE&S SESOR additional report is selected. Notifies selected DE&S personnel.
10. and here if PJHQ When PJHQ are required to be notified of an occurrence. Notifies PJHQ personnel.
11. and here if Ground Equipment When a report has been raised that involves a piece of ground equipment. Notifies interested users (with an ASIMS account).
12. and here if Armament When a report has been raised that involves aircraft armament. Notifies interested users (with an ASIMS account).
13. and here if perceived Capability shortfall (knowledge and/or equipment)
When a report is linked to a shortfall in Capability (both equipment and underlying knowledge). Notifies Air Capability department.
C 2.7.4. Once all the required entries have been chosen, select the Accept and Send For Info button, located at the bottom of the screen. This will accept the report and send a notification to every user who is a member of the Internal Distribution lists selected containing a link to the report. A PDF version of the report is sent to every user in the External distribution list selected.

Issue 6 73 AL15
MAA_OpAssure_KE_MAN_001 Version_6.15 Jul_2021
OFFICIAL
Fig 25

Issue 6 74 AL15
MAA_OpAssure_KE_MAN_001 Version_6.15 Jul_2021
OFFICIAL
C 2.8. Actions following Auto-Acceptance
C 2.8.1. If a report has been auto-accepted by ASIMS the following occurs:
a. The report becomes viewable by all ASIMS users.
b. The report will be distributed to the platform associated internal info distribution list. All members of this distribution list will receive a notification which will contain a link to the DASOR.
c. A comment will be added by Mr User Anonymous stating “Report automatically accepted”
d. The name ‘Mr User Anonymous’ will be used in the Actions section of the Report Admin tab to indicate that the report was auto-accepted.
e. A notification will be sent to all members of the occurrence managers role group informing them the report has been auto-accepted.
Fig 26
Warning: The report has not been appropriately checked prior to distribution and may not reach all intended targets.
C 2.8.2. As soon as possible an Occurrence Manager is to carry out the tasks detailed in Parts C 2.4 to C 2.7 inclusive.
Issue 6 75 AL15
MAA_OpAssure_KE_MAN_001 Version_6.15 Jul_2021
OFFICIAL
C 2.9. Send for Action
C 2.9.1. The send for action function is used to request selected role groups to action the Technical or ATM Supervisor tabs of a report and will:
a. Open a Technical or ATM Supervisor section if required when one was not opened as part of the original report workflow (i.e. a Technical Section may be required for an ATM report if the occurrence relates to a piece of ATM equipment).
b. Send a reminder notification to the respective Maintenance or ATM Supervisor role groups if they have not populated the Technical or ATM Supervisor sections of the report.
c. Add the report to the Requiring Action list in the Report Summary of the User Home Screen for all members of the role group.
d. Enable all members of the role group to edit either the respective Technical or ATM/ATM Supervisor tabs as necessary.
C 2.9.2. Open the Distribution tab of the DASOR and select the show link next to the Action Addressees heading. This will display all the role groups at each Station within ASIMS. By default, the list will open at the Station identified within the DASOR.
C 2.9.3. Select the role groups required by ticking the box preceding the required role group name(s).
C 2.9.4. Once all the role groups have been chosen, select Send for Action button to complete the process and send a notification to all members of the selected role groups. The email will state they need to perform an action on the report and contain a link to the report.
C 2.9.5. If a Maintenance role group is selected for action and a Technical tab is not already present, one will be created.
C 2.9.6. If an ATM Supervisor role group is selected for action and an ATM Supervisor tab is not already present, one will be created.
C 2.9.7. It is best practice to add a Comment to the report stating what action you would like the role group members to perform (see Part C 5 for adding comments).
C 2.9.8. The send for action function can be repeated as required.

Issue 6 76 AL15
MAA_OpAssure_KE_MAN_001 Version_6.15 Jul_2021
OFFICIAL
Fig 27
C 2.10. Monitoring Actions
C 2.10.1. The Report Admin tab contains an Actions section which lists all the actions initiated and completed on a report. This details the DASOR workflow allocation, send for info, send for action and send for comments requests.
C 2.10.2. This section can be used to check what actions have been performed and what actions is still outstanding, i.e. those without an Action Completed date.

Issue 6 77 AL15
MAA_OpAssure_KE_MAN_001 Version_6.15 Jul_2021
OFFICIAL
Fig 28
C 2.11. Hashtags
C 2.11.1. The Occurrence Manager can add hashtags to any report they manage. This will provide the ability to group similar types of reports together for searching and analysis.
C 2.11.2. There are 2 lists of hashtags available within ASIMS:
a. A global list. Defined across the ASIMS user community and managed by the ASIMS team.
b. A local list. Defined at Ship/Station/Organisation level.
C 2.11.3. Within a DASOR, hashtags are added to the report in the Description of Event section in the Summary tab of the report.
C 2.11.4. Access the Summary tab and select the Edit button to allow write access to the form.
C 2.11.5. Selecting the #TAGS box (normally blue but orange if there are suggested hashtags available) to the left of the Narrative Description of Event text box in the Description of Event section will open the Hashtag section on the right of the screen. Any suggested hashtags will automatically appear in an orange SUGESTED TAGS box below the Narrative Description of Event field.
Note: The suggestions are made when a hashtag associated word (contained within the hashtag definition) appears in the narrative description of event.

Issue 6 78 AL15
MAA_OpAssure_KE_MAN_001 Version_6.15 Jul_2021
OFFICIAL
Fig 29
C 2.11.6. The suggested hashtags can be accepted by dragging the hashtag from the SUGGETED TAGS box and dropping it into the TAG DROPZONE box, only hashtags in the TAG DROPZONE are associated with the report.
C 2.11.7. Warning: Suggested hashtags are made each time the Hashtag section is accessed, leave the hashtags in the Suggested TAGS box if not required.
C 2.11.8. Additional hashtags can be added from the global or local lists:
a. Use the Search Hashtag function to list hashtags from the global list.
b. All Local station hashtags will be displayed in the Local Hashtag section.
C 2.11.9. Drag and drop the hashtags from the Hashtags section into the TAG DROPZONE as required.
C 2.11.10. Once all the appropriate hashtags have been added close the hashtag section by selecting the X in the top right-hand corner of the Hashtag section to exit the section.
C 2.11.11. Select Save at the top of the Summary tab to confirm the hashtag changes.
C 2.11.12. You can view the hashtags associated with a report by clicking the #TAGS box to the left of the Narrative Description of Event text box while viewing a report, the hashtags will be displayed in a TAGS box below the Narrative Description of Event.
C 2.12. Progressing to Investigation

Issue 6 79 AL15
MAA_OpAssure_KE_MAN_001 Version_6.15 Jul_2021
OFFICIAL
C 2.12.1. Once all tabs have been populated and reviewed and the level of investigation has been agreed the Occurrence Manger tab needs to be updated before the report is sent for investigation.
C 2.12.2. Every report should be investigated even at a basic level. It is the Occurrence Managers’ responsibility to manage the onward flow of the report to the identified Investigator(s).
C 2.12.3. Navigate to the Occurrence Manager tab and select the Edit button to enable write access to the form.
C 2.12.4. Using the Investigation Type dropdown box select the appropriate investigation type for the report: TBD; LI; OSI; or SI.
Fig 30
C 2.12.5. If the investigation is instigated by the Director General of the DSA the DG DSA Convened tick box must be selected to enable additional functionality within ASIMS to align with the Defence AIB process.
Fig 31
C 2.12.6. The individuals who will be performing the investigation now need to be selected using the Investigators field. For LI the Occurrence Manager will be automatically selected as the likelihood will be that the majority of LI will fall to the Occurrence Manager to act as the Investigator. The Occurrence Manager should be removed if they are not conducting the investigation.
C 2.12.7. Selecting the Investigators field will display a list of different users depending on the level of investigation:
a. LI. Occurrence Manager role group members + all Station Investigators.

Issue 6 80 AL15
MAA_OpAssure_KE_MAN_001 Version_6.15 Jul_2021
OFFICIAL
b. OSI. Station Investigators who are OI trained.
c. SI. All Defence AIB Station Investigators.
C 2.12.8. Select a name in the list and it will be added to the Investigators field. To add another investigator, select the Investigators field again and the list will reappear.
Note: To add a name to the list of Station Investigators contact the relevant Station Flight Safety/Air Safety representative or equivalent.
C 2.12.9. Following selection of the required investigators select the Save button to confirm the changes.
C 2.12.10. The report is now ready to be progressed to investigation by selecting the Send for Investigation button.
Note: For OSI and SI level investigations if there are any requests for comment open then the Send for Investigation button will not appear. The details of any outstanding requests can be seen from the Report Admin tab in the Actions section. If there are requests for comment outstanding (Action Completed is blank) navigate to the Comments tab and click the Close all Comments button to close all outstanding comments and the Send for Investigation button will appear.
C 2.12.11. Sending the report for investigation performs the following actions:
a. An email notification is sent to the selected investigators.
b. The chosen investigators are granted edit permission to the Occurrence Manager, Investigation and Findings tabs.
c. The report will appear in the investigator’s Requiring Action list in the Report Summary section of the User Home Screen.
d. The report is retained in the Occurrence Manager’s Managed list in the Report Summary section of the User Home Screen until the report is sent to DDH/AM review.
C 2.13. Linking Reports
C 2.13.1. Reports can be linked for several reasons and it is possible that more than one report may be submitted for the same event by different reporters, providing their individual perspective of the occurrence.
Note: If duplicate reports are identified please inform the ASIMS Helpdesk at the earliest opportunity who will delete the duplicate report.
C 2.13.2. It is the responsibility of Occurrence Managers to decide if a report needs to be linked to another report, there are four different types of links available:
• Similar Occurrence
• Same Incident
• Master Report

Issue 6 81 AL15
MAA_OpAssure_KE_MAN_001 Version_6.15 Jul_2021
OFFICIAL
• Subordinate Report
C 2.13.3. Similar Occurrence; used to link reports that are of a similar nature or of interest and is for information purposes only. It enables a user quick access to other reports that the Occurrence Manager has linked to the report being viewed. There is no form of validation performed when this type of link is added, any report can be linked to any other report using Similar Occurrence.
C 2.13.4. Same Incident; used to link multiple reports for the same incident. When multiple parties are involved in an incident, each will often raise a separate report. To prevent multiple reports being updated with the findings of the subsequent investigation, one report is identified as the prime report and all others as the non-prime report. Each non-prime report is then linked to the prime report using ’same incident’, this enables all the non-prime report/s to be sent for DDH/AM Review and closure without the investigation or findings being added. Only prime reports need to be updated with the results of the investigation and findings. Negotiation between the Occurrence Managers involved should decide which report will be the prime and which the non-prime report/s. When linking reports of the same incident both reports must have the same date of occurrence and one report must be prime and the other non-prime.
Note: The Prime DASOR for Occurrence field is contained within the Occurrence Mangaer tab, all reports are designated Prime by default.
C 2.13.5. Master Report and Subordinate Report; used to link reports while an investigation is ongoing and enables the results of the investigation on the master report to be added to all linked subordinate reports. E.g. a report is raised and an investigation started (master report) during the investigation additional reports (subordinate report) are raised for different occurrences of the same incident. Each additional report can be linked to the master report. When the investigation is complete and the master report closed, the investigation results (Investigation, Findings & Recommendations tabs) will be copied to all subordinate reports and they will be closed along with the master report.
C 2.13.6. The action of linking reports together is carried out in the Report Admin tab within a DASOR:
a. Copy and paste the whole DASOR reference (e.g. asor\Wyton – RAF\ATC – WYT\\14\7698) into the Report Reference box.
b. Select the type of link using the Link To dropdown box.

Issue 6 82 AL15
MAA_OpAssure_KE_MAN_001 Version_6.15 Jul_2021
OFFICIAL
Fig 32
c. Select the Link button to link the reports.
d. The linked reports can be accessed by selecting the report listed in the linked reports section.
C 2.14. Transferring to INForm
C 2.14.1. If a DASOR has been raised but it is not an air safety incident, then it may be appropriate for it to be managed via the INForm process. If this is the case, the report can be sent to DDH/AM Review for closure without the need for investigation details to be recorded.
Note: A report can only be transferred to INForm while it is at status “Open Report”.
C 2.14.2. Navigate to the Occurrence Manager tab and select the Edit button to enable write access to the form.
C 2.14.3. Tick the Transferred to INForm tick box and enter the INForm serial number.
Fig 33
Note: When the transferred to INForm box is selected the Prime DASOR for Occurrence tick box will be automatically unticked.

Issue 6 83 AL15
MAA_OpAssure_KE_MAN_001 Version_6.15 Jul_2021
OFFICIAL
C 2.14.4. Following population of the INForm serial number select the Save button to confirm the changes.
C 2.14.5. The report can now be sent to DDH/AM Review for closure without the requirement to populate the Investigation & Findings tabs.
Note: A report marked as transferred to INForm cannot be closed by the same person who selected the transferred to INForm box.

Issue 6 84 AL15
MAA_OpAssure_KE_MAN_001 Version_6.15 Jul_2021
OFFICIAL
C 3. Maintenance Role
C 3.1. Introduction
Fig 34
C 3.1.1. All DASORs will require action within the Technical section except ATM and Airprox reports.
C 3.1.2. Members of Maintenance Role Groups are responsible for completing the Technical section of a DASOR and should complete as many of the fields as appropriate.
C 3.1.3. Each member of the Maintenance role group will be sent a notification when a DASOR requires action. The notification will contain a link to the DASOR and a copy of the brief title.
C 3.1.4. Selecting the link will open that specific report in the default web browser. Alternatively, all the reports that you are required to complete the Technical section for can be viewed by selecting the number of reports in the Requiring Action column of the DASORs row in the Reports Summary section on the User Home Screen. This will display the related DASORs in a results table. Selecting a row of the table will open the respective DASOR in a new window.

Issue 6 85 AL15
MAA_OpAssure_KE_MAN_001 Version_6.15 Jul_2021
OFFICIAL
C 3.2. Technical Tab Completion
C 3.2.1. The technical tab header colour changes depending upon the associated status:
a. Yellow. In progress – The Maintenance role group can add data and is viewable by all ASIMS users but is not yet complete.
b. Green. Complete – The Maintenance role group have completed their work and populated all relevant fields.
Note: When the technical tab has been marked complete the Maintenance Role group will no longer be able to edit the tab.
C 3.2.2. To populate the Technical section, select the Edit button to enable write access to the tab fields.
C 3.2.3. As many fields as possible should be completed to provide maximum detail of the event. The following required fields are marked with a red asterisk and must be completed before the tab can be marked complete:
a. Aircraft Repair Category.
b. Engine Repair Category.
c. F760 Fault Narrative Report Raised. Yes or No.
d. QOR. Yes or No
e. MoD F765 Publication Amendment Raised. Yes or No.
Note: Where additional reports such as MOD F760, F765, or F791 are raised, these must be attached or linked to the originating DASOR. A copy of the DASOR must be attached to all MOD F760, F765 or F791 raised as a result of the occurrence.
C 3.3. Technical Tab Sections
C 3.3.1. Technical Action Reporting Individual. This section will be automatically populated with the details of the first incumbent from the Maintenance role group who accesses the Technical tab; the fields remain editable.
C 3.3.2. If the technical failure is a serious fault select the Serious Fault tick box (see MAM-P Chapter 9.3 for further guidance). This will generate a Serious Fault Details section below the Technical Fault or Maintenance Action Required section for completion. See Para C 3.3.7.
Note: The action of selecting the Serious Fault tick box marks all future notifications as high importance.
C 3.3.3. Aircraft Repair Category.

Issue 6 86 AL15
MAA_OpAssure_KE_MAN_001 Version_6.15 Jul_2021
OFFICIAL
a. Aircraft Repair Category: Required field. Select a category from the drop-down list.
Note: If unknown of not applicable select No Maint Required.
b. Engine Repair Category: Required field. Select a category from the drop-down list. The number of selections available will vary depending upon the aircraft type chosen when the report was submitted. If the aircraft registration is not in the system, then there will be 4 engine repair categories to complete; select No Engine Fitted for those fields not required.
Note: If unknown or not applicable select No Maint Required.

Issue 6 87 AL15
MAA_OpAssure_KE_MAN_001 Version_6.15 Jul_2021
OFFICIAL
Fig 35
Issue 6 88 AL15
MAA_OpAssure_KE_MAN_001 Version_6.15 Jul_2021
OFFICIAL
C 3.3.4. Technical Fault or Maintenance Action Required.
a. Major System Involved: Select the appropriate major system related to the occurrence.
b. Sub-System Involved: Select the appropriate sub-system related to the occurrence.
c. Name of Component (If applicable): Free text field. Type in the name of the component at fault if applicable.
d. Type of Failure/Fault: Select the appropriate type of fault/failure related to the occurrence.
e. NSN/Sect Ref: Enter the NSN or section reference of the component.
f. Part No: Enter the Part number or section reference of the component.
g. Serial No: Enter the serial number or section reference of the component.
Note: If the Major System Involved or Name of Component (If applicable) fields are completed then the NSN/Sect Ref, Part No and Serial No. fields become required and must be completed before the tab can be marked complete.
C 3.3.5. To add an additional technical fault, to the section, select the Add Technical Fault button. An additional Major System, Sub-System, Name of Component, Type of Failure/Fault and associated NSN, Part No and Ser No fields will appear.
Note: If a repair category has been selected (other than ‘No Maint Required’) there must have been an affected system and this should be recorded in the Technical Fault section.
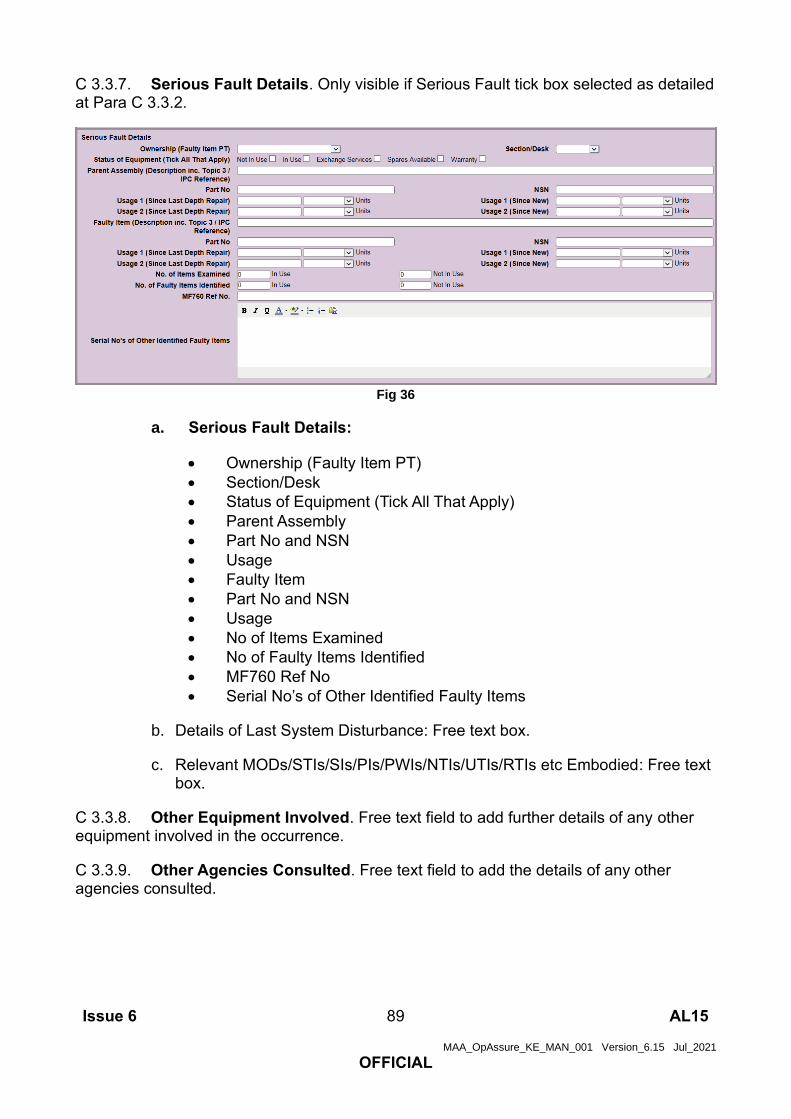
Issue 6 89 AL15
MAA_OpAssure_KE_MAN_001 Version_6.15 Jul_2021
OFFICIAL
C 3.3.7. Serious Fault Details. Only visible if Serious Fault tick box selected as detailed at Para C 3.3.2.
Fig 36
a. Serious Fault Details:
• Ownership (Faulty Item PT)
• Section/Desk
• Status of Equipment (Tick All That Apply)
• Parent Assembly
• Part No and NSN
• Usage
• Faulty Item
• Part No and NSN
• Usage
• No of Items Examined
• No of Faulty Items Identified
• MF760 Ref No
• Serial No’s of Other Identified Faulty Items
b. Details of Last System Disturbance: Free text box.
c. Relevant MODs/STIs/SIs/PIs/PWIs/NTIs/UTIs/RTIs etc Embodied: Free text box.
C 3.3.8. Other Equipment Involved. Free text field to add further details of any other equipment involved in the occurrence.
C 3.3.9. Other Agencies Consulted. Free text field to add the details of any other agencies consulted.
Issue 6 90 AL15
MAA_OpAssure_KE_MAN_001 Version_6.15 Jul_2021
OFFICIAL
C 3.3.10. Rectification Work Carried Out.
a. Originator’s Reference Number or Work Card Number: Detail the ORN or Work Card Number for the task if applicable.
b. Airframe Flying Hours (at time of occurrence): Detail the flying hours of the airframe at time of the occurrence if applicable.
c. Investigation and Rectification Work Carried Out and Why: Describe all rectification work carried out and the reason for completing the work.
Note: Where no maintenance activity is required the form should be annotated ‘No work required’. In this circumstance, the local Occurrence Manager can complete the Technical Section input as necessary.
d. Identify any of the following additional reports/forms raised:
• F760 Fault Narrative Report Raised:
• QOR:
• MoD F765 Publication Amendment Raised:
• Other Action/Reports Raised:
Note: F760 Fault Narrative Report Raised, QOR and MoD F765 Publication Amendment Raised fields are required and must be completed before the tab can be marked complete.
C 3.4. Review and Complete
C 3.4.1. Once satisfied the relevant fields are complete and spell checked select the Save button located in the top right-hand corner of the tab.
Note: When the Technical tab header is yellow further information can be added throughout the report process and will be necessary where a technical investigation is extensive or delayed by restricted access to the aircraft. If additional information is added, it is good practice to inform the Occurrence Manager Offline and add a comment to the report highlighting the action taken.
C 3.4.2. If you have any relevant attachments (photos, film footage, documents etc.) they can be added to the report at this stage. There is a file size limit of 10MB so if you have a large film, please split it down into multiple short clips and/or compress the file. Navigate to the Attachments tab, select the Browse button to locate the file then select Attach File. To remove an attachment, please contact the ASIMS Helpdesk.
C 3.4.3. Once all Technical details have been added and there is no further information to be included on the form select the Mark Complete button. The tab header will change to green and the Maintenance role group will no longer have permission to edit the form details.
Note: All required fields (marked with a red asterisks) must be completed before the tab can be marked complete. Once complete the report will be removed from the users Requiring Action column in the Reports Summary section of the User Home Screen.

Issue 6 91 AL15
MAA_OpAssure_KE_MAN_001 Version_6.15 Jul_2021
OFFICIAL
C 3.4.4. If any further changes are required once the Mark Complete button has been selected the Occurrence Manager will need to be requested to send the report to the Maintenance role group for Action.

Issue 6 92 AL15
MAA_OpAssure_KE_MAN_001 Version_6.15 Jul_2021
OFFICIAL
C 4. ATM Supervisor Role
C 4.1. Introduction
Fig 37
C 4.1.1. All DASORs reported by the ATC, ABM and ALI community require action from the ATM Supervisor role group.
C 4.1.2. An ATM Supervisor will receive an email notification that a DASOR requires action and the notification will contain a link to the DASOR and a copy of the brief title.
C 4.1.3. Selecting the link will open that specific report in the default web browser. Alternatively, all the reports that you are acting as an ATM Supervisor for can be viewed by selecting the number of reports in the Requiring Action column of the DASORs row in the Reports Summary section on the User Home Screen. This will display the related DASORs in a results table. Selecting a row of the table will open the respective DASOR in a new window.
C 4.2. ATM Supervisor Tab Completion
C 4.2.1. The tab header colour changes depending upon the associated status:
a. Yellow. In progress – The ATM Supervisor role group can add data and is viewable by all ASIMS users, but the tab is not yet complete.
b. Green. Complete – The ATM Supervisor role group have completed their work and populated all relevant fields.

Issue 6 93 AL15
MAA_OpAssure_KE_MAN_001 Version_6.15 Jul_2021
OFFICIAL
Note: When the supervisor tab has been marked complete the Supervisor Role group will no longer be able to edit the tab.
C 4.2.2. To complete the ATM Supervisor tab, select the Edit button to enable write access to the tab fields.
C 4.2.3. As many fields as possible should be completed to provide maximum detail of the event.
C 4.3. ATM Supervisor Tab Sections
Fig 38
C 4.3.1. Supervisor Details. This section will be automatically populated with the details of the first incumbent from the ATM Supervisor role group who accesses the ATM Supervisor tab; the fields remain editable.
C 4.3.2. Occurrence Details. Complete as many of the occurrence details as possible.
C 4.3.3. Supervisors Narrative. Provide Supervisor comments in this section including the detail and context of the actions performed. If the Supervisor has no further information to include in the report annotate the section with ‘No comment required’.
C 4.4. Review and Complete
C 4.4.1. Once satisfied the relevant fields are complete and spell checked select the Save button located in the top right-hand corner of the tab.

Issue 6 94 AL15
MAA_OpAssure_KE_MAN_001 Version_6.15 Jul_2021
OFFICIAL
C 4.4.2. If you have any relevant attachments (photos, film footage, documents etc.) they can be added to the report at this stage. There is a file size limit of 10MB so if you have a large film, please split it down into multiple short clips and/or compress the file. Navigate to the Attachments tab, select the Browse button to locate the file then select Attach File. To remove an attachment, please contact the ASIMS Helpdesk.
C 4.4.3. Once all ATM Supervisor details have been added and there is no further information to be included on the form select the Mark Complete button. The tab header will change to green and the ATM Supervisor will no longer have permission to edit the form details.
Note: Once complete the report will be removed from the user Requiring Action column in the Reports Summary section of the User Home Screen.
C 4.4.4. If any further changes are required once the Mark Complete button has been selected the Occurrence Manager will need to be requested to send the report to the ATM Supervisor role group for Action.
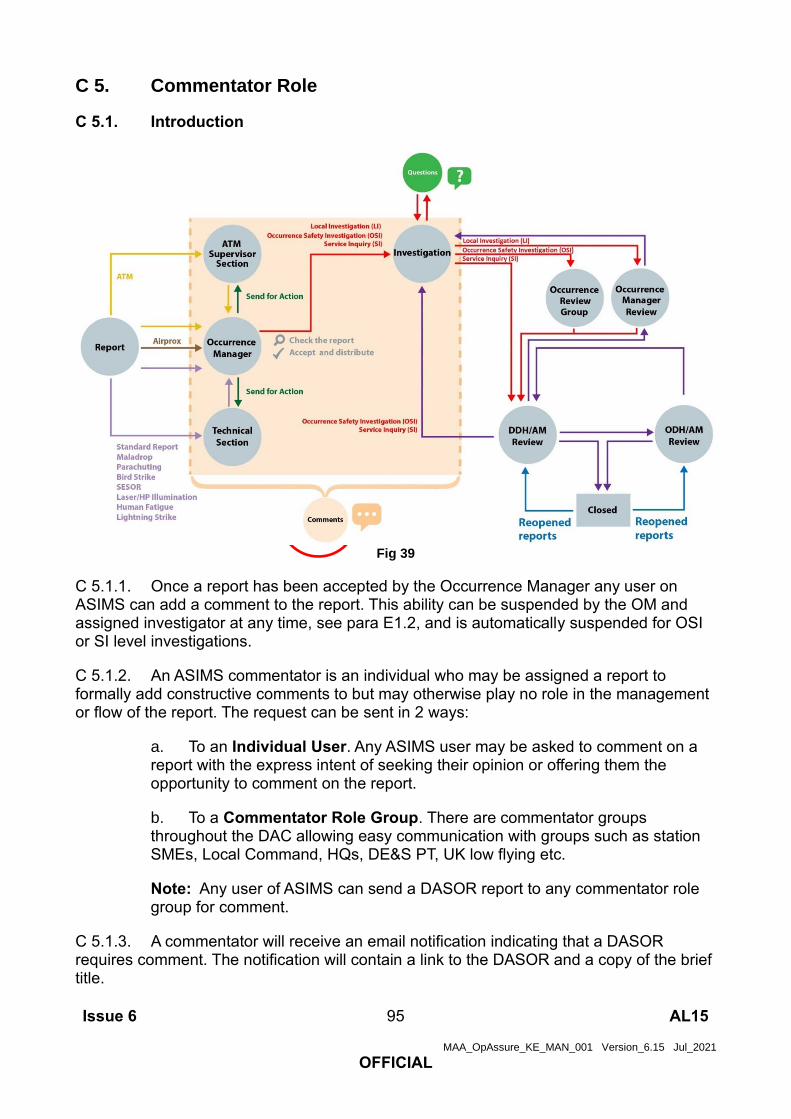
Issue 6 95 AL15
MAA_OpAssure_KE_MAN_001 Version_6.15 Jul_2021
OFFICIAL
C 5. Commentator Role
C 5.1. Introduction
Fig 39
C 5.1.1. Once a report has been accepted by the Occurrence Manager any user on ASIMS can add a comment to the report. This ability can be suspended by the OM and assigned investigator at any time, see para E1.2, and is automatically suspended for OSI or SI level investigations.
C 5.1.2. An ASIMS commentator is an individual who may be assigned a report to formally add constructive comments to but may otherwise play no role in the management or flow of the report. The request can be sent in 2 ways:
a. To an Individual User. Any ASIMS user may be asked to comment on a report with the express intent of seeking their opinion or offering them the opportunity to comment on the report.
b. To a Commentator Role Group. There are commentator groups throughout the DAC allowing easy communication with groups such as station SMEs, Local Command, HQs, DE&S PT, UK low flying etc.
Note: Any user of ASIMS can send a DASOR report to any commentator role group for comment.
C 5.1.3. A commentator will receive an email notification indicating that a DASOR requires comment. The notification will contain a link to the DASOR and a copy of the brief title.

Issue 6 96 AL15
MAA_OpAssure_KE_MAN_001 Version_6.15 Jul_2021
OFFICIAL
C 5.1.4. Selecting the link will open that specific report in the default web browser. You can view all the reports that you are acting as a commentator or need to comment on by selecting the number of reports in the requiring action column of the reports summary section which will display the related DASORs in a results table below.
Note: Selecting any row in the table will open that DASOR report in a new window.
C 5.1.5. If a specific piece of information is required a question can be asked of an individual by either the Occurrence Manager, Investigator or ADH/AM. The individual will receive an email notification indicating that a DASOR question requires an answer. The notification will contain a link to the DASOR and a copy of the brief title.
C 5.1.6. Selecting the link will open that specific report in the default web browser. A User can view all the reports that they need to provide an answer on by selecting the number of questions in the requiring action column of the reports summary section which will display the related DASORs in a results table below.
C 5.2. Adding Comments
C 5.2.1. Read the report before navigating to the Report Admin tab to see if the report was sent to the user as an individual or as part of a commentator role group. This may have a bearing on how the comment is submitted (see Para C 5.2.3)
C 5.2.2. Select the Comments tab and add a relevant comment in the blank Add a Comment text box.
Fig 40
C 5.2.3. Select Check Spelling before submitting the comments to the DASOR by selecting one of the following options:
a. Add Comment. The comment will be added but the comment action will remain open for other members of the Commentator role group to add their own comments or for the user to provide additional comments. The action completed section of the Actions table in the Report Admin tab will remain blank.
b. Add Final Comment. The comment will be added and the action will be closed. The action completed section of the Actions table in the Report Admin tab will have a date, time and name of actioner displayed.

Issue 6 97 AL15
MAA_OpAssure_KE_MAN_001 Version_6.15 Jul_2021
OFFICIAL
Note: If the user is a member of more than one role group that has been sent the report for comment they will be presented with a popup asking them to confirm which role group or all role groups they are adding the final comment on behalf of.
Note: If Add Final Comment has been selected and at a later stage additional comments need to be added the user will need to contact the Occurrence Manager for the report to resend for comment.
C 5.3. Acknowledging Comments
C 5.3.1. Use of the acknowledged comments function allows the user to see which comments have already been read and which comments have been newly submitted. Once comments have been read select the Acknowledge New Comment(s) button.
C 5.3.2. Comments that are new and have not been acknowledged are displayed with a red header. Acknowledged comments are displayed with a grey header.
Fig 41
Note: This function is unique to an individual user account.
C 5.4. Comment Status
C 5.4.1. The Comment status field is displayed at the top of the Comments tab and indicates to the user when the report contains unacknowledged comments.
C 5.4.2. There are four comment statues:
• Not Requested. No comments have been requested.
• Awaiting Comments. Comments have been requested and at least one request is outstanding.
• Comments Received. All requested comments have been received (Add Final Comment selected for all requests).
• New Comment. Indicates a comment has been added to a report that the user has not acknowledged.

Issue 6 98 AL15
MAA_OpAssure_KE_MAN_001 Version_6.15 Jul_2021
OFFICIAL
C 5.4.3. When a comment is added to a report the comment status automatically changes to New Comment. Then when the user selects the Acknowledge New Comment(s) button the comment status changes to indicate if comment requests are outstanding, closed or not made.
Note: The New Comment status is unique to an individual user account.
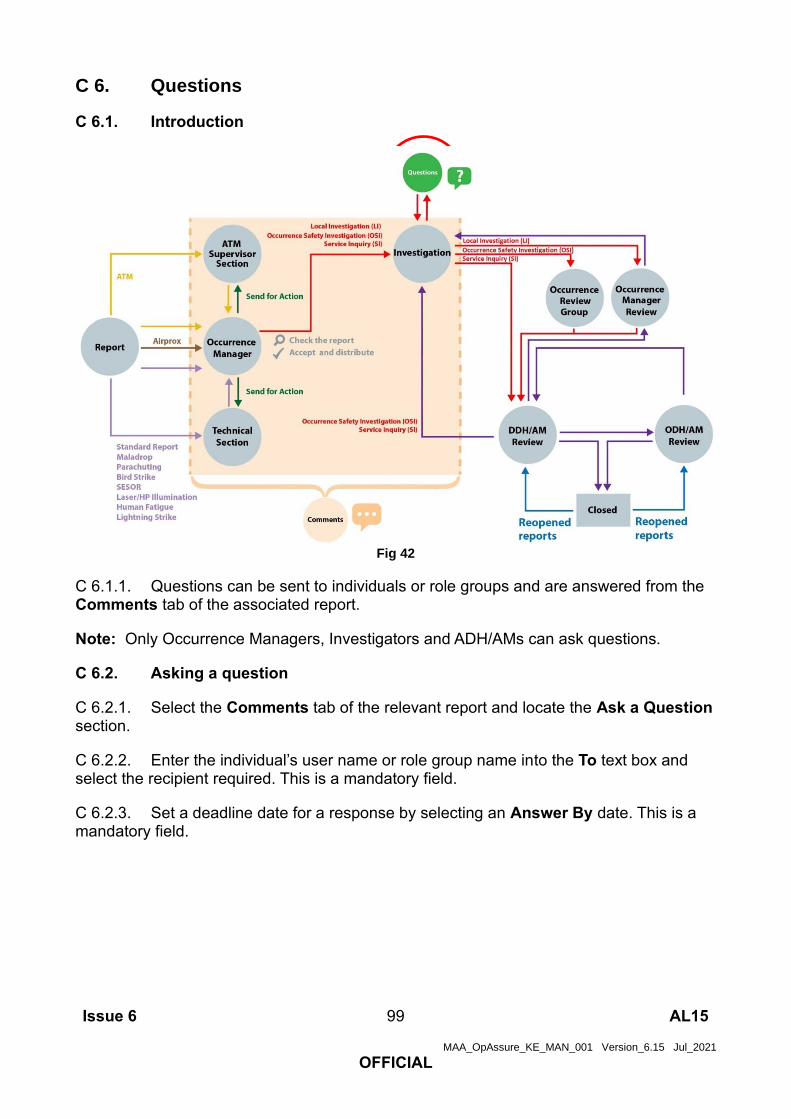
Issue 6 99 AL15
MAA_OpAssure_KE_MAN_001 Version_6.15 Jul_2021
OFFICIAL
C 6. Questions
C 6.1. Introduction
Fig 42
C 6.1.1. Questions can be sent to individuals or role groups and are answered from the Comments tab of the associated report.
Note: Only Occurrence Managers, Investigators and ADH/AMs can ask questions.
C 6.2. Asking a question
C 6.2.1. Select the Comments tab of the relevant report and locate the Ask a Question section.
C 6.2.2. Enter the individual’s user name or role group name into the To text box and select the recipient required. This is a mandatory field.
C 6.2.3. Set a deadline date for a response by selecting an Answer By date. This is a mandatory field.

Issue 6 100 AL15
MAA_OpAssure_KE_MAN_001 Version_6.15 Jul_2021
OFFICIAL
C 6.2.4. Enter the question into the question box, check spelling before selecting the Ask Question button to send the question to the recipient. The recipient of the question will receive an email notification informing them a question has been asked of them with a link to the report. The report will also appear in their Reports Summary section of the Users Home Screen in the Questions row.
Fig 43
C 6.2.5. When viewing the Comments tab, as the recipient, an unanswered question will be displayed with a yellow header. All other users will see the question in the same format as a normal comment (i.e. a red header).
C 6.3. Answering a question
C 6.3.1. Select the Comments tab of the relevant report and locate the question. Any outstanding question the user has been asked will appear with a yellow header.
C 6.3.2. Selecting the Acknowledge button will display the answer text box. Populate the response to the question in this box.
Warning: Do not answer the question by adding a new comment as described in Part C 5.2.
C 6.3.3. Select Check Spelling before submitting the answer to the question by selecting one of the following options:
a. Add Answer. The answer will be added but the question action will remain open for the user(s) to provide additional responses.
b. Add Final Answer. The answer will be added and the question closed and the header colour changed to red in line with all other comments.
Note: All responses to a question will be displayed below the question irrespective of other comments made or questions asked within the report.

Issue 6 101 AL15
MAA_OpAssure_KE_MAN_001 Version_6.15 Jul_2021
OFFICIAL
C 6.3.4. If the person or role group who has been asked a question does not reply before the answer by date they will be sent a notification when the date passes reminding them to answer the question.
C 6.4. Acknowledge Answer
C 6.4.1. When a question has been answered the person who asked the question will receive an email notification, they must acknowledge the final answer by selecting the Acknowledge Final Answer button to complete the question process.

Issue 6 102 AL15
MAA_OpAssure_KE_MAN_001 Version_6.15 Jul_2021
OFFICIAL
Part D Managing ASIMS

Issue 6 103 AL15
MAA_OpAssure_KE_MAN_001 Version_6.15 Jul_2021
OFFICIAL
D 1. Managing ASIMS Overview
D 1.1. Introduction
D 1.1.1. To allow DASORs to be managed effectively and to allow the data contained within ASIMS to be accessed as required, it is necessary to manage certain aspects of ASIMS.
D 1.1.2. A user can manage their individual profile and personalise ASIMS as appropriate for their requirements in the following ways:
a. Manage and maintain their personal account details.
b. Mange the DASOR aircraft information notifications they receive.
c. Personalise the User Home Screen Reports Summary view unique to their account.
d. Follow reports of interest relevant to the individual user.
e. Create a personalised dashboard of saved search results.
f. Manage role group membership and Station investigator lists – Permission apply.
D 1.1.3. This section will provide details about how the above ASIMS account management can be achieved.

Issue 6 104 AL15
MAA_OpAssure_KE_MAN_001 Version_6.15 Jul_2021
OFFICIAL
D 2. My Details
D 2.1. Introduction
D 2.1.1. The My Details function provides a user with the ability to manage personal details within ASIMS, unique to their account.
Warning: Details should be kept as current as possible; this is particularly relevant for the email address associated with the account as this is used by ASIMS for the purpose of sending notifications.
D 2.1.2. The My Details page is accessible from the Menu Bar by selecting the button.
D 2.2. Amend/Update/View
Fig 44
D 2.2.1. The My Details page allows a user to amend/update: personal details, aircraft notifications and view additional information related to their account.
D 2.2.2. A user can amend/update the following in the My Details page:
a. Title. Rank/Title of the user.
b. Users Name. User’s First Name and Last Name.
c. Job Title. The title of the user’s current role.
d. Email Address. The user’s preferred email address for ASIMS notifications.

Issue 6 105 AL15
MAA_OpAssure_KE_MAN_001 Version_6.15 Jul_2021
OFFICIAL
Warning: Email addresses are to be restricted to ‘@mod.gov.uk’ or known industry addresses. Users are not to use personal public email addresses (i.e. Hotmail, Gmail, Yahoo etc).
e. Supress emails until. If a user wishes to not receive ASIMS notifications for a period, i.e. due to a long absence from work, they can be suppressed until a date such that they are required again.
f. Phone Number. A contact number for the user.
g. Internal Info Distribution Role. Enables the user to subscribe to aircraft information notifications, these notifications are based on the aircraft type a report has been raised on and the user will receive a ‘for information notification’ each time a report is accepted onto ASIMS for that aircraft type.
h. Change Password? A tick box that, on selection, displays additional fields to input a new user password and confirm the changed password. The user will then have to accept the SyOps agreement by selecting the tick box at the bottom of the agreement.
Warning: Passwords are case sensitive, they must be 8-15 characters in length and contain at least one letter, one number and one special character from the following selection !"#$%&'()*+,-./:;<=>?@[\]^_`{|}~
D 2.2.3. Once all changes have been made select the Save button to confirm. On selection of Save the user will be taken back to the User Home Screen.
D 2.2.4. In addition, a user can also view the following:
a. User’s roles. Provides a list of the role groups the user is assigned to.
b. Receive Report Feedback? Displays whether the user account receives report feedback (Yes) or not (No).
c. SyOps Agreed. Details the date and time the SyOps agreement was last signed. Selecting the View button will display the ASIMS Users SyOps agreement at the bottom of the page.

Issue 6 106 AL15
MAA_OpAssure_KE_MAN_001 Version_6.15 Jul_2021
OFFICIAL
D 3. Following Reports/Recommendations
D 3.1. Introduction
D 3.1.1. Any DASOR or Recommendation can be followed by an ASIMS account holder allowing ready access to reports of interest through the Reports Summary section of the User Home Screen without having to initiate a search for each report.
D 3.2. Follow a Report
D 3.2.1. To follow a DASOR a user must first access the report.
D 3.2.2. Select the Follow Report button in the top right-hand corner of the report.
D 3.2.3. The report is now being followed by that user’s account and will be included in the Followed column of the Reports Summary section on the User Home Screen.
D 3.3. Un-follow a Report
D 3.3.1. To unfollow a DASOR a user must first access the followed report.
D 3.3.2. Select the Unfollow Report button in the top right-hand corner of the report.
D 3.3.3. The report is no longer being followed by that user’s account and will be removed from the Followed column of the Reports Summary section on the User Home Screen.
D 3.4. Follow a Recommendation
D 3.4.1. To follow a recommendation a user must first access the required recommendation.
D 3.4.2. Select the Follow Recommendation button in the top left-hand corner of the recommendation.
D 3.4.3. The recommendation is now being followed by that user’s account and will be included in the Followed column of the Reports Summary section on the User Home Screen.
D 3.5. Unfollow a Recommendation
D 3.5.1. To unfollow a recommendation a user must first access the followed recommendation.
D 3.5.2. Select the Unfollow Recommendation button in the top left-hand corner of the recommendation.
D 3.5.3. The recommendation is no longer being followed by that user’s account and will be removed from the Followed column of the Reports Summary section on the User Home Screen.

Issue 6 107 AL15
MAA_OpAssure_KE_MAN_001 Version_6.15 Jul_2021
OFFICIAL
D 4. Home Screen Reports Summary
D 4.1. Introduction
D 4.1.1. The number of DASORs and recommendations that a user is required to action, is managing, is following or have a question outstanding on are displayed in a table within the Reports Summary section, positioned at the bottom of the User Home Screen.
D 4.1.2. The Reports Summary section allows ready access to these reports without having to undertake a search for each one. Additionally, it provides the ability to view the status of reports relevant to the account holder and allows the user to generate a default view for future use.
D 4.2. Reports Summary Sections
Fig 45
D 4.2.1. Default View buttons. See Part D 4.4.
D 4.2.2. Report Summary Totals. Provides DASOR totals differentiated by Occurrence Type, Recommendations, Questions, Serious Faults, and SESORs under the following headings:
a. Requiring Action. These are reports where the user is a member of a role group required to complete an action, either completing a section of the report or requested to provide comment.
b. Managed. These are reports for which the user is an Occurrence Manager, in DDH/AM or ODH/AM Review Groups. The same report may appear in both the Requiring Action and Managed list depending on what stage the report is at.

Issue 6 108 AL15
MAA_OpAssure_KE_MAN_001 Version_6.15 Jul_2021
OFFICIAL
c. Followed. Displays all the reports a user is following. See Part D 3 for how to follow a report.
Note: Selection of any of the total numbers will display a list of those associated report in an additional table below the totals (see D 4.2.3).
D 4.2.3. Reports Summary List of Reports. Displays a list of the DASOR details of the selected total with the following headings:
a. Attachment. A paperclip symbol indicates whether an attachment has been added to the respective DASOR.
b. Reference. Displays the DASOR reference; hovering the cursor over the reference will display the Brief Title from the associated report.
c. Link. A link symbol indicates whether the DASOR is linked to another DASOR.
d. Status. The current status of the report (see definitions in Part P 5):
• Submitted report – awaiting acceptance
• Open Report
• Under Investigation
• OM Review
• ORG Review
• DDH/AM Review
• ODH/AM Review
e. Comment Status. Displays the comment status from the comments tab of the report.
f. Tech. The Technical tab colour coded status:
• Yellow. In progress
• Green. Complete
• Grey. Section not present.
g. Sup. The ATM Supervisor tab colour coded status:
• Yellow. In progress
• Green. Complete
• Grey. Section not present.

Issue 6 109 AL15
MAA_OpAssure_KE_MAN_001 Version_6.15 Jul_2021
OFFICIAL
h. Comm. The Commentator tab colour coded status:
• Red. Global comments disabled.
• Green. Global comments enabled.
i. Date of Occurrence. The date the occurrence happened.
j. Aircraft Mark. Aircraft Type and Mark associated with the occurrence.
k. Registration. The registration of the aircraft associated with the occurrence.
l. Occurrence Type. The Occurrence type: Air; ATC/ABM/ALI; Maintenance; Synthetic; Other.
m. Incident. The Incident type: Accident; Incident; Hazard/Observation; Hostile Action/Loss.
n. Perceived Severity. The severity of the occurrence as perceived by the reporter.
o. Last Updated. The date the DASOR was last updated.
D 4.3. Reports Summary Functionality
D 4.3.1. The reports summary displays a breakdown by Status of DASORs and Recommendations applicable to the user.
D 4.3.2. A user can change the number of reports displayed by changing the Show dropdown box. The user can select either: 5; 10; 25; 50; or 100 entries to be displayed in a single view.
D 4.3.3. Selecting any column heading will sort the order the list is displayed. Selecting the heading once will sort ascending, selecting the heading again will sort descending.
D 4.3.4. The reports displayed in the list of reports can be filtered across all the fields displayed:
a. Insert the search criteria required into the Search text box on the right of the screen just above the list of reports.
b. The report results will be automatically filtered displaying only those where the text entered matches any of the fields displayed in the summary, including the brief title which is displayed when you move your mouse over the report reference.
c. To reset the search, delete the content of the text box.
D 4.4. Default View

Issue 6 110 AL15
MAA_OpAssure_KE_MAN_001 Version_6.15 Jul_2021
OFFICIAL
D 4.4.1. The Reports Summary section display configuration can be saved so that each time the user logs into ASIMS the users determined default view will be displayed on the User Home Screen.
D 4.4.2. Following setup of the Reports Summary section to the desired view select the Save As Default View button to confirm the current Reports Summary configuration as the default view; this is inclusive of any ordering and/or text searching of data chosen.
D 4.4.3. If further changes are made to the view of the Reports Summary section as needed by the user, selecting the Reset To Default View button will return the Reports Summary section to the default view.
D 4.4.4. When returning to the User Home Page from a different area of ASIMS the view displayed will always be in the configuration that was last shown.
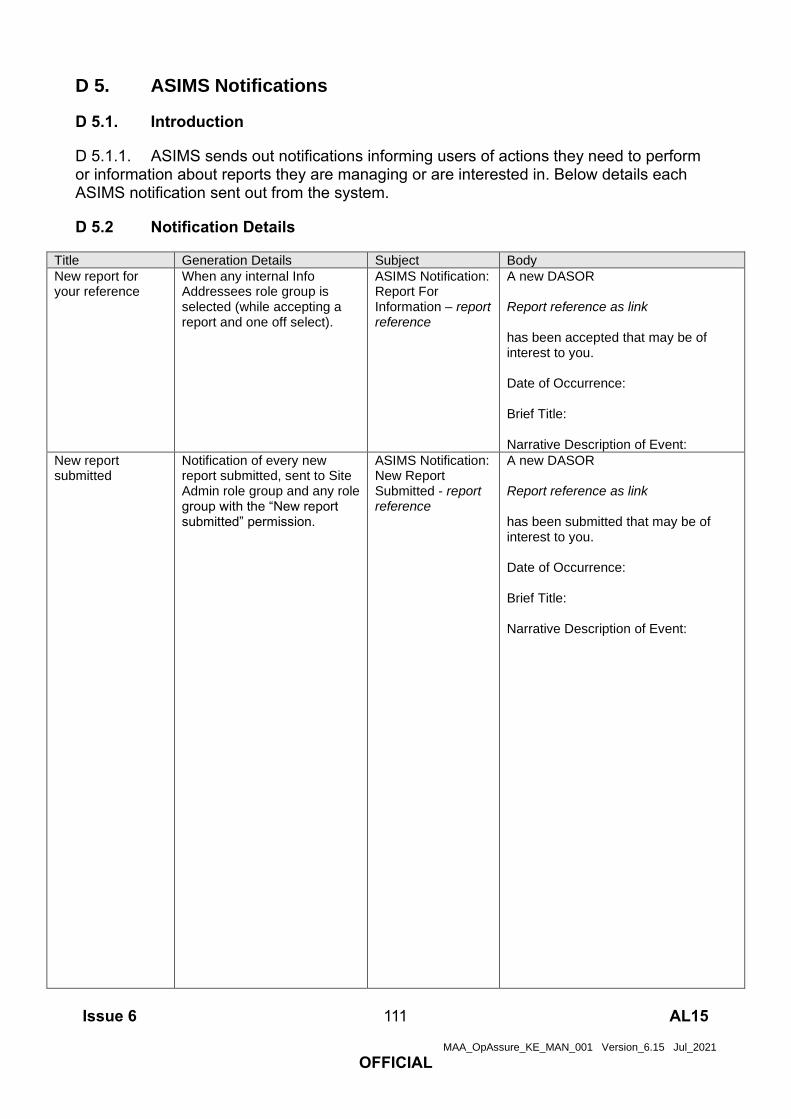
Issue 6 111 AL15
MAA_OpAssure_KE_MAN_001 Version_6.15 Jul_2021
OFFICIAL
D 5. ASIMS Notifications
D 5.1. Introduction
D 5.1.1. ASIMS sends out notifications informing users of actions they need to perform or information about reports they are managing or are interested in. Below details each ASIMS notification sent out from the system.
D 5.2 Notification Details
Title Generation Details Subject Body
New report for your reference
When any internal Info Addressees role group isselected (while accepting a report and one off select).
ASIMS Notification: Report For Information – report reference
A new DASOR
Report reference as link
has been accepted that may be of interest to you.
Date of Occurrence:
Brief Title:
Narrative Description of Event:
New report submitted
Notification of every new report submitted, sent to Site Admin role group and any role group with the “New report submitted” permission.
ASIMS Notification: New Report Submitted - report reference
A new DASOR
Report reference as link
has been submitted that may be of interest to you.
Date of Occurrence:
Brief Title:
Narrative Description of Event:

Issue 6 112 AL15
MAA_OpAssure_KE_MAN_001 Version_6.15 Jul_2021
OFFICIAL
Title Generation Details Subject Body
New report assigned to you
Sent to Occurrence Manager/ Technical/Supervisor role groups when a new report is submitted.
Sent to Occurrence Manager / Technical/Supervisor role groups when a Station/Unit is changed
Sent to Technical/Supervisor role groups when a report is sent for action to that role group.
Sent to Occurrence Manager role group when report Returned to Occurrence Manager from DDH/AM review (LI)
Sent to ORG members (individuals) when report sent to ORG
Sent to Occurrence Manager role group when a report is sent for Occurrence Manager Review (LI Investigation)
Sent to DDH/AM Review group or ODH/AM Review group when a report is re-opened.
ASIMS Notification: Report Assigned To Your Role Group - report reference
A DASOR
Report reference as link
has been sent to your ASIMS Role Group for Action.
Please review the report and action in accordance with the red text displayed when viewing the report.
Date of Occurrence:
Report Status:
Brief Title:
Narrative Description of Event:
DASOR has been auto accepted
Sent to Occurrence Manager role group when a report is automatically accepted
ASIMS Notification: Auto accepted Report - report reference
A new DASOR
Report reference as link
has been automatically accepted.
Please review the report, check that it does not contain information above OFFICIAL (including attachments), populate the Occurrence Manager tab and distribute it to all the appropriate info addressees (Distribution tab).
Date of Occurrence:
Brief Title:
Narrative Description of Event:

Issue 6 113 AL15
MAA_OpAssure_KE_MAN_001 Version_6.15 Jul_2021
OFFICIAL
Title Generation Details Subject Body
Comment needed Sent to individual or role group members when a report is sent for comment (Comment Addressees – Distribution Tab).
ASIMS Notification: Comment Required - report reference
A DASOR
Report reference as link
has been sent to you for Comment.
Please review the report and add your comment to the Comments tab. Use Add Comment to add an interim/holding response and use Add Final Comment to add a final response and close the request.
Date of Occurrence:
Brief Title:
Narrative Description of Event:
User's reports change status
Sent to reporter when a report they submitted (when logged in) is accepted or closed
ASIMS Notification: Status Changed - report reference
Report Reference: Reference as a link
The status of the DASOR you submitted has changed to status you can view the report by clicking the reference above.
Date of Occurrence:
Brief Title:
Narrative Description of Event:
User's reports change status
Sent to reporter when a report they submitted (without logging in and email address supplied) is accepted or closed
ASIMS Notification: Status Changed - report reference
Report Reference:
Date of Occurrence:
Brief Title:
The status of the DASOR you submitted has changed to status, a PDF copy of the report is attached for reference.
Investigation assigned to you
Sent to individuals who have been identified as investigators when a report is sent for investigation.
ASIMS Notification: Investigation assigned to you - report reference
A DASOR
Report reference as link
has been sent to you for Investigation.
Please complete the investigation on this report by populating the Investigation and Findings tabs. Close all comments before sending this report on for review.
Date of Occurrence:
Brief Title:
Narrative Description of Event:

Issue 6 114 AL15
MAA_OpAssure_KE_MAN_001 Version_6.15 Jul_2021
OFFICIAL
Title Generation Details Subject Body
Investigation returned from DDH/AM
Sent to Occurrence Manager role group and individuals who have been identified as investigators when an OSI or SI investigation is returned to investigation from DDH/AM review.
ASIMS Notification: Report returned from DDH/AM Review - report reference
A DASOR
Report reference as link
has been returned to you for amendment from DDH/AM Review.
Date of Occurrence:
Brief Title:
Narrative Description of Event:
Investigation returned from Occurrence Manager Review
Sent to individuals who have been identified as investigators when a report is returned to investigation from OM review
ASIMS Notification: Report returned from Occurrence Manager Review - report reference
A DASOR
Report reference as link
has been returned to you for amendment from Occurrence Manager Review.
Date of Occurrence:
Brief Title:
Narrative Description of Event:
Investigation returned from ORG
Sent to individuals who have been identified as investigators when a report is returned to investigation from ORG
ASIMS Notification: Report returned from ORG Review - report reference
A DASOR
Report reference as link
has been returned to you for amendment from ORG Review.
Date of Occurrence:
Brief Title:
Narrative Description of Event:
Question Asked Sent to the individual or role group asked a question
ASIMS Notification: Question Asked - report reference
You have been asked the following question relating to DASOR report reference
Question
Please acknowledge the question and add an answer on the comments tab. Use Add Answer to add an interim/holding response and use Add Final Answer to add your final response and close the question.
Question Answered
Sent to the individual who asked a question when an answer has been added (add answer) to a question
ASIMS Notification: Question Answered - report reference
An interim/holding response to your question
Question

Issue 6 115 AL15
MAA_OpAssure_KE_MAN_001 Version_6.15 Jul_2021
OFFICIAL
Title Generation Details Subject Body
on DASOR report reference
has been made, you can view the answer on the comments tab
Question Final Answered
Sent to the individual who asked a question when a final answer is added to a question
ASIMS Notification: Question Final Answered - report reference
A final answer to your question
Question
has been posted on DASOR report reference
Please view the response and acknowledge the final answer on the comments tab.
Question Not Final Answered (For asker)
Sent to the individual who asked a question when the question is overdue (Answer by Date has passed, and no final answer added).
ASIMS Notification: Question Asked Not Final Answered - report reference
A final answer to your question
Question
on DASOR report reference
has not been made before the answer by date and is now overdue.
Question Not Final Answered (For responder)
Sent to the individual or role group who has been asked a question when the question is overdue (Answer By Date has passed and no final answer added).
ASIMS Notification: Question Not Final Answered - report reference
The question
Question
on DASOR report reference
is overdue.
Please add your final answer to the question as the required by date has passed. The question can be answered on the comments tab.
Question Closed (For asker)
Sent to the individual who asked a question when the report is closed if the person closing the report is different from the person who asked the question.
ASIMS Notification: Question has been closed by different user- report reference
The question you asked
Question
on DASOR report reference
was not answered and the report has now been closed.
Answer acknowledged (For asker)
Sent to the individual who asked a question when the answer has been acknowledged.
ASIMS Notification: An answer to your question has been acknowledged - report reference
The answer to a question you asked
Question
on DASOR report reference
has been acknowledged.
Recommendation Sent to ADH/AM
Sent to ADH/AM role group when a recommendation is sent to ADH.
ASIMS Notification: Recommendation Sent to ADH/AM
Recommendation
Recommendation ref as a link

Issue 6 116 AL15
MAA_OpAssure_KE_MAN_001 Version_6.15 Jul_2021
OFFICIAL
Title Generation Details Subject Body
has been Sent to your ASIMS Role Group for action.
Please review the recommendation and Accept, Reject, Request Rewrite, Elevate or Copy to another ADH/AM.
Title:
Recommendation owner - Role Group
Sent to the Recommendation Owner role group when a recommendation is Accepted by the ADH (if a Recommendation Owner role group has been identified when the recommendation was created).
Sent to the Recommendation Owner role group when the Recommendation Owner is set/changed.
Sent to the Recommendation Owner role group when the ADH/AM clicks “Resend for Implementation”.
ASIMS Notification: Recommendation Owner Assigned - Role Group
Recommendation
Recommendation ref as a link
has been sent to your role group to implement as the Recommendation Owner.
Update the justification and implementation plan fields before assigning an implementor. If you are implementing the recommendation yourself update the Work Performed tab with the details of action taken to implement the recommendation.
Title:
Recommendation owner – individual
Sent to the Recommendation Owner individual when the recommendation is Accepted by the ADH (if a Recommendation Owner individual has been identified when the recommendation was created).
Sent to the Recommendation Owner individual when the Recommendation Owner is set/changed.
Sent to the Recommendation Owner individual identified when the ADH/AM clicks “Resend for Implementation”.
ASIMS Notification: Recommendation Owner Assigned – Individual
Recommendation
Recommendation ref as a link
has been sent to you to implement as the Recommendation Owner.
Update the justification and implementation plan fields before assigning an implementor. If you are implementing the recommendation yourself update the Work Performed tab with the details of action taken to implement the recommendation.
Title:
Recommendation Implementor
Sent to the individual when the recommendation is Accepted by the ADH (if an implementor has been identified when the
ASIMS Notification: Recommendation Implementor Assigned
Recommendation
Recommendation ref as a link
has been sent to you for Implementation.

Issue 6 117 AL15
MAA_OpAssure_KE_MAN_001 Version_6.15 Jul_2021
OFFICIAL
Title Generation Details Subject Body
recommendation was created).
Sent to individual when the Recommendation Owner sets/changes the implementor.
Sent to the individual when the Recommendation Owner clicks “Return to Implementor” from owner review.
Sent to the individual when the ADH/AM clicks “Resend for Implementation” (if an implementor has been identified).
Please review the recommendation and update the Work Performed tab with the details of action taken to implement the recommendation.
Title:
Recommendation implementation complete (Individual)
Sent to the Recommendation Owner individual when the implementor clicks the “Implementation Complete” button.
ASIMS Notification: Recommendation Implementation Complete – Individual
Recommendation
Recommendation ref as a link
has been sent to you as the Recommendation Owner.
Please review the work performed by the implementor(s) and when satisfied send to the ADH/AM.
Title:
Recommendation implementation complete (Role group)
Sent to the Recommendation Owner role group when the implementor clicks the “Implementation Complete” button.
ASIMS Notification: Recommendation Implementation Complete - Role group
Recommendation
Recommendation ref as a link
has been sent to you as a member of the Recommendation Owner Role Group.
Please review the work performed by the implementor(s) and when satisfied send to the ADH/AM.
Title:
Recommendation assigned to group for review
Sent to Defence AIB role group when a SI recommendation is closed by the ADH/AM role group
Sent to DG DSA role group when a SI recommendation is
ASIMS Notification: Recommendation Assigned
A recommendation
Recommendation ref as a link
raised on a DASOR where the investigation was convened by the DG DSA has been sent to your Role Group for Review.

Issue 6 118 AL15
MAA_OpAssure_KE_MAN_001 Version_6.15 Jul_2021
OFFICIAL
Title Generation Details Subject Body
accepted by the Defence AIB role group
Sent to Defence AIB role group when a SI recommendation is rejected by the ADH/AM role group
Sent to DG DSA role group when a rejected SI recommendation is accepted by the Defence AIB role group.
Please review the recommendation and Accept or Reject its implementation.
Title:
Recommendation assigned to group for review
Sent to ADH Role Group when the Recommendation Owner clicks “Send to ADH/AM”.
ASIMS Notification: Recommendation ADH/AM Review
Recommendation
Recommendation ref as a link
has been sent to your role group for action.
Please review the recommendation implementation and if satisfied close the recommendation.
Title:
Recommendation rejected
Sent to individuals who have been identified as the report investigators when a Recommendation raised on that report is Rejected.
ASIMS Notification: Recommendation Rejected
A recommendation
Recommendation ref as a link
that you raised has been rejected.
Please view the recommendation for details of why it was rejected.
Title:
Recommendation implementation rejected
Sent to ADH/AM role group when an implementation of the recommendation is rejected by the Defence AIB role group.
Sent to the ADH/AM role group when an implementation of the recommendation is rejected by the DG DSA role group.
ASIMS Notification: Recommendation Implementation Rejected
Recommendation
Recommendation ref as a link
has been returned to your role group because the implementation has been rejected by either Defence AIB or DG DSA.
Please review the recommendation for details of why it was rejected before re-implementing.
Title:
Recommendation closed
Sent to individuals who have been identified as the report investigators when a Recommendation raised on that report is closed.
ASIMS Notification: Recommendation Closed
Recommendation
Recommendation ref as a link
for a report you investigated has been closed.

Issue 6 119 AL15
MAA_OpAssure_KE_MAN_001 Version_6.15 Jul_2021
OFFICIAL
Title Generation Details Subject Body
Please use the link above to access the recommendation and view the details of its implementation.
Title:
Recommendation Rejection rejected
Sent to the ADH/AM role group when the rejection of a SI recommendation is not approved by the Defence AIB role group.
Sent to the Defence AIB role group when the rejection of a SI recommendation is not approved by the DG DSA role group.
ASIMS Notification: Recommendation Rejected
Recommendation
Recommendation ref as a link
has been assigned to your role group because the rejection of the implementation has not been accepted.
Title:
Recommendation Rejected for Rewrite
Sent to individuals who have been identified as the report investigators when a Recommendation raised on that report is returned for rewrite.
ASIMS Notification: Recommendation Rejected for Rewrite
Recommendation
Recommendation ref as a link
has been returned to you for rewrite.
Please view the recommendation for details of why it was rejected for rewrite, amend the full recommendation field on the summary tab and send back to ADH/AM.
Title:
Recommendation Elevated
Sent to the ODH/AM Review Group when the ADH/AM elevates a Recommendation.
ASIMS Notification: Recommendation Elevated
Recommendation
Recommendation ref as a link
has been elevated to your Role Group.
Please review the recommendation and Accept, Reject, Request Rewrite, Elevate or Copy to another ADH/AM.
Title:
Recommendation Copied
Sent to the role group a recommendation has been copied to.
ASIMS Notification: Recommendation Copied
Recommendation
Recommendation ref as a link
has been copied to your Role Group.
Please review the recommendation and Accept, Reject, Request Rewrite, Elevate or Copy to another ADH/AM.
Title:

Issue 6 120 AL15
MAA_OpAssure_KE_MAN_001 Version_6.15 Jul_2021
OFFICIAL
Title Generation Details Subject Body
Question Asked (Recommendation)
Sent to the individual or role group who has been asked a question on a recommendation.
ASIMS Notification: Recommendation Question Asked – Recommendation Reference
You have been asked question
Question
on Recommendation
Recommendation ref as a link
Please acknowledge the question and add an answer on the comments tab. Use “Add Answer” to add an interim/holding response and use “Add Final Answer” to add your final response and close the request.
Question Final Answered (Recommendation)
Sent to the individual who asked a question on a Recommendation when a final answer has been added to the question.
ASIMS Notification: Recommendation Question Final Answered - Recommendation Ref
A final answer to your question
Question
has been posted on Recommendation Recommendation ref as a link
Please view the response and acknowledge the final answer on the comments tab.
Question Answered (Recommendation)
Sent to the individual who asked a question on a Recommendation when an answer has been added to the question.
ASIMS Notification: Recommendation Question Answered - Recommendation Ref
An interim/holding response to your question
Question
on Recommendation Recommendation ref as a link
has been posted and you can view the answer on the comments tab.
Recommendation Question Not Final Answered (For asker)
Sent to the individual who asked a question when the question is overdue (Answer By Date has passed and no final answer added).
ASIMS Notification: Recommendation Question Asked Not Final Answered - Recommendation Title
A final answer to your question
Question
on Recommendation Recommendation ref as a link
has not been posted before the answer by date and is now overdue.
Recommendation Question Not Final Answered (For responder)
Sent to the individual or role group who has been asked a question when the question is overdue (Answer By Date has passed and no final answer added).
ASIMS Notification: Recommendation Question Not Final Answered - Recommendation Title
The question
Question
on Recommendation Recommendation Title as link
is overdue.
Please add your final answer to the question as the required by date has passed. The question can be answered on the comments tab.

Issue 6 121 AL15
MAA_OpAssure_KE_MAN_001 Version_6.15 Jul_2021
OFFICIAL
Title Generation Details Subject Body
Comment needed(Recommendation)
Sent to the individual or role group who have been requested to comment on aRecommendation.
ASIMS Notification: RecommendationComment Required - RecommendationReference
Recommendation
Title:
Recommendation ref as a link
has been sent to you for Comment.
Please review the recommendation and add your comment to theComments tab. Use “Add Comment” to add an interim/holding response and use “Add Final Comment” to add a final response and close the request.

Issue 6 122 AL15
MAA_OpAssure_KE_MAN_001 Version_6.15 Jul_2021
OFFICIAL
D 6. Local Administrators
D 6.1. Introduction
D 6.1.1. Maintaining role group members and unit investigator lists is an essential activity to ensure that the correct personnel are populated into the appropriate workflows for a DASOR.
D 6.1.2. Local administration rights have been awarded to local air/flight safety teams to manage role groups and investigator lists, specific to their AoR.
D 6.1.3. The administration pages are accessed by selecting Admin of the Menu Bar.
Note: This will only be available if the user has the appropriate permissions.
D 6.2. Amending Role Groups
D 6.2.1. Locate and select the Edit Roles item from the Menu Bar.
Fig 46
D 6.2.2. Maintaining role groups can be performed by either editing the role group to add/remove a user or by editing the user and adding/removing them from a role group. The Edit Roles page allows the user to perform both actions.

Issue 6 123 AL15
MAA_OpAssure_KE_MAN_001 Version_6.15 Jul_2021
OFFICIAL
Fig 47
D 6.2.3. To edit a Role, enter the role group name, or part of a name, into the Quick Lookup field; this will automatically filter the user list.
D 6.2.4. Select the role group you wish to edit and select the Edit Roles… button.
Fig 48
D 6.2.5. To add a user to the role group, type the required users name into the Not assigned to this role box, select the required user and then click the >> button to move it into the right-hand box marked Assigned to this role.
D 6.2.6. To remove a user from the role group, select the required user from the Assigned to this role box, select the << button to move it into the left-hand box marked Not assigned to this role.
D 6.2.7. Select the Update Role button to save any changes made.

Issue 6 124 AL15
MAA_OpAssure_KE_MAN_001 Version_6.15 Jul_2021
OFFICIAL
D 6.2.8. A pop-up window will appear to confirm the account has been updated. Select the OK button to confirm.
D 6.2.9. The Roles section has a Users’ Details List button, once a role group has been selected from the list select this button to download an excel spread sheet of all users in that role group.
D 6.2.10. To edit a User, enter the users PUID (if known) or name into the Quick Lookup field; this will automatically filter the user list.
D 6.2.11. Select the required user to amend and select the Edit User Roles… button.
D 6.2.12. If no user account exists an account request will need to be made through the ASIMS Helpdesk.
Fig 49
D 6.2.13. To add a role group to a user account, type the required role group as requested into the Not assigned to this role box, select the required role group and then click the >> button to move it into the right-hand box marked Assigned to this role.
D 6.2.14. To remove a role group from a user account, select the required role group from the Assigned to this role box, select the << button to move it into the left-hand box marked Not assigned to this role.
Note: This screen can also be used to set the OI Trained & Date Training Completed fields on the users account, this information is used to filter the list of station investigators available when selecting the level of investigation (See part C 2.12 for assigning investigators to a report).

Issue 6 125 AL15
MAA_OpAssure_KE_MAN_001 Version_6.15 Jul_2021
OFFICIAL
D 6.2.15. A pop-up window will appear to confirm the account has been updated. Select the OK button to confirm.
D 6.3. Assigning Investigator(s)
D 6.3.1. If an Occurrence Manager is required to initiate an investigation on a DASOR, the investigators must be included in the station/unit Investigator selectable list. When a user is added to the Investigator list they become selectable by the Occurrence Manager for allocation to an investigation.
Note: All station investigators are available for LI investigations, only OI trained (see D 6.2.14 for setting the OI trained field on a user’s account) station investigators are available for OSI level investigations and all Defence AIB station investigators are available for SI investigations.
D 6.3.2. Locate and select the Investigators tab.
Fig 50
D 6.3.3. Identify the Station at which the user needs to be allocated using either of the following methods:
a. Enter the station name (or in part) where the user needs to be allocated to in the Quick lookup field. This will filter the stations and provide a suggested list from which to select from.
b. Scroll through the Select a station list to find the required Station.

Issue 6 126 AL15
MAA_OpAssure_KE_MAN_001 Version_6.15 Jul_2021
OFFICIAL
Fig 51
D 6.3.4. Select the required Station before selecting the Assign Investigators button.
Fig 52
D 6.3.5. Identify the user who needs to be allocated as an investigator by entering the users PUID (if known) or name into the Not assigned to this role quick lookup box. This will filter the users and provide a suggested list from which to select from.
D 6.3.6. Select the required user before selecting the >> button. The selected user will appear in the Assigned to this role list.
D 6.3.7. Select the Update Station Investigators button to confirm the action.
D 6.3.8. A pop-up window will appear to confirm the station has been updated. Select the OK button to confirm.
D 6.3.9. Once the update has completed the Occurrence Manager will be able to select the individual from the Investigation list within the DASOR report.

Issue 6 127 AL15
MAA_OpAssure_KE_MAN_001 Version_6.15 Jul_2021
OFFICIAL
Part E Investigation, Findings and Recommendations

Issue 6 128 AL15
MAA_OpAssure_KE_MAN_001 Version_6.15 Jul_2021
OFFICIAL
E 1. Investigation
E 1.1. Introduction
Fig 53
E 1.1.1. The purpose of an investigation is to determine the cause(s) of an occurrence, with the intention of implementing actions to prevent recurrence (or reduce the likelihood or impact of recurrence).
Note: ASIMS does not specify how an investigation is carried out – this is the responsibility of the relevant ADH/AM – but it does provide the repository for the results of investigations.
E 1.1.2. There are different ‘levels’ of investigation which may be undertaken, ranging from a basic, informal LI where no written investigation report is mandated (which may even be just one SQEP individual reading the occurrence narrative and deciding on the findings) through to a full SI. This Section is relevant to all types of investigation.
E 1.1.3. An investigation consists of 3 key elements within ASIMS:
a. The investigation report/narrative
b. Codification/classification of the outcome, cause, and causal factors, which are collectively to be known as the Findings (this aspect is covered in Part E 2 of this Manual).

Issue 6 129 AL15
MAA_OpAssure_KE_MAN_001 Version_6.15 Jul_2021
OFFICIAL
c. Prevention measures taken, mitigations/local actions or recommendations taken to prevent reoccurrence. For each cause & causal factor identified they must have the actions that have been taken to prevent reoccurrence recorded or a justification of no action taken.
E 1.1.4. All DASORs will be allocated an Investigator by the reports Occurrence Manager. Once allocated and the report has been progressed to under investigation only the assigned Investigator(s) and members of the occurrence manager role group for LI and OSI investigations have access to the Investigation and Findings tabs until the investigation is complete.
E 1.1.5. Each investigator assigned will receive an email notification that a DASOR requires action. The notification will contain a link to the DASOR and a copy of the brief title.
E 1.1.6. Selecting the link will open that report in the default web browser. Alternatively, all the reports that you are acting as an Investigator for can be viewed by selecting the number of reports in the Requiring Action column of the DASORs row in the Reports Summary section on the User Home Screen. This will display the related DASORs in a results table. Selecting a row of the table will open the respective DASOR in a new window.
E 1.2. Managing Comments
E 1.2.1. All comments relating to the DASOR are recorded on the Comments tab and all ASIMS users can add a comment to any report. In order to manage the submission of comments during an investigation an assigned investigator can turn global commenting on or off. Global Comments are On as default for LI and Off for OSI and SI investigations.
Note: If a user or role group has been sent a report for comment or a user asked a question on a report with Global Comments Off they will be able to view the comments tab to add the comment or answer the question. Access to the comments tab will be removed once the user or role group has added their final comment or final answer.
Fig 54
E 1.2.2. In order to turn Global Comments off:
a. Open the Comments tab of the DASOR.

Issue 6 130 AL15
MAA_OpAssure_KE_MAN_001 Version_6.15 Jul_2021
OFFICIAL
b. Select the Global Comments Off button in the top right-hand corner of the tab. This action will turn the On button grey and the Off button red to indicate global comments have been turned off and will stop users outside of the investigation being able to view the comments tab.
E 1.2.3. In order to turn Global Comments on:
a. Open the Comments tab of the DASOR.
b. Select the Global Comments On button to allow all users the ability to comment on the report. This action will turn the On button green and the Off button grey.
E 1.2.4. Additional information relating to the report may be required during an investigation. To allow a user to comment on the report in this ‘global comments off’ configuration the report must be sent for comment to the user or role group as necessary:
a. Open the Distribution tab of the DASOR and select the show link next to the Comment Addressees heading. This will display all the role groups at each Station within ASIMS. By default, the list will open at the Station identified within the DASOR.
b. Select the required user(s) and/or role group(s) by either:
• Ticking the box preceding the required role group name(s) in the Send for comments to Role Group section
or,
• Typing the required role group or individual user name in the Send for comments to Individual User or Role Group text box and selecting the appropriate user or role group displayed.
c. Once all the individual users and/or role groups have been chosen, select the Send for Comment button to complete the process and send a notification to all individual users selected and members of the selected role groups. The email will state they need to comment on the report and contain a link to the report.
E 1.2.5. An investigator can also ask a specific question of an individual or role group, see para C 5.4.
E 1.3. Investigation Tab Completion
E 1.3.1. Once all the relevant information has been gathered the investigation can be recorded on ASIMS.
Note: While a report is under investigation the Investigation tab is only visible to the Investigator(s) and the occurrence manager role group for LI and OSI investigations. This enables the investigation details to be added without the information being made public and allows the tab to be completed in stages.
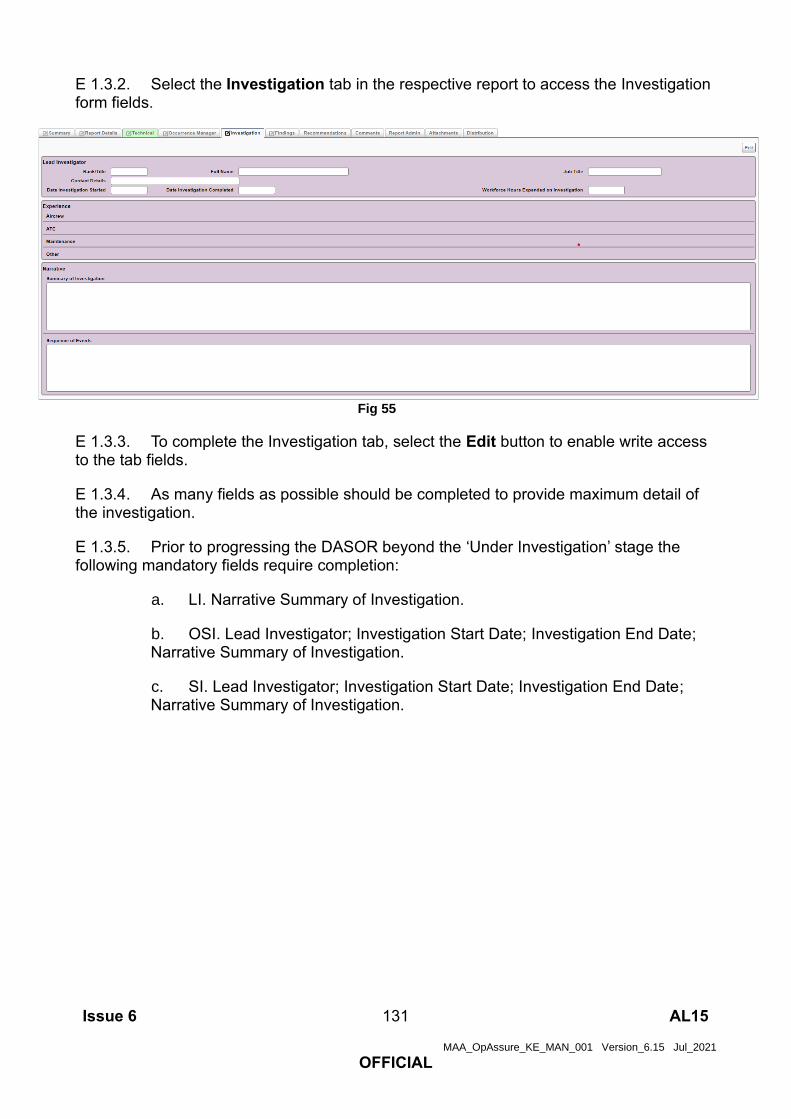
Issue 6 131 AL15
MAA_OpAssure_KE_MAN_001 Version_6.15 Jul_2021
OFFICIAL
E 1.3.2. Select the Investigation tab in the respective report to access the Investigation form fields.
Fig 55
E 1.3.3. To complete the Investigation tab, select the Edit button to enable write access to the tab fields.
E 1.3.4. As many fields as possible should be completed to provide maximum detail of the investigation.
E 1.3.5. Prior to progressing the DASOR beyond the ‘Under Investigation’ stage the following mandatory fields require completion:
a. LI. Narrative Summary of Investigation.
b. OSI. Lead Investigator; Investigation Start Date; Investigation End Date; Narrative Summary of Investigation.
c. SI. Lead Investigator; Investigation Start Date; Investigation End Date; Narrative Summary of Investigation.

Issue 6 132 AL15
MAA_OpAssure_KE_MAN_001 Version_6.15 Jul_2021
OFFICIAL
E 1.4. Investigation Tab Sections
E 1.4.1. Lead Investigator.
a. Lead Investigator Details: Rank/Title; Full Name; Job Title; Contact Details. The lead investigator details are automatically populated with the details of the first person to edit the tab. The details can be changed as required.
b. Investigation Details: Date Investigation Started; Date Investigation Completed; Workforce Hours Expended on Investigation. Complete the details of the investigation process as required.
E 1.4.2. Experience. The experience of the individuals involved can be included by selecting the appropriate, Add Aircrew, Add ATC, Add Maintenance, Add Other, button to display the Enter the experience details of all the people involved in the occurrence:
a. Aircrew: Rank/Title; Role; Hours (flown) Last 30 Days; Hours (flown) last 3 Months; Hours (flown) on Type; Total Hours (flown).
b. ATC: Rank/Title; Role; Time on Console; Experience Years; Experience Months; Endorsements; Other Info.
c. Maintenance: Rank/Title; Role; Total (time) on Type; Experience Years; Experience Months; Other Info.
d. Other: Rank/Title; Role; Trade; Experience Years; Experience Months; Other Info.
Note: Human fatigue information can be added for each individual identified if it is relevant to the investigation by selecting the Include Fatigue tick box. Additional fields will be displayed, deselect the tick box to remove the additional fields if deemed not relevant, see para B 3.7 for details on the Fatigue form fields.

Issue 6 133 AL15
MAA_OpAssure_KE_MAN_001 Version_6.15 Jul_2021
OFFICIAL
Fig 56
E 1.4.3. Narrative.
a. Summary of Investigation. Summarise the type of investigation conducted detailing all the steps that have been performed.
b. Sequence of Events. Provide a sequence of events for the occurrence.
E 1.5. Review and Complete
E 1.5.1. Once satisfied the relevant fields are complete and spell checked select the Save button located in the top right-hand corner of the tab.
Note: At this stage the Investigation tab is only visible to the assigned Investigator(s) and those in the occurrence manager role group for LI and OSI investigations.

Issue 6 134 AL15
MAA_OpAssure_KE_MAN_001 Version_6.15 Jul_2021
OFFICIAL
E 2. Findings
E 2.1. Introduction
E 2.1.1. The Findings tab is completed by the appointed investigator(s) and records a summary of the findings from the investigation, allowing occurrences to be classified.
E 2.1.2. Findings are the collective term used for the Outcome, Cause, Causal Factors, Effects and Observations. These factors should be categorised within every DASOR to allow for effective trending of occurrences.
E 2.1.3. The ASIMS Findings taxonomy system facilitates the Bow-Tie method of analysis. ASIMS does not produce Bow-Ties. Bow-Tie is a method of conceptualising the links between the causal factors, preventative barriers (risk mitigation controls) and consequences (outcomes) of an occurrence, where the release of the hazard (the ‘top event’) is the centre of the Bow-Tie.
E 2.1.4. Additional Findings
E 2.1.4.1 The Findings tab facilitates the creation of multiple findings by using the Add Finding button. This enables multiple groups of findings (Outcome – Cause – Causal Factors) to be recorded for a DASOR. For example, a technical fault in flight may have resulted in a report-worthy safety incident. However, the subsequent investigation may establish that an associated maintenance activity had been both incorrectly completed and not properly supervised. The conclusion is that 3 elements led to the incident occurrence and each element requires investigation:
• why was the maintenance activity being carried out incorrectly?
• why was supervision inadequate?
• why did the technical fault in flight lead to an air safety incident?
E 2.1.4.2 To accurately record the investigation an additional Finding should be added for each element (a separate finding for each phase of the occurrence) allowing each element to have their own outcome, cause and causal factors identified. This makes it easier to identify which causal factor initiated which cause and subsequently led to each outcome.
E 2.2. Taxonomy
E 2.2.1. The ASIMS Findings Taxonomy has been created to provide greater clarity between Outcomes (the What) and Causal Factors (the Why) and to allow greater compatibility with Bow Tie analysis methodology.
E 2.2.2. The Findings taxonomy is split into 3 distinct groups:
a. Outcome. What happened? The realisation of a hazard in the form of an incident of accident. Outcomes have been broken down into 5 sub-sets and describe the occurrences which the regulated community, and the aviation industry in general, is interested in.

Issue 6 135 AL15
MAA_OpAssure_KE_MAN_001 Version_6.15 Jul_2021
OFFICIAL
• Air Operations. Post Captains Signature.
• Ground Operations. Forward Activity to Pre-Captains Signature.
• Airworthiness. Depth Activity (inc Aircraft Manufacture).
• ATC/ABM/ALI. ATC or ABM.
• General. All Other inc Hostile.
Each sub-set has a 3-level taxonomy. Technical Fault (with no other outcome) and Hazard Observation (where no hazard was realised) can be selected within each sub-set to identify which area of interest they occurred in.
b. Cause. The cause is a factor which leads directly to an outcome, explaining how the event happened. Typically, it will represent the final barrier to fail; the final link in the chain before the top event was realised. If there were multiple co-incident failures, then choose the most significant. Causes have been broken down into 4 sub-sets each with further taxonomy delineation for selection.
• Human Factors Performance
• Technical
• Environmental
• Unfriendly/Hostile Action
Note: If the cause is identified as being Technical then the element at fault must be identified with the cause. This is done by identifying the Technical Fault on the Technical tab, then when the Technical taxonomy entry is selected a list of all technical faults will be displayed and the radio button on the far right must be selected to indicate which system resulted in the technical cause.
Fig 57

Issue 6 136 AL15
MAA_OpAssure_KE_MAN_001 Version_6.15 Jul_2021
OFFICIAL
c. Causal Factors. This describes the real world as a set of pre-conditions. The taxonomy has 5 sub-sets of influence where each can affect a given scenario in a positive of negative way. Of note, the control measures (barriers) at this level can only be influenced at this level e.g. Organisations are best placed to address deficiencies in an Organisation barrier.
• Organisation – high level issues, typically held at MOD or ODH level and influencing on a global level e.g. acquisition of equipment.
• Team/Task Factors – Task or process based, typically held at station/DDH level and influencing at a local level e.g. generation of flying programme.
• Individual Factors – The elements that an individual has that can influence activities on a daily basis e.g. experience, skills, physical and mental attributes.
• Technical Factors – the elements that aircraft, equipment and tools can influence daily activities e.g. design, serviceability.
• Environmental – the workplace influence and natural environment factors that influence daily activity e.g. lighting (in hangars), weather
Causal Factors is a collective term within ASIMS for:
• Contributory Factor. Why it happened – affects the likelihood of Incident and degree of hazard exposure
• Aggravating Factor. What made the outcome worse – affect the severity of the outcome once exposed to the hazard
• Other Factor. Any other factors associated with the occurrence – i.e. relevant to this occurrence but not affecting its likelihood or severity of the outcome
E 2.2.3. Effects. These are the consequences of the occurrence, they are important to help DDH/AM prioritise resources and justify expenditure. Effects are broken down into the following categories:
• Aircraft or Equipment Damage
• Down-time
• Environmental Impact
• Financial Cost
• Flight Effect
• Workforce Hours Expended
• Nil Effect
• Personal Injury
• Reputational Impact
E 2.3. Findings Tab Completion
E 2.3.1. The Findings tab can be completed in stages. Select the Findings tab in the respective report to access the Findings form fields.
E 2.3.2. To complete the Findings tab, select the Edit button to enable write access to the tab fields.

Issue 6 137 AL15
MAA_OpAssure_KE_MAN_001 Version_6.15 Jul_2021
OFFICIAL
E 2.3.3. As many fields as possible should be completed to provide maximum detail of the Findings.
E 2.3.4. To progress the report to the next stage the following must be identified:
• An Outcome.
• A Cause.
• At least one Causal Factor.
• At least one Effect.

Issue 6 138 AL15
MAA_OpAssure_KE_MAN_001 Version_6.15 Jul_2021
OFFICIAL
Fig 58
E 2.4. Findings Tab Sections
E 2.4.1. Outcome.
a. Enter the name of the taxonomy entry into the Outcome text box or select Pick Outcome – a pop up window will appear.

Issue 6 139 AL15
MAA_OpAssure_KE_MAN_001 Version_6.15 Jul_2021
OFFICIAL
b. Select the appropriate outcome by double-clicking through the outcome taxonomy levels. Double-clicking the level 3 taxonomy will populate the Outcome fields.
c. Provide additional detail by completing the Narrative Description of Outcome.
E 2.4.2. Cause.
a. Enter the name of the taxonomy entry into the Cause text box or select Pick Cause – a pop up window will appear.
b. Select the appropriate cause by double-clicking through the cause taxonomy levels. Double-clicking the level 3 taxonomy will populate the Cause fields.
c. Provide additional detail by completing the Narrative Description of Cause.
E 2.4.3. To link a formal ADH/AM recommendation to the Cause select Link to existing Recommendation or Recommendation for DDH/ODH/AM Approval and follow the procedure at E 3.2.
E 2.4.4. If the action does not require ADH/AM approval and has been implemented already, select Mitigation/Local Actions; a window will appear so that all local mitigating actions can be recorded.
Note: ASIMS acts as our corporate memory, all mitigations and actions taken to prevent reoccurrence must be recorded either as a formal ADH/AM recommendation or within the Mitigation/Local Actions field.

Issue 6 140 AL15
MAA_OpAssure_KE_MAN_001 Version_6.15 Jul_2021
OFFICIAL
Fig 59
E 2.4.5. If no action is required select Justification of No Action; a window will appear so that a justification of no action can be recorded.
Fig 60

Issue 6 141 AL15
MAA_OpAssure_KE_MAN_001 Version_6.15 Jul_2021
OFFICIAL
E 2.4.6. Causal Factor.
a. Select the type of Causal Factor being added; Contributory, Aggravating or Other.
b. Enter the name of the taxonomy entry into the Causal Factors text box or select Pick Causal Factors – a pop up window will appear.
Note: If a Technical Fault cause is selected you will be required to select which major system from the technical tab the cause relates to. Each Major and Sub-system identified in the technical section will be displayed below the cause and the equipment radio button for the system should be selected.
c. Select the appropriate causal factor by double-clicking through the causal factor taxonomy levels. Double-clicking the level 3 taxonomy will populate the Causal Factor fields.
d. Provide additional detail by completing the Narrative Description of Causal Factor.
e. Additional Causal Factors can be added by selecting the Add Casual Factors button as required. Repeat para E 2.4.4a to E 2.4.4e for each Causal Factor added.
E 2.4.7. To link a formal ADH/AM recommendation to the Causal Factor select Link to existing Recommendation or Recommendation for DDH/ODH/AM Approval and follow the procedure at E 3.2.
E 2.4.8. If the action does not require ADH/AM approval and has already been implemented, select Mitigation/Local Actions; a window will appear so that all local mitigating actions can be recorded.
Note: ASIMS acts as our corporate memory, all mitigations and actions taken to prevent reoccurrence must be recorded either as a formal ADH/AM recommendation or within the no Mitigation/Local Actions field.
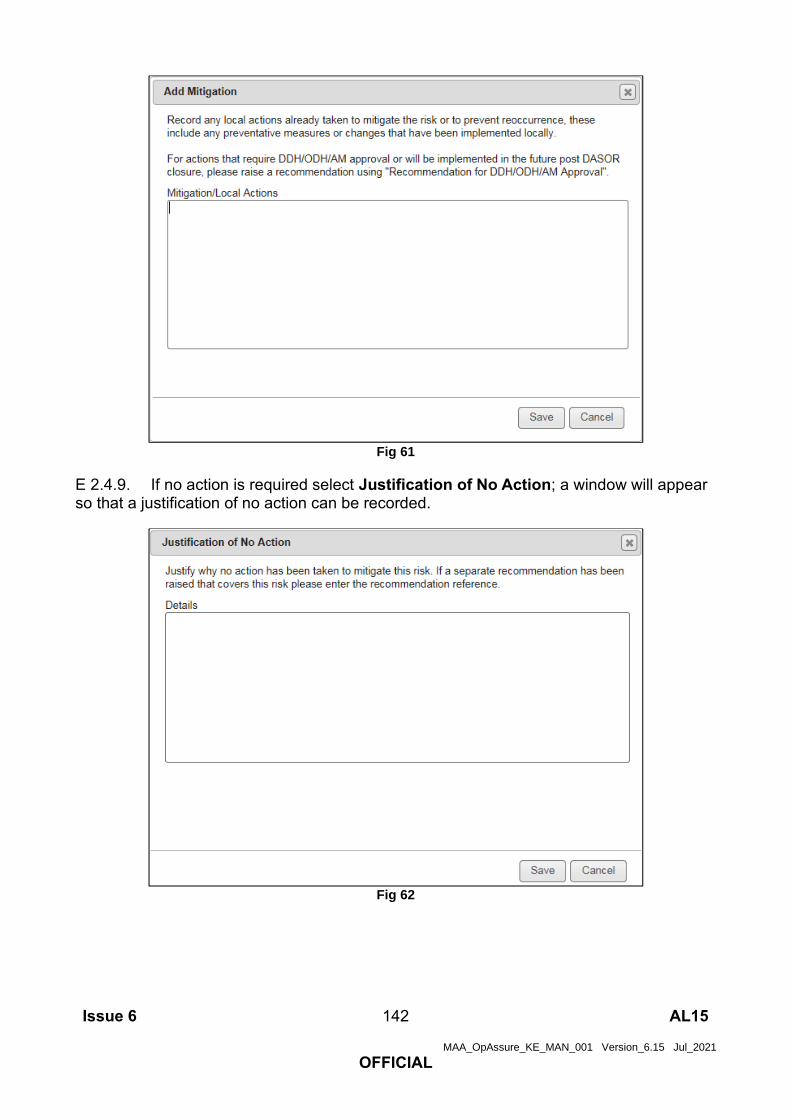
Issue 6 142 AL15
MAA_OpAssure_KE_MAN_001 Version_6.15 Jul_2021
OFFICIAL
Fig 61
E 2.4.9. If no action is required select Justification of No Action; a window will appear so that a justification of no action can be recorded.
Fig 62

Issue 6 143 AL15
MAA_OpAssure_KE_MAN_001 Version_6.15 Jul_2021
OFFICIAL
E 2.4.10. Observations. An observation is a factor that was not considered to have played a part in the occurrence under investigation or assessed as likely to contribute to a similar occurrence in future; but was perceived to be worthy of comment due to its potential to affect Air Safety. Select the Observations bar to display the Observation text box. Populate as required.
Fig 63
E 2.4.11. Effects.
a. Select the Effects bar to make the Effects fields visible.
b. Select from the level 1 drop down menu. If flight effect is selected also select a level 2.
c. Add additional detail in the text box as required.
d. Additional effects can be added by selecting the Add Effect button.
Fig 64

Issue 6 144 AL15
MAA_OpAssure_KE_MAN_001 Version_6.15 Jul_2021
OFFICIAL
E 2.5. Review and Complete
E 2.5.1. Once satisfied the relevant fields are complete and spell checked select the Save button located in the top right-hand corner of the tab.
Note: At this stage the Findings tab is only visible to the assigned Investigator(s) and those in the occurrence manager role group for LI and OSI investigations.

Issue 6 145 AL15
MAA_OpAssure_KE_MAN_001 Version_6.15 Jul_2021
OFFICIAL
E 3. Raising Recommendations
E 3.1. Introduction
E 3.1.1. Recommendations should propose remediation strategies to mitigate the findings of an investigation and can be raised against a Cause or Causal factor in a DASOR. They are not to include reference to individual discipline. Disciplinary actions should be captured externally to the ASIMS process in order to maintain a Just Culture.
Note: Only remediation strategies that require ADH/AM (DDH/AM or ODH/AM Review Group) approval or mitigations/local actions that will be implemented in the future, post DASOR closure should be raised as a Recommendation. All other actions implemented should be recorded using the Mitigations/Local Actions field, see para E 2.4.
E 3.1.2. Recommendations can be raised following any kind of investigation and must be managed by an ADH/AM (DDH/AM or ODH/AM Review Group).
E 3.1.3. This section will explain how Recommendations are managed within ASIMS.
Note: Once again, readers are reminded that this is simply the process within ASIMS and does not necessarily reflect the actual management review process at an establishment.
E 3.1.4. The process life cycle of a recommendation is displayed below:
Fig 65

Issue 6 146 AL15
MAA_OpAssure_KE_MAN_001 Version_6.15 Jul_2021
OFFICIAL
E 3.2. Recommendation Generation
E 3.2.1. A recommendation is raised by the assigned Investigator(s) of a DASOR or in the case of an OSI they can be raised by the ORG, and each recommendation is raised against a Cause or Causal Factor within the Findings tab of a report.
E 3.2.2. Select the Recommendation for DDH/ODH/AM Approval button immediately below the Cause or Causal Factor for it to be identified against; a pop-up Add Recommendation window will appear.
Fig 66
E 3.2.3. The following fields must to be completed:
a. Title. Provide the Recommendation with a short summary title.
b. Full Recommendation. Describe the Recommendation in more detail.
c. ADH/AM. Select the appropriate ADH/AM from the drop-down list of DDH/AM & ODH/AM Review Groups.

Issue 6 147 AL15
MAA_OpAssure_KE_MAN_001 Version_6.15 Jul_2021
OFFICIAL
E 3.2.4. The following fields can be completed if known:
a. Recommendation Owner. Begin typing the name of an individual or role group and make the appropriate selection from the filtered list. This will more than likely be decided by the ADH/AM.
b. Recommendation Implementor. Begin typing the name of an individual and make the appropriate selection from the filtered list. This will more than likely be decided by the Recommendation Owner.
The fields should be left blank if details are not known at the time of drafting the recommendation.
E 3.2.5. Once all fields have been completed select the Save button. This action will record the recommendation information against the assigned Cause or Causal Factor in the Findings tab.
E 3.2.6. At this stage the Recommendation is still in draft and can be edited further by selection the Edit button or deleted by selecting the Delete button next to the respective Recommendation.
E 3.2.7. More than one recommendation can be assigned to a Cause or Causal Factor by selecting the respective Add Recommendation button and repeating E 3.2.2 to E 3.2.6.
E 3.2.8. The Recommendation will be allocated a reference number once the Findings tab save button has been selected following the actions at Section E 2.5.
E 3.3. Send to ADH/AM
E 3.3.1. In order to complete the recommendation generation, the draft needs to be progressed to the ADH/AM. This action is undertaken in the Recommendations tab by selecting the Send to ADH button against the respective recommendation.
Note: For Local Investigations (LI) the Send to ADH button is only available for the reports occurrence managers while the report is at Occurrence Manager Review. Unless the investigation is being conducted by an occurrence manager when the button is available immediately.
Note: For Occurrence Safety Investigations (OSI) the Send to ADH button is only available for the ORG and it is their responsibility to review all recommendations prior to sending to ADH.
Note: Until completion, the recommendation contents are only visible to members of the nominated ADH/AM, recommendation owner and implementor(s).

Issue 6 148 AL15
MAA_OpAssure_KE_MAN_001 Version_6.15 Jul_2021
OFFICIAL
E 3.4. Linking to an existing recommendation
E 3.4.1. If an existing recommendation adequately mitigates the identified finding then the cause or causal factor can be linked to an open recommendation within the reports ADH/AM chain (DDH/AM Review Group or ODH/AM Review Group). Select the Link to existing Recommendation button to display a pop-up allowing the selection of available recommendations.
Fig 67
E 3.4.2. Select the recommendation you wish to link to from the drop-down list and the remained of the fields will be automatically populated from the recommendation.
E 3.4.3. Once you are satisfied you have selected the correct recommendation select the Accept button to link to the recommendation.

Issue 6 149 AL15
MAA_OpAssure_KE_MAN_001 Version_6.15 Jul_2021
OFFICIAL
E 4. Send for Review
E 4.1. Introduction
E 4.1.1. Once satisfied the investigation is complete the report can be sent for review to the relevant groups. Reports are sent to different review groups depending on the level of investigation and who completed the investigation.
Note: At this stage the Investigation, Findings and Recommendation tabs are only visible to the assigned Investigator(s) and those in the occurrence manager role group for LI and OSI investigations.
E 4.1.2. Complete the Investigation tab see Part E 1.3 for further details.
E 4.1.3. Complete the Findings tab see Part E 2 for further details.
E 4.1.4. Add any recommendations, see Part E 3 for further details.
E 4.1.5. Once all the investigation details, findings and recommendations have been added to the report it is ready to be progressed for OM Review for LIs, DDH/AM review for SIs and ORG review (see Part E 6) for OSIs.
E 4.2. Send to Occurrence Manager Review
E 4.2.1. Only LIs where the investigation is not conducted by a member of the Occurrence Manager will go through Occurrence Manager Review.
E 4.2.2. Select the Send to OM Review button to progress the report. The report will be sent to the Occurrence Manager role group for review and will be removed from the Investigator(s) Requiring Action list in the Reports Summary section of the User Home Screen.
E 4.3. Send to DDH/AM Review
E 4.3.1. LIs where the investigation is conducted by the Occurrence Manager can be sent straight to DDH/AM review. To progress the report to the next stage the following must be completed:
a. Change the Further Action field in the Occurrence Manager tab to Nil Further Action. b. Ensure the Technical tab and/or ATM Supervisor tab is marked complete.
c. Submit any recommendations to the relevant ADH/AM by selecting the corresponding Send to ADH/AM button in the Recommendations tab.

Issue 6 150 AL15
MAA_OpAssure_KE_MAN_001 Version_6.15 Jul_2021
OFFICIAL
d. All requests for comments are closed, the details of any outstanding requests can be seen from the Report Admin tab in the Actions section. If there are requests for comment outstanding (Action Completed is blank) navigate to the Comments tab and click the Close all Comments button to close all outstanding comments.
E 4.3.2. SIs only. To progress the report to the next stage the following must be completed:
a. Change the Further Action field in the Occurrence Manager tab to Nil Further Action.
b. Ensure the Technical tab and/or ATM Supervisor tab is marked complete.
c. Submit any recommendations to the relevant ADH/AM by selecting the corresponding Send to ADH/AM button in the Recommendations tab.
d. All requests for comments are closed, the details of any outstanding requests can be seen from the Report Admin tab in the Actions section. If there are requests for comment outstanding (Action Completed is blank) navigate to the Comments tab and click the Close all Comments button to close all outstanding comments.
E 4.3.3. For SIs and LIs completed by Occurrence Managers the Send to DDH/AM Review button will now become available. The report will be sent to the DDH/AM Review Group for review and will be removed from the Investigator(s) Requiring Action list in the Reports Summary section of the User Home Screen.
E 4.4. Send to ORG
E 4.4.1. OSIs only. To progress the report to the next stage the following must be completed:
a. Change the Further Action field in the Occurrence Manager tab to Nil Further Action.
b. Ensure the Technical tab and/or ATM Supervisor tab is marked complete.
c. All requests for comments are closed, the details of any outstanding requests can be seen from the Report Admin tab in the Actions section. If there are requests for comment outstanding (Action Completed is blank) navigate to the Comments tab and click the Close all Comments button to close all outstanding comments
E 4.4.2. For OSIs the Send to ORG Review button will become available. Selection of this button will display a pop-up window for ORG members to be identified.
Note: The person who selects the Send to ORG Review button will be automatically added as an ORG Member, remove if not appropriate.

Issue 6 151 AL15
MAA_OpAssure_KE_MAN_001 Version_6.15 Jul_2021
OFFICIAL
E 4.4.3. Complete the appropriate fields and select the Submit button. The report will now be sent to the ORG for review and will be removed from the Investigator(s) Requiring Action list in the Reports Summary section of the User Home Screen.
Fig 68

Issue 6 152 AL15
MAA_OpAssure_KE_MAN_001 Version_6.15 Jul_2021
OFFICIAL
E 5. Occurrence Manager Review
E 5.1. Introduction
E 5.1.1. For LI level investigations that have been completed by investigators who are not in the reports Occurrence Manager role group the report will pass to the Occurrence Manager Review stage for review and onward transmission to DDH/AM review.
Note: This section is relevant to LI workflow only.
Fig 69
E 5.2. Review and Complete
E 5.2.1. The Occurrence Manager should review the work of the investigators to assure themselves the investigation has been completed satisfactorily, all findings identified, and mitigations recorded, or recommendations raised to prevent reoccurrence.
Note: At this stage the Investigation, findings and recommendation tabs are only visible to those in the occurrence manager role group.
E 5.2.2. Review the Investigation tab see Part E 1 for further details.
E 5.2.3. Review the Findings tab see Part E 2 for further details.
E 5.2.4. Add/edit/delete recommendations see Part E 3 for further details.

Issue 6 153 AL15
MAA_OpAssure_KE_MAN_001 Version_6.15 Jul_2021
OFFICIAL
E 5.2.5. If the Occurrence Manager is not satisfied with the level of investigation the report can be returned to the investigator(s) by selecting the Send back to Investigation button.
E 5.2.6. Once all the investigation details, findings and recommendations have been added to the report it is ready to be progressed for DDH/AM review.
E 5.2.7. To progress the report to the next stage the following must be completed:
a. Change the Further Action field in the Occurrence Manager tab to Nil Further Action.
b. Ensure the Technical tab and/or ATM Supervisor tab is marked complete.
c. Submit any recommendations to the relevant ADH/AM by selecting the corresponding Send to ADH/AM button in the Recommendations tab.
d. All requests for comments are closed, the details of any outstanding requests can be seen from the Report Admin tab in the Actions section. If there are requests for comment outstanding (Action Completed is blank) navigate to the Comments tab and click the Close all Comments button to close all outstanding comments.

Issue 6 154 AL15
MAA_OpAssure_KE_MAN_001 Version_6.15 Jul_2021
OFFICIAL
E 6. ORG
E 6.1. Introduction
E 6.1.1. For OSI level investigations the report will pass to the ORG stage for review and onward transmission to DDH/AM review.
Note: This section is relevant to OSI workflow only.
Fig 70
E 6.2. ORG Tab Completion
E 6.2.1. Once the ORG has sat the ORG tab requires completion. The ORG tab can be completed in stages. Select the ORG tab in the respective report to access the ORG form fields.
E 6.2.2. Select the Edit button to enable write access to the tab fields.
E 6.2.3. Complete as many fields as possible to provide maximum detail from the ORG. The following required fields are marked with a red asterisk and must be completed before the report can be sent to DDH/AM Review:
a. Date of ORG field.
b. Review of OSI section.

Issue 6 155 AL15
MAA_OpAssure_KE_MAN_001 Version_6.15 Jul_2021
OFFICIAL
c. Chairperson Comment section.
E 6.3. ORG Tab Sections
Fig 71
E 6.3.1. ORG Particulars
a. Event being Investigated. Auto populated.
b. Date of ORG. Enter the date of the ORG manually or by using the calendar. Select the Today button to enter the current date.
c. ORG Chairperson. Provide the name of the individual assigned as the ORG Chair. To add a name, select in the field and begin typing the required individual’s name or role and select the required name from the filtered list.
d. ORG Members. Provide the name(s) of the ORG membership. To add a name, select in the field and begin typing the required individual’s name or role and select the required name from the filtered list. Repeat as required until all members have been added. To remove a member, select the X next to the appropriate individual’s name.

Issue 6 156 AL15
MAA_OpAssure_KE_MAN_001 Version_6.15 Jul_2021
OFFICIAL
e. ORG Members Under Training. Provide the name(s) of any ORG members under training. To add a name, select in the field and begin typing the required individual’s name or role and select the required name from the filtered list. Repeat as required until all members have been added. To remove a member, select the X next to the appropriate individual’s name.
f. ORG Observers/SMEs. Provide the name(s) of any observers and/or SMEs requested to assist the ORG. To add a name, select in the field and begin typing the required individual’s name or role and select the required name from the filtered list. Repeat as required until all members have been added. To remove a member, select the X next to the appropriate individual’s name.
E 6.3.2. Review of OSI.
a. The investigation has established the cause(s) of the event. Select Yes or No from the drop-down box. If No is selected a text box will be displayed and you must provide a summary of any action taken as a result.
b. All the causal/contributory factors have been identified. Select Yes or No from the drop-down box. If No is selected a text box will be displayed and you must provide a summary of any action taken as a result.
c. The recommendations address all the causal/contributory factors. Select Yes or No from the drop-down box. If No is selected a text box will be displayed and you must provide a summary of any action taken as a result.
d. Application of Just Culture Policy. The application of just culture can be assessed for each human factor’s performance cause identified on the findings tab. To add an assessment against an individual, click the Add Individual button on the relevant human factor’s performance cause. The Add Individual button can be used to add multiple individuals as required.
Fig 72
(1) Individual. Select the individual being assessed for the application of just culture, the available list of individuals is based on the experience details populated on the Investigation tab.
(2) Behaviour Type. Select the attributed behaviour type from the available list.
(3) Is there a concern about the accountability of this individual? Select Yes or No from the drop-down box. If Yes is selected three additional fields are displayed.

Issue 6 157 AL15
MAA_OpAssure_KE_MAN_001 Version_6.15 Jul_2021
OFFICIAL
Fig 73
(4) Using the FAIR System Accountability Framework has a level of accountability been determined for this individual? Select Yes or No from the drop-down box.
(5) Have the Substitution and Routine Tests been applied? Select Yes or No from the drop-down box.
(6) Is further action recommended against the individual or the organisation? Select Yes or No from the drop-down box.
E 6.3.3. Chairperson Comment. The ORG Chair should briefly summarise the ORG administration and findings. An explanation of the behavioural types and associated accountability decisions(s) for each individual or organisation should also be made if applicable.
E 6.4. Review and Complete
E 6.4.1. Once satisfied the relevant fields are complete and spell checked select the Save button located in the top right-hand corner of the tab.
E 6.4.2. Add/amend/delete any findings, see Part E 2 for further details.
E 6.4.3. Add/amend/delete any recommendations, see Part E 2 for further details.
E 6.4.4. In order to progress the report to DDH/AM review the following must be completed:
a. Change the Further Action field in the Occurrence Manager tab to Nil Further Action.
b. Submit any recommendations to the relevant ADH/AM by selecting the Send to ADH/AM button on the Recommendations tab, see Part E 3.3 for further details
E 6.4.5. The Send for DDH/AM Review button will now become available for selection to progress the report. The report will now be sent to the DDH/AM for review and will be removed from the ORG member(s) Requiring Action list in the Reports Summary section of the User Home Screen.

Issue 6 158 AL15
MAA_OpAssure_KE_MAN_001 Version_6.15 Jul_2021
OFFICIAL
Part F ADH DASOR Review and Closure

Issue 6 159 AL15
MAA_OpAssure_KE_MAN_001 Version_6.15 Jul_2021
OFFICIAL
F 1. DDH / AM Review
F 1.1. Introduction
Fig 74
F 1.1.1. The DDH/AM Review is a formal stage in the processing/staffing of all occurrences. This step allows a SQEP DDH or equivalent AM to review all DASORs allocated to their AoR to consider the suitability and thoroughness of investigation, mitigations/local action applied and recommendations generated before signing-off the appropriate resolution and/or acceptance of RtL for the occurrence.
F 1.1.2. The ASIMS DDH/AM Review Group supports the Duty Holder concept across Defence aviation. In addition to formal Delivery Duty Holders, the DDH/AM Review Group is intended for Duty Holder Facing Organizations and Industry at the appropriate level.
Warning: Do not get confused between the function of the DDH/AM Review Group within ASIMS, and the DDH/AM Review function on a unit. The ASIMS DDH/AM Review Group is set up to perform the function of signing-off DASORs and approving recommendations within ASIMS. A unit may set up local management processes to support this task and to perform a management review of occurrences; this DDH/AM Review function is constituted at local duty holder/accountable manager discretion.

Issue 6 160 AL15
MAA_OpAssure_KE_MAN_001 Version_6.15 Jul_2021
OFFICIAL
F 1.1.3. Any person within the DDH/AM Review Group can act on behalf of the whole role group; therefore, it is important to have local procedures in place to ensure that the appropriate person is signing-off the DASOR/Recommendation.
F 1.2. Members of DDH/AM Review Group
F 1.2.1. It is at the DDH/AM discretion which staff are given DDH/AM Review Group membership rights.
F 1.2.2. The DDH/AM may delegate the management of safety occurrences and recommendations on ASIMS and may not include themselves in the DDH/AM Review Group but remains accountable and should be kept informed of all decisions made on their behalf.
Note: In such cases, it would be appropriate for the DDH/AM to have an ASIMS Commentator role group which can then be used to forward specific DASORs for comment.
F 1.3. DDH/AM Review
F 1.3.1. When a DASOR is sent to DDH/AM Review an email notification will be sent to all DDH/AM Review Group members highlighting the need to action a report and providing a hyperlink to the respective DASOR. The DASOR will be added to both the Requiring Action and Managed list of the Reports Summary Section on the User Home Screen. Selecting the report total from the summary table will display those specific reports in a list at the bottom of the screen. Selecting a DASOR from the list will open the report in a new window.
F 1.3.2. Similarly, any recommendations which have been raised within the DDH/AM AoR will be shown in the Requiring Action column of the Recommendations row.
F 1.3.3. Review the content of each tab within the DASOR to familiarise yourself with the report and ensure a suitable investigation has been completed, appropriate recommendations raised, mitigations/local actions recorded and where justification of no action has been indicated the action taken must ensure that any finding raised has been suitably mitigated and the risk reduced to ALARP and tolerable.
F 1.3.4. Navigate to the Comments tab.
F 1.3.5. Add suitable comments pertaining to the report and any recommendations raised in the DDH/AM Comments box. Select Save to save the comments made.

Issue 6 161 AL15
MAA_OpAssure_KE_MAN_001 Version_6.15 Jul_2021
OFFICIAL
Fig 75
F 1.3.6. Should there be further investigation or staffing required the DASOR can be returned to the Investigator; see Section F 1.4.
F 1.3.7. Should there be wider implications beyond the DDH/AM AoR, or the DDH/AM believes it necessary, the report may be submitted for further review at the ODH/AM level; see Section F 1.5
F 1.3.8. Should the DASOR be deemed complete and ready for closure see Section F 1.6.
Note: All recommendations raised on the DASOR must be Accepted or Rejected before the DASOR can be closed.
F 1.4. Return to Investigation
F 1.4.1. If further investigation or staffing of the DASOR is required, the DASOR can be returned to the Investigator by selecting the Return to Investigation button in the top right of the page.
Note: In this situation there will usually be discussion ‘outside’ ASIMS, but it would be useful for audit purposes to add a comment to the DASOR to record the requirement for returning the report.
F 1.5. Report Closure
F 1.5.1. Following selection of the DDH/AM Review Complete button the DASOR sign-off statement will be displayed.

Issue 6 162 AL15
MAA_OpAssure_KE_MAN_001 Version_6.15 Jul_2021
OFFICIAL
Fig 76
Note: The DASOR sign-off statement highlights the duties required of the DDH/AM (or nominated representatives) when reviewing an air safety occurrence.
F 1.5.1. The DDH/AM is required to complete the sign-off statement to indicate that they are content for the DASOR to be closed.
F 1.5.3. The user is required to enter their ASIMS password to indicate that the statement has been read.
F 1.5.4. Select the Close radio button followed by selection of the Review Complete button. On selection of the Review Complete button the DASOR status will change to Closed and Filed.
Note: Although recommendations are linked to an originating DASOR, they are not dependent on the parent report. A DASOR may be closed even though the recommendations generated by it have not (yet) been implemented.
F 1.6. Elevate to ODH/AM Review
F 1.6.1. Following selection of the DDH/AM Review Complete button the DASOR sign-off statement will be displayed.
Note: The DASOR sign-off statement highlights the duties required of the DDH/AM (or nominated representatives) when reviewing an air safety occurrence.
F 1.6.2. The user is required to enter their ASIMS password to indicate that the statement has been read.
F 1.6.3. Select the Send to ODH/AM radio button followed by selection of the Review Complete button.

Issue 6 163 AL15
MAA_OpAssure_KE_MAN_001 Version_6.15 Jul_2021
OFFICIAL
Note: On selection of the Review Complete button the DASOR will be sent to the ODH/AM Review role group for action. This is generally only necessary when there is an action the ODH/ AM needs to take responsibility for. It is not to be used to just make the ODH/AM aware of a safety issue.
F 1.7. Complete pending comments
F 1.7.1. Following selection of the DDH/AM Review Complete button the DASOR sign-off statement will be displayed.
Note: The DASOR sign-off statement highlights the duties required of the DDH/AM (or nominated representatives) when reviewing an air safety occurrence.
F 1.7.2. The user is required to enter their ASIMS password to indicate that the statement has been read.
F 1.7.3. Select the Complete report pending comments radio button followed by selecting Review Complete.
Note: This selection will change the status of the report to “complete pending comments” for a period of 30 days during which time anyone wishing to add comments to the report can do so. The DASOR will close comments at the end of 30 days and send a notification to the DDH/AM Review Group requesting further action as appropriate. The report will remain in the managed column of the Reports Summary section of the User Home Screen during the pending period.

Issue 6 164 AL15
MAA_OpAssure_KE_MAN_001 Version_6.15 Jul_2021
OFFICIAL
F 2. ODH / AM Review Group
F 2.1. Introduction
Fig 77
F 2.1.1. The ASIMS ODH/AM Review Group is a formal stage in the processing/staffing for those occurrences which have been specifically referred to ODH/AM level by the subordinate DDH/AM organizations.
F 2.1.2. In addition to formal ODHs, the ODH/AM Review Group is intended for Duty Holder Facing Organizations and Industry at the appropriate level.
F 2.1.3. The ODH/AM Review Group will perform a similar task to the DDH/AM Review Group, although with wider visibility corresponding to their broader area of responsibility. They may also wish to add further recommendations to the DDH/AMs within their AoR, or another ODH/Equivalent AM.
F 2.1.4. For DASORs/Recommendations which have been transferred to the ODH/AM Review Group, the ASIMS functionality allows occurrence sign-off by a SQEP at ODH/equivalent AM level, and consideration of recommendations raised as a result of the occurrence.
F 2.1.5. Any person within the ODH/AM Review Group can act on behalf of the whole role group, therefore, it is important to have local procedures in place to ensure that the appropriate person is signing-off the DASOR/Recommendation.

Issue 6 165 AL15
MAA_OpAssure_KE_MAN_001 Version_6.15 Jul_2021
OFFICIAL
F 2.2. Members of ODH/AM Review Group
F 2.2.1. It is at the ODH/ AM discretion which staff are given ODH/AM Review Group membership rights.
F 2.2.2. The ODH/AM may delegate the management of safety occurrences and recommendations on ASIMS to staff, and not include themselves in the ODH/AM Review Group but remains accountable.
Note: In such cases, it would be appropriate for the ODH/AM to have an ASIMS Commentator role group which can then be used to forward specific DASORs for comment.
F 2.3. ODH/AM Review
F 2.3.1 When a DASOR is sent to ODH/AM Review an email notification will be sent to all ODH/AM Review Group members highlighting the need to action a report and providing a hyperlink to the respective DASOR. The DASOR will be added to both the Requiring Action and Managed list of the Reports Summary Section on the User Home Screen. Selecting the report total from the summary table will display those specific reports in a list at the bottom of the screen. Selecting a DASOR from the list will open the report in a new window.
F 2.3.2 Similarly, any recommendations which have been raised within the ODH/AM AoR will be shown in the Requiring Action column of the Recommendations row.
F 2.3.3 Review the content of each tab within the DASOR to familiarise yourself with the report and ensure a suitable investigation has been completed, appropriate recommendations raised, mitigations/local actions recorded and where justification of no action has been indicated the action taken must ensure that any finding raised has been suitably mitigated and the risk reduced to ALARP and tolerable.
F 2.3.4 Navigate to the Comments tab.
F 2.3.5 Add suitable comments pertaining to the report and any recommendations raised in the ODH/AM Comments box. Select Save to save the comments made.

Issue 6 166 AL15
MAA_OpAssure_KE_MAN_001 Version_6.15 Jul_2021
OFFICIAL
Fig 78
F 2.3.6 Should there be further investigation or staffing required the DASOR can be returned to DDH/AM Review by selecting the Return to DDH/AM button.
F 2.3.7 Should the DASOR be deemed complete and ready for closure see Section F 2.4.
Note: All recommendations on the DASOR must be either Accepted or Rejected before a the DASOR can be closed.
F 2.3.8. There is no functionality within ASIMS to transfer DASOR’s or Recommendations to SDH level. This does not mean that issues cannot be referred to SDH, rather that this referral needs to be performed using normal staffing procedures outside of ASIMS.
Note: In such cases the DASOR and/or Recommendations will remain open and owned in ASIMS by the ODH/AM Review Group until closure has been approved by the SDH. Where appropriate, the staffing documentation may be attached to the DASOR or Recommendation by the ODH Review role group staff.
F 2.4. Report Closure
F 2.5.1. Following selection of the ODH/AM Review Complete button the DASOR sign-off statement will be displayed.

Issue 6 167 AL15
MAA_OpAssure_KE_MAN_001 Version_6.15 Jul_2021
OFFICIAL
Fig 79
Note: The DASOR sign-off statement highlights the duties required of the DDH/AM (or nominated representatives) when reviewing an air safety occurrence.
F 2.5.2. The ODH/AM is required to complete the sign-off statement to indicate that they are content for the DASOR to be closed.
F 2.5.3. The user is required to enter their ASIMS password to indicate that the statement has been read.
F 2.5.4. Select the Close radio button followed by selection of the Review Complete button. On selection of the Review Complete button the DASOR status will change to Closed and Filed.
Note: Although recommendations are linked to an originating DASOR, they are not dependent on the parent report. A DASOR may be closed even though the recommendations generated by it have not (yet) been implemented.
F 2.6. Complete pending comments
F 2.6.1. Following selection of the ODH/AM Review Complete button the DASOR sign-off statement will be displayed.
Note: The DASOR sign-off statement highlights the duties required of the DDH/AM (or nominated representatives) when reviewing an air safety occurrence.
F 2.6.2. The user is required to enter their ASIMS password to indicate that the statement has been read.
F 2.6.3. Select the Complete report pending comments radio button followed by selecting Review Complete.

Issue 6 168 AL15
MAA_OpAssure_KE_MAN_001 Version_6.15 Jul_2021
OFFICIAL
Note: This selection will change the status of the report to “complete pending comments” for a period of 30 days during which time anyone wishing to add comments to the report can do so. The DASOR will close comments at the end of 30 days and send a notification to the DDH/AM Review Group requesting further action as appropriate. The report will remain in the managed column of the Reports Summary section of the User Home Screen during the pending period.

Issue 6 169 AL15
MAA_OpAssure_KE_MAN_001 Version_6.15 Jul_2021
OFFICIAL
Part G Significant Equipment Safety Occurrence Report (SESOR)

Issue 6 170 AL15
MAA_OpAssure_KE_MAN_001 Version_6.15 Jul_2021
OFFICIAL
G 1. ASIMS SESOR Functionality
G 1.1. Introduction
G 1.1.1. A Significant Equipment Safety Occurrence Report (SESOR) is used to communicate awareness of a potential equipment air safety hazard between DE&S DTs. The form is raised and responded to on ASIMS in the DASOR format. This guide separately details the ‘procedure for raising a SESOR’ and the ‘procedure for responding to a SESOR’; users should refer to the appropriate section.
G 1.2. SESOR Process Flow
G 1.2.1. The following demonstrates the process flow of a SESOR:
Fig 80
G 1.3. Procedure for Raising a SESOR
G 1.3.1. SESORs are raised in a similar way to a normal DASOR, but only by DE&S Delivery Teams or the DAT.

Issue 6 171 AL15
MAA_OpAssure_KE_MAN_001 Version_6.15 Jul_2021
OFFICIAL
Note: In raising a SESOR, both the Reporter’s Section and the Technical Section are completed by the initiating platform maintenance role group. The exception being where the SESOR is raised by a platform maintenance role group against equipment managed by a commodities DT (e.g. life preserver); in this instant the commodity maintenance role group will be responsible for maintaining the technical section of the SESOR as per Para G 13.3.14.
G 1.3.4. Access the ASIMS website5, log in and select Create New DASOR from the ASIMS User Home Screen6. Complete all highlighted fields and all other appropriate fields starting with the Reporter’s Section:
a. Occurrence Type: Select ‘Other’ and enter ‘SESOR’ in the text box
b. Event Type: Select ‘Hazard/Observation’
c. Service: Select ‘Defence’
d. Additional Reports: Select SESOR (DE&S use only).
Warning: If this additional form is not ticked the report will remain a DASOR.
Note: Selecting this additional report will: automatically populate the Date of Occurrence (with the date the SESOR is raised), Ship/Station/Organisation in the Occurrence Details section (with DE&S SESOR); enable the technical section fields to be visible to the reporter; makes the report non-prime; and sends all notifications with a high priority flag.
e. Complete your details as the Individual Reporting (if you logged into ASIMS these details will be auto populated).
f. Your Role During Occurrence should be the “Engineering Authority”.
g. Identify whether the SESOR was generated from an In-form/EMS report or not.
h. The Aircraft Commander, Authorising Officer and Injuries sections are not applicable.
i. Date and Time of Occurrence: Mandatory field. This field will be automatically populated with the date the SESOR is initiated.
Note: Do not override this date with the date the original occurrence happened; the occurrence date will be on the originating DASOR (if raised).
j. Time of Occurrence: Select the current time from the drop-down list and then Local from the adjacent drop-down list.
5 https://www.asims.r.mil.uk/
6 Do not raise a SESOR by clicking the Create New DASOR button on the ASIMS Home Page – i.e. you must log in.

Issue 6 172 AL15
MAA_OpAssure_KE_MAN_001 Version_6.15 Jul_2021
OFFICIAL
k. Place of Occurrence: Mandatory field. Enter place of occurrence if known or use ‘MoD Abbey Wood’ as a default.
l. Country: Mandatory field.
m. Ship/Station/Organisation: Select DE&S – SESOR.
Note: This should be already populated if SESOR (DE&S use only) additional form was selected.
n. Unit/Squadron/Flight/Site: Select the relevant platform or commodity DT section (if a commodity managed item).
o. Aircraft Registration: If known; if not insert ‘N/A’.
p. Aircraft Type/Mark: Mandatory field. If no aircraft involved, select ‘No Aircraft’.
Note: This field will auto populate from the aircraft registration if the platform is present on the MAR.

Issue 6 173 AL15
MAA_OpAssure_KE_MAN_001 Version_6.15 Jul_2021
OFFICIAL

Issue 6 174 AL15
MAA_OpAssure_KE_MAN_001 Version_6.15 Jul_2021
OFFICIAL
Fig 81
q. Meteorological Conditions, Flight Details and Briefed Task are not required.
r. Brief Title must start with the word ‘SESOR’. The rest of the Brief Title must be typed in sentence case, not block capitals, and should summarise the potential hazard in one sentence.
s. Narrative Description of Event. This text field must be completed in three Sections as detailed below:
(1) Section 1: This SESOR has been raise to make Delivery Teams aware of (state clearly what the hazard is) as a result of (State clearly why this is a hazard). Delivery Teams are to review and elevate the issue to respective DH chains, as required.
(2) Section 2: State Reference e.g. DASOR/Airworthiness Directive/Service Inquiry etc.
(3) Section 3: Must provide, in general, the circumstances of the occurrence. Detailed information can be provided in the technical information or in attachments if required.

Issue 6 175 AL15
MAA_OpAssure_KE_MAN_001 Version_6.15 Jul_2021
OFFICIAL
Note: The details in Italics are for the DTs to update with the occurrence information.
t. Perceived Severity: Select from High, Medium, Low or Negligible.
G 1.3.5 The Technical Section must be completed in the following order:
Note: If the technical section is to be completed by another DT, i.e. a commodities DT, only the required fields are to be completed at this stage and progress to Para G 1.3.6.
a. Aircraft Repair Category: Required Field. If ‘No Aircraft’ has been chosen in the Aircraft Type/Mark field then this field will already be populated with ‘No maint req’d’.
b. Engine Repair Category: Required Field. If ‘No Aircraft’ has been chosen in the Aircraft Type/Mark field then these fields will already be populated with ‘No maint req’d’. The number of selections available will vary depending upon the aircraft type chosen when the report was submitted. If the aircraft registration is not in the system then there will be 4 engine repair categories to complete.
c. Technical Fault or Maintenance Action Required: Select any Major Systems, Sub-Systems and components involved and for each component identified the NSN, Part Numbers and Serial Numbers must be populated. Also indicate type of failure or fault. If more than one NSN is applicable then further details should be included in the Other Equipment Involved box.
Note: Additional Major Systems and associated Sub-Systems and components involved can be added by selecting Add Technical Fault.
d. Other Agencies Consulted: Only if applicable.
e. Investigation and Rectification Work Carried Out and Why?: Describe the occurrence in detail from a technical perspective indicating any preliminary investigation findings, associated on-going work, mitigation strategies and an initial risk assessment. Provide as much information as possible to enable TAAs from other DTs to decide if their platforms are ‘affected’. The information should be presented in a clear and logical manner following, where possible, the headings given below:
(1) Detailed Description of Occurrence. Include a detailed technical description of the occurrence building on the general description in the Reporter’s Section Narrative.
(2) Initial Investigation Results and On-Going Work. Provide any relevant details from early investigations and associated on-going work.
(3) Mitigation Strategies (short, medium and long). Describe any mitigation strategies that have already been considered or implemented.

Issue 6 176 AL15
MAA_OpAssure_KE_MAN_001 Version_6.15 Jul_2021
OFFICIAL
(4) Initial Risk Assessment: Provide an initial risk assessment. Also include any operational risks here.
f. Required fields: Indicate if any of the following additional reports/forms have been raised:
• F760 Fault Narrative Report Raised: • QOR: • MoD F765 Publication Amendment Raised: • Other Action/Reports Raised:

Issue 6 177 AL15
MAA_OpAssure_KE_MAN_001 Version_6.15 Jul_2021
OFFICIAL
Fig 82
G 1.3.6. A final check of the report must be conducted to ensure that no information higher than Official has been included.
G 1.3.7. Select the Review Report >> button (top right).
G 1.3.8. Further information can be added to the Technical Section throughout the reporting process by the responsible Maintenance role group; this will be necessary when other DTs request more information to decide if they are affected or not. Information can be added by selecting the Technical tab in the relevant report and selecting Edit. Following the addition of any updated information select Save.
Note: Before additional information is added to the SESOR, the initiating DT must notify the Occurrence Manager (OC S&E Team) offline. Additional information should only be sent to those DTs who have requested it.
G 1.3.9. Link any associated DASORs to the SESOR from the Report Admin tab. Please refer to Section C 2.13 Linking Reports for how to link reports within ASIMS.
Note: Supporting attachments (photos, film footage, documents, etc) can be added to the report at any stage (file size limit of 10MB; larger films must be split into shorter clips). Navigate to the Attachments tab, click the Browse button, locate the file and click Attach File. To remove an attachment, contact the ASIMS Helpdesk.
G 1.3.10. Select the Sign and Submit Report button.
G 1.3.11. A message will appear asking the user to consider the following:
a. Does this event have an Air Safety implication?
b. Should this be an In-form/EMS report, i.e. non air safety reporting!
c. Does this report contain above Official content; remove classified locations etc.
Press OK to submit the report.
G 1.3.12. The report has been submitted to the Occurrence Manager role group and in parallel to the Maintenance role group who will receive an email notifying them of a requirement for them to action the report.
Note: For Occurrence Mangers the report will be added to the Requiring Action and Managed list and for Maintenance members the report will be added to the Requiring Action list in the Reports Summary section of the User Home Screen.
Note: Local Delivery Team procedures should be in place identifying who, in the Maintenance Role Group, should lead on completing/updating the Technical Section.
G 1.3.14. If the Technical section is to be completed by a DT other than the Initiating DT the Maintenance Role Group, i.e. a commodities DT, the user can log in to ASIMS and select the Technical tab of the relevant report, then:

Issue 6 178 AL15
MAA_OpAssure_KE_MAN_001 Version_6.15 Jul_2021
OFFICIAL
a. Select Edit
b. Follow the process at Para G 1.3.5 to G 1.3.6.
c. Check to ensure no information higher than Official has been included in the Technical section.
d. Select Save.
G 1.4. SESOR Occurrence Manager Role
G 1.4.1. For SESORs, the Occurrence Manager will be the relevant OC S&E Team (or DAT). They will check the report for completeness, where necessary make minor amendments (without changing the report’s meaning) and accept/distribute the SESOR to both comment and info addressees.
G 1.4.2. All the reports that you are acting as an Occurrence Manager for can be viewed by selecting the number of reports in the Managed column of the SESORs row in the Reports Summary section on the User Home Screen. This will display the related SESORs in a results table. Selecting a row of the table will open the respective SESOR in a new window.
G 1.4.3. The Occurrence Manager must conduct the following actions in the order detailed:
a. Select Edit in the Occurrence Manager tab.
b. Check the Occurrence Manager Details name fields; they are auto populated with the details of the first individual who enters the editable content. This may not be the individual who is assigned to manage the SESOR, check to make sure they are the correct details and amend as required.
c. The Further Action field will be automatically marked as ‘ongoing’ and the Investigation Type will be marked as N/A.
d. Select DE&S SESOR from the ODH/AM menu.
e. Select the Age of Report to 1st Age.
f. Add any additional Reports if necessary using the + button.
g. The Assessed Severity field has been auto populated from the reporter’s input (Perceived Severity). Consider and amend as necessary.

Issue 6 179 AL15
MAA_OpAssure_KE_MAN_001 Version_6.15 Jul_2021
OFFICIAL
h. Select Save.
Fig 83
i. Review the report in accordance with Para C 2.4. View each tab, select Edit of the respective tab that requires amendment, make any changes necessary (amendments must not change the meaning of the SESOR unless agreed with the initiating DT off line) and select Save before progressing to the next tab.
j. Select the Distribution tab and click (Show) next to Info Addressees. The distribution list for the aircraft type defined in the Reporter’s Section will automatically open.7
k. The following should be automatically pre-selected:
(1) 01. Internal – Info Dist for the Aircraft Type identified in the report.
(2) 02. External – Info Dist for the Aircraft Type identified in the report8.
(3) 09. and here if SESOR.
l. Select the Accept and Send for Info button at the bottom right of screen; you will be asked “are you sure”. On clicking ‘OK’ the report will be formally accepted by the Occurrence Manager onto ASIMS enabling all users to view the report and a notification sent to info addressees only.
7 If ‘No Aircraft’ was selected in the Reporter’s Section, the ‘No Aircraft’ distribution list will be automatically opened.
8 The 02. External – Info Dist option is not available if ‘No Aircraft’ selected in Reporter’s section.

Issue 6 180 AL15
MAA_OpAssure_KE_MAN_001 Version_6.15 Jul_2021
OFFICIAL
Fig 84
m. Select the Comments tab and enter a suitable Occurrence Manager comment such as: “This is a SESOR - Action Addressee DTs are requested to acknowledge receipt of this SESOR, state if affected (or not) by the hazard and indicate intent to raise a DASOR (if appropriate)”. If a SESOR is being raised for Info only, enter a comment such as: “This is a SESOR, addresses are only required to acknowledge receipt and confirm understanding of the issue”. Then click the Add Comment button.
n. Return to the Distribution tab and select (Show) next to the Comment Addressees. The distribution list for DE&S SESOR will automatically open.
o. Select all appropriate Commentator Role Groups in the DE&S SESOR list (do not select Maintenance, OM or ADH/AM role groups). This will distribute across all selected Air DTs.

Issue 6 181 AL15
MAA_OpAssure_KE_MAN_001 Version_6.15 Jul_2021
OFFICIAL
Fig 85
p. Select the Send For Comment button; you will be asked “are you sure”. The report will then be moved to the DT commentator role groups for action (see ‘Procedure for Responding to a SESOR’ below). This completes the Occurrence Manager’s initial input9.
G 1.4.4. Following distribution of the SESOR, the Occurrence Manager will manage comment addressee comments, ensuring that all DTs have provided a final comment; final comments are easily monitored in the Report Admin tab. Once all final comments have been received, the Occurrence Manager should follow the process at G 1.4.5 below or, in the event a DT requests further information10, the process at G 1.4.6 and G 1.4.7 below.
G 1.4.5. Once all final comments have been received, the Occurrence Manager must:
a. Select the Occurrence Manager tab and select the Edit button.
9 Once ASIMS has processed the report the OM receives the following message in red bold text on the report heading ‘Please complete the Investigation Type and select the Investigators on the Occurrence Manager tab then click the ‘Send for Investigation’ button.’ This message should be ignored.
10 Further information may be required by a DT to establish if its air systems are affected by a potential hazard.

Issue 6 182 AL15
MAA_OpAssure_KE_MAN_001 Version_6.15 Jul_2021
OFFICIAL
b. Change the Further Action field in the Occurrence Manager Section to read Nil Further Action.
c. Select Save (to leave the Edit screen).
d. Select the Comments tab and select the Close All Comments button.
Note: This action only needs to be performed if some comment addressees have not selected the Add Final Comment button and the occurrence manager is content a suitable comment has been submitted.
e. Select the Technical tab and select the Mark Complete button.
f. Select the Send for DDH/AM Review (top right of screen next to Edit button); you will be asked “are you sure”. A notification will be sent to the DDH/AM Review Group, which in the case of SESORs will be the DE&S Airworthiness Team (DAT). This completes the Occurrence managers input (unless it is returned by the DDH/AM Role Group for further work.
G 1.4.6. In the event a DT requests further information, the initiating DT will, where possible, provide an update in the Technical Section. Once this has been done, the Occurrence Manager will communicate this update as follows:
a. Select the Comments tab and select the Close All Comments button.
b. Select the Distribution tab and the (Show), next to Comment Addressees. Select those addressees (Commentator Role Groups) that have requested further information or did not make a final comment on the initial SESOR distribution.
c. Select Send For Comment
G 1.4.7. This information updating process can be repeated several times until all DTs have entered a final comment, as indicated to the Occurrence Manager in the Report Admin tab. The report can then be further progressed as detailed in G 1.4.4.
G 1.5. Procedure for Responding to a SESOR
G 1.5.1. Once the Occurrence Manager has clicked Send For Comment, all selected DE&S Air and Air Commodity DTs will receive email notifications annotated as ‘high importance’ (email subject line will be in red). The notification will be directed to those persons detailed within each DT SESOR Commentator Role Group and will read as follows:
A DASOR [DASOR Reference] has been sent to your ASIMS Role Group for Comment. Brief Title: [Brief Title of SESOR]
G 1.5.2. All the reports that a user is required to Comment on can be viewed by selecting the number of reports in the Requiring Action column of the SESORs row in the

Issue 6 183 AL15
MAA_OpAssure_KE_MAN_001 Version_6.15 Jul_2021
OFFICIAL
Reports Summary section on the User Home Screen. This will display the related SESORs in a results table. Selecting a row of the table will open the respective SESOR in a new window.
G 1.5.3. The SESOR commentator role group is responsible for commenting on a SESOR11.
G 1.5.4. Platform SESOR Commentator Role Groups should respond to an email notification by accessing the SESOR on ASIMS, clicking on the Comments tab and entering an appropriate comment.
G 1.5.5. A DT response (comment) to a SESOR should be succinct and restricted to an acknowledgement of receipt (in the first instant), a statement declaring if the DT is affected or not by the potential hazard, indication of intent to raise a DASOR (if affected) and a request for additional information when affected status cannot be established from the initial SESOR information12.
Note: Local DT procedures should be in place identifying who, in the Commentator role group, should lead on entering a comment.
G 1.5.6. On completing the comment, click Add Final Comment button if DT input is complete or Add Comment if a further comment at a later time/date is necessary.
Note: When adding a final comment if the responder is in multiple commentator role groups that have been requested to comment they will be prompted to select which role group they are adding the final comment on behalf of.
G 1.5.7. The Occurrence Manager will not forward a SESOR to the DAT for review/closure until all DTs have made an appropriate final comment and pressed the Add Final Comment button; this provides assurance that all DTs have considered the issue and responded appropriately (closed loop reporting).
G 1.5.8. Where a DT requests additional information, the SESOR will remain open until the initiating DT updates the Technical Section with the required information and DTs have all selected the Add Final Comment button.
G 1.5.9. If a DT is affected by a potential hazard detailed in a SESOR, they must consider raising a DASOR to inform their stakeholder community (and DHs) in accordance with RA 1410. The DASOR must be linked to the SESOR. Refer to C 2.13 about how to link reports in ASIMS.
G 1.6. DAT Review Role
G 1.6.1. When a report has been sent for review the DDH/AM Review Group will receive an email notifying them of a requirement to complete the DDH/AM comments section and close the report. The DDH/AM review is the final action before closing a SESOR and is
11 SESOR Commentator role groups are normally based on the platform team e.g. COMMENTATOR-SESOR-TUCANO. However, where a DT choses to have a single SESOR commentator role group for commenting on a SESOR, DTs should develop local instructions to define the internal process by which relevant LoAA holders are consulted to develop and authorise a single, agreed, formal response that includes all platforms in the DT.
12 See CoMPI-04 for a breakdown of response timelines

Issue 6 184 AL15
MAA_OpAssure_KE_MAN_001 Version_6.15 Jul_2021
OFFICIAL
conducted by the DAT; this includes a review of the SESOR to identify any pan Military Air Environment issues and trends. Where such issues are identified the DAT will initiate mitigating action.
G 1.6.2. The DAT will complete the SESOR process by completing the following actions:
a. Read/review the report by viewing each tab.
b. Select the Comments tab and enter a suitable comment in the DDH/AM Comments box; any subsequent actions as a result of the DDH/AM review must be noted here. Then Select the Save button.
Fig 86
c. If further action by the Occurrence manager is required, select Return to Occurrence Manager button at the top right corner of the screen.
d. If you are content to process the SESOR further, select the DDH/AM Review Complete button at the top right corner of the screen and you will be presented with a closing statement and 3 options.
Fig 87
e. To select the action required enter your ASIMS password into the field, select one of the following options and select Review Complete.

Issue 6 185 AL15
MAA_OpAssure_KE_MAN_001 Version_6.15 Jul_2021
OFFICIAL
(1) Close – If you accept the closing stamen and wish to close the SESOR.
(2) Send to ODH/AM Review – Do not use, SESOR do not support this function.
(3) Complete report pending comments - This selection will change the status of the report to complete pending comments for 30 days during which time anyone wishing to add comments to the report can do so. The SESOR will close comments at the end of the time period and send a notification to the DDH/AM Review Group requesting closure, extension or further action as appropriate.
G 1.7. SESOR Searching
G 1.7.1. Please refer to Section I 2 for the searching of reports.
Note: ‘SESOR’ is a selection in the ‘Type of Report’ filter in the standard search. ‘Significant Equipment Safety Occurrence Report (SESOR) - DE&S use only’ is a selection in the ‘Additional Reports’ field in the advanced search. Selecting either of these options in the respective search engine will return only reports that have the ‘SESOR (DE&S use only)’ additional report tick box selected.

Issue 6 186 AL15
MAA_OpAssure_KE_MAN_001 Version_6.15 Jul_2021
OFFICIAL
Part H Recommendations

Issue 6 187 AL15
MAA_OpAssure_KE_MAN_001 Version_6.15 Jul_2021
OFFICIAL
H 1. Recommendation Progression
H 1.1. Introduction
H 1.1.1. Recommendations should propose remediation strategies to mitigate the findings of an investigation and can be raised against a Cause or Causal factor in a DASOR. They are not to include reference to individual discipline. Disciplinary actions should be captured externally to the ASIMS process in order to maintain a Just Culture.
Note: Only remediation strategies that require ADH/AM (DDH/AM or ODH/AM Review Group) approval should be raised as a Recommendation, all other actions should be recorded using the Mitigations/Local Actions field, see E 2.4.3 or E 2.4.5 for Cause or Causal Factors remediation strategies respectively.
H 1.1.2. Recommendations can be raised following any kind of investigation and must be managed by an ADH/AM (DDH/AM or ODH/AM Review Group).
H 1.1.3. This section will explain how Recommendations are managed within ASIMS.
Note: Once again, readers are reminded that this is simply the process within ASIMS and does not necessarily reflect the actual management review process at an establishment.
H 1.1.5. The process life cycle of a recommendation is displayed below:
Fig 88

Issue 6 188 AL15
MAA_OpAssure_KE_MAN_001 Version_6.15 Jul_2021
OFFICIAL
H 1.2. ADH/AM
H 1.2.1. The ADH/AM will receive an email notification for each recommendation submitted to them for consideration; the notification will contain a link to the Recommendation. Selecting the link will open that specific recommendation in the default web browser. Alternatively, all the recommendations that you are acting as an ADH/AM for can be viewed by selecting the number of recommendations in the Requiring Action column of the Recommendations row in the Reports Summary section on the User Home Screen. This will display the related Recommendations in the list of results table. Selecting a row of the table will open the respective Recommendation in a new window.
H 1.2.2. A recommendation is initially made up of a recommendation details section and 4 tabs:
a. The recommendation details section displays the recommendation reference; status; originating report brief title; the planned completion date; the date of the last update and the investigation source.
b. The Distribution tab enables the recommendation to be sent for comment to individual users or role groups.
c. The Summary tab contains additional details of the recommendation including the AD/AM; the Recommendation Owner; the Implementor; the recommendation title and description.
d. The Related Recommendations tab shows any other recommendations that are related to it. If the recommendation has been raised as a copy of another recommendation the original is listed here.
e. The Related DASORs tab shows a summary from the originating DASOR and the finding the recommendation was raised on. This tab will also list any subordinate reports when the recommendation has been raised on a master report, see C 2.13.6 for details of Master/Subordinate linked reports.
Fig 89
H 1.2.3. When an ADH/AM receives a recommendation, they will be presented with 5 choices; the buttons for selection are positioned in the top right-hand corner:

Issue 6 189 AL15
MAA_OpAssure_KE_MAN_001 Version_6.15 Jul_2021
OFFICIAL
H 1.2.4. Rewrite. Return the recommendation to the investigator so that it can be amended before re-submission to the ADH/AM. Provide a reason for the required change in the pop-up window and select the Rewrite button to return the recommendation to the investigator(s) for edit. Select the X to return to the recommendation at any time.
Fig 90
H 1.2.5. Reject. If the ADH/AM is content to close with no further action citing the hazard identified by the recommendation is already ALARP and tolerable. If the investigation was marked as being convened by DG DSA then the recommendation will be passed to the Defence AIB and DG DSA for comment before closure. Provide a reason for the rejection in the pop-up window and select the Reject button to confirm. Select the X to return to the recommendation at any time.
Fig 91
H 1.2.6. Elevate. If the work required is beyond the capability of the ADH/AM, then it can be elevated within the AoR. Select the ADH/AM to elevate the recommendation to from the drop-down list in the pop-up window and provide written justification for this course of action. Select the Save button to confirm. Select the X to return to the recommendation at any time.

Issue 6 190 AL15
MAA_OpAssure_KE_MAN_001 Version_6.15 Jul_2021
OFFICIAL
Fig 92
Note: Recommendations can only be elevated if the ADH/AM has been set as a DDH/AM Review Group.
H 1.2.7. Copy. Copy the recommendation to a different ADH/AM not within the current AoR to prevent similar occurrences. This will create a copy of this recommendation from the chosen ADH/AM to implement and it will be related back to the originating in the Related Recommendations tab. Select the relevant ADH/AM role group(s) from the filtered list. More than one ADH/AM can be selected. Select the Copy to ADH button to confirm. Select the X to return to the recommendation at any time.
Fig 93

Issue 6 191 AL15
MAA_OpAssure_KE_MAN_001 Version_6.15 Jul_2021
OFFICIAL
H 1.2.8. Accept. The ADH/AM accepts the recommendation and takes responsibility for implementing the actions specified as the recommendation responsible owner. Complete the fields in the pop-up window. Select the Accept button to confirm. Select the X to cancel and return to the recommendation at any time. The recommendation status will be changed to Assigned with the planned date and recommendation owner set. An email notification will be sent to the recommendation owner and the recommendation will appear in their Reports Summary section of the User Home Screen.
Note: The recommendation will remain in the ADH/AMs Managed list until the recommendation owner has completed their work at which point a notification will be received and the recommendation added back to the Requiring Action list in the Reports Summary section of the User Home Screen. See section E 3.6 for follow up actions.
Fig 94
• Planned Date. Choose the date by which you intend to complete the recommendation. You can enter the date manually in the format DD/MM/YYYY or use the date picker
• Recommendation Owner. A suggested recommendation owner may have been selected by the originator of the recommendation. This is the person or role group who will own the recommendation and manage the work of implementing it. The owner can be changed as required.

Issue 6 192 AL15
MAA_OpAssure_KE_MAN_001 Version_6.15 Jul_2021
OFFICIAL
• Recommendation Implementor. A suggested recommendation implementor may have been selected by the originator of the recommendation. This is the person who will be completing the work of implementing the recommendation. This can be changed as required or left blank for the Recommendation Owner to identify.
• Reason for Acceptance. Narrative field for capturing your reason for accepting the recommendation.
H 1.2.9. All recommendations on a DASOR must be either Accepted or Rejected before a the DASOR can be closed.
H 1.2.10. Once a Recommendation has been accepted additional tabs will become available within the Recommendation:
a. Work Performed.
b. Comments. Except for those associated with the recommendation, comments are only visible to those individuals who have been asked a question or who have been sent the recommendation for comment.
c. Distribution. A recommendation can be sent to an individual or role group to add a comment to the recommendation from the distribution tab using the comment addressees’ function. All comments are added to the comments tab.
(1) Open the Distribution tab of the recommendation and select the show link next to the Comment Addressees heading. This will display all the role groups at each Station within ASIMS. By default, the list will open at the Station identified within the DASOR the recommendation was raised against.
(2) Select the required user(s) and/or role group(s) by either:
• Ticking the box preceding the required role group name(s) in the Send for comments to Role Group section
or,
• Typing the required role group or individual user name in the Send for comments to Individual User or Role Group text box and selecting the appropriate user or role group displayed.
(3) Once all the individual users and/or role groups have been chosen, select the Send for Comment button to complete the process and send a notification to all individual users selected and members of the selected role groups. The email will state they need to comment on the report and contain a link to the report.
d. Attachments.
e. Audit.

Issue 6 193 AL15
MAA_OpAssure_KE_MAN_001 Version_6.15 Jul_2021
OFFICIAL
Fig 95
H 1.2.11. The Recommendation ADH/AM can ask a question to any ASIMS user in relation to the recommendation by accessing the Comments tab in the associated recommendation and following the same process outlined for DASOR questions at section C 6.2.
H 1.2.12. The Recommendation ADH/AM can change the planned date for the recommendation at any time by selecting the Update Planned Date button in the top right-hand corner of the relevant recommendation; this action will open a pop-up window with 2 fields:
a. Planned Date. Change the planned date by selecting in the date field and use the date picker to select a revised date or manually amend the date in the field.
b. Justification for change. A text box to provide an explanation of why the change was required.
Select the Save button to confirm the action.
H 1.2.13. The Recommendation ADH/AM can change the Recommendation Owner at any time by selecting the Change Owner button in the top right-hand corner of the relevant recommendation; this action will open a pop-up window with one field:
a. Recommendation Owner. Select the required user or role group.
Select the Save button to confirm the action.
H 1.3. Recommendation Owner

Issue 6 194 AL15
MAA_OpAssure_KE_MAN_001 Version_6.15 Jul_2021
OFFICIAL
H 1.3.1. When a recommendation has been accepted the ADH/AM will assign a Recommendation Owner and it will be their responsibility to manage the recommendation by assigning an implementor, monitoring progress and accepting or rejecting the work carried out prior to returning it to the ADH/AM for review and closure.
H 1.3.2. The Recommendation Owner will receive an email notification for each recommendation assigned to them; the notification will contain a link to the Recommendation. Selecting the link will open that specific recommendation in the default web browser. Alternatively, all the recommendations that you are acting as a Recommendation Owner for can be viewed by selecting the number of recommendations in the Requiring Action column of the Recommendations row in the Reports Summary section on the User Home Screen. This will display the related Recommendations in the list of results table. Selecting a row of the table will open the respective Recommendation in a new window.
H 1.3.3. The Recommendation Owner should familiarise themselves with the recommendation by viewing the content of each tab within the recommendation.
H 1.3.4. The Recommendation Owner assigns a Recommendation Implementor by selecting the Set/Change Implementor button in the top right corner of the relevant recommendation; this action will open a pop-up window with the field titled Rec Implementor. Select the individual(s) who will be implementing the recommendation by:
Fig 96
a. Selecting into the field.
Note: This field may be blank to begin with if no Implementor has already been proposed.
b. Begin typing the relevant name and selecting it from the filtered list.
Note: Multiple people can be selected by reselecting in the field after each selection and repeating the name search.
c. Select the Set/Change Implementors button to confirm the change.
Note: A notification will be sent to all the assigned Recommendation Implementors informing them an action is required.
H 1.3.5. The Recommendation Owner can ask a question to any ASIMS user in relation to the recommendation by accessing the Comments tab in the associated

Issue 6 195 AL15
MAA_OpAssure_KE_MAN_001 Version_6.15 Jul_2021
OFFICIAL
recommendation and following the same process outlined for DASOR questions at section C 6.2.
H 1.3.6. A recommendation can be sent to an individual or role group to add a comment to the recommendation from the Distribution tab using the comment addressees’ function. All comments are added to the comments tab.
a. Open the Distribution tab of the recommendation and select the show link next to the Comment Addressees heading. This will display all the role groups at each Station within ASIMS. By default, the list will open at the Station identified within the DASOR the recommendation was raised against.
b. Select the required user(s) and/or role group(s) by either:
(1) Ticking the box preceding the required role group name(s) in the Send for comments to Role Group section
or,
(2) Typing the required role group or individual user name in the Send for comments to Individual User or Role Group text box and selecting the appropriate user or role group displayed.
c. Once all the individual users and/or role groups have been chosen, select the Send for Comment button to complete the process and send a notification to all individual users selected and members of the selected role groups. The email will state they need to comment on the report and contain a link to the report.
H 1.3.7. The Recommendation Owner can change/remove/add the assigned Implementors for the recommendation at any time be selecting the Set/Change Implementor button in the top right corner of the relevant recommendation and following the action at E 3.4.4.
Note: The Recommendation Owner has edit permissions for the summary tab, this enables them to complete the Justification and/or Implementation Plan as guidance for the implementor if required. Alternately these fields can be left blank for the implementor to complete as part of their work implementing the recommendation.
H 1.4. Implementor
H 1.4.1. The assigned Recommendation Implementor will have the responsibility of recording the actions taken to implement the recommendation onto ASIMS.
H 1.4.2. The Recommendation Implementor will receive an email notification for each recommendation assigned to them; the notification will contain a link to the Recommendation. Selecting the link will open that specific recommendation in the default web browser. Alternatively, all the recommendations that you are acting as a Recommendation Implementor for can be viewed by selecting the number of recommendations in the Requiring Action column of the Recommendations row in the Reports Summary section on the User Home Screen. This will display the related

Issue 6 196 AL15
MAA_OpAssure_KE_MAN_001 Version_6.15 Jul_2021
OFFICIAL
Recommendations in the list of results table. Selecting a row of the table will open the respective Recommendation in a new window.
H 1.4.3. The Recommendation Implementor is required to record the implementation plan and the solution of the recommendation in the Summary tab. Enter the tab and select the Edit button to enable write access to the tab fields. The following fields are to be completed:
a. Justification. Records the details of why the recommendation has been implemented the way it has including contextual details.
b. Implementation Plan. Records how the recommendation is going to be implemented.
c. Confirm the changes to the tab by selecting the Save button.
Fig 97

Issue 6 197 AL15
MAA_OpAssure_KE_MAN_001 Version_6.15 Jul_2021
OFFICIAL
H 1.4.4. The Work Performed tab is where the Recommendation Implementor provides a running record of all the actions taken during the implementation in order to maintain a history of the work performed and is designed to function in a similar way to the comment’s functionality of a DASOR:
a. Enter the tab and select into the Action Taken field.
b. Enter the specific action carried out.
c. Select the Save button to confirm.
d. Repeat this process as required until the implementation work is complete.
Note: The input will now appear is a History log at the bottom of the tab.
Fig 98
H 1.4.5. If there are any relevant attachments to support the recommendation or work carried out they can be uploaded in the Attachments tab. To add an attachment, select the Browse… button in the Attachments tab and identify the relevant locally stored file. Once identified select the Add Attachment button to upload it to the Recommendation.
Note: Once a file has been successfully uploaded it will be listed in an attachments table at the bottom of the tab.
H 1.4.6. The Recommendation Implementor can ask a question to any ASIMS user in relation to the recommendation by accessing the Comments tab in the associated recommendation and following the same process outlined for DASOR questions at section C 6.2.
H 1.4.7. A recommendation can be sent to an individual or role group to add a comment to the recommendation from the Distribution tab using the comment addressees’ function. All comments are added to the comments tab.

Issue 6 198 AL15
MAA_OpAssure_KE_MAN_001 Version_6.15 Jul_2021
OFFICIAL
a. Open the Distribution tab of the recommendation and select the show link next to the Comment Addressees heading. This will display all the role groups at each Station within ASIMS. By default, the list will open at the Station identified within the DASOR the recommendation was raised against.
b. Select the required user(s) and/or role group(s) by either:
(1) Ticking the box preceding the required role group name(s) in the Send for comments to Role Group section
or,
(2) Typing the required role group or individual user name in the Send for comments to Individual User or Role Group text box and selecting the appropriate user or role group displayed.
c. Once all the individual users and/or role groups have been chosen, select the Send for Comment button to complete the process and send a notification to all individual users selected and members of the selected role groups. The email will state they need to comment on the report and contain a link to the report.
H 1.4.8. When all the required actions have been performed to implement the recommendation select the Implementation Complete button to confirm to return the recommendation to the Recommendation Owner. This action will remove the recommendation from the Requiring Action list in the Reports Summary section of the User Home Screen.
H 1.5. Owner Review
H 1.5.1. The Recommendation Owner will receive an email notification when the Recommendation Implementor has marked the recommendation complete. The notification will contain a link to the recommendation and selecting the link will open it.
H 1.5.2. The recommendation status will show as Owner Review and the Recommendation Owner should review all the tabs in the recommendation to ensure they are content with the work completed and that the appropriate details have been accurately recorded before either:
a. Returning the recommendation to the Implementor. If the work carried out does not satisfy fully the recommendation, select the Return to Implementor(s) button to send the Implementor a notification that further work is required.
Or,
b. Send to the ADH/AM. If the work carried out has satisfied the recommendation by selecting the Send to ADH/AM button.
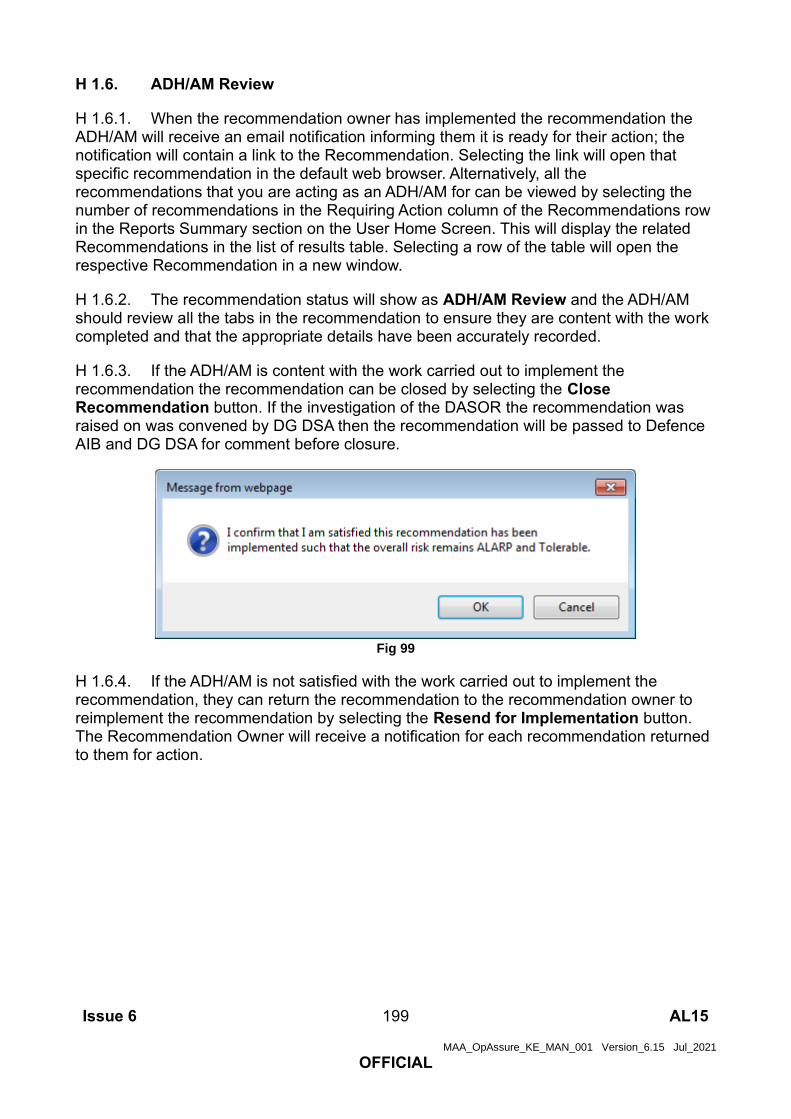
Issue 6 199 AL15
MAA_OpAssure_KE_MAN_001 Version_6.15 Jul_2021
OFFICIAL
H 1.6. ADH/AM Review
H 1.6.1. When the recommendation owner has implemented the recommendation the ADH/AM will receive an email notification informing them it is ready for their action; the notification will contain a link to the Recommendation. Selecting the link will open that specific recommendation in the default web browser. Alternatively, all the recommendations that you are acting as an ADH/AM for can be viewed by selecting the number of recommendations in the Requiring Action column of the Recommendations row in the Reports Summary section on the User Home Screen. This will display the related Recommendations in the list of results table. Selecting a row of the table will open the respective Recommendation in a new window.
H 1.6.2. The recommendation status will show as ADH/AM Review and the ADH/AM should review all the tabs in the recommendation to ensure they are content with the work completed and that the appropriate details have been accurately recorded.
H 1.6.3. If the ADH/AM is content with the work carried out to implement the recommendation the recommendation can be closed by selecting the Close Recommendation button. If the investigation of the DASOR the recommendation was raised on was convened by DG DSA then the recommendation will be passed to Defence AIB and DG DSA for comment before closure.
Fig 99
H 1.6.4. If the ADH/AM is not satisfied with the work carried out to implement the recommendation, they can return the recommendation to the recommendation owner to reimplement the recommendation by selecting the Resend for Implementation button. The Recommendation Owner will receive a notification for each recommendation returned to them for action.

Issue 6 200 AL15
MAA_OpAssure_KE_MAN_001 Version_6.15 Jul_2021
OFFICIAL
Part I Data Exploitation

Issue 6 201 AL15
MAA_OpAssure_KE_MAN_001 Version_6.15 Jul_2021
OFFICIAL
I 1. ASIMS Data Exploitation
I 1.1. Introduction
I 1.1.1. To facilitate the exploitation of Air Safety occurrence data ASIMS provides a DASOR and Recommendation search functionality, the facility to export searches to MS Excel, a trending tool and a configurable dashboard (see Part D 5 for the dashboard).
I 1.1.2. The search functions, trending tool and dashboard are accessed from the Analysis tab on the ASIMS menu bar.
I 1.1.3. There are 2 methods of searching DASORs; a standard search and an advanced search.
I 1.1.4. There are 2 methods of searching Recommendations; a standard search and an advanced search.
I 1.1.5. Manipulating the data is often best achieved by downloading the raw data into a programme such as MS Excel to utilise the manipulation and graphics powers of the software over and above ASIMS capability. From all search engines the search results can be downloaded into MS Excel for further exploitation.
I 1.1.6. ASIMS has a built-in trending capability which can automatically show you numbers and rates of various items over time.

Issue 6 202 AL15
MAA_OpAssure_KE_MAN_001 Version_6.15 Jul_2021
OFFICIAL
I 2. DASOR Searching
I 2.1. Standard Search
I 2.1.1. The standard DASOR search is accessed by selecting DASOR Search from the Analysis tab on the ASIMS menu bar.
I 2.1.2. The standard DASOR search enables you to look for occurrence reports using common search fields. Search criteria can be saved and the search results downloaded using predefined or user defined download template options into an MS Excel spreadsheet.
Note: Users are limited to 1,000 reports per download to preserve system resources. If a larger download is required use the advanced DASOR search function.
Fig 100
I 2.2. Searchable Fields
I 2.2.1. Reference – If a specific DASOR is required use this field to search for the report using a full or partial reference number. Each report reference is made up of 5 fields separated by a backslash in the format ‘asor\Station\Unit\Platform\Year\Sequence Number’. To search a partial reference, enter 5 backslashes into the field and insert the part of the reference known in its corresponding position. All reports matching these criteria will be returned.
I 2.2.2. Incident Date Range – Select predetermined date ranges or enter specific dates.

Issue 6 203 AL15
MAA_OpAssure_KE_MAN_001 Version_6.15 Jul_2021
OFFICIAL
I 2.2.3. Brief Title or Narrative Description of Event Contains – Enter the text to search from these DASOR fields.
I 2.2.4. Comments Contains – Enter the text to search from this DASOR section.
Fig 101
Note: For ‘Brief Title or Narrative Description of Event Contains’ or ‘Comments Contains’ searches, each word included will be searched separately. If “quotation marks” are used the word(s) within the quotation marks will be searched as a phrase: e.g. if wing tip is entered into the field each report containing the word wing and each report containing the word tip will be returned. If “wing tip” is entered only reports containing the phrase wing tip will be returned.
Note: For ‘Brief Title or Narrative Description of Event Contains’ or ‘Comments Contains’ searches, each word included will be searched for inclusion as a whole word or part word. E.g. if duct is entered into the field each report containing the word duct will be returned along with reports containing ducting, conducted or reconduct etc. If you wish to search for whole words only then you should use the advanced search, see I 2.8.
I 2.2.5. Filters – Choose the DASOR field you wish to search and select Update List. The available options for that filter will be displayed below the Filters section for selection.
I 2.2.6. Status – Select the status of report you wish to search.
I 2.2.7. Comment Status – Select the comment status of the report you wish to search.

Issue 6 204 AL15
MAA_OpAssure_KE_MAN_001 Version_6.15 Jul_2021
OFFICIAL
I 2.2.8. Hashtags – Choose hashtags as required to further restrict your results. Note: The list of hashtags can be filtered by station local hashtags by using ticking the Filter by Station tick box and selecting the station required.
Note: For ‘Filters’, ‘Status’ and ‘Hashtag’ searches multiple entries can be selected by holding down the [Ctrl] key and choosing more than one selection.
I 2.2.9. To de-select unwanted search terms hold down the [Ctrl] key and select the unwanted search term.
Note: Selecting without holding [Ctrl] will result in selection of the search term selected and de-selection of all other terms previously selected.
I 2.2.10. There are 3 additional search criteria options that can be activated by selecting the respective tick box:
a. Show only entries past deadline date.
b. Search only reports marked as Prime DASOR. Selection of this option will return all reports meeting the search criteria that are identified as the prime DASOR for an event. Selection of this option should also provide a more accurate number of actual occurrences figure as more than one report can be submitted for the same event but only one should be selected as prime, see Para C 2.6.1. Non-selection will return all reports meeting the search criteria.
c. Allow selection of retired data. This selection allows previously selectable fields that have since been removed from public use to be viewable.
I 2.2.11. Following selection of the required search criteria select View Results. To clear all search criteria select Reset All Filters.
I 2.3. Search Results
I 2.3.1. Search results are displayed in the Reports matching criteria section.
I 2.3.2. The content of each report can be viewed by selecting any field in the respective row of the report details. Hovering the mouse cursor over the Report reference will display the report’s brief title.
I 2.3.3. When viewing the reports, the next and previous report links in the top right-hand corner of the screen can be used to cycle up and down the search results list.
I 2.3.4. The reports can be sorted in ascending or descending order by selecting the respective column field heading; the arrow next to the column heading denotes the order displayed. Selecting the field heading a second time will reverse the order.

Issue 6 205 AL15
MAA_OpAssure_KE_MAN_001 Version_6.15 Jul_2021
OFFICIAL
Fig 102
I 2.3.5. The number of search results displayed in the Reports matching criteria list can be increased or reduced by selecting Fewer or More as required.
I 2.4. Trend Chart Option
I 2.4.1. Selecting the Trend Chart button will export the search results into the ASIMS Trending tool (see Section H 4).
I 2.5. Download Options
I 2.5.1. The search results can be downloaded into a MS Excel spreadsheet for further analysis and data exploitation from the Download Options section.
I 2.5.2. Select the download format required from the drop-down list before selecting the Download Data button. The download list displays the public download formats and any private download formats created by an individual, unique to that login (see Para H 2.6)
I 2.5.3. A popup will be displayed asking whether the download should be opened, saved or cancelled.
Warning: Always select Save. Corruption of the data can occur if you Open the file without saving it first. This is essential if you intend to use the data to produce MS Excel pivot tables.
I 2.5.4. The file name will automatically contain the date the file was downloaded and the name of the download format selected.
Fig 103
I 2.6. My Saved Download Options
I 2.6.1 It is possible to create custom download formats in ASIMS, unique to that login.

Issue 6 206 AL15
MAA_OpAssure_KE_MAN_001 Version_6.15 Jul_2021
OFFICIAL
Fig 104
I 2.6.2. To create a custom download format, select the (show) link next to the My Saved Download Options heading to display the section and perform the following steps:
a. Download reports using one of the public download formats that closely matches your requirement.
b. Remove any columns not required.
c. Add additional columns as required (see Para H 2.6.5).
d. Remove all DASOR data from the spreadsheet below the field headings.
e. Save the amended spreadsheet locally.
f. Upload the locally saved file by entering a name for the new download file in the Report name field, select the locally saved spreadsheet using the Browse button in the Excel file to upload field, and select the Save button.
I 2.6.3. The custom download file will be uploaded into ASIMS and will be available for selection when downloading future searches using the Download Options function.
Note: The revised file will be private and only available to the individual who uploaded it.
I 2.6.4. If you wish to add columns not currently included in a download option, select the link (Show Report Details) within the My Saved Download Options section and then select the Air Safety Occurrence Report link to display a list of available fields that are downloadable.

Issue 6 207 AL15
MAA_OpAssure_KE_MAN_001 Version_6.15 Jul_2021
OFFICIAL
Fig 105
I 2.6.6. The file lists the name of the column as displayed in ASIMS (System Field Name) and the name of the field to include within the download (Field Label).
I 2.6.7. Find the name of the field you wish to include and then display rows 1 and 2 of the custom download file being created to display the Field label names for each column in row 1.
Fig 106

Issue 6 208 AL15
MAA_OpAssure_KE_MAN_001 Version_6.15 Jul_2021
OFFICIAL
Note: These rows are compressed by default. Move the mouse cursor to the top of row 3 row heading until the cursor changes to a pair of horizontal parallel lines. Click and hold the left mouse button and drag the row downward, row 2 will appear. Repeat for row 2 to show row 1. Alternatively, double click the left mouse button when the cursor changes to a pair of horizontal parallel lines.
Fig 107
Fig 108
I 2.6.8. Insert a new column between 2 existing columns; do not add a new column at the end of the columns.
Fig 109

Issue 6 209 AL15
MAA_OpAssure_KE_MAN_001 Version_6.15 Jul_2021
OFFICIAL
I 2.6.10. Add the Field Label name for the new column you wish to include into row 1, this is from the (Show Report Details) list. Add a display name into row 3 (this can be anything you want as it is just for display in the spreadsheet).
Fig 110
I 2.7. My Saved Search
I 2.7.1. Frequently used searches can be saved using the My Saved Searches function.
Note: This is useful when carrying out regular searches using the same search criteria and when using one of the standard incident date ranges (Month to date, Previous Month etc.); each time the search is run the dates are automatically changed.
I 2.7.2. Select the required search report criteria as detailed in Section H 2 and select the (show) link next to the My Saved Searches heading.
I 2.7.3. Enter a name in the Search Name field and select Save Search.
Fig 111
I 2.7.4. To run a saved search searches, select the required Search Name in the list of saved searches.
I 2.8. Advanced Search
I 2.8.1. The advanced DASOR search is accessed by selecting DASOR Search (Adv) from the Analysis tab on the ASIMS menu bar.

Issue 6 210 AL15
MAA_OpAssure_KE_MAN_001 Version_6.15 Jul_2021
OFFICIAL
I 2.8.2. The advanced DASOR search enables you to create search expressions using any field available from a DASOR. Search criteria can be saved and the search results downloaded using predefined or user defined download template options into an MS Excel spreadsheet.
Note: If the download is greater than 1,000 reports it will be scheduled in the background to preserve system resources (see H 2.12).
Fig 112
I 2.9. Search Expression - Advanced
I 2.9.1. The search expression is the criteria used to search for reports. The advanced DASOR search screen is made up of 2 main parts; a list of searchable Fields and the Search Expressions.
I 2.9.2. To create a search expression, drag the required fields you wish to search on from the Fields list on the left and drop them into the Search Expression area in the middle of the screen.
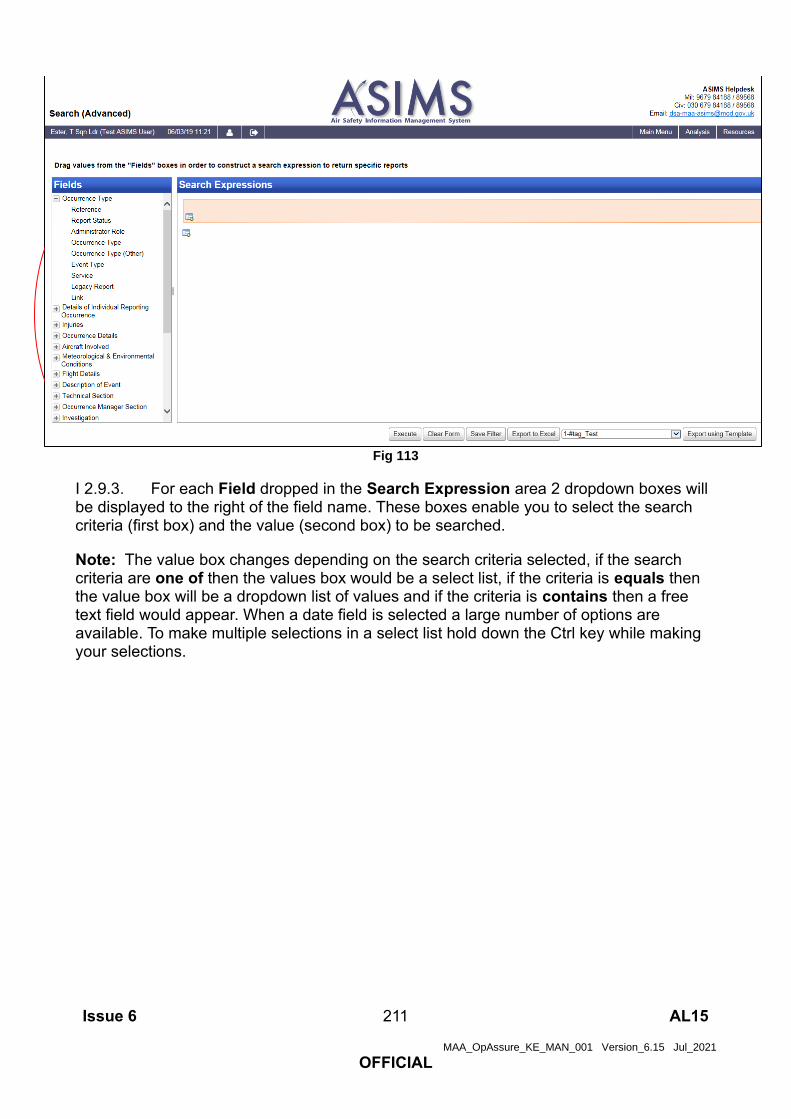
Issue 6 211 AL15
MAA_OpAssure_KE_MAN_001 Version_6.15 Jul_2021
OFFICIAL
Fig 113
I 2.9.3. For each Field dropped in the Search Expression area 2 dropdown boxes will be displayed to the right of the field name. These boxes enable you to select the search criteria (first box) and the value (second box) to be searched.
Note: The value box changes depending on the search criteria selected, if the search criteria are one of then the values box would be a select list, if the criteria is equals then the value box will be a dropdown list of values and if the criteria is contains then a free text field would appear. When a date field is selected a large number of options are available. To make multiple selections in a select list hold down the Ctrl key while making your selections.

Issue 6 212 AL15
MAA_OpAssure_KE_MAN_001 Version_6.15 Jul_2021
OFFICIAL
Fig 114
I 2.9.4. Additional search expressions can be added into your search allowing a combination of multiple searches into one expression rather than run 2 separate searches.
Select the button (either inside or outside the existing expressions) and a new expression area will appear where you can add the additional search expression.
Fig 115
I 2.9.5. Once the search expression has been created select the Execute button to perform the search. To clear all search criteria, select Clear Form.
Note: When searching a field using contains, if multiple words are entered into the criteria field they will be searched as a phrase and not a list of individual words. E.g. entering training sortie will only return reports containing the phrase training sortie and will exclude reports that only contain the words training or sortie even if both words are in the same field but do not appear together.
I 2.9.6. If you wish to search for multiple words then you will need to list each word within its own field.

Issue 6 213 AL15
MAA_OpAssure_KE_MAN_001 Version_6.15 Jul_2021
OFFICIAL
Fig 116
Note: Each word included will be searched for inclusion as a whole or part word. E.g. if duct is entered into the field each report containing the word duct will be returned along with reports containing ducting, conducted or reconduct etc. If you wish to search for an exact word only then you need to put a percent sign and space before and after the word. E.g. % duct %, will only returns reports containing the word duct.
Fig 117
I 2.10. Search Results - Advanced
I 2.10.1. Any reports matching the search expression will be displayed in the Safety Report Search Results section.

Issue 6 214 AL15
MAA_OpAssure_KE_MAN_001 Version_6.15 Jul_2021
OFFICIAL
Fig 118
I 2.10.2. By default, only 4 column fields are displayed in the search results: Reference; Status; Brief Title; and Date of Occurrence. Additional columns can be added by dragging the field name from the Fields list into the results table and pressing the Update or Execute buttons to populate the new field with data.
Fig 119
Warning: If a search is performed where there are multiple entries contained within a field (e.g. multiple Causal Factors can be added to a report) and this field is added to the search criteria or results table a row will be returned for each Causal Factor entry.

Issue 6 215 AL15
MAA_OpAssure_KE_MAN_001 Version_6.15 Jul_2021
OFFICIAL
Fig 120
I 2.10.4. The reports can be sorted in ascending or descending order by selecting the respective column field heading; the arrow next to the column heading denotes the order displayed. Selecting the field heading a second time will reverse the order.
Fig 121
I 2.10.5. The number of search results displayed can be increased or reduced by changing the number of reports showing per page and selecting Update.

Issue 6 216 AL15
MAA_OpAssure_KE_MAN_001 Version_6.15 Jul_2021
OFFICIAL
Fig 122
I 2.11. Save Filter - Advanced
I 2.11.1. Search expressions can be saved by selecting the Save Filter button. This will save the search expression created and the chosen fields used to display the search results.
I 2.11.2. Following selection of the Save Filter button a prompt will be displayed to create a name for the search. The saved search will then appear in the Saved Filters section.
Fig 123
Fig 124
I 2.12. Exporting Data
I 2.12.1. The search results can be downloaded into a MS Excel spreadsheet for further analysis and data exploitation in 2 ways:
a. Export to Excel. This will download to MS Excel only the fields and data displayed in the table of search results in the Safety Report Search Results section.

Issue 6 217 AL15
MAA_OpAssure_KE_MAN_001 Version_6.15 Jul_2021
OFFICIAL
b. Export using Template. Select the download format required from the drop-down list before selecting the Export using Template button. This function allows you to download to MS Excel using the available public and private download formats (For more information on download templates see section H 2.5). Note: When downloading using a template the MS Excel document will contain one row for each report returned from the search even if more than one report is displayed within the search results due to the fields included, as per H 2.10.3.
I 2.12.2. A popup will be displayed asking whether the download should be opened, saved or cancelled.
Warning: Always select Save. Corruption of the data can occur if you Open the file without saving it first. This is essential if you intend to use the data to produce MS Excel pivot tables.
I 2.12.3. The file name will automatically contain the date the file was downloaded and the name of the download format selected.
Fig 125
I 2.12.4. If an export of data of more than 1,000 reports is initiated the export will be scheduled and run in the background. When the export is requested a popup message is displayed, select OK to continue.

Issue 6 218 AL15
MAA_OpAssure_KE_MAN_001 Version_6.15 Jul_2021
OFFICIAL
Fig 126
I 2.12.5. Provide the download a name when prompted and select OK.
Fig 127
Fig 128
I 2.12.6. The download is scheduled to run in the background; you can continue using ASIMS as normal.
I 2.12.7. Once the export is complete an email notification will be sent to confirm completion of the download.
I 2.12.8. Return to the advanced search and the download will be listed in the Scheduled Exports section. Select the report to save the file locally.
Fig 129

Issue 6 219 AL15
MAA_OpAssure_KE_MAN_001 Version_6.15 Jul_2021
OFFICIAL
I 3. ASIMS Data Download
I 3.1. Introduction
I 3.1.1. ASIMS data downloads are exported into MS Excel. Using this data in a pivot table allows for easy manipulation of the data and provides useful graphical outputs.
I 3.1.2. ASIMS download template DASOR Chart contains a predefined pivot table and chart. All other downloads provide the raw data and the user is responsible for creating any pivot tables and charts using the Pivot Table and Pivot Chart Wizard within MS Excel.
Note: When selecting the required data make sure the column headings are also selected as these will form the fields within the pivot table and chart.
Warning: Using [Ctrl] and [A] will also select the hidden rows 1 and 2 that are used by ASIMS to populate the data and therefore use row 1 to create the fields not row 3.
I 3.1.3. Once a pivot table and pivot chart have been created there will be 3 tabs available: the pivot chart; the pivot table and the raw data downloaded from ASIMS.
Note: In MS Excel 2010 onward when using the wizard, the chart will initially appear in the same tab as the table unless moved to its own tab. For the purposes of this manual the latter will be assumed.
I 3.2. ASIMS Data
I 3.2.1. The data tab will contain the raw DASOR data downloaded from ASIMS.
Note: If a Link column is presented/chosen within the download a URL to the respective DASOR will be displayed. To use the URL, select in the cell, go to the end of the text in the formula bar and press return; the URL will be underlined and will become an active link. To activate multiple cells, activate one and then use ‘format painter’ to copy the active format to the inactive links.
I 3.3. Pivot Table
I 3.3.1. The pivot table tab. The ChartData tab details the number of reports in each element of the chart, if you wish to view a specific section’s data, double click the total and a new tab will be created with just the data for those reports within the total.

Issue 6 220 AL15
MAA_OpAssure_KE_MAN_001 Version_6.15 Jul_2021
OFFICIAL
Fig 130
Fig 131

Issue 6 221 AL15
MAA_OpAssure_KE_MAN_001 Version_6.15 Jul_2021
OFFICIAL
I 3.4. Pivot Chart
I 3.4.1. The pivot chart tab. Navigate to the Chart tab and you will be presented with a blank chart in the centre of the screen and a PivotTable Field List on the right-hand side of the screen.
Fig 132
I 3.4.2. You can drag and drop fields from the Field list into any of the 3 boxes with a blue border; Page Fields, Category Fields and Series Fields.

Issue 6 222 AL15
MAA_OpAssure_KE_MAN_001 Version_6.15 Jul_2021
OFFICIAL
Fig 133
I 3.4.3. As you build up the pivot chart the pivot table is automatically updated to reflect the changes.
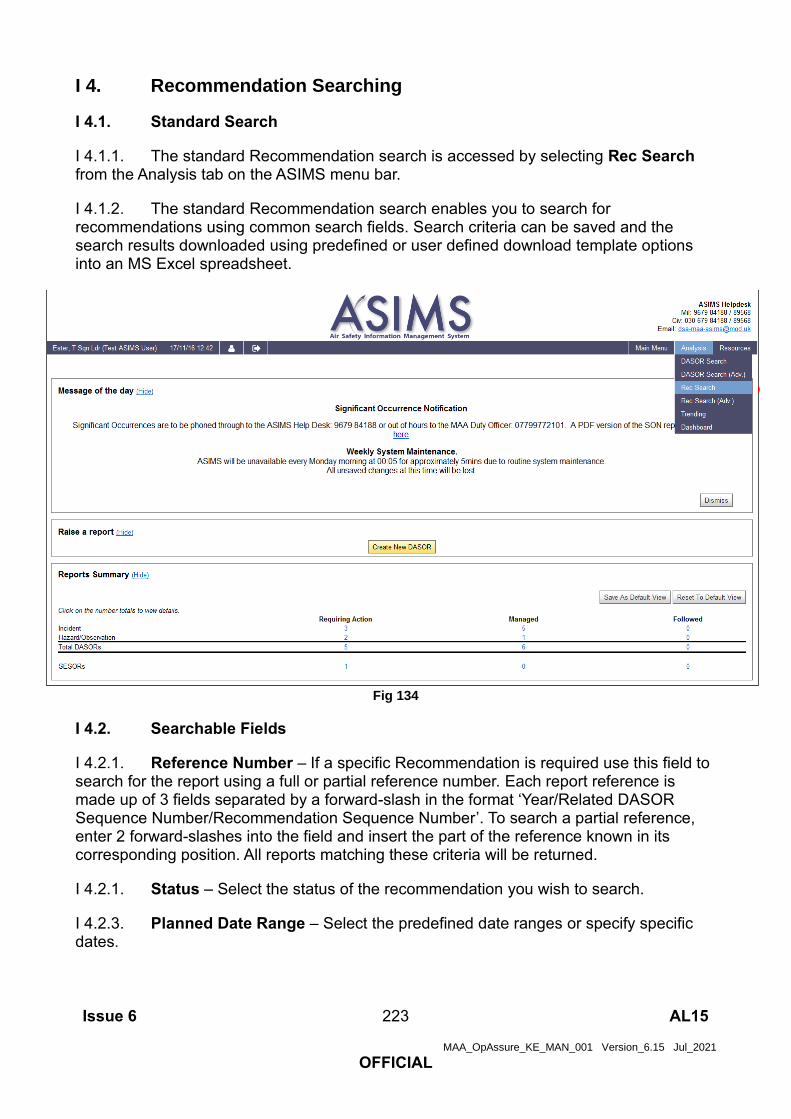
Issue 6 223 AL15
MAA_OpAssure_KE_MAN_001 Version_6.15 Jul_2021
OFFICIAL
I 4. Recommendation Searching
I 4.1. Standard Search
I 4.1.1. The standard Recommendation search is accessed by selecting Rec Search from the Analysis tab on the ASIMS menu bar.
I 4.1.2. The standard Recommendation search enables you to search for recommendations using common search fields. Search criteria can be saved and the search results downloaded using predefined or user defined download template options into an MS Excel spreadsheet.
Fig 134
I 4.2. Searchable Fields
I 4.2.1. Reference Number – If a specific Recommendation is required use this field to search for the report using a full or partial reference number. Each report reference is made up of 3 fields separated by a forward-slash in the format ‘Year/Related DASOR Sequence Number/Recommendation Sequence Number’. To search a partial reference, enter 2 forward-slashes into the field and insert the part of the reference known in its corresponding position. All reports matching these criteria will be returned.
I 4.2.1. Status – Select the status of the recommendation you wish to search.
I 4.2.3. Planned Date Range – Select the predefined date ranges or specify specific dates.

Issue 6 224 AL15
MAA_OpAssure_KE_MAN_001 Version_6.15 Jul_2021
OFFICIAL
I 4.2.4. Last Updated Date Range – Select the predefined date ranges or specify specific dates.
I 4.2.5. ADH/AM Responsible Owner – Select from the list of ADH role groups.
I 4.2.6. Recommendation Owner (Role) – Select from the list of available owner role groups.
I 4.2.7. Recommendation Owner (User) – Enter the ASIMS users name or role for a list of users that match the entered criteria.
I 4.2.8. Recommendation Implementor - Enter the ASIMS users name for a list of users that match the entered criteria.
I 4.2.9. Recommendation Title Contains – Enter text that appears in the recommendation title.
I 4.2.10. Recommendation Description Contains – Enter text that appears in the recommendation description
I 4.2.11. Action Taken Contains – Enter the text to search from this Recommendation field.
I 4.2.12. Originating Report. Details of the Recommendations’ related DASORs can also be searched using Ship/Station/Organisation, Aircraft Mark, Investigation Type, Registration, Location, Contributory Factor, Major System, Aircraft Repair Category or Incident Date From to identify Recommendations related to the respective DASOR field.
Note: For ‘Status’, ‘Ship/Station/Organisation’, ‘Aircraft Mark’ and ‘Investigation Type’ searches multiple fields can be selected by holding down the [Ctrl] key and highlighting more than one selection.
I 4.2.13. To de-select unwanted search terms hold down the [Ctrl] key and select the unwanted search term.
Note: Selecting without holding [Ctrl] will result in selection of the search term selected and de-selection of all other terms previously selected.
I 4.2.14. Following selection of the required search criteria select View Results. To clear all search criteria select Reset.
I 4.3. Search Results
I 4.3.1. Search results are displayed in a table format at the bottom of the screen.
I 4.3.2. The search results can be downloaded to MS Excel by selecting the Download button.
I 4.3.3. The content of each recommendation can be viewed by selecting any field in the respective row of the recommendation search results.

Issue 6 225 AL15
MAA_OpAssure_KE_MAN_001 Version_6.15 Jul_2021
OFFICIAL
I 4.3.4. The reports can be sorted in ascending or descending order by selecting the respective column field heading; the arrow next to the column heading denotes the order displayed. Selecting the field heading a second time will reverse the order.
Fig 135
I 4.4. Advanced Search

Issue 6 226 AL15
MAA_OpAssure_KE_MAN_001 Version_6.15 Jul_2021
OFFICIAL
I 4.4.1. The advanced Recommendation search is accessed by selecting Rec Search (Adv.) from the Analysis tab on the ASIMS menu bar.
I 4.4.2. The advanced Recommendation search enables you to create search expressions using any field available within a Recommendation. Search criteria can be saved and the search results downloaded using predefined or user defined download template options into an MS Excel spreadsheet.
Fig 136
I 4.5. Search Expression - Advanced
I 4.5.1. The search expression is the criteria used to search for reports. The advanced Recommendation search screen is made up of 2 main parts; a list of searchable Fields and the Search Expressions.
I 4.5.2. To create a search expression, drag the required fields you wish to search on from the Fields list and drop them into the Search Expression area.
I 4.5.3. For each Field dropped in the Search Expression area 2 dropdown boxes will be displayed to the right of the field name. These boxes enable you to select the search criteria (first box) and the value (second box) to be searched.
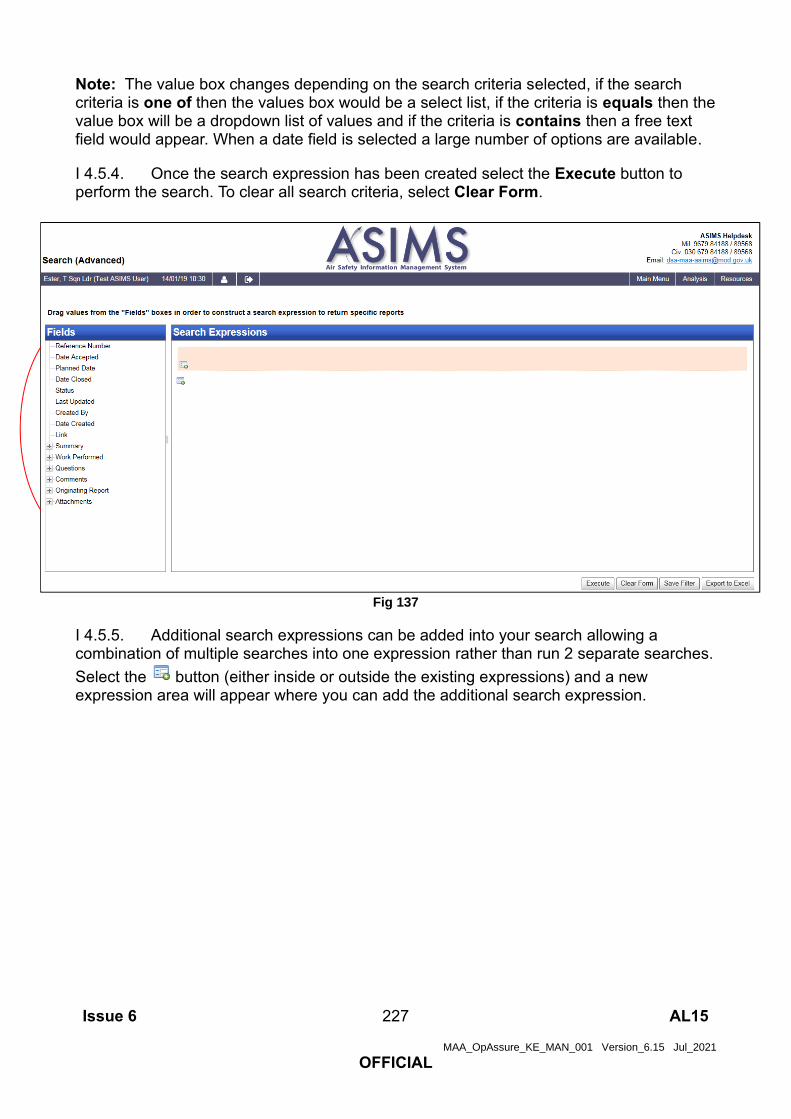
Issue 6 227 AL15
MAA_OpAssure_KE_MAN_001 Version_6.15 Jul_2021
OFFICIAL
Note: The value box changes depending on the search criteria selected, if the search criteria is one of then the values box would be a select list, if the criteria is equals then the value box will be a dropdown list of values and if the criteria is contains then a free text field would appear. When a date field is selected a large number of options are available.
I 4.5.4. Once the search expression has been created select the Execute button to perform the search. To clear all search criteria, select Clear Form.
Fig 137
I 4.5.5. Additional search expressions can be added into your search allowing a combination of multiple searches into one expression rather than run 2 separate searches.
Select the button (either inside or outside the existing expressions) and a new expression area will appear where you can add the additional search expression.

Issue 6 228 AL15
MAA_OpAssure_KE_MAN_001 Version_6.15 Jul_2021
OFFICIAL
Fig 138
I 4.6. Search Results - Advanced
I 4.6.1. Any reports matching the search expression will be displayed in the Recommendation Search Results section.
Fig 139

Issue 6 229 AL15
MAA_OpAssure_KE_MAN_001 Version_6.15 Jul_2021
OFFICIAL
I 4.6.2. By default, only 5 column fields are displayed in the search results: Reference; Status; Title; Planned Date; and Implemented Date. Additional columns can be added by dragging the field name from the Fields list into the results table and pressing Update or Execute to populate the new field with data.
Fig 140
I 4.6.3. The reports can be sorted in ascending or descending order by selecting the respective column field heading; the arrow next to the column heading denotes the order displayed. Selecting the field heading a second time will reverse the order.
I 4.6.4. The number of search results displayed can be increased or reduced by changing the number of reports showing per page and selecting Update.
I 4.6.5. The content of each recommendation can be viewed by selecting any field in the respective row of the recommendation search results.
I 4.7. Save Filter - Advanced
I 4.7.1. Search expressions can be saved by selecting the Save Filter button. This will save the search expression created and the chosen fields used to display the search results.
I 4.7.2. Following selection of the Save Filter button a prompt will be displayed to create a name for the search. The saved search will then appear in the Saved Filters section.

Issue 6 230 AL15
MAA_OpAssure_KE_MAN_001 Version_6.15 Jul_2021
OFFICIAL
Fig 141
Fig 142
I 4.7. Exporting Data
I 4.7.1. The search results can be downloaded into a MS Excel spreadsheet for further analysis and data exploitation:
a. Export to Excel. This will download to MS Excel only the fields and data displayed in the table of search results in the Recommendation Search Results section.
Fig 143
I 4.7.2. A popup will be displayed asking whether the download should be opened, saved or cancelled.
Warning: Always select Save. Corruption of the data can occur if you Open the file without saving it first. This is essential if you intend to use the data to produce MS Excel pivot tables.

Issue 6 231 AL15
MAA_OpAssure_KE_MAN_001 Version_6.15 Jul_2021
OFFICIAL
I 4.7.3. The file name will automatically contain the date the file was downloaded and the name of the download format selected (i.e. REC).
I 4.7.4. If an export of data of more than 1,000 reports is initiated the export will be scheduled and run in the background. When the export is requested a popup message is displayed, select OK to continue.
Fig 144
I 4.7.5. Provide the download a name when prompted and select OK.
Fig 145
Fig 146
I 4.7.6. The download is scheduled to run in the background; you can continue using ASIMS as normal.
I 4.7.7. Once the export is complete an email notification will be sent to confirm completion.
I 4.7.8. Return to the advanced recommendation search and the download will be listed in the Scheduled Exports section. Select the report to save the file locally.

Issue 6 232 AL15
MAA_OpAssure_KE_MAN_001 Version_6.15 Jul_2021
OFFICIAL
Fig 147

Issue 6 233 AL15
MAA_OpAssure_KE_MAN_001 Version_6.15 Jul_2021
OFFICIAL
I 5. Trending
I 5.1. Introduction
I 5.1.1. The trending function provides the ability to quickly identify trends within ASIMS, using predefined trend categories, enabling the user to quickly drill down into the selected data.
I 5.1.2. Trending is accessed by selecting Trending from the Analysis tab on the ASIMS menu bar.
Fig 148
I 5.1.3. When Trending is first displayed the last 6 months is of data is displayed showing the breakdown of reports trending on Aircraft type.
I 5.1.4. The Trending screen is made up of 2 sections the filters for trend chart and trend chart sections.

Issue 6 234 AL15
MAA_OpAssure_KE_MAN_001 Version_6.15 Jul_2021
OFFICIAL
Fig 149
I 5.2. Filters for Trend Chart
I 5.2.1. This section controls the information displayed in the trend chart, the main elements of this section are the Trend dropdown list, which controls the fields displayed on the chart, and the date fields. You can also use the Saved Searches drop down to perform trending on any search you have saved within the DASOR Search page. Once you have made a change to any of the fields in this section select the Update Chart button to update the chart displayed.
Fig 150
I 5.3. Trend Chart
I 5.3.1. The trend chart displays the information as defined in the filters section, the chart will show the number of reports raised per month for the trend selected. In the example the Trend has been changed to Aircraft type for the 6 months prior to Nov 16.

Issue 6 235 AL15
MAA_OpAssure_KE_MAN_001 Version_6.15 Jul_2021
OFFICIAL
Fig 151
I 5.3.2. The chart(s) are displayed in tabs within the chart section, each tab is named to match the trend being displayed.
I 5.3.3. The chart has title that details the information being displayed and a legend defining the designation of colour blocks within a row.
I 5.3.4. At the bottom of the chart is an Export Report button, this will copy the chart into a word document, and a Remove Chart button, this will remove the chart tab but is only available if more than one chart tab is being displayed.
I 5.3.5. The Trend chart displays a row for each aircraft type and each row contains a colour coded block for each month during the period. If you hover the mouse cursor over a block the details (date period, trend and number of reports raised) of that block will be displayed.
I 5.3.6. In order to drill into the data, click a block within a trend row and a popup is displayed.
Fig 152
I 5.3.7. The popup enables you to drill down into the data several ways:
a. You can drill into the whole trend item.

Issue 6 236 AL15
MAA_OpAssure_KE_MAN_001 Version_6.15 Jul_2021
OFFICIAL
b. You can view the month of data for all the trends.
c. You can view the data for that trend for that month.
I 5.3.8. Once you have selected the data you wish to view you can either view the data as a New Chart on the trend screen or you can View Data within the DASOR search page where you can then view each individual report or download the data.
I 5.8.9. If you select New Chart an additional tab is added to the chart section displaying the data selected. In this example “Typhoon And August 2016” was selected.
Fig 153
I 5.8.10. Now that you have drilled down into the original data you can change the Trend as required to further analyse the data displayed. Once you have changed the Trend select the Update Chart button to refresh the chart section. Note: the legend is indicating the original trend that was selected and the title is indicating the date range.
Issue 6 237 AL15
MAA_OpAssure_KE_MAN_001 Version_6.15 Jul_2021
OFFICIAL
Fig 154
I 5.8.10. You can continue to drill down and change the trend as required. If you wish to reset the chart tabs you have created select the Clear All button.

Issue 6 238 AL15
MAA_OpAssure_KE_MAN_001 Version_6.15 Jul_2021
OFFICIAL
I 6. Dashboard
I 6.1. Introduction
I 6.1.1. The dashboard function provides the ability to display previously saved searches as a chart and it allows up to 4 charts to be displayed at one time.
I 6.1.2. Dashboard is accessed by selecting Dashboard from the Analysis tab on the ASIMS menu bar.
Fig 155
I 6.1.3. When Dashboard is accessed any previous searches added will be display but if none have been added then you will be presented with four empty boxes and a list of available searches.

Issue 6 239 AL15
MAA_OpAssure_KE_MAN_001 Version_6.15 Jul_2021
OFFICIAL
Fig 156
I 6.2. Adding a chart
I 6.2.1. To display the results of your saved search as a graph drag the search from the filter list on the left and drop the search into one of the free boxes.

Issue 6 240 AL15
MAA_OpAssure_KE_MAN_001 Version_6.15 Jul_2021
OFFICIAL
Fig 157
I 6.2.2. The saved search will then be converted into a bar chart and displayed in the box selected.
Fig 158
I 6.2.3. Any chart displayed can be altered by clicking the i above the chart, this will allow you to change the chart type, data groups and add a trend line, you can also alter the colours used for the chart.
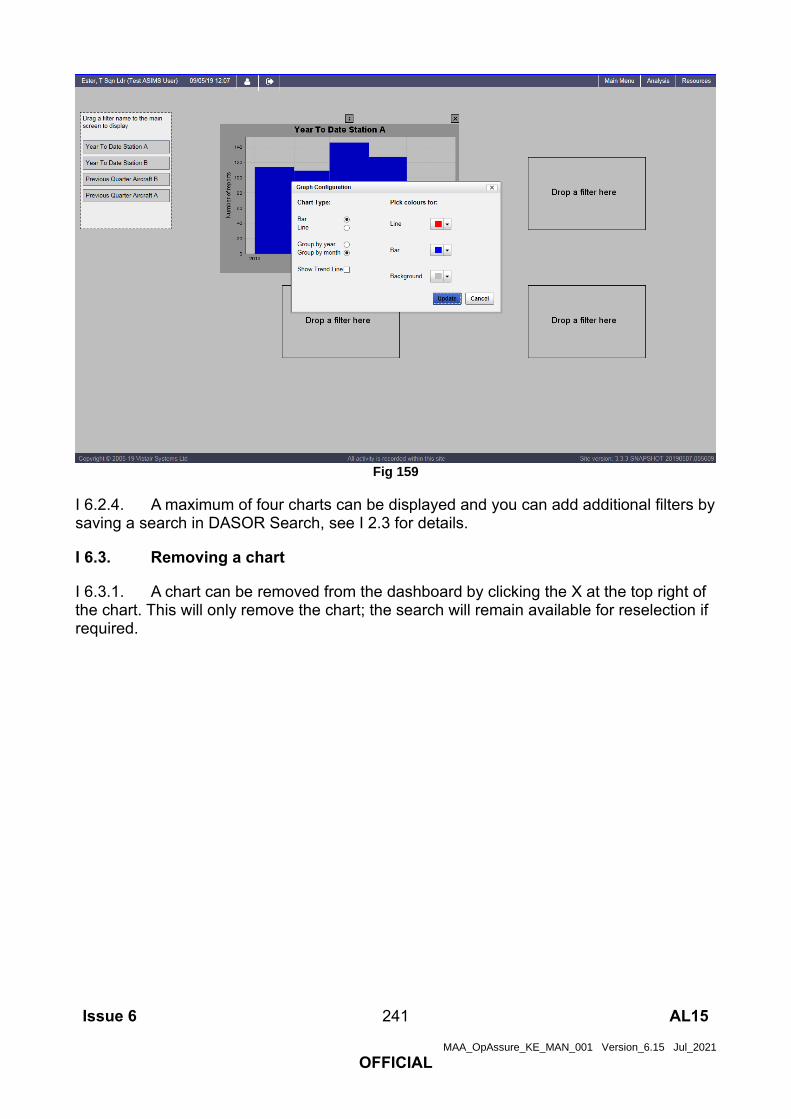
Issue 6 241 AL15
MAA_OpAssure_KE_MAN_001 Version_6.15 Jul_2021
OFFICIAL
Fig 159
I 6.2.4. A maximum of four charts can be displayed and you can add additional filters by saving a search in DASOR Search, see I 2.3 for details.
I 6.3. Removing a chart
I 6.3.1. A chart can be removed from the dashboard by clicking the X at the top right of the chart. This will only remove the chart; the search will remain available for reselection if required.