artistic wire adjustable ring, bracelets, necklace ... · this necklace has beads in the...
TRANSCRIPT

Visit jtv.com/jewelrymaking • JTV • Knoxville, TN 37922
JSKIT0905TM Packaged by Beadalon for Jewelry TV
Intended for Adult Use Only.
ARTISTIC WIRE ADJUSTABLE RING, BRACELETS, NECKLACE FINDINGS FORMS
R6. Properly removed Ring form.
R3. Bend the wire to the left around the peg clockwise one full revolution.
Remember to rotaten the Jig rather than trying to wrap the wire around the peg.
R5. Properly formed and cut wire form on Findings Form, ready for removal from Findings Form.
R4. Carefully cut 1/4 of the loop off using the flush cutters with the flush portion facing the ring that will stay on the form.
R2. Bring the long end of the wire around the acrylic circle counter-clockwise, between the peg and circle tight on top of the first wire. Continue around the top of the circle so the wire is between the circle and the peg on the left.
R1. To make a ring with beads, place the end of the wire between the circle form and the right peg as shown. Hold with your thumb. For more adjustability flip the Findings form and wrap with the pegs in the down position.
ADJUSTABLE RING INSTRUCTIONS (WITH BEADS)

ADJUSTABLE RING INSTRUCTIONS (WITH BEADS)
R8. Make certain beads are in your desired pattern, and that they do not take up too much room, the room is necessary for the adjustability of the ring.
R7. Place seed beads, or other small beads, onto the wire. Remember: beads will reduce the size of the ring, the more beads the more the reduction in size.
R9. Use the Round Nose Pliers to make a loop that matches the opposite loopg by grasping the wire and using the round nose at the correct depth to match the size of the opposite loopg.
R10. Bend the end of the wire over the Round Nose Pliers to form a matching loop.
R11. Carefully cut away 1/4 of the loop of the newly formed ring with flush cutters, with the flush side of the cutters facing the wire that will stay on the ring.
R15. Use the Bent Chain Nose Pliers to carefully close the loop with the ring wire inside.
R13. Grasp the ring and bend it to a right angle towards the ring wire, then do the same with the other loop.
R12. Adjust the loose wire to conform to the same curvature of the center wire. Use care not to place a bend in the wire, rather a nice curve that matches the center wire.
R14. Catch the ring wire into one of the loops as shown.
2
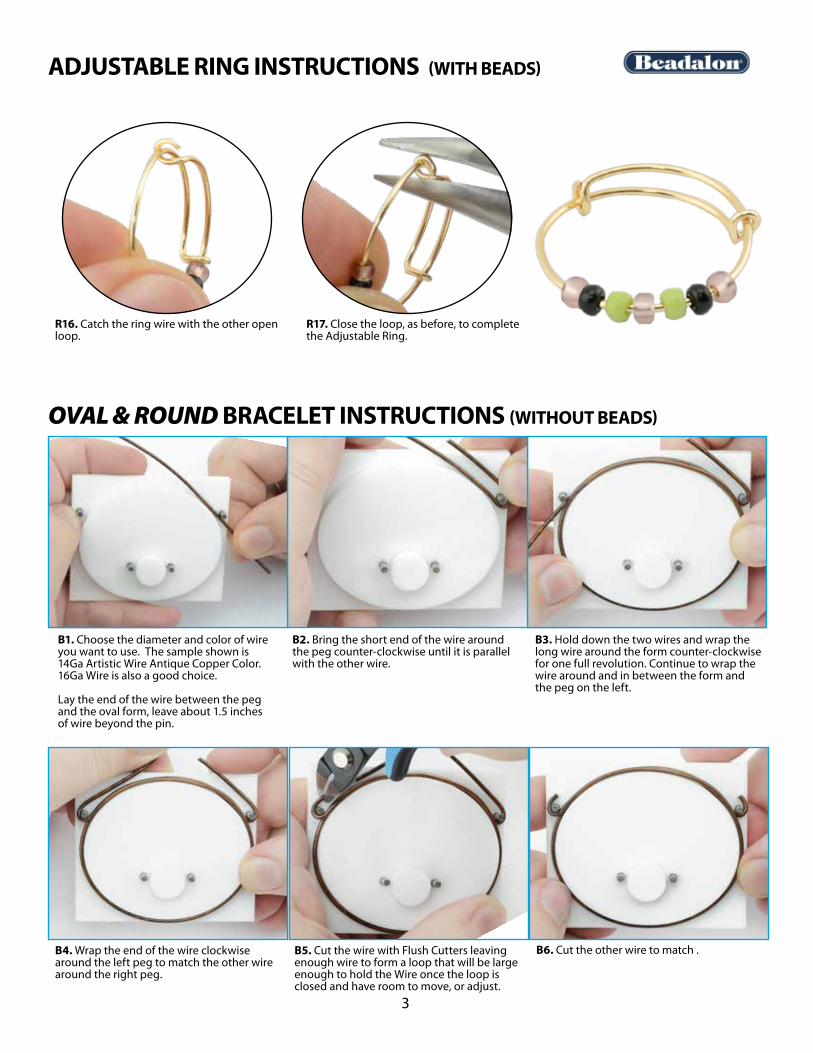
R16. Catch the ring wire with the other open loop.
R17. Close the loop, as before, to complete the Adjustable Ring.
ADJUSTABLE RING INSTRUCTIONS (WITH BEADS)
B6. Cut the other wire to match .
B3. Hold down the two wires and wrap the long wire around the form counter-clockwise for one full revolution. Continue to wrap the wire around and in between the form and the peg on the left.
B5. Cut the wire with Flush Cutters leaving enough wire to form a loop that will be large enough to hold the Wire once the loop is closed and have room to move, or adjust.
B4. Wrap the end of the wire clockwise around the left peg to match the other wire around the right peg.
B2. Bring the short end of the wire around the peg counter-clockwise until it is parallel with the other wire.
B1. Choose the diameter and color of wire you want to use. The sample shown is 14Ga Artistic Wire Antique Copper Color. 16Ga Wire is also a good choice.
Lay the end of the wire between the peg and the oval form, leave about 1.5 inches of wire beyond the pin.
OVAL & ROUND BRACELET INSTRUCTIONS (WITHOUT BEADS)
3

ADJUSTABLE OVAL BRACELET INSTRUCTIONS (WITHOUT BEADS)
B8. Grasp the loop as shown with Bent Chain Nose Pliers, make sure with larger gauges of Wire that you have a good grasp on the wire for the bend.
B7. Remove the Bracelet from the Findings Form.
B9. Twist the pliers to bend the loop up so that the curved portion of the loop is pointing at the Wire.
B10. Flip the Wire Form in your hand and repeat steps 8 & 9 on the other loop.
B11. Carefully slip one loop onto the wire.
B15. Follow steps B12 & 13 to securely close the second loop. Make sure there is ample room for the wire to move freely within the loop.
Add charms and beads with jump rings to finish off your design.
B13. Rotate the wire form and pliers to close the tip of the loop. Leave ample room for the wire to move freely inside of the newly closed loop.
B12. Using the Bent Chain Nose Pliers, carefully close the loop part of the way.
B14. Guide the other loop onto the wire, if you are adding a charm that does not have an open ring, add that now.
4

N2. Less adjustability is the option chosen for these instructions, it requires about 73.6 cm (29 in) of wire. If you choose for more adjustability about 78.7 cm (31 in) of wire is necessary. Simply flip the jig so the pegs are farther apart. Place the end of the wire into the space between the right peg (starting peg) and the circle. Use wire directly from a coil for less waste.
N1. Straighten the 16Ga or 14Ga Wire with the Wire Straightener tool. Do not squeeze too tightly for the first couple of passes, then squeeze a little tighter after kinks or bumps begin to disappear.
N3. Bend the end of the wire around the peg tightly to form the loop shown above.
N4. Hold the wire down on the surface of the Findings Form with your non-dominant hand. Wrap the wire by turning the Findings Form and holding the wire in place with non dominant hand. Guide wire with dominant hand. Make sure the wire goes in between the other peg and the form then around to the starting peg.
Less adjustability
Flip the position of the
Jig for more adjustability.
ADJUSTABLE NECKLACE NSTRUCTIONS
Starting Peg
Starting Peg
TM
Visit jtv.com/jewelrymaking • JTV • Knoxville, TN 37922
Packaged by Beadalon for Jewelry TV
5

N5. Continue to guide the wire around the jig between the starting peg and the form. It is important to hold the wire down onto the surface of the Findings Form so the wire doesn’t slip and distort out of round.
N6. Bend the end of the wire back around the second peg as shown above to create the other loop. These first instructions are for a neck ring without beads strung on to the base wire. Remove the Wire Form from the Jig.
N7. Use Flush cutters to cut the loop as shown, make sure to cut the portion that will leave the loop ON the Necklace, then cut the other loop the same way.
N8. The wire form should look like the above photo.
N9. The Wire Form will need to be adjusted smaller to counter act the “splay” from the tensile spring-back of the wire from the Jig. Use something that is about 4 1/2” in diameter to adjust the wire form (large mayonnaise jar works well).
N10. Properly formed and size adjusted necklace form. If adding a pendant that cannot be opened and added later, place the pendant on at this time and drop to the non-adjustable area.
Adjustable area.
Non-Adjustable area.
6

®
N12. Hold the wire close to the Loop with your free hand, then twist the tool to create a more rounded loop, but do not close the loop. Then do the same on the other loop.
N11. Hold the wire with one hand close to the loop with your hand then grasp the loop with Round Nose Pliers. For more consistent Loops use a pair of Step Bail Making Pliers (as shown).
N13. Grasp one of the loops on the necklace with the Bent Chain Nose Pliers as shown.
N14. Hold the wire with your fingers close to where the bend will take place. Bend the loop by twisting the pliers to form a 90 degree angle, pointing the curved portion of the loop toward the wire below it.
N15. Flip the Necklace Form and grasp the other loop as before. Make sure the Pendant stays out of the adjustable portion of the necklace while prepping the loops for the next step.
N16. Bend the 90 degree angle into this loop the same way as before to place the curved loop pointing down toward the other wire.
7

N17. Hook the loop onto the wire as shown. N18. Grasp the loop, with the wire in the center and use the wide portion of the Bent Chain Nose Pliers at the angle shown.
N19. Carefully squeeze the Pliers until the loop closes. Make sure the wire moves freely within the loop. Flip the Necklace and repeat Steps N17-19 to complete the loop closure to finish the necklace.
N20. Properly formed and size adjusted with closed loops that allow for easy movement open and close for adjusting over the head. Add any pendants or other items to the necklace using Bails, Jump Rings, or other easy to open Findings. The sample necklace had the pendant added at Step N12.
This necklace created with 14Ga Artistic Wire Gold Color, Instant
Pendant with coil and Bead. Pen-dant placed before connecting
the loops.
Note: The Instant Pendant could be hung from the adjustable area
on this necklace.
This necklace created with 14Ga Artistic Wire Rose Gold Color. Pen-
dant created with a large pearl and 14Ga Rose Gold Color Wire. Bail easily placed onto finished
adjustable necklace.
Note: This pendant could be hooked onto the adjustable area
of the necklace.
8

®
N21. Straighten the 16Ga or 14Ga Wire with the Wire Straightener. Do not squeeze too tightly for the first couple of passes, then squeeze a little tighter after any kinks or bumps begin to disappear.
N22. Less adjustability is the option chosen for these instructions, it requires about 76.2cm (30 in) of wire. If you choose for more adjustability (about 81.2 cm (32 in of wire) simply flip the jig so the pegs are father apart. Place the end of the wire into the space between the right peg and the circle. For less waste use wire directly from the coil.
ADJUSTABLE NECKLACE INSTRUCTIONS (with Beads)
This necklace has beads in the non-adjustable area, this area can be filled with beads without hindering
any of the adjustability of the necklace to go over the wearer’s head.
This necklace has beads in the adjustable area, this area is where the necklace gets the “adjustability”. Make sure not to use
too many beads so you can get the necklace over the head.
Note: the amount of beads on this necklace requires the use of the Jig in the more
adjustable position.
Less adjustability.The pegs in the Findings Form Jig are placed so that it can be used with less adjustability or more
adjustability. Simply flip the Jig so that the pegs are either in
the up position when starting, or more adjustability when
starting.
More adjustability.
Starting Peg.
Starting Peg.
9

N23. Bend the end of the wire around the peg tightly to form the loop shown above.
N24. Hold the wire down on the form with your non-dominant hand and wrap the wire by turning the Findings Form. Make sure the wire goes between the peg and the form then around to the starting peg.
N25. Carefully guide the wire between the starting peg and the form. It is important to hold the wire down onto the surface of the Findings Form so the wire doesn’t slip and distort out of round.
N26. Once you have the wire formed to the circle about 3 inches past the second peg cut the wire. Do not bend this wire around the peg. Remove Wire Form from the Jig.
N27. Adjust the size of the Wire Form by wrapping it around an object with a diameter of about 4 1/2 in so that the diam-eter becomes about 5 1/2 in. A large mayonnaise jar is about the right size.
N28. For a necklace with beads in the adjustable area, add beads to the wire that does not have the loop, as shown. Make sure that you have enough adjustability to get the necklace over the head.10

N29. Once you have beads as you like and adjustability tested to go over the head. Bend the end of the wire with Round Nose Pliers or the Step Bail Making Pliers into a loop to match the other loop.
N31. Grasp one of the loops with Bent Chain Nose pliers as before.
N30. Grasp the loop and twist the tool to create a more rounded loop, but do not close. Repeat on the other loop.
N32. Bend the wire at a 90 degree angle toward the bottom wire. Make certain the beads are between the loops, then flip the Necklace and repeat Steps K&L on the other loop of the Necklace.
N33. Hook the loop onto the wire as shown. N34. Use the Bent Chain Nose Pliers to close the loop. Repeat this step making sure the beads are between the loops and that the loops are not too tight to hinder adjustability.
®
11

Beads placed on the wire in the non adjustable
area.
Beads placed inside of the
adjustable area. This can be tricky as you don’t want to
take up too much of the adjust-ability area so the necklace
can be fit over the head.
Beads and or Findings made into Pendants placed on the non adjustable
part of the Necklace.
N35. For beads in the adjustable area, add beads to the size adjusted wire form as shown. You can use as many beads as you want up to where the loops will be.
N36. Bend the end of the wire with Round Nose Pliers or the Step Bail Making Pliers into a loop to match the other loop. Repeat Steps J, K and L to finish the Necklace with the beads in the non-adjustable area.
®
TM
®
12