armourfloor - bigrivergroup.com.au · 3 big river flooring installer / owner responsibility timber...
TRANSCRIPT
Contents
Disclaimers and Caveats 2
Installer/Owner Responsibility 3
Product Description 4
Product Specifications 5
Floor Design 7
Sound Transmission & Insulation 8
Sub-floor Preparation 9
Installation 11
Finishing 17
Caring For Your Floor 18
Armourfloor®Specifications & Installation Instructions
2
Colour Variation
The outstanding visual characteristic of flooring manufactured from Australian hardwood timbers is the variation in colour and texture between individual floor boards. The unique aesthetic appeal of the flooring lies in the harmonious combination of these variations, rather than uniformity of colour and grain. Even within the same timber species, colour and natural markings vary, so each board is imbued with its own appeal. This natural variation ensures that every installation is unique.
Packs of flooring should be opened prior to installation and the customer shown the colour variation that can be expected in the floor. Where practical, any boards that the customer is concerned about should be used in areas that are not main thoroughfares (in cupboards, etc.).
Natural Features
Another characteristic of Australian hardwood flooring is the occurrence of natural features such as gum veins, knots and small holes caused by borer activity. All trees exhibit these features, although they may be more dominant in one species or in one particular tree than another. These natural markings are part of the tree’s history and add to the character and uniqueness of the floor. It is essential that the customer is aware that such features are to be expected.
Flooring Samples
Small sample boards provide only an approximate indication of typical boards in a particular species. When choosing a species, customers should always try to view larger installed showroom panels or, where possible, completed floors, to appreciate the variations that can be expected in the selected species. Photographs of completed floors can help but viewing an installed floor is best.
Big River’s Responsibility
Under the terms of our warranties, Big River will undertake to repair or replace any defective products during the warranty period. The choice of remedy is at the discretion of Big River. A representative of Big River or the supplier of the material will usually be available to inspect any flooring product considered to be out of specification. Where the location makes this unreasonable, products must be shipped to a Big River location for evaluation at the purchaser’s expense. All material should be thoroughly inspected before installation. Any material considered to be faulty or of poor quality must not be laid. No claims will be allowed for visible defects in material that has been laid.
NOTE: Material will not be replaced because of natural colour variations. Big River will not accept responsibility for colour variations in material that has been installed. Refer to the relevant Big River Warranty for detailed conditions and limitations of liability.
Important Information
3
Big River Flooring Installer / Owner Responsibility
Timber is a product of nature and therefore not perfect. Big River timber flooring is manufactured in accordance with accepted industry standards, which permit a defect tolerance of no more than 5%. The defects may be of a manufacturing or natural type.
◆ The installer assumes all responsibility for final inspection of the product quality. This inspection of all flooring should be done before installation. Carefully examine material for colour, finish and quality before installing. If material is not acceptable, do not install it; contact the supplier immediately.
◆ Before installation the installer must determine that the job site environment and sub-floor meet or exceed all applicable recommendations of the construction and materials industries. The manufacturer declines any responsibility for job failure resulting from or associated with sub-floor or job-site environment deficiencies.
◆ Before installation the installer/owner has final inspection responsibility as to grade and finish. The installer must exercise reasonable judgment and hold back or cut off pieces with defects, whatever the cause.
◆ Use of stain, filler or putty for defect correction during installation should be accepted as normal procedure.
◆ When ordering, a 5% cutting and grading allowance should be added to the total square metres.
◆ Should an individual piece be doubtful as to grade, manufacture or finish, the installer should not use the piece.
◆ In flooring applications the use of appropriate products for correcting subfloor voids should be accepted as normal industry practice.
Installers Please Note
As outlined above, please inspect all product before installation for visible faults, discolouration and extreme colour variation. If the product is not of the quality expected, contact your supplier for further information and advice before installation. Once the product has been installed, no claims will be allowed for material with visible faults, discolouration or extreme colour variation.
Armourfloor can be laid over any flat, stable surface (such as concrete or particle board)provided that the following criteria are followed:
◆ When installed over existing flooring such as tiles, vinyl, etc., Armourfloor should be installed as a floating floor and not glued to the existing flooring. The gluing process can add extra stress to the tiles or vinyl, causing them to delaminate from the sub-floor. Likewise, Armourfloor should not be installed over existing flooring if any material on the existing floor is loose or has the potential to delaminate from the sub-floor.
◆ Should the material that is underneath the Big River floor delaminate from the sub-floor then the Big River warranty will be null and void.
◆ Always use class D3 adhesive to join boards together.
4
Armourfloor® Product Description
Manufactured in Australia from 5 layers of veneered hardwood, Armourfloor is quite simply Australia and New Zealand’s most stable timber floor. This versatile flooring system can be used as a floating floor, or it can be glued directly to existing floors.
Listed below are some of the benefits of the Big River strip-flooring system.
◆ Big River is a wholly Australian owned and operated company. ◆ Australian quality standards certified. ◆ Armourfloor has a lifetime guarantee on the structural integrity of the product in
domestic applications. ◆ 25-year stability warranty. ◆ Supplied raw with no factory-applied coatings. Splits in boards must be filled with
putty on site. ◆ Suitable for water based, solvent based, oil and wax floor coatings. ◆ Big River warrants its products in accordance with the statutory requirements of
the relevant authorities. ◆ Manufactured from hardwood timber sourced from sustainably managed regrowth
and plantation forests. ◆ The product is a total hardwood construction. ◆ It can be used on heated concrete slabs. ◆ Floor can be laid directly on to concrete slab. Does not need battens, etc (see
installation instructions). ◆ Available in a large range of species. ◆ Because it is cross laminated (5 ply) it is dimensionally stable. ◆ It can be re-sanded. ◆ No acclimatisation period needed. ◆ Good strength and impact resistance. ◆ Excellent soundproofing qualities. ◆ Can be installed in all conditions. Please Note: In extreme conditions minor
movement can be expected. ◆ Available in plank widths of 138mm and 189mm. ◆ Timber product ideal for allergy or asthma sufferers.
Armourfloor Raw
Big River Armourfloor® is an unfinished product that requires sanding and coating in the same manner as solid T&G flooring products. Boards are not end matched and the splits have been filled at the factory. Armourfloor Raw is a peeled product and therefore more porous than regular timber products so it usually requires a sealer and two coats of a commercial grade floor coating. In extreme cases a third coat may be required.
The Big River Group is an accredited timber flooring manufacturer under the guidelines of the Engineered Wood Products Association of Australasia (EWPAA). Big River products meet Australian and New Zealand standards, one of the very few companies in Australia and New Zealand to do so. This is your assurance of a premium quality timber floor.
5
Armourfloor® Product Specifications
Armourfloor is manufactured with a total hardwood balanced construction, producing plywood boards manufactured to AS/NZS2271:2004 “Plywood and Blockboard for exterior use” and stress graded in accordance with AS/NZS2269:2012. Faces graded to AS/NZS2271:2004 “Plywood - Structural”.
Construction of Armourfloor
Big River Armourfloor is manufactured using a five-ply construction.
◆ The face veneer determines the species of the flooring. The entire construction is manufactured using hardwood veneers.
◆ The bottom or base board is the same species as the face veneer giving unrivaled balance.
◆ The material is laminated using exterior B-bond to AS/NZS 2271. ◆ Supplied uncoated with no factory applied coatings. The boards are also
unfilled. Colour-matched fillers must be used on site before coating. ◆ Raw material is supplied with no coating at all and the ends are not end-matched.
NOTE: All these products need to have glue applied to the groove, as per the installation instructions, prior to joining the planks together.
Available species
Armourfloor is available in the following species: Blackbutt, Flooded Gum, Spotted Gum, Sydney Blue Gum.
6
Armourfloor® Product Specifications
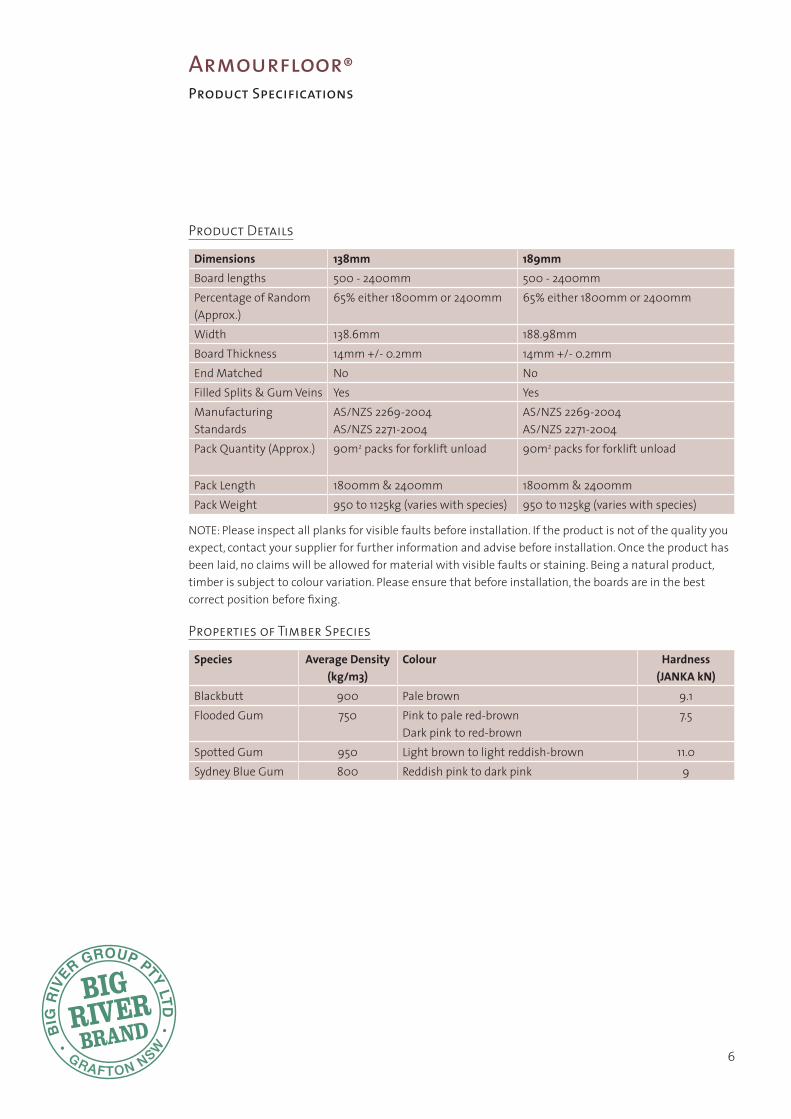
Product Details
Dimensions 138mm 189mmBoard lengths 500 - 2400mm 500 - 2400mmPercentage of Random (Approx.)
65% either 1800mm or 2400mm 65% either 1800mm or 2400mm
Width 138.6mm 188.98mmBoard Thickness 14mm +/- 0.2mm 14mm +/- 0.2mmEnd Matched No NoFilled Splits & Gum Veins Yes YesManufacturing Standards
AS/NZS 2269-2004 AS/NZS 2271-2004
AS/NZS 2269-2004 AS/NZS 2271-2004
Pack Quantity (Approx.) 90m2 packs for forklift unload 90m2 packs for forklift unload
Pack Length 1800mm & 2400mm 1800mm & 2400mmPack Weight 950 to 1125kg (varies with species) 950 to 1125kg (varies with species)
NOTE: Please inspect all planks for visible faults before installation. If the product is not of the quality you expect, contact your supplier for further information and advise before installation. Once the product has been laid, no claims will be allowed for material with visible faults or staining. Being a natural product, timber is subject to colour variation. Please ensure that before installation, the boards are in the best correct position before fixing.
Properties of Timber Species
Species Average Density (kg/m3)
Colour Hardness (JANKA kN)
Blackbutt 900 Pale brown 9.1Flooded Gum 750 Pink to pale red-brown
Dark pink to red-brown7.5
Spotted Gum 950 Light brown to light reddish-brown 11.0Sydney Blue Gum 800 Reddish pink to dark pink 9

7
Table A provides a summary of the floor live loading requirements of AS1170.1 for a range of occupancies. Designers should be aware that these loads are considered the minimum requirements and should make allowance for changes in building use during the life expectancy of the building.To meet the general requirements of the Building Code of Australia in terms of structural provision, other floor live loads may only be used if the building designer is prepared to deem such loadings as safe for the life expectancy of the structure, including changes of occupancy.
Table A - Summary of AS1170.1 Floor Live Loads
Flooring Application Uniformly Distributed Live Load (kPa)
Point Live Load (kN)
Housing 1.5 1.8Institutional bedrooms and wards (hospitals and prisons)
2.0 1.8
Cafeterias, dining rooms and restaurants 2.0 2.7Assembly areas with fixed seating (classrooms, lecture rooms, theatres, places of worship)
4.0 2.7
Light industrial workrooms (workshops, factories,warehouses)
3.0* 3.5*
Residential and apartment buildings (units, hotels, motels, boarding houses)
3.0-5.0 2.7-3.6
Assembly areas without fixed seating (public halls, museums, dance areas, bars, public lounges)
5.0* 3.6
*To be determined but not less than the given value.
Table B - Allowable point live load (working stress) kN
Timber Species Thickness (mm) Stress Grade Span 450mmBlackbutt 14.0 F27 3.7kNFlooded Gum 14.0 F27 3.7kNSydney Blue Gum 14.0 F22 3.2kN
Testing was conducted by the Department of Primary Industries Queensland (DPI) in accordance with CSIRO Division of Forest Products Technological Paper No. 34 ‘Minimum strength and stiffness necessary for wooden floors in houses’.
The test results showed that, in addition to the tabulated point live load capabilities, the thickness versus stress grade data detailed in Table B also met the domestic flooring live load stiffness requirements of 0.17mm per 100N, to provide a comfortable feel for human traffic.
Armourfloor® Floor Design
8
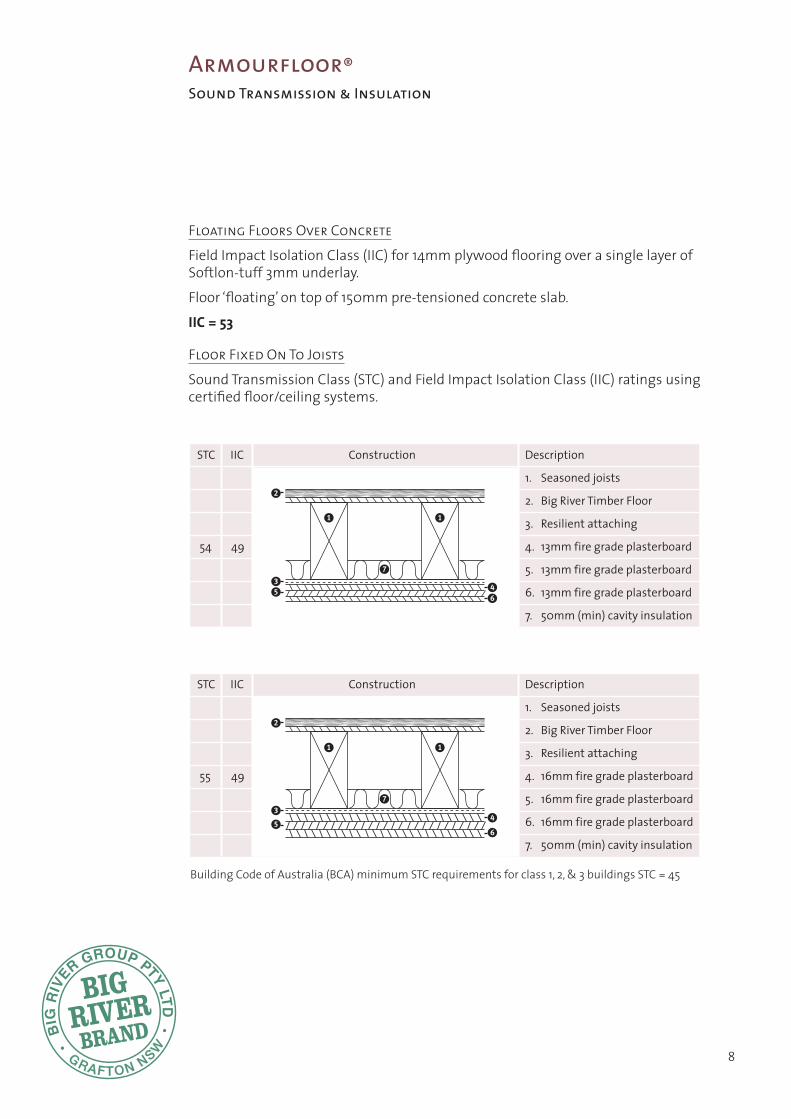
Floating Floors Over Concrete
Field Impact Isolation Class (IIC) for 14mm plywood flooring over a single layer of Softlon-tuff 3mm underlay.
Floor ‘floating’ on top of 150mm pre-tensioned concrete slab.
IIC = 53
Floor Fixed On To Joists
Sound Transmission Class (STC) and Field Impact Isolation Class (IIC) ratings using certified floor/ceiling systems.
Sound Transmission& Insulation
Floating Floors Over ConcreteField Impact Isolation Class (IIC) for 14mm plywood flooring over a single layer ofSoftlon-tuff 3mm underlay.
Floor ‘floating’ on top of 150mm pre-tensioned concrete slab.
IIC = 53Floor Fixed On To JoistsSound Transmission Class (STC) and Field Impact Isolation Class (IIC) ratingsusing certified floor/ceiling systems.
STC IIC Construction Description
1. Seasoned joists
2. Big River Timber Floor
3. Resilient attaching
54 49 4. 13mm fire grade plasterboard
5. 13mm fire grade plasterboard
6. 13mm fire grade plasterboard
7. 50mm (min) cavity insulation
STC IIC Construction Description
1. Seasoned joists
2. Big River Timber Floor
3. Resilient attaching
55 49 4. 16mm fire grade plasterboard
5. 16mm fire grade plasterboard
6. 16mm fire grade plasterboard
7. 50mm (min) cavity insulation
Building Code of Australia (BCA) minimum STC requirements for class 1, 2, & 3 buildings STC = 45
1 1
2
35 4
6
7
1 1
2
3
54
6
7
Information Sheet 4
Brisbane/Sunshine Coast/Townsville/Darwin (07) 3451 8300Melbourne/Tasmania/South Australia (03) 9586 6901Perth (08) 9456 0500 • Sydney/Illawarra (02) 8822 5555
Armourfloor® Sound Transmission & Insulation

9
Armourfloor® Sub-Floor Preparation
Place a straight edge (1500mm to 3000mm) along the surface of the sub-floor. Check that no depressions deeper than 3mm are evident below the straight edge.
If the sub-floor levels exceed the 3mm recommended by Big River, the sub-floor must be levelled either by grinding and filling (for a concrete sub-floor) or by sanding and/or laying hard underlay (for a timber sub-floor).
NOTE: Out-of-tolerance sub-floors are the major cause of movement during installation. Big River will not accept claims resulting from inadequate sub-floor preparation.
Grind the concrete sub-floor using a machine suitable for the size of the project.
Fill, using a suitable levelling agent from a reputable manufacturer in accordance with the manufacturer’s recommendations.
Levelling compound should be durable, compatible with the substrate and flooring, resistant to cracking and delaminating, be self-levelling and include primers and bonding agents as required.
Sand timber sub-floors using a machine suitable for the size of the project.
Sub-floor moisture content
The moisture content of a concrete sub-floor should not exceed the maximum of 70% relative humidity (hygrometer) or 5.5% (electrical resistance meter).
The moisture content of a timber sub-floor should not exceed 70% relative humidity (hygrometer) or 15% (electrical resistance meter).
If the moisture content exceeds Big River’s recommendations, a suitable physical or chemical moisture or vapour barrier system from a reputable manufacturer must be used. Follow the manufacturer’s instructions at all times.
Sub-floor ventilation
Where the sub-floor is fully enclosed by brickwork or concrete, it must be constructed so that it provides adequate cross-flow ventilation. If the sub-floor spaces are exposed to the ground (e.g., soil) ventilation shall be in accordance with building authority’s requirements. Generally, a minimum ground clearance of 400mm at the base of the bearers should be provided, with sufficient drainage to prevent water build-up.
An impervious membrane may be required if the ground below the flooring is regularly subject to damp conditions.
10
Armourfloor® Sub-Floor Preparation
Below Grade Applications
If the soil surrounding any part of the dwelling is 75mm or more above the level of the floor, the floor is considered to be below grade. The soil and drainage should always be sloped to ensure moisture is directed away from the building.
If the Armourfloor® is to be laid below grade it is important to ensure that all precautions are taken to prevent moisture from penetrating to the timber floor. These precautions can include extra moisture protection to the floor and walls of the building.
Heated Slabs
For full instructions, see Installing Over Heated Slabs in the Installation section.
Pre-installation
If required, remove skirting boards, quarter-round or doorway thresholds. These items can be refitted after installation is complete. Doorway architrave should be undercut to allow the Armourfloor to fit neatly. This is best done using an electric under-cut saw. If using a hand saw, a piece of underlay and flooring placed against the architrave can be used as a height guide.
NOTE: Ideally, before installation begins, the building where the floor is being laid should be in the final stages of completion, with all trades having left the site. If this is not the case, installation is not recommended.
When installing Armourfloor as a floating floor, use an underlay recommended by Big River. Ensure all underlay meets the requirements set out in the Building Code of Australia with regard to sound transmission. Suitable products are available from Big River.
Unroll the underlay so that all ends butt neatly against the walls.
Seams between lengths should also butt together, with no overlaps.
To prevent overlaps, tape the ends, sides and seams of the underlay.

11
Armourfloor® Installation
General Installation Procedures
The following general information is an important part of the Armourfloor® installation process.
NOTE: Installation must be carried out according to the Armourfloor® installation instructions. Failure to do so can void the warranty.
The final grading process is to be carried out on-site. This final inspection is to be made by the installer of the product, except in the case of checking for colour variations, which should be carried out in conjunction with the owner of the floor.
Site Conditions
It is the responsibility of the installer and the owner to ensure that the job site conditions and the sub-floor are environmentally and structurally acceptable before installation commences.
Big River does not accept responsibility for any issues arising from failures caused by the sub-floor or site conditions being outside the relevant Australian Standards.
It is the responsibility of the installer to ensure that the work site is safe. If there are any safety concerns, the installer should cease work immediately and not continue the installation until the work site is completely safe.
The timber flooring installation should always be the last service on to the site. If this is not possible, foot traffic on the finished product should be limited to a minimum.
Drainage should always be directed away from the building.
Timber flooring should only be delivered if the worksite is enclosed, dry and in a lockable condition.
The flooring should be installed under the “in-situ” conditions in which it is to be used. This should include heating and/or air-conditioning. Do not install and finish the floor if the ambient conditions are extreme; always wait for suitable conditions.
NOTE: Commencement of installation is considered to be acceptance by the installer of the jobsite conditions. If the site is not acceptable, installation should not commence.
Grading and Colour Variation
It is important that the customer is fully aware of the natural colour variations between floorboards of the same species. Packs of flooring should be opened prior to installation and the customer should be shown the colour variation that can be expected in the floor. Where practical, any boards that the customer is concerned about should be used in areas that are not main thoroughfares (in cupboards, etc.).
If the installer or customer is not happy with any boards that have been included in the packs, contact Big River to arrange for an inspection or for replacement of the material if it is considered to be out of specification.
NOTE: Material will not be replaced because of natural colour variations. Big River will not accept any responsibility for colour variations in material that has been installed.
12
Armourfloor® Installation
Setting Out
Accurately setting out the floor prior to laying the material can prevent problems during installation. It is critical to establish a primary working line for the project; this is usually through the longest continuous area of the floor. This then becomes the reference for the project.
NOTE: Initial alignment of the floor is critical. A misaligned starting row can cause side and end gaps to appear in the proceeding rows of flooring.
To achieve the best “look” for the floor it is important to “rack out” the flooring to achieve a random appearance. Start the floor by using either the random planks supplied or by cutting the boards to a pre-determined length. Joints between boards should be located randomly. Allow at least 400mm between adjacent end joints. This will avoid “clustered” joints. To avoid repeated patterns, randomly cut starting boards to different lengths.
Pre-installation Inspection
Inspect all material before installation. Any material considered not to be of the correct quality must not be laid. If there is any doubt that the quality is to the required standard, contact the supplier of the material for further information. No claims will be allowed for visible defects in material that has been laid.
NOTE: Care should be taken at this stage to ensure that colour and grain variations between Armourfloor boards are randomly mixed throughout the finished floor. Big River uncoated flooring products come in large packs, so it is important to unpack the material prior to installation and sort according to colour and grain variations. Using boards of differing lengths results in a more natural appearance.
Allowing for Floor Expansion
To start the first row, place 10mm-thick spacers between the boards and the wall, approximately 600mm apart or near the board ends. A gap between the floorboards and the walls allows for slight movements caused by structural movement of the building or by seasonal changes in relative humidity. The gap between the floorboards and the wall should be covered by either the skirting boards or a suitable cover strip. A minimum gap of at least 10mm must be left around the perimeter of the floor and around any fixed furniture such as island benches etc.. Intermediate expansion should also be included in floors that are longer or wider than 15 metres.
Gluing the Tongue-and-Groove Joint
Always apply the glue to the top of the groove. Wipe off all excess glue immediately using a damp cloth; it can be very difficult to remove cured glue from the finished floor. Always use a tapping block on the tongue of the board to lightly tap the boards together. Tapping too hard or using a hammer can damage the tongue and increase the chance of damage to the floorboard.

13
Armourfloor® Installation
Installing First Row of Boards
Lay the first row of boards with the groove facing the wall and with glue applied to the grooves. Using a tapping block and hammer, tap the boards together firmly. At the end of the row, use an installation bar to tap the last board into place. Cut the last board in the row so there is a 10mm expansion gap on the end.
To ensure a random pattern of boards, start the second row with a board at least 500mm shorter than the first board in the first row. Again, using the tapping block and hammer, firmly tap the adjacent boards together until no gap is visible.
Continue installing the floor, repeating the process until the last row is ready for installation.
Installing the Final Row
The final row of boards, in most installations, will need to be ripped lengthwise to fit. The cut must allow for the expansion clearance or gap between the wall and the flooring, as well as compensate for uneven walls.
Allow a minimum of 12 hours for the glue to cure before allowing foot traffic on the floor.
Direct Glue Applications
Where boards are glued directly to the sub-floor, the adhesive should be a durable, moisture-cured polyurethane, selected for the product and site conditions. It should be sufficient to hold the boards in place, ensure rigidity and be able to transmit the required load.
The adhesive should be compatible with the substrate and flooring, be non-staining and resistant to ageing, oxidation and ultraviolet light.
Use adhesive in accordance with the manufacturer’s instructions, allowing for the appropriate field and perimeter expansion.
Follow sub-floor preparation instructions above. Spread an even measure of a polyurethane floor adhesive as per the adhesive manufacturers application instructions. Adhesive should be applied without bubbles or lumps under finished surfaces or edges. Clean excess adhesive progressively. Remove all excess adhesive on completion.
Follow fixing and installation procedure above.
14
Armourfloor® Installation – Heated Slabs
Installing Over Heated Slabs
Armourfloor® boards can be installed over heated slabs, either as a floating floor or glued directly to the concrete slab.
Concrete Slab Requirements
When installing Armourfloor® over a heated slab it is extremely important to ensure that the slab is dry. If the slab is not dry, moisture left in the slab will be driven into the timber flooring when the heating is turned on. This will alter the dimensions of the floorboards and can adversely affect the performance of the floor.
The moisture content of a concrete slab should not exceed the minimum of 5.5% when measured using an electrical resistance metre, or 70% relative humidity when using a hygrometer.
NOTE: A slab with high humidity can register low moisture content.
If the moisture content exceeds the above recommendations, a chemical moisture vapour system from a reputable manufacturer must be used. Follow the manufacturer’s instructions at all times.
Pre-Installation
If all of the above criteria have been met, the slab heating should be turned on for at least 72 hours, then switched off for 24 hours, before installation commences.
Installation
Armourfloor® can be installed as either a floating floor or can be glued directly to the concrete or timber sub-floor as per Big River installation instructions.
NOTE: It is very important that expansion gaps are included (Big River recommends a minimum of 10mm). This will ensure that the floor has room to expand when the heating is turned on and will compensate for normal floor movement.
It is also important that heavy objects such as benches are not installed on top of “floating” floor applications. This will restrict the movement of the floor by pinning it to the sub-floor, which can cause gapping.
Where flooring runs through a doorway into another room, take advantage of the opportunity to install an expansion gap. The flooring should be finished up to the doorway, leaving a 10mm gap covered by an appropriate cover strip. Lengths of flooring in excess of 10 metres must have appropriate 10mm expansion gaps inserted in the floor.
15
Armourfloor® Installation – Heated Slabs
Post Installation (Floors Coated in Situ)
Beginning 48 hours after the installation has been completed, the heating system should be switched on and the temperature gradually increased over a period of 5 days until the maximum operating temperature is achieved as per the under-floor heating manufacturer’s instruction or to a maximum of 28 degrees Celsius. The floor should be maintained at this temperature for a minimum of 2 weeks.
After completing the Post Installation procedure the heating should be switched off for 3 days and the process should be continued as outlined below.
Sanding & Coating the Floor
After the floor has cooled the floor can be sanded and coated as per standard industry practices.
Turning on the Heating System
On completion of the sanding and coating the process as outlined under Post Installation ( above ) should be implemented.
Seasonal Operation
The under-floor heating should be turned on and the temperature increased gradually over a 5 day period. For maximum stability, humidity must be maintained between 35% and 55% relative humidity. Seasonal gapping should be expected.
16
Final Floor Inspection
When installation is complete the floor should be cleaned thoroughly using the appropriate cleaning products. The floor should always be left in the best possible condition.
Any imperfections in the floor should be filled with the appropriate colour matched caulking product; this includes hot wax repairs. Any minor scuffing or scratches left by the installation process should be repaired using the appropriate materials. If the floor has been damaged and cannot be repaired to an acceptable condition, the individual board or area of flooring should be replaced.
On completion of sanding and coating, the process as outlined under Post Installation (above) should be implemented.
Achieving the Best Results
To achieve the best result, the following important points should be considered when laying a Big River floor:
◆ Always tap boards from the tongue side; never tap on the groove. ◆ Never “over tap” the boards; over hitting will cause damage to the floor by
disrupting the groove and in some cases wedging the groove open. ◆ Always use a class D3 adhesive to glue the boards together. ◆ The glue should be run in a continuous bead on the top side of the groove on both
the side and the end of the board. ◆ Remove excess glue that is squeezed out of the joint with a clean, damp rag before
it dries. Change rags and water often to avoid leaving a residue on the boards. ◆ To achieve a uniform appearance for the whole floor, Big River recommends working
from several packs at once, dry-laying the flooring and mixing the board lengths to avoid the end joints being too close together. Joints should be spaced a minimum 400mm apart.
◆ Always allow for a wastage factor when quoting on a floor. This could be as little as 5% on a simple floor and 10% or more on complicated areas.
◆ Fixtures should not be installed on floating floors, including kitchen benches and other heavy items. This will restrict the movement of the floor.
◆ It is important to ensure that the customer knows how to clean and maintain the floor. It is good practice to include a cleaning kit in the quote. These products are available from Big River, along with a full maintenance program. Maintenance is critical to ensure the floor is kept in the best possible condition and to maximise longevity of the floor.
Armourfloor® Installation

17
Armourfloor® Finishing
Armourfloor® is an engineered flooring product with the properties of natural boards and therefore can be coated like any other timber flooring product.
Before sanding Armourfloor, apply a trowel filled with a quality putty such as TimberMate. If unsure of the closest putty match, contact your nearest Big River branch or flooring outlet.
Note that Armourfloor boards are filled with putty at the factory, but have no grain filler.
Sand the timber floor with a polisher to a 120 to 150 grit finish.
Apply sealer coat as required, either Loba EasyPrime, Loba Exotengrund (for exotics) or Loba PrimaSeal (for a richer look).
Start the coating process using the recommended roller type, coverage rate and drying time as outlined in the relevant sealer data sheet. This sealer coat does not require a cutback but may be buffed with a maroon nylon pad for a superior finish.
Apply a second coat using Loba WS Duo, Loba WS EasyFinish or Loba WS Viva with an application rate of between 8 and 12 square metres per litre (depending on the species).
This coating should dry in 2 to 4 hours, depending on conditions and airflow, and can be sanded after 6 hours.
Cut the floor back lightly with a 22 screen or a maroon pad with “320 grit wings” to remove any dust or foreign matter and prepare for the final coat.
Apply a third coat using Loba WS Duo, Loba WS EasyFinish or Loba WS Viva with a coverage rate of between 8 and 12 litres per square metre, depending on the timber species.
This coating should be dry in 2 to 4 hours, depending on the ambient conditions and airflow, and will be ready for light foot traffic after 24 hours.
NOTE: In hot or humid weather, add Loba WS ARGO (Wet Edge Extender) to the Loba top coats for superior performance. For extra UV protection against timber oxidisation, add Loba UV Protect to each top coat application.
18
Overall Appearance of Finished Floors
The inspection of your new floor should be done from a standing position with normal lighting. Glare, particularly from large windows,magnifies any irregularities in the floor. The floor will have imperfections that are typical of the type or species that is used.
Armourfloor factory finished timber floors, like all floor coverings will show signs of wear over time, depending on the amount of use your floor receives. By putting in place a regular cleaning and maintenance program, you can ensure your floor is kept in its best possible condition.
The following information is meant as a guide.
Maintenance of Armourfloor
✔ Sweep or vacuum your floor regularly. A build up of grit can damage the surface of your floor. The vacuum head must be a brush or felt type. Ensure the wheels of the vacuum are clean and free wheeling so it does not damage the coating. Do not use vacuum cleaners with “beater bar heads”.
✔ Use a soft bristle broom or static mop to keep the floor clean. ✔ Wipe up spills immediately before they get sticky or dry. Liquid left standing can dull
the finish on your floor. Itmay also damage the wood and can leave a discolouring residue.
✔ Periodically, as required you should coat your floor with Aquacare 4450 UV Revive. One coat of Aquacare 4450 UV Revive or similar product will conceal any minor scuffs and scratches. The sole purpose is to provide a sacrificial coat, ensuring the protection of the UV layer.
✔ Use rugs or mats in high traffic areas such as room entries, passages and work areas.
✔ To avoid an uneven appearance to your floor, occasionally rearrange furniture and rugs.Where possible drape or shade large windows.
✔ Keep pets’ nails trimmed, paws clean and free from dirt grit, grease etc. ✔ Do not slide or roll heavy objects directly on your timber floor. If moving heavy
furniture, consider laying a solid protective covering such as plywood or hardboard on your floor and gently walk the item across the floor. The use of carpet or cardboard is not considered adequate to prevent surface damage.
✔ Never wear stiletto or spike heeled shoes on your floor. Always check your shoes for debris imbedded in the soles. A woman weighing 57 kg (125 pounds) walking in stiletto heels has an impact of 140.6 kg per square centimetre (2,000 pounds per square inch). An exposed nail in the heel of the shoe can exert up to 562 kg per square centimetre (8,000 pounds per square inch). These types of impacts can dent any wood floor surface.
✔ Protect your new floor by using felt pads under the legs of all movable furniture and by the use of mats at entrances to minimise dirt and moisture from being tracked inside.These mats/rugs should be laid both externally and internally at the entrances. Do not use rugs and mats with solid rubber or vinyl backing. These items must be made of materials that “breathe’’. This is to prevent moisture entrapment under the rug/mat.These mats/rugs must be kept clean and free of dirt and grit.
✔ Where climate control equipment has been installed always maintain a relative humidity of between 50-70%.
Armourfloor® Caring For Your Floor
19
✘ Never use industrial cleaning machines or steam mops.✘ Never use mats or rugs on the floor when under-floor heating is being used.✘ Never use cleaning products such as oil soaps,waxes or other household cleaners
that contain silicon, tung oil or ammonia.✘ Never use steel wool on your floor.✘ Never drag furniture or heavy objects over your timber floor.✘ Never pour water directly onto the floor.✘ Never allow grit to build up on your floor - it can be very abrasive.
Maintenance of Raw Armourfloor
Timber floors properly finished are the easiest of all floor surfaces to keep clean and new looking. Unlike carpeted or resilient floors that show age regardless of care, timber floors can be kept looking like new, year after year,with minimum care. Below are some simple steps to keeping your floor in good condition.
✔ Always use a vacuum cleaner with rubber wheels or dust mop to clean the floor. Ensure that wheels rotate freely.
✔ Use mats at all external entries to reduce the wear on the floor and the amount of dirt and grit that can get on to your floor.
✔ Rugs and mats can be used in high traffic areas to reduce wear of the coatings. Do not use these items in the first 6 months.
✔ All spills should be cleaned up immediately.✔ Use felt protective pads on furniture legs, etc., especially furniture that is moved
regularly.✘ Do not allow grit to build up on your floor – it can be very abrasive.✘ Never use abrasive cleaners or wax on the floor. Use products purchased from a
timber-flooring retailer.✘ A steam mop should not be used to clean Big River Timber floors.✘ Avoid walking on timber floors with high-heeled shoes or shoes with damaged
heels. Shoes with objects imbedded in the sole can mark the floor.✘ Keep pets’ claws trimmed to avoid scratching the floor.✘ Always avoid intentionally pouring water on to a timber floor. Excessive amounts of
water may seep between the boards or into scratches, causing fibres to swell and affect the finish.
✘ Never use mats or rugs on the floor when under floor heating is being used.
Always refer to the coating manufacturer’s recommendations on floor cleaning and maintenance
PLEASE NOTE: All timber products are affected by direct sunlight.
Armourfloor® Caring For Your Floor