archived - welcome to nyc.gov | city of new york
TRANSCRIPT

Controlled versions of Department of Forensic Biology Manuals only exist electronically on the Forensic Biology network. All printed versions are non-controlled copies.
FORENSIC BIOLOGY SEROLOGY MANUAL
Approving Authority: Eugene Y. Lien, Technical Leader, Serology Operations
Procedure Effective
Date Revision History
General Guidelines 3/24/2010 Processing of Postmortem Specimens 7/16/2012 Bloodstain Preparation from Whole Blood 7/16/2012 Kastle-Meyer (KM) Presumptive Test for Blood 3/24/2010 Acid Phosphatase Presumptive Test for Semen 3/24/2010 Amylase Diffusion Presumptive Test for Saliva 7/16/2012 Slide Preparation for Spermatozoa Searches 9/17/2012 Initial Version Christmas Tree Stain for Spermatazoa 3/24/2010 P30 ELISA 7/16/2012
References
*date is based on footnote
Archive
d 05/2
1/201
4
Docum
ent C
ontro
l Coo
rdina
tor

FORENSIC BIOLOGY SEROLOGY PROCEDURES MANUAL
AMYLASE DIFFUSION PRESUMPTIVE TEST FOR SALIVA
DATE EFFECTIVE 07-16-2012
APPROVING AUTHORITY QUALITY ASSURANCE MANAGER
PAGE 1 OF 5
Controlled versions of Department of Forensic Biology Manuals only exist electronically on the Forensic Biology network. All printed versions are non-controlled copies.
Preparing Amylase Plate 1. Prepare starch-containing agarose gel by adding the ingredients listed below: 100 ml batch size (enough for 2 plates) 1.0g Sigma Type I agarose 0.1g potato starch 100mL amylase gel buffer
To dissolve, mix and boil this solution. Allow to slightly cool. Pour 40mL each into a 10 x 10cm disposable Petri dishes. Avoid air bubbles as much as possible. Scale up batch size when necessary.
2. Punch wells in the gel using the suction tube apparatus, leaving at least 1.5cm between
wells. Use Amylase sheet as a template. • Make sure that the holes that you create are completely clean of agar debris and
residual liquid. This can be ensured by punching each hole twice in succession. • Following this protocol and with an accurate dispersion of agarose will guarantee
an adequate amount of space for the loading of 10uL each of standard, control, or sample into each well.
3. Use Parafilm® around the lid/bottom joint to seal the amylase plates. 4. Store in a 4°C refrigerator upside-down (resting on the lid) to avoid condensation on the
gel. 5. Pre-made plates are good for one week.
Archive
d 05/2
1/201
4
Docum
ent C
ontro
l Coo
rdina
tor

FORENSIC BIOLOGY SEROLOGY PROCEDURES MANUAL
AMYLASE DIFFUSION PRESUMPTIVE TEST FOR SALIVA
DATE EFFECTIVE 07-16-2012
APPROVING AUTHORITY QUALITY ASSURANCE MANAGER
PAGE 2 OF 5
Controlled versions of Department of Forensic Biology Manuals only exist electronically on the Forensic Biology network. All printed versions are non-controlled copies.
Preparing Standards/Samples 1. Extract approximately a 5 x 5mm stain or a portion of a swab in 100uL deionized water
for 30 minutes at room temperature using the pipette tip and test tube method. For samples that have been analyzed with P30 ELISA, use the extracts prepared in that procedure.
2. Prepare "-amylase standards containing 0.02 and 0.002 units each per 10 uL of deionized
water (dH2O) from purchased amylase.
A. Prepare 1mL of 20 units/10uL amylase by adding the appropriate amount of amylase standard to dH2O. The appropriate amount of amylase standard to add is determined by the QC of the current lot of amylase. See example calculation below.
B. Continue to prepare the remaining 2, 0.2, 0.02, and 0.002 unit standards by doing
ten-fold serial dilutions. This is easily accomplished by first adding 900uL of dH2O to each of 4 microcentrifuge tubes. Then transfer 100uL of your 20 unit standard into one of the tubes containing 900uL of dH2O. This is your 2 unit standard. Continue making the remaining dilutions in the same manner.
When doing serial dilutions, make sure to mix each standard well before each subsequent transfer. Use a fresh unplugged pipette tip for each transfer.
Sample calculation:
Given a specific activity of 870 units amylase/mg total protein (from vendor) with a total protein concentration of 30 mg/mL, then:
870 units amylase x 30 mg total protein x 1 mL = 26.1 units amylase/uL mg total protein mL of solution 1000 uL
Archive
d 05/2
1/201
4
Docum
ent C
ontro
l Coo
rdina
tor

FORENSIC BIOLOGY SEROLOGY PROCEDURES MANUAL
AMYLASE DIFFUSION PRESUMPTIVE TEST FOR SALIVA
DATE EFFECTIVE 07-16-2012
APPROVING AUTHORITY QUALITY ASSURANCE MANAGER
PAGE 3 OF 5
Controlled versions of Department of Forensic Biology Manuals only exist electronically on the Forensic Biology network. All printed versions are non-controlled copies.
Use this value in the equation C1 x V1 = C2 x V2 where C1 and C2 are concentrations of solutions 1 and 2, while V1 and V2 are volumes of solutions 1 and 2. In this case, solution 1 is the vendor amylase stock solution while solution 2 is the 20 units standard in preparation:
(26.1 units amymase/uL)(x uL) = (20 units/10uL)(1000uL) Solving for x = 77uL of vendor amylase stock solution 1000uL (total volume) – 77uL (amylase stock solution) = 923uL of dH2O. Loading/Incubation/Staining of Amylase Plates 1. Have a witness verify the Amylase documentation with the tube labels. 2. Fill wells according to the Amylase Diffusion documentation (10 uL each well) with
standards, negative control (deionized water), and samples. The first two wells are reserved for the 0.02U and 0.002U amylase standard, the negative control is added to the third well, and the remaining wells are filled with samples.
3. Incubate 5-8 hours at 37oC or 12-16 hours at room temperature; keep the plate in a humid
chamber to avoid drying. 4. Pour a 0.01N (100-fold dilution of a 1N stock) iodine solution onto the gel; clear areas
indicate regions of amylase activity. Do not over stain the plate. Do this by monitoring the plate as it is staining; pour off the iodine solution when a sufficient amount of staining has occurred so that all the standards are clearly visible.
5. Photograph the results via the Mideo System. Ensure there is a scale in the photograph.
Save the file as a JEPG and upload to the LIMS system for the related Amylase assay. 6. Measure the diameter of the clear areas and record on the documentation.
Entire items (blood spatter patterns, etc.) can be tested for amylase. Prepare a large plate on a bordered glass plate (scale up reagents) and allow to solidify; bring item (or area of item) into contact with the gel for 5 minutes. Follow steps 3-6 above to visualize any amylase pattern.
Archive
d 05/2
1/201
4
Docum
ent C
ontro
l Coo
rdina
tor

FORENSIC BIOLOGY SEROLOGY PROCEDURES MANUAL
AMYLASE DIFFUSION PRESUMPTIVE TEST FOR SALIVA
DATE EFFECTIVE 07-16-2012
APPROVING AUTHORITY QUALITY ASSURANCE MANAGER
PAGE 4 OF 5
Controlled versions of Department of Forensic Biology Manuals only exist electronically on the Forensic Biology network. All printed versions are non-controlled copies.
Interpretation of Results The values of diffusion for the 0.02 and 0.002 unit standards should fall in the ranges of 7-15 and 4-10 mm, respectively. In addition, the amount of diffusion of the 0.02 unit standard must be greater than that of the 0.002 unit standard. The interpretation of amylase results depends on the source of the sample: 1. Body cavity swabs (e.g., vaginal and anal) are positive if the diameter is equal to or
greater than the diameter of the 0.02 U standard. Designate as orifice (“O”) on the amylase documentation.
2. Samples not from a body cavity (e.g., penile swabs, cigarette butts, cups, etc.) are positive if the diameter is equal to or greater than the 0.002U standard. Designate as external (“E”) on the amylase documentation.
3. The location from which a “dried secretion” swab is taken affects the interpretation.
Swabs taken essentially from a body cavity or similar place (e.g., introitus, etc.) are interpreted as if the sample is from a body cavity. Other locations (e.g., breast, thigh, penis, etc.) may need to be interpreted differently.
Below is a general list of common sample types and designation as body cavity/orifice samples:
ANUS OUTSIDE/OUTER ANUS
EXTERNAL GENITALIA (female) OUTSIDE/OUTER VAGINA/L EXTERNAL VAGINA/L PERIANAL FOURCHET PERINEAL INTROITUS PERINEUM LABIA MAJORA PERIORAL LABIA MINORA PERIVAGINAL LIPS VESTIBULE MOUTH VULVA
Archive
d 05/2
1/201
4
Docum
ent C
ontro
l Coo
rdina
tor

FORENSIC BIOLOGY SEROLOGY PROCEDURES MANUAL
AMYLASE DIFFUSION PRESUMPTIVE TEST FOR SALIVA
DATE EFFECTIVE 07-16-2012
APPROVING AUTHORITY QUALITY ASSURANCE MANAGER
PAGE 5 OF 5
Controlled versions of Department of Forensic Biology Manuals only exist electronically on the Forensic Biology network. All printed versions are non-controlled copies.
Below is a general list of common sample types and designation as external samples: BUTTOCKS INGUINAL CHEEK INNER THIGH CHIN MONS VENEVIS (mons pubis) GROIN PENIS SCROTUM Revision History: March 24, 2010 – Initial version of procedure. July 16, 2012 – Specific names of worksheets were removed and replaced with generic terminology to accommodate LIMS.
Archive
d 05/2
1/201
4
Docum
ent C
ontro
l Coo
rdina
tor

FORENSIC BIOLOGY SEROLOGY PROCEDURES MANUAL
ACID PHOSPHATASE PRESUMPTIVE TEST FOR SEMEN
DATE EFFECTIVE 03-24-2010
APPROVED BY EUGENE LIEN
PAGE 1 OF 1
Controlled versions of Department of Forensic Biology Manuals only exist electronically on the Forensic Biology network. All printed versions are non-controlled copies.
GENERAL An Acid Phosphatase test is a presumptive test for semen. It may be performed directly on a cut out portion of a stain, an extract of a stain, or a “wipe” of the stained material. A wipe may be made using a piece of filter paper, thread, or swab. Wet the wipe with water, then rub over the stained area while still wet. CONTROLS Analysts using Acid Phosphatase test reagents must test each lot/aliquot of reagent at least once per day, using positive and negative controls, before any evidence items are tested. The results of this test shall be recorded in the case notes. Semen must be used as a positive control. A drop of deionized water may be used for the negative control. If controls do not pass, inform the Quality Assurance Team immediately. PROCEDURE 1. Apply a drop of the Alpha-Naphthyl Phosphate reagent; wait 60 seconds.
If a purple color occurs at this point, the testing results should indicate “inconclusive.” 2. Apply a drop of the Fast Blue B reagent. An immediate purple color is a positive
reaction. Revision History: March 24, 2010 – Initial version of procedure.
Archive
d 05/2
1/201
4
Docum
ent C
ontro
l Coo
rdina
tor

FORENSIC BIOLOGY SEROLOGY PROCEDURES MANUAL
BLOODSTAIN PREPARATION FROM WHOLE BLOOD
DATE EFFECTIVE 07-16-2012
APPROVING AUTHORITY QUALITY ASSURANCE MANAGER
PAGE 1 OF 2
Controlled versions of Department of Forensic Biology Manuals only exist electronically on the Forensic Biology network. All printed versions are non-controlled copies.
Staincards are prepared from all vouchered blood samples and from post-mortem blood samples: 1. Take custody of the blood vials awaiting bloodstain preparation. 2. Prepare the UltraSTAINTM cards by affixing a pre-printed FB case number sticker (if
available) and writing in the following:
� Initials of person preparing the stain � FB number, if no sticker is available
Wear latex gloves when handling these cards. 3. Preparation of the bloodstain must be witnessed by another laboratory staff member.
The witness must confirm that the processor is handling the correct blood vial and stain card BEFORE the stain is made. After each stain is made, the witness must initial the stain card and the evidence packaging worksheet.
4. Prepare stains one at a time. Staining of the cards and the opening of liquid blood
samples MUST be performed under a biological safety cabinet with the exhaust fan operating. It is advisable that a new KimWipe™ be used to open each vial stopper. Make sure a blood tube is closed before preparing the next stain.
5. Fold back the paper "flap" and make four stains on the card, placing the blood in the
outlined areas. Use four drops of blood per area; apply the drops slowly, allowing them to soak in. This will prevent appreciable transfer to the paper "flap".
6. Bring down the paper "flap", turn the entire card over, and allow it to air-dry upside
down. The stain cards must be allowed to dry overnight before storage. 7. Package the air-dried stains into a 4x6" KAPAKTM bag. Heat seal the KAPAKTM. The
person sealing the bag must date and initial the bag. Store at room temperature, and record the storage location for the chain of custody.
Archive
d 05/2
1/201
4
Docum
ent C
ontro
l Coo
rdina
tor

FORENSIC BIOLOGY SEROLOGY PROCEDURES MANUAL
BLOODSTAIN PREPARATION FROM WHOLE BLOOD
DATE EFFECTIVE 07-16-2012
APPROVING AUTHORITY QUALITY ASSURANCE MANAGER
PAGE 2 OF 2
Controlled versions of Department of Forensic Biology Manuals only exist electronically on the Forensic Biology network. All printed versions are non-controlled copies.
8. CLEAN THE BIOLOGICAL SAFETY CABINET (refer to QC Procedure #QC125 of the Quality Assurance/Quality Control Manual).
9. Place all case files that contain any sexual assault evidence in the designated area so that
they may be processed. Place all cases files that contained any evidence from the NYPD or DA’s office back from where they were retrieved (either “cases to be called on,” “cases to be assigned,” or the assigned analyst). Place all remaining case folders in the Forensic Biology office so that they may be filed.
10. Disposal of blood and blood vials:
For non-vouchered blood, the remainder of the liquid blood and the blood vial will be discarded immediately. Purple-topped vials must be discarded in a plastic BIOHAZARD “sharps” container.
For vouchered blood, the remainder of the liquid blood is discarded into bleach immediately after making the bloodstain card. The empty vial rinsed with 10% bleach. The empty vial is packaged for return to the Evidence Unit.
Revision History: March 24, 2010 – Initial version of procedure. July 16, 2012 – Specific terminology was removed and replaced with generic terminology to accommodate LIMS.
Archive
d 05/2
1/201
4
Docum
ent C
ontro
l Coo
rdina
tor

FORENSIC BIOLOGY SEROLOGY PROCEDURES MANUAL
CHRISTMAS TREE STAIN FOR SPERMATOZOA
DATE EFFECTIVE 03-24-2010
APPROVED BY EUGENE LIEN
PAGE 1 OF 1
Controlled versions of Department of Forensic Biology Manuals only exist electronically on the Forensic Biology network. All printed versions are non-controlled copies.
The nuclear material within the cell is stained red by the Nuclear Fast Red stain. Sperm heads are usually well differentiated with the acrosome staining significantly less dense than the distal region of the head. Epithelial membranes and sperm tails are stained green by the Picric Indigo Carmine (PIC) stain; nuclei inside epithelial cells appear purple. Yeast cells also stain red, however the stain is uniform throughout the cell and extends into polyp-like structures that are occasionally seen in yeast. Reagents: Nuclear Fast Red and Picric Indigo Carmine 1. Fix cells to the slide by heating (approximately 5 to10 seconds). 2. Cover cell debris with Nuclear Fast Red stain and allow to sit for at least 10 minutes. 3. Wash away the nuclear fast red with deionized water. 4. Add PIC stain to the still-wet slide; allow to sit for no more than 30 seconds. 5. Wash away the PIC stain with ethanol. 6. Place slide over a heat source to complete drying. 7. Examine the slide at 100X or 400X (don’t use immersion oil). Revision History: March 24, 2010 – Initial version of procedure.
Archive
d 05/2
1/201
4
Docum
ent C
ontro
l Coo
rdina
tor

FORENSIC BIOLOGY SEROLOGY PROCEDURES MANUAL
GENERAL GUIDELINES
DATE EFFECTIVE 03-24-2010
APPROVED BY EUGENE LIEN
PAGE 1 OF 1
Controlled versions of Department of Forensic Biology Manuals only exist electronically on the Forensic Biology network. All printed versions are non-controlled copies.
1. The procedures within this Serology Procedures Manual are intended to support the processes outlined in the Evidence Examination Procedure in the Evidence and Case Management Manual.
2. In general, screening tests and/or confirmatory tests are used to identify physiological
fluids such as blood, semen, and saliva prior to further analysis. 3. All reagents are available pre-made and are quality control checked, where possible. Do
not make your own or use supplies that have not been quality control checked. If reagents are needed, contact the Quality Assurance Unit for assistance.
Revision History: March 24, 2010 – Initial version of procedure.
Archive
d 05/2
1/201
4
Docum
ent C
ontro
l Coo
rdina
tor

FORENSIC BIOLOGY SEROLOGY PROCEDURES MANUAL
KASTLE-MEYER (KM) PRESUMPTIVE TESTING FOR BLOOD
DATE EFFECTIVE 03-24-2010
APPROVED BY EUGENE LIEN
PAGE 1 OF 1
Controlled versions of Department of Forensic Biology Manuals only exist electronically on the Forensic Biology network. All printed versions are non-controlled copies.
GENERAL A Kastle-Meyer test may be performed directly on a cut out portion of a stain, an extract of a stain, or a “wipe” of the stained material. A wipe may be made using a piece of filter paper, thread, or swab. Wet the wipe with water, then rub over the stained area while still wet. CONTROLS Positive and negative controls must be used to test each lot/aliquot of reagent at least once per day and before any evidence items are tested. Blood must be used as a positive control. A drop of deionized water may be used for the negative control. If controls do not pass, inform the Quality Assurance Team immediately. PROCEDURE 1. Apply a drop of KM reagent if using a wipe. If performing directly on a cut out portion
of a stain, use enough until sample is covered. Observe any color change.
A normal color reaction is a greenish/gray tint with the presence of possible blood. A PINK COLOR HERE IS DUE TO THE PRESENCE OF AN OXIDIZING AGENT (e.g., a chemical oxidant), NOT BLOOD. If a pink color occurs at this point, the testing results should indicate “inconclusive.”
2. Add a drop of 3% hydrogen peroxide. An immediate pink color is a positive result. Revision History: March 24, 2010 – Initial version of procedure.
Archive
d 05/2
1/201
4
Docum
ent C
ontro
l Coo
rdina
tor

FORENSIC BIOLOGY SEROLOGY PROCEDURES MANUAL
P30 ENZYME LINKED IMMUNOSORBENT ASSAY (ELISA)
DATE EFFECTIVE 07-16-2012
APPROVING AUTHORITY QUALITY ASSURANCE MANAGER
PAGE 1 OF 14
Controlled versions of Department of Forensic Biology Manuals only exist electronically on the Forensic Biology network. All printed versions are non-controlled copies.
Solutions: Phosphate buffered saline (PBS) PBS-Casein (PBS with 0.02% w/v casein) Standards: P30 antigen [prostate specific antigen (PSA)] and phosphate buffered saline Plates: Immulon II microELISA plates (microtiter plate) Antibodies: Mouse monoclonal anti-human PSA (prostate specific antigen, P30)
Rabbit polyclonal anti-human PSA Goat anti-rabbit IgG alkaline phosphatase conjugate Mouse IgG1, Kappa chain (MOPC 21, mouse myeloma protein)
Note: Store all antibodies at 4oC.
SOLUTION PREPARATION Phosphate buffered saline (PBS):
1. To prepare 1 liter, dissolve 5 tablets in 1 liter of deionized water. This can be stored at 4oC for up to 2 weeks.
2. On label write initials of preparer, the date of make (DOM) and the date of discard (DOD).
For each plate or pair of plates you will need 1 bottle (1 liter).
PBS-Casein (PBS with 0.02% w/v Hammerstein casein): If preparing from Frozen Casein Aliquots:
1. Thaw casein at room temperature. 2. Dilute 20mL of casein stock solution to 1 liter of PBS.
If preparing from a Bottle of Liquid Stock Casein (Refrigerated): 1. Shake the bottle well.
2. Using a graduated cylinder, take 20mL of casein stock solution and dilute it into 1 liter of PBS.
One plate uses approximately 500mL.
Archive
d 05/2
1/201
4
Docum
ent C
ontro
l Coo
rdina
tor

FORENSIC BIOLOGY SEROLOGY PROCEDURES MANUAL
P30 ENZYME LINKED IMMUNOSORBENT ASSAY (ELISA)
DATE EFFECTIVE 07-16-2012
APPROVING AUTHORITY QUALITY ASSURANCE MANAGER
PAGE 2 OF 14
Controlled versions of Department of Forensic Biology Manuals only exist electronically on the Forensic Biology network. All printed versions are non-controlled copies.
PLATE PREPARATION: COATING THE PLATES 1. Prepare an appropriate dilution of mouse monoclonal anti-human PSA by adding the
antiserum to PBS as determined by the QC of the current lot of antiserum. Each plate requires about 5mL of diluted antiserum. Always make dilutions in glass, not in plastic.
2. Prepare a 1/8000 dilution of MOPC by adding 10uL MOPC to 80 mL PBS. Always make
dilutions in glass, not in plastic. This is enough for 16 plates. For 4 plates add 2.5uL MOPC to 20mL PBS.
3. Coat the plate as shown in the diagram. Use 100uL of the appropriate solution per well. PBS = phosphate buffered saline "PSA = mouse monoclonal anti-human PSA M = MOPC
1 2 3 4 5 6 7 8 9 10 11 12
A PBS M M M M M M M M M M M
B PBS M M M M M M M M M M M
C PBS "PSA "PSA "PSA "PSA "PSA "PSA "PSA "PSA "PSA "PSA "PSA
D PBS "PSA "PSA "PSA "PSA "PSA "PSA "PSA "PSA "PSA "PSA "PSA
E PBS M M M M M M M M M M M
F PBS M M M M M M M M M M M
G PBS "PSA "PSA "PSA "PSA "PSA "PSA "PSA "PSA "PSA "PSA "PSA
H PBS "PSA "PSA "PSA "PSA "PSA "PSA "PSA "PSA "PSA "PSA "PSA
4. Cover plates with Parafilm® and label “Coating” with initials and date. Incubate overnight
(approximately 17-20 hours) at 4oC.
Archive
d 05/2
1/201
4
Docum
ent C
ontro
l Coo
rdina
tor

FORENSIC BIOLOGY SEROLOGY PROCEDURES MANUAL
P30 ENZYME LINKED IMMUNOSORBENT ASSAY (ELISA)
DATE EFFECTIVE 07-16-2012
APPROVING AUTHORITY QUALITY ASSURANCE MANAGER
PAGE 3 OF 14
Controlled versions of Department of Forensic Biology Manuals only exist electronically on the Forensic Biology network. All printed versions are non-controlled copies.
BLOCKING THE PLATES: 1. Prime/Rinse washer (See Rinsing and Priming procedure below.) 2. Use the “Block 1” program to aspirate contents of well. (This will wash each plate twice and
fill the wells with wash buffer) Let the filled plate sit at room temperature for 15-20 minutes (see Block 1 procedure).
3. Use the “Block 2” program to aspirate the final wash (See Block 2 procedure). 4. Tap plate upside-down on paper towels to remove access liquid. 5. Plates that are not used immediately should be wrapped in Parafilm® and stored at 4oC; they
can be stored for up to 2 weeks.
Archive
d 05/2
1/201
4
Docum
ent C
ontro
l Coo
rdina
tor

FORENSIC BIOLOGY SEROLOGY PROCEDURES MANUAL
P30 ENZYME LINKED IMMUNOSORBENT ASSAY (ELISA)
DATE EFFECTIVE 07-16-2012
APPROVING AUTHORITY QUALITY ASSURANCE MANAGER
PAGE 4 OF 14
Controlled versions of Department of Forensic Biology Manuals only exist electronically on the Forensic Biology network. All printed versions are non-controlled copies.
Instructions for Bio-Rad 1575 washers The Bio-Rad 1575 plate washer has a cover that can be swiveled to an opened or closed position. Rinsing and priming 1. The on/off switch is located on the right-hand side of the lower back of the washer. Turn
plate washer on. 2. After initialization (concurrent with a quick flash of a Bio-Rad version #), the main menu
appears and looks like this:
The circles with the triangles above represent the soft keys that you will be pressing to access various functions on the machine. In this menu, soft keys corresponding to “In” and “Out” , when pressed instruct the plate washer to move the plate holder in and out of the washer, respectively. Soon after turning on the plate washer, the plate holder automatically sets itself in the out position.
3. Fill the Rinse bottle with deionized water, close the lid, and attach the tube with the blue
colored line to the top of the container. Also, make sure that the stopper connected to the yellow and red colored lines is snugly connected to the Waste bottle (if not, the plate washer will not aspirate, which can result in flooding of the plate holder).
4. Prime the washer with deionized water (from the Rinse bottle). Do this by pressing the very
first soft key corresponding to the upward arrow in the main menu. Now you will see the Prime/Rinse menu. Press the soft key corresponding to “YES” and the washer will proceed to prime itself. This step is important to ensure proper vacuum pressure and for the washer to dispense correct volumes. Always make sure to re-prime the washer whenever changing the blue colored tube from the Wash bottle to the Rinse bottle and vice versa.
5. Fill the Wash bottle with PBS-casein solution. Remove the blue-striped tube from the Rinse
bottle and attach it to the Wash bottle. Repeat the priming procedure 1 time using the PBS-casein solution from the Wash bottle. You are now ready to run the plate washer.
Archive
d 05/2
1/201
4
Docum
ent C
ontro
l Coo
rdina
tor

FORENSIC BIOLOGY SEROLOGY PROCEDURES MANUAL
P30 ENZYME LINKED IMMUNOSORBENT ASSAY (ELISA)
DATE EFFECTIVE 07-16-2012
APPROVING AUTHORITY QUALITY ASSURANCE MANAGER
PAGE 5 OF 14
Controlled versions of Department of Forensic Biology Manuals only exist electronically on the Forensic Biology network. All printed versions are non-controlled copies.
Running plate washer programs BLOCK 1 1. To start the blocking procedure, insert a coated plate into the plate washer lengthwise, so that
plate well #A1 is located on the upper right portion of the plate 2. Proceed with the first portion of the blocking procedure in which the contents of the wells are
aspirated, washed 2 times, and then filled with PBS-casein. The program that does this is called BLOCK1.
3. To access the BLOCK1 program, press the soft key that corresponds to “YES” while in the
main menu. You will now be in the run menu. While in the run menu, scroll to the BLOCK1 program by pressing the soft keys that correspond to the upward and downward arrows.
• Before proceeding, you should see “RUN: BLOCK1” on the first line of the display.
Press the “YES” key.
• You will then see “LAST STRIP 12” on the first line of the display. Press the “YES” key again.
• Usually you will then get one more prompt (“CONNECT THE WASH R9" ) on the
first line of the display. Press the “YES” key once again.
The program will then run on its own, leaving the wells filled at the end of the program. 4. Incubate the plate for 15-20 min. at room temperature as described in the P30 protocol. BLOCK 2 5. If you have removed your plate for the incubation step, place plate back into the plate washer
by using the “IN” and “OUT” keys from the main menu. The last step of the blocking procedure requires aspiration of the wells. This is achieved by the BLOCK2 program. Access the BLOCK2 program from the run menu as described in step 3 for the BLOCK1 program. Before proceeding, you should see “RUN: BLOCK2” on the first line of the display. Run the BLOCK2 program by pressing the “YES” key.
Archive
d 05/2
1/201
4
Docum
ent C
ontro
l Coo
rdina
tor

FORENSIC BIOLOGY SEROLOGY PROCEDURES MANUAL
P30 ENZYME LINKED IMMUNOSORBENT ASSAY (ELISA)
DATE EFFECTIVE 07-16-2012
APPROVING AUTHORITY QUALITY ASSURANCE MANAGER
PAGE 6 OF 14
Controlled versions of Department of Forensic Biology Manuals only exist electronically on the Forensic Biology network. All printed versions are non-controlled copies.
WASH 6. The washing program required for the P30 run has been named “WASH”. The WASH
program can be accessed from the run menu as described for the BLOCK1 program above. Before running the WASH program, make sure that “RUN: WASH” appears on the first line of the display. Press the “YES” key to run the WASH program. This program will wash/aspirate the plate three times with PBS-casein.
7. When finished using the plate washer, remove plate from the washer. Replace it with the
“test” plate, a dummy wash plate that is provided at each plate washing station.
• Remove the blue colored tubing from the WASH bottle and attach it to the RINSE bottle.
• Prime the machine with deionized water; access the priming command from the main menu as described above.
• Run the WASH program so that the lines are thoroughly flushed with deionized water.
8. Turn off plate washer. Discard liquids from the WASH and WASTE bottles and rinse
thoroughly with water. Loosely replace covers onto these bottles and leave them near the plate washer.
9. When the plate washer sits idle for about 10 min., it will display a “PLEASE RINSE”
message. When you are ready to use the washer again, press the “YES” key to return to the main menu.
Archive
d 05/2
1/201
4
Docum
ent C
ontro
l Coo
rdina
tor
FORENSIC BIOLOGY SEROLOGY PROCEDURES MANUAL
P30 ENZYME LINKED IMMUNOSORBENT ASSAY (ELISA)
DATE EFFECTIVE 07-16-2012
APPROVING AUTHORITY QUALITY ASSURANCE MANAGER
PAGE 7 OF 14
Controlled versions of Department of Forensic Biology Manuals only exist electronically on the Forensic Biology network. All printed versions are non-controlled copies.
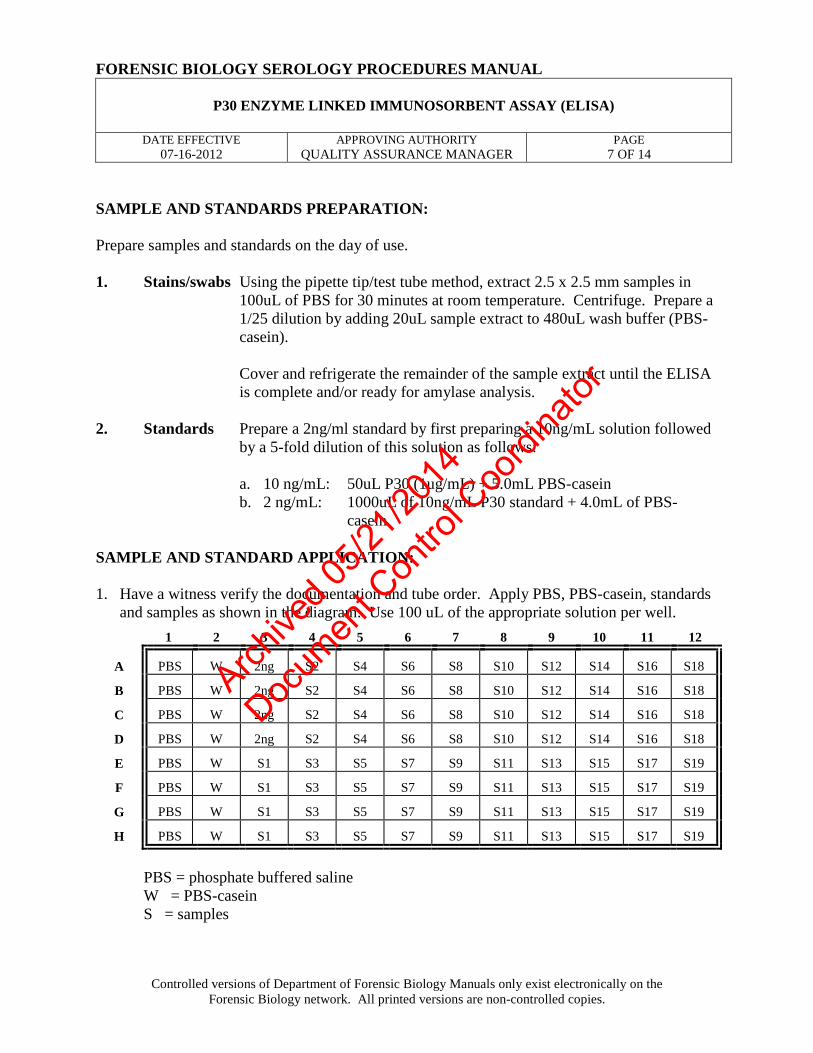
SAMPLE AND STANDARDS PREPARATION: Prepare samples and standards on the day of use. 1. Stains/swabs Using the pipette tip/test tube method, extract 2.5 x 2.5 mm samples in
100uL of PBS for 30 minutes at room temperature. Centrifuge. Prepare a 1/25 dilution by adding 20uL sample extract to 480uL wash buffer (PBS-casein).
Cover and refrigerate the remainder of the sample extract until the ELISA is complete and/or ready for amylase analysis.
2. Standards Prepare a 2ng/ml standard by first preparing a 10ng/mL solution followed
by a 5-fold dilution of this solution as follows: a. 10 ng/mL: 50uL P30 (1ug/mL) + 5.0mL PBS-casein b. 2 ng/mL: 1000uL of 10ng/mL P30 standard + 4.0mL of PBS-
casein. SAMPLE AND STANDARD APPLICATION: 1. Have a witness verify the documentation and tube order. Apply PBS, PBS-casein, standards
and samples as shown in the diagram. Use 100 uL of the appropriate solution per well.
1 2 3 4 5 6 7 8 9 10 11 12
A PBS W 2ng S2 S4 S6 S8 S10 S12 S14 S16 S18
B PBS W 2ng S2 S4 S6 S8 S10 S12 S14 S16 S18
C PBS W 2ng S2 S4 S6 S8 S10 S12 S14 S16 S18
D PBS W 2ng S2 S4 S6 S8 S10 S12 S14 S16 S18
E PBS W S1 S3 S5 S7 S9 S11 S13 S15 S17 S19
F PBS W S1 S3 S5 S7 S9 S11 S13 S15 S17 S19
G PBS W S1 S3 S5 S7 S9 S11 S13 S15 S17 S19
H PBS W S1 S3 S5 S7 S9 S11 S13 S15 S17 S19
PBS = phosphate buffered saline W = PBS-casein S = samples
Archive
d 05/2
1/201
4
Docum
ent C
ontro
l Coo
rdina
tor

FORENSIC BIOLOGY SEROLOGY PROCEDURES MANUAL
P30 ENZYME LINKED IMMUNOSORBENT ASSAY (ELISA)
DATE EFFECTIVE 07-16-2012
APPROVING AUTHORITY QUALITY ASSURANCE MANAGER
PAGE 8 OF 14
Controlled versions of Department of Forensic Biology Manuals only exist electronically on the Forensic Biology network. All printed versions are non-controlled copies.
2. Cover the plates with Parafilm® and incubate at room temperature for 1 hour. Prime/Rinse washer.
3. Use the “Wash” program to aspirate contents of wells. Make sure that there is no excess
buffer remaining in the wells by gently tapping the plate upside-down on papertowels. 4. For each plate, prepare an appropriate dilution of rabbit polyclonal anti-PSA by adding
the antiserum to PBS as determined by the QA of the current lot of anti-serum. 5. Apply 100 uL of the diluted rabbit anti-human polyclonal anti-PSA to each well of
columns 2-12. Apply 100 uL of PBS to each well of column 1. 6. Cover the plates with Parafilm® and incubate the plates at room temperature for 1 hour. 7. Use the “Wash” program to aspirate contents of wells. Make sure that there is no excess
buffer remaining in the wells by gently tapping the plate upside-down on papertowels. 8. For each plate, prepare an appropriate dilution of the goat anti-rabbit IgG alkaline
phosphatase conjugate by adding the antiserum to PBS as determined by the QA of the current lot of antiserum.
9. Apply 100 uL diluted goat anti-rabbit alkaline phosphatase conjugate to each well of
columns 2-12. Apply 100 uL of PBS to each well of column 1. 10. Cover the plates with Parafilm® and incubate at room temperature for 1 hour. During the
incubation, aliquot 20mL of alkaline substrate buffer (ASB) and allow to come to room temperature, about 30 minutes. For each two plates, dissolve one 20mg p-nitrophenyl phosphate tablet (PNPP) in the 20mL of ASB. Store in a dark place until needed.
11. Use the “Wash” program to aspirate contents of wells. Make sure that there is no excess
buffer remaining in the wells. 12. Apply 100 uL of PNPP substrate solution to each well of columns 1-12. 13. Cover the plates with Parafilm and incubate for 1 hour at 37oC. Uncover and read at
405nm.
Archive
d 05/2
1/201
4
Docum
ent C
ontro
l Coo
rdina
tor

FORENSIC BIOLOGY SEROLOGY PROCEDURES MANUAL
P30 ENZYME LINKED IMMUNOSORBENT ASSAY (ELISA)
DATE EFFECTIVE 07-16-2012
APPROVING AUTHORITY QUALITY ASSURANCE MANAGER
PAGE 9 OF 14
Controlled versions of Department of Forensic Biology Manuals only exist electronically on the Forensic Biology network. All printed versions are non-controlled copies.
READING THE PLATE BioRad Benchmark and 680 XR Plate Reader 1. Turn on the computer and allow the Windows software to boot up. Turn on the
Benchmark or 680 XR plate reader and let it warm up. For the 680 XR plate reader, type in the password “00000” and hit the Enter soft key to start the program. This will take approximately 3 minutes following an initial self-diagnosis that requires about 1 minute. When the plate reader has warmed up, its screen should read as follows: Benchmark 680 XR
PLATE READING: 01: Forensic-P30 M=2:405, R=4:655 M405 (2) R655 (4) Mixing = ON (05s) Shake: 5 s, Low
Incu.= OFF 2. From this point on, you will be controlling the plate reader from the computer it is
attached to.
• Double click on the Forensic-p30 Microplate Manager 5.2.1 shortcut icon. • The screen for the plate readers should now read Remote Mode
3. A protocol window will appear. The default settings should read as follows: Reader: Benchmark Model 680 XR Read speed: N/A Fast Read Reading Parameters: Dual Dual
Measurement Filter: 405 405 Reference Filter: 655 655 Dual Wavelength Operation: Subtract Subtract Incubator On: deselected deselected Mix Speed: N/A Low Initial Wait: 0 sec 0 sec Mix Time: 5 sec 5 sec 4. Place your microtiter plate into the plate reader.
Archive
d 05/2
1/201
4
Docum
ent C
ontro
l Coo
rdina
tor

FORENSIC BIOLOGY SEROLOGY PROCEDURES MANUAL
P30 ENZYME LINKED IMMUNOSORBENT ASSAY (ELISA)
DATE EFFECTIVE 07-16-2012
APPROVING AUTHORITY QUALITY ASSURANCE MANAGER
PAGE 10 OF 14
Controlled versions of Department of Forensic Biology Manuals only exist electronically on the Forensic Biology network. All printed versions are non-controlled copies.
5. Click Run located at the upper right corner of the protocol window. The plate analysis takes about 20 seconds.
6. When the analysis is finished the Raw Data window appears. Save the Raw Data onto the network by doing the following:
• Go to File from the main menu and select Export. • Change the following:
i. Save In: box to read M:\FBIOLOGY_MAIN\P30ELISA\RAW_DATA folder.
ii. Save As Type: box to Tab delimited (.txt) iii. File Name to your plate name.
Name plates using the date (MMDDYY) and plate letter (i.e. 021210A). The plate letter is written on the top right corner of the plate.
• Click Save. Printing Raw Data: 1. On the Benchmark plate reader, press the START/STOP soft key once and then the
PAGE(+) key three times, and then press ENTER. The raw data will print on thermal paper using the built in thermal printer. (Note: The raw data can also be printed using an external network printer by going to File and selecting Print .)Write on the printout your initials, date and plate name.
2. The 680 XR plate reader does not have a built in thermal printer so the raw data has to be
printed using an external network printer by going to File and selecting Print . Write on the printout your initials, date and plate name.
3. When you are finished with the Microplate Manager software, go to File in the main
menu and select Exit. Click NO when prompted to save changes to your plate. 4. When done, shut down the computer and turn off the plate reader.
Archive
d 05/2
1/201
4
Docum
ent C
ontro
l Coo
rdina
tor

FORENSIC BIOLOGY SEROLOGY PROCEDURES MANUAL
P30 ENZYME LINKED IMMUNOSORBENT ASSAY (ELISA)
DATE EFFECTIVE 07-16-2012
APPROVING AUTHORITY QUALITY ASSURANCE MANAGER
PAGE 11 OF 14
Controlled versions of Department of Forensic Biology Manuals only exist electronically on the Forensic Biology network. All printed versions are non-controlled copies.
P30 result calculations Refer to the LIMS manual for Forensic Biology for specific procedures within the LIMS system. 1. Open the appropriate P30 batch in the LIMS system. 2. Select all of the Test Batch samples and navigate to Data Entry for the batch. 3. Import the Instrument Data from the appropriate P30 run. Save the Data Entry to trigger
the P30 calculations. 4. Fill in the Orifice/External values for each sample, and save. The final Interpretation
values should populate. 5. Select all of the data values and release the data to record the data into the LIMS system. 6. Confirm the QC Batch Parameter data entry for the P30 batch. Save and Release the data
to update LIMS system. 7. Save the P30 batch to update the entire batch data into the LIMS system. 8. CALCULATION OF P30 ELISA RESULTS Manual calculations The calculations are done automatically by transferring the data from the microtiter plate reader to the LIMS system to perform them. If necessary, the calculations can be done manually as follows: 1. Subtract the mean value for column 1 from each value in all remaining columns. 2. Calculate the plate threshold value (PT) of the plate:
Archive
d 05/2
1/201
4
Docum
ent C
ontro
l Coo
rdina
tor

FORENSIC BIOLOGY SEROLOGY PROCEDURES MANUAL
P30 ENZYME LINKED IMMUNOSORBENT ASSAY (ELISA)
DATE EFFECTIVE 07-16-2012
APPROVING AUTHORITY QUALITY ASSURANCE MANAGER
PAGE 12 OF 14
Controlled versions of Department of Forensic Biology Manuals only exist electronically on the Forensic Biology network. All printed versions are non-controlled copies.
Determine the average (AVE) and standard deviation (standard deviation = s = s1/2) (SD) of the values in column 2.
PT value = 2(AVE) + 3(SD) 3. Subtract the PT value from the values in columns 3-12. 4. For all standards and samples, calculate the average of the duplicate samples for both the
MOPC and monoclonal PSA coated wells. 5. Subtract the MOPC averages from their corresponding monoclonal PSA averages. The
remaining value is the P30 ELISA result.
Archive
d 05/2
1/201
4
Docum
ent C
ontro
l Coo
rdina
tor

FORENSIC BIOLOGY SEROLOGY PROCEDURES MANUAL
P30 ENZYME LINKED IMMUNOSORBENT ASSAY (ELISA)
DATE EFFECTIVE 07-16-2012
APPROVING AUTHORITY QUALITY ASSURANCE MANAGER
PAGE 13 OF 14
Controlled versions of Department of Forensic Biology Manuals only exist electronically on the Forensic Biology network. All printed versions are non-controlled copies.
Example: The 2 ng standard gave a final ELISA value of 0.055. Sample 1 is in wells A3-D3; sample 2 is in wells E3-H3 Value Value A2 0.114 A3 0.081 } MOPC B2 0.091 B3 0.063 } MOPC C2 0.123 C3 0.356 } monoclonal PSA D2 0.063 D3 0.325 } monoclonal PSA E2 0.081 E3 0.266 } MOPC F2 0.085 F3 0.272 } MOPC G2 0.085 G3 0.711 } monoclonal PSA H2 0.070 H3 0.847 } monoclonal PSA Average of column 2 values: 0.089 Standard deviation of column 2 values: 0.020 Plate threshold = 2(0.089) + 3(0.020) = 0.238 Subtract the PT value from each value in column 3; if less than zero, enter zero. A3 0.000 B3 0.000 average of A3 and B3 = 0.000 C3 0.118 D3 0.087 average of C3 and D3 = 0.103 E3 0.028 F3 0.034 average of E3 and F3 = 0.031 G3 0.473 H3 0.609 average of G3 and H3 = 0.541 P30 ELISA results: Sample 1 = (AVE C3/D3) - (AVE A3/B3) = (0.103) - (0.000) = 0.103 Sample 2 = (AVE G3/H3) - (AVE E3/F3) = (0.541) - (0.010) = 0.531
Archive
d 05/2
1/201
4
Docum
ent C
ontro
l Coo
rdina
tor

FORENSIC BIOLOGY SEROLOGY PROCEDURES MANUAL
P30 ENZYME LINKED IMMUNOSORBENT ASSAY (ELISA)
DATE EFFECTIVE 07-16-2012
APPROVING AUTHORITY QUALITY ASSURANCE MANAGER
PAGE 14 OF 14
Controlled versions of Department of Forensic Biology Manuals only exist electronically on the Forensic Biology network. All printed versions are non-controlled copies.
INTERPRETATION OF RESULTS The interpretation of P30 results depends on the source of the sample: 1. Body cavity swabs (e.g., oral, vaginal, and anal) are positive if the result is greater than
the 2ng standard. 2. Samples not from a body cavity (e.g., panties, etc.) are positive if the result is greater than
0.05 absorbance units. 3. The location from which a “dried secretion” swab is taken will affect the interpretation.
Swabs taken essentially from a body cavity or similar place (e.g., introitus, etc.) are interpreted as if the sample is from a body cavity. Other locations (e.g., breast, thigh, etc.) may need to be interpreted differently.
4. If P30 results are close to the 2ng level (for body cavity swabs) or the 0.05 level (for
other samples), a slide should be prepared from the sample and a sperm search done. A general guideline is that sperm searches should be performed when the P30 values is >70% of the 2ng cutoff.
5. Off scale P30 values are indicated by “HIGH” in the results table of the P30 ELISA
spreadsheet. All “HIGH” values are interpreted as positive results. Revision History: March 24, 2010 – Initial version of procedure. July 16, 2012 – Specific names of worksheets were removed and replaced with generic terminology to accommodate LIMS.
Additionally, procedures concerning “sample and standard application” were revised to allow the use of different dilutions of the antibodies as determined by the quality control tests.
Archive
d 05/2
1/201
4
Docum
ent C
ontro
l Coo
rdina
tor
FORENSIC BIOLOGY SEROLOGY PROCEDURES MANUAL
PROCESSING OF POSTMORTEM SPECIMENS
DATE EFFECTIVE 03-24-2010
APPROVED BY EUGENE LIEN
PAGE 1 OF 20
Controlled versions of Department of Forensic Biology Manuals only exist electronically on the Forensic Biology network. All printed versions are non-controlled copies.
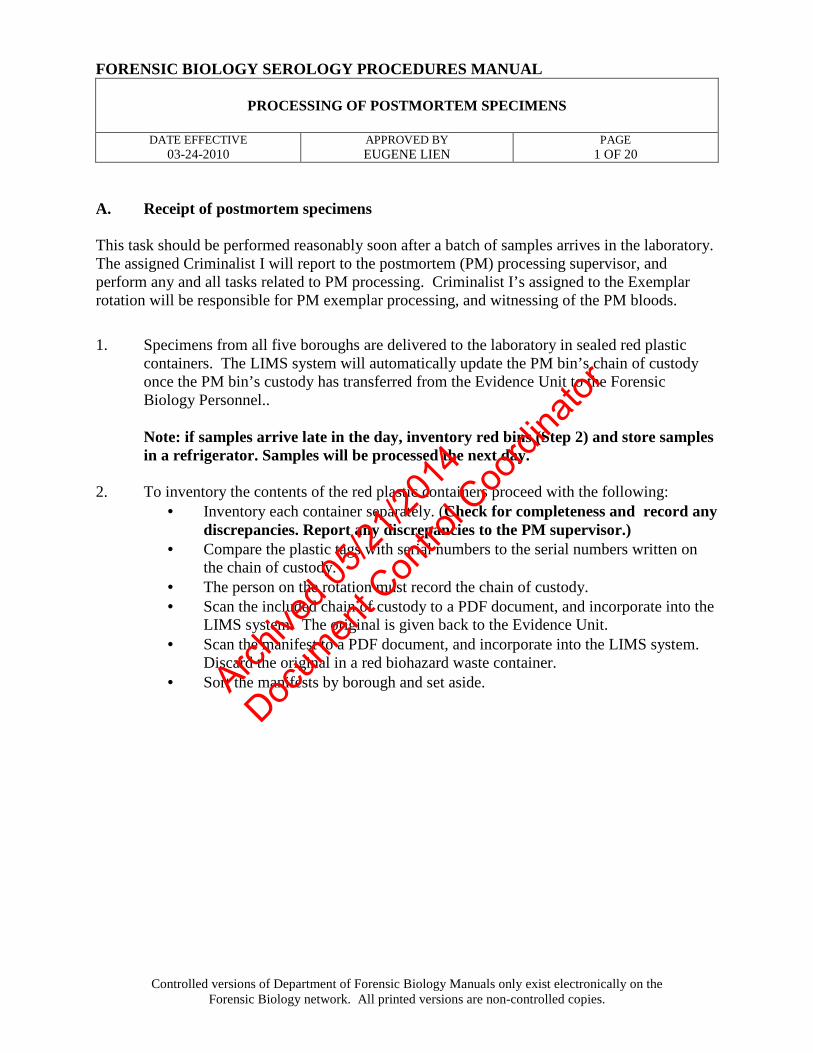
A. Receipt of postmortem specimens This task should be performed reasonably soon after a batch of samples arrives in the laboratory. The assigned Criminalist I will report to the postmortem (PM) processing supervisor, and perform any and all tasks related to PM processing. Criminalist I’s assigned to the Exemplar rotation will be responsible for PM exemplar processing, and witnessing of the PM bloods.
1. Specimens from all five boroughs are delivered to the laboratory in sealed red plastic
containers. The LIMS system will automatically update the PM bin’s chain of custody once the PM bin’s custody has transferred from the Evidence Unit to the Forensic Biology Personnel..
Note: if samples arrive late in the day, inventory red bins (Step 2) and store samples in a refrigerator. Samples will be processed the next day.
2. To inventory the contents of the red plastic containers proceed with the following:
• Inventory each container separately. (Check for completeness and record any discrepancies. Report any discrepancies to the PM supervisor.)
• Compare the plastic tags with serial numbers to the serial numbers written on the chain of custody.
• The person on the rotation must record the chain of custody. • Scan the included chain of custody to a PDF document, and incorporate into the
LIMS system. The original is given back to the Evidence Unit. • Scan the manifest to a PDF document, and incorporate into the LIMS system.
Discard the original in a red biohazard waste container. • Sort the manifests by borough and set aside. Arch
ived 0
5/21/2
014
Docum
ent C
ontro
l Coo
rdina
tor

FORENSIC BIOLOGY SEROLOGY PROCEDURES MANUAL
PROCESSING OF POSTMORTEM SPECIMENS
DATE EFFECTIVE 03-24-2010
APPROVED BY EUGENE LIEN
PAGE 2 OF 20
Controlled versions of Department of Forensic Biology Manuals only exist electronically on the Forensic Biology network. All printed versions are non-controlled copies.
3. For discrepancies or problems with the inventory, refer to “Section E: Troubleshooting” and proceed as specified.
4. Fill out the PM documentation for each bin. The LIMS system will automatically create
the chain of custody for each sample, and record the packaging and processing as the analyst unpacks the postmortem evidence and exemplar samples.
5. Ensure that the PM items all have barcode labels and are stored in an appropriate container (See Table 1).
If items are not packaged properly, repackage according to the table below. Seal the package with Evidence Tape or using a heat-sealer for the 4x6” KAPAK™ bag, except where indicated. Initial and date all seals. Note: the evidence tape should not obscure the ME # on the barcode label.
Table 1 Sample Packaging Bloodstain cards
4x6” KAPAK™ bag (seal KAPAK bag)
Hair, Nails, Trace Evidence*
Coin envelopes placed into 4x6” KAPAK™ bag (do not seal KAPAK bag)
Oral, vaginal, anal, penile, and bladder swabs*
Coin envelopes placed into 4x6” KAPAK™ bag (do not seal KAPAK bag)
Bone
Plastic specimen container
Muscle or soft tissue
Plastic specimen container or 15 ml Falcon tube
* Store samples from the same ME # in the same KAPAK bag. Do not seal the bag. 6. Once inventoried and processed, store samples in the appropriate storage area (See Table
2).
Archive
d 05/2
1/201
4
Docum
ent C
ontro
l Coo
rdina
tor

FORENSIC BIOLOGY SEROLOGY PROCEDURES MANUAL
PROCESSING OF POSTMORTEM SPECIMENS
DATE EFFECTIVE 03-24-2010
APPROVED BY EUGENE LIEN
PAGE 3 OF 20
Controlled versions of Department of Forensic Biology Manuals only exist electronically on the Forensic Biology network. All printed versions are non-controlled copies.
Table 2 Room Temperature (20°C)
Refrigerator (4°C)
Freezer (-20°C)
- Bloodstain cards - Fingernails - Hair - Other Trace Evidence
- Oral, vaginal, anal, penile, and bladder swabs
- SAK - Samples in RNAlater®
- Bone - Muscle or Soft Tissue - Product of conception
(POC) 7. Spray the inside of the red bins with disinfectant and let air dry. Set the red containers
aside in the designated area for pick up. B. Postmortem bloodstain processing (non-vouchered bloods) 1. Make the ME barcode labels for the bloodstain cards using the LIMS system. Wear
gloves when handling the bloodstain cards. Handwrite the ME # if unable to generate labels. Initial each bloodstain card prepared.
The preparer of the bloodstain cards must initial and date each card.
2. The setup of the bloods and bloodstain cards must be witnessed by another laboratory staff member. That person must confirm that the order of the blood vials in the rack match the order of the prepared bloodstain cards. The witness will record the witnessing setup in the documentation.
3. The bloodstain cards should have the following information prior to processing:
a) ME case number (on affixed label or handwritten) b) Initials of the person preparing the stain c) Date the stain card was prepared d) LIMS’ stain card ID
4. Prepare stains one at a time. Staining of the cards and the opening of liquid blood
samples MUST be performed under a biological safety hood with the exhaust fan operating. A new KimWipe™ should be used to open each vial stopper. Make sure the blood vial is closed before preparing the next bloodstain card.
Archive
d 05/2
1/201
4
Docum
ent C
ontro
l Coo
rdina
tor

FORENSIC BIOLOGY SEROLOGY PROCEDURES MANUAL
PROCESSING OF POSTMORTEM SPECIMENS
DATE EFFECTIVE 03-24-2010
APPROVED BY EUGENE LIEN
PAGE 4 OF 20
Controlled versions of Department of Forensic Biology Manuals only exist electronically on the Forensic Biology network. All printed versions are non-controlled copies.
5. Use a transfer pipet to make four stains for each bloodstain card, filling in the four circles on each card with blood.
6. Re-cap non-vouchered PM blood vials and discard in the plastic biohazard “sharps”
container. 7. Allow the bloodstain cards to dry overnight in the hood with the exhaust fan running.
Document that the stain cards are being stored in the hood. 8. Package the air-dried stains into a 4x6” KAPAK™ bag. Seal the bag with evidence tape
or using a heat sealer. Initial and date the seal. 9. Organize the bloodstain cards by borough and in ME # order. Add the cards to the
appropriate yellow borough bin located on the bench where they are temporarily stored until a supervisor has had a chance to review the cards. Document the cards’ new storage location.
10. Bloodstain cards of ME cases that have been assigned FB #’s by a supervisor will be
labeled with the FB # and transferred to the red bin on the bench. Cards of ME cases that will not be assigned an FB # are transferred to the blue borough bins. The transfer of cards reviewed by the supervisor are placed to their appropriate long-term storage locations by the assigned Criminalist III on PM Processing:
� Cards with FB #’s are stored numerically by FB # in the designated bloodstain
card box. � Cards without FB # are stored numerically by borough and ME # in the
designated bloodstain card box.
The electronic chain of custody will document the transfer between storage locations and Criminalists.
11. CLEAN THE BIOLOGICAL SAFETY CABINET (refer to Quality Control
Procedure #QC125 in the Quality Assurance/Quality Control Manual).
Archive
d 05/2
1/201
4
Docum
ent C
ontro
l Coo
rdina
tor

FORENSIC BIOLOGY SEROLOGY PROCEDURES MANUAL
PROCESSING OF POSTMORTEM SPECIMENS
DATE EFFECTIVE 03-24-2010
APPROVED BY EUGENE LIEN
PAGE 5 OF 20
Controlled versions of Department of Forensic Biology Manuals only exist electronically on the Forensic Biology network. All printed versions are non-controlled copies.
C. Assignment of case numbers This task should be performed by the PM supervisor or trained supervisor. 1. Gather all appropriate documentation The daily case census sheets are available
electronically through the MEANS system (see Appendix I). The autopsy case worksheets are available electronically through the Document Archiving system (see Appendix II).
2. Compare each autopsy case documentation with the manifest and the specimens received
to ensure that all of the specimens designated for Forensic Biology have been received. See Section E. Troubleshooting if there are discrepancies.
3. Screen all the documentation for potential Forensic Biology cases. The following types
of cases should be assigned an FB case number:
� Homicides � Any case in which sexual assault evidence (SAK or orifice/penile swabs) has been
collected � Any case in which a Forensic Biology test is requested via email, phone, or noted
on the manifest. Note: Hemoglobin, thrombophilia, and sickle cell cases are assigned an MG # and not an FB #. Contact the Molecular Genetics group.
� Any unknown body with PM samples requiring DNA identification (must verify the victim is still unknown by checking MEANS or the ID Unit)
� Any case in which evidence from the NYPD or DA’s office has been submitted � POC/fetus (only if criminal activity is involved) Arch
ived 0
5/21/2
014
Docum
ent C
ontro
l Coo
rdina
tor

FORENSIC BIOLOGY SEROLOGY PROCEDURES MANUAL
PROCESSING OF POSTMORTEM SPECIMENS
DATE EFFECTIVE 03-24-2010
APPROVED BY EUGENE LIEN
PAGE 6 OF 20
Controlled versions of Department of Forensic Biology Manuals only exist electronically on the Forensic Biology network. All printed versions are non-controlled copies.
4. For cases that will be assigned an FB case number: Check the database to determine if FB case numbers have been assigned to the ME numbers.
a. If the database has an FB # for the ME #, the PM samples will be signed into the
pre-existing case numbers. b. If the database does not have an FB # for the ME #, review and assign the PM
samples an FB case number. Enter the appropriate information into the database. Create a new case folder by obtaining a manila folder with the FB case number.
Upon electronically assigning a FB # to the ME #, LIMS will create a unique PM number
for each specimen. Exception: For Missing Persons cases (unknown victim), the PM sexual assault evidence (PM SAK or PM orifice/penile swabs) should be placed on a separate chain of custody from the other PM samples.
5. PM SAK and PM orifice/penile swabs must be signed over to the Evidence Unit so that
they may be processed. All other specimens must be placed in retained storage. Continue to document the chain of custody for these items to reflect their final location.
6. Give the FB cases to the evidence sign-in supervisor. 7. All other cases are not assigned an FB case number. These would include cases where the
Manner of Death is:
� Pending Studies (possible homicides, i.e.- CUPPI, case unknown pending police investigation)
� Natural � Therapeutic Complication � Accident/Motor vehicle accidents (MVA’s) which are under investigation (i.e.-
hit and run) � Suicide � Undetermined � Or any case which involves child abuse or suspected child abuse
8. For cases that will NOT be assigned an FB case number: File the daily case census
sheets and respective autopsy worksheets in chronological order for archival purposes. After 30 days, discard the paperwork. Electronic copies are available through MEANS and DMS.
Archive
d 05/2
1/201
4
Docum
ent C
ontro
l Coo
rdina
tor

FORENSIC BIOLOGY SEROLOGY PROCEDURES MANUAL
PROCESSING OF POSTMORTEM SPECIMENS
DATE EFFECTIVE 03-24-2010
APPROVED BY EUGENE LIEN
PAGE 7 OF 20
Controlled versions of Department of Forensic Biology Manuals only exist electronically on the Forensic Biology network. All printed versions are non-controlled copies.
D. Discarding postmortem items
Refer to the table below regarding storage and discarding of blood and non-blood items: Table 3:
Bloodstain? Non-Blood? Discard? FB cases Y Y Retain all indefinitely. Non-FB cases Y Y Discard non-blood after 6
months; discard bloodstain after 5 years.
N Y Discard non-blood after 5 years.
Y N Discard bloodstain after 5 years.
POC/Fetus (criminal activity)
n/a Y Retain a small piece and discard the remainder.
A copy of the manifest will be filed with Batch Chain for the sample being discarded. The original manifest will be filed in a binder for discarded postmortem samples.
E. Troubleshooting
Problem Recommended Action Archive
d 05/2
1/201
4
Docum
ent C
ontro
l Coo
rdina
tor

FORENSIC BIOLOGY SEROLOGY PROCEDURES MANUAL
PROCESSING OF POSTMORTEM SPECIMENS
DATE EFFECTIVE 03-24-2010
APPROVED BY EUGENE LIEN
PAGE 8 OF 20
Controlled versions of Department of Forensic Biology Manuals only exist electronically on the Forensic Biology network. All printed versions are non-controlled copies.
Problem Recommended Action
Unlabeled specimen; unscanable label
Criminalist I: For an unlabeled specimen, do not process; record the deviation and notify supervisor. Store questionable samples in designated refrigerated area. For an unscanable label, process as long as the ME number is legible. Criminalist III/IV: Narrow down possible ME by process of elimination. Contact ME who performed the autopsy to request an additional sample. If not available, retrieve sample from Department of Toxicology.
Unreadable but scannable barcode label
Criminalist I: Scan barcode and generate new label. Use new label to confirm ME# with manifest and place label on staincard. Continue with processing.
Specimen collected but not listed on manifest
Criminalist I: Record the deviation and continue with processing. Criminalist III/IV: Confirm what samples were collected by the ME who performed the autopsy.
Specimen not collected but listed on manifest
Criminalist I: Record the deviation and notify the supervisor. Criminalist III/IV: Contact ME who performed the autopsy to request an additional sample. If not available retrieve sample from Department of Toxicology.
Archive
d 05/2
1/201
4
Docum
ent C
ontro
l Coo
rdina
tor
FORENSIC BIOLOGY SEROLOGY PROCEDURES MANUAL
PROCESSING OF POSTMORTEM SPECIMENS
DATE EFFECTIVE 03-24-2010
APPROVED BY EUGENE LIEN
PAGE 9 OF 20
Controlled versions of Department of Forensic Biology Manuals only exist electronically on the Forensic Biology network. All printed versions are non-controlled copies.
Problem Recommended Action
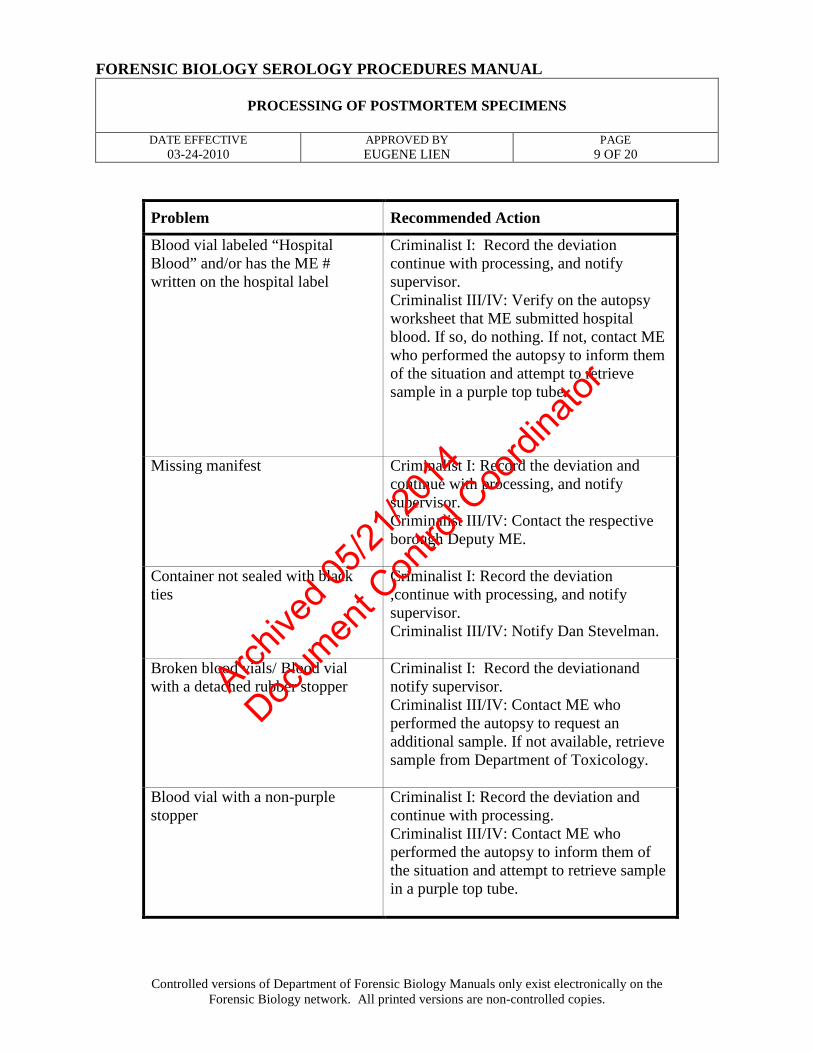
Blood vial labeled “Hospital Blood” and/or has the ME # written on the hospital label
Criminalist I: Record the deviation continue with processing, and notify supervisor. Criminalist III/IV: Verify on the autopsy worksheet that ME submitted hospital blood. If so, do nothing. If not, contact ME who performed the autopsy to inform them of the situation and attempt to retrieve sample in a purple top tube.
Missing manifest Criminalist I: Record the deviation and continue with processing, and notify supervisor. Criminalist III/IV: Contact the respective borough Deputy ME.
Container not sealed with black ties
Criminalist I: Record the deviation ,continue with processing, and notify supervisor. Criminalist III/IV: Notify Dan Stevelman.
Broken blood vials/ Blood vial with a detached rubber stopper
Criminalist I: Record the deviationand notify supervisor. Criminalist III/IV: Contact ME who performed the autopsy to request an additional sample. If not available, retrieve sample from Department of Toxicology.
Blood vial with a non-purple stopper
Criminalist I: Record the deviation and continue with processing. Criminalist III/IV: Contact ME who performed the autopsy to inform them of the situation and attempt to retrieve sample in a purple top tube.
Archive
d 05/2
1/201
4
Docum
ent C
ontro
l Coo
rdina
tor

FORENSIC BIOLOGY SEROLOGY PROCEDURES MANUAL
PROCESSING OF POSTMORTEM SPECIMENS
DATE EFFECTIVE 03-24-2010
APPROVED BY EUGENE LIEN
PAGE 10 OF 20
Controlled versions of Department of Forensic Biology Manuals only exist electronically on the Forensic Biology network. All printed versions are non-controlled copies.
Problem Recommended Action
Blood that appears to be decomp fluid, grayish in color, or clotted
Criminalist I: Record the deviation and continue with processing, and notify supervisor. For blood clots, smear clot onto the stain card. Discard leftover blood clot properly. Criminalist III/IV: Contact ME who performed the autopsy and ask for a bone sample.
Blood labeled “decomp” on blood vial or autopsy case worksheet
Criminalist I: Record the deviation , continue with processing, and notify supervisor. Criminalist III/IV: Contact ME who performed the autopsy and ask for a bone sample.
Blood vial labeled for HIV testing (or paperwork for HIV testing included)
Criminalist I: Do not process; Record the deviation and notify supervisor. Store questionable samples in designated refrigerated area. Criminalist III/IV: Return items to the Manhattan morgue.
RNAlater® samples: liver, spleen, and heart and/or requisition forms
Criminalist I: Do not process; record the deviation and notify supervisor. Place samples in designated refrigerated area. Criminalist III/IV: Notify the Molecular Genetics group to pick up samples and sign Batch Chain.
Incorrect or no sample submitted for decomposed victim or a case for FB
Criminalist III/IV: Contact ME who performed the autopsy and ask for an appropriate sample (long bone, rib, etc.) Retrieve sample from Toxicology as a last resort.
Archive
d 05/2
1/201
4
Docum
ent C
ontro
l Coo
rdina
tor
FORENSIC BIOLOGY SEROLOGY PROCEDURES MANUAL
PROCESSING OF POSTMORTEM SPECIMENS
DATE EFFECTIVE 03-24-2010
APPROVED BY EUGENE LIEN
PAGE 11 OF 20
Controlled versions of Department of Forensic Biology Manuals only exist electronically on the Forensic Biology network. All printed versions are non-controlled copies.
F. Civil paternity requests Do not accept any phone calls from family members. Direct all phone calls to the OCME Legal Department. 1. A paternity request is initiated with an email from the Legal Department indicating the
family plans to have DNA paternity testing done and to place any specimens on hold. 2. Check the PM database to determine the following:
A. Was a sample collected? B. What type of PM sample is available (blood, hair, etc.)? C. Is this an FB or non-FB case? D. Verify subject’s name with autopsy sheet (See Appendix II, Section A for
viewing autopsy sheet in DMS).
Archive
d 05/2
1/201
4
Docum
ent C
ontro
l Coo
rdina
tor

FORENSIC BIOLOGY SEROLOGY PROCEDURES MANUAL
PROCESSING OF POSTMORTEM SPECIMENS
DATE EFFECTIVE 03-24-2010
APPROVED BY EUGENE LIEN
PAGE 12 OF 20
Controlled versions of Department of Forensic Biology Manuals only exist electronically on the Forensic Biology network. All printed versions are non-controlled copies.
3. Locate the appropriate PM sample and verify that you have the correct PM sample and
subject name. Place PM sample into paternity bin for FB case # assignment. 4. Send a “reply to all” email answering all of the questions listed above in #2. List all
samples in FB custody. Indicate if there is an inconsistency between the subject’s name listed in the email from the Legal Department and what is listed in the autopsy sheet.
5. If no sample is available in FB, contact the Toxicology Department for a potential sample.
If a sample is available, retrieve it from EU, and process the sample. Store the stain card in the appropriate retained storage location. Update all appropriate databases. Retain the email requesting a specimen from the Toxicology Department and your reply. Place PM Sample into the Paternity Bin for FB Case Number assignment.
6. FB will be contacted by the Legal Department when a paternity kit has arrived for the
subject. Retrieve the kit. 7. Locate the appropriate FB case file & sample. 8. Open kit and discard any glass containers for liquid blood in the sharps container. 9. Submit a quarter of the PM sample for testing. If PM sample appears to be decomposed,
submit half of the sample. (Example- If four circles are stained, submit one circle. If the bloodstain is decomp fluid, submit two circles.) Do not send the entire sample; a minimum of 50% of the sample should be retained. If the testing laboratory or family is requesting the entire item, verify this with the Legal Department and proceed as advised.
10. Submit the portion of stain card in a coin envelope labeled with the subject name, ME #,
and any other relevant information. Submit a portion of the tissue or bone sample in a plastic, puncture- and leak-proof container labeled as described previously. Seal, initial, and date packaging. Return unused sample to their original storage location.
11. Fill out an OCME autopsy specimen chain of custody documentation and shipping
paperwork. Refer to the autopsy sheet for information regarding the subject’s age, race, time of death, and medical examiner who performed the autopsy.
Archive
d 05/2
1/201
4
Docum
ent C
ontro
l Coo
rdina
tor

FORENSIC BIOLOGY SEROLOGY PROCEDURES MANUAL
PROCESSING OF POSTMORTEM SPECIMENS
DATE EFFECTIVE 03-24-2010
APPROVED BY EUGENE LIEN
PAGE 13 OF 20
Controlled versions of Department of Forensic Biology Manuals only exist electronically on the Forensic Biology network. All printed versions are non-controlled copies.
12. If requested, have autopsy specimen chain of custody notarized. Consult with the PM Blood Processing Supervisor for a list of Public Notaries within the agency.
13. Make copies of the paperwork and save the sender’s receipt from the shipping envelope.
File the relevant paperwork in the FB file. Update the paternity database. 14. Place sample, court order, and other appropriate paperwork in the kit. 15. Seal and place kit in appropriate area to be sent. Call the appropriate shipping company to
arrange pick-up, as needed. Record the confirmation number in FB file. 16. Email the original contact and inform them that the kit will be picked up. Include the
confirmation number. File the email with the relevant paperwork in the FB file.
Archive
d 05/2
1/201
4
Docum
ent C
ontro
l Coo
rdina
tor

FORENSIC BIOLOGY SEROLOGY PROCEDURES MANUAL
PROCESSING OF POSTMORTEM SPECIMENS
DATE EFFECTIVE 03-24-2010
APPROVED BY EUGENE LIEN
PAGE 14 OF 20
Controlled versions of Department of Forensic Biology Manuals only exist electronically on the Forensic Biology network. All printed versions are non-controlled copies.
APPENDIX I: DataEase MEANS (Forensic Biology Version) Note: A user must obtain access rights from DoITT in order to use MEANS. DoITT will issue
the username and password. A. Printing Barcode Labels
1. Double-click on the MEANS icon on desktop a. Enter login name. b. Enter password. c. Make sure that “CSC” is selected for the field “Log on to:”
2. The MEANS “Forensic Biology Main Menu” screen (pictured below) will appear:
3. Select “Print DNA label for ME Case”. The “Print Barcode Label for ME Case” will appear (pictured below):
Archive
d 05/2
1/201
4
Docum
ent C
ontro
l Coo
rdina
tor

FORENSIC BIOLOGY SEROLOGY PROCEDURES MANUAL
PROCESSING OF POSTMORTEM SPECIMENS
DATE EFFECTIVE 03-24-2010
APPROVED BY EUGENE LIEN
PAGE 15 OF 20
Controlled versions of Department of Forensic Biology Manuals only exist electronically on the Forensic Biology network. All printed versions are non-controlled copies.
4. To print a label, either type in the ME# without spaces or hyphens or scan the barcode from the labels on the manifest sheet.
5. Click on “Print Label.” 6. Click on “OK” to print. 7. To print a different label, select “Clear” and repeat steps #4-#6. You must clear
the ME# otherwise the previous label will be reprinted. 8. Log out as soon as you are done. Failure to log out prohibits other users from
accessing the program (See Section B for logging out).
B. Logging Out of MEANS:
1. Select “Close” to exit from each menu open. 2. Select “Close (and exit system)” (pictured below) to quit out of MEANS.
Note: Do not use the “×” on the upper-right corner to close out of menus in MEANS.
Archive
d 05/2
1/201
4
Docum
ent C
ontro
l Coo
rdina
tor

FORENSIC BIOLOGY SEROLOGY PROCEDURES MANUAL
PROCESSING OF POSTMORTEM SPECIMENS
DATE EFFECTIVE 03-24-2010
APPROVED BY EUGENE LIEN
PAGE 16 OF 20
Controlled versions of Department of Forensic Biology Manuals only exist electronically on the Forensic Biology network. All printed versions are non-controlled copies.
C. Printing Daily Case Census Sheets
1. Select “Print Case Census (By Date)” from the Forensic Biology Main Menu (pictured below):
a. The “Print Daily Case Census” screen will appear (pictured below). Enter a “From” date and a “To” date. For the current, select the “Click here for today’s date” button.
2. Select the borough (Brooklyn, Queens, Manhattan, Bronx, or Richmond) by clicking on the desired borough button.
3. Select “Print” to run the report.
Archive
d 05/2
1/201
4
Docum
ent C
ontro
l Coo
rdina
tor
FORENSIC BIOLOGY SEROLOGY PROCEDURES MANUAL
PROCESSING OF POSTMORTEM SPECIMENS
DATE EFFECTIVE 03-24-2010
APPROVED BY EUGENE LIEN
PAGE 17 OF 20
Controlled versions of Department of Forensic Biology Manuals only exist electronically on the Forensic Biology network. All printed versions are non-controlled copies.
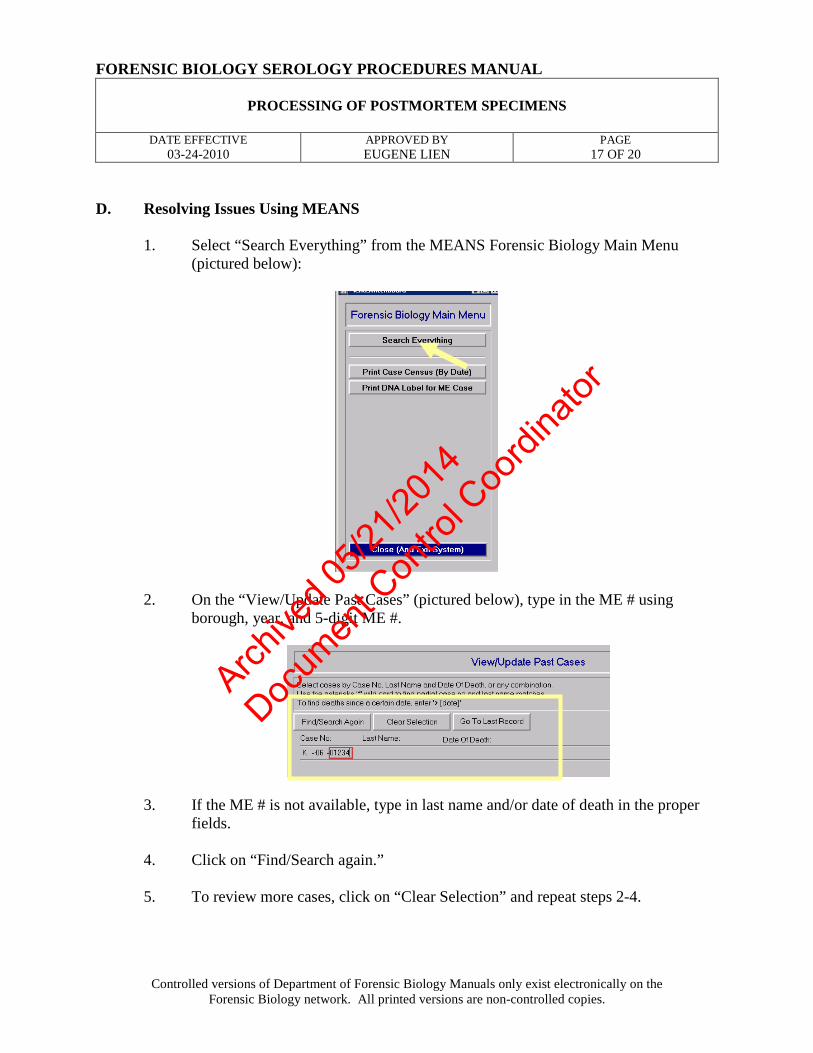
D. Resolving Issues Using MEANS
1. Select “Search Everything” from the MEANS Forensic Biology Main Menu (pictured below):
2. On the “View/Update Past Cases” (pictured below), type in the ME # using borough, year, and 5-digit ME #.
3. If the ME # is not available, type in last name and/or date of death in the proper fields.
4. Click on “Find/Search again.” 5. To review more cases, click on “Clear Selection” and repeat steps 2-4.
Archive
d 05/2
1/201
4
Docum
ent C
ontro
l Coo
rdina
tor

FORENSIC BIOLOGY SEROLOGY PROCEDURES MANUAL
PROCESSING OF POSTMORTEM SPECIMENS
DATE EFFECTIVE 03-24-2010
APPROVED BY EUGENE LIEN
PAGE 18 OF 20
Controlled versions of Department of Forensic Biology Manuals only exist electronically on the Forensic Biology network. All printed versions are non-controlled copies.
APPENDIX II: DMS (Document Imaging and Management System) Browser Note: A user must obtain access rights from DoITT in order to use MEANS. DoITT will issue
the username and password. A. Printing out Autopsy Worksheets
1. Double click on OCME DMS Browser icon on desktop a. Enter username. b. Enter password. c. Click “Log In” button or hit “Enter.”
2. The “Document Imaging and Management System” main screen (pictured below) will appear:
3. Double click on “Record Management”.
Archive
d 05/2
1/201
4
Docum
ent C
ontro
l Coo
rdina
tor

FORENSIC BIOLOGY SEROLOGY PROCEDURES MANUAL
PROCESSING OF POSTMORTEM SPECIMENS
DATE EFFECTIVE 03-24-2010
APPROVED BY EUGENE LIEN
PAGE 19 OF 20
Controlled versions of Department of Forensic Biology Manuals only exist electronically on the Forensic Biology network. All printed versions are non-controlled copies.
4. Enter Medical Examiner case number in the field called “Case Number” in the following format: if the ME # is Q06-00432, enter q0600432 (no hyphens or spaces). See example below:
5. Click on the “Submit” button (hitting “enter” will not work.) 6. The following screen will appear:
Archive
d 05/2
1/201
4
Docum
ent C
ontro
l Coo
rdina
tor

FORENSIC BIOLOGY SEROLOGY PROCEDURES MANUAL
PROCESSING OF POSTMORTEM SPECIMENS
DATE EFFECTIVE 03-24-2010
APPROVED BY EUGENE LIEN
PAGE 20 OF 20
Controlled versions of Department of Forensic Biology Manuals only exist electronically on the Forensic Biology network. All printed versions are non-controlled copies.
7. Look for “Case Worksheet”; this is a scanned .pdf image of the autopsy worksheet. a. To obtain a copy, click on “Original.” b. The autopsy worksheet will open up in an Internet Explorer window
(pictured below):
c. Double click on the printer icon to obtain a printed copy of the autopsy worksheet. Click “X” to close the window.
d. Go back to the main login screen and double click the red “Log Out” button. Then click the “Close” icon at the top of the screen.
Revision History: March 24, 2010 – Initial version of procedure. July 16, 2012 – Specific terminology was removed and replaced with generic terminology to accommodate LIMS.
Archive
d 05/2
1/201
4
Docum
ent C
ontro
l Coo
rdina
tor

FORENSIC BIOLOGY SEROLOGY PROCEDURES MANUAL
SLIDE PREPARATION FOR SPERMATOZOA SEARCHES
DATE EFFECTIVE 09-17-2012
APPROVING AUTHORITY QUALITY ASSURANCE MANAGER
PAGE 1 OF 1
Controlled versions of Department of Forensic Biology Manuals only exist electronically on the Forensic Biology network. All printed versions are non-controlled copies.
There are two methods to prepare slides for spermatozoa searches. Either may be used: 1. Mashing
A. Cut 1.0 x 1.0 mm of the sample and place it on a clean microscope slide. B. Add a drop of distilled water. C. Tweeze apart sample until fibers are in a thin even layer across the slide. D. Fix sample to the slide by heating on a hot-plate (approximately 5 to 10 seconds). E. Stain slide using the Christmas Tree Staining procedure.
2. Pipette Tip/Test Tube Extraction
A. Using the pipette tip/test tube method, extract 1.5 x 1.5 mm samples in 50uL of distilled water for 30 minutes at room temperature.
B. Centrifuge sample for 2 minutes. C. Pipette pellet onto microscope slide. D. Fix sample to the slide by heating on a hot-plate (approximately 5 to10 seconds). E. Stain slide using the Christmas Tree Staining procedure.
Revision History: September 17, 2012 – Initial version of procedure.
Archive
d 05/2
1/201
4
Docum
ent C
ontro
l Coo
rdina
tor

REFERENCES – FORENSIC BIOLOGY SEROLOGY PROCEDURES GENERAL REFERENCES Boorman, K.E. and B.E. Dodd, “An introduction to blood group serology”, Little, Brown, & Co., Boston (1961). Gaensslen, R.E., “Sourcebook in forensic serology, immunology, and biochemistry”, (1983). Issitt, P.D. and C.H. Issit, “Applied blood group serology”, Spectra Biologicals, Oxnard CA (1979). “Isoelectric focusing: principles and methods”, Pharmacia Fine Chemicals, Uppsalla, Sweden (1982). Righetti, P.G., “IEF: theory, methodology, and applications”, Elsevier Biomedicals Press, New York (1983). Stites, et al., “Basic and clinical immunology”, 4th ed., Lange Medical Publishing, Los Altos, CA (1982). PRESUMPTIVE AND CONFIRMATORY TEST REFERENCES Kastle-Meyer, Leucomalachite Green and other presumptive tests for blood Burdett, P.E., “Presumptive tests for blood - a comparative survey”, HOCRE, report 201: 1-10 (1983). Gaensslen, R.E., “Catalytic Tests” in “Sourcebook in forensic serology, immunology, and biochemistry”, section 6: 101-116 (1983). Garner, D.D., et al., “An evaluation of tetramethylbenzidine as a presumptive test for blood” , J. For. Sci. 21(4): 816-821 (1976). Higake, R.S. and W.M.S. Philp, “A study of the sensitivity, stability and specificity of phenolphthalein as an indicator test for blood”, Can. Soc. Foren. Sci. J. 9(3): 97-102 (1976). Saferstein, R., “Forensic characterization of bloodstains” in “Forensic Science Handbook”, 3rd edition, chapter 12: 319-324 (1987).
Archive
d 05/2
1/201
4
Docum
ent C
ontro
l Coo
rdina
tor

Sheehan, F.X., and L. Kobilinsky, “Human blood identification: a forensic science approach”, J. Chem. Ed. 61(6): 542-546 (1984). ACID PHOSPHATASE PRESUMPTIVE TEST FOR SEMEN Gaensslen, R.E., “Identification of semen” in “Sourcebook in forensic serology, immunology, and biochemistry”, section 10: 149-182 (1983). SPERMATOZOA IDENTIFICATION Chapman, R.L. et al., “The isolation of spermatozoa from sexual assault swabs using Proteinase K”, J. For. Sci. Soc. 23(4): 207-212 (1989). Cortner, G.V. and A.J. Boudreau, “Phase contrast microscopy versus differential interference contrast microscopy as applicable to the observation of spermatozoa”, J. For. Sci. 23(4): 830-832 (1978). Ellis, H.D., “Recovery of spermatozoa from semen stains”, Amer. J. Clin. Path. 34(1): 95-98 (1960). Gaensslen, R.E., “Identification of semen” in “Sourcebook in forensic serology, immunology, and biochemistry”, section 10: 149-1822 (1983). Hueske, E.E., “Techniques for extraction of spermatozoa from stained clothing: a critical review”, J. For. Sci. 22(3): 597-598 (1977). Keating, S.M., “The laboratory's approach to sexual assault cases: sources of information and acts of intercourse”, J. For. Sci. Soc. 28(1): 35-48 (1988). Keating, S.M., “The laboratory's approach to sexual assault cases: demonstration of the possible offender”, J. For. Sci. Soc. 28(2): 99-110 (1988). Wilcott, G.M. and M.A. Crosse, “Detection of spermatozoa in the mouth”, J. For. Sci. Soc. 26(2): 125-128 (1986).
Archive
d 05/2
1/201
4
Docum
ent C
ontro
l Coo
rdina
tor

P30 IDENTIFICATION Gaensslen, R.E., “Identification of semen” in “Sourcebook in forensic serology, immunology, and biochemistry”, section 10: 149-182 (1983). AMYLASE Gaensslen, R.E., “Identification of saliva” in “Sourcebook in forensic serology, immunology, and biochemistry”, section 11: 457-462 (1983). Kipps, A.E. and P.H. Whitehead, “A method for quantitating amylase and its use in the investigation of various body fluids”, Ann. Clin. Biochem. 11: 219-223 (1974) Kipps, A.E. and P.H. Whitehead, “The significance of amylase in forensic investigations of body fluids”, For. Sci. 6: 137-144 (1975)
Archive
d 05/2
1/201
4
Docum
ent C
ontro
l Coo
rdina
tor