appsense management center product guide
TRANSCRIPT

Version 8.3
Management Center
Product Guide

APPSENSE MANAGEMENT CENTER PRODUCT GUIDE ii
© AppSense Limited, 2012
All rights reserved. No part of this document may be produced in any form (including photocopying or storing it in any medium) for any purposes without the written permission of AppSense Limited, except in accordance with applicable law. Furthermore, no part of this document may be sold, licensed or distributed. The doing of an unauthorized act in relation to a copyright work may result in both a civil claim for damages and criminal prosecution.
The information contained in this document is believed to be accurate at the time of printing and may be subject to change without notice. Any reference to a manufacturer or product does not constitute an endorsement of, or representation or warranty (whether express, implied or statutory) in respect of, the manufacturer or product or the use of the product with any AppSense software.
This document does not grant any right or license to you in respect of any patents, patent applications, trademarks, copyrights, or other intellectual property rights in or relating to the subject matter of this document. Where relevant, any AppSense software provided pursuant to or otherwise related to this document shall only be licensed to you on and subject to the end user license agreement which shall be displayed and which you shall be required to accept prior to accessing or using the software.
AppSense is a registered trademark of AppSense Holdings Limited or its affiliated companies in the United Kingdom, the United States and/or other countries, Microsoft, Windows and SQL Server are all registered trademarks or Microsoft Corporation in the United States and/or other countries. The names of actual products and companies mentioned in this document may be the trademarks of their respective owners.

C O N T E N T S
Welcome viii
About This Document ix
Terms and Conventions ix
Feedback ix
Section 1 About Management Center 1
Management Center Introduction 2
Architecture 2
Management Server 3
Database 3
Database Maintenance 4
CCA on managed endpoints 4
Management Console 5
Home View 6
Deployment Groups View 7
Alerts View 8
Packages View 9
Reports View 10
Security View 11
Enterprise Licensing View 12
Connecting to the Management Console 12
Workflow 13
iii

APPSENSE MANAGEMENT CENTER PRODUCT GUIDE iv
Section 2 Server Configuration 15
Management Server Configuration Utility 16
Configuration 16
Accounts 17
Upgrade 18
Administrator Privileges 18
First-time Setup Wizard 19
Server Configuration Maintenance 23
Configure a Server using Low SQL Privileges 37
Delegated Rights 37
Export Scripts 38
Securing Communications using SSL 41
SSL on IIS 7 42
SSL on IIS 6 42
Troubleshooting 57
Failover 57
Section 3 Client Communications Agent 59
Client Communications Agent Overview 60
Client Access Credentials 60
Installing the CCA 62
Integrated Install CCA Functionality 63
Install CCA Manually 65
Install CCA in Silent Mode 65
Client Access Log 66
CCA Communication with the Management Server 66
Registering with the Management Server 67
Installing Agents with the AppSense Installation Manager 68
Polling Periods 71
CCA Diagnostics 72

APPSENSE MANAGEMENT CENTER PRODUCT GUIDE v
Section 4 Home 74
Home Introduction 75
Connect to The Management Server 75
Management Server Overview 76
Management Server Details 80
System Events 81
Section 5 Deployment Groups 82
Deployment Groups Introduction 83
Deployment Groups Overview 84
Configuring Deployment Groups 85
Membership Rules 86
Failover Servers 88
Diagnostics 91
Client Access Credentials 92
Deployment Groups 93
Deployment Group 94
Computers 110
Section 6 Alerts 111
Alerts Introduction 112
Viewing Alerts 112
All Alerts 114
Alert Rules 116
Rule 119
Section 7 Packages 125
Packages Introduction 126
Packages View 126
Package Upload 129
Package Assignment 132
Package Installation 133

APPSENSE MANAGEMENT CENTER PRODUCT GUIDE vi
Section 8 Reports 135
Reports Introduction 136
Reports View 136
Report Filters 138
Generate Reports 138
Default Report Templates 139
Section 9 Security 142
Security Introduction 143
Server Permissions 143
Object Permissions 144
Ownership 145
User Access 146
Security Roles 148
Server Security Roles 148
Object Security Roles 151
Section 10 Enterprise Auditing 153
Auditing Events 154
Event Types 154
Application Manager Events 158
Environment Manager Events 159
Personalization Server Events 162
Performance Manager Events 163
Management Center Events 167
System Events 170
Event Details 170
Section 11 Enterprise Licensing 172
Enterprise Licensing 173
Appendixes
Appendix A Security Model 176
Security Challenges 177
Authentication and Authorization 178

APPSENSE MANAGEMENT CENTER PRODUCT GUIDE vii
Securing Communications using SSL 178
Appendix B Concurrency Support 179
Glossary 181

WELCOME
In this Section:
About This Document on page ix
Terms and Conventions on page ix
Feedback on page ix

APPSENSE MANAGEMENT CENTER PRODUCT GUIDE WELCOMEAbout This Document ix
ABOUT THIS DOCUMENT
This Product Guide is for use by AppSense Management Center administrators. It provides information on how the Management Center works and describes its components and architecture.
The aim of the guide is to enable the administrator to optimize the effectiveness of the Management Center and assist in troubleshooting any issues that may arise.
TERMS AND CONVENTIONS
The following tables shows the textual and formatting conventions used in this document:
Convention Use
Bold Highlights items you can select in Windows and the product interface, including nodes, menus items, dialogs and features.
Code Used for scripting samples and code strings.
Italic Highlights values you can enter in console text boxes and titles for other guides and Helps in the documentation set.
Green + underlined Indicates a glossary link.
> Indicates the path of a menu option. For example, “Select File > Open" means "click the File menu, and then click Open."
Information tables - Highlights important points of the main text or provides supplementary information, additional techniques and help for users. Also used to provides links to further information which include more detail about the topic, either in the current document or related sources
Caution/Warning — Provides critical information relating to specific tasks or indicates important considerations or risks.
FEEDBACK
The AppSense Documentation team aim to provide accurate and high quality documentation to assist you in the installation, configuration and ongoing operation of AppSense products.
We are constantly striving to improve the documentation content and value any contribution you wish to make based on your experiences with AppSense products.
Please email any comments to: [email protected]

1
About Management Center
In this Section:
Management Center Introduction on page 2
Architecture on page 2
Management Server on page 3
Database on page 3
CCA on managed endpoints on page 4
Management Console on page 5
Connecting to the Management Console on page 12
Workflow on page 13
APPSENSE MANAGEMENT CENTER PRODUCT GUIDE 1 ABOUT MANAGEMENT CENTERManagement Center Introduction 2
MANAGEMENT CENTER INTRODUCTION
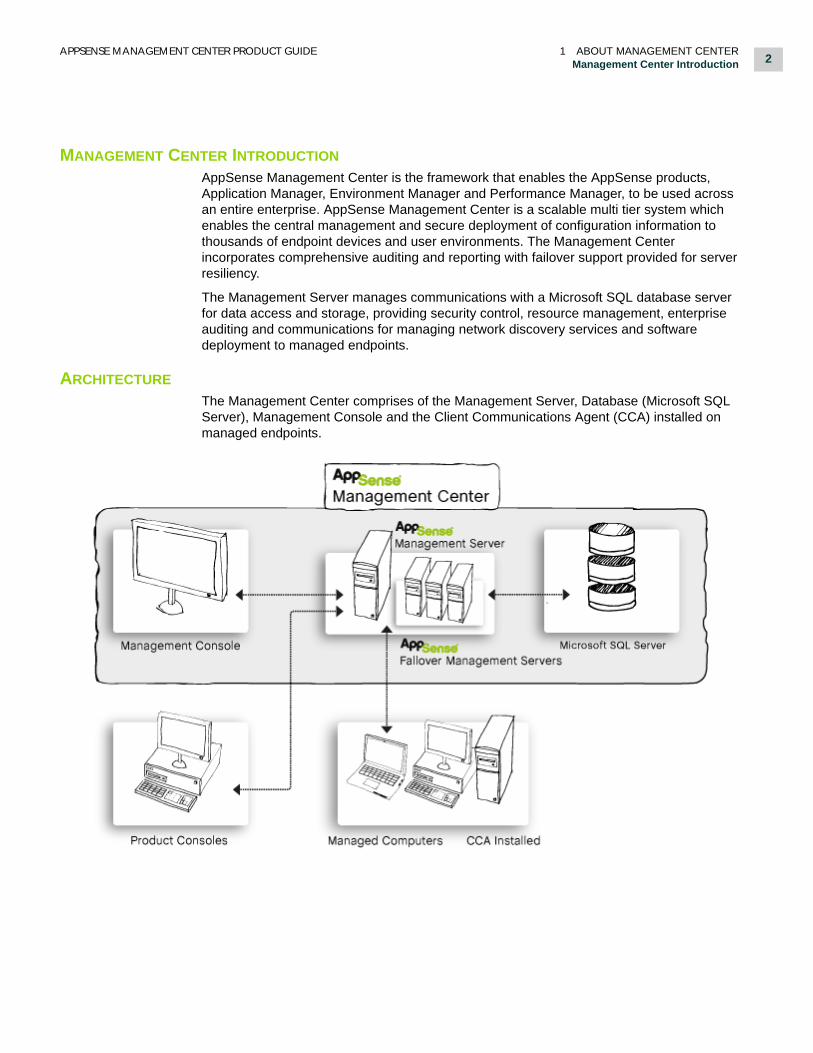
AppSense Management Center is the framework that enables the AppSense products, Application Manager, Environment Manager and Performance Manager, to be used across an entire enterprise. AppSense Management Center is a scalable multi tier system which enables the central management and secure deployment of configuration information to thousands of endpoint devices and user environments. The Management Center incorporates comprehensive auditing and reporting with failover support provided for server resiliency.
The Management Server manages communications with a Microsoft SQL database server for data access and storage, providing security control, resource management, enterprise auditing and communications for managing network discovery services and software deployment to managed endpoints.
ARCHITECTURE
The Management Center comprises of the Management Server, Database (Microsoft SQL Server), Management Console and the Client Communications Agent (CCA) installed on managed endpoints.

APPSENSE MANAGEMENT CENTER PRODUCT GUIDE 1 ABOUT MANAGEMENT CENTERManagement Server 3
The CCA uploads event data from managed endpoints, via the Management Server, to the database and downloads product configurations and software updates from the database. Product configurations are created using the product consoles and stored in the Management Center database from where they can be downloaded along with product agents by the CCA for installation on managed machines.
The Management Center includes the following components:
Management Server
Database
CCA on managed endpoints
Management Console
MANAGEMENT SERVER
The Management Server manages communications (using Microsoft Internet Information Services - IIS) with a Microsoft SQL Server database for data access and storage, providing security control, communications for managing network discovery services and software deployment to managed endpoints, resource management and enterprise auditing.
Management Server security manages network authorization for Management Consoles and product Consoles.
Handles download schedules, group management and file transfers, and network discovery services for integration with Active Directory.
Enterprise auditing manages event data access and storage via the Management Console alert rules which includes mechanisms for generating SNMP and SMTP alert notifications.
Management Center supports a list of failover of servers which can take over the role of the Management Server to allow the system to continue functioning in the event of a hardware or environment failure.
For further information on the Management Server, refer to the Home chapter.
DATABASE
The Management Center relies on the availability on the network of a Microsoft SQL server for the storage and retrieval of AppSense software agents, configuration packages, licenses and event and alert data.
The Microsoft SQL database server is administered by the Management Server and can be installed locally on the Management Center computer or on a separate computer.
For further information about managing user permissions for the SQL database during installation and upgrade, refer to the AppSense Management Center Installation and Upgrade Guide.

APPSENSE MANAGEMENT CENTER PRODUCT GUIDE 1 ABOUT MANAGEMENT CENTERCCA on managed endpoints 4
Database Maintenance
It is strongly recommended that you regularly backup and maintain the databases for your AppSense Servers, as they can handle large amounts of data and quickly grow to very large sizes depending on how you set them up.
You can manage the quantities of data which are accumulated using basic functionality in each of the products as a complement to the usual maintenance practices in your organization.
The default database recovery mode is Simple Mode and can be modified in the Server Configuration utility Database node. This recovery mode allows the database to be restored to the point of the last backup.
Allow the database to be restored to any point in time by setting the recovery mode to Full. If you use this mode, ensure that the database is backed up regularly to avoid excessive transaction log growth.
For further information refer to the Server Configuration chapter.
The Management Center provides the Delete Events dialog box for deleting large amounts of events which can accumulate during the normal running of the Management Center.
CCA ON MANAGED ENDPOINTS
The Client Communications Agent (CCA) is installed on managed endpoints to manage communications between the product agents and the AppSense Management Center. The CCA can be deployed using the Install CCA functionality from within the Management Console, by downloading and installing the Agent on the managed endpoints from the Management Server website or using a third-party deployment mechanism.
The CCA polls the Management Server to manage the download and installation of agent, configuration and prerequisite package updates and also sends event data generated by the product agents to the Management Server.
The CCA can be downloaded and installed directly on managed endpoints from the Management Server web site or deployed by other methods such as the Install CCA option, Active Directory group policy objects, or third-party deployment solutions such as Microsoft Systems Center Configuration Manager (SCCM).
For further information about CCA installation methods refer to the AppSense Management Center Installation and Upgrade Guide.

APPSENSE MANAGEMENT CENTER PRODUCT GUIDE 1 ABOUT MANAGEMENT CENTERManagement Console 5
MANAGEMENT CONSOLE
The Management Console provides an interface to the Management Server and the other components of the Management Center allowing you to control Deployment Groups, Users, Event data and Alerts, Configurations and Packages, registered computers and Reports.
Navigation Pane
The Navigation Pane consists of the navigation tree and navigation buttons. The navigation tree is the area for managing nodes of the configuration. The navigation buttons allow you to view the different areas of the console, including:
Home View — Manages the server connection and provides connection status information, quick links and status of user authentication, deployment groups, computers and alerts.
Deployment Groups View — Manages deployment groups including Group Membership, Installation Schedules, Enterprise Auditing, Packages, Alerts, Events and Computer settings.
Alerts View — Manages alerts and alert rules for AppSense software events sent to the server from client computers.
Packages View — Manages agent and configuration software packages.

APPSENSE MANAGEMENT CENTER PRODUCT GUIDE 1 ABOUT MANAGEMENT CENTERManagement Console 6
Reports View — Provides a comprehensive list of reports for each product which you can generate to analyze the activity and status.
Security View— Manages role-based access to the Management Console.
Enterprise Licensing View— Allows you to add and manage licenses.
Work Area
The Work Area provides the main area for managing the settings, controls and views of the selected node in the navigation panel. The contents of the work area vary according to the selected nodes in the navigation tree and the selected navigation buttons. Sometimes the work area is split into two panes. For example, one pane provides a summary of the settings in the other pane.
Actions
The Actions area displays in the right-hand column and shows available controls for the current view.
Additional Console Features
Shortcut Menu — right-click shortcuts are available in the navigation tree and some areas of the Console.
The minimum screen resolution is 800 x 600.
Home View
The Home view allows you manage server connections including failover servers and provides an overview of the server deployment groups, computers, alerts and monitor system events.

APPSENSE MANAGEMENT CENTER PRODUCT GUIDE 1 ABOUT MANAGEMENT CENTERManagement Console 7
The display in the navigation tree, work area and actions area varies according to whether a Management Server is connected.
The availability of views in the console depends on the rights of the currently connected user.
For details on user and role-based rights, refer to the Security chapter.
For further information on the Management Server refer to the Home chapter.
The navigation tree expands to display the connected Management Server.
Deployment Groups View
The Deployment Groups view allows you to manage and monitor Deployment Groups with controls for handling settings, alerts, events and computers.
For further information on Deployment Groups, refer to the Deployment Groups chapter.

APPSENSE MANAGEMENT CENTER PRODUCT GUIDE 1 ABOUT MANAGEMENT CENTERManagement Console 8
Alerts View
The Alerts view allows you to manage alerts and alert rules.
Alerts are triggered by events sent from managed endpoints according to the alert rules. A predefined set of alert rules is available and you can modify these or create your own. Alert rules must be enabled for alerts to be raised. Some predefined alert rules are not enabled by default.
Each alert rule can generate an alert based on an individual event or range of events and can also include criteria for matching events originating on specific computers and from specific users. Alert rules can also include actions for generating alerts via SNMP and SMTP e-mail notifications.
For more information on Alerts, refer to the Alerts chapter.

APPSENSE MANAGEMENT CENTER PRODUCT GUIDE 1 ABOUT MANAGEMENT CENTERManagement Console 9
Packages View
The Packages view displays the list of AppSense software agent and configuration packages and allows you to add, remove, export and allocate security to packages on the Management Server.
The AppSense Management Suite installation process, in Enterprise mode, automatically loads agent packages into the Management Center database, including the CCA, and Product Agents. Configuration packages can be added separately by saving to the Management Center from the product consoles or by using the Add Configuration action to select configurations stored as files locally or on the network. Additional product agents which are stored as files locally or on the network can also be added using the Add Agent action.
The Add Package option in the Actions pane, toggles to Add Configuration or Add Agent depending on which node is selected in the navigation tree.
The security option allows you to change ownership of specific packages and allocate permissions for users and groups to manage the packages.
For more information about Packages, refer to the Packages chapter.

APPSENSE MANAGEMENT CENTER PRODUCT GUIDE 1 ABOUT MANAGEMENT CENTERManagement Console 10
Reports View
The Reports view allows you to generate a range of reports for the Management Center and each of the AppSense products, based on events sent to the server.
The security option allows you to change ownership of specific reports or groups of reports and allocate permissions for users and groups to manage the reports.
For further information about Reports, refer to the Reports chapter.

APPSENSE MANAGEMENT CENTER PRODUCT GUIDE 1 ABOUT MANAGEMENT CENTERManagement Console 11
Security View
The Security view allows you to setup and manage user and group permissions on the Management Center. Security roles which specify different levels of access allow you to allocate server-wide security permissions or assign object security permissions in certain areas of the Management Console.
For further information on Security, refer to the Security chapter.
The Security view allows you to set server-wide permissions for users and groups, view and manage object permissions which have been set up in other areas of the Management Console and create and maintain security roles which define the level of access for users or groups.

APPSENSE MANAGEMENT CENTER PRODUCT GUIDE 1 ABOUT MANAGEMENT CENTERConnecting to the Management Console 12
Enterprise Licensing View
The Enterprise Licensing view allows you to add and manage AppSense product licenses.
AppSense Management Center allows you to manage individual AppSense product licenses and full Management Suite licenses for computers operating in Enterprise mode.
For further information refer to the Enterprise Licensing chapter.
CONNECTING TO THE MANAGEMENT CONSOLE
To start using AppSense Management Center you need to open the Management Console. The console opens to Home > Management Server, click Connect to select a Management Server.
For further information, refer to the Home chapter.
Once connected to a Management Server the console functionality is available.
APPSENSE MANAGEMENT CENTER PRODUCT GUIDE 1 ABOUT MANAGEMENT CENTERWorkflow 13
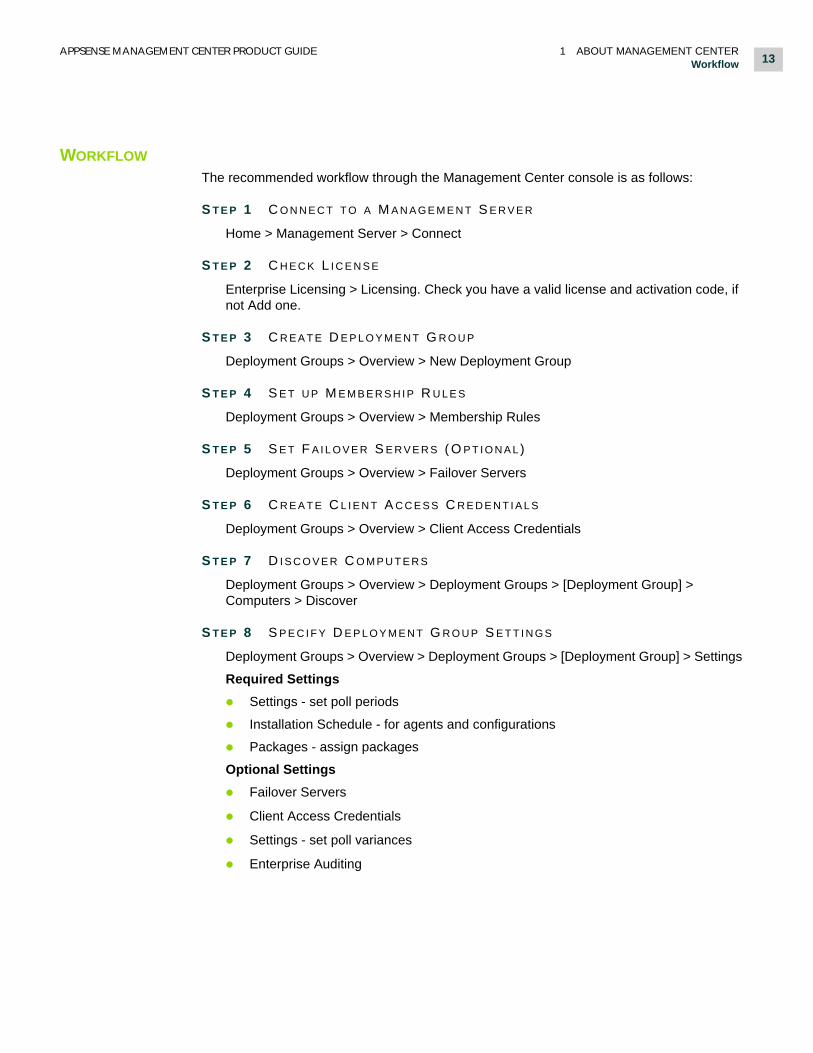
WORKFLOW
The recommended workflow through the Management Center console is as follows:
S T E P 1 C O N N E C T T O A M A N A G E M E N T S E R V E R
Home > Management Server > Connect
S T E P 2 C H E C K L I C E N S E
Enterprise Licensing > Licensing. Check you have a valid license and activation code, if not Add one.
S T E P 3 C R E A T E D E P L O Y M E N T G R O U P
Deployment Groups > Overview > New Deployment Group
S T E P 4 S E T U P M E M B E R S H I P R U L E S
Deployment Groups > Overview > Membership Rules
S T E P 5 S E T F A I L O V E R S E R V E R S ( O P T I O N A L)
Deployment Groups > Overview > Failover Servers
S T E P 6 C R E A T E C L I E N T A C C E S S C R E D E N T I A L S
Deployment Groups > Overview > Client Access Credentials
S T E P 7 D I S C O V E R C O M P U T E R S
Deployment Groups > Overview > Deployment Groups > [Deployment Group] > Computers > Discover
S T E P 8 S P E C I F Y D E P L O Y M E N T G R O U P S E T T I N G S
Deployment Groups > Overview > Deployment Groups > [Deployment Group] > Settings
Required Settings
Settings - set poll periods
Installation Schedule - for agents and configurations
Packages - assign packages
Optional Settings
Failover Servers
Client Access Credentials
Settings - set poll variances
Enterprise Auditing

APPSENSE MANAGEMENT CENTER PRODUCT GUIDE 1 ABOUT MANAGEMENT CENTERWorkflow 14
S T E P 9 I N S T A L L C C A A N D A S S I G N E D P A C K A G E S
Deployment Groups > Overview > Deployment Groups > [Deployment Group] > Computers > Install CCA
Optional steps include the set up of Security, managing Alerts and producing Reports.
For further information on any of the workflow steps, refer to the relevant chapter within this Product Guide.

2
Server Configuration
In this Section:
Management Server Configuration Utility on page 16
Configure a Server using Low SQL Privileges on page 37
Securing Communications using SSL on page 41
Failover on page 57

APPSENSE MANAGEMENT CENTER PRODUCT GUIDE 2 SERVER CONFIGURATIONManagement Server Configuration Utility 16
MANAGEMENT SERVER CONFIGURATION UTILITY
The Server Configuration Utility (SCU) is used firstly to configure the AppSense Management Center and secondly as a maintenance tool. This section includes the following:
Configuration
Accounts
Upgrade
Administrator Privileges
First-time Setup Wizard
Server Configuration Maintenance
Configuration
The installation of the Management Center is a two step process. The installer performs the first step of the process by creating any folders and copying the files to the correct locations. The SCU performs the second step which is to configure the system.
The following are configured:
Prerequisites - The SCU checks whether the AppSense Management Center prerequisites are present. Any missing Automatically Installed Components prerequisites will be installed but any missing Manually Installed Components, for example, BITS Server Extensions will be reported and will require manual installation.
For details on the Automatically and Manually Installed Components refer to the Installation > Prerequisites section in the AppSense Management Center Installation and Upgrade Guide.
SQL Database - All of the Management Center information is stored in a database. The SCU can create a database and upgrade an existing database. It also manages the SQL accounts used by the Management Center to access the information in the database.
IIS - The Management Center uses web services for the client communications (Client Communications Agent, Management Consoles and other AppSense product consoles). The SCU creates and configures the web application directories and applications pools.
Windows Services - The Management Center also uses windows services to perform specific functions. The SCU is responsible for registering and configuring the services.
For further information refer to the First-time Setup Wizard section.
During the initial installation the SCU uses a wizard to collect any information. After that it configures the system for use.

APPSENSE MANAGEMENT CENTER PRODUCT GUIDE 2 SERVER CONFIGURATIONManagement Server Configuration Utility 17
Accounts
There are two different accounts used by the Server Configuration Utility, the Configuration account and the Service account, both of which are set up by the database administrator.
The Configuration account and Service account must be two separate accounts.
Configuration Account
The Configuration account is the account which the SCU uses to perform all of the initial setup tasks on the database. The SCU does not persist the Configuration account, so credentials are required each time the SCU is launched. Credentials are always requested by the First-time Setup Wizard, however once the initial setup has been completed the SCU will automatically connect with the account launching the SCU. If this account fails to connect then the connection dialog displays.
The Configuration account is used to perform the following tasks:
Creates the database - only performed if the database does not exist, requires db_creator rights.
Creates logins - only performed if a login does not exist, requires security_admin rights.
Ensures the database schema matches the version defined by the product.
Checks for variances, for example the properties of the database do not match the product expectations and confirms the database user logins.
Populates the initial data set into the database.
The Configuration account must have dbo rights, or be a member of the ManagementServerAdministrator role. Some additional rights may be needed for optional tasks. The additional rights are detailed in the above list.
The account can use either Windows Authentication which uses the account currently running the SCU, Impersonated Windows Authentication where a specific username and password are required or SQL Authentication.
Service Account
The Service account is used by the Windows Services and Web Services which make up the Management Server.
The SCU persists the username and password of the Service account within the FileName.exe.config and web.config accounts of the Windows and Web Services. Both the username and password are encrypted using the Microsoft Crypto API using the certificate of the local machine.
The Service account must be a member of the ManagementServerService role and should not have any additional rights on the database of the SQL instance.
The account can use either Impersonated Windows Authentication or SQL Authentication.

APPSENSE MANAGEMENT CENTER PRODUCT GUIDE 2 SERVER CONFIGURATIONManagement Server Configuration Utility 18
Upgrade
During the upgrade process the Management Suite installer copies any new agents, prerequisites or report definitions to the server install directory. These are automatically added to the database on an upgrade.
Microsoft SQL Server 2000 Support Warning
Microsoft SQL Server 2000 support has been deprecated and is no longer supported for new installations. Upgrade support will be removed in a future release.
Administrator Privileges
Due to the nature of the SCU, it needs to be run with elevated privileges. The user running the SCU must have administrator rights on the machine to configure the system. It may be the case that the user has administrator rights to the server, but not to the SQL server. In this case, the SCU has the ability to export the SQL Scripts that need to run to create and configure the database. These scripts can be given to an SQL administrator and run independently of the SCU Alternatively, Impersonated Windows Authentication can be selected in the SCU and an account with SQL server rights supplied to provide access to the database for the duration of the SCU session. If the latter option is taken variances will be seen in the SCU.
For further details on configuring the server with restricted privileges, refer to Configure a Server using Low SQL Privileges on page 37.

APPSENSE MANAGEMENT CENTER PRODUCT GUIDE 2 SERVER CONFIGURATIONManagement Server Configuration Utility 19
First-time Setup Wizard
The Management Server Configuration Utility (SCU) first runs as a wizard in which you specify settings for the Management Server.
For further information on using the Management Server Configuration Utility after first time setup, refer to Server Configuration Maintenance on page 23.
SERVER CONFIGURATION WIZARD STEPS The wizard guides you through the following steps:
1. Prerequisites – The prerequisite check provides a list of the required components and indicates whether each component is installed. Any components which are not enabled

APPSENSE MANAGEMENT CENTER PRODUCT GUIDE 2 SERVER CONFIGURATIONManagement Server Configuration Utility 20
are indicated and the View button allows you to display and fix the list of variances by installing components which are not installed.
Some missing components can be fixed by the installer but other components, such as BITS and IIS, must be installed manually. You can proceed or fix the relevant issues and return to the wizard later. If you proceed without resolving outstanding issues, a message notifies you that the product might not operate correctly.
2. Web Site — Select a valid Management Center web site. The utility lists all existing web sites. The selected web site controls the port used to access the server. The default web site is sufficient unless you have a specially designated web site which already exists.
3. Client Authentication - Specify the authentication method which managed endpoints use to access server web directories on the Management Server.
Windows authentication (Recommended) - If selected, the Client Communications Agent (CCA) must authenticate with the server using Windows Authentication. This increases the security of the server, ensuring only computers in the domain can access the server.
Anonymous authentication - If selected, CCAs can access the server unchallenged.
If the CCA is installed on computers in a Workgroup you must select Anonymous authentication.
4. Configuration Credentials and Database Selection - Enter the credentials for the Configuration Account.
The Configuration account must be a separate account to the Service account. For further information refer to Accounts on page 17.

APPSENSE MANAGEMENT CENTER PRODUCT GUIDE 2 SERVER CONFIGURATIONManagement Server Configuration Utility 21
Select the Authentication Type:
Windows Authentication
Pass-through authentication where the currently logged on domain user credentials are automatically provided to access the database.
Impersonated Windows Authentication
A username and password must be supplied and then this account is impersonated to provide access to the database for the duration of the SCU session.
SQL Authentication
An SQL Authentication account can be specified to provide access to the database.
Accounts, including both username and password are created within the SQL Server itself rather than making use of existing Windows domain accounts.
Enter the Username and Password for the Configuration account.
Specify the SQL Server and Instance to use, in the format <servername>\<Instance>,<Port> and enter or select an existing Database. Instance and Port are optional elements.
To create a new database, ensure the configuration account has dbcreator server privileges and enter a unique database name.
To setup the schema, on a new empty database, ensure the configuration account is the database owner or a member of the db_owner role, and select the database from the list.
To upgrade an existing database, the configuration account must have dbo privilege, and the database should be selected from the list. Always backup your database before performing an upgrade.

APPSENSE MANAGEMENT CENTER PRODUCT GUIDE 2 SERVER CONFIGURATIONManagement Server Configuration Utility 22
To use an existing database, the configuration account must be a member of the ManagementServerAdministrator or dbo database roles.
5. Database Service Credentials - Enter the credentials for the Service Account.
The Web service and Windows services use these credentials for the database connection on an ongoing basis after the SCU has exited.
Select the Authentication Type:
Impersonated Windows Authentication
A Windows username and password must be supplied and then this account is impersonated each time access to the database is required.
SQL Authentication
An SQL Authentication account can be specified to provide access to the database.
Accounts, including both username and password are created within the SQL Server itself rather than making use of existing Windows domain accounts.
If the Service account does not already exist in the SQL Server and the Configuration account has securityadmin server privileges, a new account is created.
6. Summary — A summary of the settings displays with details of pending actions, such as create a database with a specific name or update an existing database. Click Accept to carry out the actions.

APPSENSE MANAGEMENT CENTER PRODUCT GUIDE 2 SERVER CONFIGURATIONManagement Server Configuration Utility 23
Server Configuration Maintenance
The Server Configuration Utility (SCU) allows you to manage and monitor the status of the Management Server and resolve incorrect settings using variance reports, prerequisites checking, database connectivity, website, web services, services configuration and AppSense support mechanisms.
Most issues can be automatically fixed by the SCU, those that cannot are reported so that manual steps can be taken to rectify the problem.
Run the SCU using a user account with Local Administrator privileges. Otherwise, a warning message notifies you at start up that some functions may fail, or give inaccurate results. You are prompted for confirmation to continue. If you select No, the SCU closes.
For further details refer to First-time Setup Wizard on page 19.
The Management Server root node displays a summary of the state of the selected Management Server. To re-launch the Server Configuration Wizard select Run Wizard.

APPSENSE MANAGEMENT CENTER PRODUCT GUIDE 2 SERVER CONFIGURATIONManagement Server Configuration Utility 24
This section covers the following:
Prerequisites
Database Settings
Recovery Model
Database Accounts
Web Site
Services
Encryption
Support Report
Variance Report
Prerequisites
The Prerequisites node provides a summary of the product installation required components and indicates whether each component is installed.
The Background Intelligent Transfer Service (BITS) Server Extensions requires the SCU to be restarted.
Any components which are not enabled are indicated by a red cross. In this instance, the Variances Report section displays, click View to display the Variance Report. If the missing components can be fixed automatically by the SCU the Repair Selection and Repair All options are available, click to install the missing components. If the component requires manual installation the Repair options are disabled and you have to manually install the components.

APPSENSE MANAGEMENT CENTER PRODUCT GUIDE 2 SERVER CONFIGURATIONManagement Server Configuration Utility 25
Database Settings
The Database node within the AppSense Management Server Configuration Utility is used to administer settings required to create or upgrade the Management Server Database.
It is also possible to configure specific accounts that will be used by the various services to communicate with the database.
The Database Settings contains the following:
Server Name - this details the server and instance name of the SQL Server hosting the Management Center database.
Database Name - this is the friendly name for the configured Management Center database.
Configuration Account - displays the account that the SCU is using to connect to the database.

APPSENSE MANAGEMENT CENTER PRODUCT GUIDE 2 SERVER CONFIGURATIONManagement Server Configuration Utility 26
Authentication Mode - details the authentication methods supported by the SQL Server hosting the Management Center database.
This can be one of the following settings:
SQL Server and Windows Authentication mode
Accounts connecting to this SQL Server, such as the Configuration and Service account support SQL Authentication, Windows Authentication, and Impersonated Windows Authentication. This is also known as Mixed Mode authentication.
Windows Authentication mode
Accounts connecting to this SQL Server, such as the Configuration and Service accounts, support Windows Authentication and Impersonated Windows Authentication. SQL Authentication is not supported.
Recovery Model - refer to the Recovery Model section for further details
Disconnect - allows the administrator to disconnect the existing database from the AppSense Management Server Configuration Utility.
Actions
Create or Change Database - allows the administrator to edit an existing or create a new Management Center database within the Management Server Configuration Utility. A wizard is launched which guides the administrator through configuring database selection, Configuration account credentials, database usage and Service account credentials.
Upgrade Database - only available when connected to an out of date database. Select to upgrade the database to the latest version. The Upgrade Database dialog box displays, click Yes to perform the upgrade. The database schema is updated and the latest agent packages are uploaded.
Assign to all Windows Services and Assign to all Web Directories - ensures that the selected Service account added by the administrator is propagated down to all Services and Web directories associated with the currently selected database.
Export Script - can be used to export the relevant SQL script associated with creating a new database, upgrading an existing database or performing database maintenance tasks, when the current user does not have the relevant privileges necessary to perform the required tasks. These scripts can then be forwarded to a user who does have necessary SQL privileges and can be edited and run by that user.
For further information on configuring the server with restricted privileges, refer to Configure a Server using Low SQL Privileges on page 37.
Backup your database before performing any actions.

APPSENSE MANAGEMENT CENTER PRODUCT GUIDE 2 SERVER CONFIGURATIONManagement Server Configuration Utility 27
Recovery Model
The Recovery Model dictates the way in which the database can be restored to the point of its last backup. It is recommended that the database be backed up regularly. The default recovery model is set to Simple.
Recovery Model Pros ConsData Loss Implications Recovery Point
Simple Allows high-performance bulk copying.Uses the least amount of storage space.
Transaction log backups not available as the contents of the transaction log are truncated each time a checkpoint is issued for the database.
Changes since the most recent database or differential backup are lost.
Can recover to the end of any backup.Changes beyond this point are lost.
Bulk Logged Allows high performance bulk copying.Minimal log space is used.
You can’t restore to a specific mark in the database, nor can you restore just parts of the database.
Typically none.If the log is damaged, or bulk operations occurred since the most recent log backup, changes since that last backup will be lost.
Can recover to the end of any backup.Changes beyond this point are lost.
Full No work is lost due to a lost or damaged data file.Allows you to restore just part of a database or do a complete recovery.
Uses the most transaction log space of all the recovery models and it causes a slight hit to SQL Server Performance.
Typically none.If the log is damaged, changes since the most recent log backup are lost.
Can recover to any point in time.
The following table provides an overview of the three available recovery models:
Simple
Simple recovery is easier to manage than the Full or Bulk Logged models and is the chosen, default recovery model for the Management Center database. However, it must be noted that this recovery model can incur higher data loss than Full and Bulk Logged recovery if a data file is damaged.
Bulk Logged
The Bulk Logged recovery model provides higher performance and lower log space than the Full recovery model, however it achieves this at the expense of available recovery points.
Full
The Full recovery model provides the most flexibility for recovering databases to an earlier point in time. However, it is essential that a backup procedure is in place to avoid transaction log growth.

APPSENSE MANAGEMENT CENTER PRODUCT GUIDE 2 SERVER CONFIGURATIONManagement Server Configuration Utility 28
Database Accounts
The Database > Accounts display a list of all login names for all the accounts with dbo rights (if the SCU is connected with this account) and ManagementServerService and ManagementServerAdministrator roles.
Accounts can be added, edited or removed.
The following roles are assigned depending on the account type:
ManagementServerService
This is the role set aside for the Service Account which is used for access from web services and Windows services. This role has access to all of the Management Server stored procedures. This role is configurable on any website directory or service.
ManagementServerAdministrator
This is the role set aside for the Configuration Account which is used to connect to the database to perform operations including creating, upgrading and configuring the Management Server and database.
Once an account is added, it can then be assigned access to a specific Website or Service using the Change Database Account... option from the relevant directory beneath the Web Site or Service node.

APPSENSE MANAGEMENT CENTER PRODUCT GUIDE 2 SERVER CONFIGURATIONManagement Server Configuration Utility 29
Web Site
The Web Site node is used to edit the global properties of all web applications associated with the selected web site. The web site defines the port used to connect the Client Communications Agent and the Console to the Management Server.
You may want to change the web site to configure the port, the bindings to IP addresses, the delegation of features or SSL certificate for a given Management Server.
Each web directory within the Web Site has Settings which show details of the current URL used to access the relevant web directory on the Management Server and the authentication mode used in order to access each directory.
The Database Service Credentials are used to specify SQL Server instance, the database name and the service account name which is set up for access to the relevant web services.
ManagementServer
The ManagementServer root web directory hosts the Downloads web page for downloading the Management Console, Client Communications Agent, AppSense products and documentation.
A diagnostics log can also be generated from this page which is stored at %Program Files%\AppSense\Management Center\Server\Bin by default.
The HTTP Runtime Timeout period can be set which determines how long IIS waits to get a response from the server. The default setting is 110 seconds.
The Database Service Credentials can be edited from here which will amend the account used for access to this level of web services.

APPSENSE MANAGEMENT CENTER PRODUCT GUIDE 2 SERVER CONFIGURATIONManagement Server Configuration Utility 30
ManagementServer/Deployment
The ManagementServer/Deployment web directory provides the Management Server web services which the CCA uses to access the Management Center database. These hosted web services include:
Polling - Managed endpoints receive settings such as poll periods and installation schedule during a poll.
Prerequisite checking & installation - Managed endpoints download agents, configurations and prerequisites using BITS.
Event Collection - Managed endpoints upload the majority of event using BITS.
Server Diagnostics - Managed endpoints send high priority events.
The Directory Access contains details of the web services which the Management Console uses to store and retrieve data for the Management Center database.
The Directory Access can be switched between Windows Authenticated and Anonymous which determines the endpoint authentication used between the CCA and the Management Server.
Windows authentication (recommended) - CCAs must authenticate with the server using Windows Authentication. This increases the security of the server, ensuring only computers in the domain can access the server.
Anonymous authentication - CCAs can access the server unchallenged.
If the CCA is installed on computers in a Workgroup you must select Anonymous authentication.
For further details on log files, refer to the Client Access Log on page 66.
A diagnostics log, DeploymentDirectory.log, can also be generated from this page which is stored at %Program Files%\AppSense\Management Center\Server\Web Site\Deployment by default.
The HTTP Runtime Timeout period can be set which determines how long IIS waits to get a response from the server. The default setting is 110 seconds.
The Database Service Credentials can be edited from here which will amend the account used to access the database from this web directory.
ManagementServer/DataAccess
The ManagementServer/DataAccess web directory provides the interface to the Data Access Services. All communication from the Management Console comes here.
The HTTP Runtime Timeout period can be set which determines how long IIS waits to get a response from the server. The default setting is 110 seconds.
The Database Service Credentials can be edited from here which will amend the account used to access the database from this web directory.

APPSENSE MANAGEMENT CENTER PRODUCT GUIDE 2 SERVER CONFIGURATIONManagement Server Configuration Utility 31
ManagementServer/PackageManagement
The ManagementServer/PackageManagement web directory provides an interface to the Package Management Services. All communication from the Application Manager, Environment Manager and Performance Manager consoles comes here.
The HTTP Runtime Timeout period can be set which determines how long IIS waits to get a response from the server. The default setting is 110 seconds.
The Database Service Credentials can be edited from here which will amend the account used to access the database from this web directory.

APPSENSE MANAGEMENT CENTER PRODUCT GUIDE 2 SERVER CONFIGURATIONManagement Server Configuration Utility 32
Services
The Services node within the Server Configuration Utility offers a summary of the AppSense Services associated with the Management Center and allows the administrator to control their status. There are four associated services:
AppSense Alerts Service - responsible for creating alerts, based on events, for the Management Server and dispatches associated actions.
AppSense Events Dispatcher Service - responsible for monitoring for new event files being uploaded and adds the events to the Management Server database.
AppSense Scheduler Service - responsible for managing all scheduled tasks associated with the Management Server. This includes discovery and offline machine detection.
AppSense Deployment Service - responsible for managing the installation of the CCA when chosen by the user from the Management Console.
Each Service has Settings which include the name of the AppSense service, the start-up type, the path to where the executable is located and the status of the service.
The Service can be stopped, started, paused or resumed.
A diagnostics log can be generated for each Service which is stored at %Program Files%\AppSense\Management Center\Server\Bin by default.

APPSENSE MANAGEMENT CENTER PRODUCT GUIDE 2 SERVER CONFIGURATIONManagement Server Configuration Utility 33
Encryption
If multiple Management Servers are being utilized in a failover scenario, then the Encryption node is used to share the encryption key between each Management Server, any encryption that is required uses the Microsoft Windows Cryptographic Service Provider. Alternatively, it can be used to back up the key securely in the database.
If failover servers are being used the same public-private key pair needs to be used by all of the servers.
Firstly, a transfer key needs to be made available on one of the servers (the master) and access permissions to this key, will only be given to service and administrator accounts by default. The transfer key contains both the public and private keys. Click Store to save the key in the database in a password protected format.
For further information on failover servers, refer to the Configure a Server using Low SQL Privileges section in the Server Configuration chapter.
Once the password has been stored the transfer key is shown as present and can now be retrieved by other servers to create the correct public-private key pair. Click Retrieve on each of your servers and re-enter the password to decrypt the transfer key.

APPSENSE MANAGEMENT CENTER PRODUCT GUIDE 2 SERVER CONFIGURATIONManagement Server Configuration Utility 34
Support Report
The Support Report contains information about your system that can aid the AppSense Technical Support Team. The basic report contains the following:
Product Definition - this contains the information on all of the settings controlled by the SCU.
List of Variances - variances are disparities between the value that a setting should be and the underlying system value.
Current Log - contains the SCU log file, ManagementCenter.log that is in the Management Center’s bin folder:
%Program Files%\AppSense\Management Center\Server\Bin
In addition to the basic information you can also include other information about the server. Including this information will help to diagnose complex problems that are caused by interactions with other parts of the system:
Services - this is a complete list of the services and their settings that are running on the server.
Root Web Directories - this is a list of all of the root web directories and their settings that are on the same web site as the Management Center.
Application Pools - this is a list of all application pools and their settings in IIS.
Group Policy - this is the output to running gpresult /Z which details the resultant set of Policy (RSoP) information for the server, in verbose mode.
Web Sites - a list of all web sites.
SQL Instances - a list of all SQL servers that are available to the server.
Environment Variables - a complete list of the environment variables defined on the server.
The support report is encrypted using RSA Public-key encryption. No-one can access the contents of the report without the private key, so the data contained in the report is secure and can be safely transmitted to AppSense via email or any other transmission system.

APPSENSE MANAGEMENT CENTER PRODUCT GUIDE 2 SERVER CONFIGURATIONManagement Server Configuration Utility 35
Variance Report
Variances occur when a setting or property on the server differs from the recommended value. The top-level node of the Management Server Configuration Utility provides a summary of the status of the server configuration. In the event that there are variances, the navigation node where the variances occur display in red and the Summary Information in the work area detail the number of variances. The Variance Report section displays a View button, which when selected displays the Variance Report screen.

APPSENSE MANAGEMENT CENTER PRODUCT GUIDE 2 SERVER CONFIGURATIONManagement Server Configuration Utility 36
Variance Report
A Variance Report provides a list of all variances in the system including details about the cause of each issue.
Repair Variances
You can repair all, or selected, variances in the list. Refresh the list to identify any remaining variances. You may be able to rectify these manually based on the reported details for each issue. Repeat this process to ensure no other issues are outstanding. If variances still remain after this process, refer to the support options available in the Support node.
If any variances remain, check that a valid SQL database Configuration account is connected to the database. You can check the account is available and correctly setup in the Accounts node. Ensure the account is assigned the appropriate product service role:
Management Center – ManagementServerAdministrator.

APPSENSE MANAGEMENT CENTER PRODUCT GUIDE 2 SERVER CONFIGURATIONConfigure a Server using Low SQL Privileges 37
CONFIGURE A SERVER USING LOW SQL PRIVILEGES
In many environments it is necessary to setup the Management Server whilst only having minimal privileges to the SQL Server and database. In this scenario, there are two options both with slightly different rights on the server.
Delegated Rights
Export Scripts
Once the steps in this section have been followed, for additional security the configuration account can be disabled within the Microsoft SQL Management Studio. However, this account must be re-enabled to successfully use the SCU.
Delegated Rights
This option allows an empty database and Service account to be setup by an SQL Administrator and dbo rights delegated to a Configuration account.
The following steps are performed by the SQL Administrator:
1. Create a new database.
2. Create a new login to represent the Configuration account and assign the account as the dbo of the database.
3. Create a new login to represent the Service account.
4. Supply the server and database name and both the username and password of both accounts to the user launching the SCU.

APPSENSE MANAGEMENT CENTER PRODUCT GUIDE 2 SERVER CONFIGURATIONConfigure a Server using Low SQL Privileges 38
Export Scripts
This option involves supplying the SQL Administrator with exported SQL scripts allowing them to inspect and execute the scripts.
EXPORT THE SCRIPTS TO SEND TO THE SQL ADMINISTRATOR
1. Open the Server Configuration Utility from Start > All Programs > AppSense > Management Center.
2. In the Wizard Welcome screen, click Skip Wizard to launch the relevant Server Configuration Utility console.
3. Select the Database node and select Actions > Export Scripts.
4. Select I want to create a new database and click Next.
5. Select all three of the following scripts and click Next.
Create Database
Create Schema
Create Login
6. Enter the path to which to export the scripts, for example:
C:\Users\Administrator\Documents and click Save.
7. Once the files have been exported, click Finish.
8. Send the exported scripts to the SQL Administrator.

APPSENSE MANAGEMENT CENTER PRODUCT GUIDE 2 SERVER CONFIGURATIONConfigure a Server using Low SQL Privileges 39
ACTIONS FOR SQL ADMINISTRATOR TO PERFORM
Using SQL Server Management Studio the following steps must be carried out to create the database.
Create Database Script
To execute this script you must be a member of dbcreator Server Role.
1. In SQL Server Management Studio, open the Create Database script, modify the following line:
SET @DatabaseName = ’ ’ to contain the required database name, for example ’ManagementServer’
Click Execute.
This script automatically creates the database. You can create the database manually if you prefer, there are no AppSense specific settings for the database.
Create Schema Script
To execute this script you must be a member of db_owner for the database created in the Create Database Script step above.
1. Open the Create Schema script and ensure the newly created database is selected in the Available Databases drop-down list.
2. Click Execute.
This script creates the database tables and store procedures.
Create Login Script
To execute this script you must be a member of securityadmin Server Role.
The Configuration account and the Service account must be separate accounts. For further information refer to Accounts on page 17.
1. Open the Create Login script, enter the following details for the Configuration account:
Modify the following line:
SET @UserName = ’ ’ to contain the login name. If this is a Windows login the value will be of the form ’Domain\User’.
Modify the following line:
SET @password = ’ ’ to contain a password, for example ’abc123’
Ensure you set default values for the other following variables:

APPSENSE MANAGEMENT CENTER PRODUCT GUIDE 2 SERVER CONFIGURATIONConfigure a Server using Low SQL Privileges 40
@isSql2005 = '1' -- For all SQL Server versions >= 2005
@enabled ='1'
@forcePswdPolicy ='1'
@forcePswdExpire = '0'
@mustChange = '0'
2. Click Execute.
This automatically creates the Configuration account. You can create manually if you prefer. Refer to step 5 for required permissions.
3. Open the Create Login script again to enter the following details for the Service account:
Modify the following line:
SET @UserName = ’ ’ to contain the login name. If this is a Windows login the value will be of the form ’Domain\User’.
Modify the following line:
SET @password = ’ ’ to contain a password, for example ’def456’
Ensure you set default values for the other following variables:
@isSql2005 = '1' -- For all SQL Server versions >= 2005
@enabled ='1'
@forcePswdPolicy ='1'
@forcePswdExpire = '0'
@mustChange = '0'
4. Click Execute.
This automatically creates the Service account. You can create manually is you prefer. Refer to step 6 for required permissions.
5. In the Login Properties dialog for the Configuration account select User Mapping and select db_owner and ManagementServerAdministrator roles on the database.
6. In the Login Properties dialog for the Service account select User Mapping and select ManagementServerService role on the database.

APPSENSE MANAGEMENT CENTER PRODUCT GUIDE 2 SERVER CONFIGURATIONSecuring Communications using SSL 41
RUN THE SERVER CONFIGURATION UTILITY
1. Open the Server Configuration Utility, on the Management Server node click Run Wizard.
2. Click Next until you get to the Configuration Credentials and Database Selection dialog.
3. Select the Authentication Type, Username and Password for the Configuration account which you set up in Actions For SQL Administrator To Perform step 1.
4. Enter the Server Name, in the format <Servername>\<Instance>,<Port> and the Database Name which you set up in Actions For SQL Administrator To Perform step 1. Click Next.
5. In the Database Service Credentials dialog select the Authentication Type, Username and Password for the Service account which you set up in Actions For SQL Administrator To Perform step 3. Click Next to run the wizard.
6. The wizard sets up the IIS settings and connects to the database using the Configuration account. The database is checked to ensure it is the correct version and the schema is up to date and the Service account is assigned for communication between the management server and the database.
7. After the wizard completes, click the Database node. Click Connect, select the Configuration account and click OK.
SECURING COMMUNICATIONS USING SSLYou can optionally configure the Management Server web site to support Secure Socket Layers (SSL) to provide secure communications using Active Directory.
SSL provides confidentiality and integrity of communications to ensure sensitive data is accessible only by authorized users, including:
Event data
Agents and agent configuration data
If you are setting up SSL certificates on web servers using other supported operating systems and other versions of Microsoft SQL Server, see the following for further information: http://msdn.microsoft.com/library/default.asp?url=/library/en-us/dnnetsec/html/secnetht16.asp
This section provides information about setting up the website for SSL by creating a self-signed certificate.
This section includes:
SSL on IIS 7 on page 42
SSL on IIS 6 on page 42
You can also complete the steps shown in this section using Microsoft SelfSSL which is available for download from Microsoft as part of the IIS 6.0 Resource Kit Tools. For more information, see the Microsoft Support website.
Other types of certificate issued by a trusted Certification Authority are also supported.

APPSENSE MANAGEMENT CENTER PRODUCT GUIDE 2 SERVER CONFIGURATIONSecuring Communications using SSL 42
Troubleshooting on page 57
SSL on IIS 7
SETUP SSL ON IIS 7
1. In Start > All Programs > Administrative Tools > Internet Information Services (IIS) Manager, select the <ServerName> node and in the IIS section click Server Certificates.
2. Select Create Self-Signed Certificate in the Actions panel.
3. Provide a friendly name for the certificate and click OK.
4. Select the Default Web Site node and click Edit Bindings in the shortcut menu.
5. Click Add and in the Type drop-down list select HTTPS.
6. In the SSL Certificate drop-down list, select the friendly name of the certificate specified in step 3.
7. Click OK and Close.
SSL on IIS 6
Step 1 Install Microsoft Certificate Services on page 42
Step 2 Create a New Self-signed Certificate on page 46
Step 3 Issue a Self-signed Certificate Request on page 50
Step 4 Install a Self-signed Certificate in IIS on page 53
Step 5 Prevent HTTP Unsecured Communications on page 55
S T E P 1 I N S T A L L M I C R O S O F T C E R T I F I C A T E S E R V I C E S
1. In Control Panel, open Add or Remove Programs and select Add/Remove Windows Components.
The Windows Component Wizard displays.

APPSENSE MANAGEMENT CENTER PRODUCT GUIDE 2 SERVER CONFIGURATIONSecuring Communications using SSL 43
2. Select Certificate Services.
3. A prompt advises you that installing Certificate Services prevents you from modifying the machine name or domain membership.

APPSENSE MANAGEMENT CENTER PRODUCT GUIDE 2 SERVER CONFIGURATIONSecuring Communications using SSL 44
4. Click Yes to confirm you want to proceed and click Next.
The CA Type screen displays.
5. Select Stand-alone root CA and click Next to proceed.
The CA Identifying Information screen displays.

APPSENSE MANAGEMENT CENTER PRODUCT GUIDE 2 SERVER CONFIGURATIONSecuring Communications using SSL 45
6. Enter AppSense-CA as the Common name for this CA and click Next to proceed.
The Certificate Database Settings screen displays.
7. Accept the default settings and click Next to proceed.
A prompt advises you that Internet Information Services must be restarted.
8. Click Yes to confirm you want to proceed.
During the installation, you may be prompted for the Windows Server 2003 installation media.
A prompt advises you that Active Server Pages (ASPs) must be enabled.
9. Click Yes to confirm you want to proceed.
When the installation completes, click Finish to exit the Windows Component Wizard.

APPSENSE MANAGEMENT CENTER PRODUCT GUIDE 2 SERVER CONFIGURATIONSecuring Communications using SSL 46
S T E P 2 C R E A T E A N E W S E L F - S I G N E D C E R T I F I C A T E
1. Navigate to Start > Programs > Administrative Tools, and select Internet Information Services (IIS) Manager.
2. Expand Computer Name(local computer) > Web Sites in the left-hand tree view, right-click Default Web Site and select Properties.
3. In the Directory Security tab, click Server Certificate to invoke the IIS Certificate Wizard.

APPSENSE MANAGEMENT CENTER PRODUCT GUIDE 2 SERVER CONFIGURATIONSecuring Communications using SSL 47
4. Click Next.
The Server Certificate screen displays.
5. Select Create a new certificate
6. Click Next.
The Delayed or Immediate Request screen displays.

APPSENSE MANAGEMENT CENTER PRODUCT GUIDE 2 SERVER CONFIGURATIONSecuring Communications using SSL 48
7. Accept the default setting and click Next.
The Name and Security Settings screen displays.
8. Enter AppSense-MC
9. Click Next.
The Organization Information screen displays.
APPSENSE MANAGEMENT CENTER PRODUCT GUIDE 2 SERVER CONFIGURATIONSecuring Communications using SSL 49
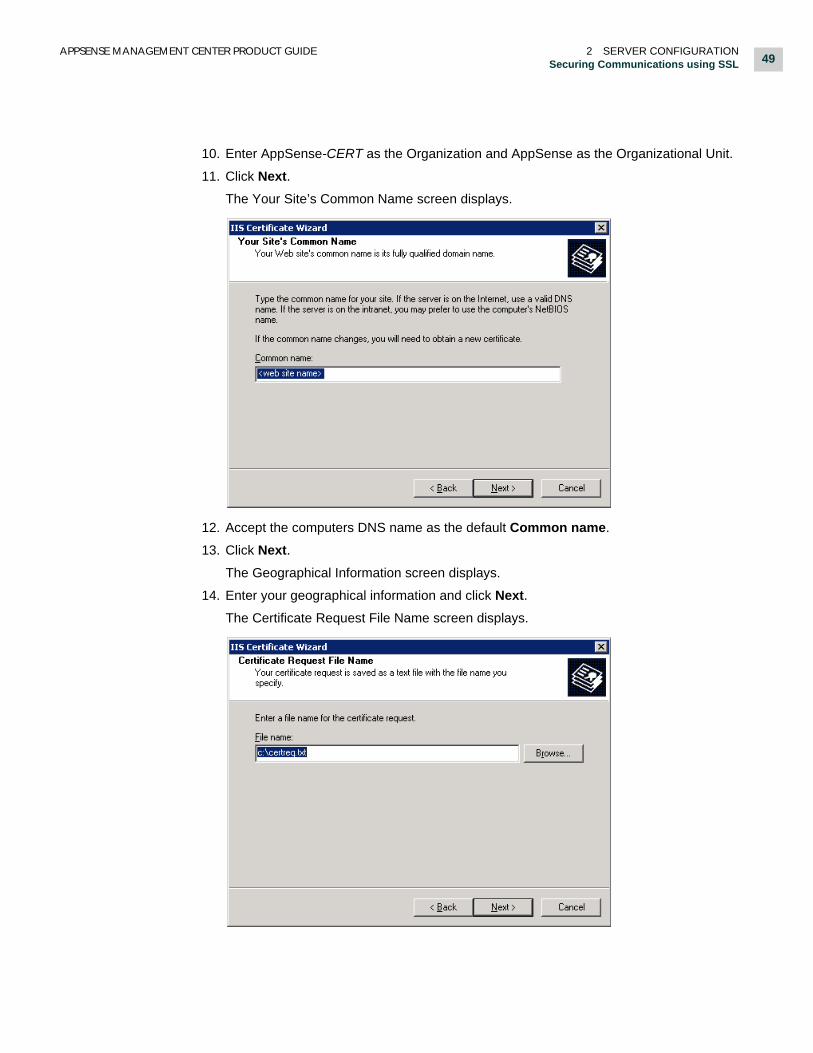
10. Enter AppSense-CERT as the Organization and AppSense as the Organizational Unit.
11. Click Next.
The Your Site’s Common Name screen displays.
12. Accept the computers DNS name as the default Common name.
13. Click Next.
The Geographical Information screen displays.
14. Enter your geographical information and click Next.
The Certificate Request File Name screen displays.
APPSENSE MANAGEMENT CENTER PRODUCT GUIDE 2 SERVER CONFIGURATIONSecuring Communications using SSL 50
15. Specify a location to save the certificate request, and click Next.
The Request Summary File Summary screen displays.
16. Check the details are correct and click Next.
17. Click Finish to complete the certificate request and close the Default Web Site Properties dialog box.
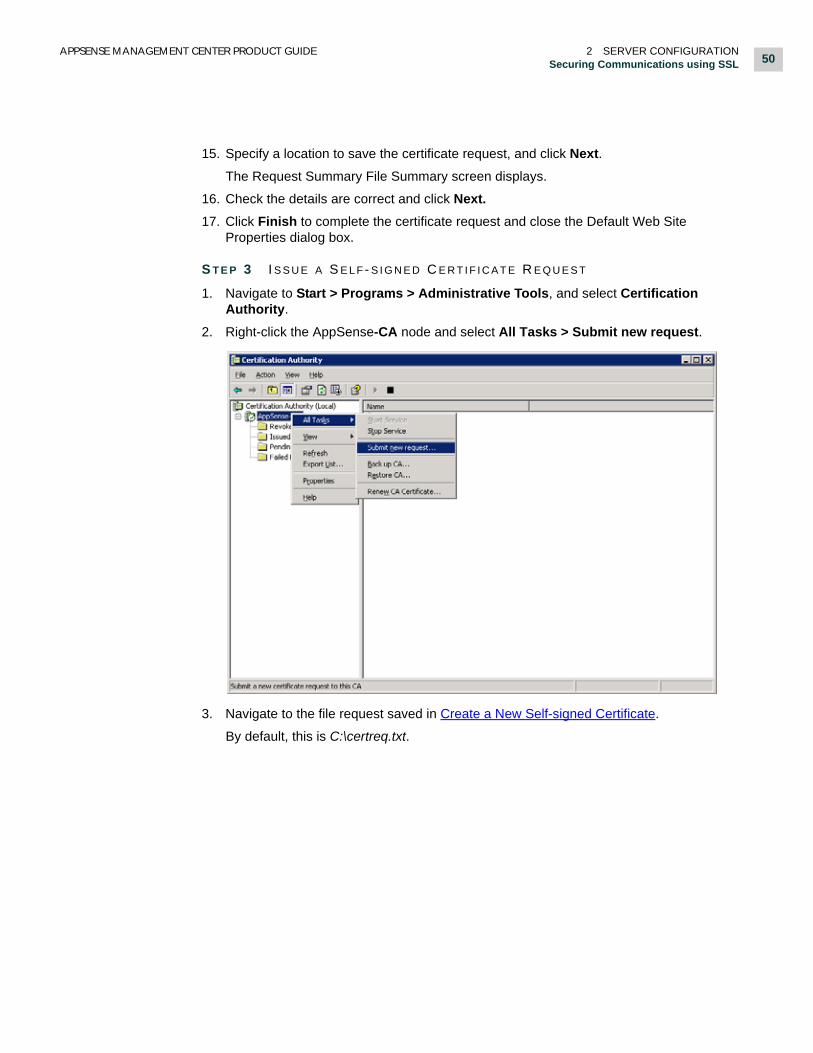
S T E P 3 I S S U E A S E L F- S I G N E D C E R T I F I C A T E R E Q U E S T
1. Navigate to Start > Programs > Administrative Tools, and select Certification Authority.
2. Right-click the AppSense-CA node and select All Tasks > Submit new request.
3. Navigate to the file request saved in Create a New Self-signed Certificate.
By default, this is C:\certreq.txt.

APPSENSE MANAGEMENT CENTER PRODUCT GUIDE 2 SERVER CONFIGURATIONSecuring Communications using SSL 51
4. Select the file and click Open.
5. In the AppSense-CA node, select Pending Requests.
6. Right-click the item in the right-hand pane, and select All Tasks > Issue.
7. In the AppSense-CA node, select the Issued Certificates node.

APPSENSE MANAGEMENT CENTER PRODUCT GUIDE 2 SERVER CONFIGURATIONSecuring Communications using SSL 52
8. Right-click the item in the right-hand pane, and select All Tasks > Export Binary Data.
9. At the Export Binary Data prompt, select Binary Certificate, and select Save binary data to a file.
10. Click OK to proceed.

APPSENSE MANAGEMENT CENTER PRODUCT GUIDE 2 SERVER CONFIGURATIONSecuring Communications using SSL 53
11. The Save Binary Data dialog box displays.
12. Save the certificate as C:\cert.cer.
13. Close the Certificate Authority console.
S T E P 4 I N S T A L L A S E L F- S I G N E D C E R T I F I C A T E I N I I S
1. In the Internet Information Services (IIS) Manager console, right-click Default Web Site and select Properties
2. In the Directory Security tab, click Server Certificate to launch the IIS Certificate Wizard.
3. Click Next.
The Pending Certificate Request screen displays.

APPSENSE MANAGEMENT CENTER PRODUCT GUIDE 2 SERVER CONFIGURATIONSecuring Communications using SSL 54
4. Select Process the pending request and install the certificate.
5. Click Next.
The Process a Pending Request screen displays.
6. Enter the path and file name to C:\cert.cer
7. Click Next.
The SSL Port screen displays.

APPSENSE MANAGEMENT CENTER PRODUCT GUIDE 2 SERVER CONFIGURATIONSecuring Communications using SSL 55
8. Accept the default SSL port 443 and click Next.
The Certificate Summary screen displays.
9. Click Next.
10. Click Finish to complete the certificate installation.
Once the certificate has been installed, you can now modify the Default Web Site so that only SSL communications are accepted.
S T E P 5 P R E V E N T H T T P U N S E C U R E D C O M M U N I C A T I O N S
After configuring SSL, communication using both HTTP and HTTPS is supported. The following steps can be used to disable HTTP, ensuring all communication is secure.
Ensure that SSL is disabled for the Management Server Downloads sub-directory.
1. In the Internet Information Services (IIS) Manager console, expand <server name> > Web Sites > Default Web Site and select Properties.
2. In the Properties dialog box Directory Security tab, click Edit.
The Secure Communications dialog box appears.

APPSENSE MANAGEMENT CENTER PRODUCT GUIDE 2 SERVER CONFIGURATIONSecuring Communications using SSL 56
3. Select Require secured channel (SSL).
4. Click OK.
5. Click OK to close the Properties dialog box.
6. Expand the ManagementServer node, select the Downloads node Properties.
7. In the Downloads Properties dialog box Directory Security tab, click Edit to display the Secure Communications dialog box.
8. Deselect Require secured channel (SSL).
9. Click OK.
You must ensure that this option is deselected for the Management Server Downloads node to allow CCA packages to be deployed to managed endpoints.
10. Click OK to close the Downloads Properties dialog box and close the Internet Information Services (IIS) Manager console.
APPSENSE MANAGEMENT CENTER PRODUCT GUIDE 2 SERVER CONFIGURATIONFailover 57
Troubleshooting
CCA Fails to Connect to a Management Server when SSL State Changes
When the state of the web site Secure Socket Layers (SSL) configuration is changed, either from the enabled or the disabled state, the web site must be restarted to allow the CCA to connect to the correct URLs for downloading packages or uploading events to the Management Server.
Restart the web site as follows:
1. On the computer hosting the Management Server, launch Internet information Services (IIS) Manager.
2. In the left hand navigation panel, expand the server node and highlight the Default Web Site node.
3. Select Stop in the Action menu or toolbar and click Start to restart the web site.
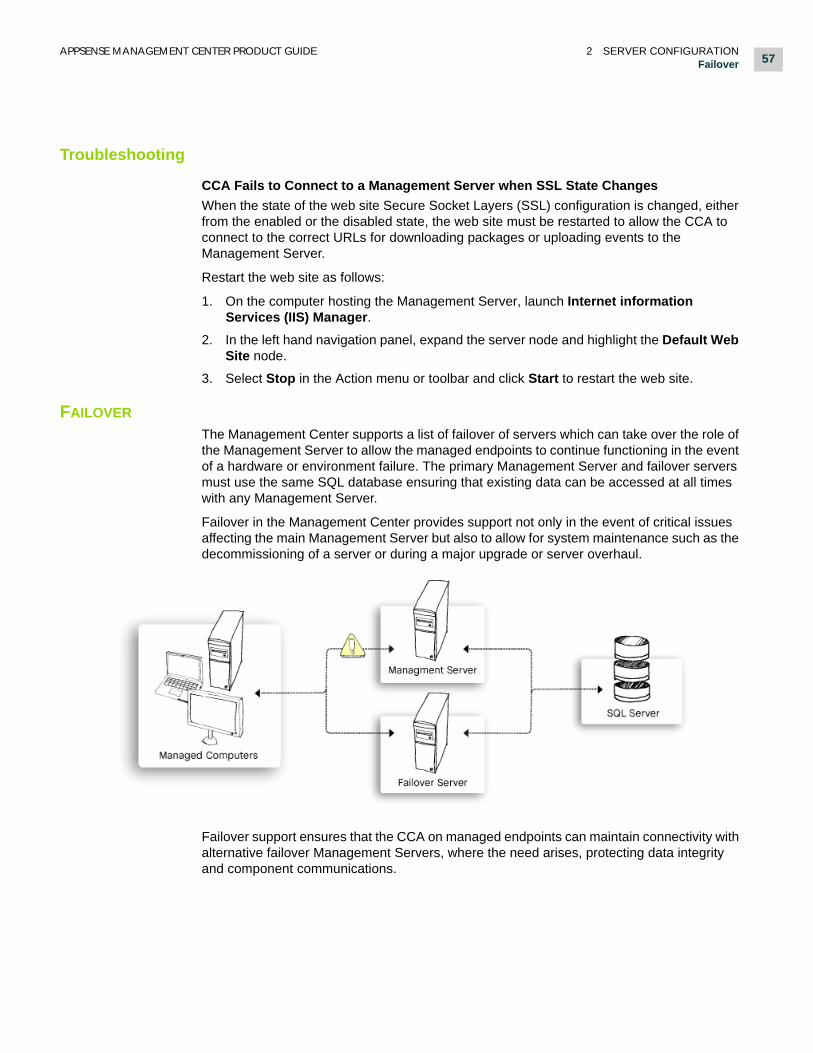
FAILOVER
The Management Center supports a list of failover of servers which can take over the role of the Management Server to allow the managed endpoints to continue functioning in the event of a hardware or environment failure. The primary Management Server and failover servers must use the same SQL database ensuring that existing data can be accessed at all times with any Management Server.
Failover in the Management Center provides support not only in the event of critical issues affecting the main Management Server but also to allow for system maintenance such as the decommissioning of a server or during a major upgrade or server overhaul.
Failover support ensures that the CCA on managed endpoints can maintain connectivity with alternative failover Management Servers, where the need arises, protecting data integrity and component communications.

APPSENSE MANAGEMENT CENTER PRODUCT GUIDE 2 SERVER CONFIGURATIONFailover 58
If multiple Management servers are being utilized then a transfer key needs to be shared between each Management server, for further details refer to Encryption on page 33.
For further information on Deployment Groups, refer to the Deployment Groups chapter.
Failover servers are maintained by the Management Center using the lists defined in the Management Console. The failover server lists are registered on managed endpoints via the CCA. The CCA can also register the Management Server URLs it uses, which are added to the list of failover servers in the Management Center. Each server is listed in order of priority, with the highest priority URL at the top of the list.
In the event that the first listed Management Server is unavailable, the CCA attempts to connect with the next Management Server in the list until a connection is achieved.
The list of Management Servers can be managed both globally for all Deployment Groups or locally applying a unique list to each Deployment Group. A local list of Management Servers applied to a Deployment Group configuration overrides the global list.
Arranging Management Servers locally for each Deployment Group allows you to manage the Management Center infrastructure flexibly, for example if you set up servers geographically bandwidth is conserved.

3
Client Communications Agent
In this Section:
Client Communications Agent Overview on page 60
Client Access Credentials on page 60
Installing the CCA on page 62
CCA Communication with the Management Server on page 66
CCA Diagnostics on page 72
APPSENSE MANAGEMENT CENTER PRODUCT GUIDE 3 CLIENT COMMUNICATIONS AGENTClient Communications Agent Overview 60
CLIENT COMMUNICATIONS AGENT OVERVIEW
The Client Communications Agent (CCA) is a software agent that must be deployed to all clients managed by the AppSense Management Center. The CCA runs as a Windows Service and performs tasks on the client when instructed by the Management Server. These tasks include the installation, upgrade and uninstall of AppSense agents and configurations and the collection and uploading of auditing information from any AppSense product agent.
The CCA polls the Management Servers periodically as determined by the poll period of the deployment group of which it is a member. Membership of a deployment group is determined by the set of membership rules as defined within the Management Console. During each poll, the CCA asks the Management Server which agents, configurations and prerequisites should be installed on the client, and which auditing events should be collected. The CCA uses this information to ensure only the correct set of agents and configurations are installed on the client and to filter the events collected by the AppSense product agents. The CCA periodically uploads all collected events to the Management Server.
CLIENT ACCESS CREDENTIALS
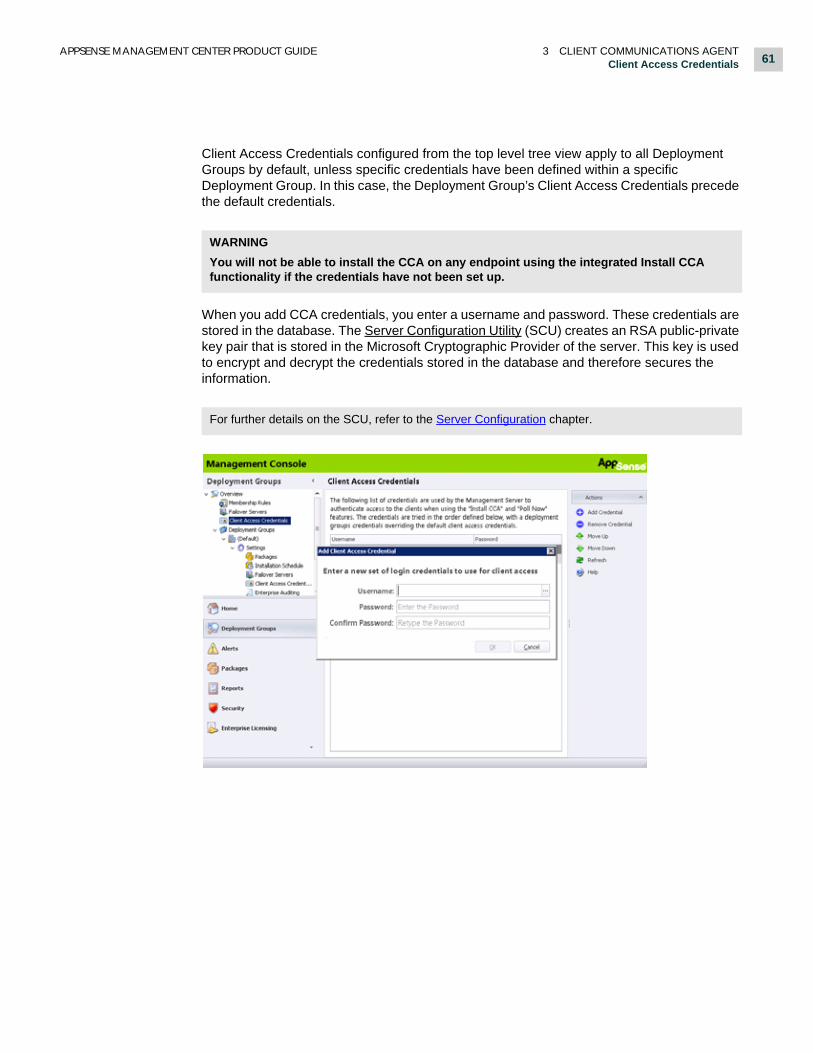
The Client Access Credentials are used to specify a list of credentials used by the Management Server to install the Client Communications Agent (CCA).
These credentials must be supplied before attempting to install the CCA on any endpoint via the Management Console.
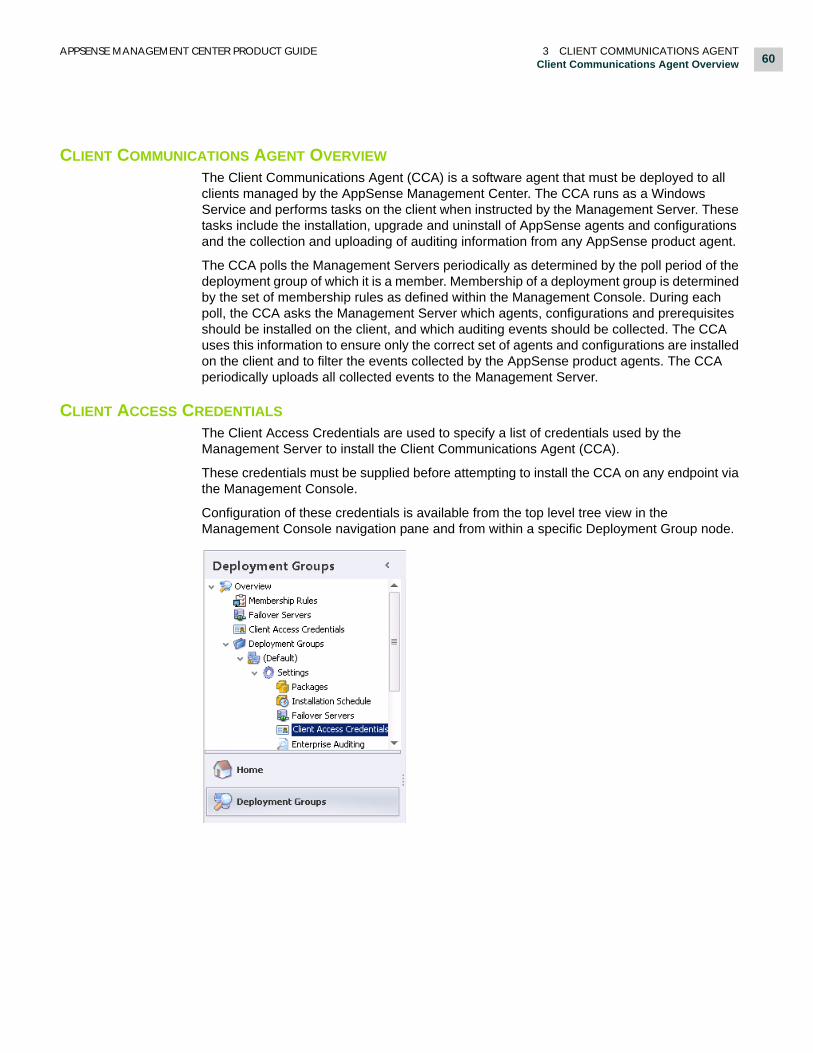
Configuration of these credentials is available from the top level tree view in the Management Console navigation pane and from within a specific Deployment Group node.
APPSENSE MANAGEMENT CENTER PRODUCT GUIDE 3 CLIENT COMMUNICATIONS AGENTClient Access Credentials 61
WARNING
You will not be able to install the CCA on any endpoint using the integrated Install CCA functionality if the credentials have not been set up.
Client Access Credentials configured from the top level tree view apply to all Deployment Groups by default, unless specific credentials have been defined within a specific Deployment Group. In this case, the Deployment Group’s Client Access Credentials precede the default credentials.
When you add CCA credentials, you enter a username and password. These credentials are stored in the database. The Server Configuration Utility (SCU) creates an RSA public-private key pair that is stored in the Microsoft Cryptographic Provider of the server. This key is used to encrypt and decrypt the credentials stored in the database and therefore secures the information.
For further details on the SCU, refer to the Server Configuration chapter.

APPSENSE MANAGEMENT CENTER PRODUCT GUIDE 3 CLIENT COMMUNICATIONS AGENTInstalling the CCA 62
On attempting to install the CCA, the credentials supplied are tried in the order defined in the list. These credentials can be ordered by making use of the Move Up and Move Down options in the Actions pane.
INSTALLING THE CCAThe Client Communications Agent (CCA) must be installed on all endpoints to be managed by AppSense Management Center. The CCA can be distributed using the integrated Install CCA functionality within the Management Console, by downloading the ClientCommunicationAgent.msi package from the Management Server web site or by third-party deployment mechanisms.
8.2 Client Communications Agents must be installed to allow any 8.2 products to be deployed.
Prerequisites
The following are prerequisites for all computers to allow CCA installation:
Allow File and Print Sharing in the Firewall settings.
The default Windows File and Print share exception opens up the following ports:
NetBIOS - TCP 139, UDP 137, UDP 138
LLMNR - TCP 5255, UDP 5355
SMB - TCP 445
RPC - TCP 135, TCP 445, UDP 445
Access to ADMIN$ share and IPC$ share.
Access to the Service Control Manager (SCM) with the following rights:
Create a service (SC_MANAGER_CREATE_SERVICE)
Query service status (SERVICE_QUERY_STATUS)
Service all access (SERVICE_ALL_ACCESS)
Service stop (SERVICE_STOP)
Service start (SERVICE_START)
Service delete (DELETE)
Windows Installer service running.
Server service running.
Typically, the local administrator has all the relevant access rights to install the CCA from the Management Console.

APPSENSE MANAGEMENT CENTER PRODUCT GUIDE 3 CLIENT COMMUNICATIONS AGENTInstalling the CCA 63
It is recommended that Membership Rules and Deployment Groups are set up before installing the CCA. For further information, refer to the Deployment Groups chapter.
The IT administrators in organizations often create master images which include the operating system with all the required software and updates required for a new computer, as a labor saving approach to setting up multiple computers. It is recommended to install the CCA on a master image prior to rolling out to computers in your organization.
Use one of the following methods to install the CCA:
Integrated Install CCA Functionality
Install CCA Manually
Install CCA in Silent Mode
Integrated Install CCA Functionality
The Management Console provides an Install CCA function which allows you to deploy the CCA to multiple computers which match the Management Center Deployment Group and Membership Rules. The CCA can be deployed either on a Microsoft Active Directory network or in a Microsoft Windows Workgroup in small or medium scale environments.
Workflow
The Install CCA functionality detects the Management Center deployment groups and uses group membership rules to provide the list of computers to which the CCA can be deployed. Active Directory is queried for Directory groups. You can select to include or exclude computers from the list.
The software requirements for the target client computers are detected and the 32-bit or 64-bit version of the CCA, assigned to the deployment group of which the computer is a member, is downloaded. If no version of the CCA is assigned to the group then the latest version is downloaded.
CCAs are copied to the target computers and installed silently, along with the correct URL of the Management Server.
The basic steps required to install the CCA are as follows:
S T E P 1 C L I E N T A C C E S S C R E D E N T I A L S
Deployment Groups > Client Access Credentials
You will not be able to install the CCA on any endpoint using the integrated Install CCA functionality if the credentials have not been set up.
Enter the user credentials; username and password, for an account which has local administrator privileges on the endpoint that the CCA is being installed.
You can add multiple accounts, they will be attempted in order of the list.

APPSENSE MANAGEMENT CENTER PRODUCT GUIDE 3 CLIENT COMMUNICATIONS AGENTInstalling the CCA 64
S T E P 2 D E P L O Y M E N T G R O U P
Deployment Groups > Deployment Groups
Create a Deployment Group.
Configure the Settings - Polling period, which will vary depending on size of enterprise. Polling is where the CCA on the endpoint initiates communication with the Management Server. The poll period is split into the following:
Computer poll period - CCA downloads updates to the Deployment Groups and Agent and Configuration Packages.
Upload poll period - CCA uploads Events.
Poll variance - reduces the impact of multiple machines polling the Management Server at any one time.
A warning displays in Deployment Groups > [Groupname] > Computers if an installation schedule is set to Disable.
Setup the Installation Schedule in Settings.
S T E P 3 M E M B E R S H I P R U L E S
Deployment Groups > Membership Rules
Every Deployment Group has a one to one relationship with a set of Membership Rules.
The Membership Rules act like a filter to discover computers within Active Directory.
Select Edit Group Conditions to add a new condition based on NetBIOS Name or Active Directory.
For the computers discovered by Membership Rules the Computer Status should initially display: No CCA deployed.
Select Submit from the Membership Rules work area.
Select Discover from the Actions pane.
The discovered computers that match the Membership Rules are listed in the relevant Deployment Group > Computers node.

APPSENSE MANAGEMENT CENTER PRODUCT GUIDE 3 CLIENT COMMUNICATIONS AGENTInstalling the CCA 65
S T E P 4 I N S T A L L C C A
Deployment Groups > [Deployment Group] > Computers
Select the computer or computers on which you want to install the CCA.
Select Install CCA from the Actions pane.
If the computer is in a Workgroup you must make sure that Anonymous authentication is selected as the client authentication method in the SCU.
The Client Access Log provides details on the installation progress. The Deployed (%) column indicates the percentage of all the packages assigned to the group that have been deployed.
Install CCA Manually
To manually install the CCA on a managed endpoint, download and run the CCA installation package on a client computer.
The Management Center download page displays where you can download the CCA, product consoles, release notes and components which are prerequisites for installing the AppSense Management Suite.
Use a web browser to view the Management Server URL and prefix the address appropriately with HTTPS or HTTP depending on whether you are implementing the Management Center with SSL encryption and a valid certificate or in a workgroup environment without SSL. For example:
If you have not configured SSL communications, use the HTTP prefix for the Management Server web site:http://<computer name>/ManagementServer/
For further information on installing the CCA manually, refer to the AppSense Management Center Installation and Upgrade Guide.
https://<computer name>/ManagementServer
Install CCA in Silent Mode
You can install the AppSense Communications Agent silently via a third-party deployment mechanism or from a command line prompt.
For further information on installing the CCA in silent mode, refer to the AppSense Management Center Installation and Upgrade Guide.

APPSENSE MANAGEMENT CENTER PRODUCT GUIDE 3 CLIENT COMMUNICATIONS AGENTCCA Communication with the Management Server 66
Client Access Log
There are a number of Client Access Log files that can be generated, these can be used to diagnose any problems, for example, CCA failing to install. The log files are generated as follows:
Management Console - Client Access Log displays in Deployment Groups > Computers and Deployment Groups > Deployment Groups > Deployment Group > Computers. The log details what actions and instructions the AppSenseBootstrap.exe is sending and receiving to the server whilst installing CCA on the endpoint.
Management Server - Select Generate diagnostics log in the Server Configuration Utility > Management Server > Services > AppSense Deployment Service. A DeploymentService.log is generated and stored here:
%Program Files%\AppSense\Management Center\Server\Bin
Client Computer - The following log files are created and stored in the system directory:
AppSenseBootstrap.log
CCA.log
CCA COMMUNICATION WITH THE MANAGEMENT SERVER
When communicating with the Management Server, the CCA will make use of the designated Client Authentication model as specified in the Management Server Configuration Utility during installation of the Management Server. This makes use of either Anonymous or Windows Authentication.
When Anonymous authentication is selected, the CCA communicates with the Management Server using a specific account designated for anonymous access, IUSR_[server name].
All interactions with the Management Server then inherit the permissions assigned to this account.
When Windows authentication is used, the computer credentials are used to communicate with the Management Server.

APPSENSE MANAGEMENT CENTER PRODUCT GUIDE 3 CLIENT COMMUNICATIONS AGENTCCA Communication with the Management Server 67
Registering with the Management Server
Once the CCA has been installed successfully, the CCA service registers with the Management Server.
There are a number of ways in which the CCA can register with the Management Server:
CCA is installed directly via the Install CCA option within the Management Console, it will automatically register with the Management Server.
CCA is installed manually using the Client Communications Agent MSI file as downloaded from the Management Server website, a valid Management Server must be supplied to allow the CCA to communicate and register with the Management Server.
CCA is installed manually from the command line including a valid Management Server URL and optionally, a specific Deployment Group with which to self-register.
The CCA can only self-register if Allow CCAs to self-register with this group is selected in Deployment Groups > [Deployment Group] > Settings > Registration.
Licenses are installed immediately.
If a Deployment Group is not specified during the installation process or the relevant group does not allow the CCAs to self-register, then the Management Server searches the membership rules, if a match is found the computer is placed in the group. If no match is found then the computer is placed in the catch-all (Default) Deployment Group.
After the CCA registers with the server, the AppSense Client Communications Agent service implements the policies to install software, generate events and poll the server for further changes and package updates.
All available agent, configuration and prerequisite packages are stored within the Management Server database, which is populated by the Management Server installation procedure.
A list of assigned packages, configured for the specific deployment group is downloaded by the CCA on the managed endpoint device from the Management Server. This list is then compared with the contents of a package store located on the managed endpoint device at:
%Program Files%\AppSense\Management Center\Communications Agent\Downloaded
If this list of assigned packages differs from the contents of the local package store, the required packages are downloaded from the Management Server. Computer restart is co-ordinated according to the Installation Schedule settings as specified on the relevant deployment group. Packages are then installed on computer startup.

APPSENSE MANAGEMENT CENTER PRODUCT GUIDE 3 CLIENT COMMUNICATIONS AGENTCCA Communication with the Management Server 68
Installing Agents with the AppSense Installation Manager
Agent installations and upgrades are only performed at computer startup and before user logon, meaning that functionality provided by the agents is never compromised while end users are logged on. You can use the AppSense Installation Manager to control when the endpoint computer restarts to install agents.
The following shows an example of the message an endpoint displays when AppSense Installation Manager is installing agents:
End-point Install and Uninstall Order
The agent schedule installs, changes, or uninstalls agents, including the Client Communications Agent (CCA), at computer startup. In addition, if you set the configuration schedule to At Computer Startup, configurations also install at computer startup. The CCA carries out the actions in the following sequence based on the packages assigned to the endpoint:
Uninstall AppSense product configurations which are no longer assigned.
Uninstall AppSense product agents which are no longer assigned.
Install or upgrade software prerequisites, for example MS Core XML Services (MSXML).
Install or upgrade assigned AppSense product agents.
Install or upgrade assigned AppSense product configurations.
Upgrade or uninstall the CCA.
When simultaneously deploying an agent and configuration for the same product, the CCA ensures that both are installed on computer startup regardless of the configuration schedule. This ensures configurations which depend on an upgraded agent are not installed too soon.When a configuration is deployed, but no change is made to its product agent, deployment occurs according to the installation schedule. For further information refer to Installation Schedule on page 99.
The AppSense Installation Manager functionality is only available when using v8.3 or later of the Management Center and CCA.
Older versions of the CCA may reboot the endpoint without warning any logged in users.

APPSENSE MANAGEMENT CENTER PRODUCT GUIDE 3 CLIENT COMMUNICATIONS AGENTCCA Communication with the Management Server 69
Agent Installation Schedule
The following options in Deployment Group > Settings > Installation Schedule > Agent Schedule allow the administrator to control whether the end user can postpone installation of packages.
Immediately - Allow user postponement for up to x hour(s)
If selected, once agents have been downloaded and are scheduled for immediate installation the end user receives the AppSense Installation Manager Postponement message.
Schedule - Allow user postponement within the schedule
If selected, once agents have been downloaded and are scheduled for installation the end user receives the AppSense Installation Manager Postponement message.
For further information on the Installation Schedule, refer to Installation Schedule on page 99.
AppSense Installation Manager Postponement Message
If the administrator has selected to allow the end user to postpone installation of agents the following message displays when there are agents ready to install:
The postponement message only displays if only one user is logged on. This prevents a user logging off other users on the system.
The message gives the user the option to postpone the installation and therefore the system restart until a more convenient time so that they have the opportunity to save work before a system restart is forced.
The user can select from the following options:
Restart Now - initiates a system restart which installs the package upon computer startup and before log on.
Be reminded in 10 minutes
Be reminded in 30 minutes

APPSENSE MANAGEMENT CENTER PRODUCT GUIDE 3 CLIENT COMMUNICATIONS AGENTCCA Communication with the Management Server 70
Be reminded in 1 hour
Available Postponement Periods for Scheduled InstallationsThe available postponement time periods are determined by the installation schedule.For example, a postponement time will not be offered if it would delay the installation past the scheduled installation time. Or, if the scheduled installation time is less than the minimum postponement time the option to postpone does not display and only the Restart Now option is available.The default postponement period is always the shortest selectable time period.
AppSense Installation Manager Countdown Message
When there are no more postponement intervals available the following countdown message displays:
Warning
If a user has bypassed the agent installation before the end of the schedule, for example by shutting the computer down, then the installation will automatically take place at computer startup.
The Postponement message and the Countdown message display in the following languages:
The AppSense Installation Manager countdown message only displays the Restart now button for single user sessions. If there are multiple users the countdown message displays for information only informing the users of the remaining time before a restart will take place with no option to restart.
The maximum countdown time is 5 minutes, the countdown time can reduce if the scheduled installation time is in less than 5 minutes.
US English
UK English
French
German

APPSENSE MANAGEMENT CENTER PRODUCT GUIDE 3 CLIENT COMMUNICATIONS AGENTCCA Communication with the Management Server 71
Agent Installation Schedule Recommended Settings
When using the AppSense Installation Manager functionality the following settings are recommended:
Setting Suggested Use
Immediately and with postponement
Use this setting when you need to push out an update quickly, such as an important patch release or hotfix.
Scheduled and with postponement
Use this setting when you need to push out updates in a predictable manner. For example, when an installation is required by a certain time of day.
At Computer Startup Use this setting when either the update can wait until the end user schedules a computer restart, or when a remote computer restart would be scheduled out of normal working hours to install an update - this is the recommended setting for servers.
Polling Periods
The CCA regularly polls the server for updates and changes to the deployment policy, as configured on the Settings node of the relevant Deployment Group.
Computer Poll Period
The Computer Poll Period determines how frequently the CCA communicates with the Management Server to check for changes related to assigned product agents, configurations or deployment group settings.
The Computer Poll Period can be set to occur as low as 1 minute intervals or as high as every 7 days. The default Computer Poll Period is set to 1 hour and the following are selectable values:
1, 5, 15,30 minutes
1, 4, 8, 12 hours
1, 2, 5, 7 days
Once a computer poll period is determined, you can include a poll variance to reduce the impact of multiple CCAs polling at any one time. The variance ranges from 0 to 100 percent and works by staggering when the CCAs poll. Example, if a poll period is set to 10 minutes with a variance of plus or minus (+/-)10% the CCA will poll between 9 and 11 minutes. The default Computer Poll Period Variance is 20%.
Upload Poll Period
The Upload Poll Period determines how frequently the CCA uploads event data from the managed endpoint device to the Management Server database.
The Upload Poll Period can be set to occur as low as 1 minute or as high as 1 Day. The default upload poll period is set to 30 minutes and the following are selectable values:
1, 5, 15, 30 minutes
1, 4, 8, 12, hours
1 Day

APPSENSE MANAGEMENT CENTER PRODUCT GUIDE 3 CLIENT COMMUNICATIONS AGENTCCA Diagnostics 72
Once an upload poll period is determined, you can include a variance to reduce the impact of multiple CCAs uploading at any one time.
CCA DIAGNOSTICS
Diagnostics provide the administrator with an overall view of the health of the Client Communications Agent (CCA) in terms of the relationship and communication with the Management Server.
The Failover Servers and Diagnostics features are supported from CCA version 7.2 and above.
Diagnostics can be enabled or disabled for each Management Server from the Failover Servers node by selecting the Diagnostics Enabled option next to the relevant Management Server. By default this option is disabled.
When the Diagnostics Enabled option is selected, the CCA on managed endpoint devices runs a series of self-tests on first contact with the Management Server or when requested by the Management Server during a poll.
Additionally, to perform a manual diagnostics test select the Request Diagnostics option from the Actions pane available from the Computers view of a specific deployment group.
An event which indicates the test result, is raised in the Windows Event Log on the managed endpoint device and sent to the Management Server.
Each test provides a success or failure result and, where a test fails, a detailed error report is included in the event report.
In the event of a test failure the Management Console highlights, in red, the names of the computers where the failure occurred and also highlights the deployment groups in the navigation pane containing computers on which the tests failed.
There are four specific tests that are run when diagnostics are requested:
Connectivity
The connectivity test involves the CCA attempting to poll the Management Server. Any response, other than an HTTP 200 (Success) return value, indicates a failure and a detailed error message is returned. If this test fails, the results cannot be sent to the Management Server (as there is no connectivity) but can be viewed in the local Application Windows Event Log on the endpoint device.
Download of Packages
This test downloads a sample file from the Management Server to the local hard disk of the endpoint device, using the Background Intelligent Transfer Service (BITS).
Instead of downloading a full MSI package, the CCA downloads a small XML file which can be easily validated and has a minimal impact on network bandwidth. The XML file is downloaded from the same directory as standard MSI packages to ensure the same access rights affect both file types. Once the test is complete, the downloaded file is deleted.
Since BITS downloads can be delayed if the local computer is under heavy load, the download occurs within a new high priority BITS job, ensuring the test completes in a shorter time. A single BITS job is used to download files from all enabled failover URLs.

APPSENSE MANAGEMENT CENTER PRODUCT GUIDE 3 CLIENT COMMUNICATIONS AGENTCCA Diagnostics 73
If any errors are reported during the download, the test fails. A description of the error is included in the test results.
High Priority Events
The high priority events diagnostics test allows critical events to be sent to the Management Server database from the managed endpoint device. A typical high priority event is the reporting of a failure to install packages. The test attempts a call by the CCA from the managed endpoint to the Management Server with an empty list of events. Any error values returned by the call are added to the results.
Upload of Events
The diagnostics test attempts to upload an events file using BITS from the local hard disk on the endpoint device to the Management Server. The events file is empty so as to help minimize impact on network bandwidth, and is uploaded to the same directory on the Management Server as standard event uploads.
%\Program Files%\AppSense\Management Center\Server\Web Site\Deployment\Events
Since BITS uploads can be delayed if the local computer is under heavy load, the upload occurs within a new high priority BITS job ensuring the test completes in a shorter time.
If any errors are reported during the upload, the test fails. The description of the error is included in the test results.
This test only verifies that events can be sent from the CCA on the managed endpoint device to the Management Server. No checks are made to ensure that the events can be uploaded to the database. When this fails, an event is added to the Management Server event log and raises a Management Center event, where possible.
The Computers view within a specific Deployment Group provides a Diagnostic State which indicates the current state of the diagnostics taking place on the endpoint device.
There are four diagnostics states including:
Untested
Pending
Requested
Completed
The diagnostics test results are reported to the Management Server and displayed in the Diagnostics tab in the Management Panel area of the Computers view within the relevant deployment group, including a breakdown of the test type and the result of each test.
4
Home
In this Section:
Home Introduction on page 75
Connect to The Management Server on page 75
Management Server Overview on page 76
Management Server Details on page 80
System Events on page 81

APPSENSE MANAGEMENT CENTER PRODUCT GUIDE 4 HOMEHome Introduction 75
HOME INTRODUCTION
The Home view serves two purposes, firstly, to select a Management Server to which to connect and secondly, to provide a global overview of all Groups, Computers and Alerts for the connected server. The connected Management Server has a System Events node which reports all recorded event IDs.
For further information on Events ID’s, refer to Auditing Events on page 154.
CONNECT TO THE MANAGEMENT SERVER
You can connect to the Management Server using the Click here to connect link in the Connection option in the Work Area.
Select Management Server
The Select Management Server dialog box displays when you select to connect to a Management Server in the Home view of the Management console.
The dialog box allows you to connect to a Management Server and maintain the list of Management Servers with which you regularly connect.

APPSENSE MANAGEMENT CENTER PRODUCT GUIDE 4 HOMEManagement Server Overview 76
Settings
New Server – Click to add a new server to the list by providing details in the Add Server dialog box, including friendly name, server name (computer name or IP address), connection type and port number (HTTP/80, HTTPS/443).
Edit Server – Click to edit a listed server by providing details in the Edit Server dialog box, including, friendly name, server name (computer name or IP address), connection type and port number (HTTP/80, HTTPS/443).
Delete Server – Remove the highlighted server from the list.
Highlight the server to which you want to connect and click Connect to display the Connect to [Management Server Name] dialog.
Connect to [Management Server]
The Connect to [Management Server Name] dialog box prompts you to provide credentials for connecting to the selected server, either using the currently connected user account or a custom user. You can browse for a user on the active directory or local network, provide a password and, where appropriate, the domain.
A user can only connect successfully if they have Connect permissions configured in the Security view of the Management console.
For further information, refer to the Security chapter.
MANAGEMENT SERVER OVERVIEW
The Home > Management Server view displays as follows if there is a Management Server connected.
A global overview of the Management Server displays in the work area and includes the following:

APPSENSE MANAGEMENT CENTER PRODUCT GUIDE 4 HOMEManagement Server Overview 77
Connection
Indicates the connection status with a Management Server:
Click here to connect (only available when no server is connected) — No server is connected.
Click the link to launch the Select Management Server dialog box for connecting the Management Console to a Management Server.
Connected To — Indicates the name and path of the currently connected Management Server.
Click the link to toggle the display to the Management Server Details.
User - Name of the user connected to the server, as selected in the Connect to [Management Server] dialog box.
Click the link to toggle the display to Security > Server Permissions.
Global Permissions - Indicates the Server Role assigned to the user connected to the server.
Click the link to toggle the view to Security > Security Roles > Server.
For further information, refer to Security Roles on page 148.
Groups
Indicates the number of deployment groups configured on the connected server:
Groups — Indicates the number of Deployment Groups which currently exist on the Management Server.
Click the link to toggle the view to Deployment Groups > Overview.
Deployed - Number of groups deployed.
Click the link to toggle the view to Deployment Groups > Overview > Deployment Groups.
With Errors - Number of groups with deployment errors.
Click the link to toggle the view to Deployment Groups > Overview > Deployment Groups.
Computers
Indicates the number of computers configured on the connected server.
Computers - Number of Managed Computers.
Deployed - Number of computers with packages deployed.
Offline - Number of computers offline. A computer shows as offline if the CCA does not poll back within twice the default poll period.
The poll period is set in Deployment Groups > Overview > Deployment Groups > [Deployment Group Name] > Settings.
APPSENSE MANAGEMENT CENTER PRODUCT GUIDE 4 HOMEManagement Server Overview 78
With Errors - Number of computers with errors. An error occurs if an attempt has been made to deploy a package and it has failed.
Click any of the links to toggle the display to Deployment Groups > Overview > Computers.
Alerts
Indicates the number of alerts currently active on the server:
Alerts - Indicates the number of alerts.
Alert rules allow you to specify the event criteria to match with an incoming event to generate an alert. Alert rules allocate a severity for an alert and matches against the specified event ID. Alert rules can also match against any value for computer or user to generate more specific alerts.
Click the link to toggle the display to Alerts > All.
Critical - Number of critical alerts.
Click the link to toggle the display to Alerts > All > Critical.
New - Number of new alerts.
Click the link to toggle the display to Alerts > All > New.
New In Last 24 Hours - Number of new alerts raised in the last 24 hours.
Click the link to toggle the display to Alerts > All > New In Last 24 Hours.
Actions
Connect (only available when no server is connected) - Select to connect to a Management Server using the Select Management Server dialog box.
Disconnect (only available when a server is connected) - Select to disconnect the currently connected Management Server.
Download Page (only available when connected to a Management Server) - Displays the Management Center Download Page in a web browser. All available software releases are listed for download.
The Downloads page is best viewed in Internet Explorer 7 or higher.

APPSENSE MANAGEMENT CENTER PRODUCT GUIDE 4 HOMEManagement Server Overview 79
Comms Timeout - Displays the Communications Timeout dialog box.
The following timeout values can be set to determine the amount of time the Management Console should wait to get a response from the Management Server, the default values are set to 60 seconds:
General Timeout - used by the Management Console when communicating with the Management Server.
Report Timeout - used by the Management Console when generating a report.
Select OK to save the values to the database.
The default value is set to 60 seconds, be aware that if you set the value too low the Management Console may not be able to communicate with the server and if the value is set too high then the Management Console may stall if there is a communications issue.

APPSENSE MANAGEMENT CENTER PRODUCT GUIDE 4 HOMEManagement Server Details 80
MANAGEMENT SERVER DETAILS
The Home > Management Server > [Management Server Name] node displays details of the connected Management Server.
The following table lists the server details that display in the work area:
Property Value
Groups Number of deployment groups within the Management Center. This includes the (Default) deployment group which is always present.
Groups - Deployed Number of deployment groups which are fully deployed. Counts deployment groups that have all computers 100% deployed.
Groups - Error Number of deployment groups which have computers reporting errors.
Computers Number of computers currently registered with the Management Server.
Computers - Errors Number of computers reporting errors.
Computers - Deployed Number of computers which are fully deployed.
Computers - Offline Number of offline computers.
Events - New Number of events currently generated and uploaded to the Management Server by managed endpoints.
Events - New In The Last 24 Hours
Number of events generated within the past 24 hours.
Alerts Number of new alerts which have not yet been resolved or acknowledged.
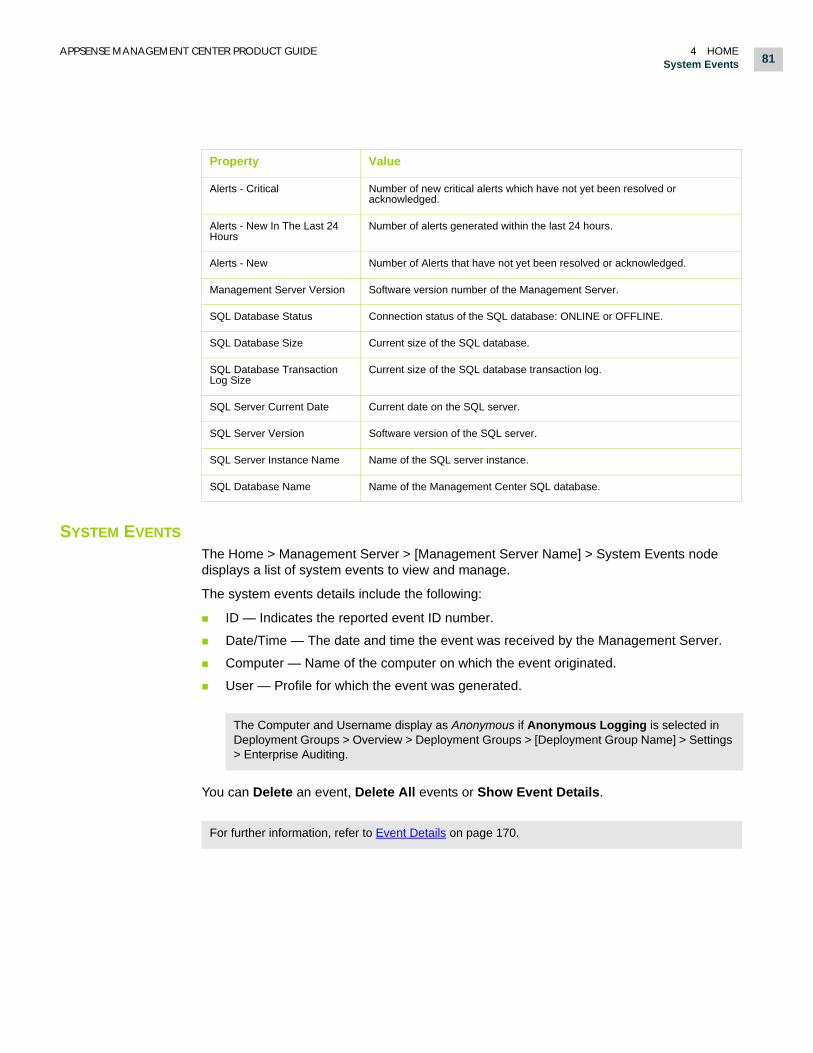
APPSENSE MANAGEMENT CENTER PRODUCT GUIDE 4 HOMESystem Events 81
SYSTEM EVENTS
The Home > Management Server > [Management Server Name] > System Events node displays a list of system events to view and manage.
The system events details include the following:
ID — Indicates the reported event ID number.
Date/Time — The date and time the event was received by the Management Server.
Computer — Name of the computer on which the event originated.
User — Profile for which the event was generated.
The Computer and Username display as Anonymous if Anonymous Logging is selected in Deployment Groups > Overview > Deployment Groups > [Deployment Group Name] > Settings > Enterprise Auditing.
For further information, refer to Event Details on page 170.
You can Delete an event, Delete All events or Show Event Details.
Alerts - Critical Number of new critical alerts which have not yet been resolved or acknowledged.
Alerts - New In The Last 24 Hours
Number of alerts generated within the last 24 hours.
Alerts - New Number of Alerts that have not yet been resolved or acknowledged.
Management Server Version Software version number of the Management Server.
SQL Database Status Connection status of the SQL database: ONLINE or OFFLINE.
SQL Database Size Current size of the SQL database.
SQL Database Transaction Log Size
Current size of the SQL database transaction log.
SQL Server Current Date Current date on the SQL server.
SQL Server Version Software version of the SQL server.
SQL Server Instance Name Name of the SQL server instance.
SQL Database Name Name of the Management Center SQL database.
Property Value

5
Deployment Groups
In this Section:
Deployment Groups Introduction on page 83
Deployment Groups Overview on page 84
Configuring Deployment Groups on page 85
Membership Rules on page 86
Failover Servers on page 88
Client Access Credentials on page 92
Deployment Groups on page 93
Computers on page 110

APPSENSE MANAGEMENT CENTER PRODUCT GUIDE 5 DEPLOYMENT GROUPSDeployment Groups Introduction 83
DEPLOYMENT GROUPS INTRODUCTION
Deployment Groups contain controls for handling group membership, package assignment, installation schedule, failover servers, client access credentials, enterprise auditing policies, monitoring for alerts and events and computer management settings.
Membership Rules act as a filter to include or exclude conditions to match computers to deployment groups. Membership rules have a one to one relationship with deployment groups and are set up in the Deployment Groups > Overview > Membership Rules.
The Deployment Groups view has the following nodes:
Deployment Groups Overview - global overview of deployment groups, computers and alerts for the Management Server.
Membership Rules - determines to which group a computer is assigned.
Failover Servers - global list of alternative management servers for all deployment groups.
Client Access Credentials - global list of client access credentials for all deployment groups.
Computers- global list of all computers for the management server.
Deployment Groups - contains the following nodes:
(Default) - pre-defined deployment group. Computers are assigned to the (Default) group if no membership rules are matched.
[Deployment Group] - user created deployment group, populated with computers that match the group membership rules.
Each deployment group has the following nodes:
Settings - controls the polling periods and polling variations, package assignment, installation schedule, failover servers, Client Access Credentials and enterprise auditing at deployment group level.
If you set up the failover server list for the deployment group and select Override Default Failover Servers then this list overrides the global list setup in Deployment Groups > Overview > Failover Servers.
If you set up the Client Access Credentials for the deployment group, the list overrides the global list setup in Deployment Groups > Overview > Client Access Credentials.
Alerts - list of all alerts for the deployment group.
Events - list of all events for the deployment group.
Computers - list of all computers in the deployment group.

APPSENSE MANAGEMENT CENTER PRODUCT GUIDE 5 DEPLOYMENT GROUPSDeployment Groups Overview 84
DEPLOYMENT GROUPS OVERVIEW
The Deployment Groups > Overview work area provides a global overview of Deployment Groups, Computers and Alerts and includes the following:
Groups
The Groups section displays the number of deployment groups including the (Default) deployment group. The (Default) group is a pre-defined deployment group. Computers are assigned to the (Default) group if no membership rules are matched.
The number of groups that have all of their computers completely deployed i.e. packages are 100% deployed, are also displayed.
Click on Groups or Deployed to change the view to the Deployment Groups node.
In the Actions pane you have the option to create a New Deployment Group, this creates a new group in the Deployment Groups node.
Computers
The Computers section displays a global overview of Managed Computers, including the number of managed endpoints, the number of completely deployed computers i.e. packages are 100% deployed, the number of computers that are offline and the number of computers with errors.
The Computer Poll Period is set up in Deployment Groups > [Deployment Group] > Settings, the default poll period is set at 1 Hour.
Click on Computers, Deployed, Offline or With Errors to change the view to the Computers node.
A computer is considered offline if the installed CCA does not poll back within twice its default poll period.
A computer shows with errors if an attempt to deploy a package has failed or has a diagnostic error. The relevant Computer displays in red in the Computers node and also the Group to which the computer belongs.
Alerts
The Alerts section displays an overview of all alerts and then shows the breakdown for critical alerts, alerts within the last 24 hours and new alerts.
Critical - a critical alert is defined in Alerts > Alert Rules > Details > Severity.
Created in Last Day - alerts which have a status of new and that have been raised in the last 24 hours.
New - a new alert is defined in the alert Status.
For further information about Alerts, refer to the Alerts section.
The critical, created in last day and new alert categories are not mutually exclusive, therefore, an alert can potentially be seen in all 3 categories.

APPSENSE MANAGEMENT CENTER PRODUCT GUIDE 5 DEPLOYMENT GROUPSConfiguring Deployment Groups 85
CONFIGURING DEPLOYMENT GROUPS
Once created, Deployment Groups can be configured in a number of ways, this is a suggested workflow so you can see all elements that need to be setup.
Further information on each of these steps is provided in the relevant section throughout this chapter.
S T E P 1 C R E A T E D E P L O Y M E N T G R O U P
Deployment Groups > Overview > Deployment Groups > New Deployment Group in the Actions pane.
A new deployment group is created. The new group is created with the name NewGroup, once one new group has been created all subsequent new groups are appended with a number. The focus is on the Computers node within the deployment group node. Move back up to the NewGroup node to rename the node. To rename the node you can right-click and select Rename from the context menu, alternatively you can click on the Name field in the Details section in the deployment group work area, this provides a drop down editable box.
S T E P 2 S E T U P M E M B E R S H I P R U L E S
Deployment Groups > Overview > Membership Rules
A membership rule is automatically created on creation of a deployment group. Edit the membership rules to set up the conditions. You can move the membership rules up and down, this is important because when discovering computers the computer is placed in the first deployment group that has a matching rule.
S T E P 3 D E P L O Y M E N T G R O U P S E T T I N G S
Deployment Groups > Overview > Deployment Groups > [Deployment Group Name] > Settings
Set up the following elements specific to the deployment group:
Packages - lists all available packages, select the packages you want to install.
Installation Schedule - set up how the agent and configuration packages install, for example, immediately or at scheduled times.
Failover Servers - list of alternative Management Servers to which Communications Agents connect. This list overrides the default Failover Servers list setup in Deployment Groups > Overview > Failover Servers.
Client Access Credentials - list of credentials used by the Management Server to install the Communications Agent on client computers. Move the credentials up and down to order the list, this is important because the credentials are attempted in the order they appear in the list. This list overrides the default Client Access Credentials list setup in Deployment Groups > Overview > Client Access Credentials.
Enterprise Auditing - Lists event IDs for all products, select to enable enterprise auditing. Turn anonymous, machine or user, logging on or off.

APPSENSE MANAGEMENT CENTER PRODUCT GUIDE 5 DEPLOYMENT GROUPSMembership Rules 86
S T E P 4 D I S C O V E R C O M P U T E R S
Deployment Groups > Overview > Deployment Groups > [Deployment Group Name] > Computers
Click Discover in the Actions pane to find computers that match the group membership rules. Matching computers display in the list.
S T E P 5 I N S T A L L C C A
Deployment Groups > Overview > Deployment Groups > [Deployment Group Name] > Computers
Click Install CCA to deploy the Client Communications Agent out to the selected computers. You must have the CCA Credentials set up to be able to install the CCA.
The Client Access Log tab in the Computers work area displays details on the installation progress.
MEMBERSHIP RULES
Membership rules can be configured to determine which Deployment Group a computer is assigned to. These rules are configured by adding or excluding conditions based on computer by NetBIOS name, or path references to Active Directory computers, computer groups or containers.
The Deployment Groups to which you want to assign membership rules must have been created first in the Deployment Groups node.
A membership rule is automatically created on creation of every deployment group.
The (Default) Deployment Group has a non-editable set of membership rules to Include All. You cannot add, or remove a condition or change the priority for this group.

APPSENSE MANAGEMENT CENTER PRODUCT GUIDE 5 DEPLOYMENT GROUPSMembership Rules 87
When multiple membership conditions are added for a specific Membership Rule for a deployment group, boolean logic dictates that these rules have an OR relationship added.
Example
Cross-domain environments are not currently supported for membership rules.
If a computer is located in the Test organizational unit in the Development domain OR the computer NetBIOS name includes doc-xp then the computer is a member of the XP Deployment Group.
Membership Rules are processed in the order the Deployment Groups are listed in the Membership Rules work area. Therefore, if a computer matches multiple membership conditions in different Deployment Groups, it is added to the first Deployment Group in the list where a membership condition matches.
To change the order of the Deployment Groups use the Move Up and Move Down options in the Actions pane.
The Discover option in the Actions pane performs an immediate discovery for computers and places the computers into the first group that has a matching rule.

APPSENSE MANAGEMENT CENTER PRODUCT GUIDE 5 DEPLOYMENT GROUPSFailover Servers 88
An automatic discovery of computers is performed every five minutes, which is not configurable.
FAILOVER SERVERS
The Failover Servers node allows you to maintain a list of failover servers which can take over the role of the Management Server in the event of the following:
A connection, hardware or environment failure.
Decommissioning a Management Server.
Conducting an update.
Overhauling a Management Server.
The Client Communications Agent (CCA) on managed endpoints downloads the list of servers and maintains the list as a reference. If a Management Server is unavailable, the managed computer refers to the list and attempts to register with the next available server in the list. The list of servers consists of one or more URLs. You can specify a server using the server NetBIOS name, the fully qualified domain name or the IP address.
The failover servers can be maintained in the default list which applies to all deployment groups and in local lists for each deployment group. Local deployment group lists override the default settings. The failover settings are maintained in the following locations of the Management Console:
Default list - Deployment Groups > Overview > Failover Servers
Local list - Deployment Groups > Overview > Deployment Groups > [Deployment Group Name] > Settings > Failover Servers
The Failover Servers node, whether it is the default or the local node, allows you to add and remove failover servers by Server name. The list of servers is shown in order of priority. To change the order use the Move Up and Move Down options in the Actions pane. To validate

APPSENSE MANAGEMENT CENTER PRODUCT GUIDE 5 DEPLOYMENT GROUPSFailover Servers 89
connections, select Diagnostics Enabled, to set a diagnostics check prompt on any client computer connecting with a particular server. By default, the Server is enabled but the Server Enabled option allows you to disable the server to prevent further connections.
When the CCA successfully registers with a Management Server, the URL of the server is added to the server list if the URL does not already exist. This ensures the CCA never loses contact with the Management Server. A URL can be removed from the list of servers to which CCAs connect, by deselecting the Server Enabled option.
The Failover Servers and Diagnostics features are supported only from CCA version 7.2 and above. It is recommended to upgrade your CCA installations before configuring Failover Servers and Diagnostics.
Deployment Groups Failover Servers
The Deployment Groups > Overview > Deployment Groups > [Deployment Group Name] > Settings > Failover Servers node includes the following options which are not available in the default Failover Servers list:
Override Default Failover Servers - Overrides the default list of failover servers and applies the settings in the list to all computers in the local deployment group.
If you have a default failover list and a deployment group failover list configured but do not select Override Default Failover Servers the failover servers defined in the group are ignored.
Manage Default Failover Servers - Link to the default Failover Servers list in Deployment Groups > Overview > Failover Servers.

APPSENSE MANAGEMENT CENTER PRODUCT GUIDE 5 DEPLOYMENT GROUPSFailover Servers 90
Failover Servers List
The Management Server list, whether it be the default list or the local list, displays in the work area and includes the options shown in the following table:
Column Description
Server The URL address of the failover server. Displayed in one of the following formats and may also include port specifications: Server host name:
IP address:
Fully qualified path:
Diagnostics Enabled Not selected by default.When selected for Management Servers, all connecting CCAs on Managed Computers perform self-tests at startup and on request to ensure that connectivity is available.
CCA self-tests report events to the Management Server, except in the case of connectivity issues or failure, and also reports to the local Windows Event Log.
CCA self-tests check the following: Connectivity. Package downloads. Event uploads. Ability to raise high priority events, such as failure to install packages.
Server Enabled Selected by default. When selected, the server is available. When deselected, the server is unavailable for any further connections. Client computers automatically redirect to the next available server in the list. This can be used when decommissioning a server by preventing CCAs connecting to the server.
Actions
Add Server — Launches the Add Failover Server dialog box. Enter a URL or browse for a server to add to the list. Select the Connection Type, HTTP or HTTPS, and the connection port.
Remove Servers — Removes servers from the list of failover servers.
Any servers removed from the Failover Servers list which are still listed by CCAs on managed endpoints registering with the server, are added back into the list automatically. To avoid this occurring, it may be necessary to disable redundant or decommissioned servers until all managed endpoints have been updated with the correct list of available servers.
Move Up — Moves the selected server to a higher position in the list and in the order of priority.
http://MyServer:80/ManagementServer
http://123.456.789.0/ManagementServer
http://MyServer.MyDomain.com/ManagementServer

APPSENSE MANAGEMENT CENTER PRODUCT GUIDE 5 DEPLOYMENT GROUPSFailover Servers 91
Move Down — Moves the selected server to a lower position in the list and in the order of priority.
Test Server Connection — When selected, the Management Server performs a connection test to each selected server in the list and reports any successes or failures in a dialog.
Diagnostics
The CCA on managed endpoints runs a series of self-tests on first contact with the Management Server or when requested by the Management Server during a poll. Diagnostics can be enabled or disabled for any Management Server listed in the Failover Servers list.
Each failover server entry in the failover servers lists includes the Diagnostics Enabled option. The Management Server always requests a self-test when the CCA first polls due to a reboot or service restart.
All tests are run and an event, which indicates the test result, is raised in the Windows Event Log and sent to the Management Server. Each test contributes a success value to the results and, when tests fail, a detailed error report is also included in the event report. In the event of a test failure, the Management Console highlights, in red, the names of computer where the failure occurred and also highlights the deployment groups in the navigation pane containing computers on which the tests failed.
The CCA performs the following self-tests:
Connectivity
The connectivity test polls the Management Server. Any response, other than an HTTP 200 (Success) return value, indicates a failure and a detailed error message is returned. If this test fails, the results cannot be sent to the Management Server but can be viewed in the local Windows Event Log.
Package Download
This test downloads a file from the Management Server to the local hard disk, using BITS. Instead of downloading an MSI package, the test downloads a small XML file which can be easily validated and has a minimal impact on network bandwidth. The XML file is downloaded from the same directory as packages to ensure the same access rights affect both file types. Once the test is complete, the downloaded file is deleted.
Since BITS downloads can be delayed if the local computer is under heavy load, the download occurs within a new high priority BITS job, ensuring the test completes in a shorter time. A single BITS job is used to download files from all enabled failover URLs.
If any errors are reported during the download, the test fails. The description of the error is included in the test results.
Upload Events
This test attempts to upload an events file using BITS from the local hard disk to the Management Server. The events file contains no events to help minimize impact on network bandwidth and is uploaded to the same directory as standard event uploads.
Since BITS uploads can be delayed if the local computer is under heavy load, the upload occurs within a new high priority BITS job ensuring the test completes in a shorter time.

APPSENSE MANAGEMENT CENTER PRODUCT GUIDE 5 DEPLOYMENT GROUPSClient Access Credentials 92
If any errors are reported during the upload, the test fails. The description of the error is included in the test results.
This test only verifies that events can be sent from the CCA to the Management Server. No checks are made to ensure that the events can be uploaded to the database. When this fails, an event is added to the Management Server event log and raised a Management Center event, where possible.
Raise High Priority Events
The high priority events mechanism allows critical events to be sent to the Management Server database. A typical high priority event is the reporting of a failure to install packages. The test attempts a call by the CCA to the Management Server web page with an empty list of events. Any error values returned by the call are added to the self-test results.
CLIENT ACCESS CREDENTIALS
Client Access Credentials are used by the Management Server to authenticate access to the clients when installing the Client Communications Agent (CCA).
For further information about the Client Communications Agent, refer to the Client Communications Agent chapter.
You will not be able to install the CCA on any endpoint using the integrated Install CCA functionality if the credentials have not been set up.
These credentials must be supplied before attempting to install the CCA on any endpoint via the Management Console.
You can configure a default list of credentials in Deployment Groups > Overview > Client Access Credentials and a deployment group list, which overrides the default, in Deployment Groups > Overview > Deployment Groups > [Deployment Group Name] > Settings > Client Access Credentials.

APPSENSE MANAGEMENT CENTER PRODUCT GUIDE 5 DEPLOYMENT GROUPSDeployment Groups 93
For further information about the SCU, refer to the Server Configuration chapter.
Client Access Credentials configured from the top level tree view apply to all Deployment Groups by default, unless specific credentials have been defined within a specific Deployment Group. In this case, the Deployment Group’s Client Access Credentials override the default Client Access Credentials.
The credentials are attempted in the order defined in the work area, to change the order use the Move Up and Move Down options in the Actions pane.
Select Add Credential to enter a username and password. The credentials are stored in the database, the Server Configuration Utility (SCU) creates an RSA public-private key pair that is stored in the Microsoft Cryptographic Provider of the server. This key is used to encrypt and decrypt the credentials stored in the database and therefore secures the information.
DEPLOYMENT GROUPS
The Deployment Groups work area lists all deployment groups. A global overview of the number of computers and alerts in each deployment group is displayed, together with the number of computers that have all their packages completely deployed.

APPSENSE MANAGEMENT CENTER PRODUCT GUIDE 5 DEPLOYMENT GROUPSDeployment Groups 94
Select New Deployment Group in the Actions pane to create a new deployment group. A new node is created for the deployment group.
For details of the suggested workflow after creating a deployment group, refer to Configuring Deployment Groups on page 85.
If an existing deployment group is deleted, computers within the deleted group are moved to the (Default) group.
The (Default) node includes computers which are registered to the Management Server but do not match the membership criteria of existing deployment groups.
Deployment Group
The Deployment Group work area displays an overview of the following:
Details
The name and description of the deployment group. Click in either field to make any amendments.
Settings
Click the Manage Group Settings link to change focus the to the deployment group Settings node.
Computers
Displays the total number of computers within the selected deployment group, the user has permission to view, the number of completely deployed computers i.e. packages are 100% deployed, the total number of Computers which are currently offline and the number of computers which have either a deployment or diagnostic error.
Alerts
Displays the total number of unresolved alerts that the user has permission to view for the deployment group. Also displays, the total number of unresolved alerts which belong to an alert rule that has Critical severity, the total number of unresolved alerts that have been raised in the last 24 hours and the total number of alerts which have a status set to New.
Events
Click on any of the active links to change focus to selected node within the deployment group.
Displays the total number of events in the system which belong to the selected deployment group that the user has permission to view and the total events raised in the last 24 hours.

APPSENSE MANAGEMENT CENTER PRODUCT GUIDE 5 DEPLOYMENT GROUPSDeployment Groups 95
Actions
For further information about Security, refer to Security chapter.
Security — Launches the Security for [Deployment Group Name] dialog box in which you can change the Allow/Deny settings in the list of available Security Roles and change the owner of the current object.
Each deployment group includes the following sub-nodes for managing settings, alerts, events and computers:
Settings
Alerts
Events
Computers
Settings
The Settings node provides options in the main panel for poll periods and CCA registration. The sub-nodes provide settings for Packages, Installation Schedule, Failover Servers, Client Access Credentials and Enterprise Auditing.
The Settings node main panel includes the following sections:
Polling
Computer poll period — Sets the frequency the managed computer checks the server for changes to the deployment group. When new settings, agents or configurations are detected, the CCA on the managed computer downloads the relevant components and installs them. The computer also initiates diagnostics tests when a request is detected on this poll period.
Computer poll period variance — Poll variance is used to reduce the impact on the Management Server when polling occurs. Use the slider to apply a variance as to when the CCAs are to poll.
The Failover Servers and Diagnostics features are supported only in CCA version 7.2 and later.
Product agents and configurations are installed according to the installation schedule. Expand the settings node to display the Installation Schedule sub-node to configure the schedule settings.
The default computer poll period is 1 Hour.

APPSENSE MANAGEMENT CENTER PRODUCT GUIDE 5 DEPLOYMENT GROUPSDeployment Groups 96
Upload poll period — Sets the frequency with which managed endpoints upload event data.
Upload poll period variance — This variance works in the same manner as the computer poll period variance and is used to stagger the times when the CCAs upload event data to the Management server.
The default upload poll period is 30 minutes.
The Computer Poll Period ranges from 1 minute to 7 days. The Upload Poll Period ranges from 1 minute to 1 day. The options for setting the poll period are limited to avoid overloading the demand on network bandwidth which very short poll periods would cause and the risk of missing critical updates and downloads that much longer poll periods might cause.
Registration
Allow CCAs to self-register with this group
Select this option to allow CCAs to self-register with this deployment group. Self-registering CCAs are installed using a command line with the GROUP_NAME parameter specifying the group with which the CCA registers.
This option is disabled by default but provides an alternative method for installing CCAs on managed endpoints to register with a specific Deployment Group on the Management Center rather than predefining the group membership in the Management Console.
This option is disabled for the (Default) Deployment Group.
For further information about installing the CCA, refer to Installing the CCA on page 62.
Sub-nodes
Expand the settings node in the navigation tree to display the following sub-nodes:
Packages
Installation Schedule
Failover Servers
Client Access Credentials
Enterprise Auditing

APPSENSE MANAGEMENT CENTER PRODUCT GUIDE 5 DEPLOYMENT GROUPSDeployment Groups 97
Packages
The Packages sub-node allows you to manage the list of software packages and assign package versions to the current deployment group for download to the managed endpoints. The view displays the list of products, available packages and assignments.
Deployment Packages View
The packages view is split into two panels. The upper panel displays the list of packages which will be installed and the lower panel displays the list of available packages.
Both views display the type of software package - agent or configuration, the name of the product, the platform on which the package is supported for example, 32-bit or 64-bit and the version number - An Agent package version number reflects the version of the software: 8.x.x.x. A Configuration package version number reflects the version of the software with the last digit incremented as configuration packages are updated, for example, 8.x.x.1, 8.x.x.2. The date the package was last modified and the package description are also displayed.

APPSENSE MANAGEMENT CENTER PRODUCT GUIDE 5 DEPLOYMENT GROUPSDeployment Groups 98
Packages are listed by product group in nested sub-nodes and can be expanded or collapsed.
To assign packages drag and drop a selected package from the lower panel to the upper panel or select the relevant package in the available list and click Assign in the Actions pane. You can unassign packages using the same drag and drop method from the list of assigned packages to the list of available packages or select the package and click Unassign.
Management Center packages are assigned by default but product packages must be assigned manually including:
Agent packages
Configuration packages saved to the Management Center
A product agent must be deployed with a configuration to implement the configuration rules. If you assign a configuration package to a deployment group without assigning an agent, a warning message displays at the top of the panel.
Product agent packages are saved to the Management server database by default as part of the Management Center installation. Configuration packages for each product can be added to the database via the product consoles by saving the configurations to the Management Server.
The following products are supported:
Application Manager
Environment Manager
Performance Manager
Management Center
When the installation schedule for a group is disabled, a warning displays in the assigned packages panel notifying you that the packages will not be installed.
The warning is removed in either of the following circumstances:
The installation schedule is enabled.
All packages are unassigned from the group.

APPSENSE MANAGEMENT CENTER PRODUCT GUIDE 5 DEPLOYMENT GROUPSDeployment Groups 99
Submit
Package Installation
Depending on the Installation Schedule Settings for the deployment group the AppSense Installation Manager co-ordinates the installation of packages. This will result in a computer reboot if new or updated agent packages are deployed.
Select the Submit button to implement the changes when changes are made to the settings for a particular product agent or configuration.
Actions
Assign — Adds the selected available packages to the list of will be installed packages.
Unassign — Removes the selected packages from the list of will be installed packages.
Show All Versions — Displays all versions of agents and configurations in the list of available packages.
Show Latest Version — Displays only the latest versions of agents and configurations in the list of available packages.
Use Latest Version — Assigns the latest version of the selected configuration. Agent packages must be manually assigned.
Installation Schedule
The Installation Schedule sub-node allows you to set the times and frequency for installing agent and configuration packages downloaded by computers belonging to this group.
Software agents and configurations are installed according to the installation schedule for the deployment group. Licenses are installed immediately upon download by the CCA from the Management Server.
The Installation Schedule node includes the following sections:
Agent Schedule
The agent schedule controls when agent packages install. Select from the following options:
Disable - Assigned agents are not downloaded or installed.
Assigned licenses are installed automatically as soon as they are downloaded.
Immediately - Assigned agents are installed immediately once they are downloaded.
All software is installed immediately after the endpoints have completed downloading packages. Note that agent installation requires a system reboot.
If you do not select Submit and you attempt to navigate away from the packages work area after making changes, a warning message displays with a prompt to submit changes, click Yes to save changes or No to navigate away without saving.
On Submit the assigned packages are Deployed.

APPSENSE MANAGEMENT CENTER PRODUCT GUIDE 5 DEPLOYMENT GROUPSDeployment Groups 100
Allow user postponement for up to x hour(s) Select to allow the end user to postpone the installation of agents by the selected number of hours. The maximum postponement period is 8 hours, the periods can be selected in 1 hour increments. The default is set to 0 hours, note that if left at zero the end user will not receive the AppSense Installation Manager postponement message or the countdown timer message and the computer will restart without notifying the logged in users.
For further information about AppSense Installation Manager and user postponement refer to Installing Agents with the AppSense Installation Manager on page 68.
At Computer Startup - Assigned agents install when the endpoints are started and before user logon. This is the default setting for all Deployment Groups with the exception of the (Default) group which has a default setting of Disable.
Schedule - Assigned agents install at scheduled times. Select to display the Schedule.
Click on a Start or End time to display a drop down list, select the required time. The Agent packages are installed according to the specified days and times enabled in the list.
Setting the Installation ScheduleThe CCA will install packages after the start time, and before the end time.For example, with a start time of 08:00 and an end time of 18:00, packages will be installed between 08:00 and 18:00.A scheduled end time can be set before the start time to invert the installation period.For example, with a start time of 18:00 and an end time of 08:00, packages install after 18.00 and before 08.00 on the specified day.
Allow user postponement within the schedule Select to allow the end user to postpone the installation of agents within the installation schedule time frame. The end user will receive the AppSense Installation Manager postponement message at the beginning of the installation schedule, before being forced to install at the end of the installation schedule.
The user can select to restart when the message displays or postpone installation by 10 minutes, 30 minutes or 1 hour - as long as these time periods do not exceed the

APPSENSE MANAGEMENT CENTER PRODUCT GUIDE 5 DEPLOYMENT GROUPSDeployment Groups 101
end of the schedule time. Note that the postponement message only displays if only one user is logged on, this prevents a user logging off other users on the system.
A countdown message displays when there are only 5 minutes remaining in the schedule warning that a restart will be forced.
For further information about AppSense Installation Manager and user postponement refer to Installing Agents with the AppSense Installation Manager on page 68.
Configuration Schedule
If simultaneously deploying agents and configurations for the same product the CCA ensures both are installed on computer startup regardless of the configuration installation schedule.When a configuration is deployed but no agent change is required deployment occurs according to the installation schedule.For further information about installation management refer to Installing Agents with the AppSense Installation Manager on page 68.
The installation schedule controls when configurations install. Select from the following options:
Same as Agent - Assigned configurations will use the same settings as the agent.
Disable - Assigned configurations will not be downloaded or installed.
Immediately - Assigned configurations are installed once they are downloaded. This is the default setting for deployment groups with the exception of the (Default) group which has a default setting of Disable.
At Computer Startup - Assigned configurations are installed when endpoints are started.
Schedule - Assigned configurations are installed at scheduled times. Select to display the Schedule.

APPSENSE MANAGEMENT CENTER PRODUCT GUIDE 5 DEPLOYMENT GROUPSDeployment Groups 102
Click on a Start or End time to display a drop down list, select the required time. The configuration packages are installed according to the specified days and times enabled in the list.
Setting the Installation ScheduleThe CCA will install packages after the start time, and before the end time.For example, with a start time of 08:00 and an end time of 18:00, packages will be installed between 08:00 and 18:00.A scheduled end time can be set before the start time to invert the installation period.For example, with a start time of 18:00 and an end time of 08:00, packages install after 18.00 and before 08.00 on the specified day.
Please note that the Configuration Installation Schedule is available in version 8.2 or later.
If you attempt to uninstall a configuration when the Agent Schedule is set to Disable, the Configuration Schedule is ignored. Therefore, no agent or configuration packages uninstall.
Configuration Installation Settings
This option allows the administrator to configure the minimum time interval required to re-attempt to install a configuration package should the first attempt fail for any reason.
The time interval for the Minimum retry interval can be set in minutes or hours up to a maximum of 1 day. A Do not retry setting is available. The default value is 10 minutes.
Once the CCA on the managed computer has polled the Management Server for the list of packages to install and their associated installation schedule, the packages are installed at the scheduled time. If the installation of any of these prerequisites or agents fail, installation is re-attempted at computer startup.
Failed configuration installs can be retried without rebooting. If the installation of any configuration packages fails, installation is re-attempted after the time period as specified.
Re-attempts to install the packages continue indefinitely up until the point the installation is successful.
Submit
Click to commit any changes to the database. A notification prompts you to commit any unsaved changes when you attempt to navigate away from the page without saving.

APPSENSE MANAGEMENT CENTER PRODUCT GUIDE 5 DEPLOYMENT GROUPSDeployment Groups 103
Failover Servers
For further information about failover servers, refer to Failover Servers on page 88.
The Failover Servers and Diagnostics features are supported only from CCA version 7.2.
This node allows you to add and remove failover servers. The list of servers is shown in order of priority and you can move the servers up and down in the list to change the order of priority. You can also validate connections and set a diagnostics check prompt on any client computer connecting with a particular server. By default, the server URL is enabled but an option allows you to disable the server to prevent further connections.
When the CCA successfully registers with a Management Server, the URL of the server is added to the server list if the URL does not already exist. This ensures the CCA never loses contact with the Management Server. A URL can be removed from the list of servers to which CCAs connect, by deselecting the Server Enabled option.
The Deployment Group Failover Servers node includes the following:
Manage Default Failover Servers - Click the link to the change focus to the default Failover Servers node.
Override Default Failover Servers - Select to override the default list of failover servers and apply to all computers in the deployment group.
Failover Servers List
The Management Server list includes the following options:
Server - The address of the failover server. Displays in one of the following formats and may also include port specifications:
Server host name:
http://MyServer:80/ManagementServer
IP address:
http://123.456.789.0/ManagementServer
Fully qualified path:
http://MyServer.MyDomain.com/ManagementServer
Diagnostics Enabled - When selected for Management Servers, all connecting CCAs on managed endpoints perform self-tests at startup and on request to ensure that connectivity is available. CCA self-tests report events to the Management Server, except in the case of connectivity issues or failure, and also reports to the local Windows Event Log. CCA self-tests check the following:
Connectivity
Package downloads
Event uploads
Ability to raise high priority events, such as failure to install packages
APPSENSE MANAGEMENT CENTER PRODUCT GUIDE 5 DEPLOYMENT GROUPSDeployment Groups 104
Server Enabled - Selected by default. When selected, the server is available. When deselected, the server is unavailable for any further connections. Client computers automatically redirect to the next available server in the list. This can be used when decommissioning a server by preventing CCAs connecting to the server.
Actions
Add Server — Launches the Add Failover Server dialog box. Enter a server name or browse for a server to add to the list. Select the Connection Type, HTTP or HTTPS, and the connection port.
Remove Servers — Removes selected servers from the list of failover servers.
Any servers removed from the Failover Servers list which are still listed by CCAs on managed endpoints registering with the server, are added back into the list automatically. To avoid this occurring, it may be necessary to disable redundant or decommissioned servers until all managed endpoints have been updated with the correct list of available servers.
Move Up — Moves the selected server to a higher position in the list and in the order of priority.
Move Down — Moves the selected server to a lower position in the list and in the order of priority.
Test Server Connection — When selected, the Management Server performs a connection test to each selected server in the list and reports any successes or failures in the dialog.
Client Access Credentials
The Client Access Credentials node allows you to manage the list of authorized users that can be used by the Management Server to install the Communications Agent on client computers in the deployment group.
For further information about Client Access Credentials, refer to Client Access Credentials on page 92.
This list overrides the default list setup in Deployment Groups > Overview > Client Access Credentials.
Click on the Manage Default Client Access Credentials link to change focus to the default list.

APPSENSE MANAGEMENT CENTER PRODUCT GUIDE 5 DEPLOYMENT GROUPSDeployment Groups 105
Enterprise Auditing
The Enterprise Auditing node allows you to specify which events client computers send to the Management Server for each product agent. You can turn anonymous logging on or off for computer names, usernames, or both.
Events can be generated for:
Application Manager
Environment Manager
Management Center
Performance Manager
User Personalization Manager
Anonymous Logging
Always use anonymous MACHINE name in events — Events for actions performed on specific computers are reported without recording the computer name.
Always use anonymous USER name in events — Events for actions by specific users are reported without recording the username.
Event Filter
Provides expandable lists of events by product which you can enable for enterprise auditing either individually or by product group to generate and send to the Management Server.
For further information relating to specific events, refer to the Enterprise Auditing chapter.
Actions
Toggle All — Toggles the Enabled status selection for all products.
Toggle Product — Toggles the Enabled status selection for a highlighted top-level list item. This action is only enabled when the top-level list item is highlighted.
Toggle — Toggles the Enabled status selection of the highlighted list item.

APPSENSE MANAGEMENT CENTER PRODUCT GUIDE 5 DEPLOYMENT GROUPSDeployment Groups 106
Alerts
The Alerts node allow you to manage the list of alerts for all computers in the deployment group and provides a list of the events raised for the selected item in that group in a tabbed panel in the lower area of the view. Actions allow you to process alerts by flagging them as acknowledged or resolved, or delete alerts from the list.
For information on managing alerts for all deployment groups, refer to the Alerts chapter.
Actions
Acknowledge — Updates the status of the selected alerts to acknowledged.
Resolve — Updates the status of the selected alerts to resolved.
Delete — Deletes the selected alerts.
Delete All — Deletes all alerts.
Show Event Details — Launches the Event Details dialog box for viewing information about the selected event.
Refresh — Refreshes the information on the Alerts work area.
Events
For further information about Enterprise Auditing, refer to Enterprise Auditing on page 105 or the Enterprise Auditing chapter.
The Events node lists the events raised by computers in the deployment group according to the configuration settings in the Enterprise Auditing node.
Actions
Delete — Deletes the selected events.
Delete All — Deletes all events.
Show Event Details — Launches the Event Details dialog box for viewing information about the selected event.
Refresh — Refreshes the information on the Alerts work area.

APPSENSE MANAGEMENT CENTER PRODUCT GUIDE 5 DEPLOYMENT GROUPSDeployment Groups 107
Event Details
The Event details dialog box displays when you double-click an event in the System Events node in Home > Management Server > [Management Server] or when you select Show Event Details in the Actions pane on the right-hand side of a work area.
The Event details dialog box allows you to scroll through the list of events to reveal further details about the events, and includes:
Date
Time
Event ID
Product
User
Computer
Scroll arrows — Move up and down through the event list.
Description — Provides additional detail about the event. The lower panel of this area includes event details by category.
Computers
The Computers node allows you to manage the list of computers in the deployment group. Management options allow you to add, move, delete computers and monitor alerts, events, AppSense software agent and configuration packages and computer details.
The computers are divided into three lists, those that are in the group, those that have been discovered by Membership Rules within this group and those that have been added to the group manually but have not registered.
The list displays the computer name, number of active alerts the computer is showing, the date and time the computer last communicated with the Management Server. A computer is considered offline if the installed CCA does not poll back within twice its default poll period. A red indicator displays if the computer is offline. The list also displays, a status message and the deployed state of the computer, expressed as a percentage.

APPSENSE MANAGEMENT CENTER PRODUCT GUIDE 5 DEPLOYMENT GROUPSDeployment Groups 108
Control Tabs
The following tabs display at the bottom on the Computers work area:
Computer Details - displays information about the selected computer, and includes the computer hardware and system details.
Alerts - allows you to monitor alerts for the selected computer, and includes the alert rule to which the alert belongs, the alert severity and the alert status.
Events - allows you to monitor events on the selected computer, and includes the event number, the date and time the event occurred and the computer and username of where the event occurred if anonymous logging is not turned on.
Packages - allows you to view packages on the selected computer, and includes the package name, version, the product to which the package belongs, the installation status, for example, installed, pending install or pending uninstall.
Diagnostics - provides details of the diagnostics test on the selected computer and the result of each test performed.
Test – indicates which test from the following has been performed:
Connectivity
Download of Packages
High Priority Events
Upload of Events
Result - indicates the current state of the diagnostics taking place on the computer, for example, untested, pending, requested or completed with test passed or test failed.
Client Access Log – provides progress updates on the installation of the CCA.

APPSENSE MANAGEMENT CENTER PRODUCT GUIDE 5 DEPLOYMENT GROUPSDeployment Groups 109
Computer Find
The Computer Find facility allows you to locate a specific computer or range of computers.
Enter a full string or partial strings in the edit field to match computer names using wildcard characters, including:
Question mark (?) — Indicates a single character
Asterisk (*) — Indicates zero or more characters
The Computer Find facility searches for computers by deployment group ending with the (Default) group. The search continues in turn to each group until a match is found. If there are no more matches, a message box notifies you that there are no more results.
Search through results using the Find Next and Find Previous buttons.
Actions
Discover — Click to discover the computers that match membership rules and assign to deployment groups. If no rules match, the computer is assigned to the (Default) group.
Add Computers — Click to manually add computers to the list. The Select Computers dialog displays, navigate to select the required computers.
Install CCA — Highlight the computers on which you want to install the CCA and click Install CCA. The Client Access Credentials must have been setup before you can install the CCA.
Poll Now — Allows you to immediately poll any endpoints you have selected from within a specific Deployment Group.
Move — Highlight the computers you want to move and click Move, the Move Computers dialog displays, select the deployment group to which to move the computer.
Delete — Deletes the selected computers from the system.
Deleted computers remain listed in this group until all software packages have been removed with Pending delete status displayed next to the computer name in the overview panel.
Agents and packages are deleted as follows:
Product Agents and Configurations — AppSense product agents and configurations uninstall according to the Installation Schedule.
Client Communications Agent (CCA) — The CCA uninstalls after product agents have uninstalled, according to the Installation Schedule.
When the Agent Schedule is disabled the Configuration Schedule is ignored and therefore no agent or configuration packages uninstall.
APPSENSE MANAGEMENT CENTER PRODUCT GUIDE 5 DEPLOYMENT GROUPSComputers 110
Delete All — Deletes all computers in the group.
Unregister — Unregisters the selected, deleted computer from the management server.
If you select this option before the packages and agents have successfully been deleted from this computer, the CCA reregisters the computer again on the next poll period.
Restore — Restores a computer which is set to Delete.
Show Event Details — Launches the Event Details dialog box for viewing information about the selected event.
Request Diagnostics — Starts a diagnostics check on selected computers to test connectivity with the main management server and any failover servers for which Run Diagnostics is selected in the Failover Servers node.
The Failover Servers and Diagnostics features are supported only in CCA version 7.2 and above. It is recommended to upgrade your CCA installations before rolling out a configuration which uses Failover Servers and Diagnostics.
Clear Filter — Clears any filters that have been applied to the display. To apply a filter to the display right-click on the column you want to filter and select Filter Editor. The Filter Editor is used to filter the list based on the entered criteria.
Reset Grouping — Resets any grouping that has been applied to the display. To group the display right-click on the column you want to group the list by and select Group By This Column. For example, if you select to group by the Alerts column, all computers listed will be grouped depending on the number of Alerts they have, so all those with 5 Alerts will be grouped together and all those with 10 Alerts will be grouped together and so on.
COMPUTERS
The Deployment Groups > Overview > Computers node allows you to manage the list of computers across all deployment groups for the Management Server. Management options allow you to add, move, delete computers and monitor alerts, events, AppSense software agent and configuration packages and computer details.
This global Computers work area provides the same detail and options as the Deployment Groups > [Deployment Group Name] > Computers work area. For further information refer to the Deployment Group Computers section.

6
Alerts
In this Section:
Alerts Introduction on page 112
All Alerts on page 114
Alert Rules on page 116

APPSENSE MANAGEMENT CENTER PRODUCT GUIDE 6 ALERTSAlerts Introduction 112
ALERTS INTRODUCTION
Alerts are triggered by events sent from managed endpoints, according to alert rules.
An alert rule can generate an alert based on an individual event or range of events and can also include criteria for matching events originating on specific computers and from specific users. Alert rules can also include actions for generating alerts via SNMP and SMTP e-mail notifications.
A predefined set of alert rules is available which you can modify, alternatively you can create new alert rules. Alert rules must be enabled for alerts to be raised. Note that some predefined alert rules are not enabled by default.
The Alerts navigation button provides the alert filters and alert rules and includes the following nodes:
All Alerts
Alert Rules
Viewing Alerts
Alerts can be viewed throughout the Management Console in the following ways:
Alerts Panel
The Alerts panel in the work area displays in the following places:
Home > Management Server for a global overview of all alerts.
Deployment Groups > Overview for an overview of all alerts for all deployment groups.
For further information on deployment groups alerts, refer to the Deployment Groups chapter.
The Alerts are categorized into Alerts, Critical, New and New In Last 24 Hours, click on a category to toggle the display, to Alerts > [category]. For example, click Critical to toggle the display to Alerts > All > Critical.

APPSENSE MANAGEMENT CENTER PRODUCT GUIDE 6 ALERTSAlerts Introduction 113
Alerts Tab
The Alerts tab in the work area displays in the following places:
Deployment Groups > Overview > Deployment Groups > [Deployment Group Name] > Computers
Deployment Groups > Overview > Computers
The color indicator signifies the alert severity, the alert ID, the alert rule, computer and group name, date and time of the last event added to the alert, and alert status are all displayed. To re-order the display click on any column heading. You can use this view to update the alert Status.

APPSENSE MANAGEMENT CENTER PRODUCT GUIDE 6 ALERTSAll Alerts 114
Alerts work area
The Alerts work area displays in the following places:
Alerts > All
For further information refer to All Alerts on page 114.
Deployment Groups > Overview > Deployment Groups > [Deployment Group Name] > Alerts
The color indicator signifies the alert severity, the alert ID, the alert rule, computer and group name and the date and time of the last event added to the alert status are all displayed. To re-order the display click on any column heading. You can use this view to update the alert Status.
ALL ALERTS
Alert filters sort and handle alerts for events generated by computers in all deployment groups, according to the rules you define in Alert Rules.
For further information on managing alerts for specific deployment groups or computers, refer to the Deployment Groups chapter.
Expand the All node to display the filter nodes. The following filters are available:
All - displays a global overview of all alerts from computers across all deployment groups.
APPSENSE MANAGEMENT CENTER PRODUCT GUIDE 6 ALERTSAll Alerts 115
Created in last day - displays alerts which have a status of new and that have been raised in the last 24 hours.
Critical - alerts for critical severity events. Critical events have a red indicator preceding the alert. A critical alert is defined in Alerts > Alert Rules > Alert Rule > Details > Severity.
High - displays alerts for high severity events. High events have an orange indicator preceding the alert. A high alert is defined in Alerts > Alert Rules > Alert Rule > Details > Severity.
Medium - displays alerts for medium severity events. Medium events have a yellow indicator preceding the alert. A medium alert is defined in Alerts > Alert Rules > Alert Rule > Details > Severity.
Low - displays alerts for low severity events. Low events have a green indicator preceding the alert. A low alert is defined in Alerts > Alert Rules > Alert Rule > Details > Severity.
New - displays alerts for new events. A new alert is defined in the alert Status column.
Acknowledged - displays alerts flagged as acknowledged. An acknowledged alert is defined in the alert Status column.
Resolved - displays alerts flagged as resolved. A resolved alert is defined in the alert Status column.
Alert Status
When an alert rule gets triggered by an event the Management Server checks if there is an alert for that rule with a status of New. If there is, the Management Server adds the event to that alert. If there isn’t an alert then a new alert is raised and the event is added to that. Therefore, it is important that once an alert has been seen and the appropriate action taken you set the status to Acknowledged or Resolved so that you can see a new alert if the problem recurs.
Update the New status to Acknowledged or Resolved in the Status column or from the Actions pane.
Highlight an alert to display a list of all events raised for that alert in the Events tab. Select Show Event Details in the Actions pane for further details on a specific event.
For further information on Events, refer to the Enterprise Auditing chapter.
There are three Delete options available:
Delete Events - Launches the Delete Events dialog box allowing you to select events in a date and time range to delete from the database.
Delete - Deletes selected alerts or events.
Delete All - Deletes all alerts. Events remain in the database.
You can delete alerts from the lists of alerts or according to the acknowledged or resolved states.

APPSENSE MANAGEMENT CENTER PRODUCT GUIDE 6 ALERTSAlert Rules 116
Delete Events
The Delete Events dialog box allows you to delete events from the database within a specified date and time range, or all events.
Delete all events — Deletes all events in the Management Server database. Disables the date and time range selection options.
Delete events from range:
From — Allows you to specify a start date and time for events to delete from the database.
To — Allows you to specify an end date and time for events to delete from the database.
You can enter date and time values or select a date from the calendar which displays when you expand the drop-down list for each setting. The time values can be adjusted either by entering values directly or using the keyboard arrow keys to scoll to the required hour, minute and second values.
Skip events that are associated with an alert — Events associated with an alert are not deleted from the database.
ALERT RULES
Alert Rules allow you to set up alert notifications matched with incoming events sent from computers to the Management Server. Alert notifications can be sent via SNMP or as e-mail notifications via SMTP. You can assign severity levels to alert notifications according to requirements.

APPSENSE MANAGEMENT CENTER PRODUCT GUIDE 6 ALERTSAlert Rules 117
Default Alert Rules
The following table lists the alert rules that are enabled by default:
Alert Rule Event ID Severity
Application execution denied 9000 High
Application Manager agent ended unexpectedly 9090 Critical
Application Manager agent restarted 9091 Low
Application Manager agent terminated 9092 High
Application Manager agent unrecoverable 9093 Critical
Application Manager not licensed 9099 Critical
Component Analysed 9021 Low
Component failed to optimize 9203 High
Component optimized 9202 Low
Computer assigned to Deployment Group 9712 Medium
Computer startup action fail 9410 High
Computer startup action success 9409 Low
Computer successfully registered with Management Server 9751 Low
CPU clamping off 9105 Medium
CPU clamping on 9104 Medium
Environment Manager agent ended unexpectedly 9390 Critical
Environment Manager agent restarted 9391 Low
Environment Manager agent terminated 9392 High
Environment Manager agent unrecoverable 9393 Critical
Environment Manager agent not licensed 8399 Critical
Events failed to upload to the Management Server 9705 High
Events within the Management Server database were deleted 9707 Medium
No valid Application Manager configuration found 9095 Critical
No valid Environment Manager configuration found 9495 Critical
No valid Performance Manager configuration found 9195 Critical
Overwrite changed owner 9002 Medium
Package created, modified or deleted 9702 Medium
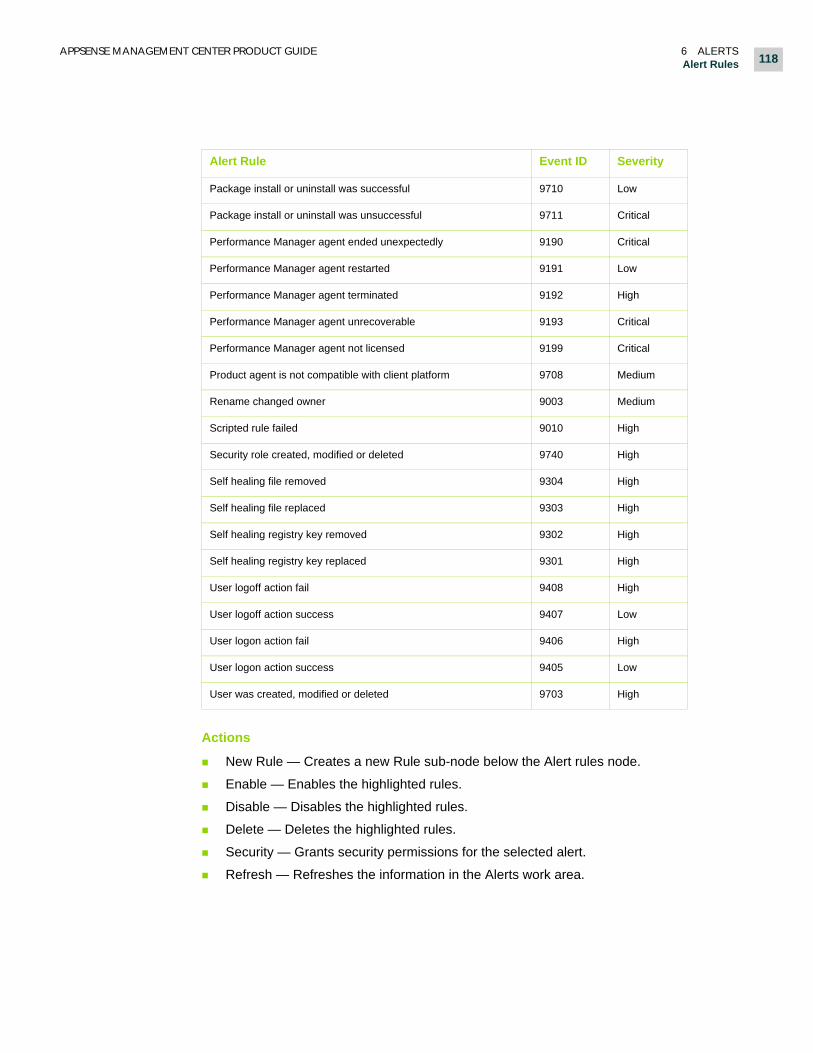
APPSENSE MANAGEMENT CENTER PRODUCT GUIDE 6 ALERTSAlert Rules 118
Actions
New Rule — Creates a new Rule sub-node below the Alert rules node.
Enable — Enables the highlighted rules.
Disable — Disables the highlighted rules.
Delete — Deletes the highlighted rules.
Security — Grants security permissions for the selected alert.
Refresh — Refreshes the information in the Alerts work area.
Package install or uninstall was successful 9710 Low
Package install or uninstall was unsuccessful 9711 Critical
Performance Manager agent ended unexpectedly 9190 Critical
Performance Manager agent restarted 9191 Low
Performance Manager agent terminated 9192 High
Performance Manager agent unrecoverable 9193 Critical
Performance Manager agent not licensed 9199 Critical
Product agent is not compatible with client platform 9708 Medium
Rename changed owner 9003 Medium
Scripted rule failed 9010 High
Security role created, modified or deleted 9740 High
Self healing file removed 9304 High
Self healing file replaced 9303 High
Self healing registry key removed 9302 High
Self healing registry key replaced 9301 High
User logoff action fail 9408 High
User logoff action success 9407 Low
User logon action fail 9406 High
User logon action success 9405 Low
User was created, modified or deleted 9703 High
Alert Rule Event ID Severity

APPSENSE MANAGEMENT CENTER PRODUCT GUIDE 6 ALERTSAlert Rules 119
Rule
The rule node allows you to specify alert rule names, descriptions, status and severity and view rule criteria and actions. The Actions area on the right-hand side of the console allows you to edit the criteria and actions for the rule in the Criteria and Actions nodes.
The Rule node includes the following sections:
Details
Name — Editable text box for entering a rule name.
Description — Editable text box for entering a rule description. The text box expands to allow you to enter detailed descriptions. Click OK to confirm the description you have entered.
Severity — Drop-down list for selecting a severity level to apply to the alert rule.
Status — Drop-down list from which to select options to enable or disable the current rule.
Criteria
The Criteria list provides details of the alert rule criteria. You can edit these criteria by expanding the Rule node to display the Criteria node or by selecting the action button in the right-hand Actions panel.
The Criteria list includes:
Event ID — Events with this ID number generate alerts of this type.
For event IDs and descriptions, refer to the Enterprise Auditing chapter.
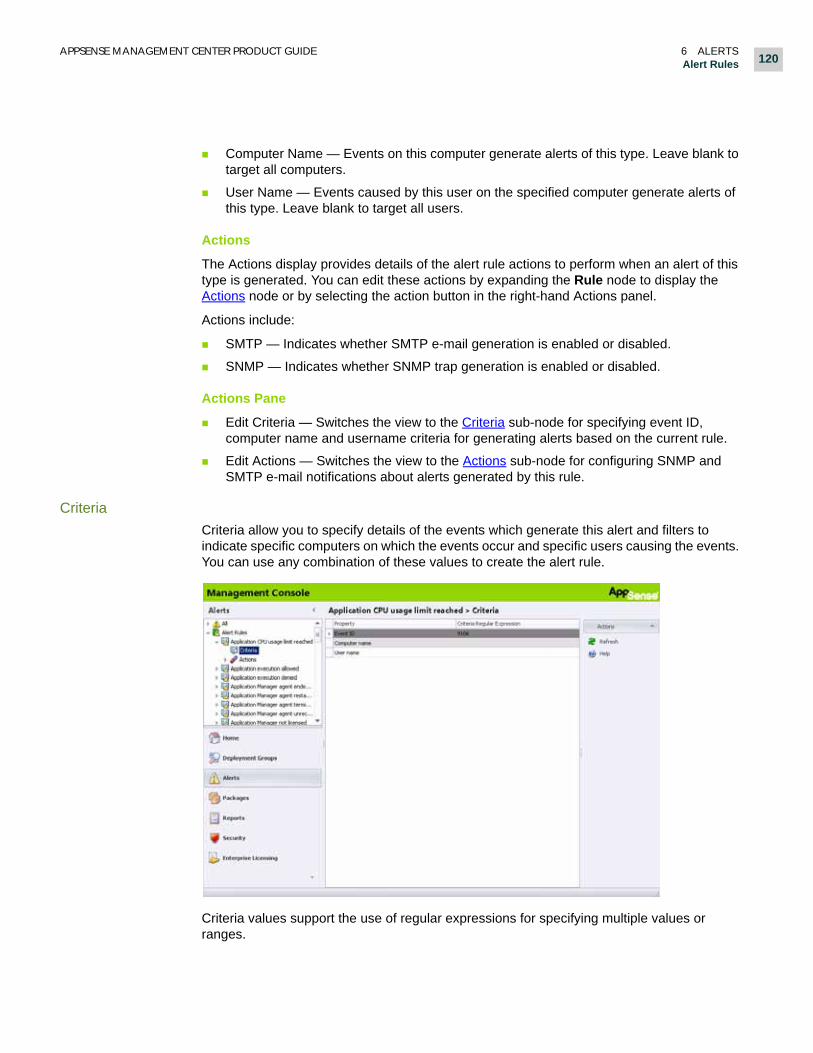
APPSENSE MANAGEMENT CENTER PRODUCT GUIDE 6 ALERTSAlert Rules 120
Computer Name — Events on this computer generate alerts of this type. Leave blank to target all computers.
User Name — Events caused by this user on the specified computer generate alerts of this type. Leave blank to target all users.
Actions
The Actions display provides details of the alert rule actions to perform when an alert of this type is generated. You can edit these actions by expanding the Rule node to display the Actions node or by selecting the action button in the right-hand Actions panel.
Actions include:
SMTP — Indicates whether SMTP e-mail generation is enabled or disabled.
SNMP — Indicates whether SNMP trap generation is enabled or disabled.
Actions Pane
Edit Criteria — Switches the view to the Criteria sub-node for specifying event ID, computer name and username criteria for generating alerts based on the current rule.
Edit Actions — Switches the view to the Actions sub-node for configuring SNMP and SMTP e-mail notifications about alerts generated by this rule.
Criteria
Criteria allow you to specify details of the events which generate this alert and filters to indicate specific computers on which the events occur and specific users causing the events. You can use any combination of these values to create the alert rule.
Criteria values support the use of regular expressions for specifying multiple values or ranges.

APPSENSE MANAGEMENT CENTER PRODUCT GUIDE 6 ALERTSAlert Rules 121
Delimiter characters must be used where appropriate. For example, when specifying a domain and computer name or username, such as:
Domain\\Computer or Domain\\User.
The Criteria node includes:
Event ID — Enter the ID number of the event type for which you wish to generate this alert. Use regular expressions to specify multiple values or ranges.
Examples
Regular Expression Description
9700 Match only event 9700
97[0-9][0-9] Match any Management Center event
9000|9001 Match either the 9000 or 9001 events
Computer Name — Enter the name of the computer from which the specified event must originate to generate this alert. Use regular expressions to specify multiple values or ranges.
Examples
Regular Expression Description
^AB Matches all computers whose NetBIOS name starts with AB
^SALES_COMP1$ Only matches SALES_COMP1 computer
SALES_COMP1 Matches any computer containing SALES_COMP1, so will match PRESALES_COMP1 and SALES_COMP10 and so on.
User Name — Enter the name of the user that causes the specified event to generate this alert. Use regular expressions to specify multiple values or ranges.
Example
Regular Expression Description
^FRED\.BLOGGS$ Matches user FRED.BLOGGS

APPSENSE MANAGEMENT CENTER PRODUCT GUIDE 6 ALERTSAlert Rules 122
Actions
Alert rule actions allow you specify whether to generate SNMP traps and e-mail notifications when alert criteria are met.
The Actions node includes links to the SMTP and SNMP sub-nodes for configuring and enabling notifications via SMTP and enabling SNMP notifications for the current alert type.
SMTP
The SMTP node allows you to enable or disable e-mail notifications and configure the user to which e-mail notifications are sent about this alert.

APPSENSE MANAGEMENT CENTER PRODUCT GUIDE 6 ALERTSAlert Rules 123
SMTP Configuration
SMTP configuration settings allow you to specify the server to which e-mails are sent and the e-mail header details including To, From and Subject details.
Property Configuration
Server Settings N/A
Server Enter the path to the e-mail server through which e-mail notifications are sent to the specified user.
User Name Username with which the Management Server accesses the e-mail server.
Password Password for the user profile with which the Management Server accesses the e-mail server.
E-mail Settings N/A
To Address to which e-mail notifications are sent about the current alert.
From Address from which e-mail notifications are sent about the current alert.
Subject Subject line displayed in e-mail notifications about the current alert.
Expand Server Settings and E-mail Settings to display the configuration settings.
SNMP
The SNMP node allows you to enable or disable notifications when alert rule criteria are met.

APPSENSE MANAGEMENT CENTER PRODUCT GUIDE 6 ALERTSAlert Rules 124
You will need to install a third party SNMP trap to receive these notifications.
SNMP notifications are broadcast on the network and received by an SNMP trap.

7
Packages
In this Section:
Packages Introduction on page 126
Packages View on page 126
Package Upload on page 129
Package Assignment on page 132
Package Installation on page 133
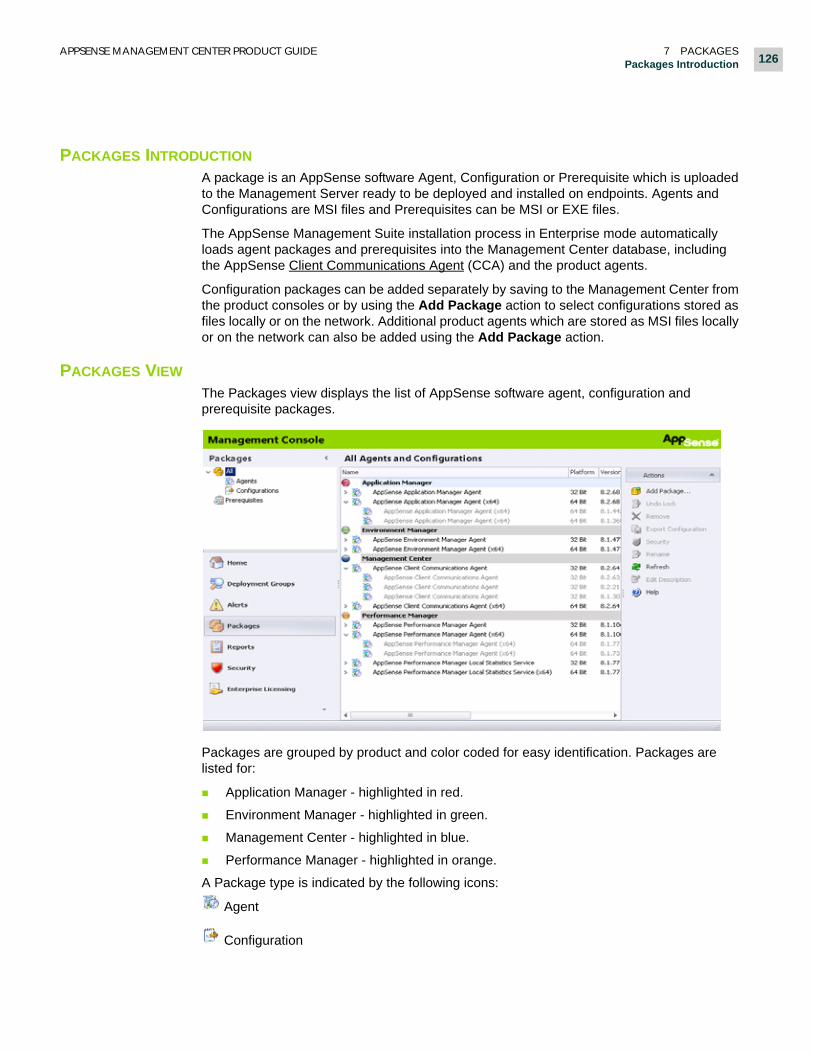
APPSENSE MANAGEMENT CENTER PRODUCT GUIDE 7 PACKAGESPackages Introduction 126
PACKAGES INTRODUCTION
A package is an AppSense software Agent, Configuration or Prerequisite which is uploaded to the Management Server ready to be deployed and installed on endpoints. Agents and Configurations are MSI files and Prerequisites can be MSI or EXE files.
The AppSense Management Suite installation process in Enterprise mode automatically loads agent packages and prerequisites into the Management Center database, including the AppSense Client Communications Agent (CCA) and the product agents.
Configuration packages can be added separately by saving to the Management Center from the product consoles or by using the Add Package action to select configurations stored as files locally or on the network. Additional product agents which are stored as MSI files locally or on the network can also be added using the Add Package action.
PACKAGES VIEW
The Packages view displays the list of AppSense software agent, configuration and prerequisite packages.
Packages are grouped by product and color coded for easy identification. Packages are listed for:
Application Manager - highlighted in red.
Environment Manager - highlighted in green.
Management Center - highlighted in blue.
Performance Manager - highlighted in orange.
A Package type is indicated by the following icons:
Agent
Configuration

APPSENSE MANAGEMENT CENTER PRODUCT GUIDE 7 PACKAGESPackages View 127
Prerequisite
Select a node in the Packages Navigation Pane to filter the view. You can select to filter the display by Agents, Configurations or Prerequisites.
All
The display shows all Agent and Configuration packages in the Management Server. The display can be filtered further to display only Agents or Configurations.
Agents Display
The display shows all Agent packages in the Management Server. The display includes the type of package, in this case, Agent, the name of the package, the architecture platform, such as 32-bit or 64-bit, the product version number, and the date and time the package was last modified.
Highlight a package and right-click to display the shortcut menu, select Rename to amend the package name.
Configurations Display
The display shows all Configuration packages in the Management Server. The display includes the type of package, in this case, Configuration, the name of the package, the architecture platform, such as 32-bit or 64-bit, the product version number, the date and time the package was last modified and the status. The Status is Editable or Locked by [Domain\Username]. If the configuration is locked it indicates that the configuration is open and being edited from within the product console. If the configuration is editable it indicates that the configuration is available and can be opened and edited from within the product console.
Highlight a package and right-click to display the shortcut menu, select Rename to amend the package name.
Actions
Add Package/Agent/Configuration — Launches the Browse for package dialog box which allows you to navigate the local disk or network to select an agent or configuration MSI file to add to the list of available packages on the server. Once you have selected a file, the Agent Upload dialog box displays allowing you to install the agent or configuration package in the database.
For further information refer to Package Upload on page 129.
Undo Lock — Select to remove the lock on a configuration. The Undo Lock dialog displays, select Yes to remove the lock and save any edits, No to undo any edits and delete the work in progress configuration or Cancel to cancel the action.
When a configuration is opened a work in progress configuration is created where the edits can be made. A work in progress configuration cannot be deployed and remains in this state until it is unlocked.

APPSENSE MANAGEMENT CENTER PRODUCT GUIDE 7 PACKAGESPackages View 128
Remove — Deletes the highlighted packages from the database. If the package is assigned to any deployment group it is removed from the group and uninstalled from the groups computers.
Only System Administrators, Package Administrators and users with PackageModifier privileges can remove a package.
Export Configuration (Configurations only) — Launches the Save As dialog box allowing you to browse to a location and save a copy of the selected configuration as a Windows Installer File (MSI).
Security — Launches the Security for [ObjectName] dialog box in which you can change the Allow/Deny permission settings in the list of available Security Roles and change the owner of the current object.
For further information about Security, refer to the Security chapter.
Rename — Launches the Rename Package dialog box in which you can change the name of the package.
Refresh — Refreshes the information in the Packages work area.
Edit Description — Launches the Edit Package Description dialog in which you can change the description of the package.
Prerequisites Display
The display shows all prerequisite installers in the Management Server. The display includes the name of the prequisite package, the architecture platform, the version number and the installer status, which is Installed or Missing.

APPSENSE MANAGEMENT CENTER PRODUCT GUIDE 7 PACKAGESPackage Upload 129
Actions
Upload Installer - Available when a required prerequisite installer is missing. Select the missing prerequisite and select to display the Upload Prerequisite dialog box. Enter the file location and name or select the ellipsis to browse for the file. Click Next to upload the prerequisite file.
Delete Installer - Select a prerequisite and select to delete the installer for the prerequisite. A warning message displays for you to confirm the deletion, click Yes to continue.
Export Installer - Select a prerequisite and select to export the installer for the prerequisite. The Browse For Folder dialog box displays, navigate to the required destination folder and click OK.
The name of the prerequisite installer remains the same and cannot be changed.
PACKAGE UPLOAD
Packages can be uploaded to the Management Server by the following options:
Packages > All > Add Package
Packages > All > Agents > Add Agent
Packages > All > Configurations > Add Configuration
Select the relevant Add option to display the Browse for package dialog box, navigate to the packages location, select the file and click Open.
Only System Administrators, Package Administrators and users with PackageCreator and PackageModifier privileges can upload a package.
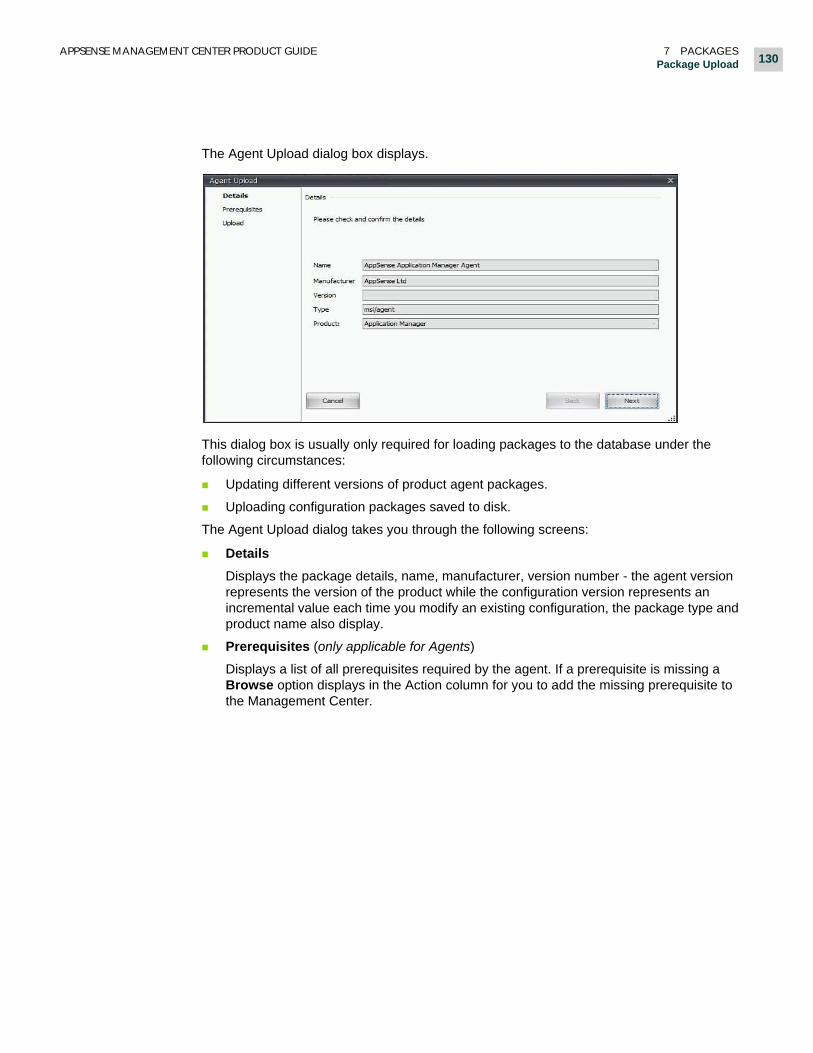
APPSENSE MANAGEMENT CENTER PRODUCT GUIDE 7 PACKAGESPackage Upload 130
The Agent Upload dialog box displays.
This dialog box is usually only required for loading packages to the database under the following circumstances:
Updating different versions of product agent packages.
Uploading configuration packages saved to disk.
The Agent Upload dialog takes you through the following screens:
Details
Displays the package details, name, manufacturer, version number - the agent version represents the version of the product while the configuration version represents an incremental value each time you modify an existing configuration, the package type and product name also display.
Prerequisites (only applicable for Agents)
Displays a list of all prerequisites required by the agent. If a prerequisite is missing a Browse option displays in the Action column for you to add the missing prerequisite to the Management Center.

APPSENSE MANAGEMENT CENTER PRODUCT GUIDE 7 PACKAGESPackage Upload 131
Select Browse to locate and select the missing prerequisite installer file. If the selected
file is correct the cross icon changes to the prerequisite icon on the Agent Upload dialog box. If the selected file is the incorrect file, the cross icon remains and you need to select a different file.
Upload
Uploads the package to the Management database. The status bar shows the upload progress.

APPSENSE MANAGEMENT CENTER PRODUCT GUIDE 7 PACKAGESPackage Assignment 132
PACKAGE ASSIGNMENT
Once an agent or configuration package has been uploaded to the Management Server it is available for assignment to a deployment group.
Select the Deployment Groups button in the Navigation pane and select Overview > Deployment Groups > [Deployment Group] > Settings > Packages.
All available packages are listed in the bottom half of the work area. Packages are grouped by product and color coded for easy identification. Packages are listed for:
Application Manager - identified by a red icon.
Environment Manager - identified by a green icon.
Management Center - identified by a blue icon.
Performance Manager - identified by an orange icon.
The display includes the package type - agent or configuration, name of the package, the architecture platform, product version number, date and time it was last modified and a package description.
To assign a package to the deployment group select a package and then select Assign from the Actions pane. A warning message displays which requires you to confirm the assignment. The same warning message displays if you select to Unassign a package from a deployment group.

APPSENSE MANAGEMENT CENTER PRODUCT GUIDE 7 PACKAGESPackage Installation 133
For further information on package installation refer to Installing Agents with the AppSense Installation Manager on page 68 and Installation Schedule on page 99.
Once the package is assigned the display in the top half of the work area is updated with the package details. The package is downloaded to the Managed Computer at the next poll period and is held in the CCA download folder. Agent and Configuration packages install based on the deployment group Installation Schedule.
Actions
Assign - Highlight a package in the packages are available section of the work area and select to assign it to the deployment group. The package shows in the will be installed section of the work area. The package is downloaded to the managed computer at the next poll period.
Unassign - Highlight a package in the packages are available section of the work area and select to unassign it from the deployment group. The package is removed from the will be installed section of the work area. The package is uninstalled at the next poll period.
Install, upgrade and uninstall of agents require a computer reboot.
Use Latest Version (only available for Configurations) - If the configuration assigned to the deployment group is not the latest version this option is available, select to replace the assigned configuration with the latest version available. A Replace Package message displays, click Yes to confirm the replacement.
Any changes made on this view must be submitted. Click Submit in the bottom of the work area.
If you make changes but do not submit them, a warning message displays as you attempt to navigate away from the view. Click Yes to save the changes or No to discard them.
PACKAGE INSTALLATION
Once packages are assigned to deployment groups they can be installed on to managed endpoints.
The CCA must be installed on a computer before any other package can be installed. Alternatively, packages can be installed manually on a computer or by a 3rd party deployment tool, such as Microsoft System Center Configuration Manager (SCCM).
Within the Deployment Groups navigation view navigate to one of the following locations:
Overview > Computers - displays a global overview of all computers, highlight a computer and select the Packages tab to display a list of packages assigned to that computer.
Overview > Deployment Groups > [Deployment Group] > Computers - displays an overview of all computers within the deployment group, highlight a computer and select the Packages tab to display a list of packages assigned to that computer.

APPSENSE MANAGEMENT CENTER PRODUCT GUIDE 7 PACKAGESPackage Installation 134
Packages Tab
The Packages tab displays a list of all packages assigned to the selected computer. The display includes the package type - indicated by use of the Agent, Configuration or Prerequisite icon -product name, package name, version number, installation status and status message.
The Installation Status indicates the progress of the package. The possible states are as follows:
Installed - Managed package which is successfully installed.
Install Failed - The installation was unsuccessful. The reason is shown in the Status Message column.
Pending Upgrade - Computer waiting with an upgrade action.
Upgrade Failed - The upgrade was unsuccessful. The reason is shown in the Status Message column.
Pending Uninstall - Computer waiting with an uninstall action.
To uninstall a package it must be unassigned in Deployment Groups > Overview > Deployment Groups > Deployment Group > Settings > Packages.
Uninstalled - Managed package was successfully uninstalled.
Uninstall Failed - The uninstall was unsuccessful. The reason is shown in the Status Message column.
Install Prerequisites Failed - Prerequisite install or download failed. The reason is shown in the Status Message column
Computers show in red in the Computers list if any of their packages are in a failed state.
The Status Message displays a description of the installation status.
Pending Install - Package assigned with an install action.
Checking Prerequisites - Computer checking package prerequisites.
Downloading - Computer downloading package.
Download Failed - Package download failed. The error is reported in the Status Message column.

8
Reports
In this Section:
Reports Introduction on page 136
Reports View on page 136
Report Filters on page 138
Generate Reports on page 138
Default Report Templates on page 139

APPSENSE MANAGEMENT CENTER PRODUCT GUIDE 8 REPORTSReports Introduction 136
REPORTS INTRODUCTION
AppSense Management Center has the facility to produce reports for the following:
Application Manager - reports based on events raised.
Environment Manager - reports based on events raised.
Performance Manager - reports based on events raised.
Management Center - reports based on events raised and data stored in the Management Server.
The AppSense Management Suite Installer installs the report templates which are in REPDEFX format. New report templates and updates to existing templates are periodically made available for download from www.myappsense.com.
REPORTS VIEW
The Reports view allows you to generate a range of reports for the Management Center and each of the AppSense products.
A global list of all report templates is listed in alphabetical order on the top level Reporting node. The Reporting sub nodes list the report templates by product, such as, Management Center.
Actions
Generate Report — Select a template in the work area and select to generate a report.
If you select a report from this level all data is included. To filter the report results refer to Report Filters on page 138.

APPSENSE MANAGEMENT CENTER PRODUCT GUIDE 8 REPORTSReports View 137
Import Reports — Launches the Open dialog box. Navigate to locate additional report templates which you have previously downloaded to your local disk or network source. Report templates are packaged in REPDEFX format. Multiple reports can be selected for import.
If you import an update to an existing template a warning message displays informing you an existing template will be replaced. Click Yes to continue.
If the Management Suite was installed manually using the product MSIs there will be no default reports, use the Import Reports option to upload the report packages. From the Open dialog box, navigate to the installation folder\Software\Products\Reports, all available report packs are listed in ARPX format, select the required product report packs and click Open. The Reports are added to the database and can be seen in the Management Console. The warning message, described above, displays if you attempt to upload an existing report.
Remove Reports — Select a template from the list in the work area and select to delete the report template. You can select multiple reports. A confirmation message displays with a list of the selected reports. Click Yes to continue.
Security — Select a template in the work area and select to launch the Security for {ObjectName} dialog box. You can change the Allow/Deny settings in the list of available Security Roles and change the owner of the current object.
For further information, refer to the Security chapter.

APPSENSE MANAGEMENT CENTER PRODUCT GUIDE 8 REPORTSReport Filters 138
REPORT FILTERS
The report facility allows you to produce tailored reports by use of the filter parameters.
The filter parameters are available to the right of the work area when you select a specific report template. You can select a specific report template in one of the following ways:
Reports > Reporting > double-click a report from the list in the work area.
Reports > Reporting > [Product] > [Reports Template]
Reports > Reporting > [Product] > double-click a report from the list in the work area.
Report parameters vary according to the product and report type you are generating. Common filter parameters include time and date ranges, event types, computers and users.
Wildcards
Asterisk (*) and question mark (?) wildcard characters are supported in the report parameters. The asterisk represents zero or more characters, and the question mark wildcard represents a single character.
GENERATE REPORTS
As a report is generated it displays in the work area. Multiple reports can be generated, a new tab in the work area is created for each report. Select a tab to toggle the view between generated reports.
Reports can be printed or exported to a range of supported electronic formats.
Page margins can be manually adjusted using the control handles displayed in each Report view.
Reports display with a toolbar which includes a flexible range of display and navigation tools, as follows:
Document Map - Shows the report navigation panel which displays the list of contents for the report. Select a heading in the list to jump to a specific location in the report.
The document map can be docked to remain hidden when not in use and shown as a tab at the left-hand side of the report. The document map slides open when the cursor hovers over the tab.
Search - Displays the Find dialog box. You can search the report for references containing specific characters, words or phrases and includes case and whole word matching.
Print - Displays the Print dialog box for printing a report.
Print Direct - Prints the document directly to your default printer.
Page Setup - Allows you to set page layout options including page size, paper source, orientation and margins.
Margins can be adjusted manually using the handles shown in the report display
Hand Tool - Provides easy scrolling of the current report.
Zoom - Allows you to adjust the zoom to a specified value or to make incremental adjustments manually by clicking the buttons to zoom in or out.
Page Navigation - Buttons allow you to jump to the next, previous, first and last pages.

APPSENSE MANAGEMENT CENTER PRODUCT GUIDE 8 REPORTSDefault Report Templates 139
Multiple Page Display - Allows you to select multiple pages to display simultaneously.
Color - Displays a selection palette. You can select an alternative background color for the generated report.
Watermark - Allows you to add a watermark to report pages before printing with a range of watermark display options.
Export Document - Allows you to save the report to disk in a range of output formats including, PDF, Text, CSV, HTML, MHT, Excel (XLS), RTF and BMP.
Send E-mail - Allows you to send the report by e-mail.
You are prompted to save the report in one of a range of output formats to a temporary location on the disk. An e-mail is created using your e-mail application and includes the saved report as a file attachment. Complete the address details and add any additional information before sending the e-mail.
File attachment output formats include, PDF, Text, CSV, MHT, Excel (XLS), RTF, BMP.
Exit - Closes the report currently displayed.
DEFAULT REPORT TEMPLATES
The default report templates are loaded into the Management Console when the Management Center is installed using the AppSense Management Suite Installer. If the Management Suite is installed manually using the product MSIs then you must import the reports from the following location on the installation media:
For further information refer to Import Reports in Reports View on page 136.
\Software\Products\Reports
The following tables list the default reports for all products in the Management Suite.
Environment Manager Reports
Performance Manager Reports
Application Manager Reports
Management Center Reports

APPSENSE MANAGEMENT CENTER PRODUCT GUIDE 8 REPORTSDefault Report Templates 140
Report Name Description
Computer Startup Action Provides details of Computer Startup events
Removable Storage Control Action Provides details of Removable Storage Control events
Self Healing Action Provides details of Self Healing events
User Logon/Logoff Action Provides details of User Logon/Logoff events
Report Name Description
Application CPU Usage Provides details of application CPU usage events
Application memory event details Provides details of application memory usage events
Thread throttling Provides details of thread throttling events
User memory usage Provides details of user memory usage events
Table 8.1 Environment Manager Reports
Table 8.2 Performance Manager Reports
Table 8.3 Application Manager Reports
Report Name Description
Application Activity Summary of Application Activity
Application Activity - Detailed Details of Application Activity
Application Termination Activity Application Termination Report
Client Activity Summary of Client Activity
Client Activity - Detailed Details of Client Activity Report
Computer Activity Summary of Computer Activity
Computer Activity - Detailed Details of Computer Activity
Event Activity Summary of Event Activity
Event Activity - Detailed Details of Event Activity
User Activity Summary of User Activity

APPSENSE MANAGEMENT CENTER PRODUCT GUIDE 8 REPORTSDefault Report Templates 141
User Activity - Detailed Details of User Activity
User Rights Management Activity User Rights Management Report
Web Installation Activity Summary of web installations allowed or denied due to Application Manager rules
Web Installation Discovery Summary of web installations which were denied due to lack of privileges
Web Installation Failed Summary of web installations that failed due to interruption or user cancellation
Report Name Description
Alerts Detailed report of alerts and their associated alert rules
Computers Overview of Computers
Events Detailed report of events and their associated parameters, including event definitions
Events Definitions Overview of all Events Definitions
Groups Overview of Groups
Package Audit Overview of Package audit data
Table 8.4 Management Center Reports
Table 8.3 Application Manager Reports
Report Name Description

9
Security
In this Section:
Security Introduction on page 143
Server Permissions on page 143
Object Permissions on page 144
Security Roles on page 148

APPSENSE MANAGEMENT CENTER PRODUCT GUIDE 9 SECURITYSecurity Introduction 143
SECURITY INTRODUCTION
The Security view allows you to delegate and manage user and group permissions on the Management Center using security roles which determine levels of access to the different areas of the Management Center and can be applied throughout the Management Console.
For example, it may be necessary to lockdown access to specific deployment groups to geographically dispersed administrators so that they can only manage their own local managed endpoints whilst still being able to view (have read-only access) to other deployment groups.
SERVER PERMISSIONS
Server Permissions allow you to define the level of access for designated groups and users throughout the Management Center and specify rights for editing settings and performing actions.
You can add Server Permissions by active directory group or user. To add by group, select Server Permissions > Groups > Add Group. The Select Groups dialog displays, browse and select from the local computer or domain.
To add by user, select Server Permissions > Users > Add User. The Select Users dialog displays, browse and select from the local computer or domain.

APPSENSE MANAGEMENT CENTER PRODUCT GUIDE 9 SECURITYObject Permissions 144
You can edit the roles assigned to the groups or users. Select Server Permissions > Groups or Users > Edit Roles. The Global Security Roles dialog displays.
The Global Security Roles dialog displays the list of default Server Roles and any other server roles that have been created.
For further information on Server Roles, refer to Server Security Roles on page 148.
Select Allow to assign a role to the group or user.
OBJECT PERMISSIONS
Objects are specific areas of the Management Center and include the following:
Groups
Packages
Reports
Alert Rules
Object Permissions are access rights which are granted, by security roles, to groups or users to view, edit or change ownership for specific objects.

APPSENSE MANAGEMENT CENTER PRODUCT GUIDE 9 SECURITYObject Permissions 145
Ownership
Object Ownership displays the list of controlled objects and the group or user allocated as the object owner.
The following are controlled objects:
Deployment Groups – view and edit.
Packages – manage agents and configurations.
Reports – view and generate all reports or individual reports.
Alert Rules – view and edit all alert rules or individual alert rules.
You can toggle the display to group the objects by type, which is the default, or by owner. Select Group by Owner or Group by Type in the Actions pane to alter the display.
Ownership of an object grants full control and overrides any restrictions which might also apply to the user or group.
To change the object owner, highlight an object and select Change Ownership in the Actions pane. The Security Form dialog displays, select a group or user from the list, alternatively to select a group or user that is not listed, click Add to display the Select Users or Groups dialog, enter or browse to select the group or user that you want to be the object owner.

APPSENSE MANAGEMENT CENTER PRODUCT GUIDE 9 SECURITYObject Permissions 146
User Access
User Access displays the list of objects that have been modified for user access.
Refresh the display from the Actions pane to make sure any recent modifications are displayed.
You can also modify an object directly from the object type node, as listed below, by use of the Security option available in the Actions pane.
The Security for [object type] dialog displays.
You can toggle the display to group the objects by type, which is the default, or by user. Select Group by User or Group by Type in the Actions pane to alter the display.
To change the user access highlight an object and select Edit Roles in the Actions pane. The Security for [object type name] dialog displays.
Deployment Groups
Alerts
Packages
Reports

APPSENSE MANAGEMENT CENTER PRODUCT GUIDE 9 SECURITYObject Permissions 147
The Security for [object type name] dialog displays the following two tabs:
Permissions - Add or Remove groups or users permission to access the object. If you assign permissions to a group or user that does not have rights to the object area in the Management Console, a warning message displays.
Click Yes to allow the user to login.
Select the security role to assign to the group or user for the object type.
Object Security Roles are created in Security > Security Roles > Object. Refer to Object Security Roles on page 151 for further information.
Owner - Change the owner of the object. You can select an owner from the list or Add a new group or user. The owner is granted full control over the object.

APPSENSE MANAGEMENT CENTER PRODUCT GUIDE 9 SECURITYSecurity Roles 148
SECURITY ROLES
Security roles define the range of actions the user or group can perform. Security Roles are divided into global server settings and object specific settings. Each type of setting has three predefined security roles. You can create new roles and assign permissions from a predefined list.
Server Security Roles
Server Security Roles are global settings across the whole of the management server.
Predefined Server Security Roles are as follows:
Modifier - permission to perform edit and delete actions across the whole management server.
Server Administrator - permission to perform create, edit and delete actions across the whole management server. This role is assigned by default to the user installing the Management Center and has Server Administrator permissions enabled, see Role Definition.
Viewer - permission restricted to read-only across the whole management server.

APPSENSE MANAGEMENT CENTER PRODUCT GUIDE 9 SECURITYSecurity Roles 149
Select New Server Role from the Actions pane to define a new role. The Role Definition dialog displays:
The Role Definition dialog lists all server role permissions, select to enable which permissions you want to assign to the new role. The following permissions are available:
Server Administrator - which are assigned to the Server Administrator role.
Failover Server Administrator
Failover Server Viewer
Deployment Administrator
The following have Administrator, Creator, Modifier and Viewer permissions available:
Group
Security
Package
Report
Alert Rule

APPSENSE MANAGEMENT CENTER PRODUCT GUIDE 9 SECURITYSecurity Roles 150
New Server Role Examples
Example 1
If an administrator wants to delegate the administration of the groups to someone else they can create a Restricted Group Administrator role with the following permissions:
Group Administrator
Package Viewer
Package Creator
Report Viewer
Alert Rule Viewer
Deployment Administrator
A user that is assigned the Restricted Administrator role will be able to do the following:
Create, modify and delete groups and assign computers to those groups.
Deploy the CCA to computers.
View all the packages and be able to assign them to the groups.
Add new packages and be able to delete those packages.
Produce reports.
However, the user will not be able to do the following:
Delete any existing packages.
Delete any alerts or events.
Remove or add any reports.
Change the security for any objects other than the ones they created, or added.
Example 2
If there are individuals that are responsible for creating and maintaining product configurations but do not require any access to the management console itself then the administrator can create a Package Editor role with the following permission:
Package Administrator
A user that is assigned this role will be able to open, edit and save configurations to the Management Server using the product consoles.

APPSENSE MANAGEMENT CENTER PRODUCT GUIDE 9 SECURITYSecurity Roles 151
Object Security Roles
Object Security Roles are settings specific to objects.
Predefined Object Security Roles are as follows:
Viewer — permission only to view the object.
Modifier — permission to perform edit actions, but not delete actions, on the object.
Full Control — permission to perform edit and delete actions on the object.
Server Roles override Object Roles.
Select New Object Role from the Actions pane to define a new role. The Role Definition dialog displays:
The Role Definition dialog lists all object role permissions, select to enable which permissions you want to assign to the new role. The following permissions are available:
Full Control
Security
View
Modify
Change Ownership
Report Export
Computer Assignment
Alert Rule Assignment

APPSENSE MANAGEMENT CENTER PRODUCT GUIDE 9 SECURITYSecurity Roles 152
Event View
Installation Schedule Modify
Package Assignment
The roles setup here are the roles you can select when modifying object security. Refer to User Access on page 146 for further information.
New Object Role Example
If an administrator wants to delegate the responsibility for assigning packages to a particular group they can create a Package Manager object role with the following permissions:
View
Package Assignment
If a user is then added to the Security for a group and given the Package Manager role, the user will only be able to see that group (assuming they have no other roles assigned to them). They will be able to see all of the settings for the group but the only thing they can change would be the packages assigned to the group.

10
Enterprise Auditing
In this Section:
Auditing Events on page 154
Application Manager Events on page 158
Environment Manager Events on page 159
Personalization Server Events on page 162
Performance Manager Events on page 163
Management Center Events on page 167
System Events on page 170
Event Details on page 170

APPSENSE MANAGEMENT CENTER PRODUCT GUIDE 10 ENTERPRISE AUDITINGAuditing Events 154
AUDITING EVENTS
All AppSense products, Application Manager, Environment Manager, Performance Manager and the Client Communications Agent (CCA) raise events on the endpoint.
You can define how local events are handled using the individual product consoles.
If you want to use Enterprise Auditing you must define which events you want to record at enterprise level using the Management Center console.
Navigate to Deployment Groups > [Deployment Group] > Settings > Enterprise Auditing
You can select to enable anonymous event logging, for either computer name or username, or both.
Each product is listed in the Event Filter. Expand a product node to display a list of all events, select which ones you want to enable. Some events are enabled by default, de-select to disable.
Event Types
There are two types of events that are raised on the endpoint:
Normal Events
High Priority Events
Normal Events
When normal events are raised on the endpoint, the CCA collects them locally and stores them in an xml .evt file in the CCA directory, typically:
C:\Program Files\AppSense\Management Center\CCA\Upload.

APPSENSE MANAGEMENT CENTER PRODUCT GUIDE 10 ENTERPRISE AUDITINGAuditing Events 155
The CCA will periodically zip up the xml .evt file and transfer it to the Management Center database using BITS. The polling period is determined in the Upload Poll Period setting in Deployment Groups > Deployment Group > Settings.
The events display in the Management Center console in the Deployment Groups > Computers node > Events tab. Or in the specific Deployment Group Computers node, Events tab.

APPSENSE MANAGEMENT CENTER PRODUCT GUIDE 10 ENTERPRISE AUDITINGAuditing Events 156
High Priority Events
When high priority events are raised on the endpoint they are sent directly to the Management Center database, using a HTTP connection, the CCA does not wait for the poll period.
High priority events are predefined and non configurable. They are as follows:
Event ID Description
9790 The Communications Agent has ended unexpectedly.
9791 The Communications Agent has restarted.
9792 The Communications Agent has been terminated due to being in the starting or stopping state for a prolonged period.
9793 The Communications Agent has exceeded its maximum restarts attempts.
9090 The Application Manager Agent has ended unexpectedly.
9091 The Application Manager Agent has restarted.
9092 The Application Manager Agent has been terminated due to being in the starting or stopping state for a prolonged period.
9093 The Application Manager Agent has exceeded its maximum restart attempts.
9190 The Performance Manager Agent has ended unexpectedly.
9191 The Performance Manager Agent has restarted.
9192 The Performance Manager Agent has been terminated due to being in the starting or stopping state for a prolonged period.
9193 The Performance Manager Agent has exceeded its maximum restart attempts.
9390 The Environment Manager Agent ended unexpectedly.
9391 The Environment Manager Agent has restarted.
9392 The Environment Manager Agent has been terminated due to being in the starting or stopping state for a prolonged period.
9393 The Environment Manager Agent has exceeded its maximum restart attempts.
9095 AppSense Application Manager has not been configured.
9096 Application Manager configuration upgraded.
9195 The Performance Manager Agent cannot find a valid configuration.
9196 AppSense Performance Manager has detected a configuration from a previous version and it has been upgraded.
9495 AppSense Environment Manager has not been configured.
9496 An old configuration has been found.

APPSENSE MANAGEMENT CENTER PRODUCT GUIDE 10 ENTERPRISE AUDITINGAuditing Events 157
9751 The Communications Agent registered with the server.
9752 The Communications Agent joined its assigned group.
9754 The Communications Agent ran a diagnostics test on a server.
9756 The Communications Agent identified an error with the BITS service. The service cannot be started, either because it is disabled or because it has no enabled devices associated with it.
9713 The Communications Agent reverted to another Management Server due to connectivity problems.
Event ID Description

APPSENSE MANAGEMENT CENTER PRODUCT GUIDE 10 ENTERPRISE AUDITINGApplication Manager Events 158
APPLICATION MANAGER EVENTS
The following table lists the Application Manager Events that can be enabled for Enterprise Auditing.
Event ID Event Name Event Description Event Log Type
9000 Denied Execution Prohibited execution request. Warning
9001 Allowed Execution Allowed execution request. Information
9002 Overwrite Changed Owner
Overwrite of an allowed executable. Warning
9003 Rename Changed Owner
Rename of a prohibited executable. Warning
9004 Application Limit Denial
Application limit denial. Warning
9005 Time Limit Denial Time limit denial. Warning
9006 Self-Authorization Self-authorization decision by user. Warning
9007 Self-Authorized allow Self-authorization execution request. Warning
9009 Scripted Rule Timeout Script execution timed out. Warning
9010 Scripted Rule Fail Script failed to complete. Warning
9011 Scripted Rule Success
Script completed successfully Information
9012 Trusted Vendor Denial Digital Certificate failed Trusted Vendor check.
Warning
9013 Network Item denied Prohibited Network Item request. Warning
9014 Network Item allowed Allowed Network Item request. Information
9015 Application Started An allowed application started running. Information
9016 Unable to change ownership
The file’s ownership could not be changed. Error
9017 Application Termination
An application has been terminated by Application Manager.
Warning
9018 Application User Rights changed
The application’s user rights have been changed.
Warning
9019 AM allowed install Allowed web installation request. Information
9020 AM restricted install Restricted web installation request. Information
9021 Windows restricted install (Basic Discovery Mode)
Windows restricted web installation request. Information
9022 Web Installation Fail Web Installation failed to complete Warning

APPSENSE MANAGEMENT CENTER PRODUCT GUIDE 10 ENTERPRISE AUDITINGEnvironment Manager Events 159
ENVIRONMENT MANAGER EVENTS
The following table lists the Environment Manager Events that can be enabled for Enterprise Auditing.
9023 Self-Elevation Self-Elevation request Information
9095 Not configured AppSense Application Manager has not been configured.
Warning
9099 Agent not licensed AppSense Application Manager is not licensed.
Error
9001, 9007 and 9014 events are disabled by default as they can generate excessive event data on busy endpoints. A warning displays at the top right of the Event filter list if you select a high volume events.
It is recommended that these events are only used for troubleshooting purposes, and only for short periods of times.
Event ID Event Name Event Description Event Log Type
Event ID Event Name Event Description Event Log Type
9300 Self healing process started
A process being monitored for self healing stopped and has been restarted.
Information
9301 Self healing registry key replaced
A registry key being monitored for self healing was changed and has now been reset.
Information
9302 Self healing registry key removed
A registry key being monitored for self healing was inserted and has now been removed.
Information
9303 Self healing file replaced
A file being monitored for self healing was modified or removed and has now been replaced.
Information
9304 Self healing file removed
A file being monitored for self healing was added and has now been removed.
Information
9305 Self healing service stopped
A service being monitored for self healing started and has now been stopped.
Information
9306 Self healing service started
A service being monitored for self healing stopped and has now been restarted.
Information
9307 Self healing registry value replaced
A registry value being monitored for self healing was changed and has now been reset.
Information
9308 Self healing registry removed
A registry value being monitored for self healing was inserted and has now been removed.
Information
9399 Software is not licensed
The Environment Manager software has not been licensed.
Warning

APPSENSE MANAGEMENT CENTER PRODUCT GUIDE 10 ENTERPRISE AUDITINGEnvironment Manager Events 160
9400 Lockdown edit control blocked drive
An edit control has had a blocked drive entered into it.
Information
9401 Lockdown edit control blocked text
An edit control has had blocked text entered into it.
Information
9402 Lockdown accelerator keys blocked
An application has had accelerator keys blocked.
Information
9403 Lockdown dialog blocked
An application has had a dialog box blocked. Information
9404 Lockdown MSAA access blocked
An application has had access blocked for a control using MSAA detection.
Information
9405 User logon action success
A user logon action completed successfully. Information
9406 User logon action fail A user logon action failed to complete successfully.
Information
9407 User logoff action success
A user logoff action completed successfully. Information
9408 User logoff action fail A user logoff action failed to complete successfully.
Information
9409 Computer startup action success
A computer startup action completed successfully.
Information
9410 Computer startup action fail
A computer startup action failed to complete successfully.
Information
9420 User session reconnect action success
A user session reconnect action completed successfully.
Information
9421 User session reconnect action fail
A user session reconnect action failed to complete successfully.
Information
9422 User session disconnect action success
A user session disconnect action completed successfully.
Information
9423 User session disconnect action fail
A user session disconnect action failed to complete successfully.
Information
9424 User session locked action success
A user session locked action completed successfully.
Information
9425 User session locked action fail
A user session action failed to complete successfully.
Information
9426 User session unlocked action success
A user session unlocked action completed successfully.
Information
9427 User session unlocked action fail
A user session unlocked action failed to complete successfully.
Information
Event ID Event Name Event Description Event Log Type
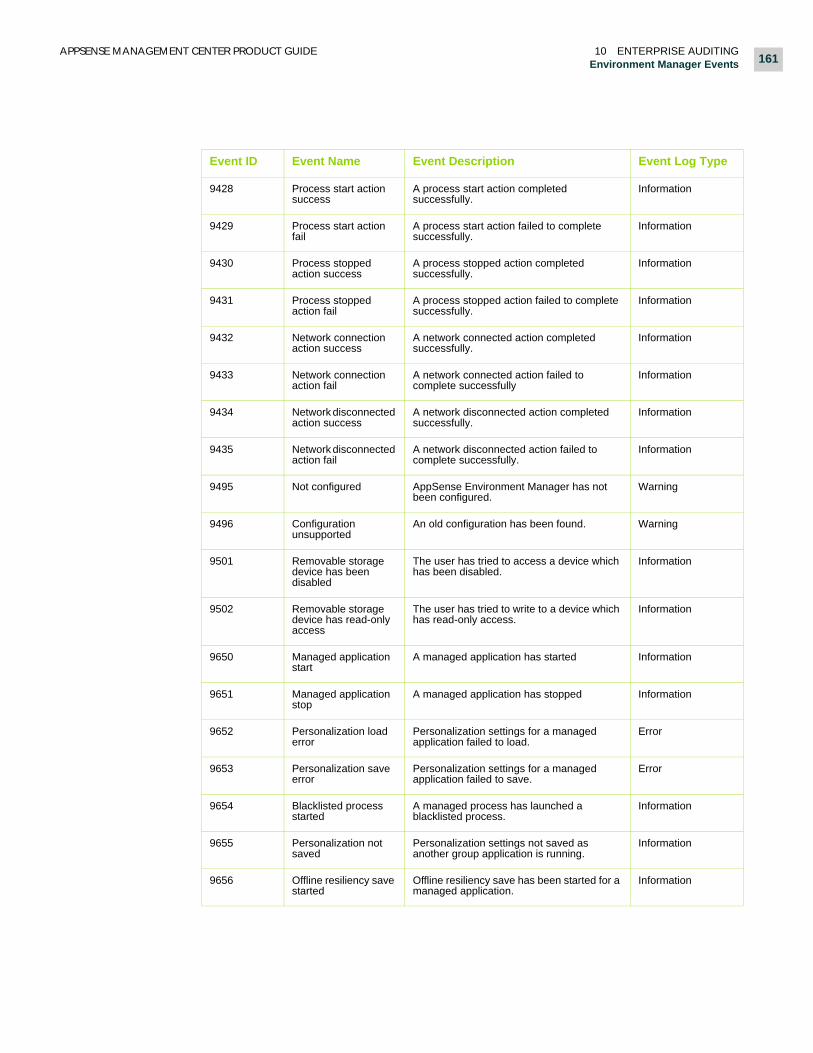
APPSENSE MANAGEMENT CENTER PRODUCT GUIDE 10 ENTERPRISE AUDITINGEnvironment Manager Events 161
9428 Process start action success
A process start action completed successfully.
Information
9429 Process start action fail
A process start action failed to complete successfully.
Information
9430 Process stopped action success
A process stopped action completed successfully.
Information
9431 Process stopped action fail
A process stopped action failed to complete successfully.
Information
9432 Network connection action success
A network connected action completed successfully.
Information
9433 Network connection action fail
A network connected action failed to complete successfully
Information
9434 Network disconnected action success
A network disconnected action completed successfully.
Information
9435 Network disconnected action fail
A network disconnected action failed to complete successfully.
Information
9495 Not configured AppSense Environment Manager has not been configured.
Warning
9496 Configuration unsupported
An old configuration has been found. Warning
9501 Removable storage device has been disabled
The user has tried to access a device which has been disabled.
Information
9502 Removable storage device has read-only access
The user has tried to write to a device which has read-only access.
Information
9650 Managed application start
A managed application has started Information
9651 Managed application stop
A managed application has stopped Information
9652 Personalization load error
Personalization settings for a managed application failed to load.
Error
9653 Personalization save error
Personalization settings for a managed application failed to save.
Error
9654 Blacklisted process started
A managed process has launched a blacklisted process.
Information
9655 Personalization not saved
Personalization settings not saved as another group application is running.
Information
9656 Offline resiliency save started
Offline resiliency save has been started for a managed application.
Information
Event ID Event Name Event Description Event Log Type

APPSENSE MANAGEMENT CENTER PRODUCT GUIDE 10 ENTERPRISE AUDITINGPersonalization Server Events 162
PERSONALIZATION SERVER EVENTS
The following table lists the Personalization Server Events that can be enabled for Enterprise Auditing.
Event ID Event Name Event Description Event Log Type
9600 Failed to connect to Personalization Database
The Personalization Server failed to connect to the Personalization Database.
Error
9601 Windows Impersonation Logon Failed.
The Personalization Server failed to log on, using Windows Impersonation, with the credentials supplied via the Server Configuration Utility.
Error
9602 Failed Database Compatibility Check
Protocol Version of the Personalization Server Database is incompatible with the Protocol Version of the Personalization Server.
Error
9657 Offline resiliency save complete
Offline resiliency has successfully saved a managed application’s personalization settings.
Information
9658 Personalization settings purged
Personalization settings purged as offline mode is disabled.
Information
9659 Personalization settings updated
User personalization settings updated from personalization server.
Information
9660 Personalization failed Personalization for a managed application failed.
Error
9661 Timeout Communicating with Personalization Server
A timeout occurred whilst trying to communicate with the Personalization Server.
Warning
9662 Trigger Action Times All the actions have run for the trigger. Information
Event ID Event Name Event Description Event Log Type

APPSENSE MANAGEMENT CENTER PRODUCT GUIDE 10 ENTERPRISE AUDITINGPerformance Manager Events 163
PERFORMANCE MANAGER EVENTS
The following table lists the Performance Manager Events that can be enabled for Enterprise Auditing.
Event ID Event Name Event Description Event Log Type
9100 User Memory Usage Warning
Amount of memory consumed by a user has exceeded a warning level set in a User Memory Limit.
Information
9101 User memory usage warning lapsed
Amount of memory consumed by a user has fallen back to a safe level as defined in a User Memory Limit.
Information
9102 User memory usage blocked
Amount of memory available to this user as defined in a User Memory rule has been exceeded. No more memory allocation will be allowed.
Warning
9103 User memory usage blocking lapsed
Amount of memory consumed by a user has fallen back to a safe (non-blocked) level as defined in a User Memory Limit.
Information
9104 Thread Throttling Clamping On
Total CPU Usage has exceeded a threshold and will be clamped.
Information
9105 Thread Throttling Clamping Off
Total CPU Usage has fallen under a threshold and clamping will stop.
Information
9106 Application CPU Usage clamping On
An Application has exceeded its CPU Usage limit. Information
9107 Per Application Memory Usage Exceeded
Memory usage for a particular application has exceeded a threshold.
Information
9108 Per Application Memory Usage Reduced
Memory usage for a particular application has dropped below a threshold.
Information
9109 Per Application Memory Usage Terminated
An application has been terminated because it used too much memory.
Warning
9110 Application CPU Usage Clamping Off
An application has now fallen below its CPU Usage limit and will no longer be clamped.
Information
9115 Working set trimmed
Working set for an application has been trimmed. Information
9116 CPU Affinity changed
CPU Affinity of an application has changed. Information
9119 Per Application Hard Memory Limit Reached
Memory usage for a particular application has reached its maximum limit
Warning
9120 Thread Throttling - Clamped Processes
Total CPU Usage has exceeded a threshold and applications will be clamped.
Information
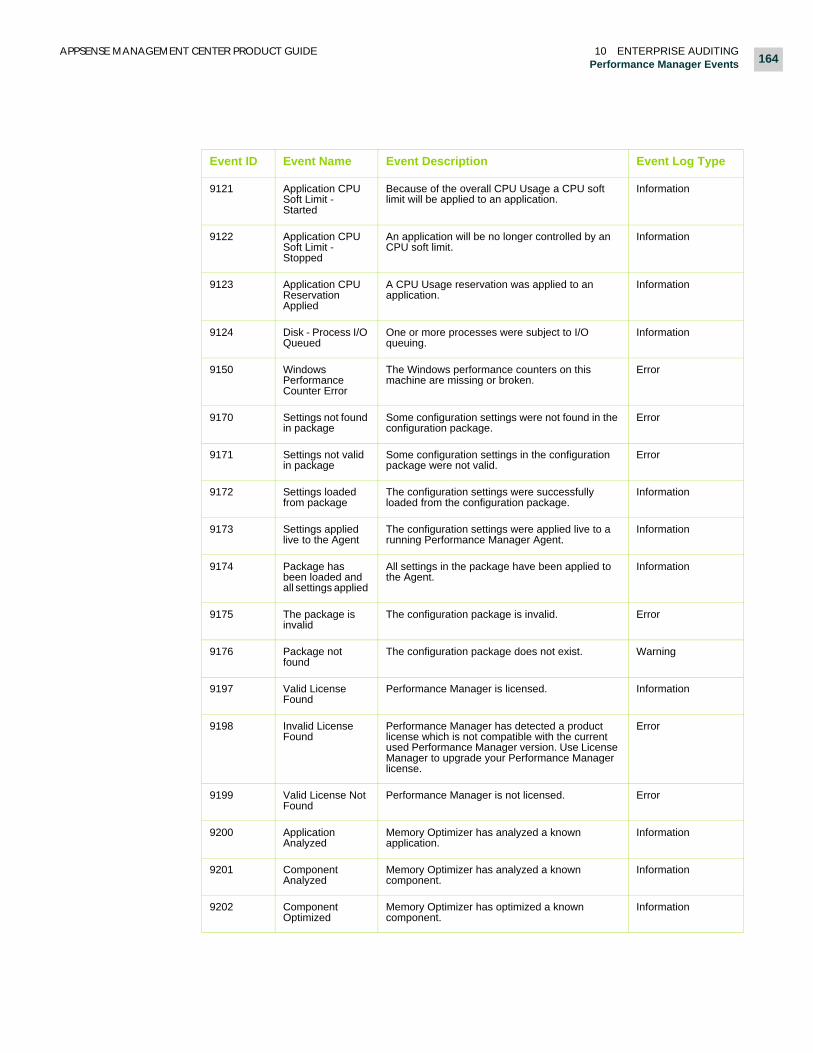
APPSENSE MANAGEMENT CENTER PRODUCT GUIDE 10 ENTERPRISE AUDITINGPerformance Manager Events 164
9121 Application CPU Soft Limit - Started
Because of the overall CPU Usage a CPU soft limit will be applied to an application.
Information
9122 Application CPU Soft Limit - Stopped
An application will be no longer controlled by an CPU soft limit.
Information
9123 Application CPU Reservation Applied
A CPU Usage reservation was applied to an application.
Information
9124 Disk - Process I/O Queued
One or more processes were subject to I/O queuing.
Information
9150 Windows Performance Counter Error
The Windows performance counters on this machine are missing or broken.
Error
9170 Settings not found in package
Some configuration settings were not found in the configuration package.
Error
9171 Settings not valid in package
Some configuration settings in the configuration package were not valid.
Error
9172 Settings loaded from package
The configuration settings were successfully loaded from the configuration package.
Information
9173 Settings applied live to the Agent
The configuration settings were applied live to a running Performance Manager Agent.
Information
9174 Package has been loaded and all settings applied
All settings in the package have been applied to the Agent.
Information
9175 The package is invalid
The configuration package is invalid. Error
9176 Package not found
The configuration package does not exist. Warning
9197 Valid License Found
Performance Manager is licensed. Information
9198 Invalid License Found
Performance Manager has detected a product license which is not compatible with the current used Performance Manager version. Use License Manager to upgrade your Performance Manager license.
Error
9199 Valid License Not Found
Performance Manager is not licensed. Error
9200 Application Analyzed
Memory Optimizer has analyzed a known application.
Information
9201 Component Analyzed
Memory Optimizer has analyzed a known component.
Information
9202 Component Optimized
Memory Optimizer has optimized a known component.
Information
Event ID Event Name Event Description Event Log Type

APPSENSE MANAGEMENT CENTER PRODUCT GUIDE 10 ENTERPRISE AUDITINGPerformance Manager Events 165
9203 Component failed to Optimize
AppSense Performance Manager has failed to optimize a component
Warning
9204 Application Identified At Runtime
Memory Optimizer has analyzed a running process and added a new application to the optimization database.
Information
9205 Component Identified At Runtime
Memory Optimizer has analyzed a loaded component in a process and added it to the optimization database.
Information
9206 Database Analyzed
Memory Optimizer has analyzed all known applications within the optimization database.
Information
9207 Database Optimized
Memory Optimizer has optimized all known applications within the optimization database.
Information
9208 Application Optimized
Memory Optimizer has optimized a known application.
Information
9209 Database Cleaned
Memory Optimizer has cleaned the optimization database.
Information
9210 Application Cleaned
Memory Optimizer has cleaned a known application.
Information
9211 Component Cleaned
Memory Optimizer has cleaned a known component.
Information
9212 Out Of Memory Memory Optimizer has run out of memory and cannot rebase any more DLLs.
Error
9216 Statistics Collection Strategy
Details of the statistics configuration. Information
9217 Invalid Local Database Folder
The local statistics database folder is invalid. Error
9218 General Local Statistics Service Error
An error occurred in the Local Statistics Service. Error
9219 Disk Cleanup Started
Started cleaning up the local statistics database folder.
Information
9220 Disk Cleanup of Single Database
Deleted a single old local database. Information
9221 Disk Cleanup Complete
Started cleaning up the local statistics database folder.
Information
9222 Consolidation Search Started
Started searching for databases to consolidate. Information
9223 Single File Consolidation Started
Started to transfer a local statistics database for consolidation.
Information
9224 Single File Consolidation Completed
Completed the transfer of a local statistics database for consolidation.
Information
Event ID Event Name Event Description Event Log Type

APPSENSE MANAGEMENT CENTER PRODUCT GUIDE 10 ENTERPRISE AUDITINGPerformance Manager Events 166
9225 Consolidation Search Completed
Finished searching for databases to consolidate. Information
9226 Statistics Scheduled Collection
Statistics collection is now scheduled at a new collection level.
Information
9228 Database Import Failed
An incoming database could not be imported. Error
9229 Database Connection Failed
Could not connect to the configured Reporting Database.
Error
9230 Disk Cleanup Started
Started searching for old received databases to delete.
Information
9231 Disk Cleanup Completed
Finished searching for old received databases to delete.
Information
9232 Purge of Reporting Database Started
Started purging the Reporting Database. Information
9233 Purge of Reporting Database Completed
Finished purging the Reporting Database. Information
9234 General Central Statistics Service Error
An error occurred in the Central Statistics Service. Error
Event ID Event Name Event Description Event Log Type

APPSENSE MANAGEMENT CENTER PRODUCT GUIDE 10 ENTERPRISE AUDITINGManagement Center Events 167
MANAGEMENT CENTER EVENTS
The following table lists the Management Center Events that can be enabled for Enterprise Auditing.
The events are reported to the local Windows Event Log according to the Deployment Group Events settings and also to the Management Server by the CCA.
Event ID Event Name Event Description Event Log Type
8000 Communication Agent Start
The Communication Agent has started successfully.
Information
8001 Communication Agent Stop
The Communications Agent. Information
9090 Service Ended Unexpectedly(Application Manager)
The Application Manager Agent has ended unexpectedly. This has occurred <service restart count> times. The watchdog will now attempt to restart the service.
Information
9091 Service Restarted (Application Manager)
The Application Manager Agent has restarted. Information
9092 Service Terminated (Application Manager)
The Application Manager Agent has been terminated due to being in the starting or stopping state for a prolonged period.
Information
9093 Service Unrecoverable(Application Manager)
The Application Manager Agent has exceeded the maximum restart attempts.
Information
9190 Service Ended Unexpectedly (Performance Manager)
The Performance Manager Agent has ended unexpectedly.
Information
9191 Service Restarted (Performance Manager)
The Performance Manager Agent restarted. Information
9192 Service Terminated (Performance Manager)
The Performance Manager Agent has been terminated due to being in the starting or stopping state for a prolonged period.
Information
9193 Service Unrecoverable(Performance Manager)
The Performance Manager Agent has exceeded the maximum restart attempts.
Information
9390 Service Ended Unexpectedly(Environment Manager)
The Environment Manager Agent has ended unexpectedly.
Information
9391 Service Restarted (Environment Manager)
The Environment Manager Agent has restarted. Information

APPSENSE MANAGEMENT CENTER PRODUCT GUIDE 10 ENTERPRISE AUDITINGManagement Center Events 168
9392 Service Terminated (Environment Manager)
The Environment Manager Agent has been terminated due to being in the starting or stopping state for a prolonged period.
Information
9393 Service Unrecoverable (Environment Manager)
The Environment Manager Agent has exceeded the maximum restart.
Information
9700 Action Notification Success
An action notification was dispatched successfully.
Information
9701 Action Notification Failure
An action notification has failed to dispatch. Information
9702 Package Modified An agent or configuration was created or deleted.
Information
9703 User Modified A user was created, modified or deleted. Information
9704 Priority Event Failure A priority event failed to upload to the Management Server.
Information
9705 Event Upload Failure One or more events failed to upload to the Management Server.
Information
9707 Events Purged. Events within the database were purged. Information
9708 Platform Mismatch Package
An agent is only available for computers of a different platform in this group.
Information
9710 Package Installation Success
A package has been installed or uninstalled successfully by the Client Communications Agent (CCA).
Information
9711 Package Installation Failure
A package has been unsuccessfully installed or uninstalled by the Client Communications Agent (CCA).
Information
9712 Computer Registration
A computer has been assigned to a group. Information
9713 Failover Change URL
The Communications Agent reverted to another Management Server due to connectivity problems.
Information
9715 Computer Self-registration
A computer has self registered with a group. Information
9716 Computer Self-registration Failed
A computer has failed to self-register with a group.
Information
9718 Communications Agent Installed License
The Communications Agent installed a license. Information
9720 BITS Server Extensions Not Installed
The Events Dispatcher service could not detect that BITS Server Extensions was installed.
Information
Event ID Event Name Event Description Event Log Type
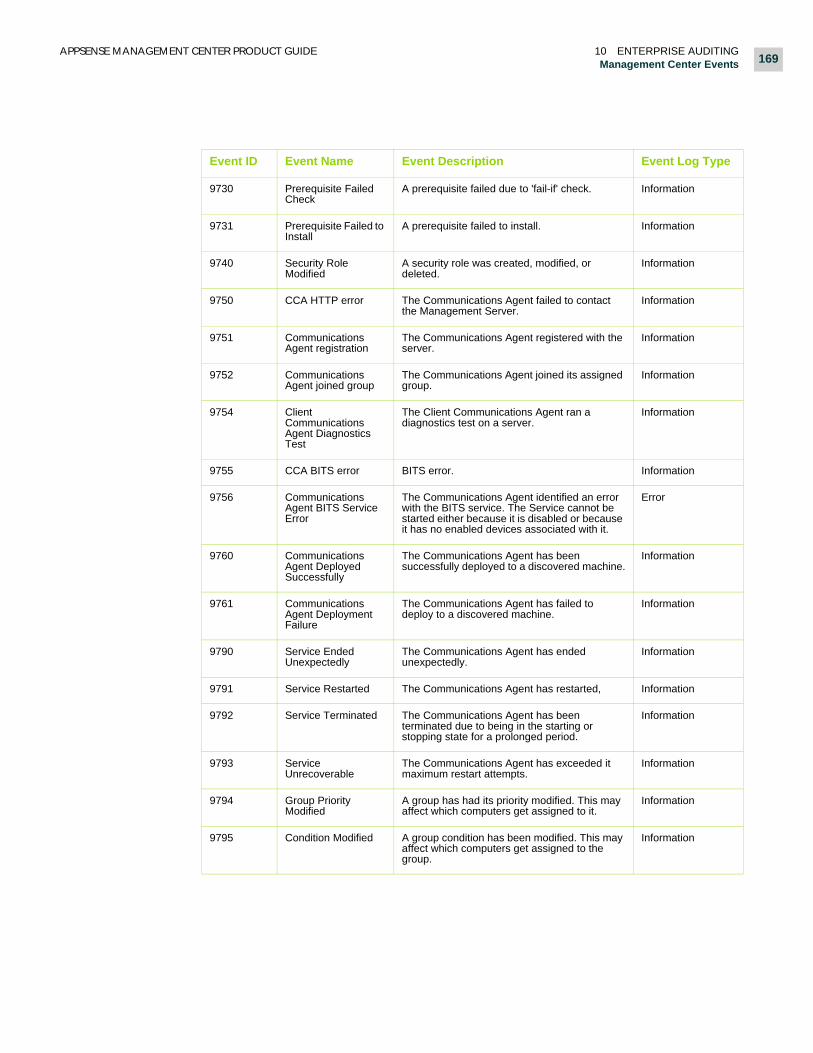
APPSENSE MANAGEMENT CENTER PRODUCT GUIDE 10 ENTERPRISE AUDITINGManagement Center Events 169
9730 Prerequisite Failed Check
A prerequisite failed due to 'fail-if' check. Information
9731 Prerequisite Failed to Install
A prerequisite failed to install. Information
9740 Security Role Modified
A security role was created, modified, or deleted.
Information
9750 CCA HTTP error The Communications Agent failed to contact the Management Server.
Information
9751 Communications Agent registration
The Communications Agent registered with the server.
Information
9752 Communications Agent joined group
The Communications Agent joined its assigned group.
Information
9754 Client Communications Agent Diagnostics Test
The Client Communications Agent ran a diagnostics test on a server.
Information
9755 CCA BITS error BITS error. Information
9756 Communications Agent BITS Service Error
The Communications Agent identified an error with the BITS service. The Service cannot be started either because it is disabled or because it has no enabled devices associated with it.
Error
9760 Communications Agent Deployed Successfully
The Communications Agent has been successfully deployed to a discovered machine.
Information
9761 Communications Agent Deployment Failure
The Communications Agent has failed to deploy to a discovered machine.
Information
9790 Service Ended Unexpectedly
The Communications Agent has ended unexpectedly.
Information
9791 Service Restarted The Communications Agent has restarted, Information
9792 Service Terminated The Communications Agent has been terminated due to being in the starting or stopping state for a prolonged period.
Information
9793 Service Unrecoverable
The Communications Agent has exceeded it maximum restart attempts.
Information
9794 Group Priority Modified
A group has had its priority modified. This may affect which computers get assigned to it.
Information
9795 Condition Modified A group condition has been modified. This may affect which computers get assigned to the group.
Information
Event ID Event Name Event Description Event Log Type

APPSENSE MANAGEMENT CENTER PRODUCT GUIDE 10 ENTERPRISE AUDITINGSystem Events 170
SYSTEM EVENTS
System Events are events which are raised by the Management Server and are not associated with any deployment group.
You can view the System Events in:
Home > Management Server > [Management Server Name] > System Events
EVENT DETAILS
A list of logged events can be seen in the following locations in the Management Console:
Home > Management Server > [Management Server Name] > System Events
Deployment Groups > Overview > Deployment Groups > [Deployment Group Name] > Events
Deployment Groups > Overview > Deployment Groups > [Deployment Group Name] > Computers > Events tab
Deployment Groups > Overview > Computers > Events tab
For further information on any event listed, highlight an event and select Show Event Details from the Actions pane to display the Event Details dialog box. Select the Up or Down arrow to scroll through the event list.

APPSENSE MANAGEMENT CENTER PRODUCT GUIDE 10 ENTERPRISE AUDITINGEvent Details 171
Any Events list view allows you to Delete individual events or select to Delete All from the Actions pane.

11
Enterprise Licensing
In this Section:
Enterprise Licensing on page 173

APPSENSE MANAGEMENT CENTER PRODUCT GUIDE 11 ENTERPRISE LICENSINGEnterprise Licensing 173
ENTERPRISE LICENSING
Enterprise Licensing allows you to:
Add, activate, import, export, edit or delete licenses for individual or all products in the AppSense Management Suite.
Import and manage licenses from MSI file format.
Export licenses to MSI file format for saving to other computers which can be remotely accessed.
Any product licenses added will be automatically deployed, by the Management Center, to managed endpoints. Managed endpoints are any devices which have the Client Communications Agent (CCA) installed.

APPSENSE MANAGEMENT CENTER PRODUCT GUIDE 11 ENTERPRISE LICENSINGEnterprise Licensing 174
AppSense products require one of the following licenses:
License Description
AppSense Management Suite
Full Suite license. Requires activation using the activation code sent from AppSense with the
license code.
AppSense Management Center
No license required.
Application Manager Single product license. Requires activation using the activation code sent from AppSense with the
license code.
Performance Manager Single product license. Requires activation using the activation code sent from AppSense with the
license code.
Environment Manager Single product license. Requires activation using the activation code sent from AppSense with the
license code.
Evaluation Full Suite or single product license. Evaluation licenses are available during the first installation of the product
and do not require activation. They are valid for 21 days.
For further information on Events, refer to the Enterprise Auditing chapter.
The AppSense Licensing Console can be used to manage licenses for standalone products. For further information, refer to the AppSense Licensing Console Help.
If a product license or an evaluation license expires you will receive limited or no functionality on the endpoint. An Event is raised for each unlicensed product.

APPENDIXES
These appendixes provide additional or supporting information about topics covered in the guide and includes:
Security Model on page 176
Concurrency Support on page 179

A
Security Model
The AppSense Management Center can be implemented in a secure, distributed environment with Active Directory integration, Secure Socket Layers (SSL) for encrypted communications, authenticated Management Server and database connections.
This section provides details of a typical security architecture, the challenges to address and the approach used to implement a secure set up.

APPSENSE MANAGEMENT CENTER PRODUCT GUIDE A SECURITY MODELSecurity Challenges 177
The following diagram shows a typical implementation of the Management Center using secure communications.
SECURITY CHALLENGES
The security model for implementing the AppSense Management Center installation, shown in the above diagram, addresses the following types of security threats which may pose a challenge to the system:
System integrity - attempts to tamper with configuration and agent packages distributed to managed endpoints through the introduction of malware or modifications to software packages undermine the security policies which the management software is required to implement.
Data confidentiality - Event and alert data is continuously relayed to the SQL database via the Management Server and could be vulnerable to the threat of access by unauthorized users.

APPSENSE MANAGEMENT CENTER PRODUCT GUIDE A SECURITY MODELAuthentication and Authorization 178
AUTHENTICATION AND AUTHORIZATION
Authentication using Active Directory integration ensures that AppSense Management and product software is only accessed or modified by authorized administrative users.
Connections from the Management Server to the database can be authenticated using Microsoft Windows authentication or Microsoft SQL authentication.
An appropriate certificate issued by a Certification Authority, following enterprise policy and procedure and installed on the Management Server, ensures the server can be validated before client connections established. Client connections are from managed endpoints and computers hosting the Management Center console and the product consoles.
SECURING COMMUNICATIONS USING SSLSSL provides confidentiality and integrity of communications to ensure sensitive data is accessible only by authorized users, including:
Event data
Agents and agent configuration data
For further information about setting up SSL secure communications, refer to Securing Communications using SSL on page 178.
If you are setting up SSL certificates on web servers using other supported operating systems and other versions of Microsoft SQL Server, see the following for further information:http://msdn.microsoft.com/library/default.asp?url=/library/en-us/dnnetsec/html/secnetht16.asp

B
Concurrency Support
Concurrency support ensures multiple users can connect to the Management Center simultaneously but not edit the same data simultaneously.
Users connecting with Management Consoles are regulated by the principle that the first user to submit edits to a particular area are applied. Other users are notified that the settings

APPSENSE MANAGEMENT CENTER PRODUCT GUIDE B CONCURRENCY SUPPORT180
have changed and the view is updated. However, multiple users can edit different data simultaneously. For example, a user editing the installation schedule, can submit changes at the same time another user submits changes to the group Membership settings.
Product consoles are regulated by a locking mechanism which ensures that the first user to access a configuration has exclusive editing control until the configuration is saved and unlocked. Other users can view the configuration while it is locked but not edit the data. When the configuration changes are saved and the configuration is unlocked, other users may attempt to access and edit the configuration.
Editing Management Center Settings
When different users compete to edit the same data in the Management Console, the first to submit an edit is allowed, a notification is issued to the other users and the Management Console is refreshed.
Editing Product Configurations
Product configuration concurrency errors are prevented by a locking system which ensures that only one user can edit a configuration at any time. Product configurations can be unlocked when editing is finished to allow others users to modify the configuration.
When a configuration is locked, other users can only open the current saved version in read-only mode.
The locked status and details of the user who has locked the configuration are displayed in both the Management Console and in product consoles when editing a configuration.
Administrative users on the Management Center can override configurations which are locked by other users by resetting the lock.
GLOSSARY
Agent
CCA
Configuration
Client Communications Agent
Client Computer
Deploy
Deployed
Deployment
Discovered Computer
DNS
Enterprise Mode
LSA
Managed Computer
Management Server
NetBIOS
Regular Expression
Server Configuration Utility
SQL Server
Universal Naming Convention
Virtual Desktop Infrastructure
APPSENSE MANAGEMENT CENTER PRODUCT GUIDE GLOSSARY AGENTDiscovered Computer 182
Agent
An executable component of the AppSense software which takes actions according to AppSense product configuration settings. For example, the Application Manager Agent is software that runs as a Windows service to carry out tasks on a computer, as specified by the configuration deployed to that computer.
CCA
See Client Communications Agent.
Configuration
A collection of settings created in the product console. A navigation tree of component settings is used to graphically represent the configuration while it is created and modified by the Administrator. A configuration file can be saved from the console for deployment or for editing at a later time.
Client Communications Agent
Client Communications Agent (CCA). Installed on computers operating in an Enterprise installation to provide a link between the product agent running on a managed computer and the AppSense Management Center.
The CCA sends event data generated by the product agents to the Management Server and also polls the Management Server to manage the download and installation of software configuration, agent and package updates.
The CCA can be downloaded and installed directly on client computers from the Management Server website.
Client Computer
Computer where the user logon sessions are hosted.
Deploy
To deliver a configuration or AppSense software component to one or more computers, which can include the local machine.
Deployed
See Deployment.
Deployment
The entire management of the lifecycle of an agent or configuration. Includes, download, install of pre-requisites, install, upgrade and uninstall.
Discovered Computer
A computer which matches the membership rules for a deployment group.

APPSENSE MANAGEMENT CENTER PRODUCT GUIDE GLOSSARY DNSSQL Server 183
DNS
Domain Name System. Translates a computer’s fully qualified domain name into an IP address. Networked computers use IP addresses to locate and connect to each other. However, IP addresses are difficult to remember.
Example
On the web it is easier to remember the domain name www.appsense.com than its corresponding IP address. DNS allows you to connect to another networked computer or remote service by using its user-friendly computer name and domain name rather than its numerical IP address.
Enterprise Mode
Installation method for AppSense Management Suite. Installs the full suite of product consoles and the selected server products.
LSA
Local Security Authority. This is an important required component of Windows that deals with login authentication and security policies. It verifies users logging on to a Windows computer or server and handles password changes.
Managed Computer
Computer which has the CCA installed.
Management Server
Allows Administrators to organise computers into groups and administer deployment of AppSense Packages. Collects and stores event data from computers and provides a centralized reporting mechanism.
NetBIOS
Network Basic Input/Output System. This is a program that allows applications on different computers to communicate within a local area network (LAN).
Regular Expression
Often called a pattern, a regular expression describes or matches a set of strings. They are usually used to give a concise description of a set without having to list all elements and are used to search and manipulate bodies of text.
Server Configuration Utility
Utility to configure and maintain AppSense server products.
SQL Server
A server machine with Microsoft SQL Server software running. The SQL Server hosts the AppSense Management Center database which contains the configuration, package, event and deployment instructions.
APPSENSE MANAGEMENT CENTER PRODUCT GUIDE GLOSSARY UNIVERSAL NAMING CONVENTIONVirtual Desktop Infrastructure 184
Universal Naming Convention
(UNC) This is a NetBIOS naming format for identifying the location of servers, printers, and other resources on a local area network (LAN). Almost all LANs are based on NetBIOS, making a NetBIOS naming format an easy and compatible way to access files and resources across a network.
UNC begins with two backslashes (\\) and takes the form:
\\Computer_name\Share_name
Virtual Desktop Infrastructure
VDI. A VM concept to describe the architecture used for delivering Virtual Machines from the data center to the client.