ansys fluent in workbench custom-input-parameter · • use define_output_parameter() udf macro •...
TRANSCRIPT
© 2012 ANSYS, Inc. May 20, 2013 1 Release 14.5
14.5 Release
ANSYS Fluent in Workbench Custom-Input-Parameter
Maciej Ginalski
© 2012 ANSYS, Inc. May 20, 2013 2 Release 14.5
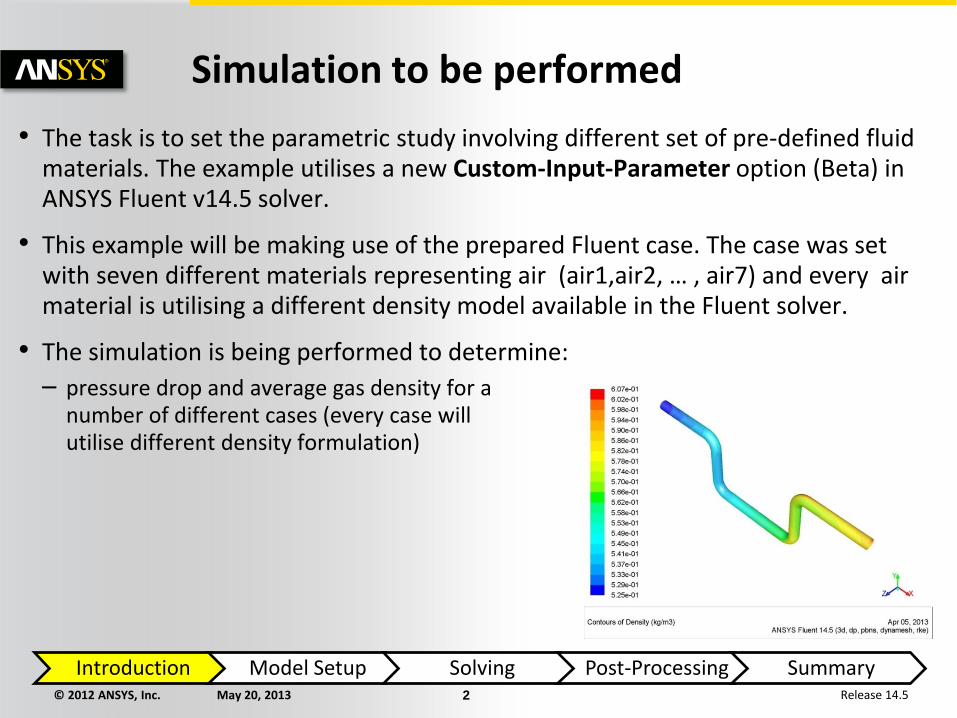
Simulation to be performed
• The task is to set the parametric study involving different set of pre-defined fluid materials. The example utilises a new Custom-Input-Parameter option (Beta) in ANSYS Fluent v14.5 solver.
• This example will be making use of the prepared Fluent case. The case was set with seven different materials representing air (air1,air2, … , air7) and every air material is utilising a different density model available in the Fluent solver.
• The simulation is being performed to determine:
– pressure drop and average gas density for a number of different cases (every case will utilise different density formulation)
Introduction Model Setup Solving Post-Processing Summary
© 2012 ANSYS, Inc. May 20, 2013 3 Release 14.5
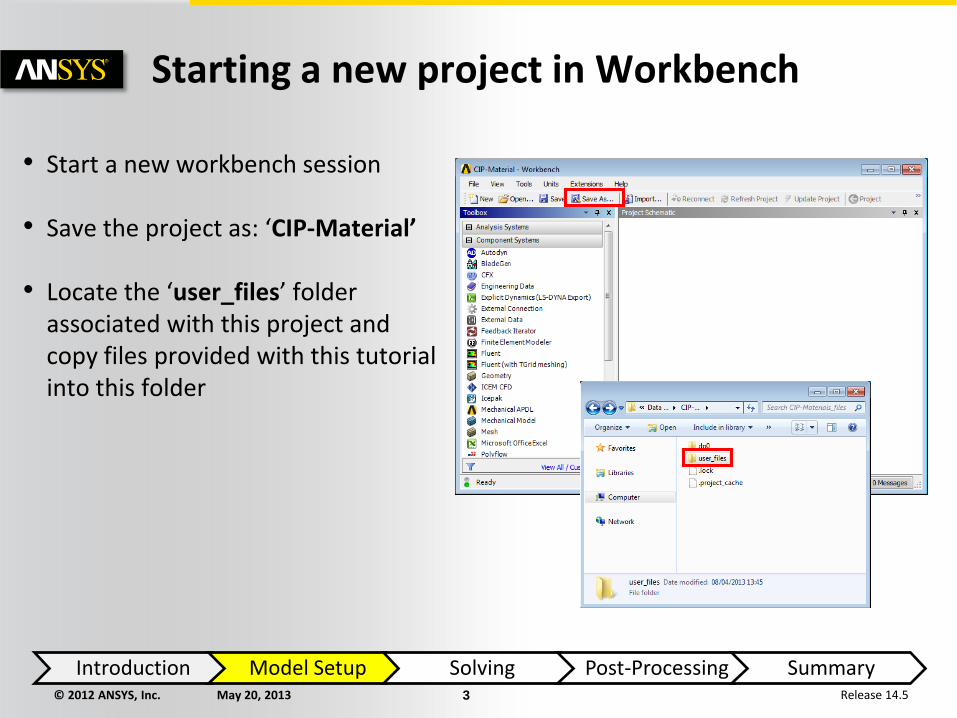
• Start a new workbench session
• Save the project as: ‘CIP-Material’
• Locate the ‘user_files’ folder associated with this project and copy files provided with this tutorial into this folder
Starting a new project in Workbench
Introduction Model Setup Solving Post-Processing Summary

© 2012 ANSYS, Inc. May 20, 2013 4 Release 14.5
• Open any Text Editor and copy & paste the following function definition
• Save the file as: ‘CUI-Material.scm’ in the ‘user_files’ directory of you workbench project
(define (Material value)
(format "### Changing Material to: air~a ...\n" value)
(ti-menu-load-string (format #f "/define/boundary-conditions/fluid fluid yes air~a
no no no no 0 no 0 no 0 no 0 no 0 no 1 no no no no" value))
(format "\n### Material changed to air~a successfully!" value)
)
Define Scheme Function
Introduction Model Setup Solving Post-Processing Summary
Fluent TUI command
Custom Input Variable Scheme function name

© 2012 ANSYS, Inc. May 20, 2013 5 Release 14.5
• Drag a Fluent component system onto the project schematics • Right-click on ‘Setup’, and select
‘Register Startup Scheme File’, and Browse
• Browse to and select the file “CUI-Material.scm” located in
project’s ‘user_file’ folder
Select open to close the panel.
Import Fluent Case File
Introduction Model Setup Solving Post-Processing Summary
© 2012 ANSYS, Inc. May 20, 2013 6 Release 14.5
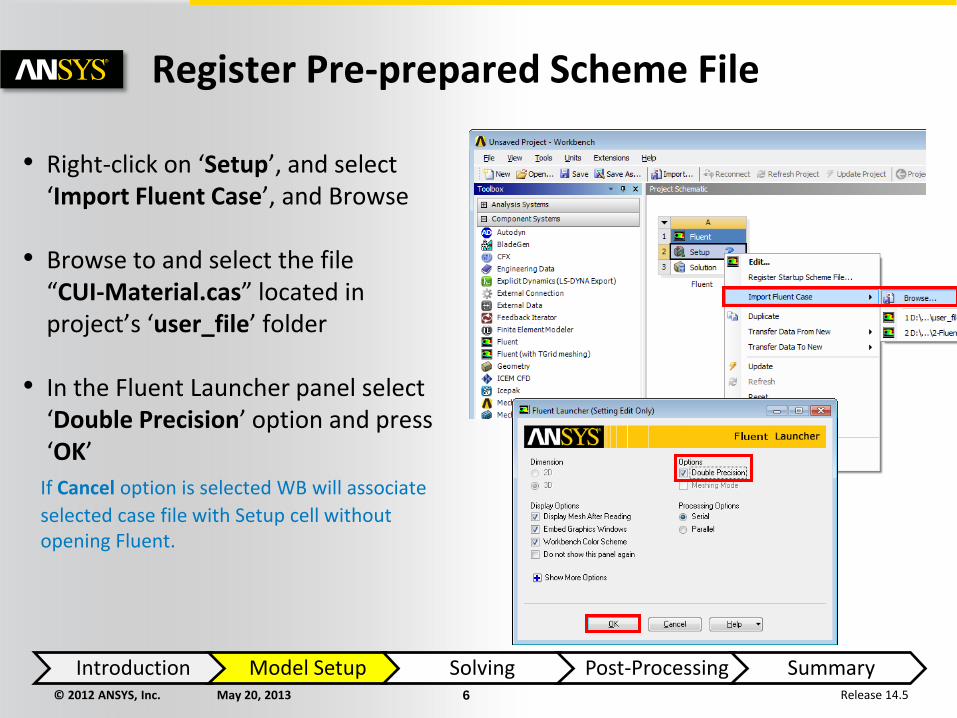
Register Pre-prepared Scheme File
• Right-click on ‘Setup’, and select ‘Import Fluent Case’, and Browse
• Browse to and select the file “CUI-Material.cas” located in
project’s ‘user_file’ folder • In the Fluent Launcher panel select
‘Double Precision’ option and press ‘OK’
If Cancel option is selected WB will associate
selected case file with Setup cell without opening Fluent.
Introduction Model Setup Solving Post-Processing Summary
© 2012 ANSYS, Inc. May 20, 2013 7 Release 14.5
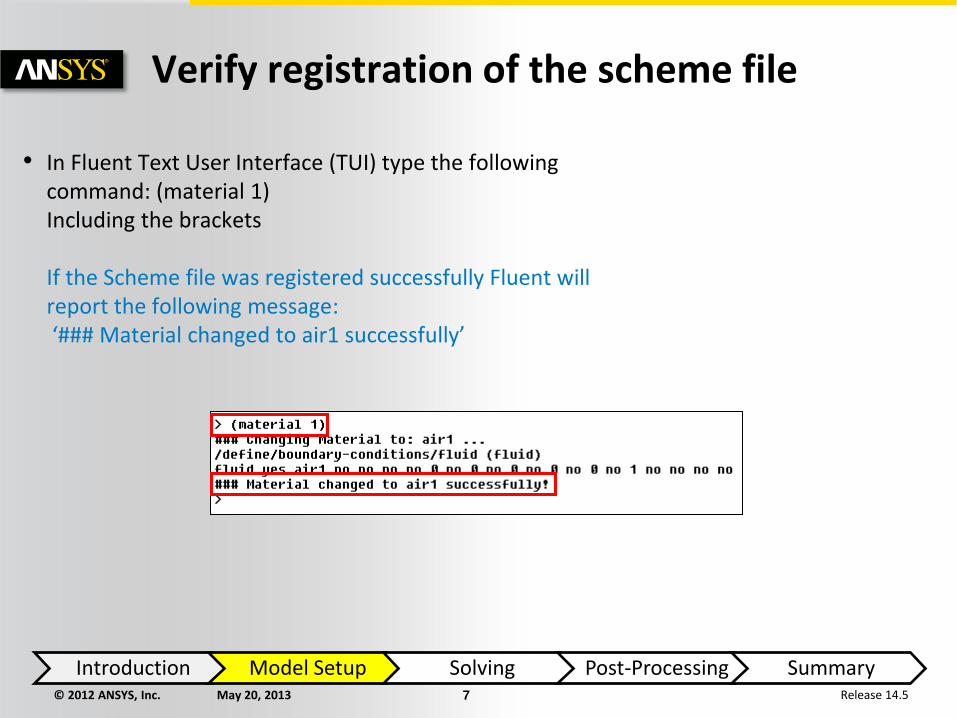
• In Fluent Text User Interface (TUI) type the following command: (material 1) Including the brackets If the Scheme file was registered successfully Fluent will report the following message: ‘### Material changed to air1 successfully’
Introduction Model Setup Solving Post-Processing Summary
Verify registration of the scheme file

© 2012 ANSYS, Inc. May 20, 2013 8 Release 14.5
Enable Beta options in Fluent
• Type the following TUI command to enable Beta options in Fluent. /define/beta /yes ok
Introduction Model Setup Solving Post-Processing Summary

© 2012 ANSYS, Inc. May 20, 2013 9 Release 14.5
Define Custom-Input-Parameter
• In Text Console type the following command: /define/parameters/custom-input-parameters create
• Name of parameter: material-id material-id is the parameter name that will appear in WB and parameters panel in Fluent
• Material-id value [0]: 1 material-id value is the initial value of the parameter
• Name of custom-input-variable: id id is the name of the variable passing information between WB and Fluent
• Enter the name of apply-function []: material material is the name of the scheme function defined within the scheme file
Introduction Model Setup Solving Post-Processing Summary
© 2012 ANSYS, Inc. May 20, 2013 10 Release 14.5
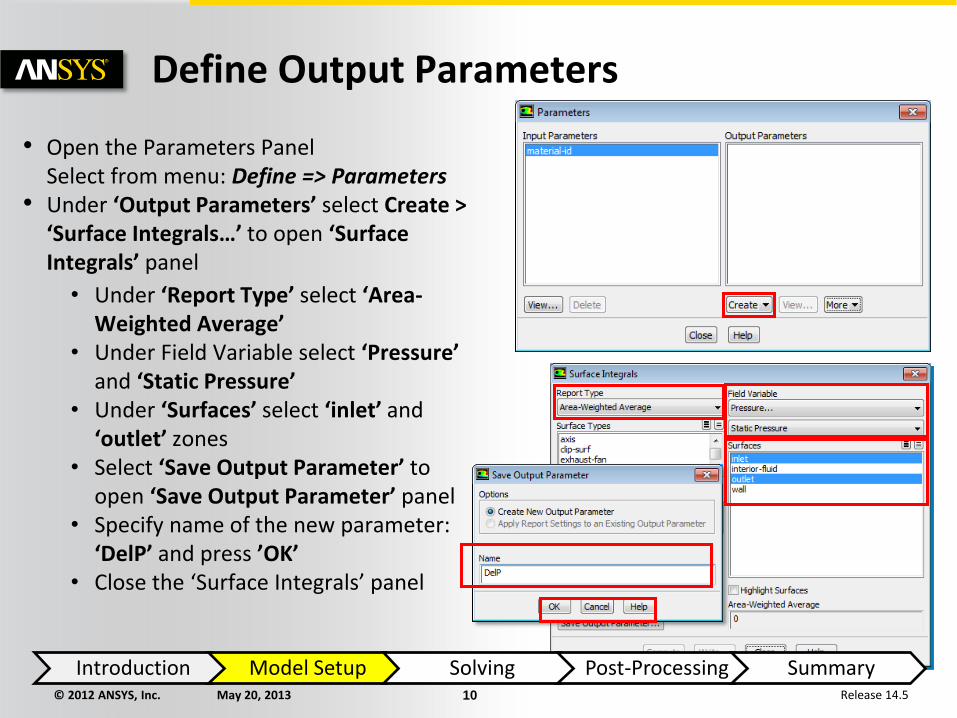
Define Output Parameters
• Open the Parameters Panel Select from menu: Define => Parameters
• Under ‘Output Parameters’ select Create > ‘Surface Integrals…’ to open ‘Surface Integrals’ panel
• Under ‘Report Type’ select ‘Area-Weighted Average’
• Under Field Variable select ‘Pressure’ and ‘Static Pressure’
• Under ‘Surfaces’ select ‘inlet’ and ‘outlet’ zones
• Select ‘Save Output Parameter’ to open ‘Save Output Parameter’ panel
• Specify name of the new parameter: ‘DelP’ and press ’OK’
• Close the ‘Surface Integrals’ panel
Introduction Model Setup Solving Post-Processing Summary
© 2012 ANSYS, Inc. May 20, 2013 11 Release 14.5
Define Output Parameters
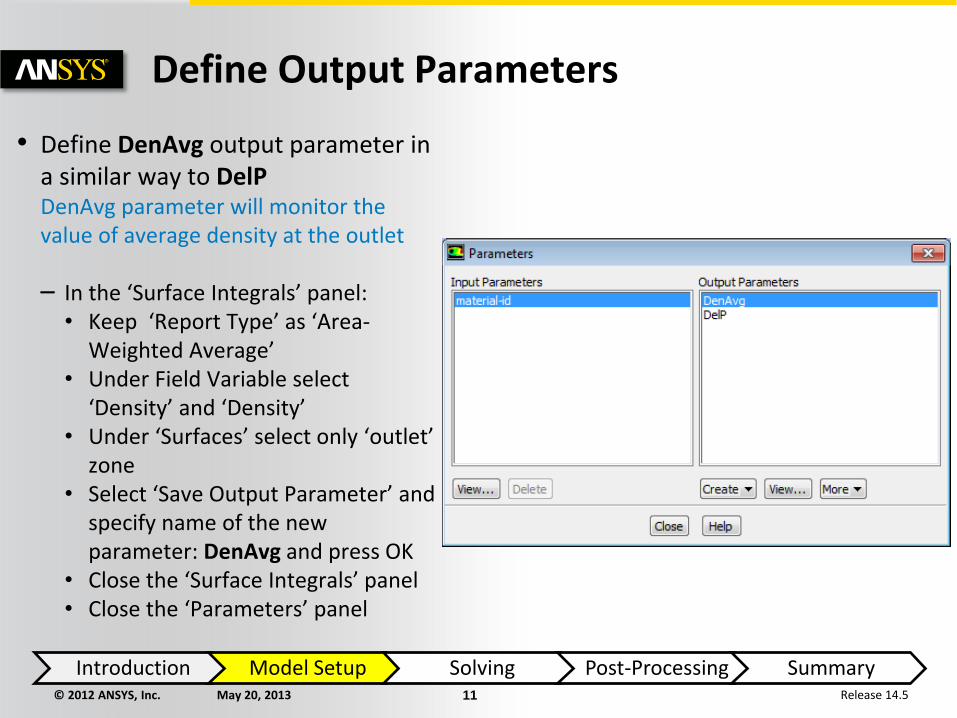
• Define DenAvg output parameter in a similar way to DelP DenAvg parameter will monitor the value of average density at the outlet – In the ‘Surface Integrals’ panel: • Keep ‘Report Type’ as ‘Area-
Weighted Average’ • Under Field Variable select
‘Density’ and ‘Density’ • Under ‘Surfaces’ select only ‘outlet’
zone • Select ‘Save Output Parameter’ and
specify name of the new parameter: DenAvg and press OK
• Close the ‘Surface Integrals’ panel • Close the ‘Parameters’ panel
Introduction Model Setup Solving Post-Processing Summary
© 2012 ANSYS, Inc. May 20, 2013 12 Release 14.5
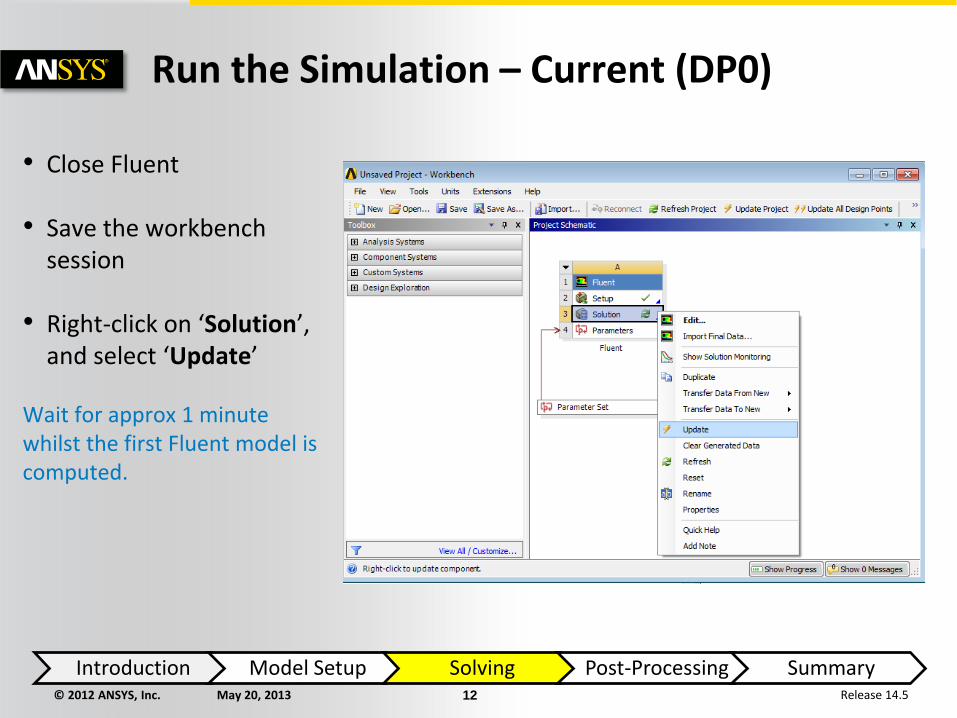
• Close Fluent
• Save the workbench session
• Right-click on ‘Solution’, and select ‘Update’
Wait for approx 1 minute whilst the first Fluent model is computed.
Run the Simulation – Current (DP0)
Introduction Model Setup Solving Post-Processing Summary

© 2012 ANSYS, Inc. May 20, 2013 13 Release 14.5
Run the Parametric Study
• Right-click on ‘Parameters Set’ bar, and select ‘Edit’ to access parameters manager
• Add six new Design Points (DPs) in the ‘Table of Design Points’ by specifying ‘material-id’ value as demonstrated on the picture
• Select ‘Update All Design Points’ This will take about 5 minutes to compute. • Observe the effect of varying the
material parameters has made to the output parameters.
Introduction Model Setup Solving Parametric Study Summary

© 2012 ANSYS, Inc. May 20, 2013 14 Release 14.5
Wrap-up
This workshop has shown the basic steps required to define and utilise Custom-Input-Parameter enhancements introduced as the Beta feature in Fluent at R14.5 The main motivation behind this functionality is to allow users to avoid the limitations of standard parameters defined in Fluent GUI. Every model feature, and every solver setting can now be converted to a parameter which will be further exposed within the workbench environment. In v15.0 will bring more new features and support in GUI.
Introduction Model Setup Solving Post-Processing Summary

© 2012 ANSYS, Inc. May 20, 2013 15 Release 14.5
Further work • There are many ways the simulation in this tutorial could be extended
• Use more elaborate combinations of material settings • User can prepare multiple variations of material properties involving tabular data or
extrapolated functions.
• Multiple Custom-Input-Parameters • User can define multiple Apply Functions and store these functions in the registered
scheme file.
• More elaborate TUI commands • The single custom-input-parameter can be employed to control multiple settings at once
(i.e. once parameter can be used to control number of boundary conditions)
• Use DEFINE_OUTPUT_PARAMETER() UDF macro • Extended by the potential of DEFINE_OUTPUT_PARAMETER UDF macro Custom-Input-
Parameters provide extensive capability of controlling and reporting every aspect of Fluent simulation with a set of pre-defined parameters.
Introduction Model Setup Solving Post-Processing Summary