an introduction to tivoli net view for os 390 v1r2 sg245224
TRANSCRIPT
An Introduction to Tivoli NetViewfor OS/390 V1R2
Arne Olsson, Brett Petersen, Budi Darmawan, Francois Lepage
International Technical Support Organization
SG24-5224-00
http://www.redbooks.ibm.com


International Technical Support Organization SG24-5224-00
An Introduction to Tivoli NetViewfor OS/390 V1R2
September 1998
© Copyright International Business Machines Corporation 1998. All rights reservedNote to U.S Government Users - Documentation related to restricted rights - Use, duplication or disclosure is subject to restrictionsset forth in GSA ADP Schedule Contract with IBM Corp.
First Edition (September 1998)
This edition applies to Tivoli NetView for OS/390 V1R2.
Comments may be addressed to:IBM Corporation, International Technical Support OrganizationDept. HZ8 Building 678P.O. Box 12195Research Triangle Park, NC 27709-2195
When you send information to IBM, you grant IBM a non-exclusive right to use or distribute the information in any way it believes appropriate without incurring any obligation to you.
Before using this information and the product it supports, be sure to read the general information in Appendix D, “Special Notices” on page 371.
Take Note!

Contents
Preface . . . . . . . . . . . . . . . . . . . . . . . . . . . . . . . . . . . . . . . . . . . . . . . . . . . . . . ixThe Team That Wrote This Redbook . . . . . . . . . . . . . . . . . . . . . . . . . . . . . . . . . . . . ix
Chapter 1. Introduction to TME 10 NetView V1R2 . . . . . . . . . . . . . . . . . . . . .11.1 Summary of TME 10 NetView for OS/390 V1R2 Functions . . . . . . . . . . . . .11.2 ITSO Residency Environment . . . . . . . . . . . . . . . . . . . . . . . . . . . . . . . . . . .41.3 Dependencies for Various TME 10 NetView for OS/390 V1R2 Functions . .5
Part 1. NetView Automation Enhancements . . . . . . . . . . . . . . . . . . . . . . . . . . . . . . . . . . . . . . . . . . .7
Chapter 2. Automation Table Enhancements . . . . . . . . . . . . . . . . . . . . . . . .92.1 New AUTOTEST Command . . . . . . . . . . . . . . . . . . . . . . . . . . . . . . . . . . . .9
2.1.1 AUTOTEST Syntax . . . . . . . . . . . . . . . . . . . . . . . . . . . . . . . . . . . . . .102.1.2 Logical Flows . . . . . . . . . . . . . . . . . . . . . . . . . . . . . . . . . . . . . . . . . .102.1.3 AUTOTEST Examples. . . . . . . . . . . . . . . . . . . . . . . . . . . . . . . . . . . .14
2.2 New AUTOTBL Design . . . . . . . . . . . . . . . . . . . . . . . . . . . . . . . . . . . . . . .162.2.1 Principles of Multiple Tables . . . . . . . . . . . . . . . . . . . . . . . . . . . . . . .162.2.2 AUTOTBL Syntax Detail . . . . . . . . . . . . . . . . . . . . . . . . . . . . . . . . . .172.2.3 AUTOTBL Examples . . . . . . . . . . . . . . . . . . . . . . . . . . . . . . . . . . . . .17
Chapter 3. Automation Notification Enhancements . . . . . . . . . . . . . . . . . .233.1 Concept of Automation Notification . . . . . . . . . . . . . . . . . . . . . . . . . . . . . .233.2 Implementing Automation Notification . . . . . . . . . . . . . . . . . . . . . . . . . . . .24
3.2.1 Configuration Files Changes . . . . . . . . . . . . . . . . . . . . . . . . . . . . . . .243.2.2 Notification Policy Setup . . . . . . . . . . . . . . . . . . . . . . . . . . . . . . . . . .263.2.3 Information Policy Setup . . . . . . . . . . . . . . . . . . . . . . . . . . . . . . . . . .27
3.3 Commands in Automation Notification. . . . . . . . . . . . . . . . . . . . . . . . . . . .293.3.1 EZLEASLN Command. . . . . . . . . . . . . . . . . . . . . . . . . . . . . . . . . . . .303.3.2 INFORM Command . . . . . . . . . . . . . . . . . . . . . . . . . . . . . . . . . . . . . .333.3.3 INFORMTB Command . . . . . . . . . . . . . . . . . . . . . . . . . . . . . . . . . . .343.3.4 ILOG Command . . . . . . . . . . . . . . . . . . . . . . . . . . . . . . . . . . . . . . . .35
3.4 RODM Notification Processing . . . . . . . . . . . . . . . . . . . . . . . . . . . . . . . . .36
Chapter 4. Pipe and REXX PPI Enhancements . . . . . . . . . . . . . . . . . . . . . .394.1 SPLIT Stage . . . . . . . . . . . . . . . . . . . . . . . . . . . . . . . . . . . . . . . . . . . . . . .394.2 APPEND Stage . . . . . . . . . . . . . . . . . . . . . . . . . . . . . . . . . . . . . . . . . . . . .404.3 NLS Stage . . . . . . . . . . . . . . . . . . . . . . . . . . . . . . . . . . . . . . . . . . . . . . . .414.4 DELDUPES Stage . . . . . . . . . . . . . . . . . . . . . . . . . . . . . . . . . . . . . . . . . .424.5 VARLOAD Stage. . . . . . . . . . . . . . . . . . . . . . . . . . . . . . . . . . . . . . . . . . . .434.6 INSTORE Stage . . . . . . . . . . . . . . . . . . . . . . . . . . . . . . . . . . . . . . . . . . . .444.7 EDIT Stage . . . . . . . . . . . . . . . . . . . . . . . . . . . . . . . . . . . . . . . . . . . . . . . .454.8 EXPOSE Stage . . . . . . . . . . . . . . . . . . . . . . . . . . . . . . . . . . . . . . . . . . . . .464.9 QSAM Stage . . . . . . . . . . . . . . . . . . . . . . . . . . . . . . . . . . . . . . . . . . . . . . .474.10 LOOKUP Stage. . . . . . . . . . . . . . . . . . . . . . . . . . . . . . . . . . . . . . . . . . . .484.11 TAKE/DROP Stage . . . . . . . . . . . . . . . . . . . . . . . . . . . . . . . . . . . . . . . . .504.12 PPI Stage . . . . . . . . . . . . . . . . . . . . . . . . . . . . . . . . . . . . . . . . . . . . . . . .504.13 REXX PPI Interface: DSIPHONE . . . . . . . . . . . . . . . . . . . . . . . . . . . . . .52
Chapter 5. RODM/GMFHS Enhancements . . . . . . . . . . . . . . . . . . . . . . . . . .555.1 Cloning . . . . . . . . . . . . . . . . . . . . . . . . . . . . . . . . . . . . . . . . . . . . . . . . . . .555.2 Date/Time for Formatting or Printing of the RODM Log . . . . . . . . . . . . . . .56
© Copyright IBM Corp. 1998 iii
5.3 Automatic Restart Manager . . . . . . . . . . . . . . . . . . . . . . . . . . . . . . . . . . . 575.4 RODM Checkpoint Data Set Failure Handling . . . . . . . . . . . . . . . . . . . . . 57
Chapter 6. MVS TCP/IP Support . . . . . . . . . . . . . . . . . . . . . . . . . . . . . . . . . 596.1 Software Customization . . . . . . . . . . . . . . . . . . . . . . . . . . . . . . . . . . . . . . 59
6.1.1 Software Customization - DSIPARM . . . . . . . . . . . . . . . . . . . . . . . . 596.1.2 TSO Server Setup . . . . . . . . . . . . . . . . . . . . . . . . . . . . . . . . . . . . . . 626.1.3 Software Customization - TCP/IP Definitions . . . . . . . . . . . . . . . . . . 62
6.2 AON MVS TCP/IP Examples . . . . . . . . . . . . . . . . . . . . . . . . . . . . . . . . . . 636.2.1 TCP/IP Server Management . . . . . . . . . . . . . . . . . . . . . . . . . . . . . . 646.2.2 Issue PING . . . . . . . . . . . . . . . . . . . . . . . . . . . . . . . . . . . . . . . . . . . 676.2.3 MVS TCP/IP Session Status . . . . . . . . . . . . . . . . . . . . . . . . . . . . . . 696.2.4 Issue TSO Commands . . . . . . . . . . . . . . . . . . . . . . . . . . . . . . . . . . . 736.2.5 Trace Route Command . . . . . . . . . . . . . . . . . . . . . . . . . . . . . . . . . . 75
Chapter 7. Event/Automation Service . . . . . . . . . . . . . . . . . . . . . . . . . . . . 777.1 Event/Automation Service Installation . . . . . . . . . . . . . . . . . . . . . . . . . . . 78
7.1.1 Prepare IHSAEVNT Task. . . . . . . . . . . . . . . . . . . . . . . . . . . . . . . . . 787.1.2 Customizing the NPDA Filter . . . . . . . . . . . . . . . . . . . . . . . . . . . . . . 807.1.3 Workstation Software Installation . . . . . . . . . . . . . . . . . . . . . . . . . . . 807.1.4 Tivoli Enterprise Console Preparation . . . . . . . . . . . . . . . . . . . . . . . 82
7.2 Events from Tivoli Enterprise Console to OS/390 . . . . . . . . . . . . . . . . . . 847.3 Alerts from OS/390 to TEC . . . . . . . . . . . . . . . . . . . . . . . . . . . . . . . . . . . 897.4 Messages from OS/390 to TEC . . . . . . . . . . . . . . . . . . . . . . . . . . . . . . . . 93
Chapter 8. Miscellaneous Enhancements . . . . . . . . . . . . . . . . . . . . . . . . . 978.1 SETCONID Command . . . . . . . . . . . . . . . . . . . . . . . . . . . . . . . . . . . . . . . 978.2 IDLEOFF Command . . . . . . . . . . . . . . . . . . . . . . . . . . . . . . . . . . . . . . . . 99
8.2.1 IDLEOFF Syntax . . . . . . . . . . . . . . . . . . . . . . . . . . . . . . . . . . . . . . . 998.2.2 IDLEOFF Considerations . . . . . . . . . . . . . . . . . . . . . . . . . . . . . . . . 1008.2.3 IDLEOFF Examples . . . . . . . . . . . . . . . . . . . . . . . . . . . . . . . . . . . . 101
8.3 Allocate/Free DD . . . . . . . . . . . . . . . . . . . . . . . . . . . . . . . . . . . . . . . . . . 1028.4 Console Enhancements . . . . . . . . . . . . . . . . . . . . . . . . . . . . . . . . . . . . . 1038.5 Timer Enhancements. . . . . . . . . . . . . . . . . . . . . . . . . . . . . . . . . . . . . . . 105
8.5.1 New Options for the DEFAULTS Command . . . . . . . . . . . . . . . . . . 1058.5.2 New Options for the OVERRIDE Command . . . . . . . . . . . . . . . . . . 1058.5.3 New Options for the AT and AFTER Commands . . . . . . . . . . . . . . 1068.5.4 New Options for the EVERY Command . . . . . . . . . . . . . . . . . . . . . 106
8.6 Storage Enhancements . . . . . . . . . . . . . . . . . . . . . . . . . . . . . . . . . . . . . 1068.7 Log, Member Browse and List CLIST Enhancements . . . . . . . . . . . . . . 1098.8 MSM Initialization Message . . . . . . . . . . . . . . . . . . . . . . . . . . . . . . . . . . 1108.9 LISTAE CLIST . . . . . . . . . . . . . . . . . . . . . . . . . . . . . . . . . . . . . . . . . . . . 1108.10 ASSIGN Command Enhancement . . . . . . . . . . . . . . . . . . . . . . . . . . . . 1128.11 DOM Enhancement . . . . . . . . . . . . . . . . . . . . . . . . . . . . . . . . . . . . . . . 1148.12 CMIP Filtering . . . . . . . . . . . . . . . . . . . . . . . . . . . . . . . . . . . . . . . . . . . 115
8.12.1 Prerequisites . . . . . . . . . . . . . . . . . . . . . . . . . . . . . . . . . . . . . . . . 1168.12.2 Start Options . . . . . . . . . . . . . . . . . . . . . . . . . . . . . . . . . . . . . . . . 1168.12.3 Migration Issues. . . . . . . . . . . . . . . . . . . . . . . . . . . . . . . . . . . . . . 116
8.13 AON and MultiSystem Manager Integration . . . . . . . . . . . . . . . . . . . . . 117
iv An Introduction to Tivoli NetView for OS/390 V1R2

Part 2. Graphical Monitoring of Network Resources . . . . . . . . . . . . . . . . . . . . . . . . . . . . . . . . . . .119
Chapter 9. NetView Management Console . . . . . . . . . . . . . . . . . . . . . . . . .1219.1 Installation and Operation . . . . . . . . . . . . . . . . . . . . . . . . . . . . . . . . . . . .122
9.1.1 NetView Management Console Installation . . . . . . . . . . . . . . . . . . .1229.1.2 Operating the NetView Management Console Server . . . . . . . . . . .140
9.2 Understanding NetView Management Console . . . . . . . . . . . . . . . . . . . .1429.2.1 NetView Management Console Main Menu . . . . . . . . . . . . . . . . . . .1449.2.2 NetView Management Console Window Customization . . . . . . . . . .1469.2.3 Managing Views . . . . . . . . . . . . . . . . . . . . . . . . . . . . . . . . . . . . . . .1499.2.4 NetView Management Console Console Properties. . . . . . . . . . . . .1519.2.5 View Customization. . . . . . . . . . . . . . . . . . . . . . . . . . . . . . . . . . . . .1629.2.6 Resource Properties . . . . . . . . . . . . . . . . . . . . . . . . . . . . . . . . . . . .1679.2.7 Display Status History and Alert History . . . . . . . . . . . . . . . . . . . . .1719.2.8 Topology Display Subsystem View . . . . . . . . . . . . . . . . . . . . . . . . .178
9.3 Command Profile Editor . . . . . . . . . . . . . . . . . . . . . . . . . . . . . . . . . . . . .1829.3.1 Creating a Command Set . . . . . . . . . . . . . . . . . . . . . . . . . . . . . . . .1849.3.2 Creating a Profile . . . . . . . . . . . . . . . . . . . . . . . . . . . . . . . . . . . . . .1859.3.3 Creating an Operator. . . . . . . . . . . . . . . . . . . . . . . . . . . . . . . . . . . .1879.3.4 Saving a Command Profile . . . . . . . . . . . . . . . . . . . . . . . . . . . . . . .188
9.4 NetView Management Console Command Support . . . . . . . . . . . . . . . . .1899.4.1 Command Service Configuration . . . . . . . . . . . . . . . . . . . . . . . . . . .1899.4.2 Command Service Usage . . . . . . . . . . . . . . . . . . . . . . . . . . . . . . . .1899.4.3 NetView/390 Commands from the NMC Client . . . . . . . . . . . . . . . .1909.4.4 NetView 3270 Java Client . . . . . . . . . . . . . . . . . . . . . . . . . . . . . . . .193
Chapter 10. Tivoli Management Region Feature . . . . . . . . . . . . . . . . . . . .19710.1 Tivoli Management Region Feature Customization . . . . . . . . . . . . . . . .198
10.1.1 Automation Table Customization . . . . . . . . . . . . . . . . . . . . . . . . . .19810.1.2 MultiSystem Manager Initialization Members . . . . . . . . . . . . . . . . .19910.1.3 MultiSystem Manager Exception Views . . . . . . . . . . . . . . . . . . . . .20010.1.4 Installing the MSM Agent Software . . . . . . . . . . . . . . . . . . . . . . . .20110.1.5 Customizing Enterprise Console . . . . . . . . . . . . . . . . . . . . . . . . . .20210.1.6 Customizing TME 10 Distributed Monitoring . . . . . . . . . . . . . . . . .20210.1.7 Configuring the Tivoli Management Region Agent . . . . . . . . . . . . .214
10.2 Tivoli Management Region Process Flows . . . . . . . . . . . . . . . . . . . . . .21510.2.1 MultiSystem Manager INITTOPO and GETTOPO Flow . . . . . . . . .21510.2.2 MultiSystem Manager Flow for Status Changes . . . . . . . . . . . . . .21710.2.3 Sending Commands to TME Resources from NetView/390 . . . . . .219
10.3 Operating the Tivoli Management Region Services . . . . . . . . . . . . . . . .22010.3.1 Starting the MultiSystem Manager Agent. . . . . . . . . . . . . . . . . . . .22010.3.2 Verifying Command Support . . . . . . . . . . . . . . . . . . . . . . . . . . . . .22210.3.3 Stopping the MultiSystem Manager Agent . . . . . . . . . . . . . . . . . . .223
10.4 MSMAgent Topology with NetView Management Console . . . . . . . . . .22310.4.1 Tivoli Management Region Object Hierarchy . . . . . . . . . . . . . . . . .22310.4.2 Exception Views . . . . . . . . . . . . . . . . . . . . . . . . . . . . . . . . . . . . . .22910.4.3 Resource-Specific Commands . . . . . . . . . . . . . . . . . . . . . . . . . . .230
10.5 Secure TCP/IP Option. . . . . . . . . . . . . . . . . . . . . . . . . . . . . . . . . . . . . .232
Chapter 11. NetWare Agent . . . . . . . . . . . . . . . . . . . . . . . . . . . . . . . . . . . .23311.1 Customization of the MultiSystem Manager NetWare Environment . . . .23311.2 Customization of the NetWare Agent Code . . . . . . . . . . . . . . . . . . . . . .23711.3 NetWare Scenarios . . . . . . . . . . . . . . . . . . . . . . . . . . . . . . . . . . . . . . . .240
v

11.3.1 NetWare Alerts . . . . . . . . . . . . . . . . . . . . . . . . . . . . . . . . . . . . . . 24011.3.2 NetWare Resource-Specific Commands . . . . . . . . . . . . . . . . . . . 248
Chapter 12. Topology Correlation . . . . . . . . . . . . . . . . . . . . . . . . . . . . . . . 25112.1 Correlation Concept and Implementation . . . . . . . . . . . . . . . . . . . . . . . 251
12.1.1 Correlation Method Implementation . . . . . . . . . . . . . . . . . . . . . . . 25212.1.2 Modifying FLBSYSD Member of SNA Topology Manager. . . . . . . 255
12.2 Default Correlation. . . . . . . . . . . . . . . . . . . . . . . . . . . . . . . . . . . . . . . . 25512.3 Free-Form Text Correlation . . . . . . . . . . . . . . . . . . . . . . . . . . . . . . . . . 258
Chapter 13. Visual BLDVIEWS . . . . . . . . . . . . . . . . . . . . . . . . . . . . . . . . . 25913.1 Software Requirements . . . . . . . . . . . . . . . . . . . . . . . . . . . . . . . . . . . . 259
13.1.1 Software Installation on the Workstation . . . . . . . . . . . . . . . . . . . 25913.1.2 Software Installation on the Host . . . . . . . . . . . . . . . . . . . . . . . . . 259
13.2 Getting Started . . . . . . . . . . . . . . . . . . . . . . . . . . . . . . . . . . . . . . . . . . 26013.3 Resource Types . . . . . . . . . . . . . . . . . . . . . . . . . . . . . . . . . . . . . . . . . 262
13.3.1 Network Resource Objects. . . . . . . . . . . . . . . . . . . . . . . . . . . . . . 26313.3.2 Selective Control Objects. . . . . . . . . . . . . . . . . . . . . . . . . . . . . . . 26513.3.3 View Objects . . . . . . . . . . . . . . . . . . . . . . . . . . . . . . . . . . . . . . . . 266
13.4 Build/Set Resources . . . . . . . . . . . . . . . . . . . . . . . . . . . . . . . . . . . . . . 26713.5 Build Views . . . . . . . . . . . . . . . . . . . . . . . . . . . . . . . . . . . . . . . . . . . . . 270
13.5.1 Sample Building Network View . . . . . . . . . . . . . . . . . . . . . . . . . . 27113.5.2 An Example of an Exception View . . . . . . . . . . . . . . . . . . . . . . . . 28113.5.3 Using Wildcards . . . . . . . . . . . . . . . . . . . . . . . . . . . . . . . . . . . . . . 288
13.6 Visual BLDVIEWS and RODMVIEW . . . . . . . . . . . . . . . . . . . . . . . . . . 290
Part 3. New NetView Interfaces . . . . . . . . . . . . . . . . . . . . . . . . . . . . . . . . . . . . . . . . . . . . . . . . . . . 293
Chapter 14. NetView 3270 Java Client . . . . . . . . . . . . . . . . . . . . . . . . . . . 29514.1 Software Installation . . . . . . . . . . . . . . . . . . . . . . . . . . . . . . . . . . . . . . 295
14.1.1 Software Installation on MVS . . . . . . . . . . . . . . . . . . . . . . . . . . . . 29514.1.2 Software Installation on a Windows 95 Workstation . . . . . . . . . . . 296
14.2 How to Work with NetView Java Client . . . . . . . . . . . . . . . . . . . . . . . . 30414.2.1 Log On to TME 10 NetView for OS/390 . . . . . . . . . . . . . . . . . . . . 30414.2.2 Command Facility Session. . . . . . . . . . . . . . . . . . . . . . . . . . . . . . 30614.2.3 Other Sessions . . . . . . . . . . . . . . . . . . . . . . . . . . . . . . . . . . . . . . 31014.2.4 Hardware Monitor . . . . . . . . . . . . . . . . . . . . . . . . . . . . . . . . . . . . 31014.2.5 Define a New Full-Screen Session . . . . . . . . . . . . . . . . . . . . . . . . 31114.2.6 Managing Your Windows . . . . . . . . . . . . . . . . . . . . . . . . . . . . . . . 313
Chapter 15. Web Access to NetView/390 . . . . . . . . . . . . . . . . . . . . . . . . . 31715.1 Software Installation on MVS . . . . . . . . . . . . . . . . . . . . . . . . . . . . . . . . 31715.2 Web Access . . . . . . . . . . . . . . . . . . . . . . . . . . . . . . . . . . . . . . . . . . . . 31715.3 Issuing Commands Using the Web Browser . . . . . . . . . . . . . . . . . . . . 320
Chapter 16. DB2 Access from NetView/390 . . . . . . . . . . . . . . . . . . . . . . . 32516.1 Activating DB2 Access for NetView . . . . . . . . . . . . . . . . . . . . . . . . . . . 32516.2 DB2 Access PIPE Stages . . . . . . . . . . . . . . . . . . . . . . . . . . . . . . . . . . 327
16.2.1 SQL Stage . . . . . . . . . . . . . . . . . . . . . . . . . . . . . . . . . . . . . . . . . . 32716.2.2 SQLCODES Stage. . . . . . . . . . . . . . . . . . . . . . . . . . . . . . . . . . . . 32816.2.3 SQSELECT Sample Program . . . . . . . . . . . . . . . . . . . . . . . . . . . 329
16.3 DB2 Access Samples . . . . . . . . . . . . . . . . . . . . . . . . . . . . . . . . . . . . . 32916.3.1 Creating DB2 Database . . . . . . . . . . . . . . . . . . . . . . . . . . . . . . . . 32916.3.2 Automation to Collect Data from System . . . . . . . . . . . . . . . . . . . 331
vi An Introduction to Tivoli NetView for OS/390 V1R2

16.3.3 Automation Support. . . . . . . . . . . . . . . . . . . . . . . . . . . . . . . . . . . .333
Chapter 17. Commands to OS/390 UNIX (OpenEdition) . . . . . . . . . . . . . .33517.1 Defining the UNIX Server . . . . . . . . . . . . . . . . . . . . . . . . . . . . . . . . . . .33517.2 Starting the UNIXSERV. . . . . . . . . . . . . . . . . . . . . . . . . . . . . . . . . . . . .33717.3 Stopping the UNIXSERV . . . . . . . . . . . . . . . . . . . . . . . . . . . . . . . . . . .33817.4 Issuing Commands to OS/390 UNIX . . . . . . . . . . . . . . . . . . . . . . . . . . .33817.5 Command Server (UNIX) . . . . . . . . . . . . . . . . . . . . . . . . . . . . . . . . . . .340
Chapter 18. Commands to TSO . . . . . . . . . . . . . . . . . . . . . . . . . . . . . . . . .34318.1 Defining the TSOSERV . . . . . . . . . . . . . . . . . . . . . . . . . . . . . . . . . . . . .34318.2 Starting the TSOSERV . . . . . . . . . . . . . . . . . . . . . . . . . . . . . . . . . . . . .34418.3 Stopping the TSOSERV . . . . . . . . . . . . . . . . . . . . . . . . . . . . . . . . . . . .34518.4 Issuing Commands to TSO . . . . . . . . . . . . . . . . . . . . . . . . . . . . . . . . . .34618.5 Command Server (TSO) . . . . . . . . . . . . . . . . . . . . . . . . . . . . . . . . . . . .348
Part 4. Appendices . . . . . . . . . . . . . . . . . . . . . . . . . . . . . . . . . . . . . . . . . . . . . . . . . . . . . . . . . . . . .351
Appendix A. Sample Control Files . . . . . . . . . . . . . . . . . . . . . . . . . . . . . . . . . 353A.1 Output from nvtec.sh . . . . . . . . . . . . . . . . . . . . . . . . . . . . . . . . . . . . . . . . . . . 353
Appendix B. Sample REXX Programs . . . . . . . . . . . . . . . . . . . . . . . . . . . . . . 357B.1 LISTAE CLIST. . . . . . . . . . . . . . . . . . . . . . . . . . . . . . . . . . . . . . . . . . . . . . . . 357B.2 Initializing DB2 Database . . . . . . . . . . . . . . . . . . . . . . . . . . . . . . . . . . . . . . . 358B.3 Creating Object with Correlater Field . . . . . . . . . . . . . . . . . . . . . . . . . . . . . . 360B.4 VBDENETF REXX Program . . . . . . . . . . . . . . . . . . . . . . . . . . . . . . . . . . . . . 361B.5 VBDNOTF.REX. . . . . . . . . . . . . . . . . . . . . . . . . . . . . . . . . . . . . . . . . . . . . . . 364B.6 EML5224 Command . . . . . . . . . . . . . . . . . . . . . . . . . . . . . . . . . . . . . . . . . . . 367
Appendix C. Sample JCLs . . . . . . . . . . . . . . . . . . . . . . . . . . . . . . . . . . . . . . . 369C.1 Copy EAS to OpenEdition. . . . . . . . . . . . . . . . . . . . . . . . . . . . . . . . . . . . . . . 369
Appendix D. Special Notices . . . . . . . . . . . . . . . . . . . . . . . . . . . . . . . . . . . . . 371
Appendix E. Related Publications . . . . . . . . . . . . . . . . . . . . . . . . . . . . . . . . . 373E.1 International Technical Support Organization Publications. . . . . . . . . . . . . . 373E.2 TME 10 NetView for OS/390 V1R2 Publications. . . . . . . . . . . . . . . . . . . . . . 373
List of Abbreviations . . . . . . . . . . . . . . . . . . . . . . . . . . . . . . . . . . . . . . . . . .375
How to Get ITSO Redbooks . . . . . . . . . . . . . . . . . . . . . . . . . . . . . . . . . . . . .377How IBM Employees Can Get ITSO Redbooks . . . . . . . . . . . . . . . . . . . . . . . . . . 377How Customers Can Get ITSO Redbooks . . . . . . . . . . . . . . . . . . . . . . . . . . . . . . 378IBM Redbook Order Form . . . . . . . . . . . . . . . . . . . . . . . . . . . . . . . . . . . . . . . . . . 379
Index . . . . . . . . . . . . . . . . . . . . . . . . . . . . . . . . . . . . . . . . . . . . . . . . . . . . . . .381
ITSO Redbook Evaluation . . . . . . . . . . . . . . . . . . . . . . . . . . . . . . . . . . . . . .393
vii

viii An Introduction to Tivoli NetView for OS/390 V1R2

Preface
This redbook will help you install, tailor and configure the new functions in TME 10 NetView for OS/390 V1R2. This redbook is divided into three sections:
1. Automation enhancements
This section will help you understand all the automation enhancements including management of TCP/IP resources and TCP/IP sessions to TCP/IP for MVS. You will find examples of how notification and inform policies can be used to send TEC events and e-mail. We provide examples of how NetView can send messages and alerts to TEC and how to send TEC events to NetView. The automation table testing and PIPE enhancements are also described in this section.
2. Graphical monitoring of network resources
This section will help you install, tailor and use the new Java-based graphical user interface called NetView Management Console. The Tivoli MultiSystem Manager agent allows you to manage your distributed Tivoli environments from TME 10 NetView for OS/390 V1R2. We provide you with information on how to install and customize the agent and the prerequisite products such as Tivoli Enterprise Console and TME 10 Distributed Monitoring. The new NetWare agent with TCP/IP support and access to NDS is also covered in this section. We provide examples of how you can use the Visual BLDVIEWS tool to create customized views for NGMF and NetView Management Console. In addition you find examples of the new topology correlation functions.
3. New NetView interfaces
The 3270 Java client allows you to access NetView through TCP/IP and run NetView applications from many Java-capable workstations. The Web server allows you to send NetView commands and receive responses using a Web browser. The new PIPE SQL stages makes it possible to access DB/2 from NetView. You find some program examples showing the capability of this new interface. The TSO server and UNIX server allow you to issue TSO and OS/390 UNIX commands from NetView.
The Team That Wrote This Redbook
This redbook was produced by a team of specialists from around the world working at the Systems Management and Networking ITSO Center, Raleigh.
Arne Olsson is an International Technical Support Organization specialist at the Systems Management and Networking ITSO Center, Raleigh. His responsibilities at the ITSO include TME 10 NetView for OS/390 and TME 10 Global Enterprise Manager. Before joining the ITSO he worked as a Systems Engineer in Sweden for 18 years primarily with network and systems management solutions for large customers.
Brett Petersen is a Systems Management Specialist in South Africa. He has 14 years of experience in the IT field, of which the last six have been in the systems management arena.
Budi Darmawan is an Advisory I/T Specialist in IBM Indonesia. He has five years of experience in system and network management. He has worked at IBM for
© Copyright IBM Corp. 1998 ix
eight years. His areas of expertise include Tivoli and general system management in mainframes and distributed systems.
Francois Lepage is a Customer Service I/T Specialist in IBM France. He has six years of experience in system and network management. He has worked at IBM for 13 years. His areas of expertise include NetView for OS/390, System Automation and Helpdesk. He was responsible for the first NGMF V2R3 implementation with nine network environments at a large European manufacturing customer.
Thanks to the following people for their invaluable contributions to this project:
Kathryn CasamentoCarla SadtlerKarl WozabalSystems Management and Networking ITSO Center,Raleigh
Anthony BoddieScott BrownLarry GreenBill IrlbeckRob JohnsonPam McleanSteve MonroeSimon PercivalPaul QuigleyBob RisleyChris SchaubachDavid SchmidtGregory SmithJeff WeinerIBM RTP, Tivoli NetView for OS/390 Development
Sandy KlemashRoy MitchellAngela PittsKay SintalMark WrightIBM RTP, Tivoli NetView for OS/390 Beta Programs
x An Introduction to Tivoli NetView for OS/390 V1R2
Chapter 1. Introduction to TME 10 NetView V1R2
This chapter provides you with a brief overview of the new and enhanced functions in TME 10 NetView for OS/390 V1R2. We also provide you with some information about the configuration we used during the residency. A complete list of all the hardware and software requirements for each TME 10 NetView for OS/390 V1R2 function is provided in the announcement letter and also in the TME 10 NetView for OS/390 V1R2 Planning Guide.
The first question you might ask yourself is why is the book called An Introduction to Tivoli NetView for OS/390 V1R2 and not An Introduction to TME 10 NetView for OS/390 V1R2. The reason is that the that all new products will use the Tivoli brand name rather than the TME 10 brand name. The decision to change to the Tivoli brand name was taken just before the announcement of TME 10 NetView for OS/390 V1R2, so this name change was not implemented in this release of the product.
Another important topic these days is whether products are ready for the year 2000. TME 10 NetView for OS/390 V1R2 is ready for the year 2000 and this is now documented in the announcement letter.
1.1 Summary of TME 10 NetView for OS/390 V1R2 Functions
This release of NetView for OS/390 contains many new functions addressing many different areas. For example, you might have a special interest in automation or how you can manage your networks resources graphically. We grouped the new functions into three different sections in this redbook to make it easier to find the topics of most interest to you.
• NetView Automation Enhancements
– Automation table enhancements
The automation table enhancements include the capability to test the automation table prior to putting it into production. You can have multiple tables and turn portions of the automation table on and off. You find a description in Chapter 2, “Automation Table Enhancements” on page 9.
– Automation notification
The AON function in TME 10 NetView for OS/390 V1R2 now allows you define a notification policy for notification when a certain network device has encountered a problem. The notification method can be the use of a pager, e-mail, alerts or TEC events. In TME 10 NetView for OS/390 V1R1 a new RODM status called Automation In Progress was defined. In TME 10 NetView for OS/390 V1R2 you have a new RODM status called Operator Intervention Required. When no more automation is defined for a particular resource you can enable the linking of this object to the new Operator Intervention Required View (refer to Chapter 3, “Automation Notification Enhancements” on page 23).
– Pipe enhancements
Several new PIPE stages have been added in this release including, SPLIT, APPEND, NLS, DELDUPES, VARLOAD and INSTORE. Existing pipe stages have been enhanced including the EDIT, EXPOSE, QSAM, LOOKUP and TAKE/DROP stages. There are examples of these new and
© Copyright IBM Corp. 1998 1
enhanced PIPE stages in Chapter 4, “Pipe and REXX PPI Enhancements” on page 39.
– RODM/GMFHS enhancements
Cloning and ARM support was introduced in TME 10 NetView for OS/390 V1R1. In TME 10 NetView for OS/390 V1R2 Cloning and ARM support is now provided for RODM and GMFHS. You can take advantage of the new start date/time and stop date/time parameters when printing the RODM log. Using these parameters will help reduce the amount of output. This release provides you with new options on how to handle RODM checkpoint failures. You will find a description of these functions in Chapter 5, “RODM/GMFHS Enhancements” on page 55. You can also find additional information about cloning and ARM in An Introduction to TME 10 NetView V1R1, SG24-4922.
– MVS TCP/IP support
TME 10 NetView for OS/390 V1R2 provides management functions for MVS TCP/IP resources. The AON component has been enhanced to provide NetView 390 operators with this capability. The TCP/IP management includes the ability automate management of TCP/IP resources (refer to Chapter 6, “MVS TCP/IP Support” on page 59).
– Event Automation Service
Event Automation Service has been integrated into TME 10 NetView for OS/390 V1R2. Event Automation Services was previously available in the Global Enterprise Manager. It provides the required adapters to send messages and alerts from TME 10 NetView for OS/390 V1R2 to Tivoli Enterprise Console. Events from Tivoli Enterprise Console can also be sent to TME 10 NetView for OS/390 V1R2 giving you flexibility to choose which platform you want to manage your environment from. The Event Automation Service is described in Chapter 7, “Event/Automation Service” on page 77.
– Miscellaneous enhancements
This chapter documents many of the enhanced commands and some of the samples shipped with TME 10 NetView for OS/390 V1R2. Enhanced commands in this release includes SETCONID, IDLEOFF, ALLOCATE/FREE, CONSOLE, BROWSE and LIST.
Timer commands such as AT, AFTER and EVERY have also been enhanced.
Some of the samples shipped with TME 10 NetView for OS/390 V1R2 are described such as MEMSTAT, which allows you to keep frequently used members in storage. You find examples of these enhancements in Chapter 8, “Miscellaneous Enhancements” on page 97.
• Graphical Monitoring of Network Resources
– NetView Management Console
In addition to NGMF this release provides you with a new Java-based graphical user interface. NetView Management Console consists of a server and a client component. The client uses Java and provides you with a platform-independent solution to manage your network resources graphically (refer to Chapter 9, “NetView Management Console” on page 121).
2 An Introduction to Tivoli NetView for OS/390 V1R2

– Tivoli Topology Service
The Tivoli Topology Service from Global Enterprise Manager has been integrated into TME 10 NetView for OS/390 V1R2. This function allows you to manage your distributed Tivoli environment from TME 10 NetView for OS/390 V1R2. This is described in Chapter 10, “Tivoli Management Region Feature” on page 197. You can find additional information in TME 10 Global Enterprise Manager, Topology Service and NetView Java Client, SG24-2121.
– NetWare agent
There is a new NetWare agent that uses TCP/IP communication to TME 10 NetView for OS/390 V1R2. This new NetWare agent has also been enhanced to access NetWare Directory Service (NDS). An overview of these functions is provided in Chapter 11, “NetWare Agent” on page 233. A more comprehensive description of how to manage NetWare from NetView for OS/390 can be found in Managing NetWare Environments from MVS Using NPM, MSM-NetWare, SG24-4527.
– Visual BLDVIEWS
Managing your network using NGMF or NetView Management Console may require that you want to create customized views. The Visual BLDVIEWS tool allows you to create such customized views more easily. The tool runs on a workstation and uses drag and drop technique to customize your views before uploading the views to RODM. The Visual BLDVIEWS tool can also be used to display and change values of objects in RODM, using RODMVIEW (refer to Chapter 13, “Visual BLDVIEWS” on page 259).
– Topology correlation
Topology correlation is enhanced and allows dynamic correlation of networking resources. You can also specify correlation on user-defined values. You find a description and examples in Chapter 12, “Topology Correlation” on page 251.
• New NetView Interfaces
– NetView 3270 Java Client
The 3270 Java Client allows access to TME 10 NetView for OS/390 V1R2 from AIX, Windows 95/NT, OS/2, HP-UX and Sun Solaris. It uses TCP/IP to communicate with TME 10 NetView for OS/390 V1R2 and allows you to run command facility and full-screen applications. In Chapter 14, “NetView 3270 Java Client” on page 295 you find information on how we used it on Windows/95.
– Web Access to TME 10 NetView for OS/390 V1R2
Using the TME 10 NetView for OS/390 V1R2 Web server function you can send commands to TME 10 NetView for OS/390 V1R2 using a Web browser. This is described in Chapter 15, “Web Access to NetView/390” on page 317.
– DB/2 access from NetView
The DB/2 access is provided by the new PIPE SQL stages. You can find a description and examples of how to use this interface in Chapter 16, “DB2 Access from NetView/390” on page 325.
Introduction to TME 10 NetView V1R2 3

– Commands to TSO
Using the new TSO server function you can issue commands to TSO from TME 10 NetView for OS/390 V1R2. If you want to send NetView commands from TSO, you can use the provided sample CNMS8029. These functions are described in Chapter 18, “Commands to TSO” on page 343.
– Commands to OS/390 UNIX
The UNIX server function allows you to send commands from TME 10 NetView for OS/390 V1R2 to OS/390 UNIX. The sample CNMS8029 can be used to send commands from OS/390 UNIX to NetView. You will find a description of these functions in Chapter 17.4, “Issuing Commands to OS/390 UNIX” on page 338.
1.2 ITSO Residency Environment
The following is a high-level diagram of the environment we used during our residency at the ITSO.
Figure 1. ITSO Configuration
4 An Introduction to Tivoli NetView for OS/390 V1R2

1.3 Dependencies for Various TME 10 NetView for OS/390 V1R2 Functions
In Table 1, we list the prerequisites for each function that we used during the residency. You should refer to the official documentation for a complete list of hardware and software prerequisites. Table 1 is provided for you to see the levels we used during our residency.
We used the Enterprise Option of TME 10 NetView for OS/390 V1R2. The high-level language used for TME 10 NetView for OS/390 V1R2 was AD/Cycle LE/370. TME 10 NetView for OS/390 V1R2 was installed on an OS/390 R3 system with TCP/IP for MVS V3R2. All features that do not appear in the list have all the prerequisites available in the MVS portion of TME 10 NetView for OS/390 V1R2.
Table 1. Feature Dependency Summary
Feature Dependency/Requirement
Automation Notification Event Automation Service is needed for TEC event notification
TCP/IP for MVS Management Commands to TSO (TSOSERV)
Event Automation Service AIX 4.2 Tivoli Framework 3.2 Tivoli Enterprise Console 3.1
NetView Management Console NetView Management Console server on Windows NT 4.0 withTCP/IP and SNA connection to MVSNetView Management Console client on Windows NT 4.0 with TCP/IPconnection to NetView Management Console server JDK 1.1.6
Tivoli Management Region Feature AIX 4.2 Tivoli Framework 3.2 Tivoli Enterprise Console 3.1 Tivoli Distributed Monitoring 3.5
NetWare Agent NetWare 4.11 Server
Visual BLDVIEWS Windows NT workstation with TCP/IP connection to TME 10 NetViewfor OS/390 V1R2
Topology Correlation MultiSystem Manager Agent for Tivoli MultiSystem Manager Agent for IP LNM 2.0
3270 Java Client Windows/95 Workstation with Java 1.1.6 and TCP/IP connection
Web Access to TME 10 NetView forOS/390
TCP/IP connection and Netscape Web Browser
DB2 Access from TME 10 NetView forOS/390
DB2 V5
UNIX Server OS/390 R3 and OS/390 UNIX (formerly known as OpenEdition)
Introduction to TME 10 NetView V1R2 5

6 An Introduction to Tivoli NetView for OS/390 V1R2

Part 1. NetView Automation Enhancements
© Copyright IBM Corp. 1998 7

8 An Introduction to Tivoli NetView for OS/390 V1R2

Chapter 2. Automation Table Enhancements
The automation table enhancements in TME 10 NetView for OS/390 V1R2 allow you to test your automation table to see what would have happened if this table was put into production. You can now work with multiple logical tables and the new loading function allows you to add and remove segments of the automation table.
2.1 New AUTOTEST Command
Previously, the AUTOTBL command had a TEST keyword, which enabled you to catch incorrect automation table syntax. It was not able to handle other kinds of problems, such as:
• Logical errors
Maybe you created a logical error by simply forgetting quotes.
• Ordering errors
Maybe you have a generic automation table entry and you forgot to code CONTINUE=YES.
• Unintended matching
Maybe you have had messages and alerts match on statements not intended to.
• Not matching on a statement as intended due to a mismatch
Perhaps you failed to match on a message or alert because you coded the message or alert details incorrectly in the automation table.
• One message or alert matching on multiple statements unexpectedly
Maybe you have seen cases where a message or alert matched multiple statements and that wasn't what you intended.
The new AUTOTEST command helps you to avoid these problems. It enables you to discover and correct any logic, typographical, or ordering problems prior to putting a new automation table into your production environment. It has the capability to simulate production messages and MSUs and run them through a test automation table in batch mode.
© Copyright IBM Corp. 1998 9

2.1.1 AUTOTEST SyntaxThe syntax of the AUTOTEST command is:
AUTOTEST OFF - Turn off testing STATUS - Show current TESTING status. MEMBER=name, - Table member name for testing DD=DSIPARM/DSIASRC, - DD name of table member LISTING=name, - Listing file REPLACE - Replace member of the same name SOURCE =OFF - Turn off messages and alerts =PARALLEL - Take production input in parallel =sname - Take input stored in a file TASKNAME=taskname, - Autotask that does the processing. REPORT=repname, - Output report member name RPTREPL - Replace member of the same name RECORD =OFF - Turn off recording of msg traffic =recname, - Store messages/alerts in file LOGREPL - Replace member of same name
There is a new task that must be started before automation table testing can take place. This is the DSIATOPT task and it is started with the command:
START TASK=DSIATOPT
Note: The AUTOCNT statement has a new TEST parameter related to the AUTOTEST command. You can specify the TEST parameter to request a report for the automation table being tested with the AUTOTEST command.
2.1.2 Logical FlowsThe AUTOTEST command has multiple options. The following pages give you a high-level flow of how these options work. Three functions are described:
• AUTOTEST testing options
• AUTOTEST in batch mode
• AUTOTEST stop options
AUTOCNT RESET REPORT=MSG/MSU/BOTH TEST
10 An Introduction to Tivoli NetView for OS/390 V1R2

Figure 2. AUTOTEST Testing Options
Messages and alerts flow from NetView interfaces 0 into the active automation table. If you use the automation table testing capability, you will use a test table. The testing of the test automation table can be done in either batch mode or in parallel with the active automation table. Figure 2 shows you the high-level flow for the testing options and how to obtain input for your test table:
• With the Record parameter 1 you can store messages and alerts from the normal flow in a data set (AUTOTEST RECORD=Member). The elements in this file are in AIFR block format. The recorded member is stored in a new DD name: DSIASRC. When you have recorded enough messages use the OFF option on the Record parameter (AUTOTEST RECORD=OFF).
After recording messages, you have to use the sname option from the Source parameter 2 of the AUTOTEST command to use the recorded messages and alerts for your testing (AUTOTEST MEMBER=Member name,SOURCE=Source name).
• With the Parallel option the normal flow of messages and alerts 3 can be used for testing in parallel with the active automation table (AUTOTEST MEMBER=Member name,SOURCE=PARALLEL).
Automation Table Enhancements 11

Figure 3. AUTOTEST in Batch Mode
If you have previously chosen to save the input messages and alerts in a file, then you need to issue the AUTOTEST command again and you need to specify which automation table member you want to use. The automation table you have specified 4 in the Member parameter will be compiled and stored in memory as the AUTOTBL command does with active automation table.
You can specify an automation table member from DSIPARM or DSIASRC DD names. The source file member is in the DSIARSC DDNAME with the name used when recording the messages and alerts. The result of the testing is documented in a report member 5 in a new DD name: DSIARPT. The Listing option creates a listing of the tested table in the DSILIST DD name. The automation table listing is used to map the report file with the statements numbers in the tested table. The listing and report parameters are both required.
12 An Introduction to Tivoli NetView for OS/390 V1R2

Figure 4. AUTOTEST Stop Options
If you use the option Source=parallel6, then you can stop processing by issuing the AUTOTEST=OFF command 9 to clear your test environment and remove the test table from memory.
The other option is to use Source=OFF 7. This option gives you the ability to retry the AUTOTEST command without reloading and recompiling the test table. In fact the compiled test table is still loaded in memory. NetView will look for an already compiled and loaded table if you omit the member= option in the AUTOTEST command. This gives you the ability to use, for example, another source and the already compiled and loaded table.
If you have chosen to test recorded messages from an input file 8, then the AUTOTEST process will automatically stop at the end of the input file.
When all your tests are finished 9, then you can clear the AUTOTEST environment with the AUTOTEST OFF command10. The compiled test table will be removed from storage.
Automation Table Enhancements 13
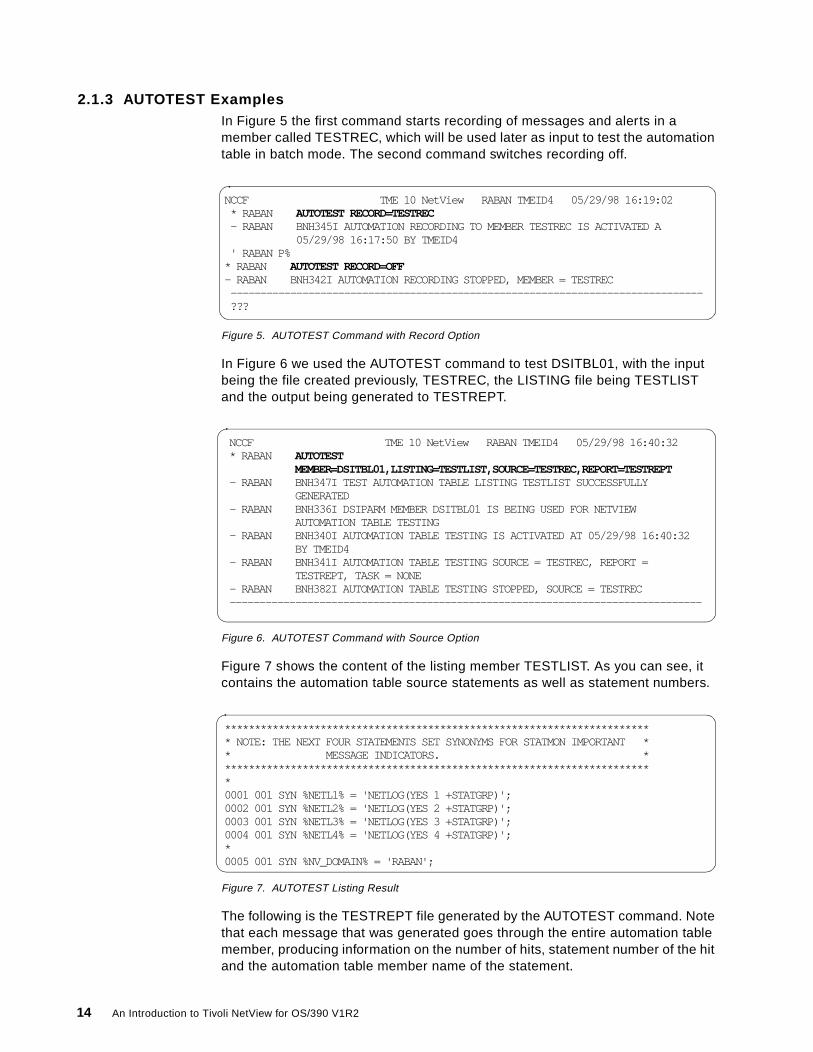
2.1.3 AUTOTEST ExamplesIn Figure 5 the first command starts recording of messages and alerts in a member called TESTREC, which will be used later as input to test the automation table in batch mode. The second command switches recording off.
Figure 5. AUTOTEST Command with Record Option
In Figure 6 we used the AUTOTEST command to test DSITBL01, with the input being the file created previously, TESTREC, the LISTING file being TESTLIST and the output being generated to TESTREPT.
Figure 6. AUTOTEST Command with Source Option
Figure 7 shows the content of the listing member TESTLIST. As you can see, it contains the automation table source statements as well as statement numbers.
Figure 7. AUTOTEST Listing Result
The following is the TESTREPT file generated by the AUTOTEST command. Note that each message that was generated goes through the entire automation table member, producing information on the number of hits, statement number of the hit and the automation table member name of the statement.
NCCF TME 10 NetView RABAN TMEID4 05/29/98 16:19:02 * RABAN AUTOTEST RECORD=TESTREC - RABAN BNH345I AUTOMATION RECORDING TO MEMBER TESTREC IS ACTIVATED A 05/29/98 16:17:50 BY TMEID4 ' RABAN P%* RABAN AUTOTEST RECORD=OFF- RABAN BNH342I AUTOMATION RECORDING STOPPED, MEMBER = TESTREC ------------------------------------------------------------------------------- ???
NCCF TME 10 NetView RABAN TMEID4 05/29/98 16:40:32 * RABAN AUTOTEST MEMBER=DSITBL01,LISTING=TESTLIST,SOURCE=TESTREC,REPORT=TESTREPT - RABAN BNH347I TEST AUTOMATION TABLE LISTING TESTLIST SUCCESSFULLY GENERATED - RABAN BNH336I DSIPARM MEMBER DSITBL01 IS BEING USED FOR NETVIEW AUTOMATION TABLE TESTING - RABAN BNH340I AUTOMATION TABLE TESTING IS ACTIVATED AT 05/29/98 16:40:32 BY TMEID4 - RABAN BNH341I AUTOMATION TABLE TESTING SOURCE = TESTREC, REPORT = TESTREPT, TASK = NONE - RABAN BNH382I AUTOMATION TABLE TESTING STOPPED, SOURCE = TESTREC -------------------------------------------------------------------------------
************************************************************************ NOTE: THE NEXT FOUR STATEMENTS SET SYNONYMS FOR STATMON IMPORTANT ** MESSAGE INDICATORS. *************************************************************************0001 001 SYN %NETL1% = 'NETLOG(YES 1 +STATGRP)';0002 001 SYN %NETL2% = 'NETLOG(YES 2 +STATGRP)';0003 001 SYN %NETL3% = 'NETLOG(YES 3 +STATGRP)';0004 001 SYN %NETL4% = 'NETLOG(YES 4 +STATGRP)';*0005 001 SYN %NV_DOMAIN% = 'RABAN';
14 An Introduction to Tivoli NetView for OS/390 V1R2

Figure 8. AUTOTEST Output Report File
>> Automation table test of member DSIPARM.DSITBL01 Listing: TESTLIST>> Time: 05/29/98 16:40:32 Requesting operator: TMEID4 Source: TESTREC
-----------> Input number: 1. Type = Message --------------
DSI208I TIME EXPIRATION - ID= 'ADOIV ' - CMD= 'EZLEOIVT'
Matches: 7 Comparisons: 39Match Location Location Type Member----- ---------------- ---------------- -------- 01. 39 Statement Number DSITBL01 02. 89 Statement Number EZLDSIAO 03. 90 Statement Number EZLDSIAO 04. 91 Statement Number EZLDSI20 05. 339 Statement Number FKVMSU01 06. 347 Statement Number FKWMSU01 07. 372 Statement Number CNMSIHSA
-----------> Input number: 2. Type = Message --------------
IST663I CDINIT REQUEST FROM RAK FAILED , SENSE=08570003IST664I REAL OLU=USIBMRA.RAKT20A REAL DLU=USIBMRA.RABT11AIST889I SID = F8D3D16440ABF817IST264I REQUIRED RESOURCE RABT11A NOT ACTIVEIST314I END
Matches: 6 Comparisons: 44Match Location Location Type Member----- ---------------- ---------------- -------- 01. 122 Statement Number DSITBL01 02. 124 Statement Number FKVISTAO 03. 231 Statement Number FKVISTAO 04. 235 Statement Number FKVSA60 05. 339 Statement Number FKVMSU01
Automation Table Enhancements 15
2.2 New AUTOTBL Design
The enhancements to automation table loading in TME 10 NetView for OS/390 V1R2 enable you to make changes to the automation table flexibly and easily. In previous releases of NetView, you had only one table loaded and compiled in memory. This table can be composed of multiple physicals members if you use %INCLUDE statements in your main table. Once loaded the table was searched as one logical entity and you had to code CONTINUE(YES) on your automation table statements to allow processing to continue after the first match.
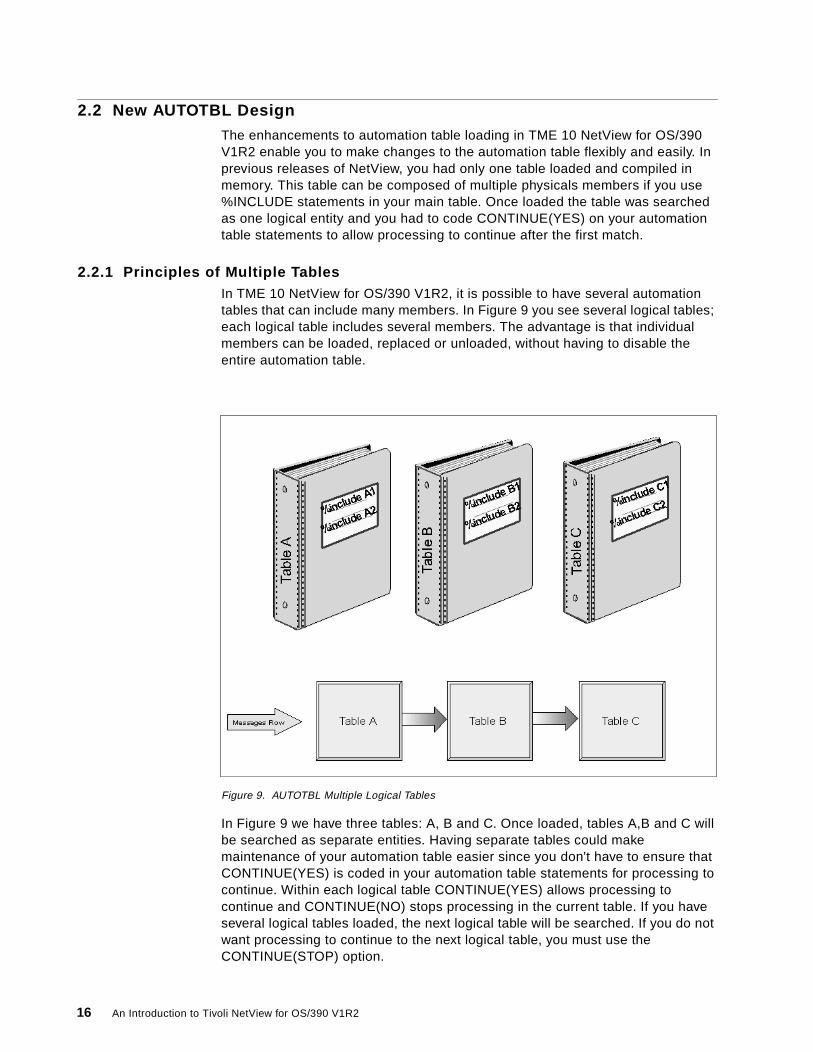
2.2.1 Principles of Multiple TablesIn TME 10 NetView for OS/390 V1R2, it is possible to have several automation tables that can include many members. In Figure 9 you see several logical tables; each logical table includes several members. The advantage is that individual members can be loaded, replaced or unloaded, without having to disable the entire automation table.
Figure 9. AUTOTBL Multiple Logical Tables
In Figure 9 we have three tables: A, B and C. Once loaded, tables A,B and C will be searched as separate entities. Having separate tables could make maintenance of your automation table easier since you don't have to ensure that CONTINUE(YES) is coded in your automation table statements for processing to continue. Within each logical table CONTINUE(YES) allows processing to continue and CONTINUE(NO) stops processing in the current table. If you have several logical tables loaded, the next logical table will be searched. If you do not want processing to continue to the next logical table, you must use the CONTINUE(STOP) option.
16 An Introduction to Tivoli NetView for OS/390 V1R2

2.2.2 AUTOTBL Syntax DetailThe syntax of the AUTOTBL command is as follows:
AUTOTBL OFF - Turns automation processing OFF STATUS - Lists the status of all tables MEMBER=membername - Member name of table TEST - For syntax checking SWAP AT=number - Swap this table for one already loaded INSERT AT=number - Insert this table AT table number BEFORE=number - Insert BEFORE table number AFTER=number - Insert AFTER table number FIRST - This table will be the FIRST table LAST - This table will be the LAST table LISTING=name - Create a table LISTING REPLACE - Replace listing with same name DISABLE/ENABLE NAME=name - DISABLE or ENABLE this table name SEQUENCE=seqnum - Only this one statement LABEL=label - Only the statement with LABEL ENDLABEL=label - Only the statement with ENDLABEL BLOCK=label - The block defined by LABEL/ENDLABEL pair GROUP=label - All statements with GROUP name REMOVE NAME=name - remove from the list of active automation tables
2.2.3 AUTOTBL ExamplesIn this example, we loaded two message tables, MSGTBL1 and MSGTBL2, with an INSERT of FIRST and LAST respectively. Then we issued an AUTOTBL STATUS command to list the status of the two tables.
Figure 10. AUTOTBL Insert Option
We used the DISABLE function to disable table MSGTBL1. The status command tells us that that MSGTBL1 is in a DISABLED state.
NCCF TME 10 NetView RABAN TMEID3 04/28/98 10:08:02* RABAN AUTOTBL MEMBER=MSGTBL1,INSERT FIRST- RABAN DSI410I DSIPARM MEMBER MSGTBL1 BEING USED FOR NETVIEW AUTOMATION* RABAN AUTOTBL MEMBER=MSGTBL2,INSERT LAST- RABAN BNH360I INSERT REQUEST COMPLETED FOR DSIPARM MEMBER MSGTBL2 AT LOCATION 2 WITHIN THE LIST OF ACTIVE AUTOMATION TABLES* RABAN AUTOTBL STATUS' RABANBNH361I THE AUTOMATION TABLE CONSISTS OF THE FOLLOWING LIST OF MEMBERS:TMEID4 COMPLETED INSERT FOR TABLE #1: MSGTBL1 AT 05/29/98 10:07:50 (FIRST)TMEID4 COMPLETED INSERT FOR TABLE #2: MSGTBL2 AT 05/29/98 10:07:55 (LAST)-------------------------------------------------------------------------------
Automation Table Enhancements 17
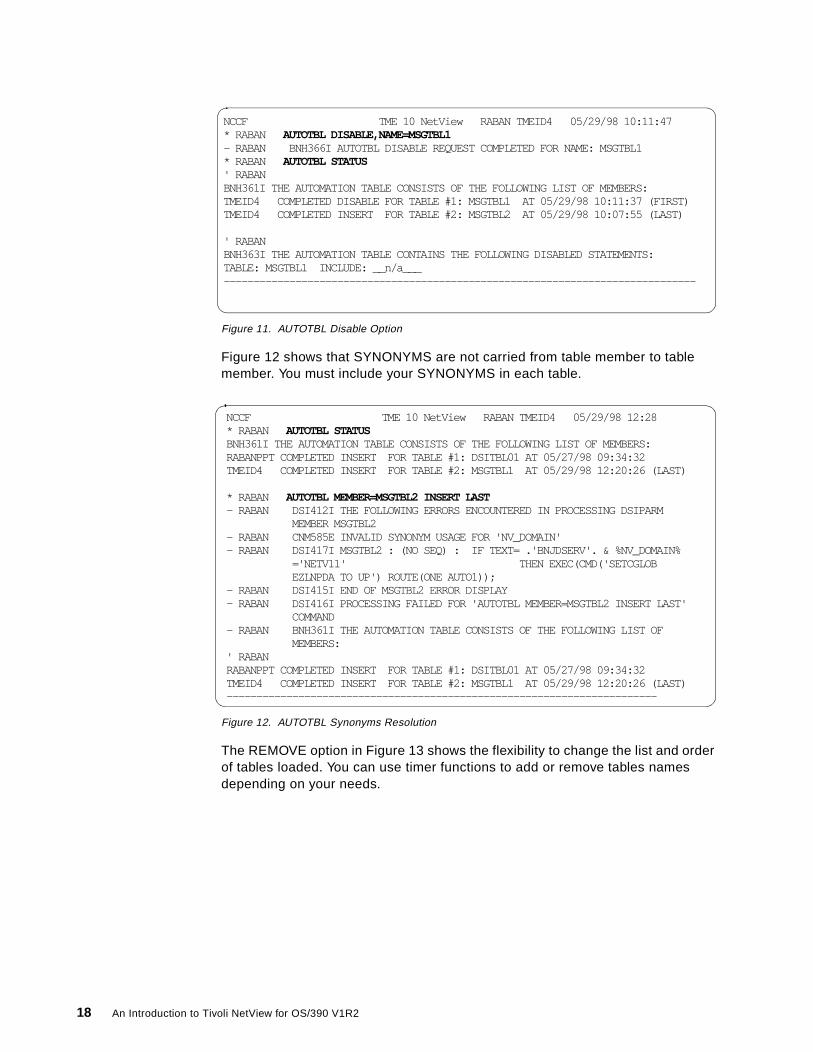
Figure 11. AUTOTBL Disable Option
Figure 12 shows that SYNONYMS are not carried from table member to table member. You must include your SYNONYMS in each table.
Figure 12. AUTOTBL Synonyms Resolution
The REMOVE option in Figure 13 shows the flexibility to change the list and order of tables loaded. You can use timer functions to add or remove tables names depending on your needs.
NCCF TME 10 NetView RABAN TMEID4 05/29/98 10:11:47* RABAN AUTOTBL DISABLE,NAME=MSGTBL1- RABAN BNH366I AUTOTBL DISABLE REQUEST COMPLETED FOR NAME: MSGTBL1* RABAN AUTOTBL STATUS' RABANBNH361I THE AUTOMATION TABLE CONSISTS OF THE FOLLOWING LIST OF MEMBERS:TMEID4 COMPLETED DISABLE FOR TABLE #1: MSGTBL1 AT 05/29/98 10:11:37 (FIRST)TMEID4 COMPLETED INSERT FOR TABLE #2: MSGTBL2 AT 05/29/98 10:07:55 (LAST)
' RABANBNH363I THE AUTOMATION TABLE CONTAINS THE FOLLOWING DISABLED STATEMENTS:TABLE: MSGTBL1 INCLUDE: __n/a___-------------------------------------------------------------------------------
NCCF TME 10 NetView RABAN TMEID4 05/29/98 12:28 * RABAN AUTOTBL STATUS BNH361I THE AUTOMATION TABLE CONSISTS OF THE FOLLOWING LIST OF MEMBERS: RABANPPT COMPLETED INSERT FOR TABLE #1: DSITBL01 AT 05/27/98 09:34:32 TMEID4 COMPLETED INSERT FOR TABLE #2: MSGTBL1 AT 05/29/98 12:20:26 (LAST)
* RABAN AUTOTBL MEMBER=MSGTBL2 INSERT LAST - RABAN DSI412I THE FOLLOWING ERRORS ENCOUNTERED IN PROCESSING DSIPARM MEMBER MSGTBL2 - RABAN CNM585E INVALID SYNONYM USAGE FOR 'NV_DOMAIN' - RABAN DSI417I MSGTBL2 : (NO SEQ) : IF TEXT= .'BNJDSERV'. & %NV_DOMAIN% ='NETV11' THEN EXEC(CMD('SETCGLOB EZLNPDA TO UP') ROUTE(ONE AUTO1)); - RABAN DSI415I END OF MSGTBL2 ERROR DISPLAY - RABAN DSI416I PROCESSING FAILED FOR 'AUTOTBL MEMBER=MSGTBL2 INSERT LAST' COMMAND - RABAN BNH361I THE AUTOMATION TABLE CONSISTS OF THE FOLLOWING LIST OF MEMBERS: ' RABAN RABANPPT COMPLETED INSERT FOR TABLE #1: DSITBL01 AT 05/27/98 09:34:32 TMEID4 COMPLETED INSERT FOR TABLE #2: MSGTBL1 AT 05/29/98 12:20:26 (LAST) ------------------------------------------------------------------------
18 An Introduction to Tivoli NetView for OS/390 V1R2

Figure 13. AUTOTBL Remove Option
The SWAP option is used in Figure 14 to replace the table name specified in the NAME= parameter with the table specified in the MEMBER= parameter.
Figure 14. AUTOTBL Swap Option
In Figure 15 you can see that you cannot replace a table name loaded in first or last position with the SWAP option if your new table has another name. You must use the REMOVE and the INSERT options. However, you can swap the same table name to activate your changes.
NCCF TME 10 NetView RABAN TMEID4 05/29/98 13:49 * RABAN AUTOTBL STATUS ' RABAN BNH361I THE AUTOMATION TABLE CONSISTS OF THE FOLLOWING LIST OF MEMBERS: RABANPPT COMPLETED INSERT FOR TABLE #1: DSITBL01 AT 05/27/98 09:34:32 TMEID4 COMPLETED INSERT FOR TABLE #2: MSGTBL1 AT 05/29/98 12:20:26 (LAST)
* RABAN AUTOTBL REMOVE NAME=MSGTBL1 - RABAN BNH360I REMOVE REQUEST COMPLETED FOR DSIPARM MEMBER MSGTBL1 AT LOCATION 2 WITHIN THE LIST OF ACTIVE AUTOMATION TABLES * RABAN AUTOTBL STATUS - RABAN DSI410I DSIPARM MEMBER DSITBL01 BEING USED FOR NETVIEW AUTOMATION - RABAN DWO040I AUTOMATION TABLE DSITBL01 ACTIVATED 05/27/98 09:34:32 RABANPPT ------------------------------------------------------------------------
* RABAN AUTOTBL STATUS - RABAN DSI410I DSIPARM MEMBER DSITBL01 BEING USED FOR NETVIEW AUTOMA - RABAN DWO040I AUTOMATION TABLE DSITBL01 ACTIVATED 05/27/98 09:34:32 * RABAN AUTOTBL MEMBER=MSGTBL2 SWAP NAME=DSITBL01 - RABAN DSI410I DSIPARM MEMBER MSGTBL2 BEING USED FOR NETVIEW AUTOMATION * RABAN AUTOTBL STATUS - RABAN DSI410I DSIPARM MEMBER MSGTBL2 BEING USED FOR NETVIEW AUTOMATION - RABAN DWO040I AUTOMATION TABLE MSGTBL2 ACTIVATED 05/29/98 14:10:21 * RABAN AUTOTBL MEMBER=DSITBL01 SWAP NAME=MSGTBL2 - RABAN DSI410I DSIPARM MEMBER DSITBL01 BEING USED FOR NETVIEW AUTOMATION * RABAN AUTOTBL MEMBER=MSGTBL1 INSERT LAST - RABAN BNH360I INSERT REQUEST COMPLETED FOR DSIPARM MEMBER MSGTBL1 AT LOCATION 2 WITHIN THE LIST OF ACTIVE AUTOMATION TABLES * RABAN AUTOTBL MEMBER=MSGTBL2 SWAP NAME=DSITBL01 - RABAN BNH360I SWAP REQUEST COMPLETED FOR DSIPARM MEMBER MSGTBL2 AT LOCATION 1 WITHIN THE LIST OF ACTIVE AUTOMATION TABLES * RABAN AUTOTBL STATUS BNH361I THE AUTOMATION TABLE CONSISTS OF THE FOLLOWING LIST OF MEMBERS: TMEID4 COMPLETED INSERT FOR TABLE #1: MSGTBL2 AT 05/29/98 14:17:09 TMEID4 COMPLETED INSERT FOR TABLE #2: MSGTBL1 AT 05/29/98 14:15:28 (LAST) ------------------------------------------------------------------------
Automation Table Enhancements 19
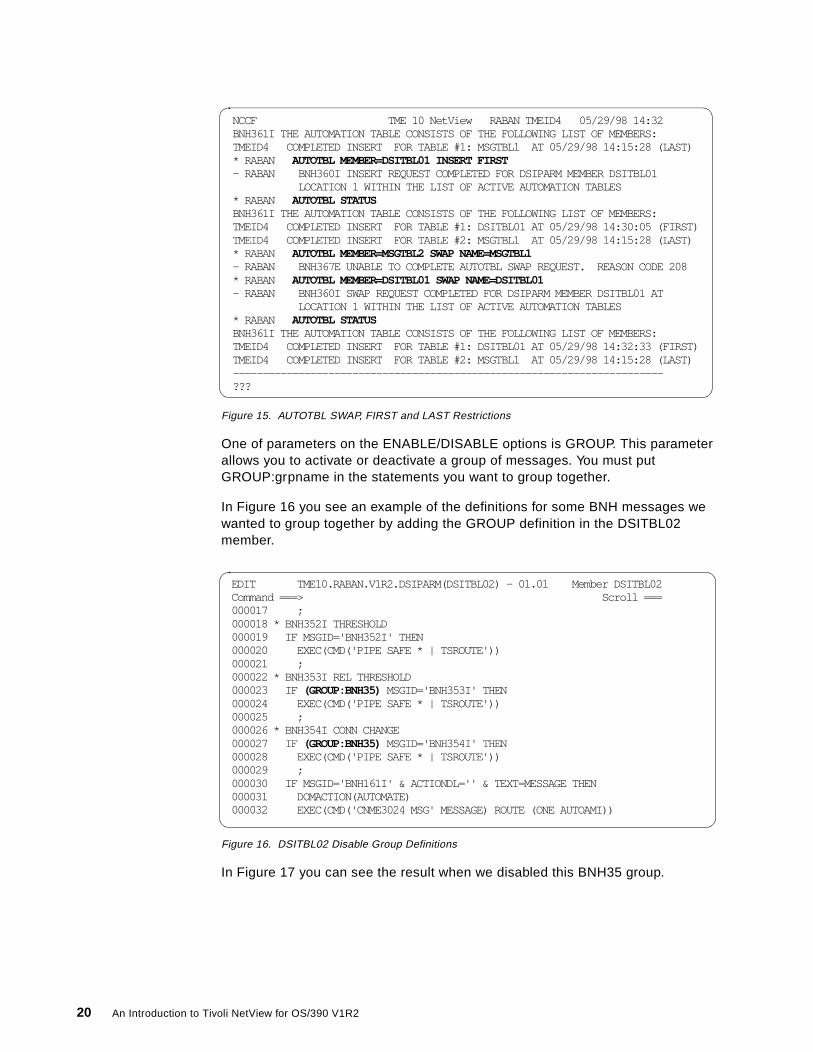
Figure 15. AUTOTBL SWAP, FIRST and LAST Restrictions
One of parameters on the ENABLE/DISABLE options is GROUP. This parameter allows you to activate or deactivate a group of messages. You must put GROUP:grpname in the statements you want to group together.
In Figure 16 you see an example of the definitions for some BNH messages we wanted to group together by adding the GROUP definition in the DSITBL02 member.
Figure 16. DSITBL02 Disable Group Definitions
In Figure 17 you can see the result when we disabled this BNH35 group.
NCCF TME 10 NetView RABAN TMEID4 05/29/98 14:32 BNH361I THE AUTOMATION TABLE CONSISTS OF THE FOLLOWING LIST OF MEMBERS: TMEID4 COMPLETED INSERT FOR TABLE #1: MSGTBL1 AT 05/29/98 14:15:28 (LAST) * RABAN AUTOTBL MEMBER=DSITBL01 INSERT FIRST - RABAN BNH360I INSERT REQUEST COMPLETED FOR DSIPARM MEMBER DSITBL01 LOCATION 1 WITHIN THE LIST OF ACTIVE AUTOMATION TABLES * RABAN AUTOTBL STATUS BNH361I THE AUTOMATION TABLE CONSISTS OF THE FOLLOWING LIST OF MEMBERS: TMEID4 COMPLETED INSERT FOR TABLE #1: DSITBL01 AT 05/29/98 14:30:05 (FIRST) TMEID4 COMPLETED INSERT FOR TABLE #2: MSGTBL1 AT 05/29/98 14:15:28 (LAST) * RABAN AUTOTBL MEMBER=MSGTBL2 SWAP NAME=MSGTBL1 - RABAN BNH367E UNABLE TO COMPLETE AUTOTBL SWAP REQUEST. REASON CODE 208 * RABAN AUTOTBL MEMBER=DSITBL01 SWAP NAME=DSITBL01 - RABAN BNH360I SWAP REQUEST COMPLETED FOR DSIPARM MEMBER DSITBL01 AT LOCATION 1 WITHIN THE LIST OF ACTIVE AUTOMATION TABLES * RABAN AUTOTBL STATUS BNH361I THE AUTOMATION TABLE CONSISTS OF THE FOLLOWING LIST OF MEMBERS: TMEID4 COMPLETED INSERT FOR TABLE #1: DSITBL01 AT 05/29/98 14:32:33 (FIRST) TMEID4 COMPLETED INSERT FOR TABLE #2: MSGTBL1 AT 05/29/98 14:15:28 (LAST) ------------------------------------------------------------------------ ???
EDIT TME10.RABAN.V1R2.DSIPARM(DSITBL02) - 01.01 Member DSITBL02 Command ===> Scroll === 000017 ; 000018 * BNH352I THRESHOLD 000019 IF MSGID='BNH352I' THEN 000020 EXEC(CMD('PIPE SAFE * | TSROUTE')) 000021 ; 000022 * BNH353I REL THRESHOLD 000023 IF (GROUP:BNH35) MSGID='BNH353I' THEN 000024 EXEC(CMD('PIPE SAFE * | TSROUTE')) 000025 ; 000026 * BNH354I CONN CHANGE 000027 IF (GROUP:BNH35) MSGID='BNH354I' THEN 000028 EXEC(CMD('PIPE SAFE * | TSROUTE')) 000029 ; 000030 IF MSGID='BNH161I' & ACTIONDL='' & TEXT=MESSAGE THEN 000031 DOMACTION(AUTOMATE) 000032 EXEC(CMD('CNME3024 MSG' MESSAGE) ROUTE (ONE AUTOAMI))
20 An Introduction to Tivoli NetView for OS/390 V1R2

Figure 17. AUTOTBL Disable Group Result
The AUTOTBL Status command shows that the group named BNH35 is disabled in automation table DSITBL02.
NCCF TME 10 NetView RABAN TMEID4 05/29/98 17:06 * RABAN AUTOTBL STATUS BNH361I THE AUTOMATION TABLE CONSISTS OF THE FOLLOWING LIST OF MEMBERS: TMEID4 COMPLETED INSERT FOR TABLE #1: DSITBL02 AT 05/29/98 16:57:55 ( TMEID4 COMPLETED INSERT FOR TABLE #2: MSGTBL1 AT 05/29/98 14:15:28 ( * RABAN AUTOTBL DISABLE NAME=DSITBL02,GROUP=BNH35 - RABAN BNH366I AUTOTBL DISABLE REQUEST COMPLETED FOR NAME: DSITBL02 BNH35 * RABAN AUTOTBL STATUS BNH361I THE AUTOMATION TABLE CONSISTS OF THE FOLLOWING LIST OF MEMBERS: TMEID4 COMPLETED INSERT FOR TABLE #1: DSITBL02 AT 05/29/98 16:57:55 ( TMEID4 COMPLETED INSERT FOR TABLE #2: MSGTBL1 AT 05/29/98 14:15:28 ( ' RABAN BNH363I THE AUTOMATION TABLE CONTAINS THE FOLLOWING DISABLED STATEMENTS: TABLE: DSITBL02 INCLUDE: __n/a___ GROUP : BNH35 ------------------------------------------------------------------------
Automation Table Enhancements 21

22 An Introduction to Tivoli NetView for OS/390 V1R2

Chapter 3. Automation Notification Enhancements
This chapter discusses the new Notification and Inform policy that comes with AON in TME 10 NetView for OS/390 V1R2. This chapter discusses this enhancement in the following sections:
• Concepts of Automation Notification
• Implementing Automation Notification
• Commands in Automation Notification
• RODM Notification with NetView Management Console
3.1 Concept of Automation Notification
Figure 18 shows the concept of notification and inform policy in TME 10 NetView for OS/390 V1R2.
Figure 18. Notification and Inform Policy
1 The event happens, and based on the automation table and AON configuration file, AON can decide to notify an operator.
2 Based on the environment setup, AON can decide to change the corresponding RODM object to show that there is an Automation In Progress (AIP) or put the object in the Operator Intervention View (OIV). See 3.4, “RODM Notification Processing” on page 36.
© Copyright IBM Corp. 1998 23

3 When AON decides to invoke the notification system using the EZLENFRM or EZLEASLN CLIST, it evaluates the notify policies to determine what notification should be sent out and where.
4 If the notification policy includes the statement INFORM=policyname, the INFORM policy is invoked to send notification using e-mail or pager. You can also define your own user-defined method such as FAX as shown in EZLINSMP.
Previously, automation with AON could result in a huge amount of notifications either using DDF or RODM, and only limited by resource type. With the new automation notification scheme, we can:
• Select by resource name that notification is needed
• Select by event type for those resource
• Determine the notification methods
The inform policy is one of the notification methods. This inform policy provides a mechanized way of informing a certain person or group of persons on an event by:
• Resource name • Resource type • Event type • Day of week • Time of day
The sample inform policy provides communication through NetFinity for OS/2. It supports pager and e-mail notification.
The notification policy is defined in the AON configuration file (EZLCFG01) and the inform policy is defined in a member of DSIPARM that is referred from EZLCFG01. The default is EZLINSMP.
3.2 Implementing Automation Notification
The following steps show an outline of actions necessary to enable the notification policy:
• Set up the configuration files
• Set up notification policy entries
• Set up the inform policy
3.2.1 Configuration Files ChangesWe perform the following changes to our configuration files (besides the notification policy):
• Changes to DSITBL01 to enable event forwarding to TEC if you need to notify through TEC.
This requires that the Event/Automation Service (IHSAEVNT) has been customized according to Chapter 7, “Event/Automation Service” on page 77. AON uses subfield 07 of subvector 10 that contains the word TECUPD. Figure 19 shows part of DSITBL01 that we uncommented.
24 An Introduction to Tivoli NetView for OS/390 V1R2

Figure 19. DSITBL01 Update for AON
• Modify the ENVIRON SETUP clause in the AON configuration file (EZLCFG01) to establish the notification functions. Figure 20 shows the ENVIRON SETUP clause.
Figure 20. EZLCFG01 - Definition of ENVIRON SETUP Clause
In this clause we defined:
– 1 You must specify GENALERT=YES to update RODM and NetView Management Console.
– 2, 3 and 4 defines the RODM destination and AIP/OIV processing as described in 3.4, “RODM Notification Processing” on page 36.
– 5 defines the INFORM policy member.
• ENVIRON AIP that defines the resources to be put into AIP (Automation In Progress) status. Figure 21 shows the ENVIRON AIP clause.
Figure 21. EZLCFG01 - Definition of ENVIRON AIP Clause
• Optional modification of THRESHOLD and MONIT definitions to set how the monitoring and threshold will be handled for notification processing.
************************************************************************ BEGINNING OF AON MSU Automation Members: ** ** ** Uncomment the following statement if you want AON events routed ** to the Tivoli Enterprise Console ** *IF MSUSEG(0000.10.11.07 3)='TECUPD' THEN SRF(TECROUTE PASS);
ENVIRON SETUP, NETVIEW=NET, GENALERT=YES, 1 FTAFPFX=TAFA1F, SYSNAME=RABAN, TRACE=NONE, DBMAINT=REUSE, RODMAIP=YES, 2 RODMOIV=YES, 3 RODMNAME=RODM1, 4 HELDMSG=(INFO,WARN,ERROR,ACTION), RODMDOM=RABAN, INFORMPM=EZLINSMP 5
*** AIP *** ENVIRON AIP,LINEPORT=Y, LINE aka PORT resource Types PULINKSTA=Y, PU aka LINKSTA resource Types CDRM=Y, CDRM resource Type NCP=Y, NCP resource Type LANMGR=Y, LANMGR resource Type LANBRIDGE=Y LANBRIDGE resource Type
Automation Notification Enhancements 25

3.2.2 Notification Policy SetupThe notification policy contains the definition of the NOTIFY clauses in EZLCFG01. The NOTIFY clause has the following syntax:
• DEFAULTS defines the default notification.
• ResourceType:
The resource type for NOTIFY can be any AON-supported resource type. The supported resource types are defined in EZLRT statements in EZLTABLE, FKVTABLE, FKWTABLE and FKXTABLE. The following are examples of AON supported resource types:
– LINE– PU– CDRM– NCP– LANMGR– LANPORT– LANBRIDGE– NAMESERV
• ResourceName:
You can put a wildcard at the end of resource name for a group of resources with similar names
• Eventtype:
– CRITTHRS: When critical threshold is exceeded.– NOMOMONS: When no more monitoring intervals are defined.– REMIND: A reminder that a resource is still down.– BRGCONGEST: LAN bridge congestion.– ADPCONGEST: LAN adapter congestion.– NAMESERV: Name server failure threshold exceeded.
The following parameters define whether these notifications will be generated or not:
– ALERT: Generating alert or TEC event (implies alert generated)– INFORM: Generating inform action with a specific inform policy– MSG: Generating messages– DDF: Shows the notification on DDF
• Exit10 code that can override any notification action.
The NOTIFY definitions that we created are in Figure 22.
26 An Introduction to Tivoli NetView for OS/390 V1R2

Figure 22. Notification Policy Definition in EZLCFG01
This notification policy defines:
• The default is that no notification is generated. For example, if a resource called ABC* failed (and it was not a reminder or critical threshold event), then no notification would take place.
• For resources with a name starting with RABU* we notify by all methods.
• For resources that have the name of WTR*, NetView sends INFORM action to the policy named WTR_POL and sends TEC events.
• CRITTHRS events send notification to TEC.
• REMIND events will issue messages only.
3.2.3 Information Policy SetupInformation policy setup definition is performed in EZLINSMP as stated in the ENVIRON SETUP clause in EZLCFG01. This member can have the %INCLUDE directive. All lines started with an asterisk '*' are comments.
The following directives are used to define the inform policy:
SETUP This setup defines the global values used in the policy definitions. This directive is only used once. The syntax is:
INFORM This clause defines a group of CONTACT definitions that will be used by this INFORM policy. The syntax is:
CONTACT This clause defines the person or persons this notification policy will contact. You can define on-duty times and how these persons should be contacted. The syntax is:
NOTIFY DEFAULTS,ALERT=NO,MSG=NO,DDF=NO,INFORM=NO NOTIFY RABU*,ALERT=TEC,MSG=YES,DDF=YES,INFORM=ALL_POLNOTIFY WTR*,ALERT=TEC,MSG=NO,DDF=NO,INFORM=WTR_POL NOTIFY CRITTHRS,ALERT=TEC,MSG=NO,DDF=NO,INFORM=NO NOTIFY REMIND,ALERT=NO,MSG=YES,DDF=NO,INFORM=NO
Automation Notification Enhancements 27
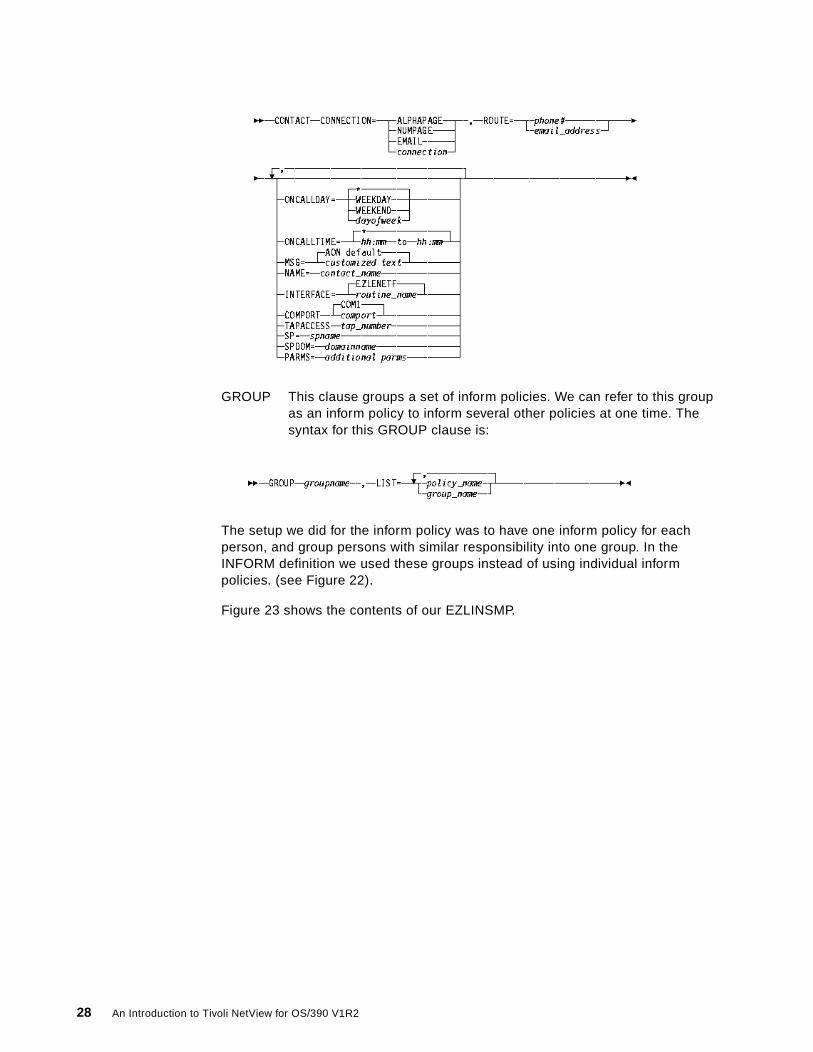
GROUP This clause groups a set of inform policies. We can refer to this group as an inform policy to inform several other policies at one time. The syntax for this GROUP clause is:
The setup we did for the inform policy was to have one inform policy for each person, and group persons with similar responsibility into one group. In the INFORM definition we used these groups instead of using individual inform policies. (see Figure 22).
Figure 23 shows the contents of our EZLINSMP.
28 An Introduction to Tivoli NetView for OS/390 V1R2

Figure 23. Contents of Inform Policy in EZLINSMP
We modified the EZLENETF program to call the REXX socket that activates a mail program in a Windows 95 workstation. The REXX program in TME 10 NetView for OS/390 is called VBDENETF (see B.4, “VBDENETF REXX Program” on page 361). The INTERFACE parameter in our inform policy points to this routine. The program in Windows 95 is run under IBM Object REXX for Windows 95 and is called VBDNOTF.REX (see B.5, “VBDNOTF.REX” on page 364). This program uses the mailto freeware that can be found at http://www.winfiles.com/apps/98/mail-command.html from [email protected].
3.3 Commands in Automation Notification
There are several commands and CLISTs that can be used in the notification and inform policies.
• EZLEASLN: Notification program that uses the notification policy.
SETUP LOG=YES,MEMBER=INFLOG;* ** Define groups so contact statements do not need to be duplicated ** *GROUP ALL_POL,LIST=BUDI,FRANCOIS,ARNE;GROUP WTR_POL,LIST=BUDI,FRANCOIS;* ** POLICY for Budi ** *INFORM BUDI;CONTACT CONNECTION=EMAIL, [email protected], NAME=Budi Darmawan, INTERFACE=VBDENETF;* *CONTACT ONCALLDAY=WEEKDAY, ONCALLTIME=08:00 to 17:00, CONNECTION=EMAIL, [email protected], NAME=Budi Darmawan, INTERFACE=VBDENETF;* ** POLICY for Francois ** *INFORM FRANCOIS;CONTACT CONNECTION=EMAIL, [email protected], NAME=Francois Lepage, INTERFACE=VBDENETF;* *CONTACT ONCALLDAY=WEEKDAY, CONNECTION=EMAIL, [email protected], NAME=Francois Lepage, INTERFACE=VBDENETF;* ** POLICY for Arne ** *INFORM ARNE;CONTACT CONNECTION=EMAIL, [email protected], NAME=Arne Olsson, INTERFACE=VBDENETF;
Automation Notification Enhancements 29

• INFORMTB: Activate, test or inactivate an INFORM table (similar to AUTOTBL command).
• INFORM: Informing a certain person (that is, policy name).
• ILOG: Inform log panel.
3.3.1 EZLEASLN CommandThis command serves as the API for the notification system. We can utilize the notification system in our own code by calling this routine. The syntax for calling EZLEASLN is:
This command can be used to trigger a notify event in a REXX program such as that shown in Figure 24.
Figure 24. Sample Notification Program
The result of running this sample program is shown in Figure 25.
When testing this example we found that it is best to pass a resource type supported by AON to EZLEASLN. In the example we used PU as the resource type. AON will only generate the alert and TEC notification if the resource type is known. You can in fact define additional resource types in AON and thereby use the notification and inform policy and other AON functions for resource types specific to your environment.
NCCF TME 10 NetView RABAN TMEID5 07/08/98 00:30:03 * RABAN PIPE < DSICLD.SLNSAMP | CONSOLE | RABAN /*REXX Displays the sample NOTIFICATION */ | RABAN parse arg status res_type res | RABAN 'EZLEASLN NOTIFY=Y,AON,'status',SLNSAMP,EZL531,'date()','time(), | RABAN ','res','res_type','opid(); * RABAN SLNSAMP INACTV PU RABUDI ------------------------------------------------------------------------------
???
30 An Introduction to Tivoli NetView for OS/390 V1R2

Figure 25. Notification Action in NETLOG
Our NOTIFY definition specified that events for resources with a name starting with RABU* should be sent to policy ALL_POL. This group contains the policies for BUDI, FRANCOIS and ARNE and their contact methods (which are all e-mail). The NETLOG documents that these e-mails were sent successfully.
1 shows the message form of the notification (since we put the MSG=YES in the NOTIFY clause).
In Figure 26 you can see the e-mail message in Lotus Notes. You see the message text INFORM FOR NODE RABUDI STATUS=CONCT DOMAIN=RABAN. The first line of the message text is indented and this was probably caused by our sample interface routine.
STATMON.BROWSE ACTS NETWORK LOG FOR 07/08/98 (98189) COLS 024 101 HOST: HOST01 *1* *2* *3* *4* SCROLL = -+----3----+----4----+----5----+----6----+----7----+----8----+----9--- 00:30:03 SLNSAMP INACTV PU RABUDI 00:30:04 *EZL531I PU RABUDI IS INACTIVE DUE TO OPERATOR TMEID5 1 00:30:04 CNM493I DSITBL01 : (NO SEQ) : DUIFECMV 00:30:40 BR NETLOGA 00:30:47 Send result OK 00:31:12 CNM493I CNMSIHSA : (NO SEQ) : PIPE SAFE * | PPI TECROUTE 00:31:12 DSI208I TIME EXPIRATION - ID= 'FKX00138' - CMD= 'FKXEACT2 00:31:55 CNM493I CNMSIHSA : (NO SEQ) : PIPE SAFE * | PPI TECROUTE 00:31:55 DSI208I TIME EXPIRATION - ID= 'DSITDQD ' - CMD= 'CNMETDQD 00:31:59 BR EZLCFG01 00:32:11 CNM493I CNMSIHSA : (NO SEQ) : PIPE SAFE * | PPI TECROUTE 00:32:11 DSI208I TIME EXPIRATION - ID= 'ADOIV ' - CMD= 'EZLEOIVT **** END OF LOG ****
Automation Notification Enhancements 31

Figure 26. Inform E-Mail Message in Lotus Notes
The other notifications that are generated for NODE RABUDI are an alert and a TEC event. Figure 27 shows the Alert Detail window of the event. These notifications are generated since we put ALERT=TEC in the notification policy.
Figure 27. Alert Notification
N E T V I E W SESSION DOMAIN: RABAN TMEID5 07/08/98 00:30:04 NPDA-43S * EVENT DETAIL * PAGE
RABAN RABUDI +--------+ DOMAIN | CTRL | +--------+
DATE/TIME: RECORDED - 07/08 00:30 CREATED - 07/08/98 00:30:04
EVENT TYPE: PERMANENT
DESCRIPTION: OPERATOR INTERVENTION REQUIRED
PROBABLE CAUSES: NETWORK OPERATOR
APPLICATION PROGRAM TEXT: *EZL531I PU RABUDI IS INACTIVE DUE TO OPERATOR TMEID5 INTERVENTION
UNIQUE ALERT IDENTIFIER: PRODUCT ID - 5697B8200 ALERT ID - 00010204
ENTER A (ACTION) OR DM (DETAIL MENU)
???CMD==>
32 An Introduction to Tivoli NetView for OS/390 V1R2

Figure 28 shows the TEC event that is generated.
Figure 28. TEC Event Notification
3.3.2 INFORM CommandThe INFORM command is a synonym for EZLECALL that invokes the inform policy for a person. The syntax is as follows:
In Figure 29 you see an example where we used the INFORM command to notify BUDI.
Automation Notification Enhancements 33

Figure 29. Issuing INFORM Command Directly
The notification policy for BUDI specifies that notification should be sent through e-mail. As a result we get the following e-mail in Lotus Notes:
Figure 30. Inform E-Mail Message in Lotus Notes
3.3.3 INFORMTB CommandThe INFORMTB command allows you to test, load or unload the INFORM policy member. It works similar to the AUTOTBL command. The syntax of this command is:
The following is a sample from running the INFORMTB commands:
NCCF TME 10 NetView RABAN TMEID5 06/02/98 11:11:58 * RABAN INFORM BUDI TEST INFORMATION ON INFORM COMMAND 001 C RABAN Send result OK C RABAN EZL460I EMAIL ACTION WAS SUCCESSFULLY ISSUED FOR POLICY BUDI BY OPERATOR TMEID5 C RABAN Send result OK C RABAN EZL460I EMAIL ACTION WAS SUCCESSFULLY ISSUED FOR POLICY BUDI BY OPERATOR TMEID5 ------------------------------------------------------------------------------
???
34 An Introduction to Tivoli NetView for OS/390 V1R2

Figure 31. INFORMTB Command
3.3.4 ILOG CommandThe ILOG command is used to show the status of notifications. Figure 32 shows the INFORM record list panel when you invoke either the ILOG command or AON 1.9.
Figure 32. Status of Issued INFORM
There are several statuses of these entries, which are:
• ISSUED: The request has been sent.
• ACKNOWLEDGED: An operator has acknowledged this entry.
NCCF TME 10 NetView RABAN TMEID5 06/02/98 11:33:36 * RABAN INFORMTB STATUS C RABAN EZL453I INFORM POLICY ACTIVATED AT 07:17:23 ON 06/02/98 BY AUTO1 C RABAN EZL452I DSIPARM MEMBER EZLINSMP IS BEING USED FOR INFORM POLICY * RABAN INFORMTB OFF C RABAN EZL450I INFORM POLICY INACTIVE * RABAN INFORMTB STATUS C RABAN EZL448I NO INFORM POLICY MEMBER IS LOADED * RABAN INFORMTB EZLINSM1 TEST C RABAN EZL447E A SETUP/INFORM/GROUP STATEMENT WAS EXPECTED AT LINE 46 C RABAN EZL451I TEST OF INFORM POLICY MEMBER DSICMD WAS UNSUCCESSFUL * RABAN INFORMTB EZLINSMP TEST C RABAN EZL451I TEST OF INFORM POLICY MEMBER EZLINSMP WAS SUCCESSFUL * RABAN INFORMTB EZLINSMP C RABAN EZL452I DSIPARM MEMBER EZLINSMP IS BEING USED FOR INFORM POLICY * RABAN INFORMTB STATUS C RABAN EZL453I INFORM POLICY ACTIVATED AT 11:33:30 ON 06/02/98 BY TMEID5 C RABAN EZL452I DSIPARM MEMBER EZLINSMP IS BEING USED FOR INFORM POLICY ------------------------------------------------------------------------------
???
EZLKINFL INFORM LOG UTILITY More : + Enter 1 -ACKNOWLEDGE 2 -REINFORM 3 -REINFORM/NEW MESSAGE 4 -DELETE _ CONTACT ENTRY NUMBER 1 OUT OF 21 CURRENT CONTACT STATUS REINFORMED BUDI DARMAWAN EMAIL AT 15:14:36 ON 06/01/98 INFORM FOR PU RABUDI STATUS=CONCT DOMAIN=RABAN _ CONTACT ENTRY NUMBER 2 OUT OF 21 CURRENT CONTACT STATUS ACKNOWLEDGED BUDI DARMAWAN EMAIL AT 15:14:36 ON 06/01/98 INFORM FOR PU RABUDI STATUS=CONCT DOMAIN=RABAN _ CONTACT ENTRY NUMBER 3 OUT OF 21 CURRENT CONTACT STATUS ISSUED FRANCOIS LEPAGE EMAIL AT 15:14:36 ON 06/01/98 INFORM FOR PU RABUDI STATUS=CONCT DOMAIN=RABAN _ CONTACT ENTRY NUMBER 4 OUT OF 21 CURRENT CONTACT STATUS DELETED FRANCOIS LEPAGE EMAIL AT 15:14:36 ON 06/01/98 INFORM FOR PU RABUDI STATUS=CONCT DOMAIN=RABAN _ CONTACT ENTRY NUMBER 5 OUT OF 21 CURRENT CONTACT STATUS ISSUED ARNE OLSSON EMAIL AT 15:14:36 ON 06/01/98 INFORM FOR PU RABUDI STATUS=CONCT DOMAIN=RABAN Command ===> _ F1=Help F2=Main Menu F3=Return F5=Refresh F6=Roll F7=Backward F8=Forward F9=Search F12=Cancel
Automation Notification Enhancements 35

• DELETED: Deleted from the log database.
• ROUTED: Sent to another NetView domain.
• REINFORMED: Reissued to the destination.
• REINFORMED/NEW: Reissued to the destination and has a new log entry.
• FAILED: The send was not successful.
• NOTROUTED: Could not send to the target NetView domain.
• UNKNOWN ENTRY: Inform Log Corruption Error.
The functions you can perform on this panel are:
• ACKNOWLEDGE: To acknowledge this entry use 1 in the command field.
• DELETE: To remove entry from the log database use 4 in the command field.
• REINFORM: To reissue the message to the destination use 2 in the command field.
• REINFORM/NEW MESSAGE: To reissue the message to the destination but change the message text use 3 in the command field.
3.4 RODM Notification Processing
AON in TME 10 NetView for OS/390 V1R1 can change the status of an SNA and LAN RODM objects into Automation In Progress status. This shows that AON is trying to recover the object. However, when no more automation is defined for that resource, there is no mechanism to tell the operators that they need to do something.
In TME 10 NetView for OS/390 V1R2, AON creates a new Network_View object called Operator Intervention View if you set RODMOIV=YES as in Figure 20. This view enables a collection for objects that has had the AIP status, and AON does not have another automation action defined. Those objects are linked to this view directly. Figure 33 shows you the view hierarchy and the sample failed resource.
36 An Introduction to Tivoli NetView for OS/390 V1R2

Figure 33. Operator Intervention View
An automatic timer ADOIV is invoked every 3 minutes to clean up satisfactory resources from the Operator Intervention View. The timer is started from EZLCFG01. The resource will typically be removed from the Operator Intervention View when it is recovered. AON uses the ADOIV timer to perform cleanup of the Operator Intervention View resources in the unlikely event that the resource was recovered and no notification was received.
Figure 34. ADOIV Setup in EZLCFG01
************************************************************************* TIMER SAMPLE FOR DOING OPERATOR INTERVENTION VIEW CLEANUP @D8A @P9C *************************************************************************TIMER ADOIV,TIME='EVERY 3', TASK=AUTOIV1,COMMAND='EZLEOIVT'
Automation Notification Enhancements 37

38 An Introduction to Tivoli NetView for OS/390 V1R2
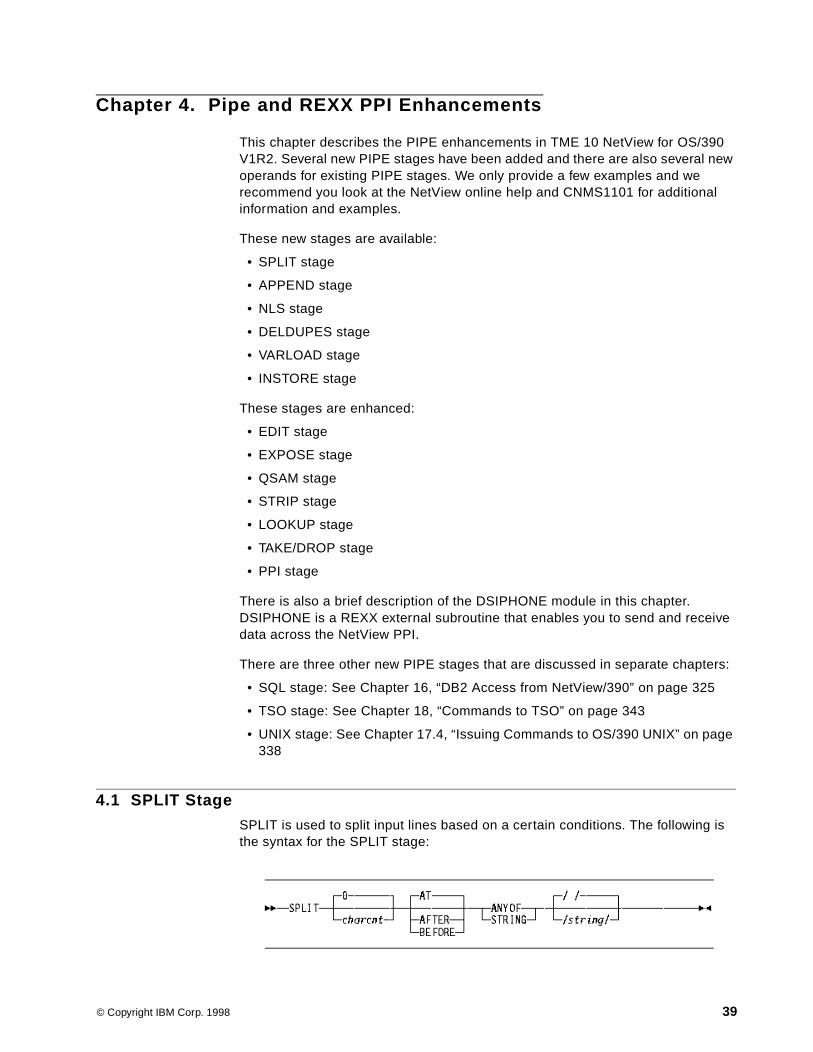
Chapter 4. Pipe and REXX PPI Enhancements
This chapter describes the PIPE enhancements in TME 10 NetView for OS/390 V1R2. Several new PIPE stages have been added and there are also several new operands for existing PIPE stages. We only provide a few examples and we recommend you look at the NetView online help and CNMS1101 for additional information and examples.
These new stages are available:
• SPLIT stage
• APPEND stage
• NLS stage
• DELDUPES stage
• VARLOAD stage
• INSTORE stage
These stages are enhanced:
• EDIT stage
• EXPOSE stage
• QSAM stage
• STRIP stage
• LOOKUP stage
• TAKE/DROP stage
• PPI stage
There is also a brief description of the DSIPHONE module in this chapter. DSIPHONE is a REXX external subroutine that enables you to send and receive data across the NetView PPI.
There are three other new PIPE stages that are discussed in separate chapters:
• SQL stage: See Chapter 16, “DB2 Access from NetView/390” on page 325
• TSO stage: See Chapter 18, “Commands to TSO” on page 343
• UNIX stage: See Chapter 17.4, “Issuing Commands to OS/390 UNIX” on page 338
4.1 SPLIT Stage
SPLIT is used to split input lines based on a certain conditions. The following is the syntax for the SPLIT stage:
© Copyright IBM Corp. 1998 39

Figure 35 shows the usage of the SPLIT stage.
Figure 35. SPLIT Stage Examples
4.2 APPEND Stage
APPEND is used to append the output of a PIPE to the output of a sub-pipe. It functions as a reservoir, holding all the primary pipe's output until the secondary pipe finishes executing, and sends the output in succession. The following is the syntax of the APPEND stage:
The stage separator needs to be different for stages that appear in the sub-pipe that is appended. As you can see in the following example, the stage separator is repeated, which means that for the first APPEND stage you have || as the stage separator, and for the next APPEND stage (inside the previous stage) you have |||| as the stage separator.
Figure 36 shows the use of APPEND to give the header and footer of a command output and set the entire result underscored.
NCCF TME 10 NetView RABAN TMEID5 05/21/98 14:54 * RABAN PIPE LIT /THIS IS A TEST/ | SPLIT | CONSOLE | RABAN THIS | RABAN + IS | RABAN + A | RABAN + TEST * RABAN PIPE LIT /THIS IS ANOTHER TEST/ | SPLIT AFTER STR /T/ | CONSOLE | RABAN T | RABAN + HIS IS ANOT | RABAN + HER T | RABAN + EST * RABAN PIPE LIT /THIS IS YET ANOTHER TEST/ | SPLIT 5 BEFORE STR /S/ | CONSOLE | RABAN T | RABAN + HIS IS YET ANOTH | RABAN + ER TEST ------------------------------------------------------------------------
???
40 An Introduction to Tivoli NetView for OS/390 V1R2
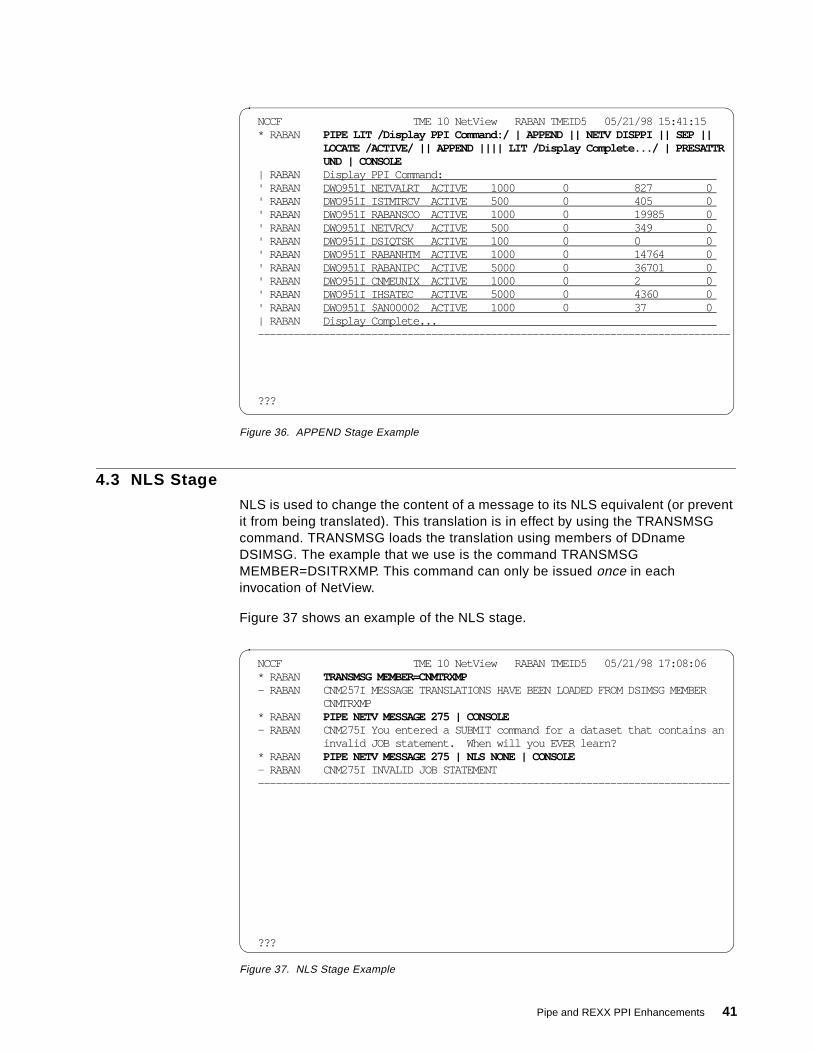
Figure 36. APPEND Stage Example
4.3 NLS Stage
NLS is used to change the content of a message to its NLS equivalent (or prevent it from being translated). This translation is in effect by using the TRANSMSG command. TRANSMSG loads the translation using members of DDname DSIMSG. The example that we use is the command TRANSMSG MEMBER=DSITRXMP. This command can only be issued once in each invocation of NetView.
Figure 37 shows an example of the NLS stage.
Figure 37. NLS Stage Example
NCCF TME 10 NetView RABAN TMEID5 05/21/98 15:41:15 * RABAN PIPE LIT /Display PPI Command:/ | APPEND || NETV DISPPI || SEP || LOCATE /ACTIVE/ || APPEND |||| LIT /Display Complete.../ | PRESATTR UND | CONSOLE | RABAN Display PPI Command: ' RABAN DWO951I NETVALRT ACTIVE 1000 0 827 0 ' RABAN DWO951I ISTMTRCV ACTIVE 500 0 405 0 ' RABAN DWO951I RABANSCO ACTIVE 1000 0 19985 0 ' RABAN DWO951I NETVRCV ACTIVE 500 0 349 0 ' RABAN DWO951I DSIQTSK ACTIVE 100 0 0 0 ' RABAN DWO951I RABANHTM ACTIVE 1000 0 14764 0 ' RABAN DWO951I RABANIPC ACTIVE 5000 0 36701 0 ' RABAN DWO951I CNMEUNIX ACTIVE 1000 0 2 0 ' RABAN DWO951I IHSATEC ACTIVE 5000 0 4360 0 ' RABAN DWO951I $AN00002 ACTIVE 1000 0 37 0 | RABAN Display Complete... -------------------------------------------------------------------------------
???
NCCF TME 10 NetView RABAN TMEID5 05/21/98 17:08:06 * RABAN TRANSMSG MEMBER=CNMTRXMP - RABAN CNM257I MESSAGE TRANSLATIONS HAVE BEEN LOADED FROM DSIMSG MEMBER CNMTRXMP * RABAN PIPE NETV MESSAGE 275 | CONSOLE - RABAN CNM275I You entered a SUBMIT command for a dataset that contains an invalid JOB statement. When will you EVER learn? * RABAN PIPE NETV MESSAGE 275 | NLS NONE | CONSOLE - RABAN CNM275I INVALID JOB STATEMENT -------------------------------------------------------------------------------
???
Pipe and REXX PPI Enhancements 41
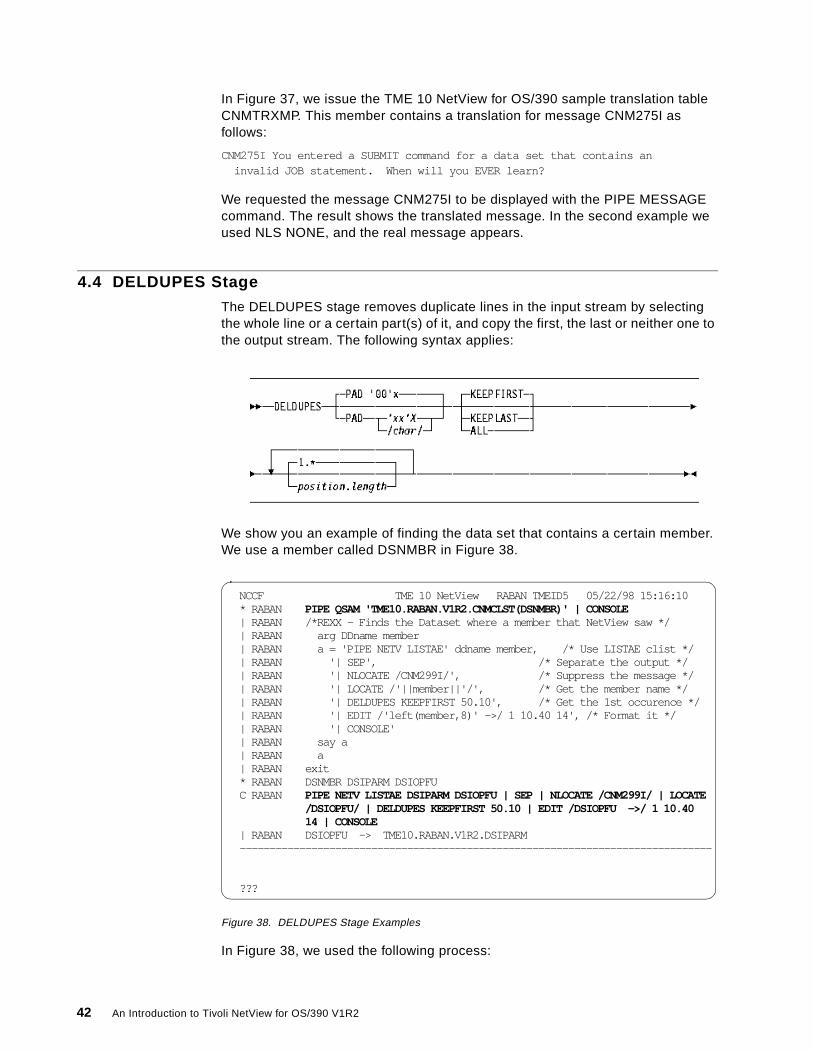
In Figure 37, we issue the TME 10 NetView for OS/390 sample translation table CNMTRXMP. This member contains a translation for message CNM275I as follows:
CNM275I You entered a SUBMIT command for a data set that contains an invalid JOB statement. When will you EVER learn?
We requested the message CNM275I to be displayed with the PIPE MESSAGE command. The result shows the translated message. In the second example we used NLS NONE, and the real message appears.
4.4 DELDUPES Stage
The DELDUPES stage removes duplicate lines in the input stream by selecting the whole line or a certain part(s) of it, and copy the first, the last or neither one to the output stream. The following syntax applies:
We show you an example of finding the data set that contains a certain member. We use a member called DSNMBR in Figure 38.
Figure 38. DELDUPES Stage Examples
In Figure 38, we used the following process:
NCCF TME 10 NetView RABAN TMEID5 05/22/98 15:16:10 * RABAN PIPE QSAM 'TME10.RABAN.V1R2.CNMCLST(DSNMBR)' | CONSOLE | RABAN /*REXX - Finds the Dataset where a member that NetView saw */ | RABAN arg DDname member | RABAN a = 'PIPE NETV LISTAE' ddname member, /* Use LISTAE clist */ | RABAN '| SEP', /* Separate the output */ | RABAN '| NLOCATE /CNM299I/', /* Suppress the message */ | RABAN '| LOCATE /'||member||'/', /* Get the member name */ | RABAN '| DELDUPES KEEPFIRST 50.10', /* Get the 1st occurence */ | RABAN '| EDIT /'left(member,8)' ->/ 1 10.40 14', /* Format it */ | RABAN '| CONSOLE' | RABAN say a | RABAN a | RABAN exit * RABAN DSNMBR DSIPARM DSIOPFU C RABAN PIPE NETV LISTAE DSIPARM DSIOPFU | SEP | NLOCATE /CNM299I/ | LOCATE /DSIOPFU/ | DELDUPES KEEPFIRST 50.10 | EDIT /DSIOPFU ->/ 1 10.40 14 | CONSOLE | RABAN DSIOPFU -> TME10.RABAN.V1R2.DSIPARM -------------------------------------------------------------------------------
???
42 An Introduction to Tivoli NetView for OS/390 V1R2
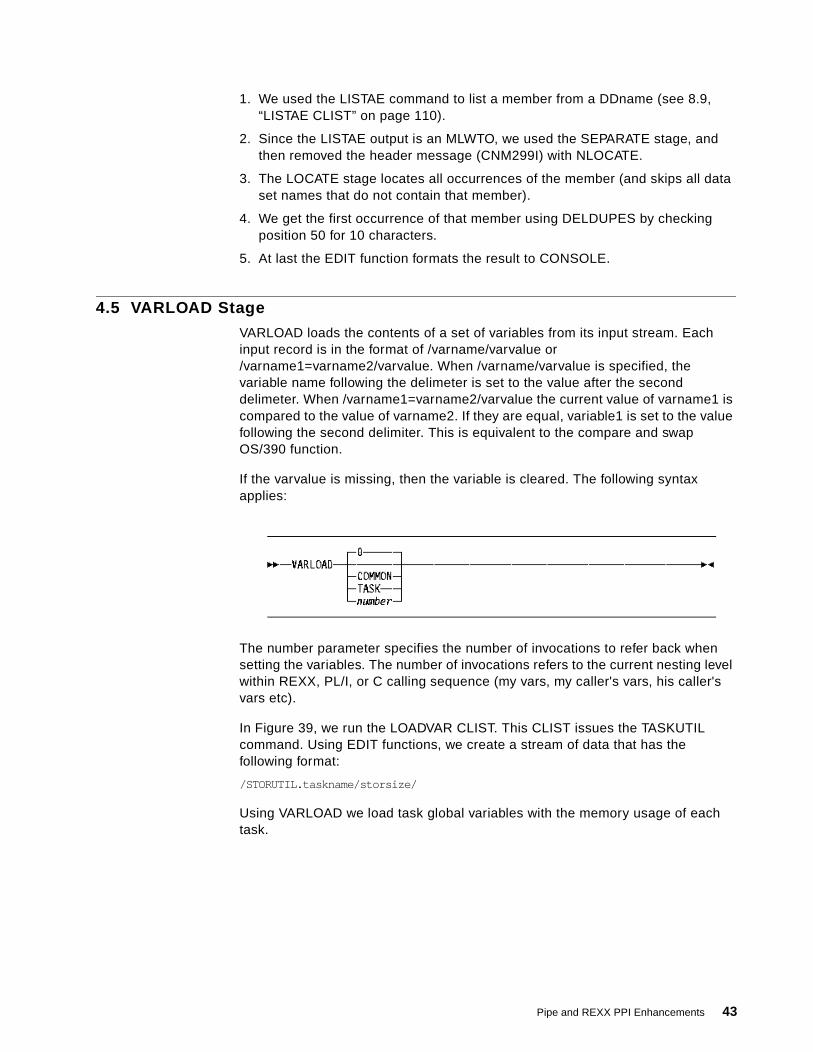
1. We used the LISTAE command to list a member from a DDname (see 8.9, “LISTAE CLIST” on page 110).
2. Since the LISTAE output is an MLWTO, we used the SEPARATE stage, and then removed the header message (CNM299I) with NLOCATE.
3. The LOCATE stage locates all occurrences of the member (and skips all data set names that do not contain that member).
4. We get the first occurrence of that member using DELDUPES by checking position 50 for 10 characters.
5. At last the EDIT function formats the result to CONSOLE.
4.5 VARLOAD Stage
VARLOAD loads the contents of a set of variables from its input stream. Each input record is in the format of /varname/varvalue or /varname1=varname2/varvalue. When /varname/varvalue is specified, the variable name following the delimeter is set to the value after the second delimeter. When /varname1=varname2/varvalue the current value of varname1 is compared to the value of varname2. If they are equal, variable1 is set to the value following the second delimiter. This is equivalent to the compare and swap OS/390 function.
If the varvalue is missing, then the variable is cleared. The following syntax applies:
The number parameter specifies the number of invocations to refer back when setting the variables. The number of invocations refers to the current nesting level within REXX, PL/I, or C calling sequence (my vars, my caller's vars, his caller's vars etc).
In Figure 39, we run the LOADVAR CLIST. This CLIST issues the TASKUTIL command. Using EDIT functions, we create a stream of data that has the following format:
/STORUTIL.taskname/storsize/
Using VARLOAD we load task global variables with the memory usage of each task.
Pipe and REXX PPI Enhancements 43

Figure 39. VARLOAD Stage Examples
4.6 INSTORE Stage
INSTORE is used to load or unload a member into/from memory. The following syntax applies:
We show you an example of loading a test CLIST to be executed using INSTORE and then removed again without creating a data set in Figure 40.
1. We construct a Hello world program with LITERALs.
2. Using INSTORE we put this program into memory.
3. We execute the in-memory program TEST1.
4. When we put the INSTORE stage as the first stage, the in-memory member is removed.
5. We try to execute TEST1 again and message DSI002I confirms that the in memory member has been removed.
NCCF TME 10 NetView RABAN TMEID5 05/22/98 16:14:12 * RABAN PIPE QSAM 'TME10.RABAN.V1R2.CNMCLST(LOADVAR)' | CONSOLE | RABAN /*REXX loading variable data */ | RABAN arg type . '('args . | RABAN if type = '' then exit | RABAN e1='| EDIT "/STORUTIL." 1 1.8 STRIP NEXT "/" NEXT' | RABAN if args = 'CLEAR' then edit = e1 | RABAN else edit = e1 '54.10 STRIP NEXT' | RABAN address NETVASIS 'PIPE NETV TASKUTIL', /* Task Util */ | RABAN '| SEP | LOCATE /'type'/', /* With certain type */ | RABAN edit, /* Format the output */ | RABAN '| VARLOAD TASK', /* Load Global Var */ | RABAN '| COUNT LINES', /* Count it */ | RABAN '| EDIT ?Number of lines loaded ? 1 1.* NEXT', | RABAN '| CONSOLE' /* and send the msg */ | RABAN exit * RABAN LOADVAR PPT - RABAN Number of lines loaded 1 * RABAN LOADVAR AUTO - RABAN Number of lines loaded 51 -------------------------------------------------------------------------------
???
44 An Introduction to Tivoli NetView for OS/390 V1R2
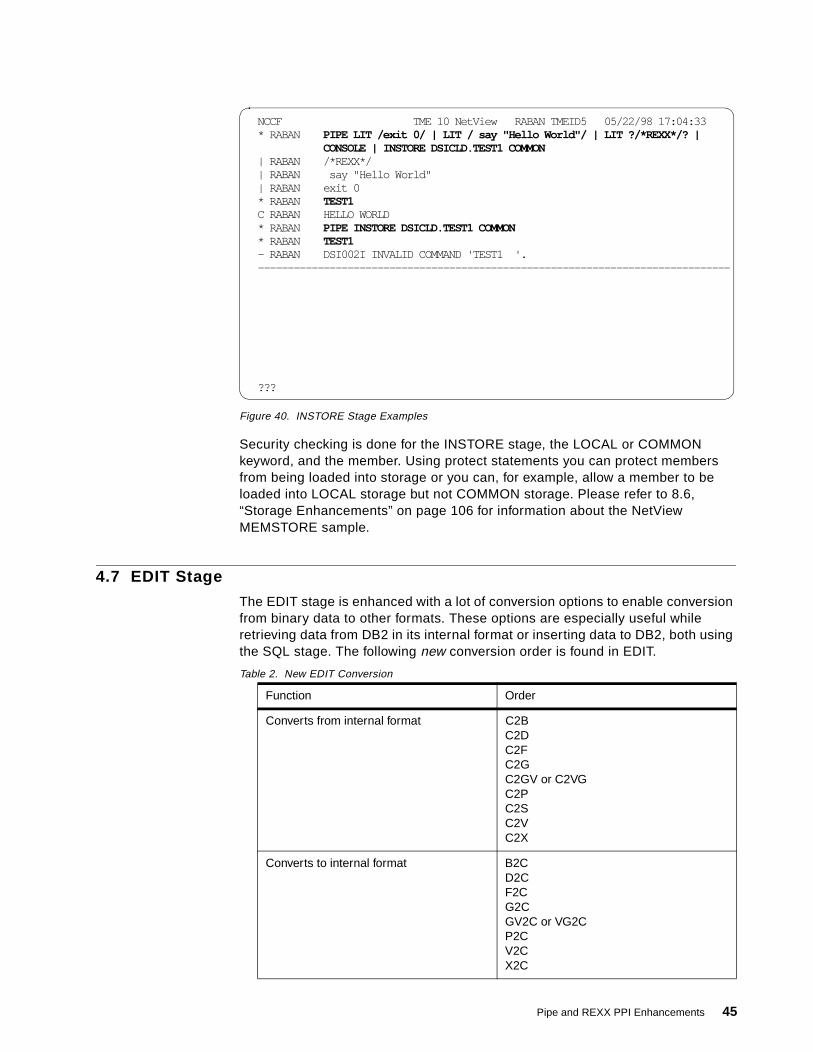
Figure 40. INSTORE Stage Examples
Security checking is done for the INSTORE stage, the LOCAL or COMMON keyword, and the member. Using protect statements you can protect members from being loaded into storage or you can, for example, allow a member to be loaded into LOCAL storage but not COMMON storage. Please refer to 8.6, “Storage Enhancements” on page 106 for information about the NetView MEMSTORE sample.
4.7 EDIT Stage
The EDIT stage is enhanced with a lot of conversion options to enable conversion from binary data to other formats. These options are especially useful while retrieving data from DB2 in its internal format or inserting data to DB2, both using the SQL stage. The following new conversion order is found in EDIT.
Table 2. New EDIT Conversion
Function Order
Converts from internal format C2B C2D C2F C2G C2GV or C2VG C2P C2S C2V C2X
Converts to internal format B2C D2C F2C G2C GV2C or VG2C P2C V2C X2C
NCCF TME 10 NetView RABAN TMEID5 05/22/98 17:04:33 * RABAN PIPE LIT /exit 0/ | LIT / say "Hello World"/ | LIT ?/*REXX*/? | CONSOLE | INSTORE DSICLD.TEST1 COMMON | RABAN /*REXX*/ | RABAN say "Hello World" | RABAN exit 0 * RABAN TEST1 C RABAN HELLO WORLD * RABAN PIPE INSTORE DSICLD.TEST1 COMMON * RABAN TEST1 - RABAN DSI002I INVALID COMMAND 'TEST1 '. -------------------------------------------------------------------------------
???
Pipe and REXX PPI Enhancements 45
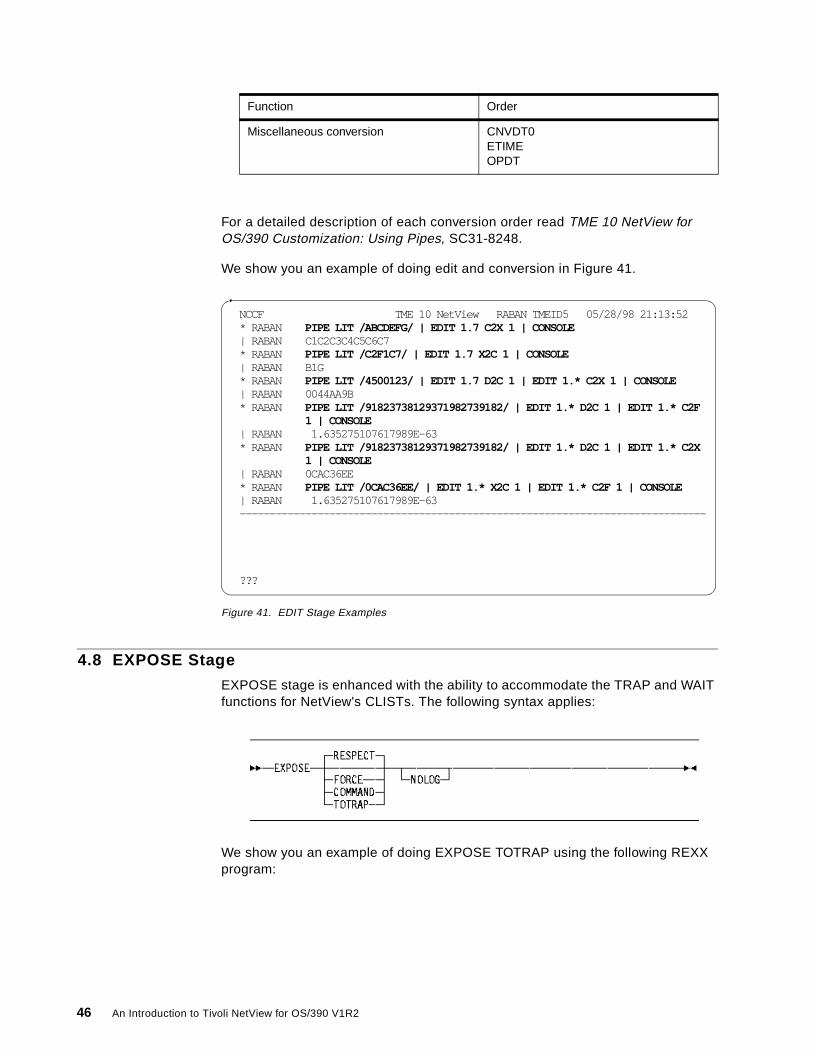
For a detailed description of each conversion order read TME 10 NetView for OS/390 Customization: Using Pipes, SC31-8248.
We show you an example of doing edit and conversion in Figure 41.
Figure 41. EDIT Stage Examples
4.8 EXPOSE Stage
EXPOSE stage is enhanced with the ability to accommodate the TRAP and WAIT functions for NetView's CLISTs. The following syntax applies:
We show you an example of doing EXPOSE TOTRAP using the following REXX program:
Miscellaneous conversion CNVDT0 ETIME OPDT
Function Order
NCCF TME 10 NetView RABAN TMEID5 05/28/98 21:13:52 * RABAN PIPE LIT /ABCDEFG/ | EDIT 1.7 C2X 1 | CONSOLE | RABAN C1C2C3C4C5C6C7 * RABAN PIPE LIT /C2F1C7/ | EDIT 1.7 X2C 1 | CONSOLE | RABAN B1G * RABAN PIPE LIT /4500123/ | EDIT 1.7 D2C 1 | EDIT 1.* C2X 1 | CONSOLE | RABAN 0044AA9B * RABAN PIPE LIT /91823738129371982739182/ | EDIT 1.* D2C 1 | EDIT 1.* C2F 1 | CONSOLE | RABAN 1.635275107617989E-63 * RABAN PIPE LIT /91823738129371982739182/ | EDIT 1.* D2C 1 | EDIT 1.* C2X 1 | CONSOLE | RABAN 0CAC36EE * RABAN PIPE LIT /0CAC36EE/ | EDIT 1.* X2C 1 | EDIT 1.* C2F 1 | CONSOLE | RABAN 1.635275107617989E-63 ------------------------------------------------------------------------------
???
46 An Introduction to Tivoli NetView for OS/390 V1R2

Figure 42. Sample TRAP and WAIT REXX Program
The result is shown in Figure 43.
Figure 43. EXPOSE Stage Examples
4.9 QSAM Stage
The QSAM stage command reads and writes from dynamically allocated data definition names or data sets. Since TME 10 NetView for OS/390 V1R2, QSAM stage can exist as any stage of the PIPE command. It can write to the disk specified by the DD name or data set name. The following syntax applies:
We use the QSAM stage to create a member called DATA001, which contains the output from the taskutil, resource and disppi commands in Figure 44.
/*REXX-----------------------------------------------------------*/ parse arg command 'TRAP AND SUPPRESS ONLY MESSAGES CNM*' command 'WAIT 5 FOR MESSAGES' if event()="M" then say command "is wrong"exit
NCCF TME 10 NetView RABAN TMEID5 05/28/98 20:28:02 * RABAN VBDWAIT ASA C RABAN 4 *-* command C RABAN +++ RC(-1) +++ C RABAN ASA is wrong * RABAN PIPE NETV VBDWAIT ASA | CONSOLE - RABAN DWO373E ERROR: IMPROPER TRAPPING OF MESSAGES WITHIN A PIPELINE. VBDWAIT FAILED. C RABAN 3 *-* 'TRAP AND SUPPRESS ONLY MESSAGES CNM*' C RABAN +++ RC(-1) +++ - RABAN CNM421I COMMAND LIST VBDWAIT - INVALID COMMAND ASA ENCOUNTERED C RABAN 4 *-* command C RABAN +++ RC(-1) +++ - RABAN CNM984E VBDWAIT ATTEMPTED TO WAIT FOR MESSAGES WITHOUT ACTIVE TRAP * RABAN PIPE NETV VBDWAIT ASA | EXPOSE TOTRAP | CONSOLE C RABAN 4 *-* command C RABAN +++ RC(-1) +++ C RABAN ASA is wrong ------------------------------------------------------------------------------
???
Pipe and REXX PPI Enhancements 47
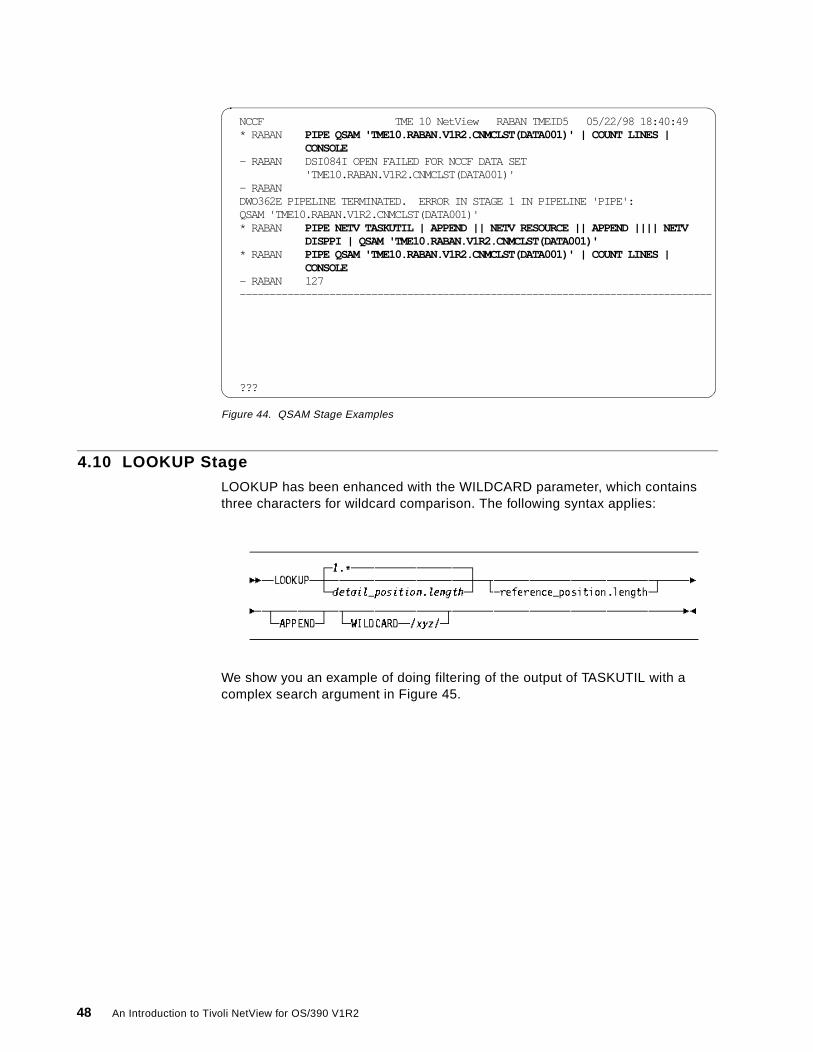
Figure 44. QSAM Stage Examples
4.10 LOOKUP Stage
LOOKUP has been enhanced with the WILDCARD parameter, which contains three characters for wildcard comparison. The following syntax applies:
We show you an example of doing filtering of the output of TASKUTIL with a complex search argument in Figure 45.
NCCF TME 10 NetView RABAN TMEID5 05/22/98 18:40:49 * RABAN PIPE QSAM 'TME10.RABAN.V1R2.CNMCLST(DATA001)' | COUNT LINES | CONSOLE - RABAN DSI084I OPEN FAILED FOR NCCF DATA SET 'TME10.RABAN.V1R2.CNMCLST(DATA001)' - RABAN DWO362E PIPELINE TERMINATED. ERROR IN STAGE 1 IN PIPELINE 'PIPE': QSAM 'TME10.RABAN.V1R2.CNMCLST(DATA001)' * RABAN PIPE NETV TASKUTIL | APPEND || NETV RESOURCE || APPEND |||| NETV DISPPI | QSAM 'TME10.RABAN.V1R2.CNMCLST(DATA001)' * RABAN PIPE QSAM 'TME10.RABAN.V1R2.CNMCLST(DATA001)' | COUNT LINES | CONSOLE - RABAN 127 -------------------------------------------------------------------------------
???
48 An Introduction to Tivoli NetView for OS/390 V1R2

Figure 45. LOOKUP Stage Examples
The LOOKUP stage is shown in Figure 46. LOOKUP takes the first input (1) as its main data. The second input (2) is the reference input, which is compared to the primary input. A match should direct the result to the primary output (3), a non-match to the secondary output (4). If the reference input does not have a match, it is sent to the third output (5).
Figure 46. Sample LOOKUP Processing
Refer to 8.2, “IDLEOFF Command” on page 99 for additional information about the NetView supplied IDLEOFF sample which uses the wildcard function.
NCCF TME 10 NetView RABAN TMEID5 05/28/98 20:03:27 * RABAN PIPE QSAM 'TME10.RABAN.V1R2.CNMCLST(VBDLKUP)' | CONSOLE | RABAN /* Sample Lookup that gets the filter from its input */ | RABAN arg filter . | RABAN 'PIPE (END %) | NETV TASKUTIL', | RABAN '| SEP', /* Separate it */ | RABAN '| AA: LOOKUP WILDCARD /?**/', | RABAN '| CONSOLE', /* Show only matched msg */ | RABAN '% AA: | STEM REST.', /* Drop unmatched messages */ | RABAN '% LIT /'filter'/', /* Put the filters and */ | RABAN '| AA: | HOLE' /* Drop missing filters */ | RABAN exit * RABAN VBDLKUP AUT?L* ' RABAN AUTOLNMA AUTO 250 0.18 0.00 0.00 0 40 **NONE** ' RABAN AUTOLMUA AUTO 250 0.20 0.00 0.00 0 40 **NONE** ' RABAN AUTALRT AUTO 250 0.39 0.00 0.00 0 199 **NONE** ------------------------------------------------------------------------------ ???
Pipe and REXX PPI Enhancements 49

4.11 TAKE/DROP Stage
You can take or drop several lines from MLWTO or multiple messages. If you use option LINES, then you don't need to add SEPARATE and COLLECT stages for a TAKE/DROP stage in MLWTO. The following syntax applies:
We show you an example of doing filtering of the output of the TASKUTIL command for the top 10 storage users in Figure 47.
Figure 47. TAKE/DROP Stage Examples
4.12 PPI Stage
The PPI stage was introduced in TME 10 NetView V1R1 and allows you to communicate with another adress space in the same host using the NetView PPI interface. The PPI stage can be used as a sender, receiver or requestor.
The following is one of the examples provided in the online help for the PPI stage. It generates an alert and sends it to the PPI receiver called NETVALRT. This example has an input stream which means that the PPI stage acts as a sender. The data received in the input stream is passed to the PPI receiver specified in the PPI stage.
NCCF TME 10 NetView RABAN TMEID5 05/28/98 17:33:59 * RABAN PIPE NETV TASKUTIL SORT=STOR | DROP FIRST 2 LINES | TAKE 10 LINES | CONSOLE ' RABAN + -------- ---- --- ----------- ------ ------ -------- --------- -------- MNT MNT 255 0.02 0.00 0.00 0 24935 N/A AAUTSKLP DST 247 12.32 0.00 0.00 0 1536 N/A FLBTOPO AUTO 250 95.95 0.00 0.00 0 1101 FLBTOPO TMEID4 OST 251 8.91 0.00 0.00 0 638 **NONE** TMEID6 OST 251 4.29 0.00 0.00 0 575 **NONE** CNMTAMEL DST 250 1.72 0.00 0.00 0 485 N/A AUTO1 AUTO 250 55.43 0.00 0.00 0 449 **NONE** GATRABAN AUTO 250 1.41 0.00 0.00 0 386 **NONE** AUTNET1 AUTO 250 22.23 0.00 0.00 0 372 **NONE** ------------------------------------------------------------------------------
???
50 An Introduction to Tivoli NetView for OS/390 V1R2

Figure 48. PPI Stage Example
In Figure 49 you see the result of running the example. The first output stream generates the data to the console and the second output stream gives you the return codes. The return code is a ten digit signed decimal number.
Figure 49. Generating Alerts
In Figure 50 you see the NPDA Alert Detail screen for the generated alert.
/*** Make an alert ********/ altxt = '41038D000000000000780000'X altxt = altxt||'0B92000001100012345678'X altxt = altxt||'1010000D110E0A0040F2F3F4F5F6F7F8'X altxt = altxt||'069304032012'X altxt = altxt||'0E950601150213E1068101011504'X altxt = altxt||'1103030109C7C5D5C1D3F34040C3D6D4C3'X altxt = altxt||'04931001'X altxt = altxt||'30310602046E01F40512'X||'ENU'||'032111'X altxt = altxt||'2030'X||'Here is my subvector 31 stuff.' 'pipe (end =) var altxt', '| a: PPI NETVALRT', '|cons dump', '= a:', '|color whi', '|cons'
NCCF TME 10 NetView RABAN ARNE 07/14/98 11:01:22 * RABAN ALERT - RABAN -------- Message data --------------------- 09ED5930 008000AE 004F002E | ÿ ? | *| 09ED5940 1101070C D9C1C2C1 D5404040 00000000 |****RABAN | 09ED5950 00000000 C1D9D5C5 40404040 00000000 | ARNE | 09ED5960 00000000 00004103 8D000000 00000078 | †*A Ã| 09ED5970 00000B92 00000110 00123456 78101000 | *k ** **ÓÃ** | 09ED5980 0D110E0A 0040F2F3 F4F5F6F7 F8069304 |**** 2345678*l*| 09ED5990 0320120E 95060115 0213E106 81010115 |****n*****̃ *a***| 09ED59A0 04110303 0109C7C5 D5C1D3F3 4040C3D6 |******GENAL3 CO| 09ED59B0 D4C30493 10013031 0602046E 01F40512 |MC*l*******>*4**| 09ED59C0 C5D5E403 21112030 C8859985 4089A240 |ENU*****Here is | 09ED59D0 94A840A2 A482A585 83A39699 40F3F140 |my subvector 31 | 09ED59E0 A2A3A486 864B |stuff. | - RABAN +0000000000 ----------------------------------------------------------------------- ???
Pipe and REXX PPI Enhancements 51

Figure 50. NPDA Alert Detail
4.13 REXX PPI Interface: DSIPHONE
In TME 10 NetView for OS/390 V1R2, we have a new feature that enables a REXX program to communicate using the NetView PPI interface. This API is the DSIPHONE module. The DSIPHONE interface is used by the TSO Server, UNIX Server and in the Command Server sample (CNMS8029) to send commands to and from UNIX and TSO (see Chapter 17.1, “Defining the UNIX Server” on page 335 and Chapter 18, “Commands to TSO” on page 343). The following is the syntax of DSIPHONE:
where you can use
• OPENRECV or AUTHRECV to establish a PPI connection
• SEND or RECEIVE data using that connection
• CLOSE the PPI connection
N E T V I E W SESSION DOMAIN: RABAN ARNE 07/14/98 11:01:25 NPDA-43S * EVENT DETAIL * PAGE RABAN GENAL3 +--------+ DOMAIN | COMC | +--------+ APPLICATION PROGRAM TEXT: Here is my subvector 31 stuff. UNIQUE ALERT IDENTIFIER: PRODUCT ID - 2345678 ALERT ID - 12345678 ENTER A (ACTION) ??? CMD==>
52 An Introduction to Tivoli NetView for OS/390 V1R2

• Check the DSIPHONE version
You can read more about the DSIPHONE and PPI interface in:
• TME 10 NetView for OS/390 Application Programmer's Guide • TME 10 NetView for OS/390 Customization: Using Pipes
Pipe and REXX PPI Enhancements 53

54 An Introduction to Tivoli NetView for OS/390 V1R2

Chapter 5. RODM/GMFHS Enhancements
There are four new features available with TME 10 NetView for OS/390 for RODM and GMFHS support. These are:
• Cloning
• Date/time formatting of the RODM log
• Automatic Restart Manager (ARM)
• Checkpoint data set failure handling for RODM
5.1 Cloning
The cloning function for RODM/GMFHS requires that MVS/ESA V5R2M0 or above is installed. The advantages of using cloning are that one set of RODM/GMFHS definitions can be used for the whole sysplex, which reduces complexity. To install cloning, define the symbols and values in the IEASYMXX member of SYS1.PARMLIB. After an IPL of the system you can use the symbols defined in IEASYMXX, in the RODM/GMFHS initialization members.
Figure 51. SYNONYM Definition
In Figure 51, we defined the symbol VERSION, which we used in the GMFHS startup procedure.
EDIT SYS1.PARMLIB(IEASYM11) - 01.04 Columns 0000 Command ===> Scroll == ****** ***************************** Top of Data ********************** 000001 SYSDEF SYSNAME(SA11) 000002 SYMDEF(&ENTERP=' ') 000003 SYMDEF(&PROCED=' ') 000004 SYMDEF(&NETVTYPE='ENTERPRI') 000005 SYMDEF(&SYSLEVEL='V5') 000006 SYMDEF(&VERSION=V1R2) 000007 SYSCLONE(AN)
© Copyright IBM Corp. 1998 55

Figure 52. Modified GMFHS Startup with SYNONYM
The VERSION parameter is used in the DSIPARM data set name.
Cloning support can be used in the following members:
EKGCUST RODM customization member.
DUIGINIT Initialization parameters for GMFHS.
DUIGPWLU Provides graphical data server LU names to GMFHS, which are not to be allowed to acquire a session.
DUIGDYNA Defines the files that GMFHS can allocate using the MVS Dynamic Allocation function.
CNMSJH08 Backup job for the event log.
5.2 Date/Time for Formatting or Printing of the RODM Log
Using the start and end date/time parameter to format and print the RODM log reduces the amount of data produced, enabling diagnostics to be performed more easily. The format of the parameters are:
//********************************************************************** //* //GMFHS PROC Q1='TME10', ** USER DSN HIGH LEVEL QUALIFIER // SQ1='TME10.V1R2', ** SYSTEM DSN HIGH LEVEL QUALIFIER // VQ1=TME10, ** HIGH LVL DSN QUALIFIER-VSAM DSNS // DOMAIN=RABAN, ** NETVIEW DOMAIN NAME // PROG=DUIFT000, ** PGM USED TO START GMFHS HOST MAIN TASK // REG=32M, ** REGION SIZE IN K FOR MAIN TASK // AGGRST=N, ** RUN AGG CALCULATION ON STARTUP // RESWS=NO, ** RESOURCE STATUS WARM START // ARM=*NOARM, ** AUTOMATIC RESTART MANAGER //STEP1 EXEC PGM=&PROG,REGION=®, // PARM='&AGGRST,RESWS=&RESWS,DOMAIN=&DOMAIN,ARM=&ARM,SUBSYM=&SUBSYM' //STEPLIB DD DSN=&SQ1..CNMLINK,DISP=SHR // DD DSN=&SQ1..SEKGMOD1,DISP=SHR // DD DSN=&SQ1..SCNMSASC,DISP=SHR //* DEFAULT IS PL/I (IF YOU WANT LE/370 YOU MUST COMMENT OUT THE //* FOLLOWING TWO LINES FOR PL/I AND UNCOMMENT THE LE/370 (CEE) //* DATASET (PL/I AND LE/370 ARE MUTUALLY EXCLUSIVE) //* DD DSN=PLI.V2R3M0.PLILINK,DISP=SHR //* DD DSN=PLI.V2R3M0.SIBMLINK,DISP=SHR //* UNCOMMENT THE FOLLOWING CEE DATASET FOR LE/370 // DD DSN=TME10.V1R2.SCEERUN,DISP=SHR //* INITIALIZATION PARAMETERS DATASET //CNMPARM DD DSN=&Q1..&DOMAIN..&VERSION..DSIPARM,DISP=SHR //* RUNTIME LIBRARY MESSAGES //SYSTERM DD SYSOUT=A //* THE FOLLOWING ARE FOR THE RODM LOAD UTILITY //EKGLANG DD DSN=&SQ1..SEKGLANG,DISP=SHR //EKGLUTB DD DSN=&SQ1..SEKGLUTB,DISP=SHR //EKGPRINT DD SYSOUT=A //EKGIN3 DD DUMMY,DCB=BLKSIZE=80 //* //* NOTE: REMOVE THE COMMENTS FROM THE NEXT TWO STATEMENTS ALONG WITH //* THE JOBCARD WHEN MAKING THIS A BATCH JOB. //* PEND //*GMFHS EXEC GMFHS
56 An Introduction to Tivoli NetView for OS/390 V1R2

%STIME mm/dd/yyyy hh:mm:ss%ETIME mm/dd/yyyy hh:mm:ss
The sample EXEC statement is:
//STEP1 EXEC PGM=EKGLG000,// PARM='%STIME 04/26/1998 08:00:00 %ETIME 04/27/1998 08:00:00
The PARM parameter is used in the EKGRLOG job, which can be found in TME10.V1R2.SEKGSMP1 and is coded as in the above example.
5.3 Automatic Restart Manager
TME 10 NetView for OS/390 V1R2 supports Automatic Restart Manager (ARM) for RODM/GMFHS in a SysPlex environment. The advantage of this is that the RODM/GMFHS started tasks can be restarted more quickly on the same, or another system in the SysPlex, which increases its availability. To enable ARM support, the system that RODM/GMFHS runs on must be defined to the SysPlex. The couple data sets must be defined in SYS1.PARMLIB and the ARM policy must be activated.
Figure 53. Sample GMFHS Startup with ARM Support
In the RODM/GMFHS started task, the parameter ARM= needs to be coded to either ARM=*ARM or the element name in ARM.
5.4 RODM Checkpoint Data Set Failure Handling
RODM Checkpoint Data Set Failure Handling enables RODM to continue running following certain checkpoint function setup failures, such as those that happen when the checkpoint data sets are too small, or don't exist. A new parameter has been added to the RODM customization member (EKGCUST):
//GMFHS PROC Q1='TME10', ** USER DSN HIGH LEVEL QUALIFIER // SQ1='TME10.V1R2', ** SYSTEM DSN HIGH LEVEL QUALIFIER // VQ1=TME10, ** HIGH LVL DSN QUALIFIER-VSAM DSNS // DOMAIN=RABAN, ** NETVIEW DOMAIN NAME // VERSION=V1R2, ** NETVIEW DOMAIN NAME // PROG=DUIFT000, ** PGM USED TO START GMFHS HOST MAIN TASK // REG=32M, ** REGION SIZE IN K FOR MAIN TASK // AGGRST=N, ** RUN AGG CALCULATION ON STARTUP // RESWS=NO, ** RESOURCE STATUS WARM START // ARM=*ARM, ** AUTOMATIC RESTART MANAGER //* ** *ARM = REGISTER WITH AUTOMATIC //* RESTART MGR. (ARM) USING //* GMFHS-GENERATED NAME, WHICH //* IS 'NETVIEW@@' CONCATENATED //* WITH UP TO 5 CHARACTERS OF //* THE VALUE OF THE DOMAIN //* KEYWORD IN THE JCL EXEC PARMS. //* IF THE DOMAIN KEYWORD IS NOT //* SPECIFIED OR HAS NO VALUE, THEN //* GMFHS USES 'NETVIEW@@' PADDED //* WITH BLANKS //* ** name = REGISTER WITH ARM USING //* THE NAME PROVIDED BY THIS //* ARM KEYWORD //* ** *NOARM = DO NOT REGISTER WITH ARM //* ** DEFAULT OPTION = *NOARM
RODM/GMFHS Enhancements 57

This parameter indicates whether or not the checkpoint function is to be enabled, as well as what RODM will do when the checkpoint data sets do not exist or are too small to map the master window, translation segment(s), and/or data window(s).
The following explains the parameters:
REQUIRED Checkpoint function must be set up or RODM is not to continue.
REQUEST Checkpoint function desired, but RODM may continue.
NONE Checkpoint function is not required. This is only valid for an RODM cold start.
The sample of the EKGCUST member within DSIPARM is using the CHECKPOINT_FUNCTION set to NONE.
58 An Introduction to Tivoli NetView for OS/390 V1R2

Chapter 6. MVS TCP/IP Support
NetView AON MVS TCP/IP support requires MVS TCP/IP V3R2 or later, and TME 10 NetView for OS/390 V1R2. It also requires the TSO server to be active. It also presupposes that AON, with the TCP/IP tower, has been installed according to the TME 10 NetView for OS/390 Installation and Administration Guide, SC31-8236. Figure 54 shows the diagram of this function.
Figure 54. AON MVS TCP/IP Support
In this chapter AON uses TSO commands through TSOSERV to monitor TCP/IP resources. AON also supports UNIXSERV for management of TCP/IP resources. We did not test this option during our residency but it is supported. For more information about TSOSERV and UNIXSERV refer to Chapter 18, “Commands to TSO” on page 343 and Chapter 17.4, “Issuing Commands to OS/390 UNIX” on page 338.
6.1 Software Customization
There are three main areas of customization: in the DSIPARM data set, TSO server setup and in the TCP/IP data sets.
6.1.1 Software Customization - DSIPARMThere are numerous parameter changes that can be done to enable AON TCP/IP support to run more smoothly, but we concentrate on those parameters that are relevant to the MVS portion of AON TCP/IP support. All of the following customization takes place in the FKXCFG01 member in the DSIPARM library.
© Copyright IBM Corp. 1998 59

Figure 55. FKXCFG01 - TCP/IP Configuration IP390
There are three choices as to what options you may want to install under AON TCP/IP support. The first INSTALLOPT is for the installation of the TCP/IP tower of AON. If INITIALIZE is not coded as YES, none of the next two statements are effective. Depending on what you may be running at your installation, you may choose to initialize the NetView for AIX option, or the MVS TCP/IP for System 390 support. In our installation, we did not have NVAIX running, so we initialized the AON tower with INITIALIZE=Y for TCP/IP and IP390.
The TSOSERV parameter needs to be customized for TSO Servers only.
Figure 56. FKXCFG01 - TSO Server for AON
There are two parts that need to be customized to your environment. Firstly, the prefix of the TSO USERID that the TSOSERV runs under and executes commands on the MVS system and secondly, the procedure name of the TSOSERV, which is found in DSIPARM. We called our procedure CNMSJTSO and the prefix of the TSO user ID NV2TSO.
***************************** * INSTALLOPT TCPIP, INITIALIZE= Y, IC=FKXEINIT, DEFTAB=FKXTABLE, OPER=NV6KOP * INSTALLOPT NVAIX, INITIALIZE=N, MSGOP=NV6KOPM * INSTALLOPT IP390, INITIALIZE=Y * *****************************
* *----------------------------------------------------------------------* * Set up TSO Servers for Local Stacks * *----------------------------------------------------------------------* * TSOSERV NV2TSO,PROC=CNMSJTSO * *----------------------------------------------------------------------*
60 An Introduction to Tivoli NetView for OS/390 V1R2

Figure 57. FKXCFG01 - TCP390 Setup
We need to set up the host TCP/IP service point definitions. The format is TCP390 and a name. The name can be anything that would be meaningful. We elected to use MVS11, which is our system host name. The IP address is the host IP address. The DOMAIN can be either LOCAL or a remote NetView domain name. We used LOCAL. If you specify a remote NetView domain, that domain may or may not be running AON. The TCP/IP commands are routed to the remote domain, executed there, with correlated responses returned back to the originating domain. The SERVER= parameter defines the TSO user ID defined in the TSOSERV stacks set previously. We used the prefix NV2TSO. This is followed by a number, which defines the number of TSO user IDs you wish to use. For example, if the statement was coded as follows: SERVER=(NV2TSO,3), this would mean that three TSO server user IDs would be used, namely, NV2TSO1, NV2TSO2 and NV2TSO3. The TCPNAME statement defines the TCP/IP STC running on the host. In our example, this was called T11ATCP. The HOSTNAME parameter is the TCP/IP host name. In our case, this was defined as MVS11.
Figure 58. FKXCFG01 - Defining Critical Resources
The TCPIP statement is used to define critical TCP/IP resources to AON. These are critical resources that you would want to monitor. The format of this is as follows: TCPIP name,RESTYPE=HOST, where name is any name meaningful to your institution. In our example, they are two workstations, which we named GEORGE and BRETT. The SP is the host service point definition, in our case MVS11; the IPADDR is the IP address of the workstation; and the HOSTNAME= is the TCP/IP hostname. To actively monitor these two resources they would need to be defined under the active monitoring definitions.
*-------------------------------------------------------------* SET SPECIFIC TCP390 ENTRIES*-------------------------------------------------------------* TCP 3.2 LOCAL TSO SERVICE POINTTCP390 MVS11, IPADDR=9.24.104.220, HIER2=SP-APPL, HIER3=NETSP, DOMAIN=LOCAL, SERVER=(NV2TSO,3), TCPNAME=T11ATCP, HOSTNAME=MVS11**-------------------------------------------------------------
*------------------------------------- * CRITICAL RESOURCES *------------------------------------- TCPIP BRETT,RESTYPE=HOST, SP=MVS11, IPADDR=9.24.104.11, HOSTNAME=WTR05212 * TCPIP GEORGE,RESTYPE=HOST, SP=MVS11, IPADDR=9.24.104.242, HOSTNAME=WTR05203 *
MVS TCP/IP Support 61
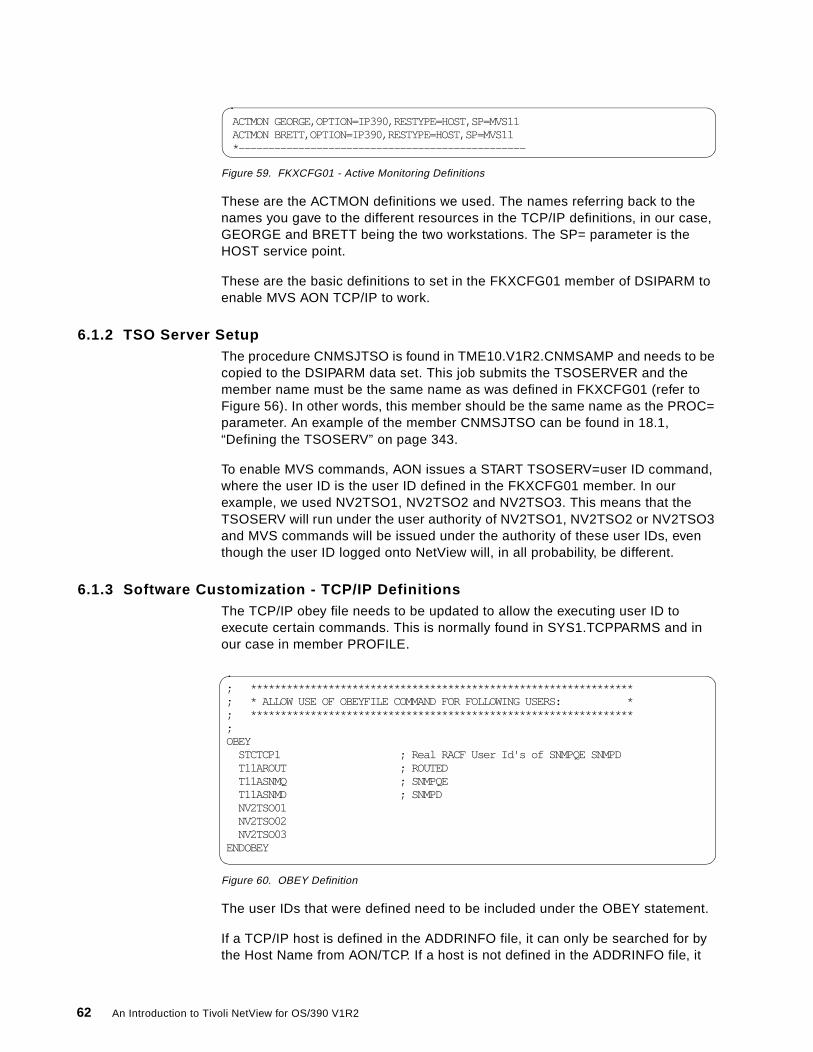
Figure 59. FKXCFG01 - Active Monitoring Definitions
These are the ACTMON definitions we used. The names referring back to the names you gave to the different resources in the TCP/IP definitions, in our case, GEORGE and BRETT being the two workstations. The SP= parameter is the HOST service point.
These are the basic definitions to set in the FKXCFG01 member of DSIPARM to enable MVS AON TCP/IP to work.
6.1.2 TSO Server SetupThe procedure CNMSJTSO is found in TME10.V1R2.CNMSAMP and needs to be copied to the DSIPARM data set. This job submits the TSOSERVER and the member name must be the same name as was defined in FKXCFG01 (refer to Figure 56). In other words, this member should be the same name as the PROC= parameter. An example of the member CNMSJTSO can be found in 18.1, “Defining the TSOSERV” on page 343.
To enable MVS commands, AON issues a START TSOSERV=user ID command, where the user ID is the user ID defined in the FKXCFG01 member. In our example, we used NV2TSO1, NV2TSO2 and NV2TSO3. This means that the TSOSERV will run under the user authority of NV2TSO1, NV2TSO2 or NV2TSO3 and MVS commands will be issued under the authority of these user IDs, even though the user ID logged onto NetView will, in all probability, be different.
6.1.3 Software Customization - TCP/IP DefinitionsThe TCP/IP obey file needs to be updated to allow the executing user ID to execute certain commands. This is normally found in SYS1.TCPPARMS and in our case in member PROFILE.
Figure 60. OBEY Definition
The user IDs that were defined need to be included under the OBEY statement.
If a TCP/IP host is defined in the ADDRINFO file, it can only be searched for by the Host Name from AON/TCP. If a host is not defined in the ADDRINFO file, it
ACTMON GEORGE,OPTION=IP390,RESTYPE=HOST,SP=MVS11 ACTMON BRETT,OPTION=IP390,RESTYPE=HOST,SP=MVS11 *------------------------------------------------
; ****************************************************************; * ALLOW USE OF OBEYFILE COMMAND FOR FOLLOWING USERS: *; ****************************************************************; OBEY STCTCP1 ; Real RACF User Id's of SNMPQE SNMPD T11AROUT ; ROUTED T11ASNMQ ; SNMPQE T11ASNMD ; SNMPD NV2TSO01 NV2TSO02 NV2TSO03 ENDOBEY
62 An Introduction to Tivoli NetView for OS/390 V1R2

can only be searched for by the IP address. To define a TCP/IP host in the ADDRINFO file, the xxxx.HOST.LOCAL data set needs to be updated to include the host name.
Figure 61. Host Name Definition
In this case, we defined the host name MVS11 and the workstation WTR05212, which was defined in the FKXCFG01 member as BRETT. Once this has been done, the MAKESITE program needs to be run from TSO, either from the ISPF command (option6) or via TSO MAKESITE. Once this has completed, the TCPIP STC needs to be stopped and the data sets created by the MAKESITE program, userid.HOSTS.ADDRINFO and userid.HOSTS.SITEINFO, need to be renamed to the HLQ of the data sets running your TCPIP STC. We renamed NV2TSO1.HOSTS.ADDRINFO and NV2TSO1.HOSTS.SITEINFO to TCPIP.T11A.HOSTS.ADDRINFO and TCPIP.T11A.HOSTS.SITEINFO. The TCPIP STC can be restarted.
6.2 AON MVS TCP/IP Examples
Figure 62 shows the main AON menu.
Figure 62. AON Primary Panel
As stated before, we concentrate on the MVS functions of AON TCP/IP. From the main NetView panel screen, select AON and option 4, TCP/IP Automation.
; HOST : 9.67.43.100 : NAMESERVER :::: HOST : 9.67.43.126 : RALEIGH :::: HOST : 9.24.104.220 : MVS11 :::: HOST : 9.24.104.11 : WTR05212 ::::
EZLK0000 AON: Operator Commands Main Menu RABAN Select an option 4 0. Tutorial 1. AON Base Functions 2. SNA Automation 3. LAN Automation 4. TCP/IP Automation Command ===> F1=Help F2=End F3=Return F6=Roll F12=Cancel
MVS TCP/IP Support 63

Figure 63. TCP/IP Automation - Main Menu
Select option 2 to invoke the MVS TCP/IP Menu.
6.2.1 TCP/IP Server ManagementBefore being able to manage the MVS TCP/IP environment, the TSOSERV needs to be activated. The servers are activated during AON initialization. If your server should fail you can restart it either by issuing a START TSOSERV=NV2TSO1 from an NCCF command line, where NV2TSO1 is the predefined user ID, or by selecting option 6 - TCP/IP Server Management.
FKXK0000 TCP/IP Automation: Commands Menu RABAN Select an option 2 1. NetView for AIX Menu 2. MVS TCP/IP Menu 3. Display Resource List Command ===> F1=Help F2=Main Menu F3=Return F6=Roll F12=Cancel
64 An Introduction to Tivoli NetView for OS/390 V1R2

Figure 64. MVS TCP/IP Commands Menu
This screen gives you information regarding the TSO servers you have defined and are going to run, with the majority of the data being supplied by definitions you have customized in the FKXCFG01 member of the DSIPARM data set. To start the TSO Server, enter 1.
Figure 65. TCP/IP for OS/390 Servers
The EZL922I message informs you that TSOSERV has been submitted for execution. By using PF5, Refresh, the status will change.
FKXK2000 MVS TCP/IP Commands Menu RABAN Select an option 6 1. Issue Ping 2. MVS TCP/IP Session Status 3. Issue Tracerte Command 4. Issue TSO Commands 5. SNMP MENU 6. TCP/IP Server Management Command ===> F1=Help F2=Main Menu F3=Return F6=Roll F12=Cancel
FKXK2600 TCP/IP for 390 Servers RABAN More : Select an option: 1=Start 2=Stop Service Submit MVS PPI Domid Point Server Type JCL Jobname Buffer Status 1 RABAN MVS11 NV2TSO1 TSO CNMSJTSO 0 DOWN _ RABAN MVS11 NV2TSO2 TSO CNMSJTSO $AN00003 0 ACTIV _ RABAN MVS11 NV2TSO3 TSO CNMSJTSO $AN00004 n/a ACTIV Command ===> F1=Help F2=Main Menu F3=Return F5=Refresh F6=Roll F7=Backward F8=Forward F12=Cancel
MVS TCP/IP Support 65
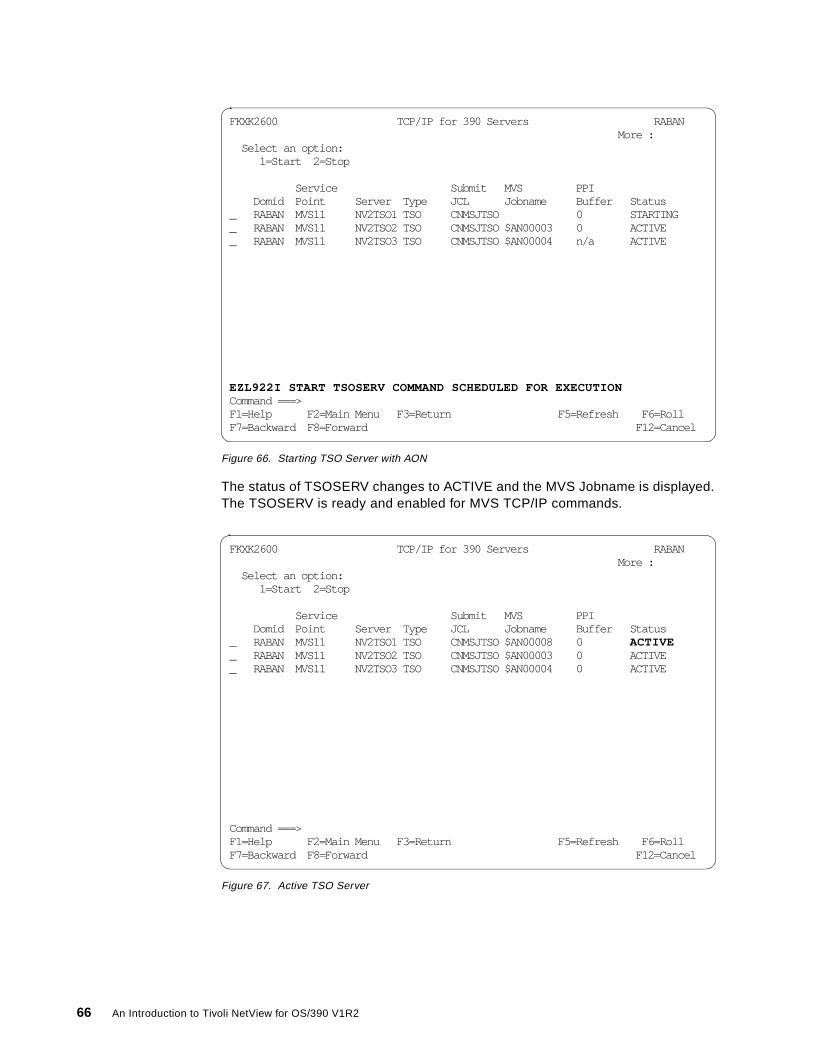
Figure 66. Starting TSO Server with AON
The status of TSOSERV changes to ACTIVE and the MVS Jobname is displayed. The TSOSERV is ready and enabled for MVS TCP/IP commands.
Figure 67. Active TSO Server
FKXK2600 TCP/IP for 390 Servers RABAN More : Select an option: 1=Start 2=Stop Service Submit MVS PPI Domid Point Server Type JCL Jobname Buffer Status_ RABAN MVS11 NV2TSO1 TSO CNMSJTSO 0 STARTING_ RABAN MVS11 NV2TSO2 TSO CNMSJTSO $AN00003 0 ACTIVE_ RABAN MVS11 NV2TSO3 TSO CNMSJTSO $AN00004 n/a ACTIVE EZL922I START TSOSERV COMMAND SCHEDULED FOR EXECUTION Command ===> F1=Help F2=Main Menu F3=Return F5=Refresh F6=RollF7=Backward F8=Forward F12=Cancel
FKXK2600 TCP/IP for 390 Servers RABAN More : Select an option: 1=Start 2=Stop Service Submit MVS PPI Domid Point Server Type JCL Jobname Buffer Status _ RABAN MVS11 NV2TSO1 TSO CNMSJTSO $AN00008 0 ACTIVE _ RABAN MVS11 NV2TSO2 TSO CNMSJTSO $AN00003 0 ACTIVE _ RABAN MVS11 NV2TSO3 TSO CNMSJTSO $AN00004 0 ACTIVE Command ===> F1=Help F2=Main Menu F3=Return F5=Refresh F6=Roll F7=Backward F8=Forward F12=Cancel
66 An Introduction to Tivoli NetView for OS/390 V1R2

6.2.2 Issue PINGAfter returning to the MVS TCP/IP Commands Menu, select option 1 to issue a ping.
Figure 68. Running PING Command
There is an option to ping the resource with either the IP address or by its host name. In our example, we could use either the IP address of 9.24.104.11 or its host name of WTR05212. If WTR05212 was not defined in the TCP/IP ADDRINFO, the IP address would have to be used. If you know the service point name, you can enter it, or ? to display all of the service points. The PING parameters are based on the defaults from the TCP390 DEFAULTS definition. These are customizable and you may want to change the packet size to reduce the amount of data. The PING count could be changed if your PING commands are often coming back negatively even though your workstation is active. We noticed that sometimes the first PING fails while successive PING commands work.
FKXK2000 MVS TCP/IP Commands Menu RABAN Select an option 1 1. Issue Ping 2. MVS TCP/IP Session Status 3. Issue Tracerte Command 4. Issue TSO Commands 5. SNMP MENU 6. TCP/IP Server Management Command ===> F1=Help F2=Main Menu F3=Return F6=Roll F12=Cancel
MVS TCP/IP Support 67

Figure 69. PING Command Entry
We have one service point defined to our system, MVS11, which we selected.
Figure 70. Service Point Host Selection Screen
The service point, MVS11, is filled in and all that is required is to press Enter to continue.
FKXK2100 MVS TCP/IP Automation: Ping from a Service Point RABAN Host Name or IP WTR05212________________________ Address ________________________________ Service Point Name ?_______ (? for Selection list) Ping Count 1__ Ping Timeout 10_ Ping Length 256_ s Routing Details Command ===> F1=Help F2=Main Menu F3=Return F6=Roll F12=Cancel
EZLKSLCT Operator Command Interface: SELECTION RABAN Select one of the following. Then press enter. HOSTNAME s MVS11 TCP390 MVS11 Command ===> F1=Help F2=Main Menu F3=Return F5=Refresh F6=Roll F7=Backward F8=Forward F12=Cancel
68 An Introduction to Tivoli NetView for OS/390 V1R2

Figure 71. PING Command Screen
The response from the PING command is displayed. The time it took to reach the destination is provided in the PING command response.
Figure 72. PING Command Result
6.2.3 MVS TCP/IP Session StatusFrom the main MVS TCP/IP Commands Menu, select option 2 MVS TCP/IP Session Status.
FKXK2100 MVS TCP/IP Automation: Ping from a Service Point RABAN Host Name or IP WTR05212________________________ Address ________________________________ Service Point Name MVS11 (? for Selection list) Ping Count 1__ Ping Timeout 10_ Ping Length 256_ s Routing Details FKX910I SERVICE POINT NAME SET. PRESS ENTER TO CONTINUE Command ===> F1=Help F2=Main Menu F3=Return F6=Roll F12=Cancel
FKXKLWN2 OUTPUT FROM TCP/IP 390 Line 1 of 2 Ping V3R2: Pinging host 9.24.104.11. Use ATTN to interrupt. PING: Ping #1 response took 0.024 seconds. Successes so far 1. Command==> F3=Ret F4=Fndprev F5=Rptfnd F6=Roll F7=Back F8=Forward F12=Cancel
MVS TCP/IP Support 69
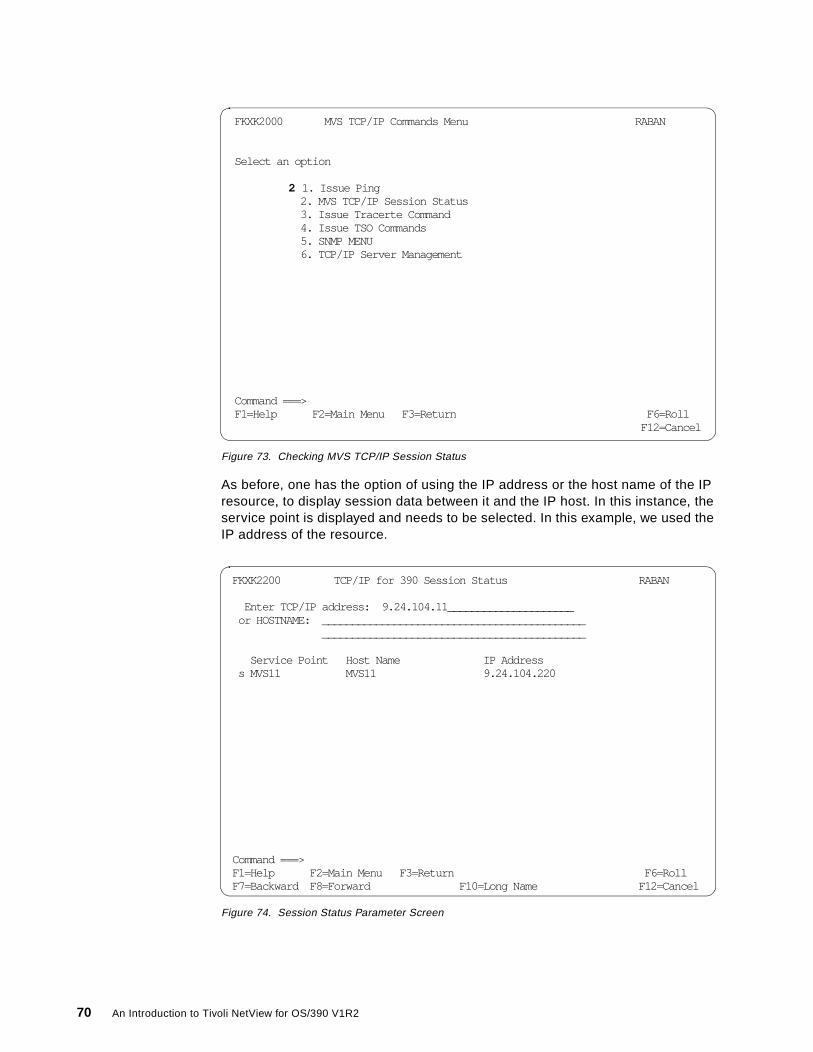
Figure 73. Checking MVS TCP/IP Session Status
As before, one has the option of using the IP address or the host name of the IP resource, to display session data between it and the IP host. In this instance, the service point is displayed and needs to be selected. In this example, we used the IP address of the resource.
Figure 74. Session Status Parameter Screen
FKXK2000 MVS TCP/IP Commands Menu RABAN Select an option 2 1. Issue Ping 2. MVS TCP/IP Session Status 3. Issue Tracerte Command 4. Issue TSO Commands 5. SNMP MENU 6. TCP/IP Server Management Command ===> F1=Help F2=Main Menu F3=Return F6=Roll F12=Cancel
FKXK2200 TCP/IP for 390 Session Status RABAN Enter TCP/IP address: 9.24.104.11_____________________ or HOSTNAME: ____________________________________________ ____________________________________________ Service Point Host Name IP Address s MVS11 MVS11 9.24.104.220 Command ===> F1=Help F2=Main Menu F3=Return F6=Roll F7=Backward F8=Forward F10=Long Name F12=Cancel
70 An Introduction to Tivoli NetView for OS/390 V1R2

As you can see, one session is active between the host and the resource WTR05212. If the cursor is placed on the host resource, MVS11, the PF11 key can be used to ZOOM into the session.
Figure 75. Session Status Screen
This screen contains a lot of useful information on the session, which allows you to identify, for example, hung FTP and TELNET sessions. You can determine if sessions are hung by looking at the send and receive counters. If you use the Refresh key, you can see if the send and receive counters are increasing.
FKXK2210 TCP/IP for 390 Session Status RABAN CLIENT WTR05212 Service Active IP Point Sessions Address HostName MVS11 1 9.24.104.220 MVS11 Command ===> F1=Help F2=Main Menu F3=Return F4=Commands F6=Roll F7=Backward F8=Forward F10=Long Name F11=Zoom F12=Cancel
MVS TCP/IP Support 71

Figure 76. Detail Session Status - ZOOMed
By using the PF4 key commands are displayed. These are commands that can be used specifically for this session. The drop command allows you to drop hung FTP and TELNET sessions.
Figure 77. Issue Command through the Session
FKXK2220 TCP/IP for 390 Session Status RABAN SERVICE CLIENT - - - -> POINT WTR05212 MVS11 9.24.104.220 Active Sessions 1 Sess Host Logical ID Name Type Status Send Rec Unit Appl. 1010 WTR05212 TELNET ESTABLSH 8539 289 RABAE001 RABAN052 Command ===> F1=Help F2=Main Menu F3=Return F4=Commands F5=Refresh F6=Roll F7=Backward F8=Forward F10=Long Name F12=Cancel
FKXK2221 TCP/IP for 390 Session Status RABAN SERVICE CLIENT - - - -> POINT - - - - > SESSION WTR05212 MVS11 1010 9.24.104.220 TELNET Session ...................................... ID TYPE Status : 1010 Commands : 1010 TELNET ESTABLSHD : WTR05212 _ 1.Ping : : RABAE001 2.Tracerte : : RABAN052 3.Autoview : : 4.Drop : : 5.ARP Cache : : Send: 8539 : : Rec: 289 : : : : F1=Help F12=Cancel : : : :....................................: Command ===> F1=Help F2=Main Menu F3=Return F6=Roll F7=Backward F8=Forward F12=Cancel
72 An Introduction to Tivoli NetView for OS/390 V1R2

6.2.4 Issue TSO CommandsFrom the main MVS TCP/IP Menu screen, select option 4, Issue TSO Commands.
Figure 78. Run a TSO Command
This requires that the host service point for the TSO commands be entered. If you are unsure as to what the MVS name is, enter a ? for a list. In our case, we know that this is MVS11. Similar to TSO, the last executed commands will be stored on this panel. You can move the cursor to any command in the list and by pressing the Enter key the selected command will be executed. In our example, we used first the TSO PROF command, followed by the NETSTAT CONN command.
FKXK2000 MVS TCP/IP Commands Menu RABAN Select an option 4 1. Issue Ping 2. MVS TCP/IP Session Status 3. Issue Tracerte Command 4. Issue TSO Commands 5. SNMP MENU 6. TCP/IP Server Management Command ===> F1=Help F2=Main Menu F3=Return F6=Roll F12=Cancel
MVS TCP/IP Support 73
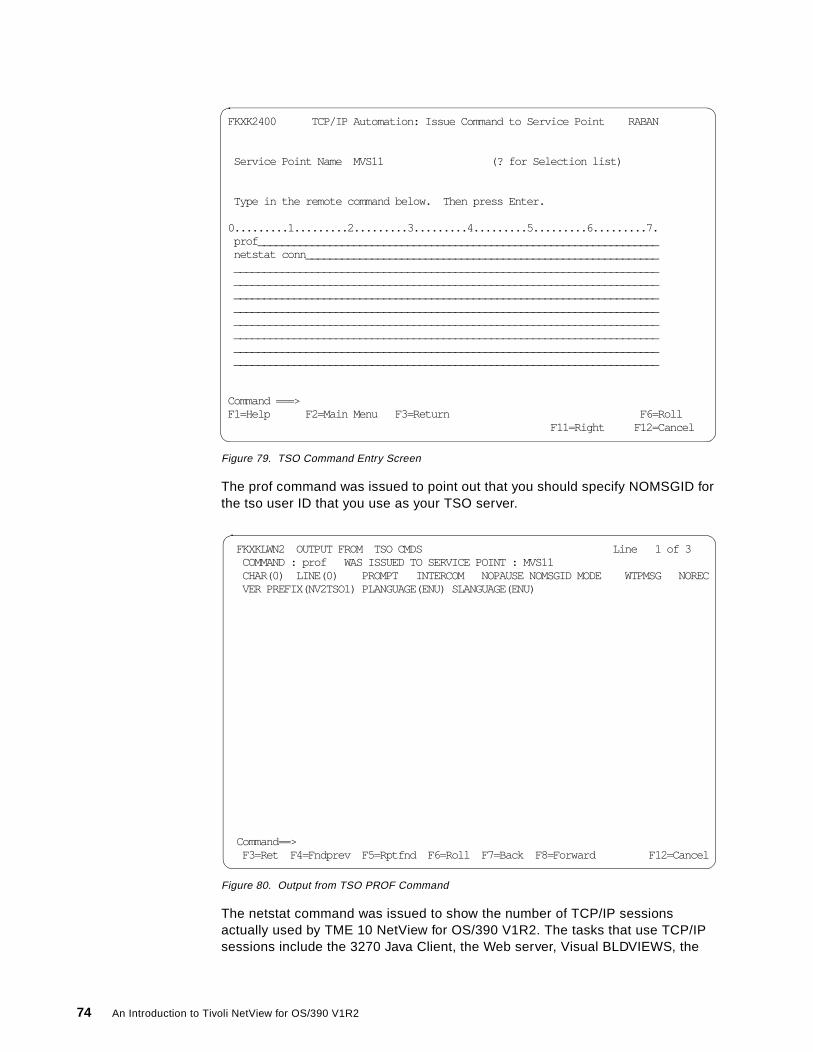
Figure 79. TSO Command Entry Screen
The prof command was issued to point out that you should specify NOMSGID for the tso user ID that you use as your TSO server.
Figure 80. Output from TSO PROF Command
The netstat command was issued to show the number of TCP/IP sessions actually used by TME 10 NetView for OS/390 V1R2. The tasks that use TCP/IP sessions include the 3270 Java Client, the Web server, Visual BLDVIEWS, the
FKXK2400 TCP/IP Automation: Issue Command to Service Point RABAN Service Point Name MVS11 (? for Selection list) Type in the remote command below. Then press Enter. 0.........1.........2.........3.........4.........5.........6.........7. prof___________________________________________________________________ netstat conn___________________________________________________________ _______________________________________________________________________ _______________________________________________________________________ _______________________________________________________________________ _______________________________________________________________________ _______________________________________________________________________ _______________________________________________________________________ _______________________________________________________________________ _______________________________________________________________________ Command ===> F1=Help F2=Main Menu F3=Return F6=Roll F11=Right F12=Cancel
FKXKLWN2 OUTPUT FROM TSO CMDS Line 1 of 3 COMMAND : prof WAS ISSUED TO SERVICE POINT : MVS11 CHAR(0) LINE(0) PROMPT INTERCOM NOPAUSE NOMSGID MODE WTPMSG NOREC VER PREFIX(NV2TSO1) PLANGUAGE(ENU) SLANGUAGE(ENU) Command==> F3=Ret F4=Fndprev F5=Rptfnd F6=Roll F7=Back F8=Forward F12=Cancel
74 An Introduction to Tivoli NetView for OS/390 V1R2

TME 10 NetView for OS/390 V1R2 TCP/IP Alert Receiver and NetView Management Console Server.
Figure 81. Output from TSO NETSTAT CONN Command
6.2.5 Trace Route CommandFigure 82 shows the menu for the trace route command for a TCP/IP address and Figure 83 shows the result.
The tracerte command is very useful to determine the path to a certain destination and the time it took to reach the destination.
FKXKLWN2 OUTPUT FROM TSO CMDS Line 1 of 16 COMMAND : netstat conn WAS ISSUED TO SERVICE POINT : MVS11 MVS TCP/IP Netstat V3R2 Active Transmission Blocks User Id Conn Local Socket Foreign Socket State ---- -- ---- ----- ------ ------- ------ ---- INTCLIEN 1000 *..TELNET *..* Listen INTCLIEN 1010 MVS11..TELNET WTR05212..1630 Established NETVN11 1002 *..9999 *..* Listen NETVN11 1012 *..9998 *..* Listen T11APORT 1003 *..PMAP *..* Listen T11APORT UDP *..PMAP *..* UDP T11AFTPC 1005 *..FTP-C *..* Listen NETVN11 1006 *..4021 *..* Listen NETVN11 1007 *..4020 *..* Listen NETVN11 1008 *..6767 *..* Listen Command==> F3=Ret F4=Fndprev F5=Rptfnd F6=Roll F7=Back F8=Forward F12=Cancel
MVS TCP/IP Support 75

Figure 82. tracerte Command Entry Panel
You can see in the tracerte response that the route from MVS11 to 9.24.106.32 went through the gateway called 9.24.104.1. In the previous panel we defined three tracerte attempts. In the tracerte response you can see the time it took to reach the destination.
Figure 83. tracerte Command Result
FKXK2300 MVS TCP/IP Automation: Trace Route from a service point RABAN Host Name or IP 9.24.106.32____________________ Address ________________________________ Service Point Name MVS11 (? for Selection list) Max 30 Try 3 Port 4096 Wait 5 Debug 2 ( 1=Y , 2=N ) Command ===> F1=Help F2=Main Menu F3=Return F6=Roll F12=Cancel
CNMKWIND OUTPUT FROM TRACERTE from SP MVS11 to 9.24.106.32 LINE 0 OF 4 *------------------------------- Top of Data -------------------------- Trace route to 9.24.106.32 (9.24.106.32) 1 (9.24.104.1) 10 ms 8 ms 10 ms 2 (9.24.106.32) 1509 ms 11 ms 12 ms *------------------------------ Bottom of Data ------------------------ TO SEE YOUR KEY SETTINGS, ENTER 'DISPFK' CMD==>
76 An Introduction to Tivoli NetView for OS/390 V1R2

Chapter 7. Event/Automation Service
The Event and Automation Service is a separate address space that is usually called IHSAEVNT. This address space can run as a Started task or as an UNIX/390 daemon. Its functions as a bridge between TME 10 NetView for OS/390 and Tivoli Enterprise Console (see Figure 84).
The Event/Automation Service uses TCP/IP to communicate with TEC. It translates TEC events to SNA format and translates SNA alerts and S/390 messages into TEC events.
This provides flexibility to manage from either or both interfaces and platforms. With minor automation table modifications and simple CLISTs, the implementation can be as detailed or simplified as required for the specific needs.
The following diagram represents the flow of data between TME 10 NetView for OS/390 and the Event/Automation Service. The PPI is used for all cross-memory transfers of data.
Figure 84. TME 10 NetView for OS/390 Event/Automation Service
The following sections discuss the general installation of this facility and then discusses each function as referenced in Figure 84:
• Installation is described in section 7.1, “Event/Automation Service Installation” on page 78.
• 1 is described in section 7.2, “Events from Tivoli Enterprise Console to OS/390” on page 84.
© Copyright IBM Corp. 1998 77
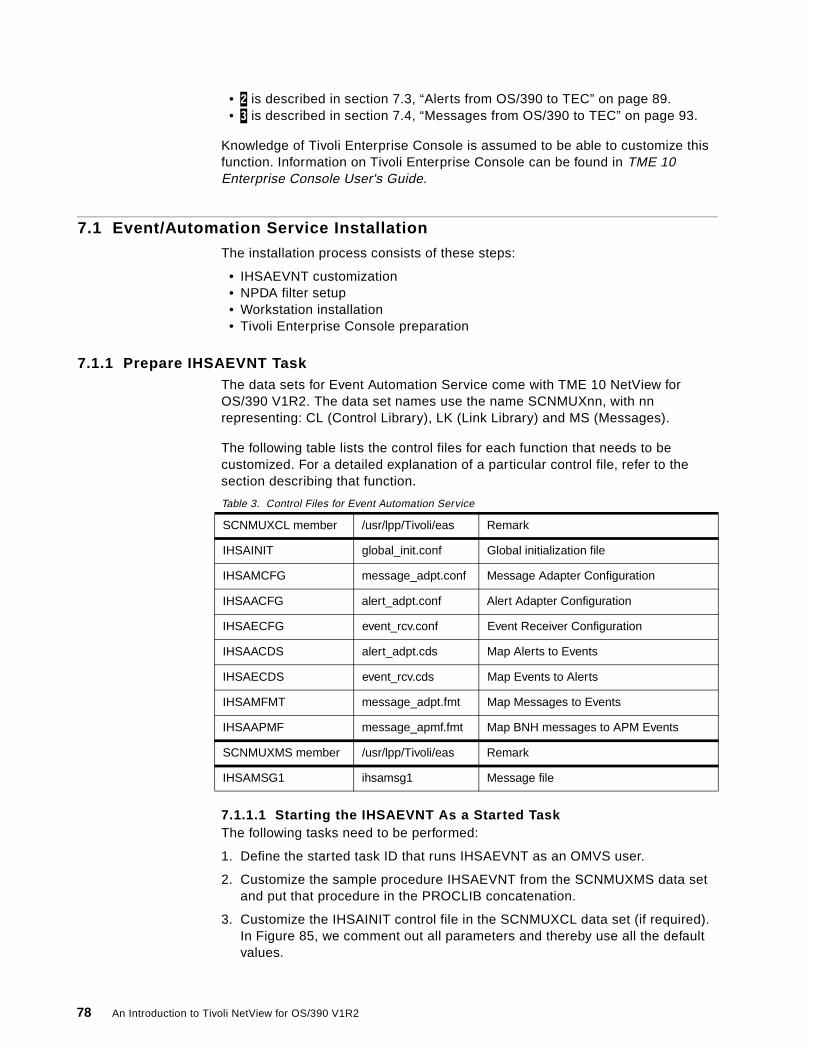
• 2 is described in section 7.3, “Alerts from OS/390 to TEC” on page 89. • 3 is described in section 7.4, “Messages from OS/390 to TEC” on page 93.
Knowledge of Tivoli Enterprise Console is assumed to be able to customize this function. Information on Tivoli Enterprise Console can be found in TME 10 Enterprise Console User's Guide.
7.1 Event/Automation Service Installation
The installation process consists of these steps:
• IHSAEVNT customization • NPDA filter setup • Workstation installation • Tivoli Enterprise Console preparation
7.1.1 Prepare IHSAEVNT TaskThe data sets for Event Automation Service come with TME 10 NetView for OS/390 V1R2. The data set names use the name SCNMUXnn, with nn representing: CL (Control Library), LK (Link Library) and MS (Messages).
The following table lists the control files for each function that needs to be customized. For a detailed explanation of a particular control file, refer to the section describing that function.
Table 3. Control Files for Event Automation Service
7.1.1.1 Starting the IHSAEVNT As a Started TaskThe following tasks need to be performed:
1. Define the started task ID that runs IHSAEVNT as an OMVS user.
2. Customize the sample procedure IHSAEVNT from the SCNMUXMS data set and put that procedure in the PROCLIB concatenation.
3. Customize the IHSAINIT control file in the SCNMUXCL data set (if required). In Figure 85, we comment out all parameters and thereby use all the default values.
SCNMUXCL member /usr/lpp/Tivoli/eas Remark
IHSAINIT global_init.conf Global initialization file
IHSAMCFG message_adpt.conf Message Adapter Configuration
IHSAACFG alert_adpt.conf Alert Adapter Configuration
IHSAECFG event_rcv.conf Event Receiver Configuration
IHSAACDS alert_adpt.cds Map Alerts to Events
IHSAECDS event_rcv.cds Map Events to Alerts
IHSAMFMT message_adpt.fmt Map Messages to Events
IHSAAPMF message_apmf.fmt Map BNH messages to APM Events
SCNMUXMS member /usr/lpp/Tivoli/eas Remark
IHSAMSG1 ihsamsg1 Message file
78 An Introduction to Tivoli NetView for OS/390 V1R2

4. Customize each component as shown in the following sections.
Figure 85. IHSAINIT (global_init.conf)
7.1.1.2 Starting the IHSAEVNT As an OMVS DaemonThe following tasks need to be performed:
1. Create a directory structure /usr/lpp/Tivoli/eas.
2. Copy all control files to that directory.
3. Create a dummy file called IHSAC000 with the sticky bit on.
4. Create a startup file for IHSAEVNT. (We call it ihss.sh.)
5. Customize the config_init.conf if required. We comment out all parameters for our test (see the contents of IHSAINIT in Figure 85).
6. Customize each component as shown in the following sections.
All the above tasks can be performed using a job (see Appendix C.1, “Copy EAS to OpenEdition” on page 369).
As a general debugging practice, it is easy to check the number of messages, alerts or events that have been processed by IHSAEVNT. The following command can be used:
# PPI Receiver ID #PPI=IHSATEC # # Alert Adapter Configuration File #ALRTCFG=IHSAACFG #ALRTCFG=\/usr/lpp/Tivoli/eas/alert_adpt.conf # # Message Adapter Configuration File #MSGCFG=IHSAMCFG #MSGCFG=\/usr/lpp/Tivoli/eas/message_adpt.conf # # Event Receiver Configuration File #ERCVCFG=IHSAECFG #ERCVCFG=\/usr/lpp/Tivoli/eas/event_rcv.conf # # Trace Message Output Destination #OUTPUT=SYSOUT # # Tasks not started at initialization (example)#NOSTART TASK=ALERTA #NOSTART TASK=MESSAGEA # # Control Task #TRACE TASK=CONTROL LEVEL=OFF # # Alert Adapter Task #TRACE TASK=ALERTA LEVEL=OFF # # Message Adapter Task #TRACE TASK=MESSAGEA LEVEL=OFF # # Event Receiver Task #TRACE TASK=EVENTRCV LEVEL=OFF
Event/Automation Service 79

Figure 86. Sample DISPLAY QSTATS Commands
The control task sends all the messages and alerts to ALERTA and MESSAGE while the EVENTRCV sends all the events it receives to the control task.
7.1.2 Customizing the NPDA FilterThe NPDA filter must be modified to pass the alerts to or from Tivoli Enterprise Console. Figure 87 shows a sample program to clear the NPDA filters and change the default of the TECROUTE filter to pass alerts to Tivoli Enterprise Console.
Figure 87. ARECLEAR CLIST
7.1.3 Workstation Software InstallationInstallation of the Event Automation Service software is performed using the Tivoli's desktop. The following procedure describes the installation process.
1. From the Tivoli Desktop, select Desktop , Install and Install Product (see Figure 88).
* RABAN MVS F IHSAEVNT,DISPLAY QSTATS E RABAN IHS0145I TASK QCOUNT TOTAL SENT TOTAL RCVD E RABAN IHS0146I ---- ------ ---------- ---------- E RABAN IHS0147I CONTROL 0 1499 228 E RABAN IHS0147I ALERTA 0 0 94 E RABAN IHS0147I MESSAGEA 0 0 1405 E RABAN IHS0147I EVENTRCV 0 228 0 ------------------------------------------------------------------------
/* REXX CLIST to Delete Default Alert Filter Settings */ ' NPDA SRF AREC DELETE E HELD TREF CTRL ' ' NPDA SRF AREC DELETE E PERM TREF CTRL ' ' NPDA SRF AREC DELETE E PERF TREF CTRL ' ' NPDA SRF AREC DELETE E HELD TREF LCTL ' ' NPDA SRF AREC DELETE E PERM TREF LCTL ' ' NPDA SRF AREC DELETE E PERF TREF LCTL ' ' NPDA SRF AREC DELETE E HELD ' ' NPDA SRF AREC DELETE E PERM ' ' NPDA SRF AREC DELETE E USER ' ' NPDA SRF AREC DELETE E NTFY ' ' NPDA SRF AREC DELETE E INST ' ' NPDA SRF AREC DELETE E SCUR ' ' NPDA SRF AREC DELETE E UNKN ' ' NPDA SRF AREC DELETE E PERF ' ' NPDA SRF AREC DELETE TREF CPU ' ' NPDA SRF AREC PASS DEFAULT ' /* The following was added to make sure the TECROUTE */ /* filter is set to PASS for Messages and Alerts */ /* to be forwarded to Tivoli Enterprise Console */' NPDA SRF TECROUTE PASS DEFAULT ' EXIT
80 An Introduction to Tivoli NetView for OS/390 V1R2

Figure 88. Installing Tivoli Software
2. You may need to change the installation source directory using the Select Media button. Select the product that you want to install (TME 10 NetView for OS/390 Event Automation Service), the host where you want it to be installed at and click Install & Close . Figure 89 shows the Product Selection window.
Figure 89. Tivoli Product Selection Window
3. Choose Continue to confirm the installation and then Close after the installation has completed.
Event/Automation Service 81

7.1.4 Tivoli Enterprise Console PreparationCompleting the Tivoli Enterprise Console part of the Event Automation Service installation includes running the nvtec.sh shell script. This script runs on the event server machine and prepares Tivoli Enterprise Console for both the Event Automation Service and the MultiSystem Manager Tivoli Management Region Feature (see Chapter 10, “Tivoli Management Region Feature” on page 197).
The nvtec.sh is stored in the directory $BINDIR/TDS/EventService. ($BINDIR is set when you set up the Tivoli environment variables.) You must run the following shell script to set the Tivoli environment variables:
. /etc/Tivoli/setup_env.sh
The nvtec.sh shell script can invoke two other scripts shipped with the Global Enterprise Manager:
• ihsttec.sh: Imports the APM baroc and rule files.
• amsseverity.sh: Modifies Tivoli Enterprise Console severity levels. It adds three additional levels: NORMAL, INFORMATIONAL and SEVERE. Figure 90 shows the result.
Figure 90. TEC Event Display with Additional Severities
The following is what nvtec.sh does:
1. Parameter and component input. We can enter various parameters and options in the first stage, such as:
• NetView OS/390 IP host name • Administrator to be created (The default is GemAdmin.) • TEC rulebase to copy (The default is the default rulebase.)
82 An Introduction to Tivoli NetView for OS/390 V1R2

• Selection of rulebase and classes to load, including support to Tivoli topology agent
• Topology server parameter
2. Constructs the new nvtec_rb in $BINDIR/TDS/EventService/nvtec_rb. This new rulebase is created by importing Baroc files and rule files from various sources depending on the selections made in the previous stage.
• $BINDIR/TDS/EventService: EAS classes and rules • $BINDIR/../generic: Various SENTRY classes and rules • $BINDIR/../generic_unix/MSM/MSMAgent: MSMAgent support • Calls ihsttec.sh to import interapp baroc and rules • Calls amsseverity.sh to add three new severity levels to TEC
3. Compiles and loads the nvtec_rb rulebase:
• Compile the rulebase • Load the rulebase • Create event sources and event groups • Create GemAdmin console • Stop and restart the EventServer
The complete listing for nvtec.sh execution is provided in Appendix A.1, “Output from nvtec.sh” on page 353. Boldface indicates operator entered responses.
The nvtec_rb in our environment contains the following baroc files:
1. root.baroc2. tec.baroc3. tecad_logfile.baroc4. tecad_nt.baroc5. tecad_snmp.baroc6. tecad_ov.baroc7. tecad_hpov.baroc8. tecad_nv6k.baroc9. tecad_snm.baroc10.tecad_snaevent.baroc11.as400msg.baroc12.tecad_nv390msg.baroc13.Sentry.baroc14.tivoli.baroc15.universal.baroc16.MSMAgent.baroc17.interapp.baroc
We loaded the following rule files:
1. ov_default.rls2. log_default.rls3. tecad_snaevent.rls4. tecad_nv390msg.rls5. tecad_nv390fwd.rls6. forwardSentry.rls7. interapp.rls
Note: The order in which the baroc files and the rule files are loaded is very important.
Event/Automation Service 83

7.2 Events from Tivoli Enterprise Console to OS/390
TME 10 NetView for OS/390 sends alerts and messages to a Tivoli Enterprise Console. It also receives events from Tivoli Enterprise Console based on rules defined in the Tivoli Enterprise Console Event Server.
Any Tivoli Enterprise Console event that passes the TME 10 NetView for OS/390 Hardware Monitor ESREC and AREC filters are displayed on the TME 10 NetView for OS/390 Hardware Monitor Alert's Dynamic screen.
Figure 91. Tivoli Enterprise Console Event to Hardware Monitor Alert Flow
• 1 The TEC Server uses the existing forward_event function to send events from TEC to TME 10 NetView for OS/390. The Event Receiver component should have been registered with the local portmapper as a TEC event receiver.
• 2 The Event Receiver converts the event into an alert and sends the alert to the Hardware Monitor across the PPI.
• 3 As with all alerts, the Hardware Monitor makes the alert available to the automation table. The AREC and ESREC filters are settable from the automation table as well as with NPDA's SRF command.
The control files for the Event Receiver component are:
• IHSAECFG or event_rcv.conf file. You may need to change the following parameters:
NetViewAlertReceiver The alert receiver PPI name; the default is NETVALRT.
PortNumber Defines the port number used by the event receiver. The default is 0, which means that a port number will be dynamically assigned by portmapper.
UsePortmapper Relates to the PortNumber definition, it must be yes or no accordingly.
84 An Introduction to Tivoli NetView for OS/390 V1R2

• IHSAECDS or event_rcv.cds, contains the default class definition statements for the event receiver. This file defines the event to alert subvector fields mapping.
When everything is defined correctly, the Hardware Monitor Alerts Dynamic screen has Tivoli Enterprise Console events each containing several subvector 31 that contains all the TEC event slots and their values. Figure 92shows the ALERTS STATIC Display and Figure 93 shows the detail display of the event where the majority is the SV31.
Figure 92. Alert Static Display
N E T V I E W SESSION DOMAIN: RABAN TMEID5 05/20/98 09:39:41 NPDA-30B * ALERTS-STATIC *
SEL# DOMAIN RESNAME TYPE TIME ALERT DESCRIPTION:COMMPROBABLE CAUSE ( 1) RABAN RS600015 PWS 09:24 Sentry Tivoli;Tivoli/Ente:severity=CRITICAL; % ( 2) RABAN LANMGR2 DEV 09:16 RESENT ALERT-UPDATED INFO:COMM SUBSYSTEM % ( 3) RABAN LANMGR1 DEV 09:16 RESENT ALERT-UPDATED INFO:COMM SUBSYSTEM % ( 4) RABAN RS600015 PWS 09:14 Sentry Tivoli;Tivoli/Ente:severity=CRITICAL; % ( 5) RABAN RS600015 PWS 09:01 Sentry Tivoli;Tivoli/Ente:severity=CRITICAL; % ( 6) RABAN RS600015 PWS 09:01 Sentry Tivoli;Tivoli/Ente:severity=CRITICAL; % ( 7) RABAN RS600015 PWS 09:00 Sentry Tivoli;Tivoli/Ente:severity=CRITICAL; % ( 8) RABAN RS600015 PWS 08:57 Sentry Tivoli;Tivoli/Ente:severity=CRITICAL; % ( 9) RABAN RS600015 PWS 08:57 Sentry Tivoli;Tivoli/Ente:severity=CRITICAL; % (10) RABAN RS600015 PWS 08:57 Sentry Tivoli;Tivoli/Ente:severity=CRITICAL; % (11) RABAN RS600015 PWS 08:55 Sentry Tivoli;Tivoli/Ente:severity=CRITICAL; % (12) RABAN RS600015 PWS 08:54 Sentry Tivoli;Tivoli/Ente:severity=CRITICAL; % (13) RABAN BRETT DEV 08:54 PROBLEM RESOLVED:APPLICATION PROGRAM % (14) RABAN BRETT DEV 08:54 PROBLEM RESOLVED:APPLICATION PROGRAM % (15) RABAN GEORGE DEV 08:53 RESENT ALERT-UPDATED INFO:APPLICATION PROGRAM % DEPRESS ENTER KEY TO VIEW ALERTS-DYNAMIC OR ENTER A TO VIEW ALERTS-HISTORY ENTER SEL# (ACTION),OR SEL# PLUS M (MOST RECENT), P (PROBLEM), DEL (DELETE)
???CMD==> 1 d
Event/Automation Service 85
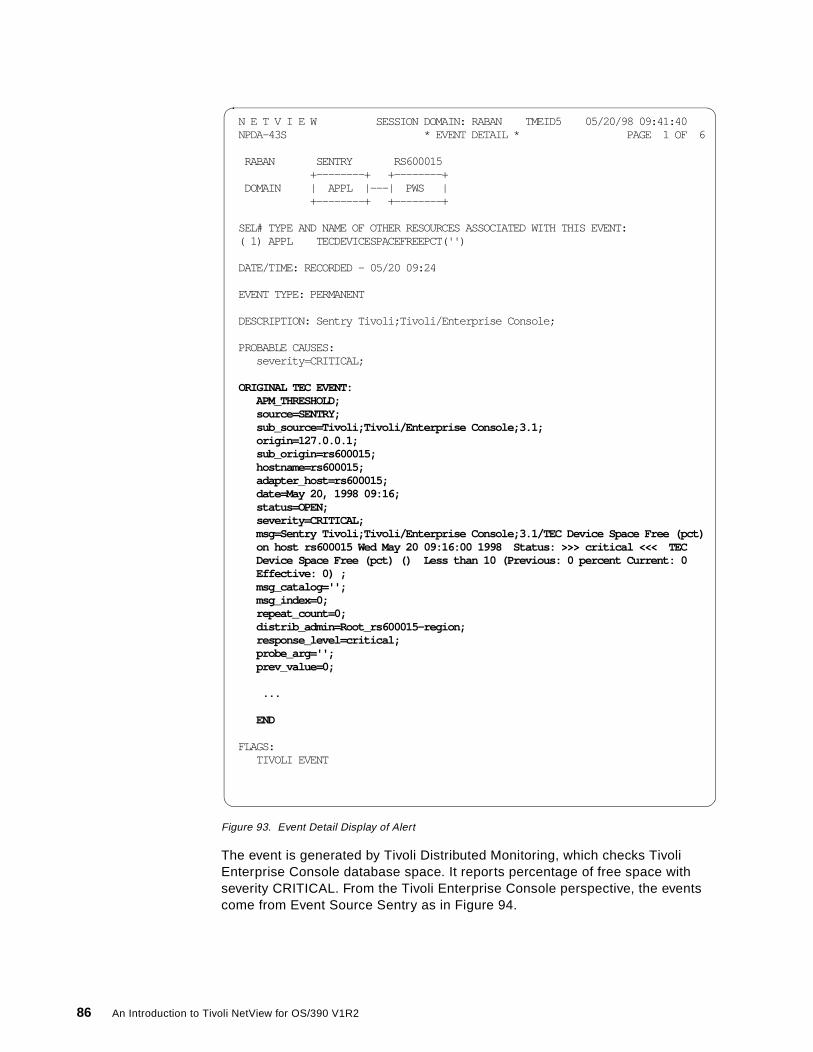
Figure 93. Event Detail Display of Alert
The event is generated by Tivoli Distributed Monitoring, which checks Tivoli Enterprise Console database space. It reports percentage of free space with severity CRITICAL. From the Tivoli Enterprise Console perspective, the events come from Event Source Sentry as in Figure 94.
N E T V I E W SESSION DOMAIN: RABAN TMEID5 05/20/98 09:41:40 NPDA-43S * EVENT DETAIL * PAGE 1 OF 6
RABAN SENTRY RS600015 +--------+ +--------+ DOMAIN | APPL |---| PWS | +--------+ +--------+
SEL# TYPE AND NAME OF OTHER RESOURCES ASSOCIATED WITH THIS EVENT: ( 1) APPL TECDEVICESPACEFREEPCT('')
DATE/TIME: RECORDED - 05/20 09:24
EVENT TYPE: PERMANENT
DESCRIPTION: Sentry Tivoli;Tivoli/Enterprise Console;
PROBABLE CAUSES: severity=CRITICAL;
ORIGINAL TEC EVENT: APM_THRESHOLD; source=SENTRY; sub_source=Tivoli;Tivoli/Enterprise Console;3.1; origin=127.0.0.1; sub_origin=rs600015; hostname=rs600015; adapter_host=rs600015; date=May 20, 1998 09:16; status=OPEN; severity=CRITICAL; msg=Sentry Tivoli;Tivoli/Enterprise Console;3.1/TEC Device Space Free (pct) on host rs600015 Wed May 20 09:16:00 1998 Status: >>> critical <<< TEC Device Space Free (pct) () Less than 10 (Previous: 0 percent Current: 0 Effective: 0) ; msg_catalog=''; msg_index=0; repeat_count=0; distrib_admin=Root_rs600015-region; response_level=critical; probe_arg=''; prev_value=0;
...
END
FLAGS: TIVOLI EVENT
86 An Introduction to Tivoli NetView for OS/390 V1R2
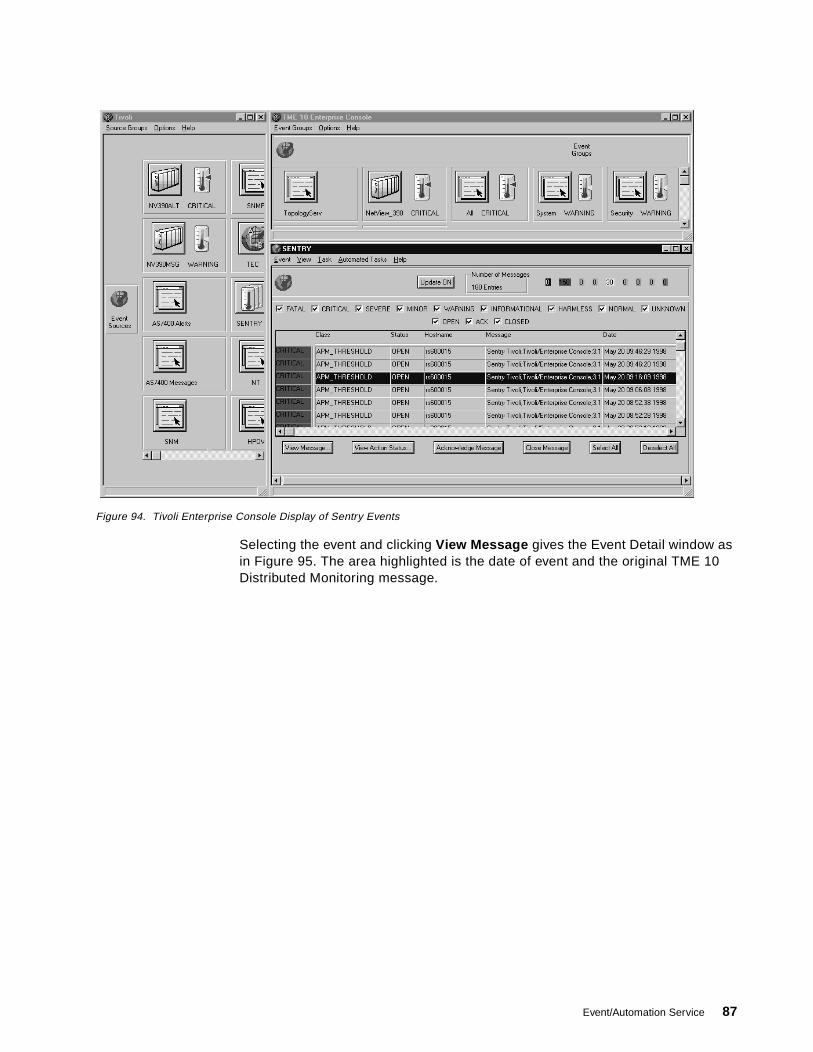
Figure 94. Tivoli Enterprise Console Display of Sentry Events
Selecting the event and clicking View Message gives the Event Detail window as in Figure 95. The area highlighted is the date of event and the original TME 10 Distributed Monitoring message.
Event/Automation Service 87
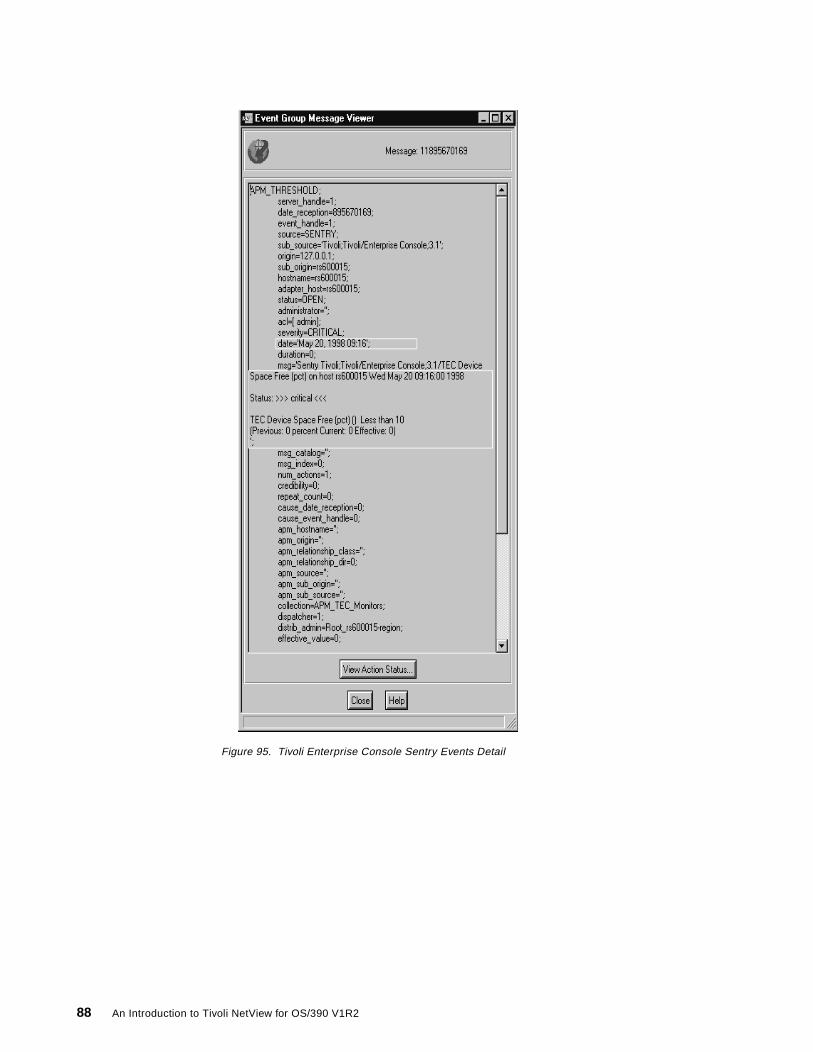
Figure 95. Tivoli Enterprise Console Sentry Events Detail
88 An Introduction to Tivoli NetView for OS/390 V1R2

7.3 Alerts from OS/390 to TEC
The routing of all alerts from TME 10 NetView for OS/390 to a TEC server is accomplished through one filter statement. The TECROUTE filter directs alerts to the Event/Automation Services PPI receiver ID.
Figure 96. Alert to Event Flow
• 1 Alerts that pass the ESREC and AREC filters are passed through the TECROUTE filter in Hardware Monitor. Alerts are then passed to the automation table.
• 2 The automation table has the opportunity to change the TECROUTE filter. The alert is then given back to the Hardware Monitor.
• 3 From the data recording component, the Hardware Monitor sends alerts that passed the TECROUTE filter to the main task across the PPI.
• 4 The main task routes the alert to the appropriate adapter.
• 5 The alert adapter converts the alert to an event and sends the event to the Event Integration Facility (EIF) component of the adapter.
• 6 The EIF passes the event through filtering and if necessary sends the event over an unsecure TCP/IP socket to the TEC server.
The control files for this alert adapter component are:
• BNJMBDST, the Hardware Monitor control file needs the TECROUTE definition to define the PPI receiver for the alert adapter. The default is IHSATEC. You do not need to define this TECROUTE parameter if you use the default name.
• IHSAACFG or the alert_adpt.conf file is the configuration file where you need to define the following definitions:
ServerLocation The TCP/IP address or the TCP/IP hostname of the Tivoli Enterprise Console Event server
Event/Automation Service 89
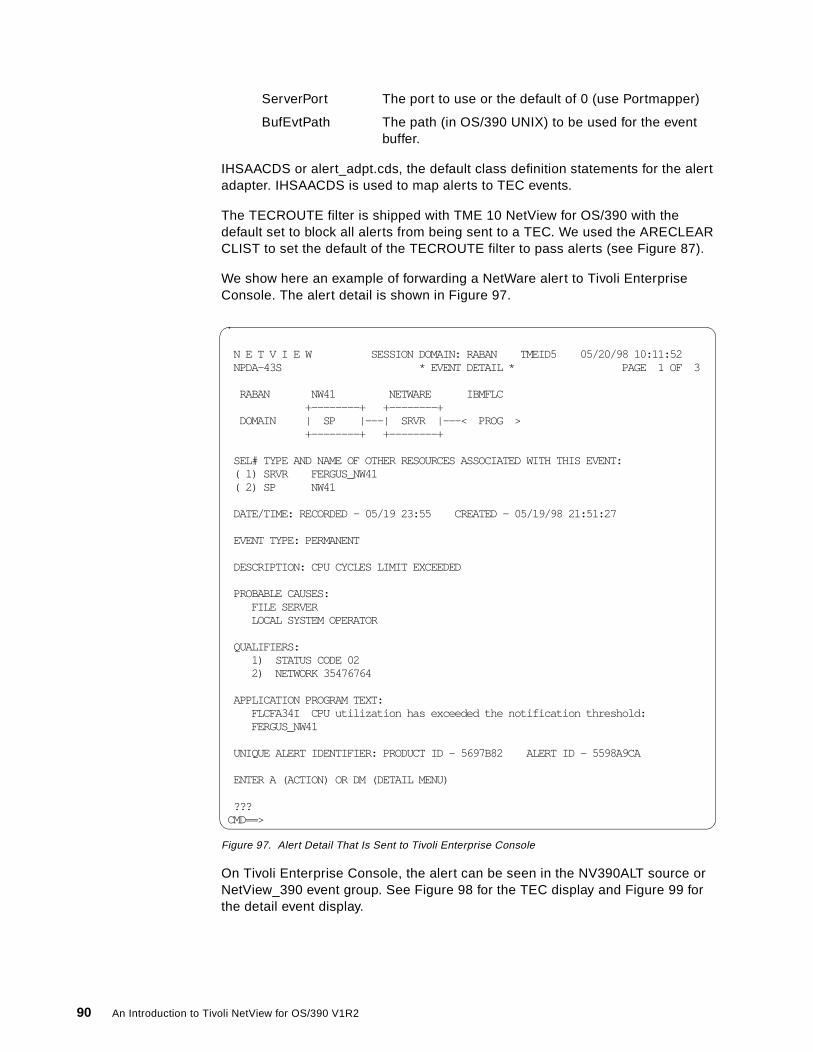
ServerPort The port to use or the default of 0 (use Portmapper)
BufEvtPath The path (in OS/390 UNIX) to be used for the event buffer.
IHSAACDS or alert_adpt.cds, the default class definition statements for the alert adapter. IHSAACDS is used to map alerts to TEC events.
The TECROUTE filter is shipped with TME 10 NetView for OS/390 with the default set to block all alerts from being sent to a TEC. We used the ARECLEAR CLIST to set the default of the TECROUTE filter to pass alerts (see Figure 87).
We show here an example of forwarding a NetWare alert to Tivoli Enterprise Console. The alert detail is shown in Figure 97.
Figure 97. Alert Detail That Is Sent to Tivoli Enterprise Console
On Tivoli Enterprise Console, the alert can be seen in the NV390ALT source or NetView_390 event group. See Figure 98 for the TEC display and Figure 99 for the detail event display.
N E T V I E W SESSION DOMAIN: RABAN TMEID5 05/20/98 10:11:52 NPDA-43S * EVENT DETAIL * PAGE 1 OF 3
RABAN NW41 NETWARE IBMFLC +--------+ +--------+ DOMAIN | SP |---| SRVR |---< PROG > +--------+ +--------+
SEL# TYPE AND NAME OF OTHER RESOURCES ASSOCIATED WITH THIS EVENT: ( 1) SRVR FERGUS_NW41 ( 2) SP NW41
DATE/TIME: RECORDED - 05/19 23:55 CREATED - 05/19/98 21:51:27
EVENT TYPE: PERMANENT
DESCRIPTION: CPU CYCLES LIMIT EXCEEDED
PROBABLE CAUSES: FILE SERVER LOCAL SYSTEM OPERATOR
QUALIFIERS: 1) STATUS CODE 02 2) NETWORK 35476764
APPLICATION PROGRAM TEXT: FLCFA34I CPU utilization has exceeded the notification threshold: FERGUS_NW41
UNIQUE ALERT IDENTIFIER: PRODUCT ID - 5697B82 ALERT ID - 5598A9CA
ENTER A (ACTION) OR DM (DETAIL MENU)
???CMD==>
90 An Introduction to Tivoli NetView for OS/390 V1R2

Figure 98. Tivoli Enterprise Console Display of NV390ALT Events
Selecting the event and clicking View Message gives the Event Detail window as shown in Figure 99. The highlighted slots show the event date and the source (NV390ALT).
As a general rule you should try to syncrononize the clocks between the different machines. This will make it easier to correlate time stamps in events, alerts and messages.
Event/Automation Service 91

Figure 99. Tivoli Enterprise Console NetWare Events Detail
92 An Introduction to Tivoli NetView for OS/390 V1R2

7.4 Messages from OS/390 to TEC
OS/390 Write to Operator messages called WTOs can be directed through the TME 10 NetView for OS/390 automation table and sent to a TEC. Our use of the TME 10 NetView for OS/390 V1R2 message processing was confined to those messages provided in the sample message adapter configuration file IHSAMFMT. Many more messages can be directed to the TEC. We chose to send primarily TME 10 NetView for OS/390 messages.
To generate messages to Tivoli Enterprise Console, we can modify member CNMSIHSA to allow forwarding of certain messages. We chose to forward all DSI messages. This was achieved using the following definition:
Figure 100 displays the message flow of this message adapter.
Figure 100. Message to Event Flow
• 1 The automation table drives commands, which route the message to the main task across the PPI. In the simplest case, this command is:
PIPE SAFE * | PPI TECROUTE IHSATEC.
• 2 The main task routes the message to the appropriate adapter.
• 3 The message adapter converts the message to an event and sends the event to the EIF component of the adapter.
• 4 The EIF passes the event through filtering and if necessary, sends the event over an unsecure TCP/IP pipe to the TEC Event server.
IF MSGID = 'DSI' . THEN EXEC(CMD('PIPE SAFE * | PPI TECROUTE IHSATEC') ROUTE(ONE AUTO1)) CONTINUE(Y);
1
2
3
4
Event/Automation Service 93

The following control files are used by the message adapter:
• IHSAMCFG or message_adpt.conf is the configuration of the message adapter. The following parameters need to be customized:
ServerLocation The TCP/IP address or TCP/IP hostname of the Tivoli Enterprise Console event server
PortNumber TCP/IP port that is used or put 0 to use PortMapper
BufEvtPath The OS/390 UNIX path that is used to buffer events to Tivoli Enterprise Console
• IHSAMFMT or message_adpt.fmt contains the default format mapping statements used to format messages to TEC events. You may need to include the IHSAAPMF (or message_apmf.fmt for OS/390 UNIX) file.
• IHSAAPMF or message_apmf.fmt contains format statements to map BNH messages to APM events.
The following message of AUTOWRAP stopped in the Netlog is captured and forwarded to Tivoli Enterprise Console.
Figure 101. Message Captured and Sent to Tivoli Enterprise Console
In Tivoli Enterprise Console, the message is received as an event with source NV390MSG. These messages (see Figure 102) can be selected and viewed as shown in Figure 103.
STATMON.BROWSE ACTP NETWORK LOG FOR 05/20/98 (98140) COLS 025 102 10:18 HOST: HOST01 *1* *2* *3* *4* SCROLL ==> CSR +----3----+----4----+----5----+----6----+----7----+----8----+----9----+---10-- 09:38:07 CNM493I EZLDSI00 : (NO SEQ) : EZLE1I01 RABAN DSI020I OPERATOR TM 09:38:07 DSI020I OPERATOR TMEID5 LOGGED ON FROM TERMINAL RABUDI1 USING PROF 09:38:09 CNM493I CNMSIHSA : (NO SEQ) : PIPE SAFE * | PPI TECROUTE IHSATEC 09:38:09 DSI083I AUTOWRAP STOPPED 09:38:10 CNM357I PFKDEF : PF KEY SETTINGS NOW ESTABLISHED. 'DISPFK' TO SEE 09:38:10 HOLD 09:38:10 MAINMENU 09:38:43 NPDA 09:38:43 CNM493I CNMSIHSA : (NO SEQ) : PIPE SAFE * | PPI TECROUTE IHSATEC 09:38:43 DSI208I TIME EXPIRATION - ID= 'ADOIV ' - CMD= 'EZLEOIVT' 09:38:55 IST663I CDINIT REQUEST FROM RAK FAILED , SENSE=087D0001 09:38:55 IST664I REAL OLU=USIBMRA.RALVSMV6 REAL DLU=USIBMRA.RALYDPD6 09:38:55 IST889I SID = F8D3D16443A67EAC 09:38:55 IST314I END 09:38:55 IST663I CDINIT REQUEST FROM RAK FAILED , SENSE=08570003 09:38:55 IST664I REAL OLU=USIBMRA.RALVSMV6 REAL DLU=USIBMRA.RABANJE 09:38:55 IST889I SID = F8D3D16443A67EAD 09:38:55 IST264I REQUIRED RESOURCE RABANJE NOT ACTIVE
CMD==> TO SEE YOUR KEY SETTINGS, ENTER 'DISPFK'
94 An Introduction to Tivoli NetView for OS/390 V1R2

Figure 102. Tivoli Enterprise Console Display of NV390MSG Events
Selecting the event and choosing View Message gives the Event Detail window as shown in Figure 103. The highlighted slots are the source (NV390MSG) and the actual message content.
Event/Automation Service 95

Figure 103. Tivoli Enterprise Console Message Event Detail
96 An Introduction to Tivoli NetView for OS/390 V1R2

Chapter 8. Miscellaneous Enhancements
This chapter contains examples of the many useful miscellaneous enhancements in TME 10 NetView for OS/390 V1R2. These enhancements include:
• SETCONID command
• IDLEOFF command
• ALLOCATE/FREE commands
• CONSOLE command
• Timer Enhancement of the DEFAULT, OVERRIDE, AT, AFTER and EVERY commands
• Storage enhancement with MEMSTORE
• BROWSE and LIST commands enhancement
• MSM Initialization
• LISTAE (LISTA Extension)
• ASSIGN command enhancement
• Delete Operator Message (DOM) enhancement
• CMIP filtering
• AON and MultiSystem Manager Integration
8.1 SETCONID Command
With the advent of the SYSPLEX environment, there is a need for each Extended MVS Console (EMC) to have a unique address. As in most installations, there are normally more than one NetView address spaces running in a Sysplex environment. This can cause problems. When a NetView operator logs on, he or she is automatically allocated an Extended MVS Console with the same name as the user ID. This means that there is a possibility of having two or more EMCs with the same name. In the Sysplex, when MVS commands are issued, the system does not know which EMC to send the reply to. Thus unique MVS Extended Console names need to be defined in the NetView operator initial CLIST to alleviate this problem.
The SETCONID addresses this problem and at the same time reduces system overhead. The SETCONID command is related to the:
• GETCONID - Obtains an extended master console.
• DISCONID - Displays all extended master consoles in use by NetView.
• RELCONID - Releases an extended master console.
The SETCONID command allows you to reserve a unique EMC name for each and every NetView user ID and autotask. The difference between SETCONID and GETCONID is that SETCONID reserves an EMC, without allocating it, while GETCONID physically allocates an EMC. By using SETCONID, the system overhead is reduced, as no EMC is allocated until required, which is when an MVS command is issued or an MVS message is received. The SETCONID command should be used in those NetView operator initial CLISTs that are unlikely to issue or receive MVS commands or messages, while the GETCONID
© Copyright IBM Corp. 1998 97

command should be used for NetView operators who frequently issue or receive MVS commands and messages.
The syntax of the command is:
SETCONID CONSOLE=console_name
console_name MVS EMC name to be obtained. This must be 2 - 8 characters in length, with the first character being alphabetic (A-Z), or with the special characters @, # or $. The other valid characters are A-Z, 0-9, @, # or $.
We put the operator initial CLIST to set the EMC to the unique name of the applid that the operator is logging on with.
Figure 104. Defines SETCONID in Profile
When the operator logs on to NetView, the above message is displayed. If the console name that is allocated with the SETCONID is not unique, no error message is produced until the GETCONID is issued, or an MVS command or message is issued or received.
Figure 105. Usage of SETCONID and LIST Command
In Figure 105, we used the SETCONID command to allocate an EMC with the name of SETCONEG. Using the LIST command, you can see that the DEFAULT MVS CONSOLE NAME is set to SETCONEG.
/* */ 'SETCONID CONSOLE='applid() 'PFKDEF' ............... DSI633I SETCONID COMMAND SUCCESSFULLY COMPLETED
NCCF TME 10 NetView RABAN TMEID3 04/21/98 10:46::58* RABAN SETCONID CONSOLE=SETCONEG* RABAN LIST TMEID3- RABAN STATION: TMEID3 TERM: RAKTX014- RABAN HCOPY: NOT ACTIVE PROFILE: DSIPROFB- RABAN STATUS: ACTIVE IDLE MINUTES: 0- RABAN ATTENDED: YES CURRENT COMMAND: LIST- RABAN AUTHRCVR: YES CONTROL: GLOBAL- RABAN NGMFADMN: YES DEFAULT MVS CONSOLE NAME: SETCONEG- RABAN NGMFVSPN: NNNN (NO SPAN CHECKING ON NGMF VIEWS)- RABAN NGMFCMDS: YES AUTOTASK: NO- RABAN IP ADDRESS: N/A- RABAN OP CLASS LIST: 1 2- RABAN DOMAIN LIST: CNM01 (I) CNM02 (I) CNM99 (I) B01NV (I)- RABAN ACTIVE SPAN LIST: NONE- RABAN END OF STATUS DISPLAY--------------------------------------------------------------------------------
???
98 An Introduction to Tivoli NetView for OS/390 V1R2

8.2 IDLEOFF Command
IDLEOFF enforces time limits on tasks by operator ID or by luname. It is shipped in the CNMSAMP library as CNMS1100 and needs to be moved to a DSICLD concatenated CLIST library. The command module statement is shipped with NetView and can be found in the DSICMDU member of DSIPARM. IDLEOFF enforces an idle time limit by checking idle time value as reported by the list command. This value is the total time elapsed since input was provided by the task's owner. Commands queued to a task by EXCMD or EVERY commands do not change that task's idle time value. Attended NetView tasks can be:
• Operator Station Tasks (OST) directly logged on
• Automated OST's accessible through a system console
• Distributed autotasks (started with RMTCMD)
• NetView-NetView tasks (NNTs)
Figure 106. IDLE Time and Operator Type
A simple way of discovering if a task is eligible to fall under the IDLEOFF command is by issuing a LIST opid. In Figure 106, we issued a LIST TMEID2. From the resultant display, check the IDLE MINUTES, whether this task is ATTENDED and whether it is an AUTOTASK. Also, check ATTENDED to see if there is a CONS associated with this AUTOTASK. If the operator or AUTOTASK is ATTENDED and is not an AUTOTASK, it will fall under the IDLEOFF command parameters. However, if an AUTOTASK is associated with an MVS console, it will fall under the IDLEOFF command, even though it may be an AUTOTASK.
8.2.1 IDLEOFF SyntaxThe syntax of the IDLEOFF command is:
IDLEOFF idle limit(minutes) {TEST}IDLEOFF EXCEPTOP opidIDLEOFF EXCEPTLU lu-nameIDLEOFF EXCEPTAUTO ALL DIST CONSOLE NONEIDLEOFF EXCEPTNNT ALL NONE
NCCF TME 10 NetView RABAN TMEID3 04/22/98 08:52:37 A * RABAN LIST TMEID2 - RABAN STATION: TMEID2 TERM: RA615S1 - RABAN HCOPY: NOT ACTIVE PROFILE: DSIPROFB - RABAN STATUS: ACTIVE IDLE MINUTES: 846 - RABAN ATTENDED: YES CONS CURRENT COMMAND: - RABAN AUTHRCVR: YES CONTROL: GLOBAL - RABAN NGMFADMN: YES DEFAULT MVS CONSOLE NAME: NONE - RABAN NGMFVSPN: NNNN (NO SPAN CHECKING ON NGMF VIEWS) - RABAN NGMFCMDS: YES AUTOTASK: NO - RABAN IP ADDRESS: N/A - RABAN OP CLASS LIST: 1 2 - RABAN DOMAIN LIST: CNM01 (I) CNM02 (I) CNM99 (I) B01NV (I) - RABAN ACTIVE SPAN LIST: NONE - RABAN END OF STATUS DISPLAY -------------------------------------------------------------------------------
Miscellaneous Enhancements 99

IDLEOFF EXCMDUSER ALLIDLEOFF EXCEPTRMTCMD ALL NONEIDLEOFF ?
idle limit Specifies the maximum time, in minutes, that an operator may be inactive, before he or she will be forced inactive, unless previously exempted.
TEST Produces a list of tasks that would have been stopped but does not issue the STOP command.
EXCEPTOP Specifies a list of operator IDs that are not to be forced off by the IDLEOFF commands. If an operator ID is preceded by a not (~) sign, then that name is removed from the exemption list.
EXCEPTLU Specifies a list of lu-names that are not to be forced off by the IDLEOFF commands. If the lu-name is preceded by a not (~) sign, then that name is removed from the exemption list.
EXCEPTAUTO Specifies which AUTOTASKS are to be exempt. ALL is the default. It specifies that ALL attended autotasks are exempt.
DIST Specifies distributed (those receiving RMTCMD) are exempt.
CONSOLE Specifies system console autotasks are exempt.
NONE Specifies that no autotasks are exempt.
EXCEPTNNT Specifies whether NNT tasks are to be exempt or not. ALL is the default. It specifies that all NNT tasks are exempt. NONE specifies that no NNT tasks are exempt.
EXCEPTRMTCMD Specifies whether users of RMTCMDS are exempt or not. ALL is the default. It specifies that all users of RMTCMD are exempt.
Note: This exempts any task that ever uses RMTCMD, even if that task has no RMTCMD sessions at present and even if the RMTCMD failed to start a session. NONE specifies that no RMTCMDS are exempt.
? Requests a report of exempt operators and autotasks.
Wildcards can be used. The * specifies that 0 or any number of characters is to be skipped, while the ? specifies that only one character is to be skipped.
8.2.2 IDLEOFF ConsiderationsIDLEOFF needs to be run under an AUTOTASK. That AUTOTASK needs to have STOP TASK authority against all operators and autotasks it may need to issue a STOP TASK against. The IDLEOFF command should be restricted for use by administrators only.
To set up IDLEOFF perform these steps:
• Define an autotask to run IDLEOFF.
• Issue IDLEOFF commands in the autotasks initial CLIST.
100 An Introduction to Tivoli NetView for OS/390 V1R2

• Add the AUTOTASK to the NetView initial CLIST.
8.2.3 IDLEOFF ExamplesWe issued the following commands:
IDLEOFF EXCEPTOP *IDLEOFF EXCEPTLU *IDLEOFF EXCEPTAUTO NONEIDLEOFF EXCEPTNNT NONEIDLEOFF EXCEPTRMTCMD NONE
After issuing these command we queried the IDLEOFF status.
Figure 107. IDLEOFF Result: Check Exemption
No exemptions from IDLEOFF are used. This means that all operators and attended autotasks that have consoles assigned will be monitored.
Figure 108. IDLEOFF Command Result: Testing
We issued the IDLEOFF 1 TEST command, to test which operators and autotasks would be stopped by the IDLEOFF 1 command. As you can see, four operators or autotasks have been idle for longer than a minute.
NCCF TME 10 NetView RABAN TMEID3 04/22/98 11:12::53* RABAN IDLEOFF ?C RABAN IDLEOFF No exemptions from idle time limits.--------------------------------------------------------------------------------
NCCF TME 10 NetView RABAN TMEID3 04/22/98 11:16:45 * RABAN IDLEOFF 1 TEST | RABAN IDLEOFF OPID=TMEID7 LU=SC052124 TIME=1128 | RABAN IDLEOFF OPID=TMEID2 LU=RA615S1 TIME=991 | RABAN IDLEOFF OPID=AUTO2 LU=AUTO2 TIME=86 | RABAN IDLEOFF OPID=TMEID5 LU=TMEID5 TIME=66 -------------------------------------------------------------------------------
Miscellaneous Enhancements 101

Figure 109. IDLEOFF Command Result: Exempting TMEID7
We issued the IDLEOFF EXCEPTOP TMEID7 command to exempt TMEID7 from falling under the IDLEOFF command. It is listed under active tasks that are exempt from idle time limits.
Figure 110. IDLEOFF Command Result: After TMEID7 Exempted
Issuing the IDLEOFF 1 TEST command showed that TMEID7 has been excluded from the list of whom the IDLEOFF command would have stopped.
8.3 Allocate/Free DD
This enhancement substitutes DD as a synonym for the file (ddname) option of the ALLOCATE and FREE commands.
NCCF TME 10 NetView RABAN TMEID3 04/22/98 11:19:39 * RABAN IDLEOFF EXCEPTOP TMEID7 | RABAN IDLEOFF TMEID7 added to EXCEPTOP list. | RABAN IDLEOFF Operators exempt from idle time limits: TMEID7 | RABAN IDLEOFF EXCEPTAUTO: NONE | RABAN IDLEOFF EXCEPTNNT: NONE | RABAN IDLEOFF EXCEPTRMTCMD: NONE | RABAN IDLEOFF Active tasks exempt from idle time limits: OPID LUNAME Idle Time Except Criteria TMEID7 SC052124 1131 EXCEPTOP -------------------------------------------------------------------------------
???
NCCF TME 10 NetView RABAN TMEID3 04/22/98 11:23:16 * RABAN IDLEOFF 1 TEST | RABAN IDLEOFF OPID=TMEID2 LU=RA615S1 TIME=997 | RABAN IDLEOFF OPID=AUTO2 LU=AUTO2 TIME=93 | RABAN IDLEOFF OPID=TMEID5 LU=TMEID5 TIME=72 -------------------------------------------------------------------------------
???
102 An Introduction to Tivoli NetView for OS/390 V1R2

Figure 111. ALLOCATE and FREE Command
Using the DD synonym for DATASET name, we issued an allocate for a data set with a DD name of TEST and released it with the FREE DD command.
8.4 Console Enhancements
The CONSOLE= command has been enhanced to include the *ANY* keyword. This addresses the need to have more than one console defined to an automated operator and helps to reduce the number of automated operators defined and maintained for console support. This will enable commands to be issued from any MVS console.
The syntax of the command is:
AUTOTASK OPID=operid,CONSOLE=*ANY*{,DROP}
*ANY* Assigns the autotask to respond to commands from any console not already assigned to by an autotask.
DROP Removes the association between a specific MVS console and a NetView autotask.
After issuing AUTOTASK OPID=IDLEOFF,CONSOLE=*ANY*, we displayed the consoles in NetView.
NCCF TME 10 NetView RABAN TMEID3 04/22/98 11:23:16 * RABAN ALLOCATE DATASET(TMEID3.TEST)DD(TEST) | RABAN CNM272I TEST IS NOW ALLOCATED ........................ ........................ ........................ | RABAN FREE DD(TEST) | RABAN CNM272I TEST IS NOW DEALLOCATED -------------------------------------------------------------------------------
???
Miscellaneous Enhancements 103

Figure 112. DISCONID from NCCF
IDLEOFF has a console *ANY* defined to it. From SDSF, we issued the /F NETVN11,DISCONID command, where NETVN11 is the address space of our NetView.
Figure 113. Display of MVS Console Used by NetView from SDSF
As another example, we issued the command /F NETVN11,LIST IDLEOFF.
NCCF TME 10 NetView RABAN TMEID3 04/22/98 12:23:19 * RABAN DISCONID ' RABAN CNM492I OPERATOR ID CONSOLE ID CONSOLE NAME CNM492I ----------- ---------- ------------ CNM492I CNMCSSIR EXTENDED CNMCSSIR CNM492I TMEID3 EXTENDED BSPTEST CNM492I TMEID2 EXTENDED TMEID2 CNM492I AUTO1 EXTENDED AUTO1 CNM492I AUTO2 0 * *MASTER* CNM492I TMEID5 1 * 01 CNM492I AUTOAMI EXTENDED AUTOAMI CNM492I IDLEOFF 0 * *ANY* CNM492I END DISPLAY -----------------------------------------------------------------------------
???
. . . . . . . . . . . . . . . . . . . . . . . . Display Filter View Print Options Help ----------------------------------------------------------------------- SDSF SYSLOG 350.101 SA11 SA11 04/22/1998 LINE 18,375 COMMAND ISSUED COMMAND INPUT ===> SCROLL ===> CSR RESPONSE=SA11 DISCONID RESPONSE=SA11 CNM492I OPERATOR ID CONSOLE ID RESPONSE=SA11 CNM492I ----------- ---------- ------------ RESPONSE=SA11 CNM492I CNMCSSIR EXTENDED CNMCSSIR RESPONSE=SA11 CNM492I TMEID3 EXTENDED BSPTEST RESPONSE=SA11 CNM492I TMEID2 EXTENDED TMEID2 RESPONSE=SA11 CNM492I AUTO1 EXTENDED AUTO1 RESPONSE=SA11 CNM492I AUTO2 0 * *MASTER* RESPONSE=SA11 CNM492I TMEID5 1 * 01 RESPONSE=SA11 CNM492I AUTOAMI EXTENDED AUTOAMI RESPONSE=SA11 CNM492I IDLEOFF 0 * *ANY* RESPONSE=SA11 CNM492I END DISPLAY
104 An Introduction to Tivoli NetView for OS/390 V1R2

Figure 114. NetView List Command from SDSF
8.5 Timer Enhancements
New options are added to the DEFAULTS, OVERRIDE, AT, EVERY and AFTER commands, to continue queuing a timer and to request notification by a new message, BNH357E, when a timer fails. Enhancements have also been made to stop timers that fail due to NetView termination deleting the timer in the SAVE/RESTORE database. A new option was also added to the AT, EVERY and AFTER commands to provide the ability to assign timers to a secondary operator if the first one is down.
8.5.1 New Options for the DEFAULTS CommandTIMEFMSG specifies whether the BNH357 message is produced when timed commands fail due to the target operator being unable to queue them. EVERYCON specifies whether timer commands of the type EVERY should continue to be queued even after queuing failures occur. The NetView default in both instances is NO.
The syntax is:
TIMEFMSG=YES/NOEVERYCON=YES/NO
8.5.2 New Options for the OVERRIDE CommandTIMEFMSG specifies whether the BNH357 message is produced when timed commands fail due to the target operator being unable to queue them. EVERYCON specifies whether timer commands of the type EVERY should continue to be queued even after queuing failures occur. DEFAULT indicates that the option specified on the DEFAULTS command should be used. The NetView default in both instances is DEFAULT.
The syntax is:
TIMEFMSG=YES/NO/DEFAULTEVERYCON=YES/NO/DEFAULT
. . . . . . . . . . . . . . . . . . . . . . . . Display Filter View Print Options Help ----------------------------------------------------------------------- SDSF SYSLOG 350.101 SA11 SA11 04/22/1998 LINE 18,375 COMMAND ISSUED COMMAND INPUT ===> SCROLL ===> CSR RESPONSE=SA11 LIST IDLEOFF RESPONSE=SA11 STATION: IDLEOFF TERM: IDLEOFF RESPONSE=SA11 HCOPY: NOT ACTIVE PROFILE: DSIPROFB RESPONSE=SA11 STATUS: ACTIVE IDLE MINUTES: 0 RESPONSE=SA11 ATTENDED: YES CONS CURRENT COMMAND: LIST RESPONSE=SA11 AUTHRCVR: YES CONTROL: GLOBAL RESPONSE=SA11 NGMFADMN: YES DEFAULT MVS CONSOLE NAME: NONE RESPONSE=SA11 NGMFVSPN: NNNN (NO SPAN CHECKING ON NGMF VIEWS) RESPONSE=SA11 NGMFCMDS: YES AUTOTASK: YES RESPONSE=SA11 IP ADDRESS: N/A RESPONSE=SA11 OP CLASS LIST: 1 2 RESPONSE=SA11 DOMAIN LIST: CNM01 (I) CNM02 (I) CNM99 (I) B01NV (I) RESPONSE=SA11 ACTIVE SPAN LIST: NONE RESPONSE=SA11 END OF STATUS DISPLAY
Miscellaneous Enhancements 105

8.5.3 New Options for the AT and AFTER CommandsTIMEFMSG specifies whether the BNH357 message is produced when timed commands fail due to the target operator being unable to queue them. The NetView default is NO. ROUTE specifies on which operator the command is to be run. A single operator or a group name can be specified.
The syntax is:
TIMEFMSG=YES/NOROUTE=operid
8.5.4 New Options for the EVERY CommandTIMEFMSG specifies whether the BNH357 message is produced when timed commands fail due to the target operator being unable to queue them. EVERYCON specifies whether timer commands of the type EVERY should continue to be queued even after queuing failures occur. The NetView default in both instances is NO. ROUTE specifies on which operator the command is to be run. A single operator or a group name can be specified.
The syntax is:
TIMEFMSG=YES/NOEVERYCON=YES/NOROUTE=operid
Figure 115. TIMER Commands
In the above example, we issued the following command:
EVERY 00:30,TIMEFMSG=YES,EVERYCON=YES,ROUTE=TMEID3,DISCONID
We then issued the LIST TIMER=ALL,OP=TMEID3 command. The operator ID following the OP: label is where the CLIST will execute while the operator in parenthesis indicates the origin of the timer command.
8.6 Storage Enhancements
Automation applications, such as AON and AOC, can cause high I/O rates to data sets allocated to NetView, due to reading the same members over and over from
NCCF TME 10 NetView RABAN TMEID3 04/22/98 16:40:25* RABAN EVERY 00:30,TIMEFMSG=YES,EVERYCON=YES,ROUTE=TMEID3,DISCONID- RABAN P DSI034I COMMAND SCHEDULED BY AT/EVERY/AFTER COMMAND - 'DISCONID'- RABAN P DSI201I TIMER REQUEST SCHEDULED FOR EXECUTION 'ID=SYS00006'* RABAN LIST TIMER=ALL,OP=TMEID3' RABAN PDISPLAY OF OUTSTANDING TIMER REQUESTSTYPE: EVERY TIME: 04/22/98 17:10:15 INTERVAL: 000 00:30:00 EVERYCON: YES COMMAND: DISCONID OP: TMEID3 (TMEID3 ) ID: SYS00006 TIMEFMSG: YES001 TIMER ELEMENT(S) FOUND FOR TMEID3END OF DISPLAY-------------------------------------------------------------------------------
???
106 An Introduction to Tivoli NetView for OS/390 V1R2
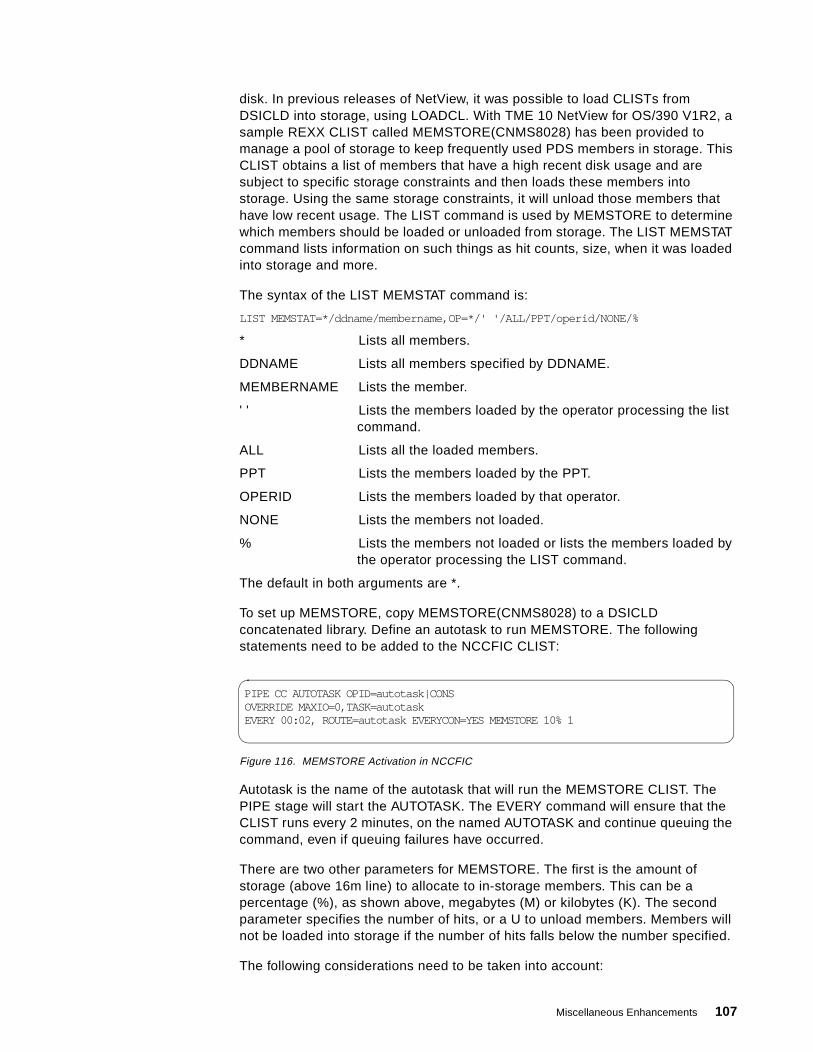
disk. In previous releases of NetView, it was possible to load CLISTs from DSICLD into storage, using LOADCL. With TME 10 NetView for OS/390 V1R2, a sample REXX CLIST called MEMSTORE(CNMS8028) has been provided to manage a pool of storage to keep frequently used PDS members in storage. This CLIST obtains a list of members that have a high recent disk usage and are subject to specific storage constraints and then loads these members into storage. Using the same storage constraints, it will unload those members that have low recent usage. The LIST command is used by MEMSTORE to determine which members should be loaded or unloaded from storage. The LIST MEMSTAT command lists information on such things as hit counts, size, when it was loaded into storage and more.
The syntax of the LIST MEMSTAT command is:
LIST MEMSTAT=*/ddname/membername,OP=*/' '/ALL/PPT/operid/NONE/%
* Lists all members.
DDNAME Lists all members specified by DDNAME.
MEMBERNAME Lists the member.
' ' Lists the members loaded by the operator processing the list command.
ALL Lists all the loaded members.
PPT Lists the members loaded by the PPT.
OPERID Lists the members loaded by that operator.
NONE Lists the members not loaded.
% Lists the members not loaded or lists the members loaded by the operator processing the LIST command.
The default in both arguments are *.
To set up MEMSTORE, copy MEMSTORE(CNMS8028) to a DSICLD concatenated library. Define an autotask to run MEMSTORE. The following statements need to be added to the NCCFIC CLIST:
Figure 116. MEMSTORE Activation in NCCFIC
Autotask is the name of the autotask that will run the MEMSTORE CLIST. The PIPE stage will start the AUTOTASK. The EVERY command will ensure that the CLIST runs every 2 minutes, on the named AUTOTASK and continue queuing the command, even if queuing failures have occurred.
There are two other parameters for MEMSTORE. The first is the amount of storage (above 16m line) to allocate to in-storage members. This can be a percentage (%), as shown above, megabytes (M) or kilobytes (K). The second parameter specifies the number of hits, or a U to unload members. Members will not be loaded into storage if the number of hits falls below the number specified.
The following considerations need to be taken into account:
PIPE CC AUTOTASK OPID=autotask|CONS OVERRIDE MAXIO=0,TASK=autotask EVERY 00:02, ROUTE=autotask EVERYCON=YES MEMSTORE 10% 1
Miscellaneous Enhancements 107

• Changes made to members that are loaded into storage will only take effect when they are unloaded or reloaded.
• For high-usage CLISTs, performance is enhanced using the LOADCL command.
To stop MEMSTORE from running, purge the timer and unload all members loaded by MEMSTORE(MEMSTORE 0 U).
Figure 117. Run MEMSTORE
We issued the timer-driven MEMSTORE command under autotask IDLEOFF. MEMSTORE will run every 2 minutes, use a maximum of 10% of NetView allocated storage and will load any member that has a hit of one. The hit-count of one is naturally for illustration only. The MEMSTORE sample recommends 5.
NCCF TME 10 NetView RABAN TMEID3 04/23/98 10:10:36* RABAN PIPE CC AUTOTASK OPID=IDLEOFF|CONS- RABAN CNM570I STARTING AUTOMATION TASK IDLEOFF- RABAN DSI530I 'IDLEOFF' : 'OST' IS READY AND WAITING FOR WORK* RABAN OVERRIDE MAXIO=0,TASK=IDLEOFF- RABAN DSI633I OVERRIDE COMMAND SUCCESSFULLY COMPLETED* RABAN EVERY 00:02,ROUTE=IDLEOFF EVERYCON=YES MEMSTORE 10% 1- RABAN P DSI034I COMMAND SCHEDULED BY AT/EVERY/AFTER COMMAND - 'MEMSTORE 10% 1'- RABAN P DSI201I TIMER REQUEST SCHEDULED FOR EXECUTION 'ID=SYS00009'-------------------------------------------------------------------------------
???
108 An Introduction to Tivoli NetView for OS/390 V1R2

Figure 118. List MEMSTORE Result
After two minutes, we issued the LIST MEMSTAT=DSICLD command. From the output displayed, you can see the number of hits, the AUTOTASK that loaded the CLIST into storage, the amount of storage per member and the date and time that the member was loaded into storage.
NetView, internally, will weigh hits according to age. Hits in the last minute have full weight; hits over an hour will have zero weight, with hits in between having weights depending on their age. For example, a value of 1.00 is the same as one hit in the last minute or two hits with an average age of 30 minutes.
8.7 Log, Member Browse and List CLIST Enhancements
Log BROWSE supports message color (foreground, extended highlighting, blink, underline and reverse video), the same as you would see on the NCCF screen. You can use the ICOLOR command to toggle between message colors and no message colors.
Another parameter, XINCL, was included in the member BROWSE command, for extended browsing.
NCCF TME 10 NetView RABAN TMEID3 04/23/98 10:15:17* RABAN LIST MEMSTAT=DSICLD' RABANBNH375IDDNAME MEMNAME HITS LOADTASK STORAGE DATE TIME DP-------- -------- ------- -------- ------- -------- -------- --DSICLD CNME1049 0.91DSICLD CNME1010 0.00DSICLD CNME1066 0.00DSICLD CNME5001 0.93 IDLEOFF 16K 04/23/98 09:44:43DSICLD CNMS8028 11.71 IDLEOFF 24K 04/23/98 09:42:43DSICLD CNME1096 0.00DSICLD CNME1505 0.45 IDLEOFF 68K 04/23/98 09:42:45DSICLD CNME1097 0.00DSICLD CNME1034 0.00DSICLD FLBCMIPA 0.00DSICLD CNME1033 0.00DSICLD CNME1035 0.00DSICLD EZLERODM 0.00DSICLD FLCAMSG9 0.00DSICLD FLCALAUT 0.00DSICLD FLCALALH 0.00DSICLD FLCANAUT 0.00DSICLD FLCANALH 0.00DSICLD FLCANNAU 0.00DSICLD FLCAEALT 0.00DSICLD FLCAEAUT 0.00???
Miscellaneous Enhancements 109

Figure 119. Browsing Member with %INCLUDE
As can be seen from Figure 119, we issue the BR DSICMD XINCL command. The transition into and out of included members is shown. XINCL is now the default for the BROWSE command. In this example DATASET: 1 means that this member is from the first data set in the LISTA output from the DD statement (DSIPARM). Note that a 0 would mean an INSTORE'd member.
The LIST CLIST= command now indicates if a CLIST was found on DISK or in STORAGE. LIST will also show you the actual CLIST that will run, whether it be in storage or on disk, while the BROWSE Clistname command will only show you the CLIST that is on disk. If a CLIST is not loaded by LOADCL, but is loaded by INSTORE, the LIST CLIST command will display the CLIST as INSTORE, but indicates that the member is from disk. The LIST CLIST command cannot differentiate between INSTORE and DISK.
8.8 MSM Initialization Message
A new message has been added for MSM initialization. BLDVIEWS can be automated off this message.
FLC126I GETTOPO COMMANDS FROM MULTISYSTEM MANAGER INITIALIZATION FILEFLCAINP HAVE BEEN PROCESSED.
8.9 LISTAE CLIST
In B.1, “LISTAE CLIST” on page 357, you will find a sample program called LISTAE, which gives you the capability to search for a member in data set names allocated in DD statements in the NetView procedure. This is a sample and not
NETVIEW.BRWS ------ BROWSE DSICMD (DSIPARM ) --- LINE 00000 TO 00025 OF 03222 SCROLL ==> CSR----+----1----+----2----+----3----+----4----+----5----+----6----+----7----+---- ******************************** TOP OF DATA ********************* DATASET: 1************************************************************************ 5697-B82 (C) COPYRIGHT TIVOLI SYSTEMS, 1997, 1998 ** 5655-007 (C) COPYRIGHT IBM CORPORATION 1986, 1995 ** ALL RIGHTS RESERVED. ** NAME(DSICMD) SAMPLE(CNMS1005) RELATED-TO( ) ** DESCRIPTION: SAMPLE DSIPARM COMMAND MODEL STATEMENTS FOR ** TME 10 NETVIEW. ** ************************************************************************************************************************************************* INCLUDE ANY CUSTOMER COMMAND PROCESSORS ************************************************************************* ***************** START OF MEMBER DSICMDU FROM DSICMD DATASET: 1************************************************************************ 5655-007 (C) COPYRIGHT IBM CORPORATION 1993, 1995 ** ALL RIGHTS RESERVED. ** NAME(DSICMDU) SAMPLE(CNMS1073) RELATED-TO(DSICMD) ** DESCRIPTION: DSIPARM SAMPLE FOR CUSTOMER COMMAND PROCESSORS. ** ************************************************************************
110 An Introduction to Tivoli NetView for OS/390 V1R2

part of TME 10 NetView for OS/390 V1R2. These are some examples of how you can use it:
The DSIDMN member from DSIPARM has been copied into a DSIPARM data set named TME10.RABAN.V1R2.DSIPARM containing all the customized members for our NetView. Data set TME10.V1R2.DSIPARM contains all the original members.
Figure 120. LISTAE Locating DSIPARM Member DSIDMN
The DSIDMNU member that we use comes from the NetView product library and it is not customized in our environment.
Figure 121. LISTAE Locating DSIPARM Member DSIDMNU
The DSIDMND member does not exist. It's a typographical error to show what appears when the member is not found.
Figure 122. LISTAE Member Not Found
NCCF TME 10 NetView RABAN TMEID4 05/28/98 16:53 * RABAN LISTAE DSIPARM DSIDMN | RABAN CNM299I Extended: Searching for member DSIDMN DDNAME DATA SET NAME MEMBER DISP -------- --------------------------------------------- -------- -------- DSIPARM TME10.RABAN.V1R2.DSIPARM DSIDMN SHR,KEEP TME10.V1R2.DSIPARM DSIDMN SHR,KEEP ------------------------------------------------------------------------
* RABAN LISTAE DSIPARM DSIDMNU | RABAN CNM299I Extended: Searching for member DSIDMNU DDNAME DATA SET NAME MEMBER DISP -------- --------------------------------------------- -------- -------- DSIPARM TME10.RABAN.V1R2.DSIPARM SHR,KEEP TME10.V1R2.DSIPARM DSIDMNU SHR,KEEP ------------------------------------------------------------------------
* RABAN LISTAE DSIPARM DSIDMND | RABAN CNM299I Extended: Searching for member DSIDMND DDNAME DATA SET NAME MEMBER DISP -------- --------------------------------------------- -------- -------- DSIPARM TME10.RABAN.V1R2.DSIPARM SHR,KEEP TME10.V1R2.DSIPARM SHR,KEEP ------------------------------------------------------------------------
Miscellaneous Enhancements 111
In this example we locate CLISTs from the DSICLD DD statement. The CNME1034 has to be customized but from which data set is the CLIST read? It is easy to find with LISTAE.
Figure 123. LISTAE Locating CLISTs
The module libraries can also be searched making it easier to find which STEPLIB library a particular module is in.
Figure 124. LISTAE Finding a Load Module
8.10 ASSIGN Command Enhancement
The ASSIGN command in TME 10 NetView for OS/390 V1R2 can assign messages from the SSI, based on conditions similar to the automation table statements. This facility is provided using IF conditions stored in a DSIPARM member. That member is then activated using the ASSIGN MEMBER= statement. The syntax specific to member message filtering is:
ASSIGN MEMBER=membername,PRIMARY=operator ... ASSIGN MEMBER=membername|ALL,DROP
This enhancement provides the member either from a real DSIPARM member or from a PIPE stage. (In this case the member name must start with an asterisk '*'.)
The IF statements in the member are basically null statements and therefore any action associated with them will be ignored.
* RABAN LISTAE DSICLD CNME1034 | RABAN CNM299I Extended: Searching for member CNME1034 DDNAME DATA SET NAME MEMBER DISP -------- --------------------------------------------- -------- -------- DSICLD TME10.RABAN.V1R2.CNMCLST CNME1034 SHR,KEEP TME10.V1R2.CNMCLST CNME1034 SHR,KEEP TME10.V1R2.SEZLCLST SHR,KEEP TME10.V1R2.CNMSAMP SHR,KEEP TME10.V1R2.SEKGSMP1 SHR,KEEP ------------------------------------------------------------------------
* RABAN DISPMOD CNMCSSIR ' RABAN CNM263I MODULE LENGTH CSECT DATE PTF EPA AM ATTR CNM263I CNMCSSIR 0041C0 CNMCSSIR 98.050 ------- 89FC0E40 31 RN RU AUTH CNM265I END OF DISPLAY * RABAN LISTAE STEPLIB CNMCSSIR | RABAN CNM299I Extended: Searching for member CNMCSSIR DDNAME DATA SET NAME MEMBER DISP -------- --------------------------------------------- -------- -------- STEPLIB TME10.RABAN.V1R2.USERLNK SHR,KEEP TME10.V1R2.CNMLINK CNMCSSIR SHR,KEEP TME10.V1R2.SEKGMOD1 SHR,KEEP TME10.V1R2.SEKGLNK1 SHR,KEEP TME10.V1R2.SEZLLINK SHR,KEEP TME10.V1R2.SCEERUN SHR,KEEP DB2V510.SDSNLOAD SHR,KEEP ------------------------------------------------------------------------
112 An Introduction to Tivoli NetView for OS/390 V1R2
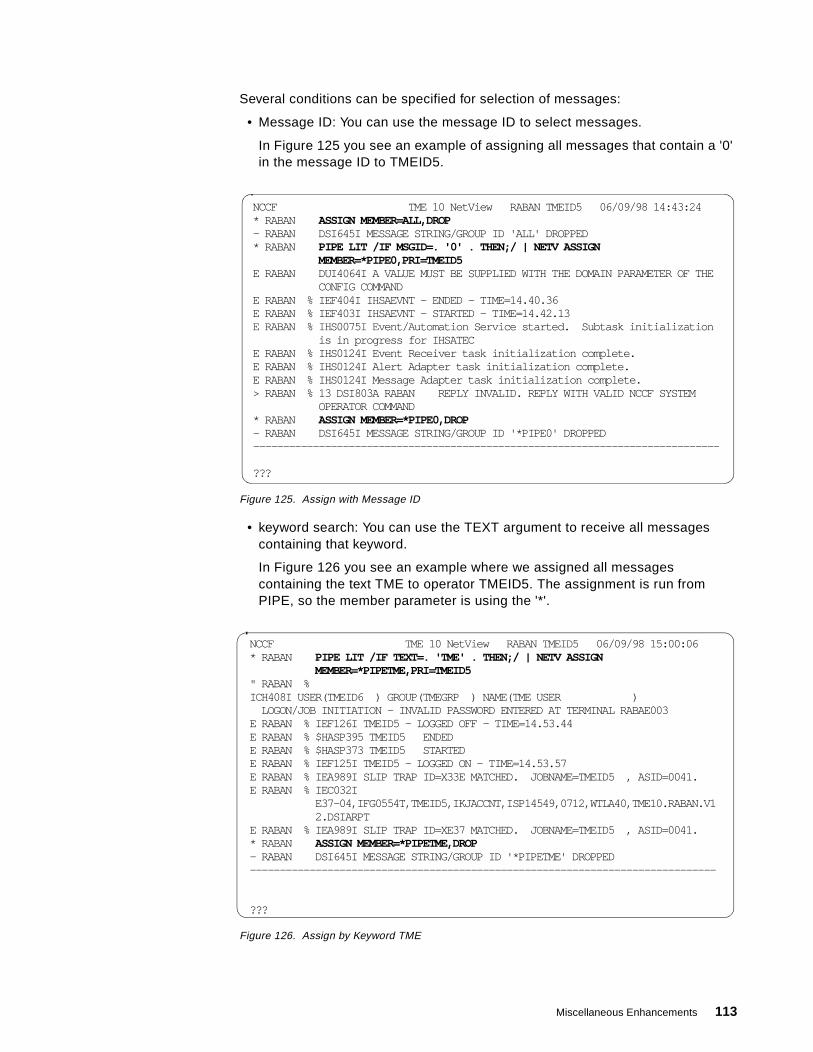
Several conditions can be specified for selection of messages:
• Message ID: You can use the message ID to select messages.
In Figure 125 you see an example of assigning all messages that contain a '0' in the message ID to TMEID5.
Figure 125. Assign with Message ID
• keyword search: You can use the TEXT argument to receive all messages containing that keyword.
In Figure 126 you see an example where we assigned all messages containing the text TME to operator TMEID5. The assignment is run from PIPE, so the member parameter is using the '*'.
Figure 126. Assign by Keyword TME
NCCF TME 10 NetView RABAN TMEID5 06/09/98 14:43:24 * RABAN ASSIGN MEMBER=ALL,DROP - RABAN DSI645I MESSAGE STRING/GROUP ID 'ALL' DROPPED * RABAN PIPE LIT /IF MSGID=. '0' . THEN;/ | NETV ASSIGN MEMBER=*PIPE0,PRI=TMEID5 E RABAN DUI4064I A VALUE MUST BE SUPPLIED WITH THE DOMAIN PARAMETER OF THE CONFIG COMMAND E RABAN % IEF404I IHSAEVNT - ENDED - TIME=14.40.36 E RABAN % IEF403I IHSAEVNT - STARTED - TIME=14.42.13 E RABAN % IHS0075I Event/Automation Service started. Subtask initialization is in progress for IHSATEC E RABAN % IHS0124I Event Receiver task initialization complete. E RABAN % IHS0124I Alert Adapter task initialization complete. E RABAN % IHS0124I Message Adapter task initialization complete. > RABAN % 13 DSI803A RABAN REPLY INVALID. REPLY WITH VALID NCCF SYSTEM OPERATOR COMMAND * RABAN ASSIGN MEMBER=*PIPE0,DROP - RABAN DSI645I MESSAGE STRING/GROUP ID '*PIPE0' DROPPED ------------------------------------------------------------------------------
???
NCCF TME 10 NetView RABAN TMEID5 06/09/98 15:00:06 * RABAN PIPE LIT /IF TEXT=. 'TME' . THEN;/ | NETV ASSIGN MEMBER=*PIPETME,PRI=TMEID5 " RABAN % ICH408I USER(TMEID6 ) GROUP(TMEGRP ) NAME(TME USER ) LOGON/JOB INITIATION - INVALID PASSWORD ENTERED AT TERMINAL RABAE003 E RABAN % IEF126I TMEID5 - LOGGED OFF - TIME=14.53.44 E RABAN % $HASP395 TMEID5 ENDED E RABAN % $HASP373 TMEID5 STARTED E RABAN % IEF125I TMEID5 - LOGGED ON - TIME=14.53.57 E RABAN % IEA989I SLIP TRAP ID=X33E MATCHED. JOBNAME=TMEID5 , ASID=0041. E RABAN % IEC032I E37-04,IFG0554T,TMEID5,IKJACCNT,ISP14549,0712,WTLA40,TME10.RABAN.V1 2.DSIARPT E RABAN % IEA989I SLIP TRAP ID=XE37 MATCHED. JOBNAME=TMEID5 , ASID=0041. * RABAN ASSIGN MEMBER=*PIPETME,DROP - RABAN DSI645I MESSAGE STRING/GROUP ID '*PIPETME' DROPPED ------------------------------------------------------------------------------
???
Miscellaneous Enhancements 113
• job name: A JOBNAME= condition can be used to filter messages to an operator who is interested in monitoring specific jobs, such as jobs related to an application. These jobs must follow some kind of naming convention.
In Figure 127 you see an example where we assigned all messages related to jobs with names starting with IHS, EKG, GMF and CNM to operator TMEID5. The source is stored in DSIPARM member NETVJOBS.
Figure 127. Assign by JOBNAME
8.11 DOM Enhancement
TME 10 NetView for OS/390 V1R2 provides assistance in determining any potential storage problem with Delete Operator Message using new CNMCSSIR functions.
There are four commands associated with this, namely:
• MVS %CNMCSSIR STATS: Shows the statistic of DOM messages.
• MVS %CNMCSSIR DIAGQUEUE: Starts storing queue information. This command should only be run for diagnosing problems by support personnel.
• MVS %CNMCSSIR NODIAGQUEUE: Stops the DIAGQUEUE command but does not flush out the collected diagnostic information.
• MVS %CNMCSSIR SHOWMSG: Shows messages collected by the DIAGQUEUE command.
Figure 128 shows the sample execution of these commands.
NCCF TME 10 NetView RABAN TMEID5 06/09/98 15:11:08 * RABAN PIPE < DSIPARM.NETVJOBS | CONSOLE | RABAN IF JOBNAME='IHS' . THEN; | RABAN IF JOBNAME='EKG' . THEN; | RABAN IF JOBNAME='GMF' . THEN; | RABAN IF JOBNAME='CNM' . THEN; * RABAN ASSIGN MEMBER=NETVJOBS,PRI=TMEID5 - RABAN DSI633I ASSIGN COMMAND SUCCESSFULLY COMPLETED E RABAN % IRR010I USERID STUSER IS ASSIGNED TO THIS JOB. E RABAN % $HASP373 CNMEUNIX STARTED - INIT C - CLASS A - SYS SA11 E RABAN % IEF403I CNMEUNIX - STARTED - TIME=15.09.07 E RABAN % - --TIMINGS (MINS.)-- ----PAGING COUNTS--- E RABAN % -JOBNAME STEPNAME PROCSTEP RC EXCP CPU SRB CLOCK SERV PG PAGE SWAP VIO SWAPS E RABAN % -CNMEUNIX 00 55 .00 .00 .0 2743 1 0 0 0 0 E RABAN DUI4064I A VALUE MUST BE SUPPLIED WITH THE DOMAIN PARAMETER OF THE CONFIG COMMAND * RABAN ASSIGN MEMBER=NETVJOBS,DROP - RABAN DSI645I MESSAGE STRING/GROUP ID 'NETVJOBS' DROPPED ------------------------------------------------------------------------------ ???
114 An Introduction to Tivoli NetView for OS/390 V1R2

Figure 128. Sample %CNMCSSIR Commands
8.12 CMIP Filtering
The CMIP Services and VTAM Topology Agent was introduced in VTAM V4R3. It provides support to report SNA local topology, SNA network topology and LUs. NetView's SNA Topology Manager which was introduced in NetView V3R1 receives information from VTAM's topology agent. The communication between SNATM and VTAM's agent is CMIP. When the information is received by SNATM, topology is displayed on NGMF and NetView Management Console.
When SNATM requests SNA local topology from VTAM the local topology agent builds and sends the information for all local SNA resources:
• Major nodes XCA and NCP
• All lines and PUs defined under these reported major nodes
NetView creates objects in RODM for each reported resource. Graphical monitoring of these resources can be performed from NMGF or NetView Management Console. After the initial topology information has been received, status changes will be reported by the VTAM topology agent and these status changes will generate the required status changes in RODM.
Because user's are sometimes interested in only a subset of the resources in a local topology, they may find unwanted resources in a local topology report. This can lead to unnecessary system resource consumption, perhaps unnecessary network traffic and unwanted resources in NGMF and NetView Management Console views.
VTAM V4R4.1 is shipped in OS/390 R5 and includes the capability to select which resources should be reported or not reported in a local topology report. This can be specified on the major node level and it also allows you to override major node specifications on the minor node level. This function is dynamic and you can use
NCCF TME 10 NetView RABAN TMEID5 06/10/98 14:34:02 * RABAN MVS %CNMCSSIR STATS E RABAN SSI MSG=0000014E CMD=0000000E DOM=00000035 RTD=00000001 QUE=0000000 * RABAN MVS %CNMCSSIR DIAGQUEUE
...
* RABAN MVS %CNMCSSIR NODIAGQUEUE * RABAN MVS %CNMCSSIR SHOWMSG E RABAN RETAINQ B095413178493604RABAN 0019 SA11 0000AAB1 JES2 E RABAN RETAINQ B095693BD43EF004RABAN 0043 SA11 0000AADD NETVN11 STC01459 E RABAN RETAINQ B095693BD43EF004 17 DSI803A RABAN REPLY INVALID. REPLY WITH VALID NCCF SYSTEM OPERATOR COMMAND E RABAN RETAINQ B09569E693A86E06RABAN 0046 SA11 0000AB3E DB2MSTR STC01463 E RABAN RETAINQ B09569E693A86E06 DSNT405E - DSNTLIDE DISPATCH PRIORITIES NOT IN SYNC: IRLM : 008B COMPARED TO DB2 : 008B E RABAN RETAINQ END ------------------------------------------------------------------------------
???
Miscellaneous Enhancements 115

VTAM commands to change your report specifications. You can also use new commands to display current reporting status.
You use the new VTAMTOPO keyword to specify your reporting options. The VTAMTOPO keyword has the following parameters to allow major nodes to force reporting:
• INCLUDE
INCLUDE will force reporting on major node and all LINEs and PUs.
• IGNORE
IGNORE will omit major node and all LINEs and PUs.
The following values can be used to allow major nodes to establish defaults for their eligible logical minor nodes. These values may be overridden at a minor node or GROUP level.
• REPORT
Report minor nodes.
• NOREPORT
Do not report (logical/switched) minor nodes.
• NOSWPUS
Do not report logical PUs, but report logical LINEs.
• NOLLINES
Do not report NTRI logical LINEs, but report logical PUs. This is the default value.
8.12.1 PrerequisitesThe prerequisites for this support is as we said earlier VTAM V4R4.1 which is shipped with OS/390 R5. The currently supported levels of SSP will accept the VTAMTOPO if coded with a VTM prefix. The correct coding of this parameter would be for example VTM.VTAMTOPO=NOLLINES. The VTM prefix is currently undocumented. At the time of writing this redbook there were plans to create documentation APARs describing the VTM prefix.
8.12.2 Start OptionsThe LLINES and NOLLINES values are no longer supported on the OSITOPO start option. ALLCDRSC and ILUCDRSC are still supported.
8.12.3 Migration IssuesThe following is a summary of the migration issues related to CMIP filtering:
• If VTAMTOPO is not added to any resource definition statement, and if you have not coded OSITOPO=LLINES, resources are reported as they would have been prior to this release.
• If you have coded OSITOPO=LLINES as a start option, this will now be rejected, and you should code VTAMTOPO=REPORT on all appropriate NTRI GROUP statements or NCP/XCA major nodes to get the same effect.
• OSITOPO=NOLLINES/LLINES is no longer valid and will generate an error message if coded.
116 An Introduction to Tivoli NetView for OS/390 V1R2

• VTAMTOPO must be added to selected resource definitions to cause permanent changes in resource reporting status.
8.13 AON and MultiSystem Manager Integration
In NetView V1R1, AON and MultiSystem Manager were integrated into the NetView product. In TME 10 NetView for OS/390 V1R2 there are a number of examples of how this integration have been enhanced:
• DBAUTO, DBINIT and DBMAINT were integrated.
• STARTEZL, STOPEZL, STARTCNM and STOPCNM were integrated.
• Message and command help for MultiSystem Manager and AON were integrated.
• Message csects for MultiSystem Manager and AON were internalized, (from old DSIFLCxx, DSIEZLxx, DSIFKVxx, DSIFKWxx and DSIFKXxx members) improving performance and installation. AON and MultiSystem Manager prefixes are now supported by the MESSAGE command.
Miscellaneous Enhancements 117

118 An Introduction to Tivoli NetView for OS/390 V1R2

Part 2. Graphical Monitoring of Network Resources
© Copyright IBM Corp. 1998 119

120 An Introduction to Tivoli NetView for OS/390 V1R2

Chapter 9. NetView Management Console
This chapter discusses the installation and usage of NetView Management Console in TME 10 NetView for OS/390 V1R2.
NetView Management Console is a new TME 10 NetView for OS/390 interface that is developed using the Java programming language. NetView Management Console is a platform-independent tool allowing graphical monitoring of your networking resources. In effect you have a choice to select the graphical user interface you want to use since NGMF is also available in TME 10 NetView for OS/390 V1R2. Figure 129 shows the components of NetView Management Console and its interaction with TME 10 NetView for OS/390.
Figure 129. NetView Management Console Structure
NetView Management Console consists of:
• TME 10 NetView for OS/390 runs on the mainframe consisting of:
– NetView/390 CNMTAMEL, which provides the support for NETCONV sessions
– GMFHS, which creates views of the objects in RODM on behalf of NetView Management Console
– RODM, which has the information about the objects– Topology managers, one for each component of MSM and for SNA
Topology Manager, which manages the status of each object and other information
© Copyright IBM Corp. 1998 121

The customization of these components is not discussed in this chapter.
• NetView Management Console Server runs on NT, OS/2 or AIX. The server communicates to TME 10 NetView for OS/390 using either the SNA APPC or TCP/IP protocols. This server actually consists of two processes: the topology communication server and the topology server that provides display services to clients.
• NetView Management Console (the clients), which runs on a Java Virtual Machine. The NetView Management Console client runs on OS/2, Windows NT, Windows 95, AIX, Solaris, and HP-UX.
9.1 Installation and Operation
This section covers the installation and some basic customization to get the NetView Management Console operational in our environment.
9.1.1 NetView Management Console InstallationNetView Management Console installation on an NT workstation consists of the following general steps:
1. Installing the server code2. Installing the client code3. Installing the MultiSystem Manager Command Set4. Preparing the operating system5. Preparing the network
The following software is installed in our Windows NT machine and required by NetView Management Console:
• NetView Management Console Server:
– Windows NT V4 with FixPack 3– IBM eNetwork Personal Communication V4.2
• NetView Management Console Client:
– Java Development Kit (JDK) V1.1.6
JDK 1.1.6 provides a JIT compiler that speeds up the NetView Management Console processing.
Installation is performed from the CD-ROM. The source directory is drv:\W32\BIN\ENU for Windows NT.
9.1.1.1 Installing Server CodeThe executable on the TME 10 NetView for OS/390 V1R2 CD for installing NetView Management Console Server code is DUINMCSW. The following are the steps we used to install the server code on a Windows NT system:
1. Run the DUINMCSW from the command line or double-click on the icon.
2. Click Yes on the confirmation windows to get the Product Information window as shown in Figure 130 and click Next .
122 An Introduction to Tivoli NetView for OS/390 V1R2

Figure 130. NetView Management Console Server Product Information Window
3. You get to the window as shown in Figure 131. Choose the necessary directory for the temporary installation files and click on Next .
Figure 131. NetView Management Console Server Temporary Install Directory Window
4. After the files are uncompressed to the temporary install directory, the program automatically runs the InstallShields installation process (see Figure 132).
NetView Management Console 123

Figure 132. NetView Management Console Server InstallShield Window
5. Read the readme file for important information on installing this product (see Figure 133).
Figure 133. NetView Management Console Server ReadMe Window
6. Choose the destination directory as in Figure 134. We strongly recommend that you keep the directory structure, and possibly only change the drive to install. The directory structure is related to other Tivoli products directory structure.
124 An Introduction to Tivoli NetView for OS/390 V1R2

Figure 134. NetView Management Console Server Installation Directory Window
7. Select the installation type you want as shown in Figure 135. Typical installation is what we used. If you don't want to install the help files, you can select the Custom install option.
Figure 135. NetView Management Console Server Install Types Window
8. You will get an installation in progress window as shown in Figure 136.
NetView Management Console 125

Figure 136. NetView Management Console Server Installation Progress Window
9. After the installation is finished, the install program checks for Tivoli's setup_env.cmd files in the directory %windir%\SYSTEM32\DRIVERS\ETC\TIVOLI\SETUP_ENV.CMD. If the file does not exist, it creates SETUP_ENV.CMD in that directory and tells you about it. This file does not exist unless you have the Tivoli Framework installed on this machine.
Figure 137. NetView Management Console Server Setup_env.cmd Information Window
This file must be run to set up the Tivoli environment variables that are used when executing most of Tivoli's programs. One of the most used environment variables is %BINDIR%.
The install process also installs the following in the same directory:
setup_env.sh
You get the following pop-up window informing you that the setup_env.sh file has been installed.
126 An Introduction to Tivoli NetView for OS/390 V1R2

Figure 138. NetView Management Console Server Setup_env.sh Information Window
9.1.1.2 Installing The Client CodeThe executable on the TME 10 NetView for OS/390 V1R2 CD for installing NetView Management Console Client code is DUINMCCW. The following are the steps we used to install the client code on a Windows NT system:
1. Run the DUINMCCW from the command line or double-click on the icon.
2. Click Yes on the confirmation windows to get the Product Information window as shown in Figure 139. Click Next .
Figure 139. NetView Management Console Product Information Window
3. You get to the window as shown in Figure 140. Choose the necessary directory for the temporary installation files and click on Next .
NetView Management Console 127
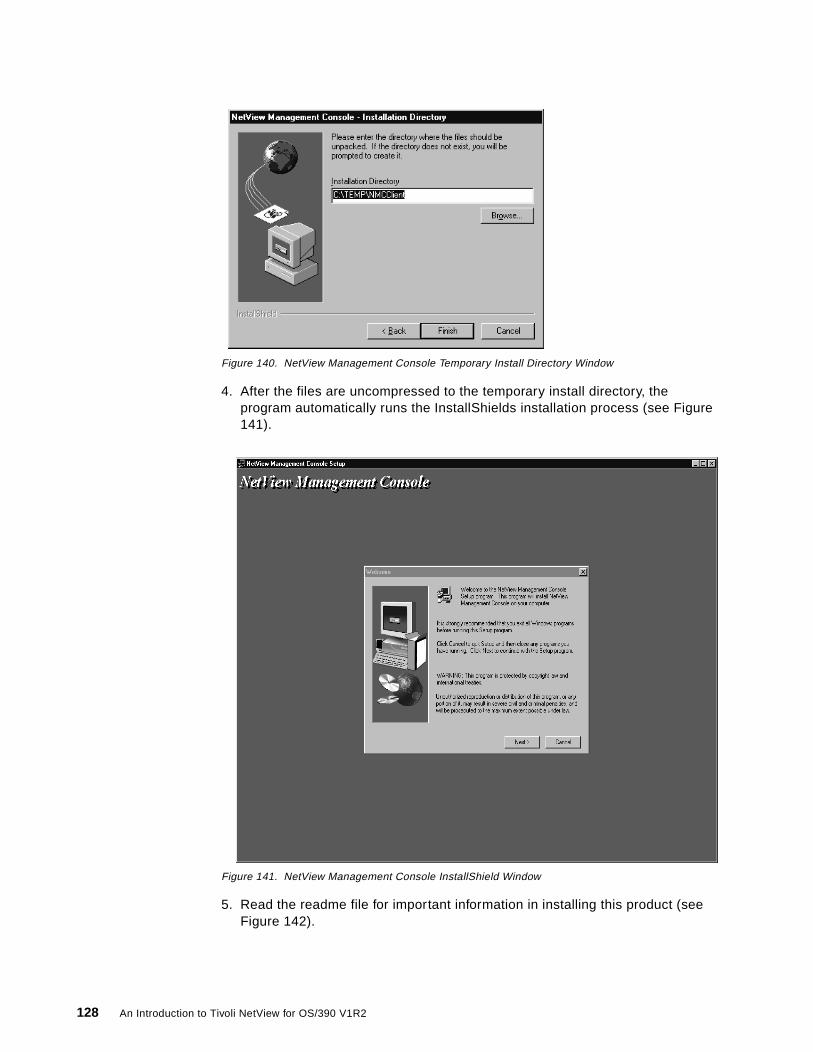
Figure 140. NetView Management Console Temporary Install Directory Window
4. After the files are uncompressed to the temporary install directory, the program automatically runs the InstallShields installation process (see Figure 141).
Figure 141. NetView Management Console InstallShield Window
5. Read the readme file for important information in installing this product (see Figure 142).
128 An Introduction to Tivoli NetView for OS/390 V1R2
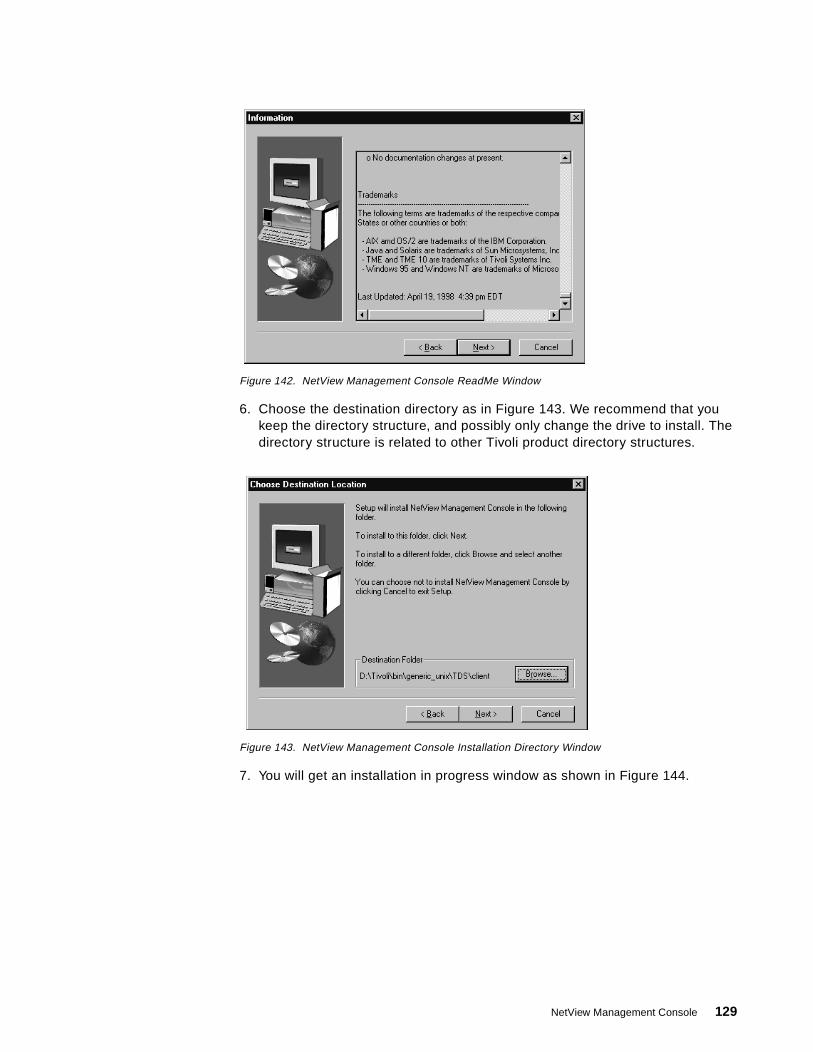
Figure 142. NetView Management Console ReadMe Window
6. Choose the destination directory as in Figure 143. We recommend that you keep the directory structure, and possibly only change the drive to install. The directory structure is related to other Tivoli product directory structures.
Figure 143. NetView Management Console Installation Directory Window
7. You will get an installation in progress window as shown in Figure 144.
NetView Management Console 129
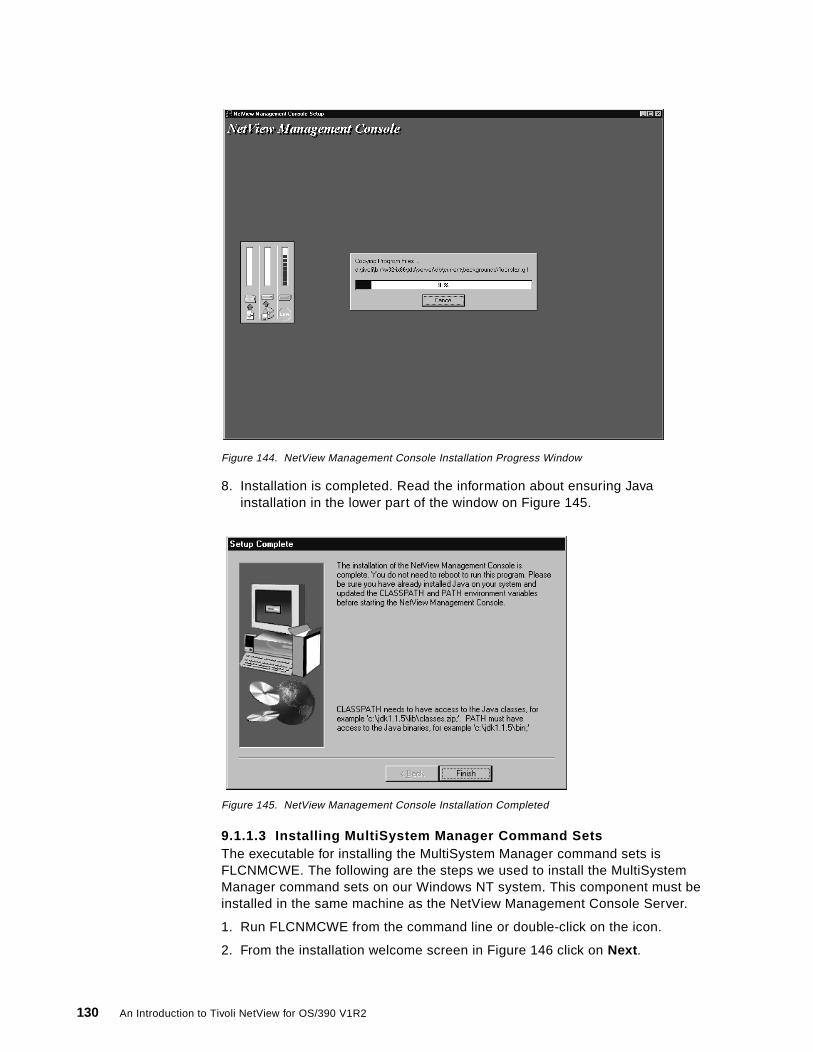
Figure 144. NetView Management Console Installation Progress Window
8. Installation is completed. Read the information about ensuring Java installation in the lower part of the window on Figure 145.
Figure 145. NetView Management Console Installation Completed
9.1.1.3 Installing MultiSystem Manager Command SetsThe executable for installing the MultiSystem Manager command sets is FLCNMCWE. The following are the steps we used to install the MultiSystem Manager command sets on our Windows NT system. This component must be installed in the same machine as the NetView Management Console Server.
1. Run FLCNMCWE from the command line or double-click on the icon.
2. From the installation welcome screen in Figure 146 click on Next .
130 An Introduction to Tivoli NetView for OS/390 V1R2

Figure 146. MultiSystem Manager Command Sets Installation
3. Select the directory where you want to put the temporary installation files (see Figure 147).
Figure 147. MultiSystem Manager Command Set - Temporary Install Files Directory
4. From the initial InstallShield window (Figure 148), click on Next .
NetView Management Console 131

Figure 148. MultiSystem Manager Command Set - InstallShield Window
5. Read the readme files in Figure 149.
Figure 149. MultiSystem Manager Command Set - Readme
6. Set the correct installation directory of the NetView Management Console Server as in Figure 150.
132 An Introduction to Tivoli NetView for OS/390 V1R2
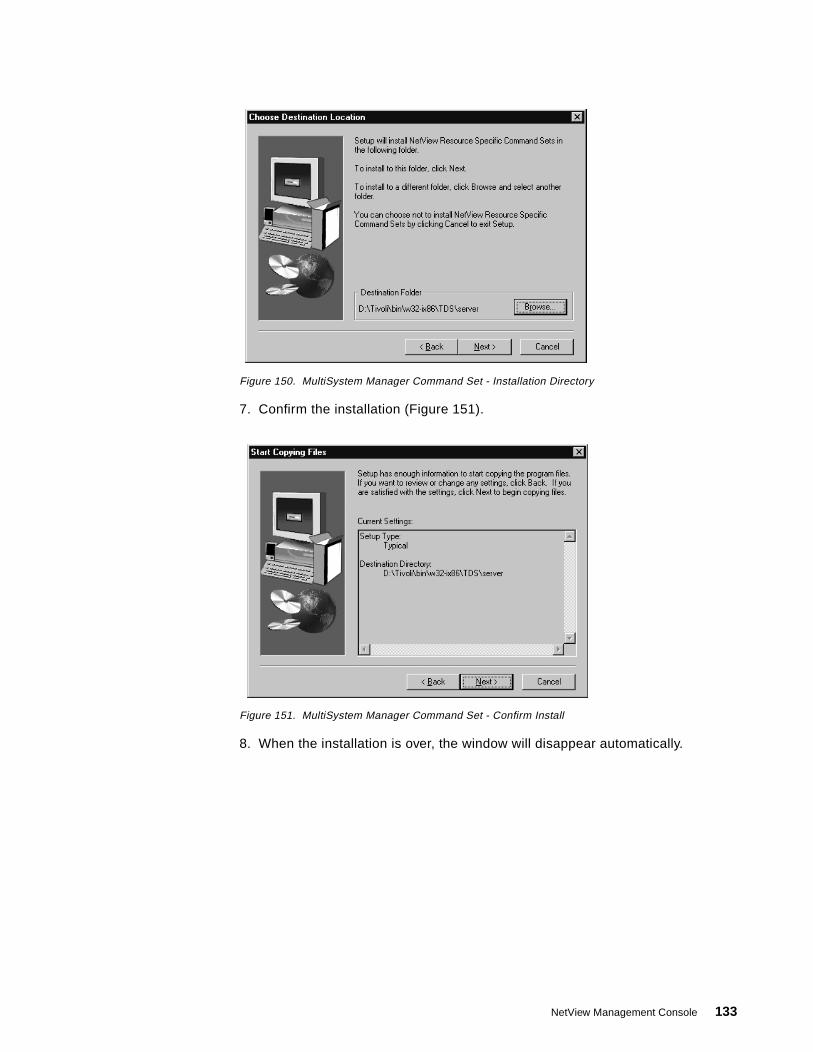
Figure 150. MultiSystem Manager Command Set - Installation Directory
7. Confirm the installation (Figure 151).
Figure 151. MultiSystem Manager Command Set - Confirm Install
8. When the installation is over, the window will disappear automatically.
NetView Management Console 133
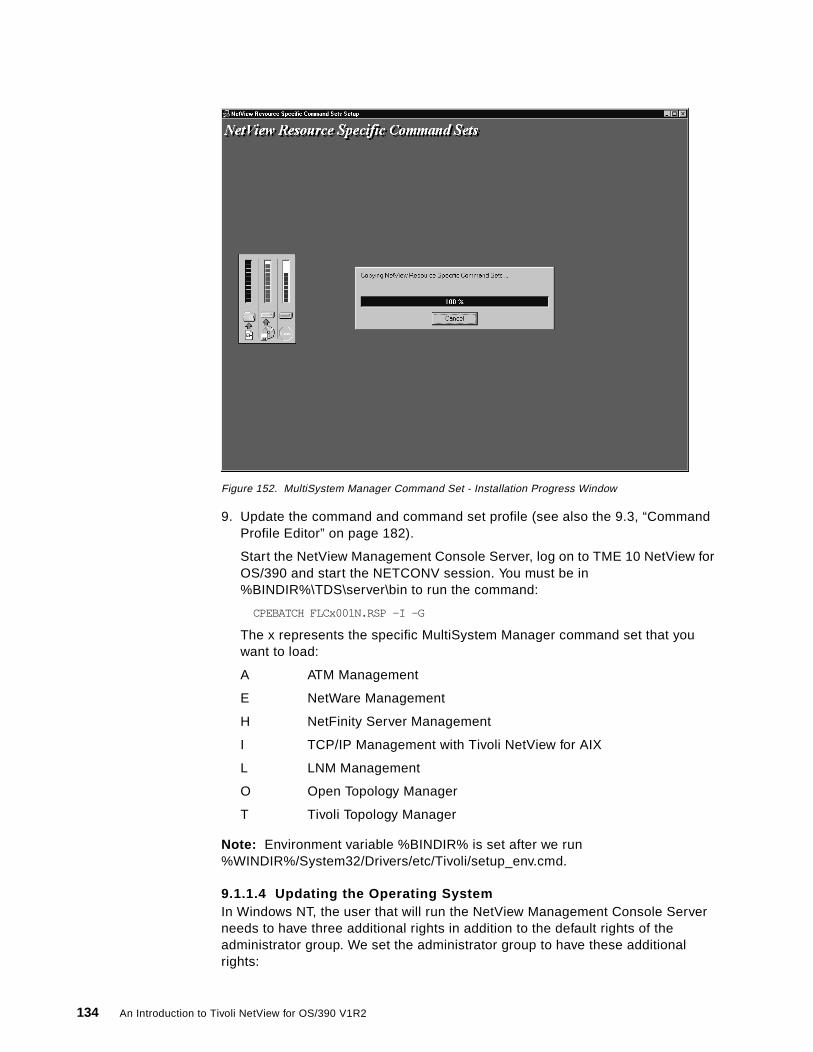
Figure 152. MultiSystem Manager Command Set - Installation Progress Window
9. Update the command and command set profile (see also the 9.3, “Command Profile Editor” on page 182).
Start the NetView Management Console Server, log on to TME 10 NetView for OS/390 and start the NETCONV session. You must be in %BINDIR%\TDS\server\bin to run the command:
CPEBATCH FLCx001N.RSP -I -G
The x represents the specific MultiSystem Manager command set that you want to load:
A ATM Management
E NetWare Management
H NetFinity Server Management
I TCP/IP Management with Tivoli NetView for AIX
L LNM Management
O Open Topology Manager
T Tivoli Topology Manager
Note: Environment variable %BINDIR% is set after we run %WINDIR%/System32/Drivers/etc/Tivoli/setup_env.cmd.
9.1.1.4 Updating the Operating SystemIn Windows NT, the user that will run the NetView Management Console Server needs to have three additional rights in addition to the default rights of the administrator group. We set the administrator group to have these additional rights:
134 An Introduction to Tivoli NetView for OS/390 V1R2

• Act as part of the operating system • Replace process level token • Log on as a service
The following steps are performed to add those rights:
1. Run the User Manager program by selecting Start - Administrative Tools (Common) - User Manager (see Figure 153).
Figure 153. User Manager Window
2. Select Policies and then User Rights and the window shown in Figure 154 will appear.
Figure 154. Changing User Rights in NT
3. Select the Show Advanced User Rights check box 1 and select the Acts as Part of the Operating System right from the drop-down list (2) and select the Add button.
NetView Management Console 135

4. In the User Right window (see Figure 155) select Administrators from the top drop-down list, select the Administrators group and the Add button to add the groups to the Add Names field. Click the OK button to save it.
Figure 155. Adding User Rights for Administrators
5. Repeat the last two steps for the Replace Process Level Token rights.
6. Repeat the last two steps for the Log on as a Service rights if you want to run the NetView Management Console Server processes as NT services.
7. If you want to run the NetView Management Console Server as NT services, you can issue the following command from the directory %BINDIR%\TDS\Server\bin:
service WTR05228/Administrator password
WTR05228 is the NT domain or computer name and password is the administrator's password.
9.1.1.5 Modifying the Communication SoftwareThere are two communication options to use for the NetView Management Console Server. You can either choose TCP/IP or SNA APPC communication.
If you choose TCP/IP and you can ping the OS/390 from the NetView Management Console Server, then you only need to verify that TCP/IP is enabled in member DUIFPMEM:
Figure 156. DSIPARM Member DUIFPMEM
If you choose SNA APPC, these steps must be performed:
1. Add or modify the VTAM major node for your NetView Management Console Server.
USETCPIP = YES TCPANAME = T11ATCP SOCKETS = 50 PORT = 4020
136 An Introduction to Tivoli NetView for OS/390 V1R2

This VTAM major node needs to define a PU T2.1 and a CPNAME. The definition that we use is shown in Figure 157.
Figure 157. VTAM Definition
2. Define the APPC attribute using IBM Personal Communication for NT.
Defining APPC for IBM Personal Communication for NT, we use the SNA Node Configuration utility (see Figure 158) and perform the following steps:
Figure 158. SNA Node Configuration
a. Create a new node definition (see Figure 159) where you need to:
• Put the NETID.CPNAME (from VTAM definition) in the Fully qualified CP name field.
• Put the CPNAME in the CP alias field.
********************************************************************** * * * VTAM SWITCHED MAJOR NODE * * * ********************************************************************** VBUILD MAXGRP=25, X MAXNO=25, X TYPE=SWNET RABUDI PU ADDR=01, X CPNAME=WTR05228, X ISTATUS=ACTIVE, X DLOGMOD=M2SDLCQ, X MODETAB=AMODETAB, X MAXOUT=7, X USSTAB=US327X * RABUDILU LU LOCADDR=0 * RABUDI1 LU LOCADDR=2 RABUDI2 LU LOCADDR=3
NetView Management Console 137

• Uncheck the Registration of LU resources check boxes in the Advanced tab.
Figure 159. Define SNA Node
b. Create a new device definition with DLC=LAN (see Figure 160). Uncheck the Use first available LAN Adapter check box.
Figure 160. Define SNA Device
c. Create a new connection definition with DLC=LAN (see Figure 161).
• Put the LAN address destination in the Destination address field. • Select the Solicit SSCP sessions check box and put the PU name in
the PU name field in the Advanced tab. • If you had put the IDNUM and IDBLK parameter in the VTAM definition,
then you need to put them in the Local Node ID fields (Block ID and Physical Unit ID).
138 An Introduction to Tivoli NetView for OS/390 V1R2
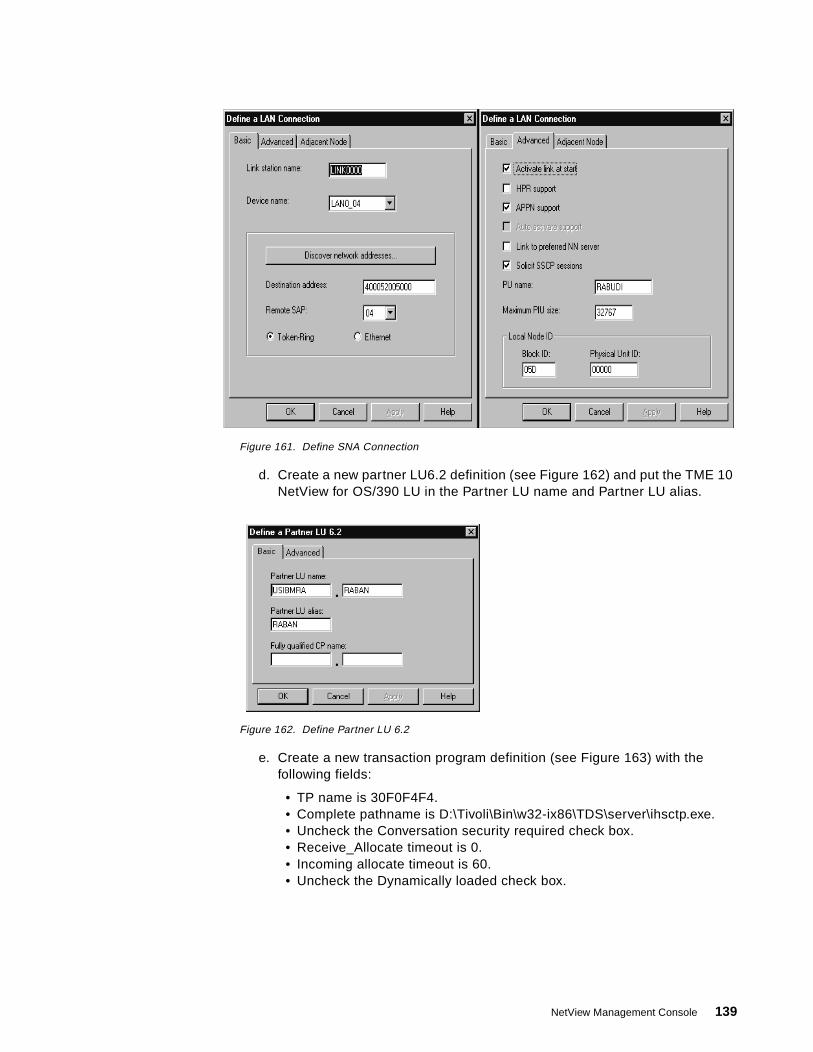
Figure 161. Define SNA Connection
d. Create a new partner LU6.2 definition (see Figure 162) and put the TME 10 NetView for OS/390 LU in the Partner LU name and Partner LU alias.
Figure 162. Define Partner LU 6.2
e. Create a new transaction program definition (see Figure 163) with the following fields:
• TP name is 30F0F4F4. • Complete pathname is D:\Tivoli\Bin\w32-ix86\TDS\server\ihsctp.exe. • Uncheck the Conversation security required check box. • Receive_Allocate timeout is 0. • Incoming allocate timeout is 60. • Uncheck the Dynamically loaded check box.
NetView Management Console 139

Figure 163. Define Transaction Program
f. Create a new LU 6.2 local LU, which is optional if you have additional LUs (see Figure 164), and put the LU name with LOCADDR=0 into the Local LU name and Local LU alias fields.
Figure 164. Define Local LU 6.2
g. Save the definitions using the menus File and Save and enter the configuration name you want.
If you need 3270 sessions, you can choose Start/Configure Session and use the previously created SNA node configuration.
9.1.2 Operating the NetView Management Console ServerThe NetView Management Console Server operation consists of starting and stopping it.
9.1.2.1 Starting the NetView Management Console ServerThe following steps should be performed to start the NetView Management Console Server:
140 An Introduction to Tivoli NetView for OS/390 V1R2

1. If you are using SNA APPC, then you must start the SNA subsystem. The SNA subsystem can be started using the CSSTART.EXE program or by opening a 3270 SNA session.
2. Start the NetView Management Console server using the NetView Management Console Server icon
Figure 165 and Figure 166 show the content of NetView Management Console Topology Server and Topology Communication Server windows.
Figure 165. Topology Server Window
Figure 166. Topology Communication Server Window
To start NetView Management Console Server as an NT service use the command %BINDIR%\TDS\server\bin\ihsxsrv start.
3. Run NETCONV from NetView.
To start the NETCONV session to NetView Management Console Server with CP name WTR05228 using an SNA APPC connection, use:
NETCONV ACTION=START,LU=WTR05228DUI101I NETCONV COMMAND PROCESSED SUCCESSFULLY.COMMUNICATION TO LU WTR05228 STARTED.
You can also create a shortcut to this program in your Startup folder.
Tips
---------------------------------------------------------------------Tivoli NetView Management Console 2.1.0Topology Server5697-B82 (C) Copyright Tivoli Systems, an IBM Company 1997, 1998.All Rights Reserved.US Government Users Restricted Rights - Use, duplication ordisclosure restricted by GSA ADP Schedule Contract with IBM Corp.Portions copyright (c) 1992 by Free Software Foundation, Inc. All rightsreserved.---------------------------------------------------------------------IHS2150I: Topology server 2.1.0 starting.IHS2200I: Topology server 2.1.0 is initialized.IHS0249I: Type 'quit' to end this process.
....-9.24.106.34---------------------------------------------------------------------Tivoli NetView Management Console 2.1.0Topology Communication Server5697-B82 (C) Copyright Tivoli Systems, an IBM Company 1997, 1998.All Rights Reserved.US Government Users Restricted Rights - Use, duplication ordisclosure restricted by GSA ADP Schedule Contract with IBM Corp.Portions copyright (c) 1992 by Free Software Foundation, Inc. All rightsreserved.---------------------------------------------------------------------IHS0248I: Topology communications server 2.1.0 is initialized.IHS0249I: Type 'quit' to end this process.
NetView Management Console 141

To start the NETCONV session to NetView Management Console Server with TCP/IP host WTR05228 (or the dotted decimal form), use:
NETCONV ACTION=START,IP=9.24.106.34DUI401I NETCONV COMMAND PROCESSED SUCCESSFULLY.COMMUNICATION TO IP 9.24.106.34 (9.24.106.34) STARTED.
The NetView Management Console server is then ready to receive requests from NetView Management Console clients.
9.1.2.2 Stopping the NetView Management Console ServerWhile stopping the NetView Management Console server, we must ensure that there are no more NetView Management Console clients that still access the server. These NetView Management Console clients may terminate abnormally.
The steps to stop NetView Management Console Server are:
1. Stop the NETCONV communication from TME 10 NetView for OS/390. Only the operator that issues NETCONV ACTION=START can terminate the communication. Use the following command for SNA communication:
NETCONV LU=WTR05228, ACTION=STOPDUI117I NETCONV COMMAND PROCESSED SUCCESSFULLY.COMMUNICATION TO LU WTR05228 IS STOPPED.
The following command is for TCP/IP communication:
NETCONV IP=9.24.106.34, ACTION=STOPDUI417I NETCONV COMMAND PROCESSED SUCCESSFULLY.COMMUNICATION TO IP 9.24.106.34 (9.24.106.34) IS STOPPED.
2. Stop the topology communications server by typing quit in its window.
Stop the topology server by typing quit in its window.
To stop the topology communication server and topology server that are started as a service, you need to use:
%BINDIR%\TDS\server\bin\ihsxsrv stop
9.2 Understanding NetView Management Console
A subset of the functions of NetView Management Console are described in this section to give you an overview of the this new graphical user interface and its functions. The basic function is of course to allow you to manage your networking resources just like with NGMF. The objective of this section is to cover some new functions related to NetView Management Console and not the actual management of particular type of networking resource.
You start the NetView Management Console client by clicking on the shortcut created on your desktop during the installation.
You can run NETCONV using EXCMD from an AUTOTASK. This will enable your NetView Management Console server to run unattended without requiring a signed-on NetView operator.
Tips
142 An Introduction to Tivoli NetView for OS/390 V1R2
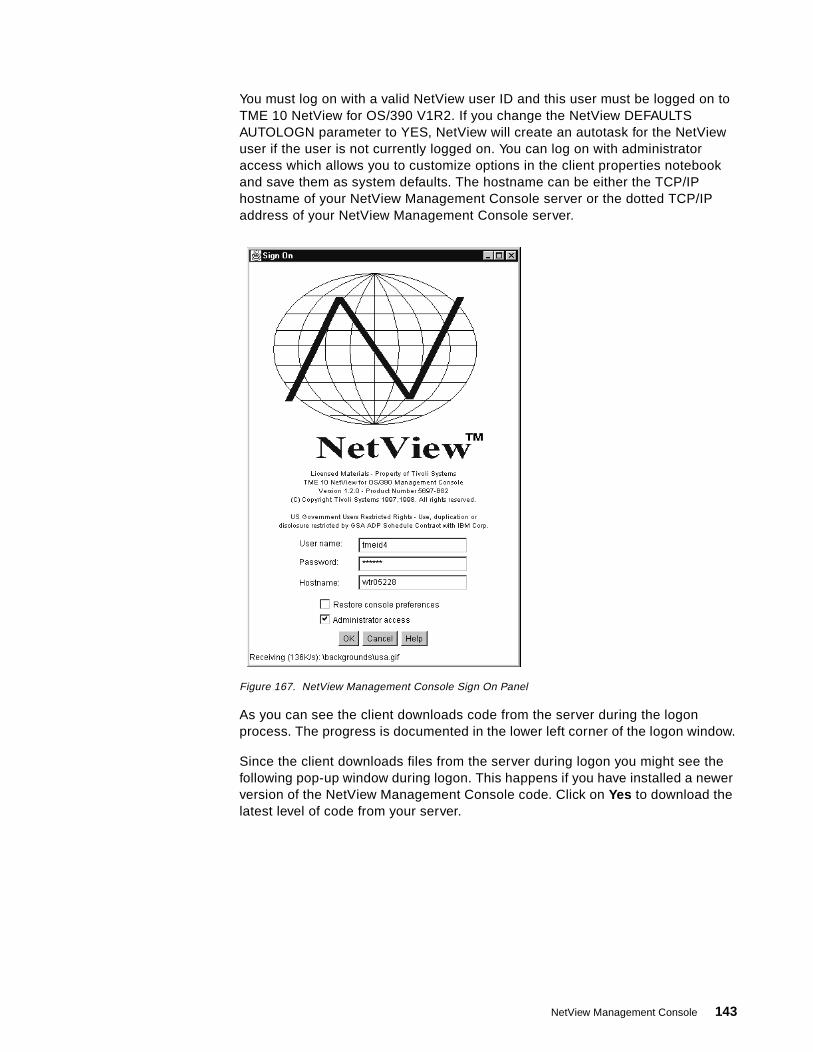
You must log on with a valid NetView user ID and this user must be logged on to TME 10 NetView for OS/390 V1R2. If you change the NetView DEFAULTS AUTOLOGN parameter to YES, NetView will create an autotask for the NetView user if the user is not currently logged on. You can log on with administrator access which allows you to customize options in the client properties notebook and save them as system defaults. The hostname can be either the TCP/IP hostname of your NetView Management Console server or the dotted TCP/IP address of your NetView Management Console server.
Figure 167. NetView Management Console Sign On Panel
As you can see the client downloads code from the server during the logon process. The progress is documented in the lower left corner of the logon window.
Since the client downloads files from the server during logon you might see the following pop-up window during logon. This happens if you have installed a newer version of the NetView Management Console code. Click on Yes to download the latest level of code from your server.
NetView Management Console 143

Figure 168. NetView Management Console Downloading a New Version
The Sign On panel will be displayed again if you downloaded a new version of the NetView Management Console client from the server.
9.2.1 NetView Management Console Main MenuBelow is the Main window after you log on to NetView Management Console. The NetView Management Console panel has multiple areas including:
• The main menu and icons at the top of window
• The Business tree with the available views on the left
• The Workspace, which currently contains the SNA_Backbone view
• The view bar at the bottom of the screen
The view bar currently displays the icon of the current view shown in the workspace.
You also find a push button called Server. If you click on it, you will see administrative information about this session:
• The server TCP/IP hostname.
• The NetView/390 user ID.
• We logged on with administrator access.
• Date and time when we logged on.
• IP addresses for the server and client.
• Life Cycle is Control.
In NetView Management Console, Control is the only available life cycle option. In Global Enterprise Manager you have additional life cycle options.
144 An Introduction to Tivoli NetView for OS/390 V1R2

Figure 169. NetView Management Console Main Menu with Business Tree
In the Business tree area the views are shown as a directory tree.
• The first category of views in the tree is Business Systems.
The Systems Management Business System represent the AMS instrumented components in NetView Management Console. AMS instrumentation is provided with TME 10 NetView for OS/390 V1R2. We discuss it later in this chapter. It provides you with the capability to monitor the status of resources such as RODM, SNATM and MSM managers. You are also able to issue commands to instrumented resources from the NetView Management Console.
• The second tree is named Networking and views in this directory represent your NetView and RODM environment. In this tree you have an Exception view tree and the View tree. The content of the networking tree is of course dependent of what you loaded into RODM.
You can expand the tree by click on the + sign beside any node in the tree or collapse it by the - sign. Also, the tree list is dynamically updated when you open more detail views or close views.
NetView Management Console 145

9.2.2 NetView Management Console Window CustomizationYou can easily customize your NetView Management Console client to fit your needs. These easy-to-use customization options are available in the main menu under the Options selection.
Figure 170. NetView Management Console View Bar and Log
As you can see we selected to show all the available options to show the log and the view filter bar in addition to the options shown in Figure 169.
Command responses will be returned in the log window placed just above the view bar. The view filter bar is located just below the current view in the workspace area. It tells you the number of resources in the current view in each status. For example, you can see that two resources in this view are in a satisfactory state. The view filter bar is used to filter resources from the current view. You just click on the push button representing the status you want to filter from the current view.
The Tear Away options allow you to tear away certain portions of your NetView Management Console client. It means that the torn away portion will be a separate window allowing flexibility in customizing your desktop to your needs. The windows you can tear away are:
• Business tree
• View bar
146 An Introduction to Tivoli NetView for OS/390 V1R2

• Workspace
• Log
Let's look at an example where we tear away the Business tree and the log. As you can see in Figure 171 we decided to put the Business tree to the right of your desktop and have the log in the upper left corner of the screen.
Each window can be separately sized and placed anywhere you want it on your desktop. You can select the Windows option in the menu bar to navigate between windows.
Figure 171. NetView Management Console Tear Away Business Tree and Log
In the following example no areas of the NetView Management Console client are torn away. This shows that you can size the following areas of your NetView Management Console main menu:
• Business Tree
• View bar
• Workspace
• Log
We sized the view bar as you can see in Figure 172. The icons representing open views are changed automatically and during the re-sizing of the menu bar the contents of each view will appear.
NetView Management Console 147

Figure 172. NetView Management Console Re-sizing the View Bar
You must save your changes to be able to restore your console preferences next time you log on. You save your changes by using the File option in the menu bar. You have two options: either saving the changes now or on exit.
To restore your preferences next time you log on you must select the Restore console preferences check box on the logon window shown in Figure 167.
148 An Introduction to Tivoli NetView for OS/390 V1R2

9.2.3 Managing ViewsIn NetView Management Console managing the views is different from NGMF. The Business tree and the view bar are used to manage open views. The Business tree will be dynamically updated with each new view. This makes it very easy to see what views you currently have open. Each time you open a more detailed view an icon is added to the view bar. As you can see in Figure 173 we have multiple views in the view bar. The icon representing the view currently displayed in the workspace has the solid border around it.
You can click on any of the icons in the view bar and that view will automatically become the current view in the workspace. The directory tree in Figure 173 shows that we have NetWare and SNA views open. The NetWare views are of course part of the MultiSystem Manager views and the SNA views are found under the SNA_Backbone_View.
Figure 173. NetView Management Console Business Tree Window
In Figure 174 we have four views open and the current view is SNA_Backbone_View. In the view bar you can see the MultiSystem Manager view and the TME_10_NetWorks view. When status changes occur they are shown as a dotted border around the the icon in the view bar. Since SNA_Backbone_View is the current view in the workspace, this icon has the solid border around it.
NetView Management Console 149

The status line of the NetView Management Console client tells you the number of resources updated.
Figure 174. NetView Management Console with Updated Resources Status
You can close a view by clicking with the right mouse button on the icon in the view bar. This gives you a selection list from which you can close this view or all views. If you click with the right mouse button in the current view in the workspace, you can close the current view. You cannot close parent views without closing dependent children views. Figure 175 shows that we tried to close the SNA_Backbone_View. Since we had dependent views open we got an error message.
150 An Introduction to Tivoli NetView for OS/390 V1R2

Figure 175. NetView Management Console Closing Views
9.2.4 NetView Management Console Console PropertiesCustomization for the NetView Management Console client is performed using the menus Options and Console Properties . This section shows various items that can be customized using the Console Properties notebook.
Most of these customization items are similar to items that can be customized in NGMF. However, NGMF customization is performed by editing a set of rc files (DUIUx00y.RC), while in NetView Management Console the customization is performed using a notebook with a graphical interface.
General customization practice for NetView Management Console client are:
• Actions that apply to all property pages.
The bottom of the Properties window has a set of buttons, these buttons apply to all the property pages:
– OK: This button is used to exit the notebook and apply your changes.– Apply: This button is used to apply your changes but keep the notebook
open.– Default: This button is used to reset properties for all pages in this
notebook to the system defaults.
NetView Management Console 151
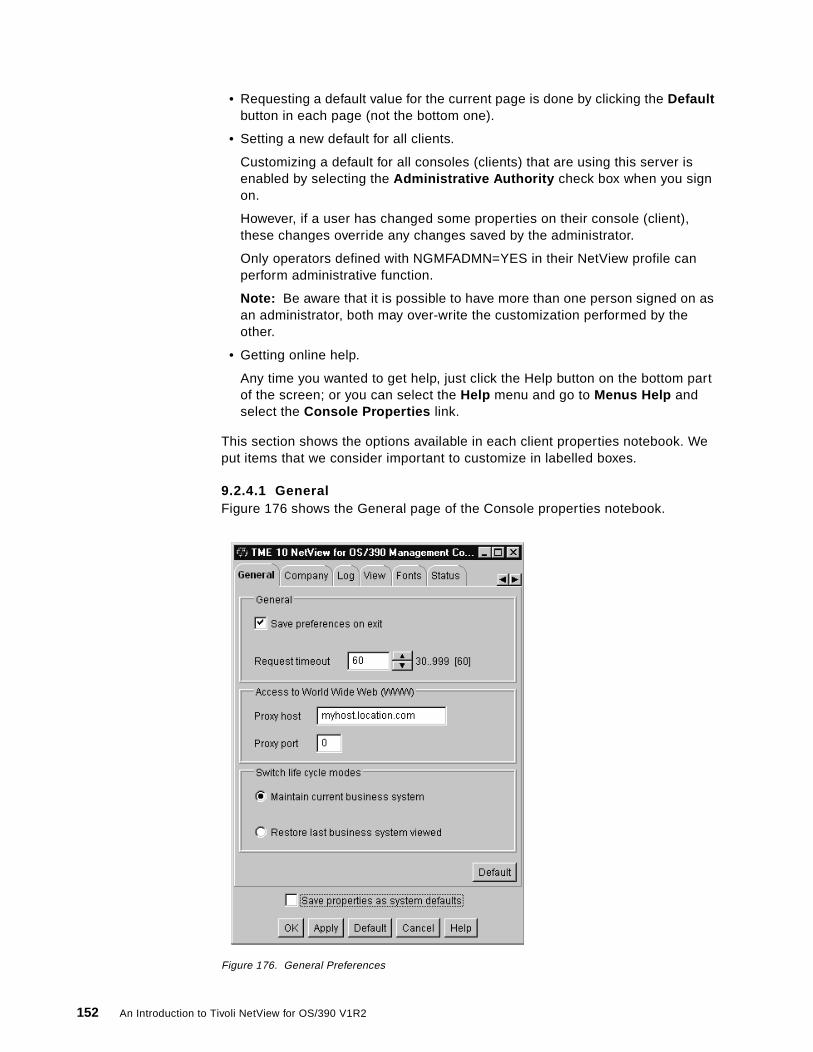
• Requesting a default value for the current page is done by clicking the Default button in each page (not the bottom one).
• Setting a new default for all clients.
Customizing a default for all consoles (clients) that are using this server is enabled by selecting the Administrative Authority check box when you sign on.
However, if a user has changed some properties on their console (client), these changes override any changes saved by the administrator.
Only operators defined with NGMFADMN=YES in their NetView profile can perform administrative function.
Note: Be aware that it is possible to have more than one person signed on as an administrator, both may over-write the customization performed by the other.
• Getting online help.
Any time you wanted to get help, just click the Help button on the bottom part of the screen; or you can select the Help menu and go to Menus Help and select the Console Properties link.
This section shows the options available in each client properties notebook. We put items that we consider important to customize in labelled boxes.
9.2.4.1 GeneralFigure 176 shows the General page of the Console properties notebook.
Figure 176. General Preferences
152 An Introduction to Tivoli NetView for OS/390 V1R2

The following fields are available to us:
Save preferences on exit Select or deselect to indicate whether you want to save the current look of the topology console window, including the window positions, window sizes, slider positions and view menu choices.
Request timeout Specify how long (in seconds) the console should wait for responses to requests before timing out. The default is 60 seconds.
Proxy host - Proxy Port In order to enable external Web access from the topology console help facility, specify both a host name or numeric IP address for the proxy server and a proxy port. You may need to ask your system administrator for the name and port numbers of the server running proxy code.
Switch life cycle modes These options are not used by NetView Management Console. They are supported by GEM (Global Enterprise Manager). NetView Management Console only supports the control life cycle option.
9.2.4.2 CompanyFigure 177 shows the Company page of the Console properties notebook. You can only update this page if you sign on with the administrative authority.
Figure 177. Company Identification
NetView Management Console 153

Here you can change the company name and the image file to be used to represent your company.
9.2.4.3 LogFigure 178 shows the settings for the Log window.
Figure 178. View Log Preferences
The following items can be changed:
Displayed items You can control how many items can be displayed and the timeout values for items while displayed.
Colors for log items The Log window contains several types of items. You can change each item's color by clicking on the arrow beside the item you want to change.
Here we change the company name to ITSO. You probably want to change this item the first time you use NetView Management Console to have your company's name (and probably logo) in the Business View tree.
Customization Tips
154 An Introduction to Tivoli NetView for OS/390 V1R2

9.2.4.4 ViewFigure 179 shows the View page of the Console properties notebook.
Figure 179. View Preferences
The following fields are available:
Auto refresh Select or deselect to indicate whether you want to automatically refresh your views whenever their topology changes, for example, when resources are added or deleted.
Beep for topology/status update Check or uncheck to indicate whether you want to hear a beep when the topology of a view changes, or when the status of a resource degrades. You do not hear a beep if a resource's status improves, only if it worsens.
Show node labels Select or deselect to indicate whether you want to display or hide the label text associated with nodes.
Show link labels Select or deselect to indicate whether you want to display or hide the label text associated with links.
NetView Management Console 155

Truncate labels Select right, left, or none to indicate whether and how you want label text truncated when it is too long to fit in a view. When labels are truncated, you can display the full label text by positioning the cursor over the resource.
Show nodes as Select Icons or Shapes to indicate how you want to display resources in views. Displaying shapes instead of icons can improve performance.
Flyover text To change the text that is displayed in the left corner of the status area when you fly over a resource, select one of the following:
•Resource name (as defined in RODM) •data1: RODM field DisplayResourceOtherData •data2: DisplayResourceUserData •data3: Customer-defined heartbeat information •data4: Customer-defined heartbeat information
Label foreground To change the color of label text, which is the text associated with resources, click on the arrow beside Label foreground. You will see a color palette in which you can select the color you want to use for label text.
Free text foreground To change the color of free text, or text a user has added to a view, click on the arrow beside Free text foreground. You will see a color palette in which you can select the color you want to use for free text.
Background To change the color of view backgrounds, click on the arrow beside Background. You will see a color palette in which you can select the color you want to use for the background.
View background preference To change the view background, select either the Image or Solid color button.
Resource type legend The Resource types button gives you a complete listing of resource types and its icon file name. The window is shown in Figure 180.
156 An Introduction to Tivoli NetView for OS/390 V1R2

Figure 180. Resource Legend
9.2.4.5 FontsFigure 181 shows the Fonts Setting page of the Console properties notebook. You set the fonts for each text area with typeface, style and size that you want.
You can see the result of your setting in the Preview area.
The Resource Type Description button in this window is a GEM only function and not used by NetView Management Console.
Note
We use the data1 as the flyover text as in the MSM and SNATOPO data models. The DisplayResourceOtherData field contains important information about the object. As we put this field as the flyover text, we can see the information easier in the leftmost part of the status line.
Customization Tips
NetView Management Console 157
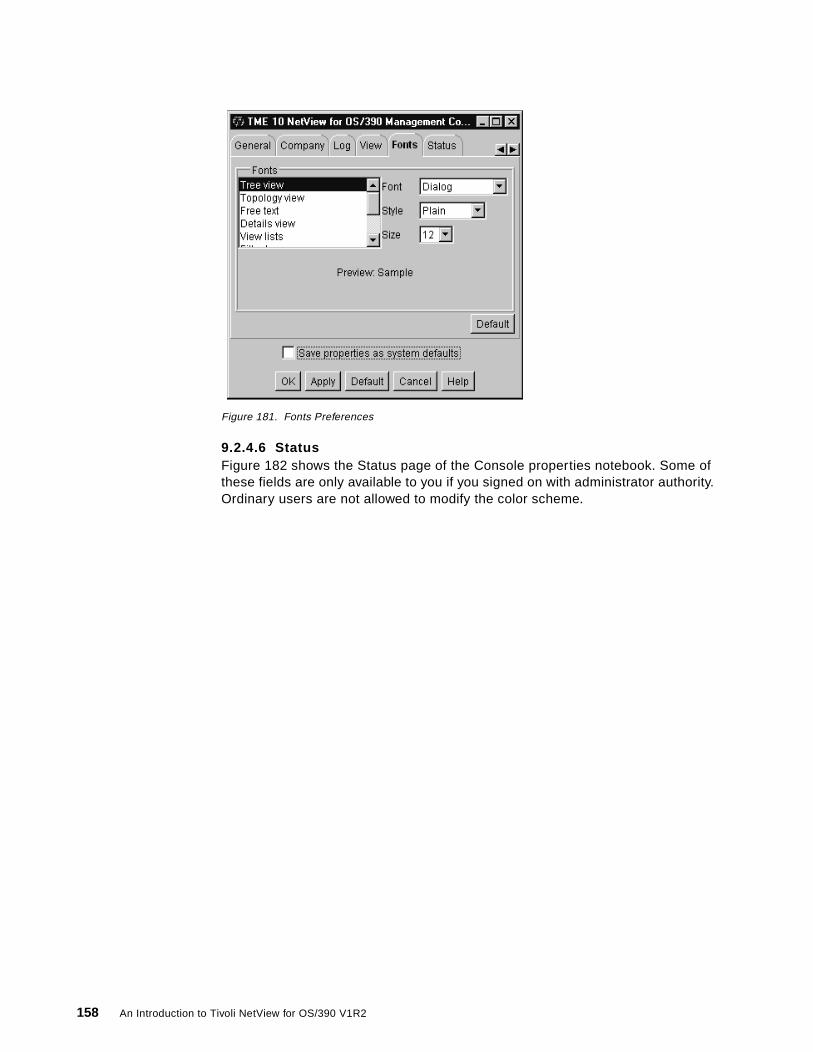
Figure 181. Fonts Preferences
9.2.4.6 StatusFigure 182 shows the Status page of the Console properties notebook. Some of these fields are only available to you if you signed on with administrator authority. Ordinary users are not allowed to modify the color scheme.
158 An Introduction to Tivoli NetView for OS/390 V1R2
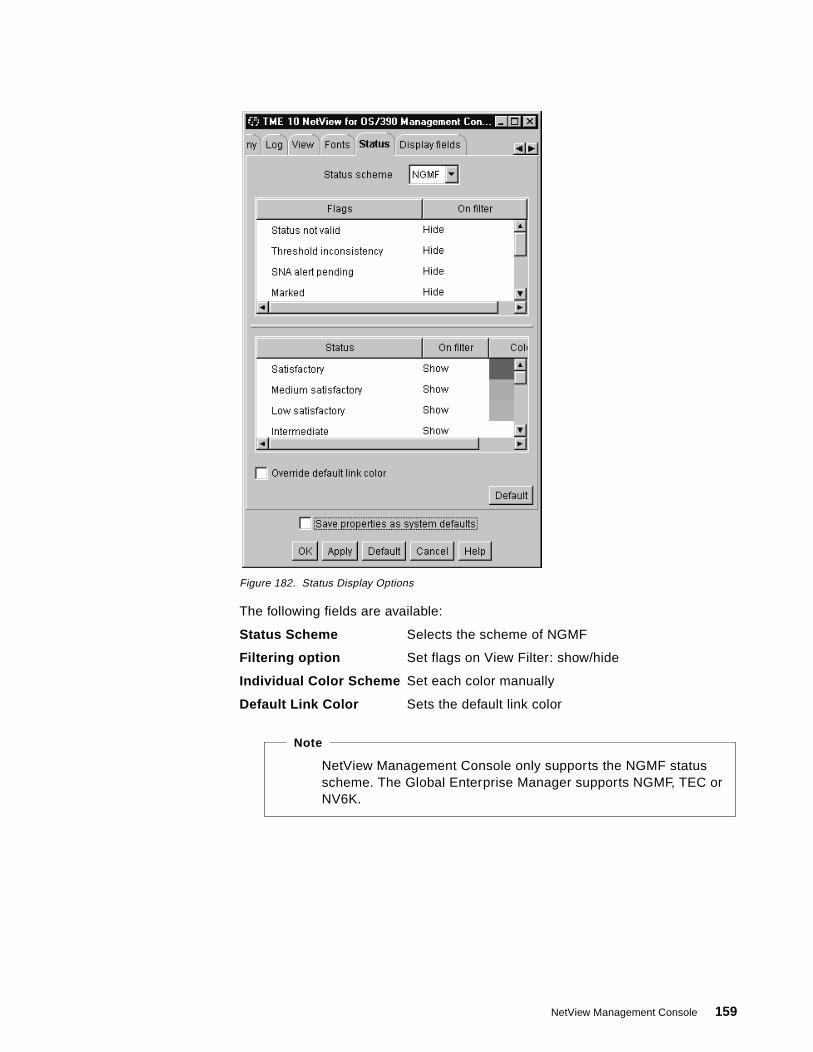
Figure 182. Status Display Options
The following fields are available:
Status Scheme Selects the scheme of NGMF
Filtering option Set flags on View Filter: show/hide
Individual Color Scheme Set each color manually
Default Link Color Sets the default link color
NetView Management Console only supports the NGMF status scheme. The Global Enterprise Manager supports NGMF, TEC or NV6K.
Note
NetView Management Console 159
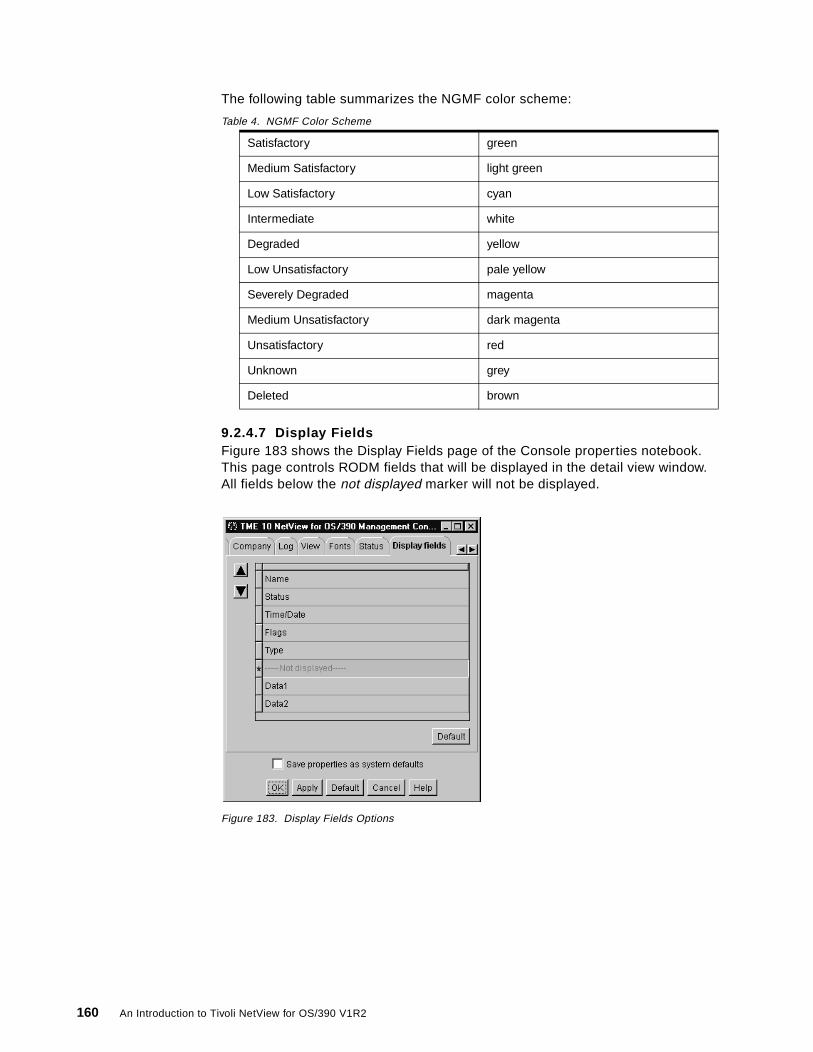
The following table summarizes the NGMF color scheme:
Table 4. NGMF Color Scheme
9.2.4.7 Display FieldsFigure 183 shows the Display Fields page of the Console properties notebook. This page controls RODM fields that will be displayed in the detail view window. All fields below the not displayed marker will not be displayed.
Figure 183. Display Fields Options
Satisfactory green
Medium Satisfactory light green
Low Satisfactory cyan
Intermediate white
Degraded yellow
Low Unsatisfactory pale yellow
Severely Degraded magenta
Medium Unsatisfactory dark magenta
Unsatisfactory red
Unknown grey
Deleted brown
160 An Introduction to Tivoli NetView for OS/390 V1R2

9.2.4.8 Sort FieldsFigure 184 shows the Sort Fields page of the Console properties notebook. This page controls RODM fields that will be sorted for a detail view window. All fields below the not sorted marker will not be used for sorting.
Figure 184. Sort Fields Options
9.2.4.9 ServiceFigure 185 shows the Service page of the Console properties notebook. This page controls the tracing options of NetView Management Console
.
Figure 185. Service Options
NetView Management Console 161

9.2.5 View CustomizationThis includes customizing the layout and background of the view. The result of this customization is stored in the NetView Management Console server. In order to save your customization (and change it globally), you must sign on with administrator authority.
Figure 186. View Options
You can customize the following items:
• Object appearance:
– Toggle the icon, node labels and link labels– Set the label truncation
• View behavior: Toggle the Auto refresh feature
• Annotation: Adding free text
• Other view properties: Such as label colors and background color or image (see Figure 187)
162 An Introduction to Tivoli NetView for OS/390 V1R2
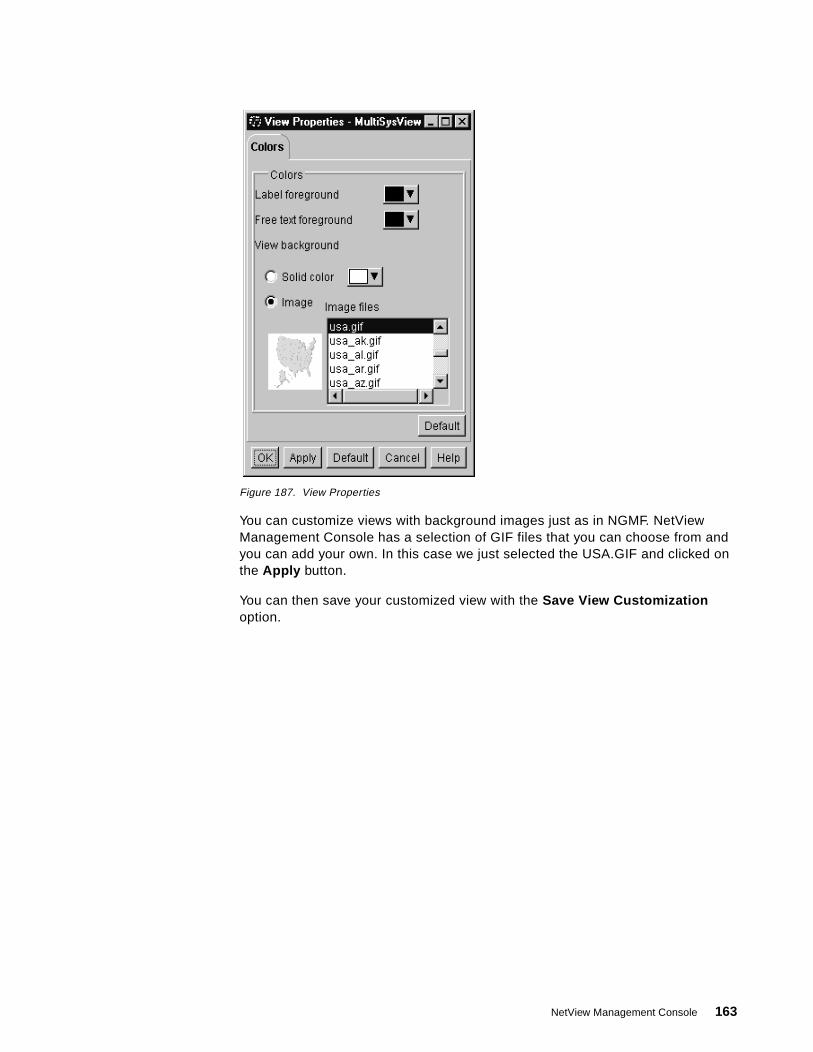
Figure 187. View Properties
You can customize views with background images just as in NGMF. NetView Management Console has a selection of GIF files that you can choose from and you can add your own. In this case we just selected the USA.GIF and clicked on the Apply button.
You can then save your customized view with the Save View Customization option.
NetView Management Console 163

Figure 188. NetView Management Console Customizing View Background
You can add your own background picture. You must copy your gif or jpg file to the the NetView Management Console server directory:
%BINDIR%\TDS\server\db\current\backgrounds
The new background picture will be automatically downloaded to the NetView Management Console client workstation next time you log on. Refer to the NetView Management Console User's Guide, GC31-8665 for more information.
If you select Show as Details from the selection list in Figure 186, your view will be displayed similar to what you see in Figure 189.
164 An Introduction to Tivoli NetView for OS/390 V1R2

Figure 189. NetView Management Console View As Detail
This is an SNA subarea view and we have used the filter bar to filter all resources in satisfactory status. This means in this case that only resources in unsatisfactory status are displayed. The filter bar makes it very easy to limit the number of resources on the screen and makes it easier to find the resource you are looking for.
We also customized the display fields in this view. In the previous section we looked at the Console Properties where we changed the display fields options and added Data1.
You select View Properties to get Figure 190. Use the arrows to move fields you want to display before the Not displayed line.
NetView Management Console 165

Figure 190. NetView Management Console Display Fields
Click on Apply to apply the changes.
166 An Introduction to Tivoli NetView for OS/390 V1R2

9.2.6 Resource PropertiesThe resource properties notebook is used to display and set important information about a selected resource. We chose a scenario where we lost the connection between NetView/390 and NetView Management Console to show the the resource properties notebook with flags and aggregation.
In Figure 191 we have the TME_Networks aggregate and the RS600015_TME10_Mgr object with a flag on each icon.
Figure 191. NetView Management Console TME_Networks_View
By clicking with the right mouse button on the RS600015_TME_Mgr object we get a selection list and we select Resource Properties . The Resource Properties notebook is opened and shown in Figure 192.
On top of the screen you see the icon representation of the resource. You also find:
• Resource name
• The resource status
• Status time stamp
• Resource manager
• The Data1 information
NetView Management Console 167

In the lower portion of the screen you see the flags set for this resource. In this case the flag Status not valid is set since we lost the connection to TME 10 NetView for OS/390 V1R2. The Resource Properties notebook is used to display resource flags and you can also set some resource flags here. For example, to indicate that the resource is under investigation by an operator you can set the following flags:
• Marked
• Suspended
Refer to Figure 195 where you can see that a main menu option can be used to list suspended resources.
Figure 192. NetView Management Console Resource Properties
The Resource Properties notebook for the aggregate object rs600015_TME_Network can be opened in the same way. Since this is an aggregate object you see the Information tab and an Aggregation tab in the notebook. The resource flags are different since this is an aggregation object.
168 An Introduction to Tivoli NetView for OS/390 V1R2

Figure 193. Resource Properties Aggregate Resource
The Aggregation tab allows you to modify the aggregation thresholds for this aggregate object.
NetView Management Console 169
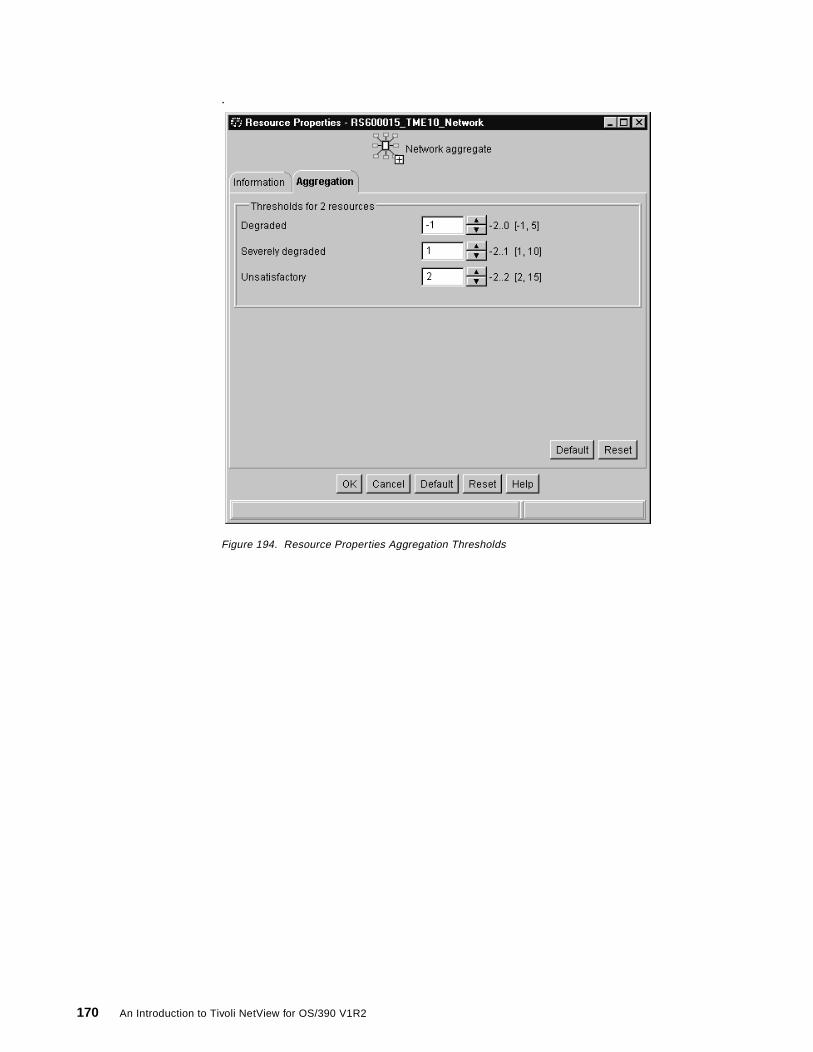
.
Figure 194. Resource Properties Aggregation Thresholds
170 An Introduction to Tivoli NetView for OS/390 V1R2

9.2.7 Display Status History and Alert HistoryThe NetView Management Console main menu has an option called Tasks. It has two functions called Locate Resource and List Suspended resources. In Figure 195 we used these main menu options to locate an SNA resource.
Figure 195. NetView Management Console Locate Resource
You get a pop-up menu in which you type in the resource name and this resource is located. In our case we located an SNA resource called RAARNILU. This is a cross domain resource.
In Figure 196 we see the result of the locate request. The resource is in an unsatisfactory status. If we select the resource and click with the right mouse button, we get a selection list. The selection list contains available commands for this resource such as:
• Display
• Activate
• Inactivate
• Recycle
By selecting the Event Viewer option we get the status history for the selected resource.
NetView Management Console 171

Figure 196. NetView Management Console Event Viewer
The status history for resource RAARNILU is displayed. The last entry shows that that this resource currently is inactive and that it became inactive at 20:01:30.
172 An Introduction to Tivoli NetView for OS/390 V1R2

Figure 197. NetView Management Console Status History
Let's look at a resource managed by MultiSystem Manager. From the Netware_Networks view we do a Locate Failing Resources command.
NetView Management Console 173
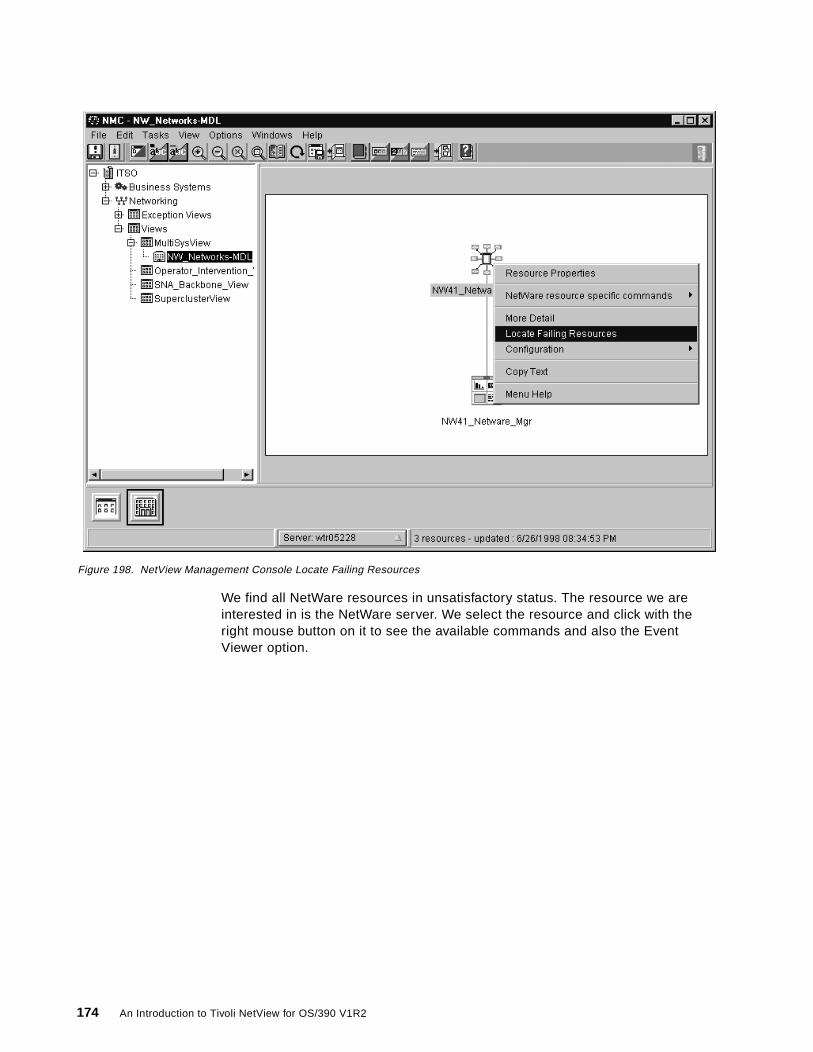
Figure 198. NetView Management Console Locate Failing Resources
We find all NetWare resources in unsatisfactory status. The resource we are interested in is the NetWare server. We select the resource and click with the right mouse button on it to see the available commands and also the Event Viewer option.
174 An Introduction to Tivoli NetView for OS/390 V1R2

Figure 199. NetView Management Console Event Viewer
When we use the Event Viewer option we get a list of alerts for this resource as shown in Figure 200.
NetView Management Console 175
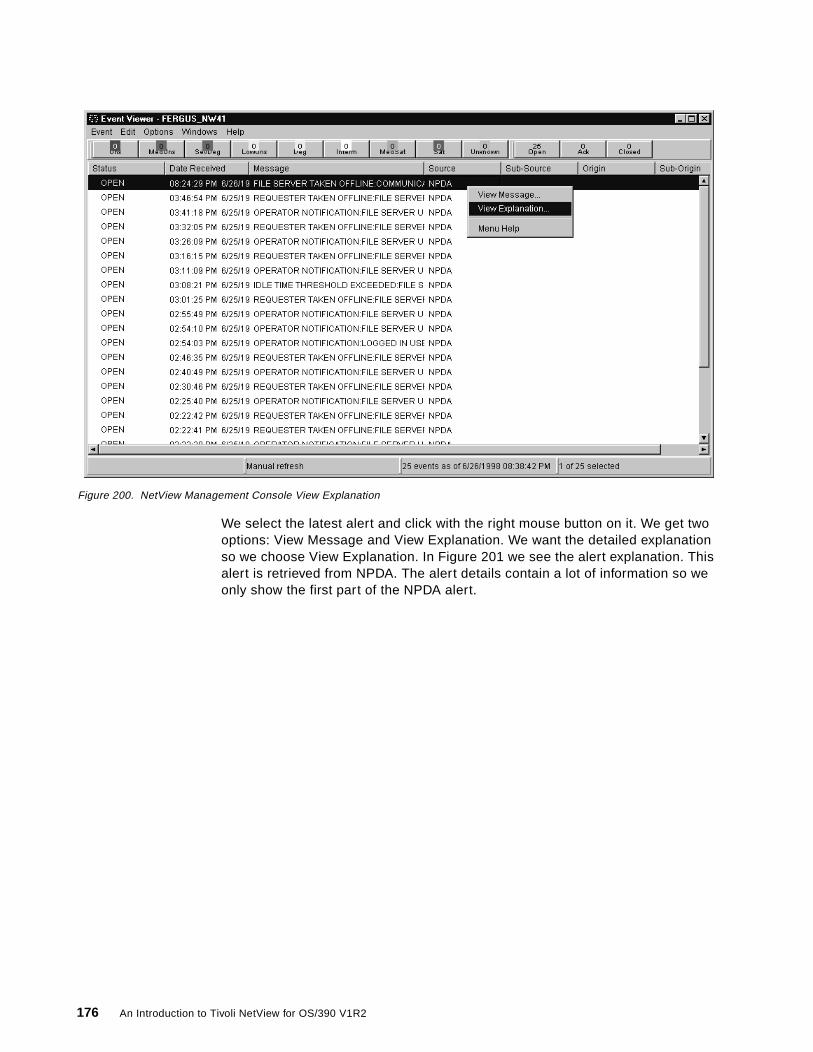
Figure 200. NetView Management Console View Explanation
We select the latest alert and click with the right mouse button on it. We get two options: View Message and View Explanation. We want the detailed explanation so we choose View Explanation. In Figure 201 we see the alert explanation. This alert is retrieved from NPDA. The alert details contain a lot of information so we only show the first part of the NPDA alert.
176 An Introduction to Tivoli NetView for OS/390 V1R2

Figure 201. NetView Management Console View Explanation Partial Result
NetView Management Console 177

9.2.8 Topology Display Subsystem ViewThe Business Systems directory tree contains the Systems Management Business System. This view is created by the AMS instrumentation shipped in TME 10 NetView for OS/390 V1R2 for the components in this view. To be able to see this view you must perform the following customization:
1. Include the required members into your automation table and start the AUTOAMI autotask.
Uncomment these statements in member CNME1034:
• AUTOTBL MEMBER=DSIAMIAT,INSERT
• AUTOTASK OPID=AUTOAMI
2. Customize DSIAMII.
You must have the DSIAMII member in the DSIPARM concatenation and you must put the names of your GMFHS and RODM procedures in the INIT=CNMETDIN parameter.
3. Run the INITAMI command.
You must run the INITAMI command. You can also put this command as the initial CLIST of the AUTOAMI task.
After this you should see the Topology Display Subsystem on your NetView Management Console client. It should have similar content to the following screen:
Figure 202. Topology Display Subsystems View
178 An Introduction to Tivoli NetView for OS/390 V1R2
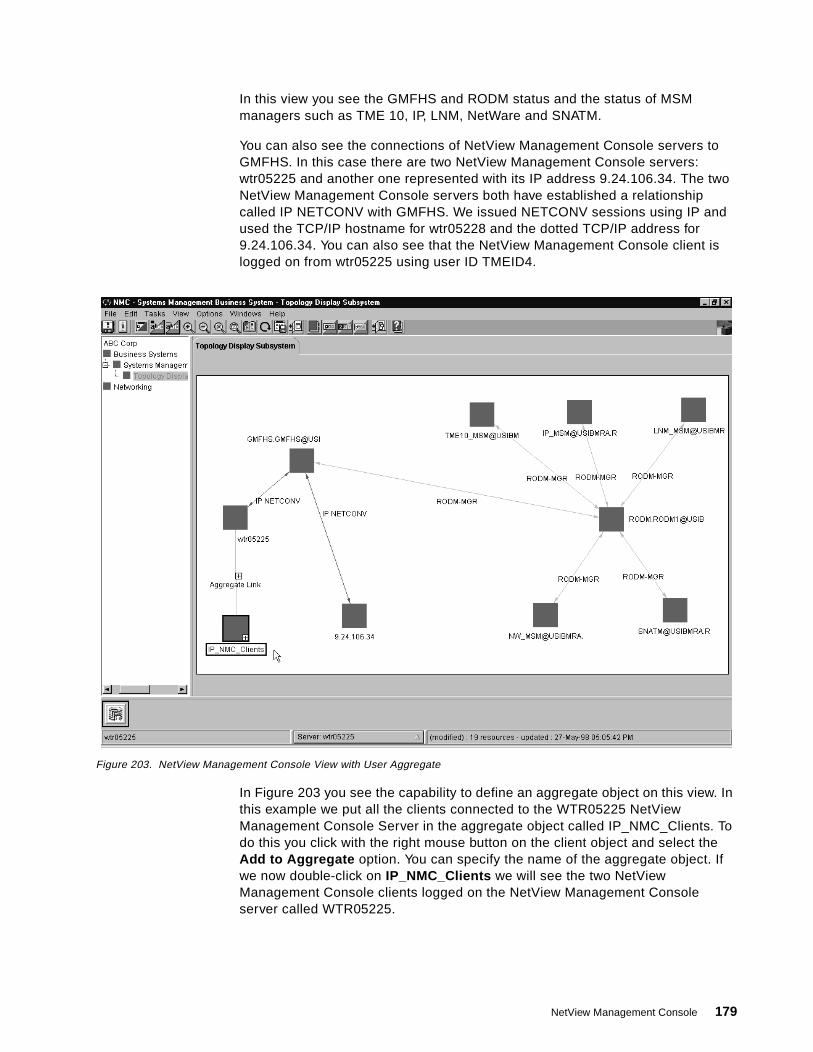
In this view you see the GMFHS and RODM status and the status of MSM managers such as TME 10, IP, LNM, NetWare and SNATM.
You can also see the connections of NetView Management Console servers to GMFHS. In this case there are two NetView Management Console servers: wtr05225 and another one represented with its IP address 9.24.106.34. The two NetView Management Console servers both have established a relationship called IP NETCONV with GMFHS. We issued NETCONV sessions using IP and used the TCP/IP hostname for wtr05228 and the dotted TCP/IP address for 9.24.106.34. You can also see that the NetView Management Console client is logged on from wtr05225 using user ID TMEID4.
Figure 203. NetView Management Console View with User Aggregate
In Figure 203 you see the capability to define an aggregate object on this view. In this example we put all the clients connected to the WTR05225 NetView Management Console Server in the aggregate object called IP_NMC_Clients. To do this you click with the right mouse button on the client object and select the Add to Aggregate option. You can specify the name of the aggregate object. If we now double-click on IP_NMC_Clients we will see the two NetView Management Console clients logged on the NetView Management Console server called WTR05225.
NetView Management Console 179

Figure 204. NetView Management Console Aggregate More Details
The instrumentation provided for the Topology Display Subsystem resources varies by component and is described in the online help.
Figure 205. NetView Management Console Online Help
180 An Introduction to Tivoli NetView for OS/390 V1R2
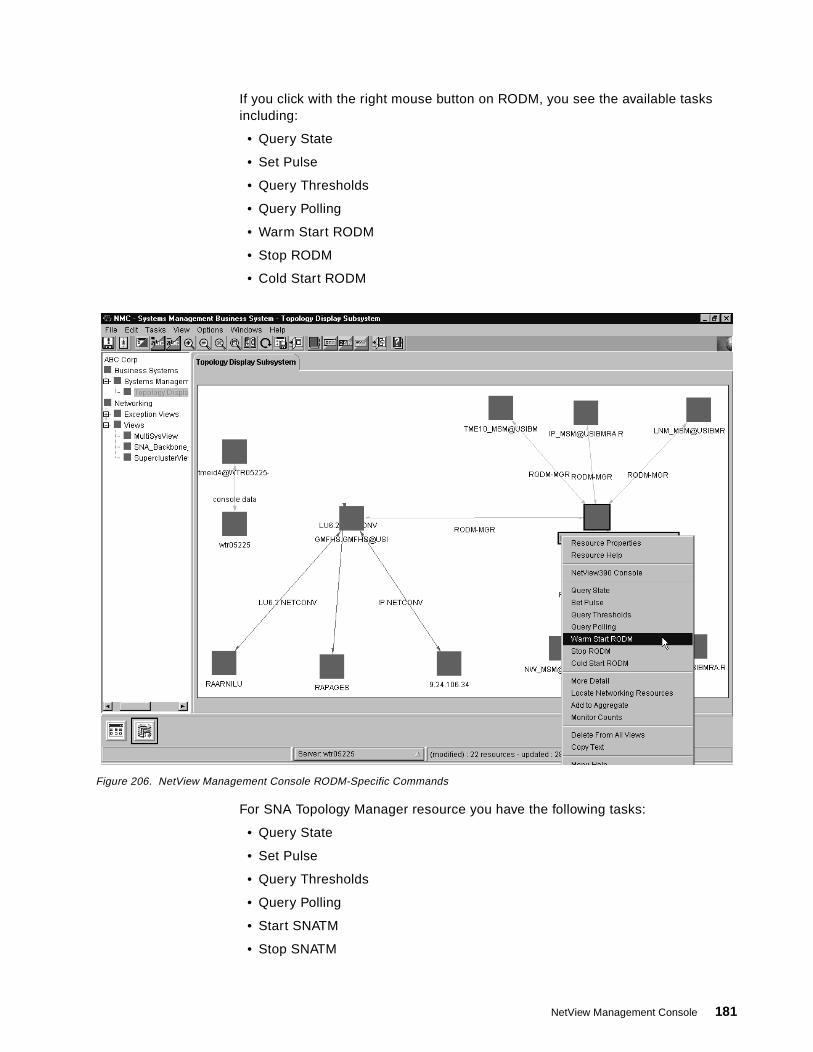
If you click with the right mouse button on RODM, you see the available tasks including:
• Query State
• Set Pulse
• Query Thresholds
• Query Polling
• Warm Start RODM
• Stop RODM
• Cold Start RODM
Figure 206. NetView Management Console RODM-Specific Commands
For SNA Topology Manager resource you have the following tasks:
• Query State
• Set Pulse
• Query Thresholds
• Query Polling
• Start SNATM
• Stop SNATM
NetView Management Console 181

As you can see the first four tasks are common to both components. These tasks are recommended/mandatory when instrumenting business systems using the Global Enterprise Manager. All responses to these commands are returned in the NetView Management Console log window.
Figure 207. NetView Management Console SNATOPO-Specific Commands
In conclusion the Topology Display Subsystem view gives you an overview of your environment by showing you the status of each component and the protocol used for your NETCONV sessions. It also allows you to control your resources with the ability to issue commands to the components from your NetView Management Console client.
9.3 Command Profile Editor
The NetView Management Console Command Profile Editor is similar to the Command Profile Editor in NGMF. It enables you to define commands and allocate certain commands to certain operators depending on their responsibilities.
Only operators defined with NGMFADMN=YES can access the Command Profile Editor. The following command is for starting Command Profile Editor in Windows NT:
%WINDIR%\System32\Drivers\etc\Tivoli\setup_env.cmd %BINDIR%\TDS\server\bin\CPE
182 An Introduction to Tivoli NetView for OS/390 V1R2

Figure 208 shows the initial Command Profile Editor window. There are four folders in that window. Those folders represent:
Figure 208. Initial Command Profile Editor Window
Operators This represents an operator. Each operator is assigned a profile to be used when he or she logs on to NetView Management Console.
Profiles Collection and menu structure of commands and command sets that will be assigned to operators. There is one special profile that is called <default>. This profile is used by all operators that are not defined in the operator folder.
Commands and Command Sets A command is a set of definitions consisting of:
•Command name
•Correlation with resource manager
•The actual command string
•The method to send the command
A command set is a set of commands.
Resource Managers A resource manager defines who the manager is of a resource. This manager controls the status and topology of the object in RODM.
The following are some sample scenarios to show how CPE can be used to customize NetView Management Console:
• Creating command sets to ease command organization
• Creating a command profile
• Assigning a profile to an operator
NetView Management Console 183

9.3.1 Creating a Command SetUse the following steps to create a new command set called Generic Commands:
1. From the main Command Profile Editor window, open the Commands folder and select Folder , Add new and Command Set (see Figure 209).
Figure 209. Command Profile Editor Adding Command Set
2. Fill in the command set name, menu text and help file (in HTML format) in the Creating Command Set window (see Figure 210).
Figure 210. Command Profile Editor Creating Command Set
3. Click OK and you will get an empty Command Set window. You can add commands, other command sets and separators, reorder them and get something as in Figure 211.
184 An Introduction to Tivoli NetView for OS/390 V1R2
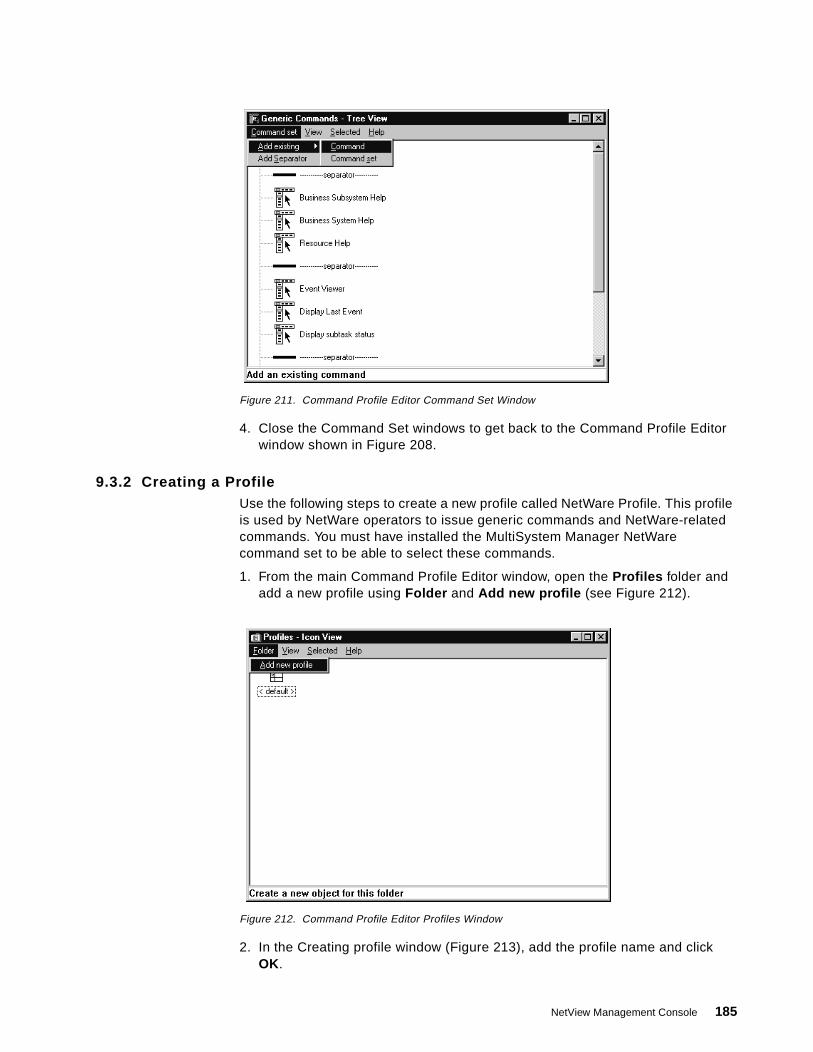
Figure 211. Command Profile Editor Command Set Window
4. Close the Command Set windows to get back to the Command Profile Editor window shown in Figure 208.
9.3.2 Creating a ProfileUse the following steps to create a new profile called NetWare Profile. This profile is used by NetWare operators to issue generic commands and NetWare-related commands. You must have installed the MultiSystem Manager NetWare command set to be able to select these commands.
1. From the main Command Profile Editor window, open the Profiles folder and add a new profile using Folder and Add new profile (see Figure 212).
Figure 212. Command Profile Editor Profiles Window
2. In the Creating profile window (Figure 213), add the profile name and click OK.
NetView Management Console 185

Figure 213. Command Profile Editor Creating Profile
3. You then have an empty profile window, where you can add a new command, command set or separator (see Figure 214).
Figure 214. Command Profile Editor Empty Profile Window
4. Add the Generic Commands and NETWARE command sets by choosing each and clicking on the Apply button on the Add command set window (see Figure 215).
Figure 215. Command Profile Editor Add Command Set Dialog
5. You will have a NETWARE Profile window as shown in Figure 216.
186 An Introduction to Tivoli NetView for OS/390 V1R2

Figure 216. Command Profile Editor Command Profile Window
6. Close all open windows to get back to the Command Profile Editor main window.
9.3.3 Creating an OperatorUse the following steps to create a new operator to use the NetWare Profile. This operator name is TMEID8.
1. From the main Command Profile Editor window, open the Operators folder and select Folder and Add new operator (see Figure 217).
Figure 217. Command Profile Editor Operator Folder
2. In the new operator dialog, enter the User name and the appropriate Profile name (see Figure 218).
NetView Management Console 187

Figure 218. Command Profile Editor Create Operator Dialog
3. Click OK to go back to the Command Profile Editor window.
9.3.4 Saving a Command ProfileThe most important step in using Command Profile Editor is that you must remember to save your customization in the primary Command Profile Editor window. Select Profile editor and Save changes (see Figure 219).
Figure 219. Command Profile Editor Save Profiles
With this customization, when TMEID8 signs on to the NetView Management Console, he or she will only get the generic commands for all resources, while for NetWare objects he or she can use all the commands.
Group commands into command sets. This will come in handy when you customize many profiles for many types of operators.
Tips
188 An Introduction to Tivoli NetView for OS/390 V1R2
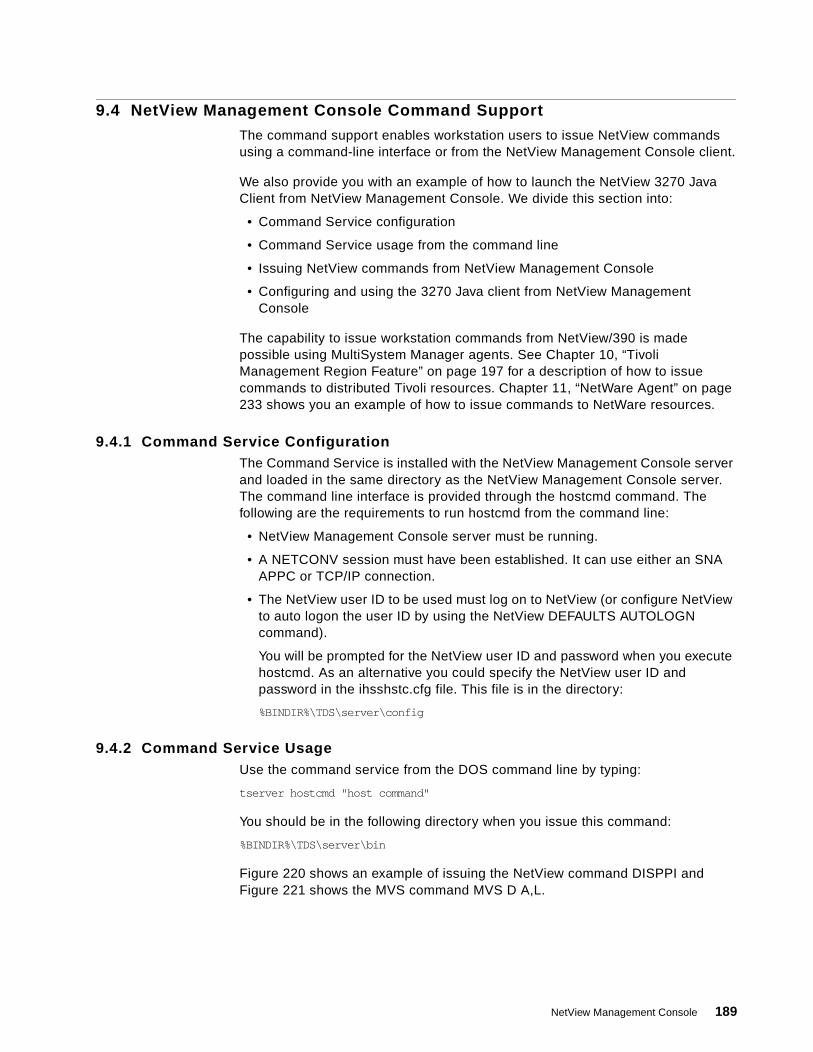
9.4 NetView Management Console Command Support
The command support enables workstation users to issue NetView commands using a command-line interface or from the NetView Management Console client.
We also provide you with an example of how to launch the NetView 3270 Java Client from NetView Management Console. We divide this section into:
• Command Service configuration
• Command Service usage from the command line
• Issuing NetView commands from NetView Management Console
• Configuring and using the 3270 Java client from NetView Management Console
The capability to issue workstation commands from NetView/390 is made possible using MultiSystem Manager agents. See Chapter 10, “Tivoli Management Region Feature” on page 197 for a description of how to issue commands to distributed Tivoli resources. Chapter 11, “NetWare Agent” on page 233 shows you an example of how to issue commands to NetWare resources.
9.4.1 Command Service ConfigurationThe Command Service is installed with the NetView Management Console server and loaded in the same directory as the NetView Management Console server. The command line interface is provided through the hostcmd command. The following are the requirements to run hostcmd from the command line:
• NetView Management Console server must be running.
• A NETCONV session must have been established. It can use either an SNA APPC or TCP/IP connection.
• The NetView user ID to be used must log on to NetView (or configure NetView to auto logon the user ID by using the NetView DEFAULTS AUTOLOGN command).
You will be prompted for the NetView user ID and password when you execute hostcmd. As an alternative you could specify the NetView user ID and password in the ihsshstc.cfg file. This file is in the directory:
%BINDIR%\TDS\server\config
9.4.2 Command Service UsageUse the command service from the DOS command line by typing:
tserver hostcmd "host command"
You should be in the following directory when you issue this command:
%BINDIR%\TDS\server\bin
Figure 220 shows an example of issuing the NetView command DISPPI and Figure 221 shows the MVS command MVS D A,L.
NetView Management Console 189
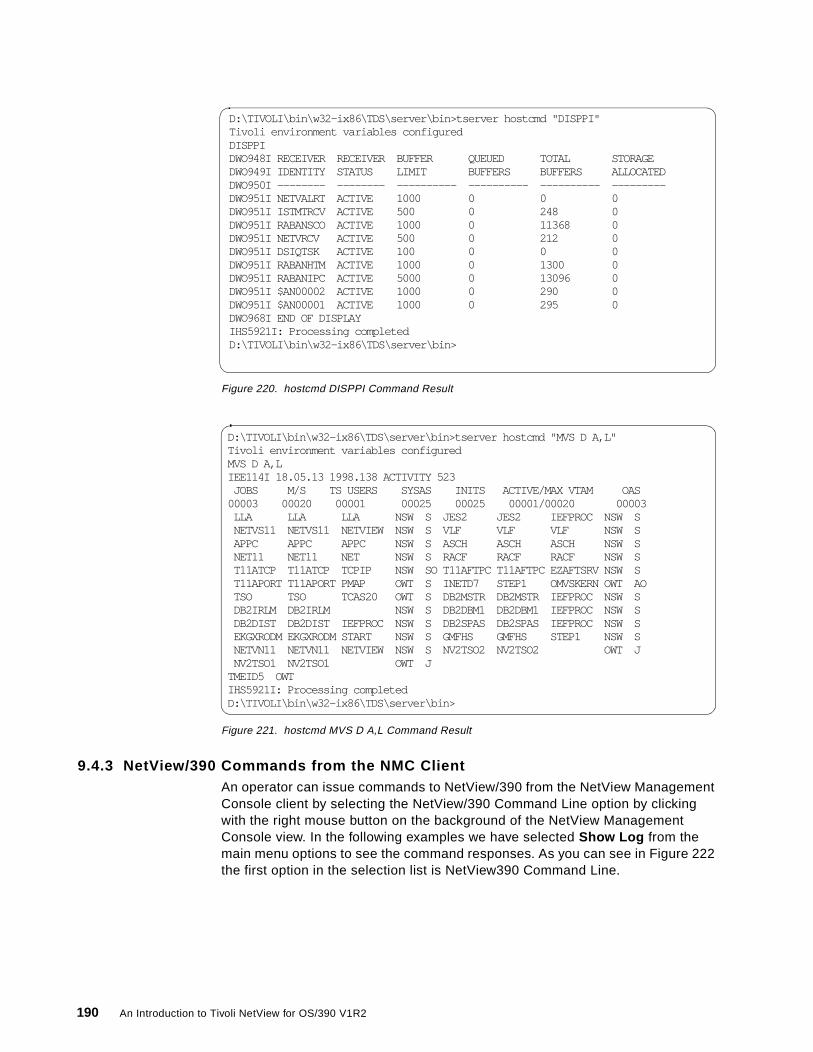
Figure 220. hostcmd DISPPI Command Result
Figure 221. hostcmd MVS D A,L Command Result
9.4.3 NetView/390 Commands from the NMC ClientAn operator can issue commands to NetView/390 from the NetView Management Console client by selecting the NetView/390 Command Line option by clicking with the right mouse button on the background of the NetView Management Console view. In the following examples we have selected Show Log from the main menu options to see the command responses. As you can see in Figure 222 the first option in the selection list is NetView390 Command Line.
D:\TIVOLI\bin\w32-ix86\TDS\server\bin>tserver hostcmd "DISPPI"Tivoli environment variables configuredDISPPIDWO948I RECEIVER RECEIVER BUFFER QUEUED TOTAL STORAGEDWO949I IDENTITY STATUS LIMIT BUFFERS BUFFERS ALLOCATEDDWO950I -------- -------- ---------- ---------- ---------- ---------DWO951I NETVALRT ACTIVE 1000 0 0 0DWO951I ISTMTRCV ACTIVE 500 0 248 0DWO951I RABANSCO ACTIVE 1000 0 11368 0DWO951I NETVRCV ACTIVE 500 0 212 0DWO951I DSIQTSK ACTIVE 100 0 0 0DWO951I RABANHTM ACTIVE 1000 0 1300 0DWO951I RABANIPC ACTIVE 5000 0 13096 0DWO951I $AN00002 ACTIVE 1000 0 290 0DWO951I $AN00001 ACTIVE 1000 0 295 0DWO968I END OF DISPLAYIHS5921I: Processing completedD:\TIVOLI\bin\w32-ix86\TDS\server\bin>
D:\TIVOLI\bin\w32-ix86\TDS\server\bin>tserver hostcmd "MVS D A,L"Tivoli environment variables configuredMVS D A,LIEE114I 18.05.13 1998.138 ACTIVITY 523 JOBS M/S TS USERS SYSAS INITS ACTIVE/MAX VTAM OAS00003 00020 00001 00025 00025 00001/00020 00003 LLA LLA LLA NSW S JES2 JES2 IEFPROC NSW S NETVS11 NETVS11 NETVIEW NSW S VLF VLF VLF NSW S APPC APPC APPC NSW S ASCH ASCH ASCH NSW S NET11 NET11 NET NSW S RACF RACF RACF NSW S T11ATCP T11ATCP TCPIP NSW SO T11AFTPC T11AFTPC EZAFTSRV NSW S T11APORT T11APORT PMAP OWT S INETD7 STEP1 OMVSKERN OWT AO TSO TSO TCAS20 OWT S DB2MSTR DB2MSTR IEFPROC NSW S DB2IRLM DB2IRLM NSW S DB2DBM1 DB2DBM1 IEFPROC NSW S DB2DIST DB2DIST IEFPROC NSW S DB2SPAS DB2SPAS IEFPROC NSW S EKGXRODM EKGXRODM START NSW S GMFHS GMFHS STEP1 NSW S NETVN11 NETVN11 NETVIEW NSW S NV2TSO2 NV2TSO2 OWT J NV2TSO1 NV2TSO1 OWT JTMEID5 OWTIHS5921I: Processing completedD:\TIVOLI\bin\w32-ix86\TDS\server\bin>
190 An Introduction to Tivoli NetView for OS/390 V1R2
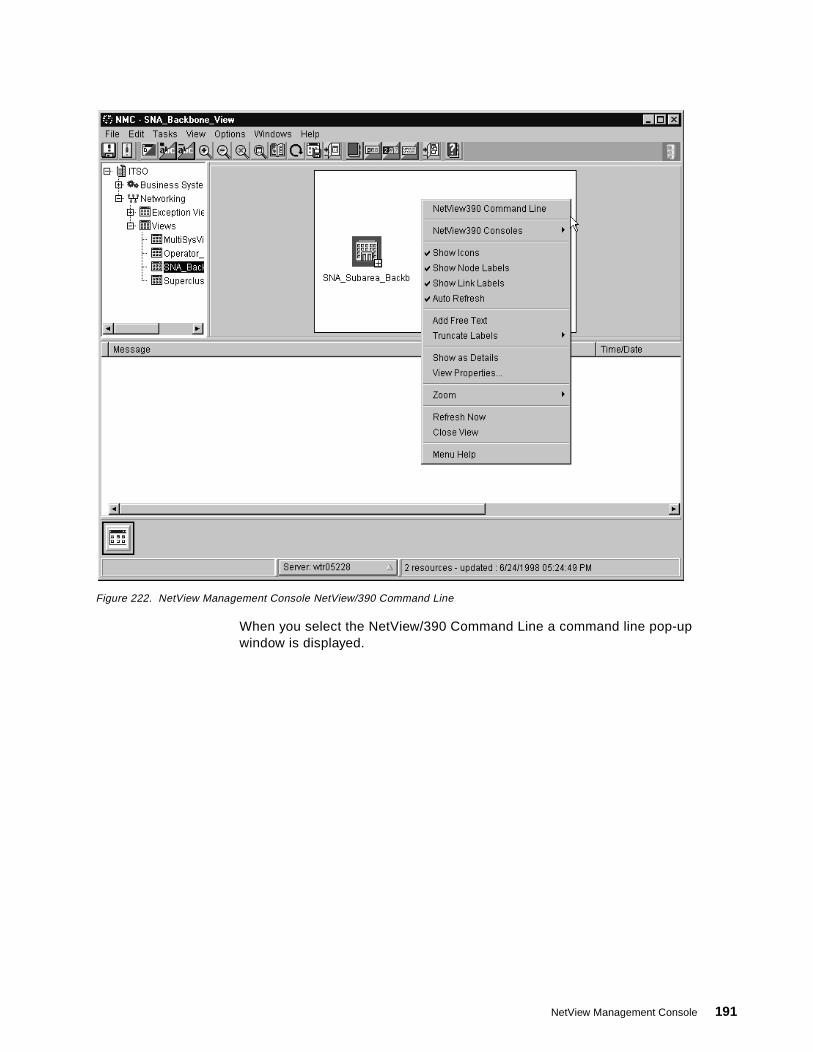
Figure 222. NetView Management Console NetView/390 Command Line
When you select the NetView/390 Command Line a command line pop-up window is displayed.
NetView Management Console 191

Figure 223. NetView/390 Commands from NetView Management Console
You can enter any NetView/390 command and click on Send and Close . We displayed the status of VTAM node wtr05228.
The command response is displayed in the NetView Management Console log as shown in Figure 224:
192 An Introduction to Tivoli NetView for OS/390 V1R2

Figure 224. NetView Management Console Command Response
9.4.4 NetView 3270 Java ClientYou can also launch the NetView 3270 Java Client from the NetView Management Console Client. This requires that both the NetView 3270 Java Client and the NetView Management Console client are installed on the workstation. These are the steps required to enable this on a Windows NT machine:
• Add the 3270 Java Client to your classpath variable.
You must add the following to your classpath:
drw:\ibmflb\jars\ibmflbclass.jar
• Modify the file ihssnv390cons.rsp.
This file is located in the following directory:
%BINDIR%\TDS\server\sample
You must modify this file with the TCP/IP port number you are using for you NetView 3270 Java Client. The default is 9999. You also have to specify the TCP/IP hostname of your NetView system.
• Copy ihssnv390cons.rsp into the bin directory.
We copied the ihssnv390cons.rsp from the sample directory into the following to have all the .rsp files in the same place:
%BINDIR%\TDS\server\bin
NetView Management Console 193

The bin directory is where all the .rsp files for the MultiSystem Manager agents are installed.
• Run cpebatch to install the ihssnv390cons.rsp file.
We used the following to install the ihssnv390cons.rsp file:
cpebatch ihssnv390cons.rsp -i -g
This command adds the NetView/390 Console command for the NetView domain you specified in the ihssnv390cons.rsp file to the NetView Console's command set.
You select this command by clicking with the right mouse on the background of the NetView Management Console view. In Figure 225 the second option in the selection list is NetView390 Consoles. We added the command for our NetView domain, which is called RABAN.
Figure 225. NetView Management Console NetView/390 Consoles
We you select the NetView/390 Console for your NetView/390 domain the NetView 3270 client is launched and you get the following window on your NetView Management Console client:
194 An Introduction to Tivoli NetView for OS/390 V1R2

Figure 226. NetView 3270 Java Client Initializing
Click on the OK button and the NetView/3270 Java Client Logon panel is displayed on your screen.
Figure 227. 3270 Java Client from NetView Management Console
For more information about the NetView 3270 Java Client functions please refer to Chapter 14, “NetView 3270 Java Client” on page 295.
NetView Management Console 195

We found that in order for the NetView 3270 Client to launch from the NetView Management Console Client we had to copy the help and gif directories from the IBMFLB directory to the NetView Management Console client installation directory. In our case that was:
d:\Tivoli\bin\generic_unix\TDS\client\bin
You also need a different NetView user ID when you log on from the NetView 3270 Java Client. An attempt is done by the client to log on to NetView with the user ID you used when you logged on to the NetView Management Console client but this logon is rejected by NetView/390 since the NetView Management Console user ID is already logged on.
Note
196 An Introduction to Tivoli NetView for OS/390 V1R2

Chapter 10. Tivoli Management Region Feature
The integrated MultiSystem Manager feature provides graphical monitoring of non-SNA resources from TME 10 NetView for OS/390 V1R2. In TME 10 NetView for OS/390 V1R2, MultiSystem Manager provides monitoring to Tivoli's distributed environments from TME 10 NetView for OS/390. This ability is accomplished using the MSMAgent running in the TMR server.
This agent code acts as the topology agent for all of the Tivoli resources. The communication between the TME 10 NetView for OS/390 as the manager and the MSMAgent is via TCP/IP.
The agent collects resource information and status from the distributed Tivoli environment in logical and physical configurations and forwards these to MultiSystem Manager. Figure 228 shows the process flow:
Figure 228. Process Flow for the Tivoli Topology Agent
The physical configurations of the TMRs show the distribution hierarchy and status of managed nodes in the distributed network (repeater network).
The logical configuration shows the same resources as in the physical configuration, but organized by policy regions of the TMRs. The managed nodes and all TME 10 Distributed Monitoring monitors that have been distributed to these managed nodes will be included.
© Copyright IBM Corp. 1998 197

For more information on the MultiSystem Manager Topology feature that is available with Tivoli Global Enterprise Manager, please review the ITSO redbook TME 10 Global Enterprise Manager Topology Service and NetView 3270 Java Client, SG24-2121.
The implementation of this feature requires that the Event Automation Service has been implemented and running. See Chapter 7, “Event/Automation Service” on page 77, for information about the Event/Automation Service implementation.
10.1 Tivoli Management Region Feature Customization
The following assumes that the base code of TME 10 NetView for OS/390 including the MultiSystem Manager component of TME 10 NetView for OS/390 is installed and customized. It also assumes that Tivoli Enterprise Console, TME 10 Distributed Monitoring and the Event/Automation Service are installed. With the prerequisite products already installed we have to perform the following tasks to get the Tivoli Management Region feature up and running:
1. Host customization:
a. Customize the automation table for Tivoli Management Region feature.
b. Set up the initialization member for the Tivoli Management Region feature.
c. Define the exception views for the Tivoli Management Region feature.
2. TMR workstation customization:
a. Install the MSM Agent software.
b. Customize TEC for Event Services (see also Chapter 7, “Event/Automation Service” on page 77).
c. Customize TME 10 Distributed Monitoring.
d. Set up the MSMAgent configuration.
3. Install the NetView Management Console as shown in 9.1, “Installation and Operation” on page 122.
10.1.1 Automation Table CustomizationIf you are using DSITBL01 as your automation table, uncomment the FLCSTBLT include statement:
Figure 229. Automation Table Include of FLCSTBLT
The included FLCSTBLT member shown below contains the necessary automation table entries.
*********************************************************************** * Uncomment the following statement if you are running the TME * * feature of MultiSystem Manager. * *********************************************************************** %INCLUDE FLCSTBLT
198 An Introduction to Tivoli NetView for OS/390 V1R2

Figure 230. Contents of FLCSTBLT
The FLCSTBLT member includes calls to two different CLISTs:
• FLCATAUT • FLCATALH
The FLCATAUT is used to build the objects in RODM for the MultiSystem Manager Agent and Tivoli resources and takes care of the MultiSystem Manager Agent status. The FLCATALH is used to change the status fields of the TME 10 objects in RODM based on the alerts coming in via the event adapter.
Keep the TME 10 automation entries above the entry for alerts going to GMFHS to avoid unnecessary calls. The alerts coming from the TME 10 resources are not handled by GMFHS.
10.1.2 MultiSystem Manager Initialization MembersThere is a new MultiSystem Manager initialization member for the Tivoli Management Region agent that has to be customized. The member FLCSITME is located in the DSIPARM library and should to be copied to your DSIPARM data set. This member is used to define your TME service point where the MSM topology agent is installed.
We used the following customization for our setup:
Figure 231. MultiSystem Manager Initialization Member FLCSITME
The FLCSITME member is included, using the %INCLUDE statement, in the main MultiSystem Manager initialization member FLCAINP. We used the following definitions in our FLCAINP setup:
********************************************************************* * Act upon the alerts/resolves from TME-10 TEC Event Server that * * are from Sentry. The TEC Event Server alerts are demarcated by * * the last bit in the first byte of subvector 92. For Sentry * * events, HIER(1) will be set to SENTRY. * ********************************************************************* IF (MSUSEG(0000.92 3 8) = '1' | MSUSEG(0002.92 3 8) = '1') & HIER(1) = 'SENTRY' . THEN EXEC(CMD('FLCATAUT') ROUTE(ONE AUTOTMEA)) EXEC(CMD('FLCATALH') ROUTE(ONE AUTOMSM)) CONTINUE(N);
*********************************************************************** GETTOPO TMERES, SP=RS600015, PORT=3333 ***********************************************************************
Tivoli Management Region Feature 199

Figure 232. MultiSystem Manager Initialization Member FLCAINP Excerpt
10.1.3 MultiSystem Manager Exception ViewsThe exception view is a very useful way to recognize failing resources and put them in a separate view. This separate view has to be created in RODM. The FLCSDM6T member in data set CNMSAMP is a sample of how to define the exception view object in RODM.
We used the following definitions in our FLCSDM6T:
Figure 233. FLCSDM6T Exception View Object in RODM
The next step is to tell MultiSystem Manager which objects of which classes are suitable for exception view processing. To do this you have to create a member in the DSIPARM data set with the appropriate definitions. The member name of this file has to map the value of the Exception_View_File= definition in your FLCACINP member. A sample member, FLCSEXV, is provided in the DSIPARM data set. Figure 234 shows the contents of FLCSEXV.
Figure 234. MultiSystem Manager Member FLCSEXV for Exception Views
Objects that are stored under the class defined in OBJECTCL are eligible for exception view processing. If an exception occurs for an object, it is connected to the object defined under EXVWNAME. This definition has to map the Myname field for the exception view defined in member FLCSDM6T.
*********************************************************************** * Include the initialization statements for TME service points. * *********************************************************************** DEF_AUTOTASK=AUTOMSMD RODMNAME=RODM1 EXCEPTION_VIEW_FILE=FLCSEXV %INCLUDE FLCSITME
CREATE INVOKER ::= 0000001; OBJCLASS ::= Exception_View_Class; OBJINST ::= MyName = (CHARVAR) 'TME10_Monitors'; ATTRLIST Annotation ::= (CHARVAR) 'TME10 Sentry Monitors', ExceptionViewName ::= (CHARVAR) 'TME10MON'; END;
*********************************************************************** * TME SAMPLE * *********************************************************************** * In the following TME sample, EXVWNAME equals OBJINST in sample * * FLCSDM6T * *********************************************************************** OBJECTCL=Monitor EXVWNAME=TME10_Monitors
200 An Introduction to Tivoli NetView for OS/390 V1R2

10.1.4 Installing the MSM Agent SoftwareInstallation of the MSM Agent software is performed using the Tivoli's desktop. The following procedure describes the installation process:
1. From the Tivoli Desktop, select Desktop , Install and Install Product (see Figure 235).
Figure 235. Installing Tivoli Software
2. You may need to change the installation source directory using the Select Media button. Select the product that you want to Install (MultiSystem Manager Tivoli Management Region Feature), the host you want it to be installed on and click Install & Close . Figure 236 shows the Product Selection window.
Figure 236. Tivoli Product Selection Window
Tivoli Management Region Feature 201

3. Click Continue to confirm the installation and Close after the installation completes.
10.1.5 Customizing Enterprise ConsoleAt this point we are ready to define consoles and load rules.
Tivoli Enterprise Console uses two sets of control files for its operation:
• .baroc files that defines the structure of an event
• .rls (ruleset) files that defines the processing logic of events.
For the Tivoli Management Region agent, these files are stored in the directory $BINDIR/../generic_unix/MSM/MSMAgent.
The rules and baroc files for each product are located in several different directories. The Event/Automation Service provides a sample shell script to load all those baroc and rules files into the EventServer. This script is named nvtec.sh. The detail execution of this script is discussed in 7.1.4, “Tivoli Enterprise Console Preparation” on page 82 and the output listing is in A.1, “Output from nvtec.sh” on page 353.
This shell script installs object classes and rules for Event Service, Storage Service, Topology Service and Application Policy Manager. But in order to have Monitors for NT the NT baroc files must be added manually.
10.1.6 Customizing TME 10 Distributed MonitoringThis customization can be divided in two parts:
1. Assigning distributed monitoring managed resources to a policy region
• TME 10 Distributed Monitoring managed resources customization
2. Creating an environment in which monitors can be created and distributed to defined subscribers:
• Create profile manager
• Create profile
• Define subscribers to a profile manager
10.1.6.1 Assign Managed Resources to a Policy RegionOn the desktop, double-click on the policy region icon and then select Properties on the menu bar and select Managed Resources .
202 An Introduction to Tivoli NetView for OS/390 V1R2

Figure 237. Managed Resources Selection
You should select the IndicatorCollection, SentryProfile and SentryProxy options from the Available Resources scrolling list and click the left arrow button to move these managed resources to the Current Resources scrolling list.
This operation requires the TME Admin role of senior.
Click the Set & Close button to add these resources to a policy region and close the Set Managed Resources dialog.
For more information about adding managed resources to a policy region from the command line, refer to the wsetpr command in the TME 10 Framework Reference Guide.
10.1.6.2 Create Profile ManagerThe second part of customizing TME 10 Distributed Monitoring is to create a profile manager in which you can store your TME 10 Distributed Monitoring profiles. Subscribers can then be defined to the profile manager allowing distribution of any profile defined in that profile manager to a managed node. The first step is to create the profile manager.
From the policy region menu, click on Create and Profile Manager .
The Create Profile Manager window will appear:
Tivoli Management Region Feature 203
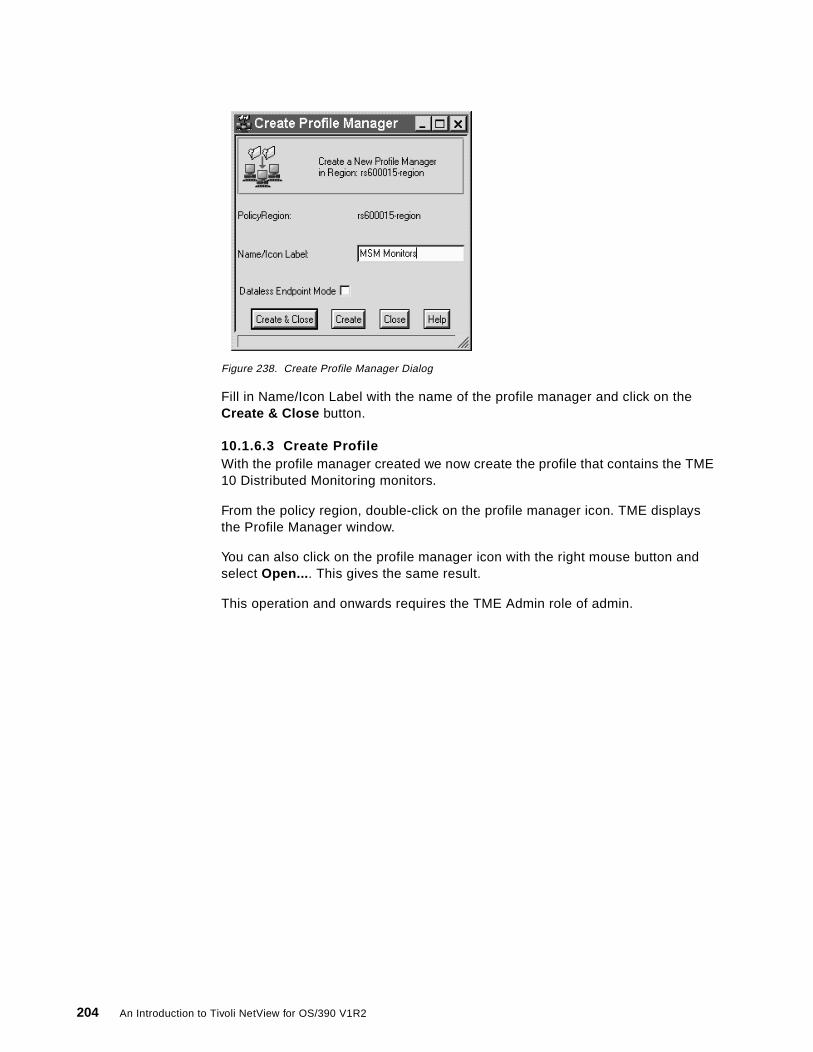
Figure 238. Create Profile Manager Dialog
Fill in Name/Icon Label with the name of the profile manager and click on the Create & Close button.
10.1.6.3 Create ProfileWith the profile manager created we now create the profile that contains the TME 10 Distributed Monitoring monitors.
From the policy region, double-click on the profile manager icon. TME displays the Profile Manager window.
You can also click on the profile manager icon with the right mouse button and select Open... . This gives the same result.
This operation and onwards requires the TME Admin role of admin.
204 An Introduction to Tivoli NetView for OS/390 V1R2

Figure 239. Create Profile Selection
Select Profile... from the Create menu to display the Create Profile dialog (see Figure 240).
Tivoli Management Region Feature 205
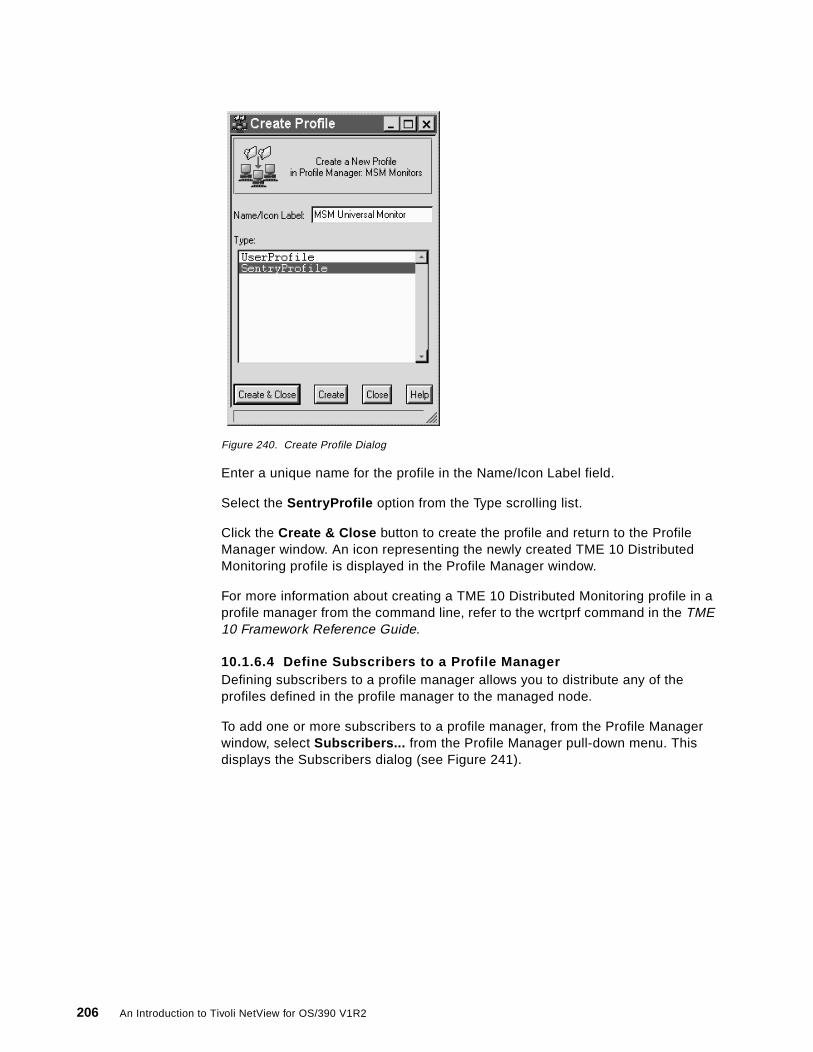
Figure 240. Create Profile Dialog
Enter a unique name for the profile in the Name/Icon Label field.
Select the SentryProfile option from the Type scrolling list.
Click the Create & Close button to create the profile and return to the Profile Manager window. An icon representing the newly created TME 10 Distributed Monitoring profile is displayed in the Profile Manager window.
For more information about creating a TME 10 Distributed Monitoring profile in a profile manager from the command line, refer to the wcrtprf command in the TME 10 Framework Reference Guide.
10.1.6.4 Define Subscribers to a Profile ManagerDefining subscribers to a profile manager allows you to distribute any of the profiles defined in the profile manager to the managed node.
To add one or more subscribers to a profile manager, from the Profile Manager window, select Subscribers... from the Profile Manager pull-down menu. This displays the Subscribers dialog (see Figure 241).
206 An Introduction to Tivoli NetView for OS/390 V1R2

Figure 241. Profile Manager Subscribers Dialog
This dialog contains a list of all profile managers and endpoints that can subscribe to the current profile manager.
Select one or more subscribers from the Available to become Subscribers scrolling list and click the left arrow button to move your selections from the available list to the Current Subscribers scrolling list.
Click on the Set Subscriptions & Close button to add the subscribers to the profile manager and dismiss the Subscribers dialog. Icons for any new subscribers are displayed in the lower half of the Profile Manager window.
Note: You must distribute the profile to establish the subscriber relationship and update subscribers system files. We explain how to distribute a TME 10 Distributed Monitoring profile after we have defined a monitor.
For more information about adding subscribers to a policy manager from the command line, refer to the wsub command in the TME 10 Framework Reference Guide.
10.1.6.5 Adding a Monitor to a TME 10 Distributed Monitoring ProfileUse the following steps to add a monitor to a TME 10 Distributed Monitoring profile.
From a Profile Manager window, double-click on a TME 10 Distributed Monitoring profile icon to display the TME 10 Distributed Monitoring Profile Properties window.
Tivoli Management Region Feature 207

Figure 242. Profile Properties Dialog
Select the Add Monitor... button.
Figure 243. Add Monitor to TME 10 Distributed Monitoring Profile Dialog
208 An Introduction to Tivoli NetView for OS/390 V1R2

Select a monitoring collection from the Monitoring Collections scrolling list. This list displays all the installed monitoring collections.
Select an option from the Monitoring Sources scrolling list. Each monitoring collection contains different monitoring sources. In this example, we used Total local space available from the Universal monitoring collection.
Selecting a monitoring source may display one or more argument fields in the Monitor Arguments scrolling list. Argument fields are displayed only if the monitoring source requires them.
Enter the appropriate information in the Monitor Arguments field. In our example we did not have any argument to enter.
Click on either the Add With Defaults button or the Add Empty button to display the Edit Monitor dialog. If you click the Add With Defaults button, the dialog displays the default settings for the monitoring source if any exist.
For more information about creating a monitor from the command line, refer to the waddmon command in the TME 10 Distributed Monitoring User's Guide.
The Edit Monitor dialog enables you to configure how often TME 10 Distributed Monitoring monitors a system resource, as well as how the application responds when a potential problem arises.
Figure 244. Edit Monitor Dialog
Tivoli Management Region Feature 209
The values you entered in the Add Monitor to TME 10 Distributed Monitoring Profile dialog are displayed at the top of the Edit Monitor dialog.
Setting up your monitors correctly is absolutely essential. This section provides you with an overview. Response levels are mapped to TEC severities and the TEC severity determines the color of the monitor when displayed on NetView Management Console. Refer to Table 5 for an explanation of how TEC severities map to NetView Management Console status.
1. Click on the Response level pop-up menu and select a response level. TME 10 Distributed Monitoring provides the following response levels:
• Critical
Indicates the highest response level. For some monitors, such as those that test for the availability of hosts and daemons, this is the only level to which triggered responses apply.
• Severe
Indicates a mid-level problem.
• Warning
Indicates a low-grade problem that may escalate if not attended to.
• Normal
Indicates the response you want TME 10 Distributed Monitoring to make when normal conditions exist. This response does not accept a threshold setting.
• Always
Indicates the response you want the application to always make, regardless of whether any of the other response levels are triggered.
2. Click on the Trigger when pop-up menu and select a threshold option. The threshold options available depend on the source being monitored and are defined by the monitoring collection.
3. If applicable, enter a value in the argument field to the right of the Response pop-up menu to define the threshold.
4. Set how you want the TME 10 Distributed Monitoring to trigger when the threshold conditions are met. You can select one or more of the following response actions:
• Send Tivoli notices • Pop up Alarm • Change Icon • Tasks
For more information about the different triggers, refer to the TME 10 Distributed Monitoring User's Guide.
The Send Enterprise Console Event option transmits TME 10 Distributed Monitoring data to the Tivoli Enterprise Console. To enable this option, select the check box button and select a severity from the pop-up menu. Then select the host on which the Tivoli Enterprise Console event server resides. You must also set up the event server to receive TME 10 Distributed Monitoring events. For more information about these procedures, see the Tivoli Enterprise Console User's Guide.
210 An Introduction to Tivoli NetView for OS/390 V1R2

In our example we didn't use any triggers but used the Send Enterprise Console Event option for all response levels, except for always.
5. Repeat steps 2 through 4 until you have set the thresholds and responses for all the response levels appropriate for your environment.
A Response Level of Normal will not give you the option to set any thresholds, which is also true for Always.
For Response Level Normal we chose Send Tivoli Enterprise Console event but for Always we turned it off. This is probably what you should do, or else your event server might be flooded.
We want to change the schedules for our monitor so we select Set Monitoring Schedule...
Figure 245. Set Monitoring Schedule Dialog
TME 10 Distributed Monitoring displays the Set Monitoring Schedule dialog. This dialog gives you the option to select how often a monitor checks the monitored resources. The maximum monitoring is once a minute. However Tivoli recommends that you monitor a resource no more than once every five minutes. The default monitoring schedule is to check for thresholds hourly.
Indicate the date and time you want the monitor to begin checking for thresholds in the Start monitoring activity fields. Select the hour and minute settings from the pop-up menus, and select either a.m. or p.m. The default start date is set to start immediately on distribution.
Indicate how often you want the monitor to check for thresholds by entering a numeric value in the Check monitor every field and selecting minutes, hours, days, weeks or months from the pop-up menu to the right of the argument field.
Click on the Change & Close button to apply the schedule. This action dismisses the Set Monitoring Schedule dialog and returns to the Edit Monitor dialog.
Note: This procedure can be performed from the desktop only.
Tivoli Management Region Feature 211

Now select Change & Close which saves your monitor and takes you back to the TME 10 Distributed Monitoring Profile Properties dialog. You then need to save the profile (see Figure 246).
Figure 246. TME 10 Distributed Monitoring Profile Properties Dialog
Now it is time to distribute the Sentry profile to the subscribing managed nodes.
10.1.6.6 Distribute Profile to Managed NodesSelect the profiles and the subscribers from the Profile Manager window (see Figure 247). Select Profile Manager and then Distribute... .
212 An Introduction to Tivoli NetView for OS/390 V1R2
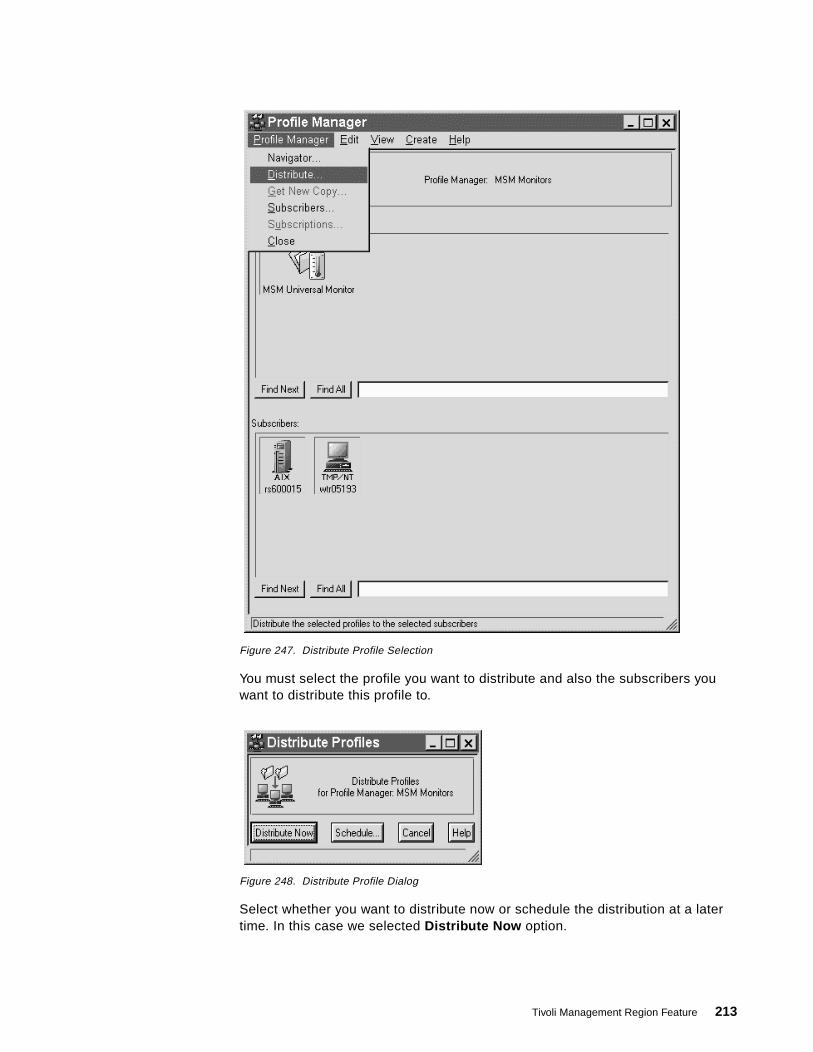
Figure 247. Distribute Profile Selection
You must select the profile you want to distribute and also the subscribers you want to distribute this profile to.
Figure 248. Distribute Profile Dialog
Select whether you want to distribute now or schedule the distribution at a later time. In this case we selected Distribute Now option.
Tivoli Management Region Feature 213

In the Operation Status area at the TME Desktop, you can notice that the profile MSM Universal Monitor from profile manager MSM Universal Monitor has been distributed.
10.1.7 Configuring the Tivoli Management Region AgentThis section explains how to customize the Tivoli Management Region agent.
The MultiSystem Manager Agent installation for AIX puts the files in a directory named $BINDIR/../generic_unix/MSM/MSMAgent; and creates a UNIX and Tivoli user named MSMAgent. All the files in that directory must be owned by MSMAgent, and the permissions must be 700 (rwx------).
The MultiSystem Manager Agent is started using the program FLCT_cmdServer.pl. Prior to running it, some customization may be necessary.
10.1.7.1 Customizing the MSMAgent.cfg FileThe customization is done by editing the MSMAgent.cfg file.
For example, the MultiSystem Manager Agent opens a port for communication with TME 10 NetView for OS/390. By default this port is 3333, which matches the default port used by the GETTOPO command. If this port is used by any other application, you could change it by modifying the CMDSERVERPORT= parameter. Remember to modify the FLCSITME member to match the new port (refer to Figure 231).
Figure 249. MSMAgent Configuration File
10.1.7.2 Enabling the Remote Command to a Managed NodeTo issue commands to a managed node from the MSMAgent, we need to:
• Run the script FLCT_instRcmd.pl using the MSMAgent user ID.
• Define the MSMAgent as a username in all machines we want to issue commands to.
# *************************************************************** # 5697-B83 (C) Copyright IBM Corp. 1997. # All Rights Reserved. # # Name: MSMAgent.cfg # # Description: This file contains configuration parameters for the # TME MSMAgent. Each parameter is set to a default # which may be modified by the system administrator # by editing this file directly. # # *************************************************************** LOGSIZE=10 # maximum size of MSMAgent.log in megabytes # if the MSMAgent.log exceeds this size it will # overwritten. CMDSERVERPORT=3333 # the port number on which cmdServer.pl will listen # for connection requests from MultiSystem Manager
214 An Introduction to Tivoli NetView for OS/390 V1R2

10.1.7.3 Setting of TEC Severity to Sentry Response LevelsThe MultiSystem Manager agent provides a program named FLCT_setMonitors.pl, which assigns TEC severity to TME 10 Distributed Monitoring response levels for all the monitors in a specific TME 10 Distributed Monitoring profile.
This program uses the parameter PROFILENAME.x= in the MSMAgent.cfg file, to select the Sentry profile to which you want to assign events.
The program assigns in each monitor of the Sentry profile, a response level to a TEC severity. As a result of that the ALWAYS response level is assigned to a TEC event severity. We don't think this is a desirable situation in a production environment. We therefore strongly recommend that you don't run this program until you have made sure you know exactly what it does, and if that is what you want.
10.2 Tivoli Management Region Process Flows
Here, we explain the various programs that are supplied with the agent. Some high-level flow diagrams are included to explain the flows between the Tivoli Management Region agent and TME 10 NetView for OS/390. We show the process flows for:
• INITTOPO and GETTOPO
• Status changes
• Command processing
10.2.1 MultiSystem Manager INITTOPO and GETTOPO FlowBefore starting FLCT_cmdServer.pl, the event server must be started. When FLCT_cmdServer.pl starts, it reads the MSMAgent.cfg file for the initialization parameters, and creates a TCP/IP server that listens for commands coming from TME 10 NetView for OS/390. After starting, it sends an event to the TEC console, informing you that the MultiSystem Manager Agent is up.
If the rules to forward events to TME 10 NetView for OS/390 are loaded, this event goes to TME 10 NetView for OS/390. The event is captured in the automation table, and then a GETTOPO TMERES command is issued.
The following is a high-level flow diagram of the INIT and GETTOPO command flow:
Tivoli Management Region Feature 215

Figure 250. INITTOPO and GETTOPO Command Flow
1 GETTOPO is sent to the MultiSystem Manager Agent.
2 The MultiSystem Manager Agent starts programs that asks the framework for information such as:
a. FLCT_getServicePoint.pl: This program returns the name of the TMR where the MSM Agent is running, and the status of the local oserv daemon, and TEC.
b. FLCT_getPhysical.pl -m: This program retrieves the physical topology of the local TMR and all the interconnected TMRs. Physical topology is composed of managed nodes and managed nodes acting as repeaters. Physical topology information is stored in a file called managedNodeDb.pag. When the parameter -m is specified, the program executes another program named FLCT_getSentryMonitors.pl that gets the name and status of all the TME10 Distributed Monitoring monitors.
c. FLCT_getLogical.pl: This program retrieves the logical topology of the local TMR and all the interconnected TMRs. Logical topology is composed of policy regions, the managed nodes inside them and TME 10 Distributed Monitoring monitors defined on them.
3 The local framework gathers information from itself, and from other interconnected regions.
4 The framework asks TME 10 Distributed Monitoring for information about monitors. It uses the FLCT_getSentryMonitors.pl program. The way that this program discovers the TME 10 Distributed Monitoring monitors in each managed node is by executing the TME 10 Distributed Monitoring command wlseng -l
216 An Introduction to Tivoli NetView for OS/390 V1R2

hostname. This command retrieves the name of all the monitors and the last TME 10 Distributed Monitoring status of all of them. Then, it associates the last response level obtained in each monitor with the TEC severity defined for that level. (For instance, we associated a TME 10 Distributed Monitoring response level of NORMAL to a TEC event severity of HARMLESS.) If the monitor has never been initialized (it doesn't have any status), the program assigns a status depending of the parameter INITIALSTATUS= specified in the MSMAgent.cfg file.
5 TME 10 Distributed Monitoring sends back the name and status of each monitor.
6 The framework sends back all the information gathered to the MultiSystem Manager Agent.
7 The MultiSystem Manager Agent formats that information and sends it back to TME 10 NetView for OS/390 that loads RODM.
10.2.2 MultiSystem Manager Flow for Status ChangesFrom now on, any change in the status of the TME 10 Distributed Monitoring monitors is sent as an event to the TEC console; and if the forwarding rules to TME 10 NetView for OS/390 are loaded, they are also sent to TME 10 NetView for OS/390.
The following is a high-level flow diagram of topology status changes:
Figure 251. Status Changes Flow
1 TME 10 Distributed Monitoring sends an event to TEC.
2 TEC forwards the event to the Event/Automation Service in MVS, which transforms the event into an SNA alert.
Tivoli Management Region Feature 217
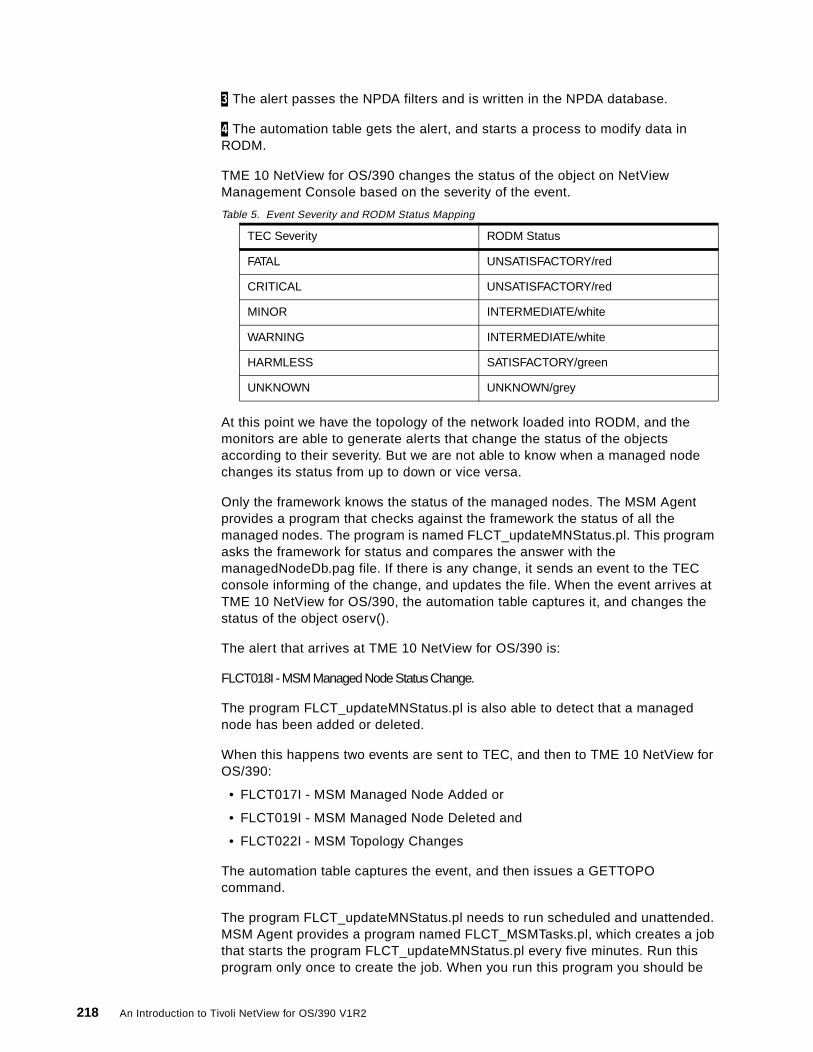
3 The alert passes the NPDA filters and is written in the NPDA database.
4 The automation table gets the alert, and starts a process to modify data in RODM.
TME 10 NetView for OS/390 changes the status of the object on NetView Management Console based on the severity of the event.
Table 5. Event Severity and RODM Status Mapping
At this point we have the topology of the network loaded into RODM, and the monitors are able to generate alerts that change the status of the objects according to their severity. But we are not able to know when a managed node changes its status from up to down or vice versa.
Only the framework knows the status of the managed nodes. The MSM Agent provides a program that checks against the framework the status of all the managed nodes. The program is named FLCT_updateMNStatus.pl. This program asks the framework for status and compares the answer with the managedNodeDb.pag file. If there is any change, it sends an event to the TEC console informing of the change, and updates the file. When the event arrives at TME 10 NetView for OS/390, the automation table captures it, and changes the status of the object oserv().
The alert that arrives at TME 10 NetView for OS/390 is:
FLCT018I - MSM Managed Node Status Change.
The program FLCT_updateMNStatus.pl is also able to detect that a managed node has been added or deleted.
When this happens two events are sent to TEC, and then to TME 10 NetView for OS/390:
• FLCT017I - MSM Managed Node Added or
• FLCT019I - MSM Managed Node Deleted and
• FLCT022I - MSM Topology Changes
The automation table captures the event, and then issues a GETTOPO command.
The program FLCT_updateMNStatus.pl needs to run scheduled and unattended. MSM Agent provides a program named FLCT_MSMTasks.pl, which creates a job that starts the program FLCT_updateMNStatus.pl every five minutes. Run this program only once to create the job. When you run this program you should be
TEC Severity RODM Status
FATAL UNSATISFACTORY/red
CRITICAL UNSATISFACTORY/red
MINOR INTERMEDIATE/white
WARNING INTERMEDIATE/white
HARMLESS SATISFACTORY/green
UNKNOWN UNKNOWN/grey
218 An Introduction to Tivoli NetView for OS/390 V1R2
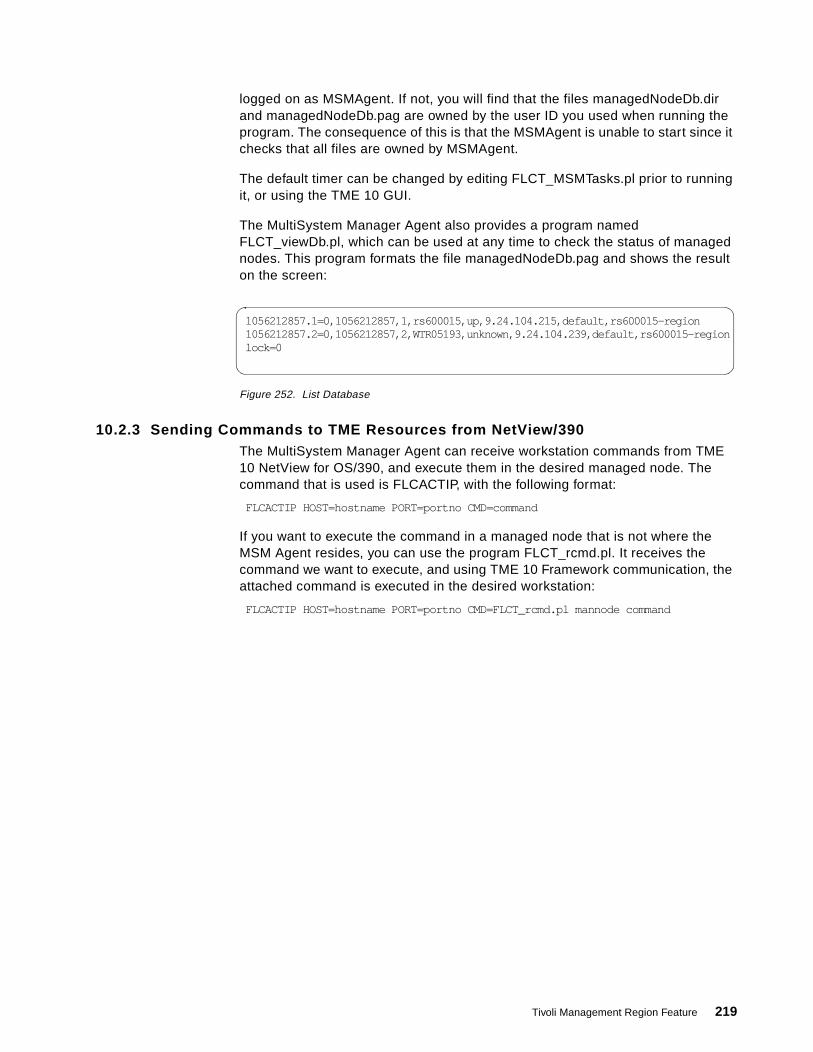
logged on as MSMAgent. If not, you will find that the files managedNodeDb.dir and managedNodeDb.pag are owned by the user ID you used when running the program. The consequence of this is that the MSMAgent is unable to start since it checks that all files are owned by MSMAgent.
The default timer can be changed by editing FLCT_MSMTasks.pl prior to running it, or using the TME 10 GUI.
The MultiSystem Manager Agent also provides a program named FLCT_viewDb.pl, which can be used at any time to check the status of managed nodes. This program formats the file managedNodeDb.pag and shows the result on the screen:
Figure 252. List Database
10.2.3 Sending Commands to TME Resources from NetView/390The MultiSystem Manager Agent can receive workstation commands from TME 10 NetView for OS/390, and execute them in the desired managed node. The command that is used is FLCACTIP, with the following format:
FLCACTIP HOST=hostname PORT=portno CMD=command
If you want to execute the command in a managed node that is not where the MSM Agent resides, you can use the program FLCT_rcmd.pl. It receives the command we want to execute, and using TME 10 Framework communication, the attached command is executed in the desired workstation:
FLCACTIP HOST=hostname PORT=portno CMD=FLCT_rcmd.pl mannode command
1056212857.1=0,1056212857,1,rs600015,up,9.24.104.215,default,rs600015-region1056212857.2=0,1056212857,2,WTR05193,unknown,9.24.104.239,default,rs600015-region lock=0
Tivoli Management Region Feature 219

Figure 253. Topology Service Command Flow
1 NetView operator sends a workstation command to the MultiSystem Manager Agent, using the FLCACTIP command.
2 The MultiSystem Manager Agent sends the command to the local framework.
3 If the command is to be executed in a remote workstation, FLCT_rcmd.pl uses the local framework to send it to the remote managed node where it is executed.
4 The remote execution is performed by the framework.
10.3 Operating the Tivoli Management Region Services
This section discusses the startup and shutdown of the MSMAgent and the command support.
10.3.1 Starting the MultiSystem Manager AgentThe following items need to be performed when starting up the Tivoli Management Region agent:
1. Issue the INITTOPO command in TME 10 NetView for OS/390 to set up the MultiSystem Manager environment.
2. Check that the automation table is running and that the MultiSystem Manager operators are logged on.
3. Log on as MSMAgent in AIX and start the program FLCT_cmdServer.pl.
4. Check that an alert MSM Agent Up arrives to NPDA.
Go to NPDA Alert Static panel, and look for an alert with the description of FLCT009I MSM Agent Up.
220 An Introduction to Tivoli NetView for OS/390 V1R2

Figure 254. NPDA Alert Static Display
Enter 2 d to select the alert.
The NPDA event detail contains the MSM Agent Up event and it has a severity of HARMLESS.
Figure 255. Event Detail Screen - MSM Agent Up
5. When the alert arrives, an automatic GETTOPO is sent to the agent.
Check that the agent in AIX is receiving the command and executing the following programs:
N E T V I E W SESSION DOMAIN: RABAN TMEID5 05/28/98 10:48:49 NPDA-30B * ALERTS-STATIC *
SEL# DOMAIN RESNAME TYPE TIME ALERT DESCRIPTION:PROBABLE CAUSE ( 1) RABAN EL24080 LAN 10:48 INCOMING CALL REFUSED :COMM CTRL PROGRAM ( 2) RABAN RS600015 PWS 10:47 FLCT009I MSM Agent Up.;:severity=HARMLESS; ( 3) RABAN EL24080 LAN 10:47 INCOMING CALL REFUSED :COMM CTRL PROGRAM ( 4) RABAN RS600015 PWS 10:47 FLCT010I MSM Agent Down.;:severity=FATAL; ( 5) RABAN RS600015 PWS 10:47 FLCT010I MSM Agent Down.;:severity=FATAL; ( 6) RABAN EL24080 LAN 10:46 INCOMING CALL REFUSED :COMM CTRL PROGRAM ( 7) RABAN@WTR05135 DEV 10:45 NO COMM WITH REMOTE NODE:COMMUNICATIONS INTF ( 8) RABAN EL24080 LAN 10:45 INCOMING CALL REFUSED :COMM CTRL PROGRAM ( 9) RABAN EL24080 LAN 10:44 INCOMING CALL REFUSED :COMM CTRL PROGRAM (10) RABAN EL24080 LAN 10:43 INCOMING CALL REFUSED :COMM CTRL PROGRAM (11) RABAN@8235TR04 DEV 10:42 PROBLEM RESOLVED:COMMUNICATIONS INTERFACE (12) RABAN EL24080 LAN 10:42 INCOMING CALL REFUSED :COMM CTRL PROGRAM (13) RABAN EL24080 LAN 10:41 INCOMING CALL REFUSED :COMM CTRL PROGRAM (14) RABAN EL24080 LAN 10:40 INCOMING CALL REFUSED :COMM CTRL PROGRAM (15) RABAN EL24080 LAN 10:38 INCOMING CALL REFUSED :COMM CTRL PROGRAM DEPRESS ENTER KEY TO VIEW ALERTS-DYNAMIC OR ENTER A TO VIEW ALERTS-HISTORY ENTER SEL# (ACTION),OR SEL# PLUS M (MOST RECENT), P (PROBLEM), DEL (DELETE)
???CMD==>
N E T V I E W SESSION DOMAIN: RABAN TMEID5 05/28/98 10:51:37 NPDA-43S * EVENT DETAIL * PAGE 1 OF 5
RABAN SENTRY RS600015 +--------+ +--------+ DOMAIN | APPL |---| PWS | +--------+ +--------+
SEL# TYPE AND NAME OF OTHER RESOURCES ASSOCIATED WITH THIS EVENT: ( 1) APPL MSMAGENT('')
DATE/TIME: RECORDED - 05/28 10:47
EVENT TYPE: TEMPORARY
DESCRIPTION: FLCT009I MSM Agent Up.;
PROBABLE CAUSES: severity=HARMLESS;
ENTER A (ACTION), SEL# (CORRELATED EVENTS), OR DM (DETAIL MENU)
???CMD==>
Tivoli Management Region Feature 221
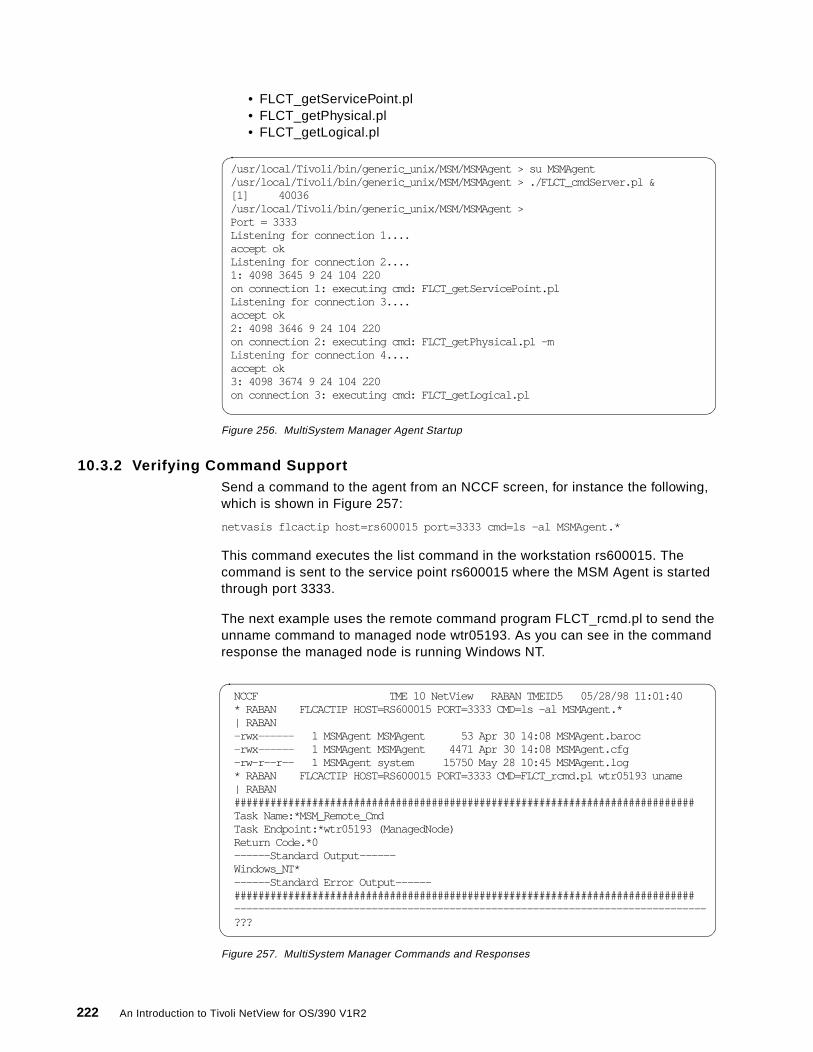
• FLCT_getServicePoint.pl • FLCT_getPhysical.pl • FLCT_getLogical.pl
Figure 256. MultiSystem Manager Agent Startup
10.3.2 Verifying Command SupportSend a command to the agent from an NCCF screen, for instance the following, which is shown in Figure 257:
netvasis flcactip host=rs600015 port=3333 cmd=ls -al MSMAgent.*
This command executes the list command in the workstation rs600015. The command is sent to the service point rs600015 where the MSM Agent is started through port 3333.
The next example uses the remote command program FLCT_rcmd.pl to send the unname command to managed node wtr05193. As you can see in the command response the managed node is running Windows NT.
Figure 257. MultiSystem Manager Commands and Responses
/usr/local/Tivoli/bin/generic_unix/MSM/MSMAgent > su MSMAgent/usr/local/Tivoli/bin/generic_unix/MSM/MSMAgent > ./FLCT_cmdServer.pl &[1] 40036/usr/local/Tivoli/bin/generic_unix/MSM/MSMAgent >Port = 3333Listening for connection 1....accept okListening for connection 2....1: 4098 3645 9 24 104 220on connection 1: executing cmd: FLCT_getServicePoint.plListening for connection 3....accept ok2: 4098 3646 9 24 104 220on connection 2: executing cmd: FLCT_getPhysical.pl -mListening for connection 4....accept ok3: 4098 3674 9 24 104 220on connection 3: executing cmd: FLCT_getLogical.pl
NCCF TME 10 NetView RABAN TMEID5 05/28/98 11:01:40 * RABAN FLCACTIP HOST=RS600015 PORT=3333 CMD=ls -al MSMAgent.* | RABAN -rwx------ 1 MSMAgent MSMAgent 53 Apr 30 14:08 MSMAgent.baroc -rwx------ 1 MSMAgent MSMAgent 4471 Apr 30 14:08 MSMAgent.cfg -rw-r--r-- 1 MSMAgent system 15750 May 28 10:45 MSMAgent.log * RABAN FLCACTIP HOST=RS600015 PORT=3333 CMD=FLCT_rcmd.pl wtr05193 uname | RABAN ############################################################################# Task Name:*MSM_Remote_Cmd Task Endpoint:*wtr05193 (ManagedNode) Return Code.*0 ------Standard Output------ Windows_NT* ------Standard Error Output------ ############################################################################# ------------------------------------------------------------------------------- ???
222 An Introduction to Tivoli NetView for OS/390 V1R2

10.3.3 Stopping the MultiSystem Manager AgentWhen the MSMAgent is stopped, MultiSystem Manager sends the MSM Agent Down alert to TME 10 NetView for OS/390. The alert detail is shown in Figure 258.
Figure 258. Event Detail Screen - MSM Agent Down
10.4 MSMAgent Topology with NetView Management Console
In this section we show you some examples of TME 10 Topology in the NetView Management Console such as:
• Hierarchy of objects in the Tivoli Management Region
• Sample Exception View of Tivoli Management Region objects
• Default Tivoli Management Region-specific commands
10.4.1 Tivoli Management Region Object HierarchyOn the NetView Management Console workstation, we open the view defined in the TME initialization file. The default name is MultiSysView, and we get the following screen:
N E T V I E W SESSION DOMAIN: RABAN TMEID5 05/28/98 10:52:37 NPDA-43S * EVENT DETAIL * PAGE 1 OF 5
RABAN SENTRY RS600015 +--------+ +--------+ DOMAIN | APPL |---| PWS | +--------+ +--------+
SEL# TYPE AND NAME OF OTHER RESOURCES ASSOCIATED WITH THIS EVENT: ( 1) APPL MSMAGENT('')
DATE/TIME: RECORDED - 05/28 10:47
EVENT TYPE: PERMANENT
DESCRIPTION: FLCT010I MSM Agent Down.;
PROBABLE CAUSES: severity=FATAL;
ENTER A (ACTION), SEL# (CORRELATED EVENTS), OR DM (DETAIL MENU)
???CMD==>
Tivoli Management Region Feature 223

Figure 259. MultiSysView - The MSM Top-Level View
From this view we open the Configuration Child view of the TME 10 MSM Object to understand its hierarchy. Figure 260 shows the overall hierarchy of the Tivoli Management Region views that were defined in RODM.
224 An Introduction to Tivoli NetView for OS/390 V1R2

Figure 260. Child View for TME 10 Networks
1 TME 10 Network View with the MSMAgent and the RS600015 aggregate.
2 The physical detail View of the region, contains all TMRs that are connected to the RS600015 (none in this case).
3 The logical detail view of the region, contains all the top-level policy regions defined to RS600015.
4 Managed nodes that are known in RS600015.
5 TME 10 Distributed Monitoring monitors for the managed node rs600015, oserv and correlated TCP/IP adapter.
6 oserv and correlated TCP/IP adapter.
From to the MultiSysView, when we double-click the TME10_Networks object, we get the TME 10 Network View. In this case we only have rs600015 as the TMR server. This view also shows the MultiSystem Manager Agent.
Tivoli Management Region Feature 225
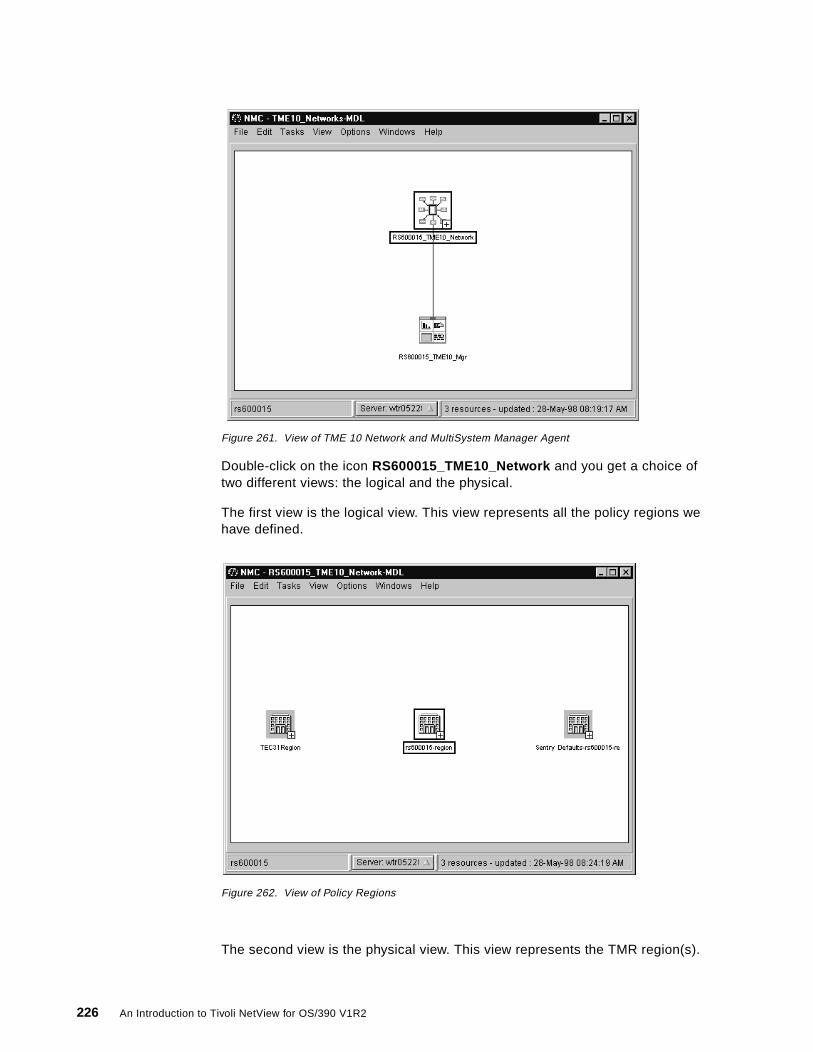
Figure 261. View of TME 10 Network and MultiSystem Manager Agent
Double-click on the icon RS600015_TME10_Network and you get a choice of two different views: the logical and the physical.
The first view is the logical view. This view represents all the policy regions we have defined.
Figure 262. View of Policy Regions
The second view is the physical view. This view represents the TMR region(s).
226 An Introduction to Tivoli NetView for OS/390 V1R2

Figure 263. View of Tivoli Management Regions
Double-click on rs600015-region (in Logical View) or TMR rs600015-region (in Physical View), and you get a view of the different managed nodes belonging to that region.
The differences between the physical (Figure 265) and logical view (Figure 264) is that there is a link between the TMR server to the managed node in the physical view.
Figure 264. View of Managed Nodes - Logical
Tivoli Management Region Feature 227
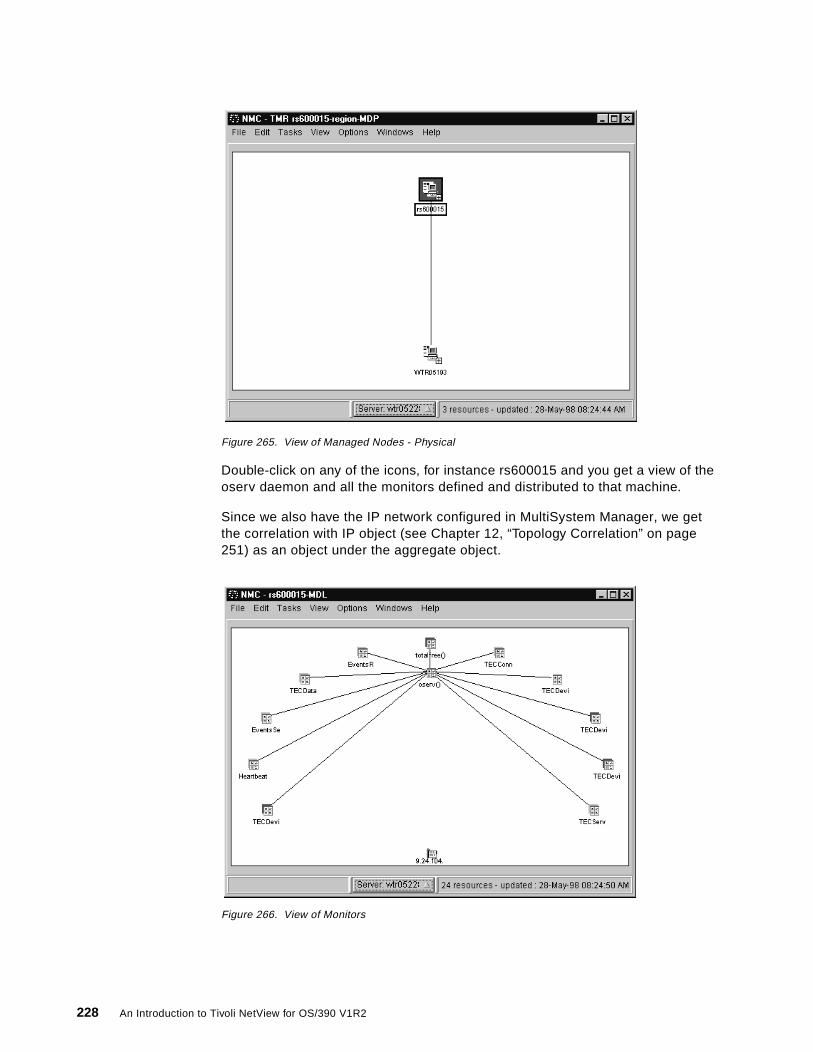
Figure 265. View of Managed Nodes - Physical
Double-click on any of the icons, for instance rs600015 and you get a view of the oserv daemon and all the monitors defined and distributed to that machine.
Since we also have the IP network configured in MultiSystem Manager, we get the correlation with IP object (see Chapter 12, “Topology Correlation” on page 251) as an object under the aggregate object.
Figure 266. View of Monitors
228 An Introduction to Tivoli NetView for OS/390 V1R2

10.4.2 Exception ViewsException views can be implemented in many different ways to get dynamic views of failing objects. The objects go to this view when they change their DisplayStatus attribute in RODM.
In our environment, we have an exception view for all the monitor objects in unsatisfactory status (refer to 10.1.3, “MultiSystem Manager Exception Views” on page 200).
Figure 267. Exception View
The Display Name of the monitors is an abbreviated name based on the TME 10 Distributed Monitoring name of the monitor and the resource monitored.
The DisplayOtherData of the monitor is built using the IP name of the workstation, and its address. To see this field, you need to open Resource Properties for the object. The result is a window similar to Figure 268. The DisplayOtherData field is in the Data1 field.
Tivoli Management Region Feature 229
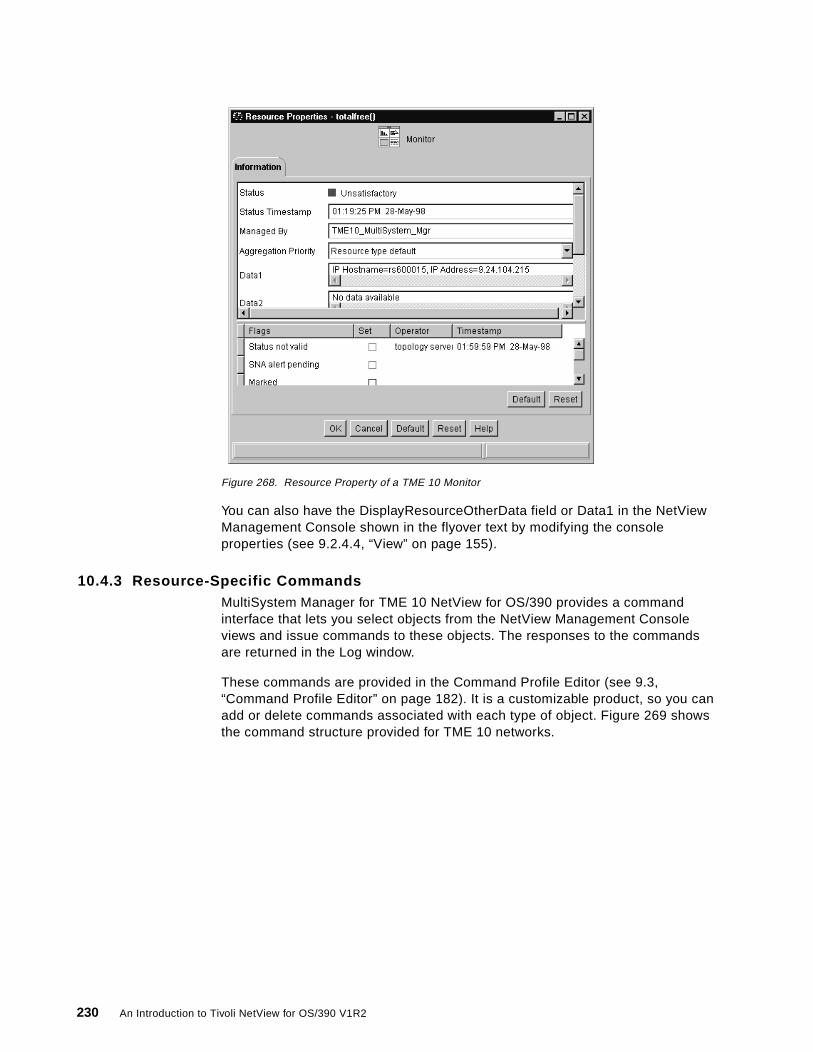
Figure 268. Resource Property of a TME 10 Monitor
You can also have the DisplayResourceOtherData field or Data1 in the NetView Management Console shown in the flyover text by modifying the console properties (see 9.2.4.4, “View” on page 155).
10.4.3 Resource-Specific CommandsMultiSystem Manager for TME 10 NetView for OS/390 provides a command interface that lets you select objects from the NetView Management Console views and issue commands to these objects. The responses to the commands are returned in the Log window.
These commands are provided in the Command Profile Editor (see 9.3, “Command Profile Editor” on page 182). It is a customizable product, so you can add or delete commands associated with each type of object. Figure 269 shows the command structure provided for TME 10 networks.
230 An Introduction to Tivoli NetView for OS/390 V1R2

Figure 269. Command Set for TME 10 Objects
The following commands are available:
• TMR.OS: Operating system-related commands:
– TME.OS.CMD: Provides a command-line interface.– TMR.OS.ENV: Displays the environement variables.– TMR.OS.UNAME: Shows the operating system name (unix name).– TMR.OS.UNAMEa: Shows the operating system name in verbose format.
The command is uname -a.
• TMR.MSMAGENT: Provides MSMAgent control:
– TMR.MSMAGENT.VIEWDB: View the MSM object database with FLCT_viewDB.pl.
– TMR.MSMAGENT.UNLOCKDB: Run unlocking to MSM Agent database with FLCT_unlockDB.pl.
• TMR.WT: Provides general Tivoli commands:
– TMR.WT.ODADMIN: Issue odadmin. List general status of TME.
Tivoli Management Region Feature 231
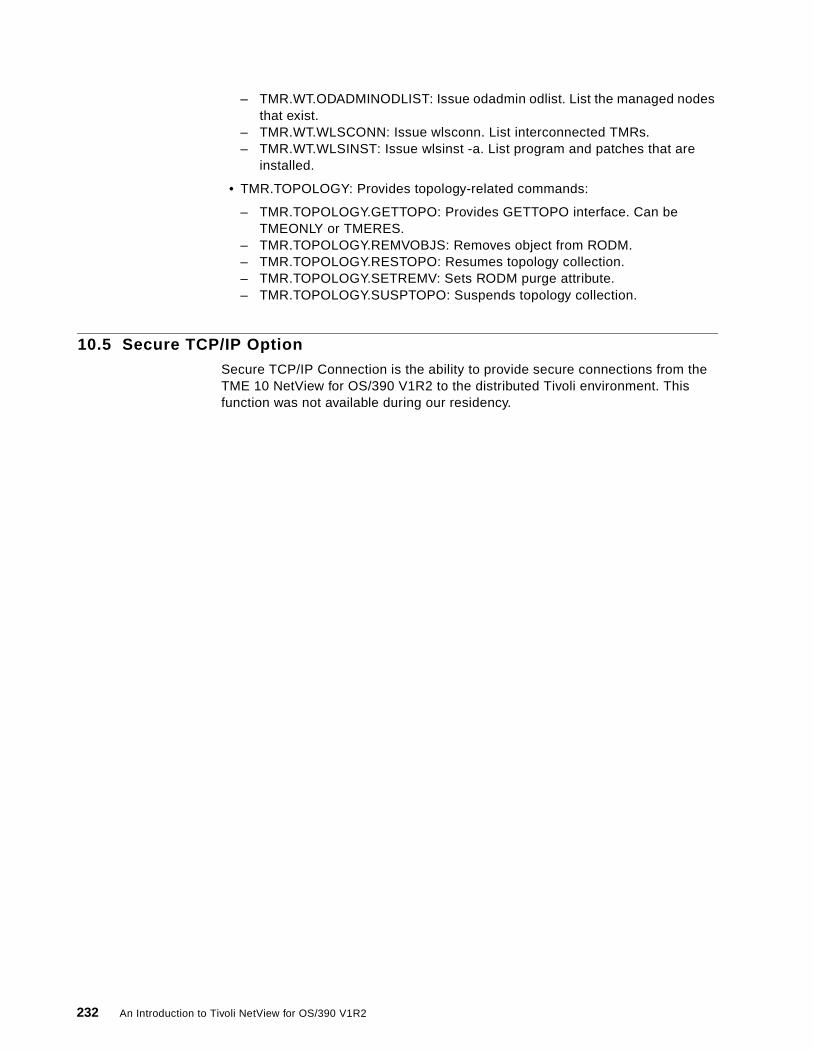
– TMR.WT.ODADMINODLIST: Issue odadmin odlist. List the managed nodes that exist.
– TMR.WT.WLSCONN: Issue wlsconn. List interconnected TMRs.– TMR.WT.WLSINST: Issue wlsinst -a. List program and patches that are
installed.
• TMR.TOPOLOGY: Provides topology-related commands:
– TMR.TOPOLOGY.GETTOPO: Provides GETTOPO interface. Can be TMEONLY or TMERES.
– TMR.TOPOLOGY.REMVOBJS: Removes object from RODM.– TMR.TOPOLOGY.RESTOPO: Resumes topology collection.– TMR.TOPOLOGY.SETREMV: Sets RODM purge attribute.– TMR.TOPOLOGY.SUSPTOPO: Suspends topology collection.
10.5 Secure TCP/IP Option
Secure TCP/IP Connection is the ability to provide secure connections from the TME 10 NetView for OS/390 V1R2 to the distributed Tivoli environment. This function was not available during our residency.
232 An Introduction to Tivoli NetView for OS/390 V1R2
Chapter 11. NetWare Agent
This chapter gives you a brief overview of the the enhancements to the NetWare support provided in TME 10 NetView for OS/390 V1R2. The NetWare agent in this release has been enhanced to support TCP/IP communication to NetView/390. It also has access to NDS on 4.x NetWare machines.
11.1 Customization of the MultiSystem Manager NetWare Environment
The TME 10 NetView for OS/390 V1R2 customization is very simple and basically consists of uncommenting members in DSIPARM. The following steps must be be performed:
1. Uncomment MEMBER FLCSTBLE in DSITBL01 to enable NetWare support.
Figure 270. DSITBL01 Include FLCSTBLE
2. Update member FLCAINP to include FLCSINW.
The MultiSystem Manager initialization member FLCAINP should be updated to support NetWare. This member is read when you issue the INITTOPO command.
************************************************************************ ** = = = = = = = = START OF MSU AUTOMATION STATEMENTS = = = = = = = = =** ************************************************************************* Uncomment the following statement if you are running the LAN ** NetWork Manager (LNM) feature of MultiSystem Manager. ************************************************************************%INCLUDE FLCSTBLL************************************************************************ Uncomment the following statement if you are running pre. V1R2 ** Novell NetWare feature of MultiSystem Manager. *************************************************************************%INCLUDE FLCSTBLN************************************************************************ Uncomment the following statement if you are running the Novell ** NetWare feature of TME 10 NetView for OS/390 V1R2. ************************************************************************%INCLUDE FLCSTBLE
© Copyright IBM Corp. 1998 233

Figure 271. FLCAINP MultiSystem Manager Initialization Member
3. Customize FLCSINW with required parameters for GETTOPO.
Figure 272. Extract from FLCSINW Member
************************************************************************ 5655-044 (C) Copyright IBM Corp. 1994, 1997. ** All Rights Reserved. ************************************************************************* ** Description: Sample initialization file for MultiSystem Manager. ** ** This file specifies the necessary information required ** by MultiSystem Manager. * ...................************************************************************************ Include the initialization statements for LNM service points. *************************************************************************%INCLUDE FLCSILNM************************************************************************ Include the initialization statements for NetWare service points. ************************************************************************%INCLUDE FLCSINW************************************************************************ Include the initialization statements for NV/6000 IP service points.************************************************************************
************************************************************************ 5655-044 (C) Copyright IBM Corp. 1994. ** All Rights Reserved. ************************************************************************* ** Description: Sample initialization file for NW feature of ** MultiSystem Manager. ** ** This file contains a sample initialization statement ** to define a NetWare service point topology agent in ** your network. * ...................***********************************************************************GETTOPO NWCPRES,************************************************************************ SP is a required keyword. The format is ** sp_netid.sp_domain.sp_spname. ************************************************************************SP=&nw41 ...................************************************************************************ REQUESTERS is optional. Valid values are MONITALL, ALL or NONE. ** If REQUESTERS is NOT specified, REQUESTERS = NONE is the default. ************************************************************************REQUESTERS=MONITALL,************************************************************************ This operand is only valid for the Novell NetWare feature of TME 10 ** NetView for OS/390 V1R2 and will not work on pre. V1R2 NetWare. ** ** NWSYSMONITOR is optional. Valid values are NO, ALL or ALERTSONLY. ** If NWSYSMONITOR is NOT specified, NWSYSMONITOR=NO is the default. ************************************************************************NWSYSMONITOR=ALL,
234 An Introduction to Tivoli NetView for OS/390 V1R2

The TCP/IP hostname of our server was NW41. The ampersand on the Service Point definition is required and indicates that this service point is using a TCP/IP connection.
4. Update RODM load job to include the exception views for NetWare (FLCSDM6N).
The NetWare exception views should be loaded into RODM and we use the sample installation job CNMSJH12.
Figure 273. Loading NetWare Exception Views into RODM
5. Customize the TCP/IP Alert Receiver task.
You should customize the TCP/IP Alert Receiver task. In DSIPARM member DSIRTTTD, you must specify the name of your TCP/IP address space and you can change the default port number. The port number must match the port number specified in the initialization file for the topology agent.
********************************* Top of Data ***************************//RODMLOAD JOB (O-111111),'TMEID3',MSGCLASS=O,MSGLEVEL=(1,1),// CLASS=I,NOTIFY=TMEID3//********************************************************************//* LICENSED MATERIALS - PROPERTY OF IBM *//* 5697-B82 (C) COPYRIGHT TIVOLI SYSTEMS 1997, 1998 *//* 5655-007 (C) COPYRIGHT IBM CORP. 1993, 1995. *//* ALL RIGHTS RESERVED. *//********************************************************************//* NAME(CNMSJH12) SAMPLE(CNMSJH12) RELATED-TO( ) *//* DESCRIPTION: GMFHS/SNA TOPOLOGY MANAGER DATA MODEL LOAD JOB *//******************************************************************** ...................//LOADDM EXEC EKGLOADN,// RODMNAME=RODM1, NAME OF GMFHS'S RODM (CHANGE OR DEL. PARM)// EKGIN1=NULLFILE, EKGIN1 overridden - see below// EKGIN3=NULLFILE, not needed for structure load// LOAD=STRUCTURE,// OPER=LOAD,// LISTL=ERRORSYNTAX,// SEVERITY=WARNING ...................// DD DSN=TME10.V1R2.CNMSAMP(FLCSDM1),DISP=SHR <-CLASS/FIELD DEF// DD DSN=TME10.V1R2.CNMSAMP(FLCSDM2),DISP=SHR <-CLASS/FIELD DEF// DD DSN=TME10.V1R2.CNMSAMP(FLCSDM3),DISP=SHR <-CLASS/FIELD DEF// DD DSN=TME10.V1R2.CNMSAMP(FLCSDM4),DISP=SHR <-CLASS/FIELD DEF// DD DSN=TME10.V1R2.CNMSAMP(FLCSDM5),DISP=SHR <-CLASS/FIELD DEF// DD DSN=TME10.V1R2.CNMSAMP(FLCSDM6),DISP=SHR <-MSM EXC VIEW// DD DSN=TME10.V1R2.CNMSAMP(FLCSDM6A),DISP=SHR <-ATM EXC VIEW// DD DSN=TME10.V1R2.CNMSAMP(FLCSDM6H),DISP=SHR <-NETFIN EXC VIEW// DD DSN=TME10.V1R2.CNMSAMP(FLCSDM6I),DISP=SHR <-IP EXC VIEW// DD DSN=TME10.V1R2.CNMSAMP(FLCSDM6L),DISP=SHR <-LNM EXC VIEW// DD DSN=TME10.V1R2.CNMSAMP(FLCSDM6M),DISP=SHR <-LMU EXC VIEW// DD DSN=TME10.V1R2.CNMSAMP(FLCSDM6N),DISP=SHR <-NETWAR EXC VIEW
NetWare Agent 235
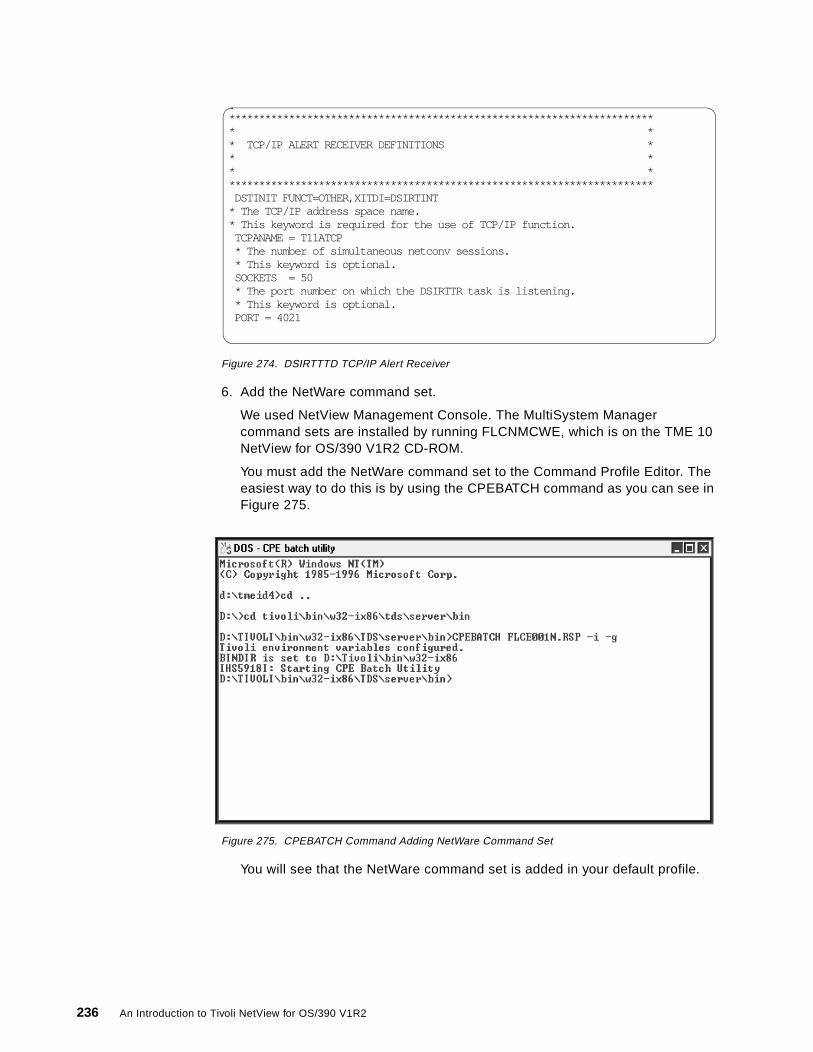
Figure 274. DSIRTTTD TCP/IP Alert Receiver
6. Add the NetWare command set.
We used NetView Management Console. The MultiSystem Manager command sets are installed by running FLCNMCWE, which is on the TME 10 NetView for OS/390 V1R2 CD-ROM.
You must add the NetWare command set to the Command Profile Editor. The easiest way to do this is by using the CPEBATCH command as you can see in Figure 275.
Figure 275. CPEBATCH Command Adding NetWare Command Set
You will see that the NetWare command set is added in your default profile.
*********************************************************************** * * * TCP/IP ALERT RECEIVER DEFINITIONS * * * * * *********************************************************************** DSTINIT FUNCT=OTHER,XITDI=DSIRTINT * The TCP/IP address space name. * This keyword is required for the use of TCP/IP function. TCPANAME = T11ATCP * The number of simultaneous netconv sessions. * This keyword is optional. SOCKETS = 50 * The port number on which the DSIRTTR task is listening. * This keyword is optional. PORT = 4021
236 An Introduction to Tivoli NetView for OS/390 V1R2
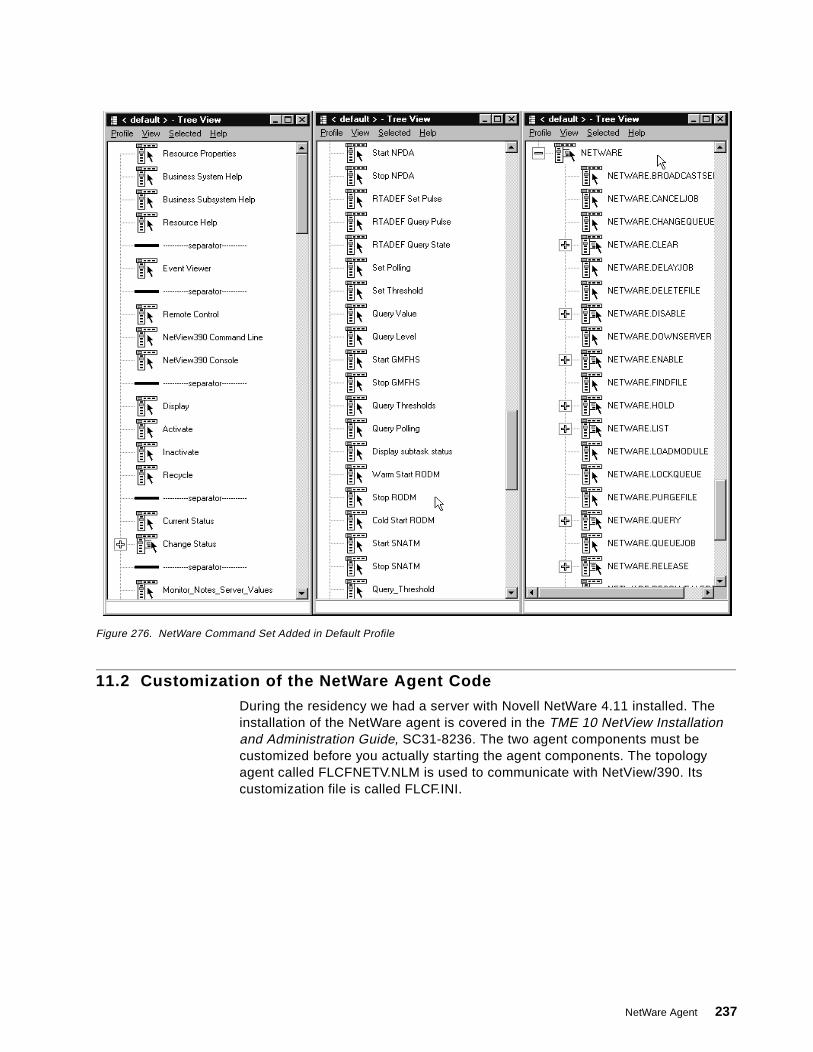
Figure 276. NetWare Command Set Added in Default Profile
11.2 Customization of the NetWare Agent Code
During the residency we had a server with Novell NetWare 4.11 installed. The installation of the NetWare agent is covered in the TME 10 NetView Installation and Administration Guide, SC31-8236. The two agent components must be customized before you actually starting the agent components. The topology agent called FLCFNETV.NLM is used to communicate with NetView/390. Its customization file is called FLCF.INI.
NetWare Agent 237

Figure 277. Flcf.ini Customization File
We modified the hostIPaddr and the NDSUserID parameters for our environment. The port number specified here must match the port number specified in DSIPARM member DSIRTTTD.
Since we only had one NetWare server we installed the status agent on the same server. The status agent receives commands from, for example, the NetView Management Console client and executes them on the NetWare server. The status agent also manages monitor thresholds. The status agent is called FLCEAGNT.NLM and its customization member is FLCE.INI.
[Config] ######################################################################## # This is the initialization file for the MultiSystem Manager NetWare # Topology Agent. These parameters are read during initialization of th # NetWare Topology Agent (flcfnetv.nlm). # # When one of the initialization parameters in this file is modified, th # value will be picked up when the MSM NetWare Topology Agent service is # stopped and restarted. NDSPassword is an exception to this, as it is # dynamically. # # Do not add any new lines to this file except for comment lines, which # have a poundsign in the first column. # ######################################################################## ######################################################################## # The MAX_BUFFER_SIZE parameter is an integer with valid values ranging from # 3400 to 24400. If an illegal value is specified, or no value is specified # the default of 24400 will be used. This parameter controls the maximum # amount of information that the agent will send to TME 10 NetView for OS/390 # at one time. The maximum value of 24400 will minimize the time required to # send data to NetView. Smaller values can be used if inadequate buffering # capacity along the TCP/IP transmission path is causing errors (in # particular, message "FLC095E THE FORMAT OF THE DATA SENT FROM THE AGENT IS # INVALID" at the NetView host indicates that data is being lost between the # agent and the host. Smaller buffer sizes can be used to prevent this error, # but will result in a longer time required to send topology data from the # Agent to the NetView host. # ######################################################################## MAX_BUFFER_SIZE=24400 ######################################################################## # The hostIPaddr parameter identifies the NetView host that will receive alert # notifications. Alerts are used to notify NetView when the the agent is # initializing and terminating, as well as to provide dynamic status changes. # The value can be specified as either a hostname, or as an IP address in # dotted decimal format (x.x.x.x). This parameter MUST be specified in order # for the MSM NetWare Topology Agent to send alerts. # ######################################################################## hostIPaddr = mvs11.ral.itso.ibm.com ######################################################################## # The hostPort is an optional parameter that can be used to specify a specific # port to be used to communicate with the TME 10 NetView NetView TCP/IP Alert# Receiver (DSIRTTR). # If DSIRTTR is configured to use it's default port, then this # parameter should be omitted to indicate that the MSM NetWare # Topology Agent should use DSIRTTR default port 4021. # ######################################################################## ######################################################################## #hostPort = 4021 ######################################################################## # NDSUserID: # # ID of a user with authorization sufficient to query the NDS for server # information. This is used in conjunction with NDSPassword (which is added # in an encrypted form to this file by the NDS PASSWORD command) to query # the NDS. # ######################################################################## NDSUserID = .Admin.itso.com
238 An Introduction to Tivoli NetView for OS/390 V1R2

Figure 278. Flce.ini Customization File
In FLCE.INI we changed the TopologyHost to the name of our NetWare server and the NDSUserID.
You must set the password to access NDS. The NDS password will be stored in encrypted form on the server and it must be set from NetView/390. The password must be the correct password for the user ID specified in the NDSUserID parameter. If the password is incorrect, you get an error message when the agent is trying to log in to NDS. The error message is:
FLCF626E Could not login to the NDS. Error Code = -610
This is the command we used to set the NDS password:
# ###################################################################### # Default values for the SET MONITOR THRESHOLD values. # ###################################################################### IdleTime = 8 VolSpace = SYS;5 DirSlots = 5 Connections = 2 Utilization = 80 Alerts = 2 Autoresolve = 15 Interval = 1 # ################# Configuration Information ######################## # ###################################################################### # TopologyHost: # # Name of the collection point that this status agent will communicate # with. If this is not specified, it is assumed that this server is the # collection point. # ###################################################################### TopologyHost = FERGUS_NW41 # ###################################################################### # StatusInterval: # # This is how often, in seconds, that the status agent will query the # server for status. # ###################################################################### StatusInterval = 10 # ###################################################################### # HeartBeatInterval: # # This is how often the status agent should send a heartbeat to the # collection point. The number of seconds between heartbeats will # be this number times the StatusInterval value. By default # the StatusInterval is 10 seconds, and the HeartBeatInterval is 6, # the number of seconds between heartbeats will be 6 * 10 or 60 seconds. # Set this to 0 to turn off heartbeats. # ###################################################################### HeartBeatInterval = 6 # ###################################################################### # HeartBeatTimeOut:# This tells the collection point how long to wait, in seconds, between # heartbeats before assuming this status agent has gone down. If the # collection point does not hear from this status agent before the # interval period is expired, it will be send a server down to # NetView for this server. # ###################################################################### HeartBeatTimeOut = 150 ######################################################################## # NDSUserID: # # ID of a user with authorization sufficient to query the NDS for server # information. This is used in conjunction with NDSPassword (which is a # in an encrypted form to this file by the NDS PASSWORD command) to quer # the NDS. # ######################################################################## NDSUserID = .Admin.itso.com
NetWare Agent 239

Figure 279. Setting the NDS Password
11.3 NetWare Scenarios
The first step before starting the server is to verify that the TCP/IP router task in NetView is active. You can use the LIST STATUS=TASKS command to verify that the task DSIRTTR is active.
Figure 280. Display Status of the DSIRTTR Task
We found it useful to make sure we had IP connectivity between TME 10 NetView for OS/390 V1R2 and the NetWare server before starting the agent. We used the PING command on TCP/IP MVS and on the NetWare server we used the LOAD PING command.
We loaded the topology agent and the status agent with the following commands:
11.3.1 NetWare AlertsThe NetWare agent can send the following alerts to TME 10 NetView for OS/390 V1R2:
• Monitored server coming online
• Monitored server going offline
FLCACTIP HOST=NW41 PORT=6761 CMD=SNAME=* NDS PASSWORD=password FLCF628I NDS password successfully updated.
CNMKWIND OUTPUT FROM LIST STATUS=TASKS LINE 0 OF 1 *------------------------------- Top of Data --------------------------- TYPE: MNT TASKID: MNT RESOURCE: RABAN STATUS: ACTIVE TYPE: PPT TASKID: RABANPPT RESOURCE: RABANPPT STATUS: ACTIVE TYPE: OPT TASKID: DSIMONIT TASKNAME: DSIMONIT STATUS: ACTIVE TYPE: OPT TASKID: DSITIMMT TASKNAME: DSITIMMT STATUS: ACTIVE TYPE: OPT TASKID: DSIDCBMT TASKNAME: DSIDCBMT STATUS: ACTIVE TYPE: OPT TASKID: DSIHLLMT TASKNAME: DSIHLLMT STATUS: ACTIVE TYPE: OPT TASKID: DSISTMMT TASKNAME: DSISTMMT STATUS: ACTIVE TYPE: OPT TASKID: SYSOP TASKNAME: DSIWTOMT STATUS: ACTIVE TYPE: OPT TASKID: RABAN TASKNAME: DSIACBMT STATUS: ACTIVE TYPE: OPT TASKID: DSILOGMT TASKNAME: DSILOGMT STATUS: ACTIVE TYPE: OPT TASKID: DSILOG TASKNAME: DSILOG STATUS: ACTIVE TYPE: OPT TASKID: DSICRTR TASKNAME: DSICRTR STATUS: ACTIVE TYPE: OPT TASKID: DSIRTTR TASKNAME: DSIRTTR STATUS: ACTIVE TYPE: OPT TASKID: DSITRACE TASKNAME: DSITRACE STATUS: ACTIVE TYPE: OPT TASKID: CNMCSSIR TASKNAME: CNMCSSIR STATUS: ACTIVE TYPE: OPT TASKID: CNMCALRT TASKNAME: CNMCALRT STATUS: ACTIVE TYPE: OPT TASKID: DSISVRT TASKNAME: DSISVRT STATUS: ACTIVE TYPE: OPT TASKID: DSIGDS TASKNAME: DSIGDS STATUS: ACTIVE TYPE: OPT TASKID: DSIAMLUT TASKNAME: DSIAMLUT STATUS: ACTIVE TYPE: OPT TASKID: BNJDSERV TASKNAME: BNJDSERV STATUS: ACTIVE TYPE: OPT TASKID: BNJMNPDA TASKNAME: BNJMNPDA STATUS: ACTIVE
LOAD FLCFNETV.NLMLOAD FLCEAGNT.NLM
240 An Introduction to Tivoli NetView for OS/390 V1R2

• MSM Agent Up/Down
• Number of connections exceeding threshold
• Number of directory slots falling below threshold
• CPU utilization exceeding threshold for a given period of time
• Space on named volume falling below a threshold
When the NetWare server is ready and the MSM agent loaded, the NetWare server sends an alert to NetView saying that the file server has come online. The following two screens contain the NPDA detail records for our server:
Figure 281. NPDA NetWare Alert Server Up (1/2)
NetWare Agent 241

Figure 282. NPDA NetWare Alert Server Up (2/2
This alert is trapped in the automation table by the FLCSTBLE member statements. An automatic GETTOPO is issued to request NetWare topology.
If your FLCSINW is customized, you will get the NetWare topology according to the specification in that file. This file is also used for the INITTOPO command. We wanted to discover the NetWare topology and use NDS so we used the GETTOPO from the NetWare resource-specific command set. We selected GETTOPO with option NWCPRES.
In Figure 283 you see the GETTOPO command in the NetWare resource-specific command set.
242 An Introduction to Tivoli NetView for OS/390 V1R2
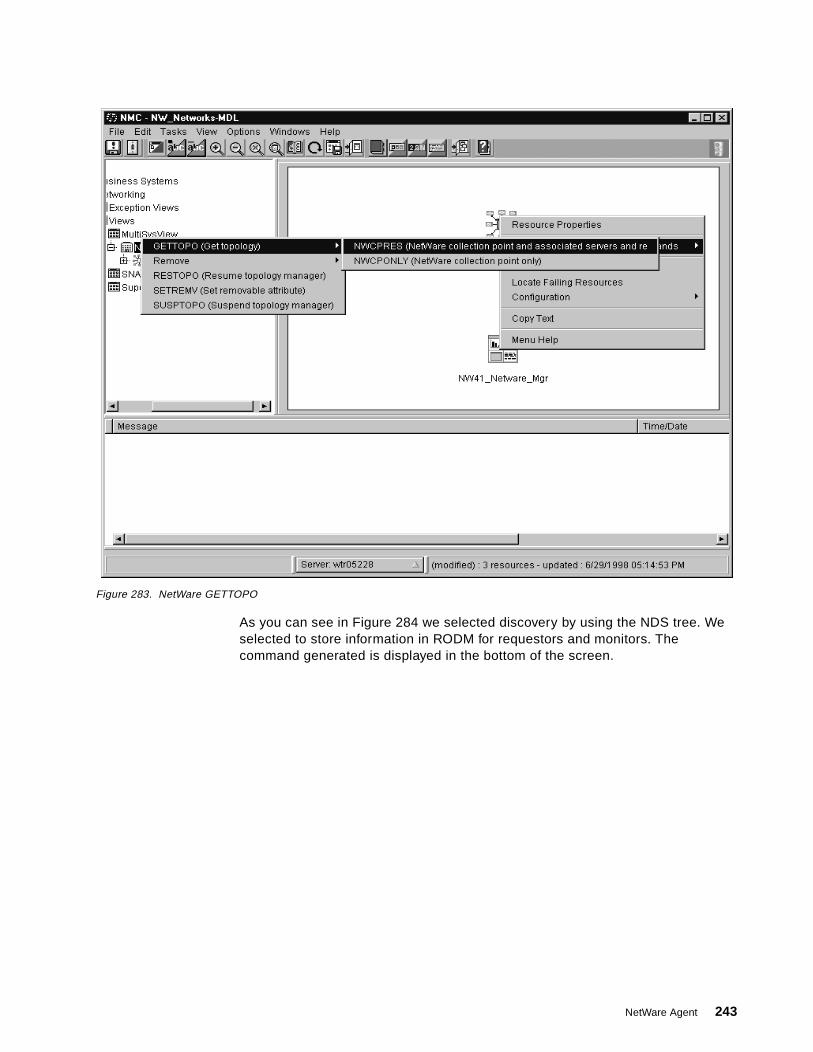
Figure 283. NetWare GETTOPO
As you can see in Figure 284 we selected discovery by using the NDS tree. We selected to store information in RODM for requestors and monitors. The command generated is displayed in the bottom of the screen.
NetWare Agent 243

Figure 284. NetWare GETTOPO Resource-Specific Command Pop-Up Window
Click on Send and Close to execute the command.
All the resources discovered by the GETTOPO command are displayed on the NetView Management Console client as shown in Figure 285.
244 An Introduction to Tivoli NetView for OS/390 V1R2

Figure 285. NetWare Resources Topology View
In Figure 286 you see the same view but we have used the Show as Details option under the View option in the NetView Management Console main menu.
NetWare Agent 245
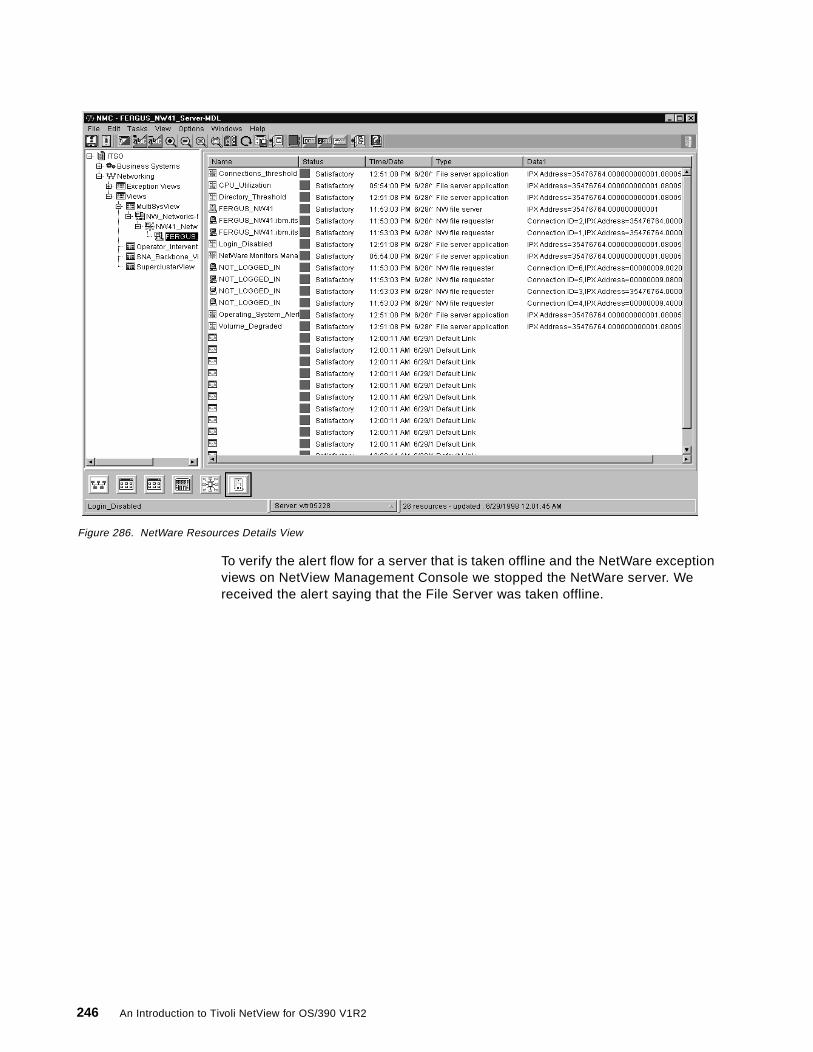
Figure 286. NetWare Resources Details View
To verify the alert flow for a server that is taken offline and the NetWare exception views on NetView Management Console we stopped the NetWare server. We received the alert saying that the File Server was taken offline.
246 An Introduction to Tivoli NetView for OS/390 V1R2

Figure 287. NPDA NetWare Alert Server Down (1/2
Figure 288. NPDA NetWare Alert Server Down (2/2)
This alert is trapped in the automation table and the NetWare server is put in unsatisfactory status in RODM. The NetWare server is then displayed on the exception view on NetView Management Console.
NetWare Agent 247
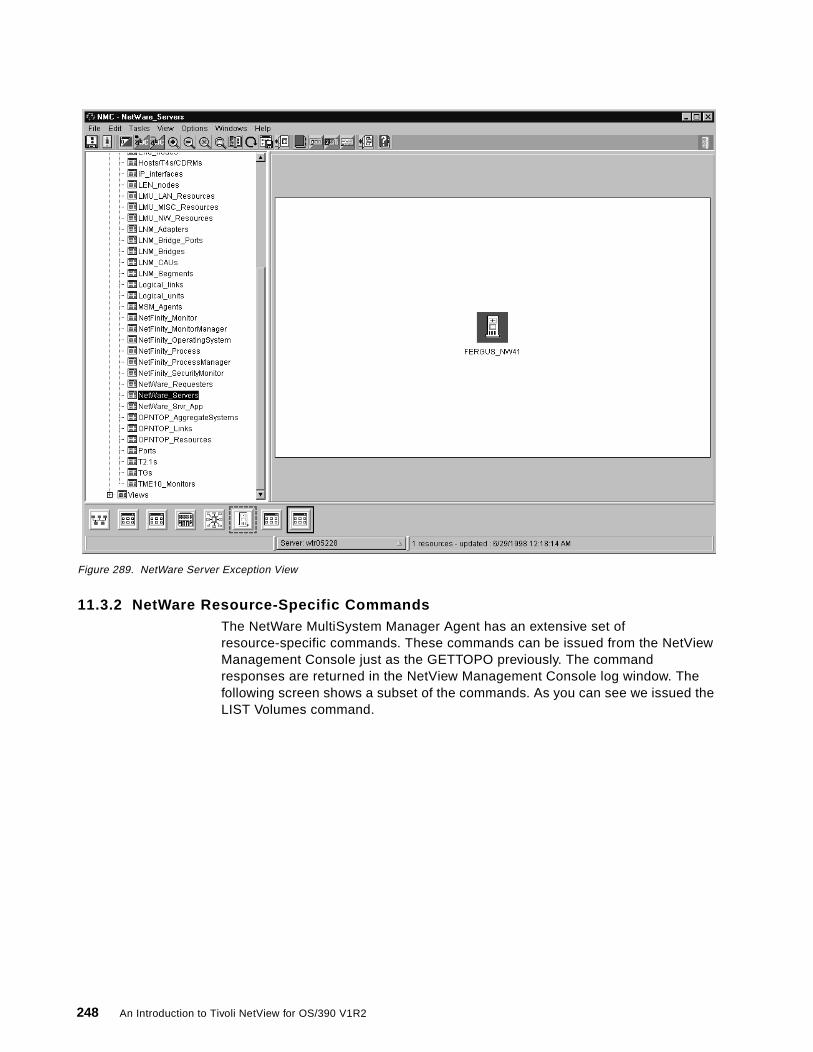
Figure 289. NetWare Server Exception View
11.3.2 NetWare Resource-Specific CommandsThe NetWare MultiSystem Manager Agent has an extensive set of resource-specific commands. These commands can be issued from the NetView Management Console just as the GETTOPO previously. The command responses are returned in the NetView Management Console log window. The following screen shows a subset of the commands. As you can see we issued the LIST Volumes command.
248 An Introduction to Tivoli NetView for OS/390 V1R2
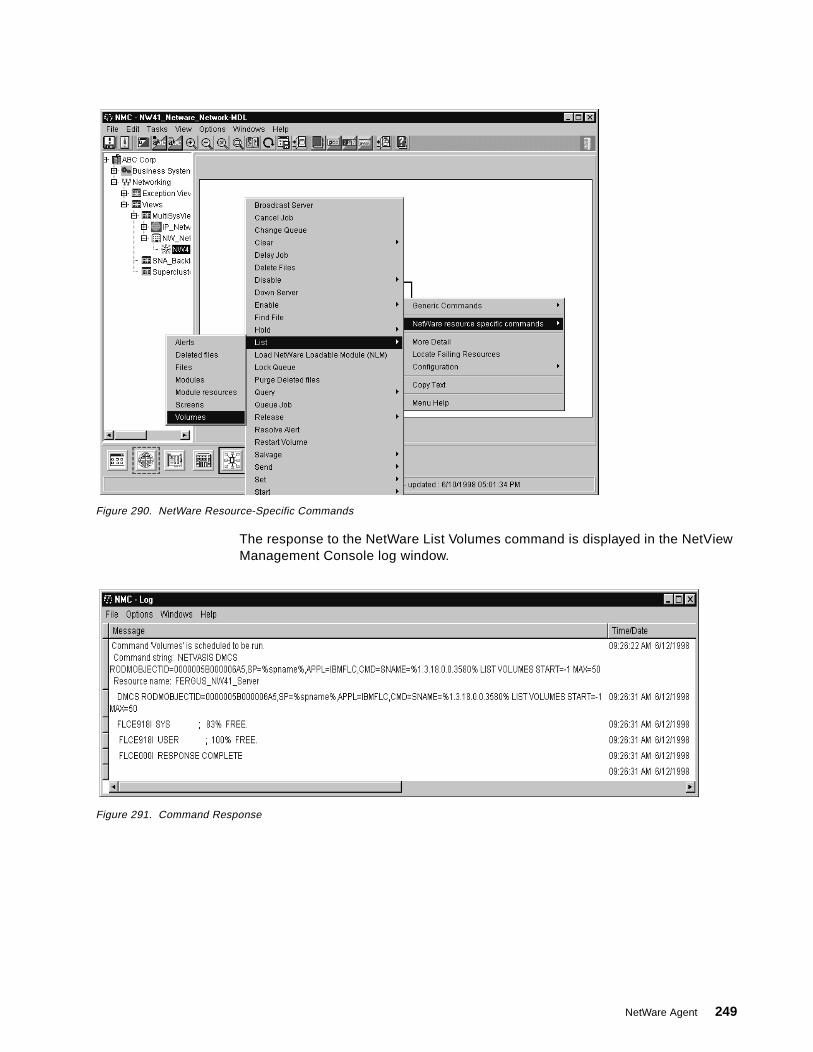
Figure 290. NetWare Resource-Specific Commands
The response to the NetWare List Volumes command is displayed in the NetView Management Console log window.
Figure 291. Command Response
NetWare Agent 249

250 An Introduction to Tivoli NetView for OS/390 V1R2
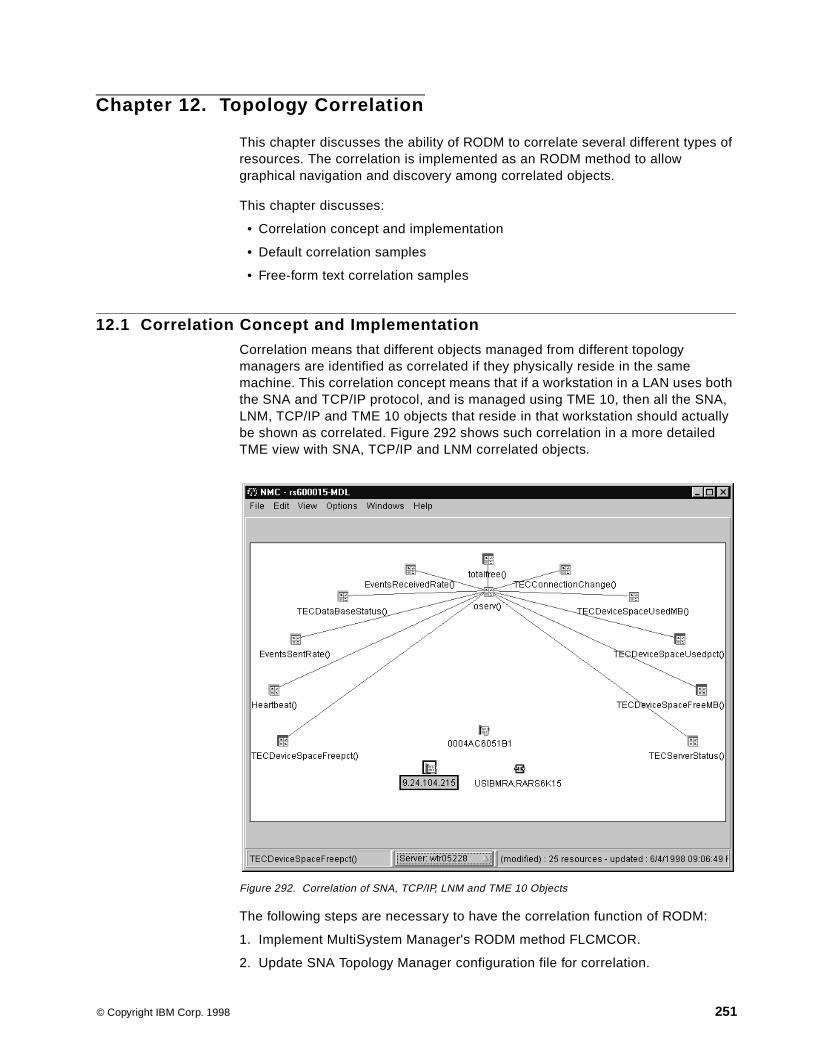
Chapter 12. Topology Correlation
This chapter discusses the ability of RODM to correlate several different types of resources. The correlation is implemented as an RODM method to allow graphical navigation and discovery among correlated objects.
This chapter discusses:
• Correlation concept and implementation
• Default correlation samples
• Free-form text correlation samples
12.1 Correlation Concept and Implementation
Correlation means that different objects managed from different topology managers are identified as correlated if they physically reside in the same machine. This correlation concept means that if a workstation in a LAN uses both the SNA and TCP/IP protocol, and is managed using TME 10, then all the SNA, LNM, TCP/IP and TME 10 objects that reside in that workstation should actually be shown as correlated. Figure 292 shows such correlation in a more detailed TME view with SNA, TCP/IP and LNM correlated objects.
Figure 292. Correlation of SNA, TCP/IP, LNM and TME 10 Objects
The following steps are necessary to have the correlation function of RODM:
1. Implement MultiSystem Manager's RODM method FLCMCOR.
2. Update SNA Topology Manager configuration file for correlation.
© Copyright IBM Corp. 1998 251
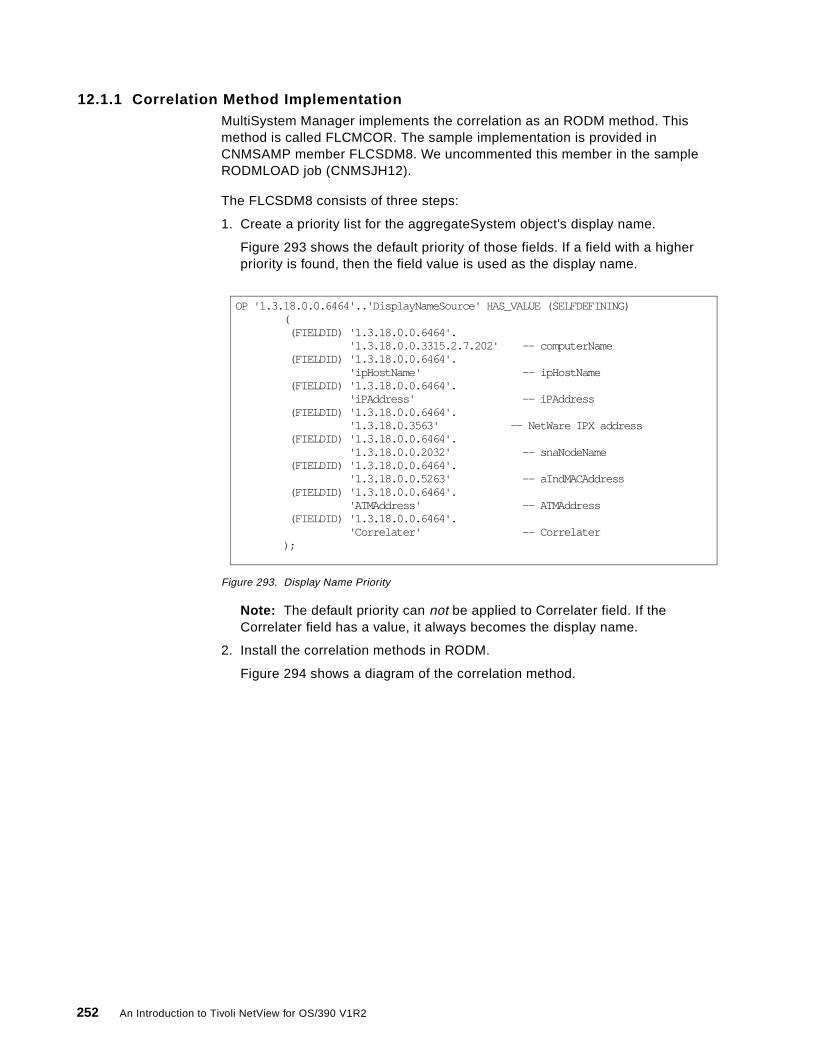
12.1.1 Correlation Method ImplementationMultiSystem Manager implements the correlation as an RODM method. This method is called FLCMCOR. The sample implementation is provided in CNMSAMP member FLCSDM8. We uncommented this member in the sample RODMLOAD job (CNMSJH12).
The FLCSDM8 consists of three steps:
1. Create a priority list for the aggregateSystem object's display name.
Figure 293 shows the default priority of those fields. If a field with a higher priority is found, then the field value is used as the display name.
Figure 293. Display Name Priority
Note: The default priority can not be applied to Correlater field. If the Correlater field has a value, it always becomes the display name.
2. Install the correlation methods in RODM.
Figure 294 shows a diagram of the correlation method.
OP '1.3.18.0.0.6464'..'DisplayNameSource' HAS_VALUE (SELFDEFINING) ( (FIELDID) '1.3.18.0.0.6464'. '1.3.18.0.0.3315.2.7.202' -- computerName (FIELDID) '1.3.18.0.0.6464'. 'ipHostName' -- ipHostName (FIELDID) '1.3.18.0.0.6464'. 'iPAddress' -- iPAddress (FIELDID) '1.3.18.0.0.6464'. '1.3.18.0.3563' -- NetWare IPX address (FIELDID) '1.3.18.0.0.6464'. '1.3.18.0.0.2032' -- snaNodeName (FIELDID) '1.3.18.0.0.6464'. '1.3.18.0.0.5263' -- aIndMACAddress (FIELDID) '1.3.18.0.0.6464'. 'ATMAddress' -- ATMAddress (FIELDID) '1.3.18.0.0.6464'. 'Correlater' -- Correlater );
252 An Introduction to Tivoli NetView for OS/390 V1R2

Figure 294. Correlation Method
In the above figure, thin arrows are processing, while the thick ones are the actual links of RODM objects.
1 This object already has a link to an aggregateSystem object. A field that has FLCMCON method is updated, so:
a. EKG_Notify calls FLCMCON.b. FLCMCON calls FLCMCOR.c. FLCMCOR updates the aggregateSystem object with new
locateable value(s) from the object.
2 Another object has a correlatable field updated, so:
a. EKG_Notify calls FLCMCON.b. FLCMCON calls FLCMCOR.c. FLCMCOR checks the aggregateSystem objects for the value of
the correlatable field. d. When the match is found, the objects are linked and the locatable
values updated.
3 The third object has a correlatable field updated, so:
a. EKG_Notify calls FLCMCON.b. FLCMCON calls FLCMCOR.c. FLCMCOR checks the aggregateSystem objects for the value of
the correlatable field.d. If no match is not found, a new aggregateSystem object is
created and locatable values entered.
Topology Correlation 253

FLCSDM8 installs the FLCMCON method into the fields that are correlated by MultiSystem Manager. Table 6 shows the fields that are used in the default correlation.
Table 6. Correlatable Fields
Class Name Field Name
nwServer memberOf
nwRequester memberOf
realLink memberOf
perspectiveLink memberOf
aggregateNode memberOf
interface memberOf
ATMSwitch memberOf
ATMBridge memberOf
ATMConcentrator memberOf
ATMPort memberOf
OperatingSystem memberOf
port aIndMACAddress
tokenRingAdapter aIndMACAddress
GMFHS_Managed_Real_Objects_Class aIndMACAddress
logicalLink iPAddress
port iPAddress
ATMDevice iPAddress
Monitor iPAddress
GMFHS_Managed_Real_Objects_Class iPAddress
realNode Correlater
realLink Correlater
perspectiveLink Correlater
aggregateNode: Correlater
aggregateLink Correlater
aggregateGraph Correlater
logicalLink Correlater
port Correlater
GMFHS_Managed_Real_Objects_Class Correlater
GMFHS_Aggregate_Objects_Class Correlater
254 An Introduction to Tivoli NetView for OS/390 V1R2
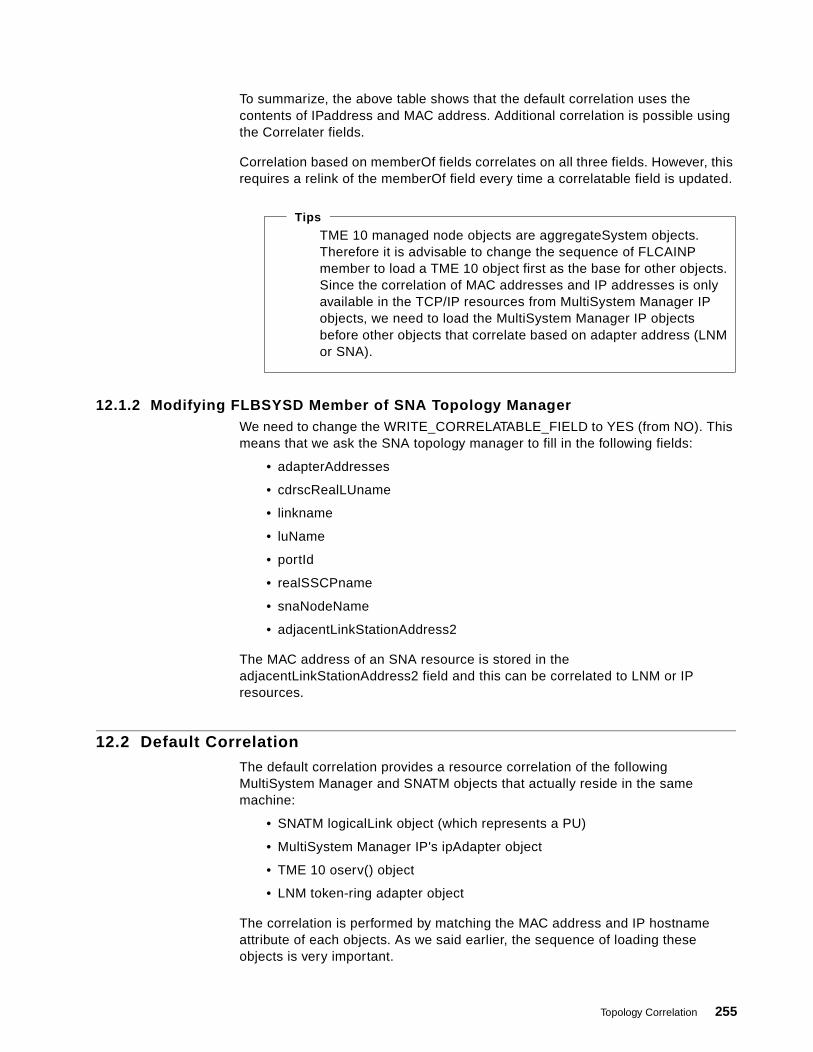
To summarize, the above table shows that the default correlation uses the contents of IPaddress and MAC address. Additional correlation is possible using the Correlater fields.
Correlation based on memberOf fields correlates on all three fields. However, this requires a relink of the memberOf field every time a correlatable field is updated.
12.1.2 Modifying FLBSYSD Member of SNA Topology ManagerWe need to change the WRITE_CORRELATABLE_FIELD to YES (from NO). This means that we ask the SNA topology manager to fill in the following fields:
• adapterAddresses
• cdrscRealLUname
• linkname
• luName
• portId
• realSSCPname
• snaNodeName
• adjacentLinkStationAddress2
The MAC address of an SNA resource is stored in the adjacentLinkStationAddress2 field and this can be correlated to LNM or IP resources.
12.2 Default Correlation
The default correlation provides a resource correlation of the following MultiSystem Manager and SNATM objects that actually reside in the same machine:
• SNATM logicalLink object (which represents a PU)
• MultiSystem Manager IP's ipAdapter object
• TME 10 oserv() object
• LNM token-ring adapter object
The correlation is performed by matching the MAC address and IP hostname attribute of each objects. As we said earlier, the sequence of loading these objects is very important.
TME 10 managed node objects are aggregateSystem objects. Therefore it is advisable to change the sequence of FLCAINP member to load a TME 10 object first as the base for other objects. Since the correlation of MAC addresses and IP addresses is only available in the TCP/IP resources from MultiSystem Manager IP objects, we need to load the MultiSystem Manager IP objects before other objects that correlate based on adapter address (LNM or SNA).
Tips
Topology Correlation 255

Figure 295 shows the event when we loaded the IP resources late, so the correlation between the IP object (1) and the MAC address object (2) is not built.
Figure 295. Correlation Error with IP Resources
Another interesting thing is that in the TME 10 resource, the aggregateSystem object is used as the ManagedNode resource, so that the TMR object and the policy region object are the parents of the IP aggregateSystem object (1).
The correct correlation is shown in Figure 296, which shows all the SNA, TCPIP, LNM and TME 10 resources under the rs600015 object. In this case, the aggregateSystem object in Figure 296 is named rs600015, which is the computerName from TME 10.
256 An Introduction to Tivoli NetView for OS/390 V1R2

Figure 296. Correlation
Figure 297 shows the RODMVIEW display of the aggregateSystem object to show the content of the DisplayResourceOtherData field.
Figure 297. RODMVIEW of the aggregateSystem Resource
EKGVQUEO Query Output RABAN TMEID5 06/01/98 19:16:42 Lines 1 to 17 of 495 -----------------------------------------------------------Matching entity ID: MyID (OBJECTID) (OBJECTID) 0000006A000009B0 '1.3.18.0.0.3519=MultiSys,1.3.18.0.0.6467=0004AC6051B1' (CLASSID) 106 '1.3.18.0.0.6464' - - - - - - - - - - - - - - - - - - NOXCPTCount (INTEGER) 3 DisplayResourceOtherData (CHARVAR) 'MAC address=0004AC6051B1, IP address=9.24.104.215, Segment No.=9.24.104.’ 'Segment1, SNA PU=USIBMRA.RARS6K15, IP HostName=rs600015'
AggregationParent (OBJECTLINKLIST) DisplayStatusCommandText (CHARVAR) EKGV0143I Returned field value is inherited (0/143) CMD==> F1= Help F2= End F3= Return F5= RptFind F6= Roll F7= Prev F8= Next F9= CopyLog F10=CopyOID F11=OSIName F12=PrevCmd
Topology Correlation 257

12.3 Free-Form Text Correlation
Free-form text correlation is performed by using the Correlater field. This function works in a very similar way to the other functions. The only difference is that this field is user-controllable.
This function can be shown using the REXX program that creates two objects in the class GMFHS_Managed_Real_Objects_Class and puts the value of ITSO in its Correlater field. This REXX program is provided in Appendix B.3, “Creating Object with Correlater Field” on page 360.
The result of running this program is shown in Figure 298.
Figure 298. Free-Form Text Correlation Result
258 An Introduction to Tivoli NetView for OS/390 V1R2

Chapter 13. Visual BLDVIEWS
This chapter describes Visual BLDVIEWS. This function helps you to design your own views without requiring the knowledge of BLDVIEW instructions and RODM data model structures. It also provides you with a graphical user interface to RODMVIEW.
13.1 Software Requirements
Visual BLDVIEWS has two components: a mainframe and workstation component. The mainframe requires NetView V3R1 or above, MultiSystem Manager, RODM and TCP/IP running. The workstation platform requires either OS/2 or the Win32 platforms.
13.1.1 Software Installation on the WorkstationVisual BLDVIEWS is available on the TME 10 NetView for OS/390 V1R2 CD-ROM in the visbldv directory. It can also be found on the on the NetView downloads page. To install Visual BLDVIEWS on Windows NT you just click on the Nmvsvbvw icon and select the appropriate installation directory.
13.1.2 Software Installation on the HostThe following tasks need to be performed to implement the host part:
1. The file Nmvsvbvh needs to be unzipped. This will create three files that need to be transferred to a DSICLD concatenated library. These are VBVSERV, DASD and DASD2.
2. An automatic operator needs to be defined in DSIOPF. In our case, this was defined as AUTOVBVS and needed to be set up to run the VBVSERV CLIST at startup.
3. The SYSTCPD DDname must be coded in the NetView procedure for the TCP/IP availability function.
4. In the VBVSERV CLIST, certain parameters need to be customized. We found that the RODMNAME field needed to be changed to reflect our RODMNAME. Also, be aware of the TCP/IP port address. In our case, we changed the RODMNAME field to RODM1, and decided to leave the IP address to the default of 6767.
© Copyright IBM Corp. 1998 259
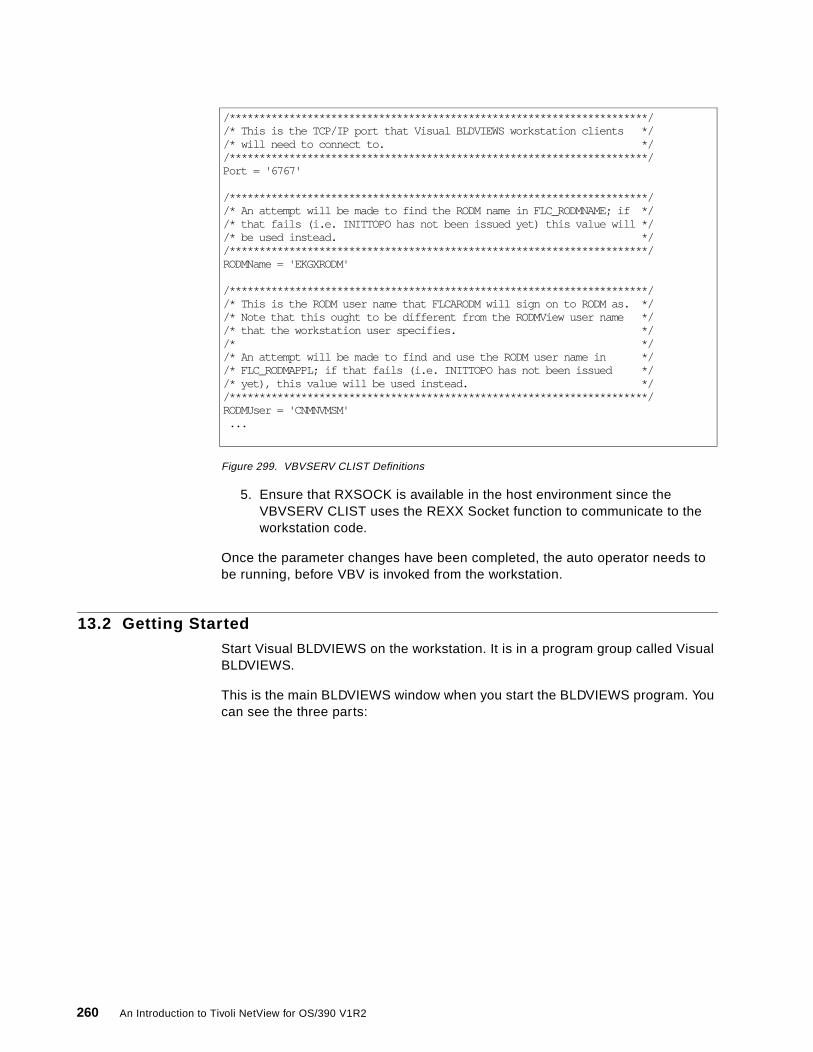
Figure 299. VBVSERV CLIST Definitions
5. Ensure that RXSOCK is available in the host environment since the VBVSERV CLIST uses the REXX Socket function to communicate to the workstation code.
Once the parameter changes have been completed, the auto operator needs to be running, before VBV is invoked from the workstation.
13.2 Getting Started
Start Visual BLDVIEWS on the workstation. It is in a program group called Visual BLDVIEWS.
This is the main BLDVIEWS window when you start the BLDVIEWS program. You can see the three parts:
/**********************************************************************//* This is the TCP/IP port that Visual BLDVIEWS workstation clients *//* will need to connect to. *//**********************************************************************/Port = '6767'
/**********************************************************************//* An attempt will be made to find the RODM name in FLC_RODMNAME; if *//* that fails (i.e. INITTOPO has not been issued yet) this value will *//* be used instead. *//**********************************************************************/RODMName = 'EKGXRODM'
/**********************************************************************//* This is the RODM user name that FLCARODM will sign on to RODM as. *//* Note that this ought to be different from the RODMView user name *//* that the workstation user specifies. *//* *//* An attempt will be made to find and use the RODM user name in *//* FLC_RODMAPPL; if that fails (i.e. INITTOPO has not been issued *//* yet), this value will be used instead. *//**********************************************************************/RODMUser = 'CNMNVMSM' ...
260 An Introduction to Tivoli NetView for OS/390 V1R2

Figure 300. Visual BLDVIEWS Panel
• The Resource Types frame gives you the list of all resources type you can access through the BLDVIEWS program.
• The Build/Set Resources frame gives you the capability to build some aggregate functions.
• The Build Views frame is where you define your view name and characteristics.
Visual BLDVIEWS 261

Figure 301. Establishing Host Communications
To establish host communications, click on Settings and then Host Communications . This panel requires you to enter your host name or the TCP/IP address and TCP/IP port before continuing. We used our own user ID and password to access RODMVIEW. Once this has been completed, click on Test and a message appears at the bottom of the window: Searching for host mvs11 . Once communications have been established, the message: VBVServer 1.0
available at RABAN (MVS11) running under task AUTOVBVS; RODMVIEW: Available appears at the bottom of the window.
13.3 Resource Types
Within this frame, there are three categories:
• Network Resource Objects contains aggregates and objects.
• Selective Control Objects lets you change the Wildcard and selective service points.
• View Objects contains the different view types.
By clicking on the little plus signs, the different resource types are expanded to get the individual object types.
262 An Introduction to Tivoli NetView for OS/390 V1R2
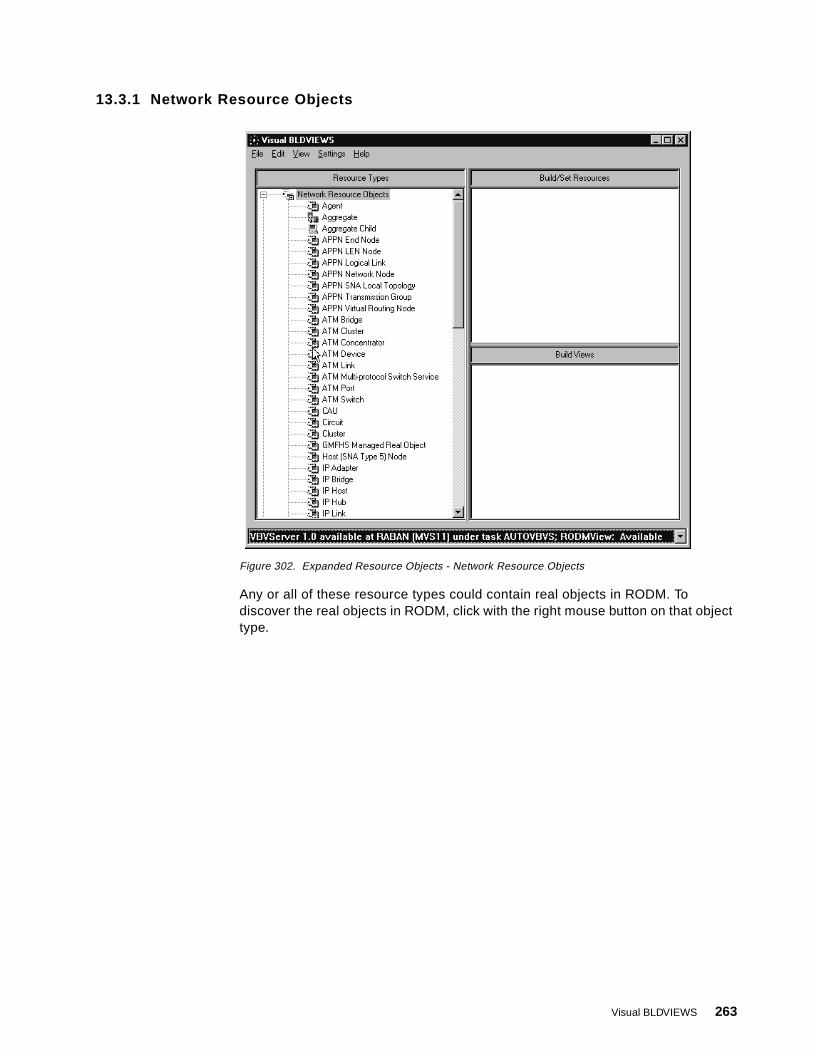
13.3.1 Network Resource Objects
Figure 302. Expanded Resource Objects - Network Resource Objects
Any or all of these resource types could contain real objects in RODM. To discover the real objects in RODM, click with the right mouse button on that object type.
Visual BLDVIEWS 263

Figure 303. Expanded Resource Objects - RODM Search
In our example, we used an SNA port.
A Get Names in RODM option appears. A search is generated in RODM for all real objects in that RODM class. Alternatively double-clicking will do the same.
264 An Introduction to Tivoli NetView for OS/390 V1R2

Figure 304. Expanded Resource Objects - Results of RODM Search
If real objects are discovered in RODM, a little plus sign appears next to the resource object. However, if no objects are found in RODM, a message appears informing you so. By default the objects are shown by expanding the selected object class.
As you can see, in our case, there are a number of real objects grouped under SNA ports in RODM. Using VBV, it is very easy to discover the real objects of different resource types that are stored in RODM, without having to know any kind of syntax or what these names are.
13.3.2 Selective Control ObjectsAs stated previously, Selective Control Objects enables you to change wildcard options or to filter the different service points. Again, the little plus sign informs you that this view can be expanded.
Visual BLDVIEWS 265

Figure 305. Expanded View of Selected Control Objects
All the service point objects that we can use for filtering resources on views are shown in Figure 305.
13.3.3 View ObjectsBy expanding the view using the little plus sign all the different view types appear.
266 An Introduction to Tivoli NetView for OS/390 V1R2

Figure 306. Expanded View of View Objects
These views are high-level views that real objects or aggregate objects can be grouped under. You need to make a selection here to create your own view.
13.4 Build/Set Resources
This is where you would create aggregates, or change fields of real objects. An object is dragged from either the Network Resource Objects or Selective Control Objects to the Build/Set Resource portion of the screen and dropped. Either the generic object or the real object can be dragged and dropped.
Visual BLDVIEWS 267

Figure 307. Copying a Resource to Build/Set Resources
In our example, we selected SNA Ports. Using the left mouse button, the resource is dragged to the Build/Set Resource side of the screen and dropped. A pop-up appears, where you can change attributes of that resource in RODM. Once you have elected to change, add or delete attributes of the different fields, the pop-up screen is closed.
Figure 308. Changing Resource Fields in RODM
268 An Introduction to Tivoli NetView for OS/390 V1R2

In Figure 308, all SNA ports are depicted in the icon under the Build/Set Resources screen. If a resource cannot be moved to this portion of the screen, the following occurs:
Figure 309. Result of Moving an Object to the Build/Set Resources Frame
In this example, we tried to drag and drop View Objects to this screen, but this is not allowed.
Real objects can also be moved in the same manner. We will expand SNA Port and select a real object from this group and show the result.
Visual BLDVIEWS 269

Figure 310. Real Object Moved to Build/Set Resources Screen Result
In the example above, we selected the real resource USIBMRA.EG24L22. As you can see, the generic object SNA port is linked to the real object USIBMRA.EG24L22.
13.5 Build Views
In our example, we selected Network View, and using the left mouse button, dragged and dropped the view into the Build Views part of the screen. As previously explained, this resource can be placed in the Build Views part of the screen.
Figure 311. View Objects - Network View Definitions
Certain fields are required to create a customized view. These are the Name(s) and Annotation fields. We elected to call our view Example_Ports with an annotation of Example of SNA Ports.
270 An Introduction to Tivoli NetView for OS/390 V1R2

Figure 312. View Objects - Network View in Build Views
This is the view of the Network View Example_Ports that we defined.
13.5.1 Sample Building Network ViewIn the first scenario, we build a network view (NV_SNA_Ports), containing an aggregate view (SNA_Port_Aggregation), made up of two real resources (USIBMRA.EG24L22 and USIBMRA.EG24L23).
Visual BLDVIEWS 271

Figure 313. Selecting Resources
In Figure 313, we have expanded the Network Resource Objects. We click on Aggregate and using drag and drop, move it to the Build/Set Resources side of the screen.
Figure 314. Completing Aggregate Settings
272 An Introduction to Tivoli NetView for OS/390 V1R2

A pop-up screen appears immediately and customization can be done in the fields provided. We elected to call our aggregate view SNA_Port_Aggregation and to allocate an aggregation threshold. After completing the settings and clicking on OK, we have the following:
Figure 315. Customizing - Aggregate Resources
Our next step is to move the two real resources under the aggregation.
Figure 316. Customizing - Real Resources
Visual BLDVIEWS 273

We expand the SNA Port Resource Types by clicking on the little plus signs, to display all the SNA Port real resources. We selected SNA Port - USIBMRA.EG24L22 and dragged and dropped it so that the arrow pointed directly on top of the Aggregate SNA_Port_Aggregation-USER. Immediately, the settings field appears.
Figure 317. Customizing - Real Resources - Aggregate Child Settings
We used the default settings and selected OK.
Figure 318. Customizing - Real Resources - Aggregate Results
Notice that the view is just modified and can be expanded by using the plus sign. Also, if your drag and drop was not accurately directed, you may have a view where USIBMRA.EG24L22 is a peer of the aggregate and not a child. We are now going to complete the aggregation by copying the second real resource, USIBMRA.EG24L23.
274 An Introduction to Tivoli NetView for OS/390 V1R2
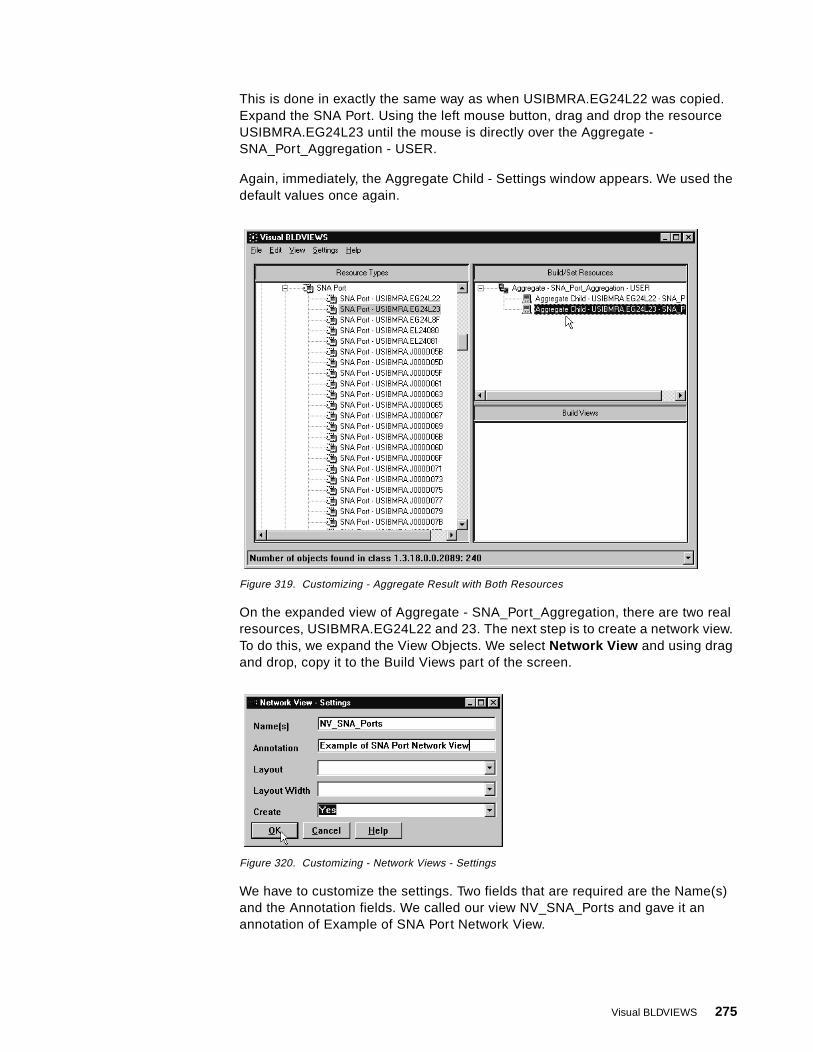
This is done in exactly the same way as when USIBMRA.EG24L22 was copied. Expand the SNA Port. Using the left mouse button, drag and drop the resource USIBMRA.EG24L23 until the mouse is directly over the Aggregate - SNA_Port_Aggregation - USER.
Again, immediately, the Aggregate Child - Settings window appears. We used the default values once again.
Figure 319. Customizing - Aggregate Result with Both Resources
On the expanded view of Aggregate - SNA_Port_Aggregation, there are two real resources, USIBMRA.EG24L22 and 23. The next step is to create a network view. To do this, we expand the View Objects. We select Network View and using drag and drop, copy it to the Build Views part of the screen.
Figure 320. Customizing - Network Views - Settings
We have to customize the settings. Two fields that are required are the Name(s) and the Annotation fields. We called our view NV_SNA_Ports and gave it an annotation of Example of SNA Port Network View.
Visual BLDVIEWS 275

Figure 321. Customizing - Network Views - Build View Results
Figure 321 shows what you should have in different areas of your screen after creating the Networks View.
Collapse the Aggregate - SNA_Port_Aggregation object.
Figure 322. Customizing - Network Views - Moving Aggregation
276 An Introduction to Tivoli NetView for OS/390 V1R2

Using drag and drop, copy Aggregate - SNA_Port_Aggregation and drop it directly on top of NetworkView - NV_SNA_Ports.
You should see that the network view contains the aggregate that you have just dragged and dropped from the Build/Set Resources part of the screen.
Figure 323. Customizing - Expanding Network Views
Our views are now complete. We need to generate the statements to build these views on the host. From the VBV panel, select File . There are a number of options, including the ability to Show BLDVIEWS source. We selected Host and then Save to Host and Run .
Visual BLDVIEWS 277

Figure 324. Customizing - Sending Views to Host
This will generated the BLDVIEWS source and execute it on the host, under the auto operator AUTOVBVS.
Figure 325. Customizing - Specify Destination Member
A pop-up will appear, prompting you to either specify the member name within the first concatenated DSIPARM data set that the BLDVIEWS statements will be generated in, or any existing data set in your TSO environment.
278 An Introduction to Tivoli NetView for OS/390 V1R2

Figure 326. Customizing - Saving Views on Host
At this stage the views are generated and saved in the data set or member you specified in the previous screen.
Figure 327. Customizing - Completed
The view generation only needs to be done once. When NetView is started at the host, a CLIST can be run to generate the views created, using the files generated by BLDVIEWS as input files.
Visual BLDVIEWS 279

Figure 328. Customizing - NGMF Network View
As you can see, the high-level network view can be found in NGMF.
Figure 329. Customizing - NGMF SNA Port Aggregate View
280 An Introduction to Tivoli NetView for OS/390 V1R2

After drilling down one level, the SNA Port Aggregation View that we defined can be seen.
Figure 330. Customizing - NGMF SNA Port Real Resources View
Finally, after going down one further level, the two real resources are found.
13.5.2 An Example of an Exception ViewIn this scenario, we show you how to use VBVs to create an exception view, containing the two ports used in the preceding example.
We expand the Network Resource Objects by clicking on the little plus sign. To get to the real resource, we find SNA Port and expand that in the same way.
Visual BLDVIEWS 281

Figure 331. Customizing - Exception View - SNA Real Resources
We select SNA Port - USIBMRA.EG24L22 and using drag and drop, move it to the Build/Set Resources part of the screen.
Figure 332. Customizing - Exception View - SNA Port Settings
As before, the Settings screen appears immediately. We used the Default values and clicked on OK.
282 An Introduction to Tivoli NetView for OS/390 V1R2
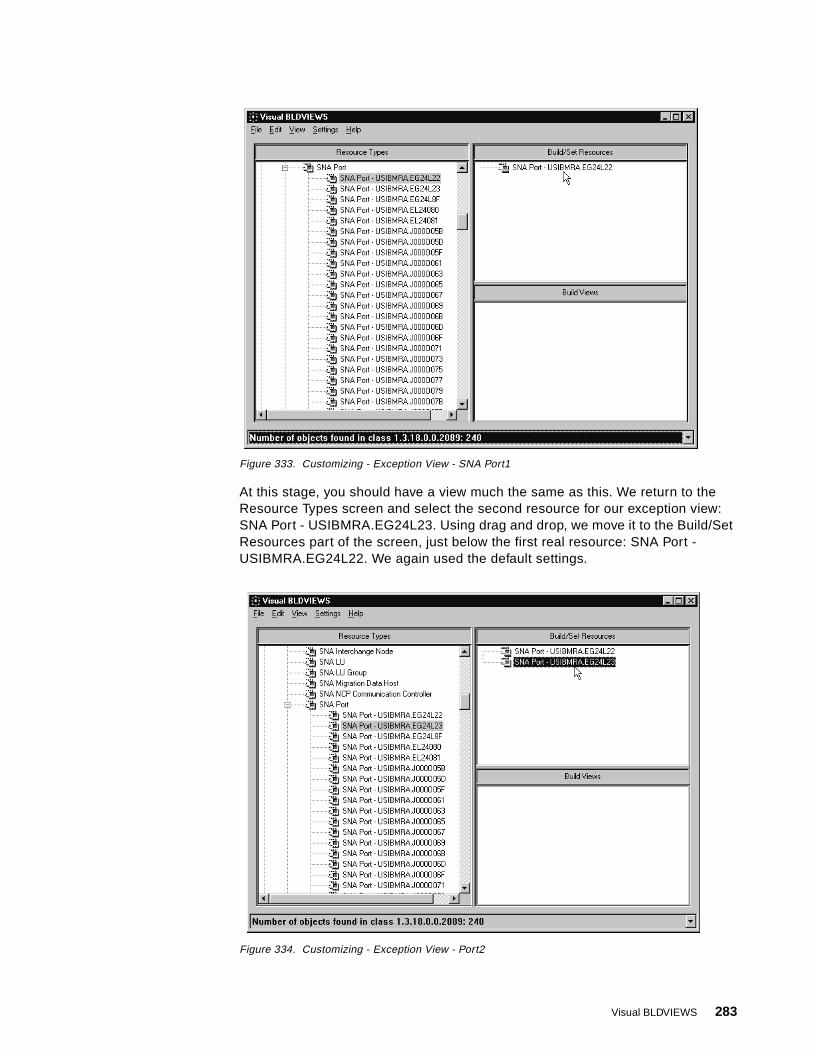
Figure 333. Customizing - Exception View - SNA Port1
At this stage, you should have a view much the same as this. We return to the Resource Types screen and select the second resource for our exception view: SNA Port - USIBMRA.EG24L23. Using drag and drop, we move it to the Build/Set Resources part of the screen, just below the first real resource: SNA Port - USIBMRA.EG24L22. We again used the default settings.
Figure 334. Customizing - Exception View - Port2
Visual BLDVIEWS 283
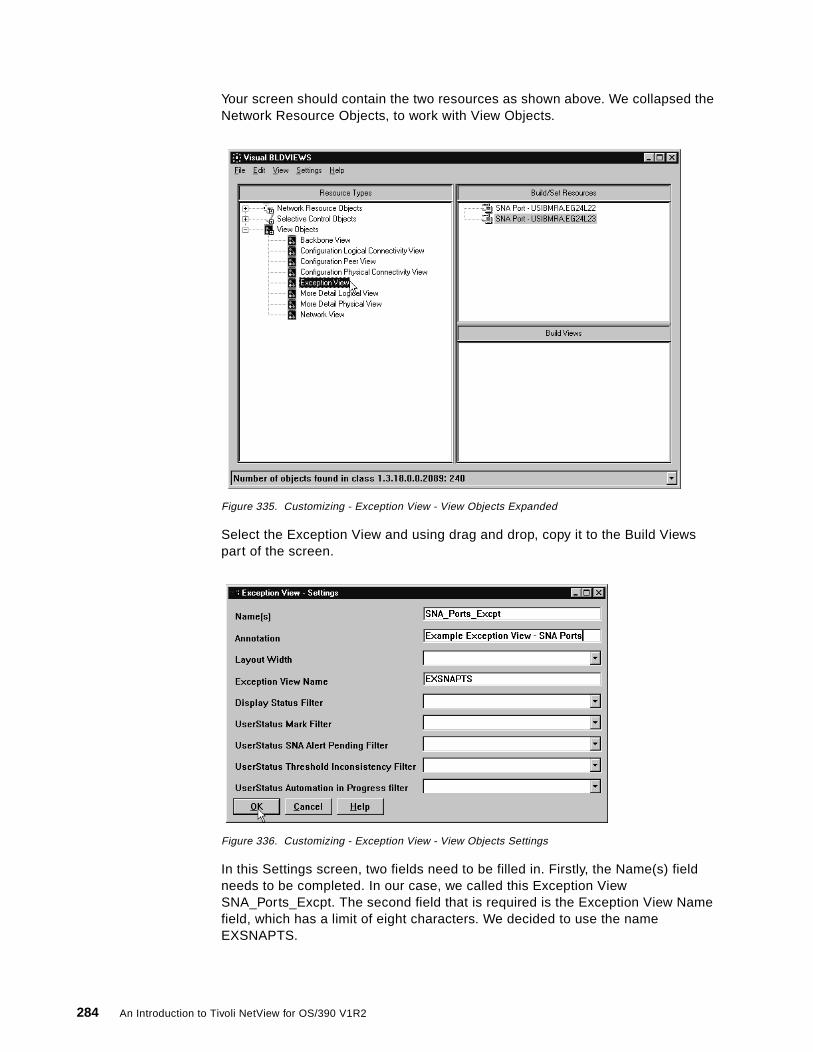
Your screen should contain the two resources as shown above. We collapsed the Network Resource Objects, to work with View Objects.
Figure 335. Customizing - Exception View - View Objects Expanded
Select the Exception View and using drag and drop, copy it to the Build Views part of the screen.
Figure 336. Customizing - Exception View - View Objects Settings
In this Settings screen, two fields need to be filled in. Firstly, the Name(s) field needs to be completed. In our case, we called this Exception View SNA_Ports_Excpt. The second field that is required is the Exception View Name field, which has a limit of eight characters. We decided to use the name EXSNAPTS.
284 An Introduction to Tivoli NetView for OS/390 V1R2

Figure 337. Customizing - Exception View - Three Objects
At this point, we have two resources in the Build/Set Resources part of the screen and one object in the Build Views part of the screen. To create the Exception View links, we need to drag and drop the real resources to the Build View part of the screen.
Figure 338. Customizing - Exception View - Moving Resources
Visual BLDVIEWS 285

It is important that the resource is dropped right on top of the Exception View - SNA_Ports_Excpt. Do exactly the same for the second real resource.
Figure 339. Customizing - Exception View - Complete
Once you have expanded the Exception View - SNA_Ports_Excpt, you should have a window similar to the view in Figure 339.
Figure 340. Customizing - Exception View - Saving to Host
286 An Introduction to Tivoli NetView for OS/390 V1R2

We select File , Host and then Save to host and run to generate and run the BLDVIEW statements on the host to create the exception view in NGMF.
Figure 341. Customizing - Exception View - Member Name
A pop-up window appears requesting the DD name and member or a data set name where the BLDVIEWS statements can be generated to. We elected to save the statements to a member called SNAEXCPT within the first concatenated DSIPARM data set. After the BLDVIEWS statements have completed, the box at the bottom of the window has a message displayed, stating where the statements have successfully been generated to and that they have completed. We found that it was important to browse through the Netlog, as error messages were generated here, even though it appeared as if, through Visual BLDVIEWS, everything had completed successfully.
Figure 342. Customizing - Exception View - NGMF Views List
In NGMF, we find the exception view we have just created.
Visual BLDVIEWS 287
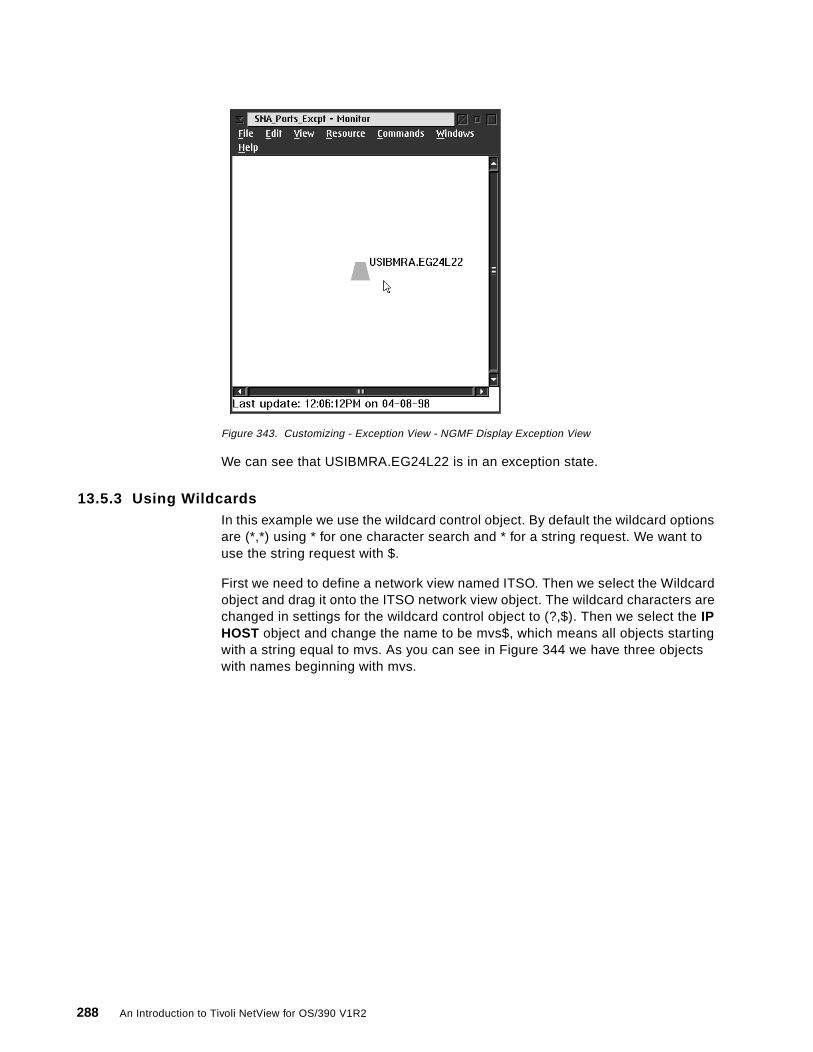
Figure 343. Customizing - Exception View - NGMF Display Exception View
We can see that USIBMRA.EG24L22 is in an exception state.
13.5.3 Using WildcardsIn this example we use the wildcard control object. By default the wildcard options are (*,*) using * for one character search and * for a string request. We want to use the string request with $.
First we need to define a network view named ITSO. Then we select the Wildcard object and drag it onto the ITSO network view object. The wildcard characters are changed in settings for the wildcard control object to (?,$). Then we select the IP HOST object and change the name to be mvs$, which means all objects starting with a string equal to mvs. As you can see in Figure 344 we have three objects with names beginning with mvs.
288 An Introduction to Tivoli NetView for OS/390 V1R2
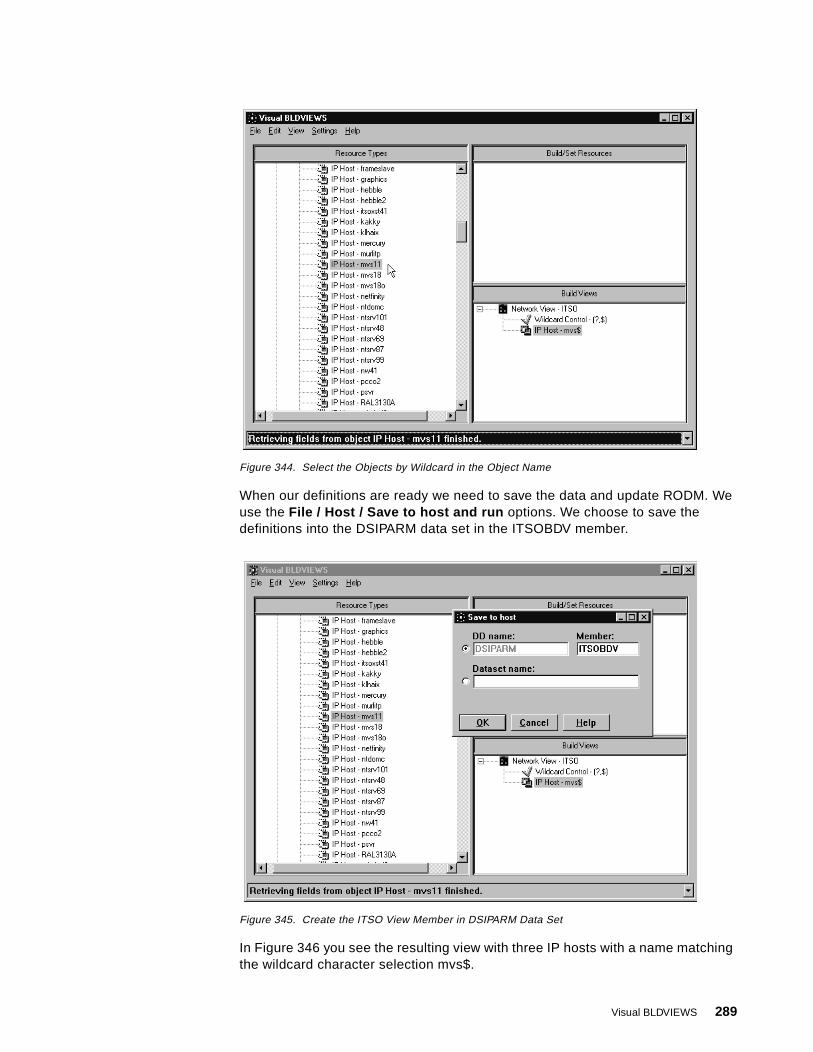
Figure 344. Select the Objects by Wildcard in the Object Name
When our definitions are ready we need to save the data and update RODM. We use the File / Host / Save to host and run options. We choose to save the definitions into the DSIPARM data set in the ITSOBDV member.
Figure 345. Create the ITSO View Member in DSIPARM Data Set
In Figure 346 you see the resulting view with three IP hosts with a name matching the wildcard character selection mvs$.
Visual BLDVIEWS 289

Figure 346. ITSO Network View on NetView Management Console
13.6 Visual BLDVIEWS and RODMVIEW
Visual BLDVIEWS also has the capability to retrieve and change the field values of RODM objects.
Select a resource such as the TME Monitor totalfree and click on it using the right mouse button. You will see the pop-up saying Get fields in RODM.
290 An Introduction to Tivoli NetView for OS/390 V1R2
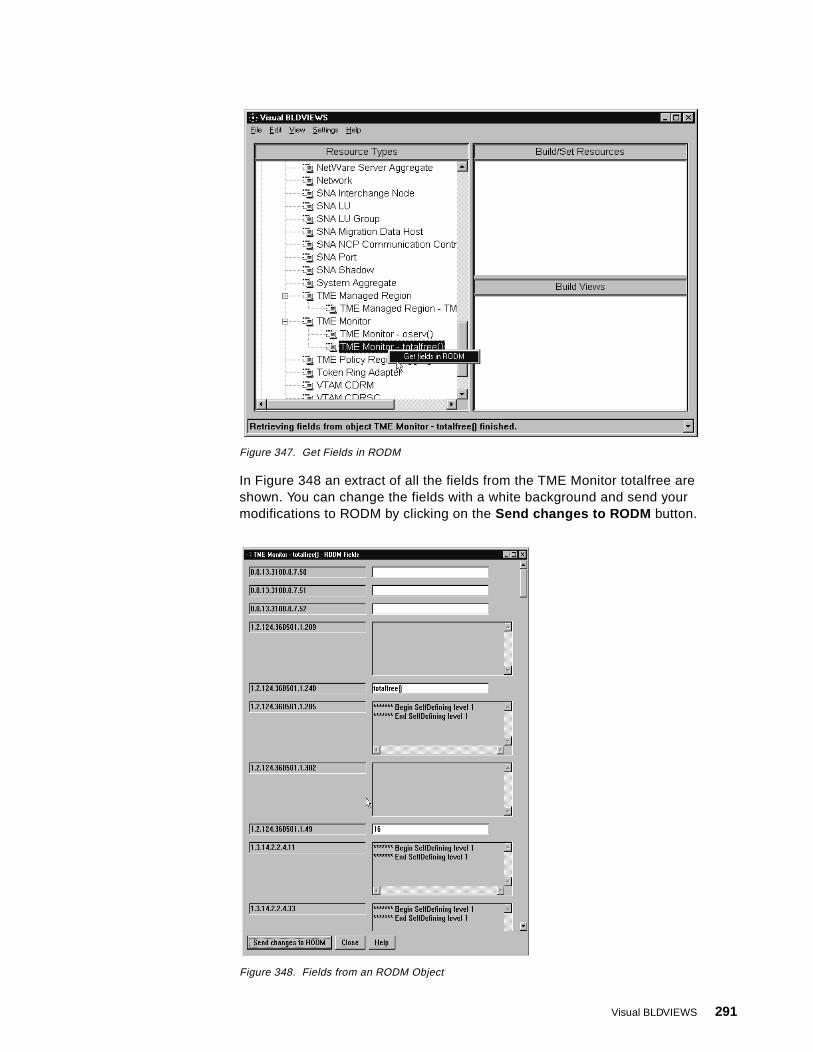
Figure 347. Get Fields in RODM
In Figure 348 an extract of all the fields from the TME Monitor totalfree are shown. You can change the fields with a white background and send your modifications to RODM by clicking on the Send changes to RODM button.
Figure 348. Fields from an RODM Object
Visual BLDVIEWS 291

292 An Introduction to Tivoli NetView for OS/390 V1R2

Part 3. New NetView Interfaces
© Copyright IBM Corp. 1998 293

294 An Introduction to Tivoli NetView for OS/390 V1R2

Chapter 14. NetView 3270 Java Client
The TME 10 NetView for OS/390 Java Client provides access to TME 10 NetView for OS/390 using a TCP/IP connection. Using this client, you can access both the command facility and full-screen applications in TME 10 NetView for OS/390 V1R2. It does not provide NGMF capabilities.
The TME 10 NetView Java Client has two components: a mainframe component and a workstation component. The NetView 3270 Java Client was available in TME 10 NetView for OS/390 V1R1 and supported clients on OS/2, Windows NT, Windows 95 and AIX. TME 10 NetView for OS/390 V1R2 supports those environments as well as Sun Solaris and HP-UX.
14.1 Software Installation
Software customization requires modification of members in your NetView/390 as well as installing and customizing the code on the distributed platform.
14.1.1 Software Installation on MVSEnsure that you have customized the following DSIPARM members:
• DSIDMNB - DSITCPIP task definition
• DSITCPCF - Task parameters for DSITCPIP
• DSITCPRF - TCP/IP logon encryption profiles
There are two values to define encryption, which are for sending and receiving data. The key can be any eight non-blank printable characters or the keywords default or disabled. The ANY_OTHER: line defines the default encryption used for operators not specifically defined.
**************************************************************** NOTE: THE FOLLOWING TASK STATEMENT IS NECESSARY FOR ** TCP/IP WORKSTATION ACCESS **************************************************************** TASK MOD=DSITCPIP,TSKID=DSITCPIP,MEM=DSITCPCF,PRI=6,INIT=Y
* TCP/IP address space name TCPANAME=T11ATCP* TCP/IP port number to use PORT=9999* Number of socket connections to accept SOCKETS=50* Diagnose creates additional messages in the log DIAGNOSE=NO
TMEID1: disabled disabledANY_OTHER: default default
© Copyright IBM Corp. 1998 295

14.1.2 Software Installation on a Windows 95 WorkstationWe used the 3270 Java Client on Windows 95. These are the necessary steps to install and customize it on this platform:
The executable module for NetView 3270 Java Client for Windows platforms is FLB4WIN.
1. Run FLB4WIN from the command line or double-click its icon.
2. Click Yes on the confirmation window to get the Product Information window as shown in Figure 349 and click Next .
Figure 349. NetView 3270 Java Client Product Information Window
3. You get to the window as shown in Figure 350. Choose the necessary directory for the temporary installation files and click on Finish .
Figure 350. NetView 3270 Java Client Temporary Install Directory Window
296 An Introduction to Tivoli NetView for OS/390 V1R2

4. After the files are uncompressed to the temporary install directory, the program automatically runs the InstallShields installation process (see Figure 351).
Figure 351. NetView 3270 Java Client InstallShield Window
5. Read the readme file for important information in installing this product (see Figure 352). In this readme file you will find all the hardware and software requirements as well as installation instructions for each platform. You can also refer to the announcement letter for the hardware and software requirements for the supported platforms and individual hardware and software requirements.
Figure 352. NetView 3270 Java Client ReadMe Window
NetView 3270 Java Client 297
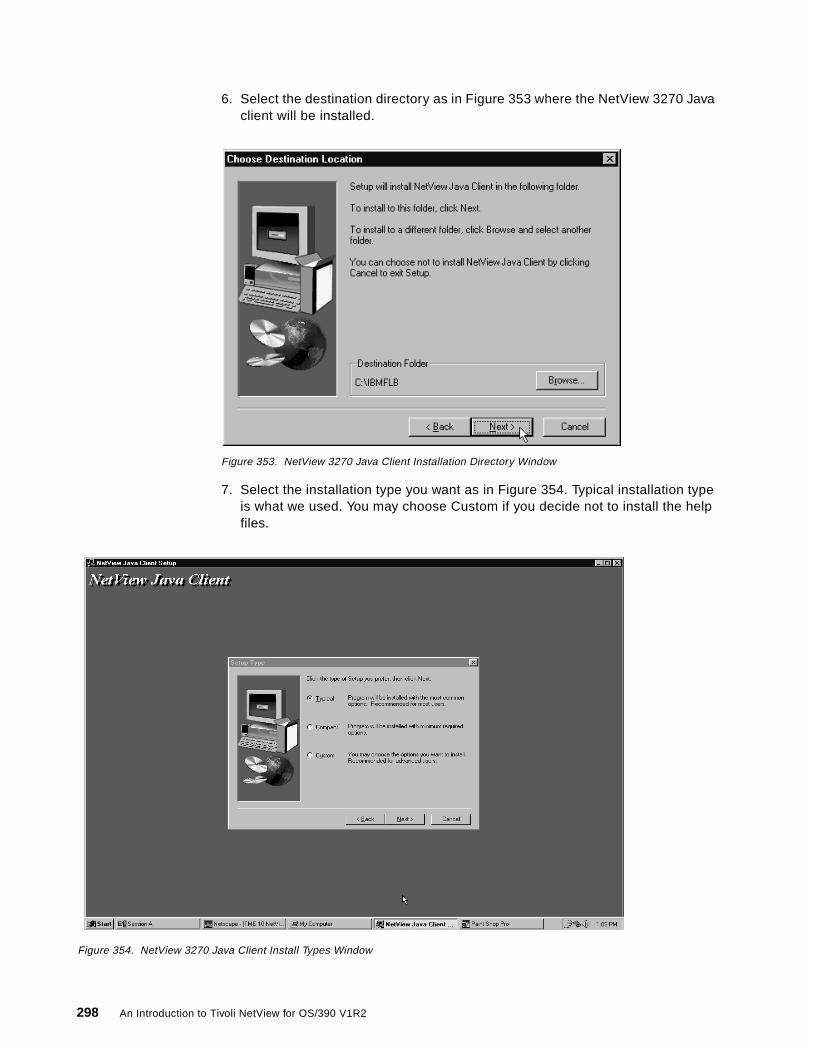
6. Select the destination directory as in Figure 353 where the NetView 3270 Java client will be installed.
Figure 353. NetView 3270 Java Client Installation Directory Window
7. Select the installation type you want as in Figure 354. Typical installation type is what we used. You may choose Custom if you decide not to install the help files.
Figure 354. NetView 3270 Java Client Install Types Window
298 An Introduction to Tivoli NetView for OS/390 V1R2

8. You will see an installation in progress window. When the installation is finished the following window is displayed (see Figure 355).
Figure 355. NetView 3270 Java Client Installation Complete Window
After the installation is finished, you will find an icon called Setup NetView Java Client on your desktop.
9. Download and install the Java Development toolkit.
The Java Development toolkit can be found on the Web. You need to download and install the level required for the platform you are installing the NetView 3270 Java Client on. We downloaded JDK 1.1.6 and installed it in the directory:
C:\jdk1.1.6
10.Verify that your PATH and CLASSPATH variables are set correctly.
The Java client installation is in fact a Java application, and both the Java client and the install procedure require PATH and CLASSPATH to be set correctly.
We added the following to the PATH and CLASSPATH definitions:
PATH=c:\jdk1.1.6\binCLASSPATH=c:\jdk1.1.6\lib\classes.zip
To verify what version you have installed use the following command in a DOS window.
The installation procedure will ask you for several pieces of information that you must enter so that the Java client can connect to NetView on the S/390 mainframe. There is help to explain what the various pieces of information are, but the following is a quick summary:
• A unique name, such as an operator ID that will appear as part of the program object icon, in the NetView Java Client icon on the desktop.
C:\>java -version java version "1.1.6"
NetView 3270 Java Client 299

• The TCP/IP host name for the S/390 mainframe.
• The port number to be used when communicating with the S/390 mainframe.
• The terminal type for the session.
• The inbound and outbound encryption keys for the session.
• The directory path for the user setting data. If you specify a path already used by your other sessions, the settings are shared among all sessions. If you want separate settings for some of your sessions, use a separate directory for each session. The install process will create the data directories if they do not already exist.
Click on the Setup NetView Java Client icon to start the setup of the NetView Java Client.
Figure 356. Java Client Introduction Panel
This is the first screen you will see when you have clicked on the icon to install the NetView Java Client. Read the information and click on Next .
300 An Introduction to Tivoli NetView for OS/390 V1R2

Figure 357. Java Client Menu Panel
This screen gives you information about the required host environment and how to customize the host environment. From this screen you are also allowed to install the Java client on the workstation.
Select Install the Java Client on the Workstation .
Figure 358. Java Client Install Panel (1 of 3)
NetView 3270 Java Client 301

The following three screens are the dialogs where you have to define the installation options such as operator ID, hostname, port number, screen size and encryption options. In our example we used the following specifications:
• Name = TMEID4
• Hostname = MVS11
• Port = 9999 (which is the default used in DSITCPCF)
• Terminal Type = 3 (27 x 132 screen size)
Select Continue when you have entered your data.
Figure 359. Java Client Install Panel (2 of 3)
This screen is used to define the encryption keys for sending/receiving data between the host and the workstation. If you decide to not use encryption, you should type disabled in lowercase in both of these fields. In our example we used the default in both directions, where TME 10 NetView for OS/390 uses an internal key.
The value you put as the encryption keys here must match the one you used in the profile member DSITCPRF in DSIPRF.
Select Continue when you have entered your data.
302 An Introduction to Tivoli NetView for OS/390 V1R2
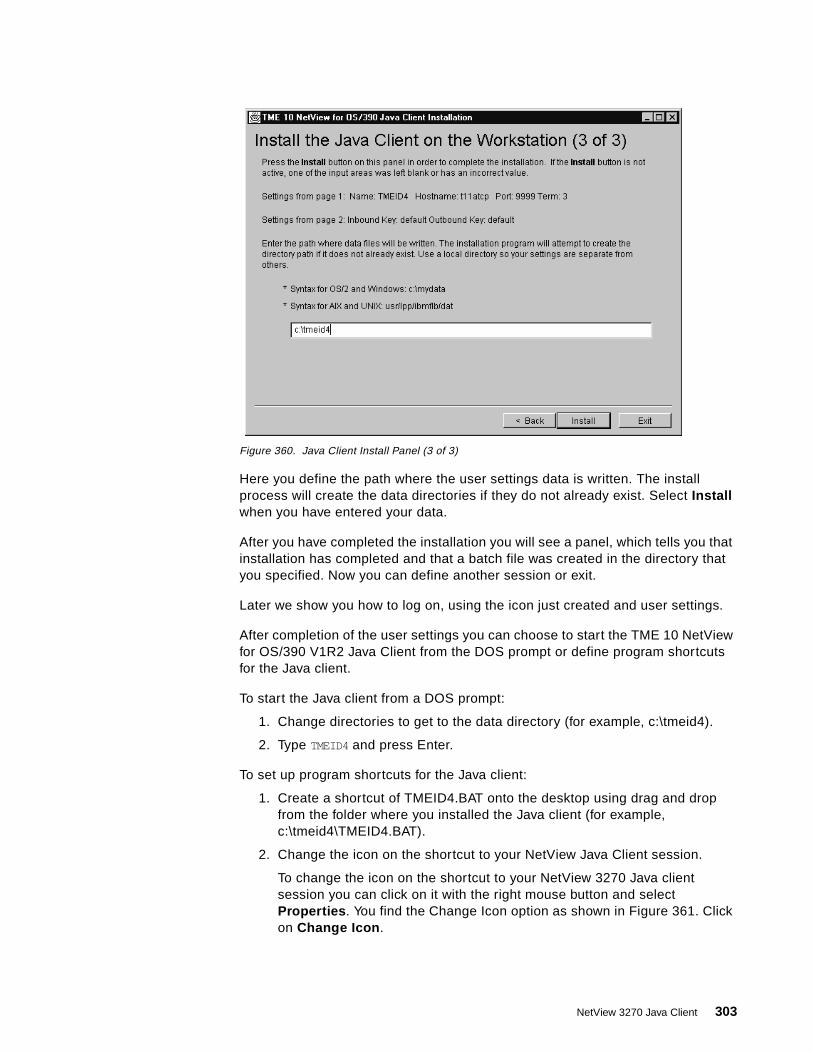
Figure 360. Java Client Install Panel (3 of 3)
Here you define the path where the user settings data is written. The install process will create the data directories if they do not already exist. Select Install when you have entered your data.
After you have completed the installation you will see a panel, which tells you that installation has completed and that a batch file was created in the directory that you specified. Now you can define another session or exit.
Later we show you how to log on, using the icon just created and user settings.
After completion of the user settings you can choose to start the TME 10 NetView for OS/390 V1R2 Java Client from the DOS prompt or define program shortcuts for the Java client.
To start the Java client from a DOS prompt:
1. Change directories to get to the data directory (for example, c:\tmeid4).
2. Type TMEID4 and press Enter.
To set up program shortcuts for the Java client:
1. Create a shortcut of TMEID4.BAT onto the desktop using drag and drop from the folder where you installed the Java client (for example, c:\tmeid4\TMEID4.BAT).
2. Change the icon on the shortcut to your NetView Java Client session.
To change the icon on the shortcut to your NetView 3270 Java client session you can click on it with the right mouse button and select Properties . You find the Change Icon option as shown in Figure 361. Click on Change Icon .
NetView 3270 Java Client 303

Figure 361. NetView Java Client Icon
The NetView 3270 Java Client installation process installs the icon in the directory you define during the installation process (refer to Figure 353).
Figure 362. NetView Java Client Icon
14.2 How to Work with NetView Java Client
Here we give you some examples of how to use the NetView Java Client application:
• How to log on to TME 10 NetView for OS/390
• How to use a Hardware Monitor full-screen session
• How to create your own full-screen session
• How to use the windowing function
14.2.1 Log On to TME 10 NetView for OS/390In our test, we used a Windows 95 workstation. The following examples are specifically for this environment.
304 An Introduction to Tivoli NetView for OS/390 V1R2

To start logging on, click on the shortcut to user ID on your desktop. In our case it was TMEID4.
The Java Client Logon screen should be opened automatically. If this does not occur, you could check the following:
• Check that the task DSITCPIP is active in NetView.
• Check that TCP/IP is started.
• Ping the MVS host name to ensure you have TCP/IP connectivity.
Figure 363. NetView Java Client Logon Screen
The logon panel contains entry fields for logging on to NetView. Enter your NetView user ID and password and press the Enter key.
You cannot log on to NetView from the Java client if you are already logged on via another session, for example, a 3270 emulation screen.
After logging on, the Command Facility panel will be displayed.
14.2.1.1 Main Menu Bar SelectionFigure 364 shows the menu bar options:
Figure 364. NetView Java Client, Main menu options
The menu bar selections are:
• File
NetView 3270 Java Client 305

Use this selection to close the client workspace.
• Window
Controls the arrangement of the windowed panels. You can use this option only if you have use the window icon to tear away the window from the workspace. Then with the window you can use:
• Cascade
• Tile horizontally
• Tile vertically
• Minimize all
• Maximize all
• Show all
• Hide all
• Connection Services
Manages the connection (log on and log off) with the TME 10 NetView for OS/390 host.
• Help
Displays help and problem determination information for the TME 10 NetView for OS/390 Java Client application.
• Session Services
Controls the establishment of new sessions and the addition or deletion of sessions.
• Books
Displays information on how to access selected TME 10 NetView for OS/390 documentation in HTML format.
14.2.2 Command Facility SessionThis window is opened by default just after the logon window.
306 An Introduction to Tivoli NetView for OS/390 V1R2

Figure 365. NetView Java Client, Command Facility Screen
No main menu is displayed after logging on to TME 10 NetView for OS/390. That is because no full-screen panels can be displayed under the Command Facility. The command line is in exactly the same place as in NetView. PF keys can be used in the same way as in NetView or by using the point and click facility at the bottom of the screen. For example, if you issue a NetView command such as taskutil, you will get the command response just like in a 3270 session.
NetView 3270 Java Client 307
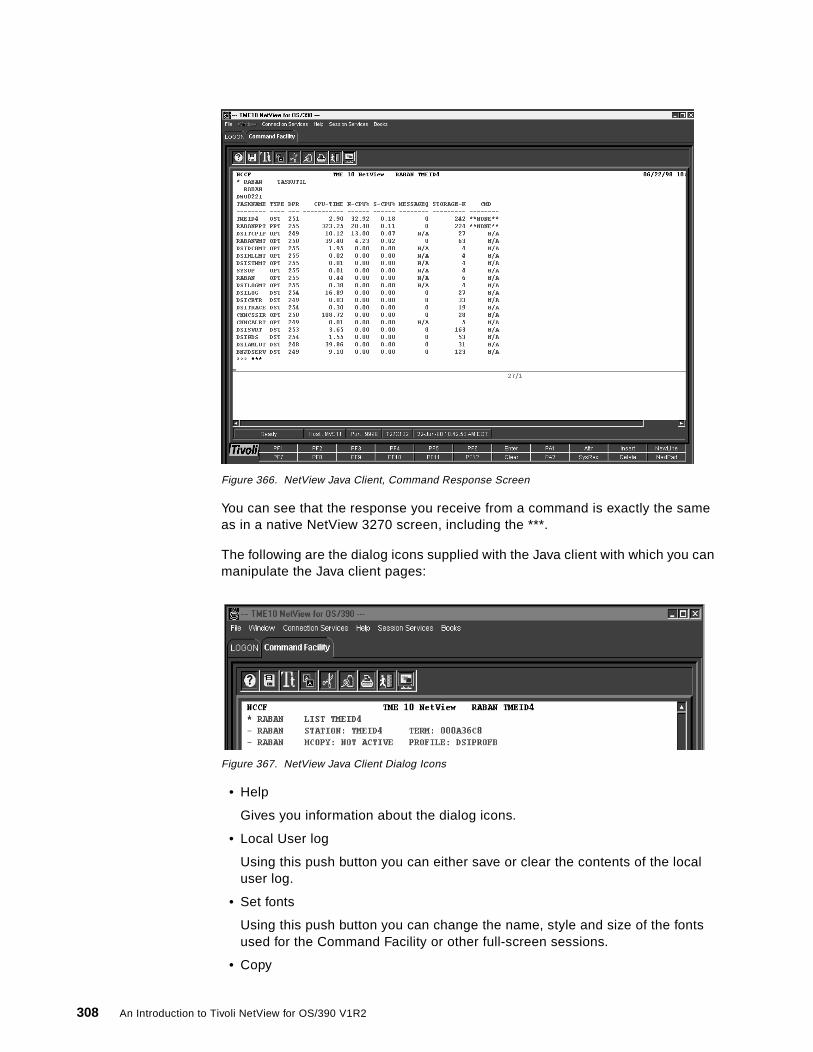
Figure 366. NetView Java Client, Command Response Screen
You can see that the response you receive from a command is exactly the same as in a native NetView 3270 screen, including the ***.
The following are the dialog icons supplied with the Java client with which you can manipulate the Java client pages:
Figure 367. NetView Java Client Dialog Icons
• Help
Gives you information about the dialog icons.
• Local User log
Using this push button you can either save or clear the contents of the local user log.
• Set fonts
Using this push button you can change the name, style and size of the fonts used for the Command Facility or other full-screen sessions.
• Copy
308 An Introduction to Tivoli NetView for OS/390 V1R2

Using this push button allows you to copy text.
• Cut
Using this push button allows you to cut text.
• Paste
Using this push button allows you to paste text.
The Print push button prints the information on the screen. You are prompted for the printer to use.
• End session
Using this push button ends a session. Ending a session will take you back to the command facility.
• Windowed panel
Using this push button allows you to arrange the active sessions as windows in a suitable way. When you use this button the Window option in the main menu is highlighted and you can arrange your windows as described in 14.2.1.1, “Main Menu Bar Selection” on page 305.
To close down the Command facility session, just click on the tab for Command facility and the End session button.
On the Command Facility window you have the capability to have all command responses in your own user log. You click on the Local User Log button and your user log is shown as follows:
NetView 3270 Java Client 309
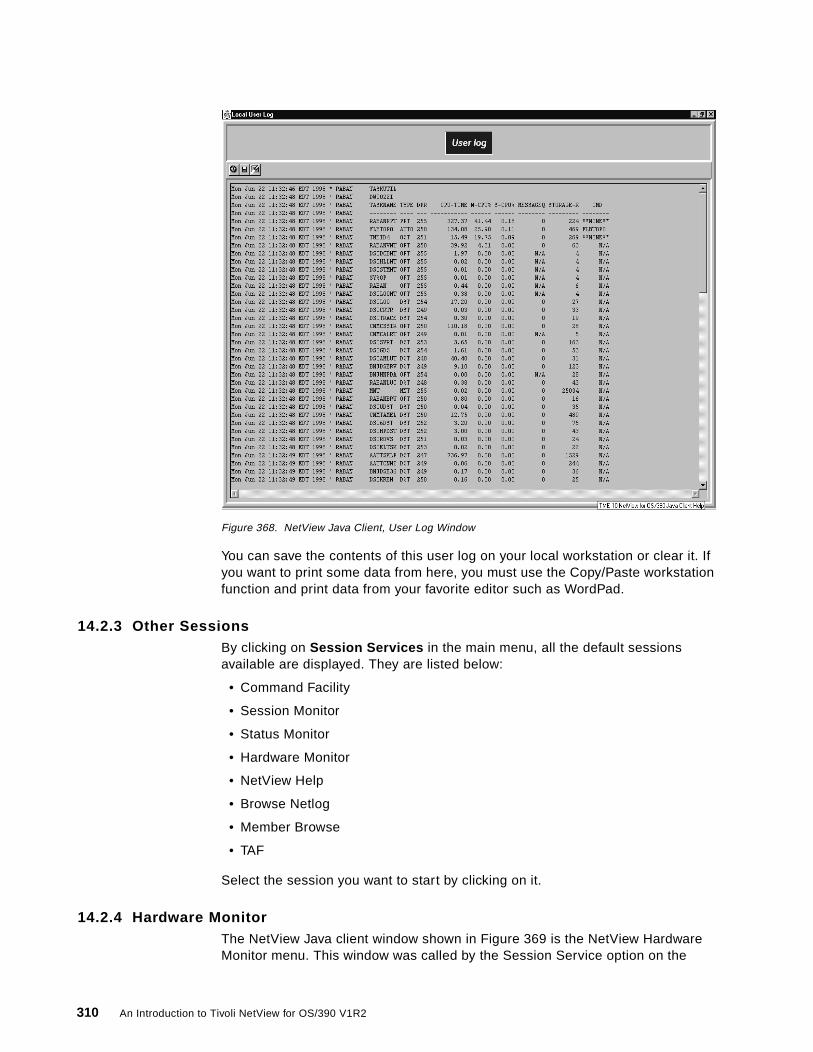
Figure 368. NetView Java Client, User Log Window
You can save the contents of this user log on your local workstation or clear it. If you want to print some data from here, you must use the Copy/Paste workstation function and print data from your favorite editor such as WordPad.
14.2.3 Other SessionsBy clicking on Session Services in the main menu, all the default sessions available are displayed. They are listed below:
• Command Facility
• Session Monitor
• Status Monitor
• Hardware Monitor
• NetView Help
• Browse Netlog
• Member Browse
• TAF
Select the session you want to start by clicking on it.
14.2.4 Hardware MonitorThe NetView Java client window shown in Figure 369 is the NetView Hardware Monitor menu. This window was called by the Session Service option on the
310 An Introduction to Tivoli NetView for OS/390 V1R2
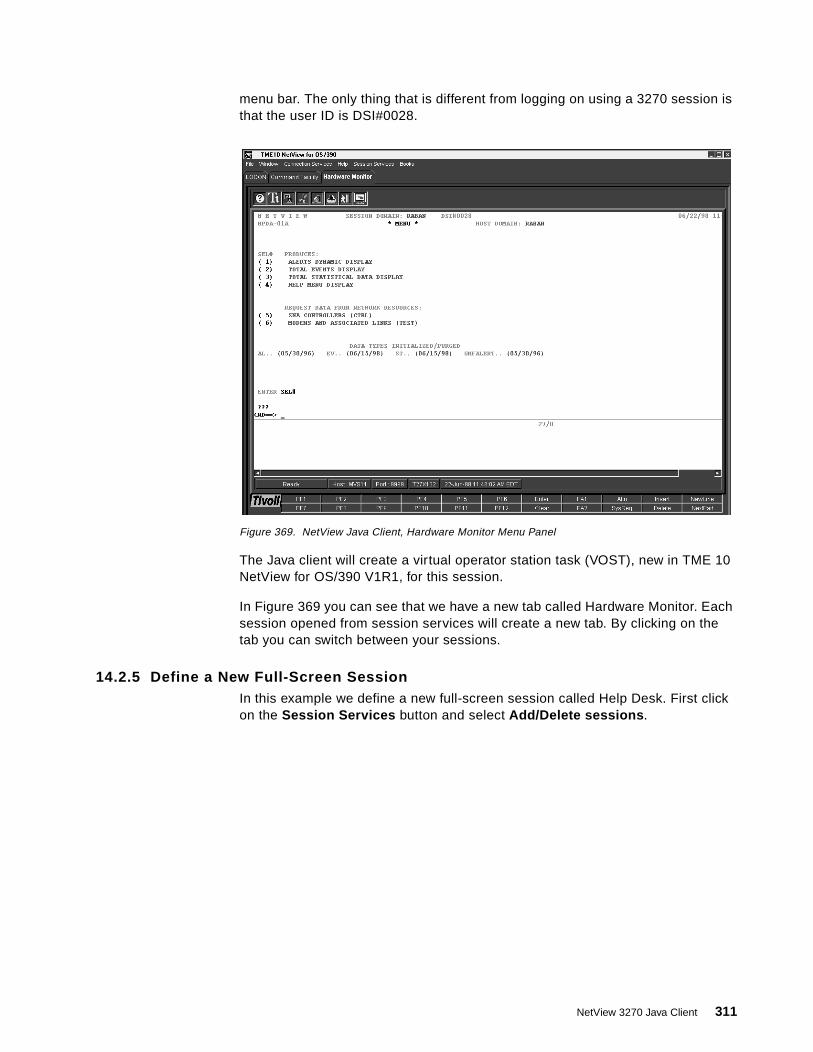
menu bar. The only thing that is different from logging on using a 3270 session is that the user ID is DSI#0028.
Figure 369. NetView Java Client, Hardware Monitor Menu Panel
The Java client will create a virtual operator station task (VOST), new in TME 10 NetView for OS/390 V1R1, for this session.
In Figure 369 you can see that we have a new tab called Hardware Monitor. Each session opened from session services will create a new tab. By clicking on the tab you can switch between your sessions.
14.2.5 Define a New Full-Screen SessionIn this example we define a new full-screen session called Help Desk. First click on the Session Services button and select Add/Delete sessions .
NetView 3270 Java Client 311

Figure 370. NetView Java Client, Add/Delete Sessions Window
In the Full Screen Session Name field, type the name you want to call the new session. In the Start command String field, type the command you want to invoke to initialize the session. Click on the Immediate button if you want the command to be executed immediately. Click on the Delay button if you want the initial command to be displayed on the command line. After that, select Add , Save and Done .
Figure 371. NetView Java Client, Session Services Window
312 An Introduction to Tivoli NetView for OS/390 V1R2

If you now click on Session Services , you will see the new HELPDESK session.
Selecting HELPDESK will open a new full-screen application.
Figure 372. NetView Java Client, HELPDESK Panel
14.2.6 Managing Your WindowsYou have several selections to arrange all Java 3270 open windows. The following is an example of a vertical arrangement of the three sessions we had open. We had Command Facility, Hardware Monitor and HELPDESK. On each window we clicked on the Windowed Panel button to tear that window away. From the Window menu option we choose Tile vertically .
NetView 3270 Java Client 313

Figure 373. NetView Java Client, Vertical Windowing Sample
If you have any problems with the NetView Java client or need some assistance, you can use the online help. The help file can be accessed from the Help option on menu bar or from the question mark icon.
314 An Introduction to Tivoli NetView for OS/390 V1R2

Figure 374. NetView Java Client, Online Help Window
NetView 3270 Java Client 315

316 An Introduction to Tivoli NetView for OS/390 V1R2

Chapter 15. Web Access to NetView/390
The Web Access to TME 10 NetView for OS/390 V1R2 allows you to send commands to NetView from your Web browser. You can use any Web browser to connect to your TME 10 NetView for OS/390 V1R2.
15.1 Software Installation on MVS
Ensure that you have customized the following DSIPARM members:
• DSIDMNB - DSIWBTSK task definition
• DSIWBMEM - Task parameters for DSIWBMEM
It is important that in the DSIWBMEM definitions, a unique port is specified. Otherwise, if there is a problem with the TCP/IP definitions, a message, BNH167I, is returned, with an error code of 48. Also, be aware that in the default definitions shipped with TME 10 NetView for OS/390, port 80 is used. If other Web servers are running, port 80 will be allocated to them and another port needs to be allocated to the NetView Web Server.
15.2 Web Access
Using the Web browser, commands that output messages can be issued. Full-screen commands are generally not supported, although BROWSE is. You can browse members and netlogs.
**************************************************************** NOTE: THE FOLLOWING TASK STATEMENT IS NECESSARY FOR ** NETVIEW WEB SERVER. **************************************************************** TASK MOD=DSIZDST,TSKID=DSIWBTSK,MEM=DSIWBMEM,PRI=5,INIT=Y
DSTINIT FUNCT=OTHER,XITDI=DSIWBINT TCPANAME = T11ATCP SOCKETS = 100 PORT = 9998
© Copyright IBM Corp. 1998 317

Figure 375. Web Server Initial Panel
To access NetView, the host name, domain and port need to be specified. In our definitions, MVS11 is the host name, ITSO.RAL.COM is the domain and the port number is 9998.
318 An Introduction to Tivoli NetView for OS/390 V1R2

Figure 376. Web Server - NetView Sign-On Screen
As you can see, there is no operator defined, and no request for operator ID and password has been made.
Figure 377. Web Server - NetView Password Screen
Once any input is entered, a password pop-up screen appears, where you have to enter your operator ID and password.
Note: Once you have signed off from NetView and you are working elsewhere in your browser, using the BACK command until you reach the NetView screen will result in you being able to use NetView commands without having to sign on again. Once you have closed your Browser window completely and reopened it, you will be prompted for your operator ID and password.
Web Access to NetView/390 319

15.3 Issuing Commands Using the Web Browser
Let's look at two examples of commands from the Web browser. To issue a command, simply type in the command. In our case, we issued the WHO command.
Figure 378. WHO Command Response 1 of 2
The response is the same as you would get in a normal NCCF screen. The pages are scrollable, in the same way as you would normally use the Web.
320 An Introduction to Tivoli NetView for OS/390 V1R2

Figure 379. WHO Command Response 2 of 2
In this example, we issued a browse command. The output is displayed in exactly the same manner as the previous example.
Web Access to NetView/390 321

Figure 380. BROWSE Command Response 1 of 2
Figure 381. BROWSE Command Response 2 of 2
322 An Introduction to Tivoli NetView for OS/390 V1R2
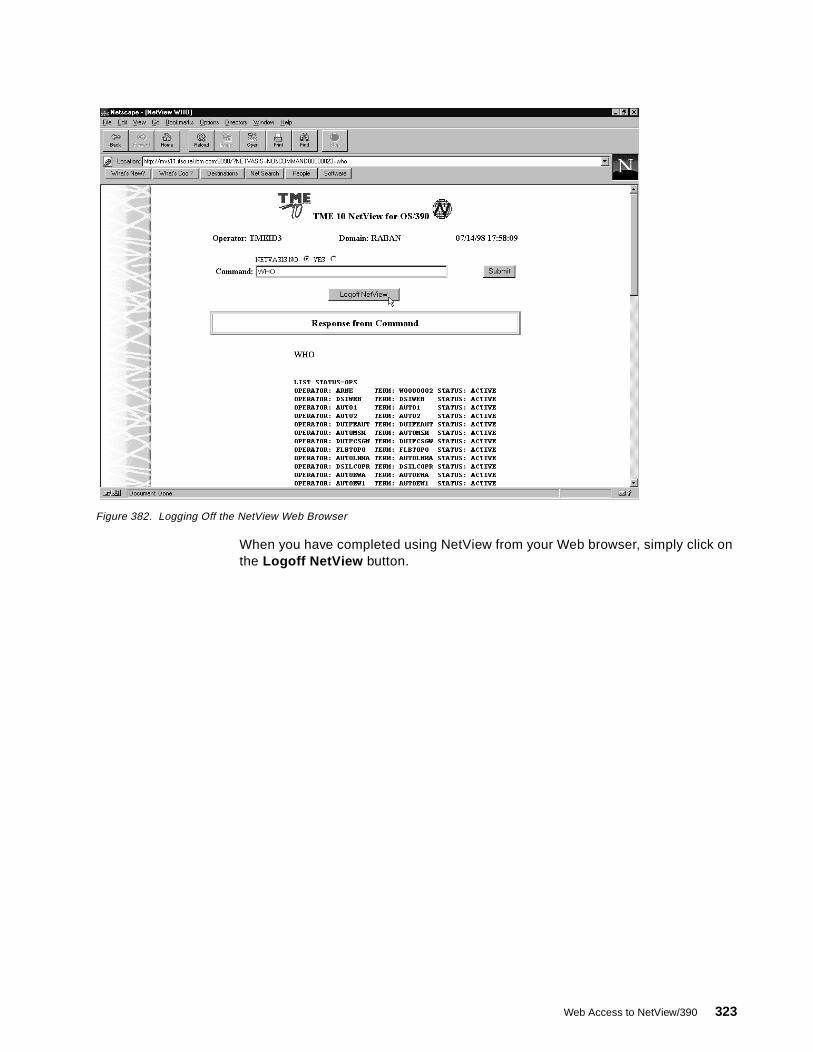
Figure 382. Logging Off the NetView Web Browser
When you have completed using NetView from your Web browser, simply click on the Logoff NetView button.
Web Access to NetView/390 323

Figure 383. Logging Off the NetView Web Browser - Warning Message
As we have stated previously, your operator ID has been logged off NetView, but by using the Back command on the Web browser, you will once again be logged on to NetView, without being prompted for an operator ID and password. The only way to prevent this is to close down the Web browser completely.
324 An Introduction to Tivoli NetView for OS/390 V1R2
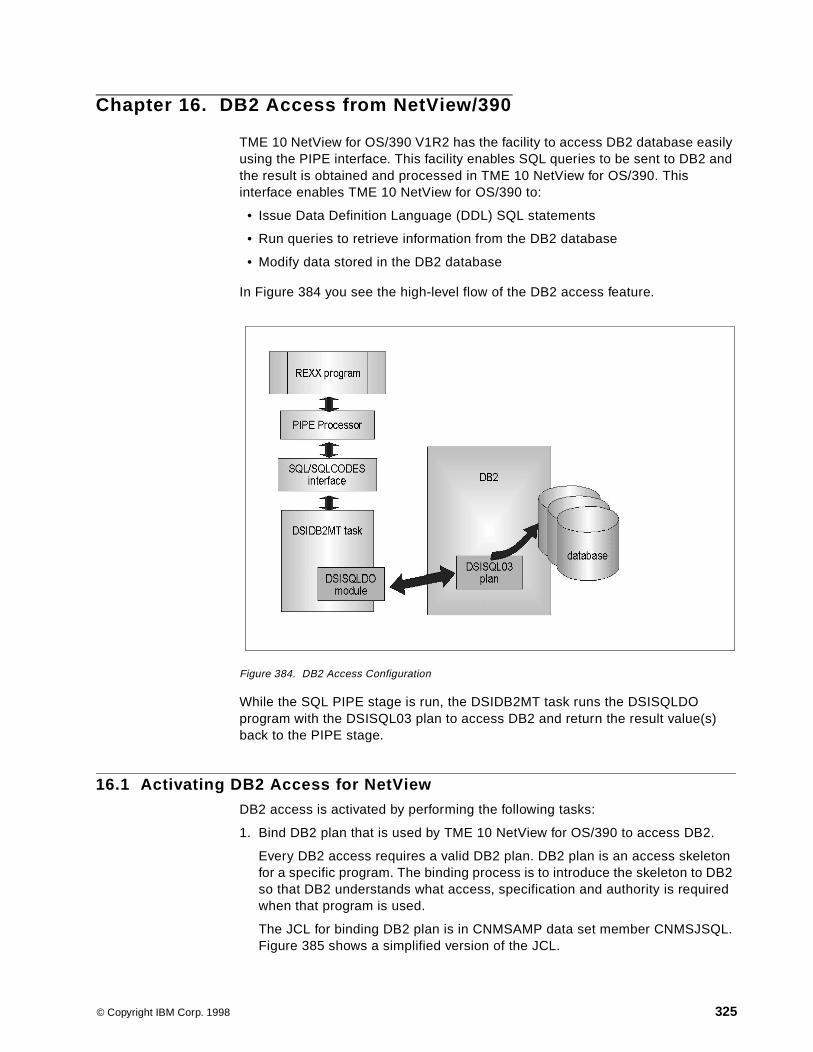
Chapter 16. DB2 Access from NetView/390
TME 10 NetView for OS/390 V1R2 has the facility to access DB2 database easily using the PIPE interface. This facility enables SQL queries to be sent to DB2 and the result is obtained and processed in TME 10 NetView for OS/390. This interface enables TME 10 NetView for OS/390 to:
• Issue Data Definition Language (DDL) SQL statements
• Run queries to retrieve information from the DB2 database
• Modify data stored in the DB2 database
In Figure 384 you see the high-level flow of the DB2 access feature.
Figure 384. DB2 Access Configuration
While the SQL PIPE stage is run, the DSIDB2MT task runs the DSISQLDO program with the DSISQL03 plan to access DB2 and return the result value(s) back to the PIPE stage.
16.1 Activating DB2 Access for NetView
DB2 access is activated by performing the following tasks:
1. Bind DB2 plan that is used by TME 10 NetView for OS/390 to access DB2.
Every DB2 access requires a valid DB2 plan. DB2 plan is an access skeleton for a specific program. The binding process is to introduce the skeleton to DB2 so that DB2 understands what access, specification and authority is required when that program is used.
The JCL for binding DB2 plan is in CNMSAMP data set member CNMSJSQL. Figure 385 shows a simplified version of the JCL.
© Copyright IBM Corp. 1998 325

Figure 385. DB2 Bind JCL
Submit the JCL after modifying:
• 1 The necessary JOB statement. • 2 The JOBLIB for DB2 load library. • 3 All these must refer to the same data set that has the characteristic of FB 80. • 4 The DB2 subsystem name. • 5 The user ID that is used to bind the plan since this ID must have BINDADD
authority and SELECT access to DB2 CATALOGs. • 6 The location ID (DB2L01) to your location or place an '*' to allow usage to
any locations
You should receive a 0 return code for all steps.
2. Make sure DSIDMNB contains the required definition for the DB2 access task
The following DSIDMNB entry must exist for the DB2 access task:
TASK MOD=DSIDB2MT,MEM=DSIDB2DF,TSKID=DSIDB2MT,PRI=6,INIT=N
3. Modify DSIPARM member DSIDB2DF.
This member tells TME 10 NetView for OS/390 which DB2 subsystem to access. There is currently only one DB2 subsystem that can be accessed for each NetView instance.
The content of this member is:
SUBSYSTEM=DB2
4. Add DB2 SDSNLOAD (or DSNLOAD for older DB2 version) to the CNMPROC's STEPLIB definition.
//SQLPREP JOB ,REZNAK.RALVM14,MSGLEVEL=(1,1), 1// MSGCLASS=A//*********************************************************************//JOBLIB DD DSN=DSN510.SDSNLOAD,DISP=SHR 2//PUTDBRM EXEC PGM=IEBGENER//SYSUT2 DD DSN=USER2.DBRMLIB(DSISQLDO),DISP=SHR 3//SYSIN DD DUMMY//SYSPRINT DD SYSOUT=A//SYSUT1 DD * . . . the actual DBRM content goes here . . ./*//*//* BIND THE PROGRAM//*//BINDPLAN EXEC PGM=IKJEFT01,DYNAMNBR=20,COND=(4,LT)//DBRMLIB DD DSN=USER2.DBRMLIB,DISP=SHR 3//SYSTSPRT DD SYSOUT=*//SYSPRINT DD SYSOUT=*//SYSUDUMP DD SYSOUT=*//SYSTSIN DD * DSN SYSTEM(DB2) 4 BIND PACKAGE(DSISQL03) MEM(DSISQLDO) ACT(REP) ISOLATION(CS) - LIB('USER2.DBRMLIB') OWNER(USER2) 3 5 BIND PLAN(DSISQL03) ACT(REP) - PKLIST(DB2L01.DSISQL03.DSISQLDO) - 6 ISOLATION(CS) OWNER(USER2) 5 END
326 An Introduction to Tivoli NetView for OS/390 V1R2
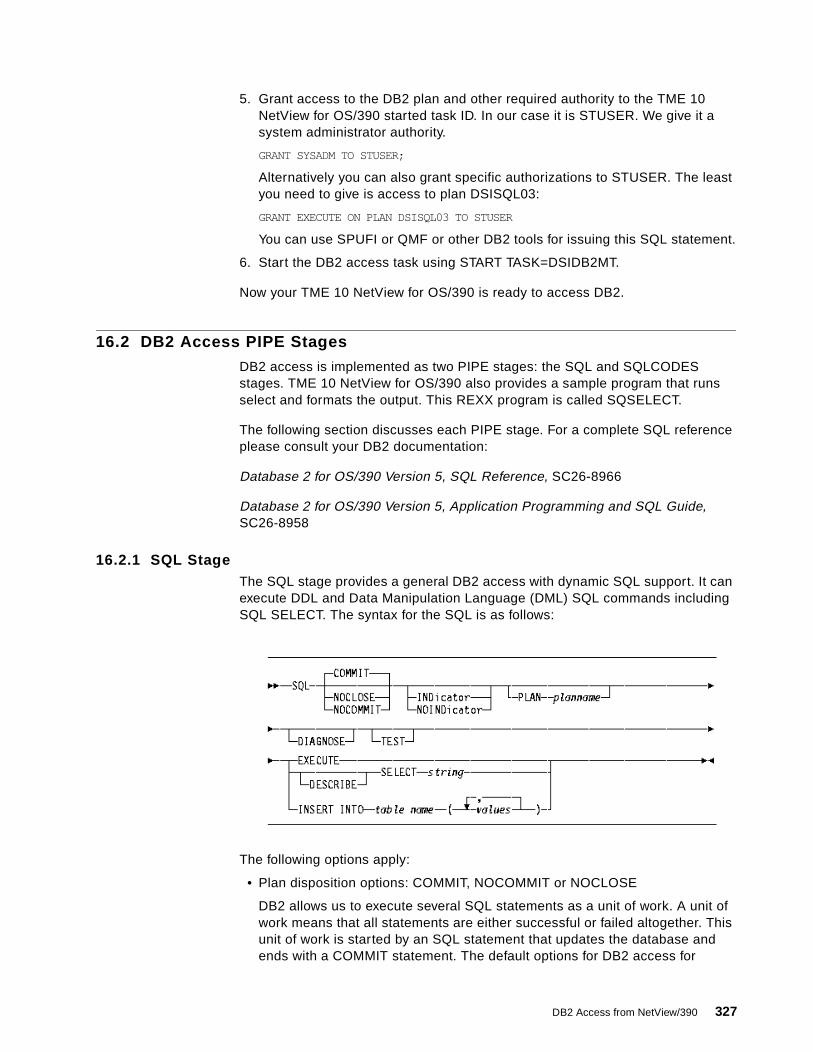
5. Grant access to the DB2 plan and other required authority to the TME 10 NetView for OS/390 started task ID. In our case it is STUSER. We give it a system administrator authority.
GRANT SYSADM TO STUSER;
Alternatively you can also grant specific authorizations to STUSER. The least you need to give is access to plan DSISQL03:
GRANT EXECUTE ON PLAN DSISQL03 TO STUSER
You can use SPUFI or QMF or other DB2 tools for issuing this SQL statement.
6. Start the DB2 access task using START TASK=DSIDB2MT.
Now your TME 10 NetView for OS/390 is ready to access DB2.
16.2 DB2 Access PIPE Stages
DB2 access is implemented as two PIPE stages: the SQL and SQLCODES stages. TME 10 NetView for OS/390 also provides a sample program that runs select and formats the output. This REXX program is called SQSELECT.
The following section discusses each PIPE stage. For a complete SQL reference please consult your DB2 documentation:
Database 2 for OS/390 Version 5, SQL Reference, SC26-8966
Database 2 for OS/390 Version 5, Application Programming and SQL Guide, SC26-8958
16.2.1 SQL StageThe SQL stage provides a general DB2 access with dynamic SQL support. It can execute DDL and Data Manipulation Language (DML) SQL commands including SQL SELECT. The syntax for the SQL is as follows:
The following options apply:
• Plan disposition options: COMMIT, NOCOMMIT or NOCLOSE
DB2 allows us to execute several SQL statements as a unit of work. A unit of work means that all statements are either successful or failed altogether. This unit of work is started by an SQL statement that updates the database and ends with a COMMIT statement. The default options for DB2 access for
DB2 Access from NetView/390 327

NetView is that each statement is committed as it is executed. However, putting the NOCOMMIT options enable us to move the COMMIT point to after later statements.
NOCLOSE option allows reusing PLAN by this SQL program.
The closing of PIPE also signifies an end to the executing unit of work. So in order to have multiple SQL commands in one unit of work, we need to put all the statements in a multi-line input to the SQL stage.
• Data presentation options: INDICATOR or NOINDICATOR
A 2-byte separator is added before each column data for SELECT statement or INSERT statement. The default for SELECT is INDICATOR while for INSERT it is NOINDICATOR.
• PLAN override
The default plan shipped in the installation job CNMSJSQL is DSISQL03.
• Debugging options: DIAGNOSE and TEST
The DIAGNOSE option is used to receive additional message from the DB2 access. The TEST option is used to run the PIPE stage in a testing mode without accessing DB2 databases.
• Execution types: EXECUTE, SELECT or INSERT
SQL statements are retrieved from the input PIPE stages and may contain multiple SQL statements. Alternatively you can also put the statement directly on the stage for a single statement execution.
• EXECUTE is used for dataless statements.
• SELECT is used for retrieving data from DB2.
• INSERT is used to insert data to DB2.
The return value can be piped to CONSOLE. TME 10 NetView for OS/390 also provides an enhancement to the EDIT PIPE stage. This enhancement is to facilitate conversion of SQL SELECT results from internal to external format and vice versa. This information is provided in Chapter 4, “Pipe and REXX PPI Enhancements” on page 39.
16.2.2 SQLCODES StageThis stage is a special stage to retrieve SQL processing results. Its result is a 44-character record with the last 11 failed SQL operations.
Since this stage's only record failed SQL operations, the SQLCODES interface is only good for diagnosing past problems.
The most recent return code is in the last four characters of the result. The following is the PIPE command to extract the last SQLCODE entry.
PIPE SQLCODES | EDIT 43.2 C2D 1 | CONSOLE
328 An Introduction to Tivoli NetView for OS/390 V1R2

16.2.3 SQSELECT Sample ProgramSQSELECT is a sample REXX program that runs the PIPE interface to describe an SQL SELECT statement and runs the actual query and finally reformats the query output based on the DESCRIBE result.
The output of the SQSELECT program is a tabular display of table output, with the column name as the header.
Figure 386 shows a sample run of the SQSELECT command with a WINDOW interface.
Figure 386. Sample Output from SQSELECT
16.3 DB2 Access Samples
The following are some examples of the usage of the DB2 access from TME 10 NetView for OS/390 V1R2. This is not meant to be an exhaustive list of what is possible with this interface. Instead this serves as some illustration of the capability of the interface.
16.3.1 Creating DB2 DatabaseAppendix B.2, “Initializing DB2 Database” on page 358 provides a REXX program to initialize the DB2 database used during this residency.
Figure 387. Running the SQL Command
The runsql procedure in Figure 387 is used to run the SQL statements one at a time and to use an elaborate method to directly capture the SQL code.
CNMKWIND OUTPUT FROM SQSELECT * FROM INVENTORY_DATA LINE 0 OF 12:25*------------------------------- Top of Data ---------------------------------EQNAME---------- CONTACT_NAME------------- CONTACT_NO LOCATIONRABUDI BUDI 352-4569 678RABUDIPC Budi 352-4569 678WTR05228 BUDI 352-4569 678RABUDI1 BUDI 352-4569 678RABUDI2 BUDI 352-4569 678RS600015 BUDI 352-4569 678RAPAGES FRANCOIS 352-3483 678RALEPAGE FRANCOIS 352-3483 678RAPAGE1 FRANCOIS 352-3483 678RAPAGE2 FRANCOIS 352-3483 678ARNESPC ARNE 352-4498 678ARNEILU ARNE 352-4498 678*------------------------------ Bottom of Data -------------------------------
runsql: procedure parse arg sqlstmt 'PIPE (END ?) LIT /'sqlstmt'/ |', 'A: SQL EXECUTE | DROP', '? A: | EDIT SKIPTO /= / UPTO /,/ 3.* 1', ' | B: FANIN | TAKE 1 | VAR RESULT | DROP', '? LIT /000/ | B:' sqlcode = strip(result)return sqlcode
DB2 Access from NetView/390 329

The result of this REXX program is in Figure 388.
Figure 388. Creating DB2 Database Output
As you can see, the first invocation failed (SQLCODE=-601), which means that the object to be created already exists. We recover that by dropping the whole database. That is why the second invocation of INIT5224 is successful.
However, we performed another test to create the database in one unit of work. The REXX code in Figure 389 shows how.
NCCF TME 10 NetView RABAN TMEID5 05/15/98 09:05:25* RABAN INIT5224C RABAN Create database TMETEST, SQLcode= -601C RABAN Drop database TMETEST= 000* RABAN INIT5224C RABAN Create database TMETEST, SQLcode= 000C RABAN Create tablespace TMEDATA, SQLcode= 000C RABAN Create table NETVIEW_DATA, SQLcode= 000C RABAN Create table INVENTORY_DATA, SQLcode= 000C RABAN Create Primary index for NETVIEW_DATA, SQLcode= 000C RABAN Create Primary index for INVENTORY_DATA, SQLcode= 000C RABAN Program completed successfully !-------------------------------------------------------------------------
???
330 An Introduction to Tivoli NetView for OS/390 V1R2

Figure 389. Creating DB2 Database in a Unit-of-Work
However, this program does not check any return codes, so all these SQL statements are executed in sequence and any failures will mean that no statements are really performed. This ability is provided by the NOCOMMIT option.
16.3.2 Automation to Collect Data from SystemTME 10 NetView for OS/390 can collect information at certain intervals and put them in the DB2 database for easy retrieval and reporting. This example shows the usage of NetView's TASKUTIL command to capture NetView's CPU usage and memory consumption.
Figure 390 shows a REXX program that issues the TASKUTIL command and saves its output in DB2.
/*REXX --------------------------------------------- * * 5224INIT * * * Initialize DB2 database for NetView purposes * * ------------------------------------------------- */ cre.1 = 'CREATE DATABASE TMETEST' cre.2 = 'CREATE TABLESPACE TMEDATA IN TMETEST', 'SEGSIZE 4', 'USING STOGROUP SYSDEFLT PRIQTY 200 SECQTY 100' cre.3 = 'CREATE TABLE NETVIEW_DATA', '( LOG_TIME TIMESTAMP NOT NULL WITH DEFAULT,', ' NETV_CPU DEC(8,2),', ' NETV_MEM DEC(10),', ' PRIMARY KEY(LOG_TIME) )', 'IN TMETEST.TMEDATA' cre.4 = 'CREATE TABLE INVENTORY_DATA', '( EQNAME CHAR(16) NOT NULL,', ' CONTACT_NAME CHAR(25),', ' CONTACT_NO CHAR(8),', ' LOCATION CHAR(3),', ' PRIMARY KEY(EQNAME) )', 'IN TMETEST.TMEDATA' cre.5 = 'CREATE UNIQUE INDEX LOGINDEX ON NETVIEW_DATA (LOG_TIME)' cre.6 = 'CREATE UNIQUE INDEX EQINDEX ON INVENTORY_DATA (EQNAME)' cre.0 = 6
'PIPE (END ;)', ' STEM CRE.', '| A: SQL NOCOMMIT EXECUTE', /* <-- Must be NOCOMMIT */ '| CONSOLE', ';A: | STEM AA. | TAKE 1 | CONSOLE' say 'Exiting ...'exit
DB2 Access from NetView/390 331

Figure 390. REXX Program to Log to DB2 Database
The result of this REXX program is in Figure 391. We also schedule this program to run every 10 minutes.
Figure 391. Logging to DB2 Database
The result is stored in NETVIEW_DATA table, as shown in Figure 392.
/*REXX * Capturing TASKUTIL result to DB2TASKNAME TYPE DPR CPU-TIME N-CPU% S-CPU% MESSAGEQ STORAGE-K CMD-------- ---- --- ----------- ------ ------ -------- --------- -------- */ 'PIPE NETV TASKUTIL | SEP | LOCATE /NETVIEW/ | LOCATE /TOTL/ |', 'VAR DATA' parse var data . . . cpu . . . stor . datetime = date("S")||"-"||time("L") /* timestamp data for DB2 */ datetime = insert('-',datetime,4) /* should have the format */ datetime = insert('-',datetime,7) /* yyyy-mm-dd-hh.mm.ss.uuuuuu */ datetime = translate(datetime,".",":") pipecmd = "PIPE (END ;)", "LIT /"||DATETIME format(CPU,5,2) STOR||"/", /* put data in pipe */ "| EDIT /INSERT INTO NETVIEW_DATA", /* Built INSERT stmt */ "(LOG_TIME,NETV_CPU,NETV_MEM)", /* Assign column names */ " values('/ 1 1.26 NEXT", /* the timestamp, 26 chars */ " /', / NEXT 28.8 NEXT", /* formatted 8 char cpu usage */ " /, / NEXT 37.* NEXT", /* the rest is the storage */ " /)/ NEXT", "| A: SQL EXECUTE", /* Execute the INSERT stmt */ "| CONSOLE", /* Dump to console */ "; A:", /* Get the STDERR of SQL */ "| EDIT SKIPTO /= / UPTO /,/ 3.* 1", /* Parse the SQL CODE */ "| B: FANIN", /* Collect with literal B: */ "| TAKE 1 | VAR RESULT | DROP", /* Save SQLCODE in result */ ";", " LIT /000/ | B:" /* put 000 as default code */ pipecmd Say datetime "Done ..." cpu storexit
NCCF TME 10 NetView RABAN TMEID5 05/15/98 09:56:53 * RABAN ISRT5224 C RABAN 1998-05-15-09.56.24.246632 Done ... 503.92 38117 * RABAN EVERY 10,ISRT5224 - RABAN P DSI034I COMMAND SCHEDULED BY AT/EVERY/AFTER COMMAND - 'ISRT5224' - RABAN P DSI201I TIMER REQUEST SCHEDULED FOR EXECUTION 'ID=SYS00007' ------------------------------------------------------------------------
???
332 An Introduction to Tivoli NetView for OS/390 V1R2

Figure 392. Contents of NETVIEW_DATA
16.3.3 Automation SupportThis example shows how an inventory database can be used to enhance automation. The program accessed the INVENTORY_DATA table that was created in 16.3.1, “Creating DB2 Database” on page 329.
That DB2 table is used to automate SENTRY events of class universal_totalfree as shown in Figure 393. (This requires that Event/Automation Service has been set up as in Chapter 7, “Event/Automation Service” on page 77.)
Figure 393. VBDTBL01 Automation Table
We load this table using:
AUTOTBL MEMBER=VBDTBL01 INSERT FIRST
This is so the simple table is always checked and will not be interfered with by other tables. (For a discussion on the AUTOTBL command see 2.2, “New AUTOTBL Design” on page 16.)
The automation table invokes the EML5224 program (see B.6, “EML5224 Command” on page 367), which queries the INVENTORY_DATA table and returns the field CONTACT_NAME based on the workstation that sends the data.
SQSELECT CONTACT_NAME FROM INVENTORY_DATA WHERE EQNAME=hier(2)
Figure 394 shows the NETLOG when the automation is executing.
CNMKWIND OUTPUT FROM SQSELECT * FROM NETVIEW_DATA*------------------------------- Top of Data ----------------------------LOG_TIME------------------ NETV_CPU NETV_MEM----1998-05-15-10.29.28.580782 535.37 394041998-05-15-11.29.28.576656 575.26 395591998-05-15-12.29.28.663778 615.41 377211998-05-15-13.29.28.599948 635.77 377211998-05-15-14.29.29.872758 676.33 388791998-05-15-15.29.28.638591 703.26 390981998-05-15-16.29.28.662974 726.14 391831998-05-15-17.29.28.608822 754.64 388901998-05-15-18.29.28.645419 781.98 388881998-05-15-19.29.28.677729 803.09 380071998-05-15-20.29.28.590549 849.36 379601998-05-15-21.29.28.631226 871.78 379591998-05-15-22.29.28.588434 891.20 379591998-05-15-23.29.28.590831 910.67 37959*----------------------------- Bottom of Data ---------------------------
IF MSUSEG(0000.31.30 3)='universal_totalfree' . THEN EXEC(CMD('EML5224') ROUTE(ALL AUTO1));
DB2 Access from NetView/390 333

Figure 394. EML5224 Automation Result
And finally based on the result it sends the message using the INFORM command (see 3.3.2, “INFORM Command” on page 33) to send an e-mail. Figure 395 shows the Lotus Notes mail.
Figure 395. Lotus Notes Notification
STATMON.BROWSE ACTP NETWORK LOG FOR 06/05/98 (98156) COLS 008 085 10:38 A HOST: HOST01 *1* *2* *3* *4* SCROLL ==> CSR --1----+----2----+----3----+----4----+----5----+----6----+----7----+----8----+ TMEID5 RABAN P% 10:31:34 IST664I REAL OLU=USIBMRA.RALVSMV6 REAL DLU= TMEID5 RABAN P% 10:31:34 IST889I SID = F8D3D16446FCC0EE TMEID5 RABAN P% 10:31:34 IST264I REQUIRED RESOURCE RABANJE NOT ACTI TMEID5 RABAN P% 10:31:34 IST314I END BNJDSERV RABAN 10:31:37 CNM493I VBDTBL01 : 05780006 : EML5224 BNJDSERV RABAN 10:31:37 CNM493I FLCSTBLT : (NO SEQ) : FLCATAUT BNJDSERV RABAN 10:31:37 CNM493I FLCSTBLT : (NO SEQ) : FLCATALH AUTO1 RABAN 10:31:37 VBD0001I Retrieving Contact for RS600015 AUTO1 RABAN 10:31:38 VBD0004I Contacting... BUDI AUTO1 RABAN 10:32:13 Send result OK AUTO1 RABAN 10:32:13 EZL460I EMAIL ACTION WAS SUCCESSFULLY ISSUED FOR TMEID5 RABAN P% 10:32:25 IST663I CDINIT REQUEST FROM RAK FAILED TMEID5 RABAN P% 10:32:25 IST664I REAL OLU=USIBMRA.RALVSMV6 ALIAS DLU= TMEID5 RABAN P% 10:32:25 IST889I SID = F8D3D16446FCC0ED TMEID5 RABAN P% 10:32:25 IST314I END
334 An Introduction to Tivoli NetView for OS/390 V1R2
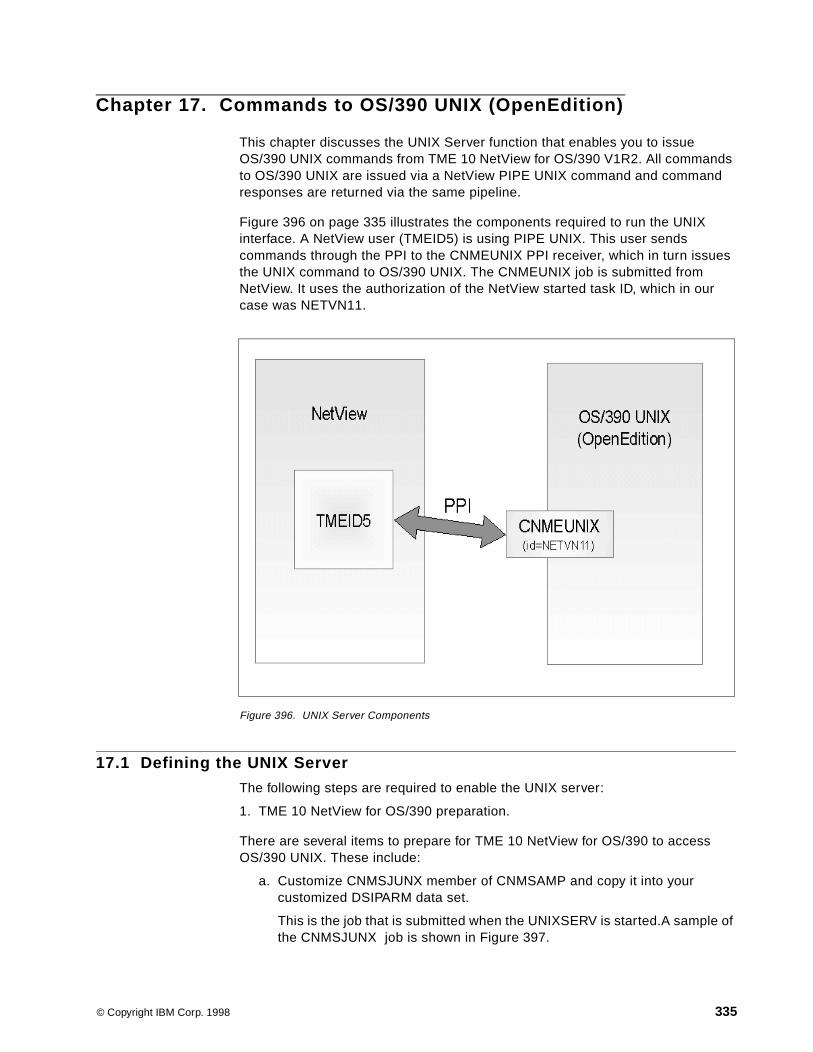
Chapter 17. Commands to OS/390 UNIX (OpenEdition)
This chapter discusses the UNIX Server function that enables you to issue OS/390 UNIX commands from TME 10 NetView for OS/390 V1R2. All commands to OS/390 UNIX are issued via a NetView PIPE UNIX command and command responses are returned via the same pipeline.
Figure 396 on page 335 illustrates the components required to run the UNIX interface. A NetView user (TMEID5) is using PIPE UNIX. This user sends commands through the PPI to the CNMEUNIX PPI receiver, which in turn issues the UNIX command to OS/390 UNIX. The CNMEUNIX job is submitted from NetView. It uses the authorization of the NetView started task ID, which in our case was NETVN11.
Figure 396. UNIX Server Components
17.1 Defining the UNIX Server
The following steps are required to enable the UNIX server:
1. TME 10 NetView for OS/390 preparation.
There are several items to prepare for TME 10 NetView for OS/390 to access OS/390 UNIX. These include:
a. Customize CNMSJUNX member of CNMSAMP and copy it into your customized DSIPARM data set.
This is the job that is submitted when the UNIXSERV is started.A sample of the CNMSJUNX job is shown in Figure 397.
© Copyright IBM Corp. 1998 335

Figure 397. CNMSJUNX Sample
b. Ensure that the DSIPHONE module from SEKGLNK1 is found in LINKLST or in your STEPLIB concatenation in your NetView procedure.
2. OS/390 UNIX preparation.
Some programs must exist in the OS/390 UNIX HFS directory. These programs and log files are usually stored in the directory /usr/lpp/netview/bin. This directory should contain the following files:
Since these programs are written in REXX, it is mandatory that REXX libraries are accessible from OS/390 UNIX. Regular REXX by default is supported by OS/390. Because the UNIX Server REXX code is compiled, you need to use REXX Compiler Run Time Libraries if installed or the REXX alternate library (SEAGALT) if the REXX Compiler is not installed. See the NetView/390 R2 program directory for more details.
3. RACF preparation.
To use the UNIX server in the environment described above we made the following RACF setup:
//CNMEUNIX JOB ,'NETVIEW UNIX SERVER',MSGCLASS=R //* //******************************************************************** //* // EXEC PGM=BPXBATCH, // PARM='PGM /usr/lpp/netview/bin/cnmeunix' //STDOUT DD PATH='/usr/lpp/netview/bin/cnmeunix.out', // PATHOPTS=(OWRONLY,OCREAT,OTRUNC), // PATHMODE=SIRWXU //STDERR DD PATH='/usr/lpp/netview/bin/cnmeunix.err', // PATHOPTS=(OWRONLY,OCREAT,OTRUNC), // PATHMODE=SIRWXU //STDENV DD * PATH=/bin:/usr/lpp/netview/bin/ /* //********************************************************************//* //STDOUT EXEC PGM=IKJEFT01,COND=((256,LE),EVEN) //SYSTSPRT DD SYSOUT=* //* //FROMHFS DD PATH='/usr/lpp/netview/bin/cnmeunix.stdout', // PATHOPTS=(ORDONLY,OCREAT) //TOSYSOUT DD SYSOUT=*,RECFM=F,BLKSIZE=255 //SYSTSIN DD DATA OCOPY INDD(FROMHFS) + OUTDD(TOSYSOUT) + TEXT + CONVERT(YES) + PATHOPTS(USE) /* //
-rwx--x--x 1 OMVSKERN 1 14080 Apr 22 16:02 cnmechld -rwx--x--x 1 OMVSKERN 1 15920 Apr 22 16:02 cnmeunix -rwx--x--x 1 OMVSKERN 1 3200 Apr 22 16:02 cnmework
336 An Introduction to Tivoli NetView for OS/390 V1R2

a. NetView's started task ID must have an OMVS segment. Use the following command to add the OMVS segment if it does not exist. The command defines the NETVN11 ID as superuser (UID=0) in OS/390 UNIX.
ALU NETVN11 OMVS(HOME('/') PROGRAM('/bin/sh') UID(0))
b. NetView's started task id must have read access to BPX.DAEMON in the RACF FACILITY class. In our case the NetView started task ID was NETVN11 so we used the following definitions:
PE BPX.DAEMON ID(NETVN11) CL(FACILITY) ACC(READ)SETR RACLIST(FACILITY) REFRESH
c. Ensure that all NetView IDs that need to access OS/390 UNIX also has the OMVS segment defined. These user IDs also need to be connected to a RACF group that has an OMVS segment defined. The following commands can be used:
ALU TMEID5 DFLTGRP(OMVSGRP) AUTH(JOIN) DATA('TMEID5') +
OMVS (HOME('/') PROGRAM('/bin/sh') UID(0))
CONNECT TMEID5 GROUP(OMVSGRP) GRPACC
ALG OMVSGRP OMVS(GID(1))
17.2 Starting the UNIXSERV
The START UNIXSERV command needs to be issued from the NCCF command line. The format of the command is:
Figure 398 shows the execution of the command.
Figure 398. Starting UNIX Server Process
There needs to be only one UNIX server running for a particular OS/390 UNIX system. The UNIX server can also be started automatically from the OS/390 UNIX startup by coding the following in the /etc/rc file.
* RABAN START UNIXSERV=* - RABAN DSI360I START REQUEST IN PROGRESS * RABAN CNMESTSO CNMEUNIX * * CNMSJUNX TMEID5 - RABAN CNM279I CNMEUNIX(JOB00888) SUBMITTED C RABAN DSI633I START COMMAND SUCCESSFULLY COMPLETED ------------------------------------------------------------------------
export PATH=/usr/lpp/netview/bin:$PATHexport _BPX_JOBNAME="CNMEUNIX" /usr/lpp/netview/bin >/tmp/nv.out 2>/tmp/nv.err &
Commands to OS/390 UNIX (OpenEdition) 337

17.3 Stopping the UNIXSERV
The STOP UNIXSERV command needs to be issued from the NCCF command line. The format of the command is:
Figure 399 shows the execution of the command.
Figure 399. Stopping UNIX Server Process
17.4 Issuing Commands to OS/390 UNIX
The format of the UNIX command using pipes is:
NETVASIS PIPE UNIX command|WAIT 20|CONS
where command is the UNIX command to be executed. Keep in mind that a UNIX command can consists of several commands separated by ;.
The following are a few examples of the usage of UNIX commands from TME 10 NetView for OS/390 V1R2. In Figure 400, we just run the ps -ef command and capture the result.
Figure 400. Simple UNIX Command
* RABAN STOP UNIXSERV=* - RABAN DSI056I UNIX SESSION STOPPING FOR * ------------------------------------------------------------------------
NCCF TME 10 NetView RABAN TMEID5 05/12/98 16:31 * RABAN PIPE UNIX ps -ef | WAIT 30 | CONSOLE x RABAN UID PID PPID C STIME TTY TIME CMD OMVSKERN 1 0 - 00:56:51 ? 0:00 OMVSKERN 117440514 1 - 15:24:08 ? 0:00 OMVSKERN 335544323 117440514 - 20:31:34 ? 0:00 OMVSKERN 4 1 - 00:58:09 ? 19:46 OMVSKERN 285212677 1 - 14:07:14 ? 11:32 OMVSKERN 570425350 419430408 - 20:31:35 ? 0:00 OMVSKERN 7 1 - 01:04:02 ? 0:00 OMVSKERN 419430408 335544323 - 20:31:34 ? 0:00 OMVSKERN 318767113 570425350 - 20:31:37 ? 0:00 ------------------------------------------------------------------------
???
338 An Introduction to Tivoli NetView for OS/390 V1R2

In Figure 401 we ran three commands in one PIPE. These commands are executed sequentially and the output is sent back to us. The first command changes the directory to /usr/lpp/netview/bin. The content of this directory is listed and the content of file cnmeunix.stdout is listed.
Figure 401. Composite UNIX Command
In the following example you see the secondary and teritiary output streams from the PIPE UNIX command. We issued a date command and the output from the command is displayed in red. The response codes from the command is returned in the secondary output stream. The response codes for the date command was +0000000000. The process ID for the command is returned in the teritiary output stream. In this case the process ID was 1090519047 for our date command. This can be useful if you are running a long running command and want to terminate it at some stage.
Figure 402. UNIX Command with Process ID and Response Codes
NCCF TME 10 NetView RABAN TMEID5 05/12/98 16:32:53 * RABAN PIPE UNIX cd /usr/lpp/netview/bin;ls -l;cat cnmeunix.stdout |WAIT 30| CONSOLE x RABAN total 120 -rwxrwxrwt 1 OMVSKERN 1 19 Apr 22 20:34 IHSAC000 -rwxrwxrwx 1 OMVSKERN 1 14080 Apr 22 20:02 cnmechld -rwxrwxrwx 1 OMVSKERN 1 15920 Apr 22 20:02 cnmeunix -rw-r--r-- 1 OMVSKERN 1 533 Apr 23 21:44 cnmeunix.err -rw-r--r-- 1 OMVSKERN 1 307 May 12 11:05 cnmeunix.out -rw-r--r-- 1 OMVSKERN 1 307 May 11 23:22 cnmeunix.out001 -rwx------ 1 OMVSKERN 1 0 May 12 15:24 cnmeunix.stderr -rwx------ 1 OMVSKERN 1 134 May 12 15:41 cnmeunix.stdout -rwxrwxrwx 1 OMVSKERN 1 3200 Apr 22 20:02 cnmework -rw-r--r-- 1 OMVSKERN 1 0 May 11 23:16 cnmunix.out001 x RABAN NetView UNIX/390 Command Server Version 1.2.0 initializing at 11:24:12 12 May 1 Running DSIPHONE version 1.2.0 TME 10 NetView/390
-------------------------------------------------------------------------------
???
NCCF TME 10 NetView RABAN TMEID3 07/10/98 23:00:08 * RABAN PIPE (END ;) A:UNIX date |wait 55| color red| CONS; A:|CONS; A:|CONS; x RABAN DSI037I Process 1090519047 spawned for 'date'. x RABAN Sat Jul 11 03:00:36 1998 x RABAN +0000000000 COMMAND date ------------------------------------------------------------------------ ???
Commands to OS/390 UNIX (OpenEdition) 339
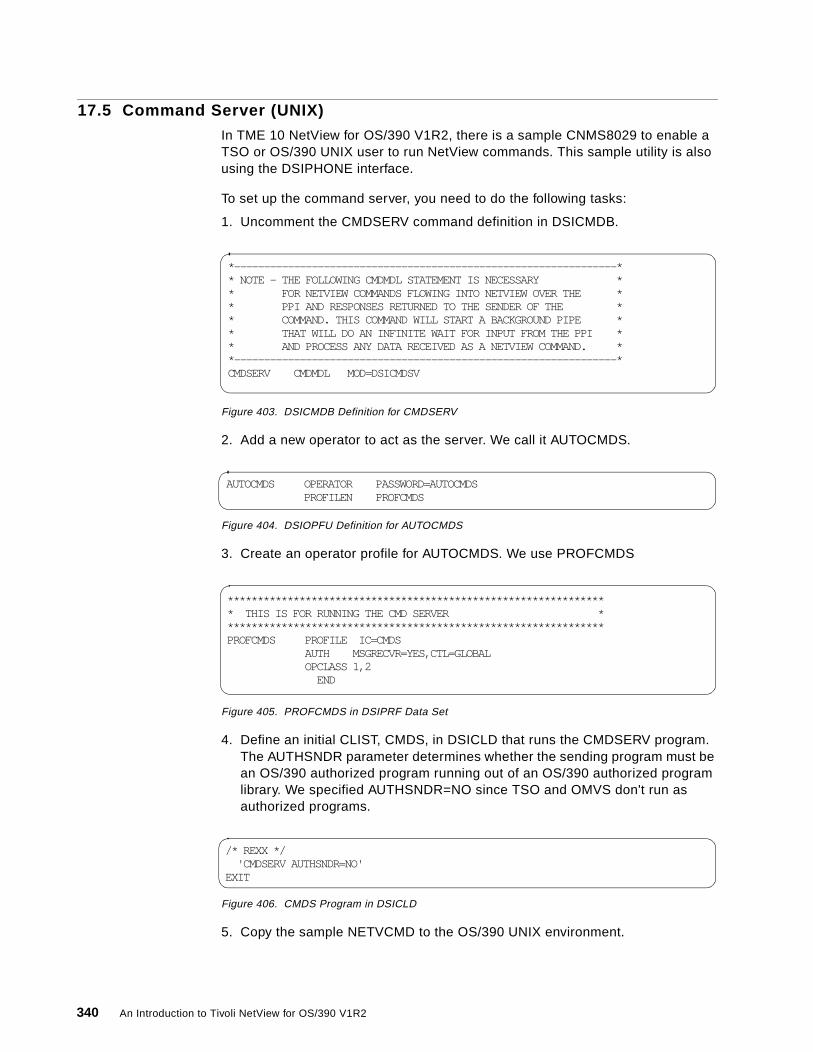
17.5 Command Server (UNIX)
In TME 10 NetView for OS/390 V1R2, there is a sample CNMS8029 to enable a TSO or OS/390 UNIX user to run NetView commands. This sample utility is also using the DSIPHONE interface.
To set up the command server, you need to do the following tasks:
1. Uncomment the CMDSERV command definition in DSICMDB.
Figure 403. DSICMDB Definition for CMDSERV
2. Add a new operator to act as the server. We call it AUTOCMDS.
Figure 404. DSIOPFU Definition for AUTOCMDS
3. Create an operator profile for AUTOCMDS. We use PROFCMDS
Figure 405. PROFCMDS in DSIPRF Data Set
4. Define an initial CLIST, CMDS, in DSICLD that runs the CMDSERV program. The AUTHSNDR parameter determines whether the sending program must be an OS/390 authorized program running out of an OS/390 authorized program library. We specified AUTHSNDR=NO since TSO and OMVS don't run as authorized programs.
Figure 406. CMDS Program in DSICLD
5. Copy the sample NETVCMD to the OS/390 UNIX environment.
*----------------------------------------------------------------** NOTE - THE FOLLOWING CMDMDL STATEMENT IS NECESSARY ** FOR NETVIEW COMMANDS FLOWING INTO NETVIEW OVER THE ** PPI AND RESPONSES RETURNED TO THE SENDER OF THE ** COMMAND. THIS COMMAND WILL START A BACKGROUND PIPE ** THAT WILL DO AN INFINITE WAIT FOR INPUT FROM THE PPI ** AND PROCESS ANY DATA RECEIVED AS A NETVIEW COMMAND. **----------------------------------------------------------------*CMDSERV CMDMDL MOD=DSICMDSV
AUTOCMDS OPERATOR PASSWORD=AUTOCMDS PROFILEN PROFCMDS
**************************************************************** THIS IS FOR RUNNING THE CMD SERVER ****************************************************************PROFCMDS PROFILE IC=CMDS AUTH MSGRECVR=YES,CTL=GLOBAL OPCLASS 1,2 END
/* REXX */ 'CMDSERV AUTHSNDR=NO'EXIT
340 An Introduction to Tivoli NetView for OS/390 V1R2

Copy TME10.V1R2.CNMSAMP(CNMS8029) to a directory that is defined in the PATH as NETVCMD. Use the following TSO commands to perform that:
ALLOC FILE(INDD) DSN('TME10.V1R2.CNMSAMP(CNMS8029)') SHR REUSE ALLOC FILE(OUTDD) PATH('/bin/netvcmd') PATHOPTS(OCREAT,OWRONLY) PATHMODE(SIXUSR,SIXGRP,SIXOTH,SIWUSR,SIRUSR) OCOPY INDD(INDD) OUTDD(OUTDD)
In Figure 407 you see the execution of NetView command DISPPI using OMVS command shell under TSO.
Figure 407. NetView Command from OS/390 UNIX
- - - - - - - - - - - - - - - - - - - - - - - - - - - # netvcmd disppi DWO948I RECEIVER RECEIVER BUFFER QUEUED TOTAL STORAGE DWO949I IDENTITY STATUS LIMIT BUFFERS BUFFERS ALLOCATE DWO950I -------- -------- ---------- ---------- ---------- -------- DWO951I NETVALRT ACTIVE 1000 0 282 0 DWO951I ISTMTRCV ACTIVE 500 0 143 0 DWO951I RABANSCO ACTIVE 1000 0 6140 0 DWO951I NETVRCV ACTIVE 500 0 571 0 DWO951I DSIQTSK ACTIVE 100 0 0 0 DWO951I RABANHTM ACTIVE 1000 0 3040 0 DWO951I IHSATEC ACTIVE 5000 0 3226 0 DWO951I CNMEUNIX ACTIVE 1000 0 0 0 DWO951I $AN00001 ACTIVE 1000 0 15 0 DWO951I $AN00002 ACTIVE 1000 0 14 0 DWO951I DSICMDSV ACTIVE 2000 0 2 0 DWO951I 34144031 ACTIVE 1000 0 0 0 DWO968I END OF DISPLAY # ===> ESC=¢ 1=Help 2=SubCmd 3=HlpRetrn 4=Top 5=Bottom 6=TSO 7=BackScr 8=Scroll 9=NextSess 10=Refresh 11=FwdRetr 12=Retrieve
Commands to OS/390 UNIX (OpenEdition) 341

342 An Introduction to Tivoli NetView for OS/390 V1R2
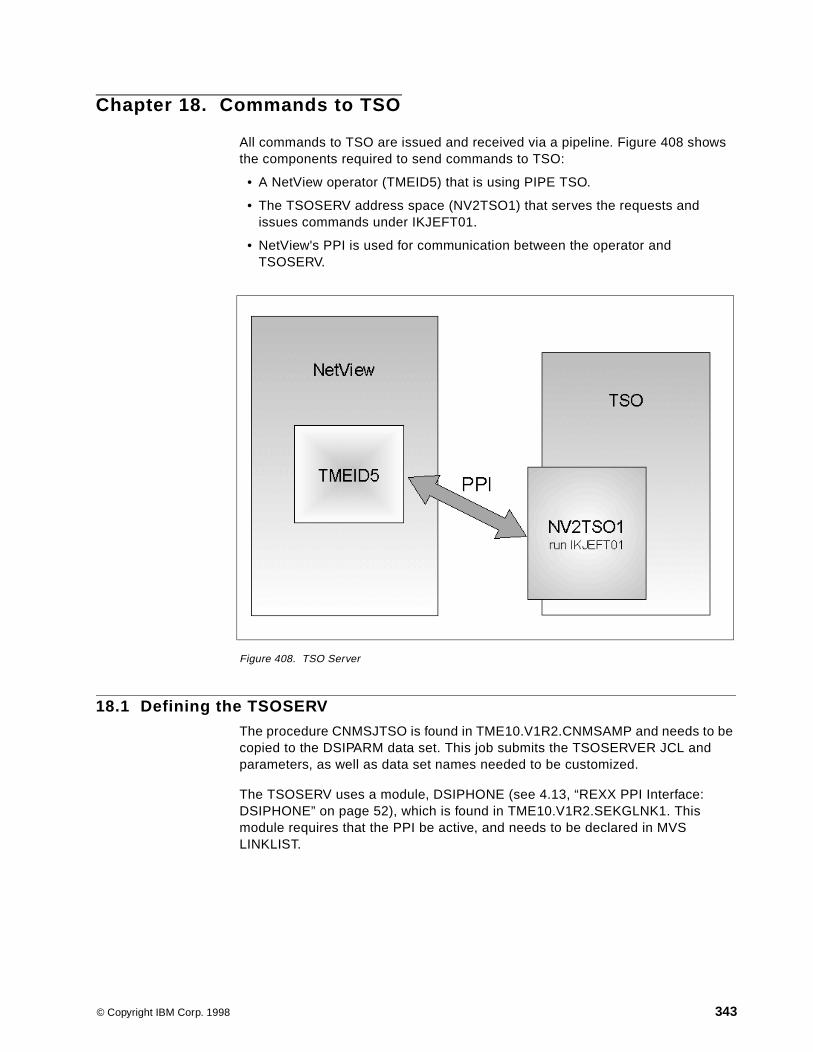
Chapter 18. Commands to TSO
All commands to TSO are issued and received via a pipeline. Figure 408 shows the components required to send commands to TSO:
• A NetView operator (TMEID5) that is using PIPE TSO.
• The TSOSERV address space (NV2TSO1) that serves the requests and issues commands under IKJEFT01.
• NetView's PPI is used for communication between the operator and TSOSERV.
Figure 408. TSO Server
18.1 Defining the TSOSERV
The procedure CNMSJTSO is found in TME10.V1R2.CNMSAMP and needs to be copied to the DSIPARM data set. This job submits the TSOSERVER JCL and parameters, as well as data set names needed to be customized.
The TSOSERV uses a module, DSIPHONE (see 4.13, “REXX PPI Interface: DSIPHONE” on page 52), which is found in TME10.V1R2.SEKGLNK1. This module requires that the PPI be active, and needs to be declared in MVS LINKLIST.
© Copyright IBM Corp. 1998 343

Figure 409. CNMSJTSO Extract
The following are the substitutions performed by CNMESTSO CLIST before submitting the job.
&jobname. This field is replaced by a NetView generated name. This typically is $ANxxxxx, where xxxxx will range from 0 through to 99999.
&userid. This field is passed from the USERID specified in the START TSOSERV=userid command.
&ppiname. This field is modified by NetView to represent the PPI name.
&key. This is a random 4 number key.
We needed to code the PASSWORD field, as NetView was running with OPERSEC=NETVPW. If OPERSEC was coded in any other way, this need not be coded and can be left to the default of PASSWORD=,.
The STEPLIB DD statement needs to be changed to reflect where the REXX run-time library resides.
The SYSEXEC DD statement needs to specify the data set where the TSO REXX CLIST, CNMETSO, may be found. The source can be found in TME10.V1R2.CNMSAMP, and as no changes are required, TME10.V1R2.CNMSAMP can be concatenated under the DSICLD DD statement, or, this exec can be copied to a user-defined CLIST data set. We chose to copy CNMETSO to our user-defined CLIST data set.
The SYSTCPD DDname defines in which data set your TCP/IP control data is found. In our case, it was defined in SYS1.TCPPARMS in member TCPDATA.
It is important to note that the tso profile of the executing user ID, NV2TSO1, needs to be set to NOMSGID.
18.2 Starting the TSOSERV
The START TSOSERV command needs to be issued from the NCCF command line. The format of the command is:
START TSOSERV=tso user ID,MEM=tsoserv jcl,OP=netview opid|NONE
//$&jobname. JOB 'accounting info',USER=&userid., // PASSWORD=NV2TSO1,MSGCLASS=A //&userid. EXEC PGM=IKJEFT01,REGION=4096K,TIME=NOLIMIT, // PARM='CNMETSO,&ppiname.,&key.,NODEBUG' //STEPLIB DD DSN=REXX.V1R3M0.SEAGALT,DISP=SHR //SYSEXEC DD DSN=TME10.RABAN.V1R2.CNMCLST,DISP=SHR //SYSTCPD DD DSN=SYS1.TCPPARMS(TCPDATA),DISP=SHR
Running CNMSJTSO as shipped in TME 10 NetView for OS/390 V1R2 requires that TCP/IP V3R2 PTF UQ17350 is applied. If you don't have this PTF applied, you can change the $&jobname. to &userid. as a bypass.
Note
344 An Introduction to Tivoli NetView for OS/390 V1R2

The MEM and OP parameters are optional.
• tso user ID is a valid TSO user ID or *, which indicates the NetView opid is to be used.
• tsoserv jcl is the name of the DSIPARM member that contains the JCL for the TSOSERV job. The default is CNMSJTSO.
• netview opid is a valid NetView opid, or NONE, which indicates that the TSOSERV is not associated with a specific NetView operator and will not be terminated by an operator logging off.
• When the last user of this TSOSERV logs off or issues the STOP command, the TSOSERV will terminate.
Figure 410. Starting the TSO Server
We started a TSOSERV with the name of NV2TSO1. We then repeated the command, but added OP=ARNE as an optional parameter. This enables the NetView opid, ARNE, to issue TSO commands to the host via the TSOSERV, NV2TSO1. When a LIST STATUS command was issued on TSOSERV, there were three taskids displayed. ARNE and TMEID3 are two NetView opids that are capable of issuing TSO commands via the TSOSERV, while NONE is the AON enabled opid, as can be seen under STARTER, with the ID of AUTNV6K1.
18.3 Stopping the TSOSERV
The STOP TSOSERV command needs to be issued from the NCCF command line. The format of the command is:
STOP TSOSERV=tso userid,MEM=tsoserv jcl,OP=netview opid|NONE
The MEM and OP parameters are optional.
• tso userid is a valid TSO user ID or ", which indicates the NetView opid is to be used.
• tsoserv jcl is the name of the DSIPARM member that contains the JCL for the TSOSERV job. The default is CNMSJTSO.
• netview opid is a valid NetView opid, or NONE, which indicates that the TSOSERV is not associated with a specific NetView operator and will not be terminated by an operator logging off.
NCCF TME 10 NetView RABAN TMEID3 04/20/98 15:20 * RABAN START TSOSERV=NV2TSO1 - RABAN DSI633I START COMMAND SUCCESSFULLY COMPLETED * RABAN START TSOSERV=NV2TSO1,OP=ARNE - RABAN DSI633I START COMMAND SUCCESSFULLY COMPLETED * RABAN LIST STATUS=TSOSERV ' RABAN BNH376I TASKID TSO NAME MEMBER PPI NAME STATUS STARTER -------- -------- -------- -------- --------- -------- NONE NV2TSO1 CNMSJTSO $AN00002 ACTIVE AUTNV6K1 ARNE NV2TSO1 CNMSJTSO $AN00002 ACTIVE TMEID3 TMEID3 NV2TSO1 CNMSJTSO $AN00002 ACTIVE TMEID3 ------------------------------------------------------------------------
???
Commands to TSO 345
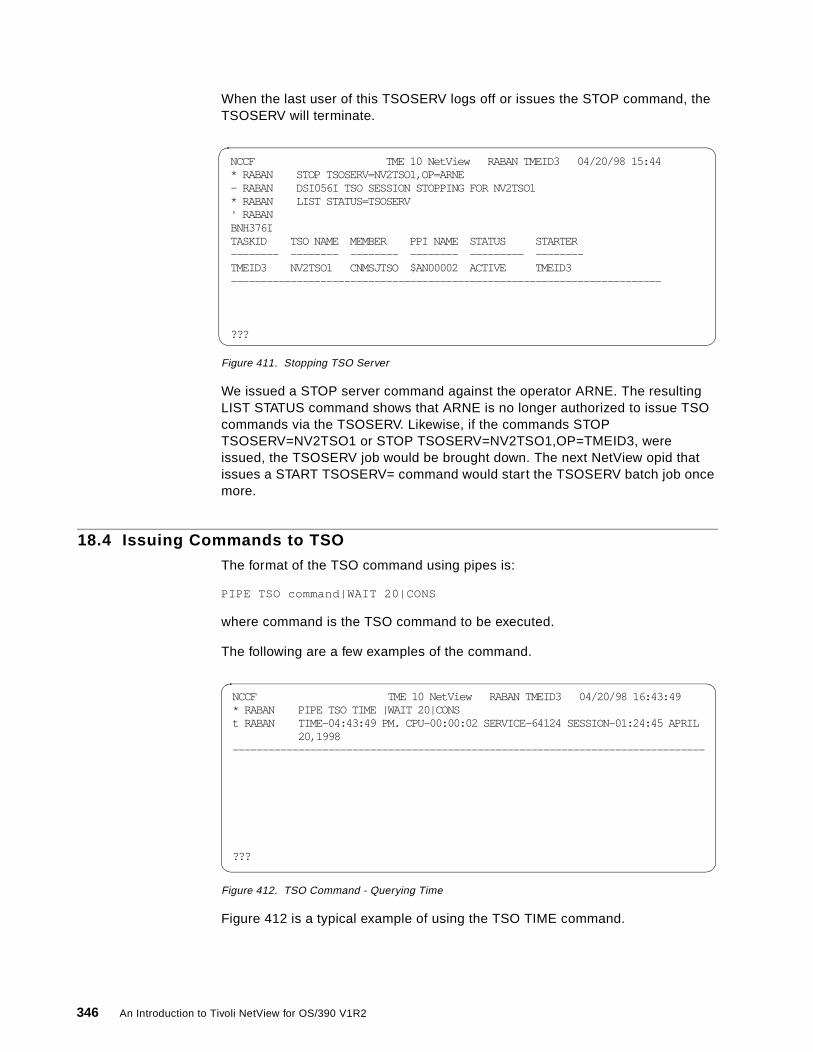
When the last user of this TSOSERV logs off or issues the STOP command, the TSOSERV will terminate.
Figure 411. Stopping TSO Server
We issued a STOP server command against the operator ARNE. The resulting LIST STATUS command shows that ARNE is no longer authorized to issue TSO commands via the TSOSERV. Likewise, if the commands STOP TSOSERV=NV2TSO1 or STOP TSOSERV=NV2TSO1,OP=TMEID3, were issued, the TSOSERV job would be brought down. The next NetView opid that issues a START TSOSERV= command would start the TSOSERV batch job once more.
18.4 Issuing Commands to TSO
The format of the TSO command using pipes is:
PIPE TSO command|WAIT 20|CONS
where command is the TSO command to be executed.
The following are a few examples of the command.
Figure 412. TSO Command - Querying Time
Figure 412 is a typical example of using the TSO TIME command.
NCCF TME 10 NetView RABAN TMEID3 04/20/98 15:44 * RABAN STOP TSOSERV=NV2TSO1,OP=ARNE - RABAN DSI056I TSO SESSION STOPPING FOR NV2TSO1 * RABAN LIST STATUS=TSOSERV ' RABAN BNH376I TASKID TSO NAME MEMBER PPI NAME STATUS STARTER -------- -------- -------- -------- --------- -------- TMEID3 NV2TSO1 CNMSJTSO $AN00002 ACTIVE TMEID3 ------------------------------------------------------------------------
???
NCCF TME 10 NetView RABAN TMEID3 04/20/98 16:43:49 * RABAN PIPE TSO TIME |WAIT 20|CONS t RABAN TIME-04:43:49 PM. CPU-00:00:02 SERVICE-64124 SESSION-01:24:45 APRIL 20,1998 -------------------------------------------------------------------------------
???
346 An Introduction to Tivoli NetView for OS/390 V1R2
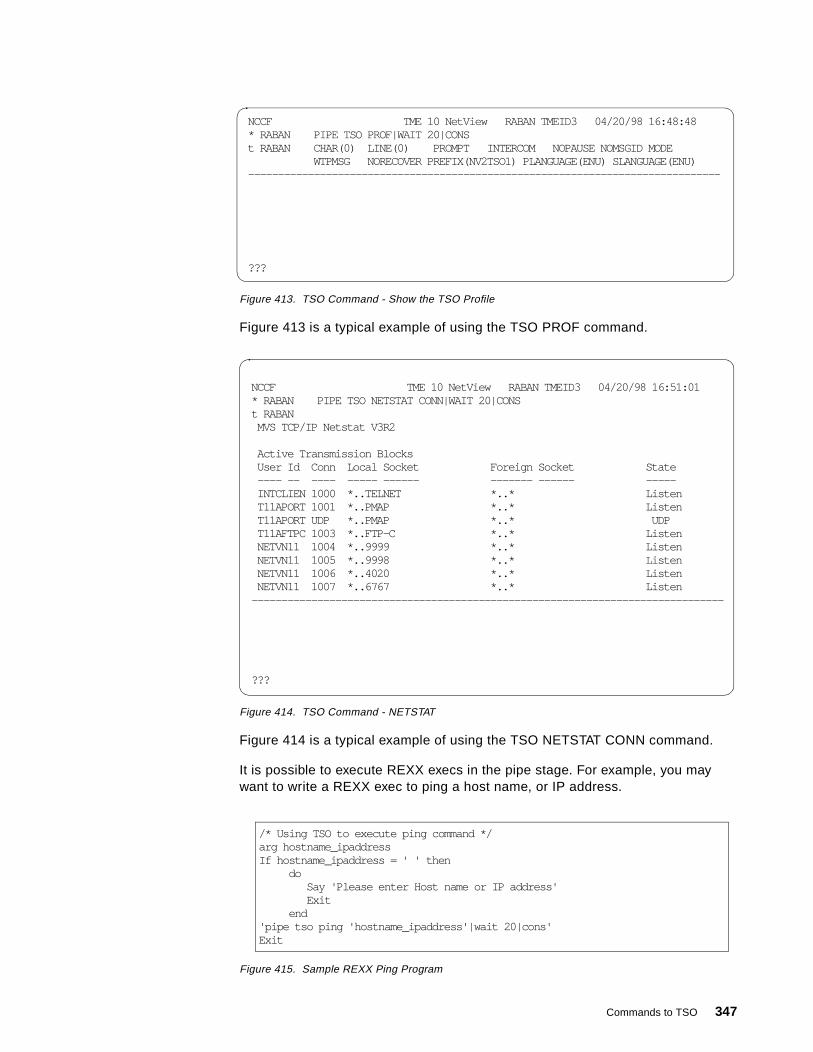
Figure 413. TSO Command - Show the TSO Profile
Figure 413 is a typical example of using the TSO PROF command.
Figure 414. TSO Command - NETSTAT
Figure 414 is a typical example of using the TSO NETSTAT CONN command.
It is possible to execute REXX execs in the pipe stage. For example, you may want to write a REXX exec to ping a host name, or IP address.
Figure 415. Sample REXX Ping Program
NCCF TME 10 NetView RABAN TMEID3 04/20/98 16:48:48 * RABAN PIPE TSO PROF|WAIT 20|CONS t RABAN CHAR(0) LINE(0) PROMPT INTERCOM NOPAUSE NOMSGID MODE WTPMSG NORECOVER PREFIX(NV2TSO1) PLANGUAGE(ENU) SLANGUAGE(ENU) -------------------------------------------------------------------------------
???
NCCF TME 10 NetView RABAN TMEID3 04/20/98 16:51:01 * RABAN PIPE TSO NETSTAT CONN|WAIT 20|CONS t RABAN MVS TCP/IP Netstat V3R2
Active Transmission Blocks User Id Conn Local Socket Foreign Socket State ---- -- ---- ----- ------ ------- ------ ----- INTCLIEN 1000 *..TELNET *..* Listen T11APORT 1001 *..PMAP *..* Listen T11APORT UDP *..PMAP *..* UDP T11AFTPC 1003 *..FTP-C *..* Listen NETVN11 1004 *..9999 *..* Listen NETVN11 1005 *..9998 *..* Listen NETVN11 1006 *..4020 *..* Listen NETVN11 1007 *..6767 *..* Listen -------------------------------------------------------------------------------
???
/* Using TSO to execute ping command */arg hostname_ipaddressIf hostname_ipaddress = ' ' then do Say 'Please enter Host name or IP address' Exit end'pipe tso ping 'hostname_ipaddress'|wait 20|cons'Exit
Commands to TSO 347

The output of the program is shown in Figure 416.
Figure 416. Output from an NVPING Command
18.5 Command Server (TSO)
In TME 10 NetView for OS/390 V1R2, there is a sample called CNMS8029 that enables a TSO or OS/390 UNIX user to run NetView commands. This sample utility is also using the DSIPHONE interface.
To set up the command server, you need to do the following tasks:
1. Uncomment the CMDSERV command definition in DSICMDB.
Figure 417. DSICMDB Definition for CMDSERV
2. Add a new operator to act as the server. We call it AUTOCMDS.
Figure 418. DSIOPFU Definition for AUTOCMDS
3. Create an operator profile for AUTOCMDS. We use PROFCMDS.
NCCF TME 10 NetView RABAN TMEID3 04/20/98 16:55:01 * RABAN NVPING 9.24.106.34 t RABAN EZA0458I Ping V3R2: Pinging host 9.24.106.34. Use ATTN to interrupt. EZA0463I PING: Ping #1 response took 0.051 seconds. Successes so far 1.------------------------------------------------------------------------------
???
*----------------------------------------------------------------** NOTE - THE FOLLOWING CMDMDL STATEMENT IS NECESSARY ** FOR NETVIEW COMMANDS FLOWING INTO NETVIEW OVER THE ** PPI AND RESPONSES RETURNED TO THE SENDER OF THE ** COMMAND. THIS COMMAND WILL START A BACKGROUND PIPE ** THAT WILL DO AN INFINITE WAIT FOR INPUT FROM THE PPI ** AND PROCESS ANY DATA RECEIVED AS A NETVIEW COMMAND. **----------------------------------------------------------------*CMDSERV CMDMDL MOD=DSICMDSV
AUTOCMDS OPERATOR PASSWORD=AUTOCMDS PROFILEN PROFCMDS
348 An Introduction to Tivoli NetView for OS/390 V1R2

Figure 419. PROFCMDS in DSIPRF Data Set
4. Define an initial CLIST, CMDS, in DSICLD that runs the CMDSERV program. The AUTHSNDR parameter determines whether the sending program must be an OS/390 authorized program running out of an OS/390 authorized program library. We specified AUTHSNDR=NO since TSO and OMVS don't run as authorized programs.
Figure 420. CMDS Program in DSICLD
5. Copy the sample NETVCMD to your TSO environment.
Copy TME10.V1R2.CNMSAMP(CNMS8029) to SYSPROC or SYSEXEC DDname. Use ISPF/PDF option 3.3 to perform that or you can use the following TSO commands (assumes that data set RISC.CLISTS is in SYSPROC).
ALLOC FILE(INDD) DSN('TME10.V1R2.CNMSAMP(CNMS8029)') SHR REUSE ALLOC FILE(OUTDD) DSN('RISC.CLISTS(NETVCMD)') SHR REUSE OCOPY INDD(INDD) OUTDD(OUTDD)
Figure 421 shows the execution of NetView command AUTOTBL STATUS from ISPF/PDF option 6.
**************************************************************** THIS IS FOR RUNNING THE CMD SERVER ****************************************************************PROFCMDS PROFILE IC=CMDS AUTH MSGRECVR=YES,CTL=GLOBAL OPCLASS 1,2 END
/* REXX */ 'CMDSERV AUTHSNDR=NO'EXIT
Commands to TSO 349
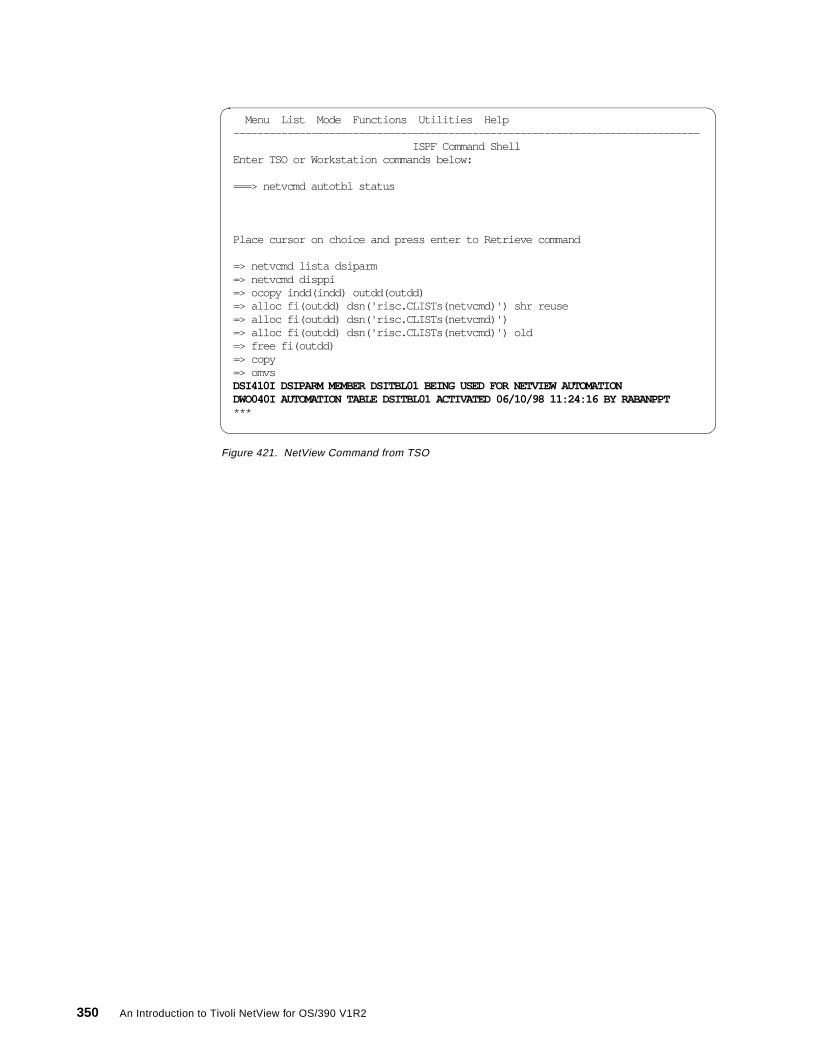
Figure 421. NetView Command from TSO
Menu List Mode Functions Utilities Help ------------------------------------------------------------------------------ ISPF Command Shell Enter TSO or Workstation commands below:
===> netvcmd autotbl status
Place cursor on choice and press enter to Retrieve command
=> netvcmd lista dsiparm => netvcmd disppi => ocopy indd(indd) outdd(outdd) => alloc fi(outdd) dsn('risc.CLISTs(netvcmd)') shr reuse => alloc fi(outdd) dsn('risc.CLISTs(netvcmd)') => alloc fi(outdd) dsn('risc.CLISTs(netvcmd)') old => free fi(outdd) => copy => omvs DSI410I DSIPARM MEMBER DSITBL01 BEING USED FOR NETVIEW AUTOMATION DWO040I AUTOMATION TABLE DSITBL01 ACTIVATED 06/10/98 11:24:16 BY RABANPPT ***
350 An Introduction to Tivoli NetView for OS/390 V1R2

Part 4. Appendices
© Copyright IBM Corp. 1998 351

352 An Introduction to Tivoli NetView for OS/390 V1R2
Appendix A. Sample Control Files
This is the output from running the nvtec.sh. It should be noted that we had Global Enterprise Manager installed in our environment so we provided the required input to actually import the interapp baroc and rule files. We also created the configuration file for TEC to forward APM events to the topology server on this machine.
A.1 Output from nvtec.shrs600015:/usr/local/Tivoli/bin/aix4-r1/TDS/EventService > ./nvtec.sh###########################################################Creating nvtec rules data base and GemAdmin user.
ATTENTION:If you are installing multiple TMRs, have you updatedthis file to include the defaults for your OS/390 NetView IP host? topology server? Rules Base Names? Responses?
Have you: reviewed the included rules and object files? commented out those you will not use? added any you need, especially other Sentry monitors?
Have you modified the user creation portion for your system?
The file name is /usr/local/Tivoli/bin/aix4-r1/TDS/EventService/nvtec.shIf you have not done so, please terminate now and reexecute.########################################################### Press Enter to continue or "q" to quit.
Please enter the name of your NetView OS/390IP host for forwarding events.If no name is entered we will use the name: xxxxxxxxIf the name entered is 'xxxxxxxx', no setup will occur.mvs11
Please enter the USERID for the sample administrator to use.If no name is entered we will use the name GemAdminfor the user and GemAdmin_rs600015-region for the administrator.If the name entered is 'xxxxxxxx', no setup will occur.GemAdmin
Please enter the name of the TEC Rules Base to copyas a starting point for creating the nvtec rules base.If no name is entered we will use the name: DefaultDefault
Do you want to import the sample file tecad_nv390fwd.rls intoyour rules base? These rules forward CRITICAL and FATAL events.If you use these rules you should make sure that no other ruleswill cause duplicate events to be forwarded.Enter 'Y' to import this file.Enter 'N' to not import this file.The default is: NY
Do you want to import Storage Services and Tivoli PLUS.baroc and .rls files into your rules base?Enter 'Y' to import these files.Enter 'N' to not import these files.The default is: YN
Do you want to import the Topology Services.baroc and .rls files into your rules base?Enter 'Y' to import these files.Enter 'N' to not import these files.The default is: YY
Do you want to import the Global Enterprise Manager (GEM)
© Copyright IBM Corp. 1998 353
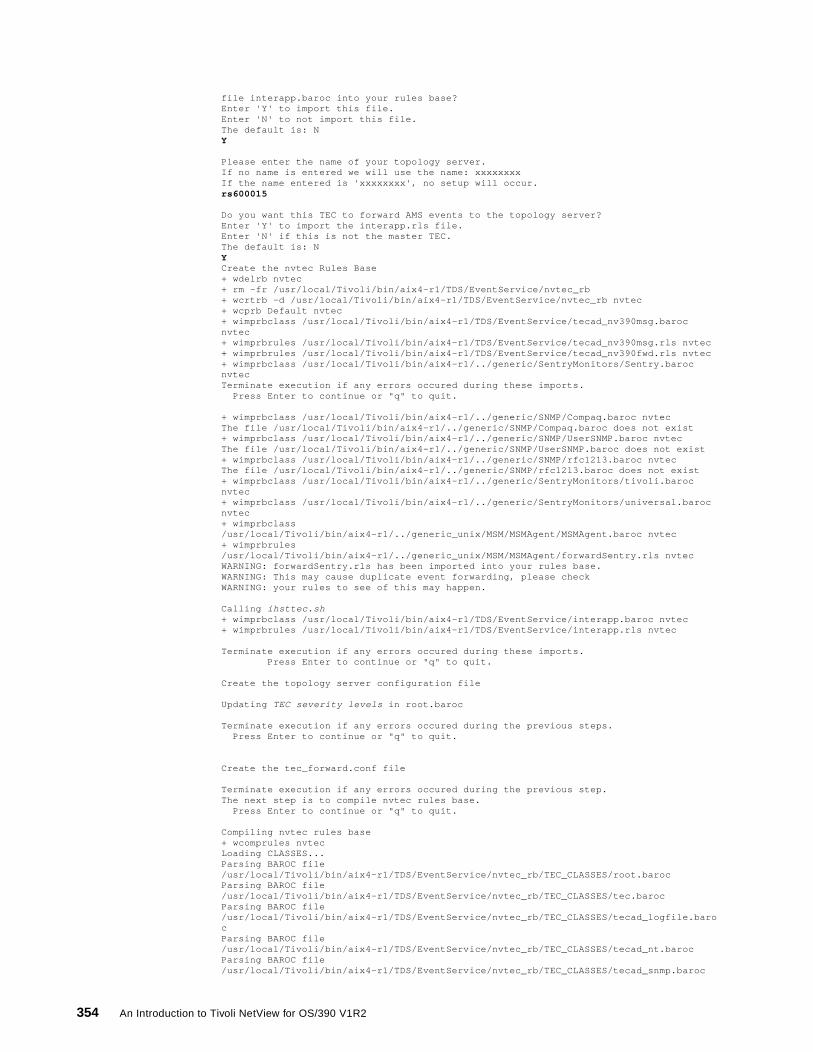
file interapp.baroc into your rules base?Enter 'Y' to import this file.Enter 'N' to not import this file.The default is: NY
Please enter the name of your topology server.If no name is entered we will use the name: xxxxxxxxIf the name entered is 'xxxxxxxx', no setup will occur.rs600015
Do you want this TEC to forward AMS events to the topology server?Enter 'Y' to import the interapp.rls file.Enter 'N' if this is not the master TEC.The default is: NYCreate the nvtec Rules Base+ wdelrb nvtec+ rm -fr /usr/local/Tivoli/bin/aix4-r1/TDS/EventService/nvtec_rb+ wcrtrb -d /usr/local/Tivoli/bin/aix4-r1/TDS/EventService/nvtec_rb nvtec+ wcprb Default nvtec+ wimprbclass /usr/local/Tivoli/bin/aix4-r1/TDS/EventService/tecad_nv390msg.baroc nvtec+ wimprbrules /usr/local/Tivoli/bin/aix4-r1/TDS/EventService/tecad_nv390msg.rls nvtec+ wimprbrules /usr/local/Tivoli/bin/aix4-r1/TDS/EventService/tecad_nv390fwd.rls nvtec+ wimprbclass /usr/local/Tivoli/bin/aix4-r1/../generic/SentryMonitors/Sentry.baroc nvtecTerminate execution if any errors occured during these imports. Press Enter to continue or "q" to quit.
+ wimprbclass /usr/local/Tivoli/bin/aix4-r1/../generic/SNMP/Compaq.baroc nvtecThe file /usr/local/Tivoli/bin/aix4-r1/../generic/SNMP/Compaq.baroc does not exist+ wimprbclass /usr/local/Tivoli/bin/aix4-r1/../generic/SNMP/UserSNMP.baroc nvtecThe file /usr/local/Tivoli/bin/aix4-r1/../generic/SNMP/UserSNMP.baroc does not exist+ wimprbclass /usr/local/Tivoli/bin/aix4-r1/../generic/SNMP/rfc1213.baroc nvtecThe file /usr/local/Tivoli/bin/aix4-r1/../generic/SNMP/rfc1213.baroc does not exist+ wimprbclass /usr/local/Tivoli/bin/aix4-r1/../generic/SentryMonitors/tivoli.baroc nvtec+ wimprbclass /usr/local/Tivoli/bin/aix4-r1/../generic/SentryMonitors/universal.baroc nvtec+ wimprbclass /usr/local/Tivoli/bin/aix4-r1/../generic_unix/MSM/MSMAgent/MSMAgent.baroc nvtec+ wimprbrules /usr/local/Tivoli/bin/aix4-r1/../generic_unix/MSM/MSMAgent/forwardSentry.rls nvtecWARNING: forwardSentry.rls has been imported into your rules base.WARNING: This may cause duplicate event forwarding, please checkWARNING: your rules to see of this may happen.
Calling ihsttec.sh+ wimprbclass /usr/local/Tivoli/bin/aix4-r1/TDS/EventService/interapp.baroc nvtec+ wimprbrules /usr/local/Tivoli/bin/aix4-r1/TDS/EventService/interapp.rls nvtec
Terminate execution if any errors occured during these imports. Press Enter to continue or "q" to quit.
Create the topology server configuration file
Updating TEC severity levels in root.baroc
Terminate execution if any errors occured during the previous steps. Press Enter to continue or "q" to quit.
Create the tec_forward.conf file
Terminate execution if any errors occured during the previous step.The next step is to compile nvtec rules base. Press Enter to continue or "q" to quit.
Compiling nvtec rules base+ wcomprules nvtecLoading CLASSES...Parsing BAROC file /usr/local/Tivoli/bin/aix4-r1/TDS/EventService/nvtec_rb/TEC_CLASSES/root.barocParsing BAROC file /usr/local/Tivoli/bin/aix4-r1/TDS/EventService/nvtec_rb/TEC_CLASSES/tec.barocParsing BAROC file /usr/local/Tivoli/bin/aix4-r1/TDS/EventService/nvtec_rb/TEC_CLASSES/tecad_logfile.barocParsing BAROC file /usr/local/Tivoli/bin/aix4-r1/TDS/EventService/nvtec_rb/TEC_CLASSES/tecad_nt.barocParsing BAROC file /usr/local/Tivoli/bin/aix4-r1/TDS/EventService/nvtec_rb/TEC_CLASSES/tecad_snmp.baroc
354 An Introduction to Tivoli NetView for OS/390 V1R2

Parsing BAROC file /usr/local/Tivoli/bin/aix4-r1/TDS/EventService/nvtec_rb/TEC_CLASSES/tecad_ov.barocParsing BAROC file /usr/local/Tivoli/bin/aix4-r1/TDS/EventService/nvtec_rb/TEC_CLASSES/tecad_hpov.barocParsing BAROC file /usr/local/Tivoli/bin/aix4-r1/TDS/EventService/nvtec_rb/TEC_CLASSES/tecad_nv6k.barocParsing BAROC file /usr/local/Tivoli/bin/aix4-r1/TDS/EventService/nvtec_rb/TEC_CLASSES/tecad_snm.barocParsing BAROC file /usr/local/Tivoli/bin/aix4-r1/TDS/EventService/nvtec_rb/TEC_CLASSES/tecad_snaevent.barocParsing BAROC file /usr/local/Tivoli/bin/aix4-r1/TDS/EventService/nvtec_rb/TEC_CLASSES/as400msg.barocParsing BAROC file /usr/local/Tivoli/bin/aix4-r1/TDS/EventService/nvtec_rb/TEC_CLASSES/tecad_nv390msg.barocParsing BAROC file /usr/local/Tivoli/bin/aix4-r1/TDS/EventService/nvtec_rb/TEC_CLASSES/Sentry.barocParsing BAROC file /usr/local/Tivoli/bin/aix4-r1/TDS/EventService/nvtec_rb/TEC_CLASSES/tivoli.barocParsing BAROC file /usr/local/Tivoli/bin/aix4-r1/TDS/EventService/nvtec_rb/TEC_CLASSES/universal.barocParsing BAROC file /usr/local/Tivoli/bin/aix4-r1/TDS/EventService/nvtec_rb/TEC_CLASSES/MSMAgent.barocParsing BAROC file /usr/local/Tivoli/bin/aix4-r1/TDS/EventService/nvtec_rb/TEC_CLASSES/interapp.barocCompiling Rules...Compiling rule set /usr/local/Tivoli/bin/aix4-r1/TDS/EventService/nvtec_rb/TEC_RULES/ov_default.rls ...Compiling rule set /usr/local/Tivoli/bin/aix4-r1/TDS/EventService/nvtec_rb/TEC_RULES/log_default.rls ...Compiling rule set /usr/local/Tivoli/bin/aix4-r1/TDS/EventService/nvtec_rb/TEC_RULES/tecad_snaevent.rls ...Compiling rule set /usr/local/Tivoli/bin/aix4-r1/TDS/EventService/nvtec_rb/TEC_RULES/tecad_nv390msg.rls ...Compiling rule set /usr/local/Tivoli/bin/aix4-r1/TDS/EventService/nvtec_rb/TEC_RULES/tecad_nv390fwd.rls ...Compiling rule set /usr/local/Tivoli/bin/aix4-r1/TDS/EventService/nvtec_rb/TEC_RULES/forwardSentry.rls ...Compiling rule set /usr/local/Tivoli/bin/aix4-r1/TDS/EventService/nvtec_rb/TEC_RULES/interapp.rls ...Final Compilation Stage...Terminate execution if any errors occured during the rules compileThe next step is to load the nvtec rules base. Press Enter to continue or "q" to quit.
+ wloadrb -u nvtecTerminate execution if any errors occured during the rules load.The next step is to create Event Sources and Event Groups. Press Enter to continue or "q" to quit.
Creating Event Sources and Event Groups+ wsetsrc -b genmainframe48 NV390ALT+ wsetsrc -b genmainframe48 NV390MSG+ wsetsrc -b logf48 LOGFILE+ wsetsrc -b sentry48 SENTRY+ wsetsrc -b tecrsvr48 TEC
The next step is to create a user named GemAdminand an administrator named GemAdmin_rs600015-regionwith complete capabilities on a UNIX system. Terminatenow if you do not want these names defined. Press Enter to continue or "q" to quit.
+ mkuser -a pgrp=staff groups=system,staff,usr shell='/bin/ksh' home=/home/$GemAdminID $GemAdminID3004-689 User "GemAdmin" exists.+ wcrtadmin -l GemAdmin -g staff -u GemAdmin_rs600015-region -n Enterprise ConsoleA resource instance of type "Administrator" named "GemAdmin_rs600015-region" alreadiew" $GemAdminTivoli+ wcrtconsole -l GemAdmin_rs600015-region @GemAdmin_rs600015-regionA resource instance of type "EnterpriseClient" named "GemAdmin_rs600015-region" already exist+ wassigneg @GemAdmin_rs600015-region NetView_390 senior admin userSun Jun 7 23:06:01 EDT 1998 (6): resource `NetView_390' exists+ wassigneg @GemAdmin_rs600015-region All senior admin userSun Jun 7 23:06:01 EDT 1998 (6): resource `All' exists+ wassigneg @GemAdmin_rs600015-region StorageServ senior admin userSun Jun 7 23:06:01 EDT 1998 (6): resource `StorageServ' exists
Sample Control Files 355

Stopping and restarting the Event Server Press Enter to continue or "q" to quit.
+ wstopesvr+ sleep 10+ wstartesvrThe TME 10 Enterprise Console Server is initializing...The TME 10 Enterprise Console Server is running.
356 An Introduction to Tivoli NetView for OS/390 V1R2

Appendix B. Sample REXX Programs
This appendix contains the source code for some of the examples described in this redbook.
B.1 LISTAE CLIST/**********************************************************************//* *//* LISTAE: LISTA Extended *//* *//* Accepts same parameters as LISTA but will also accept an *//* additional member parameter. If a member parameter is *//* provided, LISTAE will display an extended CNM299I single *//* multi-line message indicating which libraries in the *//* concatenation contain the member being searched for *//* *//* The following example of LISTA output should assist with *//* any analysis of this code: *//* *//**********************************************************************/
arg dd_arg mem_arg trace_arg
if trace_arg = '' then trace_arg = 'o'
interpret trace trace_arg
if mem_arg = '' then do 'PIPE NETVIEW LISTA' dd_arg '| COLLECT | CONSOLE' exit endelse 'PIPE NETVIEW LISTA' dd_arg '| STEM CNM299I.'
parse var cnm299i.4 ddname lib .'PIPE NETVIEW ALLOC F(DD) DATASET('lib') SHR | VAR MSG'
parse var msg msgid text select when msgid = 'CNM272I' then if fndmbr(DD, mem_arg) = 0 then cnm299i.4 = substr(cnm299i.4, 1, 55) ||, substr(mem_arg, 1, 8) ||, substr(cnm299i.4, 64, 10) when msgid = 'CNM277I' then cnm299i.4 = substr(cnm299i.4, 1, 55) ||, '????????' ||, substr(cnm299i.4,64, 10) ||, 'dataset not catalogued' otherwise cnm299i.4 = substr(cnm299i.4, 1, 55) ||, '????????' ||, substr(cnm299i.4,64, 10) ||,
© Copyright IBM Corp. 1998 357

msg end
'PIPE NETVIEW FREE F(DD) | HOLE'
if cnm299i.0 > 4 then do i = 5 to cnm299i.0 parse var cnm299i.i lib . 'PIPE NETVIEW ALLOC F(DD) DATASET('lib') SHR | VAR MSG'
parse var msg msgid text select when msgid = 'CNM272I' then if fndmbr(DD, mem_arg) = 0 then cnm299i.i = substr(cnm299i.i, 1, 55) ||, substr(mem_arg, 1, 8) ||, substr(cnm299i.i, 64, 10) when msgid = 'CNM277I' then cnm299i.i = substr(cnm299i.i, 1, 55) ||, '????????' ||, substr(cnm299i.i,64, 10) ||, 'This dataset is not catalogued' otherwise cnm299i.i = substr(cnm299i.i, 1, 55) ||, '????????' ||, substr(cnm299i.i,64, 10) ||, msg end
'PIPE NETVIEW FREE F(DD) | HOLE' end
cnm299i.1 = cnm299i.1 ' Extended: Searching for member' mem_arg 'MEMBER ' ||, substr(cnm299i.2,64)
cnm299i.3 = substr(cnm299i.3,1,54) ||, ' --' ||, substr(cnm299i.3,58)
'PIPE STEM CNM299I. | COLLECT | CONSOLE'
exit 0
B.2 Initializing DB2 Database/*REXX --------------------------------------------- * * 5224INIT * * * Initialize DB2 database for NetView purposes * * ------------------------------------------------- */ a=runsql('CREATE DATABASE TMETEST') say 'Create database TMETEST, SQLcode=' a if a<>'000' then call error_exit
a=runsql('CREATE TABLESPACE TMEDATA IN TMETEST', 'SEGSIZE 4', 'USING STOGROUP SYSDEFLT PRIQTY 200 SECQTY 100')
358 An Introduction to Tivoli NetView for OS/390 V1R2

say 'Create tablespace TMEDATA, SQLcode=' a if a<>'000' then call error_exit
a=runsql('CREATE TABLE NETVIEW_DATA', '( LOG_TIME TIMESTAMP NOT NULL WITH DEFAULT,', ' NETV_CPU DEC(5,2),', ' NETV_MEM DEC(10),', ' PRIMARY KEY(LOG_TIME) )', 'IN TMETEST.TMEDATA') say 'Create table NETVIEW_DATA, SQLcode=' a if a<>'000' then call error_exit
a=runsql('CREATE TABLE INVENTORY_DATA', '( EQNAME CHAR(16) NOT NULL,', ' CONTACT_NAME CHAR(25),', ' CONTACT_NO CHAR(8),', ' LOCATION CHAR(3),', ' PRIMARY KEY(EQNAME) )', 'IN TMETEST.TMEDATA') say 'Create table INVENTORY_DATA, SQLcode=' a if a<>'000' then call error_exit
a=runsql('CREATE UNIQUE INDEX LOGINDEX ON NETVIEW_DATA (LOG_TIME)') say 'Create Primary index for NETVIEW_DATA, SQLcode=' a if a<>'000' then call error_exit
a=runsql('CREATE UNIQUE INDEX EQINDEX ON INVENTORY_DATA (EQNAME)') say 'Create Primary index for INVENTORY_DATA, SQLcode=' a if a<>'000' then call error_exit
say 'Program completed succesfully !'exit
error_exit: /* Manually added recovery ? */ a = runsql('DROP DATABASE TMETEST') say 'Drop database TMETEST=' aexit
runsql: procedure parse arg sqlstmt 'PIPE (END ?) LIT /'sqlstmt'/ |', 'A: SQL EXECUTE | DROP', '? A: | EDIT SKIPTO /= / UPTO /,/ 3.* 1', ' | B: FANIN | TAKE 1 | VAR RESULT | DROP', '? LIT /000/ | B:' sqlcode = strip(result)return sqlcode
Sample REXX Programs 359

B.3 Creating Object with Correlater Field/*REXX ------------------------------------------------------- * * TESTCORR * * * * * * Function : Create 2 GMFHS_Managed_Real_Objects_Class * * and adds the Correlater field * * * * ----------------------------------------------------------- */ oper = 'TMEID6'
K.0 = 35 /* number of stem */ K.1 = 2 /* no of objects */
K.2 = 'GMFHS_Managed_Real_Objects_Class' K.3 = 'Correlatable_Object_1' K.4 = 3 /* THREE fields retrieve */ K.5 = 1 /* and 1 links */ K.6 = 'DisplayResourceName' /* Display Name */ K.7 = 4 /* CHARVAR */ K.8 = 'Correlatable Object 1' /* value */ K.9 = 'DisplayStatus' /* Display Status */ K.10 = 10 /* Integer */ K.11 = 129 /* Satisfactory */ K.12 = 'Correlater' /* Correlater */ K.13 = 4 /* CHARVAR */ K.14 = 'ITSO' /* value */ K.15 = 'DisplayResourceType' /* DisplayResourceType */ K.16 = 'Display_Resource_Type_Class' /* target class */ K.17 = 'DUIXC_RTN_HOST' /* target object */ K.18 = 'Resources' /* target field */
K.19 = 'GMFHS_Managed_Real_Objects_Class' K.20 = 'Correlatable_Object_2' K.21 = 3 /* THREE fields retrieve */ K.22 = 1 /* and 1 links */ K.23 = 'DisplayResourceName' /* Display Name */ K.24 = 4 /* CHARVAR */ K.25 = 'Correlatable Object 2' /* value */ K.26 = 'DisplayStatus' /* Display Status */ K.27 = 10 /* Integer */ K.28 = 129 /* Satisfactory */ K.29 = 'Correlater' /* Correlater */ K.30 = 4 /* CHARVAR */ K.31 = 'ITSO' /* value */ K.32 = 'DisplayResourceType' /* DisplayResourceType */ K.33 = 'Display_Resource_Type_Class' /* target class */ K.34 = 'DUIXC_RTN_HOST' /* target object */ K.35 = 'Resources' /* target field */
address NETVASIS 'PIPE STEM K.', /* Find the name */ '| COLLECT', /* of the nw server */ '| NETVIEW FLCARODM RODMNAME=RODM1 FUNCTION=BUILD', ' RODMUSER='||oper, '| CONSOLE'exit
360 An Introduction to Tivoli NetView for OS/390 V1R2

B.4 VBDENETF REXX Program/*-------------------------------------------------------------------*//* *//* EXEC NAME : VBDENETF *//* *//* DESCRIPTIVE NAME: SAMPLE code used to pass INFORM actions to the *//* RXSOCKET receiver. The actions supported include*//* only EMAIL. *//* *//*-------------------------------------------------------------------*/ TRACE OFF parse source . Invoc Ident . parse arg argstring /* set argstring*/
/*-------------------------------------------------------------------*//* Global Variables *//*-------------------------------------------------------------------*/ targethost='9.24.106.38' targetport=2002
signal on NOVALUE /* RAS signals */signal on SYNTAXsignal on HALTsignal on FAILURE
/*-------------------------------------------------------------------*//* Main *//*-------------------------------------------------------------------*/Call Initcall Leave_Now
/*-------------------------------------------------------------------*//* INITIALIZE LOCAL VARIABLES *//*-------------------------------------------------------------------*/INIT:INFORM_RC = 0 /* Init the RC */Errormsg = '' /* Error Message*/
/*-------------------------------------------------------------------*//* PARSE THE INCOMING BUFFER *//*-------------------------------------------------------------------*/PARSE VAR argstring bufferbuffer = strip(buffer)
/***************************************************//* TEMPLATE for obtaining the entries *//***************************************************/POLICY_NAME = SUBSTR(buffer,1,31) /* Policy Name */ONCALLDAY = SUBSTR(buffer,32,1) /* Encoded on call day */START_TIME = SUBSTR(buffer,33,5) /* Start time */STOP_TIME = SUBSTR(buffer,38,5) /* Stop time */CONNECTION = SUBSTR(buffer,43,10) /* Connection type */ROUTE = SUBSTR(buffer,53,80) /* Route */NAME = SUBSTR(buffer,133,40) /* Recipients Identifier */MESSAGE = SUBSTR(buffer,173,80) /* Message */INTERFACE = SUBSTR(buffer,253,8) /* Interface Routine Name */
Sample REXX Programs 361
SP = SUBSTR(buffer,261,80) /* Service Point */SPDOM = SUBSTR(buffer,341,5) /* Service Point Domain */COMPORT = SUBSTR(buffer,346,8) /* Communication Port */TAPNUMBER = SUBSTR(buffer,354,20) /* TAP Number */OPTIONAL = SUBSTR(buffer,374,100) /* Additional Parms */
/**************************************************************//* Invoke the NetFinity function based on the CONNECTION TYPE *//**************************************************************/call Invoke_NetFinity
RETURN Inform_rc
/*===================================================================*//* INVOKE_NETFINITY *//* *//* S T A R T O F P R O C E D U R E *//* *//* Issue RUNCMDS to NetFinity via ROPs to drive the requested action *//*===================================================================*/Invoke_NetFinity: CONNECTION = STRIP(CONNECTION)
/***************************************************/ /* DETERMINE THE CONNECTION TYPE */ /***************************************************/ Select
/*---------------------------*/ /*- Forward Alert to E-mail -*/ /*---------------------------*/ when CONNECTION = 'EMAIL' then do /***********************************************/ /* Setup NetFinity Alert Actions for an E-Mail */ /***********************************************/ outmsg = connection route message call SendIPMessage outmsg end /*---------------------------------------*/ /*- Error - Unsupported Connection Type -*/ /*---------------------------------------*/ otherwise NOP
End /* Select */
Return Inform_rc
/*===================================================================*//* *//* E N D O F P R O C E D U R E *//* *//* INVOKE_NETFINITY *//*===================================================================*/
362 An Introduction to Tivoli NetView for OS/390 V1R2

/*-------------------------------------------------------------------*//*-------------------------------------------------------------------*//* Error routines & Messages *//*-------------------------------------------------------------------*//*-------------------------------------------------------------------*/
/*-------------------------------------------------------------------*//* CLIST clist FAILED : LINE Sigl HAD A VARIABLE WITH NO VALUE *//*-------------------------------------------------------------------*/NOVALUE:
Return_code = 7 call Leave_now
/*-------------------------------------------------------------------*//* Ident COMMAND FAILED FOR REXX : RECEIVED RETCODE=SYNTAX ERROR *//* BadRC on line Sigl *//*-------------------------------------------------------------------*/SYNTAX:
BadRC = RC Return_code = 8 call Leave_now
/*-------------------------------------------------------------------*//* GET OUT!!!!! *//*-------------------------------------------------------------------*/FAILURE: Exit -1
HALT: Exit -5
/*-------------------------------------------------------------------*//* Exit Trace Call *//*-------------------------------------------------------------------*/Leave_now: If Errormsg ~= '' Then Say Errormsg
/*************************************************************/ /* Determine exit message type and state, then issue message */ /*************************************************************/
/* If Domain E/E trace is 'ON' or Oper E/E trace 'ON' ... *//* 'EZLTRACE EXIT 'Ident Inform_rc Call Exit Trace */
Exit 0
SendIPMessage: parse arg argstring /* Initialize */ res = 'SOCKET'( 'Initialize', 'VBDENETF' ) parse var res src res if src=0 then initialized = 1 else do say 'E', 200, 'Unable to initialize RXSOCKET MODULE' return src
Sample REXX Programs 363
end parse value 'SOCKET'('Socket') with src s . res = 'SOCKET'('SetSockOpt', s, 'SOL_SOCKET', 'SO_ASCII', 'ON') res = 'SOCKET'('Connect', s, 'AF_INET' targetport targethost) res = 'SOCKET'('Write', s, argstring)
/* Wait for lines sent by the server */ dataline = '' num = 0 do forever /* Receive a line and display it */ parse value 'SOCKET'('Read', s) with src len newline if src~=0 | len<=0'' then leave dataline = dataline || newline do forever if pos('15'x,dataline)=0 then leave parse var dataline nextline '15'x dataline num = num + 1 say right(num,5)':' nextline end end
/* Terminate and exit */ res = 'SOCKET'('Terminate') say "Send result" datalinereturn dataline
B.5 VBDNOTF.REX/* ---------------------------------------------------------------- *//* VBDNOTF.REX *//* *//* Run Notification method in Win95 PC to send e-mail ... *//* *//* ---------------------------------------------------------------- */
arg trace . /* trace should be 1 / '' */
signal on any name CleanUp /* make sure everything */ /* is cleaned up ... */ port = 2002 /* port to listen to */ /* must match the sender *//*------------------------------------------------------------------ * initialize socket package *------------------------------------------------------------------*/ if RxFuncQuery("SockLoadFuncs") then do rc = RxFuncAdd("SockLoadFuncs","RxSock","SockLoadFuncs") rc = SockLoadFuncs() end
/*------------------------------------------------------------------ * create the initial socket *------------------------------------------------------------------*/ s = SockSocket("AF_INET","SOCK_STREAM",0) if (s = -1) then do say "Error on SockSocket:" errno
364 An Introduction to Tivoli NetView for OS/390 V1R2
exit /* no need to cleanup */ end if trace=1 then say "Sucessfully using sock" s
/*------------------------------------------------------------------ * bind socket to port *------------------------------------------------------------------*/ server.!family = "AF_INET" server.!port = port server.!addr = "INADDR_ANY" rc = SockBind(s,"server.!") if (rc=-1) then call CleanUp "Sock Bind"
/*------------------------------------------------------------------ * set queue size *------------------------------------------------------------------*/ rc = SockListen(s,10) if (rc=-1) then call CleanUp "Set Listen Queue"
/*------------------------------------------------------------------ * infinite loop to handle requests ... *------------------------------------------------------------------*/
do forever if trace=1 then say "Waiting for client" ns = SockAccept(s,"client.!") /* Got a connection */ if trace=1 then say 'Accepting connection on' ns 'primary' s rc = SockRecv(ns,"indata",1000)
parse var indata cmd dest message select when cmd="NUMPAGE" then do /* do the connection it is dummy right now */ outdata = "OK" end when cmd="ALPHAPAGE" then do /* do the connection it is dummy right now */ outdata = "OK" end when cmd="EMAIL" then do 'D:\mailto\mailto -u [email protected]', '-d' dest, '-h smtp-gw01.ny.us.ibm.net', '-s "NetView Notification Message"', '-m "'||message||'"' if rc=0 then outdata = "OK" else outdata = "XXXXXXXXXXXXXXXXXXXXXXXX" end when cmd="FAX" then do outdata = "OK" end otherwise outdata = "XXXXXXXXXXXXXXXXXXXXXXXX" end
rc = SockSend(ns,outdata) /* Reply the result */ rc = SockSoClose(ns) ns = "" end
Sample REXX Programs 365

/* ------- signal handler to destroy dialog if condition trap happens -----*/CleanUp: signal off any
if datatype(ns,"W") then rc = SockSoClose(ns) rc = SockSoClose(s)
say "Quitting ..." if rc<>0 then say "Error" rc "occurred at line" siglexit /* leave program */
366 An Introduction to Tivoli NetView for OS/390 V1R2

B.6 EML5224 Command/*REXX --------------------------------------------- * * EML5224 * * Description : * * This program waits for the * * universal_totalfree SENTRY monitor and * * executed from VBDTBL01, it parses the alert for * * the workstation name in HIER(2) * * Queries DB2 for appropriate contact * * and sends the INFORM action based on the contact * * name * * -------------------------------------------------- */ arg eqname /* Now go there and get HIER.2 */ /* Hier.2 in SENTRY is the PWS name */ eqname=hier(2) parse var eqname eqname 'PWS'
/* Now lets Ask DB2 about the contact */ say 'VBD0001I Retrieving Contact for' eqname 'PIPE NETV SQSELECT CONTACT_NAME FROM INVENTORY_DATA', "WHERE EQNAME='"eqname"' | NLOCATE /CONTACT_NAME/ | STEM PAGNO." contact = '' select when pagno.0 = 0 then do say 'VBD0002E Equipment' eqname 'does not listed' end when strip(pagno.1)='' then do say "VBD0003E Contact for" eqname "not identified" end otherwise contact = pagno.1 end
/* Now use the INFORM policy to RUN it ... */ if contact <> '' then do say 'VBD0004I Contacting...' contact i = 0 msg='---' do forever i = i + 1 a = msuseg('0000.31('||i||').30',3) if strip(a)='' then leave parse var a kwd '=' value select when kwd='origin' then msg = msg 'Originated from' value ';' when kwd='msg' then msg = msg value otherwise nop end end 'INFORM' contact msg end
exit
Sample REXX Programs 367

368 An Introduction to Tivoli NetView for OS/390 V1R2

Appendix C. Sample JCLs
This is the job we created to install the Event/Automation Service under OS/390 UNIX. This job creates the necessary files and copies them to OS/390 UNIX.
C.1 Copy EAS to OpenEdition//COPYEAS1 JOB ,'COPY EAS CONTROL',MSGCLASS=X,CLASS=A,// REGION=2M,MSGLEVEL=(1,1),NOTIFY=TMEID5//*//*_________________________________________________________________//*//STDOUT EXEC PGM=IKJEFT01//SYSTSPRT DD SYSOUT=*//*//IHSAINIT DD DSN=TME10.RABAN.V1R2.SCNMUXCL(IHSAINIT),DISP=SHR//IHSAMCFG DD DSN=TME10.RABAN.V1R2.SCNMUXCL(IHSAMCFG),DISP=SHR//IHSAACFG DD DSN=TME10.RABAN.V1R2.SCNMUXCL(IHSAACFG),DISP=SHR//IHSAECFG DD DSN=TME10.RABAN.V1R2.SCNMUXCL(IHSAECFG),DISP=SHR//IHSAACDS DD DSN=TME10.RABAN.V1R2.SCNMUXCL(IHSAACDS),DISP=SHR//IHSAECDS DD DSN=TME10.RABAN.V1R2.SCNMUXCL(IHSAECDS),DISP=SHR//IHSAMFMT DD DSN=TME10.RABAN.V1R2.SCNMUXCL(IHSAMFMT),DISP=SHR//IHSAAPMF DD DSN=TME10.RABAN.V1R2.SCNMUXCL(IHSAAPMF),DISP=SHR//IHSAMSG1 DD DSN=TME10.V1R2.SCNMUXMS(IHSAMSG1),DISP=SHR//IHSAC000 DD *Dummy for IHSAC000/*//IHSS DD *#!/bin/sh export STEPLIB="TME10.V1R2.SCNMUXLK" export _BPX_JOBNAME="IHSAEVNT" cd /usr/lpp/Tivoli/eas exec IHSAC000exit 0/*//*//OHSAINIT DD PATH='/usr/lpp/netview/eas/global_init.conf',// PATHOPTS=(OWRONLY,OCREAT)//OHSAMCFG DD PATH='/usr/lpp/netview/eas/message_adpt.conf',// PATHOPTS=(OWRONLY,OCREAT)//OHSAACFG DD PATH='/usr/lpp/netview/eas/alert_adpt.conf',// PATHOPTS=(OWRONLY,OCREAT)//OHSAECFG DD PATH='/usr/lpp/netview/eas/event_rcv.conf',// PATHOPTS=(OWRONLY,OCREAT)//OHSAACDS DD PATH='/usr/lpp/netview/eas/alert_adpt.cds',// PATHOPTS=(OWRONLY,OCREAT)//OHSAECDS DD PATH='/usr/lpp/netview/eas/event_rcv.cds',// PATHOPTS=(OWRONLY,OCREAT)//OHSAMFMT DD PATH='/usr/lpp/netview/eas/message_adpt.fmt',// PATHOPTS=(OWRONLY,OCREAT)//OHSAAPMF DD PATH='/usr/lpp/netview/eas/message_apmf.fmt',// PATHOPTS=(OWRONLY,OCREAT)//OHSAMSG1 DD PATH='/usr/lpp/netview/eas/ihsamsg1',// PATHOPTS=(OWRONLY,OCREAT)//OHSAC000 DD PATH='/usr/lpp/netview/eas/IHSAC000',// PATHOPTS=(OWRONLY,OCREAT)
© Copyright IBM Corp. 1998 369

//OHSS DD PATH='/usr/lpp/netview/eas/ihss',// PATHOPTS=(OWRONLY,OCREAT)//*//SYSTSIN DD DATA OSHELL mkdir /usr/lpp/Tivoli OSHELL mkdir /usr/lpp/Tivoli/eas OCOPY INDD(IHSAINIT) OUTDD(OHSAINIT) TEXT CONVERT(YES) OCOPY INDD(IHSAMCFG) OUTDD(OHSAMCFG) TEXT CONVERT(YES) OCOPY INDD(IHSAACFG) OUTDD(OHSAACFG) TEXT CONVERT(YES) OCOPY INDD(IHSAECFG) OUTDD(OHSAECFG) TEXT CONVERT(YES) OCOPY INDD(IHSAACDS) OUTDD(OHSAACDS) TEXT CONVERT(YES) OCOPY INDD(IHSAECDS) OUTDD(OHSAECDS) TEXT CONVERT(YES) OCOPY INDD(IHSAMFMT) OUTDD(OHSAMFMT) TEXT CONVERT(YES) OCOPY INDD(IHSAAPMF) OUTDD(OHSAAPMF) TEXT CONVERT(YES) OCOPY INDD(IHSAMSG1) OUTDD(OHSAMSG1) TEXT CONVERT(YES) OCOPY INDD(IHSAC000) OUTDD(OHSAC000) TEXT CONVERT(YES) OCOPY INDD(IHSS) OUTDD(OHSS) TEXT CONVERT(YES) OSHELL chmod 1755 /usr/lpp/Tivoli/eas/IHSAC000 OSHELL chmod 755 /usr/lpp/Tivoli/eas/ihss/*
370 An Introduction to Tivoli NetView for OS/390 V1R2
Appendix D. Special Notices
This publication is intended to provide an introduction to TME 10 NetView for OS/390 V1R2. It can be used by customers and IBM/Tivoli employees with an interest in network and systems management. It describes the new and enhanced functions in TME 10 NetView for OS/390 V1R2 and provides many examples of how to use these functions. The information in this publication is not intended as the specification of any programming interfaces that are provided by TME 10 NetView for OS/390 V1R2. See the PUBLICATIONS section of the IBM Programming Announcement for TME 10 NetView for OS/390 V1R2 for more information about what publications are considered to be product documentation.
References in this publication to IBM products, programs or services do not imply that IBM intends to make these available in all countries in which IBM operates. Any reference to an IBM product, program, or service is not intended to state or imply that only IBM's product, program, or service may be used. Any functionally equivalent program that does not infringe any of IBM's intellectual property rights may be used instead of the IBM product, program or service.
Information in this book was developed in conjunction with use of the equipment specified, and is limited in application to those specific hardware and software products and levels.
IBM may have patents or pending patent applications covering subject matter in this document. The furnishing of this document does not give you any license to these patents. You can send license inquiries, in writing, to the IBM Director of Licensing, IBM Corporation, 500 Columbus Avenue, Thornwood, NY 10594 USA.
Licensees of this program who wish to have information about it for the purpose of enabling: (i) the exchange of information between independently created programs and other programs (including this one) and (ii) the mutual use of the information which has been exchanged, should contact IBM Corporation, Dept. 600A, Mail Drop 1329, Somers, NY 10589 USA.
Such information may be available, subject to appropriate terms and conditions, including in some cases, payment of a fee.
The information contained in this document has not been submitted to any formal IBM test and is distributed AS IS. The information about non-IBM ("vendor") products in this manual has been supplied by the vendor and IBM assumes no responsibility for its accuracy or completeness. The use of this information or the implementation of any of these techniques is a customer responsibility and depends on the customer's ability to evaluate and integrate them into the customer's operational environment. While each item may have been reviewed by IBM for accuracy in a specific situation, there is no guarantee that the same or similar results will be obtained elsewhere. Customers attempting to adapt these techniques to their own environments do so at their own risk.
Any pointers in this publication to external Web sites are provided for convenience only and do not in any manner serve as an endorsement of these Web sites.
Any performance data contained in this document was determined in a controlled environment, and therefore, the results that may be obtained in other operating
© Copyright IBM Corp. 1998 371
environments may vary significantly. Users of this document should verify the applicable data for their specific environment.
Reference to PTF numbers that have not been released through the normal distribution process does not imply general availability. The purpose of including these reference numbers is to alert IBM customers to specific information relative to the implementation of the PTF when it becomes available to each customer according to the normal IBM PTF distribution process.
The following terms are trademarks of the International Business Machines Corporation in the United States and/or other countries:
The following terms are trademarks of other companies:
C-bus is a trademark of Corollary, Inc.
Java and HotJava are trademarks of Sun Microsystems, Incorporated.
Microsoft, Windows, Windows NT, and the Windows 95 logo are trademarksor registered trademarks of Microsoft Corporation.
PC Direct is a trademark of Ziff Communications Company and is usedby IBM Corporation under license.
Pentium, MMX, ProShare, LANDesk, and ActionMedia are trademarks orregistered trademarks of Intel Corporation in the U.S. and othercountries.
UNIX is a registered trademark in the United States and othercountries licensed exclusively through X/Open Company Limited.
Other company, product, and service names may be trademarks orservice marks of others.
AD/Cycle AIXAPPN AS/400DB2 eNetworkIBM MVS/ESANetView OpenEditionOperating System/2 OS/390OS/2 RACFRS/6000 S/390System/390 VTAM
372 An Introduction to Tivoli NetView for OS/390 V1R2

Appendix E. Related Publications
The publications listed in this section are considered particularly suitable if you detailed discussion of the topics covered in this redbook.
E.1 International Technical Support Organization Publications
For information on ordering these ITSO publications see “How to Get ITSO Redbooks” on page 377.
• An Introduction to TME 10 NetView for OS/390, SG24-4922
• TME 10 Global Enterprise Manager Event/Automation and User Administration, SG24-4921
• TME 10 Global Enterprise Manager, Topology Service and NetView Java Client, SG24-2121
• Managing NetWare Environments from MVS Using NPM, MSM-NetWare, SG24-4527
• Managing IP Networks Using NetView MultiSystem Manager R2, GG24-4337
• Centralized Management of LNM and NetWare Networks Using NetView MultiSystem Manager MVS/ESA, GG24-4181
E.2 TME 10 NetView for OS/390 V1R2 Publications
The TME 10 NetView for OS/390 V1R2 publications include:
• TME 10 NetView, Administration Reference, SC31-8222
• TME 10 NetView, Application Programmer's Guide, SC31-8223
• TME 10 NetView, APPN Topology and Accounting Agent Guide, SC31-8224
• TME 10 NetView, Automation Guide, SC31-8225
• TME 10 NetView, Planning Guide, GC31-8226
• TME 10 NetView, Command Reference, SC31-8227
• TME 10 NetView, Customization Guide, SC31-8228
• TME 10 NetView, Customization: Using Assembler, SC31-8229
• TME 10 NetView, Customization: Using PL/I and C, SC31-8230
• TME 10 NetView, Customization: Using REXX and the NetView Command List Language, SC31-8231
• TME 10 NetView, Data Model Reference, SC31-8232
• TME 10 NetView, Resource Object Data Manager and GMFHS Programmer's Guide, SC31-8233
• TME 10 NetView, Graphic Monitor Facility User's Guide, GC31-8234
• TME 10 NetView, Installation and Administration Guide, SC31-8236
• TME 10 NetView, Messages, SC31-8237
• TME 10 NetView, Bridge Implementation, SC31-8238
© Copyright IBM Corp. 1998 373

• TME 10 NetView, SNA Topology Manager and APPN Accounting Manager Implementation Guide, SC31-8239
• TME 10 NetView, Tuning Guide, SC31-8240
• TME 10 NetView, User's Guide, GC31-8241
• TME 10 NetView, Customization: Using Pipes, SC31-8248
• TME 10 NetView, Diagnosis Guide, LY43-0108
(available to IBM-licensed customers only)
• TME 10 NetView, Security Reference, SC31-8606
• TME 10 NetView, MultiSystem Manager User's Guide, GC31-8607
• TME 10 NetView, Automated Operations Network User's Guide, GC31-8661
• TME 10 NetView, Automated Operations Network Customization Guide, SC31-8662
• TME 10 NetView, NetView Management Console User's Guide, GC31-8665
• OS/390 eNetwork Communications Server, SNA Resource Definition Reference, SC31-8565
• OS/390 eNetwork Communications Server, SNA Planning and Migration Guide, SC31-8622
• Database 2 for OS/390 Version 5, SQL Reference, SC26-8966
• Database 2 for OS/390 Version 5, Application Programming and SQL Guide, SC26-8958
374 An Introduction to Tivoli NetView for OS/390 V1R2

List of Abbreviations
AIX Advanced Interactive eXecutive
APF Authorized Programming Facility
AMS Application Management Specification
AON Automated Operations Network
APM Application Policy Manager
CNM Communications Network Management
DCE Distributed Computing Environment
EIF Event Integration Facility
GMT Greenwich Mean Time
EAS Event/Automation Service
FMID Function Management Identifier
GA General Availability
GEM Global Enterprise Manager
GMFHS Graphical Monitor Facility Host Subsystem
IBM International Business Machines Corporation
IP Internet Protocol
ITSO International Technical Support Organization
JCL Job Control Language
LCF Lightweight Client Framework
MSM MultiSystem Manager
NCCF Network Control Command Facility
NDS NetWare Directory Service
NGMF NetView Graphical Monitor Facility
NMC NetView Management Console
NPDA Network Problem Determination Application
OMVS OpenEdition for MVS
OS/2 Operating System/2
PPI Program to Program Interface
PSP Preventive Service Planning
PTF Program Temporary Fix
© Copyright IBM Corp. 1998
RACF Resource Access Control Facility
RDBMS Relational Data Base Management System
RODM Resource Object Data Manager
SMP/E System Modification Program/Extended
SNA System Network Architecture
SQL Structured Query Language
TCP Transmission Control Program
TEC Tivoli/Enterprise Console
TME Tivoli Management Environment
TMR Tivoli Management Region
TSO Time Sharing Option
WTO Write To Operator
375

376 An Introduction to Tivoli NetView for OS/390 V1R2
How to Get ITSO Redbooks
This section explains how both customers and IBM employees can find out about ITSO redbooks, CD-ROMs, workshops, and residencies. A form for ordering books and CD-ROMs is also provided.
This information was current at the time of publication, but is continually subject to change. The latest information may be found at http://www.redbooks.ibm.com/ .
How IBM Employees Can Get ITSO RedbooksEmployees may request ITSO deliverables (redbooks, BookManager BOOKs, and CD-ROMs) and information about redbooks, workshops, and residencies in the following ways:
• Redbooks Web Site on the World Wide Web
http://w3.itso.ibm.com/
• PUBORDER – to order hardcopies in the United States
• Tools Disks
To get LIST3820s of redbooks, type one of the following commands:
TOOLCAT REDPRINT TOOLS SENDTO EHONE4 TOOLS2 REDPRINT GET SG24xxxx PACKAGE TOOLS SENDTO CANVM2 TOOLS REDPRINT GET SG24xxxx PACKAGE (Canadian users only)
To get BookManager BOOKs of redbooks, type the following command:
TOOLCAT REDBOOKS
To get lists of redbooks, type the following command:
TOOLS SENDTO USDIST MKTTOOLS MKTTOOLS GET ITSOCAT TXT
To register for information on workshops, residencies, and redbooks, type the following command:
TOOLS SENDTO WTSCPOK TOOLS ZDISK GET ITSOREGI 1998
• REDBOOKS Category on INEWS
• Online – send orders to: USIB6FPL at IBMMAIL or DKIBMBSH at IBMMAIL
For information so current it is still in the process of being written, look at "Redpieces" on the Redbooks Web Site (http://www.redbooks.ibm.com/redpieces.html ). Redpieces are redbooks in progress; not all redbooks become redpieces, and sometimes just a few chapters will be published this way. The intent is to get the information out much quicker than the formal publishing process allows.
Redpieces
© Copyright IBM Corp. 1998 377

How Customers Can Get ITSO RedbooksCustomers may request ITSO deliverables (redbooks, BookManager BOOKs, and CD-ROMs) and information about redbooks, workshops, and residencies in the following ways:
• Online Orders – send orders to:
• Telephone Orders
• Mail Orders – send orders to:
• Fax – send orders to:
• 1-800-IBM-4FAX (United States) or (+1) 408 256 5422 (Outside USA) – ask for:
Index # 4421 Abstracts of new redbooksIndex # 4422 IBM redbooksIndex # 4420 Redbooks for last six months
• On the World Wide Web
In United StatesIn CanadaOutside North America
IBMMAILusib6fpl at ibmmailcaibmbkz at ibmmaildkibmbsh at ibmmail
[email protected]@[email protected]
United States (toll free)Canada (toll free)
1-800-879-27551-800-IBM-4YOU
Outside North America(+45) 4810-1320 - Danish(+45) 4810-1420 - Dutch(+45) 4810-1540 - English(+45) 4810-1670 - Finnish(+45) 4810-1220 - French
(long distance charges apply)(+45) 4810-1020 - German(+45) 4810-1620 - Italian(+45) 4810-1270 - Norwegian(+45) 4810-1120 - Spanish(+45) 4810-1170 - Swedish
IBM PublicationsPublications Customer SupportP.O. Box 29570Raleigh, NC 27626-0570USA
IBM Publications144-4th Avenue, S.W.Calgary, Alberta T2P 3N5Canada
IBM Direct ServicesSortemosevej 21DK-3450 AllerødDenmark
United States (toll free)CanadaOutside North America
1-800-445-92691-800-267-4455(+45) 48 14 2207 (long distance charge)
Redbooks Web SiteIBM Direct Publications Catalog
http://www.redbooks.ibm.comhttp://www.elink.ibmlink.ibm.com/pbl/pbl
For information so current it is still in the process of being written, look at "Redpieces" on the Redbooks Web Site (http://www.redbooks.ibm.com/redpieces.html ). Redpieces are redbooks in progress; not all redbooks become redpieces, and sometimes just a few chapters will be published this way. The intent is to get the information out much quicker than the formal publishing process allows.
Redpieces
378 Managing Domino/Notes with

IBM Redbook Order Form
Please send me the following:
We accept American Express, Diners, Eurocard, Master Card, and Visa. Payment by credit card notavailable in all countries. Signature mandatory for credit card payment.
Title Order Number Quantity
First name Last name
Company
Address
City Postal code
Telephone number Telefax number VAT number
Invoice to customer number
Country
Credit card number
Credit card expiration date SignatureCard issued to
379

380 Managing Domino/Notes with

Index
Symbols%CNMCSSIR commands 115%INCLUDE statements 16
Numerics3270 Java Client 74
Aabbreviations 375acronyms 375activating, a group of messages 20activating, DB2 access for NetView 325active monitoring definitions 62adding, segments of the automation table 9ADDRINFO file 63administrator access 144AFTER command, new options 106aggregate object 168, 179aggregates, creating 267aggregateSystem object 257aggregateSystem objects 253aggregation 167AIFR block format 11AIX 122ALERT 26alert
explanation 176from OS/390 to TEC 89generating 50history 171list 175mapping to TEC events 90NetWare 240notification 33storing 11
alert adapter, converting the alert 89alert_adpt.cds 90alert_adpt.conf file 89ALLCDRSC 116ALLOCATE command 103Allocate/Free DD 102Always response level 210AMS instrumentation 145amsseverity.sh 82AON
command help 117configuration file 24integration 117message csects 117MVS TCP/IP examples 63MVS TCP/IP support 59primary panel 63starting TSO server 66
APM baroc file, importing 82APM events 94APM rule file, importing 82
© Copyright IBM Corp. 1998
APPEND stage 39, 40, 41AREC filter 84ARECLEAR CLIST 80ARM=*ARM 57ASSIGN command enhancement 112assigning
by JOBNAME 114by keyword TME 114message ID 113the autotask 103
associations 103AT command, new options 106ATM Management 134AUTOAMI autotask 178AUTOCNT statement 10Automatic Restart Manager 55, 57Automation In Progress (AIP) 23, 25, 36automation notification
commands 23, 29concepts 23implementing 23
automation support 333automation table 89
adding segments 9enhancements 9listing 12removing segments 9test 9
autotask 99, 100, 103AUTOTBL
command 9design 16disable group 21disable option 18examples 17insert option 17remove option 19STATUS command 17, 21SWAP 20swap option 19synonyms resolution 18syntax 17
AUTOTESTbatch mode 12command 9command with record option 14command with source option 14examples 14in batch mode 10listing 14output report file 16retrying 13stop options 10, 13syntax 10testing options 10, 11
AUTOTEST=OFF command 13
381

Bbackground 162background images 163background picture 164baroc files 83batch mode, AUTOTEST 10, 12bibliography 373Bind DB2 plan 325BLDVIEWS 290BNH messages, mapping 94BNH357 message 105BNJMBDST 89BPX.DAEMON 337Browse Netlog session 310browsing 109browsing member 110BufEvtPath 90, 94Build Views 270Build Views frame 261Build/Set resources 267Build/Set Resources frame 261Building Network View 271Business Systems 145Business Systems directory tree 178business systems, instrumenting 182Business tree 144, 146
Cchanging
content of a message 41fields of real objects 267installation source directory 81user rights in NT 135
checking MVS TCP/IP session status 70checkpoint data set failure handling, RODM 55classes, loading 83CLASSPATH 299client downloads files 143Client Properties notebook 143CLIST 110, 112clocks, synchronzing 91cloning 55cloning support 56closing, parent views 150closing, view 150CMDSERVERPORT= parameter 214CMIP filtering 115CMIP Services 115CNMEUNIX job 335CNMEUNIX PPI receiver 335CNMS1100 99CNMSJH08 56CNMSJTSO 60, 62CNMSJUNX member 335CNMTAMEL 121CNMTRXMP 42Command Facility session 295, 310command facility session 306Command Profile Editor 182
command servercreating 184installing 130NetWare 236sample (CNMS8029) 52setting up 340TSO 348UNIX 340updating 134
Command Service, configuration 189Command Service, usage 189commands
automation notification 23, 29help 117issuing to TSO 346issuing using the Web browser 320OS/390 UNIX (OpenEdition) 335responses 146TSO 343updating 134
Communication software, modifying 136Company Identification 154Company page 153comparing, OS/390 function 43compiling, rulebase 83concepts of automation notification 23Connection Services 306console enhancements 103console preferences, restoring 148CONTACT 27CONTINUE(NO) 16CONTINUE(STOP) 16CONTINUE(YES) 16conversation security 139conversion options 45converting, from binary data 45converting, message to an event 93converting, the alert 89correlation concept 251correlation implementation 251correlation method, implementing 252correlation, default 255correlation, free-form text 258CPEBATCH 134cpebatch 194CPEBATCH command 236CPNAME 137creating
aggregates 267command set 184DB2 database 329event groups 83event sources 83GemAdmin console 83operator 187profile 185, 202, 204profile manager 202, 203views 121
critical resources, defining 61Critical response level 210
382 An Introduction to Tivoli NetView for OS/390 V1R2

current view, displaying the icon 144customizing
DSIAMII 178Enterprise Console 202MSMAgent.cfg file 214MultiSystem Manager NetWare environment 233NetWare Agent Code 237NPDA filter 80TME 10 Distributed Monitoring 202
DDASD 259DASD2 259date formatting, RODM log 55day of week 24DB2
access from NetView/390 325access PIPE stages 327access, samples 329access, starting task 327activating for NetView 325database, creating 329granting plan access 327
DBAUTO 117DBINIT 117DBMAINT 117DDF 26deactivating, a group of messages 20default correlation 254DEFAULTS AUTOLOGN command 189DEFAULTS AUTOLOGN parameter 143DEFAULTS command, new options 105defining
critical resources 61full-screen session 311local LU 140partner LU 139SNA connection 139SNA device 138SNA node 138subscribers to profile manager 202, 206transaction program 140TSOSERV 343UNIX Server 335
definition of ENVIRON AIP 25definition of ENVIRON SETUP clause 25DELDUPES stage 39, 42DELDUPES stage examples 42deleted from log database 36destination, determining a path to 75detail session status 72determining, path to a destination 75DIAGQUEUE command 114DISABLE function 17DISCONID 97DISCONID from NCCF 104DISK 110display name 252DISPLAY QSTATS commands 80displaying, fields 160
displaying, icon of the current view 144DisplayStatus 229distributed autotasks 99distributing, profile to managed nodes 212DOM enhancement 114DOM message statistics 114DOMAIN 61dotted border 149drop command 72dropping, hung FTP session 72dropping, hung TELNET session 72DSIAMII, customizing 178DSIARPT 12DSIASRC 11, 12DSIATOPT task 10DSIDB2DF 326DSIDMNB 295, 317DSILIST 12DSIMSG 41DSIPARM 12DSIPARM member DUIFPMEM 136DSIPARM member, locating 111DSIPHONE 343
checking version 53interface 52module 39
DSIRTTR task 240DSIRTTTD 235DSITBL01 update for AON 25DSITBL02 disable group 20DSITCPCF 295DSITCPIP task 295, 305DSITCPRF 295DSIWBMEM 317DSIWBTSK task definition 317DUIGDYNA 56DUIGINIT 56DUIGPWLU 56DUINMCCW 127DUINMCSW 122
EEDIT stage 39, 45, 46EKGCUST 56element name 57enabling, event forwarding to TEC 24enabling, remote command to a managed node 214encryption keys, inbound and outbound 300encryption profiles 295Enterprise Console, customizing 202ENVIRON AIP 25ENVIRON SETUP clause 25ESREC filter 84establishing, PPI connection 52event 89Event Automation Service 198event forwarding, enabling to TEC 24event groups, creating 83Event Receiver 84event sources, creating 83
383 An Introduction to Tivoli NetView for OS/390 V1R2

event type 24Event/Automation Service 77Event/Automation Service (IHSAEVNT) 24Event/Automation Service installation 78event_rcv.cds file 85event_rcv.conf file 84events, from Tivoli Enterprise Console to OS/390 84events, sending from TEC 84EventServer, restarting 83EventServer, stopping 83Eventtype 26EVERY command, new options 106EVERYCON 105EXCEPTAUTO 100exception view 229, 235, 281, 284EXCEPTLU 100EXCEPTNNT 100EXCEPTOP 100EXCEPTRMTCMD 100exempt operators, report 100Exit10 code 26EXPOSE stage 39, 46EXPOSE stage examples 47EXPOSE TOTRAP 46extended browsing 109EXVWNAME 200EZL922I message 65EZLCFG01 24EZLCFG01, notification policy definition 27EZLEASLN 24, 29, 30EZLECALL 33EZLENETF program 29EZLENFRM 24EZLINSMP 24, 27, 29
Ffields, displaying 160fields, sorting 161filter bar 165filtering, CMIP 115filtering, resources 146, 165FKXCFG01 60, 61, 62FKXCFG01 member 59flags 167, 168FLB4WIN 296FLCACTIP command 220FLCAINP 199FLCATALH 199FLCATAUT 199FLCE.INI 238FLCEAGNT.NLM 238FLCF.INI 237FLCFNETV.NLM 237FLCMCOR 251, 252FLCNMCWE 130, 236FLCSDM6T 200FLCSDM8 252FLCSEXV 200FLCSINW 234FLCSITME 199
FLCSTBLE 233, 242FLCSTBLT member 198FLCT_cmdServer.pl 214FLCT_getLogical.pl 216, 222FLCT_getPhysical.pl 222FLCT_getPhysical.pl -m 216FLCT_getSentryMonitors.pl program 216FLCT_getServicePoint.pl 216, 222FLCT_instRcmd.pl 214FLCT_rcmd.pl 220, 222FLCT_updateMNStatus.pl 218FLCT_viewDb.pl 219FLCT017I 218FLCT019I 218FLCT022I 218flyover text 157Fonts Setting page 157force reporting 116formatting, the RODM log 56forward_event function 84forwarding, messages 93FREE command 103free-form text correlation 258FTP session, hung 71FTP, dropping hung sessions 72full-screen applications 295full-screen session, defining 311
GGemAdmin console, creating 83generating, alert 50GETCONID 97GETTOPO 234GETTOPO flow 215gif file 164Global Enterprise Manager 182GMFHS 121GMFHS startup with SYNONYM 56GMFHS status 179granting, access to the DB2 plan 327GROUP 20, 28
HHardware Monitor 89, 310hierarchy of objects 223host name definition 63hostcmd command 189HP-UX 122hung FTP session 71hung TELNET session 71
IICOLOR command 109idle 100IDLE MINUTES 99idle time limit 99, 102IDLEOFF
command 99
384 An Introduction to Tivoli NetView for OS/390 V1R2

command result 101commands 100considerations 100examples 101sample 49syntax 99
IF conditions 112IHSAACDS 90IHSAACFG 89IHSAAPMF 94IHSAC000 79IHSAECDS file 85IHSAECFG file 84IHSAEVNT 77, 78
customization 78sample procedure 78starting as an OMVS daemon 79startup file 79
IHSAINIT control file 78IHSAMCFG 94IHSAMFMT 93, 94ihsshstc.cfg file 189ihssnv390cons.rsp file, modifying 193ihsttec.sh 82ILOG 30ILOG command 35ILUCDRSC 116implementing automation notification 23implementing, correlation method 252importing, APM baroc file 82importing, APM rule file 82importing, Baroc files 83in memory member 44in memory program 44inbound encryption keys 300INFORM command 26, 27, 30, 33, 34inform e-mail message in Lotus Notes 32, 34inform policy 23
for a person 33in EZLINSMP 29setting up 24
information policy setup 27INFORMATIONAL severity level 82INFORMTB command 30, 34, 35INIT=CNMETDIN parameter 178INITAMI command 178INITIALSTATUS= 217INITTOPO command 220INITTOPO flow 215installation source directory, changing 81installing
MSM Agent software 201MultiSystem Manager command sets 130NetView Management Console 122server code 122Tivoli software 81
INSTORE stage 39, 44INSTORE stage examples 45INTERFACE parameter 29inventory database 333
IP addresses 144IP NETCONV 179IP390 60issuing
commands to OS/390 UNIX 338commands to TSO 346INFORM command 34PING 67TSO commands 73
JJava Development Kit (JDK) V1.1.6 122Java Development toolkit 299Java programming language 121Java Virtual Machine 122JIT compiler 122JOBNAME, assigning by 114jpg file 164
Kkeyword TME, assigning by 114
Llabel colors 162Life Cycle 144LIST CLIST command 110LIST CLIST= command 110LIST MEMSTAT command 107list of alerts 175LIST Volumes command 248LISTAE CLIST 110, 357LISTAE, locating DSIPARM member DSIDMN 111listing parameters 12LLINES value 116LNM Management 134load module, finding 112LOAD PING command 240LOADCL 107loading
classes 83contents of a set of variables 43member 44rulebase 83translation 41
local LU, defining 140local topology report 115Locate Failing Resources command 173Log 147Log BROWSE 109Log Corruption error 36log database, deleted from 36log window 146logical errors 9logical tables 9logical topology 216LOOKUP processing sample 49LOOKUP stage 39, 48, 49
385 An Introduction to Tivoli NetView for OS/390 V1R2

Mmailto freeware 29major node, force reporting 116major node, omitting 116MAKESITE program 63managed node
distributing profiles to 212enabling the remote command 214status 197, 218
managingstatus of object 121views 149windows 313
mapping, alerts to TEC events 90mapping, BNH messages 94Marked 168master console 97matching on a statement 9matching on multiple statements 9member 110Member Browse session 310MEMSTORE command 108MEMSTORE result 109MEMSTORE sample 45MEMSTORE(CNMS8028) 107MEMSTORE(MEMSTORE) 108MEMSTORE, running 108message 117
adapter 94assigning ID 113collected 114color 109converting to an event 93forwarding 93from OS/390 to TEC 93ID 113recording 11selection 113storing 11to event flow 93
MESSAGE command 117Message Event Detail 96message_adpt.conf 94migration issues 116modifying
Communication software 136FLBSYSD member 255ihssnv390cons.rsp file 193Tivoli Enterprise Console severity levels 82
monitor objects, unsatisfactory status 229monitor, saving 212monitoring collection 209monitors 228monitors, adding to TME 10 Distributed Monitoring profile207MSG 26MSM
Agent Down alert 223Agent software, installing 201Agent Up event 221
initialization message 110managers 145managers status 179Universal Monitor 214
MSMAgent 197MSMAgent support 83MSMAgent user ID 214MSMAgent.cfg file, customizing 214multiple logical tables 9multiple tables, principles 16MultiSystem Manager
command sets 131, 134customizing NetWare environment 233installing command sets 130view 149
MultiSystem Manager Agent, starting 220MultiSystem Manager initialization members 199MultiSystem Manager integration 117MultiSystem Manager, command help 117MultiSystem Manager, message csects 117MultiSysView 223MVS console, removing associations 103MVS TCP/IP
checking session status 70Commands Menu 65session status 69support 59
NNDS tree 243NDS, password to access 239NDSUserID parameters 238NETCONV 141
starting session 141stopping communication 142support 121
NetFinity Server Management 134NETLOG, notification action 31NETSTAT CONN command 73NETVALRT 50NetView
3270 Java Client 193, 295activating DB2 access 325domain 36Help session 310logging off 324PPI interface 50removing associations 103starting Java Client setup 300to NetView tasks (NNTs) 99
NetView Management Console 121NetView Management Console Client 122NetView Management Console Console properties 151NetView Management Console Installation 130NetView Management Console installation 122NetView Management Console Main Menu 144NetView Management Console Server 75, 122, 136NetView Management Console Server Install Types 125NetView Management Console Server Product InformationWindow 123
386 An Introduction to Tivoli NetView for OS/390 V1R2

NetView Management Console Server ReadMe 124NetView Management Console Server Temporary InstallDirectory 123NetView Management Console Server, operating 140NetView Management Console Server, starting 140NetView Management Console Server, stopping 142NetView Management Console structure 121NetView Management Console, components 121NetView_390 event group 90NetViewAlertReceiver 84NetWare
agent 233agent code, customizing 237alerts 240command set 236exception views 235Management 134resource-specific commands 248
Network Resource Objects 262network resource objects 263Network_View object 36NGMF 121, 160NGMFADMN=YES 152NLS stage 39, 42NOCOMMIT option 331node configuration, SNA 137NOLLINES 116NOMSGID 74, 344NOREPORT 116Normal response level 210NORMAL severity level 82NOSWPUS 116notification
definition in EZLCFG01 27setting up entries 24setup 26
notification action in NETLOG 31notification policy 23notification processing, RODM 36notification program, sample 30notification, showing the status 35NOTIFY clause 26NPDA filter setup 78NPDA filter, customizing 80NT services 136NT, changing user rights 135NV390ALT events 91NV390ALT source 90NV390MSG 94, 95nvtec.sh output 353nvtec.sh shell script 82
OOBEY definition 62object
appearance 162hierarchy 223managing the status 121recovering 36
OMVS
segment 337starting IHSAEVNT 79user 78
online help 152Open Topology Manager 134operating system, updating 134operating, NetView Management Console Server 140operator acknowledged entry 35Operator Intervention View 23, 36Operator Station Tasks (OST) 99operator, creating 187OPERSEC 344ordering errors 9OS/2 122OS/390
alerts to TEC 89comparing function 43events from Tivoli Enterprise Console 84messages to TEC 93swapping function 43TCP/IP 65
OS/390 UNIX (OpenEdition), commands 335OS/390 UNIX preparation 336OS/390 UNIX, issuing commands 338oserv daemon 216, 228OSITOPO start option 116outbound encryption keys 300OVERRIDE command, new options 105
Ppacket size 67Parallel option 11parent views, closing 150partner LU, defining 139partner LU6.2 definition 139password, access NDS 239PDS members 107physical configurations 197physical topology 216PING command 240
entry 68issuing 67result 69running 67
Pipe enhancements 39PIPE MESSAGE command 42PIPE stages 327policy regions 197, 226PortNumber 84, 94PPI
closing connection 52establishing connection 52receiver 50stage 39, 50, 51
prefix of the TSO USERID 60preparing, OS/390 UNIX 336principles of multiple tables 16printing, information on screen 309printing, the RODM log 56procedure IHSAEVNT, sample 78
387 An Introduction to Tivoli NetView for OS/390 V1R2

procedure name of the TSOSERV 60process ID 339process level token 135prof command 74profile manager, creating 202, 203profile manager, defining subscribers to 202, 206profile, creating 185, 202, 204profiles, distributing to managed nodes 212PTF UQ17350 344
QQSAM stage 39, 47, 48queue information, storing 114
RRACF FACILITY class 337RACF group 337real objects, changing fields 267receive counters 71receiving, data across NetView PPI 39Record parameter 11recording messages 11recording off 14recovering the object 36Refresh key 71RELCONID 97remote command, enabling to a managed node 214REMOVE option 18removing, associations 103removing, duplicate lines 42removing, segments of the automation table 9REPORT 116report parameters 12resource name 24Resource Properties notebook 167resource type 24Resource Types frame 261ResourceName 26resources, filtering 146, 165resources, unwanted 115resource-specific commands 230, 248ResourceType 26response codes 339restarting, EventServer 83restoring, console preferences 148retrying, the AUTOTEST command 13REXX
external subroutine 39PPI enhancements 39PPI interface 52run-time library 344sample programs 357
RODM 145checkpoint data set failure handling 55DisplayStatus attribute 229enhancements 55method 252method FLCMCOR 251notification 23, 36
objects 121status 179
RODM logdate formatting 55formatting 56printing 56time formatting 55
RODMNAME 259RODMVIEW 290RODMVIEW display 257rulebase 83
compiling 83loading 83selection 83
runningMEMSTORE 108PING command 67TSO command 73
SS/390 messages, translating 77sample notification program 30sample translation table CNMTRXMP 42SCNMUXMS data set 78SCNMUXnn 78searching for separate entities 16secondary output stream 339selecting, rulebase 83selection of messages
113Selective Control Objects 262selective control objects 265send counters 71sending, commands to TME resources 219sending, data across NetView PPI 39sending, events from TEC 84sent to another NetView domain 36SENTRY classes 83Sentry response levels, setting 215SENTRY rules 83separate entities, searching 16server code, installing 122server management, TCP/IP 64server TCP/IP hostname 144ServerLocation 89, 94ServerPort 90Service page 161service point 235Service Point definition 235service point host selection 68service points 67Session Monitor session 310Session Services 306session status 71session status parameter 71SETCONID command 97SETCONID, in profile 98SETCONID, usage 98setting up
command server 340
388 An Introduction to Tivoli NetView for OS/390 V1R2
inform policy 24notification policy entries 24Tivoli environment variables 82variables 43
SETUP 27setup_env.sh 126Severe response level 210SEVERE severity level 82showing the status of notification 35SNA
APPC protocol 122defining connection 139defining device 138defining node 138node configuration 137reporting local topology 115Topology Manager 115translating alerts 77
SNA Topology Manager, modifying FLBSYSD 255SNATM 145Solaris 122solid border 149Sort Fields page 161sorting, fields 161Source=parallel 13SPLIT stage 39, 40splitting input lines 39SQL stage 39, 327SQL statements 328SQLCODES stage 327, 328SQSELECT 327SQSELECT sample program 329stage separator 40start options 116START TASK=DSIDB2MT 327START TSOSERV command 344STARTCNM 117STARTEZL 117starting
DB2 access task 327IHSAEVNT as an OMVS daemon 79MultiSystem Manager Agent 220NETCONV session 141NetView Java Client setup 300NetView Management Console Server 140TSO server with AON 66TSOSERV 344UNIXSERV 337
startup file 79statistics, of DOM messages 114status changes, flow 217status history 171status line 150Status Monitor session 310Status page 158sticky bit 79stop options, AUTOTEST 10, 13STOPCNM 117STOPEZL 117stopping
EventServer 83NETCONV communication 142NetView Management Console Server 142TSOSERV 345UNIXSERV 338
storage 107storage enhancements 106storing alerts 11storing messages 11STRIP stage 39submitting, TSOSERVER 62subscribers, defining to profile manager 202, 206superuser 337Suspended 168suspended resources, listing 168swapping, OS/390 function 43switching recording off 14syncrononizing, clocks 91SYNONYM definition 55sysplex 55system defaults 143Systems Management Business System 178
TTAF session 310TAKE/DROP stage 39, 50task global variables 43task parameters for DSITCPIP 295task parameters, DSIWBMEM 317TCP/IP
Alert Receiver 75Alert Receiver task 235automation main menu 64configuration IP390 60for OS/390 servers 65logon encryption profiles 295Management with Tivoli NetView for AIX 134obey file 62protocol 122router task 240server management 64service point definitions 61
TCP390 61TCP390 DEFAULTS 67TCP390 setup 61TCPNAME statement 61TEC
alerts from OS/390 89Event Display 82event notification 33events 77mapping alerts 90messages from OS/390 93sending events from 84Sentry response levels 215severity 215
TECROUTE filter 89TECUPD 24TELNET session, hung 71TELNET, dropping hung sessions 72
389 An Introduction to Tivoli NetView for OS/390 V1R2
teritiary output stream 339terminal type 300test automation table 9TEST keyword 9TEST1 44testing options, AUTOTEST 10, 11time formatting, RODM log 55time of day 24timed commands 105TIMEFMSG 105TIMER commands 106timer enhancements 105timer, purging 108Tivoli
environment variables 82, 126Framework 126installing software 81Management Region feature 197, 198Product Selection Window 81Topology Manager 134
Tivoli Enterprise Console preparation 78Tivoli Enterprise Console Sentry Events Detail 89Tivoli Enterprise Console severity levels, modifying 82Tivoli Enterprise Console, events to OS/390 84Tivoli Management Region objects, sample exception view223Tivoli Management Region, operating 220Tivoli Management Region-specific commands 223TME 10 Distributed Monitoring
customizing 202managed resources 202monitors 197
TME 10 Distributed Monitoring profile, adding monitors to207TME 10 MSM Object 224TME resources, sending commands to 219topology agent 197topology communication server 122topology correlation 251Topology Display Subsystem 178Topology Display Subsystem view 178topology information 115Topology Managers 121topology report, local 115topology server 122TopologyHost 239total time elapsed 99TP name 139trace route command 75tracerte command 76transaction program definition 139transaction program, defining 140translating, S/390 messages 77translating, SNA alerts 77translation, loading 41TRANSMSG command 41TRAP function 46TRAP program 47tree list 145TSO
command server 348commands 343issuing commands 346MAKESITE 63NETSTAT CONN command 75PROF command 73stage 39user IDs 61
TSO commandsentry 74issuing 73running 73
TSO server 52active 67for AON 60setup 59, 62starting with AON 66
TSO USERID, prefix 60TSOSERV 65, 66
defining 343procedure name 60starting 344stopping 345
TSOSERVER, submitting 62
Uunintended matching 9UNIX Server 52, 335UNIX Server, defining 335UNIX stage 39UNIX/390 daemon 77UNIXSERV, starting 337UNIXSERV, stopping 338Unknown RefID_net390
commands from the NetView Management Console cli-ent 190DB2 access 325user ID 144Web access 317
unloading, a member 44unloading, members 108unwanted resources 115updating, command 134updating, command set 134updating, operating system 134UsePortmapper 84user log 309user rights in NT, changing 135using, wildcards 288
Vvariables, setting 43VARLOAD stage 39, 43VARLOAD stage examples 44VBVSERV 259VBVSERV CLIST 259View bar 146view bar 144view bar, icon added 149
390 An Introduction to Tivoli NetView for OS/390 V1R2

view customization 162view filter bar 146View Objects 262view objects 266views 147
closing 150creating 121managing 149
Visual BLDVIEWS 74, 259VTAM definition 137VTAM Topology Agent 115VTAMTOPO keyword 116VTM prefix 116
WWAIT function 46WAIT REXX program 47Warning response level 210Web
access to NetView/390 317closing down browser 324issuing commands 320server 74
WILDCARD parameter 48wildcards, using 288windowing function 304Windows 95 122Windows NT 122windows, managing 313Workspace 144, 147workstation installation 78WRITE_CORRELATABLE_FIELD 255writing, to the disk 47
XXINCL 109
391 An Introduction to Tivoli NetView for OS/390 V1R2

392 An Introduction to Tivoli NetView for OS/390 V1R2

© Copyright IBM Corp. 1998 393
ITSO Redbook Evaluation
An Introduction to Tivoli NetView for OS/390 V1R2 SG24-5224-00
Your feedback is very important to help us maintain the quality of ITSO redbooks. Please complete thisquestionnaire and return it using one of the following methods:
• Use the online evaluation form found at http://www.redbooks.ibm.com • Fax this form to: USA International Access Code + 1 914 432 8264 • Send your comments in an Internet note to [email protected]
Which of the following best describes you?_ Customer _ Business Partner _ Solution Developer _ IBM employee_ None of the above
Please rate your overall satisfaction with this book using the scale:(1 = very good, 2 = good, 3 = average, 4 = poor, 5 = very poor)
Overall Satisfaction __________
Please answer the following questions:
Was this redbook published in time for your needs? Yes___ No___
If no, please explain:
What other redbooks would you like to see published?
Comments/Suggestions: (THANK YOU FOR YOUR FEEDBACK!)

SG24-5224-00
Printed in the U.S.A.
An Introduction to T
ivoli NetV
iew for O
S/390 V
1R2
SG
24-5224-00