amahi instruction manual · rest of the home network and making it modular with applications that...
TRANSCRIPT

Amahi Instruction Manual

Amahi Instruction Manual
History of Amahi Chapter 1 Installing fedora 12 and Amahi Home Digital Assistant (HDA) Chapter 2 Your DHCP/DNS options Chapter 3 Network Troubleshooting Chapter 4 Getting Started
Appendix: Advanced Hard drive Partitioning

Amahi Instruction Manual
History of Amahi
Amahi started, like many open source projects, as an "itch" that had to be scratched. Having a server at home, for a Linux geek that seemed to be a logical way to centralize things. With the versatility of open source and the wealth of applications that can be run on it, the idea evolved into making a home server that could do more than just share files. Friends liked it and more and more people in the community recommended it, making it into what Amahi is today! It was clear that making it simple and practical by the rest of the people in the family was important to its acceptance. From movies, music, home documents and backups, the multi-purpose nature of the server emerged as key to its practicality, hence we devised. Making it easy to setup (within one hour instead of within one week otherwise), making it usable by the rest of the home network and making it modular with applications that could be easily installed was then the goal the community set for Amahi.

Amahi Instruction Manual
CHAPTER 1 Installing Fedora 12 and Amahi Home Digital Assistant (HDA)
Few of things you are going to need in order to install Amahi:
• A computer with the minimum specifications of: • 800MHz CPU • 4GB Disk • 512MB RAM • But more is better :)
• A bootable Fedora 12 installation DVD • An Internet connection to the computer during installation. • The install code from www.amahi.org
Start the computer and insert your Fedora 12 DVD, the screen may prompt you to boot from DVD. On this screen you will want to choose “Install Fedora” and press enter
The first screen you will want to click “next”

Amahi Instruction Manual
This next screen you will need to select your language and click “next”
This screen you will need to select your keyboard layout and click “next”.
Amahi Instruction Manual
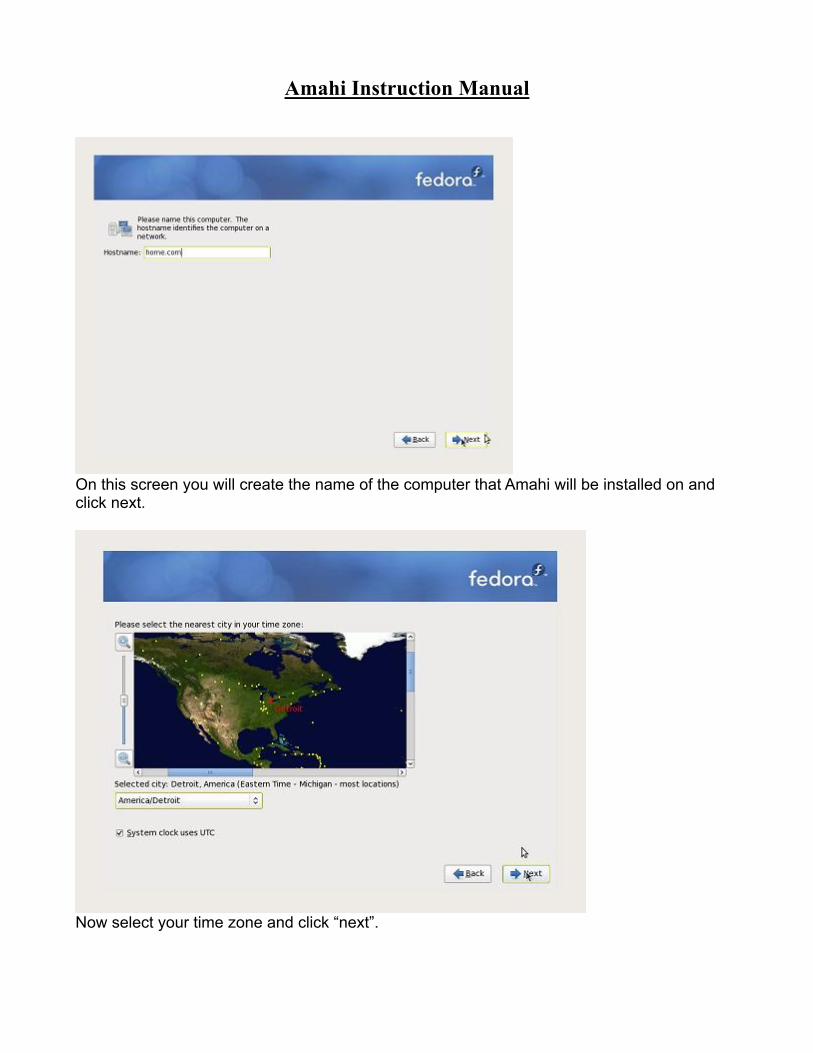
On this screen you will create the name of the computer that Amahi will be installed on and click next.
Now select your time zone and click “next”.

Amahi Instruction Manual
Setup your root (Admin) password, be sure not to forget this and click “next”.

Amahi Instruction Manual
This screen should be left as default (Remove Linux partitions on selected drives and create default layout) unless you are an advanced user (Note for advanced users: /var/hda/files should be the largest partition) and click “next”. See “ADVANCED HARDDRIVE PARTITIONING” for an example of how to set up your hda As long as you partitioned to the default settings, then you can leave the boot loader set to default also and click “next”.
After clicking next, click on Write changes to disk to start formatting the disk (WARNING AFTER THIS STEP ALL DATA WILL BE LOST ON THE DRIVE)

Amahi Instruction Manual
This step is to set up the Home Digital Assistant (HDA) repositories, you will want to de-select “Office and Productivity”, unless you are going to use you HDA home server as a desk top also, which we advise against.

Amahi Instruction Manual
Now we will click on “Add additional software repositories”, the pop up you will add under Repository name “Amahi”, under Repository URL: http://f12.amahi.org, click “ok”
At next screen select the correct Interface for your machine and click ok and then click “next”

Amahi Instruction Manual
The system will now install the base OS; this will take a little time. Now is the perfect time to go check out the application we have at http://www.amahi.org/apps

Amahi Instruction Manual
Once fedora as completed installation you will be asked to reboot. Make sure when you click the reboot button that you remove the install media (DVD, or ISO if you are installing to a virtual machine)

Amahi Instruction Manual
After the reboot you will come to the welcome screen click “Forward”
Next is the user license information, read if you choose and click “Forward”

Amahi Instruction Manual
Newer versions of Fedora will make you Create a User/password. Go ahead. However, due to this, you will need to change the password for this user in the Amahi GUI for it to be fully enabled to use the shares. After creating the new user click forward.

Amahi Instruction Manual
In the Date and Time screen, click on the “Network Time Protocol” tab, click the box next to “Enable Network Time Protocol” and click “Forward”

Amahi Instruction Manual
On the Hardware Profile page, it will ask you to send hardware information about your pc to Fedora to help better improve the software, it is up to you to send it or not and then click “Finish”

Amahi Instruction Manual
Now it is time to login, you will want to use the user name and password that you created earlier in the process. Note: You cannot log in as root.
Note: It is best to do all security updates before installing your hda code

Amahi Instruction Manual
On the main screen click on the Amahi Installer icon
By clicking on the icon this brings up a website, this is where the install code that you created
Amahi Instruction Manual
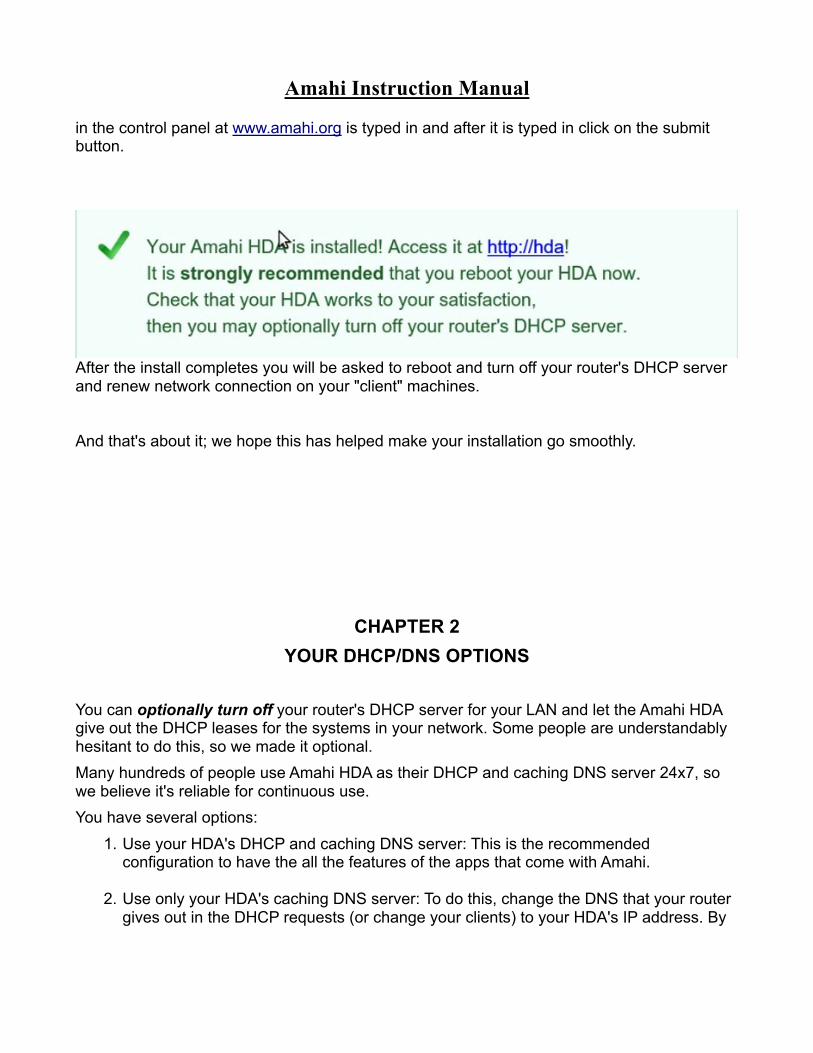
in the control panel at www.amahi.org is typed in and after it is typed in click on the submit button.
After the install completes you will be asked to reboot and turn off your router's DHCP server and renew network connection on your "client" machines. And that's about it; we hope this has helped make your installation go smoothly.
CHAPTER 2 YOUR DHCP/DNS OPTIONS
You can optionally turn off your router's DHCP server for your LAN and let the Amahi HDA give out the DHCP leases for the systems in your network. Some people are understandably hesitant to do this, so we made it optional. Many hundreds of people use Amahi HDA as their DHCP and caching DNS server 24x7, so we believe it's reliable for continuous use. You have several options:
1. Use your HDA's DHCP and caching DNS server: This is the recommended configuration to have the all the features of the apps that come with Amahi.
2. Use only your HDA's caching DNS server: To do this, change the DNS that your router gives out in the DHCP requests (or change your clients) to your HDA's IP address. By

Amahi Instruction Manual
pointing your router DNS to the IP address of the Amahi HDA you will get a lot of the functionality all of the machines in your network that uses it. With this setup, everything will work, except:
• Assigning of static IPs in your network settings will not work • PBA (Personal backup assistant) will work, except you will not be able to
network boot your systems. Use the SystemRescueCD boot option. • Automatic DHCP naming of machines in your network will not work (the Amahi
DHCP is configured to automatically allocate DNS names for machines that request their name via DHCP).
• Your Amahi HDA-provided domain will not work inside your own network
3. Do not change in the DHCP or DNS in your router: You can use the desktop in your HDA and do most every feature on your Amahi HDA, as the HDA will use its own DNS server. Other machines in the network will not take advantage of most features in the Amahi HDA. They will probably see the file server in the HDA, though it may only be accessible with an IP address, not a name. The AmahiTunes server and UPnP server may be visible to clients; however, this is not tested nor supported.
CHAPTER 3
Network Troubleshooting
Rule #1: do not turn off DHCP in your router until your HDA has full network connectivity Your HDA should be capable of browsing all the major sites and http://www.amahi.org before doing anything else upon first boot. If that is not the case, you may want to check that the settings that you programmed in amahi.org for your network and router match that of your actual network and the router in it. Amahi assumes a regular, typical home network. Steps in network troubleshooting:
Step 1 From your hda itself, (via ssh or at the desktop in a terminal), can you:
1. ping hda (this ensures the DNS server is working) 2. ping router (this ensures your HDA can see the router) 3. ping 68.180.206.184 (this ensures you can see the rest of the world) 4. ping yahoo.com (this ensures your DNS server can see the world)
If the above does not work, try and fix it by double checking the settings.

Amahi Instruction Manual
Step 2 If the above works, then and only then you may turn off the DHCP server in your router. 'IMPORTANT: after turning off the DHCP server, you must repair (or reboot) your clients for them to get the DHCP lease from your Amahi HDA. Then move to one or more the clients:
1. ping hda (this ensures the client can see the DNS server in your HDA) 2. ping router (this ensures the client can see your network gateway) 3. ping yahoo.com (this ensures the client can see the world)
If you want to stop by the IRC channel (http://talk.amahi.org) for help, it would speed things up to report where you are "stuck" in that list, like step 1.3, or 2.2.
CHAPTER 4 GETTING STARTED
OK. You've just finished installing your Amahi Home Server and rebooted it (we call it an HDA - Home Digital Assistant for short). Now what do you do? Well, the first thing is to connect to your HDA from a computer on your network. Simply enter hda (http://hda) in the URL for your browser and you'll find yourself looking at your HDA home page (you may need to refresh your network settings since your HDA is now managing your network). To get going we recommend the first things you do are:
• Create a user to access shares • Create a share for storing/sharing files in your network
Create a User To create a user
1. use the setup link (http://setup) 2. select the Users tab 3. press the "New User" button 4. enter information for the user and press the "Create button"
Create a Share To create a share

Amahi Instruction Manual
1. use the setup link (http://setup) 2. select the Shares tab 3. press the "New Share" button 4. enter information for the share and press the "Create button"
Once a share is created you can specify more details about it. Click on the Share you just created and you can specify
• whether it is visible to users on your network • which specific users can access (read) or write to the share • what sort of information will be stored in the share
Doing More with Your HDA Return to http://hda where you will find links to
• Setup - where you can setup your HDA (http://setup) • My Apps - install/uninstall additional HDA_Apps • Wiki - create and edit your personal Wiki • Calendars - shared calendars for everyone in your house
Of course there are a whole lot of other things you can do with your HDA (like use the VPN to have secure remote access, publish multiple calendars, etc).
Appendix ADVANCED HARDDRIVE PARTITIONING
Instead of using the default you can go with an advanced partitioning schema. I will use my system as an example; I am using a 60GB hard drive for fedora and a 1TB for hda part of the system.

Amahi Instruction Manual
Choose “Create custom layout” and click “Next”

Amahi Instruction Manual
Enter the size you would like your user home accounts, this can be low as hda does not use

Amahi Instruction Manual
the home partition.
Fedora I believe requires 2.5 GB at a minimum for / (root) I
Amahi Instruction Manual
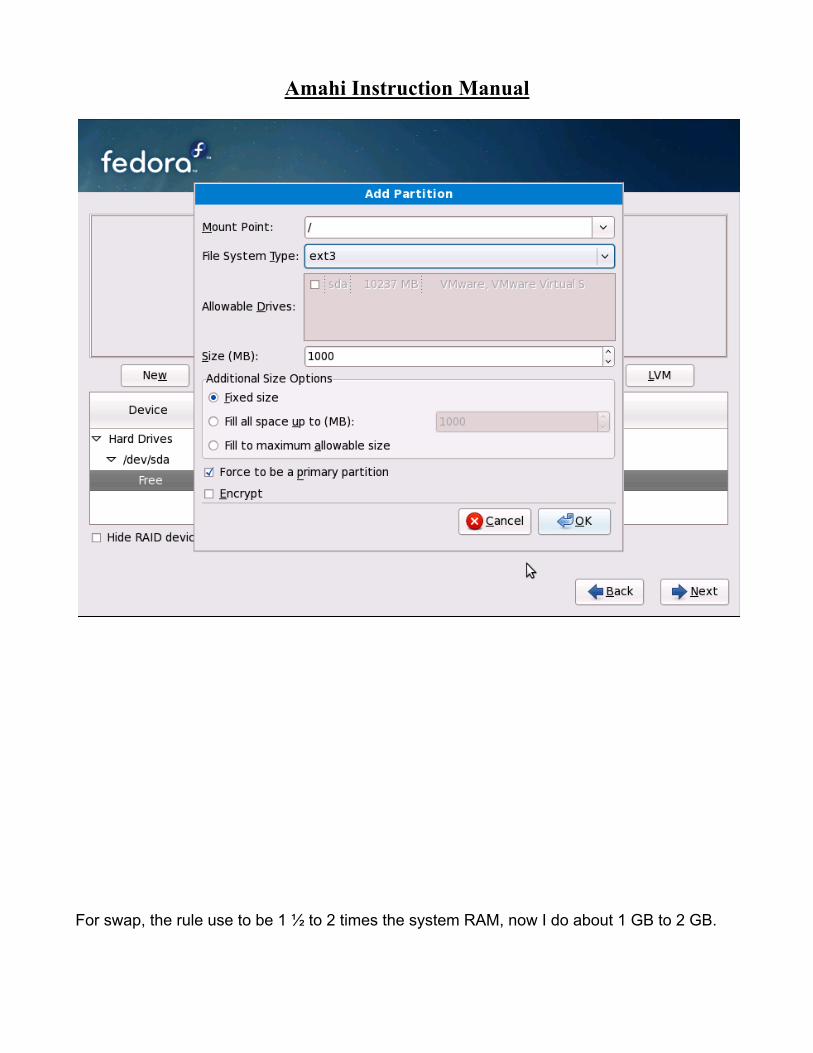
For swap, the rule use to be 1 ½ to 2 times the system RAM, now I do about 1 GB to 2 GB.

Amahi Instruction Manual
Can't forget about /tmp, sorry no screen shot, I usually use about 2 GB. For /usr you will want this to be pretty big, I would say at least 10 GB

Amahi Instruction Manual
For /var, this can be somewhat low, I did 14 GB and am only using 4%

Amahi Instruction Manual
For the hda partition, I used my 1TB /var/hda/files; this is where all the share drives are such

Amahi Instruction Manual
as music, Doc, Pictures etc....
Misc info On this screen make sure your “Network Device” is checked “Active on boot”, your Host name

Amahi Instruction Manual
should be set to “automatically via DHCP”, and leave “Miscellaneous Settings” blank and click “next”.