alwaysup user’s manual - core technologies · always on top keep alwaysup on top of other windows...
TRANSCRIPT

Copyright © 2001-2018, Core Technologies Consulting, LLC Page 1 of 70
AlwaysUp User’s Manual Version 11.0
1. Introduction .................................................................................................... 3
2. Key Features & Benefits ................................................................................ 4
3. System Requirements ................................................................................... 5
4. Using AlwaysUp ............................................................................................. 6
4.1. The Main Window ................................................................................... 6
4.2. The Menu ............................................................................................... 9
4.3. The Toolbar .......................................................................................... 12
4.4. The Task Tray Icon ............................................................................... 13
4.5. Adding an Application ........................................................................... 15
4.5.1. The General Tab ........................................................................... 16
4.5.2. The Logon Tab .............................................................................. 18
4.5.3. The Restart Tab............................................................................. 20
4.5.4. The Monitor Tab ............................................................................ 22
4.5.5. The Email Tab ............................................................................... 25
4.5.6. The Startup Tab............................................................................. 29
4.5.7. The Automate Tab ......................................................................... 32
4.5.8. The Extras Tab .............................................................................. 34
4.6. Editing Application Settings .................................................................. 37
4.7. Starting an Application .......................................................................... 40
4.8. Stopping an Application ........................................................................ 40
4.9. Restarting an Application ...................................................................... 40
4.10. Removing an Application .................................................................. 40
4.11. Creating Application Shortcuts .......................................................... 41
4.12. Reporting on an Application’s Activities ............................................ 44
4.13. Exporting an Application to a File (XML) ........................................... 46
4.14. Exporting all Applications to a Directory ............................................ 46
4.15. Importing an Application from a File (XML) ....................................... 47
4.16. Adding an Application by Drag & Drop .............................................. 47
4.17. Adding a Copy of an Application ....................................................... 47
4.18. Running Applications on your Desktop (Windows Vista and Later) .. 48
4.19. Controlling AlwaysUp Applications from the Command Line ............ 50
4.20. Working with Application Tags .......................................................... 51
4.20.1. Bulk-Changing Multiple Applications ............................................. 52
4.21. Filtering the List of Applications ........................................................ 54
5. Licensing, Registration & Pricing ................................................................. 55
6. Troubleshooting and Reporting Problems ................................................... 57
7. Appendix I: Remote Desktop and Terminal Services Sessions ................... 58
8. Appendix II: Windows 10/8/7/Vista and Windows Server 2012/2008 ........... 59
8.1. How to Show Your Application’s Windows on the Current Desktop ..... 60
9. Appendix III: The Sanity Check Utility .......................................................... 61
9.1. Special Command Line Variables ......................................................... 62
9.2. Checking a Web Server with http-ping.................................................. 63
AlwaysUp User’s Manual Version 11.0
Copyright © 2001-2018, Core Technologies Consulting, LLC Page 2 of 70
9.3. Other Sanity Check Utilities .................................................................. 63
10. Appendix IV: AlwaysUp Web Service ....................................................... 64
11. Appendix V: AlwaysUp Command Line Tools (CLT) ................................ 65
12. Appendix VI: AlwaysUp Event Log Messages .......................................... 66
12.1. How to Suppress Writing to the Event Log ........................................ 66
13. Appendix VII: How to Run Popular Applications with AlwaysUp .............. 68

AlwaysUp User’s Manual Version 11.0
Copyright © 2001-2018, Core Technologies Consulting, LLC Page 3 of 70
1. Introduction AlwaysUp runs your application as a Windows Service, starting it when your computer boots and monitoring it constantly to ensure 100% uptime. This manual describes how to use the AlwaysUp Graphical User Interface (GUI), which is responsible for adding and editing your application settings. Note that once you have configured and started your application, the GUI is not necessary to monitor your running application. Find out more about AlwaysUp at its web site: http://www.coretechnologies.com/products/AlwaysUp/
AlwaysUp User’s Manual Version 11.0
Copyright © 2001-2018, Core Technologies Consulting, LLC Page 4 of 70
2. Key Features & Benefits
• Runs your application (executable, batch file or shortcut) as a Windows Service
• Monitors your application and restarts it whenever it fails • Able to start your application as the system boots, to run when no user is
logged in and to run despite logon/logoffs -- all to guarantee uptime without manual user intervention
• Able to manage virtually any 32-bit or 64-bit Windows application with minimal configuration
• The intuitive GUI makes it easy to set up your application, but no GUI is necessary once your application has been configured.
• Able to detect and restart applications that hang, hog the CPU or consume too much memory.
• Able to restart your application (or reboot the computer) at a scheduled time
• Able to boost your application's priority to ensure that it gets preferential treatment on the host computer
• e-mails you with details of crashes, restarts and other problems • Select the CPUs on which your application will run • Supports the integration of your own custom "sanity check" utilities,
executed regularly to test if your application is functioning normally or not • Automatically dismisses common "Application error" dialog boxes that
prevent crashed applications from fully exiting • Automatically dismisses Debug dialog boxes and logs the dialog box text
for subsequent review by developers -- thus facilitating the deployment of applications in “Debug mode”
• Leverages the Windows Services API to achieve robust, low-level application control in a secure environment
• Reports all activities to the Windows Event Log • Works in all virtual environments (VMware, Virtual PC, etc.) • Works with Terminal Services and Remote Desktop • Able to capture output from console-based applications • Supports automation – arbitrary interaction with your application to
automatically fill in forms, pop down windows, etc. • Very efficient; demands minimal CPU & memory resources • No programming required!
But perhaps most important of all, AlwaysUp was designed and implemented by senior software engineers with over 20 years of real-world experience developing robust, mission-critical applications. Our software is of the highest quality, and we stand by it without reservation.
AlwaysUp User’s Manual Version 11.0
Copyright © 2001-2018, Core Technologies Consulting, LLC Page 5 of 70
3. System Requirements • Windows 10 / 8.1 / 8 / 7 / Vista / XP or Windows Server 2016 / 2012 / 2008 / 2003 (x86 and x64 versions). • 8 MB free hard drive space for installation files. The AlwaysUp components that manage and monitor your application are designed to be extremely frugal with machine resources. They almost always consume less than 1% of the CPU, less than 20 MB of RAM, and don’t fall victim to the “Memory Growth” characteristic of many applications today.
AlwaysUp User’s Manual Version 11.0
Copyright © 2001-2018, Core Technologies Consulting, LLC Page 6 of 70
4. Using AlwaysUp
4.1. The Main Window
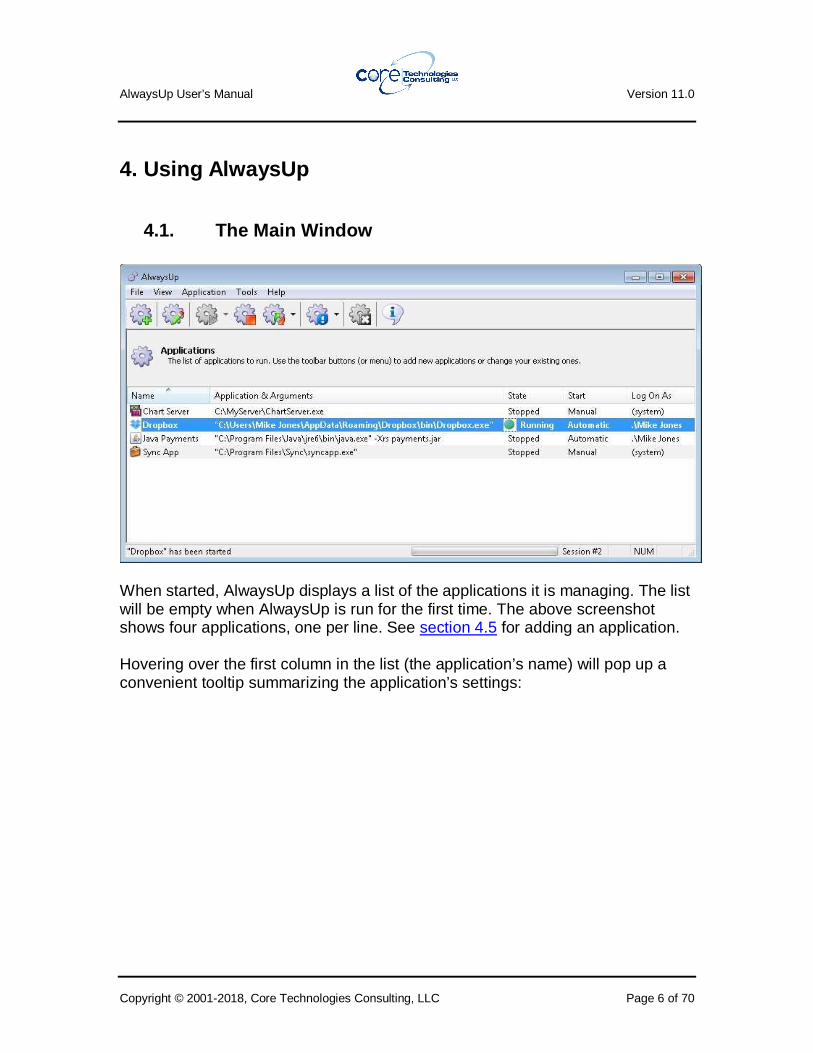
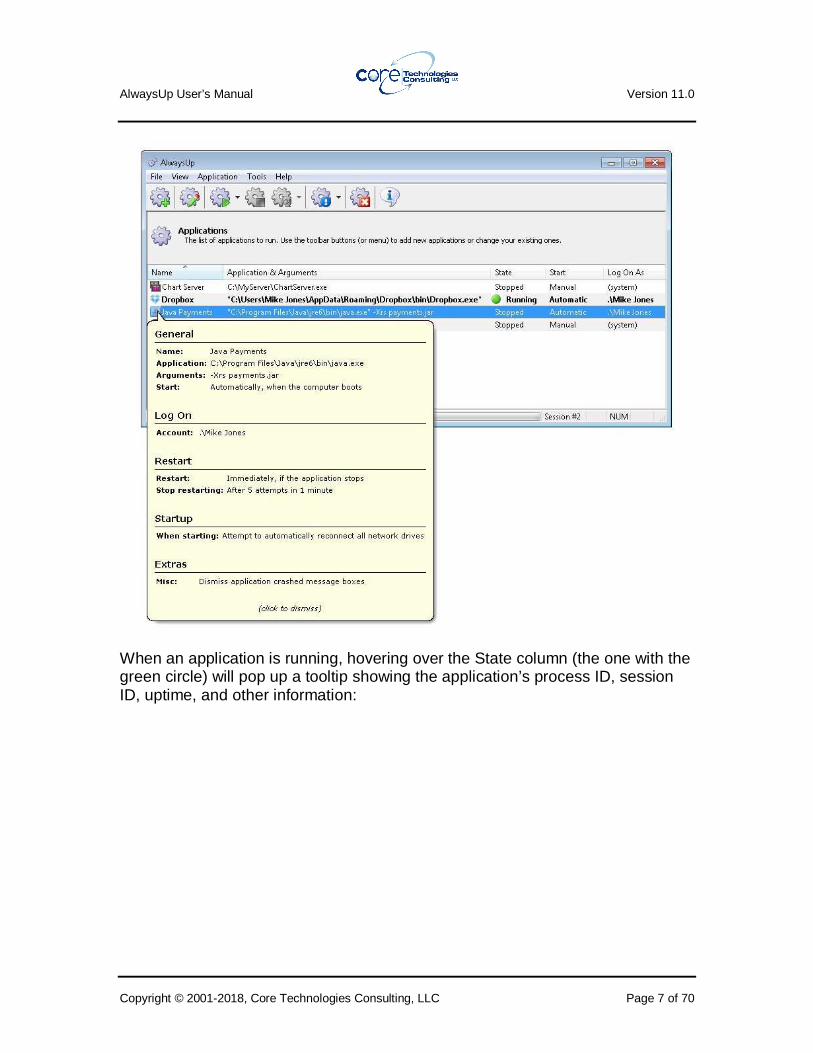
When started, AlwaysUp displays a list of the applications it is managing. The list will be empty when AlwaysUp is run for the first time. The above screenshot shows four applications, one per line. See section 4.5 for adding an application. Hovering over the first column in the list (the application’s name) will pop up a convenient tooltip summarizing the application’s settings:
AlwaysUp User’s Manual Version 11.0
Copyright © 2001-2018, Core Technologies Consulting, LLC Page 7 of 70
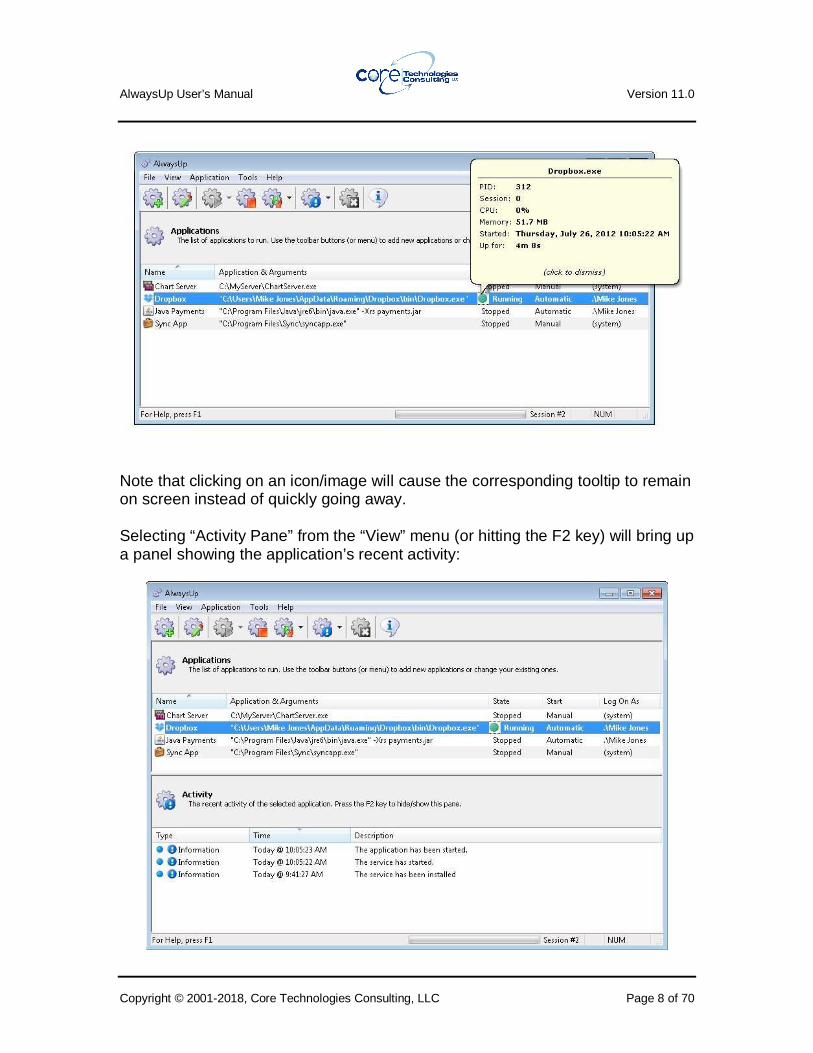
When an application is running, hovering over the State column (the one with the green circle) will pop up a tooltip showing the application’s process ID, session ID, uptime, and other information:
AlwaysUp User’s Manual Version 11.0
Copyright © 2001-2018, Core Technologies Consulting, LLC Page 8 of 70
Note that clicking on an icon/image will cause the corresponding tooltip to remain on screen instead of quickly going away. Selecting “Activity Pane” from the “View” menu (or hitting the F2 key) will bring up a panel showing the application’s recent activity:
AlwaysUp User’s Manual Version 11.0
Copyright © 2001-2018, Core Technologies Consulting, LLC Page 9 of 70
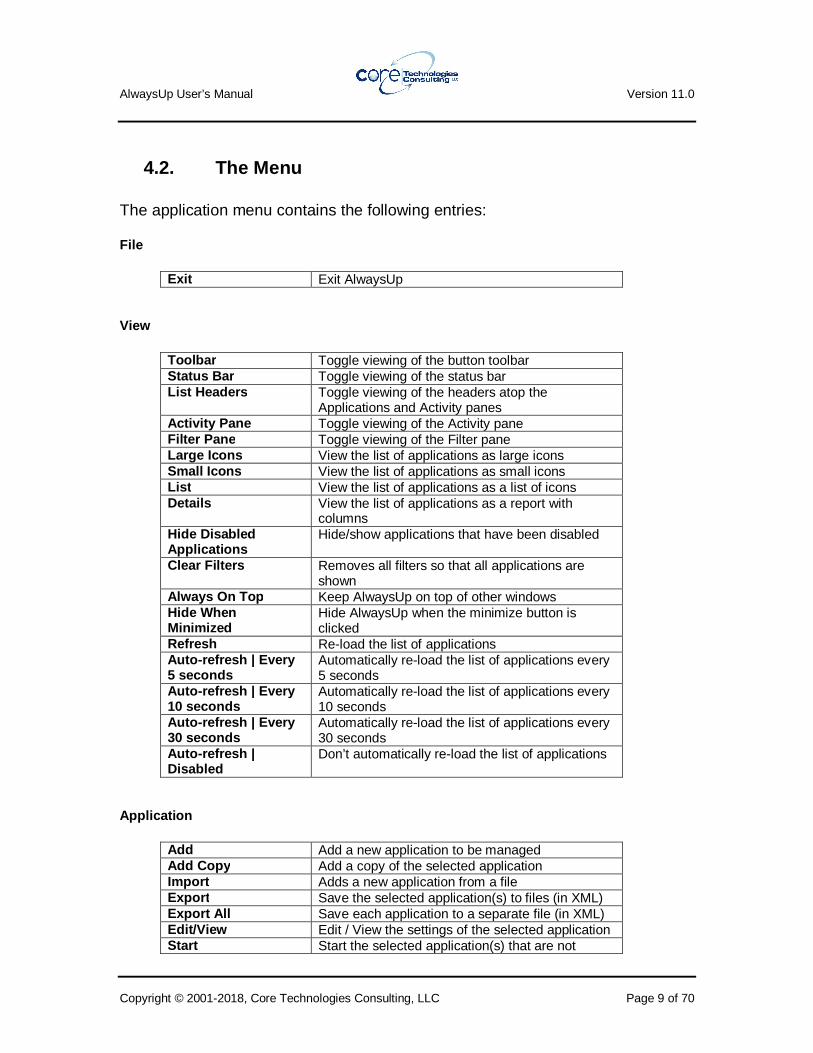
4.2. The Menu The application menu contains the following entries: File
Exit Exit AlwaysUp View
Toolbar Toggle viewing of the button toolbar Status Bar Toggle viewing of the status bar List Headers Toggle viewing of the headers atop the
Applications and Activity panes Activity Pane Toggle viewing of the Activity pane Filter Pane Toggle viewing of the Filter pane Large Icons View the list of applications as large icons Small Icons View the list of applications as small icons Lis t View the list of applications as a list of icons Details View the list of applications as a report with
columns Hide Disabled Applications
Hide/show applications that have been disabled
Clear Filters Removes all filters so that all applications are shown
Always On Top Keep AlwaysUp on top of other windows Hide When Minimized
Hide AlwaysUp when the minimize button is clicked
Refresh Re-load the list of applications Auto -refresh | Every 5 seconds
Automatically re-load the list of applications every 5 seconds
Auto -refresh | Every 10 seconds
Automatically re-load the list of applications every 10 seconds
Auto -refresh | Every 30 seconds
Automatically re-load the list of applications every 30 seconds
Auto -refresh | Disabled
Don’t automatically re-load the list of applications
Application
Add Add a new application to be managed Add Copy Add a copy of the selected application Import Adds a new application from a file Export Save the selected application(s) to files (in XML) Export All Save each application to a separate file (in XML) Edit /View Edit / View the settings of the selected application Start Start the selected application(s) that are not
AlwaysUp User’s Manual Version 11.0
Copyright © 2001-2018, Core Technologies Consulting, LLC Page 10 of 70
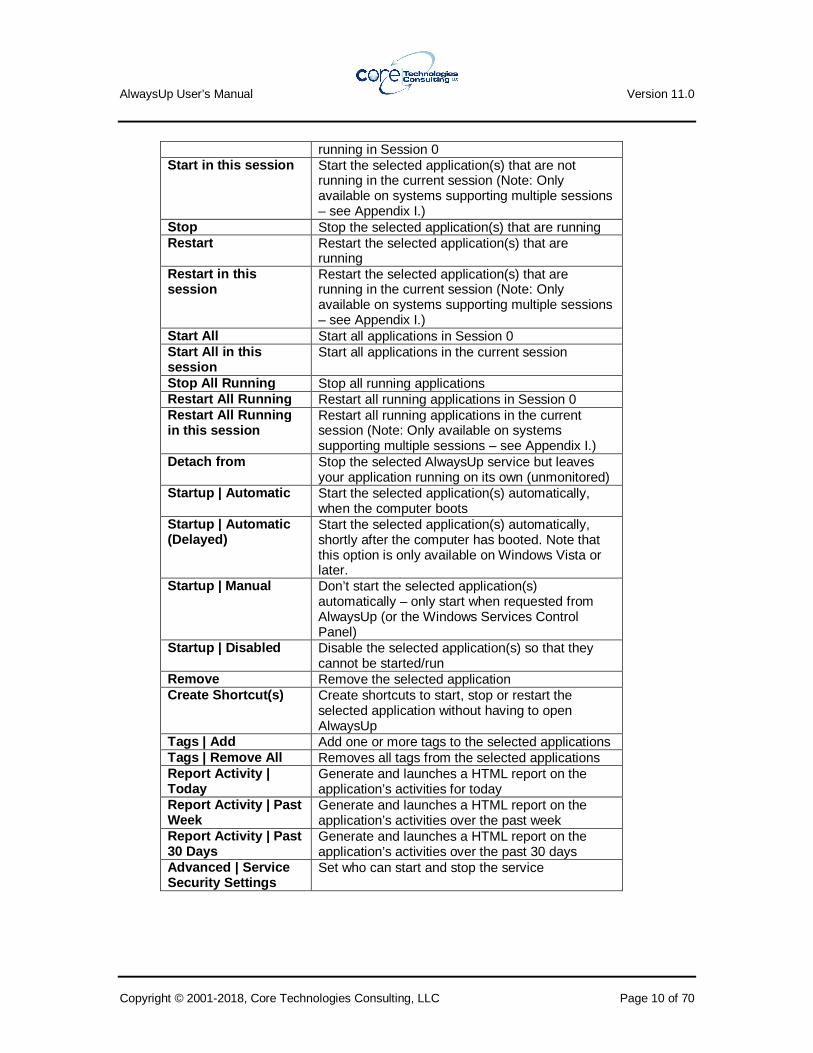
running in Session 0 Start in this session Start the selected application(s) that are not
running in the current session (Note: Only available on systems supporting multiple sessions – see Appendix I.)
Stop Stop the selected application(s) that are running Restart Restart the selected application(s) that are
running Restart in this session
Restart the selected application(s) that are running in the current session (Note: Only available on systems supporting multiple sessions – see Appendix I.)
Start All Start all applications in Session 0 Start All in this session
Start all applications in the current session
Stop A ll Running Stop all running applications Restart All Running Restart all running applications in Session 0 Restart All Running in this session
Restart all running applications in the current session (Note: Only available on systems supporting multiple sessions – see Appendix I.)
Detach from Stop the selected AlwaysUp service but leaves your application running on its own (unmonitored)
Startup | Automatic Start the selected application(s) automatically, when the computer boots
Startup | Automatic (Delayed)
Start the selected application(s) automatically, shortly after the computer has booted. Note that this option is only available on Windows Vista or later.
Startup | Manual Don’t start the selected application(s) automatically – only start when requested from AlwaysUp (or the Windows Services Control Panel)
Startup | Disabled Disable the selected application(s) so that they cannot be started/run
Remove Remove the selected application Create Shortcut(s) Create shortcuts to start, stop or restart the
selected application without having to open AlwaysUp
Tags | Add Add one or more tags to the selected applications Tags | Remove All Removes all tags from the selected applications Report Activity | Today
Generate and launches a HTML report on the application’s activities for today
Report Activity | Past Week
Generate and launches a HTML report on the application’s activities over the past week
Report Activity | Past 30 Days
Generate and launches a HTML report on the application’s activities over the past 30 days
Advanced | Service Security Settings
Set who can start and stop the service
AlwaysUp User’s Manual Version 11.0
Copyright © 2001-2018, Core Technologies Consulting, LLC Page 11 of 70
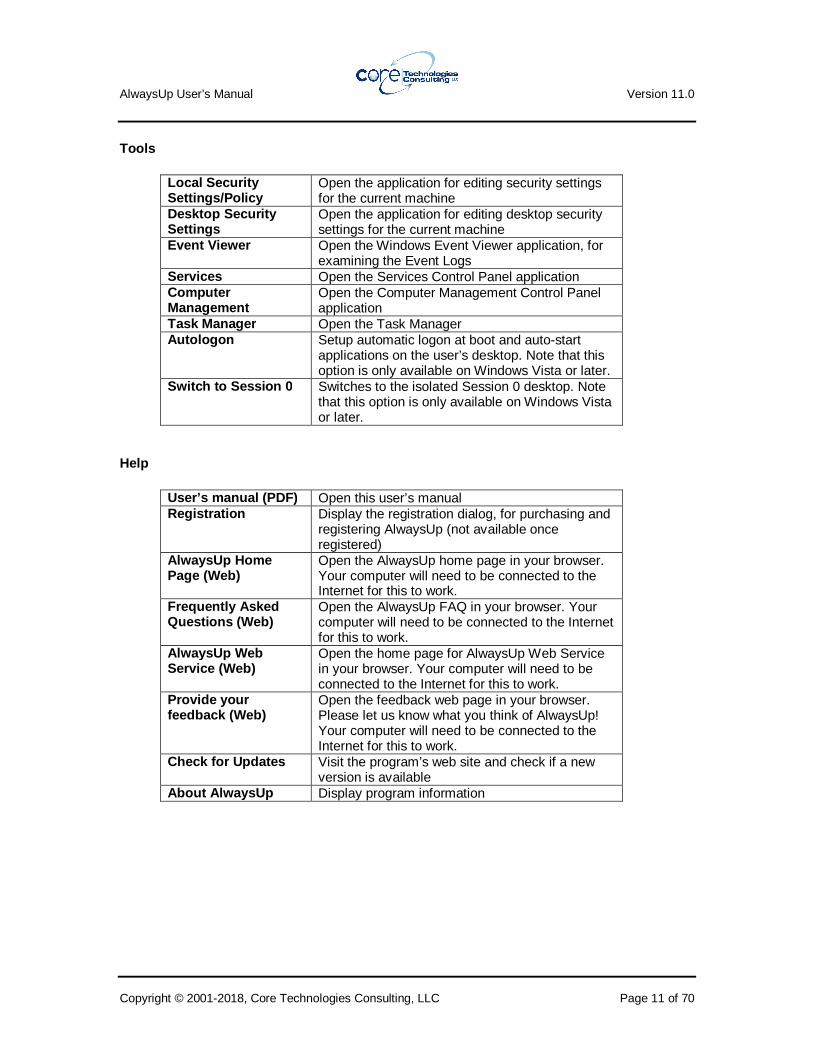
Tools
Local Security Settings/Policy
Open the application for editing security settings for the current machine
Desktop Security Settings
Open the application for editing desktop security settings for the current machine
Event Viewer Open the Windows Event Viewer application, for examining the Event Logs
Services Open the Services Control Panel application Computer Management
Open the Computer Management Control Panel application
Task Manager Open the Task Manager Autologon Setup automatic logon at boot and auto-start
applications on the user’s desktop. Note that this option is only available on Windows Vista or later.
Switch to Session 0 Switches to the isolated Session 0 desktop. Note that this option is only available on Windows Vista or later.
Help
User’s manual (PDF) Open this user’s manual Registration Display the registration dialog, for purchasing and
registering AlwaysUp (not available once registered)
AlwaysUp Home Page (Web)
Open the AlwaysUp home page in your browser. Your computer will need to be connected to the Internet for this to work.
Frequently Asked Questions (Web)
Open the AlwaysUp FAQ in your browser. Your computer will need to be connected to the Internet for this to work.
AlwaysUp Web Service (Web)
Open the home page for AlwaysUp Web Service in your browser. Your computer will need to be connected to the Internet for this to work.
Provide your feedback (Web)
Open the feedback web page in your browser. Please let us know what you think of AlwaysUp! Your computer will need to be connected to the Internet for this to work.
Check for Updates Visit the program’s web site and check if a new version is available
About A lwaysUp Display program information
AlwaysUp User’s Manual Version 11.0
Copyright © 2001-2018, Core Technologies Consulting, LLC Page 12 of 70
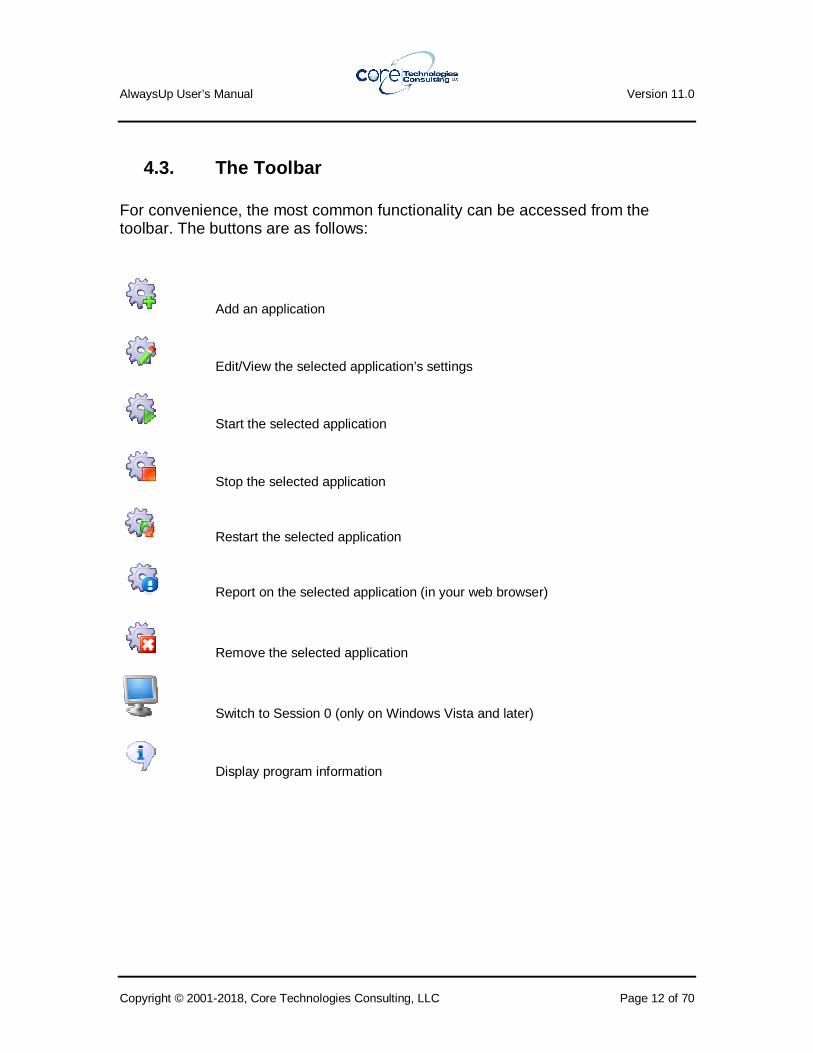
4.3. The Toolbar For convenience, the most common functionality can be accessed from the toolbar. The buttons are as follows:
Add an application
Edit/View the selected application’s settings
Start the selected application
Stop the selected application
Restart the selected application
Report on the selected application (in your web browser)
Remove the selected application
Switch to Session 0 (only on Windows Vista and later)
Display program information
AlwaysUp User’s Manual Version 11.0
Copyright © 2001-2018, Core Technologies Consulting, LLC Page 13 of 70
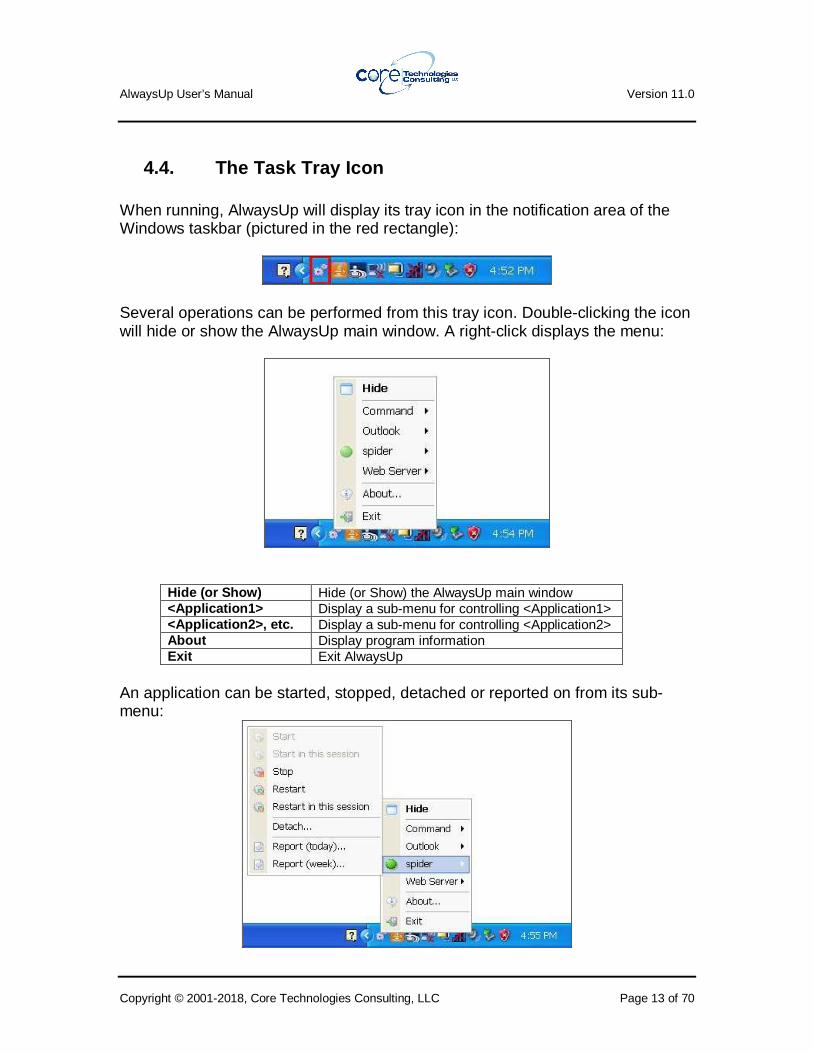
4.4. The Task Tray Icon When running, AlwaysUp will display its tray icon in the notification area of the Windows taskbar (pictured in the red rectangle):
Several operations can be performed from this tray icon. Double-clicking the icon will hide or show the AlwaysUp main window. A right-click displays the menu:
Hide (or Show) Hide (or Show) the AlwaysUp main window <Application1> Display a sub-menu for controlling <Application1> <Application2>, etc. Display a sub-menu for controlling <Application2> About Display program information Exit Exit AlwaysUp
An application can be started, stopped, detached or reported on from its sub-menu:
AlwaysUp User’s Manual Version 11.0
Copyright © 2001-2018, Core Technologies Consulting, LLC Page 14 of 70
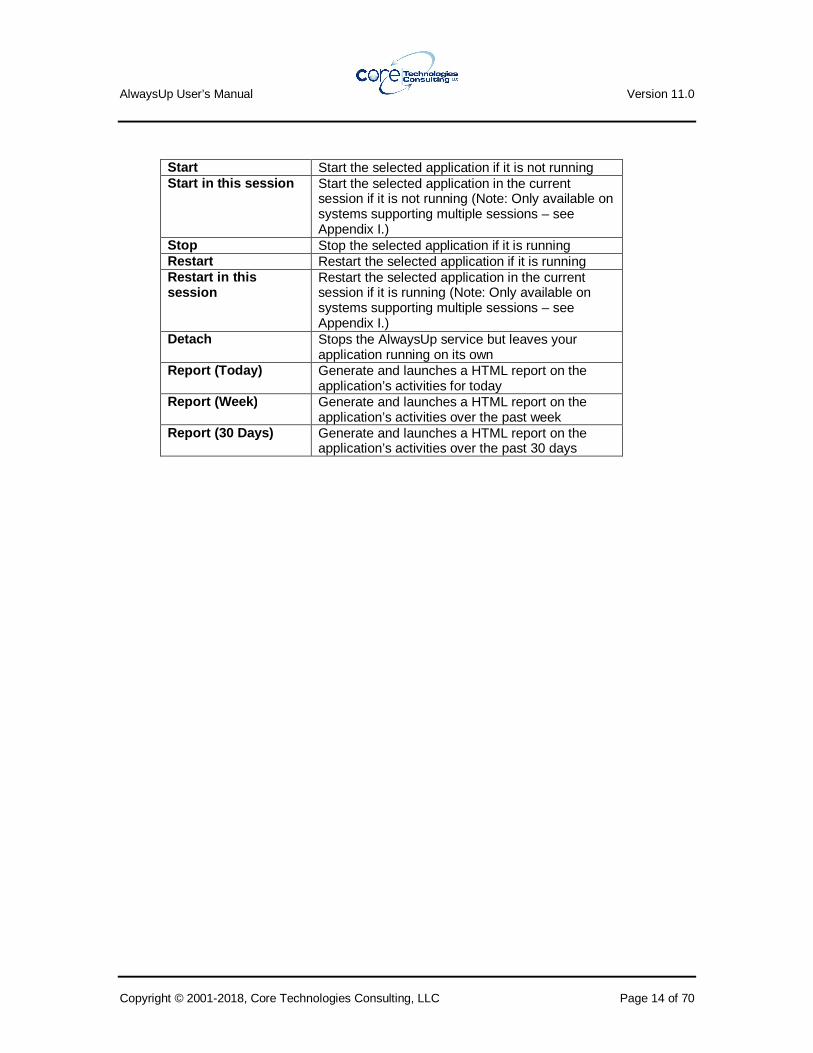
Start Start the selected application if it is not running Start in this session Start the selected application in the current
session if it is not running (Note: Only available on systems supporting multiple sessions – see Appendix I.)
Stop Stop the selected application if it is running Restart Restart the selected application if it is running Restart in this session
Restart the selected application in the current session if it is running (Note: Only available on systems supporting multiple sessions – see Appendix I.)
Detach Stops the AlwaysUp service but leaves your application running on its own
Report (T oday) Generate and launches a HTML report on the application’s activities for today
Report (Week) Generate and launches a HTML report on the application’s activities over the past week
Report (30 Days ) Generate and launches a HTML report on the application’s activities over the past 30 days

AlwaysUp User’s Manual Version 11.0
Copyright © 2001-2018, Core Technologies Consulting, LLC Page 15 of 70
4.5. Adding an Application To add an application to be monitored, click on the “Add” toolbar button or select “Add” from the “Application” menu. This will summon the “Add Application” dialog, which consists of eight tabs: General, Logon, Restart, Monitor, Email, Startup, Automate and Extras. Note that only 2 pieces of information are actually required to add an application – a name, and the path to your applicat ion – and both are specified on the General tab. Please see our web site for a short demonstration video showing how to add the Windows “Notepad” application: http://www.coretechnologies.com/products/AlwaysUp/AddNotepadDemo/
AlwaysUp User’s Manual Version 11.0
Copyright © 2001-2018, Core Technologies Consulting, LLC Page 16 of 70
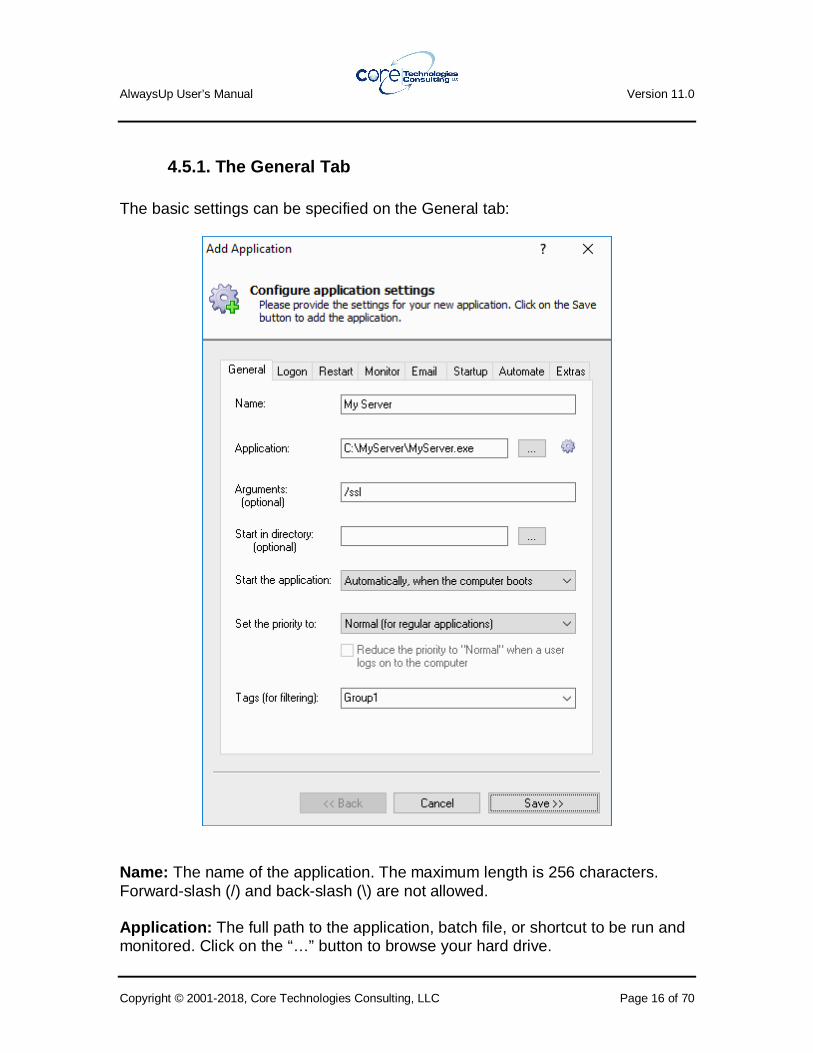
4.5.1. The General Tab The basic settings can be specified on the General tab:
Name: The name of the application. The maximum length is 256 characters. Forward-slash (/) and back-slash (\) are not allowed. Application: The full path to the application, batch file, or shortcut to be run and monitored. Click on the “…” button to browse your hard drive.

AlwaysUp User’s Manual Version 11.0
Copyright © 2001-2018, Core Technologies Consulting, LLC Page 17 of 70
Arguments (optional): Specify any arguments to your program here. Be sure to quote each component that contains spaces. For example:
-d -f “C:\Program Files\config.xml” Start in directory (optional): The working directory for the application specified. If not provided, the directory containing the application is used. Click on the “…” button to browse your hard drive. Start the application: This can be either “Automatically, when the system boots”, or “Manually, from AlwaysUp”. Set the priority to: Allows for the application to be run at a higher (or lower) priority than other applications. If your application needs first shot at the computer’s resources, above other running applications, set its priority to “Above Normal” or “High”. The highest setting is “Real-time”, but that is not recommended as it boosts your application beyond regular operating system programs and can lead to problems if your application monopolizes resources. Reduce the priority to normal when a user logs on t o the computer: This option is available when the application’s priority has been boosted beyond “Normal”. Basically, this setting can help to ensure that the computer remains responsive to users that log in while the application is running. Tags (for filtering): Enter (or select) the tags to be associated with this application. Tags can be used to filter the list of applications. See sections 4.20 and 4.21 for additional details on tags and filtering.
AlwaysUp User’s Manual Version 11.0
Copyright © 2001-2018, Core Technologies Consulting, LLC Page 18 of 70
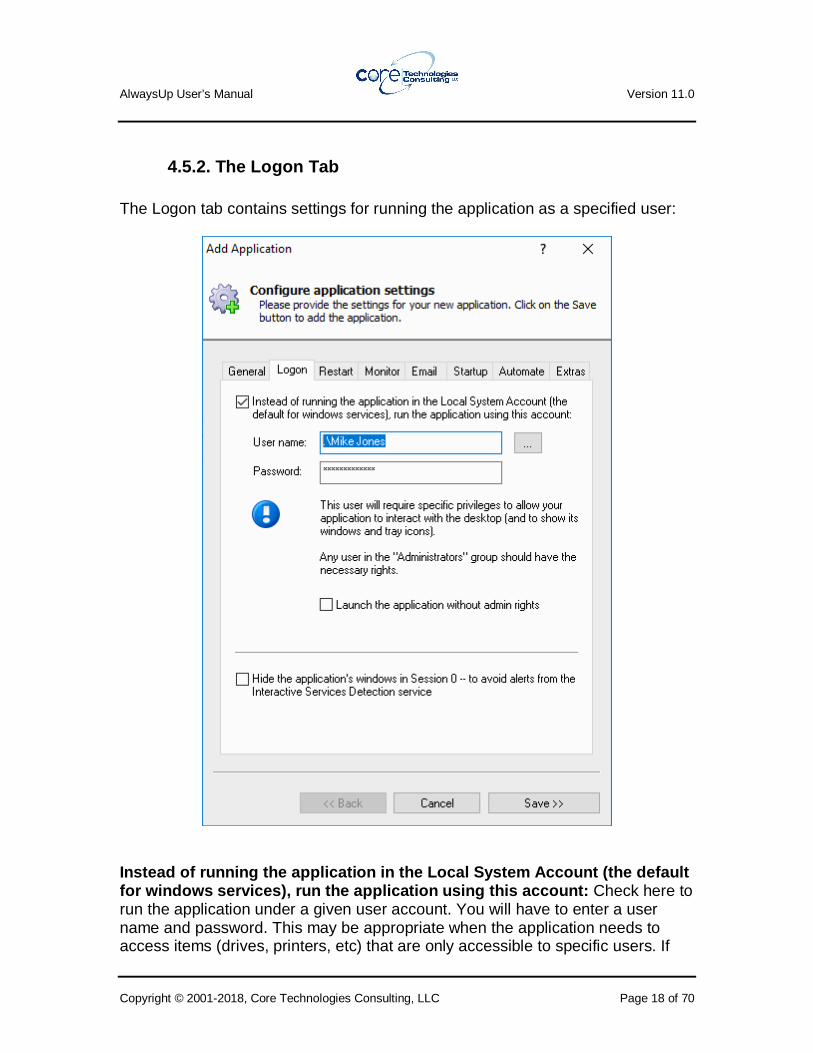
4.5.2. The Logon Tab The Logon tab contains settings for running the application as a specified user:
Instead of running the application in the Local Sys tem Account (the default for windows services), run the application using th is account: Check here to run the application under a given user account. You will have to enter a user name and password. This may be appropriate when the application needs to access items (drives, printers, etc) that are only accessible to specific users. If
AlwaysUp User’s Manual Version 11.0
Copyright © 2001-2018, Core Technologies Consulting, LLC Page 19 of 70
you are unsure what to do here, first try the default Local System Account (LSA) as that will be appropriate for most situations (i.e. do not check this box). User name: Enter the name of the user account in which to run the application. Use an account name in the form DomainName\UserName; if the account belongs to the built-in domain, you can specify .\UserName. AlwaysUp will grant the user the Log on as a Service privilege (as managed in the Control Panel/Administrative Tools/Local Security Policy application). Note that this user will require specific privileges to allow your application to interact with the desktop (to show its windows and tray icons when someone is logged on). Any user in the Administrators group should have the necessary privileges. Password: Enter the password of the Windows user account in which to run the application. Note that you will be required to enter this password whenever you make changes to the service. Launch the application without admin rights: Check this box if you are concerned about security don’t want the application to run with administrative rights. It is equivalent to running the application in the “Standard”, non-elevated UAC context. Hide the application's windows in Session 0 – to avoid alerts from the Interactive Services Detection service: By default, AlwaysUp will run your application in Session 0 – the background desktop where Windows Services operate. If your application shows a Window in Session 0, you might be alerted (annoyed?) by the Interactive Services Detection (ISD) service. Check this box have AlwaysUp hide your application’s windows in Session 0 and avoid ISD alerts. (Read more about the ISD service at our web site: https://www.coretechnologies.com/blog/alwaysup/prevent-interactive-services-detection/.)
AlwaysUp User’s Manual Version 11.0
Copyright © 2001-2018, Core Technologies Consulting, LLC Page 20 of 70
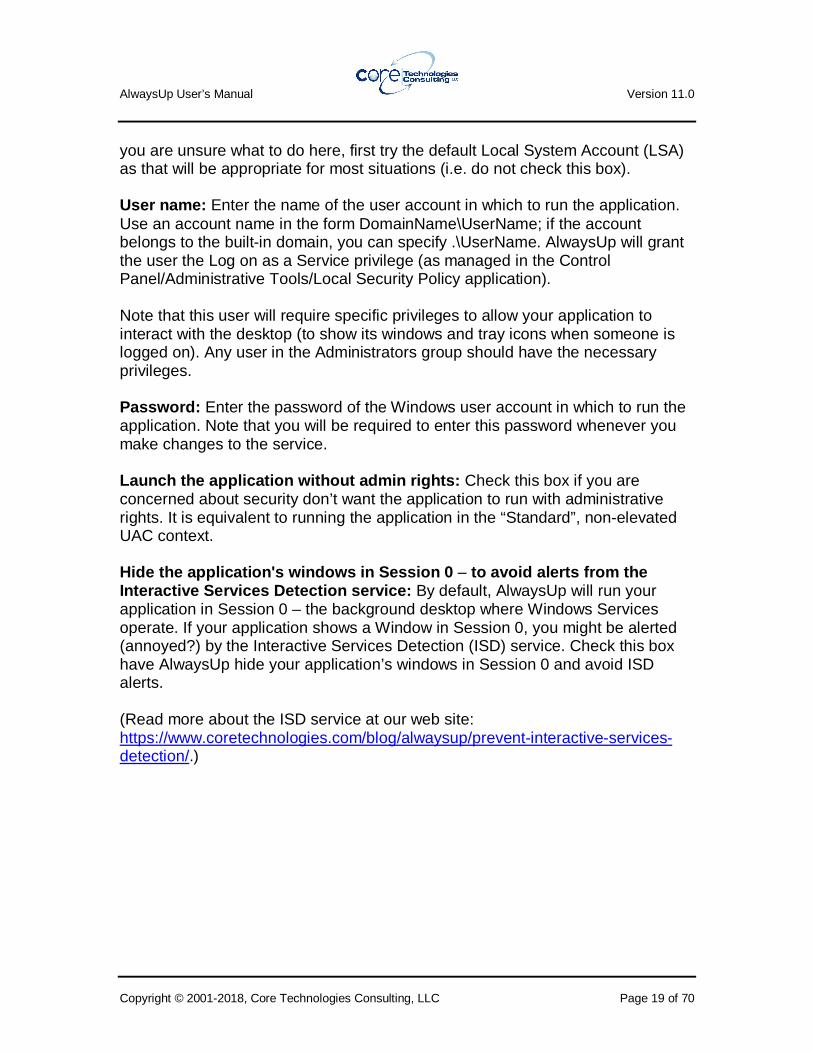
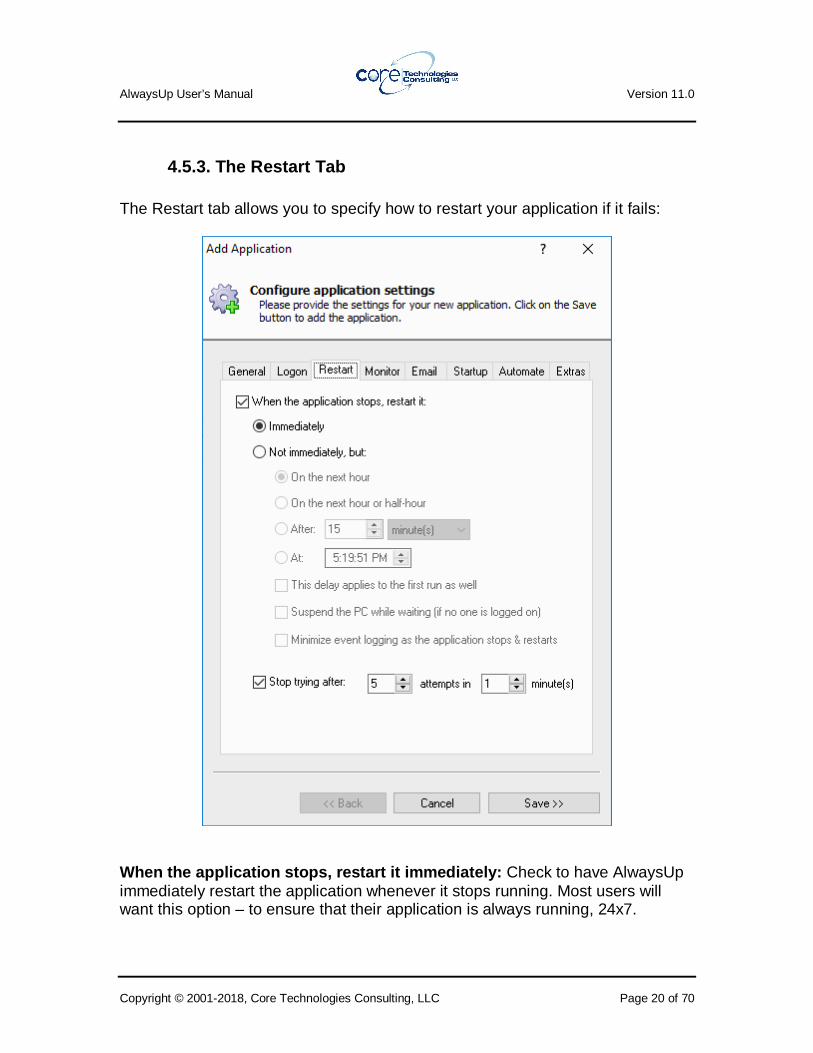
4.5.3. The Restart Tab The Restart tab allows you to specify how to restart your application if it fails:
When the application stops, restart it immediately: Check to have AlwaysUp immediately restart the application whenever it stops running. Most users will want this option – to ensure that their application is always running, 24x7.

AlwaysUp User’s Manual Version 11.0
Copyright © 2001-2018, Core Technologies Consulting, LLC Page 21 of 70
When the application stops, restart it on the next hour: Choose this option to have your application restarted on the next hour whenever it stops running. For example, if it stops at 4:23 AM, it would be restarted at 5 AM. This option can be useful for programs/scripts that are run once an hour on the hour. When the application stops, restart it on the next hour or half-hour: Choose this option to have your application restarted on the next hour or half-hour. For example, if it stops at 4:23 AM, it would be restarted at 4:30 AM. This option can be useful for programs/scripts that should be run every 30 minutes. When the application stops, restart it after: Choose this option to have your application restarted after waiting a fixed amount of time (which you must specify in seconds, minutes, hours, or days). For example, if set to 15 minutes and the application stopped at 4:23 AM, AlwaysUp would run it again at 4:38 AM. When the application stops, restart it at: Choose this option to have your application restarted at a specific time. This may be useful for applications that must be run once a day, at a fixed time. This delay applies to the first run as well: Check this box to have AlwaysUp wait before starting your application for the first time (at boot, or whenever you start your application from AlwaysUp). Suspend the PC while waiting (if no one is logged o n): If this box is checked, AlwaysUp will suspend your PC while it is waiting to restart your application and will wake up your PC when it is time to run your application. While suspended, your computer will consume minimal power. This may be a good choice for reducing the operational costs of your PC (if dedicated to the application AlwaysUp is running). Minimize event logging as the application stops & re starts: AlwaysUp writes and entry in the Windows Event Log whenever the application stops and must be restarted. However this can be overkill for applications that close normally and are restarted regularly. Check this option if you wish to avoid the logging of periodic stops and restarts. Note: Use of this option will prevent AlwaysUp from showing application stops & restarts in the activity logs (section 4.12) Stop trying after: Activate this option to prevent your application from being constantly restarted if it is failing to start properly. Specify the maximum number of attempts to tolerate over a given time frame in minutes.

AlwaysUp User’s Manual Version 11.0
Copyright © 2001-2018, Core Technologies Consulting, LLC Page 22 of 70
4.5.4. The Monitor Tab The Monitor tab groups many of the settings that describe how AlwaysUp is to monitor and manage the application:
Monitor the application and stop it whenever it “han gs”: Check to have AlwaysUp automatically stop the application whenever Windows classifies it as “Not responding” (as seen in the Windows Task Manager) for a given duration. Enter the time (in minutes) that you wish to wait before declaring a non-
AlwaysUp User’s Manual Version 11.0
Copyright © 2001-2018, Core Technologies Consulting, LLC Page 23 of 70
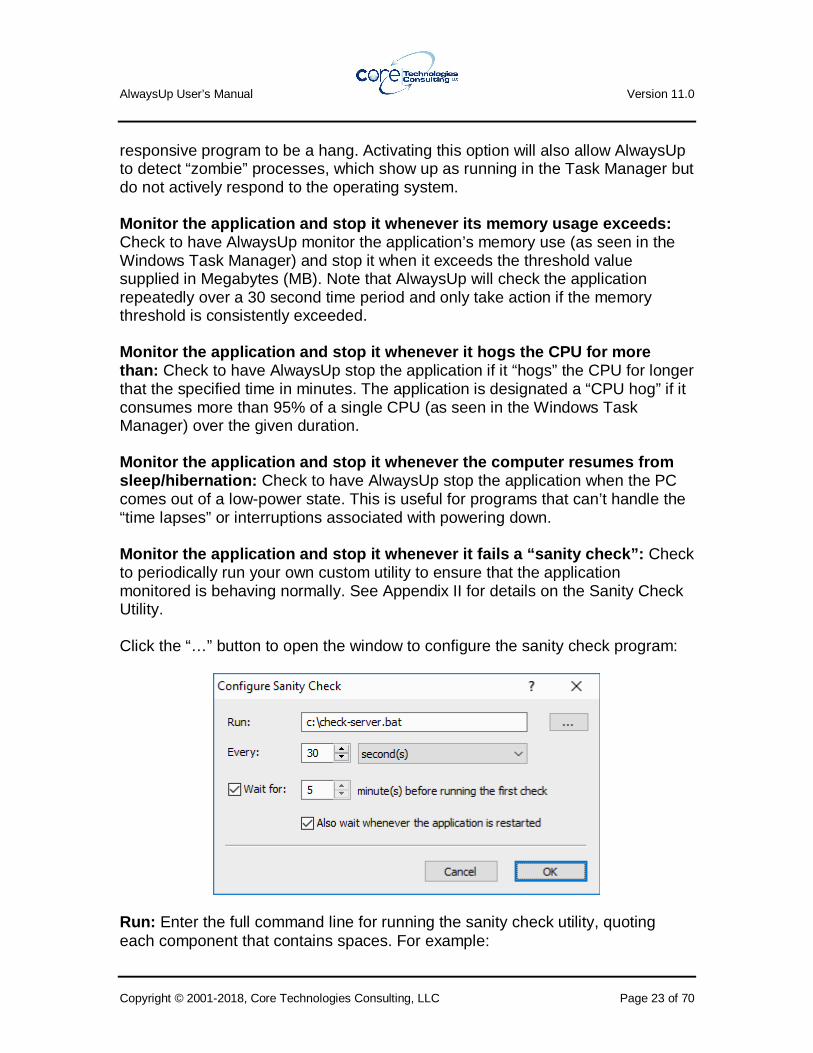
responsive program to be a hang. Activating this option will also allow AlwaysUp to detect “zombie” processes, which show up as running in the Task Manager but do not actively respond to the operating system. Monitor the application and stop it whenever its me mory usage exceeds: Check to have AlwaysUp monitor the application’s memory use (as seen in the Windows Task Manager) and stop it when it exceeds the threshold value supplied in Megabytes (MB). Note that AlwaysUp will check the application repeatedly over a 30 second time period and only take action if the memory threshold is consistently exceeded. Monitor the application and stop it whenever it hog s the CPU for more than: Check to have AlwaysUp stop the application if it “hogs” the CPU for longer that the specified time in minutes. The application is designated a “CPU hog” if it consumes more than 95% of a single CPU (as seen in the Windows Task Manager) over the given duration. Monitor the application and stop it whenever the co mputer resumes from sleep/hibernation: Check to have AlwaysUp stop the application when the PC comes out of a low-power state. This is useful for programs that can’t handle the “time lapses” or interruptions associated with powering down. Monitor the application and stop it whenever it fai ls a “sanity check”: Check to periodically run your own custom utility to ensure that the application monitored is behaving normally. See Appendix II for details on the Sanity Check Utility. Click the “…” button to open the window to configure the sanity check program:
Run: Enter the full command line for running the sanity check utility, quoting each component that contains spaces. For example:
AlwaysUp User’s Manual Version 11.0
Copyright © 2001-2018, Core Technologies Consulting, LLC Page 24 of 70
“C:\Sanity Check\Connect To HTTP Port.exe” 10.10.10.1 80 Every: Specify the time between each execution of the sanity check utility. Wait for: Check if you would like to wait a while before running the first sanity check after the service starts. This may be useful if it takes a while for your service/application to be ready. Also wait whenever the application is restarted: Check if you would like the delay to be applied on each restart, not just on the first run. Monitor the application and stop it every: Check to stop the application once per week, or once daily at a specific time. Specify the details in the adjoining controls. This option can be useful for programs that degrade over time (for example, those with memory leaks). Note that the application will be restarted as per the schedule indicated on the Restart tab. But only if the following conditions are met: Check this box if you want to provide some conditions that must be met for your application to be stopped. Its memory usage exceeds: Check this box if you want to stop your application only if it is using more than a specified amount of memory (in MB). It has been idle for at least: Check this box if you want to stop your application only if it has been idle for a while. Note that your application is deemed idle if it has not been using the CPU nor generating any I/O for 95% of the duration. No one is logged on to the computer: If checked, your application will not be restarted if someone is logged on to the computer. Note that a disconnected RDP session counts as logged on. Keep checking/trying for up to: If the conditions (memory, idle, etc.) are not met at the given time, checking this box will cause AlwaysUp to keep re-evaluating the conditions over the given period, and stop the application if they are subsequently met. Reboot the computer: Check here to reboot the entire computer as part of stopping the application. Your application will be run immediately after the computer reboots if it is set to start “Automatically, when the system boots” on the General tab.
AlwaysUp User’s Manual Version 11.0
Copyright © 2001-2018, Core Technologies Consulting, LLC Page 25 of 70
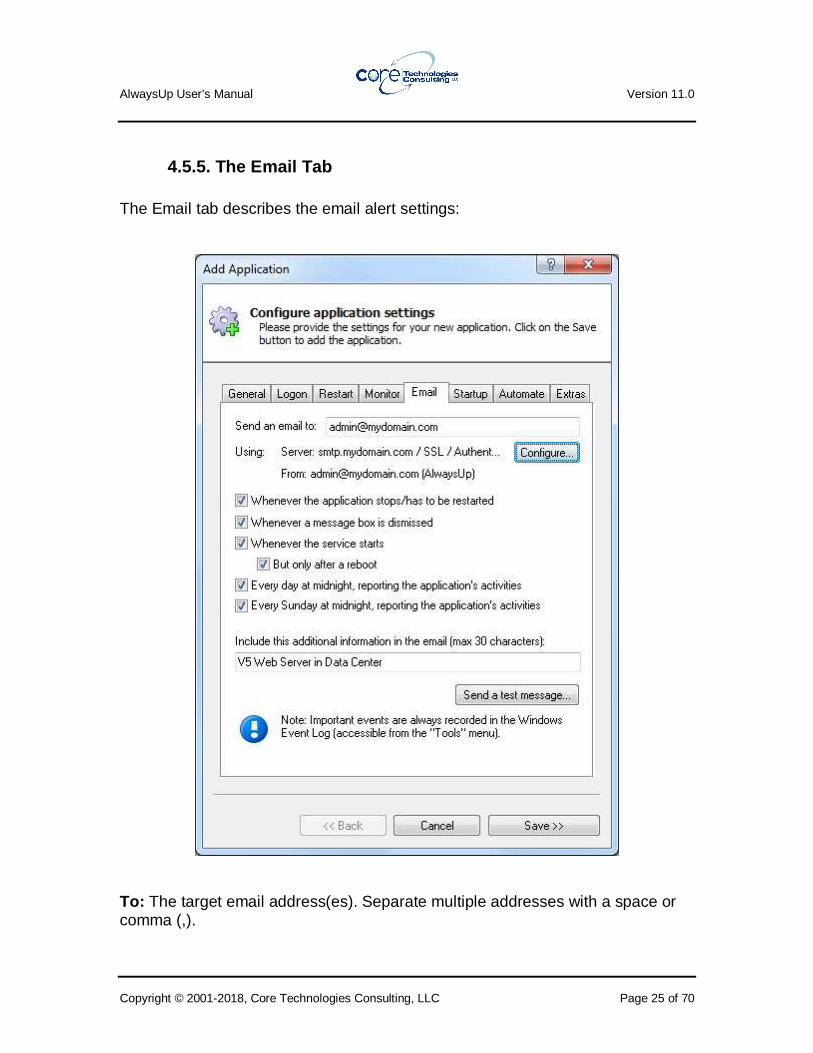
4.5.5. The Email Tab The Email tab describes the email alert settings:
To: The target email address(es). Separate multiple addresses with a space or comma (,).
AlwaysUp User’s Manual Version 11.0
Copyright © 2001-2018, Core Technologies Consulting, LLC Page 26 of 70
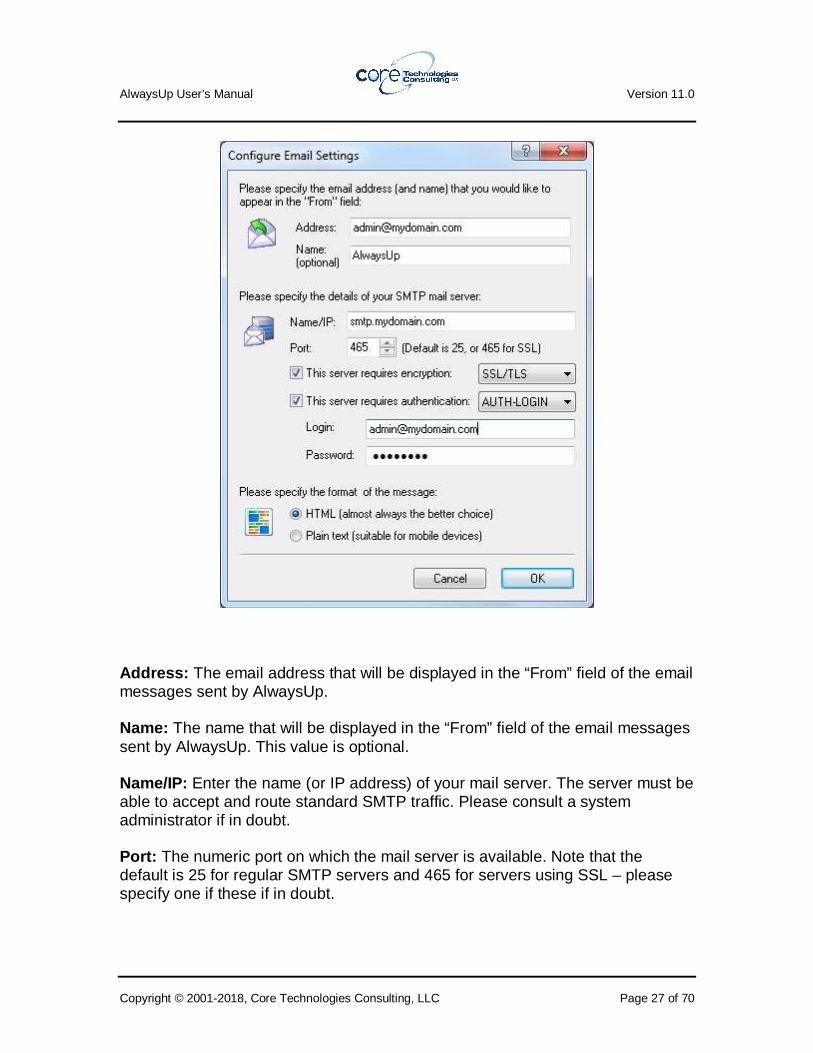
Whenever the application stops/has to be restarted: Check to send an email when the application being monitored stops prematurely/crashes. Whenever a message box is dismissed: Check to send an email whenever AlwaysUp dismisses a message box on behalf of the application being monitored. The full text of the message box will be included in the email. Whenever the service starts: Check to send an email whenever the AlwaysUp service is started. Checking the But only after a reboot box will limit the emails to only when AlwaysUp is started after a reboot. Use this option if you want to be notified when your machine reboots unexpectedly. Every day at midnight, reporting the application’s activities: Check to send a nightly email detailing the application’s activities over the previous day. A sample report is shown in section 4.12. Every Sunday at midnight, reporting the application ’s activities: Check to send a weekly email detailing the application’s activities over the previous week. A sample report is shown in section 4.12. Include this additional information in the email: Optionally specify some text that will be included in each email message sent. The text will appear in the body, in a line labeled “Additional”. If you expect many emails from various similar installations you are encouraged to enter an identifier of some kind here --one that will help you to identify the source of each message you receive. Please specify at most 30 characters. Send a test message: Clicking this button will generate a test email to the given target address(es) using the settings specified. Configure: Clicking this button will summon the “Configure Email Settings” dialog, where details on the mail server (and more) can be specified:
AlwaysUp User’s Manual Version 11.0
Copyright © 2001-2018, Core Technologies Consulting, LLC Page 27 of 70
Address: The email address that will be displayed in the “From” field of the email messages sent by AlwaysUp. Name: The name that will be displayed in the “From” field of the email messages sent by AlwaysUp. This value is optional. Name/IP: Enter the name (or IP address) of your mail server. The server must be able to accept and route standard SMTP traffic. Please consult a system administrator if in doubt. Port: The numeric port on which the mail server is available. Note that the default is 25 for regular SMTP servers and 465 for servers using SSL – please specify one if these if in doubt.
AlwaysUp User’s Manual Version 11.0
Copyright © 2001-2018, Core Technologies Consulting, LLC Page 28 of 70
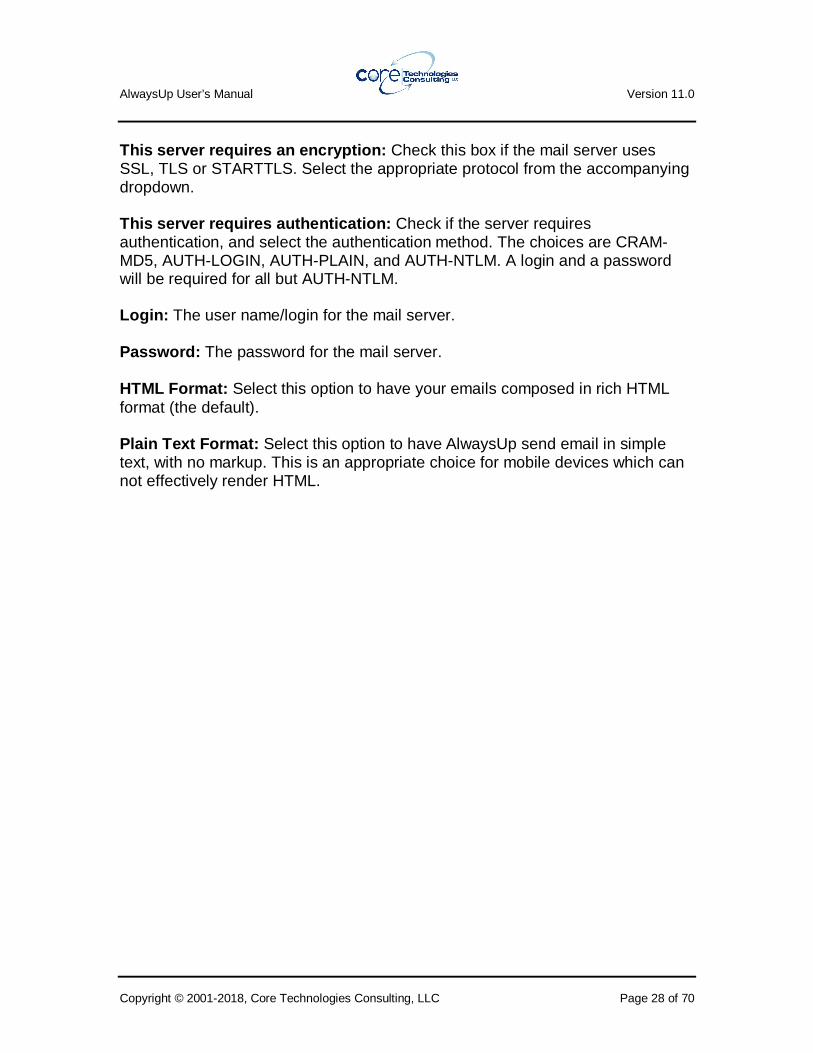
This server requires an encryption: Check this box if the mail server uses SSL, TLS or STARTTLS. Select the appropriate protocol from the accompanying dropdown. This server requires authentication: Check if the server requires authentication, and select the authentication method. The choices are CRAM-MD5, AUTH-LOGIN, AUTH-PLAIN, and AUTH-NTLM. A login and a password will be required for all but AUTH-NTLM. Login: The user name/login for the mail server. Password: The password for the mail server. HTML Format: Select this option to have your emails composed in rich HTML format (the default). Plain Text Format: Select this option to have AlwaysUp send email in simple text, with no markup. This is an appropriate choice for mobile devices which can not effectively render HTML.

AlwaysUp User’s Manual Version 11.0
Copyright © 2001-2018, Core Technologies Consulting, LLC Page 29 of 70
4.5.6. The Startup Tab The Startup tab can be used to connect to network drives, configure a program to be run prior to the main application, and to specify the set of Windows Services that must be started prior to running the main application.

AlwaysUp User’s Manual Version 11.0
Copyright © 2001-2018, Core Technologies Consulting, LLC Page 30 of 70
Attempt to automatically reconnect all network driv es: If checked, AlwaysUp will attempt to restore all persistent network drive mappings for the user running the application. Note that this will not work for any drive where a password must be supplied to access it at login. It can also take some time if any of the network drives are hosted on a “slow” server. If you wish to map a drive requiring a password, you should create a batch file with the necessary “net use” command and have AlwaysUp run that prior to starting your application (via the “Run the following program/batch file” option described below). Ensure that the Windows networking components have started: If your application makes use of the network, check this box to ensure that all network resources are available when your application starts. Pause for: If your application must wait for other programs or resources to become available, or if you wish to delay its start for any other reason, check this option and specify the number of seconds to wait. Checking the But only after a reboot box will limit the pause to only when AlwaysUp is started after a reboot. Use this option to avoid pausing when you start the service manually. Run the following program/batch file: Check this box and specify the full path to the program to be run, along with any arguments to be passed. Be sure to quote each component that contains spaces. For example:
“C:\MyServer\MapDrive.bat” Note that AlwaysUp will wait for this program to complete before running your application. As with the “Sanity check” feature, described in detail in Appendix III, AlwaysUp can be configured to pass your program one or more special command line values. Please see section 9.1 for a description of the values. Also whenever the application is restarted: Normally, the “startup” program above is run once, when AlwaysUp first starts your application (normally at boot). Check this box to have AlwaysUp run the startup program each time it restarts your application as well. This setting can be useful if you have some cleanup/housekeeping to be done between runs of the application. Stop all copies of the application running on this computer: Prior to starting the application for the first time, AlwaysUp will close all other running copies. Check this option (and the one following) for applications that only support a single instance, where starting a second copy will immediately fail.

AlwaysUp User’s Manual Version 11.0
Copyright © 2001-2018, Core Technologies Consulting, LLC Page 31 of 70
Also whenever the application is restarted: Check this option for applications that only support a single instance, where starting a second copy will immediately fail. Ensure that the following services have started: If the main application (or the startup program) depends on any existing services, select those here and they will be started prior to the main application (or the startup program). Many applications should depend on the Workstation service, which provides basic network connections. Clear selection: Un-checks all services selected in the list.
AlwaysUp User’s Manual Version 11.0
Copyright © 2001-2018, Core Technologies Consulting, LLC Page 32 of 70
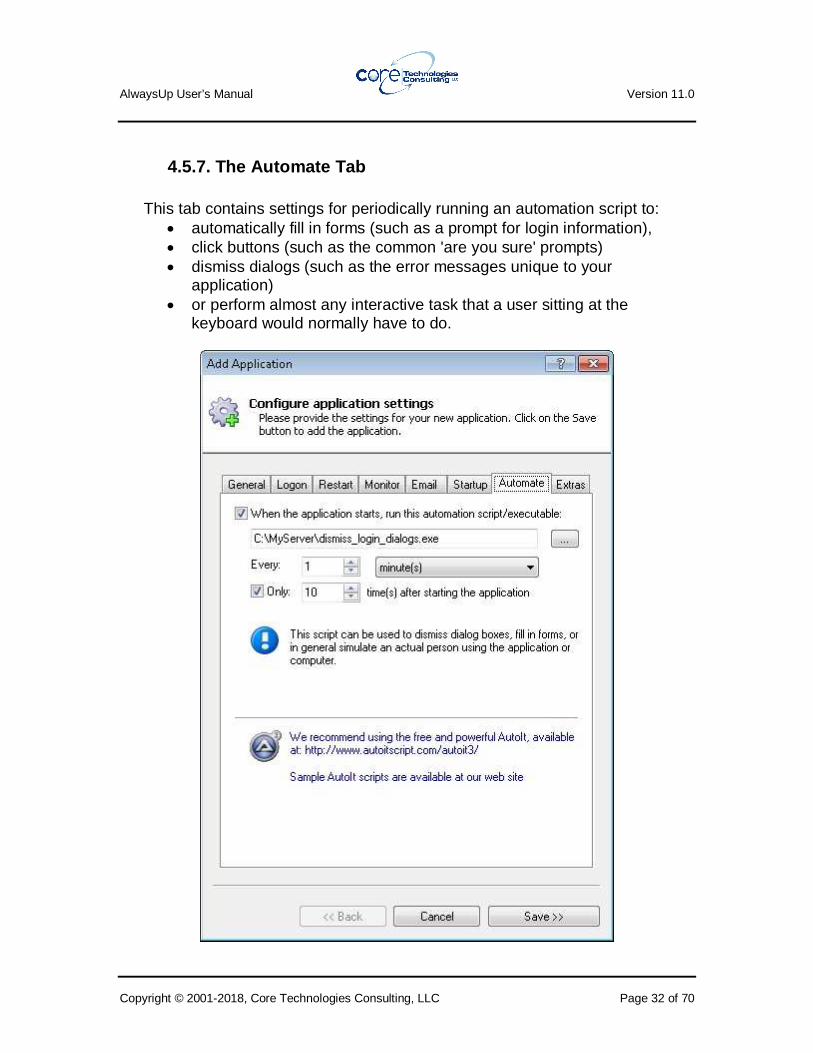
4.5.7. The Automate Tab
This tab contains settings for periodically running an automation script to: • automatically fill in forms (such as a prompt for login information), • click buttons (such as the common 'are you sure' prompts) • dismiss dialogs (such as the error messages unique to your
application) • or perform almost any interactive task that a user sitting at the
keyboard would normally have to do.
AlwaysUp User’s Manual Version 11.0
Copyright © 2001-2018, Core Technologies Consulting, LLC Page 33 of 70
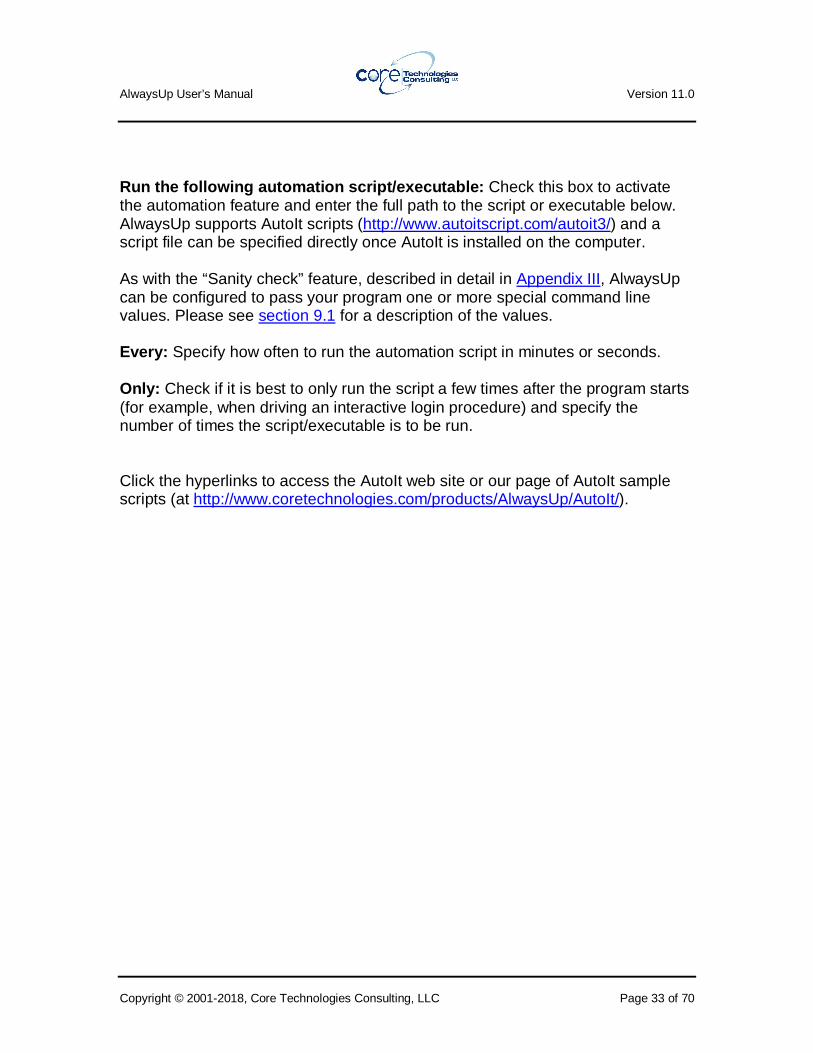
Run the following automation script/executable: Check this box to activate the automation feature and enter the full path to the script or executable below. AlwaysUp supports AutoIt scripts (http://www.autoitscript.com/autoit3/) and a script file can be specified directly once AutoIt is installed on the computer. As with the “Sanity check” feature, described in detail in Appendix III, AlwaysUp can be configured to pass your program one or more special command line values. Please see section 9.1 for a description of the values. Every: Specify how often to run the automation script in minutes or seconds. Only: Check if it is best to only run the script a few times after the program starts (for example, when driving an interactive login procedure) and specify the number of times the script/executable is to be run. Click the hyperlinks to access the AutoIt web site or our page of AutoIt sample scripts (at http://www.coretechnologies.com/products/AlwaysUp/AutoIt/).
AlwaysUp User’s Manual Version 11.0
Copyright © 2001-2018, Core Technologies Consulting, LLC Page 34 of 70
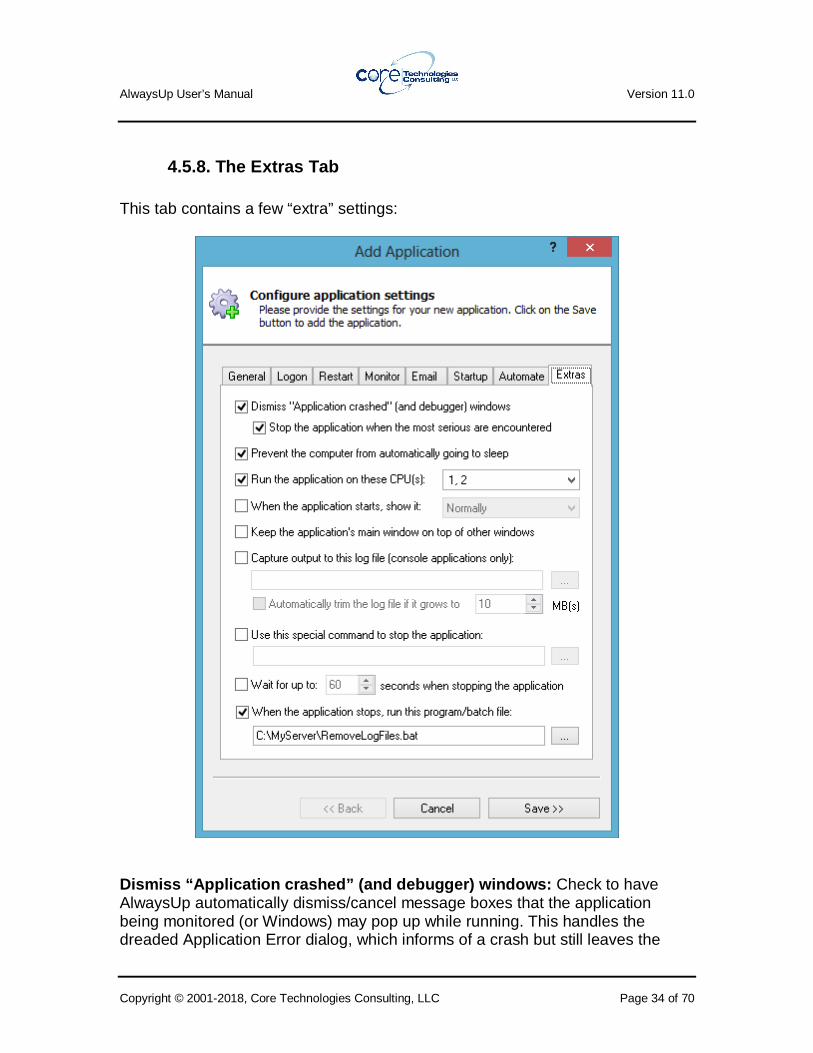
4.5.8. The Extras Tab This tab contains a few “extra” settings:
Dismiss “Application crashed” (and debugger) windows: Check to have AlwaysUp automatically dismiss/cancel message boxes that the application being monitored (or Windows) may pop up while running. This handles the dreaded Application Error dialog, which informs of a crash but still leaves the
AlwaysUp User’s Manual Version 11.0
Copyright © 2001-2018, Core Technologies Consulting, LLC Page 35 of 70
process running in a vegetative state. This option is particularly useful for developers running their applications in debug mode as the standard debug/assert dialogs are handled (and their full textual content captured in the Windows Event Log and email). Stop the application when the most serious are enco untered: Normally, AlwaysUp will simply dismiss those pesky “problem/crash/exception” dialogs and give your application a chance to handle the problem gracefully. Unfortunately, though, some of them (like the VB “run-time error” dialog) signal instant death. Check this box to have AlwaysUp immediately stop the application when it sees a fatal dialog, instead of waiting a few seconds for the application to slowly expire. Prevent the computer from automatically going to sl eep: Check this option to have AlwaysUp prevent your PC from putting itself to sleep while the service is running. Note that this option will not stop a user from intentionally putting the computer to sleep. It only prevents Windows from doing so because the PC has been idle for some time (as configured in the machine’s power settings). Run the application on these CPU(s) only: On multi-processor systems, check this box to restrict your application to run on one or more specific CPUs. Note that this option is not available on single-CPU systems. When the application starts, show it: Check this option to force your application’s main window to be displayed minimized, maximized, or normally. Note that this setting may not work properly for non-standard Windows applications and those that feature multiple top-level windows. Also, this setting will be ignored if the “When a user logs on, don’t show the applications windows…” setting on the “Logon” tab is active. Keep the application’s main window on top of other windows: Check this option to keep your application’s main window on top of other windows. This may be useful when your application needs to be visible always, such as in a kiosk environment. Note that this setting may not work properly for non-standard Windows applications and those that feature multiple top-level windows. Also, this setting will be ignored if the “When a user logs on, don’t show the applications windows…” setting on the “Logon” tab is active. Capture output to this log file (console applicatio ns only): Check this option to have the output from your console application saved to a file. Both the STDOUT and STDERR streams are captured.
AlwaysUp User’s Manual Version 11.0
Copyright © 2001-2018, Core Technologies Consulting, LLC Page 36 of 70
Automatically trim the file if it grows to: Use this option to avoid the output file from growing too large. If the file grows beyond the specified threshold, the oldest lines are trimmed from the file to make room for new output. Use this special command to stop the application: If your application is best stopped by running a program, specify the full path to that program here. AlwaysUp will wait up to 60 seconds for the program to do its work, terminating it if it takes any longer. (You can extend that time with the setting below.) As with the “Sanity check” feature, described in detail in Appendix III, AlwaysUp can be configured to pass your program one or more special command line values. Please see section 9.1 for a description of the values. Wait for up to X seconds when stopping the applicat ion: If your application can take a while to shut down, check this box and specify the number of seconds that AlwaysUp should wait for your application to exit normally. AlwaysUp may terminate your application after that time has elapsed. When the application stops, run this program/batch file: Check to specify a program that will be run whenever your application stops. Note that this program will be invoked under all circumstances, independently of how the application stops (normally or abnormally), and that AlwaysUp will wait for it to complete (except sometimes when the service is being stopped). As with the “Sanity check” feature, described in detail in Appendix III, AlwaysUp can be configured to pass your program one or more special command line values. Please see section 9.1 for a description of the values. Once all required information has been specified to your satisfaction, click the “Save >>” button to add your new application.

AlwaysUp User’s Manual Version 11.0
Copyright © 2001-2018, Core Technologies Consulting, LLC Page 37 of 70
4.6. Editing Application Settings Edit an application’s settings by either double-clicking on its entry, or highlighting its entry and choosing “Edit/View” from the “Application” menu. This will bring up the “Edit/View Application” dialog:

AlwaysUp User’s Manual Version 11.0
Copyright © 2001-2018, Core Technologies Consulting, LLC Page 38 of 70
The “Edit/View Application” dialog is identical to the “Add Application” dialog described in section 4.5, with the only difference being that the name of the application is not editable. Please see section 4.5 for a description of the “Add Application” dialog. Click on the “Save >>” button to commit your changes. If your application is running, you may be given a choice of how to proceed:

AlwaysUp User’s Manual Version 11.0
Copyright © 2001-2018, Core Technologies Consulting, LLC Page 39 of 70
Note that if you choose “Save & Restart >>”, your application will be briefly stopped while changes are saved and then restarted in a few seconds.
AlwaysUp User’s Manual Version 11.0
Copyright © 2001-2018, Core Technologies Consulting, LLC Page 40 of 70
4.7. Starting an Application Start an application by highlighting its entry in the list and clicking the “Start” toolbar button, or by selecting “Start” from the “Application” menu. This functionality will not be available if the selected application is already running. On systems that support multiple login sessions (for example, those with Remote Desktop or Terminal Services), there is also the option to start an application in the current session instead of on the default/console session. This will ensure that the application’s user interface elements are visible in the current session. Select “Start in this session” from the “Application” menu (or click on the dropdown-arrow next to the “Start” button and select the second entry from the menu displayed) to activate this functionality.
4.8. Stopping an Application Stop an application by highlighting its entry in the list and clicking the “Stop” toolbar button, or by selecting “Stop” from the “Application” menu. This functionality will not be available if the selected application is not running.
4.9. Restarting an Application Restart (that is, quickly stop and start) an application by highlighting its entry in the list and clicking the “Restart” toolbar button, or by selecting “Restart” from the “Application” menu. This functionality will not be available if the selected application is not running. On systems that support multiple login sessions (for example, those with Remote Desktop or Terminal Services), there is also the option to restart an application in the current session instead of on the default/console session. This will ensure that the application’s user interface elements are visible in the current session. Select “Restart in this session” from the “Application” menu (or click on the dropdown-arrow next to the “Restart” button and select the second entry from the menu displayed) to activate this functionality.
4.10. Removing an Application Remove an application by highlighting its entry in the list and clicking the “Remove” toolbar button, or by selecting “Remove” from the “Application” menu.

AlwaysUp User’s Manual Version 11.0
Copyright © 2001-2018, Core Technologies Consulting, LLC Page 41 of 70
You will be asked to confirm the removal. Note that an application can not be removed while it is running.
4.11. Creating Application Shortcuts AlwaysUp can create convenient windows shortcuts to start, stop and restart your application without having to open up the AlwaysUp program. With your application selected, choosing the “Create Shortcut(s)” entry in the “Application” menu summons the “Create Shortcut(s)” window (pictured here for an application called “MyApplication”):
Start: Check this option to create a shortcut that will start your application. Stop: Check this option to create a shortcut that will stop your application. Restart: Check this option to create a shortcut that will restart your application.

AlwaysUp User’s Manual Version 11.0
Copyright © 2001-2018, Core Technologies Consulting, LLC Page 42 of 70
Start in the current session: Check this option to create a shortcut that will start your application in the current session. Restart in the current session: Check this option to create a shortcut that will restart your application in the current session. Where should the shortcut(s) be placed?: Select the folder where the new shortcuts should be saved. A few special folders are available in the drop-down list and others can be visually selected by clicking on the “Browse…” button. Open this folder in Explorer after creating the sho rtcut(s)?: Checking this option will cause a new Explorer window to be opened to browse the folder with the newly created shortcuts. Click on the “Create” button to create shortcuts for the selected operations. This snapshot shows shortcuts for the “Web Server” application saved to the desktop:
AlwaysUp User’s Manual Version 11.0
Copyright © 2001-2018, Core Technologies Consulting, LLC Page 43 of 70
Simply double-click on an icon (as you would do with any other shortcut) to perform the functionality described.
AlwaysUp User’s Manual Version 11.0
Copyright © 2001-2018, Core Technologies Consulting, LLC Page 44 of 70
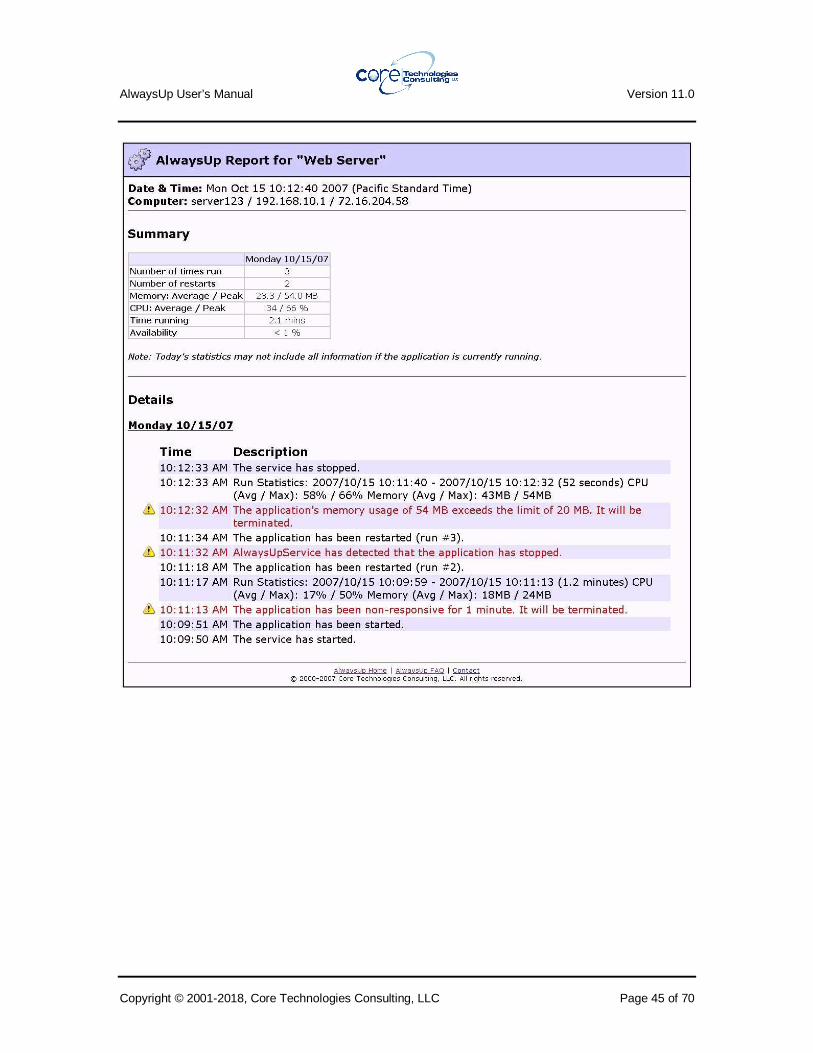
4.12. Reporting on an Application’s Activities As it runs your application, AlwaysUp writes relevant information to the “Application” section of the Windows Event Log, including:
• CPU statistics (average / peak) • Memory statistics (average / peak) • Application restart events • Threshold exceeded events (CPU & memory), etc.
AlwaysUp will summarize this activity in a single web page if you select “Report Activity” from the “Application” menu and choose whether to see today’s or the past week’s activity. The report will be opened in your web browser and can be saved in HTML format from the browser. A sample report is below.
AlwaysUp User’s Manual Version 11.0
Copyright © 2001-2018, Core Technologies Consulting, LLC Page 45 of 70
AlwaysUp User’s Manual Version 11.0
Copyright © 2001-2018, Core Technologies Consulting, LLC Page 46 of 70
4.13. Exporting an Application to a File (XML) AlwaysUp allows you to export your application’s settings to a XML file by either:
(1) selecting “Export…” from the “Application” menu and subsequently specifying an XML file to be created, or
(2) dragging-and-dropping from the list of applications to Windows Explorer (or the desktop, etc.) to create a new XML file in the specified location.
The XML file created can be taken to another machine and imported there to re-create the application on that machine. Note that the XML is described by the schema available at our web site: http://www.coretechnologies.com/products/AlwaysUp/AlwaysUpCLT/alwaysup_installservice.xsd
4.14. Exporting all Applications to a Directory All applications can be exported at once by selecting “Export all…” from the “Application” menu. You will be prompted for a directory, and an XML file will be created there for each application. Each file name created will resemble:
“<application-name>_alwaysup.xml” For example, if you have an application called “notepad”, then the exported file will be named “notepad_alwaysup.xml”. The XML files created can be taken to another machine and imported there to re-create the applications on that machine. Note that the XML is described by the schema available at our web site: http://www.coretechnologies.com/products/AlwaysUp/AlwaysUpCLT/alwaysup_installservice.xsd

AlwaysUp User’s Manual Version 11.0
Copyright © 2001-2018, Core Technologies Consulting, LLC Page 47 of 70
4.15. Importing an Application from a File (XML) AlwaysUp allows you to import a previously exported XML file by either:
(1) selecting “Import…” from the “Application” menu and selecting the XML file, or
(2) dragging-and-dropping from Windows Explorer (or the desktop, etc.) to the list of applications in AlwaysUp.
Importing a file will summon the “Add Application” window (described in section 4.5) where you can confirm settings and supply passwords if necessary prior to actually creating the application in AlwaysUp. Note that the XML is described by the schema available at our web site: http://www.coretechnologies.com/products/AlwaysUp/AlwaysUpCLT/alwaysup_installservice.xsd
4.16. Adding an Application by Drag & Drop Dragging and dropping an executable file onto AlwaysUp will summon the “Add Application” window (described in section 4.5) with the full path to the executable already specified. Note: When UAC is enabled, Windows will may disallow drag & drop from an Explorer window not started as an Administrator. Run Explorer as an Administrator to enable drag & drop.
4.17. Adding a Copy of an Application To make a copy of an application, select it in the list and choose “Add Copy…” from the “Application” menu. This will launch the “Add Application” window (described in section 4.5) with all settings copied from the selected application. The default name will be “Copy of <your-existing-application>” but of course you are free to change that before saving.
AlwaysUp User’s Manual Version 11.0
Copyright © 2001-2018, Core Technologies Consulting, LLC Page 48 of 70
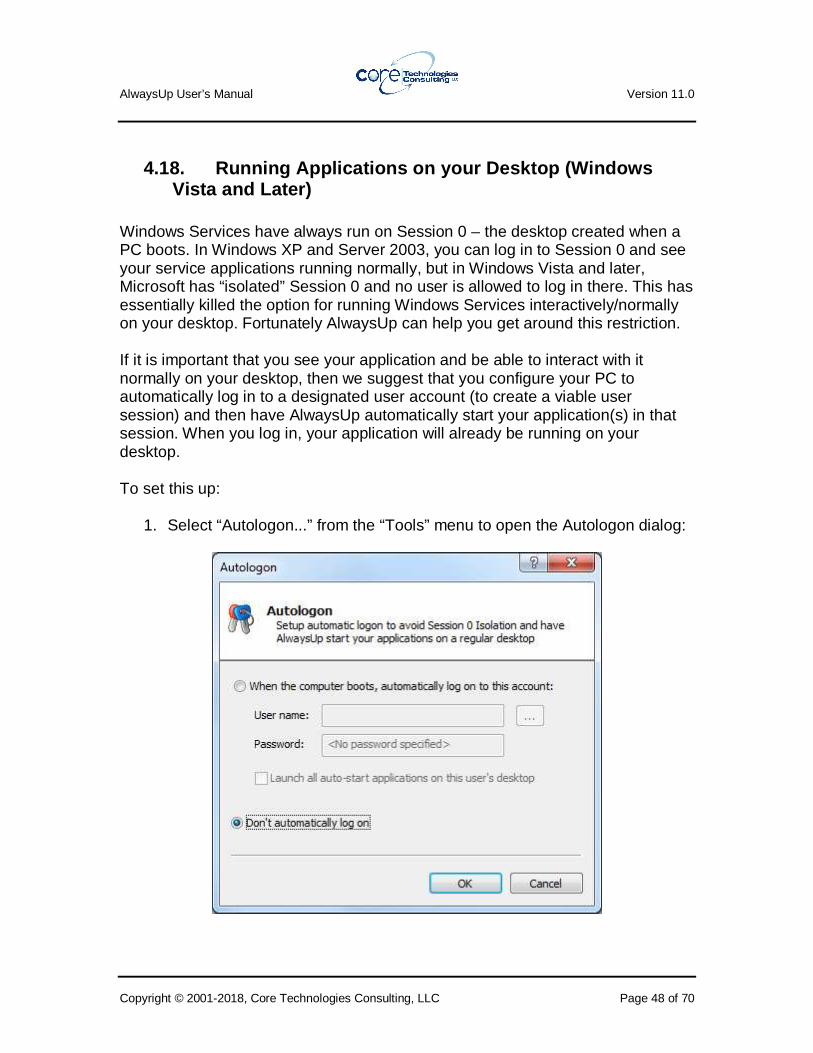
4.18. Running Applications on your Desktop (Windows Vista and Later)
Windows Services have always run on Session 0 – the desktop created when a PC boots. In Windows XP and Server 2003, you can log in to Session 0 and see your service applications running normally, but in Windows Vista and later, Microsoft has “isolated” Session 0 and no user is allowed to log in there. This has essentially killed the option for running Windows Services interactively/normally on your desktop. Fortunately AlwaysUp can help you get around this restriction. If it is important that you see your application and be able to interact with it normally on your desktop, then we suggest that you configure your PC to automatically log in to a designated user account (to create a viable user session) and then have AlwaysUp automatically start your application(s) in that session. When you log in, your application will already be running on your desktop. To set this up:
1. Select “Autologon...” from the “Tools” menu to open the Autologon dialog:
AlwaysUp User’s Manual Version 11.0
Copyright © 2001-2018, Core Technologies Consulting, LLC Page 49 of 70
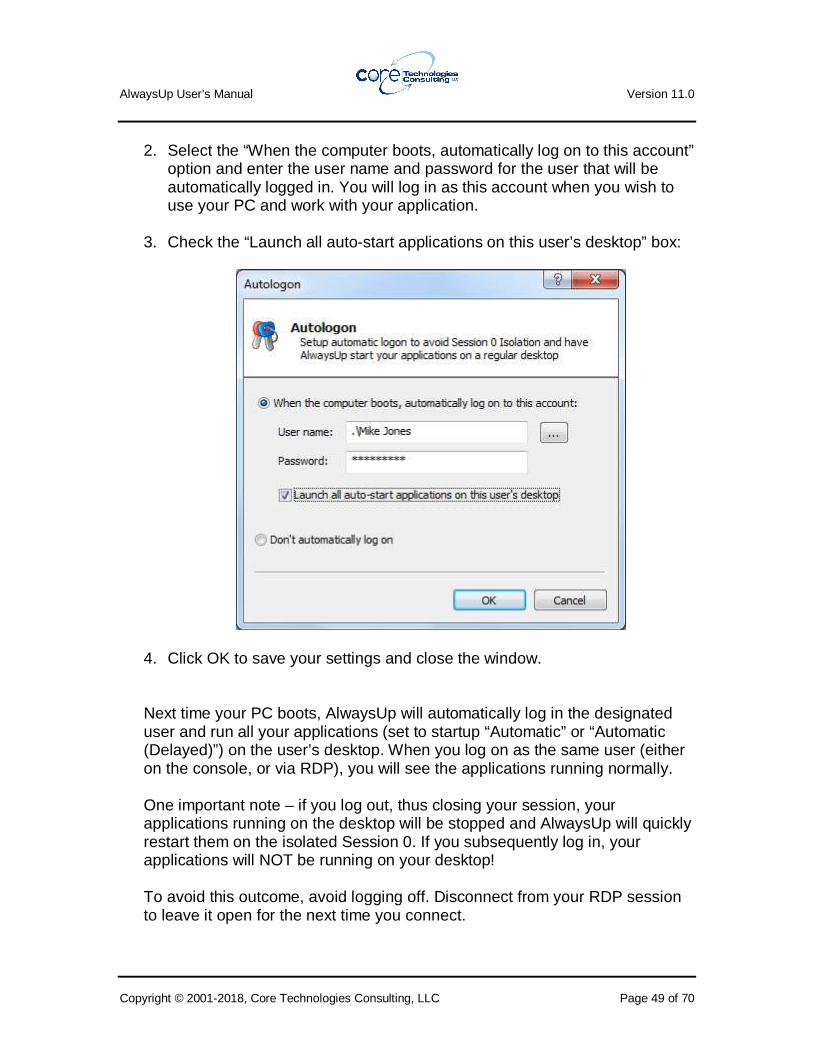
2. Select the “When the computer boots, automatically log on to this account” option and enter the user name and password for the user that will be automatically logged in. You will log in as this account when you wish to use your PC and work with your application.
3. Check the “Launch all auto-start applications on this user’s desktop” box:
4. Click OK to save your settings and close the window. Next time your PC boots, AlwaysUp will automatically log in the designated user and run all your applications (set to startup “Automatic” or “Automatic (Delayed)”) on the user’s desktop. When you log on as the same user (either on the console, or via RDP), you will see the applications running normally. One important note – if you log out, thus closing your session, your applications running on the desktop will be stopped and AlwaysUp will quickly restart them on the isolated Session 0. If you subsequently log in, your applications will NOT be running on your desktop! To avoid this outcome, avoid logging off. Disconnect from your RDP session to leave it open for the next time you connect.
AlwaysUp User’s Manual Version 11.0
Copyright © 2001-2018, Core Technologies Consulting, LLC Page 50 of 70
4.19. Controlling AlwaysUp Applications from the Command Line
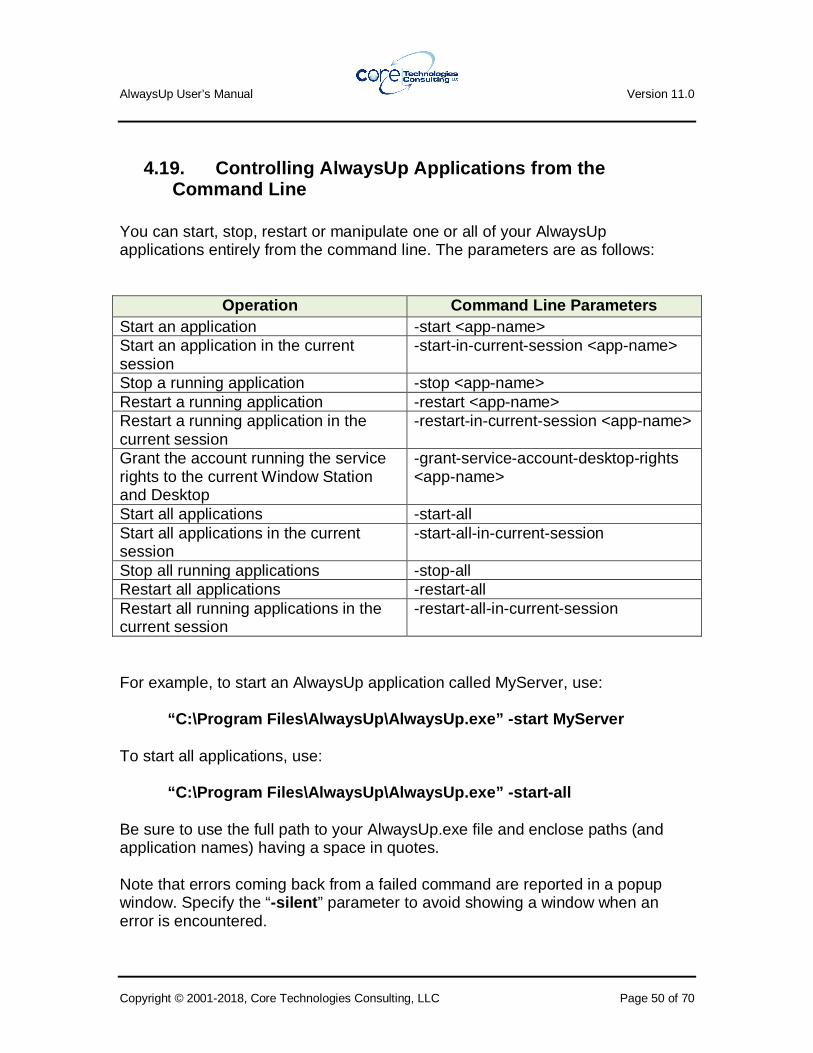
You can start, stop, restart or manipulate one or all of your AlwaysUp applications entirely from the command line. The parameters are as follows:
Operation Command Line P arameters Start an application -start <app-name> Start an application in the current session
-start-in-current-session <app-name>
Stop a running application -stop <app-name> Restart a running application -restart <app-name> Restart a running application in the current session
-restart-in-current-session <app-name>
Grant the account running the service rights to the current Window Station and Desktop
-grant-service-account-desktop-rights <app-name>
Start all applications -start-all Start all applications in the current session
-start-all-in-current-session
Stop all running applications -stop-all Restart all applications -restart-all Restart all running applications in the current session
-restart-all-in-current-session
For example, to start an AlwaysUp application called MyServer, use:
“C:\Program Files\AlwaysUp\AlwaysUp.exe” -start MySer ver
To start all applications, use:
“C:\Program Files\AlwaysUp\AlwaysUp.exe” -start-all Be sure to use the full path to your AlwaysUp.exe file and enclose paths (and application names) having a space in quotes. Note that errors coming back from a failed command are reported in a popup window. Specify the “-silent ” parameter to avoid showing a window when an error is encountered.
AlwaysUp User’s Manual Version 11.0
Copyright © 2001-2018, Core Technologies Consulting, LLC Page 51 of 70
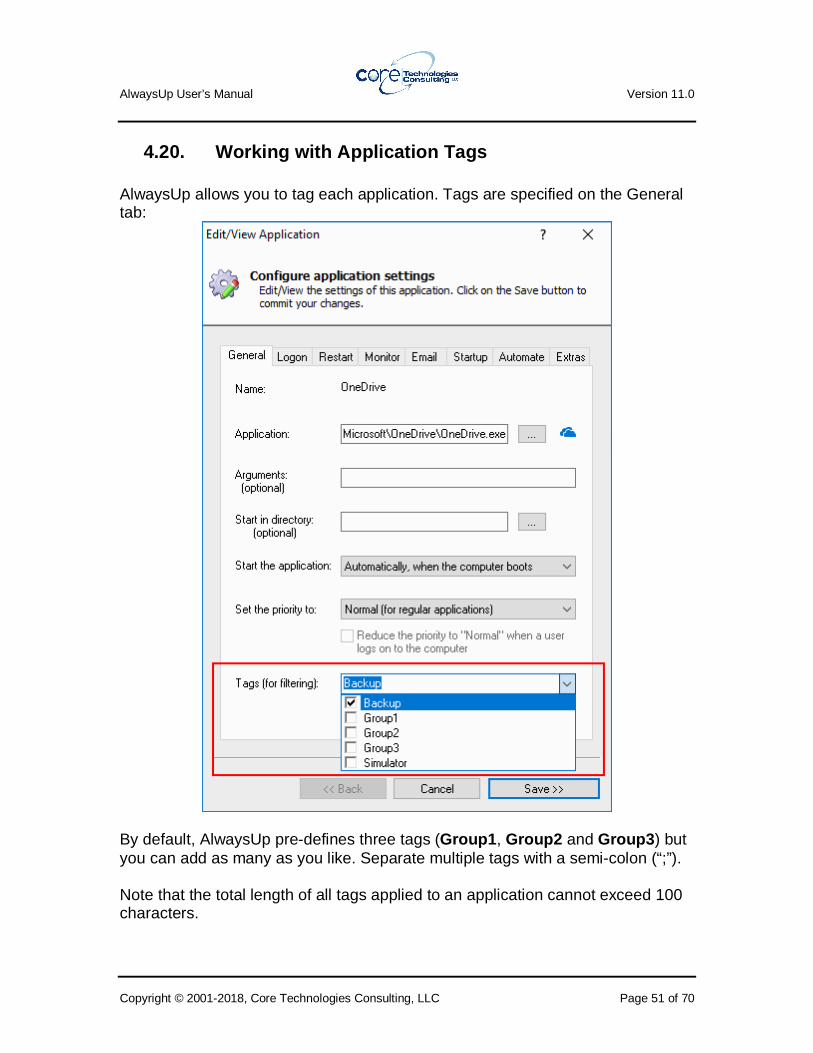
4.20. Working with Application Tags AlwaysUp allows you to tag each application. Tags are specified on the General tab:
By default, AlwaysUp pre-defines three tags (Group1 , Group2 and Group3 ) but you can add as many as you like. Separate multiple tags with a semi-colon (“;”). Note that the total length of all tags applied to an application cannot exceed 100 characters.

AlwaysUp User’s Manual Version 11.0
Copyright © 2001-2018, Core Technologies Consulting, LLC Page 52 of 70
The tags you specify will be listed in the Tags column in the main window:
4.20.1. Bulk-Changing Multiple Applications Instead of adding or removing tags from each application individually, you can also update multiple applications at once. To do so, select the applications you would like to change and choose the appropriate operation from the “Application” menu. Adding Tags Selecting “Application > Tags > Add…” summons the Add Tags window:
AlwaysUp User’s Manual Version 11.0
Copyright © 2001-2018, Core Technologies Consulting, LLC Page 53 of 70
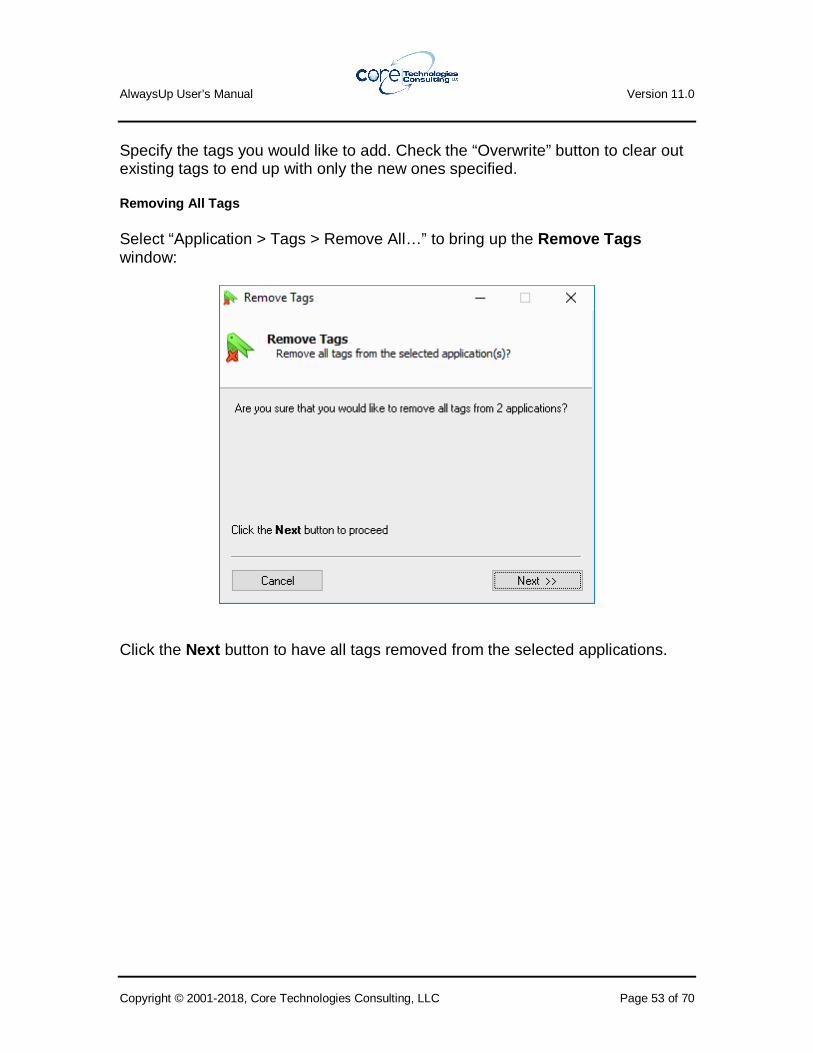
Specify the tags you would like to add. Check the “Overwrite” button to clear out existing tags to end up with only the new ones specified. Removing All Tags Select “Application > Tags > Remove All…” to bring up the Remove Tags window:
Click the Next button to have all tags removed from the selected applications.

AlwaysUp User’s Manual Version 11.0
Copyright © 2001-2018, Core Technologies Consulting, LLC Page 54 of 70
4.21. Filtering the List of Applications Customers managing many applications can use the Filter Pane to view a subset of applications. Select “View > Filter Pane” (or hit the F3 key) to show the Filter Pane, positioned directly underneath the toolbar:
The list of applications can be filtered in three ways:
1. By tag: Select a tag to show only applications having that tag 2. By text: Type in text to match only applications featuring that text 3. By disabled/enabled status: Check the box to show only applications that
have not been disabled. When searching by text, cells matching the text are highlighted:
AlwaysUp User’s Manual Version 11.0
Copyright © 2001-2018, Core Technologies Consulting, LLC Page 55 of 70
5. Licensing, Registration & Pricing AlwaysUp is free to evaluate for the first 30 days. After the trial period a license must be purchased to continue usage. Prior to licensing, AlwaysUp will:
1) Show a “Registration” dialog when it is started. Follow the instructions there to purchase a license and register the application.
2) Emit registration reminders whenever an email is sent from the program or when a message is added to the event log.
If you find the program useful, we encourage you to license it. The small licensing fee charged will fund continued development of AlwaysUp and will entitle you to expedited support from Core Technologies Consulting LLC, the author of the software. Please visit http://www.coretechnologies.com/products/AlwaysUp/ for the latest licensing and registration information. The software can be purchased there as well (Visa / MasterCard / PayPal accepted). Enterprise, Site and royalty-free OEM licensing are also options; please see: http://www.CoreTechnologies.com/products/AlwaysUp/AlwaysUp_Versions.html Pricing is as follows (subject to change – please check our site for the most current):

AlwaysUp User’s Manual Version 11.0
Copyright © 2001-2018, Core Technologies Consulting, LLC Page 56 of 70
Quantity Price per license (US dollars)
1 $49.99
2-9 $44.99 (a 10% discount!)
10-24 $39.99 (a 20% discount!)
25+ $34.99 (a 30% discount!)
Limited Site (50 PCs) $999 (save over 60%!)
Site Plus (200 PCs) $1,999 (save over 80%!)
Unlimited Site $2,999 (unlimited savings!)
Limited Enterprise (100 PCs) $1,999 (save over 60%!)
Enterprise Plus (300 PCs) $2,799 (save over 80%!)
Unlimited Enterprise $4,999 (unlimited savings!)
Limited OEM (25 PCs/year) $1,299 (perpetual savings!)
OEM Plus (100 PCs/year) $2,799 (perpetual savings!)
Unlimited OEM $4,999 (unlimited savings!)

AlwaysUp User’s Manual Version 11.0
Copyright © 2001-2018, Core Technologies Consulting, LLC Page 57 of 70
6. Troubleshooting and Reporting Problems Please consult the AlwaysUp FAQ for troubleshooting tips and answers to frequently asked questions: http://www.coretechnologies.com/products/AlwaysUp/AlwaysUp_FAQ.html If you encounter a problem while using AlwaysUp, please send email to: [email protected] Be sure to include the following information:
• Your Operating System • The version of AlwaysUp in use • Detailed steps for reproducing any software bugs/issues
Feel free to send requests for enhancements to the same address.

AlwaysUp User’s Manual Version 11.0
Copyright © 2001-2018, Core Technologies Consulting, LLC Page 58 of 70
7. Appendix I: Remote Desktop and Terminal Services Sessions
Whenever a user logs in to a Windows PC, he interacts with a “session” – his own private graphical sandbox with a dedicated desktop and set of windows. PCs with Terminal Services and Remote Desktop software allow multiple users to be logged in to a single PC simultaneously, with each user having his own private session and the illusion of being the only user of the PC. This privacy ensures that application windows in one session are not visible in (nor accessible to) another session. Each session is identified by a unique session ID. Windows services can be affected by PCs supporting multiple sessions. When the PC boots and services are started, only one session is created and all services will run in that session. Called the “console session”, or “session 0”, this special session may be handled differently by each version of Windows. For example, on Windows 2000, XP and 2003 a user can log in to the console session, but on Windows 7, Vista and Server 2008 it is isolated for security purposes (see “Impact of Session 0…” below for details). When AlwaysUp is running your application in the console session it is not visible in any other session. If you start a Remote Desktop Connection and you are granted another session (with a different ID), you will not be able to interact with your application running in the console session. Tricks such as starting Remote Desktop with the “/console” flag will allow you to connect to the console session on Windows XP and 2003, but will not do the job on Windows 7, Vista or Server 2008 as the console session is isolated there. If your application is running in a different session, you can use AlwaysUp to run it in the current session and make its windows and tray icons available to you by selecting “Start <app> in this session” or “Restart <app> in this session” from the “Application” menu. Note that restarting will temporarily stop your application. Additional information: What "sessions" are on Windows NT: http://homepages.tesco.net/~J.deBoynePollard/FGA/windows-nt-session.html Terminal Services Sessions: http://msdn2.microsoft.com/en-us/library/aa383496.aspx How Terminal Services Works: http://technet2.microsoft.com/windowsserver/en/library/2cb5c8c9-cadc-44a9-bf39-856127f4c8271033.mspx?mfr=true Impact of Session 0 Isolation on Services and Drive rs in Windows Vista http://www.microsoft.com/whdc/system/vista/services.mspx
AlwaysUp User’s Manual Version 11.0
Copyright © 2001-2018, Core Technologies Consulting, LLC Page 59 of 70
8. Appendix II: Windows 10/8/7/Vista and Windows Server 2016/2012/2008
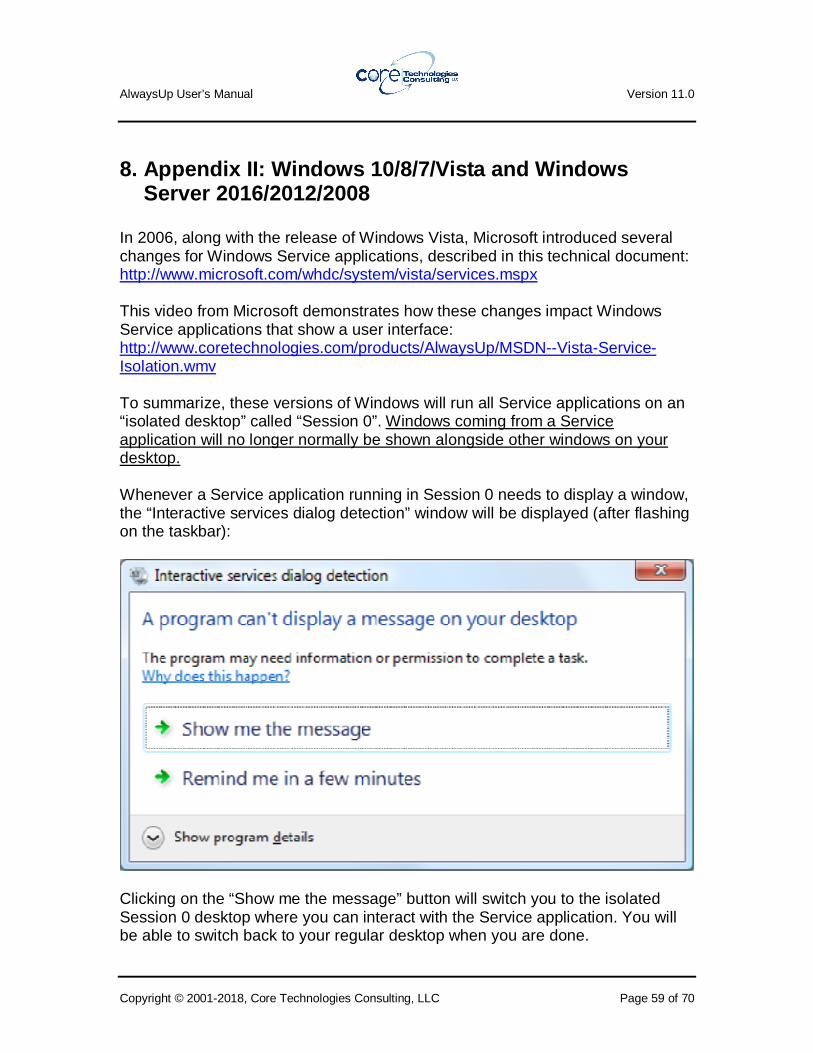
In 2006, along with the release of Windows Vista, Microsoft introduced several changes for Windows Service applications, described in this technical document: http://www.microsoft.com/whdc/system/vista/services.mspx This video from Microsoft demonstrates how these changes impact Windows Service applications that show a user interface: http://www.coretechnologies.com/products/AlwaysUp/MSDN--Vista-Service-Isolation.wmv To summarize, these versions of Windows will run all Service applications on an “isolated desktop” called “Session 0”. Windows coming from a Service application will no longer normally be shown alongside other windows on your desktop. Whenever a Service application running in Session 0 needs to display a window, the “Interactive services dialog detection” window will be displayed (after flashing on the taskbar):
Clicking on the “Show me the message” button will switch you to the isolated Session 0 desktop where you can interact with the Service application. You will be able to switch back to your regular desktop when you are done.
AlwaysUp User’s Manual Version 11.0
Copyright © 2001-2018, Core Technologies Consulting, LLC Page 60 of 70
Applications run as a Service by AlwaysUp are bound by these restrictions. If your application needs to show a window, it will be shown (by default) on the Isolated Session 0. Fortunately, this is not the end of the story…
8.1. How to Show Your Application’s Windows on the Current Desktop
After logging in, you can instruct AlwaysUp to run your application in the current session/desktop and make its windows and tray icons available to you by selecting “Start <app> in this session” (or “Restart <app> in this session”) from the “Application” menu. Note that restarting will temporarily stop your application. AlwaysUp will continue to run your application on your desktop until you log out and the session closes, at which point your application is restarted and “returned” to Session 0. Note that when your computer boots, only Session 0 is available. AlwaysUp will start your application there.

AlwaysUp User’s Manual Version 11.0
Copyright © 2001-2018, Core Technologies Consulting, LLC Page 61 of 70
9. Appendix III: The Sanity Check Utility AlwaysUp can periodically run a program (a “Sanity check utility”) to periodically check if the application being monitored is functioning normally. The utility should exit with a return code of:
• 0 when the check succeeds; • 1 when the check fails and the application should be stopped and
restarted as you have configured; • 10 when the check fails and the computer should be rebooted; • 100 when the check fails and your application should be stopped and not
restarted ; • any other value when the check fails due to an error independent of the
application being monitored (such as an error internal to the utility), or to simply indicate failure without causing a restart.
In the last case, the application is not restarted but a message is written to the event log (and an email is sent if so configured). Note that if the sanity check utility fails to complete in 120 seconds, the application will be restarted. The popular “ConnectToSocketSanityCheck” program (with full source code) is available in the “SanityCheck” sub-directory. Given a host and port on the command line, it returns 0 if a socket could be opened, 1 if the socket could not be opened, and -1 if there was an internal error initializing the sockets API. It can be used to check if a TCP/IP application is accepting connections.
AlwaysUp User’s Manual Version 11.0
Copyright © 2001-2018, Core Technologies Consulting, LLC Page 62 of 70
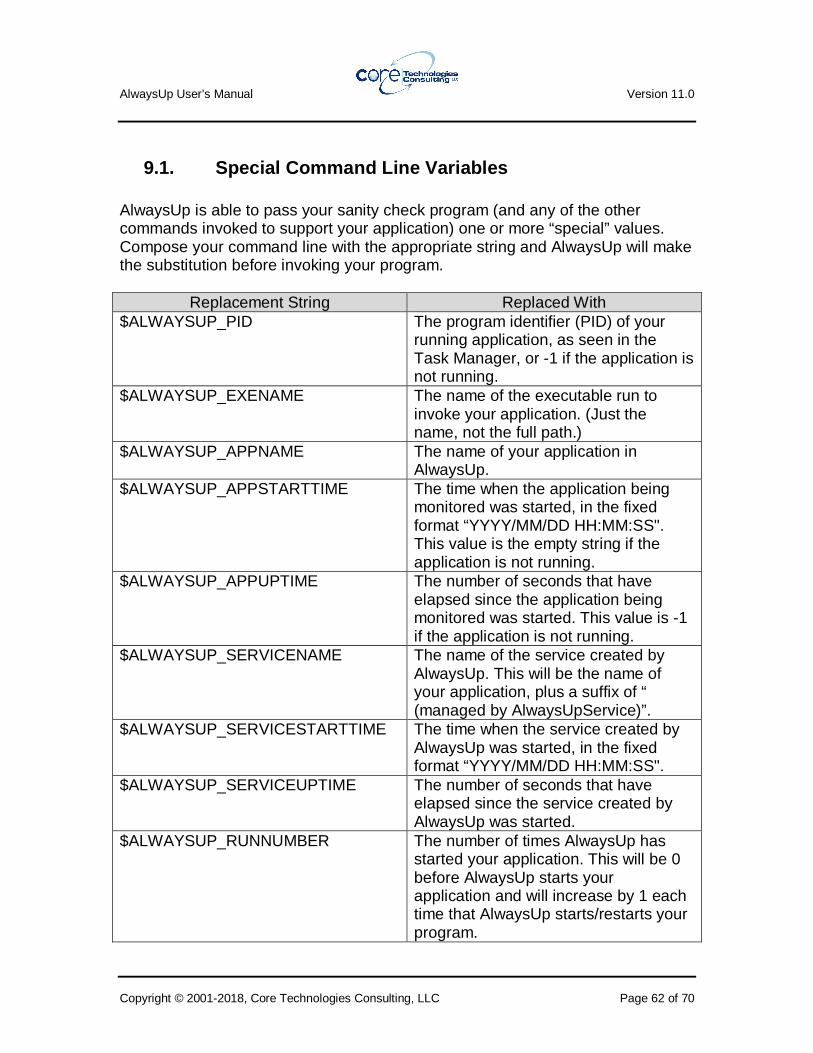
9.1. Special Command Line Variables AlwaysUp is able to pass your sanity check program (and any of the other commands invoked to support your application) one or more “special” values. Compose your command line with the appropriate string and AlwaysUp will make the substitution before invoking your program.
Replacement String Replaced With $ALWAYSUP_PID The program identifier (PID) of your
running application, as seen in the Task Manager, or -1 if the application is not running.
$ALWAYSUP_EXENAME The name of the executable run to invoke your application. (Just the name, not the full path.)
$ALWAYSUP_APPNAME The name of your application in AlwaysUp.
$ALWAYSUP_APPSTARTTIME The time when the application being monitored was started, in the fixed format “YYYY/MM/DD HH:MM:SS". This value is the empty string if the application is not running.
$ALWAYSUP_APPUPTIME The number of seconds that have elapsed since the application being monitored was started. This value is -1 if the application is not running.
$ALWAYSUP_SERVICENAME The name of the service created by AlwaysUp. This will be the name of your application, plus a suffix of “ (managed by AlwaysUpService)”.
$ALWAYSUP_SERVICESTARTTIME The time when the service created by AlwaysUp was started, in the fixed format “YYYY/MM/DD HH:MM:SS".
$ALWAYSUP_SERVICEUPTIME The number of seconds that have elapsed since the service created by AlwaysUp was started.
$ALWAYSUP_RUNNUMBER The number of times AlwaysUp has started your application. This will be 0 before AlwaysUp starts your application and will increase by 1 each time that AlwaysUp starts/restarts your program.
AlwaysUp User’s Manual Version 11.0
Copyright © 2001-2018, Core Technologies Consulting, LLC Page 63 of 70
For example, to have AlwaysUp pass your Sanity check program the application’s program identifier (PID), then your command line might resemble this: C:\myserver\my_check.exe $ALWAYSUP_PID If your main application is running with PID 563, then your Sanity program will be invoked like this: C:\myserver\my_check.exe 563
9.2. Checking a Web Server with http-ping Our free http-ping utility can also be used to ensure that your web server is serving pages. This sanity check script will use http-ping to try to read a given page from your server and will signal AlwaysUp to restart your application if the operation fails: http://www.coretechnologies.com/products/AlwaysUp/check-web-server-sanity-check.bat Please edit the script to specify the address of your own web server/page before using it! Find out more about http-ping here: http://www.coretechnologies.com/products/http-ping/
9.3. Other Sanity Check Utilities We have created a few Sanity Check programs that can be easily downloaded and used free of charge. Please visit our web site to see what is available: http://www.coretechnologies.com/products/AlwaysUp/Plugins/ If you don’t find what you need there, please send us an email describing in detail what your Sanity Check should do and we will try our best to create one for you.
AlwaysUp User’s Manual Version 11.0
Copyright © 2001-2018, Core Technologies Consulting, LLC Page 64 of 70
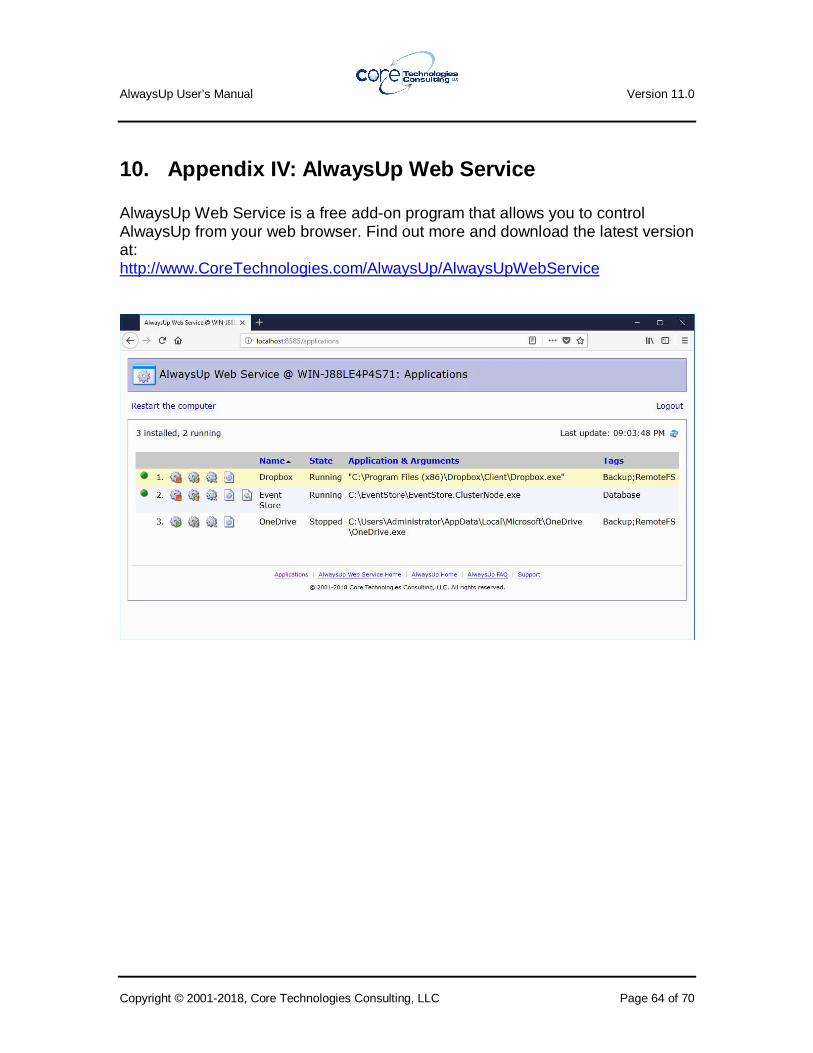
10. Appendix IV: AlwaysUp Web Service AlwaysUp Web Service is a free add-on program that allows you to control AlwaysUp from your web browser. Find out more and download the latest version at: http://www.CoreTechnologies.com/AlwaysUp/AlwaysUpWebService
AlwaysUp User’s Manual Version 11.0
Copyright © 2001-2018, Core Technologies Consulting, LLC Page 65 of 70
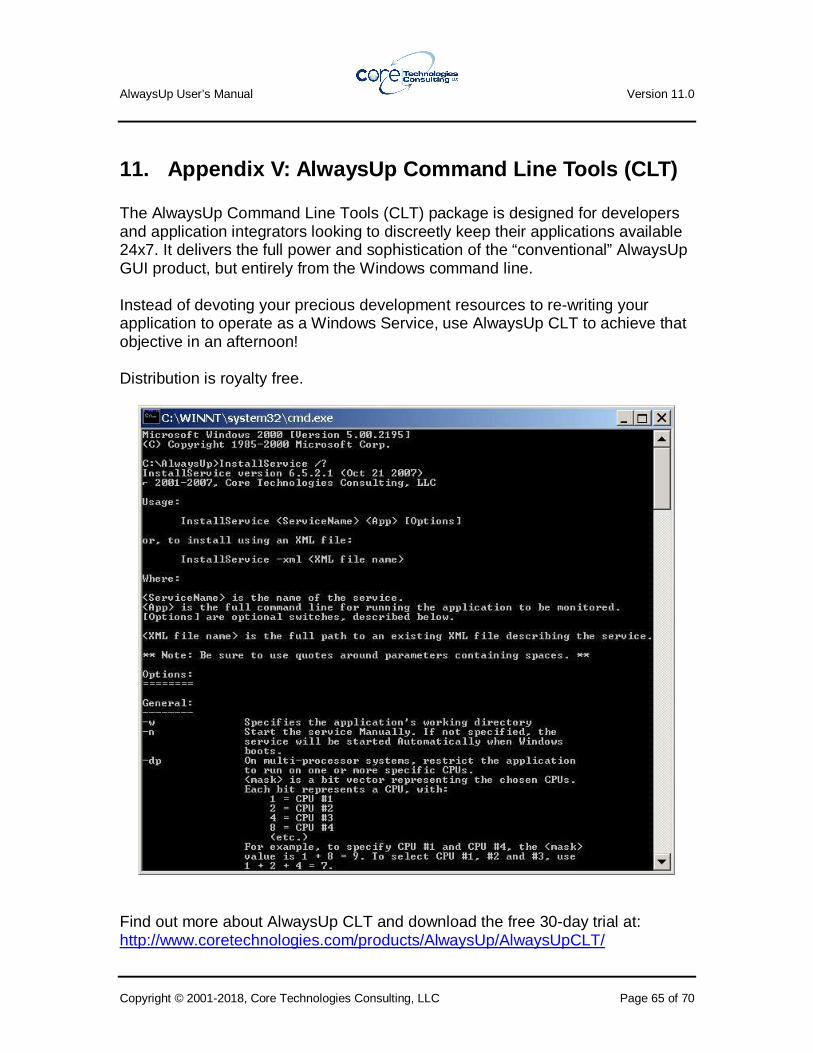
11. Appendix V: AlwaysUp Command Line Tools (CLT) The AlwaysUp Command Line Tools (CLT) package is designed for developers and application integrators looking to discreetly keep their applications available 24x7. It delivers the full power and sophistication of the “conventional” AlwaysUp GUI product, but entirely from the Windows command line. Instead of devoting your precious development resources to re-writing your application to operate as a Windows Service, use AlwaysUp CLT to achieve that objective in an afternoon! Distribution is royalty free.
Find out more about AlwaysUp CLT and download the free 30-day trial at: http://www.coretechnologies.com/products/AlwaysUp/AlwaysUpCLT/
AlwaysUp User’s Manual Version 11.0
Copyright © 2001-2018, Core Technologies Consulting, LLC Page 66 of 70
12. Appendix VI: AlwaysUp Event Log Messages As is the convention with Windows Services, AlwaysUp reports information, warnings, and errors to the Windows Application Event Log. That log is accessible through the Control Panel Event Viewer applet. Each entry is logged on behalf of the related AlwaysUp application. For example, if you have an application called "MyServer" , then the Event Log will have entries with "MyServer (managed by AlwaysUpService)" as the designated source. The following web page presents the various messages that can be logged, along with more detailed information for each situation: http://www.coretechnologies.com/products/AlwaysUp/AlwaysUp_EventLog.html
12.1. How to Suppress Writing to the Event Log Event logging can be entirely disabled or limited by category via a registry key. To do so for a specific application/service:
1. Start the Registry Editor, Regedit.exe. 2. Navigate to
HKEY_LOCAL_MACHINE\ SYSTEM\CurrentControlSet\services\ 3. In the tree on the left, click on the service that you wish to modify. If your
application is called “Notepad”, then look for “Notepad (managed by AlwaysUpService)”.
4. From the menu, select “Edit > New > DWORD (32-bit) value”. 5. Rename the new value on the right to “EventLogMask”. 6. Right-click on that name and select “Modify...” 7. Set the value to:
0 to disable all writing to the event log 1 if you want only errors 3 if you want errors and warnings 7 if you want errors, warnings and information (the default)
8. Click OK to record the value. 9. Close the Registry Editor.

AlwaysUp User’s Manual Version 11.0
Copyright © 2001-2018, Core Technologies Consulting, LLC Page 67 of 70
The changes will take effect the next time you restart your application in AlwaysUp (or reboot your PC). You can affect all AlwaysUp applications by setting the EventLogMask value in HKEY_LOCAL_MACHINE\SOFTWARE\ Core Technologies Consulting\AlwaysUp (or HKEY_LOCAL_MACHINE\SOFTWARE\Wow6432Node\Core Techno logies Consulting\AlwaysUp on 64-bit machines) instead. However an individual service’s setting, when present, will override that master setting. Note: The activity report described in section 4.12, which uses the records written to the event log, may not be accurate when not all events are written. For example, the number of times the application is started will be incorrect if information events are disabled.
AlwaysUp User’s Manual Version 11.0
Copyright © 2001-2018, Core Technologies Consulting, LLC Page 68 of 70
13. Appendix VII: How to Run Popular Applications w ith AlwaysUp
While many of our customers run their own internally developed applications with AlwaysUp, a large number use AlwaysUp to convert well-known applications to run as Windows Services. As a guide for future customers, our technical team has created step-by-step “How-To”s for more than 100 commonly used programs including:
• MetaTrader • Java Applications • Batch Files • Alpha Five Web Server • Microsoft Outlook • Tomcat • Dropbox • VirtualBox • JBoss • TeamSpeak Server • VMware Player • Mozilla Firefox • Python Scripts • Nginx • OpenOffice • FishEye • Cute FTP • Perl • Wireshark • HFS • Mozilla Thunderbird • Ruby Scripts • Livedrive • Selenium Remote Control Server • Plex Media Server • Google Drive • Fiddler • Netcam Watcher Pro • FitNesse • SugarSync • PDFCreator

AlwaysUp User’s Manual Version 11.0
Copyright © 2001-2018, Core Technologies Consulting, LLC Page 69 of 70
• Gbridge • Microsoft SkyDrive • MAPI Applications • Google Chrome • Internet Explorer • Kiosks Applications • PowerShell • Visual DataFlex • Growl • Tracd • Cubby • Node.js • Audiogalaxy • SpiderOak • Lighttpd Web Server • Adobe AIR • Apple iTunes • iCloud Control Panel • Apache Derby • Play Framework Applications • Memcached • PuTTY • Sage ACT! Pro • Evernote • Microsoft Access 2007 • Jottacloud • PHP Scripts • Buzof • Apache Solr • XBMC • Apple Safari • SyncToy • WinForms GUI • Syncdocs • Tonido • SkyDrive Pro • Box Sync • Dart Scripts • odrive • OpenOffice • Microsoft Outlook 2010

AlwaysUp User’s Manual Version 11.0
Copyright © 2001-2018, Core Technologies Consulting, LLC Page 70 of 70
• OneDrive for Business • BoxCryptor • Aria2 • WD My Cloud • pyLoad • Microsoft Excel 2013 • AutoIt Scripts • Microsoft Outlook 2013 • AeroFS • Microsoft Excel 2010 • Microsoft Word 2010 • Visual FoxPro Programs • MS Access 2010 • Syncthing • WinSCP Scripts • Calibre Server • ZooKeeper • AutoHotkey • RealtimeSync • TwoToneDetect • SpamAssassin • SimpleHTTPServer • Avuna HTTPD • Docker Daemon
The full list of applications is available at our web site: http://www.coretechnologies.com/products/AlwaysUp/Apps/ Please let us know if you would like us to create a tutorial for your application!