aluminum dog crate congratulations€¦ · aluminum dog crate aluminum dolly travel your crate with...
TRANSCRIPT
User Manual
ALUMINUM DOG CRATE
Models: All Zinger Deluxe Crate
ALUMINUM DOG CRATE
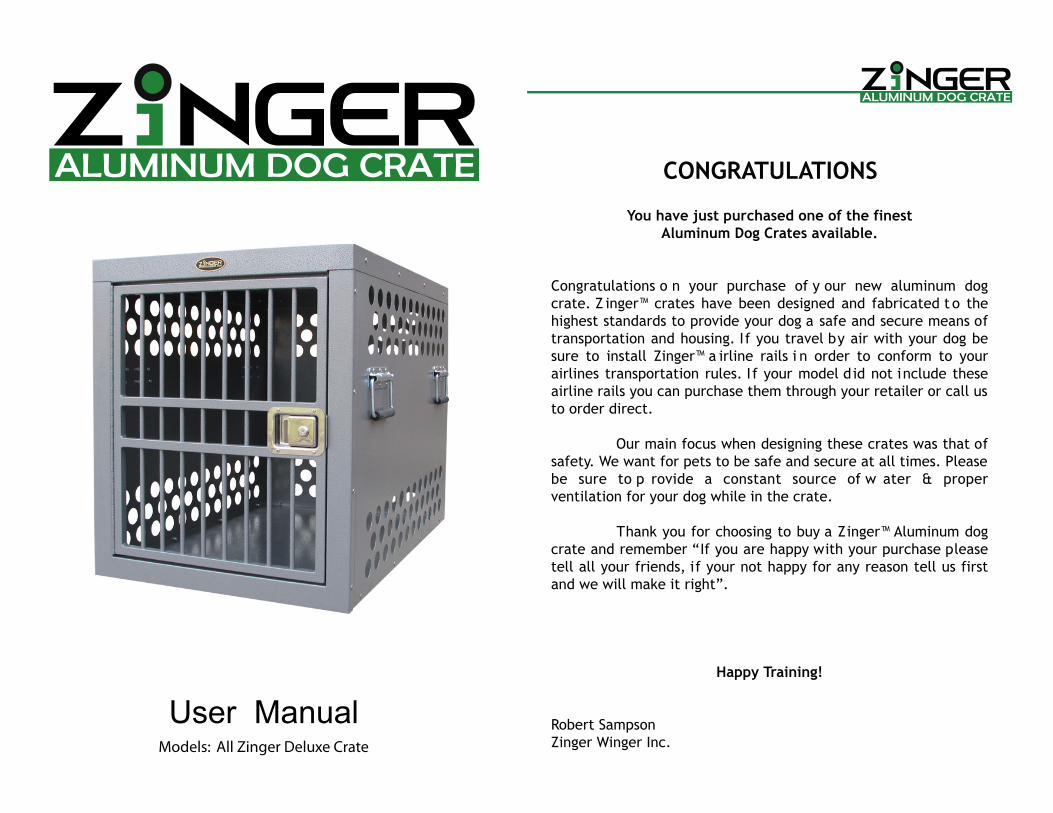
CONGRATULATIONS
You have just purchased one of the finestAluminum Dog Crates available.
Congratulations o n your purchase of y our new aluminum dog crate. Z inger™ crates have been designed and fabricated t o the highest standards to provide your dog a safe and secure means of transportation and housing. If you travel by air with your dog be sure to install Zinger™ a irline rails i n order to conform to your airlines transportation rules. I f your model did not include these airline rails you can purchase them through your retailer or call us to order direct.
Our main focus when designing these crates was that of safety. We want for pets to be safe and secure at all times. Please be sure to p rovide a constant source of w ater & proper ventilation for your dog while in the crate.
Thank you for choosing to buy a Zinger™ Aluminum dog crate and remember “If you are happy with your purchase please tell all your friends, if your not happy for any reason tell us first and we will make it right”.
Happy Training!
Robert SampsonZinger Winger Inc.
ALUMINUM DOG CRATECOMPONENTSCOMPONENTS
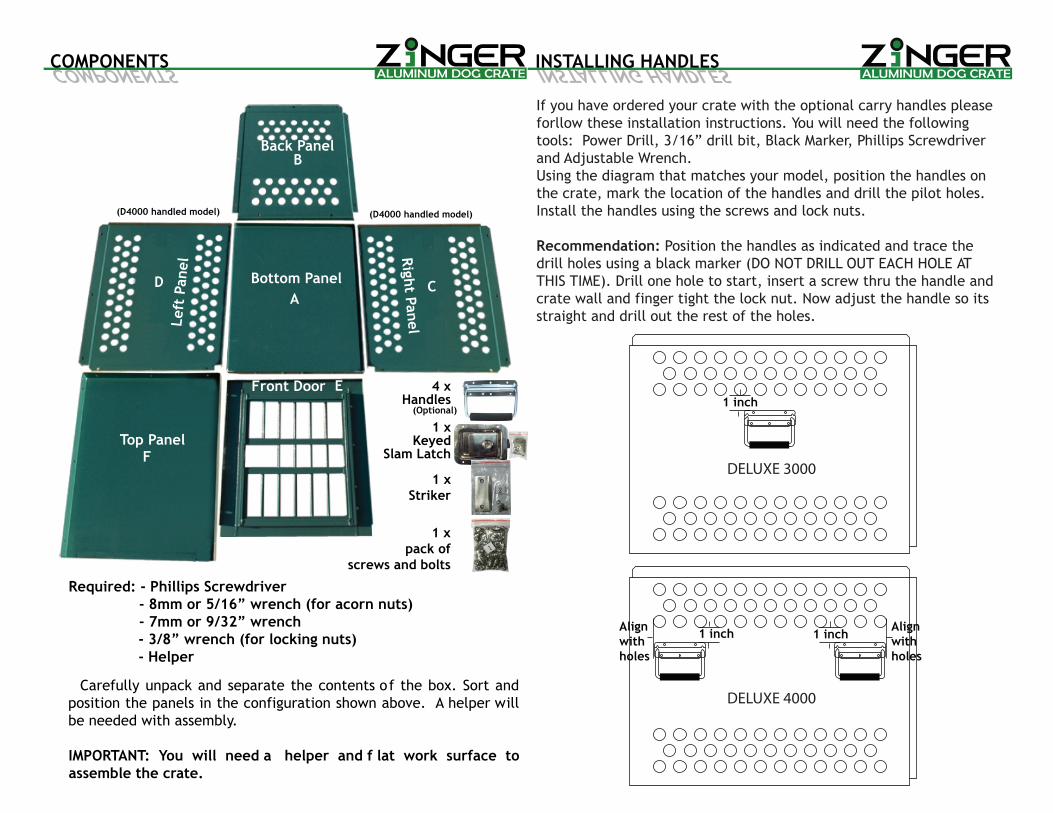
Carefully unpack and separate the contents of the box. Sort and position the panels in the configuration shown above. A helper will be needed with assembly.
IMPORTANT: You will need a helper and f lat work surface to assemble the crate.
Required: - Phillips Screwdriver - 8mm or 5/16” wrench (for acorn nuts) - 7mm or 9/32” wrench
- 3/8” wrench (for locking nuts) - Helper
Left
Pan
el
Bottom Panel
Back Panel
Top Panel
Right Panel
Front Door
A
B
CD
E
F
1 xpack of
screws and bolts
4 xHandles
1 xKeyed
Slam Latch
1 xStriker
(Optional)
(D4000 handled model)(D4000 handled model)
INSTALLING HANDLESINSTALLING HANDLESALUMINUM DOG CRATE
Alignwithholes
Alignwithholes
1 inch 1 inch
1 inch
If you have ordered your crate with the optional carry handles please forllow these installation instructions. You will need the following tools: Power Drill, 3/16” drill bit, Black Marker, Phillips Screwdriver and Adjustable Wrench. Using the diagram that matches your model, position the handles on the crate, mark the location of the handles and drill the pilot holes. Install the handles using the screws and lock nuts.
Recommendation: Position the handles as indicated and trace the drill holes using a black marker (DO NOT DRILL OUT EACH HOLE AT THIS TIME). Drill one hole to start, insert a screw thru the handle and crate wall and finger tight the lock nut. Now adjust the handle so its straight and drill out the rest of the holes.
DELUXE 4000
DELUXE 3000

A
BC
ALUMINUM DOG CRATE
P osition the r ight s ide panel(C) into place as shown. Align holes and insert machine screws. Hand tighten all nuts and bolts.
2.
ASSEMBLY - SINGLE CRATEASSEMBLY
A
C
side view
A
C
B C
NOTE: IT IS IMPORTANT TO AT FIRST HAND ASSEMBLE ALL NUTS AND BOLTS BEFORE FINAL TIGHTENING. Attach back panel(B) to base panel(A) using ( 3) machine screws and nuts. Do not t ighten nuts and bolts until the complete crate assembled.
1.
B
B
A
A
B
side viewA
ASSEMBLY - SINGLE CRATEASSEMBLYALUMINUM DOG CRATE
4. Set door frame(E) i nto p lace. Align holes and i nsert machine screws. Hand tighten all nuts and bolts.
E C E
D
P osition the left panel(D) into p lace as shown. Align holes and insert machine screws. Hand tighten all nuts and bolts.
3.
D
A
C
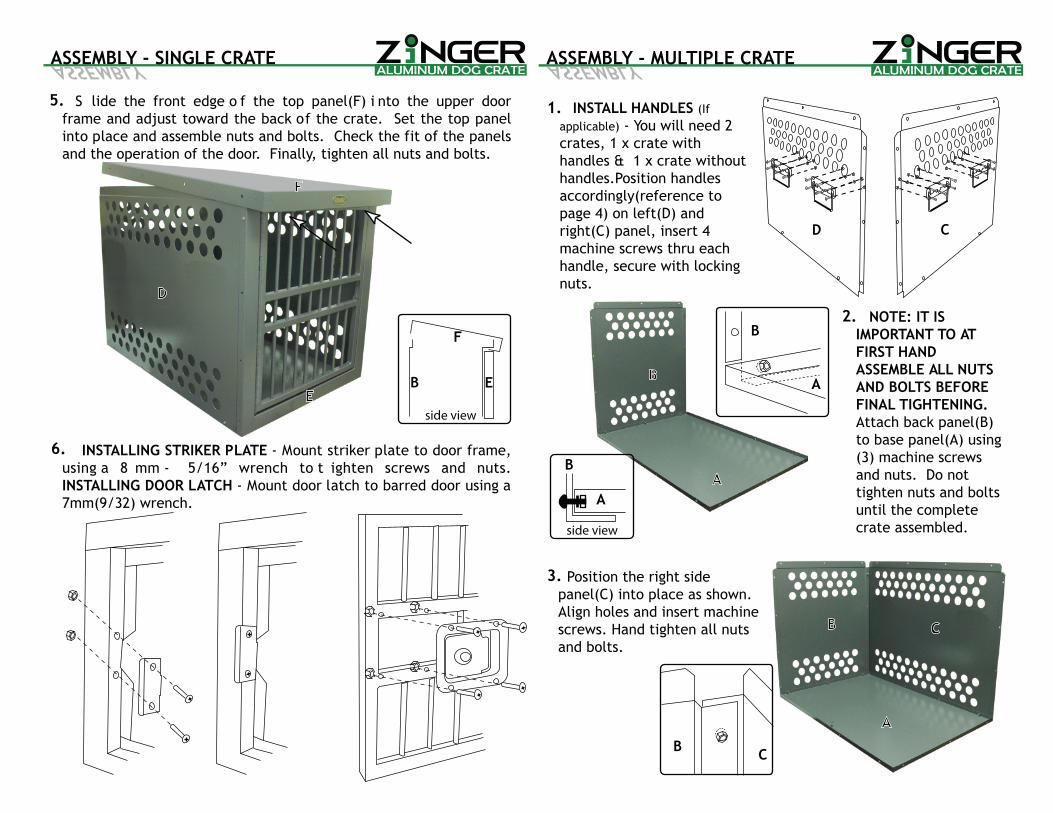
S lide the front edge o f the top panel(F) i nto the upper door frame and adjust toward the back of the crate. Set the top panel into place and assemble nuts and bolts. Check the fit of the panels and the operation of the door. Finally, tighten all nuts and bolts.
ALUMINUM DOG CRATE
5.
INSTALLING STRIKER PLATE - Mount striker plate to door frame, using a 8 mm - 5/16” wrench to t ighten screws and nuts. INSTALLING DOOR LATCH - Mount door latch to barred door using a 7mm(9/32) wrench.
6.
ASSEMBLY - SINGLE CRATEASSEMBLY
F
D
EE
F
side view
B
A
B C
ASSEMBLY - MULTIPLE CRATEASSEMBLYALUMINUM DOG CRATE
NOTE: IT IS IMPORTANT TO AT FIRST HAND ASSEMBLE ALL NUTS AND BOLTS BEFORE FINAL TIGHTENING. Attach back panel(B) to base panel(A) using (3) machine screws and nuts. Do not tighten nuts and bolts until the complete crate assembled.
1.
2.
B
A
B
A
A
B
side view
D C
Position the right side panel(C) into place as shown. Align holes and insert machine screws. Hand tighten all nuts and bolts.
3.
B C
INSTALL HANDLES (If applicable) - You will need 2 crates, 1 x crate with handles & 1 x crate without handles.Position handles accordingly(reference to page 4) on left(D) and right(C) panel, insert 4 machine screws thru each handle, secure with locking nuts.
ALUMINUM DOG CRATEASSEMBLY - MULTIPLE CRATEASSEMBLY
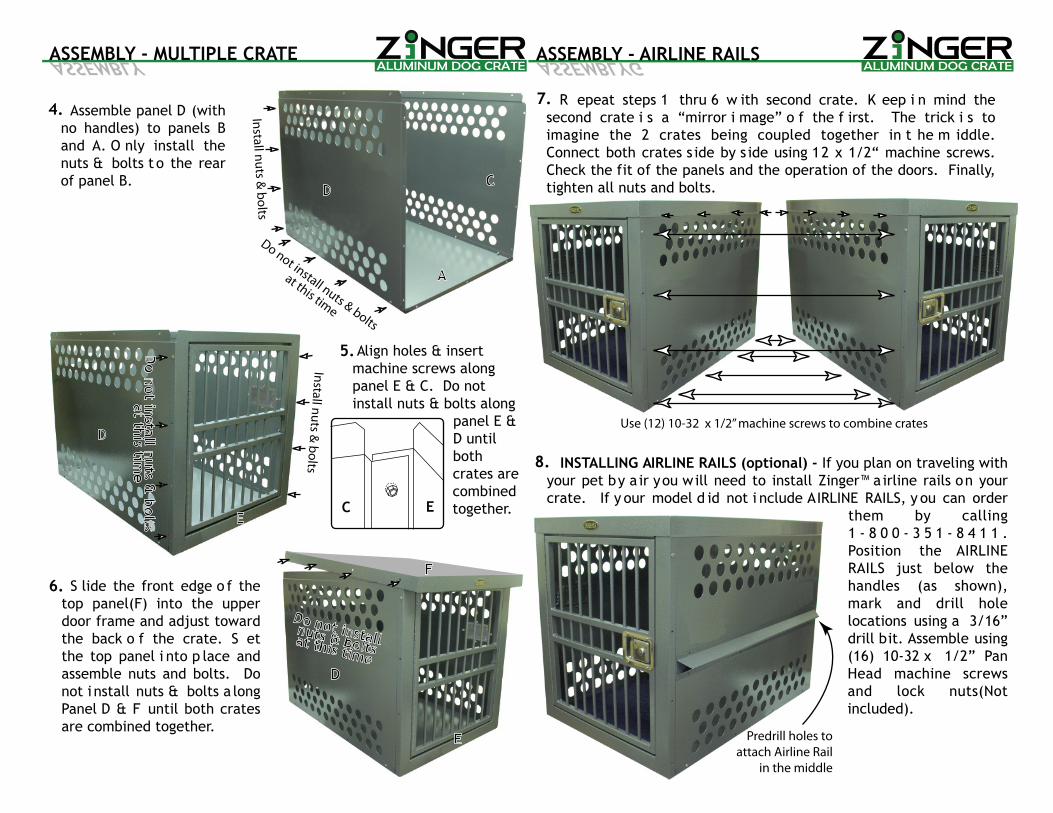
Assemble panel D (with no handles) to panels B and A. O nly install the nuts & bolts t o the rear of panel B.
4.
D
A
C
Install nuts & bolts
Do not install nuts & bolts
at this time
Align holes & insert machine screws along panel E & C. Do not install nuts & bolts along
panel E & D until both crates are combined together.
5.
D
EC E
Do not install nuts &
boltsat this tim
e
Install nuts & bolts
S lide the front edge o f the top panel(F) into the upper door frame and adjust toward the back o f the crate. S et the top panel i nto p lace and assemble nuts and bolts. Do not i nstall nuts & bolts a long Panel D & F until both crates are combined together.
6.F
D
E
Do not install nuts & boltsat this time
ASSEMBLY - AIRLINE RAILSASSEMBLYGALUMINUM DOG CRATE
7.
Use (12) 10-32 x 1/2” machine screws to combine crates
R epeat steps 1 thru 6 w ith second crate. K eep i n mind the second crate i s a “mirror i mage” o f the f irst. The trick i s to imagine the 2 crates being coupled together in t he m iddle. Connect both crates s ide by s ide using 12 x 1/2“ machine screws. Check the fit of the panels and the operation of the doors. Finally, tighten all nuts and bolts.
8.
Predrill holes toattach Airline Rail
in the middle
INSTALLING AIRLINE RAILS (optional) - If you plan on traveling with your pet by a ir you will need to install Zinger™ a irline rails on your crate. If y our model d id not i nclude AIRLINE RAILS, y ou can order
them by calling 1 - 8 0 0 - 3 5 1 - 8 4 1 1 . Position the AIRLINE RAILS just below the handles (as shown), mark and drill hole locations using a 3/16” drill bit. Assemble using (16) 10-32 x 1/2” Pan Head machine screws and lock nuts(Not included).

ACCESSORIESACCESSORIESALUMINUM DOG CRATE
Aluminum DollyTravel your crate with less effort
Airline Approved RailsFor extra protection needed in an Airline Approved Kennel
Raised Crate Flooring Keeps your dog high and dry off the kennel floor.
Non slip pebbled rubber mat. Allows you to use the top of your crate as a grooming table
Grooming/ Crate Mat
Slam Latch- Stainless SteelLocking Slam Latch provides security of your pet and piece of mind
Handles - Stainless Steel Stainless Steel Handles allow for easy carrying of your crate
Crate Cover Kennel Jacket protection from rain, snow, wind and the sun
TO ORDER: 1-800-351-8411 FAX: 1-905 -876-3360WWW.ZINGERWINGER.COM
PRODUCT INFORMATIONPRODUCT INFORMATION
SAFETY & CARE MAINTENANCE
Ensure your pet is not left in closed vehicle. Provide a constant source of water & proper ventilation for your dog at all times.
SERVICE - DO NOT RETURN TO YOUR RETAILER
If you require help in assembling your Zinger Aluminum Dog Crate please call 1-800-351-8411 for assistance. The Zinger Winger Inc. will repair or replace at our option defective parts and material.
PRODUCT WARRANTY
The Z inger W inger I nc. warrants that a ll hardware, powder coating and structural panel componets shall remain in good operational and structural condition for a period of o ne year from the date of purchase.
Any defect, o r malfunction, which h as o ccurred because of unreasonable handling, i mproper application or f ailure t o perform necessary maintenance will result in voiding this warranty.
Any Zinger Crates or part of the Crates that has been modified by any person other t han a s uitably authorized representative of t he Z inger Winger Inc. will result in voiding this warranty.
Zinger Winger Inc. liability is limited to repair or replacement of any affected parts FOB factory. Zinger Winger Inc. will not be responsible for any charges related to shipping, duties, or brokerage fees.Zinger W inger I nc. r eserves t he right t o discontinue o r change parts and products of current manufactured models.
Published by Zinger Winger Company264 Bronte St. South #13, Milton, Ontario L9T 5A3 Canada
ALUMINUM DOG CRATE
ALUMINUM DOG CRATE