alternative production systems · this management guide describes the recommended programs for each...
TRANSCRIPT

ManageMent guide
Alternative production systems

2 Introduction
I SA - A l te rnat ive management gu ide I SA - A l te rnat ive management gu ide
This guide highlights management factors, which can help to
achieve maximum profit from ISA egg layers. Results obtained
during the rearing period will be decisive for the production
period of the layers. A good growing period will enhance
viability and production levels during the laying period.
This management guide describes the recommended programs
for each period of the bird’s life cycle from hatching until
depletion, which will keep flocks healthy and highly productive
in alternative production systems. We hope that you find this
management guide useful and a positive contribution to making
continuous performances improvement of your hens.
IntroductIonThe cage system remains the most common production system
in use globally, however use of alternative production systems
is expanding across the world. In recent years ISA has been
developing pure line breeds, which take into account all breeding
goals - from productivity and parent stock performance, to
commercial stock performance and shell quality. ISA R&D
effort has also been working on behaviour, robustness and
liveability, both internally, and in collaboration with universities
and research institutes.
Welfare is also a focus of attention in the ISA breeding program.
For instance, video recording, feather scoring, body temperature
recording, behaviour testing, in rear and in production are
performed on birds which are on floor systems in an ISA R&D
farm.
In order to improve commercial stock performance resulting
from crosses between non related lines, the ISA R&D department
have conducted studies on pure line birds which are bred in a
safe environment and also with cross line offspring which are
tested in field conditions and production systems. This is a key
stage in bringing the power of hybridisation to the crosses,
which have to perform on alternative production systems.
However, regardless of the intensity and efficiency of selection,
genetic potential cannot be realised without the experience
and know-how of the stockperson managing the flocks. Good
rearing is needed to reach the best genetic potential as it
directly affects the flock’s performance
I SA - A l te rnat ive management gu ide I SA - A l te rnat ive management gu ide
nests �������������������������������������������������������� 17Perches ����������������������������������������������������� 18Partitioning and fencing ������������������������������ 18
fen cin g – out s ide ......................................... 18heating ����������������������������������������������������� 18Ventilation ������������������������������������������������ 18
Ventil at ion s ys te M ........................................ 18air circulation ������������������������������������������� 18air quality recoMMendations ������������������������ 19frequent ProbleMs associated with Poor Ventilation ������������������������������������������������ 19litter ������������������������������������������������������� 19litter ManageMent��������������������������������������� 19lighting systeMs ����������������������������������������� 19
BasIc growth concepts ���������������������������� 20Pre-lay key targets �������������������������������������� 20
in cre a se l ayer bon e Min er a lisat ion ....................... 20tr a ns it ion to l ayer feed d ie t ............................. 20
working with the birds after transfer ������������ 20training caged reared birds��������������������������� 20stocking density ����������������������������������������� 21drinking and feeding ����������������������������������� 21
Me a surin g daily feed a n d water inta ke ................... 21feed intake stiMulation �������������������������������� 21
feed Pre sentat ion ......................................... 21feed dis tr ibut ion .......................................... 21lightin g Progr a M ......................................... 22teM Per ature ............................................... 22Prel ay d ie t ................................................ 22dige s t iVe tr ac t de Velo PM ent .............................. 22
insoluble grit ��������������������������������������������� 22
LIghtIng durIng Lay ��������������������������������� 22dark laying houses �������������������������������������� 22Production in oPen house systeM ������������������� 23end of rearing /start of lay during a Period of decreasing day length ���������������������������������� 23end of rearing /start of lay during a Period of increasing day length ����������������������������������� 23light intensity ������������������������������������������� 24
FLoor eggs preventIon ����������������������������� 24light �������������������������������������������������������� 24general ManageMent adVices ������������������������� 24behaViour �������������������������������������������������� 24Ventilation ������������������������������������������������ 25rearing ����������������������������������������������������� 25equiPMent �������������������������������������������������� 25
systems eggs For avIary houses ������������������ 25
proLapse preventIon �������������������������������� 25
BIrd BehavIour ��������������������������������������� 26norMal behaViour ��������������������������������������� 26abnorMal behaViour ������������������������������������ 26
Peckin g .................................................... 26
IntroductIon ������������������������������� 2
contents ��������������������������������������� 3warranty disclaiMer ������������������������������������� 4hybridization ����������������������������������������������� 5definition of the different systeMs ������������������� 5
rearIng perIod ������������������������������ 6
BuILdIng and equIpment ������������������������������6feed and water ��������������������������������������������� 6Partitioning ������������������������������������������������� 6heating systeMs �������������������������������������������� 6Perches ������������������������������������������������������� 6Ventilation �������������������������������������������������� 7litter ��������������������������������������������������������� 7lighting systeMs ������������������������������������������� 7
rearIng puLLets �����������������������������������������7basic growth concePts - body weight deVeloPMent & uniforMity ������������������������������������������������ 7PreParing for chick arriVal ����������������������������� 8starting conditions ��������������������������������������� 9brooding Period (0-5 weeks) ��������������������������� 9teMPerature ������������������������������������������������� 9light �������������������������������������������������������� 10light intensity ������������������������������������������� 10water suPPly ���������������������������������������������� 10feed suPPly ������������������������������������������������ 10stocking density ����������������������������������������� 10standards of stocking densities ��������������������� 10
growIng perIod aFter 5 weeks oF age ���������� 11lighting during rearing �������������������������������� 11light intensity: ������������������������������������������ 12beak triMMing �������������������������������������������� 12feeding in rearing ��������������������������������������� 13feed sPecif ications during rearing Period for coMMercial layers ��������������������������������������� 13use of insoluble grit ����������������������������������� 14litter ManageMent��������������������������������������� 14transfer to laying house ������������������������������ 14
PrePa r ation – re a r in g fa r M ............................... 14PrePa r ation – l ay in g fa r M ................................ 15tr a nsfer ................................................... 15arriVa l at th e l ay in g s ite ................................. 15af ter h ous in g ............................................. 15
MiniMuM MeasureMents and record keePing ������ 16
notes ��������������������������������������������16
LayIng perIod �������������������������������17
BuILdIng and equIpment For productIon ������ 17housing equiPMent �������������������������������������� 17slats ������������������������������������������������������� 17feed and water ������������������������������������������� 17
contents

I SA - A l te rnat ive management gu ide I SA - A l te rnat ive management gu ide
crowdin g ................................................. 27broodin e ss ................................................ 27
FIBre For Layer ��������������������������������������� 28
Feed For BIrds In aLternatIve productIon������ 28en ergy ..................................................... 28Prote in a n d a Min o acids requireM ent s ................... 28Min er a l nutr it ion ........................................ 29
FeedIng management �������������������������������� 30
pasture and range management ������������������ 30Pa s ture M a nageM ent: ..................................... 30
termInaL hygIene ������������������������������������� 31
mInImum measurements and record keepIng �� 31
termInaL hygIene program ������������������������ 32stage 1 – re MoVa l ......................................... 32stage 2 – PrePa r atory ..................................... 32stage 3 – wa shin g ......................................... 32stage 4 – re-a sseM b ly ..................................... 32stage 5 – dis in fec t ion..................................... 32stage 6 – dis in fe s tat ion ................................... 32stage 7 – fuMig ation ...................................... 32stage 8 – sa nita ry b re a k Per iod ........................... 32stage 9 – PrePa r ation for a rr iVa l of n e w s tock ......... 32
notes ��������������������������������������������32
BIosecurIty and hygIene �������������33
what Is BIosecurIty? ������������������������������� 33
how to ImpLement BIosecurIty? ����������������� 33
vaccInatIon ������������������������������������������� 34Monitoring ����������������������������������������������� 34
drInkIng water quaLIty ���������������������������� 34water quality ParaMeters ����������������������������� 35
InFormatIon aBout dIseases ����������������������� 36colibacillosis �������������������������������������������� 36e coli in Poultry ����������������������������������������� 36coccidiosis PreVention ��������������������������������� 37worMs ����������������������������������������������������� 37Mites �������������������������������������������������������� 38fly control ����������������������������������������������� 38
appendIx ���������������������������������������39day length tables according to latitude���������� 39latitudes ��������������������������������������������������� 39conVersion table ���������������������������������������� 39
warranty dIscLaImer
This production management guide for layers has been prepared
by Institut de Sélection Animale B.V. and its affiliates (“ISA”)
with the greatest possible care and dedication to inform and
assist ISA’s customers on the various manners of production
to improve their production results while using ISA products.
However, specific circumstances at the farm of the customer
may impact the usability and reliability of the statements and
information mentioned in this production management guide.
No implied or explicit guarantees are given by ISA as to the
accuracy and completeness of the provided information in this
production management guide. Applying the information as
stated in this production management guide in the customers’
production environment remains a decision of the customer,
to be taken at its sole discretion.
ISA will not be liable for any losses or damages whatsoever,
whether in contract, tort or otherwise arising from reliance on
information contained in this production management guide.
V1�00

5 Introduction
I SA - A l te rnat ive management gu ide I SA - A l te rnat ive management gu ide
hyBrIdIzatIon
Lignées pures
GPS
PS
Commerciales
Shéma d’hybridation
A B C D
X X X X
X X
X
Pure lines
Commercial layers
deFInItIon oF the dIFFerent systems
Alternative production systems can be defined as a non-cage system with nests, adequate perches and a scratching area.
Within alternative production systems different housing sub systems can be defined as:
• A barn (deep litter) system is a house where birds have access to a litter area, and are able to practice natural behaviour like
dust bathing and scratching. A barn house also provides nest boxes and can have a slatted area where water and feed are
presented.
• An aviary house (multi tier) is like a barn house, in addition, birds are able to move among different levels. Feed is presented
on different levels and water is mainly presented in front of the nest box. Birds need to move through the system to eat,
drink, rest and produce eggs.
• Free range is either a barn or an aviary house from which birds have access to an outside range area.
White ISA layers in aviary system Brown ISA layers in barn system

6 Rearing Period Building And Equipment
I SA - A l te rnat ive management gu ide I SA - A l te rnat ive management gu ide
rearIng perIodBuILdIng and equIpment
For birds destined to produce eggs on an alternative system
(litter, slatted or aviary), it is strongly recommended that the
same type of housing system is used in rearing and production.
This enables the birds to become familiar with the production
house and its equipment after transfer, overcoming this stressful
period smoothly.
For aviary houses it is strongly recommended that birds are
reared on a system which teaches them to jump to water lines,
ideally located at a higher level. Providing perches in rearing
helps to get a better distribution of birds in the production
house.
In aviary rearing systems, where birds are closed in during the
first weeks, it is important to release the birds at a young age
to promote searching behaviour.
Feed and water
We recommend the use of a feeding system which distributes
the feed rapidly throughout the house and enables the birds
to finish all the distributed feed each day. This encourages the
birds` intake capacity and avoids fine particle accumulation.
Rapid floor mounted chains are the best option, with the easiest
feed intake control.
If pan or tube feeders are used they should be adapted
specifically for this technique.
The feeders as well as drinkers should be easily accessible
and visible for the birds, their height adapted to the size of
the chicks throughout their life. They should not form a big
obstacle to the movement of the birds throughout the house.
They should be placed on slats if slatted areas are used in the
house so that the birds are encouraged to use them.
Birds must use the same drinking system in the production
houses as the one they are already familiar with in the rearing
houses. Nipples must be suitable for day old chicks. For infra
red beak treated birds it is recommended to use a 360° nipple
or provide open water for the first week.
It is a good management practice to provide supplementary
drinkers during the first days of life to promote water
consumption.
In aviary rearing houses it is recommended to check whether
birds are moving in the system - to avoid dehydration
Follow the standards for drinking and feeding space given in
the section on stocking densities and environment - from day
old to depletion.
Remember: if the chicks do not drink enough for any reason,
they will not eat enough. Therefore the growth and uniformity
of the flock will be compromised.
For further details check table 2: Equipment requirement for
rearing
We recommend the installation of feed and water monitoring
equipment.
It is necessary to measure daily water and feed intake. The
consumption/empty feeder time is also a practical tool if
accurate measurements are not possible. Any strong deviations
from the previous day’s consumption might indicate the onset of
diseases or technical problems. A regular inspection of the flock
helps to avoid big surprises in the development of the flock.
partItIonIng
Facilities within the poultry house must be designed for
maximum comfort and must allow birds to express their natural
behaviour. Partitions within the house can be provided to avoid
competition and allow birds to have separate areas/pens for
feeding and drinking. This will also have a positive effect on
bird’s behaviour in terms of smothering, cannibalism, feather
pecking and mortality.
The design should incorporate as many lightweight materials as
possible. This gives better flexibility when moving and helps in
cleaning and disinfection. Lightweight materials can be either
metal, wood or plastic. The design also requires a none solid
wall such as wire mesh (large gauge) to allow airflow through
and to avoid restrictions due to dust accumulation. To prevent
birds on either side of the partition from seeing each other, it
is often recommended the bottom part should be blanked off
to a height of 30 cm.
heatIng systems
Heating system must be sufficient to meet the requirements of
the chicks. It is best to use a closed heating system, without
an open fire, because heaters (burners) consume oxygen and
produce large amounts of CO², which must be ventilated out
of the rearing house.
Different heating system could be used, brooder for spot
heating, canon for whole house heating or floor heating for
modern rearing poultry houses.
We advise to use 2 gas brooders or 2 radiant heaters of 1450
kcal / 1000 birds.
perches
Perches improve welfare by allowing the bird to express its
natural behaviour.
Perches are useful:
• To increase the usable surface per bird and decrease
floor density
• To train the bird to jump in the system
• To offer an escape to aggressed birds
The recommended perch surface per bird is 5 cm. The first
accessible level must be at 20 cm height. Perches must be
introduced before 4 weeks of age.

7 Rearing Period Rearing Pullets
I SA - A l te rnat ive management gu ide I SA - A l te rnat ive management gu ide
ventILatIon
A good ventilation system in rearing house is essential to obtain
good pullets and avoid common problems.
Ventilation must allow:
• Provision of fresh air to the stock
• Temperature control
• Consistent house climate without draughts
• Evacuation of moisture, dust and noxious gases
• Reduction of air borne pathogens level
• Minimizing the risk of conjunctivitis and blind pullets
due to ammonia
• Minimizing the risk of respiratory disease and colibacilosis
The minimum ventilation requirement is 0,7 m³/kg bodyweight
and the maximum ventilation requirement is 3,6m³/kg
bodyweight.
During the coldest winter period, it is sometimes useful to
heat the house after 6 weeks of age to maintain a good
environment in the rearing building, otherwise the problems
mentioned above can occur. Cyclic ventilation could be a way
to ensure a minimum ventilation rate.
LItter
Litter is used to cover the floor in a rearing/brooder house.
It usually consists of wood shavings or chopped straw. Litter
is an important component of the rearing input that must be
well managed to prevent unhealthy environment and potential
disease conditions. Good quality shavings must be used as litter
to avoid the risk of introducing various diseases to the site.
The following advice may assist in good litter management:
• Fresh shavings must be dried and friable
• Must be a suitable material and particle size
• Be stored in dry, hygienic, rodent-proof premises
• Avoid introducing wet or damp shavings into rearing house
• Do not use saw dust, as this could cause respiratory
issues with chicks
• Avoid wet or caked litter
Good litter when pressed in the hand should stick together
slightly and break up as the hand is released.
Litter is important in the regulation of floor temperature
and subsequently the chick’s body temperature. The litter
temperature should be approx 30˚C at the time the chicks are
placed onto the floor. This is very important for the development
of the chick in the first few days as they cannot self -regulate
their body temperature until approxiately 7 days.
Concrete floor houses with significant litter depth can lead to
moisture problem.
LIghtIng systems
Lighting systems in rearing must be dimmable and programmable.
Lights must be placed in different strategic places, above the
perches, slatted area and above the floor. Lighting system
must be independent and must allow for the programming
of each line individually. To promote a good behaviour in lay,
birds must be trained from a young age to climb on to perches
before the lights are switched off, by switching off the floor
lines first and then the perch lights.
Light intensity must be uniform inside the building. If not, it is
strongly recommended to increase bulb numbers. Use of low
frequency light could lead to flickering light, which increases
stress in the flock.
rearIng puLLets
BasIc growth concepts - Body weIght deveLopment & unIFormIty
It is extremely important to follow ISA body weight
recommendations during the whole life of the birds. From
day old to transfer, the bird will grow slowly and organ
development occurs at various ages. A lack of growth during
a stage could have a detrimental impact on pullet quality. Two
birds with the same body weight haven’t necessarily developed
the same body composition. Good growth curves lead to good
pullet development.
Growth is split in the following stages:
• The first 3 weeks are devoted to immune system and the
organ development
• From week 3 to week 6, skeleton and muscles are growing
Body weight at 5 / 6 weeks is the most important determinant of
pullet quality. Growth delay at this stage is harmful to the birds.
The next step is characterised by ovary development and rapid
growth of these organs. Sexual hormonal regulation takes place
around 18 weeks and leads to sexual maturity around 18 weeks.
At all stages flock uniformity has to be followed up to. The
objective is to have a very high uniformity in order to facilitate
flock management and stimulation. Too low uniformity leads
to poor laying performance. Number of feeders and drinkers,
feed distribution, feed presentation, management, etc… are
strong contributors to ensure uniformity. Heterogeneity at
early age has a negative impact on uniformity during transfer.
8 Rearing Period Rearing Pullets
I SA - A l te rnat ive management gu ide I SA - A l te rnat ive management gu ide
Figure 1: Bodyweight development
preparIng For chIck arrIvaL
When chicks are destined for the alternative system, we strongly
recommend a similar rearing system. The house should be
empty for at least 14 days after all the traces of the previous
flock (droppings, feathers, litter and feed) have been cleaned
out. The walls, ceiling, floor and equipment should be washed
thoroughly and disinfected. The building and its contents should
be dry before the next use.
• 12 • 6 ___________________________________________________ ___________________________________________________ ___ 0 1 2 3 4 5 6 7 8 9 10 11 12 13 14 15 16 17 18 19 20 21 22
Growth (g)
Organs
BW growth
Skeletal
Calcium Increaseat prelay
Reproductivetract
Fat
Medullary bone
Weeks in age
Muscles
table 1: standards for temperature and humidity
age(days) Brooding temperature at
the edge of the brooders
Brooding temperature at
2/3m from the brooders
room temperature relative humidity optimal
& maximal in %
0 – 3 35ºC 29 - 28ºC 33 - 31ºC 55 – 60
4 – 7 34°C 27ºC 32 - 31ºC 55 – 60
8 – 14 32ºC 26ºC 30 - 28ºC 55 – 60
15 – 21 29ºC 26 - 25ºC 28 - 26ºC 55 – 60
22 – 24 25 - 23ºC 25 - 23ºC 55 – 65
25 – 28 23 - 21ºC 23 - 21ºC 55 – 65
29 – 35 21 - 19ºC 21 - 19ºC 60 – 70
After 35 19 - 17ºC 19 - 17ºC 60 - 70
The chicks’ behaviour is the best indicator of their comfort. If they crowd together or close to the heater, it is too cold, if they tend
to escape from it and are close to surrounding or wall, it is too warm.
Start the heating system 24 to 36 hours before chicks arrive,
depending on climatic conditions, so that the brooder area and
litter are warm enough and their temperature is steady. Adjust
the heating system to 31-33ºC in the house (or 35ºC at the
edge of brooders if these are used for the chicks’ arrival). Look
for a uniform temperature and humidity throughout the house.
Place enough drinkers and feeders evenly through the house.
9 Rearing Period Rearing Pullets
I SA - A l te rnat ive management gu ide I SA - A l te rnat ive management gu ide
Figure 2: recommendended layout for 500 chicks
A: radiant heater of 1450 kcal capacity
B: drinkers (5) but (7) for hot climate
C: feed trays (10)
D: 75 watt bulb at 1.5M above floor level
E: surround: 4m diameter – 0.6 m high
32 to 35 °C
Figure 3: radiant heater position and ground temperature
BroodIng perIod (0-5 weeks)
The main goal of this period is to reach the bodyweight
standard at 5 weeks of age. The starting conditions in the
house – recommended temperature, humidity, light intensity
and duration, air exchange, enough space and an easy access
to good quality water and feed - will provide the chicks with
the necessary comfort to get to this target.
Any delay in growth at 4-5 weeks will be reflected in a reduction
in bodyweight at 16 weeks and then in performance, particularly
in mean egg weight in temperate climates.
Brooding at high density (double brooding) requires special
attention to the following points:
• Adjust the equipment to the bird number
• Do not release birds too late (4-5 weeks)
Otherwise, it will:
• Affect growth and uniformity
• Increase disease challenge
• Affect litter quality
temperature
Keep in mind that during the first few days the chicks have to
rely on the temperature that we maintain, before their own
thermoregulation starts to work properly. The best way to
check if the house temperature is correct during this period,
is to measure cloacal temperature of the chicks (40°C/104°F).
As a general rule we start with room temperatures of 31-33°C
during the first week and decrease then gradually to reach
around 20ºC at 5 weeks of age.
We give the temperature standards in Table 1 but again, the
observation of the flock is the best indicator of real needs.
When birds are crowding, temperature is too low. When birds
are inactive, lethargic and spreading away from the heat source,
temperature is too high.
Some events in the flock (e.g. Post vaccine reaction) might
require an increase in the temperature temporarily, to help the
chicks to cope with the stress.
On the other hand, high temperatures could limit good
feathering, feed intake and consequently the birds growth. It
is also important to prevent floor draughts. Adjust ventilation
to achieve an even room temperature without sudden changes.
Draught proof circular “chick guards” of a clean and flexible
material could be used. They serve to keep chicks comfortable.
In cases of multi age rearing, which we do not recommend,
temperature settings must be based on youngest chicks. Chicks
have to be reared in separate pens to maintain uniformity.
See table 1: Standards for temperature and humidity
startIng condItIons

10 Rearing Period Rearing Pullets
I SA - A l te rnat ive management gu ide I SA - A l te rnat ive management gu ide
LIght
Maintain 23-22 hours of light for the first few days with a
light intensity 30-40 lux to encourage the activity of chicks
and feed and water intake. Use the normal decreasing lighting
programme with 10-15 lux afterwards (in dark houses – rearing
or production). Later on adapt the light intensity to the birds’
behaviour and designated production system.
Note: a cyclic program could be applied for the first 2 weeks
(4h of light /2h of dark, repeated 4 times to equal 24h) and
then follow recommended lighting program, so 18 hours of
light on third week.
See table 3: Lighting program for alternative production
according to day length at 15 weeks
LIght IntensIty
It is recommended to keep a high light intensity for the first
few days to encourage water and feed intake.
See table 4 : Recommended light intensity for rearing period
water suppLy
Do not forget to wash the drinking system after disinfection,
use tepid water for the first 2 days (20-25ºc).
Start to use the automatic drinking system from the arrival
of the chicks. The use of supplementary drinkers during the
first day will improve the health of the chicks (remove them
gradually from day 4).
Clean the drinkers daily during the first 2 weeks, then once a
week.When nipple drinkers are used, use the strips of embossed
paper under the drinkers’ lines.
Adjust the lines height to that of chicks, so that all of them
have a chance to start. Enough drinking space easily accessible
is a very important tool to prevent non-starting chicks and
uneven flock.
Use a suitable water quality (see Table 17: Water quality
parameters).
Feed suppLy
A good quality starter feed should be distributed when chicks
have drunk enough water to restore their body fluid (4 hours
after delivery) where it is possible to do so.
Feed with 2950 kcal/kg and 20.5% of protein presented in
crumbs and also easily accessible for the chicks is recommended.
You can use the small additional feeders or non-smooth paper to
increase the feeding space for the first few days. We recommend
distributing smaller quantities of feed several times per day
during the first 4 weeks. Start to use the automatic feeding
system from the very beginning so that chicks get accustomed
to it. Let the chicks empty the feeders once or twice a week
to avoid the accumulation of the fine particles in the feeders.
stockIng densIty
This is one of the most important parameters of the starting
conditions. Overcrowded flock tends to have higher mortality
and culls, slower growth and lower uniformity. Keep to the
optimum stocking densities from the early arrival of the chicks.
standards oF stockIng densItIes
table 2 : equipement requirement for rearing
Stocking density (maximum) 12-14 birds / m²
Minimum ventilation rate 0.7 m³ / h / kg
Heating 2 gas brooders or 2 radiant heaters of 1450 Kcal / 1000 birds
Drinkers
Starters
Temperate climate 1 starter / 100 birds
Hot climate 1 starter / 80 birds
Bell drinkers nipples 150 birds / Hanging bell drinker (80 to 100 for hot cl imate)
Temperate climate 16 birds / nipple
Hot climate 10 birds / nipple
Feeders
Per starting pan 50 birds / starting pan
Linear chain 4 cm / bird
Per feeder 1 unit / 50 birds

11 Rearing Period Growing Period After 5 Weeks Of Age
I SA - A l te rnat ive management gu ide I SA - A l te rnat ive management gu ide
growIng perIod aFter 5 weeks oF age
LIghtIng durIng rearIng
Pullets are sensitive to changes in the lighting regime, and
these will influence the age of sexual maturity. In addition feed
consumption is greatly influenced by the duration of day length.
During rearing, the main objectives of lighting programs are
encouraging growth and controlling the birds’ sexual maturity.
Lighting programs should be adapted to rearing facilities (dark
or open house systems), conditions of production, climate and
the egg weight profile required by the market.
Irrespective of the type of building (natural or artificial light)
never increase day length between 6 weeks of age and the
moment of light stimulation. Time of light stimulation should
always be based on body weight, not on age. Premature light
stimulation and/or too low bodyweight can lead to poor
performance later in production (peak and persistency), as
well as higher mortality and poor egg shell quality.
C
B
A
A B C
Lightduration
Age in weeks
Lighting programmeduring temperate period
Lighting programmeduring hot season
Lighting programmedalaying maturity
GUIDE LINE FOR LIGHTING PROGRAMME FOR REARING IN A DARK POULTRY HOUSE
When pullets are reared in dark houses a slow step down lighting
program is recommended in order to maximize growth during
the first weeks and then a constant light duration adapted to
the growth performance or sexual maturity expected.
When pullets are reared in open system houses, control of
sexual maturity is difficult to achieve. It is recommended to
darken the poultry house and to use a lighting programme
taking into account the natural day length at the moment of
transfer. Total light duration must never be shorter than the
longest natural day length in the period between 6 weeks of
age and light stimulation.
Figure 5: guide line for lighting programme for rearing in a dark poultry house

12 Rearing Period Growing Period After 5 Weeks Of Age
I SA - A l te rnat ive management gu ide I SA - A l te rnat ive management gu ide
table 3: Lighting program for alternative production according to day length at 15 weeks
age and / or weight duration of light at 15 weeks (hours)
10 11 12 13 ≥14
1 - 3 Days 23 23 23 23 23
4 - 7 Days 22 22 22 22 22
8 - 14 Days 20 20 20 20 20
15 - 21 Days 18 18 18 18 18
22 - 28 Days 16 16 16 16 16
29 - 35 Days 14 14 14 14 15
36 - 42 Days 12 13 13 13.30 14
43 - 49 Days 11 12 12.30 13 14
Decreasing daylengths:
From 49 days to l ight stimulation10 Natural l ight Natural l ight Natural l ight Natural l ight
Increasing daylengths:
From 49 days to l ight stimulation 10 11 12 13 14
LIght IntensIty:
Light intensity should be gradually reduced to reach a level adapted to the conditions of the production house. Light intensity is a
good tool to modulate bird behaviour and feed consumption.
table 4 : recommended light intensity for rearing period
age (days) Light intensity
rearing & production in dark house
production in houses exposed to natural light
1 – 3 20 – 40 lux 40 lux
4 – 7 15 – 30 lux 40 lux
8 – 14 10 – 20 lux 40 lux
15 – Transfer 5 – 10 lux 40 lux
Beak trImmIng
This operation is usually carried out to prevent feather pecking
and cannibalism. In addition to technical recommendations,
any codes and local regulations concerned with animal welfare
should be followed.
Different methods for beak trimming are used, for example
cauterization by hot blade or infra-red treatment.
Cauterization by hot blade is a delicate operation, which
should only be performed by specially trained personnel. If
it is improperly done it will result in birds having difficulties
with eating and drinking leading to unevenness in the flock
and therefore poor performances and higher mortality later
in production. This treatment can be carried out in both the
hatchery or the rearing house.
Beak trimming by hot blade is a stressful operation: it is not
recommended to beak treat birds if the flock is not in good
health or if it is suffering from vaccine reactions. In rearing
house, adding vitamin K to the drinking water 48 hours prior
to beak trimming is helpful to prevent haemorrhages.
The equipment must be checked and properly set to make
sure that the blade is at the right temperature to cauterize
and prevent bleeding.
It is important to select the correct diameter hole for the chick
age on the beak-tipping machine and to hold the head of the
chick firmly. The chick’s beak should be held upwards at an
angle of 15 º above horizontal and the reinforced side edges
of the beak cauterized, to avoid unequal re-growth of the 2
mandibles.
After beak trimming, we recommend increasing the water
level in the drinkers and lowering the pressure in the pipes
for some days to make it easier for the birds to drink, as well
as increasing the depth of the feed to avoid the feeders from
becoming empty. Beak treatment can also be carried out at
one day old in the hatchery, before delivery of the chicks. As
the beak of the chick treated at day old is still sensitive, it is
recommended to use sideways activated nipples (360°) or
nipple drinkers with cups and using supplementary starting
mini drinkers in the rearing farm for the first few days.
Infrared treatment is done at one day old at the hatchery and
is a less stressful process then beak trimming.

13 Rearing Period Growing Period After 5 Weeks Of Age
I SA - A l te rnat ive management gu ide I SA - A l te rnat ive management gu ide
FeedIng In rearIng
Basic principles concerning feeding for chicks are:
• Do not change the feed if birds do not reach the standard bodyweight
• Promote early growth, skeleton and organ development by providing feed in crumble form for starter diet
• Use a good coarse mash grist for grower, pullet and pre lay feed
• Develop digestive tract and eating capacity (feeding management / grit)
• Feed specifications for alternative production pullet do not differ from intensive system recommendations
Feed specIF IcatIons durIng rearIng perIod For commercIaL Layers
Those requirements are based on the “european amino acids table” (WPSA, 1992) of raw materials composition and expressed
as digestible amino acids by using the digestibility coefficients mentioned in the “Tables de composition et de valeur nutritive des
matières premières destinées aux animaux d’élevage”INRA edition 2002.
table 5: Feed specifications during rearing period for commercial layers
Between
18 - 24 °c
diet
units
starter
0-4 weeks
1-28 days
grower
4-10 weeks 28-70 days
pullet
10 - 16 weeks 70 - 112
days
pre - lay
112 days to 2 % lay
Metabolisable energy kcal/kg 2950-2975 2850-2875 2750 2750
Mj/kg 12.3-12.4 11.9-12.0 11.5 11.5
Crude protein % 20.5 19 16 16,8
Methionine % 0.52 0.45 0.33 0,40
Methionine + cystine % 0.86 0.76 0.60 0.67
Lysine % 1.16 0.98 0.74 0.80
Threonine % 0.78 0.66 0.50 0.56
Tryptophan % 0.217 0.194 0.168 0.181
Digestible amino acids
Dig. Methionine % 0.48 0.41 0.30 0.38
Dig. Meth. + Cystine % 0.78 0.66 0.53 0.60
Dig. Lysine % 1.00 0.85 0.64 0.71
Dig. Threonine. % 0.67 0.57 0.43 0.48
Dig. Tryptophan % 0.186 0.166 0.145 0.155
Major minerals
Calcium % 1.05-1.10 0.90-1.10 0.90-1.00 (1) 2-2.10 (1)
Available phosphorus % 0.48 0.42 0.36 0.42
Chlorine minimum % 0.15 0.15 0.14 0.14
Sodium minimum % 0.16 0.16 0.15 0.15above 24° c
Metabolisable energy kcal/kg 2950-2975 2850-2875 2750 2750
Mj/kg 12.3-12.4 11.9-12.0 11.5 11.5
Crude protein % 20.5 20.0 16.8 17.5
Methionine % 0.52 0.47 0.35 0.42
Methionine + cystine % 0.86 0.80 0.63 0.70
Lysine % 1.16 1.03 0.78 0.84
Threonine % 0.78 0.69 0.53 0.59
Tryptophan % 0.217 0.207 0.175 0.190
Digestible amino acids
Dig. Methionine % 0.48 0.43 0.32 0.40
Dig. Meth. + Cystine % 0.78 0.69 0.56 0.63
Dig. Lysine % 1.00 0.89 0.67 0.74
Dig. Threonine. % 0.67 0.61 0.45 0.50
Dig. Tryptophan % 0.195 0.175 0.152 0.163
Major minerals
Calcium % 1.05 - 1.10 0.95 - 1.10 0.95-1.05(1) 2.1-2.2 (1)
Available phosphorus % 0.48 0.44 0.38 0.44
Chlorine minimum % 0.16 0.16 0.15 0.15
Sodium minimum % 0.17 0.17 0.16 0.16
(1) : To avoid falls in food consumption, 50% of the calcium should be supplied in granular form (diameter = 2 to 4 mm)

14 Rearing Period Growing Period After 5 Weeks Of Age
I SA - A l te rnat ive management gu ide I SA - A l te rnat ive management gu ide
use oF InsoLuBLe grIt
We recommend the distribution of grit for pullets. The grit must
be coarse and insoluble in order to develop the crop and gizzard.
The effect of this action on the digestive tract will promote a
good feed intake, which will be beneficial at the start of lay.
Grit can be provided in a round feeder or spread on the floor
by hand. The birds will scratch the floor and look for the grit.
This will contribute to improve litter quality by aerating it. In
addition, the flock is then distracted, aggression is decreased
and feathering improved.
Between 3 and 10 weeks, we recommend that 3 g per pullet
per week (particle size 2 to 3 mm) are available. After 10 weeks
this can be increased to 4 to 5 g (particle size 3 to 5 mm). It is
also possible from 10 weeks onwards to use a diet where 50
% of the calcium is supplied in carbonate form with a particle
size of 2 - 4 mm.
LItter management
Litter management points:
• The top priority is to keep the litter dry. Well managed
ventilation and good gut health are key points.
• The litter should be neither too wet nor too dry (about
25 to 30% of water)
• Litter should be friable and ‘moveable’. The birds help to
maintain this condition by scratching and dust bathing.
Providing a small daily ‘scratch feed’ of whole grain,
preferably good quality wheat or insoluble grit may
encourage scratching
• Water pressure in drinker supply lines should meet
suppliers specification to avoid leakage
• Drinkers should not be overfilled. Hanging plastic drinkers
of the ‘bell’ type should contain no more than 1.5 cm
depth of water. Furthermore these drinkers should be
suspended at such a height as to minimise the problem
of spillage resulting when birds collide with them. If the
birds can just reach to drink, and also be able to walk
underneath these drinkers, the height is ideal.
• Where nipple drinkers are provided, they should be
suspended so that the birds have to reach up to drink.
They should also be provided with (large) drip cups, in
order to reduce spillage directly from the nipples on to
the litter.
• Litter depth should be 5 to 10 cm depending on type
of floor
• Additional litter should be added, on top of the existing, in
order that moisture content is kept low. The requirement
for additional litter is very low during the summer, but
high during cold wet weather.
• Wet patches resulting from water spillage should be
promptly removed, and additional litter provided.
• During cold and / or wet weather, it is important to
regularly work the litter with a fork, in order to break up
accumulating droppings, and to ‘open up’ any compacted
litter. Usually some fresh material will be added at this
time.
transFer to LayIng house
This is a stressful period for the birds. In effect they experience
two stresses, the handling and transport involved in movement
from rearing to laying facilities, plus the change from rearing
to laying environment.
Transfer requires careful planning and management.
Transfer should ideally be done 4 weeks before production and
certainly no later than two weeks before egg production starts.
The purpose is that recovery from the stress is completed, and
does not depress the rapid ovarian development, which occurs
prior to, the commencement of egg production.
Late transfer bears the real risk of damage to the birds, in
particular to the ovaries. It is ideal to transfer when the birds
are 16 weeks of age, this will enable them to be fully adapted
to the layer housing and facilities well in advance of the onset
of lay. If birds are transferred too close to the onset of lay, the
subsequent risk of egg peritonitis is high. The movement of
birds with mature ovaries may cause rupture of yolk follicles,
which are then deposited in the body cavity.
Late transfer may also result in floor egg laying, as the birds
have not had sufficient time to become accustomed to their
new surroundings.
When transferred, the stock should be fed a pre-lay or a layers
ration – grower or pullet rations must not be used, as the
nutrient density of these feeds is too low.
PreParation – rearing farMThere is an important preliminary period before transfer, in
which time the stock is prepared for the conditions they will
encounter in the laying house. The following points should
be considered:
• The birds must always conform to the breed bodyweight.
This should not simply be according to the age of the
birds but also according to age of sexual maturity. Note
that due to the effects of transfer, birds weight can be
reduced by 10% to 15% due to moisture loss.
• Light intensity should be increased, over a period of 2
to 4 weeks, and must be equal to the level in the laying
house.*
• Rearing house temperature should also be adjusted
(usually to a lower level), over a period of 2 to 4 weeks, in
order to become similar to laying facilities temperature.*
• These two changes should be no less than 1 week before
transfer, hence the stock is well accustomed to the laying
house conditions.
• Two weeks prior to transfer the birds should not be
handled, except for routine uniformity and bodyweight
checks. Birds must have every opportunity to grow, even
during this critical period.
• Insoluble grit should have been provided for the flock,
ideally during the entire rearing period, but at least 2
weeks prior to transfer. At this time the grit should be 3
to 5 mm in size, and provided at a rate of 4 g/bird/week.

15 Rearing Period Growing Period After 5 Weeks Of Age
I SA - A l te rnat ive management gu ide I SA - A l te rnat ive management gu ide
• Feed withdrawal before departure should not exceed 6
hours and should be adapted to transport duration and
climatic conditions.
PreParation – laying farMThe laying house should be well prepared well prior to the arrival
of the new flock. The following points should be considered:
• An appropriate terminal hygiene programme, must be
implemented to avoid disease transmission.
• Maintenance and repairs completed before arrival of stock.
• Flush the water system and provide fresh water the day
before arrival of new stock. This is critical, as the key to
the successful start of the incoming flock is provision of
water. The better the water quality, the less the depression
in feed intake following transfer.
• Where nipple lines are used ensure the height is slightly
above the back of the birds (for the first 7 days), then
raised to ensure birds “comfortably stretch” to use the
nipples. Bell drinkers should be filled to double the normal
depth, and lowered to a height of 20 cm above floor
level, for the first two or three days.
• The house should be dried prior to the arrival of the new
flock. Not only are wet houses very humid, (a condition
which is depressing for the birds), they are also cold –
which is particularly noticeable during winter. Straw could
be added below the slats to absorb excessive humidity
and improve the environment.
• The house should be preheated in cold season
transferAn ideal time for transfer is during the early morning.
Disturbance to routines of drinking and eating is minimised
if the stock are unloaded and housed by the time their day
started on the rearing farm.
Transport vehicle and equipment must be clean and disinfected.
The flock should be transferred within the same day, as
this causes less stress, and avoids possible problems of low
temperatures in partially filled rearing and laying houses. Every
effort should be made before and after transfer to maintain
water and feed intake according to the normal routine of the
stock.
Precautions should be taken to minimise undue exposure to
wind and rain/sun during transfer procedure as these factors
are very stressful.
arriVal at the laying siteUnloading is a delicate procedure, it should be done as quickly
as possible into the laying house with the following provisions:
• A dry house (and equipment) at a temperature of not less
than 15°C (60°F), 18°C (65°F) is the optimum, especially
in cold weather.
• In order to encourage water intake, drinking water must
be clean and fresh from the pullets arrival. Ideally feed
should not be available at the time of the birds’ arrival
and it should be given about 2 hours later, when the flock
has had the opportunity to drink. During transport and
handling the birds lose moisture, and it is essential that
this is restored as soon as possible after arrival
• In order to improve appetite, it is better to use meal
feeding instead of ad-libitum (see Feeding management).
after housingThe period of the first 48 hours after housing is a critical period
so close supervision and observation are required to ensure
the normal behaviour of the entire flock.
The following points should be noted:
• Water consumption – normal drinking habits, within 6
hours after arrival.
• Temperature: ideally 15°C but with a maximum of 18°C.
It is important that birds do not become chilled but they
must have fresh air.
• Feed consumption – increasing appetite / intake.
• General attitude of the flock. At first it will be quiet, but
should gradually become more active and ‘talkative’, but
not frenetic or hyperactive.
• If slats are incorporated in the house, the birds have to
be encouraged to perch during the dark night period.
This may take some time initially, prior and during lights
off. This will take 3 to 7 days to take effect and birds
will then routinely perch naturally.
• Nest boxes must be closed until you see the first egg.
Open them almost 2 hours before the main house lights
and keep open until late afternoon
• Light intensity must be high (refer to lighting chapter),
• Dim the light gradually at light off (refer to lighting
chapter)
• It is recommended that birds are kept on the system for
few days if they are not reared on a partly slatted house
(according to local regulation)
During the first two days, the farm worker should spend time
with the birds, observing behaviour and monitoring water and
feed consumption. At the same time the birds will identify with
this person. This is beneficial to the relationship between the
flock and the stock person.
Inspection of the flock at any time (but especially at the start)
should not be limited to the daytime. Listening to the birds after
turning off the lights can be very useful. Although unlikely at
this stage, snicking as a result of a respiratory infection can
readily be detected when the flock is resting. Are they going
up in the system? (Refer to: working with birds).
For systems using slatted and litter area, it is recommended
to place and keep birds on slats for 3 to 4 days to allow them
to familiarise with feeders and drinkers.
It is recommended to move the remaining birds from the litter
to the slats immediately after turning off the lights.
16 Rearing Period Growing Period After 5 Weeks Of Age
I SA - A l te rnat ive management gu ide I SA - A l te rnat ive management gu ide
mInImum measurements and record keepIng
Aim: quick problem detection, quick reaction on problems or abnormalities.
table 6: Minimum measurements and record keeping
traits optimal advised practices
Feed consumption weekly
Water consumption daily
Hen bodyweight weekly
Mortality daily
Climate daily
notes

17 Laying Period Building And Equipment For Production
I SA - A l te rnat ive management gu ide I SA - A l te rnat ive management gu ide
sLats
Slats can be manufactured using different materials (plastic,
wood or metal). The slat level should be adapted according to
building design and production duration. The slat height must
be sufficient to store the manure for the whole production
cycle. However, if the slats edge is too high (>90cm), birds
will have difficulty accessing the slatted area.
To assist the birds to move from the litter to the slats/system
the provision of perches is required. Perch rails are generally
preferable to ‘ladders’, as birds may choose to lay their eggs,
or even to crowd and smother in the area under ladders. A
gradual (enclosed) slope from floor to slatted area can also
be used – angle to be at a level in which to avoid birds from
perching/resting on it. If the slope is too steep, it could lead to
an increase in floor eggs and make the access to the feeding
and drinking system difficult for the bird.
Feed and water
We recommend the use of a feeding system that distributes
the feed rapidly throughout the house and enables the birds to
finish all the distributed daily feed. It will continue to support
the birds` intake capacity, developed in rearing and lead to fast
and continuous increase of feed intake from point of lay to
its` peak of production. Rapid floor mounted chain feeders are
proving to be the best option and have the easiest feed intake
control. If pan or tube feeders are being used they should be
adapted properly to this technique.
It is very important that birds find the same type of drinkers
already accustomed to in the rearing house (for example
nipples to nipples).
The feeders, as well as drinkers, should have their height
adapted to the size of the birds so they are easily accessible
and seen by the birds. They should not form a big obstacle
to the movement of the birds throughout the house. They
should be placed on slats (preferably in front of the nests), in
case slatted areas are used in the house so that the birds are
encouraged to use them. The drinker line attracts the birds
to the nest boxes.
As already stated, the standards for drinking and feeding space
given in the section on stocking densities and environment
must be followed from transfer till depletion.
Remember: if the bird does not drink enough for any reason
it will not eat enough and so the growth, uniformity and
production of the flock will be compromised.
nests
One comfortable individual nest should be available for 5 – 6
birds or 1 m² of collective nest for 120 birds (in some specific
situations 100 birds / m² can be beneficial, see floor eggs
section). If an individual nest is used, nests should be strawed
to encourage the birds to use them. Nests must always be clean
and well maintained. A good practice is to fit the nests with
a dim (0.3-0.5 lux) light that allows the birds to find the nest
before the normal day starts. If this is not possible a dim light
placed over the slats and close to the nest must be switched
on 1.5 h before lights on to avoid floor eggs.
LayIng perIod
BuILdIng and equIpment For productIon
housIng equIpment
It is strongly recommended to rear birds using the same system that will be used in production
table 7 : standard stocking densities and environment�
Stocking density 7 birds / m²*
Minimum ventilation rate 0.7 m³ / h / kg
Drinkers
Bell drinkers 100 birds / Hanging bell drinker ( 80 in hot cl imate )
Nipple 10 birds / nipple
Feeders
Per feeding pan 25 birds / round feeder - pan
Linear chain minimum 10 cm / bird
Nest boxes 5-6 birds per nest / 120 birds per 1m² of collective nest
Perches 10 cm of perches / hen (distance 40 cm from each other)
Pop hole (access to free range) 1 / 600 hens
*Stocking densities are given for the deep litter systems. Stocking densities for aviaries could be higher – follow the manufacturer recommendations.
Do not forget to provide always enough drinking and feeding space according to the given technical requirements and local regulations.

18 Laying Period Building And Equipment For Production
I SA - A l te rnat ive management gu ide I SA - A l te rnat ive management gu ide
perches
Perches improve the welfare by allowing the bird to express
its natural behaviour.
Perches are useful to:
• increase the usable surface per bird and decreasing floor
density
• train the bird to jump on the system
• offer an escape to aggressed birds
Recommended perch length per bird is a minimum of 10 cm.
The first accessible level must be at 20 cm high. These values
may be adjusted according to local regulations.
The perches should be situated on the slats to maintain good
litter conditions. Distance between perches should be 40 cm
and a slope of 45°.
partItIonIng and FencIng
Pen size must be adapted according to local regulation.
Partitioning the house in different pens has two advantages:
• better distribution of the birds
• easier flock management
fencing – outsidePerimeter fencing is needed to protect birds from foxes,
domestic pets, feral cats, mink, badgers, other predators and
to reinforce security and bio security.
A typical fencing example could be a wire type mesh
construction, 2 metres with an overhang of 30cm, placed at an
angle of 45 degrees to the vertical on the outside of the fence.
The bottom of the fence would be approx 30 cm underground
to act as an anti-tunnelling barrier. Alternatively commercially
available safety electric fencing can be used.
In addition to reduce entry by foxes or similar predators electric
wiring could be placed on the top of the fence. To avoid gaining
access under the fence it is recommended to go approximately
50 cm underground (horizontal) with the fence.
heatIng
The laying house temperatures should be kept between 18-
22°C, though the birds will withstand the lower temperatures
during winter and higher temperatures during summer.
At lower temperatures a hen increases feed intake as the
maintenance requirements increase. On the other hand, at
higher temperatures birds tend to decrease feed consumption
due to a lower maintenance requirement and to dissipate the
heat excess produced in the metabolism.
Throughout the winter season, temperatures in the rearing
houses before and during transfer must be adjusted to those in
the production houses. Moreover, to avoid temperature stress in
wintertime, it is advisable to preheat the production houses up
to 18°C before transferring point of lay pullets and to respect
minimum ventilation (cf. Ventilation part) requirements to
avoid damage caused by high CO² and NH3 levels. It is however
preferable to go down in temperature than to go up in CO2/
NH3 levels. If necessary, use heaters.
ventILatIon
An important priority is the provision of fresh air. If the air
inside the poultry house is stuffy, humid, smelly or laden with
dust, then the rate of air change is too low.
The minimum air exchange rate is 0.7 m³ / hour / kg live bird.
Besides supplying the poultry house with fresh air, these points
must be taken into consideration:
• Removal of excess moisture helps to maintain a good
litter quality and healthy birds.
• Removal of dust from the atmosphere helps to prevent
disease. There is a strong association between dust
particles and disease, as disease organisms tend to
associate with particles of dust.
• Maintain a sufficient oxygen supply.
• Removal of gasses such as ammonia. In addition to the
specific problem of ‘ammonia blindness’, these gasses
have a generally stressful and depressive effect on the
birds.
Ventilation systeMA free range house may be ventilated mechanically, naturally,
or by a combination of both systems. Fundamental to any
system is the need for finely adjustable air inlets, usually at
eaves level on both sides of the house, and outlets in the apex
of the roof – the ridge. However, some houses may be cross
ventilated, with inlets one side of the building and the extractor
fans on the other side.
aIr cIrcuLatIon
When rate of air change is low, it is important that air is
circulated for the following reasons:
• Fresh air should be distributed to all parts of the house.
• If the warm air, from higher levels in the building is mixed
with lower levels air, birds will enjoy a more balanced
temperature.
• Mixing air allows greater removal of moisture from the
litter, keeping it dry.
• During hot weather, the effect of air moving over the
birds is one of comfort, which can help mitigate the effect
of temperature being above the optimum.
• Avoid direct draughts on the birds.
There are a number of ways to make air circulate within the
house, one of the least expensive is to purchase an axial fan
or air distribution fans.

19 Laying Period Building And Equipment For Production
I SA - A l te rnat ive management gu ide I SA - A l te rnat ive management gu ide
aIr quaLIty recommendatIons
table 8: air quality levels
trait recommended level
Ammonia (NH³) 20 ppm max
Carbon dioxide (CO²) 2500 ppm max
Frequent proBLems assocIated wIth poor ventILatIon
table 9: air quality recommendations
too little ventilation too many uneven
E coli E coli E coli
Respiratory diseases Respiratory diseases Respiratory diseases
Feed intake Feed intake Feed intake
Ammonia blindness Floor eggs Floor eggs
Poor internal and external egg quality Nervousness Nervousness
Poor production Poor production
Crowding Crowding
Litter quality Litter quality
LItter
Litter enables the birds to perform the natural functions of
scratching and dust bathing, which most welfare authorities
deem necessary for bird wellbeing. There is no doubt that the
presence of litter enables the birds to be more relaxed.
Slatted areas cover an enclosure, to which the birds are denied
access, for storage of manure. This separation of manure from
the litter makes the task of maintaining the litter in good
condition much less onerous, particularly during wet and cold
weather.
The litter adjoining the slatted area should be well lit, in order
to deter floor egg laying.
LItter management
The objective of litter management is to maintain a dry, friable
and almost odourless material, which is attractive to the birds
for scratching, and dust bathing.
The type and quality of the litter are important for the hens
and the house climate.
Different materials, which may be used:
• Sand or gravel up to 8 mm granule size
• Wood shavings
• Wheat, spelt, rye straw
• Bark mulch
• Coarse wood chips
There are two materials, which are popular - soft wood (white)
shavings and chopped straw. Sawdust is not a suitable material,
as once moistened it compacts and becomes immovable, and
consequently does not release moisture to the atmosphere.
Litter material shouldn’t be contaminated, or stored on site
from flock to flock of birds. Both materials should be dry and
uncontaminated when spread in the poultry house. Straw
should be chemically treated in order to ensure freedom from
moulds, in particular aspergillus species.
If the system allows it, it is recommended to remove frequently
accumulated litter/manure. This prevents floor eggs and
improves environment. Avoid wet and caked litter.
LIghtIng systems
The lighting system in lay must be designed to ensure
independent lighting control of the different areas. We suggest
the creation of at least two zones, one lighting line above the
nests and one lighting line above the scratching area. Three
types of lighting line is the optimum, one for scratching area,
one for slats area and one above the nests.
All lighting lines must be dimmable and programmable. The
dimming ability of the system will allow the control of behaviour
inside the building and avoid dark areas where birds may lay
on floor.
An independent programmable lighting row encourages birds
to climb/move on to slats and not to sleep on the scratching
area. This point is important to avoid floor eggs.
Nest lights can be used with brown birds to attract them into
the nest before the general lighting is on. Lighting systems using
bulbs of too low frequency will result in flickering light which
will stress birds. Warm colour type (yellow-orange spectrum)
must be used. In the event of negative bird behaviour, the use
of lampshades and red painted light covers can help.

20 Laying Period Basic Growth Concepts
I SA - A l te rnat ive management gu ide I SA - A l te rnat ive management gu ide
BasIc growth concepts
From transfer, birds continue their growth towards achieving
their physical maturity around 30 weeks of age, the body
weight gain must be at 300 g. After 30/35 weeks most body
weight gain is fat and its excess has a negative impact on lay
and feed conversion.
A lack of bodyweight gain after transfer makes hens vulnerable
and less robust against environmental variation (disease, heat,
etc…).
Flock uniformity has to be followed up to avoid extremes of
bodyweight, which can lead to poor laying performance.
pre-Lay key targets
increase layer bone MineralisationFrom a nutritional point of view the prelay period is characterised
by an increase of the calcium concentration of the feed.
The first objective of the higher calcium levels is to reinforce
the mineralisation of medullary bone, layer calcium storage,
before the beginning of the lay.
The second objective is to prevent demineralisation of early
sexual mature birds. With a classical grower feed, feed calcium
concentration is not sufficient to compensate the calcium
exported for the eggshell.
This leads to the decrease in the medullary bone calcium reserve.
Layers without adequate calcium content on prelay will have
poor eggshell quality during the last period of lay.
In summary, higher calcium level on prelay diet will prevent
layer demineralisation of early birds, reinforce medullary bone
mineralisation before transfer and ensure good eggshell quality
in the last phase of lay.
transition to layer feed dietThe prelay diet constitutes a step, in terms of feed, between
rearing and laying feed. Coarse carbonate particles represent at
least 5% of the layer feed, instead of 0% for rearing feed. Prelay
diet has a minimum 2% of coarse carbonate particles. Coarse
calcium carbonate has a strong influence on feed presentation.
If prelay diet is not used the risk of low feed consumption after
transfer is higher. For this reason it is strongly recommended
to use a prelay diet to accustom bird to layer feed.
Growth continuation, lightest bird catch up and maintaining
uniformity
During the prelay phase, bird growth continues. It is the last
period, when the lightest birds have the opportunity to improve
and adjust their bodyweight. Mature birds could begin to lay.
Both of these birds require a high nutritional feed to assist
correct growth and production. Protein and amino-acids levels
must be high at this time to meet the nutritional requirement.
Without using an adapted feed, the uniformity of the flock
could be jeopardized.
workIng wIth the BIrds aFter transFer
• The birds should be put close to drinkers and feeders
at transfer
• Maintain the flock on slatted area for a few days helps
birds to get used to slats, find drinkers, feeders, perches
and nests.
• Light intensity must be higher compared to rearing
building
• Lighting management encourages the birds to move on
to the slatted areas to rest and sleep. At dusk switch off
the lights above litter or from the bottom tier of aviary
and then switch off the lights above slats or gradually
towards the top tiers around 30 minutes later.
• In the first week, birds that are found on litter just before
dusk should be placed on to the slatted area
• At start of lay, floor eggs should be collected several
times until the level becomes acceptable
• Automatic nests must be open at least 2 hours before
lights are on. Nests should be closed once a day after all
the eggs are laid (to be adapted according to the flocks
laying behaviour). It helps to keep the nests clean and
to remove all birds from the nest.
• Maintain continuous monitoring of the growth by
measuring bodyweight
• Monitor feed and water intake
• Special attention must be given to birds having difficulty
finding the drinking/feeding points. These birds could be
found on top level of aviary system, on the scratching
area or perches and they need to be moved close to
drinkers and feeders
traInIng caged reared BIrds
As stated in previous sections, it is strongly recommended to
rear birds using the same system that will be used in production.
In some countries it might be illegal to transfer birds reared
in cages to a non caged system in production. Always follow
local legislation in this regard. However it could still happen
that birds reared in cages are transferred to the production
house with a floor or aviary system.
There are high risks associated with any such flocks. Birds
reared in cages are accustomed to the restricted environment,
they know where to find water and feed, they know more or
less all the group within a cage. Cage reared birds might be
“lost” at transfer to the floor or aviary system, will not easily
find their way to drinkers and feeders, are not accustomed to

21 Laying Period Basic Growth Concepts
I SA - A l te rnat ive management gu ide I SA - A l te rnat ive management gu ide
jump and mount on slats and into the system. Several days
following transfer an increased incidence of weakened birds
and mortality might occur, the flock also can tend to have a
low peak with many eggs laid on floor.
If you are forced to transfer the caged reared birds to floor
or aviary system of here are some tips to help you and the
birds to cope:
1� Try to transfer the flock as soon as possible (at a younger
age for example 12 weeks) so that the birds have a better
chance to get acquainted with this new environment
2� Allow them enough slatted space so that they can be
maintained there (use a temporary fence) for some time
(7-10 days) without a risk of overcrowding.
3� All the drinking and feeding equipment must be placed
on slatted areas.
4� Use different ladders and steps so that the birds are not
forced to jump too high to get back to slats.
5� Start to release the birds from slatted area to litter
gradually after you are sure they all have found water
and feed.
6� Inspect the flock more frequently and do not hesitate to
help the “lost” individuals to find water and feed.
7� When released, encourage the flock to get back to
slatted area or aviary system in the evening to sleep
there (using the tips described in previous chapter like
lighting management, feed distribution times).
8� Do not forget that this type of transfer needs much more
physical work by skilled workers.
9� Special attention is needed for coccidiosis prevention
or treatment.
stockIng densIty
The control of this parameter in lay is as important as in rearing
period. Flocks with enough living comfort in the sense of total
available feeding and drinking space will express their genetic
potential much easier.
Stocking density should be followed in accordance with local
legislation. However, if no slats are used, the density should
not be higher than 7 birds per usable m², in slatted houses
this should not exceed 9 birds per usable m², the use of aviary
system enables an increase in the stocking density up to 18 or
even more birds per m² of the floor of the house.
In any of these cases it is important to consider enough easily
accessible drinking and feeding space per bird. Overcrowded
flocks tend to have higher incidence of suboptimal feed and
water intake, pecking, cannibalism, suffocation, mortality, culls
and finally a compromised performance.
drInkIng and FeedIng
Comply with local legislation, however, when nipple drinkers
are used, ensure 1 nipple per 10 birds. If you use bell drinkers,
then 1 is sufficient for 100 birds in temperate and for 80 birds
in hot climate. As for the feeders, we consider the linear chain
feeder system is the best because it is easily emptied by the
birds. 10 cm of linear space should be assured per each bird.
When pans are used you can allow 25 birds per pan (if their
mutual distance allows the access from all sides). The height
of the feeders and drinkers should be adjusted for easy access
by all the birds and so that they do not impede movement or
encourage floor laying under them.
Measuring daily feed and water intakeIt is very useful to monitor the daily water and feed intake.
The consumption/empty feeder time is also a practical tool if
precise measurements are not possible. Any strong deviations
from the previous day’s consumption might indicate a start of
some disease or technical problem. Together with a regular
inspection of the flock it helps to avoid big surprises in the
development of the flock.
Feed Intake stImuLatIon
feed PresentationBirds have a strong preference for coarse particles - fine particles
are difficult to take and it consumes more energy for the
same quantity intake. Consequently, the feed needs to be
uniform with a maximum of 10% coarse particles above 3.2
mm and 15% maximum of fines particles below 0.5 mm. A
higher percentage of coarse particles will lead to feed sorting,
uneven bodyweight and laying performance. However, too high
proportion of fine particles will decrease feed consumption.
Particle size is very important, but the most important variable
is feed consistency. Birds do not respond well to variations in
feed regimes.
The addition of 1% oil to mash layer feed, is recommended to
improve feed presentation. Oil adheres to the finest particles
binding them together and making them easily ‘eatable’.
In some specific conditions, such as a very low feed intake or
poor feed quality and consistency, crumbs can be used. Crumbs
are easy to peck and each feed particle taken is balanced.
However a few precautions are needed with crumbs. Crumbs
increase water consumption and wet droppings. Transition from
crumbs to mash can temporarily decreases feed consumption.
feed distributionWhen birds are not eating enough the classic response is
to increase the number of feed distributions. However, this
practice encourages feed selection and does not solve feed
intake problem.
The feeder needs to be empty once a day. It is recommended
to have empty feeders by the beginning of the afternoon. This
leads to decreased feed selection and to increased mineral
and vitamin consumption - usually found in the fine particles
of feed.

22 Laying Period Lighting During Lay
I SA - A l te rnat ive management gu ide I SA - A l te rnat ive management gu ide
Early feed distribution during the laying period increases dirty
eggs and floor eggs.
For eggshell quality reasons, a minimum of 60% of the feed,
needs to be distributed in the afternoon. This program needs
to be adapted depending on observations and the type of feed
distribution equipment.
For more details, consult the ‘feeding management’ section.
lighting PrograM• High intensity after transfer
Just after transfer, light intensity needs to be high. This
encourages hens to discover their new environment (nipples,
feeder and nest location). Light intensity stimulates feed
consumption too. When feed consumption is sufficient, it can
be reduced.
• Night flash (midnight feed)
When local legislation allows it, a maximum of two hours of
light could be given to hens 3 hours after lights are turned off.
During that time, feed distribution is provided. This technique
is very useful, mainly during hot season, to encourage birds
to consume feed.
teMPeratureIn comparison with the rearing period, temperature can be
decreased by 1 or 2°C to stimulate feed consumption.
Prelay dietPrelay diet use will facilitate feed consumption after transfer.
Layer diets contain high amounts of coarse carbonate particles
and leads to strong feed texture differences compared to rearing
diets. Prelay diet minimises the negative transition effect and
increases layer feed palatability.
digestiVe tract deVeloPMentFeed management in rearing has an effect on layer feed
consumption. The idea is to develop the digestive tract during
the rearing phase to prepare the bird to eat enough during
the laying phase.
• Crop
The crop is the birds’ feed storage organ. After transfer, the
hen increases consumption from 80 to 120 g. If the crop is
not developed enough, this reduces feed intake capacity after
transfer. Crop development is achieved by introducing the
concept of meal in pullet. Feed consumption during the rearing
phase needs to be fast to develop the crop and feeders should
be empty daily . (refer to ‘feeding mangement’ section ).
• Gizzard
Pullet feed presented in coarse particles helps gizzard
development. Other factors like coarse limestone particles
in prelay feed or the use of grit during the rearing period is
useful to develop gizzard.
InsoLuBLe grIt
Grit particle sizes large enough to act as a grinding surface in
the gizzard, but small enough to be easily swallowed, yet hard
enough not to break up under pressure and above all insoluble in
the bird’s digestive juices was once considered essential. Though
research has shown that especially with the use of a mash feed,
grit is not necessary to achieve maximum feed efficiency and
production rate, there is still evidence that grit stimulates the
gizzard muscle development in rearing, stimulates digestion
and improves feed intake capacity. Certainly, where the hens
eat litter and feathers and have no grit, physical damage of
the intestinal tract may occur. It is recommended to supply 3
g of insoluble grit per hen once a month of the particle size
between 4 and 6 mm.
LIghtIng durIng Lay
The objective of the lighting programmes during production
period is:
• To encourage growth at start of lay
• To counteract the harmful effects of decreases in natural
day length
• To control the liveability through the light intensity
management
Whatever the type of laying house (natural or artificial light),
the golden rule is to never decrease daylength (interval between
lights on and lights off) after start of lay.
The lighting programme in production should be the continuation
of the lighting programme used during the rearing period. It
is essential to make sure that the light duration in production
house is as long as the light duration the birds have already
experienced in the rearing house just before transfer.
As the bodyweight plays a major role in the determination
of the egg weight profile during all the laying period, the
light stimulation has to be done according to the observed
bodyweight. The minimum bodyweight reference is:
• 1 250 to 1 300g for the brown egg layers
• 1 100 to 1 150g for the white egg layers
Uniformity is also an important parameter to consider. If
uniformity (+/-10%) is below 80% for brown and 85% for
white, delay the light stimulation.
The bodyweight reference must be fixed according to country
and egg size requirement.
dark LayIng houses
When pullets are transferred from a dark rearing house to a
dark production house, control of sexual maturity is easier to
be achieved by using the suitable lighting programme. The
following lighting programme should be used as a guide and
can be adapted to breeding product and to farm conditions
according to performances previously obtained.

23 Laying Period Lighting During Lay
I SA - A l te rnat ive management gu ide I SA - A l te rnat ive management gu ide
table 10: Lighting program for dark laying houses
age and/or Bodyweight standard program brown egg
layers
(hours)
standard program white egg
layers
(hours)
delaying maturity/hot season
program
(hours)
End of rearing to l ight stimulation 10 10 12
At bodyweight reference (BWr*) 12 11 14
BWr + 1 week 13 12 15
BWr + 2 weeks 14 13 15.30
BWr + 3 weeks 15 14 16
BWr + 4 weeks 15.30 15 16
BWr + 5 weeks 16 16 17
*BWr : bodyweight reference must be fixed according to country and eggsize requirement
It is worth noting that moving birds from a naturally lit rearing house to a dark laying house is not recommended since it slows
down the sexual development of the bird and causes a delay in the onset of lay.
productIon In open house system
When birds are exposed to the effect of natural light (houses
with natural light entering through windows or other openings,
houses where birds have access to outdoor enclosures or winter
garden), the lighting program used should take into account
the natural day length at transfer, which will vary depending
on the season.
In these houses, time of lights on and time of lights off should
coincide with the time of sunrise and sunset of the longest
day in that latitude.
end oF rearIng /start oF Lay durIng a perIod oF decreasIng day Length
To reduce the delay in sexual maturity induced by decreasing
day length, we recommend:
• Starting light stimulation when the body weight is on
table 11: Lighting duration for a given daylength
age and/or weight duration of light at 15 weeks (hours)
10 11 12 13 ≥14
Decreasing daylengths :
After 49 days 10 NL** NL NL NL
At bodyweight reference 12 13 14 15 16
At BWr(*) + 1 week 13 14 14.30 15.30 16.30
At BWr + 2 weeks 13.30 14.30 15 16 16.30
Increasing daylengths :
After 49 days 10 11 12 13 14
At bodyweight reference 11 12 13 14 15
At BWr + 1 week 12 13 14 14.30 15.30
At BWr + 2 weeks 13 14 14.30 15 16
Afterward +½ hour per week in order to reach 15 to 16.30 hours at 50% production
*BWr : bodyweight reference must be fixed according to country and eggsize or grading requirement
** NL = natural light
target by increasing the day length period by:
- 2 hours in the morning for brown egg layers
- 1 hour in the morning for white egg layers
• Then add 1 hour per week in order to get 13-15 hours
of light at 50 % production
Note: this advice needs to be adapted according to white or
brown breed, feed intake and bodyweight observed
end oF rearIng /start oF Lay durIng a perIod oF IncreasIng day Length
To avoid a premature sexual maturity, which could lead to
poorer overall performances (in egg number, egg size, shell
quality and liveability), we recommend:
• starting light stimulation when the body weight is on
target by increasing the day length period by 1 hour in
the morning (brown and white egg layers)
• adding 1 hour per week

24 Laying Period Floor Eggs Prevention
I SA - A l te rnat ive management gu ide I SA - A l te rnat ive management gu ide
In aviary systems it is important to be able to control lighting
system in different groups. In the evening, light should be
turned off in stages, first lights in the aisles, then lights in
different levels of the system, from bottom to top, to encourage
the birds to move to the resting areas before lights are turned
off.
In the morning, lights should be switched on at once, but if
floor eggs are found, a dim light can be turned on one hour
before the main lights are switched on.
LIght IntensIty
A low light intensity from 5 to 10 lux is required for production.
The most important thing to achieve is the best uniformity of
light spread possible.
Standard light bulbs with dimmers are preferable to fluorescent
lights that can be perceived as flickering by birds.
It is advisable to use higher light intensity at the start of
production to stimulate feed intake. Once feed intake meets
the desired level and the peak of production is achieved, light
intensity can be decreased.
There is a strong correlation between bird activity and feather
loss during production. Too high light intensity can encourage
pecking and result in increased mortality.
FLoor eggs preventIon
Prevention of floor eggs is a key factor for flock success.
Avoiding this behaviour requires a lot of attention at the
beginning of the lay.
In this section, we define floor eggs as all eggs laid out of the
nest; it could be floor, slats, system eggs.
The two main points are:
• The nest must be more attractive and comfortable than
other parts of the hen house
• Access to nest has to be easy for birds
LIght
Light management is one of the key factors to prevent floor
eggs.
• Light has to be well spread in the laying house, shadow
areas need to be avoided. Birds naturally lay in darkened
areas. A simple action like replacing broken bulbs, can
prevent it.
• When it is possible, a progressive light off process should
be done. Lateral light should be turned off first, this will
encourage birds to go close to the nest and to sleep on
slats and lastly, the central light should be switched off.
• According to the breed used and the lighting program
applied, a variable percentage of birds will lay before
lights on; the propensity to lay on the floor is higher for
these birds. Night light in the nest encourages these early
birds to go into the nests for laying before the general
lights come on.
• Where the legislation allows it, a night flash during the
dark period (for example 1h30 of light, 3 hours after light
off), will delay the lay of one part of the flock and reduce
the competition in the nest. This will be more efficient
if the number of birds per nest is high. In this case, all
hens will get easy access to the nest.
• In some situations adding one extra hour of light in the
morning could solve floor eggs problem
generaL management advIces
• All the corners caused by the equipment or the building
design are potential areas for eggs to be laid. Therefore
limiting corners access prevents floor eggs.
• It has been observed that keeping the birds too long on
the slats may increase the incidence of floor eggs. The
floor scratching area needs to be accessible when the
flock has discovered the upper area (nest, feeder, drinker).
• At the beginning of the lay, frequent floor egg collection
has to be done (several times per day). A floor egg will
encourage other birds to lay in the same place.
• Ensure all the birds are sleeping on the slatted area or
system
• The observation of where and when the floor eggs are laid
can give the reason for this behaviour. This information
could be very useful to understand the problem and apply
solutions to solve it.
• Grit distribution on floor discourages floor eggs by
eliminating the building of potential nests in the litter
• Installation of a deflection barrier between the nest
boxes enables the birds to be evenly distributed, diluting
the pressure in the nest boxes. This also helps prevent
overcrowding of nests located near to partitions.
• In order to prevent the floor to seem too comfortable,
frequently remove the manure.
BehavIour
Just before laying (approximately 30 minutes), birds express
a specific behaviour called «pre-laying behaviour» which
consists of 3 phases:
• Active nest searching
• Choice of nest
• Nest creation
Birds shouldn’t be disturbed during the process of searching
for a nest otherwise they stop the search. Disturbances induce

25 Laying Period Systems Eggs For Aviary Houses
I SA - A l te rnat ive management gu ide I SA - A l te rnat ive management gu ide
them to lay where they are and increases floor egg numbers.
For instance feed distribution or egg belt running can also
disturb the process of searching for a nest. Therefore, it is not
recommended in the case of floor eggs to disturb birds with
feed distribution or egg collection during the lay.
ventILatIon
Nests have to be comfortable, to encourage birds to lay there.
During winter, prevention of direct cold draughts around the
nest is recommended, while during summer, nests should be
well ventilated. Specific ventilation adjustments should be done
to increase air flow on floor or lateral areas. The purpose of
ventilation is to create a comfortable area close to the nest,
more comfortable than the other part of the laying house.
Ventilation has to be adjusted according to the season.
rearIng
The rearing system should be as close as possible to the
laying system to avoid the risk of increased floor eggs. It is
recommended to install perches in the rearing house before
4 weeks of age. Light intensity does not need to be to high,
because high intensity increases the sensitivity to dark areas
in the laying house. Early transfer is strongly recommended
in order to avoid the onset of lay in the rearing house, which
can encourage the birds to lay on the floor in the laying house.
equIpment
Equipment position and stocking density can affect floor eggs.
• Feeder / drinker
- Not too close to the nest (no bird accumulation in front
of the nest)
- Take care of feeders and drinkers height (no creation of
physical barrier between bird and nest)
- Enough feeders and drinkers to avoid competition and
stagnation near to them
• Nest
- Clean (without broken eggs, manure, etc…), attractive
- Adequate number (120 birds / m² communal nest or 5-6
hens/single nest)
- Nest access management: close the nest before light off;
open the nest before light on.
• Slats
- Not too high, installation of ramp / ladder: easy access
from scratching area to slats
- Slat slope not too sharp: comfortable area, facilitate
nest access
• Electric fence
- Installed next to the walls and corners
systems eggs For avIary houses
Eggs laid on the system is a common problem in aviary systems.
To avoid it we recommend:
• To promote birds perching as high as possible during
night, this avoids crowding in front of the nest box in
the morning.
• High perching can be promoted by using a longer dimming
period.
• A light intensity in the system close to the light intensity
in the rest of the house helps to create a space in the
system not comfortable to lay eggs.
• Avoid lights in the system that also light the nest box.
• It is essential to promote birds use of perches and plateau’s
to move up and down in the system or in between systems.
• Vertical movement can be stimulated by limiting access
to water or feed on certain levels. When this is practised
it is at the utmost importance to check if birds living on
these levels eat and drink sufficiently.
When eggs are produced on the top level in most occasions
this is due to the fact that birds are afraid to move down.
Placement of extra perches can help vertical movement and
avoid mislaid eggs on the top level. It also can help not to feed
on the upper level for the first feed distribution.
In many occasions eggs are produced on the middle level of
the system, the reason for this is feed and water intake at the
middle level. Closing the drinker line in the middle level during
the morning can promote the birds movement to the drinker
line in front of the nest.
A floor / system egg collecting scheme can help to understand
what happens after changing feed, water or light management.
proLapse preventIon
Prolapse refers to a condition seen in laying hens characterized
by part of the oviduct remaining outside of the vent after the
hen has laid an egg. Prolapse is very often combined with
pecking of the vent and cloacal area or at the everted oviduct,
leading to a rapid death.
The main causes of prolapse are the following:
• Improper body weight and frame development:
underweight pullets at point of lay, before the reproductive
tract is completely mature and oviduct muscles have
developed elasticity and strength. Pullets with excess
fat are also more prone to prolapse since fat excess
contributes to lower elasticity and tone of the tissues
involved in egg laying.
• Lighting program: too early light stimulation, before
complete development, or giving excessively large light
increments, leading to an increased incidence of double
yolks.
• Any condition encouraging pecking behaviour : high light
intensity, unbalanced feed, poor quality beak trimming,
enteritis… increasing the chances of physical damage
to oviduct tissues.

26 Laying Period Bird Behaviour
I SA - A l te rnat ive management gu ide I SA - A l te rnat ive management gu ide
To control prolapse we advise:
• Making sure the flock is uniform during rearing
• Ensuring body weight is on target by getting a steady
growth since early age
• Avoiding excess weight (i.e. fattening) during rearing
• Avoiding any sudden increase in light period
• Applying a proper lighting program to compensate natural
light and avoiding unwanted early light simulation
BIrd BehavIour
Individual or flock behaviour is influenced by many factors,
singly but more usually in combination.
normaL BehavIour
In general the bird can cope with moderate stress, such as
temperature rise or fall, transfer from rearing to laying facilities,
or change of ration, etc…
It is important to recognise any change in behaviour, as
this may indicate some problem, and it is better that this is
both recognised and remedied sooner rather than later. The
most important behavioural characteristics to recognise are
aggression and crowding.
aBnormaL BehavIour
PeckingWe recognize different kinds of pecking. Gentle pecking we
consider as normal behaviour and severe pecking as abnormal
behaviour.
Gentle pecking: careful pecks, not resulting in feathers being
pulled out and usually without interaction from the recipient
bird. This is a social and explorative behaviour
Severe/injurious pecking: forceful pecks, sometimes with
feathers being pulled out and with the recipient bird moving
away. This is clearly an aggressive behaviour.
There are stressful circumstances, which may result in aggression.
If some of the birds start pecking aggressively (not all pecking
is aggressive, much is occupational and non-damaging) it is
usual to hear squawks of pain from the pecked birds. This
needs early identification, as it is abnormal. It is an indication
that there is a serious stress affecting the flock, and prompt
remedial action is essential.
Loss of feather cover leads to increased heat loss and
consequently to higher feed consumption.
Possible causes are as follows:
• Parasitic infection:
- Red mite.
- Worms, ascarid, capillaria infestation.
• Enteritis and diarrhea
• Ventilation
- Inadequate ventilation, leading to higher levels of humidity
and smell (ammonia)
- Drafts.
• Non respect of density and equipments specification
- Insufficient floor space
- Stress of overcrowding
- Limited access to drinkers and feeders (insufficient
number/ poor distribution).
- Inability to access nests, resulting in floor laying – leading
to pecking of exposed vents.
• Shortage of water or feed:
- Drinkers / feeders empty.
- Water or feed unpalatable
- Too low pressure / leakage
- Shortage
• Feeder and water equipment not earthed properly
• Poor beak trimming
• Feed not suitable:
- Sodium deficiency
- Amino acids deficiency
- Lack of insoluble fibre
- Sudden change of grist presentation
- Too high energy level, due to a reduction in consumption
time
- Faulty manufacture – for instance, incorrect salt inclusion.
• Intensity of light too bright:
- Light source generally too powerful.
- Direct light from fluorescent bulbs (especially) or tubes;
depending on the type.
- Entry of direct sunlight into the poultry house.
- Flickering bulbs
- Sudden increases in light duration
• Nests brightly illuminated – bird’s vents targeted during
egg laying.
As pecking is difficult to control once it has started, the objective
is to be ahead of the problem in order to prevent the outbreak,
but if it does occur (bearing in mind that it is indicative of
abnormal behaviour) the objective should be to identify the
problem promptly, and remedy the cause as quickly as possible.
In case of a pecking outbreak, you need to react quickly to:
• Decrease light intensity*
• Paint bulbs or light covers in red
• Add salt into the water (0.5-1 kg/1000 l)
• Add extra vitamins / minerals / amino-acids in water
• Add a fibre source within the house (see fibre to layer)
• Add enrichment within the house (pecking blocks, fibre,
plastic bottles, plastic toys, cd, beet…).
*Caution: floor eggs could appear and feed intake could be decreased
27 Laying Period Bird Behaviour
I SA - A l te rnat ive management gu ide I SA - A l te rnat ive management gu ide
crowdingFloor-reared birds sometimes have a tendency to crowd together.
This natural behaviour can be triggered by different situations:
• Panic reaction: when birds are frightened, they try to
avoid danger
• Attraction: when they are attracted by something, as
they are curious and want to find feed and discover
their environment
• Sleeping behaviour: it enables them to reduce the loss
of body heat during the night, maintain social links and
protection against dangers.
Smothering may occur during lay in different parts of the
poultry house and often the reason is not clear. However, in
production flocks, it is most commonly observed around the
peak of production, as it seems to be related to stress situations.
Although unpredictable, smothering is more frequently observed
in different situations:
• In the evening at “lights off”
• At the moment of rest, after egg laying (noon)
• Along partitions, due to curiosity (e.g. presence of the
stockperson in the house)
• Following a change in feeding times, in feed composition
or due to lack of feeding or drinking equipment
• When flocks are restricted or feed intake is low
• When direct sunlight is getting in the poultry house
• Inadequate ventilation, uneven in-house temperature
and draughts
To control the risk of smothering:
• Minimise the number of corners (e.g. feeder). It is
sometimes better to sacrifice a little floor space, keeping a
few less birds, in order to maintain straight line partitions.
• Ensure an even light distribution within the house. Install
a light trap/deflector.
• Construct partitions with wire mesh; birds crowding
against a mesh partition are still able to breathe
• Use wire mesh covered triangles in order to eliminate
corners.
• Install electric wires along the walls, corners and partitions
• If crowding occurs during the evening, for example close
to sunset, check that sunlight does not enter the house
through the pop holes. This is almost certain to attract
too many birds into a small area. Deflector installation in
front of the pop holes could solve this issue.
• It is necessary to visit the birds at the end of the day or
when lights go off to check behaviour, especially in the
first few days after delivery.
• Install music in the houses so the birds react less to noises.
• Carry out a feed distribution one hour before lights
go off. It will evenly distribute birds through out the
building. The extra heat produced during digestion will
avoid crowding before the night.
• Lighting program must be adapted to natural day length.
Try to avoid switching off the lights before sunset, mainly
during the longer day. This needs to be considered at
flock placement.
• Ensure that available perch space is adequate
• Adapt the ventilation to obtain a uniform environment
in the house and to avoid draughts
• Avoid any feed restriction at the critical periods
• Give scratching material (e.g. grain/grit) in the afternoon
to keep birds occupied
broodinessBroodiness can appear in certain flocks in cases of stress or
when they are generally underweight. Nutrient deficiency,
heat stress and any factors related to poor growth can lead
to broodiness. Floor laying leads to broodiness, preventing
floor laying and frequent egg collection limits the amount of
broodiness.
Broodiness can be identified by characteristic behaviour patterns
such as staying in the nest, fluffed feathers, clucking and
aggression. Therefore we advise closing nests at the end of
the afternoon. Nests should not be closed until 4 hours before
lights off to avoid loss of late laid eggs.
The pause in lay depends upon rapid action.
table 12: Broodiness and lay link duration
time broody
(days)
pause in lay
(days)
1 7
2 9
3 12
4 18
According to B. Sauveur (I.N.R.A.)
We advise isolation of broodies from the moment they appear
(in the evening). Place them in a spacious pen, on a concrete or
slatted floor without a nest. Treatment is made more effective
by dipping the broodies in cold water for 20 to 30 seconds and
administering aspirin (a 125 mg tablet) before transfer to the
broody pen. The density in the pen must not be greater than
6 per m². The birds must have feed and water permanently.
At the end of 4 days, those which respond (widening of pelvic
bones) can be placed back with the flock.
The best system is to have 2 broody pens. The birds picked up
on Monday, Tuesday and Wednesday are put in the first pen
where they stay until the following Monday. The other pen is
used for the other days and follows a similar time lapse. Avoid
leaving broodies to brood on the floor, to reduce the spread
of the behaviour.

28 Laying Period Fibre For Layer
I SA - A l te rnat ive management gu ide I SA - A l te rnat ive management gu ide
FIBre For Layer
Birds have a specific requirement for fibre. They must find
fibre in the feed or in their immediate environment. It has
been shown that if birds are deficient in fibre, it can lead to
feather pecking and then feathers are used by the bird as a
fibre source. A poor feathering observed in a flock without
feathers visible on the floor could be a sign of a lack of fibre.
It is clear that a good supply of fibre improves feathering,
decreases mortality, improves gut health and digestion.
Fibre provided to layer flocks must be insoluble with as much
as possible of a coarse texture. Fibre could be provided through
the feed. According to the raw material available, total fibre
content can be very variable. 2.5% of raw cellulose is considered
as low level, above 5% as a high level. Most of the fibre can
be provided by oilseed meal (sunflower / rapeseed), alfalfa (or
lucerne), and oats. Cereal by-products could provide a good
amount of fibre in the feed, but their texture is usually too fine
to have ‘structure effect’ on the digestive tract.
Fibre should be provided directly in the building. We advise
the use of a coarse fibre such as straw, alfalfa (lucerne), wood
shavings, rice/oat husk, sillage, etc. These materials must be
available in the building through round feeders or directly as
a ball on the scratching area. Birds must have a free access
to fibre sources at all times. We advise not spreading fibre
directly on the floor. To prevent floor eggs, fibre supply must
be introduced after the peak of production when the birds are
well trained to use the nest.
Feed For BIrds In aLternatIve productIon
energyThe main difference between cage and alternative production
feed is energy requirement. Birds in alternative production
system are much more active and when they have access to
the range are confronted by temperature variations. These
two factors lead to an increase in their energy requirement.
To cover their higher energy requirement, birds eat more.
According to the housing system used, temperature and bird
feathering, feed consumption can be increased by 3 to 20%.
In alternative production, it is essential for point of lay pullets
to reach their mature body weight quickly. Energy intake is
usually the limiting factor for production and growth when lay
is starting. It is highly advisable to use a higher energy diet
from 18 to 30/35 weeks of age. Birds are able to adapt on wide
range of energy values. However, observations show energy
levels of 2750 to 2850 kcal/kg are adapted for start of lay diet.
For the second part of the production until depletion, energy
concentration must be decreased to prevent fattening, improve
feathering and livability. Lower energy diets contain more
insoluble fibre, increase consumption time and affect bird
behaviour (see ‘Fiber for laying hen’ section). However diets
with lower energy values increase feed consumption. Observing
local regulations and raw material availability, a compromise
between feed intake/FCR, bird behaviour and bird bodyweight
must be found. Classical energy feed range, observed after 35
weeks of age, are from 2600 to 2750 kcal/kg.
All the other nutrients requirements in alternative production
are very close to those used for cage system.
Protein and aMino acids requireMentsThe daily amino acids and protein requirement values are
estimated from the last review we carried out on amino acids
requirement:
table 13: recommendations for amino acids expressed in total
or digestible and ideal proteins established for a production
of 59�5 egg mass per day
Limiting
amino
acids
Based on european table 2002
Ideal
protein
requirements
in mg per g of egg
daily requirements
in mg per day
Dig. AA Total AA Dig. AA Total AA
LYS 100 13.34 15.0 795 895
MET 53 7.1 7.56 420 450
M E T +
CYS82 10.9 12.1 650 720
TRY 22.5 3.00 3.50 178 208
ILE 91 12.2 13.35 725 795
VAL 97 13.0 14.35 775 855
THR 70 9.4 11.0 560 655
These daily amino acids requirement must be adjusted according
to the feed consumption:
Dai ly amino ac ids
requirement in mg/
day/
feed consumption
observed in g / 10 =% of amino acids
in the feed
Formulation of layer diets can be carried out by introducing
ISOLEUCINE and VALINE as nutritional constraints, replacing
protein as a constraint. If this is not possible, these are
recommendations for a minimum of protein for feed containing
or not containing Meat and Bone Meal (MBM).
From a practical point of view, we estimate that it is necessary to
increase the concentration of amino acids by about 6 % during
the 18-28 weeks period in relation to the feed consumption
observed after 28 weeks. Total or digestible amino acids levels
are established for a production of 59.5 g egg mass per day.
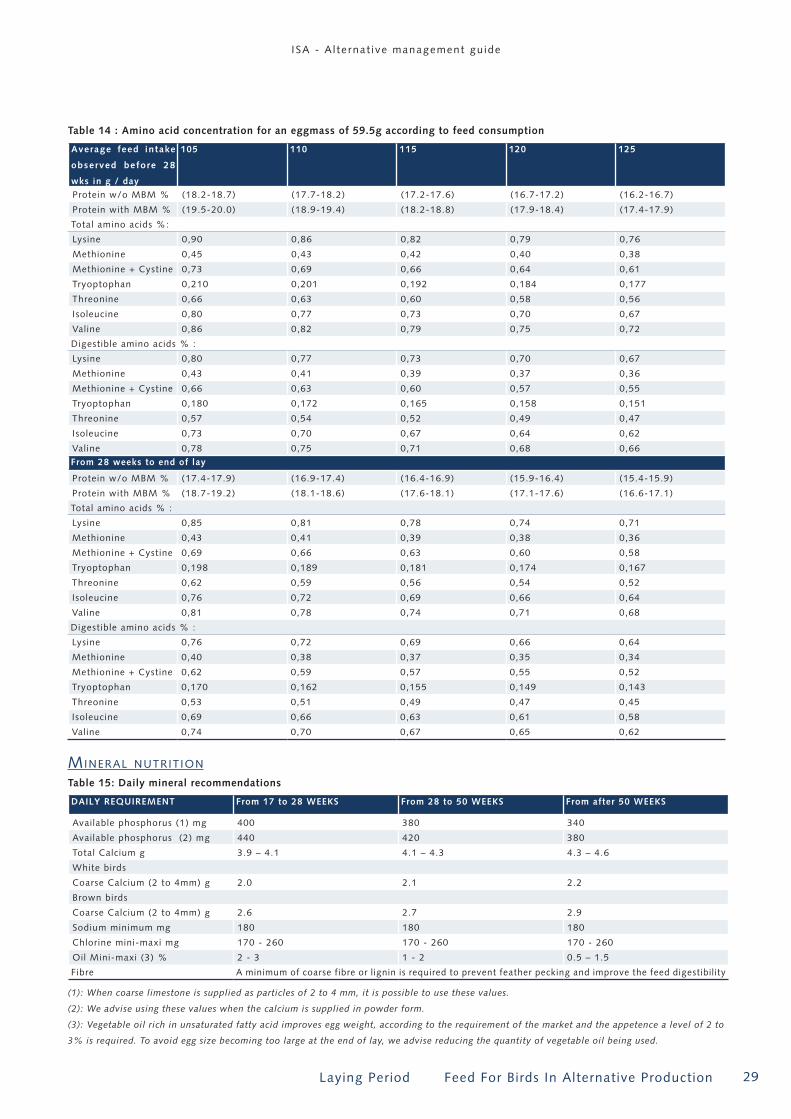
29 Laying Period Feed For Birds In Alternative Production
I SA - A l te rnat ive management gu ide I SA - A l te rnat ive management gu ide
table 14 : amino acid concentration for an eggmass of 59�5g according to feed consumption
average feed intake
observed before 28
wks in g / day
105 110 115 120 125
Protein w/o MBM % (18.2-18.7) (17.7-18.2) (17.2-17.6) (16.7-17.2) (16.2-16.7)
Protein with MBM % (19.5-20.0) (18.9-19.4) (18.2-18.8) (17.9-18.4) (17.4-17.9)
Total amino acids %:
Lysine 0,90 0,86 0,82 0,79 0,76
Methionine 0,45 0,43 0,42 0,40 0,38
Methionine + Cystine 0,73 0,69 0,66 0,64 0,61
Tryoptophan 0,210 0,201 0,192 0,184 0,177
Threonine 0,66 0,63 0,60 0,58 0,56
Isoleucine 0,80 0,77 0,73 0,70 0,67
Valine 0,86 0,82 0,79 0,75 0,72
Digestible amino acids % :
Lysine 0,80 0,77 0,73 0,70 0,67
Methionine 0,43 0,41 0,39 0,37 0,36
Methionine + Cystine 0,66 0,63 0,60 0,57 0,55
Tryoptophan 0,180 0,172 0,165 0,158 0,151
Threonine 0,57 0,54 0,52 0,49 0,47
Isoleucine 0,73 0,70 0,67 0,64 0,62
Valine 0,78 0,75 0,71 0,68 0,66From 28 weeks to end of lay
Protein w/o MBM % (17.4-17.9) (16.9-17.4) (16.4-16.9) (15.9-16.4) (15.4-15.9)
Protein with MBM % (18.7-19.2) (18.1-18.6) (17.6-18.1) (17.1-17.6) (16.6-17.1)
Total amino acids % :
Lysine 0,85 0,81 0,78 0,74 0,71
Methionine 0,43 0,41 0,39 0,38 0,36
Methionine + Cystine 0,69 0,66 0,63 0,60 0,58
Tryoptophan 0,198 0,189 0,181 0,174 0,167
Threonine 0,62 0,59 0,56 0,54 0,52
Isoleucine 0,76 0,72 0,69 0,66 0,64
Valine 0,81 0,78 0,74 0,71 0,68
Digestible amino acids % :
Lysine 0,76 0,72 0,69 0,66 0,64
Methionine 0,40 0,38 0,37 0,35 0,34
Methionine + Cystine 0,62 0,59 0,57 0,55 0,52
Tryoptophan 0,170 0,162 0,155 0,149 0,143
Threonine 0,53 0,51 0,49 0,47 0,45
Isoleucine 0,69 0,66 0,63 0,61 0,58
Valine 0,74 0,70 0,67 0,65 0,62
Mineral nutrition
table 15: daily mineral recommendations
daILy reQuIreMent From 17 to 28 WeeKs From 28 to 50 WeeKs From after 50 WeeKs
Available phosphorus (1) mg 400 380 340
Available phosphorus (2) mg 440 420 380
Total Calcium g 3.9 – 4.1 4.1 – 4.3 4.3 – 4.6
White birds
Coarse Calcium (2 to 4mm) g 2.0 2.1 2.2
Brown birds
Coarse Calcium (2 to 4mm) g 2.6 2.7 2.9
Sodium minimum mg 180 180 180
Chlorine mini-maxi mg 170 - 260 170 - 260 170 - 260
Oil Mini-maxi (3) % 2 - 3 1 - 2 0.5 – 1.5
Fibre A minimum of coarse fibre or l ignin is required to prevent feather pecking and improve the feed digestibil ity
(1): When coarse limestone is supplied as particles of 2 to 4 mm, it is possible to use these values.
(2): We advise using these values when the calcium is supplied in powder form.
(3): Vegetable oil rich in unsaturated fatty acid improves egg weight, according to the requirement of the market and the appetence a level of 2 to
3% is required. To avoid egg size becoming too large at the end of lay, we advise reducing the quantity of vegetable oil being used.

30 Laying Period Feeding Management
I SA - A l te rnat ive management gu ide I SA - A l te rnat ive management gu ide
All these daily mineral recommendations must be divided by
the observed feed consumption, to get the ideal percentage
in the feed.
Daily requirement
in mg/day/
feed consumption
observed in g/ 10 =
% in the
feed
FeedIng management
Feeding management during production should follow several
simple rules:
• Hens are grain eaters and have a preference for bigger
feed particles. They need to eat all the components
of the formulated feed including the fine with higher
concentration of aminoacids, minerals and vitamins.
• For this reason we recommend that the birds finish their
ration every day so that the feeders rest empty for a while.
• In case of floor or dirty eggs, we recommend not disturbing
the birds with feed distribution during their oviposition
time, so we recommend not feed distribution during the
first 5-6 hours of the day
• The birds should preferably eat a greater part of their
daily ration during the second half of the day. The fast
accumulation of calcium in the eggshell starts at this time
and the birds can very effectively utilize the calcium from
the feed to form a good eggshell. These are the reasons
why the feed for laying hens in production should be
distributed in the second half of their day.
• Make the least number of distributions possible to avoid
selection of bigger particles (ideally 1-3 distributions in
the afternoon – depending on the capacity of the feeding
system). The whole daily ration should be distributed
during this time. Besides the specific appetite for calcium
that the hen shows during the eggshell formation, they
also naturally eat more in the last hours of a day to meet
energy needs for the night period.
• The last feed distribution 1-2 hours before lights off also
encourages the birds to get to the house from range and
to the system (slatted area and perches) and to sleep there.
The amount of the feed distributed must be sufficient to
cover the increased consumption during the next morning
(the birds are hungry after the night period and will easily
finish the less attractive fine part of the ration). As the
feed is not distributed in the morning the hens have
time to find a nest and lay the eggs there. The remains
of feed from the previous day is eaten during this time
and the feeding system may stay empty for one or two
hours. The birds have finished their ration, all the feed
is consumed, the eggs are laid and the feeding system
is ready for the first feed distribution of the day. The
birds have enough appetite to start the intensive feed
consumption of the afternoon.
14 to 16 h 00 of light at plateau
6 to 7h00
Empty feeders every day 1/1.5h
60% of the feed in the afternoon
Night time Night time
pasture and range management
Good pasture management and range enhancement improves
welfare of the birds.
• Range enhancement
The most critical part of the range is the immediate access of
the range (first 5/10 meters) in and around the -area of the
popholes. It is recommended to place large stones or slats
immediately adjacent to the popholes or the winter garden.
The stones beside the house help to keep the birds’ feet clean
and assist to the drainage. Puddles surrounding the house can
be a source of contamination and need to be avoided.
Trees and shelter provision on the range allows birds to utilize
the range better and protect them against climatic conditions.
Pasture ManageMent:Figure 7: pasture management
Stones,slats orweldmeshEGG
ROOM
PEN 1 PEN 2
Access zone 1
Access zone 2
Fence separating paddock
Fence separating access zones
Stones,slats orweldmeshEGG
ROOM
PEN 1 PEN 2
Access zone 1
Access zone 2
Fence separating paddock
Fence separating access zones
Figure 6: Feed distribution management
Pasture comprises not only plants and grasses, but also
includes soil – which should have a certain structure if the
plant population is to flourish. The pasture has to be managed
if firstly it is to thrive, and secondly the birds are to find it
acceptable.

31 Laying Period Terminal Hygiene
I SA - A l te rnat ive management gu ide I SA - A l te rnat ive management gu ide
The ‘paddock’ grazing system, where the pasture is divided into
3 or 4 paddocks (or more) and grazed alternately for periods
of 3 to 4 weeks, is most useful from several standpoints:
• The plants have a recovery period, during which in the
appropriate season, it is possible to re-seed worn areas,
in order to maintain good pasture quality.
• When paddocks are not stocked they may be cut and
hay may be taken.
• It is possible to chain harrow the pasture, breaking up
any mat of dead herbage – an essential feature of pasture
management.
• Owing to the break periods, the ground does not become
‘fowl sick’. In particular the development of parasitic
worms is kept under control.
The areas close to (within 50 metres) the poultry house suffer
heavy wear, and will need to be repaired from time to time.
The ground may well need cultivating, prior to re-seeding, in
order to improve soil structure. Grass does not flourish unless
the soil conditions are correct.
It may be necessary to plough areas of ground, allowing
exposure to frost and rain, during the winter period, in order
to repair soil structure. Reseeding would then be during the
early spring.
If reseeding can be carried out during early autumn, this
is generally preferable to spring planting. Autumn sowing
usually enables the plant population to become much better
established, with deeper root growth, before the dry periods
that often occur during late spring and summer.
Reseeding will normally be using hard wearing ryegrass species
– these are the most durable².
• Decontamination of the range
In case of heavy contamination of the range, 500g/m² quicklime
powder could be spread in this area. Other actions like using
chain harrow, could be applied to allow sunlight (ultraviolet)
to treat the infected soil.
termInaL hygIene
The absence of stock permits unhindered access to all parts of
the building and equipment, facilitating the terminal hygiene
programme of cleaning and disinfection. As soon as the stock
have been depleted, work should commence.
The sooner the programme is completed, the greater the
reduction in potential pathogens prior to restocking.
There are two basic tasks to be carried out:
1� Cleaning – the purpose is to remove organic matter and
to make all surfaces visually clean.
2� Disinfection – the act of sanitising the ‘clean’ surfaces.
There are a number of suppliers of chemicals, and generally
different products are needed for these two tasks, detergents
are used for cleaning, and disinfectants for sanitising. Some
detergents (detergent sanitisers) do have some disinfecting
properties, but in the poultry house a suitably formulated
disinfectant should still be used to follow a detergent (sanitiser).
Chemical products must be handled carefully. Please refer to
local regulations on waste disposal.
Find a full terminal hygiene program described page 32
mInImum measurements and record keepIng
Record keeping is a management tool used to check the
flock’s performance compared to a standard. It also reveals
any irregularities to enable you to react quickly.
table 16: Minimum measurements and record keeping
Minimal optimal
Feed consumption weekly daily (weekly records)
Bird weight
arrival
≤ 28 weeks: 1 every
month
> 28 weeks: 1 every
2 months
arrival
transfer to 30 weeks
of age:
1 on 2 weeks
>30 weeks : 1 pe r
month
Mortality weekly daily
Water consumptionweekly < 28 weeks
of agedaily
Laying rate weekly daily
Egg weight weekly daily
32 Laying Period Terminal Hygiene Program
I SA - A l te rnat ive management gu ide I SA - A l te rnat ive management gu ide
termInaL hygIene program
stage 1 – reMoVal1� Livestock.
2� Deadstock – any carcasses.
3� Feedstuffs – this can be minimised by careful planning.
4� Moveable equipment – to a hard surface area with suitable
drainage.
5� Droppings and litter – to as far as possible from the farm.
6� Whilst the house is warm it is recommended to treat for
red-mite/insects.
7� Bait extensively for vermin.
stage 2 – PreParatory1� Drinking system – drain and refill with detergent solution.
2� Soaking – all surfaces and equipment with detergent
solution.
3� Hand cleaning – any non waterproof items.
stage 3 – washingPressure wash all surfaces with detergent solution. This should
not be restricted to internal surfaces – concrete access areas,
air inlets etc., Should also be washed.
stage 4 – re-asseMblyRe-instate cleaned moveable equipment into the poultry house
when dry.
stage 5 – dis infectionSpray all previously washed surfaces of building and equipment
with disinfectant solution.
Water lines must be cleaned first with an alkaline based
detergent and
after, an acid based detergent and then flushed out thoroughly.
stage 6 – dis infestationSpray all surfaces (especially nests and slats) with appropriate
chemicals for insect and mite control.
stage 7 – fuMigationClose the building before atmospheric fogging with formalin
or a suitable disinfectant.
stage 8 – sanitary break PeriodThe building closed, ideally for no less than 2 weeks. If
maintenance work is to be carried out, normal biosecurity
precautions should be observed, and stages 5, 6 and 7 must
be repeated before the new stock arrive.
stage 9 – PreParation for arriVal of new stock
1� Check the function of all equipment.
2� Supply drinking system with fresh water.
3� Feeders should remain empty.
4� Building should be heated prior to arrival of growing
pullets, if house temperature is less than 15°C.
notes

33 Biosecurity And Hygiene What Is Biosecurity?
I SA - A l te rnat ive management gu ide I SA - A l te rnat ive management gu ide
BIosecurIty and hygIene
A good health status is very important for two reasons. Healthy
animals are efficient producers. Disease costs energy. A healthy
flock brings profit. Secondly, we produce high quality food
which is safe for human consumption, free from pathogens
and other contaminations.
There are three different kinds of disease threats.
• Notifiable diseases like avian influenza and Newcastle
disease must be kept away from birds.
• Normal poultry pathogens are controlled, mainly through
vaccinations. We vaccinate against all kind of poultry
pathogens to keep our flocks healthy, to minimize losses
and to achieve good and efficient production results.
• The third category is food borne pathogens; salmonella
is the most important one.
For ISA, the veterinary health status of its farms is crucial,
because we are an exporting company. To be able to export
layer breeding stock, our farms must meet with the veterinary
health requirements globally.
Every individual farm should define, for itself, what should be
the health status of its flocks.
Biosecurity programs are installed to maintain the desired
health status -which is to be disease free. Biosecurity is the
key to prevention of disease, together and in cooperation with
custom made vaccination programs and disease eradication/
control programs.
what Is BIosecurIty?• Biosecurity is the prevention of introduction of disease.
• Biosecurity means minimising the risk of entrance of
pathogens onto a farm and into a house (flock).
• Biosecurity is the exclusion, eradication or effective
management of risks.
• Biosecurity is recognising risks and acting accordingly.
• Disease can be airborne over a limited distance.
• Disease can come with the introduction of contaminated
birds (direct contact)
• Disease can be introduced, attached to visitors/ workers/
rodents/flies/ trucks/ materials/ equipment (indirect
contact)
Airborne infections are difficult to control. The localisation of
the farm, in a low density poultry area is important. Forced
air positive pressure (FAPP) ventilation systems with absolute
filtering can help preventing airborne infections.
Management of contact infections is the responsibility of the
management; Salmonella is a real contact infection.
Avian influenza is a real contact infection.
Mycoplasma is a real contact infection, if the distance to
neighbouring farms is more than a few kilometers.
The mycoplasma synovia status of a farm is a very good indicator
for the level of biosecurity.
how to ImpLement BIosecurIty?• Make a risk assessment. Biosecurity means minimising
direct (via poultry; direct bird to bird contact) and
indirect (via people/visitors/workers/rodents/flies/truck/
materials/equipment) contact between farms.
• Only introduce birds with a guaranteed health status.
• Allow no visitors or make use of a stand still period (free
of poultry contact) for visitors of at least 48 hours ( and
preferably 72 hours). Do not allow staff/ workers on the
farm to have poultry at home. Mycoplasma’s, for instance,
can survive up to 72 hours in people’s hair.
• Install and use shower facilities; change clothes and
footwear.
• Poultry houses must be rodent and bird proof.
• Keep flies under control.
• Also feed storage must be rodent, bird and fly free.
• Use in farm equipment and tools.
• Do not allow trucks and cars on the clean part of the
premises.
• Observe strict separation between the outside and inside
of the farm premises (fences, clean road/ dirty road
principle for delivery of feed and removal of manure
and dead birds) is important in the prevention of indirect
contact between birds of different farms.
• Also maintaining the strict separation between outside and
inside of the houses is important.This can be implemented,
quite simply, by changing clothes and footwear and
washing of hands before entering a poultry house.
• Foot pans with disinfectant or disinfectant-treated pads
are hard to maintain and therefore often useless.
• Feed is a risk factor (salmonella).
• Is the drinking water clean and free from pathogens?
(The drinking water can be contaminated with E.Coli,
yeast, moulds and, when surface water is used, with
avian influenza!).

34 Biosecurity And Hygiene Vaccination
I SA - A l te rnat ive management gu ide I SA - A l te rnat ive management gu ide
The most important part of biosecurity programs is often
changing the way of thinking about what is clean and what
is dirty - and acting accordingly. An understanding of the
reasons why you implement certain biosecurity measures on
a farm can help significantly in persuading staff to behave
according to these rules.
Biosecurity measurements must be simple, well understandable,
agreed upon and monitored.
Every offence against the biosecurity rules is a serious threat
to the health status of a farm. All people must be aware of this
fact and be aware of the risks and the possible consequences
of these risks. Biosecurity is the cheapest, most effective mean
of disease control.
Biosecurity is the cheapest, most effective mean of disease
control�
the difficulty is not to implement a biosecurity program but
to maintain it�
vaccInatIon
Poultry can be vaccinated to make the birds themselves less
susceptible to poultry pathogens. Parent stock poultry can be
vaccinated to make their offspring less susceptible for disease
(providing them with maternal immunity via the yolk).
Poultry can be vaccinated to make them less susceptible for
contamination with human pathogens, i.e. Salmonella species.
Vaccination programs should be tailor made, taking into account
the following questions:
• What is the local disease situation; which diseases are
present in the area?
• What is the location of the farm, what’s the distance to
neighbouring farms and what type of birds are housed
on the neighbouring farms?
• Which diseases are present on the farm itself (endemic
diseases)?
• Does it hold parent stock or final product?
• Is it a multi age -or a single age farm?
You must make a risk assessment.
• What is the risk of infection?
• What are the costs of infection and how do they relate
to the costs of vaccination?
• What’s the damage done by vaccination compared to the
expected benefits of vaccination?
• Is protection needed during rearing and/or during lay
and/or should the offspring be protected by vaccination?
• Should you use live or killed vaccines?
• What is the most suitable/ practical route of administration
of the vaccine?
Take into account the principle of priming and boostering.
Take into account the minimum time distance between two
vaccinations targeting the same organ system.
monItorIng
Monitoring can serve different purposes.
When you vaccinate it is important to monitor the vaccine take.
Was the vaccine administered at the right time, in the right way?
You can monitor the endemic diseases on a farm.
Which pathogens are present and what is their behaviour/
dynamics?
You can use regularly taken serum samples for diagnostic
reasons.
Can observed clinical signs be linked to a rise in antibody titre
for a certain pathogen?
You can monitor the specific pathogen free status of a farm.
Frequency of sampling and amount of samples vary with the
pathogen you are monitoring.
What is the estimated/ expected prevalence of this pathogen
in the flock?
What is the risk of infection?
How crucial is it to find an infection as soon as possible?
drInkIng water quaLIty
• Water is a very important nutrient for all (production)
animals.
• Water is used as a carrier for vaccines and antibiotics/
chemotherapeutics.
• Water can be a source of pathogens.
Good quality drinking water is clean, clear, fresh, tasteless and
free from contaminants. The birds can easily find, reach and
drink it, and they can drink it as much as they need.
Other salient points are the source of the water and the type
of drinking water system used in the houses (storage vessels,
pipelines, drinkers).
What is the source of the drinking water? Is mains water used
or water from a borehole? Is surface water used? Is the quality
of the water checked before use or is it treated in any way?
Piped water system is normally a safe source.
Borehole water sometimes needs some treatments to make
it suitable for drinking. The quality of borehole water should
always be checked on a regular basis, at least once every year.
Surface water should never be used as a source for drinking
water, because of the risk of contamination with poultry
pathogens. Water fowl travel freely from country to country and
from continent to continent, carrying diseases with them (i.e.
avian influenza) and “dropping” large amounts of contaminated
droppings on places where they stop to eat and drink.
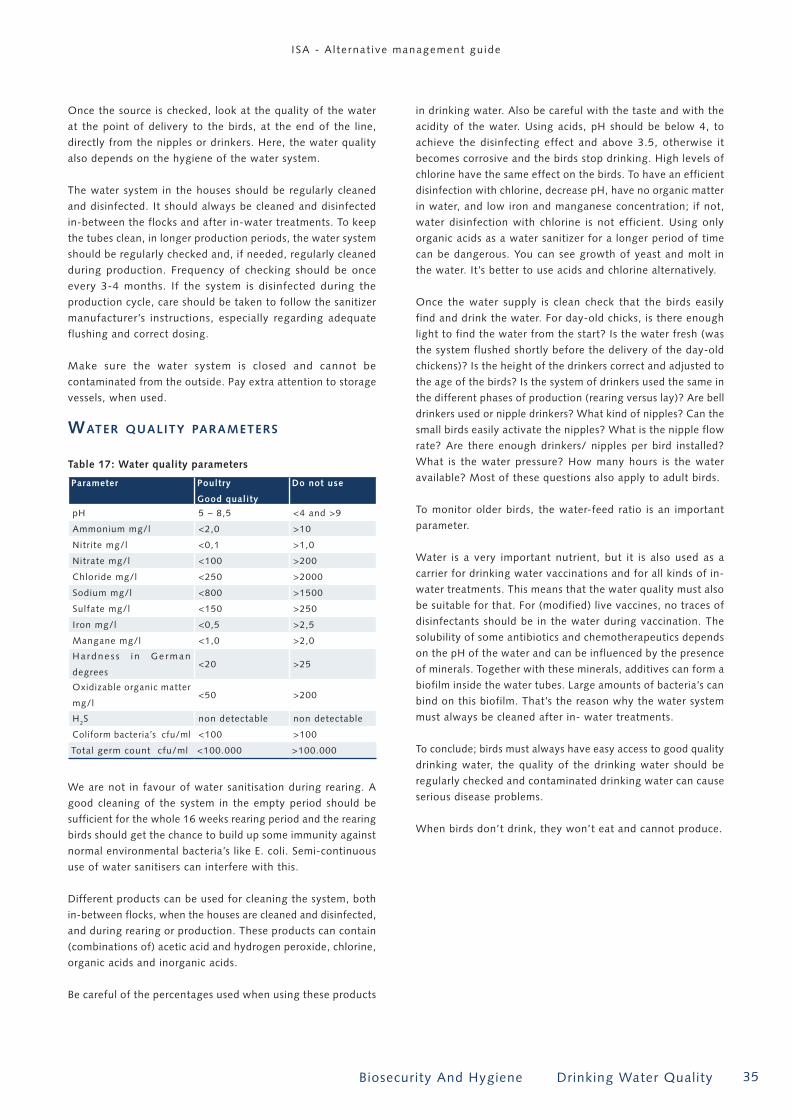
35 Biosecurity And Hygiene Drinking Water Quality
I SA - A l te rnat ive management gu ide I SA - A l te rnat ive management gu ide
Once the source is checked, look at the quality of the water
at the point of delivery to the birds, at the end of the line,
directly from the nipples or drinkers. Here, the water quality
also depends on the hygiene of the water system.
The water system in the houses should be regularly cleaned
and disinfected. It should always be cleaned and disinfected
in-between the flocks and after in-water treatments. To keep
the tubes clean, in longer production periods, the water system
should be regularly checked and, if needed, regularly cleaned
during production. Frequency of checking should be once
every 3-4 months. If the system is disinfected during the
production cycle, care should be taken to follow the sanitizer
manufacturer’s instructions, especially regarding adequate
flushing and correct dosing.
Make sure the water system is closed and cannot be
contaminated from the outside. Pay extra attention to storage
vessels, when used.
water quaLIty parameters
table 17: Water quality parameters
parameter poultry
good quality
do not use
pH 5 – 8,5 <4 and >9
Ammonium mg/l <2,0 >10
Nitrite mg/l <0,1 >1,0
Nitrate mg/l <100 >200
Chloride mg/l <250 >2000
Sodium mg/l <800 >1500
Sulfate mg/l <150 >250
Iron mg/l <0,5 >2,5
Mangane mg/l <1,0 >2,0
Ha rdne s s i n Ge rman
degrees<20 >25
Oxidizable organic matter
mg/l<50 >200
H2S non detectable non detectable
Coliform bacteria’s cfu/ml <100 >100
Total germ count cfu/ml <100.000 >100.000
We are not in favour of water sanitisation during rearing. A
good cleaning of the system in the empty period should be
sufficient for the whole 16 weeks rearing period and the rearing
birds should get the chance to build up some immunity against
normal environmental bacteria’s like E. coli. Semi-continuous
use of water sanitisers can interfere with this.
Different products can be used for cleaning the system, both
in-between flocks, when the houses are cleaned and disinfected,
and during rearing or production. These products can contain
(combinations of) acetic acid and hydrogen peroxide, chlorine,
organic acids and inorganic acids.
Be careful of the percentages used when using these products
in drinking water. Also be careful with the taste and with the
acidity of the water. Using acids, pH should be below 4, to
achieve the disinfecting effect and above 3.5, otherwise it
becomes corrosive and the birds stop drinking. High levels of
chlorine have the same effect on the birds. To have an efficient
disinfection with chlorine, decrease pH, have no organic matter
in water, and low iron and manganese concentration; if not,
water disinfection with chlorine is not efficient. Using only
organic acids as a water sanitizer for a longer period of time
can be dangerous. You can see growth of yeast and molt in
the water. It’s better to use acids and chlorine alternatively.
Once the water supply is clean check that the birds easily
find and drink the water. For day-old chicks, is there enough
light to find the water from the start? Is the water fresh (was
the system flushed shortly before the delivery of the day-old
chickens)? Is the height of the drinkers correct and adjusted to
the age of the birds? Is the system of drinkers used the same in
the different phases of production (rearing versus lay)? Are bell
drinkers used or nipple drinkers? What kind of nipples? Can the
small birds easily activate the nipples? What is the nipple flow
rate? Are there enough drinkers/ nipples per bird installed?
What is the water pressure? How many hours is the water
available? Most of these questions also apply to adult birds.
To monitor older birds, the water-feed ratio is an important
parameter.
Water is a very important nutrient, but it is also used as a
carrier for drinking water vaccinations and for all kinds of in-
water treatments. This means that the water quality must also
be suitable for that. For (modified) live vaccines, no traces of
disinfectants should be in the water during vaccination. The
solubility of some antibiotics and chemotherapeutics depends
on the pH of the water and can be influenced by the presence
of minerals. Together with these minerals, additives can form a
biofilm inside the water tubes. Large amounts of bacteria’s can
bind on this biofilm. That’s the reason why the water system
must always be cleaned after in- water treatments.
To conclude; birds must always have easy access to good quality
drinking water, the quality of the drinking water should be
regularly checked and contaminated drinking water can cause
serious disease problems.
When birds don’t drink, they won’t eat and cannot produce.

36 Biosecurity And Hygiene Information About Diseases
I SA - A l te rnat ive management gu ide I SA - A l te rnat ive management gu ide
InFormatIon aBout dIseases
coLIBacILLosIs
e coLI In pouLtry
E. Coli infections are known under different names; colibacillosis,
E. Coli peritonitis, E. Coli sepsis, E. Coli mortality, E. Coli
arthritis.
E.Coli can cause problems as a primary agent or as a secondary
pathogen.
To act as a primary pathogen, the infection pressure must
be high or other complicating factors must be present. In
alternative housing systems, high levels of ammonia can damage
the epithelium of the respiratory tract, thus opening the way
for airborne E. Coli mortality. In combination with high levels
of dust, the E. Coli, attached to dust, is able to colonize the
air sacs and the lungs.
Both in cage systems and alternative housing systems,
contaminated drinking water can be a source of e coli. Also
in both systems, ventilation stress can be a reason for e coli
mortality. Ventilation stress is caused by draught (fast movement
of cold air).
Draughts occur mainly in Spring and Autumn, when the
differences between day and night temperatures are significant
. At the end of the afternoon/ beginning of the evening, the
outside temperature drops fast. Most ventilation systems are
temperature regulated; the inside temperature is still high,
so the system pulls in this cold air with force, until the set
temperature is reached.
E. Coli mortality can be secondary to viral respiratory infections
like infectious bronchitis (IB) and avian rhinotracheitis (art),
secondary to bacterial infections like ornithobacterium
rhinotracheale (ORT) infections and secondary to parasitic
infections like red mites infections. E. Coli mortality can also
be secondary to pecking.
Peritonitis is not always related to E. Coli.
In layers there are two main types of mortality which involve
peritonitis with deposits of fibrin, namely egg yolk peritonitis
and E. Coli peritonitis.
With both types you find birds with a pale comb with blue
points.
Birds with egg yolk peritonitis are not usually found dead.
The symptoms can be observed in the flock. On post mortem,
these birds are dehydrated and display pericarditis, perihepatitis
and peritonitis with a lot of debris, which can be recognized
as solid egg yolk.
E. Coli peritonitis is (per) acute mortality. The flock looks
healthy and is performing well. The only problem is increased
Egg yolk peritonitis
E.Coli peritonitis
mortality and it can be quite difficult to see the signs.The
follicles are always hyperaemic; sometimes this is the only
visible pathological sign. Sometimes the only traces of fibrin
are seen between the follicles.
An important difference between the two is the smell. Egg yolk
peritonitis birds, when they are fresh,smell like boiled egg. E.
Coli peritonitis birds have a very bad, rotten smell.

37 Biosecurity And Hygiene Information About Diseases
I SA - A l te rnat ive management gu ide I SA - A l te rnat ive management gu ide
Egg yolk peritonitis occurs in young flocks, at the start of
production, when the flock shows a very fast increase in
lay percentage. Often these flocks come out of rearing on
bodyweight target, sometimes even 50-100 grams above
bodyweight target but when these birds are light stimulated,
they start laying very fast. In this situation, part of the follicles
“miss” the oviduct and land free in the abdomen, with egg
yolk peritonitis as result.
Nervous flocks can also show some egg yolk peritonitis as a
form of internal trauma then. One other form of internal trauma
causing egg yolk peritonitis can be seen in birds housed on a
aviary system which suffered from leg weakness; they show
too tough “belly landing”.
To conclude, egg yolk peritonitis can be a complication of viral
infections targeting the ovaries, like IB, ART and ND.
E. Coli vaccines are available, both inactivated (killed) vaccins
and modified live vaccines. Especially the modified live vaccine
shows promising results. Also autovaccines are used.
E. Coli mortality is difficult to treat. Antibiotic treatments are
often very effective, during the treatment, but once you stop
and the underlying, primary cause is still present, the mortality
comes back. Use of antibiotics is not always possible, because of
the withdrawal time of the products used. Especially in layers,
a treatment becomes very expensive when you have to destroy
all the eggs produced during 10-12 days.
Alternative treatments, like spraying with disinfectants,
and drinking water sanitation, with H2O2/ per acetic acids
combination, with organic acids or with chlorine are also
widely used.
coccIdIosIs preventIon
Infestation pressure in the houses can be reduced by using
disinfectant that destroy oocysts. Pay attention to the area
surrounding the houses for free range birds. Coccidiosis may
be responsible for enteritis and mortality. Sub-clinical infection
will damage feed conversion and uniformity.
Anticoccidia during rearing should create immunity and avoid
infection during lay. They should not be given after 14 weeks
of age at the latest. Vaccination can also be
applied and provide a good protection against coccidiosis.
worms
Worm infestation can be responsible for low weight intake,
bad uniformity, egg quality trouble, increase of pecking and
even death in case of heavy infestation.
We can frequently face infestations with ascaris worms, capillaria
worms and heterakis worms. Heterakis may be responsible
for contamination with histomonas. Control of heterakis
contamination prevents histomoniasis.
The birds get infested by ingestion of parasite eggs from the
environment. Control of worm infestation can be made by
opening up a few birds every weeks or by the examination of
droppings for worm eggs.
In free range systems, to prevent worm problems, grass
enclosure should be used in rotation and may be treated with
products able to destroy parasite eggs (calcium cyanamide,
ferrous sulphate…).
All flocks should be systematically treated for parasites at
transfer in the laying house. During production, infested flocks
should be treated and followed up according to the parasite
found and the product used.
A few products are allowed with no withdrawal period, which
allows to sell the eggs produced.
Coccidiosis - Eimeria tenella
Helminthiasis - Ascaridia galli

38 Biosecurity And Hygiene Information About Diseases
I SA - A l te rnat ive management gu ide I SA - A l te rnat ive management gu ide
mItes
Red mites are more common in cage or slat systems than in
aviary systems where the birds can get dust baths and get rid
of the red mites. Red mites may be responsible for nervousness,
feather pecking (due to stress), a drop of production, anaemia,
blood spots on the eggs, increase of floor eggs (birds don’t
want to go in the infested nests) and even for mortality. Red
mites often hide in dark and innaccessible places such as nests,
feeder legs, crossbars of slats or perches
Red mite management must be extensive and start from the
empty period when the houses must be treated with insecticides.
During the production period, several products can be used
to treat red mite problems. The most important for treatment
is to reach the places where the mites are hidden. Prevention
treatments must be done before getting heavy contamination,
as these are more difficult to manage and responsible for
economic losses.
FLy controL
Flies can be a source of several problems :
• Sanitary problems; by transmitting virus, bacteria or
parasites (worms).
• Behaviour problems; by causing birds to become nervous
resulting in aggressive pecking
• Environmental problems; by increasing ammonia level
in the houses because of the development of larvae in
the manure
• Unpleasant for people working in the houses and
neighbour’s in the local area.
Follow up of insects populations in the house is necessary to decide when is the best moment to use insecticides. To control fly
population, avoid drinker systems from leaking or overflowing which can create ideal conditions for fly egg and larvae development.
Insecticides should be applied as soon as possible after departure of the birds, while house temperature is still warm. It is still
better to use insecticides active on both adults and larvae than on adults only. Then at beginning of production, use an adulticide
insecticide to kill as soon as possible early stages of flies developing in the house; this is the only way to stop the life cycle of
the fly. It is still better to prevent and act early than let the number of flies increase , resulting in an over population and greater
difficulty in controlling them.
To avoid resistance development, it is highly recommended to get rotation between actives of both adulticide and larvicide insecticides
in order to reduce the selection pressure on fly populations.Check also if the insecticides can be used in presence of the birds or not.

39 Appendix Information About Diseases
I SA - A l te rnat ive management gu ide I SA - A l te rnat ive management gu ide
day Length taBLes accordIng to LatItude
Lat� Jan Feb Mar apr May Jun Jul aug sep oct nov dec
0 12:07 12:07 12:06 12:06 12:06 12:07 12:07 12:06 12:06 12:06 12:06 12:07
5 11:50 11:54 12:01 12:09 12:17 12:23 12:24 12:19 12:12 12:04 11:56 11:51
10 11:33 11:42 11:56 12:13 12:28 12:40 12:41 12:33 12:18 12:01 11:46 11:35
15 11:15 11:29 11:50 12:16 12:40 12:57 13:00 12:47 12:24 11:59 11:35 11:18
20 10:57 11:16 11:45 12:20 12:52 13:15 13:19 13:01 12:30 11:57 11:23 11:00
25 10:37 11:02 11:39 12:24 13:05 13:35 13:39 13:17 12:37 11:54 11:12 10:41
30 10:15 10:46 11:33 12:29 13:20 13:57 14:02 13:34 12:45 11:52 10:59 10:21
35 9:51 10:29 11:26 12:34 13:36 14:21 14:28 13:53 12:54 11:49 10:44 9:58
40 9:23 10:10 11:18 12:40 13:54 14:49 14:57 14:15 13:03 11:46 10:28 9:32
45 8:50 9:48 11:09 12:47 14:16 15:23 15:33 14:41 13:15 11:42 10:09 9:01
50 8:10 9:20 10:58 12:55 14:42 16:04 16:17 15:13 13:28 11:38 9:47 8:24
55 7:17 8:46 10:45 13:05 15:15 16:59 17:16 15:53 13:46 11:33 9:18 7:35
60 6:03 8:00 10:29 13:18 16:00 18:18 18:42 16:49 14:08 11:26 8:41 6:27
65 3:54 6:54 10:06 13:37 17:05 20:42 21:36 18:14 14:39 11:18 7:48 4:36
conversIon taBLe
0.00
15.00
30.00
45.00
60.00
15.00
30.00
45.00
60.00
0.00
15.00
30.00
45.00
60.00
30.00
15.00
45.00
60.00
LatItudes
appendIx
Energy
1 cal = 4.1868 J
1 kcal = 4.1868 kJ
Temperature
C=5/9 (°F-32)
F=(9/5°C) +32
Surface
1 cm² = 0.1550 sq. in
1 m² = 10.76387 sq.ft = 1.195985 sq. yd
Light
1 Lux =1 candela = 1 lumen/m²
Weight
115 g = ¼ lbs = 2 oz
1 kg = 2.2 lbs
Lenght
1 mm = 0.03937 in
1 m = 3.28083 ft
1m = 1.093611 yd

Institut de sélection animale BV
Villa «de Körver», Spoorstraat 69,
5831 CK Boxmeer
P.O. Box 114, 5830 AC Boxmeer
The Netherlands-EU
T +31 485 319 111
F +31 485 319 112
Institut de sélection animale sas
1, Rue Jean Rostand, Zoopôle
P.O.Box 23, 22440 Ploufragan
Cedex
France-EU
T +33 296 774 600
F +33 296 774 601
Isa north america
Division of Hendrix Genetics Ltd.
p/a 650 Riverbend Drive Suite C.
Kitchener, Ontario, N2K 3S2
Canada
T +1 519 578 2740
F +1 519 578 1870
info�isa@hendrix-genetics�com
www�isapoultry�com