all about gnarls - part 1 -...
TRANSCRIPT
ALL ABOUT GNARLS - PART 1All I know about gnarls, I mean :dummy: We w ill go through some basic tricks, transforms that can create gnarly shapes and colouring.
Basic Gnarl
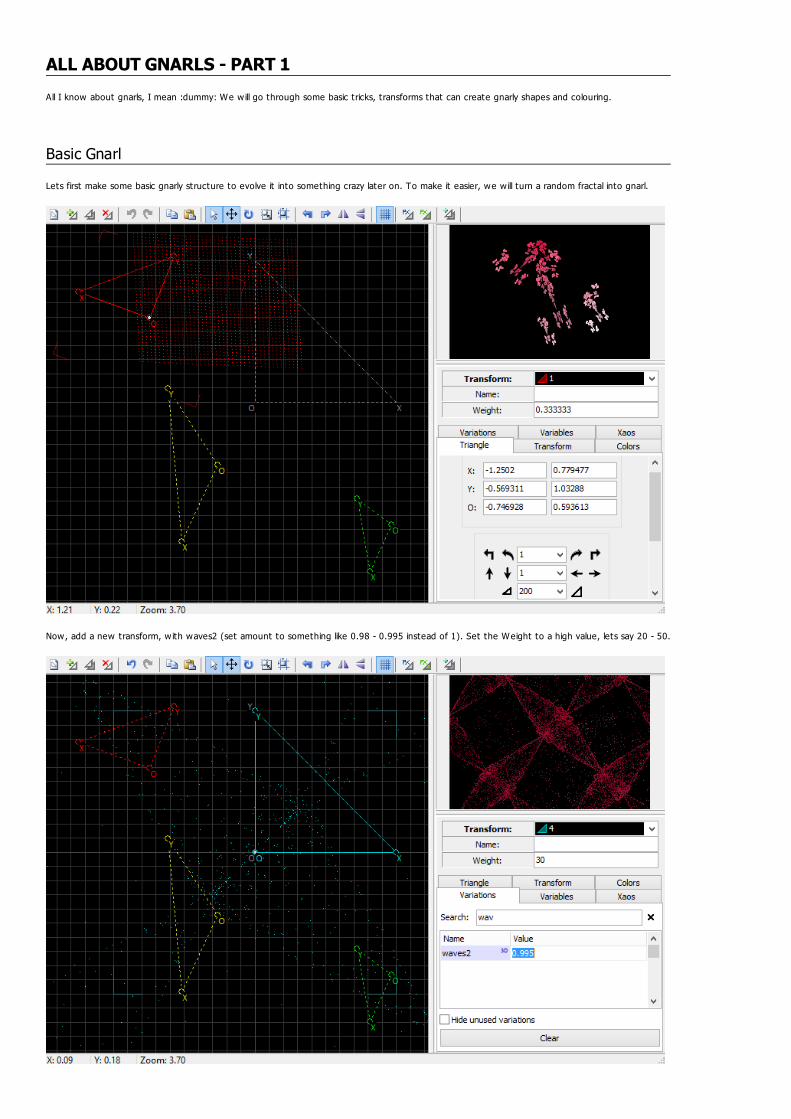
Lets first make some basic gnarly structure to evolve it into something crazy later on. To make it easier, we w ill turn a random fractal into gnarl.
Now, add a new transform, w ith waves2 (set amount to something like 0.98 - 0.995 instead of 1). Set the Weight to a high value, lets say 20 - 50.

Now, you just need right parameters. Set frequencies to some nice values - I usually keep them between 5 and 20. The scales, now, should besomething between -0.1 and 0.1.
Later, we w ill have a more detailed look of what each of those values does.
T ip: move around the affine for the gnarl transform (waves2 here).
Here we go, a very very basic gnarly structure. Lets now learn how to improve it .
Waves2 Parameters
This sect ion is an overview of what each of the waves2 parameters does, and its effect on the gnarl.
We w ill first look at a basic checkboard pattern, and apply waves2 as final (camera) transform, to separate its effect from everything else.

Now, we apply waves2. Lets set all variables to 0, and then: scale-x = 0.1 and freq-x = 5 (left), 11 (middle) and 19 (right):
Below, freq-x fixed at 5, and change scale: scale-x = 0.1 (left), 0.3 (middle) and 0.7 (right).
The freq-y and scale-y work in a similar way. Take a look at the preview below, w ill all -x variables set to 0, scale-y = 0.3 and freq-y = 12:
In a few words, freq parameter defines the frequency of waves, and scale defines their amplitude. Applied to gnarls, high frequency values w illcreate many t iny sw irls, while low frequency values w ill create few big sw irls. The scale w ill define how "rippled" they are: if the scale (in absolutevalue) is too low, the gnarl w ill not sw irl. If it is too high, it w ill look messy.

Lets see how it works on a "real" gnarl. Below, the only change I make is increasing the frequency: from 4 (left) to 7 (middle) and then to 11(right):
Not ice how the gnarly shapes get smaller and their numbers increase. Now, lets do the same w ith the scale. I'm increasing it from 0.01 (left) to0.05 (middle) to 0.15 (right)
Observe that the right variant is maybe just a bit too sw irly already, the shapes are clogged and not clear enough. To get nice clean shapes, youshould reduce the scale as you increase the frequency.
Again, lets look at examples. First, we take freq 3. Below, we have scale = 0.02 (left) and 0.1 (right):
What happens w ith the same parameters if we increase frequency to 15 on both?
Observe that, for frequency 3, scale 0.02 looks too plain, while scale 0.1 is fine. Meanwhile, for frequency 15, scale 0.02 is fine, and scale 0.1 is waytoo messy.

Finally, unt il now, we only looked at how x freq and scale work, and how y scale work, but not how they work together. Well, basically, they addup their effects.
Lets see how it works. Look at two gnarls below. The left one has freq-x = 20 and scale-x = 0.03. The right one has freq-y = 3 and scale-y = 0.11.
Now, we put those two together: freq-x = 20, freq-y = 3, scale-x = 0.03, scale-y = 0.11:
The result has shapes similar to the pattern w ith lower frequency, but some addit ional ripples caused by the high frequency pattern. I personally likeit the way it is, but we want some cleaner patterns, we need to reduce one (or both) scales.
Case 1: freq-x = 20, freq-y = 3, scale-x = 0.01, scale-y = 0.11. This setup leaves, untouched, the big pattern and adds some minor irregularit ies toit .
Case 2: freq-x = 20, freq-y = 3, scale-x = 0.03, scale-y = 0.05. Here, we leave the small ripples, and sw irl them a lit t le bit into a bigger gnarl.

Case 3: freq-x = 20, freq-y = 3, scale-x = 0.03, scale-y = 0.02. A variat ion on case 2.
And, just to close this sect ion, an example of what you can achieve by combining x and y effects:
Radial Symmetry
Now, how do people get things like below?
Well, first thing: gnarls are not perfect ly symmetric. It upsets me big t ime because it makes very hard to put them into hypert ile patterns, but Ididn't find a way to overcome it yet.
To achieve this almost symmetry, rotate the gnarl transform by 360 / n degrees, where n is the desired order of symmetry. You can rotate eithercounter clockw ise or clockw ise - it doesn't really matter. I personally prefer the CCW for some reason, but CW works as well for all examples below.

Case n = 3. We have that 360 / 3 = 120. Two examples of CCW rotat ion by 120 degrees:
Case n = 4. We have that 360 / 4 = 90. Two examples of CCW rotat ion by 90 degrees:
Case n = 5. We have that 360 / 5 = 72. Two examples of CCW rotat ion by 72 degrees:

Case n = 6. We have that 360 / 6 = 60. Two examples of CCW rotat ion by 60 degrees:
And so on. Between, I used the same waves2 setup for all examples above, only changing the rotat ion angle and the posit ion of the gnarltransform affine. Those rotat ions work not only for waves2, but for other gnarl transforms too, and let you achieve some nice and sharp patterns
Texturing
In the beginning of this tutorial, we made a simple gnarl pattern start ing from a random. As we could see, the gnarl is made of a gnarl transform(waves2 or something else) that creates the sw irls, and other transforms - in that example, the transforms that created the random - that addsome texture to it .
You can use any transforms to texture gnarls. I have 2 groups of textures in my head, basically - blurs and actual textures.
The blur setup is simple: start by creat ing a gnarl transform, and then add a few (1-3 but can be any number) of transforms w ith blur only (such assineblur, gaussian or radial), and move them around using post affines.
Take a look at the example below. We have a gnarl transform (red), and two blur transforms w ith sineblur (yellow and green):

The actual fractal looks like this:
Moving around the blur transforms (this works for any texture, not just blur) w ill create different lightning effects. Below, I only moved around andscaled up and down the blurs:
Sineblur is not the only blur in the world. For example, circleblur (left) and starblur (right) make things like those:
But, if you want some more interest ing texture, you should use other transforms that are not blur. The method is the same: add a bunch oftransforms and move them around unt il it looks good. A small difference though: you may need to scale down the transforms to get a dist inct ivetexture instead of noisy blurry messy thing.

Also, you may need to do way more moving and re-posit ioning to make the texture stand out, depending on transforms you used.
As an example, below, a texture based on sphericals:
And another one, w ith linears:

Colouring
Last but not least, colouring. After all, it looks kinda boring st ill.
At this point, you probably have something like this:
A quick thing, go to the colour tab and set: transform colour = 1 and colour speed = 0.95 or so (in Chaot ica, the equivalent is palette locat ion = 1and blend speed = 0.025).
Already a bit of an improvement:

If you are working w ith blur texture, there is a trick to improve it further. Go through all blur transforms and set the colour speed to -1 (or, inchaot ica, blend speed to 1) - which means solid colour.
(or, just to show off, w ith curves it would end up looking like this)
This second trick may not work well when you have actual texture, as it may leave the texture a bit too plain / boring, as it would kill all texturecolour variat ions.
A bit on how colour speed works. It basically sets up the amount of colour that w ill be retained from previous transforms. -1 means no colour fromprevious transforms w ill be taken, and only the transform colour w ill be used - which makes it solid colour. 1 means that transform colour w ill not beused at all.
As the gnarl transform is iterated many t imes to create those shapes, we must add transform colour in really small amounts, sett ing a value close to1 - or transform colour w ill cover up most colour variat ions.
Take a look at the previews below. Here, the transform colour of the gnarl transform is orange. See how the result looks like for colour speed = 0.7(left), 0.9 (middle) and 0.95 (right):

Common Issues And How To Fix Them
Last but not least, lets go through a few issues that commonly arise in gnarling, and ways to fix them. Most of those issues can be used as art ist iceffect too and not always require fixing.
Issue 1: we did everything right, but the gnarls somehow don't make clear sw irls, like on the picture below.
To make sw irls visible, reduce the amount of waves2. See below: waves2 = 0.997 (left), 0.994 (middle) and 0.99 (right):
Issue 2: the gnarl is too condensed in the center:
This is related to previous one. Try increasing the amount of waves2 and see what happens.
Also, instead of changing the amount of waves2, you may try changing the transform scale, as it leads to a similar result .
Issue 3: the sw irls are too bright:

This means that the weight of gnarl transform may be too high. Try decreasing it . Compare below, weight = 200 (left), 100 (middle) and 50 (right)
Issue 4: there area w ith gnarly structures is too small and there is no nice different iat ion of colours:
There are 2 possible solut ions. The first one envolves increasing frequency (and reducing scale correspondingly). This w ill not fix the coloringthough.
So, instead of doing anything w ith the gnarl transform, you need to move the post_affines of blur transforms. Below, the red transform is the gnarlone, and the other are blur ones. The setup on the left corresponds to the picture above...
...and the right setup, to the picture below. See how moving the blurs around can change your fractal's appearence. A lot.