alien legacy on-line documentation · to start alien legacy once it is installed, follow these...
TRANSCRIPT

™

22222
βδ
αINTRODUCTION ————————————————— 4
GETTING STARTED ———————————————— 6About This Manual —————————————— 6Manual Changes And Additions ————————— 6Installing Alien Legacy ————————————— 6System Requirements ————————————— 6Installing Alien Legacy On Your Hard Drive ———— 7Starting Alien Legacy ————————————— 7Start-Up Problems ——————————————— 7Changing Sound Options ——————————— 8
HISTORICAL BRIEFING ——————————————— 9
QUICK REFERENCE ——————————————— 12Control Screen Diagram ——————————— 12Game Controls ——————————————— 14Commands ———————————————— 14
ORIENTATION TOUR —————————————— 20
CALYPSO CONTROLS GUIDE ——————————— 27Startup Menu ——————————————— 27Universal Commands ———————————— 27Bridge ——————————————————— 28General Options Menu ——————————— 30Video Phone ———————————————— 31Comm. Panel ———————————————— 31Advisor Screens —————————————— 32Technology Manager ———————————— 34Inventions ————————————————— 34Sciences —————————————————— 35Vehicle Manager —————————————— 36Missions —————————————————— 37Cargo ——————————————————— 40Launching Or Changing A Mission —————— 41Mercator Map ——————————————— 42Inactive Map Options ———————————— 42Active Map Options ————————————— 43Ship Controls ———————————————— 44Surface Exploration Screen —————————— 46Main Window ——————————————— 46Control Panel ———————————————— 47Other Displays ——————————————— 48
ContentsContentsContentsContentsContents
γ

33333
εζη
Space Map ———————————————— 50Main Window ——————————————— 50Space Map Controls ————————————— 51Planet Options Menu ———————————— 52Colony Manager —————————————— 53Colony Grid ———————————————— 55Graphical Summary ————————————— 56Installations Window ———————————— 56Captain’s PDA ——————————————— 58Log ———————————————————— 58Library —————————————————— 59Status ——————————————————— 59Damage —————————————————— 59Game Options ——————————————— 60
CAPTAIN’S REFERENCE ————————————— 61Exploring Planets —————————————— 61Colonies —————————————————— 61Resources ————————————————— 62Resource Types ——————————————— 62Collecting Resources ————————————— 63Installations ———————————————— 64Building Installations ————————————— 64On-Line Status ——————————————— 65Habitats —————————————————— 66Power Plants ———————————————— 67Factories —————————————————— 67Research Labs ——————————————— 68Technology Advancements —————————— 68Creating Technologies ———————————— 69New Technologies —————————————— 69Effects Of Technological Advances ——————— 69Combat —————————————————— 70Strategy —————————————————— 70The End —————————————————— 72Glossary —————————————————— 75Advisor Dossiers —————————————— 76
Technical Support —————————————— 78Customer Services ————————————— 86Credits —————————————————— 91Index ——————————————————— 92

44444
αIntroductionIntroductionIntroductionIntroductionIntroduction“Officer on Deck!”The crew snaps to attention.“Welcome to the Bridge, Captain,” says your ScienceOfficer.
“As you were,” you say as you return the salutes of yourBridge officers and turn to view the Space Map. The starcentered in the display is larger than Sol, and its harsh blue-white glare makes you squint despite the Space Map’sheavy filters. This is Beta Caeli, over 55 light-years fromEarth. It is to be your new sun.
You’re freshly awakened from many years of cryogenicsleep. As the rejuvenating vitamin injection returns yourbody to real-time, you realize you can spare only a fewmoments to enjoy the view. You must start making vitaldecisions here, and quickly. You have just resumed com-mand of the United Nations Ship Calypso. Your bridge crewawaits your orders. And as you are soon to find out, farmore than your career is now at stake.
Welcome to Alien Legacy. The seedship UNS Calypso is anark packed with the human refugees of a horrendousinterstellar war. Your mission here, in this unknown quad-rant of the galaxy, is to continue the human race. Thechallenges facing you are truly awesome, as are the odds.
You must explore planets and moons to discover viablecolony sites in potentially hostile environments. To ensure thesurvival of the colonies, you must locate critical resourcessuch as ore and energy, and establish reliable supply lines.You must direct the growth of your colony sites, balancingpopulation growth against production capacity and resourceconsumption. You’ll have to make hard choices betweenessential priorities: building habitats for life support, powerplants for energy, factories for robots and vehicles, orresearch labs for the advanced technologies and knowledgethat will be your ultimate salvation.
And those are the least of your challenges. Beta Caeli islethal to the unwary, and a harsh teacher to the unwise. You

55555
may be facing cataclysmic natural disasters, hostile lifeforms, and even colonial rebellions if you start losingcontrol. What’s more, the blackness around you teems withancient, sleeping mysteries: some that can save yourfledgling civilization, and others that can totally annihilate it.You are racing the clock to find out about them before theyfind out about you.
From the bridge of the Calypso, you will control, guide, andinspire the activities of thousands of people. But with thispower comes grave responsibility. These people mayrepresent the last tiny remnant of humanity. You must leadwisely to maintain their confidence and assure the success ofthe colonies. While you may be able to delegate some tasksto your expert Advisors or trusted Planetary Governors, youbear ultimate responsibility for the mission at all levels. Theclock is ticking. There is no alternative. And there is nogoing back.
66666
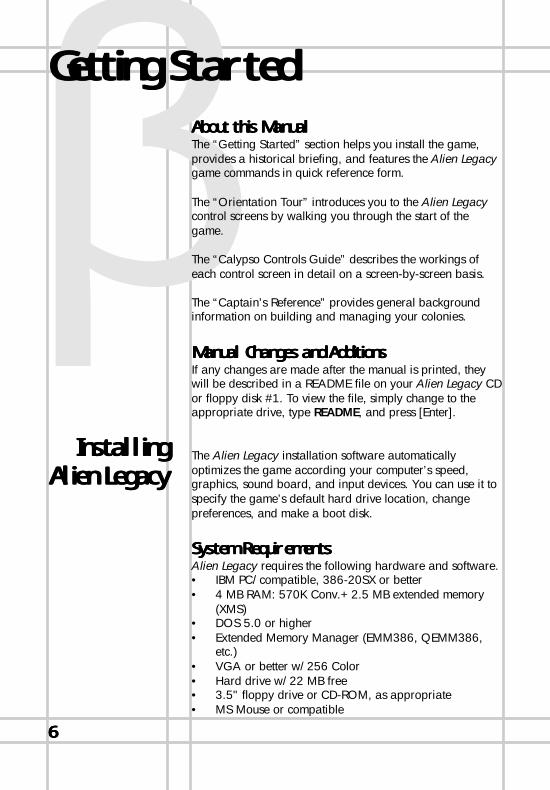
βAbout this ManualAbout this ManualAbout this ManualAbout this ManualAbout this ManualThe “Getting Started” section helps you install the game,provides a historical briefing, and features the Alien Legacygame commands in quick reference form.
The “Orientation Tour” introduces you to the Alien Legacycontrol screens by walking you through the start of thegame.
The “Calypso Controls Guide” describes the workings ofeach control screen in detail on a screen-by-screen basis.
The “Captain’s Reference” provides general backgroundinformation on building and managing your colonies.
Manual Changes and AdditionsManual Changes and AdditionsManual Changes and AdditionsManual Changes and AdditionsManual Changes and AdditionsIf any changes are made after the manual is printed, theywill be described in a README file on your Alien Legacy CDor floppy disk #1. To view the file, simply change to theappropriate drive, type README, and press [Enter].
The Alien Legacy installation software automaticallyoptimizes the game according your computer’s speed,graphics, sound board, and input devices. You can use it tospecify the game’s default hard drive location, changepreferences, and make a boot disk.
System RequirementsSystem RequirementsSystem RequirementsSystem RequirementsSystem RequirementsAlien Legacy requires the following hardware and software.• IBM PC/compatible, 386-20SX or better• 4 MB RAM: 570K Conv.+ 2.5 MB extended memory
(XMS)• DOS 5.0 or higher• Extended Memory Manager (EMM386, QEMM386,
etc.)• VGA or better w/256 Color• Hard drive w/22 MB free• 3.5" floppy drive or CD-ROM, as appropriate• MS Mouse or compatible
Getting StartedGetting StartedGetting StartedGetting StartedGetting Started
InstallingInstallingInstallingInstallingInstallingAlien LegacyAlien LegacyAlien LegacyAlien LegacyAlien Legacy

77777
Recommended:• Sound Card: Sound Blaster, Adlib, PAS• 486, SmartDrive w/512K buffer
Installing Alien Legacy on Your Hard DriveInstalling Alien Legacy on Your Hard DriveInstalling Alien Legacy on Your Hard DriveInstalling Alien Legacy on Your Hard DriveInstalling Alien Legacy on Your Hard DriveThe following directions call your floppy drive A:, your CDdrive D:, and your hard drive C:. Please substitute theappropriate drive name(s) for your system as needed.1. After starting your PC, insert the Alien Legacy CD or
disk 1 into the appropriate drive.2. Type the appropriate drive letter (A: or D:) and press
[Enter].3. Type INSTALL and press [Enter].4. Press [Enter] to close the System Requirements screen,
and press it again to close the Memory Requirementsscreen. On the menu that follows, select (highlight)Install Alien Legacy with the Up/Down arrow keys, andpress [Enter] to start the installation.
5. If installing from CD, select a MINIMUM or FULLinstallation. The MINIMUM install takes less room onyour hard disk but requires you to play from the CD, sothe game may run slower if you have a slow CD drive.The FULL Install lets you play without using the CD, buttakes more disk space.
6. When prompted, type the drive letter where you want toinstall the game (typically C). You’ll then be shown thedefault directory name (SIERRA\ALIEN). If you wish toinstall to a different directory, you may specify it now.When the directory name is correct, press [Enter].
7. Follow the on-screen instructions.
To start Alien Legacy once it is installed, follow these steps:1. If you are playing the CD version, first insert the CD into
your CD-ROM drive.2. Go to the Alien Legacy directory on your hard drive. (If
you installed Alien Legacy to the default directory, typeC: and press [Enter], then type CD\SIERRA\ALIEN andpress [Enter]. If you’re using a different drive ordirectory, substitute as needed.)
3. In the Alien Legacy directory, type AL [Enter]. You’ll seethe opening credits (press [Esc] or click to skip).
4. When the Start-up Menu appears, click New Game tostart a new game, or Load Game to start a previouslysaved game session from the point you last saved it.
Note: Don’t try toinstall Alien Legacy toyour hard drive with“copy” commands. Thegame files arecompressed to savedisk space, and won’trun unless decom-pressed by theinstallation program.
StartingStartingStartingStartingStartingAlien LegacyAlien LegacyAlien LegacyAlien LegacyAlien Legacy

88888
You can also Quit to DOS if you do not want to playnow.
Start-up ProblemsStart-up ProblemsStart-up ProblemsStart-up ProblemsStart-up ProblemsEven if you have the minimum 4 MB of RAM, Alien Legacymay not run correctly unless the RAM is configured (set up)correctly. You will need at least 570K (583,680 bytes) offree conventional memory and 2.5 MB of free extendedmemory (XMS).
If Alien Legacy does not start correctly, use the MS-DOS®
MEM command to see if you need to free up some of yourcomputer’s memory. From DOS, type MEM and press[Enter]. “Largest executable program size” is your freeconventional memory; “bytes free (XMS)” is your extendedmemory. If you don’t have enough conventional memory, goto the Technical Support section in the back of this manual tofind a way to set up your memory to run Alien Legacy. Youcan also consult your DOS and memory manager softwaredocumentation for detailed information about systemmemory.
Changing Sound OptionsChanging Sound OptionsChanging Sound OptionsChanging Sound OptionsChanging Sound OptionsYou can change your Alien Legacy game settings from DOSat any time without having to re-install the game. Followthese steps:
1. Go to the Alien Legacy directory on your hard drive. (Ifyou installed Alien Legacy to the default directory, typeC: and press [Enter], then type CD\SIERRA\ALIEN andpress [Enter]. If you’re using a different drive ordirectory, substitute as needed.)

99999
γHistorical BriefingHistorical BriefingHistorical BriefingHistorical BriefingHistorical Briefing2. In the Alien Legacy directory, type AL S [Enter].3. Select the option you wish to change from the menu.4. Follow the on-screen instructions.
This section quickly recaps the origin and intent of theCalypso’s mission and your directives.
Human history in the first half of the 21st century differedlittle from the centuries before it: always more peoplecompeting for always fewer resources, with technologyplaying an ever greater role in the pace and magnitude ofevents. Most developed countries launched exploration andcolonization missions into near space in the perpetualsearch for new resources and living space for their swellingpopulations. Even in the asteroid belt, however, nationalrivalries and territorial conflicts kept humans spending muchof their energy battling each other rather than the harshrealities of this ultimate frontier.
But then, in 2043, everything changed forever. What firstwas thought to be a previously unknown comet wassuddenly discovered to be the vast “light-sail” of an alienprobe apparently originating from Alpha Centauri. The U.S.scout ship Friendship was diverted from a mining survey ofthe Neptunian moon Titan to intercept.
The first Friday in October, 2043, after days of repeatedattempts to contact the visitor, the Friendship closed to within200 miles of the alien probe. Suddenly, without any sign ofacknowledgment, the alien ship locked on to the unarmedU.S. ship and opened fire with powerful energy-beamweapons, destroying the Friendship within seconds.
Despite subsequent counter-attacks by other vessels in thefollowing weeks, the probe drove on relentlessly towardEarth. The probe survived several missile barrages andfinally fired missiles of its own. Most of these missiles weresuccessfully intercepted by Earth-based ABM systems, butone struck in the reclaimed croplands of the Sudan, killingmillions with a murderous viral weapon. At heavy cost to allof Earth’s governments, the probe was finally destroyed.Thus began the Human-Centaurian War.

1010101010
This first violent contact was the catalyst that finally joinedthe great governments of the Earth under the leadership ofthe United Nations. They realized that only by combiningtheir strength would they be able to mount an effectivedefense against this obviously advanced and ruthless alienmenace.
The attack also ignited a furious technological revolution,causing explosive growth in human technology. Transcen-dent breakthroughs came quickly in the fields of electronics,super-construction, and propulsion, including the firstworking Bussard ramjet. This innovation used a giganticscoop to capture and store the trace hydrogen in theinterstellar medium as fuel for fusion engines. This meant analmost endless fuel source for long voyages, and allowed thedesign of huge new ships with few limits on size or mass.Previous space classes that had to carry all of their fuelcould never accelerate for long, while ramjet-equipped

1111111111
starships could accelerate halfway to their destination beforehaving to turn and decelerate.
Within just a few short years, the United Nations wasbuilding the first interstellar battle cruisers, intended to takethe fight to the Centaurians and destroy them before theycould destroy Earth. In tandem with this great war effort wasthe attempt by mankind to persevere in the face of potentialextinction. The great Odessa-class seedships were designedas gigantic arks to carry mankind from the cradle of Earth tosystems known to contain M-class (Earth-like) worlds.
In 2119, the Odessa Class 3-B seedship UNS Calypso waslaunched towards the Beta Caeli star system. At over 17parsecs from Earth, Beta Caeli was the farthest colony yetattempted. For that reason, it was considered to be thecolony with the best ultimate chance of success at evadingthe Centaurian’s genocidal wrath. The UNS Tantalus waslaunched in 2135, also to Beta Caeli. Thanks to its newRamikin fusion engine, the Odessa Class 4-C Tantalus wasexpected to arrive at the Beta Caeli system some 21 yearsahead of its older sister ship.
Preliminary scanner reports from Navigation report no

1212121212
δQuick ReferenceQuick ReferenceQuick ReferenceQuick ReferenceQuick ReferenceControlControlControlControlControlScreenScreenScreenScreenScreen
DiagramDiagramDiagramDiagramDiagram
NOTE: A dashed borderindicates screens you canopen from the GeneralOptions (GO) menu.
VEHICLE MANAGER
NAVIGATION ADVISORNOTE: The Mercator Map may beaccessed via Exploration missionsfrom the Vehicle Manager.
VEHICLE HANGAR
MILITARY ADVISOR
TECHNOLOGY MANAGER
SCIENCE ADVISOR

1313131313
SURFACE EXPLORATION
MERCATOR MAP
SPACE MAP
GAME OPTIONS PERSONAL DATA ASSISTANT
NOTE: The Calypso Colony Gridmay be accessed directly from theBridge via “View ShipResources.”
COLONY MANAGER
ENGINEERING ADVISOR
COMPUTER
COLONY GRID

1414141414
evidence of the Tantalus or any of the colony sites it ispresumed to have founded. Further reports will be forthcom-ing from your Advisors as soon as possible. Despite thistroubling news, you must proceed with the mission with allpossible dispatch. Time is of the essence.
Alien Legacy features a stylish and easy-to-use “point-and-click” interface that helps you move around the gamequickly and easily. From the Bridge, you’re just a click awayfrom the Advisor Stations, the Space Map, and theCalypso’s Site Grid, and just two clicks away from thepowerful Colony Manager, Vehicle Manager, and Technol-ogy Manager screens. You can also pilot any of yourspacecraft using the Mercator Map and Surface Explorationscreens.
Most of Alien Legacy is mouse-controlled. Some actions canalso be performed with keyboard commands. To “click” or“left-click” means to click the left-hand mouse button once.To “right-click” (r-click) means to click the right-hand mousebutton. To “double-click” means to click the indicated buttontwice, quickly.
Using keys. Key commands are indicated by brackets: [Tab],[Enter], [Esc] for example.
AnywhereAnywhereAnywhereAnywhereAnywhereExit Game [Alt]+[X]
Skip Movie Sequence
[Esc] or ClickPause Game [P]
Return toPrev. Scr. [Esc]or LeaveSave Game[Alt]+[S] SetGame Speed 1, 2,…0Load Game[Alt]+[L]
CommandsCommandsCommandsCommandsCommands
gamegamegamegamegamecontrolscontrolscontrolscontrolscontrols
1515151515
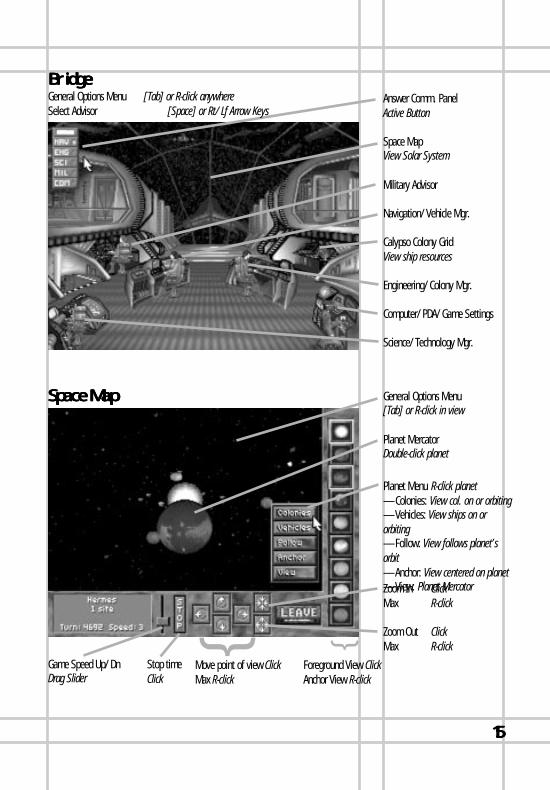
Answer Comm. PanelActive Button
Space MapView Solar System
Military Advisor
Navigation/Vehicle Mgr.
Calypso Colony GridView ship resources
Engineering/Colony Mgr.
Computer/PDA/Game Settings
Science/Technology Mgr.
BridgeBridgeBridgeBridgeBridgeGeneral Options Menu [Tab] or R-click anywhereSelect Advisor [Space] or Rt/Lf Arrow Keys
{{
Space MapSpace MapSpace MapSpace MapSpace Map
Zoom In ClickMax R-click
Zoom Out ClickMax R-click
Game Speed Up/DnDrag Slider
Stop timeClick
Planet Menu R-click planet—Colonies: View col. on or orbiting—Vehicles: View ships on ororbiting—Follow: View follows planet’sorbit—Anchor: View centered on planet—View: Planet Mercator
General Options Menu[Tab] or R-click in view
Planet MercatorDouble-click planet
Move point of view ClickMax R-click
Foreground View ClickAnchor View R-click

1616161616
Mercator MapMercator MapMercator MapMercator MapMercator Map
Build ColonyClick Equipment icon
{{Overhead View On/Off Plasma Bomb
Scan
Move Ship Arrows
Collect item Click Hand cursorFire Laser R-Click Target cursor
Cargo Limit Load: On Board/Max.
Fuel Units left(1,000 fuel = 1 energy)
Return to OrbitLeave
Explore SectorExplore SectorExplore SectorExplore SectorExplore Sector
General Options MenuR-click vacant sector
With VehicleSend ShipClick sectorSelect sector, [Enter]
Scan for Sites(Must invent)
Explore SectorClick ship
Vehicle MenuR-click vehicle
Cargo Limit Load: On Board/Max.Fuel Energy: Units left
Select SectorClick Sector Arrowsor use Arrow Keys
Colony OptionsR-click Colony
Scan for OreClick Ore icon
Scan for EnergyClick Energy icon
Cargo View orCompass icon
Sector Map ViewCargo Bay icon
Sector Map View
Direction

1717171717
Technology ManagerTechnology ManagerTechnology ManagerTechnology ManagerTechnology Manager
Astr Chem Elect Geol Biol Math Phys
Research Available
Research Needed
{
Vehicle ManagerVehicle ManagerVehicle ManagerVehicle ManagerVehicle Manager
Load ItemClick to increaseR-click to decrease(Ore, Energy, LifeSupport, Humans,Robots)
Launch Ship Now Cancel MissionSelect Different Vehicle
Invent Current Click InventView Inventions Click Lf/Rt Arrows,Spacebar
Select Mission# Trips To/From:Select Pipeline Mission
Select Destination
Select Pilot
Vehicle Hangar
Select VehicleClick on vehicle listing
See more VehiclesClick Up/Down arrows
Filter Vehicle List(By Mission, Planet, Colony)

1818181818
Go to Colony ManagerGo to Vehicle ManagerClick Vehicle icon
Colony ManagerColony ManagerColony ManagerColony ManagerColony Manager
Colony Grid ControlsOptions Menu R-click empty areaMove Grid View Drag mouse to edgeInstallation Menu R-click on building
See More Colony SummariesClick Arrows or Up/Dn ArrowKeys
Delete ColonyRemove all, R-click
Choose New InstallationClick selector box arrowsClick/R-click selector box
Build InstallationDrag from selector box, place onempty grid
Change Colony NameClick name, edit, [Enter]
Visit Site GridClick Colony Summary
List of Advisorsstationed at colony
{Colony Summary(Habitat, Factories, Power, Labs,Ships, Missiles, Ore, Energy, LifeSupport, Humans, Robots)
Colony ListClick Colony Name to bring Summary totop

1919191919
Personal Data Assistant (PDA)Personal Data Assistant (PDA)Personal Data Assistant (PDA)Personal Data Assistant (PDA)Personal Data Assistant (PDA)
Game OptionsGame OptionsGame OptionsGame OptionsGame Options
Save Current GameResume Earlier GameStart New Game
Turn Sound On/OffTurn Music On/Off
Speed Up/DownClick/R-click Speed
Select Entry Click entry, Up/Dn ArrowsOpen Library Entry Select, click or [Enter]
Select LogSelect LibraryView StatusView Damage
Select Mode [Space]to cycle through Log, Library, Status, Damage
Delete Log EntrySelect Entry, click Delete
Scroll EntriesUp/Dn Arrows
{Leave PDA[Esc] or click Power

2020202020
εOrientation TourOrientation TourOrientation TourOrientation TourOrientation TourThis tutorial runs you through a quick tour of the Calypsocontrol screens to get you familiarized with the intuitivepoint-and-click displays and controls at your disposal. Clickmeans left-click; right-clicks are specifically indicated whereneeded.
If you have not already done so, start Alien Legacy, press[Esc] to clear the opening credits, and select Start NewGame.
Video Phone ScreensVideo Phone ScreensVideo Phone ScreensVideo Phone ScreensVideo Phone ScreensAfter the introductory “cinematic” sequence, new gamesstart with your Science Advisor briefing you via the VideoPhone on the Calypso’s arrival. You’ll see a screen like thiswhenever you answer an Advisor’s “Comm. Panel” messagealert, or when someone breaks in with an urgent bulletin. To“scroll” through the briefing, click the Up and Down arrowson the right. To exit when finished, press [Esc] or [Enter], orclick the Power switch at the lower right.
Game OptionsGame OptionsGame OptionsGame OptionsGame OptionsAfter exiting the Video Phone screen, you will see your crewat their stations on the Calypso’s Bridge. Until you knowyour way around, set the game to its slowest speed in theGame Options screen. To do this, point to and click on therobot at the bottom right of the Bridge (“Consult Robot” willbe displayed). This takes you to the Computer station. (Seethe station name in the upper left?) Now, click the GameOptions button. When the Game Options menu appears,right-click on Game Speed until you reach 1. (Click GameSpeed to speed up again later, if you wish, or just type thenumber for the Game Speed setting you want.)
To return to the Computer station, click on Leave. (Through-out the game, Leave or pressing [Esc] takes you to thepreceding screen.)
Advisor StationsAdvisor StationsAdvisor StationsAdvisor StationsAdvisor StationsThe Computer station works just like the other AdvisorStations. Advisors will have an official message for you each

2121212121
time you consult them. If you ask for their advice, you mayget a more detailed or candid opinion. To see what extraadvice the robot has, click Advice.
Most Advisor stations also provide access to other areassuch as the Captain’s PDA, or the Vehicle, Technology, orColony Manager screens. We’ll go to the PDA next.
Captain’s PDACaptain’s PDACaptain’s PDACaptain’s PDACaptain’s PDAFrom the Computer station, click Captain’s PDA to displayyour Personal Data Assistant. Use your spacebar or thepurple buttons on the right to change the PDA’s function“mode.” The Log shows your current list of notes, clues, andthings to do. The Library mode shows detailed backgroundand Advisor reports (click one to open it). The Status screenlets you review the overall status of your colonies, andDamage lets you review your total losses.
When you’re done exploring the PDA, return to the Com-puter station by clicking Power or pressing [Esc]. Return tothe Bridge by clicking Bridge.
BridgeBridgeBridgeBridgeBridgeMove your mouse pointer around the various parts of theBridge. You’ll see the action you can perform in each areadescribed at the bottom of the screen. “Consult” options takeyou to an Advisor station. (“View Solar System” opens theSpace Map, and “View Ship Resources” opens the Calypso’sColony Grid. More on these later.)
Briefly visit your other Advisors. At the Advisor stations,notice the pictures on the “sidebar” at the right. This lets youconsult another Advisor by clicking on his, her, or its picture.You’ll see that the Science station (lower left) lets you accessthe Technology Manager screen, the Navigator’s station(middle left) lets you access the Vehicle Manager, and theEngineer’s station (middle right) lets you bring up the ColonyManager. For now, return to the Bridge.
Comm. PanelComm. PanelComm. PanelComm. PanelComm. PanelIf the Communications (Comm.) Panel has appeared at thetop left of the screen, it means one or more of your Advisorshas a Video Phone report for you. To respond, simply click

2222222222
the illuminated switch and read the report. These messageswill often contain data that will be stored in your PDA forfuture reference. Once you have exited all pending reports,the Comm. Panel closes.
Space MapSpace MapSpace MapSpace MapSpace MapFor a quick exploration of the Space Map, click on theBridge’s window (“View Solar System”). The Space Mapdisplays all of the worlds in the Beta Caeli star system. Youcan change your current view with the arrow and zoom but-tons along the bottom. To view the planet front and center,click its picture on the sidebar at right. Clicking on a planetin the main window will open its Mercator Map—once youhave a spacecraft on that planet, you’ll be able to explore itssurface. (To return to the Space Map from Mercator view,click Leave or press [Esc]). When you’re done exploring theSpace Map, click Leave or press [Esc] to return to theBridge.
Now we’ll use the Manager screens to start your first colonyon Gaea. (You can always abandon and restart later whenyou begin playing for real.) The first task after building acolony site is to send robots and materials there and build aHabitat for human settlers. Materials for the first Habitat arealready at the first Gaean site, but you must transport atleast five robots there from the Calypso to build it.
Vehicle ManagerVehicle ManagerVehicle ManagerVehicle ManagerVehicle ManagerFrom the Bridge, go to the Navigator’s station and clickVehicles to open the Vehicle Manager. When first opened,this screen will list all of your available ships, including theCalypso and Vehicles 1-4. Click on Vehicle 1. This will openthe Hangar screen, where you load and launch the ship.
You can transport Ore, Energy, Life Support, Humans, andRobots on your ships, as indicated by the icons in the middleof the Hangar window. To load five Robots, simply click fivetimes on the Robot icon. In addition to the Robots, add someOre, Energy, and Life Support to the cargo. (No Humansuntil you have a habitat for them!) The Load window on theright will show you how many items are loaded. To unload,right-click the item.
The bank of resource icons on the right shows inventories at

2323232323
the current site (currently, the Calypso). You start the gamewith four spaceships and a healthy supply of ore, energy,life support, and robots. You also have 2,000 settlers incryogenic hibernation on the Calypso who will be wakenedin groups and appear in inventory (if you have built habitatspace for them).
Click on “Click for mission,” and select Transport as themission type. You do not have to choose a destination(“Click for dest”) since you have only one colony at this time.To send the spaceship to New Terra, click on Launch. Allowa few moments for the spaceship to get to Gaea by returningto the Bridge.
Colony ManagerColony ManagerColony ManagerColony ManagerColony ManagerOn the Bridge, the Comm. Panel will alert you to a messagefrom Navigation when Vehicle 1 arrives at New Terra. Afteryou receive this report, go to Engineering and click onColonies. This opens the Colony Manager screen, which listsand graphically summarizes your colonies.
The upper row shows you the number of installations (habi-tats, factories, power plants, research labs), spaceships,(and later, missiles) at the colony. The lower row shows theresources (ore, energy, life support, humans, robots). Forresources, the display shows number of units over any netannual change. Red numbers show any net loss per year(consumption exceeds production) while green numbersshow any net surplus per year (production exceeds con-sumption). A white zero shows static or balanced produc-tion/consumption.
Later on, when you have many colonies, you’ll use thecolony list on the right or the scroll arrows to find the colonysummary to go to. To go to the New Terra colony site, clickanywhere on its graphical summary. This opens its ColonyGrid.
Colony GridColony GridColony GridColony GridColony GridThe Grid shows a map of New Terra and the installationsthere. To see more of the grid, hold the mouse button downand “drag” the cursor to the edge of the current view orscroll with your numeric keypad number keys. At the bottom

2424242424
of the screen is the colony’s graphical summary. At theupper right, you’ll see the colony and planet name.
Just below the planet name is the small Installations window,which shows what kind of installations you can build. If yourrobots have arrived, you can build a Habitat. Click the rightor left arrow or mouse button until the Habitat is showing,drag its picture over to any opening where it casts a shadowon the Grid, and release it. Construction commencesimmediately. You can now begin transporting humans downto the colony. Refer to the “Installations” section beginningon page 64 for resource requirements of other installationtypes.
In the Colony Manager, click on the Calypso’s summary andlook at its Grid. (You can also get here from the Bridge byclicking “View Ship Resources.”) Calypso already has aHabitat, Factory, Power Plant, and Research Lab on-line.Right-click one of these installations to view its on-lineoptions, and then press [Esc] once to return to the Grid.
General Options MenuGeneral Options MenuGeneral Options MenuGeneral Options MenuGeneral Options MenuOn the Calypso’s Colony Grid, press [Tab] or point to anempty area and right-click. This pops up the GeneralOptions (or GO) menu, which provides a convenient shortcut to many of the major screens. It is available in mostareas of Alien Legacy—use it now to go to the TechnologyManager (also accessed via the Bridge and Science Advisorstation).
Technology ManagerTechnology ManagerTechnology ManagerTechnology ManagerTechnology ManagerThis screen lets you manage the research efforts of yourcolonies. To select a new technology to invent, click the redarrows at the bottom, or click/right-click the inventionpicture. If you have the science resource “points” to inventthe current selection, the screen will display “Capable ofInventing.” If not, you’ll see the areas where you need moreresearch highlighted in red.
Your researchers can study Astronomy, Chemistry, Electron-ics, Geology, Biology, Mathematics, and Physics. Thenumber above and below each discipline shows the pointsrequired and accumulated for the current invention. You canaccumulate points by assigning your Research Lab(s) to
Note: You can click onthe Vehicle icon at thebottom, or use theright-click GeneralOptions menu to jumpto the Vehicle Man-ager. To return to theColony Manager, clickColonies or Leave.

2525252525
work in that science, or from gathering scientific discoveriesduring planetary exploration. To create an invention youhave the research points for, click Invent or press [Enter].
Press [Tab] or right-click the invention’s description to openthe General Options menu. Click on Vehicle Manager. Inthe Vehicle Manager, select Vehicle 1, which is parked atNew Terra. Choose Exploration from “Click for mission,”and then click Launch to open the Mercator Map.
Mercator MapMercator MapMercator MapMercator MapMercator MapThis screen shows the surface of the selected planet dividedinto sectors to help you navigate. You can also access thismap from the Space Map, but you need to launch anExploration mission to see or scan the surface.
You should see your ship above New Terra in sector D-2 ofGaea. Choose a sector to go to by clicking the red direc-tional arrows, or using your arrow keys. When the sectoryou want is highlighted, send the ship there by pressing[Enter]. For a short cut, simply point to a sector and click,and the ship goes there immediately.
Under the map view is a control panel that opens up onlyduring Exploration missions. The mine car icon is an Orescanner, and the lightning bolt icon scans for Energy. Theconstruction machines icon lets you build new colony sites(in suitable sectors). You may be able to develop otherscanners as well.
Click on the mine car icon and hold it down to scan for Ore.As the scanner circles spread, they’ll reveal sectors on theplanet where Ore resources can be found. Move your shipto a sector where you saw Ore on the scanner. Click againor press [Enter] to descend to the planet surface and openthe Surface Exploration screen.
Surface Exploration ScreenSurface Exploration ScreenSurface Exploration ScreenSurface Exploration ScreenSurface Exploration ScreenThis screen lets you view or scan the planet from low altitudeso you can gather Ore, Energy, and other valuable itemsfrom the surface. The round white mouse cursor aims yourship’s lasers, which you can then fire by right-clicking.
To move the spacecraft, click or press on the three golddirectional arrows on the control panel (or use your arrow
Note: Scanningdepletes fuel quickly.
2626262626
keys). If you see an Ore or Energy unit or anything elseappear as you travel, stop and move the cursor over theitem. When the cursor changes into a hand, click to load theitem into your ship’s cargo bay (if there’s room).
To the left of the movement arrows on the ship’s panel arefour other control icons. At the far left is the Overhead Viewswitch, which lets you view or scan the sector from a highviewpoint. Next is the Scanner button, which scans for allresources and clues. Next is the Plasma Bomb, which candestroy surface targets (and resources!) beneath the ship.Fourth from the left is the Cargo View switch. Click on it toopen and view the ship’s cargo bay; click again to return tothe sector view. Up top, you’ll see the compass that keepsyou oriented when flying on the surface, and your currentpilot. (You have a robot pilot now, but can send a humanpilot or even an Advisor.)
The Rest is Up to YouThe Rest is Up to YouThe Rest is Up to YouThe Rest is Up to YouThe Rest is Up to YouThat’s it! You have now seen all of the screens and majorcontrols you’ll use while playing Alien Legacy. The rest is up

2727272727
ζCalypso Controls GuideCalypso Controls GuideCalypso Controls GuideCalypso Controls GuideCalypso Controls Guide
StartupStartupStartupStartupStartupMenuMenuMenuMenuMenu
This section introduces you to the controls and functions ofeach of the menus and screens available to you as Captainof the Calypso. Click means left-click; right clicks are indi-cated where needed.
Each time you start Alien Legacy, you’re presented with theStartup menu. This menu lets you select the game you wantto play.
Start New Game. This option lets you start a new gamefrom scratch: orbiting Gaea with only the New Terra colonygrid established.
Load Saved Game. This option lets you resume a previousgame session from the point that you last saved it. You’ll bepresented with a list of saved games. Select the one youwant to play with the mouse or the Up/Dn arrows.
Quit to DOS. This option lets you exit to DOS immediately.
Universal CommandsUniversal CommandsUniversal CommandsUniversal CommandsUniversal CommandsThe following commands work in most areas of AlienLegacy.• Exit Game. Press [Alt]+[X], and click Yes or press Y.
This is your Panic or Boss button. It helps you get out ofthe game in a hurry, but won’t save your latestchanges.
• General Options Menu. Press [Tab] or R-click on anempty area. This opens the General Options menu andlets you move around the game quickly.
• Skip Movie Sequence. Press [Esc] or click the mouseduring the sequence to exit a start-up screen or “cin-ematic” sequence.
• Return to Previous Screen. Click Leave or press [Esc].

2828282828
BridgeBridgeBridgeBridgeBridge From the Bridge, you can confer with your Advisors, re-spond to Comm. Panel message alerts, and go quickly to allother parts of the game. The Bridge is the command hub ofyour activities as Captain of the Calypso.
You’ll start each new game on the Bridge (following yourinitial briefing). You can return to the Bridge using the Gen-eral Options Menu, the Bridge buttons at your Advisor sta-tions, or by leaving a screen you jumped to from the Bridge.
Move your mouse pointer around the various stations on theBridge. As you point to an station, you’ll see the action youcan perform there described at the bottom of the screen. Togo to a station, simply click the mouse or press [Enter]. Youcan also use your left and right arrow keys or spacebar toselect a station.
Clockwise from the lower left, the Bridge provides the follow-ing stations:• Consult Scientist: Receive the reports and advice of
your current Science Advisor, and access the Technol-ogy Manager screen for managing your research anddevelopment.
• Consult Military: Receive the reports and advice of yourcurrent Military Advisor.
• Consult Navigation: Receive the reports and advice ofyour current Navigation Advisor, and access the Ve-hicle Manager screen for loading and deploying yourspacecraft.
• View Solar System: View the Space Map display, zoomin on any planet or moon, and access the Managerscreens for any colonies or vehicles there.
• Consult Engineering: Receive the reports and advice ofyour current Engineering Advisor, and access theColony Manager screen for overseeing colony buildingand production.
• View Ship Resources: Go straight to the Colony Gridscreen for the Calypso and view current production,installations, and inventories.
• Consult Robot: Receive the reports and advice of your

2929292929
Comm. Panel
MilitaryAdvisor
Navigation/Ve-hicleManager
Space MapView Solar System
Calypso ColonyGrid
Computer, and access the Captain’s PDA (log and li-brary) and Game Options screens.
• To open the General Options Menu, press [Tab] orright-click anywhere on the Bridge. This menu lets youjump directly to the Space Map, Colony Manager, Ve-hicle Manager, Technology Manager, Captain’s PDA,
Engineering/ColonyManager
Computer/PDA/Game Options
Science/Technology Man-ager
General Options Menu[Tab] or R-click
Select Advisor[Space] or L/R Arrow Key

3030303030
GeneralGeneralGeneralGeneralGeneralOptionsOptionsOptionsOptionsOptions
MenuMenuMenuMenuMenu
or Game Options screens. It also lets you pause or quitthe game, and shows your Game Turns at the bottom.
The convenient General Options menu (or GO menu) pro-vides easy short cuts throughout Alien Legacy, and also letsyou monitor your Game Turns status. You can open it frommost screens by pressing [Tab], or by pointing to an emptyarea and right-clicking.
Most of this menu’s selections are self-explanatory. If youchange your mind, you can close the General Options menuagain by pressing [Esc] once or clicking outside of the menu.
• Bridge takes you back to the Bridge of the Calypso.• Space Map opens the Space Map.• Colony Manager opens the Colony Manager screen.• Vehicle Manager opens the Vehicle Manager screen.• Tech Manager opens the Technology Manager screen.• View PDA opens your Captain’s PDA.• Pause halts the game just like pressing the pause key
[P]. The game will stop and “Game Paused” will be dis-played in the middle of your screen. To unpause, pressany key.
• Options take you to the Game Options screen whereyou can save your game, load a new one, or adjustyour game settings such as sound effects and speed.
• Quit lets you exit Alien Legacy. You’ll see a windowthat says “Quit Playing Alien Legacy? Yes/No.” To exitwithout saving your latest progress, click Yes. To resumeplaying, click No or press [Enter].
• Game Turns shows the progress of time in the Gaeancalendar year (approximately 2.1 Earth years). Eachturn is about two weeks of Gaean real-time, and thereare 24 turns in a production year.
• Dismantle Colony. (In Colony Grid only.) If you removeall resources and dismantle all installations at a colony,you can use this option to dismantle the colony itself.

3131313131
Video PhoneVideo PhoneVideo PhoneVideo PhoneVideo Phone
Comm.Comm.Comm.Comm.Comm.PanelPanelPanelPanelPanel
The Video Phone screen lets you communicate with your Ad-visors without having to go to their sta-tions on the Bridge. New games startwith your primary Science Advisor re-porting to you via Video Phone about theCalypso’s arrival. You start off in orbitabove the planet Gaea, with your firstsurface colony already built. You’ll see asimilar Video Phone screen each timeyou respond to a Communications Panel(Comm. Panel) message alert, or whenyour Advisors or Planetary Governorsbreak in with urgent reports. You can seethe Advisor and read the message atyour own speed.
Some reports may be longer than the screen. For these,you’ll have a “scroll bar” on the right hand side of the mes-sage. To “scroll” through a lengthy report, click the red Upor Down arrows on the scroll bar at the right, or use yourUp or Down arrow keys. For some reports, your Advisorswill place information in your Personal Data Assistant (PDA)so you can refer to it later. When you’re finished readingthe message, you can shut off the Video Phone and exit tothe preceding screen by pressing [Esc] or clicking the Powerswitch at the lower right.
You will occasionally receive reports from your PlanetaryGovernors. Governors are responsible for making sure colo-nies on their planet run smoothly, and will not contact youunless a genuine crisis is in the making.
The Communications (Comm.) Panel will appear at the topleft of the screen with its green alert light(s) glowing if one ormore of your Advisors has a message for you. The greenlight indicates which Advisor has a report. To respond, sim-ply click the illuminated switch for that Advisor or use thefollowing function keys: [F1] NAV, [F2] ENG, [F3] SCI, [F4]MIL, [F5] COM. The Video Phone screen will open for thatAdvisor. Read the report and click the Power switch or press[Esc] when finished to return to the previous screen. Often,these messages will contain data that will be stored in yourPDA for future reference. Once you have seen and exitedfrom all pending reports, the Comm. Panel closes.

3232323232
AdvisorAdvisorAdvisorAdvisorAdvisorScreensScreensScreensScreensScreens When you’re on the Bridge, you can consult with each of
your five current Advisors: Science, Military, Navigation,Engineering, and your computer’s Robot. Advisors can giveyou valuable reports and advice to aid your command deci-sions. They also provide access to the various Managerscreens you’ll use in guiding the development of your colo-nies.
To select an Advisor to consult with on the Bridge, simplypoint to and click on the station you want. You can also use
your arrow keys to move through the Advisor stations inturn, and press [Enter] when the one you want is displayed.
Your primary Advisors are already selected from the availablestaff and assigned to their posts on the Bridge when the gamestarts. In addition to your four Human Advisors, you have theRobot Advisor who manages the Computer Center station. Ifyou send a Human Advisor on a mission, a secondary Advisorwill assume the absent Advisor’s post and duties until the Advi-sor returns (if the Advisor returns). In this hostile environment,you can never permit secondary Advisors to leave the Calypsodue to their relative inexperience and lack of replacements.
The Advisor Sidebar on the right gives you an easy way togo directly to one of your other four Advisors. Simply clickon the picture of the Advisor you want to consult with next.
The Bridge button lets you exit to the Bridge immediately.
{{
Official Report
Advice (if any)
Station Name
Current Advisor
Manager Screen(s)
See Advice
Return to Bridge
Advisor Sidebar

3333333333
The Advice button prompts the Advisor for a personal opin-ion. Advisors have an official report for you each time youconsult them. If you ask for their advice, you may get a moredetailed or candid opinion. To see what extra advice theAdvisor has, just click Advice and the added informationwill be displayed below in a contrasting color. It’s up to youto know each of your crew member’s strengths and weak-nesses, and to judge the usefulness of the advice you receiveaccordingly.
Each Advisor except Military provides you with access to aManager screen(s) for their area of expertise. If you use thesebuttons to access a Manager screen, you will return to the Advi-sor when you select Leave in the Manager screen. (The func-tions for these screens are described in their own sections, fol-lowing.)
The Science Advisor is in charge of technological researchand advancement. This Advisor is also your Executive Offi-cer, and will question your actions or decisions if they ap-pear to jeopardize the mission. The Technology buttonopens the Technology Manager, where you can manageyour research and development.
The Military Advisor is responsible for colony security, andwill be entirely responsible for dealing with hostile actions orinsurrections per your orders. After any such action, this Ad-visor will report the outcome.
The Navigation Advisor reports to you concerning the Calypsoand your fleet of spacecraft. The Vehicles button opens the Ve-hicle Manager, where you can issue or change orders concern-ing spacecraft missions, cargoes, and destinations.
The Engineering Advisor is in charge of constructing andmaintaining your colonies, both orbital and planetside, andadvises you about pertinent developments and requirements.The Colonies button opens the Colony Manager, where youcan view the status of each colony and go to its Colony Gridto manage production.
The Robot at the Computer station helps you manage themission’s data banks. The Captain’s PDA button opens yourPersonal Data Assistant, which contains your mission Log, Li-brary, Status, and Damage screens. The Game Options button

3434343434
TechnologyTechnologyTechnologyTechnologyTechnologyManagerManagerManagerManagerManager
lets you save games in progress, and control various game set-tings such as sound and speed. See “Advisor Dossiers” forbackground files on each of your human advisors.
The Technology Manager screen lets you evaluate and directthe research efforts of your colonies, which in turn will ulti-mately determine the success of your mission. New technolo-gies can help you produce and use resources more effi-ciently, fly ships farther with more cargo, or develop awe-some new capabilities to improve your life or perhaps saveit from equally awesome new threats.
You can access the Technology Manager from the Bridge viathe Science Advisor’s station, or through the General Op-tions menu. The top part of the screen illustrates and de-scribes the new technologies you have invented or are ca-
Research Needed
Research Available
{
View Inventions Click Lf/Rt Arrows,Spacebar
pable of inventing. The lower part shows the progress ofyour research as as science resource points are produced byyour research installations or collected from your explora-tions.
InventionsInventionsInventionsInventionsInventionsTo scroll through the technologies available to you, click orright-click the invention picture, or click the red arrows at the
Invent Current Click Invent
Astr Chem Elect Geol Biol Math Phys

3535353535
bottom. (You can also use your Spacebar or Left/Right ar-row keys.) If you have the research “points” to invent thecurrent selection, the screen will display “Capable of Invent-ing.” If not, you’ll see the areas in which you need more re-search highlighted in red. The description can help you de-cide if a potential technology is worth the investment. Whenyou develop a technology that supersedes a previous tech-nology, the earlier technology will be removed.
SciencesSciencesSciencesSciencesSciencesThe sciences your researchers are working in are, from leftto right, Astronomy, Chemistry, Electronics, Geology, Biol-ogy, Mathematics, and Physics. The number above eachscience’s symbol shows the points required (or spent) for thecurrently displayed invention. The number below each sci-ence shows the research points accumulated. You can accu-mulate points in each science by assigning your ResearchLab(s) to work in that discipline, or from collecting new dis-coveries during planetary exploration. To create an inven-tion you have the research for, click Invent and your scien-tists and engineers will go to work developing the new tech-nology. The screen will display the number of turns requiredto complete the invention.

3636363636
VehicleVehicleVehicleVehicleVehicleManagerManagerManagerManagerManager
Leaving the Technology ManagerYou can exit the Technology Manager by clicking Leave toreturn to the previous screen, or by right-clicking for theGeneral Options menu.
The Vehicle Manager screen is where you will assign mis-sions to Calypso and your other vehicles by specifying theship, mission type, destination, and cargo. You’ll use yourspacecraft to explore planets, transport people or resources,establish colonies or space stations, gather resources orclues, and to defend your colonies. This screen also lets youexit without launching the mission, or change a mission al-ready underway.
You can access the Vehicle Manager in many ways. Fromthe Bridge, go to the Navigator’s station and click Vehicles.From the General Options menu, select Vehicle Manager.From the Colony Grid, you can click the Vehicle icon at thebottom, or use the General Options menu. From the
Mercator Map, you can right-click a colony site and selectUse Vehicle (if a vehicle is present at that colony). From theSpace Map, you can right-click a planet to open the PlanetMenu, and then select Vehicles (if a vehicle is present at thatplanet).
VehiclesWhen first opened from the Bridge, General Options menu,or Colony Grid Vehicle icon, the Vehicle Manager lists theCalypso and all your other Vehicles in its left-hand column
Filter Vehicle List(By Mission, Planet, Colony)
Select VehicleClick on vehicle listing
See more VehiclesClick Up/Down arrows

3737373737
Select Mission# Trips To/From:Select Pipeline Mission
Select Destination
Select Pilot
Vehicle Hangar
by number. The title for each vehicle also shows its currentmission status (Parked, Orbiting, Transport, Pipeline, SpaceStation, Missile, or Special), fuel status, pilot, and location.You can Launch a new mission for any Parked vehicle, orChange any mission already underway.
The windows on the right let you “filter” the Vehicles list foreasier vehicle selection and management. To filter the list bycurrent Mission Type (top), and then By Planet (left) or byColony (right), simply click the appropriate options. For ex-ample, to see a full (unfiltered) list, click All Missions in thetop window. Then, to see all ships on or near Gaea, clickGaea under By Planet. To see just those ships at New Terra,click Parked/Orbit for mission, and then New Terra underBy Colony. You’ll use these filter options more as the gameprogresses, as you may eventually have up to 150 ships.
When you see the vehicle you want to work with, click it di-rectly or click the Up or Down arrows to scroll through thelist. When the ship you want to use is highlighted, click orpress [Enter] to go to the Vehicle Hangar where that ship islocated and choose its mission settings.
When you open the Vehicle Manager from a Planet menu,the list of ships is initially limited to those at that planet. Youcan go back to select a different ship by clicking the Ve-hicles button at the bottom of the screen.
Launch Ship Now Cancel MissionSelect Different Vehicle
Load ItemClick to increaseR-click to decrease(Ore, Energy, Life Support,Humans, Robots,Missiles)

3838383838
MissionsMissionsMissionsMissionsMissionsOnce you select a ship, click Click for Mission to specifywhat you want the ship to do. There are five basic missiontypes available most of the time: Exploration, Probe,Transport, Pipeline, and Space Station. Your advisors mayalert you to other mission types later. While the Calypso canperform only Probe missions, the rest of your fleet is madeup of multi-purpose spacecraft that can perform mostmission types.
The Exploration mission lets you explore a planet’s surfacefor colony sites, resources, and clues. To explore a planet,you must have a vehicle parked at an established colony orspace station there, in orbit about the planet, or parked onthe Calypso orbiting that planet. You must also have ad-equate Energy for the mission. Note: Game time stops whileyou are on a Surface Exploration mission.
The Probe mission lets you send a ship to orbit a planet,moon, or asteroid and gather preliminary data about it foryour PDA library. The probe remains in orbit until youchange its mission. The probe ship can also be sent to ex-plore the planet surface if it has enough fuel remaining. Youcan use the Probe mission to move the Calypso to a newplanet, moon, or asteroid.
The Transport mission lets you move vehicles and resourcecargoes from one colony to another. There are five types ofresource units you can transport: ore, energy, life support,humans, and robots. You may load and transport these re-sources in any combination up to the maximum number of
Note: You cannottransport humans toany colony or spacestation without ad-equate Habitat space.

3939393939
units allowed by your current generation of spacecraft. Usethe point-and-click Cargo List in the middle of the Hangarwindow to load the current ship. Once launched, the shipwill automatically unload its cargo at its destination, and willremain there until you give it new orders.
The Pipeline mission lets you run any number of transport“round trips” between the launch location and anothercolony. When you select Pipeline, a Trips window opensunder the Cargo list for you to specify the number of tripsand the type of cargo both To and From the destination.Given sufficient fuel at each end, the ship will refuel, reload,and relaunch automatically. You can specify from 1 to Infi-nite round trips. (The default setting, the sideways “8,” is thesymbol for infinity). For example, you might order a ship ona planet to continuously transport 3 Energy units, 3 Life Sup-port and 4 Humans to a colony on a metal-rich moon andbring back 20 ore units on every return trip.
The ship will continue the pipeline whether the specifiedcargo is ready or not. Pipeline missions continue until thespecified number of trips is completed, you change thespacecraft’s mission, or the ship is destroyed or runs out offuel.
The Space Station mission lets you send a ship to a remoteplanet, moon, or asteroid and construct an orbital platform.You can then use this platform to build an orbital colony, oruse it simply to stockpile energy units for refueling evenmore distant explorations and probes. Each world (planet,moon, or asteroid) is allowed to have one space station.
DestinationsOnce you’ve selected a mission, click on Click for Destina-tion to select an appropriate destination. Destinations de-pend on the mission type: for example, you can’t launch aspace station mission to a world that already has one. Whenyou point to a destination, you’ll see the mission’s fuel andtime requirements displayed below the Hangar window.These requirements will vary greatly depending on the rela-tive orbital position of the mission’s origin and destinationsites. Some missions won’t be possible until the planetsswing closer together. Others won’t be possible until youbuild space stations or colonies farther out in the system touse as refueling points.
Note: Be certain aboutthe number of pipelinetrips you set. You mayunintentionally strip acolony of a resourceby leaving the Trip in-dicator at infinite.

4040404040
PilotTo change the pilot for your spacecraft, click on the PilotSelector window to the left of the Load window. This opensthe Pilot menu, which lets you select from the robot, human,or Advisor pilots available at that location.
Robots are often the best choice for pilots: their high toler-ance to “G” forces lets them fly faster and maneuver better,and they can survive wider temperature ranges. Human pi-lots are better where pilot initiative is required. You’ll be no-tified when you need to send an Advisor somewhere. Whilethe primary Advisor is gone, you will work with his or herreplacement, the secondary Advisor, on the Bridge.
CargoCargoCargoCargoCargoYou can carry cargoes of ore, energy, life support, and ro-bots on any sort of mission. (You can carry humans only ifyou choose a mission and destination on which humans cansurvive.) To load an item, simply click on its icon on theCargo List or Stockpile icon bars in the Hangar windowscreen. For example, to load robots, simply click on the ro-bot icon. To load many items quickly, hold the mouse buttondown. To unload, right-click or hold down the item. You canload any combination of cargo up to the maximum unitsallowed by the current generation of ship (see the Load win-dow).
If you are loading cargo for a Pipeline mission, you willneed to set the type or number of units To and From the des-tination. You will also need to set the number of trips, if youdon’t want to use the default setting of “infinity.” (An “infin-ity” setting means the pipeline continues until fuel runs out,the destination orbits out of range, or the ship is incapaci-tated.) Click or right-click Trips to set the trips number.
The Load window on the right shows the number of itemscurrently loaded, along with the maximum number possible.Your first ships have a load limit of 30, which can go up asyou develop new technology and upgrade your vehicles.Below the Energy window is another bank of resource iconsshowing inventory stockpiles at the current location: colony,space station, or Calypso. You’ll notice how these amountschange as you load or unload cargo.

4141414141
All ships are launched fully loaded with fuel if the currentlocation has the energy units to spare. (One “lightning bolt”energy icon = 1,000 fuel units.) The Energy window showsthe fuel load-out of the selected vehicle, which in turn deter-mines the ship’s maximum mission range. Your first genera-tion of ships has a limit of 2,000 fuel units, which can beincreased later on with new technology and upgrading.It’s up to you to ensure that your ships have sufficient energyto return from their missions. While your ships can carryextra energy units as cargo, the ship must land at a spacestation or colony to off-load, convert, and reload this energyas fuel. Ships that run out of fuel during Surface Explorationwill crash, killing the pilot and destroying all cargo.
Launching or Changing a MissionLaunching or Changing a MissionLaunching or Changing a MissionLaunching or Changing a MissionLaunching or Changing a MissionOnce you have selected the ship, mission type, destination,pilot, and cargo, you can launch the mission with its currentsettings by clicking the Launch button at the bottom of thescreen. You’ll see “Vehicle Launched” displayed in red be-low the Hangar window to confirm.
If you select a ship that already has a mission underway(that isn’t Parked), you’ll be opening the Vehicle In-transitwindow (space background) rather than the Vehicle Hangarwindow. The vehicle’s current mission status will be dis-played. To change the mission type and/or destination, firstselect a new mission and destination as you did whenlaunching the mission initially. (You can’t change cargo untilyou land somewhere. Also, you can’t change to a destina-

4242424242
MercatorMercatorMercatorMercatorMercatorMapMapMapMapMap
tion not reachable with current on-board fuel, or one thatwill kill any humans on board). Then change the missionsettings by pressing the Change button at the bottom of thescreen. You’ll see “Vehicle Mission Changed!” displayed ingreen below the In-transit window.
This screen shows you the selected planet, moon, or asteroidlaid out in navigational “sectors.” The Mercator Map is yourbest source of information about a world. If you have a shipon or orbiting the planet, you can launch the ship on an Ex-ploration mission and use the Map to maneuver across theworld’s surface, scan for resources, and scout and build newcolony sites.
From the Space Map, you can access the Mercator Map byclicking on a world, or by right-clicking a world and select-
Note: The “gas giant”planets Zeus, Cronus,and Poseidon do nothave Mercator Mapsbecause you cannotexplore or establishcolonies on their sur-faces.
ing View from the Planet menu. You can also access it fromthe Vehicle Manager by selecting an Exploration mission fora ship orbiting that world or parked at one of its planetsideor orbital colonies.
Inactive Map OptionsInactive Map OptionsInactive Map OptionsInactive Map OptionsInactive Map OptionsUnless you have launched a ship on an Exploration missionto the world’s surface, the Mercator Map is inactive: a clearshield will cover the controls on the lower right. The world’sname is displayed at the lower left. You may still view anysectors on the world from orbit by using your arrow keys orclicking the red sector movement arrows to the left of themain window. You’ll see a purple sector highlight movearound as you try these controls. If you already have a
Select SectorClick Sector Arrowsor use Arrow Keys
Colony Options R-click Colony
General Options Menu R-click vacantsector

4343434343
colony on the world, you can point to it to display its name,or double-click it to access its Colony Grid. You can alsoright-click it to open its Colony menu and Use Vehicle (ifany) or Go To Colony.
Each sector is denoted by two coordinates: its letter (the“parallel”) and number (the “meridian”). For example, thecolony New Terra is in sector D-2 of Gaea. Large planetswill have more sectors than can be displayed on one
Mercator screen. To see beyond the initial map display,move the sector highlight beyond the right-hand edge of thedisplay. Small moons and asteroids may have only a fewsectors.
Active Map OptionsActive Map OptionsActive Map OptionsActive Map OptionsActive Map OptionsIf you have launched a ship on an Exploration mission of theworld’s surface, you’ll see a ship symbol. You can now usethe Mercator Map to direct the ship, scan for resources,build colony sites, or choose a sector for surface explora-tion.
If launching from a colony, you’ll see the ship over thecolony where it was parked. If launching from a Space Sta-tion or the Calypso, you’ll see the ship in the lower left win-dow with the message “Select Landing Sector.” Choose thesector to go to by clicking the red Up/Dn Rt/Lt arrows to theleft of the map, or using your arrow keys. When the sector
Explore Sector ClickshipVehicle MenuR-click vehicle
Scan for OreClick Ore icon
Scan for Energy Click Energy icon
Scan for Sites (Mustinvent)
Build ColonyClick Equipment icon
Cargo Limit Load: On Board/Max.Fuel Energy: Units left
With Vehicle
Send ShipClick sectorSelect sector, [Enter]

4444444444
you want is highlighted, send the ship there by pressing [En-ter]. For a short cut, simply point to a sector and click, andthe ship goes there immediately. Notice that moving the shipconsumes fuel at a rate proportional to the number of sectorsthe ship travels. Watch your fuel!
Ship ControlsShip ControlsShip ControlsShip ControlsShip ControlsOnce you have launched a ship on an Exploration mission,the Mercator Map opens and becomes active: the “dash-board” will open up to give you access to the ship controlsthere. The Mercator Map is a high-altitude view of the Ex-ploration mission, letting you scan and get around theplanet quickly. From here, you can build new colony sites orlocate sectors you want to explore on the surface.
The Ore Scanner (mine car icon) lets you scan the planet forsectors with significant ore deposits. To use it, click and holdthe Mine Car icon. As the scanner beams radiate outward,they’ll reveal sectors on the planet where resources can befound. Initially, you can find only surface deposits. You maybe able to improve scanning technology later to locatelarger, subterranean deposits. Note: Scanning consumes theship’s energy in a hurry. It’s more fuel effective to move theship and scan only nearby sectors.
The Energy Scanner (lightning bolt icon) scans for sectorswith significant energy deposits. It works the same way asthe Ore scanner.
The Construction control (construction machines icon) letsyou build a new colony site if you find a suitable sector.Simply click the Construction control over a suitable location,and a small “city” symbol appears on the map, indicatingthat the Colony Grid is open for development. “Building aNew Colony” will appear in green in the lower left. If thecurrent location will not support a colony, “Area Unsuitable forColony” will appear in red, and no colony will be constructed.Once the site is established, you can start transporting re-sources to it and building Habitats. It takes a modest expen-diture of ship’s energy to establish a colony site, but costs noresources to maintain it. You can have up to 48 colonies.
Some theorists predict that you may be able to develop anadvanced life-form scanner called an Eco-Scope, given abreakthrough in materials technology. Such a device could

4545454545
locate viable colony sites. If you are able to develop this, thescanner control will appear at the upper right corner of thedashboard. If you are able to develop another type of ad-vanced scanner, its control will appear in the upper right ofthe screen.
Load/EnergyThe Load window shows how many cargo items the vehicleis carrying along with its load limit. (First-generation shipsare limited to 30 units.) Once you have a full load, you mustreturn to a colony. Returning to a colony unloads and refuelsthe ship automatically (assuming the colony has energy tospare). You may then resume exploration immediately.
The Energy window shows the fuel load-out of the selectedvehicle, which in turn determines the ship’s maximum mis-sion range. Your first generation of ships has a limit of2,000 fuel units. While your ships can carry extra energyunits as cargo, the ship must land at a space station orcolony to off load, convert, and reload this energy as fuel.
Vehicle MenuIn a Mercator Map screen with an active ship, the GeneralOptions menu is changed to include current Vehicle com-mands. Right-click to open it. Over a colony, the commandsinclude: Park Vehicle, Unload Vehicle, Return Vehicle toColony, Return Vehicle to Orbit, or Leave Mercator (shipreturns to launch point). Over other sectors, the commandsinclude: Explore Surface, Build New Colony, Send Vehicleto Orbit, and Leave Mercator.
Explore SurfaceTo have your exploring ship descend to the world’s surfaceor a colony, move the ship to the appropriate sector, andthen click or press [Enter]. If the ship is over a colony, theColony Grid will open. If the ship is over an uncolonizedsector, you’ll be in the Surface Exploration screen where youcan directly view the surface and collect resources and clues.
Leaving the Mercator MapYou can exit the Mercator Map by clicking Leave to return to
4646464646
SurfaceSurfaceSurfaceSurfaceSurfaceExplorationExplorationExplorationExplorationExploration
ScreenScreenScreenScreenScreen
the previous screen, or by right-clicking for the General Op-tions menu. If you have an active ship on the Map, you canleave by parking the ship at a colony or space station, or bydescending to the surface for a Surface Exploration.
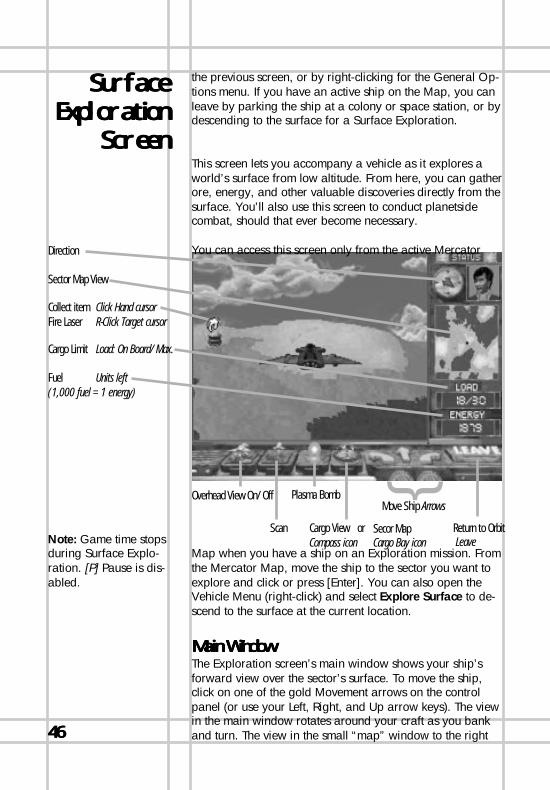
This screen lets you accompany a vehicle as it explores aworld’s surface from low altitude. From here, you can gatherore, energy, and other valuable discoveries directly from thesurface. You’ll also use this screen to conduct planetsidecombat, should that ever become necessary.
You can access this screen only from the active Mercator
{Overhead View On/Off Plasma Bomb
Scan Cargo View orCompass icon
Secor MapCargo Bay icon
Map when you have a ship on an Exploration mission. Fromthe Mercator Map, move the ship to the sector you want toexplore and click or press [Enter]. You can also open theVehicle Menu (right-click) and select Explore Surface to de-scend to the surface at the current location.
Main WindowMain WindowMain WindowMain WindowMain WindowThe Exploration screen’s main window shows your ship’sforward view over the sector’s surface. To move the ship,click on one of the gold Movement arrows on the controlpanel (or use your Left, Right, and Up arrow keys). The viewin the main window rotates around your craft as you bankand turn. The view in the small “map” window to the right
Collect item Click Hand cursorFire Laser R-Click Target cursor
Cargo Limit Load: On Board/Max.
Fuel Units left(1,000 fuel = 1 energy)
Move Ship Arrows
Return to Orbit LeaveNote: Game time stops
during Surface Explo-ration. [P] Pause is dis-abled.
Direction
Sector Map View

4747474747
stays aligned to the North—use the Direction indicatorabove it to see your ship’s current orientation relative to themap.
The round white mouse cursor in the window aims yourship’s lasers, which you can then fire with the right-handmouse button. As you fly over the surface, you will runacross icons for Ore, Energy, Life Support, Science re-sources, clues, and exotic minerals. You can collect theseitems by moving the mouse cursor over them. When the cur-sor changes to a hand, click to grab the icon and place it inyour ship’s cargo bay.
Some resource icons represent more than one unit of theitem. A particularly rich ore icon may contain over 15 oreunits, for example. They’ll all be loaded when you click onthe icon, providing you have room in the ship. If you don’thave room, the icon will remain so you can come back andpick up the remaining units later.
Some science resources, clues, and exotic minerals you pickup will be accompanied by a message describing what youfound. Read them carefully: while the most important cluesare saved in your PDA Library, others will appear only once.These items take up no room in your cargo bay.
Control PanelControl PanelControl PanelControl PanelControl PanelIn addition to the movement arrows (described above), theSurface Exploration panel has four other control icons.
At the far left is the Overhead View switch (large ship icon).Clicking this icon switches your view to a remote cameraprobe far above your ship. This lets you see all around yourship, but not as far to the front as the surface view. It alsoshows your ship’s current compass orientation. To return tothe surface view, click the View icon again.
Second from the left is the Scanner button (small ship icon).Clicking and holding this icon down switches you to Over-head View and sends out pulsating waves that reveal anyore, energy, or other items in the surrounding area. Provid-ing you have the fuel, you can continue the scan until youhave scanned the entire sector (shown on the small map atright). An item revealed by this scanner remains on the sec-tor map until you pick it up or leave. Please note that thisoption uses up your ship’s fuel at a tremendous rate.

4848484848
Third from the left is the Plasma Bomb (the Fireball icon),which you can use to attack surface targets below your ve-hicle. The plasma bomb has a much wider kill radius thanthe laser, but takes more energy as well. Warning: If youbomb a sector, you destroy all the ore and energy units insight.
Fourth from the left is the Sector Map/Cargo View switch.When it shows a Compass, click it to open and view the cur-rent contents of your cargo bay in the small window at right.When it shows an open Cargo Bay, click it to return to thedefault Sector Map view.
Other DisplaysOther DisplaysOther DisplaysOther DisplaysOther DisplaysUse the Direction indicator at the upper right to see whichway you’re facing in the main window. You’ll soon becomeproficient at using this instrument with the sector map, andmain window to navigate the surface.
To the right is the Pilot you designated for this mission. Thepilot cannot be changed unless you return to a base.
The Sector Map/Cargo Bay window below switches be-tween your Sector Map display and Cargo Bay when youclick the Cargo View icon. The Sector Map shows the terrainsurrounding your current position (the small red cross) in thissector. While this map will scroll across the surface withyour ship as you move, it is always oriented to North. If youilluminate items with the scanner, this sector map will displaythe scanned item’s location until you pick them up or exit thescreen.
To view the current contents of your ship’s cargo bay, clickthe Cargo/Sector Map View switch. The window will thendisplay the type and number of items you’ve collected so faron this exploration. Ore, Energy, and Life Support items takeup room in the Cargo Bay, but not Science resources orother items you find.
The Load field shows how many cargo items the vehicle iscarrying along with its load limit. (First-generation ships arelimited to 30 units.) When the ship is full, you can return to

4949494949
a colony to unload, and then refuel and resume explorationwith an empty hold.
The Energy field shows the fuel load-out of the selected ve-hicle, which in turn determines the ship’s maximum missionrange. Your first generation of ships has a limit of 2,000fuel units. Your ship consumes fuel as you fly over the planetand scan. While your ships can carry extra energy units ascargo, the ship must land at a space station or colony to offload, convert, and reload this energy as fuel. When you runlow on fuel, return to the Mercator Map so you can return to

5050505050
Space MapSpace MapSpace MapSpace MapSpace Map base and refuel. If you run out of fuel during Surface Explo-ration, your ship will crash, killing the pilot and destroyingthe entire cargo.
Leaving the Surface Exploration ScreenFrom the Exploration screen, you can go to the MercatorMap only. To exit and return to the Mercator Map, clickLeave or press [Esc].
The powerful Space Map display lets you view the entire
{Foreground View ClickAnchor View R-click
Move point of view ClickMax R-click
{
Zoom In ClickMax R-click
Zoom Out ClickMax R-click
Game Speed Up/DnDrag Slider
Stop time Click Beta Caeli star system from almost any perspective youwant. You can use this screen to observe the status and loca-tion of your active colonies and spacecraft, and to zoom inon the Mercator Map view for any planet, moon, or aster-oid.
You can access the Space Map from the Bridge, the GeneralOptions menu, or when leaving the Mercator Map screen.To exit, click Leave or press [Esc].
Main WindowMain WindowMain WindowMain WindowMain WindowThe main Space Map window allows you to view the BetaCaeli system from many perspectives and monitor the statusand position of your ships and orbital stations. When firstopened, the Space Map view is “anchored” to the sun BetaCaeli. This means that the zoom and directional arrows be-low the main window will change your view relative to BetaCaeli. You can change the anchor to another planet, if you
Planet Menu R-click planet
General Options Menu[Tab] or R-click in view
Planet MercatorDouble-click planet

5151515151
wish, which changes the center of the zoom and directionalarrow buttons as well.
To view a planet, you can select it from the Planet Sidebaron the right. To view the Mercator Map for the planet, clickon it in the Main Window. The Mercator Map will be inac-tive (dashboard covered) until you launch a ship to explorethe surface. To exit the Mercator Map, press [Esc] or clickLeave.
Spacecraft and orbital stations are shown as pulsing coloredlights. The Calypso is the purple light. Your space stationsare blue, and your other spacecraft are green. Any unidenti-fied ships that appear are indicated by red or yellow lights.You can go to the Calypso’s Colony Grid by clicking on theship in the Space Map. Similarly, you can go to any ship’sVehicle window by clicking on it.
The Space Map accurately simulates orbital physics, whichmeans you’ll need to account for the planets’ relative orbitalpositions in planning journeys. For example, a first-genera-tion ship on Gaea cannot reach Rhea at those times whenRhea’s orbit takes it opposite of the sun from Gaea.
Space Map ControlsSpace Map ControlsSpace Map ControlsSpace Map ControlsSpace Map ControlsStatus Window. The brown window on the bottom left givesyou the name and status of any object you point to in theMap window. For example, it shows the name and numberof current colonies on planets. For the Calypso and spacestations, it will display the name and number of availablevehicles. For vehicles, it will show the current mission. It willalso show your current game turns if you change gamespeed or stop the game.
Time Slider. Drag this slider control up or down to speed upor slow down the game speed. For example, if you are un-able to send a ship to Rhea because it is on the oppositeside of the sun, you can speed up the game until Rhea isclose enough for the mission to be launched. Keep in mind,however, that all other parts of the game will be proceedingat the same pace: resource consumption, etc.
Stop Button. Use this button to Stop the game while usingthe Space Map. The message Game Stopped will be dis-played on the left. To resume, click it again.

5252525252
Directional Arrows. Click these arrow buttons to changeyour view of the system in all directions relative to the cur-rent anchor. You can also use your arrow keys. For ex-ample, if you are anchored on Gaea, click the Up arrowbutton (or press [Up Arrow]) to rotate your view above theplanet’s orbital plane. Click the Down arrow button to re-verse. To go quickly to the furthest extreme view possiblewith any button, right-click on it.
Zoom Arrows. These buttons let you “zoom” your view in orout from the center of the current anchor quickly. To zoom inslowly, click the Zoom-in button (arrows facing in.) To zoomout slowly, click the Zoom-out button (arrows facing out). Togo to the extreme view on either button, right-click the but-ton.
Planet Sidebar. This sidebar has a button for each planet,with the current planet highlighted in grey, and the currentview anchor highlighted in white. To quickly change yourview to a particular planet, click its picture. (The default viewanchor is the sun Beta Caeli.) To change the view anchor tothat planet, right-click it instead. Once the planet is in yourforeground view, you may open its Options menu by right-clicking on it, or open its Mercator Map by double-clickingon it. You may also cycle through all planets and asteroidsusing the spacebar.
Planet Options MenuPlanet Options MenuPlanet Options MenuPlanet Options MenuPlanet Options MenuRight-clicking on a planet, moon, or asteroid in the SpaceMap will open its Options menu. The yellow Colonies andVehicles options, if available, let you access the ColonyManager and Vehicle Manager screens regarding the colo-nies and spacecraft on that planet only.
The blue Follow, Anchor, and View options let you controlhow you view the planet. Clicking Follow keeps the planet inyour foreground view as it orbits Beta Caeli. Clicking An-
Note: You cannot an-chor your view on amoon or asteroid.

5353535353
ColonyColonyColonyColonyColonyManagerManagerManagerManagerManager
chor lets you reorient the Space Map’s center from the de-fault, Beta Caeli, to any planet. This resets all directionaland zoom commands relative to the new anchor point. Nowif you use the arrows or zoom in/out buttons, all systemmovement is around the selected world. Clicking View opensthe Mercator Map for that planet, moon, or asteroid. (If youhave a spacecraft on the planet, you’ll also be able to ex-plore the surface.)
The Colony Manager screen summarizes the current status ofeach of your colonies and space stations. At a glance, you
can see the installations, vehicles, advisors, and crew ateach site, as well as your current resource inventories andtheir net change per turn. This display helps you see whichcolonies need attention so you can go straight to theirColony Grids and manage their building and productionactivities. The continuing growth and expansion of yourcolonies is vital to the success of the entire mission. Yourcolonies must be thriving and able to generate the resources,technology, and ships you’ll need to prevail.
You can access the Colony Manager from the General Op-tions menu, or from the Bridge by going to the Engineer’sstation and clicking Colonies. From the Site Grid, you canclick the Colonies button at the bottom. From the SpaceMap, you can right-click a planet to open the Planet Menu,and then select Colonies (if the planet has at least one
Colony ListClick Colony Name to bringSummary to top
Colony Summary(Habitat, Factories, Power, Labs,Ships, Missiles, Ore, Energy, LifeSupport, Humans, Robots)
Visit Site GridClick Colony Summary
See More Colony SummariesClick Arrows or Up/Dn ArrowKeys
List of Advisorsstationed at colony

5454545454
colony or space station. The colonies listed will be limited tothose at that planet.)
Starting with the Calypso, the Colony Manager lists yourcolonies in their order of creation. The left side of the screenlists each colony by graphical summary; the right side listsjust the names in the same order. Orbital space station colo-nies have an SS prefix. To see a colony summary at the topof the list, just click its name on the name list. (This becomesvery handy once you have more than 3 colonies.) If eitherlist extends beyond the window, you can click on the red Upor Down arrows (or your arrow keys) to scroll through theconcealed items. You can have up to 48 colonies total.
The upper row of the graphic summary uses icons to showyou the number of installations (habitats, factories, powerplants, research labs), spaceships, and missiles at thecolony. Additional facility types may become available asyour technology progresses. The lower row shows the re-sources (ore, energy, life support, humans, robots). For re-sources, red numbers show any net loss per 24-turn Gaeanyear (consumption exceeds production) while green numbersshow any net surplus per 24-turn year (production exceedsconsumption). One of the most challenging aspects of thesimulation is shepherding the balance of each resource foreach site. This can mean changing production, upgradingfacilities, or turning them off, or using pipelines betweencolonies to supply materials that another site can’t producefast enough on its own.
If one or more of your Advisors is at a site, you’ll also seetheir title (ENG, NAV, etc.) and a green light, similar to theComm. Panel.
Note: You start thegame with four space-ships and a healthysupply of ore, energy,life support, and robotson the Calypso, as wellas a good starter sup-ply on New Terra. Youalso have 2,000 set-tlers in cryogenic hi-bernation who will bewoken in groups asyou make room forthem in your habitatslater.

5555555555
Colony GridColony GridColony GridColony GridColony GridTo go to the Colony Grid for a particular colony, point to itsgraphical summary (highlight it in red) and then click.
Leaving the Colony ManagerYou can exit the Colony Manager by clicking Leave to returnto the previous screen, or by right-clicking for the GeneralOptions menu. Again, to go to the Colony Grid for a par-ticular colony, point to its graphical summary (highlight it inred) and then click.
Note: You cannotchange the names ofCalypso or New Terra.
Go to Colony Manager
Go to Vehicle ManagerClick Vehicle icon
Choose New InstallationClick selector box arrowsClick/R-click selector box
Build InstallationDrag from selector box, place onempty grid
Dismantle ColonyRemove all, R-click, select“Dismantle Colony”
Colony Grid Controls
General Options MenuR-click empty area
Scroll ViewDrag mouse, or use arrow keys
Installation Options R-click on buildingChange Prod/ScienceClick Change Prod
Change Colony NameClick name, edit, [Enter]
The Colony Grid shows an overhead view of the selectedcolony and the installations you’ve built there. You’ll use thisscreen to decide what installations to build, upgrade, or dis-mantle, and when to change production. It also helps yousee which sites need resources to cover an imminent deficitor build a new installation, and which sites have surplus re-sources you can transport elsewhere. You can quickly seethe results of your decisions as the net resource change goesup or down on the status summary below.
You can access a Colony Grid by clicking that colony’sgraphical summary in the Colony Manager. (Access theColony Manager from the General Options menu, throughthe Engineer’s station, or through the Space Map’s Planetmenu.) You can directly access the Calypso’s Colony Gridfrom the Bridge by going to the View Ship Resources station.From an inactive Mercator Map (dashboard covered), you

5656565656
can double-click a colony site, or right-click it and select GoTo Colony.
Colony NameAt the upper right is the Colony Name field, which displaysthe default (system-assigned) name for the current colony.Default names include the colony’s location (with an “SS”prefix for Space Station), and its order of creation: Rhea1,SSHermes10, etc. You can change the default name if youwish by clicking on it, typing in a new name of up to 8 let-ters, and pressing [Enter]. This will change the colony nameeverywhere it appears, such as the Colony Manager, Ve-hicle Manager, etc.
The field just below displays the name of the planet, moon,or asteroid that the colony is on or orbiting. (The Calypso’scolony always shows Calypso here, wherever you move theship.) You can’t change the world name.
Grid WindowThe Grid window shows a partial overhead view of yourcolony. This is where you’ll build installations or changetheir activities. To see other areas, use your numeric keypadkeys or drag the mouse cursor to the edge of the currentview to make the view scroll in that direction. Each colonywhen founded has a Vehicle Hangar and other supportbuildings. You’ll notice that the grid and installations appearquite different for planetside colonies, space station colonies,and the Calypso (itself a colony).
Graphical SummaryGraphical SummaryGraphical SummaryGraphical SummaryGraphical SummaryAt the bottom of the screen is the colony’s graphical summary,which displays the same information as that in the Colony Man-ager. The upper row shows the resources (ore, energy, life sup-port, humans, robots). The lower row displays the number of in-stallations (habitats, factories, power plants, research labs) andspaceships at the colony. For resources, red numbers show anynet loss per 24-turn Gaean year (consumption exceeds produc-tion) while green numbers show any net surplus per 24-turnyear (production exceeds consumption).

5757575757
Installations WindowInstallations WindowInstallations WindowInstallations WindowInstallations WindowBelow the Colony name fields is the Installations window. Itshows you the kind of installations allowed by your currenttechnology, as well as the resources required for each. At allstages of the game, you can build habitats, factories, powerplants and research labs. Other installation “levels” andtypes may become available later if you develop the appro-priate technology. You can have no more than 16 installa-tions per colony.
To page through the various installations and their require-ments, click on the Installations window or the red arrowsjust beneath it. If you don’t have the resources at the colonyto build a particular installation type, or have no place toput it, its picture will be obscured by the gray “no” symbol.In some cases, you may need to dismantle one facility tobuild another.
Below the installation picture is a description that tells you ifyou can create the displayed facility, and what resources itwill cost. If you lack one or more of the required resources,the description will read “Cannot Create” and the lackingresource(s) will be shown in red. You’ll have to produce ortransport at least that many resources to proceed with con-struction.
If you do have adequate resources, the description reads“Drag to Create.” You can then use the mouse to simply“drag” the installation from the Installations window to avalid location on the Grid window. A square shadow willappear beneath the installation as you move it to show youlocations where you can place the building. Try to groupyour installations in an organized manner so you can findinstallations more easily later.
The first installation you’ll build at any new colony is a Habi-tat (since humans require Habitats, and humans are re-quired to build any other type of installation). You can thentransport humans and other resources to the site to buildother installations and make the colony as self-sufficient aspossible. See “Installations” for details.
Dismantling a ColonyYou can remove a colony by first dismantling its installations(Habitats last), and transporting all people, resources, andships away from the site. Once the colony is “empty,” right-click to open the General Options menu. At the top, you’ll
Note: Calypso andNew Terra cannot bedismantled.

5858585858
Captain’sCaptain’sCaptain’sCaptain’sCaptain’sPDAPDAPDAPDAPDA
see Dismantle Colony. Click Dismantle Colony to removethe Colony from the Colony Manager.
Leaving the Colony GridYou can exit the Colony Grid by clicking Leave to return tothe previous screen, or by right-clicking for the General Op-tions menu. You can also click the Colonies button to returnto the Colony Manager, or click the Vehicle icon button forthe Vehicle Manager.
The “Captain’s PDA” is your Personal Data Assistant andinformation manager. This is where you will receive probe
and Advisor reports, monitor the ship’s log, and review mis-sion progress. You can open it by going to the Computerstation and clicking the Captain’s PDA button. You can alsoaccess it by opening the General Options menu and select-ing View PDA. When you’re done using the PDA, exit byclicking the Power button or pressing [Esc].
The PDA has four information “modes” that you can selectfrom using the purple buttons on the right: Log, Library, Sta-tus, and Damage.
LogLogLogLogLogThe Log displays your current list of notes, clues, and action
{
Delete Log EntrySelect Entry, click Delete
Scroll EntriesUp/Dn Arrows
Leave PDA[Esc] or click Power
Select EntryClick entry, Up/Dn Arrows
Open Library EntrySelect, click or [Enter]
Select Mode [Space]to cycle through Log, Library,Status, Damage

5959595959
items (things to do). As you complete each task entry, thecomputer will remove it from the list automatically. You canscroll through your current log entries using your arrow keysor by clicking on the purple Up and Down arrows below thePDA screen. If you find your log entries piling up, you canuse the Delete button to remove those you no longer need.To delete an entry you do not intend to perform, just high-light it, click Delete, and then click Yes or press [Enter] whenasked to confirm the deletion. Note, however, that when youdelete an item, it’s gone for good.
LibraryLibraryLibraryLibraryLibraryThe Library mode lets you store and retrieve detailed ar-ticles, radio transmissions, probe reports, Advisor and Plan-etary Governor reports, and clues or artifacts discoveredduring explorations. To select a Library topic, click on thetopic title to highlight it. You can also click the Up/Downarrows or use your arrow keys to move the highlighting tothe topic you want, and then click or press [Enter] to openthe topic.
To scroll through long library entries, you can click the Up/Down arrows or use your arrow keys. When done readingthe entry, click Exit or press [Esc] to return to the PDA. Asthe game progresses, you may accumulate a lot of Libraryitems you no longer need. To delete an entry, just highlightit, click Delete, and then click Yes or press [Enter] whenasked to confirm the deletion. Note: When you delete anitem, it’s gone for good.
StatusStatusStatusStatusStatusThe display-only Status screen lets you review the currentsummary of overall mission status for the Calypso and all ofyour colonies, including facilities, vehicles, robots, people,and resources. For resources, you’ll see your total invento-

6060606060
GameGameGameGameGameOptionsOptionsOptionsOptionsOptions
ries, along with any net gain (+ green numbers) or net loss (-red numbers) per year, or zeroes for static or balanced pro-duction. At the bottom, you can see your progress for totalpopulation and technological advances.
DamageDamageDamageDamageDamageThe display-only Damage screen lets youreview the total losses you’ve suffereddue to disaster, revolution, or attacks. Italso shows damage you have inflicted onother forces as “Kills.”
This screen lets you save or load yourgames, and change your game settingssuch as speed, sound effects, and music.To open it from the Bridge, click on theComputer station and then the Game
Options button. You can also access it by opening the Gen-eral Options menu ([Tab] or right-click) and selecting Op-tions.
On the left, you’ll see the game logo and morphabetizedcredits. The option buttons at the right work as follows:
• Save Game. Saves your currentgame session in progress. You cansave as many games as you haveroom for on your hard drive: eachtakes about 210K. You can assignthe saved game names yourself oruse a system default. After you savethe game, you can resume your cur-rent game or exit. Also, you canpress [Alt]+[S] to save anywhere inthe game.
• Load Game. Abandons the current game and lets youresume a previous game session from the point that youlast saved it. You can also Delete saved games. Whenyou select this option, you’ll be presented with a list ofsaved games. Select the one you want to resume or de-lete with the mouse or the Up or Down arrows, and

6161616161
ηCaptain’s ReferenceCaptain’s ReferenceCaptain’s ReferenceCaptain’s ReferenceCaptain’s ReferenceExploringExploringExploringExploringExploringPlanetsPlanetsPlanetsPlanetsPlanets
ColoniesColoniesColoniesColoniesColonies
Planets are the foundation of your new civilization. As Cap-tain of the Calypso, you will need to establish colonies onseveral planets to support your people and increase yourresources, production, and research. Each new world hasnew or unique resources that will contribute to your efforts,and each should be explored thoroughly.
To reach distant planets, moons, and asteroids with yourfleet, establish remote space stations with fuel reserves. Usethe Space Map to make the most of the planets’ orbital posi-tions when launching probe and space station missions.Planets are treasure troves of naturally occurring ore andenergy resources, and can provide startling new sciencefinds to catalyze your research efforts. You will find Ore,Energy, Life Support and Science to collect during surfaceexploration. In addition, you may find exotic minerals (met-als, jewels, crystals, etc.) and clues, which in turn can pro-vide you with vast new capabilities or knowledge. Findingthem should be one of your highest priorities.
Colonies are the population and production centers you canbuild in the Beta Caeli system. In addition to your initialcolony on the Calypso, you can establish colonies on planetsurfaces and on orbital space station platforms. They alsoserve as refueling points for your ships and as stockpilepoints for resources and weapons.
You can create planetside colonies from the Mercator Mapduring active Exploration missions. You can create one or-bital colony space station site per world by sending a space-craft on a Space Station mission to that world from the Ve-hicle Manager. For example, you can have one space sta-tion colony above a planet and one above each of itsmoons.
Once a colony site is established, you can begin transport-ing resources there and build a habitat. With a Habitat inplace, you can bring in humans and start building the pow-erful Factories, Power Plants, and Research Labs that willhelp make the colony self-sufficient. Eventually, your coloniescan begin producing surplus resources, robots, ships, andother items for transport to other locations. Managing the

6262626262
progressive growth of your colonies is your primary task.Without thriving colonies, you will lag behind in productionand population growth. In addition, the colonists in yourcare will grow angry and may revolt.
Planetside colonies can mine ore directly from the planet,and therefore are better for producing equipment that usesore in its production. They’re also better for housing the bulkof your population. Please note that mining colonies mayeventually run out of ore, however.
Orbital space station colonies can produce energy and lifesupport quite effectively, in many cases enough for export.Also, orbital colonies allow you to “siphon” fuel from thegiant gas planets Zeus, Cronos, and Poseidon, even thoughyou can’t land on these planets. Similarly, space stationshelp you mine asteroid belts.
Orbital colonies are excellent refueling stations. By stockpilingenergy at an otherwise abandoned space station, you can re-fuel your ships on their way to distant parts of the system.
There are several basic resources you’ll require in AlienLegacy. Ore, Energy, and Life Support are the consumableresources that your colonies need in constant supply for pro-duction and maintenance. Science resources are consumedas your scientists and engineers strive to advance your tech-nological capabilities. Humans and Robots are the perma-nent staff resources your colony facilities require to operate.
Even installations that produce these resources consume re-sources in the process. This makes resource management akey aspect of success in Alien Legacy. Running short on onetype of resource can bring installations and entire coloniesto a halt, or make a shambles of your pipelines. On theother hand, having several strong colonies that produce re-sources in abundant surplus will enable your explorationand research efforts to meet any challenge.
Resource TypesResource TypesResource TypesResource TypesResource TypesOre represents all consumable building materials, includingmetals, stone, fibers, ceramics, and wood. It is the raw mate-rials from which you construct robots, spacecraft, and createand maintain installations. Ore can be found in natural de-posits during planetary exploration or created by a factory.It is most plentiful on the inner planets of the star system.
ResourcesResourcesResourcesResourcesResources

6363636363
Comm. PanelSpace Map
Calypso ClnyGrid
Engineering/Clny Mgr.
View Solar SystemMilitary AdvisorNavigator/Vcle Mgr.
Computer/PDA/Game SetScience/Tech Mgr.
Energy represents all forms of consumable energy, includingfossil fuels, electromagnetism, plasma pods, nuclear energy,and solar power. Energy is necessary to keep colonies fullyfunctional and on-line. It is converted to fuel for your space-craft traveling between worlds and exploring planet sur-faces. Energy can be found in natural deposits during plan-etary exploration, created by a Power Plant, or siphoned bya factory orbiting a gas planet.
Life Support refers to the various consumable necessities thatsustain human life. On habitable worlds, it stands for food,water, and medical supplies. In artificial and hostile environ-ments, it also includes space suits and oxygen tanks. LifeSupport units are generated by Habitat facilities.
Science resources are the natural discoveries and appliedresearch breakthroughs that are invested in the developmentof new technologies. There are seven types of science re-sources, one for each science displayed in the TechnologyManager screen. You may come across these science re-sources while exploring the system, or produce them at Re-search Labs.
Humans are the personnel that you brought with you incryogenic suspension on board the Calypso. As they areawakened and sent to various colonies, humans will beginto reproduce and increase their numbers—given time and asecure environment.
Robots are tireless humanoid automatons that excel at con-struction, menial labor, and difficult space missions requir-ing tolerance to radiation and high accelerations. To add toyour supply of robots, you must devote one or more factoriesto producing them.
Humans and Robots are not “consumed” like other re-sources. They are taken from the colony’s surplus labor poolwhen you begin construction of an installation, and someare required to maintain the facility later. If the facility goesoff line, however, they are returned to the labor pool andbecome available to work on something else or be trans-ported elsewhere.
Collecting ResourcesCollecting ResourcesCollecting ResourcesCollecting ResourcesCollecting ResourcesYou can add to your resources by collecting them or produc-
6464646464
ing them. First, you can collect Ore, Energy, Science, andsometimes Life Support resources from natural deposits anddiscoveries you find during planetary surface exploration.Ore, Energy and Life Support resources are added to thefirst colony the ship lands at after collecting them, while Sci-ence resources become available immediately in the Tech-nology Manager. Second, you produce your resources. Fac-tories can mine Ore on planets, or siphon Energy from orbitaround a gas planet. Power Plants generate Energy, Habi-tats generate Life Support, and Research Labs generate Sci-ence resources. As your facilities become more technologi-cally advanced, they can produce resources more efficiently.
As you begin to collect or produce surplus resources at somecolonies, you can start to transport the surplus to other loca-tions. For this purpose, you have the Pipeline mission, re-peated transport round trips that you can set up as de-scribed in the Vehicle Manager. Someday, you may also beable to use a Mass Driver, a giant electromagnetic catapultthat hurls large ore packets to a selected destination. Themain advantage of the Mass Driver is that it releases space-craft from pipeline missions for other purposes.
Note: An orbitalcolony with an opera-tional factory above agas giant can siphonoff the top layers ofhydrogen from the up-per atmosphere. Youcan then set up a pipe-line mission to bringthis abundant energyto your other colonies.
Installations are the buildings you create at a colony tohouse your colonists and to produce resources and otheritems. There are four primary installations available: Habi-tats, Power Plants, Factories, and Research Labs. Technologi-cal advances may allow you to upgrade these installations,or to build new types of installations. You can have up to 16installations per colony, and you’ll use the Colony Gridscreen to build and manage them.
Building InstallationsBuilding InstallationsBuilding InstallationsBuilding InstallationsBuilding InstallationsYou can construct any installation at a colony if you have theresources to build it and an empty place on the colony gridto place it. Use the Installations window in the Colony Gridto view your options. When you start construction, the re-quired resources are subtracted from the colony’s inventory.The resources required will vary depending on theinstallation’s location (planet or space station), and its tech-nological “level.” Each installation takes a number of monthsor even years to complete and go on-line. While installa-tions are being built, they flash a blue light.
As your technology improves, you’ll be able to build new,more efficient installations with higher production levels, orupgrade older ones. The production increase in each new
InstallationsInstallationsInstallationsInstallationsInstallations

6565656565
level of installation varies with the type of installation, itslocation, and type of product. In general, each new level offacility can produce more goods in fewer turns than the pre-vious level, but will also require more resources to build andmaintain. You’ll be wise to have surplus resources on handto cover current needs until the new facility starts producing.You’ll also want to upgrade your facilities fairly evenly. Forexample, you’ll find it difficult to keep a Level-3 factory on-line with Level-1 power plants supplying its energy needs.
On-Line StatusOn-Line StatusOn-Line StatusOn-Line StatusOn-Line StatusEach installation has a range of operational “status” modesindicated by colored lights. A green light means the instal-lation is on-line and capable of producing. A red lightmeans it is off-line. A blue light means the installation is un-dergoing construction, upgrading, or retooling (productionchange.) A yellow light means the installation can be up-graded.
An installation goes on-line (green light) when it is com-pleted and has available resources for maintenance. Eachon-line installation has a yearly maintenance cost in Ore,Energy, and Life Support, and most require both Robot andHumans on staff. Maintenance requirements may vary de-pending on the installation’s location (planet or space sta-tion), and its technological level. If the colony lacks one ormore of these resources, installations that need them go off-line and stop producing (red light). Installations that are cur-rently on-line and producing something display a flashinggreen light. Installations that are on-line but haven’t beengiven an assignment display a steady red light.
An installation that is off-line (red light) is dormant and nei-ther manufactures anything nor uses up maintenance re-sources. Installations go off-line if you turn them off, or ifthey run out of maintenance or production resources. Insome cases, a factory that is mining ore will go off-line be-cause the ore supply at that site has been exhausted. Anewly upgraded facilty may go off-line if you aren’t pre-pared to supply its higher levels of resource consumption.
You can Change Production for Factories and ResearchLabs. The installation will be shut down for a short time to“re-tool,” and then comes back on-line creating the specifiednew item. Installations being re-tooled display a blue light.
Note: Habitats are al-ways the first installa-tion you will build atany colony. You needhabitats before youcan transport humansto the colony, and youwill need humans tobuild and maintain allother installation types.
Note: Right-click aninstallation in the Gridscreen to access itsInstallation Optionsmenu.

6666666666
You can Dismantle installations that are outmoded, that re-quire more resources than you can supply, or take up acolony space you would rather use for something else. Dis-mantling removes the installation, returns some of Ore usedto build it to the colony supply, and releases its Human andRobot workers for other tasks. Installations that are beingdismantled shine a blue light.
As your colonies grow and you make technological ad-vances, you will be able to Upgrade your installations orbuild new, more efficient ones. Improved installations aremuch more productive, and upgrading can cost less thanhalf of building a whole new installation from scratch. Onthe other hand, your installation will be unproductive whilethe upgrade is taking place (i.e., don’t try to upgrade allyour facilities at once). An installation that is capable of be-ing upgraded will display a yellow light. While upgrading istaking place, the installation will display a blue light.
Once you upgrade an installation at a colony, all new fa-cilities of that type that you build there will be of the newlevel. For example, if you upgrade a Level-1 factory to aLevel-2, you can build only Level-2 factories from then on atthat colony—unless you dismantle all Level-2 factories on thegrid.
HabitatsHabitatsHabitatsHabitatsHabitatsHabitats are the living quarters for humans at a colony.When on-line, they also produce new Humans and Life Sup-port units. You must maintain adequate habitat space for thetotal population of a colony, or else colonists may revolt.
You can upgrade Habitats as the human population in-creases at a colony. For example, you can upgrade a Level-1 Habitat to Level-2 once your colony population passes200 humans. Other upgrade thresholds are at 300, 600,800, and 1,200 colonists. More advanced Habitats canhouse more people, and produce Life Support units moreefficiently, but will also require more resources to build andmaintain.
You cannot send humans to a colony without Habitats. Off-line Habitats can house humans (but they can’t produce LifeSupport units). Habitats will fill up as your colonists propagate.
Building a Level-1 Habitat on a planet takes 2 ore, 1 energy,
Note: You cannot dis-mantle all Habitats at asite without first remov-ing all of the Humans.
Note: Habitat up-grades depend solelyon colony population.

6767676767
1 life support, and 5 robots. Once built, it can support 100humans. If on-line, it will produce 5 life support units every10 turns while using 2 ore, 3 energy, 1 life support, 3 humans,and 2 robots for yearly maintenance. Requirements varyslightly for space station habitats.
Power PlantsPower PlantsPower PlantsPower PlantsPower PlantsPower Plants create Energy units. Each Power Plant must paya yearly maintenance fee in ore, energy, and life support tostay on-line. You can always turn a plant off to save re-sources, although you may starve other installations andforce them off-line.
Building a Level-1 Power Plant on a planet takes 6 ore, 9energy, 10 life support, 16 humans, and 7 robots. Once on-line, it can produce 6 energy units every 12 turns. Its yearlymaintenance requires 1 ore, 1 energy, 3 life support, 6 hu-mans, and 3 robots. Requirements vary slightly for spacestation power plants.
Each new level of power plant can produce considerablymore energy than the previous level, but will also requireconsiderably more resources to build and maintain.
FactoriesFactoriesFactoriesFactoriesFactoriesFactories are the industrial backbone of each colony. Onplanets, they can mine ore, and manufacture items such asrobots and vehicles. In space stations, they are able to si-phon gas (when orbiting around a gas planet), but cannotmine ore in orbit. While on-line, Factories require heavyore, energy, and life support for yearly maintenance, espe-cially when producing ships or robots. Factories go off-line ifyou turn them off or can’t keep them supplied.
Use the “Change Prod” option to tell an on-line factory whatitem to manufacture. Initially, you can mine ore, or buildrobots or spacecraft. You may be able to build additionalitems later on if you develop the appropriate technology. Ifyou change production, the factory goes off-line while it re-tools.
Building a Level-1 factory on a planet takes 6 ore, 8 energy,6 life support, 4 humans, and 10 robots. Once on-line, itcan mine 5 ore units every 9 turns, build 1 robot in 12 turns,or build 1 Level-1 ship every 24 turns. Its basic yearly main-

6868686868
tenance (for mining) requires 1 ore, 3 energy, 2 life support,8 humans, and 4 robots. To build 1 robot requires an addi-tional 2 ore, 3 energy, 3 life support, 2 humans, and 3 ro-bots. To build 1 Level-1 ship requires an additional 9 ore,10 energy, 7 life support, 4 humans, and 12 robots. Re-quirements vary slightly for space station factories.
Each new level of factory can produce considerably moregoods in fewer turns than the previous level, but will alsorequire considerably more resources to build and maintain.
Research LabsResearch LabsResearch LabsResearch LabsResearch LabsResearch Labs produce science resources, which are in turnused to develop new technologies in the Technology Man-ager. The seven science resources include Astronomy, Biol-ogy, Chemistry, Electronics, Geology, Mathematics andPhysics. You may also find some of these resources whileexploring planet surfaces.
When a Research Lab comes on-line, you select the sciencethat it will study. The lab continues to produce that scienceresource until it goes off-line or you select a different sciencefor it to study. Science resources vary by the number of turnsrequired to produce them. For example, a Level-1 Lab re-quires the following number of turns for each type to outputone science unit: Astronomy 11 turns, Biology 12, Chemistry8, Electronics 15, Geology 9, Mathematics 11, and Physics6 turns. You might try to find the more costly resources dur-ing exploration, rather than dedicating labs to them.
Building a Level-1 Research Lab on a planet takes 5 ore, 3energy, 3 life support, 12 humans, and 5 robots. Its yearlymaintenance requires 10 ore, 6 energy, 4 life support, 8humans, and 4 robots.
You can begin to upgrade your labs after completing a cer-tain number of technological advances. In turn, each newlevel of lab takes one less turn to output a given science re-source than the previous level. The respective ratios for eachscience, however, will stay the same. For example, a Biologyresource will always take six more turns than a Physics unit.From the start of your mission, you will need to have engi-neers and science teams toiling away in Research Labs todiscover better ways of getting things done and increasingthe productivity of your installations and spacecraft. As newproblems and threats arise, you will also have to find newways to deal with them. Technology advancements will help
TechnologyTechnologyTechnologyTechnologyTechnologyAdvancementsAdvancementsAdvancementsAdvancementsAdvancements
Note: Installations pro-duce no resourceswhile being retooled orupgraded.

6969696969
you improve the efficiency of your colonies and overcomethe dangers awaiting you.
Creating TechnologiesCreating TechnologiesCreating TechnologiesCreating TechnologiesCreating TechnologiesThe development of new technologies is managed in theTechnology Manager screen at your Science Advisor’s sta-tion. There you can see what new technologies are availableto build, and you can select which ones you want to build,assuming you have the science resources to complete them.
Progress comes at a price. You should consider carefullywhich new technologies you want to pursue, given the bestadvice of your Science Advisor. Results still may not be whatyou expect. Also, some new technologies may come beforeyou’re ready for them. You may find yourself with very pro-ductive Factories, for example, without the resources to keepthem on-line.
New TechnologiesNew TechnologiesNew TechnologiesNew TechnologiesNew TechnologiesYou can discover new technologies in several ways. Youmay find natural phenomena that spark new discoveries, orfind artifacts that spur a breakthrough in your labs. Much ofyour progress will still come through dedicated, continuousresearch in your labs. Your Science Advisor will tell youwhen the technical staff is on the verge of a breakthroughwith a new technology.
Effects of Technological AdvancesEffects of Technological AdvancesEffects of Technological AdvancesEffects of Technological AdvancesEffects of Technological AdvancesMany new technologies take effect as soon as they are built.For example, some discoveries will let you upgrade yourFactories or Power Plants immediately, or upgrade your ve-hicles automatically the next time they dock.
Other technologies allow you to build new objects in yourFactories. Whenever a technology advance is announced,you should check your Factories to see if you can build somenew item.
Ship upgrades cost nothing. Whenever your vehicles land ata colony, they are automatically upgraded with the latestavailable armor, lasers, and engines.
Some items have no immediate use, but may be required tobuild future technologies.

7070707070
At some point, you may find yourself under attack by rebel-lious colonists or other forces. Combat may take place inspace or on a planet. Your Military Advisor will offer yourecommendations for engagement based on the situation.
Technological advances to your spacecraft (new weapons,armor, better engines) will make your space fleets more ef-fective in combat. If you develop advanced ship designs,your spacecraft will be upgraded automatically as soon asthey dock at one of your colonies. Please note that the Ca-lypso is by no stretch of the imagination a warship. If it isattacked, there is a very good chance that you and it will bedestroyed.
Should you develop the requisite technology, you’ll be ableto produce missiles at your colonial Factories. Missiles areinitially stockpiled where they are produced. You may use aspecial Missiles mission that will let you relocate missiles toships, colonies, or a planetary orbit.
You can conduct planetary combat missions directly usingthe Surface Exploration screen via an Exploration mission.This allows you to engage surface targets with the PlasmaBomb or lasers, both of which draw energy from your ship’sfuel. When you drop a bomb, you destroy all enemy targetscurrently in the viewing window plus all ore and energyicons. You do not destroy science resources or clues bybombing.
You can also attack targets with lasers. Position the roundwhite target cursor on the intended target, and right-click tofire the laser. Lasers are more precise than bombing, don’tdestroy uncollected resources, and use less energy—but theydon’t pack the same wallop, either.
1. Keep your colonies balanced and growing, and stock-pile resources when you can. If you run out of re-sources, your installations stop producing. You will thenhave to gather resources via Surface Explorations ordivert ships to transport missions.
2. Space stations turn out energy or life support resourcesmore efficiently than planetside colonies do, but cannot
CombatCombatCombatCombatCombat
StrategyStrategyStrategyStrategyStrategy

7171717171
produce ore. Use pipelines to supply space stations withore while bringing energy or life support units in return.
3. Do not try to get too many colonies up and running at thesame time. You may run out of resources, particularly ro-bots, before you’re able to produce more. You’re better offgetting one or two colonies self-sufficient before startingothers. Be sure you have the surplus ore, energy, and lifesupport production you need on-site to support robot/shipFactories or Research Labs. Also, don’t build ships unlessyou need them.
.4. Space stations are an excellent way to quickly extend
the reach of your spacecraft throughout the Beta Caelisystem. Send energy along with any mission to a newworld. The ship can then build a space station thereand use the energy it carried to refuel.
5. Build colonies on or orbiting several worlds, not justone. This will help you exploit the unique riches of eachworld: inner planets tend to be richer in ore, while theouter planets have more energy. Also, spreading yourcolonies out reduces the potential losses from unknownthreats or disaster at any one location.
6. Explore planet surfaces carefully. You don’t want tooverlook any possible clues or discoveries that can giveyou an edge. The game clock is stopped while you ex-plore, so you have nothing to lose by being thorough. Ifyou have abundant energy, use your scanners to speedup your searches.
7. Manage your time. Remember that the Pause button [P]is available, and you can speed or slow things as youwish by typing a speed setting 1…0. When the situa-tion is relatively calm, you can speed things up. Whenchaos strikes, slow things down to make sure you geteverything done.
8. Pay attention to your Advisors. Their advice can keepyou prepared for many eventualities. Similarly, checkyour PDA frequently.
9. As Captain, you may have to send senior officers onextremely hazardous missions. Nevertheless, such a riskmay be absolutely vital to the success of the mission.
10. Save your games as you go.

7272727272
Alien Legacy has many paths, and many endings to its story:few paths lead to victory. No matter how numerous or bus-tling your colonies, or how advanced your production ortechnology, you will need great vision, leadership, and luckto avoid seeing humanity’s last hopes reduced to cosmic de-bris.
When you reach the decisive moment in the game where thefate of your colonies is sealed (for better or worse), you’llsee the Mission Summary screen. This screen displays youroverall achievements as Captain. If you bring the mission toa successful conclusion, your performance will also bescored and assigned a victory level as described under Scor-ing, below. (There is only one way to lose: disastrously.)
The EndThe EndThe EndThe EndThe End
Continued PlayOnce you exit the Mission Summary screen after a victory,you may continue playing and saving the current game.However, further playing will not change your score or af-fect the outcome. This simply gives you an opportunity tocomplete your colony development or system exploration, ortry out other things you were too busy to do while preoccu-pied with survival.
ReplayYour most powerful ally in your quest for ultimate success isthe saved game. If you have prudently saved your games as

7373737373
you go, you can overcome even total annihilation by simplybacking up to a crucial junction and replaying with a differ-ent and (fingers crossed) winning strategy.
Even if you’ve already finished the game victoriously, keepin mind there are several very different ways to successfullycomplete the mission. You can use your saved games to ex-plore these alternate endings, as well.
ScoringYou must ensure the survival of your colonists to achieve anylevel of victory. Otherwise, the number of colonies you buildwon’t matter a bit. Once you bring the mission to a success-ful end that secures the future of your colonists, the Victorylevel you achieve is based on the following scoring:
• Planetside Colonies: 50 points each.
• Space Stations: 80 points each.
• InstallationsHabitats: 1 points each (all levels).Research Labs: 2 points each (all levels).Power Plants: 3 points each (all levels).Factories: 4 points each (all levels).Special Installations: 6 points each.
• ResourcesOre: 1 point per 100 units.Energy: 1 point per 100 units.Life Support: 1 point per 100 units.Humans: 1 point per 50 units.Robots: 1 point per 50 units.Vehicles: 10 points each.
• Technologies: 10 points for each invention you create.
• Cinematics: These are the “movie sequences” you trig-ger in the game. While you don’t get points for these,the number you trigger gives you an idea of how manyplot elements you’ve explored.
Scoring Levels

7474747474
Your game score is categorized as follows.
• Disastrous Loss. Not a victory. Everybody dies. Tryagain!
• Marginal Victory (0—1,000 points). Your colonieshave passed the test of survival, but barely. Your contin-ued existence is likely to be desperate, grim, and short.
• Tactical Victory (1,001—2,000 points). A bleak future,but at least your colonies can be self-sustaining most ofthe time.
• Grand Tactical Victory (2,001—3,500 points). Yourcolonies are capable of stable, and perhaps expandedproduction.
• Operational Victory (3,501—5,500 points). Your colo-nies are thriving, and your production base should beadequate to meet the many challenges before it.
• Grand Operational Victory (5,501—8,000 points).You have abundant colonies and resources, and yourcolonists enjoy a high quality of life. Your colonies haveretained enough population and capacity to eventuallycomplete colonization of the system, and perhaps be-yond.
• Strategic Victory (8,001—12,000 points). Outstandingsuccess. It won’t be long before your people can createnew seedships and colonize new systems (given a se-quel...).
• Grand Strategic Victory (12,001 + points). Superlativeachievement! You have brought your colonists throughthis time of trial with amazing success. Throughout BetaCaeli, your name will be spoken with awe and rever-ence for the remainder of time.

7575757575
Antigen. Substance that stimulates the body’s production of antibodies.Anti-matter. Matter composed of opposite energy charges to common matter. Matter/anti-matter reactions can be both a source of tremendous energy or destructive power.ATV. All Terrain Vehicle.A.U. Astronomic Unit. The average distance from Earth to the Sun, or approximately 93 millionmiles.Celestial Sphere. The spherical view of the sky relative to the observer.Collector Net. A large scoop for gathering interstellar hydrogen for ramjet fusion engines.Ecliptic. The annual path of the sun on the celestial sphere.FTL. Faster Than Light.Gas giant. Large planet composed primarily of gas compressed by immense gravity. Unin-habitable, but a rich energy source.Heliocentric. Centered on the sun, such as a planetary orbit.Light year. The distance travelled by light in a vacuum in one year, or about 6 trillion miles.Mass Driver. An immense electromagnetic catapult capable of hurling large packets of orefrom low-gravity moons or asteroids to other planets.Mutagen. Substance capable of causing mutation.Nucleotides. Product of some nucleic acid reactions. A primary component of carbon-basedlife.Oort Cloud. Spherical “layer” of comet material that encircles solar systems.Panspermia Hypothesis. A theory that states the chemical components of life existthroughout the galaxy, and are introduced to conducive planetary settings by meteors and comets.Parsec. The distance you’d have to be to see the Earth’s distance from the Sun as one sec-ond of arc (1/360th of a degree), or about 3.26 light years.Perihelion. Orbiting body’s nearest point to the sun.Positronic brain. Sophisticated artificial intelligence used in advanced robots.Plasma Bomb. Hydrogen-fueled energy weapon capable of vaporizing targets over a widearea.Precession. Gradual advance in planetary equinoxes due to gravity effects of other bodies.Ramjet Fusion Engine. An engine that makes use of the vehicle’s velocity to providefuel intake via a collector net.Seedship. Giant colony ships or arks intended to “seed” human populations in new star sys-tems.Spectroscopic analysis. Studying stars through an analysis of the light they emit.Superconductor. A substance that conducts electricity perfectly. Allows complete effi-ciency of electronic devices.Theta waves. Type of brain wave. Its existence is conjectural.UNS. United Nations Ship.
GlossaryGlossaryGlossaryGlossaryGlossary
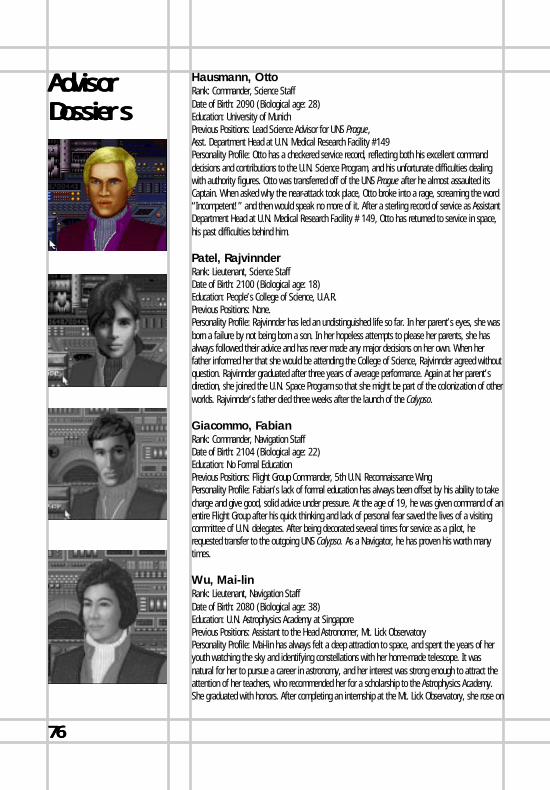
7676767676
AdvisorAdvisorAdvisorAdvisorAdvisorDossiersDossiersDossiersDossiersDossiers
Hausmann, OttoRank: Commander, Science StaffDate of Birth: 2090 (Biological age: 28)Education: University of MunichPrevious Positions: Lead Science Advisor for UNS Prague,Asst. Department Head at U.N. Medical Research Facility #149Personality Profile: Otto has a checkered service record, reflecting both his excellent commanddecisions and contributions to the U.N. Science Program, and his unfortunate difficulties dealingwith authority figures. Otto was transferred off of the UNS Prague after he almost assaulted itsCaptain. When asked why the near-attack took place, Otto broke into a rage, screaming the word“Incompetent!” and then would speak no more of it. After a sterling record of service as AssistantDepartment Head at U.N. Medical Research Facility # 149, Otto has returned to service in space,his past difficulties behind him.
Patel, RajvinnderRank: Lieutenant, Science StaffDate of Birth: 2100 (Biological age: 18)Education: People’s College of Science, U.A.R.Previous Positions: None.Personality Profile: Rajvinnder has led an undistinguished life so far. In her parent’s eyes, she wasborn a failure by not being born a son. In her hopeless attempts to please her parents, she hasalways followed their advice and has never made any major decisions on her own. When herfather informed her that she would be attending the College of Science, Rajvinnder agreed withoutquestion. Rajvinnder graduated after three years of average performance. Again at her parent’sdirection, she joined the U.N. Space Program so that she might be part of the colonization of otherworlds. Rajvinnder’s father died three weeks after the launch of the Calypso.
Giacommo, FabianRank: Commander, Navigation StaffDate of Birth: 2104 (Biological age: 22)Education: No Formal EducationPrevious Positions: Flight Group Commander, 5th U.N. Reconnaissance WingPersonality Profile: Fabian’s lack of formal education has always been offset by his ability to takecharge and give good, solid advice under pressure. At the age of 19, he was given command of anentire Flight Group after his quick thinking and lack of personal fear saved the lives of a visitingcommittee of U.N. delegates. After being decorated several times for service as a pilot, herequested transfer to the outgoing UNS Calypso. As a Navigator, he has proven his worth manytimes.
Wu, Mai-linRank: Lieutenant, Navigation StaffDate of Birth: 2080 (Biological age: 38)Education: U.N. Astrophysics Academy at SingaporePrevious Positions: Assistant to the Head Astronomer, Mt. Lick ObservatoryPersonality Profile: Mai-lin has always felt a deep attraction to space, and spent the years of heryouth watching the sky and identifying constellations with her home-made telescope. It wasnatural for her to pursue a career in astronomy, and her interest was strong enough to attract theattention of her teachers, who recommended her for a scholarship to the Astrophysics Academy.She graduated with honors. After completing an internship at the Mt. Lick Observatory, she rose on

7777777777
her merit to become Assistant to the Head Astronomer. Mai-lin applied for a space assignment withthe hope of getting closer to the stars that she loves.
Antonelli, GiannaRank: Lieutenant, Engineering StaffDate of Birth: 2104 (Biological age: 22)Education: Massachusetts Institute of TechnologyPrevious Positions: NonePersonality Profile: Gianna has always had a happy, positive outlook on life and a desire to helpothers. At the age of 18, Gianna decided to become an engineer and try to improve the world andthe lives of its people through the use of technology. She was an apt pupil and graduated near thetop of her class. Fresh out of college, Gianna is eager to provide a home for the future generationsthat the Calypso has brought to space.
Lee, EdwardRank: Commander, Engineering StaffDate of Birth: 2090 (Biological age: 28)Education: Stanford UniversityPrevious Positions: Unit Commander, 5th U.N. Engineering GroupPersonality Profile: Ed has always exhibited an unusual talent for making things work, even withoutthe proper materials or equipment. Ed was decorated for his service during the Tokyo Flood of ’14,where his quick thinking and unmatched engineering talents saved thousands of lives and millionsof dollars in property from the rising flood waters. Ed is a prize addition to the Calypso’s crew andhis advice should be well heeded.
Romanov, DimitriRank: Colonel, Military StaffDate of Birth: 2115 (Biological age: 31)Education: West Point Military Academy; Sun Tzu Academy of War; U.N. Strategy and TacticsSchoolPrevious Positions: Commanding Officer, Zweibrucken Air Base; Commander, 5th U.N. ArmoredAttack Group; Commander, U.N. European Defense CommandPersonality Profile: Dimitri has been considered very intense since early childhood, and bothteachers and his parents have always found him to be somewhat aloof. Graduating from highschool early with spectacular success, Dimitri was nominated and admitted to the West PointMilitary Academy. His exceptional performance there earned him a recommendation and finally aninvitation to attend the prestigious Sun Tzu Academy. After completing his schooling, he joined theU.N. Military Forces and rose rapidly through the ranks. He was assigned to the UNS Calypso withthe task of assuring the survival of the colonies which could well be humanity’s last bastion ofcivilization.
Williams, MelindaRank: Commander, Military StaffDate of Birth: 2095 (Biological age: 23)Education: University of ChicagoPositions Held: Assistant to Military Consulate, Saarbrucken Germany; Military Advisor, UNS Prague.Personality Profile: Although young and relatively inexperienced, Melinda is aggressive, intelligent,and a valuable asset to the Calypso. She is very ambitious and has been known to “play politics.”In tight situations, however, she can be counted on to put the welfare of the ship and crew first.Requested transfer to UNS Calypso when UNS Prague was decommissioned December 23, 2115.

7878787878
Manual Changes and AdditionsManual Changes and AdditionsManual Changes and AdditionsManual Changes and AdditionsManual Changes and AdditionsAny changes made to Alien Legacy after the manual isprinted are outlined in the README file on the CD or pro-gram disk #1. To view the file, simply change to the drivewhere the CD or disk 1 is located, type README, and press[ENTER].
For Game System Requirements and Installation, see “Get-ting Started” on page 6.
Configuring MemoryConfiguring MemoryConfiguring MemoryConfiguring MemoryConfiguring MemoryEven if you have the minimum 4 MB of RAM, Alien Legacymay not run correctly unless the RAM is configured (set up)correctly. You’ll need at least 570 K (583,680 bytes) of freeconventional memory and 2.5 MB of extended memory. Toconfigure extended memory, you’ll need a memory managersuch as HIMEM.SYS/EMM386 (which comes with MS-DOS5.0 or higher) or QEMM386 by Quarterdeck.
If Alien Legacy DOES NOT start correctly, use the MS-DOSMEM command to see if you need to free up some of yourcomputer’s memory. From your MS-DOS prompt, typeMEM and press [Enter]. “Largest executable program size”is your free conventional memory; “bytes free EMS” is ex-panded memory, and “bytes free XMS” is extendedmemory, used by Alien Legacy.
Freeing up Memory1. If you cannot run Alien Legacy because of low memory,
try the Install program’s “Make Boot Disk” option asdescribed below. A boot disk is a fast and effectiveway of freeing more memory to run the game.
2. Try customizing the AUTOEXEC.BAT and CONFIG.SYSstart-up files on your Boot Disk if you continue to haveproblems. See “Customizing the Boot Disk,” below, fordetails.
If you do not have enough memory, you probably have resi-dent or “background” programs and device drivers takingup memory that the game needs. This means you’ll need tofree up memory for Alien Legacy by removing one or moreof these programs, or moving them into “upper memory.”Consult your DOS and memory manager software documen-tation for detailed information about system memory andhow to optimize it.
PC 1
158
+ 46
35TechnicalTechnicalTechnicalTechnicalTechnicalSupportSupportSupportSupportSupport

7979797979
Creating a Boot DiskCreating a Boot DiskCreating a Boot DiskCreating a Boot DiskCreating a Boot DiskA boot disk is the simplest way to configure your computer’smemory for running Alien Legacy. (See ConfiguringMemory, above.) The Alien Legacy Install program has a“Make Boot Disk” option that makes creating a boot diskeasy. If you set it up successfully, all you will have to do isput the boot disk in your floppy drive and restart the com-puter to configure its memory correctly and launch thegame.
Note, however, that the “Make Boot Disk” option will notcopy over any QEMM lines in your start-up files, and maynot copy over your mouse or CD-ROM drivers correctly.This means that you might have to make additional changesto the boot disk to get the program running. If you’re hav-ing trouble starting the game, try the “Make Boot Disk”—itcan’t hurt. If it doesn’t work, see the “Customizing the BootDisk” section, following.
“Make Boot Disk” procedure“Make Boot Disk” procedure“Make Boot Disk” procedure“Make Boot Disk” procedure“Make Boot Disk” procedureYou can use the Install program to format and create a AlienLegacy boot disk for your computer’s A: drive. Before youstart, have a blank or formattable floppy disk for your A:drive ready. (Any files on it will be erased.)
Before you start, you’ll need a blank, formatted diskette foryour A: drive. When your boot disk is ready, see “Using ABoot Disk,” following.
If you have two floppy drives (5.25" A: and a 3.5" B:):1. After starting your PC, insert the Alien Legacy CD or
disk 1 into the appropriate drive.2. Type the appropriate drive letter (B: or D:) and press
[Enter].3. Type INSTALL and press [Enter]. The Install program will
start.4. Press [Enter] to close the System Requirements screen,
and press it again to close the Memory Requirementsscreen. On the menu that follows, select (highlight) theMAKE BOOT DISK option with the Up/Down arrowkeys, and press [Enter].
5. The Boot Disk Maker will guide you through the pro-cess—follow the on-screen prompts carefully.

8080808080
If you have one floppy drive (3.5" A:):1. After starting your PC, insert the Alien Legacy CD or
disk 1 into the appropriate drive.2. Change to that drive. (Type the appropriate drive letter
(usually A: or D:) and press [Enter].)3. Copy the Alien Legacy install files to your ALIEN direc-
tory. For example, if you’re using the default directory,type COPY INSTALL.* C:\SIERRA\ALIEN and press [En-ter].
4. Copy the file DISK.ID to your hard disk root directory.Using the preceding example,type COPY DISK.ID C:\ and press [Enter].
5. Change to your ALIEN directory on your hard disk. Forexample, if you’re using the default directory, go toC:\SIERRA\ALIEN.
6. Type INSTALL and press [Enter].7. Press [Enter] to close the System Requirements screen,
and press it again to close the Memory Requirementsscreen. On the menu that follows, select (highlight) theMAKE BOOT DISK option with the Up/Down arrowkeys, and press [Enter].
8. The Boot Disk Maker will guide you through the pro-cess—follow the on-screen prompts carefully.
When the process is finished, exit the Install program. Youcan then re-boot your computer with the boot disk in the A:drive.
Using a Boot DiskUsing a Boot DiskUsing a Boot DiskUsing a Boot DiskUsing a Boot DiskThe boot disk you’ve created with the Install program’s“Make Boot Disk” option contains a stripped-down versionof your usual start-up files. You must start (or restart) yourcomputer with the boot disk in the A: drive for it to work.(Note: A boot disk will work only in the A: drive.)
1. Place the boot disk in the A: drive and start the com-puter. (If your computer is already running, exit anyprograms and restart the system with your PC’s Resetbutton, or use [Ctrl]+[Alt]+[Del] from the keyboard.)
2. The computer will start up using the boot disk’s memoryconfiguration. (If you created the boot disk with theInstall program, it will also try to start the game auto-matically.) Otherwise, start the game manually by en-tering AL as usual in your SIERRA directory. (To returnyour computer to its normal setup later, just restart itagain without using the boot disk.)
HC
2 H

8181818181
If the game still will not run, or the drivers for your mouse,sound card, or CD-ROM drive will not load correctly, you’llneed to customize the start-up files manually. See the follow-ing section “Customizing the Boot Disk.”
Customizing Your Boot DiskCustomizing Your Boot DiskCustomizing Your Boot DiskCustomizing Your Boot DiskCustomizing Your Boot DiskTo customize a configuration for your specific system, youcan edit the CONFIG.SYS and AUTOEXEC.BAT start-up fileson the boot disk the Install program created, or create a newBoot Disk from scratch. CONFIG.SYS and AUTOEXEC.BATare simple text files that you can edit using your DOS Editutility, the Windows Notepad, or your preferred word pro-cessor in its text-only mode. On your hard drive, these filestell your computer how to arrange its memory for normaloperation. On the boot disk, these files tell your computerhow to arrange its memory specifically for running AlienLegacy.
Warning: Manually altering the CONFIG.SYS andAUTOEXEC.BAT start-up files can be a trial and error pro-cess. When opening a file to edit, triple-check to MAKESURE you are working with the files on your boot disk inthe A: drive. Otherwise, you may change the CONFIG.SYSand AUTOEXEC.BAT files on your hard drive instead, whichin turn may impair the normal operation of your system.
If you prefer to create a boot disk from scratch, you’ll need afreshly formatted system diskette for your A: drive. (See yourMS-DOS manual for details on how to create a system dis-kette.) You can then create a new CONFIG.SYS andAUTOEXEC.BAT from scratch right on the boot disk.
Compare the CONFIG.SYS and AUTOEXEC.BAT files onyour boot disk to the following examples. Differences mayindicate places where you can remove a driver, load it intoupper memory, or change a device switch to use lessmemory. As always, refer to your system reference manualsif unsure about anything.
Sample Boot Disk Sample Boot Disk Sample Boot Disk Sample Boot Disk Sample Boot Disk CONFIG.SYS CONFIG.SYS CONFIG.SYS CONFIG.SYS CONFIG.SYS FileFileFileFileFileThese examples show a “minimum configuration” that will letyou run Alien Legacy on many PCs. The lines in your startup files will differ according to your system’s drivers anddirectory names, and the version of DOS you use.
CH
3 C2 H
Note: If you haven’talready tried the Installprogram’s “Make BootDisk” method, try thatfirst before startinghere. Even if that bootdisk doesn’t let you runAlien Legacy, it will atleast give you a goodplace to start customiz-ing the configurationfiles.
Note: Parentheses indi-cate comments that areNOT part of the file.

8282828282
∆λλ
− λ 0
z =
——
=—
——
λ 0λ 0DEVICE=C:\DOS\HIMEM.SYS
DEVICE=C:\DOS\EMM386.EXE RAM 1024(You may use a different expanded memory manager)DOS=HIGH,UMB (Loads DOS into Upper Memory)FILES=30BUFFERS=20BREAK=ONLASTDRIVE=ZDEVICEHIGH=C:\MOUSE\MOUSE.SYS (See “Mouse Driv-ers,” below.)DEVICEHIGH=C:\DOS\DBLSPACE.SYS /MOVE (Only ifusing DBSLSPACE. See “Disk Compression Drivers,” below.)DEVICEHIGH=C:\DRV\CDROMDRV.SYS /D:MSCD001 /P:220(Only if playing Alien Legacy from CD. See “CD ROM Driv-ers,” below.)
Sample Boot Disk AUTOEXEC.BAT fileSample Boot Disk AUTOEXEC.BAT fileSample Boot Disk AUTOEXEC.BAT fileSample Boot Disk AUTOEXEC.BAT fileSample Boot Disk AUTOEXEC.BAT filePROMPT Sierra Boot Disk $P$G (If you are working withfiles created with “Make Bootable Floppy Disk.”)PATH=C:\DOSSET COMSPEC=C:\COMMAND.COMLOADHIGH C:\MOUSE\MOUSE.COM (Only if you don’tuse MOUSE.SYS in CONFIG.SYS. See “Mouse Drivers,” be-low.)C:\DOS\MSCDEX /D:MSCD001 (Only if playing from CD.See “CD ROM Drivers,” below.)CD C:\SIERRA\ALIEN (From “Make Boot Disk.” Changes tothe Alien Legacy directory.)AL (From “Make Boot Disk.” Starts Alien Legacy.)
To disable a line in one of your start-up files, you can justtype REM in front of it. For example,REM PROMPT Sierra Boot Disk $P$G will remove theprompt. To re-enable it, just take the REM back out again.
Mouse DriversMouse DriversMouse DriversMouse DriversMouse DriversYou should have one mouse driver line in either yourCONFIG.SYS or AUTOEXEC.BAT file—but not both! Forexample:DEVICEHIGH=C:\MOUSE\MOUSE.SYS (Used in theCONFIG.SYS file only)LOADHIGH C:\MOUSE\MOUSE.COM (Used in theAUTOEXEC.BAT file only)

8383838383
If you have a different mouse driver name (MOUSE.EXE,IMOUSE, GMOUSE, HPMOUSE, etc.) or if you keep thedriver in a different directory (C:\MSMOUSE, C:\DRIVERS,etc.) the path and driver name will be different. See yourmouse manual if unsure.
Mouse HintsUse MOUSE.SYS rather than MOUSE.COM or MOUSE.EXE,if possible. MOUSE.SYS is smaller and takes less memory.
Make sure you don’t have a mouse driver line in both theCONFIG.SYS or AUTOEXEC.BAT files. If you do, removeone, because you’re needlessly loading two mouse driversinto memory.
CD-ROM DriversCD-ROM DriversCD-ROM DriversCD-ROM DriversCD-ROM DriversIf you are running Alien Legacy from a CD, you’ll need toinclude a CD-ROM line in both the CONFIG.SYS and theAUTOEXEC.BAT files. Refer to your CD-ROM manual foryour specific details.
The boot disk’s AUTOEXEC.BAT file needs an MSCDEX line.Depending on your CD-ROM type, it should look much likeone of the following:C:\DOS\MSCDEX /D:MSCD001LH C:\DOS\MSCDEX /D:MSCD001
LOADHIGH /L:14429 C:\DOS\MSCDEX /D:MSCD001
The Boot Disk CONFIG.SYS file needs a CD device driverline. Depending on your CD-ROM type, it should look muchlike one of the following:
NOTE: We recommendthat you use the latestversion ofMSCDEX.EXE to insurethe best CD access. Asof this writing, the cur-rent version ofMSCDEX is 2.23.
DEVICE=C:\DRV\CDROMDRV.SYS /D:MSCD001 /P:220DEVICEHIGH=C:\DRV\CDROMDRV.SYS /D:MSCD001 /P:220DEVICEHIGH /L:14652 =C:\DRV\CDROMDRV.SYS /D:MSCD001 /P:220
Note that this CD ROM device name is the same that followsthe “/D:” switch as the MSCDEX line in the AUTOEXEC.BATfile. If your Dynamix CD program requires expandedmemory, you will also want to add the “/E” switch to the
end of the MSCDEX line. For example: DEVICE=C:\DRV\CDROMDRV.SYS /D:MSCD001 /P:220 /E

8484848484
Disk Compression DriversDisk Compression DriversDisk Compression DriversDisk Compression DriversDisk Compression DriversIf you use disk compression on your hard disk, you must in-clude the correct disk compression driver statement on yourboot disk, or your mouse or other drivers may not load cor-rectly. The example CONFIG.SYS shows the correct state-ment if you are using the DBLSPACE utility from MS-DOS6.0 or later. If you are using Stacker 3.1 or later, use thefollowing line instead:DEVICEHIGH=C:\STACKER\STACHIGH.SYSFor other compression utilities, refer to your manual.
Additional Boot Disk InstructionsAdditional Boot Disk InstructionsAdditional Boot Disk InstructionsAdditional Boot Disk InstructionsAdditional Boot Disk InstructionsIf you have a modem, you can download additional bootdisk instructions and a boot disk maker from the Sierra Bul-letin Board Service, or BBS. The file to download isBDALL.EXE or BDALL.ZIP (BDALL.ZIP is compressed—you’llneed the PKUNZIP shareware utility to open it.). Afterdownloading this file, select the set of instructions that willmatch your system best.
In the U.S., the BBS number is 209-683-4463; in the U.K.,the BBS number is (44) 734 304227. This file is also avail-able from the CompuServe Sierra forum: GAMAPUB (Sierra76004,2143).
TroubleshootingTroubleshootingTroubleshootingTroubleshootingTroubleshootingProblem: I have installed Alien Legacy on a compresseddrive, and it doesn’t run.Possible Solution: Alien Legacy may need more disk space.Compression software estimates available disk space usingan expected compression ratio of 2 to 1 or more. However,many Alien Legacy files won’t compress much. This meansyou may need to free up to twice as much space as the com-pression software says.
Problem: My computer has at least 4 megabytes of memory,but I receive a message saying that I don’t have enough con-ventional or expanded memory.Possible Solution: Your computer’s conventional memorymay be taken up by background programs or device driv-ers, or not configured correctly. Try creating a Boot Disk, orsee your DOS or memory manager software manuals.
Reminder: For the bootdisk to work, you mustREBOOT your com-puter with the boot diskin your A: drive. Placethe boot disk in driveA: and press your PC’sReset button, or[Ctrl]+[Alt]+[Del]. Yourcomputer will nowreboot, using the start-up files on the bootdisk in A:. Have agreat time!

8585858585
Problem: When trying to load the program or after runningthe program, the computer locks up or I am returned to theMS-DOS prompt.Possible Solution: Although your computer may satisfy all ofthe hardware and software requirements, there may be aconfiguration or software conflict in your computer whilerunning Alien Legacy. Try loading the program after bootingfrom a boot disk.
Problem: My program hesitates or locks up during gameplay. I am using a SoundBlaster or compatible sound card.Possible Solution: Run the install procedure from the gamesub-directory and select “PC Internal Speaker” for the soundoption. Then run the game. If the program operates prop-erly, there may be a configuration problem with your soundcard. Call your sound card manufacturer for assistance inconfiguring your sound card for proper operation, or callTechnical Support at Sierra On-Line.
Problem: When running from a boot disk, my mouse doesn’twork.Possible Solution: You may need to edit the AUTOEXEC.BATor CONFIG.SYS files on the boot disk to include the com-mand to load your mouse driver. See “Customizing the BootDisk.”
Error MessagesError MessagesError MessagesError MessagesError MessagesThis section offers possible solutions for error messages youmay encounter.
YOU NEED xxx MORE BYTES OF FREE MEMORY AVAIL-ABLE TO RUN THIS GAME. Try using a boot disk.
GENERAL FAILURE READING DRIVE (game drive letter).You may have a low density drive that can’t read the high-density game disks.
CRC ERROR.DATA ERROR READING DRIVE (A or B)SECTOR NOT FOUND READING DRIVE AThese mean you have a faulty game disk, and should returnit for a replacement.

8686868686
CustomerCustomerCustomerCustomerCustomerServicesServicesServicesServicesServices
The best customer service in the industry.“You don’t just buy our games—you buy the support ofthe whole company.”
Sierra On-Line is dedicated to helping you with each andevery question or problem. Whether it’s memory shortages,software compatibility, or any other issue affecting our prod-ucts, we guarantee your satisfaction.
If your question concerns returned merchandise, back or-ders, defective merchandise, or general game information,contact the Customer Service Department.
If you have problems with hardware or software set-up orcompatibility, contact the Technical Support Department.
If you want information on purchasing other Sierra products,contact the Direct Sales Department.
Customer ServiceCustomer ServiceCustomer ServiceCustomer ServiceCustomer ServiceContact the Customer Service Department for questions per-taining to returned merchandise, back orders, defective mer-chandise, and general game information. In the U.K. andEurope, use these contacts for Technical Support, Returns,and Direct Sales as well.
United StatesSierra On-LineCustomer ServiceP.O. Box 85007Bellevue, WA 98015-8507
Call 1-800-SIERRA-5(1-800-743-7725)Fax 206-562-4223
United KingdomSierra On-Line Limited4 Brewery Court,The Old Brewery,Theale, Reading, BerkshireRG7 5AJ United Kingdom
Call (44) 734 303171Fax (44) 734 3032019:00 a.m. - 5:00 p.m.,Monday—Friday
Call 33-1-46-01-4650Fax 33-1-46-31-7172Hint line 33-1-36-68-4650
Continental EuropeParc Tertiaire de MeudonImmeuble “Le Newton”25 rue Jeanne Braconnier92366 Meudon La Forêt CedexFrance

8787878787
h∆E x ∆t
≥—
—2πU.S. Technical SupportU.S. Technical SupportU.S. Technical SupportU.S. Technical SupportU.S. Technical SupportIn the U.S., contact the Technical Support Department forhelp in installing or configuring your Sierra product, or re-solving hardware or software compatibility issues.
Automated “800” Technical Support1-800-376-2683Sierra On-Line offers a toll-free, 24-hour Automated Techni-cal Support line with recorded answers to the most fre-quently asked technical questions. To access this service,call1-800-376-2683, and follow the recorded instructions tofind your specific topic and resolve the issue. If this fails tosolve your problem, you may still write, fax, email, or callour Technical Support Department as described below.
Technical Support DepartmentIf you are unable to resolve a problem with your game usingthis manual or through the Automated Support line, contactour Technical Support representatives directly. You may call,write, or fax us with your questions, or contact us via BBS.
If you choose to write or fax us with your request, pleaseprovide detailed information on your computer system andthe nature of your problem. In addition, please include youraddress and telephone number should we need to call backor send you further information.
U.S. Technical SupportSierra On-LineTechnical SupportP.O. Box 85006Bellevue, WA 98015-8506
Call (206) 644-4343Fax (206) 644-76978:15 a.m. – 4:45 p.m. PST,Monday–Friday
Sierra On-Line U.S. Technical Supportis also available through:Sierra BBS: U.S. (209)683-4463 or U.K. (44) 734 304227CompuServe: GAMAPUB (Sierra ID 76004,2143)Prodigy: Technical Support ID- WBWW55BAmerica Online: Keyword Sierra (Private Email DynamixTS)GEnie: Private E-mail to SIERRA.SUP

8888888888
sierra on CompuServesierra on CompuServesierra on CompuServesierra on CompuServesierra on CompuServeSierra offers technical support and patch files via itsCompuServe forum. In addition, you’ll find demos, hints,and reviews of many Dynamix products as well.
Members of CompuServe can type GO GAMAPUB andleave a message for us at Sierra (CIS ID 76004,2143). Ifyou are not currently a member of CompuServe, call toll-free1-800-848-8199 and ask for Representative 461 for yourFREE introductory membership and usage credit.
Patch DisksPatch DisksPatch DisksPatch DisksPatch DisksIf you have spoken to a Sierra Technical Support Represen-tative or have read about an available patch (repair) disk inour magazine InterAction, please send in your request to theaddress below, or contact us via BBS. Let us know the game,version number (VER# on the front of your game disk(s)),and the disk type you have.
Sierra On-LinePatch DisksDept. 10P.O. Box 485Coarsegold, CA 93614-0485
U.S. direct salesU.S. direct salesU.S. direct salesU.S. direct salesU.S. direct salesTo order games, hint books, or hardware, redeem coupons,use special discounts, or to find out where you can purchaseSierra games in the U.S., contact our Direct Sales Depart-ment.
U.S.Sierra On-LineDirect SalesP.O. Box 53250Bellevue, WA 98015-3250
For direct orders:Call 1-800-757-7707Fax 206-562-4223

8989898989
The Sierra No-Risk Guarantee!The Sierra No-Risk Guarantee!The Sierra No-Risk Guarantee!The Sierra No-Risk Guarantee!The Sierra No-Risk Guarantee!
THE PROMISE: We want you to be happy with every Sierra product youpurchase. Period. Complete and return the enclosed owner registration card,and we’ll be able to serve you better if you contact us with a problem. If you’reunhappy with one of our software products for any reason, you can return it foran exchange or full refund within 30 days of purchase. (If it was purchasedretail, please include the original sales receipt.) Note: this policy applies to theoriginal owner only.
THE ONLY CATCH: You have to tell us why you don’t like it, so we canimprove. If you send it back and tell us why, we’ll do our best to make youhappy.
Software Warranty & ReplacementsIf your Sierra software or disk fails within 90 days ofpurchase, we’ll replace it free of charge. To replace faultysoftware, return the CD or diskette #1 directly to us. Includea copy of your sales receipt, a note stating your gamemachine or computer type, and the type of disk(s) you need.More than 90 days after purchase, you must also include a$10.00 U.S. (£6.00 in U.K.) replacement charge.
In the U.S., return your software to:
Sierra On-Line FulfillmentP.O. Box 485Coarsegold, CA 93614Attn: Returns
Overseas, return your disk(s) to the appropriate SierraCustomer Service center, marked “Attn: Returns.”

9090909090
IT IS ILLEGAL TO MAKE UNAUTHORIZED COPIES OF THIS SOFTWAREIT IS ILLEGAL TO MAKE UNAUTHORIZED COPIES OF THIS SOFTWAREIT IS ILLEGAL TO MAKE UNAUTHORIZED COPIES OF THIS SOFTWAREIT IS ILLEGAL TO MAKE UNAUTHORIZED COPIES OF THIS SOFTWAREIT IS ILLEGAL TO MAKE UNAUTHORIZED COPIES OF THIS SOFTWAREThis software is protected under federal copyright law. It is illegal to make or distribute copies of this software except to make a backup copy forarchival purposes only. Duplication of this software for any other reason including for sale, loan, rental or gift is a federal crime. Penaltiesinclude fines as high as $50,000 and jail terms of up to five years.
Sierra On-Line, Inc. supports the industry’s effort to fight the illegal copying of personal computer software. Report Copyright Violations To:SPA, 1730 M Street N.W. Suite 700,
Washington, D.C. 20036 - (202) 452-1600
This manual, and the software described in this manual, are copyrighted. All rights are reserved. No part of this manual or the describedsoftware may be copied, reproduced, translated or reduced to any electronic medium or machine-readable form without the prior written consentof Sierra On-Line, Inc., 3380 146th Place SE, Suite 300, Bellevue, WA 98007.
® and ™ designate trademarks of, or licensed to Sierra On-Line, Inc. © Sierra On-Line, Inc. 1994. All rights reserved. Printed in the USA.
QEMM-386™ is a trademark of Quarterdeck Office Systems. IBM®, PC® are trademarks of International Business Machines Corporation.Microsoft®, MS-DOS®, Windows™, HIMEM™, are trademarks of Microsoft Corporation. Sound Blaster® is a trademark of Creative Labs, Inc.ThrustMaster® and ThrustMaster WCS® are trademarks of ThrustMaster. Stacker® is a trademark of Stac Electronics. AdLib® is a trademark ofAdLib Incorporated.
Ybarra Productions, Inc. is a Creative Insights, Inc. Company.
Limitations on WarrantyLimitations on WarrantyLimitations on WarrantyLimitations on WarrantyLimitations on Warranty
UNAUTHORIZED REPRESENTATIONS: SIERRA WARRANTS ONLY THAT THE PROGRAM WILL PERFORM AS DESCRIBED IN THE USERDOCUMENTATION. NO OTHER ADVERTISING, DESCRIPTION, OR REPRESENTATION, WHETHER MADE BY A SIERRA DEALER, DISTRIBUTOR, AGENT,OR EMPLOYEE, SHALL BE BINDING UPON SIERRA OR SHALL CHANGE THE TERMS OF THIS WARRANTY.
IMPLIED WARRANTIES LIMITED: EXCEPT AS STATED ABOVE, SIERRA MAKES NO WARRANTY, EXPRESS OR IMPLIED, REGARDING THIS PRODUCT.SIERRA DISCLAIMS ANY WARRANTY THAT THE SOFTWARE IS FIT FOR A PARTICULAR PURPOSE, AND ANY IMPLIED WARRANTY OFMERCHANTABILITY SHALL BE LIMITED TO THE NINETY (90) DAY DURATION OF THIS LIMITED EXPRESS WARRANTY AND IS OTHERWISEEXPRESSLY AND SPECIFICALLY DISCLAIMED. SOME STATES DO NOT ALLOW LIMITATIONS ON HOW LONG AN IMPLIED WARRANTY LASTS, SOTHE ABOVE LIMITATION MAY NOT APPLY TO YOU.
NO CONSEQUENTIAL DAMAGES: SIERRA SHALL NOT BE LIABLE FOR SPECIAL, INCIDENTAL, CONSEQUENTIAL OR OTHER DAMAGES, EVEN IFSIERRA IS ADVISED OF OR AWARE OF THE POSSIBILITY OF SUCH DAMAGES. THIS MEANS THAT SIERRA SHALL NOT BE RESPONSIBLE OR LIABLEFOR LOST PROFITS OR REVENUES, OR FOR DAMAGES OR COSTS INCURRED AS A RESULT OF LOSS OF TIME, DATA OR USE OF THE SOFTWARE,OR FROM ANY OTHER CAUSE EXCEPT THE ACTUAL COST OF THE PRODUCT. IN NO EVENT SHALL SIERRA’S LIABILITY EXCEED THE PURCHASEPRICE OF THIS PRODUCT. SOME STATES DO NOT ALLOW THE EXCLUSION OR LIMITATION OF INCIDENTAL OR CONSEQUENTIAL DAMAGES, SOTHE ABOVE LIMITATION OR EXCLUSION MAY NOT APPLY TO YOU.
YOU ARE ENTITLED TO USE THIS PRODUCT FOR YOUR OWN USE, BUT MAY NOT SELL OR TRANSFER REPRODUCTIONS OF THE SOFTWARE,MANUAL, OR BOOK TO OTHER PARTIES IN ANY WAY, NOR RENT OR LEASE THE PRODUCT TO OTHERS WITHOUT PRIOR WRITTEN PERMISSION OFSIERRA. YOU MAY USE ONE COPY OF THE PRODUCT ON A SINGLE GAME MACHINE, COMPUTER, OR COMPUTER TERMINAL. YOU MAY NOTNETWORK THE PRODUCT OR OTHERWISE INSTALL IT OR USE IT ON MORE THAN ONE GAME MACHINE, COMPUTER, OR COMPUTER TERMINAL ATTHE SAME TIME.

9191919191
CreditsCreditsCreditsCreditsCreditsYbarra ProductionsYbarra ProductionsYbarra ProductionsYbarra ProductionsYbarra ProductionsA Creative Insights CompanyA Creative Insights CompanyA Creative Insights CompanyA Creative Insights CompanyA Creative Insights Company
Producer: Joe YbarraTeam Leader: Andy RiedelArt Director: Mark Dickenson
Design: Scot Amos, Michael E. Moore, Rich WatersProgramming: Mike McAulay, Jeffrey McArthur, AndyRiedel, Roy Eltham
Audio Engineering: Biard MacGuineasMusic and Sound: Biard MacGuineas, Steve Baker
Art and Animation: Fred Butts, M. S. Dunhour, Botu Green,Brian E. Kumanchik, Donna Taylor, Jean Xiong
Test Manager: Tawn RiceLead Tester: Rich WatersPlaytest: Scot Amos, Wendy Barlow, Joe Cannon, MarkDickenson, M. S. Dunhour, Roy Eltham, Eric Fischer, CarolFuscher-Burns, Patrice Jones, “Fuzz” Lokajicek, JimMazrimas, Leonard Micko, Ross Nicholls, Dan Porzio, DanaPorzio, Alisa Schaefbauer, Marshall Whitworth, ThomasWilkinson
Manual: Scot Amos, Michael E. Moore, Tawn Rice, RichWaters
Special Thanks: Ken Williams, Tony Reyneke, Jeff Tunnell,Dave Rice, Kathy Gilmore, and Forrest Walker
Dynamix, Inc.Dynamix, Inc.Dynamix, Inc.Dynamix, Inc.Dynamix, Inc.
Quality Assurance Manager: Dave SteeleLead Tester: Dan HindsTesters: Gerald Azenaro, Barbara Beyer, Jan Carpenter,James Domico, Eli Haworth, Tim McClure, Duri Price, CoreyReese, Chris SingletonPublications Manager: Kevin LambManual Editor: Kurt WeberManual Design: Sue Roberts

9292929292
AAAAAAdvisors, 32, 76anchoring view, 50
BBBBBbomb, 48, 70building installations, 56, 64Bridge, 15, 27
CCCCCCaptain’s PDA, 19, 58cargo, 40cargo bay, 48change mission, 41change production, 65colonies, 61Colony Grid, 18, 55Colony Manager, 18, 53combat, 70Comm. Panel, 31Computer, 33construction, colony, 44controls, game, 14
DDDDDdamage, 59delete colony, 57delete game, 60destinations, 39dismantle installation, 66
EEEEEenergy, 63Engineering Advisor, 33exploration missions, 38, 43, 61
FFFFFfactories, 67fuel, ship, 40, 49
GGGGGGame Options, 19, 60gathering resources, 47General options menu, 14, 30Glossary, 75
HHHHHhabitats, 66hangar, vehicle, 17, 36humans, 63
IIIIIinstallations, 56, 64installing game, 6inventions, 34
LLLLLlaunch mission, 41laser, 46, 70library, 19, 59life support, 63log, 58
MMMMMmemory problems, 78Mercator Map, 16, 42messages, comm. 31Military Advisor, 33missions, 38missiles, 70
OOOOOon-line status, 65ore, 62orientation, 66
PPPPPPDA, 19, 58pilot, 39pipeline mission, 39planet options menu, 52power plants, 67preferences, 8probe mission, 38
QQQQQquick reference, 14
RRRRRresearch labs, 68resources, 62Robot Advisor, 33robots, 63
SSSSSscanners, 16, 44, 47Science Advisor, 33sciences, 35, 68settings, 19, 60Space Map, 15, 50speed, game, 51, 60starting game, 6startup menu, 27Status PDA screen, 59status, installation, 65strategy tips, 70support, product, 86, 87surface exploration, 46
TTTTTTechnology Manager, 34technology advance, 68time, Gaean, 54troubleshooting, 84tutorial, 20
UUUUUupgrade installation, 66
VVVVVVehicle Manager, 17, 36vehicle menu, 45video phone, 31view, planets, 50
IndexIndexIndexIndexIndex