alert plus web part for sharepoint 2010 - bamboo solutions alert plus v3... · running wss 3.0/moss...
TRANSCRIPT
� Installation
� Configuration
� Using Alert Plus
� Use Cases
� Licensing and Activation
� About the Setup Program
� Upgrading to Alert Plus R3.0
� Installing the Alert Plus Web Part
� Manually Activating the Alert Plus and/or Alert Subscriber Web Parts for a Site Collection
� Manually Installing or Uninstalling the Alert Plus or Alert Subscriber Web Parts
� Uninstalling Alert Plus
� Locating the Error Log File(s)
Before installing the product, read the Installing the Product section of the Online Documentation and review KB.12464: Best
Practices for Installing Bamboo Products.
To access the Setup program:
1. Download the self-extracting product EXE from the storefront and save it to a local folder on the SharePoint server.
2. Double-click the product EXE file to extract the contents of the product download.
3. The Setup program will automatically start. To start the Setup program manually, double-click the Setup.bat file in the
root of the folder where the product files were extracted.
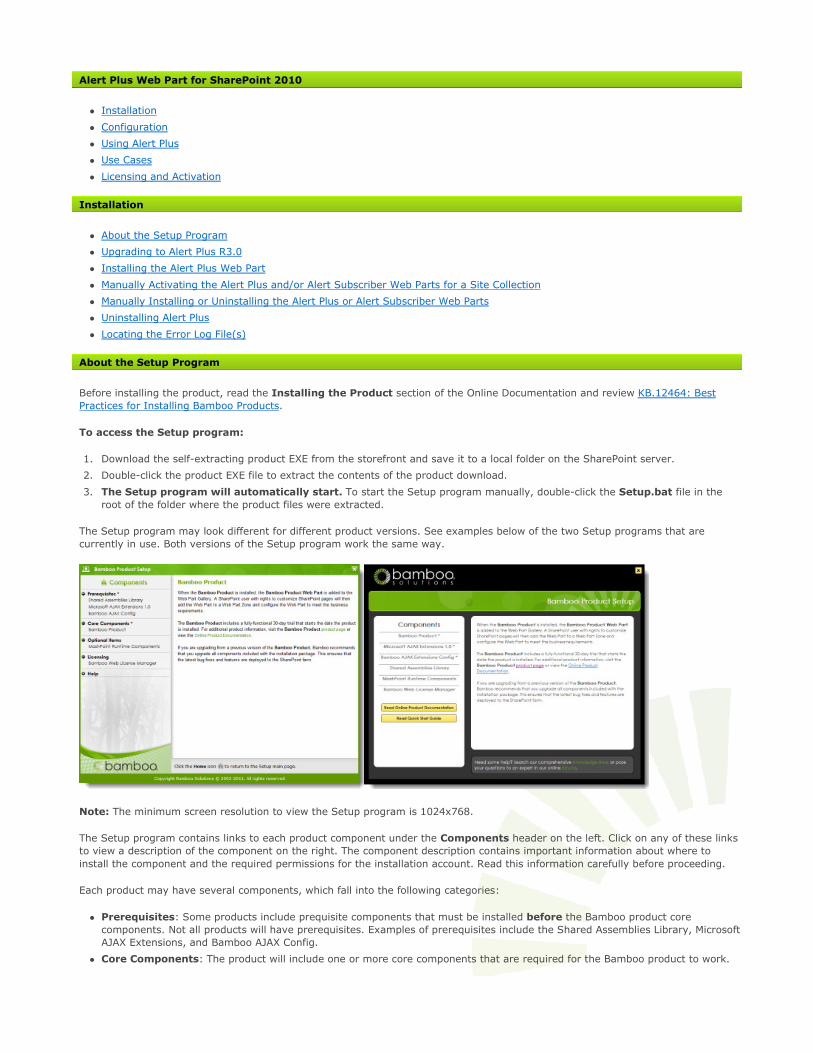
The Setup program may look different for different product versions. See examples below of the two Setup programs that are
currently in use. Both versions of the Setup program work the same way.
Note: The minimum screen resolution to view the Setup program is 1024x768.
The Setup program contains links to each product component under the Components header on the left. Click on any of these links
to view a description of the component on the right. The component description contains important information about where to
install the component and the required permissions for the installation account. Read this information carefully before proceeding.
Each product may have several components, which fall into the following categories:
� Prerequisites: Some products include prequisite components that must be installed before the Bamboo product core
components. Not all products will have prerequisites. Examples of prerequisites include the Shared Assemblies Library, Microsoft
AJAX Extensions, and Bamboo AJAX Config.
� Core Components: The product will include one or more core components that are required for the Bamboo product to work.
Alert Plus Web Part for SharePoint 2010
Installation
About the Setup Program

� Optional Items: Optional items provide additional features or functionality but are not required to use the Bamboo product.
Not all products will have optional items. Examples of optional items include the MashPoint Runtime Components and sample
ASP.NET applications.
� Licensing: All products will include the Bamboo Web License Manager or Bamboo License Manager. Licensing is required to
activate a product license. It is not required during 30-day product trials.
� Help: The Setup program also contains links to the Online Documentation and the Installation and Licensing Quick Start Guide.
Links to other product-related resources, like the Bamboo Knowledge Base, may also be included.
After reviewing the installation location and required installation permissions for a component, click the Install button at the bottom
of the Setup screen to install it. If the product includes multiple components, click the Install button for each component.
Click the Home icon to return to the Setup main page.
About the extracted product files:
The extracted product files include the file Setup.bat, which launches the Setup program, and may also include the following
folders:
� \[Product].wsp: Contains the solution deployment file for this product. There may be more than one product WSP
folder, depending on the product.
� \docs: Contains the Installation and Licensing Quick Start Guide.
� \msi : Contains installation executables for this product.
� \res: Contains files required by the Setup program.
� There may be other folders, depending on the requirements for the product.
To upgrade Alert Plus, follow the steps outlined below. To migrate Alert Plus from SharePoint 2007 to SharePoint 2010, read
KB.12642: How to Migrate Alert Plus From SharePoint 2007 to SharePoint 2010.
To upgrade Alert Plus:
1. Double-click the product EXE file.
2. Select the component you want to upgrade, then click the Install button.
3. Click Next to perform the system checks.
4. Click Next after the system checks have completed, then select the Repair/Upgrade option and click Next.
5. After the component has been upgraded successfully, click Finish.
Read all of the following information before installing the product:
� Recommendations for a Successful Installation
� Installation Location
� Required Installation Permissions
� Installation Instructions
Follow these guidelines to ensure a successful installation:
1. Back up your system.
2. Make sure that your system meets the requirements listed in the System Requirements section.
3. Review KB.12464: Best Practices for Installing Bamboo Products before installing any product.
4. Review the Installation Location and Required Installation Permissions for each product before installing it.
5. Stop the World Wide Web Publishing Service before installation.
6. If you are upgrading the product from a SharePoint 2007 version to a SharePoint 2010 version, read KB.12630: Migrating
Bamboo Products from SharePoint 2007 to SharePoint 2010.
TOP
Upgrading to Alert Plus R3.0
Installing the Product
Recommendations for a Successful Installation

If you are installing a Bamboo product in a SharePoint farm environment, make sure to start the installation on the correct server.
The required installation location is listed in the Setup program in the description for each component.
Most Bamboo products must be installed on one Web front-end (WFE) server in the SharePoint farm where the Microsoft
SharePoint Foundation Web Application service is running. Check Central Administration > System Settings for a list of
servers running this service. The product will automatically be deployed to all other WFE servers in your farm.
TOP
Required installation permissions are listed in the Setup program in the description for each component. For most Bamboo products,
the installation account must have the following permissions:
� Member of the local server Administrators group
� Member of the SharePoint Farm Administrators group
� Site collection administrator (for automatic feature activation)
TOP
1. If the Setup program is not already running, double-click the Setup.bat file in the root of the product folder to launch it.
2. Select the product component in the Setup program. Verify the installation location and required permissions and then click
Install.
3. Click Next to begin the installation. Verify that the system checks pass successfully, then read and accept the End-User License
Agreement.
4. In the Deployment Targets screen, select the Web application(s) where you want to install the product. Leave the
Automatically activate features option checked to activate product features during installation. Click Next to begin
installation.
Note: If you prefer to activate product features manually after installation, uncheck the Automatically activate features
option, then read Manually Activating the Product Features in the Online Documentation.
5. When installation is complete, review the summary screen to confirm that the product installed successfully. Click Close.
TOP
The Alert Plus Subscriber Web Part is an optional component of the Alert Plus system. It provides users a list of the alerts they are
currently subscribed to. This Web Part is intended for portal end users. When placed on a page, it passes the current user's login ID
and an Alert Plus Configuration List path to the Alert Plus Subscriber Web Service. This service processes the user ID and returns a
list of all alerts the user is currently subscribed to in that Alert Plus Configuration List.
The installation instructions for this Web Part are similar to the instructions for the Alert Plus Web Part. You need access to the
server and your account must have the appropriate administrative privileges to install applications. This Web Part is not licensed.
To install the Alert Plus Subscriber Web Part, launch the Alert Plus Setup program and click the Alert Plus Subscriber Web Part
system component. Next, click on the Install button. The setup program will check your server to determine whether you are
running WSS 3.0/MOSS 2007 or SharePoint Foundation 2010, or SharePoint Server 2010 in order to launch the appropriate msi
based installer. The Alert Plus Subscriber Web Part installation will now begin.
For installation on WSS 3.0, MOSS 2007, SharePoint Foundation 2010, or SharePoint Server 2010 do the following:
1. Click Next to begin the installation.
Installation Location
Required Installation Permissions
Installation Instructions
Installing the Alert Plus Subscriber Web Part

2. The setup wizard performs a system check prior to the installation. All the system checks must be completed successfully in
order to proceed with the installation. After the checks have completed, click Next.
3. Select the web application(s) where you want to install the product. Select the Automatically activate features check box to
automatically activate this feature for all site collections within the selected Web Application, then click Next.
WARNING: You must be logged in to the SharePoint server with a Site Collection Administrator account to automatically
activate this feature.
NOTE: If you want to manually activate this feature, you must activate the feature in the Site Collection Administration settings
(see Manually Activating the Alert Plus and/or Alert Subscriber Web Parts for a Site Collection).

4. Click Next.
5. Click Close to complete the installation.
Product feature activations can be done automatically at the site collection level when the product is installed. There are several
reasons why you may need to manually activate (or deactivate) Bamboo product features:
� You opted out of automatic feature activation during installation.
Manually Activating the Product Feature for a Site Collection

� You add a new site collection and want to add Bamboo features to it.
� You want to remove Bamboo product features from an existing site collection.
To manually activate (or deactivate) Bamboo product features, follow the instructions below.
Note: You must be a SharePoint site collection administrator to activate or deactivate features. Site collection administrators are
assigned in SharePoint Central Administration.
1. From the top-level site in the site collection, go to Site Actions > Site Settings > Site Collection Administration > Site
Collection Features.
2. Locate the Bamboo product feature. Click Activate to activate it for the entire site collection, or click Deactivate to deactivate
it.
Use the following stsadm.exe command lines to manually install and uninstall the Bamboo Alert Plus Web Part from the Command
Prompt. Stsadm.exe is located in:
<drive>:\Program Files\Common Files\Microsoft Shared\web server extensions\14\BIN\
Manually Install the Alert Plus Web Part
1. Add the solution to the SharePoint Solution Store:
Manually Installing or Uninstalling the Alert Plus Web Part

stsadm.exe -o addsolution -filename C:\HW05.R3.SP2010.SL\Bamboo.AlertPlusWebPart.wsp\cab\Bamboo.AlertPlus.wsp
NOTE: The -filename path is the path where the product download ZIP file exists on the SharePoint server.
2. Deploy the solution for a Web Application:
Stsadm.exe -o deploysolution -name Bamboo.AlertPlus.wsp -immediate -url http://WebApplicationUri:455 –
allowGacDeployment -allowCasPolicies
3. Execute the job: (If you have multiple web frontends, then you must run the following on each frontend server.)
stsadm.exe -o execadmsvcjobs
Manually Uninstall the Alert Plus Web Part
1. Retract the solution from a Web Application:
stsadm.exe -o retractsolution -name Bamboo.AlertPlus.wsp -immediate -url http://WebApplicationUri:455
2. Execute the job: (If you have multiple web frontends, then you must run the following on each frontend server.)
stsadm.exe -o execadmsvcjobs
3. Delete the solution from the SharePoint Solution Store (only after the solution is retracted from all web applications, and the
retract job is executed on each web frontend):
stsadm.exe -o deletesolution -name Bamboo.AlertPlus.wsp
Use the following stsadm.exe command lines to manually install and uninstall the Bamboo Alert Plus Web Part from the Command
Prompt. Stsadm.exe is located in:
< drive>:\Program Files\Common Files\Microsoft Shared\web server extensions\14\BIN\
Manually Install the Alert Plus Subscriber Web Part
1. Add the solution to the SharePoint Solution Store:
stsadm.exe -o addsolution -filename C:\HW05.R2.4.SL\
Bamboo.AlertSubscriberWebPart.wsp\cab\Bamboo.AlertSubscriberWebPart.wsp
NOTE: The -filename path is the path where the product download ZIP file exists on the SharePoint server.
2. Deploy the solution for a Web Application:
Stsadm.exe -o deploysolution -name Bamboo.AlertSubscriberWebPart.wsp -immediate -url http://WebApplicationUri:455 -
allowGacDeployment -allowCasPolicies
3. Execute the job: (If you have multiple web frontends, then you must run the following on each frontend server.)
stsadm.exe -o execadmsvcjobs
Manually Uninstall the Alert Plus Subscriber Web Part
1. Retract the solution from a Web Application:
stsadm.exe -o retractsolution -name Bamboo.AlertSubscriberWebPart.wsp -immediate -url http://WebApplicationUri:455
2. Execute the job: (If you have multiple web frontends, then you must run the following on each frontend server.)
stsadm.exe -o execadmsvcjobs
3. Delete the solution from the SharePoint Solution Store (only after the solution is retracted from all web applications, and the
retract job is executed on each web frontend):
stsadm.exe -o deletesolution -name Bamboo.AlertSubscriber.wsp
Manually Installing or Uninstalling the Alert Subscriber Web Part

1. Delete the Web Part from all pages within each Web Application where the product is installed.
2. Double-click the product EXE file.
3. From the Setup program, click the product component button under the Components section, and then click Install.
4. The program performs the system checks again. Once that has successfully completed, the program prompts you to
Repair/Upgrade, Remove, Install New. Select Remove, and click Next.
If you encounter any errors in the process of using this Web Part, refer to the error logs located in
<drive>:\WINDOWS\Temp\BambooSolutions\bsc_bamboo_%processid.log on the SharePoint server.
� Adding the Web Part to a Page
� Configuring the Alert Plus Web Part and Alert Plus Subscriber Web Part
� Modifying the Alert Plus List View
� Customizing the Language Settings
� About Interfacing with the Bamboo List Rollup Web Part
After the product is installed, it is available in the Virtual Server Gallery. Users with the Designer or Full Control permission levels
can add the Web Part to web site pages.
To add the Web Part to a page:
1. From a web site page, click Site Actions in the upper left corner, then select Edit Page.
2. Click Add a Web Part in the area on the page where you want to add the Web Part.
Uninstalling the Product
Locating the Error Log File(s)
Configuration
Adding the Web Part to a Page in SharePoint 2010
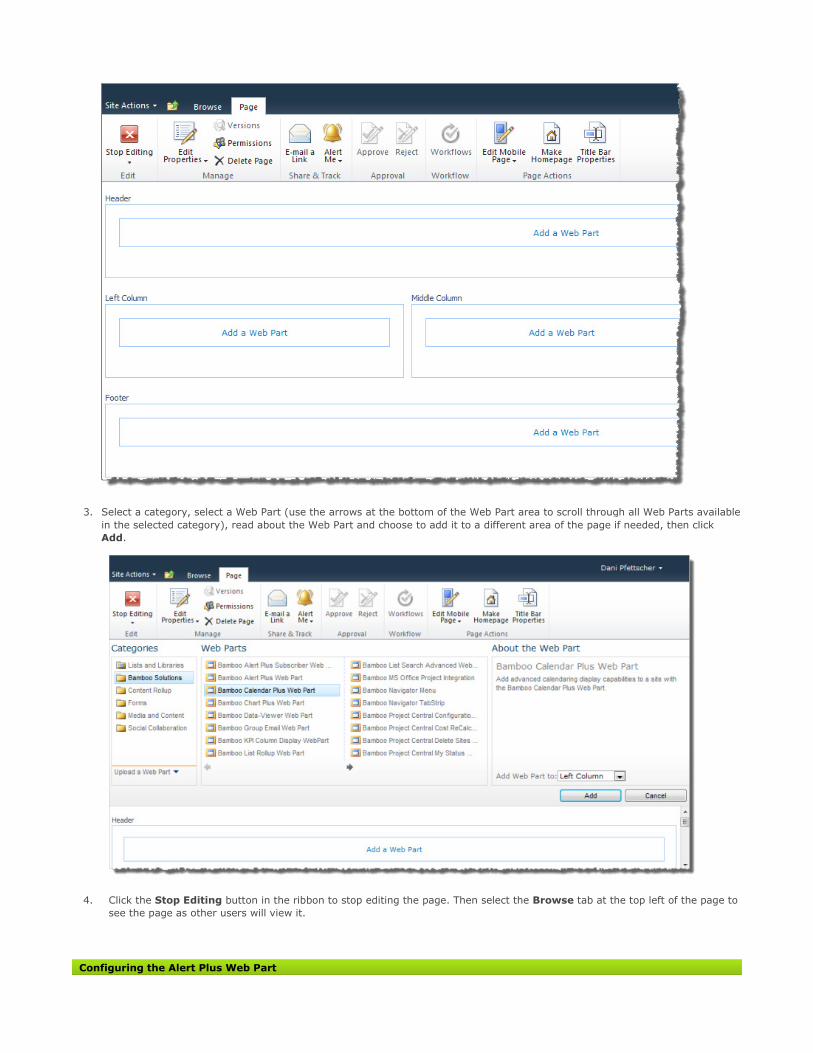
3. Select a category, select a Web Part (use the arrows at the bottom of the Web Part area to scroll through all Web Parts available
in the selected category), read about the Web Part and choose to add it to a different area of the page if needed, then click
Add.
4. Click the Stop Editing button in the ribbon to stop editing the page. Then select the Browse tab at the top left of the page to
see the page as other users will view it.
Configuring the Alert Plus Web Part

To configure the Bamboo Alert Plus Web Part:
1. Select Modify Shared Web Part from the menu accessed at the upper right corner of the Web Part. This menu is only
accessible by users with authority to modify the page.
2. The tool pane for the Alert Plus Web Part is displayed on the right side of the screen (see below). See the Bamboo Alert Plus
section to configure the following properties:
� Select the Site Group(s) that can create and view alerts. Select site group(s) that can create and edit alerts. For site
groups that have the full control permission level, the group is automatically selected and disabled. If a user does not
belong to the selected group(s) indicated in the property settings, then the Web Part is disabled and does not allow the
user to view or edit alerts.
� Select the Site Group(s) that can use the Admin Options tab. Select site group(s) that can view the Admin Options
tab in the user interface. For site groups that have the full control permission level, the group is automatically selected
and disabled. If a user does not belong to the selected group(s) indicated in the property settings, then the Web Part is
disabled and does not allow the user to view or edit alerts.
� Tab Strip Skin. Select the skin to be used for the Alert Plus tabs. The default seletion is Light Blue.
� Select a Language. Select a language from the drop-down menu to translate the Web Part user interface and tool pane
settings. You can also create your own translation or modify the default files available in the drop-down menu. See
Customizing the Language Setting for more information.
NOTE: The translation options for French, German and Spanish are currently all still in English. You must customize the
files directly to translate the Web Part user interface to the language you require. See Customizing the Language Setting
for more information.
3. Save your configuration settings by clicking Apply, and then OK.
1. Select Modify Shared Web Part from the menu accessed at the upper right corner of the Web Part. This menu is only
accessible by users with authority to modify the page.
2. The configuration page for the Bamboo Alert Plus Subscriber Web Part is displayed on the right side of the screen (see Figure 3).
Configuring the Alert Plus Subscriber Web Part

� Language. Select a language from the Language drop-down menu to translate the Web Part user interface and tool pane
settings. You can also create your own translation or modify the default files available in the drop-down menu. See
Customizing the Language Setting for more information.
NOTE: The translation options for French, German and Spanish are currently all still in English. You must customize the
files directly to translate the Web Part user interface to the language you require. See Customizing the Language Settings
for more information.
The Alert Plus Web Part item list is based on the Alert+ Configuration List. The default view of this list is called Alert+
Configuration ListView. You can modify this view to show or hide columns, set sorting, filter the list, etc. Most of the functions
available to a regular SharePoint list view are available for the Alert Plus Web Part, except Group By.
There are 8 language files included with the install of this Web Part. They are:
� 1033.English.xml
� 1036.French.xml
� 1031.German.xml
� 1034.Spanish.xml
� Help.English.xml
� Help.French.xml
� Help.German.xml
� Help.Spanish.xml
These files are located in the wpresources folder.
� For MOSS 2007, this folder may be located under the following path:
\\servername\C$\Inetpub\wwwroot\wss\VirtualDirectories\80\wpresources\Bamboo.AlertPlus
The French, German and Spanish files have not yet been translated as they are still in English. You will need to edit these files
directly to provide your own translation of the Web Part user interface and tool pane text. To make sure that these files are not
overwritten upon upgrading the Web Part with future releases, you can copy the default file for the language you want, copy this file
to the wpresource folder and rename it (For example: CompanyName.1036.French.xml). If you do not rename the files you
modify, these files will be overwritten when upgrades for the Web Part are installed.
The installation program will not remove or overwrite the translation file you've created if it is named differently from the default
resource files provided by Bamboo Solutions Corporation. However, upgrades of this Web Part may require that you modify this
custom translation file to include new resource strings that are added in future product upgrades.
The product will display the missing resource string IDs after an upgrade installation is completed.
In addition, there is another set of resource files for each language resource file called Help.Language.XML that includes only Help
text that you can access from the Support screen of this Web Part. This file can be edited to customize the language of this Help
text; however, you should not change the name of these files as they are linked to the respective main Web Part and tool pane
user interface strings. This means that when you select the 1031.German.xml file for the language setting in the tool pane, the
Help.German.xml file is automatically selected as the help file for the Support screen. If you are upgrading this Web Part, make sure
you make a copy of any of these files you have modified before upgrading, then update your backup copy with any upgrade changes
(i.e. new text strings, or updates to existing strings) to the new Help.Language.xml provided in the upgrade.
Modifying the Alert Plus List View
Customizing the Language Setting

To setup alerts on Data Views created by the Bamboo List Rollup Web Part, you must have the Alert Plus Web Part version 2.2.0 or
higher and the List Rollup Web Part version 3.0.1 or higher. Please note that Alert Plus Web Part versions prior to version 2.2.0 are
not compatible with List Rollup Web Part version 3.0.0.
� Alert Plus Performance Considerations
� List Rollup Data View Performance Considerations
� Default Alert View
� Event Tab
� Recipient(s) Tab
� Mail Format Tab
� Admin Options Tab
� Support Page
Alert Plus Performance Tuning
As a general rule, Alert Plus does not require any special performance tuning after installation, although the requirements of some
organizations may require additional considerations to be taken. This section is intended to provide those users with some
configuration guidance. In particular, the section related to the Bamboo List Rollup Data View tuning will provide specific
recommendations to achieve best performance when rolling up large amounts of data to feed Alert Plus.
Distributed Architecture
The Alert Plus product is designed to scale with your needs through its capability to be configured in a distributed architecture. If
there are multiple Web Front End Servers, the Timer Job Services are automatically distributed across the servers to improve
performance.
List Rollup Performance Tuning
Alert Plus version 2.2 and later releases contain support for defining alerts that use Bamboo List Rollup version 3.0 Data Views as
the source for alert triggers. This is a powerful capability as now a rollup of Tasks Lists throughout an entire site collection can be
alert-enabled through the configuration of a single Alert Plus Alert. In order to achieve this functionality, Alert Plus and List Rollup
must work together to query the entire set of Lists contained within the rollup. While the number of List Items is a component of the
response time of each rollup request, the largest factor affecting performance is the number of Lists contained in the rollup. While
data caching is utilized by List Rollup to achieve a performance boost, it is not enough in some environments to achieve the
necessary response times. It is suggested than any user who wants to roll up 15 or more lists into a List Rollup Data View consumed
by Alert Plus should use a custom schedule for the alert to decrease the frequency at which it runs. Please refer to the Custom Alert
Schedules section below for details on how to make this adjustment.
The following items are recommended best practices for reducing the number of alerts a user might receive when alerting on rollups
with large amounts of data (for rollups created with List Rollup Schema Designer or List Rollup - Classic Edition).
� Do not select "As Soon As Possible" for the alert frequency. It is recommended that you use either "Every Hour" or "Every day"
instead.
� You should use the Summary E-mail option so only one e-mail with multiple alerts from the same alert job is sent to the user.
� If alerting on a Data View created with the List Rollup – Classic Edition, users should enable the Item Cache for List Rollup -
Classic Edition rollups.
An Item Exists Alert Trigger Recommendation
If you are using the "An Item Exists" alert trigger, it is recommended that you set the E-mail Follow Up Days in the Admin Options
tab to 1 day or greater to avoid users receiving too many alert e-mails at once.
About Interfacing with the Bamboo List Rollup Web Part
Using Alert Plus
Alert Plus Performance Considerations
Custom Alert Schedules
The Alert Plus Web Part user interface contains a tab titled "Admin Options" that allows users to define a custom run schedule for
each alert. Access to this tab is controlled through the Web Part tool pane. For users of groups that have permission to view the tab,
each alert can be given a custom schedule dictating when and how frequently it should run. In this section of the document, we will
concentrate on how to use the custom schedule capability to improve performance. Please consult the Admin Option Tab section of
this document for details on using this tab.
All Alert Plus Alerts run on a default schedule. This default schedule is based on the user setting in the "Event" tab for the E-Mail
Frequency drop-down list. The values of "As Soon As Possible", "Every Hour", "Every Day" and "Every Week" all correspond to
unique default schedules. The "As Soon As Possible" setting runs alerts on the default schedule of every 2 minutes, for 24 hours a
day and 7 days a week. The schedule for these types of alerts will be the ones most likely to impact performance due to the high run
frequency. By defining a custom schedule with the "Admin Options" tab, you can increase the alerting interval for these type of
alerts on an individual basis to achieve best performance and still meet your alerting business requirements. Decreasing one or more
of these "As Soon As Possible" alerts to run on a 5, 8, or 10 minute interval will significantly reduce system loading.
Alert Plus version 2.2 and later releases contain support for defining alerts that use Bamboo List Rollup version 3.0 Data Views as
the source for alert triggers. This is a powerful capability as now a rollup of Tasks Lists throughout an entire site collection can be
alert-enabled through the configuration of a single Alert Plus Alert. In order to achieve this functionality, Alert Plus and List Rollup
must work together to query the entire set of Lists contained within the rollup. While the number of List Items is a component of the
response time of each rollup request, the largest factor affecting performance is the number of Lists contained in the rollup. While
data caching is utilized by List Rollup to achieve a performance boost, it is not enough in some environments to achieve the
necessary response times. It is suggested than any user who wants to roll up 15 or more lists into a List Rollup Data View consumed
by Alert Plus should use a custom schedule for the alert to decrease the frequency at which it runs. Please refer to the Custom Alert
Schedules section in the Alert Plus Performance Consideration topic for details on how to make this adjustment.
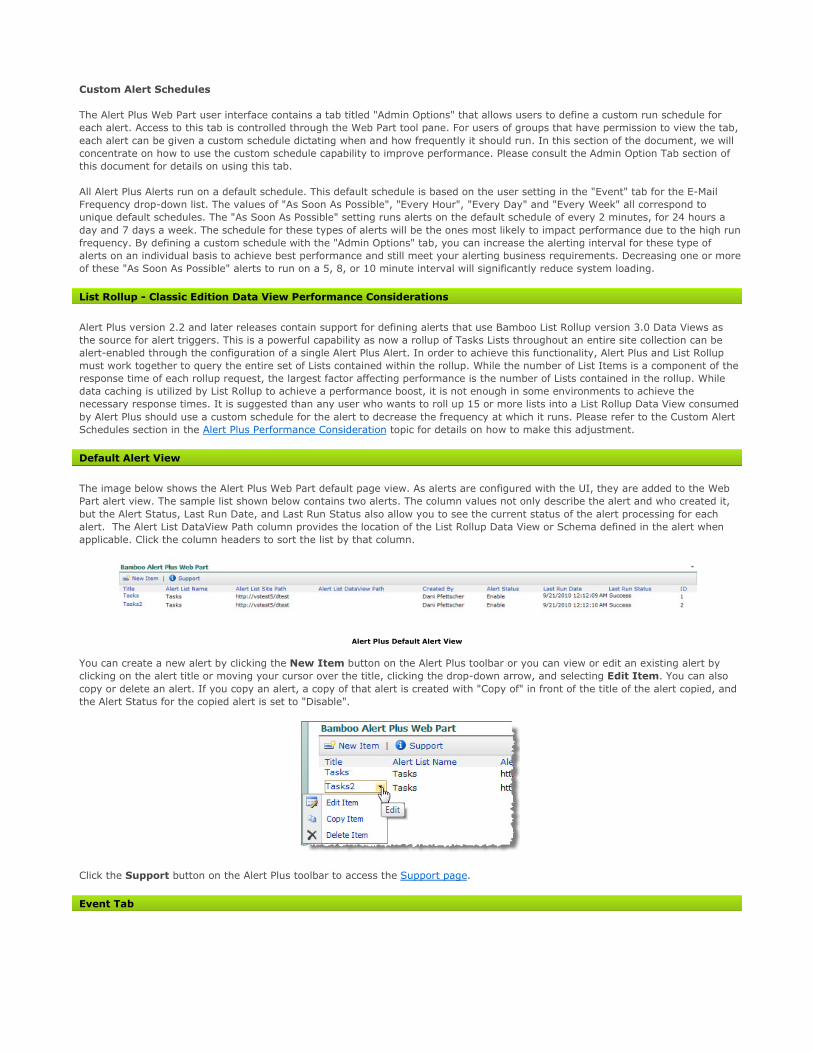
The image below shows the Alert Plus Web Part default page view. As alerts are configured with the UI, they are added to the Web
Part alert view. The sample list shown below contains two alerts. The column values not only describe the alert and who created it,
but the Alert Status, Last Run Date, and Last Run Status also allow you to see the current status of the alert processing for each
alert. The Alert List DataView Path column provides the location of the List Rollup Data View or Schema defined in the alert when
applicable. Click the column headers to sort the list by that column.
Alert Plus Default Alert View
You can create a new alert by clicking the New Item button on the Alert Plus toolbar or you can view or edit an existing alert by
clicking on the alert title or moving your cursor over the title, clicking the drop-down arrow, and selecting Edit Item. You can also
copy or delete an alert. If you copy an alert, a copy of that alert is created with "Copy of" in front of the title of the alert copied, and
the Alert Status for the copied alert is set to "Disable".
Click the Support button on the Alert Plus toolbar to access the Support page.
List Rollup - Classic Edition Data View Performance Considerations
Default Alert View
Event Tab
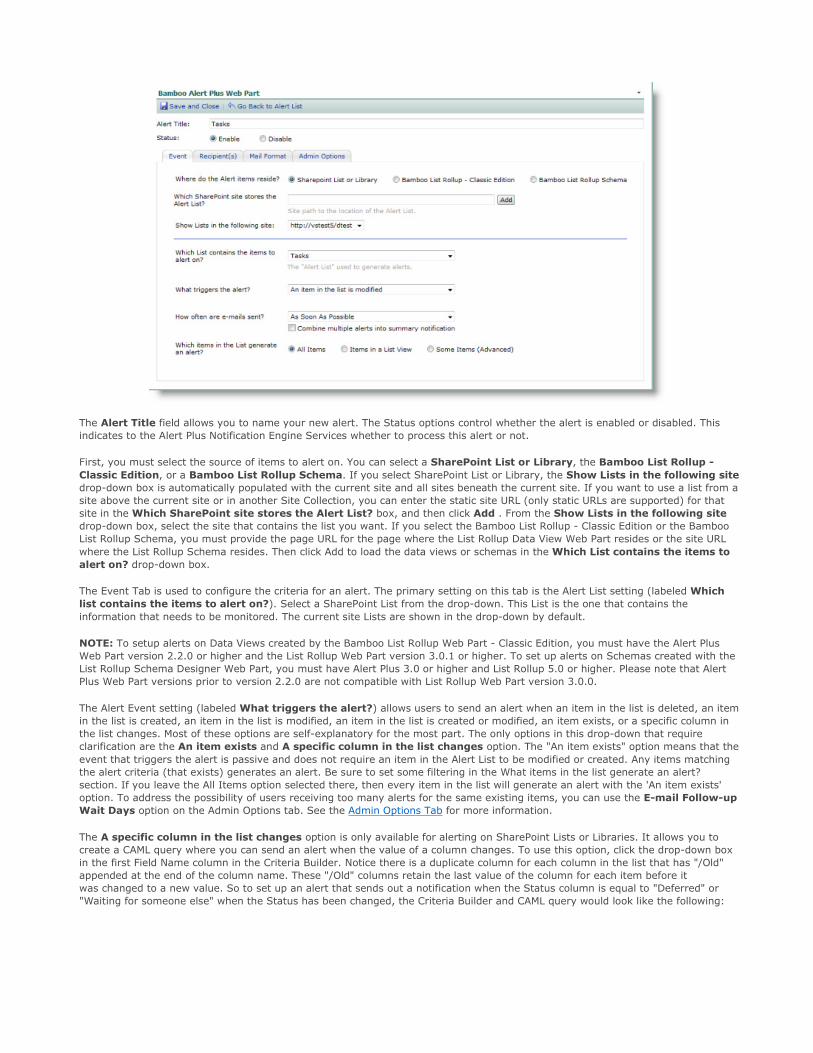
The Alert Title field allows you to name your new alert. The Status options control whether the alert is enabled or disabled. This
indicates to the Alert Plus Notification Engine Services whether to process this alert or not.
First, you must select the source of items to alert on. You can select a SharePoint List or Library, the Bamboo List Rollup -
Classic Edition, or a Bamboo List Rollup Schema. If you select SharePoint List or Library, the Show Lists in the following site
drop-down box is automatically populated with the current site and all sites beneath the current site. If you want to use a list from a
site above the current site or in another Site Collection, you can enter the static site URL (only static URLs are supported) for that
site in the Which SharePoint site stores the Alert List? box, and then click Add . From the Show Lists in the following site
drop-down box, select the site that contains the list you want. If you select the Bamboo List Rollup - Classic Edition or the Bamboo
List Rollup Schema, you must provide the page URL for the page where the List Rollup Data View Web Part resides or the site URL
where the List Rollup Schema resides. Then click Add to load the data views or schemas in the Which List contains the items to
alert on? drop-down box.
The Event Tab is used to configure the criteria for an alert. The primary setting on this tab is the Alert List setting (labeled Which
list contains the items to alert on?). Select a SharePoint List from the drop-down. This List is the one that contains the
information that needs to be monitored. The current site Lists are shown in the drop-down by default.
NOTE: To setup alerts on Data Views created by the Bamboo List Rollup Web Part - Classic Edition, you must have the Alert Plus
Web Part version 2.2.0 or higher and the List Rollup Web Part version 3.0.1 or higher. To set up alerts on Schemas created with the
List Rollup Schema Designer Web Part, you must have Alert Plus 3.0 or higher and List Rollup 5.0 or higher. Please note that Alert
Plus Web Part versions prior to version 2.2.0 are not compatible with List Rollup Web Part version 3.0.0.
The Alert Event setting (labeled What triggers the alert?) allows users to send an alert when an item in the list is deleted, an item
in the list is created, an item in the list is modified, an item in the list is created or modified, an item exists, or a specific column in
the list changes. Most of these options are self-explanatory for the most part. The only options in this drop-down that require
clarification are the An item exists and A specific column in the list changes option. The "An item exists" option means that the
event that triggers the alert is passive and does not require an item in the Alert List to be modified or created. Any items matching
the alert criteria (that exists) generates an alert. Be sure to set some filtering in the What items in the list generate an alert?
section. If you leave the All Items option selected there, then every item in the list will generate an alert with the 'An item exists'
option. To address the possibility of users receiving too many alerts for the same existing items, you can use the E-mail Follow-up
Wait Days option on the Admin Options tab. See the Admin Options Tab for more information.
The A specific column in the list changes option is only available for alerting on SharePoint Lists or Libraries. It allows you to
create a CAML query where you can send an alert when the value of a column changes. To use this option, click the drop-down box
in the first Field Name column in the Criteria Builder. Notice there is a duplicate column for each column in the list that has "/Old"
appended at the end of the column name. These "/Old" columns retain the last value of the column for each item before it
was changed to a new value. So to set up an alert that sends out a notification when the Status column is equal to "Deferred" or
"Waiting for someone else" when the Status has been changed, the Criteria Builder and CAML query would look like the following:

When you want to set a specific column value for a conditional statement, you can type the value directly into the second Field Name
drop-down box as illustrated below.
NOTE: You can use the "/Old" token in the Mail Format tab to include the old status as well as the new. An example of that text can
be found in the Mail Format Tab topic.
In addition for this trigger (and all other triggers that allow a CAML query), if you select a Date column in the first Field Name
column in the Criteria Builder, then two additional comparision operators are available in the Comparison drop-down box: Is
Approaching in and Has past by. These two operators allow you to enter a number of days in the second Field Name column to
indicate whether the date in the selected Date column is coming due in (i.e. Is approaching in X days) or is past due by (i.e. Has
past by X days) the number of days entered. For example, if you selected 'Is Approaching in 3 days', each time the Alert Plus timer
job runs, the Alert List column is within 3 days of the current date (i.e. [Today]), and the alert frequency is set to "every day", Alert
Plus will send out three e-mail notifications - one for each day. Some examples are shown below.
NOTE: The number of days entered for these two comparison operators are calendar days, so weekend days are included.
Example: Is Approaching in

Example: Has past by
The timing of e-mails is controlled by the E-mail Frequency (How often are e-mails sent?) setting. The options that can be
specified are As Soon As Possible, Every Hour, Every Day, and Every Week. To refine these default e-mail frequency options, then
please see the Admin Options Tab topic for instructions. In addition, you can select the Combine multiple alerts into summary
notification check box to have all the alerts generated by this alert sent in a summary e-mail. This e-mail is sent with the subject
and message in the following format:
NOTE: Combining multiple alerts into a summary notification is most useful when used for alert frequencies Every Hour and As soon
As Possible. However, only the alert notifications generated by the alert configured to combine notifications are combined in a
summary notification. If there is another alert configured to combine notifications those alerts are not included in any other alert
summary notifications. The alert generates the summary notification for its alert notifications only.

The What items in the list generate an alert? section allows you to define the subset of items in the Alert List that generate
alerts. You can select to alert on all items, the items contained in the SharePoint List View, or create an advanced query-based filter
(i.e. the Some Items (Advanced) option). The query-based filter option allows for you to set conditional column criteria for the alerts
to handle scenarios like:
� Alert me when the Status column is Completed.
� Alert me when a Task assigned to me is within 5 days of its due date.
� Send me alerts when Tasks assigned to me are modified or created.
Very advanced users can simply type this conditional query into the CAML Query text box. Users who do not know CAML can click on
the Show Criteria Builder check box to display a set of search controls that build the CAML query for you. The following image
shows you the features of building a query.
Important items to note when selecting columns in the Criteria Builder:
� If you choose a People or Group column type and want to alert a particular person, you must type the name of the person in the
second Field Name drop-down box. If want to use [Me] or enter an account that is not listed, copy the criteria to CAML Query
field and update it manually in the CAML Query field.
� A Date and Time column type automatically displays a Calendar control. To enter [Today] as a variable, copy the criteria to

CAML Query field and update it manually in the CAML Query field.
� If you select a Choice column type, the defined choices for that column is available for selection from the second Field Name
drop-down box.
� A Yes/No column type is defined in the CAML query as '0' (zero) representing 'No' and '1' representing 'Yes'.
Clicking the Recipient(s) tab displays the options available to control who receives the e-mails for the new alert. There are a
number of options for the Recipient Type (labeled "Who should the alert e-mails be sent to?") that include:
� Send to me - E-mail is sent to the individual that created the alert based on the e-mail address stored in their SharePoint User
Profile
� Send to a Fixed Set of Users or E-Mail Addresses - A static list of SharePoint user profiles or e-mail addresses can be
entered as recipients.
� Send to a Sharepoint Contacts List - Messages are sent to a group of individuals identified by the selected Contacts List and
optional Contacts List View. The user e-mail addresses are assumed to be contained in the Contacts List "E-Mail Address"
column, thus this column is required in the selected Contacts List and List View for this option. The image above shows this
option. If this column has been deleted and a new column created in its place, then you must make sure that the new column is
named "E-Mail Address" in order for Alert Plus to be able to resolve the e-mail address.
� The Where is the Contacts List? drop-down box is automatically populated with the current site and all sites beneath
the current site. Do one of the following:
� If you want to use a list from a site above the current site or in another Site Collection, you can enter the static site
URL (only static URLs are supported) for that site in the What SharePoint site stores the Alert List? box, and
then click Add.
� If you are selecting a Contacts List from the current site or a site beneath the current site, then select the site that
contains the Contacts List you want from the Where is the Contacts List? drop-down box.
� Select a Contacts List Name. Only lists of type 'Contacts' are available for selection.
� Select a Contacts List View to filter the contacts list to alert only a specific subset of contacts. The selected List View
must at least contain the E-mail Address column.
� Send to members of a SharePoint Site or Cross-site group - All e-mails are sent to the individuals identified by a selected
SharePoint Site or Cross-site group. The e-mail address is resolved by matching the group member(s) user ids to their
SharePoint User Profile. Only individual users listed in SharePoint Groups are supported. If an Active Directory Security Group is
listed in the SharePoint Group, we are unable to read that group to send alerts to the users within it.
� Lookup an E-Mail Address in the Alert List - This option allows you to select a column in the Alert List that defines the alert
recipient. You must then specify whether the column is configured to contain the e-mail address as text, looks up to the
SharePoint User Profile database (in the case that it is a People or Group column type) or looks up to a Contacts list. If the
column is a lookup to a Contacts List, see the Send to a SharePoint Contacts List option above for more information on what
is required.
� Lookup an E-Mail Address in another List (Advanced) - This advanced option allows you to create your own lookup within
Alert Plus instead of directly within the Alert List itself. You can create a lookup to a list on the local site or another site within
the Site Collection. If you want to use a list from a site above the current site or in another Site Collection, you can enter the
Recipient(s) Tab

static site URL (only static URLs are supported) for that site in the What SharePoint site stores the Alert List? box, and then
click Add. If you are selecting a Lookup List from the current site or a site beneath the current site, then select the site that
contains the Lookup List you want from the Where is the Lookup List? drop-down box. Once selected, the Linked Lookup List
drop-down list becomes populated with all the lists located at the specified site URL. After selecting the lookup list, select the
column in the lookup list that will be mapped to a column in the Alert list (i.e. Column to map to Alert List field). This column
must be a Single Line of Text column type. Then select the column to map to in the Alert list (i.e. Alert List Column field). This
column must also be a Single Line of Text column type.
Now you are ready to specify how the e-mail address is resolved. First, select the column in the Lookup list that contains the e-
mail address (i.e. Linked List column that identifies the recipient field). Then specify whether the e-mail address source for this
column is configured to contain the email address as text (i.e. Column Values) or this column looks up e-mail addresses in the
SharePoint User Profile database (i.e. E-mail Address Source field).
The Mail Format tab is where you author the subject and body of the alert e-mails sent for the new alert. Use the Subject and
Mail Format Tab

Message fields to build your message. The rich edit controls give you the ability to beautify your alert messages rather than just
have them sent as raw text (HTML enabled client e-mail application required). The message can be completely tailored to the
individual alerts unlike built-in SharePoint alerts that share the same hard to edit template xml. If the selected Event Type is when
"An item is modified or created", then an additional message format tab appears allowing you to customized the alert messages for
each specific event.
The following table explains which message templates are available for each alert trigger:
You are not limited to only static text. The use of special tokens in the message body or subject can provide links back to the Alert
List or Alert List Site. They can also display meta-data from the Item that generated the alert. The Help sub-tab of the Mail Format
tab provides a quick online reference to the correct formatting of tokens. The general format is as follows:
� Enter the token {sitelink} to have a link to the Alert List site inserted into the e-mail message or subject.
� The {itemlink} token inserts a link to the Item that generated the alert.
� The {subject} token inserts the notification subject line text. You can only use this token in the message body.
� The free form token {ColumnName} inserts Item field values (meta-data) from the alert item in to the message. For example,
to display the Item title, enter the token {Title}. The column name you enter must match the display name of the
SharePoint column name (not the internal name) as this is a case-sensitive token. You can also include the value of a column
before it was updated and what it was updated to by including text like the following:
The status of this item has changed from {Status/Old} to {Status}.
The message body editor allows you to create rich text e-mail notifications. Some of the features of this editor include:
� Spell Check: Mispelled words are highlighted in yellow.
� Insert a symbol: Insert a symbol from the list provided. These are the only symbols available.
� Image Manager: When you click the Image Manager button, the Image Manager pops up.
Trigger Available Message Templates
An item in the list is deleted On Item Deletion
An item in the list is created On Item Creation
An item in the list is modified On Item Modification
An item in the list is created or modified On Item Creation, On Item Modification
An item exists On Alert
A specific column in the list changes On Specific Column Changes

Notice in the image above that the Image URL box already shows an image URL path that points to the Bamboo Alert Plus Picture
Library. This library is automatically created on the site where Alert Plus is added to a page and stores all images for use with Alert
Plus. This allows you to upload images to this library from the Image Manager - without having to create the library yourself, add
images to the library, view the image, copy the image URL and then navigate back to the Mail Format tab and insert the image URL.
Now you can upload and insert pics into alert e-mails all from the Image Manager.
The Options tab gives you finer control over how the token links are included in the e-mail. There are two options on this tab:
External Host Path and Custom Item Link. The External Host Path field allows you to specify the root host path to be used in all
message links. For example, if you have corporate users that work outside the local intranet, then you can specify the public host
path for the SharePoint server. That way, when users click on the links in the e-mail alerts they receive, they can be routed through
the correct server. All internal and external users receive the link containing the external host path setting.
The Custom Item Link setting allows you to control how the URL to the SharePoint Item is constructed for the {itemlink} token. By
default, the system uses the SharePoint default display URL for an item. To change this, enter the full path to the item in the Custom
Item Link field. You can still use the tokens in the custom link setting to create a dynamic link. For example, a valid entry for this
setting might be: http:/portal.sharepoint.com/teamsite/mycustomitemform.aspx?id={id}. The {id} token will be replaced with the
real item id when the link is inserted into the message.
Admin Options Tab

Access to the Admin Options tab is controlled through the Web Part Tool Pane properties. Users that are allowed to see the tab can
refine the default run schedules for alerts and control the frequency of e-mails.
There are two settings on this tab. The first, E-mail Follow-up Wait Days, is used to specify the number of days the system should
wait between sending e-mails generated for the same alert item when the What Triggers the alert? field on the Event tab is set to
An Item Exists. The default period is one day. This means that the system will wait one day between the time it sends an e-mail
and the next time an e-mail is sent for the same alert item. This prevents users from being inundated with continuous e-mails for
the same alert item. The field can be used to specify a value greater than one to increase the wait time, or it can be set to zero to
tell the system to continuously send e-mails regardless of when the last alert e-mail was sent.
The other setting on the Admin Options tab allows users to override the default run schedule for the Alert Plus Service. If a user
selects the Use Custom Schedule check box, then they can configure a custom schedule for that alert. This allows the granularity
of the alert processing to either be increased of decreased. It also allows for a window to be set to specify the time of day that
processing should take place. The Start Time and End Time controls determine the run period. The Frequency Value and Frequency
Unit control determine how frequently during the run period that alerts are processed.
The default processing schedule used by Alert Plus is determined by the E-mail Frequency ("How often are e-mails sent?") setting
specified in the Event Tab. These are the options that are used unless they are overridden from the Admin Options tab.
Accessing the Support Page
The Support page provides information about the Alert Plus system configuration to assist customers with troubleshooting their Alert
Plus setup. This page includes options for testing the most common communication problems for Web Services and e-mail servers,
as well as a link to view error logs. The Support page can be accessed from the Support link on the Action bar of the Alert Plus Web
E-mail Frequency Setting Alert Processing Schedule
As Soon As Possible Every 2 minutes, 24 hours a day, 7 days a week
Every Hour Every 1 hour, 24 hours a day, 7 days a week
Every Day Once each day at 6:00 AM
Every Week Once each week on specified day at 6:00 AM
Support Page

Part.
Alert Plus Registration
The Alert Plus Registration section allows you to enter a site URL, then click Check Registration to test whether the Alert Plus Web
Part is registered for that site. When the Support page is loaded, it automatically checks to see if Alert Plus is registered on the
current site.
Alert Plus Event Handlers
Click View to see the event handlers used by Alert Plus. Review the Reg Info column to determine the registered events for each
alert. If no events are listed for an alert, try editing and saving the alert again.
From the Registration Info box, click View to view the XML code for the Web Part registration. This information is helpful to our
Support staff if you continue to experience a problem with the Web Part.
Alert Plus E-mail Support
Click Send Email to test the configured e-mail settings for Alert Plus and display the results in the Test Result box.
Test Result
The Test Result box shows the results from the Alert Plus E-mail Support test. The results are cleared each time the Web Part Page
is loaded, or you can click Clear to clear the results.
� UC1.Alert on a Tasks List, and send alerts for every task to the assigned person
� UC2.Send a Task alert to a project team
� UC3.Setting up an Alert for a Document Library or Discussion
� UC4.Subscribe to a Subset of Items in the List
� UC5.Setting up a Tasks List with an escalation of reminder alerts to the Task assignee
� UC6.Determine Which Alerts You Are Subscribed To
� UC7.How to remove an employee from alert processing
� UC8.Set up an alert for a Bamboo List Rollup Data View
� Use Case FAQs
As a project manager, you have set up a Tasks List for the team to work on their assignments. Every time a Tasks List item is
created or updated, you want to send an alert message to the person to whom the task is assigned. This use case uses the standard
SharePoint Tasks List with the Assigned To field defined as a lookup field to the SharePoint User Profile where the e-mail address is
stored.
The Alert field selections for Use Case 1 are:
Figure 12: Standard SharePoint Tasks list with Assigned To as the lookup field
Use Cases
UC1. Alert on a Tasks List, and send alerts for every task to the assigned person
Alert List - What list contains the items to
alert on? Tasks
Event Type - What triggers the alert? An item is created or modified
E-mail Frequency - How often are e-mails sent? As Soon As Possible
Item Criteria - What items in the list generate an alert? All Items
Who should the alert e-mails be sent to? Lookup an E-mail Address in the Alert List
Where is the e-mail address to lookup stored? In SharePoint User Profiles
Which user lookup column in the Alert List should be used to find the
recipient? Assigned To

Step 1 - Create Alert Event
� Select the Tasks List from the drop-down list.
� Select the trigger action for when the item is either created or modified.
� Select mail frequency for when you want the alert e-mails to go out.
� For filter criteria, select All Items in the list.
Figure 13: UC1 Event tab
Step 2 - Create Recipients
The Assigned To column in the Tasks list is a lookup field into SharePoint's User Profile Information. We will set Alert Plus to use this
field to resolve the recipient e-mail address. That way each e-mail alert will go to the individual that is assigned the task.
Figure 14: UC1 Recipient tab
� Select "Lookup an E-Mail Address in the Alert List" from the first drop-down list.
� Select the "Assigned to" column which is the index field to the user profile information.
� Select "in SharePoint User Profiles" as the source of e-mail addresses.
Step 3 - Create E-Mail Message
Create your notification e-mail message.

Figure 15: UC1 Mail Format Tab
This use case is similar to Use Case 1 above, but instead of sending the alerts to the assigned individual we will send messages to
the entire project team. This use case uses the standard SharePoint Tasks List and assumes that there is a Contact List with a
predefined view named "Project Managers". We will also take off the training wheels, so to speak, and provide the list of values to be
entered without accompanying screen shots. Refer to the Alert Plus Web Part User Guide section for a refresher on how the UI works
if necessary.
The Alert field selections for Use Case 2 are:
Setting up an alert on a Document Library is no different than setting one up for a List. Simply choose a document library instead of
a list in the "What list contains the items to alert on?" field of the Event tab. Alerts for Discussions are also supported.
Use the "What items in the list do you want to alert on?" options. You can filter the set of items using a SharePoint List View by
selecting the "Items in a List View" radio button option. An advanced query can be defined through the "Some Items (Advanced)"
option. Write your own CAML query there, or use the Criteria Builder controls to help build the CAML for you.
This use case is another extension of Use Case 1 above. You want to set up an escalation of notification process for a Tasks List.
Rather than sending the normal notification e-mails when items change, you want to be able to send overdue alerts when items are
overdue, and send reminder e-mails 5 days before the due date. This actually requires two alerts to be defined: one for the overdue
alerts and one for the reminder e-mails. Let's refer to these two alerts in our discussion that follows as the Overdue Alert and
Reminder Alert. The general alert parameters are defined as follows:
UC2. Send a Task alert to a project team
Alert List - What list contains the items to
alert on? Tasks
Event Type - What triggers the alert? An item is created or modified
E-mail Frequency - How often are e-mails sent? As Soon As Possible
Item Criteria - What items in the list generate an alert? All Items
Who should the alert e-mails be sent to? Send to members of a Contacts List
Contact List Contacts
Contact List View Project Managers
UC3. Setting up an Alert for a Document Library or Discussion
UC4. Subscribe to a Subset of Items in the List
UC5. Setting up a Tasks List with an escalation of reminder alerts to the Task assignee
Alert List - What list contains the items to
alert on? Tasks
Event Type - What triggers the alert? An item exists.
E-mail Frequency - How often are e-mails sent? As Soon As Possible
Item Criteria - What items in the list generate an alert? Some Items (Advanced)
CAML Query (see below)
Who should the alert e-mails be sent to? Lookup an E-Mail Address in the Alert List
Where is the e-mail address to lookup stored? In SharePoint User Profiles
Which user lookup column in the Alert List should be used to find the
recipient? Assigned To
Overdue Alert - CAML Query
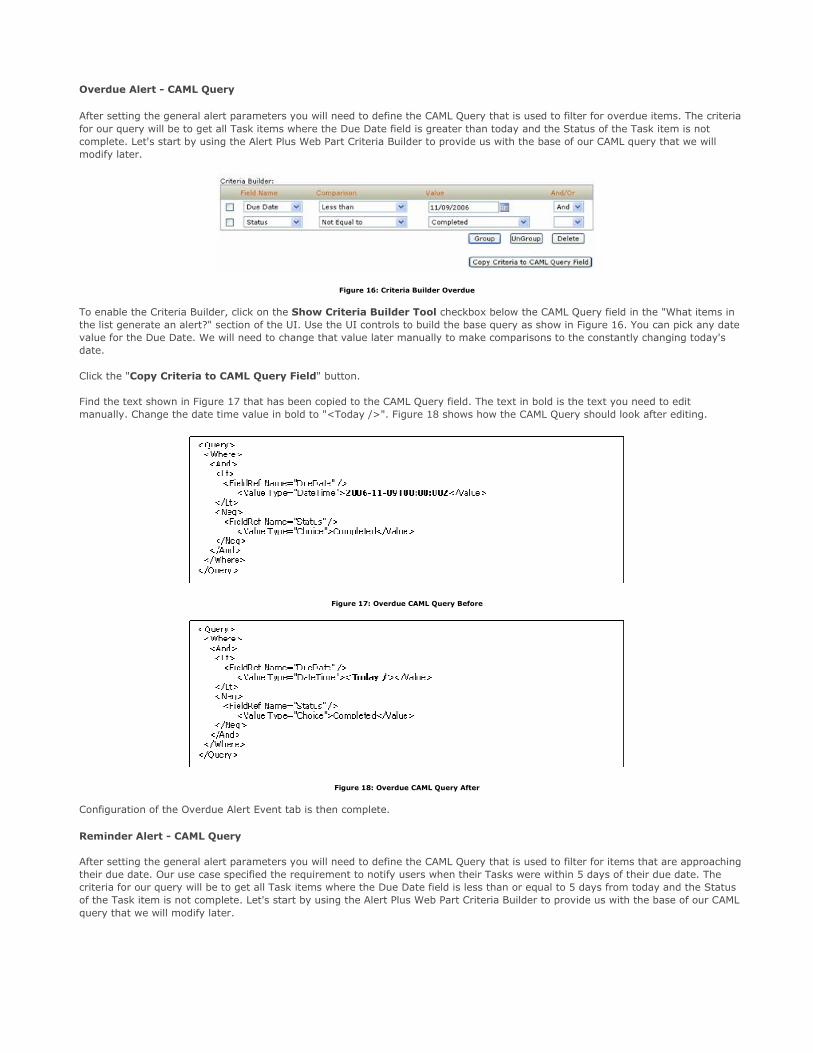
After setting the general alert parameters you will need to define the CAML Query that is used to filter for overdue items. The criteria
for our query will be to get all Task items where the Due Date field is greater than today and the Status of the Task item is not
complete. Let's start by using the Alert Plus Web Part Criteria Builder to provide us with the base of our CAML query that we will
modify later.
Figure 16: Criteria Builder Overdue
To enable the Criteria Builder, click on the Show Criteria Builder Tool checkbox below the CAML Query field in the "What items in
the list generate an alert?" section of the UI. Use the UI controls to build the base query as show in Figure 16. You can pick any date
value for the Due Date. We will need to change that value later manually to make comparisons to the constantly changing today's
date.
Click the "Copy Criteria to CAML Query Field" button.
Find the text shown in Figure 17 that has been copied to the CAML Query field. The text in bold is the text you need to edit
manually. Change the date time value in bold to "<Today />". Figure 18 shows how the CAML Query should look after editing.
Figure 17: Overdue CAML Query Before
Figure 18: Overdue CAML Query After
Configuration of the Overdue Alert Event tab is then complete.
Reminder Alert - CAML Query
After setting the general alert parameters you will need to define the CAML Query that is used to filter for items that are approaching
their due date. Our use case specified the requirement to notify users when their Tasks were within 5 days of their due date. The
criteria for our query will be to get all Task items where the Due Date field is less than or equal to 5 days from today and the Status
of the Task item is not complete. Let's start by using the Alert Plus Web Part Criteria Builder to provide us with the base of our CAML
query that we will modify later.

Figure 19: Criteria Builder Reminder
� To enable the Criteria Builder, click on the Show Criteria Builder Tool check box below the CAML Query field in the "What items
in the list generate an alert?" section of the UI.
Use the UI controls to build the base query as show in Figure 19. You can pick any date value for the Due Date value. We will later
need to change that value manually to make comparisons to the constantly changing today's date.
Click the "Copy Criteria to CAML Query Field" button.
Find the text shown in Figure 20 that has been copied to the CAML Query field. The text in bold is the text you will need to edit
manually. Change the date time value in bold to "<Today /><addValue value="+5" />". The special addValue token next to the
"[Today]" text will direct the Alert Plus system to add a number of days (or subtract in the case of negative numbers) to today's
date. Please see Figure 21 for how the CAML Query should look after editing.
Figure 20: Reminder CAML Query Before
Figure 21: Reminder CAML Query After
Configuration of the Reminder Alert Event tab is then complete.
This capability is part of the Alert Plus Subscriber Web Part. Place this Web Part onto the desired page, and when users visit that
page a list of the alerts they are subscribed to will be displayed. The list is limited to providing results from a single Alert Plus
Configuration List whose path is specified in the Web Part Tool Pane. It will also only display the alert subscription list for the
currently logged on user.
The best way to begin is to login as that user and use the Alert Plus Subscriber Web Part to get the list of alerts the employee is
subscribed to. Check the recipient type options for these alerts and delete all alerts that the user created selecting "Send to Me". If
they are part of a "Send to a Fixed Set of Users or E-Mail Addresses", then edit those alerts and remove them from the recipient list.
Alerts that are based on a Contacts list, site group, or cross-site group can remain, but the departing employee should be removed
from the source group. Alerts with a lookup recipient type will need to have the source column for the e-mail address reset to
UC6. Determine Which Alerts You Are Subscribed To
UC7. How to remove an employee from alert processing
another user.
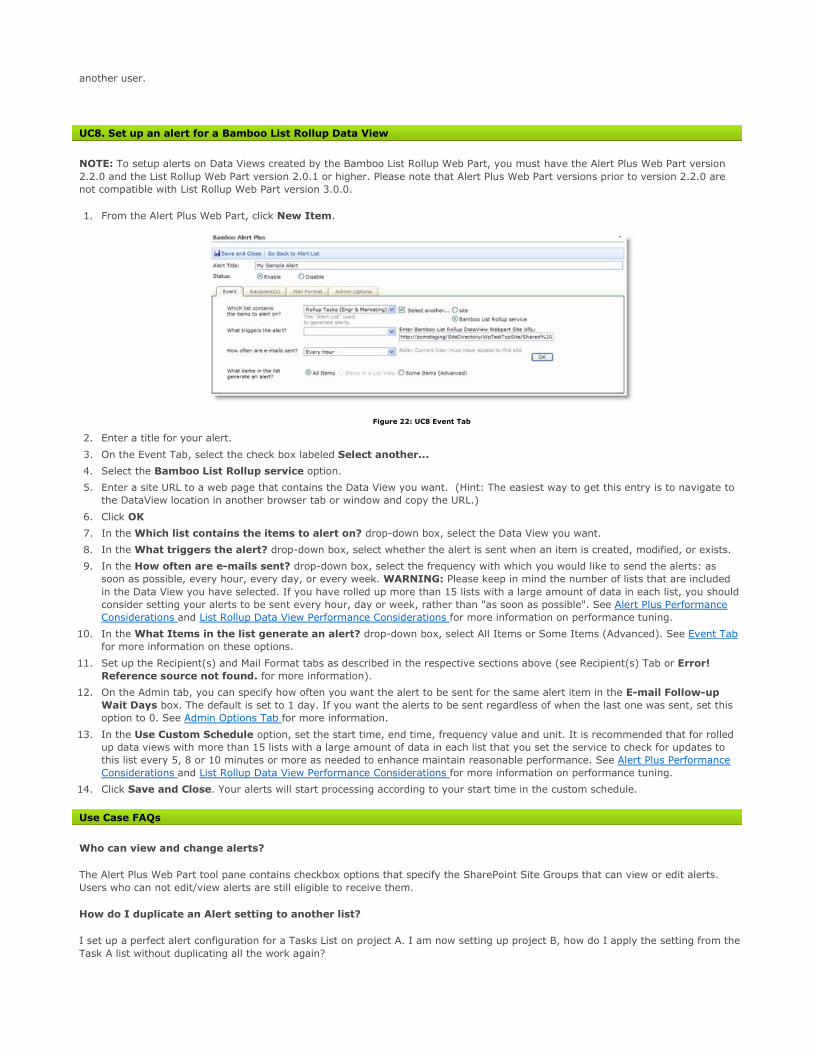
NOTE: To setup alerts on Data Views created by the Bamboo List Rollup Web Part, you must have the Alert Plus Web Part version
2.2.0 and the List Rollup Web Part version 2.0.1 or higher. Please note that Alert Plus Web Part versions prior to version 2.2.0 are
not compatible with List Rollup Web Part version 3.0.0.
1. From the Alert Plus Web Part, click New Item.
Figure 22: UC8 Event Tab
2. Enter a title for your alert.
3. On the Event Tab, select the check box labeled Select another...
4. Select the Bamboo List Rollup service option.
5. Enter a site URL to a web page that contains the Data View you want. (Hint: The easiest way to get this entry is to navigate to
the DataView location in another browser tab or window and copy the URL.)
6. Click OK
7. In the Which list contains the items to alert on? drop-down box, select the Data View you want.
8. In the What triggers the alert? drop-down box, select whether the alert is sent when an item is created, modified, or exists.
9. In the How often are e-mails sent? drop-down box, select the frequency with which you would like to send the alerts: as
soon as possible, every hour, every day, or every week. WARNING: Please keep in mind the number of lists that are included
in the Data View you have selected. If you have rolled up more than 15 lists with a large amount of data in each list, you should
consider setting your alerts to be sent every hour, day or week, rather than "as soon as possible". See Alert Plus Performance
Considerations and List Rollup Data View Performance Considerations for more information on performance tuning.
10. In the What Items in the list generate an alert? drop-down box, select All Items or Some Items (Advanced). See Event Tab
for more information on these options.
11. Set up the Recipient(s) and Mail Format tabs as described in the respective sections above (see Recipient(s) Tab or Error!
Reference source not found. for more information).
12. On the Admin tab, you can specify how often you want the alert to be sent for the same alert item in the E-mail Follow-up
Wait Days box. The default is set to 1 day. If you want the alerts to be sent regardless of when the last one was sent, set this
option to 0. See Admin Options Tab for more information.
13. In the Use Custom Schedule option, set the start time, end time, frequency value and unit. It is recommended that for rolled
up data views with more than 15 lists with a large amount of data in each list that you set the service to check for updates to
this list every 5, 8 or 10 minutes or more as needed to enhance maintain reasonable performance. See Alert Plus Performance
Considerations and List Rollup Data View Performance Considerations for more information on performance tuning.
14. Click Save and Close. Your alerts will start processing according to your start time in the custom schedule.
Who can view and change alerts?
The Alert Plus Web Part tool pane contains checkbox options that specify the SharePoint Site Groups that can view or edit alerts.
Users who can not edit/view alerts are still eligible to receive them.
How do I duplicate an Alert setting to another list?
I set up a perfect alert configuration for a Tasks List on project A. I am now setting up project B, how do I apply the setting from the
Task A list without duplicating all the work again?
UC8. Set up an alert for a Bamboo List Rollup Data View
Use Case FAQs

Yes, you can use the Alert Plus Web Part copy function to duplicate existing alerts. This function is available from the Alert Plus Web
Part list view. Use the item drop-down menu to select the Copy Item menu item. This will create a duplicate of the selected alert
with the text "Copied" prefixed to the Alert Title. The new alert will be set to a status of Disabled. All other alert configuration
settings will be copied from the original alert.
While the copy function works if you are working within the same Alert Plus Web Part, Alert Plus does not provide built-in support for
moving or copying alert items across Alert Plus Configuration Lists. Since all alert information is contained in items in the Alert Plus
Configuration List, you can use SharePoint data migration tools or custom coding to move alert items between lists that exist in
different sites. The Bamboo List Bulk Import product is one such custom tool that is able to do this.
A Project Manager wants to receive an alert when a Status column changes from Close to Re-Open. How do I set that
up?
This scenario is currently not supported today, but will be in the next release of Alert Plus. The system will allow you to alert on a
Status=Re-Open or any other value, but not on specific changes from one value (Close) to another (Re-Open).
For trials, no license key is required. For more information on our licensing, refer to
http://store.bamboosolutions.com/BambooMainWeb/FAQ.aspx.
Once purchased, the product licensing is controlled through a separate license key and activation program installed on the server
where SharePoint Central Administration is installed. To license Bamboo products, you must:
1. Install the Bamboo Web License Manager on the SharePoint server where SharePoint Central Administration is installed (just
install one time - not for each product that you install).
2. From Bamboo Web License Manager, locate the product you want to activate, enter in your license key(s) and activate the
product on the servers where you want the product to run - all from one place. You can activate the license online or via email.
You can also check the licensing status of Bamboo products you installed to determine whether a product trial will soon expire or
whether the product has been deactivated or not.
You must be a machine and SharePoint Farm administrator to install and run the Bamboo Web License Manager.
1. On the server where SharePoint Central Administration is installed, then from the Setup program screen, click the Bamboo
Web License Manager component button, then click Install.
2. Read the End-User License Agreement and choose to accept or abort the install.
3. Click Next to continue.
4. The program performs some system checks to determine whether your server is ready for installation. Click Next to continue.
5. The program is restricted to only install the Bamboo Web License Manager on the server where it detects the SharePoint Central
Administration has been installed. This web application should already be selected for you as well as the Automatically activate
features check box. Click Next to continue.
6. The Bamboo Web License Manager is then installed on the server. Click Next to view a details screen of the installation.
7. Click Close.
Note: If you encounter any issues with the installation, please reference our Knowledge Base for help and troubleshooting.
1. Open SharePoint Central Administration (make sure you have the proper access rights to log in). Notice the Bamboo Solutions
heading at the bottom of the page.
About Licensing
Installing the Bamboo Web License Manager
Licensing and Activating the Web Part
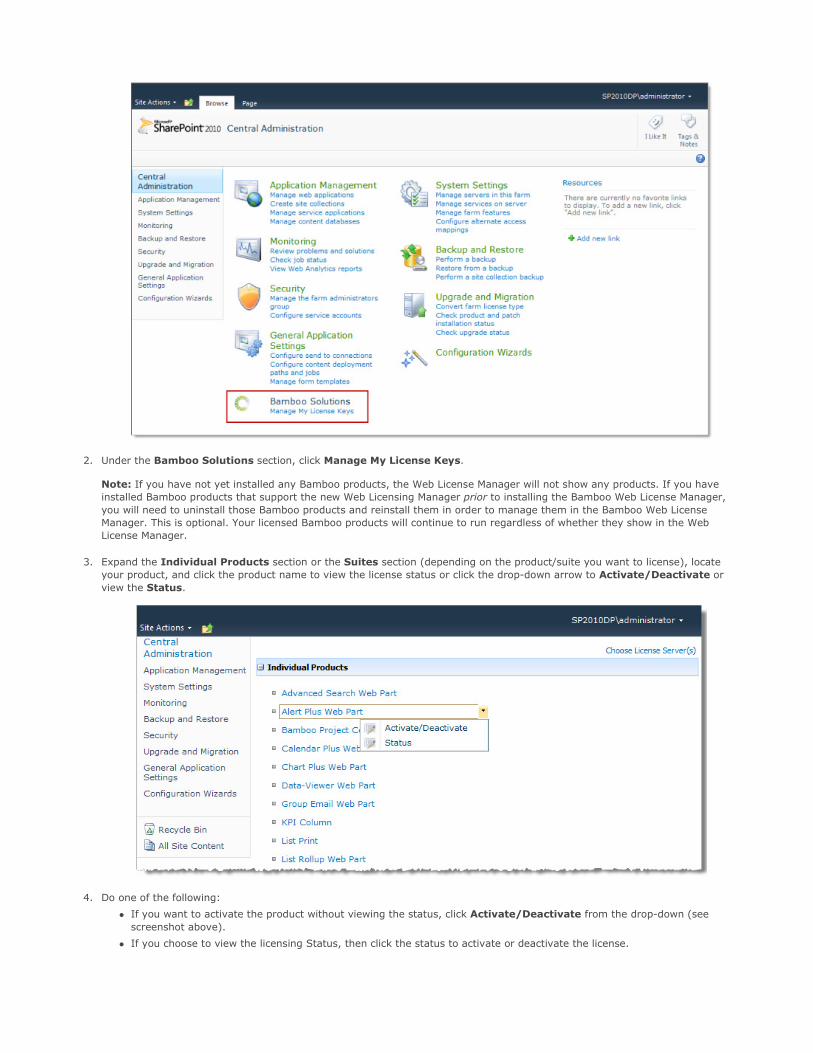
2. Under the Bamboo Solutions section, click Manage My License Keys.
Note: If you have not yet installed any Bamboo products, the Web License Manager will not show any products. If you have
installed Bamboo products that support the new Web Licensing Manager prior to installing the Bamboo Web License Manager,
you will need to uninstall those Bamboo products and reinstall them in order to manage them in the Bamboo Web License
Manager. This is optional. Your licensed Bamboo products will continue to run regardless of whether they show in the Web
License Manager.
3. Expand the Individual Products section or the Suites section (depending on the product/suite you want to license), locate
your product, and click the product name to view the license status or click the drop-down arrow to Activate/Deactivate or
view the Status.
4. Do one of the following:
� If you want to activate the product without viewing the status, click Activate/Deactivate from the drop-down (see
screenshot above).
� If you choose to view the licensing Status, then click the status to activate or deactivate the license.

5. Do one of the following:
� To activate online, type or copy and paste the license key into the field provided and click Activate.
� To activate by email, enter the license key and select the Activate by E-mail check box, then click Activate.

6. If you choose to activate by email, click the [email protected] email address and send the License Key and
Machine Key to Bamboo Support. Our Support Team will reply with an activation key that you will then type into the boxes
provided. Then click Activate.
7. Your product has now been activated and is ready for use.
8. Optional Step: Click the Choose License Server(s) link. This page allows you to select all the web front end servers you may
want to install Bamboo products on. However, this is optional. Please read the license servers page to determine your
selections. Click OK, after you have made your selections.
