agilent n2820/1a high-sensitivity current probes
TRANSCRIPT

Agilent Technologies
Agilent N2820/1A High-SensitivityCurrent Probes
User’s Guide

Notices© Agilent Technologies, Inc. 2013
No part of this manual may be reproduced in any form or by any means (including elec-tronic storage and retrieval or translation into a foreign language) without prior agree-ment and written consent from Agilent Technologies, Inc. as governed by United States and international copyright laws.
Manual Part NumberN2820–97000
Edition2nd EditionFebruary 2013Designed in USAAgilent Technologies, Inc.Oscilloscope Products Division
WarrantyThe material contained in this document is provided “as is,” and is subject to being changed, without notice, in future editions. Further, to the maximum extent permitted by applicable law, Agilent disclaims all war-ranties, either express or implied, with regard to this manual and any information contained herein, including but not limited to the implied warranties of merchantability and fitness for a particular purpose. Agilent shall not be liable for errors or for incidental or consequential damages in connection with the furnishing, use, or performance of this document or of any information con-tained herein. Should Agilent and the user have a separate written agreement with warranty terms covering the material in this document that conflict with these terms, the warranty terms in the separate agree-ment shall control.
Technology Licenses The hardware and/or software described in this document are furnished under a license and may be used or copied only in accor-dance with the terms of such license.
Restricted Rights LegendIf software is for use in the performance of a U.S. Government prime contract or subcon-tract, Software is delivered and licensed as "Commercial computer software" as defined in DFAR 252.227-7014 (June 1995), or as a "commercial item" as defined in FAR 2.101(a) or as "Restricted computer soft-ware" as defined in FAR 52.227-19 (June 1987) or any equivalent agency regulation or contract clause. Use, duplication or disclo-sure of Software is subject to Agilent Tech-nologies’ standard commercial license terms, and non-DOD Departments and Agencies of the U.S. Government will receive no greater than Restricted Rights as defined in FAR 52.227-19(c)(1-2) (June 1987). U.S. Government users will receive no greater than Limited Rights as defined in FAR 52.227-14 (June 1987) or DFAR 252.227-7015 (b)(2) (November 1995), as applicable in any technical data.
Instrument MarkingsThe CE mark is a registered trade-mark of the European Community. ISM GRP 1-A denotes the instru-
ment is an Industrial Scientific and Medical Group 1 Class A product. ICES/NMB-001 indicates product compliance with the Canadian Interference-Causing Equipment Standard.
This product complies with the WEEE Directive (2002/96/EC) marking requirements. The affixed label indicates that you must not discard this electri-
cal/electronic product in domestic house-hold waste. Product Category: With reference to the equipment types in the WEEE Directive Annex I, this product is classed as a “Monitoring and Control instru-mentation” product. Do not dispose in domestic household. To return unwanted products, contact your local Agilent office, or refer to www.agilent.com for more infor-mation.
This symbol indicates the Envi-ronmental Protection Use Period (EPUP) for the product’s toxic
substances for the China RoHS require-ments.
Safety NoticesC A U T I O N . A CAUTION notice denotes a hazard. It calls attention to an operating procedure, practice, or the like that, if not correctly performed or adhered to, could result in damage to the product or loss of important data. Do not proceed beyond a CAUTION notice until the indicated conditions are fully understood and met.
W A R N I N G . A WARNING notice denotes a hazard. It calls attention to an operating procedure, practice, or the like that, if not correctly per-formed or adhered to, could result in personal injury or death. Do not pro-ceed beyond a WARNING notice until the indicated conditions are fully understood and met.
2 N2820/1A User’s Guide

Contents
N2820/1A User’s Guide 3
Contents
1 General InformationIntroduction 6Accessories 10Measurements on Battery Powered Devices 12Connecting the Probe to The Oscilloscope 13N2820A Probes and Dual-Grid View 18Charge—A New Measurement 20Dynamic Range 24Inspecting the Probe 26Returning the Probe for Service 27Safety Information 28
2 ProbingIntroduction 32Attaching a Probe Head 34N2822/4A Probe Heads 35N2825A User-Defined Head 37Make-Before-Break Connectors 40To Attach the Sensor Leads 44To Change an N2825A Head’s ID Resistor 45To Add an RSENSE Resistor to an N2825A Head 49
3 Characteristics and SpecificationsCurrent Range Graphs 54Zoomed-In Input Voltage Range Versus Supply Voltage 56Zoomed-In Input Current Range Versus Supply Voltage 57Dimensions 59
4 Performance Data PlotsN2820A Frequency Response 62N2820A Common Mode Rejection Ratio 64N2820A Step Response 65N2820A Step Tracking 66

4 N2820/1A User’s Guide
Contents
N2820A Input Impedance 68Input Load Model 69
5 Performance VerificationAverage Gain of Zoomed-In Channel 73Average Gain of Zoomed-Out Channel 77Performance Test Record 80

5Agilent Technologies
1General Information
Introduction 6Accessories 10Measurements on Battery Powered Devices 12Connecting the Probe to The Oscilloscope 13N2820A Probes and Dual-Grid View 18Charge—A New Measurement 20Dynamic Range 24Inspecting the Probe 26Returning the Probe for Service 27Safety Information 28
The N2820A and N2821A high- sensitivity current probes allow you to measure AC and DC currents from 50 μA to 5A. These high dynamic- range probes are designed to be used on devices that have very tight geometry constraints. Since these probes do not need to be degaussed and do not require frequent calibration, you can focus on making your measurements. The probes accurately construct the current waveform by measuring the voltage across an RSENSE resistor, which results in highly repeatable measurements.
CAUTION Before using the probe, refer to “Safety Information” on page 28.

6 N2820/1A User’s Guide
1 General InformationIntroduction
Introduction
The N2820A and N2821A probes are shipped in the case that is shown in Figure 1. When you receive the probe, inspect it as described in “Inspecting the Probe” on page 26. When opening the case, lift out the foam cutout and flip the cutout over to reveal the ground lead and secondary cable as shown in the following figure. The secondary cable is only provided with N2820A probes.
Figure 1 Probe in Supplied Case
Figure 2 shows the different components of the N2820A and N2821A probes. The N2820A two- channel probe, with its two internal, parallel differential amplifiers, provides simultaneous low and high gain views. The N2821A also

General Information 1Introduction
N2820/1A User’s Guide 7
includes two amplifiers and its main output can be switched between these two views. Before using an N2820A probe, connect the secondary cable as described in “Connecting the Probe to The Oscilloscope” on page 13. The N2821A single- channel probe looks identical to the N2820A but does not include the secondary cable. The accessories provided with the probes are shown in Figure 3 on page 10.
Figure 2 Probe Parts Identification
CAUTION Probes are ESD sensitive devices, particularly at the probe heads. Follow standard ESD precautions when handling. Remove head accessories when storing the probe.

8 N2820/1A User’s Guide
1 General InformationIntroduction
Oscilloscope Compatibility The N2820A and N2821A probes are compatible with the Agilent oscilloscopes shown in Table 1. The table also lists the minimum required firmware version for the oscilloscope.
NOTE The N2820A and N2821A probes are designed for oscilloscopes with 1 MW AutoProbe-interface channel inputs.
NOTE Infiniium and InfiniiVision 4000 X-Series oscilloscopes support up to two N2820A probes or up to four N2821A probes on a 4-channel oscilloscope. InfiniiVision 3000 X-Series oscilloscopes support up to two N2820/1A probes on a 4-channel oscilloscope.
Is Your Oscilloscope Software Up-to-Date?
Agilent periodically releases software updates to support your probe, fix known defects, and incorporate product enhancements. To download the latest firmware, go to www.agilent.com and search for your oscilloscope’s topic. Click on the “Drivers, Firmware & Software” tab.
Table 1 Compatible Oscilloscopes and Support
Oscilloscope
Probe
N2820A2 Channel Probe
N2821A1 Channel Probe
Infiniium Oscilloscopes (firmware version 4.2 or above)90000A, X-, and Q-Series not supported not supported
9000 H-Series ✓a
a Dual-Grid View available
✓
9000A-Series ✓a ✓
InfiniiVision Oscilloscopes (4000 X firmware version 3.10 or above, 3000 X firmware version 2.30 or above)4000 X-Series ✓ ✓
3000 X-Series Supported Spring of 2013
2000 X-Series not supported not supported
General Information 1Introduction
N2820/1A User’s Guide 9
Infiniium Dual-Grid View The N2820A probe provides two channel- input cables which allow two simultaneous views of the current waveform: a high- gain zoomed- in and a low- gain zoomed- out view. On Infiniium oscilloscopes, both zoomed- in and zoomed- out waveforms can be simultaneously displayed in dual- grid view, where each waveform can be viewed in a different time span. To learn more about dual- grid view, refer to “N2820A Probes and Dual- Grid View” on page 18. InfiniiVision oscilloscopes do not support dual- grid views. The zoomed- in channel has 500 kHz bandwidth and the zoomed- out channel has 3 MHz bandwidth. N2821A probes, having only one channel- input cable, do not support the simultaneous display of zoomed- out and zoomed- in views.
NOTE There is no upgrade available to convert an N2821A (1 channel) probe to an N2820A (2 channel) probe.
Probe Heads The probe is supplied with the N2822A, N2824A, and N2825A interchangeable RSENSE probe heads. The N2822A and N2824A heads include different RSENSE resistor values. The N2825A user- defined head does not include an RSENSE resistor and is selected in situations when you want to use your own RSENSE resistor that you have mounted on your DUT. To learn about configuring and using the heads, refer to Chapter 2, “Probing”.
Make-Before-Break (MBB)Connectors
Five Make- Before- Break (MBB) connectors are provided with the probes. The MBB connectors allow you to quickly probe multiple locations on your DUT without interrupting the circuit under test. Refer to “Make- Before- Break Connectors” on page 40 for more information.
Channel Identification Rings When multiple probes are connected to the oscilloscope, use the channel identification rings to associate the channel inputs with each probe. Place one colored ring near the probe’s channel connector and place an identical color ring near the probe head.

10 N2820/1A User’s Guide
1 General InformationAccessories
Accessories
Supplied Accessories The N2820A and N2821A probes come with the accessories shown in Figure 3. To learn how to use these accessories, refer to Chapter 2, “Probing”.
Figure 3 Supplied Accessories

General Information 1Accessories
N2820/1A User’s Guide 11
NOTE To ensure the display of accurate waveforms, always connect the supplied ground lead when probing battery-powered devices, such as mobile phones. Refer to “Measurements on Battery Powered Devices” on page 12.
Replacement Accessories Table 2 shows the available replacement accessories and parts.
Table 2 Replacement Accessories
ModelNumber Description QuantityN2822A 20 mW RSENSE Head 1
N2824A 100 mW RSENSE Head 1
N2825A User-defined RSENSE Head 1
N2826A Replacement unsocketed sensor leads (22 AWG) 5
N2827A Secondary Cable for use with N2820A probe 1
N2828A Replacement MBB Headers 5
N2829A Replacement MBB Receptacles and socketed sensor leads (22 AWG)
5

12 N2820/1A User’s Guide
1 General InformationMeasurements on Battery Powered Devices
Measurements on Battery Powered Devices
When making measurements on a battery- powered (floating) device, such as a mobile phone, always connect the supplied ground lead between ground on your device and the probe’s ground connector as shown in Figure 4. Simply snap the end of the ground lead onto the probe’s connector. Without the ground connection, the common mode voltage is not guaranteed to be within the common mode range of the amplifiers.
NOTE Failure to connect the ground lead may result in inaccurate waveforms.
Figure 4 Supplied Ground Lead on Device

General Information 1Connecting the Probe to The Oscilloscope
N2820/1A User’s Guide 13
Connecting the Probe to The Oscilloscope
If you have an N2820A two- channel probe, locate the secondary cable and gently snap the cable into the probe amplifier as shown in Figure 5. The N2821A probes are not designed for use with the secondary cable and cannot be upgraded.
Figure 5 Connecting the N2820A’s Secondary Cable
On N2820A probes, you can connect the primary and secondary probe cables to any available oscilloscope channel. Although connecting the cables to adjacent channels may reduce clutter, this is not a requirement. For example, you could connect an N2820A’s primary cable to channel 2 and its secondary cable to channel 4. Connecting an N2820A probe does require connecting the primary cable first promptly followed by the secondary cable. This enables the oscilloscope to automatically associate the two inputs to the same probe. Figure 6 on page 14 is an example of connecting two N2820A probes to non- adjacent channel inputs.
NOTE To ensure the display of accurate waveforms, always connect the supplied ground lead when probing battery-powered devices. Refer to “Measurements on Battery Powered Devices” on page 12.
To Clean the Probe
Disconnect the probe from the oscilloscope and clean the probe with a soft cloth dampened with a mild soap and water solution. Make sure that the probe is completely dry before reconnecting it to an oscilloscope.

14 N2820/1A User’s Guide
1 General InformationConnecting the Probe to The Oscilloscope
Figure 6 Two N2820A Probes Connected to the Oscilloscope

General Information 1Connecting the Probe to The Oscilloscope
N2820/1A User’s Guide 15
Probe Configuration(Infiniium Oscilloscopes)
Use the Probe Configuration dialog box to setup your probe. For N2820A probes, the probe’s primary channel tab in the Probe Configuration dialog box configures both the primary and secondary channel. The secondary channel is listed on another tab but is not controlled from that tab.
Figure 7 Infiniium’s Probe Configuration Dialog Box (N2821A Probe)
To configure the probe
1 Connect the probe to the oscilloscope. On N2820A probes, connect the primary channel first followed by the secondary channel.
2 Click the Setup > Probe Configuration menu command.
3 In the Probe Configuration dialog box, click the tab that represents the primary channel for the probe.

16 N2820/1A User’s Guide
1 General InformationConnecting the Probe to The Oscilloscope
4 If you are using an N2821A probe, use the Primary Channel Output field to configure the input channel as a zoomed- in or zoomed- out channel.
5 If you are using an N2825A user- defined head, in the dialog box click Add Head to assign a unique name to the head and enter the resistance of the external RSENSE resistor in the User Def Head Resistance field. For more information, refer to “N2825A User- Defined Head” on page 37.
Probe Configuration(InfiniiVision Oscilloscopes)
For N2820A probes, softkeys for the probe’s primary channel configure both the primary and secondary channel. Unlike Infiniium oscilloscopes, InfiniiVision oscilloscopes do not support the assigning of names to identify N2825A/RSENSE combinations.
Figure 8 InfiniiVision’s R-Sense Entry Box

General Information 1Connecting the Probe to The Oscilloscope
N2820/1A User’s Guide 17
To configure the probe
1 Connect the probe to the oscilloscope. On N2820A probes, connect the primary channel first followed by the secondary channel.
2 Press the front- panel channel key that is associated with the probe’s primary input.
3 Press the Probe softkey.
4 If you are using an N2821A probe, press the Zoom-In softkey to toggle between zoomed- in (blue selection box on softkey) or zoomed- out (clear selection box) for the channel.
5 If you are using an N2825A user- defined head, press the R-Sense softkey, shown in Figure 8 on page 16, and enter the resistance of the RSENSE resistor that you are using.

18 N2820/1A User’s Guide
1 General InformationN2820A Probes and Dual-Grid View
N2820A Probes and Dual-Grid View
When using an N2820A probe on a 9000 H- Series or 9000A Infiniium oscilloscope, the zoomed- in and zoomed- out waveforms can be simultaneously viewed in dual- grid view, as shown in Figure 9. In dual- grid view, the zoomed- out waveform originates from the probe's low- gain amplifier, and the zoomed- in waveform originates from the probe's high- gain amplifier. The zoomed- in waveform has less noise and dynamic range than the zoomed- out waveform.
NOTE Dual-Grid View is not supported in InfiniiVision oscilloscopes.
Figure 9 Displayed Zoom Windows

General Information 1N2820A Probes and Dual-Grid View
N2820/1A User’s Guide 19
If you’re familiar with the oscilloscope’s Zoom Mode, you may be interested to know that while Zoom Mode uses software to expand the zoomed- in waveform, dual- grid view uses hardware amplification applied by the probe’s high- gain amplifier.
On the display, the white bounding- area box identifies the portion of the zoomed- out waveform that is displayed in the zoomed- in window. This box does not indicate waveform clipping.
Dual- grid view allows simultaneous viewing of high sensitivity and high dynamic- range inputs. One example of using dual- grid view is to quickly identify and view a specific pulse and perform a DC power measurement on that pulse.
To view only one window, click Setup > Display to open the Display Setup dialog box and, in the Quantity field, select 1.
NOTE For best measurement results, on the oscilloscope click Setup > Acquisition and select one of the High Resolution settings.

20 N2820/1A User’s Guide
1 General InformationCharge—A New Measurement
Charge—A New Measurement
For the N2820A and N2821A probes, the oscilloscopes include a new measurement, Charge. This measurement determines the total current consumption over time with the results listed in ampere- hours (Ah). For N2820A probes, the measurement includes the area under the curve across both zoomed- in and zoomed- out waveforms.
Figure 10 shows a Charge measurement on an Infiniium oscilloscope’s with Zoom Mode applied and zoom window gating enabled. Figure 11 on page 21 shows the measurement on an InfiniiVision oscilloscope.
NOTE Always connect the ground lead when probing mobile phones, as explained in “Measurements on Battery Powered Devices” on page 12.
Figure 10 Charge Measurement of Mobile Phone Current in Standby State with Zoom Mode (Infiniium Oscilloscope)

General Information 1Charge—A New Measurement
N2820/1A User’s Guide 21
With the oscilloscope’s Zoom Mode turned on, gating can be used to show a reduced zoom- window time span compared to the normal window. This is indicated on the non- zoomed waveform by a white boundary- area box (Infiniium scopes) or a non- shaded boundary- area box (InfiniiVision scopes). Click the oscilloscope’s Zoom button to turn on Zoom Mode. For Infiniium oscilloscopes you must additionaly select Gate to Zoom Window in the Charge measurement’s Enter Measurement Info dialog box. Zoom mode is a software only expansion and results in the same vertical resolution and accuracy between the zoom and non- zoom waveforms.
Figure 11 Full Screen Charge Measurement with Zoom Mode (InfiniiVision Oscilloscope)
Zoom Mode Buttons
9000 H-Series and 9000A Oscilloscopes
3000 X and 4000 X-Series Oscilloscopes

22 N2820/1A User’s Guide
1 General InformationCharge—A New Measurement
On InfiniiumOscilloscopes
To make a Charge measurement:
1 Connect the probe. If an N2825A user- defined head is used, enter the RSENSE resistance as explained in “Probe Configuration (Infiniium Oscilloscopes)” on page 15.
2 Click Measure > Mixed > Charge (N282XA).
3 In the Enter Measurement Info dialog box:
a If Zoom Mode is turned on, select Gate to Zoom Window to enable a reduced zoom- window time span. If Zoom Mode is turned off, the Gate to Zoom Window field is not selectable (grayed out).
b If more than one N2820/1A probe is connected in the oscilloscope, the dialog box allows you to select the probe used for the measurement.
Figure 12 Enter Measurement Info Dialog Box

General Information 1Charge—A New Measurement
N2820/1A User’s Guide 23
On InfiniiVisionOscilloscopes
To make a Charge measurement:
1 Connect the probe. If an N2825A user- defined head is used, enter the RSENSE resistance as explained in “Probe Configuration (InfiniiVision Oscilloscopes)” on page 16.
2 Press the front- panel Meas key.
3 Press the Type: softkey.
4 Select one of two measurements:
Charge - Full Screen. The Full Screen measurement interval variation measures the value on all displayed data points. For more information, refer to the oscilloscope’s Help system.
Charge - N Cycles. The N Cycles measurement interval variation measures the value on an integral numer of periods of the displyed signal. If less than three edges are present, the measurement shows “No edges”. For more information, refer to the oscilloscope’s Help system.
5 If more than one N2820/1A probe is connected to the oscilloscope, softkeys appear that allow you to specify the channel on which to perform the measurement.

24 N2820/1A User’s Guide
1 General InformationDynamic Range
Dynamic Range
The N2820A and N2821A probes provide a large dynamic measurement range (>20,000:1 or 86 dB on the zoomed- in channel) that allows you to observe both the entire current waveform and extremely small current fluctuations. As shown in Figure 13, you could simultaneously view a mobile phone’s 135 mA receive current pulses and 2 mA idle current in the presence of 2A transmit current pulses, with a single acquisition. When using N2820A probes on Infiniium oscilloscopes, use the powerful new dual- grid view as explained in “N2820A Probes and Dual- Grid View” on page 18.
Figure 13 Small Pulses in the Presence of Large Pulses
RSENSE Value and DynamicRange
Since the N2820A probe has two outputs, each with a different gain, dynamic range encompasses both channels while using a single RSENSE value. For example, with a 100 mW RSENSE resistor, the zoomed- in waveform can display

General Information 1Dynamic Range
N2820/1A User’s Guide 25
about 50 µA and the zoomed- out channel can display about 2.2A for a dynamic range of approximately 93 dB:
The value of the RSENSE resistor can range from 1 mW to 1 MW as shown in Figure 29, “Maximum Current Range,” on page 54. Using these two RSENSE values in different measurements, the dynamic range could be increased to 100 dB.
Effects Other Than DynamicRange
Selecting the proper RSENSE resistance is often a compromise between a value that is large enough to obtain accurate measurements while small enough to avoid negatively affecting the circuit under test. Increasing the resistance
■ decreases the noise,■ increases sensitivity, and■ increases the burden voltage across the RSENSE resistor
(I2R).Decreasing the resistance will have the opposite effect.
Channel Position on theScreen
This probe does not have voltage offset. Use the oscilloscope’s position controls to adjust the location of the waveform on the screen. Vertical scaling occurs about zero amperes.
93dB 202.2A
50 μA--------------log=
26 N2820/1A User’s Guide
1 General InformationInspecting the Probe
Inspecting the Probe
■ Inspect the shipping container for damage.
Keep the damaged shipping container or cushioning material until the contents of the shipment have been checked for completeness and the probe has been checked mechanically and electrically.
■ Check the accessories.
■ If the contents are incomplete or damaged, notify your Agilent Technologies Sales Office.
■ Inspect the probe. If there is mechanical damage or defect, or if the probe does not operate properly or pass calibration tests, notify your Agilent Technologies Sales Office.
If the shipping container is damaged, or the cushioning materials show signs of stress, notify the carrier as well as your Agilent Technologies Sales Office. Keep the shipping materials for the carrier’s inspection. The Agilent Technologies office will arrange for repair or replacement at Agilent Technologies’ option without waiting for claim settlement.
General Information 1Returning the Probe for Service
N2820/1A User’s Guide 27
Returning the Probe for Service
If the probe is found to be defective we recommend sending it to an authorized service center for all repair and calibration needs. Perform the following steps before shipping the probe back to Agilent Technologies for service.
1 Contact your nearest Agilent sales office for information on obtaining an RMA number and return address.
2 Write the following information on a tag and attach it to the malfunctioning equipment.■ Name and address of owner■ Product model number (for example, N2820A)■ Product Serial Number (for example, MYXXXXXXXX)■ Description of failure or service required
NOTE Include probing and browsing heads if you feel the probe is not meeting performance specifications or a yearly calibration is requested.
3 Protect the probe by wrapping in plastic or heavy paper.
4 Pack the probe in the original carrying case or if not available use bubble wrap or packing peanuts.
5 Place securely in sealed shipping container and mark container as "FRAGILE".
NOTE If any correspondence is required, refer to the product by serial number and model number.
Contacting AgilentTechnologies
For technical assistance, contact your local Agilent Call Center.
■ In the Americas, call 1 (800) 829- 4444
■ In other regions, visit http://www.agilent.com/find/assistBefore returning an instrument for service, you must first call the Call Center at 1 (800) 829- 4444.

28 N2820/1A User’s Guide
1 General InformationSafety Information
Safety Information
This manual provides information and warnings essential for operating this probe in a safe manner and for maintaining it in safe operating condition. Before using this equipment and to ensure safe operation and to obtain maximum performance from the probe, carefully read and observe the following warnings, cautions, and notes.
This product has been designed and tested in accordance with accepted industry standards, and has been supplied in a safe condition. The documentation contains information and warnings that must be followed by the user to ensure safe operation and to maintain the product in a safe condition.
Note the external markings on the probe that are described in this document.
To avoid personal injury and to prevent fire or damage to this product or products connected to it, review and comply with the following safety precautions. Be aware that if you use this probe assembly in a manner not specified, the protection this product provides may be impaired.
WARNING Use Only Grounded Instruments.Do not connect the probe’s ground lead to a potential other than earth ground. Always make sure the probe and the oscilloscope are grounded properly.
WARNING Connect and Disconnect Properly.Connect the probe to the oscilloscope and connect the ground lead to earth ground before connecting the probe to the circuit under test. Disconnect the probe input and the probe ground lead from the circuit under test before disconnecting the probe from the oscilloscope.

General Information 1Safety Information
N2820/1A User’s Guide 29
WARNING Observe Probe Ratings.Do not apply any electrical potential to the probe input which exceeds the maximum rating of the probe. Make sure to comply with the voltage versus frequency derating curve found in this manual.
WARNING Keep Away From Live Circuits.Avoid open circuitry. Do not touch connections or components when power is present.
WARNING Indoor Use Only.Do not operate in wet/damp environments. Keep product surfaces dry and clean.
WARNING Do Not Operate With Suspected Failures. Refer to qualified service personnel.
WARNING Never leave the probe connected to a conductor while it is not connected to an oscilloscope or voltage measuring instrument.
WARNING Do not use a probe which is cracked, damaged or has defective leads.
WARNING Do not install substitute parts or perform any unauthorized modification to the probe.
WARNING Do not operate the probe or oscilloscope in the presence of flammable gasses or fumes. Operation of any electrical instrument in such an environment constitutes a definite safety hazard.
WARNING Do not use the probe or oscilloscope in a manner not specified by the manufacturer.
WARNING Service instructions are for trained service personnel. To avoid dangerous electric shock, do not perform any service unless qualified to do so. Do not attempt internal service or adjustment unless another person, capable of rendering first aid and resuscitation, is present.

30 N2820/1A User’s Guide
1 General InformationSafety Information
CAUTION The probe cable is a sensitive part of the probe and, therefore, you should be careful not to damage it through excessive bending or pulling. Avoid any mechanical shocks to this product in order to guarantee accurate performance and protection.
NOTE Avoid, if possible, the proximity of other conductors which may create noise.
Concerning the Oscilloscope or Voltage Measuring Instrument to Which the Probe is Connected
WARNING Whenever it is likely that the ground protection is impaired, you must make the instrument inoperative and secure it against any unintended operation.
WARNING If you energize the instrument by an auto transformer (for voltage reduction or mains isolation), the ground pin of the input connector terminal must be connected to the earth terminal of the power source.
WARNING Before turning on the instrument, you must connect the protective earth terminal of the instrument to the protective conductor of the (mains) power cord. The mains plug shall only be inserted in a socket outlet provided with a protective earth contact. You must not negate the protective action by using an extension cord (power cable) without a protective conductor (grounding). Grounding one conductor of a two-conductor outlet is not sufficient protection.
WARNING Only fuses with the required rated current, voltage, and specified type (normal blow, time delay, etc.) should be used. Do not use repaired fuses or short-circuited fuse holders. To do so could cause a shock or fire hazard.
WARNING Capacitors inside the instrument may retain a charge even if the instrument is disconnected from its source of supply.

31Agilent Technologies
2Probing
Introduction 32Attaching a Probe Head 34N2822/4A Probe Heads 35N2825A User-Defined Head 37Make-Before-Break Connectors 40To Attach the Sensor Leads 44To Change an N2825A Head’s ID Resistor 45To Add an RSENSE Resistor to an N2825A Head 49
In this chapter, you’ll learn how to configure and connect the probe to your Device Under Test (DUT). The probe accessories are very flexible and can be configured to match your unique probing requirements regarding convenience versus accuracy. Some of these connection options are compared in Figure 14 on page 33.

32 N2820/1A User’s Guide
2 ProbingIntroduction
Introduction
As mentioned in chapter 1, there are three interchangeable RSENSE probe heads: N2822A, N2824A, and N2825A. The N2822A and N2824A heads include different internal RSENSE resistor values. The N2825A user- defined head does not include an RSENSE resistor and is selected in situations when you want to use your own external RSENSE resistor that is mounted on your DUT. For instructions on how to attach a probe head to the probe, refer to “Attaching a Probe Head” on page 34. Figure 14 on page 33 illustrates the relative merits of using the three different heads and the method used to connect them to your DUT.
CAUTION Always wear an ESD wrist strap when working with active probes. Not doing so can result in the probe becoming permanently damaged.
Probe Leads The probe heads do not come with the leads soldered on them. Instead, you must solder on the appropriate leads as described in “To Attach the Sensor Leads” on page 44. You can use any of the following leads:
■ Accessory un- socketed leads (22 AWG).■ Accessory socketed leads (22 AWG).■ Your own leads.The socketed leads are designed to plug directly onto the following items:
■ Standard PC board headers with 2.54 mm (0.1”) contact- pitch spacing.
■ MBB accessory headers mounted on the PC board. You can quickly snap the socketed lead on and off the MBB header.
Dynamic Range Refer to “Dynamic Range” on page 24 to learn how the selection of the RSENSE resistor affects dynamic range.

Probing 2Introduction
N2820/1A User’s Guide 33
Figure 14 Different Probing Connections With Relative Merit

34 N2820/1A User’s Guide
2 ProbingAttaching a Probe Head
Attaching a Probe Head
You do not need any tools to attach or remove a probe head. To attach a head to the probe, gently press the head into position on the probe amplifier while carefully mating the connector as shown in Figure 15. Never apply excessive force when attaching the head. To remove a head, pull the head straight off the probe in the direction shown.
NOTE Do not remove the four head screws when removing the head.
NOTE You can safely change a probe head while the probe is connected to an oscilloscope that is powered on.
CAUTION If lead wires are attached, do not pull on the wires as this could damage the head.
Figure 15 Attaching and Removing a Head from the Probe

Probing 2N2822/4A Probe Heads
N2820/1A User’s Guide 35
N2822/4A Probe Heads
The N2822/4A heads include an RSENSE resistor. Because the oscilloscope recognizes when these probes are connected, the oscilloscope automatically knows the value of the RSENSE resistor when calculating measurements.
CAUTION The maximum sensor resistor power rating is 500 mW. The maximum acceptable average current for the N2822A is 5 Arms and N2824A is 2.2 Arms.
Burden Voltage When an N2822/4A head is used, the resistance of the head’s connectors, sensor leads, and internal RSENSE resistor is connected in series with the DUT’s circuit and current is flowing through the probe head, as shown in Figure 16 on page 36. Therefore, a burden voltage (I2R) is introduced into your circuit. Burden voltages may affect the circuit and will tend to increase the noise. Burden voltages do not affect the measurement. Table 4 on page 36 lists the resistances added by various probing components.
NOTE N2825A heads do not contribute a burden voltage as the current is not flowing through the head.
Table 3 Description of Heads
Description N2822A N2824A
RSENSE Resistor 20 mΩ 100 mΩ
RSENSE Tolerance ±1% ±1%Maximum Power Dissipationa 500 mW 500 mWCurrent Range 250 µA to 5A 50 µA to 2.2AAdded Benefit Smaller voltage drop (lower burden voltage). For higher sensitivity (ie. lower noise).
a Temperature coefficient is 20 ppm / °C

36 N2820/1A User’s Guide
2 ProbingN2822/4A Probe Heads
Figure 16 Vburden Developed Across Probing Components
Need a Different RSENSEResistor Value?
If you need to use a different RSENSE resistance than provided by the N2822A and N2824A heads, you can convert an N2825A head to an internal RSENSE head. Refer to “Converting an N2825A to Internal RSENSE Head” on page 39.
NOTE Do not change the RSENSE resistor in N2822A or N2824A heads.
Table 4 Resistance Added by Head Components
ComponentResistance Contribution
(Round Trip)Sensor Leads Without Socket 20 mΩ
Sensor Leads With Socket 40 mΩ
MBB Header Only (Not Connected) 20 mΩ
MBB Header/Receptacle/Socket 40 mΩ
RSENSE (N2822A Head) 20 mΩ
RSENSE (N2824A Head) 100 mΩ

Probing 2N2825A User-Defined Head
N2820/1A User’s Guide 37
N2825A User-Defined Head
Use the N2825A user- defined head in situations where you want to use your own RSENSE resistor that you have mounted on your DUT. As shown in Figure 14 on page 33, the N2825A head has the lowest burden voltage. But, in some situations, the N2825A head may be less convenient to use than the N2822A and N2824A heads.
Associating a Head with anRSENSE Resistance
On Infiniium oscilloscopes, use the Probe Configuration dialog box, shown in Figure 17, to associate an N2825A head with a specific RSENSE resistance on your DUT. This enables the oscilloscope to make accurate measurements. The dialog box fields are explained in the following sections.
Figure 17 Infiniium Dialog Box With N2825A Heads

38 N2820/1A User’s Guide
2 ProbingN2825A User-Defined Head
In the dialog box, use the User Def Head Resistance field to enter the RSENSE resistance. Because the oscilloscope associates this resistance with the N2825A head, you only need to enter the value of your RSENSE resistor the first time that you use the N2825A head.
On InfiniiVision oscilloscopes, associate an N2825A head with a specific RSENSE resistance by pressing the front- panel channel key that is associated with the probe’s primary input. Then, click the Probe softkey followed by the R-Sense softkey.
Using Multiple RSENSEResistances in Your DUTs?
In this situation you can do one of the following actions:
■ Enter the User Def Head Resistance each time that you use the N2825A head, or
■ On Infiniium oscilloscopes, open the Probe Configuration dialog box, and use the Add Head field to assign a unique name for each of your N2825A/RSENSE resistance associations. Each time that you connect the probe, select the appropriate name in the dialog box.
■ If you use less than six different RSENSE resistances in your DUTs, you can avoid entering the resistance or selecting a name (Infiniium only) each time that you use the N2825A. This is accomplished by changing the N2825A’s internal ID resistor as explained in “To Change an N2825A Head’s ID Resistor” on page 45. After changing the ID resistor, the first time that you use the N2825A you must enter the associated RSENSE resistance. However, for subsequent uses, the oscilloscope automatically associates this resistance with the specific N2825A head. You can order additional N2825A heads from Agilent.
NOTE Remember to mark your different N2825A heads, using a marker pen or tape, so that you can distinguish between them.

Probing 2N2825A User-Defined Head
N2820/1A User’s Guide 39
Converting an N2825A toInternal RSENSE Head
Although the N2825A is intended to be used with an external RSENSE resistor mounted on your DUT, you can add an RSENSE resistor internal to the N2825A head. This converts the N2825A head so that it is similar to the N2822/4A heads. The value of the precision resistor can range from 1 mW to 1 MW in 1 mW increments. You must still enter the RSENSE resistance the first time that you connect the converted N2825A to the oscilloscope. Refer to “To Add an RSENSE Resistor to an N2825A Head” on page 49. You could also change the head’s internal ID resistor as explained “Associating a Head with an RSENSE Resistance” on page 37.

40 N2820/1A User’s Guide
2 ProbingMake-Before-Break Connectors
Make-Before-Break Connectors
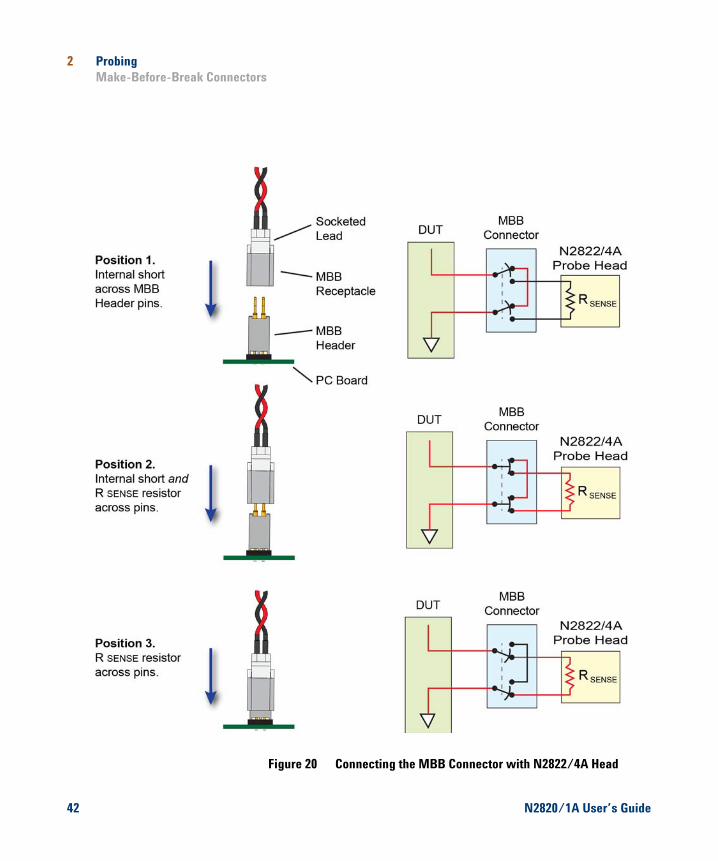
The supplied Make- Before- Break (MBB) connectors allow you to quickly probe multiple locations on your DUT without having to solder or unsolder the leads. You can easily connect and disconnect them without interrupting the circuit- under- test as shown in Figure 18. The MBB can be used with all RSENSE probe heads including the N2825A user- defined probe head.
Figure 18 Probing with MBB Connector on DUT
MBB connectors consist of a receptacle and header. A sensor lead with socket snaps onto the receptacle as shown in Figure 19 on page 41.
The header has two 0.025” square pins that are soldered onto pads with 2.54 mm (0.1”) contact- pitch spacing.

Probing 2Make-Before-Break Connectors
N2820/1A User’s Guide 41
Figure 19 Socketed Lead Snaps Onto the MBB Receptacle
To Use the MBB Connector
1 Solder one or more headers onto your DUT.
2 Snap the sensor lead’s socket onto the receptacle.
NOTE Once attached to the receptacle, the socket cannot easily be removed without deforming the receptacle. For information on ordering additional socketed sensor leads, receptacles, and headers, refer to Table 2 on page 11.
3 Repeatedly plug the lead with MBB receptacle onto different headers as you probe your DUT.
Figure 20 illustrates how the MBB connection changes as you gently push the socket/receptacle onto the header while using an N2822/4A head. Figure 21 on page 43 shows the schematic when using the MBB with an N2825A user- defined head.
42 N2820/1A User’s Guide
2 ProbingMake-Before-Break Connectors
Figure 20 Connecting the MBB Connector with N2822/4A Head

Probing 2Make-Before-Break Connectors
N2820/1A User’s Guide 43
Figure 21 MBB Connector With N2825A User-Defined Head
To Download the HeaderGerber File
You can download a Gerber file from Agilent that defines many of the parameters needed to design the PC board connection for the MBB header. Gerber files can be imported into many PC board layout applications. You can download this file using the following URL:
www.agilent.com/find/N2828A
For information on the physical dimensions of the MBB header and MBB socket/receptacle, refer to Figure 34 on page 59.

44 N2820/1A User’s Guide
2 ProbingTo Attach the Sensor Leads
To Attach the Sensor Leads
1 Detach the head from the probe amplifier as explained in “Attaching a Probe Head” on page 34.
2 Position the sensor leads into the head’s access hole as shown in Figure 22.
Figure 22 Placing the Leads into the Tip’s Access Hole
3 Flip the head as shown in Figure 23 and insert the leads up through the PC board’s solder holes TP1 and TP2. Insert the RED (+) lead at TP2 and the BLACK lead at TP1. Solder the leads in place.
Figure 23 Lead Positions on PC Board

Probing 2To Change an N2825A Head’s ID Resistor
N2820/1A User’s Guide 45
To Change an N2825A Head’s ID Resistor
1 Detach the head from the probe amplifier as explained in “Attaching a Probe Head” on page 34.
2 Remove the four hex screws that secure the cover of the N2825A RSENSE head and remove the cover.
Figure 24 Removing the N2825A Cover
3 Remove the PC board from the head.
Figure 25 Remove PC Board
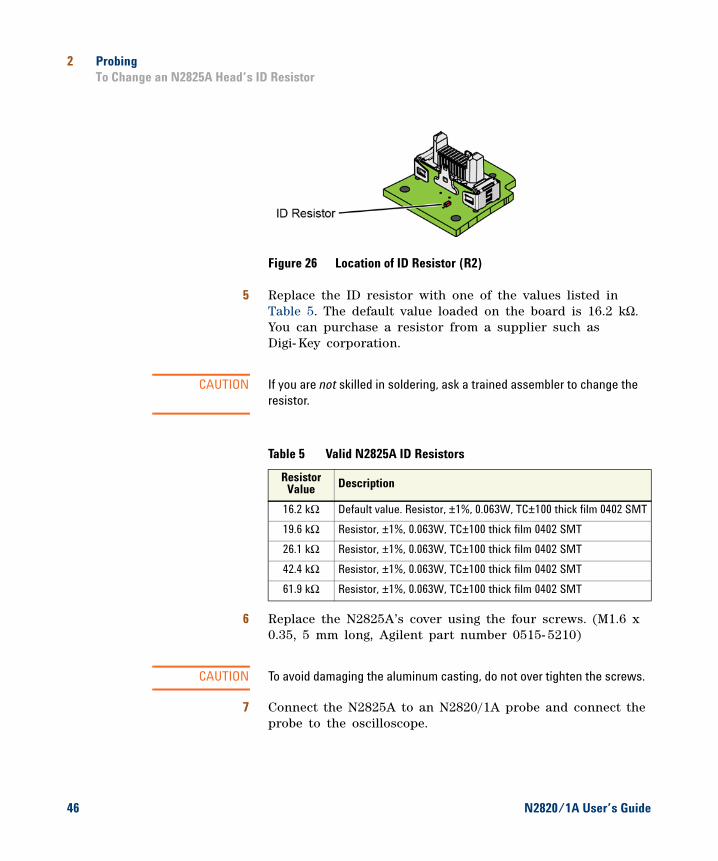
4 On the reverse side of the PC board, locate ID resistor, R2, as shown in Figure 26.
46 N2820/1A User’s Guide
2 ProbingTo Change an N2825A Head’s ID Resistor
Figure 26 Location of ID Resistor (R2)
5 Replace the ID resistor with one of the values listed in Table 5. The default value loaded on the board is 16.2 kW. You can purchase a resistor from a supplier such as Digi- Key corporation.
CAUTION If you are not skilled in soldering, ask a trained assembler to change the resistor.
6 Replace the N2825A’s cover using the four screws. (M1.6 x 0.35, 5 mm long, Agilent part number 0515- 5210)
CAUTION To avoid damaging the aluminum casting, do not over tighten the screws.
7 Connect the N2825A to an N2820/1A probe and connect the probe to the oscilloscope.
Table 5 Valid N2825A ID Resistors
ResistorValue Description
16.2 kΩ Default value. Resistor, ±1%, 0.063W, TC±100 thick film 0402 SMT19.6 kΩ Resistor, ±1%, 0.063W, TC±100 thick film 0402 SMT26.1 kΩ Resistor, ±1%, 0.063W, TC±100 thick film 0402 SMT42.4 kΩ Resistor, ±1%, 0.063W, TC±100 thick film 0402 SMT61.9 kΩ Resistor, ±1%, 0.063W, TC±100 thick film 0402 SMT

Probing 2To Change an N2825A Head’s ID Resistor
N2820/1A User’s Guide 47
8 On Infiniium oscilloscopes,
a Click the Setup > Probe Configuration menu command.
b Select the tab for the probe’s primary channel. N2821A probes only have a primary channel.
c In the User Def Head Resistance field, enter the resistance of the DUT’s RSENSE resistor in ohms.
d In the dialog box, click Add Head to give your head with associated external RSENSE resistor a unique name.
9 On InfiniiVision oscilloscopes,
a Press the front- panel channel key that is associated with the probe’s primary input.
b Click the Probe softkey.
c Press the R-Sense softkey and enter the resistance of the RSENSE resistor that you are using.
10 For future reference, mark your different N2825A heads using a marker pen or tape and record the information in Table 6 on page 48. In the table’s fourth column, record the name that you entered in the Probe Configuration dialog box.
48 N2820/1A User’s Guide
2 ProbingTo Change an N2825A Head’s ID Resistor
Table 6 N2825A Identification
N2825A Marking
Associated DUT RSENSEResistor Value
ID ResistorValue
Probe Name Registeredon the Oscilloscope

Probing 2To Add an RSENSE Resistor to an N2825A Head
N2820/1A User’s Guide 49
To Add an RSENSE Resistor to an N2825A Head
You can add your own RSENSE resistor to N2825A heads. Use a resistor of type ±1%, 0.5W, TC ±600, thick film 2010 SMT. The value of the precision resistor can range from 1 mW to 1 MW in 1 mW increments. When selecting the resistance value, you must observe the 500 mW maximum power rating of the head.
1 Detach the head from the probe amplifier as explained in “Attaching a Probe Head” on page 34.
2 Remove the four hex screws that secure the head’s cover and remove the cover.
Figure 27 Removing the Cover
3 Change or add the RSENSE resistor (R1) as shown in Figure 28.
CAUTION If you are not skilled in soldering, ask a trained assembler to change the resistor.

50 N2820/1A User’s Guide
2 ProbingTo Add an RSENSE Resistor to an N2825A Head
Figure 28 Location of RSENSE Resistor (R1)
4 Replace the head’s cover using the four screws. (M1.6 x 0.35, 5 mm long, Agilent part number 0515- 5210)
CAUTION To avoid damaging the aluminum casting, do not over tighten the screws.
5 Connect the N2825A to an N2820/1A probe and connect the probe to the oscilloscope.
6 On Infiniium oscilloscopes,
a Click the Setup > Probe Configuration menu command.
b Select the tab for the probe’s primary channel. N2821A probes only have a primary channel.
c In the User Def Head Resistance field, enter the resistance of the DUT’s RSENSE resistor in ohms.
d In the dialog box, click Add Head to give your head with associated external RSENSE resistor a unique name.
7 On InfiniiVision oscilloscopes,
a Press the front- panel channel key that is associated with the probe’s primary input.
b Click the Probe softkey.
c Press the R-Sense softkey and enter the resistance of the RSENSE resistor that you are using.

51Agilent Technologies
3Characteristics and Specifications
Current Range Graphs 54Zoomed-In Input Voltage Range Versus Supply Voltage 56Zoomed-In Input Current Range Versus Supply Voltage 57Dimensions 59
This chapter provides the characteristics and specifications for the N2820A and N2821A probes. The probe should be warmed up for at least 20 minutes before any testing and the environmental conditions should not exceed the probe’s specified limits.

52 N2820/1A User’s Guide
3 Characteristics and Specifications
Table 7 Characteristics and Specifications
Item CharacteristicBandwidth (–3 dB) Zoom-Out Channel: DC to 3 MHz
Zoom-In Channel: DC to 500 kHz
Risetime (Tr = 0.35/BW, 10% – 90%) Zoom-Out Channel: < 0.116 µsZoom-In Channel: < 0.7 µs
Minimum Measurable Currenta 250 µA (with N2822A 20 mΩ,)50 µA (with N2824A 100 mΩ,)5 mA (with N2825A user defined 1 mΩ,)500 nA (with N2825A user defined 1 kΩ,)
Maximum Measurable Current 5A (with N2822A 20 mΩ, 500 mW)2.2A (with N2824A 100 mΩ, 500 mW)5A (with N2825A, 1 mΩ installed)1.2 mA (with N2825A user defined 1 kΩ,)
Output Voltage Rate Zoom-In Channel: 6 V/A (with N2822A 20 mΩ)30 V/A (with N2824A 100 mΩ)
Zoom-Out Channel: 0.04 V/A (with N2822A 20 mΩ)0.6 V/A (with N2824A 100 mΩ)
Amplitude Accuracyb (specification) ±3% or 10 µA (whichever is greater)
Maximum Input Voltage ±12V
Burden Voltage (voltage drop on RSENSE) Measured current * RSENSE
Dynamic Range 20,000:1, 86 dB (N2820A)1,000:1, 60 dB (N2821A)
Output Impedance 1 MΩGain (warranted specification) Zoom-In: 300 ±3%
Zoom-Out: 1.95 ±3%
Noise, ACrms 150 µA (with N2822A 20 mΩ, (hi res mode on) c
240 µA (with N2822A 20 mΩ, (hi res mode off)30 µA (with N2824A 100 mΩ, (hi res mode on) b
50 µA (with N2824A 100 mΩ, (hi res mode off)
Sensor Resistor Accuracy ±1% (N2822A, N2824A)
Sensor Resistor Power Rating 500 mW (N2822A, N2824A)
Temperature Coefficient of Sensor Resistor < 20 ppm/°C
Cable Lengths Sensor leads: 16 cmProbe cable: 1.2m
a Vsupply is equal to 5V, solder attached.b Denotes warranted spec after 20 minute warm up. All others entries in the table are characteristics.c With scope with high resolution mode on, sampling rate < 2.5 MSa/s, 20 MHz low-pass filter on.

Characteristics and Specifications 3
N2820/1A User’s Guide 53
Table 8 Environmental Characteristics
Item CharacteristicTemperature (operating) Operating: 0° C to 40° C
Non-Operating: –40° C to 70° CHumidity (operating) Operating: tested at 95% RH @ +40° C
Non-Operating: tested at 90% RH, +65° C
ESD 8 kV HBM
Indoor Use This probe is rated for indoor use only
Table 9 Compatible Oscilloscopes
InfiniiVision Oscilloscopes3000 X-Series (with software version 2.30 or higher)
4000 X-Series (with software version 3.10 or higher)
Infiniiuma Oscilloscopes
a Infiniium 90000A and 90000 X/Q-Series oscilloscopes are not compatible with N2820/1A current probes.
9000A and 9000 H-Series (with software version 4.20 or higher)

54 N2820/1A User’s Guide
3 Characteristics and SpecificationsCurrent Range Graphs
Current Range Graphs
The following graphs show the minimum and maximum current ranges versus RSENSE resistance.
NOTE These graphs represent a condition where the sensor leads are solder attached to the RSENSE resistor, the maximum probe-head power rating of 500 mW is observed, and the oscilloscope is set to high-resolution.
Figure 29 Maximum Current Range

Characteristics and Specifications 3Current Range Graphs
N2820/1A User’s Guide 55
Figure 30 Minimum Current Range

56 N2820/1A User’s Guide
3 Characteristics and SpecificationsZoomed-In Input Voltage Range Versus Supply Voltage
Zoomed-In Input Voltage Range Versus Supply Voltage
For the zoomed- in probe input, the following graph shows the typical input voltage range allowed based on the supply voltage that you are measuring. For example, when measuring a 5V input, the input voltage range is \45 mV.
Figure 31 Zoomed-In Input Voltage Range Versus Supply Voltage
NOTE This plot can be used with N2825A heads (user-defined RSENSE) to verify current range versus supply voltage.

Characteristics and Specifications 3Zoomed-In Input Current Range Versus Supply Voltage
N2820/1A User’s Guide 57
Zoomed-In Input Current Range Versus Supply Voltage
For the zoomed- in probe input, the following two graphs show the typical input current range allowed based on the supply voltage that you are measuring. For example, when using an N2824A head and measuring a 5V input, the current range is \0.54A. When using an N2822A head and measuring a 5V input, the current range is \1.0A.
Figure 32 Zoomed-In Input Current Range Versus Supply Voltage(N2824A 100 mW Head)

58 N2820/1A User’s Guide
3 Characteristics and SpecificationsZoomed-In Input Current Range Versus Supply Voltage
Figure 33 Zoomed-In Input Current Range Versus Supply Voltage(N2822A 20 mW Head)

Characteristics and Specifications 3Dimensions
N2820/1A User’s Guide 59
Dimensions
Figure 34 Probe and Tip Dimensions

60 N2820/1A User’s Guide
3 Characteristics and SpecificationsDimensions

61Agilent Technologies
4Performance Data Plots
N2820A Frequency Response 62N2820A Common Mode Rejection Ratio 64N2820A Step Response 65N2820A Step Tracking 66N2820A Input Impedance 68Input Load Model 69
This chapter provides the performance plots for the N2820A.

62 N2820/1A User’s Guide
4 Performance Data PlotsN2820A Frequency Response
N2820A Frequency Response
BW: . . . . . . . . . . . . . . . . . . . . . . . . . . . . . . . 590 kHz
Figure 35 Frequency Response, Zoomed-In Channel

Performance Data Plots 4N2820A Frequency Response
N2820/1A User’s Guide 63
BW: . . . . . . . . . . . . . . . . . . . . . . . . . . . . . . . 3.5 MHz
Figure 36 Frequency Response, Zoomed-Out Channel

64 N2820/1A User’s Guide
4 Performance Data PlotsN2820A Common Mode Rejection Ratio
N2820A Common Mode Rejection Ratio
Figure 37 Common Mode Rejection Ratio (CMRR)

Performance Data Plots 4N2820A Step Response
N2820/1A User’s Guide 65
N2820A Step Response
Zoomed- In Channel
10–90% rising edge step: . . . . . . . . . . . . . . . 584.2 ns
20–80% rising edge step: . . . . . . . . . . . . . . . 365.8 ns
Zoomed- Out Channel
10–90% rising edge step: . . . . . . . . . . . . . . . 96.76 ns
20–80% rising edge step: . . . . . . . . . . . . . . . 63.33 ns
Figure 38 Step Response

66 N2820/1A User’s Guide
4 Performance Data PlotsN2820A Step Tracking
N2820A Step Tracking
Input Step
10–90% Rise Time: . . . . . . . . . . . . . . . . . . . 1.688 µs
20–80% Rise Time: . . . . . . . . . . . . . . . . . . . 1.153 µs
Output Step
10–90% Rise Time: . . . . . . . . . . . . . . . . . . . 1.769 µs
20–80% Rise Time: . . . . . . . . . . . . . . . . . . . 1.204 µs
Figure 39 Zoomed-In Channel Step Tracking

Performance Data Plots 4N2820A Step Tracking
N2820/1A User’s Guide 67
Input Step
10–90% Rise Time: . . . . . . . . . . . . . . . . . . . 446.9 ns
20–80% Rise Time: . . . . . . . . . . . . . . . . . . . 299.8 ns
Output Step
10–90% Rise Time: . . . . . . . . . . . . . . . . . . . 450.0 ns
20–80% Rise Time: . . . . . . . . . . . . . . . . . . . 302.6 ns
Figure 40 Zoomed-Out Channel Step Tracking

68 N2820/1A User’s Guide
4 Performance Data PlotsN2820A Input Impedance
N2820A Input Impedance
Figure 41 Input Impedance

Performance Data Plots 4Input Load Model
N2820/1A User’s Guide 69
Input Load Model
Figure 42 Input Load Model

70 N2820/1A User’s Guide
4 Performance Data PlotsInput Load Model

71Agilent Technologies
5Performance Verification
Average Gain of Zoomed-In Channel 73Average Gain of Zoomed-Out Channel 77Performance Test Record 80
This chapter describes how to verify the performance of the N2820A and N2821A probes. The performance verification requires an N2825A probe head and consists of verifying the probe’s DC gain.
NOTE The performance measured in this procedure is for the probe by itself. Agilent high performance real-time scopes apply probe correction that will further enhance the performance of the probes.
NOTE Agilent recommends a test interval of one year or 2000 hours of operation.
CAUTION Electrostatic discharge (ESD) can quickly and imperceptibly damage or destroy high performance probes, resulting in costly repairs. Always wear a wrist strap when handling probe components and insure that cables are discharged before being connected.

72 N2820/1A User’s Guide
5 Performance Verification
Table 10 Required Test Equipment
Test Equipment Recommended ModelDigital Multimeter General purpose instrument for DC voltage measurement.
DC Power Supply Recommended: ±20VMaximum: ≤ ±35V
Probe Power Supply Agilent 1143A Probe Offset Control and Power Module
Probe Adapter Agilent N1022A/B Probe Adapter.
Adapters 3.5 mm-to-BNC
BNC-to-banana

Performance Verification 5Average Gain of Zoomed-In Channel
N2820/1A User’s Guide 73
Average Gain of Zoomed-In Channel
This procedure applies to both N2820A and N2821A probes.
NOTE Allow the probe to warm up for at least 20 minutes.
1 Snap an N2825A head onto the N2820/1A probe and connect the test equipment as shown in Figure 43. Be sure to connect the positive side of the DC supply to the red lead on the N2825A head.
Figure 43 Test Setup for Measuring Vin
2 Set the DC power supply to +20 mV.
NOTE Although this is the recommended setting, you can use any voltages up to +35 mV.

74 N2820/1A User’s Guide
5 Performance VerificationAverage Gain of Zoomed-In Channel
3 Record the value of +Vin measured on the multimeter:
+Vin:
4 Move the multimeter’s leads to the banana plug on the output of the N1022A/B as shown in Figure 44.
5 Record the value of +Vout measured on the multimeter:
+Vout:
Figure 44 Test Setup for Measuring Vout
6 Calculate the positive gain of the zoomed- in (primary) channel and record the result in the following line:

Performance Verification 5Average Gain of Zoomed-In Channel
N2820/1A User’s Guide 75
positive gain:
7 Set the DC power supply to –20 mV.
NOTE Although this is the recommended setting, you can use any negative voltage less than –35 mV.
8 Connect the multimeter on the DC power supply as shown in Figure 43 on page 73.
9 Record the value of –Vin measured on the multimeter:
–Vin:
10 Connect the multimeter’s leads to the banana plug on the output of the N1022A/B as shown in Figure 44 on page 74.
11 Record the value of –Vout measured on the multimeter:
–Vout:
12 Calculate the negative gain of the zoomed- in (primary) channel and record the result in the following line:
negative gain:
13 Calculate the average of the two gains:
positive gain+Vout+Vin------------=
negative gain–Vout–Vin-----------=

76 N2820/1A User’s Guide
5 Performance VerificationAverage Gain of Zoomed-In Channel
average gain (zoomed- in):
14 The average gain (zoomed- in) should be 300 ±3%. Enter the value in Table 11 on page 80.
average gain positive gain negative gain+2
------------------------------------------------------------=

Performance Verification 5Average Gain of Zoomed-Out Channel
N2820/1A User’s Guide 77
Average Gain of Zoomed-Out Channel
Perform this procedure only for N2820A probes.
NOTE Allow the probe to warm up for at least 20 minutes.
1 Snap an N2825A head onto the N2820/1A probe and connect the test equipment as shown in Figure 45. Be sure to connect the positive side of the DC supply to the red lead on the N2825A head.
Figure 45 Test Setup for Measuring Vin
2 Set the DC power supply to +500 mV.
NOTE Although this is the recommended setting, you can use any voltage up to +700 mV.

78 N2820/1A User’s Guide
5 Performance VerificationAverage Gain of Zoomed-Out Channel
3 Record the value of +Vin measured on the multimeter:
+Vin:
4 Move the multimeter’s leads to the banana plug on the output of the N1022A/B as shown in Figure 46.
5 Record the value of +Vout measured on the multimeter:
+Vout:
Figure 46 Test Setup for Measuring Vout
6 Calculate the positive gain of the zoomed- out (secondary) channel and record the result in the following line:
positive gain:
positive gain+Vout+Vin------------=

Performance Verification 5Average Gain of Zoomed-Out Channel
N2820/1A User’s Guide 79
7 Set the DC power supply to –500 mV.
NOTE Although this is the recommended setting, you can use any negative voltage less than –700 mV.
8 Connect the multimeter on the DC power supply as shown in Figure 45 on page 77.
9 Record the value of –Vin measured on the multimeter:
–Vin:
10 Connect the multimeter’s leads to the banana plug on the output of the N1022A/B as shown in Figure 46 on page 78.
11 Record the value of –Vout measured on the multimeter:
–Vout:
12 Calculate the negative gain of the zoomed- out (secondary) channel and record the result in the following line:
negative gain:
13 Calculate the average of the two gains:
average gain (zoomed- out):
14 The average gain (zoomed- out) should be 1.95 ±3%. Enter the value gain in Table 11 on page 80.
negative gain–Vout–Vin-----------=
average gain positive gain negative gain+2
------------------------------------------------------------=

80 N2820/1A User’s Guide
5 Performance VerificationPerformance Test Record
Performance Test Record
Table 11 N2820/1A Performance Test Record
Model #: Date: Tested by:
Recommended next test date:
Recommended Test Interval: 1 year / 2000 hours
Probe Amplifier Test Limits Result Pass/Fail
Average Gain of Zoomed-In Channel (N2820/1A)Average Gain (zoomed-in ) 300 ±3%
Average Gain of Zoomed-Out Channel (N2820A only)Average Gain (zoomed-out) 1.95 ±3%

N2820/1A User’s Guide 81
Index
Index
Numerics1143A Probe Offset Control and Power
Module, 72
Aaccessories
replacement, 11supplied, 10
Add Head field, 16Agilent Technologies, contacting, 27Ah, 20attaching probe head, 34
Bbattery-powered devices, 12burden voltage, 35
Ccable
primary, 7secondary, 7
cables, 7channel identification rings, 9Charge Full Screen measurement, 23Charge measurement, 20, 23Charge N Cycles measurement, 23cleaning, 13compatible oscilloscopes, 8connecting probe, 13current consumption, 20current range, 54, 55
Ddimensions, 59
dual-grid view, 9, 18dynamic range
and R-Sense resistor, 24
EESD, 7
Ffloating devices, 12
GGate to Zoom Window, 21, 22Gerber file, MBB header, 43ground lead, 10, 12
Hheader, 40High Resolution settings, 19
IID resistor, 45
values, 46impedance, channel input, 8Infiniium oscilloscope, 8, 18InfiniiVision oscilloscope, 8inspecting, 26
Lleads, 32
Mmake-before-break connector, 9
maximum current range, 54maximum power dissipation, 35MBB connector, 40MBB header, 10
Gerber file, 43MBB receptacle, 10Meas key, 23measurement, Charge, 20minimum current range, 55mobile phone, 12, 20, 24
NN1022B probe adapter, 72N2822A probe head, 11, 35N2824A probe head, 11, 35N2825A user-defined head, 11, 37
converting, 39marking, 48
N2826A, 11N2827A secondary cable, 11N2828A replacement MBB Kit, 11N2829A replacement MBB Kit, 11
Ooscilloscope
compatibility, 8Infiniium, 8, 15, 18, 22InfiniiVision, 8, 16, 23Probe Configuration dialog box, 15
Pperformance test record, 80performance verification, 71phone, mobile, 12, 20power dissipation, maximum, 35

82 N2820/1A User’s Guide
Index
primary cable, 13Primary Channel Output field, 16probe
cleaning, 13configuration, 15connecting, 13inspecting, 26leads, 32N2820A connection order, 13service, 27
Probe Configuration dialog box, 15, 47Probe Configuration menu, 15probe head
attaching, 34ID resistor, 45N2822/4A, 35N2825A, 37
probe power supply, 72Probe softkey, 17, 38, 50probe, configuring, 15, 17probing connections, choices, 33
Rreceptacle, 40replacement kits, 11returning for service, 27RSENSE resistors, 5R-Sense softkey, 17, 38, 50
Ssafety, 28Safety Considerations, 28safety warnings, 28secondary cable, 11, 13
connecting, 13sensor leads, 11socket, 10socketed lead, 40specifications, 51
Ttwisted leads, 10Type
softkey, 23
Uupgrade, 9User Def Head Resistance field, 16user-defined head, 37
Vvoltage, burden, 35
Wwindows
zoom, 18
ZZoom Mode, 20zoom windows, 18
turning off, 19zoom-in, 9Zoom-In softkey, 17zoom-out, 9