agile visualization with roassal -...
TRANSCRIPT

Agile Visualization with Roassal
Chapter 1
Agile Visualization withRoassal
with the participation of:Vanessa Peña-Araya ([email protected])
Attaching a meaning to a large amount of data is challenging without ad-equate tools. Textual outputs are known to be limited in their expressivenessand support for interaction.
Roassal is an agile visualization engine made to visualize and interactwith arbitrary data, defined in terms of objects and their relationships. Roas-sal is commonly employed to produce interactive visualizations and itsrange of applications is diverse. For example, the Moose community usesRoassal to visualize software.
This chapter introduces Roassal’s principles and describes its expressiveAPI to quickly render your data. At the end of the chapter, you will be ableto create interactive and visual representations.
The development of Roassal has been sponsored by ESUG.org. For moreinformation, please visit the Roassal website:http://objectprofile.com/#/pages/products/roassal/overview.html
1.1 Installation and first visualization
Roassal is part of the Moose distribution1. Nothing has to be installed andyou can directly proceed to your first visualization.
1http://www.moosetechnology.org/
Agile Visualization with Roassal

2 Agile Visualization with Roassal
Installing Roassal in a fresh Pharo image is easy, thanks to Gofer andMetacello. Just open a workspace and execute:
Gofer new smalltalkhubUser: 'ObjectProfile'project: 'Roassal';package: 'ConfigurationOfRoassal';load.
(Smalltalk at: #ConfigurationOfRoassal) load
Roassal is known to work with the versions 1.4, 2.0, 3.0, and 4.0 of Pharo.
A first visualization.
The first visualization we will show represents the Collection class hierarchy.It defines each class as a box connected with its subclasses. Each box displaysthe number of methods and number of instance variables of the representedclass.
view := ROView new.classElements := ROElement forCollection:
Collection withAllSubclasses.
classElementsdo: [ :c |
c width: c model instVarNames size.c height: c model methods size.c + ROBorder.c @ RODraggable ].
view addAll: classElements.
associations := classElementscollect: [:c |
(c model superclass = Object)ifFalse: [ (view elementFromModel: c
model superclass) -> c]]thenSelect: [ :assoc | assoc isNil not ].
edges := ROEdge linesFor: associations.view addAll: edges.
ROTreeLayout new on: view elements.view open
Figure 1.1: First visualization using the Roassal framework
How to achieve this visualization will be explained in this chapter. Thenext chapter details how to create it using the Mondrian domain-specific

1.1 Installation and first visualization 3
language (DSL) by using the Mondrian builder, which is part of Roassal.
Roassal Easel
The Roassal easel is a tool to interactively script visualizations. Themetaphor used with the easel is to turn the programmer into a painter carry-ing out the work on an easel: creating, adjusting, erasing are just a few (key)strokes away.
The Roassal easel is accessible from the Pharo World menu. Just look forthe R icon2.
The easel is made of two independent windows, the one on the left-handside renders the script written in the textual window on the right-hand side.By accepting (Cmd-s, Alt-s / right-clicking and pressing accept) in the edi-tor, the visualization will be updated. This is the same keystroke used foraccepting a method in the system browser. The advantage of this is to havea short feedback loop. With this, the meaning of your script is always onekeystroke away.
The visualization window contains many examples of visualizations, in-cluding a step-by-step tutorial. Examples are separated in two categories:ROExample and ROMondrianExample, and are accessible by clicking in the exam-ples button in the upper part of the visualization window.
2Note that a Glamour-based easel is also provided, under the Moose section of the Worldmenu. The Glamour-based Roassal easel is similar to the easel presented here. A dedicatedpresentation of this version may be found in the moose book, http://themoosebook.org.

4 Agile Visualization with Roassal
Figure 1.2: Roassal Easel examples separated by the ROMondrianViewBuilderand ROExample categories
The ROMondrianExample category includes examples created with Mon-drian, a domain specific language built at on top of Roassal. These examplesprimarily use the ROMondrianViewBuilder class to make a visualization. TheROExample category directly illustrates Roassal.
1.2 Roassal core model
The root of each visualization is an instance of the class ROView, which isthe container for all the graphical components to be rendered. Such compo-nents are instances of a subclass of ROAbstractComponent, typically instancesof ROElement and ROEdge. Usually, a graphical component holds a referenceto a domain object. Some visual properties (such as the size or color) may bedirectly deduced from the domain object. We will shortly come back to thatpoint. For now, we will illustrate the basic and fundamental operations.
Adding an element. The very first step in seeing graphical components,is to add them to a view, and then open the view. This is exactly what thefollowing code snippet does.

1.2 Roassal core model 5
view := ROView new.element := ROElement new size: 100.view add: element.view open.
It creates and opens a visualization with a single element of a squaresize of 100 pixels. However, by executing this code nothing appears in thevisualization. The element has effectively been added to the view, but wehave not told the element how it should be rendered.
Adding a Shape. The visual aspect of an element is given by shapes, in-stances of subclasses of ROShape. By default, every element has no shape3.Let’s add some shape (a border) to our element:
view := ROView new.element := ROElement new size: 100.element addShape: ROBorder. "added line"view add: element.view open.
Unsurprisingly, adding a shape to an element is simply carried out bysending the addShape: message with the shape we want to add. Since this isa frequent operation, one can use the + message to achieve the same effect.We could have instead written element + ROBorder.
In this example we added the ROBorder shape. As its name suggests,ROBorder adds a squared border to the ROElement. By default, the color fora ROBorder is black. Many other shapes are available, including customiz-able labels, circles or filled rectangles. Such shapes may also be composed tocreate sophisticated visual aspects. The notion of shapes will be detailed inSection 1.3.
Reacting to events. Currently, our lonely element cannot do much. Tomake our element aware of user actions, such as clicking, drag-and-drop,keystroking, we need to specify event callbacks.
As in most user interface and graphical frameworks, each action a usermay perform generates an event. Such an event is an instance of a subclassof an ROEvent. To make the graphical element responsive with an event, ablock has to be associated to an event class and attached to the graphicalelement.
3An element always has a shape, instance of RONullShape. The null object design pattern ishere employed.

6 Agile Visualization with Roassal
For example, to make our square responsive to user clicks, we need toadd an event handler, i.e., the block that will be executed when the eventoccurs:
view := ROView new.element := ROElement new size: 100.element + ROBorder."Open an inspector when clicking"element on: ROMouseClick do: [ :event | event inspect ].view add: element.view open.
Clicking on the square will now open an inspector. In the meantime, wefavor the message + over addShape: since it is shorter and just as informative.
Interaction for complex response. Although widely used in commongraphical frameworks, directly answering to user actions is often too simplefor handling complex situations. Consider dragging-and-dropping, whichhappens by moving the mouse while maintaining a mouse button pressed.Although a common operation, drag-and-drop is quite complex. For exam-ple, the mouse movement in pixels needs to be projected in the plan of the el-ement and the visualization needs to be refreshed. Since this is a common op-eration, we will save the programmer from using a construct like element on:ROMouseDrag do: [ ... ]. Instead, we provide interactions, a lightweight mech-anism to reuse and compose event handlers. Making our non-movable ele-ment draggable is simply done with element @ RODraggable. The @ method isa shortcut for addInteraction:. We will detail other interactions in Section 1.7.
RODraggable is a subclass of ROInteraction, the root of all the interactions inRoassal. RODraggable allows an element to react to a mouse drag. Our smallexample is refined as:
view := ROView new.element := ROElement new size: 100.element
+ ROBorder "-> add shape"@ RODraggable. "-> add interaction"
view add: element.view open.
More Elements. Interesting visualizations are likely to contain a large num-ber of elements. Elements may be added either with successive invocationsof add: on a ROView, or in one shot by sending addAll:. Consider:

1.2 Roassal core model 7
view := ROView new.element1 := ROElement new size: 100.element2 := ROElement new size: 50.elements := Array with: element1 with: element2.elements do: [ :el | el + ROBorder @ RODraggable ].view addAll: elements.view open.
The code above opens a window with two square elements, with the ori-gin at the top left corner. We first create two elements of size 50 and 100,respectively, and add them to the view using the addAll: message. We makethe two elements with borders and both are draggable. Note that in our ex-ample the shape and the interaction are added before opening the view. Itcan be done afterwards. Even once added and rendered, graphical compo-nents are free to be modified.
An element may be translated by sending translateBy: or translateTo: with apoint as parameter. The parameter representing the step or the position inpixels. The axes are defined as shown in Figure 1.2, the x-axis increases fromleft to right and the y-axis from top to bottom.
view := ROView new.element1 := ROElement new size: 100.element2 := ROElement new size: 50.elements := Array with: element1 with:
element2.elements do: [ :el | el + ROBorder @
RODraggable ].view addAll: elements.element2 translateBy: [email protected] open.
When a visualization contains more than one element it is better to havean algorithm to automatically position each element. Such an algorithm iscalled a layout. Roassal provides many layouts to arrange elements by po-sitioning them in the space. A layout in Roassal is a subclass of ROLayout.Layouts are described in Section 1.5.
Nesting Elements. A ROElement object can also contain other ROElement ob-jects. We refer to this containment relationship as nesting. Nesting enableselements to be structured as a tree. In addition, as shown by the followingexample, the location of children is relative to that of the parent. This meansthat when we translate the parent, the children will be translated as well.

8 Agile Visualization with Roassal
view := ROView new.parent := ROElement new
size: 100;+ ROBorder.
children := ROElement newsize: 50;+ ROBorder red.
parent add: children.view add: parent."Translate the parent"parent translateTo: [email protected] open.
Nesting elements are stretchable per default: when translating a childnode, its parent’s bounds will be extended to contain this element in its newposition.
view := ROView new.parent := ROElement new
size: 100;+ ROBorder.
children := ROElement newsize: 50;+ ROBorder red.
parent add: children.view add: parent."Translate the children"children translateTo: [email protected] open.
Each element has a resize strategy stored as resizeStrategy instance vari-able. By default, the resize strategy is an instance of ROExtensibleParent,which means a parent will extend its bounds to fit all its child elements.A number of resize strategies are available; just look for the subclasses ofROAbstractResizeStrategy class, as its subclasses each define a strategy to beused by elements.
So far, we have introduced the interactions, the shapes, the child el-ements, and briefly mentioned the possibility to have an object domain.Schematically, an element representation looks like Figure 1.3.

1.2 Roassal core model 9
Figure 1.3: ROElement representation
Translating the view’s camera. A view also answers to the translateBy: andtranslateTo: messages. Even if it looks like it, it is not the view that changes itsposition but its camera. The camera component of a view, represented by aninstance of ROCamera, is the point of view from which a visualization objectis actually viewed. More about the camera can be found in Section 1.8
The Collection hierarchy example
As an example we will create the Collection hierarchy visualization seen ear-lier in this chapter. We will build it by executing the following steps:
1. Add all data with no particular shape. In this case data is the Collectionclass with all its subclasses;
2. render each class according to its characteristics;
3. add a link between a class and its superclass;
4. arrange the elements as an hierarchy with a layout.
In this section, we start with the first step: adding all elements represent-ing each class of the hierarchy.
We can do this easily by sending the forCollection: message to the ROElementclass, which is a helper to build ROElements from a collection. Each ROElementfrom the returning value of this message is a representation of each elementfrom the parameter. We add a border shape to each of them and make themdraggable for easier manipulation. Finally, we apply a default layout to seeall the elements in the view. More explanation of how layouts work willfollow later.

10 Agile Visualization with Roassal
view := ROView new.classElements := ROElement forCollection: Collection withAllSubclasses.classElements
do: [ :c | c + ROBorder.c @RODraggable ].
view addAll: classElements.ROHorizontalLineLayout new on: view elements.view open.
Figure 1.4: Adding the elements representing classes
1.3 Detailing shapes
A graphical component (instance of ROElement or ROEdge) is given a shapeby sending the + (or addShape:) message with an argument that is either asubclass of ROShape, or an instance of such a class.
Similarly, the @ message may take as argument either a class or an in-stance, in order to override default values.
When the parameter of + is a shape, attributes such as the color to befilled or the border color may be individually set. When the class is sent asparameter, the element will be shaped with an instance of that class withdefault values for each of its attributes.
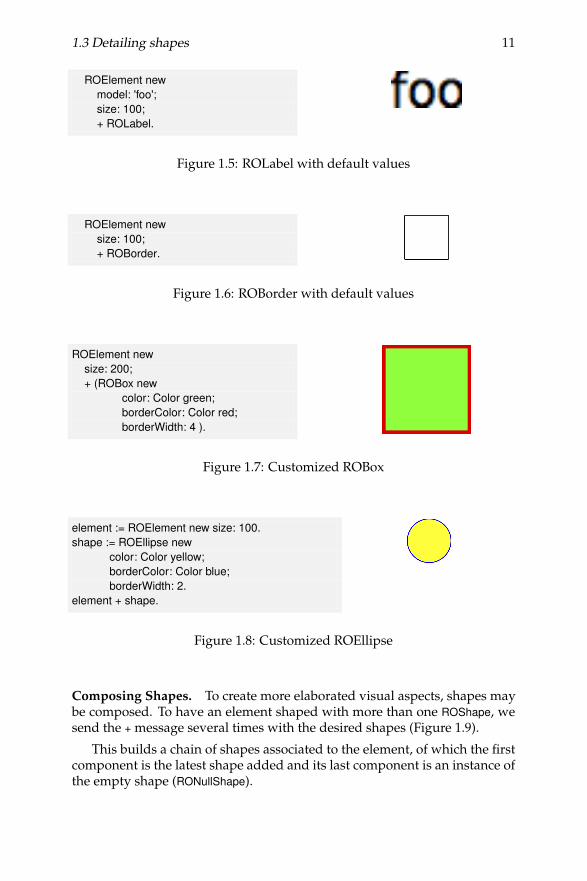
Some of the shapes available are label (ROLabel), border (ROBorder), box(ROBox) and circle (ROEllipse). By default, ROLabel will display the printStringvalue of the model (i.e., object domain) of the element. It is also possible tochange it by setting a custom text as shown in Figure 1.5. When applyingROBorder, ROBox and ROEllipse to a ROElement, the shape will be adapted tothe bounds of the element. It is also possible to set attributes as color, bordercolor or border width to a shape. This is shown in Figure 1.6, Figure 1.7 andFigure 1.8.
1.3 Detailing shapes 11
ROElement newmodel: 'foo';size: 100;+ ROLabel.
Figure 1.5: ROLabel with default values
ROElement newsize: 100;+ ROBorder.
Figure 1.6: ROBorder with default values
ROElement newsize: 200;+ (ROBox new
color: Color green;borderColor: Color red;borderWidth: 4 ).
Figure 1.7: Customized ROBox
element := ROElement new size: 100.shape := ROEllipse new
color: Color yellow;borderColor: Color blue;borderWidth: 2.
element + shape.
Figure 1.8: Customized ROEllipse
Composing Shapes. To create more elaborated visual aspects, shapes maybe composed. To have an element shaped with more than one ROShape, wesend the + message several times with the desired shapes (Figure 1.9).
This builds a chain of shapes associated to the element, of which the firstcomponent is the latest shape added and its last component is an instance ofthe empty shape (RONullShape).

12 Agile Visualization with Roassal
| element label border circle |element := ROElement new size: 180.label := ROLabel new text: 'composed shape'.border := ROBorder new color: Color red.circle := ROEllipse new
color: Color yellow.borderWidth: 0.
element + label.element + border.element + circle.
Figure 1.9: Composing shapes
The Collection hierarchy example
We now will add some shapes to the classes in the Collection hierarchy exam-ple. Each class representation will have a width representing the number ofinstance variables of the class and a height representing the number of itsmethods.
view := ROView new.classElements := ROElement forCollection: Collection withAllSubclasses.classElements do: [ :c |
c width: c model instVarNames size.c height: c model methods size.c + ROBorder.c @ RODraggable ].
view addAll: classElements.ROHorizontalLineLayout new on: view elements.view open.
Figure 1.10: Adding some shape for each class
1.4 Edges: linking elements 13
1.4 Edges: linking elements
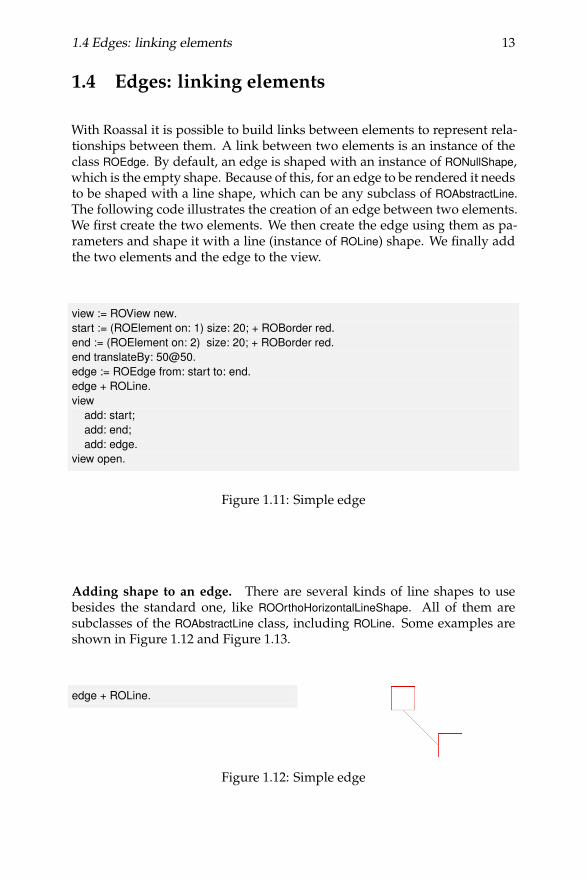
With Roassal it is possible to build links between elements to represent rela-tionships between them. A link between two elements is an instance of theclass ROEdge. By default, an edge is shaped with an instance of RONullShape,which is the empty shape. Because of this, for an edge to be rendered it needsto be shaped with a line shape, which can be any subclass of ROAbstractLine.The following code illustrates the creation of an edge between two elements.We first create the two elements. We then create the edge using them as pa-rameters and shape it with a line (instance of ROLine) shape. We finally addthe two elements and the edge to the view.
view := ROView new.start := (ROElement on: 1) size: 20; + ROBorder red.end := (ROElement on: 2) size: 20; + ROBorder red.end translateBy: [email protected] := ROEdge from: start to: end.edge + ROLine.view
add: start;add: end;add: edge.
view open.
Figure 1.11: Simple edge
Adding shape to an edge. There are several kinds of line shapes to usebesides the standard one, like ROOrthoHorizontalLineShape. All of them aresubclasses of the ROAbstractLine class, including ROLine. Some examples areshown in Figure 1.12 and Figure 1.13.
edge + ROLine.
Figure 1.12: Simple edge
14 Agile Visualization with Roassal
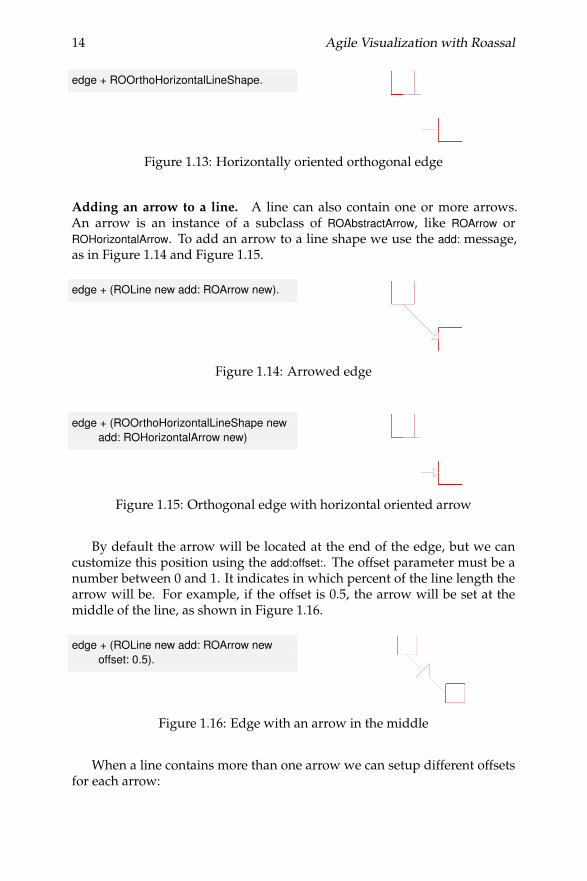
edge + ROOrthoHorizontalLineShape.
Figure 1.13: Horizontally oriented orthogonal edge
Adding an arrow to a line. A line can also contain one or more arrows.An arrow is an instance of a subclass of ROAbstractArrow, like ROArrow orROHorizontalArrow. To add an arrow to a line shape we use the add: message,as in Figure 1.14 and Figure 1.15.
edge + (ROLine new add: ROArrow new).
Figure 1.14: Arrowed edge
edge + (ROOrthoHorizontalLineShape newadd: ROHorizontalArrow new)
Figure 1.15: Orthogonal edge with horizontal oriented arrow
By default the arrow will be located at the end of the edge, but we cancustomize this position using the add:offset:. The offset parameter must be anumber between 0 and 1. It indicates in which percent of the line length thearrow will be. For example, if the offset is 0.5, the arrow will be set at themiddle of the line, as shown in Figure 1.16.
edge + (ROLine new add: ROArrow newoffset: 0.5).
Figure 1.16: Edge with an arrow in the middle
When a line contains more than one arrow we can setup different offsetsfor each arrow:

1.4 Edges: linking elements 15
line := ROLine new.line add: ROArrow new offset: 0.1.line add: ROArrow new offset: 0.5.edge + line.
Figure 1.17: Edge with two arrows
The Collection hierarchy example
Now we know how to make links between elements. With the followingcode we can create edges between each class to its superclass. To do so, wefirst need to create a collection of associations to build edges with them. Eachassociation represents a starting point as the association key and an endingpoint as the association value. For this example each association goes from aROElement representing a class to the ROElement that represents its superclass.
Once we have the associations, we create the instances of ROEdge by us-ing the linesFor: message. This message takes as parameter a collection ofassociations and returns a collection of edges.
view := ROView new.classElements := ROElement forCollection: Collection withAllSubclasses.view addAll: classElements.associations := OrderedCollection new.classElements do: [ :c |
c width: c model instVarNames size.c height: c model methods size.c + ROBorder.c @ RODraggable.(c model superclass = Object)
ifFalse: [ associations add: ((view elementFromModel: c model superclass) -> c)]].
edges := ROEdge linesFor: associations.view addAll: edges.ROHorizontalLineLayout new on: view elements.view open

16 Agile Visualization with Roassal
Figure 1.18: Adding links between each class and its superclass
Now we have each class in the Collection hierarchy with the shape wewant and connected with each superclass. However we do not see a realhierarchy. This is because we need an appropriate layout to arrange all theelements of the view. The next section covers how to apply layouts to ele-ments.
1.5 Layouts
A layout defines how a collection of elements is automatically arranged. Toapply a layout, use the on: message with a collection of ROElements as param-eter. In the example shown in in Figure 1.19 we use the spriteOn: conveniencemessage to create a collection of ROElements, each one with size 50, shapedwith a red border and draggable. We then apply a layout to arrange theelements on a grid.
view := ROView new.view addAll: (ROElement spritesOn: (1 to: 4)).ROGridLayout on: view elements.view open.
Figure 1.19: ROGridLayout applied to a group of ROElements
Figure 1.20 illustrates some of the layouts available in Roassal. Theselayouts, in addition to those not presented here, can be found as subclassesof ROLayout.
As a layout is applied to a collection of elements, different sets of ele-ments can have different layouts. In the following example two collections

1.5 Layouts 17
(a) ROGridLayout (b) ROCircleLayout (c) ROTreeLayout
(d) ROTreeMapLayout (e) ROVerticalLineLayout (f) ROHorizontalLineLayout
Figure 1.20: Some of the layouts available applied to a group of elements
of elements are arranged with two layouts. The first one aligns elementsalong a vertical line and the second along a horizontal line. We first cre-ate elements for the vertical line, apply the ROVerticalLineLayout and shapethem with a label. We then do the same for the second group, using theROHorizontalLineLayout and spacing them to avoid overlapping.

18 Agile Visualization with Roassal
| view verticalElements horizontalElements |view := ROView new.verticalElements := ROElement spritesOn: (1 to: 3).ROVerticalLineLayout on: verticalElements.verticalElements do: [ :el | el + ROLabel ].horizontalElements := ROElement spritesOn: (4 to: 6).ROHorizontalLineLayout on: horizontalElements.horizontalElements do: [ :el |
el + ROLabel.el translateBy: (60@ 0) ]. "spacing"
viewaddAll: horizontalElements;addAll: verticalElements.
view open.
Figure 1.21: Applying different layouts to different sets of elements
Layouts in nested structures. Layout of nested elements is relative to eachelement’s containers. In the following example, two elements are created,each one with three child elements arranged as a grid. We finally arrangethe parent elements using a horizontal line layout.
view := ROView new.elements := (ROElement spritesOn: (1 to: 2)).elements
do: [ :el | el addAll: (ROElement spritesOn: (1 to: 3))."arranging the children nodes"ROGridLayout on: el elements.].
view addAll: elements.ROHorizontalLineLayout on: view elements.view open.
Figure 1.22: Nested elements with different layouts
Creating a new layout. Roassal offers a number of layouts (over 23 at thetime this chapter is being written). It may happen that one needs a new

1.5 Layouts 19
layout to accommodate a particular representation. This section is aboutdedicate layouts. Before jumping into the creation a new layout, we firstneed to understand how layouts are structured.
All layout classes inherit from ROLayout. This class defines the most com-monly used method to apply a layout, on:, from the instance or from the classside. The method on: calls to executeOnElements:, which is the main method toapply a layout. This method is shown in the following code:
ROLayout >> executeOnElements: elements"Execute the layout, myself, on the elements"maxInterations := elements size.self doInitialize: elements.self doExecute: elements asOrderedCollection.self doPost: elements.
The executeOnElements: method invokes three hook methods:
1. doInitialize: Method executed before beginning the layout. Useful whenthe graph to be ordered needs to be prepared;
2. doExecute: Apply the layout algorithm. Elements are relocated accord-ingly;
3. doPost: Method executed after having performed the layout.
A pre- and post-processing may be defined. This is useful for example ifthe layout is multi-staged or if appropriate events have to be emitted. Theseactions are set as callbacks using the ROLayoutBegin and ROLayoutEnd events.ROLayoutBegin and ROLayoutEnd are announced by doInitialize: and doPost:, re-spectively. An example of its use is shown in the following code:
| layout t |t := 0.layout := ROHorizontalLineLayout new.layout on: ROLayoutBegin do: [ :event | t := t + 1 ].layout on: ROLayoutEnd do: [ :event | t := t + 1 ].layout applyOn: (ROElement forCollection: (1 to: 3)).self assert: (t = 2).
The doExecute: method arranges elements using a particular algorithm.This method takes as parameter the collection of elements to lay out.
Now we know the structure of the ROLayout class, we will define a newlayout, called RODiagonalLineLayout, to position elements along a diagonal line.Creating a subclass of ROLayout is the first step.
ROLayout subclass: #RODiagonalLineLayoutinstanceVariableNames: 'initialPosition'

20 Agile Visualization with Roassal
classVariableNames: ''poolDictionaries: ''category: 'Roassal-Layout'
The instance variable initialPosition defines where the virtual line starts,which means, where the first element of the line will be located. This variableis set in an initialize method:
RODiagonalLineLayout >> initializesuper initialize.initialPosition := 0@0.
RODiagonalLineLayout >> initialPosition: aPointinitialPosition := aPoint
RODiagonalLineLayout >> initialPosition^ initialPosition
If the layout needed to execute special actions before or after it is applied,we would overwrite the doInitialize: or doPost: methods. However, this is notthe case. The method we need to overwrite is doExecute: which actually doesthe job: translating all the elements along the virtual diagonal line:
RODiagonalLineLayout >> doExecute: elements| position |position := initialPosition.elements do: [ :el |
el translateTo: position.position := position + el extent ]
We can test our layout with the following code:
| view elements |view := ROView new.elements := ROElement spritesOn: (1 to: 3).view addAll: elements.RODiagonalLineLayout on: view elements.view open.
Figure 1.23: Diagonal Line layout applied to a collection of elements
One key point of the layouts in Roassal is to consider the size of the el-ements to layout. When defining a new layout, remember to make youralgorithm use the element size.

1.5 Layouts 21
The Collection hierarchy example
As we need a hierarchy for the Collection example, the ROTreeLayout is usefulin obtaining an adequate visualization.
"Create the elements to be displayed"view := ROView new.classElements := ROElement forCollection: Collection withAllSubclasses.view addAll: classElements.associations := OrderedCollection new.
classElements do: [:c |"Make each element reflect their model characteristics"
c width: c model instVarNames size.c height: c model methods size.
"Add shape for the element to be seen"c + ROBorder.
"Make it draggable by the mouse"c @ RODraggable.
"Create associations to build edges"(c model superclass = Object)
ifFalse: [ associations add: ((view elementFromModel: c model superclass) -> c)]].
"Add edges between each class and its superclass"edges := ROEdge linesFor: associations.view addAll: edges.
"Arrange all the elements as a hierarchy"ROTreeLayout new on: view elements.view open
The resulting visualization can be seen in Figure 1.24.

22 Agile Visualization with Roassal
Figure 1.24: Collection class hierarchy with width representing the numberof instance variables and height the number of methods.
1.6 Events and Callbacks
Roassal allows any visible component in a visualization, including the viewitself, to emit and react to events. There are two kinds of events definedin Roassal. The first kind of event is low level and represents user actions,which includes clicking or moving the mouse or pressing a key. The secondkind of event includes those triggered by the view itself, which typicallyincludes movements of the camera, applying a layout, or refreshing the view.All events inherit from the ROEvent class.
To see how events work, we will show an example of a visualization thatreacts to mouse clicks, translating an element to where the click was made.There are several event classes to deal with mouse events: ROMouseClick,ROMouseMove, ROMouseEnter and ROMouseLeave, among others; and to dealwith key pressing, the ROKeyDown class.
We will make the visualization react to mouse left click using theROLeftMouseClick event. The reaction will create an animation to translate theelement to the event’s position.

1.7 The interaction hierarchy 23
We use the on:do: message to set a Roassal object to react to an event,as shown in the following code. The first parameter must be the class ofthe expected event and the second one a block, that defines the action to beexecuted when the event is received.
view := ROView new.el := ROElement sprite.view add: el.view
on: ROMouseLeftClickdo: [ :event | ROLinearMove new for: el to: event position ].
view open.
ROLinearMove is one of the Roassal interactions. As its name suggests, itcreates an animation for an element to be translated in a linear move. Moreabout interactions is explained in the following section.
1.7 The interaction hierarchy
A graphical element responds to events by setting callbacks or interactions.We have already presented how to set callbacks. In this section we will detailthe interactions.
The root class of all Roassal interactions is ROInteraction. An interaction isset to an element by sending the @ message with a subclass of ROInteraction oran instance of such a class as parameter. There are diverse interactions thatcan be applied to an element such as RODraggable or ROGrowable. RODraggableallows an element to be dragged by the mouse and ROGrowable makes an
element increase its size when clicked.
An element may have more than one interaction. For example, we canapply both RODraggable or ROGrowable to an element. The following codeillustrates this. Click the element to make it bigger or drag it on the view.
| view element |view := ROView new.element := ROElement new size: 10.element
+ ROBox;@ RODraggable;@ ROGrowable.
view add: element.view open.
Some interactions are more complex to set up, like popup elements whichare displayed when the mouse is over an element.

24 Agile Visualization with Roassal
From the available interactions in Roassal, only a few examples are pre-sented here.
ROAbstractPopup
ROAbstractPopup allows elements to react to mouse over events by display-ing a popup. There are two kinds of popups, (i) ROPopup, which by de-fault displays a box with the printString value of the element model; and (ii)ROPopupView which displays a custom view.
To add a popup to an element just send the @ message with the ROPopupclass as argument. It is also possible to set up a custom text using the text:message with a string as parameter.
In the following example, we create an element by sending the spriteOn:message to the ROElement class, with an arbitrary string as its model. Theresulting element has size 50, a red border and is draggable by the mouse.We finally add the ROPopup to the element.
view := ROView new.el := ROElement spriteOn: 'baz'.el @ ROPopup. "Or with custom text -> (ROPopup text: 'this is custom text')"view add: el.view open.
Figure 1.25: ROPopup
ROPopupView is slightly more complex as it needs the definition of theview to popup. This interaction can be created by sending the view: messageto the ROPopupView class with the new view to be displayed. The parametercan also be a block that defines a view. When the mouse is over an element,the block is evaluated using the same element as parameter, allowing theview to be dynamically created.
The following example creates a view with five elements. Each one reactswhen the mouse is placed over it by displaying a popup. The popup view isdefined as a block that creates a view with the same number of nodes as theelement model where the mouse is. For example, and as Figure 1.7 shows,when passing the mouse over the node “3”, a popup with three gray boxesappears.

1.7 The interaction hierarchy 25
view := ROView new.elements := ROElement spritesOn: (1 to: 5)."create the view to popup"viewToPopup := [ :el | | v |
v := ROView new."Add as many elements as the value represented"v addAll: (ROElement forCollection: (1 to: el model)).v elementsDo: [ :e | e size: 20; + ROBox ].ROGridLayout on: v elements.v ].
elements do: [ :e | e + ROLabel; @ (ROPopupView view: viewToPopup)].view addAll: elements.ROHorizontalLineLayout on: view elements.view open.
Figure 1.26: ROPopupView that creates a view with the same number of ele-ments as the model of the element the mouse is over.
RODynamicEdge
A recurrent need when visualizing data elements and their relations is show-ing outgoing edges when the mouse points to an element. Instead of tryingto get the right mixture of callbacks when entering or leaving the element,the interaction RODynamicEdge considerably eases the task.
The following example makes some lines appear when the mouse hoversover some elements:
| rawView el1 el2 el3 |rawView := ROView new.rawView add: (el1 := ROBox element size: 20).rawView add: (el2 := ROBox element size: 20).rawView add: (el3 := ROBox element size: 20).ROCircleLayout on: (Array with: el1 with: el2 with: el3).el1 @ RODraggable.el2 @ RODraggable.el3 @ RODraggable.el1 @ (RODynamicEdge toAll: (Array with: el2 with: el3) using: (ROLine arrowed color:
Color red)).rawView open

26 Agile Visualization with Roassal
ROAnimation
Animations are also interactions in Roassal (i.e., ROAnimation is a subclassof ROInteraction). All animations are subclasses of ROAnimation. Some ani-mations allow elements to be translated either linearly at a constant speed(ROLinearMove), with an acceleration (ROMotionMove), or following a mathe-matical function (ROFunctionMove). ROZoomInMove and ROZoomOutMove per-form an animation zooming in or out.
Each animation has a number of cycles to complete, executing each oneby sending the doStep message. A ROAnimation also allows one to set a blockto be executed after the animation is finished, using the after: message. It isimportant to notice that any action to be carried out after the animation isfinished must be set before the animation is triggered, otherwise it will notbe executed.
view := ROView new.element := ROElement new.element size: 10.element + (ROEllipse color: Color green).view add: element.element translateBy: [email protected] new
nbCycles: 360;blockY: [ :x | (x * 3.1415 / 180) sin * 80 + 50 ];on: element.
view open.
Figure 1.27: Animating function
Figure 1.27 presents ROLinearMove. The following code allows an elementto follow a sinus curve using the ROFunctionMove.
1.8 Understanding a View’s Camera
A view’s camera represents the point of view from which the space is actu-ally viewed.
When translateBy: or translateTo: messages are sent to a view, what actuallyhappens is that its camera moves instead of the view itself. The positionof the camera is given by the position message. The camera’s position is setmanually sending the same messages to the camera, translateBy: or translateTo:,but using negated values as parameters. This means that if the view has tobe translated by 10 pixels horizontally and vertically, we can do it like this:

1.8 Understanding a View’s Camera 27
view translateBy: 10@10
Or translate the view’s camera by hand:
view camera translateBy: (-10)@(-10)
A camera has an extent, which is what we are seeing, and a real extent,which represents the far extent. The extent of the view’s camera affects theway a view is drawn in a canvas. When rendering a view, each point, rect-angle or other shape that needs to be drawn will be plotted according tothe camera’s extent. This is done by transforming each absolute position invirtual points relative to the camera’s vision. For example, when zoomingin on a view, the content on the extent is “stretched” to fill the real extent,which makes objects bigger. The extent and the real extent of the camera aremodified using extent: and realExtent: accessors, respectively. The camera alsostores the window size of the visualization.
The camera has an altitude from the view, which is computed using theextent. The smaller the extent is, the lower the camera is located, and vice-versa. The altitude of the camera can be set by sending the altitude: messageusing a number as parameter. A camera cannot be rotated, only translated.This also means that the camera is always perpendicularly looking at theview.
Figure 1.28 illustrates what we have just mentioned. It indicates all of theinformation regarding the view for which it is associated.We also see that thevisible part of the visualization is given by the camera’s extent.

28 Agile Visualization with Roassal
(a) Camera diagram
(b) Camera extent, showingwhat it is actually seen
Figure 1.28: Components of a view’s camera
The ROZoomMove interaction affects the extent of the camera. This inter-action modifies the camera’s position and extends it to fit a desired rectan-gle. For example, when zooming in to focus on a particular element of theview, the ROZoomMove translates and extends the camera to fit that element’sbounds. This movement is simulated by changing the camera’s altitude.
Using the camera to build a minimap for navigation. The interaction andanimation model offered by Roassal support complex behavior. Considerthe following code:
| view eltos |view := ROView new.view @ RODraggable .view on: ROMouseRightClick do: [ :event |
ROZoomInMove new on: view ].view on: ROMouseLeftClick do: [ :event |
ROZoomOutMove new on: view ].

1.8 Understanding a View’s Camera 29
elts := ROElement spritesOn: (1 to: 400).elts do: [ :el | el + ROLabel ].view addAll: elts.ROGridLayout new on: view elements.
"Mini map opens by pressing m"view @ ROMiniMap.view open.
It opens a view with 400 labelled elements and elements are ordered us-ing a grid layout. Pressing the left mouse button zooms in the view. Theright mouse button zooms out. Pressing the m key will open a minimap.This feature is enabled using the ROMiniMap interaction.
The ROMiniMap opens a new window that gives a complete vision of a vi-sualization. It also eases the navigation by using the original view’s camera.
The minimap is composed of a smaller version of the visualization and alupa (magnifying glass), which represents the current visible part of the mainview’s window.
Coming back to our main example, the interaction is simply added bysending the @ROMiniMap message to a view and pressing “m” to open it (Fig-ure 1.29).
Figure 1.29: ROMiniMap applied to the Collection Hierarchy example
The smaller version of the view is displayed using ROMiniMapDisplayer, aparticular shape, subclass of ROViewDisplayer. ROViewDisplayer is a shape thatdisplays a view on an element (it is essentially used for the popup view).The difference between both is that ROMiniMapDisplayer uses its own camera,

30 Agile Visualization with Roassal
which has a different extent than the view’s camera. This allows one to seethe same view with different sizes.
The magnifier size represents the visible part of the window and its po-sition is related to the view’s camera position. When the view is translatedto a point, the magnifier follows it by changing its position: the point repre-senting the camera position is translated to a point on the ROMiniMapDisplayercamera extent. And when the view is zoomed in or zoomed out the extentof the camera is changed, increasing or decreasing the magnifier’s size.
1.9 Beyond Pharo
Roassal has been designed to be easily ported to other Smalltalk dialects.Currently it has been ported to VisualWorks.
Roassal consists of three main components:
• The Roassal Core, a set of packages that define all the main classes, likeROView, ROElement, ROShape and ROCamera. It also contains all the tests.
• The Mondrian DSL, composed of the Roassal-Builder and Roassal-Builder-Tests packages.
• The platform-dependent packages, which are dedicated to eachSmalltalk dialect Roassal is ported to.
In the platform-dependent packages several classes must be imple-mented. The main ones are a native canvas class, where a view can berendered, and a widget factory class, which can return an object to con-tain the canvas and receive and delegate all the external events. The firstmust be a subclass of ROAbstractCanvas and the second must be subclass ofRONativeWidgetFactory.
The ROPlatform class defines how the bridge between the core and thedependent packages must be implemented. This class defines instancevariables, like canvasClass and widgetFactory, which store the correspondingclasses to use according to their name. Each platform-dependent packagemust implement its own platform class as subclass of ROPlatform and ref-erence all the implemented platform dependent classes. Internally, everytime one of these classes is needed, the core relies on the current instance ofROPlatform to return the needed class.

1.10 Chapter summary 31
1.10 Chapter summary
Roassal enables any graph of objects to be visualized. This chapter has re-viewed the main features of Roassal:
• Create graphical elements and shape them to look as desired.
• Create edges to represent relationships between graphical elements.
• Apply layouts to arrange collections of elements automatically.
• Make elements react to events by setting callbacks and defined interac-tions.
• Move the visualization point of view, by interacting with its camera.
Screenshots, online example, screencast about Roassal may be found on-line: http://objectprofile.com.
Acknowledgment. We thank Chris Thorgrimsson and ESUG for support-ing the development of Roassal.
We are very grateful to Nicolas Rosselot Urrejola and Stéphane Ducassefor their reviews. We also thank Emmanuel Pietriga and Tudor Girba for themultiple discussions we had about the design of Roassal.