administrator guide hp thinpro 7
TRANSCRIPT

Administrator Guide
HP ThinPro 7.0

© Copyright 2018 HP Development Company, L.P.
Citrix and XenDesktop are trademarks of Citrix Systems, Inc. and/or one or more of its subsidiaries, and may be registered in the United States Patent and Trademark Office and in other countries. Linux® is the registered trademark of Linus Torvalds in the U.S. and other countries. Microsoft, Windows, Windows Vista, and Windows Server are either registered trademarks or trademarks of Microsoft Corporation in the United States and/or other countries. UNIX is a registered trademark of The Open Group. VMware and Horizon View are registered trademarks or trademarks of VMware, Inc. in the United States and/or other jurisdictions.
Confidential computer software. Valid license from HP required for possession, use or copying. Consistent with FAR 12.211 and 12.212, Commercial Computer Software, Computer Software Documentation, and Technical Data for Commercial Items are licensed to the U.S. Government under vendor's standard commercial license.
The information contained herein is subject to change without notice. The only warranties for HP products and services are set forth in the express warranty statements accompanying such products and services. Nothing herein should be construed as constituting an additional warranty. HP shall not be liable for technical or editorial errors or omissions contained herein.
First Edition: August 2018
Document Part Number: L39590-001
Open source software
This product includes software licensed under an open source software license, such as the GNU General Public License and the GNU Lesser General Public License or other open source license. To the extent HP has an obligation or, in its sole discretion, chooses to make the source code for such software available under the applicable open source software license, source code for the software can be obtained from the following location: ftp://ftp.hp.com/pub/tcdebian/pool/thinpro700/.

User input syntax key
Text that you must enter into a user interface is indicated by fixed-width font.
Item Description
Text without brackets or braces Items you must type exactly as shown
<Text inside angle brackets> A placeholder for a value you must provide; omit the brackets
[Text inside square brackets] Optional items; omit the brackets
{Text inside braces} A set of items from which you must choose only one; omit the braces
| A separator for items from which you must choose only one; omit the vertical bar
... Items that can or must repeat; omit the ellipsis
iii

iv User input syntax key

Table of contents
1 Getting started ............................................................................................................................................. 1
Finding more information ...................................................................................................................................... 1
Choosing an OS configuration ............................................................................................................................... 2
Choosing a remote management service .............................................................................................................. 3
Starting the thin client for the first time ............................................................................................................... 3
Switching between administrator mode and user mode ...................................................................................... 3
2 GUI overview ................................................................................................................................................. 4
Desktop .................................................................................................................................................................. 4
Taskbar ................................................................................................................................................................... 5
3 Connection configuration ............................................................................................................................... 6
Desktop connection management ........................................................................................................................ 6
Connection Manager (ThinPro only) ...................................................................................................................... 7
Advanced connection settings ............................................................................................................................... 7
Kiosk mode ............................................................................................................................................................ 8
4 Connection types ......................................................................................................................................... 10
Citrix ..................................................................................................................................................................... 10
Citrix Connection Manager ................................................................................................................ 10
Connection ...................................................................................................................... 10
Configuration .................................................................................................................. 11
General Settings ............................................................................................................. 12
Options .......................................................................................................... 12
Local Resources ............................................................................................ 13
Window ......................................................................................................... 13
Firewall ......................................................................................................... 14
Keyboard Shortcuts ...................................................................................... 14
Session .......................................................................................................... 15
Advanced ......................................................................................................................... 15
RDP ....................................................................................................................................................................... 15
RDP per-connection settings ............................................................................................................ 15
Network ........................................................................................................................... 15
Service ............................................................................................................................. 16
Window ............................................................................................................................ 17
Options ............................................................................................................................ 17
v
Local Resources .............................................................................................................. 18
Experience ....................................................................................................................... 19
Diagnostics ...................................................................................................................... 19
Advanced ......................................................................................................................... 20
RemoteFX .......................................................................................................................................... 20
RDP multi-monitor sessions ............................................................................................................. 20
RDP multimedia redirection .............................................................................................................. 21
RDP device redirection ...................................................................................................................... 21
RDP USB redirection ........................................................................................................ 21
RDP mass storage redirection ........................................................................................ 21
RDP printer redirection ................................................................................................... 22
RDP audio redirection ..................................................................................................... 22
RDP smart card redirection ............................................................................................. 23
VMware Horizon View .......................................................................................................................................... 23
VMware Horizon View per-connection settings ................................................................................ 23
Network ........................................................................................................................... 23
General ............................................................................................................................ 24
Security ........................................................................................................................... 25
RDP Options .................................................................................................................... 25
RDP Experience ............................................................................................................... 26
Advanced ......................................................................................................................... 27
VMware Horizon View multi-monitor sessions ................................................................................. 27
VMware Horizon View keyboard shortcuts ....................................................................................... 27
VMware Horizon View device redirection .......................................................................................... 28
VMware Horizon View USB redirection ........................................................................... 28
VMware Horizon View audio redirection ......................................................................... 28
VMware Horizon View smart card redirection ................................................................ 28
VMware Horizon View webcam redirection .................................................................... 29
Changing the VMware Horizon View protocol ................................................................................... 29
VMware Horizon View HTTPS and certificate management requirements ...................................... 29
Web Browser ........................................................................................................................................................ 30
Web Browser per-connection settings ............................................................................................. 30
Configuration .................................................................................................................. 31
Preferences ..................................................................................................................... 31
Advanced ......................................................................................................................... 31
Additional connection types (ThinPro only) ........................................................................................................ 31
TeemTalk ........................................................................................................................................... 31
Configuration .................................................................................................................. 31
TeemTalk Session Wizard ............................................................................. 32
Advanced ......................................................................................................................... 33
XDMCP ............................................................................................................................................... 33
vi

Configuration .................................................................................................................. 33
Advanced ......................................................................................................................... 33
Secure Shell ....................................................................................................................................... 33
Configuration .................................................................................................................. 34
Advanced ......................................................................................................................... 34
Telnet ................................................................................................................................................. 34
Configuration .................................................................................................................. 34
Advanced ......................................................................................................................... 35
Custom ............................................................................................................................................... 35
Configuration .................................................................................................................. 35
Advanced ......................................................................................................................... 35
5 HP True Graphics ......................................................................................................................................... 36
Server-side requirements .................................................................................................................................... 36
Client-side requirements ..................................................................................................................................... 36
Client-side configuration ..................................................................................................................................... 36
Compression settings ........................................................................................................................ 36
Window settings ................................................................................................................................ 37
Monitor layout and hardware limitations ......................................................................................... 37
Enabling HP True Graphics for multiple monitors on the HP t420 ................................ 37
Tips & best practices ............................................................................................................................................ 38
6 Active Directory integration ......................................................................................................................... 39
Login screen ......................................................................................................................................................... 39
Single sign-on ...................................................................................................................................................... 39
Desktop ................................................................................................................................................................ 39
Screen lock ........................................................................................................................................................... 40
Administrator mode ............................................................................................................................................. 40
Settings and the domain user ............................................................................................................................. 40
7 Start menu .................................................................................................................................................. 41
Connection management .................................................................................................................................... 41
Switch to Administrator/Switch to User .............................................................................................................. 41
System Information ............................................................................................................................................. 41
Control Panel ....................................................................................................................................................... 41
Tools ..................................................................................................................................................................... 41
Power ................................................................................................................................................................... 42
Search .................................................................................................................................................................. 42
vii

8 Control Panel .............................................................................................................................................. 43
System ................................................................................................................................................................. 43
Network settings ............................................................................................................................... 43
Wired network settings .................................................................................................. 44
Wireless network settings .............................................................................................. 44
DNS settings .................................................................................................................... 46
IPSec rules ....................................................................................................................... 47
Configuring VPN settings ................................................................................................ 47
Configuring HP Velocity .................................................................................................. 47
DHCP options ..................................................................................................................................... 48
Component Manager ......................................................................................................................... 48
Removing components ................................................................................................... 48
Undoing a change ........................................................................................................... 49
Applying the changes permanently ................................................................................ 49
Security ................................................................................................................................................................ 49
Security settings ............................................................................................................................... 49
Local Accounts ................................................................................................................ 50
Encryption ....................................................................................................................... 50
Options ............................................................................................................................ 50
Certificates ........................................................................................................................................ 51
Certificate Manager ......................................................................................................... 51
SCEP Manager ................................................................................................................. 51
Manageability ...................................................................................................................................................... 52
Active Directory configuration .......................................................................................................... 52
Status tab ........................................................................................................................ 52
Options tab ...................................................................................................................... 53
HP ThinState ...................................................................................................................................... 53
Managing an HP ThinPro image ...................................................................................... 53
Capturing an HP ThinPro image to an FTP server ........................................ 53
Deploying an HP ThinPro image using FTP or HTTP .................................... 54
Capturing an HP ThinPro image to a USB flash drive ................................... 54
Deploying an HP ThinPro image with a USB flash drive ............................... 55
Managing a client profile ................................................................................................ 55
Saving a client profile to an FTP server ........................................................ 55
Restoring a client profile using FTP or HTTP ............................................... 55
Saving a client profile to a USB flash drive ................................................... 56
Restoring a client profile from a USB flash drive ......................................... 56
VNC Shadowing ................................................................................................................................. 56
Input Devices ........................................................................................................................................................ 57
Hardware .............................................................................................................................................................. 57
Display preferences ........................................................................................................................... 58
viii

Redirecting USB devices .................................................................................................................... 58
Configuring printers .......................................................................................................................... 59
Appearance .......................................................................................................................................................... 59
Customization Center ........................................................................................................................ 60
9 System Information ..................................................................................................................................... 61
10 HP Smart Client Services ............................................................................................................................ 62
Supported operating systems ............................................................................................................................. 62
Prerequisites for HP Smart Client Services ......................................................................................................... 62
Obtaining HP Smart Client Services .................................................................................................................... 62
Viewing the Automatic Update website .............................................................................................................. 63
Creating an Automatic Update profile ................................................................................................................. 63
MAC-address-specific profiles .......................................................................................................... 63
Updating thin clients ........................................................................................................................................... 64
Using the broadcast update method ................................................................................................ 64
Using the DHCP tag update method ................................................................................................. 64
Example of performing DHCP tagging ............................................................................ 64
Using the DNS alias update method ................................................................................................. 65
Using the manual update method .................................................................................................... 65
Performing a manual update .......................................................................................... 65
11 Profile Editor ............................................................................................................................................. 66
Opening Profile Editor ......................................................................................................................................... 66
Loading a client profile ........................................................................................................................................ 66
Client profile customization ................................................................................................................................ 66
Selecting the platform for a client profile ........................................................................................ 66
Configuring a default connection for a client profile ........................................................................ 67
Modifying the registry settings of a client profile ............................................................................ 67
Adding files to a client profile ........................................................................................................... 67
Adding a configuration file to a client profile ................................................................. 67
Adding certificates to a client profile ........................................................... 68
Adding a symbolic link to a client profile ........................................................................ 68
Saving the client profile .................................................................................................................... 68
Serial or parallel printer configuration ................................................................................................................ 69
Obtaining the printer settings ........................................................................................................... 69
Setting up printer ports ..................................................................................................................... 69
Installing printers on the server ....................................................................................................... 69
ix
12 Troubleshooting ........................................................................................................................................ 71
Troubleshooting network connectivity ............................................................................................................... 71
Troubleshooting Citrix password expiration ....................................................................................................... 71
Using system diagnostics to troubleshoot .......................................................................................................... 71
Saving system diagnostic data ......................................................................................................... 72
Uncompressing the system diagnostic files ..................................................................................... 72
Uncompressing the system diagnostic files on Windows-based systems .................... 72
Uncompressing the system diagnostic files in Linux- or Unix-based systems ............. 72
Viewing the system diagnostic files .................................................................................................. 72
Viewing files in the Commands folder ............................................................................ 72
Viewing files in the /var/log folder ................................................................................. 73
Viewing files in the /etc folder ........................................................................................ 73
Appendix A USB updates ................................................................................................................................. 74
HP ThinUpdate ..................................................................................................................................................... 74
Appendix B BIOS tools (desktop thin clients only) ............................................................................................. 75
BIOS settings tool ................................................................................................................................................ 75
BIOS flashing tool ................................................................................................................................................ 75
Appendix C Resizing the flash drive partition .................................................................................................... 76
Appendix D Registry keys ............................................................................................................................... 77
Audio .................................................................................................................................................................... 77
CertMgr ................................................................................................................................................................ 78
ComponentMgr .................................................................................................................................................... 78
ConnectionManager ............................................................................................................................................. 78
ConnectionType ................................................................................................................................................... 79
custom ............................................................................................................................................... 79
firefox ................................................................................................................................................ 82
freerdp ............................................................................................................................................... 86
ssh ..................................................................................................................................................... 96
teemtalk .......................................................................................................................................... 100
telnet ............................................................................................................................................... 103
view ................................................................................................................................................. 107
xdmcp .............................................................................................................................................. 115
xen ................................................................................................................................................... 119
DHCP .................................................................................................................................................................. 131
Dashboard .......................................................................................................................................................... 131
Display ............................................................................................................................................................... 132
x

Imprivata ............................................................................................................................................................ 134
Network ............................................................................................................................................................. 134
Power ................................................................................................................................................................. 144
SCIM ................................................................................................................................................................... 146
ScepMgr ............................................................................................................................................................. 146
Search ................................................................................................................................................................ 147
Serial .................................................................................................................................................................. 147
SystemInfo ......................................................................................................................................................... 148
TaskMgr ............................................................................................................................................................. 148
USB ..................................................................................................................................................................... 148
auto-update ....................................................................................................................................................... 149
background ........................................................................................................................................................ 151
config-wizard ..................................................................................................................................................... 152
desktop .............................................................................................................................................................. 153
domain ............................................................................................................................................................... 154
entries ................................................................................................................................................................ 155
firewall ............................................................................................................................................................... 155
hwh264 .............................................................................................................................................................. 156
keyboard ............................................................................................................................................................ 156
logging ............................................................................................................................................................... 157
login ................................................................................................................................................................... 157
mouse ................................................................................................................................................................ 158
restore-points .................................................................................................................................................... 158
screensaver ....................................................................................................................................................... 158
security .............................................................................................................................................................. 160
shutdown ........................................................................................................................................................... 161
sshd .................................................................................................................................................................... 161
time .................................................................................................................................................................... 161
touchscreen ....................................................................................................................................................... 163
translation ......................................................................................................................................................... 163
usb-update ........................................................................................................................................................ 164
users .................................................................................................................................................................. 164
vncserver ........................................................................................................................................................... 167
zero-login .......................................................................................................................................................... 169
Index ........................................................................................................................................................... 171
xi

xii
1 Getting started
This guide is for administrators of HP thin clients based on the HP ThinPro operating system and assumes that you will log in to the system as an administrator when modifying system configurations or using administrative tools as described in this guide.
NOTE: HP ThinPro has two possible OS configurations: ThinPro and Smart Zero. HP ThinPro-based thin clients can be purchased with either OS configuration as the default, and you can switch between OS configurations via Control Panel.
For more information about each OS configuration, see Choosing an OS configuration on page 2. For more information about switching between OS configurations, see Customization Center on page 60.
Finding more informationNOTE: Information at websites listed in this table might be available in English only.
Resource Contents
HP support website
http://www.hp.com/support
Administrator guides, hardware reference guides, white papers, and other documentation
▲ Search for the thin client model, and then see the User Guides section of the support page for that model.
NOTE: HP Device Manager and HP Remote Graphics Software each have a dedicated support page, so search for the app name instead, and then see the User Guides section.
Microsoft support website
http://support.microsoft.com
Documentation for Microsoft software
Citrix support website
http://www.citrix.com/support
Documentation for Citrix software
VMware support website
http://www.vmware.com/support
Documentation for VMware software
Finding more information 1
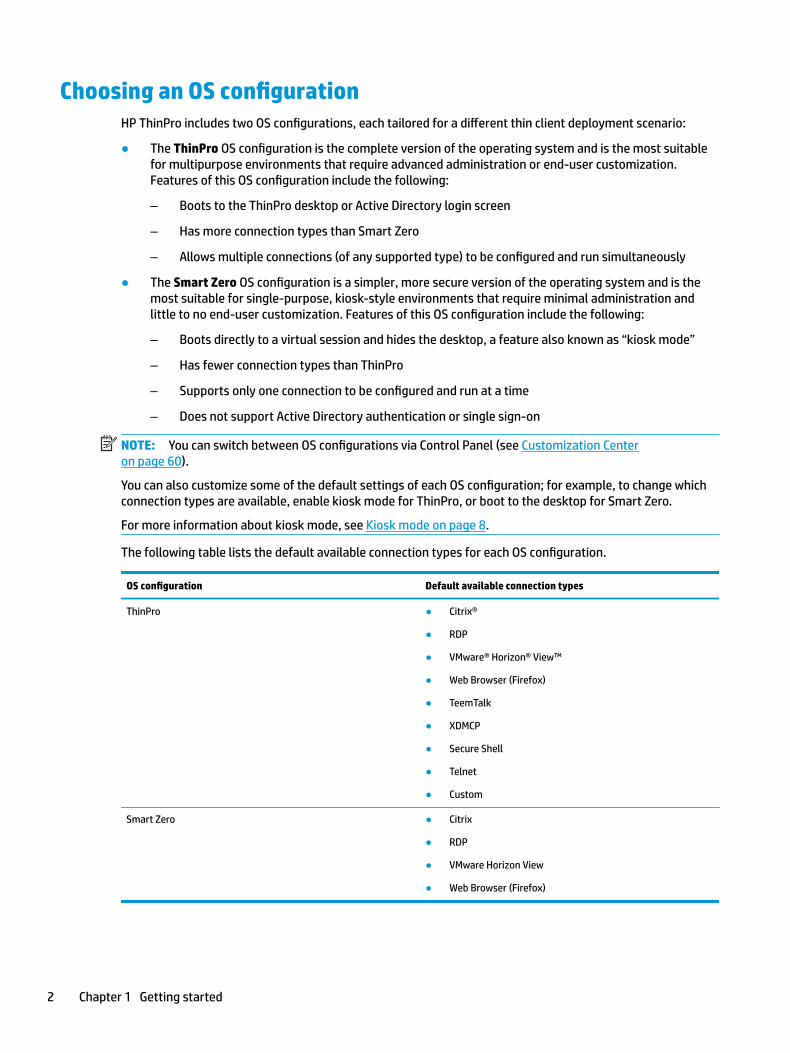
Choosing an OS configurationHP ThinPro includes two OS configurations, each tailored for a different thin client deployment scenario:
● The ThinPro OS configuration is the complete version of the operating system and is the most suitable for multipurpose environments that require advanced administration or end-user customization. Features of this OS configuration include the following:
– Boots to the ThinPro desktop or Active Directory login screen
– Has more connection types than Smart Zero
– Allows multiple connections (of any supported type) to be configured and run simultaneously
● The Smart Zero OS configuration is a simpler, more secure version of the operating system and is the most suitable for single-purpose, kiosk-style environments that require minimal administration and little to no end-user customization. Features of this OS configuration include the following:
– Boots directly to a virtual session and hides the desktop, a feature also known as “kiosk mode”
– Has fewer connection types than ThinPro
– Supports only one connection to be configured and run at a time
– Does not support Active Directory authentication or single sign-on
NOTE: You can switch between OS configurations via Control Panel (see Customization Center on page 60).
You can also customize some of the default settings of each OS configuration; for example, to change which connection types are available, enable kiosk mode for ThinPro, or boot to the desktop for Smart Zero.
For more information about kiosk mode, see Kiosk mode on page 8.
The following table lists the default available connection types for each OS configuration.
OS configuration Default available connection types
ThinPro ● Citrix®
● RDP
● VMware® Horizon® View™
● Web Browser (Firefox)
● TeemTalk
● XDMCP
● Secure Shell
● Telnet
● Custom
Smart Zero ● Citrix
● RDP
● VMware Horizon View
● Web Browser (Firefox)
2 Chapter 1 Getting started

Choosing a remote management serviceRegardless of the OS configuration, there are two different remote management services that you can use to manage HP ThinPro-based thin clients:
● HP Device Manager (HPDM) is ideal for large environments with a variety of operating systems, including a mixture of HP ThinPro-based and Windows®-based thin clients. HPDM provides a greater variety of management options than HP Smart Client Services. For more information or to download HPDM, go to http://www.hp.com/go/hpdm.
● HP Smart Client Services can manage HP ThinPro-based thin clients only and is optimized for use with Smart Zero and a “zero management” scenario. For more information, see HP Smart Client Services on page 62. For information on how to download HP Smart Client Services, see Obtaining HP Smart Client Services on page 62.
HP recommends evaluating both services and choosing the one that is best for your deployment.
Starting the thin client for the first timeWhen you first start a new HP ThinPro-based thin client, a setup program runs automatically. The Initial Setup Wizard allows you to select a language, select the keyboard mapping, select a network connection, and configure the date and time settings.
TIP: If you want to modify the configuration of a single thin client and then copy and deploy the configuration to other thin clients, first use the Initial Setup Wizard and the Control Panel to modify the configuration, and then deploy the configuration using HPDM or HP ThinState. For more information, see GUI overview on page 4 or Control Panel on page 43. For more information about HP ThinState, see HP ThinState on page 53.
Switching between administrator mode and user mode▲ Right-click the desktop or select Start, and then select Switch to Administrator from the menu.
For more information about the desktop, see Desktop on page 4.
For more information about Control Panel, see Taskbar on page 5 and Control Panel on page 43.
NOTE: The first time you switch to administrator mode, you are prompted to set up an administrator password. The administrator password must be entered every subsequent time you switch to administrator mode. When Active Directory authentication is enabled, you can also switch to administrator mode by entering the domain credentials of a person in the domain admin group.
When in administrator mode, the screen is surrounded by a red border.
Choosing a remote management service 3

2 GUI overview
DesktopNOTE: The following image demonstrates the desktop for ThinPro with a U.S. locale setting. For Smart Zero, the taskbar is vertical and right-aligned by default, and the desktop theme varies by connection type. The display format of some taskbar information varies by locale setting.
Item Description
(1) Desktop In ThinPro, you can arrange connection shortcuts in the desktop area and customize the background theme.
In Smart Zero, the desktop is replaced by a customizable login screen with a theme specific to the chosen connection type.
(2) Connection shortcuts Double-click a connection shortcut to launch a connection. Right-click the icon to display a menu of actions related to the current connection and select to drag the icon to a new location.
(3) Taskbar Provides quick access to programs and system functions (see Taskbar on page 5for more information).
4 Chapter 2 GUI overview
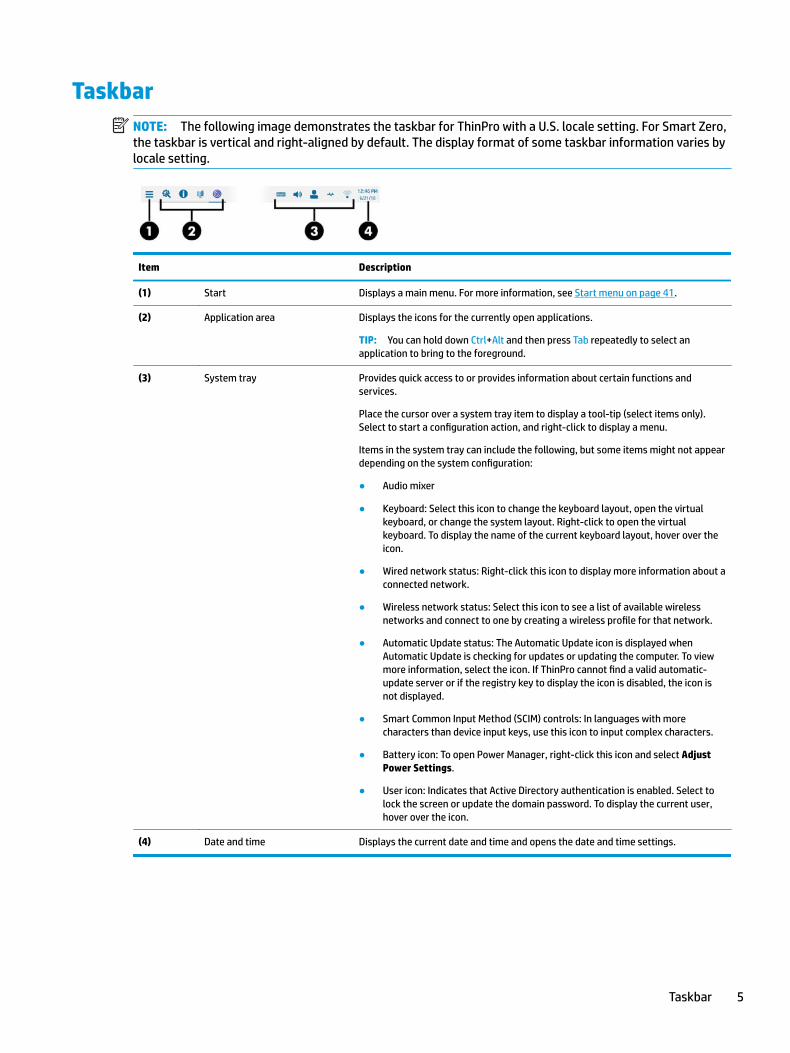
TaskbarNOTE: The following image demonstrates the taskbar for ThinPro with a U.S. locale setting. For Smart Zero, the taskbar is vertical and right-aligned by default. The display format of some taskbar information varies by locale setting.
Item Description
(1) Start Displays a main menu. For more information, see Start menu on page 41.
(2) Application area Displays the icons for the currently open applications.
TIP: You can hold down Ctrl+Alt and then press Tab repeatedly to select an application to bring to the foreground.
(3) System tray Provides quick access to or provides information about certain functions and services.
Place the cursor over a system tray item to display a tool-tip (select items only). Select to start a configuration action, and right-click to display a menu.
Items in the system tray can include the following, but some items might not appear depending on the system configuration:
● Audio mixer
● Keyboard: Select this icon to change the keyboard layout, open the virtual keyboard, or change the system layout. Right-click to open the virtual keyboard. To display the name of the current keyboard layout, hover over the icon.
● Wired network status: Right-click this icon to display more information about a connected network.
● Wireless network status: Select this icon to see a list of available wireless networks and connect to one by creating a wireless profile for that network.
● Automatic Update status: The Automatic Update icon is displayed when Automatic Update is checking for updates or updating the computer. To view more information, select the icon. If ThinPro cannot find a valid automatic-update server or if the registry key to display the icon is disabled, the icon is not displayed.
● Smart Common Input Method (SCIM) controls: In languages with more characters than device input keys, use this icon to input complex characters.
● Battery icon: To open Power Manager, right-click this icon and select Adjust Power Settings.
● User icon: Indicates that Active Directory authentication is enabled. Select to lock the screen or update the domain password. To display the current user, hover over the icon.
(4) Date and time Displays the current date and time and opens the date and time settings.
Taskbar 5

3 Connection configuration
Desktop connection managementConnection management can be done directly from the desktop as well as through the legacy Connection Manager (see Connection Manager (ThinPro only) on page 7) or the Start menu. By default, the desktop displays an icon as a shortcut for each configured connection.
When you first start the computer, several sample connection icons are displayed on the desktop. You can create a new, generic connection shortcut for any of the connection types supported by ThinPro.
▲ To create a new connection shortcut, right-click the desktop, and then select Create.
All icons are automatically placed into a grid. You can click and drag an icon to any other grid position on the desktop. After an icon has been moved to a grid position, it is pinned in that position. It stays in that position even if other connection shortcuts are added, deleted, or rearranged.
Any icons not pinned to a grid position are floating. They might be automatically moved when connection shortcuts are added, deleted, or rearranged. To change a pinned icon to a floating icon, right-click the icon and clear Pin Position.
You can start, stop, edit, copy, rename, or delete each connection. If user editing is not enabled, non-administrator users can only start or stop a connection.
▲ To manage a connection on the desktop, right-click the connection icon, and then select an action.
NOTE: If user editing is not enabled, you must switch to administrator mode to manage a connection.
● Start/Stop: Starts a connection or stops an active connection. You can also double-click the connection icon. When the connection is active, a green circle is displayed on the connection icon, and the connection icon is displayed in the taskbar. When a connection starts, if any connection parameters are missing, a dialog box asks for the missing parameters. For example, because none of the starting icons have a remote server defined, a dialog box asks for the address or name of the remote server when the connection is started.
● Edit: Opens the complete connection editor.
● Copy: Creates a copy of the connection with all the parameters of the original connection and a unique name.
● Rename: Allows you to rename the connection. You can also double-click the text beneath the connection icon or use the connection editor.
● Delete: Deletes the connection.
6 Chapter 3 Connection configuration

Connection Manager (ThinPro only)NOTE: HP recommends using the connection shortcuts. However, you can use the legacy Connection Manager interface.
The following image demonstrates Connection Manager with a U.S. locale setting.
Item Description
(1) Connection list Lists the configured connections and whether each connection is active or inactive.
(2) Start Starts the selected connection.
(3) Stop Stops the selected connection.
(4) Edit Lets you edit the selected connection.
(5) Delete Deletes the selected connection.
(6) Add Lets you add a new connection.
NOTE: See Choosing an OS configuration on page 2 for a list of the available connection types.
(7) Settings Lets you edit general settings for Citrix connections. These settings apply to all connections of that type.
To open Connection Manager:
1. In administrator mode, select Start, and then type Connection Manager in the search box.
2. Select Connection Manager.
For more information about configuring connections, see the following:
● Connection configuration on page 6
● Connection types on page 10
Advanced connection settingsThe following table describes the settings that are available under the Advanced category when editing a connection of any connection type.
Connection Manager (ThinPro only) 7
NOTE: These settings affect the connection you are currently configuring only.
Option Description
Fallback Connection Specifies the fallback connection. If the connection fails to start, the fallback connection will attempt to start instead.
NOTE: This option is not available for the VMware Horizon View connection type.
Auto start priority Determines the order that connections will auto-start. 0 means auto-start is disabled. The other values determine the startup order, with 1 being the highest priority.
Share credentials with screensaver Enables users to unlock the local screen saver using their credentials for that connection.
NOTE: This option is only available for the Citrix, RDP, and VMware Horizon View connection types.
Auto reconnect If enabled, this connection will attempt to auto-reconnect if the connection is dropped.
NOTE: Stopping a connection via Connection Manager will prevent an auto-reconnection.
Wait for network before connecting Disable this option if your connection doesn’t need the network to start or if you don’t want to wait for network to start the connection.
Show icon on desktop If enabled, a desktop icon is created for this connection. This option is enabled by default.
If disabled, the connection is not visible on the desktop, but is visible in the Start menu and Connection Manager.
Allow the user to launch this connection If enabled, this connection can be launched by an end user.
Allow the user to edit this connection If enabled, this connection can be modified by an end user.
Login dialog options Enable or disable these options to configure the login dialog for the connection.
NOTE: This option is only available for the Citrix, RDP, and VMware Horizon View connection types.
The following options are available:
● Show server field
● Show username field
● Show password field
● Show domain field
● Show ‘remember me’ checkbox
NOTE: This option saves the user name and domain, but the password still needs to be entered each time.
Kiosk modeWhen a thin client is configured for kiosk mode, it performs an automatic login to the default connection on startup using predefined user credentials. If the connection is ever lost due to a logout, disconnect, or network failure, it reconnects automatically as soon as it can be restored.
8 Chapter 3 Connection configuration
TIP: The remote host can be configured to start resources automatically upon login, making the kiosk mode experience seamless.
The easiest way to configure a thin client for kiosk mode is to switch it to Smart Zero (see Customization Center on page 60) and configure a connection. When this is done, the following settings are set automatically:
● The taskbar auto-hides.
● The connection auto-starts.
● The connection auto-reconnects.
● The connection shares the user credentials with the local screen saver.
● The desktop theme is set to that connection type’s default theme.
● The USB redirection protocol in USB Manager is set to that connection type’s protocol.
If you want to configure a thin client for kiosk mode in ThinPro (for example, if you want to use a connection type available only with ThinPro), manually configure the following settings for the desired connection:
● In Customization Center, set the taskbar to Auto hide.
● In connection’s settings, do the following:
– Set Auto start priority to 1.
– Enable Auto reconnect.
– Enable Share credentials with screensaver, if available.
– For a Web Browser connection only, select the Enable kiosk mode option.
● In USB Manager, set the proper USB redirection protocol, if necessary.
TIP: When in kiosk mode, to minimize the connection and return to the local desktop, press Ctrl+Alt+End.
Kiosk mode 9
4 Connection types
CitrixThe following table describes the supported Citrix XenApp backends.
Access type XenApp version
Direct (legacy) Not supported by Citrix
PNAgent (legacy) 7.6 LTSR and later/7.14 and later
Web browser 7.6 LTSR and later/7.14 and later
StoreFront 7.6 LTSR and later/7.14 and later
The following table describes the supported Citrix XenDesktop® backends.
Access type XenApp version
PNAgent (legacy) 7.6 LTSR and later/7.14 and later
Web browser 7.6 LTSR and later/7.14 and later
StoreFront 7.6 LTSR and later/7.14 and later
Citrix Connection Manager
NOTE: Connection, configuration, and advanced settings affect only the connection you are currently configuring. General settings affect all Citrix connections.
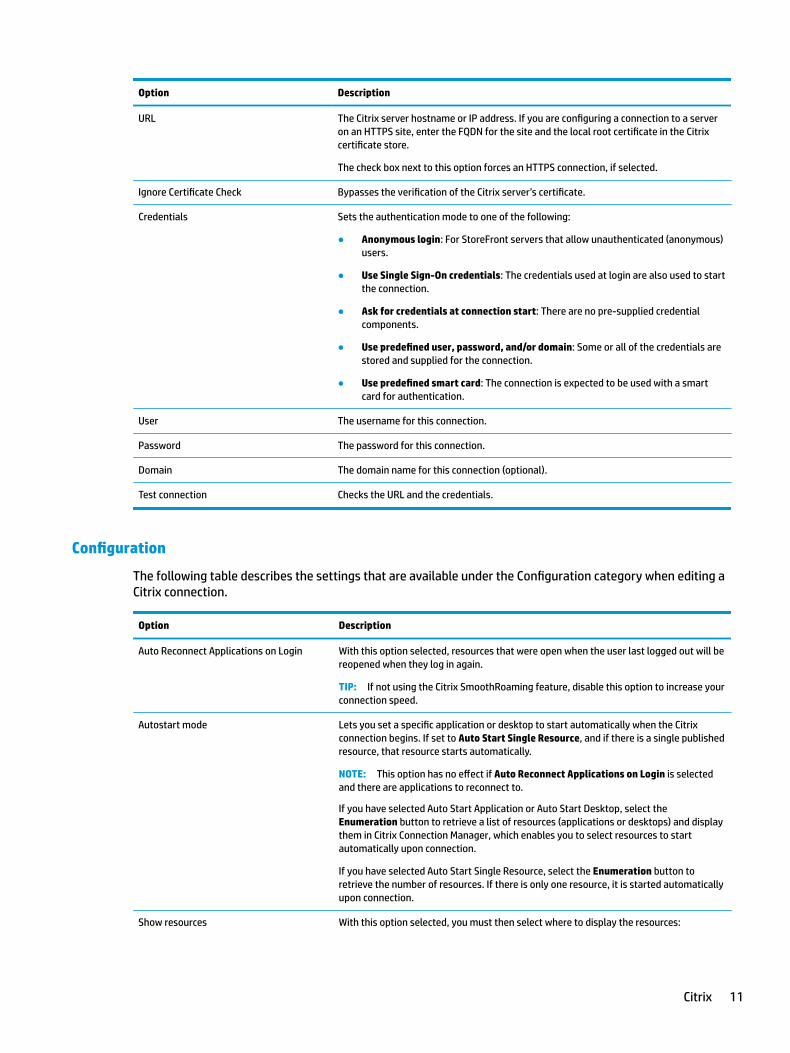
Connection
The following table describes the settings that are available under the Connection category when editing a Citrix connection.
Option Description
Name The connection name.
Connection Mode Sets the connection mode to one of the following:
● PNAgent
● StoreFront
● Direct
NOTE: Authentication options are displayed following this option and vary depending on the connection mode you selected. See Citrix documentation for more information.
NOTE: You can test the connection settings by selecting the Test connection button.
10 Chapter 4 Connection types
Option Description
URL The Citrix server hostname or IP address. If you are configuring a connection to a server on an HTTPS site, enter the FQDN for the site and the local root certificate in the Citrix certificate store.
The check box next to this option forces an HTTPS connection, if selected.
Ignore Certificate Check Bypasses the verification of the Citrix server’s certificate.
Credentials Sets the authentication mode to one of the following:
● Anonymous login: For StoreFront servers that allow unauthenticated (anonymous) users.
● Use Single Sign-On credentials: The credentials used at login are also used to start the connection.
● Ask for credentials at connection start: There are no pre-supplied credential components.
● Use predefined user, password, and/or domain: Some or all of the credentials are stored and supplied for the connection.
● Use predefined smart card: The connection is expected to be used with a smart card for authentication.
User The username for this connection.
Password The password for this connection.
Domain The domain name for this connection (optional).
Test connection Checks the URL and the credentials.
Configuration
The following table describes the settings that are available under the Configuration category when editing a Citrix connection.
Option Description
Auto Reconnect Applications on Login With this option selected, resources that were open when the user last logged out will be reopened when they log in again.
TIP: If not using the Citrix SmoothRoaming feature, disable this option to increase your connection speed.
Autostart mode Lets you set a specific application or desktop to start automatically when the Citrix connection begins. If set to Auto Start Single Resource, and if there is a single published resource, that resource starts automatically.
NOTE: This option has no effect if Auto Reconnect Applications on Login is selected and there are applications to reconnect to.
If you have selected Auto Start Application or Auto Start Desktop, select the Enumeration button to retrieve a list of resources (applications or desktops) and display them in Citrix Connection Manager, which enables you to select resources to start automatically upon connection.
If you have selected Auto Start Single Resource, select the Enumeration button to retrieve the number of resources. If there is only one resource, it is started automatically upon connection.
Show resources With this option selected, you must then select where to display the resources:
Citrix 11

Option Description
● In a broker window: Displays resources in a window.
● Directly on desktop: Displays resources on the desktop.
Show resources in the Start Menu With this option selected, remote resources from the connection are shown in the Start menu.
Show only subscribed resources If selected, only subscribed resources are shown during a Citrix connection.
General Settings
NOTE: These settings affect all Citrix connections.
To edit the general settings:
▲ In Citrix Connection Manager, select the General Settings tab, and then select Xen Connection General Settings Manager.
Options
The following table describes the settings that are available under the Options category when editing the Citrix general settings.
Option Description
Enable HDX MediaStream Enables HDX MediaStream.
Enable MultiMedia Enables multimedia.
Enable Connection Bar Enables the connection bar.
Enable Auto Reconnect Enable automatic reconnection of dropped connections.
Enable Session Reliability Enables the Citrix Session Reliability feature. See Citrix documentation for more information.
Enable Smart Card Channel Enables the smart card channel feature.
NOTE: If you want to use a smart card in the Citrix session but are not using a smart card connection, enable this option.
Session Reliability Timeout (seconds) Specifies the session reliability timeout in seconds. The default is 180 seconds.
Enable Clipboard Redirection Enables clipboard redirection.
Use Data Compression Use data compression for this connection.
Enable H264 Compression Enables H.264 compression. See Citrix documentation to determine if this method of data compression is best for your use cases.
Enable Middle Button Paste Enables the middle mouse button paste function.
User Agent String Specify a User Agent string to be used for requests sent to the Citrix server. This option is useful for a NetScaler configuration.
Sound Sets the sound quality or disables sound entirely.
Encryption Level Specifies the encryption level of an ICA session.
Transport Protocol Specifies the transport protocol for the connection and whether to use a fallback transport protocol.
12 Chapter 4 Connection types

Option Description
● Off (default): Use TCP.
● On: Use UDP and do not fall back to TCP on failure.
● Preferred: Try UDP first and fall back to TCP on failure.
Local Resources
The following table describes the settings that are available under the Local Resources category when editing the Citrix general settings.
Option Description
Citrix USB Redirection Status To configure, select USB Manager. See Redirecting USB devices on page 58.
● Enabled: USB redirection is supported for the Citrix connection.
● Disabled: USB redirection is disabled for the Citrix connection.
Printers Controls how local printer redirection is handled.
Webcam/Audio-Input Controls how local webcam and audio input redirection is handled.
Drive Mapping/Redirection Specifies the method used to access the local drive.
NOTE: Select only one method of drive redirection.
● USB Redirection: Enables USB redirection. For more options, open USB Manager.
● Dynamic Drive Mapping: Enables dynamic drive mapping.
● Static Drive Mapping (Legacy): Enables static drive mapping, which allows you to specify drive mappings to local paths. To specify these paths, select Configure Mapping Folders.
Window
The following table describes the settings that are available under the Window category when editing the Citrix general settings.
Option Description
TWI Mode Lets you display a single seamless window on the local ThinPro desktop as if it were a native application.
Default Window Size When TWI Mode is set to Force Seamless Off, this controls the default window size.
Default Window Colors Sets the default color depth.
Left Monitor
Right Monitor
Top Monitor
Bottom Monitor
When Show the Virtual Desktop on all monitors is disabled, these fields let you specify how the virtual desktop is displayed across specific monitors.
Citrix 13

Firewall
The following table describes the settings that are available under the Firewall category when editing the Citrix general settings.
Option Description
Proxy Type Specifies the proxy type.
Proxy Address The IP address of the proxy server.
Proxy Port The port for connection to the proxy server.
Username The username to use for connection to the proxy server.
Password The password to use for connection to the proxy server.
Use Alternate Address for Firewall Connection The Citrix ICA Client will request the alternate address defined for the server when contacting servers inside the firewall. The alternate address must be specified for each server in a server farm.
Keyboard Shortcuts
The following table describes the settings that are available under the Keyboard Shortcuts category when editing the Citrix general settings.
Option Description
Enable UseLocalIM Uses the local input method to interpret keyboard input. This is supported only for European languages.
Use EUKS Number Controls the usage of Extended Unicode Keyboard Support (EUKS) on Windows servers. Valid options are described below:
● 0: EUKS is not used.
● 1: EUKS is used as a fallback.
● 2: EUKS is used whenever possible.
Keyboard Mapping File Specifies the keyboard mapping file. Select Auto to allow the file to be selected automatically. Otherwise, select a specific mapping file.
NOTE: To use your own keyboard mapping file, save it in the folder: /usr/lib/ICAClient/keyboard/.
Handling of keyboard shortcuts Specifies how keyboard shortcuts should be handled. The following settings are available:
● Translated: Keyboard shortcuts apply to the local desktop (client side).
● Direct in full screen desktops only: Keyboard shortcuts apply to the remote desktop (server side), but only for a non-seamless ICA session in full-screen mode.
● Direct: Keyboard shortcuts apply to the remote desktop (server side) for both seamless and non-seamless ICA sessions when their windows have the keyboard focus.
Stop Direct key handling Specifies the key combination that disables Direct handling of keyboard shortcuts.
Alt+F1 ... Alt+F12 Lets you add keyboard shortcuts to be handled.
14 Chapter 4 Connection types
Session
The following table describes the settings that are available under the Session category when editing the Citrix general settings.
Option Description
Auto Logout Delay Before App Launch When using a Citrix server with multiple published resources, this specifies the number of seconds to allow a user to launch an app after login before the system automatically logs out and returns to the initial login screen.
Auto Logout Delay After App Close When using a Citrix server with multiple published resources, this specifies the number of seconds between the closing of the last Xen published resource and when the user is automatically logged out and returned to the initial login screen.
Server Check Timeout To perform a basic connectivity check to the selected server and port, set this option to a value other than the default –1.
TIP: Setting any of these values to less than 0 will disable auto-logout.
NOTE: Citrix processing delays might increase the auto-logout time.
Advanced
NOTE: See Advanced connection settings on page 7 for information about the settings available under the Advanced category when editing a connection.
RDPThe RDP client is based on FreeRDP 1.1 and meets the following requirements for RDP:
● Hardware-accelerated RemoteFX
● MMR supported when connecting to Windows hosts with the Desktop Experience feature enabled
● USBR supported when connecting to RDP servers that enable it
RDP per-connection settings
NOTE: These settings affect the connection you are currently configuring only.
Network
The following table describes the settings that are available under the Network category when editing an RDP connection.
Option Description
Connection Name A custom name for this connection.
Server Name/Address The IP address or server name for this connection, or the RD Web Access feed URL. If required, the port can be appended to the server after a colon (by default, the port is 3389 for a direct RDP connection).
NOTE: The RD Web Access feed URL must begin with https://. By default, this is added automatically as specified by the rdWebFeedUrlPattern registry key, which defines the pattern of the URL.
RDP 15

Option Description
Credentials ● Use Single Sign-On credentials: The credentials used at login are also used to start the connection.
● Ask for credentials at connection start: There are no pre-supplied credential components.
● Use predefined user, password, and/or domain: Some or all of the credentials are stored and supplied for the connection.
● Use predefined smart card: The connection is expected to be used with a smart card for authentication.
User The username for this connection.
Password The password for this connection.
Domain The domain name for this connection (optional).
Use RD Gateway Enables additional RD Gateway options, such as the gateway address, port, and credentials.
Server Probe Launches the Server Probe, which can be used to determine which RDP features are supported by your RDP server.
Service
The following table describes the settings that are available under the Service category when editing an RDP connection.
Option Description
Service Sets the RDP service to one of the following:
● Remote Computer: When using this service, a direct RDP connection is created to a remote computer. A remote application or alternate shell can optionally be started upon connection. The following additional options are available for a Remote Computer service:
– If Mode is set to Remote Application, the Application field specifies the path of the application to run.
– If Mode is set to Alternate Shell, the Command field specifies the command that executes the application to run in the alternate shell. For example, to run Microsoft® Word, type Word.exe.
If Mode is set to Alternate Shell, the Directory field specifies the server’s working directory path for the application’s program files. For example, the working directory for Microsoft Word is C:\Program Files\Microsoft.
● RD Web Access: When using this service, a list of RemoteApp resources is retrieved from the server and presented to the user, and the actual RDP connection is started when a resource is selected. The following additional options are available for RD Web Access:
– Keep resource selection window open: With this option selected, users can open multiple resources simultaneously from the resource selection window.
– Auto-start single resource: With this option selected, and if there is a single published resource, that resource will start automatically upon connection.
– Resource filter and Web Feed Browser: These can be used to limit the remote resources that will be made available to the user in the resource selection window.
16 Chapter 4 Connection types
Option Description
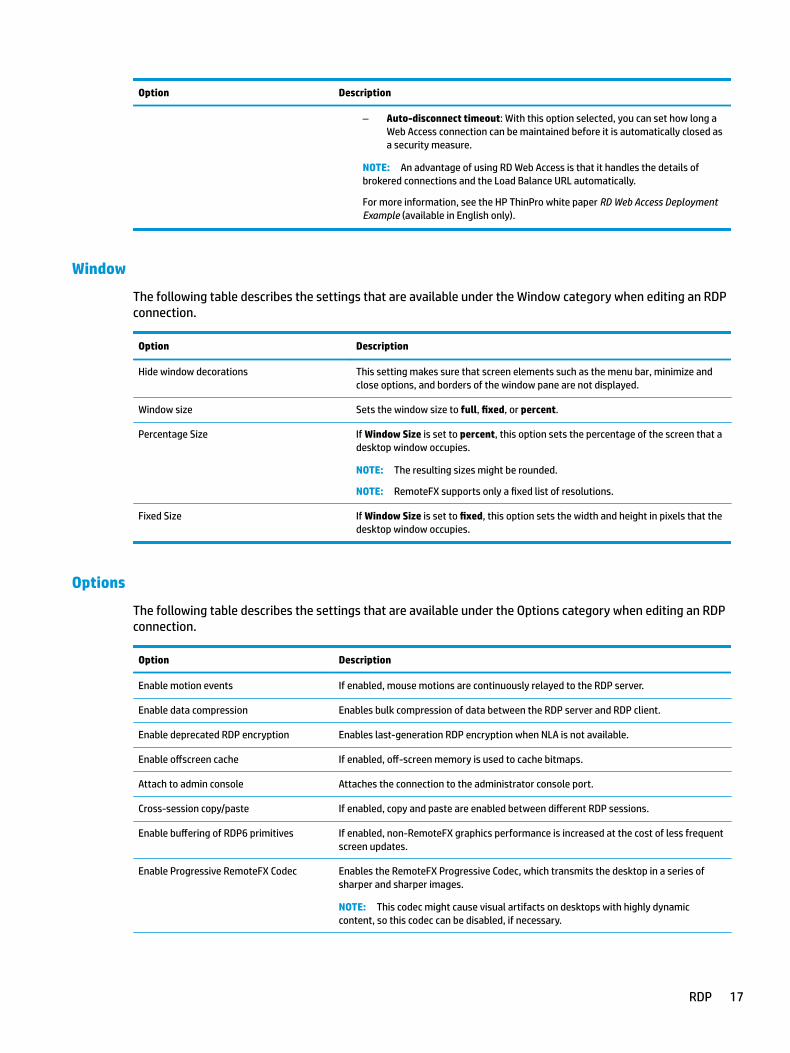
– Auto-disconnect timeout: With this option selected, you can set how long a Web Access connection can be maintained before it is automatically closed as a security measure.
NOTE: An advantage of using RD Web Access is that it handles the details of brokered connections and the Load Balance URL automatically.
For more information, see the HP ThinPro white paper RD Web Access Deployment Example (available in English only).
Window
The following table describes the settings that are available under the Window category when editing an RDP connection.
Option Description
Hide window decorations This setting makes sure that screen elements such as the menu bar, minimize and close options, and borders of the window pane are not displayed.
Window size Sets the window size to full, fixed, or percent.
Percentage Size If Window Size is set to percent, this option sets the percentage of the screen that a desktop window occupies.
NOTE: The resulting sizes might be rounded.
NOTE: RemoteFX supports only a fixed list of resolutions.
Fixed Size If Window Size is set to fixed, this option sets the width and height in pixels that the desktop window occupies.
Options
The following table describes the settings that are available under the Options category when editing an RDP connection.
Option Description
Enable motion events If enabled, mouse motions are continuously relayed to the RDP server.
Enable data compression Enables bulk compression of data between the RDP server and RDP client.
Enable deprecated RDP encryption Enables last-generation RDP encryption when NLA is not available.
Enable offscreen cache If enabled, off-screen memory is used to cache bitmaps.
Attach to admin console Attaches the connection to the administrator console port.
Cross-session copy/paste If enabled, copy and paste are enabled between different RDP sessions.
Enable buffering of RDP6 primitives If enabled, non-RemoteFX graphics performance is increased at the cost of less frequent screen updates.
Enable Progressive RemoteFX Codec Enables the RemoteFX Progressive Codec, which transmits the desktop in a series of sharper and sharper images.
NOTE: This codec might cause visual artifacts on desktops with highly dynamic content, so this codec can be disabled, if necessary.
RDP 17

Option Description
Enable Multimedia Redirection Allows multimedia files to be sent directly to the client for local playback.
Certificate verification policy Select one of the following:
● Accept all RDP server certificates
● Use remembered hosts; warn if unknown or invalid certificate
● Skip remembered hosts; warn if unknown or invalid certificate
● Connect only to pre-approved RDP servers
TLS Version Sets the version of Transport Layer Security to be used during the early stages of negotiation with the RDP server. Either set this to match the version of TLS used by your RDP server, or try setting it to auto.
NOTE: There are some server-side defects in some unpatched RDP servers that can cause the auto setting to fail, so it is not the default setting.
Send hostname as For per-device licensing, this selects how the client hostname is sent to the RDP server. Select hostname or mac.
Hostname to send Normally, the thin client's hostname is used for Client Access Licenses. This field allows a different value to be sent.
TIP: Select the (i) icon next to this option for more information.
Load Balance Info Use this option with a brokered RDP connection.
TIP: Select the (i) icon next to this option for more information.
NOTE: For more information about the options Enable deprecated RDP encryption and TLS Version, see the HP ThinPro white paper Security Layers for RDP Connections (available in English only).
Local Resources
The following table describes the settings that are available under the Local Resources category when editing an RDP connection.
NOTE: HP recommends high-level device redirection for all local devices unless there is a specific reason to use USB redirection (USBR) instead. For more information, see the HP ThinPro white paper USB Manager (available in English only).
Option Description
Audio Devices Determines whether audio devices are redirected by high-level RDP audio redirection, low-level USB redirection, or disabled for this connection.
Printers Determines whether printers are redirected by high-level printer redirection (which requires them to be set up via the Printers tool in Control Panel), low-level USB redirection, or disabled for this connection.
Serial/Parallel Ports Determines whether serial and parallel ports are redirected or disabled for this connection.
USB Storage Determines whether USB storage devices such as flash drives and optical drives are redirected by high-level storage redirection, low-level USB redirection, or disabled for this connection.
Local Partitions Determines whether local partitions of the thin client's flash drive are redirected or disabled for this connection.
18 Chapter 4 Connection types

Option Description
Smart Cards Determines whether smart cards are redirected by high-level smart card redirection or disabled for this connection.
NOTE: When the Use predefined smart card setting is enabled, this setting is disabled.
Other USB Devices Determines whether other classes of USB devices (such as webcams and tablets) are redirected by low-level USB redirection or disabled for this connection.
Experience
The following table describes the settings that are available under the Experience category when editing an RDP connection.
Option Description
Choose your connection speed to optimize performance
Selecting a connection speed (LAN, Broadband, or Modem) will enable or disable the following options to optimize performance:
● Desktop background
● Font smoothing
● Desktop composition
● Show contents of window while dragging
● Menu and window animation
● Themes
Selecting Client Preferred Settings allows the RDP client to choose which options to use to provide the best RDP experience.
You can also select your own custom combination of options.
End-to-End Connection Health Monitoring
Select to enable the timeout options.
NOTE: For more information, see the HP ThinPro white paper RDP Connection Drop Detection (available in English only).
Warning Timeout Specifies the amount of time in seconds after receiving the last network traffic from the server before the user is warned of a lost connection. This function can be disabled by clearing the option or setting the time to zero.
With the Show Warning Dialog option selected, a warning dialog will be displayed when this timeout is reached. Otherwise, the warning is written to the connection log only.
TIP: HP recommends increasing the timeout value for networks that experience frequent busy periods or momentary outages.
Recovery Timeout Specifies the amount of time in seconds after receiving the last network traffic from the server that the RDP client waits for the connection to recover without taking any special action. At the end of this period, the RDP client attempts a quick reconnection with the session.
Error Timeout Specifies the amount of time in seconds after receiving the last network traffic from the server that the RDP client waits before stopping attempts to reconnect with that server.
Diagnostics
The following table describes the settings that are available under the Diagnostics category when editing an RDP connection.
RDP 19
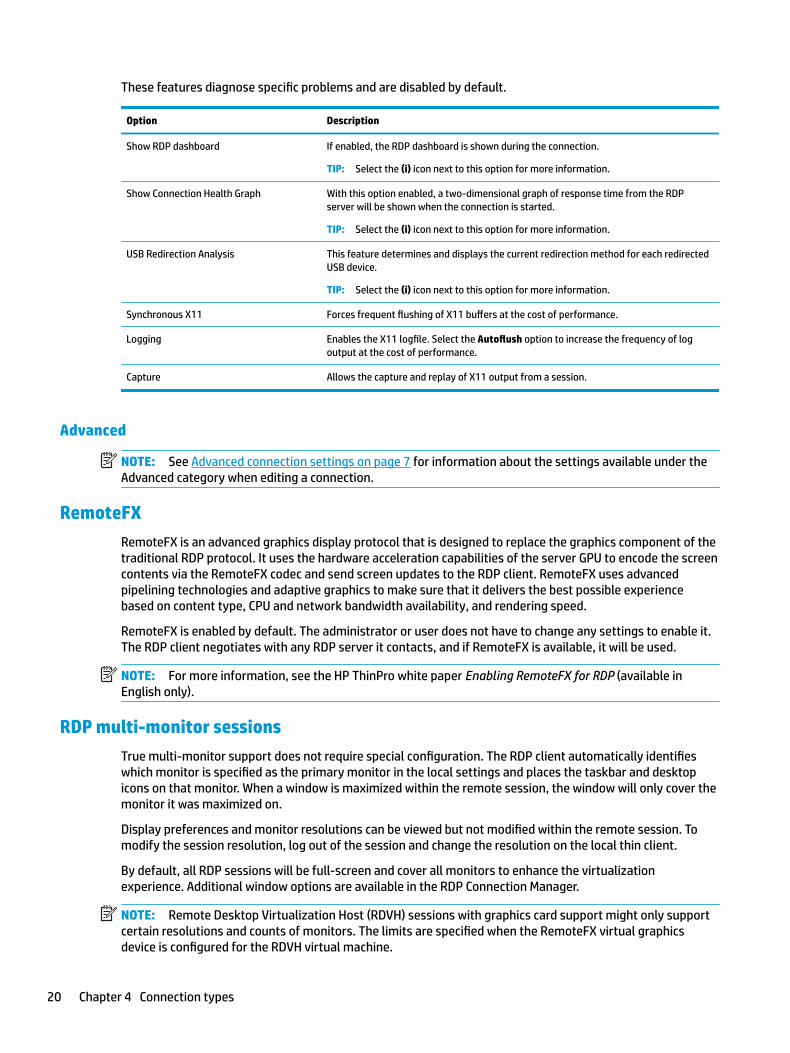
These features diagnose specific problems and are disabled by default.
Option Description
Show RDP dashboard If enabled, the RDP dashboard is shown during the connection.
TIP: Select the (i) icon next to this option for more information.
Show Connection Health Graph With this option enabled, a two-dimensional graph of response time from the RDP server will be shown when the connection is started.
TIP: Select the (i) icon next to this option for more information.
USB Redirection Analysis This feature determines and displays the current redirection method for each redirected USB device.
TIP: Select the (i) icon next to this option for more information.
Synchronous X11 Forces frequent flushing of X11 buffers at the cost of performance.
Logging Enables the X11 logfile. Select the Autoflush option to increase the frequency of log output at the cost of performance.
Capture Allows the capture and replay of X11 output from a session.
Advanced
NOTE: See Advanced connection settings on page 7 for information about the settings available under the Advanced category when editing a connection.
RemoteFX
RemoteFX is an advanced graphics display protocol that is designed to replace the graphics component of the traditional RDP protocol. It uses the hardware acceleration capabilities of the server GPU to encode the screen contents via the RemoteFX codec and send screen updates to the RDP client. RemoteFX uses advanced pipelining technologies and adaptive graphics to make sure that it delivers the best possible experience based on content type, CPU and network bandwidth availability, and rendering speed.
RemoteFX is enabled by default. The administrator or user does not have to change any settings to enable it. The RDP client negotiates with any RDP server it contacts, and if RemoteFX is available, it will be used.
NOTE: For more information, see the HP ThinPro white paper Enabling RemoteFX for RDP (available in English only).
RDP multi-monitor sessions
True multi-monitor support does not require special configuration. The RDP client automatically identifies which monitor is specified as the primary monitor in the local settings and places the taskbar and desktop icons on that monitor. When a window is maximized within the remote session, the window will only cover the monitor it was maximized on.
Display preferences and monitor resolutions can be viewed but not modified within the remote session. To modify the session resolution, log out of the session and change the resolution on the local thin client.
By default, all RDP sessions will be full-screen and cover all monitors to enhance the virtualization experience. Additional window options are available in the RDP Connection Manager.
NOTE: Remote Desktop Virtualization Host (RDVH) sessions with graphics card support might only support certain resolutions and counts of monitors. The limits are specified when the RemoteFX virtual graphics device is configured for the RDVH virtual machine.
20 Chapter 4 Connection types
NOTE: For more information about RDP multi-monitor sessions, see the HP ThinPro white paper True Multi-Monitor Mode for RDP (available in English only).
RDP multimedia redirection
Multimedia redirection (MMR) is a technology that integrates with Windows Media Player on the remote host and streams the encoded media to the RDP client instead of playing it on the remote host and re-encoding it via RDP. This technology reduces the server load and network traffic, and greatly improves the multimedia experience, supporting 24 fps playback of 1080p videos with automatic audio syncing. MMR is enabled by default. The RDP client will negotiate with any RDP server it contacts, and if MMR is available, it will be used.
MMR also uses an advanced codec detection scheme that identifies whether the thin client supports the codec being requested by the remote host before attempting to redirect it. The result is that only supported codecs will be redirected and all unsupported codecs fall back to server-side rendering.
TIP: For simplified management, HP recommends that MMR be enabled or disabled on the remote host.
RDP device redirection
Device redirection makes sure that when a user plugs a device into the thin client, the device is automatically detected and accessible in the remote session. RDP supports redirection of many different types of devices.
RDP USB redirection
USB redirection works by transmitting low-level USB protocol calls over the network to the remote host. Any USB device plugged into the local host appears within the remote host as a native USB device, as if it were plugged in locally. Standard Windows drivers support the device in the remote session, and all device types are supported without requiring additional drivers on the thin client.
Not all devices default to USB redirection. For example, USB keyboards, mice, and other input devices usually are not set to be redirected, as the remote session expects input to come from the thin client. Some devices such as mass storage, printers, and audio devices might use additional options for redirection.
Note the following additional information about USB redirection with RDP:
● The server must support USB redirection for it to be available to the thin client. General-purpose USB redirection is supported with RDVH servers with RemoteFX, Windows 8, Windows 10, Windows Server 2012, and Windows Server 2016.
● The protocol in USB Manager in Control Panel must be set to RDP.
● For RDP connections, the controls in USB Manager determine if a USB device is redirected. The settings for the individual connection determine how a USB device is redirected.
RDP mass storage redirection
By default, the RDP session redirects all mass storage devices to the remote host using high-level drive redirection. When a device such as a USB flash drive, USB DVD-ROM drive, or USB external HDD is plugged into the thin client, the thin client detects and mounts the drive on the local file system. RDP then detects a mounted drive and redirects it to the remote host. Within the remote host, it will appear as a new disk drive in Windows Explorer, with the name <device label> on <client hostname>; for example, Bill_USB on HP04ab598100ff.
There are three restrictions to this type of redirection.
● The device will not appear in the taskbar on the remote host with an icon to eject the device. Because of this, make sure to give the device a sufficient amount of time to sync data after a copy before removing the device to be sure that the device does not corrupt. Typically, less than one second is required after
RDP 21
the file copy dialog finishes, but up to 10 seconds might be required depending on the device write speed and network latency.
● Only file systems supported by the thin client will be mounted. The supported file systems are FAT32, NTFS, ISO9660 (CD-ROMs), UDF (DVD-ROMs), and ext3.
● The device will be treated as a directory; common drive tasks like formatting and modification of the disk label will not be available.
USB redirection of storage devices can be disabled in an individual connection's settings. If desired, you can disable mass storage redirection altogether. To do this, turn off USB redirection, and then change the registry keys as described in the following table.
Registry entry Value to set Description
root/USB/root/holdProtocolStatic 1 Makes sure that the USBR type will not be automatically changed when a connection is set or unset
root/USB/root/protocol local Makes sure that the RDP connection does not attempt to redirect any devices to the remote session
To completely disable local mounting of USB mass storage devices or to disable the redirection of USB mass storage devices but still allow other devices to redirect, in the thin client file system, delete the udev rule /etc/udev/rules.d/010_usbdrive.rules.
RDP printer redirection
By default, RDP has two methods of printer redirection enabled:
● USB redirection: Any USB printer plugged into the device will show up as a local printer in the remote session. The standard printer installation process must happen in the remote session if the printer is not already installed on that remote host. There are no settings to manage locally.
● High-level redirection: If either USB redirection is unavailable on the remote host or the printer is a parallel or serial printer, use high-level redirection. Configure the printer to use a local printer spooler, and the RDP client automatically sets up a remote printer that sends print spooling commands through a virtual channel from the remote host to the thin client.
A generic postscript driver is used if no driver is specified, but additional printer features might be available if the printer is set up locally with a specific Windows driver. This Windows driver must match the driver that the printer would use when locally attached to a Windows operating system. This information is usually found under Model in the printer properties.
NOTE: See Serial or parallel printer configuration on page 69 for more information.
RDP audio redirection
By default, high-level audio redirection will redirect audio from the remote host to the thin client. Basic voice control might need to be set up, and RDP 7.1 contains a number of advanced audio redirection features that might require additional configuration.
See the following notes about using audio redirection with RDP:
● RDP delivers the highest quality audio as the network bandwidth allows. RDP reduces audio quality to play on low-bandwidth connections.
● No native audio or video syncing mechanisms are available in standard RDP. Longer videos might not sync with audio. MMR or RemoteFX can resolve this issue.
22 Chapter 4 Connection types

● HP recommends high-level audio redirection, but USB redirection of audio devices is possible if additional functionality is present, such as a digital volume control. Only high-level redirection is available for analog devices.
● Microphone redirection is enabled by default. The default microphone volume might need to be adjusted on the thin client. Older Windows RDP servers must have their settings modified to enable audio input.
● Both the local and remote volume settings will affect the final volume. HP recommends setting the local volume to a maximum and adjusting the volume within the remote host.
RDP smart card redirection
By default, smart cards will be redirected using high-level redirection, allowing them to be used to log in to the session and other remote applications.
To enable smart card login for an RDP connection:
▲ Select Use predefined smart card in the RDP Connection Manager.
This will allow the user to connect without first specifying credentials. The RDP client will start the RDP session, and the user will be prompted to authenticate by smart card.
This technology requires drivers for the smart card reader driver to be installed on the thin client. By default, the CCID and Gemalto drivers are installed, which adds support for the majority of smart card readers available. Additional drivers can be installed by adding them to /usr/lib/pkcs11/.
NOTE: When smart card login is enabled, Network Level Authentication is not supported and is automatically disabled.
VMware Horizon View
VMware Horizon View per-connection settings
NOTE: These settings affect the connection you are currently configuring only.
Network
The following table describes the settings that are available under the Network category when editing a VMware Horizon View connection.
Option Description
Name Enter a name for this connection.
Address Enter the hostname or IP address of a VMware Horizon View server.
Credentials ● Log in anonymously using unauthenticated access
● Use Single Sign-On credentials: The credentials used at login are also used to start the connection.
● Ask for credentials at connection start: There are no pre-supplied credential components.
● Use predefined user, password, and/or domain: Some or all of the credentials are stored and supplied for the connection.
● Use predefined smart card: The connection is expected to be used with a smart card for authentication.
User Enter the username to use for the connection.
VMware Horizon View 23

Option Description
Password Enter the password to use for the connection.
Domain Enter the domain to use for the connection.
General
The following table describes the settings that are available under the General category when editing a VMware Horizon View connection.
Option Description
Enable MMR Enables multimedia redirection for BLAST and PCoIP connections.
NOTE: HP recommends disabling this option.
For connections made with RDP protocol, use the Enable Multimedia Redirection option. See RDP Options on page 25.
Enable client drive redirection Enables the shared folder feature for BLAST and PCoIP connections. This option is enabled by default.
Don’t start application maximized If enabled, applications do not start in maximized windows.
Automatic login When enabled, the user is automatically logged in when the connection is established.
NOTE: HP recommends enabling this option.
Virtualization pack for Skype for Business Enables virtualization of Skype for Business.
NOTE: Video calls might use most of the processing power of a thin client. HP recommends disabling this option.
Enable seamless window Enables applications to start in seamless window mode.
Default Desktop Specifies a desktop to start automatically when a VMware Horizon View connection is launched.
Preferred Protocol Lets you select PCoIP, RDP, or BLAST as the preferred protocol or choose to select the protocol later.
Network Condition for BLAST Lets you select the network condition for a BLAST connection:
● Excellent
● Typical (default)
● Poor
Application Size Sets the application window size. You can select All Monitors, Full Screen, Large Window, or Small Window.
Desktop Size Sets the desktop window size. You can select All Monitors, Full Screen, Large Window, or Small Window.
Printers Controls how local printer redirection is handled:
● ThinPrint: Shares printers using high-level redirection.
● USB Redirection
● Disable
NOTE: For connections made with RDP protocol, see RDP printer redirection on page 22.
24 Chapter 4 Connection types
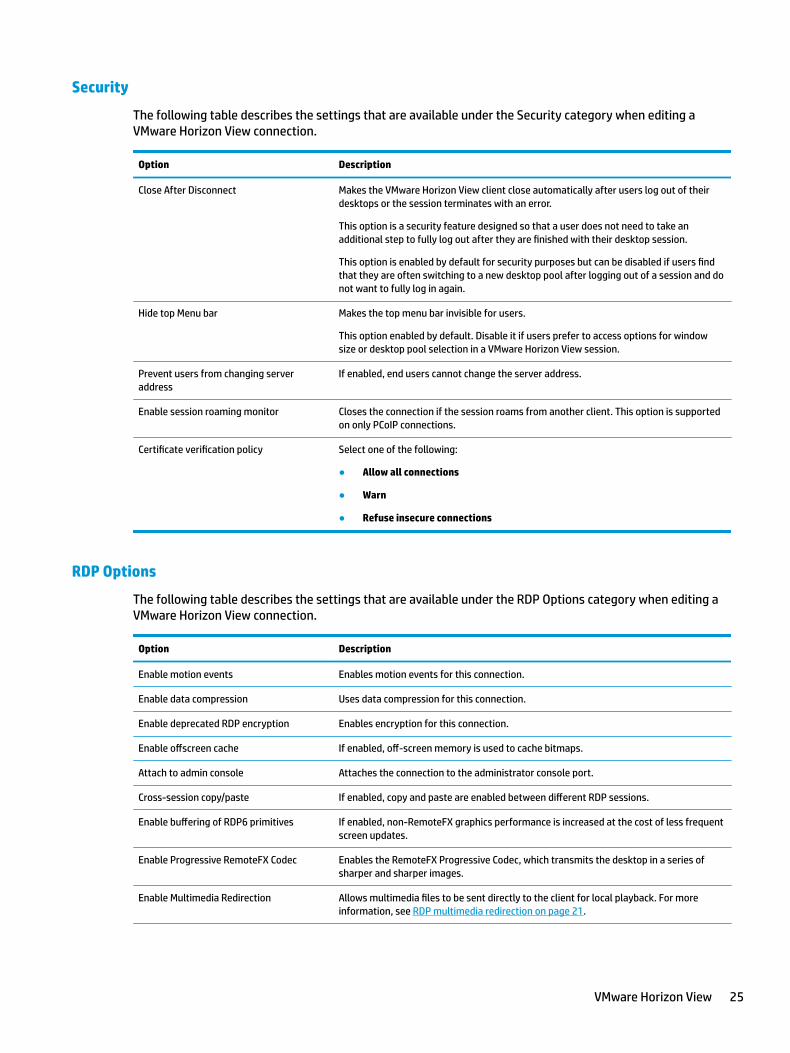
Security
The following table describes the settings that are available under the Security category when editing a VMware Horizon View connection.
Option Description
Close After Disconnect Makes the VMware Horizon View client close automatically after users log out of their desktops or the session terminates with an error.
This option is a security feature designed so that a user does not need to take an additional step to fully log out after they are finished with their desktop session.
This option is enabled by default for security purposes but can be disabled if users find that they are often switching to a new desktop pool after logging out of a session and do not want to fully log in again.
Hide top Menu bar Makes the top menu bar invisible for users.
This option enabled by default. Disable it if users prefer to access options for window size or desktop pool selection in a VMware Horizon View session.
Prevent users from changing server address
If enabled, end users cannot change the server address.
Enable session roaming monitor Closes the connection if the session roams from another client. This option is supported on only PCoIP connections.
Certificate verification policy Select one of the following:
● Allow all connections
● Warn
● Refuse insecure connections
RDP Options
The following table describes the settings that are available under the RDP Options category when editing a VMware Horizon View connection.
Option Description
Enable motion events Enables motion events for this connection.
Enable data compression Uses data compression for this connection.
Enable deprecated RDP encryption Enables encryption for this connection.
Enable offscreen cache If enabled, off-screen memory is used to cache bitmaps.
Attach to admin console Attaches the connection to the administrator console port.
Cross-session copy/paste If enabled, copy and paste are enabled between different RDP sessions.
Enable buffering of RDP6 primitives If enabled, non-RemoteFX graphics performance is increased at the cost of less frequent screen updates.
Enable Progressive RemoteFX Codec Enables the RemoteFX Progressive Codec, which transmits the desktop in a series of sharper and sharper images.
Enable Multimedia Redirection Allows multimedia files to be sent directly to the client for local playback. For more information, see RDP multimedia redirection on page 21.
VMware Horizon View 25

Option Description
TLS Version Sets the version of Transport Layer Security to be used during the early stages of negotiation with the RDP server. Either set this to match the version of TLS used by your RDP server, or try setting it to auto.
NOTE: There are some server-side defects in some unpatched RDP servers that can cause the auto setting to fail, so it is not the default setting.
Send hostname as For per-device licensing, this selects how the client hostname is sent to the RDP server. Select hostname or mac.
Hostname to send Normally, the thin client's hostname is used for Client Access Licenses. This field allows a different value to be sent.
TIP: Select the (i) icon next to this option for more information.
Load Balance Info Use this option with a brokered RDP connection.
TIP: Select the (i) icon next to this option for more information.
Remote computer sound Specifies where the remote computer’s sound should be played (remotely or locally) or if it should not be played at all.
Enable port mapping Maps the thin client's serial and parallel ports to the remote session.
Enable printer mapping Maps the local print queue to the remote session. Use this option if either USB redirection is unavailable on the remote host or the printer is a parallel or serial printer. Configure the printer to use a local printer spooler, and the VMware Horizon View client automatically sets up a remote printer that sends print spooling commands through a virtual channel from the remote host to the thin client.
This method requires both that the printer be configured on the thin client and a Windows driver be specified on the thin client because the VMware Horizon View client needs to specify to the remote host which driver to use for the remote printer. This Windows driver must match the driver that the printer would use when locally attached to a Windows operating system. This information is usually found under the Model in the printer properties.
Shared folders Add, Remove, or Edit shared folders.
RDP Experience
The following table describes the settings that are available under the RDP Experience category when editing a VMware Horizon View connection.
Option Description
Choose your connection speed to optimize performance
Selecting a connection speed (LAN, Broadband, or Modem) will enable or disable the following options to optimize performance:
● Desktop background
● Font smoothing
● Desktop composition
● Show contents of window while dragging
● Menu and window animation
● Themes
Selecting Client Preferred Settings will allow the VMware Horizon View client to choose which options to use.
26 Chapter 4 Connection types
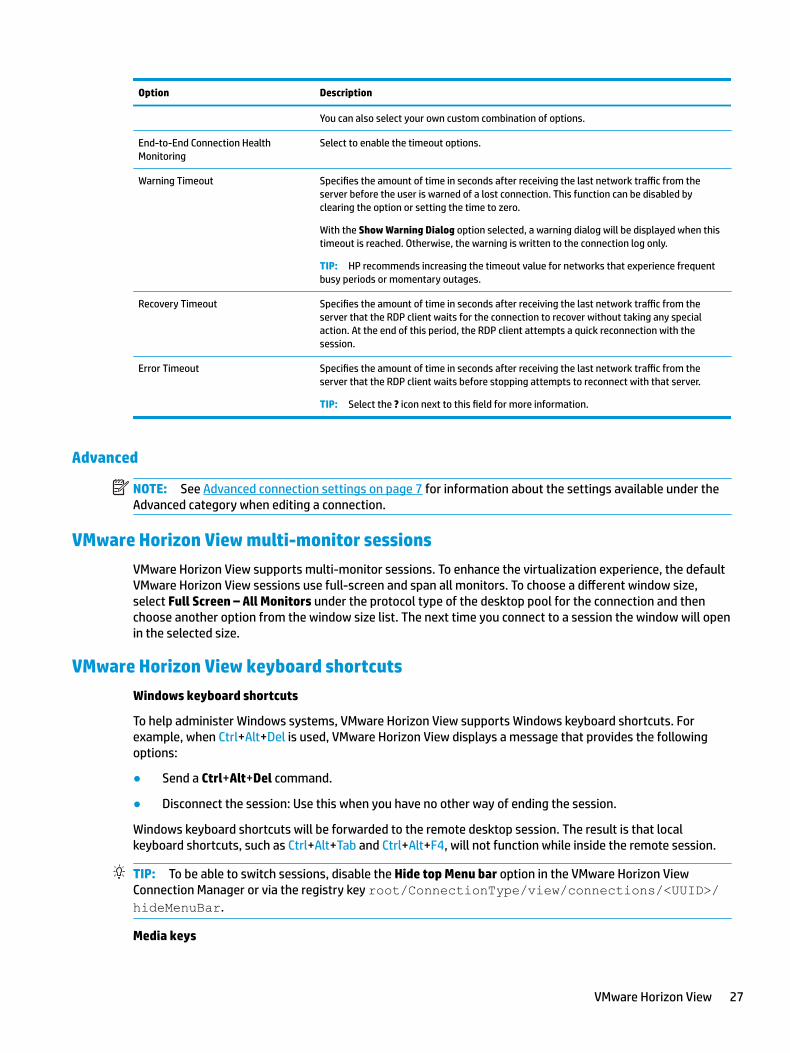
Option Description
You can also select your own custom combination of options.
End-to-End Connection Health Monitoring
Select to enable the timeout options.
Warning Timeout Specifies the amount of time in seconds after receiving the last network traffic from the server before the user is warned of a lost connection. This function can be disabled by clearing the option or setting the time to zero.
With the Show Warning Dialog option selected, a warning dialog will be displayed when this timeout is reached. Otherwise, the warning is written to the connection log only.
TIP: HP recommends increasing the timeout value for networks that experience frequent busy periods or momentary outages.
Recovery Timeout Specifies the amount of time in seconds after receiving the last network traffic from the server that the RDP client waits for the connection to recover without taking any special action. At the end of this period, the RDP client attempts a quick reconnection with the session.
Error Timeout Specifies the amount of time in seconds after receiving the last network traffic from the server that the RDP client waits before stopping attempts to reconnect with that server.
TIP: Select the ? icon next to this field for more information.
Advanced
NOTE: See Advanced connection settings on page 7 for information about the settings available under the Advanced category when editing a connection.
VMware Horizon View multi-monitor sessions
VMware Horizon View supports multi-monitor sessions. To enhance the virtualization experience, the default VMware Horizon View sessions use full-screen and span all monitors. To choose a different window size, select Full Screen – All Monitors under the protocol type of the desktop pool for the connection and then choose another option from the window size list. The next time you connect to a session the window will open in the selected size.
VMware Horizon View keyboard shortcuts
Windows keyboard shortcuts
To help administer Windows systems, VMware Horizon View supports Windows keyboard shortcuts. For example, when Ctrl+Alt+Del is used, VMware Horizon View displays a message that provides the following options:
● Send a Ctrl+Alt+Del command.
● Disconnect the session: Use this when you have no other way of ending the session.
Windows keyboard shortcuts will be forwarded to the remote desktop session. The result is that local keyboard shortcuts, such as Ctrl+Alt+Tab and Ctrl+Alt+F4, will not function while inside the remote session.
TIP: To be able to switch sessions, disable the Hide top Menu bar option in the VMware Horizon View Connection Manager or via the registry key root/ConnectionType/view/connections/<UUID>/hideMenuBar.
Media keys
VMware Horizon View 27

VMware Horizon View uses media keys to control options such as volume, play/pause, and mute during a remote desktop session. This supports multimedia programs such as Windows Media Player.
VMware Horizon View device redirection
VMware Horizon View USB redirection
To enable USBR for VMware Horizon View connections, select VMware Horizon View as the remote protocol in USB Manager.
For more information on USBR, including device- and class-specific redirection, see RDP USB redirection on page 21.
VMware Horizon View audio redirection
If you do not need the audio recording capability, use high-level audio redirection. Audio will play out of the 3.5 mm jack or, by default, a USB headset if it is plugged in. Use the local audio manager to adjust the input/output level, select playback, and capture devices.
The VMware Horizon View client supports high-level audio-record redirection only via the PCoIP connection type on x86 units when connecting to a server running VMware Horizon View 5.2 Feature Pack 2 or higher or the BLAST connection type on x86 units when connecting to a server running VMware Horizon View 7.x or higher. If you need audio-recording support and are using a different configuration, use one of the following methods:
● If your system uses VMware Horizon View Client 1.7 or higher, use the RDP protocol to allow for high-level audio redirection through either the 3.5 mm jack or a USB headset.
NOTE: To use high-level audio-record redirection through the RDP protocol, the server must support it and be configured to allow audio recording over a remote session. The server must be running Windows 7 or greater. You also must make sure the HKLM\SYSTEM\CurrentControlSet\Control\Terminal Server\WinStations\RDP-Tcp\fDisableAudioCapture registry key is set to 0.
● If you have a USB headset with a microphone, you can use USBR. Set the USB headset to be redirected into the session. The headset will show up as an audio device. By default, USB audio devices are not redirected and the VMware Horizon View client uses high-level audio redirection. To redirect the USB headset, use the thin client’s USB Manager and select the USB headset to be redirected. Make sure that VMware Horizon View is selected as the USBR protocol and make sure that the headset is selected under the devices to be redirected.
NOTE: VMware and HP do not recommend using USBR for headsets. A large amount network bandwidth is required to stream audio data over the USBR protocol. Also, you might experience poor audio quality with this method.
VMware Horizon View smart card redirection
To use a smart card to log in to the VMware Horizon View server:
1. Be sure smart card login is enabled in the VMware Horizon View Connection Manager.
After starting the connection, the VMware Horizon View client will display a list of server credentials.
2. To unlock the credentials and access the VMware Horizon View Manager server, type the appropriate PIN for the server.
28 Chapter 4 Connection types
NOTE: After you supply the correct PIN, the user’s credentials will be used to log in to the VMware Horizon View Manager server. Please see the VMware Horizon View documentation for details on configuring the server to support smart card login. As long as the server is configured to allow smart card login, the user’s credentials will pass through and they will be logged in to the desktop without having to enter their PIN again.
NOTE: To log in to the VMware Horizon View Manager administrator server with a smart card, the local smart card driver must be installed on the thin client. See RDP smart card redirection on page 23 for more information on smart card driver installation. Once logged in to the remote host, the smart card will be passed to the remote host using a virtual channel, not USBR. This virtual channel redirection makes sure that the smart card can be used for tasks such as email signing, screen locking, and so on, but might cause the smart card to not show as a smart card device in the Windows Device Manager.
NOTE: The remote host must have the proper smart card drivers installed.
VMware Horizon View webcam redirection
The VMware Horizon View client supports high-level webcam redirection only through RTAV using x86 units connected to a back-end server running VMware Horizon View 5.2 Feature Pack 2 or higher. Other connection methods do not support high-level webcam redirection and can redirect webcams only using USBR. Based on internal testing and validation, HP has found that the performance of a webcam connected through basic USBR performs poorly. HP does not recommend the use of this configuration and suggests that customers who require this function test using x86 units with RTAV technology to ensure satisfactory levels of performance. With USBR, the webcam might perform poorly or not at all. See RDP USB redirection on page 21 for more information.
Changing the VMware Horizon View protocol
VMware Horizon View Client can use either the PCoIP, RDP, or BLAST protocol.
To change the protocol:
1. In VMware Horizon View Client, select a pool that supports one of the supported protocols.
2. Under the Connection menu, select Settings.
3. Change the protocol by using the drop-down box next to Connect Via.
NOTE: Use VMware Horizon View Manager to set which protocol should be used for each desktop pool.
TIP: HP recommends using the PCoIP protocol to enhance the desktop experience. However, the RDP protocol provides more options for customization and might work better on slower connections.
VMware Horizon View HTTPS and certificate management requirements
VMware Horizon View Client 1.5 and VMware Horizon View Server 5.0 and later require HTTPS. By default, the VMware Horizon View client warns about untrusted server certificates, such as self-signed (like the VMware Horizon View Manager default certificate) or expired certificates. If a certificate is signed by a Certificate Authority (CA) and the CA is untrusted, the connection will return an error and the user will not be allowed to connect.
HP recommends that a signed certificate verified by a standard trusted root CA be used on the VMware Horizon View Manager server. This makes sure that users will be able to connect to the server without being prompted or required to do any configuration. If using an internal CA, the VMware Horizon View client connection returns an error until you complete one of the following tasks:
● Use Certificate Manager to import the certificate from a file or URL.
● Use a remote profile update to import a certificate.
VMware Horizon View 29

● In the VMware Horizon View Connection Manager, set Connection Security Level to Allow all connections.
The following table describes certificate trust when the security level is set to Refuse insecure connections.
Certificate trust Result
Trusted Trusted
Self-signed Error
Expired Error
Untrusted Error
The following table describes certificate trust when the security level is set to Warn.
Certificate trust Result
Trusted Trusted
Self-signed Warning
Expired Warning
Untrusted Error
The following table describes certificate trust when the security level is set to Allow all connections.
Certificate trust Result
Trusted Trusted
Self-signed Untrusted
Expired Untrusted
Untrusted Untrusted
The following table describes the connection behavior associated with each result.
Result Description
Trusted Connects without a certificate warning dialog and displays a green lock icon
Untrusted Connects without a certificate warning dialog and displays a red unlock icon
Warning Connects with a certificate warning dialog and displays a red unlock icon
Error Does not allow the connection
Web Browser
Web Browser per-connection settings
NOTE: These settings affect the connection you are currently configuring only.
30 Chapter 4 Connection types

Configuration
The following table describes the settings that are available under the Configuration category when editing a Web Browser connection.
Option Description
Name The connection name.
URL The URL for the connection.
Intended Use Lets you specify how USB redirection is performed when the Web Browser connection starts. Select Citrix, RDP, or Internet.
Allow smartcard login Allows you to use smart-card authentication for a connection if you select a URL or icon that starts a remote connection.
Enable kiosk mode Enables kiosk mode.
Enable full screen Uses full screen mode for the connection.
Enable print dialog Enables the print dialog box.
Preferences
Use these options to configure the Web Browser. These options can be shared by multiple Web Browser connections or be specific to a single connection.
Advanced
NOTE: See Advanced connection settings on page 7 for information about the settings available under the Advanced category when editing a connection.
Additional connection types (ThinPro only)NOTE: By default, these connection types are not available in Smart Zero. For more information, see Choosing an OS configuration on page 2.
TeemTalk
NOTE: These settings affect only the connection you are currently configuring.
For more information about HP TeemTalk, see the User Guide for HP TeemTalk.
Configuration
The following table describes the settings that are available under the Configuration category when editing a TeemTalk connection.
Option Description
Name The connection name.
TeemTalk creation wizard Opens the TeemTalk Session Wizard. See the other tables in this section for more information.
System beep Enables the system beep sound.
Additional connection types (ThinPro only) 31

TeemTalk Session Wizard
The following table describes the settings that are available under the Connection Information category in the TeemTalk Session Wizard.
Option Description
Session Name The name of the session.
Transport The network transport to use for the connection. Valid transports are: TCP/IP, Serial, SSH2, and SSL.
Connection The connection method to be used. Advanced connection options can be configured via the button.
Emulation Emulation types are: hp70092, IBM 3151, IBM3270 Display, IBM3270 Printer, IBM5250 Display, IBM5250 Printer, MD Prism, TA6530, VT Series, and Wyse.
The following table describes the settings that are available under the Advanced Options category in the TeemTalk Session Wizard.
Option Description
Emulation Printer The HP TeemTalk emulation printer settings.
Auto Logon The HP TeemTalk auto login settings.
Key Macros The HP TeemTalk key macros settings.
Mouse Actions The HP TeemTalk mouse actions settings.
Soft Buttons The HP TeemTalk soft buttons settings.
Attributes The HP TeemTalk attributes settings.
Auxiliary Ports The HP TeemTalk auxiliary ports settings.
Hotspots The HP TeemTalk hotspots settings.
The following table describes the settings that are available under the Preferences category in the TeemTalk Session Wizard.
Option Description
Start session connected Starts the session connected.
Show Status Bar Displays the status bar for this connection.
The following table describes additional settings that are available under the Preferences category in the TeemTalk Session Wizard.
Option Description
Show Configuration Bar Displays the Configuration Bar.
Save Current Window Position Saves current window's size and position when you select Save Preferences. It will be restored on the next system launch.
32 Chapter 4 Connection types
Option Description
NOTE: Select Save Preferences each time you change the window size or position to save the new values.
Run in Full Screen Mode Select to make the window full screen and remove the frame, soft buttons, menu, and configuration bars.
NOTE: This option does not become effective until the next system launch and overrides the Show Configuration Bar and Save Current Window Position options.
Browser Command In the box, type the command that runs your web browser, such as:
/ display html links Firefox
Command Line Start Up Options Use to specify an alternate location for the startup options.
NOTE: For specific information on HP TeemTalk Command Line Startup Options, see the HP TeemTalk Terminal Emulator User Guide.
Advanced
NOTE: See Advanced connection settings on page 7 for information about the settings available under the Advanced category when editing a connection.
XDMCP
NOTE: These settings affect the connection you are currently configuring only.
Configuration
The following table describes the settings that are available under the Configuration category when editing an XDMCP connection.
Option Description
Name The connection name.
Type The XDMCP connection type. Valid options are: chooser, query, and broadcast.
Address This value is required if the Type value is set to query.
Use font server Use a remote X font server instead of locally installed fonts.
Font server Font server is not enabled unless the Use font server option is selected.
Configure display Select to set the display configuration for the connection. If you do not set this configuration, the default configuration will be used.
Advanced
NOTE: See Advanced connection settings on page 7 for information about the settings available under the Advanced category when editing a connection.
Secure Shell
NOTE: These settings affect only the connection you are currently configuring.
Additional connection types (ThinPro only) 33

Configuration
The following table describes the settings that are available under the Configuration category when editing an SSH connection.
Option Description
Name The connection name.
Address The IP address of the remote system.
Port The remote port to use for the connection.
User name The username to use for the connection.
Run application The application to run to make the connection.
Compression Select this option if you want to compress the data sent between the server and thin client.
X11 connection forwarding If the server has an X server on it, select this option to allow the user to open user interfaces from the SSH session and display them locally on the thin client.
Force TTY allocation Select this option and specify a command to initiate a temporary session to run the command. Once the command has completed, the session will terminate. If no command is specified, then the session will run normally as if the option were not selected.
Foreground color The default color of the text in the SSH session.
Background color The default color of the background in the SSH session.
Font Valid options are: 7X14, 5X7, 5X8, 6X9, 6X12, 7X13, 8X13, 8X16, 9X15, 10X20, and 12X24.
Advanced
NOTE: See Advanced connection settings on page 7 for information about the settings available under the Advanced category when editing a connection.
Telnet
NOTE: These settings affect the connection you are currently configuring only.
Configuration
The following table describes the settings that are available under the Configuration category when editing a Telnet connection.
Option Description
Name The name of the connection.
Address The IP address of the remote system.
Port The port to use on the remote system.
Foreground color The foreground color.
34 Chapter 4 Connection types

Option Description
Background color The background color.
Font Valid options are: 7X14, 5X7, 5X8, 6X9, 6X12, 6X13, 7X13, 8X13, 8X16, 9X15, 10X20, and 12X24.
Advanced
NOTE: See Advanced connection settings on page 7 for information about the settings available under the Advanced category when editing a connection.
Custom
If you would like to install a custom Linux® application, you can use the Custom connection to allow you to open this application through Connection Manager.
NOTE: These settings affect the connection you are currently configuring only.
Configuration
The following table describes the settings that are available under the Configuration category when editing a Custom connection.
Option Description
Name The connection name.
Enter command to run The command to run to make the remote connection.
Advanced
NOTE: See Advanced connection settings on page 7 for information about the settings available under the Advanced category when editing a connection.
Additional connection types (ThinPro only) 35

5 HP True Graphics
HP True Graphics offloads rich multimedia content to the thin client’s GPU, delivering high-frame-rate images and boosting efficiency.
Server-side requirementsSee the following table for a list of supported server-side products of the independent software vendor (ISV) you are using for your virtual desktop infrastructure (VDI).
ISV Supported products
Citrix® XenApp®/XenDesktop® 7.0 or newer
IMPORTANT: The Citrix server must support sending session data in H.264 format (a Citrix technology known as SuperCodec). H.264 is enabled by default and is processed using the DeepCompressionV2 encoder, a CPU-based compression algorithm.
VMware® VMware Horizon™ 6.0 and newer
VMware Horizon View™ 5.2 and 5.3
VMware View® 5.1
Client-side requirementsSee the following table for a list of supported thin client operating systems and supported client-side software from the ISV you are using for your VDI.
Supported operating systems Supported Citrix clients Supported VMware clients
HP ThinPro 5.0 and newer Citrix Receiver 13.1.1 and newer
NOTE: A version of Citrix Receiver that supports HP True Graphics is preinstalled starting with HP ThinPro 5.2 and is available as an add-on for HP ThinPro 5.0 and 5.1.
VMware Horizon Client 4.0 and newer (using the Blast protocol)
Client-side configurationNOTE: The information in this section applies to Citrix only. For VMware, simply use the Blast protocol to enable HP True Graphics.
Compression settings
To enable HP True Graphics on HP ThinPro:
▲ Select the Enable H264 Compression general setting for Citrix connections.
36 Chapter 5 HP True Graphics
NOTE: Some screen data, such as text, might be sent using methods other than H.264. In general, it is best to keep this feature enabled, but for troubleshooting or specific use cases, the following registry keys can be set to 0 to disable this feature:
● root/ConnectionType/xen/general/enableTextTracking
● root/ConnectionType/xen/general/enableSmallFrames
Window settings
To force remote applications to run in windowed mode:
▲ Set the TWI Mode general setting for Citrix connections to Force Seamless Off.
Monitor layout and hardware limitations
Consider the following limitations on monitor layout:
● Most configurations with a maximum of two monitors that have a 1920 × 1200 resolution are supported.
● HP t420 Thin Client: Due to its default BIOS configuration, this model uses HP True Graphics for one monitor only, by default. See Enabling HP True Graphics for multiple monitors on the HP t420 on page 37 for more information.
● HP t630 Thin Client: This model supports a maximum of two monitors at 1920 × 1200 or one monitor at 3840 × 2160.
● HP t730 Thin Client: This model supports a maximum of three monitors at 1920 × 1200.
● Rotated monitors might not display correctly.
● If you are using HP True Graphics with two monitors and trying to play a video using HDX MediaStream, the video will fail because H.264 supports only two hardware decode sessions, which are being consumed by the monitors.
NOTE: HDX MediaStream is also trying to leverage local hardware decoding of H.264, which causes the issue.
Enabling HP True Graphics for multiple monitors on the HP t420
To enable HP True Graphics for multiple monitors on the HP t420:
1. Restart the thin client and press F10 to access the BIOS.
2. Select Advanced ► Integrated Graphics.
3. Set Integrated Graphics to Force.
4. Set UMA Frame Buffer Size to 512 MB.
After these steps are performed, the amount of memory available for graphics is expanded, and HP True Graphics can be used for two monitors.
TIP: These settings can also be configured via HPDM or via the BIOS tools included with HP ThinPro.
Client-side configuration 37

Tips & best practicesConsider the following when using HP True Graphics:
● After connecting to a remote desktop, you can use Citrix HDX Monitor to determine which encoder is being used for the session by examining the Component_Encoder value under the Graphics - Thinwire Advanced section. If the value reads DeepCompressionV2Encoder or DeepCompressionEncoder, then the server is properly sending the data in a format that is accelerated by HP True Graphics.
NOTE: If legacy graphics are being forced via a server policy, such as CompatibilityEncoder or LegacyEncoder, the server is compressing graphics in a method that is compatible with older versions of Citrix clients, and HP True Graphics will not provide enhanced performance.
● HP True Graphics might provide some benefits to older versions of XenDesktop if using HDX 3D Pro. Benefits are not provided if HDX 3D Pro is used with the visual quality set to Always Lossless, because then the graphical information is not sent to the thin client in H.264 format.
38 Chapter 5 HP True Graphics
6 Active Directory integration
By using Active Directory integration, you can force users to log in to the thin client using domain credentials. Optionally, those credentials can be encrypted and stored and then later supplied to remote connections as they start, which is a process known as single sign-on.
NOTE: Enabling authentication requires no special domain permissions.
There are two modes in which Active Directory integration can operate. By simply enabling authentication against the domain, domain credentials can be used for the following operations:
● Logging in to the thin client
● Starting a connection using Single Sign-On
● Switching to administrator mode using administrative credentials
● Unlocking a locked screen using the login credentials
● Overriding a locked screen using administrative credentials
The thin client can also be formally joined to the domain. This adds the thin client to the domain’s database and might enable dynamic DNS, where the thin client informs the DNS server of changes in its IP address or hostname association. Unlike domain authentication, a formal join requires credentials of a domain user authorized to add clients to the domain. Joining to the domain is optional. All domain functions except dynamic DNS are available without joining.
Login screenWhen domain authentication is enabled, ThinPro displays a domain login screen upon startup. The login screen also includes options that might be necessary to configure before logging in.
The background desktop layout, login dialog style, login dialog text, and which buttons are available can all be adjusted via registry settings and/or configuration file settings. For more information, see the HP ThinPro white paper Login Screen Customization (available in English only).
If the system detects that the user tried to log in with expired credentials, they are prompted to update their credentials.
Single sign-onAfter a domain user has logged in, the credentials that were used can also be presented at startup to any connection configured to use them. This allows a user to sign in to the thin client and start Citrix, VMware Horizon View, and RDP sessions without having to enter their credentials again, for as long as they are logged in to the thin client.
DesktopOnce the user has successfully logged in using domain credentials, an Active Directory icon is available on the taskbar. The user can select the icon to perform the following functions:
Login screen 39

● Show who is logged in to the system
● Lock the screen
● Change the domain password
Screen lockThe screen can be locked due to inactivity timeout or through manual locking. If the screen was locked by a domain user, the unlock dialog expects the user to provide the same domain password they used to log in. Like the login dialog, there are options provided, plus one additional function: screen unlock. If the screen-unlock button is selected, the unlock screen instead requires the root (administrator) password or any set of domain credentials in the domain admin group, which was designated during domain authentication setup. When the user supplies override credentials, the screen does not return to the desktop; it instead returns to the login screen.
Administrator modeIn addition to the traditional method of using the root password to enter administrator mode, the domain credentials of a user in the designated domain administrator group can be used to switch to administrator mode.
Settings and the domain userWhen a domain user is logged in, any changes to settings are saved in a registry layer that applies only to that user. This includes newly created connections.
If the user has made no changes to system settings or connections, the system defaults will apply instead.
When the system is changed to administrator mode, settings and connection changes are no longer being made to the user-specific layer of the registry. Instead, while in administrator mode, all changes apply instead to the base-level registry. In that way, a change to a setting while in administrator mode applies to all users unless there is a user-specific, custom setting already specified.
40 Chapter 6 Active Directory integration

7 Start menu
▲ To open the Start menu, select Start .
Connection managementThe menu lists all the available connections. Right-click the connection name to manage that connection or select it to start the connection. If the connection is running, selecting it stops the connection. For more information on connection management, see Desktop connection management on page 6.
Switch to Administrator/Switch to UserThis option allows you to switch between administrator mode and user mode.
System InformationThis option starts the System Information application. For more information, see System Information on page 61.
Control PanelThis option starts Control Panel. For more information, see Control Panel on page 43.
ToolsThere are many system tools provided, including one to start programs, such as a text terminal, or to run the Initial Setup Wizard a second time. If you are logged in as a user, only authorized tools are displayed. If this list is empty, the Tools menu entry is hidden.
Menu option Description
X Terminal Lets you execute Linux commands.
Wireless Statistics Lets you view information about wireless access points.
Check for Updates Searches for updates from the server.
Text Editor Opens a basic text editor for viewing and editing text files.
Task Manager Lets you monitor the CPU usage and the CPU usage history for the thin client.
Snipping Tool Lets you take a snapshot of a rectangular selection of the screen, a specific window, or the entire screen.
Registry Editor Opens the ThinPro Registry Editor.
Initial Setup Wizard Starts the Initial Setup Wizard.
Connection management 41

PowerThese options allow you to log out, shut down the computer, restart the computer, or enable the Sleep state.
An administrator can restrict the options visible to a user using the Power Manager tool. See System on page 43.
SearchWhen you type in the search box, a set of potential matches for your search are displayed from most likely to least likely. The search includes the visible names of controls, tools, and connections and associated aliases and synonyms. For example, in administrator mode, typing encryption displays the Security control, because that control offers encryption parameters.
To see all available options, type a space in the search box or select the magnifying glass icon.
Search also returns the options to create new connections of all available types. This can be used to manage connections.
42 Chapter 7 Start menu
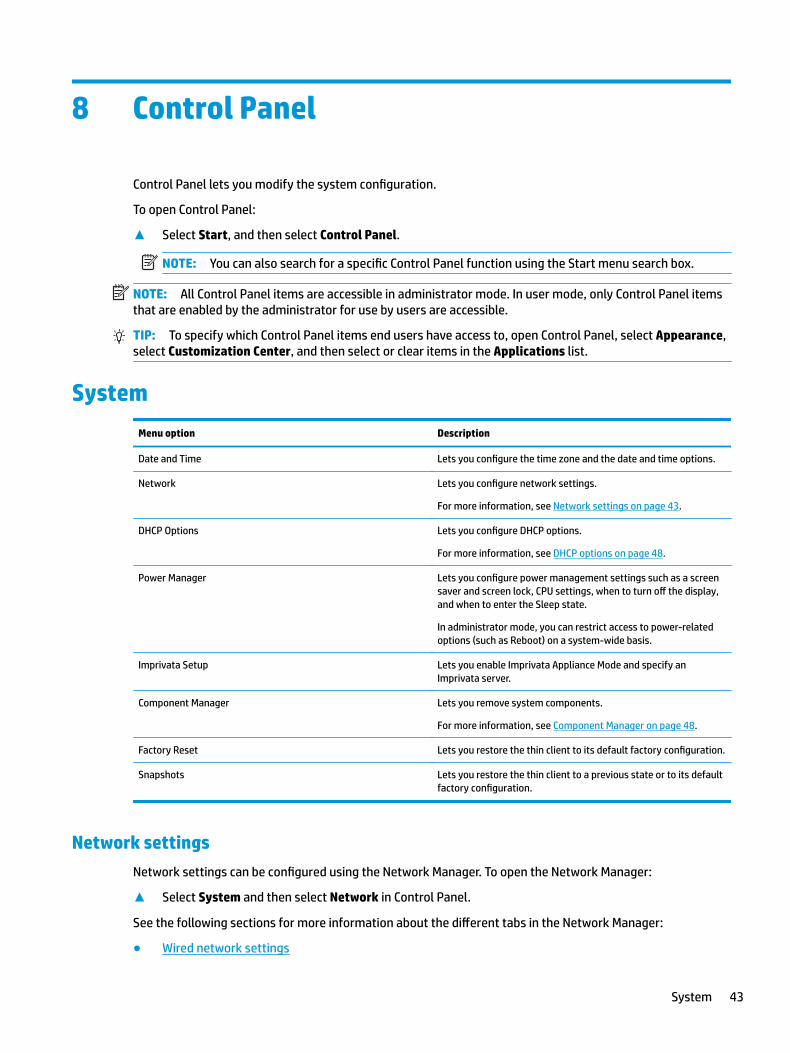
8 Control Panel
Control Panel lets you modify the system configuration.
To open Control Panel:
▲ Select Start, and then select Control Panel.
NOTE: You can also search for a specific Control Panel function using the Start menu search box.
NOTE: All Control Panel items are accessible in administrator mode. In user mode, only Control Panel items that are enabled by the administrator for use by users are accessible.
TIP: To specify which Control Panel items end users have access to, open Control Panel, select Appearance, select Customization Center, and then select or clear items in the Applications list.
System
Menu option Description
Date and Time Lets you configure the time zone and the date and time options.
Network Lets you configure network settings.
For more information, see Network settings on page 43.
DHCP Options Lets you configure DHCP options.
For more information, see DHCP options on page 48.
Power Manager Lets you configure power management settings such as a screen saver and screen lock, CPU settings, when to turn off the display, and when to enter the Sleep state.
In administrator mode, you can restrict access to power-related options (such as Reboot) on a system-wide basis.
Imprivata Setup Lets you enable Imprivata Appliance Mode and specify an Imprivata server.
Component Manager Lets you remove system components.
For more information, see Component Manager on page 48.
Factory Reset Lets you restore the thin client to its default factory configuration.
Snapshots Lets you restore the thin client to a previous state or to its default factory configuration.
Network settings
Network settings can be configured using the Network Manager. To open the Network Manager:
▲ Select System and then select Network in Control Panel.
See the following sections for more information about the different tabs in the Network Manager:
● Wired network settings
System 43
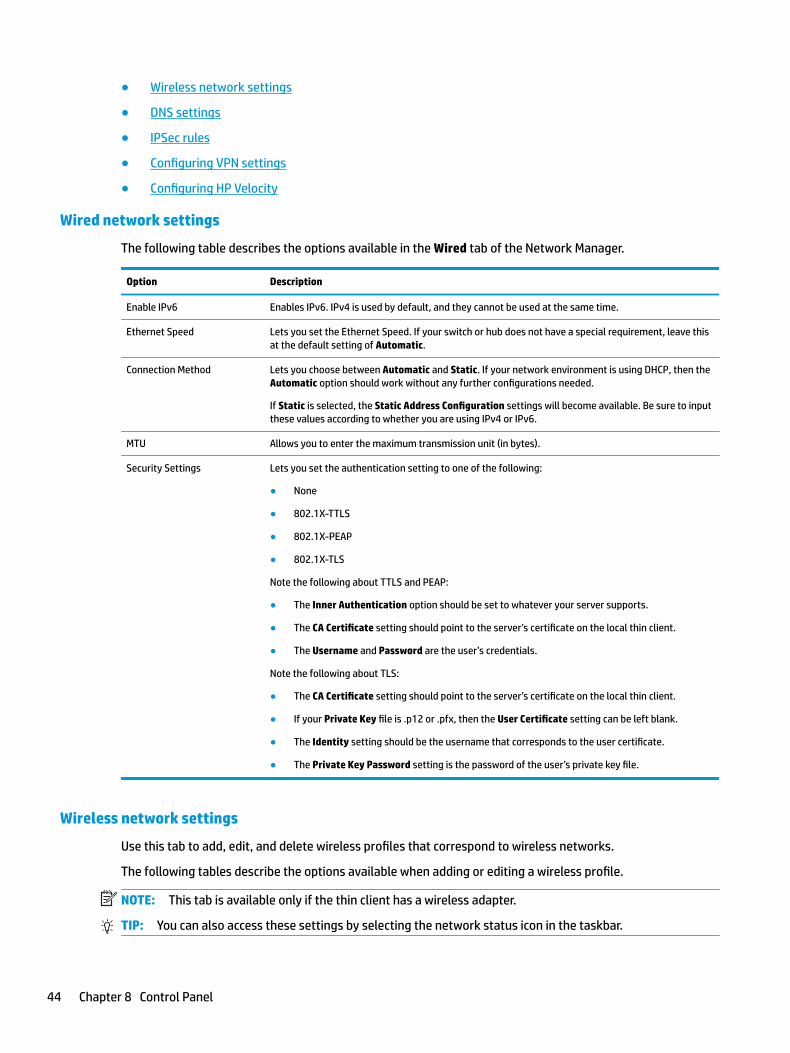
● Wireless network settings
● DNS settings
● IPSec rules
● Configuring VPN settings
● Configuring HP Velocity
Wired network settings
The following table describes the options available in the Wired tab of the Network Manager.
Option Description
Enable IPv6 Enables IPv6. IPv4 is used by default, and they cannot be used at the same time.
Ethernet Speed Lets you set the Ethernet Speed. If your switch or hub does not have a special requirement, leave this at the default setting of Automatic.
Connection Method Lets you choose between Automatic and Static. If your network environment is using DHCP, then the Automatic option should work without any further configurations needed.
If Static is selected, the Static Address Configuration settings will become available. Be sure to input these values according to whether you are using IPv4 or IPv6.
MTU Allows you to enter the maximum transmission unit (in bytes).
Security Settings Lets you set the authentication setting to one of the following:
● None
● 802.1X-TTLS
● 802.1X-PEAP
● 802.1X-TLS
Note the following about TTLS and PEAP:
● The Inner Authentication option should be set to whatever your server supports.
● The CA Certificate setting should point to the server’s certificate on the local thin client.
● The Username and Password are the user’s credentials.
Note the following about TLS:
● The CA Certificate setting should point to the server’s certificate on the local thin client.
● If your Private Key file is .p12 or .pfx, then the User Certificate setting can be left blank.
● The Identity setting should be the username that corresponds to the user certificate.
● The Private Key Password setting is the password of the user’s private key file.
Wireless network settings
Use this tab to add, edit, and delete wireless profiles that correspond to wireless networks.
The following tables describe the options available when adding or editing a wireless profile.
NOTE: This tab is available only if the thin client has a wireless adapter.
TIP: You can also access these settings by selecting the network status icon in the taskbar.
44 Chapter 8 Control Panel

Use the Wireless tab to configure general settings.
Option Description
Scan AP Scans for available wireless networks.
SSID Use this box to manually enter the SSID of the wireless network if it is not found by the scan.
Wireless Band Select Auto, 2.4GHz, or 5GHz.
SSID Hidden Enable this option if the SSID of the wireless network is set to be hidden (not broadcasting).
Enable IPv6 Enables IPv6. IPv4 is used by default, and they cannot be used at the same time.
Enable Power Management Enables the power management feature for the wireless adapter.
Connection Method Lets you select between Automatic and Static. If your network environment is using DHCP, then the Automatic option should work without any further configurations.
If Static is selected, the Static Address Configuration settings will become available. Be sure to input these values according to whether you are using IPv4 or IPv6.
Security Settings Lets you set the authentication setting to one of the following:
● None
● WEP
● WPA/WPA2-PSK
● 802.1X-TTLS
● 802.1X-PEAP
● 802.1X-TLS
● EAP-FAST
For WEP and WPA/WPA2-PSK, you just need to enter the network key and select OK.
For EAP-FAST, set Anonymous Identity, Username, Password, and Provisioning Method. You do not need to change the PAC file settings.
See Wired network settings on page 44 for more information about TTLS, PEAP, and TLS.
Auto Connect This option is reserved for future use.
Enable Wireless Enables the wireless adapter.
Use the IPv4 tab to configure IPv4 connection settings.
Option Description
IPv4 Enabled Enables IPv4.
IPv4 Method Lets you select between Automatic and Static. If your network environment is using DHCP, then the Automatic option should work without any further configurations.
If Static is selected, the Static Address Configuration settings are displayed, and you must enter the IPv4 settings.
Use the IPv6 tab to configure IPv6 connection settings.
System 45

Option Description
IPv6 Enabled Enables the usage of an IPv6 global address.
NOTE: HP ThinPro tries to obtain an IPv6 global address via route advertisement or DHCPv6.
IPv6 Method Lets you select between Automatic and Static. If your network environment is using DHCP, then the Automatic option should work without any further configurations.
If Static is selected, the Static Address Configuration settings are displayed, and you must enter the IPv6 settings.
Use the Security tab to configure the connection security settings.
Option Description
Authentication Lets you set the authentication setting to one of the following:
● None
● WEP
● WPA/WPA2-PSK
● WPA/WPA2 Enterprise-TTLS
● WPA/WPA2 Enterprise-PEAP
● WPA/WPA2 Enterprise-TLS
● EAP-FAST
For WEP and WPA/WPA2-PSK, you just need to enter the network key and select OK.
For EAP-FAST, set Anonymous Identity, Username, Password, and Provisioning Method. You do not need to change the PAC file settings.
See Wired network settings on page 44 for more information about TTLS, PEAP, and TLS.
DNS settings
The following table describes the options available in the DNS tab of the Network Manager.
Option Description
Hostname This is generated automatically according to the MAC address of the thin client. You can alternatively set a custom hostname.
DNS Servers Use this box to set custom DNS server information.
Search Domains Use this box to restrict the domains that are searched.
HTTP Proxy
FTP Proxy
HTTPs Proxy
Use these boxes to set proxy server information using the following format:
http://<address>:<port>
HP recommends using the http:// prefix for all three proxy settings because it is supported better.
NOTE: The proxy settings are set to the http_proxy, ftp_proxy, and https_proxy environmental variables for the system.
46 Chapter 8 Control Panel
IPSec rules
Use this tab to add, edit, and delete IPSec rules. An IPSec rule should be the same for each system that uses IPSec to communicate.
When configuring an IPSec rule, use the General tab to set the rule’s information, addresses, and authentication method. The Source Address is the IP address of the thin client, and the Destination Address is the IP address of the system that the thin client is going to communicate with.
NOTE: Only the PSK and Certificate authentication types are supported. Kerberos authentication is not supported.
Use the Tunnel tab to configure settings for tunnel mode.
Use the Phase I and Phase II tabs to configure advanced security settings. The settings should be the same for all peer systems that communicate with each other.
NOTE: An IPSec rule can also be used to communicate with a computer running Windows.
Configuring VPN settings
HP ThinPro supports two types of VPN:
● Cisco
● PPTP
Enable the Auto Start option to start the VPN automatically.
Note the following about creating a VPN using Cisco:
● The Gateway is the gateway’s IP address or hostname.
● The Group name and Group password are the IPSec ID and IPSec password.
● The Domain setting is optional.
● The User name and User password are the user credentials that have rights to create a VPN connection on the server side.
● The Security Type should be set the same as it is on the server side.
● The NAT Traversal option should be set according to your VPN environment.
● The IKE DH Group option sets the Diffie-Hellman group to use for VPN.
● The PFS Type option sets the Diffie-Hellman group to use for Perfect Forward Secrecy.
Note the following about creating a VPN using PPTP:
● The Gateway is the gateway’s IP address or hostname.
● The NT Domain setting is optional.
● The User name and User password are the user credentials that have rights to create a VPN connection on the server side.
Configuring HP Velocity
Use the HP Velocity tab to configure HP Velocity settings. Go to http://www.hp.com/go/velocity for more information about the HP Velocity modes.
System 47
DHCP options
To open the DHCP Option Manager:
▲ Select System and then select DHCP Options in Control Panel.
The DHCP Option Manager displays details of the DHCP options that are requested by the thin client.
TIP: The drop-down list allows you to filter which DHCP tags are displayed.
To direct the thin client to request or ignore specific DHCP options:
▲ Select or deselect the check boxes in the Requested column.
If a pencil is shown in the DHCP Code column, the code number can be changed in case there is a conflict on your DHCP server over a particular code number.
To change a DHCP code:
▲ Double-click the DHCP code and type a new number.
NOTE: Changeable DHCP codes can only be changed while that DHCP option is enabled in the Requested column.
To learn more about how a DHCP option is used on the thin client and on the DHCP server:
▲ Select the icon in the Info column of that option.
Component Manager
Component Manager lets you remove system components that are not used in your environment, which might be desirable to reduce the image size or increase security. For example, if Citrix connections are never used in your environment, you might want to remove the Citrix component.
As components are removed, the new configuration can be tested before you apply the changes permanently. You can also undo changes that were made, if the changes have not yet been applied permanently.
IMPORTANT: After the new configuration is applied permanently, all snapshots are removed and a new factory snapshot is created. Removed components cannot be restored after this point.
NOTE: Removing components might not reduce the use of local disk space, but it should reduce the size of any disk images created from the local system.
To open the Component Manager:
▲ Select System and then select Component Manager in Control Panel.
Removing components
To remove components:
1. In the Component Manager, select the desired components.
TIP: To select multiple components, use Ctrl or Shift.
2. Select Remove Component(s).
3. If the confirmation dialog appears, select OK.
4. After the components are removed, test the new configuration.
48 Chapter 8 Control Panel

Undoing a change
You can undo each change, one at a time, if the changes have not yet been applied permanently. A restart of the thin client is required after each undo.
To undo a change made with the Component Manager:
1. In the Component Manager, select Revert Last Change.
2. Select Yes to restart the thin client.
Repeat this process for as many changes you want to undo.
IMPORTANT: If you take a snapshot of the image while testing a new configuration, you cannot undo the changes via the Component Manager. Those changes can be undone only by restoring a previous snapshot via the Snapshots tool. However, this does not work if the changes have already been applied permanently, because that function deletes all existing snapshots. If changes have already been applied permanently, you must reinstall the operating system to restore most removed components. Some components (such as Citrix, RDP, and VMware Horizon View) might be available as add-ons on the web and can be restored by reinstalling them.
Applying the changes permanently
To apply changes made with the Component Manager permanently:
IMPORTANT: After the new configuration is applied permanently, all snapshots are removed and a new factory snapshot is created. Removed components cannot be restored after this point.
1. In the Component Manager, select Apply Component Configuration.
2. Select Yes.
Security
Menu option Description
Security For more information, see Security settings on page 49.
Change Domain Password If a domain is being used, lets you change the domain password.
Certificates Opens Certificate Manager, which lets you easily import, view, or remove certificates.
For more information, see Certificate Manager on page 51.
Firewall Manager Lets you configure firewall settings.
SCEP Manager Allows for network-based certificate management.
Security settings
Security settings can be configured using Security Manager. To open Security Manager, select Security and then select Security in Control Panel.
See the following sections for more information about the different tabs in Security Manager.
Security 49
● Local Accounts on page 50
● Encryption on page 50
● Options on page 50
Local Accounts
The Local Accounts tab can be used to change the local root and user account passwords or to disable authentication using those accounts.
CAUTION: Disabling the root and/or user accounts might leave your system in an unusable state unless Active Directory authentication is enabled. For example, if the root account is disabled, you will only be able to change to administrator mode using domain credentials of an administrator. However, disabling the local accounts might improve security when Active Directory authentication is enabled because you no longer have to maintain and update a shared secret such as the thin client’s root password.
If Active Directory authentication has been used and there is any cached data for domain users on the thin client, you can also delete the user’s cached data from this tab.
NOTE: If the user logged in using a domain account, they cannot delete their own account’s data because it would leave the system in an indeterminate state.
Encryption
Active Directory credentials and other secrets can be hashed for functions like screen-unlock and/or encrypted and stored on the system for single sign-on.
The hash algorithm for creating a password’s hash can be selected from this menu. The default, scrypt, is a well-accepted key derivation function. Argon2, another key derivation function is also available, as well as conventional hashes SHA-256 and SHA-512. The advantage of a key derivation function is that it is computationally expensive to compute a rainbow table that matches plain-text passwords to precomputed hash values, whereas conventional hashes are meant to execute as fast as possible. All hashes are stored with 128 or more bits of random salt which changes each time the password hash is computed and stored.
Encrypted passwords are used in situations where they can be reversed and supplied to connections when they start (single sign-on). The encryption algorithm can be selected here from a wide variety supported by OpenSSL. Unless there is a good reason to select a different value, HP recommends using the default encryption algorithm, which is generally regarded as a modern, secure algorithm by the security community. The number of salt bits and key bits will vary from one algorithm to another and you can get details by pressing the info button next to the algorithm selector. Encryption keys are unique per thin client and are stored in a place that only administrators can read. Furthermore, only certain authorized applications on the system can do decryption.
Both hashes and encrypted secrets can be set with a time-to-live. If the amount of time between when the secret was hashed or encrypted and the time when it is used or decrypted exceeds the time-to-live, the hash-match or decryption will fail.
By default, the single sign-on password is usable for only one day, but any passwords stored with connection or network settings can be used indefinitely.
Options
Local user must log in: If this option is selected when Active Directory authentication is disabled, the login screen still appears at startup and logout. In this situation, the local user or root credentials must be used to gain access to the system.
Enable secret peek: If enabled, most password and secret entry fields on the system display a small eyeball icon on the right side. When that eyeball icon is selected by pressing and holding down the left mouse button,
50 Chapter 8 Control Panel
the secret is displayed in plain text as long as the mouse button is held down. As soon as the button is released, the secret is again obscured.
Use domain text entry: If enabled, a separate Domain input field is provided for the domain name where applicable. If disabled, the domain is determined by the value entered in the User field instead. For instance, if the User field contains “mike@mycorp”, the domain is assumed to be “mycorp”. If the user field is “graycorp\mary”, the domain is assumed to be “graycorp”.
Allow administrators to override screen lock: If enabled, you can override a locked screen and return it to the login screen or ThinPro desktop, just as if the user had manually logged out of the thin client.
Certificates
NOTE: For more information about using certificates in Linux, go to https://www.openssl.org/docs/.
Certificate Manager
To open Certificate Manager:
▲ Select Security and then select Certificates in Control Panel.
Use Certificate Manager to manually install a certificate from a certificate authority (CA). This action copies the certificate to the user’s local certificate store (/usr/local/share/ca-certificates) and configures OpenSSL to use the certificate for connection verification.
If desired, use Profile Editor to attach the certificate to a profile, as described in Adding certificates to a client profile on page 68.
NOTE: Generally, a self-signed certificate will work as long as it is valid according to specification and can be verified by OpenSSL.
SCEP Manager
To open the SCEP Manager:
▲ Select Security and then select SCEP Manager in Control Panel.
Use the SCEP Manager when you need to enroll or renew client-side certificates from a CA.
During an enrollment or renewal, the SCEP Manager generates the thin client’s private key and certificate request, and then it sends the request to the CA on the SCEP server. When the CA issues the certificate, the certificate is returned and placed in the thin client’s certificate store. OpenSSL uses the certificate for connection verification.
NOTE: Before enrollment, make sure that the SCEP server is configured properly.
Use the Identifying tab of the SCEP Manager to enter information about the user, if desired.
NOTE: The Common Name is required and is the thin client’s Fully Qualified Domain Name (FQDN) by default. The other information is all optional. The Country or Region is entered as two letters, such as US for the United States and CN for China.
Use the Servers tab of the SCEP Manager to add SCEP servers and enroll or renew certificates.
TIP: When entering a new SCEP server, save the server information first, and then use the Settings button to go back and do an enrollment.
Security 51
Manageability
Menu option Description
Active Directory For more information, see Active Directory configuration on page 52.
Automatic Update Lets you configure the Automatic Update server manually.
For more information, see HP Smart Client Services on page 62.
Easy Update Launches HP Easy Tools.
For more information, see the user guide for HP Easy Tools.
HPDM Agent Lets you configure the HP Device Manager (HPDM) Agent.
For more information, see the Administrator Guide for HPDM.
SSHD Manager Enables access through a secure shell.
ThinState HP ThinState lets you make a copy of or restore the entire operating system image or just its configuration settings.
For more information, see HP ThinState on page 53.
VNC Shadow Lets you configure VNC Shadowing options.
For more information, see VNC Shadowing on page 56.
Active Directory configuration
Status tab
This control lets you activate or deactivate authentication against a domain, joining the domain, and various domain-related options.
After you make a change to domain parameters on the Status tab, the page shows a pending action and you must select Apply to make that action happen. Joining or unjoining the domain requires credentials with permissions to perform that operation. After enabling authentication or joining the domain, some of the sub-parameters might be marked as read-only because it is not possible to change them at that point in time. Instead, you must unjoin or disable authentication altogether and then apply the changes. Then you can re-enable authentication or join with altered sub-parameters.
Option Description
Domain name If the thin client can determine the domain name using DHCP options, it will be displayed here. Otherwise you will have to enter the fully-qualified domain name manually.
Authenticate against domain When enabled, domain credentials can be used, as outlined in the Active Directory Integration section of this guide.
Require thin client login This is on by default, and it causes the system to boot up into the domain login screen. If disabled, domain credentials can still be used to switch to administrator mode or to override a locked screen, but single sign-on will not be available.
Workgroup Usually this is auto-detected from information provided by network servers, but you can use this as a manual override if you have an unusual network topology.
Domain controllers These are usually detected using DNS lookups, but you can specify them manually if your network is not supplying that information.
52 Chapter 8 Control Panel
Option Description
Join the thin client to the domain As explained in the chapter on Active Directory Integration, this option lets you formally add the thin client to the Active Directory’s databases.
Organizational Unit (OU) The thin client is usually added to the “Computers” OU of the database, but you can manually enter a different value here if your database schema demands it.
Dynamic DNS If enabled, the thin client will try to update the DNS server whenever its IP-address/hostname association changes.
Options tab
Option Description
Enable single sign-on If enabled, a password supplied at login is encrypted and saved on the system. When a connection starts with SSO credentials configured, it can decrypt the password and pass it to the connection so that it can be used for remote login.
Domain login group If enabled, login is restricted to users in the listed domain group.
Domain admin group If enabled, escalation to administrator mode and screen-lock override is limited to members of the listed domain group.
Enable cached domain login If enabled, a hash of the user’s password is saved on the system and can be used for login even when the Active Directory server is inaccessible.
Retain user preferences at logout If this option is enabled, any setting changes made by a domain user are stored in a place where those settings are applied only to that user. If this option is disabled, any such user-specific changes are discarded when the user logs out.
Allow domain password changes If enabled, expired passwords result in a prompt that allows the user to update their password, and they can manually update their password using the user icon on the taskbar.
HP ThinState
HP ThinState allows you to capture and deploy an HP ThinPro image or configuration (profile) to another thin client of compatible model and hardware.
Managing an HP ThinPro image
Capturing an HP ThinPro image to an FTP server
To capture an HP ThinPro image to an FTP server:
IMPORTANT: The directory on the FTP server where you intend to save the captured image must already exist before initiating the capture.
1. Select Management > ThinState in Control Panel.
2. Select the HP ThinPro image, and then select Next.
3. Select make a copy of the HP ThinPro image, and then select Next.
4. Select a FTP server, and then select Next.
5. Enter the FTP server information in the fields.
NOTE: The name of the image file is set by default to be the thin client’s hostname.
Manageability 53
Select Compress the image if you want to compress the captured image.
NOTE: The HP ThinPro image file is a simple disk dump. The uncompressed size is about 1 GB, and a compressed image without add-ons is approximately 500 MB.
6. Select Finish.
When the image capture begins, all applications stop and a new window appears showing the progress. If a problem occurs, select Details for information. The desktop reappears after the capture is complete.
Deploying an HP ThinPro image using FTP or HTTP
IMPORTANT: If you abort a deployment, the previous image will not be restored and the contents of the thin client's flash drive will be corrupted.
To deploy an HP ThinPro image using FTP or HTTP:
1. Select Management > ThinState in Control Panel.
2. Select the HP ThinPro image, and then select Next.
3. Select restore an HP ThinPro image, and then select Next.
4. Select either the FTP or HTTP protocol, and then enter the server information in the fields.
NOTE: The Username and Password fields are not required if you are using the HTTP protocol.
5. Select Retain HP ThinPro Configuration if you want to preserve all previously configured settings.
6. Select Finish.
When the image deployment begins, all applications stop and a new window appears showing the progress. If a problem occurs, select Details for information. The desktop reappears after the deployment is complete.
NOTE: An MD5sum check is done only if the MD5 file exists on the server.
Capturing an HP ThinPro image to a USB flash drive
To capture an HP ThinPro image to USB flash drive:
IMPORTANT: Back up any data on the USB flash drive before you begin. HP ThinState automatically formats the flash drive to create a bootable USB flash drive. This process will erase all data currently on the flash drive.
1. Select Management > ThinState in Control Panel.
2. Select the HP ThinPro image, and then select Next.
3. Select make a copy of the HP ThinPro image, and then select Next.
4. Select create a bootable USB flash drive, and then select Next.
The thin client restarts and then prompts you to enter a USB flash drive.
5. Insert a USB flash drive into a USB port on the thin client.
6. Select the USB flash drive, and then select Finish.
A new window displays the progress. If a problem occurs, select Details for information. The desktop reappears after the capture is complete.
54 Chapter 8 Control Panel

Deploying an HP ThinPro image with a USB flash drive
To deploy an HP ThinPro image with a USB flash drive:
IMPORTANT: If you abort a deployment, the previous image will not be restored and the contents of the thin client's flash drive will be corrupted. In this state, the thin client must be reimaged using a USB flash drive.
1. Turn off the target thin client.
2. Insert the USB flash drive.
3. Turn on the thin client.
NOTE: The screen remains black for 10-15 seconds while the thin client detects and boots from the USB flash drive. If the thin client fails to boot from the USB flash drive, try unplugging all other USB devices and repeat the procedure.
Managing a client profile
A client profile contains the connections, settings, and customizations that you configured using Connection Manager and Control Panel. A profile is saved in a configuration file that is specific to the version of HP ThinPro in which it was created.
NOTE: A client profile can also be preconfigured and deployed using Profile Editor and Automatic Update (see Profile Editor on page 66 and HP Smart Client Services on page 62 for more information).
Saving a client profile to an FTP server
To save a client profile to an FTP server:
IMPORTANT: The directory on the FTP server where you intend to save the profile must already exist before initiating the save.
1. Select Management > ThinState in Control Panel.
2. Select the HP ThinPro configuration, and then select Next.
3. Select save the configuration, and then select Next.
4. Select on a FTP server, and then select Next.
5. Enter the FTP server information in the fields.
6. Select Finish.
Restoring a client profile using FTP or HTTP
To restore a client profile using FTP or HTTP:
1. Select Management > ThinState in Control Panel.
2. Select the HP ThinPro configuration, and then select Next.
3. Select restore a configuration, and then select Next.
4. Select on a remote server, and then select Next.
5. Select either the FTP or HTTP protocol, and then type the server information in the fields.
NOTE: The Username and Password fields are not required if you are using the HTTP protocol.
6. Select Finish.
Manageability 55

Saving a client profile to a USB flash drive
To save a client profile to a USB flash drive:
1. Insert a USB flash drive into a USB port on the thin client.
2. Select Management > ThinState in Control Panel.
3. Select the HP ThinPro configuration, and then select Next.
4. Select save the configuration, and then select Next.
5. Select on a USB key, and then select Next.
6. Select the USB flash drive.
7. Select Browse.
8. Navigate to the desired location on the USB flash drive and assign a file name to the profile.
9. Select Save.
10. Select Finish.
Restoring a client profile from a USB flash drive
To restore a client profile from a USB flash drive:
1. Insert the USB flash drive containing the profile into a USB port on the target thin client.
2. Select Management > ThinState in Control Panel.
3. Select the HP ThinPro configuration, and then select Next.
4. Select restore a configuration, and then select Next.
5. Select on a USB key, and then select Next.
6. Select the USB key.
7. Select Browse.
8. Double-click the desired configuration file on the USB key.
9. Select Finish.
VNC Shadowing
Virtual Network Computing (VNC) is a remote desktop protocol that allows you to see the desktop of a remote computer and control it with your local mouse and keyboard.
To increase security, HP recommends leaving VNC disabled unless it is needed for remote diagnosis. Then, disable VNC when remote access to the thin client is no longer necessary.
To access the VNC Shadow tool:
▲ Select Manageability and then select VNC Shadow in Control Panel.
NOTE: You must restart the thin client before any changes to the VNC Shadowing options will take effect.
The following table describes the options available in the VNC Shadow tool.
Option Description
Enable VNC Shadow Enables VNC Shadowing.
56 Chapter 8 Control Panel
Option Description
VNC Read Only Makes the VNC session read-only.
VNC Use Password Makes a password required when accessing the thin client using VNC. Select Set Password to set the password.
Show “Stop Shadowing” Button If enabled, a Stop Shadowing button shows in the top left corner of the remote system. It stops VNC shadowing when pressed.
VNC Allow Loopback Only If enabled, you can connect to the VNC server only from this thin client that is identified by the loopback address.
VNC Notify User to Allow Refuse Enables a notification dialog on the remote system that informs the remote user when someone is attempting to connect using VNC. The user can refuse either allow or refuse access.
Automatically close the notification after (seconds) Closes the User Notification Message after x seconds.
User Notification Message Allows you to display a message in the notification dialog to the remote user.
Refuse connections in default If enabled, the VNC connection will be refused by default when the timer expires.
Re-set VNC server right now Resets the VNC server after applying the new settings.
Input Devices
Menu option Description
Keyboard Lets you change the keyboard layout to accommodate the language used by the primary keyboard and the secondary keyboard.
Keyboard Shortcuts Lets you create, modify, and delete keyboard shortcuts.
Mouse Lets you configure the mouse speed and whether mouse input is right-handed or left-handed.
On thin clients with a TouchPad, this menu option also lets you disable or enable the TouchPad.
Touch Screen Lets you configure touch screen options.
SCIM Input Method Lets you configure the Smart Common Input Method (SCIM) for Chinese, Japanese, and Korean input.
For more information on this open source program, go to http://sourceforge.net/apps/mediawiki/scim/index.php?title=Main_Page.
Hardware
Menu option Description
Display Lets you configure and test display options.
For more information, see Display preferences on page 58.
Input Devices 57

Menu option Description
Sound Lets you control the playback, input devices, and input audio levels.
USB Manager Lets you configure the redirection options for USB devices.
For more information, see Redirecting USB devices on page 58.
Serial Manager Lets you configure serial devices.
Printers Lets you set up local and network printers. Local printers can be shared across the network.
For more information, see Configuring printers on page 59.
Display preferences
HP ThinPro allows you to create profiles for display preferences and apply different profiles to different monitors. A profile includes resolution, refresh rate, bit depth, and orientation.
To configure display profiles:
1. Select Hardware and then select Display in Control Panel.
2. Configure the options as necessary, and then select Apply.
NOTE: The options may differ depending on the hardware model.
See the following tips about when customizing display profiles would be useful:
● Some applications might require a specific resolution or bit depth to function properly.
● Some applications might require the display to be rotated.
● An administrator might want to standardize on one display profile, even though there are many different monitors across the organization.
To quickly change the display configuration when using external monitors (mobile thin clients only):
▲ Press Fn + F4.
Redirecting USB devices
To redirect USB devices:
1. In Control Panel, select Hardware, and then select USB Manager.
2. On the Protocol page, select a remote protocol.
If the setting is Local, you can also specify the options allow devices to be mounted and mount devices read-only.
3. On the Devices page, you can enable or disable redirection for individual devices if necessary.
4. On the Classes page, you can select specific device classes to be redirected to remote sessions.
5. When you are finished, select Apply.
58 Chapter 8 Control Panel
Configuring printers
To configure a printer:
1. Select Hardware and then select Printers in Control Panel.
2. In the Printing dialog, select Add .
3. In the New Printer dialog, select the printer to configure, and then select Forward.
NOTE: If you select a serial printer, be sure to input the correct settings on the right side of the dialog, or the printer might not function correctly.
4. Select the make of the printer. If you are unsure, select the Generic (recommended) option, and then select Forward.
5. Select the model of and driver for the printer, and then select Forward.
NOTE: If you are unsure of the printer model or which driver to use, or if the model of your printer is not listed, select Back and try using the Generic (recommended) option for the make of the printer.
If using the Generic (recommended) make, be sure to select text-only (recommended) for the model and Generic text-only printer [en] (recommended) for the driver.
6. Fill in optional information about the printer, such as its name and location.
NOTE: HP recommends that you type the correct driver name into the Windows Driver box. The driver must also be installed on the Windows server for the printer to work properly. If a driver is not specified, a generic postscript driver is used. Using a specific Windows driver might enable more printer functions.
7. Select Apply, and then print a test page if desired.
Repeat this process to configure additional printers if necessary.
TIP: The most common problem is that the wrong driver is being used for the printer. To change the driver, right-click the printer and select Properties, and then change the make and model.
Appearance
Menu option Description
Background Manager Lets you configure the background theme and dynamically display system information (such as the thin client's hostname, IP address, hardware model, and MAC address) in the background.
For more information, see the HP ThinPro white paper Login Screen Customization (available in English only).
Customization Center Lets you do the following:
● Switch between the ThinPro and Smart Zero configurations
● Configure desktop and taskbar options
● Select which connection types and Control Panel items end users have access to
For more information, see Customization Center on page 60.
Language Lets you display the HP ThinPro interface in a different language.
Appearance 59

Customization Center
To open Customization Center:
▲ Select Appearance and then select Customization Center in Control Panel.
The button at the top of the Desktop page can be used to switch between the ThinPro and Smart Zero configurations. See Choosing an OS configuration on page 2 for more information about the differences between the two configurations.
NOTE: When switching from ThinPro to Smart Zero, if you have configured a single connection, that connection is used automatically as the Smart Zero connection. If you have configured multiple connections, you are prompted to select the connection to use.
Before switching to Smart Zero mode, the domain authentication function on the thin client should be disabled. Domain authentication and Smart Zero mode are incompatible.
The following table describes the rest of the options available on the Desktop page.
Option Description
Launch the Connection Manager at start up
When enabled, Connection Manager launches automatically at system startup.
Enable right-click menu Disable this option to disable the context menu that appears when you right-click the desktop
Enable X host access control security When enabled, only the systems listed in the XHost Access Control List area are allowed to remotely control the thin client.
Enable USB Update Enables updates to be installed from a USB flash drive. See USB updates on page 74 for more information.
Authenticate USB Update Disable this option to allow end users to install updates via USB.
Allow user to switch to administrator mode
Disable this option to remove the Administrator/User Mode Switch option from Control Panel in user mode.
Time before cancelling administrator mode
Specifies the idle timeout (in minutes) after which administrator mode will be terminated. If set to 0 or negative, administrator mode will never be automatically terminated.
Use the Connections and Applications pages to select which connection types and Control Panel applications are available in user mode.
Use the Taskbar page to configure the taskbar.
60 Chapter 8 Control Panel
9 System Information
In the Start menu, select System Information to view system, network, and software information. The following table describes the information that is displayed on each panel.
Panel Description
General Displays information about the BIOS, operating system, CPU, and memory.
Network Displays information about the network interface, gateway, and DNS settings.
Net Tools Provides the following tools for monitoring and troubleshooting purposes:
● Ping: Specify an IP address of another device on the network to attempt to establish contact.
● DNS Lookup: Use this tool to resolve a domain name into an IP address.
● Trace Route: Use this tool to track the path that a network packet takes from one device to another.
Software Information Displays a list of installed add-ons on the Service Packs tab and software version information on the Software Installed tab.
TIP: You can also access the Administrator Guide (this document) from this screen.
Software License Displays the EULA for the HP ThinPro operating system.
System Logs Displays the following logs:
● Authorization and Security
● Connection Manager
● DHCP Leases
● General System Log
● Kernel
● Network Manager
● Smart Client Services
● X Server
● OneSign
In administrator mode, the debug level can be changed to display additional information that might be requested by HP support for troubleshooting purposes.
Select Diagnostic to save a diagnostic file. For more information, see Using system diagnostics to troubleshoot on page 71.
NOTE: See SystemInfo on page 148 for information about registry keys that can be used to hide the System Information screens.
61

10 HP Smart Client Services
HP Smart Client Services is a set of server-side tools that enable you to configure client profiles that can be distributed to large numbers of thin clients. This function is called Automatic Update.
HP ThinPro detects an Automatic Update server upon startup and configures settings accordingly. This simplifies device installation and maintenance.
Supported operating systemsHP Smart Client Services supports the following operating systems:
● Windows Server® 2016
● Windows Server 2012 R2
● Windows Server 2012
● Windows 7
● Windows Server 2008
● Windows Server 2008 R2
● Windows Server 2003
● Windows Vista®
● Windows XP
NOTE: The installer is 32-bit only, although it is supported on both the 32-bit and 64-bit versions of the Windows operating system.
Prerequisites for HP Smart Client ServicesBefore installing HP Smart Client Services, verify the configuration and installation status of the following components:
● Internet Information Services (IIS)
● .NET Framework 3.5
For information about installing or enabling these components on the operating system that you are using for the server, go to http://www.microsoft.com.
Obtaining HP Smart Client ServicesTo obtain HP Smart Client Services, go to ftp://ftp.hp.com/pub/tcdebian/SmartClientServices/.
62 Chapter 10 HP Smart Client Services
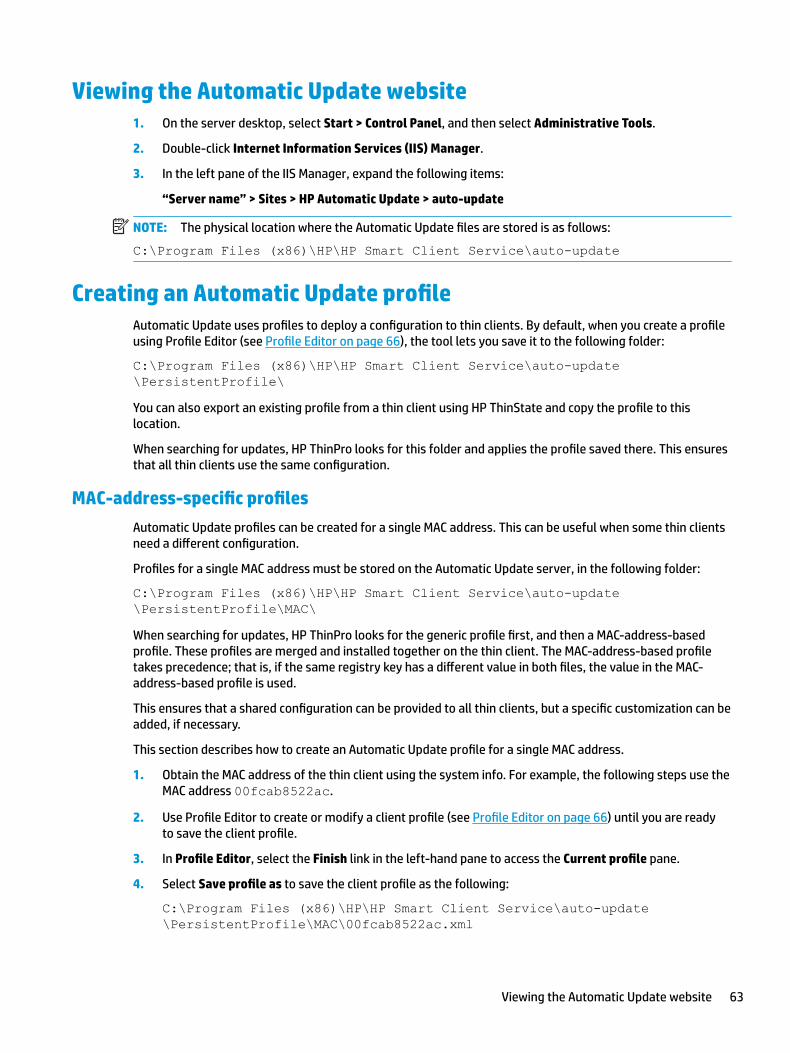
Viewing the Automatic Update website1. On the server desktop, select Start > Control Panel, and then select Administrative Tools.
2. Double-click Internet Information Services (IIS) Manager.
3. In the left pane of the IIS Manager, expand the following items:
“Server name” > Sites > HP Automatic Update > auto-update
NOTE: The physical location where the Automatic Update files are stored is as follows:
C:\Program Files (x86)\HP\HP Smart Client Service\auto-update
Creating an Automatic Update profileAutomatic Update uses profiles to deploy a configuration to thin clients. By default, when you create a profile using Profile Editor (see Profile Editor on page 66), the tool lets you save it to the following folder:
C:\Program Files (x86)\HP\HP Smart Client Service\auto-update\PersistentProfile\You can also export an existing profile from a thin client using HP ThinState and copy the profile to this location.
When searching for updates, HP ThinPro looks for this folder and applies the profile saved there. This ensures that all thin clients use the same configuration.
MAC-address-specific profiles
Automatic Update profiles can be created for a single MAC address. This can be useful when some thin clients need a different configuration.
Profiles for a single MAC address must be stored on the Automatic Update server, in the following folder:
C:\Program Files (x86)\HP\HP Smart Client Service\auto-update\PersistentProfile\MAC\When searching for updates, HP ThinPro looks for the generic profile first, and then a MAC-address-based profile. These profiles are merged and installed together on the thin client. The MAC-address-based profile takes precedence; that is, if the same registry key has a different value in both files, the value in the MAC-address-based profile is used.
This ensures that a shared configuration can be provided to all thin clients, but a specific customization can be added, if necessary.
This section describes how to create an Automatic Update profile for a single MAC address.
1. Obtain the MAC address of the thin client using the system info. For example, the following steps use the MAC address 00fcab8522ac.
2. Use Profile Editor to create or modify a client profile (see Profile Editor on page 66) until you are ready to save the client profile.
3. In Profile Editor, select the Finish link in the left-hand pane to access the Current profile pane.
4. Select Save profile as to save the client profile as the following:
C:\Program Files (x86)\HP\HP Smart Client Service\auto-update\PersistentProfile\MAC\00fcab8522ac.xml
Viewing the Automatic Update website 63
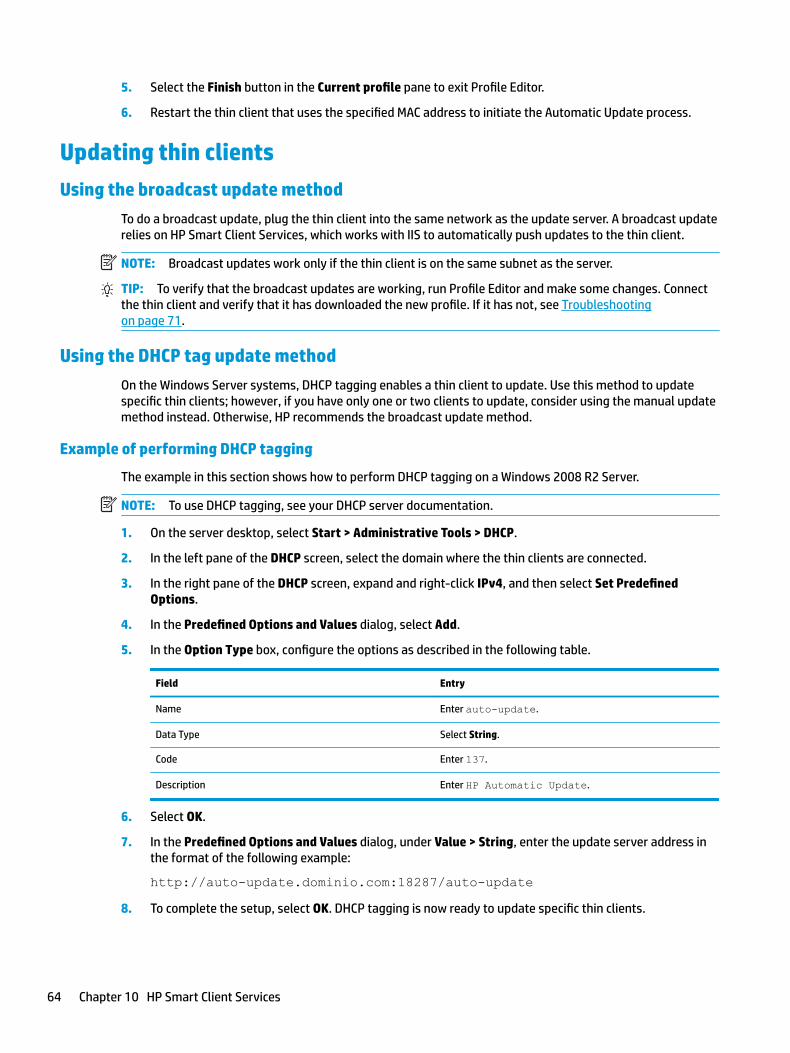
5. Select the Finish button in the Current profile pane to exit Profile Editor.
6. Restart the thin client that uses the specified MAC address to initiate the Automatic Update process.
Updating thin clients
Using the broadcast update method
To do a broadcast update, plug the thin client into the same network as the update server. A broadcast update relies on HP Smart Client Services, which works with IIS to automatically push updates to the thin client.
NOTE: Broadcast updates work only if the thin client is on the same subnet as the server.
TIP: To verify that the broadcast updates are working, run Profile Editor and make some changes. Connect the thin client and verify that it has downloaded the new profile. If it has not, see Troubleshooting on page 71.
Using the DHCP tag update method
On the Windows Server systems, DHCP tagging enables a thin client to update. Use this method to update specific thin clients; however, if you have only one or two clients to update, consider using the manual update method instead. Otherwise, HP recommends the broadcast update method.
Example of performing DHCP tagging
The example in this section shows how to perform DHCP tagging on a Windows 2008 R2 Server.
NOTE: To use DHCP tagging, see your DHCP server documentation.
1. On the server desktop, select Start > Administrative Tools > DHCP.
2. In the left pane of the DHCP screen, select the domain where the thin clients are connected.
3. In the right pane of the DHCP screen, expand and right-click IPv4, and then select Set Predefined Options.
4. In the Predefined Options and Values dialog, select Add.
5. In the Option Type box, configure the options as described in the following table.
Field Entry
Name Enter auto-update.
Data Type Select String.
Code Enter 137.
Description Enter HP Automatic Update.
6. Select OK.
7. In the Predefined Options and Values dialog, under Value > String, enter the update server address in the format of the following example:
http://auto-update.dominio.com:18287/auto-update8. To complete the setup, select OK. DHCP tagging is now ready to update specific thin clients.
64 Chapter 10 HP Smart Client Services

Using the DNS alias update method
During system startup, Automatic Update attempts to resolve the DNS alias auto-update. If that host name resolves, it attempts to check for updates at http://auto-update:18287. This update method enables thin clients to access a single update server across the entire domain, thus simplifying management for deployments with many subnets and DHCP servers.
To configure the DNS alias update method:
▲ Change the hostname of the server hosting HP Smart Client Services to auto-update or create a DNS alias of auto-update for that server.
Using the manual update method
Use the manual update method to connect a thin client to a specific server for an update. Also, use this method if you want to test an update on a single thin client before pushing the update to many thin clients, or if you have specific updates to be installed on only one or two thin clients.
NOTE: Be sure you specify the hostname of the manual server in the profile that you are updating to. Otherwise the settings reset to automatic when downloading the profile. Use Profile Editor to modify these settings at root/auto-update.
NOTE: If multiple thin clients require specific updates, use the DHCP tagging method.
If no update segregation is required, use the broadcast update method.
Performing a manual update
1. Select Management > Automatic Update in Control Panel.
2. Select Enable manual configuration.
3. Set the Protocol as http.
4. In the Server field, enter the update server hostname and port in the following format:
<hostname>:182875. In the Path field, enter the following:
auto-update6. Select Preserve thin client configuration if you want to preserve all previously configured settings.
7. Select OK, and then the thin client will pull the updates.
Updating thin clients 65

11 Profile Editor
HP Smart Client Services contains Profile Editor, which allows administrators to create client profiles and upload them to the Automatic Update server.
TIP: In addition to creating a new client profile, you can edit an existing profile that was exported using HP ThinState.
A client profile contains the connections, settings, and customizations that were configured using Connection Manager and various Control Panel items. A client profile is saved in a configuration file that is specific to the version of HP ThinPro in which it was created.
Opening Profile Editor▲ Select Start, select All Programs, select HP, select HP Automatic Update Server, and then select
Profile Editor.
Loading a client profileThe name of the currently-loaded client profile is indicated on the initial screen of Profile Editor.
To load a different client profile:
1. At the initial screen of Profile Editor, select the link that displays the name of the currently-loaded client profile.
2. Navigate to a client profile, and then select Open.
Client profile customization
Selecting the platform for a client profile
Use the Platform screen in Profile Editor to do the following:
● Select the desired HP ThinPro image version that is compatible with your hardware
● Choose between ThinPro and Smart Zero
● View installed client kits that provide additional registry settings
NOTE: Client kits should be placed in the following directory:
C:\Program Files (x86)\HP\HP Smart Client Service\auto-update\Packages
To configure a client profile’s platform settings:
1. On the Platform screen in Profile Editor, select an OS Build ID that corresponds to the desired image version.
IMPORTANT: Be sure to create a different client profile for each hardware type.
66 Chapter 11 Profile Editor

NOTE: If a client kit is installed, it is displayed automatically in the Client Kits box, and additional registry settings will be available on the Registry screen.
2. Set the configuration to either standard (ThinPro) or zero (Smart Zero).
NOTE: For older image versions, this setting is greyed out and set to zero automatically.
Configuring a default connection for a client profile
To configure a default connection for a client profile:
1. On the Connection screen in Profile Editor, choose the desired connection type from the Type drop-down list.
NOTE: The available connection types differ depending on whether you chose ThinPro or Smart Zero on the Platform screen.
2. In the Server field, enter the name or IP address of the server.
Modifying the registry settings of a client profile
To change default registry settings for a client profile:
1. On the Registry screen in Profile Editor, expand the folders in the Registry settings tree to locate the registry setting you want to change.
2. Select the registry key, and then enter the desired value in the Value field.
NOTE: See Registry keys on page 77 for a comprehensive list and description of registry keys.
Adding files to a client profile
Use the Files screen in Profile Editor to add configuration files that will be installed on the thin client automatically when the client profile is installed. This is typically used for the following reasons:
● To add certificates
● To modify device settings when a registry setting for the change is unavailable
● To modify the behavior of the system by inserting custom scripts or modifying existing scripts
You can also specify a symbolic link that points to a file already installed on the thin client. Use this when the file needs to be accessed from more than one directory.
Adding a configuration file to a client profile
1. On the Files screen in Profile Editor, select Add a file.
2. Select Import File, locate the file to be imported, and then select Open.
NOTE: Files can also be exported using the Export File button, if further details about the file are required.
3. In the Path field, enter the path where the file will be installed on the thin client.
4. In the File details section, set the Owner, Group, and Permissions fields to the appropriate values.
Client profile customization 67

NOTE: Typically, setting the owner and group as root and the permissions as 644 is satisfactory. If a special owner, group, or permissions are required, refer to standard Unix® file permissions for guidelines on changing the file details.
5. Select Save to finish adding the configuration file to the client profile.
NOTE: A file installed as part of a profile will automatically overwrite any existing file on the file system at the destination path. Additionally, a second profile without the file attached will not revert previously attached files. All files that have been installed through profile attachment are permanent and must be reverted manually or through a factory reset.
Adding certificates to a client profile
Client profiles automatically include certificates that are imported to a standard client certificate store for the following applications:
● VMware Horizon View, Citrix, RDP
● Automatic Update
● HP Smart Client Services
● Web browser stores
To import other certificates to a client profile:
1. On the Files screen in Profile Editor, select Add a file.
2. Select Import File, locate the certificate, and then select Open.
NOTE: The certificate should be formatted as a .pem or .crt file.
3. In the Path field, set the path to the following:
/usr/local/share/ca-certificates4. Select Save to finish adding the certificate to the client profile.
5. After installing the client profile, use Certificate Manager to confirm that the certificate was imported properly.
Adding a symbolic link to a client profile
1. On the Files screen in Profile Editor, select Add a file.
2. In the Type drop-down list, select Link.
3. In the Symbolic link details section, set the Link field to the path of the desired file already installed on the thin client.
4. Select Save to finish adding the symbolic link.
Saving the client profile
1. In Profile Editor, select Finish in the left-hand pane to access the Current profile screen.
2. Select Save Profile to save to the current client profile, or select Save Profile As to save as a new client profile.
NOTE: If Save Profile is disabled, your client profile has not changed since the last time it was saved.
3. Select the Finish button in the Current profile screen to exit Profile Editor.
68 Chapter 11 Profile Editor
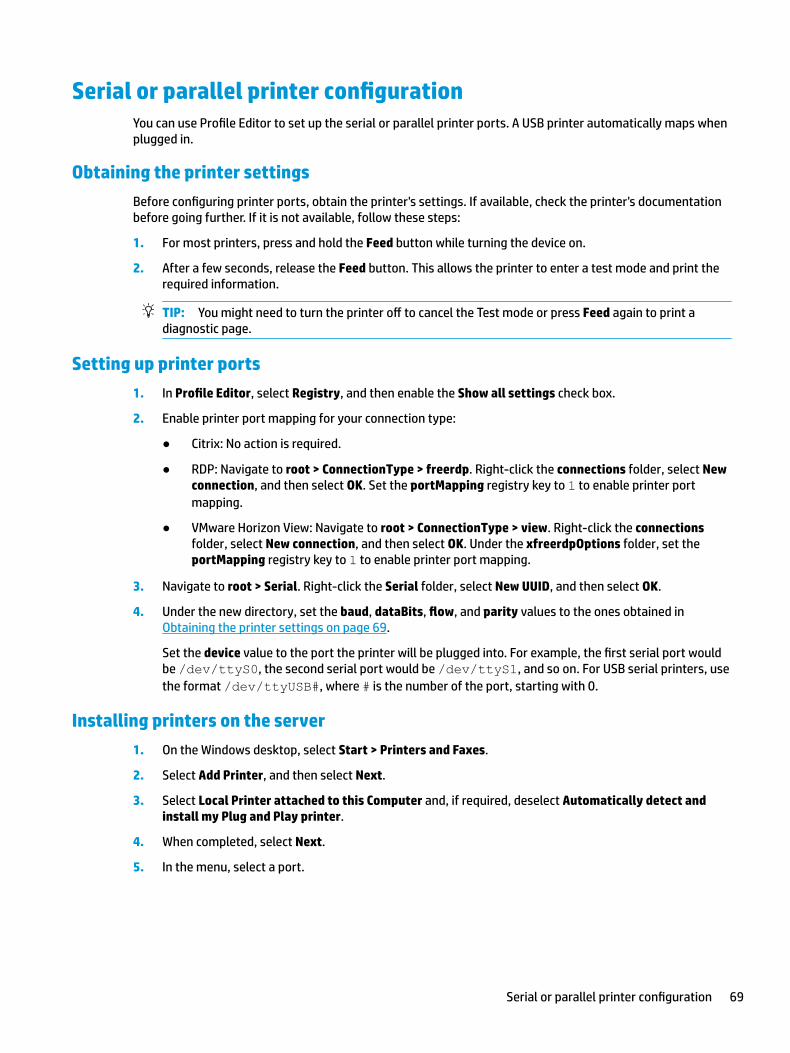
Serial or parallel printer configurationYou can use Profile Editor to set up the serial or parallel printer ports. A USB printer automatically maps when plugged in.
Obtaining the printer settings
Before configuring printer ports, obtain the printer's settings. If available, check the printer's documentation before going further. If it is not available, follow these steps:
1. For most printers, press and hold the Feed button while turning the device on.
2. After a few seconds, release the Feed button. This allows the printer to enter a test mode and print the required information.
TIP: You might need to turn the printer off to cancel the Test mode or press Feed again to print a diagnostic page.
Setting up printer ports
1. In Profile Editor, select Registry, and then enable the Show all settings check box.
2. Enable printer port mapping for your connection type:
● Citrix: No action is required.
● RDP: Navigate to root > ConnectionType > freerdp. Right-click the connections folder, select New connection, and then select OK. Set the portMapping registry key to 1 to enable printer port mapping.
● VMware Horizon View: Navigate to root > ConnectionType > view. Right-click the connections folder, select New connection, and then select OK. Under the xfreerdpOptions folder, set the portMapping registry key to 1 to enable printer port mapping.
3. Navigate to root > Serial. Right-click the Serial folder, select New UUID, and then select OK.
4. Under the new directory, set the baud, dataBits, flow, and parity values to the ones obtained in Obtaining the printer settings on page 69.
Set the device value to the port the printer will be plugged into. For example, the first serial port would be /dev/ttyS0, the second serial port would be /dev/ttyS1, and so on. For USB serial printers, use the format /dev/ttyUSB#, where # is the number of the port, starting with 0.
Installing printers on the server
1. On the Windows desktop, select Start > Printers and Faxes.
2. Select Add Printer, and then select Next.
3. Select Local Printer attached to this Computer and, if required, deselect Automatically detect and install my Plug and Play printer.
4. When completed, select Next.
5. In the menu, select a port.
Serial or parallel printer configuration 69

NOTE: The port you need is in the section of ports labeled TS###, where ### is a number between 000–009, 033–044. The appropriate port depends on your hostname and the printer you want to install. For example, with a hostname of ZTAHENAKOS and a serial printer, select the port with (ZTAHENAKOS:COM1). For a parallel printer, select (ZTAHENAKOS:LPT1). The TS### is assigned by the server, so it will not be the same every time.
6. Select the manufacturer and driver for your printer.
TIP: If desired, use the driver disc Windows Update to install the driver.
NOTE: For basic or test printing, the Generic Manufacturer or Generic/Text Only printer usually works.
7. If prompted to keep the existing driver and it is known to work, keep it, and then select Next.
8. Assign a name to the printer. To use it as the default printer, select Yes, and then select Next.
9. To share the printer, select Share name and assign it a share name. Otherwise, select Next.
10. On the next page, you may request a test print. HP recommends this because it will verify the printer setup is correct. If it is not set up properly, review the settings and try again.
NOTE: If the thin client disconnects from the server, the printer will need to be set up again the next time the thin client connects.
70 Chapter 11 Profile Editor

12 Troubleshooting
Troubleshooting network connectivity1. Ping the desired server by doing the following:
a. Select the System Information button on the taskbar, and then select the Net Tools tab.
b. Under Select Tool, select Ping.
c. In the Target Host box, enter the server address, and then select Start Process.
If the ping is successful, the system will display the following output:
PING 10.30.8.52 (10.30.8.52) 56(84) bytes of data.64 bytes from 10.30.8.52: icmp_seq-1 ttl=64 time=0.81 5 ms 64 bytes from 10.30.8.52: icmp_seq=2 ttl=64 time=0.735 msIf the ping is unsuccessful, the thin client might be disconnected from the network and experience a long delay with no system output.
2. If the thin client does not respond to the ping, do the following:
a. Check the network cable and check the network settings in Control Panel.
b. Try pinging other servers or thin clients.
c. If you can reach other thin clients, verify that you typed the correct server address.
d. Ping the server using the IP address instead of the domain name or vice-versa.
3. Check the system logs by doing the following:
a. Select the System Information button on the taskbar, and then select the System Logs tab.
b. Check for any errors in the logs.
c. If there is an error, then the Server is not set up notification appears. Verify that the server is set up properly and that HP Smart Client Services is running.
Troubleshooting Citrix password expirationIf users are not being prompted to change expired Citrix passwords, then make sure the XenApp Services site (PNAgent site) has the Prompt authentication method set to allow users to change expired passwords. If you allow users to change their passwords by connecting directly to the domain controller, then make sure the time of the thin client is in sync with the domain controller and use the full domain name (for example, domain_name.com) when entering the Citrix login credentials. For more information, see Citrix documentation.
Using system diagnostics to troubleshootSystem diagnostics take a snapshot of the thin client that can be used to help solve issues without physical access to the thin client. This snapshot contains log files from the BIOS information and the processes active at the time the system diagnostics were run.
Troubleshooting network connectivity 71

TIP: You can change the Debug level setting in the System Logs tab of the System Information window to specify the amount of information to be included in the diagnostic report. This information may be requested by HP for troubleshooting. Because the system resets log files when it reboots, be sure to capture logs before a reboot.
For the most useful logs, set the level to capture a high level of detail before reproducing the problem and creating a diagnostic report.
Saving system diagnostic data
1. Insert a USB flash drive into the thin client.
2. Select the System Information button on the taskbar, and then select the System Logs tab.
3. Select Diagnostic, and then save the compressed diagnostic file Diagnostic.tgz to the USB flash drive.
Uncompressing the system diagnostic files
The system diagnostic file Diagnostic.tgz is compressed and will need to be uncompressed before you can view the diagnostic files.
Uncompressing the system diagnostic files on Windows-based systems
1. Download and install a copy of the Windows version of 7-Zip.
NOTE: You may obtain a free copy of 7-Zip for Windows at http://www.7-zip.org/download.html.
2. Insert the USB flash drive that contains the saved system diagnostic file, and then copy Diagnostic.tgz to the desktop.
3. Right-click Diagnostic.tgz and select 7-zip > Extract files.
4. Open the newly created folder named Diagnostic and repeat step 3 on Diagnostic.tar.
Uncompressing the system diagnostic files in Linux- or Unix-based systems
1. Insert the USB flash drive that contains the saved system diagnostic file, and then copy Diagnostic.tgz to the home directory.
2. Open a terminal and browse to the home directory.
3. On the command line, enter tar xvfz Diagnostic.tgz.
Viewing the system diagnostic files
The system diagnostic files are divided into the Commands, /var/log, and /etc folders.
Viewing files in the Commands folder
This table describes the files to look for in the Commands folder.
File Description
demidecode.txt This file contains information on the system BIOS and graphics.
dpkg_--list.txt This file lists the packages installed at the time system diagnostics were run.
ps_-ef.txt This file lists the active processes at the time system diagnostics were run.
72 Chapter 12 Troubleshooting

Viewing files in the /var/log folder
The useful file in the /var/log folder is Xorg.0.log.
Viewing files in the /etc folder
The /etc folder contains the file system at the time the system diagnostics were run.
Using system diagnostics to troubleshoot 73

A USB updates
When USB updates are enabled (see Customization Center on page 60), you can use a USB flash drive to simultaneously install multiple add-ons and certificates, as well as deploy a profile.
To perform USB updates:
1. Place the desired files onto a USB flash drive.
NOTE: The files can be placed in the root directory or in subfolders.
2. Connect the USB flash drive to the thin client.
Updates are detected automatically and displayed in the USB Update dialog, in which you can search and view details about the detected updates.
3. Select the check boxes next to the updates you want to install, and then select Install.
4. After installation, restart the thin client if prompted.
HP ThinUpdateHP ThinUpdate allows you to download images and add-ons from HP and create bootable USB flash drives for image deployment. For more information see the Administrator Guide for HP ThinUpdate.
74 Appendix A USB updates

B BIOS tools (desktop thin clients only)
There are two kinds of BIOS tools for HP ThinPro:
● BIOS settings tool: Used to retrieve or modify BIOS settings
● BIOS flashing tool: Used to update the BIOS
These tools can be run via an X terminal.
BIOS settings toolThe following table describes the syntax for the BIOS settings tool.
NOTE: Changes do not take effect until the next reboot.
Syntax Description
hptc-bios-cfg –G <file name> Retrieves the current BIOS settings and saves them to the specified file so they can be viewed or modified (CPQSETUP.TXT by default).
hptc-bios-cfg –S <file name> Writes the BIOS settings from the specified file (CPQSETUP.TXT by default) to the BIOS.
hptc-bios-cfg –h Displays a list of options.
BIOS flashing toolThe following table describes the syntax for the BIOS flashing tool.
NOTE: Changes do not take effect until the next reboot.
Syntax Description
hptc-bios-flash <image name> Prepares the system to update the BIOS during the next restart. This command automatically copies the files into the correct location and prompts you to restart the thin client.
NOTE: This command requires that the Tool-less update option in the BIOS settings is set to Auto.
hptc-bios-flash –h Displays a list of options.
BIOS settings tool 75

C Resizing the flash drive partition
IMPORTANT: HP thin clients that ship from the factory with HP ThinPro use the entire flash drive. The image capture methods capture the smallest possible image, allowing images from larger flash drives to be deployed onto smaller flash drives that have enough space for the captured image. Resizing the flash drive partition should no longer be necessary for HP thin clients that ship from the factory with HP ThinPro. For thin clients with HP ThinPro that are not using the entire flash drive for any reason, see the following information.
To use the entire space of the flash drive, you have to modify the partition size and expand the file system to take up that additional space. This can be accomplished using the resize-image script via an X terminal.
NOTE: When an image is deployed via HPDM, HP ThinState, or Automatic Update, the file system is automatically resized to use all available space on the flash drive.
The following table describes the syntax for the resize-image script.
Syntax Description
resize-image When called with no parameters, the script displays the current size of the partition and the amount of available space on the flash drive. The script prompts you to enter the target partition size and then confirm the change. The change takes effect after the next thin client restart.
NOTE: It is not possible to decrease the partition size. The entered value must be larger than the current partition size.
resize-image --size <size in MB>
Example: resize-image --size 1024
Using this syntax, you can specify the target partition size in megabytes (MB) as a parameter and then confirm the change.
resize-image --no-prompt
– or –
resize-image --no-prompt --size <size in MB>
Example: resize-image --no-prompt --size 1024
Using this syntax, the script runs automatically with no user interaction required.
If no specific size is given as a parameter simultaneously, the partition size is increased to the maximum size.
TIP: This non-interactive mode is useful for scripting and performing this operation from a remote administration tool like HP Device Manager.
76 Appendix C Resizing the flash drive partition
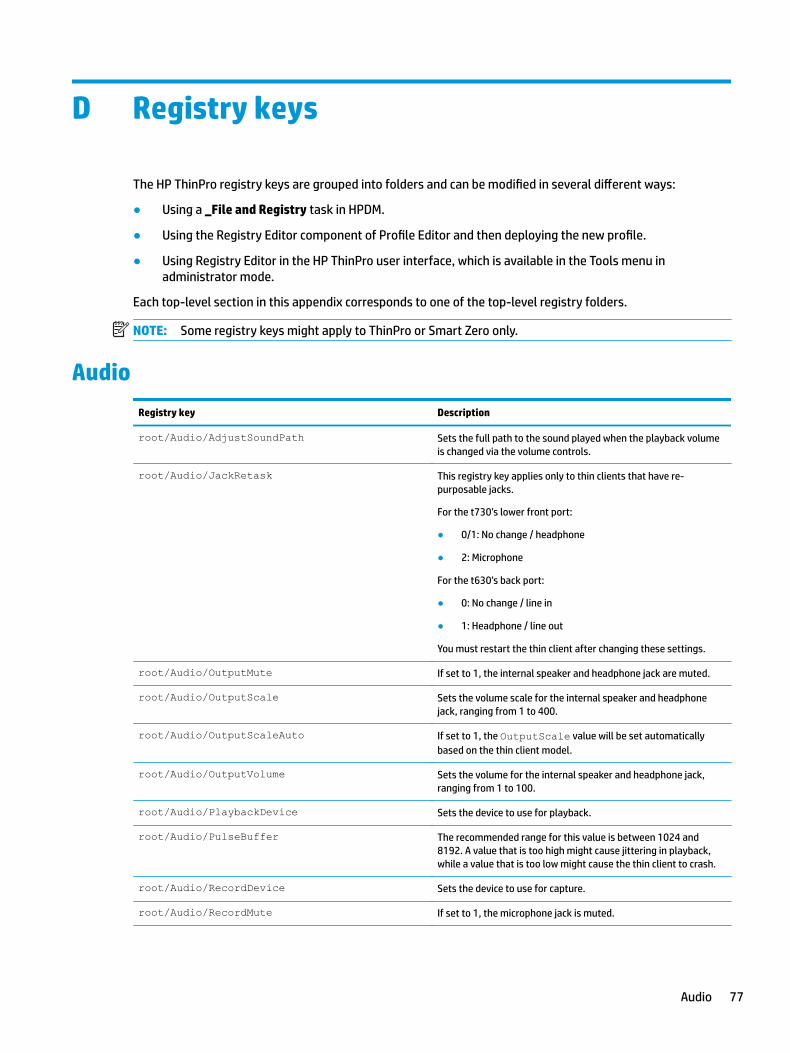
D Registry keys
The HP ThinPro registry keys are grouped into folders and can be modified in several different ways:
● Using a _File and Registry task in HPDM.
● Using the Registry Editor component of Profile Editor and then deploying the new profile.
● Using Registry Editor in the HP ThinPro user interface, which is available in the Tools menu in administrator mode.
Each top-level section in this appendix corresponds to one of the top-level registry folders.
NOTE: Some registry keys might apply to ThinPro or Smart Zero only.
Audio
Registry key Description
root/Audio/AdjustSoundPath Sets the full path to the sound played when the playback volume is changed via the volume controls.
root/Audio/JackRetask This registry key applies only to thin clients that have re-purposable jacks.
For the t730’s lower front port:
● 0/1: No change / headphone
● 2: Microphone
For the t630’s back port:
● 0: No change / line in
● 1: Headphone / line out
You must restart the thin client after changing these settings.
root/Audio/OutputMute If set to 1, the internal speaker and headphone jack are muted.
root/Audio/OutputScale Sets the volume scale for the internal speaker and headphone jack, ranging from 1 to 400.
root/Audio/OutputScaleAuto If set to 1, the OutputScale value will be set automatically based on the thin client model.
root/Audio/OutputVolume Sets the volume for the internal speaker and headphone jack, ranging from 1 to 100.
root/Audio/PlaybackDevice Sets the device to use for playback.
root/Audio/PulseBuffer The recommended range for this value is between 1024 and 8192. A value that is too high might cause jittering in playback, while a value that is too low might cause the thin client to crash.
root/Audio/RecordDevice Sets the device to use for capture.
root/Audio/RecordMute If set to 1, the microphone jack is muted.
Audio 77
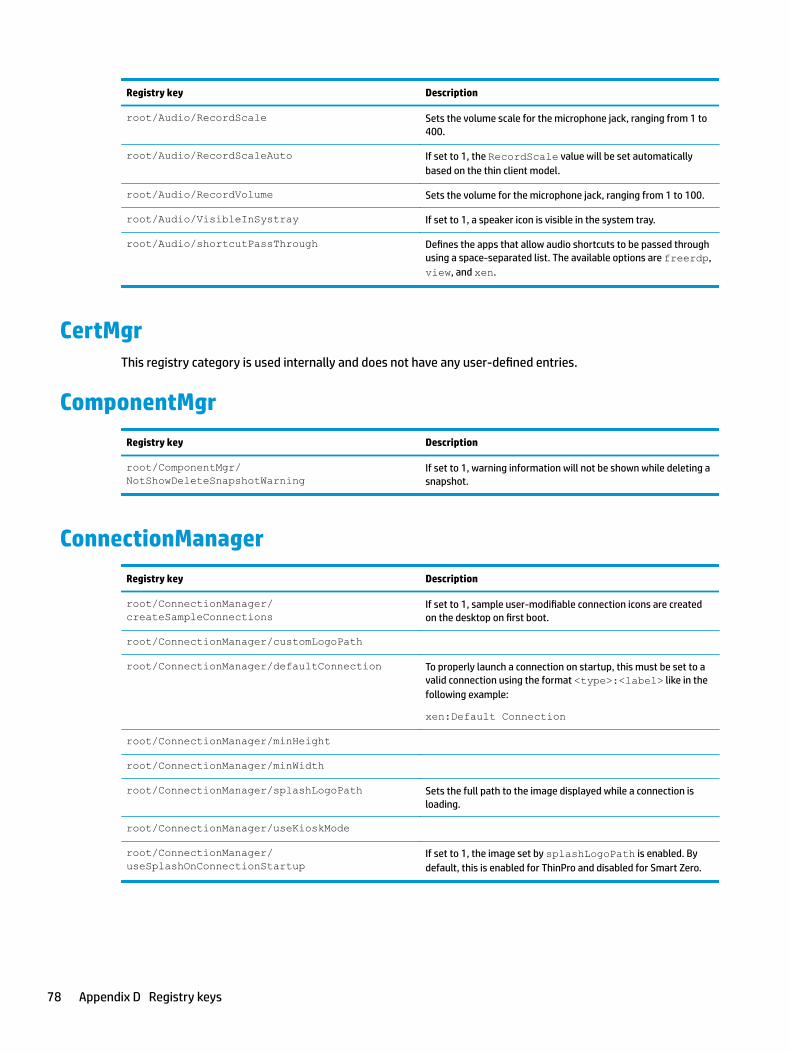
Registry key Description
root/Audio/RecordScale Sets the volume scale for the microphone jack, ranging from 1 to 400.
root/Audio/RecordScaleAuto If set to 1, the RecordScale value will be set automatically based on the thin client model.
root/Audio/RecordVolume Sets the volume for the microphone jack, ranging from 1 to 100.
root/Audio/VisibleInSystray If set to 1, a speaker icon is visible in the system tray.
root/Audio/shortcutPassThrough Defines the apps that allow audio shortcuts to be passed through using a space-separated list. The available options are freerdp, view, and xen.
CertMgrThis registry category is used internally and does not have any user-defined entries.
ComponentMgr
Registry key Description
root/ComponentMgr/NotShowDeleteSnapshotWarning
If set to 1, warning information will not be shown while deleting a snapshot.
ConnectionManager
Registry key Description
root/ConnectionManager/createSampleConnections
If set to 1, sample user-modifiable connection icons are created on the desktop on first boot.
root/ConnectionManager/customLogoPath
root/ConnectionManager/defaultConnection To properly launch a connection on startup, this must be set to a valid connection using the format <type>:<label> like in the following example:
xen:Default Connection
root/ConnectionManager/minHeight
root/ConnectionManager/minWidth
root/ConnectionManager/splashLogoPath Sets the full path to the image displayed while a connection is loading.
root/ConnectionManager/useKioskMode
root/ConnectionManager/useSplashOnConnectionStartup
If set to 1, the image set by splashLogoPath is enabled. By default, this is enabled for ThinPro and disabled for Smart Zero.
78 Appendix D Registry keys

ConnectionType
custom
Registry key Description
root/ConnectionType/custom/authorizations/user/add
If set to 1, an end user has permission to add a new connection of this type using Connection Manager. This key has no effect on Smart Zero.
root/ConnectionType/custom/authorizations/user/general
If set to 1, an end user has permission to modify the general settings for this connection type using Connection Manager. This key has no effect on Smart Zero.
root/ConnectionType/custom/connections/<UUID>/afterStartedCommand
Sets the command to execute after the connection has been started.
root/ConnectionType/custom/connections/<UUID>/afterStoppedCommand
Sets the command to execute after the connection has been stopped.
root/ConnectionType/custom/connections/<UUID>/authorizations/user/edit
If set to 1, an end user has permission to modify the connection settings for this connection.
root/ConnectionType/custom/connections/<UUID>/authorizations/user/execution
If set to 1, an end user has permission to execute this connection.
root/ConnectionType/custom/connections/<UUID>/autoReconnect
If set to 1, the connection will be restarted when it is closed or disconnected.
root/ConnectionType/custom/connections/<UUID>/autoReconnectDelay
Sets the amount of time in seconds to wait before reconnecting the session. The default of 0 will cause the connection to reconnect immediately. This setting only takes effect when autoReconnect is set to 1.
root/ConnectionType/custom/connections/<UUID>/autostart
If set to a value of 1–5, the connection will be started automatically after the system boots, with the value of 1 having the highest priority.
root/ConnectionType/custom/connections/<UUID>/autostartDelay
Reserved for future use.
root/ConnectionType/custom/connections/<UUID>/beforeStartingCommand
Sets the command to execute before the connection starts.
root/ConnectionType/custom/connections/<UUID>/command
Sets the main command for the custom connection to execute.
root/ConnectionType/custom/connections/<UUID>/connectionEndAction
This registry key is either used internally or reserved for future use. The value should not be changed.
root/ConnectionType/custom/connections/<UUID>/coord
This registry key is either used internally or reserved for future use. The value should not be changed.
root/ConnectionType/custom/connections/<UUID>/dependConnectionId
This registry key is either used internally or reserved for future use. The value should not be changed.
root/ConnectionType/custom/connections/<UUID>/extraEnvValues/<UUID>/key
Sets the name of an extra environment variable for use with the connection.
root/ConnectionType/custom/connections/<UUID>/extraEnvValues/<UUID>/value
Sets the value of an extra environment variable for use with the connection.
root/ConnectionType/custom/connections/<UUID>/fallBackConnection
Sets the fallback connection via its UUID.
ConnectionType 79

Registry key Description
root/ConnectionType/custom/connections/<UUID>/hasDesktopIcon
If set to 1, the desktop icon for this connection is enabled. This key has no effect on Smart Zero.
root/ConnectionType/custom/connections/<UUID>/iconPosition
Sets the x,y coordinates of a pinned desktop icon. If not specified, the icon floats.
root/ConnectionType/custom/connections/<UUID>/label
Sets the connection name that is displayed in the UI. On Smart Zero, this will typically be set to Default Connection and does not display in the UI.
root/ConnectionType/custom/connections/<UUID>/startMode
If set to the default focus and the connection is already started, the connection will be given focus. Otherwise, an error will be returned stating that the connection is already started.
root/ConnectionType/custom/connections/<UUID>/waitForNetwork
If set to 1, the connection will not be launched until networking is available. This ensures that, on a slow network, the connection does not launch before networking is available, which could cause a failure.
root/ConnectionType/custom/coreSettings/USBrelevant
Specifies if this connection type is USB-relevant. If it is, it might have a USB plugin for redirecting USB devices.
root/ConnectionType/custom/coreSettings/appName
Sets the internal application name to use for this connection type. This key should not need to be modified.
root/ConnectionType/custom/coreSettings/className
Sets the internal application class name to use for this connection type. This key should not need to be modified.
root/ConnectionType/custom/coreSettings/editor
Sets the internal application name to use when Connection Manager is launched for this connection type. This key should not need to be modified.
root/ConnectionType/custom/coreSettings/generalSettingsEditor
Sets the internal application name to use when the General Settings Manager is launched for this connection type. This key should not need to be modified.
root/ConnectionType/custom/coreSettings/icon Specifies the icon from the icon theme set to use for this connection.
root/ConnectionType/custom/coreSettings/icon16Path
Sets the path to the 16 × 16 pixel icon for this application.
root/ConnectionType/custom/coreSettings/icon32Path
Sets the path to the 32 × 32 pixel icon for this application.
root/ConnectionType/custom/coreSettings/icon48Path
Sets the path to the 48 × 48 pixel icon for this application.
root/ConnectionType/custom/coreSettings/iconActive
Reserved for future use.
root/ConnectionType/custom/coreSettings/label Sets the name to display for this connection type in the UI.
root/ConnectionType/custom/coreSettings/priorityInConnectionLists
Sets the priority of this connection type when it is displayed in Connection Manager and the configuration wizard that displays during initial setup. A higher value moves the connection type towards the top of the list. If set to 0, the connection type is hidden from the configuration wizard and is shown last in Connection Manager. Connection types with the same priority are listed in alphabetical order.
root/ConnectionType/custom/coreSettings/serverRequired
Sets whether a server name or address is unused, optional, or required for this connection type.
80 Appendix D Registry keys
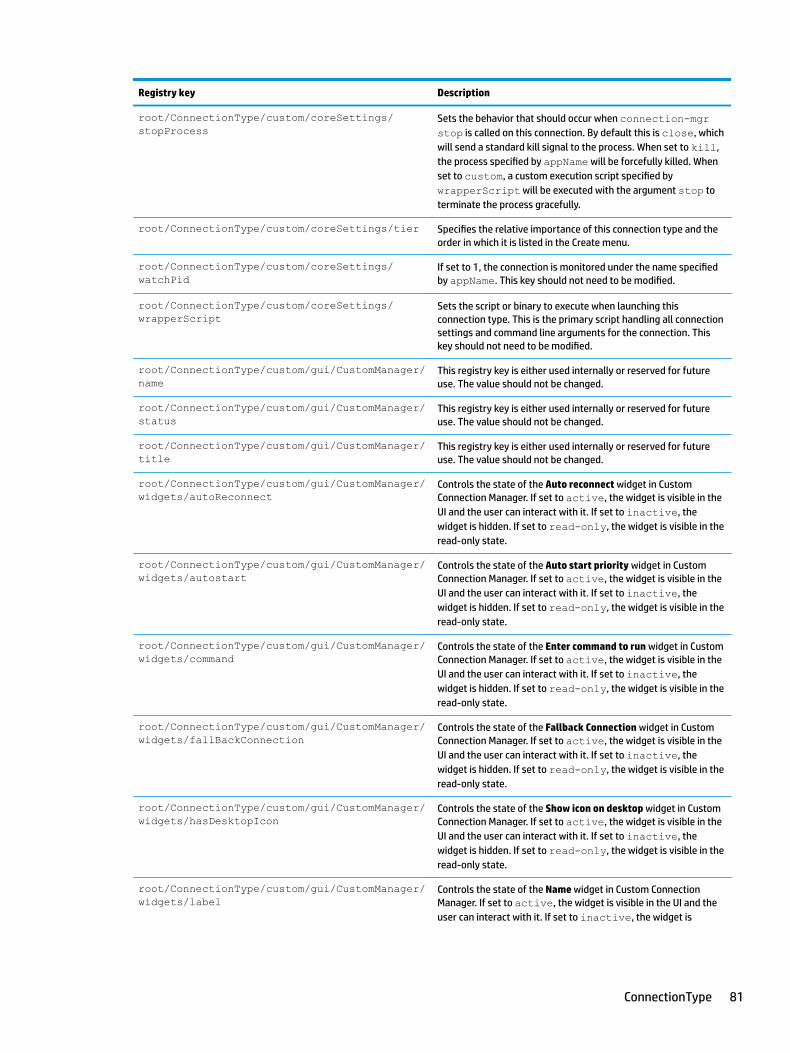
Registry key Description
root/ConnectionType/custom/coreSettings/stopProcess
Sets the behavior that should occur when connection-mgr stop is called on this connection. By default this is close, which will send a standard kill signal to the process. When set to kill, the process specified by appName will be forcefully killed. When set to custom, a custom execution script specified by wrapperScript will be executed with the argument stop to terminate the process gracefully.
root/ConnectionType/custom/coreSettings/tier Specifies the relative importance of this connection type and the order in which it is listed in the Create menu.
root/ConnectionType/custom/coreSettings/watchPid
If set to 1, the connection is monitored under the name specified by appName. This key should not need to be modified.
root/ConnectionType/custom/coreSettings/wrapperScript
Sets the script or binary to execute when launching this connection type. This is the primary script handling all connection settings and command line arguments for the connection. This key should not need to be modified.
root/ConnectionType/custom/gui/CustomManager/name
This registry key is either used internally or reserved for future use. The value should not be changed.
root/ConnectionType/custom/gui/CustomManager/status
This registry key is either used internally or reserved for future use. The value should not be changed.
root/ConnectionType/custom/gui/CustomManager/title
This registry key is either used internally or reserved for future use. The value should not be changed.
root/ConnectionType/custom/gui/CustomManager/widgets/autoReconnect
Controls the state of the Auto reconnect widget in Custom Connection Manager. If set to active, the widget is visible in the UI and the user can interact with it. If set to inactive, the widget is hidden. If set to read-only, the widget is visible in the read-only state.
root/ConnectionType/custom/gui/CustomManager/widgets/autostart
Controls the state of the Auto start priority widget in Custom Connection Manager. If set to active, the widget is visible in the UI and the user can interact with it. If set to inactive, the widget is hidden. If set to read-only, the widget is visible in the read-only state.
root/ConnectionType/custom/gui/CustomManager/widgets/command
Controls the state of the Enter command to run widget in Custom Connection Manager. If set to active, the widget is visible in the UI and the user can interact with it. If set to inactive, the widget is hidden. If set to read-only, the widget is visible in the read-only state.
root/ConnectionType/custom/gui/CustomManager/widgets/fallBackConnection
Controls the state of the Fallback Connection widget in Custom Connection Manager. If set to active, the widget is visible in the UI and the user can interact with it. If set to inactive, the widget is hidden. If set to read-only, the widget is visible in the read-only state.
root/ConnectionType/custom/gui/CustomManager/widgets/hasDesktopIcon
Controls the state of the Show icon on desktop widget in Custom Connection Manager. If set to active, the widget is visible in the UI and the user can interact with it. If set to inactive, the widget is hidden. If set to read-only, the widget is visible in the read-only state.
root/ConnectionType/custom/gui/CustomManager/widgets/label
Controls the state of the Name widget in Custom Connection Manager. If set to active, the widget is visible in the UI and the user can interact with it. If set to inactive, the widget is
ConnectionType 81
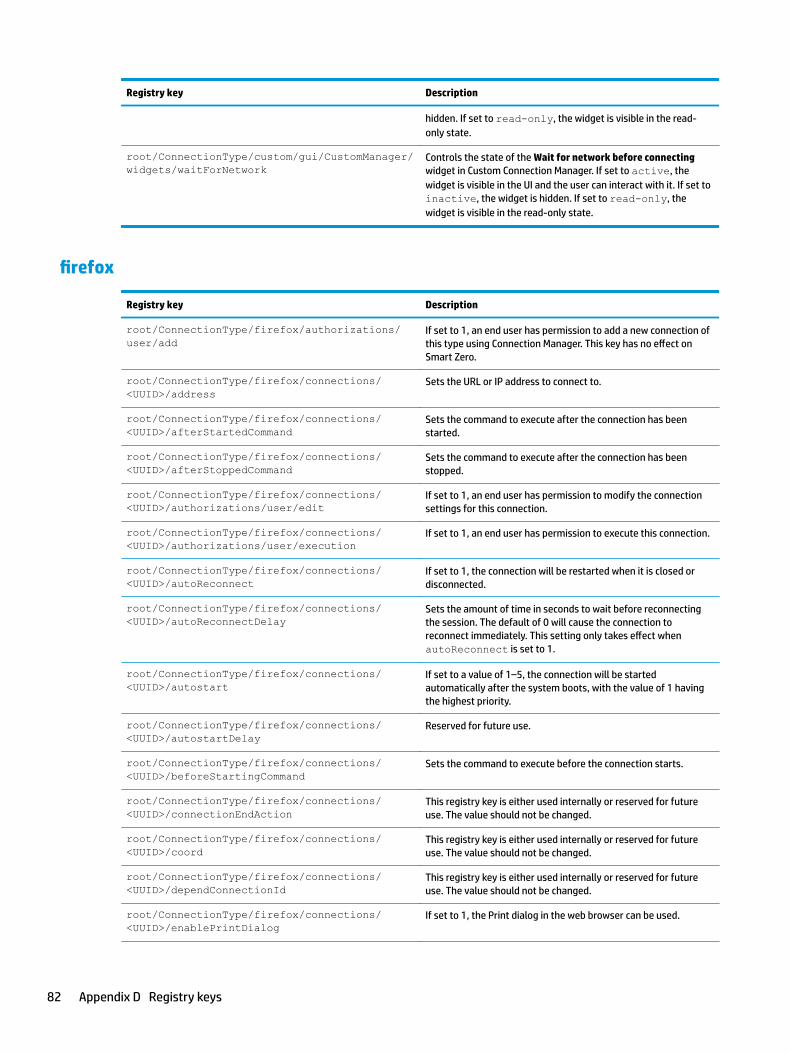
Registry key Description
hidden. If set to read-only, the widget is visible in the read-only state.
root/ConnectionType/custom/gui/CustomManager/widgets/waitForNetwork
Controls the state of the Wait for network before connecting widget in Custom Connection Manager. If set to active, the widget is visible in the UI and the user can interact with it. If set to inactive, the widget is hidden. If set to read-only, the widget is visible in the read-only state.
firefox
Registry key Description
root/ConnectionType/firefox/authorizations/user/add
If set to 1, an end user has permission to add a new connection of this type using Connection Manager. This key has no effect on Smart Zero.
root/ConnectionType/firefox/connections/<UUID>/address
Sets the URL or IP address to connect to.
root/ConnectionType/firefox/connections/<UUID>/afterStartedCommand
Sets the command to execute after the connection has been started.
root/ConnectionType/firefox/connections/<UUID>/afterStoppedCommand
Sets the command to execute after the connection has been stopped.
root/ConnectionType/firefox/connections/<UUID>/authorizations/user/edit
If set to 1, an end user has permission to modify the connection settings for this connection.
root/ConnectionType/firefox/connections/<UUID>/authorizations/user/execution
If set to 1, an end user has permission to execute this connection.
root/ConnectionType/firefox/connections/<UUID>/autoReconnect
If set to 1, the connection will be restarted when it is closed or disconnected.
root/ConnectionType/firefox/connections/<UUID>/autoReconnectDelay
Sets the amount of time in seconds to wait before reconnecting the session. The default of 0 will cause the connection to reconnect immediately. This setting only takes effect when autoReconnect is set to 1.
root/ConnectionType/firefox/connections/<UUID>/autostart
If set to a value of 1–5, the connection will be started automatically after the system boots, with the value of 1 having the highest priority.
root/ConnectionType/firefox/connections/<UUID>/autostartDelay
Reserved for future use.
root/ConnectionType/firefox/connections/<UUID>/beforeStartingCommand
Sets the command to execute before the connection starts.
root/ConnectionType/firefox/connections/<UUID>/connectionEndAction
This registry key is either used internally or reserved for future use. The value should not be changed.
root/ConnectionType/firefox/connections/<UUID>/coord
This registry key is either used internally or reserved for future use. The value should not be changed.
root/ConnectionType/firefox/connections/<UUID>/dependConnectionId
This registry key is either used internally or reserved for future use. The value should not be changed.
root/ConnectionType/firefox/connections/<UUID>/enablePrintDialog
If set to 1, the Print dialog in the web browser can be used.
82 Appendix D Registry keys
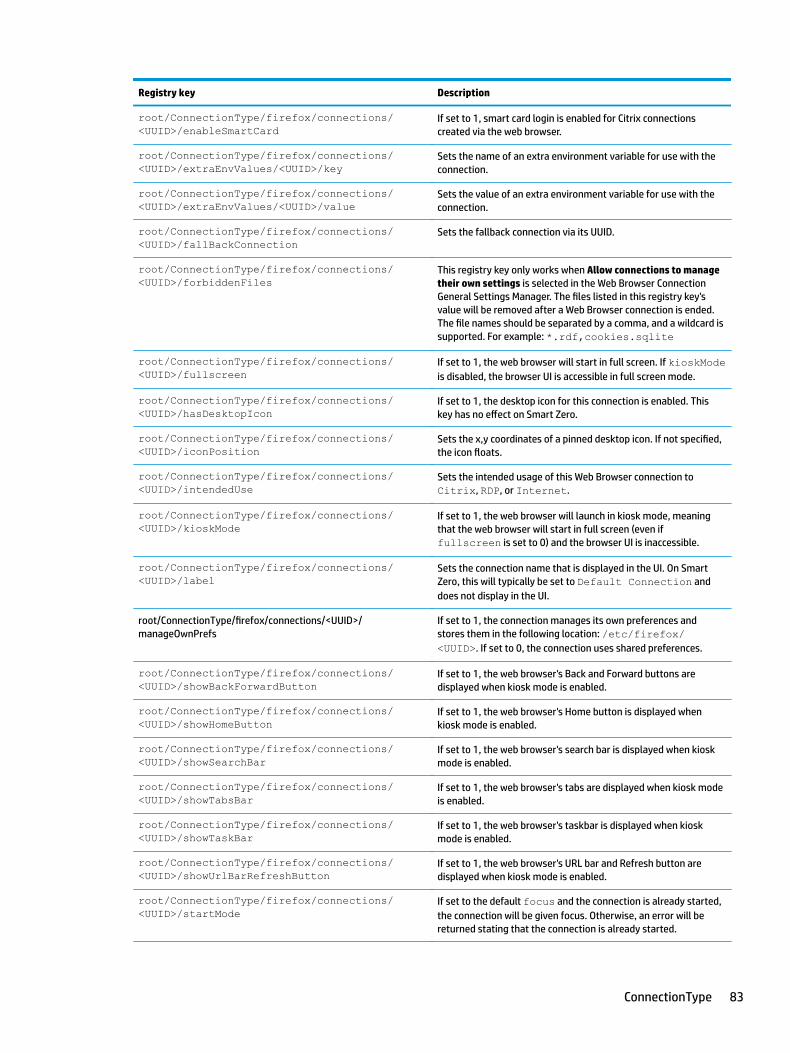
Registry key Description
root/ConnectionType/firefox/connections/<UUID>/enableSmartCard
If set to 1, smart card login is enabled for Citrix connections created via the web browser.
root/ConnectionType/firefox/connections/<UUID>/extraEnvValues/<UUID>/key
Sets the name of an extra environment variable for use with the connection.
root/ConnectionType/firefox/connections/<UUID>/extraEnvValues/<UUID>/value
Sets the value of an extra environment variable for use with the connection.
root/ConnectionType/firefox/connections/<UUID>/fallBackConnection
Sets the fallback connection via its UUID.
root/ConnectionType/firefox/connections/<UUID>/forbiddenFiles
This registry key only works when Allow connections to manage their own settings is selected in the Web Browser Connection General Settings Manager. The files listed in this registry key's value will be removed after a Web Browser connection is ended. The file names should be separated by a comma, and a wildcard is supported. For example: *.rdf,cookies.sqlite
root/ConnectionType/firefox/connections/<UUID>/fullscreen
If set to 1, the web browser will start in full screen. If kioskMode is disabled, the browser UI is accessible in full screen mode.
root/ConnectionType/firefox/connections/<UUID>/hasDesktopIcon
If set to 1, the desktop icon for this connection is enabled. This key has no effect on Smart Zero.
root/ConnectionType/firefox/connections/<UUID>/iconPosition
Sets the x,y coordinates of a pinned desktop icon. If not specified, the icon floats.
root/ConnectionType/firefox/connections/<UUID>/intendedUse
Sets the intended usage of this Web Browser connection to Citrix, RDP, or Internet.
root/ConnectionType/firefox/connections/<UUID>/kioskMode
If set to 1, the web browser will launch in kiosk mode, meaning that the web browser will start in full screen (even if fullscreen is set to 0) and the browser UI is inaccessible.
root/ConnectionType/firefox/connections/<UUID>/label
Sets the connection name that is displayed in the UI. On Smart Zero, this will typically be set to Default Connection and does not display in the UI.
root/ConnectionType/firefox/connections/<UUID>/manageOwnPrefs
If set to 1, the connection manages its own preferences and stores them in the following location: /etc/firefox/<UUID>. If set to 0, the connection uses shared preferences.
root/ConnectionType/firefox/connections/<UUID>/showBackForwardButton
If set to 1, the web browser's Back and Forward buttons are displayed when kiosk mode is enabled.
root/ConnectionType/firefox/connections/<UUID>/showHomeButton
If set to 1, the web browser's Home button is displayed when kiosk mode is enabled.
root/ConnectionType/firefox/connections/<UUID>/showSearchBar
If set to 1, the web browser's search bar is displayed when kiosk mode is enabled.
root/ConnectionType/firefox/connections/<UUID>/showTabsBar
If set to 1, the web browser's tabs are displayed when kiosk mode is enabled.
root/ConnectionType/firefox/connections/<UUID>/showTaskBar
If set to 1, the web browser's taskbar is displayed when kiosk mode is enabled.
root/ConnectionType/firefox/connections/<UUID>/showUrlBarRefreshButton
If set to 1, the web browser's URL bar and Refresh button are displayed when kiosk mode is enabled.
root/ConnectionType/firefox/connections/<UUID>/startMode
If set to the default focus and the connection is already started, the connection will be given focus. Otherwise, an error will be returned stating that the connection is already started.
ConnectionType 83

Registry key Description
root/ConnectionType/firefox/connections/<UUID>/waitForNetwork
If set to 1, the connection will not be launched until networking is available. This ensures that, on a slow network, the connection does not launch before networking is available, which could cause a failure.
root/ConnectionType/firefox/coreSettings/USBrelevant
Specifies if this connection type is USB-relevant. If it is, it might have a USB plugin for redirecting USB devices.
root/ConnectionType/firefox/coreSettings/appName
Sets the internal application name to use for this connection type. This key should not need to be modified.
root/ConnectionType/firefox/coreSettings/className
Sets the internal application class name to use for this connection type. This key should not need to be modified.
root/ConnectionType/firefox/coreSettings/editor
Sets the internal application name to use when Connection Manager is launched for this connection type. This key should not need to be modified.
root/ConnectionType/firefox/coreSettings/icon Specifies the icon from the icon theme set to use for this connection.
root/ConnectionType/firefox/coreSettings/icon16Path
Sets the path to the 16 × 16 pixel icon for this application.
root/ConnectionType/firefox/coreSettings/icon32Path
Sets the path to the 32 × 32 pixel icon for this application.
root/ConnectionType/firefox/coreSettings/icon48Path
Sets the path to the 48 × 48 pixel icon for this application.
root/ConnectionType/firefox/coreSettings/iconActive
Reserved for future use.
root/ConnectionType/firefox/coreSettings/label
Sets the name to display for this connection type in the UI.
root/ConnectionType/firefox/coreSettings/priorityInConnectionLists
Sets the priority of this connection type when it is displayed in Connection Manager and the Configuration Wizard that displays during initial setup. A higher value will move the connection type towards the top of the list. If set to 0, the connection type is hidden from Configuration Wizard and is shown last in Connection Manager. Connections types with the same priority are listed in alphabetical order.
root/ConnectionType/firefox/coreSettings/restartIdleTime
Sets the time in minutes before the web browser restarts when the system is not receiving user input. If set to 0, restart is disabled.
root/ConnectionType/firefox/coreSettings/serverRequired
Sets whether a server name or address is unused, optional, or required for this connection type.
root/ConnectionType/firefox/coreSettings/stopProcess
Sets the behavior that should occur when connection-mgr stop is called on this connection. By default this is close, which will send a standard kill signal to the process. When set to kill, the process specified by appName will be forcefully killed. When set to custom, a custom execution script specified by wrapperScript will be executed with the argument stop to terminate the process gracefully.
root/ConnectionType/firefox/coreSettings/tier Specifies the relative importance of this connection type and the order in which it is listed in the Create menu.
root/ConnectionType/firefox/coreSettings/wrapperScript
Sets the script or binary to execute when launching this connection type. This is the primary script handling all connection
84 Appendix D Registry keys
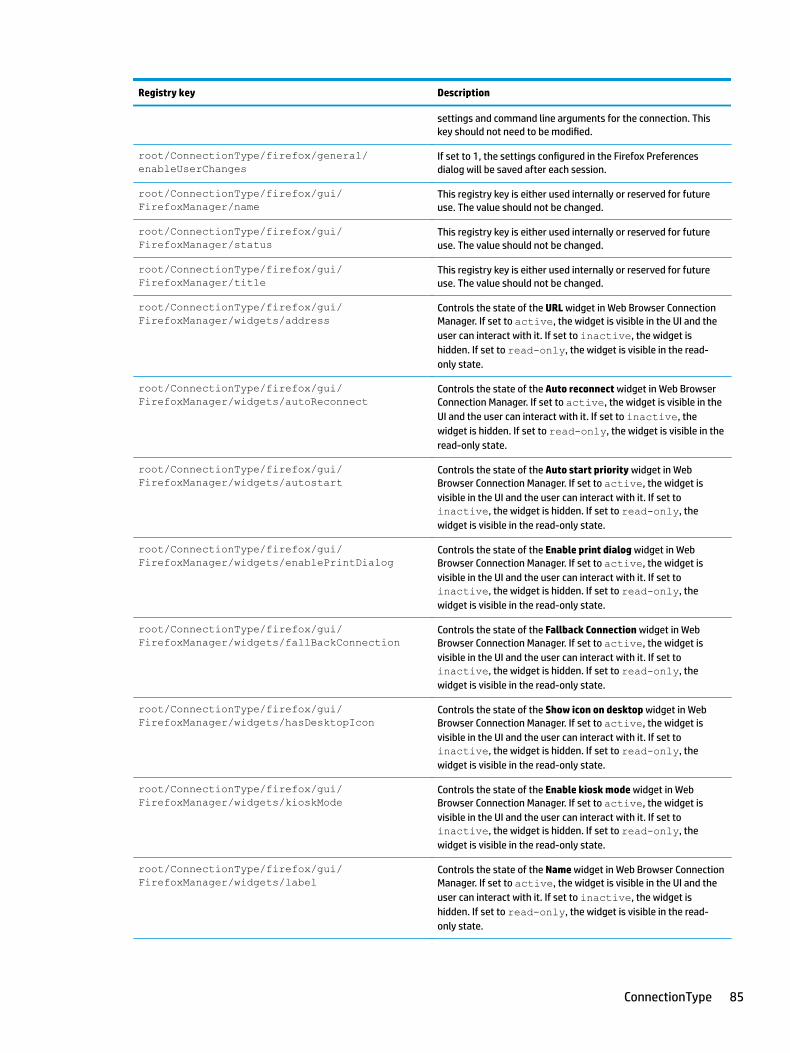
Registry key Description
settings and command line arguments for the connection. This key should not need to be modified.
root/ConnectionType/firefox/general/enableUserChanges
If set to 1, the settings configured in the Firefox Preferences dialog will be saved after each session.
root/ConnectionType/firefox/gui/FirefoxManager/name
This registry key is either used internally or reserved for future use. The value should not be changed.
root/ConnectionType/firefox/gui/FirefoxManager/status
This registry key is either used internally or reserved for future use. The value should not be changed.
root/ConnectionType/firefox/gui/FirefoxManager/title
This registry key is either used internally or reserved for future use. The value should not be changed.
root/ConnectionType/firefox/gui/FirefoxManager/widgets/address
Controls the state of the URL widget in Web Browser Connection Manager. If set to active, the widget is visible in the UI and the user can interact with it. If set to inactive, the widget is hidden. If set to read-only, the widget is visible in the read-only state.
root/ConnectionType/firefox/gui/FirefoxManager/widgets/autoReconnect
Controls the state of the Auto reconnect widget in Web Browser Connection Manager. If set to active, the widget is visible in the UI and the user can interact with it. If set to inactive, the widget is hidden. If set to read-only, the widget is visible in the read-only state.
root/ConnectionType/firefox/gui/FirefoxManager/widgets/autostart
Controls the state of the Auto start priority widget in Web Browser Connection Manager. If set to active, the widget is visible in the UI and the user can interact with it. If set to inactive, the widget is hidden. If set to read-only, the widget is visible in the read-only state.
root/ConnectionType/firefox/gui/FirefoxManager/widgets/enablePrintDialog
Controls the state of the Enable print dialog widget in Web Browser Connection Manager. If set to active, the widget is visible in the UI and the user can interact with it. If set to inactive, the widget is hidden. If set to read-only, the widget is visible in the read-only state.
root/ConnectionType/firefox/gui/FirefoxManager/widgets/fallBackConnection
Controls the state of the Fallback Connection widget in Web Browser Connection Manager. If set to active, the widget is visible in the UI and the user can interact with it. If set to inactive, the widget is hidden. If set to read-only, the widget is visible in the read-only state.
root/ConnectionType/firefox/gui/FirefoxManager/widgets/hasDesktopIcon
Controls the state of the Show icon on desktop widget in Web Browser Connection Manager. If set to active, the widget is visible in the UI and the user can interact with it. If set to inactive, the widget is hidden. If set to read-only, the widget is visible in the read-only state.
root/ConnectionType/firefox/gui/FirefoxManager/widgets/kioskMode
Controls the state of the Enable kiosk mode widget in Web Browser Connection Manager. If set to active, the widget is visible in the UI and the user can interact with it. If set to inactive, the widget is hidden. If set to read-only, the widget is visible in the read-only state.
root/ConnectionType/firefox/gui/FirefoxManager/widgets/label
Controls the state of the Name widget in Web Browser Connection Manager. If set to active, the widget is visible in the UI and the user can interact with it. If set to inactive, the widget is hidden. If set to read-only, the widget is visible in the read-only state.
ConnectionType 85
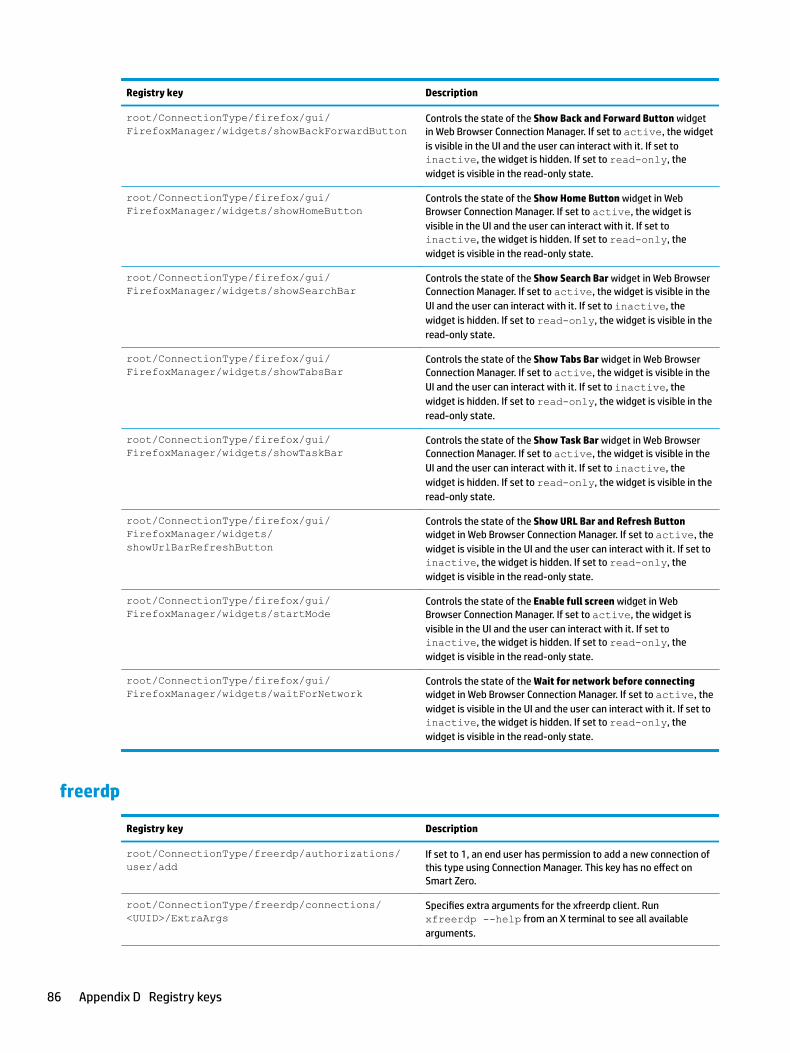
Registry key Description
root/ConnectionType/firefox/gui/FirefoxManager/widgets/showBackForwardButton
Controls the state of the Show Back and Forward Button widget in Web Browser Connection Manager. If set to active, the widget is visible in the UI and the user can interact with it. If set to inactive, the widget is hidden. If set to read-only, the widget is visible in the read-only state.
root/ConnectionType/firefox/gui/FirefoxManager/widgets/showHomeButton
Controls the state of the Show Home Button widget in Web Browser Connection Manager. If set to active, the widget is visible in the UI and the user can interact with it. If set to inactive, the widget is hidden. If set to read-only, the widget is visible in the read-only state.
root/ConnectionType/firefox/gui/FirefoxManager/widgets/showSearchBar
Controls the state of the Show Search Bar widget in Web Browser Connection Manager. If set to active, the widget is visible in the UI and the user can interact with it. If set to inactive, the widget is hidden. If set to read-only, the widget is visible in the read-only state.
root/ConnectionType/firefox/gui/FirefoxManager/widgets/showTabsBar
Controls the state of the Show Tabs Bar widget in Web Browser Connection Manager. If set to active, the widget is visible in the UI and the user can interact with it. If set to inactive, the widget is hidden. If set to read-only, the widget is visible in the read-only state.
root/ConnectionType/firefox/gui/FirefoxManager/widgets/showTaskBar
Controls the state of the Show Task Bar widget in Web Browser Connection Manager. If set to active, the widget is visible in the UI and the user can interact with it. If set to inactive, the widget is hidden. If set to read-only, the widget is visible in the read-only state.
root/ConnectionType/firefox/gui/FirefoxManager/widgets/showUrlBarRefreshButton
Controls the state of the Show URL Bar and Refresh Button widget in Web Browser Connection Manager. If set to active, the widget is visible in the UI and the user can interact with it. If set to inactive, the widget is hidden. If set to read-only, the widget is visible in the read-only state.
root/ConnectionType/firefox/gui/FirefoxManager/widgets/startMode
Controls the state of the Enable full screen widget in Web Browser Connection Manager. If set to active, the widget is visible in the UI and the user can interact with it. If set to inactive, the widget is hidden. If set to read-only, the widget is visible in the read-only state.
root/ConnectionType/firefox/gui/FirefoxManager/widgets/waitForNetwork
Controls the state of the Wait for network before connecting widget in Web Browser Connection Manager. If set to active, the widget is visible in the UI and the user can interact with it. If set to inactive, the widget is hidden. If set to read-only, the widget is visible in the read-only state.
freerdp
Registry key Description
root/ConnectionType/freerdp/authorizations/user/add
If set to 1, an end user has permission to add a new connection of this type using Connection Manager. This key has no effect on Smart Zero.
root/ConnectionType/freerdp/connections/<UUID>/ExtraArgs
Specifies extra arguments for the xfreerdp client. Run xfreerdp --help from an X terminal to see all available arguments.
86 Appendix D Registry keys
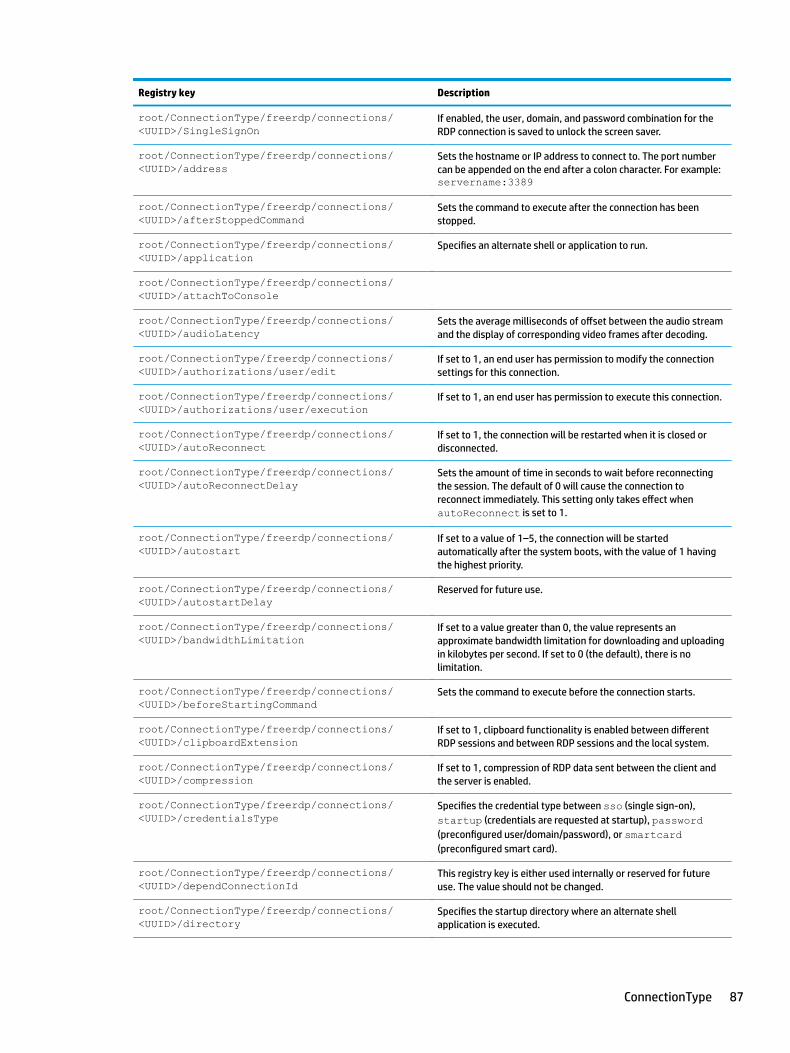
Registry key Description
root/ConnectionType/freerdp/connections/<UUID>/SingleSignOn
If enabled, the user, domain, and password combination for the RDP connection is saved to unlock the screen saver.
root/ConnectionType/freerdp/connections/<UUID>/address
Sets the hostname or IP address to connect to. The port number can be appended on the end after a colon character. For example: servername:3389
root/ConnectionType/freerdp/connections/<UUID>/afterStoppedCommand
Sets the command to execute after the connection has been stopped.
root/ConnectionType/freerdp/connections/<UUID>/application
Specifies an alternate shell or application to run.
root/ConnectionType/freerdp/connections/<UUID>/attachToConsole
root/ConnectionType/freerdp/connections/<UUID>/audioLatency
Sets the average milliseconds of offset between the audio stream and the display of corresponding video frames after decoding.
root/ConnectionType/freerdp/connections/<UUID>/authorizations/user/edit
If set to 1, an end user has permission to modify the connection settings for this connection.
root/ConnectionType/freerdp/connections/<UUID>/authorizations/user/execution
If set to 1, an end user has permission to execute this connection.
root/ConnectionType/freerdp/connections/<UUID>/autoReconnect
If set to 1, the connection will be restarted when it is closed or disconnected.
root/ConnectionType/freerdp/connections/<UUID>/autoReconnectDelay
Sets the amount of time in seconds to wait before reconnecting the session. The default of 0 will cause the connection to reconnect immediately. This setting only takes effect when autoReconnect is set to 1.
root/ConnectionType/freerdp/connections/<UUID>/autostart
If set to a value of 1–5, the connection will be started automatically after the system boots, with the value of 1 having the highest priority.
root/ConnectionType/freerdp/connections/<UUID>/autostartDelay
Reserved for future use.
root/ConnectionType/freerdp/connections/<UUID>/bandwidthLimitation
If set to a value greater than 0, the value represents an approximate bandwidth limitation for downloading and uploading in kilobytes per second. If set to 0 (the default), there is no limitation.
root/ConnectionType/freerdp/connections/<UUID>/beforeStartingCommand
Sets the command to execute before the connection starts.
root/ConnectionType/freerdp/connections/<UUID>/clipboardExtension
If set to 1, clipboard functionality is enabled between different RDP sessions and between RDP sessions and the local system.
root/ConnectionType/freerdp/connections/<UUID>/compression
If set to 1, compression of RDP data sent between the client and the server is enabled.
root/ConnectionType/freerdp/connections/<UUID>/credentialsType
Specifies the credential type between sso (single sign-on), startup (credentials are requested at startup), password (preconfigured user/domain/password), or smartcard (preconfigured smart card).
root/ConnectionType/freerdp/connections/<UUID>/dependConnectionId
This registry key is either used internally or reserved for future use. The value should not be changed.
root/ConnectionType/freerdp/connections/<UUID>/directory
Specifies the startup directory where an alternate shell application is executed.
ConnectionType 87

Registry key Description
root/ConnectionType/freerdp/connections/<UUID>/disableMMRwithRFX
If set to 1, multimedia redirection is disabled if a valid RemoteFX session is established.
root/ConnectionType/freerdp/connections/<UUID>/domain
Sets the default domain to supply to the remote host during login. If a domain is not specified, the default domain for the remote host will be used.
root/ConnectionType/freerdp/connections/<UUID>/enableMMR
If set to 1, the Multimedia Redirection add-on is enabled, causing supported codecs played through Windows Media Player to be redirected to the client.
root/ConnectionType/freerdp/connections/<UUID>/extraEnvValues/<UUID>/key
Sets the name of an extra environment variable for use with the connection.
root/ConnectionType/freerdp/connections/<UUID>/extraEnvValues/<UUID>/value
Sets the value of an extra environment variable for use with the connection.
root/ConnectionType/freerdp/connections/<UUID>/fallBackConnection
Sets the fallback connection via its UUID.
root/ConnectionType/freerdp/connections/<UUID>/frameAcknowledgeCount
Sets the number of video frames the server can push without waiting for acknowledgement from the client. Lower numbers result in a more responsive desktop but lower frame rate. If set to 0, frame acknowledgement is not used in the client-server interactions.
root/ConnectionType/freerdp/connections/<UUID>/gatewayAddress
Sets the RD Gateway server name or address.
root/ConnectionType/freerdp/connections/<UUID>/gatewayCredentialsType
Specifies the credential type between whether credentials are to be supplied by sso (single sign-on), startup (credentials are requested at startup), or password (preconfigured user/domain/password).
root/ConnectionType/freerdp/connections/<UUID>/gatewayDomain
Sets the default domain to supply to the RD Gateway during login. Usually, this setting is used with kiosk-style applications where a generic user name is used to login. If gatewayUsesSameCredentials is to 1, this value is disabled.
root/ConnectionType/freerdp/connections/<UUID>/gatewayEnabled
If set to 1, RD Gateway is expected to be used.
root/ConnectionType/freerdp/connections/<UUID>/gatewayPassword
Sets the default password to supply to the RD Gateway during login. This value is usually encrypted. Usually, this setting is used with kiosk-style applications where a generic user name is used to login. If gatewayUsesSameCredentials is to 1, this value is disabled.
root/ConnectionType/freerdp/connections/<UUID>/gatewayPort
Sets the port number to use when contacting the RDP server. This value can be left empty. The most common value is 443.
root/ConnectionType/freerdp/connections/<UUID>/gatewayUser
Sets the default user name to supply to the RD Gateway during login. Usually, this setting is used with kiosk-style applications where a generic user name is used to login. If gatewayUsesSameCredentials is to 1, this value is disabled.
root/ConnectionType/freerdp/connections/<UUID>/gatewayUsesSameCredentials
If set to 1, the same credentials that are used to connect to the final server are used to connect to the RD Gateway.
root/ConnectionType/freerdp/connections/<UUID>/hasDesktopIcon
If set to 1, the desktop icon for this connection is enabled. This key has no effect on Smart Zero.
88 Appendix D Registry keys

Registry key Description
root/ConnectionType/freerdp/connections/<UUID>/hostnameType
If set to hostname, the system hostname is sent to the remote host. This is typically used to identify the thin client associated with a particular RDP session. The sent hostname can be overridden using sendHostname in the connection-specific settings. If set to mac, the MAC address of the first available network adapter is sent instead of the hostname.
root/ConnectionType/freerdp/connections/<UUID>/iconPosition
Sets the x,y coordinates of a pinned desktop icon. If not specified, the icon floats.
root/ConnectionType/freerdp/connections/<UUID>/label
Sets the connection name that is displayed in the UI. On Smart Zero, this will typically be set to Default Connection and does not display in the UI.
root/ConnectionType/freerdp/connections/<UUID>/loadBalanceInfo
This value is the load balancing cookie sent for brokering purposes to the server upon connection and corresponds to the loadbalanceinfo field in the .rdp file. By default, the value is empty.
root/ConnectionType/freerdp/connections/<UUID>/localPartitionRedirection
If set to 1, the local non-USB storage partitions are redirected to the remote host via the Storage extension. If set to 0, the extension is disabled for non-USB storage partitions that are not used by HP ThinPro.
root/ConnectionType/freerdp/connections/<UUID>/loginfields/domain
If set to 1, the Domain field is shown in the login dialog for the connection. If set to 2, the field is shown but disabled. If set to 0, the field is hidden.
root/ConnectionType/freerdp/connections/<UUID>/loginfields/password
If set to 1, the Password field is shown in the login dialog for the connection. If set to 2, the field is shown but disabled. If set to 0, the field is hidden.
root/ConnectionType/freerdp/connections/<UUID>/loginfields/rememberme
If set to 1, the Remember me check box is shown in the login dialog for the connection. If set to 2, the check box is shown but disabled. If set to 0, the check box is hidden.
root/ConnectionType/freerdp/connections/<UUID>/loginfields/server
If set to 1, the Server box is shown in the login dialog for the connection. If set to 2, the box is shown but disabled. If set to 0, the box is hidden. If set to 3, the system settings are used.
root/ConnectionType/freerdp/connections/<UUID>/loginfields/showpassword
If set to 1, the Show password check box is shown in the login dialog for the connection. If set to 2, the check box is shown but disabled. If set to 0, the check box is hidden.
root/ConnectionType/freerdp/connections/<UUID>/loginfields/smartcard
If set to 1, the Smart card login check box is shown in the login dialog for the connection. If set to 2, the check box is shown but disabled. If set to 0, the check box is hidden. This check box might not appear if no smart card is detected, even if this option is enabled.
root/ConnectionType/freerdp/connections/<UUID>/loginfields/username
If set to 1, the User Name field is shown in the login dialog for the connection. If set to 2, the field is shown but disabled. If set to 0, the field is hidden.
root/ConnectionType/freerdp/connections/<UUID>/mouseMotionEvents
If set to 0, mouse motion events are not sent to the server. This can prevent some user feedback such as tooltips from functioning properly.
root/ConnectionType/freerdp/connections/<UUID>/offScreenBitmaps
If set to 0, off-screen bitmaps are disabled. This can increase performance slightly but will cause blocks of the screen to update asynchronously, causing screen transitions to update non-uniformly.
ConnectionType 89

Registry key Description
root/ConnectionType/freerdp/connections/<UUID>/password
Sets the default password to supply to the remote host during login. This value will be encrypted. Generally, this setting is used for kiosk-style applications where a generic password is used for login.
root/ConnectionType/freerdp/connections/<UUID>/perfFlagDesktopComposition
If set to 1, desktop composition (such as translucent borders) is allowed if supported by the server. Turning off desktop composition can improve performance for low-bandwidth connections. Generally, this only affects RemoteFX. If set to 2, the value is selected based on the thin client performance.
root/ConnectionType/freerdp/connections/<UUID>/perfFlagFontSmoothing
If set to 1, font smoothing is allowed if supported by the server and enabled. Turning off font smoothing can improve performance on low-bandwidth connections. If set to 2, the value is selected based on the thin client performance.
root/ConnectionType/freerdp/connections/<UUID>/perfFlagNoCursorSettings
If set to 1, cursor blinking is disabled, which can improve performance on low-bandwidth RDP connections. If set to 2, the value is selected based on the thin client performance.
root/ConnectionType/freerdp/connections/<UUID>/perfFlagNoCursorShadow
If set to 1, mouse cursor shadows are disabled, which can improve performance on low-bandwidth RDP connections. If set to 2, the value is selected based on the thin client performance.
root/ConnectionType/freerdp/connections/<UUID>/perfFlagNoMenuAnimations
If set to 1, menu animations are disabled, which can improve performance on low-bandwidth RDP connections. If set to 2, the value is selected based on the thin client performance.
root/ConnectionType/freerdp/connections/<UUID>/perfFlagNoTheming
If set to 1, user interface themes are disabled, which can improve performance on low-bandwidth RDP connections. If set to 2, the value is selected based on the thin client performance.
root/ConnectionType/freerdp/connections/<UUID>/perfFlagNoWallpaper
If set to 1, the desktop wallpaper is disabled, which can improve performance on low-bandwidth RDP connections. If set to 2, the value is selected based on the thin client performance.
root/ConnectionType/freerdp/connections/<UUID>/perfFlagNoWindowDrag
If set to 1, full-content window dragging is disabled, which can improve performance on low-bandwidth RDP connections. The window outline is used instead. If set to 2, the value is selected based on the thin client performance.
root/ConnectionType/freerdp/connections/<UUID>/portMapping
If set to 1, all serial and parallel ports are redirected to the remote host via the Ports extension. If set to 0, the extension is disabled.
root/ConnectionType/freerdp/connections/<UUID>/printerMapping
If set to 1, all printers defined locally via CUPS are redirected to the remote host via the Printers extension. If set to 0, the extension is disabled. If set to 2, the USB printers are redirected as configured in USB Manager.
root/ConnectionType/freerdp/connections/<UUID>/rdWebFeed/autoDisconnectTimeout
Sets the number of minutes there can be no RemoteApp and Desktop resource running before the connection ends automatically. A countdown counter is displayed during the last 20 seconds providing the user an opportunity to disarm the timer. If set to 0 (the default), the timer is disabled.
root/ConnectionType/freerdp/connections/<UUID>/rdWebFeed/autoStartSingleResource
If set to 1, and if only a single published resource (RemoteApp program or virtual desktop) is returned by the server, that resource will be started automatically.
root/ConnectionType/freerdp/connections/<UUID>/rdWebFeed/filter/<UUID>/alias
Specifies the alias of a resource for the resource filter. RemoteApp and Desktop resources with a matching alias will be available to users.
90 Appendix D Registry keys
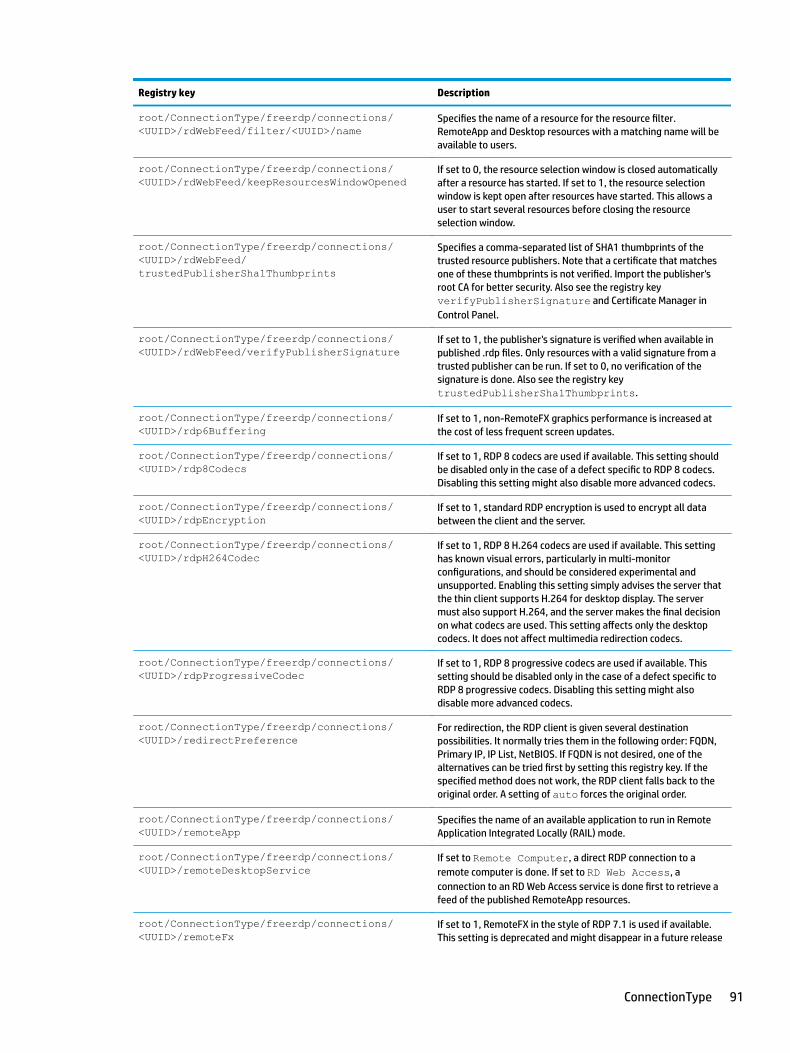
Registry key Description
root/ConnectionType/freerdp/connections/<UUID>/rdWebFeed/filter/<UUID>/name
Specifies the name of a resource for the resource filter. RemoteApp and Desktop resources with a matching name will be available to users.
root/ConnectionType/freerdp/connections/<UUID>/rdWebFeed/keepResourcesWindowOpened
If set to 0, the resource selection window is closed automatically after a resource has started. If set to 1, the resource selection window is kept open after resources have started. This allows a user to start several resources before closing the resource selection window.
root/ConnectionType/freerdp/connections/<UUID>/rdWebFeed/trustedPublisherSha1Thumbprints
Specifies a comma-separated list of SHA1 thumbprints of the trusted resource publishers. Note that a certificate that matches one of these thumbprints is not verified. Import the publisher's root CA for better security. Also see the registry key verifyPublisherSignature and Certificate Manager in Control Panel.
root/ConnectionType/freerdp/connections/<UUID>/rdWebFeed/verifyPublisherSignature
If set to 1, the publisher's signature is verified when available in published .rdp files. Only resources with a valid signature from a trusted publisher can be run. If set to 0, no verification of the signature is done. Also see the registry key trustedPublisherSha1Thumbprints.
root/ConnectionType/freerdp/connections/<UUID>/rdp6Buffering
If set to 1, non-RemoteFX graphics performance is increased at the cost of less frequent screen updates.
root/ConnectionType/freerdp/connections/<UUID>/rdp8Codecs
If set to 1, RDP 8 codecs are used if available. This setting should be disabled only in the case of a defect specific to RDP 8 codecs. Disabling this setting might also disable more advanced codecs.
root/ConnectionType/freerdp/connections/<UUID>/rdpEncryption
If set to 1, standard RDP encryption is used to encrypt all data between the client and the server.
root/ConnectionType/freerdp/connections/<UUID>/rdpH264Codec
If set to 1, RDP 8 H.264 codecs are used if available. This setting has known visual errors, particularly in multi-monitor configurations, and should be considered experimental and unsupported. Enabling this setting simply advises the server that the thin client supports H.264 for desktop display. The server must also support H.264, and the server makes the final decision on what codecs are used. This setting affects only the desktop codecs. It does not affect multimedia redirection codecs.
root/ConnectionType/freerdp/connections/<UUID>/rdpProgressiveCodec
If set to 1, RDP 8 progressive codecs are used if available. This setting should be disabled only in the case of a defect specific to RDP 8 progressive codecs. Disabling this setting might also disable more advanced codecs.
root/ConnectionType/freerdp/connections/<UUID>/redirectPreference
For redirection, the RDP client is given several destination possibilities. It normally tries them in the following order: FQDN, Primary IP, IP List, NetBIOS. If FQDN is not desired, one of the alternatives can be tried first by setting this registry key. If the specified method does not work, the RDP client falls back to the original order. A setting of auto forces the original order.
root/ConnectionType/freerdp/connections/<UUID>/remoteApp
Specifies the name of an available application to run in Remote Application Integrated Locally (RAIL) mode.
root/ConnectionType/freerdp/connections/<UUID>/remoteDesktopService
If set to Remote Computer, a direct RDP connection to a remote computer is done. If set to RD Web Access, a connection to an RD Web Access service is done first to retrieve a feed of the published RemoteApp resources.
root/ConnectionType/freerdp/connections/<UUID>/remoteFx
If set to 1, RemoteFX in the style of RDP 7.1 is used if available. This setting is deprecated and might disappear in a future release
ConnectionType 91

Registry key Description
of HP ThinPro. This setting should be disabled only in the case of a defect specific to RemoteFX protocol. Disabling this setting might also disable more advanced codecs.
root/ConnectionType/freerdp/connections/<UUID>/requireEncryptionOracleRemediation
If set to 1, the Remote Desktop Client refuses to connect to servers that do not offer suitable protections. This addresses Microsoft security vulnerability CVE-2018-0886.
root/ConnectionType/freerdp/connections/<UUID>/scCertificate
If a preconfigured smart card login is selected, this gives an identifier corresponding to the certificate on that smart card to be used for authentication.
root/ConnectionType/freerdp/connections/<UUID>/scPin
If a preconfigured smart card login is selected, this gives the PIN or password for that smart card.
root/ConnectionType/freerdp/connections/<UUID>/scRedirection
If set to 1, all local smart card readers are redirected to the remote host but are not used for the Network Level Authentication (NLA) of the RDP session.
NOTE: If credentialsType is set to smartcard or smartcard is set to 1, scRedirection is ignored, depending on the HP ThinPro version. In this configuration, the smart card readers are always redirected.
root/ConnectionType/freerdp/connections/<UUID>/seamlessWindow
If set to 1, window decorations are disabled. This can be desirable in a multi-monitor configuration to allow the connection to be set to the size of the primary monitor.
root/ConnectionType/freerdp/connections/<UUID>/securityLevel
Sets the certificate security level. If set to 0, all connections are allowed. If set to 1, remembered hosts are selected and a warning dialog is shown if verification is not passed. If set to 2, remembered hosts are not selected and a warning dialog is shown if verification is not passed. If set to 3, all insecure connections are refused.
root/ConnectionType/freerdp/connections/<UUID>/sendHostname
Sets the thin client hostname that is sent to the remote host. If left blank, the system hostname is sent. The registry key root/ConnectionType/freerdp/general/sendHostname must be set to hostname for this key to be used.
root/ConnectionType/freerdp/connections/<UUID>/showConnectionGraph
This is a diagnostic function. If set to 1, when the session starts, a separate program will be started to graph the connection's health.
root/ConnectionType/freerdp/connections/<UUID>/showRDPDashboard
If set to 1, when the session starts, a separate window displays RDP performance and status.
root/ConnectionType/freerdp/connections/<UUID>/smartcard
If set to 1, local smartcard authentication to the remote host is allowed. Currently, this will disable Network Level Authentication (NLA).
root/ConnectionType/freerdp/connections/<UUID>/sound
If set to 1, the playback and recording devices are redirected to the remote host via the Audio extension. If set to 0, the extension is disabled. If set to 2, the USB audio devices are redirected as configured in USB Manager. Generally, HP recommends setting this value to 1 so that high-level audio redirection is used. This will improve audio quality and ensure that client audio redirected via other extensions (such as Multimedia Redirection) matches local audio settings.
root/ConnectionType/freerdp/connections/<UUID>/startMode
If set to the default focus and the connection is already started, the connection will be given focus. Otherwise, an error will be returned stating that the connection is already started.
92 Appendix D Registry keys

Registry key Description
root/ConnectionType/freerdp/connections/<UUID>/timeoutError
Sets the number of milliseconds to wait after losing the connection before giving up on reconnecting with the server. If set to 0, reconnection is attempted forever.
root/ConnectionType/freerdp/connections/<UUID>/timeoutRecovery
Sets the number of milliseconds to wait after losing the connection for networking to recover without trying a forced reconnect.
root/ConnectionType/freerdp/connections/<UUID>/timeoutWarning
Sets the number of milliseconds to wait after losing the connection before warning the user that the connection has been lost.
root/ConnectionType/freerdp/connections/<UUID>/timeoutWarningDialog
If set to 1, when an end-to-end connection drop is detected, a dialog is displayed and the screen will turn grayscale. Otherwise, messages are written to the connection log and the session freezes.
root/ConnectionType/freerdp/connections/<UUID>/timeoutsEnabled
If set to 1, end-to-end connection health checks are done.
root/ConnectionType/freerdp/connections/<UUID>/tlsVersion
Sets the version of Transport Layer Security to be used during the early stages of negotiation with the RDP server. Either set this to match the version of TLS used by your RDP server, or try setting it to auto.
NOTE: There are some server-side defects in some unpatched RDP servers that can cause the auto setting to fail, so it is not the default setting.
root/ConnectionType/freerdp/connections/<UUID>/usbMiscRedirection
If set to 0, redirection is disabled for all other USB devices except those handled by sound, printerMapping, portMapping, usbStorageRedirection, and localPartitionRedirection. If set to 2, all other USB devices are redirected to the remote host as configured in USB Manager.
root/ConnectionType/freerdp/connections/<UUID>/usbStorageRedirection
If set to 1, USB storage devices are redirected to the remote host via the Storage extension. If set to 0, the extension is disabled. If set to 2, USB storage devices are redirected as configured in USB Manager.
root/ConnectionType/freerdp/connections/<UUID>/username
Sets the default user name to supply to the remote host during login. Generally, this setting is used for kiosk-style applications where a generic user name is used for login.
root/ConnectionType/freerdp/connections/<UUID>/waitForNetwork
If set to 1, the connection will not be launched until networking is available. This ensures that, on a slow network, the connection does not launch before networking is available, which could cause a failure.
root/ConnectionType/freerdp/connections/<UUID>/windowMode
If set to Remote Application, RDP will run in Remote Application Integrated Locally (RAIL) mode. This requires that the RemoteApp server allows the desired application to run as a remote application. The application will be displayed in a separate window within the desktop environment, making it look like the application is part of the local system. Also see the remoteApp registry key. If set to Alternate Shell, a non-standard shell is invoked. Also see the application and directory registry keys.
root/ConnectionType/freerdp/connections/<UUID>/windowSizeHeight
ConnectionType 93

Registry key Description
root/ConnectionType/freerdp/connections/<UUID>/windowSizePercentage
root/ConnectionType/freerdp/connections/<UUID>/windowSizeWidth
root/ConnectionType/freerdp/connections/<UUID>/windowType
root/ConnectionType/freerdp/connections/<UUID>/x11Capture
This is a diagnostic function. If set to 1, X11 operations are captured for later playback.
root/ConnectionType/freerdp/connections/<UUID>/x11CaptureDir
This is a diagnostic function. The value sets the directory for X11 capture files.
root/ConnectionType/freerdp/connections/<UUID>/x11LogAutoflush
This is a diagnostic function. If set to 1, the X11 logfile is more frequently flushed to disk.
root/ConnectionType/freerdp/connections/<UUID>/x11Logfile
This is a diagnostic function. The value sets the path to the X11 logfile.
root/ConnectionType/freerdp/connections/<UUID>/x11Logging
This is a diagnostic function. If set to 1, X11 operations are logged.
root/ConnectionType/freerdp/connections/<UUID>/x11Synchronous
This is a diagnostic function. If set to 1, X11 operations are not buffered.
root/ConnectionType/freerdp/connections/<UUID>/xkbLayoutId
Sets an XKB layout ID for bypassing the system keyboard. To see the list of available IDs, enter the following command in an X terminal: xfreerdp --kbd-list.
root/ConnectionType/freerdp/coreSettings/USBrelevant
Specifies if this connection type is USB-relevant. If it is, it might have a USB plugin for redirecting USB devices.
root/ConnectionType/freerdp/coreSettings/appName
Sets the internal application name to use for this connection type. This key should not need to be modified.
root/ConnectionType/freerdp/coreSettings/className
Sets the internal application class name to use for this connection type. This key should not need to be modified.
root/ConnectionType/freerdp/coreSettings/disableLinkDropWarning
If set to 1, the operating system does not generate a dialog indicating that networking is down because the connection protocol handles such situations.
root/ConnectionType/freerdp/coreSettings/editor
Sets the internal application name to use when Connection Manager is launched for this connection type. This key should not need to be modified.
root/ConnectionType/freerdp/coreSettings/icon Specifies the icon from the icon theme set to use for this connection.
root/ConnectionType/freerdp/coreSettings/icon16Path
Sets the path to the 16 × 16 pixel icon for this application.
root/ConnectionType/freerdp/coreSettings/icon32Path
Sets the path to the 32 × 32 pixel icon for this application.
root/ConnectionType/freerdp/coreSettings/icon48Path
Sets the path to the 48 × 48 pixel icon for this application.
root/ConnectionType/freerdp/coreSettings/iconActive
Reserved for future use.
root/ConnectionType/freerdp/coreSettings/initialConnectionTimeout
Sets the number of seconds to wait for an initial response from the RDP server before giving up.
94 Appendix D Registry keys

Registry key Description
root/ConnectionType/freerdp/coreSettings/label
Sets the name to display for this connection type in the UI.
root/ConnectionType/freerdp/coreSettings/priorityInConnectionLists
Sets the priority of this connection type when it is displayed in Connection Manager and the Configuration Wizard that displays during initial setup. A higher value will move the connection type towards the top of the list. If set to 0, the connection type is hidden from Configuration Wizard and is shown last in Connection Manager. Connections types with the same priority are listed in alphabetical order.
root/ConnectionType/freerdp/coreSettings/stopProcess
Sets the behavior that should occur when connection-mgr stop is called on this connection. By default this is close, which will send a standard kill signal to the process. When set to kill, the process specified by appName will be forcefully killed. When set to custom, a custom execution script specified by wrapperScript will be executed with the argument stop to terminate the process gracefully.
root/ConnectionType/freerdp/coreSettings/tier Specifies the relative importance of this connection type and the order in which it is listed in the Create menu.
root/ConnectionType/freerdp/coreSettings/watchPid
If set to 1, the connection is monitored under the name specified by appName. This key should not need to be modified.
root/ConnectionType/freerdp/coreSettings/wrapperScript
Sets the script or binary to execute when launching this connection type. This is the primary script handling all connection settings and command line arguments for the connection. This key should not need to be modified.
root/ConnectionType/freerdp/coreSettings/wrapperScriptGeneration
Lets Connection Manager know what type of parameters to pass to the wrapper script.
root/ConnectionType/freerdp/general/autoReconnectDialogTimeout
If autoReconnect is enabled, this key sets the number of seconds before timing out any error dialogs for the connection. If set to 0, the dialogs wait indefinitely for user interaction.
root/ConnectionType/freerdp/general/disablePasswordChange
When a remote login fails due to bad credentials, the user is presented with a button that brings up a dialog for updating their password. If this key is set is 1, that button and dialog are not displayed.
root/ConnectionType/freerdp/general/preferredAudio
Sets the default audio backend for high-level audio redirection (both in and out).
root/ConnectionType/freerdp/general/rdWebFeedUrlPattern
Sets the pattern used to build the RD Web Access URL. The host of the URL, e.g. myserver.com, is replaced by the value of the connection's Address field. This pattern is not used when the address is already a URL.
root/ConnectionType/freerdp/general/serialPortsDriver
This setting ensures a better compatibility with the expected underlying Windows driver SerCx2.sys, SerCx.sys, or Serial.sys.
root/ConnectionType/freerdp/general/serialPortsPermissive
If set to 1, errors for unsupported features will be ignored.
ConnectionType 95
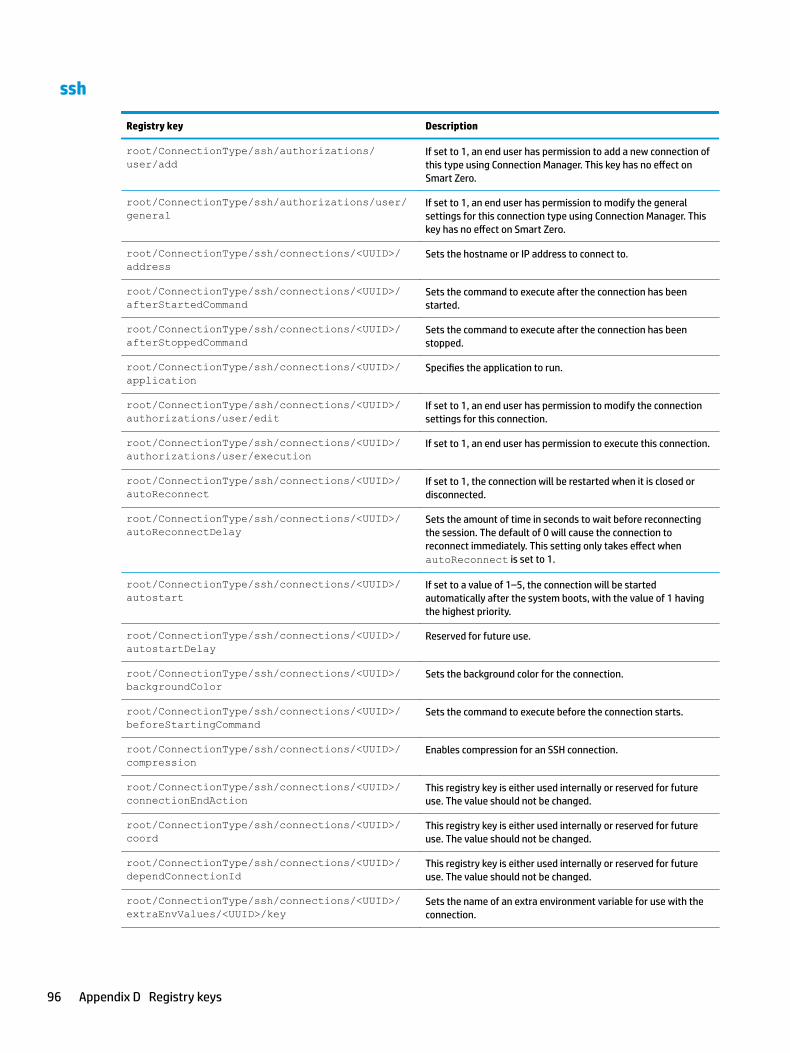
ssh
Registry key Description
root/ConnectionType/ssh/authorizations/user/add
If set to 1, an end user has permission to add a new connection of this type using Connection Manager. This key has no effect on Smart Zero.
root/ConnectionType/ssh/authorizations/user/general
If set to 1, an end user has permission to modify the general settings for this connection type using Connection Manager. This key has no effect on Smart Zero.
root/ConnectionType/ssh/connections/<UUID>/address
Sets the hostname or IP address to connect to.
root/ConnectionType/ssh/connections/<UUID>/afterStartedCommand
Sets the command to execute after the connection has been started.
root/ConnectionType/ssh/connections/<UUID>/afterStoppedCommand
Sets the command to execute after the connection has been stopped.
root/ConnectionType/ssh/connections/<UUID>/application
Specifies the application to run.
root/ConnectionType/ssh/connections/<UUID>/authorizations/user/edit
If set to 1, an end user has permission to modify the connection settings for this connection.
root/ConnectionType/ssh/connections/<UUID>/authorizations/user/execution
If set to 1, an end user has permission to execute this connection.
root/ConnectionType/ssh/connections/<UUID>/autoReconnect
If set to 1, the connection will be restarted when it is closed or disconnected.
root/ConnectionType/ssh/connections/<UUID>/autoReconnectDelay
Sets the amount of time in seconds to wait before reconnecting the session. The default of 0 will cause the connection to reconnect immediately. This setting only takes effect when autoReconnect is set to 1.
root/ConnectionType/ssh/connections/<UUID>/autostart
If set to a value of 1–5, the connection will be started automatically after the system boots, with the value of 1 having the highest priority.
root/ConnectionType/ssh/connections/<UUID>/autostartDelay
Reserved for future use.
root/ConnectionType/ssh/connections/<UUID>/backgroundColor
Sets the background color for the connection.
root/ConnectionType/ssh/connections/<UUID>/beforeStartingCommand
Sets the command to execute before the connection starts.
root/ConnectionType/ssh/connections/<UUID>/compression
Enables compression for an SSH connection.
root/ConnectionType/ssh/connections/<UUID>/connectionEndAction
This registry key is either used internally or reserved for future use. The value should not be changed.
root/ConnectionType/ssh/connections/<UUID>/coord
This registry key is either used internally or reserved for future use. The value should not be changed.
root/ConnectionType/ssh/connections/<UUID>/dependConnectionId
This registry key is either used internally or reserved for future use. The value should not be changed.
root/ConnectionType/ssh/connections/<UUID>/extraEnvValues/<UUID>/key
Sets the name of an extra environment variable for use with the connection.
96 Appendix D Registry keys
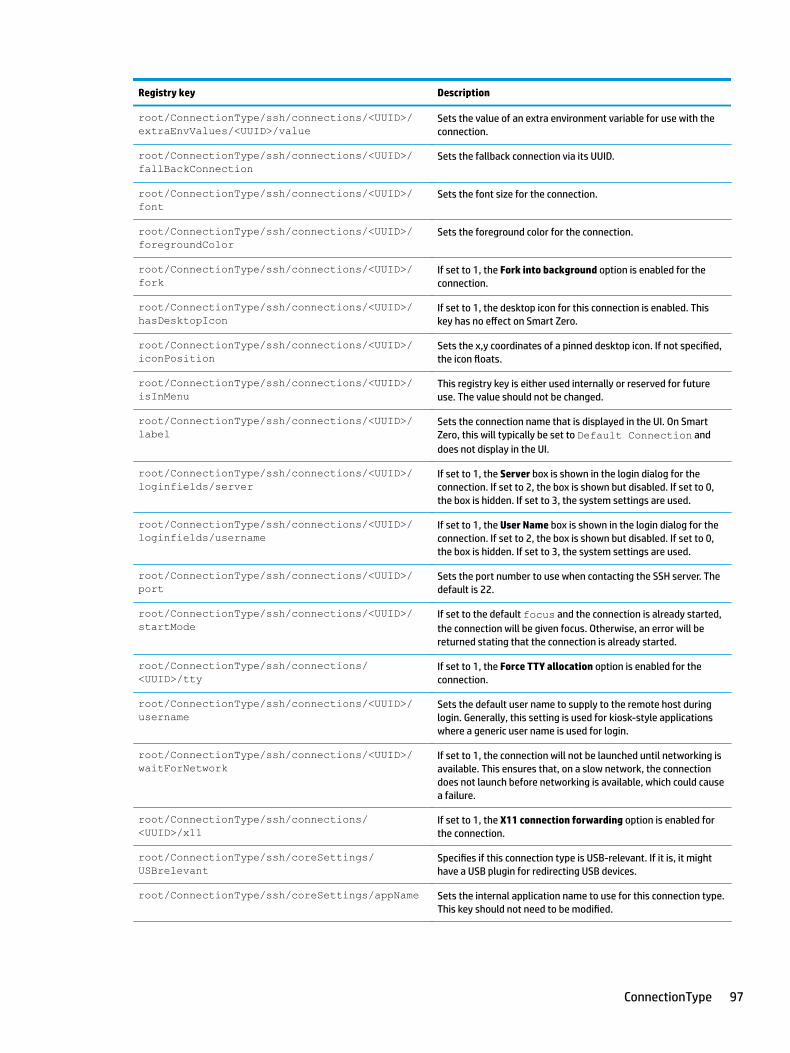
Registry key Description
root/ConnectionType/ssh/connections/<UUID>/extraEnvValues/<UUID>/value
Sets the value of an extra environment variable for use with the connection.
root/ConnectionType/ssh/connections/<UUID>/fallBackConnection
Sets the fallback connection via its UUID.
root/ConnectionType/ssh/connections/<UUID>/font
Sets the font size for the connection.
root/ConnectionType/ssh/connections/<UUID>/foregroundColor
Sets the foreground color for the connection.
root/ConnectionType/ssh/connections/<UUID>/fork
If set to 1, the Fork into background option is enabled for the connection.
root/ConnectionType/ssh/connections/<UUID>/hasDesktopIcon
If set to 1, the desktop icon for this connection is enabled. This key has no effect on Smart Zero.
root/ConnectionType/ssh/connections/<UUID>/iconPosition
Sets the x,y coordinates of a pinned desktop icon. If not specified, the icon floats.
root/ConnectionType/ssh/connections/<UUID>/isInMenu
This registry key is either used internally or reserved for future use. The value should not be changed.
root/ConnectionType/ssh/connections/<UUID>/label
Sets the connection name that is displayed in the UI. On Smart Zero, this will typically be set to Default Connection and does not display in the UI.
root/ConnectionType/ssh/connections/<UUID>/loginfields/server
If set to 1, the Server box is shown in the login dialog for the connection. If set to 2, the box is shown but disabled. If set to 0, the box is hidden. If set to 3, the system settings are used.
root/ConnectionType/ssh/connections/<UUID>/loginfields/username
If set to 1, the User Name box is shown in the login dialog for the connection. If set to 2, the box is shown but disabled. If set to 0, the box is hidden. If set to 3, the system settings are used.
root/ConnectionType/ssh/connections/<UUID>/port
Sets the port number to use when contacting the SSH server. The default is 22.
root/ConnectionType/ssh/connections/<UUID>/startMode
If set to the default focus and the connection is already started, the connection will be given focus. Otherwise, an error will be returned stating that the connection is already started.
root/ConnectionType/ssh/connections/<UUID>/tty
If set to 1, the Force TTY allocation option is enabled for the connection.
root/ConnectionType/ssh/connections/<UUID>/username
Sets the default user name to supply to the remote host during login. Generally, this setting is used for kiosk-style applications where a generic user name is used for login.
root/ConnectionType/ssh/connections/<UUID>/waitForNetwork
If set to 1, the connection will not be launched until networking is available. This ensures that, on a slow network, the connection does not launch before networking is available, which could cause a failure.
root/ConnectionType/ssh/connections/<UUID>/x11
If set to 1, the X11 connection forwarding option is enabled for the connection.
root/ConnectionType/ssh/coreSettings/USBrelevant
Specifies if this connection type is USB-relevant. If it is, it might have a USB plugin for redirecting USB devices.
root/ConnectionType/ssh/coreSettings/appName Sets the internal application name to use for this connection type. This key should not need to be modified.
ConnectionType 97

Registry key Description
root/ConnectionType/ssh/coreSettings/className
Sets the internal application class name to use for this connection type. This key should not need to be modified.
root/ConnectionType/ssh/coreSettings/editor Sets the internal application name to use when Connection Manager is launched for this connection type. This key should not need to be modified.
root/ConnectionType/ssh/coreSettings/icon Specifies the icon from the icon theme set to use for this connection.
root/ConnectionType/ssh/coreSettings/icon16Path
Sets the path to the 16 × 16 pixel icon for this application.
root/ConnectionType/ssh/coreSettings/icon32Path
Sets the path to the 32 × 32 pixel icon for this application.
root/ConnectionType/ssh/coreSettings/icon48Path
Sets the path to the 48 × 48 pixel icon for this application.
root/ConnectionType/ssh/coreSettings/iconActive
Reserved for future use.
root/ConnectionType/ssh/coreSettings/label Sets the name to display for this connection type in the UI.
root/ConnectionType/ssh/coreSettings/priorityInConnectionLists
Sets the priority of this connection type when it is displayed in Connection Manager and the Configuration Wizard that displays during initial setup. A higher value will move the connection type towards the top of the list. If set to 0, the connection type is hidden from Configuration Wizard and is shown last in Connection Manager. Connections types with the same priority are listed in alphabetical order.
root/ConnectionType/ssh/coreSettings/serverRequired
Sets whether a server name or address is unused, optional, or required for this connection type.
root/ConnectionType/ssh/coreSettings/stopProcess
Sets the behavior that should occur when connection-mgr stop is called on this connection. By default this is close, which will send a standard kill signal to the process. When set to kill, the process specified by appName will be forcefully killed. When set to custom, a custom execution script specified by wrapperScript will be executed with the argument stop to terminate the process gracefully.
root/ConnectionType/ssh/coreSettings/tier Specifies the relative importance of this connection type and the order in which it is listed in the Create menu.
root/ConnectionType/ssh/coreSettings/watchPid If set to 1, the connection is monitored under the name specified by appName. This key should not need to be modified.
root/ConnectionType/ssh/coreSettings/wrapperScript
Sets the script or binary to execute when launching this connection type. This is the primary script handling all connection settings and command line arguments for the connection. This key should not need to be modified.
root/ConnectionType/ssh/gui/SshManager/name This registry key is either used internally or reserved for future use. The value should not be changed.
root/ConnectionType/ssh/gui/SshManager/status This registry key is either used internally or reserved for future use. The value should not be changed.
root/ConnectionType/ssh/gui/SshManager/title This registry key is either used internally or reserved for future use. The value should not be changed.
98 Appendix D Registry keys
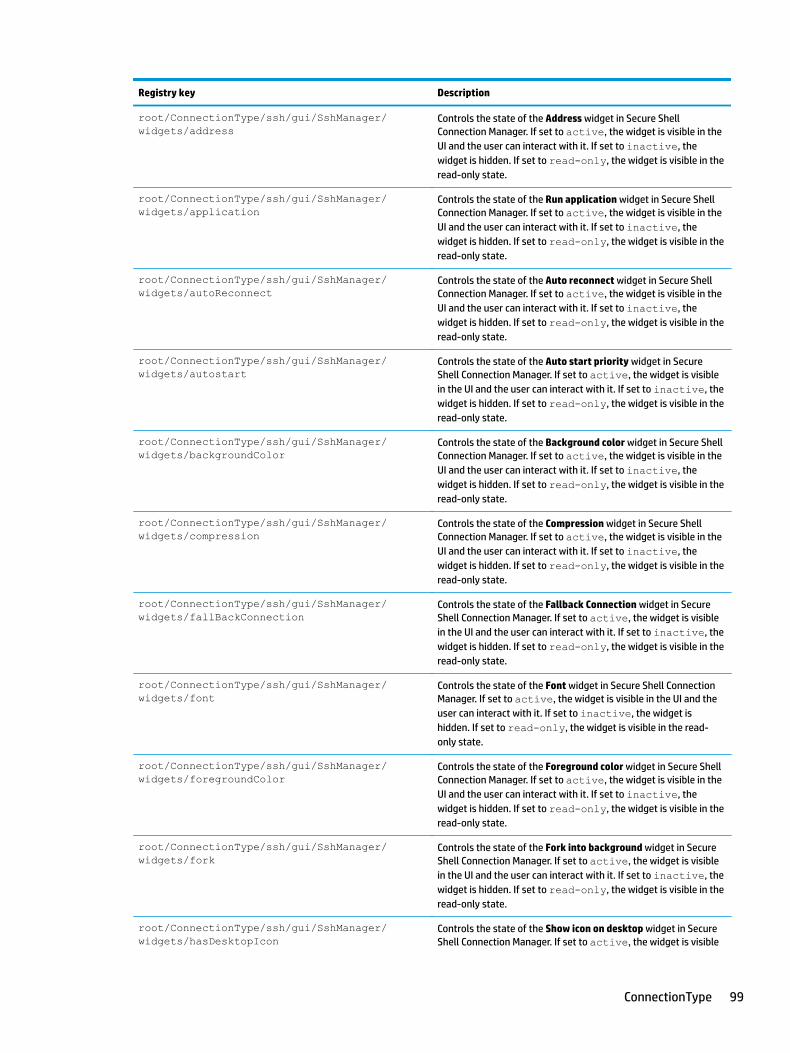
Registry key Description
root/ConnectionType/ssh/gui/SshManager/widgets/address
Controls the state of the Address widget in Secure Shell Connection Manager. If set to active, the widget is visible in the UI and the user can interact with it. If set to inactive, the widget is hidden. If set to read-only, the widget is visible in the read-only state.
root/ConnectionType/ssh/gui/SshManager/widgets/application
Controls the state of the Run application widget in Secure Shell Connection Manager. If set to active, the widget is visible in the UI and the user can interact with it. If set to inactive, the widget is hidden. If set to read-only, the widget is visible in the read-only state.
root/ConnectionType/ssh/gui/SshManager/widgets/autoReconnect
Controls the state of the Auto reconnect widget in Secure Shell Connection Manager. If set to active, the widget is visible in the UI and the user can interact with it. If set to inactive, the widget is hidden. If set to read-only, the widget is visible in the read-only state.
root/ConnectionType/ssh/gui/SshManager/widgets/autostart
Controls the state of the Auto start priority widget in Secure Shell Connection Manager. If set to active, the widget is visible in the UI and the user can interact with it. If set to inactive, the widget is hidden. If set to read-only, the widget is visible in the read-only state.
root/ConnectionType/ssh/gui/SshManager/widgets/backgroundColor
Controls the state of the Background color widget in Secure Shell Connection Manager. If set to active, the widget is visible in the UI and the user can interact with it. If set to inactive, the widget is hidden. If set to read-only, the widget is visible in the read-only state.
root/ConnectionType/ssh/gui/SshManager/widgets/compression
Controls the state of the Compression widget in Secure Shell Connection Manager. If set to active, the widget is visible in the UI and the user can interact with it. If set to inactive, the widget is hidden. If set to read-only, the widget is visible in the read-only state.
root/ConnectionType/ssh/gui/SshManager/widgets/fallBackConnection
Controls the state of the Fallback Connection widget in Secure Shell Connection Manager. If set to active, the widget is visible in the UI and the user can interact with it. If set to inactive, the widget is hidden. If set to read-only, the widget is visible in the read-only state.
root/ConnectionType/ssh/gui/SshManager/widgets/font
Controls the state of the Font widget in Secure Shell Connection Manager. If set to active, the widget is visible in the UI and the user can interact with it. If set to inactive, the widget is hidden. If set to read-only, the widget is visible in the read-only state.
root/ConnectionType/ssh/gui/SshManager/widgets/foregroundColor
Controls the state of the Foreground color widget in Secure Shell Connection Manager. If set to active, the widget is visible in the UI and the user can interact with it. If set to inactive, the widget is hidden. If set to read-only, the widget is visible in the read-only state.
root/ConnectionType/ssh/gui/SshManager/widgets/fork
Controls the state of the Fork into background widget in Secure Shell Connection Manager. If set to active, the widget is visible in the UI and the user can interact with it. If set to inactive, the widget is hidden. If set to read-only, the widget is visible in the read-only state.
root/ConnectionType/ssh/gui/SshManager/widgets/hasDesktopIcon
Controls the state of the Show icon on desktop widget in Secure Shell Connection Manager. If set to active, the widget is visible
ConnectionType 99
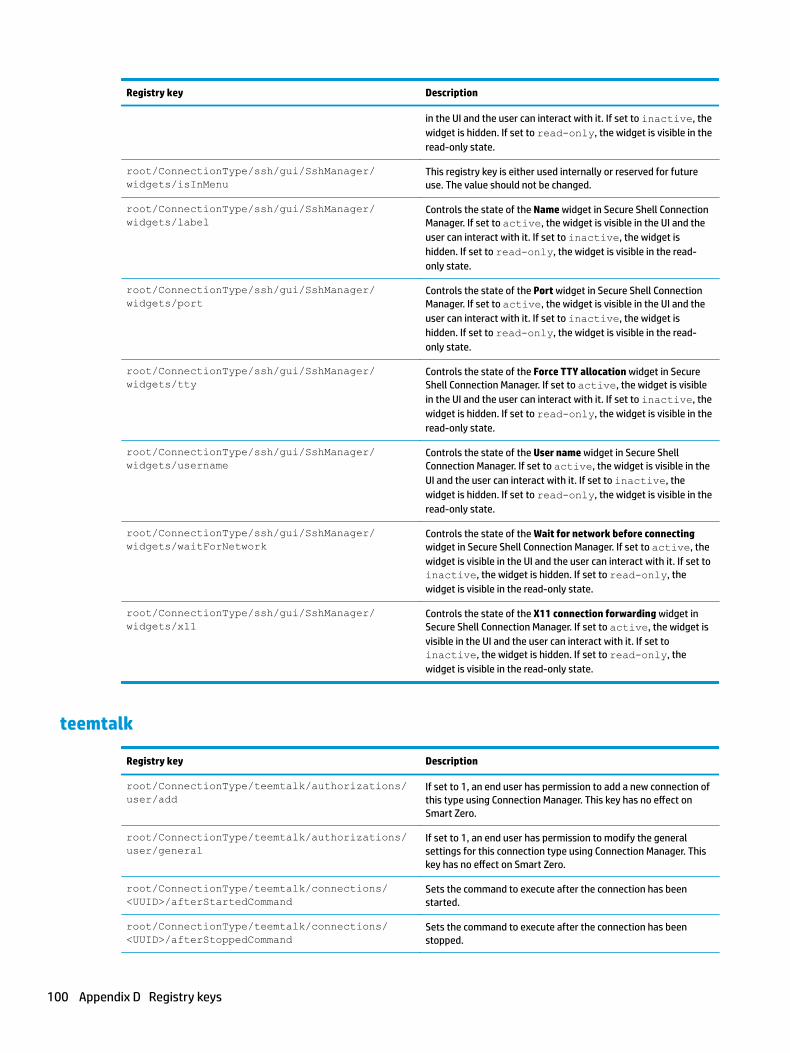
Registry key Description
in the UI and the user can interact with it. If set to inactive, the widget is hidden. If set to read-only, the widget is visible in the read-only state.
root/ConnectionType/ssh/gui/SshManager/widgets/isInMenu
This registry key is either used internally or reserved for future use. The value should not be changed.
root/ConnectionType/ssh/gui/SshManager/widgets/label
Controls the state of the Name widget in Secure Shell Connection Manager. If set to active, the widget is visible in the UI and the user can interact with it. If set to inactive, the widget is hidden. If set to read-only, the widget is visible in the read-only state.
root/ConnectionType/ssh/gui/SshManager/widgets/port
Controls the state of the Port widget in Secure Shell Connection Manager. If set to active, the widget is visible in the UI and the user can interact with it. If set to inactive, the widget is hidden. If set to read-only, the widget is visible in the read-only state.
root/ConnectionType/ssh/gui/SshManager/widgets/tty
Controls the state of the Force TTY allocation widget in Secure Shell Connection Manager. If set to active, the widget is visible in the UI and the user can interact with it. If set to inactive, the widget is hidden. If set to read-only, the widget is visible in the read-only state.
root/ConnectionType/ssh/gui/SshManager/widgets/username
Controls the state of the User name widget in Secure Shell Connection Manager. If set to active, the widget is visible in the UI and the user can interact with it. If set to inactive, the widget is hidden. If set to read-only, the widget is visible in the read-only state.
root/ConnectionType/ssh/gui/SshManager/widgets/waitForNetwork
Controls the state of the Wait for network before connecting widget in Secure Shell Connection Manager. If set to active, the widget is visible in the UI and the user can interact with it. If set to inactive, the widget is hidden. If set to read-only, the widget is visible in the read-only state.
root/ConnectionType/ssh/gui/SshManager/widgets/x11
Controls the state of the X11 connection forwarding widget in Secure Shell Connection Manager. If set to active, the widget is visible in the UI and the user can interact with it. If set to inactive, the widget is hidden. If set to read-only, the widget is visible in the read-only state.
teemtalk
Registry key Description
root/ConnectionType/teemtalk/authorizations/user/add
If set to 1, an end user has permission to add a new connection of this type using Connection Manager. This key has no effect on Smart Zero.
root/ConnectionType/teemtalk/authorizations/user/general
If set to 1, an end user has permission to modify the general settings for this connection type using Connection Manager. This key has no effect on Smart Zero.
root/ConnectionType/teemtalk/connections/<UUID>/afterStartedCommand
Sets the command to execute after the connection has been started.
root/ConnectionType/teemtalk/connections/<UUID>/afterStoppedCommand
Sets the command to execute after the connection has been stopped.
100 Appendix D Registry keys

Registry key Description
root/ConnectionType/teemtalk/connections/<UUID>/authorizations/user/edit
If set to 1, an end user has permission to modify the connection settings for this connection.
root/ConnectionType/teemtalk/connections/<UUID>/authorizations/user/execution
If set to 1, an end user has permission to execute this connection.
root/ConnectionType/teemtalk/connections/<UUID>/autoReconnect
If set to 1, the connection will be restarted when it is closed or disconnected.
root/ConnectionType/teemtalk/connections/<UUID>/autostart
If set to a value of 1–5, the connection will be started automatically after the system boots, with the value of 1 having the highest priority.
root/ConnectionType/teemtalk/connections/<UUID>/beforeStartingCommand
Sets the command to execute before the connection starts.
root/ConnectionType/teemtalk/connections/<UUID>/connectionEndAction
This registry key is either used internally or reserved for future use. The value should not be changed.
root/ConnectionType/teemtalk/connections/<UUID>/coord
This registry key is either used internally or reserved for future use. The value should not be changed.
root/ConnectionType/teemtalk/connections/<UUID>/dependConnectionId
This registry key is either used internally or reserved for future use. The value should not be changed.
root/ConnectionType/teemtalk/connections/<UUID>/extraEnvValues/<UUID>/key
Sets the name of an extra environment variable for use with the connection.
root/ConnectionType/teemtalk/connections/<UUID>/extraEnvValues/<UUID>/value
Sets the value of an extra environment variable for use with the connection.
root/ConnectionType/teemtalk/connections/<UUID>/fallBackConnection
Sets the fallback connection via its UUID.
root/ConnectionType/teemtalk/connections/<UUID>/hasDesktopIcon
If set to 1, the desktop icon for this connection is enabled. This key has no effect on Smart Zero.
root/ConnectionType/teemtalk/connections/<UUID>/iconPosition
Sets the x,y coordinates of a pinned desktop icon. If not specified, the icon floats.
root/ConnectionType/teemtalk/connections/<UUID>/isInMenu
This registry key is either used internally or reserved for future use. The value should not be changed.
root/ConnectionType/teemtalk/connections/<UUID>/label
Sets the connection name that is displayed in the UI. On Smart Zero, this will typically be set to Default Connection and does not display in the UI.
root/ConnectionType/teemtalk/connections/<UUID>/startMode
If set to the default focus and the connection is already started, the connection will be given focus. Otherwise, an error will be returned stating that the connection is already started.
root/ConnectionType/teemtalk/connections/<UUID>/systembeep
If set to 1, system beep is enabled for the connection.
root/ConnectionType/teemtalk/connections/<UUID>/ttsName
Sets the TeemTalk profile name.
root/ConnectionType/teemtalk/connections/<UUID>/waitForNetwork
If set to 1, the connection will not be launched until networking is available. This ensures that, on a slow network, the connection does not launch before networking is available, which could cause a failure.
root/ConnectionType/teemtalk/coreSettings/USBrelevant
Specifies if this connection type is USB-relevant. If it is, it might have a USB plugin for redirecting USB devices.
ConnectionType 101

Registry key Description
root/ConnectionType/teemtalk/coreSettings/appName
Sets the internal application name to use for this connection type. This key should not need to be modified.
root/ConnectionType/teemtalk/coreSettings/className
Sets the internal application class name to use for this connection type. This key should not need to be modified.
root/ConnectionType/teemtalk/coreSettings/editor
Sets the internal application name to use when Connection Manager is launched for this connection type. This key should not need to be modified.
root/ConnectionType/teemtalk/coreSettings/generalSettingsEditor
Sets the internal application name to use when the General Settings Manager is launched for this connection type. This key should not need to be modified.
root/ConnectionType/teemtalk/coreSettings/icon
Specifies the icon from the icon theme set to use for this connection.
root/ConnectionType/teemtalk/coreSettings/icon16Path
Sets the path to the 16 × 16 pixel icon for this application.
root/ConnectionType/teemtalk/coreSettings/icon32Path
Sets the path to the 32 × 32 pixel icon for this application.
root/ConnectionType/teemtalk/coreSettings/icon48Path
Sets the path to the 48 × 48 pixel icon for this application.
root/ConnectionType/teemtalk/coreSettings/iconActive
Reserved for future use.
root/ConnectionType/teemtalk/coreSettings/label
Sets the name to display for this connection type in the UI.
root/ConnectionType/teemtalk/coreSettings/priorityInConnectionLists
Sets the priority of this connection type when it is displayed in Connection Manager and the Configuration Wizard that displays during initial setup. A higher value will move the connection type towards the top of the list. If set to 0, the connection type is hidden from Configuration Wizard and is shown last in Connection Manager. Connections types with the same priority are listed in alphabetical order.
root/ConnectionType/teemtalk/coreSettings/serverRequired
Sets whether a server name or address is unused, optional, or required for this connection type.
root/ConnectionType/teemtalk/coreSettings/stopProcess
Sets the behavior that should occur when connection-mgr stop is called on this connection. By default this is close, which will send a standard kill signal to the process. When set to kill, the process specified by appName will be forcefully killed. When set to custom, a custom execution script specified by wrapperScript will be executed with the argument stop to terminate the process gracefully.
root/ConnectionType/teemtalk/coreSettings/tier
Specifies the relative importance of this connection type and the order in which it is listed in the Create menu.
root/ConnectionType/teemtalk/coreSettings/wrapperScript
Sets the script or binary to execute when launching this connection type. This is the primary script handling all connection settings and command line arguments for the connection. This key should not need to be modified.
root/ConnectionType/teemtalk/gui/TeemtalkManager/name
This registry key is either used internally or reserved for future use. The value should not be changed.
root/ConnectionType/teemtalk/gui/TeemtalkManager/status
This registry key is either used internally or reserved for future use. The value should not be changed.
102 Appendix D Registry keys
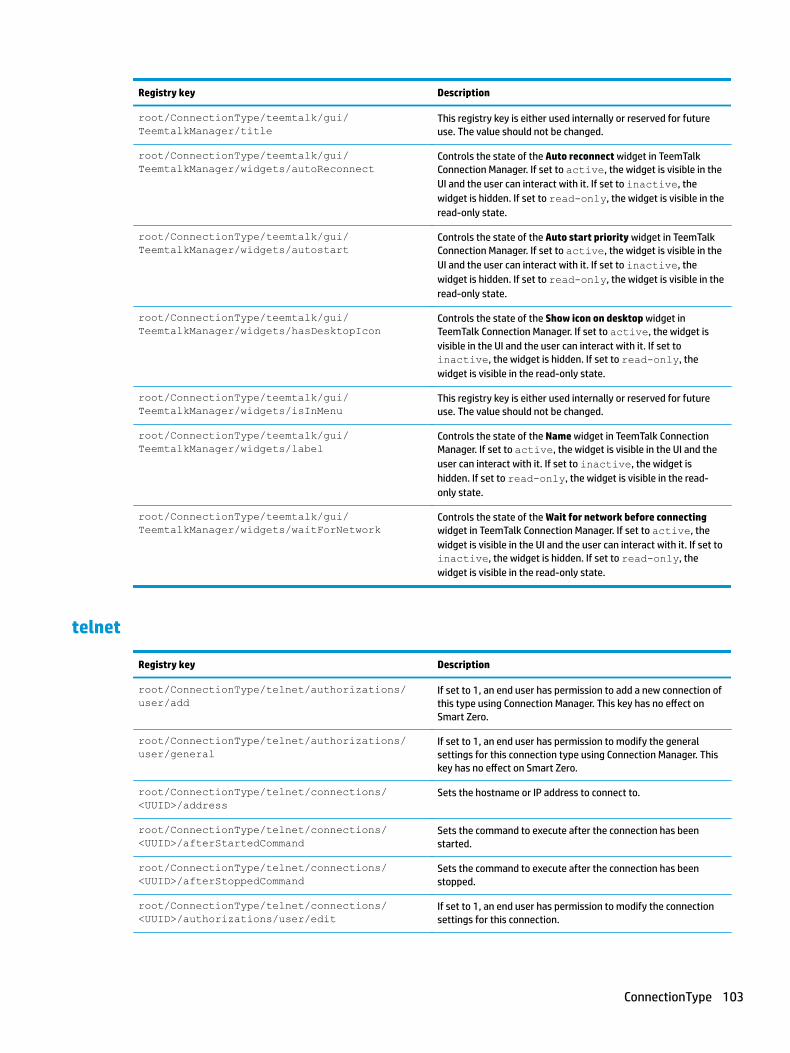
Registry key Description
root/ConnectionType/teemtalk/gui/TeemtalkManager/title
This registry key is either used internally or reserved for future use. The value should not be changed.
root/ConnectionType/teemtalk/gui/TeemtalkManager/widgets/autoReconnect
Controls the state of the Auto reconnect widget in TeemTalk Connection Manager. If set to active, the widget is visible in the UI and the user can interact with it. If set to inactive, the widget is hidden. If set to read-only, the widget is visible in the read-only state.
root/ConnectionType/teemtalk/gui/TeemtalkManager/widgets/autostart
Controls the state of the Auto start priority widget in TeemTalk Connection Manager. If set to active, the widget is visible in the UI and the user can interact with it. If set to inactive, the widget is hidden. If set to read-only, the widget is visible in the read-only state.
root/ConnectionType/teemtalk/gui/TeemtalkManager/widgets/hasDesktopIcon
Controls the state of the Show icon on desktop widget in TeemTalk Connection Manager. If set to active, the widget is visible in the UI and the user can interact with it. If set to inactive, the widget is hidden. If set to read-only, the widget is visible in the read-only state.
root/ConnectionType/teemtalk/gui/TeemtalkManager/widgets/isInMenu
This registry key is either used internally or reserved for future use. The value should not be changed.
root/ConnectionType/teemtalk/gui/TeemtalkManager/widgets/label
Controls the state of the Name widget in TeemTalk Connection Manager. If set to active, the widget is visible in the UI and the user can interact with it. If set to inactive, the widget is hidden. If set to read-only, the widget is visible in the read-only state.
root/ConnectionType/teemtalk/gui/TeemtalkManager/widgets/waitForNetwork
Controls the state of the Wait for network before connecting widget in TeemTalk Connection Manager. If set to active, the widget is visible in the UI and the user can interact with it. If set to inactive, the widget is hidden. If set to read-only, the widget is visible in the read-only state.
telnet
Registry key Description
root/ConnectionType/telnet/authorizations/user/add
If set to 1, an end user has permission to add a new connection of this type using Connection Manager. This key has no effect on Smart Zero.
root/ConnectionType/telnet/authorizations/user/general
If set to 1, an end user has permission to modify the general settings for this connection type using Connection Manager. This key has no effect on Smart Zero.
root/ConnectionType/telnet/connections/<UUID>/address
Sets the hostname or IP address to connect to.
root/ConnectionType/telnet/connections/<UUID>/afterStartedCommand
Sets the command to execute after the connection has been started.
root/ConnectionType/telnet/connections/<UUID>/afterStoppedCommand
Sets the command to execute after the connection has been stopped.
root/ConnectionType/telnet/connections/<UUID>/authorizations/user/edit
If set to 1, an end user has permission to modify the connection settings for this connection.
ConnectionType 103
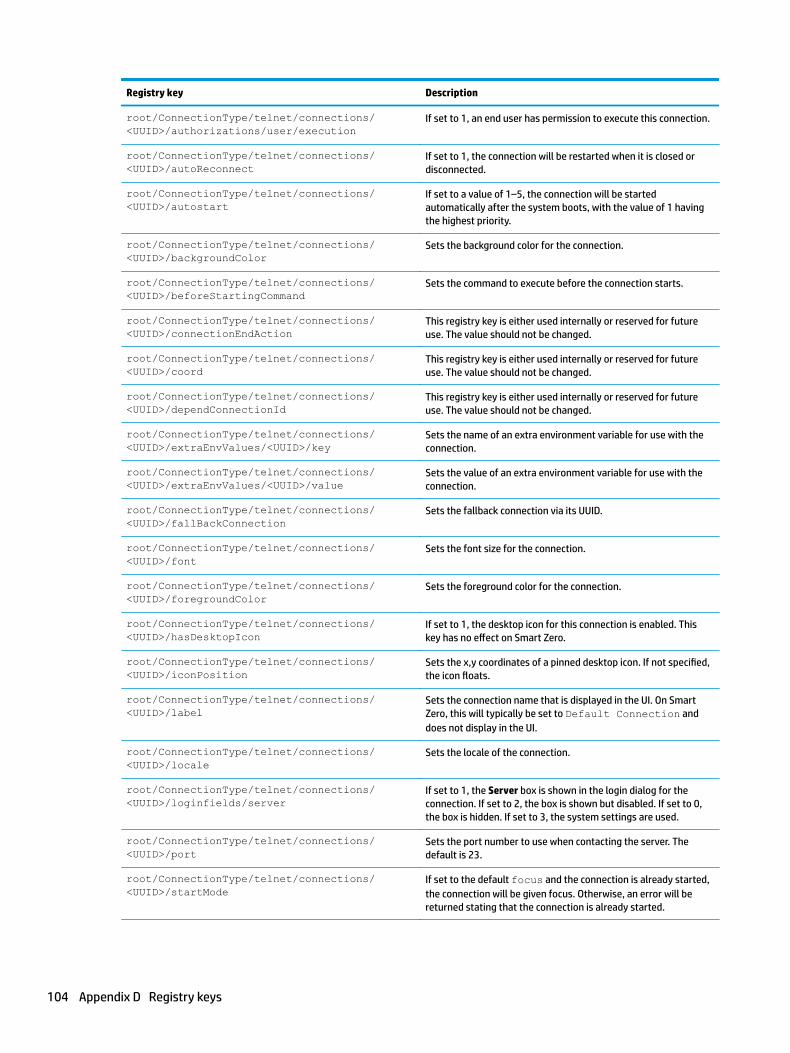
Registry key Description
root/ConnectionType/telnet/connections/<UUID>/authorizations/user/execution
If set to 1, an end user has permission to execute this connection.
root/ConnectionType/telnet/connections/<UUID>/autoReconnect
If set to 1, the connection will be restarted when it is closed or disconnected.
root/ConnectionType/telnet/connections/<UUID>/autostart
If set to a value of 1–5, the connection will be started automatically after the system boots, with the value of 1 having the highest priority.
root/ConnectionType/telnet/connections/<UUID>/backgroundColor
Sets the background color for the connection.
root/ConnectionType/telnet/connections/<UUID>/beforeStartingCommand
Sets the command to execute before the connection starts.
root/ConnectionType/telnet/connections/<UUID>/connectionEndAction
This registry key is either used internally or reserved for future use. The value should not be changed.
root/ConnectionType/telnet/connections/<UUID>/coord
This registry key is either used internally or reserved for future use. The value should not be changed.
root/ConnectionType/telnet/connections/<UUID>/dependConnectionId
This registry key is either used internally or reserved for future use. The value should not be changed.
root/ConnectionType/telnet/connections/<UUID>/extraEnvValues/<UUID>/key
Sets the name of an extra environment variable for use with the connection.
root/ConnectionType/telnet/connections/<UUID>/extraEnvValues/<UUID>/value
Sets the value of an extra environment variable for use with the connection.
root/ConnectionType/telnet/connections/<UUID>/fallBackConnection
Sets the fallback connection via its UUID.
root/ConnectionType/telnet/connections/<UUID>/font
Sets the font size for the connection.
root/ConnectionType/telnet/connections/<UUID>/foregroundColor
Sets the foreground color for the connection.
root/ConnectionType/telnet/connections/<UUID>/hasDesktopIcon
If set to 1, the desktop icon for this connection is enabled. This key has no effect on Smart Zero.
root/ConnectionType/telnet/connections/<UUID>/iconPosition
Sets the x,y coordinates of a pinned desktop icon. If not specified, the icon floats.
root/ConnectionType/telnet/connections/<UUID>/label
Sets the connection name that is displayed in the UI. On Smart Zero, this will typically be set to Default Connection and does not display in the UI.
root/ConnectionType/telnet/connections/<UUID>/locale
Sets the locale of the connection.
root/ConnectionType/telnet/connections/<UUID>/loginfields/server
If set to 1, the Server box is shown in the login dialog for the connection. If set to 2, the box is shown but disabled. If set to 0, the box is hidden. If set to 3, the system settings are used.
root/ConnectionType/telnet/connections/<UUID>/port
Sets the port number to use when contacting the server. The default is 23.
root/ConnectionType/telnet/connections/<UUID>/startMode
If set to the default focus and the connection is already started, the connection will be given focus. Otherwise, an error will be returned stating that the connection is already started.
104 Appendix D Registry keys

Registry key Description
root/ConnectionType/telnet/connections/<UUID>/waitForNetwork
If set to 1, the connection will not be launched until networking is available. This ensures that, on a slow network, the connection does not launch before networking is available, which could cause a failure.
root/ConnectionType/telnet/coreSettings/USBrelevant
Specifies if this connection type is USB-relevant. If it is, it might have a USB plugin for redirecting USB devices.
root/ConnectionType/telnet/coreSettings/appName
Sets the internal application name to use for this connection type. This key should not need to be modified.
root/ConnectionType/telnet/coreSettings/className
Sets the internal application class name to use for this connection type. This key should not need to be modified.
root/ConnectionType/telnet/coreSettings/editor
Sets the internal application name to use when Connection Manager is launched for this connection type. This key should not need to be modified.
root/ConnectionType/telnet/coreSettings/generalSettingsEditor
Sets the internal application name to use when the General Settings Manager is launched for this connection type. This key should not need to be modified.
root/ConnectionType/telnet/coreSettings/icon Specifies the icon from the icon theme set to use for this connection.
root/ConnectionType/telnet/coreSettings/icon16Path
Sets the path to the 16 × 16 pixel icon for this application.
root/ConnectionType/telnet/coreSettings/icon32Path
Sets the path to the 32 × 32 pixel icon for this application.
root/ConnectionType/telnet/coreSettings/icon48Path
Sets the path to the 48 × 48 pixel icon for this application.
root/ConnectionType/telnet/coreSettings/iconActive
Reserved for future use.
root/ConnectionType/telnet/coreSettings/label Sets the name to display for this connection type in the UI.
root/ConnectionType/telnet/coreSettings/priorityInConnectionLists
Sets the priority of this connection type when it is displayed in Connection Manager and the Configuration Wizard that displays during initial setup. A higher value will move the connection type towards the top of the list. If set to 0, the connection type is hidden from Configuration Wizard and is shown last in Connection Manager. Connections types with the same priority are listed in alphabetical order.
root/ConnectionType/telnet/coreSettings/serverRequired
Sets whether a server name or address is unused, optional, or required for this connection type.
root/ConnectionType/telnet/coreSettings/stopProcess
Sets the behavior that should occur when connection-mgr stop is called on this connection. By default this is close, which will send a standard kill signal to the process. When set to kill, the process specified by appName will be forcefully killed. When set to custom, a custom execution script specified by wrapperScript will be executed with the argument stop to terminate the process gracefully.
root/ConnectionType/telnet/coreSettings/tier Specifies the relative importance of this connection type and the order in which it is listed in the Create menu.
root/ConnectionType/telnet/coreSettings/wrapperScript
Sets the script or binary to execute when launching this connection type. This is the primary script handling all connection
ConnectionType 105

Registry key Description
settings and command line arguments for the connection. This key should not need to be modified.
root/ConnectionType/telnet/gui/TelnetManager/name
This registry key is either used internally or reserved for future use. The value should not be changed.
root/ConnectionType/telnet/gui/TelnetManager/status
This registry key is either used internally or reserved for future use. The value should not be changed.
root/ConnectionType/telnet/gui/TelnetManager/title
This registry key is either used internally or reserved for future use. The value should not be changed.
root/ConnectionType/telnet/gui/TelnetManager/widgets/address
Controls the state of the Address widget in Telnet Connection Manager. If set to active, the widget is visible in the UI and the user can interact with it. If set to inactive, the widget is hidden. If set to read-only, the widget is visible in the read-only state.
root/ConnectionType/telnet/gui/TelnetManager/widgets/autoReconnect
Controls the state of the Auto reconnect widget in Telnet Connection Manager. If set to active, the widget is visible in the UI and the user can interact with it. If set to inactive, the widget is hidden. If set to read-only, the widget is visible in the read-only state.
root/ConnectionType/telnet/gui/TelnetManager/widgets/autostart
Controls the state of the Auto start priority widget in Telnet Connection Manager. If set to active, the widget is visible in the UI and the user can interact with it. If set to inactive, the widget is hidden. If set to read-only, the widget is visible in the read-only state.
root/ConnectionType/telnet/gui/TelnetManager/widgets/backgroundColor
Controls the state of the Background color widget in Telnet Connection Manager. If set to active, the widget is visible in the UI and the user can interact with it. If set to inactive, the widget is hidden. If set to read-only, the widget is visible in the read-only state.
root/ConnectionType/telnet/gui/TelnetManager/widgets/fallBackConnection
Controls the state of the Fallback Connection widget in Telnet Connection Manager. If set to active, the widget is visible in the UI and the user can interact with it. If set to inactive, the widget is hidden. If set to read-only, the widget is visible in the read-only state.
root/ConnectionType/telnet/gui/TelnetManager/widgets/foregroundColor
Controls the state of the Foreground color widget in Telnet Connection Manager. If set to active, the widget is visible in the UI and the user can interact with it. If set to inactive, the widget is hidden. If set to read-only, the widget is visible in the read-only state.
root/ConnectionType/telnet/gui/TelnetManager/widgets/hasDesktopIcon
Controls the state of the Show icon on desktop widget in Telnet Connection Manager. If set to active, the widget is visible in the UI and the user can interact with it. If set to inactive, the widget is hidden. If set to read-only, the widget is visible in the read-only state.
root/ConnectionType/telnet/gui/TelnetManager/widgets/label
Controls the state of the Name widget in Telnet Connection Manager. If set to active, the widget is visible in the UI and the user can interact with it. If set to inactive, the widget is hidden. If set to read-only, the widget is visible in the read-only state.
root/ConnectionType/telnet/gui/TelnetManager/widgets/port
Controls the state of the Port widget in Telnet Connection Manager. If set to active, the widget is visible in the UI and the
106 Appendix D Registry keys

Registry key Description
user can interact with it. If set to inactive, the widget is hidden. If set to read-only, the widget is visible in the read-only state.
root/ConnectionType/telnet/gui/TelnetManager/widgets/waitForNetwork
Controls the state of the Wait for network before connecting widget in Telnet Connection Manager. If set to active, the widget is visible in the UI and the user can interact with it. If set to inactive, the widget is hidden. If set to read-only, the widget is visible in the read-only state.
view
Registry key Description
root/ConnectionType/view/authorizations/user/add
If set to 1, an end user has permission to add a new connection of this type using Connection Manager. This key has no effect on Smart Zero.
root/ConnectionType/view/authorizations/user/commandLineBox
If set to 1, an end user has permission to enter command-line arguments in VMware Horizon View Connection Manager.
root/ConnectionType/view/authorizations/user/general
If set to 1, an end user has permission to modify the general settings for this connection type using Connection Manager. This key has no effect on Smart Zero.
root/ConnectionType/view/connections/<UUID>/ExtraArgs
Specifies extra arguments for the VMware Horizon View client. Run view_client --help or vmware-view --help from an X terminal to see all available arguments.
root/ConnectionType/view/connections/<UUID>/SingleSignOn
root/ConnectionType/view/connections/<UUID>/afterStartedCommand
Sets the command to execute after the connection has been started.
root/ConnectionType/view/connections/<UUID>/afterStoppedCommand
Sets the command to execute after the connection has been stopped.
root/ConnectionType/view/connections/<UUID>/allowBlacklistedDrivers
If set to 1, allows VMware Horizon View connections to enable the H.264 feature with AMD open-source graphic drivers. If set to 0, VMware Horizon View connections disable hardware acceleration with blacklisted drivers (such as AMDGPU and Radeon).
root/ConnectionType/view/connections/<UUID>/appInMenu
If set to 1, all applications for this connection will be displayed in the taskbar menu.
root/ConnectionType/view/connections/<UUID>/appOnDesktop
If set to 1, all applications for this connection will be displayed on the desktop.
root/ConnectionType/view/connections/<UUID>/applicationSize
Sets the size in which the VMware Horizon View client will launch applications.
root/ConnectionType/view/connections/<UUID>/attachToConsole
root/ConnectionType/view/connections/<UUID>/authorizations/user/edit
If set to 1, an end user has permission to modify the connection settings for this connection.
root/ConnectionType/view/connections/<UUID>/authorizations/user/execution
If set to 1, an end user has permission to execute this connection.
ConnectionType 107
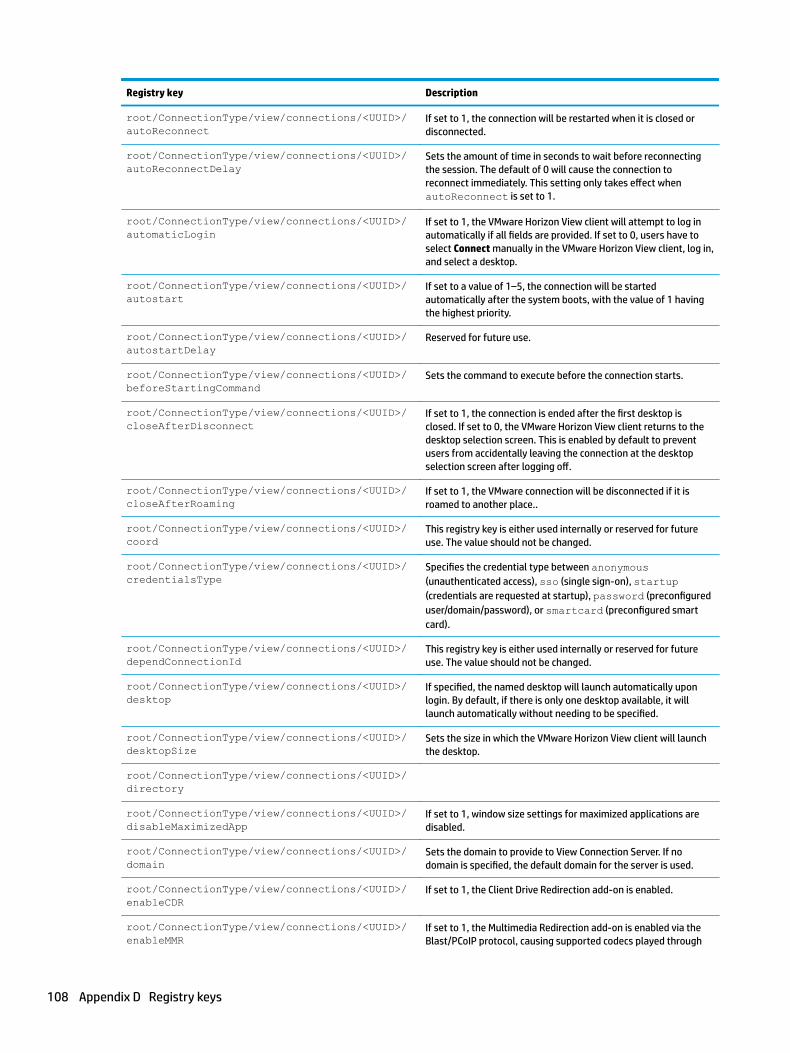
Registry key Description
root/ConnectionType/view/connections/<UUID>/autoReconnect
If set to 1, the connection will be restarted when it is closed or disconnected.
root/ConnectionType/view/connections/<UUID>/autoReconnectDelay
Sets the amount of time in seconds to wait before reconnecting the session. The default of 0 will cause the connection to reconnect immediately. This setting only takes effect when autoReconnect is set to 1.
root/ConnectionType/view/connections/<UUID>/automaticLogin
If set to 1, the VMware Horizon View client will attempt to log in automatically if all fields are provided. If set to 0, users have to select Connect manually in the VMware Horizon View client, log in, and select a desktop.
root/ConnectionType/view/connections/<UUID>/autostart
If set to a value of 1–5, the connection will be started automatically after the system boots, with the value of 1 having the highest priority.
root/ConnectionType/view/connections/<UUID>/autostartDelay
Reserved for future use.
root/ConnectionType/view/connections/<UUID>/beforeStartingCommand
Sets the command to execute before the connection starts.
root/ConnectionType/view/connections/<UUID>/closeAfterDisconnect
If set to 1, the connection is ended after the first desktop is closed. If set to 0, the VMware Horizon View client returns to the desktop selection screen. This is enabled by default to prevent users from accidentally leaving the connection at the desktop selection screen after logging off.
root/ConnectionType/view/connections/<UUID>/closeAfterRoaming
If set to 1, the VMware connection will be disconnected if it is roamed to another place..
root/ConnectionType/view/connections/<UUID>/coord
This registry key is either used internally or reserved for future use. The value should not be changed.
root/ConnectionType/view/connections/<UUID>/credentialsType
Specifies the credential type between anonymous (unauthenticated access), sso (single sign-on), startup (credentials are requested at startup), password (preconfigured user/domain/password), or smartcard (preconfigured smart card).
root/ConnectionType/view/connections/<UUID>/dependConnectionId
This registry key is either used internally or reserved for future use. The value should not be changed.
root/ConnectionType/view/connections/<UUID>/desktop
If specified, the named desktop will launch automatically upon login. By default, if there is only one desktop available, it will launch automatically without needing to be specified.
root/ConnectionType/view/connections/<UUID>/desktopSize
Sets the size in which the VMware Horizon View client will launch the desktop.
root/ConnectionType/view/connections/<UUID>/directory
root/ConnectionType/view/connections/<UUID>/disableMaximizedApp
If set to 1, window size settings for maximized applications are disabled.
root/ConnectionType/view/connections/<UUID>/domain
Sets the domain to provide to View Connection Server. If no domain is specified, the default domain for the server is used.
root/ConnectionType/view/connections/<UUID>/enableCDR
If set to 1, the Client Drive Redirection add-on is enabled.
root/ConnectionType/view/connections/<UUID>/enableMMR
If set to 1, the Multimedia Redirection add-on is enabled via the Blast/PCoIP protocol, causing supported codecs played through
108 Appendix D Registry keys

Registry key Description
Windows Media Player to be redirected to the client. This greatly improves full-screen and high-definition video playback for codecs such as WMV9, VC1, and MPEG4. Video is rendered locally using the CPU power.
root/ConnectionType/view/connections/<UUID>/enableMediaProvider
If set to 1, the VMware Horizon Virtualization Pack for Skype Business component is enabled. This component enables Linux users to redirect Skype for Business calls with the VMware Horizon View Client.
root/ConnectionType/view/connections/<UUID>/enableSeamlessWindow
If set to 1, the VMware Horizon View client starts applications in seamless window mode.
root/ConnectionType/view/connections/<UUID>/enableSingleMode
root/ConnectionType/view/connections/<UUID>/extraEnvValues/<UUID>/key
Sets the name of an extra environment variable for use with the connection.
root/ConnectionType/view/connections/<UUID>/extraEnvValues/<UUID>/value
Sets the value of an extra environment variable for use with the connection.
root/ConnectionType/view/connections/<UUID>/fallBackConnection
Sets the fallback connection via its UUID.
root/ConnectionType/view/connections/<UUID>/fullscreen
If set to 1, the VMware Horizon View client launches in full screen mode when started.
root/ConnectionType/view/connections/<UUID>/hasDesktopIcon
If set to 1, the desktop icon for this connection is enabled. This key has no effect on Smart Zero.
root/ConnectionType/view/connections/<UUID>/hideMenuBar
If set to 1, the top menu bar within the desktop is hidden. This bar is used to manage remote devices and start other desktops.
root/ConnectionType/view/connections/<UUID>/iconPosition
Sets the x,y coordinates of a pinned desktop icon. If not specified, the icon floats.
root/ConnectionType/view/connections/<UUID>/isInMenu
This registry key is either used internally or reserved for future use. The value should not be changed.
root/ConnectionType/view/connections/<UUID>/label
Sets the connection name that is displayed in the UI. On Smart Zero, this will typically be set to Default Connection and does not display in the UI.
root/ConnectionType/view/connections/<UUID>/lockServer
If set to 1, end users are prevented from changing the server address.
root/ConnectionType/view/connections/<UUID>/loginfields/domain
If set to 1, the Domain field is shown in the login dialog for the connection. If set to 2, the field is shown but disabled. If set to 0, the field is hidden.
root/ConnectionType/view/connections/<UUID>/loginfields/password
If set to 1, the Password field is shown in the login dialog for the connection. If set to 2, the field is shown but disabled. If set to 0, the field is hidden.
root/ConnectionType/view/connections/<UUID>/loginfields/rememberme
If set to 1, the Remember me check box is shown in the login dialog for the connection. If set to 2, the check box is shown but disabled. If set to 0, the check box is hidden.
root/ConnectionType/view/connections/<UUID>/loginfields/server
If set to 1, the Server box is shown in the login dialog for the connection. If set to 2, the box is shown but disabled. If set to 0, the box is hidden. If set to 3, the system settings are used.
ConnectionType 109

Registry key Description
root/ConnectionType/view/connections/<UUID>/loginfields/showpassword
If set to 1, the Show password check box is shown in the login dialog for the connection. If set to 2, the check box is shown but disabled. If set to 0, the check box is hidden.
root/ConnectionType/view/connections/<UUID>/loginfields/smartcard
If set to 1, the Smart card login check box is shown in the login dialog for the connection. If set to 2, the check box is shown but disabled. If set to 0, the check box is hidden. This check box might not appear if no smart card is detected, even if this option is enabled.
root/ConnectionType/view/connections/<UUID>/loginfields/username
If set to 1, the User Name field is shown in the login dialog for the connection. If set to 2, the field is shown but disabled. If set to 0, the field is hidden.
root/ConnectionType/view/connections/<UUID>/networkCondition
Allows the selection of the network conditions for the best experience.
root/ConnectionType/view/connections/<UUID>/password
Sets the default password to supply to the remote host during login. This value will be encrypted. Generally, this setting is used for kiosk-style applications where a generic password is used for login.
root/ConnectionType/view/connections/<UUID>/preferredProtocol
Sets the preferred protocol.
root/ConnectionType/view/connections/<UUID>/printerMapping
If set to 1, all printers defined locally via CUPS are redirected to the remote host via ThinPrint. If set to 0, the printer mapping is disabled. If set to 2, the USB printers are redirected as configured in USB Manager.
root/ConnectionType/view/connections/<UUID>/saveCredentials
root/ConnectionType/view/connections/<UUID>/server
Sets the address of the remote host to connect to. This is typically a URL such as http://server.domain.com.
root/ConnectionType/view/connections/<UUID>/sessionEndAction
root/ConnectionType/view/connections/<UUID>/singleDesktop
root/ConnectionType/view/connections/<UUID>/smartcard
If set to 1, locally-attached smart cards are forwarded to the remote host, allowing them to be used by applications on the remote host. This only enables smart card login for the remote host, not for View Connection Server.
root/ConnectionType/view/connections/<UUID>/startMode
If set to the default focus and the connection is already started, the connection will be given focus. Otherwise, an error will be returned stating that the connection is already started.
root/ConnectionType/view/connections/<UUID>/useCurrentViewConfig
If set to 1, the HP scripts do not create a new /etc/vmware/config file and the VMware Horizon View client uses the current /etc/vmware/config file.
root/ConnectionType/view/connections/<UUID>/username
Sets the default user name to supply to the remote host during login. Generally, this setting is used for kiosk-style applications where a generic user name is used for login.
root/ConnectionType/view/connections/<UUID>/viewSecurityLevel
If set to Refuse insecure connections, the VMware Horizon View client will not allow a user to connect to View Connection Server if the server's SSL certificate is invalid. If set to Warn, the VMware Horizon View client will display a warning if the server's certificate is not able to be verified, and if the certificate
110 Appendix D Registry keys

Registry key Description
is self-signed or expired, the user still will not be allowed to connect. If set to Allow all connections, the server certificate will not be verified and connections to any server will be allowed.
root/ConnectionType/view/connections/<UUID>/waitForNetwork
If set to 1, the connection will not be launched until networking is available. This ensures that, on a slow network, the connection does not launch before networking is available, which could cause a failure.
root/ConnectionType/view/connections/<UUID>/xfreerdpOptions/attachToConsole
root/ConnectionType/view/connections/<UUID>/xfreerdpOptions/audioLatency
Sets the average milliseconds of offset between the audio stream and the display of corresponding video frames after decoding.
root/ConnectionType/view/connections/<UUID>/xfreerdpOptions/clipboardExtension
If set to 1, clipboard functionality is enabled between different RDP sessions and between RDP sessions and the local system.
root/ConnectionType/view/connections/<UUID>/xfreerdpOptions/colorDepth
This setting is deprecated. It is used to reduce the color depth of the connection below that of the native desktop resolution. Frequently, this has been used to reduce network bandwidth. Reducing color depth to a level not supported by the video driver can cause screen corruption or launch failures.
root/ConnectionType/view/connections/<UUID>/xfreerdpOptions/compression
If set to 1, compression of RDP data sent between the client and the server is enabled.
root/ConnectionType/view/connections/<UUID>/xfreerdpOptions/disableMMRwithRFX
If set to 1, multimedia redirection is disabled if a valid RemoteFX session is established.
root/ConnectionType/view/connections/<UUID>/xfreerdpOptions/enableMMR
If set to 1, the Multimedia Redirection add-on is enabled, causing supported codecs played through Windows Media Player to be redirected to the client.
root/ConnectionType/view/connections/<UUID>/xfreerdpOptions/frameAcknowledgeCount
Sets the number of video frames the server can push without waiting for acknowledgement from the client. Lower numbers result in a more responsive desktop but lower frame rate. If set to 0, frame acknowledgement is not used in the client-server interactions.
root/ConnectionType/view/connections/<UUID>/xfreerdpOptions/general/sendHostname
If set to hostname, the system hostname is sent to the remote host. This is typically used to identify the thin client associated with a particular RDP session. The sent hostname can be overridden using sendHostname in the connection-specific settings. If set to mac, the MAC address of the first available network adapter is sent instead of the hostname.
root/ConnectionType/view/connections/<UUID>/xfreerdpOptions/hostnameType
If set to hostname, the system hostname is sent to the remote host. This is typically used to identify the thin client associated with a particular RDP session. The sent hostname can be overriden using sendHostname in the connection-specific settings. If set to mac, the MAC address of the first available network adapter is sent instead of the hostname.
root/ConnectionType/view/connections/<UUID>/xfreerdpOptions/loadBalanceInfo
This value is the load balancing cookie sent for brokering purposes to the server upon connection and corresponds to the loadbalanceinfo field in the .rdp file. By default, the value is empty.
root/ConnectionType/view/connections/<UUID>/xfreerdpOptions/mouseMotionEvents
If set to 0, mouse motion events are not sent to the server. This can prevent some user feedback such as tooltips from functioning properly.
ConnectionType 111
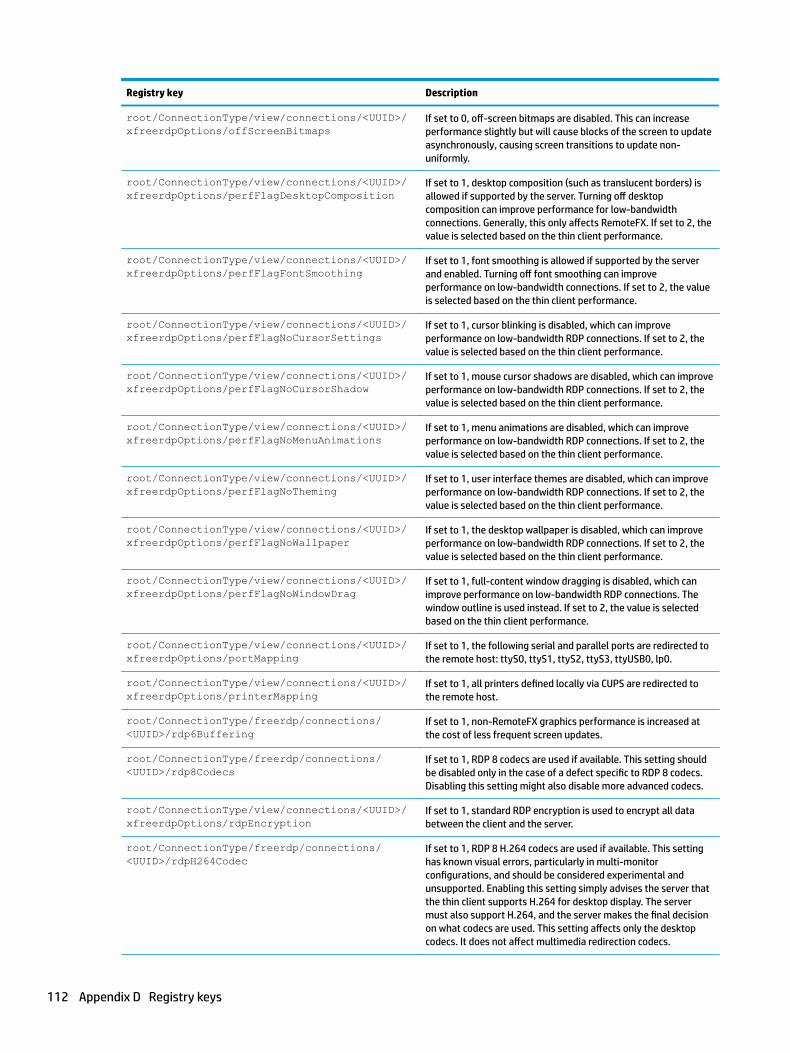
Registry key Description
root/ConnectionType/view/connections/<UUID>/xfreerdpOptions/offScreenBitmaps
If set to 0, off-screen bitmaps are disabled. This can increase performance slightly but will cause blocks of the screen to update asynchronously, causing screen transitions to update non-uniformly.
root/ConnectionType/view/connections/<UUID>/xfreerdpOptions/perfFlagDesktopComposition
If set to 1, desktop composition (such as translucent borders) is allowed if supported by the server. Turning off desktop composition can improve performance for low-bandwidth connections. Generally, this only affects RemoteFX. If set to 2, the value is selected based on the thin client performance.
root/ConnectionType/view/connections/<UUID>/xfreerdpOptions/perfFlagFontSmoothing
If set to 1, font smoothing is allowed if supported by the server and enabled. Turning off font smoothing can improve performance on low-bandwidth connections. If set to 2, the value is selected based on the thin client performance.
root/ConnectionType/view/connections/<UUID>/xfreerdpOptions/perfFlagNoCursorSettings
If set to 1, cursor blinking is disabled, which can improve performance on low-bandwidth RDP connections. If set to 2, the value is selected based on the thin client performance.
root/ConnectionType/view/connections/<UUID>/xfreerdpOptions/perfFlagNoCursorShadow
If set to 1, mouse cursor shadows are disabled, which can improve performance on low-bandwidth RDP connections. If set to 2, the value is selected based on the thin client performance.
root/ConnectionType/view/connections/<UUID>/xfreerdpOptions/perfFlagNoMenuAnimations
If set to 1, menu animations are disabled, which can improve performance on low-bandwidth RDP connections. If set to 2, the value is selected based on the thin client performance.
root/ConnectionType/view/connections/<UUID>/xfreerdpOptions/perfFlagNoTheming
If set to 1, user interface themes are disabled, which can improve performance on low-bandwidth RDP connections. If set to 2, the value is selected based on the thin client performance.
root/ConnectionType/view/connections/<UUID>/xfreerdpOptions/perfFlagNoWallpaper
If set to 1, the desktop wallpaper is disabled, which can improve performance on low-bandwidth RDP connections. If set to 2, the value is selected based on the thin client performance.
root/ConnectionType/view/connections/<UUID>/xfreerdpOptions/perfFlagNoWindowDrag
If set to 1, full-content window dragging is disabled, which can improve performance on low-bandwidth RDP connections. The window outline is used instead. If set to 2, the value is selected based on the thin client performance.
root/ConnectionType/view/connections/<UUID>/xfreerdpOptions/portMapping
If set to 1, the following serial and parallel ports are redirected to the remote host: ttyS0, ttyS1, ttyS2, ttyS3, ttyUSB0, lp0.
root/ConnectionType/view/connections/<UUID>/xfreerdpOptions/printerMapping
If set to 1, all printers defined locally via CUPS are redirected to the remote host.
root/ConnectionType/freerdp/connections/<UUID>/rdp6Buffering
If set to 1, non-RemoteFX graphics performance is increased at the cost of less frequent screen updates.
root/ConnectionType/freerdp/connections/<UUID>/rdp8Codecs
If set to 1, RDP 8 codecs are used if available. This setting should be disabled only in the case of a defect specific to RDP 8 codecs. Disabling this setting might also disable more advanced codecs.
root/ConnectionType/view/connections/<UUID>/xfreerdpOptions/rdpEncryption
If set to 1, standard RDP encryption is used to encrypt all data between the client and the server.
root/ConnectionType/freerdp/connections/<UUID>/rdpH264Codec
If set to 1, RDP 8 H.264 codecs are used if available. This setting has known visual errors, particularly in multi-monitor configurations, and should be considered experimental and unsupported. Enabling this setting simply advises the server that the thin client supports H.264 for desktop display. The server must also support H.264, and the server makes the final decision on what codecs are used. This setting affects only the desktop codecs. It does not affect multimedia redirection codecs.
112 Appendix D Registry keys

Registry key Description
root/ConnectionType/freerdp/connections/<UUID>/rdpProgressiveCodec
If set to 1, RDP 8 progressive codecs are used if available. This setting should be disabled only in the case of a defect specific to RDP 8 progressive codecs. Disabling this setting might also disable more advanced codecs.
root/ConnectionType/freerdp/connections/<UUID>/redirectPreference
For redirection, the RDP client is given several destination possibilities. It normally tries them in the following order: FQDN, Primary IP, IP List, NetBIOS. If FQDN is not desired, one of the alternatives can be tried first by setting this registry key. If the specified method does not work, the RDP client falls back to the original order. A setting of auto forces the original order.
root/ConnectionType/view/connections/<UUID>/xfreerdpOptions/remoteFx
If set to 1, RemoteFX is used if available.
root/ConnectionType/view/connections/<UUID>/xfreerdpOptions/sendHostname
Sets the thin client hostname that is sent to the remote host. If left blank, the system hostname is sent. The registry key root/ConnectionType/view/connections/<UUID>/xfreerdpOptions/general/sendHostname must be set to hostname for this key to be used.
root/ConnectionType/view/connections/<UUID>/xfreerdpOptions/sound
If set to Bring to this computer, sound is redirected from the remote host to the client using a standard virtual channel. If set to Leave at remote computer, sound is left at the remote host. This can be useful when using a redirected USB audio device. If set to any other value, audio is disabled. Generally, HP recommends setting this value to Bring to this computer and not redirecting USB playback devices to the remote host. This will improve audio quality and ensure that client audio redirected via other virtual channels (such as Multimedia Redirection) matches local audio settings.
root/ConnectionType/view/connections/<UUID>/xfreerdpOptions/timeoutError
Sets the number of milliseconds to wait after losing the connection before giving up on reconnecting with the server. If set to 0, reconnection is attempted forever.
root/ConnectionType/view/connections/<UUID>/xfreerdpOptions/timeoutRecovery
Sets the number of milliseconds to wait after losing the connection for networking to recover without trying a forced reconnect.
root/ConnectionType/view/connections/<UUID>/xfreerdpOptions/timeoutWarning
Sets the number of milliseconds to wait after losing the connection before warning the user that the connection has been lost.
root/ConnectionType/view/connections/<UUID>/xfreerdpOptions/timeoutWarningDialog
If set to 1, when an end-to-end connection drop is detected, a dialog is displayed and the screen will turn grayscale. Otherwise, messages are written to the connection log and the session freezes.
root/ConnectionType/view/connections/<UUID>/xfreerdpOptions/timeoutsEnabled
If set to 1, end-to-end connection health checks are done.
root/ConnectionType/view/connections/<UUID>/xfreerdpOptions/tlsVersion
Sets the version of Transport Layer Security to be used during the early stages of negotiation with the RDP server. Either set this to match the version of TLS used by your RDP server, or try setting it to auto.
NOTE: There are some server-side defects in some unpatched RDP servers that can cause the auto setting to fail, so it is not the default setting.
root/ConnectionType/view/connections/<UUID>/xfreerdpOptions/xkbLayoutId
Sets an XKB layout ID for bypassing the system keyboard. To see the list of available IDs, enter the following command in an X terminal: xfreerdp --kbd-list.
ConnectionType 113
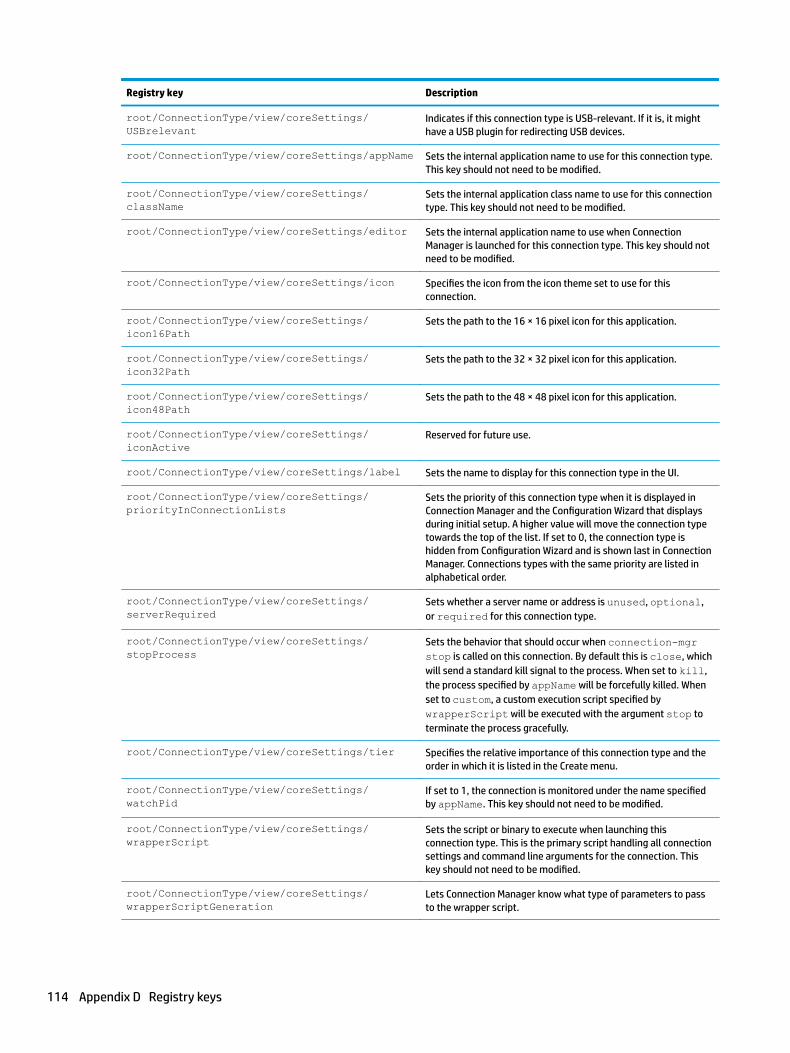
Registry key Description
root/ConnectionType/view/coreSettings/USBrelevant
Indicates if this connection type is USB-relevant. If it is, it might have a USB plugin for redirecting USB devices.
root/ConnectionType/view/coreSettings/appName Sets the internal application name to use for this connection type. This key should not need to be modified.
root/ConnectionType/view/coreSettings/className
Sets the internal application class name to use for this connection type. This key should not need to be modified.
root/ConnectionType/view/coreSettings/editor Sets the internal application name to use when Connection Manager is launched for this connection type. This key should not need to be modified.
root/ConnectionType/view/coreSettings/icon Specifies the icon from the icon theme set to use for this connection.
root/ConnectionType/view/coreSettings/icon16Path
Sets the path to the 16 × 16 pixel icon for this application.
root/ConnectionType/view/coreSettings/icon32Path
Sets the path to the 32 × 32 pixel icon for this application.
root/ConnectionType/view/coreSettings/icon48Path
Sets the path to the 48 × 48 pixel icon for this application.
root/ConnectionType/view/coreSettings/iconActive
Reserved for future use.
root/ConnectionType/view/coreSettings/label Sets the name to display for this connection type in the UI.
root/ConnectionType/view/coreSettings/priorityInConnectionLists
Sets the priority of this connection type when it is displayed in Connection Manager and the Configuration Wizard that displays during initial setup. A higher value will move the connection type towards the top of the list. If set to 0, the connection type is hidden from Configuration Wizard and is shown last in Connection Manager. Connections types with the same priority are listed in alphabetical order.
root/ConnectionType/view/coreSettings/serverRequired
Sets whether a server name or address is unused, optional, or required for this connection type.
root/ConnectionType/view/coreSettings/stopProcess
Sets the behavior that should occur when connection-mgr stop is called on this connection. By default this is close, which will send a standard kill signal to the process. When set to kill, the process specified by appName will be forcefully killed. When set to custom, a custom execution script specified by wrapperScript will be executed with the argument stop to terminate the process gracefully.
root/ConnectionType/view/coreSettings/tier Specifies the relative importance of this connection type and the order in which it is listed in the Create menu.
root/ConnectionType/view/coreSettings/watchPid
If set to 1, the connection is monitored under the name specified by appName. This key should not need to be modified.
root/ConnectionType/view/coreSettings/wrapperScript
Sets the script or binary to execute when launching this connection type. This is the primary script handling all connection settings and command line arguments for the connection. This key should not need to be modified.
root/ConnectionType/view/coreSettings/wrapperScriptGeneration
Lets Connection Manager know what type of parameters to pass to the wrapper script.
114 Appendix D Registry keys

Registry key Description
root/ConnectionType/view/general/rdpOptions Options specified here will be forwarded directly to the RDP client if RDP is used as the display protocol for the VMware Horizon View connection. To see a full list of options, enter the following command in an X terminal: rdesktop --help
root/ConnectionType/view/gui/viewManager/name This registry key is either used internally or reserved for future use. The value should not be changed.
root/ConnectionType/view/gui/viewManager/status
This registry key is either used internally or reserved for future use. The value should not be changed.
root/ConnectionType/view/gui/viewManager/title
This registry key is either used internally or reserved for future use. The value should not be changed.
root/ConnectionType/view/gui/viewManager/widgets/autostart
Controls the state of the Auto start priority widget in VMware Horizon View Connection Manager. If set to active, the widget is visible in the UI and the user can interact with it. If set to inactive, the widget is hidden. If set to read-only, the widget is visible in the read-only state.
root/ConnectionType/view/gui/viewManager/widgets/fallBackConnection
Controls the state of the Fallback Connection widget in VMware Horizon View Connection Manager. If set to active, the widget is visible in the UI and the user can interact with it. If set to inactive, the widget is hidden. If set to read-only, the widget is visible in the read-only state.
root/ConnectionType/view/gui/viewManager/widgets/label
Controls the state of the Name widget in VMware Horizon View Connection Manager. If set to active, the widget is visible in the UI and the user can interact with it. If set to inactive, the widget is hidden. If set to read-only, the widget is visible in the read-only state.
xdmcp
Registry key Description
root/ConnectionType/xdmcp/authorizations/user/add
If set to 1, an end user has permission to add a new connection of this type using Connection Manager. This key has no effect on Smart Zero.
root/ConnectionType/xdmcp/authorizations/user/general
If set to 1, an end user has permission to modify the general settings for this connection type using Connection Manager. This key has no effect on Smart Zero.
root/ConnectionType/xdmcp/connections/<UUID>/address
Sets the hostname or IP address to connect to.
root/ConnectionType/xdmcp/connections/<UUID>/afterStartedCommand
Sets the command to execute after the connection has been started.
root/ConnectionType/xdmcp/connections/<UUID>/afterStoppedCommand
Sets the command to execute after the connection has been stopped.
root/ConnectionType/xdmcp/connections/<UUID>/authorizations/user/edit
If set to 1, an end user has permission to modify the connection settings for this connection.
root/ConnectionType/xdmcp/connections/<UUID>/authorizations/user/execution
If set to 1, an end user has permission to execute this connection.
root/ConnectionType/xdmcp/connections/<UUID>/autoReconnect
If set to 1, the connection will be restarted when it is closed or disconnected.
ConnectionType 115
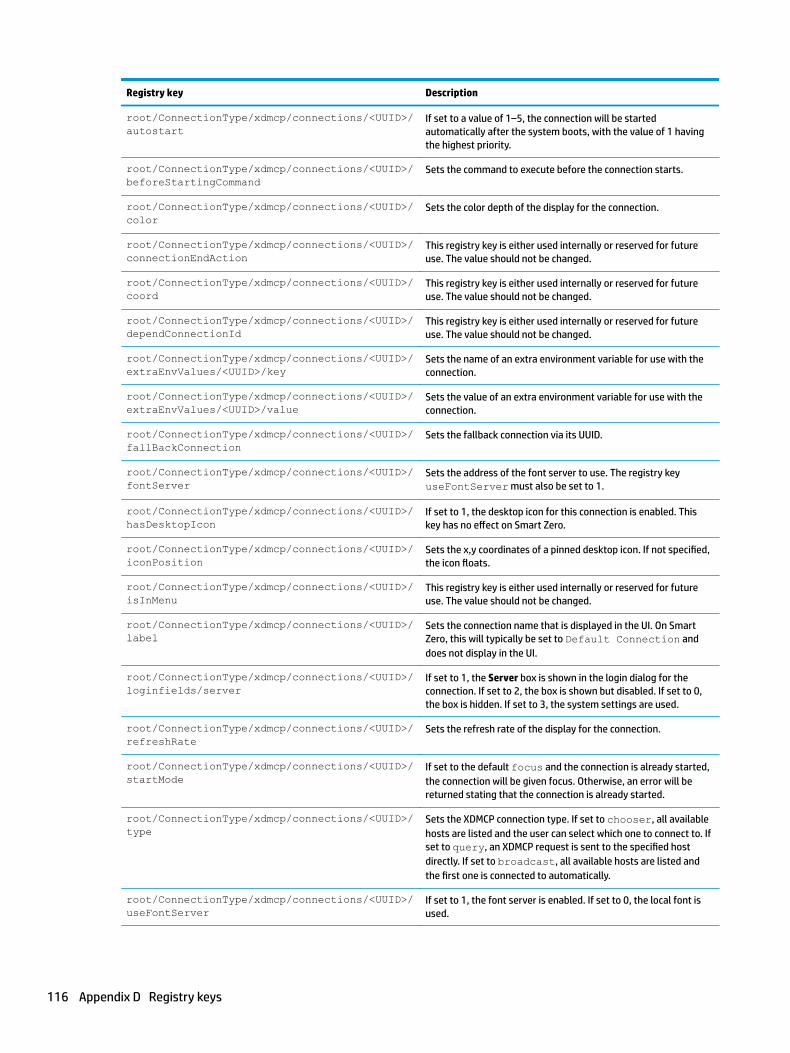
Registry key Description
root/ConnectionType/xdmcp/connections/<UUID>/autostart
If set to a value of 1–5, the connection will be started automatically after the system boots, with the value of 1 having the highest priority.
root/ConnectionType/xdmcp/connections/<UUID>/beforeStartingCommand
Sets the command to execute before the connection starts.
root/ConnectionType/xdmcp/connections/<UUID>/color
Sets the color depth of the display for the connection.
root/ConnectionType/xdmcp/connections/<UUID>/connectionEndAction
This registry key is either used internally or reserved for future use. The value should not be changed.
root/ConnectionType/xdmcp/connections/<UUID>/coord
This registry key is either used internally or reserved for future use. The value should not be changed.
root/ConnectionType/xdmcp/connections/<UUID>/dependConnectionId
This registry key is either used internally or reserved for future use. The value should not be changed.
root/ConnectionType/xdmcp/connections/<UUID>/extraEnvValues/<UUID>/key
Sets the name of an extra environment variable for use with the connection.
root/ConnectionType/xdmcp/connections/<UUID>/extraEnvValues/<UUID>/value
Sets the value of an extra environment variable for use with the connection.
root/ConnectionType/xdmcp/connections/<UUID>/fallBackConnection
Sets the fallback connection via its UUID.
root/ConnectionType/xdmcp/connections/<UUID>/fontServer
Sets the address of the font server to use. The registry key useFontServer must also be set to 1.
root/ConnectionType/xdmcp/connections/<UUID>/hasDesktopIcon
If set to 1, the desktop icon for this connection is enabled. This key has no effect on Smart Zero.
root/ConnectionType/xdmcp/connections/<UUID>/iconPosition
Sets the x,y coordinates of a pinned desktop icon. If not specified, the icon floats.
root/ConnectionType/xdmcp/connections/<UUID>/isInMenu
This registry key is either used internally or reserved for future use. The value should not be changed.
root/ConnectionType/xdmcp/connections/<UUID>/label
Sets the connection name that is displayed in the UI. On Smart Zero, this will typically be set to Default Connection and does not display in the UI.
root/ConnectionType/xdmcp/connections/<UUID>/loginfields/server
If set to 1, the Server box is shown in the login dialog for the connection. If set to 2, the box is shown but disabled. If set to 0, the box is hidden. If set to 3, the system settings are used.
root/ConnectionType/xdmcp/connections/<UUID>/refreshRate
Sets the refresh rate of the display for the connection.
root/ConnectionType/xdmcp/connections/<UUID>/startMode
If set to the default focus and the connection is already started, the connection will be given focus. Otherwise, an error will be returned stating that the connection is already started.
root/ConnectionType/xdmcp/connections/<UUID>/type
Sets the XDMCP connection type. If set to chooser, all available hosts are listed and the user can select which one to connect to. If set to query, an XDMCP request is sent to the specified host directly. If set to broadcast, all available hosts are listed and the first one is connected to automatically.
root/ConnectionType/xdmcp/connections/<UUID>/useFontServer
If set to 1, the font server is enabled. If set to 0, the local font is used.
116 Appendix D Registry keys
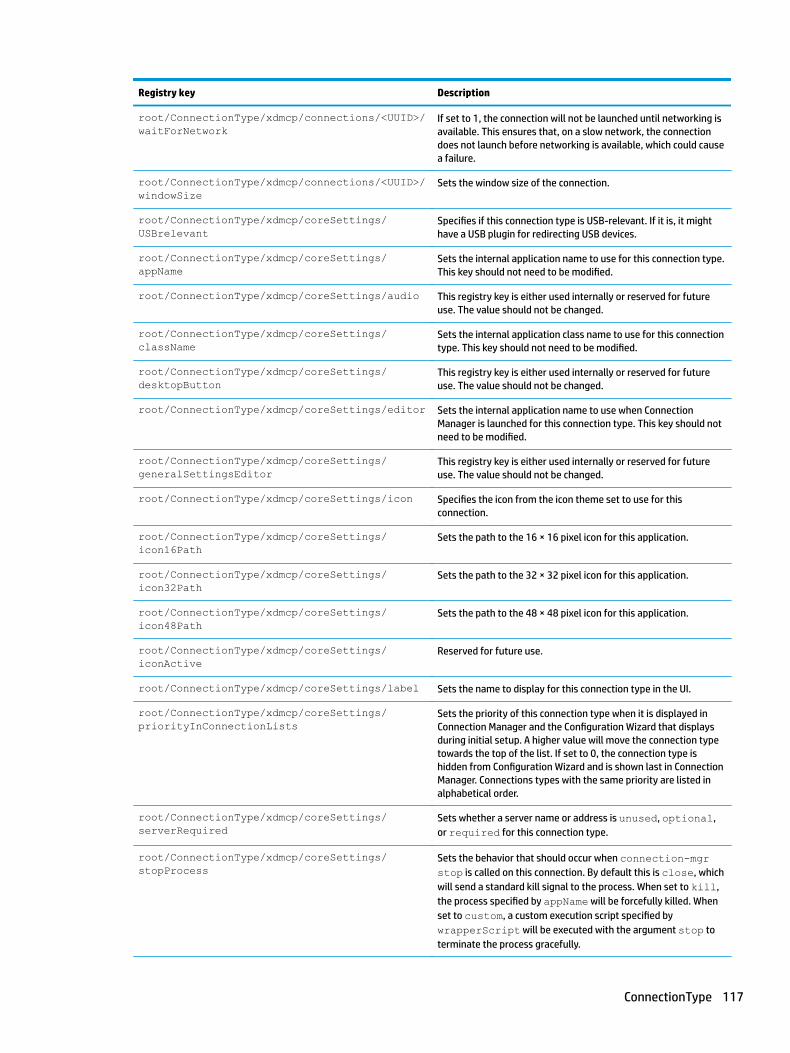
Registry key Description
root/ConnectionType/xdmcp/connections/<UUID>/waitForNetwork
If set to 1, the connection will not be launched until networking is available. This ensures that, on a slow network, the connection does not launch before networking is available, which could cause a failure.
root/ConnectionType/xdmcp/connections/<UUID>/windowSize
Sets the window size of the connection.
root/ConnectionType/xdmcp/coreSettings/USBrelevant
Specifies if this connection type is USB-relevant. If it is, it might have a USB plugin for redirecting USB devices.
root/ConnectionType/xdmcp/coreSettings/appName
Sets the internal application name to use for this connection type. This key should not need to be modified.
root/ConnectionType/xdmcp/coreSettings/audio This registry key is either used internally or reserved for future use. The value should not be changed.
root/ConnectionType/xdmcp/coreSettings/className
Sets the internal application class name to use for this connection type. This key should not need to be modified.
root/ConnectionType/xdmcp/coreSettings/desktopButton
This registry key is either used internally or reserved for future use. The value should not be changed.
root/ConnectionType/xdmcp/coreSettings/editor Sets the internal application name to use when Connection Manager is launched for this connection type. This key should not need to be modified.
root/ConnectionType/xdmcp/coreSettings/generalSettingsEditor
This registry key is either used internally or reserved for future use. The value should not be changed.
root/ConnectionType/xdmcp/coreSettings/icon Specifies the icon from the icon theme set to use for this connection.
root/ConnectionType/xdmcp/coreSettings/icon16Path
Sets the path to the 16 × 16 pixel icon for this application.
root/ConnectionType/xdmcp/coreSettings/icon32Path
Sets the path to the 32 × 32 pixel icon for this application.
root/ConnectionType/xdmcp/coreSettings/icon48Path
Sets the path to the 48 × 48 pixel icon for this application.
root/ConnectionType/xdmcp/coreSettings/iconActive
Reserved for future use.
root/ConnectionType/xdmcp/coreSettings/label Sets the name to display for this connection type in the UI.
root/ConnectionType/xdmcp/coreSettings/priorityInConnectionLists
Sets the priority of this connection type when it is displayed in Connection Manager and the Configuration Wizard that displays during initial setup. A higher value will move the connection type towards the top of the list. If set to 0, the connection type is hidden from Configuration Wizard and is shown last in Connection Manager. Connections types with the same priority are listed in alphabetical order.
root/ConnectionType/xdmcp/coreSettings/serverRequired
Sets whether a server name or address is unused, optional, or required for this connection type.
root/ConnectionType/xdmcp/coreSettings/stopProcess
Sets the behavior that should occur when connection-mgr stop is called on this connection. By default this is close, which will send a standard kill signal to the process. When set to kill, the process specified by appName will be forcefully killed. When set to custom, a custom execution script specified by wrapperScript will be executed with the argument stop to terminate the process gracefully.
ConnectionType 117
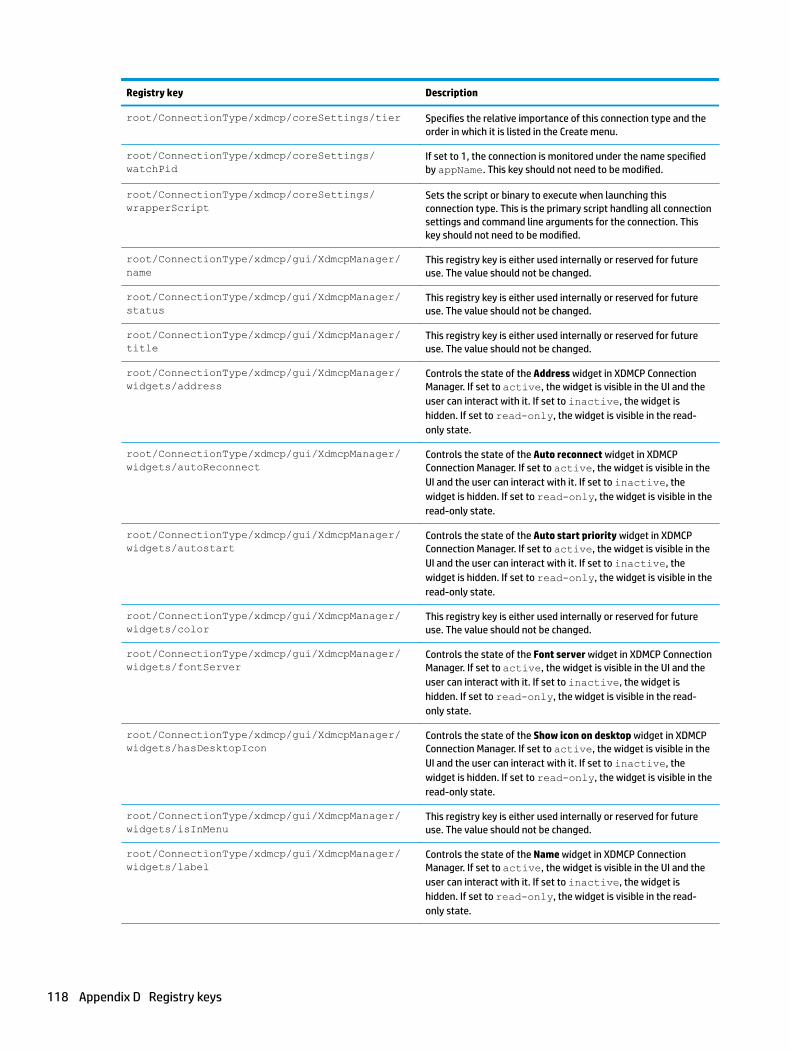
Registry key Description
root/ConnectionType/xdmcp/coreSettings/tier Specifies the relative importance of this connection type and the order in which it is listed in the Create menu.
root/ConnectionType/xdmcp/coreSettings/watchPid
If set to 1, the connection is monitored under the name specified by appName. This key should not need to be modified.
root/ConnectionType/xdmcp/coreSettings/wrapperScript
Sets the script or binary to execute when launching this connection type. This is the primary script handling all connection settings and command line arguments for the connection. This key should not need to be modified.
root/ConnectionType/xdmcp/gui/XdmcpManager/name
This registry key is either used internally or reserved for future use. The value should not be changed.
root/ConnectionType/xdmcp/gui/XdmcpManager/status
This registry key is either used internally or reserved for future use. The value should not be changed.
root/ConnectionType/xdmcp/gui/XdmcpManager/title
This registry key is either used internally or reserved for future use. The value should not be changed.
root/ConnectionType/xdmcp/gui/XdmcpManager/widgets/address
Controls the state of the Address widget in XDMCP Connection Manager. If set to active, the widget is visible in the UI and the user can interact with it. If set to inactive, the widget is hidden. If set to read-only, the widget is visible in the read-only state.
root/ConnectionType/xdmcp/gui/XdmcpManager/widgets/autoReconnect
Controls the state of the Auto reconnect widget in XDMCP Connection Manager. If set to active, the widget is visible in the UI and the user can interact with it. If set to inactive, the widget is hidden. If set to read-only, the widget is visible in the read-only state.
root/ConnectionType/xdmcp/gui/XdmcpManager/widgets/autostart
Controls the state of the Auto start priority widget in XDMCP Connection Manager. If set to active, the widget is visible in the UI and the user can interact with it. If set to inactive, the widget is hidden. If set to read-only, the widget is visible in the read-only state.
root/ConnectionType/xdmcp/gui/XdmcpManager/widgets/color
This registry key is either used internally or reserved for future use. The value should not be changed.
root/ConnectionType/xdmcp/gui/XdmcpManager/widgets/fontServer
Controls the state of the Font server widget in XDMCP Connection Manager. If set to active, the widget is visible in the UI and the user can interact with it. If set to inactive, the widget is hidden. If set to read-only, the widget is visible in the read-only state.
root/ConnectionType/xdmcp/gui/XdmcpManager/widgets/hasDesktopIcon
Controls the state of the Show icon on desktop widget in XDMCP Connection Manager. If set to active, the widget is visible in the UI and the user can interact with it. If set to inactive, the widget is hidden. If set to read-only, the widget is visible in the read-only state.
root/ConnectionType/xdmcp/gui/XdmcpManager/widgets/isInMenu
This registry key is either used internally or reserved for future use. The value should not be changed.
root/ConnectionType/xdmcp/gui/XdmcpManager/widgets/label
Controls the state of the Name widget in XDMCP Connection Manager. If set to active, the widget is visible in the UI and the user can interact with it. If set to inactive, the widget is hidden. If set to read-only, the widget is visible in the read-only state.
118 Appendix D Registry keys

Registry key Description
root/ConnectionType/xdmcp/gui/XdmcpManager/widgets/refreshRate
This registry key is either used internally or reserved for future use. The value should not be changed.
root/ConnectionType/xdmcp/gui/XdmcpManager/widgets/type
Controls the state of the Type widget in XDMCP Connection Manager. If set to active, the widget is visible in the UI and the user can interact with it. If set to inactive, the widget is hidden. If set to read-only, the widget is visible in the read-only state.
root/ConnectionType/xdmcp/gui/XdmcpManager/widgets/useFontServer
Controls the state of the Use font server widget in XDMCP Connection Manager. If set to active, the widget is visible in the UI and the user can interact with it. If set to inactive, the widget is hidden. If set to read-only, the widget is visible in the read-only state.
root/ConnectionType/xdmcp/gui/XdmcpManager/widgets/waitForNetwork
Controls the state of the Wait for network before connecting widget in XDMCP Connection Manager. If set to active, the widget is visible in the UI and the user can interact with it. If set to inactive, the widget is hidden. If set to read-only, the widget is visible in the read-only state.
root/ConnectionType/xdmcp/gui/XdmcpManager/widgets/windowSize
This registry key is either used internally or reserved for future use. The value should not be changed.
xen
Registry key Description
root/ConnectionType/xen/authorizations/user/add
If set to 1, an end user has permission to add a new connection of this type using Connection Manager. This key has no effect on Smart Zero.
root/ConnectionType/xen/authorizations/user/general
If set to 1, an end user has permission to modify the general settings for this connection type using Connection Manager. This key has no effect on Smart Zero.
root/ConnectionType/xen/connections/<UUID>/SingleSignOn
If set to 1, the connection shares credentials with the screen saver.
root/ConnectionType/xen/connections/<UUID>/address
Sets the address of the remote host to connect to. This is typically a URL such as http://server.domain.com.
root/ConnectionType/xen/connections/<UUID>/afterStartedCommand
Sets the command to execute after the connection has been started.
root/ConnectionType/xen/connections/<UUID>/afterStoppedCommand
Sets the command to execute after the connection has been stopped.
root/ConnectionType/xen/connections/<UUID>/appInMenu
If set to 1, all applications for the connection will be displayed in the taskbar menu.
root/ConnectionType/xen/connections/<UUID>/appInWindowOrOnDesktop
If set to 1 and appOnDesktop is enabled, all applications for the connection are displayed in a broker window. If set to 0, the applications for the connection are displayed directly on the desktop.
root/ConnectionType/xen/connections/<UUID>/appOnDashboard
If set to 1, all applications for the connection will be displayed on the taskbar.
root/ConnectionType/xen/connections/<UUID>/appOnDesktop
If set to 1, all applications for the connection will be displayed on the desktop.
ConnectionType 119

Registry key Description
root/ConnectionType/xen/connections/<UUID>/authorizations/user/edit
If set to 1, an end user has permission to modify the connection settings for this connection.
root/ConnectionType/xen/connections/<UUID>/authorizations/user/execution
If set to 1, an end user has permission to execute this connection.
root/ConnectionType/xen/connections/<UUID>/autoLaunchSingleApp
If set to 1, and if only a single published application or desktop is returned by the Citrix server, that resource will be launched automatically.
root/ConnectionType/xen/connections/<UUID>/autoReconnect
If set to 1, the connection will be restarted when it is closed or disconnected.
root/ConnectionType/xen/connections/<UUID>/autoReconnectAppsOnLogin
If set to 1, the system will attempt to reconnect any active or disconnected Citrix sessions upon initial login.
root/ConnectionType/xen/connections/<UUID>/autoReconnectDelay
Sets the amount of time in seconds to wait before reconnecting the session. The default of 0 will cause the connection to reconnect immediately. This setting only takes effect when autoReconnect is set to 1.
root/ConnectionType/xen/connections/<UUID>/autoRefreshInterval
Controls the amount of time in seconds before the resources are cleared and refreshed again from the server. Set to -1 to disable. It is normally not required to frequently refresh the resources from the server.
root/ConnectionType/xen/connections/<UUID>/autoStartDesktop
If set to 1 and if autoStartResource is empty, the first desktop to become available when the connection is started will be launched automatically.
root/ConnectionType/xen/connections/<UUID>/autoStartResource
Sets the name of the desktop or application to start automatically when the connection is launched.
root/ConnectionType/xen/connections/<UUID>/autoStartWithGuessing
If set to 1, the connection tries to launch autoStartDesktop or autoStartResource first. If the connection cannot launch either successfully, it tries to launch another resource by guessing.
root/ConnectionType/xen/connections/<UUID>/autostart
If set to a value of 1–5, the connection will be started automatically after the system boots, with the value of 1 having the highest priority.
root/ConnectionType/xen/connections/<UUID>/autostartDelay
Reserved for future use.
root/ConnectionType/xen/connections/<UUID>/beforeStartingCommand
Sets the command to execute before the connection starts.
root/ConnectionType/xen/connections/<UUID>/connectionMode
Sets the Citrix connection mode for the connection.
root/ConnectionType/xen/connections/<UUID>/connectionStopAction
Defines the action to be done when the connection is ended from Connection Manager. The available options are disconnect and logoff.
root/ConnectionType/xen/connections/<UUID>/continueWithNewPassword
If set to 1, after resetting the password, the connection continues to launch with the new password. If set to 0, after resetting the password, the current connection closes.
root/ConnectionType/xen/connections/<UUID>/coord
This registry key is either used internally or reserved for future use. The value should not be changed.
root/ConnectionType/xen/connections/<UUID</credentialsType
Specifies the credential type between anonymous (unauthenticated access), sso (single sign-on), startup
120 Appendix D Registry keys
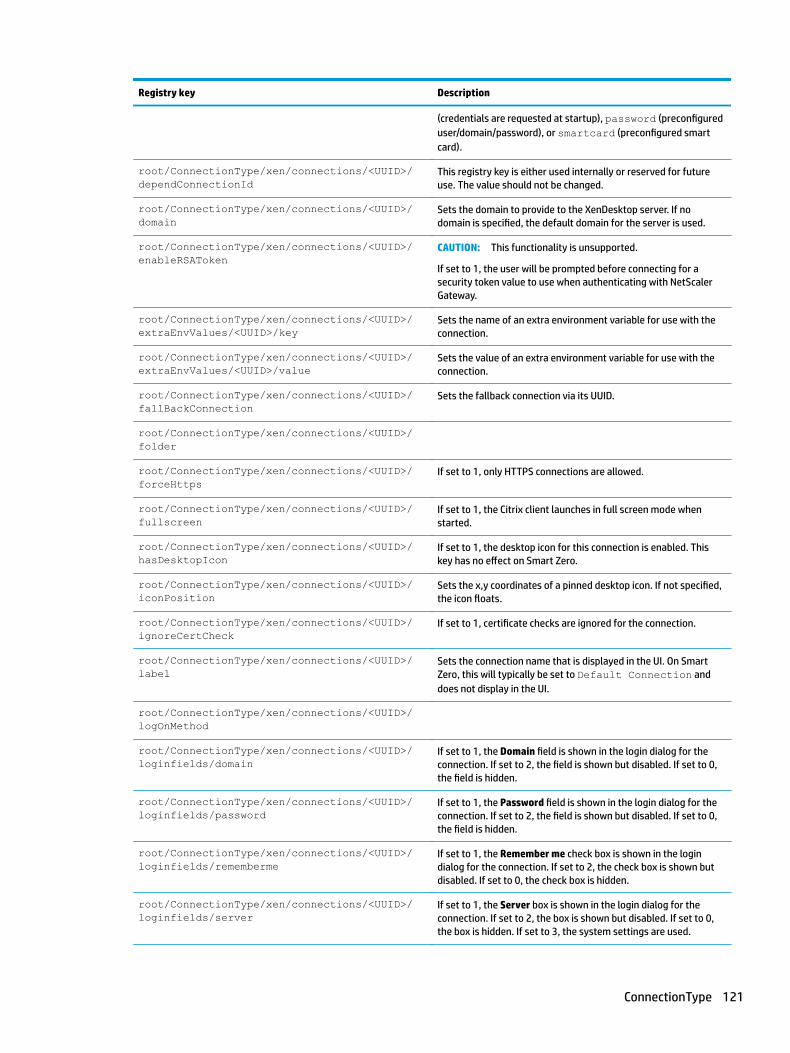
Registry key Description
(credentials are requested at startup), password (preconfigured user/domain/password), or smartcard (preconfigured smart card).
root/ConnectionType/xen/connections/<UUID>/dependConnectionId
This registry key is either used internally or reserved for future use. The value should not be changed.
root/ConnectionType/xen/connections/<UUID>/domain
Sets the domain to provide to the XenDesktop server. If no domain is specified, the default domain for the server is used.
root/ConnectionType/xen/connections/<UUID>/enableRSAToken
CAUTION: This functionality is unsupported.
If set to 1, the user will be prompted before connecting for a security token value to use when authenticating with NetScaler Gateway.
root/ConnectionType/xen/connections/<UUID>/extraEnvValues/<UUID>/key
Sets the name of an extra environment variable for use with the connection.
root/ConnectionType/xen/connections/<UUID>/extraEnvValues/<UUID>/value
Sets the value of an extra environment variable for use with the connection.
root/ConnectionType/xen/connections/<UUID>/fallBackConnection
Sets the fallback connection via its UUID.
root/ConnectionType/xen/connections/<UUID>/folder
root/ConnectionType/xen/connections/<UUID>/forceHttps
If set to 1, only HTTPS connections are allowed.
root/ConnectionType/xen/connections/<UUID>/fullscreen
If set to 1, the Citrix client launches in full screen mode when started.
root/ConnectionType/xen/connections/<UUID>/hasDesktopIcon
If set to 1, the desktop icon for this connection is enabled. This key has no effect on Smart Zero.
root/ConnectionType/xen/connections/<UUID>/iconPosition
Sets the x,y coordinates of a pinned desktop icon. If not specified, the icon floats.
root/ConnectionType/xen/connections/<UUID>/ignoreCertCheck
If set to 1, certificate checks are ignored for the connection.
root/ConnectionType/xen/connections/<UUID>/label
Sets the connection name that is displayed in the UI. On Smart Zero, this will typically be set to Default Connection and does not display in the UI.
root/ConnectionType/xen/connections/<UUID>/logOnMethod
root/ConnectionType/xen/connections/<UUID>/loginfields/domain
If set to 1, the Domain field is shown in the login dialog for the connection. If set to 2, the field is shown but disabled. If set to 0, the field is hidden.
root/ConnectionType/xen/connections/<UUID>/loginfields/password
If set to 1, the Password field is shown in the login dialog for the connection. If set to 2, the field is shown but disabled. If set to 0, the field is hidden.
root/ConnectionType/xen/connections/<UUID>/loginfields/rememberme
If set to 1, the Remember me check box is shown in the login dialog for the connection. If set to 2, the check box is shown but disabled. If set to 0, the check box is hidden.
root/ConnectionType/xen/connections/<UUID>/loginfields/server
If set to 1, the Server box is shown in the login dialog for the connection. If set to 2, the box is shown but disabled. If set to 0, the box is hidden. If set to 3, the system settings are used.
ConnectionType 121

Registry key Description
root/ConnectionType/xen/connections/<UUID>/loginfields/showpassword
If set to 1, the Show password button is shown in the login dialog for the connection. If set to 2, the button is shown but disabled. If set to 0, the button is hidden.
root/ConnectionType/xen/connections/<UUID>/loginfields/smartcard
If set to 1, the Smart card login check box is shown in the login dialog for the connection. If set to 2, the check box is shown but disabled. If set to 0, the check box is hidden. This check box might not appear if no smart card is detected, even if this option is enabled.
root/ConnectionType/xen/connections/<UUID>/loginfields/username
If set to 1, the User Name field is shown in the login dialog for the connection. If set to 2, the field is shown but disabled. If set to 0, the field is hidden.
root/ConnectionType/xen/connections/<UUID>/password
Sets the default password to supply to the remote host during login. This value will be encrypted. Generally, this setting is used for kiosk-style applications where a generic password is used for login.
root/ConnectionType/xen/connections/<UUID>/resListRequest
If set to 1, a connection only lists the resources without launching them or downloading icons.
root/ConnectionType/xen/connections/<UUID>/saveNewUrl
This is an internal value. If set to ToBeAsked, the script prompts the user. If set to Auto, the script does not prompt the user, and whether the URL is saved depends on the case. If set to Yes, the user asked to save the new URL. If set to No, the user asked to not save the new URL.
root/ConnectionType/xen/connections/<UUID>/savePassword
root/ConnectionType/xen/connections/<UUID>/smartCardModuleKey
Specifies the security module to use for a smart card connection.
root/ConnectionType/xen/connections/<UUID>/startMode
If set to the default focus and the connection is already started, the connection will be given focus. Otherwise, an error will be returned stating that the connection is already started.
root/ConnectionType/xen/connections/<UUID>/subscribedOnly
If set to 1, only subscribed resources for the connection are displayed.
root/ConnectionType/xen/connections/<UUID>/unplugSmartCardAction
Sets the action to perform when a smart card is unplugged during a connection. disconnect will disconnect the current session. close will close all the opened resources. noaction will do nothing.
root/ConnectionType/xen/connections/<UUID>/username
Sets the default user name to supply to the remote host during login. Generally, this setting is used for kiosk-style applications where a generic user name is used for login.
root/ConnectionType/xen/connections/<UUID>/waitForNetwork
If set to 1, the connection will not be launched until networking is available. This ensures that, on a slow network, the connection does not launch before networking is available, which could cause a failure.
root/ConnectionType/xen/coreSettings/USBrelevant
Specifies if this connection type is USB-relevant. If it is, it might have a USB plugin for redirecting USB devices.
root/ConnectionType/xen/coreSettings/appName Sets the internal application name to use for this connection type. This key should not need to be modified.
root/ConnectionType/xen/coreSettings/autoLogoutDelayAfterLaunch
This setting applies to Citrix servers with multiple published resources. If less than 0, no auto-logout is performed. Otherwise, this setting dictates the number of seconds between the closing
122 Appendix D Registry keys
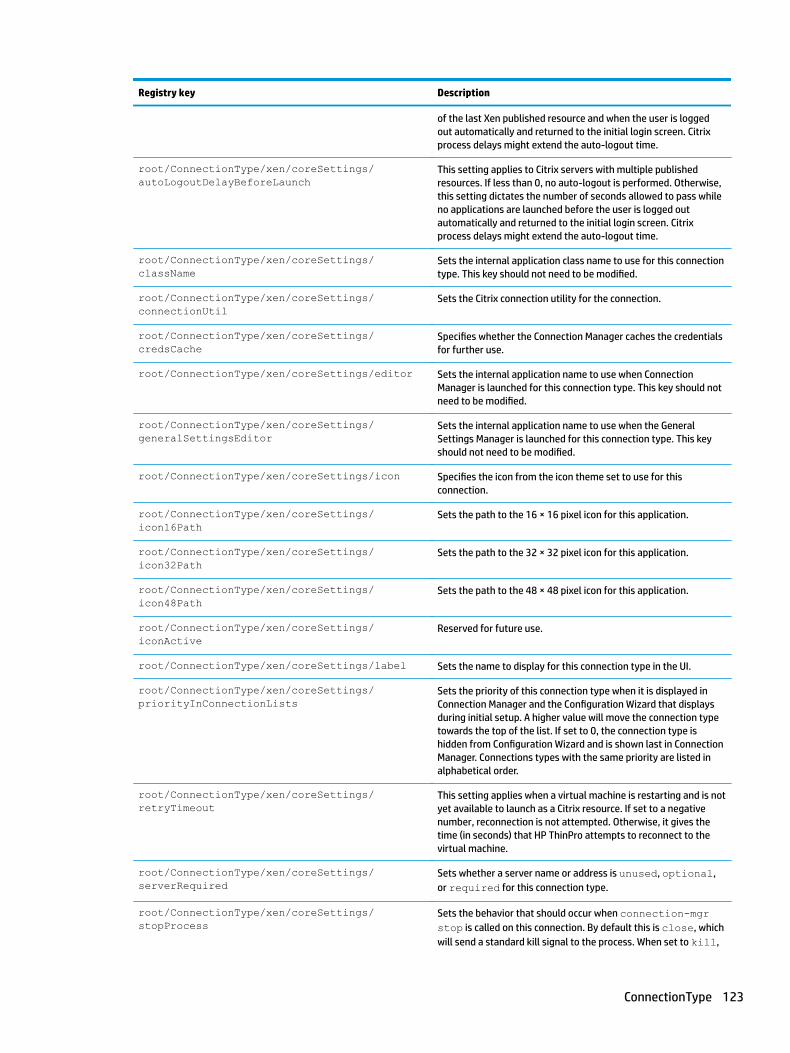
Registry key Description
of the last Xen published resource and when the user is logged out automatically and returned to the initial login screen. Citrix process delays might extend the auto-logout time.
root/ConnectionType/xen/coreSettings/autoLogoutDelayBeforeLaunch
This setting applies to Citrix servers with multiple published resources. If less than 0, no auto-logout is performed. Otherwise, this setting dictates the number of seconds allowed to pass while no applications are launched before the user is logged out automatically and returned to the initial login screen. Citrix process delays might extend the auto-logout time.
root/ConnectionType/xen/coreSettings/className
Sets the internal application class name to use for this connection type. This key should not need to be modified.
root/ConnectionType/xen/coreSettings/connectionUtil
Sets the Citrix connection utility for the connection.
root/ConnectionType/xen/coreSettings/credsCache
Specifies whether the Connection Manager caches the credentials for further use.
root/ConnectionType/xen/coreSettings/editor Sets the internal application name to use when Connection Manager is launched for this connection type. This key should not need to be modified.
root/ConnectionType/xen/coreSettings/generalSettingsEditor
Sets the internal application name to use when the General Settings Manager is launched for this connection type. This key should not need to be modified.
root/ConnectionType/xen/coreSettings/icon Specifies the icon from the icon theme set to use for this connection.
root/ConnectionType/xen/coreSettings/icon16Path
Sets the path to the 16 × 16 pixel icon for this application.
root/ConnectionType/xen/coreSettings/icon32Path
Sets the path to the 32 × 32 pixel icon for this application.
root/ConnectionType/xen/coreSettings/icon48Path
Sets the path to the 48 × 48 pixel icon for this application.
root/ConnectionType/xen/coreSettings/iconActive
Reserved for future use.
root/ConnectionType/xen/coreSettings/label Sets the name to display for this connection type in the UI.
root/ConnectionType/xen/coreSettings/priorityInConnectionLists
Sets the priority of this connection type when it is displayed in Connection Manager and the Configuration Wizard that displays during initial setup. A higher value will move the connection type towards the top of the list. If set to 0, the connection type is hidden from Configuration Wizard and is shown last in Connection Manager. Connections types with the same priority are listed in alphabetical order.
root/ConnectionType/xen/coreSettings/retryTimeout
This setting applies when a virtual machine is restarting and is not yet available to launch as a Citrix resource. If set to a negative number, reconnection is not attempted. Otherwise, it gives the time (in seconds) that HP ThinPro attempts to reconnect to the virtual machine.
root/ConnectionType/xen/coreSettings/serverRequired
Sets whether a server name or address is unused, optional, or required for this connection type.
root/ConnectionType/xen/coreSettings/stopProcess
Sets the behavior that should occur when connection-mgr stop is called on this connection. By default this is close, which will send a standard kill signal to the process. When set to kill,
ConnectionType 123
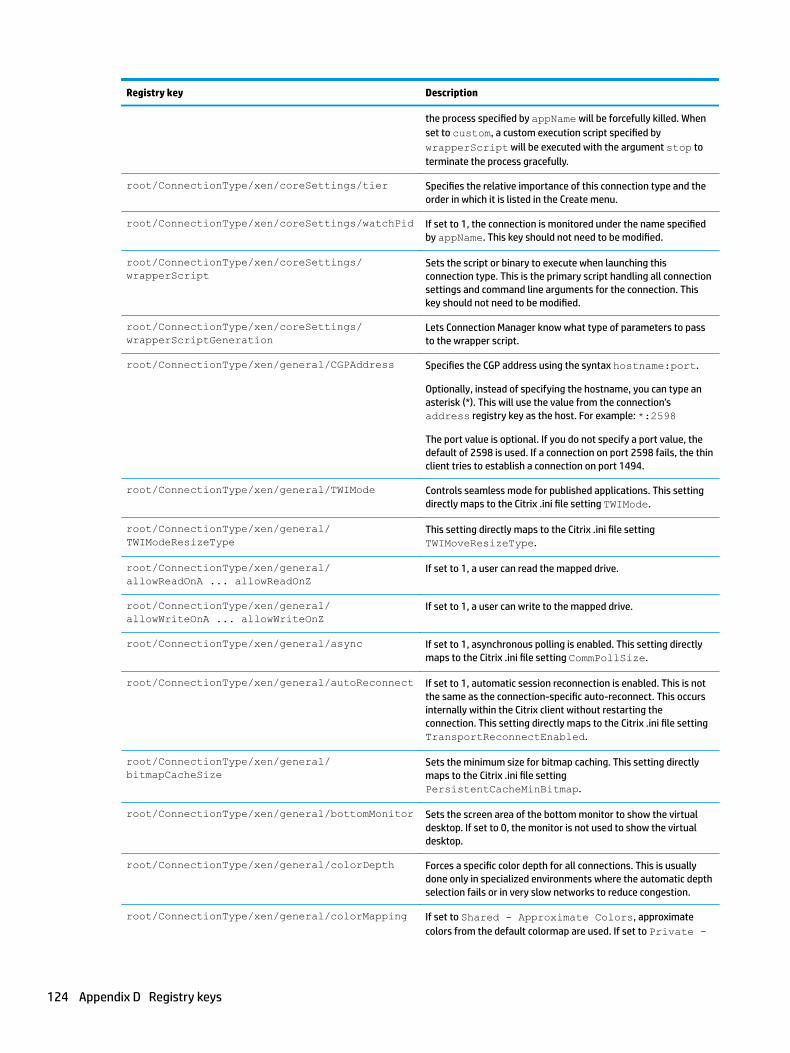
Registry key Description
the process specified by appName will be forcefully killed. When set to custom, a custom execution script specified by wrapperScript will be executed with the argument stop to terminate the process gracefully.
root/ConnectionType/xen/coreSettings/tier Specifies the relative importance of this connection type and the order in which it is listed in the Create menu.
root/ConnectionType/xen/coreSettings/watchPid If set to 1, the connection is monitored under the name specified by appName. This key should not need to be modified.
root/ConnectionType/xen/coreSettings/wrapperScript
Sets the script or binary to execute when launching this connection type. This is the primary script handling all connection settings and command line arguments for the connection. This key should not need to be modified.
root/ConnectionType/xen/coreSettings/wrapperScriptGeneration
Lets Connection Manager know what type of parameters to pass to the wrapper script.
root/ConnectionType/xen/general/CGPAddress Specifies the CGP address using the syntax hostname:port.
Optionally, instead of specifying the hostname, you can type an asterisk (*). This will use the value from the connection’s address registry key as the host. For example: *:2598
The port value is optional. If you do not specify a port value, the default of 2598 is used. If a connection on port 2598 fails, the thin client tries to establish a connection on port 1494.
root/ConnectionType/xen/general/TWIMode Controls seamless mode for published applications. This setting directly maps to the Citrix .ini file setting TWIMode.
root/ConnectionType/xen/general/TWIModeResizeType
This setting directly maps to the Citrix .ini file setting TWIMoveResizeType.
root/ConnectionType/xen/general/allowReadOnA ... allowReadOnZ
If set to 1, a user can read the mapped drive.
root/ConnectionType/xen/general/allowWriteOnA ... allowWriteOnZ
If set to 1, a user can write to the mapped drive.
root/ConnectionType/xen/general/async If set to 1, asynchronous polling is enabled. This setting directly maps to the Citrix .ini file setting CommPollSize.
root/ConnectionType/xen/general/autoReconnect If set to 1, automatic session reconnection is enabled. This is not the same as the connection-specific auto-reconnect. This occurs internally within the Citrix client without restarting the connection. This setting directly maps to the Citrix .ini file setting TransportReconnectEnabled.
root/ConnectionType/xen/general/bitmapCacheSize
Sets the minimum size for bitmap caching. This setting directly maps to the Citrix .ini file setting PersistentCacheMinBitmap.
root/ConnectionType/xen/general/bottomMonitor Sets the screen area of the bottom monitor to show the virtual desktop. If set to 0, the monitor is not used to show the virtual desktop.
root/ConnectionType/xen/general/colorDepth Forces a specific color depth for all connections. This is usually done only in specialized environments where the automatic depth selection fails or in very slow networks to reduce congestion.
root/ConnectionType/xen/general/colorMapping If set to Shared - Approximate Colors, approximate colors from the default colormap are used. If set to Private -
124 Appendix D Registry keys
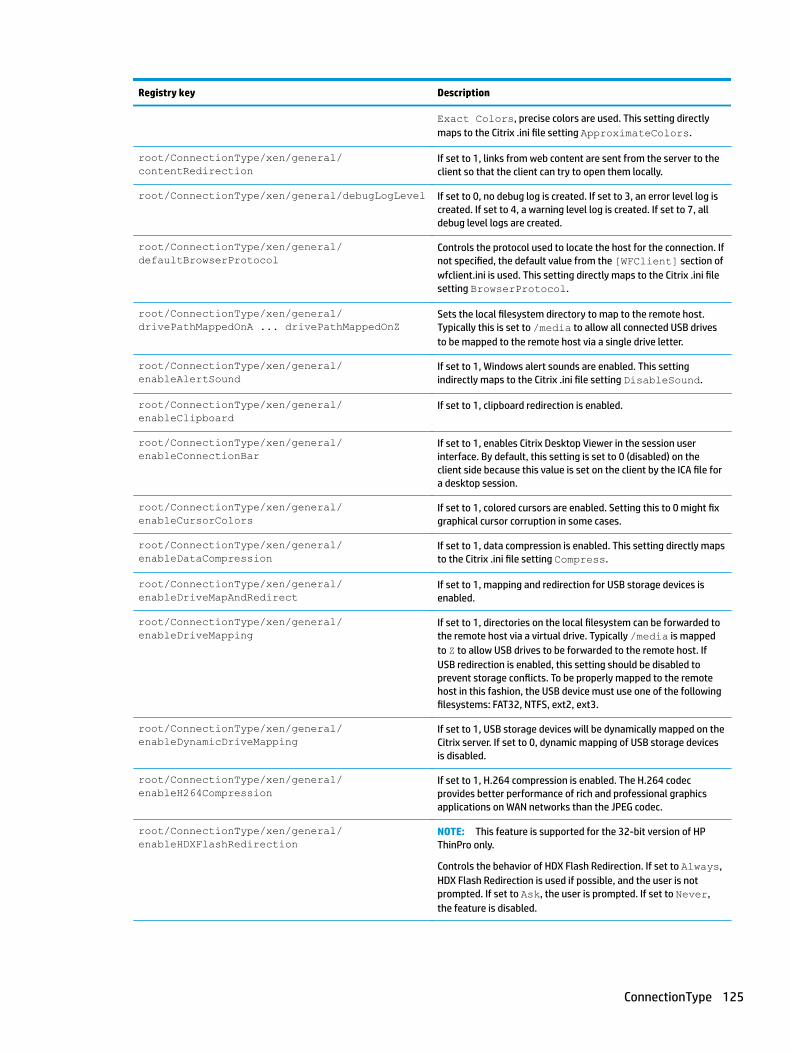
Registry key Description
Exact Colors, precise colors are used. This setting directly maps to the Citrix .ini file setting ApproximateColors.
root/ConnectionType/xen/general/contentRedirection
If set to 1, links from web content are sent from the server to the client so that the client can try to open them locally.
root/ConnectionType/xen/general/debugLogLevel If set to 0, no debug log is created. If set to 3, an error level log is created. If set to 4, a warning level log is created. If set to 7, all debug level logs are created.
root/ConnectionType/xen/general/defaultBrowserProtocol
Controls the protocol used to locate the host for the connection. If not specified, the default value from the [WFClient] section of wfclient.ini is used. This setting directly maps to the Citrix .ini file setting BrowserProtocol.
root/ConnectionType/xen/general/drivePathMappedOnA ... drivePathMappedOnZ
Sets the local filesystem directory to map to the remote host. Typically this is set to /media to allow all connected USB drives to be mapped to the remote host via a single drive letter.
root/ConnectionType/xen/general/enableAlertSound
If set to 1, Windows alert sounds are enabled. This setting indirectly maps to the Citrix .ini file setting DisableSound.
root/ConnectionType/xen/general/enableClipboard
If set to 1, clipboard redirection is enabled.
root/ConnectionType/xen/general/enableConnectionBar
If set to 1, enables Citrix Desktop Viewer in the session user interface. By default, this setting is set to 0 (disabled) on the client side because this value is set on the client by the ICA file for a desktop session.
root/ConnectionType/xen/general/enableCursorColors
If set to 1, colored cursors are enabled. Setting this to 0 might fix graphical cursor corruption in some cases.
root/ConnectionType/xen/general/enableDataCompression
If set to 1, data compression is enabled. This setting directly maps to the Citrix .ini file setting Compress.
root/ConnectionType/xen/general/enableDriveMapAndRedirect
If set to 1, mapping and redirection for USB storage devices is enabled.
root/ConnectionType/xen/general/enableDriveMapping
If set to 1, directories on the local filesystem can be forwarded to the remote host via a virtual drive. Typically /media is mapped to Z to allow USB drives to be forwarded to the remote host. If USB redirection is enabled, this setting should be disabled to prevent storage conflicts. To be properly mapped to the remote host in this fashion, the USB device must use one of the following filesystems: FAT32, NTFS, ext2, ext3.
root/ConnectionType/xen/general/enableDynamicDriveMapping
If set to 1, USB storage devices will be dynamically mapped on the Citrix server. If set to 0, dynamic mapping of USB storage devices is disabled.
root/ConnectionType/xen/general/enableH264Compression
If set to 1, H.264 compression is enabled. The H.264 codec provides better performance of rich and professional graphics applications on WAN networks than the JPEG codec.
root/ConnectionType/xen/general/enableHDXFlashRedirection
NOTE: This feature is supported for the 32-bit version of HP ThinPro only.
Controls the behavior of HDX Flash Redirection. If set to Always, HDX Flash Redirection is used if possible, and the user is not prompted. If set to Ask, the user is prompted. If set to Never, the feature is disabled.
ConnectionType 125

Registry key Description
root/ConnectionType/xen/general/enableHDXFlashServerContentFetch
NOTE: This feature is supported for the 32-bit version of HP ThinPro only.
Controls the behavior of HDX Flash Server-Side Content Fetching. If disabled, the client will fetch for content.
root/ConnectionType/xen/general/enableHDXMediaStream
If set to 1, HDX MediaStream is enabled. If set to 0, media files will still play via standard streaming, but the quality might not be as high.
root/ConnectionType/xen/general/enableHWH264 If set to 1, and if enableH264Compression is also set to 1, hardware compression for H.264 is enabled. If set to 0, H.264 compression will be handled by software.
root/ConnectionType/xen/general/enableMapOnA ... enableMapOnZ
If set to 1, a local filesystem directory can be mapped to this drive on the remote host. The corresponding drivePathMappedOn registry key must be set to a valid local directory for drive mapping to work properly.
root/ConnectionType/xen/general/enableMultiMedia
If set to 1, multimedia is enabled. HDX Lync might have a conflict when this setting is enabled. This setting maps directly to the multimedia in the virtual channels section of the Citrix .ini file settings. Enable this setting when HDX MediaStream is enabled.
root/ConnectionType/xen/general/enableOffScreenSurface
If set to 1, the server can use the X PixMap format for off-screen drawing. This reduces bandwidth in 15-bit and 24-bit color modes at the expense of X server memory and processor time. This setting directly maps to the Citrix .ini file setting EnableOSS.
root/ConnectionType/xen/general/enableSessionReliability
If set to 1, Citrix Session Reliability is enabled. Session Reliability changes the way sessions are resumed after losing a network connection. Please see Citrix documentation for more information on Session Reliability.
root/ConnectionType/xen/general/enableSmallFrames
If set to 1, small non-H.264 rectangle updates are enabled for H.264. enableTextTracking must also be enabled for this to have an effect.
root/ConnectionType/xen/general/enableSmartCard
If set to 1, smart card login is enabled.
root/ConnectionType/xen/general/enableTextTracking
If set to 1, optimized lossless text overlays are enabled for H.264.
root/ConnectionType/xen/general/enableUSBRedirection
If set to 1, USB storage devices will be redirected.
root/ConnectionType/xen/general/encryptionLevel
Sets the level of encryption. Encryption protocols for all levels are defined in the [EncryptionLevelSession] section of module.ini. This setting directly maps to the Citrix .ini file setting [EncryptionLevelSession].
root/ConnectionType/xen/general/fontSmoothingType
Sets the font smoothing type.
root/ConnectionType/xen/general/hotKey<1thru15>Char
Sets the hot key to forward to the remote session when the key or key combination set in the corresponding hotKeyShift is pressed.
root/ConnectionType/xen/general/hotKey<1thru15>Shift
Sets the key or key combination used to activate the hot key set in the corresponding hotKeyChar.
root/ConnectionType/xen/general/httpAddresses/<UUID>/address
126 Appendix D Registry keys
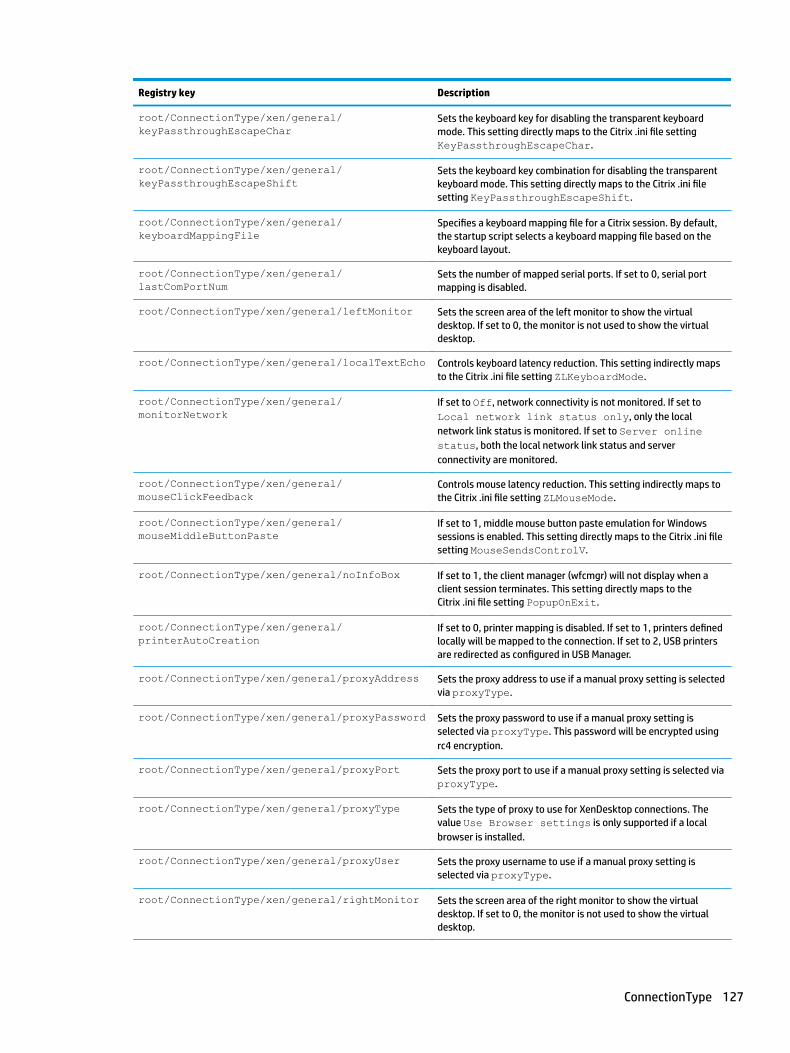
Registry key Description
root/ConnectionType/xen/general/keyPassthroughEscapeChar
Sets the keyboard key for disabling the transparent keyboard mode. This setting directly maps to the Citrix .ini file setting KeyPassthroughEscapeChar.
root/ConnectionType/xen/general/keyPassthroughEscapeShift
Sets the keyboard key combination for disabling the transparent keyboard mode. This setting directly maps to the Citrix .ini file setting KeyPassthroughEscapeShift.
root/ConnectionType/xen/general/keyboardMappingFile
Specifies a keyboard mapping file for a Citrix session. By default, the startup script selects a keyboard mapping file based on the keyboard layout.
root/ConnectionType/xen/general/lastComPortNum
Sets the number of mapped serial ports. If set to 0, serial port mapping is disabled.
root/ConnectionType/xen/general/leftMonitor Sets the screen area of the left monitor to show the virtual desktop. If set to 0, the monitor is not used to show the virtual desktop.
root/ConnectionType/xen/general/localTextEcho Controls keyboard latency reduction. This setting indirectly maps to the Citrix .ini file setting ZLKeyboardMode.
root/ConnectionType/xen/general/monitorNetwork
If set to Off, network connectivity is not monitored. If set to Local network link status only, only the local network link status is monitored. If set to Server online status, both the local network link status and server connectivity are monitored.
root/ConnectionType/xen/general/mouseClickFeedback
Controls mouse latency reduction. This setting indirectly maps to the Citrix .ini file setting ZLMouseMode.
root/ConnectionType/xen/general/mouseMiddleButtonPaste
If set to 1, middle mouse button paste emulation for Windows sessions is enabled. This setting directly maps to the Citrix .ini file setting MouseSendsControlV.
root/ConnectionType/xen/general/noInfoBox If set to 1, the client manager (wfcmgr) will not display when a client session terminates. This setting directly maps to the Citrix .ini file setting PopupOnExit.
root/ConnectionType/xen/general/printerAutoCreation
If set to 0, printer mapping is disabled. If set to 1, printers defined locally will be mapped to the connection. If set to 2, USB printers are redirected as configured in USB Manager.
root/ConnectionType/xen/general/proxyAddress Sets the proxy address to use if a manual proxy setting is selected via proxyType.
root/ConnectionType/xen/general/proxyPassword Sets the proxy password to use if a manual proxy setting is selected via proxyType. This password will be encrypted using rc4 encryption.
root/ConnectionType/xen/general/proxyPort Sets the proxy port to use if a manual proxy setting is selected via proxyType.
root/ConnectionType/xen/general/proxyType Sets the type of proxy to use for XenDesktop connections. The value Use Browser settings is only supported if a local browser is installed.
root/ConnectionType/xen/general/proxyUser Sets the proxy username to use if a manual proxy setting is selected via proxyType.
root/ConnectionType/xen/general/rightMonitor Sets the screen area of the right monitor to show the virtual desktop. If set to 0, the monitor is not used to show the virtual desktop.
ConnectionType 127
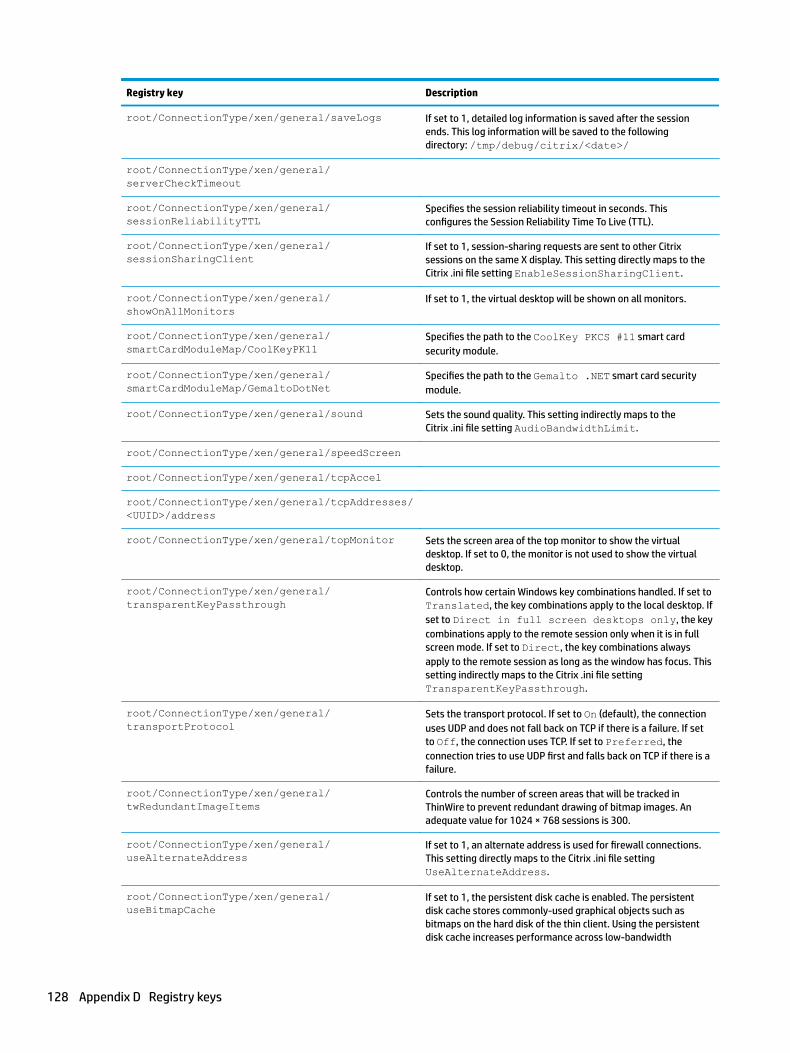
Registry key Description
root/ConnectionType/xen/general/saveLogs If set to 1, detailed log information is saved after the session ends. This log information will be saved to the following directory: /tmp/debug/citrix/<date>/
root/ConnectionType/xen/general/serverCheckTimeout
root/ConnectionType/xen/general/sessionReliabilityTTL
Specifies the session reliability timeout in seconds. This configures the Session Reliability Time To Live (TTL).
root/ConnectionType/xen/general/sessionSharingClient
If set to 1, session-sharing requests are sent to other Citrix sessions on the same X display. This setting directly maps to the Citrix .ini file setting EnableSessionSharingClient.
root/ConnectionType/xen/general/showOnAllMonitors
If set to 1, the virtual desktop will be shown on all monitors.
root/ConnectionType/xen/general/smartCardModuleMap/CoolKeyPK11
Specifies the path to the CoolKey PKCS #11 smart card security module.
root/ConnectionType/xen/general/smartCardModuleMap/GemaltoDotNet
Specifies the path to the Gemalto .NET smart card security module.
root/ConnectionType/xen/general/sound Sets the sound quality. This setting indirectly maps to the Citrix .ini file setting AudioBandwidthLimit.
root/ConnectionType/xen/general/speedScreen
root/ConnectionType/xen/general/tcpAccel
root/ConnectionType/xen/general/tcpAddresses/<UUID>/address
root/ConnectionType/xen/general/topMonitor Sets the screen area of the top monitor to show the virtual desktop. If set to 0, the monitor is not used to show the virtual desktop.
root/ConnectionType/xen/general/transparentKeyPassthrough
Controls how certain Windows key combinations handled. If set to Translated, the key combinations apply to the local desktop. If set to Direct in full screen desktops only, the key combinations apply to the remote session only when it is in full screen mode. If set to Direct, the key combinations always apply to the remote session as long as the window has focus. This setting indirectly maps to the Citrix .ini file setting TransparentKeyPassthrough.
root/ConnectionType/xen/general/transportProtocol
Sets the transport protocol. If set to On (default), the connection uses UDP and does not fall back on TCP if there is a failure. If set to Off, the connection uses TCP. If set to Preferred, the connection tries to use UDP first and falls back on TCP if there is a failure.
root/ConnectionType/xen/general/twRedundantImageItems
Controls the number of screen areas that will be tracked in ThinWire to prevent redundant drawing of bitmap images. An adequate value for 1024 × 768 sessions is 300.
root/ConnectionType/xen/general/useAlternateAddress
If set to 1, an alternate address is used for firewall connections. This setting directly maps to the Citrix .ini file setting UseAlternateAddress.
root/ConnectionType/xen/general/useBitmapCache
If set to 1, the persistent disk cache is enabled. The persistent disk cache stores commonly-used graphical objects such as bitmaps on the hard disk of the thin client. Using the persistent disk cache increases performance across low-bandwidth
128 Appendix D Registry keys

Registry key Description
connections but reduces the amount of available disk space on the thin client. For thin clients on high-speed LANs, usage of the persistent disk cache is not necessary. This setting directly maps to the Citrix .ini file setting PersistentCacheEnabled.
root/ConnectionType/xen/general/useEUKS Controls the use of Extended Unicode Keyboard Support (EUKS) on Windows servers. If set to 0, EUKS is not used. If set to 1, EUKS is used as a fallback. If set to 2, EUKS is used whenever possible.
root/ConnectionType/xen/general/useLocalIM If this setting is enabled, the local X input method is used to interpret keyboard input. This is supported for European languages only. This setting directly maps to the Citrix .ini file setting useLocalIME.
root/ConnectionType/xen/general/userAgent The string from this key will be presented by the Citrix client and will be helpful for administrators to know where the connection request is from.
root/ConnectionType/xen/general/waitForNetwork
If set to 1, the connection will not be launched until networking is available. This ensures that, on a slow network, the connection does not launch before networking is available, which could cause a failure.
root/ConnectionType/xen/general/webcamFramesPerSec
Controls the HDXWebCamFramesPerSec variable in the All_Regions.ini file.
root/ConnectionType/xen/general/webcamHeight Controls the HDXWebCamHeight variable in the All_Regions.ini file.
root/ConnectionType/xen/general/webcamQuality Controls the HDXWebCamQuality variable in the All_Regions.ini file. Valid input ranges from 1 to 63.
root/ConnectionType/xen/general/webcamSupport If set to 0, the webcam and webcam audio are disabled. If set to 1, the webcam and webcam audio are enabled, with compression. If set to 2, USB redirection of the webcam and webcam audio is enabled.
root/ConnectionType/xen/general/webcamWidth Controls the HDXWebCamWidth variable in the All_Regions.ini file.
root/ConnectionType/xen/general/windowHeight Sets the height of the window in pixels if windowSize is set to Fixed Size.
root/ConnectionType/xen/general/windowPercent Sets the size of the window as a percentage if windowSize is set to Percentage of Screen Size.
root/ConnectionType/xen/general/windowSize If set to Default, the server-side settings are used. If set to Full Screen, the window is maximized without borders on all available screens. If set to Fixed Size, the windowWidth and windowHeight registry keys can be used to specify the size of the window in pixels. If set to Percentage of Screen Size, the windowPercent key can be used to specify the size of the window as a percentage. For Percentage of Screen Size to take effect, enableForceDirectConnect must be set to 1 and TWIMode must be set to 0. This setting only works with XenApp and only if the server allows direct connections. This setting does not work with XenDesktop.
root/ConnectionType/xen/general/windowWidth Sets the width of the window in pixels if windowSize is set to Fixed Size.
ConnectionType 129

Registry key Description
root/ConnectionType/xen/gui/XenDesktopPanel/disabled
If set to 1, the Xen Desktop panel and its taskbar are disabled. This is usually used when autoStartResource or autoStartDesktop is enabled.
root/ConnectionType/xen/gui/XenManager/name This registry key is either used internally or reserved for future use. The value should not be changed.
root/ConnectionType/xen/gui/XenManager/status This registry key is either used internally or reserved for future use. The value should not be changed.
root/ConnectionType/xen/gui/XenManager/title This registry key is either used internally or reserved for future use. The value should not be changed.
root/ConnectionType/xen/gui/XenManager/widgets/address
Controls the state of the Service URL widget in Citrix Connection Manager. If set to active, the widget is visible in the UI and the user can interact with it. If set to inactive, the widget is hidden. If set to read-only, the widget is visible in the read-only state.
root/ConnectionType/xen/gui/XenManager/widgets/appInMenu
Controls the state of the Show applications on taskbar widget in Citrix Connection Manager. If set to active, the widget is visible in the UI and the user can interact with it. If set to inactive, the widget is hidden. If set to read-only, the widget is visible in the read-only state.
root/ConnectionType/xen/gui/XenManager/widgets/appOnDesktop
Controls the state of the Show applications on desktop widget in Citrix Connection Manager. If set to active, the widget is visible in the UI and the user can interact with it. If set to inactive, the widget is hidden. If set to read-only, the widget is visible in the read-only state.
root/ConnectionType/xen/gui/XenManager/widgets/autoReconnect
Controls the state of the Auto reconnect widget in Citrix Connection Manager. If set to active, the widget is visible in the UI and the user can interact with it. If set to inactive, the widget is hidden. If set to read-only, the widget is visible in the read-only state.
root/ConnectionType/xen/gui/XenManager/widgets/autoStartDesktop
Controls the state of the Auto Start Desktop widget in Citrix Connection Manager. If set to active, the widget is visible in the UI and the user can interact with it. If set to inactive, the widget is hidden. If set to read-only, the widget is visible in the read-only state.
root/ConnectionType/xen/gui/XenManager/widgets/autoStartResource
Controls the state of the Auto Start Resource widget in Citrix Connection Manager. If set to active, the widget is visible in the UI and the user can interact with it. If set to inactive, the widget is hidden. If set to read-only, the widget is visible in the read-only state.
root/ConnectionType/xen/gui/XenManager/widgets/autostart
Controls the state of the Auto start priority widget in Citrix Connection Manager. If set to active, the widget is visible in the UI and the user can interact with it. If set to inactive, the widget is hidden. If set to read-only, the widget is visible in the read-only state.
root/ConnectionType/xen/gui/XenManager/widgets/domain
Controls the state of the Domain widget in Citrix Connection Manager. If set to active, the widget is visible in the UI and the user can interact with it. If set to inactive, the widget is hidden. If set to read-only, the widget is visible in the read-only state.
130 Appendix D Registry keys
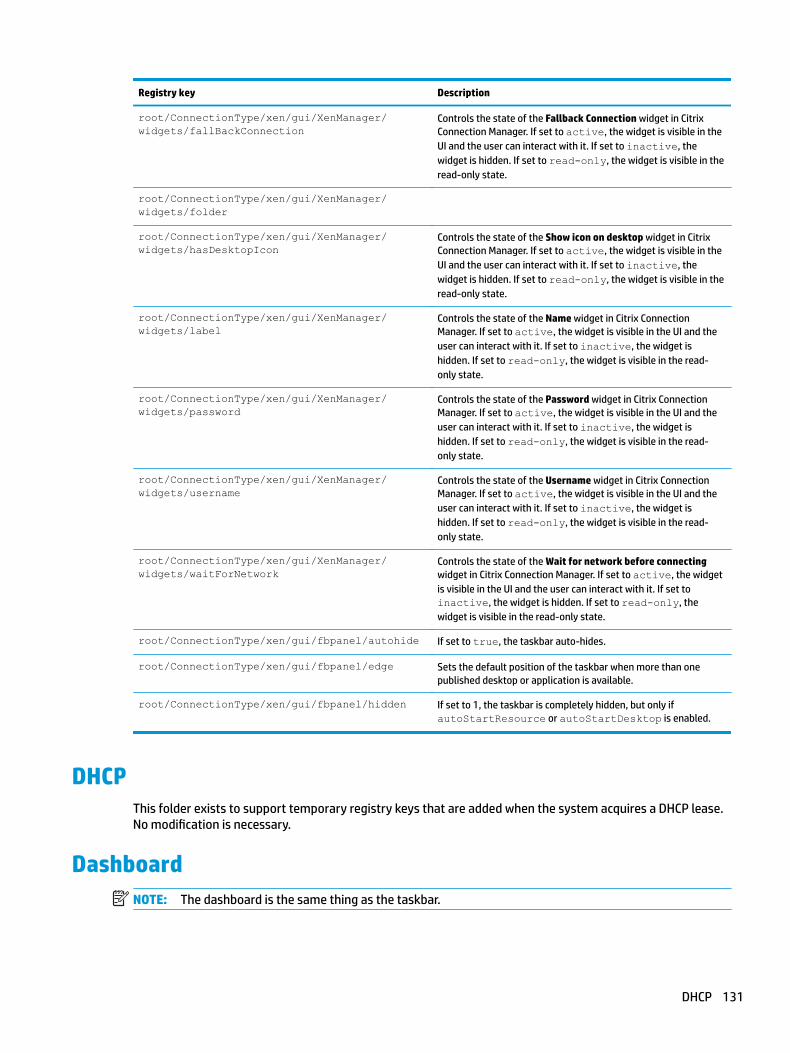
Registry key Description
root/ConnectionType/xen/gui/XenManager/widgets/fallBackConnection
Controls the state of the Fallback Connection widget in Citrix Connection Manager. If set to active, the widget is visible in the UI and the user can interact with it. If set to inactive, the widget is hidden. If set to read-only, the widget is visible in the read-only state.
root/ConnectionType/xen/gui/XenManager/widgets/folder
root/ConnectionType/xen/gui/XenManager/widgets/hasDesktopIcon
Controls the state of the Show icon on desktop widget in Citrix Connection Manager. If set to active, the widget is visible in the UI and the user can interact with it. If set to inactive, the widget is hidden. If set to read-only, the widget is visible in the read-only state.
root/ConnectionType/xen/gui/XenManager/widgets/label
Controls the state of the Name widget in Citrix Connection Manager. If set to active, the widget is visible in the UI and the user can interact with it. If set to inactive, the widget is hidden. If set to read-only, the widget is visible in the read-only state.
root/ConnectionType/xen/gui/XenManager/widgets/password
Controls the state of the Password widget in Citrix Connection Manager. If set to active, the widget is visible in the UI and the user can interact with it. If set to inactive, the widget is hidden. If set to read-only, the widget is visible in the read-only state.
root/ConnectionType/xen/gui/XenManager/widgets/username
Controls the state of the Username widget in Citrix Connection Manager. If set to active, the widget is visible in the UI and the user can interact with it. If set to inactive, the widget is hidden. If set to read-only, the widget is visible in the read-only state.
root/ConnectionType/xen/gui/XenManager/widgets/waitForNetwork
Controls the state of the Wait for network before connecting widget in Citrix Connection Manager. If set to active, the widget is visible in the UI and the user can interact with it. If set to inactive, the widget is hidden. If set to read-only, the widget is visible in the read-only state.
root/ConnectionType/xen/gui/fbpanel/autohide If set to true, the taskbar auto-hides.
root/ConnectionType/xen/gui/fbpanel/edge Sets the default position of the taskbar when more than one published desktop or application is available.
root/ConnectionType/xen/gui/fbpanel/hidden If set to 1, the taskbar is completely hidden, but only if autoStartResource or autoStartDesktop is enabled.
DHCPThis folder exists to support temporary registry keys that are added when the system acquires a DHCP lease. No modification is necessary.
DashboardNOTE: The dashboard is the same thing as the taskbar.
DHCP 131
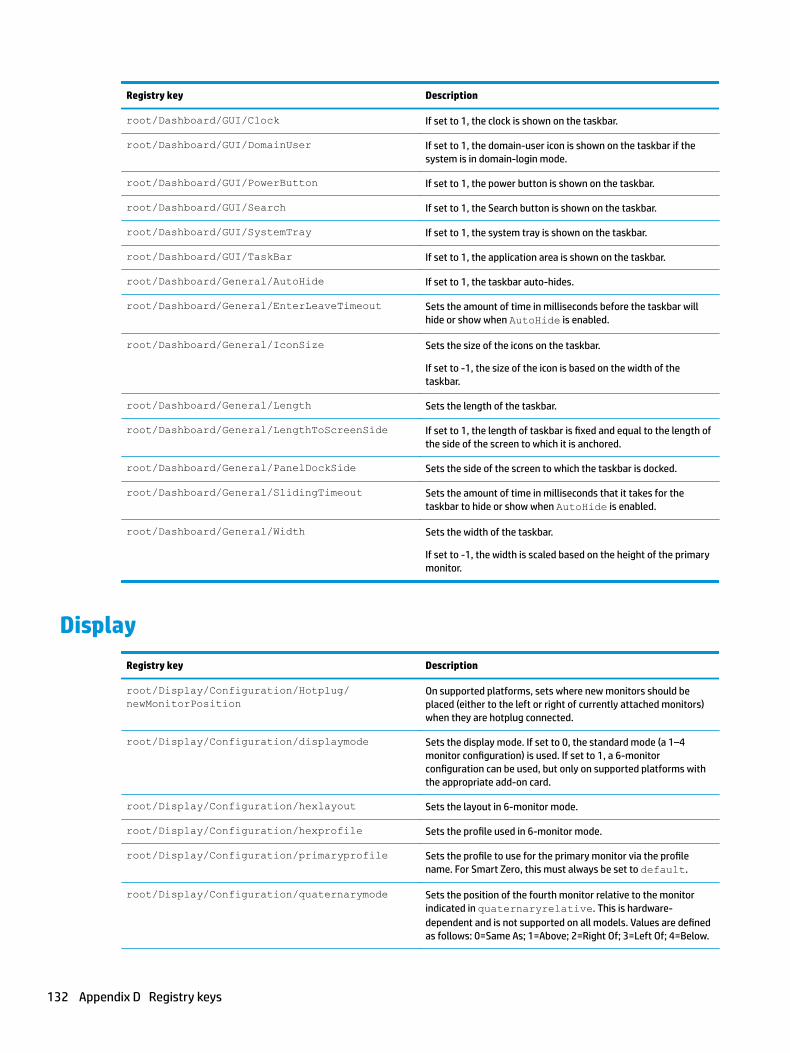
Registry key Description
root/Dashboard/GUI/Clock If set to 1, the clock is shown on the taskbar.
root/Dashboard/GUI/DomainUser If set to 1, the domain-user icon is shown on the taskbar if the system is in domain-login mode.
root/Dashboard/GUI/PowerButton If set to 1, the power button is shown on the taskbar.
root/Dashboard/GUI/Search If set to 1, the Search button is shown on the taskbar.
root/Dashboard/GUI/SystemTray If set to 1, the system tray is shown on the taskbar.
root/Dashboard/GUI/TaskBar If set to 1, the application area is shown on the taskbar.
root/Dashboard/General/AutoHide If set to 1, the taskbar auto-hides.
root/Dashboard/General/EnterLeaveTimeout Sets the amount of time in milliseconds before the taskbar will hide or show when AutoHide is enabled.
root/Dashboard/General/IconSize Sets the size of the icons on the taskbar.
If set to -1, the size of the icon is based on the width of the taskbar.
root/Dashboard/General/Length Sets the length of the taskbar.
root/Dashboard/General/LengthToScreenSide If set to 1, the length of taskbar is fixed and equal to the length of the side of the screen to which it is anchored.
root/Dashboard/General/PanelDockSide Sets the side of the screen to which the taskbar is docked.
root/Dashboard/General/SlidingTimeout Sets the amount of time in milliseconds that it takes for the taskbar to hide or show when AutoHide is enabled.
root/Dashboard/General/Width Sets the width of the taskbar.
If set to -1, the width is scaled based on the height of the primary monitor.
Display
Registry key Description
root/Display/Configuration/Hotplug/newMonitorPosition
On supported platforms, sets where new monitors should be placed (either to the left or right of currently attached monitors) when they are hotplug connected.
root/Display/Configuration/displaymode Sets the display mode. If set to 0, the standard mode (a 1–4 monitor configuration) is used. If set to 1, a 6-monitor configuration can be used, but only on supported platforms with the appropriate add-on card.
root/Display/Configuration/hexlayout Sets the layout in 6-monitor mode.
root/Display/Configuration/hexprofile Sets the profile used in 6-monitor mode.
root/Display/Configuration/primaryprofile Sets the profile to use for the primary monitor via the profile name. For Smart Zero, this must always be set to default.
root/Display/Configuration/quaternarymode Sets the position of the fourth monitor relative to the monitor indicated in quaternaryrelative. This is hardware-dependent and is not supported on all models. Values are defined as follows: 0=Same As; 1=Above; 2=Right Of; 3=Left Of; 4=Below.
132 Appendix D Registry keys
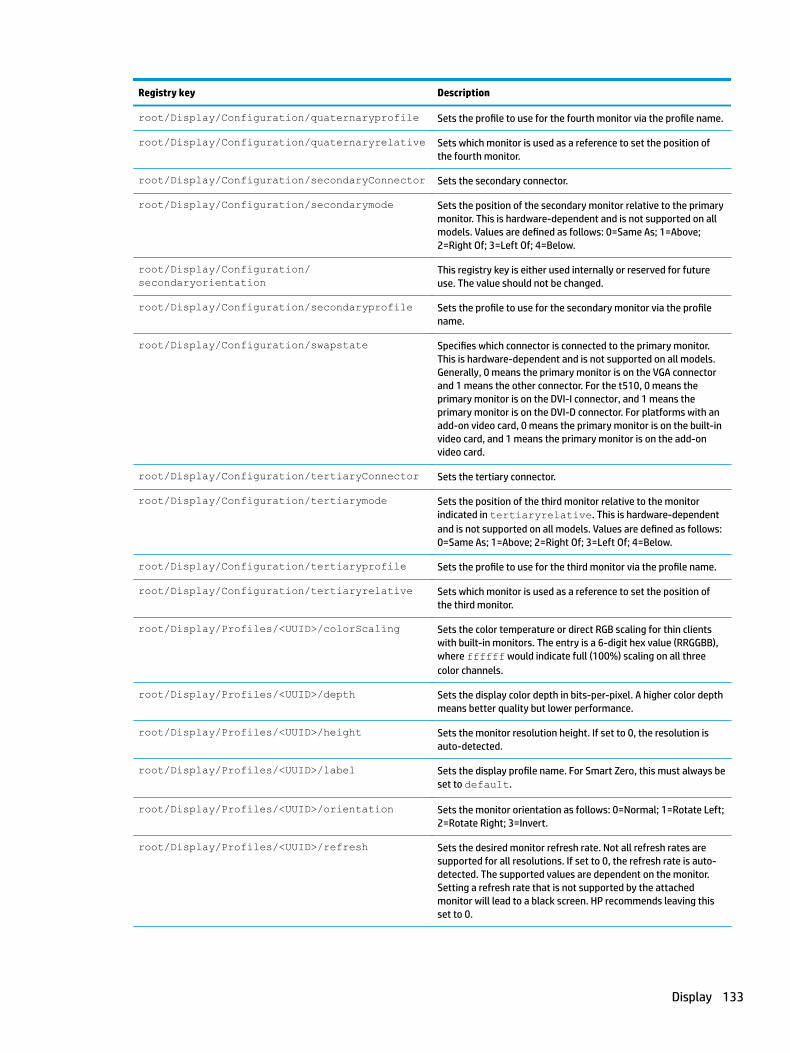
Registry key Description
root/Display/Configuration/quaternaryprofile Sets the profile to use for the fourth monitor via the profile name.
root/Display/Configuration/quaternaryrelative Sets which monitor is used as a reference to set the position of the fourth monitor.
root/Display/Configuration/secondaryConnector Sets the secondary connector.
root/Display/Configuration/secondarymode Sets the position of the secondary monitor relative to the primary monitor. This is hardware-dependent and is not supported on all models. Values are defined as follows: 0=Same As; 1=Above; 2=Right Of; 3=Left Of; 4=Below.
root/Display/Configuration/secondaryorientation
This registry key is either used internally or reserved for future use. The value should not be changed.
root/Display/Configuration/secondaryprofile Sets the profile to use for the secondary monitor via the profile name.
root/Display/Configuration/swapstate Specifies which connector is connected to the primary monitor. This is hardware-dependent and is not supported on all models. Generally, 0 means the primary monitor is on the VGA connector and 1 means the other connector. For the t510, 0 means the primary monitor is on the DVI-I connector, and 1 means the primary monitor is on the DVI-D connector. For platforms with an add-on video card, 0 means the primary monitor is on the built-in video card, and 1 means the primary monitor is on the add-on video card.
root/Display/Configuration/tertiaryConnector Sets the tertiary connector.
root/Display/Configuration/tertiarymode Sets the position of the third monitor relative to the monitor indicated in tertiaryrelative. This is hardware-dependent and is not supported on all models. Values are defined as follows: 0=Same As; 1=Above; 2=Right Of; 3=Left Of; 4=Below.
root/Display/Configuration/tertiaryprofile Sets the profile to use for the third monitor via the profile name.
root/Display/Configuration/tertiaryrelative Sets which monitor is used as a reference to set the position of the third monitor.
root/Display/Profiles/<UUID>/colorScaling Sets the color temperature or direct RGB scaling for thin clients with built-in monitors. The entry is a 6-digit hex value (RRGGBB), where ffffff would indicate full (100%) scaling on all three color channels.
root/Display/Profiles/<UUID>/depth Sets the display color depth in bits-per-pixel. A higher color depth means better quality but lower performance.
root/Display/Profiles/<UUID>/height Sets the monitor resolution height. If set to 0, the resolution is auto-detected.
root/Display/Profiles/<UUID>/label Sets the display profile name. For Smart Zero, this must always be set to default.
root/Display/Profiles/<UUID>/orientation Sets the monitor orientation as follows: 0=Normal; 1=Rotate Left; 2=Rotate Right; 3=Invert.
root/Display/Profiles/<UUID>/refresh Sets the desired monitor refresh rate. Not all refresh rates are supported for all resolutions. If set to 0, the refresh rate is auto-detected. The supported values are dependent on the monitor. Setting a refresh rate that is not supported by the attached monitor will lead to a black screen. HP recommends leaving this set to 0.
Display 133
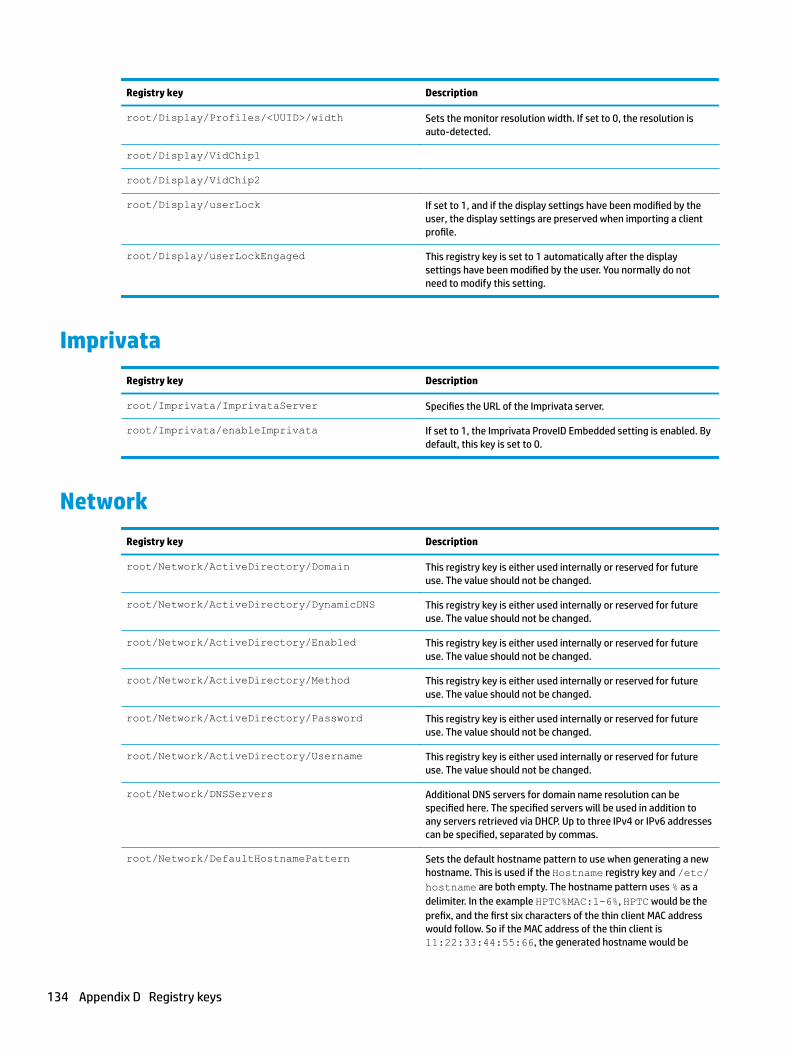
Registry key Description
root/Display/Profiles/<UUID>/width Sets the monitor resolution width. If set to 0, the resolution is auto-detected.
root/Display/VidChip1
root/Display/VidChip2
root/Display/userLock If set to 1, and if the display settings have been modified by the user, the display settings are preserved when importing a client profile.
root/Display/userLockEngaged This registry key is set to 1 automatically after the display settings have been modified by the user. You normally do not need to modify this setting.
Imprivata
Registry key Description
root/Imprivata/ImprivataServer Specifies the URL of the Imprivata server.
root/Imprivata/enableImprivata If set to 1, the Imprivata ProveID Embedded setting is enabled. By default, this key is set to 0.
Network
Registry key Description
root/Network/ActiveDirectory/Domain This registry key is either used internally or reserved for future use. The value should not be changed.
root/Network/ActiveDirectory/DynamicDNS This registry key is either used internally or reserved for future use. The value should not be changed.
root/Network/ActiveDirectory/Enabled This registry key is either used internally or reserved for future use. The value should not be changed.
root/Network/ActiveDirectory/Method This registry key is either used internally or reserved for future use. The value should not be changed.
root/Network/ActiveDirectory/Password This registry key is either used internally or reserved for future use. The value should not be changed.
root/Network/ActiveDirectory/Username This registry key is either used internally or reserved for future use. The value should not be changed.
root/Network/DNSServers Additional DNS servers for domain name resolution can be specified here. The specified servers will be used in addition to any servers retrieved via DHCP. Up to three IPv4 or IPv6 addresses can be specified, separated by commas.
root/Network/DefaultHostnamePattern Sets the default hostname pattern to use when generating a new hostname. This is used if the Hostname registry key and /etc/hostname are both empty. The hostname pattern uses % as a delimiter. In the example HPTC%MAC:1-6%, HPTC would be the prefix, and the first six characters of the thin client MAC address would follow. So if the MAC address of the thin client is 11:22:33:44:55:66, the generated hostname would be
134 Appendix D Registry keys
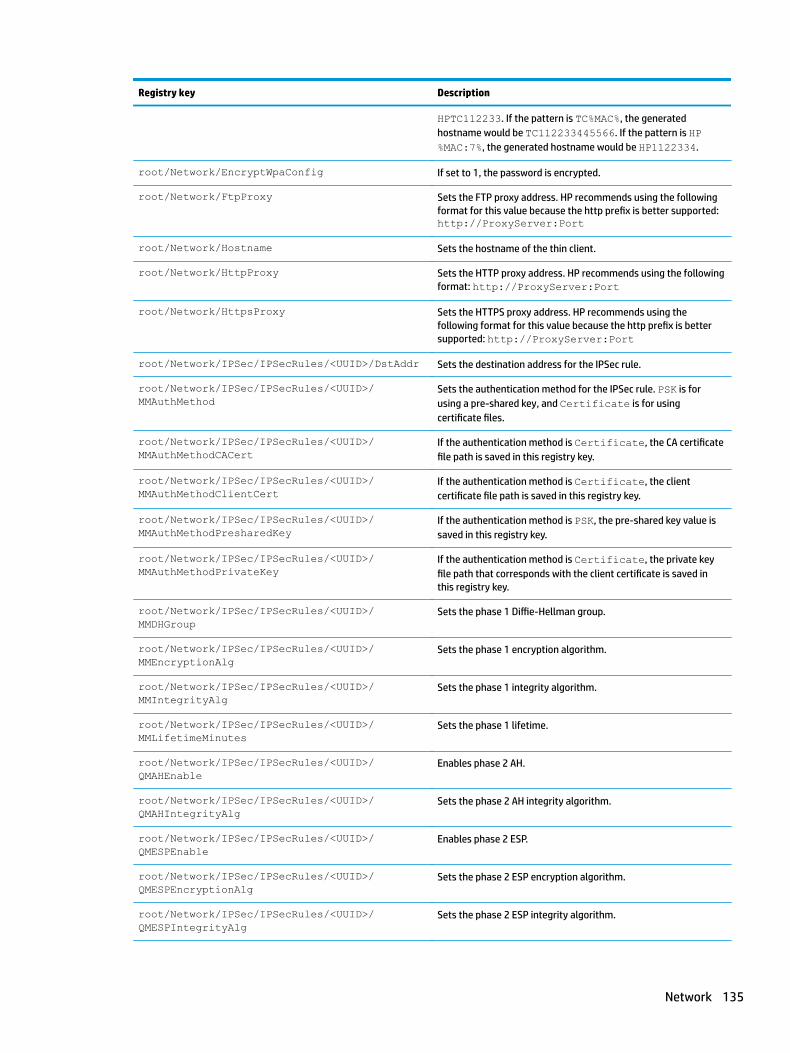
Registry key Description
HPTC112233. If the pattern is TC%MAC%, the generated hostname would be TC112233445566. If the pattern is HP%MAC:7%, the generated hostname would be HP1122334.
root/Network/EncryptWpaConfig If set to 1, the password is encrypted.
root/Network/FtpProxy Sets the FTP proxy address. HP recommends using the following format for this value because the http prefix is better supported: http://ProxyServer:Port
root/Network/Hostname Sets the hostname of the thin client.
root/Network/HttpProxy Sets the HTTP proxy address. HP recommends using the following format: http://ProxyServer:Port
root/Network/HttpsProxy Sets the HTTPS proxy address. HP recommends using the following format for this value because the http prefix is better supported: http://ProxyServer:Port
root/Network/IPSec/IPSecRules/<UUID>/DstAddr Sets the destination address for the IPSec rule.
root/Network/IPSec/IPSecRules/<UUID>/MMAuthMethod
Sets the authentication method for the IPSec rule. PSK is for using a pre-shared key, and Certificate is for using certificate files.
root/Network/IPSec/IPSecRules/<UUID>/MMAuthMethodCACert
If the authentication method is Certificate, the CA certificate file path is saved in this registry key.
root/Network/IPSec/IPSecRules/<UUID>/MMAuthMethodClientCert
If the authentication method is Certificate, the client certificate file path is saved in this registry key.
root/Network/IPSec/IPSecRules/<UUID>/MMAuthMethodPresharedKey
If the authentication method is PSK, the pre-shared key value is saved in this registry key.
root/Network/IPSec/IPSecRules/<UUID>/MMAuthMethodPrivateKey
If the authentication method is Certificate, the private key file path that corresponds with the client certificate is saved in this registry key.
root/Network/IPSec/IPSecRules/<UUID>/MMDHGroup
Sets the phase 1 Diffie-Hellman group.
root/Network/IPSec/IPSecRules/<UUID>/MMEncryptionAlg
Sets the phase 1 encryption algorithm.
root/Network/IPSec/IPSecRules/<UUID>/MMIntegrityAlg
Sets the phase 1 integrity algorithm.
root/Network/IPSec/IPSecRules/<UUID>/MMLifetimeMinutes
Sets the phase 1 lifetime.
root/Network/IPSec/IPSecRules/<UUID>/QMAHEnable
Enables phase 2 AH.
root/Network/IPSec/IPSecRules/<UUID>/QMAHIntegrityAlg
Sets the phase 2 AH integrity algorithm.
root/Network/IPSec/IPSecRules/<UUID>/QMESPEnable
Enables phase 2 ESP.
root/Network/IPSec/IPSecRules/<UUID>/QMESPEncryptionAlg
Sets the phase 2 ESP encryption algorithm.
root/Network/IPSec/IPSecRules/<UUID>/QMESPIntegrityAlg
Sets the phase 2 ESP integrity algorithm.
Network 135

Registry key Description
root/Network/IPSec/IPSecRules/<UUID>/QMLifetimeSeconds
Sets the phase 2 lifetime.
root/Network/IPSec/IPSecRules/<UUID>/RuleDescription
Sets the description for the IPSec rule.
root/Network/IPSec/IPSecRules/<UUID>/RuleEnable
If set to 1, the rule is enabled.
root/Network/IPSec/IPSecRules/<UUID>/RuleName Sets the name for the IPSec rule.
root/Network/IPSec/IPSecRules/<UUID>/SrcAddr Sets the source address for the IPSec rule.
root/Network/IPSec/IPSecRules/<UUID>/TunnelDstAddr
Sets the tunnel destination address for the IPSec rule.
root/Network/IPSec/IPSecRules/<UUID>/TunnelEnable
Enables tunnel mode for the IPSec rule.
root/Network/IPSec/IPSecRules/<UUID>/TunnelSrcAddr
Sets the tunnel source address for the IPSec rule.
root/Network/KeepPreviousDNS If set to 1, previously-configured DNS servers and search domains not generated by the Network Manager will be kept in resolv.conf. If set to 0, resolv.conf will be overwritten completely.
root/Network/SearchDomains Additional search domains for FQDN resolution can be specified here. The specified domains will be appended to any incomplete server definitions in an attempt to generate an FQDN that can be resolved via DNS. For example, a search domain of mydomain.com will allow the server definition myserver to resolve properly to myserver.mydomain.com, even if the DNS server does not have myserver in its name resolution tables. Up to five additional search domains can be specified.
root/Network/VPN/AutoStart If set to 1, VPN starts automatically when the system starts up.
root/Network/VPN/PPTP/Domain Sets the PPTP domain.
root/Network/VPN/PPTP/Gateway Sets the PPTP gateway.
root/Network/VPN/PPTP/Password Sets the PPTP user password.
root/Network/VPN/PPTP/Username Sets the PPTP username.
root/Network/VPN/Type Sets the VPN type.
root/Network/VPN/VPNC/DPDEndianess Sets the endianness of the DPD sequence number (see rfc3706). 0: big endian; 1: little endian. Try toggling this if the session aborts intermittently for no apparent reason.
root/Network/VPN/VPNC/DPDInterval Sets the DPD interval (see rfc3706) in seconds.
root/Network/VPN/VPNC/DebugLevel Sets the debug level to either 0, 1, 2, 3, or 99. This generates a lot of logs. Enable this only when you need to troubleshoot a VPN issue.
root/Network/VPN/VPNC/Domain Sets the VPNC domain.
root/Network/VPN/VPNC/Gateway Sets the VPNC gateway.
root/Network/VPN/VPNC/Group Sets the VPNC group.
root/Network/VPN/VPNC/GroupPassword Sets the VPNC group password.
root/Network/VPN/VPNC/IKEDHGroup Sets the VPNC IKE Diffie-Hellman group.
136 Appendix D Registry keys
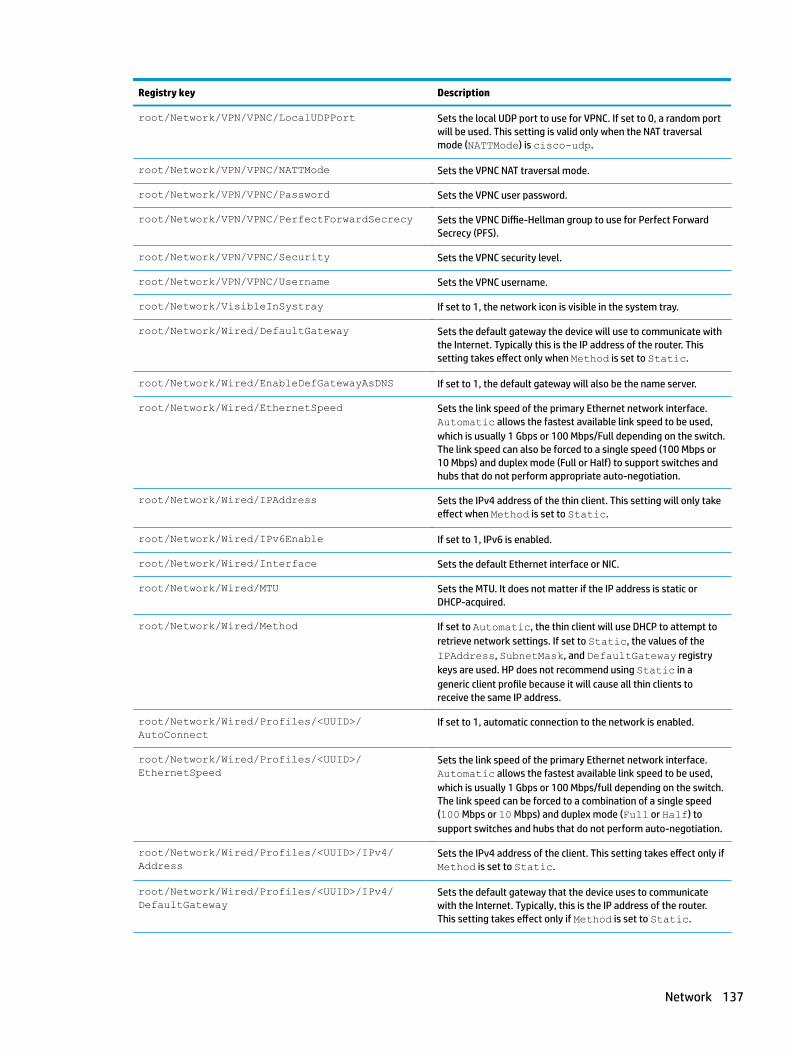
Registry key Description
root/Network/VPN/VPNC/LocalUDPPort Sets the local UDP port to use for VPNC. If set to 0, a random port will be used. This setting is valid only when the NAT traversal mode (NATTMode) is cisco-udp.
root/Network/VPN/VPNC/NATTMode Sets the VPNC NAT traversal mode.
root/Network/VPN/VPNC/Password Sets the VPNC user password.
root/Network/VPN/VPNC/PerfectForwardSecrecy Sets the VPNC Diffie-Hellman group to use for Perfect Forward Secrecy (PFS).
root/Network/VPN/VPNC/Security Sets the VPNC security level.
root/Network/VPN/VPNC/Username Sets the VPNC username.
root/Network/VisibleInSystray If set to 1, the network icon is visible in the system tray.
root/Network/Wired/DefaultGateway Sets the default gateway the device will use to communicate with the Internet. Typically this is the IP address of the router. This setting takes effect only when Method is set to Static.
root/Network/Wired/EnableDefGatewayAsDNS If set to 1, the default gateway will also be the name server.
root/Network/Wired/EthernetSpeed Sets the link speed of the primary Ethernet network interface. Automatic allows the fastest available link speed to be used, which is usually 1 Gbps or 100 Mbps/Full depending on the switch. The link speed can also be forced to a single speed (100 Mbps or 10 Mbps) and duplex mode (Full or Half) to support switches and hubs that do not perform appropriate auto-negotiation.
root/Network/Wired/IPAddress Sets the IPv4 address of the thin client. This setting will only take effect when Method is set to Static.
root/Network/Wired/IPv6Enable If set to 1, IPv6 is enabled.
root/Network/Wired/Interface Sets the default Ethernet interface or NIC.
root/Network/Wired/MTU Sets the MTU. It does not matter if the IP address is static or DHCP-acquired.
root/Network/Wired/Method If set to Automatic, the thin client will use DHCP to attempt to retrieve network settings. If set to Static, the values of the IPAddress, SubnetMask, and DefaultGateway registry keys are used. HP does not recommend using Static in a generic client profile because it will cause all thin clients to receive the same IP address.
root/Network/Wired/Profiles/<UUID>/AutoConnect
If set to 1, automatic connection to the network is enabled.
root/Network/Wired/Profiles/<UUID>/EthernetSpeed
Sets the link speed of the primary Ethernet network interface. Automatic allows the fastest available link speed to be used, which is usually 1 Gbps or 100 Mbps/full depending on the switch. The link speed can be forced to a combination of a single speed (100 Mbps or 10 Mbps) and duplex mode (Full or Half) to support switches and hubs that do not perform auto-negotiation.
root/Network/Wired/Profiles/<UUID>/IPv4/Address
Sets the IPv4 address of the client. This setting takes effect only if Method is set to Static.
root/Network/Wired/Profiles/<UUID>/IPv4/DefaultGateway
Sets the default gateway that the device uses to communicate with the Internet. Typically, this is the IP address of the router. This setting takes effect only if Method is set to Static.
Network 137
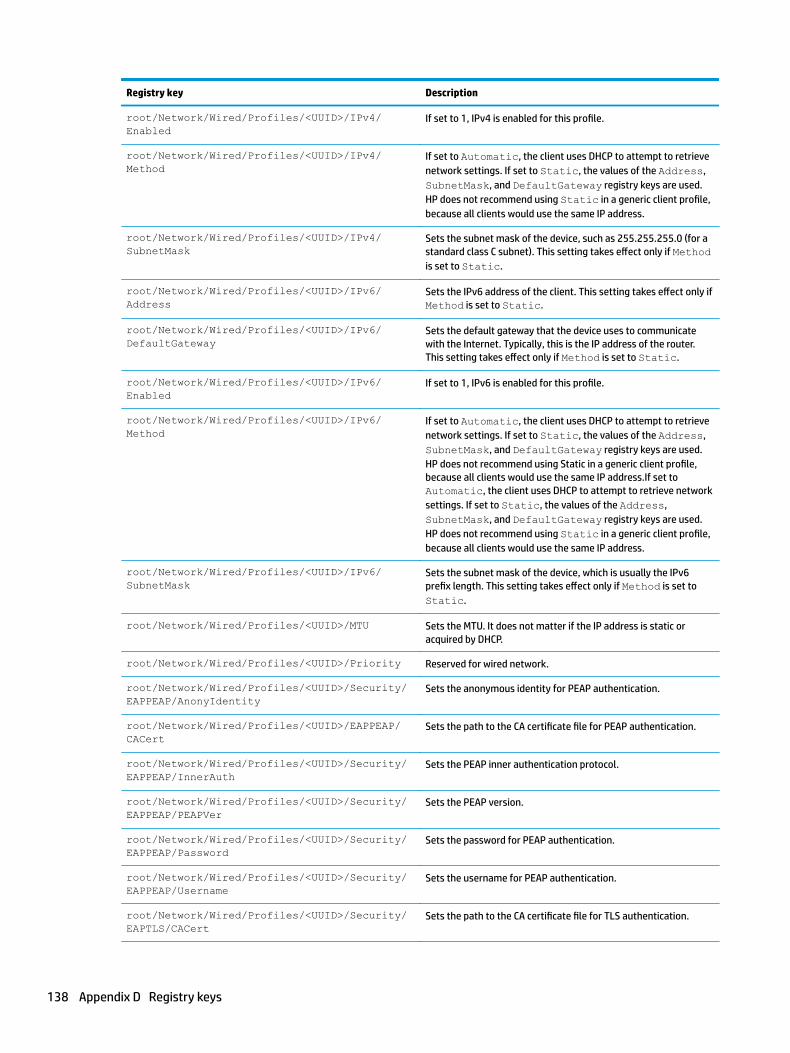
Registry key Description
root/Network/Wired/Profiles/<UUID>/IPv4/Enabled
If set to 1, IPv4 is enabled for this profile.
root/Network/Wired/Profiles/<UUID>/IPv4/Method
If set to Automatic, the client uses DHCP to attempt to retrieve network settings. If set to Static, the values of the Address, SubnetMask, and DefaultGateway registry keys are used. HP does not recommend using Static in a generic client profile, because all clients would use the same IP address.
root/Network/Wired/Profiles/<UUID>/IPv4/SubnetMask
Sets the subnet mask of the device, such as 255.255.255.0 (for a standard class C subnet). This setting takes effect only if Method is set to Static.
root/Network/Wired/Profiles/<UUID>/IPv6/Address
Sets the IPv6 address of the client. This setting takes effect only if Method is set to Static.
root/Network/Wired/Profiles/<UUID>/IPv6/DefaultGateway
Sets the default gateway that the device uses to communicate with the Internet. Typically, this is the IP address of the router. This setting takes effect only if Method is set to Static.
root/Network/Wired/Profiles/<UUID>/IPv6/Enabled
If set to 1, IPv6 is enabled for this profile.
root/Network/Wired/Profiles/<UUID>/IPv6/Method
If set to Automatic, the client uses DHCP to attempt to retrieve network settings. If set to Static, the values of the Address, SubnetMask, and DefaultGateway registry keys are used. HP does not recommend using Static in a generic client profile, because all clients would use the same IP address.If set to Automatic, the client uses DHCP to attempt to retrieve network settings. If set to Static, the values of the Address, SubnetMask, and DefaultGateway registry keys are used. HP does not recommend using Static in a generic client profile, because all clients would use the same IP address.
root/Network/Wired/Profiles/<UUID>/IPv6/SubnetMask
Sets the subnet mask of the device, which is usually the IPv6 prefix length. This setting takes effect only if Method is set to Static.
root/Network/Wired/Profiles/<UUID>/MTU Sets the MTU. It does not matter if the IP address is static or acquired by DHCP.
root/Network/Wired/Profiles/<UUID>/Priority Reserved for wired network.
root/Network/Wired/Profiles/<UUID>/Security/EAPPEAP/AnonyIdentity
Sets the anonymous identity for PEAP authentication.
root/Network/Wired/Profiles/<UUID>/EAPPEAP/CACert
Sets the path to the CA certificate file for PEAP authentication.
root/Network/Wired/Profiles/<UUID>/Security/EAPPEAP/InnerAuth
Sets the PEAP inner authentication protocol.
root/Network/Wired/Profiles/<UUID>/Security/EAPPEAP/PEAPVer
Sets the PEAP version.
root/Network/Wired/Profiles/<UUID>/Security/EAPPEAP/Password
Sets the password for PEAP authentication.
root/Network/Wired/Profiles/<UUID>/Security/EAPPEAP/Username
Sets the username for PEAP authentication.
root/Network/Wired/Profiles/<UUID>/Security/EAPTLS/CACert
Sets the path to the CA certificate file for TLS authentication.
138 Appendix D Registry keys
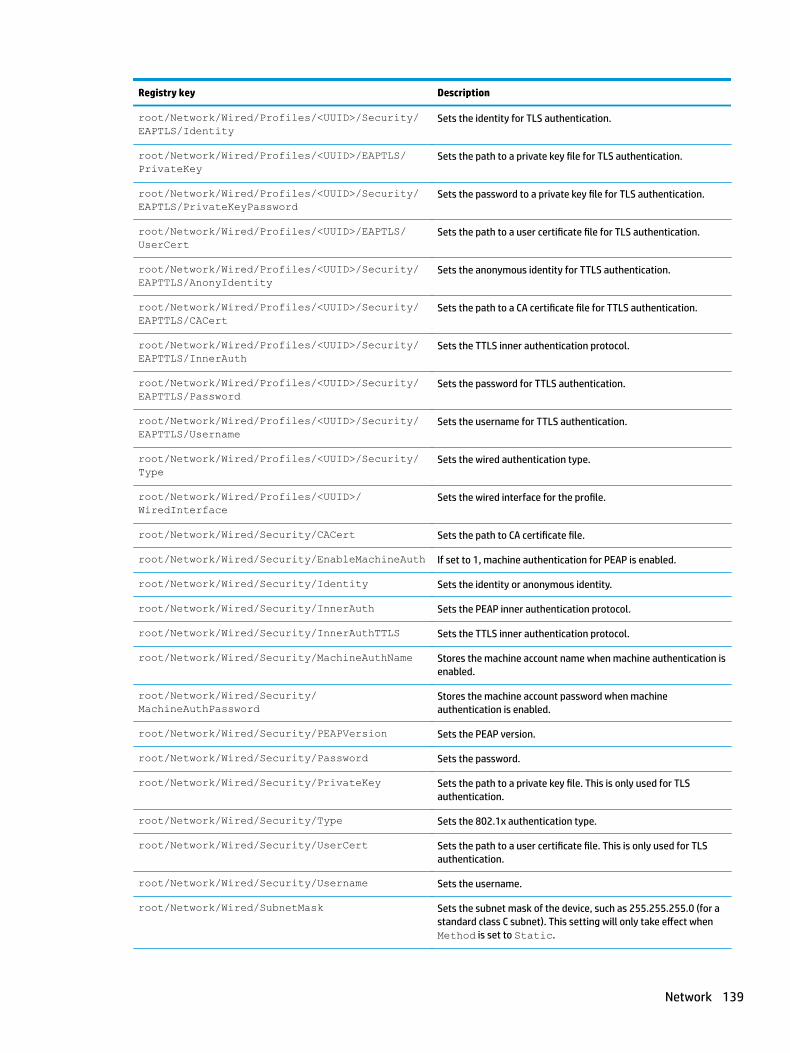
Registry key Description
root/Network/Wired/Profiles/<UUID>/Security/EAPTLS/Identity
Sets the identity for TLS authentication.
root/Network/Wired/Profiles/<UUID>/EAPTLS/PrivateKey
Sets the path to a private key file for TLS authentication.
root/Network/Wired/Profiles/<UUID>/Security/EAPTLS/PrivateKeyPassword
Sets the password to a private key file for TLS authentication.
root/Network/Wired/Profiles/<UUID>/EAPTLS/UserCert
Sets the path to a user certificate file for TLS authentication.
root/Network/Wired/Profiles/<UUID>/Security/EAPTTLS/AnonyIdentity
Sets the anonymous identity for TTLS authentication.
root/Network/Wired/Profiles/<UUID>/Security/EAPTTLS/CACert
Sets the path to a CA certificate file for TTLS authentication.
root/Network/Wired/Profiles/<UUID>/Security/EAPTTLS/InnerAuth
Sets the TTLS inner authentication protocol.
root/Network/Wired/Profiles/<UUID>/Security/EAPTTLS/Password
Sets the password for TTLS authentication.
root/Network/Wired/Profiles/<UUID>/Security/EAPTTLS/Username
Sets the username for TTLS authentication.
root/Network/Wired/Profiles/<UUID>/Security/Type
Sets the wired authentication type.
root/Network/Wired/Profiles/<UUID>/WiredInterface
Sets the wired interface for the profile.
root/Network/Wired/Security/CACert Sets the path to CA certificate file.
root/Network/Wired/Security/EnableMachineAuth If set to 1, machine authentication for PEAP is enabled.
root/Network/Wired/Security/Identity Sets the identity or anonymous identity.
root/Network/Wired/Security/InnerAuth Sets the PEAP inner authentication protocol.
root/Network/Wired/Security/InnerAuthTTLS Sets the TTLS inner authentication protocol.
root/Network/Wired/Security/MachineAuthName Stores the machine account name when machine authentication is enabled.
root/Network/Wired/Security/MachineAuthPassword
Stores the machine account password when machine authentication is enabled.
root/Network/Wired/Security/PEAPVersion Sets the PEAP version.
root/Network/Wired/Security/Password Sets the password.
root/Network/Wired/Security/PrivateKey Sets the path to a private key file. This is only used for TLS authentication.
root/Network/Wired/Security/Type Sets the 802.1x authentication type.
root/Network/Wired/Security/UserCert Sets the path to a user certificate file. This is only used for TLS authentication.
root/Network/Wired/Security/Username Sets the username.
root/Network/Wired/SubnetMask Sets the subnet mask of the device, such as 255.255.255.0 (for a standard class C subnet). This setting will only take effect when Method is set to Static.
Network 139
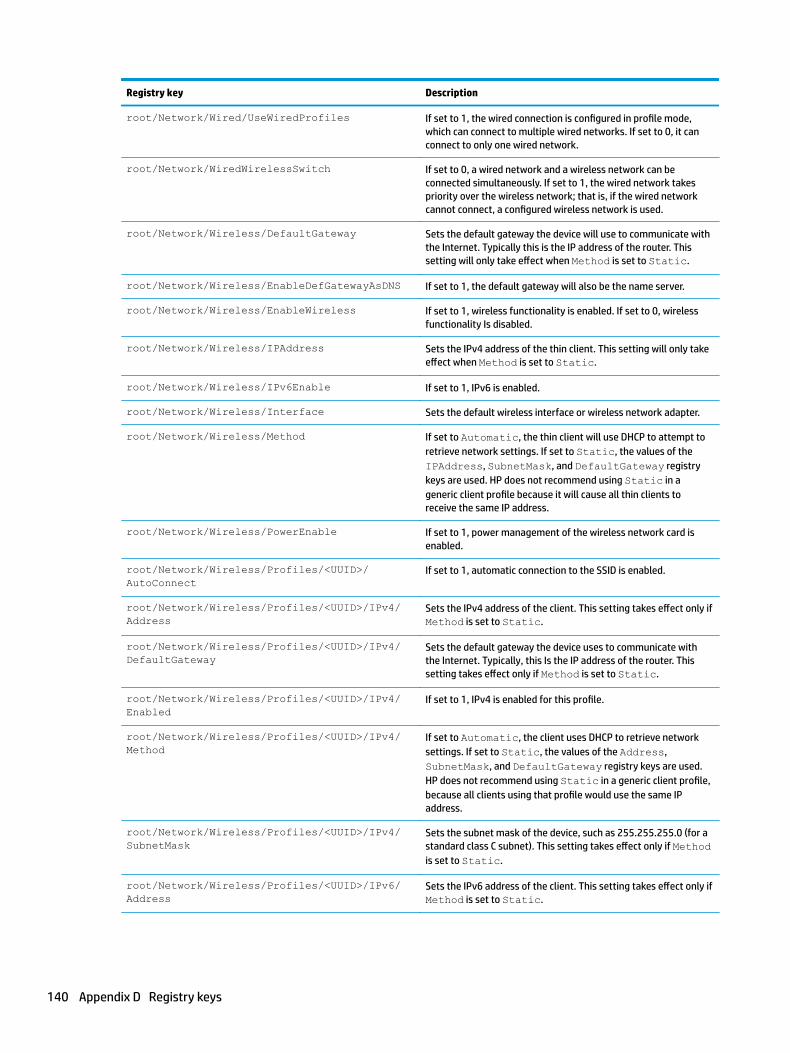
Registry key Description
root/Network/Wired/UseWiredProfiles If set to 1, the wired connection is configured in profile mode, which can connect to multiple wired networks. If set to 0, it can connect to only one wired network.
root/Network/WiredWirelessSwitch If set to 0, a wired network and a wireless network can be connected simultaneously. If set to 1, the wired network takes priority over the wireless network; that is, if the wired network cannot connect, a configured wireless network is used.
root/Network/Wireless/DefaultGateway Sets the default gateway the device will use to communicate with the Internet. Typically this is the IP address of the router. This setting will only take effect when Method is set to Static.
root/Network/Wireless/EnableDefGatewayAsDNS If set to 1, the default gateway will also be the name server.
root/Network/Wireless/EnableWireless If set to 1, wireless functionality is enabled. If set to 0, wireless functionality Is disabled.
root/Network/Wireless/IPAddress Sets the IPv4 address of the thin client. This setting will only take effect when Method is set to Static.
root/Network/Wireless/IPv6Enable If set to 1, IPv6 is enabled.
root/Network/Wireless/Interface Sets the default wireless interface or wireless network adapter.
root/Network/Wireless/Method If set to Automatic, the thin client will use DHCP to attempt to retrieve network settings. If set to Static, the values of the IPAddress, SubnetMask, and DefaultGateway registry keys are used. HP does not recommend using Static in a generic client profile because it will cause all thin clients to receive the same IP address.
root/Network/Wireless/PowerEnable If set to 1, power management of the wireless network card is enabled.
root/Network/Wireless/Profiles/<UUID>/AutoConnect
If set to 1, automatic connection to the SSID is enabled.
root/Network/Wireless/Profiles/<UUID>/IPv4/Address
Sets the IPv4 address of the client. This setting takes effect only if Method is set to Static.
root/Network/Wireless/Profiles/<UUID>/IPv4/DefaultGateway
Sets the default gateway the device uses to communicate with the Internet. Typically, this Is the IP address of the router. This setting takes effect only if Method is set to Static.
root/Network/Wireless/Profiles/<UUID>/IPv4/Enabled
If set to 1, IPv4 is enabled for this profile.
root/Network/Wireless/Profiles/<UUID>/IPv4/Method
If set to Automatic, the client uses DHCP to retrieve network settings. If set to Static, the values of the Address, SubnetMask, and DefaultGateway registry keys are used. HP does not recommend using Static in a generic client profile, because all clients using that profile would use the same IP address.
root/Network/Wireless/Profiles/<UUID>/IPv4/SubnetMask
Sets the subnet mask of the device, such as 255.255.255.0 (for a standard class C subnet). This setting takes effect only if Method is set to Static.
root/Network/Wireless/Profiles/<UUID>/IPv6/Address
Sets the IPv6 address of the client. This setting takes effect only if Method is set to Static.
140 Appendix D Registry keys

Registry key Description
root/Network/Wireless/Profiles/<UUID>/IPv6/DefaultGateway
Sets the default gateway the device uses to communicate with the Internet. Typically, this Is the IP address of the router. This setting takes effect only if Method is set to Static.
root/Network/Wireless/Profiles/<UUID>/IPv6/Enabled
If set to 1, IPv6 is enabled for this profile.
root/Network/Wireless/Profiles/<UUID>/IPv6/Method
If set to Automatic, the client uses DHCP to attempt to retrieve network settings. If set to Static, the values of the Address, SubnetMask, and DefaultGateway registry keys are used. HP does not recommend using Static in a generic client profile, because all clients would use the same IP address.
root/Network/Wireless/Profiles/<UUID>/IPv6/SubnetMask
Sets the subnet mask of the device, which is usually the IPv6 prefix length. This setting takes effect only if Method is set to Static.
root/Network/Wireless/Profiles/<UUID>/PowerEnable
If set to 1, power management of the wireless network card is enabled.
root/Network/Wireless/Profiles/<UUID>/Priority
Defines the priority of the network. For a wireless network, a larger number means a higher priority. High priority is preferred for a wireless network connection.
root/Network/Wireless/Profiles/<UUID>/SSID Sets the wireless access point to use via SSID.
root/Network/Wireless/Profiles/<UUID>/SSIDHidden
Specifies whether the SSID of the wireless access point is hidden.
root/Network/Wireless/Profiles/<UUID>/Security/EAPFAST/AnonyIdentity
Sets the anonymous identity for EAP-FAST authentication.
root/Network/Wireless/Profiles/<UUID>/Security/EAPFAST/FastProvision
Sets the provisioning option for EAP-FAST authentication.
root/Network/Wireless/Profiles/<UUID>/Security/EAPFAST/PACFile
Sets the path to the PAC file for EAP-FAST authentication.
root/Network/Wireless/Profiles/<UUID>/Security/EAPFAST/Password
Sets the password for EAP-FAST authentication.
root/Network/Wireless/Profiles/<UUID>/Security/EAPFAST/Username
Sets the username for EAP-FAST authentication.
root/Network/Wireless/Profiles/<UUID>/Security/EAPPEAP/AnonyIdentity
Sets the anonymous identity for EAP PEAP authentication.
root/Network/Wireless/Profiles/<UUID>/Security/EAPPEAP/CACert
Sets the path to the CA certificate file for EAP PEAP authentication.
root/Network/Wireless/Profiles/<UUID>/Security/EAPPEAP/InnerAuth
Sets the PEAP inner authentication protocol.
root/Network/Wireless/Profiles/<UUID>/Security/EAPPEAP/PEAPVer
Sets the PEAP version.
root/Network/Wireless/Profiles/<UUID>/Security/EAPPEAP/Password
Sets the password for EAP PEAP authentication.
root/Network/Wireless/Profiles/<UUID>/Security/EAPPEAP/Username
Sets the username for EAP PEAP authentication.
root/Network/Wireless/Profiles/<UUID>/Security/EAPTLS/CACert
Sets the path to the CA certificate file for TLS authentication.
Network 141

Registry key Description
root/Network/Wireless/Profiles/<UUID>/Security/EAPTLS/Identity
Sets the identity for TLS authentication.
root/Network/Wireless/Profiles/<UUID>/Security/EAPTLS/PrivateKey
Sets the path to a private key file for TLS authentication.
root/Network/Wireless/Profiles/<UUID>/Security/EAPTLS/PrivateKeyPassword
Sets the password to a private key file for TLS authentication.
root/Network/Wireless/Profiles/<UUID>/Security/EAPTLS/UserCert
Sets the path to a user certificate file for TLS authentication.
root/Network/Wireless/Profiles/<UUID>/Security/EAPTTLS/AnonyIdentity
Sets the anonymous identity for TTLS authentication.
root/Network/Wireless/Profiles/<UUID>/Security/EAPTTLS/CACert
Sets the path to a CA certificate file for TTLS authentication.
root/Network/Wireless/Profiles/<UUID>/Security/EAPTTLS/InnerAuth
Sets the TTLS inner authentication protocol.
root/Network/Wireless/Profiles/<UUID>/Security/EAPTTLS/Password
Sets the password for TTLS authentication.
root/Network/Wireless/Profiles/<UUID>/Security/EAPTTLS/Username
Sets the username for TTLS authentication.
root/Network/Wireless/Profiles/<UUID>/Security/PSK/PreSharedKey
Sets the password for PSK authentication.
root/Network/Wireless/Profiles/<UUID>/Security/Type
Sets the wireless authentication type.
root/Network/Wireless/Profiles/<UUID>/Security/WEP/AuthType
Sets the WEP authentication type.
root/Network/Wireless/Profiles/<UUID>/Security/WEP/Key
Sets the WEP password.
root/Network/Wireless/Profiles/<UUID>/Security/WEP/KeyIndex
Sets the WEP password index.
root/Network/Wireless/Profiles/<UUID>/Security/WirelessBand
Specifies the frequency range selection. Select Auto to scan all wireless channels; select 2.4GHz to scan only 2.4 GHz channels; select 5GHz to scan only 5 GHz channels.
root/Network/Wireless/Profiles/<UUID>/Security/WirelessInterface
Sets the wireless interface for the profile.
root/Network/Wireless/Roaming/enableRoamingOptions
If set to 1, wireless roaming options are configurable.
root/Network/Wireless/Roaming/longScanInterval
Specifies how often, in seconds, to scan for an access point with a stronger signal when the signal strength is above the roaming threshold. The default is 60.
root/Network/Wireless/Roaming/roamingNap Specifies how often, in seconds, the connection sleeps when the wpa_applicant status changes. This helps reduce spurious Wi-Fi events from breaking live connections when roaming occurs.
root/Network/Wireless/Roaming/roamingThreshold
Sets the minimum signal strength, in dBm, allowed before attempting to roam to a stronger access point. Note that this value is negative.
142 Appendix D Registry keys
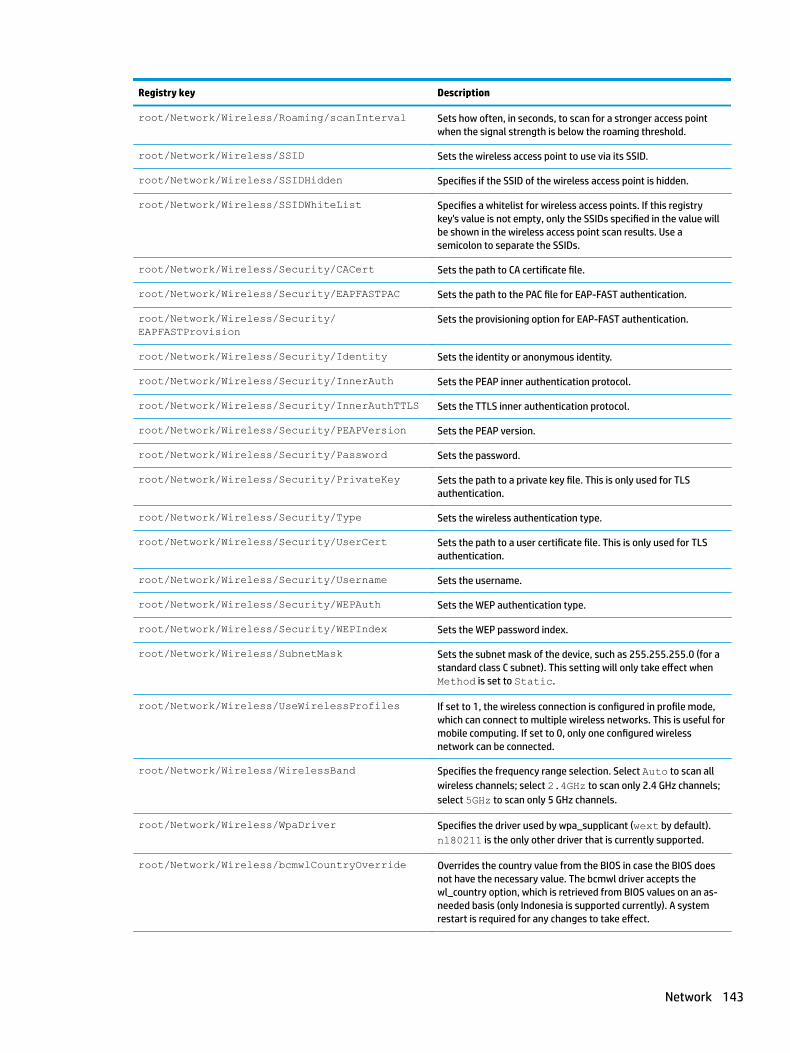
Registry key Description
root/Network/Wireless/Roaming/scanInterval Sets how often, in seconds, to scan for a stronger access point when the signal strength is below the roaming threshold.
root/Network/Wireless/SSID Sets the wireless access point to use via its SSID.
root/Network/Wireless/SSIDHidden Specifies if the SSID of the wireless access point is hidden.
root/Network/Wireless/SSIDWhiteList Specifies a whitelist for wireless access points. If this registry key's value is not empty, only the SSIDs specified in the value will be shown in the wireless access point scan results. Use a semicolon to separate the SSIDs.
root/Network/Wireless/Security/CACert Sets the path to CA certificate file.
root/Network/Wireless/Security/EAPFASTPAC Sets the path to the PAC file for EAP-FAST authentication.
root/Network/Wireless/Security/EAPFASTProvision
Sets the provisioning option for EAP-FAST authentication.
root/Network/Wireless/Security/Identity Sets the identity or anonymous identity.
root/Network/Wireless/Security/InnerAuth Sets the PEAP inner authentication protocol.
root/Network/Wireless/Security/InnerAuthTTLS Sets the TTLS inner authentication protocol.
root/Network/Wireless/Security/PEAPVersion Sets the PEAP version.
root/Network/Wireless/Security/Password Sets the password.
root/Network/Wireless/Security/PrivateKey Sets the path to a private key file. This is only used for TLS authentication.
root/Network/Wireless/Security/Type Sets the wireless authentication type.
root/Network/Wireless/Security/UserCert Sets the path to a user certificate file. This is only used for TLS authentication.
root/Network/Wireless/Security/Username Sets the username.
root/Network/Wireless/Security/WEPAuth Sets the WEP authentication type.
root/Network/Wireless/Security/WEPIndex Sets the WEP password index.
root/Network/Wireless/SubnetMask Sets the subnet mask of the device, such as 255.255.255.0 (for a standard class C subnet). This setting will only take effect when Method is set to Static.
root/Network/Wireless/UseWirelessProfiles If set to 1, the wireless connection is configured in profile mode, which can connect to multiple wireless networks. This is useful for mobile computing. If set to 0, only one configured wireless network can be connected.
root/Network/Wireless/WirelessBand Specifies the frequency range selection. Select Auto to scan all wireless channels; select 2.4GHz to scan only 2.4 GHz channels; select 5GHz to scan only 5 GHz channels.
root/Network/Wireless/WpaDriver Specifies the driver used by wpa_supplicant (wext by default). nl80211 is the only other driver that is currently supported.
root/Network/Wireless/bcmwlCountryOverride Overrides the country value from the BIOS in case the BIOS does not have the necessary value. The bcmwl driver accepts the wl_country option, which is retrieved from BIOS values on an as-needed basis (only Indonesia is supported currently). A system restart is required for any changes to take effect.
Network 143

Registry key Description
root/Network/Wireless/disableUserCreateWirelessProfile
If set to 1, user accounts cannot create wireless profiles from the wireless system tray.
root/Network/Wireless/disableUserWirelessProfileTrayMenu
If set to 1, the wireless menu of the wireless system tray icon is disabled for the user account.
root/Network/Wireless/disableWirelessProfileTrayMenu
If set to 1, the wireless menu of the wireless system tray icon is disabled.
root/Network/Wireless/tryAutoWirelessIfUserFailed
If set to 1, if a user tries to connect to a wireless AP and fails, the wireless module tries to connect wirelessly using all available profiles. If set to 0, if a user tries to connect to a wireless AP and fails, the wireless status is set to disconnected. This is a fallback function.
root/Network/disableLeftClickMenu If set to 1, the left-click menu for the network system tray icon is disabled.
root/Network/disableRightClickMenu If set to 1, the right-click menu for the network system tray icon is disabled.
root/Network/enableVPNMenu If set to 1, the left-click VPN menu accessible from the network taskbar icon is enabled.
root/Network/iPeak/enableIPeak Enables or disables iPeak. If iPeak is not supported on a platform, it is not loaded regardless of the value of this setting.
root/Network/iPeak/ShowStatus If set to 1, the HP Velocity status is displayed as part of the system tray icon. HP Velocity is not supported on the HP t420.
root/Network/iPeak/SingleSidedAccelerate If set to 1, the single-sided acceleration feature of HP Velocity is enabled. If set to 0, this feature is disabled. HP Velocity is not supported on the HP t420 or HP mt20.
root/Network/iPeak/Status If set to 1, HP Velocity is enabled. If set to 2, HP Velocity is enabled in Monitor mode. If set to 0, HP Velocity is disabled. HP Velocity is not supported on the HP t420.
root/Network/userLock If set to 1, and if the network settings have been modified by the user, the network settings are preserved when importing a client profile.
root/Network/userLockEngaged This registry key is set to 1 automatically after the network settings have been modified by the user. You normally do not need to modify this setting.
Power
Registry key Description
root/Power/applet/VisibleInSystray If set to 1, the battery icon is displayed in the system tray.
root/Power/buttons/logout/authorized If set to 1, the logout function is available.
root/Power/buttons/power/authorized If set to 1, the power function is available.
root/Power/buttons/poweroff/authorized If set to 1, the poweroff function is available.
root/Power/buttons/reboot/authorized If set to 1, the reboot function is available.
root/Power/buttons/sleep/authorized If set to 1, the Sleep function is available.
144 Appendix D Registry keys
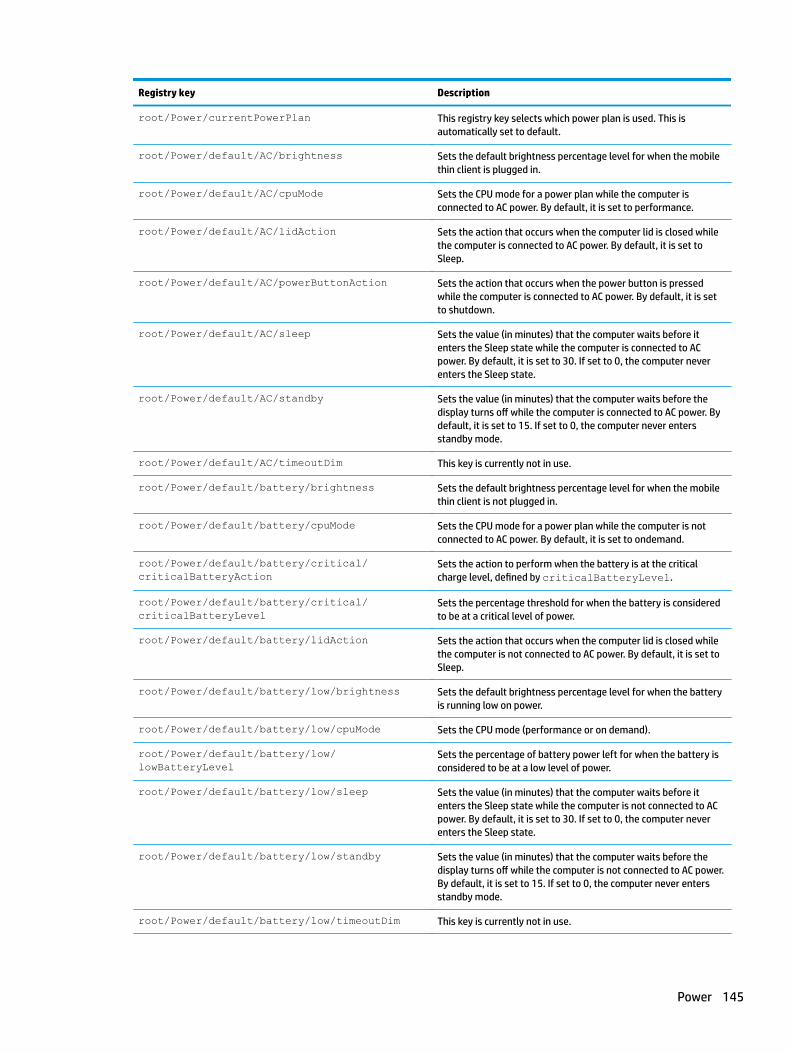
Registry key Description
root/Power/currentPowerPlan This registry key selects which power plan is used. This is automatically set to default.
root/Power/default/AC/brightness Sets the default brightness percentage level for when the mobile thin client is plugged in.
root/Power/default/AC/cpuMode Sets the CPU mode for a power plan while the computer is connected to AC power. By default, it is set to performance.
root/Power/default/AC/lidAction Sets the action that occurs when the computer lid is closed while the computer is connected to AC power. By default, it is set to Sleep.
root/Power/default/AC/powerButtonAction Sets the action that occurs when the power button is pressed while the computer is connected to AC power. By default, it is set to shutdown.
root/Power/default/AC/sleep Sets the value (in minutes) that the computer waits before it enters the Sleep state while the computer is connected to AC power. By default, it is set to 30. If set to 0, the computer never enters the Sleep state.
root/Power/default/AC/standby Sets the value (in minutes) that the computer waits before the display turns off while the computer is connected to AC power. By default, it is set to 15. If set to 0, the computer never enters standby mode.
root/Power/default/AC/timeoutDim This key is currently not in use.
root/Power/default/battery/brightness Sets the default brightness percentage level for when the mobile thin client is not plugged in.
root/Power/default/battery/cpuMode Sets the CPU mode for a power plan while the computer is not connected to AC power. By default, it is set to ondemand.
root/Power/default/battery/critical/criticalBatteryAction
Sets the action to perform when the battery is at the critical charge level, defined by criticalBatteryLevel.
root/Power/default/battery/critical/criticalBatteryLevel
Sets the percentage threshold for when the battery is considered to be at a critical level of power.
root/Power/default/battery/lidAction Sets the action that occurs when the computer lid is closed while the computer is not connected to AC power. By default, it is set to Sleep.
root/Power/default/battery/low/brightness Sets the default brightness percentage level for when the battery is running low on power.
root/Power/default/battery/low/cpuMode Sets the CPU mode (performance or on demand).
root/Power/default/battery/low/lowBatteryLevel
Sets the percentage of battery power left for when the battery is considered to be at a low level of power.
root/Power/default/battery/low/sleep Sets the value (in minutes) that the computer waits before it enters the Sleep state while the computer is not connected to AC power. By default, it is set to 30. If set to 0, the computer never enters the Sleep state.
root/Power/default/battery/low/standby Sets the value (in minutes) that the computer waits before the display turns off while the computer is not connected to AC power. By default, it is set to 15. If set to 0, the computer never enters standby mode.
root/Power/default/battery/low/timeoutDim This key is currently not in use.
Power 145

Registry key Description
root/Power/default/battery/powerButtonAction Specifies what to do when power button is pressed.
root/Power/default/battery/sleep Sets how many minutes to wait before entering Sleep. 0 = never.
root/Power/default/battery/standby Sets how many minutes to wait before turning off the display. 0 = never.
root/Power/default/battery/timeoutDim This key is currently not in use.
SCIM
Registry key Description
root/SCIM/ScimEnabled If set to 1, SCIM is enabled for Chinese, Japanese, and Korean input.
ScepMgr
Registry key Description
root/ScepMgr/General/AutoRenew/Enabled If set to 1, certificates will be renewed automatically before they expire.
root/ScepMgr/General/AutoRenew/TimeFrame Sets the number of days before a certificate's expiration date that the SCEP Manager will try to renew the certificate automatically.
root/ScepMgr/IdentifyingInfo/CommonName Sets the common name to use for SCEP identifying information, such as your name or the Fully-Qualified Domain Name (FQDN) of the device. The FQDN is used by default if this value is left empty.
root/ScepMgr/IdentifyingInfo/CountryName Sets the country or region to use for SCEP identifying information.
root/ScepMgr/IdentifyingInfo/EmailAddress Sets the email address to use for SCEP identifying information.
root/ScepMgr/IdentifyingInfo/LocalityName Sets the locality name to use for SCEP identifying information, such as a city name.
root/ScepMgr/IdentifyingInfo/OrganizationName Sets the organization name to use for SCEP identifying information, such as a company name or government organization name.
root/ScepMgr/IdentifyingInfo/OrganizationUnitName
Sets the organizational unit name to use for SCEP identifying information, such as a department name or section name.
root/ScepMgr/IdentifyingInfo/StateName Sets the state or province to use for SCEP identifying information.
root/ScepMgr/ScepEnroll/ScepServers/<UUID>/CertFileChanged
The registry key is used only to inform other applications that a certificate file has changed. This should not need to be modified.
root/ScepMgr/ScepEnroll/ScepServers/<UUID>/DontVerifyPeer
This registry key is used for https only. If set to 1, the SCEP client does not verify the server certificate. This key is set to 0 by default.
root/ScepMgr/ScepEnroll/ScepServers/<UUID>/KeySize
Sets the key size to use for the generated key pair.
root/ScepMgr/ScepEnroll/ScepServers/<UUID>/ServerName
Sets the SCEP server name.
146 Appendix D Registry keys
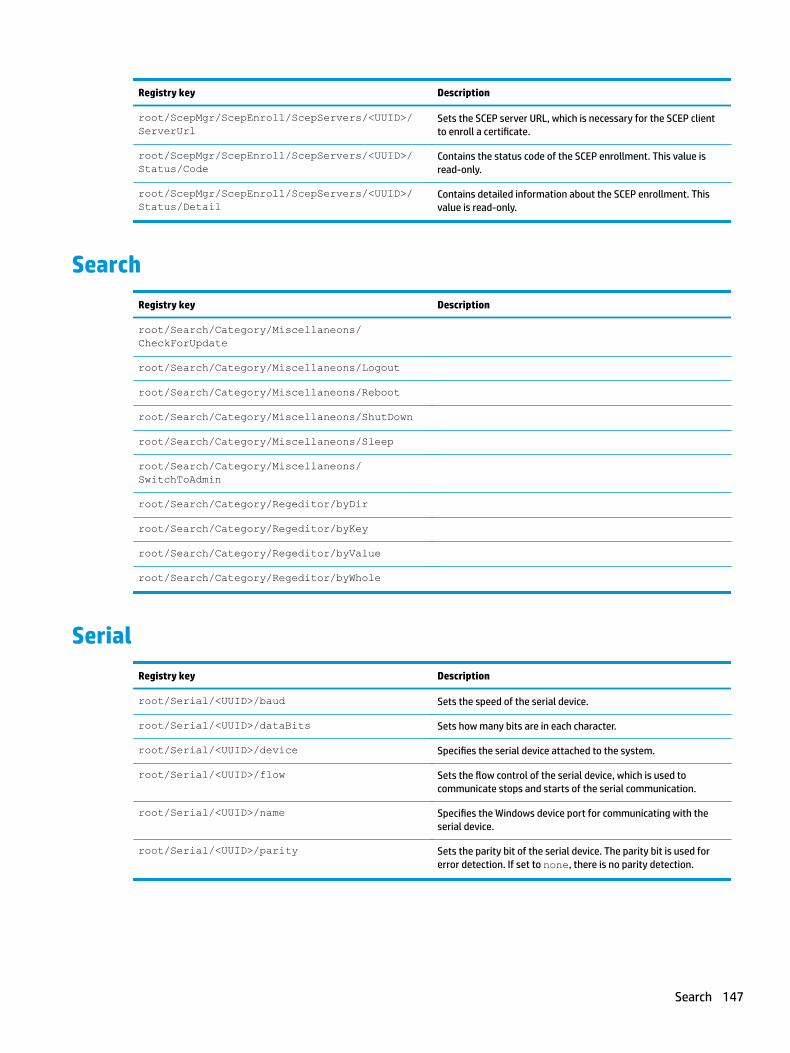
Registry key Description
root/ScepMgr/ScepEnroll/ScepServers/<UUID>/ServerUrl
Sets the SCEP server URL, which is necessary for the SCEP client to enroll a certificate.
root/ScepMgr/ScepEnroll/ScepServers/<UUID>/Status/Code
Contains the status code of the SCEP enrollment. This value is read-only.
root/ScepMgr/ScepEnroll/ScepServers/<UUID>/Status/Detail
Contains detailed information about the SCEP enrollment. This value is read-only.
Search
Registry key Description
root/Search/Category/Miscellaneons/CheckForUpdate
root/Search/Category/Miscellaneons/Logout
root/Search/Category/Miscellaneons/Reboot
root/Search/Category/Miscellaneons/ShutDown
root/Search/Category/Miscellaneons/Sleep
root/Search/Category/Miscellaneons/SwitchToAdmin
root/Search/Category/Regeditor/byDir
root/Search/Category/Regeditor/byKey
root/Search/Category/Regeditor/byValue
root/Search/Category/Regeditor/byWhole
Serial
Registry key Description
root/Serial/<UUID>/baud Sets the speed of the serial device.
root/Serial/<UUID>/dataBits Sets how many bits are in each character.
root/Serial/<UUID>/device Specifies the serial device attached to the system.
root/Serial/<UUID>/flow Sets the flow control of the serial device, which is used to communicate stops and starts of the serial communication.
root/Serial/<UUID>/name Specifies the Windows device port for communicating with the serial device.
root/Serial/<UUID>/parity Sets the parity bit of the serial device. The parity bit is used for error detection. If set to none, there is no parity detection.
Search 147

SystemInfo
Registry key Description
root/SystemInfo/Pages/General If set to 0, the General tab of the System Information window is hidden from end users.
root/SystemInfo/Pages/License If set to 0, the Software License tab of the System Information window is hidden from end users.
root/SystemInfo/Pages/NetTools If set to 0, the Net Tools tab of the System Information window is hidden from end users.
root/SystemInfo/Pages/Network If set to 0, the Network tab of the System Information window is hidden from end users.
root/SystemInfo/Pages/SoftwareInformationTab/ServicePacks
If set to 0, the Service Packs tab in the Software Information section of the System Information window is hidden from end users.
root/SystemInfo/Pages/SoftwareInformationTab/SoftwareInformation
If set to 0, the Software Information tab of the System Information window is hidden from end users.
root/SystemInfo/Pages/SoftwareInformationTab/SoftwareInstalled
If set to 0, the Software Installed tab in the Software Information section of the System Information window is hidden from end users.
root/SystemInfo/Pages/SystemLogs If set to 0, the System Logs tab of the System Information window is hidden from end users.
root/SystemInfo/authorized If set to 0, the System Information button on the taskbar is disabled for end users.
TaskMgr
Registry key Description
root/TaskMgr/General/AlwaysOnTop If set to 1, the Task Manager window is always on top.
USB
Registry key Description
root/USB/Classes/<class type>/ClassID Sets the USB class ID number.
root/USB/Classes/<class type>/DisplayName Sets the USB class name.
root/USB/Classes/<class type>/State Sets whether the class is mapped to the remote host.
root/USB/Classes/<class type>/Visible Sets whether the class is shown in the UI, not shown in the UI, or disabled.
root/USB/Devices/<UUID>/DisplayName Sets the name to show in USB Manager. If not supplied, USB Manager will attempt to generate an appropriate name using device information.
root/USB/Devices/<UUID>/ProductID Sets the product ID of the device.
148 Appendix D Registry keys
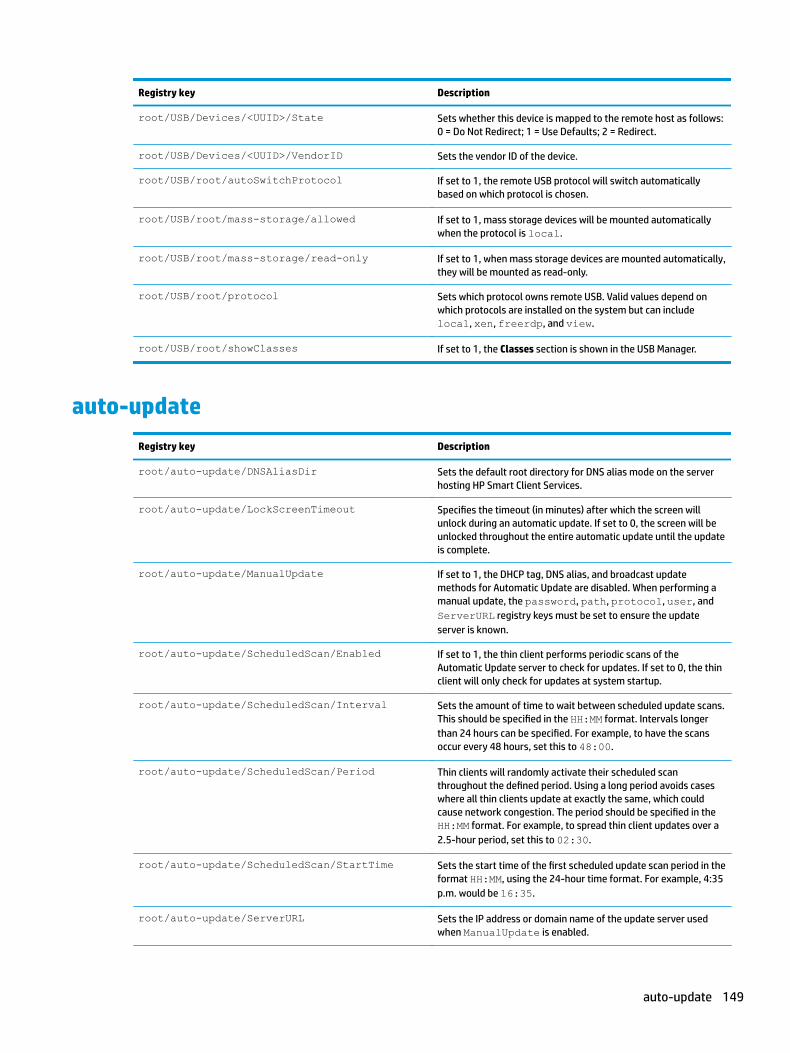
Registry key Description
root/USB/Devices/<UUID>/State Sets whether this device is mapped to the remote host as follows: 0 = Do Not Redirect; 1 = Use Defaults; 2 = Redirect.
root/USB/Devices/<UUID>/VendorID Sets the vendor ID of the device.
root/USB/root/autoSwitchProtocol If set to 1, the remote USB protocol will switch automatically based on which protocol is chosen.
root/USB/root/mass-storage/allowed If set to 1, mass storage devices will be mounted automatically when the protocol is local.
root/USB/root/mass-storage/read-only If set to 1, when mass storage devices are mounted automatically, they will be mounted as read-only.
root/USB/root/protocol Sets which protocol owns remote USB. Valid values depend on which protocols are installed on the system but can include local, xen, freerdp, and view.
root/USB/root/showClasses If set to 1, the Classes section is shown in the USB Manager.
auto-update
Registry key Description
root/auto-update/DNSAliasDir Sets the default root directory for DNS alias mode on the server hosting HP Smart Client Services.
root/auto-update/LockScreenTimeout Specifies the timeout (in minutes) after which the screen will unlock during an automatic update. If set to 0, the screen will be unlocked throughout the entire automatic update until the update is complete.
root/auto-update/ManualUpdate If set to 1, the DHCP tag, DNS alias, and broadcast update methods for Automatic Update are disabled. When performing a manual update, the password, path, protocol, user, and ServerURL registry keys must be set to ensure the update server is known.
root/auto-update/ScheduledScan/Enabled If set to 1, the thin client performs periodic scans of the Automatic Update server to check for updates. If set to 0, the thin client will only check for updates at system startup.
root/auto-update/ScheduledScan/Interval Sets the amount of time to wait between scheduled update scans. This should be specified in the HH:MM format. Intervals longer than 24 hours can be specified. For example, to have the scans occur every 48 hours, set this to 48:00.
root/auto-update/ScheduledScan/Period Thin clients will randomly activate their scheduled scan throughout the defined period. Using a long period avoids cases where all thin clients update at exactly the same, which could cause network congestion. The period should be specified in the HH:MM format. For example, to spread thin client updates over a 2.5-hour period, set this to 02:30.
root/auto-update/ScheduledScan/StartTime Sets the start time of the first scheduled update scan period in the format HH:MM, using the 24-hour time format. For example, 4:35 p.m. would be 16:35.
root/auto-update/ServerURL Sets the IP address or domain name of the update server used when ManualUpdate is enabled.
auto-update 149
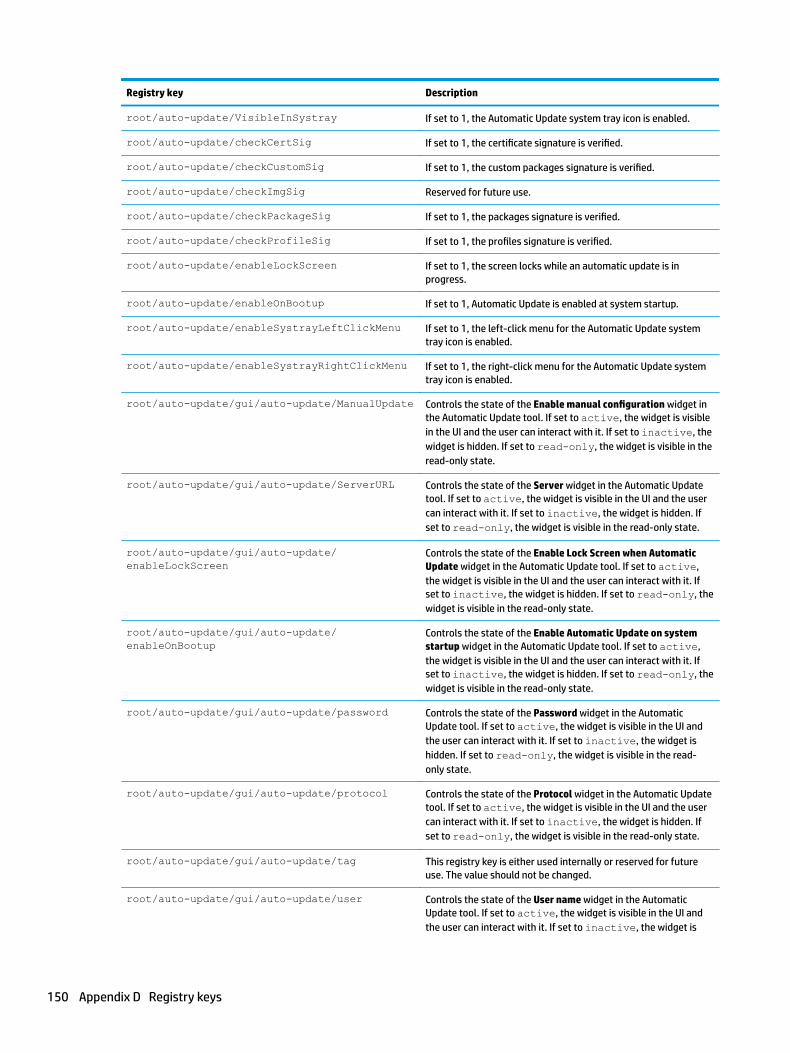
Registry key Description
root/auto-update/VisibleInSystray If set to 1, the Automatic Update system tray icon is enabled.
root/auto-update/checkCertSig If set to 1, the certificate signature is verified.
root/auto-update/checkCustomSig If set to 1, the custom packages signature is verified.
root/auto-update/checkImgSig Reserved for future use.
root/auto-update/checkPackageSig If set to 1, the packages signature is verified.
root/auto-update/checkProfileSig If set to 1, the profiles signature is verified.
root/auto-update/enableLockScreen If set to 1, the screen locks while an automatic update is in progress.
root/auto-update/enableOnBootup If set to 1, Automatic Update is enabled at system startup.
root/auto-update/enableSystrayLeftClickMenu If set to 1, the left-click menu for the Automatic Update system tray icon is enabled.
root/auto-update/enableSystrayRightClickMenu If set to 1, the right-click menu for the Automatic Update system tray icon is enabled.
root/auto-update/gui/auto-update/ManualUpdate Controls the state of the Enable manual configuration widget in the Automatic Update tool. If set to active, the widget is visible in the UI and the user can interact with it. If set to inactive, the widget is hidden. If set to read-only, the widget is visible in the read-only state.
root/auto-update/gui/auto-update/ServerURL Controls the state of the Server widget in the Automatic Update tool. If set to active, the widget is visible in the UI and the user can interact with it. If set to inactive, the widget is hidden. If set to read-only, the widget is visible in the read-only state.
root/auto-update/gui/auto-update/enableLockScreen
Controls the state of the Enable Lock Screen when Automatic Update widget in the Automatic Update tool. If set to active, the widget is visible in the UI and the user can interact with it. If set to inactive, the widget is hidden. If set to read-only, the widget is visible in the read-only state.
root/auto-update/gui/auto-update/enableOnBootup
Controls the state of the Enable Automatic Update on system startup widget in the Automatic Update tool. If set to active, the widget is visible in the UI and the user can interact with it. If set to inactive, the widget is hidden. If set to read-only, the widget is visible in the read-only state.
root/auto-update/gui/auto-update/password Controls the state of the Password widget in the Automatic Update tool. If set to active, the widget is visible in the UI and the user can interact with it. If set to inactive, the widget is hidden. If set to read-only, the widget is visible in the read-only state.
root/auto-update/gui/auto-update/protocol Controls the state of the Protocol widget in the Automatic Update tool. If set to active, the widget is visible in the UI and the user can interact with it. If set to inactive, the widget is hidden. If set to read-only, the widget is visible in the read-only state.
root/auto-update/gui/auto-update/tag This registry key is either used internally or reserved for future use. The value should not be changed.
root/auto-update/gui/auto-update/user Controls the state of the User name widget in the Automatic Update tool. If set to active, the widget is visible in the UI and the user can interact with it. If set to inactive, the widget is
150 Appendix D Registry keys

Registry key Description
hidden. If set to read-only, the widget is visible in the read-only state.
root/auto-update/password Sets the password used when ManualUpdate is enabled. This is only used when protocol is set to ftp. This value will be encrypted.
root/auto-update/path Sets the relative path from the default server URL for when ManualUpdate is enabled. Typically, this is empty or set to auto-update.
root/auto-update/preserveConfig If set to 1, the current thin client configuration settings will be preserved when an image update occurs via Automatic Update.
root/auto-update/protocol Sets the protocol used when ManualUpdate is enabled.
root/auto-update/tag This registry key is obsolete. It previously set the tag number used for DHCP (137). This is now detected via the tag name auto-update.
root/auto-update/user Sets the username used when ManualUpdate is enabled. This is only used when 'protocol' is set to 'ftp'.
background
Registry key Description
root/background/bginfo/alignment Sets the Background Sysinfo text alignment.
root/background/bginfo/enabled If set to 1, system information is displayed on the desktop background (Background Sysinfo).
root/background/bginfo/horizontalLocation Sets the Background Sysinfo location on the X-axis in a percentage.
root/background/bginfo/interval Sets the Background Sysinfo text refresh interval in seconds.
root/background/bginfo/preset Sets the Background Sysinfo preset file to use. If set to none, you can customize the settings in Background Manager.
root/background/bginfo/shadowColor Sets the Background Sysinfo shadow color.
root/background/bginfo/shadowOffset Sets the Background Sysinfo shadow offset. If set to 0, the shadow is disabled.
root/background/bginfo/text Sets the Background Sysinfo text. For more information, see the HP ThinPro white paper Login Screen Customization (available in English only).
root/background/bginfo/textColor Sets the Background Sysinfo text color.
root/background/bginfo/textSize Sets the Background Sysinfo text size.
root/background/bginfo/verticalLocation Sets the Background Sysinfo location on the Y-axis in a percentage.
root/background/desktop/color Specifies the solid color, the background color if any is visible behind the image, or the top color in a gradient.
root/background/desktop/color2 If theme is set to gradient, this key stores the bottom color in the gradient.
background 151
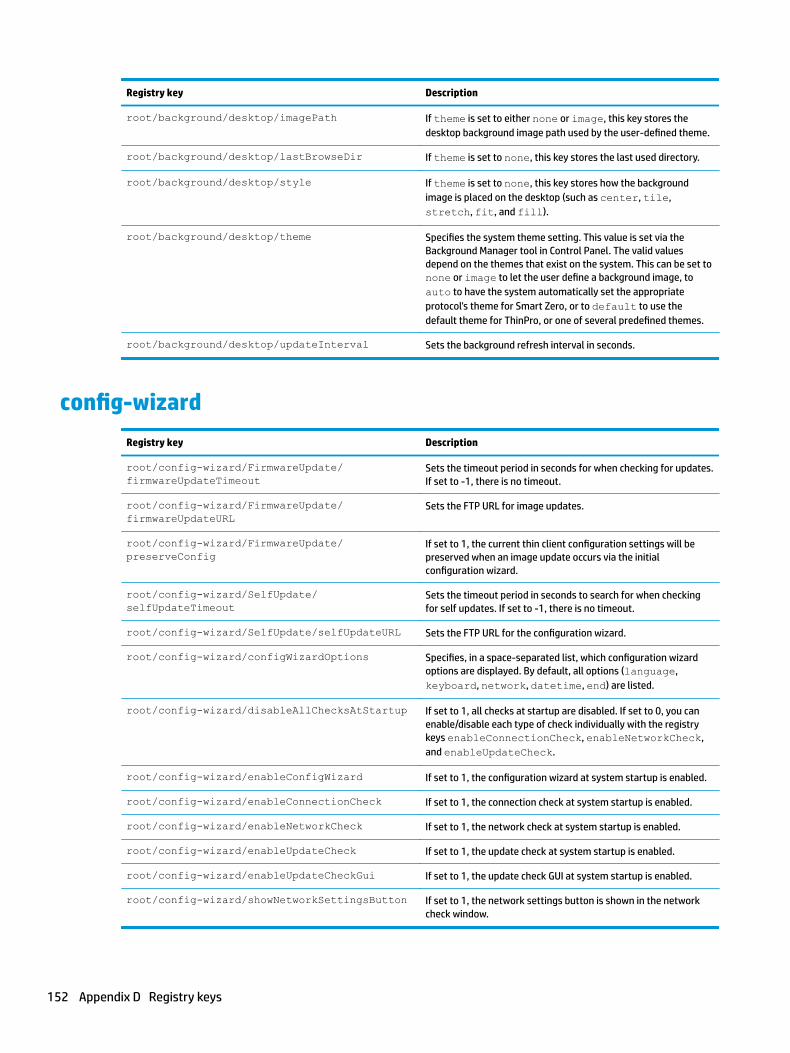
Registry key Description
root/background/desktop/imagePath If theme is set to either none or image, this key stores the desktop background image path used by the user-defined theme.
root/background/desktop/lastBrowseDir If theme is set to none, this key stores the last used directory.
root/background/desktop/style If theme is set to none, this key stores how the background image is placed on the desktop (such as center, tile, stretch, fit, and fill).
root/background/desktop/theme Specifies the system theme setting. This value is set via the Background Manager tool in Control Panel. The valid values depend on the themes that exist on the system. This can be set to none or image to let the user define a background image, to auto to have the system automatically set the appropriate protocol's theme for Smart Zero, or to default to use the default theme for ThinPro, or one of several predefined themes.
root/background/desktop/updateInterval Sets the background refresh interval in seconds.
config-wizard
Registry key Description
root/config-wizard/FirmwareUpdate/firmwareUpdateTimeout
Sets the timeout period in seconds for when checking for updates. If set to -1, there is no timeout.
root/config-wizard/FirmwareUpdate/firmwareUpdateURL
Sets the FTP URL for image updates.
root/config-wizard/FirmwareUpdate/preserveConfig
If set to 1, the current thin client configuration settings will be preserved when an image update occurs via the initial configuration wizard.
root/config-wizard/SelfUpdate/selfUpdateTimeout
Sets the timeout period in seconds to search for when checking for self updates. If set to -1, there is no timeout.
root/config-wizard/SelfUpdate/selfUpdateURL Sets the FTP URL for the configuration wizard.
root/config-wizard/configWizardOptions Specifies, in a space-separated list, which configuration wizard options are displayed. By default, all options (language, keyboard, network, datetime, end) are listed.
root/config-wizard/disableAllChecksAtStartup If set to 1, all checks at startup are disabled. If set to 0, you can enable/disable each type of check individually with the registry keys enableConnectionCheck, enableNetworkCheck, and enableUpdateCheck.
root/config-wizard/enableConfigWizard If set to 1, the configuration wizard at system startup is enabled.
root/config-wizard/enableConnectionCheck If set to 1, the connection check at system startup is enabled.
root/config-wizard/enableNetworkCheck If set to 1, the network check at system startup is enabled.
root/config-wizard/enableUpdateCheck If set to 1, the update check at system startup is enabled.
root/config-wizard/enableUpdateCheckGui If set to 1, the update check GUI at system startup is enabled.
root/config-wizard/showNetworkSettingsButton If set to 1, the network settings button is shown in the network check window.
152 Appendix D Registry keys

desktop
Registry key Description
root/desktop/preferences/arrangeBy Specifies whether to arrange icons by name or type.
root/desktop/preferences/fontFamily Specifies the font used for desktop icons.
root/desktop/preferences/gridSize Specifies, in pixels, the desktop icon grid size. If set to a value less than 64, the size is computed as a proportion of the monitor size.
root/desktop/preferences/iconGlowColor Specifies the color that glows behind the desktop icon when a pointer hovers over it. Valid strings are in the style QColor::setNamedColor(). If not set, the system chooses a color that contrasts with the background.
root/desktop/preferences/iconPercent Specifies the percentage of the grid size to use for the icon. If the value is greater than 0, it is calculated as a proportion of the grid size.
root/desktop/preferences/iconShadowColor Specifies the shadow color behind the desktop icon and text. Valid strings are in the style QColor::setNamedColor(). If not set, the system chooses a color that contrasts with the background.
root/desktop/preferences/menu/arrange/authorized
Specifies whether users can use the arrange function on the desktop.
root/desktop/preferences/menu/create/authorized
Specifies whether users can create connections from the right-click menu on the desktop.
root/desktop/preferences/menu/drag/authorized Specifies whether users can drag and drop icons on the desktop.
root/desktop/preferences/menu/lockScreen/authorized
Specifies whether users can lock the screen from the right-click menu on the desktop.
root/desktop/preferences/menu/logout/authorized
Specifies whether users can log out from the right-click menu on the desktop.
root/desktop/preferences/menu/modeSwitch/authorized
Specifies whether users can switch to administrator mode from the right-click menu on the desktop.
root/desktop/preferences/menu/power/authorized
Specifies whether users can access the power submenu from the right-click menu on the desktop.
root/desktop/preferences/menu/poweroff/authorized
Specifies whether users can turn off the system from the right-click menu on the desktop.
root/desktop/preferences/menu/reboot/authorized
Specifies whether users can restart the system from the right-click menu on the desktop.
root/desktop/preferences/menu/sleep/authorized
Specifies whether users can put the system into the Sleep state from the right-click menu on the desktop.
root/desktop/preferences/menuTextSize Specifies the height of the desktop menu text in pixels. If nonpositive, the height is calculated as a proportion of the monitor size.
root/desktop/preferences/screenMargin Specifies the margin between the screen edges and icons.
root/desktop/preferences/textbold Specifies whether to bold the text.
root/desktop/preferences/textColor Specifies the text color for the desktop icons. Valid strings are in the style QColor::setNamedColor(). If not set, the system chooses a color that contrasts with the background.
desktop 153
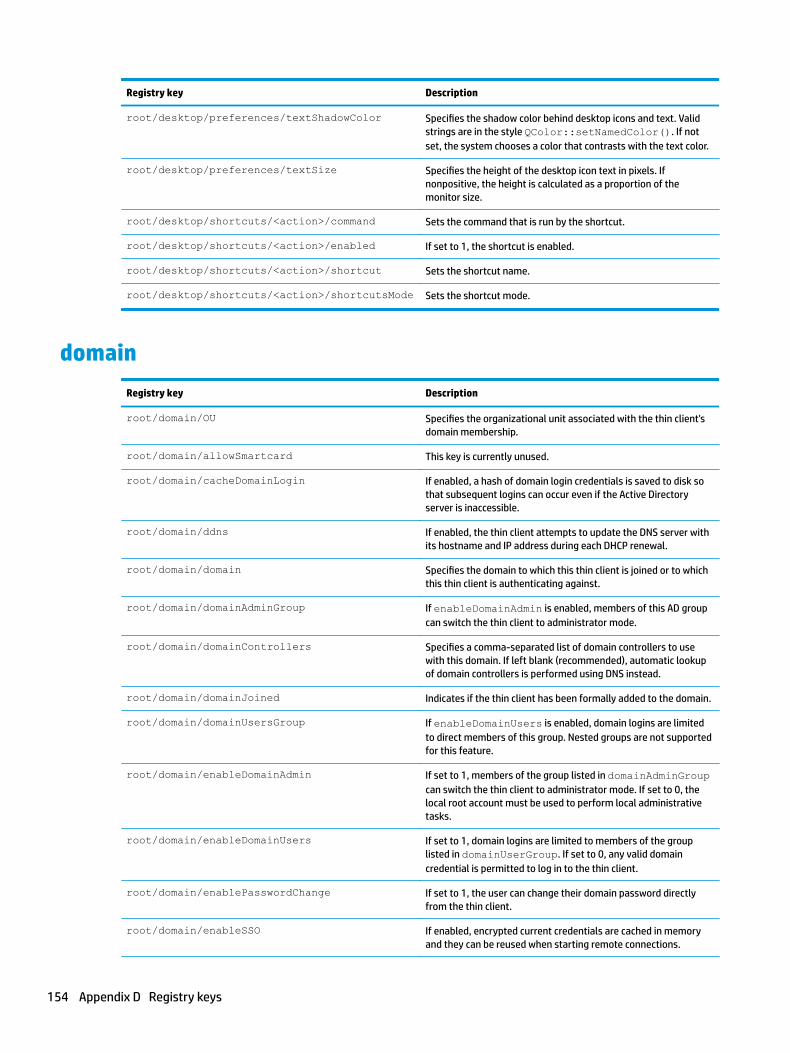
Registry key Description
root/desktop/preferences/textShadowColor Specifies the shadow color behind desktop icons and text. Valid strings are in the style QColor::setNamedColor(). If not set, the system chooses a color that contrasts with the text color.
root/desktop/preferences/textSize Specifies the height of the desktop icon text in pixels. If nonpositive, the height is calculated as a proportion of the monitor size.
root/desktop/shortcuts/<action>/command Sets the command that is run by the shortcut.
root/desktop/shortcuts/<action>/enabled If set to 1, the shortcut is enabled.
root/desktop/shortcuts/<action>/shortcut Sets the shortcut name.
root/desktop/shortcuts/<action>/shortcutsMode Sets the shortcut mode.
domain
Registry key Description
root/domain/OU Specifies the organizational unit associated with the thin client's domain membership.
root/domain/allowSmartcard This key is currently unused.
root/domain/cacheDomainLogin If enabled, a hash of domain login credentials is saved to disk so that subsequent logins can occur even if the Active Directory server is inaccessible.
root/domain/ddns If enabled, the thin client attempts to update the DNS server with its hostname and IP address during each DHCP renewal.
root/domain/domain Specifies the domain to which this thin client is joined or to which this thin client is authenticating against.
root/domain/domainAdminGroup If enableDomainAdmin is enabled, members of this AD group can switch the thin client to administrator mode.
root/domain/domainControllers Specifies a comma-separated list of domain controllers to use with this domain. If left blank (recommended), automatic lookup of domain controllers is performed using DNS instead.
root/domain/domainJoined Indicates if the thin client has been formally added to the domain.
root/domain/domainUsersGroup If enableDomainUsers is enabled, domain logins are limited to direct members of this group. Nested groups are not supported for this feature.
root/domain/enableDomainAdmin If set to 1, members of the group listed in domainAdminGroup can switch the thin client to administrator mode. If set to 0, the local root account must be used to perform local administrative tasks.
root/domain/enableDomainUsers If set to 1, domain logins are limited to members of the group listed in domainUserGroup. If set to 0, any valid domain credential is permitted to log in to the thin client.
root/domain/enablePasswordChange If set to 1, the user can change their domain password directly from the thin client.
root/domain/enableSSO If enabled, encrypted current credentials are cached in memory and they can be reused when starting remote connections.
154 Appendix D Registry keys

Registry key Description
root/domain/loginAtStart If set to 1, and if the thin client has been added to a domain, a login screen is displayed when the thin client starts up. Otherwise, the legacy ThinPro shared desktop is displayed at startup.
root/domain/retainUserRegistry If set to 1, any custom setting changes made by the user are retained between login sessions.
root/domain/workgroup Specifies the workgroup or “short domain” associated with the thin client's domain membership. This is also referred to as the NetBIOS domain name during creation of the Active Directory domain. This value is usually auto-detected during domain authentication by looking up the value from a domain controller.
entries
Registry key Description
root/entries/<UUID>/command
root/entries/<UUID>/folder
root/entries/<UUID>/icon
root/entries/<UUID>/label
root/entries/<UUID>/metaInfo
root/entries/<UUID>/onDesktop
root/entries/<UUID>/onMenu
firewall
Registry key Description
root/firewall/direct/pptp-rule
root/firewall/icmp-blocks
root/firewall/interfaces
root/firewall/masquerade
root/firewall/ports
root/firewall/services/<service>/checked
root/firewall/services/<service>/description
root/firewall/services/<service>/destinations/ipv4
root/firewall/services/<service>/destinations/ipv6
root/firewall/services/<service>/modules
root/firewall/services/<service>/port-protocols
entries 155
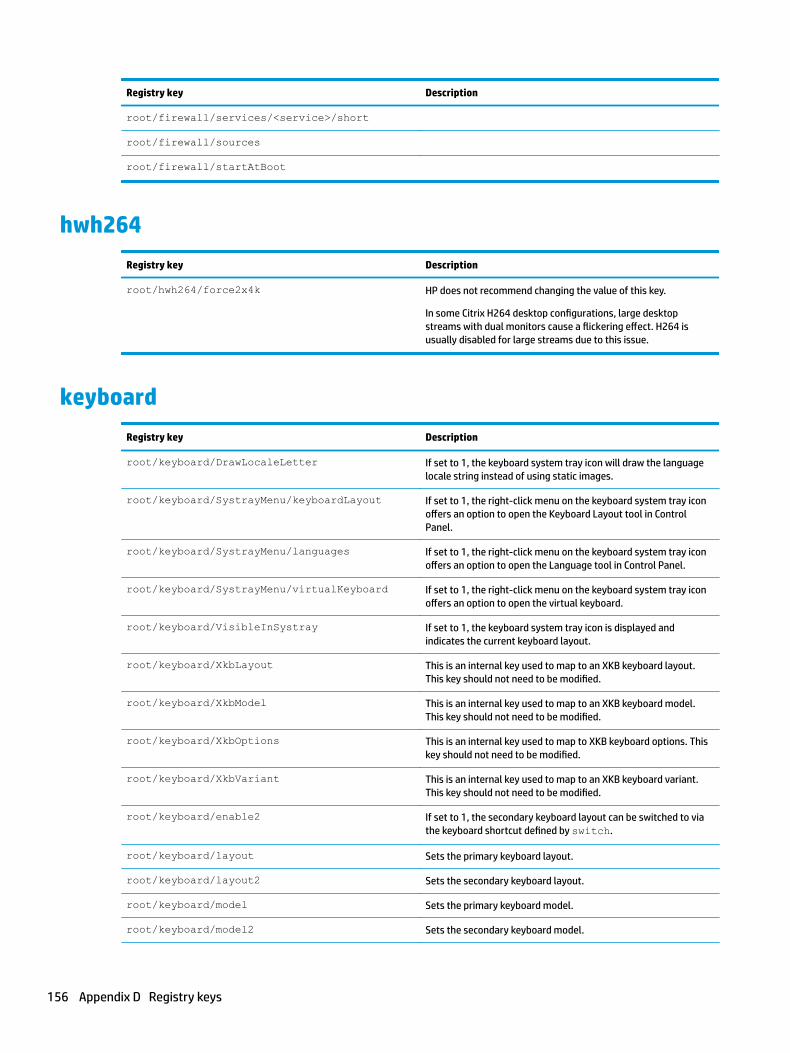
Registry key Description
root/firewall/services/<service>/short
root/firewall/sources
root/firewall/startAtBoot
hwh264
Registry key Description
root/hwh264/force2x4k HP does not recommend changing the value of this key.
In some Citrix H264 desktop configurations, large desktop streams with dual monitors cause a flickering effect. H264 is usually disabled for large streams due to this issue.
keyboard
Registry key Description
root/keyboard/DrawLocaleLetter If set to 1, the keyboard system tray icon will draw the language locale string instead of using static images.
root/keyboard/SystrayMenu/keyboardLayout If set to 1, the right-click menu on the keyboard system tray icon offers an option to open the Keyboard Layout tool in Control Panel.
root/keyboard/SystrayMenu/languages If set to 1, the right-click menu on the keyboard system tray icon offers an option to open the Language tool in Control Panel.
root/keyboard/SystrayMenu/virtualKeyboard If set to 1, the right-click menu on the keyboard system tray icon offers an option to open the virtual keyboard.
root/keyboard/VisibleInSystray If set to 1, the keyboard system tray icon is displayed and indicates the current keyboard layout.
root/keyboard/XkbLayout This is an internal key used to map to an XKB keyboard layout. This key should not need to be modified.
root/keyboard/XkbModel This is an internal key used to map to an XKB keyboard model. This key should not need to be modified.
root/keyboard/XkbOptions This is an internal key used to map to XKB keyboard options. This key should not need to be modified.
root/keyboard/XkbVariant This is an internal key used to map to an XKB keyboard variant. This key should not need to be modified.
root/keyboard/enable2 If set to 1, the secondary keyboard layout can be switched to via the keyboard shortcut defined by switch.
root/keyboard/layout Sets the primary keyboard layout.
root/keyboard/layout2 Sets the secondary keyboard layout.
root/keyboard/model Sets the primary keyboard model.
root/keyboard/model2 Sets the secondary keyboard model.
156 Appendix D Registry keys

Registry key Description
root/keyboard/numlock If set to 1, the Num Lock function is enabled at system startup. This registry key is intentionally ignored on mobile thin clients.
root/keyboard/switch Sets the keyboard shortcut for switching between the first and second keyboard layout (enable2 must also be set to 1). Valid values are as follows: grp:ctrl_shift_toggle, grp:ctrl_alt_toggle, grp:alt_shift_toggle.
root/keyboard/variant Sets the primary keyboard variant.
root/keyboard/variant2 Sets the secondary keyboard variant.
logging
Registry key Description
root/logging/general/debug If set to 1, debugging is enabled for all debug-supported subsystems. This is usually used in conjunction with generateDiagnostic.sh or the System Information Diagnostic tool to generate a diagnostic bundle with system debug logs included.
root/logging/general/debugLevel Sets the debug level. This value will be leveraged by other modules to generate the corresponding logs.
root/logging/general/showDebugLevelBox If set to 1, the Debug level option on the System Logs tab of the System Information window will be available to end users. If set to 0, the option is available to administrators only.
login
Registry key Description
root/login/buttons/configure/authorized If set to 1, the Configuration button is available at the login screen.
root/login/buttons/info/authorized If set to 1, the System Information button is available at the login screen.
root/login/keyboard/authorized If set to 1, keyboard layout settings can be configured at the login screen.
root/login/locale/authorized If set to 1, language settings can be configured at the login screen.
root/login/mouse/authorized If set to 1, mouse settings can be configured at the login screen.
root/login/onscreenKeyboard/authorized If set to 1, the onscreen keyboard is available at the login screen.
root/login/power/authorized If set to 1, the power button is available at the login screen.
root/login/poweroff/authorized If set to 1, the shut down function is available at the login screen.
root/login/reboot/authorized If set to 1, the restart function is available at the login screen.
root/login/show/authorized If set to 1, the button drawer containing additional options is available at the login screen.
logging 157
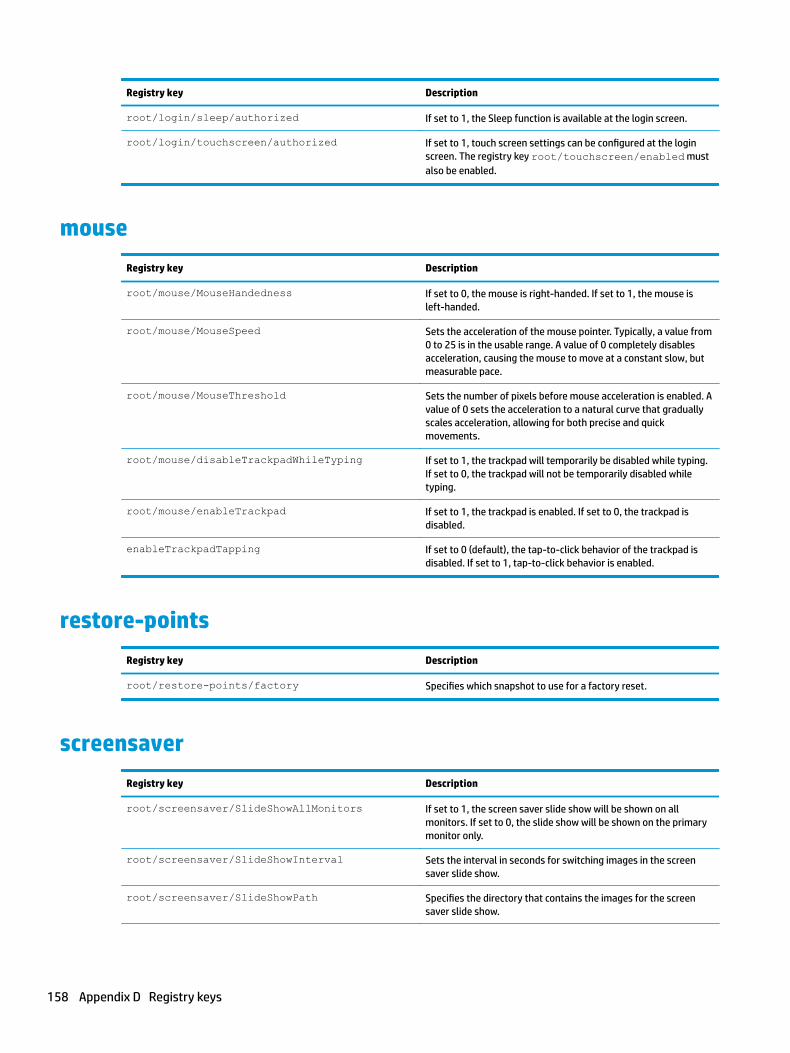
Registry key Description
root/login/sleep/authorized If set to 1, the Sleep function is available at the login screen.
root/login/touchscreen/authorized If set to 1, touch screen settings can be configured at the login screen. The registry key root/touchscreen/enabled must also be enabled.
mouse
Registry key Description
root/mouse/MouseHandedness If set to 0, the mouse is right-handed. If set to 1, the mouse is left-handed.
root/mouse/MouseSpeed Sets the acceleration of the mouse pointer. Typically, a value from 0 to 25 is in the usable range. A value of 0 completely disables acceleration, causing the mouse to move at a constant slow, but measurable pace.
root/mouse/MouseThreshold Sets the number of pixels before mouse acceleration is enabled. A value of 0 sets the acceleration to a natural curve that gradually scales acceleration, allowing for both precise and quick movements.
root/mouse/disableTrackpadWhileTyping If set to 1, the trackpad will temporarily be disabled while typing. If set to 0, the trackpad will not be temporarily disabled while typing.
root/mouse/enableTrackpad If set to 1, the trackpad is enabled. If set to 0, the trackpad is disabled.
enableTrackpadTapping If set to 0 (default), the tap-to-click behavior of the trackpad is disabled. If set to 1, tap-to-click behavior is enabled.
restore-points
Registry key Description
root/restore-points/factory Specifies which snapshot to use for a factory reset.
screensaver
Registry key Description
root/screensaver/SlideShowAllMonitors If set to 1, the screen saver slide show will be shown on all monitors. If set to 0, the slide show will be shown on the primary monitor only.
root/screensaver/SlideShowInterval Sets the interval in seconds for switching images in the screen saver slide show.
root/screensaver/SlideShowPath Specifies the directory that contains the images for the screen saver slide show.
158 Appendix D Registry keys
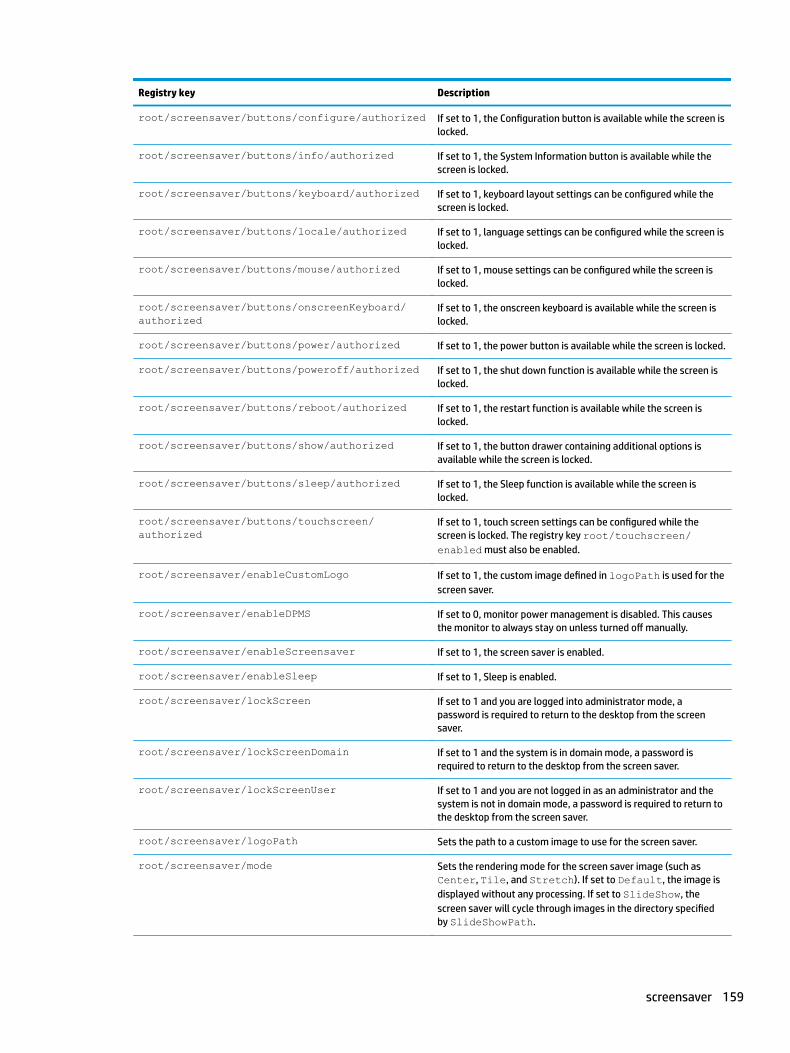
Registry key Description
root/screensaver/buttons/configure/authorized If set to 1, the Configuration button is available while the screen is locked.
root/screensaver/buttons/info/authorized If set to 1, the System Information button is available while the screen is locked.
root/screensaver/buttons/keyboard/authorized If set to 1, keyboard layout settings can be configured while the screen is locked.
root/screensaver/buttons/locale/authorized If set to 1, language settings can be configured while the screen is locked.
root/screensaver/buttons/mouse/authorized If set to 1, mouse settings can be configured while the screen is locked.
root/screensaver/buttons/onscreenKeyboard/authorized
If set to 1, the onscreen keyboard is available while the screen is locked.
root/screensaver/buttons/power/authorized If set to 1, the power button is available while the screen is locked.
root/screensaver/buttons/poweroff/authorized If set to 1, the shut down function is available while the screen is locked.
root/screensaver/buttons/reboot/authorized If set to 1, the restart function is available while the screen is locked.
root/screensaver/buttons/show/authorized If set to 1, the button drawer containing additional options is available while the screen is locked.
root/screensaver/buttons/sleep/authorized If set to 1, the Sleep function is available while the screen is locked.
root/screensaver/buttons/touchscreen/authorized
If set to 1, touch screen settings can be configured while the screen is locked. The registry key root/touchscreen/enabled must also be enabled.
root/screensaver/enableCustomLogo If set to 1, the custom image defined in logoPath is used for the screen saver.
root/screensaver/enableDPMS If set to 0, monitor power management is disabled. This causes the monitor to always stay on unless turned off manually.
root/screensaver/enableScreensaver If set to 1, the screen saver is enabled.
root/screensaver/enableSleep If set to 1, Sleep is enabled.
root/screensaver/lockScreen If set to 1 and you are logged into administrator mode, a password is required to return to the desktop from the screen saver.
root/screensaver/lockScreenDomain If set to 1 and the system is in domain mode, a password is required to return to the desktop from the screen saver.
root/screensaver/lockScreenUser If set to 1 and you are not logged in as an administrator and the system is not in domain mode, a password is required to return to the desktop from the screen saver.
root/screensaver/logoPath Sets the path to a custom image to use for the screen saver.
root/screensaver/mode Sets the rendering mode for the screen saver image (such as Center, Tile, and Stretch). If set to Default, the image is displayed without any processing. If set to SlideShow, the screen saver will cycle through images in the directory specified by SlideShowPath.
screensaver 159

Registry key Description
root/screensaver/off Sets the timeout delay in minutes before the monitor turns off.
root/screensaver/origImageCopyPath This is the path where the custom image is saved when mode is set to Default.
root/screensaver/solidColor If useSolidColor is on and enableCustomLogo is off, this solid color is used for the screen saver.
root/screensaver/standby Sets the timeout delay in minutes before the monitor goes into standby mode.
root/screensaver/suspend Sets the timeout delay in minutes before the monitor goes into suspend mode.
root/screensaver/timeoutScreensaver Sets the timeout delay in minutes before the screen saver starts.
root/screensaver/timeoutSleep Sets the timeout delay in minutes before the thin client goes into the Sleep state.
root/screensaver/useSolidColor If set to 1 and enableCustomLogo is off, the value of the solidColor key is used by the screen saver.
security
Registry key Description
root/security/SecurityFeaturs/SpeculativeStoreBypassControl
Controls whether mitigations for Speculative Store Bypass (CVE-2018-3639) are enabled. By default, these mitigations are not enabled. To enable them, set the key value to on.
For any change to this key to take effect, reboot the computer.
root/security/authenticationFailDelay Sets the approximate time, in milliseconds, to delay after a failed login attempt. The actual time will vary plus or minus 25% of this value. For example, use a value of 3000 to obtain a delay of approximately 3 seconds.
root/security/domainEntryMode If set to 1, the domain is expected to be entered in a separate text field labeled Domain. if set to 0, the domain is expected to be entered as part of the User field.
root/security/enableLockOverride If set to 1, administrators can override the screen lock of a local desktop.
root/security/enableSecretPeek If set to 1, password and PIN dialogs will have a button that, while selected, will show the entered password/PIN in clear text.
root/security/encryption/identity/encryptedSecretCipher
Sets the algorithm for symmetric encryption of a secret. All algorithms use an appropriate amount of random salt, which is regenerated each time the secret is stored. The encryption key is different on each thin client, and encryption and decryption are available only to authorized programs. The supported cipher list includes most OpenSSL ciphers and ChaCha20–Poly1305.
root/security/encryption/identity/encryptedSecretTTL
Sets the number of seconds since the last successful login that a stored encrypted secret will be considered valid. If set to a negative number, encrypted secrets will not time out.
root/security/encryption/identity/encryptedSecretTTLnonSSO
Specifies the number of seconds that a stored, non-SSO encrypted secret is considered valid. If set to a nonpositive number, encrypted secrets do not time out.
160 Appendix D Registry keys
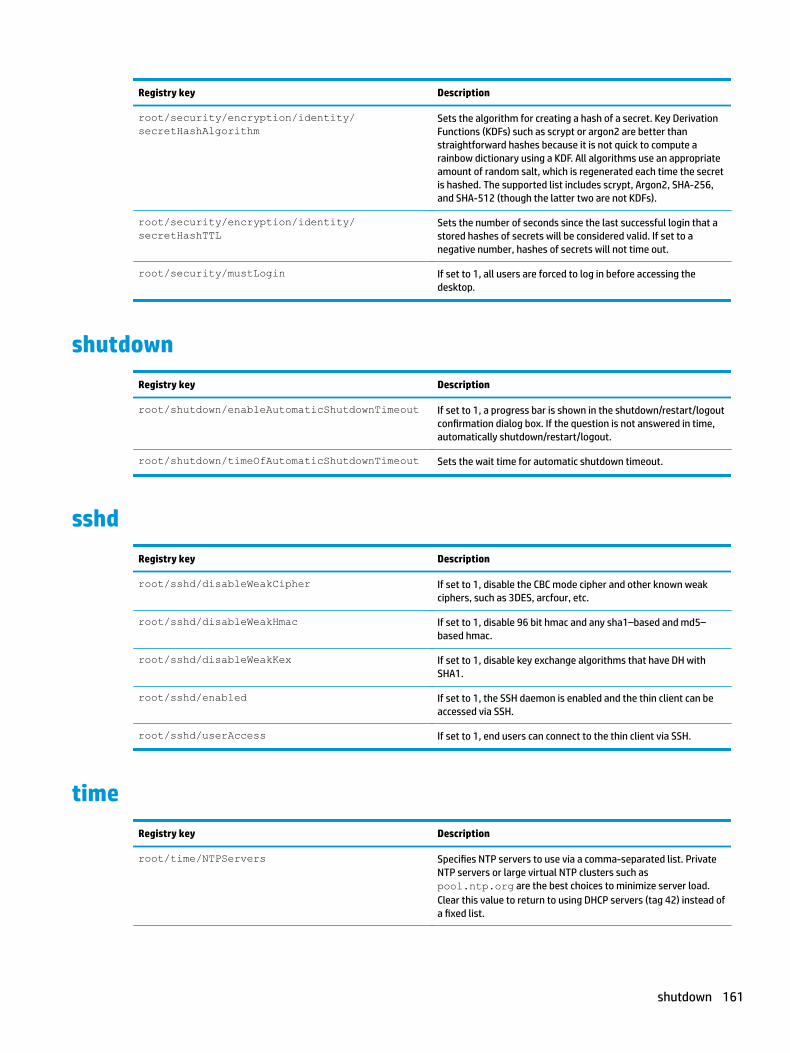
Registry key Description
root/security/encryption/identity/secretHashAlgorithm
Sets the algorithm for creating a hash of a secret. Key Derivation Functions (KDFs) such as scrypt or argon2 are better than straightforward hashes because it is not quick to compute a rainbow dictionary using a KDF. All algorithms use an appropriate amount of random salt, which is regenerated each time the secret is hashed. The supported list includes scrypt, Argon2, SHA-256, and SHA-512 (though the latter two are not KDFs).
root/security/encryption/identity/secretHashTTL
Sets the number of seconds since the last successful login that a stored hashes of secrets will be considered valid. If set to a negative number, hashes of secrets will not time out.
root/security/mustLogin If set to 1, all users are forced to log in before accessing the desktop.
shutdown
Registry key Description
root/shutdown/enableAutomaticShutdownTimeout If set to 1, a progress bar is shown in the shutdown/restart/logout confirmation dialog box. If the question is not answered in time, automatically shutdown/restart/logout.
root/shutdown/timeOfAutomaticShutdownTimeout Sets the wait time for automatic shutdown timeout.
sshd
Registry key Description
root/sshd/disableWeakCipher If set to 1, disable the CBC mode cipher and other known weak ciphers, such as 3DES, arcfour, etc.
root/sshd/disableWeakHmac If set to 1, disable 96 bit hmac and any sha1–based and md5–based hmac.
root/sshd/disableWeakKex If set to 1, disable key exchange algorithms that have DH with SHA1.
root/sshd/enabled If set to 1, the SSH daemon is enabled and the thin client can be accessed via SSH.
root/sshd/userAccess If set to 1, end users can connect to the thin client via SSH.
time
Registry key Description
root/time/NTPServers Specifies NTP servers to use via a comma-separated list. Private NTP servers or large virtual NTP clusters such as pool.ntp.org are the best choices to minimize server load. Clear this value to return to using DHCP servers (tag 42) instead of a fixed list.
shutdown 161
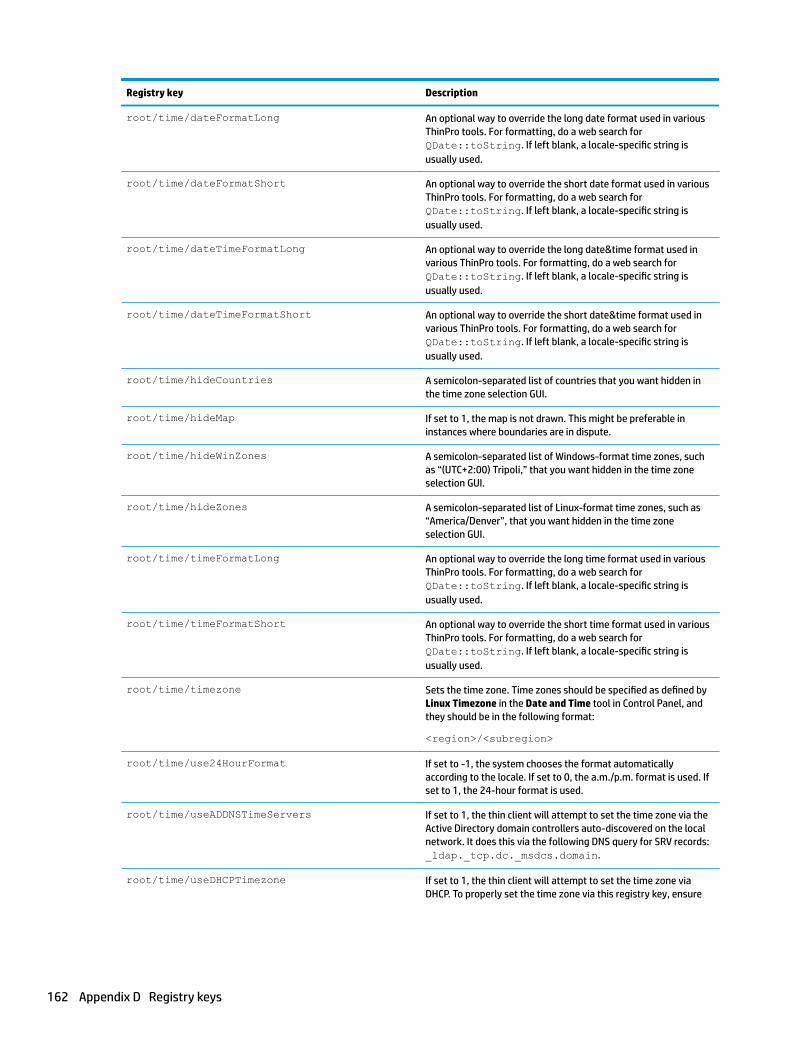
Registry key Description
root/time/dateFormatLong An optional way to override the long date format used in various ThinPro tools. For formatting, do a web search for QDate::toString. If left blank, a locale-specific string is usually used.
root/time/dateFormatShort An optional way to override the short date format used in various ThinPro tools. For formatting, do a web search for QDate::toString. If left blank, a locale-specific string is usually used.
root/time/dateTimeFormatLong An optional way to override the long date&time format used in various ThinPro tools. For formatting, do a web search for QDate::toString. If left blank, a locale-specific string is usually used.
root/time/dateTimeFormatShort An optional way to override the short date&time format used in various ThinPro tools. For formatting, do a web search for QDate::toString. If left blank, a locale-specific string is usually used.
root/time/hideCountries A semicolon-separated list of countries that you want hidden in the time zone selection GUI.
root/time/hideMap If set to 1, the map is not drawn. This might be preferable in instances where boundaries are in dispute.
root/time/hideWinZones A semicolon-separated list of Windows-format time zones, such as “(UTC+2:00) Tripoli,” that you want hidden in the time zone selection GUI.
root/time/hideZones A semicolon-separated list of Linux-format time zones, such as “America/Denver”, that you want hidden in the time zone selection GUI.
root/time/timeFormatLong An optional way to override the long time format used in various ThinPro tools. For formatting, do a web search for QDate::toString. If left blank, a locale-specific string is usually used.
root/time/timeFormatShort An optional way to override the short time format used in various ThinPro tools. For formatting, do a web search for QDate::toString. If left blank, a locale-specific string is usually used.
root/time/timezone Sets the time zone. Time zones should be specified as defined by Linux Timezone in the Date and Time tool in Control Panel, and they should be in the following format:
<region>/<subregion>
root/time/use24HourFormat If set to -1, the system chooses the format automatically according to the locale. If set to 0, the a.m./p.m. format is used. If set to 1, the 24-hour format is used.
root/time/useADDNSTimeServers If set to 1, the thin client will attempt to set the time zone via the Active Directory domain controllers auto-discovered on the local network. It does this via the following DNS query for SRV records: _ldap._tcp.dc._msdcs.domain.
root/time/useDHCPTimezone If set to 1, the thin client will attempt to set the time zone via DHCP. To properly set the time zone via this registry key, ensure
162 Appendix D Registry keys
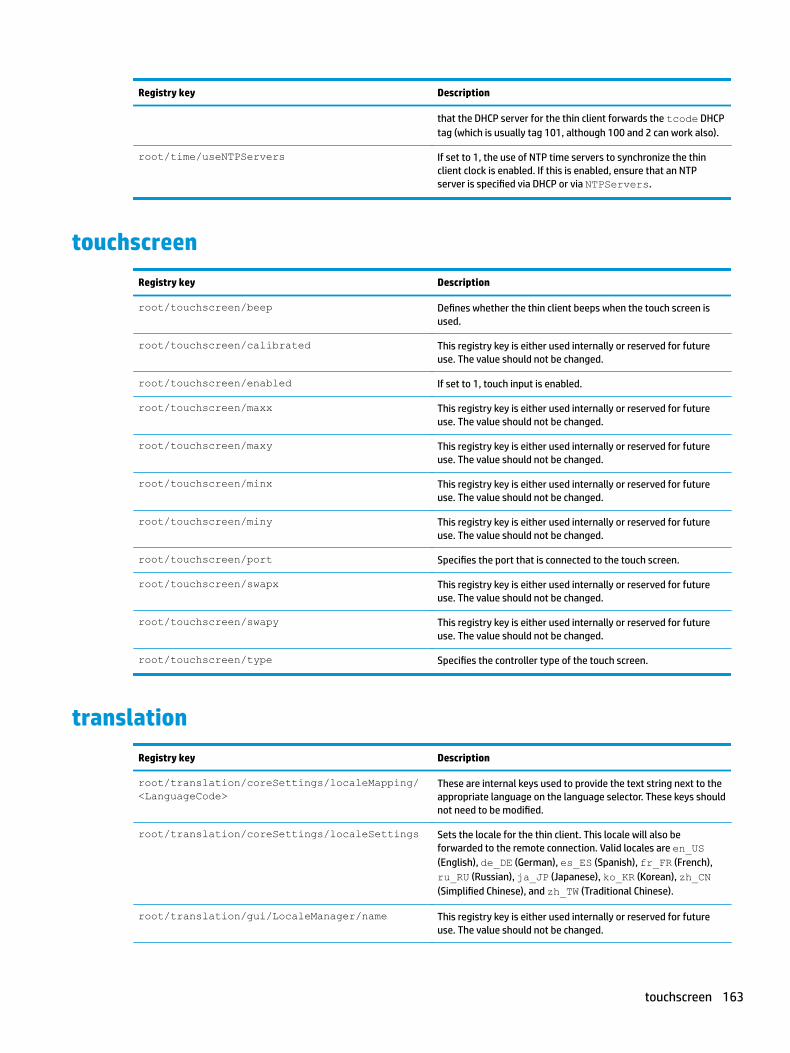
Registry key Description
that the DHCP server for the thin client forwards the tcode DHCP tag (which is usually tag 101, although 100 and 2 can work also).
root/time/useNTPServers If set to 1, the use of NTP time servers to synchronize the thin client clock is enabled. If this is enabled, ensure that an NTP server is specified via DHCP or via NTPServers.
touchscreen
Registry key Description
root/touchscreen/beep Defines whether the thin client beeps when the touch screen is used.
root/touchscreen/calibrated This registry key is either used internally or reserved for future use. The value should not be changed.
root/touchscreen/enabled If set to 1, touch input is enabled.
root/touchscreen/maxx This registry key is either used internally or reserved for future use. The value should not be changed.
root/touchscreen/maxy This registry key is either used internally or reserved for future use. The value should not be changed.
root/touchscreen/minx This registry key is either used internally or reserved for future use. The value should not be changed.
root/touchscreen/miny This registry key is either used internally or reserved for future use. The value should not be changed.
root/touchscreen/port Specifies the port that is connected to the touch screen.
root/touchscreen/swapx This registry key is either used internally or reserved for future use. The value should not be changed.
root/touchscreen/swapy This registry key is either used internally or reserved for future use. The value should not be changed.
root/touchscreen/type Specifies the controller type of the touch screen.
translation
Registry key Description
root/translation/coreSettings/localeMapping/<LanguageCode>
These are internal keys used to provide the text string next to the appropriate language on the language selector. These keys should not need to be modified.
root/translation/coreSettings/localeSettings Sets the locale for the thin client. This locale will also be forwarded to the remote connection. Valid locales are en_US (English), de_DE (German), es_ES (Spanish), fr_FR (French), ru_RU (Russian), ja_JP (Japanese), ko_KR (Korean), zh_CN (Simplified Chinese), and zh_TW (Traditional Chinese).
root/translation/gui/LocaleManager/name This registry key is either used internally or reserved for future use. The value should not be changed.
touchscreen 163
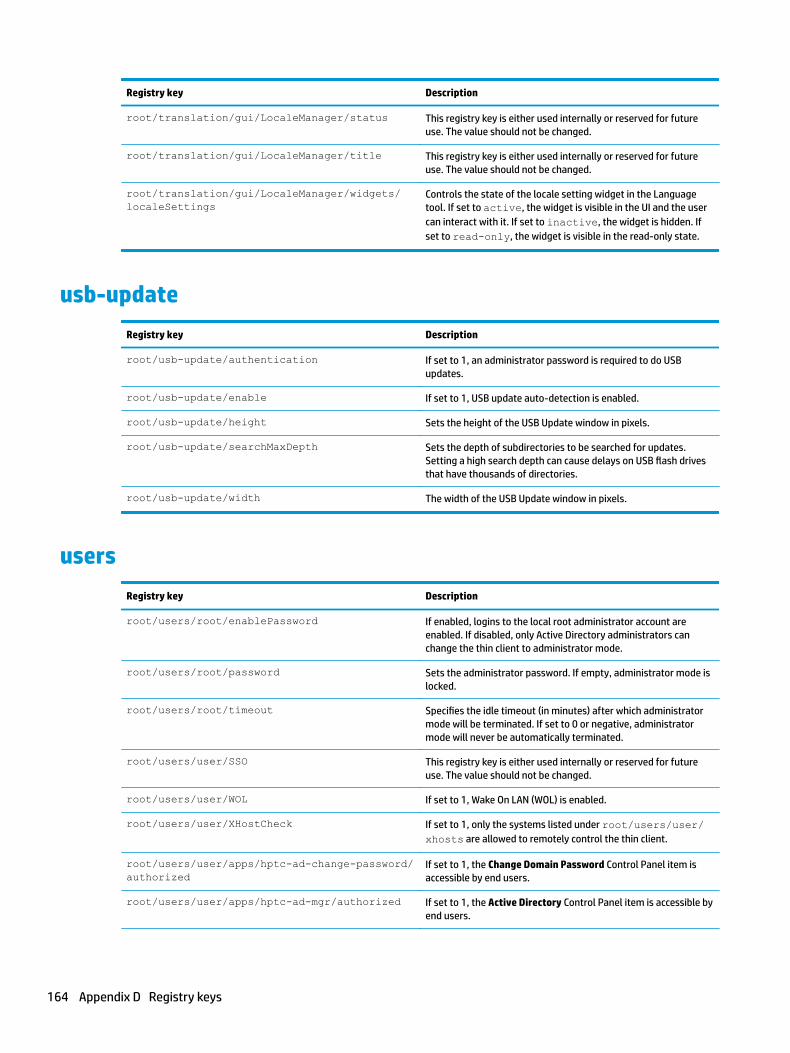
Registry key Description
root/translation/gui/LocaleManager/status This registry key is either used internally or reserved for future use. The value should not be changed.
root/translation/gui/LocaleManager/title This registry key is either used internally or reserved for future use. The value should not be changed.
root/translation/gui/LocaleManager/widgets/localeSettings
Controls the state of the locale setting widget in the Language tool. If set to active, the widget is visible in the UI and the user can interact with it. If set to inactive, the widget is hidden. If set to read-only, the widget is visible in the read-only state.
usb-update
Registry key Description
root/usb-update/authentication If set to 1, an administrator password is required to do USB updates.
root/usb-update/enable If set to 1, USB update auto-detection is enabled.
root/usb-update/height Sets the height of the USB Update window in pixels.
root/usb-update/searchMaxDepth Sets the depth of subdirectories to be searched for updates. Setting a high search depth can cause delays on USB flash drives that have thousands of directories.
root/usb-update/width The width of the USB Update window in pixels.
users
Registry key Description
root/users/root/enablePassword If enabled, logins to the local root administrator account are enabled. If disabled, only Active Directory administrators can change the thin client to administrator mode.
root/users/root/password Sets the administrator password. If empty, administrator mode is locked.
root/users/root/timeout Specifies the idle timeout (in minutes) after which administrator mode will be terminated. If set to 0 or negative, administrator mode will never be automatically terminated.
root/users/user/SSO This registry key is either used internally or reserved for future use. The value should not be changed.
root/users/user/WOL If set to 1, Wake On LAN (WOL) is enabled.
root/users/user/XHostCheck If set to 1, only the systems listed under root/users/user/xhosts are allowed to remotely control the thin client.
root/users/user/apps/hptc-ad-change-password/authorized
If set to 1, the Change Domain Password Control Panel item is accessible by end users.
root/users/user/apps/hptc-ad-mgr/authorized If set to 1, the Active Directory Control Panel item is accessible by end users.
164 Appendix D Registry keys

Registry key Description
root/users/user/apps/hptc-agent-mgr/authorized
If set to 1, the HPDM Agent Control Panel item is accessible by end users.
root/users/user/apps/hptc-auto-update/authorized
If set to 1, the Automatic Update Control Panel item is accessible by end users.
root/users/user/apps/hptc-background-mgr/authorized
If set to 1, the Background Manager Control Panel item is accessible by end users.
root/users/user/apps/hptc-cert-mgr/authorized If set to 1, the Certificate Manager Control Panel item is accessible by end users.
root/users/user/apps/hptc-component-mgr/authorized
If set to 1, the Component Manager Control Panel item is accessible by end users.
root/users/user/apps/hptc-config-wizard/authorized
If set to 1, the Initial Setup Wizard Start menu item is accessible by end users.
root/users/user/apps/hptc-connection-wizard/authorized
If set to 1, Create a Connection is accessible by end users.
root/users/user/apps/hptc-control-panel/authorized
If set to 1, Control Panel is accessible by end users.
root/users/user/apps/hptc-date-mgr/authorized If set to 1, the Date and Time Control Panel item is accessible by end users.
root/users/user/apps/hptc-dhcp-mgr/authorized If set to 1, the DHCP Options Control Panel item is accessible by end users.
root/users/user/apps/hptc-display-prefs/authorized
If set to 1, the Display Control Panel item is accessible by end users.
root/users/user/apps/hptc-easy-update/authorized
If set to 1, the Easy Update Control Panel item is accessible by end users.
root/users/user/apps/hptc-energy-star/authorized
If set to 1, the Energy Star Control Panel item is accessible by end users.
root/users/user/apps/hptc-factory-reset/authorized
If set to 1, the Factory Reset Control Panel item is accessible by end users.
root/users/user/apps/hptc-firewalld-mgr/authorized
If set to 1, the Firewall Manager Control Panel item is accessible by end users.
root/users/user/apps/hptc-i18n-mgr/authorized If set to 1, the Language Control Panel item is accessible by end users.
root/users/user/apps/hptc-imprivata-mgr/authorized
If set to 1, the Imprivata Setup Control Panel item is accessible by end users.
root/users/user/apps/hptc-keyboard-layout/authorized
If set to 1, the Keyboard Layout Control Panel item is accessible by end users.
root/users/user/apps/hptc-kiosk/authorized If set to 1, Connection Manager is accessible by end users.
root/users/user/apps/hptc-licenses/authorized If set to 1, HP License Agreement is accessible by end users.
root/users/user/apps/hptc-mixer/authorized If set to 1, the Sound Control Panel item is accessible by end users.
root/users/user/apps/hptc-mouse/authorized If set to 1, the Mouse Control Panel item is accessible by end users.
root/users/user/apps/hptc-network-mgr/authorized
If set to 1, the Network Manager Control Panel item is accessible by end users.
users 165

Registry key Description
root/users/user/apps/hptc-power-mgr/authorized
If set to 1, the Power Manager Control Panel item is accessible by end users.
root/users/user/apps/hptc-printer-mgr/authorized
If set to 1, the Printers Control Panel item is accessible by end users.
root/users/user/apps/hptc-regeditor/authorized
If set to 1, Registry Editor is accessible by end users.
root/users/user/apps/hptc-restore/authorized If set to 1, the Snapshots Control Panel item is accessible by end users.
root/users/user/apps/hptc-scep-mgr/authorized If set to 1, the SCEP Manager Control Panel item is accessible by end users.
root/users/user/apps/hptc-security/authorized If set to 1, the Security Control Panel item is accessible by end users.
root/users/user/apps/hptc-serial-mgr/authorized
If set to 1, the Serial Manager Control Panel item is accessible by end users.
root/users/user/apps/hptc-shortcut-mgr/authorized
If set to 1, the Keyboard Shortcuts Control Panel item is accessible by end users.
root/users/user/apps/hptc-snipping-tool/authorized
If set to 1, the Snipping Tool Start menu item is accessible by end users.
root/users/user/apps/hptc-sshd-mgr/authorized If set to 1, the SSHD Manager Control Panel item is accessible by end users.
root/users/user/apps/hptc-switch-admin/authorized
If set to 1, Switch to Administrator/User is accessible by end users.
root/users/user/apps/hptc-sysinfo/authorized If set to 1, System Information is accessible by end users.
root/users/user/apps/hptc-task-mgr/authorized If set to 1, the Task Manager Start menu item is accessible by end users.
root/users/user/apps/hptc-text-editor/authorized
If set to 1, the Text Editor Start menu item is accessible by end users.
root/users/user/apps/hptc-thinstate/authorized
If set to 1, theThinState Control Panel item is accessible by end users.
root/users/user/apps/hptc-touchscreen/authorized
If set to 1, the Touch Screen Control Panel item is accessible by end users.
root/users/user/apps/hptc-update/authorized If set to 1, Check for Updates is accessible by end users.
root/users/user/apps/hptc-usb-mgr/authorized If set to 1, the USB Manager Control Panel item is accessible by end users.
root/users/user/apps/hptc-user-rights/authorized
If set to 1, the Customization Center Control Panel item is accessible by end users.
root/users/user/apps/hptc-vncshadow/authorized
If set to 1, the VNC Shadow Control Panel item is accessible by end users.
root/users/user/apps/hptc-wlsstat/authorized If set to 1, Wireless Statistics is accessible by end users.
root/users/user/apps/hptc-xen-general-mgr/authorized
If set to 1, the Citrix general settings are accessible by end users.
root/users/user/apps/hptc-xterm/authorized If set to 1, X Terminal is accessible by end users.
166 Appendix D Registry keys
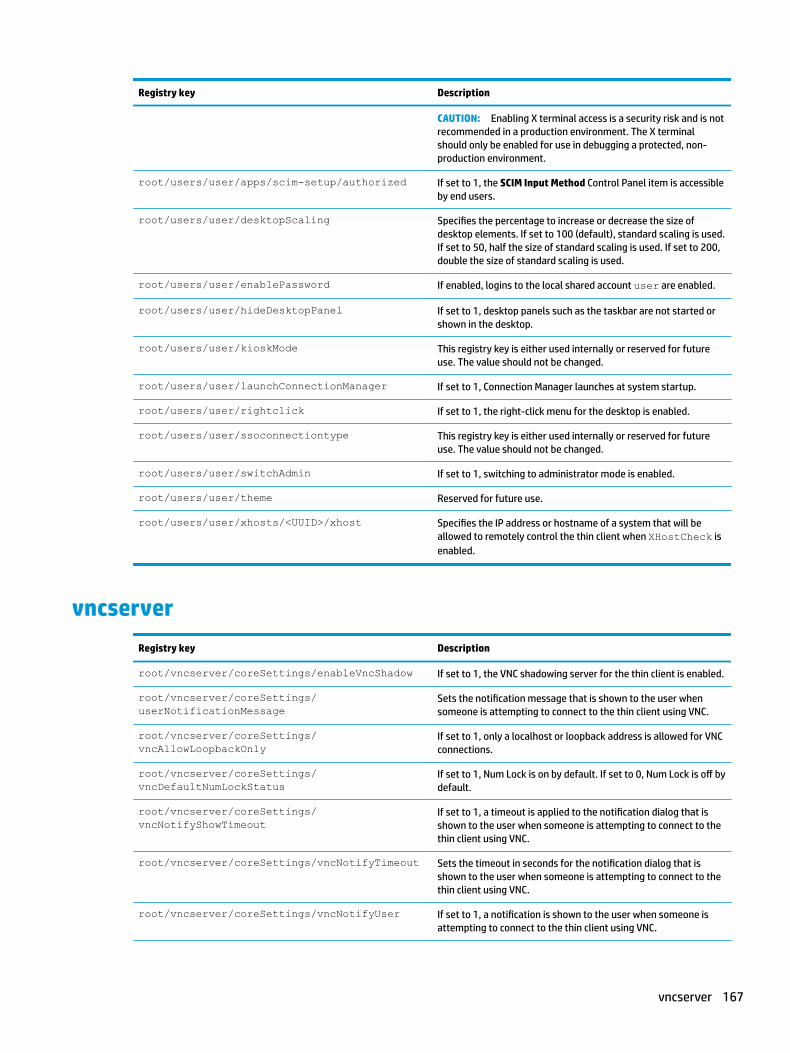
Registry key Description
CAUTION: Enabling X terminal access is a security risk and is not recommended in a production environment. The X terminal should only be enabled for use in debugging a protected, non-production environment.
root/users/user/apps/scim-setup/authorized If set to 1, the SCIM Input Method Control Panel item is accessible by end users.
root/users/user/desktopScaling Specifies the percentage to increase or decrease the size of desktop elements. If set to 100 (default), standard scaling is used. If set to 50, half the size of standard scaling is used. If set to 200, double the size of standard scaling is used.
root/users/user/enablePassword If enabled, logins to the local shared account user are enabled.
root/users/user/hideDesktopPanel If set to 1, desktop panels such as the taskbar are not started or shown in the desktop.
root/users/user/kioskMode This registry key is either used internally or reserved for future use. The value should not be changed.
root/users/user/launchConnectionManager If set to 1, Connection Manager launches at system startup.
root/users/user/rightclick If set to 1, the right-click menu for the desktop is enabled.
root/users/user/ssoconnectiontype This registry key is either used internally or reserved for future use. The value should not be changed.
root/users/user/switchAdmin If set to 1, switching to administrator mode is enabled.
root/users/user/theme Reserved for future use.
root/users/user/xhosts/<UUID>/xhost Specifies the IP address or hostname of a system that will be allowed to remotely control the thin client when XHostCheck is enabled.
vncserver
Registry key Description
root/vncserver/coreSettings/enableVncShadow If set to 1, the VNC shadowing server for the thin client is enabled.
root/vncserver/coreSettings/userNotificationMessage
Sets the notification message that is shown to the user when someone is attempting to connect to the thin client using VNC.
root/vncserver/coreSettings/vncAllowLoopbackOnly
If set to 1, only a localhost or loopback address is allowed for VNC connections.
root/vncserver/coreSettings/vncDefaultNumLockStatus
If set to 1, Num Lock is on by default. If set to 0, Num Lock is off by default.
root/vncserver/coreSettings/vncNotifyShowTimeout
If set to 1, a timeout is applied to the notification dialog that is shown to the user when someone is attempting to connect to the thin client using VNC.
root/vncserver/coreSettings/vncNotifyTimeout Sets the timeout in seconds for the notification dialog that is shown to the user when someone is attempting to connect to the thin client using VNC.
root/vncserver/coreSettings/vncNotifyUser If set to 1, a notification is shown to the user when someone is attempting to connect to the thin client using VNC.
vncserver 167

Registry key Description
root/vncserver/coreSettings/vncPassword Sets the password for VNC shadowing. The key vncUsePassword must also be enabled.
root/vncserver/coreSettings/vncReadOnly If set to 1, VNC shadowing will operate in view-only mode.
root/vncserver/coreSettings/vncRefuseInDefault
If set to 1, VNC requests are refused automatically if the user does not interact with the notification dialog before the timeout.
root/vncserver/coreSettings/vncStopButton If set to 1, an always-on-top button is shown on the left corner of the screen. Selecting that button disconnects the VNC session.
root/vncserver/coreSettings/vncTakeEffectRightNow
If set to 1, VNC settings take effect immediately after being modified.
root/vncserver/coreSettings/vncUseHTTP If set to 1, HTTP port 5800 is open for VNC connections.
root/vncserver/coreSettings/vncUsePassword If set to 1, the password specified in vncPassword is required for VNC shadowing.
root/vncserver/coreSettings/vncUseSSL If set to 1, SSL is used for VNC connections.
root/vncserver/gui/VNCShadowManager/name This registry key is either used internally or reserved for future use. The value should not be changed.
root/vncserver/gui/VNCShadowManager/status This registry key is either used internally or reserved for future use. The value should not be changed.
root/vncserver/gui/VNCShadowManager/title This registry key is either used internally or reserved for future use. The value should not be changed.
root/vncserver/gui/VNCShadowManager/widgets/enableVncShadow
Controls the state of the Enable VNC Shadow widget in the VNC Shadow tool. If set to active, the widget is visible in the UI and the user can interact with it. If set to inactive, the widget is hidden. If set to read-only, the widget is visible in the read-only state.
root/vncserver/gui/VNCShadowManager/widgets/userNotificationMessage
Controls the state of the User Notification Message widget in the VNC Shadow tool. If set to active, the widget is visible in the UI and the user can interact with it. If set to inactive, the widget is hidden. If set to read-only, the widget is visible in the read-only state.
root/vncserver/gui/vncAllowLoopbackOnly Controls the state of the Allow Loopback Connections Only widget in the VNC Shadow utility. If set to active, the widget is visible in the UI and the user can interact with it. If set to inactive, the widget is hidden. If set to read-only, the widget is visible in the read-only state.
root/vncserver/gui/VNCShadowManager/widgets/vncNotifyShowTimeout
Controls the state of the VNC Show Timeout for Notification widget in the VNC Shadow tool. If set to active, the widget is visible in the UI and the user can interact with it. If set to inactive, the widget is hidden. If set to read-only, the widget is visible in the read-only state.
root/vncserver/gui/VNCShadowManager/widgets/vncNotifyTimeout
Controls the state of the numerical widget in the VNC Shadow tool. If set to active, the widget is visible in the UI and the user can interact with it. If set to inactive, the widget is hidden. If set to read-only, the widget is visible in the read-only state.
root/vncserver/gui/VNCShadowManager/widgets/vncNotifyUser
Controls the state of the VNC Notify User to Allow Refuse widget in the VNC Shadow tool. If set to active, the widget is visible in the UI and the user can interact with it. If set to inactive, the widget is hidden. If set to read-only, the widget is visible in the read-only state.
168 Appendix D Registry keys

Registry key Description
root/vncserver/gui/VNCShadowManager/widgets/vncPassword
Controls the state of the Set Password widget in the VNC Shadow tool. If set to active, the widget is visible in the UI and the user can interact with it. If set to inactive, the widget is hidden. If set to read-only, the widget is visible in the read-only state.
root/vncserver/gui/VNCShadowManager/widgets/vncReadOnly
Controls the state of the VNC Read Only widget in the VNC Shadow tool. If set to active, the widget is visible in the UI and the user can interact with it. If set to inactive, the widget is hidden. If set to read-only, the widget is visible in the read-only state.
root/vncserver/gui/VNCShadowManager/widgets/vncRefuseInDefault
Controls the state of the Refuse connections in default widget in the VNC Shadow tool. If set to active, the widget is visible in the UI and the user can interact with it. If set to inactive, the widget is hidden. If set to read-only, the widget is visible in the read-only state.
root/vncserver/gui/vncStopButton Controls the state of the VNC Stop Shadow button widget in the VNC Shadow utility. If set to active, the widget is visible in the UI and the user can interact with it. If set to inactive, the widget is hidden. If set to read-only, the widget is visible in the read-only state.
root/vncserver/gui/VNCShadowManager/widgets/vncTakeEffectRightNow
Controls the state of the Re-set VNC server right now widget in the VNC Shadow tool. If set to active, the widget is visible in the UI and the user can interact with it. If set to inactive, the widget is hidden. If set to read-only, the widget is visible in the read-only state.
root/vncserver/gui/VNCShadowManager/widgets/vncUseHTTP
Controls the state of the VNC Use HTTP Port 5800 widget in the VNC Shadow tool. If set to active, the widget is visible in the UI and the user can interact with it. If set to inactive, the widget is hidden. If set to read-only, the widget is visible in the read-only state.
root/vncserver/gui/VNCShadowManager/widgets/vncUsePassword
Controls the state of the VNC Use Password widget in the VNC Shadow tool. If set to active, the widget is visible in the UI and the user can interact with it. If set to inactive, the widget is hidden. If set to read-only, the widget is visible in the read-only state.
root/vncserver/gui/VNCShadowManager/widgets/vncUseSSL
Controls the state of the VNC Use SSL widget in the VNC Shadow tool. If set to active, the widget is visible in the UI and the user can interact with it. If set to inactive, the widget is hidden. If set to read-only, the widget is visible in the read-only state.
zero-login
Registry key Description
root/zero-login/buttons/configure/authorized If set to 1, the Configure button is available in the login or Smart Zero credentials dialog box.
root/zero-login/buttons/info/authorized If set to 1, the System Information button is available in the login or Smart Zero credentials dialog box.
root/zero-login/buttons/keyboard/authorized If set to 1, the Keyboard Layout selection is available in the login or Smart Zero credentials dialog box.
zero-login 169
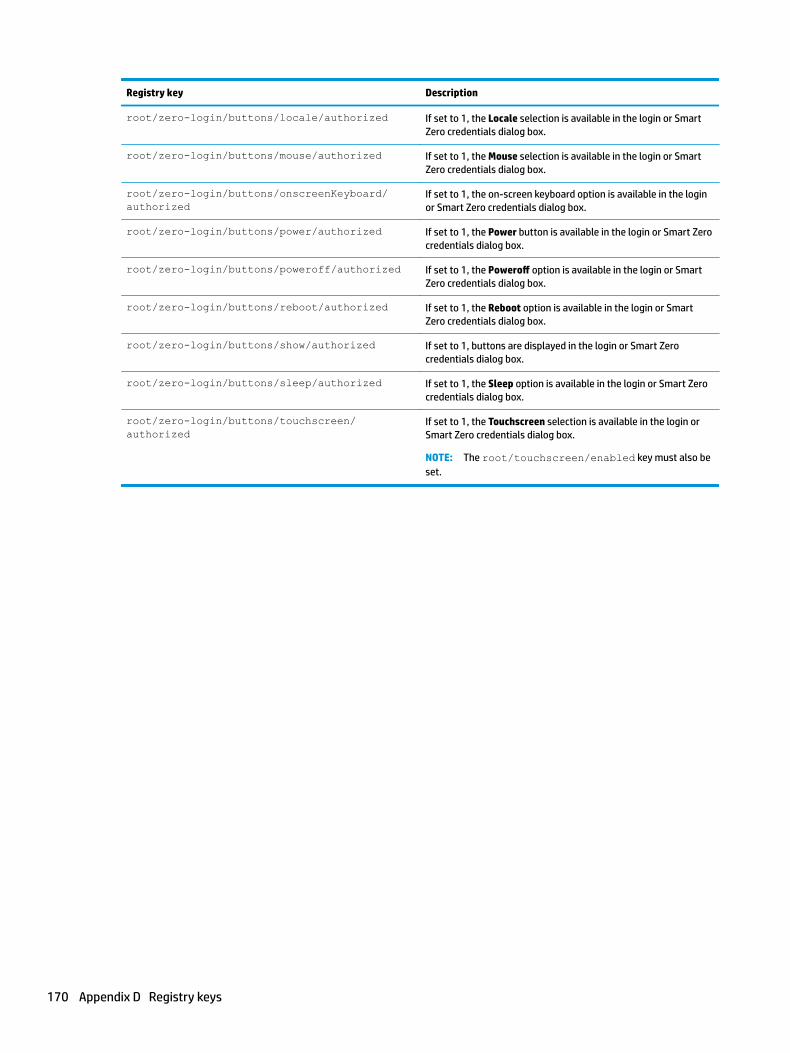
Registry key Description
root/zero-login/buttons/locale/authorized If set to 1, the Locale selection is available in the login or Smart Zero credentials dialog box.
root/zero-login/buttons/mouse/authorized If set to 1, the Mouse selection is available in the login or Smart Zero credentials dialog box.
root/zero-login/buttons/onscreenKeyboard/authorized
If set to 1, the on-screen keyboard option is available in the login or Smart Zero credentials dialog box.
root/zero-login/buttons/power/authorized If set to 1, the Power button is available in the login or Smart Zero credentials dialog box.
root/zero-login/buttons/poweroff/authorized If set to 1, the Poweroff option is available in the login or Smart Zero credentials dialog box.
root/zero-login/buttons/reboot/authorized If set to 1, the Reboot option is available in the login or Smart Zero credentials dialog box.
root/zero-login/buttons/show/authorized If set to 1, buttons are displayed in the login or Smart Zero credentials dialog box.
root/zero-login/buttons/sleep/authorized If set to 1, the Sleep option is available in the login or Smart Zero credentials dialog box.
root/zero-login/buttons/touchscreen/authorized
If set to 1, the Touchscreen selection is available in the login or Smart Zero credentials dialog box.
NOTE: The root/touchscreen/enabled key must also be set.
170 Appendix D Registry keys
Index
AActive Directory 52add-ons 1administrator mode 3audio redirection
RDP 22VMware Horizon View 28
BBackground Manager 59
CCertificate Manager 51certificates
installing 51VMware Horizon View 29
CitrixHP True Graphics 36settings 10settings, general 12
client profileadding files 67adding symbolic link 68certificates 67customization 66loading 66registry settings 67saving 68
Component Manager 48connections
advanced settings 7configuration 6hiding 59
Control PanelActive Directory 52Background Manager 59Component Manager 48Customization Center 59Date and Time 43DHCP Option Manager 48Display 58Easy Update 52Factory Reset 43Keyboard Shortcuts 57Language 59
Mouse 57Network 43overview 43Power Manager 43SCEP Manager 49SCIM Input Method 57Security 49Serial Manager 58Snapshots 43Snipping Tool 41Sound 58SSHD Manager 52Task Manager 41Text Editor 41ThinState. See HP ThinStateTouch Screen 57utilities, hiding 59VNC Shadow 56Wireless Statistics 41X Terminal 41
custom connections 35
Ddate and time settings 43device redirection
RDP 21VMware Horizon View 28
DHCP options 48display preferences 58display profiles 58
EEasy Update 52
Ffactory reset 43finding more information 1
Ggetting started 1GUI
Connection Manager (ThinPro only) 7
desktop 4
overview 4taskbar 5
HHP Device Manager. See HPDM Agent
See also remote management service
HP Smart Client Servicesinstalling 62overview 62Profile Editor. See Profile Editorsupported operating systems 62See also remote management
serviceHP TeemTalk. See TeemTalkHP True Graphics 36HP Velocity 47HPDM Agent 52
Iimage updates 1imaging. See HP ThinState
Kkeyboard shortcuts 57kiosk mode 8
Llanguage settings 59
Mmass storage redirection
RDP 21MMR. See multimedia redirectionmouse settings 57multimedia redirection
RDP 21
Nnetwork settings
accessing 43DNS 46HP Velocity 47IPSec 47VPN 47
Index 171

wired 44wireless 44
OOS configuration, choosing 2
Pparallel printer configuration 69passwords, change 49power management settings 43Power Manager 43printer configuration 69printer redirection
RDP 22printers 59Profile Editor 66
RRDP
audio redirection 22device redirection 21mass storage redirection 21multi-monitor sessions 20multimedia redirection 21printer redirection 22RemoteFX 20settings, per-connection 15smart card redirection 23USB redirection 21
registry keys 77remote management service,
choosing 3RemoteFX 20
SSCEP Manager 49, 51SCIM 57screen saver settings 43Secure Shell 33security settings 49Serial Manager 58serial printer configuration 69Sleep state 43smart card redirection
RDP 23VMware Horizon View 28
Smart Zero. See OS configurationsnapshots 43Snipping Tool 41sound settings 58SSHD Manager 52
system diagnostics 71
TTask Manager 41TeemTalk 31Telnet 34text editor 41thin clients
updating. See updating thin clients
ThinPro. See OS configurationThinState. See HP ThinStatetouch screen settings 57troubleshooting 71
network connectivity 71using system diagnostics 71
Uupdating thin clients
broadcast update 64DHCP tagging update 64DNS alias update 65manual update 65
USB redirectionRDP 21USB Manager 58VMware Horizon View 28
user mode 3
VVMware Horizon View
audio redirection 28certificates 29changing protocols 29device redirection 28keyboard shortcuts 27multi-monitor sessions 27settings, per-connection 23smart card redirection 28USB redirection 28webcam redirection 29
VNC Shadowing 56
WWeb Browser
settings, per-connection 30webcam redirection
VMware Horizon View 29websites
Citrix support 1HP support 1
Microsoft support 1VMware support 1
wireless statistics 41
XX Terminal 41XDMCP 33
172 Index