acwa construction site stormwater guide · and contractors are familiar with design criteria for...
TRANSCRIPT

ACWA CONSTRUCTION SITE STORMWATER GUIDE
March, 2013
Illustrated Best Management Practices

ACWA Construction Site Stormwater Guide
Table of Contents
ObjectivesThis guide highlights the most common best management practices (BMPs) to help inspectors and construction contractors address common problems related to erosion and construction site stormwater pollution. This guide assumes inspectors and contractors are familiar with design criteria for the BMPs used on their site. This guide covers runoff controls, which are used to divert and control drainage at a site; erosion prevention practices, which are used to prevent movement of soils; sediment controls, which manage soils and debris that are moving; and pollution prevention practices, which prevent pollutants from reaching the storm drain system or waterbodies.
DisclaimerThis guide is a field reference to help protect water quality and assist with local and Oregon Department of Environmental Quality (DEQ) regulatory compliance. Project proponents should still be familiar with and comply with local and DEQ stormwater requirements. Appendix materials have not been reviewed by the Association of Clean Water Agencies (ACWA) or DEQ.
Objectives ................................................................................................... i
Disclaimer ................................................................................................... i
Examples for a Typical Site ....................................................................... 1
Common Best Management Practices ..................................................... 2
RUNOFF CONTROLS ► ...................................................................................... 2
Check Dams ...................................................................................................... 2
Diversion of Run-On.......................................................................................... 4
EROSION PREVENTION ► ................................................................................. 5
Preservation of Existing Vegetation .................................................................. 5
Mulches ............................................................................................................. 6
Seeding and Planting ........................................................................................ 8
Erosion Blankets and Mats ............................................................................. 10
SEDIMENT CONTROLS ► ................................................................................. 10
Entrance/Exit Tracking .....................................................................................11
Sediment Fence .............................................................................................. 12
Inlet Protection ................................................................................................ 14
Fiber Rolls or Wattles ...................................................................................... 16
POLLUTION PREVENTION ► ............................................................................17
Concrete Management .....................................................................................17
Stockpile and Materials Management ............................................................. 18
Page i

ACWA Construction Site Stormwater Guide
Exam
ples
for
a Ty
pica
l Sit
eSo
urce
: Cit
y of
Ben
d, 2
013
GO
OD
HO
US
EK
EE
PIN
G T
IPS
Swee
p an
d pr
oper
ly d
ispos
e of
all
trac
ked
sedi
men
t dai
ly ■
Stor
e al
l pai
nts,
sta
ins,
solv
ents
and
haz
ardo
us m
ater
ial
■in
a c
over
ed a
nd b
erm
ed s
tora
ge a
rea
Tarp
all
load
s bef
ore
leav
ing
the
site
■
Disp
ose
of a
ll tr
ash
in a
cov
ered
dum
pste
r or t
rash
can
■
Clea
n up
spill
s pro
mpt
ly u
sing
dry
cle
anup
met
hods
■
Rem
ove
tem
pora
ry c
ontr
ols w
hen
no lo
nger
nee
ded
■
Do n
ot d
ump
or w
ash
any
mat
eria
l int
o th
e st
orm
dra
in ■
Page 1
NO
RTH
Prop
erty
Lin
eSe
dim
ent F
ence
Cons
truc
tion
Fenc
eRo
of D
rain
age
Faci
lity
Grou
nd S
lope
Dire
ctio
nEx
istin
g Ve
geta
tion
Stab
ilize
d So
ilEx
istin
g Tr
eeEx
istin
g Ve
geta
tion
LEGE
ND

Page 2 ACWA Construction Site Stormwater Guide
Common Best Management Practices
RUNOFF CONTROLS
Check Dams ►A small dam designed to reduce gully erosion and allow some settling of suspended sediment in a swale or ditch. The dam may be constructed of washed rocks or other approved materials such as gravel bags, triangular silt dikes, biobags, or sandbags.
Installation Tips Extend dam across the swale or ditch to reduce the speed of flows. ■
Install along a level contour. ■
Check dams should be constructed to prevent flow around the dam. ■
Ensure good surface contact to reduce undermining. ■
The center, or spill way of the check dam should be lower (e.g., at least 6 inches for ■smaller check dams (6 feet across or less), and up to 2 feet lower than the edges for larger dams) than the outside edges so that the flow will not go around the ends of the dam.Tightly abut bags and stack gravel bags using a pyramid approach. Gravel bags should not ■be stacked any higher than per the approved plan or local design manual specifications. Overlap the upper rows of gravel bags across the joints in lower rows. ■
The bottom (i.e., toe) of the uphill check dam should be level with the top of the downhill ■check dam (measured from the center). Notice how “point A” is level with “point B” in
“Spacing Between Check Dams” figure.Extend the downstream portion of the check dam to also act as a splash block to prevent ■erosion when flows crest the dam.DEQ staff prescribe flow-through rock check dams. Water should flow through as well as ■over rock check dams (recommended rock size typically 3”-6” to avoid filling void spaces).
Source: DEQ, 2005
Spacing Between Check Dams

ACWA Construction Site Stormwater Guide Page 3
Inspection and Maintenance TipsInspect and repair check dams before, during, and after rainfall events for damage such ■as undermining, breaching, or short-circuiting. Check the center elevation to ensure it is appropriately lower than the ends.Remove accumulated sediment prior to permanent seeding or soil stabilization. ■Incorporate removed sediment in the project or dispose of it properly. Remove sediment as needed to allow drainage, and as required. ■
Remove check dam and sediment when check dams are no longer needed. Where ■vegetation is used to line ditches, remove check dams when vegetation has matured enough to protect the ditch or swale. Immediately following check dam removal, seed, mulch or mat the area where the check dams were.
Source: Clean Water Services Source: Clean Water Services
RUNOFF CONTROL: Check Dams
Page 4 ACWA Construction Site Stormwater Guide
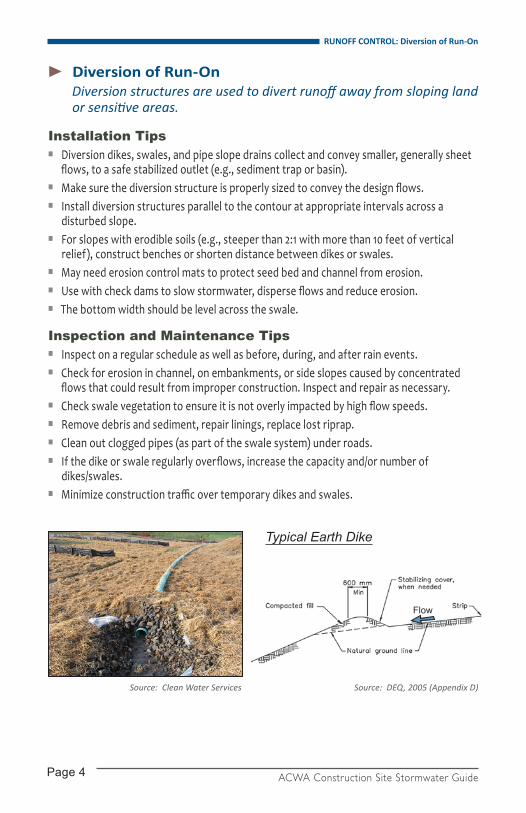
Diversion of Run-On ►Diversion structures are used to divert runoff away from sloping land or sensitive areas.
Installation Tips Diversion dikes, swales, and pipe slope drains collect and convey smaller, generally sheet ■flows, to a safe stabilized outlet (e.g., sediment trap or basin). Make sure the diversion structure is properly sized to convey the design flows. ■
Install diversion structures parallel to the contour at appropriate intervals across a ■disturbed slope.For slopes with erodible soils (e.g., steeper than 2:1 with more than 10 feet of vertical ■relief), construct benches or shorten distance between dikes or swales.May need erosion control mats to protect seed bed and channel from erosion. ■
Use with check dams to slow stormwater, disperse flows and reduce erosion. ■
The bottom width should be level across the swale. ■
Inspection and Maintenance TipsInspect on a regular schedule as well as before, during, and after rain events. ■
Check for erosion in channel, on embankments, or side slopes caused by concentrated ■flows that could result from improper construction. Inspect and repair as necessary.Check swale vegetation to ensure it is not overly impacted by high flow speeds. ■
Remove debris and sediment, repair linings, replace lost riprap. ■
Clean out clogged pipes (as part of the swale system) under roads. ■
If the dike or swale regularly overflows, increase the capacity and/or number of ■dikes/swales.Minimize construction traffic over temporary dikes and swales. ■
Source: Clean Water Services Source: DEQ, 2005 (Appendix D)
RUNOFF CONTROL: Diversion of Run-On
Flow
Typical Earth Dike

ACWA Construction Site Stormwater Guide Page 5
EROSION PREVENTION
Preservation of Existing Vegetation ►Vegetated buffers protect sensitive areas such as wetlands, streams and lakes. They also preserve greenways or significant trees and native plants by protecting soils’ infiltration capacity, stream shade (which cools surface water), wildlife habitat and scenic views.
Installation Tips Use a pre-construction meeting to confirm which vegetation is to be preserved and ■how to preserve it. Protect vegetation from: ■
Injury from construction equipment both above and below ground level, including –
breakage, scarring, cutting roots or compaction of root zone.Grade changes, which affect plants’ ability to obtain air, water or minerals. Placing –
a layer of gravel and a drainage/aeration tile system over the roots before a major fill allows air and water to circulate and protects the roots.Root exposure. –
Damage caused by excavations for utility lines. –
Clearly establish ground disturbance limits outside the drip line (or the tips of the ■branches) of preserved trees, using orange construction safety fence or flagging if approved. This will help prevent disturbance and over-compaction of the soil around the roots.Terrace the area around the plant or leave the plants on an undisturbed mound to help ■increase the plants’ survival chances.Preserve buffers adjacent to waterways where earth disturbance will occur ■(EPA has set a 50-foot buffer or equivalent sediment load reduction requirement).1
Inspection and Maintenance TipsInspect fencing often to ensure it is clearly marked and remains properly located ■throughout the life of the project. Repair fencing and/or flagging as necessary.Contact an arborist before cutting roots. Do not allow tree roots to be left exposed to ■the air—keep moist and cover with soil as soon as possible. Smoothly cut off damaged or cut roots at an angle. Re-cover and/or seal exposed plant roots.Remove the fences and barriers last, after final cleanup and landscaping is completed. ■
Source: City of Bend Source: Clean Water Services1 77 Federal Register 12286

Page 6 ACWA Construction Site Stormwater Guide
Mulches ►Use mulches to prevent erosion, to promote germination and to protect seeds from direct heat and from being carried off by runoff. Additional measures may be required to improve effectiveness on slopes.
Installation Tips
SELECTION
Mulch may be required for seeding areas during the dry season if: ■
Grass growth is expected to be slow, –
Soils are highly erodible, –
There is a water body close to the disturbed area, or –
Significant precipitation is anticipated before the grass will provide effective cover. –
Compost should be fully cured to optimize plant growth. Hot composting techniques will ■prevent most weed seeds from growing.Straw mulch should not be moldy, caked, or decayed. ■
Wood chips and grindings are not suitable for areas that require close mowing. ■
Hydraulic mulches and tackifiers are interim measures to prevent erosion until permanent ■cover is established.Gravel or crushed rocks are suitable for short slopes and areas subject to foot or vehicle ■traffic. Larger pit run rock can be used on steep slopes that are likely to have sub-surface water (springs) being carried off as runoff.
PREPaRaTION
Divert concentrated runoff away from mulched areas. ■
Ensure mulch is properly prepared and of high quality. ■
Rock mulches should be appropriately washed before application. ■
aPPLICaTION
Ensure all exposed soils are adequately and evenly covered with mulch. ■
Properly crimp, net, or tackify loose mulches like straw or compost to the ground. ■
Ensure straw is deep enough to prevent erosion (e.g., 2 to 2.5 tons per acre, or 2 inches ■uniform coverage). Apply wood chips or grindings with mulch blower, excavation equipment or by hand. ■
Apply wood or cellulose fiber with a hydromulcher at a rate dependent upon the soil type ■and slope. Use tackifier as recommended by manufacturer.Apply hydraulically applied mulches from multiple directions to ensure adequate coverage. ■
EROSION PREVENTION: Mulches

ACWA Construction Site Stormwater Guide Page 7
Inspection and Maintenance TipsMaintain specified mulch cover thickness. ■
Monitor long-term performance through the establishment of vegetative cover. ■
Areas that fail to establish enough cover to prevent erosion should be re-mulched as ■soon as such areas are identified. Re-apply and/or protect eroding areas with a net or blanket. If the problem is related to drainage, fix the drainage problem and re-mulch the eroded area.Hydraulically treated areas should be inspected and monitored after installation and ■periodically thereafter. If sheet or rill erosion is evident, promptly re-apply treatments and/or take additional measures.If hydraulic mulch or tackifiers are applied without seeding, the longevity of the products ■must match the length of time soil will remain bare or until re-vegetation occurs.
Source: Clean Water Services
Source: Clean Water Services
EROSION PREVENTION: Mulches

Page 8 ACWA Construction Site Stormwater Guide
Seeding and Planting (Temporary and Permanent) ►Well-established vegetation is one of the most effective ways to reduce erosion.
Installation Tips To ensure success, take care in site preparation, seed selection, application rate, and ■site maintenance.Properly calculate the seeding rate based on seed purity and germination information. ■
Plant more than one plant species so that at least one species will do well under ■site conditions. For optimum seeding conditions, preserve topsoil and turn stockpile material in low ■windrows (to avoid compaction and development of anaerobic conditions) until final grades are established, then spread soil over area to be seeded.
SITE PREPaRaTIONBring the seedbed area to final grade; remove all larger clods, rocks and debris and grade ■surface irregularities to less than 2 inches. The seedbed should be firm but not compact. The top layer of soil (e.g., 4 to 6 inches) should be loose and moist. If the seedbed has been idle long enough for the soil to become compact, the topsoil ■should be broken up and smoothed out. Tracking or furrowing should be done horizontally across the face of the slope, so ridges ■are along the slope contour.Divert concentrated flows away from seeded area. ■
Spread topsoil over final grades. Or conduct soil test to determine pH and nutrient ■content and incorporate amendments into the soil as needed to adjust pH to 6.0 to 7.5.
SEEDING/SEED PURITySeed must have soil contact for optimum germination. Incorporate broadcast seed into ■the soil by raking or chain dragging and then lightly tamp down to provide good seed-soil contact. Double the rate of seed application when mulch and seed are applied in a single application.Use seed specified in the project plan and measured by Pure Live Seed (PLS) weight. ■
Use recommended erosion control seed mixes for your area. ■Apply seed before applying straw mulch or other ground cover applications. ■
TIMING OF SEED aPPLICaTIONTemporary vegetative cover must be fully established by the date specified in the ■project plan or other ground cover measures must be implemented. Apply permanent seeding when no further disturbances are planned. On steep slopes ■(e.g., greater than 10 percent), apply hydroseed and mulch with a bonding agent (tackifier) in accordance with seed supplier recommendations.Supply permanent or temporary irrigation especially in abnormally hot or dry weather or ■on adverse sites. Control water application rates to provide adequate moisture without causing runoff.
EROSION PREVENTION: Seeding and Planting

ACWA Construction Site Stormwater Guide Page 9
Source: Clean Water Services
Source: Clean Water Services
Source: Clean Water Services
FERTILIzERTest areas that are being seeded for final landscaping to determine type and quantity ■of fertilizer needed.Use slow-release fertilizers and do not over apply. ■
Use non-phosphorus fertilizer on disturbed areas within 50 feet of water bodies ■and wetlands.Use stockpiled topsoil or compost to reduce the need for fertilizer. ■
Do not apply sprays in high wind or just before precipitation events. ■
Sweep up over sprayed product and use or properly dispose of it. ■
Inspection and Maintenance Tips Inspect newly seeded areas frequently to ensure plants are growing. ■
If the seeded area is damaged due to runoff, additional BMPs may be needed. Re-seed and ■mulch damaged areas to prevent sheet and rill erosion.Spot seed to fill in bare spots where plants did not grow properly. If spot seeding is ■ineffective, use an alternate method, such as sod or matting. Contact the designer if problems continue.
EROSION PREVENTION: Seeding and Planting
Page 10 ACWA Construction Site Stormwater Guide
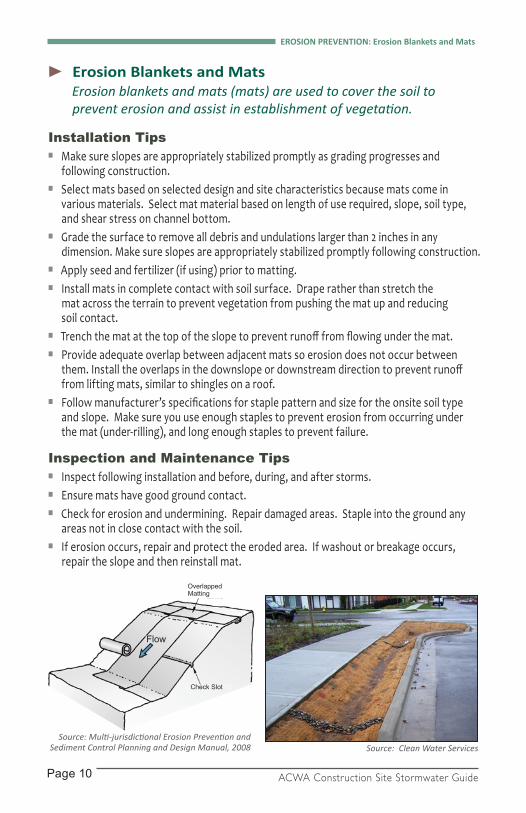
Erosion Blankets and Mats ►Erosion blankets and mats (mats) are used to cover the soil to prevent erosion and assist in establishment of vegetation.
Installation TipsMake sure slopes are appropriately stabilized promptly as grading progresses and ■following construction.Select mats based on selected design and site characteristics because mats come in ■various materials. Select mat material based on length of use required, slope, soil type, and shear stress on channel bottom. Grade the surface to remove all debris and undulations larger than 2 inches in any ■dimension. Make sure slopes are appropriately stabilized promptly following construction.Apply seed and fertilizer (if using) prior to matting. ■
Install mats in complete contact with soil surface. Drape rather than stretch the ■mat across the terrain to prevent vegetation from pushing the mat up and reducing soil contact.Trench the mat at the top of the slope to prevent runoff from flowing under the mat. ■
Provide adequate overlap between adjacent mats so erosion does not occur between ■them. Install the overlaps in the downslope or downstream direction to prevent runoff from lifting mats, similar to shingles on a roof.Follow manufacturer’s specifications for staple pattern and size for the onsite soil type ■and slope. Make sure you use enough staples to prevent erosion from occurring under the mat (under-rilling), and long enough staples to prevent failure.
Inspection and Maintenance TipsInspect following installation and before, during, and after storms. ■
Ensure mats have good ground contact. ■
Check for erosion and undermining. Repair damaged areas. Staple into the ground any ■areas not in close contact with the soil. If erosion occurs, repair and protect the eroded area. If washout or breakage occurs, ■repair the slope and then reinstall mat.
Source: Multi-jurisdictional Erosion Prevention and Sediment Control Planning and Design Manual, 2008 Source: Clean Water Services
Flow
Overlapped Matting
EROSION PREVENTION: Erosion Blankets and Mats
Check Slot

ACWA Construction Site Stormwater Guide Page 11
SEDIMENT CONTROLS
Entrance/Exit Tracking ►Properly implemented construction entrances/exits help prevent the tracking of soil onto public or private roadways that could flow into stormwater conveyance systems or surface waters. They are usually stabilized rock pads placed at each construction site entry and exit point. Other plates, panels or structural systems may also be used.
Installation Tips Install prior to initiating any site work. ■
Encourage only essential vehicles to come on and off site. ■
Use only washed rock to minimize sediment runoff. ■
Use appropriate size rock (e.g., 3 to 6 inches for larger site developments; or per local ■regulation for single-family residential).Whenever possible, construct the pad on a firm, level, and compacted subgrade. ■Avoid entrances with steep grades or located on curves of roadway.Do not install rock on paved surfaces. Use wooden curb ramps instead. ■
Install geotextile under rock when subgrade is not stable or is “pumping” up into the pad. ■
Include a tire wash facility if entrance is not effectively retaining sediment onsite. ■
Inspection and Maintenance Tips The construction entrance and tire wash requires daily, ongoing inspection. ■
Immediately sweep up and remove rock or sediment carried from the site. Stabilize onsite ■sediment generation areas to prevent tracking onto pavement. Do not flush rock or seDiment from the site into the Drainage system! ■
Add or replace rock as needed to maintain the specified dimensions. ■
If using a tire wash facility, inspect routinely and remove accumulated sediment. ■
Source: City of Bend Source: Clean Water Services

Page 12 ACWA Construction Site Stormwater Guide
Sediment Fence ►A sediment fence is a temporary sediment trap made of filtering geotextile fabric stretched between and attached to support posts; it is installed to treat overland/sheet flow.
Installation Tips Use only for sheet and rill erosion; not for concentrated flow and never across waterways. ■
All sediment fence filter fabric should have manufactured stitched loops with posts, sized ■as specified. Install stitched loops on the uphill side of the sloped area. Standard or heavy duty sediment fence fabric must meet specific ASTM requirements.Drive posts securely into the ground. ■
Install parallel to ground contours according to the specified barrier spacing for the slope. ■In areas where cross contours cannot be avoided, use check dams or wings to slow flow and prevent erosion.Considering specific site characteristics, either install at toe of slope or slightly away ■(e.g., 3 feet) from toe of slope to maximize storage capacity.When sediment fence approaches its end point, turn fence uphill and extend one full ■panel (6 feet). Bury the lower “hem” of the fabric in a trench (e.g., minimum 6 inch trench) along the ■contour to prevent sheet flow from piping under the fence. Backfill trench and compact the soil on both sides of the fence.When joining two or more sediment fences, connect the two end stakes by wrapping ■them together at least one and one half turns and driving the joined stakes into the ground together.
Source: Clean Water Services
SEDIMENT CONTROL: Sediment Fence

ACWA Construction Site Stormwater Guide Page 13
Inspection and Maintenance Tips Inspect frequently. Immediately repair damage (e.g., split, torn, slumping, ■weathered fabric; broken posts). Remove accumulated sediment once it has reached 1/3 the fence height. ■
Inspect for channel formation parallel to the fence. Splice in lateral sediment fence ■“wings” to slow velocity, or place bio-bags at intervals appropriate to the slope. Replace deteriorated or clogged geotextile. ■
Check for undercutting or piping under fence. ■
Remove fences when upslope area has been stabilized and is no longer needed. ■
Source: Clean Water Services, 2012
Source: DEQ, 2005
SEDIMENT CONTROL: Sediment Fence
Detail Fabric Post Pocket
Typical Prefabricated Sediment Fence Layout

Page 14 ACWA Construction Site Stormwater Guide
Inlet Protection ►Inlet protection devices filter coarse sediments from runoff, preventing them from entering storm drainage systems.
Installation Tips Install inlet protection devices in areas with low flows and low sediment loads. ■Additional measures must be considered depending upon soil type.Place in areas where ponding will not have adverse impacts. ■
Type and installation must allow for overflow in a severe storm event. ■
Properly install and maintain the devices to prevent short-circuiting of flow. ■
Make sure when using biobags that they are not constructed of such a dense material ■that they do not allow enough flow–through that would result in too much ponding and overtopping.DEQ recommends biobags not be used on streets or other paved areas due to their high ■maintenance and potential for damage or displacement. If biobags are used in high-traffic areas, it is recommended that additional measures be implemented to help prevent them from being run over (e.g., flagging several feet high).
Source: Clean Water Services
Source: DEQ, 2005
Typical Protection for Inlet with Opposing Flow Directions
SEDIMENT CONTROL: Inlet Protection
Flow Flow

ACWA Construction Site Stormwater Guide Page 15
Source: Multi-jurisdictional Erosion Prevention and Sediment Control Planning and Design Manual, 2008
Inlet – Prefabricated Filter Insert
Inspection and Maintenance Tips Regularly check and maintain placement of inlet protection, particularly in ■high traffic areas.Remove accumulated sediment after every storm and during and after each ■significant storm. If inlet protection becomes clogged with sediment, sediment must be carefully removed ■and inlet protection cleaned or replaced.Use mechanical means (shovel, broom, sweeper/vactor) to remove sediment as needed to ■maintain intended functions. NEVER FLUSH SEDIMENTS INTO DRAINAGE SYSTEM! ■
Repair or replace materials as needed to ensure proper functioning. If rock becomes ■clogged with sediment, it must be carefully removed and cleaned or replaced.
Source: Clean Water Services
SEDIMENT CONTROL: Inlet Protection
Flow
Flow
Flow

Page 16 ACWA Construction Site Stormwater Guide
Fiber Rolls or Wattles ►Fiber rolls or wattles (wattles) intercept and capture sediment entrained in sheet flow. Use these light-weight and easy-to-install rolls in place of sediment fences on steep slopes or as an alternative to biobags for inlet protection.
Installation Tips Place in shallow trenches along the contour of newly constructed or disturbed slopes ■and stake into the ground. Trench should be deep enough to ensure good contact on gentle slopes and to accommodate up to 1/3 the thickness of the wattle for steeper slopes, especially on sandy soils. Wattle must be tight against the soil in trench. Make sure no gaps exist between wattles. Overlap ends of adjoining wattles. ■
Stakes must be securely driven into undisturbed material to specified depth. Drive ■additional stakes on the down slope side of the trenches in highly erodible soils or on very steep slopes.If live willow stakes are installed, use a crowbar or rebar to drive holes through wattles. ■
Inspection and Maintenance Tips Make sure wattles are in contact with the soil and stakes are holding. ■
Clear sediment build-up frequently. ■
Re-stake, re-seed, re-plant vegetation, and/or install matting as necessary to ■stabilize slope.May be allowed to degrade in place if biodegradable or photodegradable ■material is used.
Source: Multi-jurisdictional Erosion Prevention and Sediment Control Planning and Design
Manual, 2008
Source: Clean Water Services
SEDIMENT CONTROL: Fiber Rolls or Wattles
Flow
Wattle Roll Installation

ACWA Construction Site Stormwater Guide Page 17
POLLUTION PREVENTION
Concrete Management ►Concrete management prevents or reduces discharge of pollutants to stormwater from concrete waste.
Installation Tips Perform on-site washout in designated areas only. ■
Train employees, delivery drivers, and subcontractors on how to use the system. ■
Do not wash out concrete trucks into storm drains, open ditches, streets or streams. ■Do not allow excess concrete to be dumped on site, except in designated areas.Wash out wastes into a properly sized temporary pit or bermed area where the concrete ■can be set, later broken up and properly disposed. Locate washout area at least 50 feet from storm drains, open ditches or water bodies. ■
When washing concrete to remove fine particles and expose the aggregate, avoid ■creating runoff by suctioning water to a tank or draining the water to a bermed or level area. Collect and return sweepings to aggregate base stockpile, or dispose in the trash.Store dry and wet materials under cover, away from drainage areas. ■
Avoid ordering and mixing excess amounts of concrete. ■
If dewatering the concrete management facility, contact the local agency or DEQ to see if ■pretreatment is needed.
Inspection and Maintenance TipsEnsure that concrete truck drivers are adhering to project practices. ■
Inspect routinely, when applicable activities are underway to ensure that concrete ■washout does not overflow and that freeboard is adequate to contain concrete and rain.Clean out designated washout areas when the washout is mostly full (e.g., 3/4 full). ■
Properly clean out any designated on-site washout areas and remove all debris upon ■project completion.
Source: Clean Water Services Source: Clean Water Services
POLLUTION PREVENTION

Page 18 ACWA Construction Site Stormwater Guide
Stockpile and Materials Management ►Stockpile management reduces or eliminates the discharge of pollutants to stormwater from stockpiles of soil, sand, rock sub-base material, concrete, mulch, compost, building materials, etc. Materials management prevents or reduces discharge of pollutants to stormwater from material delivery and storage by minimizing the storage of hazardous materials on site, storing materials in a designated area, installing secondary containment, conducting regular inspections and training employees and subcontractors.
Installation Tips
STOCKPILE MaNaGEMENT
If feasible, locate stockpiles a minimum of 50 feet away from inlets, drainage courses, or ■water bodies.Keep stockpiles organized and surrounding areas clean. ■
Protect stockpiles with a perimeter sediment barrier such as berms, sediment fences, ■or fiber rolls.Protect storm drain inlets, drainage courses, and receiving waters from stockpiles, ■using inlet protection and perimeter controls as appropriate.Implement dust control and dust suppression practices, such as temporary or vegetative ■cover, as appropriate to prevent wind and rain erosion of stockpiled material.Temporary stockpiles not removed or used by the end of one workday should be ■protected.
MaTERIaLS MaNaGEMENT
Designate areas of the construction site for material delivery and storage of soil, ■pesticides/herbicides, fertilizers, detergents, plaster or other products, fuel, oil, grease or other petroleum products and other chemicals such as acids, lime, glues, paints, solvents and curing compounds. Place storage areas near construction entrances, and ensure storage and transport is ■away from drainage paths or waterways. Place in an area that will be paved and surround materials with earthen berms.Keep an up-to-date inventory of materials delivered and stored on site. Order materials ■when they are needed and only in the quantity needed.Handle materials as infrequently as possible. ■
Store materials, especially treated wood and galvanized metals, in a covered area. ■
Place chemicals, drums and bagged materials in secondary containment. ■
Minimize hazardous materials on site. Handle them as infrequently as possible. ■
Storage of reactive, ignitable, or flammable liquids must comply with local fire codes. ■Contact the local Fire Marshal to review site materials, quantities, and proposed storage area.
POLLUTION PREVENTION: Stockpile and Materials Management

ACWA Construction Site Stormwater Guide Page 19
Inspection and Maintenance Tips
STOCKPILE MaNaGEMENT
Inspect stockpiles regularly; repair and/or replace covers or perimeter controls as needed. ■
MaTERIaLS MaNaGEMENT
Keep chemicals in their original containers and the contents labeled. ■
Train employees and subcontractors on spill prevention and spill response procedures. ■
When dangerous materials or liquid chemicals are unloaded, employees trained in ■emergency spill cleanup procedures should be present. If significant residual materials remain on the ground after construction is complete, ■properly remove materials and contaminated soil.
Source: Clean Water ServicesSource: Clean Water Services
Source: Clean Water ServicesSource: Clean Water Services
POLLUTION PREVENTION: Stockpile and Materials Management

ACWA Construction Site Stormwater Guide
Notes:

ACWA Construction Site Stormwater Guide
Notes:

ACWA Construction Site Stormwater Guide
Thanks for the hard work of the aCWa group that guided development of this field guide, under the able leadership of Wendy Edde, City of Bend. The group guiding this effort included:
John Bushard, City of Troutdale –
Delynn Clark, City of Lake Oswego –
Billy Curtiss, City of Eugene –
Keri Handaly, City of Gresham –
Dawn Hottenroth, City of Portland –
Tony Gilbertson, Clean Water Services –
Scott Gillespie, City of Eugene –
Linda Hulme, City of Fairview –
Nitin Joshi, City of Salem –
Jim Krawczyk, City of Salem –
Jennifer Morgan, Rogue Valley Sewer Services –
John Nagy, Clackamas County Water Environment Services –
Roger Thom, City of Medford –
Deborah Topp, City of Salem –
ResourcesAdditional resources for preventing erosion and reducing site sediment runoff include:
DEQ – Erosion and Sediment Control Manual (2005) –http://www.deq.state.or.us/wq/stormwater/docs/escmanual/manual.pdfDEQ - Inspector Guidance Booklet for Construction Site Erosion and Sediment Control (2005) –http://www.deq.state.or.us/wq/stormwater/docs/escmanual/inspectorguide.pdf Environmental Protection Agency – Stormwater Information –http://cfpub.epa.gov/npdes/stormwater/const.cfmEPA – Developing your Stormwater Pollution Prevention Plan for Construction Sites –http://cfpub.epa.gov/npdes/stormwater/swppp.cfmLocal stormwater design manuals – check with your local municipality or district –
about aCWa The Oregon Association of Clean Water Agencies is a private, not-for-profit professional organization of Oregon’s wastewater treatment and stormwater management utilities, along with associated professionals. ACWA’s mission is to protect and enhance Oregon’s water quality. More about ACWA can be found at www.oracwa.org
Reprinting permitted with acknowledgement
March, 2013