abdominal wall hernias || the gridiron hernioplasty
TRANSCRIPT
59 The Gridiron Hernioplasty Franz Ugahary
Introduction
Some techniques in surgery are derived from those of other professions; placing a piece of material between two layers as reinforcement and stiffening is a technique well known to engineers, carpenters, dressmakers, wallpaper hangers, and many others, who call it "laminating." Thinking about how to perform the unilateral Stoppal and Wantz2,3 operation with an open, minimally invasive approach instead of the total extraperitoneal laparoscopic approach, the author remembers his grandmother. She repaired a worn jacket by removing one or two stitches in the armhole seam and then inserting between it and the lining a piece of cloth rolled around a pair of sticks. With the two sticks the "mesh" was then unfurled and positioned. It is often said that the treatment of hernia must be as simple as possible. Modifying the instruments and using a 2.5 to 3 cm gridiron incision, the author used the same technique to reinforce the weakened layer of the abdominal wall in the treatment of groin hernias. The mesh is rolled up and inserted in the prepared space with forceps and spread out with long, thin specula or retractors. The technique has been used in over 500 operations in our department.
Preoperative Management
Day surgery is planned under local or spinal anesthesia. Anticoagulation medications are stopped 4 to 7 days earlier. The patient is asked to urinate. At operation, an intravenous line is kept open, and a single dose of antibiotic prophylaxis is given; basic monitoring consists of continuous electrocardiography, oxymetry, blood pressure, and pulse readings.
Operative Technique
The Prosthesis
The execution of this technique requires a soft, pliable, elastic prosthesis with plastic "memory," because the mesh must be rolled up and unfurled to conform to the curves of the abdominal wall. A monofilament polypropylene (Prolene®) with the larger weave is the material of choice. This material has a high infection toler-
ance and allows tissue ingrowth, while its rough surfaces prevent migration.4 For a unilateral hernia, a 10 by 15 cm or 15 by 15 cm piece of polypropylene mesh will suffice, depending on the size of the patient or abdominal wall defect.
Instruments
In addition to the instruments used for conventional hernia repair, two long, thin retractors (115 by 18 mm) with a slightly curved base and smooth ends, anatomical forceps (300 mm), and a depressor (a spoon-like device, 250 mm) are required. The forceps must be able to grasp the full length of the mesh to its distal end. A head-light or a retractor with a light source will give extra illumination. Sometimes, for teaching purposes, we use the endoscope for the preperitoneal view.
Determination of the Skin Incision
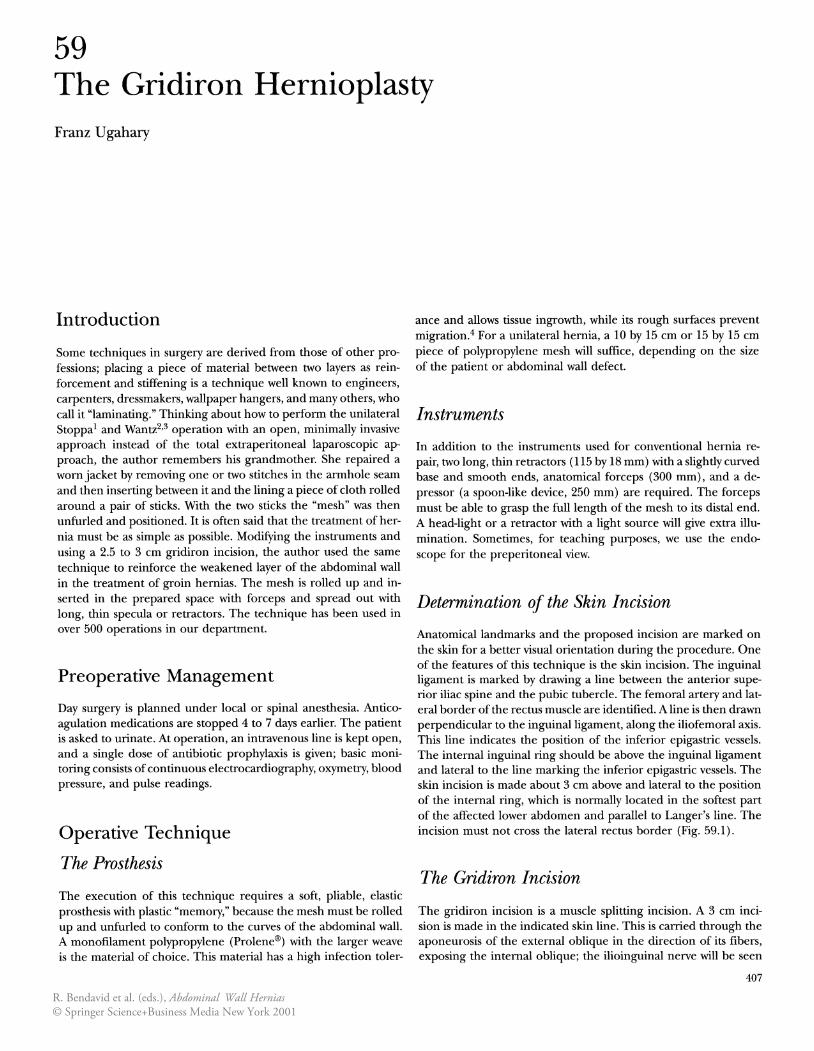
Anatomical landmarks and the proposed incision are marked on the skin for a better visual orientation during the procedure. One of the features of this technique is the skin incision. The inguinal ligament is marked by drawing a line between the anterior superior iliac spine and the pubic tubercle. The femoral artery and lateral border of the rectus muscle are identified. A line is then drawn perpendicular to the inguinal ligament, along the iliofemoral axis. This line indicates the position of the inferior epigastric vessels. The internal inguinal ring should be above the inguinal ligament and lateral to the line marking the inferior epigastric vessels. The skin incision is made about 3 cm above and lateral to the position of the internal ring, which is normally located in the softest part of the affected lower abdomen and parallel to Langer's line. The incision must not cross the lateral rectus border (Fig. 59.1).
The Gridiron Incision
The gridiron incision is a muscle splitting incision. A 3 cm incision is made in the indicated skin line. This is carried through the aponeurosis of the external oblique in the direction of its fibers, exposing the internal oblique; the ilioinguinal nerve will be seen
407
R. Bendavid et al. (eds.), Abdominal Wall Hernias© Springer Science+Business Media New York 2001
408
FIGURE 59.1. The skin incision is located normally in the softest part of the affected lower abdomen. Markings of the surface anatomy: (a) inguinal ligament, (b) femoral artery, (c) lateral border of the rectus muscle, (d) line perpendicular to the inguinal ligament from the femoral artery before it becomes the iliac artery (indicates the surface projection of the inferior epigastric vessels), (e) the internal ring should be lateral to the epigastrics and above the inguinal ligament, (f) place of the skin incision will be about two fingers laterocranial from the internal ring.
passing caudally. With the edges of the external oblique well retracted, the internal oblique and the transversus abdominis muscles are separated in the direction of their fibers. The incision is continued through the underlying transversalis fascia, carefully avoiding adherent peritoneum.
Cleavage of the Pre peritoneal Space
The peritoneum is loosened, and cleavage of the preperitoneal space is begun, using a peanut sponge or a finger. The operation table is tilted slightly head-downward and toward the opposite side. This will move the peritoneal sac and its contents away from the affected lower abdomen.
Blunt dissection is continued on the anterior abdominal wall, where the inferior epigastric vessels, covered by the transversalis fascia, are identified, both for their protection and to serve as a reference point. These vessels are followed to their junction with the iliac vessels; lateral to this point lies the internal ring and cord structures. Normally the peritoneum smoothly covers the upper surface of the internal ring. In an indirect inguinal hernia, the peritoneum bulges into and through the internal ring. The lateral preperitoneal space should be developed first, using a teasing, blunt technique. The pedicle of the sac is then dissected. Large indirect sacs may be transected at the level of the internal ring and the proximal opening in the peritoneum closed with absorbable suture. The cord should be separated from the peritoneal sac for at least 7 to 10 cm from the internal ring to facilitate later parietalization of the cord structures. During this procedure care should be taken not to damage the filmy membrane connecting the vas deferens and the testicular vessels. At the end of a correct dissection the cord structures should lie smoothly against the pelvic wall.
With a sweeping motion, using the two long, thin retractors, the
F. Ugahary
preperitoneal space is further expanded to the spaces of Bogros and Retzius. In primary repair, most of the direct hernias and peritoneal protrusions medial to the epigastric vessels are easily teased from their confining envelope of transversalis fascia. Femoral and obturator hernias are also reduced by gentle traction. Cooper's ligament is identified as a shiny, firm structure and can be used as a landmark. This thorough medial and posterior dissection is needed for smooth placement of the mesh between pubis and bladder. Care should be taken not to injure the bladder, especially when it is full. Mter all hernia content has been reduced and all potential hernia sites inspected, the mesh is prepared for insertion.
Mesh Placement
Step 1
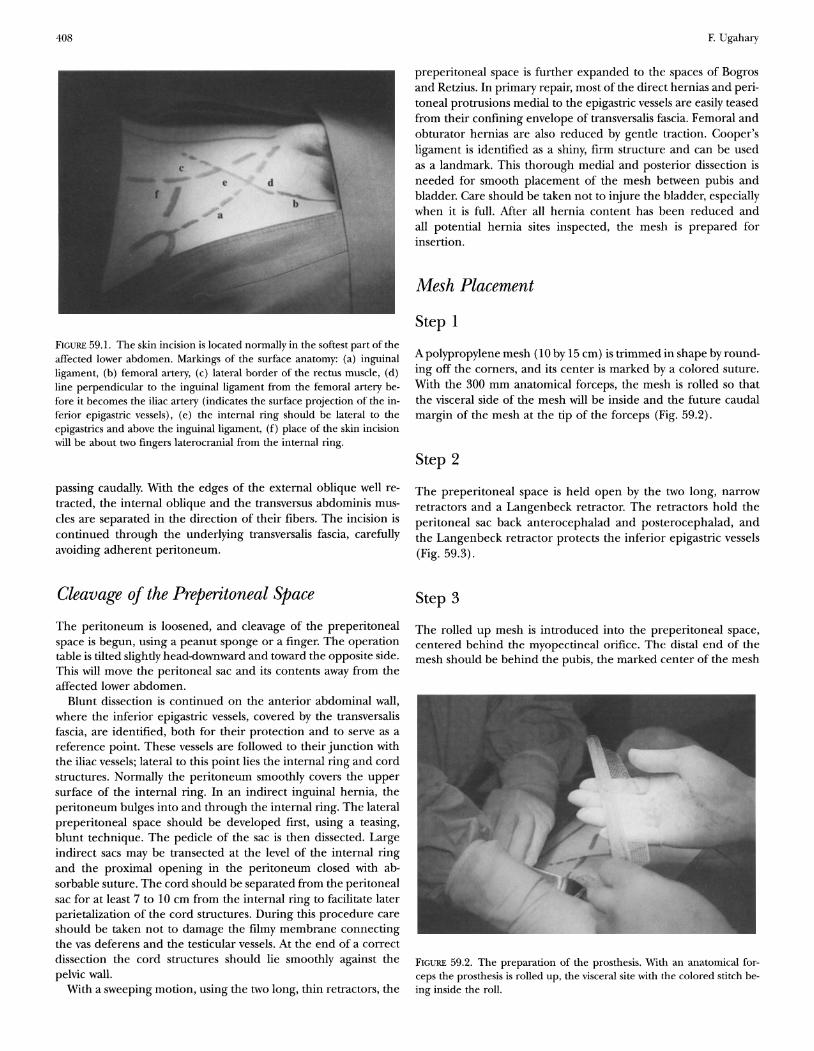
A polypropylene mesh (10 by 15 cm) is trimmed in shape by rounding off the corners, and its center is marked by a colored suture. With the 300 mm anatomical forceps, the mesh is rolled so that the visceral side of the mesh will be inside and the future caudal margin of the mesh at the tip of the forceps (Fig. 59.2).
Step 2
The preperitoneal space is held open by the two long, narrow retractors and a Langenbeck retractor. The retractors hold the peritoneal sac back anterocephalad and posterocephalad, and the Langenbeck retractor protects the inferior epigastric vessels (Fig. 59.3).
Step 3
The rolled up mesh is introduced into the preperitoneal space, centered behind the myopectineal orifice. The distal end of the mesh should be behind the pubis, the marked center of the mesh
FIGURE 59.2. The preparation of the prosthesis. With an anatomical forceps the prosthesis is rolled up, the visceral site with the colored stitch being inside the roll.

59. The Gridiron Hernioplasty
FIGURE 59.3. Insertion of the mesh. The cleaved preperitoneal space is held open with the pair of thin, curved base retractors and one retractor, which is also protecting the epigastric vessels. The mesh must be placed dorsal and cephalad to these vessels.
medial to the inferior epigastric vessels, and the lateral end at wound level (Fig. 59.4).
Step 4
While the retractors are carefully removed, a clamp is placed on the anterolateral border of the mesh, holding it at wound level. One retractor is then reintroduced in the center of the rolled up mesh in such a way that the mesh is pushed against the superior ramus of the pubis. The second retractor is then carefully inserted cephalad to the first, behind the upper layer of the rolled up mesh and not in the center of the roll (Fig. 59.5). During the careful insertion of this second retractor, the upper part of the mesh will partially open out. Then the retractor is turned cranially and lat-
FIGURE 59.4. As the lateral part of the prosthesis is grasped by a clamp and a retractor is holding the mesh against the pubis, a second retractor is being carefully inserted beneath the outer layer of the roll.
409
FIGURE 59.5. Drawing of the initial positioning of the mesh, as if viewed from within the preperitoneal space.
erally to spread out the upper part of the mesh. Using the curved portion of the retractor with a stroking, slightly rotating motion, the surgeon positions the mesh between the peritoneal sac and abdominal wall (Fig. 59.6).
Step 5
With the upper retractor now holding the mesh against the abdominal wall near the pubis, the caudal part of the mesh is stroked out with the lower retractor. Following the contours of the iliac fossa, the mesh is smoothed out with the distal end of the retractor, placed medially deep in the space of Retzius, between the pubis and bladder and inferomedially, over the obturator foramen and iliac vessels, and finally laterally, parietalizing the vas deferens and testicular vessels over the iliopsoas muscle (Fig. 59.7) .
FIGURE 59.6. Drawing to show use of both retractors, one to hold the mesh and the other to spread the mesh flat, smoothing out folds.

410
FIGURE 59.7. Drawing illustrating the final position of the mesh in the preperitoneal space behind the myopectineal orifice.
We can also use a depressor, instead of the retractor, to smooth out the distal ends of the mesh. While placing the mesh, it must be remembered that the peritoneal sac must lie on the visceral side of the mesh. The abdominal wall should not be lifted during spreading of the mesh, because, when it is allowed to drop back, it will cause the mesh to fold when the retractors are withdrawn.
Step 6
When the lateral part of the mesh is not fully unfurled, it can be eased into proper position using two forceps.
Because most of the operations are performed under regional or local anesthesia, the repair can be tested by asking the patient to cough or strain. The peritoneal sac will be seen to compress the mesh against the abdominal wall. There should be no bulge at the original hernia site.
Step 7
Finally, the transversus abdominis and internal oblique muscles are closed with one or two absorbable sutures, one of which secures the lateral anterior part of the mesh to the abdominal wall. During closure, the ilioinguinal nerve must be carefully avoided. The aponeurosis of the external oblique is closed with absorbable sutures. The skin is closed with a subcuticular suture.
Postoperative Management
If dislocation of the mesh or local complication is suspected, exploration is recommended as soon as possible following ultrasonography, especially if a recurrence is suspected. Postoperative analgesia consists of ibuprofen. All patients are contacted the following day. There are no specific restrictions regarding the resumption of work or other activities. For study purposes, follow-up
F. Ugahary
of all patients is performed at 1 week, 6 weeks, 3 months, 6 months, and 1 year after the operation.
Patients and Results
From September 1995 to December 1998, 427 hernias in 364 patients were repaired with this technique: 10 in 1995, 79 in 1996, 147 in 1997 and 191 in 1998. Three hundred sixty-nine of the hernias were primary and 58 recurrent; there were 11 sliding hernias, 4 hernias with bowel incarceration and resection, 29 scrotal hernias, and 7 femoral hernias. There were 349 men and 15 women aged 20 to 90 years. The duration of an average procedure was approximately 20 to 25 minutes, whether for primary or recurrent hernias. In the beginning, only the author used this technique, but after 1996, when the procedure was refined and the instruments modified, the three other surgeons in the department joined in.
There were seven recurrences, an overall recurrence rate of 1.7%. Four of these were identified in the first week after the initial operation, and all were immediately corrected through the same incision; one was a missed indirect hernia, one mesh displaced in the inguinal canal after a scrotal hernia repair, one mesh displaced in front of the anterior epigastric vessels, and one mesh was incompletely deployed. Detaching the former mesh and replacing it with new and larger prostheses proved easy. Three recurrences were repaired through an anterior approach; one Lichtenstein repair, one plug repair, and one with the Prolene hernia system for a medial parapubic defect. Most recurrences occurred in the first 10 patients of a surgeon, during the learning period. Before 1996, the mesh used was smaller (8 by 10 cm), and a slit was made to accommodate the cord. During the manipulation to accommodate the cord, the medial side of the prosthesis might be dislodged, resulting in recurrence. We now parietalize the cord and use a larger mesh.
Most patients were operated on under spinal anesthesia. Recovery has been rapid, with early return to daily activities, and patient satisfaction has been high. There were no serious complications or infections.
Discussion
Covering the myopectineal orifice with a nonabsorbable prosthesis in the preperitoneal space is a well-established method for the repair of groin hernias. This technique accomplishes the same objective as the totally extraperitoneal laparoscopic approach while avoiding the difficulties of endoscopy and general anesthesia. This is not only of benefit to the patient but also of great interest to those concerned with managing health-care costs.5 The preperitoneal dissection and preparation are accomplished with regular instruments and a relatively short operative procedure. When perioperative difficulty or complication occurs, no conversion is needed; it can be easily managed by lengthening the incision. The approach is simple, inexpensive, and applicable not only to primary and recurrent hernias but also to the treatment of complex hernias. The Stoppa-Wantz repair for groin hernias, with their giant prosthetic reinforcement of the visceral sac (GPRVS) technique, has proved an effective weapon against recurrence. 1,2,6 Combining the gridiron mesh in-

59. The Gridiron Hernioplasty
sertion technique with the valid principle of the GPRVS, we could say that this is an open minimally invasive GPRVS procedure (OMI-GPRVS).
Summary
This technique of repair is simple, open, minimally invasive, tension free, anatomical, and elegant to perform for the treatment of nearly all kinds of groin hernias. As with any technique, this method of hernia repair must be carefully studied and clearly understood before it can be executed. Good knowledge of and respect for the regional anatomy is mandatory. This procedure is a viable alternative to accepted techniques for groin hernia repair. When correctly performed, there should be no recurrence.
411
References
1. Stoppa RE. The preperitoneal approach and prosthetic repair of groin hernia. In Nyhus LM, Condon RE (eds): Hernia, 4th ed. Philadelphia: J.B. Lippincott; 1995:188-210.
2. Wantz GE. Giant prosthetic reinforcement of the visceral sac: the Stoppa groin hernia repair. Surg Clin N(ff(;h Am. 1998;78(6):1075-1087.
3. Wantz GE. Atlas of hernia surgtfry. New York: Raven Press; 1991. 4. Berliner SD. Biomaterials in hernia surgery. In Maddern GJ, HiattJR,
Phillips EH (eds): Hernia repair: open vs. laparoscopic approaches, 1st ed. New York: Churchill Livingstone; 1997:199-214.
5. Liem MSL, Steensel Cj, Boelhouwer RU, et al. The learning curve of totally extraperitoneal laparoscopic inguinal hernia repair. Am] Surg. 1996;171:281-285.
6. Ugahary F, Simmermacher RKJ. Groin hernia repair via a grid-iron incision: an alternative technique for preperitoneal mesh insertion. Hernia. 1998;2:123-125.