abc roster user manual
TRANSCRIPT

ABC Roster User Manual
Page 1 / 106
ABC Roster
User Manual (version 2.3)
Copyright © ABC Roster 2009 - 2017.
This document cannot be redistributed.
January 2017

ABC Roster User Manual
Page 2 / 106
Table of Contents 1. Introduction ........................................................................................................................ 5
1.1. Overview .................................................................................................................... 5 Main Features ..................................................................................................................... 5
1.2. What is new in ABC Roster 2.3? ............................................................................... 5 2. Installation .......................................................................................................................... 6
2.1. System Requirements ................................................................................................. 6 2.2. Installing ABC Roster ................................................................................................ 7
3. Prerequisites and terminology ............................................................................................ 8 3.1. Terminology ............................................................................................................... 8 3.2. The user interface ....................................................................................................... 9 3.3. Getting help .............................................................................................................. 12
4. Getting started .................................................................................................................. 14
4.1. Inputting data ............................................................................................................ 14 4.1.1. Creating a new document ................................................................................. 14
4.1.2. Adding a schedule ............................................................................................ 15 4.1.3. Setting up shift types ........................................................................................ 16 4.1.4. Adding shifts to your roster document ............................................................. 18
4.1.5. Adding employee positions .............................................................................. 20
4.1.6. Adding employees ............................................................................................ 22 5. Defining employees’ availability ..................................................................................... 24 6. Manually scheduling employees ...................................................................................... 27
6.1. Scheduling from the main window .......................................................................... 27 6.1.1. Basics ............................................................................................................... 27 6.1.2. Conflicts ........................................................................................................... 28 6.1.3. Modifying an employee’s working hours ........................................................ 30
6.1.4. Removing employees from a shift ................................................................... 31
6.1.5. Move an employee from one shift to another .................................................. 31
6.1.6. Swapping two employees ................................................................................. 31
6.2. Scheduling from the Employee properties window ................................................. 31
6.2.1. Adding the employee to a shift ........................................................................ 32
6.2.2. Modifying the employee’s work hours ............................................................ 33
6.2.3. Removing an employee from a shift ................................................................ 34
6.3. Scheduling from the Shift properties window .......................................................... 34
6.3.1. Adding an employee to the shift ...................................................................... 34
6.3.2. Removing employees from the shift ................................................................ 35
6.3.3. Modifying an employee’s work hours ............................................................. 35
6.4. Other features ........................................................................................................... 36 6.4.1. Locking employees and shifts .......................................................................... 36
6.4.2. Pinning an employee to a shift ......................................................................... 37
6.4.3. Clearing employee schedule ............................................................................. 37
6.4.4. Groups .............................................................................................................. 38 7. Constraints ........................................................................................................................ 39
7.1. Overview .................................................................................................................. 39 7.1.1. Definition ......................................................................................................... 39 7.1.2. Example ............................................................................................................ 39 7.1.3. Weak and hard constraints ............................................................................... 40
7.2. Shift constraints ........................................................................................................ 40

ABC Roster User Manual
Page 3 / 106
7.3. Employee constraints ............................................................................................... 42 7.4. Specifying constraints values ................................................................................... 45 7.5. Specifying constraints weights ................................................................................. 47 7.6. Using constraints ...................................................................................................... 48
8. Automated scheduling ...................................................................................................... 51 8.1. Principle ................................................................................................................... 51 8.2. Settings ..................................................................................................................... 51 8.3. Warnings .................................................................................................................. 52 8.4. How to improve performance .................................................................................. 53
9. Exporting schedules and reports ...................................................................................... 54 9.1. Basics ....................................................................................................................... 54 9.2. Export Formats ......................................................................................................... 54 9.3. Layout styles ............................................................................................................ 55 9.4. Advanced export settings ......................................................................................... 58 9.5. Exporting Reports .................................................................................................... 59
10. Reusing Data ................................................................................................................ 61 10.1. Reuse data from previous schedules ........................................................................ 61 10.2. Reusing data with templates ..................................................................................... 62
11. Options and Document properties ................................................................................ 64 11.1. Application settings .................................................................................................. 64
11.1.1. General ............................................................................................................. 64 11.1.2. Localisation ...................................................................................................... 65 11.1.3. Public holidays ................................................................................................. 65 11.1.4. Auto-recovery ................................................................................................... 66 11.1.5. Warnings .......................................................................................................... 66 11.1.6. Appearance ....................................................................................................... 67 11.1.7. Miscellaneous ................................................................................................... 67
11.2. Document properties ................................................................................................ 68 11.2.1. Work hours ....................................................................................................... 68 11.2.2. Cost calculations .............................................................................................. 69 11.2.3. Roster rules ....................................................................................................... 69 11.2.4. Back to back shifts ........................................................................................... 70 11.2.5. Appearance ....................................................................................................... 70 11.2.6. Security ............................................................................................................. 73 11.2.7. Email settings ................................................................................................... 73 11.2.8. Export settings .................................................................................................. 74
12. Other features ............................................................................................................... 75 12.1. Type restrictions ....................................................................................................... 75
12.1.1. Shift Types Restrictions ................................................................................... 75 12.1.2. Employee Position Restrictions ....................................................................... 76
12.2. Employee leaves ....................................................................................................... 77 12.2.1. Leave types ....................................................................................................... 77 12.2.2. Employee leave ................................................................................................ 78
12.3. Employee skills ........................................................................................................ 79 12.3.1. Skills ................................................................................................................. 79 12.3.2. Employee Skills ................................................................................................ 80
12.4. Bookings ................................................................................................................... 80 12.4.1. Booking types ................................................................................................... 80 12.4.2. Booking ............................................................................................................ 81
12.5. Events ....................................................................................................................... 82

ABC Roster User Manual
Page 4 / 106
12.6. Emailing employees ................................................................................................. 84 12.6.1. Sending custom emails ..................................................................................... 84 12.6.2. Sending individual schedules ........................................................................... 86
12.7. Importing data .......................................................................................................... 87 12.7.1. CSV format ...................................................................................................... 87 12.7.2. Importing the CSV file ..................................................................................... 88 12.7.3. XML File format .............................................................................................. 88 12.7.4. Importing the XML file .................................................................................... 91
12.8. Visualising coverage ................................................................................................ 91 12.8.1. Global coverage ................................................................................................ 91 12.8.2. Coverage for individual days ........................................................................... 92
12.9. Known limitations .................................................................................................... 93 12.10. Roadmap ............................................................................................................... 93
13. Uninstalling ABC Roster ............................................................................................. 94 14. Change log .................................................................................................................... 95

ABC Roster User Manual
Page 5 / 106
1. Introduction 1.1. Overview
ABC Roster is a free software application especially designed to assist in the complex task of organising employee shift schedules (also known as rosters) for small organisations (mainly food and beverage departments, but it can also be used in other areas). ABC Roster aims to be time-efficient and user-friendly, providing the user with a convenient and intuitive way of creating rosters quickly. Its advanced automated scheduling feature saves considerable time for the user, it takes into account the given available resources and constraints. ABC Roster’s automated planner works by exploring various possible schedules, until it finds the one that yields the best results according to the user’s criteria.
Main Features
• Easy-to-use, intuitive user interface (just drag and drop employees onto shifts) • Manage employees' availability, days off, leave, events, bookings, ... • The automated planner that can generate schedules for you • You can email the schedules to employees directly from the application • You can export the schedules to Microsoft Excel, PDF and HTML documents • It is free!
1.2. What is new in ABC Roster 2.3?
ABC Roster v 2.3 introduces new features, amongst which: - data can be imported and exported in CSV format - new employee quota and shift quota constraints - new report for leave - multiple UI improvements This release also fixes several bugs. You can see the list of all changes contained in this release in the Change log, in section 14.

ABC Roster User Manual
Page 6 / 106
2. Installation
2.1. System Requirements Hardware Available Hard Disk space: at least 15 MB free for ABC Roster RAM: 512 MB Software Operating System: Windows XP SP3 or later (Vista, 7, 8, 10) Microsoft .Net Framework 4 or higher must be installed on your machine How do I know if the .Net Framework is already installed? Windows 8, 10 users The .Net framework is normally pre-installed on your machine. Windows XP Users From Windows Desktop, go to Start�Control Panel�Add or Remove programs. Scroll down the list and check whether Microsoft .NET Framework 4.0(or higher) is installed.
Windows Vista/Windows 7 From Windows Desktop, go to Start�Control Panel�Programs � Programs and Features. Scroll down the list and check whether Microsoft .NET Framework 4.0 (or higher) is installed. If the .Net framework is not installed on your machine, you need to download it from Microsoft’s website. Below is the link for the .Net 4 Framework:

ABC Roster User Manual
Page 7 / 106
http://www.microsoft.com/en-us/download/details.aspx?id=17851 Just download the executable from the link above and follow Microsoft’s instructions for installing the framework.
2.2. Installing ABC Roster First, ensure that the Microsoft .Net framework 4 (or higher) is installed on your machine (refer to Section 1). Download and install the ABC Roster software from http://www.abc-roster.com. To do this, just download the latest setup file and install it (on a Windows XP SP3/Vista/7/8/10 PC). Note: Administrator privileges are required to install ABC Roster on your computer. However a standard user can run the application once it is installed. During the installation process, a sample ABC Roster document is copied to the ‘ABC Roster Samples’ folder, in your personal documents directory. For instance, on windows XP, the sample file’s location will be “My Documents\ABC Roster Samples\ABC Roster Sample.abcr”. You can use this file to get a quick overview of ABC Roster.

ABC Roster User Manual
Page 8 / 106
3. Prerequisites and terminology
3.1. Terminology Below is an explanation of the terminology used within ABC Roster. It is recommended that you read this section before proceeding with the remainder of this documentation, as this section will help you get a clear understanding of the concepts discussed. Roster document A Roster document contains the work schedules for your employees over a given period of time. Roster documents are intended to be department-specific within your organisation (i.e. you would probably create one Roster document for wait staff and another document for kitchen staff). For instance, you could have a Roster document that contains data for all your wait staff schedules for the past 6 months. Schedule A schedule corresponds to a certain number of days (up to 5 weeks). It is not restricted to starting on a particular day and non-working days do not have to be shown. For example, you might decide that a schedule always starts on Tuesdays and that Sundays and/or Mondays are not necessary to include on the roster as the business is closed on these days. Schedules can span up to 5 weeks. Day A working day consists of several shifts and can be associated with events and bookings. Shift A shift is a working period on time, during which employees are rostered to accomplish various tasks. Examples of possible shifts include a Breakfast shift (6 am to 11 am), or a Dinner shift (5.30 pm to 12 am). Availability In ABC Roster, availability refers to two concepts.
Time availability This applies to the whole day and corresponds to the period between the earliest and latest time the employee can work for a given day.
Shift availability This indicates whether an employee can or cannot work on a given shift.

ABC Roster User Manual
Page 9 / 106
For instance, on Tuesday, employee John may be available to work between 7 am and 6 pm. This is the time availability. However, John may not be available to work on a ‘MiniBar’ shift within this time range (due to inability or unsuitability etc.), but may be able to work on a ‘Breakfast’ shift. This is the shift availability.
Conflict A conflict occurs when: - you are trying to roster an employee for a time slot or shift for which they are unavailable - there are clashes between the employees work hours (e.g. the employee is already rostered on a shift between 8 and 11 a.m. but you are trying to roster them on another shift, between 9 and 10 a.m.). Constraint Constraints apply to employees, shifts and represent conditions that must be satisfied. Examples of constraints include:
Maximum number of work hours for a given employee during a schedule Minimum number of staff for a given shift
Constraints are mainly used by the automated planner as a mean to automatically find the best possible schedule for your employees, depending on your priorities. This is made possible by assigning a weight (i.e. penalty) to each kind of constraint. The automated planner finds the best possible schedule by minimising the total of the weight for all the constraints in the schedule However, constraints also provide you with a quick and easy way to identify what issue needs to be addressed for a schedule. You can for instance easily spot shifts that do not have enough employees, or employees working too many or too few hours.
3.2. The user interface ABC Roster’s provides an intuitive interface, which aims to maximise the information displayed to the user.

ABC Roster User Manual
Page 10 / 106
The components from the graphical user interface are listed below. The menu bar
The menu bar provides the user with a categorised list of features. The toolbar
The toolbars provides the user with a quick access to the most used features of ABC Roster.
Employee pane
Menu bar
Status bar
Constraints pane Event pane
Schedule pane
Toolbar

ABC Roster User Manual
Page 11 / 106
The employee pane
The employee list pane lists all the users assigned to the current schedule. The bottom part also provides an estimated cost of the personnel for the schedule, the total number hours worked by the staff, and the overall shift coverage. The main schedule pane
This component enables the user to quickly visualise the current schedule. Employees can be scheduled on a shift simply by dragging them from the employee list onto the desired shift.

ABC Roster User Manual
Page 12 / 106
The constraints pane
The constraint pane lists the employee and shift constraints that are not satisfied for the current schedule. Although constraints are used primarily by the automated planner, they also provide the user with a way to quickly identify issues in the current schedule. The bottom pane also displays shift coverage, allowing the user to quickly see which shifts require more staff. The event pane
The events pane lists all the events added by the user. Events can be used to remind the user of an incoming big occasion, for which extra staff or other resources might be required. The status bar
The status bar displays additional information while you are manually scheduling employees.
3.3. Getting help From most of the screens in ABC Roster, you can obtain help for an input field by first clicking on the question mark button on the top right corner of the current window and then clicking on the input field. A help popup will show, giving you more detailed information about the field.

ABC Roster User Manual
Page 13 / 106
You can achieve the same result for text fields by clicking on the field to focus it and pressing the F1 key. Finally, you can also obtain help just by hovering you mouse over a control for about 2 seconds.

ABC Roster User Manual
Page 14 / 106
4. Getting started The instructions below detail how to create a new roster document from scratch and input basic data, such as employees, days and shifts (Section 3.1). You will need to follow these steps if this is the first time you are using ABC Roster. If you already have existing data for a schedule and would like to reuse it to create a new schedule, please refer to Section 10.
4.1. Inputting data
This section describes the process for creating a new document from scratch. Depending on the size of your organisation, this might take more or less time. This process is only required to be done once. For subsequent schedules, the data created from the first schedule can be used, as explained in Section 10. Note: ABC Roster now includes a wizard to help first time users set up a roster for the first time. The wizard goes through the same steps as the ones detailed below in this section.
4.1.1. Creating a new document The first step is to create a new roster document. To do this, launch ABC Roster and then in the toolbar select File�New Document menu.
On the next screen, ticking the checkbox you start the wizard, which would take you through the steps to set up a roster for the first time. The remainder of this section assumes that you did not check the checkbox. Click on OK to continue.

ABC Roster User Manual
Page 15 / 106
The main window should now display an empty roster document.
4.1.2. Adding a schedule
The next step is to add a new schedule. Either click on the Add schedule link or use the Insert � Add schedule menu.
This will bring up the ‘Add New Schedule’ window and allow you to specify the data required to create the new schedule, as shown below.

ABC Roster User Manual
Page 16 / 106
The following information is required:
- First day of the schedule. This is the first day of the new employee schedule. It does not have to be a Monday.
- Name: This will identify the schedules amongst all the other schedules within the roster document. Two distinct schedules cannot have the same name.
- Duration: how many weeks at most the schedule will span. - Days that make up the schedule. You can uncheck the days that you do not need to
appear on employee schedules. For instance, if your business is closed on Sunday and Monday, you may want to uncheck these days.
Notes:
- you can modify a schedule at a later stage, to either rename it or add/remove days. - schedules must not fall in the same date range
Click on OK once you have input the data. On the main window, the schedule you just created should be displayed in the schedule pane, with the days that you selected.
4.1.3. Setting up shift types Before setting up shifts for your roster, you first must create Shift Types. Shift types are required to help ABC Roster categorise the shifts. Examples of shift types include ‘Breakfast’, ‘Midshift’, ‘PM’… To add shift types, go to the Document�Document types… menu.

ABC Roster User Manual
Page 17 / 106
On the left hand side of ‘Document types’ window that just popped up, the document’s existing shift types are displayed (see screenshot below). By default, there is no type defined Click on the Add button to add a new shift type.
The ‘Add new shift type’ window appears (see below), prompting you for the details of the new shift type you wish to add. The following data is required: - Name: uniquely identifies the shift type within the Roster document - Abbreviation: the abbreviated name for the type (must be unique) - Start time and end time: default time period for actual shifts associated with that shift type. - Display order: the preferred order for displaying shifts with this type on the main screen - Colour: all the shifts with that type will be displayed with that colour in the application’s main window. You may also associate a default location (e.g. room #1, full address) with shift types. The ‘included break time’ field allows you to indicate that a certain amount of time should be subtracted when doing calculations for employee working hours.
The ‘restrict employee positions’ checkbox allows you to define which employees can/cannot work on that shift type (for more details about restricting employee positions, refer to section 12.1.1). The ignore ‘back to back rules’ means that shifts of this type will not be counted when evaluating the maximum number of back to back shifts constraint (cf Sections 7.3 and 11.2.2)
Add
Edit
Delete

ABC Roster User Manual
Page 18 / 106
You may repeat this process to add other shift types corresponding to your business activities. All the shifts are displayed in the ‘Documents Types’ window, as shown in the example below.
Click on OK, which takes you back to the main window.
4.1.4. Adding shifts to your roster document Once shift types have been defined, you may start adding actual shifts. From the Menu, select Insert�Shift, or click on the corresponding toolbar button.
The ‘Add Shift’ window appears (see below) and lets you input details for creating a new shift.

ABC Roster User Manual
Page 19 / 106
The following information is required for each shift you wish to add: - Type: the corresponding shift type. The dropdown list displays all the shift types you added previously. - Day: the day to which the shift will be added - Name: the name of the shift - Start and end time: The time slot defining the shift. You may also associate a location (e.g. room #, physical address) with the shift. Locations will show up on exported/emailed schedules. Modifications to these details can be made at a later stage, except for the ‘Shift Type’. Note: You can choose whether to add shifts with the same characteristics (name, time …) to every day in the schedule or to specific days by checking the corresponding radio buttons. If the radio button ‘ON day only’ is checked, the new shift will only be added to the day selected in the dropdown. This feature enables the user to quickly set up new documents. For instance if your business is open every day for breakfast, you can add a breakfast to each day rapidly using this option, rather than adding a shift to each day individually. There are however some restrictions. On any given day: - Two shifts cannot have the same name - Two shifts cannot have the same shift type Back to the main window, the Schedule pane should now display a schedule with days and shifts, as in the example below.

ABC Roster User Manual
Page 20 / 106
Note: you can also drag shift types onto days to create shifts, which can be even faster to setup schedules. To achieve this, click on the shift types icon on the main window’s toolbar, which will bring up a window listing available shift types. Drag the types from that window onto days to create shifts.
4.1.5. Adding employee positions Before adding employees to the current schedule, we first need to define employee positions. Examples of employee positions include ‘Trainee’, ‘Employee’, ‘Supervisor’ and ‘Manager’. To define employee positions, go to the Document� Document Types… menu. A ‘Supervisor’ default employee position is automatically added to the document (see right hand side of the screen) and cannot be deleted.

ABC Roster User Manual
Page 21 / 106
Click on the ‘Add’ button to add a new position. This displays the ‘Add new employee position’ window (displayed below), allowing you to define the characteristics for the new employee position to be added.
For each employee position, you are required to fill the following information: - Name: the name of the position (must be unique) - Abbreviation: the abbreviated name of the position (must be unique) - Level: A number from 0 to 10 to help ABC Roster sort employees by their respective positions. 0 is the lowest position; you might want to assign it to a Trainee for instance. - Colour: defines the colour used to display employees with that position The ‘Restrict shift types’ checkbox allows you to define which shift types employees with the position you just created can/cannot work on (for more details about restricting shift types, refer to section 12.1.2). Add a few more employee positions, depending on your business needs. All the employee positions available for the current Roster document will be displayed in the Document Types window, as illustrated in the example below.

ABC Roster User Manual
Page 22 / 106
4.1.6. Adding employees We can now start adding employees. Click on the Add employee link, or use the Insert menu or the toolbar button.
The ‘Add new employee’ appears (pictured below).
The following information must be filled in for each employee you want to add to your document:
ABC Roster User Manual
Page 23 / 106
- First Name - Last Name - Display Name: Uniquely identifies the employee within the roster document. - The employee’s gender - The position - Skill level: value between 0 and 5 that reflects the employee’s overall skill level. This is different from the employee position’s level, mentioned previously. For example, you could have just hired a very good trainee; meanwhile some older employees are still not performing very well in their job. - Wage/salary: only required if you want the application to provide you with an estimate of the cost for the schedule. - Full-time: Check the full-time checkbox if the employee works full time. You can optionally enter employees’ contact details, or even assign a profile picture. Add your organisation’s employees.

ABC Roster User Manual
Page 24 / 106
5. Defining employees’ availability It is possible now to start rostering employees onto the shifts. However, there would still be the possibility that human error which could cause an error in scheduling an employee for a time during which they are unable to work, or on a shift for which they do not have the required skills. To prevent these possible errors, ABC Roster lets you define employee availability. In ABC Roster, the user will be prompted with warning messages whenever they try to schedule an employee on a shift for which they are not available. Availability here is not limited to time restrictions: it may also be used to reflect whether an employee has sufficient skill to work on a given shift. To define employee availability, right click on an employee in the employee list and select ‘Availability’ from the menu. The ‘Employee properties’ form will show up, displaying the “Availability” tab as illustrated below.
Shift availability is represented by green or red rectangles. Each rectangle corresponds to a shift of the schedule. If a rectangle/shift is green, it means that the employee can work for this shift; otherwise it is displayed in red. Time availability is displayed using orange and blue sliders. The orange slider symbolises the earliest time the employee can start work on a given day, while the blue one corresponds to the latest time the employee can finish. To change shift availability for individual shifts, click on these shifts. This will alternate between available (green) and unavailable (red).

ABC Roster User Manual
Page 25 / 106
It is also possible to change shift availability for all shifts with the same type. For this, select the availability status in the dropdown on the right (available or unavailable); then select the shift types. Finally, click on Set Status. This feature is useful when some employees cannot work for a given shift type during the whole schedule. For instance, a particular employee may never be available to do ‘Breakfast’ shifts. Similarly, you can change the shift availability for all shifts on a given day, simply by clicking on the green and red boxes located under each day. For instance, if a particular employee cannot work on Monday, just click on the red box under Monday. To modify time availability, drag the sliders. For example, if a particular employee can only work between 7 am and 4 pm on Tuesday, drag the orange slider until it reads 07h00 and the blue one until it reads 16h00. Notes: - Shift availability for all shifts whose end time is before the employee availability start time will automatically be set to unavailable. For instance, say the employee cannot start work before 2 pm. Then the employee’s shift availability for all shifts which end before 2 pm will be set to unavailable. - employee leave (cf. Section 12.2) will be displayed in this tab. Say you specified that Sick leaves should appear in blue, then all shifts that take place on a day where the employee is on sick leave will be displayed in blue. Also, you will not be able to modify shift or time availability for a day where the employee is on leave. Hint : hold the Control key while dragging a slider to apply time availability modifications to all days within the schedule. Back on the main window, you can quickly visualise any employee’s availability simply by clicking on their name on the employee list. Click on the availability preview pop up to close it. Employee leaves are also displayed on the pop up (all shifts on days where the employee is on leave will be represented using the colour you specified for the associated leave type.

ABC Roster User Manual
Page 26 / 106
Disabling/enabling the availability popup is controlled using the toolbar button shown below:

ABC Roster User Manual
Page 27 / 106
6. Manually scheduling employees There are several possible ways to schedule employees on shifts.
6.1. Scheduling from the main window
6.1.1. Basics The first method, from the main window, is to drag employees from the employee list (left hand side of the screen) and drop them on the desired shift. If it is possible to proceed with your action, the cursor will change once it is over the shift, as shown below.
Sometimes ABC Roster will not let you drag and drop an employee on a shift. In this case, the shift will turn red and the cursor will change, as shown on the screenshot below.
There are several possible reasons for that behaviour, amongst which: - The shift if locked (see Section 6.4.1) - The employee is locked (see Section 6.4.1) - The employee is on leave on the shift’s date (see Section 12.2) - The employee is already rostered on another shift for the same time period. If the shift’s colour changes to orange, this means that the employee can be scheduled on the shift but the employee availability will be modified first.

ABC Roster User Manual
Page 28 / 106
Look at ABC Roster’s status bar (at the bottom of the main window) to see the reason for which the employee cannot be rostered.
The default behaviour in ABC Roster is to try to roster the employee from the start on the shift, for a period of 8 hours or for the length of the shift if it’s less than 8 hours). If the employee is available during that period, they will be scheduled on and no further action is required from the user. The value of 8 hours is configurable (refer to Section 11.2.1). If the employee is not available to work from the beginning of the shift, the employee will be rostered to start on the shift as soon as they can (depending on their availability).
6.1.2. Conflicts In several situations when you try to drop an employee on a shift, a confirmation screen like the one pictured below will pop up. Examples of such situations are when the employee is unavailable to work on the shift, or if there is a time conflict between the shift and the employee’s time availability.

ABC Roster User Manual
Page 29 / 106
This window is used whenever the user needs to make a decision/clarification regarding the rostering of an employee on a shift. It shows the following information. - The employee being rostered - The employee’s current time availability for the day (and the following day if the shift is overnight) - The employee’s current work hours for the day (and the following day if the shift is overnight) - A time picker, which allows you to specify what time the employee should be rostered on - Eventual warning messages, as shown below.
Messages displayed with an orange background represent time/shift availability conflicts that can be resolved automatically by ABC Roster. Messages displayed with a red background require a decision from the user. The meaning of these various messages is detailed below. Solvable conflicts This employee is marked as unavailable for this shift This message means that the current shift availability for the employee is set to unavailable. If you click on OK at the bottom of the window, the shift availability will be automatically changed to available. Time conflict detected with availability This message informs you that the employee time availability conflicts with the time you tried to roster them on. Say John cannot start work before 8 a.m. on Tuesday, but you are trying to roster him on a shift starting at 7.30 a.m. If you click on OK at the bottom of the window, John’s availability for Tuesday will be automatically modified so that he is available for work from 7.30 a.m. ‘x’ employees cannot work on ‘y’ shifts ‘y’ shifts do not accept ‘x’ employees These messages warn you that your action goes against the type restrictions you defined. For instance, you will get this message if you specified that ‘Trainee’ employees can only work on ‘Minibar’ and ‘Morning’ shifts, but you are wanting to roster on a trainee on a ‘Night’ shift. If you click on the OK button; the employee will be rostered anyway (but restrictions rules will not be affected). For more information on type restrictions, please refer to section 11 Unsolvable conflicts

ABC Roster User Manual
Page 30 / 106
Time conflict detected with other shifts This message is displayed when the time conflicts with the current employee’s schedule. You are required to manually modify the time to resolve the conflict. No suitable time found When this message shows, this mean that the employee is already working for the full length of the shift you are trying to roster them on. If you really want to roster the employee on this shift, you have to modify the employee work hours on other shifts first. For instance, say the employee if working on a Morning shift from 8.00 am to 2 p.m., but you are trying to schedule them on a ‘Minibar’ shift which starts at 10.00 am and ends at 12.00 pm on the same day. You are required to manually modify the time to resolve the conflict. The employee is locked. When an employee is locked, you are not allowed to roster him on another shift. The only way to schedule the employee on is to manually unlock them, from the main window or from the Employee properties window. The selected period conflicts with the employee’s leave If the employee is on leave during the selected time period, try modifying your selection so that it does not clash anymore with the leave periods. Otherwise, try to modify the employee’s leave first and then try again to roster the employee on the shift. For more information on employee leaves, please refer to section 12.2. The employee is on leave during all of the shift If the employee is on leave on the shift’s date, the only way to solve this conflict is to modify employee leave first and then try again to roster the employee on the shift. For more information on employee leaves, please refer to section 12.2. Note: Special rules apply for overnight shifts. Say you have an overnight shift, starting at 8 p.m. on Monday and finishing at 5 a.m. on Tuesday. There are three scenarios if you want to roster an employee on that shift:
- The employee will start work on Monday and finish before midnight on Monday. In this case, the employee only needs to be available for work until midnight on Monday.
- The employee will start work on Monday and finish sometime after midnight on Tuesday. In this scenario, the employee only needs to be available for work until midnight on Monday. The employee’s availability on Tuesday (shift/time availability and leave) are not considered.
- The employee will work on Tuesday, say from 1 a.m. to 5 a.m. In this scenario, the employee only needs to be available for work from 1 a.m. on Tuesday. The employee’s availability on Monday (shift/time availability and leave) is not considered.
6.1.3. Modifying an employee’s working hours
From the main window, you can right click on an employee rostered on a shift and then click on ‘Edit working hours for shift’, or left click the employee and press Ctrl+E . This will bring up the form described previously in section 6.1.2).

ABC Roster User Manual
Page 31 / 106
You can also modify working hours from the employee properties form (c.f. section 6.2) and the shift properties form (c.f. section 6.3)
6.1.4. Removing employees from a shift To remove an employee from a shift, simply drag the employee out of the shift and drop it anywhere in the Schedule section, but not on another shift. Alternatively, you can either:
- right click on the employee name (from the shift they are rostered on) and select ‘Remove from shift’.
- Left click on the shift’s employee and press the DEL key
6.1.5. Move an employee from one shift to another To move an employee from one shift to another, simply drag the employee from the first shift to the second. Another solution is to first remove the employee from the shift (as explained in Section 6.1.4) and then drag that employee again from the employee list.
6.1.6. Swapping two employees ABC Roster allows you to quickly swap two employees, again by using the drag and drop. To swap two employees already rostered on two different shifts, drag one employee from one shift and drop it on the employee of the other shift. The 2nd employee’s background colour should change, to either green or red.
If the background turns green, this means that you are able to proceed with your action. A red background indicates that the two employees cannot be swapped. Refer to the status bar at the bottom of the application to obtain more details. Note: time/availability conflicts may be raised while swapping employees and you may be required to manually modify the scheduling time, as it was the case for rostering a single employee.
6.2. Scheduling from the Employee properties window The second method for rostering an employee on a shift is from the employee properties window. On the main window, double click on an employee from the employee list. The new window displays the employee’s availability and work hours as shown below.

ABC Roster User Manual
Page 32 / 106
The first column list the available shift types from the document and the other columns show the actual shifts corresponding to these shift types (or a greyed out cell when there is no shift of a particular type). When an employee is unavailable to work on a shift, this shift is represented in red. When the employee is rostered on a shift, their work hours are also represented. For instance on the figure above, the employee cannot work on any AM shift during the schedule; they also cannot work on Tuesday nor on Wednesday. The only shifts this employee is currently working on are on a MB shift (Friday, from 8.30 a.m. to 12.30 p.m.) and a PM shift (Monday, from 1.45 a.m. to 3.45 a.m.). Note: Notice how some shift types have two rows associated with them (PM and ConfPM). The extra row, with the label “(from prev. day)”, will show whenever there is at least a shift finishing after midnight for the corresponding shift type. This extra row will be used whenever an employee starts work after midnight on a shift that runs past midnight. For instance, in the example above, a PM shift starts on Sunday and finishes early on Monday morning. Because of this shift, an extra row shows for the PM shift type. If an employee working on this shift starts on Sunday, their work hours will show in the Sunday column, for the PM row. However, if the employee starts work on the same shift on Monday, their work hours will show in the Monday column, in the PM (from prev. day) row.
6.2.1. Adding the employee to a shift To roster the employee on a shift, just double click the corresponding cell for that shift. This will make the Roster employee window appear, from which you can decide the employee’s schedule for that shift.

ABC Roster User Manual
Page 33 / 106
Note: it is still possible to double click a red shift (i.e. employee unavailable). In this case, the Roster employee window will also be displayed, except that it will also display the warning messages described above.
6.2.2. Modifying the employee’s work hours Just double click on the shift’s cell, or right click on the shift cell and click on Modify hours. This will display the Roster employee on shift form, from which you can change the employee’s scheduled time for the shift.
ABC Roster User Manual
Page 34 / 106
6.2.3. Removing an employee from a shift
To remove an employee from a shift, select the shift using the mouse and press the DEL key. Alternatively, you can right click on the shift and select Remove from Shifts. Both methods allow you to remove the employee from multiple shifts, provided that multiple shifts are selected.
6.3. Scheduling from the Shift properties window
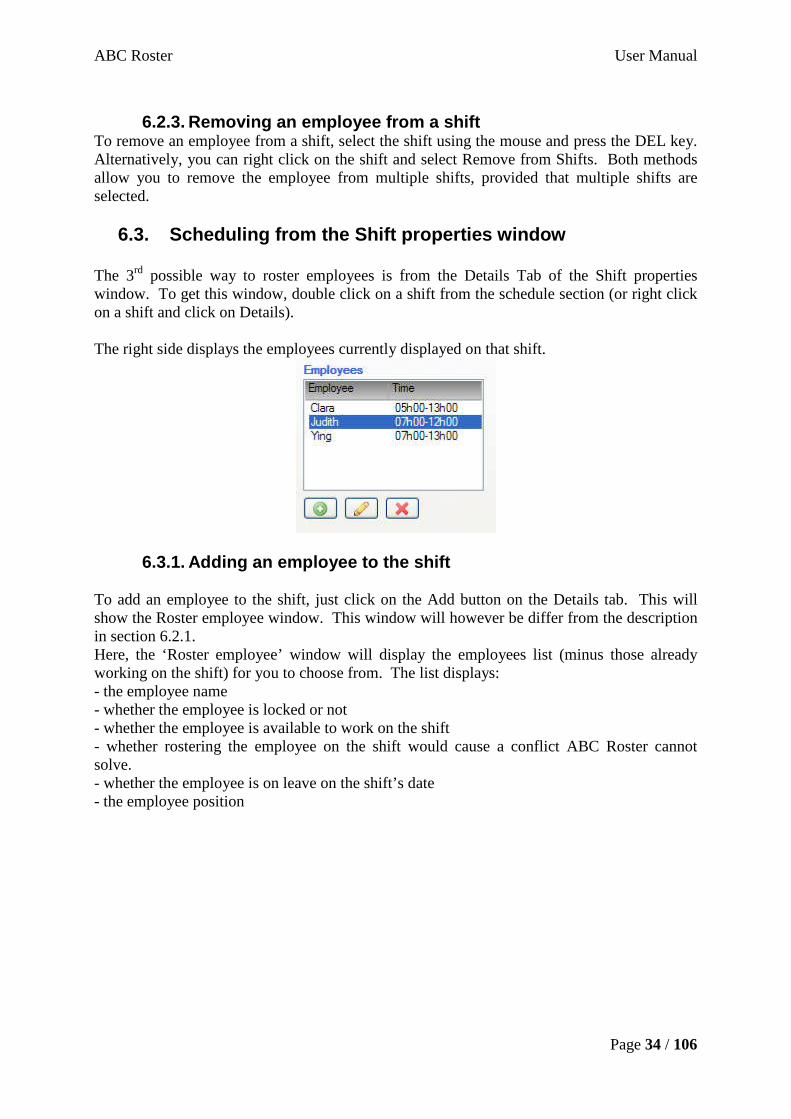
The 3rd possible way to roster employees is from the Details Tab of the Shift properties window. To get this window, double click on a shift from the schedule section (or right click on a shift and click on Details). The right side displays the employees currently displayed on that shift.
6.3.1. Adding an employee to the shift To add an employee to the shift, just click on the Add button on the Details tab. This will show the Roster employee window. This window will however be differ from the description in section 6.2.1. Here, the ‘Roster employee’ window will display the employees list (minus those already working on the shift) for you to choose from. The list displays: - the employee name - whether the employee is locked or not - whether the employee is available to work on the shift - whether rostering the employee on the shift would cause a conflict ABC Roster cannot solve. - whether the employee is on leave on the shift’s date - the employee position

ABC Roster User Manual
Page 35 / 106
The employee name will be displayed in red if the employee is locked, on leave or cannot work on the shift because of a work hours conflict. In these situations, you need to respectively unlock the employee, remove the employee leave, or modify the employee work hours on other shifts, before being able to roster this employee on the shift. Note: from this window, you can also filter employee based on the skills that are needed to schedule them onto the shift (cf Section 12.3).
6.3.2. Removing employees from the shift To remove an employee from the shift, select in the list (on the Details tab) the employees that will no longer be working on the shift and click on the Remove button or press DEL.
6.3.3. Modifying an employee’s work hours To modify a single’s employee work hours, select the employee on the list of the Details tab and click on the Modify button (or double click on the employee). This will display the Roster employee on shift form, which you can change the employee’s scheduled time for the shift. ABC Roster provides the user another quick and intuitive way to modify employees work hours, in the Time tab of the Shift properties form. For each employee rostered on the shift, there are two corresponding sliders representing the starting (green slider) and ending time (red slider) of the employee. The screenshot below illustrates that feature: there are two employees scheduled on the shift; David from 8 a.m. to 12 p.m. and John from 6 a.m. to 10.45 a.m.

ABC Roster User Manual
Page 36 / 106
Note: it is also possible to alter the schedules by using the time picker controls at the bottom of the window. Hint : To change the start/end time for all of the employees rostered on the shift, hold the Control (CTRL) key while dragging a slider.
6.4. Other features
6.4.1. Locking employees and shifts If you want to make sure that an employee’s schedule does not get modified accidentally, you can lock that employee. This will prevent the employee work hours to be modified, either manually or by the automated planner. To lock an employee, right click on the employee in the employee list in the main window and select ‘Lock’.
Once an employee is locked, it is not possible to modify their work hours manually. A similar feature is available for shifts. When a shift is locked, it is not possible to add or remove employees, or modify the work hours of the employees rostered on that shift. To lock a shift, right click on that shift in the schedule pane and click on ‘Lock’. Note: locked shift and employees are displayed with a lock icon in the schedule pane, as pictured below.
Indicates a locked employee

ABC Roster User Manual
Page 37 / 106
6.4.2. Pinning an employee to a shift If you want to make sure that an employee’s shift assignment does not get changed by mistake, you can pin that employee onto a shift. Right click on the employee you want to pin, then select ‘Pin’.
6.4.3. Clearing employee schedule To clear the employee schedule for a particular employee, right click that employee from the employee list and select clear schedule.
To clear the schedule for all employees in the current schedule, select ‘Clear all employees schedules’ from the ‘Edit’ menu.
Note that both these actions will clear the schedule for locked employees as well.

ABC Roster User Manual
Page 38 / 106
6.4.4. Groups Groups enable you to quickly schedule multiple employees together on a shift. To create a group, go to the Document� Manage employee groups menu.
From there, you can create groups and assign employees to these groups. To schedule employees from a group onto a shift, right click on that shift from the main screen and select Add employees from a group. All employees belonging to the selected group will be added to the shift (if there is no conflict with existing work hours or availability).

ABC Roster User Manual
Page 39 / 106
7. Constraints To assist the user in achieving greater productivity, ABC Roster offers an automated scheduling feature. This functionality allocates the available employee to the various shifts of the schedule, while trying to maximise the quality of the resulting schedule. The user must however provide some ‘hints’ to ABC Roster, so that the application can assess the quality of the automatically generated schedules. The user can give such clues via constraints. The automated scheduler successively generates rosters and evaluates the quality of each one of them by calculating how close they are from satisfying the constraints. The constraints used in ABC Roster are described below.
7.1. Overview
7.1.1. Definition In ABC Roster, constraints apply to either shifts or employees. Constraints are defined by a name, a value and a weight. The name identifies the constraint. The value is a target that the automated planner must reach in order to satisfy the constraint. The weight is a penalty that is assigned to the roster if the constraint is not satisfied. The weight is a value between 0 and 100. The higher the weight, the more important the constraint is considered. If the current schedule matches a constraint condition, that constraint is said to be satisfied. Let’s study an example to make this easier to understand.
7.1.2. Example ABC Roster implements a constraint named ‘Minimum number of staff’, which applies to all shifts. For each shift, this constraint allows the user to specify the minimum number of employees that should be scheduled. For each shift, the user can indicate the value of that constraint, which is the minimum number of employees required for the shift. Say you consider that at least 3 employees are needed for the ‘Breakfast’ shift on Monday morning. You would then go to the Constraints tab of the Shift properties window and input that value. Finally, the user can specify the weight of the constraint. Unlike the value, which is shift-specific, the weight chosen by the user applies to all the ‘Minimum number of staff’ constraints. Say the weight is set to 4. Now, let’s assume we have a schedule where only one employee is rostered on the ‘Breakfast’ shift. The constraint is thus unsatisfied and there would be a penalty of 8 assigned to that schedule for that particular shift constraint.

ABC Roster User Manual
Page 40 / 106
This is calculated as follows: (3[required number of employees] – 2 [actual number of employees]) * 4 [constraint weight] Note: All satisfied constraints have a penalty of 0. Using weight helps ABC Roster understand your priorities. Constraints with higher priorities should have a greater weight.
7.1.3. Weak and hard constraints Constraints have another property: they can be weak or hard. This setting only plays a role during the automated planning process. The difference is that a schedule with unsatisfied weak constraints is still considered as a valid option; but a schedule with any unsatisfied hard constraint will be immediately discarded. For instance, say you set the value of the ‘Minimum number of staff’ constraint for the ‘Breakfast’ shift on Monday to be 4. If that constraint is weak, the best schedule generated by the automated planner might only have 3 or less employees rostered on that shift. If the constraint is hard, this will not happen. Setting all the constraints to be hard is generally not a good solution: if you do not have sufficient resources (staff) to satisfy the constraints you defined, then the automated planner will not be able to generate any schedule.
7.2. Shift constraints ABC Roster implements the following shift constraints. Minimum number of staff Description: defines the minimum number of employees that should be scheduled on the associated shift. Purpose: ensures that a shift is not understaffed Input Value: the minimum number of employees to be rostered on the shift How the penalty is calculated: Number of employees on the missing compared to requirements x weight Example: The weight is 4. There are 5 employees rostered, but the constraint specified 2. Penalty = (5-2) x 4 = 12 Maximum number of staff Description: defines the maximum number of employees that should be scheduled on the associated shift. Purpose: ensures that a shift is not overstaffed
ABC Roster User Manual
Page 41 / 106
Input Value: the maximum number of employees to be rostered on the shift How the penalty is calculated: Number of ‘extra’ employees compared to requirements x weight Example: The weight is 4. Only 2 employees are rostered, but the constraint specified 5. Penalty = (5-2) x 4 = 12 Minimum average employee skill level Description: defines the minimum average skill level for all the employees rostered on the shift. Purpose: ensures that the combined employees have sufficient experience to run the shift smoothly Input Value: the average skill level for all employees on the shift How the penalty is calculated: Difference between required and actual skill average x weight Example: The weight is 3. The required skill level is 4, but the actual skill average of all employees rostered on the shift is 1. Penalty = (4-1) x 3 = 9 Minimum number of supervisors Description: defines the minimum number of employee whose position is supervisor (or above) needed on the shift Input Value: the minimum number of supervisors for the shift Purpose: ensures that there are enough leaders on the shift How the penalty is calculated: Difference between required and actual number of supervisor employee x weight Example: The weight is 4. The required number of supervisor is 2 but there are none. Penalty = (2-0) x 4 = 8 Maximum number of supervisors Description: defines the maximum number of employee whose position is supervisor (or above) needed on the shift Purpose: ensures that there are enough leaders on the shift Input Value: the maximum number of supervisors for the shift How the penalty is calculated: Difference between required and actual number of supervisor employee x weight

ABC Roster User Manual
Page 42 / 106
Example: The weight is 4. The required number of supervisor is 2 but there are none. Penalty = (2-0) x 4 = 8 Minimum and maximum number of employee positions allowed Description: Defines the number of staff allowed to work on the shift, per position Purpose: ensures that there is the right number of employees with the same position working on the shift Input Value: for specified employee positions, the minimum and maximum number of employees allowed
7.3. Employee constraints ABC Roster implements the following employee constraints. Minimum number of work hours per schedule Description: defines the minimum number of hours that a given employee must work during the schedule. Purpose: ensures that employees work enough hours Input Value: the minimum number of hours that a given employee must work during the schedule. How the penalty is calculated: Difference between required and actual number work hours x weight Example: The weight is 1. Employee John is required to work 40 hours during the schedule, but he is only scheduled to work 25 hours. Penalty = (40-25) x 1 = 15 Maximum number of work hours per schedule Description: defines the maximum number of hours that a given employee must work during the schedule. Purpose: ensures that employees are not rostered on too many shifts Input Value: the maximum number of hours that the employee must work during the schedule. How the penalty is calculated: Difference between required and actual number work hours x weight Example: The weight is 1. Employee John is required to work 40 hours during the schedule, but he is scheduled to work 45 hours.
ABC Roster User Manual
Page 43 / 106
Penalty = (45-40) x 1 = 5 Maximum number of shifts per day Description: defines the maximum number of shifts that an employee can work on during a day Purpose: ensures that employees are not rostered on too many shifts within the same day Input Value: the maximum number of shifts that the employee can work per day How the penalty is calculated: Difference between required and actual number shifts worked on a day x weight Example: The weight is 5. Employee John is required to work at most 1 shift per day, but on Tuesday he’s scheduled for 2 shifts. Penalty = (2-1) x 5 = 5 Minimum number of days off per schedule Description: defines the minimum number of days off that an employee must get per schedule. Note: here, that’s the maximum number of days in the schedule that is taken into account. For instance, if you indicated that you schedule spans 4 weeks when you created it, then the constraint will check days off over a duration of 5 weeks, even if you only actually added 2 weeks to your schedule. Purpose: ensures that employees get some time off during the schedule Input Value: the minimum number of days off How the penalty is calculated: Difference between required and actual number of days off x weight Example: The weight is 6. Employee John is required to get 2 days off but he does not get any. Penalty = (2-0) x 6 = 12 Minimum number of days off per 7 day period Description: defines the minimum number of days off that an employee must get per 7 day period. Purpose: ensures that employees get some time off every week Input Value: the minimum number of days off per 7 day period (and a flag indicating whether these days off must be consecutive) How the penalty is calculated:

ABC Roster User Manual
Page 44 / 106
For each week: (difference between required and actual number of days off + difference between expected number of consecutive days off and actual number consecutive days off) x weight Example: The weight is 6. Employee John is required to get 2 consecutive days off per week, but the first week he has 3 non consecutive days off and the 2nd week he only has 1 day off. First week penalty = (2-0) x 6 = 12 Second week penalty = (2-1) + (2-0)x 6 = 18 Total penalty: 30 Maximum number of back to back shifts allowed Description: defines the maximum number of back to back shifts that an employee can do during a schedule. Back to back shifts are defined using a rule explained in Section 11.2.4. Purpose: ensures that employees are not rostered on too many back to back shifts Input Value: the maximum number of back to back shifts allowed How the penalty is calculated: Difference between maximum required and actual number of back to back shifts x weight Example: The weight is 5. Employee John is required to not work on any back to back shifts during the schedule, but he is currently doing one. Penalty = (1-0) x 5 = 5 Shift types to avoid Description: defines the shift types on which a given employee should not be assigned. Purpose: ensures that employees are not rostered on shifts that they should avoid Input Value: the shift types that the employee should avoid How the penalty is calculated: Number of assignments on shifts that the employee should avoid x weight Example: The weight is 5. Employee John is required to not work on Breakfast shifts, but he is assigned to 3 Breakfast shifts within the schedule. Penalty = 3 x 5 = 15 Colleagues to avoid Description: specifies the other employees with which a given employee should not work. Purpose: ensures that employees are not rostered on shifts with colleagues they should not work with Input Value: the colleagues that the employee should avoid

ABC Roster User Manual
Page 45 / 106
How the penalty is calculated: Number of assignments with colleagues that the employee should avoid x weight Example: The weight is 5. Employee John is required to not work with Bob and Alice, but he’s assigned on a shift with both Bob and Alice and on a shift with Alice alone. Penalty = 3 x 5 = 15 Minimum and maximum number of shift types allowed Description: Defines the number of shifts that the employee can work, per shift type Purpose: ensures that an employees does not work too many shifts of the same type (e.g. night shifts) Input Value: for specified shift types, the minimum and maximum number of shifts that the employee can work Note: it is the user’s responsibility not to assign conflicting values to the constraints. For instance, if you specify that an employee should work more than 40 hours and less than 25 hours, ABC Roster will not display any warning. However, those two constraints cannot be both satisfied.
7.4. Specifying constraints values To specify constraint values for employees, go to the Constraints tab of the Employee properties window.

ABC Roster User Manual
Page 46 / 106
This tab shows all the employees constraints for the currently selected employee. For each constraint, you may specify: The constraint value Which employees will be affected by your modifications to the constraint. It can be:
- the current employee - all employees with the same employee position (e.g. all ‘Trainee’ employees) within
the schedule - all employees with the same full-time/part-time status within the schedule - all employees within the schedule
Whether the constraint is hard or weak. (refer to Section 7.1.3) Whether the constraint is active or not. Inactive constraints are not evaluated and thus can greatly improve the automated planner’s performance. To specify constraints values for shifts, navigate to the Constraints tab of the Shift properties window.

ABC Roster User Manual
Page 47 / 106
This tab shows all the shift constraints for the currently selected shift. For each constraint, you may specify: The constraint value Which shifts will be affected by your modifications to the constraint. It can be: - the current shift - all shifts with the same shift type (e.g. all ‘Breakfast’ shifts) - all shifts Whether the constraint is hard or weak. Whether the constraint is active or not. Inactive constraints are not evaluated and thus can greatly improve the automated planner’s performance.
7.5. Specifying constraints weights To modify constraint weights, go to the Document� Constraints�Constraint settings … menu. This will display the Constraint settings window, which allows the user to modify the associated weight for employee and shift constraints.

ABC Roster User Manual
Page 48 / 106
This enables the user to prioritise what issues should be taken into consideration in the schedule. Note: from this window, you can also choose to hide constraints that are not relevant to your organisation. Hiding constraints that you do not use can greatly improve the automated planner’s performance.
7.6. Using constraints Constraints are mainly used during the automated process, as explained in Section 8. However, they also provide the user with an easy way to quickly visualise what issues need to be addressed in the current schedule. Employee and shift constraints are displayed at the bottom of the main window. Note that only unsatisfied constraints are displayed.
For each shift, unsatisfied constraints are shown, along with an explanation and the weight for each constraint.

ABC Roster User Manual
Page 49 / 106
For instance, from the screenshot shown above it is possible to tell that a few shifts are understaffed, one is overstaffed (Morning on Sunday) and two other shifts require a supervisor to be rostered on (ConfPM and Night shifts on Sunday). Hard constraints are highlighted in red. Note: You can order the list (shown above) by clicking on the column headers. You can also directly open the shift/employee properties form by double clicking constraints. A similar feature exists for employee, accessible from the Employee constraints tab (see screenshot above). It is also possible to visualise shift and employee constraints from the Details Tab of the ‘Shift properties’ window and Employee properties window respectively. Below is a screenshot from the Shift properties window (Details tab).
Satisfied constraints are displayed in green, unsatisfied constraints are displayed in red.

ABC Roster User Manual
Page 50 / 106
The last way to visualise shift and employee constraints is on the main schedule pane. If you hover your mouse over a shift or an employee, a summary of the constraints for that shift/employee will pop up.

ABC Roster User Manual
Page 51 / 106
8. Automated scheduling Once all the constraints have been specified, you can proceed with the automated scheduling phase.
8.1. Principle The automate planner successively generates schedules, where available employees are allocated to the shifts of the schedule. Each of the generated schedules has its quality assessed, to find out whether it would be a suitable option for the user. The quality of a schedule is measured using user criteria, conveyed via the constraints: generated schedules are compared to each other using the total weight of the constraints. The lesser the total constraint weight, the better the roster is.
8.2. Settings
Go to the Tools�Automated planner… menu. This displays the ‘Automated Planner’ window, as shown below.
Before starting the automated process, you must first define its limitations. There are two possible conditions: - stop after a certain time - stop when the total weight of the generated schedule is less than a given value The automated planner will stop as soon as any of the conditions above are met. Note: for an organisation with about 20 employees and only a few shifts per days, the automated planner can usually find satisfying solutions within 2 to 3 minutes for a schedule over 1 week. There are 2 additional options: - randomising shift assignments ensure that employees are not always assigned the same shifts when you run the automated planner multiple times

ABC Roster User Manual
Page 52 / 106
- not allowing employees to work more than one shift per day makes the automated planner yield results faster, but the ‘Maximum number of shifts per day’ constraint is basically ignored (employees will have at most one shift per day). The employees work hours will be reorganised directly on the original schedule. Click on Start to begin the automated process. Once this is started, you can interrupt it at any time by clicking on Interrupt or Cancel. Both will stop the current process; however Interrupt will display the best schedule generated at this stage, while Cancel will not.
While the automated process is running, you can visualise the time already elapsed as well as the best value (i.e. total constraint weight for the entire schedule) found so far.
8.3. Warnings
The automated planner is a great feature to quickly generate schedules that satisfy user defined constraints as best as possible. This rapidly produces rosters that are generally good, provided that the user has entered adequate constraint weights to represent the priorities. However, it may be sometime difficult for the user to quantify their priorities. Because of this, it is recommended to use schedules generated by the automated planner as a starting point rather than a final document. Some tweaking by the user will normally enhance the final quality of the roster. Ensuring that constraints do not have contradictive values is the sole responsibility of the user. For instance, you will get no warning from ABC Roster if you specify that an employee must work less than 20 hours per schedule (‘Maximum number of work hours per schedule’ constraint) and more than 40 hours per schedule at the same time (‘Minimum number of work hours per schedule’ constraint). Only constraints that relate to the highest priority aspects of your schedule should be defined as hard constraints. Otherwise, if you do not have enough resources (e.g. available
ABC Roster User Manual
Page 53 / 106
employees, supervisors) to satisfy the constraints, then the automated planner will not be able to generate a schedule.
8.4. How to improve performance It is possible to improve the automated planner’s performances by:
- Hiding constraints that are not used (from the ‘Constraints�Constraint settings…’ menu)
- Deactivating constraints that are not used (from the constraints tab for shift/employees)
- Not allowing the automated planner to schedule an employee more than once per fay - Having short schedules

ABC Roster User Manual
Page 54 / 106
9. Exporting schedules and reports
9.1. Basics
Once you are satisfied with a given schedule (or if you want to show it to other people in your organisation for comments/suggestions), you may want to get a hard copy of the document. This can be done in ABC Roster by first exporting the roster to an Excel, PDF or HTML document, and printing it later on. Multiple schedules can be exported at the same time. Note: Currently, using the Export feature is the only available way to get your schedule on paper, as ABC Roster does not support direct printing at present. Exported data include days, shifts, employees, work hours, bookings and locations. Events are currently not exported. To start exporting a schedule, select that schedule from the schedule pane on the main window and go the Tools�Export… menu. The ‘Export schedule window pops up and let you define exporting settings, as shown below.
After selecting the export format and the export layout type, you must specify the file where the schedule will be exported to. You must also specify which schedules you wish to export. The ‘Advanced…’ button pops up a new window, from which you can define colours and other settings for the exported document. All these options are described below.
9.2. Export Formats

ABC Roster User Manual
Page 55 / 106
Four formats are currently supported: Microsoft Excel spreadsheet, PDF document, HTML file and XML document. For all formats, you have to fill the ‘Export file path’ field to specify which file the roster will be exported to. If you select an existing document, this document will be overwritten by the file generated by ABC Roster for PDF and HTML formats. When selecting an existing document for Excel export, you can choose between overwriting the file and adding a new spreadsheet to it. Microsoft Excel spreadsheet Exporting to an Excel document requires Microsoft Excel 2003 or higher to be installed on your machine. It is flexible export format in that you can edit the generated spreadsheets before printing or emailing them. The name of the generated spreadsheet can be specified by the user in the “Spreadsheet name” field. PDF document PDF documents require a PDF viewer to be opened, such as Adobe PDF Reader. Most PDF readers are free and installed on most computers. PDF documents cannot be edited. HTML document A HTML document can be opened by any browser application, such as Internet Explorer or Mozilla Firefox. This is a good option if you plan to put your rosters online (e.g. on your organisation’s intranet website). HTML documents can be manually edited. XML document Use this type if you want to export all data and process it before using it in another software application. After choosing the export format, you can choose between the layout styles, detailed in the next section.
9.3. Layout styles
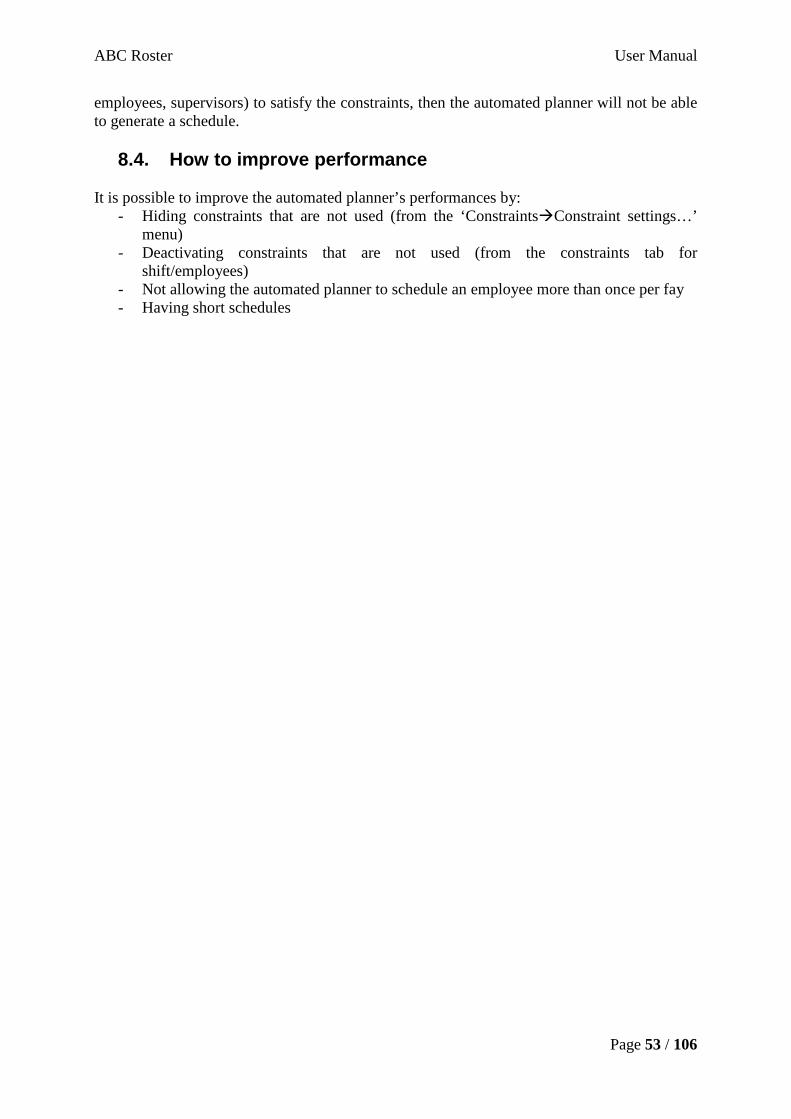
Before proceeding with the description of the styles, please note that: - ‘x’ means that a part-time employee is not working on a given day. - ‘RDO’ (Regular Day Off) signifies that a full time employee is not working on a given day - employee view. All employees for the exported schedule are sorted alphabetically. For each employee, the shifts they are working during the schedule are displayed against the day, under the following format: Shift Abbreviation – Start time. This style allows you to quickly identify what shifts a given employee is rostered on for the schedule. For instance, by looking at the exported schedule below, you can tell that Bob is working on a Breakfast shift on Saturday (from 8 am to 12 pm) and then on a PM shift from (4 pm to 11 pm) on the same day, and also that Claudia does not work on Sunday and Tuesday.
ABC Roster User Manual
Page 56 / 106
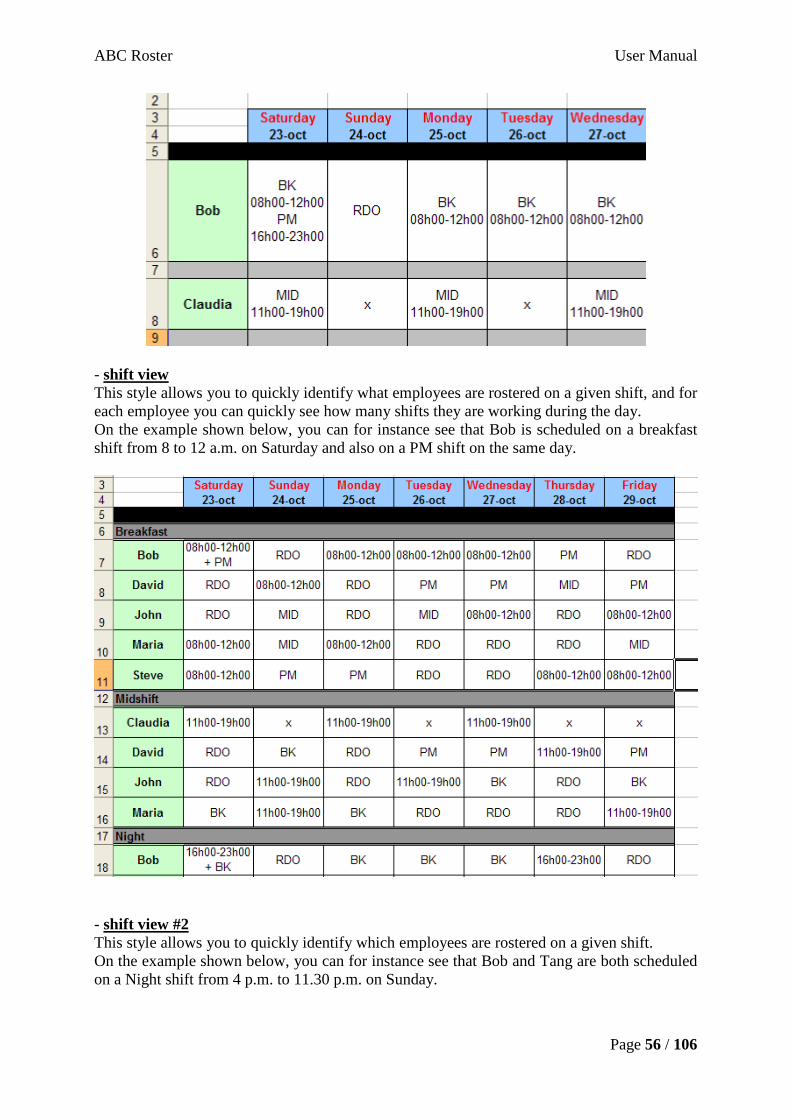
- shift view This style allows you to quickly identify what employees are rostered on a given shift, and for each employee you can quickly see how many shifts they are working during the day. On the example shown below, you can for instance see that Bob is scheduled on a breakfast shift from 8 to 12 a.m. on Saturday and also on a PM shift on the same day.
- shift view #2 This style allows you to quickly identify which employees are rostered on a given shift. On the example shown below, you can for instance see that Bob and Tang are both scheduled on a Night shift from 4 p.m. to 11.30 p.m. on Sunday.

ABC Roster User Manual
Page 57 / 106
Note: Some shift types will have two rows associated with them (Night in the example above). The extra row, with the label “(from prev. day)”, will show whenever there is at least a shift finishing after midnight for the corresponding shift type. This extra row will be used whenever an employee starts work after midnight on a shift that runs past midnight. For instance, in the example above, a Night shift starts on Sunday and finishes early on Monday morning. Because of this shift, an extra row shows for the Night shift type. If an employee working on this shift starts on Sunday, they will show in the Sunday column, for the Night row. However, if the employee starts work on the same shift but on Monday, they will show in the Monday column, but in the Night (from prev. day) row. - day view This view is similar to the shift view #2 layout, except that days are represented vertically and shifts horizontally. - schedule view This layout is only available for Excel exports, and represents the data in the same way as the main screen. This view is now convenient for printing data, but was provided as some users requested it.

ABC Roster User Manual
Page 58 / 106
9.4. Advanced export settings
You have the option of choosing the colours applied to exported schedules, to make them fit with your company standards. You may also specify what is displayed to indicate days where a given employee does not work, or whether bookings and locations should be exported as well. The Preview feature allows you to get an idea of what exported documents will look like. If you tick the ‘Apply above settings to all exports’, all future exported documents will by default have the newly defined style; otherwise only the current export will be affected.

ABC Roster User Manual
Page 59 / 106
9.5. Exporting Reports
For now, ABC Roster only allows you to export a basic report for worked hours and holidays. To export a worked hours report, go to the Tools�Export… menu and select ‘Total worked hours, holidays and costs’ for the export type. The options are the same as for exporting a schedule, except that:
- the HTML format is not available - the layout type options are not available - there is a new option, ‘Combine data’, so that you can decide whether you want to
sum up all worked hours/holidays when exporting multiple schedules

ABC Roster User Manual
Page 60 / 106

ABC Roster User Manual
Page 61 / 106
10. Reusing Data ABC Roster allows the user to quickly create new schedules by reusing existing data, from previous schedules or templates.
10.1. Reuse data from previous schedules
Let’s assume than you have an existing roster document, with at least one schedule in it. Select ‘New Schedule/Template…’ from the ‘Insert’ menu. This will bring up the window pictured below, to add a new schedule to your roster document.
Input the name of the new schedule to add. Then select ‘Reuse data from a schedule’ in the ‘Copy data from’ box. This will enable a drop down, listing all existing schedules from the current document. Pick one of these schedules to reuse its data. Note that the first day of the new schedule must match the first day of the copied schedule; for instance, if the previous schedule started on a Tuesday, then the new schedule must also start on a Tuesday. ABC Roster allows the user to decide what data should be reused copied when reusing a pre-existing schedule to create a new one.

ABC Roster User Manual
Page 62 / 106
- Employees: copies all employees from the existing schedule. If un-ticked, no employee will be added to the new schedule. - Employee constraints: copies all employee constraints from the existing schedule. If un-ticked, all employee constraints will be reset to their default values. - Employee work hours: copies employee schedules. If un-ticked, no employees will be assigned to any shift. - Days and shifts: if un-ticked, the new schedule will have no days or shift. Otherwise, the existing schedule’s days and shifts will be copied, as well as employee availability. - Shift constraints: copies all shift constraints from existing schedule. If un-ticked, all shift constraints will be reset to their default values. Using this feature enables you to rapidly create new schedules from existing data. It is however likely that you will have to make some modifications (e.g. if employee availability has changed). Note: if you add a new schedule spanning 2 weeks but the schedule you are copying the data from only contains 1 week, and if you selected the option to copy days, then your new schedule will only contains 7 days.
10.2. Reusing data with templates ABC Roster also provides another way to reuse data: templates. A template is basically a generic schedule. You can add days, shifts, employees and then define employee availability and constraints. The advantage is that you can modify the template’s shifts, employee details, availability… without altering any real schedule’s data. Creating a template To add a template, go to the Insert�Schedule/Template menu. There, select the ‘This schedule is a template’ option, as shown below.
Note that because template are generic, there is no date associated with the days; i.e. the days will be Monday, Tuesday, … and not Monday 21st September, … Note: templates do not have to be created from scratch. If you have already created a few schedules in your document, you can pick one of them and copy its data, by using the method described in Section 9. Using templates to copy data To reuse data from a template, you can reuse the method described in Section 9, except that you must select ‘Use a template’ in the ‘Copy data from’ box, instead of ‘Reuse data from a schedule’.

ABC Roster User Manual
Page 63 / 106

ABC Roster User Manual
Page 64 / 106
11. Options and Document properties This section describes the application and document settings in ABC Roster. Application settings apply across all Roster documents. Document properties are settings that are document-specific (i.e. changing the properties for the current roster document will not affect your other documents). Both application settings and Document properties are displayed in the same window, which can be accessed from either the Tools� Options menu or the Document�Document properties menu.
11.1. Application settings
Application settings apply across all roster documents and can be reset to their default values by clicking the ‘Reset application settings’ button (see screenshot above).
11.1.1. General You can specify:
- how many documents will be shown in the File� Recent document menu - how many actions can be cancelled, using the Edit�Undo menu (or Ctrl + Z) - whether ABC Roster should verify is any new version is available (this requires your
computer to be connected to the internet). This option is activated by default.

ABC Roster User Manual
Page 65 / 106
11.1.2. Localisation You can specify:
- The date format used - whether the time should be displayed following 24 or 12 h format. This affects both
the data displayed in the application and the exported documents. - which character to use as a separator between hours and minutes - the symbol for currency - the language (English, French or Italian).
11.1.3. Public holidays
Since v2.0, it is possible to specify a different pay rate for holidays. The Public holidays pane lets users define public holidays, with a name, a date, and whether the public holiday occurs every year on the same date.

ABC Roster User Manual
Page 66 / 106
11.1.4. Auto-recovery ABC Roster provides an auto save feature, which takes backups of the currently opened document at regular intervals. These automated backup files will be saved in a folder that the user can choose (although it is recommended to use the default folder). Each back up will erase the previous one.
11.1.5. Warnings General warnings You can choose whether deleting an employee/shift/day or event should display a warning message.
Employee warnings You may also want to be prompted with warnings when you are manually rostering an employee on a shift and one of the following conditions occurs:

ABC Roster User Manual
Page 67 / 106
- the employee will work back to back shift - the employee will work less than X minutes on the shift - the work hours will conflict with the time availability (otherwise availability will be
automatically modified to automatically fit work hours, as explained in Section 6.1.2) - the employee will be working more than Y shifts on the day
11.1.6. Appearance This tab lets you change the back colour of ABC Roster’s windows. The two background colours you can choose are combined together in a gradient and used for the window’s contour. The main colour is used for the centre-part of ABC Roster’s windows.
11.1.7. Miscellaneous If ABC Roster suffers from reoccurring crashes for which the user cannot identify the cause, the user can click on the ‘Show error log’ button. This will display debugging information that can be sent to ABC Roster support to help identify the problem and provide a solution. Also, you can specify proxy settings if you are using ABC Roster on a work computer where a proxy is required to connect to the internet. Finally, if you made a donation to ABC Roster, you can register you copy of the application from this tab. You will need to enter the activation key you received after making the donation and you name / company name. After activation, donation buttons will not show anymore.

ABC Roster User Manual
Page 68 / 106
11.2. Document properties This section describes document settings in ABC Roster.
11.2.1. Work hours You can choose the number of hours an employee will work by default on a shift if they are available. Say you choose 6.5 hours for this setting. Say there is a morning shift, starting from 5.00 am to 12 a.m. If you drag employee John on that shift and John and there is no conflict with John’s availability, John will be rostered from 5.00 a.m. to 11.30 a.m. (i.e. for a duration of 6.5 hours). You can also specify the default time availability when a new employee is added to a schedule.

ABC Roster User Manual
Page 69 / 106
11.2.2. Cost calculations
You can specify how many hours an employee on salary/wage works per week. This is used for estimating the cost of employees for the current schedule. (The actual number of work hours, defined by the employee schedule, is not used in that calculation for employees on salary, but only for employees on wages). Another setting is the number of hours that would normally make up a day off. This is taken into account when calculating costs for when employee on wages take paid leave, or when employees on salary take unpaid leave. Finally, you can also choose whether to apply different pay rates for:
- Night shifts - Weekends (Saturday and Sundays) - Public holidays. Public holidays are defined by the user (cf section 11.1.3)
11.2.3. Roster rules
There are situations where the employee is marked as available for the shift, but cannot work for the full length of that shift. For instance, an employee might not be able to start until 2 hours after the beginning of the shift, or might have to leave earlier. For these situations, you have the possibility to use the rules pictured below to decide whether the employee can be rostered on a shift, instead of specifying shift availability for each employees individually.

ABC Roster User Manual
Page 70 / 106
Note: these rules only apply when the employee is not available to work for the full length of the shift.
These rules are used when manually rostering an employee or when using the automated planner. For instance, let’s say that employee John is available to work for a Morning shift, which starts at 5 a.m. and ends at 11 a.m. Let’s also pretend that John cannot start work until 6 a.m., and that you set a rule saying that employees won’t be automatically rostered on a shift if they cannot start within 30 min from the beginning of that shift (as pictured above). When using the automated planner, John will never be rostered on the Morning shift, as he can only start work 1 hour after the beginning of the shift. If you try to manually roster John on the Morning shift, then the confirmation screen (cf. Section 6.1.2) will pop up, telling you about a time availability conflict.
11.2.4. Back to back shifts
ABC Roster provides the user with a way to prevent employees from being scheduled on back to back shifts, by specify the minimum amount of ‘free’ time that an employee must get between two shifts. This feature is for instance useful when trying to avoid rostering employees on an evening shift and then on the morning directly after.
Note: you can specify which shift types should be excluded when evaluating this rule (cf. section 4.1.3).
11.2.5. Appearance
ABC Roster allows you to customise the appearance of your roster documents, so that you can get the best visualisation possible, depending on your personal preferences and/or screen resolution.
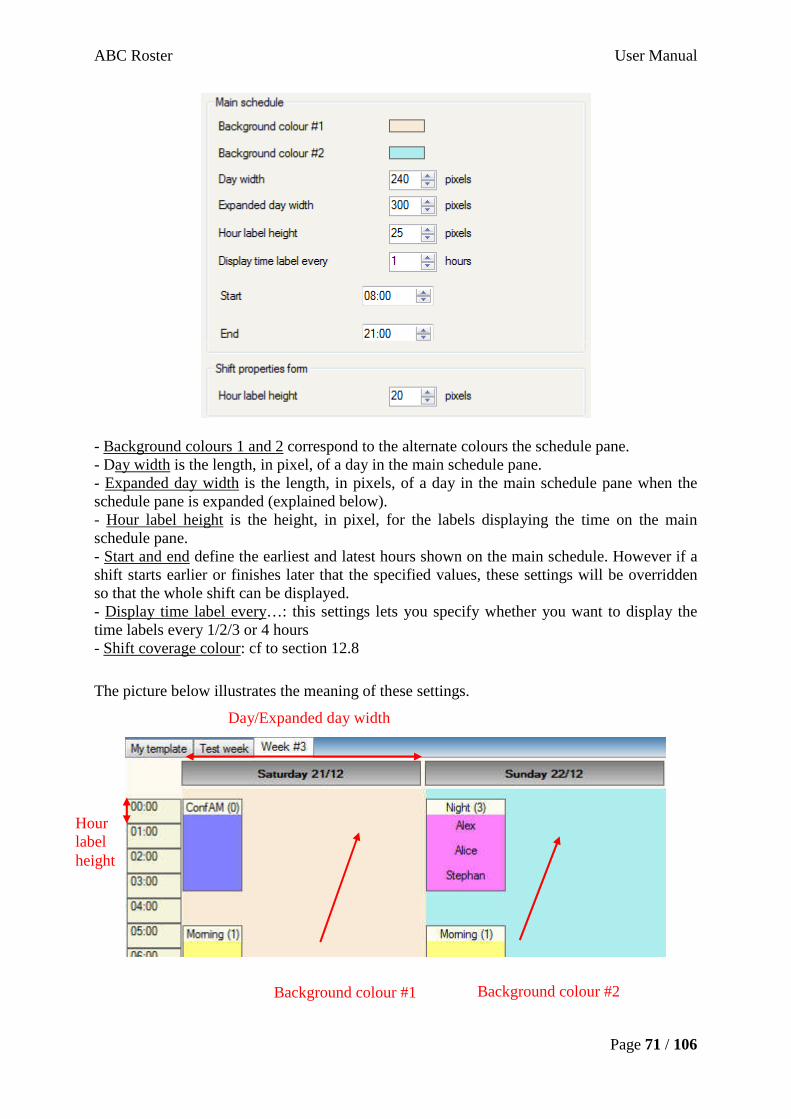
ABC Roster User Manual
Page 71 / 106
- Background colours 1 and 2 correspond to the alternate colours the schedule pane. - Day width is the length, in pixel, of a day in the main schedule pane. - Expanded day width is the length, in pixels, of a day in the main schedule pane when the schedule pane is expanded (explained below). - Hour label height is the height, in pixel, for the labels displaying the time on the main schedule pane. - Start and end define the earliest and latest hours shown on the main schedule. However if a shift starts earlier or finishes later that the specified values, these settings will be overridden so that the whole shift can be displayed. - Display time label every…: this settings lets you specify whether you want to display the time labels every 1/2/3 or 4 hours - Shift coverage colour: cf to section 12.8
The picture below illustrates the meaning of these settings.
Background colour #1 Background colour #2
Hour label height
Day/Expanded day width

ABC Roster User Manual
Page 72 / 106
Expanding/collapsing the display If there are many shifts in your schedule, and/or if you use a small screen resolution, the entire schedule will probably not fit on the screen and you will have to use scrollbars to display some data. However, you may sometimes find it useful to visualise all shifts for the current schedule on your screen, without having to use the scrollbars. This can be achieved by reducing the space taken by days (day width setting). The screenshot below illustrates this situation: all days and shifts are visible on the screen without having to use scrollbars.
As you can notice, the shifts are ‘shrunk’ to be aligned on the day’s width. If your schedule has many shifts, it may become impossible to clearly visualised detailed data. Fortunately, you can ‘expand’ the visualisation by simply clicking on a toolbar button, pictured below.
The days will be stretched so that their width is as defined by the ‘Expanded day width’ setting. This will also make the shifts bigger and thus improve visualisation. The screenshot below shows the shifts from the example above, after clicking on the ‘Expand’ toolbar button. You can notice that the shifts are bigger and that the entire schedule does not fit on the screen anymore, thus triggering the appearance of scrollbars at the bottom.
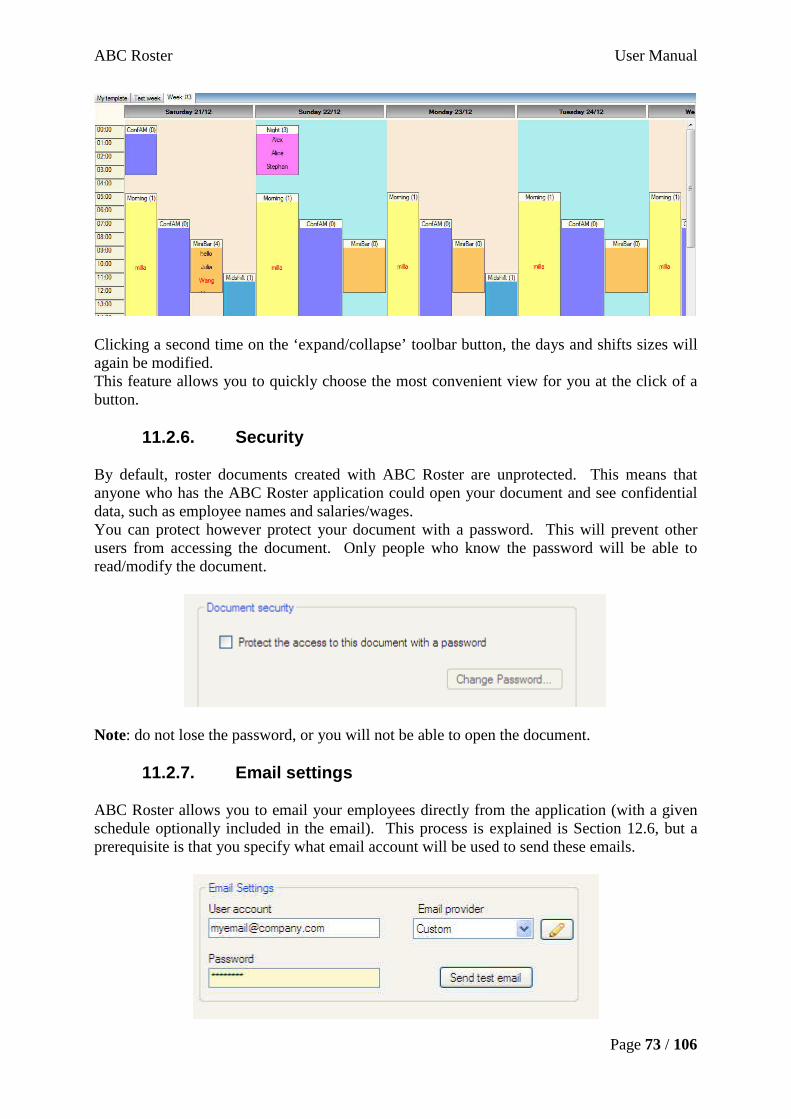
ABC Roster User Manual
Page 73 / 106
Clicking a second time on the ‘expand/collapse’ toolbar button, the days and shifts sizes will again be modified. This feature allows you to quickly choose the most convenient view for you at the click of a button.
11.2.6. Security By default, roster documents created with ABC Roster are unprotected. This means that anyone who has the ABC Roster application could open your document and see confidential data, such as employee names and salaries/wages. You can protect however protect your document with a password. This will prevent other users from accessing the document. Only people who know the password will be able to read/modify the document.
Note: do not lose the password, or you will not be able to open the document.
11.2.7. Email settings ABC Roster allows you to email your employees directly from the application (with a given schedule optionally included in the email). This process is explained is Section 12.6, but a prerequisite is that you specify what email account will be used to send these emails.

ABC Roster User Manual
Page 74 / 106
If you wish to use email accounts from Gmail, Outlook/Hotmail/Live and Yahoo, you just need to fill in the ‘User account field’ in the email settings section (pictured above) and select the correct email provider from the dropdown. If you are using a different email provider, you need to click on the edit button and fill in the required information on the new window that pops up (shown below). This information should be available from your email provider.
Once you have specified your email account, you can then click on ‘Send test email’ to test that the functionality works. This will send an email to your email account. If you choose to save the password in the Email settings section by filling the ‘Password’ field, you will not have to type it every time you send an email. If you prefer not to save the password on your computer, you will be prompted for the account password whenever you send an email. Note: if using Gmail, you might need to modify settings to allow ABC Roster to send emails https://support.google.com/accounts/answer/6010255?hl=en
11.2.8. Export settings
In this section, you can define the style that will be by default applied to all exported/emailed schedules. If you wish to apply a style to a schedule for a one-off export, please refer to Section 9.4.

ABC Roster User Manual
Page 75 / 106
12. Other features This section describes other features of ABC Roster that have not been explained so far.
12.1. Type restrictions Type restrictions provide the user with a finer control over the schedules generated by the automated planner. Type restrictions basically enable the user to specify which employees can work on which shift. This is useful for example if you do not want ‘Trainee’ employees to be allowed to work on a ‘Minibar’ shift. Note: if you try to manually roster an employee on a shift and the employee/shift association is not permitted by the restrictions, you will be prompted with a message box (refer to section 6.1.2). The automated planner will however strictly follow the defined restrictions. To define type restrictions, go to the Document� Document Types… menu.
12.1.1. Shift Types Restrictions Shift types restrictions allow you to define what employee are allowed to work on a shift with a given shift type. On the Document Types window, edit a shift type and tick the ‘Restrict employee positions’ checkbox. You then have the choice between specifying:
a] which employees positions are accepted for the shift type (only employee employees with the ticked position will be accepted on this shift). Example: ‘Only supervisors and team leaders can work on Morning shifts’ b] which employees are forbidden to work on this shift type. All employees except the ones with the ticked positions will be allowed on the shift. Example: ‘All employees except Trainees are allowed to work on Minibar shifts’
ABC Roster User Manual
Page 76 / 106
12.1.2. Employee Position Restrictions
Employee position restrictions allow you to define which shifts an employee with a given position is allowed to work on. On the Document Types window, edit an employee position and tick the ‘Restrict shift types’ checkbox. You then have the choice between specifying:
a] which types of shifts the employee can work on. E.g. ‘Supervisors can only work on Night shifts’ b] which kind of shifts the employee cannot work on. The employee will be permitted to work on all shifts, except the one corresponding to the ticked shift types. ‘Team leaders can work on all shifts except Night shifts’.
ABC Roster User Manual
Page 77 / 106
12.2. Employee leaves ABC Roster allows the user to specify when an employee goes on leave. This comes in useful to avoid rostering employees on a shift by mistake, on a day they will not event be at work! Each leave is associated with leave types, which the user must define.
12.2.1. Leave types The first step to indicate that an employee is on leave is to define leave types. Go to the Document�Document types menu. On the ‘Document types’ window that appears, select the ‘Leave’ tab, then, click the Add button to add a new Leave type. The ‘Add new leave type’ window pops up.
On this window, you are required to input the following data to add a new leave type:
- Name: the name of the booking leave (must be unique) - Abbreviation: the abbreviation for the leave type (must be unique)

ABC Roster User Manual
Page 78 / 106
- Colour: this is the colour used to represent the associated employee leaves on the availability preview pop up window (see Section 5) and on the availability and details tabs of the Employee Property window (see sections 5and 6.2).
- Whether the leave is paid or not: this setting is used when computing the schedule’s costs and only applies to full time employees. For part-timers, leave is always considered unpaid.
12.2.2. Employee leave
To define employee leave, open the Employee property form and go to the ‘Leave tab’, pictured below. The calendar displays employee leave and working days for a period of 2 months. Dates where the employee is working are displayed in bold. The grid below the calendar also displays employee leave, with more details. Displayed leave may be filtered using the dropdown.
To add (or edit) a leave, just click on the Add (or edit) button and fill in the fields on the right hand side on the screen, pictured below. A leave is defined by dates (first and last dates of the leave) and a type. If this is a partial day leave (i.e. less than a day), you can tick the ‘Partial day leave’ checkbox and then specify the start and end time for the leave. You can optionally associate a comment with the leave instance. Note: You cannot add a leave period that conflict with the employee work hours or with the dates of another leave period.

ABC Roster User Manual
Page 79 / 106
12.3. Employee skills ABC Roster allows the user to assign a set of skills to each employee. These skills can be used later on to decide whether or not to roster employees on a given shift.
12.3.1. Skills The first step to take before defining individual employee skills is to define the set of all the skills required in your organisation. Go to the Document�Document types… menu. On the ‘Document types’ window that appears, select the ‘Skills’ tab, then, click the Add button to add a new Skill. The ‘Add new skill’ window pops up.
On this window, you are required to input the following data to add a new skill:
- Name: the name of the skill (must be unique) - Abbreviation: the abbreviation for the skill (must be unique)

ABC Roster User Manual
Page 80 / 106
12.3.2. Employee Skills To define individual employee skills, open the Employee property form and go to the ‘Skill tab’, pictured below. Tick the skills that the employee has.
You can filter out employees by skill when adding employees onto a shift (cf Section 6.3.1).
12.4. Bookings ABC Roster allows the user to define bookings for each day of the schedule (this feature is more for food and beverages organisations). For instance, you might want to note down that a tour group has booked a few tables for dinner on Sunday. In ABC Roster, bookings are not directly associated with shifts. This is because you might want to differentiate between the various kinds of booking for the same shift. For instance, one may want to separate normal bookings and tour group bookings for a given ‘Dinner’ shift. Each booking is instead associated with booking types, which the user must define.
12.4.1. Booking types The first step is to define booking types. Go to the Document�Document types menu. On the ‘Document types’ window that appears, select the ‘Booking’ tab. Then, click the Add button to add a new Booking type. The ‘Add new booking type’ window is presented to you.
On this window, you are required to input the following data to add a new booking type:
- Name: the name of the booking type (must be unique)

ABC Roster User Manual
Page 81 / 106
- Abbreviation: the abbreviation for the booking type (must be unique) - Display order: this is a value, between 0 and 30, that will be used by ABC Roster to
sort the bookings when the schedule is exported to Excel (the booking type with the smallest sorting order appears first in the exported documents)
12.4.2. Booking
Once bookings types have been added to the document, you can start adding actual bookings to your schedule. First, double click on the day to which you want to add a booking, or use the Insert�Booking menu.
This will bring up the ‘Day properties’ window, pictured below.
From there, you may add/edit or remove bookings. Clicking on Add will display the ‘Add new booking’ window, from where you can add actual bookings.

ABC Roster User Manual
Page 82 / 106
The following data must be filled:
- booking type - Number booked: the number of persons expected - Comment (optional): more details about the booking
If you tick the ‘Add similar booking to every day’ checkbox, the same booking (same type, same number, same comment) will be added to every other day of the schedule. Notes: on any day, there cannot be more than one booking with the same booking type. You can change booking dates when editing a booking.
12.5. Events ABC Roster enables the user to input events, to act as reminder for occasions coming up that might have an impact on the organisation. An example could be an important sporting event nearby, which might draw more customers than usual to your business. In this case, you might want to create reminder (event) to remember that you will need to schedule more staff on during this day. To add a new event, select Insert�Event from the menu. ABC Roster will present to you the ‘Add new event’ window, pictured below.

ABC Roster User Manual
Page 83 / 106
An event is characterised by:
- a date, i.e. when the event will occur - a title, which gives an overview of the event. The title must be unique for the
associated date, i.e. two events on the same day cannot have the same title. - a description, which you may use to write down more details about the event - whether it is a recurring event or not
Events will appear in the Events pane of ABC Roster’s main window, as illustrated below.
A drop down filter (see above) lets you specify what events you want to be displayed in that window. You may choose to display: - events for the schedule you are currently viewing - events between two specific dates To modify an event, simply double click on it from the Events pane, or use right click to display the contextual menu. To delete an event, select it from the Events pane and press DEL (or use right click to display contextual menu).

ABC Roster User Manual
Page 84 / 106
You can specify recurring events, by ticking the ‘Repeat’ checkbox. This will bring up a new window, from which users can specify how often the even repeats.
12.6. Emailing employees ABC Roster allows you to email your employees directly from the application, from the Tool�Email employees… menu. (Note that you must define what email address will be used to email your employees, cf. section 11.2.7). ABC Roster allows you to send two kinds of emails: custom emails and individual schedules.
12.6.1. Sending custom emails When sending custom emails, you can choose the recipients, as well as the layout for exported schedules. All employees will receive the same email. To send custom emails, select the ‘Send custom email’ from the Send email form, pictured below. To choose email recipients, you can:
- select the employees from the list; and/or - manually enter comma-separated email addresses in the ‘additional recipients’ fields

ABC Roster User Manual
Page 85 / 106
You may include one or more schedules by ticking the ‘Include schedule(s)’ checkbox and selecting the schedules for which you want to email the corresponding roster. The roster(s) will then be included in the email body, in HTML format. The ‘Layout Type’ option is similar to the export layout types described in Section 9.3. You may also include attachments to the email. Notes:
- All recipients are included as hidden recipients, so people you sent the email to will not see each other’s email address.
- You may copy the content of a recent email by ticking the ‘Show previous emails’ checkbox, which will show a pop up and let you choose the email to copy.
Once you click on ‘Send’, ABC Roster will start sending the email. The operation might take a few minutes, depending on the number of recipients and the size of the attachments. Meanwhile, the application’s status bar will be updated to reflect the current sending operation, as pictured below. Multiple emails may be sent at the same time.
Note: once the operation is complete, a message will pop up to inform you whether the email was sent successfully or not.

ABC Roster User Manual
Page 86 / 106
12.6.2. Sending individual schedules When sending individual schedules, you can select which schedules you want to email. Only employees rostered on the selected schedules (and that have an email address assigned) will be emailed. Each employee will receive an email listing their individual work hours only (i.e. they will not see their colleagues’ work hours). To send individual schedules, select the ‘Email individual schedules’ from the Send email form, pictured below.

ABC Roster User Manual
Page 87 / 106
The roster(s) will then be included in the email body, in HTML format
12.7. Importing data Instead of manually creating the data, ABC Roster allows you import:
- employees using a CSV (comma separated values) file format - Other data (shift types, employee positions, assignments,…) via an XML file
12.7.1. CSV format
CSV files are text file whose content consists of lines, each representing an employee. Each line contains all the details for a given employee, separated by commas. Each employee requires 12 values, in a specific order, with the constraints described below:

ABC Roster User Manual
Page 88 / 106
Field Index
Field value
Mandatory Max length Description/Rules
1 First Name Yes 30 The employee’s first name 2 Last Name Yes 30 The employee’s last name 3 Display
Name Yes 30 The employee’s display name
Must be unique across the whole document
4 Sex Yes Must be M for males and F for females 5 FullTime Yes Must be F for full timers and P for part-
timers 6 Salary Mandatory only if the employee is on a
salary. Otherwise, must be blank Max 10000
7 Wage Mandatory only if the employee is on a wage. Otherwise, must be blank Max 10000
8 Skill level Yes The employee’s skill level. Must be a number between 0 and 5.
9 Employee Position
Yes The position of the employee. The value must match the name of one of the Employee positions declared in the document.
10 Email No 50 The employee’s email address 11 Phone No 20 The employee’s phone number 12 Address No The employee’s address. Can span over
several lines if between quotes. Example: Bob, Smith, Bobby, M, F, 30, 0, 5, Supervisor, [email protected], 556 234 345, "12 Albert St, MyTown"
12.7.2. Importing the CSV file Go to the Document�Manage employees… menu, then click on Import Employees… Select the CSV file containing the employees to import and then click on the ‘Import’ button. Once the import process is finish, the application will tell you which employees where imported, and which report could not be processed.
12.7.3. XML File format XML is a human readable and machine-readable format created to share data. XML The data is organised as nested node, which can have attributes. A node can also have some textual content. Each node starts with an opening tag (e.g. <Shift> and ends with a closing tag (e.g. </Shift>) In the sample below, there are 2 nodes: one ShiftTypes node, and a nested ShiftType node. The ShiftType node has one attribute, called Name, and whose value is test. <ShiftTypes> <ShiftType Name="test"><![CDATA[ content ]]> <ShiftType/> </ShiftTypes>

ABC Roster User Manual
Page 89 / 106
The XML file follows a specific format, with nested nodes describing the data to import. . Nodes are indicated in bold, and the number of occurrences within the brackets. Document (1) Types (0 or 1) ShiftTypes (0 or 1) ShiftType (1 or more) Locations (0 or 1) Location (1 or more) EmployeePositions (0 or 1) EmployeePosition (1 or more) Schedules (0 or 1) CurrentSchedule (1) Availability (1) EmployeeAvailability (1 or more) ShiftAvailability (1 or more) Here is a brief description of each node Node Occurrences Description Document 1 Root node Types 0 or 1 Specify only if document types are to be imported ShiftTypes 0 or 1 Specify only if shift types are to be imported ShiftType 1 or many 1 node for each shift type to import Locations 0 or 1 Specify only if locations are to be imported Location 1 or many 1 node for each location to import. Note: the
physical address must be contained within the node, not as attribute (see example below)
EmployeePositions Specify only if positions are to be imported EmployeePosition 1 or many 1 node for each position to import Schedules 0 or 1 1 node if any availability is to be specified CurrentSchedule 0 or 1 1 node if any availability is to be specified Availability 0 or many Lets the user define time or shift availability for
employees. 1 node for each employee for whom availability must be specified
EmployeeAvailability 0 or many Lets the user define time. 1 node per day for each employee for
ShiftAvailability 0 or many Lets the user define shift availability for employees. 1 node for each shift for which availability must be specified
Here are the attributes expected by each node Node Attribute Explanation
ShiftType
Name Type’s name Abbreviation Type’s abbreviation EndsOnSameDay Whether the time period ends on the same
day it starts (“Y” for yes, “N” for No) BreakTime The break time in minutes StartTime The default start time for that time

ABC Roster User Manual
Page 90 / 106
EndTime The default end time for that time
Location Name The location’s name Abbreviation The location’s abbreviation
EmployeePosition Name The position’s name Abbreviation The position’s abbreviation Level The position’s level (1 – 5)
EmployeeAvailability
DisplayName The display name of the employee for which availability is being specified
Day The day for which the availability is specified. Mandatory format: YYYY-MM-DD
StartTime Availability start (from 00:00 to 23:15). Mandatory time format: HH:mm
EndTime Availability end (from 00:30 to 23:59). Mandatory time format: HH:mm
ShiftAvailability
ShiftName The shift’ ShiftType The name fo the shift’s type Available Whether the employee is available to work on
that shift: “Y” (yes) or “N” (no) Note: the address, for a location node, is not specified as an attribute, but in the node itself, optionally enclosed within <![CDATA[ ]]> if the address is multiline (see example below) Here is a sample file <?xml version="1.0" encoding="utf-8"?> <Document> <Types> <ShiftTypes> <ShiftType Name="Morning" Abbreviation="AM" EndsOnSameDay="Y" BreakTime="15" StartTime="07:00" EndTime="12:00" /> <ShiftType Name="Night" Abbreviation="PM" EndsOnSameDay="N" BreakTime="0" StartTime="19:00" EndTime="02:00" /> </ShiftTypes> <Locations> <Location Name="Location 1" Abbreviation="Loc1"> <![CDATA[230 Queen Street Auckland ]]> </Location> </Locations> <EmployeePositions> <EmployeePosition Name="Driver" Abbreviation="DRV" Level="2"/> <EmployeePosition Name="Manager" Abbreviation="MGR" Level="5"/> </EmployeePositions> </Types> <Schedules> <CurrentSchedule> <Availability> <EmployeeAvailability DisplayName="Alex" Day="2017-01-18" StartTime="08:00" EndTime="22:30" > <ShiftAvailability ShiftName="Morning" ShiftType="Morning" Available="Y"></ShiftAvailability> <ShiftAvailability ShiftName="Night" ShiftType="Night" Available="N"></ShiftAvailability>

ABC Roster User Manual
Page 91 / 106
</EmployeeAvailability> </Availability> </CurrentSchedule> </Schedules> </Document>
Creation of 2 shift types - Morning (AM) from 7am to 12 am, with a 15 min break - Night (PM) from 7pm to 2 am the day after with no break time
Creation of one location:
- Location 1 (loc1) with the following address: 230 QueenStreet, Auckland Creation of 2 employee positions
- Driver (DRV) with level 2 - Manager (MGR) with level 5
Modification of Alex’s availability
- On Jan 18 2017, Alex is available from 8 pm to 10.30 pm - On the same day, Alex is available for the Morning shift but is not available for the
Night shift
12.7.4. Importing the XML file Go to the Document�Import�Data… menu and select the XML file containing the data. Once the import process is finish, the application will tell you which data was imported, and which data could not be processed.
12.8. Visualising coverage
12.8.1. Global coverage On the main screen’s toolbar, click on the arrow next to the magnifier icon and select “Coverage”
- This will display the schedule’s shift, and employee shift assignments in green. This allows the user to see coverage for each shift, for the entire schedule.

ABC Roster User Manual
Page 92 / 106
Notes: - this feature requires users to have Internet explorer 9 or greater installed on their
machine. - Colour for the coverage display can be defined in the Document properties (cf section
11.2.5). 12.8.2. Coverage for individual days
Right-click any day on the main screen, then click on Display coverage
The display is identical as the one for global coverage, except that it only shows one day at a time

ABC Roster User Manual
Page 93 / 106
12. Known Limitations and Roadmap
12.9. Known limitations This section describes issues that are known to ABC Roster. They will hopefully be fixed in later versions of ABC Roster. - Only one user at a time can access a roster file - Accessing a roster file from a file on a shared network, or from a cloud storage such as Dropbox or OneDrive, can cause problems and is not supported - Printing a Roster document directly from ABC Roster is not possible. The only workaround currently available is to export the roster to either a Microsoft Excel file, a PDF file or a HTML file and then print the file. - The cost estimation is not very accurate - A schedule cannot span more than 5 weeks - Memory issues can occur with schedules with many shifts and employees - There is no notion of repetitive schedule - Sending emails with Gmail might not work if the user has not enabled less secure apps to access their account. Refer to https://support.google.com/accounts/answer/6010255?hl=en
12.10. Roadmap
Below is a list of improvements that are being considered for ABC Roster. Please do not hesitate to give your opinion regarding these, or suggest more features.
• Provide the possibility to associate a task with each employee scheduled on a shift • Improve the automated planner • Give more control to the user over what to display on exported schedules • Be able to manage schedules for multiple locations • Cater for recurring schedules • Provide more layout/reports • Have a real skill matrix

ABC Roster User Manual
Page 94 / 106
13. Uninstalling ABC Roster If you had chosen to create an entry in the Start menu for ABC Roster when first installed, you can go to Start�All Programs� ABC Roster � Uninstall ABC Roster. Alternatively, you can go to Start � Control Panel � Add or Remove Programs. Select ABC Roster in the list and Click on Remove. Note: the roster documents you created yourself will not be deleted by the un-installation process.

ABC Roster User Manual
Page 95 / 106
14. Change log Release 2.3.0 – January 2017 New features
- XML import: document types (shift types, employee positions, …) and employee availability can be imported via an XML file
- XML export: Schedule data can be exported to XML - Times can be rounded to 5 minutes (instead of 15) - New constraint: shift type quota - New constraint : employee position quota - Shift constraints can be applied to all shifts on same date or day - Main screen: filter for displaying shifts - Main screen: filter for employees - Added notes field on shifts. Displayed on main screen - Export preview: added leave report
Other improvements
- The automated planner is slightly faster - The size for the shift properties form is remembered - The employee properties form can be resized properly - Export: new option to hide unused shift types (shift view #1 and #2) - Other UI improvements (some forms are bigger, some dropdown lists are wider …)
Bugs fixed
- Fixed crash when exporting data with the schedule view export for short shifts - Fixed proxy issues - Fixed crash when announcement in Wizard mode - Fixed crash when saving a document with a path that is too long - Fixed crash when exporting employees with short names in PDF - Toolbar properly updated after wizard - Fixed data not being saved when switching tab. This was causing data to become
inconsistent when modifying shift times - Shift type display order is now saved correctly - No more crash report when failing to open exported file. A message is displayed
instead
Release 2.2.1 – October 2016
- Main screen: Shift's normal colour reset properly when cancelling scheduling with popup
- Employee availability tab: availability correctly represented for overnight shifts when using the bottom buttons
- Export: fixed crash in schedule view for day with no shift - Export: fixed crash when trying add new sheet to an existing Excel file that is already
opened - Export: Corrected crash when no spreadsheet specified
ABC Roster User Manual
Page 96 / 106
- Export form: Corrected crash when changing format and Day view was selected - Export form: cannot start export without schedule selected - Export: corrected display of partial leaves in schedule export - Corrected application of roster rules for overnight shifts when availability ends at
23h59 - Options form: Corrected selection of custom provider - Fixed crash when modifying constraint defaults in a document with no schedule - Fixed crash when modifying shift type display order in a document with no schedule - Email form: cannot email schedules without schedule selected - Shift type form: Corrected bug with break time duration for overnight shifts
Release 2.2.0 – June 2016 New Features
- Export: exporting to OpenOffice supported - Export: new view available - Options form: Added proxy settings
Improvements
- Drag and drop: visual feedback if there are availability conflicts - Creating schedules: template repeated when cloning schedules that are longer than the
template - Export: exporting to Excel format is faster - Main screen: shifts can be sorted using a new shift type's display order property
Bugs fixed
- Fixed bug in autosave which was filling up disk space - Corrected crash when adding schedule
Breaking changes
- Schedules exported to Excel format will require Excel 2007 or greater to be opened Release 2.1.1 – November 2015 Improvements
- Handling of Unicode characters on exported PDF/HTML documents Bugs fixed
- Changing the UI language now works correctly - Corrected crash when exporting template schedules in employee view - The correct number of pages are exported for PDF/Html schedules - Automated planner: no more crashes when running the auto planner with a schedule
that already satisfies specified constraints Release 2.1 – November 2015

ABC Roster User Manual
Page 97 / 106
New Features
- ABC Roster is now available in Italian Improvements
- Automated planner: memory usage was reduced and speed improved - Shift types are sorted by alphabetical order - Modified error message when no permission to export PDF (#1880) - Users can choose not to clear locked employee's schedules when using the Clear
schedule for all employees button - On the list of employees to roster, users can now sort employees - Custom colours are remembered
Bugs fixed
- Employee list: the total of hours worked is not updated correctly after modifying the schedule
- Fixed crash when saving document after adding a new employee to an existing group - Export to Excel: fixed issue when exporting schedules with too many shift - Fixed crash when upgrading to a newer version of ABC Roster - Fixed refreshing of shift coverage when the selected schedule changes - Fixed crash when trying to undo a delete shift type action) - Better handling of personnal messages when starting the application - Fixed crash when clicking on header on Public holiday form when there was no data
in the grid - Fixed crash when clicking the Apply button multiple times when modifying a shift or
an employee, or deleting types - Automated planner: the best schedule found so far is kept when pressing the Interrupt
button - Shift properties form: no need to choose the colour twice when modifying a shift's
colour - Exported schedules: corrected display of holidays
Release 2.0 – January 2015 New Features
- ABC Roster is now available in French - Employee schedule tab: Users can choose to view only a specific week - Employee schedule tab: employees’ cost for the schedule is shown - Cost calculation: Users can now specify different pay rates for public holidays, night
shifts, and week ends - It is possible to create recurring events - Users can define employee groups to quickly schedule multiple employees to a shift - Excel exports: a new layout, Schedule view, is available - Exports: Shifts can be sorted by alphabetical order - Main screen: Users can see global coverage from the preview window (requires IE 9
or greater) - Main screen: users can now add shifts quicker by dragging a shift type onto a day - Main screen: users can now pin an employee to a specific shift - Main screen: the cost for each employee over the schedule is displayed

ABC Roster User Manual
Page 98 / 106
- Add shift form: users can specify which days of the week shifts should be added to Improvements
- The auto planner is now much faster - Employee details form: the display name is automatically set when entering the first
name - Exported report: 'holiday' replaced with 'leave' - Exported scheduled: crashes can now be reported from the application - Roster form: the name of the employee being scheduled is now clearly displayed - The error reporting feature let users know whether the error was reported successfully
or not - Main screen: the export preview data can be updated without closing it - Main screen: simplified filters for events - When adding a schedule, it is now possible to specify the duration of the schedule as a
number of days Bugs fixed
- Employee leave is now saved correctly after edition - Fixed crash when Excel version could not be identified - The auto planner does not move around employees that are locked - Corrected display bug when availability started at 11.30 pm, which prevented users to
change availability - Fixed crash when saving document to a path that contains invalid characters, such as ; - Fixed crashes when using password containing invalid characters - The display of events dates is now updated after switching date format - Events are correctly sorted when adding new events - On the employee leave tab, selecting a 'From date' no longer sets the focus on the To
date automatically - Shift names are not interpreted as dates by Excel anymore on exported schedules - Excel export: no more double separator when no bookings are exported - Fixed error reports not being sent anymore - It is not possible to delete shift assignments for a locked employee - The progress of the status bar for the auto planner was fixed - Documents in Dropbox folders can now be opened - Fixed some display issues on diverse screens - Fixed data corruption that sometimes caused employees to be scheduled outside of a
shift - Fixed display of leave days on exported schedules - Roster time form: Employees are now sorted alphabetically
Breaking changes
- Microsoft .Net Framework v 4.0 or higher is required to run the application. - Conversion from documents created with ABC Roster v 1.8.x is not supported
anymore Release 1.9.0 – December 2013 Improvements
- Main window: New button to display a quick export preview

ABC Roster User Manual
Page 99 / 106
- Main window: the earliest/latest hours displayed are configurable be users - Main window: the increment in the time labels is configurable by users - Main window: clicking on a constraint in constraints list now opens the details form
for the corresponding employee or shift - Main window: display of shift coverage next to the constraints lists - Shift properties form: display of shift coverage - Three new employee constraints are available: minimum number of days off per week,
colleagues to avoid, shifts to avoid - Constraints can now be hidden - Constraints can be now assigned default values - Default employee availability is now configurable - The automated planner can now roster an employee more than once per day - The automated planner can now randomise shift assignments - It is now possible to specify which shifts can work back to back arrangements - A skill matrix can be assigned to each employee - Employees assigned to a shift can be filtered out by skills - The constraint and detail tabs display faster for shift and employees - There is no more notifications popup up next to every shift when using the ‘roster on
all…’ feature - Availability is always shown on a 24h period - The page number is displayed on PDF schedules - User can submit error reports automatically to ABC Roster’s support when they
cannot open/save roster documents - The exported reports display costs associated with employees
Bugs Fixed
- Fixed crashes when the document was on a network share - Fixed crashes due to memory leak for documents with many schedules and/or many
shifts - Fixed crash when sending emails - Fixed crash when saving work hours from the Shift properties form - Fixed some crashes when adding a new schedule - Fixed crashes when switching tab after deleting a shift type or an employee from the
document - Fixed crash when deleting a booking type - Availability is always displayed on a 24 hour period so that the start and end sliders
can always be visible - The display is correctly updated in other schedules after changing options on
appearance panel and localisation panel - Fixed double display of error messages after a crash when loading a document - Corrected update of document properties when migrating versions of ABC Roster - The sliders to select employee availability and employee work hours should now work
properly (start cannot be before finish anymore) - Description for the ‘minimum number of supervisors’ constraint was corrected - GUI correctly updated after resetting application settings to their default values
ABC Roster User Manual
Page 100 / 106
Breaking changes
- Microsoft .Net Framework v3.5 SP 1 or higher is now required to use ABC Roster. This will mostly affect Windows XP users, as the framework is already installed Windows Vista, 7 and 8 by default.
- Conversion from documents created with ABC Roster v 1.6 and 1.7.0 is not supported anymore
Release 1.8.2 – July 2013 Improvements
- Document settings: it is now possible to use an outlook.com email without having to specify the smtp parameters
- Main window: display of the total number of worked hours per schedule Bugs Fixed
- Main window: fixed crashes when selecting Roster on All - Main window: Errors during drag and drop are no longer ignored - Main form: fixed crashes when quickly clicking on Undo/Redo multiple times - Main window: fixed other various crashes - CSV Import: fixed crashed when file already in use - Schedule Export/preview: fixed crash when the schedule contained fewer days that the
maximum limit per page - Roster form: fixed crash when modifying the time picker values - Roster form: fixed crash when displaying information for an employee on the last day
of the week - Roster form: display correctly the first available employee when the form is opened
from the Shift details window - Document types form: fixed crash when deleting a shift type in a document with no
schedule, or when closing the document right after deleting a shift type - General: crash reports can now be sent even if the crash was due to a configuration
error - General: fixed crash when sending emails if the custom smtp settigns were not
configured properly - Corrected association between ABC Roster and .abcr files
Breaking changes
- There are some integrity checks on the data when loading a schedule. Because of this, the programme could potentially crash while the week is loading (instead of crashing later while opening the roster window). If this happen, please contact ABC Roster’s support.
Release 1.8.1 – March 2013

ABC Roster User Manual
Page 101 / 106
Bugs Fixed - Export: Corrected crash when exporting or previewing schedules - Employee properties form: fixed crash when right clicking on the grid’s header on schedule tab Release 1.8 – February 2013 Improvements - Schedules (formerly called weeks) can now span up to 5 weeks - Bookings can be moved to another date - Leave periods can be specified on an hourly basis - Employees minimum working time on a shift changed from 30 minutes to 15 minutes - Shift minimum duration changed from 1 hour to 15 minutes - Minimum availability period changed from 1h to 30 min - Constraint values can have a decimal place for min and max worked hours per schedule - Constraints have shorter descriptions - Possibility to include a break time on shift types - Shift properties window: the details tab show the total worked hours for all employees - Employee properties form: it is possible to resize the employee list - Export: users can export leave total hours - Export: new option to choose whether to export working hours or not - Export: users can choose how many days they want to export per page. - Export: new option to choose whether to display shift names instead of shift types on the employee view layout - Improved cost estimation to take into account part timers, and holidays for employees on wage - The roster form includes the total number of worked hours for the day - Main window: smoother redraw of the UI - Main window: new buttons to expand/collapse the employee and constraints panels - Main form and employee properties form: new shortcuts to edit employee working hours - Document properties: it is now possible to choose the height for the time labels on the Shift property form Bugs Fixed - General: fixed display bug on the period picker - Employee leave tab: corrected display issues - Employee leave tab: correct selection of the leave record when selecting the leave from the calendar - Employee leave tab: corrected crash when double clicking on grid header - General: locked state now saved for employees - Employee schedule tab: fixed display of number of worked hours - Fixed export error when exporting combined work hours - Corrected wage/salary issue on import process - Add schedule form: corrected crash when adding a schedule with a starting date older than other weeks - Main form: it is not possible anymore to edit a shift/employee belonging to a previous week from the toolbar

ABC Roster User Manual
Page 102 / 106
- Main form: correct update of the following schedule when deleting the last day of the current schedule - Export: exporting 7 days should now fit on one page when printed from Excel - Export: corrected display of borders in Excel export - Document settings: Resetting application settings does not impact the values on the document appearance tab anymore - On application crash, errors are correctly sent to ABC Roster’s support if the user chooses that option Breaking changes - Conversion from documents created with ABC Roster v 1.4 and 1.5 is not supported anymore - Export: users cannot add a title anymore to exported documents - Leave periods: it was possible before to have an employee scheduled on a shift starting on day #1 and ending on day #2 even if the employee was on leave on day #2. This is no longer possible, and you’ll get warning messages when editing the working hours in such scenarios. Release 1.7.2 – June 2012 Bugs Fixed - Document Types screen: fixed crash that occurred after trying to delete an employee position. - Main screen: fixed crash that occurred after adding/modifying/deleting an employee when the employee list was sorted. - Fixed application crash due to the Arial font not being installed on some computers Release 1.7.1 – May 2012 Bugs Fixed - Fixed crash that occurred after opening a document converted to v1.7. This crashed occurred only for documents with locations. - Conversion from documents still in v 1.5 now works Release 1.7 – May 2012 Bugs Fixed - Document Types screens: Fixed bug that lost the previous location when re-doing a ‘modify shift type’ action - Document Types screens: Fixed bug that lost the previous employee restrictions when re-doing a ‘modify shift type’ command - Document Types screens: Fixed bug that lost the previous shift type restrictions when re-doing a ‘modify employee position’ action

ABC Roster User Manual
Page 103 / 106
- Employee details screen: Fixed bug that lost the previous employee email/phone/address/photo when re-doing a ‘modify employee details’ action - Main screen: When scheduling an employee on a shift that goes past midnight, the availability for the employee on the starting day is automatically changed to go until 11.59 pm. - Main screen: Fixed bug where changing a shift colour was not saved - Main screen: The notification pop up for email now closes automatically after a few seconds - Exported schedules: Before, if an employee started work after midnight on the last day of the week but was not included on the next week, they would not show in the exported schedule for the next week. This is now fixed. Improvements - From the Manage Employees window, you can now import a batch of Employees, using a CSV file. - It is now possible to choose the currency symbol (e.g. ‘$’, ‘€’) from the Localisation pane, in the Options window - Added support for American format dates, from the Localisation pane, in the Options window - A free text field for notes was added to the Employee details screen - You can now assign a description to each skill level (from the Document Types screen). These descriptions will show on the Employee details screen, and on the employee list, on the main screen. - You can now export worked hours reports. Other changes - Conversion from documents created with ABC Roster v1.3 is not supported anymore Release 1.6 – August 2011 Bugs Fixed - Main screen: employee positions are now correctly refreshed after deleting an existing position - Main screen: fixed bug that prevented dragging an employee on a shift outside of their availability - Document Types screens: Fixed bug that prevented deleting a shift type or a position that had restrictions associated - Document Types screens: Fixed bug that prevented deleting a position - Send email screen: Emailed schedules now use colour style and display options from exports - Main screen: fixed crash when sorting the employee list - Main screen: fixed crash when loading data - Main screen fixed bug that caused shifts starting on the previous week (and running past midnight) not to be displayed - Fixed crash when adding new week when the first day was missing and the previous week had an overnight shift on the last day - Conversion: Fixed crash when opening a document from the recent documents menu - Fixed crash when opening a document without any weeks

ABC Roster User Manual
Page 104 / 106
- Fixed issue when trying to remove password protection when the password had not been applied - Fixed crash when creating a new employee for a week and adding it to the template Improvements - Shifts can now have an associated location (e.g. physical address, room number). - It is now possible to export/email the schedules for multiple weeks at the same time - Users can now email individual schedules to employees via email - Shift types can now be deleted even if there are still shifts using that type. Associated shifts will be deleted as well - All document employees can now be managed from the Options-> Manage Employee window. This window also allows the user to completely delete an employee from the document. - Users can now choose a custom hour-minute separator (e.g. have 12:25 instead of 12h45) - Users can now associate a profile picture with each employee - When adding/modifying a shift that finishes past midnight, the next day is automatically added to the schedule if it was not present already - The screens are easier to read and more consistent-looking Other changes - It is no longer possible to have 2 weeks starting on the same day. If you do have this situation, during the conversion to ABC Roster v1.6 you will be asked to delete conflicting weeks. - Conversion from documents created with ABC Roster v1.2 is not supported anymore - The ‘week view’ layout is not available anymore for exports - Names and abbreviations for document types, shift names, week names and event titles are now case-sensitive - When selecting previously sent emails, attachments are not added automatically anymore to the new email
Release 1.5 – April 2011 Bugs Fixed - Roster screen: The period picker does not disappear anymore when there is a time conflict but other times are suitable - Roster screen: Situations where the ‘No suitable time found’ warning message appeared while modifying an employee’s existing work hours do not occur anymore - Main screen: an employee cannot be dragged on a shift when they are on leave on that day - Employee Property screen: the Roster employee contextual menu is now correctly enabled - Export to Excel (Week view): the bookings are now correctly displayed - Export to Excel: fixed crash when trying to export a schedule when the document only has one booking type. Improvements - Shifts can now end past midnight - The user can now choose between 24h and12h time format (also applicable for exported schedules) - Weeks must have at least one day and cannot overlap

ABC Roster User Manual
Page 105 / 106
- Employee Property screen: the template availability tab was removed - Employee Property screen: the leave tab is now displayed for templates - Employee Property screen: the employee work hours are now displayed on a new Schedule tab (instead of being shown on the Details tab) - Employee Property screen: the details tab now includes a phone and address fields - It is now possible to email and export templates - The back to back rules were redesigned - Main screen: new button to navigate to template - Main screen: weeks are now ordered by date (templates first) - Email employees: the most recent emails can be reused Breaking changes - When opening a document created with an older version of ABC Roster, the user will need to go through a conversion process.
- Back to back rules were redesigned. All existing back to back rules will be deleted; the user will need to provide a new definition for back to back shifts.
- Weeks cannot overlap anymore. During the conversion process, the user needs to select which overlapping weeks need to be deleted (if applicable)
- Employees must have the same salary/wage, position, skill and status (full-time/part-time) across the weeks in the document. During the conversion process, the user will need to specify the correct values for these properties.
- Also, it is no longer possible to generate schedules on a separate sheet when using the automated planner
Release 1.4.2 – January 2011 Bugs Fixed - Employee Property screen: fixed crash happening when clicking on calendar while a filter was applied - Employee Property screen: employee part-time/full-time status is now correctly saved. - Employee Property screen: employee salary/wage can now be more than $100/h - Fixed bug that allowed the creation of employees with same name as existing employees - Automated planner: the resulting schedule is now correctly saved even when the checkbox is not ticked
Release 1.4.0 – October 2010 Bugs Fixed - Shift Property screen: fix crash when selecting different shift after changes, while not on the details tab. - Fixed crash when trying to roster an employee on a shift starting after 7.45 p.m - Options screen: Fix crash when trying to change application colours from Appearance tab. - Options screen: Fixed crash on the back to back rules tab when there is no shift type in the document

ABC Roster User Manual
Page 106 / 106
- Export to Excel (Week View): employees whose name is exactly 10 character long are now correctly exported to the Excel document. - Options screen: clicking on cancel after changing the document’s background colour now correctly reverts the colours to their previous value - Fixed various errors that would occur while saving the document, mainly after adding/deleting shift types and employee positions and modifying type restrictions. - Fixed bug that prevented adding leave to newly added employees - Fixed bug with ‘Minimum number of days off’ constraint: the user must now specify the number of days off per 7 day week. - Export to PDF: Employees names and shift names now correctly wrap - Export to Html: employee, shift and booking names are correctly encoded - Automated planner: setting the time limit to 0 is no longer allowed Improvements
- A wizard was added to assist first time users - A new export layout is available (ShiftType #2) - Exported schedules now display both starting and ending time for employees (apart
from week view) - Help is available for almost all text fields and other input controls - The automated planner was improved and can now roster employees on a shift even if
they are not available for the full length of that shift. - The user has now a finer control over scenarios where an employee cannot work for
the full length of a shift (via Document Options) - It is now possible to copy a previous week’s data even if the new week does not start
on the same day - The default value of constraints’ weights were modified (will only affect new
documents created) - Employee leave is now shown on exported schedules - Various minor other changes were made to the user interface
Release 1.3.0 – August 2010
- Custom email providers (i.e. other that gmail, Yahoo and Hotmail/Live) can now be used
- Attachments can be added to emails - Support for employee leave - Introduced employee restrictions and shift restrictions - New option for Export feature: the user can choose whether to display the employee
separator or not in the employee view export. - Minor bug fixes