roster tool user guide - official tc command support site
TRANSCRIPT

Instructions for use with Roster Tool
Tool Tips and Help Screens
WorldPoint, Inc. 1326 S. Wolf Rd.
Wheeling, IL 60090 (888) 322-8350
www.eworldpoint.com

Table of Contents Capabilities ......................................................................................................................... 1
Tool Tips......................................................................................................................... 2 Help Screens ................................................................................................................... 2
Preparation .......................................................................................................................... 3 Initial Setup..................................................................................................................... 3 How to Open and Close the Roster Tool ........................................................................ 3
Quick Steps ......................................................................................................................... 4 1. Create Class ................................................................................................................ 4 2. Notify Training Center................................................................................................ 4 3. Register Students and Post Results ............................................................................. 4 4. Send Roster ................................................................................................................. 4 5. Mark Roster Submitted ............................................................................................... 4 6. Create Next Class and Register Students.................................................................... 4 7. Backup ........................................................................................................................ 4
Basic Setup.......................................................................................................................... 5 Training Center ............................................................................................................... 6 Instructors ....................................................................................................................... 8
Classes............................................................................................................................... 11 Create a New Class ....................................................................................................... 12 Notify Training Center.................................................................................................. 16 Update Class Information ............................................................................................. 17 Mark a Roster Submitted .............................................................................................. 17 Copy and Change a Class ............................................................................................. 17 List Classes ................................................................................................................... 19 Find Classes .................................................................................................................. 21 Sort Classes................................................................................................................... 23 Delete a Class................................................................................................................ 23
Students............................................................................................................................. 24 Register a New Student................................................................................................. 26 Print Sign-in Sheet ........................................................................................................ 28 Update Student Information.......................................................................................... 29 Post Student Results...................................................................................................... 29 Register a Student in Another Class ............................................................................. 31 Manage Online Students ............................................................................................... 34 Find Students ................................................................................................................ 37 Sort Students ................................................................................................................. 38 Delete a Student ............................................................................................................ 38
Rosters............................................................................................................................... 39 Print a Roster................................................................................................................. 39 E-mail a Roster ............................................................................................................. 41
Appendix........................................................................................................................... 47 Advanced Setup ............................................................................................................ 47 Using an Application Based on FileMaker® Pro ......................................................... 52 Backup and Restore ...................................................................................................... 61
WorldPoint 03/25/09 Roster Tool

WorldPoint Roster Tool Capabilities
Capabilities The Roster Tool, provided by WorldPoint®, gives the individual instructor or small training site the following capabilities to manage emergency cardiac care training records:
Record instructors, including expiration dates for teaching credentials Record class information, including date, time, location, and instructors Record student information, including name, contact information, class Update instructor, class, and student information Track class registration Notify training center of planned class Print list of all classes Print class sign-in sheets Post student results, including remediation Print and e-mail class rosters (front and back) Record online course work Find classes and students Create additional course types Define affiliated training center Specify national training organization
Training centers with the WorldPoint ONE® application can use the information sent via e-mail from the Roster Tool to recreate the class, import the students, and print the wallet cards.
Contact WorldPoint regarding the WorldPoint ONE Training Center Management software if additional capabilities are needed for managing your training classes, or if server capabilities are appropriate for your environment.
Roster Tool documentation includes: Tool tips for every field and button Help screens on each screen and tab Instructions guide available from the main menu www.WorldPointONE.com site for additional information and tutorials
Page 1

WorldPoint Roster Tool Capabilities
Tool Tips The Roster Tool has a tool tip for every field and button. Place your cursor over the field or button to display the tool tip briefly.
Help Screens
The Roster Tool has a help screen for each screen and tab. Click the Help icon to display the applicable help screen, scroll if necessary, then click [Close] to return to the Roster Tool screen.
Page 2

WorldPoint Roster Tool Preparation
Preparation Before using the Roster Tool to record class and student information, perform these steps.
Initial Setup After installing the Roster Tool on your computer, set up the Training Center that will receive your rosters and the instructors who will teach your classes.
After starting the Roster Tool from the desktop icon for the first time, choose [General Setup] from the main menu, then use the Training Center and Instructors tabs.
See Training Center on page 6.
How to Open and Close the Roster Tool To open the Roster Tool main menu, double click the desktop icon.
To exit the Roster Tool, click [QUIT] on the main menu.
Always exit Roster Tool from the main menu. Click [Main Menu] to return to the main menu, then choose [QUIT] to exit the Roster Tool properly and close files in an orderly fashion.
Page 3

WorldPoint Roster Tool Quick Steps
Quick Steps After downloading and installing the Roster Tool, and performing the initial setup, follow these steps when using the Roster Tool on a regular basis.
1. Create Class Create the classes you will be offering. Choose [Class Registration] from the main menu, then choose [NEW Class]. See Create a New Class on page 12.
2. Notify Training Center If required by your affiliated Training Center, send a notification e-mail regarding the planned class. In the Class Registration screen, choose [Notify Training Center]. See Notify Training Center on page 16.
3. Register Students and Post Results Register students in classes, then post student results when the class is completed. Choose [Student Data Entry] from the main menu. See Register a New Student on page 26.
4. Send Roster Submit the class roster to the Training Center, by printed report or e-mail. See Rosters on page 39.
5. Mark Roster Submitted Mark the class as submitted on the Class / Skill Session Data tab in the Class Registration screen. See Mark a Roster Submitted on page 17.
6. Create Next Class and Register Students In the Class Registration screen use [NEW Class] or [COPY Class]. See Create a New Class on page 12 or Copy and Change a Class on page 17.
In the Student Data Entry screen use [NEW Student], [COPY Student], or select another class for the student. See Register a New Student on page 26 or Register a Student in Another Class on page 31.
7. Backup Copy your valuable data to external media.
See Backup on page 61.
Page 4

WorldPoint Roster Tool Basic Setup
Basic Setup After installing the Roster Tool, perform initial setup before creating classes and registering students.
Use setup initially to: Define your affiliated Training Center Add instructor information
Return to the setup screens at any time to add or change information.
From the Roster Tool main menu, choose [General Setup] to reach the General Setup screen.
Page 5

WorldPoint Roster Tool Basic Setup
Training Center Set up the information about your Training Center before e-mailing your Training Center about a planned class and before printing a roster.
Enter Information This tab describes the Training Center (TC) that will receive your rosters.
In the General Setup screen, choose the Training Center tab (if it is not displayed).
Type data in the fields. Include all yellow fields for basic Roster Tool functionality, and additional fields as appropriate. Refer to the tool tips on the screen for information about individual fields.
Page 6

WorldPoint Roster Tool Basic Setup
Change Information To change information about your affiliated Training Center, use the Training Center tab to add and correct information as needed. See Advanced Setup on page 47 to change the national training organization name and logo.
Example To add the TC phone number, type the new information in the field.
Next Step Set up instructors after completing the Training Center information.
Page 7

WorldPoint Roster Tool Basic Setup
Instructors Add the instructors who will teach your classes, before creating classes.
In the General Setup screen, choose the Instructors tab to: Add instructors Maintain expiration dates for instructor credentials
Add and update instructor information as appropriate, and delete instructor records when no longer needed.
Add a record for each instructor, including the certification expiration date.
Note: Instructors are listed alphabetically by last name.
Page 8
WorldPoint Roster Tool Basic Setup
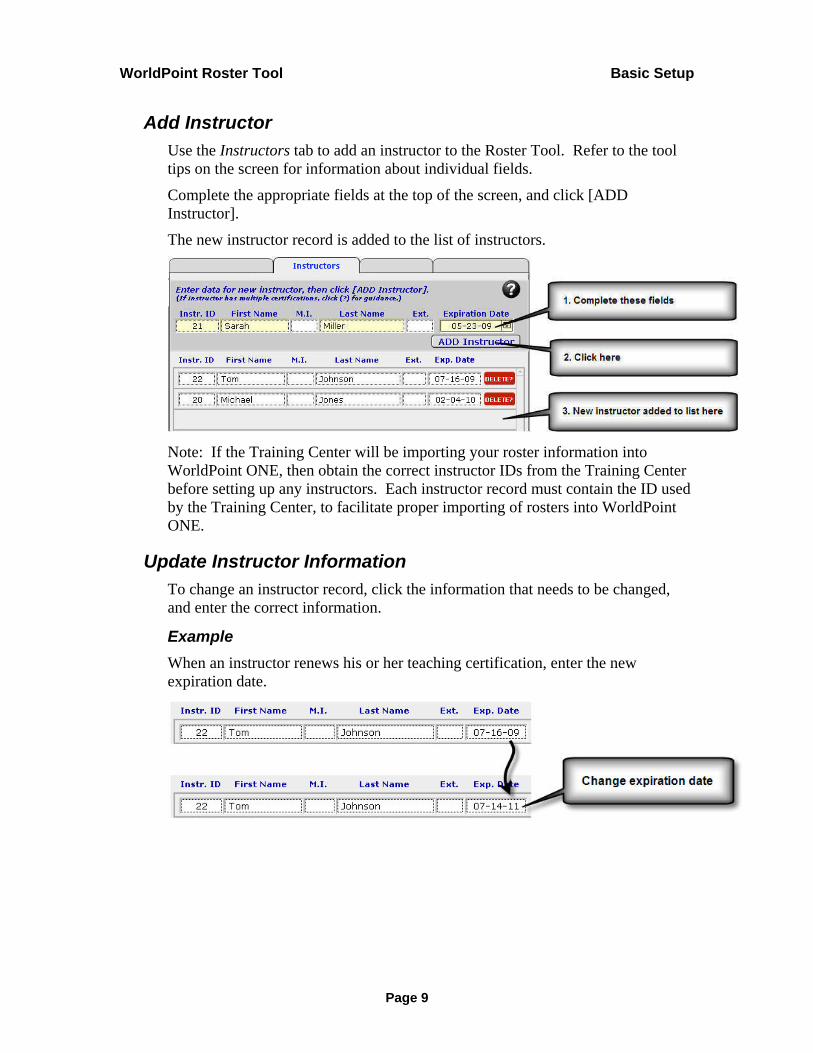
Add Instructor Use the Instructors tab to add an instructor to the Roster Tool. Refer to the tool tips on the screen for information about individual fields.
Complete the appropriate fields at the top of the screen, and click [ADD Instructor].
The new instructor record is added to the list of instructors.
Note: If the Training Center will be importing your roster information into WorldPoint ONE, then obtain the correct instructor IDs from the Training Center before setting up any instructors. Each instructor record must contain the ID used by the Training Center, to facilitate proper importing of rosters into WorldPoint ONE.
Update Instructor Information To change an instructor record, click the information that needs to be changed, and enter the correct information.
Example When an instructor renews his or her teaching certification, enter the new expiration date.
Page 9

WorldPoint Roster Tool Basic Setup
Instructor with Multiple Certifications If an instructor’s teaching assignments require different certifications, then create one record for each of the instructor’s certifications that will be needed for your classes, using the same identification number and appending several letters at the end to indicate the type of certification.
Example
Note: If the ID is longer than the field, click the ID to display the additional characters.
Delete Instructor To delete an instructor from the Roster Tool, click the [DELETE?] button by the instructor record, then click [Delete] to confirm the deletion.
Note: Instructor information already included in class records will not be removed.
Next Step Return to the main menu to create classes and register students, after the Training Center and instructor information have been added in General Setup.
Page 10

WorldPoint Roster Tool Classes
Classes After instructors have been added in General Setup, classes can be created.
You can create classes before or after the class is held. When creating a class, specify the course type, start/end date and time, location, lead instructor, and any assisting instructors.
Create the class in the Roster Tool before the class date and e-mail it to your Training Center to comply with emergency cardiac care guidelines. When necessary, classes can be entered in the Roster Tool after they have been taught, for the purposes of printing or e-mailing the roster.
From the Roster Tool main menu, choose [Class Registration] to: Create a class E-mail a planned class to the Training Center Change class information Print a roster (front) E-mail a roster (front and back) Review classes
Page 11

WorldPoint Roster Tool Classes
Create a New Class Use the Class Registration screen to create a class. Choose [NEW Class] and complete all required yellow fields, and other fields as appropriate. Refer to the tool tips on the screen for information about individual fields.
Note: The new class is created as you enter data. There is no need to confirm the record by clicking a button.
Course Type The fields at the top of the screen describe the type of class.
Heartsaver Example To create a new class with Heartsaver sub-options, choose the course type, then the sub-options from the list of sub-options available for this course type.
Class Location These fields near the top of the screen describe the teaching location.
Page 12
WorldPoint Roster Tool Classes
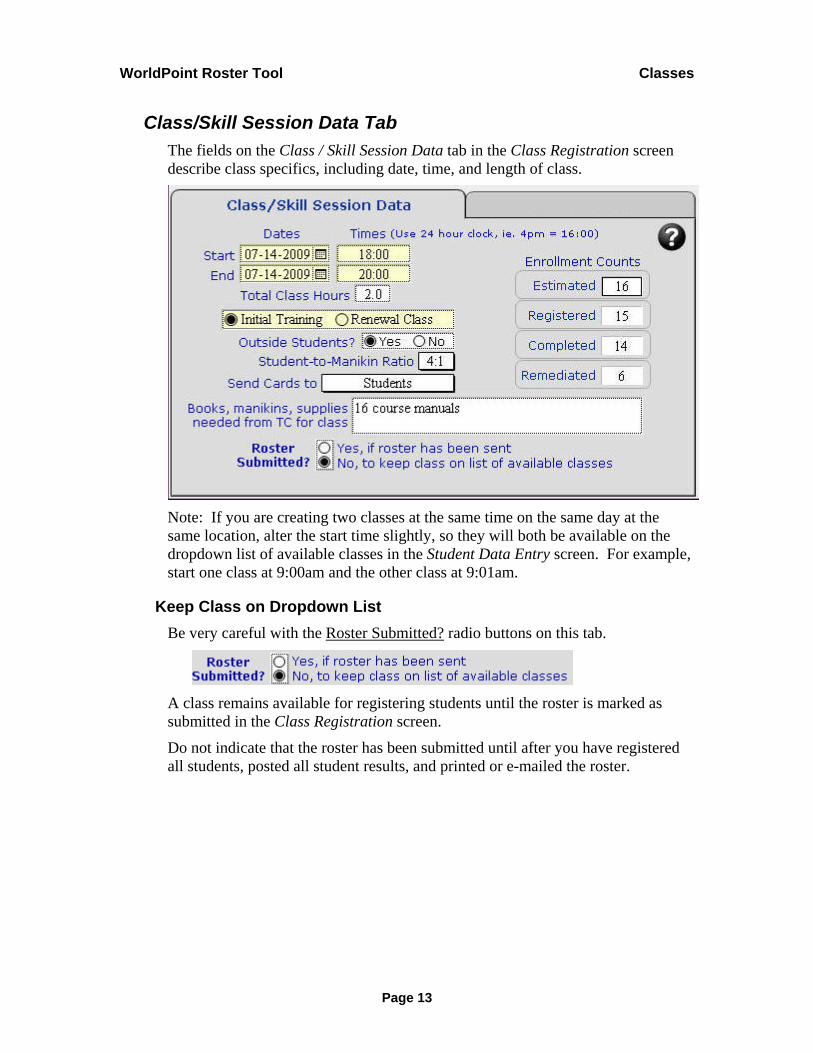
Class/Skill Session Data Tab The fields on the Class / Skill Session Data tab in the Class Registration screen describe class specifics, including date, time, and length of class.
Note: If you are creating two classes at the same time on the same day at the same location, alter the start time slightly, so they will both be available on the dropdown list of available classes in the Student Data Entry screen. For example, start one class at 9:00am and the other class at 9:01am.
Keep Class on Dropdown List Be very careful with the Roster Submitted? radio buttons on this tab.
A class remains available for registering students until the roster is marked as submitted in the Class Registration screen.
Do not indicate that the roster has been submitted until after you have registered all students, posted all student results, and printed or e-mailed the roster.
Page 13

WorldPoint Roster Tool Classes
Instructor Data Tab Use the Instructor Data tab in the Class Registration screen to assign the instructor(s) to the class.
A lead instructor must be assigned to the class. If assisting instructors are assigned, the first twelve are included on the printed roster, while all assisting instructors are included in the e-mailed roster.
Assign Lead Instructor Select the lead instructor’s ID from the dropdown list.
Assign Assisting Instructors Select the assisting instructor’s ID from the dropdown list. Assisting instructors for the class are listed in the order entered.
Page 14

WorldPoint Roster Tool Classes
Reassign Instructors To change an instructor, select a different instructor ID from the dropdown list. Any incorrect assisting instructor assignments can be deleted.
Instructor with Multiple Certifications Instructors with multiple certifications are set up with an instructor ID for each certification, with several letters appended to the ID to indicate the type of certification. Choose the instructor ID with the appropriate certification for the course type.
Example One of the assistant instructors for this class has multiple certifications.
Next Steps After completing the work in the Class Registration screen, notify your Training Center of the planned class.
After receiving Training Center approval for the class, choose [Student Data Entry] from the main menu or the Class Registration screen to go to the Student Data Entry screen and start registering students.
Page 15

WorldPoint Roster Tool Classes
Notify Training Center After creating a new class, use [Notify Training Center] to notify your Training Center via e-mail of the planned class, if your national organization’s guidelines require this.
Choose automated e-mailing if you use Outlook, Outlook Express, MS Entourage, Mail, or OS X Mail.
Choose manual e-mailing if you will use another e-mail program.
Refer to E-mail a Roster on page 41 for additional information on e-mailing from the Roster Tool.
Page 16

WorldPoint Roster Tool Classes
Update Class Information Find the class in the Class Registration screen, then correct information as needed.
Mark a Roster Submitted After student results have been posted and the roster has been submitted, remove the class description from the list of classes available for registering students.
Use the Class / Skill Session Data tab on the Class Registration screen, and choose Yes for Roster Submitted?
Note: When the roster is marked as submitted, the class record remains in the Roster Tool database, but is removed from the dropdown list used to register students in classes, to keep the information on the list current, and the size of the list manageable.
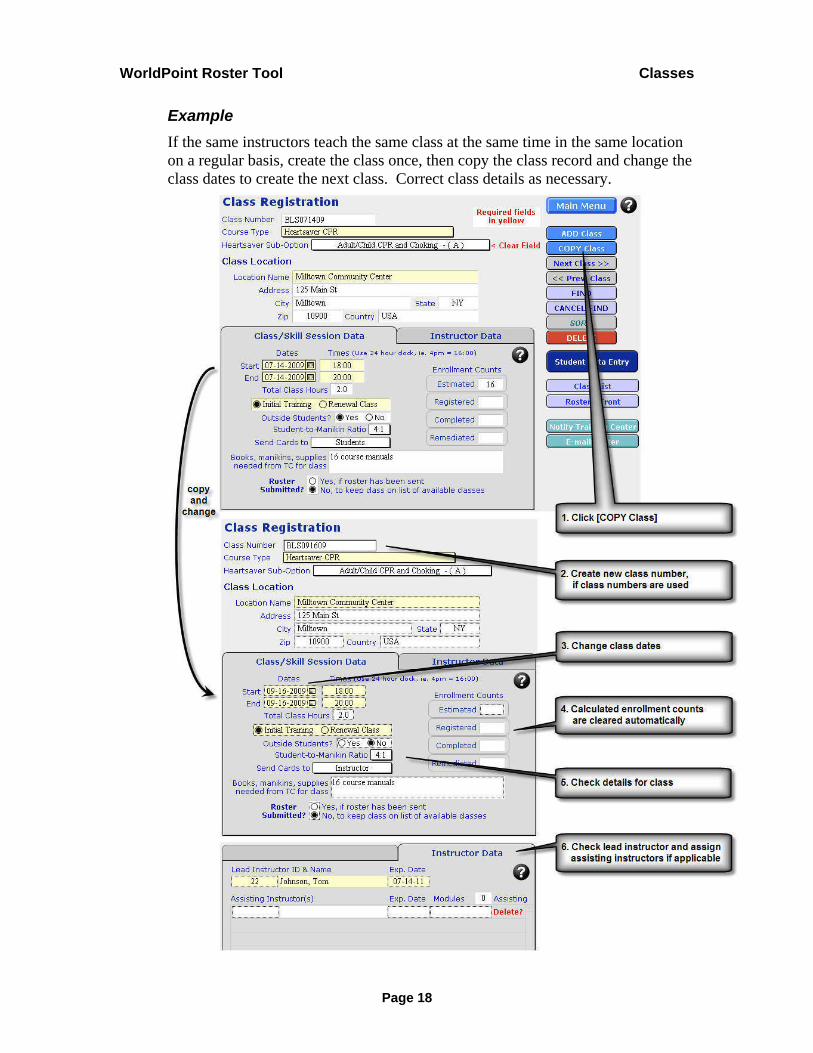
Copy and Change a Class In the Roster Tool, you can copy an existing class, then change information as appropriate to create a new class.
Use the Class Registration screen, find the existing class, click [COPY Class], then change the fields as needed.
Page 17
WorldPoint Roster Tool Classes
Example If the same instructors teach the same class at the same time in the same location on a regular basis, create the class once, then copy the class record and change the class dates to create the next class. Correct class details as necessary.
Page 18

WorldPoint Roster Tool Classes
List Classes This list of classes can be reviewed on the screen or printed, and contains the following data for each class on the report:
Start date Course type Class number, if used Teaching location Lead instructor Enrollment counts Roster status (roster is submitted or class is still available to register
students)
All classes in the Roster Tool are included unless a specific group of classes has been selected for the report. See Find on page 55.
Page 19

WorldPoint Roster Tool Classes
From the Class Registration screen, click [Class List] for a list of all classes in the Roster Tool.
To review the list of classes, use the right-hand scroll bar. To review details for any class on the report, click the [Detail] button by the class to display that class in the Class Registration screen.
To print the list of classes, click [PRINT] in the Class List. In the Print dialog box, choose “Records being browsed” for Print, and “All” for Print Range, then click [OK].
Page 20

WorldPoint Roster Tool Classes
Find Classes All classes in the Roster Tool database are listed in the order they were created.
You can use the [Next] and [Previous] buttons on the screen or the book icon in the left-hand status area to look at each class in turn, or you can use the FileMaker Pro Find capability to search for classes.
In the Class Registration screen, click [FIND], use the fields in the screen to specify the class(es) you want to find, then click the [Find] button in the left-hand status area.
Review the specified class(es) in the Class Registration screen or via the Class List report, then click [CANCEL FIND] to access all classes in the Roster Tool again.
Page 21

WorldPoint Roster Tool Classes
Examples To find all classes taught at a certain location, use the Location Name field to specify the location.
To find all Heartsaver classes with a specific set of sub-options, use the Course Type field to specify the Heartsaver course type, and the Heartsaver Sub-Option field to specify the sub-option.
To find all classes with a particular instructor as lead or assisting instructor, use both instructor ID fields to specify that instructor.
To find a class by start date, enter the specific date in the Start Dates field.
To find all classes taught in a particular month, enter the month in the Start Dates field, using the MM/YYYY format.
To find classes taught before a certain date, use the Start Dates field and the “less than” symbol (<).
To find classes taught after a certain date, use the Start Dates field and the “greater than” symbol (>).
To find all classes taught in the first six months of the year, use the Start Dates field to specify a date range.
Note: If your operating system is set to a language choice with the European date format (DD/MM/YYYY), and that date format is displayed in the class date fields, then use the European date format when finding classes by date.
Page 22

WorldPoint Roster Tool Classes
Sort Classes Classes on the Class List report are shown in order by start date, with the latest dates shown first.
To list the classes in a different order, return to the Class Registration screen, click [SORT] and specify the order for the list.
See Sort on page 57.
Delete a Class Use the Class Registration screen with the class record displayed.
Click [DELETE], then [Delete] to permanently delete the displayed class from the Roster Tool database.
Note: Do not delete a class from the Roster Tool unless the class was never taught. Deleting a class removes it from the Class List and from the records of any students registered in the class.
Page 23

WorldPoint Roster Tool Students
Students After classes have been created, students can be registered in the classes.
You can pre-register students for a class, and post student results after the class is taught, or else perform both these tasks after the class has been taught.
The Roster Tool handles both instructor-led classes with knowledge and skill components, and skill sessions for students who have completed the knowledge component online.
See Manage Online Students on page 34 to register online students and post their results.
Page 24

WorldPoint Roster Tool Students
From the Roster Tool main menu, or from the Class Registration screen, choose [Student Data Entry] to:
Register a student in a class Print a sign-in sheet Change student information Post student results Enter date of successful remediation Enter information for online students in skill sessions Print a roster (back) Review students
Page 25

WorldPoint Roster Tool Students
Register a New Student Use the Student Data Entry screen to register a student in a class. Choose [NEW Student] and complete all required yellow fields, and other fields as appropriate. Refer to the tool tips on the screen for information about individual fields.
Note: The new student record is created as you enter the data. There is no need to confirm the record by clicking a button.
Student Information The fields in the top half of the Student Data Entry screen describe the student.
Choose a Class Use the fields in the center of the Student Data Entry screen to select the class from the dropdown list to register the student in the class.
Page 26

WorldPoint Roster Tool Students
Preparation Tab Use the Preparation tab in the Student Data Entry screen for class tasks specific to each individual student. The fields at the top of the tab provide these capabilities:
Change the type of training to renewal, for a student registered in an initial training class who only needs to recertify
Confirm that prior certification is valid, for all students recertifying Record that course materials have been sent to the student (for ACLS and
PALS classes with large textbooks)
Page 27
WorldPoint Roster Tool Students
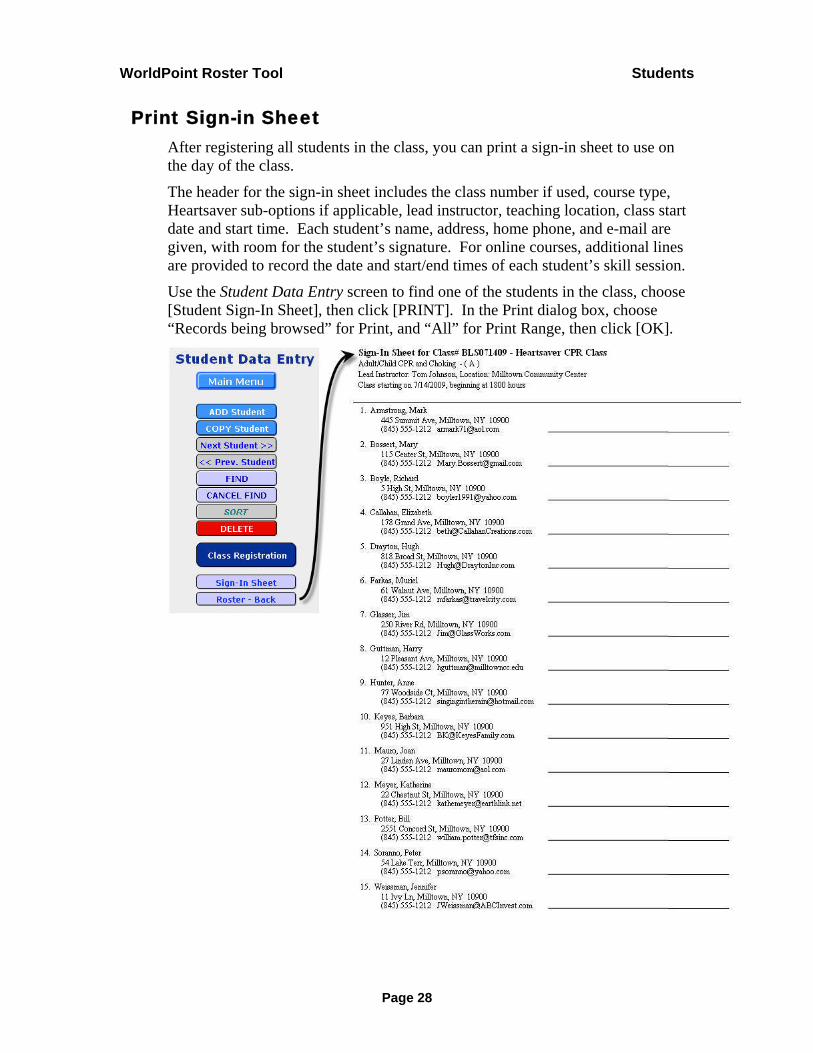
Print Sign-in Sheet After registering all students in the class, you can print a sign-in sheet to use on the day of the class.
The header for the sign-in sheet includes the class number if used, course type, Heartsaver sub-options if applicable, lead instructor, teaching location, class start date and start time. Each student’s name, address, home phone, and e-mail are given, with room for the student’s signature. For online courses, additional lines are provided to record the date and start/end times of each student’s skill session.
Use the Student Data Entry screen to find one of the students in the class, choose [Student Sign-In Sheet], then click [PRINT]. In the Print dialog box, choose “Records being browsed” for Print, and “All” for Print Range, then click [OK].
Page 28
WorldPoint Roster Tool Students
Update Student Information To update the information in a student record, use the Student Data Entry screen to find the record, click in the incorrect or empty field, and add or change the information.
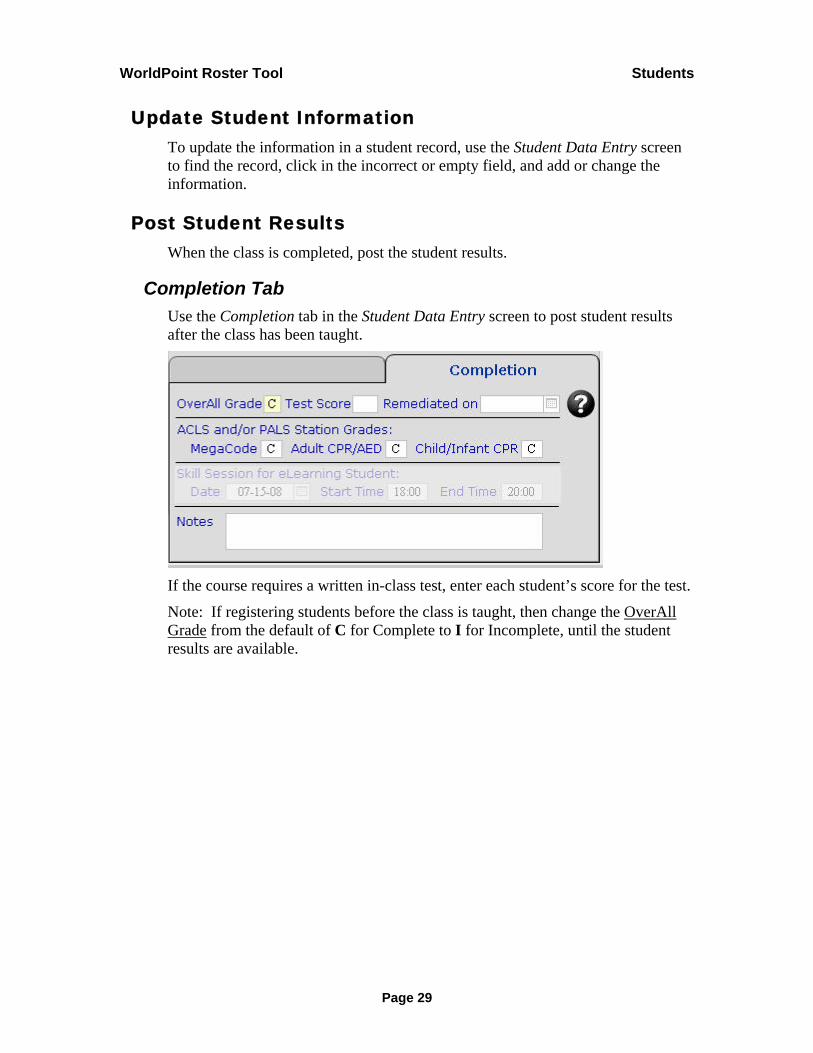
Post Student Results When the class is completed, post the student results.
Completion Tab Use the Completion tab in the Student Data Entry screen to post student results after the class has been taught.
If the course requires a written in-class test, enter each student’s score for the test.
Note: If registering students before the class is taught, then change the OverAll Grade from the default of C for Complete to I for Incomplete, until the student results are available.
Page 29

WorldPoint Roster Tool Students
Remediation When a student requires remediation, use the Completion tab in the Student Data Entry screen set his or her grade to I for Incomplete. Then after the student successfully completes his or her remediation, use the Completion tab to change the grade to C for Complete, and enter the date of the successful remediation.
Example This student completed remediation successfully.
Example for ACLS Station This student completed remediation successfully for an ACLS station.
Next Step After all students have been registered, all student results have been posted, and all remediation has been completed, you can choose [Class Registration] to go directly to the Class Registration screen and e-mail the class roster to the Training Center.
Page 30

WorldPoint Roster Tool Students
Register a Student in Another Class Existing students can be registered in other classes. The Roster Tool has two methods for handling this: use the same student record and change the class number, or else duplicate the student record and select a different class in the new copy of the student record. In other words, a student can be registered in one class at a time, or a student record can be duplicated so a student can be registered in more than one class at the same time.
One Record for the Student After a student has completed a class and the roster has been submitted to the Training Center, the student can be registered in another class by selecting a different class in the student record.
Note: Do not change the class in a student record if you will need to print or e-mail information about the completed class again at any point in the future, or if you will need to refer to that information in the Roster Tool database.
Example A student has taken a basic CPR class, and now is returning to renew.
Find the student’s record for the earlier class and select the renewal class. The Roster Tool now has one record for this student with the new class.
Page 31

WorldPoint Roster Tool Students
Example To manage the paperwork for a weekend of classes, create all the classes.
Register all the students for the first class, post student results, and send the roster for the first class.
Then, in each student record, select the second class, update the student results as needed, and send the roster for the second class.
At the end of the weekend, the Roster Tool will have one record for each student, showing them all registered in the last class.
Duplicate Records for the Student A student can be registered in another class by copying the student record and changing the class.
Example A student has taken a basic CPR class, and now is returning to take a First Aid class.
Find the student’s record for the earlier class, click [COPY Student], and select the First Aid class to change the class. The Roster Tool now has a record of both classes taken by this student.
Page 32

WorldPoint Roster Tool Students
Register Students from Same Organization If all the students in the class are from the same organization, and wish to keep personal addresses and phone numbers confidential, use the organization’s information in place of the student address and contact information.
Create one student record with the organization’s address and contact information, and select the class to register the student.
Then click [COPY Student] and change the student’s name to add the next student in the class, leaving the organization’s information and the assigned class the same.
Note: Update the OverAll Grade on the Completion tab as needed after duplicating the records.
Example A class of police officers could use the police station address and contact information to protect individual officers’ privacy.
Page 33

WorldPoint Roster Tool Students
Manage Online Students A student may use an online key to complete the knowledge part of a course outside of class. A student who completes an online course receives a certificate number indicating successful completion. The student can then attend a skill session to learn, practice, and demonstrate proficiency in the physical skills.
If a student presents an online completion certificate: Use the Student Data Entry screen to register the student in a class of the
appropriate course type for this online course. On the Preparation tab in the Student Data Entry screen, set eLearning to
Yes, then use the fields at the bottom of the tab to record the online course work.
Page 34

WorldPoint Roster Tool Students
Skill Session for Online Students Students who have completed the knowledge portion of an online course can complete their course work in a skill session.
1. Create a class using the appropriate online course type. See Create a New Class on page 12.
2. Register the student in the online class. See Register a New Student on page
26.
3. On the Preparation tab, do the following:
Click Yes for eLearning. If the Online Product # is not displayed, use the product number on the
student’s completion certificate to update the course type in General Setup.
Enter the number and date from the student’s completion certificate.
4. Post student results on the Completion tab. See Completion Tab on page 29.
Use the OverAll Grade field to record successful completion of this skill
session. Leave the Test Score field blank as all written testing was completed
online. Change the Skill Session Date and Start/End Time fields if necessary to
reflect an individual student’s work.
Page 35

WorldPoint Roster Tool Students
Online Students in an Instructor-Led Class An online student can join a regular class to complete a skill session.
1. Register the online student in the appropriate class. See Register a New Student on page 26.
Note: Contact your Training Center if you need to know the right course type for the online course.
2. On the Preparation tab, do the following: Click Yes for eLearning. Enter the number and date from the student’s completion certificate. Enter the Online Product # from the student’s completion certificate.
Note: If the product number field is entered for one online student, then the information remains available for any other online students registered in the instructor-led class.
3. On the Completion tab, post results for the student. Use the OverAll Grade field to record successful completion of this skill
session. Leave the Test Score field blank as all written testing was completed
online. Under the Skill Session heading, use the Date and Start/End Time fields to
document the online student’s actual class participation time.
Remediation for Online Students If an online student needs skill remediation, use the Completion tab in the Student Data Entry screen to set OverAll Grade to I. Then when the student completes remediation, set the OverAll Grade to C and add the date in the Remediated on field. See Remediation on page 30 for further details.
Page 36

WorldPoint Roster Tool Students
Find Students You can use the FileMaker Pro Find capability to search for a particular student or group of students.
In the Student Data Entry screen, click [FIND].
Use the fields in the screen to specify the student(s) you want to find, then click the [Find] button in the left-hand status area. After reviewing the student record(s), click [CANCEL FIND] to access all students in the Roster Tool again.
Page 37
WorldPoint Roster Tool Students
Examples Use one or more of the student information fields to specify the student or group of students.
To find all students living in the same town, use the zip code or city field to specify the town.
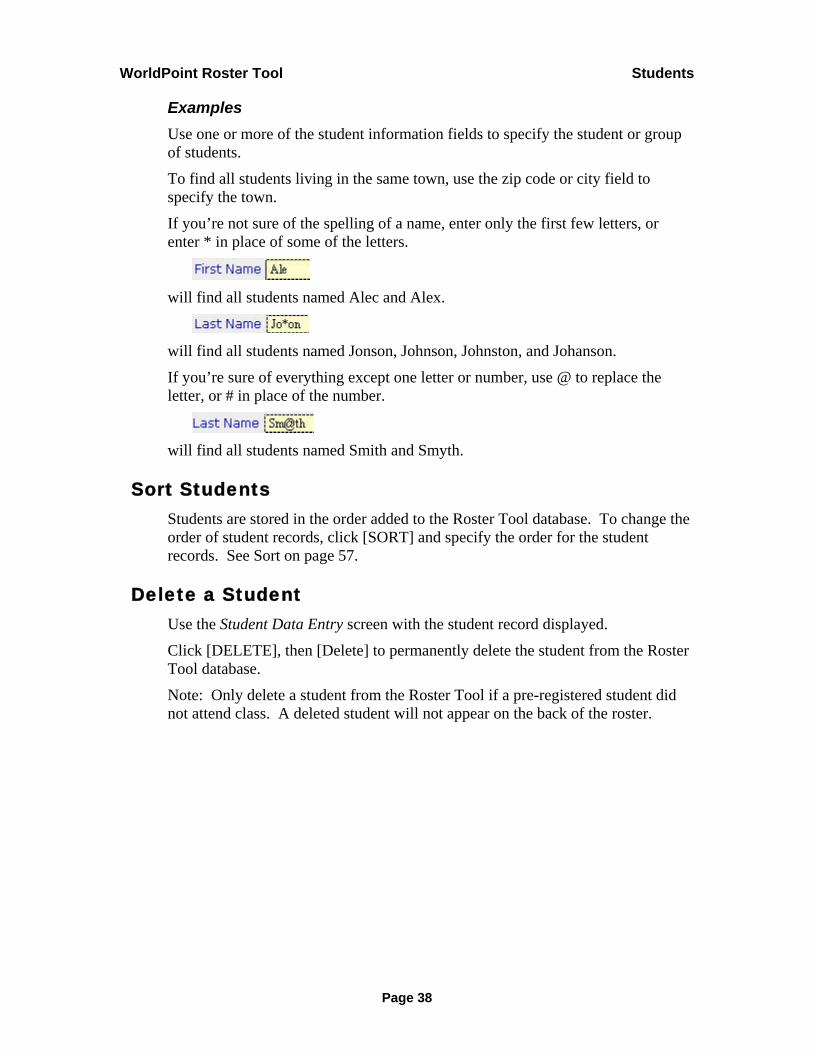
If you’re not sure of the spelling of a name, enter only the first few letters, or enter * in place of some of the letters.
will find all students named Alec and Alex.
will find all students named Jonson, Johnson, Johnston, and Johanson.
If you’re sure of everything except one letter or number, use @ to replace the letter, or # in place of the number.
will find all students named Smith and Smyth.
Sort Students Students are stored in the order added to the Roster Tool database. To change the order of student records, click [SORT] and specify the order for the student records. See Sort on page 57.
Delete a Student Use the Student Data Entry screen with the student record displayed.
Click [DELETE], then [Delete] to permanently delete the student from the Roster Tool database.
Note: Only delete a student from the Roster Tool if a pre-registered student did not attend class. A deleted student will not appear on the back of the roster.
Page 38

WorldPoint Roster Tool Rosters
Rosters After students have been registered in classes, student results posted, and all remediation completed, rosters can be printed and/or e-mailed for submission to the Training Center so student cards can be printed.
Print a Roster Print the front and back of the roster separately.
Front of Roster The front of the class roster can be printed after the class is created.
Use the Class Registration screen to select the correct class, then choose [Roster - Front], click [PRINT] and [OK].
Page 39

WorldPoint Roster Tool Rosters
Back of Roster The back of the class roster can be printed after student results have been posted.
The header for the list of students includes the class number if used, course type, Heartsaver sub-options if applicable, lead instructor, teaching location, class start date and start time. Each student’s name, address and home phone are given, with type of training (initial/renewal), written test score if applicable, remediation date if applicable, and whether the class was completed successfully. The card issue date is left blank for the Training Center to complete.
For students with online keys, the completion certificate number is included. Rosters for online courses include the date, start time, and end time of each student’s actual skill session, and whether the student completed the skill session successfully.
In the Student Data Entry screen, confirm a student in the correct class is displayed, or else select a student in the correct class, then choose [Roster - Back] and click [PRINT]. In the Print dialog box, choose “Records being browsed” for Print, and “All” for Print Range, then click [OK].
Next Step
After a roster is printed, e-mail it to the Training Center if appropriate, and then use the Class Registration screen to mark the roster as submitted. See Mark a Roster Submitted on page 17.
Page 40

WorldPoint Roster Tool Rosters
E-mail a Roster Before using the Roster Tool to e-mail a roster, confirm that you have a functional e-mail program on the same computer as the Roster Tool. Also check the back of the roster (use [Roster – Back] in the Student Data Entry screen) to confirm the class has students.
The front and back of the roster can be e-mailed to the Training Center after the student results have been posted. Send the entire roster by e-mail, using the automated process or the manual process.
Training Centers can recreate the class in WorldPoint ONE, based on the class information in the e-mail, then import the student list attachment and print the student cards.
Use the Class Registration screen to select the correct class, then choose [E-mail Roster].
Page 41

WorldPoint Roster Tool Rosters
Automated E-mail Before using the automated process, confirm the following:
You are connected to the Internet. The Training Center e-mail address has been added in General Setup. You are using Outlook, Outlook Express, MS Entourage, Mail, or OS X
Mail as your default e-mail program.
To send the roster to the Training Center by e-mail, follow these steps:
1. Choose [E-mail Roster] from the Class Registration screen.
2. Choose the Automatic E-mail tab in the roster e-mail screen.
3. Review the class information in the roster e-mail.
4. Click [Place this e-mail in your outbox] to send the roster e-mail, along with the automatically attached student list, to your e-mail program.
5. Warnings are displayed to protect against viruses sending e-mails.
When you see this message:
click [OK] to continue sending the e-mail from the Roster Tool.
Page 42

WorldPoint Roster Tool Rosters
6. If you receive a message like this:
or like this:
choose [Yes] or [Send] to allow communication from the Roster Tool to your e-mail program.
Note: If you receive one of these messages immediately after clicking [Place this e-mail in your outbox], then confirm the e-mail and send it. However, if you receive this warning at any other time, then do not confirm the e-mail as it may be caused by a virus.
7. Then, depending on the settings in your e-mail program, you may need to check the outgoing mailbox and send the e-mail, if you want it to go out right away.
Page 43

WorldPoint Roster Tool Rosters
Example If you are using MS Outlook Express, then choose the Automatic E-mail tab.
Page 44

WorldPoint Roster Tool Rosters
Manual E-mail Use the manual process if Outlook, Outlook Express, MS Entourage, Mail, or OS X Mail is not set up as your default e-mail program.
1. Choose [E-mail Roster] from the Class Registration screen.
2. Choose the Manual E-mail tab in the roster e-mail screen.
3. Review the class information to confirm this is the correct class to submit.
4. Click [Copy message content to clipboard] to copy the text of the e-mail, and then paste it into a new e-mail in your e-mail program.
5. Attach the student list to the e-mail.
Browse to find the list of students in the class. The list, automatically generated by the Roster Tool, is located in My Documents\WorldPoint Roster Tool\Attachments folder. The filename includes the class type, lead instructor ID, start date, and start time, in this format:
TYPEID_MMDDYY_HHMM
where TYPE is the class type (BLS, ACLS, PALS, FA, MISC, or ONLINE), ID is the lead instructor ID, MMDDYY is the class start date, and HHMM is the class start time.
6. Send the e-mail to your Training Center, with the class type and lead instructor name in the subject line.
Page 45

WorldPoint Roster Tool Rosters
Example 1. If you are using AOL, then choose the Manual E-mail tab in the Roster Tool.
2. Make sure the correct class is described on the Manual E-mail tab.
3. In AOL, create a new e-mail. In the Roster Tool, use the [Copy message content to clipboard] button to copy the class information. In AOL, paste the class information into the new e-mail.
4. Use the information at the bottom of the Manual E-mail tab to find the list of students, and attach it to the new e-mail in AOL.
5. In the new AOL e-mail, add the Training Center e-mail address, include the course type in the subject line, and send the new e-mail.
Next Step After a roster has been e-mailed to the Training Center (and printed if applicable), then use the Class Registration screen to mark the roster as submitted. See Mark a Roster Submitted on page 17.
Page 46

WorldPoint Roster Tool Appendix
Appendix Refer to this appendix to enhance your understanding and use of the Roster Tool.
Advanced Setup The Roster Tool provides capabilities in General Setup to change information and settings as needed.
Change name and logo for national organization Choose paper size Manage course types
National Organization Name To change the name of the national organization displayed on the front of the roster, follow these steps:
1. Use the Training Center tab in General Setup.
2. Highlight the existing national organization.
3. Type the new name.
Logo To change the logo displayed on the Roster Tool main menu, follow these steps:
1. Obtain the desired logo in JPEG format.
2. Crop blank areas around logo if necessary.
3. Use the Training Center tab in General Setup.
4. Click [Insert Logo].
5. Browse to select the new logo.
Page 47

WorldPoint Roster Tool Appendix
Paper Size Use the radio buttons on the Settings tab in the General Setup screen for paper format to choose letter size (8.5 x 11) or European size (A4).
The Roster Tool setting for paper size controls the date format in the text of the e-mails. When paper size is set to US Letter, class dates in the roster e-mail are displayed in the “Month Day, Year” format; when paper size is set to A4, class dates in the roster e-mail are displayed in the “Day Month Year” format.
Note: The language choice in the operating system controls the date format in the Class Registration screen, so if the language choice is for American English, then the date format is MM/DD/YYYY. Other language choices can be made in the operating system if the DD/MM/YYYY format is needed.
Prepare for Upgrade If an upgrade becomes available for the Roster Tool, click [Prepare for upgrade] on the Settings tab in General Setup before installing the upgrade. This will create a Transfer folder in the WorldPoint Roster Tool folder containing tab-delimited data for your instructors, classes, and students.
Note: Make a note of any custom course types you have added to the Roster Tool, as they are not preserved by clicking [Prepare for upgrade].
Page 48

WorldPoint Roster Tool Appendix
Course Types In the General Setup screen, choose the Course Types tab to review the standard courses available with the Roster Tool, and to add new course types if applicable.
Page 49

WorldPoint Roster Tool Appendix
Review Course Types
Use the scroll bar to review the list of available course types.
Add New Course Type
Additional course types can be added to the Roster Tool, if needed for your classes.
Complete the appropriate fields at the top of the screen, choosing the category as appropriate, and click [ADD Course].
Note: Use MISC (Miscellaneous) for custom course types; use ONLINE for classes with online knowledge components.
Note: Keep a record of the custom course types you add to the Roster Tool. If new course types become available in the future, downloading an update for the new course types will delete your custom course types in the Roster Tool, and you will need to add them again.
Change Course Type
To change a course type, click in the incorrect or empty field, and add or change the information.
Page 50

WorldPoint Roster Tool Appendix
Delete Course Type
The course types provided with the Roster Tool and any course types you add are protected from accidental deletion.
If any of these course types are not needed for current or future classes, they can be deleted.
Note: Please delete course types with caution, as this action is irreversible.
1. Use the Settings tab in General Setup and choose Yes for Enable DELETE for course types to remove the protection.
2. Choose the Course Types tab.
3. Locate the course type to be removed from the Roster Tool, click its [DELETE?] button, then click [Delete] to confirm the deletion.
4. After deleting unneeded course types, return to the Settings tab in General Setup and choose No for Enable DELETE for course types to protect the remaining course types once again.-
Page 51

WorldPoint Roster Tool Appendix
Using an Application Based on FileMaker® Pro The Roster Tool stores information in a FileMaker Pro database.
Required Fields Fields with yellow backgrounds are required for full Roster Tool functionality.
Note: When adding a new class in the Class Registration screen, the course type field must be completed before attempting any other task.
Find and Browse Modes You will do all your work in the Roster Tool in the Browse mode, except when finding a group of records.
Always add and review records in Browse mode. Check the mode at the bottom of the screen, and do not attempt to add records in Find mode.
Page 52

WorldPoint Roster Tool Appendix
Reviewing Records Class and student records are stored in the order entered. To review these records in the Class Registration screen or the Student Data Entry screen, use the [Next] and [Previous] buttons on the screen, or the icons in the left-hand status area. See Sort on page 57 to change the order of the records.
Status Area On the left-hand side of the Roster Tool screen, the status area provides capabilities to scroll through class and student records.
Click the arrows on the pages of the flip book icon to display the records one by one.
Use the slide bar under the flip book to move quickly through the records.
Page 53

WorldPoint Roster Tool Appendix
Keyboard Shortcuts After learning to use the Roster Tool, you may prefer to use these keyboard shortcuts.
Key(s) Action
Ctrl ’ (single quote) Fill this field with data from last record entered
Ctrl F Find
Ctrl I Show indexed history of data entered in a field *
Tab Move to next field
Shift Tab Move to previous field
When using a two key shortcut, hold down the first key while pressing the second key, then release both keys.
Note: On a Macintosh keyboard, the Ctrl key is the four-leaf clover.
* Data history
While entering data or choosing search criteria for a find, you may access data previously entered in the database.
1. Position the cursor in a field.
2. Using the keyboard, hold down the [Ctrl] key and press [I].
3. Review the indexed history for this field.
4. Select the appropriate field, then click [Paste].
Page 54

WorldPoint Roster Tool Appendix
Find FileMaker Pro software provides extensive search capabilities for finding individual students, groups of students, specific classes, and groups of classes.
1. Click the [FIND] button on the right in the Class Registration or Student Data
Entry screen.
2. Specify the records to find by entering or selecting data in the field(s).
3. Click the [Find] button on the left in the status area.
4. Review the selected record(s).
5. Click [CANCEL FIND] to access all records in the Roster Tool database again.
Note: Always click [CANCEL FIND] after performing a Find, before attempting to add new records to the Roster Tool. Do not add new classes or students while in Find mode. After performing a find always check the last line on the screen, to make sure it shows Browse instead of Find, before adding more records.
Example: Students at a class location To find all students who trained at the community center, use the Location field in the Student Data Entry screen, with the search criteria “Milltown Community Center”.
Example: Students needing recertification To find all students needing recertification in the next six months, use the Start Date field on the Student Data Entry screen to search for students in classes starting at least 18 months ago, with a search criteria such as “<01-01-2008” to indicate dates earlier than January 1, 2008.
Example: Planned classes To find all classed planned within a date range, use the Start Dates field on the Class / Skill Session Data tab in the Class Registration screen, with a date range for the search criteria such as “08-01-2009 … 08-31-2009” to find all classes starting in August.
Example: Classes taught by an instructor To find all classes taught by a particular instructor, use the Lead Instructor and Assisting Instructor fields on the Instructor Data tab in the Class Registration screen, with the instructor’s ID or name as search criteria.
Page 55

WorldPoint Roster Tool Appendix
Search symbols Use symbols from the left-hand status area to refine your searches.
In Find mode, position the cursor in the correct field and select a symbol from the dropdown list, then enter the data you want to find, or else type the symbol while entering the data you want to find.
+ Symbol Name Example
* wild card Last Name: Sm*th to find Smith, Smyth, and Smooth
= exact match Last Name: =Smith to find only students named Smith
< less than Registered: <24 to find classes with less than 24 students
> greater than Start Date: >06152009 to find classes after June 15
… range Start Date: 08/01/2009…08/31/2009 to find all classes starting in August
Page 56
WorldPoint Roster Tool Appendix
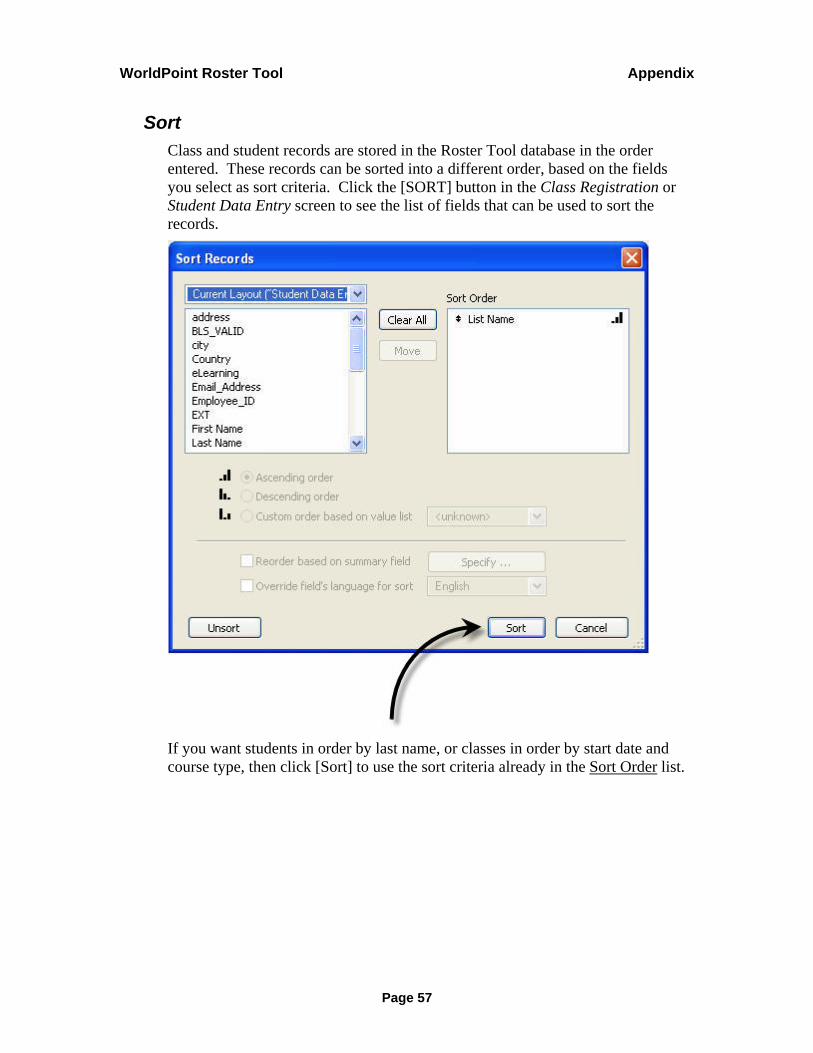
Sort Class and student records are stored in the Roster Tool database in the order entered. These records can be sorted into a different order, based on the fields you select as sort criteria. Click the [SORT] button in the Class Registration or Student Data Entry screen to see the list of fields that can be used to sort the records.
If you want students in order by last name, or classes in order by start date and course type, then click [Sort] to use the sort criteria already in the Sort Order list.
Page 57

WorldPoint Roster Tool Appendix
Custom Sort If you want to sort by other criteria, then use the Sort Records dialog box to move the fields you want to use from the alphabetic list of fields on the left, to the Sort Order list on the right. Highlight each field, then click [Move] to add it to the Sort Order list.
To sort the student records by course type, then by student name, use First Name, Last Name, and COURSELOG::CourseType as sort criteria.
Page 58

WorldPoint Roster Tool Appendix
When the list of fields for sorting is complete, highlight and drag the arrow symbol in the Sort Order list to put the fields in the correct order, if necessary.
After the sort criteria fields are selected and in the correct order, then click [Sort].
After reviewing the records in the requested sort order, you can put the records back in the order they were entered, by clicking [SORT] on the Roster Tool screen, then [Unsort] in the Sort Records dialog box.
Page 59

WorldPoint Roster Tool Appendix
FileMaker Pro Messages Most messages in the Roster Tool are self explanatory. Please refer to the following explanations, listed alphabetically, if necessary.
Commit Records/Requests has been canceled. Do you wish to continue with this script?
You have an incomplete class record open, and must either delete the new record or finish it before doing anything else.
To delete the incomplete class record, click [Cancel] once, then click [Delete] twice.
To finish creating the new class record, click [Continue] and add the Course Type field with the yellow background.
File Link is defined to require a value, but it is not available on this layout. Use another layout to assign a value to this field.
You clicked [NEW Class] to create a new class record, and then started another task. You must finish the new class record, or else delete the incomplete class record, before doing anything else.
To delete the incomplete class record, click [OK], then click [Cancel] twice.
To continue creating the new class record, click [OK], then [Revert], and add the Course Type for the new record.
No records are present. To create a new record choose the New Record menu command.
Click [OK], then click the [NEW Class] or [NEW Student] button to create a new record.
Print has been canceled. Do you wish to continue with this script?
Click [Cancel] to return to the displayed report.
Revert all changes to this record since it was last entered? You have an incomplete class record open, and must either delete the new record or finish it before doing anything else.
To delete the incomplete class record, click [Cancel] twice, then [Delete] twice.
To finish creating the new class record, click [Revert] and add the Course Type field.
Page 60

WorldPoint Roster Tool Appendix
Backup and Restore Protect the valuable data in your Roster Tool.
Backup Perform backups on a regular basis.
1. Return to the Roster Tool main menu and click [QUIT] to exit.
2. Access “My Documents” to find the WorldPoint Roster Tool folder.
3. Copy the entire folder to external media.
Note: Store and rotate backups carefully.
Restore If you need to reinstall the Roster Tool, back up the entire WorldPoint Roster Tool folder, and write down any custom course types you have added.
Delete the old WorldPoint Roster Tool folder, then reinstall the Roster Tool from the CD again, and restore your data by copying all files starting with TCI_ from the backup to the WorldPoint Roster Tool folder.
Page 61

WorldPoint Roster Tool Appendix
WorldPoint ONE and the WorldPoint Roster Tool were developed by EMS Solutions®, Inc., for WorldPoint Inc. www.EMSSolutions.org
WorldPoint, WorldPoint ONE, and WorldPoint Roster Tool are trademarks of WorldPoint, Inc., registered in the U.S. and other countries. www.eworldpoint.com
The Roster Tool Instructions guide is an independent publication and has not been authorized, sponsored, or otherwise approved by FileMaker, Inc.
The Roster Tool uses a FileMaker® Pro runtime engine.
FileMaker is a trademark of FileMaker, Inc., registered in the U.S. and other countries. www.filemaker.com
Other brands and product names mentioned in this manual may be trademarks or registered trademarks of their respective companies and are hereby acknowledged.
Page 62