8kg front load washing machine - kogan.com
TRANSCRIPT

8KG FRONT LOAD WASHING MACHINE (SERIES 7) KAGFLWASH8D


Warning
• To avoid hurting people or damaging property, you must read and adhere to this manual before using the product. Failure to adhere to the manual could cause serious harm or death.
• Ensure you have read, and fully understand the contents of this manual before operating your machine.
• Dismantling, repair or alterations should only be carried out by a professional technician. Unauthorised repairs may result in electric shock, fire or injury.
• The washer should only be connected to power with a dry plug and dry hands. Otherwise, an electric shock may occur.
• Damaged or loose wires or plugs should not be used, turn off the power, cease use immediately, and contact Kogan.com support.
• Do not damage the power cable. Do not damage, alter, forcibly bend, pull, twist, or mishandle the cable. Do not place heavy items on the cable or plug.
• The machine should not come into contact with water during maintenance or repair.
• Do not put gasoline, benzene, alcohol, thinners, or fabrics with stains from these substances, into or near to the washing machine, as a fire or explosion may result.
• This washing machine is equipped with a dual-electrode grounding plug and should be used with an appropriate socket. The socket should be properly insulated.
• Use a single socket only, not an adapter, and ensure that the voltage and current matches the plug marked specifications. Sharing the same socket with other electric appliances may cause a fire or trip the power.
• Thoroughly wipe the power plug when the dirt has adhered to the prong or around the base of the prong. Do not use water to clean the prongs.
• The washing machine should not be installed in a humid place or in places exposed to wind and rain.
• The washing machine should never be used in close proximity with candles, mosquito-repellent, incense, cigarettes or other sources of open-flame.
• Do not operate the machine when there is a gas leak.
• Keep children away from the washer and do not place boxes or shelves next to the washing machine.
• This appliance is not intended for use by persons (including children) with reduced physical, sensory or mental capabilities, or lack of experience and knowledge unless they have been given supervision or instruction concerning use of the appliance by a person responsible for their safety.
• The glass door becomes hot during high-temperature washing. Do not touch the door when the machine is on, especially children.
• If you need to open the door during high-temperature washing, wait until the temperature drops to a safe level, and the door will unlock automatically.
SAFETY & WARNINGS

• Packing material may be dangerous to kids, please keep all packing material (plastic bags, foam etc) far away from kids.
• Do not pull the wire when unplugging the device from the socket, grip the plug.
• Please unplug the unit during long periods of inactivity, such as going on holidays.
• Contact Kogan.com if the machine requires maintenance or repairs.
• If the power cord or supply cord is damaged, the manufacturer or its service agent or similarly qualified person must replace it in order to avoid a hazard.
• Water temperatures of above 50 degrees C should not be used for washing.
• Do not wash, rinse or spin waterproof fabric or cloth, such as sleeping bags, raincoats, ski covers, utilities, bicycles, cars and motors. Doing so may cause abnormal vibration and damage to the washing machine, wall, floor and clothes.
• Do not stand on or put weight on the top of the unit.
• Two people are required when moving or transporting the machine.
• Keep hands and feet away from the bottom of the washing machine when it is motion.
• Check the water supply hose connection by turning on the water before washing.
• The new hose-sets supplied with the appliance must be used, old hose-sets should not be reused.
• Do not install the washer over carpeted flooring, the carpet may block the ventilation openings on the bottom of the unit. Do not block the ventilation openings on the bottom of the washer by carpeting when the washer is installed on a carpeted floor.
• The water supply hose should be tightly screwed to the unit.
• After extended periods of use, the device may experience leakage caused by the union nut loosening. Every few months, check it and tighten it again if necessary.
• Please turn off the water tap when not using the unit, to prevent damages caused by water leakage.

8kg Front load washing machine (x1)
Inlet hose (x1) “U”-piece (x1)
Transit bolt caps (x4) User guide (x1)
COMPONENTS
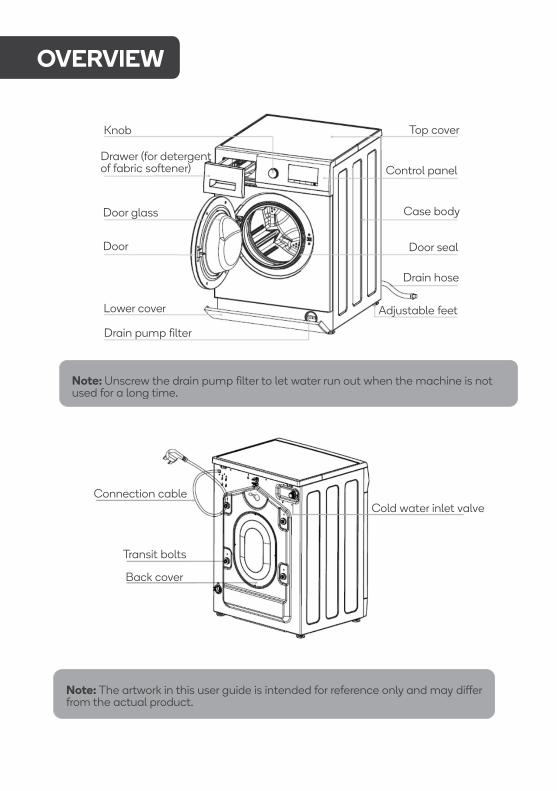
OVERVIEW
Adjustable feet
Drain hose
Door seal
Case body
Control panel
Top cover Knob
Drawer (for detergent of fabric softener)
Door glass
Door
Lower cover
Drain pump filter
Note: Unscrew the drain pump filter to let water run out when the machine is not used for a long time.
Cold water inlet valve Connection cable
Transit bolts
Back cover
Note: The artwork in this user guide is intended for reference only and may differ from the actual product.
Removing packaging
• Remove all packaging (including the foam base) or vibration and noise may occur during use.
• Dispose all of the wrapping material safely and keep it out of reach from children. Danger of suffocation!
• It is normal for water drops appear on the packaging and the door glass. This is a result of water being leftover from quality control testing, and is not harmful.
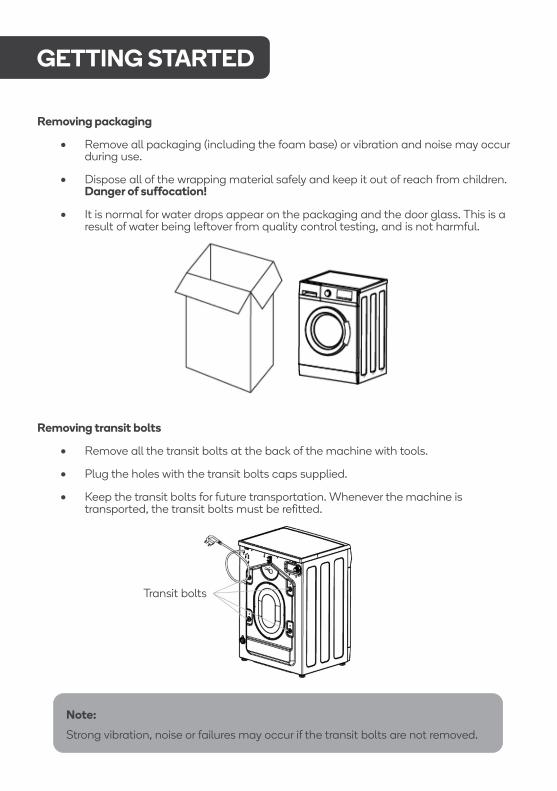
Removing transit bolts
• Remove all the transit bolts at the back of the machine with tools.
• Plug the holes with the transit bolts caps supplied.
• Keep the transit bolts for future transportation. Whenever the machine is transported, the transit bolts must be refitted.
Transit bolts
Note: Strong vibration, noise or failures may occur if the transit bolts are not removed.
GETTING STARTED

Installation position • A concrete floor is the most suitable installation surface for a washing machine,
being far less prone to vibration during the spin cycle than wooden floorboards or a carpeted surface.
• The machine must be level and securely positioned. The distance between the machine and wall must be more than 10cm.
• To avoid vibrations during the spin cycle, the machine should not be installed on soft floor coverings.

Level adjustment The machine must stand perfectly level on all four feet to ensure safe and proper operation.
Incorrect installation may increase electricity and water consumption and may cause the machine to move while in use.
To ensure the unit is level:
• Use the spanner to turn locknut in a clockwise direction. Then turn locknuts together while adjusting the feet to unscrew.
• Use a spirit level to check the machine is standing level.
• Hold the adjustable feet securely with a pipe wrench while turning the locknut again using a spanner until it sits firmly up against the housing.
Locknuts
Adjustable feet
Locked Loose
High Low
Note: Vibration and noise may occur if the lock nuts do not sit firmly up against the washing machine’s housing.

Drain hose connection 1. Direct into a sink
• If the outlet spigot has not been used before, remove any block/plug that may be in place.
• Push the drain hose onto the spigot and secure with a clip if required, ensure a loop is formed in the drain hose to prevent waste from the sink entering the washing machine.
• If required, the drain hose can be extended to a length of 4m.
2. Connected securely to a standpipe.
• Form a hook in the end of the drain hose using the “U”-piece supplied.
• Place the drain hose into your standpipe, which should have an internal diameter of approximately 38mm. This ensures there is an air break between the drain hose and standpipe.
• When discharging into a standpipe ensures that the top of the standpipe is no more than 90cm and no less than 60cm above floor level.
Loop
“U”-piece
INSTALLATION

Water inlet connection Connect the inlet hose supplied to the machine to a tap with a 3/4” thread.
Do not use any hoses previously used with another washing machine.
Installation should comply with local water authority and building regulations' requirements.
When there is an inlet valve at the back of the machine, it must be connected to a cold water supply.
Washing preparation 1. Connect the inlet hoses and turn on the tap.
2. After making sure the power socket is grounded reliably, insert the power plug into the power socket. Switch on at wall.
3. Position the drainage hose well (ie, laundry sink or drain).
How to use Washer Before washing clothes for the first time, you must run a complete cycle without clothes.
1. Turn the program select knob to “Cotton” position.
2. Press “Start/Pause” button.
If there is any water leftover from quality control testing, this will drain the water.

Control Panel
1 Start/Pause ( )
Press this button to start or pause a wash cycle. The door cannot be open once the machine has started. When the washing cycle is finished, the door can be unlocked and released two minutes after being powered off'.
Time will not be recalculated for restarting.
If the washing program is idle for more than 10 minutes without any operation, the machine will automatically enter Sleep mode. Press this button to wake up the screen.
2 Temp Press this button repeatedly to change the wash temperature.
3 Speed Press this button repeatedly to change the spin speed.
4 Function There are four basic functions and eleven combined functions. Select a suitable function by pressing this button repeatedly.
Refer to the following page for function descriptions.
5 Delay Press this button repeatedly to set the delay time of the starting of a wash cycle from 1 hour to 24 hours. This allows you to schedule a wash to begin while you’re not at home, or in time for you to wake up and remove from the machine.
6 Program Select Knob
Turn this knob clockwise or anticlockwise to select the required wash program. Once the “Start/Pause” button is pressed and the machine is running, the program cannot be changed.
Note: At the end of a wash cycle, the knob must be turned to ‘OFF’
6
OPERATION
5 4 3 2 1

Functions:
Soak Increase the time of soaking clothes.
Rinse+ Add an extra rinse on the selected program.
Anti-Ironing
Reduce the wrinkle of clothes during a washing cycle. Once this function is selected, the machine will not execute the last drain unless the “Start/Pause” button is pressed.
Note: The max running time of this function is 12 hours. If it exceeds 12 hours, the machine will drain and spin automatically
Pre-Wash This function is to add a washing for very dirty clothes, the washing duration will be prolonged.
Child lock (“Speed” + “Function”) The function of “Child lock” is to lock the control panel to prevent the misuse by children.
1. Press the “Speed” and “Function” buttons at the same time for 3 seconds.
2. The Child Lock icon ( ) will light up on the screen.
3. With this function enabled, all keys and knobs are deactivated except for the “Off” position of the Program Selection Knob.
4. The child lock function can be selected during a washing cycle without interrupting it.
To cancel the child lock function when enabled:
1. Hold the “Speed” and “Function” buttons simultaneously for 3 seconds. The
function is cancelled when the Child Lock icon ( ) disappears on the screen.
Note:
• For your safety, do not turn the knob to the “Off" position to collect clothes while the machine is running. The water temperature may be high and may scald you.
• When the washing cycle is finished, the door can be unlocked and released two minutes after being powered off. This is to allow time for temperature to cool down.

Mute (“Temp.”)
• The function of “Mute” is to disabled all prompt tone and alert sounds.
• To enable mute, press and hold the “Temp.” button for 3 seconds.
• To cancel when enabled, press and hold the “Temp.” button for 3 seconds again.
Program guide
Prog
ram
Time Temp Rin
se Spin Speed(rpm) Function Options
(min
utes
)
°C (re
peat
s)
F712E Series & F812E Series So
ak
(+15
min
)
Rin
se+
Ant
i-Iro
ning
Pre
-was
h
Cotton 80 00/20/40 /60/95 x2 0/600/800
/1000/1200 ● ● ● ●
197 00/20/40 /60/95 x3 0/600/800
/1000/1200 ● ● ● ●
Cool Wash 57 00 x2 0/600/800
/1000/1200 ● ●
95°C Anti-Bac 131 95 x2 0/600/800
/1000/1200 ● ● ●
Denim 100 00/20/40 x4 0/600/800 ● ● ●
Heavy 99 00/20/40/60 x3 0/600/800 /1000/1200 ● ● ●
Drum Clean 74 00/20/40
/60/95 x2 0/600/800 /1000/1200 ●
Spin 11 0 0 0/600/800 /1000/1200
Rinse+ Spin 16 0 x1 0/600/800
/1000/1200 ● ●
Night Wash 81 00/20/40/60 x5 0/600/800 ● ● ●
Required
Quick 15 00/20/40 x1 0/600/800 /1000/1200 ● ● ●
Mix 63 00/20/40/60 x3 0/600/800 ● ● ● ●
Silk 48 00/20/40 x2 0/600 ● ● ●
Wool 50 00/20/40 x2 0/600 ● ● ●
Synthetic 51 00/20/40/60 x2 0/600/800 ● ● ● ●

Notes:
‘ ’ is for Standard Cotton program. Standard Cotton at 60°C and 40°C are suitable to clean normally soiled cotton laundry and they are the most efficient programs in terms of combined energy and water consumption for washing that type of cotton laundry; in addition, the actual water temperature may differ from the declared cycle temperature.
The running time above is for the default programs, which is only for reference and it, May different because of different laundries, weights and washing temperature. The “00” means the temperature of water is normal. The default options of the programs are in boldface.
Clothes Preparation • Sort the laundry by colour and by care label. Most garments have a textile care
label in the collar or side seam.
• Make sure all the pockets are empty. Foreign objects (such as nails, coins, paper clips, etc.) can cause damage to other garments as well as the machine.
• Close any zips, fasten hooks and toggles, etc, before washing (figure 1)
• Dark textiles often contain excess dye and should be washed separately several times before being included in a mixed load. Always wash whites and coloureds separately.
• Badly soiled areas, stains etc. should be pre-treated with liquid detergent stain removers etc (figure 2)
• Turn over the clothes which pill easily and is with woollen surface before putting them into the machine (figure 3).
Figure 1 Figure 2 Figure 3
Put clothes into washer Unfold the laundry and load loosely into the drum. Mixing both large and small items gives better wash results and also helps distribute the load evenly during spinning. The most efficient use of energy and water is achieved when a full load is washed. However, do not overload as this causes creases and reduces cleaning efficiency.
Note: Make sure that no garments are caught between the door and the seal.

Using the detergent drawer 1. Open the drawer and add adequate detergent into main wash compartment
marked “ ” or "II".
2. Add the fabric softener into compartment marked “ ” or “ ”. Do not exceed the maximum level mark (“MAX”).
3. Add the detergent into the pre-wash compartment marked “ ” or “I” according to the selected program.
4. Close the drawer.
The correct amount of detergent will depend on the following:
• The quantity of laundry
• The soiling level of the laundry
o Lightly soiled: No visible dirt or stains. Possibly slight body odour
o Normally soiled: Visibly dirty and/or just a few slight stains
o Heavily soiled: Visible dirt and stains and/or dried on soiling
• The water hardness level.
Main wash compartment
Fabric softener compartment
Pre-wash compartment
Note: It is recommended to use low foaming powder for all washing temperature programs.

Washing Steps 1. Turn on the water tap and connect the power.
2. Open the door and put the cloth into the drum one by one.
3. Close the door and put suitable amount of detergent and fabric softener into the dispenser, then close the drawer.
4. Choose a program you need by turning the knob.
5. Press the “Temp.” button and select a wash temperature.
6. Press “Start/Pause” button to start the washing machine.
7. When the cycle is finished, there is a warning tone sounds.
Washing Program chart
Program Washing symbol Fabric
Cotton
Cottons, linens or cotton mix fabrics, e.g. table linen, towelling, underwear, T-shirts etc.
Quick
Small loads of items which require freshening up and which can be washed in a Cotton program.
Rinse+Spin This program can be used for rinsing items which can be washed in a Cotton program. Do not add any detergent.
Spin Separate spin for cotton and linen items
Standard Cotton
Cottons, linens or cotton mix fabrics, e.g. table linen, towelling, underwear, T-shirts etc.
Synthetic
Synthetic or mixed fabrics, underwear, coloured garments, non-shrink shirts.
Wool
Machine-washable or hand-washable wool or wool blends fabrics. If the care label does not specify a temperature, wash using the cold setting. Also suitable for hand-washable silks. Reduce the spin speed.
Note: When washing cycle is finished, the machine will change into a standby mode. And the machine will be sleeping after 10 minutes without any control on the control panel.

Note: The machine is fitted with a balance control device, which ensures the machine is stable during the spin. To protect the machine, it will cut in if the laundry is not evenly distributed in the drum. The laundry is redistributed by reverse rotation of the drum. This may happen several times before the unbalance disappears and normal spinning can resume. If, after 15 minutes, the laundry is still not evenly distributed in the drum, the machine will not spin. In this case, redistributed the load manually and reselect the spin program.
Door lock
When the machine is started, the door is locked. The door can be opened if you press the “Start/Pause” button during a cycle except for in the following two cases:
• If the temperature inside the drum is above 53°C, the door will remained locked.
• When the water is above a certain level, the door will remained locked.
In most cases, we recommend running a wash cycle to completion to drain the water. After it has finished, and two minutes of cool-down time has passed, the door will unlock.
In an emergency, turn the program select knob to the “Off” position and wait 2 minutes to open the door. CAUTION – Water may be hot, which could lead to scalding.
Important:
Do not try to open the door if the washing cycle has not finished or power supply is cut off during the washing cycle. The temperature may be high and you may be scalded.
Important: • Do not try to open the door when the washing cycle is not finished, or power supply
is cut off during the washing cycle, as temperature may be high and you may be scalded.
• Ensure your hands are dry and disconnect the machine from the mains electricity supply, withdrawing the plug from the socket before cleaning the machine.
• The washing machine must not be hosed down.
IMPORTANT: Do not try to open the door when the washing cycle is not finished, or power supply is cut off during the washing cycle. The temperature may be high enough to present a risk of scalding or burning.

Cleaning the Exterior
• Clean the exterior with a mild non-abrasive cleaning agent or soap and water using a well wrung-out cloth.
• Wipe dry with a soft cloth. • Do not use solvents, abrasive cleaners, glass cleaners or all-purpose cleaning
agents. These might damage plastic surfaces and other components because of the chemicals they contain.
Cleaning the Washing Drum Clean the drum every 3 months by using the “Drum Clean” program.
Cleaning the Drawer Remove detergent residues regularly.
• Pull out the drawer until a resistance is felt. Press down the release catch and at the same time pull the drawer right out of the machine.
• Remove the siphon from compartment and clean it.
• Clean the dispenser using a brush and warm water.
CLEANING & CARE

Cleaning the Drawer Housing Use a bottle brush to remove detergent residues inside the drawer housing.
Cleaning the water inlet filter Use pointed nose pliers to withdraw the plastic filter. After cleaning, put back and secure. These filters should be checked every 6 months, or more often if there are frequent interruptions to the water supply.
Cleaning the drain pump filter 1. Disconnect the machine from the mains
electricity supply and open the lower cover with a screwdriver.
2. Place a container under the pump. Unscrew and remove the filter.
3. Clean the filter carefully.
Note: The filter must be put back in place after cleaning.
Note: The filter should be cleaned every 2 months, or when the “E03” is on screen.

Power 220V-240V~50,Hz
Washing / spin capacity 8.0kg
Rated power 2100W
Water pressure 0.02-0.8MPa
Net weight / gross weight 62.70kg/66.17kg
Outer dimension (W x H x D) 595 x 845 x 545mm
Energy-Efficient Test Program Entrance Guide:
Choose the program “ ”, set the washing temperature to “60°C” and select the spin speed to “1200rpm”.
Symbol explanation
V Volt ~ Alternating Current
W Watt Hz Hertz
Safety test
CE symbol
SPECIFICATIONS
Note: Data can vary from the nominal values given depending on water pressure, water hardness, water inlet temperature, room temperature, type and volume of load, fluctuations in the electricity supply and any extra options selected.

Problem Error Code Possible Cause Solutions
The machine fills overtime. “E01”
1. The water tap is not open. 2. The drain hose is put down. 3. The water inlet valve is damaged.
1. Open the water tap. 2. Hook up the hose. 3. Change the water inlet valve.
There is a door lock alarm. “E02”
1. The door is not locked well. 2. Garment is caught between the door and the seal. 3. The door lock is damaged.
1. Lock the door well. 2. Put the garment into the drum. 3. Change the door lock.
The machine drains overtime.
“E03”
1. The drain hose is squashed or kinked. 2. The drain pump filter is block. 3. The drainage system pipes are blocked.
1. Check the drain hose. 2. Clean the filter. 3. Check the drainage system and clean it.
Water overflows the machine. / Water sensor works abnormal.
“E04”
1. The water inlet valve is damaged. 2. The connection between the water sensor and wire is not secure. 3. The water sensor is damaged.
1. Change the water inlet. 2. Check the connection and ensure it is secure. 3. Change the water sensor.
The motor does not work. “E05”
1. The connection between the motor and wire is not secure. 2. The motor is protected because of over-heat. 3. The motor is damaged.
1. Check the connection and ensure it is secure. 2. Check if the machine is overloaded. Switch off the machine and retry when the motor becomes cool. 3. Change the motor.
There is a heating tube fault.
“E06” 1. The connection between the heating tube and wire is not secure. 2. The heating tube is damaged.
1. Check the connection and ensure it is secure. 2. Change the heating tube.
There is a temperature sensor fault.
“E07”
1. The connection between the temperature sensor and wire is not secure. 2. The temperature sensor is damaged.
1. Check the connection and ensure it is secure. 2. Change the temperature sensor.
TROUBLESHOOTING

Important: If the machine is exposed to temperatures below 0°C, certain precautions should be taken.
1. Turn off the water tap.
2. Unscrew the inlet hose.
3. Unhook the drain hose from the rear support and position the end of this hose and that of the inlet hose in a bowl. Run the spin program.
4. Disconnect the appliance.
5. Screw the inlet hose and re-position the drain hose.
6. When you intend to start the machine up again, make sure that the room temperature is above 0°C.
Disposal
This marking indicates that this appliance should not be disposed with other house-hold wastes. To prevent possible harm to the environment or human health from uncontrolled waste disposal, recycle it responsibly to promote the sustainable reuse of material resources.

Need more information?
We hope that this user guide has given you the assistance needed for a simple set-up.
For the most up-to-date guide for your product, as well as any additional assistance you may require,
head online to help.kogan.com