410-1688-206b / amw50ap user guide -...
TRANSCRIPT
410-
1688
-206
B / A
MW
50AP
N2953
3 YEARS LIMITED WARRANTY: We pride ourselves on the quality of our products. For complete warranty details and a list of our worldwide offices, please visit www.targus.com. Features and specifications are subject to change without notice. Microsoft, Windows and Windows Vista are registered trademarks or trademarks of Microsoft Corporation in the United States and/or other countries. Mac is a trademark of Apple Inc., registered in the U.S. and other countries. Logitech is a registered trademark of Logitech International in the United States and other countries. All trademarks and registered trademarks are the property of their respective owners. ©2010 Targus Group International, Inc.
User Guide用戶指南 / 用户指南 / Petunjuk Pengguna / 説明書 / 사용자 가이드

Targus Wireless Optical Mouse
2
Targus Wireless Optical Mouse
3
IntroductionThank you for your purchase of the Targus Wireless Optical Mouse. The USB receiver conveniently attaches to the mouse for ease of use while traveling or on the go. This is a plug and play device so no additional software is required.
System RequirementsHardware• USB port
Operating System • Microsoft Windows® 2000• Microsoft Windows® XP• Microsoft Windows Vista®
• Microsoft Windows® 7• Mac OS® X 10.4 or later
Contents• Targus Wireless Optical Mouse• 2 x AA Batteries• Mini USB Receiver• User Guide
Table of Contents
English ........................................................................................ 3
繁體中文 ................................................................................. 9
中文简体字 ........................................................................... 16
Bahasa Indonesia ........................................................... 22
日本語 .......................................................................................... 28
한국어 ....................................................................................... 34
Targus Wireless Optical Mouse
4
Targus Wireless Optical Mouse
5
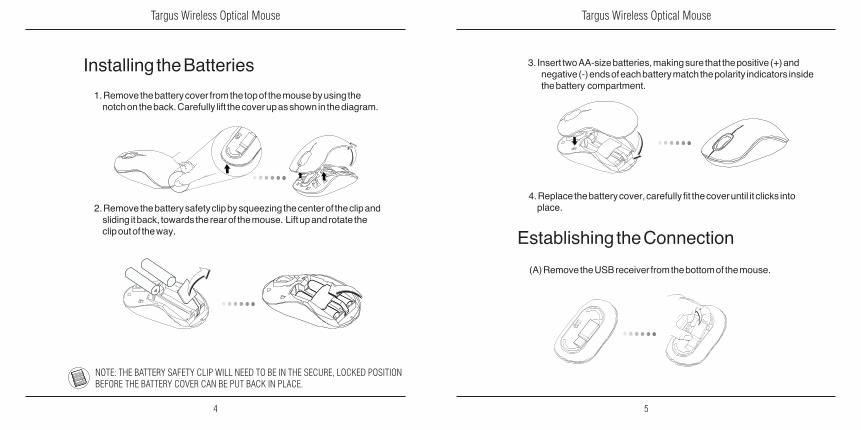
3. Insert two AA-size batteries, making sure that the positive (+) and negative (-) ends of each battery match the polarity indicators inside the battery compartment.
4. Replace the battery cover, carefully fit the cover until it clicks into place.
Establishing the Connection
(A) Remove the USB receiver from the bottom of the mouse.
1. Remove the battery cover from the top of the mouse by using the notch on the back. Carefully lift the cover up as shown in the diagram.
Installing the Batteries
2. Remove the battery safety clip by squeezing the center of the clip and sliding it back, towards the rear of the mouse. Lift up and rotate the clip out of the way.
NOTE: THE BATTERY SAFETY CLIP WILL NEED TO BE IN THE SECURE, LOCKED POSITION BEFORE THE BATTERY COVER CAN BE PUT BACK IN PLACE.
Targus Wireless Optical Mouse
6
Targus Wireless Optical Mouse
7
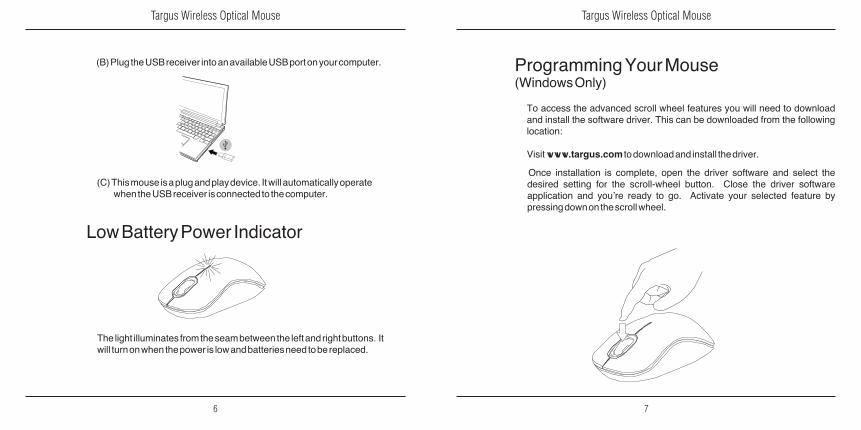
(C) This mouse is a plug and play device. It will automatically operate when the USB receiver is connected to the computer.
Low Battery Power Indicator
The light illuminates from the seam between the left and right buttons. It will turn on when the power is low and batteries need to be replaced.
(B) Plug the USB receiver into an available USB port on your computer. Programming Your Mouse (Windows Only)
Once installation is complete, open the driver software and select the desired setting for the scroll-wheel button. Close the driver software application and you’re ready to go. Activate your selected feature by pressing down on the scroll wheel.
To access the advanced scroll wheel features you will need to download and install the software driver. This can be downloaded from the following location:
Visit www.targus.com to download and install the driver.

Targus Wireless Optical Mouse
8
Targus Wireless Optical Mouse
9
Regulatory ComplianceThis device complies with Part 15 of the FCC Rules. Operation is subject to the following two conditions: (1) This device may not cause harmful interference, and (2) This device must accept any interference received, including interference that may cause undesired operation.
FCC StatementTested to Comply
This equipment has been tested and found to comply with the limits of a Class B digital device, pursuant to Part 15 of the FCC Rules. These limits are designed to provide reasonable protection against harmful interference in a residential installation. This equipment generates, uses, and can radiate radio frequency energy and if not installed and used in accordance with the instructions, may cause harmful interference to radio communications. However, there is no guarantee that interference will not occur in a particular installation. If this equipment does cause harmful interference to radio or television reception, which can be determined by turning the equipment off and on, the user is encouraged to try to correct the interference by one or more of the following measures:• Reorient or relocate the receiving antenna;• Increase the separation between the equipment and receiver;• Connect the equipment into an outlet on a circuit different from that to which the
receiver is connected;• Consult the dealer or an experienced radio/TV technician for help.Changes or modifications not authorized by the party responsible for compliance could void the user’s authority to operate this product.
Declaration of ConformityHereby, Targus, declares that this device is in compliance with the essential requirements and other relevant provisions of Directive 1999/5/EC.
Microsoft, Windows, and Windows Vista are either registered trademarks or trademarks of Microsoft Corporation in the United States and/or other countries. All trademarks and registered trademarks are the properties of their respective owners. All rights reserved.
介紹感謝您購買Targus無線光學鼠。USB接收器可收納於滑鼠背面,適合旅行與外出使用。這是一款隨插即用滑鼠,無須安裝任何軟體。
系統要求硬件• USB介面
操作系統•Microsoft Windows® 2000 •Microsoft Windows® XP•Microsoft Windows Vista®
•Microsoft Windows® 7•Mac OS® X 10.4或更高版本
內容物• Targus無線光學鼠• 2 X AA電池• 迷你USB接收器• 說明書
Targus Wireless Optical Mouse
10
Targus Wireless Optical Mouse
11
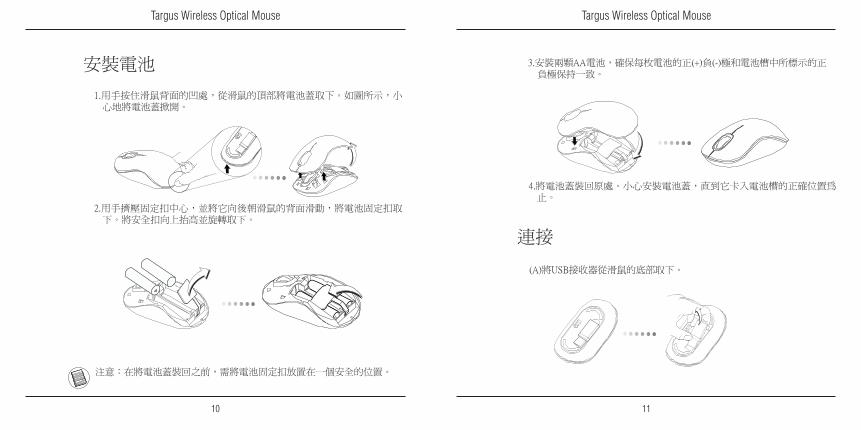
1.用手按住滑鼠背面的凹處,從滑鼠的頂部將電池蓋取下。如圖所示,小心地將電池蓋掀開。
安裝電池
2.用手擠壓固定扣中心,並將它向後朝滑鼠的背面滑動,將電池固定扣取下。將安全扣向上抬高並旋轉取下。
注意:在將電池蓋裝回之前,需將電池固定扣放置在一個安全的位置。
3.安裝兩顆AA電池,確保每枚電池的正(+)負(-)極和電池槽中所標示的正負極保持一致。
4.將電池蓋裝回原處。小心安裝電池蓋,直到它卡入電池槽的正確位置為止。
連接
(A)將USB接收器從滑鼠的底部取下。
Targus Wireless Optical Mouse
12
Targus Wireless Optical Mouse
13
(C)這是一款隨插即用的滑鼠。當USB接收器安裝到電腦上後,即可開始使用。
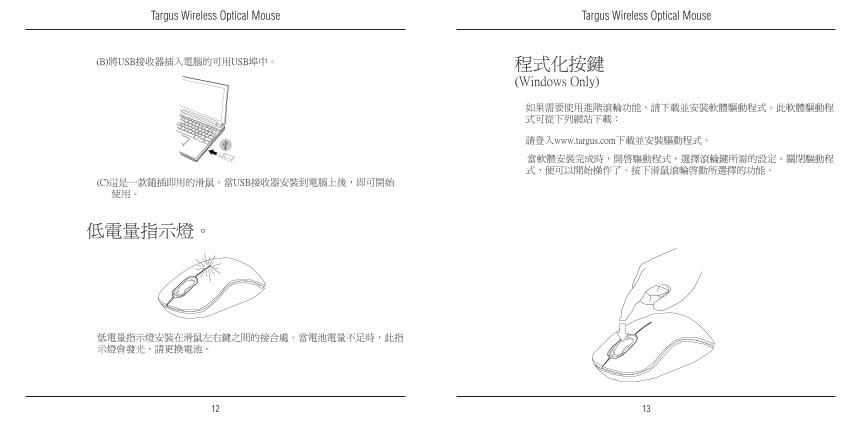
低電量指示燈。
低電量指示燈安裝在滑鼠左右鍵之間的接合處。當電池電量不足時,此指示燈會發光,請更換電池。
(B)將USB接收器插入電腦的可用USB埠中。 程式化按鍵(Windows Only)
當軟體安裝完成時,開啟驅動程式,選擇滾輪鍵所需的設定。關閉驅動程式,便可以開始操作了。按下滑鼠滾輪啟動所選擇的功能。
如果需要使用進階滾輪功能,請下載並安裝軟體驅動程式。此軟體驅動程式可從下列網站下載:
請登入www.targus.com下載並安裝驅動程式。

Targus Wireless Optical Mouse
14
Targus Wireless Optical Mouse
15
聯邦通訊委員會(FCC)聲明經測試符合規定
根據聯邦通訊委員會第15節的規定,本裝置已經測試及證明符合B級數位裝置的限制。 這些限制的設定是對於設在住宅區的裝置所發出的有害干擾,為居民提供合理保護。本裝置會產生、使用及發出無線電頻率,如不按照說明而安裝及使用,可能對無線電通訊造成有害干擾。但是這不能保證以特定的安裝方式便不會產生干擾。如本裝置確實對無線電或電視接收產生有害干擾(您可以把本裝置關了再開啟予以確定),使用者可嘗試採取以下一種或多種方法以改善干擾情況: • 調整接收天線的方向及位置• 擴大本裝置與接收器之間的距離• 把本裝置的電源介面與接收器的電源介面分開• 諮詢經銷商或經驗豐富的無線電/電視工程師,尋求協助。未經法規遵守負責方授權的變更和改動將撤銷用戶操作本產品的權利。
符合聲明Targus Group International 在此聲明本裝置符合 Directive 1999/5/EC 的實質性要求和其它相應規定。
符合規定
本裝置符合聯邦通訊委員會(FCC)第15節的規定。其操作使用必須符合下列兩種情況:(1) 本裝置不會造成有害干擾,及(2) 本裝置必須接受任何外來干擾,包括那些可能引致操作不便的干擾。
低功率電波輻射性電機管理辦法
第 十 二 條經型式認證合格之低功率射頻電機,非經許可,公司、商號或使用者均不得擅自變更頻率、加大功率或變更原設計之特性及功能。第 十 四 條低功率射頻電機之使用不得影響飛航安全及干擾合法通信;經發現有干擾現象時,應立即停用,並改善至無干擾時方得繼續使用。前項合法通信,指依電信法規定作業之無線電通信。低功率射頻電機須忍受合法通信或工業、科學及醫療用電波輻射性電機設備之干擾。
Microsoft, Windows, 及 Windows Vista為已注冊商標或在美國/其他國家的微軟公司的商標。所有的商標及注冊商標都歸商標持有者所有。版權所有。
無線滑鼠 USB接收器
CCAI09LP1030T7 CCAI09LP1040T0

Targus Wireless Optical Mouse
16
Targus Wireless Optical Mouse
17
介绍感謝您購買Targus無線光學滑鼠。USB接收器可便地連接在滑鼠上,當旅行或外出時,易於使用。這是一款隨插即用設備,所以無需使用附加的軟件。
系统要求硬件• USB接口
操作系统•Microsoft Windows® 2000 •Microsoft Windows® XP•Microsoft Windows Vista®
•Microsoft Windows® 7•Mac OS® X 10.4或更高版本
目录• Targus无线光学鼠标• 两节AA型电池• 迷你型USB接收器• 用户指南
1.用手按住鼠标背面的凹口,从鼠标的顶部将电池盖取下。如图所示,小心地将电池盖掀开。
电池安装
2.用手挤压保险夹的中心并将它向后朝鼠标的背面滑动,将电池保险夹取下。将保险夹向上抬高并旋转取下。
注:在将电池盖装回之前,需将电池保险夹放置在一个安全的位置。
Targus Wireless Optical Mouse
18
Targus Wireless Optical Mouse
19
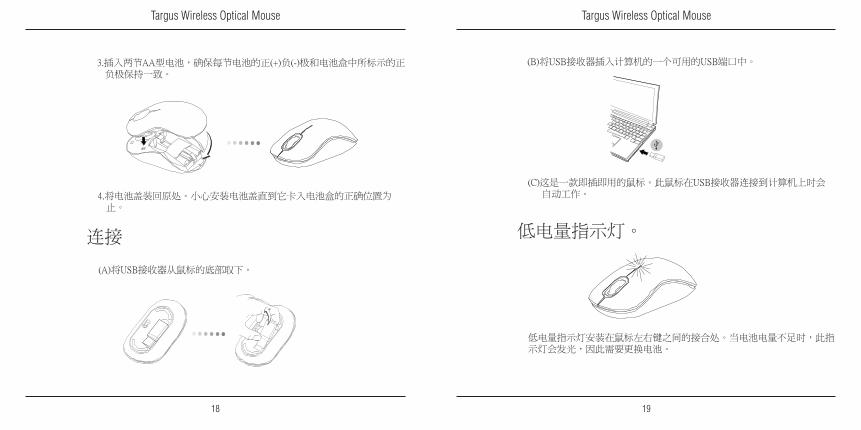
3.插入两节AA型电池,确保每节电池的正(+)负(-)极和电池盒中所标示的正负极保持一致。
4.将电池盖装回原处。小心安装电池盖直到它卡入电池盒的正确位置为止。
连接
(A)将USB接收器从鼠标的底部取下。
(C)这是一款即插即用的鼠标。此鼠标在USB接收器连接到计算机上时会自动工作。
低电量指示灯。
低电量指示灯安装在鼠标左右键之间的接合处。当电池电量不足时,此指示灯会发光,因此需要更换电池。
(B)将USB接收器插入计算机的一个可用的USB端口中。

Targus Wireless Optical Mouse
20
Targus Wireless Optical Mouse
21
对鼠标编程(Windows Only)
当软件安装完成时,打开驱动程序,选择滚轮键所需的设定值。关闭驱动应用程序,就可以开始工作了。按下鼠标滚轮激活所选择的功能。
如果需要使用先进的鼠标滚轮功能,请下载并安装软件驱动程序。此软件驱动程序可从下列网站下载:
登录www.targus.com,下载并安装驱动程序。
符合规定本装置符合联邦通讯委员会(FCC)第15节的规定。其操作使用必须符合下列两种情况:(1) 本装置不会造成有害干扰,及(2)本装置必须接受任何外来干扰,包括那些可能引致操作不便的干扰。
联邦通讯委员会(FCC)声明经测试符合规定
根据联邦通讯委员会第15节的规定,本装置已经测试及证明符合B级数位装置的限制。 这些限制的设定是对于设在住宅区的装置所发出的有害干扰,为居民提供合理保护。本装置会产生、使用及发出无线电频率,如不按照说明而安装及使用,可能对无线电通讯造成有害干扰。但是这不能保证以特定的安装方式便不会产生干扰。如本装置确实对无线电或电视接收产生有害干扰(您可以把本装置关了再开启予以确定),使用者可尝试采取以下一种或多种方法以改善干扰情况:• 调整接收天线的方向及位置• 大本装置与接收器之间的距离• 把本装置的电源接口与接收器的电源接口分开• 咨询经销商或经验丰富的无线电/电视工程师,寻求协助。 未经法规遵守负责方授权的变更和改动将撤销用户操作本产品的权利。
符合声明Targus Group International 在此声明本装置符合 Directive 1999/5/EC 的实质性要求和其它相应规定。
接收装置 CMIIT ID: 2009DJ4743鼠标 CMIIT ID: 2009DJ4300
无线电发射设备型号核准证
Microsoft, Windows, 及 Windows Vista为已注册商标或在美国/其他国家的微软公司的商 标。所有的商 标及注册商标都归商标持有者所有。版权所有。
Targus Wireless Optical Mouse
22
Targus Wireless Optical Mouse
23
1. Pindahkan penutup baterai dari atas mouse dengan menggunakan takik di belakang. Angkat secara hati-hati penutup seperti tertera pada diagram.
Memasang Baterai
2. Pindahkan klip pengaman baterai dengan menekan bagian tengah klip dan menggeserkannya melawan bagian pantat mouse. Angkat dan putar klipnya.
CATATAN: KLIP KEAMANAN BATERAI MEMBUTUHKAN KEAMANAN, KUNCI POSISI SEBE-LUM PENUTUP BATERAI DAPAT DILETAKKAN KEMBALI.
PengenalanSelamat akan pembelian Mouse Optik Nirkabel Targus Anda. Penerima USB terhubung dengan mouse secara tepat untuk kemudahan penggunaan ketika sedang dalam perjalanan atau bepergian. Ini merupakan perangkat pasang dan pakai jadi tidak membutuhkan software tambahan lagi.
Permintaan SistemHardware• port USB
Sistem Pengoperasian • Microsoft Windows® 2000• Microsoft Windows® XP• Microsoft Windows Vista®
• Microsoft Windows® 7• Mac OS® X 10.4 atau selanjutnya
Daftar Isi• Mouse Optik Nirkabel Targus • 2 x Baterai AA • Penerima USB Mini • Petunjuk Pengguna
Targus Wireless Optical Mouse
24
Targus Wireless Optical Mouse
25
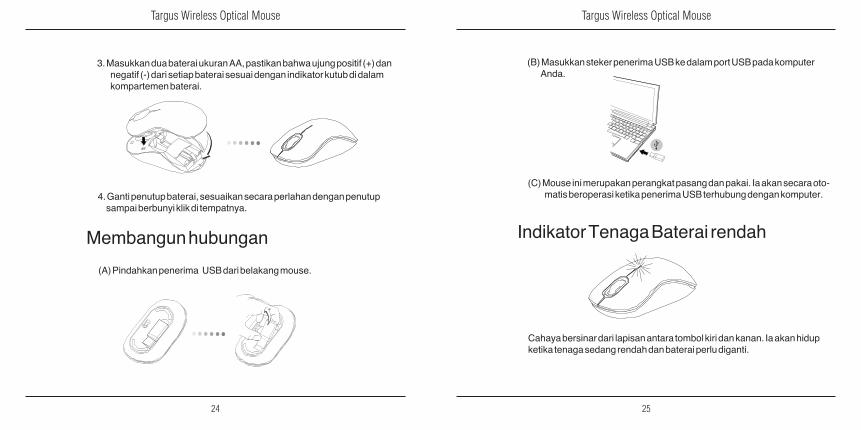
3. Masukkan dua baterai ukuran AA, pastikan bahwa ujung positif (+) dan negatif (-) dari setiap baterai sesuai dengan indikator kutub di dalam kompartemen baterai.
4. Ganti penutup baterai, sesuaikan secara perlahan dengan penutup sampai berbunyi klik di tempatnya.
Membangun hubungan
(A) Pindahkan penerima USB dari belakang mouse.
(C) Mouse ini merupakan perangkat pasang dan pakai. Ia akan secara oto-matis beroperasi ketika penerima USB terhubung dengan komputer.
Indikator Tenaga Baterai rendah
Cahaya bersinar dari lapisan antara tombol kiri dan kanan. Ia akan hidup ketika tenaga sedang rendah dan baterai perlu diganti.
(B) Masukkan steker penerima USB ke dalam port USB pada komputer Anda.
Targus Wireless Optical Mouse
26
Targus Wireless Optical Mouse
27
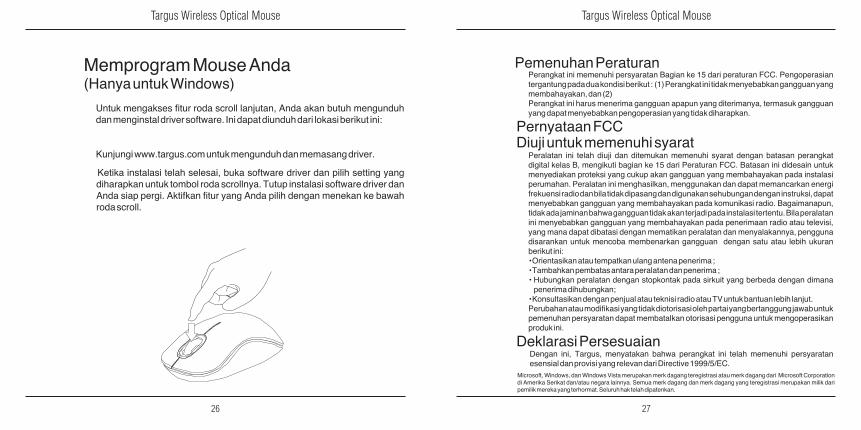
Memprogram Mouse Anda (Hanya untuk Windows)
Ketika instalasi telah selesai, buka software driver dan pilih setting yang diharapkan untuk tombol roda scrollnya. Tutup instalasi software driver dan Anda siap pergi. Aktifkan fitur yang Anda pilih dengan menekan ke bawah roda scroll.
Untuk mengakses fitur roda scroll lanjutan, Anda akan butuh mengunduh dan menginstal driver software. Ini dapat diunduh dari lokasi berikut ini:
Kunjungi www.targus.com untuk mengunduh dan memasang driver.
Pemenuhan PeraturanPerangkat ini memenuhi persyaratan Bagian ke 15 dari peraturan FCC. Pengoperasian tergantung pada dua kondisi berikut : (1) Perangkat ini tidak menyebabkan gangguan yang membahayakan, dan (2)Perangkat ini harus menerima gangguan apapun yang diterimanya, termasuk gangguan yang dapat menyebabkan pengoperasian yang tidak diharapkan.
Pernyataan FCCDiuji untuk memenuhi syarat
Peralatan ini telah diuji dan ditemukan memenuhi syarat dengan batasan perangkat digital kelas B, mengikuti bagian ke 15 dari Peraturan FCC. Batasan ini didesain untuk menyediakan proteksi yang cukup akan gangguan yang membahayakan pada instalasi perumahan. Peralatan ini menghasilkan, menggunakan dan dapat memancarkan energi frekuensi radio dan bila tidak dipasang dan digunakan sehubungan dengan instruksi, dapat menyebabkan gangguan yang membahayakan pada komunikasi radio. Bagaimanapun, tidak ada jaminan bahwa gangguan tidak akan terjadi pada instalasi tertentu. Bila peralatan ini menyebabkan gangguan yang membahayakan pada penerimaan radio atau televisi, yang mana dapat dibatasi dengan mematikan peralatan dan menyalakannya, pengguna disarankan untuk mencoba membenarkan gangguan dengan satu atau lebih ukuran berikut ini:• Orientasikan atau tempatkan ulang antena penerima ; • Tambahkan pembatas antara peralatan dan penerima ; • Hubungkan peralatan dengan stopkontak pada sirkuit yang berbeda dengan dimana
penerima dihubungkan; • Konsultasikan dengan penjual atau teknisi radio atau TV untuk bantuan lebih lanjut.Perubahan atau modifikasi yang tidak diotorisasi oleh partai yang bertanggung jawab untuk pemenuhan persyaratan dapat membatalkan otorisasi pengguna untuk mengoperasikan produk ini.
Deklarasi PersesuaianDengan ini, Targus, menyatakan bahwa perangkat ini telah memenuhi persyaratan esensial dan provisi yang relevan dari Directive 1999/5/EC.
Microsoft, Windows, dan Windows Vista merupakan merk dagang teregistrasi atau merk dagang dari Microsoft Corporation di Amerika Serikat dan/atau negara lainnya. Semua merk dagang dan merk dagang yang teregistrasi merupakan milik dari pemilik mereka yang terhormat. Seluruh hak telah dipatenkan.
Targus Wireless Optical Mouse
28
Targus Wireless Optical Mouse
29
初めにワイヤレスオプティカルマウスをお買い上げいただきありがとうございます。マウスに装着可能なUSBレシーバーで持ち運びにも便利。なこの製品は、プラグ&プレイ対応のため追加ドライバソフトは不要です。
システム要件ハードウェア• USBポート
OS• マイクロソフト・ウィンドウズ® 2000• マイクロソフト・ウィンドウズ® XP• マイクロソフト・ウィンドウズVista®
• マイクロソフト・ウィンドウズ® 7• Mac OS® X 10.4以上
内容物• ワイヤレスオプティカルマウス• 単三電池2個• ミニUSBレシーバー• ユーザーマニュアル
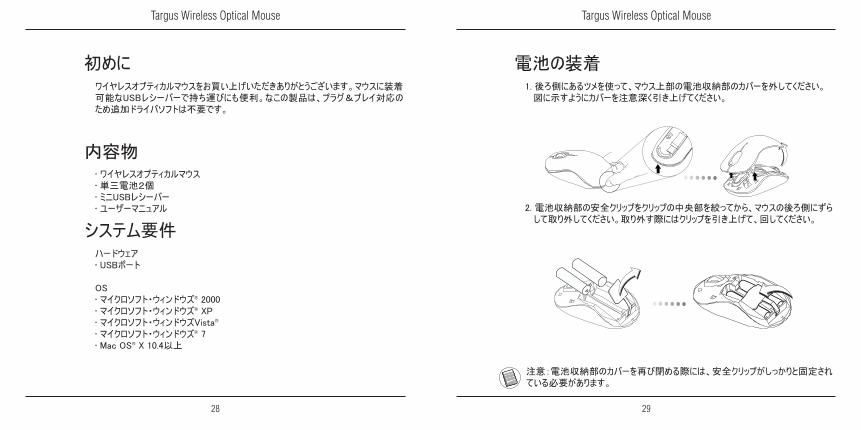
1. 後ろ側にあるツメを使って、マウス上部の電池収納部のカバーを外してください。図に示すようにカバーを注意深く引き上げてください。
電池の装着
2. 電池収納部の安全クリップをクリップの中央部を絞ってから、マウスの後ろ側にずらして取り外してください。取り外す際にはクリップを引き上げて、回してください。
注意:電池収納部のカバーを再び閉める際には、安全クリップがしっかりと固定されている必要があります。
Targus Wireless Optical Mouse
30
Targus Wireless Optical Mouse
31
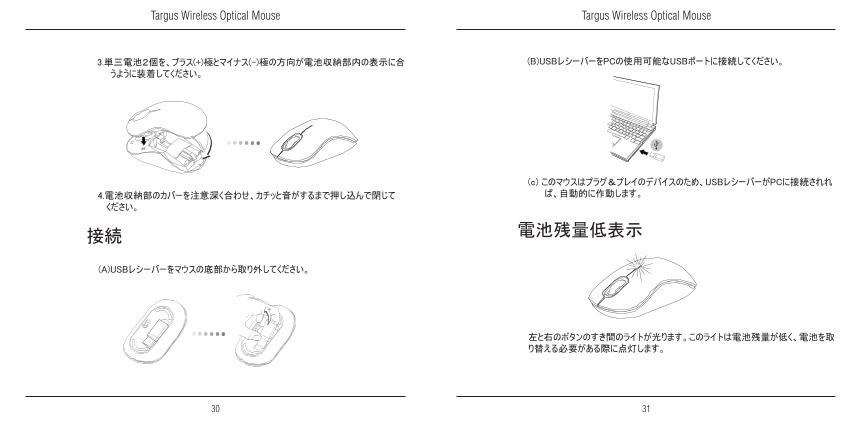
3.単三電池2個を、プラス(+)極とマイナス(-)極の方向が電池収納部内の表示に合うように装着してください。
4.電池収納部のカバーを注意深く合わせ、カチッと音がするまで押し込んで閉じてください。
接続
(A)USBレシーバーをマウスの底部から取り外してください。
(c) このマウスはプラグ&プレイのデバイスのため、USBレシーバーがPCに接続されれば、自動的に作動します。
電池残量低表示
左と右のボタンのすき間のライトが光ります。このライトは電池残量が低く、電池を取り替える必要がある際に点灯します。
(B)USBレシーバーをPCの使用可能なUSBポートに接続してください。
Targus Wireless Optical Mouse
32
Targus Wireless Optical Mouse
33
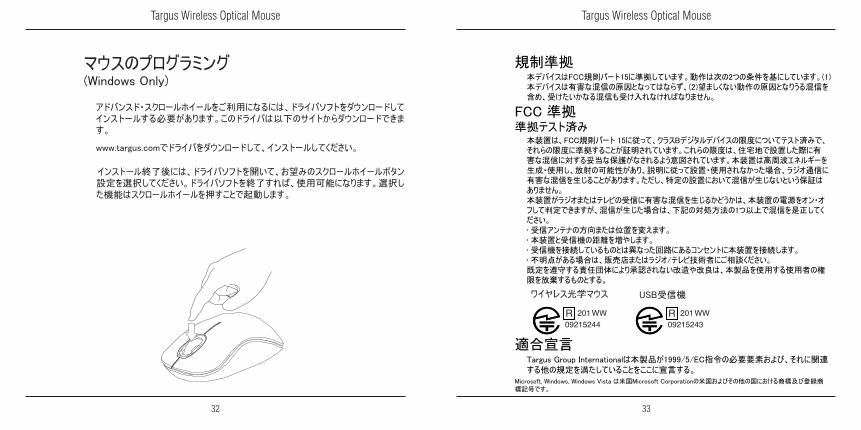
マウスのプログラミング(Windows Only)
インストール終了後には、ドライバソフトを開いて、お望みのスクロールホイールボタン設定を選択してください。ドライバソフトを終了すれば、使用可能になります。選択した機能はスクロールホイールを押すことで起動します。
アドバンスド・スクロールホイールをご利用になるには、ドライバソフトをダウンロードしてインストールする必要があります。このドライバは以下のサイトからダウンロードできます。
www.targus.comでドライバをダウンロードして、インストールしてください。
規制準拠本デバイスはFCC規則パート15に準拠しています。動作は次の2つの条件を基にしています。(1) 本デバイスは有害な混信の原因となってはならず、(2)望ましくない動作の原因となりうる混信を含め、受けたいかなる混信も受け入れなければなりません。
FCC 準拠準拠テスト済み
本装置は、FCC規則パート 15に従って、クラスBデジタルデバイスの限度についてテスト済みで、それらの限度に準拠することが証明されています。これらの限度は、住宅地で設置した際に有害な混信に対する妥当な保護がなされるよう意図されています。本装置は高周波エネルギーを生成・使用し、放射の可能性があり、説明に従って設置・使用されなかった場合、ラジオ通信に有害な混信を生じることがあります。ただし、特定の設置において混信が生じないという保証はありません。本装置がラジオまたはテレビの受信に有害な混信を生じるかどうかは、本装置の電源をオン・オフして判定できますが、混信が生じた場合は、下記の対処方法の1つ以上で混信を是正してください。• 受信アンテナの方向または位置を変えます。• 本装置と受信機の距離を増やします。• 受信機を接続しているものとは異なった回路にあるコンセントに本装置を接続します。• 不明点がある場合は、販売店またはラジオ/テレビ技術者にご相談ください。既定を遵守する責任団体により承認されない改造や改良は、本製品を使用する使用者の権限を放棄するものとする。
適合宣言Targus Group Internationalは本製品が1999/5/EC指令の必要要素および、それに関連する他の規定を満たしていることをここに宣言する。
Microsoft, Windows, Windows Vista は米国Microsoft Corporationの米国およびその他の国における商標及び登録商標記号です。
R 201 WW09215244
R 201 WW09215243
ワイヤレス光学マウス USB受信機

Targus Wireless Optical Mouse
34
Targus Wireless Optical Mouse
35
소개타거스 무선 광마우스를 구입해 주셔서 감사합니다. 여행 중이나 이동 중에 쉽게 사용할 수 있도록 USB 수신기가 마우스에 부착되어 있습니다. 이 장치는 플러그앤플레이 방식의 장치이므로 별도의 소프트웨어가 필요 없습니다.
시스템 요구 사양하드웨어• USB 인터페이스
운영체제• Microsoft Windows® 2000• Microsoft Windows® XP• Microsoft Windows Vista®
• Microsoft Windows® 7• Mac OS® X 10.4 이상
내용물• 타거스 무선 광마우스• AA 배터리 2개• 미니 USB 수신기• 사용 설명서
1. 뒤에 있는 노치를 사용하여 마우스 상단에서 배터리 덮개를 분리합니다. 그림에서와 같이 조심스럽게 덮개를 들어올립니다.
배터리 삽입
2. 클립 가운데를 누른 다음 마우스 뒤쪽으로 밀어 배터리 안전 클립을 분리합니다. 클립을 위로 올린 다음 돌려 제거합니다.
참고: 배터리 덮개를 다시 끼울 때까지 배터리 안전 클립을 안전하고 고정된 위치에 놔두어야 합니다.

Targus Wireless Optical Mouse
36
Targus Wireless Optical Mouse
37
3. AA 배터리 2개를 삽입하고, 각 배터리의 양극(+)과 음극(-)이 배터리함 내부에 표시된 양극(+) 및 음극(-)과 일치하는지 확인합니다.
4. 딸깍 소리가 날 때까지 조심스럽게 배터리 덮개를 다시 끼웁니다.
연결 방법
(A) 마우스 밑면에 있는 USB 수신기를 분리합니다.
(C) 이 마우스는 플러그앤플레이 방식의 장치입니다. USB 수신기가 컴퓨터에 연결되면 자동으로 작동을 시작합니다.
배터리 잔량 부족 표시등
왼쪽 버튼과 오른쪽 버튼 사이에 있는 표시등에 불이 들어옵니다. 전원이 부족하거나 배터리 교체가 필요할 때 이 표시등이 켜집니다.
(B) USB 수신기를 컴퓨터의 USB 포트에 연결합니다.

Targus Wireless Optical Mouse
38
Targus Wireless Optical Mouse
39
마우스 프로그래밍 방법(Windows Only)
설치가 완료되면 드라이버 소프트웨어를 열고 원하는 스크롤 휠 버튼 설정을 선택합니다. 드라이버 소프트웨어 응용프로그램을 닫으면 바로 사용할 수 있습니다. 스크롤 휠을 아래로 눌러 원하는 기능을 활성화합니다.
고급 스크롤 휠 기능에 액세스하려면 소프트웨어 드라이버를 다운로드 및 설치해야 합니다. 다음 위치에서 다운로드할 수 있습니다.
www.targus.com 을 방문하여 드라이브를 다운로드 및 설치합니다.
규정 준수본 장치는 FCC 규정의 제 15조를 준수합니다. 본 장치는작동시 다음 두 조건을 만족 시켜야 합니다. 즉 (1) 이장치는 유해한 장해를 발생시키지 않으며 (2) 이 장치는원치 않는 작동을 유발시킬 수 있는 장해를 포함하여 어떤 장해를 받더라도 이를 견딜 수 있어야 합니다.
연방 통신 위원회 (FCC) 선언문순응 검사
본 장치는 FCC 규정의 제 15조에 의거하여 B 급 디지털 장치의 제한에 검사 결과 준수합니다. 이 제한들은 주택지 설치에 있어서 유해한 장해로부터의 보호를 제공하도록 도안 되었습니다. 이 장치는 무선 주파수 에너지를 발생하며, 사용하고, 방사할 수 있으며, 안내에 따라 설치되고 사용되지 않으면 무선 통신에 유해한 장해를 일으킬 수 있습니다. 하지만, 각 설치에 장해가 일어나지 않는다는 보장은 없습니다.장치를 껐다 켜서 이 장치가 라디오 혹은 텔레비전 청취에 유해한 장해를 일으킨다고 확인되었을 경우, 사용자는 다음의 방법으로 장해를 수정하도록 하십시오: • 수신 안테나의 방향을 전환하거나 재 배치함• 장치와 수상기 사이의 간격을 늘림• 장치를 수상기가 연결된 회선 코드 구멍이 아닌 다른 회선에 연결함.• 대리점 또는 유자격 라디오/TV 기술자에게 도움을 요청하십시오. 준수 책임이 있는 당사자의 승인이 없는 변경 또는 수정사항은사용자가 본 제품을 사용할 권한을 무효로 할 수 있습니다.
준수 선언이에 타거스 그룹 국제부는 이 마우스가 Directive1999/5/EC 의 필수 요구 조건들과 그 외 관련 조항들을 따를 것을 선언합니다.

Targus Wireless Optical Mouse
40
Targus Wireless Optical Mouse
41
Microsoft, Windows, Windows Vista는 미국 및 기타 국가/지역에서 Microsoft Corporation의상표 또는 등록 상표입니다. 모든 상표와 등록 상표의 저작권은 그 소유자에게 있습니다. All rights reserved.
KCC Marking Requirement
당해 무선설비는 운용 중 전파혼신 가능성이 있음
당해 무선설비는 전파혼신 가능성이 있으므로인명안전과 관련된 서비스는 할수 없음
제품 정보신청자 이름: Targus Asia Pacific Ltd.디자인 명칭: 타거스 무선 광마우스 (Wireless Optical Mouse)모델: AMW50 (AP)생산년/월: 제품 라벨 참조생산원: Acrox Techologies Co., Ltd.원산지: 중국 (China)
TGS - AMW50 TGS - AMW50R