3 phoenix service software instructions
TRANSCRIPT

RM-84/99Nokia Customer Care Phoenix Service Software Instructions for BB5
(This page left intentionally blank.)
Page 1–2 Company Confidential Issue 1Copyright ©2005 Nokia. All Rights Reserved.

Table of ContentsPhoenix installation steps in brief.............................................................................................................................................1–5Installing Phoenix...........................................................................................................................................................................1–6Updating Phoenix installation....................................................................................................................................................1–8Uninstalling Phoenix......................................................................................................................................................................1–9Repairing Phoenix installation.................................................................................................................................................1–10Phoenix service software data package overview.............................................................................................................1–11Installing Phoenix data package.............................................................................................................................................1–11Uninstalling Phoenix data package........................................................................................................................................1–15Configuring users in Phoenix....................................................................................................................................................1–16Managing connections in Phoenix..........................................................................................................................................1–16Installing flash support files for FPS-8 and FPS-10.............................................................................................................1–19Updating FPS-8 and FPS-10 flash prommer software.......................................................................................................1–22Activating FPS-8.............................................................................................................................................................................1–23Deactivating FPS-8........................................................................................................................................................................1–24
List of FiguresFigure 1 Dongle not found...........................................................................................................................................................1–6Figure 2 Disclaimer text................................................................................................................................................................1–7Figure 3 InstallShield Wizard Complete...................................................................................................................................1–8Figure 4 Installation interrupted................................................................................................................................................1–9Figure 5 Remove program............................................................................................................................................................1–9Figure 6 Finish uninstallation...................................................................................................................................................1–10Figure 7 Repair program............................................................................................................................................................1–11Figure 8 Continue data package installation.......................................................................................................................1–12Figure 9 Data package setup information............................................................................................................................1–13Figure 10 Data package destination folder..........................................................................................................................1–13Figure 11 Start copying files......................................................................................................................................................1–14Figure 12 Finish data package installation..........................................................................................................................1–14Figure 13 Uninstalling Phoenix data package.....................................................................................................................1–15Figure 14 Finishing data package uninstallation...............................................................................................................1–15Figure 15 Login..............................................................................................................................................................................1–16Figure 16 Login, user configured.............................................................................................................................................1–16Figure 17 Select Mode: Manual.................................................................................................................................................1–17Figure 18 Connections list..........................................................................................................................................................1–18Figure 19 Connection information..........................................................................................................................................1–18Figure 20 Scan product...............................................................................................................................................................1–19Figure 21 Product support module information (example from RM-1)......................................................................1–19Figure 22 Flash update welcome dialog...............................................................................................................................1–20Figure 23 Flash installation interrupted................................................................................................................................1–20Figure 24 Flash destination folder..........................................................................................................................................1–21Figure 25 Finish flash update....................................................................................................................................................1–21Figure 26 Choosing Prommer maintenance........................................................................................................................1–22Figure 27 Prommer SW update finished...............................................................................................................................1–22Figure 28 Prommer maintenance window..........................................................................................................................1–23Figure 29 Flash directory window...........................................................................................................................................1–23Figure 30 Prommer maintenance...........................................................................................................................................1–24Figure 31 Box activation.............................................................................................................................................................1–24Figure 32 Deactivation warning..............................................................................................................................................1–25
RM-84/99Phoenix Service Software Instructions for BB5 Nokia Customer Care
Issue 1 Company Confidential Page 1–3Copyright ©2005 Nokia. All Rights Reserved.

RM-84/99Nokia Customer Care Phoenix Service Software Instructions for BB5
(This page left intentionally blank.)
Page 1–4 Company Confidential Issue 1Copyright ©2005 Nokia. All Rights Reserved.

Phoenix installation steps in brief
Before you beginRecommended PC HW requirements:
• Computer processor: Pentium 700 MHz or higher• RAM 256 MB• Disk space 100-200 MB
Supported operating systems:
• Windows 2000 Service Pack 3 or higher• Windows XP Service Pack 1 or higher
ContextPhoenix is the service software for reprogramming, testing and tuning the phone.
Phoenix installation contains:
• Service software support for all phone models included in the package• Flash update package files for programming devices• All needed drivers for:
• DK2 dongle• DKU-2 USB cable
Note: Separate installation packages for flash update files and drivers are also available, but it is notnecessary to use them unless updates appear between Phoenix service software releases. If separateupdate packages are used, they should be used after Phoenix and data packages have been installed.
The phone model specific data package includes all changing product specific data:
• Product software Binary files• Files for type label printing• Validation file for the Faultlog repair data reporting system• All product specific configuration files for Phoenix software components
Note: Phoenix service SW and phone data packages should only be used as complete installationpackages. Uninstallation should be made from the Windows Control Panel.
To install Phoenix, you need to:
Steps1. Connect a DK2 dongle to your computer.2. Install the Phoenix Service SW.3. Install the phone-specific Data Package for Phoenix.4. Configure users.5. Manage connection settings (depends on the tools you are using).
If you use FPS-8: • Update FPS-8 SW• Activate FPS-8
RM-84/99Phoenix Service Software Instructions for BB5 Nokia Customer Care
Issue 1 Company Confidential Page 1–5Copyright ©2005 Nokia. All Rights Reserved.

If you use FPS-10: • Update FPS-10 SW
Note: There is no need to activate FPS-10.• Activate SX-4 smart card if you need tuning and
testing functions in service software
Note: When FPS-10 is used only for productSW updates, SX-4 smart card is not needed.
ResultsPhoenix is now ready to be used with FPS-8 or FPS-10 flash prommers and other tools as well.
Installing Phoenix
Before you begin• Check that a dongle is attached to the parallel port of your computer.• Download the installation package (for example, phoenix_service_sw_2004_39_x_xx.exe) to your computer (in
C:\TEMP, for instance).• Close all other programs.• Depending on the operating system, administrator rights may be required to be able to install Phoenix .• If uninstalling or rebooting is needed at any point, you will be prompted by the InstallShield program.
ContextAt some point during the installation procedure you may get the following message:
Figure 1 Dongle not found
One possible reason may be a defective or too old PKD-1 dongle (five digit serial number dongle when usedwith FPS-8/FPS-10 prommers).
First check the COM/parallel ports used! After correcting the problem Installation can be restarted.
For more detailed information, please refer to Phoenix Help files. Each feature in Phoenix has its own Helpfunction, which can be activated while running the program. Press the F1 key or the feature’s Help button toactivate a Help file.
Steps1. To start installation, run the application file (for example,phoenix_service_sw_2004_39_x_xx.exe).2. In the Welcome dialogue, click Next.
RM-84/99Nokia Customer Care Phoenix Service Software Instructions for BB5
Page 1–6 Company Confidential Issue 1Copyright ©2005 Nokia. All Rights Reserved.
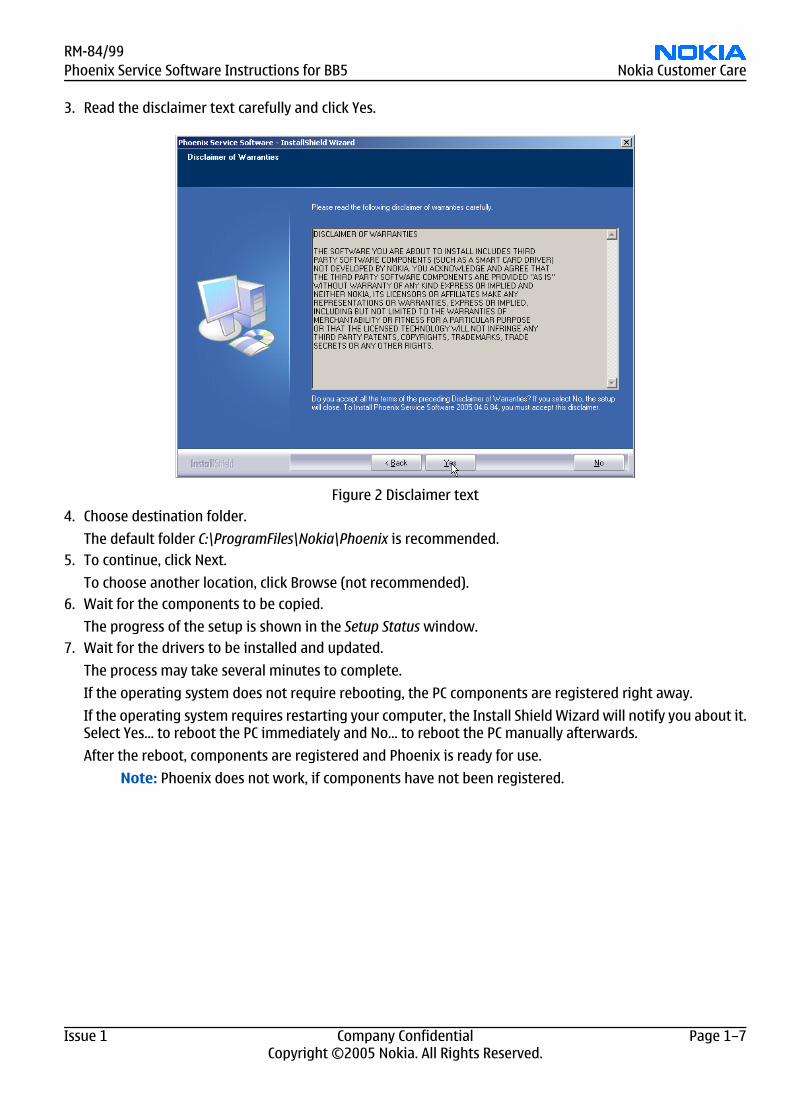
3. Read the disclaimer text carefully and click Yes.
Figure 2 Disclaimer text4. Choose destination folder.
The default folder C:\ProgramFiles\Nokia\Phoenix is recommended.5. To continue, click Next.
To choose another location, click Browse (not recommended).6. Wait for the components to be copied.
The progress of the setup is shown in the Setup Status window.7. Wait for the drivers to be installed and updated.
The process may take several minutes to complete.
If the operating system does not require rebooting, the PC components are registered right away.
If the operating system requires restarting your computer, the Install Shield Wizard will notify you about it.Select Yes... to reboot the PC immediately and No... to reboot the PC manually afterwards.
After the reboot, components are registered and Phoenix is ready for use.
Note: Phoenix does not work, if components have not been registered.
RM-84/99Phoenix Service Software Instructions for BB5 Nokia Customer Care
Issue 1 Company Confidential Page 1–7Copyright ©2005 Nokia. All Rights Reserved.
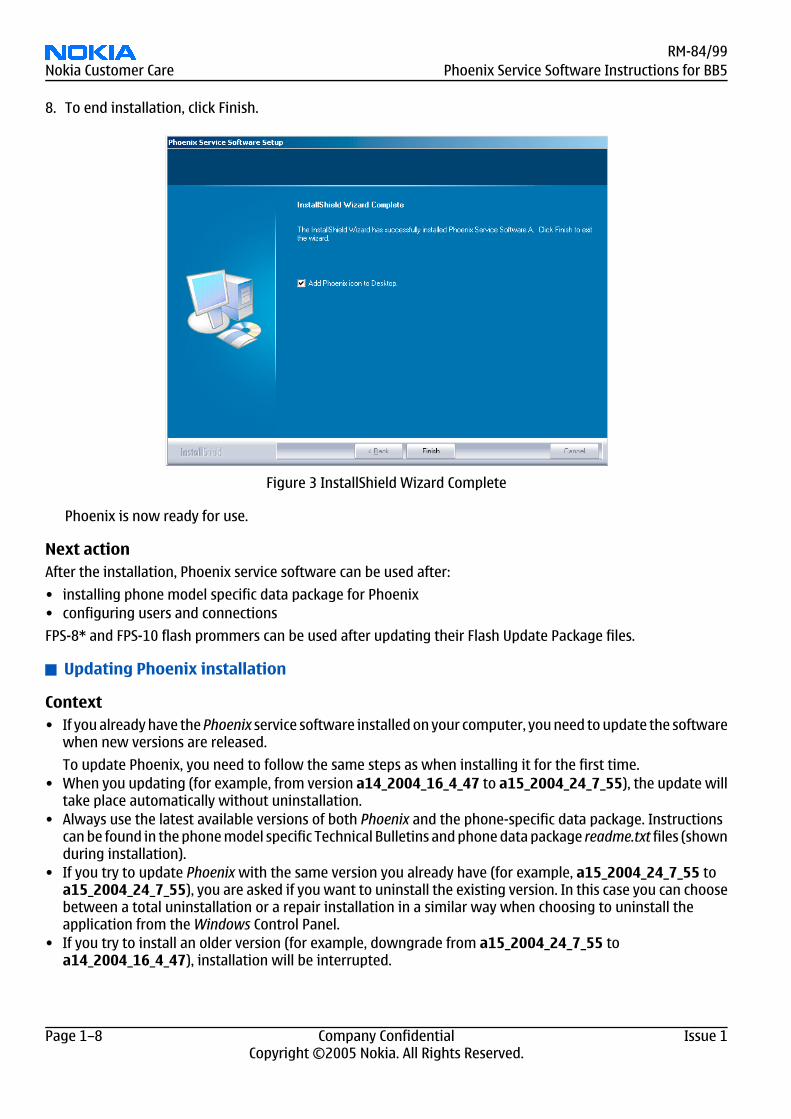
8. To end installation, click Finish.
Figure 3 InstallShield Wizard Complete
Phoenix is now ready for use.
Next actionAfter the installation, Phoenix service software can be used after:
• installing phone model specific data package for Phoenix• configuring users and connections
FPS-8* and FPS-10 flash prommers can be used after updating their Flash Update Package files.
Updating Phoenix installation
Context• If you already have the Phoenix service software installed on your computer, you need to update the software
when new versions are released.
To update Phoenix, you need to follow the same steps as when installing it for the first time.• When you updating (for example, from version a14_2004_16_4_47 to a15_2004_24_7_55), the update will
take place automatically without uninstallation.• Always use the latest available versions of both Phoenix and the phone-specific data package. Instructions
can be found in the phone model specific Technical Bulletins and phone data package readme.txt files (shownduring installation).
• If you try to update Phoenix with the same version you already have (for example, a15_2004_24_7_55 toa15_2004_24_7_55), you are asked if you want to uninstall the existing version. In this case you can choosebetween a total uninstallation or a repair installation in a similar way when choosing to uninstall theapplication from the Windows Control Panel.
• If you try to install an older version (for example, downgrade from a15_2004_24_7_55 toa14_2004_16_4_47), installation will be interrupted.
RM-84/99Nokia Customer Care Phoenix Service Software Instructions for BB5
Page 1–8 Company Confidential Issue 1Copyright ©2005 Nokia. All Rights Reserved.
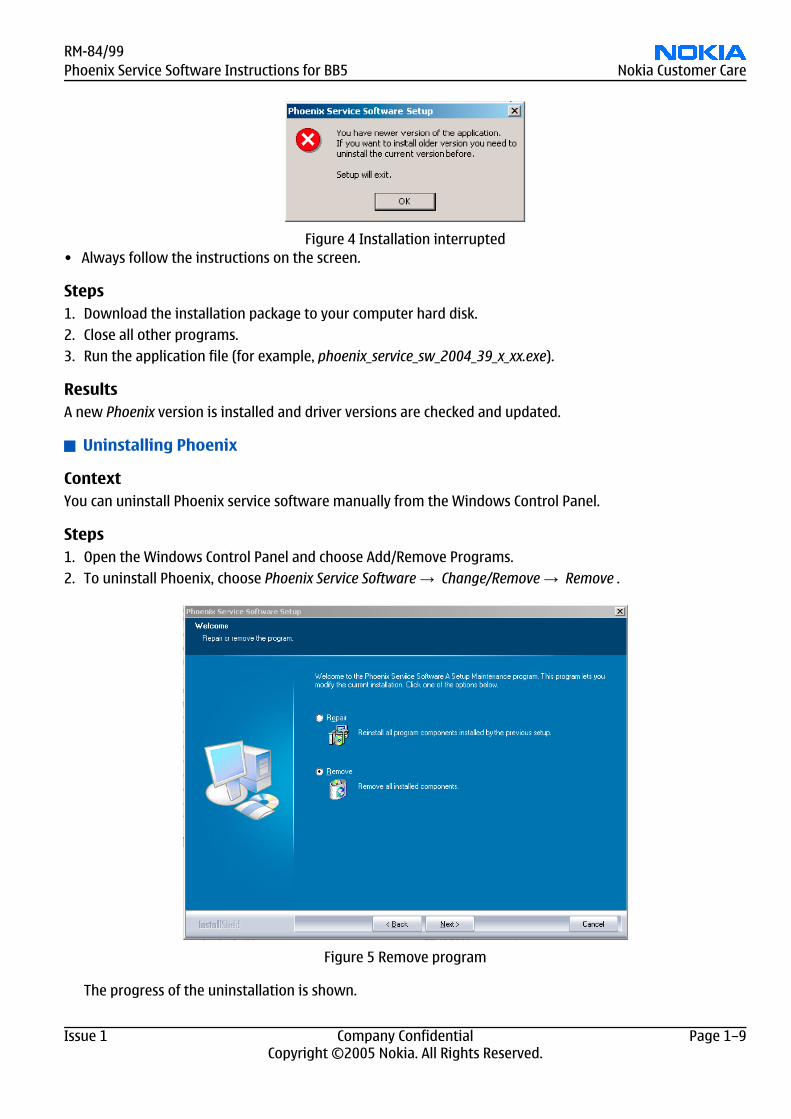
Figure 4 Installation interrupted• Always follow the instructions on the screen.
Steps1. Download the installation package to your computer hard disk.2. Close all other programs.3. Run the application file (for example, phoenix_service_sw_2004_39_x_xx.exe).
ResultsA new Phoenix version is installed and driver versions are checked and updated.
Uninstalling Phoenix
ContextYou can uninstall Phoenix service software manually from the Windows Control Panel.
Steps1. Open the Windows Control Panel and choose Add/Remove Programs.2. To uninstall Phoenix, choose Phoenix Service Software → Change/Remove → Remove .
Figure 5 Remove program
The progress of the uninstallation is shown.
RM-84/99Phoenix Service Software Instructions for BB5 Nokia Customer Care
Issue 1 Company Confidential Page 1–9Copyright ©2005 Nokia. All Rights Reserved.
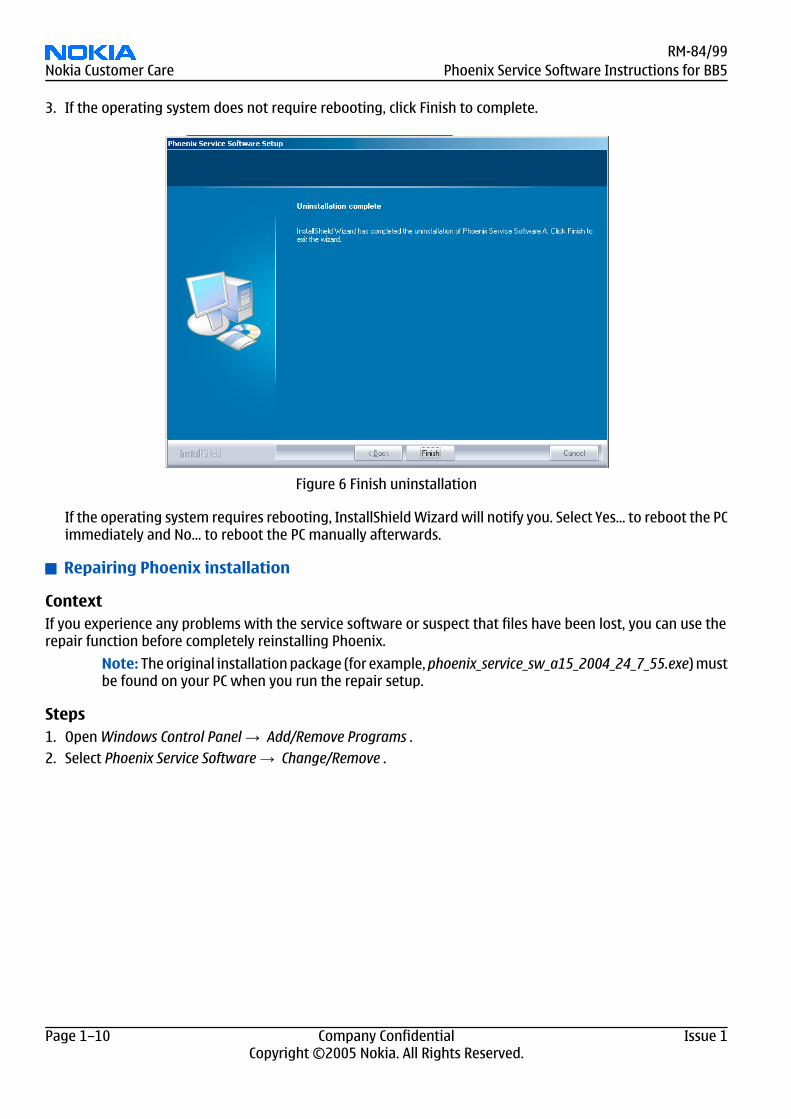
3. If the operating system does not require rebooting, click Finish to complete.
Figure 6 Finish uninstallation
If the operating system requires rebooting, InstallShield Wizard will notify you. Select Yes... to reboot the PCimmediately and No... to reboot the PC manually afterwards.
Repairing Phoenix installation
ContextIf you experience any problems with the service software or suspect that files have been lost, you can use therepair function before completely reinstalling Phoenix.
Note: The original installation package (for example, phoenix_service_sw_a15_2004_24_7_55.exe) mustbe found on your PC when you run the repair setup.
Steps1. Open Windows Control Panel → Add/Remove Programs .2. Select Phoenix Service Software → Change/Remove .
RM-84/99Nokia Customer Care Phoenix Service Software Instructions for BB5
Page 1–10 Company Confidential Issue 1Copyright ©2005 Nokia. All Rights Reserved.
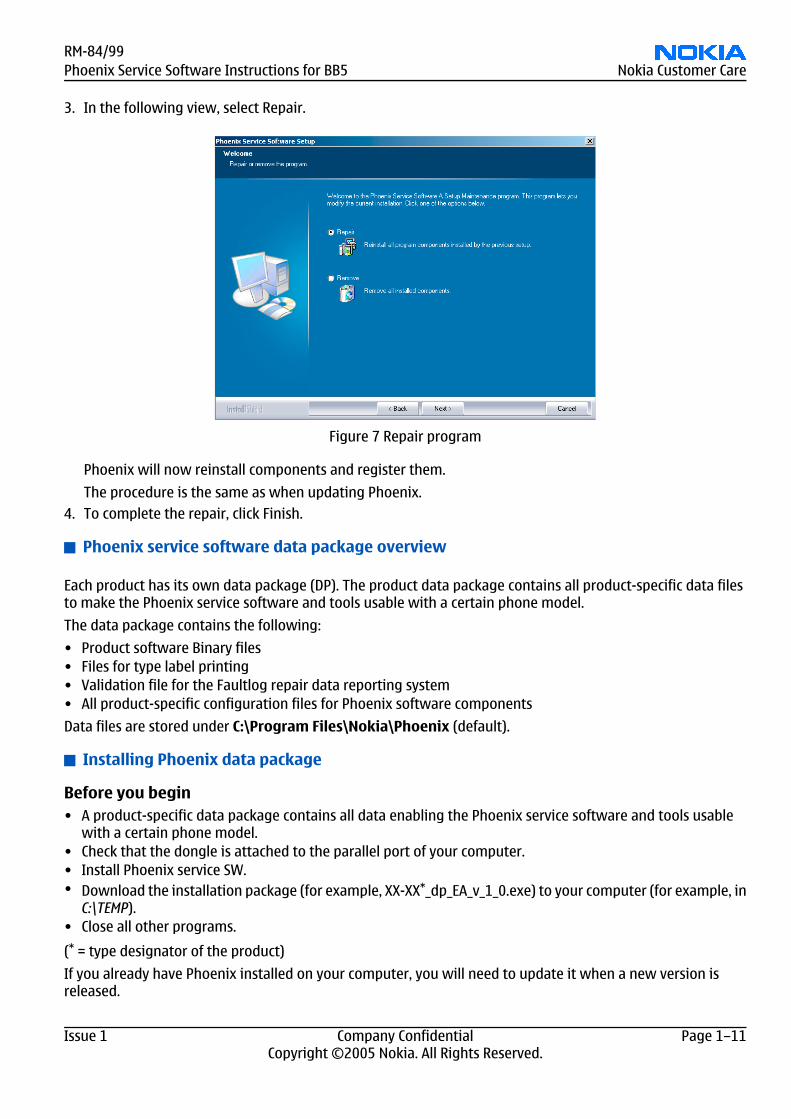
3. In the following view, select Repair.
Figure 7 Repair program
Phoenix will now reinstall components and register them.
The procedure is the same as when updating Phoenix.4. To complete the repair, click Finish.
Phoenix service software data package overview
Each product has its own data package (DP). The product data package contains all product-specific data filesto make the Phoenix service software and tools usable with a certain phone model.
The data package contains the following:
• Product software Binary files• Files for type label printing• Validation file for the Faultlog repair data reporting system• All product-specific configuration files for Phoenix software components
Data files are stored under C:\Program Files\Nokia\Phoenix (default).
Installing Phoenix data package
Before you begin• A product-specific data package contains all data enabling the Phoenix service software and tools usable
with a certain phone model.• Check that the dongle is attached to the parallel port of your computer.• Install Phoenix service SW.• Download the installation package (for example, XX-XX*_dp_EA_v_1_0.exe) to your computer (for example, in
C:\TEMP).• Close all other programs.
(* = type designator of the product)
If you already have Phoenix installed on your computer, you will need to update it when a new version isreleased.
RM-84/99Phoenix Service Software Instructions for BB5 Nokia Customer Care
Issue 1 Company Confidential Page 1–11Copyright ©2005 Nokia. All Rights Reserved.
Note: Very often the Phoenix Service SW and the phone-specific data package for Phoenix come inpairs, meaning that a certain version of Phoenix can only be used with a certain version of the datapackage. Always use the latest available versions of both. Instructions can be found in phone modelspecific Technical Bulletins and readme.txt files of the data packages.
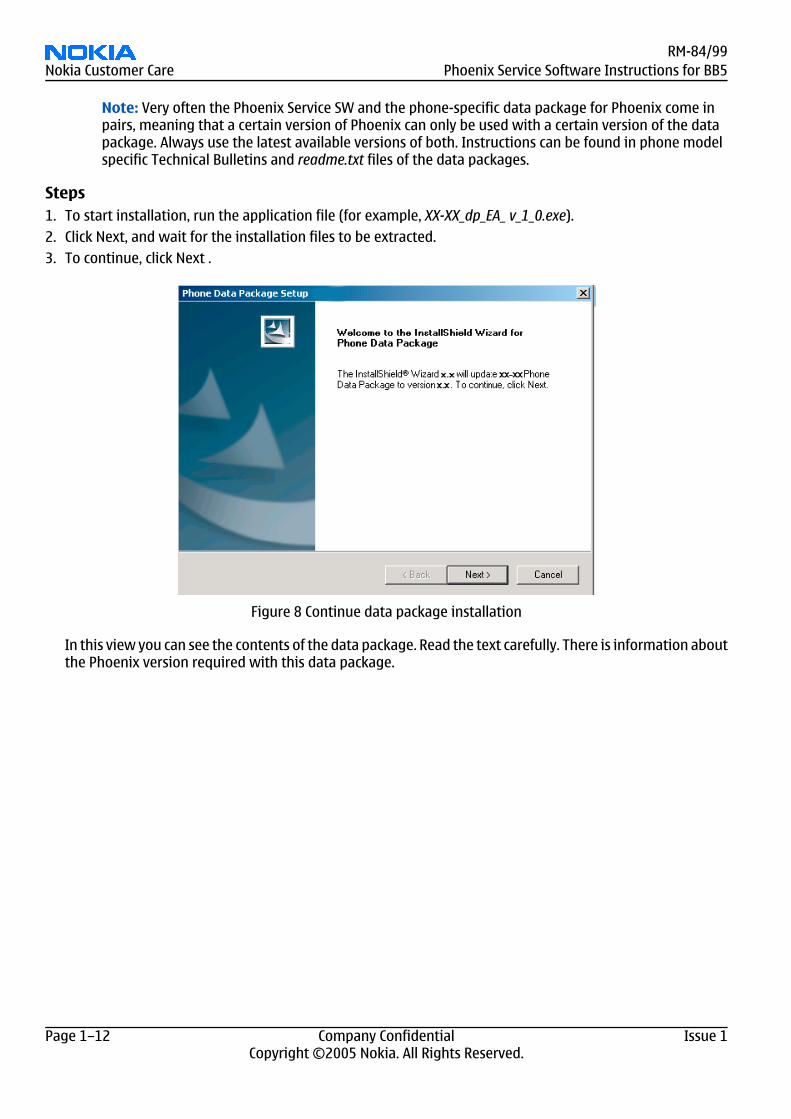
Steps1. To start installation, run the application file (for example, XX-XX_dp_EA_ v_1_0.exe).2. Click Next, and wait for the installation files to be extracted.3. To continue, click Next .
Figure 8 Continue data package installation
In this view you can see the contents of the data package. Read the text carefully. There is information aboutthe Phoenix version required with this data package.
RM-84/99Nokia Customer Care Phoenix Service Software Instructions for BB5
Page 1–12 Company Confidential Issue 1Copyright ©2005 Nokia. All Rights Reserved.

4. To continue, click Next.
Figure 9 Data package setup information5. Confirm location and click Next to continue.
Figure 10 Data package destination folder
The install shield checks where the Phoenix application is installed and the directory is shown.
RM-84/99Phoenix Service Software Instructions for BB5 Nokia Customer Care
Issue 1 Company Confidential Page 1–13Copyright ©2005 Nokia. All Rights Reserved.

6. To start copying the files, click Next.
Figure 11 Start copying files
Phone model specific files are installed. Please wait.7. To complete the installation, click Finish.
Figure 12 Finish data package installation
You now have all phone model specific files installed in your Phoenix Service SW.
Next actionPhoenix can be used, for example, for flashing phones and printing type labels after:
• Configuring users• Managing connections
RM-84/99Nokia Customer Care Phoenix Service Software Instructions for BB5
Page 1–14 Company Confidential Issue 1Copyright ©2005 Nokia. All Rights Reserved.

FPS-8* and FPS-10 can be used after updating their Flash Update Package files.
Uninstalling Phoenix data package
ContextIf you try to install the same version of the Phoenix data package that you already have, you are asked if youwant to uninstall the existing version.
There is no need to uninstall the older version of a data package, unless instructions to do so are given inthe readme.txt file of the data package and bulletins related to the release.
Please read all related documents carefully.
Steps1. To uninstall the data package, click OK Cancel to interrupt the uninstallation.
Figure 13 Uninstalling Phoenix data package2. Once the previously installed data package is uninstalled, click Finish.
Figure 14 Finishing data package uninstallation
Alternative steps• You can also uninstall the data package manually from Windows Control Panel → Add/Remove Programs →
xx-xx * Phone Data Package . (*= type designator of the phone)
Next actionRun the installation package again to continue installation from the beginning.
RM-84/99Phoenix Service Software Instructions for BB5 Nokia Customer Care
Issue 1 Company Confidential Page 1–15Copyright ©2005 Nokia. All Rights Reserved.
Configuring users in Phoenix
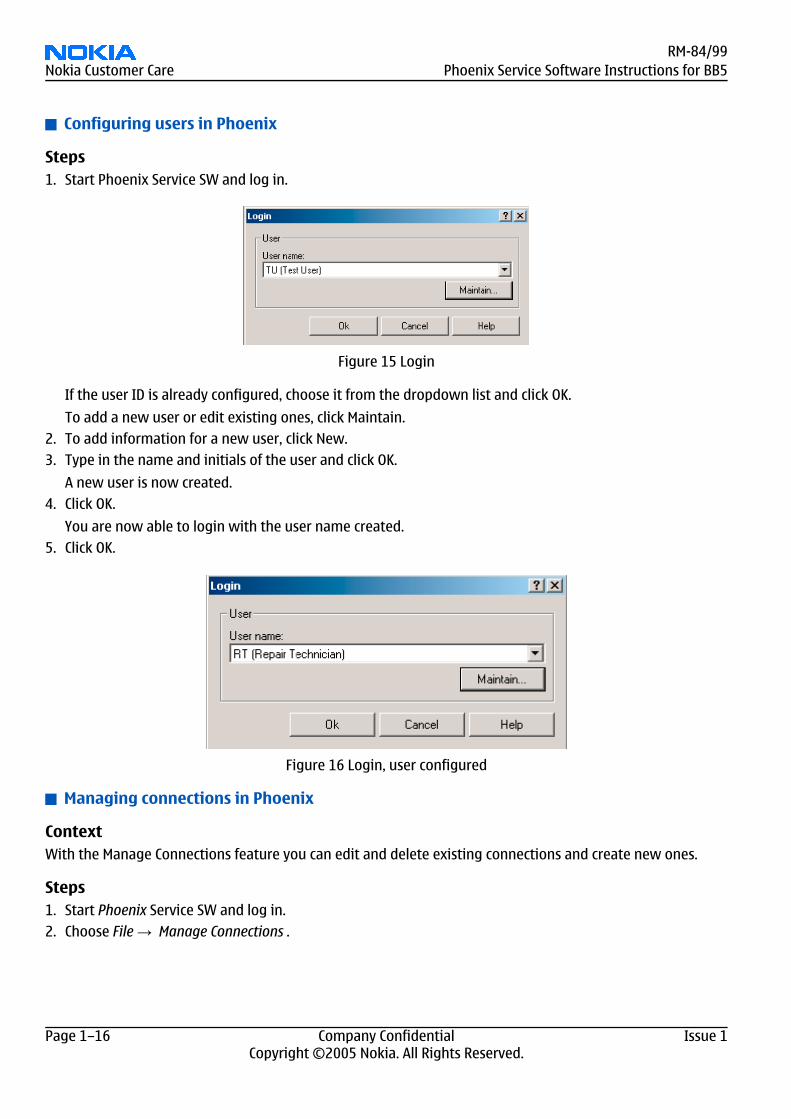
Steps1. Start Phoenix Service SW and log in.
Figure 15 Login
If the user ID is already configured, choose it from the dropdown list and click OK.
To add a new user or edit existing ones, click Maintain.2. To add information for a new user, click New.3. Type in the name and initials of the user and click OK.
A new user is now created.4. Click OK.
You are now able to login with the user name created.5. Click OK.
Figure 16 Login, user configured
Managing connections in Phoenix
ContextWith the Manage Connections feature you can edit and delete existing connections and create new ones.
Steps1. Start Phoenix Service SW and log in.2. Choose File → Manage Connections .
RM-84/99Nokia Customer Care Phoenix Service Software Instructions for BB5
Page 1–16 Company Confidential Issue 1Copyright ©2005 Nokia. All Rights Reserved.

3. To add a new connection, click Add, and select if you want to create it manually or by using the ConnectionWizard.
In the following dialogs you are asked to select settings for the connection. If you use the Wizard, connectthe tools and a phone to your PC and the wizard will automatically try to configure the correct connection.
4. Select Manual mode, and click Next to continue.
Figure 17 Select Mode: Manual
i For an FPS-10 flash prommer with a USB Connection, choose the following connection settings:
• Media: FPS-10 USB• Device Index: 0• Serial Num: See Serial No from the label attached to the bottom of your FPS-10• Active Media: USB
ii For an FPS-10 flash prommer with a LAN connection, choose the following connection settings:
• Media: FPS-10 TCP/IP• Net Serv Name: Select Scan. Choose your own FPS-10 device based on the correct MAC address. See
Serial No from the label attached to the bottom of your FPS-10.• Port Num: Use default value, click Next.• Protocol Family: Use default value, click Next.• Socket Type: Use default value, click Next.• TX Buffer Size: Use default value, click Next.• RX Buffer Size: Use default value, click Next.
Note: When the phone is connected to a PC for the first time, allow the PC to install the USB devicedrivers first.
Please note that this may take some time to complete.
RM-84/99Phoenix Service Software Instructions for BB5 Nokia Customer Care
Issue 1 Company Confidential Page 1–17Copyright ©2005 Nokia. All Rights Reserved.
After the drivers are installed and if there are problems, check that the USB connection is active fromthe Windows Control Panel or contact the local PC support.
iii For an FPS-8 flash prommer, choose the following connection settings:
• Media: FPS-8• Port Num: COM Port where FPS-8 is connected• COMBOX_DEF_MEDIA: FBUS
iv For a plain USB connection choose the following connection settings:
Note: First connect the DKU-2 USB cable between the PC USB port and phone.
• Media: USB
Note: When the phone is connected to a PC for the first time, allow the PC to install the USB devicedrivers first.
Please note that this may take some time to complete.
After the drivers are installed and if there are problems, check that the USB connection is active fromthe Windows Control Panel or contact the local PC support.
5. To complete the configuration, click Finish.
If you are using the Wizard, connect the tools and a phone to your PC and the wizard will automatically tryto configure the correct connection. Please note that this may take time because Phoenix will go throughall connections on the PC.
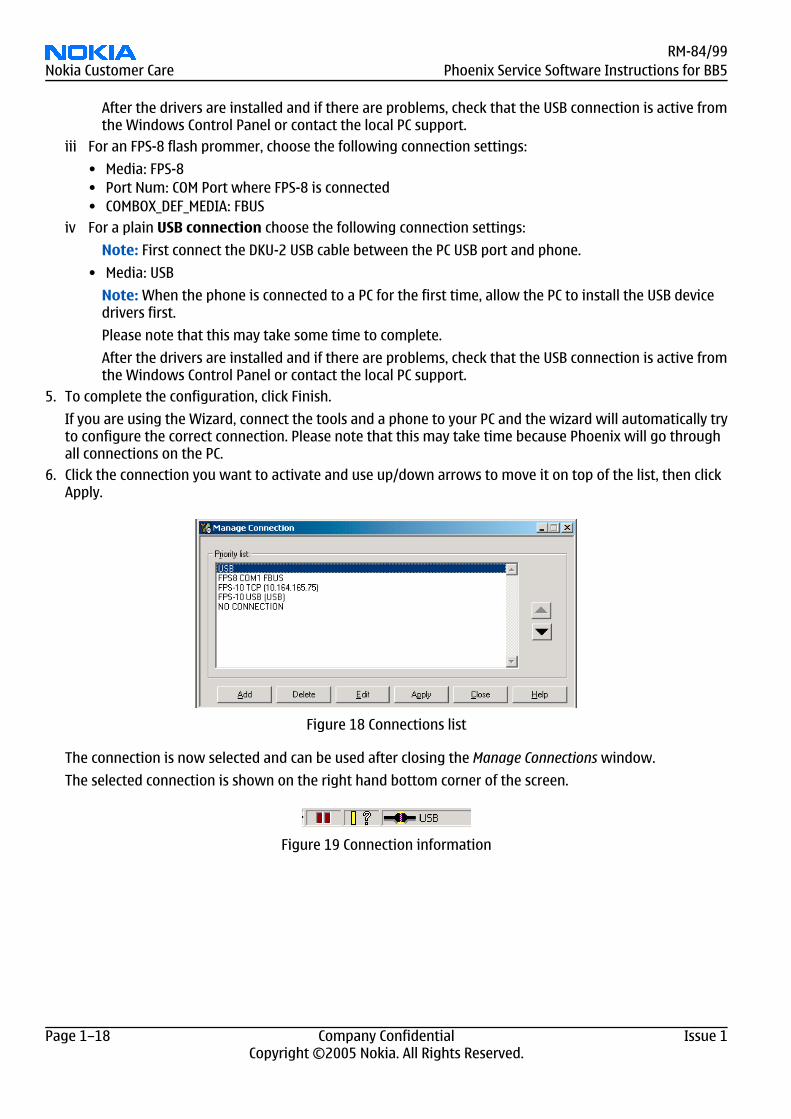
6. Click the connection you want to activate and use up/down arrows to move it on top of the list, then clickApply.
Figure 18 Connections list
The connection is now selected and can be used after closing the Manage Connections window.
The selected connection is shown on the right hand bottom corner of the screen.
Figure 19 Connection information
RM-84/99Nokia Customer Care Phoenix Service Software Instructions for BB5
Page 1–18 Company Confidential Issue 1Copyright ©2005 Nokia. All Rights Reserved.

7. To use the selected connection, connect the phone to Phoenix with correct service tools, make sure that thephone is switched on and from the File menu, choose Scan Product.
Figure 20 Scan product
ResultsThe product support module information appears in the status bar:
Figure 21 Product support module information (example from RM-1)
Installing flash support files for FPS-8 and FPS-10
Before you begin• Install Phoenix Service SW.• Install phone model specific data package for Phoenix.• If you want to update the flash support files, they are delivered in the same installation package with Phoenix
or newer Phoenix packages beginning from December 2004. In case you want to update the MCU files, installthe latest data package (see Technical Bulletins for information on the latest one). However, normally it isenough to install Phoenix and the phone-specific data package because the Phoenix installation alwaysincludes the latest flash update package files for FPS-8 and FPS-10.
• A separate installation package for flash support files is available, and the files can be updated according tothis instruction if updates appear between Phoenix/data package releases.
ContextIf you are not using a separate installation package, you can skip this section and continue with Updating FPS-8 and FPS-10 flash prommer software (Page 1–22) after installing a new phone data package.
RM-84/99Phoenix Service Software Instructions for BB5 Nokia Customer Care
Issue 1 Company Confidential Page 1–19Copyright ©2005 Nokia. All Rights Reserved.

Steps1. To begin the installation, double-click the flash update file (for example, flash_update_03_183_0014.exe).
Figure 22 Flash update welcome dialog
If the same version of Flash Update package already exists, and you want to reinstall it, the previous packageis first uninstalled. Restart installation again after uninstallation.
2. If you try to downgrade the existing version to older ones, the setup will be aborted. If there is a need todowngrade the version, uninstall newer files manually from the Windows Control Panel and then rerun theinstallation.
Figure 23 Flash installation interrupted
If an older version exists on your PC and it needs to be updated, click Next to continue installation.
RM-84/99Nokia Customer Care Phoenix Service Software Instructions for BB5
Page 1–20 Company Confidential Issue 1Copyright ©2005 Nokia. All Rights Reserved.
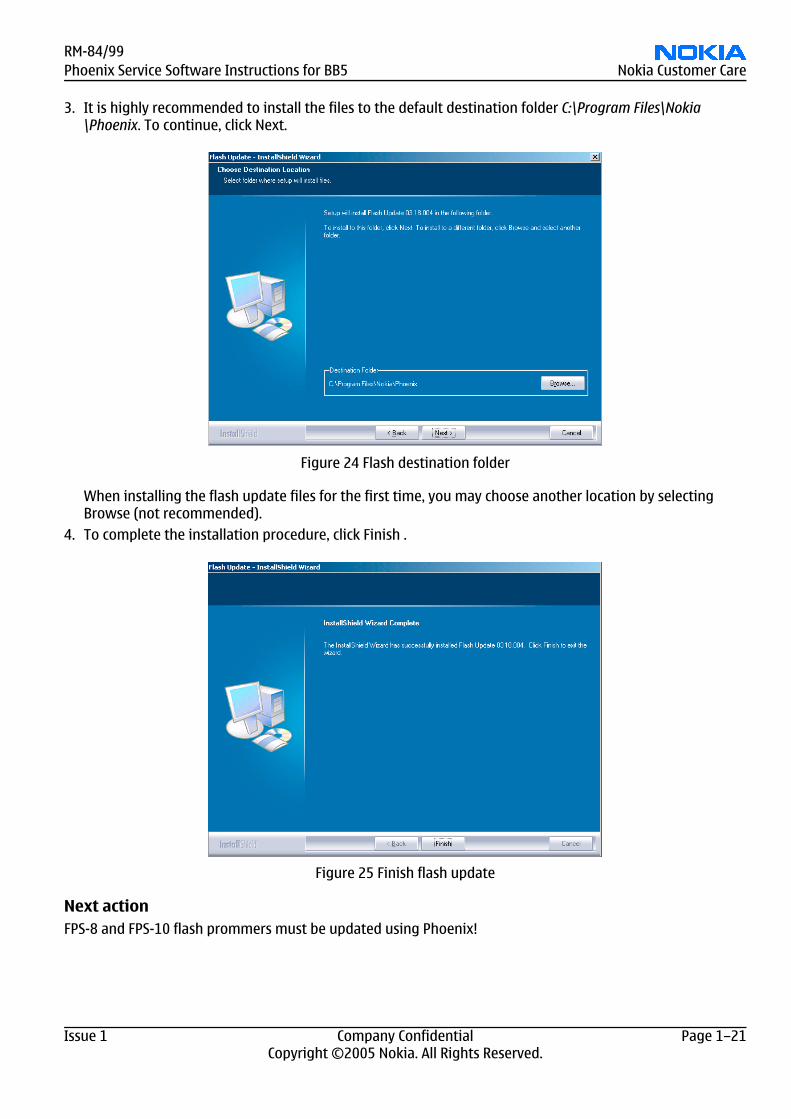
3. It is highly recommended to install the files to the default destination folder C:\Program Files\Nokia\Phoenix. To continue, click Next.
Figure 24 Flash destination folder
When installing the flash update files for the first time, you may choose another location by selectingBrowse (not recommended).
4. To complete the installation procedure, click Finish .
Figure 25 Finish flash update
Next actionFPS-8 and FPS-10 flash prommers must be updated using Phoenix!
RM-84/99Phoenix Service Software Instructions for BB5 Nokia Customer Care
Issue 1 Company Confidential Page 1–21Copyright ©2005 Nokia. All Rights Reserved.

Updating FPS-8 and FPS-10 flash prommer software
Steps1. Start Phoenix Service Software and log in, manage connection correctly for your flash prommer.
2. Choose Maintenance → Prommer maintenance .
Figure 26 Choosing Prommer maintenance3. When the new flash update package is installed to computer, you aree asked to update the files to your
prommer. To update the files, click Yes.4. Wait until you are notified that the update has been successful; the procedure will take a couple of minutes.
To close the Prommer Maintenance window, click OK.
Figure 27 Prommer SW update finished
RM-84/99Nokia Customer Care Phoenix Service Software Instructions for BB5
Page 1–22 Company Confidential Issue 1Copyright ©2005 Nokia. All Rights Reserved.

Figure 28 Prommer maintenance window
Alternative steps• To update the FPS-8 SW, click theUpdate button and select the appropriate fps8upd.ini file in C:\Program
Files\Nokia\Phoenix\Flash.• To update the FPS-10 SW, click the Update button and select the appropriate fpsxupd.ini file in C:\Program
Files\Nokia\Phoenix\Flash.
Figure 29 Flash directory window• All files can be loaded separately to the prommer used. To do this, click the right mouse button in the Flash
box files window and select the file type to be loaded.
More information can be found in the Phoenix Help.
Activating FPS-8
ContextBefore FPS-8 can be successfully used for phone programming, it must first be activated.
RM-84/99Phoenix Service Software Instructions for BB5 Nokia Customer Care
Issue 1 Company Confidential Page 1–23Copyright ©2005 Nokia. All Rights Reserved.
First fill in the FPS-8 activation request sheet in the FPS-8 sales package and follow the instructions given.
When activation file is received (for example, 00000.in), copy it to the C:\ProgramFiles\Nokia\Phoenix\BoxActivation directory on your computer (this directory is created when Phoenix is installed).
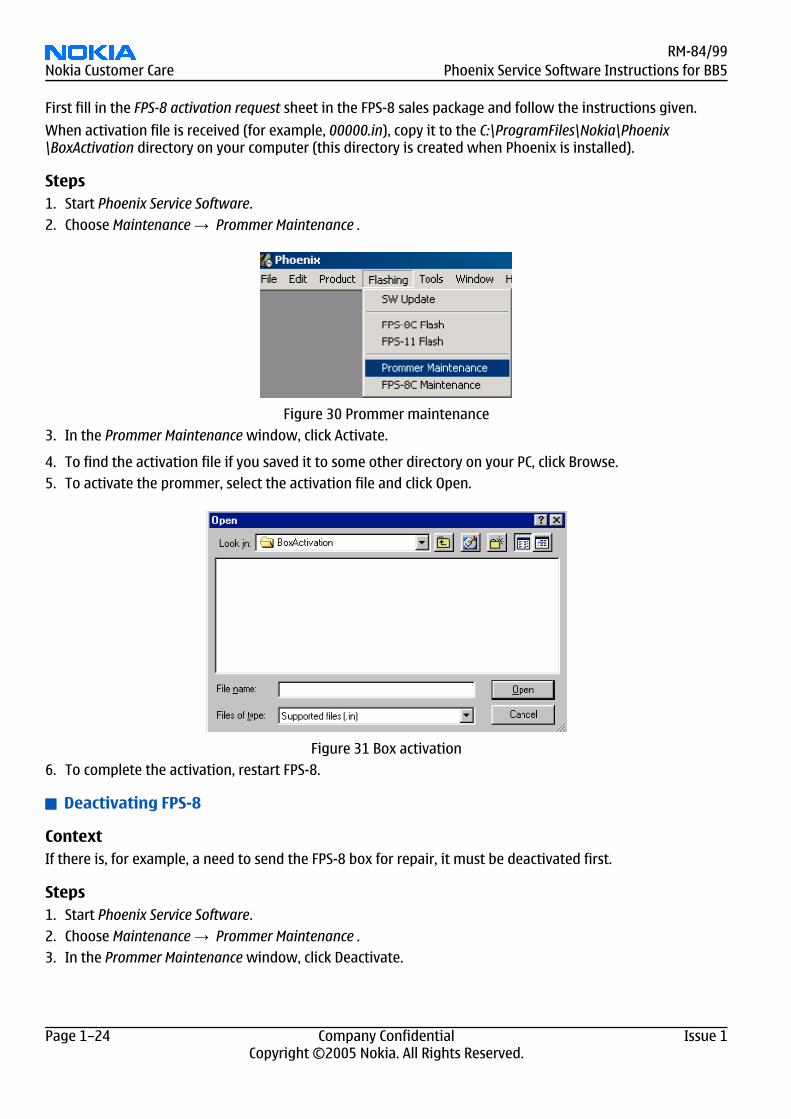
Steps1. Start Phoenix Service Software.2. Choose Maintenance → Prommer Maintenance .
Figure 30 Prommer maintenance3. In the Prommer Maintenance window, click Activate.
4. To find the activation file if you saved it to some other directory on your PC, click Browse.5. To activate the prommer, select the activation file and click Open.
Figure 31 Box activation6. To complete the activation, restart FPS-8.
Deactivating FPS-8
ContextIf there is, for example, a need to send the FPS-8 box for repair, it must be deactivated first.
Steps1. Start Phoenix Service Software.2. Choose Maintenance → Prommer Maintenance .3. In the Prommer Maintenance window, click Deactivate.
RM-84/99Nokia Customer Care Phoenix Service Software Instructions for BB5
Page 1–24 Company Confidential Issue 1Copyright ©2005 Nokia. All Rights Reserved.
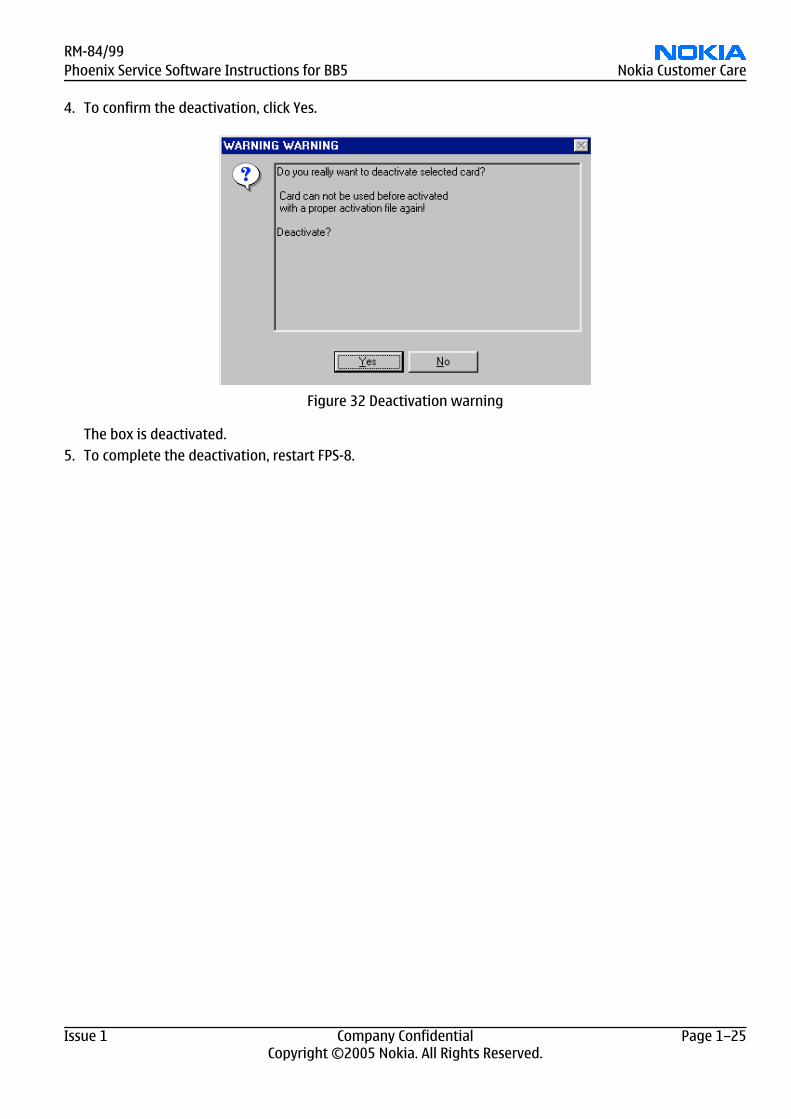
4. To confirm the deactivation, click Yes.
Figure 32 Deactivation warning
The box is deactivated.5. To complete the deactivation, restart FPS-8.
RM-84/99Phoenix Service Software Instructions for BB5 Nokia Customer Care
Issue 1 Company Confidential Page 1–25Copyright ©2005 Nokia. All Rights Reserved.

RM-84/99Nokia Customer Care Phoenix Service Software Instructions for BB5
(This page left intentionally blank.)
Page 1–26 Company Confidential Issue 1Copyright ©2005 Nokia. All Rights Reserved.