2020 annual competency self-study guide - pedicare
TRANSCRIPT

2020
ANNUAL
COMPETENCY
SELF-STUDY GUIDE

Page | 1
2020 ANNUAL COMPETENCY SELF-STUDY GUIDE
W E L C O M E! You are about to begin the Annual Competency Self-Study Guide. Each employee must meet
annual continuing education requirements mandated by PediCare and Mississippi State Department of Health.
The competencies required include review and knowledge of specific topics to ensure the health and safety of
patients and employees. These competencies must be demonstrated for your continued practice at PediCare
Staffing Agency.
DIRECTIONS
1. Read the 2020 Annual Competency Self-Study Guide.
2. Complete activities for each Core section.
3. Attend Skills Check-Off on one of the following dates (Times & Location to be announced):
• November 5, 2020
• November 6, 2020
• November 7, 2020

Page | 2
OBJECTIVES
After reviewing this self-study guide, the reader will:
1. Identify the appropriate PediCare standards related to:
• General Care
▪ Infection Control
▪ Hand Hygiene
▪ Patient Equipment – Cleaning & Disinfecting
▪ Medication Administration
• Respiratory Care
▪ Tracheostomy Care
▪ Mechanical Suctioning
▪ Oxygen Administration
▪ Cough Assist Therapy
• Gastrointestinal Care
▪ Enteral Feeding Tubes
• Neurological Care
▪ Seizure Management
• Genitourinary Care
▪ Intermittent Catheterization
• Central Venous Catheter Care (RN Only)
• Ventilator Management & Troubleshooting (RN Only)
2. Apply knowledge of topics covered to ensure the health and safety of patients and employees.
3. Identify and utilize available resources when assistance is needed.

Page | 3
TABLE OF CONTENTS
SECTION 1: General Care
Infection Control Policy ............................................................................................................................................................... 4
Hand Hygiene Policy .................................................................................................................................................................... 5
Patient Equipment – Cleaning & Disinfecting Policy ................................................................................................................... 9
Nursing Documentation Policy .................................................................................................................................................. 10
Medication Administration Policy ............................................................................................................................................. 12
SECTION 2: Respiratory Care
Respiratory Skills Online Education ........................................................................................................................................... 14
Tracheostomy Care – General Guidelines Policy ....................................................................................................................... 16
Tracheostomy Stoma/Skin Care Policy ...................................................................................................................................... 19
Tracheostomy Change – Routine & Emergency Policy .............................................................................................................. 21
Changing Tracheostomy Ties Policy ........................................................................................................................................... 24
Mechanical Suctioning Policy .................................................................................................................................................... 26
Oxygen Administration Policy .................................................................................................................................................... 29
Cough Assist Therapy Policy ...................................................................................................................................................... 31
SECTION 3: Gastrointestinal Care
Gastrointestinal Skills Online Education .................................................................................................................................... 33
Pediatric: Alternate Feeding Methods Online Course ............................................................................................................... 33
Enteral Feeding Tubes – General Guidelines Policy................................................................................................................... 34
Gastrostomy Tube – Care of & Replacement Policy .................................................................................................................. 38
SECTION 4: Neurological Care
Pediatric: Seizures Online Course .............................................................................................................................................. 42
Seizure Management Policy ...................................................................................................................................................... 43
SECTION 5: Genitourinary Care
Catheterization Skills Online Education ..................................................................................................................................... 45
Intermittent Catheterization Policy ........................................................................................................................................... 46
SECTION 6: Central Venous Catheter Care (RN ONLY)
Central Venous Catheter Care Skills Online Education .............................................................................................................. 50
Central Venous Catheters – General Guidelines Policy ............................................................................................................. 52
Implanted Ports – Accessing & Discontinuing Access Policy ..................................................................................................... 59
SECTION 7: Ventilator Management (RN ONLY)
Using Trilogy100: An Instructional Video Online Course ........................................................................................................... 64
Ventilatory Management & Troubleshooting Policy ................................................................................................................. 65

Page | 4
Policies & Procedures
Title: Infection Control
Policy Number: NSG – 002
Scope: Private Duty Nursing
Performed by: Registered Nurse (RN)
Licensed Practical Nurse (LPN)
Date Effective: September 2020
Date Revised:
1. PURPOSE:
1.1 To outline principles of infection control and prevention.
2. POLICY:
2.1 PediCare shall comply will all recommendations regarding standards and guidelines issued by the Center
of Disease Control (CDC) and/or Mississippi State Department of Health (MSDH).
2.2 Education and training will be provided upon orientation and will be repeated regularly to maintain
competency, including updated policies and procedures. Infection control and prevention education will
include:
• Hand Hygiene
• Personal Protective Equipment Use
• Environmental Cleaning
• Medical Equipment
2.3 All new hire employees must provide evidence of tuberculin (TB) skin testing within one year prior to
hire date. Employees will then provide screening form annually or more frequently if clinically indicated.
2.4 Employees suspected of having a transmittable infectious disease/illness are not allowed to work until
written physician statement has been provided to Administrative staff and signs and symptoms of illness
are no longer present.

Page | 5
Policies & Procedures
Title: Hand Hygiene
Policy Number: NSG – 001
Scope: Private Duty Nursing
Performed by: Registered Nurse (RN)
Licensed Practical Nurse (LPN)
Date Effective: September 2020
Date Revised:
1. PURPOSE:
1.1 To promote hand hygiene as a preventative practice of infection control.
2. POLICY:
2.1 When performing hand hygiene, healthcare personnel should use an alcohol-based hand rub or wash
with soap and water (see Appendix A)
2.2 Healthcare personnel must perform hand hygiene before and after touching any patient or their
environment.
2.3 Healthcare personnel will also perform hand hygiene:
• When arriving and before leaving a home.
• Before putting on gloves.
• Immediately after removing gloves.
• Before handling clean equipment and supplies.
• Before clean procedures such as preparing, handling, or serving food or medications.
• Before moving from one patient care activity to another.
• Before eating.
• Before and after performing personal functions such as sneezing or using the restroom.
• Any time hands are visibly soiled.
• Whenever in doubt that your hands are clean.
2.4 In emergent situations, healthcare personnel must perform hand hygiene as soon as possible after the
patient is stabilized.
2.5 Gloves
2.5.1 Gloves are not used as a substitute for performing hand hygiene.
2.5.2 Healthcare personnel must know appropriate situations requiring gloves. (See Appendix B)
2.5.3 Change gloves between performing clean and contaminated care procedures.
2.5.4 Complete an assessment for every interaction with a patient and their environment to
determine risk and need for gloves.

Page | 6
➢ Risk Assessment includes reviewing potential risk for the following:
• Exposure to blood, body fluids, secretions, excretions, tissues
• exposure to non-intact skin
• exposure to undiagnosed/diagnosed rashes
• exposure to mucous membranes
• exposure to contaminated equipment or surfaces.
2.5 Nails and Nail Polish
2.6.1 Natural nails are kept clean and short and should not extend beyond the tip of the finger.
2.6.2 Artificial nails and nail enhancements including nail polish, shellac and gel of any kind are not worn.
2.7 Hand and Wrist Jewelry
2.7.1 Hand and wrist jewelry is limited to: a ring or watch/smart watch/medical alert bracelet that is not touched during patient care and is removed or pushed above the wrist before performing hand hygiene.
2.8 Skin Integrity
2.8.1 Healthcare personnel must cover open cuts or sores on hands or wrists with waterproof bandages. Replace the bandage if its integrity is compromised.
2.8.2 Healthcare personnel should contact Administrative team for guidance if unable to perform hand hygiene as outlined in this policy (i.e., dermatitis, skin sensitivities, splints, casts, bandages).
2.9 Education and Training
2.9.1 Healthcare personnel will receive education and training about hand hygiene work standards, during initial orientation and on an annual basis.
2.9.2 Healthcare personnel will provide education to patients and their families about:
• Importance of hand hygiene
• When to wash hands
• How to hand wash with soap and water or alcohol-based hand rub

Page | 7
Appendix A
Hand Hygiene Work Standards
Page | 8
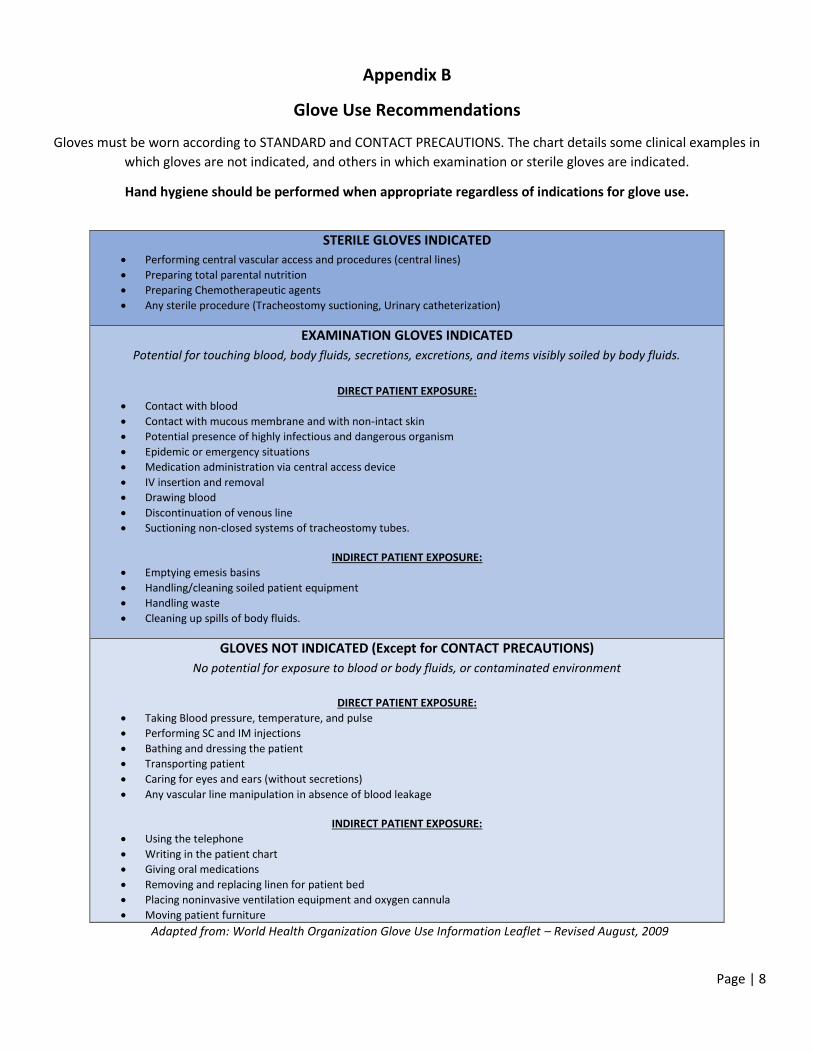
Appendix B
Glove Use Recommendations
Gloves must be worn according to STANDARD and CONTACT PRECAUTIONS. The chart details some clinical examples in
which gloves are not indicated, and others in which examination or sterile gloves are indicated.
Hand hygiene should be performed when appropriate regardless of indications for glove use.
STERILE GLOVES INDICATED
• Performing central vascular access and procedures (central lines)
• Preparing total parental nutrition
• Preparing Chemotherapeutic agents
• Any sterile procedure (Tracheostomy suctioning, Urinary catheterization)
EXAMINATION GLOVES INDICATED
Potential for touching blood, body fluids, secretions, excretions, and items visibly soiled by body fluids.
DIRECT PATIENT EXPOSURE:
• Contact with blood
• Contact with mucous membrane and with non-intact skin
• Potential presence of highly infectious and dangerous organism
• Epidemic or emergency situations
• Medication administration via central access device
• IV insertion and removal
• Drawing blood
• Discontinuation of venous line
• Suctioning non-closed systems of tracheostomy tubes.
INDIRECT PATIENT EXPOSURE:
• Emptying emesis basins
• Handling/cleaning soiled patient equipment
• Handling waste
• Cleaning up spills of body fluids.
GLOVES NOT INDICATED (Except for CONTACT PRECAUTIONS)
No potential for exposure to blood or body fluids, or contaminated environment
DIRECT PATIENT EXPOSURE:
• Taking Blood pressure, temperature, and pulse
• Performing SC and IM injections
• Bathing and dressing the patient
• Transporting patient
• Caring for eyes and ears (without secretions)
• Any vascular line manipulation in absence of blood leakage
INDIRECT PATIENT EXPOSURE:
• Using the telephone
• Writing in the patient chart
• Giving oral medications
• Removing and replacing linen for patient bed
• Placing noninvasive ventilation equipment and oxygen cannula
• Moving patient furniture
Adapted from: World Health Organization Glove Use Information Leaflet – Revised August, 2009

Page | 9
Policies & Procedures
Title: Patient Equipment – Cleaning and Disinfecting
Policy Number: NSG – 003
Scope: Private Duty Nursing
Performed by: Registered Nurse (RN)
Licensed Practical Nurse (LPN)
Date Effective: September 2020
Date Revised:
1. PURPOSE:
1.1 To prevent transmission of infection to patient or from patient to healthcare worker.
2. POLICY:
2.1 Equipment that is visibly soiled must be cleaned before use and/or storage.
2.2 Manufacturer’s instructions regarding cleaning and disinfection of equipment are to be followed.
2.3 Soiled patient care equipment should be handled in a manner that prevents exposure to skin and
mucous membranes, contamination of clothing or the environment.
2.4 Cleaning and disinfection schedules and methods vary according to the type of surface to be cleaned
and the amount and type of soil present.
2.5 Establish procedures/schedules for routine cleaning of all patient equipment. Documentation is to be
completed when equipment has been cleaned.

Page | 10
Policies & Procedures
Title: Nursing Documentation
Policy Number: NSG – 004
Scope: Private Duty Nursing
Performed by: Registered Nurse (RN)
Licensed Practical Nurse (LPN)
Date Effective: September 2020
Date Revised:
1. PURPOSE:
1.1 To outline the minimum documentation requirements for registered nurses (RN) caring for inpatients.
2. POLICY:
2.1 Documentation facilitates communication among health care team members, promotes continuity of
care, and serves as the legal record of care provided.
2.2 Documentation includes information about the patient’s status, nursing assessment and interventions,
expected outcomes, evaluation of the patient’s outcomes and of responses to nursing care.
2.3 Documentation will occur in the electronic health record forms and flowsheets.
2.4 The patient’s record reflects assessments performed by the nurse. The documented assessment forms a
baseline for developing nursing diagnoses and planning patient care. The record reflects the plan of
care, which is an ongoing process beginning when the nurse identifies the patient’s nursing problem list
and the nursing interventions that will address the patient’s problems.
2.5 Documenting nursing interventions promotes continuity of patient care and improves communication.
The patient’s record specifies what nursing interventions were performed by whom, when, and where
and patient’s response to interventions.
2.6 Document at least once per shift, including but not limited to:
• Physical assessment and reassessment based on patient’s condition:
▪ Vital signs and monitored parameters
▪ Pain assessment
▪ Assessment of pertinent systems’ status
▪ Skin status
▪ Psychological or psychosocial status
• Nursing care and responses to interventions, as applicable:
▪ Wounds, dressings
▪ Lines, drains, and/or airways
▪ Pain management
▪ Medications

Page | 11
▪ Intake & output (I&O)
▪ Interventions
▪ Activity, mobility
▪ Skin care
▪ Hygiene and personal care
• Patient education topics as appropriate for patient and/or family/caregiver
• Nursing progress note, using “Narrative Note” template
2.7 Based on the patient’s condition, situation, and complexity, clinical judgment and critical thinking are
employed to determine the need for additional data collection and/or more frequent monitoring and
documentation.

Page | 12
Policies & Procedures
Title: Medication Administration – General Guidelines
Policy Number: NSG – 005
Scope: Private Duty Nursing
Performed by: Registered Nurse (RN)
Licensed Practical Nurse (LPN)
Date Effective: September 2020
Date Revised:
1. PURPOSE:
1.1 To ensure client safety when preparing and administering all medications.
1.2 To comply with key principles regarding medication administration.
2. POLICY:
2.1 All medications require a physician order for administration.
2.2 Medication orders shall be clarified if it is believed patient safety will be affected by carrying out the
order.
2.3 Perform appropriate hand hygiene procedures during and after preparation and administration of
medications.
2.4 Medications are supplied by the child’s family and/or designated pharmacy.
2.5 Administration
2.5.1 The nurse administering medications shall understand the indication, therapeutic effect, side
effects, and clinical responsibilities for each medication.
2.5.2 To prevent distractions from other persons or activities, refrain from other aspects of
individualized client care while administering medications to ensure appropriate safety checks
are followed.
2.5.3 Observe the Five (5) Rights of medication administration:
1. Right Drug 2. Right Amount 3. Right Patient 4. Right Route 5. Right Time
2.5.4 Patients shall be observed when taking oral medications.
2.5.5 Regularly scheduled medications shall be administered within 60 minutes before or after the
scheduled time.
2.5.6 Verify patient is not allergic to medication being administered.

Page | 13
2.5.7 Check medication expiration dates prior to administration.
2.6 PRN Medications
2.6.1 PRN medications are administered based on clinical assessment, pain scales and the indications
for the PRN medication and other medications that have been administered.
2.6.2 Documentation of PRN medication will occur on the appropriate record immediately after
administration and include clinical assessment, pain scale (if used) and indications for use.
2.6.3 Therapeutic effectiveness and any adverse effects will also be documented following
administration at the appropriate time.

Page | 14
Respiratory Skills Online Education
Tracheostomy Care in the Home Setting
https://youtu.be/KIqPEUQQee4
Inline Catheter Suctioning
https://youtu.be/85eraWgiraw
NT & Oral Suctioning
https://youtu.be/85eraWgiraw

Page | 15
Giving a Cough Assist Treatment
https://youtu.be/0hAslVzfFLs
Giving a CPT Vest Treatment
https://youtu.be/mKiix67dd90
Recognizing Respiratory Distress
https://youtu.be/Fmt6JB-W_M8

Page | 16
Policies & Procedures
Title: Tracheostomy Care – General Guidelines
Policy Number: NSG – 011
Scope: Private Duty Nursing
Performed by: Registered Nurse (RN)
Licensed Practical Nurse (LPN)
Date Effective: September 2020
Date Revised:
DEFINITIONS:
Established Tracheostomy Stoma- Stoma that is more than 14 days post-op and that has had 2 uncomplicated tracheostomy tube changes and when patient stability is deemed appropriate by physician. Qualified Personnel for Care of Established Tracheostomy Stoma: Registered Nurse (RN), Licensed Practical Nurse (LPN), and Parent/Family following education and demonstrated competency in this process.
1. PURPOSE:
1.1 To outline nursing management of pediatric patients with established tracheostomies in the home care setting.
2. POLICY:
2.1 Prior to providing care for pediatric patient with established tracheostomy stoma, the nurse will have
first completed the following learning modules/activities:
1. Attend an educational session on tracheostomies.
2. Complete a competency checklist with a certified nurse demonstrating appropriate
tracheostomy care.
2.2 Clean technique, using sterile supplies, will be used for care of established tracheostomies. Aseptic
technique will be used for care of patients who are immunocompromised or as ordered by physician.
2.3 Assessment of trach tube patency is performed every 2 hours for infants and pediatrics and PRN by assessment of respiratory status.
2.4 Trach tubes should be changed weekly, as per physician order, or PRN based on the child’s need. (Refer
to NSG-012: Tracheostomy Change – Routine & Emergency)
2.5 Trach ties are changed daily, per physician order or PRN based on the child's need. (Refer to NSG-014:
Tracheostomy Care – Changing Trach Ties)
2.6 Tracheostomy stoma/skin care is performed daily, per physician order or PRN based on the child's need. (Refer to NSG-013: Tracheostomy Stoma/Skin Care)

Page | 17
2.7 Mechanical Suctioning
2.7.1 Tracheostomy tube suctioning is performed as needed based on nursing assessment of the child's condition and routinely per physician order. (Refer to NSG-015: Tracheostomy Care – Mechanical Suctioning)
2.7.2 Change suction canister/tubing weekly or more often if needed.
2.8 Humidification
2.8.1 Heat and Moisture Exchange (HME) are worn during the day on the end of the trach tube or in-line on a home ventilator. HMEs should be changed daily or when it becomes wet or soiled with secretions.
2.8.2 Mist Collars are worn over the tracheostomy tube by patients not on a ventilator. The mist collars are used when the patient is asleep during naps and at night or as per physician order.
2.9 Cuffed tracheostomy tubes are inflated per physician order.
2.10 Emergency Supplies
2.10.1 Supplies for tracheostomy care and emergent tracheostomy tube replacement/change must be available in a readily accessible location at all times.
2.10.2 Tracheostomy care equipment and supplies (see Appendix A) are checked each shift. Expired and/or missing supplies are replaced.
2.10.3 Tracheostomy Go Bag and supplies must accompany patient when leaving the home.
2.11 Documentation in clinical chart:
• Assessments
• Emergency supplies available at the bedside
• Mechanical suctioning
• Humidification source
• Child’s tolerance to interventions

Page | 18
Appendix A
Tracheostomy Equipment and Supplies:
Required in Readily Accessible Location and for Go-Bag when leaving Home
• Ambu-Bag and mask of appropriate size for face
• Neonatal mask for tracheostomy stoma
• Trach tube of the SAME size & type
• Trach tube ONE SIZE SMALLER & same type
• Trach tube obturator (in clear bag to keep clean)
• Trach ties
• Scissors
• Water based lubricant
• Sterile water
• Normal Saline bullets
• Suction machine/canister/tubing
• Suction catheters of appropriate size
• Yankauer suction device
• Gloves
• DeLee suction trap
• 10mL syringe for inflating/deflating cuff (if trach tube is cuffed)
• Humidification supplies (HMEs or mist collar)
• Neck roll
• Pulse oximeter/Power cord/Extra probes
If the child is on a ventilator, the following will also be needed:
• Ventilator with fully charged batteries/power cord
• Extra ventilator circuit and filter

Page | 19
Policies & Procedures
Title: Tracheostomy Stoma/Skin Care
Policy Number: NSG – 013
Scope: Private Duty Nursing
Performed by: Registered Nurse (RN)
Licensed Practical Nurse (LPN)
Date Effective: September 2020
Date Revised:
1. PURPOSE:
1.1 To outline nursing management of pediatric patients with established tracheostomies in the home care setting, including stoma/skin care.
2. POLICY:
2.1 Tracheostomy skin/stoma care is performed daily, per physician order or PRN based on the child's need.
2.2 Assess skin condition around stoma and neck every shift and PRN based on child’s condition.
3. PROCEDURE:
3.1 Gather supplies: Sterile Water Peroxide (If needed) Q-Tips Pre-cut tracheostomy gauze/Dressing (If needed)
Sterile Gauze Gloves
3.2 Perform proper hand hygiene with soap and water.
3.3 Explain the procedure to the child, parent/family and how they may assist as appropriate.
3.4 Don gloves.
3.5 Dip the Q-Tips in sterile water and clean around the stoma site and under the trach tube flanges,
working outward from the stoma site. Remove all mucus and crust from the site.
• For particularly thick and hard secretions, ½ strength hydrogen peroxide (mix equal parts
hydrogen peroxide and sterile water) may be used to cleanse the stoma site followed by sterile
water.
3.6 Pat the tracheostomy area dry with sterile gauze.
• No powders, lotions or petroleum jelly should be applied to the stoma site. If cream/ointment is
prescribed by a physician order, use only a thin layer.
• Caution should be utilized to ensure prescribed creams/ointments do not enter the airway.
• Powders should not be used around tracheostomy stoma site.
3.7 Assess the skin for signs of breakdown, irritation, granulation, or infection.

Page | 20
3.8 If a dressing is required, utilize non-fraying materials such as pre-cut tracheostomy gauzes.
• Regular gauze should not be used for tracheostomy stoma dressings as frayed edges may irritate
and/or enter the stoma and airway.
• Polyurethane foam dressings with high moisture vapor transmission rates may be utilized on
highly exudating stomas to help decrease maceration of the surrounding skin and
hypergranulation of the stoma. These foam dressings may be cut to fit.
3.9 Assess trach ties and replace if soiled or wet. (Refer to policy NSG – 014: Tracheostomy Care – Changing
Trach Ties)
3.10 Reporting to Physician
• Skin breakdown, bleeding, granulation tissue
3.11 Documentation in clinical chart
• Assessments of skin and stoma site
• Tracheostomy care performed
• Child’s tolerance of procedure
• Complications noted during skin/stoma care and actions taken.

Page | 21
Policies & Procedures
Title: Tracheostomy Change – Routine & Emergency
Policy Number: NSG – 012
Scope: Private Duty Nursing
Performed by: Registered Nurse (RN)
Licensed Practical Nurse (LPN)
Date Effective: September 2020
Date Revised:
1. PURPOSE:
1.1 To outline nursing management of pediatric patients with established tracheostomies in the home care setting, including routine & emergency trach change.
2. POLICY:
2.1 Prior to changing tracheostomy tubes, the nurse will have first completed the following learning
modules/activities:
3. Attend an educational session on tracheostomy tubes.
4. Complete a competency checklist with a certified nurse during simulation or first tracheostomy
tube change.
2.2 Trach tubes should be changed weekly, as per physician order, or PRN based on the child’s need by 1 qualified personnel and 1 assistant. A qualified personnel/assistant may be a Registered Nurse (RN), Licensed Practical Nurse (LPN), or Parent/Family following education and demonstrated competency in this process.
2.3 A new/clean trach tube is assessed prior to insertion for cracks and integrity. If any concern regarding
the condition of the new/clean trach tube is noted, it should be discarded and a new trach tube
obtained.
2.4 Routine trach changes are performed prior to eating or at least 2 hours after a meal.
2.5 Document each trach change in the clinical chart along with how the child tolerated the procedure.
2.6 Changes to the tracheostomy stoma or intolerance to the trach change are reported to the physician.
2.7 Supplies for tracheostomy care and emergent trach tube replacement/change must be available in a readily accessible location at all times (see Appendix A).
2.8 Trach tubes may require reinsertion on an emergent basis due to airway obstruction or unplanned decannulation.

Page | 22
3. PROCEDURE:
3.1 Gather supplies: Same size trach tube/obturator Suction machine/catheters 1 size smaller trach tube/obturator Ambu-Bag/Mask/Oxygen Trach ties Gloves/Mask Scissors Rolled towel or small blanket
Water soluble lubricant Saline Bullets Sterile water/Syringe (for cuffed trach tube)
3.2 Perform proper hand hygiene with soap and water.
3.3 Explain the procedure to the child, parent/family and how they may assist as appropriate.
3.4 Prepare the new tracheostomy tube.
1. Check the size of the trach and inspect the trach tube for flaws. 2. If the trach is cuffed, inflate and deflate the cuff to check cuff integrity. 3. Insert the obturator inside the new trach tube. 4. Prepare the new trach ties by trimming to appropriate length. Secure new ties to one
side of the new trach tube. 5. Lubricate the end of the new trach tube with water soluble lubricant and place on a
clean surface within reach.
3.5 Position the child to maintain proper and safe restraint of the child. Place a rolled towel/blanket under the shoulders to hyperextend the neck.
• If needed, wrap the child with a small blanket to secure hands and feet, leaving the head and neck exposed. The assistant helps hold, if necessary.
3.6 Don gloves and suction the trach.
• Assess respiratory status. Assess secretions for color, odor, amount, and viscosity.
3.7 Encourage deep breaths or provide manual ventilation if necessary.
3.8 Perform tracheostomy change.
1. While holding the old trach in place, remove the old trach ties with the other hand. 2. Wipe/clean around the trach if needed while continuing to hold the old trach securely in
place. 3. Pick up the new trach with the free hand. 4. Remove the old trach with an upward, outward motion and place on a clean surface. 5. Immediately insert the new trach with an inward, downward motion and remove the
obturator, holding the new trach in place securely. 6. Secure the trach ties in place. Trach tube should be midline. Trach ties should be secure
so that one finger fits between neck and ties. While holding trach tube securely, make any adjustments to trach ties, if necessary.
7. Suction the trach if needed.
3.9 Troubleshooting A Trach Change • If unable to insert new trach tube:
1. Reposition the child’s neck and reattempt insertion of new trach. 2. If repositioning does not work, reinsert the old trach that you know fits. 3. If still unable to insert the trach, try to insert the smaller size trach tube. 4. If unable to insert the smaller size trach, call 911.

Page | 23
5. Start CPR, if needed, and begin giving breaths with Ambu-bag by placing the mask over the nose and mouth. If air is leaking out of the tracheostomy stoma while you are bagging, then cover the stoma with a neonatal mask.
6. If you can successfully place the smaller tube, notify the physician immediately after the tube change.
3.10 Documentation in clinical chart
• Assessments
• Routine trach change • Size of trach tube placed
• Child’s tolerance to procedure
• Supplies accessible at the bedside • Any complications noted during the trach change and actions taken

Page | 24
Policies & Procedures
Title: Tracheostomy Care – Changing Trach Ties
Policy Number: NSG – 014
Scope: Private Duty Nursing
Performed by: Registered Nurse (RN)
Licensed Practical Nurse (LPN)
Date Effective: September 2020
Date Revised:
1. PURPOSE:
1.1 To outline nursing management of pediatric patients with established tracheostomies in the home care setting, including changing trach ties.
1.2 To safely perform a tracheostomy tie change.
2. POLICY:
2.1 Prior to change tracheostomy ties independently, the nurse will have first completed the following
learning modules/activities:
5. Attend an educational session on care of tracheostomy tubes.
6. Complete a competency checklist with a certified nurse during simulation or first tracheostomy
tie change.
2.2 Trach ties are changed once a day, per physician order or PRN based on the child's condition by 1 qualified personnel and 1 assistant. A qualified personnel/assistant may be a Registered Nurse (RN), Licensed Practical Nurse (LPN), or Parent/Family following education and demonstrated competency in this process.
2.3 Assessment of trach tube securement device security should be performed every 2 hours and PRN based on the child’s need.
3. PROCEDURE:
3.1 Gather supplies: New trach ties Soap/Water Scissors Washcloth/Gauze Gloves Rolled towel/Blanket
3.2 Perform hand hygiene.
3.3 Explain the procedure to the child, parent/family and how they may assist as appropriate.
3.4 Trim the new trach ties to fit the child’s neck.

Page | 25
3.5 Place the child in a position to maintain safe and proper control of the child.
• If needed, use a rolled towel/blanket under the child’s neck.
• It may be necessary to wrap the child with a blanket to secure hands and feet, leaving the head and neck exposed. The assistant helps hold.
3.6 Don clean gloves.
3.7 While holding the trach in place, remove the old trach ties with the other hand. • Assess skin around neck and under flanges of trach tube.
3.8 Wash neck with soap and water and pat dry.
3.9 Insert new trach ties through openings on each side of the trach tube flanges and fasten securely. Bring the ties around the neck and secure with velcro closure.
• Trach tube should be midline.
• Trach ties should be secure so that one finger fits between neck and ties.
• While holding trach tube securely, make any adjustments to trach ties, if necessary.
3.10 Reporting to Physician
• Changes to the tracheostomy stoma/skin
3.11 Documentation in clinical chart
• Assessment of skin and stoma
• Trach tie change
• Child’s tolerance of procedure
• Complications noted during trach tie change and actions taken.

Page | 26
Policies & Procedures
Title: Tracheostomy Care – Mechanical Suctioning
Policy Number: NSG – 015
Scope: Private Duty Nursing
Performed by: Registered Nurse (RN)
Licensed Practical Nurse (LPN)
Date Effective: September 2020
Date Revised:
1. PURPOSE:
1.1 To outline nursing management of pediatric patients with established tracheostomies in the home care setting, including mechanical suctioning of trach tubes.
1.2 To maintain a patent airway and minimize the risk of hypoxia and infection.
2. POLICY:
Personnel who may suction
• Registered Nurse (RN), Licensed Practical Nurse (LPN) completed the following
learning modules/activities:
1. Attend an educational session on mechanical suctioning.
2. Complete a competency checklist with a certified nurse demonstrating
mechanical suctioning.
• Parent/Family following education and demonstrated competency in this skill.
Assess patient’s need for suctioning
• Mucous in the trach tube opening
• Congestion or rattles not cleared by coughing
• Increased respiratory rate and/or heart rate
• Restlessness or frightened appearance
• Nasal flaring and/or chest retractions
• Decreased O2 saturations
• Skin color changes
• Routine suctioning schedule per order
Types of Suctioning
• Premeasured technique – inserting a suction catheter to a premeasured depth with the distal tip just protruding from the end of the trach tube
• Deep suctioning – In general, this method should not be used because it can cause epithelial damage. Avoid inserting suction catheter until resistance is felt as this causes trauma to carina. Special circumstances (copious thick secretions or partially obstructed tracheostomy tube) may necessitate occasional use of deep suction (i.e. 1.5 cm past the pre-measured depth).

Page | 27
Measurement of suction depth
• Measure using a trach tube the same size as the patient’s tube. Use length of trach tube indicated on box plus measured distance of tracheostomy above stoma (add length of tracheostomy extender if used).
• Utilize cm markings on catheter to determine suction depth with each suction pass.
Special Considerations
• Supplies for tracheostomy care and emergent tracheostomy tube replacement/change must be available in a readily accessible location at all times.
• Tracheostomy tube suctioning is performed as needed based on nursing assessment of the child's condition and routinely per physician order.
• Perform hand hygiene before and after patient contact and use PPE (gloves, faceshield/mask/gown if there is a risk of contamination with secretions).
• Routine instillation with sterile normal saline is not recommended. It may be used for thick secretions or difficulty suctioning. Volume should not exceed 0.5 ml in infants and 1 ml in pediatrics.
• Hyperoxygenate prior to suctioning if clinically indicated.
➔ Increases the amount of oxygen delivered to the patient
➔ Patients requiring high supplemental O2 or severely desaturating
➔ Previous detrimental effects from suctioning
Suctioning in the community setting
• Strict sterile suction technique using sterile suction catheter and gloves.
• Modified sterile suction technique using sterile suction catheter and non-sterile gloves ensuring portion of suction catheter entering tracheostomy tube does not contact any unclean surface.
• Clean technique using non-sterile gloves with suction catheter being used for multiple suction passes and cleansed with sterile water. Discard suction catheter every 24 hours or if catheter comes in contact with unclean surface or if dropped on the floor.
Managing suction equipment
• Appropriate setting for suction machine:
➔ Infants: 60-80 mmHG
➔ Children: 80-100 mmHG
➔ Adolescents: 80-120 mmHG
• Suction canister should be cleaned daily if needed. Change suction canister/tubing
weekly or more often if needed.
3. PROCEDURE:
3.1 Assess respiratory status and need for suctioning.

Page | 28
3.2 Gather supplies: Suction machine Suction catheter of appropriate size Suction tubing/canister Gloves and appropriate PPE
Sterile water for rinsing Normal Saline bullets for instillation
Ambu-Bag Oxygen (If ordered)
3.3 Perform proper hand hygiene with soap and water.
3.4 Explain the procedure to the child, parent/family and how they may assist as appropriate.
3.5 Turn on suction machine and check suction pressure.
3.6 Position the child on back.
• Older child may choose to sit upright. Younger children may need to be held by an assistant or
wrapped in a blanket.
3.7 Open the suction kit.
1. Fill rinsing container with sterile water.
2. Place glove on dominant hand. Grab the suction catheter with gloved hand and connect
to suction tubing.
3. Turn the suction machine on with ungloved hand. Grasp the suction catheter below the
tip with gloved hand.
4. Place the tip of the suction catheter in the sterile water and apply suction by holding
thumb over the suction port.
5. Remove catheter from sterile water.
3.8 Suction tracheostomy.
1. Hold suction catheter at premeasured suctioning length.
2. Keeping thumb off the suction port, insert the catheter into the trach tube to the
premeasured length.
3. Place your thumb over the suction port as you roll the catheter between your fingers
while withdrawing from the trach. Suction for 5-10 seconds.
4. Assess color, amount, and viscosity of secretions.
3.9 Repeat suctioning up to 3 times until respirations sound clear and catheter returns little to no mucus.
• Allow child to rest between suctioning.
• Provide oxygen if needed.
• Instill normal saline if needed for thick secretions or difficulty passing suction catheter.
3.10 Turn off suction machine. Discard suction catheter.
• If using catheter more than once, rinse catheter in sterile water and wrap in glove. Discard if
catheter comes in contact with unclean surface or dropped.
3.11 Documentation in clinical chart
• Assessments
• Suctioning
• Child’s tolerance to procedure in clinical chart • Any complications noted during suctioning and actions taken.
Page | 29
Policies & Procedures
Title: Oxygen Administration
Policy Number: NSG – 010
Scope: Private Duty Nursing
Performed by: Registered Nurse (RN)
Licensed Practical Nurse (LPN)
Date Effective: September 2020
Date Revised:
1. PURPOSE:
1.1 To safely administer oxygen to treat and prevent the symptoms of hypoxia.
2. POLICY:
2.1 A physician’s order is required to initiate and discontinue oxygen therapy.
2.1.1 Order for oxygen therapy should include:
• O2 delivery method
• O2 flow rate or FiO2
• Titration of the oxygen flow rate to achieve an acceptable range of SpO2 values
2.2 Oxygen therapy should be administered continuously unless ordered for specific situations requiring
intermittent use only (i.e. sleep, during BiPap/Ventilator use)
2.3 Patients requiring oxygen therapy must be monitored by continuous pulse oximetry or at intervals
ordered by physician (i.e. spot check daily/PRN)
2.4 The private home oxygen company contracted by the patient will be responsible for the initiation,
monitoring, and management of equipment.
2.5 All oxygen tubing, humidifiers, nebulizers, aerosol masks, and standard cannulas should be cleaned
weekly/PRN and changed when visibly soiled.
2.6 Safe Handling of Oxygen/Equipment
2.6.1 Oxygen therapy equipment must not be used in the presence of open flame. No smoking is
allowed in the vicinity of oxygen therapy equipment. No heat source within 5 ft of oxygen
delivery system.
2.6.2 Oils and petroleum products are not to be used around the patient’s face.
2.6.3 Oxygen cylinders should be secured in a cylinder cart or bracket at all times.
2.6.4 Do not use humidity on portable oxygen cylinders during patient transport.
2.6.5 Oxygen must not be allowed to flow into the circuit of a BiPAP or CPAP unit that is not turned
on. Ensure that the oxygen flow is turned off prior to turning off the BiPAP/CPAP unit.

Page | 30
3. PROCEDURE:
3.1 Assess clinical status of patient and check the physician order for oxygen.
3.2 Explain the procedure to the client as appropriate.
3.3 Perform appropriate hand hygiene.
3.4 Apply a pulse oximeter and assess SpO2.
3.5 Obtain the correct oxygen delivery device and humidifier bottle, if required.
3.6 Connect the device to the oxygen source and set the oxygen flow rate as prescribed.
3.7 Apply the device to the patient.
3.8 Continue to monitor SpO2 until oxygen saturation has stabilized within target range.
3.9 Discontinue oxygen therapy when the patient’s oxygen saturation can be maintained in or above the target range without the use of supplemental oxygen or per physician order.
3.10 Documentation in clinical chart:
• Assessments
• Date, time of initiation of oxygen
• O2 flow rate or FiO2 setting and delivery device
• Use of pulse oximetry
• Vital signs, including SpO2

Page | 31
Policies & Procedures
Title: Cough Assist Therapy
Policy Number: NSG – 016
Scope: Private Duty Nursing
Performed by: Registered Nurse (RN)
Licensed Practical Nurse (LPN)
Date Effective: September 2020
Date Revised:
1. PURPOSE:
1.1 To identify appropriate application of the Cough Assist therapy.
1.2 To outline the steps required to perform Cough Assist therapy using the Respironics Cough Assist E70.
1.3 To reduce the risks and other complications of Cough Assist therapy.
2. POLICY:
2.1 Prior to performing Cough Assist therapy independently, the nurse will have first completed the
following learning modules/activities:
7. Attend an educational session on cough assist therapy.
8. Complete a competency checklist with a certified nurse during simulation or first cough assist
therapy treatment.
2.2 A physician’s order is required for Cough Assist therapy.
2.3 Cough Assist therapy is initiated and settings are adjusted primarily by the PT, RRT, or DME company
appointed personnel. Preset settings of 1, 2 or 3 will be assigned to be used by nurse to perform cough
assist therapy.
2.4 Appropriate Personal Protective Equipment (PPE) should be worn by staff during therapy.
2.5 Indications for use: Patient is unable to mobilize or expectorate secretions effectively.
2.6 Contraindications:
• Absolute
➢ Any patient with a history of bullous emphysema
➢ Susceptibility to pneumothorax or pneumomediastinum
➢ Recent barotraumas
• Caution
➢ Therapy immediately following a meal
➢ Nausea/Vomiting
➢ Tachypnea
➢ History of intrinsic lung disease

Page | 32
2.7 Contact the physician if the patient’s condition changes, if there are any concerns that the patient no
longer meets the clinical indications for cough assist or if therapy seems ineffective or not producing the
same effect as prior treatments.
2.8 Supplemental oxygen should not be added to the Cough Assist circuit as it is a potential fire hazard.
3. PROCEDURE:
3.1 Gather Supplies: Appropriate PPE 6-ft disposable smooth bore tubing Cough Assist E70 15 mm connector Breathing filter Suction machine/catheters Patient Interface: Transparent mask or Trach tube connector
3.2 Perform hand hygiene and don PPE.
3.3 Turn on the Cough Assist machine using the power button.
3.4 Set machine to the Preset 1, 2, or 3.
3.5 Connect the tubing to the client interface.
3.6 Press the “Therapy” button to start the set. CA therapy begins immediately.
• A cough cycle is composed of one inspiration, expiration, and pause phase.
• A standard sequence consists of 3 to 6 consecutive cough cycles for pediatric patients, followed by a rest period of 30 seconds.
• Patients should be returned to their normal oxygen or ventilator settings during the rest period, if necessary.
• Sequences can be repeated 3 to 6 times if needed to clear secretions.
3.7 Suction equipment should be available and visible secretions should be removed via suction from mouth, tracheostomy tube, or tubing, as needed.
• The client may cough up secretions during the treatment.
• Press “Standby” and disconnect the tubing from the patient interface to empty the secretions before the next cycle.
• Press “therapy” to resume session.
3.8 Once cough assist therapy session is complete, disconnect the tubing from the patient interface.
• The filter may be kept and reused up to 1 month unless visibly soiled.
• After each treatment wash the mask or trach adapter in mild soapy water. Rinse thoroughly and air dry.
• Dispose of the 15mm connector that attaches to the mask or trach adapter at the end of the day.
3.9 Wipe the exterior of the machine with mild detergent and water or 70% isopropyl alcohol. Always unplug the equipment before cleaning.
3.10 Documentation in clinical chart
• Assessments
• Cough Assist treatment
• Child’s tolerance of procedure
• Any complications noted during cough assist treatment and actions taken

Page | 33
Gastrointestinal Skills Online Education
Gastrostomy Tube Care
https://youtu.be/Z6WEuyovNkU
Pediatric – Alternate Feeding Methods Course
https://education.bayada.com/pediatric-practice/content/pediatric-alternate-
feeding-methods
*Print completion certificate

Page | 34
Policies & Procedures
Title: Enteral Feeding Tubes – General Guidelines
Policy Number: NSG – 006
Scope: Private Duty Nursing
Performed by: Registered Nurse (RN)
Licensed Practical Nurse (LPN)
Date Effective: September 2020
Date Revised:
1. PURPOSE:
1.1 To provide consistent best practice guidelines for management of pediatric patients receiving enteral feeding.
1.2 To minimize complications associated with enteral tube feeding.
2. POLICY:
Physician order required
• To start or discontinue tube feeding
• Route (i.e. NG, OG, NJ, PGJ, GT, JT)
• Formula type, volume, flow rate
• Flush type and amount
• To give medications via enteral feeding tube
Feeding tube dwell times
• PVC feeding tubes – 3 day dwell
• Polyurethane or Silicone feeding tubes – 30 day dwell
• Enteral feeding tubes with a stylet – 30 day dwell
• Balloon gastrostomy tube – 3-4 months
Method of Administration
• Continuous: feeding for up to 24 hours/day continuously – feeding pump required
• Bolus: feeding is infused over a short time period (30-60 minutes) at specified intervals (gravity or feeding pump)
Medication Administration
• Calibrated syringes are used to administered liquid medications through the enteral tube.
• Medication in pill or capsule form that are not available as a suspension must be modified to liquid - sterile water is used when mixing.
• Do not give any sublingual, enteric coated or sustained release medication through the enteral tube.
• Medications should be given one at a time.

Page | 35
Special Considerations
• Maintain head of bed elevated during feeds at least 30 degrees unless contraindicated.
• If HOB must be lowered for a procedure, return to elevated position as soon as able.
• Consider length of procedure, patient tolerance of feed, and tube type to ensure risk of aspiration is minimized (i.e.: CPT)
• Monitor patients for intolerance of tube feeding. (abdominal distention, nausea, vomiting, diarrhea, abdominal pain).
• Administer tube feed formula at room temperature.
Infection Control • Maintain clean technique when accessing tube, hanging or making additions to formula/tube feed.
• Cover, label and refrigerate remaining formula and use within 24hrs.
• For patient flushes, medication preparation & administration and formula dilutions: ➢ Neonates/infants or immunocompromised patients: Use sterile or
boiled tap water (not from the bathroom). ➢ All other patients: Tap water (not from the bathroom) or bottled water
may be used for other patients if municipal water is safe for community use.
• Ensure ends of feeding tube are capped when not in use. Clean each enteral tubing connection when accessing.
• Formula will be suspended for no longer than 8 hours.
• Flush feeding set and tubing with tap water prior to refilling with formula for the next period.
• Do not add new formula to that remaining in container from previous feed.
• Change administration sets and additional medication and administration supplies every 24 hours.
• Mic-Key extension set is cleaned with soap and water daily. Change every 2-4 weeks or sooner is needed.
Verification of feeding tube placement
• Prior to each intermittent feed, medication administration.
• At least every 4 hours when patient is receiving a continuous feed.
• Following episodes of vomiting, retching or severe coughing.
Flushing of feeding tubes
• All types (NG, OG, ND, NJ, PGJ, PEG, Button) ➢ Flush with a pause/push technique to decrease clogging of tube. ➢ Flush every 4 hours during a continuous feed to maintain patency ➢ Flush after each intermittent feed to maintain patency ➢ Flush after each medication is administered
• Infants: 3 mL sterile water
• Children: 3-5 mL sterile water
• Adolescents: 5-10 mL sterile water
• G-tubes 5-10 mL sterile water
• J-tubes 10-15 mL sterile water is recommended due to longer length

Page | 36
Insertion site care • NG, OG: ➢ Observe skin at nares, lips and oral mucosa for any redness or breakdown
every shift. ➢ Alternate nares with re-insertion of nasal tube if possible. ➢ Check security of tape or anchoring device frequently to prevent dislodging.
• Gastrostomy Button, PGJ, PEG: ➢ Observe & assess PGJ/PEG/Button insertion site every shift – assess skin
condition, notify physician of redness greater than 1 cm, swelling, excessive drainage or leaking of gastric contents or tube feed.
➢ Clean insertion site daily and PRN ➢ Apply absorbent dressing if required (change dressing daily/PRN). ➢ Check security of PGJ/PEG anchoring device frequently to prevent
dislodging ➢ Rotate gastrostomy buttons and PEG tubes 360 ° daily ➢ J-tubes or GJ tubes should not be rotated as this can cause the tube to coil
and occlude.
3. PROCEDURE:
3.1 Placement Verification
3.1.1 Nasogastric (NG) or Orogastric (OG) Feeding Tubes:
• Confirm that external length of feeding tube matches the baseline measurement documented in the care plan.
• Inject 1-2mL of air while auscultating with a stethoscope over the abdomen for the sound of air entry.
• Gently aspirate and visualize gastric contents. ➢ Difficulty obtaining aspirate:
1. Use a larger sized syringe 2. Reposition patient 3. Inject 1-5 ml of air, wait 5 minutes, and attempt again.
3.1.2 Nasojejunal (NJ) Feeding Tubes:
• Initial placement is verified by x-ray
• Once placement is confirmed, document marking at nare in care plan and confirm placement every 4 hours.
3.1.3 Button (balloon) Feeding Tubes:
• Check water volume in balloon PRN for leaking or concerns with placement.
3.1.4 Gastrostomy (PEG), Jejunostomy (J-tubes, PGJ)
• Confirm correct placement by ensuring gastrostomy flange is flush to the skin. ➢ PEG: compare the level at which the flange for tube is placed to length
documented at the time of insertion. ➢ PGJ: Measure external length of tube and compare to length documented at the
time of insertion. Check for any discoloration of tube shaft. If discoloration is less than 3 in. from insertion site an X-ray should be done to confirm placement.

Page | 37
3.2 Displaced Feeding Tubes
3.2.1 Nasogastric (NG) or Orogastric (OG):
• Notify Physician if concerned that patient has aspirated enteral feed
• Reinsert if ordered
3.2.2 Feeding Tubes with Stylet:
• Notify Physician and report to ER/MD office for replacement and x-ray confirmation.
3.2.3 Gastrostomy (PEG), Jejunostomy (PGJ):
• For PG and PGJ tubes, notify physician. Interventional Radiology will need to be consulted for tube reinsertion.
• Cover site with a sterile dressing.
• If ordered and available, insert of a Foley catheter to maintain a tract and report to ER/MD office for replacement and x-ray confirmation.
3.2.4 Button (balloon) Feeding Tubes:
• Refer to NSG-007: Gastrostomy Tube – Care of & Replacement for policy regarding replacement
• Notify physician if unable to reinsert new G-button
3.3 Occluded Feeding Tubes
• If tube occlusion occurs do not force irrigation.
• Do not use carbonated beverages to attempt to clear occlusion.
• Notify physician if occlusion persists.
3.4 Documentation in clinical chart:
• Type of feeding tube
• Document external length of feeding tube and/or placement verification
• Record formula type, hourly intake, and flush volume
• Any symptoms of feeding intolerance: vomiting, diarrhea, abdominal distension and/or pain
• Insertion site assessment and care

Page | 38
Policies & Procedures
Title: Gastrostomy Tube – Care of and Replacement
Policy Number: NSG – 007
Scope: Private Duty Nursing
Performed by: Registered Nurse (RN)
Licensed Practical Nurse (LPN)
Date Effective: September 2020
Date Revised:
1. PURPOSE:
1.1 To provide care of and proper use of balloon type gastrostomy tube to administer nutrition, medications, or gastric decompression.
1.2 To safely perform a routine change of a balloon type gastrostomy tube.
1.3 To safely replace a balloon type gastrostomy tube if accidental dislodgement occurs.
2. POLICY:
2.1 Prior to replacing gastrostomy tubes independently, the nurse will have first completed the following
learning modules/activities:
9. Attend an educational session on balloon gastrostomy tubes.
10. Complete a competency checklist with a certified nurse during simulation or first balloon
gastrostomy tube replacement.
2.2 Balloon gastrostomy tubes that have deemed stable by physician can be replaced routinely by a certified
nurse.
2.3 Balloon type gastrostomy tube replacement prior to 3 months post-op visit must be replaced by
Physician.
2.4 Balloon gastrostomy tubes will be replaced as soon as possible – stoma will begin to close quickly.
Replace with same size gastrostomy tube. If unable to insert same size tube, replace with foley catheter
(if available) to keep stoma open and report to ER for replacement.
2.5 Manufacturer recommended balloon gastrostomy tube change is routinely every 3-4 months or more
often if balloon gastrostomy tube is damaged, leaking through valve, or balloon is broken.
3. PROCEDURE:
3.1 Care and maintenance:
3.1.1 Perform appropriate Hand Hygiene procedures.
3.1.2 Rotate the balloon gastrostomy tube 360 ° daily to ensure the tube can move freely.

Page | 39
3.1.3 Provide cleaning daily or PRN based on site condition.
• Sterile water and cotton tipped applicator to clean stoma and surrounding skin for 2 weeks after insertion
• Soap and water to clean stoma and surrounding skin when healed (after 2 weeks)
3.1.4 Assess skin condition daily.
• Apply dressing as needed if there is drainage
• Apply protective cream to skin around G-tube if there is a Physician order
3.1.5 Assess volume of sterile water in balloon PRN for leaking or concerns.
• Insert a Luer slip tip syringe into the balloon valve and withdraw the fluid while holding the gastrostomy tube in place.
• Assess the amount of water in the syringe and compare with recommended volume for the device or specific patient order.
➢ Low profile balloon gastrostomy tubes should be filled with 5mL of fluid. ➢ 12 french low profile gastrostomy tubes should be filled with 3-5mL of fluid. ➢ Never fill the balloon with more than 10 mL (5 ml for 12fr tubes) of fluid.
3.1.6 Connect the feeding tube extension to the feeding port, lining up the black marks and rotating ¼ turn clockwise.
• Provide medication, feeding or fluids per physician order.
• Gastric decompression may be provided by attaching to gravity or suction drainage according to physician orders
3.1.7 Disconnect the feeding tube extension when no longer needed for medication, feeding or fluids by clamping the extension tube and rotating until black marks line up and gently pulling upward. Close feeding port plug.
3.1.8 Flush the gastrostomy tube with sterile water every 4 hours during continuous feeds, after intermittent feeds or medication administration, or every 8 hours if the tube is not being used.
• Volumes of sterile water as below or per specific physician order: ➢ Infants: 3 mL ➢ Children: 3-5 mL ➢ Adolescents: 5-10 mL
3.1.9 Rinse feeding tube extension with water after each feed or every 4 hours with a continuous feed. Wash in warm soapy water and rinse with clear water daily. Discard and obtain a new extension tube weekly and prn.
3.2 Routine Replacement with a New Balloon Gastrostomy Tube
3.2.1 Scheduled replacement should be done prior to a bolus feed or after a continuous feed has been stopped for 2-4 hours.
3.2.2 Replace with a new balloon gastrostomy tube of the same Fr. size and length into the established stoma
3.2.3 Gather supplies: Non-sterile gloves 60mL Catheter tip syringe Normal Saline Sterile Water Water soluble lubricant Luer Slip-Tip syringe New Balloon Gastrostomy Tube- same Fr. size and length
3.2.4 Perform Hand Hygiene. Apply clean gloves.

Page | 40
3.2.5 Explain procedure to client and family as appropriate. Provide age appropriate distraction techniques and pain management strategies.
3.2.6 Open new balloon gastrostomy tube box and confirm integrity gastrostomy tube. 1. Draw 5 ml sterile water into luer slip tip syringe 2. Attach a luer slip tip syringe to balloon valve of the device. 3. Inflate the balloon on tube, remove syringe and observe the balloon integrity,
noted any asymmetry or leaks. 4. Remove water from balloon.
3.2.7 Position child in supine or side-lying position. An assistant may be needed to hold client.
3.2.8 Apply lubricating gel to tip of gastrostomy tube.
3.2.9 Remove old gastrostomy tube. 1. Attach a luer slip tip syringe to the balloon valve in the child’s stomach. 2. Remove water from the balloon. 3. Gently remove the gastrostomy tube from the stomach. It may help to use a
small amount of water-soluble lubricant during removal.
3.3.10 Gently guide the tube into stoma following the course of the stoma tract. The tube can be gently rotated to assist in tube placement. Minimal resistance should be felt.
1. Insert the balloon low profile gastrostomy tube into the stoma until the external base is flush with the skin. Hold the tube in place.
2. Fill the balloon with 5 mL sterile water or amount specific to that client. 3. Confirm correct placement by attaching an extension set into the feeding port
and aspirating stomach contents.
3.3.11 If stomach contents cannot be aspirated and correct placement of gastrostomy tube is not confirmed, notify physician prior to administering feeds or medications.
3.3.12 Observe for abdominal discomfort and distension at next feeding.
3.3 Replacement of Dislodged Balloon Gastrostomy Tube
3.3.1 If tube is accidentally dislodged less than 3 months after initial insertion, notify physician to replace the tube as tract is not fully established.
3.3.2 Gather supplies: Non-sterile gloves 60mL Catheter tip syringe Normal Saline Sterile Water Water soluble lubricant Luer Slip-Tip syringe
3.3.3 Perform Hand Hygiene. Apply clean gloves.
3.3.4 Explain procedure to client and family as appropriate. Provide age appropriate distraction techniques and pain management strategies.
3.3.5 Clean external surface of balloon gastrostomy tube with Normal Saline prior to replacing in stoma.
3.3.6 Confirm integrity of balloon in gastrostomy tube that has become dislodged. 1. Attach a luer slip tip syringe to balloon valve of the device. 2. Remove all water from the balloon and discard. 3. Draw 5 ml sterile water into luer slip tip syringe 4. Re-inflate the balloon on existing tube, remove syringe and observe the balloon
integrity, noted any asymmetry or leaks.

Page | 41
5. Remove water from balloon. If the balloon is intact, the existing device may be replaced.
6. If balloon is not intact – see section 3.2.5.
3.3.7 Position child in supine or side-lying position. An assistant may be needed to hold client.
3.3.8 Apply lubricating gel to tip of gastrostomy tube.
3.3.9 Gently guide the tube into stoma following the course of the stoma tract. The tube can be gently rotated to assist in tube placement. Minimal resistance should be felt.
1. Insert the balloon low profile gastrostomy tube into the stoma until the external base is flush with the skin. Hold the tube in place.
2. Fill the balloon with 5 mL sterile water or amount specific to that client. 3. Confirm correct placement by attaching an extension set into the feeding port
and aspirating stomach contents.
3.3.9 If stomach contents cannot be aspirated and correct placement of gastrostomy tube is not confirmed, notify physician prior to administering feeds or medications.
3.3.10 Observe for abdominal discomfort and distension at next feeding.
3.4 Reporting to Physician
• Vomiting with feeds
• Leakage around stoma
• Abdominal distension, swelling at site
• Pain
• Development of granulation tissue
• Skin irritation at the insertion site
• Inability to rotate button 360 degrees (external migration)
• Pain with feeds or flushing
• Stoma red and raised
• Decreased flow of feeds
3.5 Documentation in clinical chart
• Date and time of re-insertion/removal
• Bleeding or drainage at site and intervention
• Size of tube/button placed
• Any difficulty inserting the tube
• Amount of water in the balloon
• Child’s tolerance of procedure

Page | 42
Neurological Care Online Education
Pediatric – Seizures
https://education.bayada.com/pediatric-practice/content/pediatric-seizures
*Print completion certificate

Page | 43
Policies & Procedures
Title: Seizure Management
Policy Number: NSG – 001
Scope: Private Duty Nursing
Performed by: Registered Nurse (RN)
Licensed Practical Nurse (LPN)
Date Effective: September 2020
Date Revised:
1. PURPOSE:
1.1 To outline key principles for the management of seizure activity in the home care setting.
1.2 To provide a safe and supportive environment to minimize risk of injury.
2. POLICY:
2.1 Implement seizure precautions for child in the event of new-onset seizure, a seizure history, if at high
risk for seizure activity and as ordered by physician.
2.2 Assess neurological status every shift and PRN based on child’s clinical condition.
2.3 Follow seizure action plan outlining management during seizure activity, emergency medication
administration, and when to notify physician/911.
2.4 Supplies for seizure management must be available in a readily accessible location at all times and checked every shift.
3. PROCEDURE:
3.1 Safety precautions:
• Use seizure pads on side rails or crib sides to prevent injury.
• Side rails or crib sides should be up at all times when child is in bed.
• Remove objects from bed that can cause injury.
• Supervise child during bathing, meals, when ambulating or participating in potentially hazardous activities.
• Check suction, oxygen devices, and emergency supplies each shift.
• Secure child with lap belts/safety harness when up in wheelchair and other equipment.
• For patients requiring use of helmet, ensure helmet is worn at all times during activity to prevent possible head trauma.
• Maintain bed in the lowest position at all times. Use safety mats around bed if child at risk for climbing out.

Page | 44
3.2 During a seizure:
• Maintain a patent airway. ➢ Do not attempt to insert anything into the mouth.
➢ When possible, gently place patient on their side or turn their head to the side to prevent
aspiration.
➢ Suction excessive saliva or emesis if needed but do not try to suction or place anything
beyond the teeth.
➢ Loosen constrictive clothing especially around the neck.
• Assess vital signs as soon as possible, including temperature.
• Assess neurological status, noting seizure characteristics.
• Protect the patient from injury.
• Initiate protocols from seizure action plan.
3.3 Following a seizure:
• Place in the recovery position on the left side after the cessation of seizure unless medically contraindicated.
• Remain with the patient to provide emotional support and reorientation.
• Observe for prolonged or unusual symptoms of neurological deficits or behavior changes to ensure appropriate treatment is initiated.
• Monitor vital signs/neurological assessment until the patient is awake/alert/at baseline.
• Notify physician for changes in seizure type, concerns with neurological status, or failure to respond to emergency treatment.
2.5 Documentation in the clinical chart:
• Date/time
• Length of seizure
• Alterations in behavior
• Seizure observations
➢ Characteristics
➢ Movements
➢ Loss of bladder/bowel control
➢ Changes in color (pallor, cyanosis)
• Interventions required (emergency medication, oxygen, pulse oximetry monitoring)
• Any injuries obtained during seizure
• Postictal assessment
• Notification of physician or 911 and actions taken

Page | 45
Genitourinary Care Online Education
Intermittent Catheterization
Female: https://youtu.be/4oaHKzXEnGc
Male: https://youtu.be/uVDlDcxuf00

Page | 46
Policies & Procedures
Title: Intermittent Urinary Catheterization
Policy Number: NSG – 008
Scope: Private Duty Nursing
Performed by: Registered Nurse (RN)
Licensed Practical Nurse (LPN)
Date Effective: September 2020
Date Revised:
1. PURPOSE:
1.1 To provide guidelines for performing intermittent urinary catherization in the home care setting.
1.2 To minimize risks associated with urinary catheterization.
2. POLICY:
2.1 Prior to providing care for pediatric patient requiring intermittent urinary catheterization, the nurse will
have first completed the following learning modules/activities:
1. Attend an educational session on urinary catheterization.
2. Complete a competency checklist with a certified nurse demonstrating appropriate urinary
catheterization skill.
2.2 Urinary catheterization should be performed under the direction of a physician order. Order should
include:
1. Type of urinary catheterization
2. Catheterization frequency
3. Patient specific protocols
2.3 Insertion/Application
2.3.1 Urinary catheterization should be performed using aseptic technique and sterile
equipment.
• Sterile gloves, drape, and an appropriate antiseptic solution for periurethral cleaning
and a single-use packet of lubricant jelly should be used for catheterization.
2.3.2 If ordered by physician, self-catheterization and intermittent catheterization in the home care
setting may utilize clean technique.
2.3.3 The smallest bore catheter possible should be utilized to minimize urethral trauma and
irritation.
2.4 Patients utilizing urinary catheters will have intake and output (I&O) recorded in the clinical chart.

Page | 47
3. PROCEDURE:
3.1 Sterile Intermittent Catheterization
3.1.1 Gather supplies: Urinary Catheter Soap/Water/Washcloths Water-soluble lubricant Antiseptic Solution Collection device Non-Sterile Gloves
Toilet tissue/Baby wipe Sterile Gloves
3.1.2 Perform hand hygiene and apply clean gloves.
3.1.3 Position the child appropriately in supine, high fowler’s, or dorsal recumbent position.
3.1.4 Wash perineal area.
1. For female patients:
• Open labia with non-dominant hand and cleanse entrance to urinary meatus
with soap/water and washcloth wiping from front to back on each side with a
downward stroke, using a new washcloth with each stroke.
2. For male patients:
• Cleanse suprapubic and pubic area with soap/water and washcloth. Grasp the
shaft of the penis firmly with non-dominant hand. Cleanse urinary meatus and
glands with soap/water and washcloth beginning at the urethral opening.
Retract foreskin on uncircumcised male patients. Cleanse in a circular motion
moving from the meatus outward towards the shaft of the penis. For
uncircumcised male patients, push foreskin back into place after cleansing.
3.1.5 Remove gloves and perform hand hygiene.
3.1.6 Prepare supplies on a sterile field near patient utilizing aseptic technique with sterile supplies:
1. Open urinary catheter package and apply lubricant to tip of catheter.
2. Open antiseptic solution applicators and place on sterile field.
3. Drape patient appropriately.
4. Don sterile gloves.
3.1.7 Using non-dominant hand, separate labia to expose urinary opening for females. For males, hold
penis behind its head and pull it gently and lightly upward to straighten the urinary opening
Gently grasp the glans (tip) of the penis and retract foreskin, if necessary.
3.1.8 Clean with antiseptic solution:
1. Female: With the dominant hand, cleanse meatus with the antiseptic solution
applicators. Wipe downward once with each applicator and discard. Begin at labium on
side farther from you and move towards labium closer to you. Wipe once down the
center of the meatus.
2. Male: With the dominant hand, cleanse the meatus and glans with antiseptic solution,
beginning at urethral opening and moving toward the shaft of the penis. Make one
complete circle around the penis with each applicator, discarding after each wipe.
3.1.9 With free hand, pick up catheter 1.5 to 2 in. from tip.
1. Place the drainage end of the catheter in collection device.

Page | 48
2. Gently insert the lubricated end of the catheter into the urinary opening.
• For female patients:
➢ Insert the catheter 2-3 in. until urine begins to flow.
• For male patients:
➢ Insert the catheter 8-10 in. until urine begins to flow.
3.1.10 Remove the catheter slowly when the urine flow stops.
3.1.11 Wipe the urinary opening with toilet paper/baby wipe.
• For uncircumcised male patients: replace the foreskin to its normal position.
3.1.12 Remove and discard gloves and perform hand hygiene.
3.2 Clean Intermittent Catheterization
3.2.1 Gather supplies: Urinary Catheter Soap/Water/Washcloths Water-soluble lubricant Antiseptic Solution Collection device Non-Sterile Gloves
Toilet tissue/Baby wipe
3.2.2 Perform hand hygiene.
3.2.3 Position the child appropriately in supine, high fowler’s, or dorsal recumbent position.
3.2.4 Prepare supplies on a clean surface near patient utilizing clean technique with sterile supplies:
1. Open urinary catheter package and apply lubricant to tip of catheter.
2. Drape patient appropriately.
3. Don gloves.
3.2.5 Using non-dominant hand, separate labia to expose urinary opening for females. For males, hold
penis behind its head and pull it gently and lightly upward to straighten the urinary opening
Gently grasp the glans (tip) of the penis and retract foreskin, if necessary.
3.2.6 Wash perineal area.
1. For female patients:
• Open labia with non-dominant hand and cleanse entrance to urinary meatus
with soap/water and washcloth wiping from front to back on each side with a
downward stroke, using a new washcloth with each stroke.
2. For male patients:
• Cleanse suprapubic and pubic area with soap/water and washcloth. Grasp the
shaft of the penis firmly with non-dominant hand. Cleanse urinary meatus and
glands with cleanser and washcloth beginning at the urethral opening. Retract
foreskin on uncircumcised male patients. Cleanse in a circular motion moving
from the meatus outward towards the shaft of the penis. For uncircumcised
male patients, push foreskin back into place after cleansing.
3.2.7 With free hand, pick up catheter 1.5 to 2 in. from tip of catheter.
1. Place the drainage end of the catheter in collection device.

Page | 49
2. Gently insert the lubricated end of the catheter into the urinary opening.
• For female patients:
➢ Insert the catheter 2-3 in. until urine begins to flow.
• For male patients:
➢ Insert the catheter 8-10 in. until urine begins to flow.
3.2.8 Remove the catheter slowly when the urine flow stops.
3.2.9 Wipe the urinary opening with toilet paper/baby wipe.
• For uncircumcised males: replace the foreskin to its normal position.
3.2.10 Remove and discard gloves and perform hand hygiene.
3.3 Reporting to Physician
• Difficulty inserting catheter
• Change in urine color, amount, and/or odor
• Fever
• Pain
• Skin irritation at the urinary opening
• Increased or new leaking
• Bleeding
3.4 Documentation in clinical chart
• Catheterization type and catheter size used
• Assessment of urine
• Urine output
• Any complications noted during catheterization and actions taken
• Child’s tolerance of procedure

Page | 50
Central Venous Catheter Care Online Education *RN ONLY*
Central Line Care: Flushing a Catheter
https://youtu.be/uHQYpe__cQ0
Central Line Care: Dressing Change
https://youtu.be/epiPT8pAbWk
Central Line Care: Dressing Change
https://youtu.be/Zc74zbSMZag
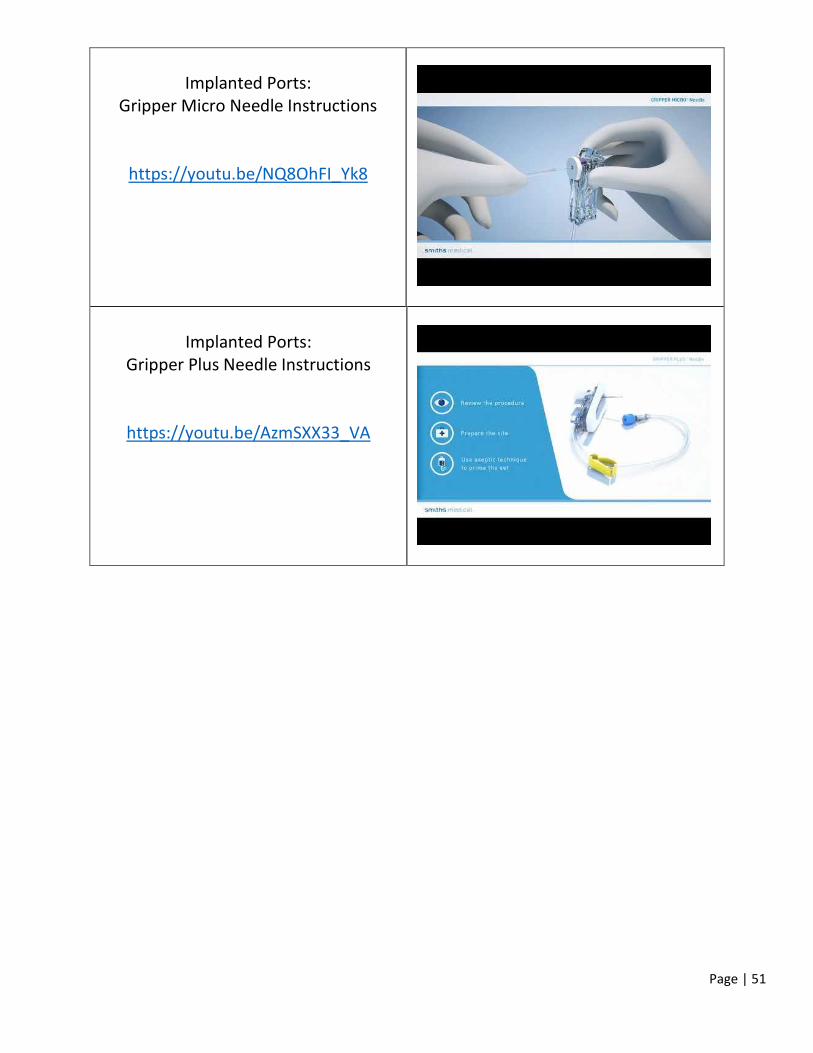
Page | 51
Implanted Ports:
Gripper Micro Needle Instructions
https://youtu.be/NQ8OhFI_Yk8
Implanted Ports:
Gripper Plus Needle Instructions
https://youtu.be/AzmSXX33_VA

Page | 52
Policies & Procedures
Title: Central Venous Catheters – General Guidelines
Policy Number: NSG – 018
Scope: Private Duty Nursing
Performed by: Registered Nurse (RN)
Date Effective: September 2020
Date Revised:
1. PURPOSE:
1.1 To outline key principles for the management of central venous catheters (CVC) in the home care setting.
1.2 To minimize the risk of infection, damage, displacement, and other complications associated with the use and care of CVCs.
1.3 To maintain the patency of CVCs.
2. POLICY:
2.1 Prior to providing care for a pediatric patient with a central venous catheter, the registered nurse will
have first completed the following learning modules/activities:
3. Attend an educational session on CVCs.
4. Complete a competency checklist with a certified nurse demonstrating appropriate care of a
CVC, including accessing, flushing/locking, tubing/adapter changes, and dressing changes.
2.2 Prior to accessing CVCs for any reason, nurses must perform appropriate Hand Hygiene procedures.
2.3 Accessing a Central Venous Catheter
2.3.1 To decrease the risk of contamination, accessing CVCs should be kept to a minimum.
2.3.2 Assess CVC function by aspirating for blood return and flushing prior to each intermittent CVC
use and as clinically indicated with continuous infusions. EXCEPTION: Small lumen (3 Fr. And
under) where no blood withdrawal or blood infusion is recommended.
2.3.3 Intermittent medications/fluid will be administered through a needleless adapter or needleless
injection port on IV tubing.
2.3.4 Needleless adapters will be used for all IV infusions.
2.3.5 Needleless adapters will be cleaned for 15 seconds using an alcohol swab and friction in a
twisting motion prior to each access (scrub the hub).
2.3.6 For accessing an Implanted Port see NSG - 019: Implanted Ports – Accessing and Discontinuing
Access.

Page | 53
2.4 Flushing & Locking a CVC
2.4.1 Flush all CVC lumens with 0.9% Sodium Chloride (Short term, tunneled and implanted)
• After blood withdrawal
• After blood administration
• Before and after each medication administration
• For maintenance of an unused lumen
2.4.2 Flush lumens using stop & start flush technique
• CVCs will be flushed using at least a 10mL syringe to avoid excessive pressure, to avoid possible rupture of the catheter or dislodgement of a clot
• Physician will be notified for intervention if unable to flush a lumen or aspirate blood
2.4.3 Lock with the following:
• Heparin flush (10units/mL): Amount per Physician order
2.5 Changing Tubing & Adapters
2.5.1 Prior to changing needleless adapters or tubing, clean connection for 15 seconds using an alcohol swab and friction in a twisting motion
2.5.2 Prime tubing and adapters prior to attaching to CVC.
2.5.3 Needleless Adapters: • CVC lumens will be capped with a sterile needleless adapter at all times:
➢ When applied to an IV infusion ➢ When not directly connected to tubing
• Change needleless adapters: every 7 days and if removed for any reason, if there is residual blood or debris within the needleless connector and prior to drawing a sample for blood culture. Document change on flowsheet.
2.5.4 Tubing and extension sets: • Tubing and extension sets will be changed every 72hrs except:
➢ Lipid emulsions: parenteral nutrition tubing q 24hr
• When tubing is changed, any needleless adapters, stopcocks or other tubing connected to the same lumen must be changed at the same time
• New IV tubing will be used when a new CVC is inserted
• Clamp lumens with manufacturer’s clamp when not in use (non-valved CVCs)
2.6 Dressing Changes
2.6.1 Use aseptic technique using sterile gloves when applying new dressings.
2.6.2 Skin will be disinfected with Chlorhexidine 2%/Alcohol 70% during dressing changes Note: for infants less than 2 months, or client sensitive to chlorhexidine, use povidone-iodine swab or 70% alcohol swab or wipe off chlorhexidine with sterile saline.
2.6.3 Dressings will be changed:
• Transparent semi-permeable dressing every 5-7 days and PRN when dressing soiled, wet or non-occlusive.
• Gauze (or combination of gauze & transparent dressing) – every 2 days

Page | 54
2.6.4 Site will be assessed at least every 8 hours for: ➢ Signs of inflammation ➢ Infection ➢ Bleeding ➢ Leakage at insertion site ➢ Length of CVC ➢ Securement device
2.7 Catheter Securement
2.7.1 CVC must be stabilized with sutures or stabilization device.
2.7.2 If CVC migrates externally it should not be advanced back into the vein. The CVC should be stabilized at the point of external migration and assessed by physician/Medical Imaging prior to further use.
2.8 Catheter Damage
2.8.1 If the CVC catheter becomes damaged, immediately clamp the line between the break and the chest wall to prevent air embolism or bleeding from the device. Notify the physician immediately.
3. PROCEDURE:
3.1 Assessing CVC patency – Assess CVC function by aspirating for blood return and flushing prior to each intermittent medication or intermittent infusion or when clinically indicated with continuous infusions. Exception: Small lumen (3Fr. and under) where no blood withdrawal or blood infusion is recommended.
3.1.1 Gather supplies: 10 mL syringe prefilled with 0.9% Sodium Chloride Alcohol swabs
3.1.2 Perform hand hygiene.
3.1.3 Clean needleless adapter for 15 seconds using an alcohol swab and friction in a twisting motion. Allow to dry.
3.1.4 Attach 10mL syringe prefilled with 0.9% sodium chloride. 3.1.5 Gently flush lumen with 1-2 mLs of 0.9% sodium chloride. 3.1.6 Gently aspirate the CVC for blood return just until blood can be seen in the CVC lumen 3.1.7 Flush the lumen with remainder of saline, using stop and start flush technique. 3.1.8 Administer medication/infusion. 3.1.9 Perform hand hygiene following procedure. 3.1.10 Following medication administration, flush lumen with ordered flush amount.

Page | 55
3.2 Flushing and Locking
3.2.1 Flushing and locking is performed on Central Venous Catheters that are used intermittently (not connected to a running infusion), following each access. If the CVC is not routinely accessed then these lumens are flushed/locked on a schedule specific to each type of CVC.
3.2.2 Gather supplies: 10mL syringe prefilled with 0.9% sodium chloride 10mL syringe prefilled Heparin solution 10 units/mL Alcohol swabs 3.2.3 Perform hand hygiene
3.2.4 Open catheter clamp (non-valved CVC).
3.2.5 Clean needleless adapter for 15 seconds using an alcohol swab and friction in a twisting motion. Allow to dry.
3.2.6 Flush: Attach 0.9% Sodium Chloride flush syringe, inject the required volume and remove the syringe:
• After blood withdrawal, before and after medication administration, for maintenance of an unused lumen
• Using a stop and start flush technique
• Do not use force to flush or lock a CVC.
3.2.7 Lock: Inject required amount of Heparin flush through the needleless adapter and remove the syringe.
3.2.8 Clamp the catheter after the syringe has been removed (on CVC’s that have a clamp).
3.2.9 Repeat the procedure for other lumens.
• Use separate flush and lock syringes for each lumen.
3.2.11 Documentation:
• Heparin administration on appropriate record.
• Flush volumes as appropriate on I/O Record.
3.3 Tubing and Adapter Change
3.3.1 Gather supplies: Alcohol swabs Primed tubing Primed needleless adapter Extension set (if needed) Tubing change sticker Clean gloves
10mL syringe prefilled with 0.9% Sodium Chloride 10mL syringe prefilled with Heparin (if needed)
3.3.2 Perform hand hygiene and apply clean gloves.
3.3.3 For tubing change, stop IV infusion.
3.3.4 For clamped CVC, clamp lumen to prevent air embolism or blood loss. 3.3.5 Clean needleless adapter or tubing connection where the hub meets the lumen for 15 seconds
using an alcohol swab and friction in a twisting motion. Allow to dry.

Page | 56
3.3.6 Loosen connection to facilitate rapid change over. If difficult to loosen, use a tourniquet or glove for improved grip. Do not use metal forceps as this could damage the hub.
3.3.7 Disconnect tubing or adapter.
3.3.8 Clean CVC catheter end with alcohol swab. Allow to dry.
3.3.9 While maintaining aseptic technique to avoid catheter contamination, connect new primed
tubing or adapter.
3.3.10 Unclamp catheter and re-establish IV infusion, if applicable, or flush and lock unused lumens according to orders.
3.3.11 Document date of tubing or adapter change in medical record. Write date changed on tubing
change sticker and attach to tubing.
3.3 Dressing Change
3.4.1 Gather supplies: Dressing tray/set Sterile gloves Clean Gloves 2 - Chlorhexidine 2%/Alcohol 70% - swab sticks for skin disinfection Sterile transparent semi-permeable or sterile gauze dressing Tape (if needed) 0.9% Sodium Chloride (for skin cleansing if required) Sterile cotton tipped applicators (if required) Alcohol based hand sanitizer
3.4.2 Perform hand hygiene and don clean gloves.
3.4.3 Remove dressing.
3.4.4 Discard gloves and dressing.
3.4.5 Perform hand hygiene.
3.4.6 Inspect insertion site for: • Signs of infection or inflammation • Secure sutures or stabilization device in place • Catheter slippage/movement • Leaking IV fluid • Pain or swelling along tunneled area • Notify physician promptly if any of the above are noted
3.4.7 If drainage is present, cleanse skin and catheter with 0.9% Sodium Chloride using aseptic technique.

Page | 57
3.4.8 Disinfect skin with 2% Chlorhexidine/Alcohol 70% swab stick applicator. With the first swab stick, using friction, clean around the exit site of catheter and area where dressing is to be placed using a back and forth motion for 15 seconds. Flip the swab stick and moving in opposite direction clean site for another 15 seconds. With the second swab stick, cleanse length of exposed catheter. For patients less than 2 months old wipe off chlorhexidine after 30 seconds with sterile 0.9% Sodium Chloride.
3.4.9 If there is a contraindication to chlorhexidine, povidone-iodine or 70% alcohol can be used as alternatives. Note: Silicone catheters can be damaged with adhesive removers and acetone.
3.4.10 Allow skin to dry completely.
3.4.11 Apply skin protectant to area for irritated or fragile skin and if catheter stabilization device will
be used (using aseptic technique and avoiding the insertion site).
3.4.12 Perform hand hygiene.
3.4.13 Don sterile gloves.
3.4.14 Apply new catheter stabilization device if catheter is not sutured in place (follow manufacturer’s directions for use).
3.4.15 Apply transparent semipermeable dressing to cover both the insertion site and sutures/securement device. Lay transparent dressing in place and mold it over the catheter with fingertips. Do not stretch dressing over skin surface. Slightly overlap the border tabs under hub of lumens. Press transparent portion of dressing into place. Add adhesive strips to stabilize CVC and to label dressing change date. Apply gentle pressure to entire dressing to ensure optimal adhesion.
3.4.16 If using plain sterile gauze, secure with a full border of tape or cover with transparent dressing.
3.4.17 Secure tubing to the skin with supplied tape strips to prevent traction on the dressing or insertion site.
3.4.18 Document dressing change and condition of insertion site on appropriate record.
4. REFERENCES:
Infusion Nurses Society, Gorski, L, et all (2016) Vascular Device Management- Infusion Therapy Standards of Practice, Norwood, MA.
O’Grady,N et al. (2011) Guidelines for the Prevention of Intravascular Catheter-Related infections. National Center for Infectious Diseases. Atlanta, Georgia. http://cdc.gov/hicpac/BSI/BSI-guidelines-2011.htmL
Perry, A, Potter, P. & Ostendorf,W (2014) Clinical Nursing Skills & Techniques –8th Edition. St. Louis, Missouri: Elsevier Mosby: Chapter 20: Safe Medication Preparation page 488.

Page | 58
CENTRAL VENOUS CATHETERS - Pediatric Standards Prior to accessing CVC for any reason perform Hand Hygiene for at least 15 seconds with alcohol-based hand rub or antiseptic soap and water.
Heparin volume should be determined by physician order
CVC TYPE and Approximate Priming Volume
Heparin Use/NS Flushing Frequency for CVAD in Intermittent Mode
Heparin Use/NS Flushing Frequency for CVAD in Maintenance Mode
Implanted Port
Pediatrics: Approximate priming volume
Internal Diameter (I.D.) 0.8 mm I.D. 0.8 ml 1.0 mm I.D. 1.1 – 1.2 ml 1.1 mm I.D. 1.2 ml 1.4 mm I.D. 1.7 ml 1.6 mm I.D. 2 ml
Pediatrics:
• For implanted port (open and closed) flush with 3-5 ml NS (or amount specified per physician order) before and after each use.
➢ After flushing with NS (for implanted port open and closed), flush with heparin (10 units/ml) after each use or every 24 hours (or per physician order).
Pediatrics:
• For implanted port (open and closed) flush with 3-5 ml NS (or amount specified per physician order) every 4 weeks.
➢ After flushing with NS (for implanted port open and closed), flush with heparin (100 units/ml) every 4 weeks and prior to de-accessing (or per physician order).
Centrally tunneled open end (i.e., Hickman, Broviac)
Pediatrics: Approximate priming volume
2-3 F 0.12 - 0.15 ml 4 F 0.3 ml 5 F 0.5 ml 6 F 0.6 - 0.8 ml 7 F 0.6 - 0.9 ml 9 F 0.6 - 1.3 ml
Pediatrics:
• Flush with 1-3 ml NS (or amount specified per physician order) before and after each use.
➢ After flushing with NS, flush with heparin (10 units/ ml) after each use or every 24 hours (or per physician order).
Pediatrics:
• Flush with1-3 ml NS (or amount specified per physician order) every 24 hours (or per physician order) (8).
➢ After flushing with NS, flush with heparin (10 units/ml) every 24 hours (or per physician order).
Centrally tunneled closed end (i.e., Groshong)
Pediatrics: Approximate priming volume
2-3 F 0.12 - 0.15 ml 4 F 0.3 ml 5 F 0.5 ml 6 F 0.6 - 0.8 ml 7 F 0.6 - 0.9 ml 9 F 0.6 - 1.3 ml
Pediatrics:
• Flush with 1-3 ml NS (or amount specified per physician order) before and after each use.
➢ After flushing with NS, flush with heparin (10 units/ml) after each use or every 24 hours (or per physician order)
Pediatrics:
• Flush with 1-3 ml NS (or amount specified per physician order) every 24 hours (or per physician order).
➢ After flushing with NS, flush with heparin (10 units/ml) every 24 hours (or per physician order).
Central non-tunneled open end (PICC, SC)
Pediatrics: Approximate priming volume
1.9 F 0.06 ml 3-3.5 F 0.2 - 0.5 ml 4 F 0.6 ml 5 F 0.4 - 0.8 ml 6 F 0.5 - 0.6 ml
Pediatrics:
• If PICC > 2FR flush with 2-3 ml NS (or amount specified per physician order) before and after each use or every 12 hours (or per physician order).
➢ After flushing with NS, flush with heparin (10 units/ml) after each use or every 12 hours (or per physician order).
Pediatrics:
• If PICC > 2FR flush with 2-3 ml NS (or amount specified per physician order) every 12 hours (or per physician order).
➢ After flushing with NS, flush with heparin (10 units/ml) every 12 hours (or per physician order).
Central non-tunneled closed end or valved (i.e., Bard Solo Power PICC)
Pediatrics: Approximate priming volume
1.9 F 0.06 ml 3-3.5 F 0.2 - 0.5 ml 4 F 0.6 ml 5 F 0.4 - 0.8 ml 6 F 0.5 - 0.6 ml
Pediatrics:
• If PICC > 2FR flush with 2-3 ml NS (or amount specified per physician order) before and after each use or every 12 hours (or per physician order).
➢ After flushing with NS, flush with heparin (10 units/ml) after each use or every 12 hours (or per physician order).
Pediatrics:
• If PICC > 2FR flush with 2-3 ml NS (or amount specified per physician order) every 12 hours (or per physician order).
➢ After flushing with NS, flush with heparin (10 units/ml) every 12 hours (or per physician order).

Page | 59
Policies & Procedures
Title: Implanted Ports – Accessing & Discontinuing Access
Policy Number: NSG-019
Scope: Private Duty Nursing
Performed by: Registered Nurse (RN)
Date Effective: September 2020
Date Revised:
DEFINITIONS:
Implanted Port – a port that is surgically placed in the chest or arm that is used for long-term venous access for infusion of medications, parenteral nutrition, IV solutions, administering blood and blood sampling. An implanted port is accessed with a non-coring needle.
1. PURPOSE:
1.1 To maintain patency and minimize the risks of infiltration, infection, septal damage, and other complications associated with the care and use of implanted ports.
2. POLICY:
2.1 Prior to providing care for a pediatric patient with an implanted port, the registered nurse will have first
completed the following learning modules/activities:
5. Attend an educational session on implanted ports.
6. Complete a competency checklist with a certified nurse demonstrating appropriate accessing
and discontinuing assess of implanted ports.
2.2 Use only non-coring needles to access the port. (See Addendum A & B)
2.3 Once the port is accessed, the needle may remain in the port up to 7 days. Needleless adapter if used is changed every 7 days, with the needle and extension tubing.
2.4 To prevent peripheral port occlusion and/or damage, avoid using an arm that has an implanted port for BPs or venipuncture.
2.5 If implanted port is accessed for continuous use, dress with a transparent semi permeable dressing.
2.6 Implanted ports can be used for all types of intravenous therapy, including infusion of blood products, parenteral nutrition, and infusion of chemotherapy agents as well as for blood sampling.
3. PROCEDURE:
3.1 Accessing an Implanted Port
3.1.1 If ordered, apply an aesthetic cream to the skin over the port, 15 minutes in advance of procedure.
3.1.2 Gather supplies: Anesthetic cream (optional)

Page | 60
Dressing tray/set Sterile gloves
Chlorhexidine/alcohol - swab or swabstick 2 - 10mL syringes prefilled with 0.9% Sodium Chloride
Appropriately sized non-coring needle with extension tubing Transparent semi permeable dressing
Needleless adapter (if not included with non-coring needle set) Alcohol based hand sanitizer
3.1.3 Prior to accessing CVCs for any reason, nurses must perform hand hygiene for at least 15 seconds with alcohol-based hand rub or antiseptic soap and water.
3.1.4 Palpate the port to identify the septum. Report to physician any rotation or migration of port or any abnormal skin condition.
3.1.5 Open dressing tray. Add non-coring needle.
✓ Choose non-coring needle length (3/4 – 1 1/2) depending on the size of the port and the amount of subcutaneous tissue overlying the port. Ideally the bend in the needle rests on the skin when the port is accessed.
3.1.6 Disinfect skin over port with 2% Chlorhexidine/Alcohol 70% swab stick applicator. Using friction clean using a back and forth motion for 15 seconds. Flip the swab stick and moving in opposite direction clean area using a back and forth motion for another 15 seconds. For patients less than 2 months old wipe off chlorhexidine after 30 seconds with sterile 0.9% Sodium Chloride. Allow to dry completely.
3.1.7 While being careful not to contaminate the non-coring needle, attach saline fiilled syringe and prime with saline. Leave syringe attached to tubing.
3.1.8 Don sterile gloves.
3.1.9 Remove needle cover.
3.1.10 With non- dominant hand, locate port by palpation and secure between thumb and index finger.
3.1.11 Insert non-coring needle perpendicular to the port septum and push it firmly through the skin and septum until needle touches the bottom of the port.
✓ Once the septum is punctured, the needle should not be tilted or rocked; these actions may cause fluid leakage, extravasation, and damage to the septum.
3.1.12 Verify correct needle placement by gently withdrawing on the syringe to assess for blood return.
• If unable to withdraw blood: 1. Make sure needle is at the bottom of the port 2. Reposition patient or ask to cough 3. Flush gently with saline
• If still unable to aspirate, remove needle and reattempt access using a new non-coring needle. A longer, non-coring needle may be required.

Page | 61
3.1.13 Flush with saline using a stop and start motion to create a turbulent flow to clear all blood from the extension tubing, port and catheter. Observe for ease of flushing and any sign of subcutaneous infiltration.
3.1.14 Clamp extension tubing, leaving syringe attached.
• For continuous use of port, apply transparent dressing to cover the access site and to stabilize the needle in the port.
• For blood withdrawal, or other intermittent use, attach needleless adapter.
• For continuous medication/fluid administration attach appropriate tubing.
3.2 Discontinuing Access
3.2.1 Ensure port is locked with heparin prior to removal of the needle.
3.2.2 Perform hand hygiene and don clean gloves.
3.2.3 Remove dressing.
3.2.4 Remove needle according to manufacturer’s instructions (see Appendix A & B).
3.2.5 Cleanse the site with Chlorhexidine and allow to dry.
3.2.6 Apply a bandaid if required.
3.3 Documentation in clinical chart
• Assessments
• Needle size placed or removed
• Fluid/Heparin volumes • Child’s tolerance to procedure
• Any complications noted during the accessing or discontinuing access and actions taken

Appendix A
Page | 62

Appendix B
Page | 63

Page | 64
Ventilator Management Online Education *RN ONLY*
Using Trilogy100: An Instructional Video
https://youtu.be/uHQYpe__cQ0
https://education.bayada.com/content/using-trilogy100-instructional-video-caregivers
*Print completion certificate
Page | 65
Policies & Procedures
Title: Ventilator Management & Troubleshooting
Policy Number: NSG – 017
Scope: Private Duty Nursing
Performed by: Registered Nurse (RN)
Date Effective: September 2020
Date Revised:
1. PURPOSE:
1.1 To provide standards of nursing care for safe and efficient management of a mechanically ventilated person.
1.2 To minimize patient risk secondary to ventilator malfunction.
2. POLICY:
2.1 Prior to performing nursing care for a chronically mechanically ventilated patient, the registered nurse
will have first completed the following learning modules/activities:
7. Attend an educational session on ventilators.
8. Complete a competency checklist with a certified nurse during simulation or during care of
chronically mechanically ventilated patient.
2.2 The RN shall be knowledgeable of current and prescribed ventilator settings.
2.3 Ventilator alarms must be on at all times and checked every shift.
2.4 Alarm response: for all audible ventilator alarms, the RN will respond immediately to the patient and assess for respiratory distress or a disconnection.
2.5 Emergency equipment, suction, oxygen, and Ambu-Bag are readily available at the bedside and during transport of all persons with artificial airways.
2.6 Ventilator circuits are changed weekly or PRN for circuit malfunction.
2.7 Inline HMEs are changed daily or PRN when it becomes wet or soiled with secretions.
3. PROCEDURE:
3.1 The RN will:
• Assess vital signs every shift or more frequently if clinically warranted.
• Assess respiratory status every 2 hours and PRN based on clinical condition.
• Document ventilator settings every shift.
• Maintain artificial airway, including care of and suctioning.
• Change ventilator circuit weekly or PRN for circuit malfunction.
• Change Inline HMEs daily or PRN if wet or soiled with secretions.
• Check emergency equipment, suction, oxygen, and ambu-bag every shift.
• Verify ventilator alarms are on and audible every shift.

Page | 66
• Respond to ventilator alarms immediately to the patient and assess for respiratory distress or a disconnection.
3.2 Responding to Ventilator Alarms:
• Check the child first: ➢ If the patient is not breathing, unresponsive or color is poor – initiate emergency
procedures. For dislodged trach, replace the trach tube and initiate emergency
procedures.
➢ If the child is responsive and breathing, check the ventilator. Provide manual breaths with
Ambu-bag if needed until problem with ventilator is corrected.
• Low Minute Ventilation Alarm, Low Inspiratory Pressure Alarm, Low Expiratory Pressure Alarm, Circuit Disconnect Alarm:
1. Verify the child is not disconnected from the ventilator and the trach is in place.
2. If the child is not disconnected, check the ventilator circuit for:
➢ Disconnected tubing
➢ Kinked tubing
➢ Punctured tubing
➢ Loose fitting tubing
➢ Water in the exhalation valve
➢ Loose fitting HME
➢ Leak around trach tube
3. Once the source of the leak has been determined, reconnect the child to the ventilator
and verify the circuit is working properly.
• High Minute Ventilation Alarm, High Expiratory Pressure Alarm, High Expiratory Pressure Alarm, Low VTI Alarm, Check Circuit Alarm:
1. Check the child for obstruction or circuit blockage:
➢ Check to see if suctioning is needed.
➢ Check the trach tube for obstruction.
➢ Check the activity of the child.
2. If the high pressure alarm is not related to the child, remove the child from the ventilator
and check the circuit for:
➢ Water in the tubing
➢ Kink in the tubing
➢ Blocked exhalation valve
3. Once the source of the obstruction has been determined, reconnect the child to the
ventilator and verify the circuit is working properly.
• Power Alarm: 1. Check following on the ventilator:
➢ A/C power
➢ Internal battery
➢ External battery
2. If all 3 power systems have failed, provide manual breaths with Ambu-bag until the
problem is corrected.

Page | 67
• Low Circuit Leak Alarm: 1. Check following on the ventilator:
➢ Make sure the exhalation port is not obstructed.
3.3 Documentation in the clinical chart:
• Assessments
• Ventilator settings
• Emergency equipment at the bedside
• Unexpected outcome and nursing interventions