invertekfiles.vivid-illumination.com/downloads/electronics_user... · 2016. 10. 2. · chapter 1...
TRANSCRIPT

INVERTEK®
CombiPlus
PURE SINE WAVE INVERTER ATS / BATTERY CHARGER /SOLAR CHARGER
USER MANUAL
利佳興業股份有限公司 RICH ELECTRIC CO.,LTD.

2
CONTENTS Introduction ..................................................................................................................................4 Specification....................................................................................................................................7 Dimension .......................................................................................................................................9 Chapter 1 Installation..................................................................................................................11 1.1 Box Contents.......................................................................................................11 1.2 Location ..............................................................................................................11 1.3 Requirements......................................................................................................11 1.4 Connection of Battery Cables ...........................................................................12 1.5 Connection of AC Cabling ................................................................................12 1.6 Optional Connections ........................................................................................13 1.7 Grounding...........................................................................................................14 1.8 Remote Control Panel (RCP-4) ........................................................................14 Chapter 2 Settings........................................................................................................................15 2.1 Four Control Modes Applicatioin ......................................................................15 MODE 1: AC Power as Priority Support ..........................................................15
MODE 2: AC Generator .....................................................................................18 MODE 3: Green Power as Priority Support .....................................................20 MODE 4: Inverter as Priority Support .............................................................23 Chapter 3 Wiring .........................................................................................................................25 3.1 Optional Fan Cover Application ......................................................................25 3.2 Upper-Front Panel Display ...............................................................................26 3.3 Lower-Front Panel Display...............................................................................29 3.4 Battery Connection ............................................................................................30 3.5 Parallel Connection Schematic .........................................................................32 3.6 3-Phase Connection Schematic .........................................................................33 3.7 3-Phase System 15 Modules ..............................................................................34 Capter 4 User Constants .............................................................................................................35 4.1 Structure of User Constants..................................................................................36 4.2 Operation Flow.......................................................................................................40

3
Chapter 5 Constants List.............................................................................................................48 U Group: Monitor......................................................................................................48 A Group: Initialize.....................................................................................................49 B Group: General ......................................................................................................49 C Group: Inverter......................................................................................................50 D Group: Charger......................................................................................................50 E Group: Aux-Relay ..................................................................................................51 F Group: Solar Charger............................................................................................56 O Group: Operator....................................................................................................56 Chapter 6 Programming Constants ...........................................................................................61 A Group: Initialize.....................................................................................................61 B Group: General ......................................................................................................63 C Group: Inverter......................................................................................................70 D Group: Charger......................................................................................................72 E Group: Aux-Relay ..................................................................................................75 O Group: Operator....................................................................................................81 U Group: Monitor......................................................................................................83 Chapter 7 Trouble Shooting Table.............................................................................................89

4
Introduction General
Multi-functional Feature The “CombiPlus” is a powerful true sine wave inverter, a sophisticated battery charger that
features adaptive charge technology and a high-speed AC Auto Transfer Switch (ATS) in a single compact enclosure. Besides these primary functions, however, the CombiPlus has several advanced features that provide a range of new applications as outlined below:
Uninterrupted AC Power
In the event of a grid failure, or shore or generator power being disconnected, the inverter within the CombiPlus is automatically activated and takes over supply to the connected loads. This happens so fast (less than 10 milliseconds) that computers and other electronic equipment will continue to operate without disruption.
Parallel Operation
Virtually unlimited power thanks to parallel operation up to 5 units can operate in parallel to achieve higher power output. Five CP-3000-242 units, for example, provide 15kW of output power with 350A charging capacity.
Three Phase Capability
In addition to parallel connection, three units of the same model can be configured for three-phase output. But that’s not all: up to five sets of three units can be parallel connected for a huge 45kW inverter and 1050A charger!
Power Control-Dealing with limited generator or shore side power
The “CombiPlus” is a very powerful battery charger. It will therefore draw a lot of current from the generator or shore side power. A maximum generator or shore current can be set (B2-05). The “CombiPlus” will then take account of other AC loads and use whatever is extra for charging thus preventing the generator or shore supply from overload.
Power Assist-Boosting the capacity of shore or generator power
This feature takes the principle of Power Control to a farther dimension allowing the “CombiPlus” to supplement the capacity of the alternative source. Where peak power is so often required only for a limited period; it is possible to reduce the size of generator needed or conversely enable more to be achieved from typically limited shore connection. When the load reduces, the spare power is used to recharge the battery.

5
Battery Charger
Adaptive 4-stage charge characteristic: Bulk-Absorption-Float-Equalize The “CombiPlus” features a microprocessor controlled “adaptive” battery management system that can be preset to suit different types of batteries. The “adaptive” feature will automatically optimize the process relative to the way the battery is being used.
The right amount of charge: Variable Absorption Time When only shallow discharges occur (a yacht connected to shore power for example), the absorption time is kept in order to prevent overcharging of the battery. After a deep discharge, the absorption time is automatically increased to make sure that the battery is completely recharged.
Preventing damage due to excessive gassing: The Battery Safe Mode
If, in order to quickly charge a battery, a high charge current in combination with a high absorption voltage has been chosen. The “CombiPlus” will prevent damage due to excessive gassing by automatically limiting the rate of voltage increase once the gassing voltage has been reached.
Less maintenance and aging when the battery is not use: The Equalize Mode
The equalize mode kicks in whenever the battery has not been subjected to discharge during 24 hours. In the equalize mode, float voltage is reduced to 2.2V/cell (13.2V for 12V battery) to minimize gassing and corrosion of the positive plate. One a week, the voltage is raised back to absorption level to “equalize” the battery. This feature prevents stratification of the electrolyte and sulphation, a major cause of early battery failure.
2 outputs to charge 2 battery banks
The “CombiPlus” features 2 outputs, of which 1 can carry the full output current. The second output, limited to approximately 4A and with a slightly lower output voltage, is intended to top up a starter battery.
To increase battery life: Temperature Compensation
Every “CombiPlus” comes with a battery temperature sensor (BTS-3) when connected, charge voltage will automatically decrease with increasing battery temperature. This feature is especially recommended for sealed batteries and/or when important fluctuation of battery temperature is expected.

6
Battery Voltage Sense In order to compensate for voltage loss due to cable resistance, the “CombiPlus” is provided with a voltage sense facility so that the battery always receives the correct charge voltage.
Extensional Solar Charger CombiPlus also provides the availability of up to 10 sets of Solar Charger, SunStar-45 or SunStar-60 (optional) to be used with solar panel to charge the battery. CombiPlus sends the 4-stage charging command to extensional Solar Charger via port C (Extension Port) for the best quality of solar charging.

7
Specification
MODEL
12 Volt System
24 Volt System
48 Volt System
CP-1500-12X (1)
CP-1500-24X
CP-1500-48X
CP-3000-12X (1)
CP-3000-24X
CP-3000-48X
GENERAL
Ventilation Forced cooling Forced cooling
Temperature
– Operation
– Storage
-20℃~ +70℃
-25℃~ +80℃
-20℃~ +70℃
-25℃~ +80℃
Protection
a. Output short circuit ˇ ˇ b. Over load ˇ ˇ
c. Battery voltage too high ˇ ˇ d. Battery voltage too low ˇ ˇ
e. DC voltage ripple too high ˇ ˇ f. Temperature Sensor Transformer ˇ(105℃) ˇ(105℃) Electronic & Powerstage ˇ(70℃) ˇ(70℃) BTS-3 ˇ(50℃) ˇ(50℃) Humidity 0~95% (non condensing) 0~95% (non condensing)
Power control Function ˇ ˇ Power assist Function ˇ ˇ Uninterrupted AC power ˇ (less than 10 msec) ˇ (less than 10 msec) Adaptive 4-stage charge ˇ ˇ Two output to charge 2 battery banks ˇ ˇ Auxiliary Relay X 3 X 3
Parallel operation ˇ(Max. 5 sets) ˇ(Max. 5 sets) 3-phase capacity ˇ ˇ Battery voltage sensor ˇ ˇ Battery Temperature sensor (BTS-3) ˇ ˇ Remote control port ˇ ˇ Extension Port (Port C) ˇ ˇ INVERTER
Input Voltage Range (VDC) 9.5 -16V / 19-32V / 38-64V
Output Voltage (VAC) 185~240 VAC / 90~120 VAC
Output Frequency 50Hz /60Hz ± 0.1%
Output Waveform Pure sinewave

8
(1) X should be 1, output voltage = 90~120 VAC or 2, output voltage = 185~240 VAC
Output Voltage THD < 5%
Power Factor (All Loads) ˇ
No linger load, crest factor 3: 1
Cont. Power Output (W)
Under 70℃ (cosθ=1.0)
1500W
(No derate)
3000W
(No derate)
Cont. Power Output (W)
Over 70℃ (cosθ=1.0)
0W
(Shutdown)
0W
(Shutdown)
Maximum Power (W) 3000W 6000W
Maximum Efficiency (%) 82/84/85 84/86/89
Zero-load Power (W) 12W 18W
CHARGER
Input Voltage Range (VAC) 200~250 VAC / 100~125 VAC
Input Frequency 45-55Hz /55-65 Hz
Power Factor 1
Charge Characteristic 4-stage adaptive / Bulk-Absorption-Float-Equalize
Maximum DC Voltage Ripple (Vrms) < 1.25 V
Charge Current House Battery (A) 70A/40A/20A 140A/70A/40A
Charge Current Starter Battery (A) 4A
Absorption Voltage Default (VDC) 14.4V / 28.8V / 57.6V
Float voltage Default (VDC) 13.8V / 27.6V / 55.2V
Equalize Voltage default (VDC) 13.2V / 26.4V / 52.8V
Output Charge Voltage (min ~ max) 8V~16V / 11V~32V / 22V~64V
Battery Temperature sensor BTS-3
AC INPUT SWITCH
AC IN Terminal Circuit Breaker 15A (120V) /15A (230V) 30A (120V) /15A (220V)
Switch-over Time
a. inverter to AC input 0 msec.
b. AC input to inverter 0 msec.
Detection Time AC Input Fault 4 ~10 msec.
Trip Level AC Input to Inverter 90 VAC / 180 VAC
Trip Level Inverter to AC Input 94 VAC / 187 VAC
Min.~ Max. Frequency Range 45-55 Hz / 55-65 Hz
Mechanical
Cabinet / Protecting Class Aluminum / IP20
Dimension (HXWXD) 362 x 258 x 370 mm 424 x 258 x 370 mm
Weight (kgs) 30 kgs 35 kgs

9
Dimension CP-1500W-12/24 Unit: mm
AC IN CHARGER
SOLARCHARGER
SOLARPANEL
INVERTER AC OUT
ATS
POWER
Invertek CombiPlus
DSPL
ENT
RUNSTOP
REMOTE
R
BATTERYBULK
ABSOR
FLOAT
COM. ERR.
1MODE
2MODE
3MODE
4MODE
ERR.
COM.
1
0
Power Management Control System
Installation Holes
Backside Mounting Holes Bottom Mounting Holes
10
1010
10M6-4
M8-4

10
CP-3000W-12/24 Unit: mm
AC IN CHARGER
SOLARCHARGER
SOLARPANEL
INVERTER AC OUT
ATS
POWER
Invertek CombiPlus
DSPL
ENT
RUNSTOP
REMOTE
R
BATTERYBULK
ABSOR
FLOAT
COM. ERR.
1MODE
2MODE
3MODE
4MODE
ERR.
COM.
1
0
Power Management Control System
Installation Holes
Backside Mounting Holes Bottom Mounting Holes
10
1010
10M6-4
M8-4

11
Chapter 1 Installation
This product should be installed by a qualified electrician. 1.1 Box Contents
CombiPlus USER MANUAL Bag Containing connection items, ie:
Battery Temperature Sensor (BTS-03) Four M8 nuts (including spring washers) Four terminals and casing
1.2 Location
The product must be installed in a dry and well-ventilated area, as close as possible to batteries. There should be a clear space of at least 20 cm around the appliance for cooling.
Excessively high ambient temperature will result in the following Reduced service life Reduced charge current Reduced peak capacity or shutdown of the inverter
Never position the appliance directly above the batteries. The product is suitable for wall mounting. The back and the bottom of the enclosure has holes for wall mounting purposes, see Page 9 and 10.
The appliance can be mounted horizontally as well as vertically; vertical mounting is preferable. Te vertical position offers optimum cooling.
The interior of the product must remain accessible after installation. Ensure the AC and DC input cables are fitted with fuses and circuit breakers. Try and keep the distance between the product and battery to a minimum in order to minimize cable voltage losses. For safety purpose, this product should be installed in a heat-resistant environment if it is used with equipment where a substantial amount of power is to be converted. You should prevent the presence of e.g. chemicals, synthetic components, curtains or textiles, etc. in the immediate vicinity.
1.3 Requirements Screwdrivers for removing the lower-front panel and connecting AC loads. 2 battery cables (maximum length 6 meters)

12
Including battery terminals and cable ends. Insulated box spanner (13 mm) for securing the DC terminal nuts. Three-wire cable for AC cabling.
1.4 Connection of Battery Cables
In order to fully utilize the full capacity of the product, batteries with sufficient capacity and battery cables with sufficient cross section should be used, please see table:
Model Item
CP-1500-12X CP-1500-24X CP-3000-12X CP-3000-24X
Recommended battery capacity (Ah)
200~700 100~400 400~1200 200~700
Recommended cross section (mm2)(0~6m)
50 mm2 38 mm2 80 mm2 50 mm2
Remark: Internal resistance is the important factor when working with low capacity batteries. Consult your supplier. Procedure: Proceed as follows to connect the battery cables: Use an insulated box spanner in order to avoid shorting the battery. Avoid shorting the battery cables:
Undo the four screws at the lower-front panel of the enclosure and remove the panel. Connect the battery cable: the + (red) on the right and the – (black) on the left. Please
see page 30 and 31. Don’t reverse the (+) and (-) of the battery. This may cause internal damage. Tighten the connections after positioning the fastening items supplied with product. Secure the nuts tightly in order to reduce the contact resistance as much as possible.
1.5 Connection of AC Cabling The enclosure must be grounded for safety purpose. An earth screw has been fitted at
the bottom side of the enclosure. The terminal block can be found at lower-front panel of the enclosure: The shore or mains (AC IN) cable must be connected to AC IN terminals, use a three-wire cable and a cross section of 4~10 mm2.
Procedure: Proceed as follows to connect the AC cables.
The AC output cable can be connected directly to terminal block containing the word

13
“AC OUT”. The terminal points are indicated clearly. From left to right: “G” (earth), “N” (neutral), and “L” (phase).
The AC input cable can be connected to the terminal block containing the word “AC IN”, the terminal points are indicated clearly from left to right “L” (phase), “N” (neutral), and “G” (earth). The current which is switched through to the output (AC OUT) is not fused. External fuses or current limiters have to be installed.
1.6 Optional Connections
A number of operational connections are possible: 1.6.1 Second Battery
The “CombiPlus” has a connection for charging a starter battery. For connection, see page 29.
1.6.2 Voltage Sense Two sense wires may be connected to compensate possible battery cable losses during
charging. Use wires of at least 0.75 mm2. For connection, see page 29. 1.6.3 Battery Temperature Sensor (BTS-3) The battery temperature sensor supplied with the product may be used for temperature
compensated charging, see page 29. The sensor is insulated and must be mounted on the batteries minus pole. 1.6.4 3 Sets of Auxiliary Relay (RY1, RY2, RY3) Output The “CombiPlus” provides 3 sets of Auxiliary Relays for users to connect to other
appliances or to output the alarm signals. 3 sets of relays can be programmed for respective function. (E Group Constants) and can be practically applied which is one of the greatest features.
1.6.5 Parallel Connection The product can be connected in parallel using several identical modules, please see
page 32. The batteries must be connected in accordance with page 32.This requires interconnecting the products with the package of a special box, parallel box, to be supplied by factory in conjunction with a connection diagram.
Parallel connection requires compliance with the following conditions: 1. No more than 5 units should be connected in parallel. 2. Only identical models should be connected in parallel. 3. Ensure sufficient battery capacity is available. 4. The prescribed cable cross sections (between battery and distribution point) must
be multiplied with the number of appliances to be connected in parallel. 5. Position the products close to each other but ensure there is adequate clearance for
ventilation minimum 20 cm. For better ventilation, please install the fan cover

14
(optional). 6. The BTS, voltage sensor and remote control panel (RCP) must be connected to
Master. 7. The cables for each appliance must be equal in length (AC and DC)
1.6.6 3-Phase Operation The product can also be used in a 3-phase system, see page 33. The batteries must be connected in accordance with page 33. The following condition conditions should be complied with in the case of 3-1phase operation: 1. Only identical models should be used. 2. Ensure sufficient battery capacity is available. 3. Position the products close to each other but ensure there is adequate clearance for
ventilation minimum 20 cm. (For the better ventilation environment, it is highly recommended to install the fan cover in the air-in on the right side of CombiPlus.
4. The BTS, voltage sensor should preferably be connected all three units (1 Master unit and 2 Follower units).
5. Only a single remote control can be connected.
1.7 Grounding When the input voltage of the CombiPlus is not switched through, the neutral of “AC OUT” is connected to ground by means of a relay. This function can be disabled by constant B2-07 (B2-07=0 Disconnect)
1.8 Remote Control Panel (RCP-4)
The product can be operated remotely from remote port with the aid of a remote control panel. For connection of a remote control panel, see page 28. Note: The display panel and operation flow of the remote control panel is exactly the same as the upper-front display panel.

15
Chapter 2 Settings
Settings may only be changed by a qualified engineer. Carefully read the user manual before any change is made. When setting the charger, all connections to the battery must be disconnected from the
CombiPlus. Do not use non-rechargeable batteries. Batteries should be placed in a dry and well-ventilated area during charging. The product default settings are for charging gel batteries. For the recommended battery
voltage initial settings, see D1 (Charger) Group parameters.
2.1 Four Control Modes Applications
MODE 1: AC Power as Priority Support (Example of CP-3000-242) When CombiPlus enters to MODE 1, B2-09 (AC IN DynaCur Limit)=0 (Disable) and the value of B2-18 (MODE1: ACINCurrent Lmt) will be loaded to B2-05. 1. INVERTER Mode:
When AC IN=0 A, AC OUT load is completely supplied by INVERTER. It goes to the inverter mode.
Battery
Grid,Shore,Generator Power Load
ATS OFFAC IN AC OUT
5A
5A
0A
75A

16
2. Power Control Mode (a) In this example:
All AC loads are off, with the “CombiPlus” constant B2-05=5A (AC IN Current Limit), the AC CHARGER will not take more than 5A with limits to battery charge current to 75A.
3. Power Control Mode (b)
Now some small loads are switched on and load increase to 3A. Only 5-3=2A is left to charge the batteries and charge current is reduced to about 30A. ※ Note: Shore current is automatically limited to 5A and the AC input circuit breaker will not trip!
Battery
Shore Power Max 5A Load
ATS ONAC IN AC OUT
5A
2A
30A
5A
B2-05=5A
3A
Battery
Shore Power Max 5A Load
ATS ONAC IN AC OUT
5A
5A
0A
75A
5A
B2-05=5A

17
4. Power Control Mode (c) The load is switched on and current consumption increase to 5A. Nothing is left to charge
the battery. The charge current is automatically reduced to 0A, and the AC input circuit breaker does
not trip!
Battery
Shore Power Max 5A Load
ATS ONAC IN AC OUT
5A
0A
5A
B2-05=5A
5A
5. Power Assist Mode
And now the other load adds and switches on and the current increases to 11A. This is where Power Assist is needed.
The bidirectional converter starts operating as inverter to add 6A to the 5A that is available from the shore-side: Total 6+5=11A, and no overload on the AC supply.
As soon as the load reduces to less than 5A, any current that is left over will be used to recharge the battery.
Battery
Shore Power Max 5A Load
ATS ONAC IN AC OUT
5A
6A
5A
B2-05=5A
11A
90A

18
MODE 2: AC Generator (Example of CP-3000-242) When CombiPlus enters to MODE 2, B2-09(AC IN DynaCur Limit)=1 (Enable) and the value of B2-21 (MODE 2: ACINCurrent Lmt) will be loaded to B2-05. 1. INVERTER Mode:
When AC IN=0 A, AC OUT load is completely supplied by INVERTER. It goes to the inverter mode.
Battery
Grid,Shore,Generator Power Load
ATS OFFAC IN AC OUT
5A
5A
0A
75A
2. Power Control Mode (a)
In this example: All AC loads are off, with the “CombiPlus” constant B2-05=5A (AC IN Current Limit), the AC CHARGER will not take more than 5A with limits to battery charge current to 75A.
Battery
Shore Power Max 5A Load
ATS ONAC IN AC OUT
5A
5A
0A
75A
5A
B2-05=5A

19
3. Power Control Mode (b) Now some small loads are switched on and load increase to 3A. Only 5-3=2A is left to
charge the batteries and charge current is reduced to about 30A. ※ Note: Shore current is automatically limited to 5A and the AC input circuit breaker will not trip!
Battery
Shore Power Max 5A Load
ATS ONAC IN AC OUT
5A
2A
30A
5A
B2-05=5A
3A
4.Power Control Mode (c)
The load is switched on and current consumption increase to 5A. Nothing is left to charge the battery.
The charge current is automatically reduced to 0A, and the AC input circuit breaker does not trip!
Battery
Shore Power Max 5A Load
ATS ONAC IN AC OUT
5A
0A
5A
B2-05=5A
5A

20
MODE 3: Green Power as Priority Support When CombiPlus enters to MODE 3, B2-09(AC IN DynaCur Limit)=0 (Disable) and the value of B2-20 (MODE3: ACINCurrent Lmt) will be loaded to B2-05. 1. INVERTER Mode:
When the battery voltage is not lower than (B2-14) voltage value, inverter mode takes priority to supply voltage to AC OUT for load consumption.
(INVERTER ON+ ATS OFF + AC CHARGER OFF)
Battery
Shore Power Ready Load
ATS OFFAC IN AC OUT3A
5A
B2-05=5A
3A
45A
SolarCharger
Solar Panel
or
2. Power Control Mode
When AC IN power is ready, INVERTER is active and battery voltage is lower than B2-14 voltage value and longer than the second time set in B2-15, ATS will be switched on to ensure AC OUT to continuously supply the load. At the moment, AC OUT will be supplied by AC IN power. At the same time, the battery is charged from AC IN power (AC CHARGER OFF) only by other wind charger or DC generator charger.
The difference between MODE 3 and MODE 4 is that in MODE 3, when AC IN power is ready, AC CHARGER is off and the battery is charged by other renewable energy. This is why MODE 3 is called Green Power as Priority Support Mode (INVERTER OFF+ ATS ON + AC CHARGER OFF)

21
Battery
Shore Power Load
ATS ONAC IN AC OUT
5A
B2-05=5A
3A
SolarCharger
Solar Panel
or
3A
AC Charger OFF
3. Power Assist Mode And now the other load adds and the current increases to 11A. This is where Power
Assist function is needed! (ATS ON + AC CHARGER OFF + INVERTER ON + Power Assist Mode ON)
As soon as the load reduces to less than 5A, power assist function stops.
Battery
Shore Power Load
ATS ONAC IN AC OUT
5A
B2-05=5A
11A
SolarCharger
Solar Panel
or
5A
6A
90A

22
4. “INVERTER Mode” Repeat When the battery is recharged by other renewable energy source, battery voltage is
higher than B2-14 voltage value and longer than second time set in B2-15, inverter mode takes priority to supply voltage to AC OUT again for load consumption.
Battery
Shore Power Ready Load
ATS OFFAC IN AC OUT
3A
SolarCharger
Solar Panel
or
3A
45A
0A

23
MODE 4: INVERTER as Priority Support When CombiPlus enters to MODE 4, B2-09(AC IN DynaCur Limit)=0 (Disable) and the value of B2-19 (MODE4: ACINCurrent Lmt)will be loaded to B2-05. 1. INVERTER Mode:
When the battery voltage is not lower than (B2-10) voltage value, inverter mode takes priority to supply voltage to AC OUT for load consumption.
(INVERTER ON+ ATS OFF + AC CHARGER OFF)
Battery
Shore Power Ready Load
ATS OFFAC IN AC OUT3A
5A
B2-05=5A
3A
45A
SolarCharger
Solar Panel
or
2. Power Control Mode:
When AC IN power is ready, INVERTER is active and battery is about to be exhausted, battery voltage is lower than B2-10 voltage value and longer than the second time set in B2-11, ATS will be switched on to ensure AC OUT to continuously the load. At the moment, AC OUT will be supplied by AC IN power. At the same time, the power control mode is active and will supply the extra AC IN power to charge the battery! (INVERTER OFF + ATS ON + AC CHARGER ON + Power Control Mode ON)
Battery
Shore Power Load
ATS ONAC IN AC OUT2A
5A
B2-05=5A
3A
30A
SolarCharger
Solar Panel
or
5A

24
3. Power Assist Mode And now the other load adds and the current increases to 11A. This is where Power
Assist function is needed! (ATS ON + AC CHARGER OFF + INVERTER ON + Power Assist Mode ON)
As soon as the load reduces to less than 5A, any current that is left over will be used to recharge the battery.
Battery
Shore Power Load
ATS ONAC IN AC OUT6A
5A
B2-05=5A
11A
90A
SolarCharger
Solar Panel
or
5A
4. “INVERTER Mode” Repeat
When the battery voltage is higher than B2-12 voltage value and longer than second time set in B2-15, inverter mode takes priority to supply voltage to AC OUT again for load consumption.
Battery
Shore Power Ready Load
ATS OFFAC IN AC OUT3A
5A
B2-05=5A
3A
45A
SolarCharger
Solar Panel
or

25
Chapter 3 Wiring
3.1 Optional Fan Cover Application 3.1.1 Standard Single Unit When the unit is installed in an environment with good ventilation, the fan cover is not needed. 3.1.2 Single Unit Installed When the unit is installed nearby wall side which Blocks the airflow coming to the unit, the fan cover is needed. 3.1.3 Multiple and 3-Phase Application When there is more than one CombiPlus in parallel connection or 3-phase connection, the optional accessory, fan covers, are highly recommended to be installed for each CombiPlus to have better ventilation in cooling down the temperature.

26
3.2 Upper-Front Panel Display
Push Buttons
Push buttons Name Description PB1 RUN/STOP CombiPlus RUN/STOP key PB2 MODE 1 AC Power as Priority Support PB3 MODE 2 AC Generator PB4 MODE 3 Green Power as Priority SupportPB5 MODE 4 INVERTER as Priority Support
Before changing from one mode to another, it has to stop running and be in STOP mode.
PB6 DSPL Multi-display select key PB7 ENTER Data write-in key
PB8 UP(△) △ Increment key
PB9 DOWN (▽) ▽ Decrement key
Press △ and ▽ keys at the same time to enable the cursor to move to the left digit from the current digit.
PB 1
PB3
PB5
PB2
PB4 PB9
1 2 3 4 5 67 89 10
PB6
PB7
PB8

27
Note: 1. When pressing RUN/STOP key, the holding time to remain on the key has to be at least 2
seconds (initial setting) to activate the RUN or STOP function in order to avoid any accidental pressing on the RUN/STOP key. The second time can be adjusted in RUN/STOP KeyHoldTime (O2-07).
2. When changing any of four modes to another mode, CombiPlus has to STOP and then press the desired mode key. When pressing MODE 1 or MODE 2 or MODE 3 or MODE 4 key, the holding time has to remain on the key has to be at least 5 seconds (initial setting) to activate the mode change in order to avoid any accidental pressing on the mode keys. The second time can be adjusted in MODE Key Hold Time (O2-06).
3. The beep sound of key pressing can be selected to be enabled or disabled in Key Pressed Beep Sel (O2-01)
4. When all the keys are not pressed at all for a certain time (O1-02), it goes to idle mode. Once any key is pressed, the display will return to the LCD monitor selection value set in constant O1-01.
5. When all the keys are not pressed at all for a certain time (O2-09), all the LCD Display and LED Indicators are not active but RUN/STOP indicator remains active. The display idle function can save the display power.
6. Press △ key to increase the setting value and ▽ key to decrease the setting value. Press △ and ▽ keys at the same time to enable the cursor to move to the left digit from the current digit. For example, if the current digit stays in decimal, press △ and ▽ at the same time for the digit to move to centesimal.

28
LED Indicators LED Name L ED ON LED OFF
1 AC IN
1. Input voltage normal, and position > ”transfer Voltage Level” (150VAC~240VAC)
2. Input voltage frequency range in between(45~65Hz)
No input power
2 AC CHARGER
Green : Battery charger is working.
3 SOLAR PANEL Solar module is delivering energy.
1. Solar module aren’t connect or
2. Day or Night / (cloudy day)
4 SOLAR CHARGER Solar charger is working No external solar charger is connected.
5 AC OUT There is voltage at the “AC OUT” terminal.
6 INVERTER Green : Inverter is working.
7 BATTERY FLOAT or ABSOR. Or BULK charge state of battery.
8 ATS Green : ATS switch is active AC IN voltage is being sent directly to AC OUT terminal
Green : CombiPlus turn on. Red : CombiPlus turn off.
9 RUN/STOP
NOTE: Green Blink : Auto-Restart is in use 10 COM./ERR. Remote control port in communication/in error

29
3.3 Lower-Front Panel Connection
Connections / Lower-Front side A PORT A (IN) Connections for parallel power/3-phase power B PORT B (OUT) Connections for parallel power/3-phase power C PORT C (EXT) Connections for external solar/wind modules D CHARGE Connecting terminal for starting battery of 4A E BTS (Battery temp. sensor) Connecting terminal for temperature sensor. F Vsens +/-
(Battery Voltage Sense) Connecting terminal for Battery Voltage feedback
G RY1 contact Connecting terminal for auxiliary contact 1. H RY2 contact Connecting terminal for auxiliary contact 2. I RY3 contact Connecting terminal for auxiliary contact 3. J AC OUT L Connecting terminal for AC output Line K AC OUT N Connecting terminal for AC output Neutral L AC OUT G Connecting terminal for AC output Ground M AC IN G Connecting terminal for AC input Ground N AC IN N Connecting terminal for AC input Neutral O AC IN L Connecting terminal for AC input Line P Battery POS+/ NEG- Battery cables.
P
G
H
I
EF
O MN L J K
A B C
D

30
3.4 Battery Connection 3.4.1 Star Connection Schematic
V-SENSBTSCHARGE
RY1
AC
RY2
AC
RY3
AC
POS+
NEG-
BB
AC INPUT
BREAKER
PORT A
(IN)PORT B
(OUT)PORT C
(EXT)
AC IN
LN
G
AC OUT
LN
G
WARNING:
Don't reverse the (+) and (-) of the battery.This may cause inte
rnal damage.
AC
IN
CH
AR
GE
R
SO
LA
RC
HA
RG
ER
SOL
AR
PAN
EL
INV
ER
TE
RA
C O
UT
AT
S
POW
ER
Inve
rtek
Com
biPl
us
DSP
L
ENT
RU
NST
OP
RE
MO
TE
R
BA
TTE
RY
BUL
K
ABS
OR
FLO
AT
CO
M.
ER
R.
1M
OD
E2
MO
DE
3M
OD
E4
MO
DE
ERR
.
CO
M.
1 0
Pow
er M
anag
emen
t Con
trol
Sys
tem
Battery
Length La=Lb=Lc
Length Ld=Le=Lf
La
Lb
Lc
Ld
Le
Lf
F1
F2F3F4
V-SENSBTSCHARGE
RY1
AC
RY2
AC
RY3
AC
POS+
NEG-
BB
AC INPUT
BREAKER
PORT A
(IN)PORT B
(OUT)PORT C
(EXT)
AC IN
LN
G
AC OUT
LN
G
WARNING:
Don't reverse the (+) and (-) of the battery.This may cause inte
rnal damage.
AC
IN
CH
AR
GE
R
SO
LA
RC
HA
RG
ER
SOLA
RPA
NEL
INV
ER
TE
RA
C O
UT
AT
S
POW
ER
Inve
rtek
Com
biPl
us
DSP
L
ENT
RU
NST
OP
RE
MO
TE
R
BA
TT
ER
YBU
LK
AB
SOR
FLO
AT
CO
M.
ERR
.
1M
OD
E2
MO
DE
3M
OD
E4
MO
DE
ER
R.
CO
M.
1 0
Powe
r Man
agem
ent C
ontro
l Sys
tem
V-SENSBTSCHARGE
RY1
AC
RY2
AC
RY3
AC
POS+
NEG-
BB
AC INPUT
BREAKER
PORT A
(IN)PORT B
(OUT)PORT C
(EXT)
AC IN
LN
G
AC OUT
LN
G
WARNING:
Don't reverse the (+) and (-) of the battery.This may cause inte
rnal damage.
AC
IN
CH
AR
GE
R
SO
LAR
CH
AR
GER
SOL
AR
PAN
EL
INV
ER
TER
AC
OU
T
AT
S
POW
ER
Inve
rtek
Com
biPl
us
DSP
L
ENT
RU
NST
OP
RE
MO
TE
R
BA
TT
ER
YB
ULK
AB
SOR
FLO
AT
CO
M.
ER
R.
1M
OD
E2
MO
DE
3M
OD
E4
MO
DE
ER
R.
CO
M.
1 0
Powe
r Man
agem
ent C
ontro
l Sys
tem

31
3.4.2 Rail Connection Schematic
Battery
Length La=Lb=Lc
Length Ld=Le=Lf
La
Lb
Lc
Ld
Le
Lf
F1
F2
F3
F4
V-SENSBTSCHARGE
RY1
AC
RY2
AC
RY3
AC
POS+
NEG-
BB
AC INPUT
BREAKER
PORT A
(IN)PORT B
(OUT)PORT C
(EXT)
AC IN
LN
G
AC OUT
LN
G
WARNING:
Don't reverse the (+) and (-) of the battery.This may cause inte
rnal damage.
AC
IN
CH
AR
GE
R
SO
LAR
CH
AR
GE
RSO
LA
RPA
NE
L
INV
ER
TE
RA
C O
UT
AT
S
POW
ER
Inve
rtek
Com
biPl
us
DSP
L
ENT
RU
NST
OP
RE
MO
TE
R
BA
TT
ER
YB
UL
K
ABS
OR
FLO
AT
CO
M.
ER
R.
1M
OD
E2
MO
DE
3M
OD
E4
MO
DE
ER
R.
CO
M.
1 0
Pow
er M
anag
emen
t Con
trol
Sys
tem
V-SENSBTSCHARGE
RY1
AC
RY2
AC
RY3
AC
POS+
NEG-
BB
AC INPUT
BREAKER
PORT A
(IN)PORT B
(OUT)PORT C
(EXT)
AC IN
LN
G
AC OUT
LN
G
WARNING:
Don't reverse the (+) and (-) of the battery.This may cause inte
rnal damage.
AC
IN
CH
AR
GE
R
SO
LA
RC
HA
RG
ER
SOL
AR
PAN
EL
INV
ER
TE
RA
C O
UT
AT
S
POW
ER
Inve
rtek
Com
biPl
us
DSP
L
ENT
RU
NST
OP
RE
MO
TE
R
BA
TT
ER
YB
UL
K
AB
SOR
FLO
AT
CO
M.
ER
R.
1M
OD
E2
MO
DE
3M
OD
E4
MO
DE
ER
R.
CO
M.
1 0
Powe
r Man
agem
ent C
ontr
ol S
yste
m
V-SENSBTSCHARGE
RY1
AC
RY2
AC
RY3
AC
POS+
NEG-
BB
AC INPUT
BREAKER
PORT A
(IN)PORT B
(OUT)PORT C
(EXT)
AC IN
LN
G
AC OUT
LN
G
WARNING:
Don't reverse the (+) and (-) of the battery.This may cause inte
rnal damage.
AC
IN
CH
AR
GE
R
SO
LAR
CH
AR
GE
RSO
LA
RPA
NE
L
INV
ER
TE
RA
C O
UT
AT
S
POW
ER
Inve
rtek
Com
biPl
us
DSP
L
ENT
RU
NST
OP
RE
MO
TE
R
BA
TT
ER
YB
UL
K
AB
SOR
FLO
AT
CO
M.
ER
R.
1M
OD
E2
MO
DE
3M
OD
E4
MO
DE
ER
R.
CO
M.
1 0
Pow
er M
anag
emen
t Con
trol
Sys
tem

32
3.5 Parallel Connection Schematic
AC INL in
N in
PE
AC OUT
L out
N out
PE
MASTER
SLAVE 1
SLAVE 2
Parallel Box
V-SENSBTSCHARGE
RY1
AC
RY2
AC
RY3
AC
POS+
NEG-
BB
AC INPUT
BREAKER
PORT A
(IN)PORT B
(OUT)PORT C
(EXT)
AC IN
LN
G
AC OUT
LN
G
WARNING:
Don't reverse the (+) and (-) of the battery.This may cause inte
rnal damage.
AC
IN
CH
AR
GE
R
SO
LAR
CH
AR
GER
SOL
AR
PAN
EL
INV
ER
TER
AC
OU
T
AT
S
POW
ER
Inve
rtek
Com
biPl
us
DSP
L
ENT
RU
NST
OP
REM
OTE
R
BA
TTER
YB
ULK
AB
SOR
FLO
AT
CO
M.
ER
R.
1M
OD
E2
MO
DE
3M
OD
E4
MO
DE
ERR
.
CO
M.
1 0
Pow
er M
anag
emen
t Con
trol S
yste
m
V-SENSBTSCHARGE
RY1
AC
RY2
AC
RY3
AC
POS+
NEG-
BB
AC INPUT
BREAKER
PORT A
(IN)PORT B
(OUT)PORT C
(EXT)
AC IN
LN
G
AC OUT
LN
G
WARNING:
Don't reverse the (+) and (-) of the battery.This may cause inte
rnal damage.
AC
IN
CH
AR
GER
SO
LA
RC
HA
RG
ER
SOLA
RPA
NE
L
INV
ER
TER
AC
OU
T
AT
S
POW
ER
Inve
rtek
Com
biPl
us
DSP
L
ENT
RU
NST
OP
REM
OT
E
R
BA
TTER
YB
ULK
ABS
OR
FLO
AT
CO
M.
ER
R.
1M
OD
E2
MO
DE
3M
OD
E4
MO
DE
ER
R.
CO
M.
1 0
Powe
r Man
agem
ent C
ontro
l Sys
tem
V-SENSBTSCHARGE
RY1
AC
RY2
AC
RY3
AC
POS+
NEG-
BB
AC INPUT
BREAKER
PORT A
(IN)PORT B
(OUT)PORT C
(EXT)
AC IN
LN
G
AC OUT
LN
G
WARNING:
Don't reverse the (+) and (-) of the battery.This may cause inte
rnal damage.
AC
IN
CH
AR
GER
SO
LA
RC
HA
RG
ERSO
LAR
PAN
EL
INV
ERT
ERA
C O
UT
ATS
POW
ER
Inve
rtek
Com
biPl
us
DSP
L
ENT
RU
NST
OP
RE
MO
TE
R
BAT
TER
YBU
LK
ABS
OR
FLO
AT
CO
M.
ERR
.
1M
OD
E2
MO
DE
3M
OD
E4
MO
DE
ER
R.
CO
M.
1 0
Pow
er M
anag
emen
t Con
trol S
yste
m
Parallel Box
SLAVE 3
V-SENSBTSCHARGE
RY1
AC
RY2
AC
RY3
AC
POS+
NEG-
BB
AC INPUT
BREAKER
PORT A
(IN)PORT B
(OUT)PORT C
(EXT)
AC IN
LN
G
AC OUT
LN
G
WARNING:
Don't reverse the (+) and (-) of the battery.This may cause inte
rnal damage.
AC
IN
CH
AR
GE
R
SO
LAR
CH
AR
GER
SOL
AR
PAN
EL
INV
ER
TER
AC
OU
T
AT
S
POW
ER
Inve
rtek
Com
biPl
us
DSP
L
ENT
RUN
STO
PR
EM
OTE
R
BA
TTE
RY
BULK
AB
SOR
FLO
AT
CO
M.
ERR
.
1M
OD
E2
MO
DE
3M
OD
E4
MO
DE
ERR
.
CO
M.
1 0
Powe
r Man
agem
ent C
ontr
ol S
yste
m
Parallel Box
SLAVE 4
V-SENSBTSCHARGE
RY1
AC
RY2
AC
RY3
AC
POS+
NEG-
BB
AC INPUT
BREAKER
PORT A
(IN)PORT B
(OUT)PORT C
(EXT)
AC IN
LN
G
AC OUT
LN
G
WARNING:
Don't reverse the (+) and (-) of the battery.This may cause inte
rnal damage.
AC
IN
CH
AR
GE
R
SO
LAR
CH
AR
GE
RSO
LAR
PAN
EL
INV
ERTE
RA
C O
UT
AT
S
POW
ER
Inve
rtek
Com
biPl
us
DSP
L
ENT
RU
NST
OP
REM
OT
E
R
BATT
ERY
BU
LK
ABS
OR
FLO
AT
CO
M.
ER
R.
1M
OD
E2
MO
DE
3M
OD
E4
MO
DE
ER
R.
CO
M.
1 0
Powe
r Man
agem
ent C
ontr
ol S
yste
m
Parallel Box
For t
he M
AST
ER, c
onst
ant B
2-05
and
B3-
01 m
ust b
e se
t.
For t
he S
LAV
E 1
and
2, c
onst
ant s
ettin
gs a
re n
ot re
quire
d.

33
3.6 3-Phase Connection Schematic
AC INL1L2
PE
AC OUT
N out
PE
MASTER
FOLLOWER 1
FOLLOWER 2
L3N in
L1
L2
L3
3-Phase Box
V-SENSBTSCHARGE
RY1
AC
RY2
AC
RY3
AC
POS+
NEG-
BB
AC INPUT
BREAKER
PORT A
(IN)PORT B
(OUT)PORT C
(EXT)
AC IN
LN
G
AC OUT
LN
G
WARNING:
Don't reverse the (+) and (-) of the battery.This may cause inte
rnal damage.
AC
IN
CH
AR
GER
SO
LA
RC
HA
RG
ER
SOL
AR
PAN
EL
INV
ER
TER
AC
OU
T
AT
S
POW
ER
Inve
rtek
Com
biPl
us
DSP
L
ENT
RU
NST
OP
RE
MO
TE
R
BATT
ERY
BU
LK
AB
SOR
FLO
AT
CO
M.
ER
R.
1M
OD
E2
MO
DE
3M
OD
E4
MO
DE
ER
R.
CO
M.
1 0
Powe
r Man
agem
ent C
ontro
l Sys
tem
V-SENSBTSCHARGE
RY1
AC
RY2
AC
RY3
AC
POS+
NEG-
BB
AC INPUT
BREAKER
PORT A
(IN)PORT B
(OUT)PORT C
(EXT)
AC IN
LN
G
AC OUT
LN
G
WARNING:
Don't reverse the (+) and (-) of the battery.This may cause inte
rnal damage.
AC
IN
CH
AR
GE
R
SO
LAR
CH
AR
GER
SOL
AR
PAN
EL
INV
ER
TER
AC
OU
T
ATS
POW
ER
Inve
rtek
Com
biPl
us
DSP
L
ENT
RU
NST
OP
REM
OTE
R
BA
TTE
RY
BU
LK
AB
SOR
FLO
AT
CO
M.
ER
R.
1M
OD
E2
MO
DE
3M
OD
E4
MO
DE
ER
R.
CO
M.
1 0
Powe
r Man
agem
ent C
ontro
l Sys
tem
V-SENSBTSCHARGE
RY1
AC
RY2
AC
RY3
AC
POS+
NEG-
BB
AC INPUT
BREAKER
PORT A
(IN)PORT B
(OUT)PORT C
(EXT)
AC IN
LN
G
AC OUT
LN
G
WARNING:
Don't reverse the (+) and (-) of the battery.This may cause inte
rnal damage.
AC
IN
CH
AR
GER
SO
LAR
CH
AR
GE
RSO
LA
RPA
NE
L
INV
ER
TER
AC
OU
T
ATS
POW
ER
Inve
rtek
Com
biPl
us
DSP
L
ENT
RU
NST
OP
REM
OT
E
R
BA
TTER
YB
UL
K
AB
SOR
FLO
AT
CO
M.
ER
R.
1M
OD
E2
MO
DE
3M
OD
E4
MO
DE
ER
R.
CO
M.
1 0
Pow
er M
anag
emen
t Con
trol S
yste
m
3-Phase Box
3-Phase Box
MA
STER
con
stan
ts se
tting
: B
4-01
=1
B4-
02=1
B
4-03
=0
FOLL
OW
ER 1
con
stan
ts se
tting
: B
4-01
=1
B4-
02=0
B
4-03
=0
FOLL
OW
ER 2
con
stan
ts se
tting
: B
4-01
=1
B4-
02=0
B
4-03
=0

34
3.7 3-Phase System 15 Modules
PORT A
(IN)PORT B
(OUT)PORT C
(EXT)
AC IN
LN
G
AC OUT
LN
G
AC
IN
CH
AR
GE
R
SO
LAR
CH
AR
GE
RSO
LA
RPA
NE
L
INV
ER
TER
AC
OU
T
AT
S
POW
ER
Inve
rtek
Com
biPl
us
DSP
L
ENT
RU
NST
OP
RE
MO
TE
R
BA
TTE
RY
BU
LK
AB
SOR
FLO
AT
CO
M.
ER
R.
1M
OD
E2
MO
DE
3M
OD
E4
MO
DE
ER
R.
CO
M.
1 0
Pow
er M
anag
emen
t Con
trol S
yste
m
PORT A
(IN)PORT B
(OUT)PORT C
(EXT)
AC IN
LN
G
AC OUT
LN
G
AC
IN
CH
AR
GER
SO
LA
RC
HA
RG
ERSO
LA
RPA
NEL
INV
ERTE
RA
C O
UT
AT
S
POW
ER
Inve
rtek
Com
biPl
us
DSP
L
ENT
RU
NST
OP
RE
MO
TE
R
BA
TTE
RY
BU
LK
AB
SOR
FLO
AT
CO
M.
ER
R.
1M
OD
E2
MO
DE
3M
OD
E4
MO
DE
ER
R.
CO
M.
1 0
Powe
r M
anag
emen
t Con
trol S
ystem
PORT A
(IN)PORT B
(OUT)PORT C
(EXT)
AC IN
LN
G
AC OUT
LN
G
AC
IN
CH
AR
GER
SO
LA
RC
HA
RG
ERSO
LAR
PAN
EL
INV
ER
TER
AC
OU
T
ATS
POW
ER
Inve
rtek
Com
biPl
us
DSP
L
ENT
RUN
STO
PR
EMO
TE
R
BA
TT
ERY
BU
LK
AB
SOR
FLO
AT
CO
M.
ER
R.
1M
OD
E2
MO
DE
3M
OD
E4
MO
DE
ER
R.
CO
M.
1 0
Powe
r Man
agem
ent C
ontro
l Sys
tem
PORT A
(IN)PORT B
(OUT)PORT C
(EXT)
AC IN
LN
G
AC OUT
LN
G
AC
IN
CH
AR
GE
R
SO
LAR
CH
AR
GE
RSO
LA
RPA
NEL
INV
ER
TER
AC
OU
T
ATS
POW
ER
Inve
rtek
Com
biPl
us
DSP
L
ENT
RU
NST
OP
REM
OT
E
R
BATT
ER
YB
UL
K
AB
SOR
FLO
AT
CO
M.
ER
R.
1M
OD
E2
MO
DE
3M
OD
E4
MO
DE
ER
R.
CO
M.
1 0
Pow
er M
anag
emen
t Con
trol S
yste
m
PORT A
(IN)PORT B
(OUT)PORT C
(EXT)
AC IN
LN
G
AC OUT
LN
G
AC
IN
CH
AR
GER
SO
LA
RC
HA
RG
ERSO
LA
RPA
NEL
INV
ERT
ERA
C O
UT
AT
S
POW
ER
Inve
rtek
Com
biPl
us
DSP
L
ENT
RU
NST
OP
REM
OTE
R
BA
TTE
RY
BU
LK
AB
SOR
FLO
AT
CO
M.
ER
R.
1M
OD
E2
MO
DE
3M
OD
E4
MO
DE
ER
R.
CO
M.
1 0
Powe
r Man
agem
ent C
ontro
l Sys
tem
Parallel
Box
Parallel
Box
Parallel
Box
Parallel
Box
Follower 2
PORT A
(IN)PORT B
(OUT)PORT C
(EXT)
AC IN
LN
G
AC OUT
LN
G
AC
IN
CH
AR
GE
R
SO
LAR
CH
AR
GE
RSO
LA
RPA
NE
L
INV
ER
TER
AC
OU
T
AT
S
POW
ER
Inve
rtek
Com
biPl
us
DSP
L
ENT
RU
NST
OP
RE
MO
TE
R
BA
TTE
RY
BU
LK
AB
SOR
FLO
AT
CO
M.
ER
R.
1M
OD
E2
MO
DE
3M
OD
E4
MO
DE
ER
R.
CO
M.
1 0
Pow
er M
anag
emen
t Con
trol S
yste
m
PORT A
(IN)PORT B
(OUT)PORT C
(EXT)
AC IN
LN
G
AC OUT
LN
G
AC
IN
CH
AR
GER
SO
LA
RC
HA
RG
ERSO
LA
RPA
NEL
INV
ERTE
RA
C O
UT
AT
S
POW
ER
Inve
rtek
Com
biPl
us
DSP
L
ENT
RU
NST
OP
RE
MO
TE
R
BA
TTE
RY
BU
LK
AB
SOR
FLO
AT
CO
M.
ER
R.
1M
OD
E2
MO
DE
3M
OD
E4
MO
DE
ER
R.
CO
M.
1 0
Powe
r M
anag
emen
t Con
trol S
ystem
PORT A
(IN)PORT B
(OUT)PORT C
(EXT)
AC IN
LN
G
AC OUT
LN
G
AC
IN
CH
AR
GER
SO
LA
RC
HA
RG
ERSO
LAR
PAN
EL
INV
ER
TER
AC
OU
T
ATS
POW
ER
Inve
rtek
Com
biPl
us
DSP
L
ENT
RUN
STO
PR
EMO
TE
R
BA
TT
ERY
BU
LK
AB
SOR
FLO
AT
CO
M.
ER
R.
1M
OD
E2
MO
DE
3M
OD
E4
MO
DE
ER
R.
CO
M.
1 0
Powe
r Man
agem
ent C
ontro
l Sys
tem
PORT A
(IN)PORT B
(OUT)PORT C
(EXT)
AC IN
LN
G
AC OUT
LN
G
AC
IN
CH
AR
GE
R
SO
LAR
CH
AR
GE
RSO
LA
RPA
NEL
INV
ER
TER
AC
OU
T
ATS
POW
ER
Inve
rtek
Com
biPl
us
DSP
L
ENT
RU
NST
OP
REM
OT
E
R
BATT
ER
YB
UL
K
AB
SOR
FLO
AT
CO
M.
ER
R.
1M
OD
E2
MO
DE
3M
OD
E4
MO
DE
ER
R.
CO
M.
1 0
Pow
er M
anag
emen
t Con
trol S
yste
m
PORT A
(IN)PORT B
(OUT)PORT C
(EXT)
AC IN
LN
G
AC OUT
LN
G
AC
IN
CH
AR
GER
SO
LA
RC
HA
RG
ERSO
LA
RPA
NEL
INV
ERT
ERA
C O
UT
AT
S
POW
ER
Inve
rtek
Com
biPl
us
DSP
L
ENT
RU
NST
OP
REM
OTE
R
BA
TTE
RY
BU
LK
AB
SOR
FLO
AT
CO
M.
ER
R.
1M
OD
E2
MO
DE
3M
OD
E4
MO
DE
ER
R.
CO
M.
1 0
Powe
r Man
agem
ent C
ontro
l Sys
tem
Parallel
Box
Parallel
Box
Parallel
Box
Parallel
Box
Follower 1
PORT A
(IN)PORT B
(OUT)PORT C
(EXT)
AC IN
LN
G
AC OUT
LN
G
AC
IN
CH
AR
GE
R
SO
LAR
CH
AR
GE
RSO
LA
RPA
NE
L
INV
ER
TER
AC
OU
T
AT
S
POW
ER
Inve
rtek
Com
biPl
us
DSP
L
ENT
RU
NST
OP
RE
MO
TE
R
BA
TTE
RY
BU
LK
AB
SOR
FLO
AT
CO
M.
ER
R.
1M
OD
E2
MO
DE
3M
OD
E4
MO
DE
ER
R.
CO
M.
1 0
Pow
er M
anag
emen
t Con
trol S
yste
m
PORT A
(IN)PORT B
(OUT)PORT C
(EXT)
AC IN
LN
G
AC OUT
LN
G
AC
IN
CH
AR
GER
SO
LA
RC
HA
RG
ERSO
LA
RPA
NEL
INV
ERTE
RA
C O
UT
AT
S
POW
ER
Inve
rtek
Com
biPl
us
DSP
L
ENT
RU
NST
OP
RE
MO
TE
R
BA
TTE
RY
BU
LK
AB
SOR
FLO
AT
CO
M.
ER
R.
1M
OD
E2
MO
DE
3M
OD
E4
MO
DE
ER
R.
CO
M.
1 0
Powe
r M
anag
emen
t Con
trol S
ystem
PORT A
(IN)PORT B
(OUT)PORT C
(EXT)
AC IN
LN
G
AC OUT
LN
G
AC
IN
CH
AR
GER
SO
LA
RC
HA
RG
ERSO
LAR
PAN
EL
INV
ER
TER
AC
OU
T
ATS
POW
ER
Inve
rtek
Com
biPl
us
DSP
L
ENT
RUN
STO
PR
EMO
TE
R
BA
TT
ERY
BU
LK
AB
SOR
FLO
AT
CO
M.
ER
R.
1M
OD
E2
MO
DE
3M
OD
E4
MO
DE
ER
R.
CO
M.
1 0
Powe
r Man
agem
ent C
ontro
l Sys
tem
PORT A
(IN)PORT B
(OUT)PORT C
(EXT)
AC IN
LN
G
AC OUT
LN
G
AC
IN
CH
AR
GE
R
SO
LAR
CH
AR
GE
RSO
LA
RPA
NEL
INV
ER
TER
AC
OU
T
ATS
POW
ER
Inve
rtek
Com
biPl
us
DSP
L
ENT
RU
NST
OP
REM
OT
E
R
BATT
ER
YB
UL
K
AB
SOR
FLO
AT
CO
M.
ER
R.
1M
OD
E2
MO
DE
3M
OD
E4
MO
DE
ER
R.
CO
M.
1 0
Pow
er M
anag
emen
t Con
trol S
yste
m
PORT A
(IN)PORT B
(OUT)PORT C
(EXT)
AC IN
LN
G
AC OUT
LN
G
AC
IN
CH
AR
GER
SO
LA
RC
HA
RG
ERSO
LA
RPA
NEL
INV
ERT
ERA
C O
UT
AT
S
POW
ER
Inve
rtek
Com
biPl
us
DSP
L
ENT
RU
NST
OP
REM
OTE
R
BA
TTE
RY
BU
LK
AB
SOR
FLO
AT
CO
M.
ER
R.
1M
OD
E2
MO
DE
3M
OD
E4
MO
DE
ER
R.
CO
M.
1 0
Powe
r Man
agem
ent C
ontro
l Sys
tem
Parallel
Box
Parallel
Box
Parallel
Box
Parallel
Box
Master
Slave 1
Slave 2
Slave 3
Slave 4
L1
L2
L3
PE
Nin
AC IN
L1
L2
L3
PE
Nout
AC OUT
3-Phase
Box
3-Phase
Box
3-Phase
Box
Slave 1
Slave 2
Slave 3
Slave 4
Slave 1
Slave 2
Slave 3
Slave 4
For t
he se
tting
s of M
AST
ER, F
OLL
OW
ERS
and
SLAV
ES, s
ee 3
.5 a
nd 3
.6

35
Chapter 4 User Constants There are four “Macro Function” under the main menu of the “CombiPlus” and they are “Operation”, “Initialize”, “Programming” and “Modified Constants”. The functions and their contents are as below.
Function Content
Operation
“CombiPlus” can monitor AC IN voltage and current, AC OUT voltage and current, battery voltage, battery current and ripple voltage in charging and discharging battery and other extension modules status. This is U (Monitor Group) constants.
Initialize Operation Condition Setting Group A (Initialize) Group: Multi-language setting, constants initialization setting and constants modification allowed/prohibited setting.
Programming
Constant groups to program (modify) all the constants: B (General) Group, C (INVERTER) Group, D (AC CHARGER) Group, E (Aux-relay) Group F (Solar charger) Group, G (DC to DC charger) Group H (DC load control) Group and O (Operator) Group
Modified Constants Operating the read-out and modification of the constants group setting which are different from initial setting. Users can program and modify constants
**** Operation of “Macro Function” On any display screen, pressing DSPL key could have the effect just like ESC key to enable the display screen go back to previous any of four “Macro Function” (XXXXXXXX can be either Operation or Initialize or Programming or Modified Constants.) And continue to press DSPL key to select “Macro Function”
*** Main Menu *** XXXXXXXX

36
4.1 The following is the structure of user constants.

37

38

39

40
4.2 The following is the operation flow.
MENU
*** Main Menu ***
Operation
*** Main Menu ***
Initialize
*** Main Menu ***
Programming
*** Main Menu ***
Modified Constants
*** Main Menu ***
Operation
Main Menu
DSPL
DSPL
DSPL
DSPL
MENU Function PARAMETERS
*** Main Menu *** Function U1 AC IN Voltage Control Mode Solar Charger Status
Operation Monitor U1-01 = 220V U1-08 = Mode1 U1-15 = xxx
AC IN Current Operation Status Solar Supply Current
U1-02 = 00.0A U1-09 = xxxxxxxx U1-16 = 0.0A
AC OUT Voltage Aux-Relay Status Solar Supply Power
U1-03 = 230V U1-10 = xxx U1-17 = 0.0W
AC OUT Current Elapsed Time Solar : Amp-Hours
U1-04 = 00.0A U1-11 = 0HR U1-18 = 0AH
Battery Voltage Bat. Temp. Sensor Solar:TotalAmp-Hours
U1-05 = 24.0V U1-12=--℃ U1-19 = 0AH
Battery RippleVoltag CPU ID 1 AC IN Voltage
U1-06 = 0.0V U1-13 = CPD0706 U1-01 = 220V
Battery Current CPU ID 2
U1-07 = 0A U1-14 = CPM0701
Function U2
Fault Trace
Function U3
Fault History
Function U1
Monitor
ENTER
DSPL
ENTER
DSPL
Main Menu : Operation

41
MENU GROUP Parameters Parameter Edit Enter
*** Main Menu ***
Operation
*** Main Menu *** Access Level A1-01 = 1 ***
Initialize Constant Set Constant Set Entry Accepted
A1-01 = 0
Operation Only
Select Language A1-02 = 0 ***
English English Entry Accepted
Init Parameters A1-03 = 0 ***
No Initialize No Initialize Entry Accepted
A1-03 = 1
Default Setting
Password 1 Password 1
A1-04 = 0 00"0" Entry Accepted
Access Level Password 1
Constant Set 00"1"
DSPL
Main Menu : Initialize
ENTER
DSPL
ENTER
DSPL
ENTER
DSPL
ENTER
ENTER
ENTER
DSPL
ENTER
ENTER
DSPL
ENTER
MENU GROUP Function Parameters Parameter Edit
*** Main Menu ***
Operation
*** Main Menu ***
Initialize
*** Main Menu *** Group B Function B1 Output Frequency B1-01 = 0 ***
Programming General Output Frequency 50Hz 50Hz Entry Accepted
Group C Function B2 B1-01 = 1
Inverter Auto Transfer Switch 60Hz
Group D Function B3
Charger Parallel System
Group E Function B4
Aux-Relay 2-3 Phase
Group F Function B1
Solar Charger Output Frequency
Group O
Operator
Group B
General
Main Menu : Programing - Function B1 - B1-01
DSPL
DSPLENTER
DSPL
ENTER
DSPL
ENTER
DSPL
ENTER
DSPL
ENTER

42
MENU GROUP Function Parameters Parameter Edit
*** Main Menu ***
Operation
*** Main Menu ***
Initialize
*** Main Menu *** Group B Function B1
Programming General Output Frequency
Group C Function B2 AC IN Low DisconnectAC IN Low Disconnect
Inverter Auto Transfer Switch B2-01 = 180V18"0"V Entry Accepted
Group D Function B3 AC IN Low connectAC IN Low Disconnect
Charger Parallel System B2-02 = 187V18"1"V
Group E Function B4 AC IN High ConnectAC IN Low Disconnect
Aux-Relay 2-3 Phase B2-03 = 265V1"8"1V
Group F Function B1 AC IN High DisconnectAC IN Low Disconnect
Solar Charger Output Frequency B2-04 = 270V"1"81V
Group O AC IN Current LimitAC IN Low Disconnect
Operator B2-05 = 16A18"1"V
Group B AC IN Waveform Check
General Active
Ground Relay
Connect
AC IN Frequency Range
45Hz~65Hz
MODE 3: Udc Lower ? V
AC IN Dynamic Limit B2-14 = 23.5V
Normal
MODE 3: Lower for ? Sec
MODE 2: Udc Lower ? V B2-15 = 0sec
B2-10 = 23.5V
MODE 3: Udc Higher ?V
MODE 2: Lower for ? SecB2-16 = 28.8V
B2-11 = 0sec
MODE 3: HigherfFor ?sec
MODE 2: Udc Higher ?V B2-17 = 0sec
B2-12 = 28.8V
AC IN Low Disconnect
MODE 2: HigherfFor ?secB2-01 = 180V
B2-13 = 0sec
Main Menu : Programing - Function B2 - B2-01
DSPL
DSPLENTER
DSPL
ENTER
DSPL▼ ▲
▼ ▲
▼ ▲
▼ ▲
▼ ▲
▼ ▲
▼ ▲
▼ ▲
▼ ▲
▼ ▲
ENTER
DSPL▼ ▲
ENTER
DSPL▼ ▲
▼ ▲
▼ ▲
▼ ▲
▼ ▲
▼ ▲
▼ ▲
▼ ▲
▼ ▲
ENTER
▼ ▲
▼ ▲
▼ ▲
DOWN ▲
DOWN ▲
DOWN ▲
DOWN ▲
DOWN ▲
▼▲
▼▲
▼▲
Press ▲ and ▼ key at the
same time to enable the
cursor go to the left digit
from the current digit.

43
MENU GROUP Function Parameters Parameter Edit
*** Main Menu ***
Operation
*** Main Menu ***
Initialize
*** Main Menu *** Group B Function B1
Programming General Output Frequency
Group C Function B2
Inverter Auto Transfer Switch
Group D Function B3 Number of Slave Number of Slave
Charger Parallel System B3-01 = 0 "0" Entry Accepted
Group E Function B4 Number of Slave
Aux-Relay 2-3 Phase "1"
Group F Function B1
Solar Charger Output Frequency
Group O
Operator
Group B
General
Main Menu : Programing - Function B3 - B3-01
DSPL
DSPLENTER
DSPL
ENTER
DSPL
ENTER
DSPL
ENTER
DSPL
ENTER
MENU GROUP Function Parameters Parameter Edit
*** Main Menu ***
Operation
*** Main Menu ***
Initialize
*** Main Menu *** Group B Function B1
Programming General Output Frequency
Group C Function B2
Inverter Auto Transfer Switch
Group D Function B3
Charger Parallel System
Group E Function B4 2-3 Phase Connection B4-01 = 0 ***
Aux-Relay 2-3 Phase Disable Disable Entry Accepted
Group F Function B1 2-3 Phase Master B4-01 = 1
Solar Charger Output Frequency Slave Enable
Group O 2-3 Phase Type
Operator 3 Phase
Group B
General
Main Menu : Programing - Function B4 - B4-01
DSPL
DSPLENTER
DSPL
ENTER
DSPL
ENTER
DSPL
ENTER
DSPL
ENTER

44
MENU GROUP Function Parameters Parameter Edit
*** Main Menu ***
Operation
*** Main Menu ***
Initialize
*** Main Menu *** Group B
Programming General
Group C Inverter Out Voltage Inverter Out Voltage
Inverter C1-01 = 230V 23"0"V Entry Accepted
Group D DC In Low Shut-down Inverter Out Voltage
Charger C1-02 = 18.00V 23"1"V
Group E DC In Low Restart
Aux-Relay C1-03 = 21.80V
Group F Power Assist Select
Solar Charger Enable
Group O Power Assist Level
Operator 2.0
Group B Inverter Out Voltage
General C1-01 = 230V
Main Menu : Programing - Function C1 - C1-01
DSPL
DSPLENTER
DSPL
ENTER
DSPL
ENTER
DSPL
ENTER
MENU GROUP Function Parameters Parameter Edit
*** Main Menu ***
Operation
*** Main Menu ***
Initialize
*** Main Menu *** Group B
Programming General
Group C
Inverter
Group D AC CHARGER Selection AC CHARGER Selection
Charger Enable Enable Entry Accepted
Group E Charge Curve AC CHARGER Selection
Aux-Relay Adaptive+Safe Disable
Group F Absorption Voltage Float Voltage
Solar Charger D1-03 = 28.80V D1-07 = 27.60V
Group O Rep-Absorption Time Charge Current
Operator D1-04 = 18.00Hr D1-08 = 52A
Group B Rep-Abs Interval Stop After 10Hr Bulk
General D1-05 = 7.00Days Enable
Max. Absorption Time Equalize Mode Select
D1-06 = 4Hr Enable
AC CHARGER Selection
Enable
Main Menu : Programing - Function D1 - D1-01
DSPL
DSPLENTER
DSPL
ENTER
DSPL
ENTER
DSPL
ENTER

45
MENU GROUP Function Parameters Parameter Edit
*** Main Menu ***
Operation
*** Main Menu ***
Initialize
*** Main Menu *** Group B
Programming General
Group C
Inverter
Group D
Charger
Group E Function E1 Load Higher than ? A Load Higher than ? A
Aux-Relay Set Aux1 ON E1-01 = 13.3A 13."3"A Entry Accepted
Group F Function E2 Load Higher than for ?sec Load Higher than ? A
Solar Charger Set Aux1 OFF E1-02 = 0sec 13."4"A
Group O Function E3 Udc Lower than ? V Not Charge for ? Sec
Operator Set Aux2 ON E1-03 = 23.5V E1-07 = 0sec
Group B Function E4 Udc Lower for ?sec Fan ON for ? Sec
General Set Aux2 OFF E1-04 = 0sec E1-08 = 0sec
Function E5 Udc Higher than ? V Udc Ripple Alarm Sel
Set Aux3 ON E1-05 = 32.0V Alarm
Function E6 Udc Higher for ?sec UdcRipAlarm for ?sec
Set Aux3 OFF E1-06 = 0sec E1-18 = 0sec
Main Menu : Programing - Group E - Function E1 - E1-01
DSPL
DSPLENTER
DSPL
ENTER
DSPL
ENTER
DSPL
ENTER
DSPL
ENTER
MENU GROUP Function Parameters Parameter Edit
*** Main Menu ***
Operation
*** Main Menu ***
Initialize
*** Main Menu *** Group B
Programming General
Group C
Inverter
Group D
Charger
Group E Function E1 Load Higher than ? A Load Higher than ? A
Aux-Relay Set Aux-Relay1 ON E2-01 = 3.32A 3.3"2"A Entry Accepted
Group F Function E2 Load Higher than for ?sec Load Higher than ? A
Solar Charger Set Aux-Relay1 OFF E2-02 = 0sec 3.3"3"A
Group O Function E3 Udc Lower than ? V Not Charge for ? Sec
Operator Set Aux-Relay2 ON E2-03 = 23.50V E2-07 = 0sec
Group B Function E4 Udc Lower than for ?sec Fan ON for ?sec
General Set Aux-Relay2 OFF E2-04 = 0sec E2-08 = 0sec
Function E5 Udc Higher than ? V Udc Ripple Alarm Sel
Set Aux-Relay3 ON E2-05 = 32.00V Alarm
Function E6 Udc Higher than for ?sec UdcRipAlarm for ?sec
Set Aux-Relay3 OFF E2-06 = 0sec E2-19 = 0sec
Main Menu : Programing - Group E - Function E2 - E2-01
DSPL
DSPLENTER
DSPL
ENTER
DSPL
ENTER
DSPL
ENTER
DSPL
ENTER

46
MENU GROUP Function Parameters Parameter Edit
*** Main Menu ***
Operation
*** Main Menu ***
Initialize
*** Main Menu *** Group B
Programming General
Group C Solar Charger Enable F1-01 = 0 ***
Inverter Disable Disable Entry Accepted
Group D Reset Amp-Hours F1-01 = 1
Charger NO Enable
Group E
Aux-Relay
Group F
Solar Charger
Group O
Operator
Group B
General
Main Menu : Programing - Function F1 - F1-01
DSPL
DSPLENTER
DSPL
ENTER
DSPL
ENTER
DSPL
ENTER
MENU GROUP Function Parameters Parameter Edit
*** Main Menu ***
Operation
*** Main Menu ***
Initialize
*** Main Menu *** Group B Function O1 Power-On Monitor Sel O1-01 = 4 ***
Programming General Monitor Select Battery Voltage Battery Voltage Entry Accepted
Group C Function O2 Key Idle Detect Time O1-01 = 5
Inverter Key Selections O1-02 = 180sec Battery RippleVoltage
Group D Power-On Monitor Sel
Charger Battery Voltage
Group E
Aux-Relay
Group F
Solar Charger
Group O
Operator
Group B
General
Main Menu : Programing - Group O - Function O1 - O1-01
DSPL
DSPLENTER
DSPL
ENTER
DSPL
ENTER
DSPL
ENTER
DSPL
ENTER
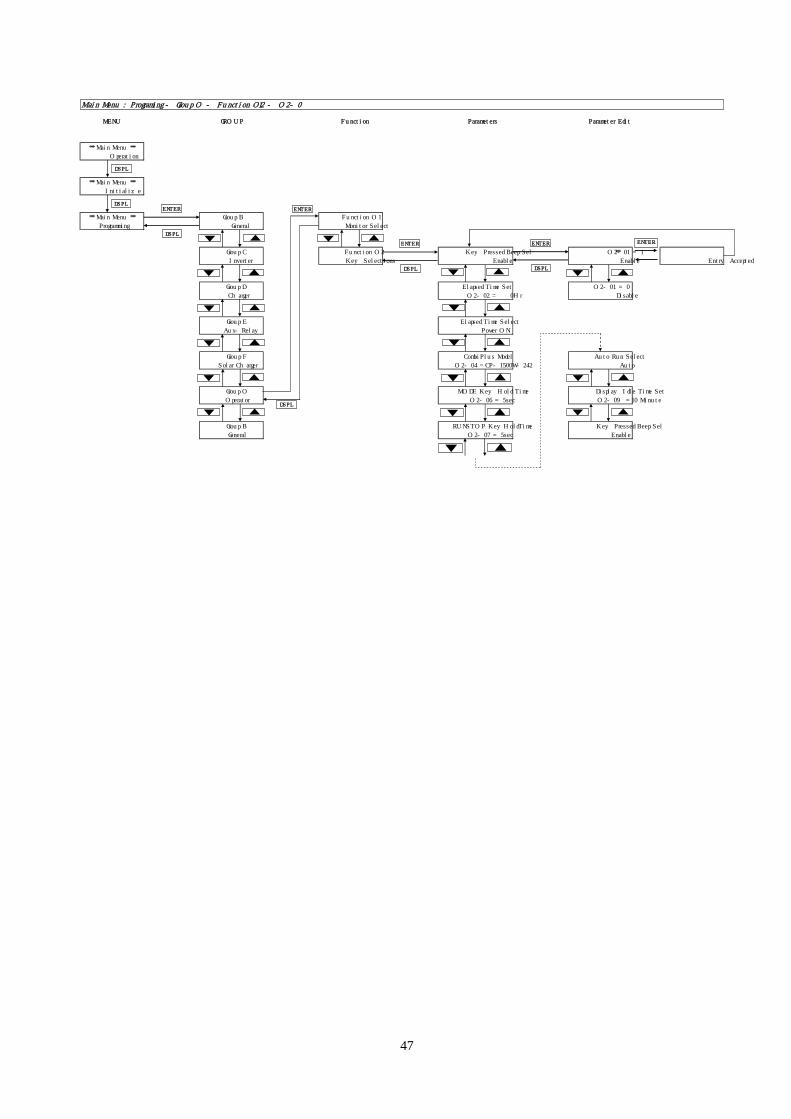
47
MENU GROUP Function Parameters Parameter Edit
*** Main Menu ***
Operation
*** Main Menu ***
Initialize
*** Main Menu *** Group B Function O1
Programming General Monitor Select
Group C Function O2 Key Pressed Beep Sel O2-01 = 1 ***
Inverter Key Selections Enable Enable Entry Accepted
Group D Elapsed Time Set O2-01 = 0
Charger O2-02 = 0Hr Disable
Group E Elapsed Time Select
Aux-Relay Power ON
Group F CombiPlus Model Auto Run Select
Solar Charger O2-04 = CP-1500W-242 Auto
Group O MODE Key Hold Time Display Idle Time Set
Operator O2-06 = 5sec O2-09 = 10 Minute
Group B RUNSTOP KeyHoldTime Key Pressed Beep Sel
General O2-07 = 5sec Enable
Main Menu : Programing - Group O - Function O2 - O2-01
DSPL
DSPLENTER
DSPL
ENTER
DSPL
ENTER
DSPL
ENTER
DSPL
ENTER
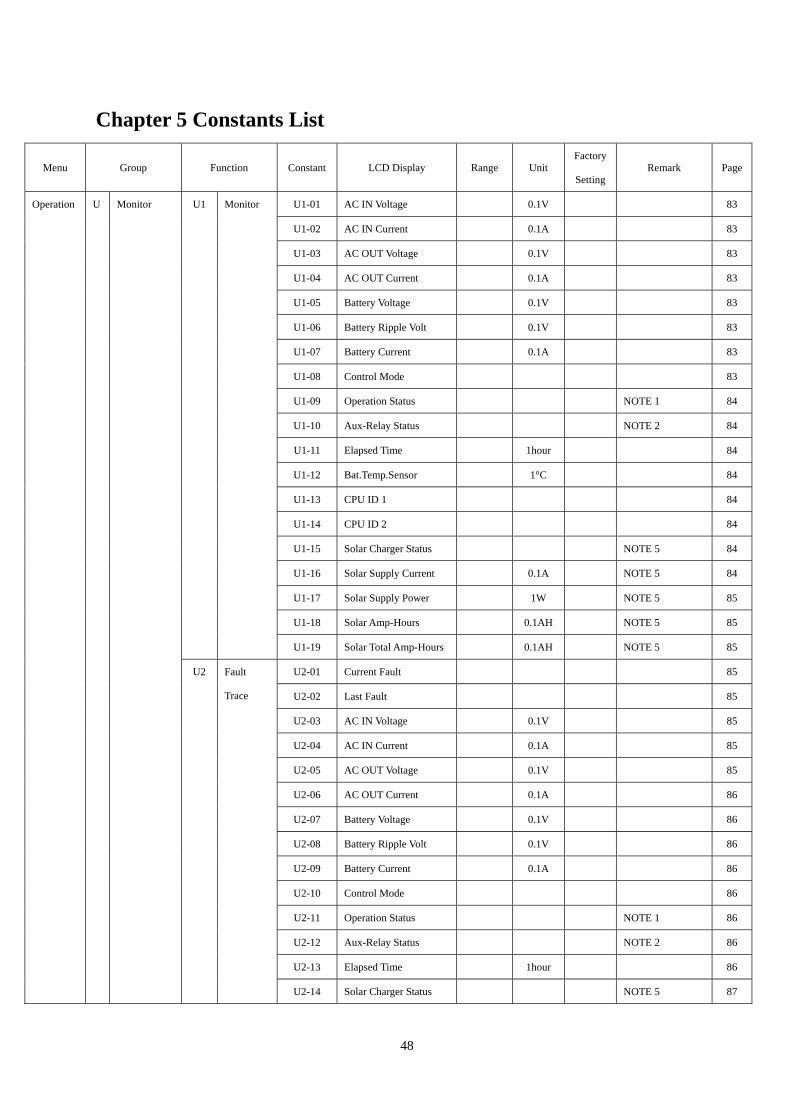
48
Chapter 5 Constants List
Menu Group Function Constant LCD Display Range Unit Factory
Setting Remark Page
U1-01 AC IN Voltage - 0.1V - 83
U1-02 AC IN Current - 0.1A - 83 U1-03 AC OUT Voltage - 0.1V - 83 U1-04 AC OUT Current - 0.1A - 83 U1-05 Battery Voltage - 0.1V - 83 U1-06 Battery Ripple Volt - 0.1V - 83 U1-07 Battery Current - 0.1A - 83 U1-08 Control Mode - - - 83 U1-09 Operation Status - - - NOTE 1 84
U1-10 Aux-Relay Status - - - NOTE 2 84 U1-11 Elapsed Time - 1hour - 84 U1-12 Bat.Temp.Sensor - 1°C - 84 U1-13 CPU ID 1 - - - 84 U1-14 CPU ID 2 - - - 84 U1-15 Solar Charger Status - - - NOTE 5 84 U1-16 Solar Supply Current - 0.1A - NOTE 5 84 U1-17 Solar Supply Power - 1W - NOTE 5 85
U1-18 Solar Amp-Hours - 0.1AH - NOTE 5 85
U1 Monitor
U1-19 Solar Total Amp-Hours - 0.1AH - NOTE 5 85 U2-01 Current Fault - - - 85 U2-02 Last Fault - - - 85 U2-03 AC IN Voltage - 0.1V - 85 U2-04 AC IN Current - 0.1A - 85 U2-05 AC OUT Voltage - 0.1V - 85 U2-06 AC OUT Current - 0.1A - 86
U2-07 Battery Voltage - 0.1V - 86 U2-08 Battery Ripple Volt - 0.1V - 86 U2-09 Battery Current - 0.1A - 86 U2-10 Control Mode - - - 86 U2-11 Operation Status - - - NOTE 1 86 U2-12 Aux-Relay Status - - - NOTE 2 86 U2-13 Elapsed Time - 1hour - 86
Operation
U
Monitor
U2 Fault
Trace
U2-14 Solar Charger Status - - - NOTE 5 87

49
Menu Group Function Constant LCD Display Range Unit Factory
Setting Remark Page
U2-15 Solar Charge Current - 0.1A - NOTE 5 87
U2-16 Solar Supply Power - 1W - NOTE 5 87 U2-17 Solar : Amp-Hours - 1AH - NOTE 5 87 U2-18 Solar:TotalAmp-Hours - 1AH - NOTE 5 87
U2 Fault
Trace
U2-26 Bat.Temp. Sensor - 1°C - 87 U3-01 Last Fault - - - 87 U3-02 Fault Message 2 - - - 87 U3-03 Fault Message 3 - - - 88
U3-04 Fault Message 4 - - - 88 U3-05 Elapsed Time 1 - 1hour - 88 U3-06 Elapsed Time 2 - 1hour - 88 U3-07 Elapsed Time 3 - 1hour - 88
Operation
U
Monitor
U3 Fault
History
U3-08 Elapsed Time 4 - 1hour - 88
A1-01 Access Level 0~1 1 1 0: Operation Only
1: Constant Set 61
A1-02 Select Language - - 0 0:English 61
A1-03 Init Parameters 0~1 1 0 0: No Initialize
1:Default Setting 61
Initialize A Initialize A1 Initialize
A1-04 Password 1 0~999 1 0 62
B1 Output
Frequency B1-01 Output Frequency 0~1 1 0
0: 50 Hz
1:60 Hz 63
B2-01 AC IN Low Disconnect NOTE 3 1V NOTE 3 63
B2-02 AC IN Low Connect NOTE 3 1V NOTE 3 63
B2-03 AC IN High Connect NOTE 3 1V NOTE 3 64
B2-04 AC IN High Disconnect NOTE 3 1V NOTE 3 64
B2-05 AC IN Current Limit NOTE 3 0.1A NOTE 3 64
B2-06 AC IN Waveform
Check 0~1 1 1
0: Ignore
1: Active 64
B2-07 Ground Relay 0~1 1 1 0: Disconnect
1: Connect 65
B2-08 ACIN Frequency Range 0~1 1 1 0:50/60Hz+-5Hz
1:45Hz~65Hz 65
Programm-
ing
B General
B2 Auto
Transfer
Switch
B2-09 AC IN DynaCur Limit 0~1 1 0 0: Normal
1:Dynamic 65

50
Menu Group Function Constant LCD Display Range Unit Factory
Setting Remark Page
B2-10 MODE 4: BatLo?V
ATS ON
0~32.00
0~16.000.01V
23.5V
11.75V 66
B2-11 MODE 4: BatLo?S
ATS ON 0~255 1 sec 10 sec 66
B2-12 MODE 4: BatHi?V
ATSOFF
0~32.0
0~16.0 0.01V
28.8V
14.4V 66
B2-13 MODE 4: BatHi?S
ATSOFF 0~255 1 sec 60 sec 66
B2-14 MODE 3: BatLo?V
ATS ON
0~32.0
0~16.0 0.01V
23.5V
11.75V 66
B2-15 MODE 3: BatLo?S
ATS ON 0~255 1 sec 10 sec 66
B2-16 MODE 3: BatHi?V
ATSOFF
0~32.0
0~16.0 0.01V
28.8V
14.4V 66
B2-17 MODE 3: BatHi?S
ATSOFF 0~255 1 sec 60 sec 66
B2-18 MODE1:ACINCurrent
Lmt NOTE 3 0.1A NOTE 3 67
B2-19 MODE2:ACINCurrent
Lmt NOTE 3 0.1A NOTE 3 67
B2-20 MODE3:ACINCurrent
Lmt NOTE 3 0.1A NOTE 3 68
B General B2 Auto
Transfer
Switch
B2-21 MODE4:ACINCurrent
Lmt NOTE 3 0.1A NOTE 3 68
B3 Parallel B3-01 Number of Slave 0~4 1 0 68
B4-01 2-3 Phase Connection 0~1 1 0 0:Disable
1:Enable 68
B4-02 2-3 Phase Master 0~1 1 0 0:Slave
1:Master 69
B4 2-3 Phase
B4-03 2-3 Phase Type 0~2 1 0
0:3 phase
1: Split phase 180
2: Two Leg phase
120
69
C1-01 Inverter Out Voltage NOTE 3 1V NOTE 3 70
C1-02 Bat Low ? V Shut-down NOTE 3 1V NOTE 3 70
Programm-
ing
C Inverter C1 Inverter
C1-03 Bat Low ? V Restart NOTE 3 1V NOTE 3 70

51
Menu Group Function Constant LCD Display Range Unit Factory
Setting Remark Page
C1-05 Power Assist Select 0~1 1 1 0: Disable
1: Enable 70
C Inverter C1 Inverter
C1-06 Power Assist Level 1.0~3.5 0.1 2.0 71
D1-01 AC CHARGER
Selection 0~1 1 1
0:Disable
1:Enable 72
D1-02 Charge Curve 1~3 1 3
1: Fixed
2: Adaptive
3: Adaptive+safe
72
D1-03 Absorption Voltage NOTE 3 1V NOTE 3 73
D1-04 Rep-Absorption Time 1~72 0.25hou
r 4
4x0.25=1 hour 73
D1-05 Rep-Abs Interval 1~180 0.25day 28 28x0.25=7day 73
D1-06 Max. Absorption Time 1~8 1hour 4hour 73
D1-07 Float Voltage NOTE 3 1V NOTE 3 73
D1-08 Charge Current NOTE 3 1A NOTE 3 74
D1-09 Stop After 10Hr Bulk 0~1 1 1 0:Disable
1:Enable 74
D Charger D1 Charger
D1-10 Equalize Mode Select 0~1 1 1 0:Disable
1:Enable 74
E1-01 LOAD Higher than ? A NOTE 3 0.01A NOTE 3 75
E1-02 LOAD Higher for ? sec 0~255 1sec 0sec 75 E1-03 Udc Lower than ? V NOTE 3 1V NOTE 3 75 E1-04 Udc Lower for ? sec 0~255 1sec 0sec 75 E1-05 Udc Higher than ? V NOTE 3 1V NOTE 3 75 E1-06 Udc Higher for ? sec 0~255 1sec 0sec 75 E1-07 Not Charge for ? sec 0~255 1sec 0sec 75 E1-08 Fan On for ? sec 0~255 1sec 0sec 75
E1-09 When bulk Protection 0~1 1 0 0:Disable
1:Enable 76
E1-10 System Fault Occurs 0~1 1 0 0:Disable
1:Enable 76
E1-11 Temp. Alarm Sel 0~1 1 0 0:Alarm
1:Pre-alarm 76
Programm-
ing
E Aux-Relay E1 Set Aux-
Relay 1
ON
E1-12 Temp. Alarm for ?sec 0~255 1sec 0sec 76

52
Menu Group Function Constant LCD Display Range Unit Factory
Setting Remark Page
E1-13 Low Batt. Alarm Sel 0~1 1 0 0:Alarm
1:Pre-alarm 76
E1-14 Low Batt. for ? sec 0~255 1sec 0sec 76
E1-15 Overload Alarm Sel 0~1 1 0 0:Alarm
1:Pre-alarm 76
E1-16 OL Alarm for ? sec 0~255 1sec 0sec 76
E1-17 Udc Ripple Alarm Sel 0~1 1 0 0:Alarm
1:Pre-alarm 76
E Aux-Relay E1 Set Aux-
Relay 1
ON
E1-18 UdcRipAlarm for ? sec 0~255 1sec 0sec 76 E2-01 Load Lower than ? A NOTE 3 0.01A NOTE 3 77
E2-02 Load Lower for ? sec 0~255 1sec 0sec 77 E2-03 Udc Lower than ? V NOTE 3 1V NOTE 3 77 E2-04 Udc Lower for ? sec 0~255 1sec 0sec 77 E2-05 Udc Higher than ? V NOTE 3 1V NOTE 3 77 E2-06 Udc Higher for ? sec 0~255 1sec 0sec 77 E2-07 Charging for ? sec 0~255 1sec 0sec 77 E2-08 Fan Off for ? sec 0~255 1sec 0sec 78
E2-09 Charge Finished ? Min 0~1000 1min 0 78 E2-10 RY1 not ON for ? mins 0~1000 1min 0 78 E2-11 AC IN Loss for ? sec 0~255 1sec 0sec 78
E2-12 No Temp. Alarm Sel 0~1 1 0 0:Alarm
1:Pre-alarm 78
E2-13 No Temp. Alarm ? sec 0~255 1sec 0sec 78
E2-14 No Low Bat. Alarm Sel 0~1 1 0 0:Alarm
1:Pre-alarm 79
E2-15 No Low Bat for ? sec 0~255 1sec 0sec 79
E2-16 No OL Alarm Sel 0~1 1 0 0:Alarm
1:Pre-alarm 79
E2-17 No OL Alarm for ? sec 0~255 1sec 0sec 79
E2-18 No UdcRipple Alarm
Sel 0~1 1 0
0:Alarm
1:Pre-alarm 79
Programm-
ing
E Aux-Relay E2 Set Aux-
Relay 1
OFF
E2-19 No UdcRipple
Alarm ?sec 0~255 1sec 0sec
79

53
Menu Group Function Constant LCD Display Range Unit Factory
Setting Remark Page
E3-01 Load Higher than ? A NOTE 3 0.01A NOTE 3 79 E3-02 Load Higher for ?sec 0~255 1sec 0sec 79 E3-03 Udc Lower than ? V NOTE 3 1V NOTE 3 79 E3-04 Udc Lower for ? sec 0~255 1sec 0sec 79 E3-05 Udc Higher than ? V NOTE 3 1V NOTE 3 79 E3-06 Udc Higher for ? sec 0~255 1sec 0sec 79 E3-07 Not Charge for ? sec 0~255 1sec 0sec 79 E3-08 Fan On for ? sec 0~255 1sec 0sec 79
E3-09 When bulk Protection 0~1 1 0 0:Disable
1:Enable 79
E3-10 System Fault Occurs 0~1 1 0 0:Disable
1:Enable 79
E3-11 Temp. Alarm Sel 0~1 1 0 0:Alarm
1:Pre-alarm 79
E3-12 Temp. Alarm for ?sec 0~255 1sec 0sec 79
E3-13 Low Batt. Alarm Sel 0~1 1 0 0:Alarm
1:Pre-alarm 79
E3-14 Low Batt. for ? sec 0~255 1sec 0sec 79
E3-15 Overload Alarm Sel 0~1 1 0 0:Alarm
1:Pre-alarm 79
E3-16 OL Alarm for ? sec 0~255 1sec 0sec 79
E3-17 Udc Ripple Alarm Sel 0~1 1 0 0:Alarm
1:Pre-alarm 79
E3 Set Aux-
Relay 2
ON
E3-18 UdcRipAlarm for ?sec 0~255 1sec 0sec 79 E4-01 Load Lower than ? A NOTE 3 0.01A NOTE 3 79 E4-02 Load Lower for ? sec 0~255 1sec 0sec 79 E4-03 Udc Lower than ? V NOTE 3 1V NOTE 3 79 E4-04 Udc Lower for ? sec 0~255 1sec 0sec 79 E4-05 Udc Higher than ? V NOTE 3 1V NOTE 3 79 E4-06 Udc Higher for ? sec 0~255 1sec 0sec 79 E4-07 Charging for ? sec 0~255 1sec 0sec 79 E4-08 Fan OFF for ? sec 0~255 1sec 0sec 79 E4-09 Charge Finished ?Min 0~1000 1min 0 79
Programm-
ing
E Aux-Relay
E4 Set Aux-
Relay 2
OFF
E4-10 RY2 not ON for ?mins 0~1000 1min 0 79

54
Menu Group Function Constant LCD Display Range Unit Factory
Setting Remark Page
E4-11 AC IN Loss for ?sec 0~255 1sec 0sec 79
E4-12 No Temp. Alarm Sel 0~1 1 0 0:Alarm
1:Pre-alarm 79
E4-13 No Temp. Alarm ? sec 0~255 1sec 0sec 79
E4-14 No Low Bat. Alarm Sel 0~1 1 0 0:Alarm
1:Pre-alarm 79
E4-15 No Low Bat for ? sec 0~255 1sec 0sec 79
E4-16 No OL Alarm Sel 0~1 1 0 0:Alarm
1:Pre-alarm 79
E4-17 No OL Alarm for ? sec 0~255 1sec 0sec 79
E4-18 No UdcRipple Alarm
Sel 0~1 1 0
0:Alarm
1:Pre-alarm 79
E4 Set Aux-
Relay 2
OFF
E4-19 No UdcRipple
Alarm ?sec 0~255 1sec 0sec
79
E5-01 Load Higher than ? A NOTE 3 0.01A NOTE 3 79 E5-02 Load Higher for ?sec 0~255 1sec 0sec 79 E5-03 Udc Lower than ? V NOTE 3 1V NOTE 3 79 E5-04 Udc Lower for ? sec 0~255 1sec 0sec 79 E5-05 Udc Higher than ? V NOTE 3 1V NOTE 3 79 E5-06 Udc Higher for ? sec 0~255 1sec 0sec 79 E5-07 Not Charge for ? sec 0~255 1sec 0sec 79 E5-08 Fan ON for ? sec 0~255 1sec 0sec 79
E5-09 When bulk Protection 0~1 1 0 0:Disable
1:Enable 79
E5-10 System Fault Occurs 0~1 1 0 0:Disable
1:Enable 79
E5-11 Temp. Alarm Sel 0~1 1 0 0:Alarm
1:Pre-alarm 79
E5-12 Temp. Alarm for ?sec 0~255 1sec 0sec 79
E5-13 Low Batt. Alarm Sel 0~1 1 0 0:Alarm
1:Pre-alarm 79
E5-14 Low Batt. for ? sec 0~255 1sec 0sec 79
E5-15 Overload Alarm Sel 0~1 1 0 0:Alarm
1:Pre-alarm 79
Programm-
ing
E Aux-Relay
E5 Set Aux-
Relay 3
ON
E5-16 OL Alarm for ? sec 0~255 1sec 0sec 79

55
Menu Group Function Constant LCD Display Range Unit Factory
Setting Remark Page
E5-17 Udc Ripple Alarm Sel 0~1 1 0 0:Alarm
1:Pre-alarm 79
E5 Set Aux-
Relay 3
ON E5-18 UdcRipAlarm for ?sec 0~255 1sec 0sec 79 E6-01 Load Lower than ? A NOTE 3 0.01A NOTE 3 79 E6-02 Load Lower for ? sec 0~255 1sec 0sec 79 E6-03 Udc Lower than ? V NOTE 3 1V NOTE 3 79 E6-04 Udc Lower for ? sec 0~255 1sec 0sec 79 E6-05 Udc Higher than ? V NOTE 3 1V NOTE 3 79 E6-06 Udc Higher for ? sec 0~255 1sec 0sec 79 E6-07 Charging for ? sec 0~255 1sec 0sec 79 E6-08 Fan OFF for ? sec 0~255 1sec 0sec 79 E6-09 Charge Finished ?Min 0~1000 1min 0 79 E6-10 RY3 not ON for ?mins 0~1000 1min 0 79 E6-11 AC IN Loss for ?sec 0~255 1sec 0sec 79
E6-12 No Temp. Alarm Sel 0~1 1 0
0:Alarm
1:Pre-alarm
79
E6-13 No Temp. Alarm ? sec 0~255 1sec 0sec 79
E6-14 No Low Bat. Alarm Sel 0~1 1 0 0:Alarm
1:Pre-alarm 79
E6-15 No Low Bat for ? sec 0~255 1sec 0sec 79
E6-16 No OL Alarm Sel 0~1 1 0 0:Alarm
1:Pre-alarm 79
E6-17 No OL Alarm for ? sec 0~255 1sec 0sec 79
E6-18 No UdcRipple Alarm
Sel 0~1 1 0
0:Alarm
1:Pre-alarm 79
E6
Set Aux-
Relay 3
OFF
E6-19 No UdcRipple
Alarm ?sec 0~255 1sec 0sec
79
E7-01 Aux1 Usage Select 0~1 1 0 0:Do not use Aux
1: Use Aux 80
E7-02 Aux1 Invert Select 0~1 1 0 0: Normal
1: Invert switch 80
Programm-
ing
E Aux-Relay
E7 Aux-
Relay 1
Option
E7-03 Aux1 notSwitchOff T 0~1000 1 min 0 80

56
Menu Group Function Constant LCD Display Range Unit Factory
Setting Remark Page
E8-01 Aux2 Usage Select 0~1 1 0 0:Do not use Aux
1: Use Aux 80
E8-02 Aux2 Invert Select 0~1 1 0 0: Normal
1: Invert switch 80
E8 Aux-
Relay 2
Option
E8-03 Aux2 notSwitchOff T - - - 80
E9-01 Aux3 Usage Select 0~1 1 0 0:Do not use Aux
1: Use Aux 80
E9-02 Aux3 Invert Select 0~1 1 0 0: Normal
1: Invert switch 80
E Aux-Relay
E9 Aux-
Relay 3
Option
E9-03 Aux3 notSwitchOff T - - - 80
F1-01 Solar Charger Enable 0~1 1 1
0: Disable
1: Enable
NOTE 5
-
F1-02 Reset Amp-Hours 0~1 1 0
0: No
1: Yes
NOTE 5
-
F Solar
Charger
F1 Solar
Charger
F1-03 Solar Monitor Sel 0~10 1 0
0: Sum of display
1~10: independent
display
NOTE 5
-
O1-01 Power-ON Monitor Sel 0~26 1 4 NOTE 4 81 O1 Monitor
Select O1-02 Key Idle Detect Time 10~600 1sec 180 sec 81
O2-01 Key Pressed Beep Sel 0~1 1 1 0:Disable
1:Enable 81
O2-02 Elapsed Time Reset 0~60000 1hour 0 81
O2-03 Elapsed Time Select 0~1 1 0 0:Power ON
1: Run Time 81
O2-04 CombiPlus Model - - - 81 O2-06 MODE Key Hold Time 2~10 1sec 5 sec 82
O2-07 RUN/STOP
KeyHoldTime 2~10 1sec 2 sec
82
O2-08 Auto Run Select 0~1 1 1 0: Manual
1: Auto 82
Programm-
ing
O Operator
O2 Key
Selections
O2-09 Display IdleTime Set 0~60 1min 10 min 82

57
NOTE 1: Operation Status U1-09 = X X X X X X X X X X X X
Fault:
0=OK
1=Fault Udc ripple:
0=OK
1=Udc-ripple
Pre-alarm
OL:
0=OK
1=Over load pre-alarm
Battery Low:
0=OK
1=Battery low pre-alarm
Remoter:
0=Remoter disconnect
1=Remoter connect
AC OUT:
0=No output
1=output
AC IN:
0=AC IN disconnect
1=AC IN connect
OH:
0=OK
1=OH Pre-alarm
ATS:
0=OFF
1=ON
AC CHARGER:
0=OFF
1=ON
Inverter:
0=OFF
1=ON
RUN/STOP:
0=STOP
1=RUN

58
NOTE 2: U1-10 = X X X
NOTE 3:
Constant
Model B2-01 B2-02 B2-03 B2-04 B2-05 C1-01 C1-02 C1-03 D1-03 D1-07
CP-1500-122 180V 187V 265V 270V 16.0A 230V 9.3V 10.9V 14.4V 13.8V
CP-3000-122 180V 187V 265V 270V 16.0A 230V 9.3V 10.9V 14.4V 13.8V
CP-1500-242 180V 187V 265V 270V 16.0A 230V 18.6V 21.8V 14.4V 13.8V
CP-3000-242 180V 187V 265V 270V 16.0A 230V 18.6V 21.8V 14.4V 13.8V
CP-1500-121 94V 101V 138V 143V 30.0A 120V 9.3V 10.9V 28.8V 27.6V
CP-3000-121 94V 101V 138V 143V 30.0A 120V 9.3V 10.9V 28.8V 27.6V
CP-1500-241 94V 101V 138V 143V 30.0A 120V 18.6V 21.8V 28.8V 27.6V
CP-3000-241 94V 101V 138V 143V 30.0A 120V 18.6V 21.8V 28.8V 27.6V
E1-01 E1-03 E1-05 E2-01 E2-03 E2-05
E3-01 E3-03 E3-05 E4-01 E4-03 E4-05
Constant
Model
D1-08
E5-01 E5-03 E5-05 E6-01 E6-03 E6-05
CP-1500-122 35A 6.65A 11.75V 16.0V 1.66A 11.75V 16.0V
CP-3000-122 70A 13.3A 11.75V 16.0V 3.32A 11.75V 16.0V
CP-1500-242 17A 6.65A 23.5V 32.0V 1.66A 23.5V 32.0V
CP-3000-242 35A 13.3A 23.5V 32.0V 3.32A 23.5V 32.0V
CP-1500-121 35A 12.75A 11.75V 16.0V 3.18A 11.75V 16.0V
CP-3000-121 70A 25.5A 11.75V 16.0V 6.37A 11.75V 16.0V
CP-1500-241 17A 12.75A 23.5V 32.0V 3.18A 23.5V 32.0V
CP-3000-241 35A 25.5A 23.5V 32.0V 6.37A 23.5V 32.0V
Aux-Relay3:
0=OFF
1=ON
Aux-Relay2:
0=OFF
1=ON
Aux-Relay1:
0=OFF
1=ON

59
NOTE 4: Parameter Setting LCD Display
0 AC IN Voltage
1 AC IN Current
2 AC OUT Voltage
3 AC OUT Current
4 Battery Voltage
5 Battery Ripple Volt
6 Battery Current
7 Control Mode
8 Operation Status
9 Aux-Relay Status
10 Elapsed Time
11 Bat.Temp.Sensor
12 CPU ID 1
13 CPU ID 2
14 Solar Charger Status
15 Solar Supply Current
16 Solar Supply Power
17 Solar Amp-Hours
18 Solar Total
Amp-Hours
O1-01=
19 DC Generator Status
NOTE 5: The constants marked with NOTE 5 are only visible when extension port (Port C) is connected. After power on, the CombiPlus will start to scan each built-in module and extension module. The constants marked with NOTE 5 will be visible only when the extension port (Port C) is connected with extension module. A1-04=Password 1 Lock the constants setting (A1-01=1) 1. Finish setting all the programmable parameters to desired values. 2. Change A1-01=0 (Operation only), factory setting is A1-01=1 (Constants set). 3. Go to A1-04 and press RUN/STOP key and UP key at the same time till A1-05 parameter
occurs. 4. Enter the desired password (max. 4 digits) 5. Press UP key to leave A1-05

60
Above procedure completes locking the constants setting and no more programming selection would appear. A1-01 would only display 0 (Operation only) and would not display 1 (Constants set).
Unlock the constants setting 1. Enter the password in A1-04 to be exactly the same as the one earlier set in A1-05 2. When the password in A1-04 matches the one earlier set in A1-05, the unlocking is
completed. A1-01=1 (Constants set) would appear again for programming.

61
Chapter 6 Programming Constants A Group (Initialize): A1 Group (Initialize) A1-01: Access level
Use constant A1-01 to select the user constant access level. This level determines which user constants can be changed and displayed.
Setting Function
A1-01=0
This setting allows the “operation” and “initialize” to be changed or displayed. Use this setting to prevent user constant settings from being changed.
A1-01=1 (Initial setting)
This setting allows all user constants to be changed or displayed.
A1-02: Select Language
Use constant A1-02 to select the language displayed by the CombiPlus. A value of 0 set English and values of others set other language.
This user constant is not returned to factory setting when constants are initialized. It must be manually reset to factory setting. Setting Function
A1-02=0 (Initial setting)
English language
A1-02=1 Reserved, under development A1-02=2 Reserved, under development A1-02=3 Reserved, under development A1-02=4 Reserved, under development A1-02=5 Reserved, under development A1-02=6 Reserved, under development
A1-03: Init Parameters
Use constant A1-03 to initialize the user constants. When initialized, the user constants will return to their factory preset values. You should
normally record the setting of any constants that are changed from factory presets.

62
Setting Function
A1-03=0 (Initial setting)
Returns to initialize Display without initializing any user constants.
A1-03=1 Initializes the user constants to factory settings. A1-04: Init Password 1
This constant is reserved for the factory to test and set the functions. Users are not allowed to set this constant.
Lock the constants setting (A1-01=1) 1. Finish setting all the programmable parameters to desired values. 2. Change A1-01=0 (Operation only), factory setting is A1-01=1 (Constants set). 3. Go to A1-04 and press RUN/STOP key and UP key at the same time till A1-05 parameter
occurs. 4. Enter the desired password (max. 4 digits) 5. Press UP key to leave A1-05
Above procedure completes locking the constants setting and no more programming selection would appear. A1-01 would only display 0 (Operation only) and would not display 1 (Constants set).
Unlock the constants setting 1. Enter the password in A1-04 to be exactly the same as the one earlier set in A1-05 2. When the password in A1-04 matches the one earlier set in A1-05, the unlocking is
completed. A1-01=1 (Constants set) would appear again for programming.

63
B Group (General): B1 Group (Output Frequency) B1-01: Output frequency
B1-01 is used to set the output frequency at INVERTER AC output Setting Function
B1-01=0 (Initial setting)
50Hz at INVERTER AC output
B1-01=1 60Hz at INVERTER AC output
B2-08: AC IN Frequency Range Setting Function
When B1-01=0: Acceptable AC input frequency is 50Hz ±5Hz (45~55Hz)
B2-08=0 When B1-01=1: Acceptable AC input frequency is 60Hz ±5Hz (55~65Hz)
B2-08=1 (Initial setting)
Accept wide AC input frequency range between 45~65Hz
B2 Group (Auto Transfer Switch) B2-01: AC IN Low Disconnect
Use constant B2-01 to determine the AC IN voltage below which level the ATS (Auto Transfer Switch) will switch off.
This voltage level will always lie below the AC IN Low Connect (B2-02) level. In fact, changing this level will also change the AC IN Low Connect (B2-02) level.
B2-02: AC IN Low Connect
This setting forms a pair with AC IN Low Disconnect (B2-01). With this setting, one determines the AC IN low voltage at which level the ATS will switch on. This should lie above AC IN Low Disconnect (B2-01) level to prevent continuous switching off the ATS when the voltage is fluctuating around the level.
In fact, the parameter which is changed is the difference between AC IN Low Disconnect (B2-01) and AC IN Low Connect (B2-02).
The result of this is that when changing B2-01 level, this level (B2-02) also changes. ※ Note: B2-02 can be ignored for a short time when AC IN Waveform Check (B2-06) is

64
disabled (B2-06=0) When the AC IN voltage drops due to the increasing charge current, the AC CHARGER
will take care that the voltage does not drop below this level. B2-03: AC IN High Connect
This setting forms a pair with AC IN High Disconnect (B2-04). With this setting, one determines the AC IN high voltage at which level the ATS will switch on. This should lie below the AC IN High Disconnect (B2-04) level to prevent continuous switching of the ATS when the voltage is fluctuating around that level.
In fact, the parameter which is changed is the difference between AC IN High Disconnect (B2-04) and AC IN High Connect (B2-03).
The result of this is that when changing B2-04 level, this level (B2-03) also changes. B2-04: AC IN High Disconnect
Use constant B2-04 to determine the AC IN voltage above which level the ATS will switch off.
This voltage level will always lie above the AC IN High Connect (B2-03) level. In fact, changing this level will also change the AC IN High Connect (B2-03) level.
B2-05: AC IN Current Limit
Use constant B2-05 to set the set the specific maximum AC input current. This value is very important for both battery charger and inverter output power assist.
When using constant B2-05, the values determine the actual AC current limit. ※Note: With Power Support enabled, there is a minimum value for the AC input current limit.
Please see the note at Power Support (page 70). B2-06: AC IN Waveform Check
Use constant B2-06 to enable/disable the fast detection of input voltage wave shape. Setting Function
B2-06=0 (Ignore)
By disabling AC IN waveform check, AC IN Low Disconnect (B2-01) is ignored. When the load current is higher 1.5 times than AC In Current Limit (B2-05), this is used to prevent unnecessary switching to INVERTER due to voltage drop when a high load is connected.

65
B2-06=1 (Initial setting)
(Active)
This detection checks the wave shape, if it is not sinusoidal within certain limits, the AC input voltage is rejected.
However, certain generator or very weak mains supply have an ill shaped sinusoidal output especially when the load suddenly changes. The fast detection will detect a failure in such a case.
This will result in a slightly longer transfer time. B2-07: Ground Relay
Used to enable/disable the internal ground relay functionality. The ground relay is useful when an earth-leakage circuit-breaker is part of the installation.
When ATS (Auto Transfer Switch) is open (INVERTER mode), the Neutral of the inverter is connected to “G” terminal.
When ATS closes (AC IN is transferred to AC OUT), the Neutral is first disconnected from “G” terminal. Setting Function
B2-07=0 The internal ground relay is open with “G” terminal. B2-07=1
(Initial setting) The internal ground relay is closed with “G” terminal.
B2-08: AC IN Frequency Range Refer to page 63 (B1-01) B2-09: AC IN Dynamic Current Limit
This setting is an expansion of the AC IN Current Limit (B2-05) mechanism. Setting Function
B2-09=0 (Initial setting)
The AC current limit is specified by the AC IN Current Limit (B2-05) setting

66
B2-09=1
The effective AC input current limit depends on the load history. When the load is lower than the AC IN Current Limit (B2-05), the effective AC input current limit is also lower but slightly above the load.
When the load increase, the effective current limit also increases with a delay. The thought behind this is that when a generator is running at a low load, it can’t switch to full load immediately and it needs some time to increase the power.
※ An example: We have a 2KVA generator.
We adjust the AC IN Current Limit (B2-05) setting to 8A and we enable Power Assist (C1-05=1). We have no load connected and the batteries are fully charged. Therefore, no current from generator is drawn.
At this moment, we connect a load of 7A to the CombiPlus with this setting (B2-09) disabled, the CombiPlus would not react because the load is below the AC IN Current Limit (B2-05) setting. The result is that the full load is connected to generator which will drop in voltage because it can’t deliver that current instantly which could result in switching to INVERTER.
If however we had this setting (Dynamic Current Limit) enabled, the effective AC input current limit would be far lower than 8A because the load was zero. So connecting a load of 7A will result in CombiPlus starting to power assist and no voltage drop is being examined on the AC OUT. The generator starts to supply the load and the effective AC input current limit will increase to 8A slowly. At the moment, the CombiPlus will stop Power Assist and the full load is on the generator.
This is powerful option in combination with Power Assist but even without Power Assist, it can prevent unnecessary switching to INVERTER because the charge current will reduce when AC input current becomes higher than the effective AC input current limit.
B2-10: MODE4: Bat Lo?V ATS ON B2-11: MODE4: Bat Lo?S ATS ON B2-12: MODE4: Bat Hi?V ATSOFF B2-13: MODE4: Bat Hi?S ATSOFF B2-14: MODE3: Bat Lo?V ATS ON B2-15: MODE3: Bat Lo?S ATS ON B2-16: MODE3: Bat Hi?V ATSOFF B2-17: MODE3: Bat Lo?S ATSOFF

67
B2-10~B2-13 are used to set the condition of ATS to be ON/OFF in MODE4 B2-14~B2-17 are used to set the condition of ATS to be ON/OFF in MODE3 When CombiPlus is in either MODE4 or MODE3, INVERTER mode takes priority to
supply voltage to AC OUT for load consumption. When AC IN power is ready, INVERTER is active and battery is about to be exhausted, ATS will be switched on to ensure AC OUT to continuously supply the load. At the moment, AC OUT will be supplied by AC IN power. At the same time, the battery can be charged by other renewable energy such as solar charger, wind charger or DC generator charger (MODE3) which is normally the solar house application in no need of AC CHARGER. The battery can be charged by AC IN (AC CHARGER) or other renewable energy such as solar charger, wind charger or DC generator charger (MODE4) which is normally the application requesting both AC charging and DC charging.
When charging battery slowly reaches to certain level, this means battery will be fully charged soon and the ATS will be switched off for INVERTER to take over the ongoing supply to AC OUT for load.
B2-10 and B2-11 are used to set ATS to be “ON” when the battery voltage is lower than B2-10 voltage value and longer than the second time set in B2-11 in MODE4.
(INVERTER OFF+ATS ON+AC CHARGER ON) B2-12 and B2-13 are used to set ATS to be “OFF” when the battery voltage is higher than
B2-12 voltage value and longer than the second time set in B2-13 in MODE4. (INVERTER ON+ATS OFF+AC CHARGER OFF)
B2-14 and B2-15 are used to set ATS to be “ON” when the battery voltage is lower than B2-14 voltage value and longer than the second time set in B2-15 in MODE3.
(ATS ON+INVERTER OFF+AC CHARGER ON) B2-16 and B2-17 are used to set ATS to be “OFF” when the battery voltage is higher than
B2-16 voltage value and longer than the second time set in B2-17 in MODE3. (INVERTER ON+ATS OFF+ AC CHARGER OFF) B2-18: MODE1: ACIN Current Lmt
Use constant B2-18 to set the set the specific maximum AC input current in MODE 1. This value is very important for both battery charger and inverter output power assist.
When using constant B2-18, the values determine the actual AC current limit. B2-19: MODE2: ACIN Current Lmt
Use constant B2-19 to set the set the specific maximum AC input current in MODE 2. This value is very important for both battery charger and inverter output power assist.
When using constant B2-19, the values determine the actual AC current limit.

68
B2-20: MODE3: ACIN Current Lmt
Use constant B2-20 to set the set the specific maximum AC input current in MODE 3. This value is very important for both battery charger and inverter output power assist.
When using constant B2-20, the values determine the actual AC current limit. B2-21: MODE4: ACIN Current Lmt
Use constant B2-21 to set the set the specific maximum AC input current in MODE 4. This value is very important for both battery charger and inverter output power assist.
When using constant B2-21, the values determine the actual AC current limit. B3 Group (Parallel System) B3-01: Number of Slaves
A parallel system is built with 1 master and up to 4 slaves with this setting, one can specify the number of slaves in system. This setting has only to be done in the master. It is not required to specify the number of slaves. The system will work just fine without this setting being specified.
This setting is added for convenience of the end-user when the AC IN power is larger than the total of B2-05* the number of the CombiPlus (Master + Slaves) when B3-01=0. The only effect of this setting is on the scaling of AC IN Current Limit (B2-05). If B3-01=0, one must divide the available AC current by the number of CombiPlus (Master + Slaves) and set the limit accordingly. So an example of setting the B2-05=10A in a parallel system with 3 CombiPlus would result in a limit of 3*10A=30A
If however in this system the number of slaves is set 2 (B3-01=2), then the division is done internally and setting the AC IN Current Limit to 10A (B2-05=10) will result in 10A for the whole system and shared by the Master and Slaves. This system is often applied when the AC IN power is limited such as the generator of limited small capacity.
B4 Group (2-3 Phase) B4-01: 2-3 Phase Connection
All the CombiPlus in a multi-phase system must have 2-3 phase enabled. Use this setting to perform this.
If more CombiPlus per phase are connected in parallel, then only the masters of parallel system must have 2-3 phase enabled.

69
Setting Function B4-01=0
(Initial setting) 2-3 Phase connection disabled.
B4-01=1 2-3 Phase connection enabled. B4-02: 2-3 Phase Master
In a multi-phase system, there is always one (and only one) master. The CombiPlus for other phases are called followers.
Use this setting to designate one of the CombiPluses is master. If this parameter is set (B4-02=0), the CombiPlus is a follower. Setting Function
B4-02=0 (Initial setting)
2-3 Phase connection system is called Follower
B4-02=1 2-3 Phase connection system is called Master B4-03: 2-3 Phase Type
Use constant B4-03 to determine the kind of multi-phase required. Setting Function
B4-03=0 (Initial setting)
3 Phase type: Three combiPluses are required. Output is 3-phase with 120°phase shift.
B4-03=1 Split Phase 180°Type: Two combiPluses are required. Output is 2-phase with phase 180°shift
B4-03=2
Two Leg 3 Phase 120°Type: Two CombiPluses are required. Output is 2-phase of a normal 3-phase system so two phases with 120°phase shift.

70
C Group (INVERTER): C1 Group (INVERTER) C1-01: INVERTER Output Voltage
Use constant C1-01 to change the RMS output voltage of the INVERTER. C1-02: Bat Low ?V Shut-down
With this setting, one can determine the battery voltage at which level the INVERTER will switch off. This can be useful to prevent drawing too much current from an exhausted battery.
This voltage level will always lie below the Bat Low ? V Restart (C1-03) level. In fact, changing this level will also change the Bat Low ? V Restart (C1-03) level.
C1-03: Battery Low ? V Restart
This setting forms a pair with Bat Low ? V Shut-down (C1-02). With this setting, one determines the battery voltage at which level the INVERTER will switch on.
In fact, the parameter which is changed is the difference between Bat Low ? V Shut-down (C1-02) and Bat Low ? V Restart (C1-03). The result of this is that when changing the Bat Low ? V Shut-down (C1-02) level, this level also changes.
C1-05: Power Assist Select
Using this constant C1-05, the Power Assist feature can be enabled or disabled. Use Power Assist to prevent an external circuit breaker to trip when the load on the CombiPlus is too high.
If the load exceeds the AC IN Current Limit (B2-05), the CombiPlus will start inverting and will provide the extra current needed.
※ Note: When Power Assist is enabled. C1-05=1 (Initial setting), there is a minimum AC input current limit of approximate 2-3 Amps. Setting a lower limit (B2-05) than this minimum value will result in the minimum limit. (Note: In a parallel system, this limits per CombiPlus!)
Setting Function C1-05=0 Power Assist Function is disabled. C1-05=1
(Initial setting) Power Assist Function is enabled.

71
C1-06: Power Assist Level
This setting is a special setting for power assist mode when the CombiPlus is charging and due to a sudden load, the AC IN current exceeds the AC IN Current Limit (B2-05), the CombiPlus will switch to power assist mode (when C1-05=1)
At that moment, the current need is unknown. The CombiPlus makes an assumption of the magnitude of this current. This assumption is equal to AC IN Current Limit (B2-05) multiplied by this Power Assist Level (C1-06). The default factor is two.
This will prevent the circuit breaker from tripping because current provided by the INVERTER minus the current drawn by the load is always lower than the rating of the circuit breaker. This happens, of course, when the AC IN Current Limit (B2-05) is correctly adjusted to the circuit breaker.
If for instance in a generator application, the circuit breaker has a higher value than the AC IN Current Limit (B2-05)(Normal load of generator is lower than maximum peak load) and one knows that the load which is switched on always draws a certain current, one can consider to increase this factor (C1-06) to achieve better results with sudden load changes.

72
D Group (AC CHARGER): D1 Group (Charger) D1-01: AC CHARGER Selection
Setting Function D1-01=0 “AC CHARGER” is disabled. D1-01=1
(Initial setting) “AC CHARGER” is enabled.
D1-02: Charge Curve
Setting Function D1-02=1 Fixed D1-02=2 Adaptive D1-02=3
(Initial setting) Adaptive + Battery safe
The Fixed (D1-02=1) charge curve will have a faxed Absorption Time (D1-06). The Adaptive (D1-02=2) and Adaptive +Battery safe (D1-02=3) curve derive the
Absorption time from the Bulk time. The maximum Absorption time of these charge curves is determined by Absorption Time (D1-06) setting.
The Adaptive + Battery safe (D1-02=3) curve has a special regulation in the absorption phase. The absorption phase will start when the battery voltage reaches 14.4V( for 12V batteries) regardless of the specified Absorption Voltage (D1-03). During the absorption phase, the voltage will increase with a fixed ramp until the voltage reaches the absorption voltage or the calculated absorption time is over in the latter case, the absorption phase will end before the absorption voltage is reached.

73
64
60
56
52
48
44
40 20
22
24
26
28
30
32
1 hour Repeated Absorption
1 dayfloat
7 daysreduced
7 days reduced float
AbsorptionBulk hours
20 x Bulk-hours orMax.Absorption time
Battery Safe mode
Time
Time
120%100%80%60%40%20%0%
16
15
14
13
12
11
10
Amps
Volts Charge voltage
Charge current
D1-03: Absorption Voltage
Use this setting to specify the absorption voltage. D1-04: Repeated Absorption Time
Use this setting to specify the duration of the repeated absorption “pulses”. D1-05: Repeated Absorption Interval
Use this setting to specify the interval between repeated absorptions. D1-06: Maximum Absorption Time
If the Charge Curve is fixed (D1-02=1), then this setting is used to determine the absorption time.
In all other cases, this setting determines the maximum absorption time. D1-07: Float Voltage
Use this setting to specify the float voltage.

74
D1-08: Charge Current
Use this setting to specify the current with which the battery is charged in the bulk phase. ※ Note: The actual charge current depends on other conditions also. Therefore, under certain
circumstances, it is possible that the actual charge current is lower than this setting. This can, among others, be due to:
A low AC IN Current Limit (B2-05) in combination with a high load. A high environmental temperature A too high ripple voltage due to improper cabling.
D1-09: Stop After 10Hr Bulk
This is a safety setting. When the bulk phase lasts more than 10 hours, this can be indication that a battery cell is damaged.
The absorption voltage (or the 14.4V for battery when Battery Safe (D1-02=3) mode is used) will never be reached in that case and the other cells will be over-charged resulting in the production of an explosive gas.
Therefore, the charger is disabled if the bulk phase lasts more than 10 hours. This setting can be disabled because it does not always indicate a problem when the bulk
phase lasts very long. The charge current can be very low due to limited AC input current and/or AC loads. Also, DC loads can “steal away” part of the charge current. In that case, the bulk phase will need more time to complete and this setting must be disabled.
※ Note: When this setting is disabled, there is no safety check against over-charging. Setting Function
D1-09=0 Stop After 10Hr Bulk setting is disabled D1-09=1
(Initial setting) Stop After 10Hr Bulk setting is enabled
D1-10: Equalize Mode Select (Storage Mode Select)
This setting is used for enabling/disabling the Equalize Mode. In this mode, the voltage setpoint is 13.2V (for 12V battery). If Equalize mode is disabled,
then the normal float voltage will be used. Setting Function
D1-10=0 Equalize mode is disabled D1-10=1
(Initial setting) Equalize mode is enabled

75
E Group (Auxiliary Relay): E1 Group (Setting Aux-Relay 1 ON Condition) E1-01: LOAD Higher than ? Amps E1-02: LOAD Higher for ? sec
Use these settings to switch the Aux-Relay 1 ON. When the actual AC OUT load is above a certain value (E1-01) for a certain time (E1-02).
The corresponding Aux-Relay 1 OFF condition is E2-01: Load Lower than ? Amps and E2-02: Load Lower for ? sec.
※ Note: If setting E1-02=0 sec (Initial setting). Then the E1-01 is ignored. ※ Note: If setting E2-02=0 sec (Initial setting). Then the E2-01 is ignored. E1-03: Udc Lower than ? Voltage E1-04: Udc Lower for ? sec
Use these settings to switch the Aux-Relay 1 ON. When battery voltage becomes lower than a certain limit (E1-03) for a certain time (E1-04).
※ Note: If E1-04=0 sec (Initial setting), then E1-03 is ignored. E1-05: Udc Higher than ? Voltage E1-06: Udc Higher for ? sec
Use these settings to switch the Aux-Relay 1 ON when battery voltage becomes higher than a certain limit (E1-05) for a certain time (E1-06).
※ Note: If E1-06=0 sec (Initial setting), then E1-05 is ignored. E1-07: Not Charge for ? sec
Use this setting to switch on the Aux-Relay 1 when the AC CHARGER is not charging for a certain time (E1-07).
Normally used for generating an alarm situation. E1-08: Fan ON for ? sec
This will switch the Aux-Relay 1 ON when the internal fan switches on. This can be used together with the E2-08: Fan OFF for ? sec setting to drive an external fan.

76
E1-09: When bulk protection is activated.
This will set the Aux-Relay1 ON when the “bulk protection” (D1-09=1) is activated. This condition will remain valid as long as the AC CHARGER is disabled due to that safety mechanism. One can use this setting to generate an alarm.
E1-10: System Fault Occurs
This will switch on the Aux-Relay 1 when the CombiPlus switches off due to an internal alarm situation.
E1-11: Temp. Alarm Select (When E1-12=0, ignore this setting) E1-12: Temp. Alarm for ? sec
If you want to switch on the Aux-Relay 1 when there is a over temperature alarm, this setting (E1-11) can be used to choose between pre-alarm or normal alarm.
As with other Aux-Relay 1 settings, a delay value (E1-12) must be specified also. This can be done with Delay value for set Aux-Relay 1 ON when over temperature alarm (E1-12) setting.
E1-13: Low Batt. Alarm Select (When E1-14=0, ignore this setting) E1-14: Low Batt. Alarm for ? sec
If you want to switch on the Aux-Relay 1 when there is a low battery alarm, this setting (E1-13) can be used to choose between pre-alarm or normal alarm.
As with other Aux-Relay 1 settings, a delay value (E1-14) must be specified also. This can be done with Delay value for set Aux-relay 1 ON when low battery alarm (E1-14) setting.
E1-15: OverLoad Alarm Select (When E1-16=0, ignore this setting) E1-16: OverLoad Alarm for ? sec
If you want to switch on the Aux-Relay 1 when there is a overLoad alarm, this setting (E1-15) can be used to choose between pre-alarm or normal alarm.
As with other Aux-Relay 1 setting, a delay value (E1-16) must be specified also. This can be done with Delay value for set Aux-Relay 1 ON when overload alarm (E1-16) setting.
E1-17: Udc Ripple Alarm Select (When E1-18=0, ignore this setting) E1-18: OverLoad Alarm for ? sec

77
If you want to switch on the Aux-Relay 1 when there is a battery voltage ripple alarm. This setting (E1-17) can be used to choose between pre-alarm or normal alarm.
As with other Aux-Relay 2, setting a delay value (E1-18) must be specified also. This can be done with Delay value for set Aux-Relay 1 ON when battery voltage ripple alarm (E1-18) setting.
E2 Group (Setting Aux-Relay 1 OFF Condition) E2-01: Load Lower than ? Amps E2-02: Load Lower for ? sec
Use these settings to switch Aux-Relay 1 OFF. When the actual AC OUT Load is below a certain value (E2-01) for a certain time (E2-02).
The corresponding Aux-Relay ON condition is E1-01: Load Higher than ? Amps and E1-02: Load Higher for ? sec.
※ Note: If setting E2-02 (E1-02)=0 sec (Initial setting), then the E2-01 (E1-01) is ignored. E2-03: Udc Lower than ? Voltage E2-04: Udc Lower for ? sec
Use these settings to switch off the Aux-Relay 1 when battery voltage becomes lower than a certain limit (E2-03) for a certain time (E2-04)
※ Note: If E2-04=0 sec (Initial Setting), then E2-03 is ignored. E2-05: Udc Higher than ? Voltage E2-06: Udc Higher for ? sec
Use these settings to switch off the Aux-Relay 1 when battery voltage becomes higher than a certain limit (E2-05) for a certain time (E2-06)
※ Note: If E2-06=0 sec (Initial setting), then E2-05 is ignored. E2-07: Charging for ? sec
This setting switches the Aux-Relay 1 OFF when the AC CHARGER started for a certain time (E2-07). This can be useful when the Aux-Relay 1 is for instance used a low battery alarm.
Use the Set Udc Lower than ? Voltage (E1-03) setting to start the alarm and use this setting (E2-07) to stop it.

78
※ Note: As along as the battery voltage is lower than the specified limit (E1-03), the alarm will be active.
E2-08: Fan OFF for ? sec
This will switch the Aux-Relay 1 OFF when the internal fan switches off. This can be used together with the E1-08: Fan ON for ? sec setting to drive an external fan.
E2-09: Charge finished for ? Min (When E2-09=0, ignore this setting)
This condition becomes active when the charge bulk phase is finished for a certain time (E2-09).
For the charge curve, take a look at for instance the Charge Current (D1-08) setting. This is useful when the Aux-Relay 1 is used to start a generator. Once started, one might
want to keep the generator on until the batteries are more or less charged. E2-10: Aux-Relay 1 not ON for ? minutes (When E2-10=0, ignore this setting)
If one does not need special off condition, one can use this setting and the Aux-Relay 1 will switch off automatically when there has been no ON condition for a certain time (E2-10).
E2-11: AC IN loss for ? sec (When E2-11=0, ignore this setting)
This setting will switch off Aux-Relay1 if the RMS value of AC IN voltage is too low for a certain time (E2-11).
This AC level is determined by the AC IN Low Disconnect (B2-01) setting. Use this setting (E2-11) to disable re-starting of a generator which is switched off by hand
when the Aux-Relay 1 is used to generate a start signal for that generator. E2-12: No Temp. Alarm Select (When E2-13=0, ignore this setting) E2-13: No Temp. Alarm for ? sec
If you want to switch off the Aux-Relay 1 when there is no over temperature alarm, this setting (E2-12) can be used to choose between pre-alarm or normal alarm.
As with other Aux-Relay 1 setting, a delay value must be specified also. This can be done with the Delay value for set Aux-Relay 1 OFF when No Overtemperature Alarm (E2-13) setting.

79
E2-14: No Low Batt. Alarm Select (When E2-15=0, ignore this setting) E2-15: No Low Batt Alarm for ? sec
If you want to switch off the Aux-Relay 1 when there is no low battery alarm, this setting (E2-14) can be used to choose between pre-alarm or normal alarm.
As with other Aux-Relay 1 setting, a delay must be specified also. This can be done with the Delay value for set Aux-Relay 1 OFF when No Low Battery Alarm (E2-15) setting.
E2-16: No OverLoad Alarm Select (When E2-17=0, ignore this setting) E2-17: No OverLoad Alarm for ? sec
If you want to switch off the Aux-Relay 1 when there is no OverLoad alarm, this setting (E2-16) can be used to choose between pre-alarm or normal alarm.
As with other Aux-Relay 1 setting, a delay must be specified also. This can be done with the Delay value for set Aux-Relay 1 OFF when No OverLoad Alarm (E2-17) setting.
E2-18: No Udc Ripple Alarm Select (When E2-19=0, ignore this setting) E2-19: No Udc Ripple Alarm for ? sec
If you want to switch off the Aux-Relay 1 when there is no battery voltage ripple alarm, this setting (E2-18) can be used to choose between pre-alarm or normal alarm.
As with other Aux-Relay 1 setting, a delay must be specified also. This can be done with the Delay value for set Aux-Relay 1 OFF when No Battery voltage Ripple Alarm (E2-19) setting.
E3 Group (Setting Aux-Relay 2 ON Condition) E4 Group (Setting Aux-Relay 2 OFF Condition) E5 Group (Setting Aux-Relay 3 ON Condition) E6 Group (Setting Aux-Relay 3 OFF Condition) ※ Note: The functions and the settings of E3, E4, E5 and E6 Groups are exactly
the same as those of E1 and E2 Group so please refer to above E1 and E2 Group description and setting for E3, E4, E5 and E6 Groups.

80
E7 Group (Aux-Relay 1 Option) E7-01: Aux-Relay 1 Usage Select
Setting Function E7-01=0
(Initial setting) Auxiliary Relay 1 is not allowed to be active (Idle).
E7-01=1 Auxiliary Relay 1 is allowed to be active. E7-02: Aux-Relay 1 Invert Select
Setting Function E7-02=0
(Initial setting) Auxiliary Relay 1 is normal.
E7-02=1 Auxiliary Relay 1 is Invert switch and that is ON becomes off and OFF becomes ON.
This is used to invert the Aux-Relay 1 So ON becomes OFF and OFF becomes ON. In the
program, the labels are adapted to reflect this inversion. E7-03: Aux1 not Switch Off Time (Aux-Relay 1 do not switch off with certain period)
Use constant E7-03 to determine the minimum ON time. The Aux-Relay 1 will not be switched off within the time specified here measured from the
moment that all on condition are inactive. ※ Note: OFF conditions with a delay of 0 minute, ignore this setting. E8 Group (Aux-Relay 2 Option) E9 Group (Aux-Relay 3 Option) ※ The functions and the settings of E8 and E9 Groups are exactly the same as
those of E7 Group so please refer to above E7 Group description and setting for E8 and E9 Groups.

81
O Group (Operator): O1 Group (Monitor Select) O1-01: Power ON LCD Monitor Select
After power of the CombiPlus is on, the monitor selections will be showed on LCD Display, U1-05 Battery Voltage is the initial display shown.
All the constants in U1 Group can be programmed (U1-01~U-26). O1-02: Key Idle Detect Time
Use constant O1-02 to set the idle time when the keyboard is not operated and once any key is pressed, the display will return to the LCD monitor selection value set in constant O1-01.
Initial Setting=180 sec, setting range: 10~600 sec. O2 Group (Key Selections) O2-01: Key Pressed Beep Select
Setting Function O2-01=0 When keys are pressed, beep sound will not be heard. O2-01=1
(Initial setting) When keys are pressed, beep sound will be heard.
O2-02: Elapsed Time Reset
Use constant O2-02 to reset elapsed time. O2-03: Elapsed Time Select
Setting Function O2-03=0
(Initial setting) The elapsed time started to be counted after power is on.
O2-03=1 The elapsed time started to be counted after RUN. O2-04: CombiPlus Model
This is the model number to be displayed.

82
O2-06: MODE Key Hold Time
Use constant O2-06 to set the time it takes to press MODE key to transfer from one of fours modes to another mode. (This has to be done in STOP mode)
Initial setting=5 sec, setting range: 2~10 sec. O2-07: RUN/STOP Key Hold Time
Use constant O2-07 to set the time it takes to press RUN/STOP key to activate its function. Initial setting=2 sec, setting range: 2~10 sec.
O2-08: Power ON Auto Run Select
Use constant O2-08 to select to auto run manually or automatically. Setting Function
O2-08=0 Auto Run is active when pressing Run/STOP key O2-08=1
(Initial setting) Auto Run is active when the power is on.
O2-09: LCD Display Idle Time Set
Use constant O2-09 to set the idle time when the keypad is not operated and all the LCD Display and LED Indicators of the CombiPlus entering the idle mode which only RUN/STOP indicator is active.
Once any key on the panel is pressed, it will return to the display before Idle status. Initial setting=10 min, setting range: 0~60 min.

83
U Group (Monitor): U1 Group (Monitor) U1-01: AC IN Voltage
Use U1-01 to monitor the current voltage value of AC IN power in unit of 0.1V. U1-02: AC IN Current
Use U1-02 to monitor the current value of AC IN power in unit of 0.1A. U1-03: AC OUT Voltage
Use constant U1-03 to monitor AC OUT voltage value in unit of 0.1V. U1-04: AC OUT Current
Use constant U1-04 to monitor AC OUT current value in unit of 0.1A . U1-05: Battery Voltage
Use constant U1-05 to monitor the battery voltage in unit of 0.1V. U1-06: Battery Ripple Voltage
Use constant U1-06 to monitor the battery ripple voltage in unit of 0.1V. U1-07: Battery Current
Use constant U1-07 to monitor battery current value in unit of 0.1A. U1-08: Control Mode
Use constant U1-08 to monitor the current control mode (MODE 1, MODE 2, MODE 3 or MODE 4)

84
U1-09: Operation Status
There are 12 digits to account for each operation status. Please see NOTE 1 in Chapter 5. U1-10: Aux-Relay Status
Use constant U1-10 to monitor the ON/OFF status of 3 sets of Aux-Relay (RY1, RY2, RY3). Please see NOTE 2 in Chapter 5.
U1-11: Elapsed Time
Use constant U1-11 to monitor the elapsed time after power ON (O2-03=0) or after RUN (O2-03=1) in unit of 1 hour.
U1-12: Battery Temperature Sensor
Use constant U1-12 to monitor the temperature that has been detected by Battery Temperature Sensor (BTS-3) in unit of 1℃.
U1-13: CPU ID1
Use constant U1-13 to check the software version 1. U1-14: CPU ID2
Use constant U1-14 to check the software version 2. U1-15: Solar Charger Status
Use constant U1-15 to monitor solar charger status after solar module is connected to the extension port (Port C).
U1-16: Solar Supply Current
Use constant U1-16 to monitor the solar supply current value in unit of 0.1A.

85
U1-17: Solar Supply Power
Use constant U1-17 to monitor the solar supply power value in unit of 1W. U1-18: Solar Amp-Hours
Use constant U1-18 to monitor solar Amp-Hours value in unit of 1AH. U1-19: Solar Total Amp-Hours
Use constant U1-19 to monitor solar total Amp-Hours value in unit of 1AH. U2 Group (Fault Trace) U2-01: Current Fault
Use constant U2-01 to monitor the current fault that results in “CombiPlus” stopping operating.
U2-02: Last Fault
Use constant U2-02 to monitor the last fault that has been recorded. U2-03: AC IN Voltage
Use constant U2-03 to monitor the AC input voltage value in unit of 0.1V when the current fault occurs.
U2-04: AC IN Current
Use constant U2-04 to monitor the AC input current value in unit of 0.1A when the current fault occurs.
U2-05: AC OUT Voltage
Use constant U2-05 to monitor the AC output voltage value in unit of 0.1V when the current fault occurs.
86
U2-06: AC OUT Current
Use constant U2-06 to monitor the AC output current value in unit of 0.1A when the current fault occurs.
U2-07: Battery Voltage
Use constant U2-07 to monitor the battery voltage value in unit of 0.1V when the current fault occurs.
U2-08: Battery Ripple Volt
Use constant U2-08 to monitor the battery ripple voltage in unit of 0.1V when the current fault occurs.
U2-09: Battery Current
Use constant U2-09 to monitor the battery current value in unit of 0.1A when the current fault occurs.
U2-10: Control Mode
Use constant U2-10 to monitor what the control mode (MODE 1, MODE 2, MODE 3 or MODE 4) is when the current fault occurs.
U2-11: Operation Status
Use constant U2-11 to monitor 12 digits which account for each operation status when the current fault occurs. Please see NOTE 1 in Chapter 5.
U2-12: Aux-Relay Status
Use constant U2-12 to monitor the ON/OFF status of 3 sets of Aux-Relay (RY1, RY2, RY3) when the current fault occurs. Please see NOTE 2 in Chapter 5.
U2-13: Elapsed Time
Use constant U2-13 to monitor the elapsed time after power ON (O2-03=0) or after RUN (O2-03=1) in unit of 1 hour when the current fault occurs.

87
U2-14: Solar Charger Status
Use constant U2-14 to monitor solar charger status when the current fault occurs. This constant is only visible when extension port is connected to solar module.
U2-15: Solar Charge Current
Use constant U2-15 to monitor the solar charge current value in unit of 0.1A when the current fault occurs.
U2-16: Solar Supply Power
Use constant U2-16 to monitor the solar supply power value in unit of 1W when the current fault occurs.
U2-17: Solar Amp-Hours
Use constant U2-17 to monitor solar Amp-Hours value in unit of 1AH when the current fault occurs.
U2-18: Solar Total Amp-Hours
Use constant U2-18 to monitor solar total Amp-Hours value in unit of 1AH when the current fault occurs.
U2-26: Battery Temperature Sensor
Use constant U2-26 to monitor the current temperature that has been detected by Battery Temperature Sensor (BTS-3) in unit of 1℃ when the current fault occurs.
U3 Group (Fault History) U3-01: Last Fault
Use constant U3-01 to monitor the latest fault stored in the software. U3-02: Fault Message 2
Use constant U3-02 to monitor the most recent second fault stored in the software.

88
U3-03: Fault Message 3
Use constant U3-03 to monitor the most recent third fault stored in the software. U3-04: Fault Message 4
Use constant U3-04 to monitor the most recent fourth fault stored in the software. U3-05: Elapsed Time 1
Use constant U3-05 to monitor the elapsed time before the latest fault occurs. U3-06: Elapsed Time 2
Use constant U3-06 to monitor the elapsed time before the most recent second fault occurs. U3-07: Elapsed Time 3
Use constant U3-07 to monitor the elapsed time before the most recent third fault occurs.
U3-08: Elapsed Time 4
Use constant U3-08 to monitor the elapsed time before the most recent fourth fault occurs.

89
Chapter 7 Trouble Shooting Table
Proceed as follows for a quick detection of common faults. DC loads must be disconnected from the batteries and the AC loads must be disconnected
from the INVERTER before the INVERTER and/or battery charger (AC CHARGER) is tested.
Consult your Rich Electric dealer if the fault cannot be resolved.
Problem or Error message Cause Solution
The “CombiPlus” fails to operate when power on.
The battery voltage is too high or too low.
Ensure that the battery voltage is within the correct value range.
‘ ’: blink
The battery voltage is low. Charge the battery or check the battery connections.
The “CombiPlus” cuts out because the battery voltage is too low.
Charge the battery or check the battery connections.
‘ ’: blink
The load on the inverter of “CombiPlus” is higher than the normal load.
Reduce the load.
The INVERTER of “CombiPlus” cuts out due to excessive load.
Reduce the load.
‘ ’: blink
The ambient temperature is too high, or the load is excessive.
Place the “CombiPlus” in a cool and well-ventilated room, or reduce the load.
‘Udc-UV’ Battery under volt
Udc-UV Battery under volt
‘OL’ Inverter OverLoad
OL Inverter OverLoad
‘OH’ Heatsink Max Temp.

90
The ambient temperature is too high, or the load is excessive.
Place the “CombiPlus” in a cool and well-ventilated room, or reduce the load.
‘ ’: blink
Voltage ripple on the DC input exceeds 1.25Vrms
Check the battery cables and terminals. Check the battery capacity; increase it if necessary.
The INVERTER of “CombiPlus” cuts out as a result of excessive voltage ripple on the DC input
Install batteries with a higher capacity. Use shorter and/or thicker battery cables and reset the CombiPlus (Power OFF and ON again).
‘ ’: blink
Battery charger is not in normal charging status to cause battery voltage too high. Incorrect battery voltage connection (12V system but connected to 24V battery)
Replace the “CombiPlus”. Recheck if the CombiPlus and the battery voltage is matched.
‘ ’: blink
The actual charge current is 1.5 times larger than the set current value (D1-08) when AC CHARGER is operating.
Stop the Charge mode of the “CombiPlus”. Repair or replace the “CombiPlus”.
OH Heatsink Max Temp.
‘Udc-ripple’ Volt Ripple Exceeds
Udc-ripple Volt Ripple Exceeds
‘Udc-OV’ Battery over voltage.
Udc-OV Battery over voltage.
‘Idc-OC’ Over current.
Idc-OC Over current.

91
‘ ’: blink
The charging time of AC CHARGER has been over 10 hours and remains in Bulk Charge mode. (D1-09=1) shows the battery is at fault.
Replace the battery banks.
The AC IN voltage or frequency is out of range.
Ensure that the AC IN voltage is within the range 220V system: 180VAC~260VAC 110V system: 90VAC~130VAC And that the frequency matches the setting.
The charger is not functioning
“CombiPlus” internal circuit breaker has tripped.
Reset the internal circuit breaker.
Incorrect charging current. Set the charging current at between (0.1~0.2) × battery capacity.
A defective battery connection.
Check the battery terminals.
The absorption voltage has been set an incorrect value.
Adjust the absorption voltage to the correct value.
The float voltage has been set to an incorrect value.
Adjust the float voltage to the correct value.
The battery is not being charged fully.
The internal DC fuse is defective
“CombiPlus” is damaged.
The absorption voltage has been set to an incorrect value.
Adjust the absorption voltage to the correct value.
The battery is overcharged. The float voltage has been set to an incorrect value.
Adjust the float voltage to the correct value.
‘Bat-NG’ Battery Fault
Bat-NG Battery Fault

92
The battery is too small. Reduce the charging current or use a battery with a higher capacity.
A defective battery. Replace the battery. The battery is overcharged.
The battery is too hot. Connect a Battery Temperature Sensor (BTS-3)
Battery overtemperature (> 50℃)
1. Allow battery to cool down. 2. Place battery in a cool environment. 3. Check for shorted cells.
Battery charge current drop to 0 A when the absorption voltage is reached.
Battery Temperature Sensor (BTS-3) is faulty
1. Unplug Battery Temperature Sensor (BTS-3) from “CombiPlus” and power off the “CombiPlus” then wait 5 seconds and power on again. 2. If the “CombiPlus” AC CHARGE normally, the BTS-3 is faulty and needs to be replaced.