2014-16 field commander wiring manual for reinke … field commander wiring manual for reinke pivots...
TRANSCRIPT
1
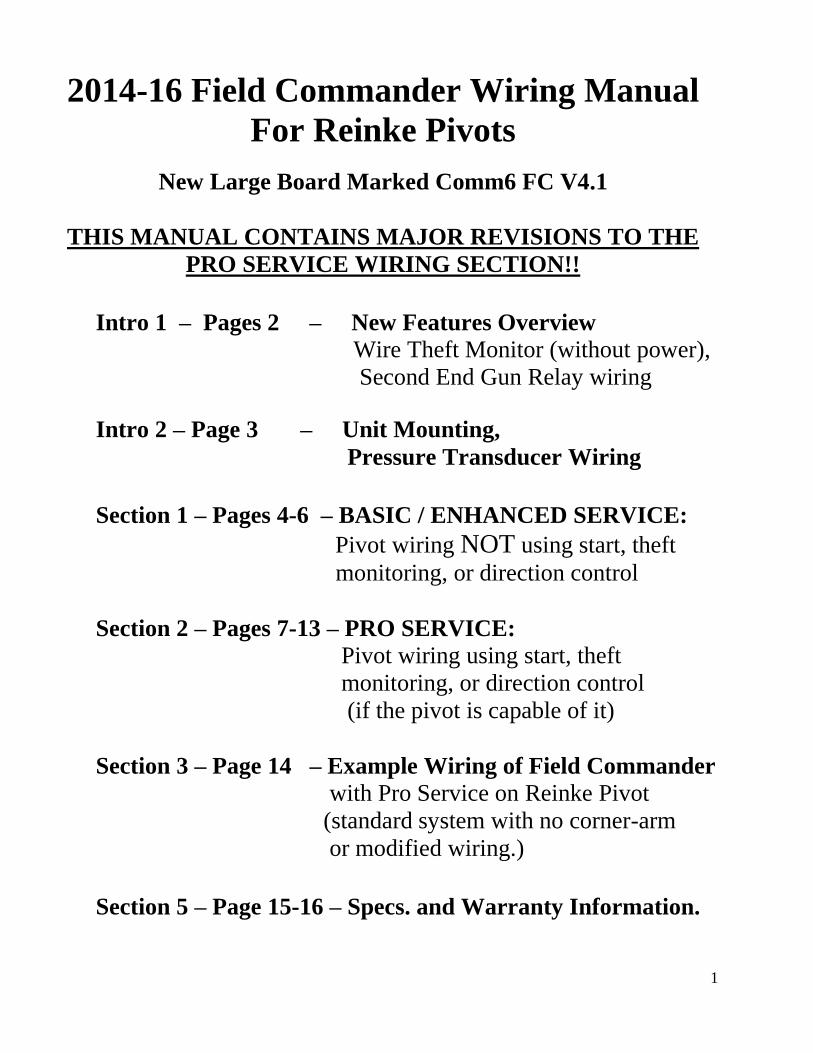
2014-16 Field Commander Wiring Manual
For Reinke Pivots
New Large Board Marked Comm6 FC V4.1
THIS MANUAL CONTAINS MAJOR REVISIONS TO THE
PRO SERVICE WIRING SECTION!!
Intro 1 – Pages 2 – New Features Overview
Wire Theft Monitor (without power),
Second End Gun Relay wiring
Intro 2 – Page 3 – Unit Mounting,
Pressure Transducer Wiring
Section 1 – Pages 4-6 – BASIC / ENHANCED SERVICE:
Pivot wiring NOT using start, theft
monitoring, or direction control
Section 2 – Pages 7-13 – PRO SERVICE:
Pivot wiring using start, theft
monitoring, or direction control
(if the pivot is capable of it)
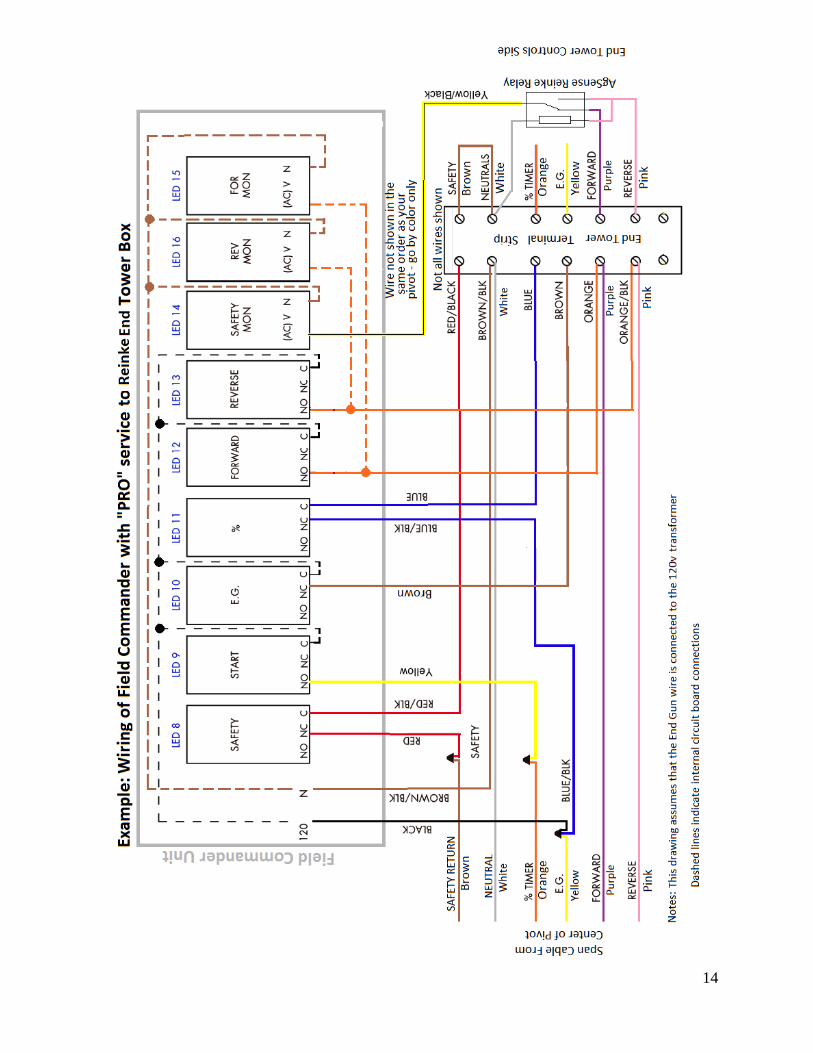
Section 3 – Page 14 – Example Wiring of Field Commander
with Pro Service on Reinke Pivot
(standard system with no corner-arm
or modified wiring.)
Section 5 – Page 15-16 – Specs. and Warranty Information.

2
Introduction – The new 2014-15 Field Commander has a couple of new features.
These new features required changing the position and purpose of some wires in the Field
Commander unit.
The Black/Red Stripe wire (previously unused) is now required to be connected to the
tower box earth ground bar on all pivots covered in this manual. This wire is used for
wire theft detection, and to help eliminate static electricity issues.
New Features:
1. Wire Theft Monitor (without power) – For many years, the PRO Field
Commander has done Theft Monitoring based on power. If the unit sent an alert
that power was lost, you knew to go check the pivot for wire theft. The new 2014
Field Commander still has this feature, AND now includes a method of detecting
wire theft on all service levels when the pivot does not have power available.
When the pivot has lost power (power outage, load control, gen-set, main
disconnect turned off, etc…) the Field Commander will use the Black/Red Stripe
wire (connected to the tower box earth ground bar) to check the wires of the pivot
several times a minute to monitor if the wires have been cut. This wire theft feature
requires good connections at each tower box ground bar and collector ring. Any
poor/loose connections or bad spots in the collector ring could cause a false alarm
to be sent.
2. Second End Gun Wiring – A Second End Gun Relay has been added to the
2014-15 Field Commanders. Unfortunately, due to the new style of wiring PRO
service on Reinke pivots, there are no wires available in the Field Commander
unit for the Second End Gun – if you still wish to use that relay, you can add a
separate 2 wire cable and connect the wires to the NO and C terminals of the
ENDG2 relay inside the Field Commander (terminals 19 and 21). You must
make sure that any added wires are running through the existing strain relief, or if
a new strain relief is added, it must be well sealed to prevent any water from
entering the unit – water damage is not covered under warranty.

3
Field Commander Mounting
The Field Commander can be mounted to the pivot two different ways:
On pivots with truss cable supports (rabbit ears) on the end tower, mount the unit
on the truss cable supports as high as possible using the supplied beam clamps that
will still allow the cable to reach the end tower box.
On pivots without truss cable supports (rabbit ears), you can use the supplied beam
clamps and two large hose clamps to clamp the Field Commander to the irrigation
pipe at the last tower.
WARNING – the top of the Field Commander needs to be as flat (level) as possible
with the sky, and must not have any obstructions keeping the GPS antenna from
having a clear view of the sky in all directions!! If the unit is tilted too far in any
direction, or obstructed, you may loose GPS signal.
Note: also be careful to keep the Field Commander out of the direct spray path of
impact sprinklers or any other type of high pressure direct spray.
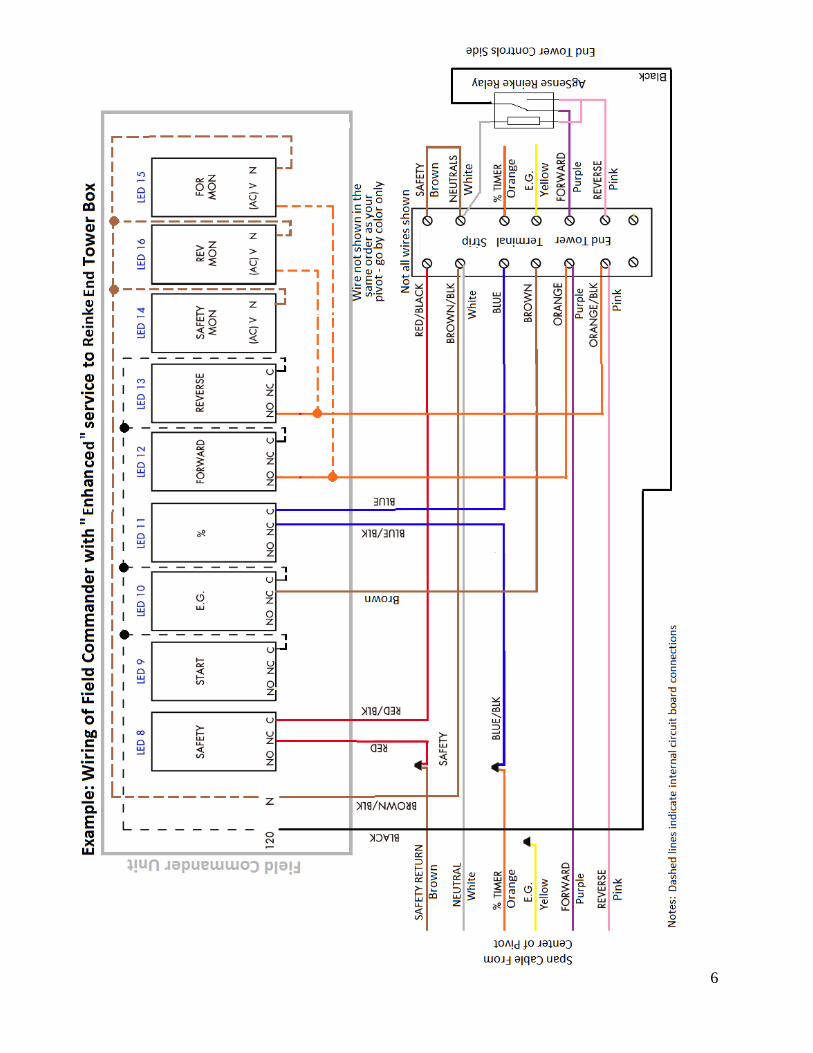
BASIC/ENHANCED WIRING - Field Commander Wire &
Pressure Transducer Wire Locations (Standard Field
Commander)

4
Reinke - BASIC/ENHANCED WIRING
- Note - On some Reinke pivots, the safety circuit begins at the second-to-last tower instead of at
the end tower. (where the Brown Safety wire connects to the White Neutral wires) On these systems
you will need to change the second-to-last tower and the end tower. In the end tower, make a jumper
to connect the white neutral wires to the brown safety wire. At the second-to-last tower, locate the
white wire that connects the overwatering timer contact (#10 on most) to the neutral wires on the
terminal strip. Remove this white wire from the terminal strip, but leave it connected to the
overwatering timer contact. Then, connect that white wire to the brown safety wire that goes out to
the end tower. (this wire most likely is capped or not hooked up to anything in this second-to-last
tower box)
You should now have a safety circuit that starts in the end tower box where the brown wire is
connected to neutral, and then travels to the second-to-last tower box on the brown wire, goes to the
overwatering timer contact #10, then exits the overwatering timer on terminal #8, goes to the limit
switch, then leaves the limit switch and goes to the next tower closer to the main panel.
AFTER COMPLETING THIS, YOU MUST TEST THE SAFETY TO BE CERTAIN THE SYSTEM
WORKS CORRECTLY. WITH THE SYSTEM RUNNING, DISCONNECT THE BROWN
SAFETY WIRE FROM THE TERMINAL STRIP IN THE END TOWER BOX – THIS SHOULD
SAFETY THE SYSTEM OFF IF THE RE-WIRING WAS DONE CORRECTLY.
ONLY AFTER THIS SAFETY TEST PASSES, THEN PROCEED TO STEP 1 OF THE
WIRING BELOW.
Only do Steps 1 – 8 for basic stop feature and tape off unused wires
Add Steps 9 – 10 for speed control
Add Steps 11 – 12 for endgun control
1. Remove the Reinke brown (safety) wire from the terminal strip in the end tower box (Span cable
wire coming from the center) and install our Red/Black Stripe wire in its place. - See Note at top of
page -
2. Use a wire nut to connect our Red wire to the Reinke brown (safety) wire that was removed from
the terminal strip in step 1.
3. Install our Brown/Black Stripe wire into the terminal strip with the other white Neutral wires.
4. Install our Black/Red Stripe wire into the Earth Ground bar with the Reinke Green Wires.
5. Install our Black wire into the relay assembly as shown (see Picture 1 below) Relay part number
-W78ARCSX-11, and Base part number – 70-459-1
6. Run jumper wires from the forward and reverse on the terminal strip and install them into the
relay as shown (see Picture 1 below - this gives the Field Commander 120v on the black wire no
matter which direction the pivot is moving)
7. Install our Orange wire into the tower terminal strip with the Reinke purple wire. (Forward Run)
8. Install our Orange/Black wire into the tower terminal strip with the Reinke pink wire. (Reverse
Run)
9. Remove the Reinke orange (percent timer) wire from the terminal strip in the end tower box
(Span cable wire coming from the center) and install our Blue wire in its place.
10. Use a wire nut to connect our Blue/Black wire to the Reinke orange (percent timer) wire that was
removed from the terminal strip in step 9
11. Remove the Reinke yellow (endgun) wire from the terminal strip in the end tower box (Span
cable wire coming from the center) and install our Brown wire in its place.
12. Install a wire nut onto (to cap off) the Reinke yellow wire that was removed in step 11.

5
Additional Relay/s for Reinke – (other neutral safety type pivots similar)
6

7
REINKE - PRO WIRING
WARNING!! READ THIS SECTION CAREFULLY!!! THERE ARE
MANY WIRING CHANGES IN THE FOLLOWING PAGES
COMPARED TO PAST YEARS/MANUALS!!
The items in this PRO section should ONLY BE PERFORMED BY A
QUALIFIED REINKE DEALER/TECHNICIAN!!
The re-wiring of the Field Commander for these Reinke pivots greatly simplifies
installation, allows the safety to remain a Neutral safety, and also allows the Field
Commander to remotely change direction of the pivot (provided the pivot panel has
the newer “pulse the safety for less than a second” style of auto reverse. (this newer
style of Reinke auto reverse can be added to most Reinke panels if it doesn’t already
have it installed) This new wiring does however require that all pivot speed control be
done via the Field Commander – the pivots percent timer will no longer control the
speed of the pivot when wired PRO.
Note: Pro not available on RAMS panels.
THE TWO TRACES ON THE FIELD COMMANDER BOARD SHOWN
IN THE PICTURES BELOW MUST BE CUT OUT, AND THE WIRING
INSIDE THE FIELD COMMANDER UNIT MUST BE CHANGED TO
MATCH THE PICTURES BELOW BEFORE INSTALLING THE
UNIT!!! FAILURE TO DO SO WILL CAUSE THE FIELD
COMMANDER UNIT TO BE DAMAGED.

8
CHANGE THE FIELD COMMANDER WIRING TO MATCH THIS PICTURE
BEFORE MAKING ANY WIRING CHANGES TO THE PIVOT, YOU
MUST TEST THE PIVOT, MAKE SURE THE PIVOT MOVES IN
BOTH DIRECTIONS, AND MAKE SURE THE SAFETY WILL STOP
THE PIVOT CORRECTLY. ONCE THESE HAVE BEEN TESTED,
YOU CAN START MAKING WIRING CHANGES TO THE PIVOT.
Changes to make inside the main control panel:
1. At the Reinke Control Panel, remove the Reinke Yellow (goes out to the towers) wire from the
terminal strip and connect it to 120v directly from the transformer. (after the 120v fuse, or add a
fuse as necessary) Also, remove any endgun stops/ramps/shutoffs.
(End gun wire will have 120v at all times, even when pivot is idle)
2. At the Reinke Control Panel, remove the Reinke Orange (goes out to the towers) wire from the
terminal strip and connect it to the relay assy as shown in the picture below that matches your
panel.
3. At the Reinke Control Panel, run jumper wires from the relay assy as shown in the picture below
that matches your panel.
NOTE: On panels with a pressure switch, when using the Field Commander to start the pivot WET,
you may need to bypass the pressure switch with a jumper wire (completely bypasses the pressure
switch, no low pressure shutdown) or with a One-Shot timer (bypasses the pressure switch for xx
amount of minutes so the system can pressure up, then lets the pressure switch take control again.)

9

10

11
The Touchscreen panels must be configured to use Alarm1 to
start the pivot by setting it to trigger a start when Alarm 1 goes
from Cold (0 volts) to Hot (120v)

12
Reinke PRO wiring at the end of the pivot (End tower box typically, or Second to last tower box if pivot has corner
system – never mount unit out on the corner system)
1. In the tower box, remove the Reinke Yellow (end gun) wire (Span cable wire coming from the center) from
the terminal strip in the end tower box and install our Brown wire in its place.
2. Use a wire nut to connect our Black wire and Blue/Black wire to the Reinke Yellow wire that was removed
from the terminal strip in step 1.
3. Remove the Reinke brown (safety) wire from the terminal strip in the end tower box (Span cable wire coming
from the center), and install our Red/Black Stripe wire in its place.
4. Use a wire nut to connect our Red wire to the Reinke brown (safety) wire that was removed from the terminal
strip in step 3.
5. Install our Brown/Black Stripe wire into the terminal strip with the other Reinke Neutral (white) wires.
6. Install our Black/Red Stripe wire into the Earth Ground bar with the Reinke Green wires.
7. Remove the Reinke orange (percent timer) wire from the terminal strip in the end tower box (Span cable wire
coming from the center), and install our Blue wire in its place.
8. Use a wire nut to connect our Yellow wire to the Reinke orange (percent timer) wire that was removed from
the terminal strip in step 7.
9. Install our Orange wire into the tower terminal strip with the Reinke Purple wire. (Forward Run)
10. Install our Orange/Black wire into the tower terminal strip with the Reinke Pink wire. (Reverse Run)
11. Add an isolation relay as shown, and install our Yellow/Black wire into that relay assy as shown in the image
below.
*Please continue to the next page *

13
12. Please call AgSense at 605-352-8350 to have the remote programming of this unit changed to make sure its
set as PRO service, and also make sure it has Reinke Direction Control selected. – you must do this for this
unit to work correctly.
13. AFTER calling AgSense to set up the unit correctly, you then need to test every function of the pivot again
to make sure it runs both directions, and safety works correctly. You can then test starting, stopping,
endgun, speed, and direction control from the wagnet.net website or app to make sure the unit is working
correctly.
14

15
Power Requirements for these units:
DC Powered Unit 7-40V DC:
At 12v DC: 1.0A MAX
0.1A - 0.5A during normal operation
120vAC Powered Unit:
At 120v AC: 0.25A MAX
0.05A - 0.15A during normal operation
The above numbers are the current required for our unit to operate. Below is the current the
relays in our box can control:
On both AC and DC units, each relay can handle a peak max of 5A, 3A constant (at a max
voltage of 120vAC, or 30vDC).
Warranty Information:
All warranty service provided by the AgSense service center, or an authorized technician.
Warranty repairs require a Return Merchandise Authorization Number (RMA);
Have your dealer contact AgSense to obtain this RMA number.
For the Period of : AgSense will:
60 Days Money back Guarantee if not satisfied with
product.
2 Years Repair on any unit that fails due to defect
in materials or workmanship. AgSense
labor and parts would be provided free of
charge during the warranty period. (This
does not include dealer labor.)
What is not covered:
Service trips to your home to teach you how to use the product.
Improper installation, delivery or maintenance. If you have an installation problem contact your dealer or installer.
Failure of product resulting from modification to product or due to unreasonable failure to provide reasonable and necessary maintenance.
Labor necessary to move device from one location to another.
Improper installation of battery.
Failure due to corrosion or water damage. o Units installed in direct contact with sprinklers require a tower box or other watertight
protection.
Damage to the product caused by improper power supply voltage, accident, fire, floods or acts of God.
Damage caused after delivery.

16
Exclusion of implied warranties – Your sole and exclusive remedy is product repair as
provided in this Limited Warranty. Any implied warranties, including the implied
warranties of merchantability or fitness for a particular purpose, are limited to two years
or the shortest period allowed by law.
This warranty is extended to the original purchaser and any succeeding owner for the products
purchased for use within the USA.
Some states do not allow the exclusion or limitation of incidental or consequential damages. This
warranty gives you specific legal rights, and you may also have the other rights which vary from
state to state. To know what your legal rights are, consult your local or state consumer affairs
office or your state’s Attorney General.
DISCLAIMER: The use of Field Commander/Crop Link/Aqua Trac shall not be utilized by
customer as a substitute for the Customer's personal observation of the manner in which
Customer's irrigation equipment is functioning. AgSense specifically advises Customer that this
product is designed to enhance Customer's ability to control existing irrigation equipment and to
provide the Customer with additional information about existing irrigation equipment. Field
Commander/Crop Link/Aqua Trac relies upon GPS, Satellite and Internet technology which not
always functions properly, accordingly, AgSense disclaims any and all responsibility for the
reliability of this technology. Customer acknowledges that AgSense does not have the ability to
control the reliability of GPS, Satellite and Internet Technology. AgSense specifically disclaims
any and all liability for Customer's failure to personally determine whether or not the irrigation
equipment that belongs to Customer is functioning properly. AgSense, its agents, members or
officers will not be liable for Customer's loss of profits, business interruption, or any other type
of consequential damages arising because of the failure to Customer's equipment, GPS, Satellite
or Internet to function properly.
CUSTOMER'S RESPONSIBILITIES: Customer agrees to keep the irrigation equipment upon
which Field Commander/Crop Link/Aqua Trac is installed in good repair and
maintenance. Customer acknowledges the importance of and agrees to keep all safety devices
which came with Customer's irrigation equipment in working order. Customer agrees to keep an
end field stop and barricades in place to prevent damage to the irrigation equipment in the event
that Field Commander/Crop Link/Aqua Trac malfunctions. Customer agrees that Field
Commander/Crop Link/Aqua Trac cannot solely replace the personal monitoring of the operation
of irrigation equipment.
REMEDY: Customer acknowledges that Field Commander/Crop Link/Aqua Trac’s sole
obligation and Customer's exclusive remedy in the event of any material and continuing
nonconformity, defect, or error in the information service shall be to take reasonable corrective
actions upon discovery of the problem.